

Page 1

HP Photo Creations User Guide v1.14
Welcome! ..................................................................................................................................................... 3
System Requirements ................................................................................................................................ 5
Quick Start ................................................................................................................................................... 6
Print at Home .......................................................................................................................................... 6
Ship to Home .......................................................................................................................................... 9
Tool Panels ........................................................................................................................................... 14
Quick Change Tools ............................................................................................................................. 15
Photo Tools Drop-Down Menu ............................................................................................................. 15
Quick Design Overview ........................................................................................................................ 16
Feature Reference ..................................................................................................................................... 19
The Product Catalog ............................................................................................................................. 19
Importing Photos................................................................................................................................... 20
Photo Selection ..................................................................................................................................... 21
Step-by-Step Layout Method ................................................................................................................ 22
Working with Your Photos .................................................................................................................... 23
Working with the Layout Preview ......................................................................................................... 25
Design Precautions .............................................................................................................................. 27
Quick Tools ........................................................................................................................................... 28
Working with a Photo Book’s Storyboard ............................................................................................. 29
Working with Themes (the Basics) ....................................................................................................... 30
Working with Text ................................................................................................................................. 31
Working with Touch-Up Controls .......................................................................................................... 33
Advanced Design ................................................................................................................................. 36
Adding Additional Photos to your Project ............................................................................................. 39
Saving Your Project .............................................................................................................................. 40
Good saving habits ............................................................................................................................... 40
Starting Over ......................................................................................................................................... 41
Loading a Previously Saved Project ..................................................................................................... 41
Transferring Designs ............................................................................................................................ 42
Ordering ..................................................................................................................................................... 44
Placing an Order ................................................................................................................................... 44
Uploading your Order ........................................................................................................................... 46
Continue Shopping ............................................................................................................................... 47
Print at Home ............................................................................................................................................. 48
Frequently Asked Questions (FAQ) ........................................................................................................ 52
Computer System ................................................................................................................................. 52
Design and Usage ................................................................................................................................ 52
Terminology .......................................................................................................................................... 54
Ordering ................................................................................................................................................ 54
Copyright © 2004–2009 RocketLife Page 1 of 59
Page 2

HP Photo Creations User Guide v1.14
Glossary ..................................................................................................................................................... 55
Copyright © 2004–2009 RocketLife Page 2 of 59
Page 3
HP Photo Creations User Guide v1.14
Welcome!
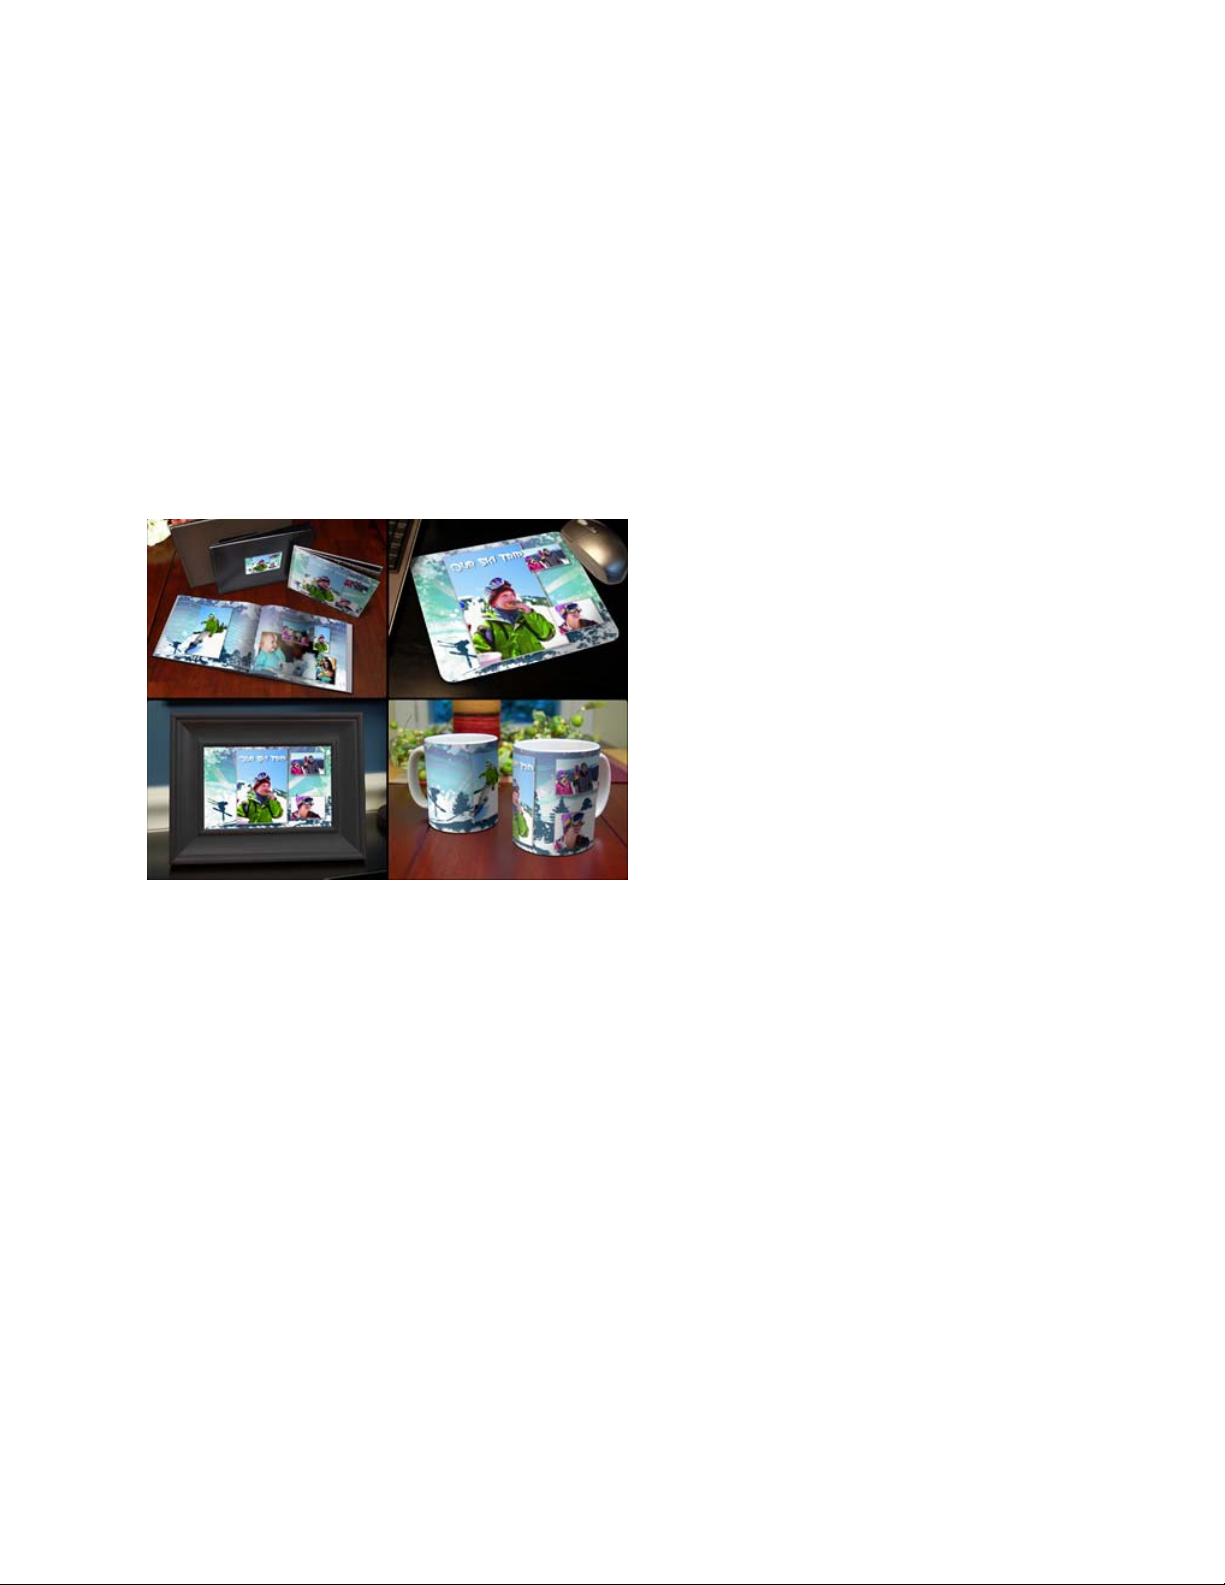
HP Photo Creations, powered by RocketLife, is the fast, easy way to make professional quality
keepsakes from your photos. Within moments, you’ll be making elegant photo books, calendars, coffee
mugs, greeting cards, and more. Our Smart Arrangement Technology is like having an experienced
designer by your side. You’ll see your photos transform into colorful, multilayered designs that tell a story.
Want to get even more creative? You can personalize almost every part of the layout with text, graphics,
and sophisticated effects such as tinting and transparency.
Best of all, once you finish your design, you can try it on every item we make — no need to start over.
The lifelike 3D previews let you see just how your projects will look.
Print at Home or Ship to Home — It’s Your Choice
A few clicks later, your order is on its way to our nationwide network of professional printing companies.
We ship to all 50 US states and territories as well as to US military addresses.
Or to enjoy your creations right away, you can also print many projects (such as photo books, cards, and
collage prints) at home, using high-quality paper from HP and others.
Birthdays, vacations, weddings, graduations, baby showers, holidays, sports…don’t let your memories
just sit on your computer. Bring them to life with HP Photo Creations, the fast, easy way to make
beautiful photo gifts and keepsakes.
Here’s what our customers are saying:
“I just wanted to let you know that I received the book and it’s beautiful!”
“I really like the mugs I made using this software. I think they are a really great gift idea for
Father’s Day, birthdays, or any of the other gift-giving holidays.”
“I literally spent over two hours on this — not because it was difficult but because it was so
amazingly easy, fun, and thorough! I had to try out everything.”
Copyright © 2004–2009 RocketLife Page 3 of 59
Page 4

HP Photo Creations User Guide v1.14
“I just received my book and I love it. I would like to order additional copies.”
“I showed my book to my creative writing group last night, and they were all impressed. They
wanted to know where I had gotten it produced.”
Copyright © 2004–2009 RocketLife Page 4 of 59
Page 5

HP Photo Creations User Guide v1.14
System Requirements
1GHz Pentium 4 processor
•
•
256MB RAM
• 15MB hard drive space
• Microsoft Windows XP, Vista, or Windows 7
• Broadband Internet connection
Copyright © 2004–2009 RocketLife Page 5 of 59
Page 6
HP Photo Creations User Guide v1.14
Quick Start
You can make professional-looking photo products in Photo Creations with just a few clicks, or you can
customize them extensively. In either case, you start by choosing how you want to print and receive your
products — on your home printer or through the mail. Your choice affects the types of products you can
make. (You can’t print a leather-bound photo book at home, for example.)
Next, you pick a type of product, add your photos, and preview the arrangement. In most cases, the
automatic Smart Arrangement looks great, but you can edit the layout and even the photos to personalize
it further. (You can also try your designs on different products; the layouts adjust automatically to fit the
new shape.) When you’re satisfied with the way your project looks, you then print it yourself or submit the
order for processing.
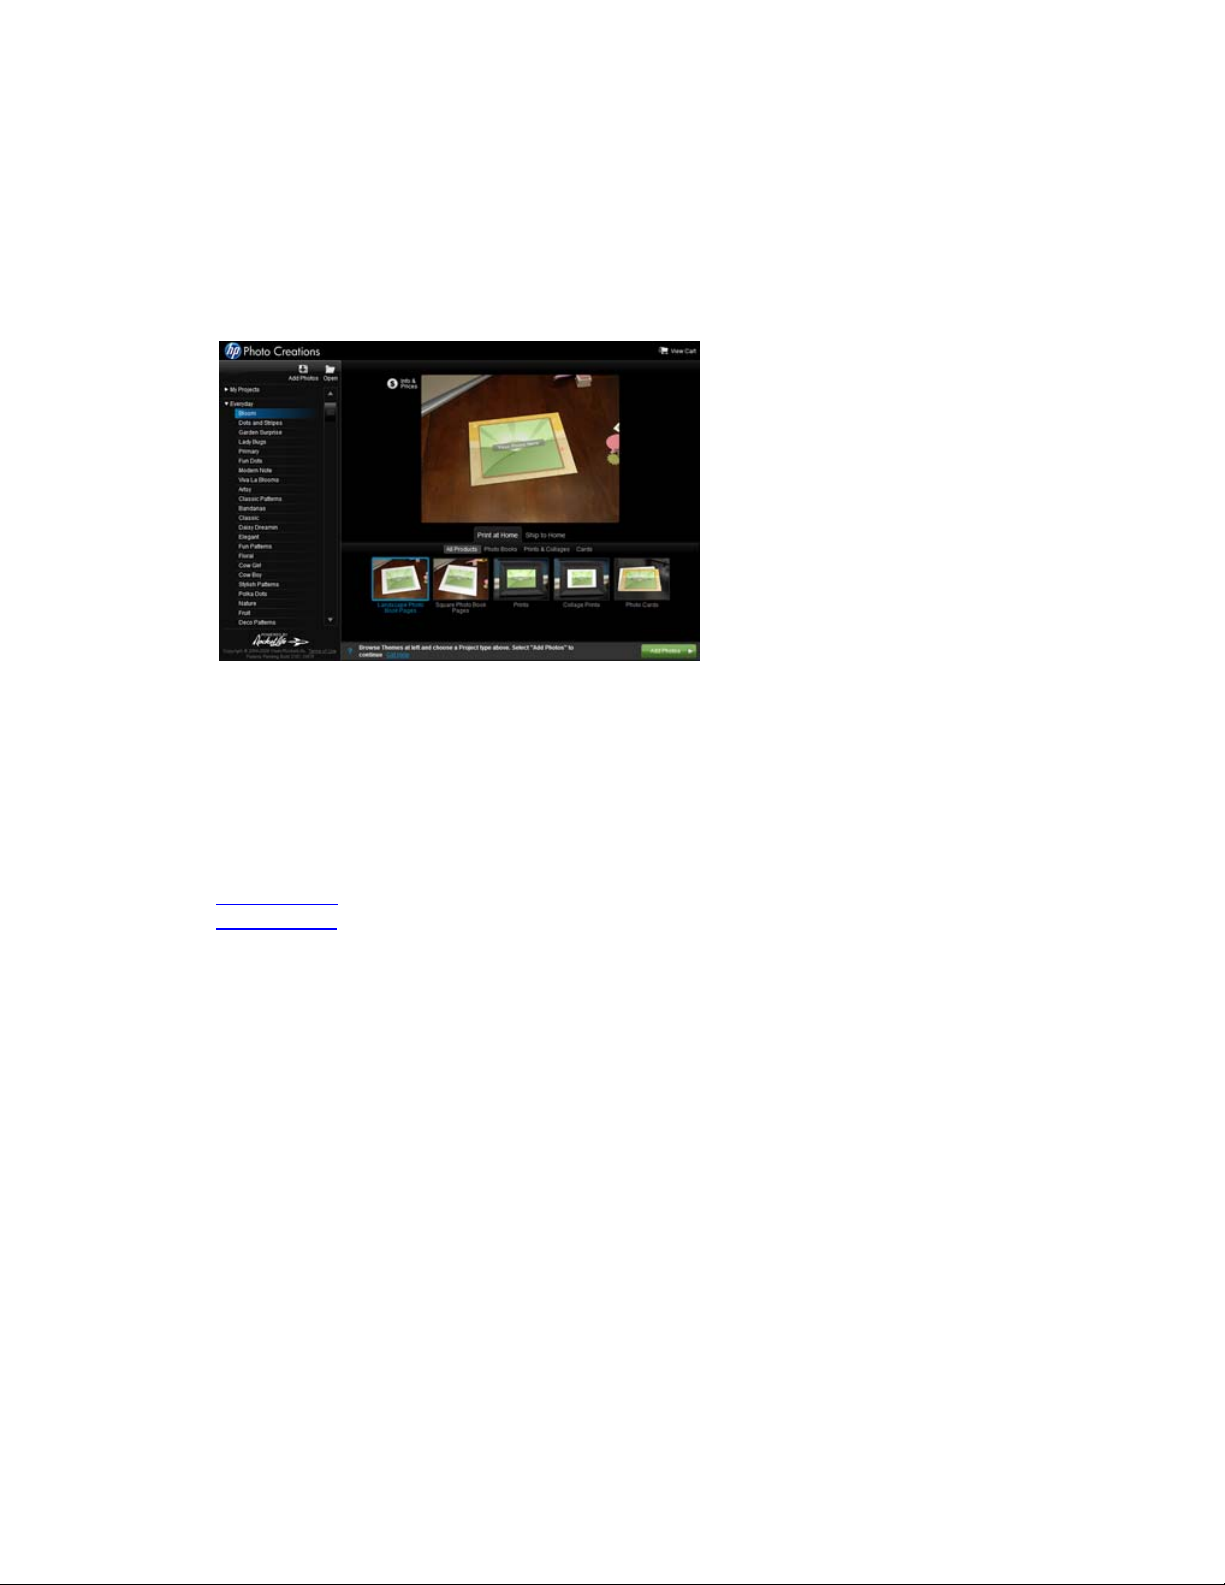
To start, click one of the tabs below the product preview:
• Print at Home
• Ship to Home
We describe how to use these options in the sections below.
Print at Home
To print a project on your home printer, start by clicking the Print at Home tab.
Copyright © 2004–2009 RocketLife Page 6 of 59
Page 7
HP Photo Creations User Guide v1.14
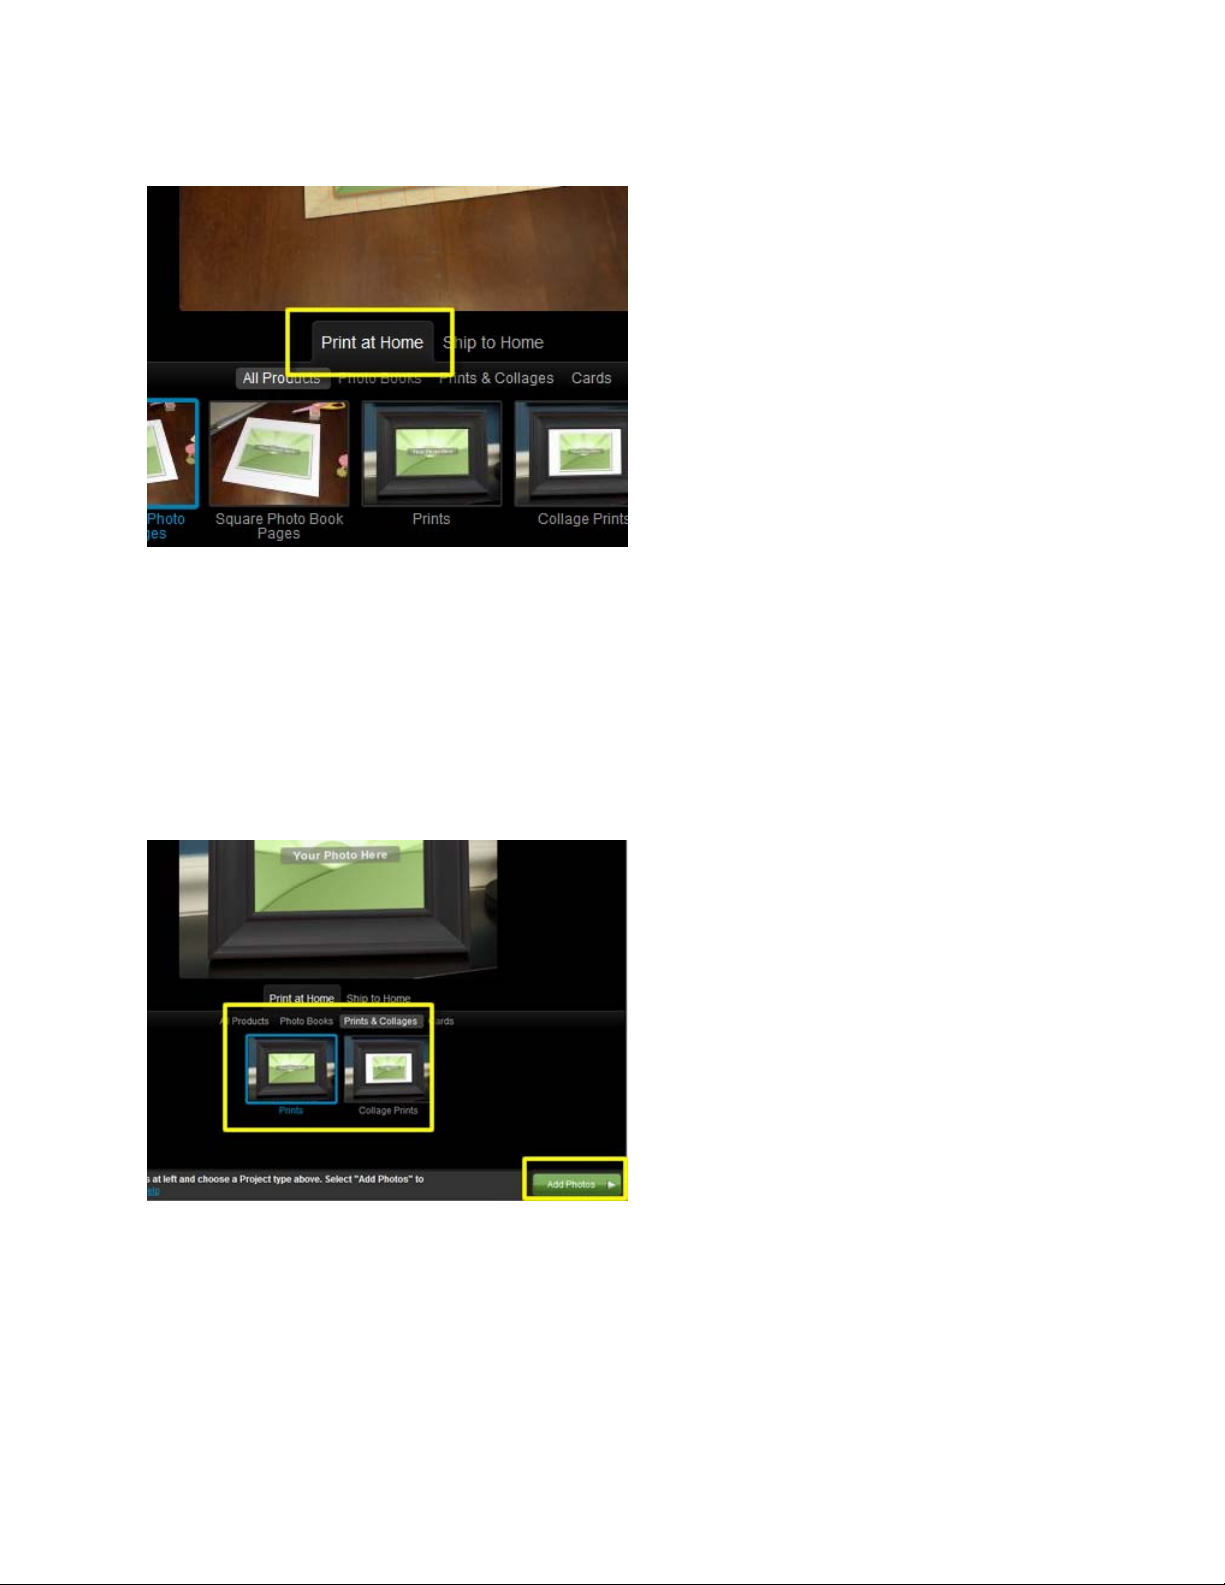
Step 1: Choose a Product to Make
In this example, we’ll choose Prints.
1. Click the Print at Home tab; a series of product categories will appear.
2. Choose a category (choose Prints & Collages for now).
3. Select a product (choose Prints).
4. Click the Add Photos button.
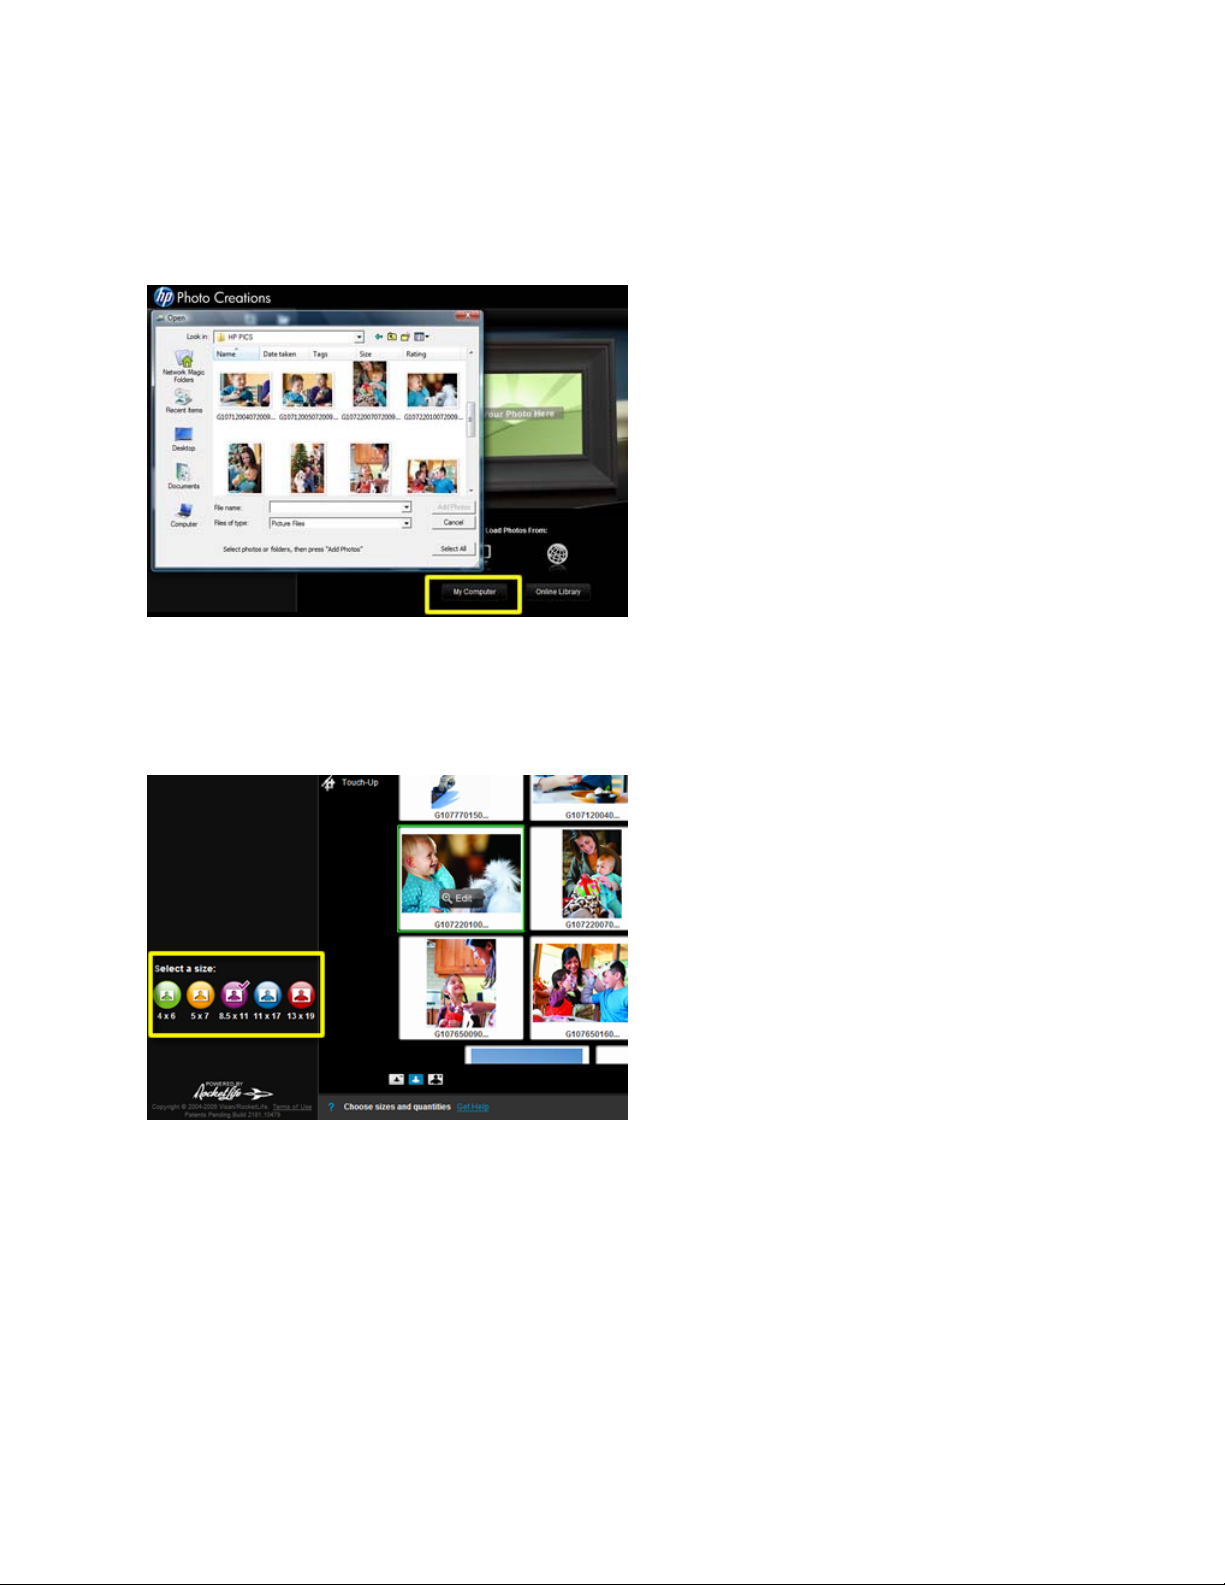
Step 2: Import Your Photos
Next, the software will ask you to locate the photos you want to use. You can choose photos on your
computer or ones you’ve uploaded to an online service such as Flickr.com. For now, let’s choose photos
on your computer.
1. Click the My Computer button. A file browser window will appear.
2. Select a folder of photos, or specific photos within a folder. Tip: The more photos you select, the
more creative layout possibilities you’ll have.
Copyright © 2004–2009 RocketLife Page 7 of 59
Page 8
HP Photo Creations User Guide v1.14
3. Click the Add Photos button. The software will import your photos. To add more, click the My
Computer button again.
4. After you’ve loaded all the photos you want to use, click the Continue button.
Step 3: Choose a Print Size
1. Click once on the photo you want to print.
2. Select a print size (for example, 5x7) by clicking one of the buttons at the left side of the screen.
3. Click the Print 5x7 Prints button.
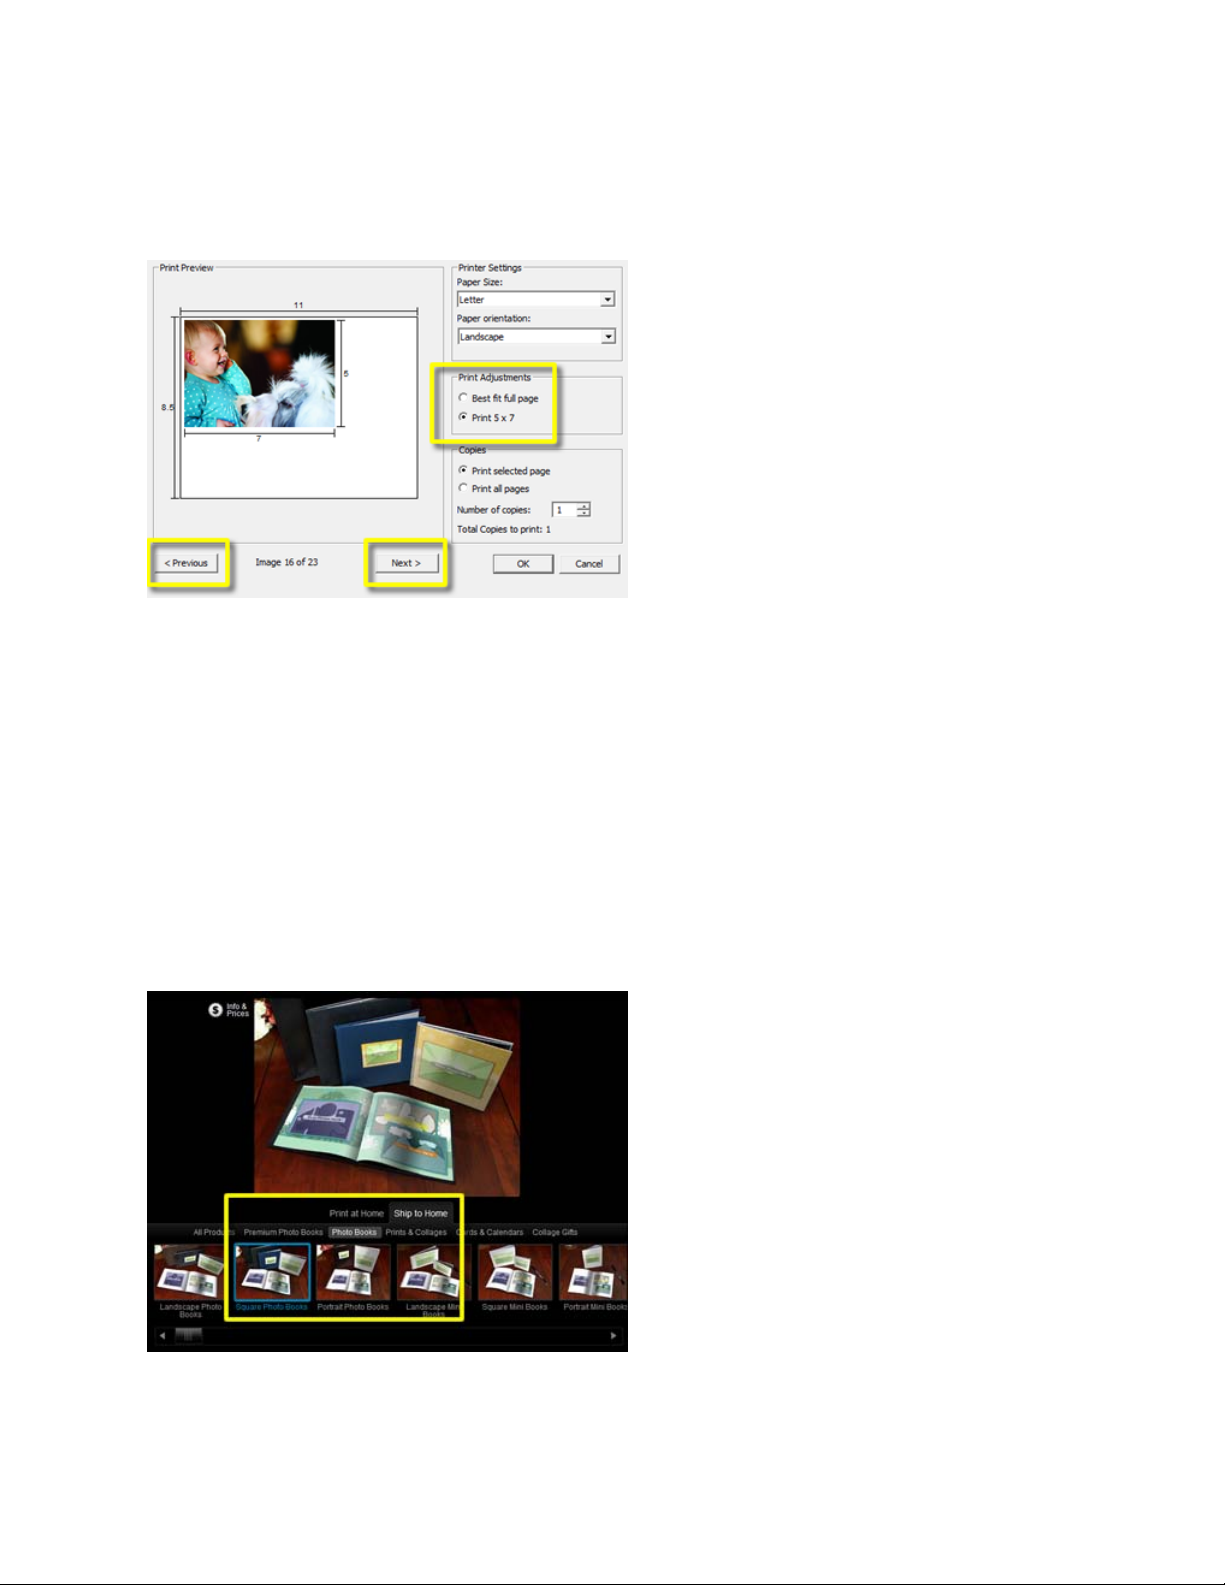
Step 4: Customize Printer Settings
A window will appear, showing you how the photo will look when printed. In most cases, you will
simply click the OK button to begin printing, but you can also make adjustments first:
• In the Print Adjustments section, you can choose between:
o “Best fit full page” (the software resizes the photo to fill the page)
o “Print 5x7” (the software prints the photo at the actual size — 5x7 inches in this example)
• In the Copies section, you can choose between:
o “Print selected page” (only the current photo prints)
o “Print all pages” (all imported photos print)
Copyright © 2004–2009 RocketLife Page 8 of 59
Page 9
HP Photo Creations User Guide v1.14
• To select a different photo without returning to the main screen, click the Previous or Next
buttons.
When you’re done, you can click the Catalog button to start another project.
Ship to Home
Step 1: Choose a Product to Make
In this example, we’ll make a wedding Photo Book.
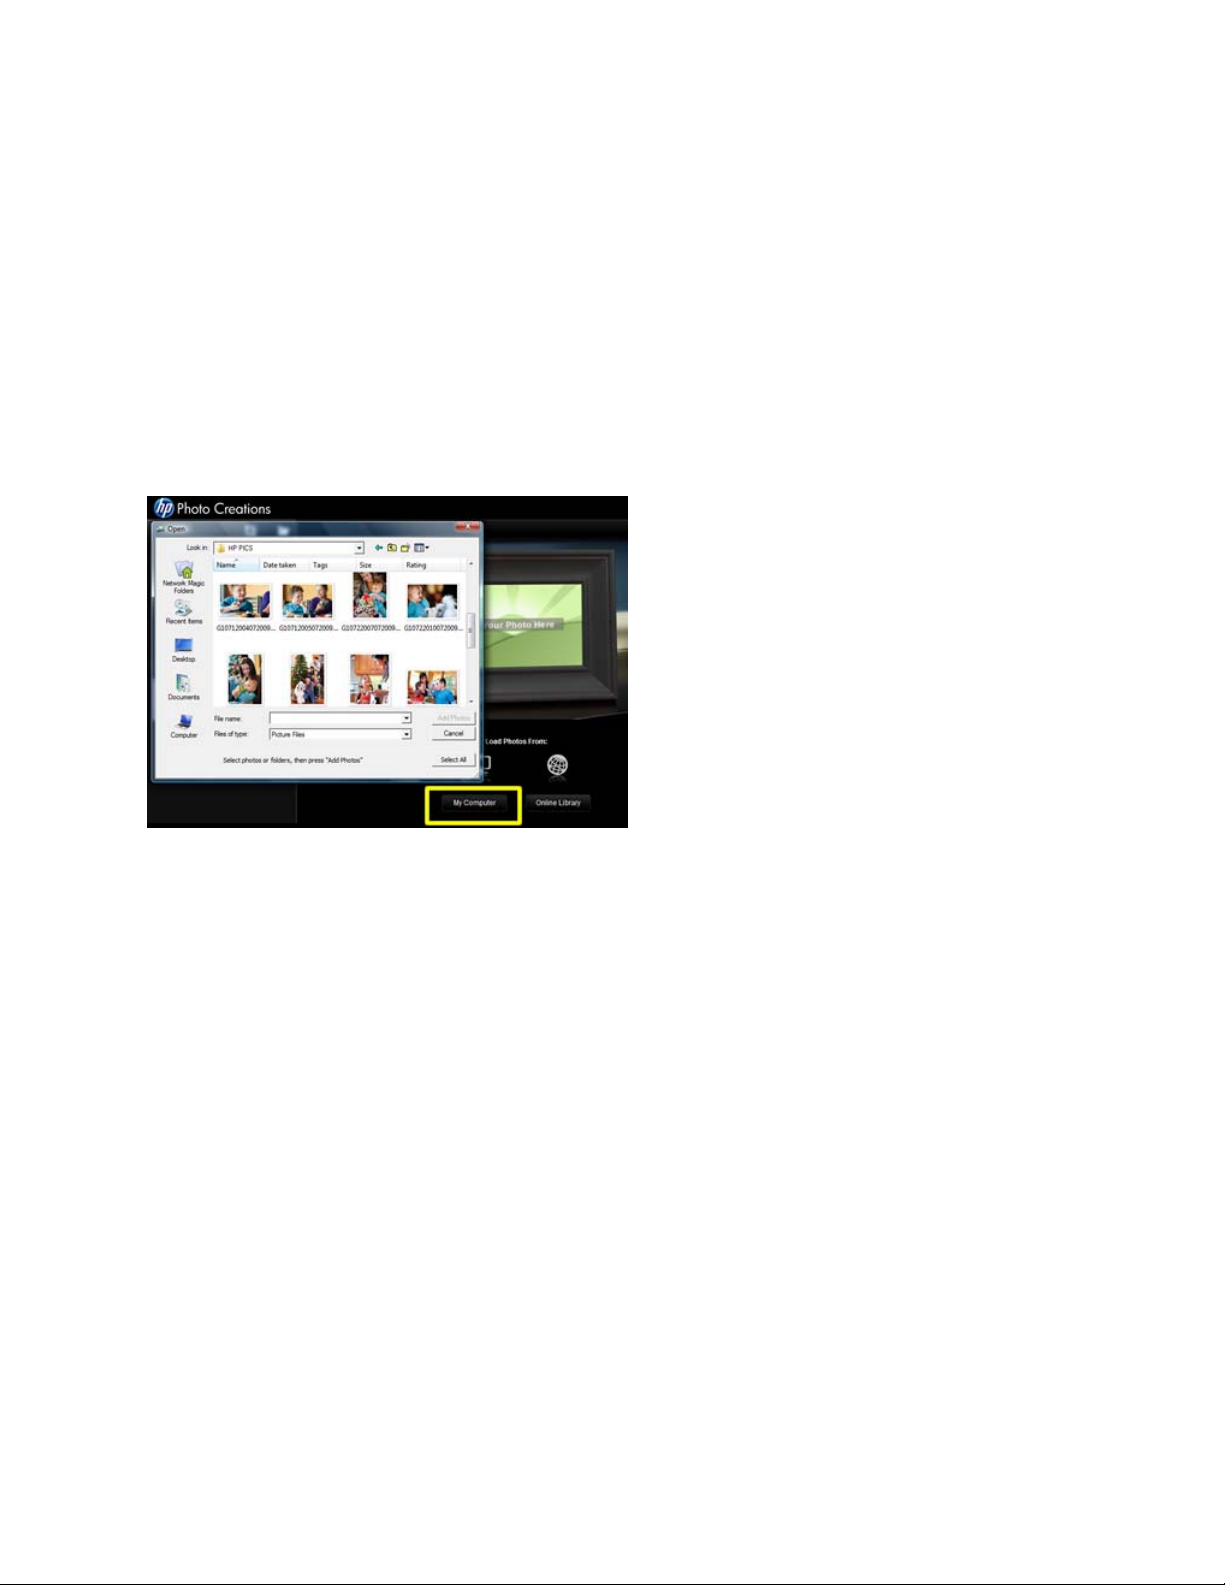
1. Click the Ship to Home tab; a series of product categories will appear.
2. Choose a category (choose Photo Books for now).
3. Select a product (choose Square Photo Books).
4. Choose a Theme Category best suited for the occasion (choose Wedding ).
5. Select a Theme (choose Just Married).
6. Click the Add Photos Button
Copyright © 2004–2009 RocketLife Page 9 of 59
Page 10
HP Photo Creations User Guide v1.14
Step 2: Import Your Photos
Next, the software will ask you to locate the photos you want to use. You can choose photos on your
computer or ones you’ve uploaded to an online service such as Flickr.com. For now, let’s choose photos
on your computer.
1. Click the My Computer button. A file browser window will appear.
2. Select a folder of photos, or specific photos within a folder. Tip: The more photos you select, the
more creative layout possibilities you’ll have.
3. Click the Add Photos button. The software will import your photos. To add more, click the My
Computer button again.
4. After you’ve loaded all the photos you want to use, click the Continue button.
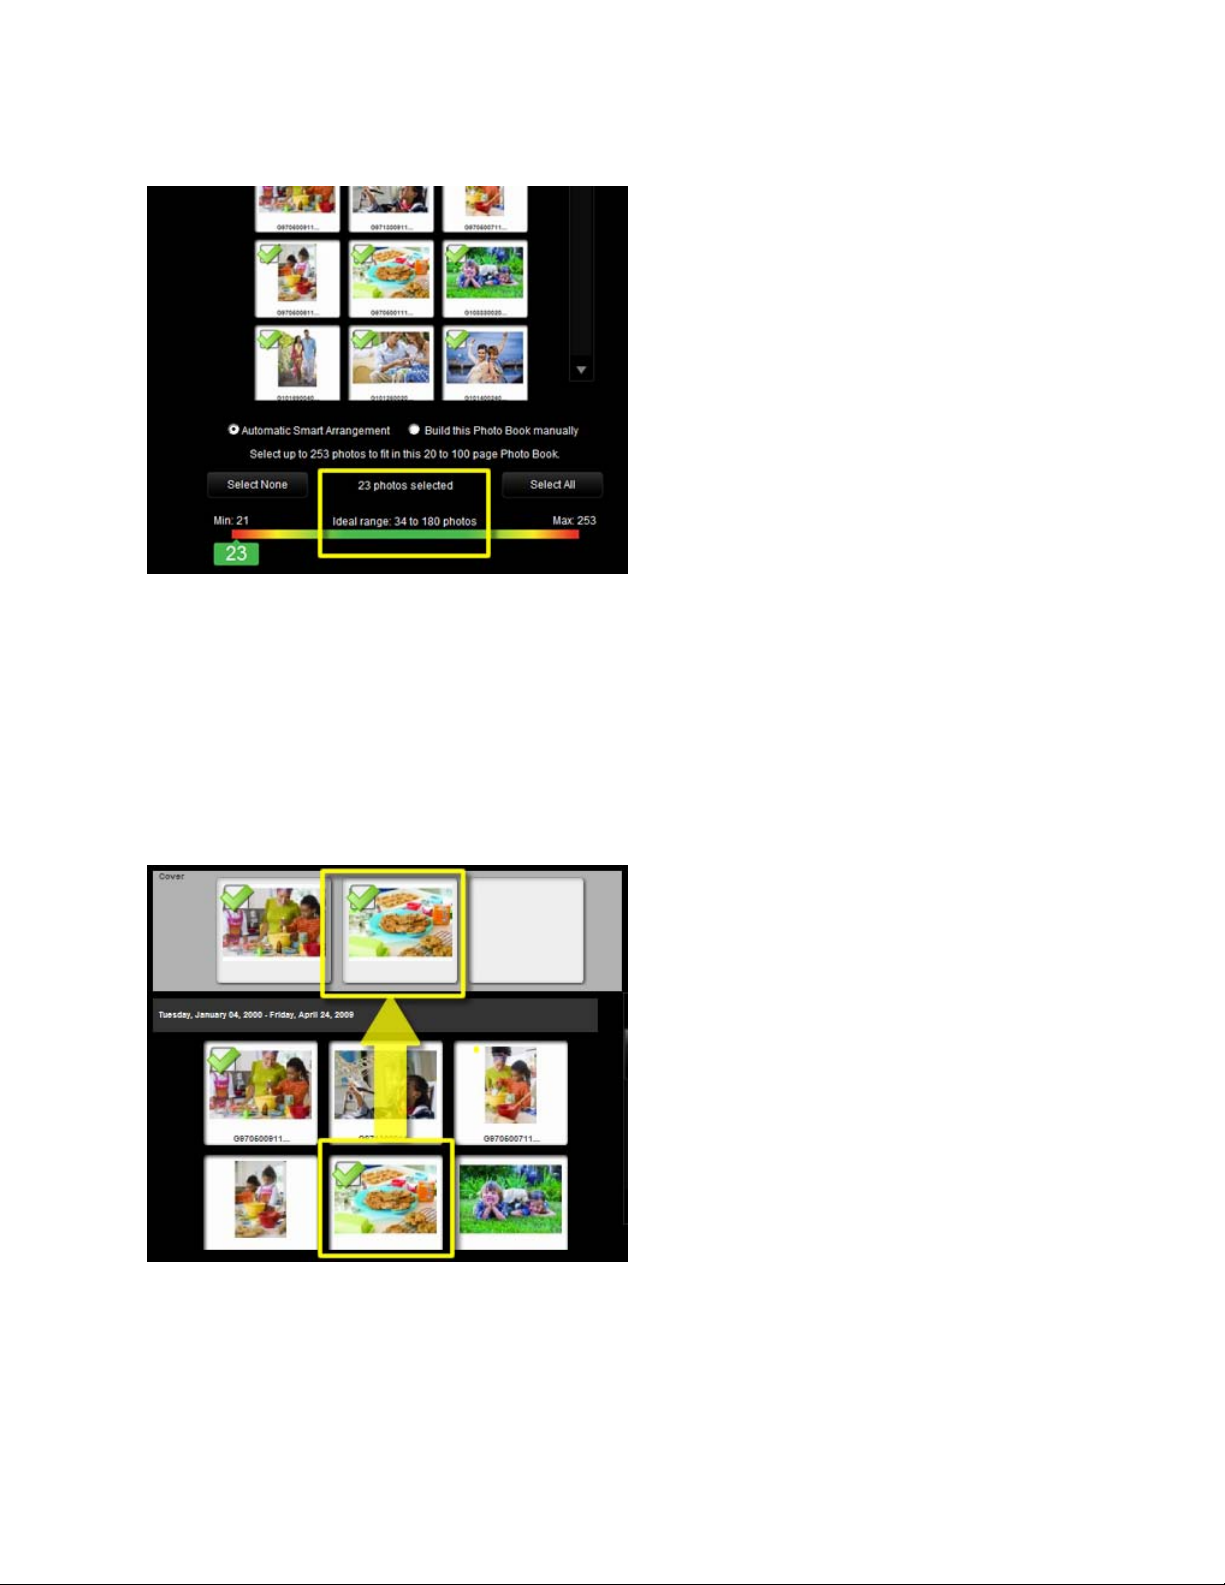
Step 3: Confirm Photos (and rotate if necessary)
By default, our Smart Arrangement Technology will group your photos by the date they were taken.
You can also opt to lay out your book manually. In either case, this is a good time to verify which
photos you want to use and make sure they’re rotated correctly.
1. To temporarily enlarge a photo to see it better, simply click on it.
2. While the photo is enlarged, you can click on the rotation buttons to rotate it left or right.
3. Click the enlarged photo again to return it to the normal preview size.
4. If you don’t want to use a particular photo, click its checkmark to deselect it.
5. Each type of product has a minimum and maximum number of photos. Note the Ideal Range
indicated in the meter at the bottom of the page. If you need to import additional photos, click the
Add Photos button.
6. Click Continue when you’re ready to begin the layout.
Copyright © 2004–2009 RocketLife Page 10 of 59
Page 11
HP Photo Creations User Guide v1.14
Step 4: Design Your Title Page
1. Select up to three photos for your title page by clicking them.
2. Click the Continue button. Smart Arrangement will design the book and show you a 3D preview.
3. To add a text title, click the Add a Title button. A text panel will appear.
4. Type some text (for example, “Our Wedding”) in the box. Your words will appear in the 3D
preview.
5. If you like, experiment with fonts, colors, size, backgrounds, and alignment by clicking the
corresponding buttons. You can also add captions or additional text areas.
6. When you’re happy with your design, click Continue.
Copyright © 2004–2009 RocketLife Page 11 of 59
Page 12

HP Photo Creations User Guide v1.14
Step 5: Personalize Interior Pages
The software will show all the pages in your photo book in a horizontal row called the storyboard. You
can click on any page in the storyboard to personalize it, or proceed to order your book. Here are
some of the many customizations you can make:
• Photos tab — Access your used and unused photos, along with unique theme graphics
• Themes tab — An entire library of themes is available, great for any occasion
• Text tab — Apply photo captions, as well as independent bodies of text
• Touch-Up tab — Enhance your photos with useful tools such as Crop and Red-Eye removal
• Design tab — A wide range of advanced design options are available for the perfect look
Please refer to the Design Guide
To save your work in progress, click the Save Projects button at the top left.
Copyright © 2004–2009 RocketLife Page 12 of 59
section for tips that will help you make the most of your projects.
Page 13
HP Photo Creations User Guide v1.14
• Click Continue when you are ready to order
Step 6: Choose Sizes and Quantities
1. Click the + and – buttons next to each type of product to select the number of copies you want.
2. Choose among available book sizes with the buttons at the left. Note that some book types have
additional options, such as a photo jacket.
3. As you set your quantities, you’ll notice the price change in the left side panel.
4. When you’ve finished choosing sizes and quantities, click the Add to Cart button
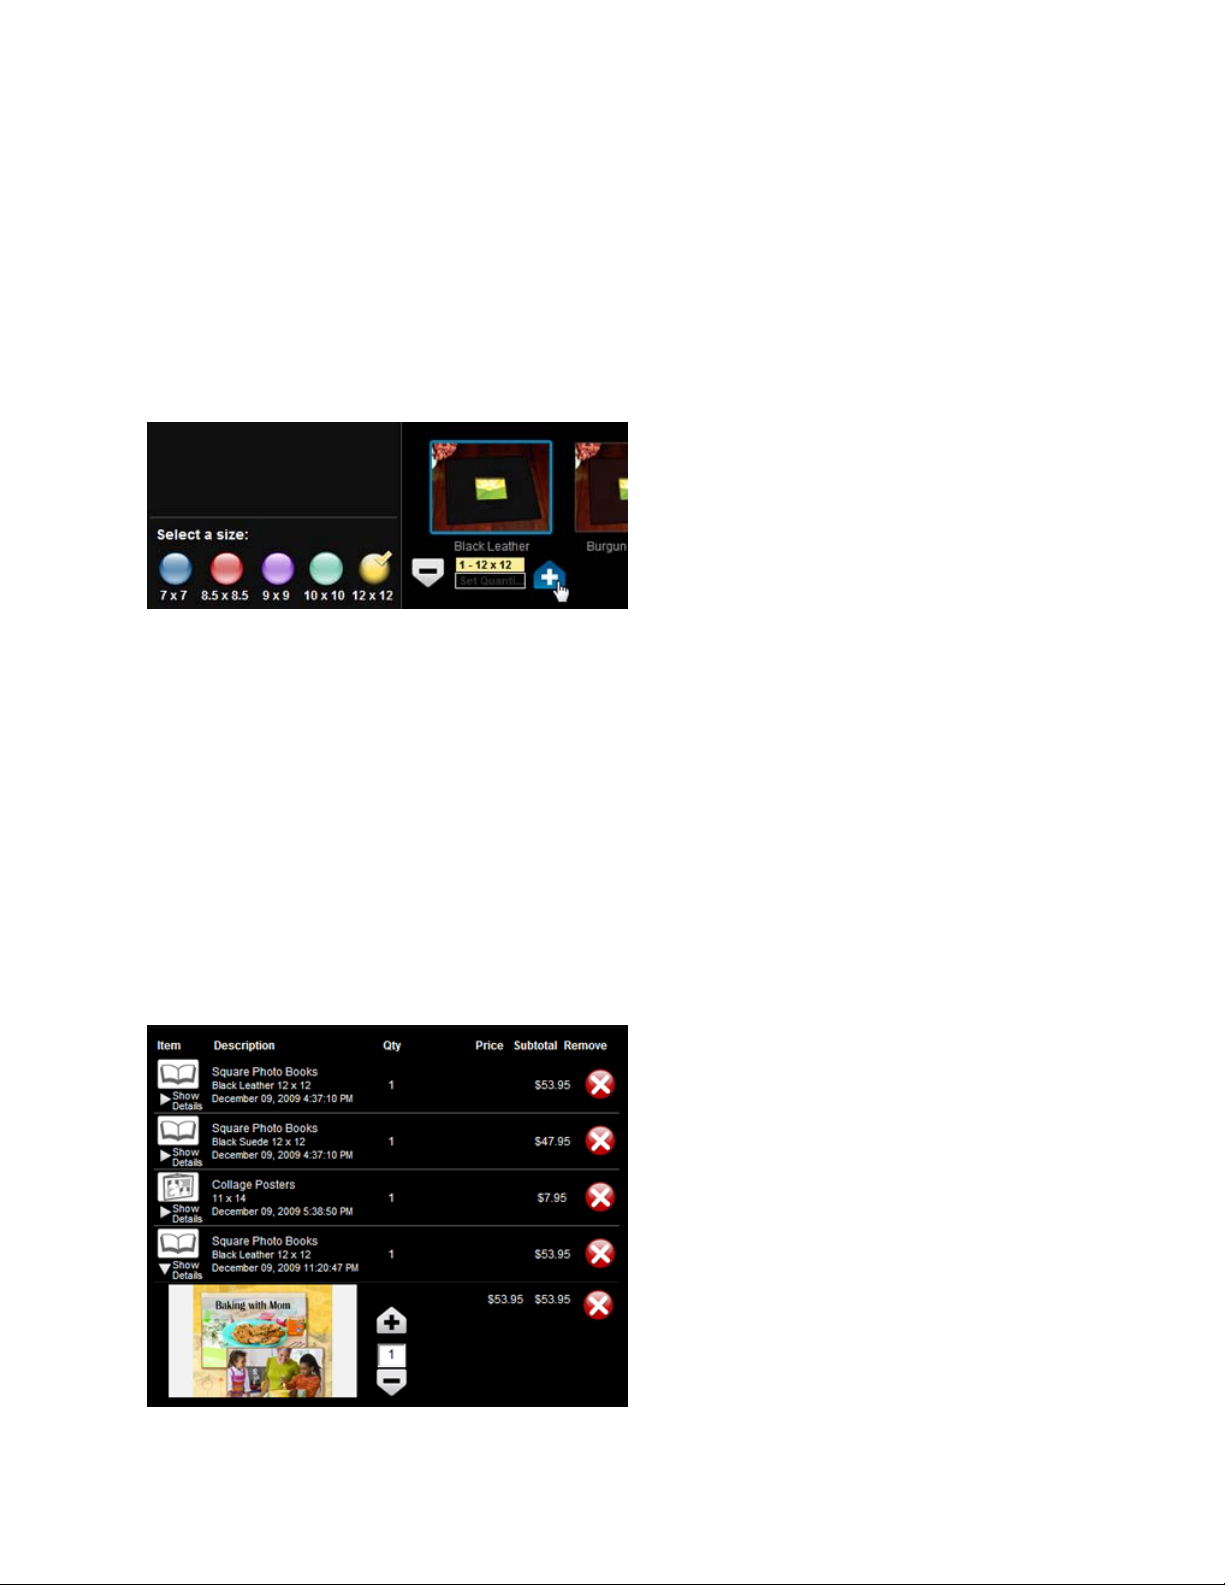
Step 7: Confirm Quantities
The software will check your project for errors such as photos that are too small to print clearly, and then
create the final high-resolution files for printing. You can also adjust quantities here.
1. Click the Show Details button to reveal additional itemization info and a layout preview.
2. Use the + and – buttons to change quantities as desired. (Click the X button to remove items from
the cart.
3. This is a good time to save your project if you haven’t already. Click the Save button. You may
also want to try your design on other products, such as photo cards and mugs. Thanks to our
unique technology, your layouts adjust automatically so you don’t have to start from scratch. To
see how it works, just click the Continue Shopping button. Your current project will wait safely in
your cart while you experiment.
4. Click Check Out when you are ready to order. Your project will begin uploading. (This may take
several minutes.)
Copyright © 2004–2009 RocketLife Page 13 of 59
Page 14

HP Photo Creations User Guide v1.14
Step 8: Submit Your Order
Order with confidence! We use industry-standard SSL encryption to process your orde r safely.
1. Enter your billing and shipping information.
2. Choose a shipping method (expedited shipping is available).
3. Click Complete This Order to finalize your secure transaction.
After your order uploads, the software will display an onscreen receipt, which you can print for your
records. We will also send you a receipt via email.
When you’re done, you can click the Catalog button to start a new project, or transfer your design to
another product of your choice.
Tool Panels
After you’ve selected your photos and created your project, you’ll notice a set of editing tabs to the left of
the Preview Screen, which open the following panels:
Photos
• Used Photos
• UnusedPhotos
• Graphic Elements
Themes
• Select Category
• Apply Theme
Text
• Text Font
• Text Color
• Text Background
Touch-Up
• Touch Up
• Crop
• Brightness
• Red-Eye
• Airbrush Effect
• Monochrome
• Sepiatone
• Rub Through
• Blur
• Photo Border
• No Border
• White Thin
• White Thick
Copyright © 2004–2009 RocketLife Page 14 of 59
Page 15

HP Photo Creations User Guide v1.14
• Black Thin
• Soft Thin
• Soft Thick
• No Border / No Shadow
• Photo Tint
• Monochrome
• Sepia Tone
• Assorted Tints
• Transparency
• 10% Increments (0–100)
Design
• Select Category
• Apply Theme
• Theme Variations
• Placeable Graphics
• Photo Borders
• Background Color or Photo
• Copy Photo To Page
• Copy Photo To Page Spread
• Background Photo Tint
• Background Photo Blur
Quick Change Tools When you are in any of the Tool Panels above, a set of Quick Change buttons (Designs, Layouts, and Rotations) will appear at the top of the panel. These buttons are great for making quick and inspiring
variations to your designs.
• Designs button — cycles through all the available variations in the current theme.
• Layouts button — cycles through a set of layouts appropriate to the number of photos on the
page.
• Rotations button — cycles through subtle photo rotations.
Photo Tools Drop-Down Menu
You will find a Tools drop-down menu at the top left corner of any selected photo, placeable graphic, or
text box. Click on it to open the Photo Tools menu. This menu contains the following features:
• Rotate — Rotates the selected photo 90 degrees left or right.
• Layer — Moves a photo, placeable graphic, or text box to the front or back of another object on
the layout.
• Crop — Allows you to trim the edges of the selected photo.
• Add Photo Caption — Opens the Text Panel. Here you can type or paste a caption and adjust
alignment, size, and transparency of text. You can also adjust the font style and color.
• Make Favorite Photo — Makes the selected photo the largest in the layout.
• Make Photo Full Page — Enlarges the selected photo to fill the page.
Copyright © 2004–2009 RocketLife Page 15 of 59
Page 16

HP Photo Creations User Guide v1.14
• Copy to Background — Copies the selected photo to the background, blending it with the
current theme.
• Remove Photo — Removes the selected photo, placeable graphic, or text box from the layout.
(Removed photos are returned to the Unused Photos tab in the Photos panel in case you want
to use them later.)
Quick Design Overview
This is an overview of the steps in creating and ordering a photo product.
Browse the Project Catalog
1. Select a Theme Category.
2. Choose a theme appropriate for the occasion.
3. Select “Ship to Home” or “Print at Home.”
4. Choose a product type from the associated tab (for example, Premium Photo Books).
5. Choose a product type (for example, Portrait Lay-Flat Premium Leather).
Add Photos
1. Click the Add Photos or Start Creating button.
2. Select My Computer to choose photos from your computer.
3. Add individual photos or an entire folder. (The more photos you add, the more creative layout
possibilities you’ll have.)
Create a Project
1. Click Continue after adding your photos.
2. Select the photos you’d like to work with.
3. Notice the Ideal Range shown in the photo counter. Add or remove photos if necessary.
Automatic Smart Arrangement
1. Click Continue.
2. Select up to three photos for your title page, then click Continue.
3. To add a title, click Add a Title — or Continue to skip this step.
Build This Book Manually
1. Click “Build this Photo Book manually.”
2. You can import as many additional photos as you wish
3. Click Continue.
Apply Themes
1. Click the Themes button.
2. Choose a desired Category and associated Theme.
3. Apply the theme to pages, spreads or the entire book.
4. Click the Designs button above to cycle through theme variations.
5. Click Design and manually select a Theme Variation.
Create Page Spreads
1. Select the Photos or Touch-Up button.
Copyright © 2004–2009 RocketLife Page 16 of 59
Page 17

HP Photo Creations User Guide v1.14
2. Use the Add or Remove spread buttons.
3. Unlock the spread to add or remove individual pages.
Layout Variations
1. Click the Try Layouts button.
2. Click Tools>Make Favorite Photo.
3. Manually reposition, resize, or rotate your photos.
Drag & Drop Layout
• Drag Used and Unused photos to the layout.
• Drag Used and Unused photos to storyboard pages.
Tools — Drop-down editing tools menu
• Click the Tools button.
• Select a feature, such as “Crop Photo.”
Photo Borders
1. Select a photo on your layout.
2. Click the Touch-Up button.
3. Click the Photo Border button.
4. Select a desired border style.
5. Add the same border style to all photos on the layout.
6. Click the Design button.
7. Click the Photo Borders button.
8. Select a border style for all photos.
Photo Tints
1. Select a photo on the layout.
2. Click the Touch-Up button.
3. Click the Photo Tint tab.
4. Choose a desired tint.
Saving a Project
1. Click the Save button.
2. Name your project, then click the Save button. You can save multiple projects under different
names. You can also overwrite existing projects (replacing them).
Opening a Project
1. Click Open at the Product Catalog.
2. Select your saved product.
3. Click Open.
Ordering Projects
1. Select the desired product type and available options (left panel).
2. Adjust your quantities with the + and – buttons (right panel).
3. Click Add to Cart when you’re ready to order
Copyright © 2004–2009 RocketLife Page 17 of 59
Page 18

HP Photo Creations User Guide v1.14
Review the Cart
1. Click the Show Details button for a project preview.
2. Adjust quantities as desired. You can also remove products from the cart by clicking the X button.
Check Out
1. Enter your billing and shipping information.
2. Choose a desired shipping method.
3. You can apply any valid coupon code if available.
4. Click Place Order when you’re ready.
After the order is uploaded, the software will display an onscreen receipt, which you can print for your
records. You’ll also receive an order confirmation via email.
Continue Shopping
After your order is complete, click the Continue Shopping button to return to the Project Catalog. You
can start creating more projects right away.
Copyright © 2004–2009 RocketLife Page 18 of 59
Page 19

HP Photo Creations User Guide v1.14
Feature Reference
This section contains details on the various tools in the software and how to use them.
The Product Catalog
Browsing the Catalog
• Select a Theme Category in the Category Panel (ex. Every day, Basics
• Choose a desired Theme (ex. Bloom, Bright Papers, etc.)
• Cycle through the available Product Thumbs below and choose a produc
• Use the drop-down menu to select different product categories (ex. Collage Gifts)
)
t
Product Information and Pricing
• Click the Info & Prices button
• The Product Info tab will display useful details pertaining to your product of choice
• The Prices & Options tab will display concise pricing tables for the selected produc
• Click the Close button ( “X” ) to restore the 3D Product Preview
t
Copyright © 2004–2009 RocketLife Page 19 of 59
Page 20

HP Photo Creations User Guide v1.14
Importing Photos
1. Click the Add Photos or Start Creating button to import your photos.
2. Click My Computer to browse for photos on your hard disk, flash card, CD-ROM, or other
media.
3. Select a folder of images or individual images and click Add Photos. The following image
formats are supported:
• JPEG (.jpg)
• Bitmap (.bmp)
• PNG with transparency (.png)
• GIF (.gif)
4. Click Continue after your photos have been imported.
Copyright © 2004–2009 RocketLife Page 20 of 59
Page 21

HP Photo Creations User Guide v1.14
Photo Selection
Organizing your Photos
(An introduction to Smart Arrangement Technology)
• Your photos will be grouped based on their time stamps (when they were taken).
• De-select unwanted photos individually or by group using the associated checkboxes
• Click on a photo to display a zoomed preview.
• Use the rotation buttons to reorient your photos as needed
• Click Add Photos to import additional photos.
• The Select None button will de-select all imported photos
• The Select All button will select all imported photos
.
.
.
.
Copyright © 2004–2009 RocketLife Page 21 of 59
Page 22

HP Photo Creations User Guide v1.14
Photo Layout Options
• Step-By-Step will create photo book pages and arrange your photos automatically
• For best results, it’s recommended to stay within the Ideal Range of photos as indicated.
• Step-By-Step layouts are restricted to a minimum and maximum amount of photos
• Build this Photo Book manually will start your project from scratch
• The manual layout option is not restricted to a minimum or maximum photo count.
• Click Continue after selecting a preferred layout method
.
.
.
.
Step-by-Step Layout Method
Cover Photos
• You can choose up to three imported photos that will be applied to the cover.
• If you skip this step, Smart Arrangement Technology will choose cover photos for you.
• Click Continue.
Copyright © 2004–2009 RocketLife Page 22 of 59
Page 23

HP Photo Creations User Guide v1.14
Adding a Cover Title
1. Click Add a Title.
2. A Text Box will appear on your cover page.
3. Input your desired text into the blank dialog box below.
4. You may alter the text with the alignment buttons (Top to Bottom & Left to Right).
5. Utilize the Larger and Smaller buttons to adjust the font size.
6. Utilize the Opaque and Transp. buttons to adjust text transparency.
7. You may freely reposition, resize and rotate the Text Box on the Layout Preview.
8. There are three distinct Text Categories in the left-side panel:
• Text Font — Offers a wide variety of unique fonts to choose from
• Text Color — Select a font color best suited for your design
• Text Background — Fills in the Text Box with a color or gradient of your choice
9. Click Continue.
Working with Your Photos
Used and Unused Photos
• Click the Photos button to reveal the Photos & Graphics Pane
• Your photos will be grouped based on Smart Arrangement Technology
• Click the Used Photos and Unused Photos buttons to cycle between the two types
Copyright © 2004–2009 RocketLife Page 23 of 59
l
Page 24

HP Photo Creations User Guide v1.14
Applying Photos
• You may click-to-add or drag-and-drop photos to the Layout Preview
• You may also drag-and-drop photos directly onto a Storyboard Thumb
Photo Thumb Options
• Hovering over a used or unused photo thumb will produce a magnifying glass icon
• Click the magnifying glass for a zoomed preview of the photo with two options:
1) Add — Will apply the phot o to the Layout Preview
2) Replace — Will swap the photo with one that is actively selected in the Layout Preview
Copyright © 2004–2009 RocketLife Page 24 of 59
Page 25

HP Photo Creations User Guide v1.14
Working with the Layout Preview
Photo Controls
The following controls are available on photos, text boxes and graphics (layout elements):
1) Reposition (center icon)
You may drag and drop a layout element to reposition it
2) Rotate (top right corner icon)
Use this control to apply a moderate rotation (or tilt)
3) Resize (lower right corner icon)
This control will allow you to resize the layout element as desired
4) Photo Selection Wheel (lower left corner icon on photos)
This unique control will quickly cycle through and replace the selected photo
Photo Tools
The following tools are also available on layout elements (upper left corner button)
1) Rotate
Will apply a 90° left or right rotation
2) Layer
Will move the currently selected element in front of or behind other elements
Copyright © 2004–2009 RocketLife Page 25 of 59
Page 26

HP Photo Creations User Guide v1.14
3) Crop Photo
This will display an easy to use photo cropping interface
4) Add Photo Caption
This will open the text panels so can apply dialog directly onto your photo
5) Make Favorite Photo
Will automatically re-adjust your layout so the selected photo is emphasized (largest)
6) Make Photo Full Page
All layout elements will be removed and the selected photo will be set to full page
7) Copy to Background
The selected photo will be applied to the background, blended with the theme variation
8) Remove Photo
Removes the photo from the layout and places it in the Unused Photos panel
9) Remove Graphics & FX (Background Photo)
The theme variation will be removed, revealing the background photo
Basic Layout Controls
• Click the Preview button to generate a static 3D preview of your product
• Use the Prev and Next buttons to cycle through your layouts
• There are three available layout preview modes:
1) Small
Copyright © 2004–2009 RocketLife Page 26 of 59
Page 27

HP Photo Creations User Guide v1.14
This is the default setting. Layout size will scale accordingly, depending upon OS window
size, offering the most flexibility while designing your product.
2) Large
This feature offers an extended viewing area at the expense of limited design features.
3) Full
Your layouts will be rendered at the highest quality in full screen. You can’t edit layouts while
in full-screen mode.
Design Precautions
Low Resolution Warning
• When a resized photo exceeds its actual pixel dimensions, a low resolution warning will appear
• An exclamation icon will appear on the affected photo in the layout preview
• Reviewing your project before ordering is recommended
.
Undo and Redo
• These features are available in case you make a mistake while designing your produc
• Click the Undo button to revert your layout to a previous state
Copyright © 2004–2009 RocketLife Page 27 of 59
t
Page 28

HP Photo Creations User Guide v1.14
• The Redo button will restore your layout to the last known state
• There are several Undo and Redo levels at your disposal, so correcting your layout is easy
Layout Elements (Collage Products Only)
Each layout can hold a maximum of eight design elements consisting of:
1) Imported Photos
2) Text Boxes
3) Independent Theme Grap hics
Design Transfers
• Transferring designs between two different aspect ratios may result in inconsistencies. (Fo
example, transferring a wide photo book’s design to a square photo book may alter the look.)
• We recommend you spot-check your transferred layouts and adjust them if necessary before
ordering your product.
Quick Tools
Utilizing the Quick Tools
There are three fast and easy features you can use to enhance your layouts
1) Designs button
This will cycle through all available theme variations for the current theme
2) Rotations button
Will apply rotations to layout elements in various degrees
3) Layouts button
This button will automatically rearrange the photos on your layout
r
Copyright © 2004–2009 RocketLife Page 28 of 59
Page 29

HP Photo Creations User Guide v1.14
Working with a Photo Book’s Storyboard
Moving Spreads and Pages
• To move a page spread, simply drag and drop it over another spread on the storyboard
• To move a page, click the padlock icon located between the spread to first unlo ck it, then drag
and drop the page over any other on the storyboard
Adding and Deleting Spreads and Pages
• These buttons are located just above the storyboard
• They are visible when the Photos and Touch-Up panels are activated
• The Add Page Spread button will generate a new spread at the end of the storyboard
• The Remove Page Spread button will delete the selected spread
• Unlocking the page spreads will display the Add Page and Remove Page buttons
• The Add Page button will generate a new page at the end of the storyboard
• The Remove Page button will delete the selected page
Copyright © 2004–2009 RocketLife Page 29 of 59
Page 30

HP Photo Creations User Guide v1.14
Minimum and Maximum Pages
• Collage products such as photo books require a minimum amount of pages to order
• Photo books are also restricted to a maximum amount of pages
• These requirements can easily be referenced by first clicking the Info & Prices button
• Minimum and Maximum restrictions are found in the Prices and & Options tab
• The software will warn you if you attempt to order a product that’s too long or shor
t
Working with Themes (the Basics)
Changing the current Theme
• Click the Themes button
• Select a new Theme Category appropriate to the occasion (ex. Birthdays or Wedding
• Choose a corresponding Theme (ex. Girl’s Birthday or Spring Wedding
• When a new theme is chosen, a Theme Variation will automatically apply to the current layou
Copyright © 2004–2009 RocketLife Page 30 of 59
)
)
t
Page 31

HP Photo Creations User Guide v1.14
Applying Themes
Just above the storyboard, you’ll notice two application options:
1) Apply Theme to Facing Page
This feature will apply the theme variation seamlessly to the facing page of the spread
2) Apply to all Pages
This will span all associated theme variations across the entire photo book
• When the page spreads are unlocked or when designing other collage products, only
the Apply to all… option will be available
Working with Text
Applying text to your layout
• Click the Text button
• There are three ways to apply text to your layout
Photo Captions
When typing into the empty dialog box, it will apply to the selected photo or graphic
Copyright © 2004–2009 RocketLife Page 31 of 59
:
Page 32

HP Photo Creations User Guide v1.14
Add a Title button
This will generate an independent text box on your layout, best suited for titles
Add a Text Box button
This will also generate an independent text box on your layout, for larger bodies of text
• Independent text boxes can be manually resized, repositioned and rotated
• Text can be copied and pasted via Ctrl-C and Ctrl-V keyboard commands
Text Alignment
• Use the Top, Middle and Bottom buttons to vertically align your text
• Use the Left, Center and Right buttons to align your text horizontally
Font Size
• Use the Larger and Smaller buttons to incrementally increase or decrease the font size
• Font size will automatically adjust when manually resizing a Title or Text box on your layou
Transparency
• Text transparency can be adjusted with the Opaque and Transp. buttons
• Photo and Text Box transparency levels can be adjusted with the Opaque and Transp. buttons
t
Fonts, Colors and Backgrounds
• There are three distinct Text Categories in the left-side text panel
1) Text Font
Offers a wide variety of unique fonts to choose from
2) Text Color
Select a font color best suited for your design
3) Text Backgr ound
Fills in the Text Box with a color or gradient of your choice
:
Copyright © 2004–2009 RocketLife Page 32 of 59
Page 33

HP Photo Creations User Guide v1.14
Working with Touch-Up Controls
Accessing the Touch-Up panel
• Click the Touch-Up button to open the associated pane
• There are five categories to choose from (covered in the following segments)
l
Touch Up
• The following features are available in this category
1) Crop
This will open the photo cropping controls
• Drag the four resizing icons to adjust the cropping area
• Use the center icon to drag and reposition the cropping area
• Click Done when you’re finished, or Cancel to undo your changes
2) Brightness
Use this feature to adjust the brightness of any selected photo
• Click Darker to incrementally darken your photo
• Click Brighter to incrementally lighten your photo
Copyright © 2004–2009 RocketLife Page 33 of 59
Page 34

HP Photo Creations User Guide v1.14
• Click Reset to revert your photo’s brightness level to its original state
• Click Done when you’re finished
3) Red-Eye
This brush-controlled feature will remove “red eye” from your photos
• Click Small, Medium or Large to select a brush size
• Using the mouse, paint over the red eye effect in your photo
• Click Done when you’re finished, or Cancel to undo your changes
Airbrush Effects
• Begin by selecting a photo on the layout preview. The following airbrush effects are available:
1) Monochrome
Allows you to apply a monochrome airbrush effect to your photos
• Click Small, Medium, Large or X-Large to select a brush size
• Using the mouse, paint over any area of your photo
• Click Done when you’re finished, or Cancel to undo your changes
2) Sepiatone
Allows you to apply a sepiatone airbrush effect to your photos
• Click Small, Medium, Large or X-Large to select a brush size
• Using the mouse, paint over any area of your photo
• Click Done when you’re finished, or Cancel to undo your changes
3) Rub Through
Allows you to rub a different photo through the currently selected one to blend them
• Select a photo to rub through
• Click Open when you’ve selected the photo
• Click Small, Medium, Large or X-Large to select a brush size
• Using the mouse, paint over any area of your photo
• Click New rub-through Image if you’d like to blend additional photos
• Click Done when you’re finished, or Cancel to undo your changes
4) Blur
Allows you to airbrush a blur effect to your photos
• Click Small, Medium, Large or X-Large to select a brush size
Copyright © 2004–2009 RocketLife Page 34 of 59
Page 35

HP Photo Creations User Guide v1.14
• Using the mouse, paint over any area of your photo
• Click Done when you’re finished, or Cancel to undo your changes
Photo Border
• Select a photo on the layout preview you’d like to adjus
• Click the Photo Border button in the category pane
• A subset of available photo border options will appea
• Select a desired photo borde
Photo Tint
• Select a photo on the layout preview
• Click the Photo Tint button in the category pane
• A subset of available photo tint options will appear
• Select a desired tin
t
r
t
l
r
l
Copyright © 2004–2009 RocketLife Page 35 of 59
Page 36

HP Photo Creations User Guide v1.14
Transparency
• Select a photo or graphic on the layout preview
• Click the Transparency button in the category pane
• A subset of available transparency increments will appear
• Select a desired increment
l
Advanced Design
Accessing advanced design controls
• Click the Design button
• This will open the Theme Category panel as well as Advanced Design categories below
• There are six advanced design categories to choose from:
Theme Variations
This will allow you to manually select a theme variation for your layout
• First, select a theme category in the left side panel (ex. Sports
Copyright © 2004–2009 RocketLife Page 36 of 59
)
Page 37

HP Photo Creations User Guide v1.14
• Then choose an associated theme (ex. Soccer
• The panel below will refresh to display all available Soccer variations
• You may be as diverse as you wish when choosing variations for your layouts
Placeable Graphics
Each theme contains a set of unique graphics that can be added to your layout
• First, click the Placeable Graphics button
• Available graphics are displayed for the current theme
• Select a theme category in the left side panel (ex. Every day
• Choose an associated theme (ex. Modern Note
• The panel will refresh to display all available Modern Note graphic
• Click on a desired graphic to add it to your layou
)
)
)
s
t
Theme graphics may also be added to your layout via the Photos panel
• Click on the Photos button to open the Photos and Graphics pane
• Click the Graphic Elements button
• Click to add a desired graphic to your layou
• To view graphics associated with other themes, click the Design button
• Select a theme category (ex. Baby
Copyright © 2004–2009 RocketLife Page 37 of 59
t
)
l
Page 38

HP Photo Creations User Guide v1.14
• Choose an associated theme (ex. Expecting
• Click the Photos button
• Click Graphic Elements
• The panel will refresh to display graphics from the Expecting theme
Photo Borders
This is a universal setting which will apply a chosen border type to all photos
• Click the Photo Borders button
• Select a border style that will be applied to all photos on your layou
)
t
Background Color or Photo
These options will allow you to copy a selected photo to the background, or apply a different background
color to blend with the current theme variation
• Click Background Color or Photo
• Select Copy Photo to Page to apply a selected photo to the background
• Copy Photo to Page Spread will span the photo across a two page spread
• Select a background color to blend it with the current theme variation
• To access other background color options, first select a theme categor
• Then choose an associated theme
Copyright © 2004–2009 RocketLife Page 38 of 59
y
Page 39

HP Photo Creations User Guide v1.14
• The Background Color or Photo panel will refresh to display new color sets
Background Photo Tint
This option will allow you to apply a color tint to the background photo on your layout
• Click Background Photo Tin
• Select an available color tint which will apply to the background photo
• To access additional color sets, first select a theme category (ex. Collections
• Then choose an associated theme (ex. Brights
• The Background Photo Tint panel will refresh to display new color set
t
)
s
)
Background Photo Blur
This option will allow you to apply a blur effect to your background photo
• Click Background Photo Blu
• Select a desired blur incremen
Adding Additional Photos to your Project
At any time while you are editing a project, you can add more photos.
• Click the Add Photos button
• Click My Compute
r
r
t
Copyright © 2004–2009 RocketLife Page 39 of 59
Page 40

HP Photo Creations User Guide v1.14
• Navigate to and select the photos you wish to add to your projec
• Click Add Photos
• Click Continue
• The newly added photos will be available in the Unused Photos pane
Saving Your Project
• Click the Save button
• You can save your project to a hard disk, flash drive, or other storage media
• Type a name for your project
• Click the Save button
• A progress bar will be seen on the layout preview
• When it completes, your project has been saved
• You can overwrite existing projects or save multiple copies under different name
• The Save button can be found at the Product Catalog, editing screens, and the Ordering
section
• All of your designs listed under My Project at the Product Catalog will be saved
t
l
s
Good saving habits
It’s good practice to save your work in progress regularly.
Copyright © 2004–2009 RocketLife Page 40 of 59
Page 41

HP Photo Creations User Guide v1.14
• Consider saving multiple copies of your work (ex. Photo book revisions
• The software will not save your work automatically; this must be done manually
• Always save your design before ordering; it only takes a few moments
• Do not tamper with or edit any of the files contained within your saved project folder; doing so
may cause irreversible damage
Starting Over
At times, you may wish to “clean slate” your session. This restores the software back to its original state
when you first launched it, and lets you load a new set of photos to work with.
)
• Click the New button
• Then click Restart Session
• Any unsaved work will be los
• However, the Save Projects button will be available as a final opportunity to save your work
• To continue without saving, click Restart Session again
• Click Cancel should you change your mind
Loading a Previously Saved Project
• At the Product Catalog, click the Open button
t
.
Copyright © 2004–2009 RocketLife Page 41 of 59
Page 42

HP Photo Creations User Guide v1.14
• A Windows File Requester will appea
• Navigate to and select your saved project folde
• Click Open
• Your design(s) will be listed under My Projec
• The last project you worked on when saving will be displayed in the 3D preview
• To revisit your design, click Edit Projec
Transferring Designs
Some designs might look fantastic on several different products. Here’s how you can easily apply the
design from any project to any other type of project, i.e. turning all the pages from a Photo Book into a set
of Posters you can choose from… or Mouse Pads, or Mugs…
r
r
t
t
• To transfer your work, first select a design listed under My Produc
• It will automatically display in the 3D preview
• Then, select a product below to transfer it to
• Utilize the drop-down menu to access additional product type
• When you’re ready to transfer your favorite design, click the Apply Design button
t
s
Copyright © 2004–2009 RocketLife Page 42 of 59
Page 43

HP Photo Creations User Guide v1.14
Copyright © 2004–2009 RocketLife Page 43 of 59
Page 44

HP Photo Creations User Guide v1.14
Ordering
Here, you’ll select the quantity of products you want to order, and then submit your billing and shipping
information. The software will then upload your project to one of our printing partners for production.
Placing an Order
Sizes and Quantities
• Click Place Orde
• Product size options can be found in the left side pane
• The plus and minus buttons to the right will set your desired quantity per selected item
• Some photo book types have additional options, such as a photo jacke
• Simply click within the check-box if you wish to include one
• As you set your quantities, you’ll notice an itemization appear, providing a subtotal
r
l
t
Adding to the Cart
• When you’ve finished choosing sizes and quantities, click Add to Car
• Your design will be prepared in high resolution, indicated by a progress ba
• Rendering takes place locally on your system; no uploading occurs at this poin
Copyright © 2004–2009 RocketLife Page 44 of 59
t
r
t
Page 45

HP Photo Creations User Guide v1.14
Reviewing your Cart
• Click the Show Details button to reveal addition itemization info and a layout preview
• Use the plus or minus buttons to re-adjust your desired quantities as needed
• Each item in the cart will have its own time stamp for reference as to when it was added
• Click the “X” button to remove items from the cart
Copyright © 2004–2009 RocketLife Page 45 of 59
Page 46

HP Photo Creations User Guide v1.14
Persistent Cart
• Items in your cart will remain there unless they’ve been ordered or removed
• This means that you don’t have to place your order right away
• The next time you launch the software, the Check-Out button will be active
• Clicking Check-Out will take you directly to the Car
t
Entering your Order Information
• Enter your credit card billing and payment information
• Then select a shipping method
• If you have a valid coupon code, enter it into the Coupon Code field and click Apply
• If the coupon code is accepted, you’ll notice a code description appear and an altered subtota
• If by chance coupon code does not work, contact customer support before placing your orde
• SSL encryption is used to secure your transaction and keep your personal information safe
Uploading your Order
• When you’re ready to order, click the Place Order button
• Uploading times are generally based upon the upstream bandwidth cap provided by your ISP
• When the upload process completes, you’ll be presented with an on screen receip
• You may print the onscreen receipt to keep for your records
• A confirmation email will also be sent to the address you provide upon check-ou
l
r
t
t
Copyright © 2004–2009 RocketLife Page 46 of 59
Page 47

HP Photo Creations User Guide v1.14
Continue Shopping
• Click Continue Shopping
• You’ll be returned to the Product Catalog
Copyright © 2004–2009 RocketLife Page 47 of 59
Page 48

HP Photo Creations User Guide v1.14
Print at Home
• Select a desired print size with the buttons located in the left side panel.
• When you’re ready to print, click the Print button at bottom right.
• A printer dialog window will display, showing a print preview of the current page.
Copyright © 2004–2009 RocketLife Page 48 of 59
Page 49

HP Photo Creations User Guide v1.14
• Click the drop down menu to select the printer you would like to use, then click the Properties
button.
• Choose the desired print quality and paper type as needed.
Copyright © 2004–2009 RocketLife Page 49 of 59
Page 50

HP Photo Creations User Guide v1.14
• Click OK to close the Printer dialog box.
• Use the Best fit full page option to make best use of your paper.
• Use the Print dropdown menu to choose whether to print the Selected page, or All pages.
• Choose a quantity using the plus and minus buttons, or you may click in the box and type a
number. The Total Copies to print will be indicated.
Copyright © 2004–2009 RocketLife Page 50 of 59
Page 51

HP Photo Creations User Guide v1.14
• Click OK to begin printing
Copyright © 2004–2009 RocketLife Page 51 of 59
Page 52

HP Photo Creations User Guide v1.14
Frequently Asked Questions (FAQ)
Computer System
What are the minimum PC system requirements?
• 1GHz Pentium 4 processor
• 256MB RAM
• 15MB hard drive space
• Microsoft Windows XP, Vista, or Windows 7
• Broadband Internet connection
Will installing the software change how other files open on my computer?
No. Your computer file system and file type extensions will not change. Your computer will perform the
same way it did before installing the software.
How do I uninstall the software?
Use the “Add/Remove Programs” function in Windows XP or the “Uninstall a Program” feature in
Windows Vista and Windows 7.
Design and Usage
How do I start a project from scratch?
After you’ve loaded your photos, you’ll see two options: “Use Smart Arrangement” and “Build this project
manually.” Select “Build this project manually.” The software will take you to the layout view and place all
your photos in the Unused panel.
How do I add more photos to my project?
To add additional photos to your project, click Add Photos. Select the location from which you’d like to
import your photos (typically a folder on your computer). Once the program adds your new photos, click
Continue. The new photos will be available in the Unused Photos panel of the Editing section.
Why can’t I add more photos to my pages?
At this time, layouts for collage projects support a maximum of eight elements, which includes photos,
placeable graphics, and text boxes.
What happens when I transfer the design of one product to another?
Transferring a design will take each layout you’ve created in your project and copy it to another collage
project of your choice. For example, perhaps you’d like to order a set of coffee mugs using some of your
favorite photo book pages. After you transfer the design from your photo book project to the mug project,
the software will instantly show you an array of coffee mugs, each displaying a page from your photo
book! Note: When you transfer one project to another with a different aspect ratio (relationship of height
to width), you may need to adjust the new layout slightly before ordering. For example, the transfer from a
portrait (tall) photo book to a landscape (wide) photo book will alter the look.
Copyright © 2004–2009 RocketLife Page 52 of 59
Page 53

HP Photo Creations User Guide v1.14
When I de-select photos, they still show up in the Unused Photos Panel. Why?
Choosing photos you wish to work with is primarily intended for Smart Arrangement layouts. De-selecting
photos will not omit them from your project entirely. We recommend you scan through the batch of photos
you wish to use prior to importing them into the software, or be more selective when initially importing a
batch of photos.
Why can’t I see my Unused Photos when I load my project?
If you notice broken thumbnail icons in the Unused Photos panel, it could mean the software can’t find the
photos. This will happen if, for example, you had imported a batch of photos from an SD card and then
removed the card. You will need to re-insert the SD card when you revisit the project.
How can I sort my photos in the Used and Unused photo panels?
Photos are sorted and grouped based on Smart Arrangement Technology. They will be sorted according
to when the photos were taken and grouped in a way that allows you to easily see which photos might fit
well together.
Can I delete unwanted photos from the photo panels?
Not at this time.
How can I make the layout preview bigger?
If maximizing the program window still produces a layout preview that’s too small, you can switch to Large
or Full mode by clicking the corresponding button. Large mode will expand your view of the layout (at the
expense of limited design controls). Full mode will show your layouts in full-screen format. Full mode does
not support layout editing.
How do I move photo book pages and page spreads?
Simply click and drag a spread to another position on the storyboard. To move single pages, first unlock
the page spread by clicking on the padlock icon found on the storyboard.
Why do my photo borders change when I use the Replace feature?
When you use the Replace feature, the software will show the default border associated with your
selected theme variation. You can easily change this with the Touch-Up controls; select Photo Border.
Why is my Saved Project folder empty?
The software will not erase the contents of your Saved Project folder. You may have inadvertently moved
the files to another location or renamed them. Running automatic backup software ca n sometimes cause
files to move as well.
Can I edit Saved Project photos in third-party programs?
No. Altering or editing files contained within your saved project is not recommended or supported. Doing
so may result in irreversible damage to your project.
Can I transfer my saved projects to another computer?
Yes. You can easily copy your saved project to CD-ROM, DVD-ROM, or other removable media such as
a USB flash drive (space permitting). This makes it easy to show off your projects to family, co-workers,
friends, and even clients. You can start a project on one computer and complete it on another.
Copyright © 2004–2009 RocketLife Page 53 of 59
Page 54

HP Photo Creations User Guide v1.14
Terminology
What is the “Photo Safe Area”?
The Photo Safe area is the region within your layout that is considered safe for manufacturing. Elements
(such as images or text) that cross this boundary may be cut off during production. The software shows
you the Photo Safe boundaries when you move elements around in a layout.
What are “My Creations”?
Each time you create a project and return to the catalog, the software will list it under My Projects in the
Catalog. This is convenient and allows you to work on several different Projects without having to start
over each time. In addition, they will all be retained when saving your project.
What is “My Project” list?
Each time you create a project and return to the catalog, it will be listed under “My Project” in the Catalog.
This is convenient and allows for you to work on several different Projects without having to start over
each time. In addition, your settings will be retained when you save your project.
Ordering
How long will it take to receive my order?
Use the Info & Pricing button in the Software to see manufacturing turnaround times for specific projects.
Shipping time will vary based on your chosen shipping option (Ground, 2nd Day, Overnight, etc.)
Is online ordering safe?
The software establishes a secure SSL connection directly with our e-commerce servers. This secure
connection is used to send customer payment and order information and adheres to the standards used
by web browsers and financial institutions.
Why isn’t my coupon code working?
Most coupon codes can be used only once. Try inputting the code again and clicking the Apply button. If it
still doesn’t work, we recommend you contact customer support before placing the order.
The product I received is not the product I created. What happened?
If you saved the project, open it and inspect your work. Switch to full viewing mode for a closer look. Also,
if your saved project contains more than one project (found under the My Projects listing), inspect those
as well; you may have inadvertently ordered the wrong project.
Copyright © 2004–2009 RocketLife Page 54 of 59
Page 55

HP Photo Creations User Guide v1.14
Glossary
We design our software to make creating photo gifts fast and easy, but some jargon is unavoidable. Here
are explanations of some of the important terms and concepts.
3D Preview
This view offers a dramatic, 3D representation of your customized product. Consider it a reference to
what the manufactured product will look like.
Aspect ratio
The relationship of width to height. For example, most digital cameras capture photos in a 4:3 aspect
ratio, meaning the width is 1.33 times the height (4/3 = 1.33).
Bitmap (.bmp)
Bitmap images contain a fixed number of pixels, the dots that make up a photo. As a result, they can lose
detail and appear jagged if they are scaled to high magnifications onscreen or if they are printed at a
lower resolution than they were created for.
Blur
This is a special filter used to create an out of focus effect on your photo. You can apply it to all or part of
a photo. Choose a brush size (small, medium, or large) and rub over the area you wish to blur.
Border
This will add a border effect around a selected photo. The options range from no border to softened
edges. Click the Touch-Up menu, select the Photo Borders category, and then choose a desired border
effect.
Brightness
This lets you brighten or darken an image.
Caption
A caption is a body of text you can apply directly to photos on your layouts.
Cart
This is where products are stored and reviewed before orderin g.
CD-ROM
Compact Disc Read-Only Memory. You can burn saved projects onto blank CDs to back them up or
transfer them to another computer.
Checkout
The process of inputting your credit card, billing address, and desired shipping method.
Continue Shopping
This button will return you to the Product Catalog.
Copyright © 2004–2009 RocketLife Page 55 of 59
Page 56

HP Photo Creations User Guide v1.14
Coupon Code
A code relating to a promotional event. You enter it during the check-out process.
Crop
Cropping is the process of removing portions of your photo or placeable graphic. You can crop an image
using the Crop tool located within the Touch-Up tools menu.
Favorite Photo
This photo will be automatically emphasized (enlarged and centered) within the layout preview.
Flash Card
A form of flash memory. Flash memory is computer memory used for storing and transferring data
between systems and devices, such as digital cameras.
Font
A complete set of characters — letters, numbers, and symbols — that share a common weight, width, and
style; also known as typeface.
GIF (.gif)
Graphics Interchange Format. The file format commonly used to display simple images on the World
Wide Web. It was designed to save space, so it supports only a small number of colors and thus is not a
good choice for photos. JPEG is a better choice for photos.
Graphics Panel
This area of the screen displays all available placeable graphics associated with the current theme.
Independent Theme Graphics
Also called “placeable graphics,” these are unique theme based elements you ca n apply and manipulate
on your layouts.
JPEG (.jpg)
Joint Photographic Experts Group (JPEG) format is commonly used to display photographs and other
continuous-tone images on the World Wide Web. Unlike GIF format, JPEG retains all color information
but compresses file size by selectively discarding data.
Layer
Layers are like sheets of stacked acetate. You can see through transparent are as of a layer to the layers
below. You move a layer to position the content on the layer, like sliding a sheet of acetate in a stack. You
can also change the opacity of a layer to make content partially transparent.
Layout Preview
The interactive window representing your layout. Elements such as photos, placeable graphics, and text
boxes are added, manipulated, and arranged in the layout preview.
Copyright © 2004–2009 RocketLife Page 56 of 59
Page 57

HP Photo Creations User Guide v1.14
Low Resolution Warning
Using an image that’s too small (i.e., low resolution) results in pixilation — a blocky, co arse look when the
image is enlarged to fit the layout. If your photo is too small, a warning icon will appear in the lower left of
the preview panel.
Local Hard Disk
A storage device inside or attached to your computer. Most of your information, programs, photos, files,
and the computer operating system are likely stored on it.
Monochrome
Literally “single color”; usually taken to mean black-and-white or grayscale.
My Products
A listing of products you’ve created during a single session. This listing is found at the Product Catalog
screen.
Opaque
Neither transparent (allowing all light to pass through) nor translucent (allowi ng some light to pass
through).
Page Spread
A set of pages viewed together, such as the two pages visible whenever you open a book or magazine.
The page spread is a basic unit in book design.
Photo Border
A part or strip that represents the outer edge of your photos, such as “thin black” and “thin white.” The
software offers several styles.
Photo Selection Wheel
This control is found in the bottom left corner of any photo you place onto your layout. It allows you to
quickly swap the photo with any other used photos.
Photo Tint
A color overlay applied directly to your photo.
Photos Panel
This panel displays all of your imported photos, separated into two categories: Used and Unused.
Pixel
Picture Element, the dots that make up an image on an electronic display. A photo with an insufficient
number of pixels will trigger a low resolution warning in the software.
Placeable Graphic
A theme-based image such as a heart or star you can add to your layouts and manipulate.
Copyright © 2004–2009 RocketLife Page 57 of 59
Page 58

HP Photo Creations User Guide v1.14
PNG (.png)
Portable Network Graphics (PNG) format, used both for photos and Web graphics. Unlike JPEG, it also
supports transparency, allowing “peek through” layeri ng effects.
Product Catalog
The starting point when you first launch the software. You can access all available products here as well
as transfer designs from one product to another.
Red Eye
An ugly red glow caused by a reflection of the camera flash in the subject’s retina. To fix it, select the
Touch-up button. This will open the Effects Categories in the left panel. Select the Red-Eye tab to
remove red-eye from selected photo.
Reset
Clears any pending errors or events and brings a system to normal condition.
Restart Session
Will clear all data from your session. All unsaved work will be lost.
Rotate
This will rotate the selected photo 90 degrees left or right.
Rub Through
The act of blending two or more photos together. Portions of the background photo will become visible or
“rubbed through” the foreground photo via an airbrush effect.
Saving Project
The process of saving your design. Saved projects can be opened on other computers running the same
software.
Sepiatone
A brownish gray tone, named after the sepia officinalis cuttlefish. Sepia toning was originally a process of
converting metallic silver in prints to a sulfide compound, allowing for substantial preservation. It imparts
an antique look to a design.
Smart Arrangement Technology
A feature specifically designed to remove the tedious task of having to sort through your digital photos.
The software will identify and group your photos according to the date they were taken and other
aesthetic factors, making it possible to automatically arrange a photo book within seconds.
SSL Encryption
Secure Sockets Layer, a cryptographic security protocol designed to prevent eavesdropping or tampering
of network communications (such as payment details) between a client and server.
Copyright © 2004–2009 RocketLife Page 58 of 59
Page 59

HP Photo Creations User Guide v1.14
Storyboard
In Preview mode, a row of small images representing the pages in your project. You can rearrange the
pages by dragging them left or right.
Text Alignment
The way lines of text in a text box are lined up. You can align text vertically to the top, center, or bottom of
a text box and horizontally to the left, center, or right. Selecting the Text tab displays the alignment
options.
Text Box
A layout element that holds a body of text. Unlike photo captions, text boxes can be resized and
repositioned independently on the layout.
Theme
A collection of layout variations, with graphics designed exclusively for the event or occasion. The
software offers a vast assortment to choose among, such as Graduation, Just Married, and Anniversary.
Theme Category
An overall genre, such as “Sports,” that contains several related themes, such as “Football” and
“Baseball.”
Touch-Up
A slight correction or adjustment to a photo, placeable graphic, or text.
Touch-Up Panel
This panel contains several features designed to enhance your photos, including airbrush effects,
borders, and tints.
Transfer Designs
To apply the design of one product to another. For example, you can transfer a photo book to a series of
coffee mugs, automatically copying each page to an individual mug.
Transparency
The degree to which a background image shows through foreground eleme nts such as photos and text.
Increasing an object’s transparency blends it with the design.
Unused Photos
Photos you have imported but not yet placed in your design. They are stored in the Unused Photos panel
for easy access.
Copyright © 2004–2009 RocketLife Page 59 of 59
 Loading...