

Page 1

HP P6000 Control Panel
User Guide
Abstract
This document describes the use of the HP P6000 Control Panel and is intended for users and administrators involved in the
installation, operation and management of HP P6000 EVA storage systems.
HP Part Number: T5494-96601
Published: September 2013
Edition: 11
Page 2

© Copyright 2008, 2013 Hewlett-Packard Development Company, L.P.
Confidential computer software. Valid license from HP required for possession, use or copying. Consistent with FAR 12.211 and 12.212, Commercial
Computer Software, Computer Software Documentation, and Technical Data for Commercial Items are licensed to the U.S. Government under
vendor's standard commercial license.
The information contained herein is subject to change without notice. The only warranties for HP products and services are set forth in the express
warranty statements accompanying such products and services. Nothing herein should be construed as constituting an additional warranty. HP shall
not be liable for technical or editorial errors or omissions contained herein.
Page 3

Contents
1 Introduction...............................................................................................4
What's new.............................................................................................................................4
2 Working with a Control Panel......................................................................5
Control Panel features...............................................................................................................5
Interface quick tour...................................................................................................................6
Accessing a Control Panel.........................................................................................................6
Capturing Control Panel data.....................................................................................................6
Configuring access to HP P6000 Command View (filter list)...........................................................7
Confirming system alerts............................................................................................................7
Connecting to the management module (initial setup)....................................................................8
Enabling disk device ports.......................................................................................................11
Locating the storage system WWN label...................................................................................11
Reestablishing the storage system IP address..............................................................................11
Service option pages..............................................................................................................14
Resetting the storage system World Wide Name.........................................................................14
Setting the automatic loop recovery policy.................................................................................14
Setting controller power on behavior.........................................................................................15
Setting host ports topology.......................................................................................................15
Setting the storage system password..........................................................................................15
Troubleshooting......................................................................................................................16
Login error (ABM client filter related).....................................................................................16
Operation failed error (upgrade related)...............................................................................16
Updating management module software....................................................................................16
Unbypassing disk drives..........................................................................................................17
Uninitializing a storage system.................................................................................................17
3 Storage system concepts............................................................................18
Controllers.............................................................................................................................18
Controller power-on behavior...................................................................................................18
Disk device ports....................................................................................................................19
Disk device loop pairs.............................................................................................................19
Host ports..............................................................................................................................19
HP P6000 Command View software suite..................................................................................19
HP P6000 Command View ABM and SBM versions....................................................................19
HP Management Integration Framework software .......................................................................20
Initialization and uninitialization...............................................................................................20
Internet Protocol configurations.................................................................................................21
Management module..............................................................................................................21
Management module IP addresses............................................................................................22
Operational states..................................................................................................................23
Passwords..............................................................................................................................23
Private and public networks.....................................................................................................23
World Wide Name (WWN)....................................................................................................24
4 Support and other resources......................................................................25
Release history.......................................................................................................................25
Contacting HP........................................................................................................................26
Related information.................................................................................................................26
Customer self repair................................................................................................................27
Glossary....................................................................................................28
Index.........................................................................................................29
Contents 3
Page 4

1 Introduction
What's new
HP P6000 Control Panel version 2.8 includes the following new or updated features compared to
version 2.7.
• HP P6000 Command View support. HP P6000 Control Panel adds support for version 10.3
of array-based HP P6000 Command View.
4 Introduction
Page 5

2 Working with a Control Panel
Control Panel features
The HP P6000 Control Panel is primarily intended for use by storage system administrators and
service personnel. When you log in as a storage administrator, the Administrator options, Service
options, and User options are available. When you log in as a user, only the User options are
available.
The following menu options are available in the HP P6000 Control Panel.
Administrator options
These options allow storage administrators to view and change storage system settings.
• Configure Administrator login options
• Configure controller device ports
• Configure controller host ports
• Configure network options
• Power down or restart system
• Uninitialize system
• Update management module software
• View detailed system information
Service options
These options allow storage administrators and service personnel to view detailed service logs.
• View last controller fault
• View message logs
User options
These options allow users to view storage system settings and change the user login password.
• Configure User login options
• Launch HP P6000 Command View
• View network information
• View system information
Control Panel features 5
Page 6
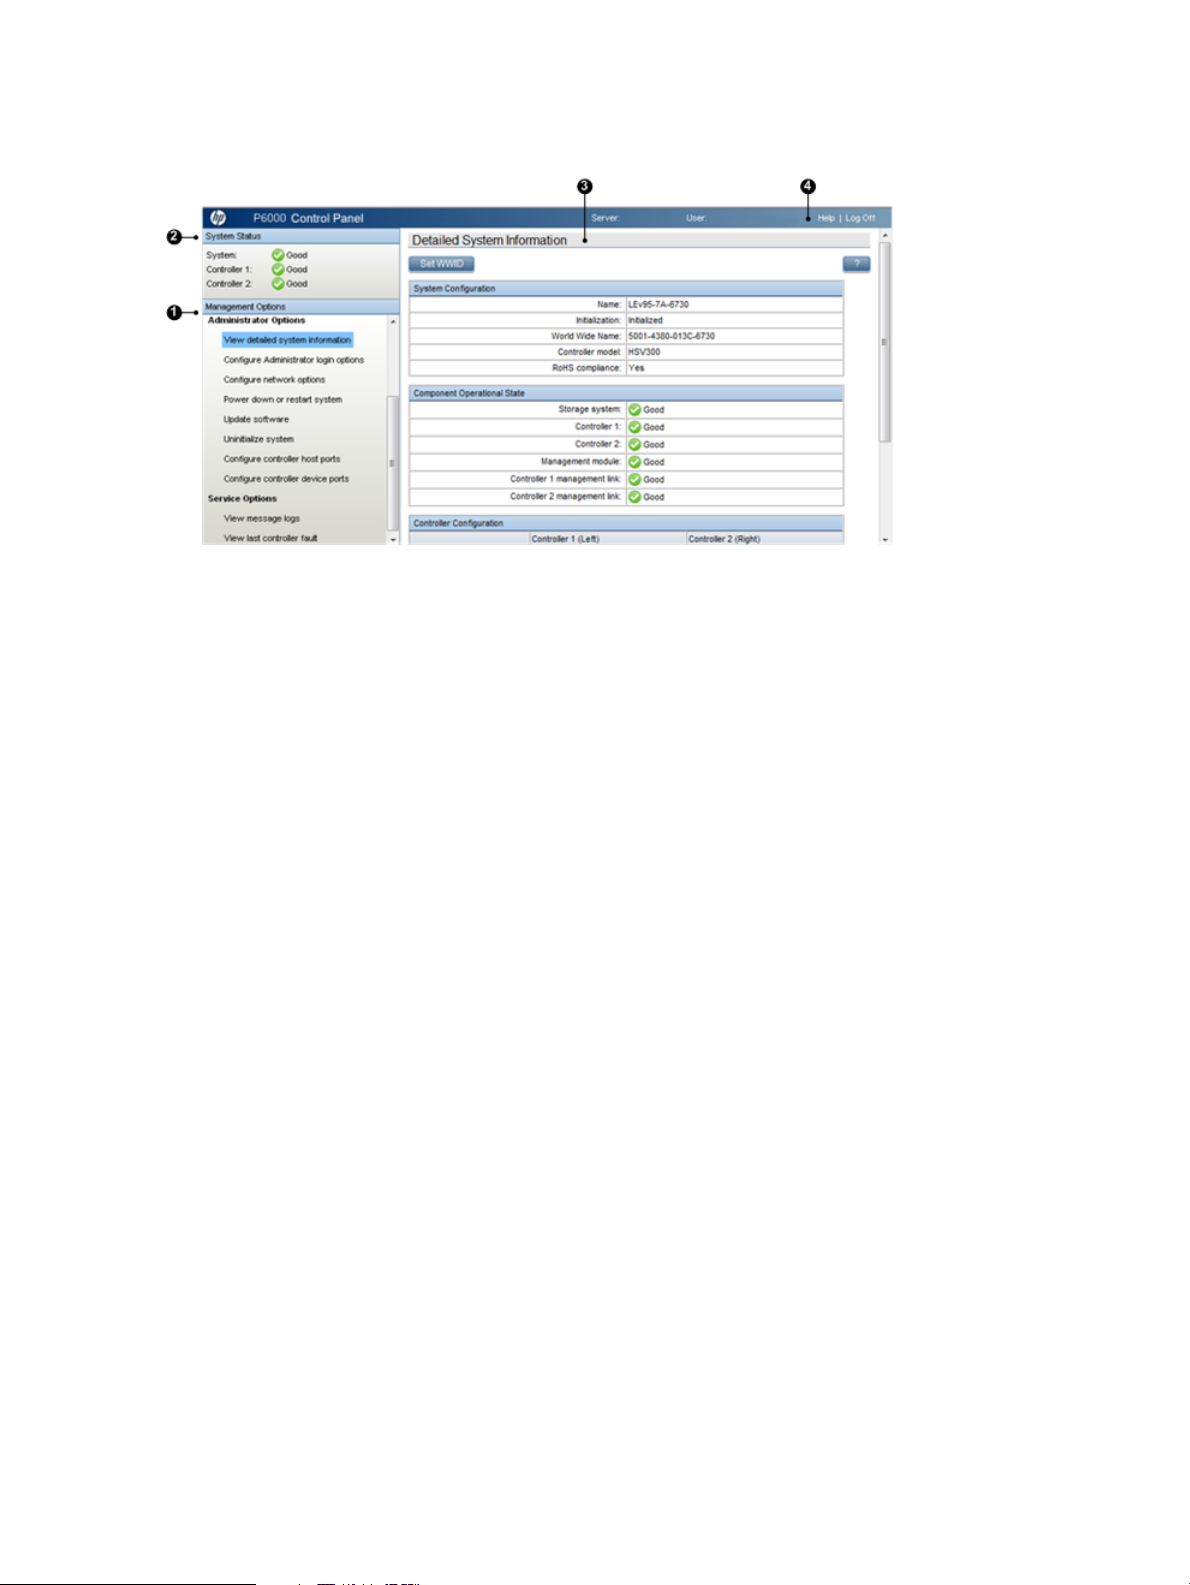
Interface quick tour
1. Management options pane 2. System status pane 3. Content pane 4. Session pane
Management options pane (1). The management options pane displays administrator options,
service options, and user options.
System status pane (2). The system status pane displays a summary of operational states for the
storage system and its controllers.
Content pane (3). The content pane displays information and actions that you can perform for the
option that is selected.
Session pane (4). The session pane displays the name of the HP P6000 EVA storage system, the
user that is logged in, a link to online help, and the logoff button.
Accessing a Control Panel
Every HP P6000 EVA storage system with array-based management includes Control Panel
functionality. To access the Control Panel for a given HP P6000 EVA storage system, you must
know the IP address of the system.
Procedure
1. Open a browser.
2. Browse to https://HP P6000 EVA storage system IP address:2373. The HP
P6000 Control Panel login window appears.
Example: https://21.44.63.101:2373
3. Log in as a storage user or storage administrator. (User name user or admin and password.
The Control Panel GUI opens.
Capturing Control Panel data
You can capture data from an HP P6000 Control Panel window and paste it into other applications.
Considerations
• You must be logged in as a storage administrator.
Procedure
1. Navigate to the desired window.
2. Right-click anywhere within a data text box. A menu opens.
3. Choose Select All. The data in the text box is highlighted.
4. Right-click again and select Copy. The data is copied.
6 Working with a Control Panel
Page 7
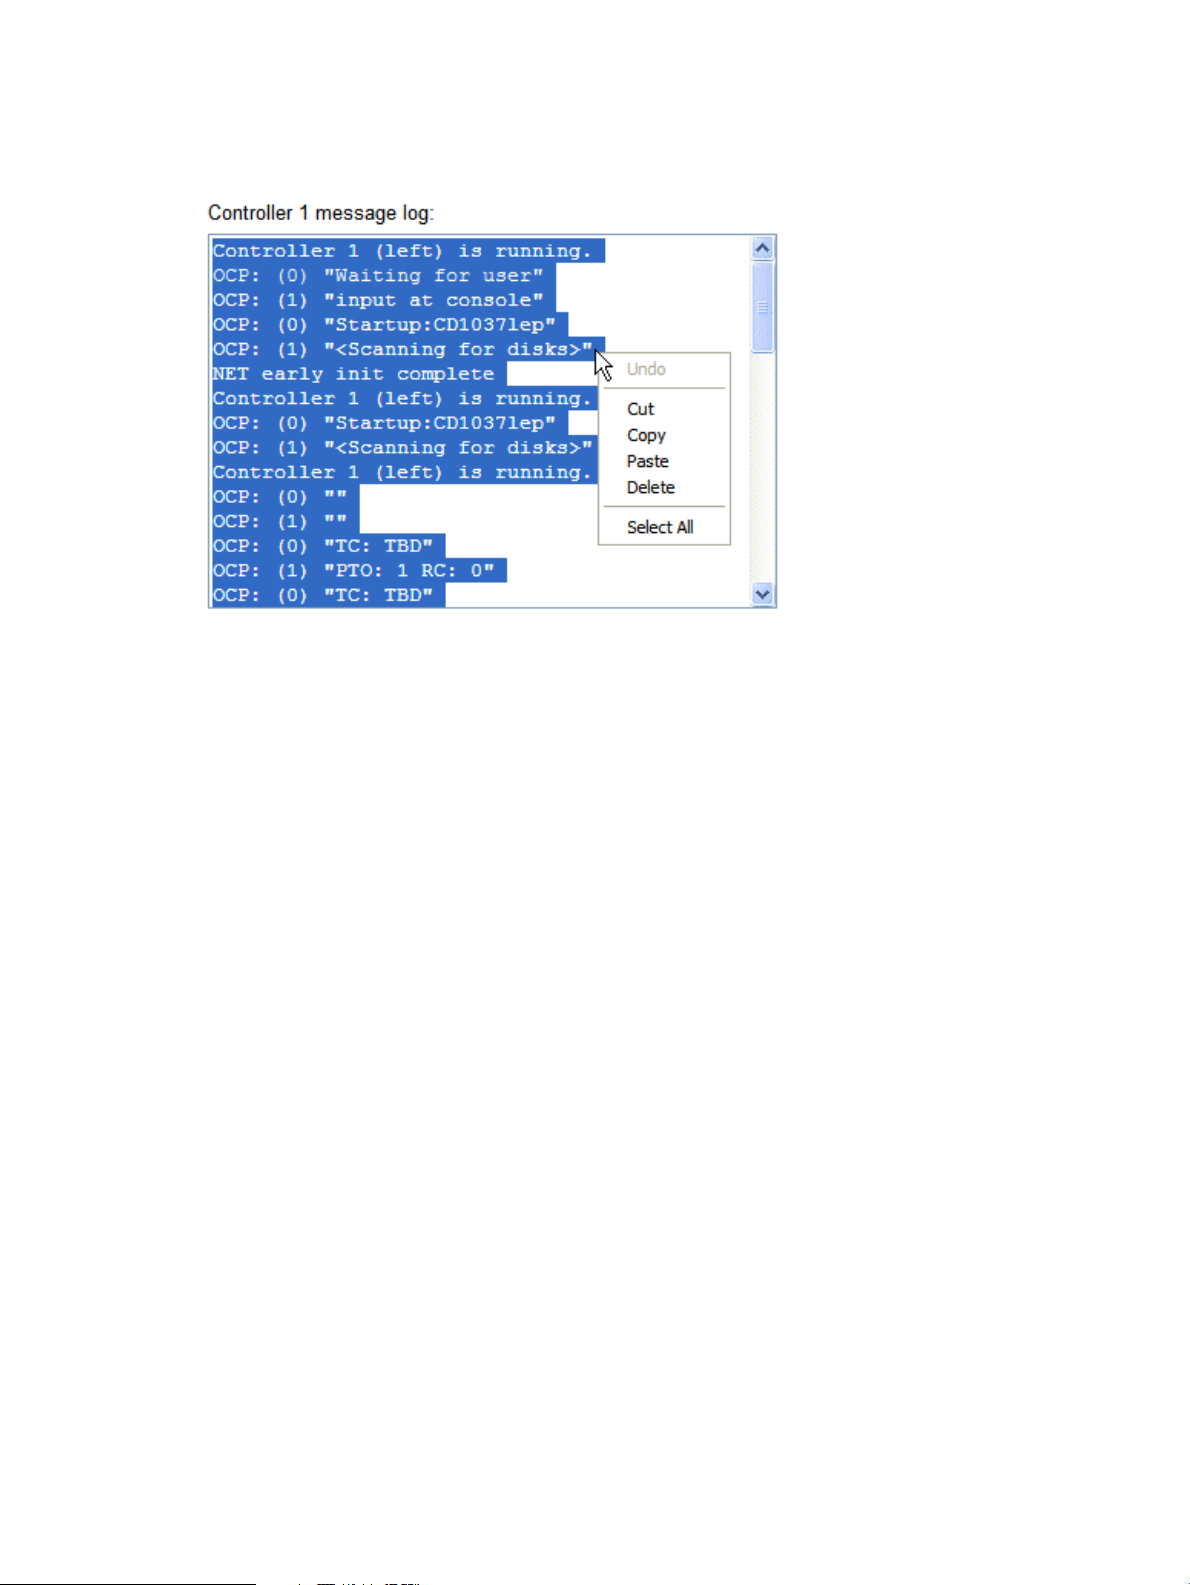
5. Open a text file and paste the data.
Example
Selecting text on the View Message Logs page.
Configuring access to HP P6000 Command View (filter list)
You can control which servers are allowed to access the array-based instance of HP P6000
Command View on this storage system. This is done by creating and enabling a filter list of allowed
HP P6000 Command View client IP addresses.
Considerations
• You must be logged in as an administrator.
• The HP P6000 Command View client filter list can be enabled and disabled from the Control
Panel.
• Proxy server configuration. If the client computer is using a proxy server to access array-based
HP P6000 Command View, the proxy server settings in the Control Panel must be configured
correctly. Otherwise, the detected client IP address may not match the IP address in the list.
• DNS resolution. If the DNS server settings are not configured correctly in the HP P6000 Control
Panel, a host name that is added to the client filter list may not be resolved to the correct IP
address.
• If access to the HP P6000 Control Panel is not possible, the HP P6000 Command View client
filter list can be disabled by using the reset button on the HP P6000 management module.
See HP P6000 management module.
• Restrictions apply. See Management module IP addresses.
To view or change the access list:
1. Select Administrator Options > Configure Network Options. The Detailed Network Options
page appears.
2. Click Configure client filter.
3. Follow the instructions on the page.
Confirming system alerts
In rare cases when a storage system is not in a normal state and requires intervention, an alert
message can appear in the Control Panel. Review the message and select an action.
Configuring access to HP P6000 Command View (filter list) 7
Page 8
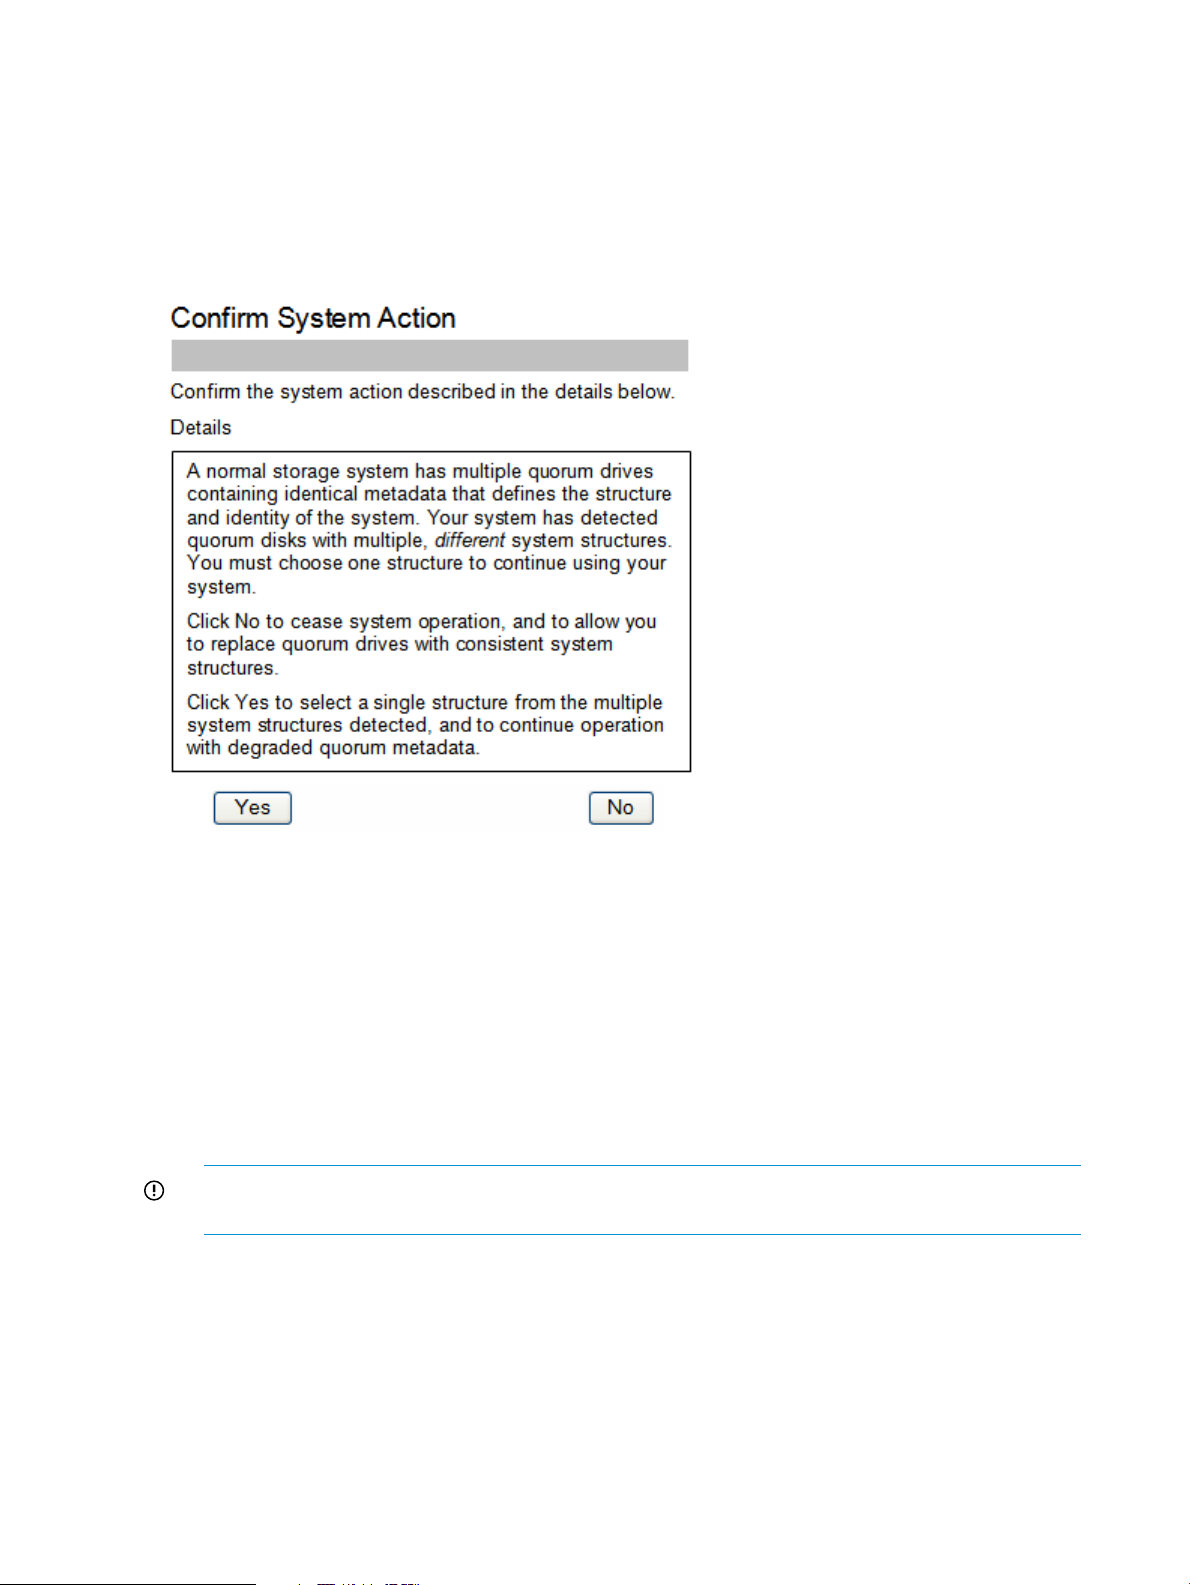
Considerations
• You must be logged in as a storage administrator to see and act on the alert messages.
Procedure
1. Review the message and alternative actions.
2. Click Yes or No as appropriate.
Example
Connecting to the management module (initial setup)
This topic addresses initially setting the HP P6000 EVA storage system IP address and connecting
to the HP P6000 management module. Once set up and connected, you can browse to the HP
P6000 Control Panel. See also Reestablishing the storage system IP address.
Considerations
• You cannot save changes in the HP P6000 management module configuration if the storage
system is not running or has not been initialized. See Initialization and uninitialization.
• You can connect to the HP P6000 management module through a private or public network.
See Private and public networks.
IMPORTANT: HP recommends that you connect the HP P6000 management module through
a private network, or configure it behind a firewall or proxy server.
• You will need to access the back of the storage system. The LAN cable to the HP P6000
management module and the reset button are on the back of the controller enclosure. The
LAN connection on the HP P6000 management module is MDI-X compliant and supports
straight-through or crossover Ethernet cables (Cat 5e or better).
• You must be logged in as a storage administrator to complete the procedure.
• Restrictions apply. See Management module IP addresses.
The following procedures assume that the HP P6000 EVA storage system has already been initialized
using HP P6000 SmartStart or HP P6000 Command View.
8 Working with a Control Panel
Page 9
Procedure when on a public network (initial setup)
Use this procedure when the HP P6000 EVA management module is connected through a public
network.
IMPORTANT: When your LAN is part of a public network, HP recommends that you temporarily
disconnect from the public network while performing this procedure.
1. If currently connected, disconnect the public network LAN cable from the back of the HP P6000
management module in the controller enclosure.
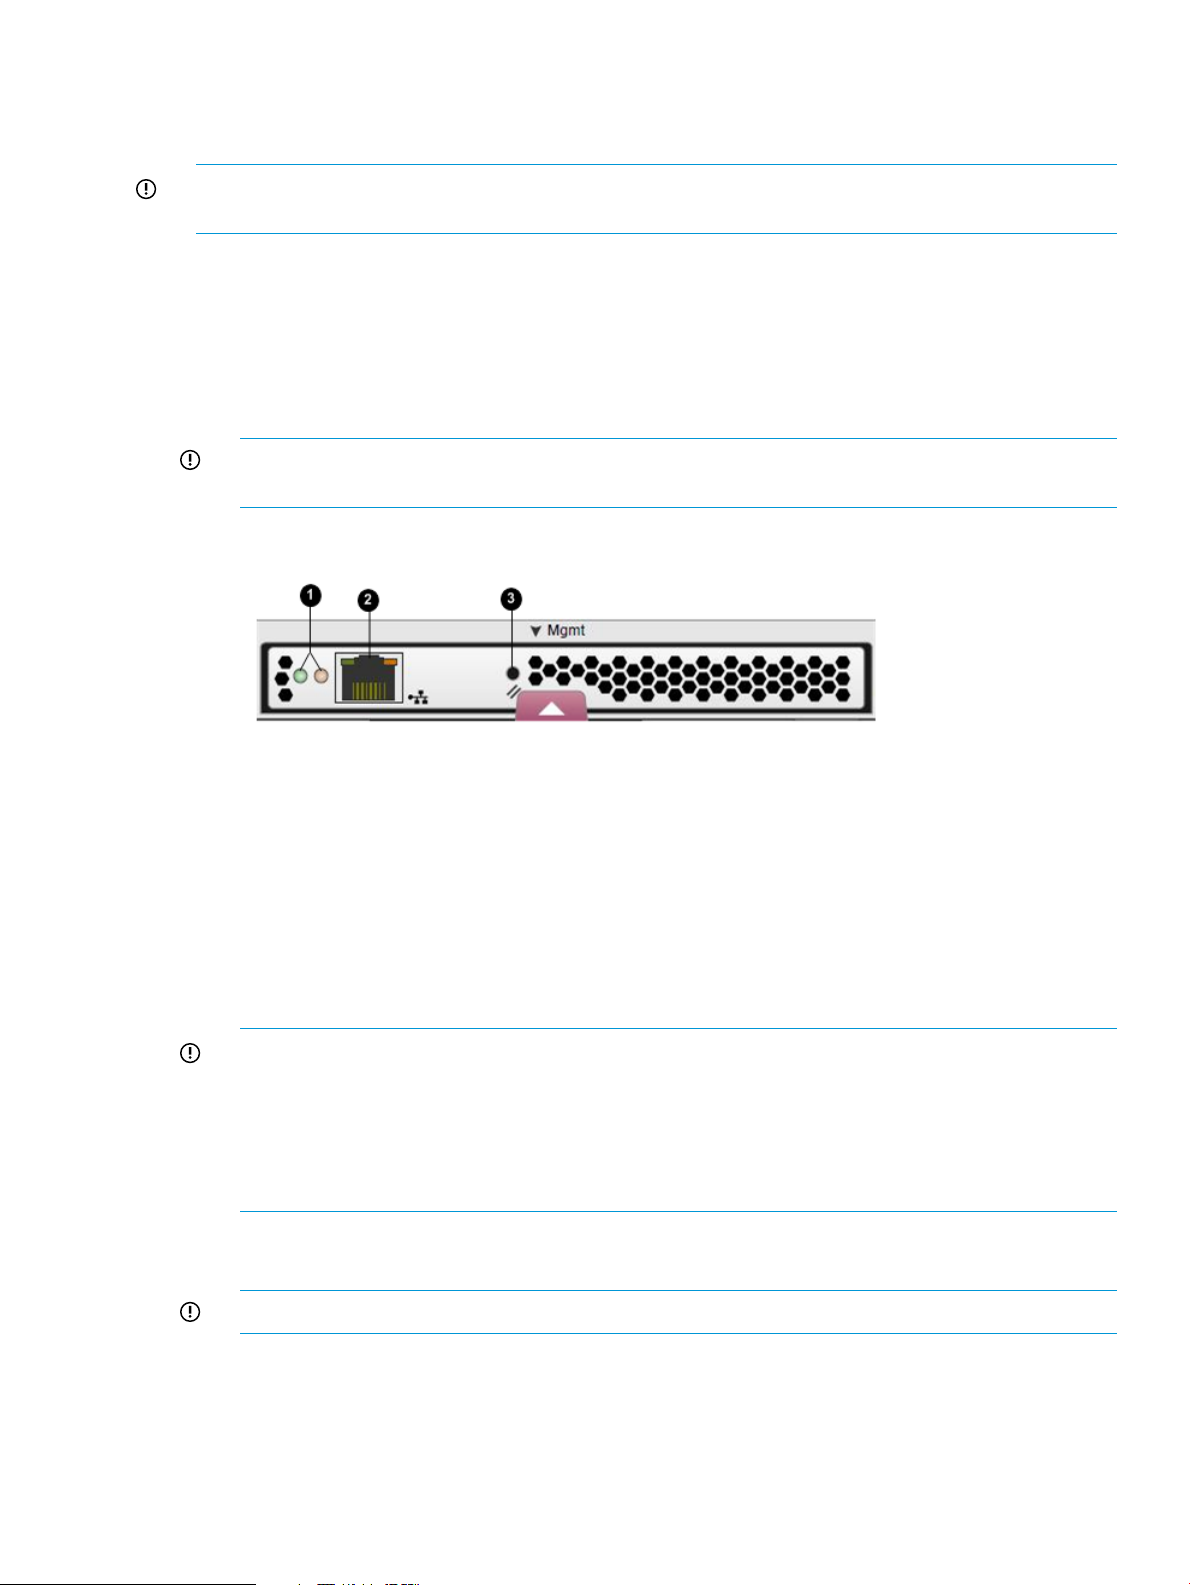
2. Press and hold the recessed Reset button for 4 to 5 seconds, then release it. This sets an IP
address of 192.168.0.1/24 (IPv4) and fd50:f2eb:a8a::7/48 (IPv6) in private address space.
The green indicator on the top left corner of the LAN connector (Ethernet jack) will flash during
the reset, which may take up to 2 minutes. When the reset operation is completed, the green
indicator light will turn solid green.
IMPORTANT: At initial setup, you cannot browse to the HP P6000 Control Panel until you
perform this step.
1. LEDs 2. LAN connector 3. Reset button
3. Do one of the following:
• Temporarily connect a LAN cable from a private network to the HP P6000 management
module.
• Temporarily connect a laptop computer directly to the HP P6000 management module
using a LAN patch cable.
4. Browse to https://192.168.0.1:2373 (IPv4) or https://fd50:f2eb:a8a::7/48
(IPv6) and log in as a storage administrator. The default user name is admin. No password
is required during the initial setup. The HP P6000 Control Panel GUI appears.
IMPORTANT: HP recommends that you change or delete the default IPv4 and IPv6 addresses
to avoid duplicate address detection issues in your network.
HP recommends that you change the default passwords. If you change the password for the
storage administrator or storage user account for the HP P6000 Control Panel, be sure to
record the new passwords since they cannot be cleared without resetting the HP P6000
management module.
5. Select Administrator Options > Configure Network Options.
6. Enter a new IP address and other network settings that apply.
IMPORTANT: Restrictions apply. See Management module IP addresses.
7. Click Save Changes. The IP address changes immediately, causing you to lose connectivity to
the HP P6000 Control Panel.
The new IP address is stored and remains in effect, even when the storage system is later shut
down or restarted.
Connecting to the management module (initial setup) 9
Page 10

IMPORTANT: The new IP address will be lost if the storage system is later uninitialized or
the HP P6000 management module is reset.
8. Remove the LAN cable to the private network or laptop and reconnect the cable to the public
network.
9. From a computer on the public network, browse to https://new IP address:2373 and
log in. The HP P6000 Control Panel GUI appears.
Procedure when on a private network (initial setup)
Use this procedure when the HP P6000 management module is connected through a private
network.
1. Press and hold the recessed Reset button for 4 to 5 seconds, then release it. This sets an IP
address of 192.168.0.1/24 (IPv4) and fd50:f2eb:a8a::7/48 (IPv6) in private address space.
The green indicator on the top left corner of the LAN connector (Ethernet jack) will flash during
the reset, which may take up to 2 minutes. When the reset operation is completed, the green
indicator light will turn solid green.
IMPORTANT: At initial setup, you cannot browse to the HP P6000 Control Panel until you
perform this step.
1. LEDs 2. LAN connector 3. Reset button
2. Browse to https://192.168.0.1:2373 (IPv4) or https://fd50:f2eb:a8a::7/48
(IPv6) and log in as a storage administrator. The default user name is admin. No password
is required during the initial setup. The HP P6000 Control Panel GUI appears.
IMPORTANT: HP recommends that you change or delete the default IPv4 and IPv6 addresses
to avoid duplicate address detection issues in your network.
HP recommends that you change the default passwords.
If you change the password for the storage administrator or storage user account for the HP
P6000 Control Panel, be sure to record the new passwords since they cannot be cleared
without resetting the HP P6000 management module.
3. Select Administrator Options > Configure Network Options.
4. Enter a new IP address and other network settings that apply.
IMPORTANT: Restrictions apply. See Management module IP addresses.
5. Click Save Changes. The IP address changes immediately, causing you to lose connectivity to
the Control Panel.
The new IP address is stored and remains in effect, even when the storage system is later shut
down or restarted.
IMPORTANT: The new IP address will be lost if the storage system is later uninitialized or
the HP P6000 management module is reset.
10 Working with a Control Panel
Page 11

6. From a computer on the private network, browse to https://new IP address:2373 and
log in. The HP P6000 Control Panel GUI appears.
Enabling disk device ports
When the storage system detects certain device errors on a loop pair, the device ports are
automatically disabled and the operational state is changed.
Considerations
• You must be logged in as a storage administrator.
Procedure
To locate disabled ports and enable them:
1. Select Administrator Options > Configure Controller Device Ports
2. Select a controller and review the operational state of each loop pair.
3. If the Enable Port Pair button is displayed, correct the problem (outside of this application).
4. Return to this application and click the Enable Port Pair button.
Locating the storage system WWN label
1. Open the storage system door and remove the bezel from the controller enclosure.
2. The WWN label is below the serial number label on the left side.
3. Replace the bezel.
Reestablishing the storage system IP address
This topic addresses the rare cases, such as following an uninitialization or the replacement of
certain components, when the HP P6000 Control Panel may become unavailable. If browsing to
the HP P6000 Control Panel fails after these events, you may have to reestablish the IP address.
See also Connecting to the HP P6000 management module (initial setup).
Considerations
• You cannot save changes in the HP P6000 management module configuration if the HP P6000
EVA storage system is not running or has not been initialized. See Initialization and
uninitialization.
• You can connect to the HP P6000 management module through a private or public network.
See Private and public networks.
IMPORTANT: HP recommends that you connect the HP P6000 management module through
a private network, or configure it behind a firewall or proxy server.
• The following procedures include a step to reset the HP P6000 management module.
Enabling disk device ports 11
Page 12

IMPORTANT: HP recommends that you save logs files that might be needed for
troubleshooting before performing the reset step. Log files can be saved via the Capture System
Information option on the Server Options page in HP P6000 Command View.
• You will need to access the back of the storage system. The LAN cable to the HP P6000
management module and the reset button are on the back of the controller enclosure. The
LAN connection on the HP P6000 management module is MDI-X compliant and supports
straight-through or crossover Ethernet cables (Cat 5e or better).
• You must be logged in as a storage administrator to complete the procedure.
The following procedures assume that the HP P6000 EVA storage system has already been initialized
using HP P6000 SmartStart or HP P6000 Command View.
Procedure when on a public network (reestablishing the IP address)
Use this procedure when the HP P6000 management module is connected through a public network.
IMPORTANT: When your LAN is part of a public network, HP recommends that you temporarily
disconnect from the public network while performing this procedure.
1. If currently connected, disconnect the public network LAN cable from the back of the HP P6000
management module in the controller enclosure.
2. Press and hold the recessed Reset button for 4 to 5 seconds, then release it. This sets an IP
address of 192.168.0.1/24 (IPv4) and fd50:f2eb:a8a::7/48 (IPv6) in private address space.
The green indicator on the top left corner of the LAN connector (Ethernet jack) will flash during
the reset, which may take up to 2 minutes. When the reset operation is completed, the green
indicator light will turn solid green.
IMPORTANT: If the IP address saved in memory has been lost, you cannot browse to the HP
P6000 Control Panel until you perform this step.
1. LEDs 2. LAN connector 3. Reset button
3. Do one of the following:
• Temporarily connect a LAN cable from a private network to the HP P6000 management
module.
• Temporarily connect a laptop computer directly to the HP P6000 management module
using a LAN patch cable.
4. Browse to https://192.168.0.1:2373 (IPv4) or https://fd50:f2eb:a8a::7/48
(IPv6) and log in as a storage administrator. The default user name is admin and password.
The Control Panel GUI appears.
12 Working with a Control Panel
Page 13

IMPORTANT: HP recommends that you change or delete the default IPv4 and IPv6 addresses
to avoid duplicate address detection issues in your network.
HP recommends that you change the default passwords.
If you change the password for the storage administrator or storage user account for the HP
P6000 Control Panel, be sure to record the new passwords since they cannot be cleared
without resetting the HP P6000 management module.
5. Select Administrator Options > Configure Network Options.
6. Enter a new IP address and other network settings that apply.
IMPORTANT: Restrictions apply. See Management module IP addresses.
7. Click Save Changes. The IP address changes immediately, causing you to lose connectivity to
the HP P6000 Control Panel.
The new IP address is stored and remains in effect, even when the storage system is shut down
or restarted.
IMPORTANT: The new IP address will be lost if the storage system is uninitialized or the HP
P6000 management module is reset.
8. Remove the LAN cable to the private network or laptop and reconnect the cable to the public
network.
9. From a computer on the public network, browse to https://new IP address:2373 and
log in. The HP P6000 Control Panel GUI appears.
Procedure when on a private network (reestablishing the IP address)
Use this procedure when the HP P6000 management module is connected through a private
network.
1. Press and hold the recessed Reset button for 4 to 5 seconds, then release it. This sets an IP
address of 192.168.0.1/24 (IPv4) and fd50:f2eb:a8a::7/48 (IPv6) in private address space.
The green indicator on the top left corner of the LAN connector (Ethernet jack) will flash during
the reset, which may take up to 2 minutes. When the reset operation is completed, the green
indicator light will turn solid green.
IMPORTANT: If the IP address saved in memory has been lost, you cannot browse to the HP
P6000 Control Panel until you perform this step.
1. LEDs 2. LAN connector 3. Reset button
2. Browse to https://192.168.0.1:2373 (IPv4) or https://fd50:f2eb:a8a::7/48
(IPv6) and log in as a storage administrator. The user name is admin and password. The HP
P6000 Control Panel GUI appears.
3. Select Administrator Options > Configure Network Options.
4. Enter a new IP address and other network settings that apply.
IMPORTANT: Restrictions apply. See Management module IP addresses.
Reestablishing the storage system IP address 13
Page 14

5. Click Save Changes. The IP address changes immediately, causing you to lose connectivity to
the Control Panel.
The new IP address is stored and remains in effect, even when the storage system is shut down
or restarted.
IMPORTANT: The new IP address will be lost if the storage system is later uninitialized or
the HP P6000 management module is reset.
6. From a computer on the private network, browse to https://new IP address:2373 and
log in. The Control Panel GUI appears.
Service option pages
HP P6000 Control Panel service option pages include:
• View last controller fault. Review the events associated with a controller’s last fault.
• View message logs. Review the log of Control Panel events.
CAUTION: These HP P6000 Control Panel pages provide service information for storage system
administrators and HP service engineers only. Performing service actions without fully understanding
the information on these pages can lead to data loss or corruption.
Resetting the storage system World Wide Name
Each HP P6000 EVA storage system is assigned a unique WWN when it is manufactured. In rare
cases, such as after uninitialization or replacement of certain components, you may need to reenter
its WWN and checksum.
Considerations
• You must be logged in as a storage administrator.
• To perform the procedure, you will need to locate the WWN label on the front of the storage
system. See Locating the WWN label.
• Licenses for storage system features are tied to the storage system WWN.
CAUTION: Failure to enter the correct WWN can result in a loss of licensed features.
Procedure
To reset the World Wide Name:
1. Locate and record the WWN and checksum.
2. Select Administrator Options > View Detailed System Information > Set WWID
3. Follow the instructions on the page.
Setting the automatic loop recovery policy
A policy controls whether the storage system automatically attempts to recover from loop pair
errors. The policy can be enabled or disabled.
Considerations
• You must be logged in as a storage administrator.
Procedure
To set or view the policy:
1. Select Administrator Options > Configure Controller Device Ports.
2. Select a controller. The policy appears in the Automatic Loop Recovery box.
3. If necessary, change the policy and click the Save Changes button.
14 Working with a Control Panel
Page 15

Setting controller power on behavior
The controller power on behavior is set by the Controller Power Option. By default, the option is
disabled and the controllers are not automatically started when the HP P6000 management module
is powered on or restarted. When the option is enabled, the controllers are automatically started
when the management module is powered on or restarted. You can view or change the behavior.
Considerations
• You must be logged in as a storage administrator.
Procedure
To view or change the setting:
1. Select Administrator Options > Power Down or Restart System.
2. The setting appears in the Controller Power Option box.
3. If necessary, change the setting and click Set.
Procedure for a storage system shut down
After setting this feature, if you shut down the storage system, perform the following steps.
1. Use HP P6000 Command View to shut down the controllers and disk enclosures.
2. Turn off power from the rack power distribution unit.
3. Turn on power from the rack power distribution unit. After the management module starts, the
controllers will automatically start.
Setting host ports topology
The topology for the storage system's host ports can be set to Fabric or Direct. Fabric refers to
topologies in which hosts are connected to the HP P6000 EVA storage system via switches. Direct
refers to topologies in which hosts are directly connected to the HP P6000 EVA storage system
without switches. The protocol used with each topology can be Fibre Channel or iSCSI.
Considerations
• You must be logged in as a storage administrator.
• Avoid an incorrect topology setting.
CAUTION: An incorrect topology setting causes the HP P6000 EVA storage system to lose
communication with the storage area network.
Procedure
To view or change the setting:
1. Select Administrator Options > Configure Controller Host Ports.
2. Select the controller. The setting appears in the Topology box.
3. If necessary, change the topology and click Save Changes.
Setting the storage system password
Considerations
• You must be logged in as a storage administrator.
• Storage system passwords must comply with format guidelines. See Passwords.
• Synchronizing the password with server-based HP P6000 Command View
IMPORTANT: If the storage system is managed by an instance of server-based HP P6000
Command View, HP strongly recommends that you store or update the password in HP P6000
Command View immediately after creating or changing the password on the storage system.
Setting controller power on behavior 15
Page 16

In HP P6000 Command View, the relevant online help procedures are: Accessing password
protected storage systems, Enabling management of a password-protected storage system,
and Updating storage system passwords.
Procedure
1. Select Administrator Options > Configure Administrator login options. The Administrator Login
Options page opens.
2. Follow the instructions on the page.
Troubleshooting
Login error (ABM client filter related)
Problem
The login to array-based HP P6000 Command View indicates Access Denied.
Explanation / resolution
The HP P6000 Command View client filter in the Control Panel is enabled and access has been
denied.
1. Review the client filter list and do one of the following:
• If the denied computer is not on the client list and you want to allow access, add the client
computer's IP address to the list.
• If you want to allow access for all computers, disable the client filter.
See Configuring access to HP P6000 Command View (filter list).
2. If the denied computer is on the list, review the following:
a. Proxy server configuration. If the client computer is using a proxy server to access
array-based HP P6000 Command View, the proxy server settings must be configured
correctly. Otherwise, the detected client IP address may not match the IP address in the
list.
b. DNS resolution issue. If the DNS server settings are not configured correctly in the HP
P6000 Control Panel, a host name that is added to the client filter list may not be resolved
to the correct IP address.
Operation failed error (upgrade related)
Problem
The login to HP P6000 Control Panel indicates Operation Failed!, Request did not contain a
required security token or token was invalid. Access to server denied.
Explanation / resolution
After upgrading array-based HP P6000 Command View on the management module, a browser's
cache may contain an invalid security certificate. HP recommends clearing a browser's cache then
logging in again.
• In Internet Explorer select Tools > Internet Options > Browsing history > Delete > Temporary
Internet files > Delete files.
• In Mozilla Firefox select Tools > Clear Recent History > Everything > Details > Cache > Clear
Now.
Updating management module software
HP updates for HP P6000 management module software include HP P6000 Control Panel
functionality.
General considerations
16 Working with a Control Panel
Page 17

• You must first obtain the new HP P6000 management module software file from HP.
• You must be logged in as a storage administrator.
• HP recommends that you read any notes on page 2 of the installation wizard before you
confirm the installation.
• If both the controller software and the HP P6000 management module software are to be
updated, complete the controller software update first, then update the management module
software.
• After upgrading, you may need to clear the cache of any browser that is used to access the
HP P6000 Control Panel. See Logon access denied to Control Panel.
Internal IP address considerations when updating
• The management module IP addresses which are used internally by the storage system can
vary with versions of HP P6000 management module software. If the new software uses
different internal IP addresses than the previous version, you must reboot the management
module after the update.
Procedure
1. Select Administrator Options > Update management module software. The Update Management
Module software page opens.
2. Follow the instructions on the page.
Unbypassing disk drives
When the storage system detects certain errors, a physical disk's ports on a loop pair are disabled
for I/O (bypassed).
Considerations
• You must be logged in as a storage administrator.
Procedure
1. Select Administrator Options > Configure Controller Device Ports.
2. Select a controller.
3. Click Unbypass All.
Uninitializing a storage system
The HP P6000 Control Panel allows storage administrators to uninitialize HP P6000 EVA storage
systems. Storage administrators can also use HP P6000 Command View. See also Initialization
and uninitialization.
Considerations
• You must be logged in as a storage administrator.
CAUTION: Uninitialization deletes all user data and configuration information on the storage
system. If you uninitialize a storage system, you must re-initialize it before it can be used for
storage again.
Procedure
1. Select Administrator Options > Uninitialize Storage System.
2. Follow the instructions on the page.
Unbypassing disk drives 17
Page 18

3 Storage system concepts
Controllers
HP P6000 EVA storage systems contain a redundant pair of disk array controllers that manage
storage system operation and serve as the physical interface to the SAN. All host I/O and
management commands from HP P6000 Command View are processed by the controller pair.
More information is available in HP P6000 EVA user guides. See related information.
Controller type identification
HP P6000 controller identification format is HSVxxx. The following table shows the relationship
between controller types and storage system models.
Controller
Hardware Type
Controller
Software Type
HP P6000 EVA Models
EVA 3000VCSHSV100
EVA 5000VCSHSV110
EVA 4000, EVA 4100, EVA 6000 and EVA 6100XCSHSV200
EVA 8000 and EVA 8100XCSHSV210
EVA 4400XCSHSV300
EVA 4400 with embedded Fibre Channel switchXCSHSV300–S
P6300 EVA, P6350 EVAXCSHSV340
P6500 EVA, P6550 EVAXCSHSV360
EVA 6400XCSHSV400
EVA 8400XCSHSV450
Controller power-on behavior
When the management module on an HP P6000 EVA storage system is powered on or restarted,
the default behavior is to not power on the controllers. This behavior is set with the Controller Power
Option and can be changed so that the controllers are automatically powered on. See Setting
controller power on behavior. The default, the Controller Power Option is disabled.
When the Controller Power Option is disabled, and power to the storage system is turned on from
the rack power distribution unit, only the disk enclosures boot up. When the option is enabled, the
controllers also boot up, making the entire storage system ready for use.
Management module considerations
• When the Controller Power Option is enabled, and the management module is removed from
its slot and reinserted to reset power or restart the management module from the Control Panel,
only the controllers automatically boot up after a full shutdown. In this case, you must ensure
that the disk enclosures are powered on first; otherwise, the controller boot up process may
be interrupted.
• When the reset button on an HP P6000 management module is pressed, the Controller Power
Option is reset to its default setting of disabled.
• Before performing a hot swap of an HP P6000 management module, ensure that the controllers
are powered on. Hot swap of a management module can only occur when the controllers are
powered on and accessible by the HP P6000 Control Panel.
18 Storage system concepts
Page 19

Disk device ports
Disk device ports are the HP P6000 EVA storage system ports that logically and physically connect
the internal controllers with the physical disk enclosures. Device port connectors and cables are
located on the back of each controller. More information is available in HP P6000 user guides.
See related information.
Disk device loop pairs
HP P6000 disk device port connections include two loops, loop A and loop B. Every physical disk
that is inserted into a drive enclosure is automatically connected to both loops. The loops operate
independently during normal operation, but provide redundant connections in case one fails. More
information is available in HP P6000 user guides. See related information.
Host ports
Host ports are the HP P6000 EVA storage system ports that logically and physically connect a
storage system with external hosts (servers). Host port connectors and cables are located on the
back of each controller. More information is available in HP P6000 user guides. See related
information.
HP P6000 Command View software suite
The HP P6000 Command View software suite includes the following:
• HP P6000 Command View software — For managing HP P6000 EVA storage systems,
provisioning of storage to servers, and instant replication of storage volumes.
• HP P6000 Performance Advisor software — Monitors HP P6000 storage systems and provides
metrics that help analyze performance.
• HP Management Integration Framework software — Provides additional storage system security
and access management. See HP Management Integration Framework software.
• HP P6000 SmartStart — Provides a DVD-based wizard that helps you install HP P6000
Command View. The wizard also helps you configure, provision and mount storage volumes
on Windows and Linux servers.
• HP Storage System Scripting Utility (SSSU) software — Provides comprehensive command line
support, server-to-storage system communication, and tools for automating storage-related
tasks.
• HP P6000 Performance Data Collector software — Collects HP P6000 EVA performance data
that is displayed by HP P6000 Performance Advisor. The software also displays performance
data graphically in Windows Performance Monitor (Perfmon) or in tabular form in a command
prompt window.
• HP EVA to 3PAR StoreServ Online Import software — Migrates virtual disks on HP P6000 EVA
storage systems to virtual volumes on HP 3PAR storage systems.
HP P6000 Command View ABM and SBM versions
HP P6000 Command View is the primary storage management software for HP P6000 EVA storage
systems and is available in two versions
Array-based storage management (ABM). The array-based version of HP P6000 Command View
comes factory-installed on HP P6000 EVA storage system models which have internal management
modules. The array-based version manages only the storage system on which it is installed. In
many cases, the array-based version eliminates the need for a separate management server in the
SAN.
Server-based storage management (SBM). The server-based version of HP P6000 Command View
is customer installed on a server in the SAN. The server-based version provides management of
Disk device ports 19
Page 20

multiple HP P6000 EVA storage systems. The server on which HP P6000 Command View is installed
is called a storage management server.
HP Management Integration Framework software
HP Management Integration Framework software provides storage-related security features and
user interface capabilities and is included with HP P6000 Command View.
HP Management Integration Framework software provides the following interfaces and high level
features:
• Security interface.
• Enhanced storage-related security integration and Management Group administration.
• Configuration interface.
• Command line tools.
• Automatic discovery of machines on a LAN.
• User interface integration for Management Integration Framework capable products.
Initialization and uninitialization
Initialization
Initialization makes a new storage system ready to use with your hosts. The HP P6000 Control
Panel does not include an initialization feature. Storage administrators can initialize a new storage
system by using HP P6000 Command View or HP P6000 SmartStart.
Initialization can include one or more of the following actions:
• Establishes the storage system name.
• Creates one or two default disk groups.
• Sets a disk-failure protection level (disk spares).
• Sets the storage system date and time.
Uninitialization
The HP P6000 Control Panel allows storage administrators to uninitialize HP P6000 EVA storage
systems. Storage administrators can also use HP P6000 Command View.
CAUTION: Uninitialization deletes all user data and configuration information on the storage
system. If you uninitialize a storage system, you must re-initialize it before it can be used for storage
again.
When a storage system is uninitialized, certain logical structures are removed and all user data
is irretrievably deleted.
• All application data on the storage system is deleted and cannot be recovered.
• All presentation to hosts ends and I/O with the hosts stops.
• All source virtual disks and snapclones are deleted.
• All local replication is stopped. Snapshot and mirrorclone virtual disks are deleted.
• All remote replication is stopped. All DR groups on the storage system are deleted. All virtual
disks in the DR groups are deleted. (Remote copies of the virtual disks are not deleted.)
Uninitialization followed by power down
IMPORTANT: If a storage system is uninitialized and then powered down before it is re-initialized,
the HP P6000 management module IP address and network configuration information will be lost.
To restore this information, see Reestablishing the storage system IP address.
20 Storage system concepts
Page 21

More information on initialization and uninitialization is in the HP P6000 Command View User
Guide. See related information.
Internet Protocol configurations
• IP addresses on the Detailed Network Options page are specified using standard IPv4 or IPv6
formats.
• IP addresses on the Configure Client Filter for HP P6000 Command View page can be specified
using standard IPv4 and IPv6 formats and CIDR formats.
IP address formats
RemarksFormat and example
IPv4
192.168.1.1
IPv4 with CIDR notation
192.168.1.1/24
IPv6
2001:0DB8:0000:0000:0000:0000:1428:57AB
IPv6 with compressed notation
2001:DB8::1428:57AB
IPv6 with CIDR notation
2001:DB8::1428:57AB/9
Classless Inter-Domain Routing (CIDR) specifies an IP address range using a combination of an IP
address and a value indicating the number of 1-bits that start a mask (similar to a subnet mask),
for example xxx.xxx.xxx.xxx/n (IPv4) or xxxx:xxxx:xxxx:xxxx:xxxx:xxxx:xxxx:xxxx/n (IPv6). For
an IP address to be included in a CIDR notated address range, the n leftmost 1-bits in the given IP
address must match the n leftmost 1-bits in the IP Address portion of the CIDR notated address.
Management module
IPv4 IP address are generally shown
in decimal notation, separated by
dots (periods).
IPv6 IP addresses are generally
shown in eight groups of four
hexadecimal digits, separated by
colons.
HP P6000 EVA storage systems with array-based management contain a hardware component
called the management module. The module includes an RJ45 jack for connecting the storage
system to your LAN (Ethernet network). It also includes the software that runs the HP P6000 Control
Panel.
The HP P6000 management module provides access to service data via the HP P6000 Control
Panel and is always active, even when the controller enclosure is in standby mode.
Management module reset button
The Reset button on the HP P6000 management module performs the following functions:
• Sets the IP address for the storage system. See Reestablishing the storage system IP address.
• Sets the logon credentials (user name, password) for both the HP P6000 Control Panel and
array-based HP P6000 Command View to their default values:
admin, blank (no password)
user, blank (no password)
• Disables the HP P6000 Command View client filter list. See Configuring access to HP P6000
Command View.
Internet Protocol configurations 21
Page 22

• Erases all log files that are stored on the management module.
• Sets the Controller Power Option to disabled. See also Controller power on behavior.
The amber indicator on the top right corner of the LAN connector (Ethernet jack) will flash during
the reset, which may take up to 2 minutes. When the reset operation is completed, the green
indicator light in the upper left corner of the LAN connector will turn solid green.
1. LEDs 2. LAN connector 3. Reset button
Management module software
Management module software can be updated using the HP P6000 Control Panel. See Updating
management module software. After the files are uploaded, the software is automatically loaded
to nonvolatile memory.
Management module IP addresses
The HP P6000 management module has an internal network and an interface to external networks.
External network interface
The external network interface communicates with devices such as:
• Web browsers connected to the HP P6000 Control Panel or HP P6000 Command View
• DNS servers
• Routers
• NTP servers
Storage administrators can enter the IP addresses for connecting to these devices using the Detailed
Network Options page.
Internal network
The storage system's internal network provides communication between the storage controllers and
the management module. The HP P6000 Control Panel does not allow reserved internal IP addresses
to be entered for network devices. The reserved internal IP addresses vary with the version of HP
P6000 management module software as follows:
• February 2010 release and later. The reserved internal IP addresses are 10.253.251.230
through 10.253.251.249.
• Releases prior to February 2010. The reserved IP addresses are 10.0.0.1, 10.0.0.2, and
10.0.0.3. In addition, the use of IP addresses 10.0.0.0 through 10.255.255.255 for
connecting to an external network is not supported by the management module.
22 Storage system concepts
Page 23

Operational states
DescriptionIcon
Good. The device is operating normally.
Attention. The device is not operating normally and may
fail. Or, the device is in a transitional state that is not one
of its steady states.
Failed. The device has failed.
Unknown. The operational state of the device is unknown.
Passwords
IMPORTANT: When an HP P6000 EVA storage system with array-based management is first
installed, HP P6000 Control Panel and storage system passwords are blank. For security purposes,
HP recommends that you immediately create passwords.
Storage system password
The storage system password is the password that other HP P6000 management software, such
as a server-based instance of HP P6000 Command View, must send to be granted storage
administrator access to an HP P6000 array-based storage system. In the HP P6000 Control Panel
this password is also called a management server password.
Storage system password requirements:
• Must be 8-16 characters
• Can include the letters A to Z, in upper or lower case
• Can include the numbers 0 to 9
• Can include the special characters: ! " # $ % & ' ( ) * + , - . / : ; < = > ? @ [ ] ^ _ ‘ { | }
• Cannot include the special characters: ~ \
• Cannot include spaces
Control Panel passwords
The Administrator password is the password that must be entered when logging in to the HP P6000
Control Panel as a storage administrator. Storage administrators can view information, change
settings and perform actions.
The User password is the password that must be entered when logging in to the HP P6000 Control
Panel as a user. Users can only view information and change the user login password.
IMPORTANT: If you change the password for the HP P6000 Control Panel administrator or user
accounts, be sure to record the new passwords since they cannot be cleared without resetting the
management module.
Private and public networks
Because HP P6000 EVA storage systems with array-based management are connected to your
local area network, it is important that you configure the connection properly to ensure that your
HP P6000 system is secure. HP recommends that you connect to a private network, or configure
it behind a firewall or proxy server.
The Internet Assigned Numbers Authority (IANA) reserves the following IP address ranges for
private internets:
Operational states 23
Page 24

10.0.0.0 - 10.255.255.255
172.16.0.0 - 172.31.255.255
192.168.0.0 - 192.168.255.255
See also Management module IP addresses.
World Wide Name (WWN)
A World Wide Node Name (WWN) is a globally unique 64-bit identifier assigned to each device
in a Fibre Channel storage area network. WWNs are typically displayed as four-character
hexadecimal groups. Example: 3600-5B64-C92E-2EC1.
24 Storage system concepts
Page 25

4 Support and other resources
Release history
HP P6000 Control Panel releases:
New featuresVersionRelease
See What's New2.82013 (Sep)
2.72012 (Oct)
• HP P6000 Command View support. HP P6000 Control
Panel adds support for version 10.2 of array-based HP
P6000 Command View.
2.62012 (May)
2.52011 (Oct)
2.42011 (Mar)
• HP P6000 Command View support. Updated. HP P6000
Control Panel adds support for version 10.1 of
array-based HP P6000 Command View.
• Product name. Changed. The product name is changed
from HP P6000 Web-based Operator Control Panel to
HP P6000 Control Panel. Note that P6000 is the HP
storage platform family name; it does not refer to a
specific model.
• HP P6000 Command View support. Updated. HP P6000
Control Panel adds support for version 10.0 of
array-based HP P6000 Command View.
• Product name. Changed. The product name is changed
from HP StorageWorks Web-based Operator Control
Panel to HP P6000 Web-based Operator Control Panel
(WOCP). Note that P6000 is the HP storage platform
family name; it does not refer to a specific model.
• HP P6000 Command View support. Updated. HP P6000
WOCP adds support for version 9.4 of array-based HP
P6000 Command View.
• Controller power option. New. See Controller power on
behavior.
• Power the whole system off. Changed. The Power the
whole system off action now includes powering down
the disk shelves and drives.
• P6300 and P6500 support. Added. HP P6000 WOCP
also supports HP P6300 and HP P6500 storage systems.
2.3.12010 (Aug)
2.32010 (Feb)
• HP Command View EVA support. Updated. HP EVA
WOCP adds support for version 9.3 of array-based HP
Command View EVA.
• HP EVA management module reset. Changed. The reset
behavior has changed. See Management module reset
button.
• HP Management Integration Framework support.
Updated. HP EVA WOCP adds support for version 1.2
of HP Management Integration Framework.
• Management Integration Framework software name.
References to Management Infrastructure software have
been changed to Management Integration Framework
software.
• IPv6 support. Support for Internet Protocol version 6 (IPv6)
is added.
• Internal IP addresses.The WOCP interface prevents entry
of reserved internal IP addresses. See Management
module IP addresses.
Release history 25
Page 26

New featuresVersionRelease
Management Integration Framework software
•
compatibility. The HP EVA WOCP is compatible with HP
Management Integration Framework software.
Contacting HP
HP technical support
For worldwide technical support information, see the HP support website:
http://www.hp.com/support
Before contacting HP, collect the following information:
2.22009 (Mar)
2.12008 (Dec)
• HP Command View EVA access filter. Specify the IP
addresses of computers that are allowed to access
array-based HP Command View EVA. See Configuring
access to HP Command View EVA.
• Restart an HP EVA management module. Restart a
storage system's internal management module.
• Run array-based HP Command View EVA. Run the
array-based version of HP Command View EVA from the
WOCP. .
• Stop the HP EVA WOCP. Stop the WOCP application.
• HP EVA WOCP port number. Changed. The port number
for the HP EVA WOCP is now 2373. See Accessing a
WOCP.
• Search feature. Online help includes a search feature.
Initial release1.02008 (Feb)
• Product model names and numbers
• Technical support registration number (if applicable)
• Product serial numbers
• Error messages
• Operating system type and revision level
• Detailed questions
Subscription service
HP recommends that you register your product at the Subscriber's Choice for Business website:
http://www.hp.com/go/wwalerts
After registering, you will receive e-mail notification of product enhancements, new driver versions,
software updates, and other product resources.
Documentation feedback
HP welcomes your feedback. To make comments and suggestions about product documentation
you can:
• Send an e-mail to storagedocsFeedback@hp.com.
All submissions become the property of HP.
Related information
Documents
To find related documents, browse to the Manuals page of the HP Business Support Center web
site:
26 Support and other resources
Page 27

http://www.hp.com/support/manuals
• For most related documentation, navigate to the Storage section, select a storage category
(Storage Software and product.
Websites
• HP.com
http://www.hp.com
• HP storage
http://www.hp.com/go/storage
• HP manuals
http://www.hp.com/support/manuals
• HP download drivers and software
http://www.hp.com/support/downloads
• HP software depot
http://www.software.hp.com
Customer self repair
HP CSR programs allow you to repair your HP storage product. If a CSR part needs replacing, HP
ships the part directly to you so that you can install it at your convenience. Some parts do not
qualify for CSR. Your HP-authorized service provider will determine whether a repair can be
accomplished by CSR.
For more information about CSR, contact your local service provider. For North America, see the
CSR website:
http://www.hp.com/go/selfrepair
This product has no customer-replaceable components.
Customer self repair 27
Page 28

Glossary
This glossary provides the spelled-out form of technical abbreviations and acronyms
found in this document. The glossary does not include definitions of terms. To find
definitions and detailed explanations of terms and concepts, use the search feature,
table of contents or index.
ABM Array Based Management.
ALPA Arbitrated Loop Physical Address.
DNS Domain Name System.
DR Data Replication.
EVA Enterprise Virtual Array.
I/O Input Output.
iSCSI Internet Small Computer System Interface.
LAN Local Area Network.
SAN Storage Area Network.
SAS Serial Attached SCSI.
SBM Server Based Management.
UUID Unique Universal Identifier.
28 Glossary
Page 29

Index
A
automatic loop recovery policy, setting, 14
C
control panel
accessing, 6
features, 5
interface quick tour, 6
controller power on behavior, setting, 15
controllers
power-on behavior, 18
types, 18
customer self repair, 27
D
device loop pairs, 19
device ports, 19
documentation
providing feedback, 26
related documents, 26
H
host ports, 19
host ports topology, setting, 15
HP Management Integration Framework, 20
HP P6000 Command View
ABM and SBM versions, 19
filter list, 7
software suite, 19
host ports topology, setting, 15
initialization and uninitialization, 20
IP address, 11
password, setting, 15
passwords, about, 23
system alerts, 7
WWN label, locating, 11
WWN, resetting, 14
Subscriber's Choice, HP, 26
support, HP, 26
system alerts, 7
T
troubleshooting
login error, 16
operation failed error, 16
U
unbypassing disk drives, 17
uninitializing a storage system, 17
W
websites
HP , 27
HP Subscriber's Choice for Business, 26
product manuals, 26
what's new, 4
world wide name (WWN), 24
I
Internet Protocol configurations, 21
M
management module
about, 21
connection to (initial setup), 8
IP addresses, 22
updating software, 16
O
operational states, 23
P
private and public networks, 23
R
release history, 25
S
storage system
automatic loop recovery policy, setting, 14
device loop pairs, 19
device ports, 11
host ports, 19
29
 Loading...