

Page 1
LaserJet Professional P1100 Printer series
User Guide
www.hp.com/support/ljp1100series
Page 2

Page 3

HPLaserJetProfessionalP1100Printer
series
User Guide
Page 4

Copyright and License
Trademark Credits
©Copyright2015 HPDevelopment Company,
L.P.
Reproduction, adaptation, or translation
withoutpriorwritten permissionis prohibited,
exceptasallowedunderthecopyrightlaws.
The information contained herein is subject to
change without notice.
The only warranties for HP products and
servicesareset forth in theexpress warranty
statements accompanying such products and
services.Nothinghereinshouldbeconstrued
as constituting an additional warranty. HP shall
notbe liablefor technicalor editorial errors or
omissions containedherein.
Edition 2, 12/2016
Adobe®, Adobe Photoshop®, Acrobat®, and
PostScript®aretrademarks of AdobeSystems
Incorporated.
Apple and the Apple logo are trademarks of
AppleComputer, Inc.,registered inthe U.S. and
othercountries.iPodis a trademarkof Apple
Computer,Inc. iPodisforlegalorrightholderauthorizedcopyingonly.Don't stealmusic.
Microsoft®,Windows®,Windows®XP,and
WindowsVista®areU.S.registeredtrademarks
of MicrosoftCorporation.
UNIX®isa registeredtrademark ofTheOpen
Group.
Page 5

Conventions used in this guide
TIP:
Tips provide helpful hints or shortcuts.
NOTE: Notes provide important information to explain a concept or to complete a task.
CAUTION: Cautions indicateproceduresthatyou shouldfollowto avoidlosingdata ordamagingthe
product.
WARNING!
catastrophiclossofdata,orextensivedamagetotheproduct.
Warnings alert you to specific procedures that you should follow to avoid personal injury,
ENWW
iii
Page 6

iv Conventionsusedinthisguide ENWW
Page 7

Table of contents
1 Product basics
2 Software for Windows
.......................................................................................................................................................................
Product comparison
Environmentalfeatures.........................................................................................................................................
Productfeatures.....................................................................................................................................................
Productviews
Front andleft side view........................................................................................................................
Backview.............................................................................................................................................
Serialnumberandproductnumberlocation
Control-panellayout............................................................................................................................
Supported operating systems for Windows
Supportedprinter-driversforWindows..............................................................................................................
Priority forprint settings
Change printer-driver settings for Windows
RemovesoftwareforWindows...........................................................................................................................
Usethe uninstallutility toremove Windowssoftware.....................................................................
UsetheWindowsControlPaneltoremovesoftware.......................................................................
Supportedutilities(wirelessmodelsonly)..........................................................................................................
Embedded Webserver
................................................................................................................................................................
.........................................................................................................................................................
......................................................................................
..........................................................................................................................................................
.....................................................................................................................
......................................................................................................................................
....................................................................................................................
....................................................................................................................................
1
2
2
3
4
4
6
6
7
9
10
10
11
12
13
13
13
14
14
3 Use the product with Mac
Software forMac..................................................................................................................................................
ENWW
..................................................................................................................................................
Supported operating systems for Macintosh
Supportedprinterdrivers forMacintosh...........................................................................................
RemovesoftwareforMac
Priority for printsettings for Mac.......................................................................................................
Changeprinter-driversettingsforMacintosh..................................................................................
SoftwareforMac computers
HPPrinter Utility forMac.................................................................................................
Installsoftware forMac computersona wirelessnetwork...........................................
.................................................................................................................
.............................................................................................................
..............................................................................................
15
16
16
16
16
16
17
18
18
18
v
Page 8

SupportedutilitiesforMac(wirelessmodelsonly)
Embedded Webserver
Printwith Mac.......................................................................................................................................................
Create and use printing presets in Macintosh
Resizedocumentsorprint onacustom papersize
Printa coverpage..............................................................................................................................
Printmultiple pagesononesheet ofpaperin Macintosh................................................................
Printon bothsides (duplex)
Printon bothsides manually...........................................................................................
................................................................................................................
...............................................................................................................
..........................................................................
.............................................................................................
..........................................................................
18
18
20
20
20
20
21
21
21
4 Connect the product
Supported network operating systems (wireless models only)
USBconnection
CDinstallation
Network connection (wireless models only)
Supportednetwork protocols...........................................................................................................
Installtheproduct ona wirelessnetwork withthesoftwareCD
Turn offthe product wirelessunit
Configurethe networkproduct.........................................................................................................
5 Paper and print media
Understandpaperandprintmediause...............................................................................................................
Specialpaperorprintmediaguidelines
Changethe printdrivertomatchthe mediatypeand size
Supported paper sizes
Supportedpapertypesandtraycapacity
Supportedpaperand printmediatypes
Trayandbin capacity.........................................................................................................................
Paperorientation forloadingtrays
Loadpaper trays..................................................................................................................................................
Priority feed slot.................................................................................................................................
Input tray
...........................................................................................................................................................
...................................................................................
.....................................................................................................................................................................
....................................................................................................................................
....................................................................................................................
......................................................
.....................................................................................................
UsetheWirelessConfigurationutility
Restoredefaultwirelesssettings...................................................................................
Vieworchange networksettings....................................................................................
Setorchangethenetworkpassword
IPaddress........................................................................................................................
Linkspeed setting...........................................................................................................
........................................................................................................................................................
..............................................................................................................
.........................................................................................................................................................
...........................................................................................................
...........................................................................................
......................................................................................................................
............................................................................................................................................
Trayadjustment forshortmedia(base modelsonly)....................................................
............................................................................
.............................................................................
.................................................................................
23
24
25
25
26
26
26
26
26
26
27
27
27
27
28
29
30
31
32
33
34
34
34
35
35
35
35
35
6 Print tasks
vi
...........................................................................................................................................................................
37
ENWW
Page 9

vii
Cancela printjob
Printwith Windows...............................................................................................................................................
..................................................................................................................................................
Stopthe currentprint jobfromthe controlpanel(wirelessmodels only).......................................
Stopthe current print jobfrom the software program.....................................................................
OpentheWindowsprinterdriver......................................................................................................
Gethelp for anyprintoptionwith Windows......................................................................................
Changethenumberofprint copieswithWindows...........................................................................
Printcolored textas blackwithWindows.........................................................................................
SavecustomprintsettingsforreusewithWindows........................................................................
Usea printingquick set...................................................................................................
Createacustomprintingquickset.................................................................................
Improveprintquality withWindows..................................................................................................
Selectapagesize............................................................................................................
Selectacustompagesize............................................................................
Selecta papertype..........................................................................................................
Selecttheprint resolution...............................................................................................
Print thefirst orlast page ondifferentpaperwith Windows............................................................
Scaleadocument tofitpage sizewithWindows..............................................................................
Addawatermarktoa documentwithWindows
Printonboth sides(duplex)withWindows.......................................................................................
Manuallyprint onbothsides(duplex)............................................................................
Createabooklet withWindows
Printmultiple pagespersheet withWindows..................................................................................
SelectpageorientationwithWindows.............................................................................................
UseHPePrint
.....................................................................................................................................
Use HPCloud Print
Use HP Direct Print (wireless models only)
UseAirPrint
......................................................................................................................
.........................................................................................................
.......................................................................................................................
...............................................................................
.............................................................................
38
38
38
39
39
39
39
39
39
39
40
40
40
40
40
40
41
41
41
41
41
42
43
43
43
43
44
45
7 Manage and maintain the product
Printtheinformationpages.................................................................................................................................
Configuration page
Suppliesstatuspage.........................................................................................................................
Demopage.........................................................................................................................................
UsetheHPEmbeddedWebServer (wirelessmodelsonly)
Open theHP EmbeddedWeb Serverby usinga network connection
HPEmbeddedWeb Serversections
ENWW
....................................................................................................................................
...........................................................................................................................................
Information tab................................................................................................................
Settings tab......................................................................................................................
Networking tab
.................................................................................................................................
Links
................................................................................................................
..........................................................................................
....................................................
..............................................................................................................
50
47
48
48
48
48
49
49
49
49
50
50
Page 10

Economysettings
Auto-Off mode...................................................................................................................................
PrintwithEconoMode.......................................................................................................................
Managesuppliesand accessories
Check and ordersupplies
Replacement instructions
Cleantheproduct.................................................................................................................................................
Cleanthe pickuproller.......................................................................................................................
Cleanthepaperpath.........................................................................................................................
Cleantheprint-cartridgearea...........................................................................................................
Cleanthe exterior..............................................................................................................................
Productupdates...................................................................................................................................................
................................................................................................................................................
.....................................................................................................................................
................................................................................................................................
Print-cartridge storage...................................................................................................
HPPolicyonnon-HPprintcartridges.............................................................................
HPfraudhotlineand Website.........................................................................................
Recycle supplies
Redistribute toner...........................................................................................................
Replacetheprint cartridge..............................................................................................
Replacethepickuproller................................................................................................
Replace the separation pad
...........................................................................................................................
...............................................................................................................................
........................................................................................................
51
51
51
52
52
52
52
52
52
53
53
54
57
60
63
63
64
65
67
67
8 Solve problems
Solvegeneralproblems.......................................................................................................................................
Interpret control-panel lightpatterns.................................................................................................................
Clearjams.............................................................................................................................................................
Solve paper-handling problems
Solveimage-qualityproblems............................................................................................................................
...................................................................................................................................................................
Troubleshooting checklist
Factorsthat affectproductperformance.........................................................................................
Common causes of jams
Jamlocations.....................................................................................................................................
Clear jamsfrom theinputtray...........................................................................................................
Clearjamsfrom theoutputareas......................................................................................................
Clearjams frominsidethe product...................................................................................................
Solverepeatedjams..........................................................................................................................
Changethejamrecoverysetting......................................................................................................
Imagedefectexamples.....................................................................................................................
Light print orfaded..........................................................................................................
Tonerspecks...................................................................................................................
Dropouts..........................................................................................................................
Verticallines....................................................................................................................
...............................................................................................................................
.................................................................................................................................
.........................................................................................................................................
69
70
70
71
72
75
75
76
76
78
81
82
82
83
84
84
84
84
84
85
vi
ENWW
Page 11

ix
Gray background
Tonersmear....................................................................................................................
Loosetoner......................................................................................................................
Verticalrepetitive defects...............................................................................................
Misformed characters
Pageskew........................................................................................................................
Curlor wave.....................................................................................................................
Wrinklesorcreases.........................................................................................................
Tonerscatteroutline.......................................................................................................
Moisture...........................................................................................................................
Optimizeandimprove imagequality................................................................................................
Changeprintdensity.......................................................................................................
Solve performance problems
Solveconnectivityproblems...............................................................................................................................
Solve direct-connect problems
Solvewirelessproblems...................................................................................................................
Solveproductsoftwareproblems.......................................................................................................................
Solve common Windows problems
Solve commonMacintosh problems
.............................................................................................................................................
..........................................................................................................................
..................................................................................................................
......................................................................................................................
...............................................................................................................
.............................................................................................................
85
85
85
86
86
86
86
87
87
88
88
88
90
91
91
91
93
93
93
Appendix A Supplies and accessories
Order parts, accessories, andsupplies
Partnumbers........................................................................................................................................................
Paper-handlingaccessories
Printcartridges..................................................................................................................................
Cables and interfaces
Appendix B Service and support
HPlimitedwarranty statement.........................................................................................................................
UK,Ireland,andMalta.....................................................................................................................
Austria, Belgium, Germany, andLuxemburg
Belgium, France, andLuxemburg
Italy...................................................................................................................................................
Spain................................................................................................................................................
Denmark..........................................................................................................................................
Norway.............................................................................................................................................
Sweden............................................................................................................................................
Portugal............................................................................................................................................
Greeceand Cyprus
Hungary...........................................................................................................................................
CzechRepublic
...........................................................................................................................................
...............................................................................................................................................
..................................................................................................................................
.............................................................................................................................
...........................................................................................................................
......................................................................................................................................
............................................................................................
...............................................................................................................
.........................................................................................................................................
106
97
98
98
98
98
98
99
100
101
101
102
103
103
104
104
104
105
105
105
ENWW
Page 12

Slovakia
Poland..............................................................................................................................................
Bulgaria............................................................................................................................................
Romania...........................................................................................................................................
BelgiumandtheNetherlands.........................................................................................................
Finland.............................................................................................................................................
Slovenia...........................................................................................................................................
Croatia..............................................................................................................................................
Latvia................................................................................................................................................
Lithuania..........................................................................................................................................
Estonia.............................................................................................................................................
Russia..............................................................................................................................................
HP's Premium Protection Warranty: LaserJet toner cartridge limited warranty statement
HP policy onnon-HP supplies
HPanticounterfeit Website...............................................................................................................................
Datastoredon thetoner cartridge....................................................................................................................
EndUserLicenseAgreement
Customer self-repair warranty service
Customersupport..............................................................................................................................................
...........................................................................................................................................
................................
..........................................................................................................................................
...........................................................................................................................................
...........................................................................................................................
106
106
107
107
107
108
108
108
108
109
109
109
110
111
112
113
114
118
119
Appendix C Specifications
Physical specifications
Power consumption, electrical specifications, and acoustic emissions
Environmental specifications
Appendix D Environmental product stewardship program
Protectingthe environment...............................................................................................................................124
Ozone production
Powerconsumption........................................................................................................................................... 124
Tonerconsumption............................................................................................................................................124
Paperuse........................................................................................................................................................... 125
Plastics............................................................................................................................................................... 125
HP LaserJet print supplies
Paper.................................................................................................................................................................. 125
Materialrestrictions........................................................................................................................................... 125
Disposal of waste equipment by users (EU and India)
Electronic hardware recycling
Brazilhardwarerecyclinginformation..............................................................................................................126
Chemicalsubstances
Product Power Data per European UnionCommission Regulation 1275/2008
Restriction on Hazardous Substancesstatement (India)
...................................................................................................................................................
.......................................................................................................................................................
...........................................................................................................................................
...............................................................................................................................................................
................................................................................................................................................
..........................................................................................................................................
.........................................................................................................................................................
...................................................................
.............................................................................................
.................................................................................................
.....................................................
...........................................................................................
121
122
122
122
123
124
125
125
126
126
126
126
vi
ENWW
Page 13

xi
Restriction on Hazardous Substancesstatement (Turkey)
Restriction on Hazardous Substances statement (Ukraine)
SubstancesTable(China)
SEPAEcolabelUserInformation(China)
Theregulation ofthe implementationon Chinaenergylabel forprinter,fax,andcopier...............................128
MaterialSafetyData Sheet(MSDS)
EPEAT
...........................................................................................................................................................................................
Formoreinformation......................................................................................................................................... 128
.................................................................................................................................................
........................................................................................................................
................................................................................................................................
........................................................................................
......................................................................................
126
127
127
127
128
128
Appendix E Regulatory information
Declaration of Conformity (HPLaserJetProfessional P1102, P1102s, P1106, P1108, andP1109)
Declaration of Conformity (HP LaserJetProP1102w and P1109w)
Regulatorystatements......................................................................................................................................
FCCregulations
Canada-IndustryCanadaICES-003ComplianceStatement
VCCIstatement(Japan)
EMCstatement (Korea)
Powercordinstructions..................................................................................................................
Power cordstatement (Japan)
Lasersafety.....................................................................................................................................
Laserstatement forFinland............................................................................................................
GSstatement (Germany)
EurasianConformity (Belarus,Kazakhstan,Russia)
Additionalstatements forwirelessproducts....................................................................................................
FCC compliancestatement—United States
Australiastatement.........................................................................................................................
BrazilANATEL statement
Canadian statements
Exposureto RadioFrequency Radiation(Canada)
European Unionregulatory notice
Noticeforuse inRussia...................................................................................................................
Mexicostatement............................................................................................................................
Taiwanstatement............................................................................................................................
Koreanstatement............................................................................................................................
Vietnam Telecom wired/wireless marking for ICTQC Typeapproved products
..................................................................................................................................
.................
.........................................................................
..............................................................................................................................................
................................................................
................................................................................................................................
.................................................................................................................................
.....................................................................................................................
..............................................................................................................................
...............................................................................
.............................................................................................
.............................................................................................................................
....................................................................................................................................
..................................................................................
..............................................................................................................
................................
129
130
132
134
134
134
134
134
134
135
135
135
137
137
138
138
138
138
138
138
139
139
139
139
139
140
......................................................................................................................................................................................
Index
ENWW
141
Page 14

xii ENWW
Page 15

1 Product basics
●
Product comparison
●
Environmental features
●
Product features
●
Product views
ENWW
1
Page 16
Product comparison
Tray
Duplexing
Duplexing
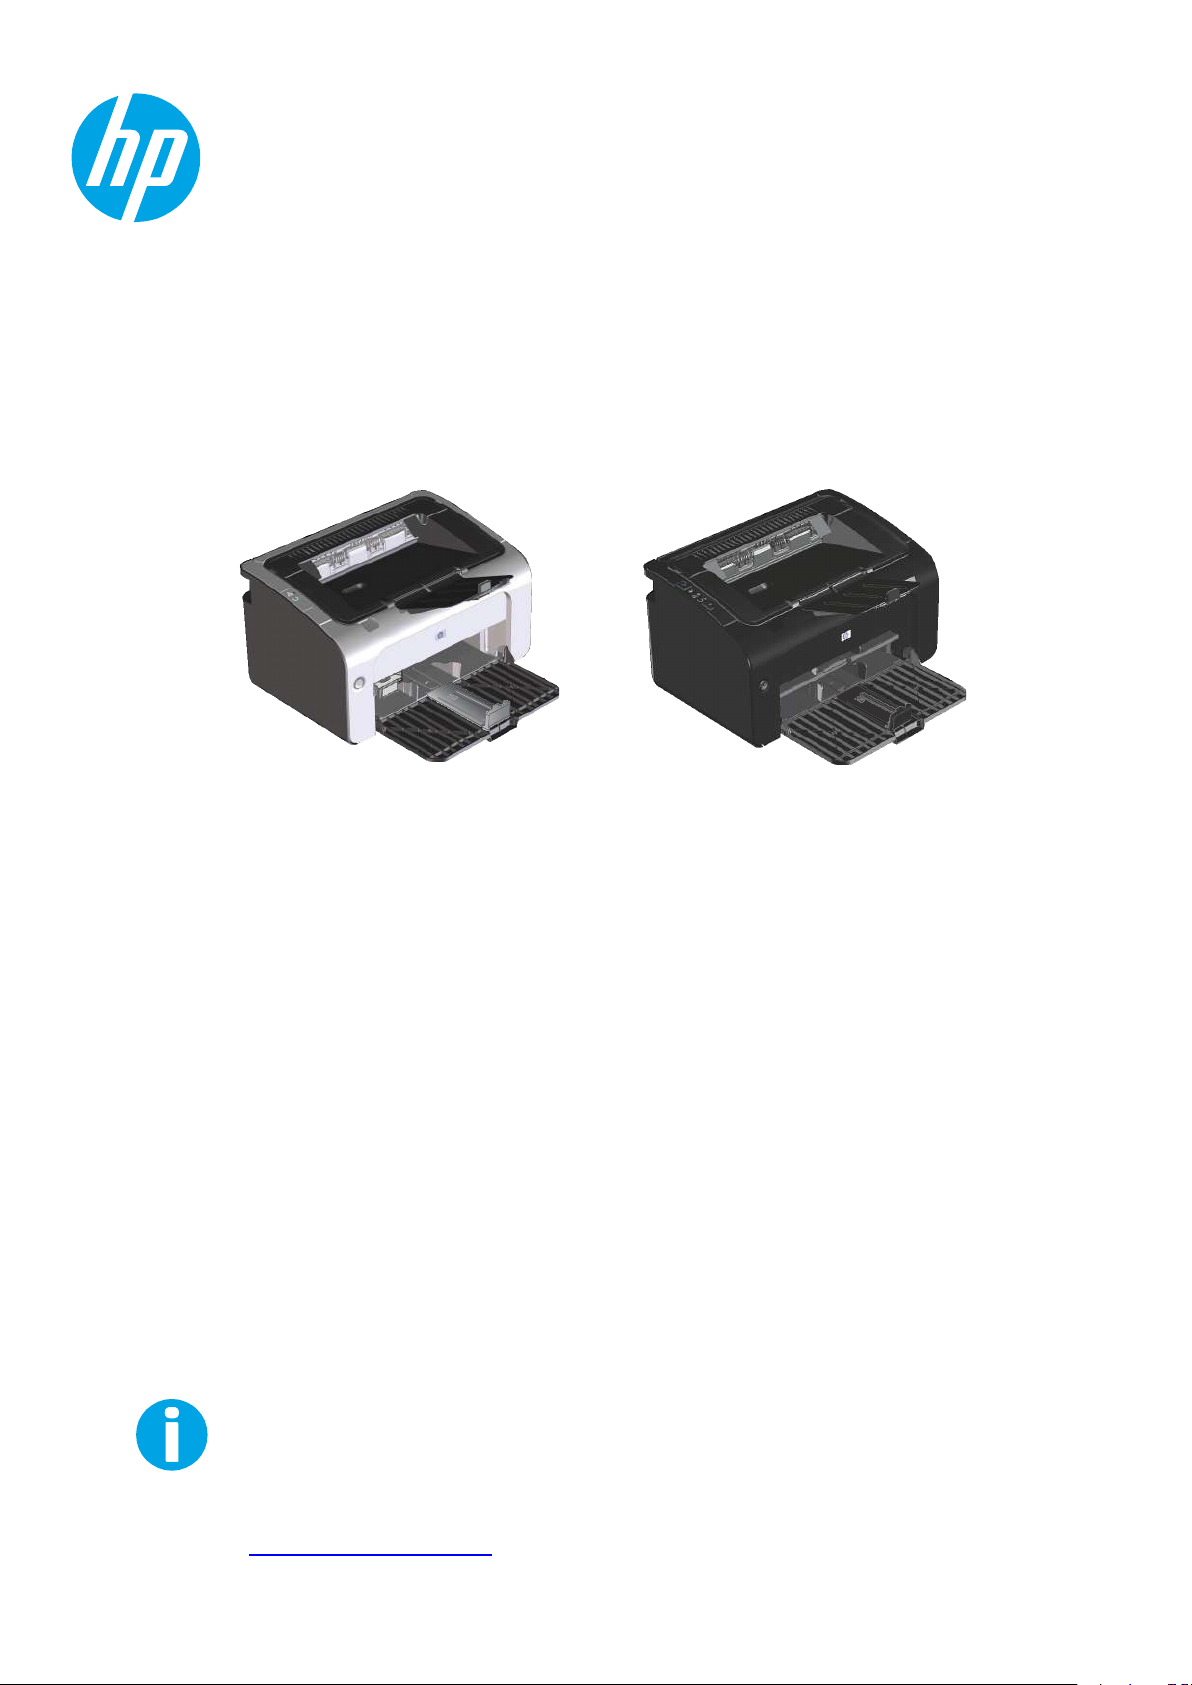
HP LaserJet Professional P1100 Printer series HP LaserJet Professional P1100w Printer series
●
Speed:Up to 18 A4pages perminute (ppm),19letter-size
ppm
●
●
●
: 150-sheetinput tray
Connectivity: Hi-Speed USB 2.0 port
: Manual duplexing(usingthe printerdriver)
●
Speed:18 A4pages per minute(ppm),19 letter-sizeppm
●
Trays:150-sheet main-input trayand10-sheet priority
input slot
●
Connectivity
wireless networking
●
: Hi-Speed USB 2.0 port and 802.11b/g
: Manual duplexing(using the printerdriver)
Environmental features
Recycling
Energysavings
Duplex
HPSmartWebPrinting
Reduce waste by using recycledpaper.
Recycle print cartridges by using the HP return process.
Save energy with productAuto-Off mode.
Save paper by using the manual duplex printing setting.
Use HPSmart Web Printing to select,store, and organizetext and graphicsfrom multiple Web pages and
then edit and print exactly what you see onscreen. It gives you the control you need for printing
meaningful informationwhile minimizingwaste.
Download HP Smart Web Printing from this Web site: www.hp.com/go/smartweb.
2 Chapter 1 Product basics
ENWW
Page 17

Product features
Benefit Supporting features
Excellent print quality ● Genuine HP print cartridge.
●
FastRes 600 setting provides 600 dots per inch (dpi) effective print quality. FastRes 1200 setting
provides 1,200 dpi effective printquality.
●
Adjustable settings to optimize print quality.
Supported operating
systems
Ease of use ● The print cartridge is easyto install.
Flexible paper handling ● A 10-sheetpriority input slot(wireless modelsonly)
Interface connections ● Hi-Speed USB 2.0 port
Energy savings ● Afterauser-specifiedtime,theAuto-Offfeatureautomaticallyconserveselectricityby
●
Windows Vista (32-bit and 64-bit)
●
Windows XP (32-bit and 64-bit)
●
Windows 7
●
Windows Server 2003 (32-bit and 64-bit)
●
Windows Server 2008 (32-bit and 64-bit)
●
Mac OS X v10.4, v10.5, v10.6
●
Convenientaccess to theprint cartridge andtothe paper path throughthe print-cartridge door.
●
Paper tray can be adjustedwith onehand.
●
A 150-sheet(75 g/m2(20 lb) paper) input tray.
●
A 125-sheet(75 g/m2(20 lb) paper) output bin.
●
Manual duplexing (two-sided printing).
●
802.11b/g wireless networking (wireless models only)
substantiallyreducing power consumptionwhen theproduct isnot printing.
Economical printing ● N-upprinting(printingmorethanonepageona sheet)and themanualtwo-sidedprinting
Supplies management ● Authentication for genuine HPprint cartridges.
Accessibility ● The onlineuser guide is compatiblewith text screen-readers.
Security ● Kensington lock receptacle on the back of theproduct.
ENWW
features savepaper.
●
EconoMode printer driver featuresaves toner.
●
Easy ordering for replacement supplies.
●
Suppliesstatuspageshowsestimatedtonerlevelintheprintcartridge.Not availablefornon-HP
supplies.
●
All doors and coverscan beopened by using one hand.
Product features
3
Page 18
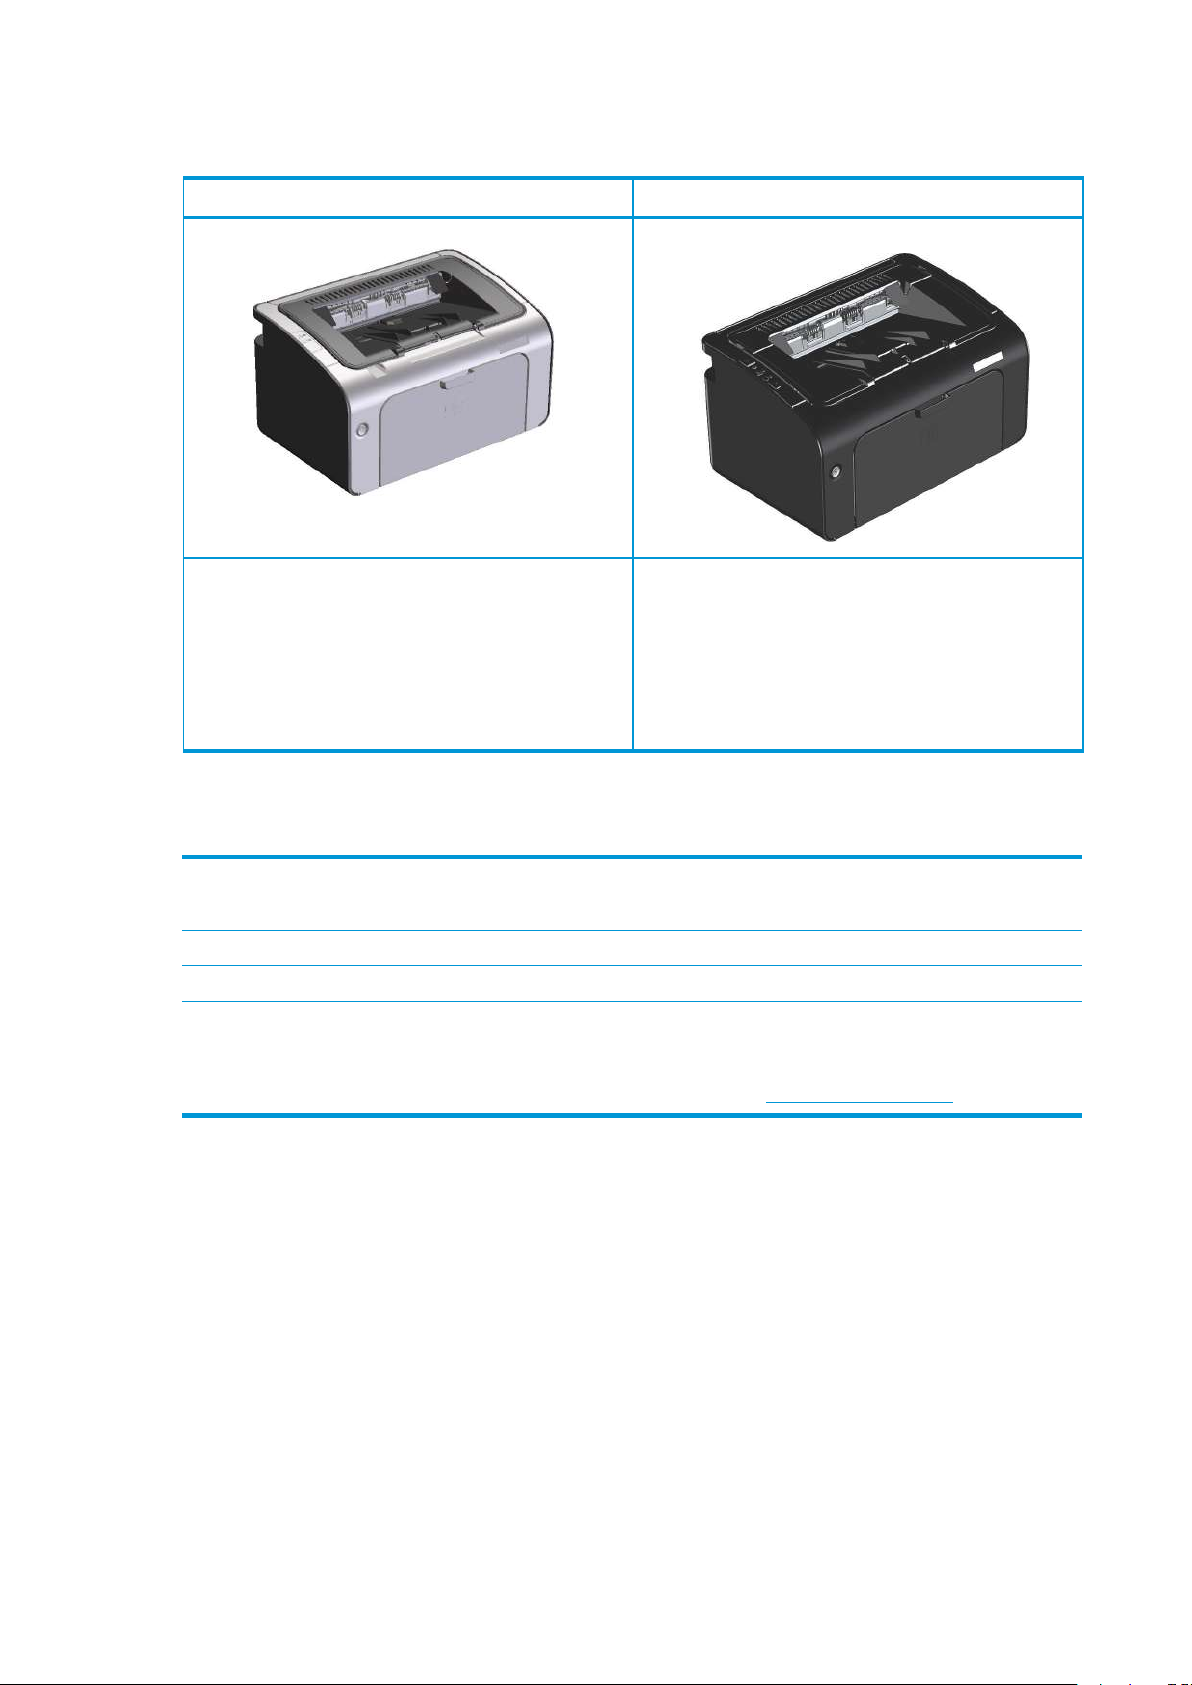
Product views
Front and left side view
7
6
1
Output bin
1
2
3
5 4
2
Foldable output tray extension
3
Input tray
4
Short media extender tool
5
Power button
6
Print-cartridge door lift-tab
7
Control panel
4
Chapter 1 Product basics
ENWW
Page 19

7
6
1
Output bin
2
Foldable output tray extension
3
Priority input slot
4
Main input tray
5
Power button
1
2
3
5
4
6
Print-cartridge door lift-tab
7
Control panel
ENWW
Product views
5
Page 20
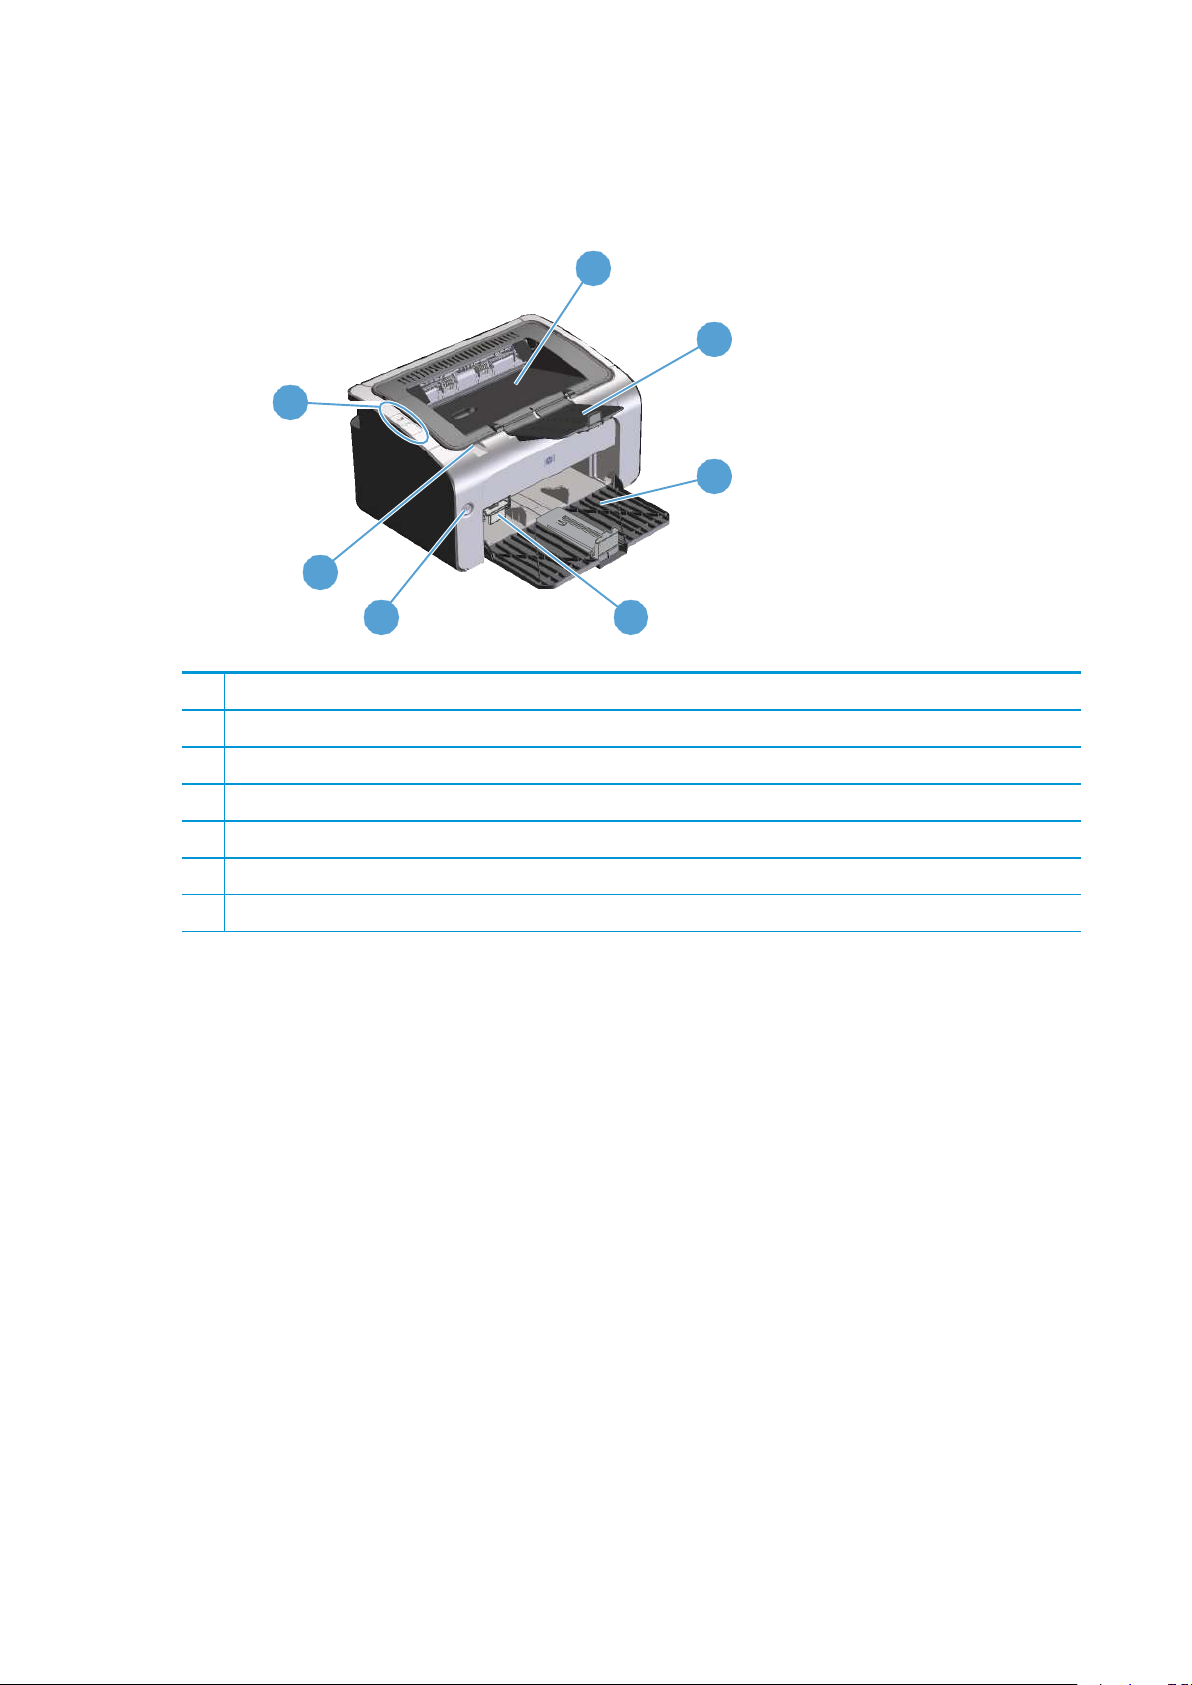
Back view
1
3
1
USB port
2
Power connector
3
Kensington lock
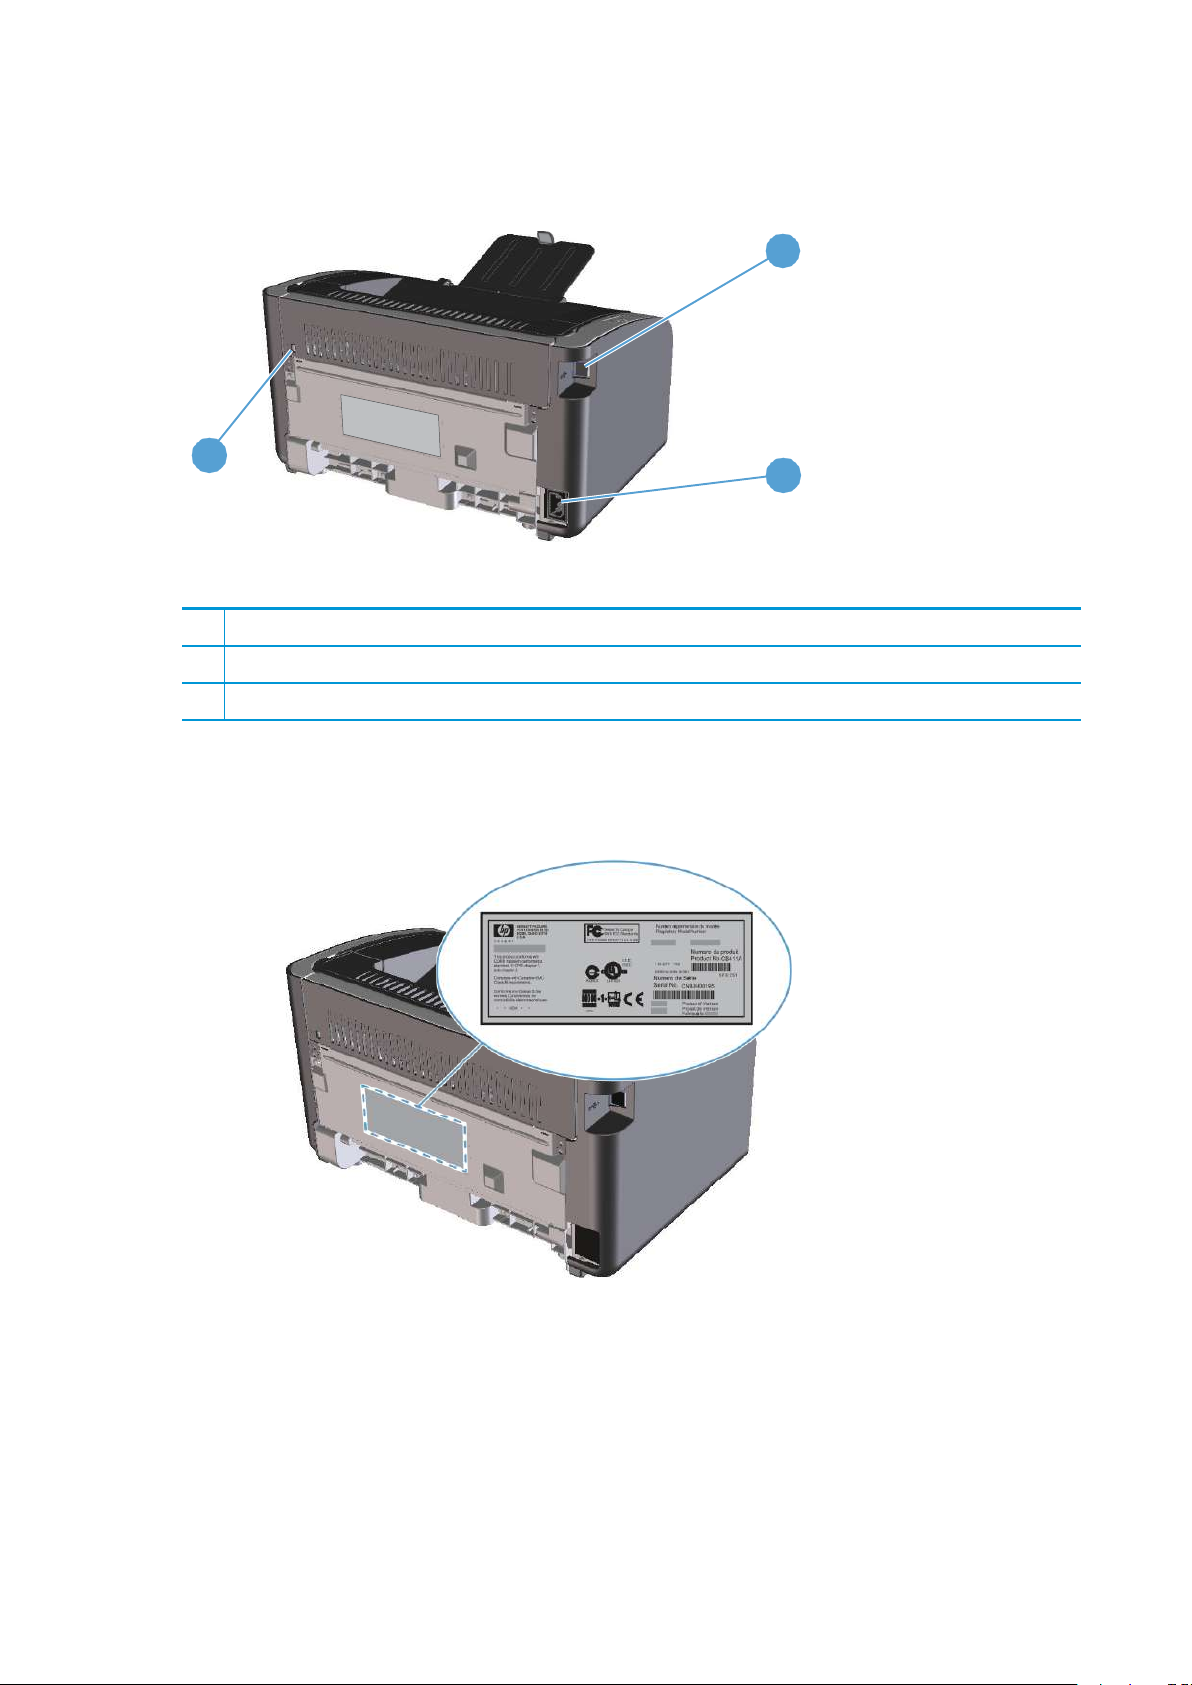
Serial number and product number location
The label that contains the product number and serial number is on the rear of the product.
2
6
Chapter 1 Product basics
ENWW
Page 21
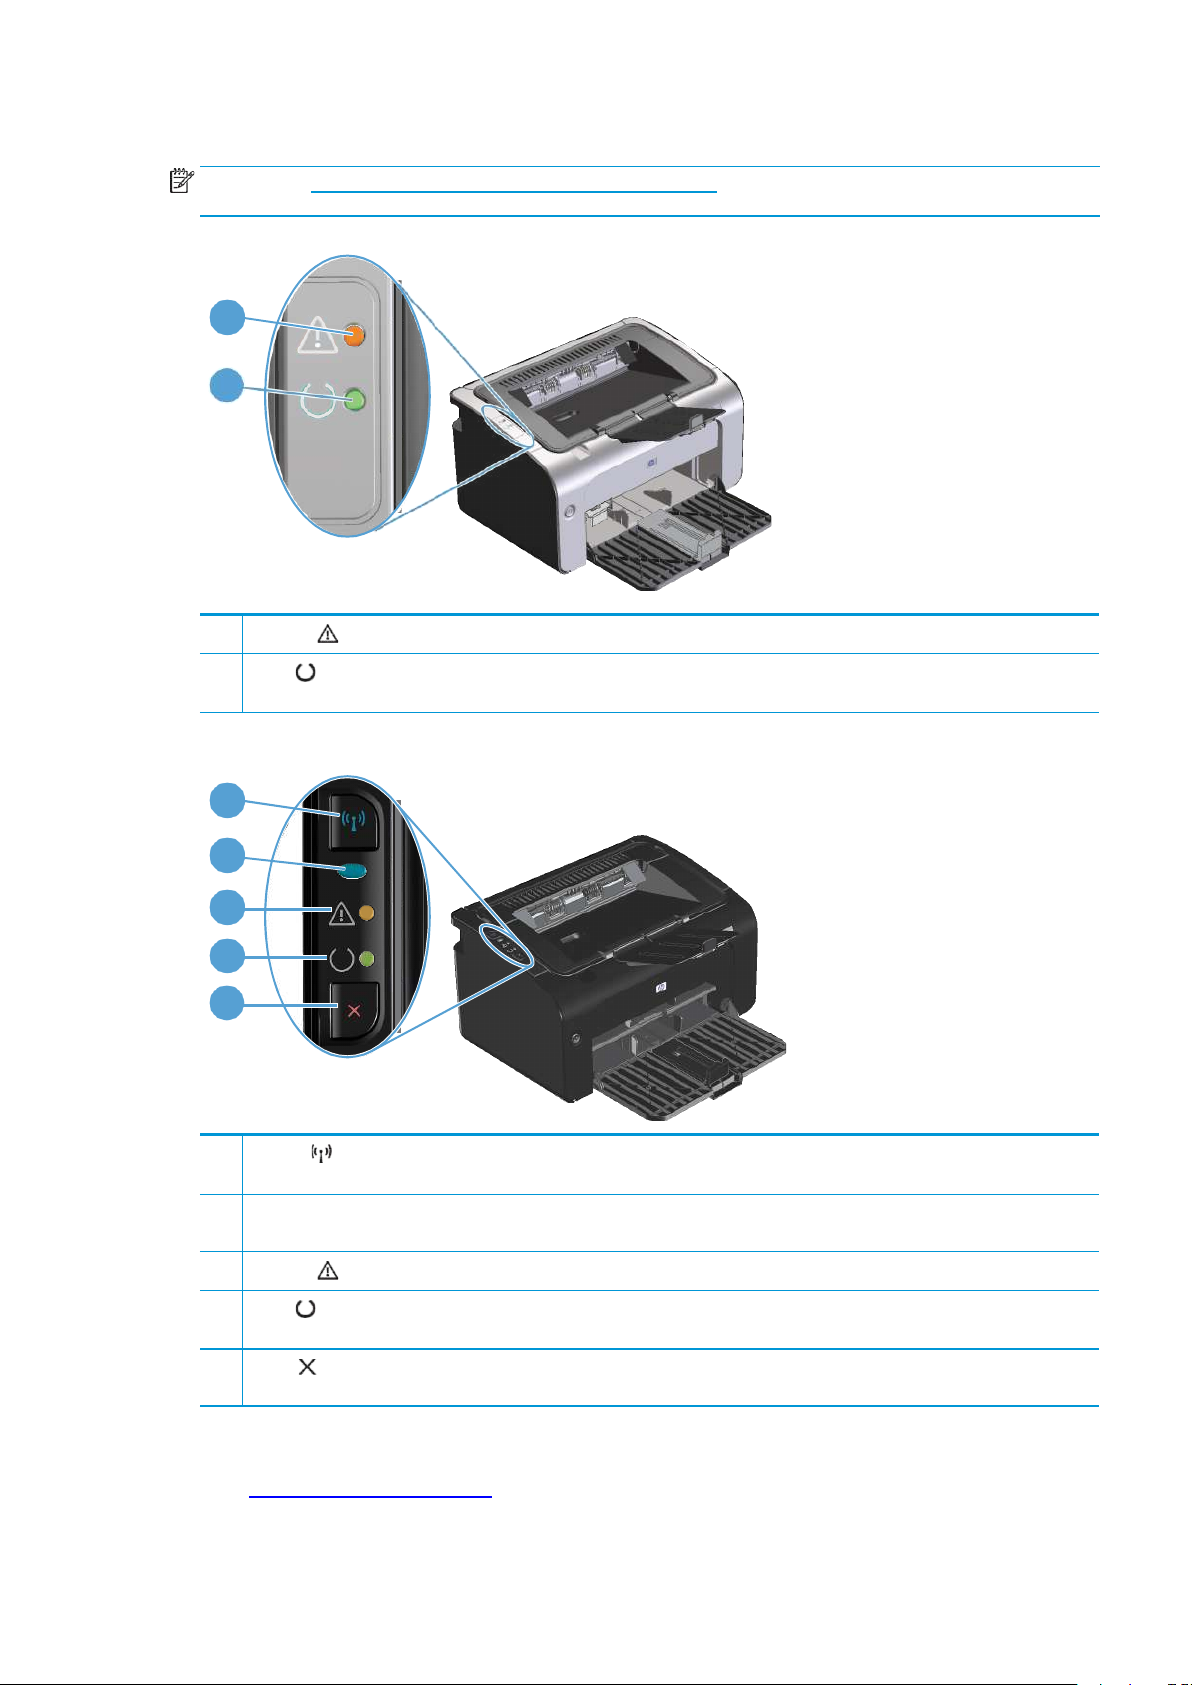
Control-panel layout
NOTE:
See Interpretcontrol-panel lightpatterns onpage 72 for adescription ofwhatthe light patterns
mean.
1
2
1
Attention light: Indicatesthat theprint cartridgedoor is open or othererrors exist.
2
Ready
blinks.
light:Whentheproductisreadyto print, theready light is on.Whentheproductisprocessingdata,thereadylight
1
2
3
4
5
1
Wireless
feature.
2
Wirelesslight:Whentheproductissearchingforanetwork,thewirelesslightblinks.Whentheproductisconnectedtoa
wireless network, thewireless light ison.
3
Attention light: Indicatesthat theprint cartridgedoor is open or othererrors exist.
4
Ready
blinks.
5
Cancel
configuration page.
button: To detect wireless networks, press the wireless button. This button also enables and disables the wireless
light:Whentheproductisreadyto print, theready light is on.Whentheproductisprocessingdata,thereadylight
button:To canceltheprintjob,pressthecancelbutton.Press andhold the button for 5 seconds to print a
ENWW
Product views
7
Page 22

8
Chapter 1 Product basics
ENWW
Page 23

2 Software for Windows
●
Supported operating systems for Windows
●
Supported printer-drivers for Windows
●
Priority for print settings
●
Change printer-driver settings for Windows
●
Remove software for Windows
●
Supported utilities (wireless models only)
ENWW
9
Page 24

Supported operating systems for Windows
The product comes with software for the following Windows® operating systems:
●
Windows Vista (32-bit and 64-bit)
●
Windows XP (32-bit and 64-bit)
●
Windows 7
●
Windows Server 2003 (32-bit and 64-bit)
Formore informationabout upgradingfrom Windows2000Serverto WindowsServer 2003,using
Windows Server 2003 Point and Print, orusingWindowsServer 2003 Terminal Services and Printing, go
to www.microsoft.com.
●
Windows Server 2008 (32-bit and 64-bit)
Supported printer-drivers forWindows
Theproduct comeswith softwareforWindowsthat allowsthe computertocommunicatewith theproduct.
Thissoftwareiscalledaprinterdriver.Printerdriversprovideaccesstoproductfeatures,suchasprintingon
custom-sized paper, resizing documents, and inserting watermarks.
NOTE: Themostrecent driversareavailableat www.hp.com/support/ljp1100series. Dependingonthe
configurationofWindows-based computers,theinstallationprogramfortheproductsoftwareautomatically
checksthecomputerforInternetaccessin ordertoobtainthelatestdrivers.
InadditiontotheprinterdriverthatisinstalledfromtheproductCD,theXMLPaperSpecification(XPS)driver
is available for download from the Web.
10 Chapter2 SoftwareforWindows
ENWW
Page 25

Priority for print settings
Changes to print settings are prioritized depending on where the changes are made:
NOTE:
●
●
●
●
The names of commands and dialog boxes might vary depending on your software program.
Page Setup dialog box: ClickPage Setup or a similar command on the File menuofthe program you
are working in to open this dialog box. Settings changed here override settings changed anywhere else.
Print dialog box: Click Print, Print Setup, or a similar command on the File menu of the program you
areworking intoopen thisdialog box.Settings changedinthe Printdialog boxhavea lowerpriorityand
usually do not override changes made in the
Printer Properties dialog box (printer driver)
printer driver.Settings changedin thePrinter Propertiesdialog boxusually donot overridesettings
anywhere else inthe printing software. You can changemost of theprint settings here.
Default printer driver settings
print jobs, unless settings are changed inthePage Setup, Print, or Printer Properties dialog boxes.
: The default printer driversettings determine thesettings used in all
Page Setup
: Click
dialog box.
Properties
in the
Print
dialog box to open the
ENWW
Priority for printsettings 11
Page 26

Change printer-driver settings for Windows
2.
Select
the
driver,
and
then
click
,
2.
2.
Change the settings for all print jobs
until the software program is closed
1.
Onthe File menuin thesoftware
program, clickPrint.
PropertiesorPreferences
Thestepscanvary;thisprocedureismost
common.
.
Change the default settingsforallprint
jobs
1.
WindowsVista and Windows7: Click
Start, click Control Panel, and then
in the category for Hardware and
Sound clickPrinter.
-or-
Windows XP, Windows Server 2003,
and Windows Server 2008 (using the
default Start menu view): Click Start
and then click Printers and Faxes.
-or-
Windows XP,WindowsServer 2003,
and Windows Server 2008 (using the
Classic Startmenu view)
click
Settings
, and then click
Printers
.
Right-clickthedrivericon,andthen
select Printing Preferences.
:Click
Start
Change the product configuration
settings
1.
WindowsVista and Windows7: Click
Start, click Control Panel, and then
in the category for Hardware and
Sound clickPrinter.
-or-
Windows XP, Windows Server 2003,
and Windows Server 2008 (using the
default Start menu view): Click Start,
and then click Printers and Faxes.
-or-
Windows XP,Windows Server 2003,
and Windows Server 2008 (using the
,
Classic Start menu view)
click
Settings
, and then click
Printers
.
Right-clickthedrivericon,andthen
select Properties.
3.
Click the Device Settings tab.
:Click
Start
,
12 Chapter2 SoftwareforWindows
ENWW
Page 27

Remove software forWindows
2.
2.
Use the uninstall utility to remove Windows software
1.
Click the
2.
Click theHPmenu item, and then click the
3.
Click theUninstall menu item,and then follow the onscreen instructions toremove the software.
Start
button, and then click the
ProgramsorAll Programs
HP LaserJet Professional P1100 Printer series
Use the Windows Control Panel to remove software
Windows XP, Windows Server 2003, and Windows Server 2008
1.
Click the Start button, click the Control Panel item, and then click the Add or Remove Programs item.
Find and select the product from the list.
3.
Click the
Windows Vista and Windows 7
1.
Click the
Find and select the product from the list.
3.
Select theUninstall/Change option.
Change/Remove
Start
button, click the
button to remove the software.
Control Panel
item, and then click the
menu item.
Programs and Features
menu item.
item.
ENWW
Remove software for Windows
13
Page 28

Supported utilities (wireless models only)
Embedded Web server
The product is equipped with an embedded Web server, which provides access to information about product
and network activities. This information appears in a Web browser, such as Microsoft Internet Explorer, Apple
Safari, orFirefox.
The embedded Web server resides on the product. It is not loaded on a network server.
TheembeddedWebserverprovidesaninterfacetotheproductthat anyonewho hasanetwork-connected
computerandastandardWebbrowsercanuse.Nospecialsoftwareisinstalledorconfigured,butyoumust
haveasupportedWebbrowseronyourcomputer.TogainaccesstotheembeddedWebserver,typethe IP
addressforthe productinthe addressline ofthebrowser.(TofindtheIP address,printaconfigurationpage.
Formoreinformation aboutprinting aconfiguration page, seePrint theinformationpages onpage48.)
For a complete explanation of the features and functionality of the embedded Web server, see HP Embedded
Web Server sections on page 49.
14 Chapter2 SoftwareforWindows
ENWW
Page 29

3
Use the product withMac
●
Software forMac
●
Print with Mac
ENWW
15
Page 30

Software for Mac
1.
Supported operating systems for Macintosh
The product supports the following Macintosh operating systems:
●
Mac OS X v10.4, v10.5, and v10.6
NOTE:
PPC and Intel® Core™ processors are supported.
Supported printer drivers for Macintosh
TheHPLaserJet softwareinstallerprovidesPostScript® PrinterDescription (PPD)files, aCUPSdriver, andthe
HPPrinterUtilities forMac OSX.TheHPprinterPPD file,in combinationwiththeCUPSdriver,provides full
printing functionality and access to specific HP printer features.
Remove software for Mac
Use the uninstall utility to remove the software.
Browse to the following folder:
Library/Printers/hp/laserjet/P1100_P1560_P1600Series/
2.
Double-click the
3.
Click the
Continue
HP Uninstaller.app
button, and then follow the onscreen instructions to remove thesoftware.
file.
Priority for print settings for Mac
Changes to print settings are prioritized depending on where the changes are made:
NOTE:
Thenamesof commands anddialog boxesmightvarydepending onyour software program.
●
Page Setup dialog box: Click Page Setup or a similarcommand on the Filemenu of the program you
areworkingin toopen thisdialog box. Settingschanged heremightoverride settingschanged
anywhere else.
Print dialog box
●
areworking intoopen thisdialog box.Settings changedinthe Printdialog boxhavea lowerpriorityand
do not override changes made in the Page Setup dialog box.
Default printer driver settings
●
print jobs, unless settings are changed in the Page Setup or Print dialog boxes.
16 Chapter3 Usetheproduct withMac
: Click
Print,Print Setup
: The default printer driversettings determine thesettings used in all
, or a similar command on the
File
menu of the program you
ENWW
Page 31

Change printer-driver settings for Macintosh
1.
File
Print
2.
1.
File
Print
2.
3.
Installable
Options
1.
System
3.
Driver
4.
Change the settings for all print jobs
until the software program is closed
On the
Changethesettingsthatyou wanton
the variousmenus.
menu, click
.
Change the defaultsettings for all print
jobs
On the
Changethesettingsthatyou wanton
the variousmenus.
3.
On the Presets menu,click Saveas
and type a name for the preset.
Thesesettings are savedinthe Presets
menu.To usethenewsettings,you must
selectthesavedpresetoptioneverytime
you open a program and print.
menu, click
.
Change the product configuration
settings
Mac OS X v10.4
1.
Fromthe Applemenu,clickSystem
Preferences and then Print& Fax.
2.
Click PrinterSetup.
Click the
Mac OS X v10.5 and v10.6
Fromthe Applemenu,click
Preferences and then Print& Fax.
2.
Click Options &Supplies.
Click the
Selectthedriverfrom the list,and
configurethe installed options.
menu.
menu.
ENWW
Software for Mac
17
Page 32

Software for Mac computers
1.
11.
12.
When
the
window
with
the
listofprinters
appears,
choose
the
Bonjour
option
(listed
with
the
product
HP Printer Utility for Mac
UsetheHP LaserJetUtilityto printtheproduct informationpagesand tochangethe Auto-Offsettingfrom a
Mac computer.
To open the HP LaserJet Utility, complete the procedure below.
▲
Open the Print Queue, and then click the
Utility
icon.
Install software for Mac computers on a wireless network
Beforeinstalling theproductsoftware, makesurethe productisnot connectedtothenetworkusing a
network cable.
NOTE:
To connect the product to a computer on a wireless network, follow these steps:
2.
3.
4.
5.
6.
7.
8.
You must have Mac OS X V10.6 to install the product on a wireless network.
Open Finder in the dashboard.
Applications
Click
Open Print Queue, click Printer Setup, click the Utility tab, and then click Open Printer Utility.
Click HTMLConfig.
Click the Networking tab, and then click Wireless in the list on the left.
UnderCommunication Mode,clickInfrastructure, select anetwork namefrom theAvailable Network
Names (SSID)
From the Security Mode pop-up menu under Authentication, click WEP.
Type the WEP key and then click Apply.
, and then double-click
list, and then click the<<button.
System Preferences
, and then click
Print & Fax
.
9.
ClickOKin the confirmation box.
10.
Close the
InthePrint& Faxwindow,choosethe USBoption(listedwiththeproductmodel)andthen clickthe
minus - button.
model), and then click Add.
HTML Config
windows and the
Print Queue
Supported utilities for Mac (wireless models only)
Embedded Web server
Network models are equipped with an embedded Web server, which provides access to information about
deviceand networkactivities. Thisinformation appearsina Webbrowser, suchas MicrosoftInternet
Explorer, Netscape Navigator, Apple Safari, or Firefox.
The embedded Web server resides on the device. It is not loaded on a network server.
18 Chapter3 Usetheproduct withMac
window.
ENWW
Page 33

TheembeddedWebserverprovidesaninterfacetothedevice thatanyonewhohasanetwork-connected
computerandastandardWebbrowsercanuse.Nospecialsoftwareisinstalledorconfigured,butyoumust
haveasupportedWebbrowseronyourcomputer.TogainaccesstotheembeddedWebserver,typetheIP
addressforthedeviceintheaddress lineofthe browser.(TofindtheIP address,print aconfigurationpage.)
ENWW
Software for Mac
19
Page 34

Print with Mac
2.
3.
2.
2.
Create and use printing presets in Macintosh
Use printing presets to save the current printer driver settings for reuse.
Create a printing preset
1.
On the File menu, click Print.
Select thedriver.
Select the print settings.
4.
In the Presets box, click Save As..., and type a name for the preset.
5.
Click OK.
Use printing presets
1.
On the File menu, click Print.
Select thedriver.
3.
In the Presets box, select the printing preset that you want to use.
NOTE: Touse printer-driverdefault settings,select Standard.
Resize documents or print on a custom paper size
You can scale a document to fit on a different size of paper.
On the File menu, click Print.
1.
2.
Open the Paper Handling menu.
3.
Intheareafor
drop-down list.
4.
If you want to use only paper that is smaller than the document, select
Destination Paper Size
,select
Scale tofitpapersize
Print a cover page
You can print a separate cover page for your document that includes a message (such as “Confidential”).
1.
On the File menu, click Print.
Select thedriver.
3.
OpentheCover Page menu,and then selectwhethertoprint the coverpage Before Document orAfter
Document
4.
In the Cover Page Type menu, select the message that you want to print on the cover page.
NOTE: To print ablank cover page, select Standard as the CoverPage Type.
.
,and thenselect thesize fromthe
Scale down only
.
20 Chapter3 Usetheproduct withMac
ENWW
Page 35

Print multiple pages on one sheet of paper in Macintosh
2.
1.
5.
6.
Youcanprint morethan onepageonasinglesheet ofpaper. Thisfeatureprovidesa cost-effectivewayto
print draft pages.
1.
On the
Select thedriver.
3.
Open the
4.
Next to
or 16).
5.
Next to
6.
Next to
File
menu, click
Layout
menu.
Pages per Sheet
Layout Direction
Borders
, select the type of border to print around each page on the sheet.
Print on both sides (duplex)
Print on both sides manually
Insertenoughpaperinto theinputtrayto accommodatethe printjob.Ifyou areloadingspecial paper
such as letterhead, load it face-down in the tray.
2.
On the File menu, click Print.
3. MacOS Xv10.4
binding
-or-
:In the
item.
Print
.
,selectthe number ofpages that youwantto print oneach sheet (1, 2,4, 6, 9,
, select the order and placement of the pages on the sheet.
Layout
drop-downlist, selectthe
Long-edged binding
itemor the
Short-edged
ENWW
Mac OS X v10.5 and v10.6
4.
ClickPrint.Follow theinstructionsinthe dialogboxthatopens onthecomputerscreenbeforeplacing
the output stack in the tray for printing the second half.
Go to the product, and remove any blank paper that is in the tray.
Taketheprinted stackfromthe outputbin, andthen insertthe stackprinted sidedown into thetray
with the top edge feeding into the product first.
7.
At the computer, click the Continue button to finish the print job.
: Click the
Two-sided
check box.
Print withMac 21
Page 36

22 Chapter3 Usetheproduct withMac
ENWW
Page 37

4 Connect the product
●
Supported network operating systems (wireless models only)
●
USB connection
●
Network connection (wireless models only)
ENWW
23
Page 38

Supported network operating systems (wireless models only)
The product supports the following operating systems for wireless printing:
●
Windows Vista (32-bit and 64-bit)
●
Windows XP (32-bit and 64-bit)
●
Windows 7
●
Windows Server 2003 (32-bit and 64-bit)
●
Windows Server 2008 (32-bit and 64-bit)
●
Mac OS X v10.4, v10.5, and v10.6
24 Chapter4 Connecttheproduct
ENWW
Page 39

USB connection
1.
2.
3.
This product supports a Hi-Speed USB 2.0connection. You must usean A-to-B typeUSB cable thatis no
longer than 2 m (6.56 ft).
CD installation
Insert the software installation CD into the computer CD drive.
NOTE: DonotconnecttheUSBcableuntilprompted.
If the installation program does not start automatically, browse the CD contents and run the SETUP.EXE
file.
Follow the onscreen instructions to install the software.
When you use the CD to install the software, you can choose the following types of installations:
●
Easy Install(recommended)
Youwill notbeprompted toacceptor makechangesto defaultsettings, andyouautomatically will
accept the software license agreement.
●
Advanced Install
You will be prompted to accept or make changes to default settings.
ENWW
USB connection
25
Page 40

Network connection (wireless models only)
1.
2.
3.
1.
2.
The product can connect to wireless networks.
Supported network protocols
Toconnect anetworking-equippedproducttoa network,you needanetwork thatusesone ofthefollowing
protocols.
●
TCP/IP (IPv4 or IPv6)
●
Port 9100
●
LPR
●
DHCP
●
AutoIP
●
SNMP
●
Bonjour
●
SLP
●
WSD
●
NBNS
Install the product on a wireless network with the software CD
Insert the software CD into the computer CD tray.
If the installation program does not start automatically, browse the CD contents and run the SETUP.EXE
file.
Follow the onscreen instructions to complete the product installation.
Whenthe installationis complete,if youwant toverify thatthe producthas anetworkIPaddress,print
aconfigurationpage.Pressandholdtheproductcancel button untilthe ready light blinks, and
then release the button to print the configuration page.
Turn off the product wireless unit
Ifyou want todisconnect theproductfroma wirelessnetwork, you canturn offthe wirelessunitin the
product.
At the product control panel, pressand hold the wireless buttonfor more than 5seconds.
Toconfirm thatthe wirelessunit is turnedoff, printaconfiguration page,and then verifythat the
product IP address is specified as 0.0.0.0 on theconfiguration page.
Configure the network product
Use the Wireless Configuration utility
Use the Wireless Configuration utility to configure the product to print on a wireless network.
26 Chapter4 Connecttheproduct
ENWW
Page 41

1.
Connect the wireless product to the computer through a USB cable.
5.
1.
2.
3.
1.
2.
2.
Click the
3.
Click the HP menu item, and then click the HP LaserJet Professional P1100 Printer series menu item.
4.
Click the
Follow the onscreen instructions to configure the product to print ona wireless network.
Start
button, and then click the
Wireless Configuration
Restore default wireless settings
Turn the product off.
Pressandhold thewireless button and thecancel button, and then turn the product on.
Hold the buttons until all the lights blink in unison, and then release the buttons.
View or change network settings
Use the embedded Web server to view or change IP configuration settings.
Print a configuration page, and locate the IP address.
●
Ifyouare usingIPv4,theIPaddresscontainsonlydigits.Ithasthisformat:
xxx.xxx.xxx.xxx
●
IfyouareusingIPv6,theIPaddressisahexadecimalcombinationofcharactersanddigits.Ithasa
format similar to this:
ProgramsorAll Programs
menu item.
menu item.
xxxx::xxxx:xxxx:xxxx:xxxx
Toopenthe embedded Webserver, typethe IP addressinto the addressline of aWeb browser.
3.
Click theNetworking tab toobtainnetwork information. You canchange settings as needed.
Set or change the network password
Use the embedded Web server to set a network password or change an existing password.
1.
Open the embedded Web server, click the
NOTE: If a password has previously been set, you are prompted to type the password. Type the
password,and thenclickthe
2.
Typethenew password inthe
3.
At the bottom of the window, click the
IP address
The product IP address can be set manually, orit can beconfigured automatically using DHCP, BootP, or
AutoIP.
To change the IP address manually, use the HP Embedded Web Server.
Apply
Password
button.
Apply
Networking
box andin the
button to save the password.
tab, and click the
Confirm Password
Password
box.
link.
ENWW
Network connection (wireless models only)
27
Page 42

1.
Open the HP Embedded Web Server, and then click the
Networking
tab.
2.
In the navigation pane, click the
3.
In the
4.
Type the required datain the Manual IP Address box,theIP Subnet Mask box, andthe Manual Default
Gateway box.
5.
Click theApply button.
Link speed setting
UsetheNetworking tabintheHPEmbeddedWebServerto setthelink speedifnecessary.Thesetting ison
the Advanced page.
Incorrect changesto thelinkspeed settingmightprevent the productfrom communicating withother
network devices. For most situations, leave the product in automatic mode. Changes can cause the product
to turn off, and then on. Only make changes when the product is idle.
IP Address Configuration
IPv4 Configuration
section, click the
link or the
Manual IP
IPv6 Configuration
option.
link.
28 Chapter4 Connecttheproduct
ENWW
Page 43

5 Paper and printmedia
●
Understand paper and print media use
●
Special paper or print media guidelines
●
Change the print driver to match the media type and size
●
Supported paper sizes
●
Supported paper types and tray capacity
●
Paper orientation for loading trays
●
Load paper trays
ENWW
29
Page 44

Understand paper and print media use
Thisproductsupportsavarietyof paperandotherprintmedia inaccordancewiththe guidelinesinthisuser
guide.Paper orprintmedia thatdoesnot meettheseguidelinesmightcause poorprintquality,increased
jams, and premature wear on the product.
Forbestresults,useonlyHP-brandpaperandprintmediadesignedforlaser printersormultiuse.Donot use
paperor printmedia madeforinkjetprinters. HPCompanycannotrecommendthe useofother brandsof
media because HP cannot control their quality.
It ispossible for paper tomeet all of theguidelines in this userguide andstill not produce satisfactory
results.Thismight betheresultofimproperhandling, unacceptabletemperatureand/orhumiditylevels,or
other variables over which HP has no control.
CAUTION: Usingpaper orprint mediathatdoes notmeet HP’sspecifications mightcause problemsforthe
product, requiring repair. This repair is not covered by the HP warranty or service agreements.
30 Chapter5 Paperandprintmedia
ENWW
Page 45

Special paper or print media guidelines
●Donot
print
partial
sheets
of
labels.
Thisproductsupportsprintingonspecialmedia.Usethefollowingguidelinestoobtainsatisfactoryresults.
Whenusing specialpaper orprint media,be sureto setthe typeand sizein theprinter driverto obtainthe
best results.
CAUTION:
HPLaserJetproductsuse fuserstobonddrytoner particlestothepaper inveryprecisedots. HP
laserpaperis designed towithstand thisextremeheat. Usinginkjetpaper could damagethe product.
Media type Do Do not
Envelopes
Labels ●
Transparencies
● Store envelopesflat.
●
Use envelopes where the seam
extendsall the waytothecorner of
the envelope.
●
Usepeel-offadhesivestripsthatare
approvedfor use inlaserprinters.
Use only labels thathave no exposed
backing betweenthem.
●
Use labels thatlie flat.
●
Use only full sheets oflabels.
● Useonly transparenciesthatare
approvedforuseinlaserprinters.
●
Place transparencies on a flat surface
after removing them from the
product.
●
Do not use envelopes that are
wrinkled,nicked,stucktogether,or
otherwise damaged.
●
Donotuse envelopes thathave
clasps,snaps, windows,or coated
linings.
●
Do not use self-stick adhesives or
other syntheticmaterials.
●
Donot uselabelsthathavewrinkles
or bubbles, orare damaged.
●
Donotusetransparentprintmedia
not approved forlaser printers.
Letterheador preprintedforms ● Use only letterhead or forms
approved for use in laser printers.
Heavypaper ● Use only heavy paper that is
approvedforuseinlaserprintersand
meets the weight specifications for
this product.
Glossyorcoatedpaper ● Useonlyglossyorcoatedpaperthat
isapprovedforuseinlaserprinters.
●
Donot useraisedormetallic
letterhead.
●
Donotusepaperthatisheavier than
the recommended media
specificationforthisproductunlessit
isHPpaperthathasbeenapproved
for usein this product.
●
Donot useglossyorcoatedpaper
designedfor use in inkjetproducts.
ENWW
Special paper or print media guidelines
31
Page 46

Change the print driver to match the media type and size
Selectingmediaby typeandsizeresults insignificantly betterprint qualityfor heavypaper, glossypaper,
and overhead transparencies. Using the wrong setting can result in unsatisfactory print quality. Always print
bytype for specialprint media, suchas labelsor transparencies. Always printby sizefor envelopes.
NOTE:
different.
1.
2.
3.
4.
5.
Depending onthe softwareprogram, thecommandsand dialogbox namesthat followmightbe
On the
Select the driver, and then click the
Click the
In the Type is or Size is list box, select the correct media type or size.
Click theOKbutton.
File
menu in the software program, click the
Properties
Paper/Quality
tab.
Print
button or the
menu item.
Preferences
button.
32 Chapter5 Paperandprintmedia
ENWW
Page 47

Supported paper sizes
This product supports various paper sizes, and it adapts to various media.
NOTE:
Toobtain bestprintresults, selecttheappropriatepapersizeandtype inyourprint driverbefore
printing.
Table 5-1 Supported paper and print media sizes
Size Dimensions Input tray Priority input slot
Letter 216x 279 mm(8.5 x11in)
Legal 216x 356 mm(8.5 x14in)
A4 210x297mm (8.27 x 11.69in)
Executive 184x267 mm (7.25x10.5 in)
A5 148x210 mm (5.83x8.27 in)
A6 105x148 mm (4.13x5.83 in)
B5(JIS) 182x257mm (7.17 x 10.12in)
16k 184x260mm (7.24 x10.23 in)
195x270mm (7.68 x10.62 in)
197 x 273 mm (7.75 x 10.75 in)
Custom Minimum:76x 127 mm(3 x5in)
(wireless models only)
Maximum: 216 x 356 mm (8.5 x 14.0 in)
Table 5-2 Supported envelopes and postcards
Size Dimensions Input tray Priority input slot
(wireless models only)
Envelope#10 105x241 mm(4.13x9.49 in)
EnvelopeDL 110x 220 mm(4.33 x 8.66in)
EnvelopeC5 162x 229 mm(6.93 x 9.84in)
EnvelopeB5 176x 250 mm (6.7x 9.8in)
EnvelopeMonarch
Double postcard
(JIS)
98 x191 mm (3.9 x 7.5 in)
148 x 200 mm (5.83 x 7.87 in)
ENWW
Supported papersizes
33
Page 48

Supported paper types and tray capacity
Supported paper and print media types
Foracomplete listof specificHP-brandpaperthat thisproductsupports,gotowww.hp.com/support/
ljp1100series.
Paper type (printer driver) Input tray Priority input slot (wireless models only)
Paper, including thefollowing types:
●
Plain
●
Vellum
●
Recycled
Rough
Envelope
Labels
Cardstock
Transparency
Postcards
Tray and bincapacity
Tray or bin Paper type Specifications Quantity
Input tray Paper Range:
60 g/m2(16 lb) bond to 163 g/m
(43 lb) bond
Envelopes
Transparencies Minimum0.13mm(0.005in) thick Up to 75 transparencies
Output bin Paper Range: Up to 125sheets of 75g/m2(20 lb)
Envelopes
Transparencies
60 g/m2(16 lb) bond to 90 g/m
(24 lb) bond
60g/m2(16 lb) bondto 163g/m
(43 lb) bond
Lessthan60 g/m2(16lb) bond to
90 g/m2(24 lb)bond
Minimum0.13 mm(0.005in)thick Up to75 transparencies
150sheets of75g/m2(20 lb) bond
2
2
Up to 10 envelopes
bond
2
Up to 10 envelopes
34 Chapter5 Paperandprintmedia
ENWW
Page 49

Paper orientation for loading trays
1.
Ifyou areusing paperthat requiresa specificorientation, loadit accordingto theinformation inthe following
table.
Paper type How to load paper
Preprintedorletterhead ●
Prepunched
Envelope
Load paper trays
CAUTION: If youtry to printon mediathat iswrinkled,folded,or damagedin anyway,ajammight occur.
See Clear jams on page 75 for more information.
Priority feed slot
Thepriority feedslot holdsup to10 sheets ofmedia or oneenvelope, onetransparency, orone sheetof
labelsorcardstock.Load mediawiththe topforwardand thesidetobe printedonfacing up.Toprevent jams
and skewing, always adjust the side media guides before feeding the media.
Input tray
Face up
●
Topedgeleadingintotheproduct
●
Face up
●
Holes toward the left sideof the product
●
Face up
●
Leftshortedgeleadingintotheproduct
Theinput trayholds 150pagesof 75g/m2(20lb) paper,orfewersheets ofheavier media(a15 mm(0.6 in)
stack height or less).
Loadmedia withthetopforwardandthe sidetobe printedon facingup.To preventjamsandskewing,
always adjust the side and front media guides.
NOTE:
When youadd new media,make sure thatyou remove allof the mediafrom the inputtray and
straightenthe entirestack.Thishelps preventmultiplesheets ofmediafrom feedingthrough theproductat
one time, reducing media jams.
Tray adjustment for short media (base models only)
To print on media shorter than 185 mm (7.28 in), use the short media extender to adjust your input tray.
Remove the shortmedia extender tool from thestorage sloton the left side ofthe media input area.
ENWW
Paperorientationforloadingtrays 35
Page 50

2.
Attach the tool to the adjustable media guide.
3.
4.
Insertthe mediaintotheproductuntil itstops, andthen slidethe adjustable mediaguide, withthe tool
attached to support the media.
Whenfinishedprinting withshortmedia, removetheshortmedia extendertool,andthen placeit back
in the storage slot.
36 Chapter5 Paperandprintmedia
ENWW
Page 51

6
Print tasks
●
Cancel a print job
●
Print with Windows
ENWW
37
Page 52

Cancel a printjob
Windows
XP,
Windows
Server
2003,
and
Windows
Server
2008
(using
the
default
Start
menu
view):
Start
Settings
Printers
and
Faxes
Windows
XP,
Windows
Server
2003,
and
Windows
Server
2008
(using
the
Classic
Start
menu
view):
Start
Settings
Printers
2.
You can stop a print job by using the software program.
NOTE: Itcantake severalminutesforall printjobsto clearafter youhavecanceleda printjob.
Stop the current print job from the control panel (wireless models only)
▲ Press the cancel button on the control panel.
Stop the current print job from the software program
Whenyou sendtheprintjob, adialogboxopens brieflyon thescreen, givingyouthe optionto cancelthe
print job.
If severaljobs are sentto the productthroughyour software, they mightbe waiting ina print queue(for
example, in Windows Print Manager). See the software program documentation for specific instructions
about canceling a print job from the computer.
If a print job is waiting in a print queue or print spooler, delete the print job there.
1.
Windows Vista and Windows 7:
and Sound clickPrinter.
-or-
Click
Start
, click
Control Panel
, and then in thecategory for
Hardware
Click
-or-
Click
In the list ofprinters, double-click the name of this product to open the print queue or spooler.
3.
Select the print jobthatyou want to cancel, right-click the job,and then click the
, click
, click
, and then click
, and then click
.
.
CancelorDelete
item.
38 Chapter6 Printtasks
ENWW
Page 53

Print with Windows
NOTE:
different.
Depending onthe softwareprogram, thecommandsand dialogbox namesthat followmightbe
Open the Windows printer driver
1.
On the File menu in the software program, click Print.
2.
Select the product, and then click Properties or Preferences.
Gethelpfor anyprintoptionwithWindows
Printer-driverHelpisseparatefromprogram Help.The printer-driverhelpprovides explanationsfor the
buttons, checkboxes,and drop-down lists thatare in theprinter driver. Italso includes instructions for
performingcommonprintingtasks,suchasprintingonbothsides,printingmultiplepagesononesheet,and
printing the first page or covers on different paper.
Activate the printer-driver Help screens in one of the following ways:
●
In the printer driver
●
Press the F1 key on the computer keyboard.
●
Click the question-mark symbol in the upper-right corner of the printer driver.
●
Right-click on any item in the driver.
Properties
dialog box, click the
Help
button.
Change the number of print copies with Windows
1.
Open the printer driver, click the Properties or Preferences button, and then click the Advanced tab.
2.
If you are printing multiple copies, click the
3.
Copies
In the
ClicktheOK button.
area, use the arrow buttons to adjust the number of copies.
Collate
check box to collate the copies.
Print colored text as black withWindows
1.
Open the printer driver, click the
2.
Click the
3.
Click theOKbutton.
Print All Text as Black
PropertiesorPreferences
check box.
Save custom print settings for reuse with Windows
Use a printing quick set
1.
Open the printer driver, and then click the Properties or Preferences button. The Print Tasks Quick
Sets
drop-down list appears on all tabs except the
2.
In the Print Tasks Quick Sets drop-down list , select one of the quick sets, andthen click OK to print the
job with the predefined settings.
Services
button, and then click the
tab.
Advanced
tab.
ENWW
Print with Windows
39
Page 54

Create a custom printing quick set
2.
3.
1.
Properties
Preferences
Paper/Quality
1.
Properties
Preferences
Paper/Quality
1.
Open the printer driver, and then click the Properties or Preferences button. The Print Tasks Quick
Sets drop-down list appears on all tabs except the Services tab.
Select an existing quick set as a base.
Select the print options for the new quick set.
4.
Click
Save As
, type a name for the quick set, and then clickOK.
Improve print quality with Windows
Select a page size
1.
Open the printer driver, click the
tab.
2.
Select a size from the
3.
Click theOKbutton.
Select a custom page size
1.
Open the printer driver, and then click the
2.
Click the Custom button. The Custom Paper Size dialog box opens.
3.
Type a name for the custom size, specify the dimensions, and then click Save.
4.
Click the Close button, and then click the OK button.
Select a paper type
Open the printer driver, click the
tab.
Size is
PropertiesorPreferences
drop-down list.
Paper/Quality
or
button, and then click the
tab.
button, and then click the
Paper/Quality
2.
Select a type from the Type is drop-down list.
3.
Click theOK button.
Select the print resolution
Open the printer driver, click the
tab.
2.
Inthe Print Qualityarea, selectan optionfrom thedrop-downlist.Seetheprinter-driver onlineHelp
for information about each of the available options.
NOTE: Tousea draft-quality resolution, inthe PrintQuality area, clickthe EconoMode check box.
3.
Click theOK button.
40 Chapter6 Printtasks
or
button, and then click the
ENWW
Page 55

Print the first or last page on different paper with Windows
1.
Properties
Preferences
Paper/Quality
1.
Load
paper
face-up
in
the
input
tray.
Open the printer driver, click the
tab.
2.
Clickthe Use DifferentPaper/Coverscheck box,and thenselect thenecessarysettings forthe front
cover, other pages, and back cover.
3.
Click theOK button.
or
Scale a document to fit page size with Windows
1.
Open the printer driver, click the Properties or Preferences button, and then click the Effects tab.
2.
Click the Print document on check box, and thenselect asize fromthe drop-down list.
3.
Click theOK button.
Add a watermark to a document with Windows
1.
Open the printer driver, click the Properties or Preferences button, and then click the Effects tab.
2.
Select a watermark from the Watermarks drop-down list.
Toprint the watermarkon the firstpage only, clickthe First pageonly checkbox.Otherwise, the
watermark is printed on each page.
3.
Click theOK button.
button, and then click the
Print on both sides (duplex) with Windows
Manually print on both sides (duplex)
2.
Open the printer driver, and then click the Properties or Preferences button.
3.
Click theFinishing tab.
4.
Click thePrint On Both Sides (manually) checkbox. If youwill bindthe document along thetop edge,
click the
Flip pages up
check box.
ENWW
5.
Click the OK button to print the first side of the job.
Print with Windows
41
Page 56

6.
Retrievethe printedstack fromtheoutputbin,and, maintainingthe paperorientation, placeitwiththe
printed-side facing down in the input tray.
7.
At the computer, click the
Continue
Create a booklet with Windows
1.
Open the printer driver, click the
2.
Click the Print on both sides (manually) check box.
3.
4.
Booklet layout
In the
sheet option automatically changes to 2 pages per sheet.
Click theOKbutton.
drop-down list, click the
button to print the second side of the job.
PropertiesorPreferences
Left bindingorRight binding
button, and then click the
option. The
Finishing
Pages per
tab.
42 Chapter6 Printtasks
ENWW
Page 57

Print multiple pages per sheet with Windows
1.
a.
b.
iii.
Proxy
Server
Apply
1.
Open the printer driver, click the Properties or Preferences button, and then click the Finishing tab.
2.
Select thenumber of pagesper sheetfromthe Pagesper sheet drop-downlist.
3.
Select the correct options for Print Page Borders, Page Order, and Orientation.
4.
Click theOK button.
Select page orientation with Windows
1.
Open the printer driver, click the Properties or Preferences button, and then click the Finishing tab.
2.
In the Orientation area, select the Portrait or Landscape option.
To print the page image upside down, select the Rotate by 180 degrees option.
3.
Click theOKbutton.
Use HP ePrint
HPePrintisasuiteofWeb-basedprintingservicesthatenableasupportedHPproducttoprintdocumentsof
the following types:
●
E-mail messages and attachments sent directly to theHPproduct’s e-mail address
●
Documents from select mobile device print applications
Use HP Cloud Print
UseHPCloudPrinttoprinte-mailmessagesandattachmentsbysendingthemtotheproduct'se-mail
address from any e-mail enabled device.
NOTE:
haveaccess tothe Internetand enable HPWeb Services.
Theproductmust beconnectedtoa wiredorwirelessnetwork.Touse HPCloud Print,youmustfirst
Enable HPWeb Servicesin the HPEmbedded Web Server(EWS)by following thesesteps:
c.
Afterthe product isconnected tothe network, printa configurationpage and identifythe product
IP address.
Atyourcomputer,open aWebbrowserandentertheproductIPaddressintotheaddressline.The
HP EWSappears.
Clickthe
proceed tothe nextstep. Ifyour networkuses a proxyserver toaccessthe Internet, followthese
instructions before proceeding to the next step:
i.
ii.
HP Web Services
Select the
Select the
box.
tab.Ifyour networkdoes not usea proxyserverto access theInternet,
Proxy Settings
Check this boxif your network uses aproxy server to access the Internet
tab.
check
ENWW
In the
button.
field, enter theproxy server address and portnumber,andthen click the
Print with Windows
43
Page 58

d.
2.
3.
a.
Print
Options
Print
Options
1.
a.
b.
Select the HP Web Services tab and click the
to the Internet, and then a message appears informing you that an information sheet will be
printed.
e.
Clickthe OKbutton.An ePrintpageprintsout.On theePrintpage, lookforthe e-mailaddressthat
is automatically assigned to the product.
Toprinta document,attachittoan e-mailmessage,and thensendthemessagetotheproduct's e-mail
address. Go to www.hpeprintcenter.com for a list of supported document types
Optionally,usetheHPePrintCenterWebsitetodefinesecuritysettingsandtoconfiguredefaultprint
settings for all HP ePrint jobs sent to this product:
Open a Web browser and go to www.hpeprintcenter.com.
b.
Click Sign In, andenter your HP ePrintCenter credentials or sign upfora new account.
c.
Select your productfrom thelist, or click the+Add printer buttonto addit. To add the product,
youneedthe productcode, whichisthesegmentof theproducte-mail addressthatis beforethe
@ symbol.
NOTE: This code is valid for only 24 hours from the time you enable HP Web Services. If it
expires, follow the instructions to enable HP Web Services again, and obtain a new code.
d.
Click the Setup button.The HP ePrint Settings dialog boxappears. Three tabs areavailable:
●
AllowedSenders.To preventyour productfrom printingunexpected documents,click the
Allowed Senderstab. Click AllowedSenders Only,andthen addthe e-mail addresses from
which you want to allow ePrint jobs.
Enable
button. The product configures the connection
●
●
Advanced. To change the product’s e-mail address, click the Advanced tab.
. To set up default settings for all ePrint jobs sent to this product, click the
tab, and then select the settings that you want to use.
Use HP Direct Print (wireless models only)
UseHPDirect Printtoprintdirectlytotheproductfromanymobiledevice(such asasmartphone,netbook,
or laptopcomputer).
NOTE:
print application installed.
The HP LaserJetProfessionalP1102w modeldoes not supportHP Direct Print.
No setup is necessary, but HPDirect Printmustbe enabled. Your mobile device must havean HP
To enable HP Direct Print, follow these steps:
Afterthe productisconnectedtothenetwork,print aconfiguration pageandidentifythe product
IP address.
Atyourcomputer,openaWebbrowserandentertheproductIPaddressintotheaddressline.The
HP EWS screen appears.
c.
Click the
d.
Onthe Networking page,clickWirelessDirect Setup.Select the checkbox, enter thenetwork
name (SSID) inthe
The IP address of the mobile device appears in the Networking page.
Networking
tab.
Wireless Direct Printing Name (SSID)
field, and thenclick the
Apply
button.
44 Chapter6 Printtasks
ENWW
Page 59

1.
Tap
the
action
item.
NOTE: To find the network name (SSID), click the Wireless Configuration menu in the
Networkingpage.
2.
Use AirPrint
Direct printingusing Apple’s AirPrintis supported foriOS 4.2or later.UseAirPrint toprint directly tothe
productfromaniPad (iOS4.2),iPhone(3GSorlater),oriPodtouch (thirdgeneration orlater) inthefollowing
applications:
●
●
●
●
NOTE:
To print, follow these steps:
To print a document from an application, select
NOTE:
If onlyone product thatsupportsHP Direct Printis connected to thewireless network, the
documentprints. Ifmorethanone productthatsupports HPDirectPrint isconnected,alistof products
appears;youmustselectyour productbeforeproceedingto thenextstep.If noproduct isdiscovered,
follow the instructions in step 1 to connect the product.
Mail
Photos
Safari
Select third-party applications
Theproductmustbeconnectedtoawiredorwirelessnetwork.
File
, and then select
Print
.
2.
3.
Print
Tap
NOTE: If youare printing for thefirst time, orif your previously selected productis not available,you
must select a product before proceeding to the next step.
Configure the print options and then tap Print.
.
ENWW
Print with Windows
45
Page 60

46 Chapter6 Printtasks
ENWW
Page 61

7 Manage and maintain the product
●
Print the information pages
●
Use the HP Embedded Web Server (wireless models only)
●
Economy settings
●
Manage supplies and accessories
●
Clean theproduct
●
Product updates
ENWW
47
Page 62

Print the informationpages
You can print the following information pages.
Configuration page
Theconfigurationpage listscurrentproductsettingsandproperties. Italso containsa statuslog report.To
print a configuration page, do the following:
1.
Open the printer driver, and then click the
2.
Click the
list item.
3.
Click thePrint button.
On wireless models, you can print the configuration page from the product control panel.
▲ Atthe controlpanel,press andholdthe cancel button untilthe ready light startsblinking,and
then release the button.
Services
Supplies status page
To print the supplies status page, select it from the Print Information Pages drop-down on the Services tab
in the printer driver. The supplies status page provides the following information:
●
The estimated percentage of toner remaining in the print cartridge
●
The number of pages and print jobs that have been processed
●
Ordering and recycling information
Demo page
To print the demo page, select it from the Print Information Pages drop-down on the Services tab in the
printerdriver.Thedemo pagecontainsexamplesof textandgraphics,and isusedtoshowproductprint
quality.
tab, and then, in the
PropertiesorPreferences
Print Information Pages
button.
drop-down list, click the
Config Page
48 Chapter7 Manageandmaintaintheproduct
ENWW
Page 63

Use the HP Embedded Web Server (wireless models only)
Use the HPEmbedded WebServer (EWS) to view product andnetwork status and tomanage printing
functions from a computer.
●
View product status information
●
Determine the remaining life on all supplies and order new ones
●
View and change the product default configuration settings
●
View and change network configuration
Youdonot needtoinstallany softwareonthecomputer.YouonlyneedtouseoneofthesesupportedWeb
browsers:
●
Internet Explorer 6.0 (and later)
●
Firefox 1.0 (andlater)
●
Mozilla 1.6 (and later)
●
Opera 7.0 (andlater)
●
Safari 1.2 (and later)
●
Konqueror 3.2 (and later)
The HPEmbedded WebServerworkswhenthe product isconnected toa TCP/IP-based network. The
HPEmbeddedWebServerdoesnotsupportIPX-basedconnectionsordirectUSBconnections.
NOTE:
youclick alink onanyof thepages, youmust haveInternet accessto goto thesiteassociatedwith thelink.
You donot haveto have Internet accessto open and use the HPEmbedded Web Server. However, if
Open the HP Embedded Web Server by using a network connection
ToopentheHPEmbeddedWebServer,typetheIPaddressorhostnameoftheproductintheaddressfieldof
asupported Webbrowser.Tofindthe IPaddress,print aconfiguration pageattheproductbypressingand
holdingthe cancel buttonwhen the ready light ison and noother jobs areprinting. Hold thebutton until
the ready light starts blinking.
TIP: After you open the URL, bookmark it so that you can return to it quickly in the future.
HP Embedded Web Server sections
Information tab
The Information pages group consists of the following pages:
Device Status
●
Device Configuration
●
displays the status of the product and HP supplies.
shows the information found on the Configuration page.
ENWW
●
SuppliesStatus showsthestatusofHPsupplies andprovidespart numbers.Toorder newsupplies,
click Order Supplies in the upper-right part of the window.
●
Network Summary shows the information found on the Network Summary page.
Usethe HPEmbedded WebServer (wirelessmodelsonly)
49
Page 64

Settings tab
Usethis tabtoconfigurethe productfrom yourcomputer.Ifthisproduct isnetworked, alwaysconsultwith
the product administrator before changing settings on this tab.
The Settings tab contains the Printing page where you can view and change the default print job settings.
Networking tab
Networkadministratorscan usethis tabto controlnetwork-related settingsfor theproductwhen itis
connected to an IP-based network.
Links
Linksare located intheupper-rightpartof thestatus pages.You musthave Internetaccessto useany of
these links. If you use a dial-up connection and did not connect when you first opened the HP Embedded Web
Server,youmust connectbeforeyoucanvisit theseWebsites.Connecting mightrequirethatyouclosethe
HP Embedded Web Server and reopen it.
●
Shopfor Supplies.Clickthis linktoconnect tothe SureSupplyWebsiteand ordergenuineHPsupplies
from HP or a reseller of your choice.
Support
●
.Connectsto the product support site.You can search forhelp regarding general topics.
50 Chapter7 Manageandmaintaintheproduct
ENWW
Page 65

Economy settings
Auto-Off mode
Auto-Off isan energy-savingfeature ofthis product.Aftera user-specified timeperiod, the product
automaticallyreduces itspower consumption(Auto-Off).Theproductreturnstothereadystate whena
buttonis pressedoraprintjob isreceived. Whentheproduct isinAuto-Offmode,all ofthecontrol-panel
LEDs and the power button backlight LED are off.
NOTE: Although theproduct lights areoff inAuto-Offmode, the productwill work normallywhen it
receives a print job.
Change the Auto-Off delay time
You can change how long the product remains idle (Auto-Off delay) before it enters Auto-Off mode.
NOTE: The default Auto-Off delay setting is 5 minutes.
1.
Open the printer properties, and then click the
2.
Select the Auto-Off delay from the
NOTE: The changed setting does not go into effect until a print job is sent to product.
Print with EconoMode
This product has an EconoMode option for printing drafts of documents. Using EconoMode can use less toner
and decreasethe cost per page.However, usingEconoMode canalso reduce printquality.
HPdoesnotrecommend thefull-timeuse ofEconoMode.If EconoModeisusedfull-time, thetonersupply
might outlast the mechanical parts in the print cartridge. If print quality begins to degrade under these
circumstances,you mustinstallanewprint cartridge,evenif thereistonersupply remaininginthe cartridge.
Enable EconoMode with Windows
1.
Open the printer driver, and then click the Properties or Preferences button.
2.
3.
Click the
Click the
Paper/Quality
EconoMode
tab.
check box.
Auto-Off
Device Settings
drop-down list.
tab.
ENWW
Economy settings
51
Page 66

Manage supplies andaccessories
Correctly using, storing, and monitoring the print cartridge can help ensure high-quality print output.
Check and order supplies
Print-cartridge storage
Do not remove the print cartridge from its package until you are ready to use it.
CAUTION:
Topreventdamage to the printcartridge, do notexpose itto light formorethan afew minutes.
HP Policy on non-HP print cartridges
HP Company cannot recommend the use of non-HP print cartridges, either new or remanufactured.
NOTE:
agreements.
To install a new genuine HP print cartridge, see Replace the print cartridge on page 54.
Any damage caused by a non-HP print cartridge is not covered under the HP warranty and service
HP fraud hotline and Web site
Call the HP fraud hotline (1-877-219-3183, toll-free in North America) or go to www.hp.com/go/
anticounterfeitwhenyouinstall anHPprintcartridge andthecontrol-panelmessagesaysthecartridgeis
non-HP. HPwill help determine ifthe cartridge isgenuine and takestepsto resolve theproblem.
Your print cartridge might not be a genuine HP print cartridge if you notice the following:
●
You are experiencing a high number of problems with the print cartridge.
●
Thecartridge doesnotlooklike itusuallydoes(forexample, theorangepulltabis missing,orthe
packaging differs from HP packaging).
Recycle supplies
TorecycleagenuineHPprintcartridge,placetheusedcartridgeinthe boxinwhichthenewcartridgearrived.
Usetheenclosed returnlabeltosendtheusedsupply toHPforrecycling. Forcompleteinformation,seethe
recycling guide that is included with each new HP supply item.
52 Chapter7 Manageandmaintaintheproduct
ENWW
Page 67

Replacement instructions
1.
2.
Redistribute toner
Whena smallamountof tonerremains inprint cartridge,faded orlightareasmightappear ontheprinted
page. You might be able to temporarily improve print quality by redistributing the toner.
Open the print-cartridge door, and then remove the print cartridge.
To redistribute the toner, gently rock the print cartridge from front to back.
CAUTION: If toner gets on your clothing, wipe it off with a dry cloth and wash the clothing in cold
water.
Hot water sets toner into the fabric
.
ENWW
Manage supplies and accessories
53
Page 68

3.
Reinsert the print cartridge into the product, and then close the print-cartridge door.
1.
If the print is still light, install a new print cartridge.
Replace the print cartridge
Whenaprintcartridgeapproaches theendofuseful life,you cancontinueprintingwiththecurrent cartridge
until redistributing the toner no longer yields acceptable print quality.
Open the print-cartridge door, and then remove the old print cartridge.
54 Chapter7 Manageandmaintaintheproduct
ENWW
Page 69

2.
Removethenewprintcartridgefromthepackaging.Placetheused printcartridgeinthebagandbox
3.
for recycling.
CAUTION:
thecartridge shutteror therollersurface.
Graspboth sidesof theprint cartridgeand gentlyrocktheprint cartridgeto distributethe tonerevenly
inside the cartridge.
Topreventdamageto theprint cartridge, holdthe printcartridge ateach end.Donot touch
ENWW
Manage supplies and accessories
55
Page 70

4.
Bend thetab on theleft side ofthe cartridge untilthetab breaks loose,andthen pullthe tab until allthe
5.
tape is removed from the cartridge. Place the tab and tape in the print-cartridge box to return for
recycling.
Insert the print cartridge in the product, and then close the print-cartridge door.
CAUTION:
water.
56 Chapter7 Manageandmaintaintheproduct
If toner gets on your clothing, wipe it off with a dry cloth and wash the clothing in cold
Hot water sets toner into the fabric
.
ENWW
Page 71

Replace the pickup roller
1.
2.
Normal use with good media causes wear. The use of poor media might require more frequent replacement
of the pickup roller.
Iftheproductregularly mispicks(nomediafeedsthrough), youmightneedtochangeorcleanthe pickup
roller. See Clean the pickup roller on page 63 to order a new pickup roller.
Open the print-cartridge door, and then remove the print cartridge.
CAUTION:
printcartridge withasheetofpaper.
Find the pickup roller.
Topreventdamage tothe printcartridge, minimize itsexposure to directlight. Coverthe
ENWW
Manage supplies and accessories
57
Page 72

3.
Releasethe small,whitetabs oneach sideofthe pickuproller, androtatethe pickuprollertowardthe
4.
5.
front.
Gently pull the pickup roller up and out.
Positionthenewpickuprollerintheslot. Thecircularandrectangularslots oneachsidepreventsyou
from installing the roller incorrectly.
58 Chapter7 Manageandmaintaintheproduct
ENWW
Page 73

6.
Rotate the top of the new pickup roller away from youuntilboth sides snap into place.
7.
Insert the print cartridge in the product, and then close the print-cartridge door.
ENWW
Manage supplies and accessories
59
Page 74

Replace the separation pad
1.
2.
3.
Normal use with good media causes wear. The use of poor media might require more frequent replacement
of the separation pad.
Ifthe productregularly pullsmultiple sheetsofmediaat atime,you mightneed tochange theseparation
pad.
NOTE: Before youchange theseparation pad, cleanthe pickup roller.See Clean thepickup roller
on page 63.
WARNING! Before changingthe separationpad,turn theproductoff,disconnectthe powercordfrom the
wall outlet, and then wait for the product to cool.
Disconnect the product power cord from the product.
Remove the paper and close the input tray. Set the product on its front.
At the bottom of the product, unscrew thetwo screws holding the separation pad in place.
60 Chapter7 Manageandmaintaintheproduct
ENWW
Page 75

4.
Remove the separation pad.
5.
Insert the new separation pad, and screw it into place.
ENWW
Manage supplies and accessories
61
Page 76

6.
Reconnect the power cord, and then turn on the product.
62 Chapter7 Manageandmaintaintheproduct
ENWW
Page 77

Cleanthe product
1.
2.
3.
4.
5.
Clean the pickup roller
If you want to clean the pickup roller before deciding to replace it, follow these instructions:
UnplugthepowercordfromtheproductandremovethepickuprollerasdescribedinReplacethe
pickup roller on page 57.
Dab a lint-free cloth in isopropyl alcohol, and scrub the roller.
WARNING! Alcoholisflammable.Keepthealcoholand clothawayfromanopenflame.Beforeyou
close the product and plug inthe power cord, allow the alcohol to dry completely.
NOTE: Incertain areasof California, airpollution control regulationsrestrict theuse ofliquid Isopropyl
Alcohol (IPA) as a cleaning agent. In those areas of California, please disregard the previous
recommendationsanduseadry,lint-freecloth,moistenedwithwater,tocleanthepickup roller.
Using a dry, lint-free cloth, wipe the pickup roller to remove loosened dirt.
Allow the pickup roller to dry completely before you reinstall it in the product.
Reconnect the power cord.
ENWW
Clean the product
63
Page 78

Clean the paper path
1.
2.
Ifyouareexperiencingtonerspecksordots ontheprintouts, cleanthepaperpath.Thisprocessusesa
transparency to removedust and tonerfromthe paperpath. Do not usebond or roughpaper.
NOTE: Forbestresultsuseasheetoftransparency. Ifyoudonothaveanytransparencies, youcanuse
copier-grade media (60 to 163 g/m2(16 to 43 lb)) that has a smooth surface.
Makesurethat theproduct is idleand theready light is on.
Loadmediaintheinput tray.
3.
Openthe printer Properties.
4.
Click the Device Settings tab.
5.
NOTE: Thecleaningprocesstakesabout2minutes.Thecleaningpagestopsperiodicallyduringthe
cleaningprocess.Do notturntheproductoffuntil thecleaningprocesshasfinished.You mightneedto
repeat the cleaning process several times to thoroughly clean the product.
In the
Cleaning Page
area, click the
Start
button to process the cleaning page.
64 Chapter7 Manageandmaintaintheproduct
ENWW
Page 79

Clean the print-cartridge area
1.
Youdonotneedtocleantheprint-cartridgearea often.However,cleaningthisareacanimprovethequality
of the printed sheets.
WARNING! Beforechangingthe separationpad, turnthe productoff,disconnectthe powercordfromthe
wall outlet, andthen wait for theproduct tocool.
Disconnectthepower cordfromtheproduct.Open theprint-cartridgedoor,andthen removetheprint
cartridge.
CAUTION: Do nottouchtheblack-spongetransferroller insidetheproduct. Doingsocan damagethe
product.
CAUTION: Toprevent damage, donotexpose theprint cartridge tolight. Cover itwith apiece of paper.
ENWW
Clean the product
65
Page 80

2.
With adry, lint-freecloth,wipe any residue from the paper-path areaand the print-cartridge cavity.
3.
Reinstall the print cartridge, and then close the print-cartridge door.
66 Chapter7 Manageandmaintaintheproduct
ENWW
Page 81

4.
Disconnect the power cord.
Clean the exterior
Use a soft, damp, lint-free cloth to wipe dust, smudges, and stains off of the exterior of the device.
Product updates
Softwareandfirmwareupdatesandinstallationinstructionsforthisproductareavailableatwww.hp.com/
support/ljp1100series. Click Downloads and drivers, click the operating system, and then select the
download for the product.
ENWW
Product updates
67
Page 82

68 Chapter7 Manageandmaintaintheproduct
ENWW
Page 83

8 Solve problems
●
Solve general problems
●
Interpret control-panel light patterns
●
Clear jams
●
Solve paper-handling problems
●
Solve image-quality problems
●
Solve performance problems
●
Solve connectivity problems
●
Solve product software problems
ENWW
69
Page 84

Solve general problems
1.
a.
b.
d.
e.
2.
a.
b.
c.
3.
4.
5.
6.
7.
8.
If theproduct is notresponding correctly, complete thesteps in thefollowing checklist,in order. Ifthe
productdoesnotpassastep,followthecorrespondingtroubleshootingsuggestions.Ifastepresolvesthe
problem, you can stop without performing the other steps on the checklist.
Troubleshooting checklist
Make sure that the product is set up correctly.
Press the power button to turn on the product or to deactivate the Auto-Off mode.
Check the power-cable connections.
c.
Makesure thattheline voltageiscorrectfortheproductpower configuration.(See thelabelthat
is onthe back ofthe product forvoltage requirements.)If you are usinga power stripand its
voltageis notwithinspecifications,plugthe productdirectlyinto thewall. Ifit isalready plugged
into the wall, try a different outlet.
Make sure that the print cartridge is installed correctly.
If none of these measures restores power, contact HP Customer Care.
Check the cabling or wireless connection (wireless models only).
Check the cable connection between the product and the computer. Make sure that the connection
is secure.
Make sure that the cable itself is not faulty by using a different cable, if possible.
For a wireless connection, look at the control panel wireless light.
●
Ifthe light ison,the producthasa connectionwithanetwork.
●
Ifthe lightisblinking,the productis searchingfora networkconnection.Makesurethatthe
wirelessrouteror accesspoint andthe productare setto usethesamemode orprotocol.
●
If thelight is off, the productis not connected to thenetwork and thewireless unit in the
product mightbe off.Press the wirelessbutton totry connecting tothe network, orrun the
Wireless Configuration utility to configure the product. See Use the Wireless Configuration
utilityonpage 26.To verifythat the productfindsthe network, printa configuration page.
The product should have an IP address assigned to it.
Ifthe productremainsunable toconnectto thenetwork, uninstalland thenreinstall theproduct. If
the errorpersists, contact a networkadministrator orrefer tothe user manualof the wireless
router or access point.
Check tosee if any control-panel lightsare lit. See Interpretcontrol-panel light patterns onpage72.
Make sure that the paper that you are using meets specifications.
Make sure that the paper is loaded correctly in the input tray.
Make sure that the product software is installed correctly.
Verifythat youhave installedtheprinterdriver forthisproduct.Check theprogram tomakesurethat
you are using the printer driver for this product.
70
Chapter 8 Solve problems
Print a configuration page. See Print the information pages on page 48.
ENWW
Page 85

a.
If the page does not print, verify that the input tray contains paper.
b.
9.
a.
b.
c.
If the page jams in the product, see Clear jams on page 75.
Print asmall document froma different program thathas worked inthe past. Ifthis solution works,
thenthe problemiswiththe programyou areusing.If thissolution doesnotwork (thedocument does
not print), complete these steps:
Try printing the job from another computer that has the product software installed.
ChecktheUSBcableconnection.Directtheproducttothecorrectport,orreinstallthesoftware,
selecting the connection type that you are using.
If the print quality is unacceptable, complete the following steps:
●
Verifythattheprint settingsarecorrectforthemediathatyouareusing.SeeChangethe
print driver to match the media type and size on page 32.
●
UsetheproceduresinSolveimage-quality problemsonpage84tosolveprint-quality
problems.
Factors that affect product performance
Several factors affect the time it takes to print a job:
●
The useof special paper (suchas transparencies, heavy paper, andcustom-size paper)
●
Product processing and download time
●
The complexity and size of graphics
●
The speed of the computer you are using
●
The USB or network connection
●
The product I/O configuration
ENWW
Solve general problems
71
Page 86

Interpret control-panel light patterns
Table 8-1 Status-light legend
Symbol for "light off"
Symbol for "light on"
Symbol for "light blinking"
Table 8-2 Control-panel light patterns
Light status State of the product Action
All lightsare off. TheproductisinAuto-Offmodeoristurned
off.
Statuslightscycle Thestatuslightscycleduringtheformatter
Readylight ison, and attentionlight is
off.
initializationperiodorwhen the productis
processinga cleaningpage.
Theproductis in thereadystate. Noaction isrequired. Theproduct is ready
Pressthe powerbuttontodeactivatethe
Auto-Offmodeor toturn ontheproduct.
No action is required. Wait for the
initializationperiodtoend.Theproduct
shouldenterthe ready state when the
initializationperiod isfinished.
to receive a print job.
72
Chapter 8 Solve problems
ENWW
Page 87

Table 8-2 Control-panel light patterns (continued)
2.
3.
Light status State of the product Action
Readylight is blinking, and attention light
is off.
Attentionlightisblinking,and ready light
is off.
Attentionlightisblinking,and ready light
is on.
Theproductisreceivingorprocessingdata. Noaction isrequired. Theproduct is
The producthas experienced an error that
canbe correctedattheproduct,such asa
jam,anopendoor, the absenceofa print
cartridge,orthe absence of paperin the
proper tray.
Theproducthasexperiencedacontinual
errorfrom which itwillrecover on itsown.
receiving or processing a print job.
Inspect the product, determine the error,
and then correct the error. If the error is
theabsence of paperin theproper trayor
theproductis ina manualfeed mode, put
theproper paperinthe trayand follow the
onscreeninstructions,or open andclose
theprint-cartridgedoor to resumeprinting.
Iftherecoveryis successful, the product
continues to the processing data state and
completes thejob.
Theattentionand readylights are on.
The product has experienced a fatal error
from which it cannot recover.
If the recovery is unsuccessful, the product
continues to the continuable error state.
Tryremovingany media fromthemedia
path and turning the product power off,
and then on again.
1.
Turnoff theproductordisconnectthe
power cord from the product.
Wait30seconds,andthenturn onthe
productorreconnectthepowercord
to theproduct.
Wait forthe productto initialize.
If the error persists, contact HP customer
support.
ENWW
Interpretcontrol-panellight patterns 73
Page 88

Table 8-2 Control-panel light patterns (continued)
Light status State of the product Action
Thewirelesslightisblinking. Theproductisattemptingtolocatea
wireless network.
Thewirelesslightis on.
Thewireless light isoff. Theproductisnotconnectedtoa network,
The productis connected to a wireless
network.
andthe wireless unitinthe product might
be turned off.
No action is required.
No action is required.
If the light is off, the product is not
connectedto the network and the wireless
unitin theproductmight be off.Press the
wireless button to try connecting to the
network,orruntheWirelessConfiguration
utilitytoconfigurethe product.SeeUsethe
WirelessConfigurationutility on page 26.
To verify that the product finds the
network, print a configuration page. The
product should have an IP address
assigned toit.
74
Chapter 8 Solve problems
For information about connecting
wirelesslytoanetwork,seeNetwork
connection (wireless models only)
on page26.
Iftheproductremainsunable to connectto
the network, uninstall and then reinstall
theproduct.If the error persists,contact a
networkadministratoror refertothe user
manual of the wireless router or access
point.
ENWW
Page 89

Clear jams
Whenclearingjams,becarefulnot totearjammedpaper.If asmallpieceof paperremainsintheproduct, it
could cause additional jams.
Common causes of jams
●
The input tray is loaded incorrectly or is too full.
NOTE:
When youadd newmedia, always removeall of themedia from theinput trayand straighten
the entire stack. This helps prevent multiple feeds and reduces media jams.
●
The media does not meet HP specifications.
●
Theproductmightneedto becleaned toremovepaperdust andotherparticlesfromthepaper path.
Loosetoner might remainin theproduct aftera mediajam.Thistoner clears upafter afew sheetsprint.
CAUTION: If youget any toner onyour clothes, washthem in coldwater. Hot water will permanently set the
toner intothe fabric.
ENWW
Clear jams
75
Page 90

Jam locations
1
Internal
areas
1.
Jams can occur at the following locations in the product.
1
3
2
2
3
NOTE: Jams can occur in more than one location.
Input tray
Output bin
Clear jams from the input tray
CAUTION: Donotusesharpobjects,suchastweezersorneedle-nosepliers,toremovejams.Damage
caused by sharp objects will not be covered by the warranty.
When removing jammed media, pull the jammed media straight away from the product. Pulling jammed
media out of the product at an angle can damage the product.
NOTE:
Depending onwhere the jamis located, someof the followingsteps might notbe necessary.
Open the print-cartridge door, and then remove the print cartridge.
76
Chapter 8 Solve problems
ENWW
Page 91

2.
Remove the media stack from the input tray.
ENWW
Clear jams
77
Page 92

3.
Withbothhands, graspthesideofthejammedmediathatismostvisible(this includesthe middle),and
4.
1.
carefully pull it free from the product.
Reinstall the print cartridge, and then close the print-cartridge door.
Clear jams from the output areas
CAUTION: Do notuse sharpobjects, suchas tweezersor needle-nosepliers, toremove jams.Damage
causedbysharpobjectswillnotbecoveredbythewarranty.
Open the print-cartridge door, and then remove the print cartridge.
78
Chapter 8 Solve problems
ENWW
Page 93

2.
Keeptheprintcartridge dooropen,andthenwithbothhands,grasp thesideofthejammed mediathat
is most visible (this includes the middle), and carefully pull it free from the product.
ENWW
Clear jams
79
Page 94

3.
Reinstall the print cartridge, and then close the print-cartridge door.
80
Chapter 8 Solve problems
ENWW
Page 95

Clear jams from inside the product
1.
2.
Open the print-cartridge door, and then remove the print cartridge.
CAUTION:
Ifyou canseethe jammedpaper,carefullygrasp thejammed paper,andslowlypull itoutof the
product.
Toprevent damage,do notexpose theprint cartridgeto light.Cover itwitha pieceof paper.
ENWW
Clear jams
81
Page 96

3.
Reinstall the print cartridge, and then close the print-cartridge door.
1.
Solve repeated jams
●
Verifythat theinput trayisnot overfilled.The inputtray capacityvaries depending onthe typeof print
media that you are using.
●
Verify that the media guides are properly adjusted.
●
Check that the input tray is securely in place.
●
Do not add print media into the input tray while the product is printing.
●
Use only HP-recommended media types and sizes.
●
Donotfanmediaprior to loadingit inatray. Toloosen the ream,holdit firmly inboth handsand twist
the media by rotating your hands in the opposite direction.
●
Donot letprintmediastack upin theoutputbin. Theprint media typeand theamount oftoner used
affect the output bin capacity.
●
Checkthepowerconnection.Makesurethatthepowercordisfirmlyconnectedtoboththeproductand
the power supply box. Plug the power cord into a grounded power outlet.
Change the jam recovery setting
Whenthe JamRecoveryfeature isturned on,the productreprints anypages thatare damagedduringajam.
Open the product Properties dialog box.
2.
Click the Device Settings tab.
3.
Click the Auto option or the Off option under Jam Recovery.
82
Chapter 8 Solve problems
ENWW
Page 97

Solve paper-handling problems
The following problems with media cause print-quality deviations, jamming, or damage to the product.
Problem
Poor print quality or toner adhesion The paper is too moist, too rough, too
Dropouts, jamming, or curl The paper has been stored incorrectly. Storepaper flat initsmoisture-proof
Excessive curl Thepaper istoomoist,hasthewrong
Jamming, damage to product The paper has cutouts or perforations. Use paper thatis freeofcutouts or
Problems with feeding The paper has ragged edges. Usehigh-qualitypaperthatismadefor
Cause
heavyor toosmooth,orit is embossed or
from a faulty paper lot.
Thepaperhasvariabilityfromonesideto
the other.
grain direction, or is of short-grain
construction
The paper varies from side-to-side. Turn the paper over.
The paper varies from side-to-side. Turn the paper over.
The paper is too moist, too rough, too
heavyor too smooth,hasthewronggrain
direction,or is of short-grainconstruction
orit isembossedor froma faultypaper
lot.
Solution
Try another kind of paper, between 100
and250Sheffield,with 4% to6%moisture
content.
wrapping.
Turn the paper over.
Use long-grain paper.
perforations.
laser printers.
Tryanotherkindofpaper,between100
and250Sheffield,4% to 6%moisture
content.
Use long-grain paper.
Printisskewed(crooked).
Morethanonesheetfeedsatonetime. Themediatraymightbeoverloaded. Remove some ofthe mediafrom the tray.
Theproductdoesnotpullmediafrom the
input tray.
The mediaguides might be incorrectly
adjusted.
Themediamightbewrinkled,folded,or
damaged.
Theproductmightbeinmanual-feed
mode.
Thepickuprollermightbe dirtyor
damaged.
The paper-length adjustment control in
the input tray is set at a length that is
greater than the media size.
Removeall media fromtheinput tray,
straightenthestack,and then load the
mediaintheinputtrayagain.Adjustthe
mediaguidestothewidth and lengthof
the media that you are using and try
printing again.
Verify that the media is not wrinkled,
folded,ordamaged.Tryprintingonmedia
from a new or different package.
At the computer, follow the onscreen
instructionsto deactivatemanual-feed
mode. Or,at the product,open and close
the print-cartridgedoor.
Contact HP Customer Care. See the
supportflyerthat camein thebox.
Setthepaper-lengthadjustmentcontrol
to thecorrect length.
ENWW
Solve paper-handlingproblems
83
Page 98

Solve image-quality problems
You can prevent most print-quality problems by following these guidelines.
●
Use paper that meetsHPspecifications. See Paper and print mediaon page 29.
●
Clean the product as necessary. See Clean the product on page 63.
Image defect examples
This section provides information about identifying and correcting print defects.
NOTE:
If these steps do not correct the problem, contact an HP-authorized dealer or service representative.
Light print or faded
Toner specks
●
Redistribute the toner toextend thelife.
●
Theprintcartridgeisnearingendoflife.Installanew
genuine HP print cartridge.
●
The mediamight not meet HP's media specifications (for
example,the mediais toomoist or too rough).
●
Ifthe whole page islight,the print density adjustmentis too
light or EconoMode might be turned on. Adjust the print
density, anddisable EconoMode inthe product Properties.
●
The mediamight not meet HP's media specifications (for
example,the mediais toomoist or too rough).
●
The productmight needto be cleaned.
●
Theprintcartridgemightbedefective.Installanewgenuine
HP printcartridge.
Dropouts
84
Chapter 8 Solve problems
●
Asinglesheetofmediamight bedefective.Tryreprinting
the job.
●
Themediamoisturecontentisunevenorthemediahas
moistspotson its surface. Tryprintingwithnewmedia.
●
The medialot isbad. The manufacturing processes can
causesomeareas to rejecttoner.Tryadifferenttypeor
brand ofmedia.
●
Theprintcartridgemightbedefective.Installanewgenuine
HP printcartridge.
ENWW
Page 99

Vertical lines
●
Change
the
media
toalighter
basis
weight.
Gray background
●
Tonermight be on thephotosensitivedrum.Printafew
morepages to seeifthe problem mightcorrectitself.
●
Thephotosensitivedrum insidetheprintcartridgehas
probably been scratched. Installa new genuineHP print
cartridge.
●
Checktheproductenvironment.Verydry(low humidity)
conditions canincrease the amount of background shading.
●
Thedensity settingmightbetoohigh.Adjustthedensity
setting.
●
Install a new genuineHP printcartridge.
Toner smear
Loose toner
●
Iftonersmears appear ontheleadingedgeof themedia,
themediaguidesmightbedirty.Wipethemediaguideswith
a dry, lint-free cloth.
●
Check the media typeand quality.
●
Thefuser temperaturemight betoo low. Inthe printer
driver, makesure the appropriate media typeis selected.
●
Try installing a new genuineHP printcartridge.
●
Thefuser temperaturemight betoo low. Inthe printer
driver, makesure the appropriate media typeis selected.
●
Clean the inside ofthe product. See Clean the product
on page63.
●
Check themedia quality.
●
PlugtheproductdirectlyintoanACoutlet instead of into a
power strip.
ENWW
Solve image-quality problems
85
Page 100

Vertical repetitive defects
Misformed characters
●
Theprint cartridgemight bedamaged.If a repetitivemark
occursatthesamespotonthe page, installanewgenuine
HP printcartridge.
●
Theinternalpartsmighthavetoneron them. If thedefects
occuron the backof thepage,the problem probablywill
correct itselfafter a few more printed pages.
●
Inthe printerdriver,makesuretheappropriatemediatype
is selected.
●
If characters are improperly formed, producing hollow
images,themediastockmightbetooslick.Tryadifferent
media.
●
If characters are improperly formed, producing a wavy
effect,theproductmightneedservice.Printaconfiguration
page.Ifthecharactersareimproperlyformed,contactan
HP-authorizeddealer orservice representative.
Page skew
Curl or wave
●
Makesurethatthemediaisloadedcorrectlyandthemedia
guides are not too tight or too loose against the media
stack.
●
The inputbin might betoo full.
●
Check the media type and quality.
●
Check the media type and quality. Both high temperature
and high humiditycause media to curl.
●
Themediamighthavebeenintheinputtraytoolong.Turn
overthe stackof media inthe tray.Also,try rotatingthe
media 180° in the input tray.
●
Thefuser temperaturemight betoo high. Intheprinter
driver, make sure that the appropriate media type is
selected.If theproblempersists,selectamediatypethat
uses alower fuser temperature, such astransparencies or
light media.
86
Chapter 8 Solve problems
ENWW
 Loading...