

HP OB2100 Service Manual

HP OmniBook 2100
Reference Guide

Notice
This manual and any examples contained herein are provided “as is” and are subject
to change without notice. Hewlett-Packard Company makes no warranty of any kind
with regard to this manual, including, but not limited to, the implied warranties of
merchantability and fitness for a particular purpose. Hewlett-Packard Co. shall not
be liable for any errors or for incidental or consequential damages in connection
with the furnishing, performance, or use of this manual or the examples herein.
Consumer transactions in Australia and the United Kingdom: The above disclaimers
and limitations shall not apply to Consumer transactions in Australia and the United
Kingdom and shall not affect the statutory rights of Consumers.
© Copyright Hewlett-Packard Company 1998. All rights reserved. Reproduction,
adaptation, or translation of this manual is prohibited without prior written
permission of Hewlett-Packard Company, except as allowed under the copyright
laws.
The programs that control this product are copyrighted and all rights are reserved.
Reproduction, adaptation, or translation of those programs without prior written
permission of Hewlett-Packard Co. is also prohibited.
Portions of the programs that control this product may also be copyrighted by
Microsoft Corporation, SystemSoft Corp., Phoenix Technologies, Ltd., and NeoMagic
Corporation. See the individual programs for additional copyright notices.
Microsoft, MS, MS-DOS, and Windows are registered trademarks of Microsoft
Corporation. Pentium and the Intel Inside logo are U.S. registered trademarks and
MMX is a U.S. trademark of Intel Corporation.
For warranty information, see the Support and Service booklet.
Hewlett-Packard Company
Mobile Computing Division
19310 Pruneridge Ave.
Cupertino, CA 95014
ii
HP Software Product License Agreement
Your HP OmniBook PC contains factory-installed software programs. Please read the
Software License Agreement before proceeding.
Carefully read this License Agreement before proceeding to operate this
equipment. Rights in the software are offered only on the condition that the
customer agrees to all terms and conditions of the License Agreement.
Proceeding to operate the equipment indicates your acceptance of these terms
and conditions. If you do not agree with the terms of the License Agreement,
you must now either remove the software from your hard disk drive and destroy
the master media, or return the complete computer and software for a full
refund.
Proceeding with configuration signifies your acceptance of the License Terms.
Unless otherwise stated below, this HP Software Product License Agreement
shall govern the use of all software that is provided to you, the customer, as part
of the HP computer product. It shall supersede any non-HP software license
terms that may be found online, or in any documentation or other materials
contained in the computer product packaging.
Operating System Software by Microsoft is licensed to you under the Microsoft
Note:
End User License Agreement (EULA) contained in the Microsoft documentation.
The following License Terms govern the use of the software:
Use.
Customer may use the software on any one computer. Customer may not
network the software or otherwise use it on more than one computer. Customer may
not reverse assemble or decompile the software unless authorized by law.
Copies and Adaptations.
(a) for archival purposes or (b) when copying or adaptation is an essential step in
the use of the software with a computer so long as the copies and adaptations are
used in no other manner.
Ownership.
software, other than ownership of the physical media. Customer acknowledges and
agrees that the software is copyrighted and protected under the copyright laws.
Customer acknowledges and agrees that the software may have been developed by
a third party software supplier named in the copyright notices included with the
software, who shall be authorized to hold the Customer responsible for any
copyright infringement or violation of this Agreement.
Product Recovery CD-ROM.
CD-ROM: (i) The product recovery CD-ROM and/or support utility software may only
be used for restoring the hard disk of the HP computer with which the product
recovery CD-ROM was originally provided. (ii) The use of any operating system
Customer agrees that he/she does not have any title or ownership of the
Customer may make copies or adaptations of the software
If your computer was shipped with a product recovery
iii

software by Microsoft contained in any such product recovery CD-ROM shall be
governed by the Microsoft End User License Agreement (EULA).
Transfer of Rights in Software.
third party only as part of the transfer of all rights and only if Customer obtains the
prior agreement of the third party to be bound by the terms of this License
Agreement. Upon such a transfer, Customer agrees that his/her rights in the software
are terminated and that he/she will either destroy his/her copies and adaptations or
deliver them to the third party.
Sublicensing and Distribution.
distribute copies or adaptations of the software to the public in physical media or by
telecommunication without the prior written consent of Hewlett-Packard.
Termination.
comply with any of these terms provided Hewlett-Packard has requested Customer
to cure the failure and Customer has failed to do so within thirty (30) days of such
notice.
Updates And Upgrades.
updates and upgrades which may be available from Hewlett-Packard under a
separate support agreement.
Export Clause.
or adaptation in violation of the U.S. Export Administration regulations or other
applicable regulation.
U.S. Government Restricted Rights.
Government is subject to restrictions as set forth in subparagraph (c)(1)(ii) of the
Rights in Technical Data and Computer Software clause in DFARS 252.227-7013.
Hewlett-Packard Company, 3000 Hanover Street, Palo Alto, CA 94304 U.S.A. Rights
for non-DOD U.S. Government Departments and Agencies are as set forth in FAR
52.227-19(c)(1,2).
Hewlett-Packard may terminate this software license for failure to
Customer agrees not to export or re-export the software or any copy
Customer may transfer rights in the software to a
Customer may not lease, sublicense the software or
Customer agrees that the software does not include
Use, duplication, or disclosure by the U.S.
Edition History
Edition 1 ........................................ September 1998
This manual is printed on recycled paper
iv

Contents
1. Introducing the OmniBook ............................... 1-1
Taking Inventory....................................... 1-3
Included in the OmniBook 2100 box ....................... 1-3
To buy OmniBook accessories ........................... 1-4
OmniBook features ................................... 1-5
Setting Up Windows .................................... 1-8
To set up the OmniBook for the first time .................... 1-9
Configuring the OmniBook with the BIOS Setup utility ............. 1-10
To run the BIOS Setup utility............................. 1-10
Configuring the OmniBook with TopTools ..................... 1-16
To install TopTools ................................... 1-16
To run TopTools ..................................... 1-16
To get more information about TopTools .................... 1-16
2. Operating the OmniBook ................................ 2-1
Starting and Stopping the OmniBook......................... 2-3
To start and stop the OmniBook .......................... 2-3
To reset the OmniBook ................................ 2-4
Using the OmniBook Touch Pad ............................ 2-5
To use the touch pad.................................. 2-5
To configure the touch pad ............................. 2-6
Using the OmniBook Display .............................. 2-7
To adjust the display brightness and contrast ................. 2-7
To extend the life of the display .......................... 2-7
To suspend the OmniBook when closing the display ............ 2-8
Adjusting the Audio System ............................... 2-9
To adjust the volume manually ........................... 2-9
To adjust the volume in Windows ......................... 2-9
Using the OmniBook Keyboard............................. 2-10
To use the Fn hot keys ................................. 2-11
To use the Windows keys ............................... 2-12
To use the embedded keypad............................ 2-12
To use the ALT GR key................................. 2-13
Checking the Status of the OmniBook ........................ 2-14
To interpret the status lights ............................. 2-14
To interpret the status panel indicators...................... 2-15
Protecting the OmniBook................................. 2-17
To set or change a password............................. 2-18
To delete a password.................................. 2-19
Contents-1

To install the McAfee VirusScan utility ...................... 2-19
To attach a security cable............................... 2-20
To set PC identification ................................ 2-21
To enable hard disk drive lock ........................... 2-21
3. Managing Battery Power................................. 3-1
Monitoring Battery Power................................. 3-3
To check the battery status.............................. 3-4
To respond to a low-battery warning ....................... 3-5
To recharge a battery.................................. 3-5
To replace the main battery ............................. 3-7
To install a second battery .............................. 3-7
Conserving Battery Power ................................ 3-8
To install APM for Windows NT 4.0 ........................ 3-8
To optimize battery life ................................ 3-9
To set time-outs...................................... 3-10
To get the most from your battery ......................... 3-11
4. Making Connections .................................... 4-1
Using OmniBook Plug-In Modules ........................... 4-3
To install hot-swap support.............................. 4-3
To replace a plug-in module............................. 4-4
To connect the floppy disk drive externally .................. 4-5
To insert or eject a floppy disk ........................... 4-5
To insert or remove a CD ............................... 4-6
To change the boot order of a device ...................... 4-7
Connecting External Devices .............................. 4-8
To indentify the external ports ........................... 4-9
To connect an external display ........................... 4-10
To enable the built-in and external displays .................. 4-10
To change display settings in the BIOS Setup utility ............. 4-10
To connect a parallel device............................. 4-11
To connect a serial device .............................. 4-11
To connect an external keyboard or PS/2 mouse............... 4-11
To connect USB devices................................ 4-12
To connect audio devices .............................. 4-13
To make an infrared connection .......................... 4-14
Using PC Cards ........................................ 4-15
To insert a PC Card ................................... 4-15
To remove a PC Card.................................. 4-16
To find tested PC Cards ................................ 4-16
To install Card Executive for Windows NT 4.0 ................. 4-17
Using Docking Products.................................. 4-18
To install a docking tray................................ 4-18
Contents-2

To dock the OmniBook ................................ 4-19
To undock the OmniBook .............................. 4-20
5. Expanding the OmniBook ................................ 5-1
Installing a Hard Disk Drive ............................... 5-3
To replace the hard disk drive............................ 5-3
To replace the hard disk drive holder ...................... 5-4
To create a Hibernate partition ........................... 5-5
Installing a RAM Expansion Module ......................... 5-6
To install a RAM expansion module ....................... 5-7
To remove a RAM expansion module ...................... 5-8
6. Using the Recovery CD .................................. 6-1
Recovering Software .................................. 6-4
To install the online User’s Handbook ........................ 6-3
To recover the factory installation of Windows ................ 6-5
To replace a damaged Recovery CD........................ 6-5
To get drivers for other operating systems.................... 6-5
To update the OmniBook BIOS ........................... 6-6
7. Troubleshooting ....................................... 7-1
Solving Problems ...................................... 7-3
Accessory Module Problems............................. 7-3
Audio Problems ..................................... 7-4
Display Problems .................................... 7-5
Hard Disk Drive Problems .............................. 7-6
Infrared Problems .................................... 7-7
Keyboard and Pointing Device Problems .................... 7-8
Memory Problems.................................... 7-9
PC Card (PCMCIA) Problems ............................ 7-9
Performance Problems ................................ 7-10
Power and Battery Problems............................. 7-11
Printing Problems .................................... 7-13
Serial, Parallel, and USB Problems......................... 7-14
Startup Problems..................................... 7-15
Testing the Operation ................................... 7-16
To create a diagnostic floppy disk ......................... 7-16
To run the diagnostic test ............................... 7-17
Contents-3

8. Specifications and Regulatory Information ................... 8-1
Hardware Specifications ................................. 8-3
Software System Resources................................ 8-5
Safety Information...................................... 8-7
Regulatory Information .................................. 8-10
U.S.A. ............................................ 8-10
Canada ........................................... 8-11
Japan ............................................ 8-11
Europe............................................ 8-12
Contents-4

1
Introducing the OmniBook

Introducing the OmniBook
Congratulations! Your OmniBook sets a new standard in personal computing.
Although it’s compact and easy to carry, the OmniBook is infused with the quality
and attention to detail that are the hallmark of Hewlett-Packard.
The OmniBook Quick Start sheet shows how to get your OmniBook up and running
quickly. This Reference Guide shows how to set up and operate the OmniBook and it
also shows what to do if you run into trouble.
This table lists other sources of supplementary information about OmniBook
products.
Source Address or Number
Online
User’s Handbook
Online
OmniBook Notes
This introduces the OmniBook and shows you the OmniBook basics.
It also contains troubleshooting information (Start, Programs,
OmniBook Library).
For late-breaking information, not available at the printing of this
manual, see OmniBook Notes (Start, Programs, OmniBook Library).
The introductory Microsoft
manual for Windows 95,
Windows 98, or Windows NT.
OmniBook website http://www.hp.com/omnibook
Corporate Evaluator’s Guide
HP Support Assist CD-ROM See the
This shipped with your OmniBook and contains information about
using the standard features of Windows 95, Windows 98, or
Windows NT 4.0.
http://www.europe.hp.com/omnibook (European mirror)
The provides information about installing other operating systems,
as well as how to configure the OmniBook in a corporate, networked
environment. Located at the OmniBook website.
Support and Service
1-2
booklet for telephone numbers.

Introducing the OmniBook
Taking Inventory
Taking Inventory
The HP OmniBook 2100 represents a new category of HP notebook computers
featuring the latest mobile technologies available. It uses high-speed Intel Pentium II
processors with MMX technology, large TFT and DSTN displays, and high-capacity
hard drives.
This chapter describes
♦ What’s included in the OmniBook shipment.
♦ Available OmniBook accessories.
♦ Description of OmniBook features.
Included in the OmniBook 2100 box
• HP OmniBook 2100.
• Floppy disk drive, installed in OmniBook (HP F1384A).
• CD-ROM drive (HP F1587A).
• AC adapter (HP F1454A) and power cord.
• Main battery (HP F1382A).
• This OmniBook Reference Guide.
• Quick Start sheet.
• Support and Service booklet.
• Working in Comfort booklet.
• List of optional OmniBook accessories.
• OmniBook Recovery CD, which includes Windows recovery,
operating system drivers, and online User’s Handbook.
• Microsoft Windows 95/Windows 98 manual.
–or–
Microsoft Windows NT 4.0 manual.
1-3

Introducing the OmniBook
Taking Inventory
To buy OmniBook accessories
Buy OmniBook accessories online! For the latest accessories and options, visit us at
http://www.hp.com/omnibook. As new accessories become available, you’ll find
them listed here.
At the time of this printing, HP offers a variety of docking solutions and the following
accessories and plug-in modules:
• Docking system and monitor stand (HP F1477A).
• Mini dock (HP F1452A).
• Port replicator (HP F1451A).
• CD-ROM drive (HP F1587A).
• DVD drive (HP F1586A).
• Floppy disk drive and external cable (HP F1384A).
• Zip drive (HP F1388A).
• Secondary battery (HP F1383A).
• PC Cards.
• SmartCard.
• Auto / airline adapter.
• OmniBook carrying case.
1-4
OmniBook features
OmniBook—Front View
Introducing the OmniBook
Taking Inventory
1. Power status light.
2. Built-in microphone.
3. Status panel.
4. Built-in speakers.
5. Touch pad (pointing device).
6. Click buttons.
7. Latch to open and close the OmniBook.
8. Main battery module.
9. Plug-in module bay (can contain a floppy disk drive, CD-ROM drive, a DVD
drive, a Zip drive, or a secondary battery).
10. Blue power button (suspends or shuts down the OmniBook).
1-5
Introducing the OmniBook
Taking Inventory
OmniBook—Side View
11. PC Card slots (upper and lower). Accepts two Type II cards or one Type III card.
12. PC Card eject buttons (upper and lower PC Card slots).
13. Audio jacks (left to right): audio line-in, external microphone, audio line-out.
14. AC adapter jack.
15. Kensington lock slot (security connector).
16. Hard disk drive.
1-6
Introducing the OmniBook
Taking Inventory
OmniBook—Rear View
17. Infrared port. Use this port for wireless data transmission between the OmniBook
and another computer or a printer with an infrared port. You must install
infrared drivers. Windows NT 4.0 does not support infrared communciation.
18. Universal Serial Bus port (USB). Windows NT 4.0 does not support USB.
19. Serial port (COM1). Use this port for a serial mouse, a modem, or a serial printer.
20. Parallel port (LPT1). Use this port for a parallel printer.
21. System-off button (to shut down the OmniBook).
22. External monitor port.
23. Docking port.
24. PS/2 keyboard or PS/2 mouse port. Supports a Y adapter for both keyboard and
mouse.
1-7

Introducing the OmniBook
Setting Up Windows
Setting Up Windows
The OmniBook has either Windows 95/Windows 98 (you select one or the other), or
Windows NT 4.0 factory-installed on the hard disk drive. When your OmniBook starts
up the first time, it takes you through a series of setup screens, including installation
of the operating system.
This section describes how to set up the OmniBook with the factory-installed
Windows operating system.
♦ Setting up the OmniBook for the first time.
1-8

To set up the OmniBook for the first time
Introducing the OmniBook
Setting Up Windows
CAUTION
Use only the HP adapter model F1454A with this product. Using any other ac
adapter could damage the OmniBook and may void your warranty. Refer to the
warranty statement for your product.
1. Connect the power cord to the ac adapter, then plug the cord into an ac outlet.
The indicator light on the ac adapter shines when powered.
2. Connect the ac adapter to the OmniBook’s left side, as shown.
3. Press the blue power button.
The Windows Setup program starts automatically.
4. Follow the instructions as they appear on the screen.
During setup, you will be prompted to accept the License Agreement and enter
the Product ID (printed on the Certificate of Authenticity on the Microsoft
Windows manual). If you are prompted to set up a user account and password,
you can either set up the account, or press ESC to skip this step.
Note
If you installed Windows NT 4.0, see page 3-8 to install Advanced Power
Management (APM).
1-9

Introducing the OmniBook
Configuring the OmniBook with the BIOS Setup utility
Configuring the OmniBook with the BIOS
Setup utility
The BIOS (Basic Input and Output System) Setup utility is a menu-driven utility that
enables you to make changes to the system configuration and tailor the operation of
your OmniBook to your individual work needs.
The settings made in the BIOS Setup utility generally control the hardware and
consequently have a fundamental effect on how the OmniBook operates.
This section describes the BIOS Setup utility menus and options in detail.
To run the BIOS Setup utility
1. Close all applications.
2. From the Start menu, click Shut Down, Restart the Computer.
3. When you see the HP logo, press F2 to enter the BIOS Setup utility.
4. Pointing devices are not active in the BIOS Setup utility. Press the RIGHT and
LEFT arrow keys to move among menus. Press the DOWN and UP arrow keys to
move among parameters in a menu. Press F5 or F6 to move through values for
the current parameter or press ENTER to change a setting. See the following
tables for more information.
5. After you select the options you want, press F10 or use the Exit menu to exit the
BIOS Setup utility.
If the settings cause a conflict between devices during reboot, the system prompts
you to run BIOS Setup and marks the conflicting settings.
1-10

Introducing the OmniBook
Configuring the OmniBook with the BIOS Setup utility
Main Menu Default
Language Sets the language for this utility and for BIOS
messages.
BIOS Revision Shows the current BIOS version. Detected
System Time Sets the time using 24-hour format. Values
set take effect immediately.
System Date Sets the date using dd/mm/yy format (except
English, which is mm/dd/yy format).
Floppy Drive Sets the floppy drive type. Floppy disk drive
Internal Hard Disk Sets the hard disk drive type and various
parameters.
Quiet Boot When enabled, hides summary of
power-on self-test and messages during boot.
Video Display Device Sets whether the built-in display
automatically switches to an external display
if one is detected.
Video Expansion When enabled, the video image covers the
entire display in lower resolution modes
(SVGA, VGA). When disabled, the video image
is centered in the display.
English
automatically.
type detected and
set automatically.
Hard disk drive
detected and set
automatically.
Enabled
Auto
Disabled
Primary Video Adapter Sets whether the internal (built-in) video
adapter automatically switches to an external
video adapter connected to the docking
system, if one is detected.
System Memory Shows the system memory size. 640KB
Extended Memory Shows the extended memory size. Detected
Auto
automatically.
1-11

Introducing the OmniBook
Configuring the OmniBook with the BIOS Setup utility
System Devices Menu Default
PS/2 Pointing Devices Disables the internal pointing devices when an
external PS/2 mouse is connected. This is required
for the scroll wheel on a PS/2 mouse to function.
External Fn Key Sets whether left-CTRL + left-ALT on an external
keyboard is interpreted as the Fn key.
IDE Controller Enables the primary (hard drive) and secondary
(optional CD-ROM drive) controllers.
FDD Controller Enables the floppy drive. Enabled
Serial Port Sets how the serial port is configured by the BIOS
(specified or automatic).
Base I/O address Sets the I/O address and interrupt. 3F8h, IRQ4
Infrared Port Sets how the infrared port is configured by the
BIOS (specified or automatic).
Mode Sets the hardware to support SIR (Standard IR),
ASK IR (amplitude shift keyed IR), or FIR (Fast IR)
infrared communications. (Driver installation
required.)
Base I/O address Sets the I/O address and interrupt. 2F8h, IRQ3
DMA channel For Fast Ir mode, sets the DMA channel. DMA3
Parallel Port Sets how the parallel port is configured by the
BIOS (specified or automatic).
Auto
Enabled
Both
Enabled
Disabled
SIR
Enabled
Mode Sets the port to normal, bi-directional, EPP, or ECP. ECP
Base I/O address Sets the I/O address. 378h
Interrupt Sets the interrupt. IRQ7
DMA channel For ECP mode, sets the DMA channel. DMA3
Audio Sets how the audio system is configured by the
BIOS (specified or automatic).
SB I/O address Sets the Sound Blaster I/O address. 220h
WSS I/O address Sets the Windows Sound System I/O address. 530h
AdLib I/O address Sets the AdLib synthesizer I/O address. 388h
1-12
Enabled

Introducing the OmniBook
Configuring the OmniBook with the BIOS Setup utility
Interrupt Sets the interrupt. IRQ5
1st DMA channel Sets the DMA channel for playback. DMA1
2nd DMA channel Sets the DMA channel for recording. DMA0
Security Menu Default
User Password Is Shows if a user password is set. Clear
Administrator Password Is Shows if an administrator password is set. Clear
Set User Password Press ENTER to set, change, or clear user
password. Password length can be no longer than
8 characters, 0-9, A-Z.
Set Administrator Password Press ENTER to set, change, or clear administrator
password. This password protects BIOS Setup
settings.
Boot Sets whether a user password is required when
the computer boots.
Resume* Sets whether a user password is required when
resuming from a suspended state.
Undock* Sets whether a user password is required when
undocking the OmniBook.
Internal Hard Disk Drive
Lock*
Floppy Boot Sets whether the floppy drive is a boot device. Enabled
* Resume, Undock, and Internal Hard Disk Drive Lock options are available only if Boot option is
enabled.
Encodes the current user password (or
administrator password if that is the only
password set), on the primary hard disk drive.
Enabled
Enabled
Disabled
Disabled
1-13

Introducing the OmniBook
Configuring the OmniBook with the BIOS Setup utility
Power (APM)
Menu*
Power Management
Mode
Smart CPU Mode Enables automatic CPU power savings. Absence of
Standby Time-out Sets the period of inactivity after which the computer
Suspend Time-out Sets the period of inactivity after which the computer
Hibernate Time-out Sets whether the computer goes from Suspend to
Hard Disk Time-out Sets the period of hard disk inactivity after which the
Time-out on AC Sets whether power management time-outs occur
Power Button Mode Sets the action of the blue power button when
Disables time-outs, selects a combination of
time-outs, or allows customized time-outs.
keyboard, mouse, and hard disk activity could cause
slower CPU response.
goes from On to Standby power mode.
goes from Standby to Suspend power mode. (Skips
Standby mode if that time-out is disabled.)
Hibernate power mode after the indicated period of
inactivity. (Skips Suspend mode if that time-out is
disabled.)
hard disk stops spinning.
while the ac adapter is connected.
pressed for less than 4 seconds.
Default
Max Power
Savings
Disabled
2 minutes
4 minutes
4 hours
2 minutes
Disabled
Suspend
Lid Switch Mode Sets the action when the OmniBook lid closes. Turn off LCD
Resume on Serial Ring Sets whether the system resumes from Suspend if a
ring signal is received.
Resume on Time of Day Sets whether the system resumes from Suspend at a
defined time of day.
Resume Time Sets the 24-hour time when the system resumes from
Suspend if enabled.
Auto Suspend on Undock Sets whether the OmniBook suspends after
undocking.
Auto Turn-on on Dock Sets whether the OmniBook turns on after docking. Enabled
* If you are using Windows 98 and have installed ACPI power management, the ACPI settings
override settings in the Power menu.
1-14
Enabled
Disabled
When Lid
Closed

Introducing the OmniBook
Configuring the OmniBook with the BIOS Setup utility
Boot Menu Default
Diskette Drive
Hard Drive
CD-ROM/DVD Drive
Exit Menu
Save Changes and Exit Saves Setup changes, exits, and reboots.
Discard Changes and Exit Discards Setup changes since last save, exits,
Get Default Values Restores default settings, stays in Setup. Does
Load Previous Values Discards Setup changes since last save, stays in
Save Changes Saves Setup changes, and stays in Setup.
Shows the order of boot devices. Move the
entries to change the order.
and reboots. Does discard Security, date, or time
changes.
not affect Security, date, or time changes.
Setup. Does not affect Security, date, or time
changes.
Security, Date and Time settings are saved at
the moment they are made.
1. Diskette drive
2. Hard drive
3. CD-ROM/DVD
drive
1-15

Introducing the OmniBook
Configuring the OmniBook with TopTools
Configuring the OmniBook with TopTools
HP TopTools is for network managers and administrators with responsibilities for
computer system management. It offers additional configuration and security
options that allow you to check what hardware and software components are
installed on your computer and access how well they are working. This section
describes how to
♦ Install and run TopTools.
♦ Get more information about TopTools.
To install TopTools
The TopTools package is included with the OmniBook, but you must install it before
you can use it. On Windows NT systems you will need Administrator privileges to
install TopTools software
.
1. Start Windows, if it is not already running.
2. Click Start, Programs, HP DMI, Setup.
To run TopTools
TopTools may be run locally on a PC or remotely by a network administrator.
• To run TopTools locally, click Start, Programs, HP DMI, HP TopTools.
To get more information about TopTools
For information on manageable HP PCs, HP TopTools, DMI, and how they lower
PC operating costs, see the HP website at
1-16
http://www.hp.com/toptools
.

2
Operating the OmniBook

Operating the OmniBook
This chapter introduces the OmniBook and helps you get familiar with basic
operation including
♦ Starting and stopping the OmniBook.
♦ Using the OmniBook touch pad.
♦ Using the OmniBook display.
♦ Adjusting the audio system.
♦ Using the OmniBook keyboard.
♦ Checking the status of the OmniBook.
♦ Protecting the OmniBook.
2-2

Operating the OmniBook
Starting and Stopping the OmniBook
Starting and Stopping the OmniBook
You can easily start and stop your OmniBook using the blue power button. However,
at certain times, you may want to use other methods for starting and stopping your
OmniBook—depending on power considerations, types of active connections, and
start-up time.
To start and stop the OmniBook
When you The OmniBook enters To turn on again
Press Fn+S*
–or–
allow time-out.
Press blue power button
–or–
click Start, Suspend**
–or–
allow time-out.
Press Fn+F12
–or–
allow time-out.
Click Start, Shut Down
(recommended)
–or–
Press and hold the blue power button until
the display shuts down.
* Windows NT and Windows 95 only. In Windows 98, Fn+S suspends the OmniBook.
** Windows 95 only. In Windows 98, click Start, Shutdown, Standby to suspend the OmniBook.
*** A plug-and-play operating system, such as Windows 95 or Windows 98, can restore network connections when
you turn on the OmniBook. For Windows NT 4.0 or a different operating system, you may have to reset the
OmniBook or restart the operating system to restore them.
Standby Mode
Saves minimal power.
Turns off the display only.
Restarts quickly.
Maintains network connections.
Suspend Mode
Saves significant power.
Turns off the display.
Saves current session to RAM.
Restarts quickly.
May restore network connections.***
Hibernate Mode
Saves maximum power.
Saves current session to disk, shuts down.
May restore network connections.***
Off Mode
Saves maximum power.
Turns off without saving current session.
At startup, resets everything, starts a new
session, and restores network connections.
Press any key or move
a pointing device to
display your current
session (“Instant-On”).
Press the blue power
button to display your
current session
(“Instant-On“).
Press the blue power
button to restart and
restore your previous
session.
Press the blue power
button to restart with a
new session.
2-3
Operating the OmniBook
Starting and Stopping the OmniBook
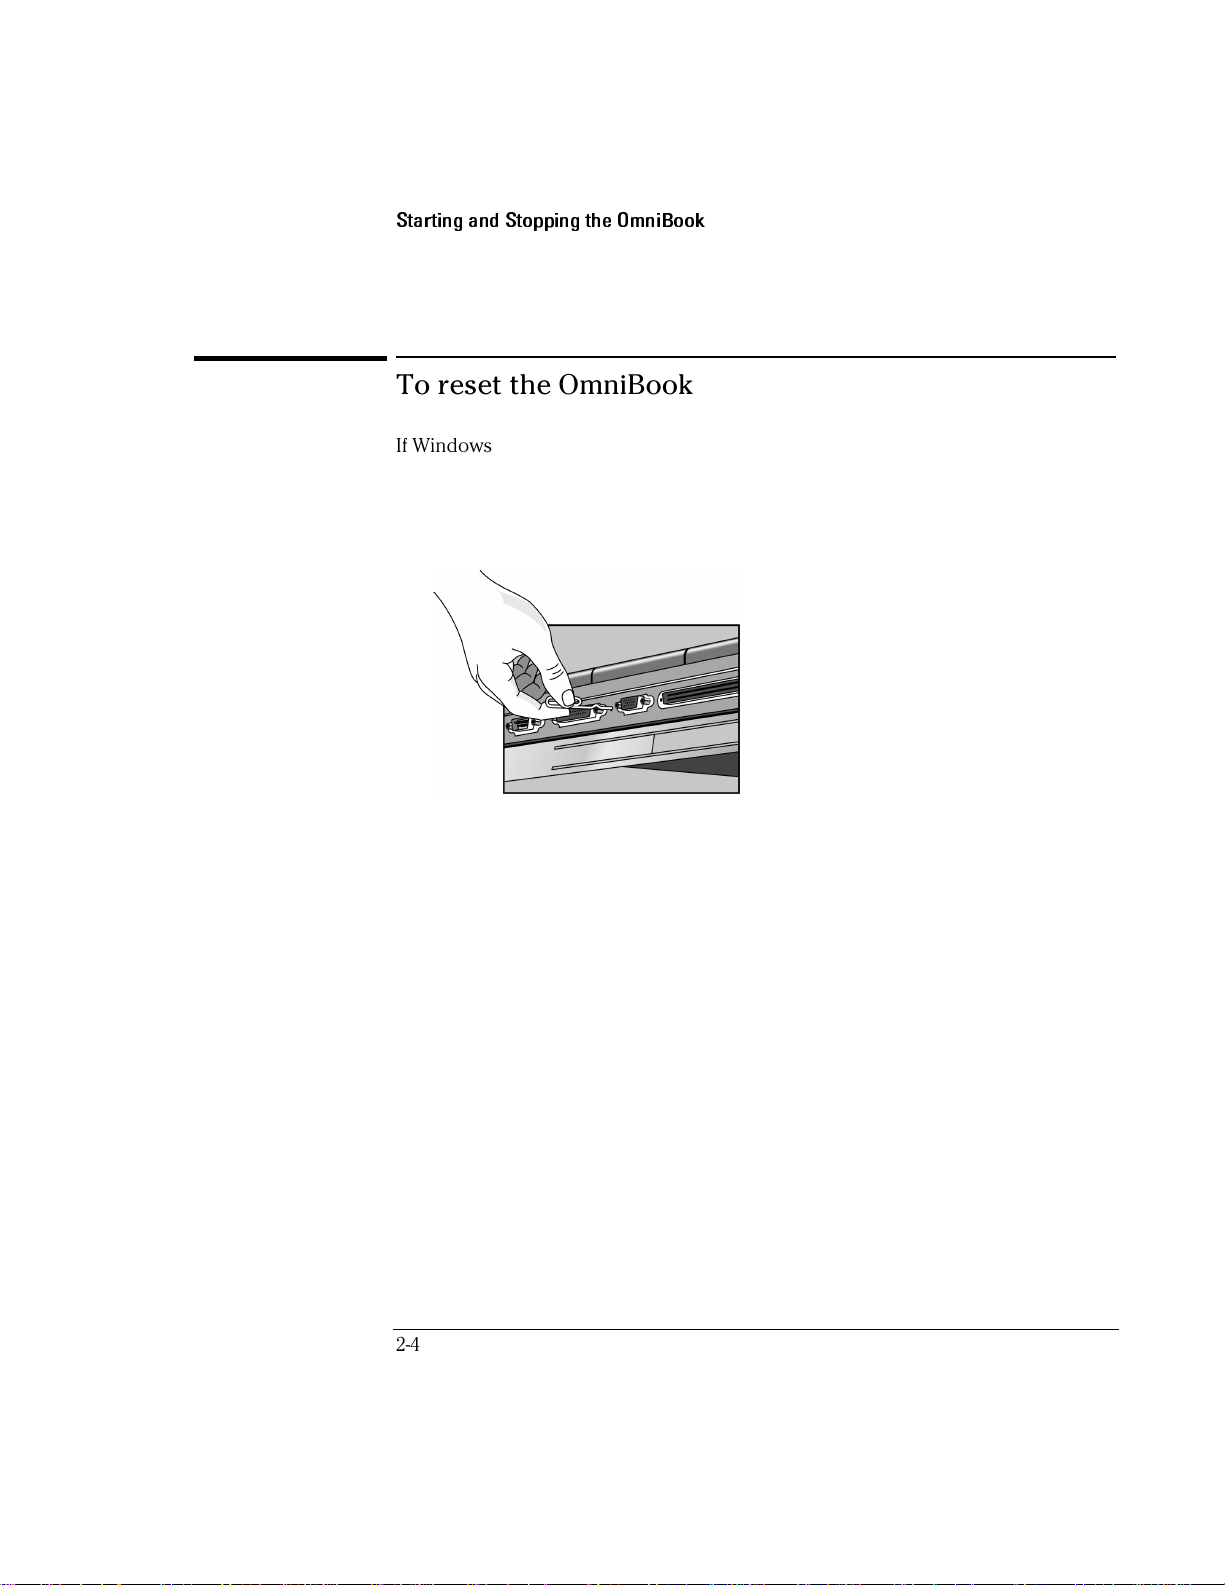
To reset the OmniBook
If Windows or the OmniBook stops responding, you can reset the OmniBook.
1. If possible, from the Start menu, shut down the OmniBook.
2. Insert a pen or straightened paper clip into the recess on the rear of the
OmniBook, as shown.
–or, if this fails–
Press and hold the blue power button until the display shuts down.
3. After the computer shuts down, press the blue power button to turn it on.
2-4
Operating the OmniBook
Using the OmniBook Touch Pad
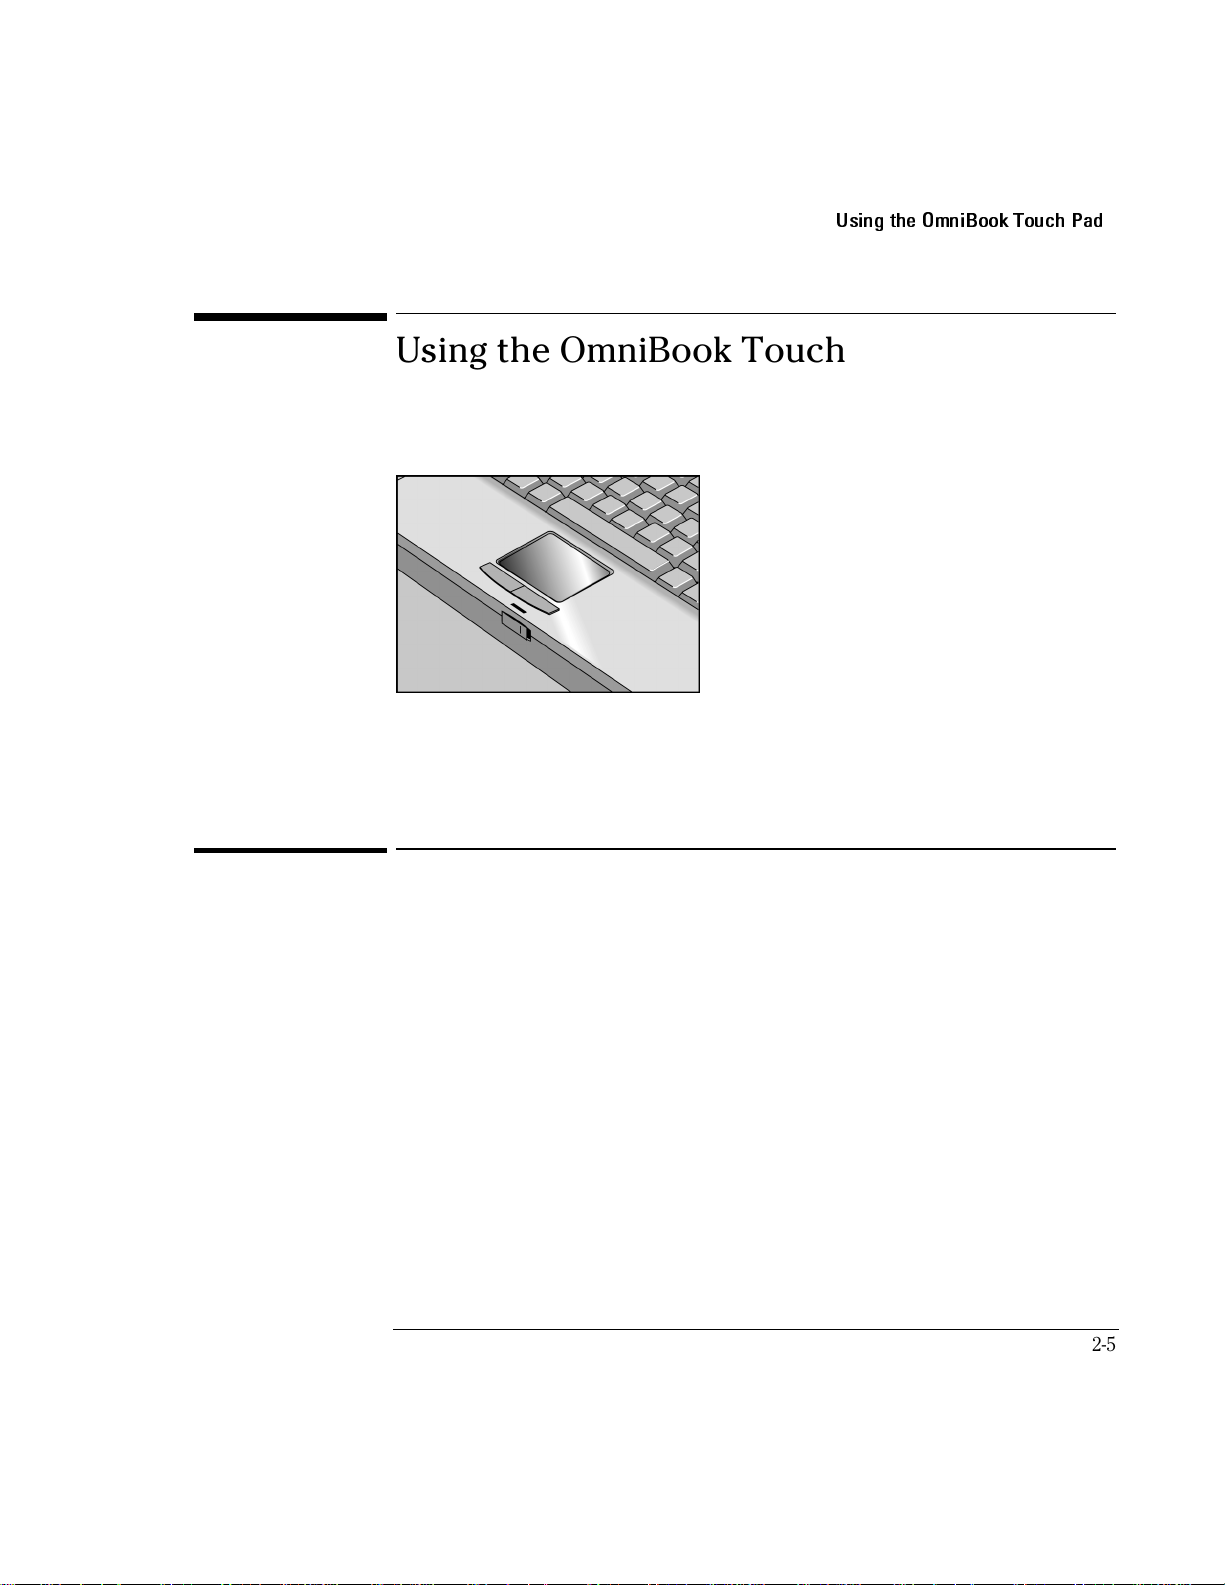
Using the OmniBook Touch Pad
The touch pad, a touch-sensitive pointing device which controls the motion and
speed of the pointer on the screen, is built into your OmniBook.
This section describes how to
♦ Use the touch pad.
♦ Configure the touch pad.
To use the touch pad
1. Move a thumb or finger across the touch pad in the direction you want the
pointer to move.
2. Use the left and right click buttons, which work like the left and right buttons on
a mouse, to make your selection. You can also tap on the touch pad instead of
clicking a button.
• To open an application, move the pointer over the icon, then press the left
button twice rapidly.
• To make menu selections, move the pointer to the item and press the left
button once.
• To open the shortcut menu for an item, move the pointer over the item and
click the right button.
• To drag an item, move the pointer over the item. Press and hold the left
button while you move the pointer to the new location. Release the button.
2-5

Operating the OmniBook
Using the OmniBook Touch Pad
To configure the touch pad
To customize the operation of the touch pad (and an external PS/2 or serial mouse,
if installed), use the Windows Control Panel Mouse icon to access Mouse Properties.
Select the tab corresponding to the item you wish to configure. Among the items that
can be configured are
• Button configuration for right or left handed operation.
• Double-click speed, pointer speed, and pointer tail.
• Touch threshold. Click Help for more information on the use of the touch pad.
Note
The touch pad’s enhanced features are not available when an external mouse is
installed.
2-6
 Loading...