

Page 1

HP OmniBook Accessories
User’s Guide
1-1
Page 2

Notice
This manual and any examples contained herein are provided “as is” and are
subject to change without notice. Hewlett-Packard Company makes no warranty of
any kind with regard to this manual, including, but not limited to, the implied
warranties of merchantability and fitness for a particular purpose. Hewlett-Packard
Co. shall not be liable for any errors or for incidental or consequential damages in
connection with the furnishing, performance, or use of this manual or the examples
herein.
Consumer transactions in Australia and the United Kingdom: The above disclaimers
and limitations shall not apply to Consumer transactions in Australia and the United
Kingdom and shall not affect the statutory rights of Consumers.
© Copyright Hewlett-Packard Company 1995–1996. All rights reserved.
Reproduction, adaptation, or translation of this manual is prohibited without prior
written permission of Hewlett-Packard Company, except as allowed under the
copyright laws.
The programs that control this product are copyrighted and all rights are reserved.
Reproduction, adaptation, or translation of those programs without prior written
permission of Hewlett-Packard Co. is also prohibited.
Portions of the programs that control this product may also be copyrighted by
Microsoft Corporation, Adaptec, Inc., Microcom Systems, Inc., SystemSoft Corp.
See the individual programs for additional copyright notices.
Microsoft, MS, and MS-DOS are registered trademarks and Windows is a trademark
of Microsoft Corporation (U.S. patent numbers 4955066 and 4974159).
For warranty information, see the Support and Service booklet.
Hewlett-Packard Company
Mobile Computing Division
1000 N.E. Circle Blvd.
Corvallis, OR 97330, U.S.A.
Edition History
Edition 1 ........................................... March 1996
Edition 2
1-2
........................................ November 1996
This manual is printed on recycled paper.
Page 3

Contents
Using OmniBook Accessories ............................... 1-5
Removing Accessory Modules ............................. 1-7
To remove accessories from the center drive bay .............. 1-8
Using the Floppy Drive .................................. 1-9
To install the floppy drive internally ....................... 1-9
To install the floppy drive externally ....................... 1-10
To insert or remove a floppy disk ......................... 1-11
Using the CD-ROM Drive ................................. 1-12
To install the CD-ROM drive ............................. 1-12
To insert or remove a CD ............................... 1-14
To use the CD-ROM drive safely .......................... 1-15
Managing Battery Power ................................. 1-16
To replace the battery ................................. 1-17
To install a high-capacity battery ......................... 1-18
To handle and store the battery safely...................... 1-19
Installing a New Hard Drive ............................... 1-20
To remove the hard drive .............................. 1-21
To install drive C..................................... 1-22
To install your OmniBook software........................ 1-22
Troubleshooting......................................... 1-25
Solving Basic Problems .................................. 1-27
To resolve floppy disk drive problems...................... 1-27
To resolve CD-ROM drive problems ....................... 1-28
To resolve battery problems............................. 1-28
To resolve hard drive problems .......................... 1-29
Specifications and Regulatory Information .................... 1-33
Hardware Specifications ................................. 1-35
Regulatory Information .................................. 1-36
U.S.A. ............................................ 1-36
Canada ........................................... 1-37
Japan ............................................ 1-37
Europe ........................................... 1-38
Europe ........................................... 1-39
1-3
Page 4

Page 5

1
Using OmniBook Accessories
1-5
Page 6

Using OmniBook Accessories
The OmniBook Accessories User’s Guide describes OmniBook accessories and
shows you how to install and use them. For complete information about operating
the OmniBook consult the OmniBook User’s Guide—an online manual.
This manual explains how to
♦ Remove accessory modules.
♦ Install and use the floppy disk drive.
♦ Install and use the CD-ROM drive.
♦ Install the high-capacity battery pack.
♦ Replace the OmniBook battery pack.
♦ Upgrade the OmniBook with a new hard drive.
1-6
Page 7
Using OmniBook Accessories
battery
drive
drive
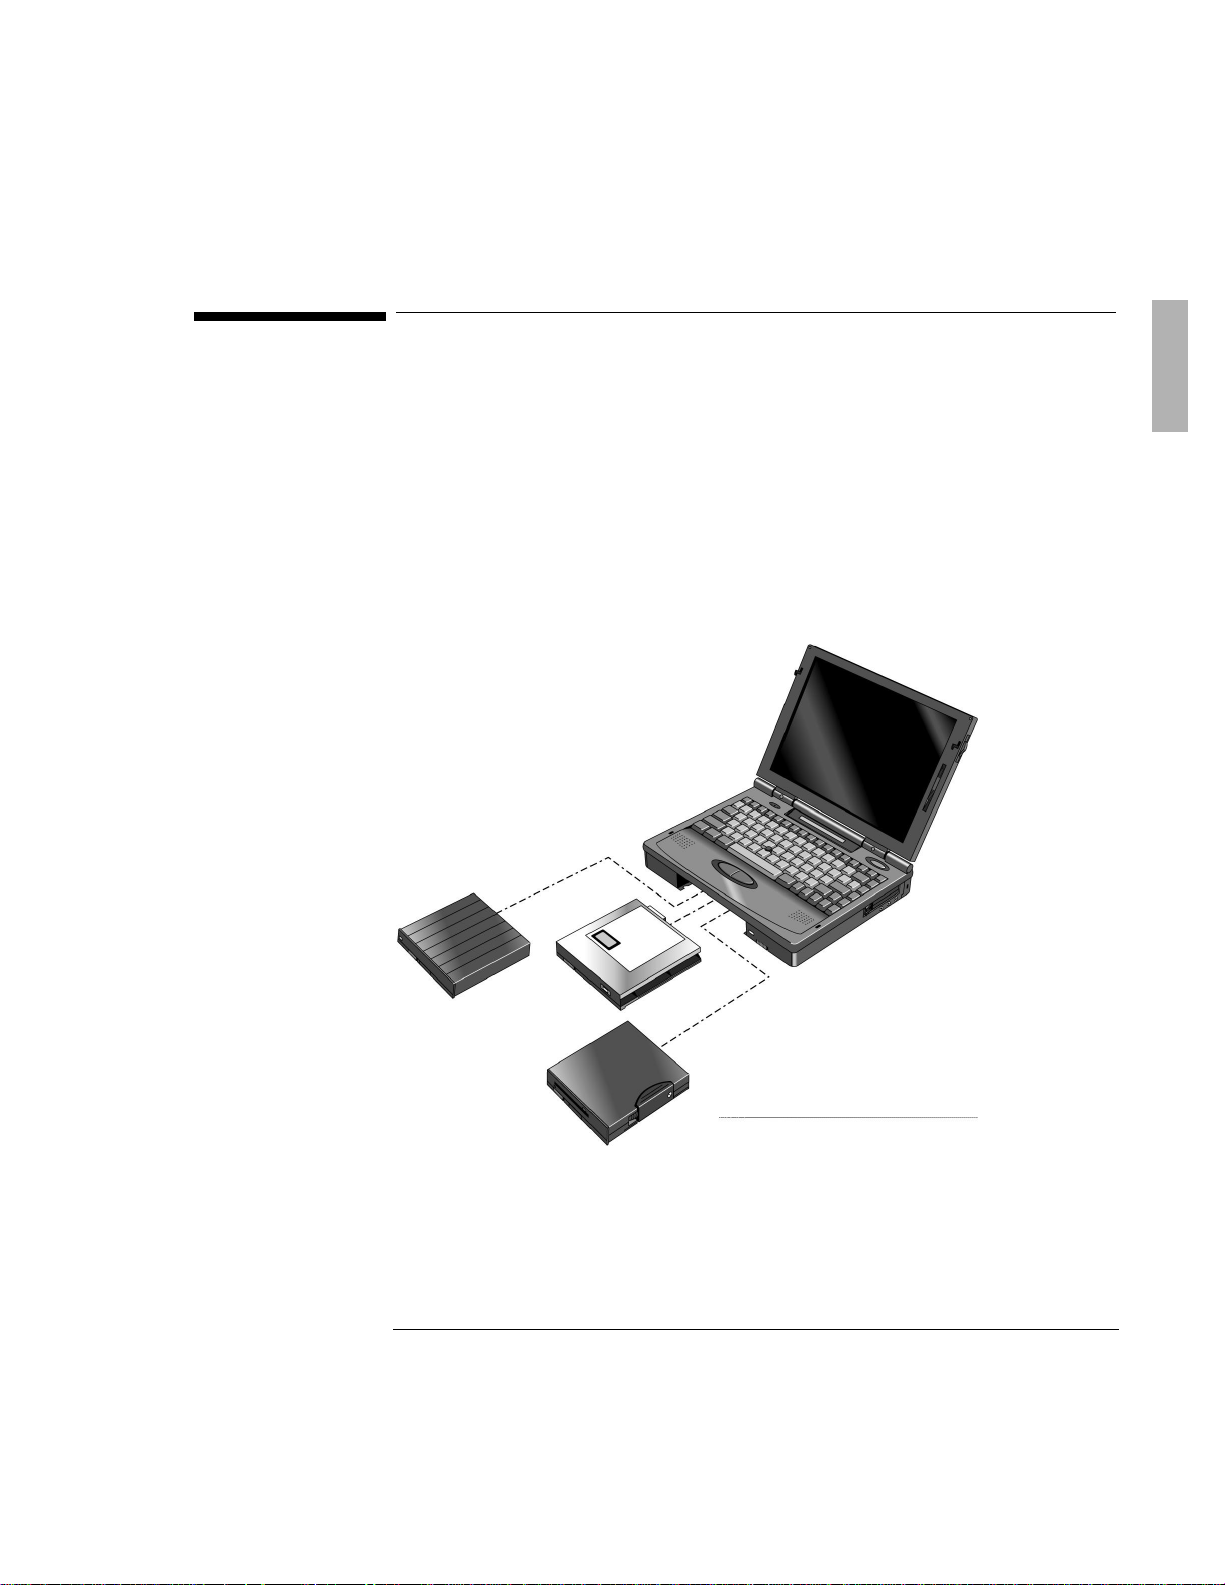
Removing Accessory Modules
Removing Accessory Modules
The OmniBook’s center drive bay can hold any of the following accessories:
♦ CD-ROM drive.
♦ Floppy disk drive.
♦ High-capacity battery for extra battery power.
This section describes how to remove the accessory modules from the center drive
bay. (See “Installing a New Hard Drive” on page 1-20 for instructions about
removing the hard drive.)
High-capacity
Floppy disk
CD-ROM
1-7
Page 8
Using OmniBook Accessories
Slide switch to release pull-tab.
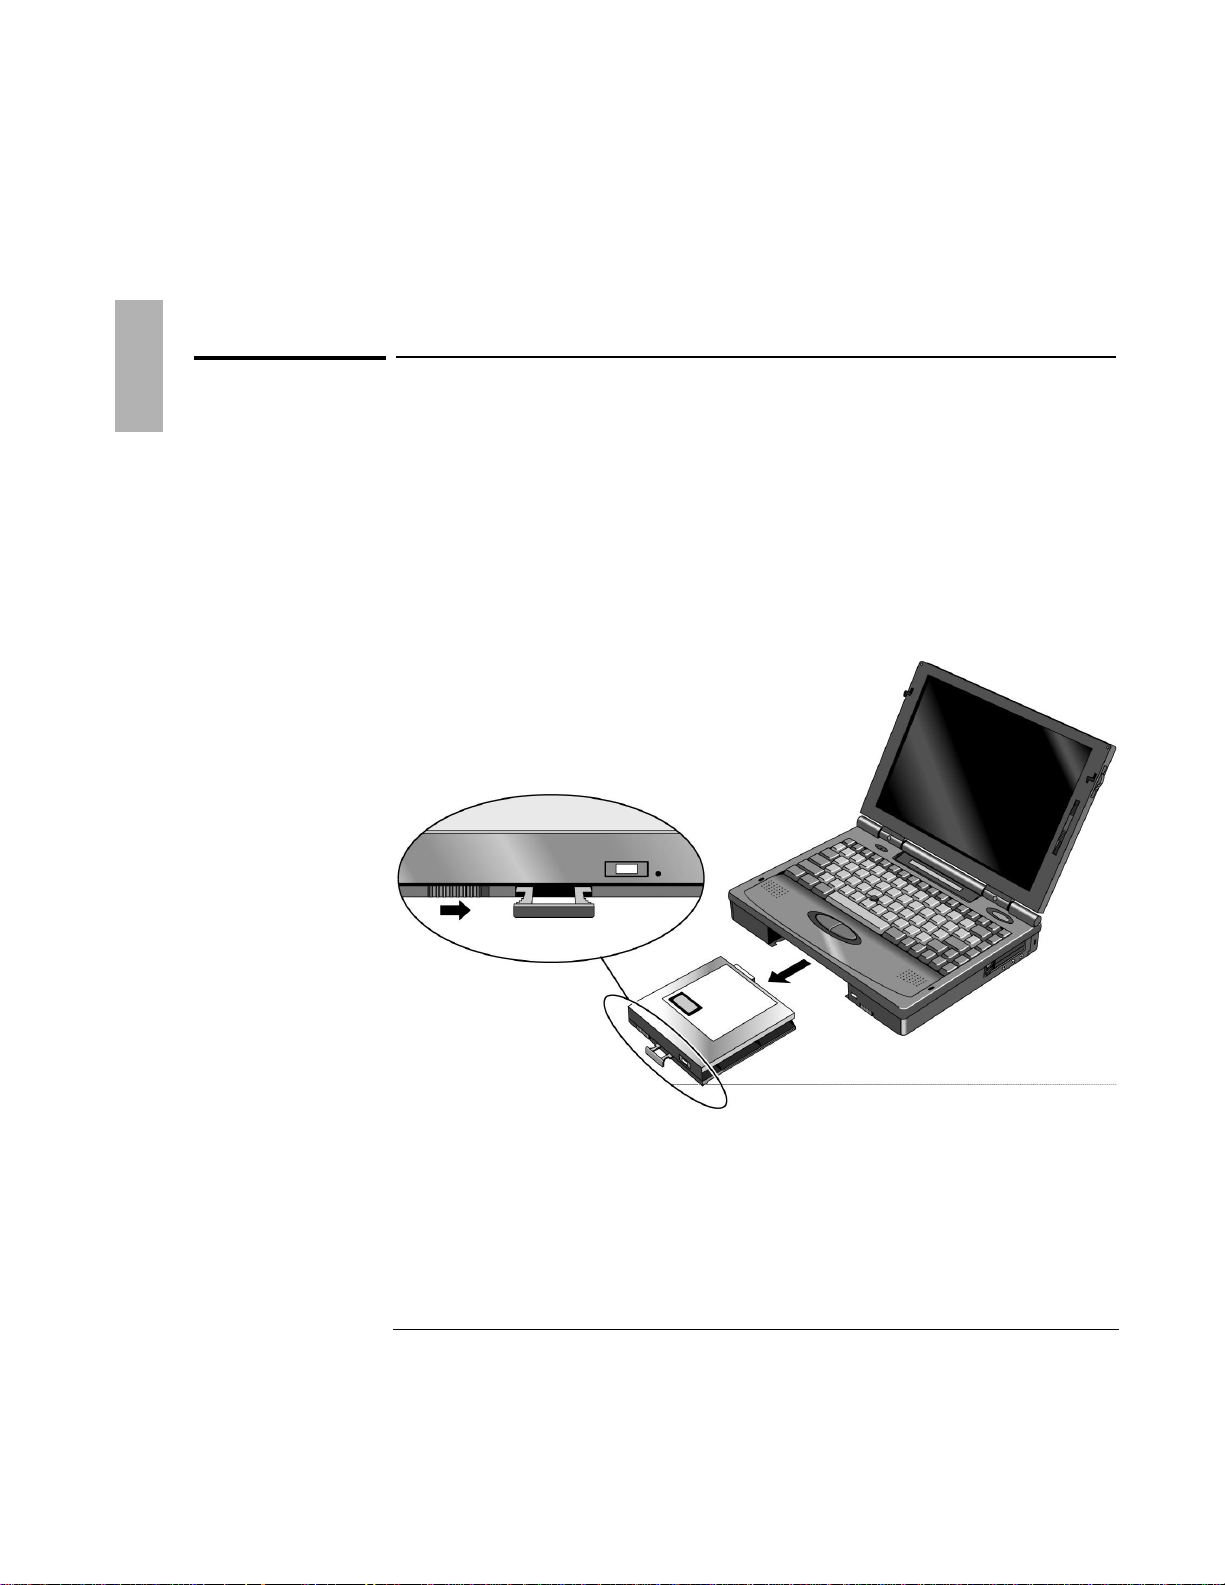
Removing Accessory Modules
To remove accessories from the center drive bay
The OmniBook’s center drive bay can hold a CD-ROM drive, a floppy disk drive, or a
high-capacity battery for extra battery power. Use the following procedure to
remove any of these devices from the OmniBook.
1. Slide the switch to the right. A pull-tab pops out.
2. Pull the pull-tab firmly to remove the module from the OmniBook.
3. Push the pull-tab back into the module after you remove the it from the
OmniBook.
1-8
Page 9
Using OmniBook Accessories
disk drive
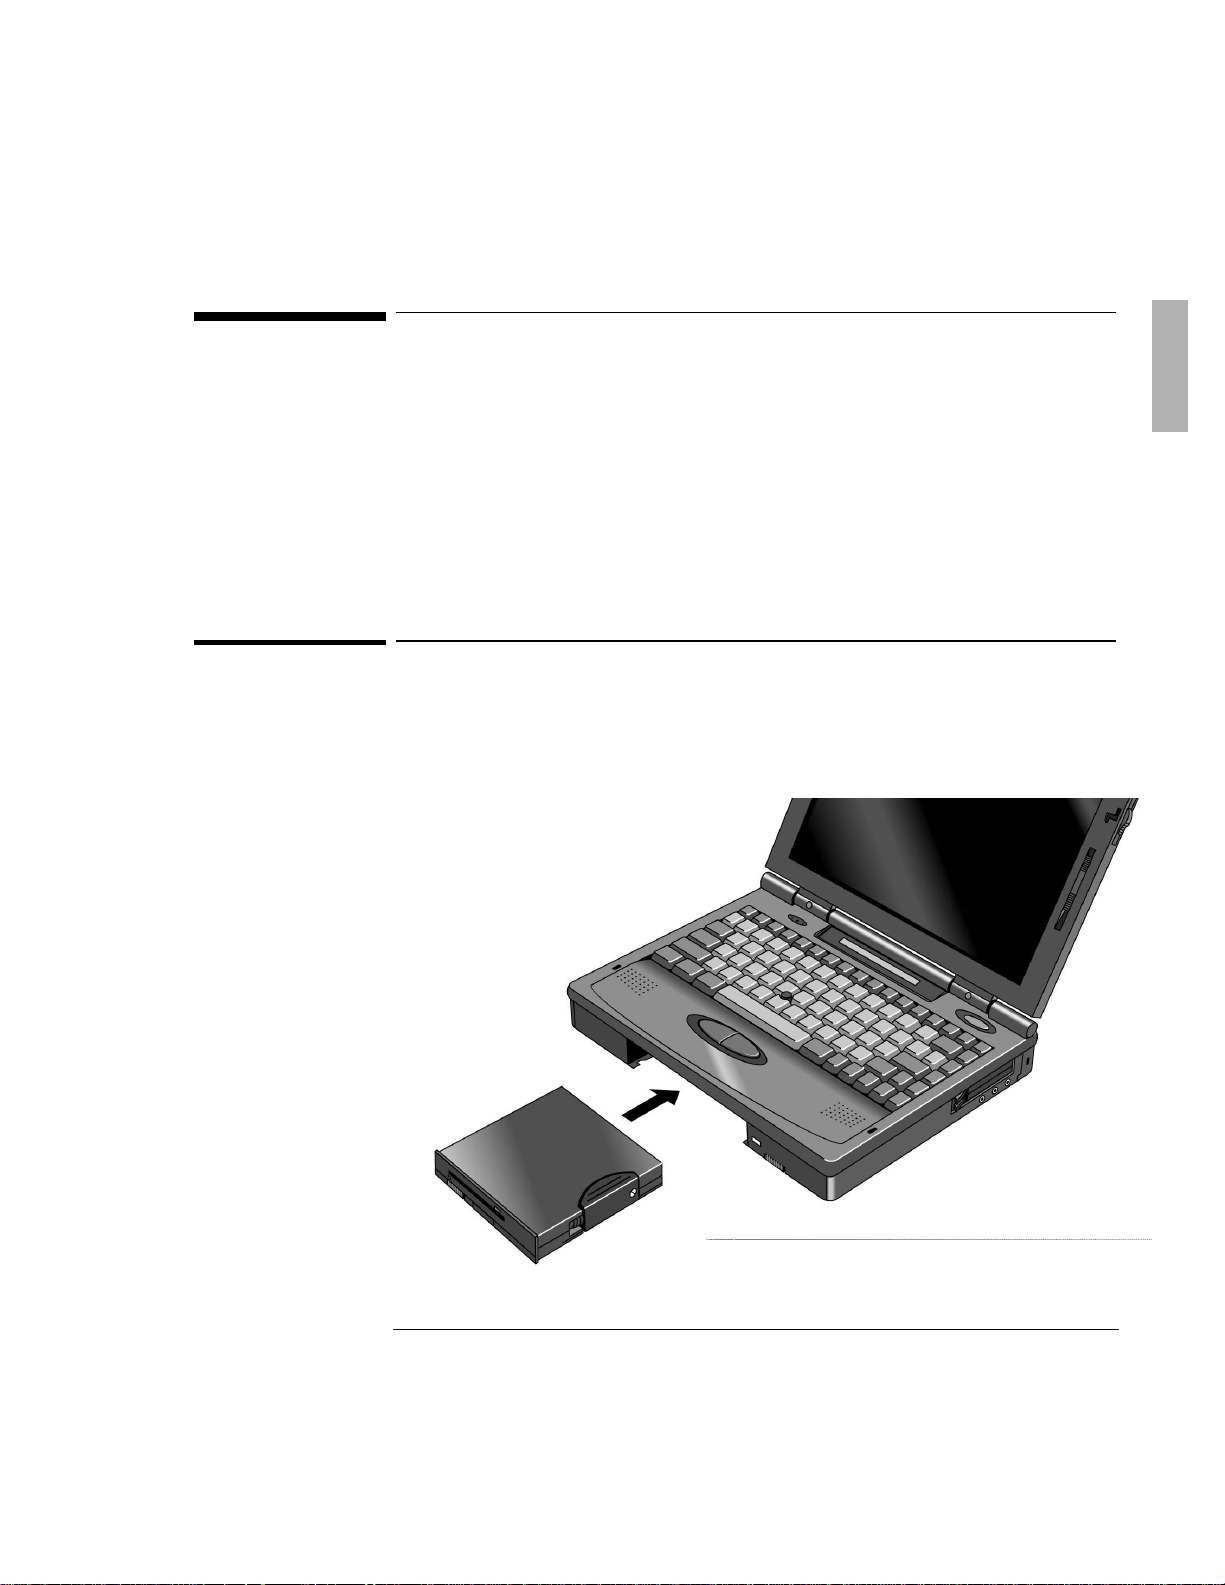
Using the Floppy Drive
Using the Floppy Drive
You can install the floppy drive in the center drive bay or attach it externally to the
parallel port.
This section describes how to
♦ Install the floppy drive internally.
♦ Install the floppy drive externally.
♦ Insert and remove a floppy disk.
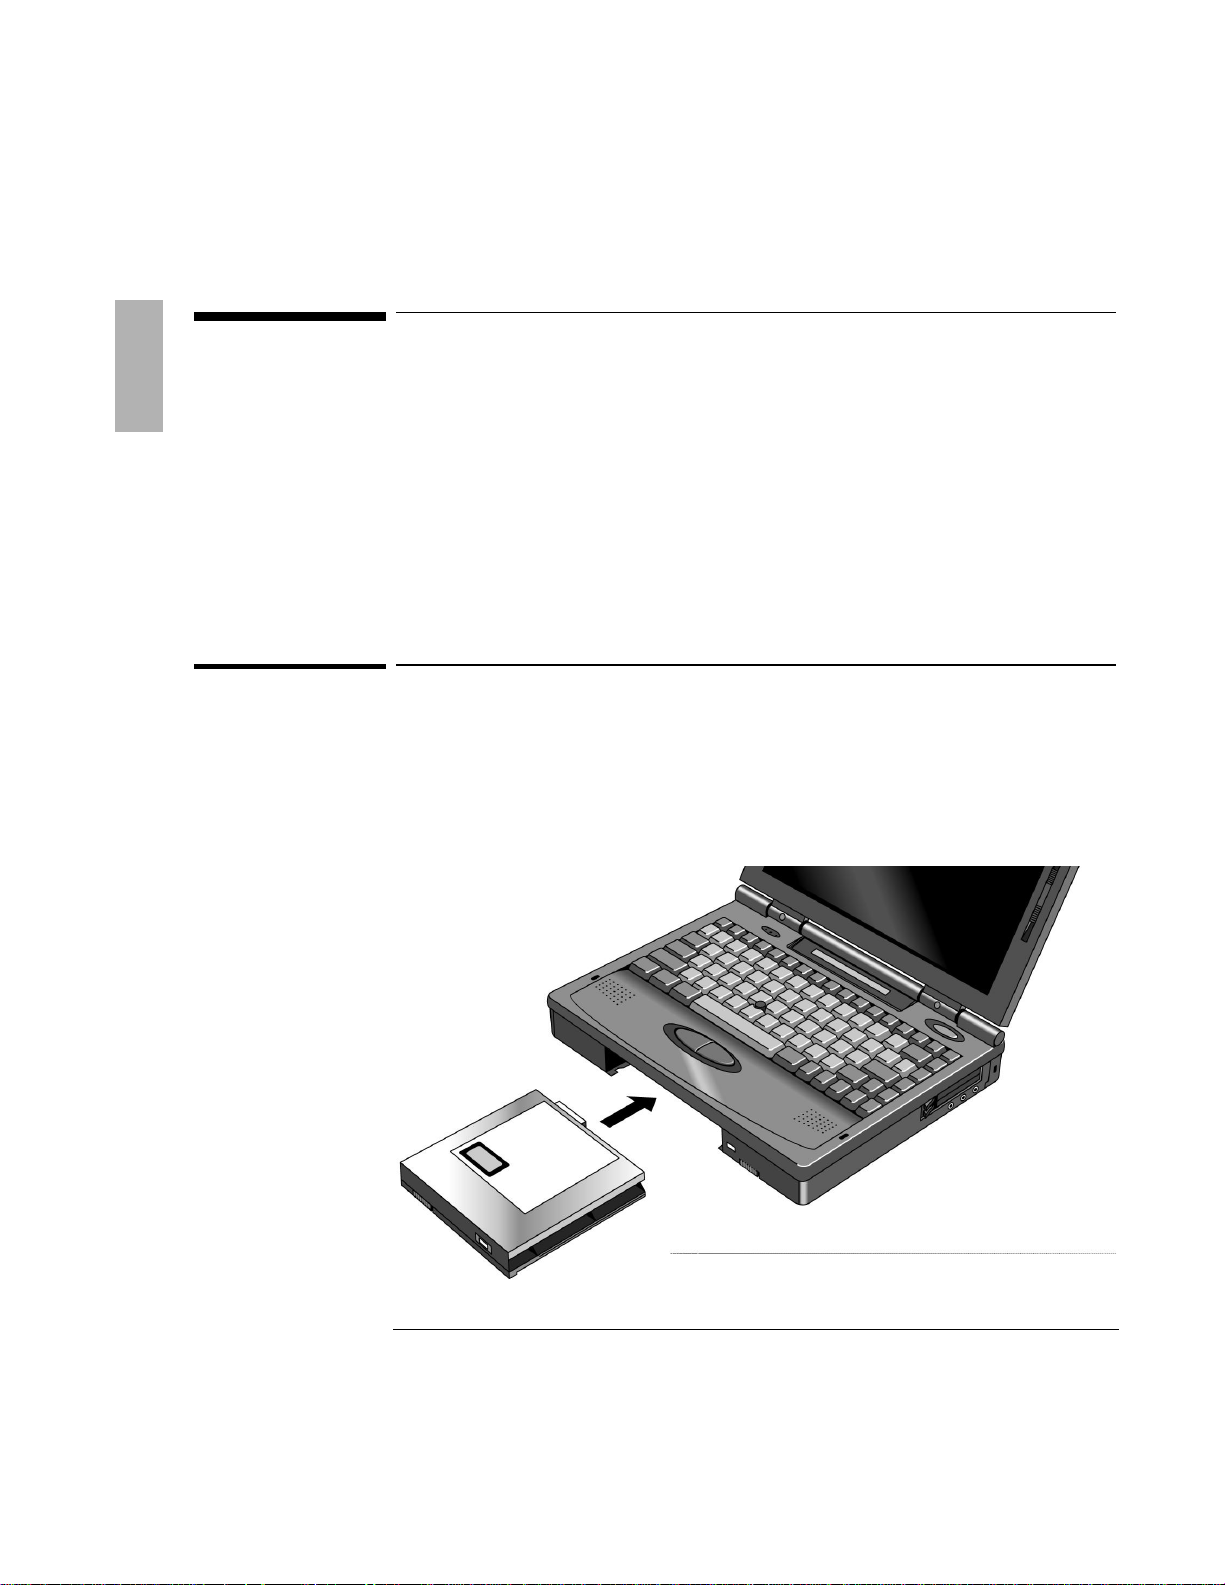
To install the floppy drive internally
1. If necessary, remove the CD-ROM drive or super battery from the OmniBook.
2. Slide the floppy drive into the OmniBook until it clicks into place.
Floppy
1-9
Page 10
Using OmniBook Accessories
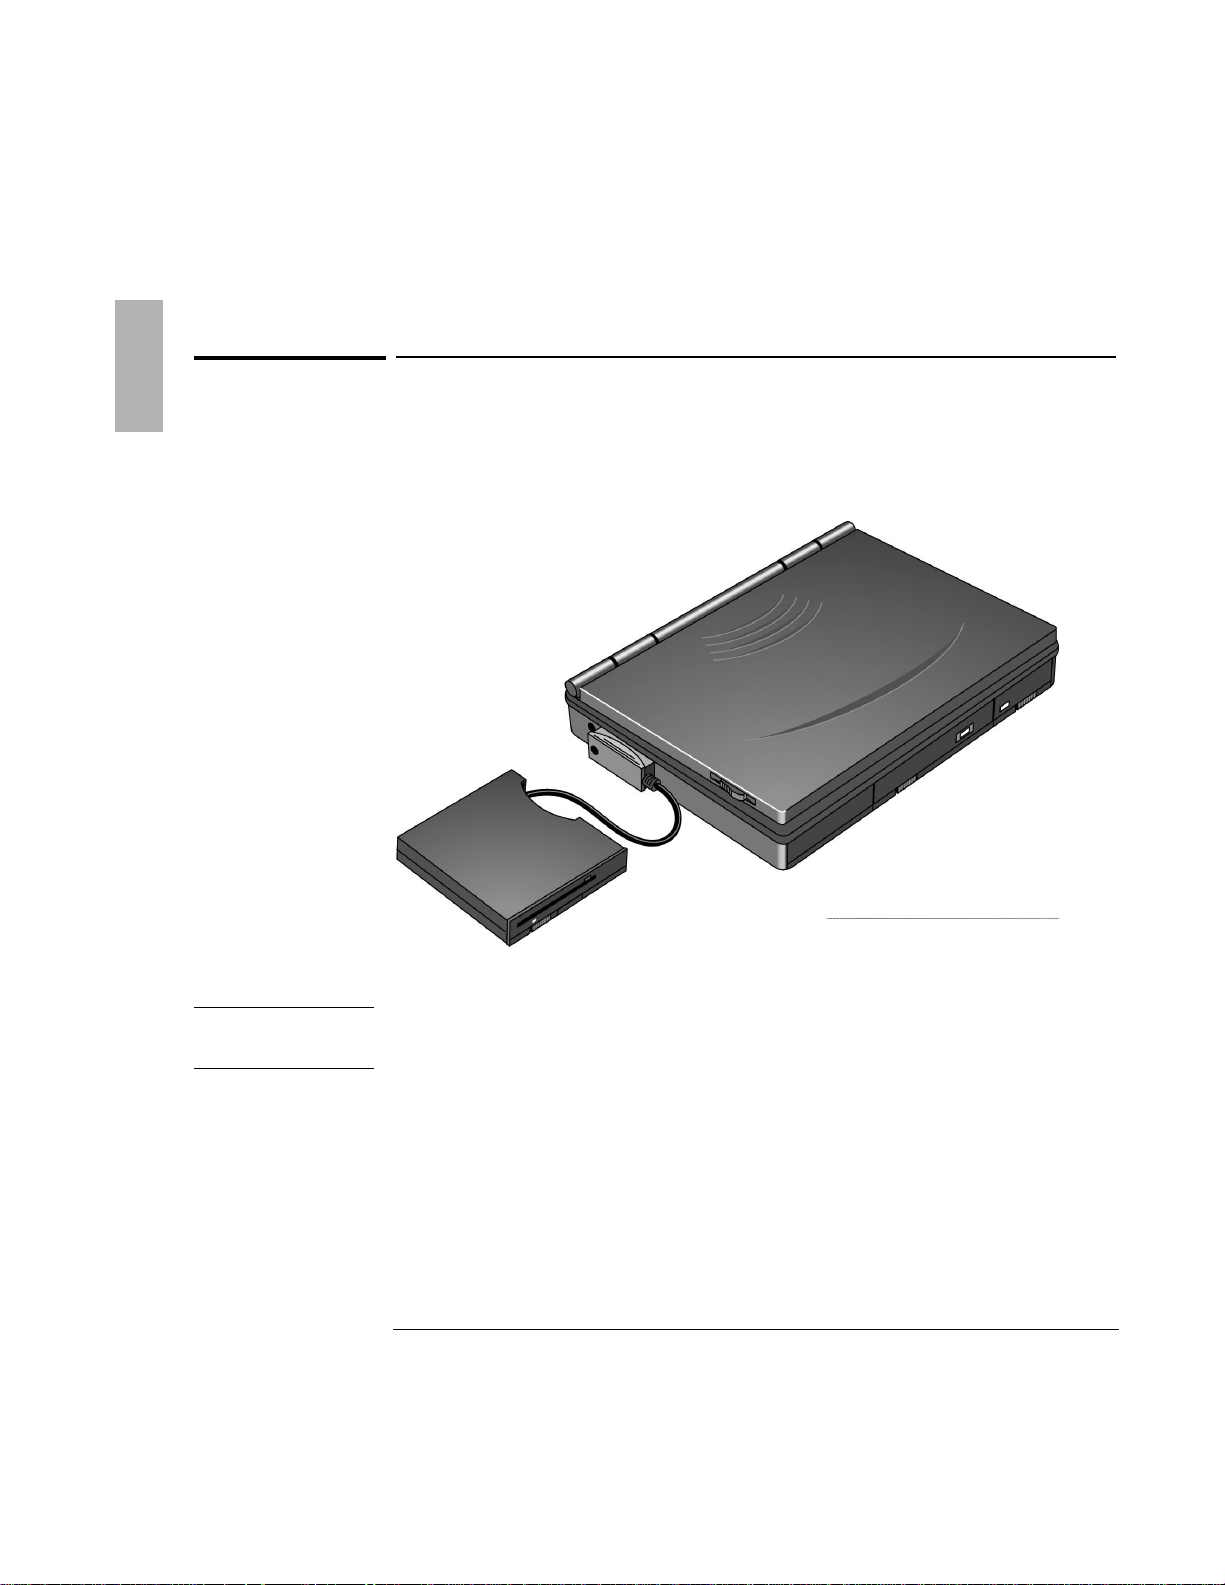
Important
The external floppy drive works only with the OmniBook’s parallel port. It does not
work with the parallel port on the docking system.
Parallel port
Using the Floppy Drive
To install the floppy drive externally
1. Pull out the floppy drive cable from the disk drive.
2. Connect the cable to the parallel port on the left side of the OmniBook.
1-10
Page 11
Using OmniBook Accessories
CAUTION
Do not remove a floppy disk while the OmniBook is actively reading or writing
data. Wait until the floppy drive is done—otherwise, you could lose data or the
OmniBook could stop responding.
remove the floppy disk.
Using the Floppy Drive
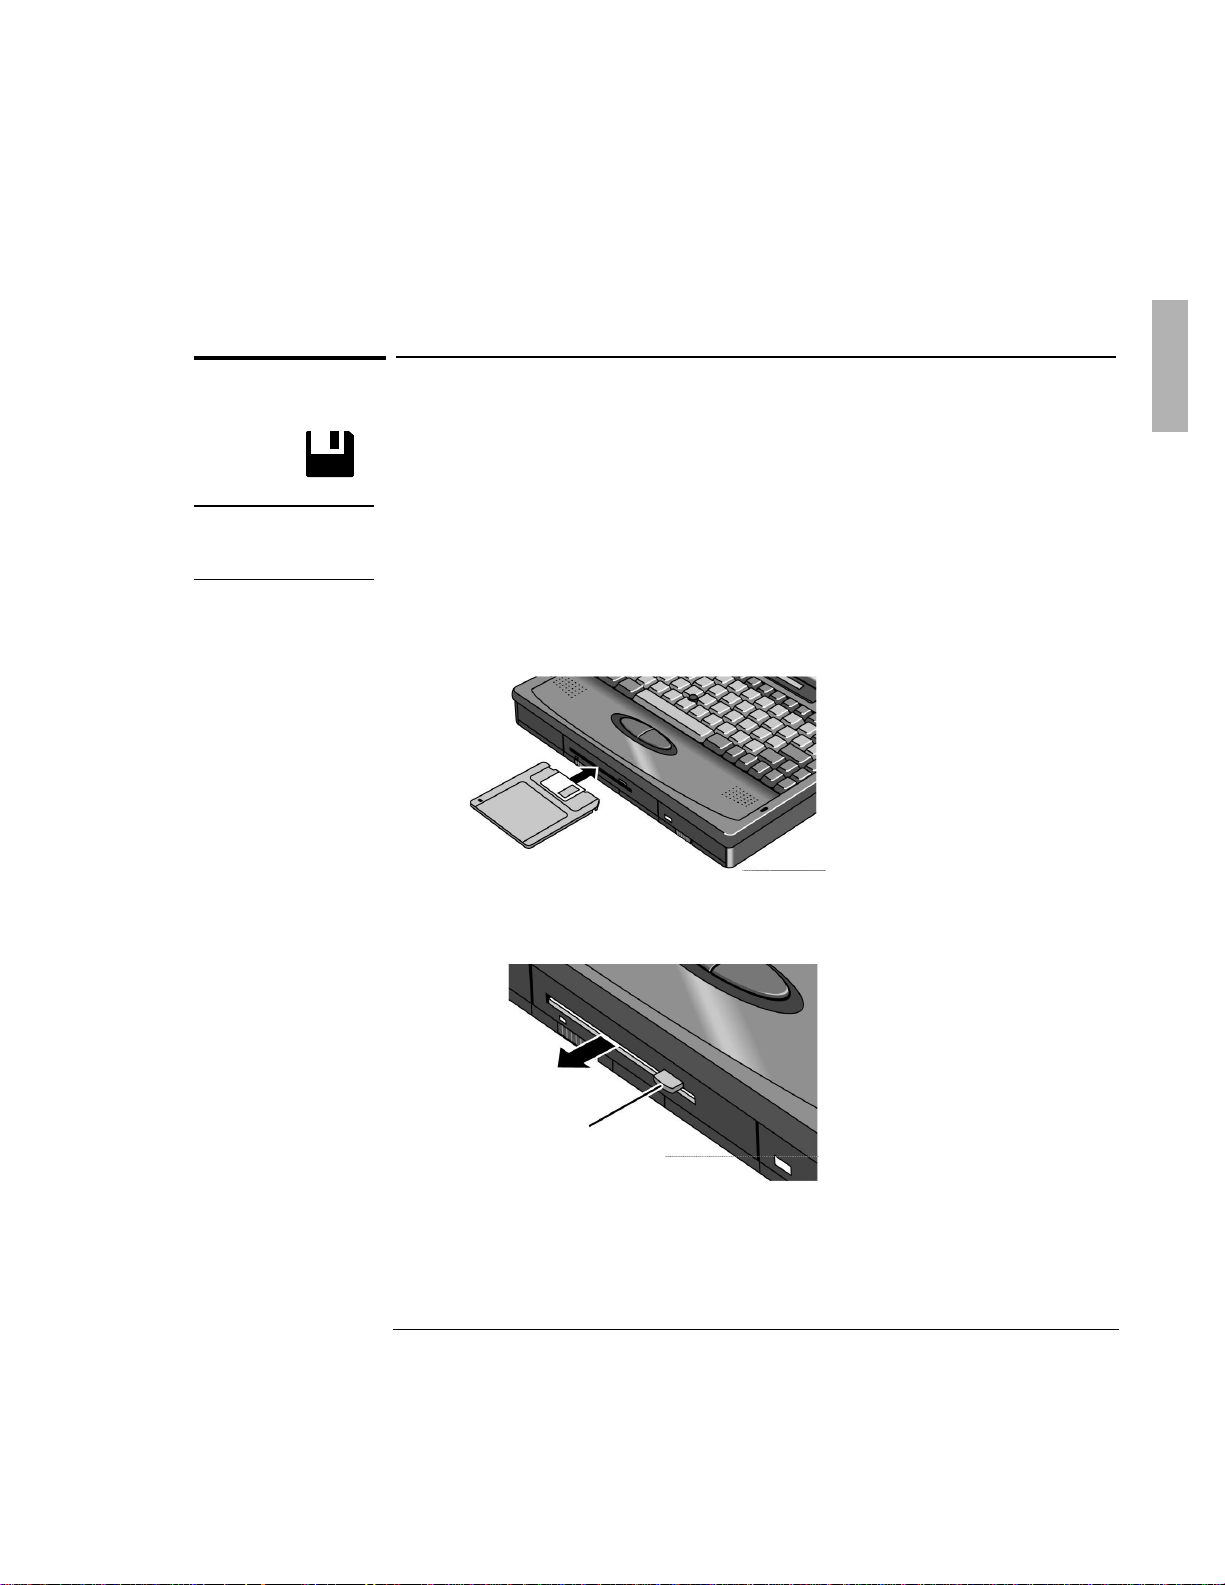
To insert or remove a floppy disk
When the OmniBook is reading or writing data to the floppy drive, the floppy disk
icon appears on the Status panel.
1. Hold the disk with its face up, then slide it into the floppy drive slot until it
clicks into place.
2. To remove the floppy disk, press the eject button.
Press the eject button to
1-11
Page 12
Using OmniBook Accessories
Using the CD-ROM Drive
Using the CD-ROM Drive
You install the CD-ROM drive in the center drive bay of the OmniBook. If you want
to use both the CD-ROM drive and the floppy disk drive, connect the floppy disk
drive to the OmniBook’s parallel port.
This section describes how to
♦ Install the CD-ROM drive.
♦ Insert and remove a CD.
♦ Use the CD-ROM drive safely.
To install the CD-ROM drive
If you’re using Windows 95
1. If necessary, remove the floppy drive or super battery from the OmniBook.
2. Slide the CD-ROM drive into the OmniBook until it clicks into place.
1-12
Page 13

Using OmniBook Accessories
Reset button
Using the CD-ROM Drive
If you’re using Windows for Workgroups
1. Save your work—you’ll be resetting the OmniBook.
2. If necessary, remove the floppy drive or super battery from the OmniBook.
3. Slide the CD-ROM drive into the OmniBook until it clicks into place.
4. Press the reset button.
Insert a ball-point pen tip or other slender object into the reset-button hole in the
left side of the case, below the ac adapter socket. Push in momentarily—the system
resets and reboots.
1-13
Page 14

Using OmniBook Accessories
CAUTION
Do not remove a CD while the OmniBook is actively reading data. Wait until
the CD-ROM drive is done—otherwise, the OmniBook could stop responding.
Press to open CD-ROM drive.
Keep CD label up.
Using the CD-ROM Drive
To insert or remove a CD
When the OmniBook is reading data from the CD-ROM drive, the CD disk icon
appears on the Status panel.
1. Press the open button on the front of the CD-ROM drive.
2. Place the CD in the drive and gently press down in the center of the CD to seat
it on the spindle.
3. Close the door to the drive.
4. To remove the CD, press the open button on the front of the CD-ROM drive.
1-14
Page 15

Using OmniBook Accessories
Using the CD-ROM Drive
To use the CD-ROM drive safely
The CD-ROM drive used with the OmniBook is certified as a Class 1 laser device
according to the U.S. Department of Health and Human Services (DHHS) Radiation
Performance standard and international standards IEC 825 / IEC 825-1 (EN60825 /
EN60825-1). This device is not considered harmful, but the following precautions
are recommended:
• Ensure proper use by reading and following the instructions carefully.
• If the unit requires service, contact an authorized HP service center—see the
OmniBook Support and Service booklet.
• Do not attempt to make any adjustment of the unit.
• Avoid direct exposure to the laser beam—do not open the unit.
CLASS 1 LASER PRODUCT
LASERSCHÜTZKLASSE 1 PRODUKT
1-15
Page 16

Using OmniBook Accessories
Managing Battery Power
Managing Battery Power
The primary source of power for the OmniBook is its rechargeable battery. The
OmniBook provides several safeguards so that you won’t be surprised by a
dead-battery condition—the status panel shows the remaining battery charge and
built-in warnings are displayed for low-battery conditions.
To preserve your current work session, the OmniBook automatically turns off when
the battery charge gets too low—your session continues when you plug in the ac
adapter or insert a fresh battery.
This section describes how to
♦ Replace the OmniBook’s battery.
♦ Install a high-capacity battery.
♦ Handle and store the battery pack safely.
1-16
Page 17

Using OmniBook Accessories
release battery.
Managing Battery Power
To replace the battery
The shading of the battery symbol on the status panel shows the approximate
charge level of the battery relative to a full charge. The battery symbol blinks when
the battery is low.
The lightning bolt symbol appears on the status panel when the battery is charging.
1. Important
Save your work.
2. If available, plug in the OmniBook’s ac adapter.
3. Slide the battery switch to the right and slide the battery out of its compartment.
Slide switch to
4. Slide the new battery all the way into the battery compartment.
1-17
Page 18

Using OmniBook Accessories
battery
Fully charged battery
Managing Battery Power
To install a high-capacity battery
To increase the time you can work on battery power, you can install a second,
high-capacity battery in the OmniBook’s center drive bay.
1. Important
Save your work.
2. If necessary, remove the floppy drive or CD-ROM drive from the OmniBook.
3. Slide the high-capacity battery into the OmniBook until it clicks into place.
A second Battery Status icon appears in the LCD status panel, showing the
charge level of the new battery.
High-capacity
1-18
Page 19

Using OmniBook Accessories
CAUTION
Do not mutilate, puncture, or dispose of the battery in fire. The battery can
burst or explode, releasing hazardous chemicals. A rechargeable battery pack
must be recycled or disposed of properly.
Managing Battery Power
To handle and store the battery safely
To safely use the battery, follow the instructions below:
• When the battery is not in use, store it in the battery pouch provided.
• Do not allow a metal object to touch across the battery contacts. This can
damage your battery pack and may cause the metal object to get hot.
• Do not disassemble. There are no serviceable parts inside.
• Handle a damaged or leaking lithium-ion battery with extreme care. If you
come in contact with the electrolyte, wash the exposed area with soap and
water. If it contacts the eye, flush the eye with water for 15 minutes and seek
medical attention.
• Do not expose the battery pack to high storage temperatures (above 60 °C,
140 °F).
• Do not dispose of the battery pack in fire.
• The battery pack is suitable for use only with an HP OmniBook 5500 and
F1338A battery charger.
• To obtain a replacement battery, contact your local dealer or HP sales office.
• When discarding a battery pack, contact your local waste disposal provider
regarding local restrictions on the disposal or recycling of batteries.
• Do not charge the battery pack if the ambient temperature exceeds 45 °C (113F).
1-19
Page 20

Using OmniBook Accessories
Installing a New Hard Drive
Installing a New Hard Drive
You can upgrade the OmniBook system by installing a new hard drive or you may
want to switch hard drives between OmniBooks.
In this section you’ll learn how to
• Remove the hard drive.
• Install a new hard drive.
• Install software on a new hard drive.
1-20
Page 21

Using OmniBook Accessories
Installing a New Hard Drive
To remove the hard drive
1. Important
Back up all the files on your current drive C. You can back up the files to a tape
drive, a network drive, a PC card, or a flexible disk.
2. Unplug the adapter.
3. Exit Windows.
• If you’re using Windows 95, use the shutdown option from the Start menu.
• If you’re using Windows for Workgroups, exit Windows, then press
CTRL+ALT+blue On/Off button simultaneously.
4. Remove all batteries from the OmniBook.
5. Close the cover and turn your computer over.
6. Remove the screw and security cover located at the back of the hard disk drive.
7. Firmly slide the drive out of the drive compartment. (This requires some force.)
1-21
Page 22

Using OmniBook Accessories
Installing a New Hard Drive
To install drive C
After following the instructions for removing drive C, use the next procedure to
install the new hard drive.
1. Gently press downwards on the hard drive while you slide it into the drive bay.
2. Make sure the drive is fully inserted.
3. Replace the screw and security cover.
4. Replace the battery or attach ac power.
5. Press the reset button.
To install your OmniBook software
The following procedure describes how to install your original OmniBook software
using the OmniBook’s internal CD-ROM drive—or an external CD-ROM drive
connected to the OmniBook’s docking system.
1. Plug in the ac adapter in case the battery is low.
2. Install the CD-ROM drive in your OmniBook.
–or–
Connect a CD-ROM drive to the docking system and dock the OmniBook.
1-22
Page 23

Using OmniBook Accessories
Installing a New Hard Drive
3. Connect the floppy drive to the parallel port.
4. Insert the Support Utility floppy disk in the floppy drive.
5. Insert the Recovery CD in the CD-ROM drive.
6. Press CTRL+ALT+DEL, or press the reset button. This restarts your OmniBook
from the floppy drive.
7. When you see a menu of startup options, select option 2—Reinstall All Files.
If you don’t have an OmniBook docking system or an OmniBook CD-ROM
drive, select option 1 for instructions. It’s a good idea to read this file for the
most up-to-date information.
8. Follow the instructions on your screen. When the process finishes, your hard
disk contains the original files that came with your OmniBook.
1-23
Page 24

Page 25

2
Troubleshooting
1-25
Page 26

Troubleshooting
Hints
If you're having a problem—and Windows is running on your OmniBook—see the
online OmniBook User’s Guide. Its troubleshooting chapter contains more
troubleshooting information.
If you run into problems installing your OmniBook accessories, you can use the
suggestions in this chapter for getting back on track.
If you have questions that this manual doesn't answer, you can
• See the online OmniBook User’s Guide—it’s your main source of information
about using the OmniBook. It includes extensive troubleshooting information.
• Check with your computer system administrator, if you have one.
• Contact your dealer, or contact Hewlett-Packard—see the OmniBook Support
and Service booklet or OmniBook Support in the online OmniBook Library.
1-26
Page 27

Troubleshooting
Solving Basic Problems
Solving Basic Problems
If your OmniBook accessory doesn’t seem to work properly, find the symptom
below that matches your situation. Try the suggestions one at a time.
This section separates problems into the following categories:
♦ Floppy disk drive problems.
♦ CD-ROM drive problems.
♦ Battery problems.
♦ Hard drive problems.
To resolve floppy disk drive problems
If a floppy drive doesn’t work
• Remove and reinsert the floppy disk.
• Check to see that the floppy disk drive configuration is correct. Note that the
floppy drive will not work on the dock parallel port—only on the OmniBook
parallel port.
1. Press FN+F2 to start the System Configuration utility.
2. From the Disks menu, click Floppy Disk Drive.
3. Select 1.44 Mb and click OK.
4. From the Exit menu, click Save and Exit.
5. Click OK.
If the OmniBook doesn’t reboot successfully from drive A
• If the OmniBook doesn’t reboot from drive A, press FN+F2 to start the System
Configuration utility. Check that the floppy drive is the first boot device.
1-27
Page 28

Troubleshooting
Solving Basic Problems
To resolve CD-ROM drive problems
Excessive static electricity discharges may cause the CD-ROM drive to stop
working. If the CD-ROM drive stops responding
• Remove and insert the CD-ROM drive again.
• Save your work, then press CTRL+ALT+DEL to reboot.
• If nothing happens, reset the OmniBook (see page 1-13).
To resolve battery problems
If the OmniBook doesn’t turn on with a fresh battery
• The new battery pack may be low. Plug in the ac adapter.
• If nothing happens, reset the OmniBook (see page 1-13).
If the battery pack doesn’t charge or stops charging
• Check that the battery is fully installed and locked in place.
• Turn off the OmniBook, then check that the battery contacts are clean and that
the ac adapter cables are fully plugged in.
• Move the OmniBook away from any nearby heat source. Unplug the ac adapter
and allow the battery to cool down. An elevated battery temperature prevents
charging.
If the battery runs down too fast
• If the operating time has gotten shorter and the battery pack is more than a year
or two old, you may need a new battery .
1-28
Page 29

Troubleshooting
Solving Basic Problems
If the OmniBook turns off immediately after it turns on
• Battery power is probably extremely low. Plug in the ac adapter, or turn off the
OmniBook and insert a fresh battery .
If the OmniBook stops responding
• Try waiting a few moments, then try turning it off and on.
• Press CTRL+ALT+DEL to reboot.
• If nothing happens, press the reset button.
To resolve hard drive problems
If your system doesn’t boot from drive C
• Make sure the hard disk is inserted completely in the unit. It may be necessary
to use a small pair of pliers to pull up on the PC-board tab. While pulling up on
the tab, gently press downwards on the hard drive while you slide it into the
drive bay.
1-29
Page 30

Troubleshooting
Solving Basic Problems
• Make sure a floppy disk isn’t inserted in drive A.
1-30
Page 31

Troubleshooting
Solving Basic Problems
If the OmniBook doesn’t reboot successfully
If your operating system is MS-DOS or Windows for Workgroups
• If no text is displayed, or if things stop before you see any text about MS-DOS,
the unit probably requires service.
• If you see error messages during startup, but Windows starts or you get an
MS-DOS prompt, exit Windows. Then type scandisk to fix problems with
drive C. Then press
Menu,” press
CTRL+ALT+DEL to reboot—but at the “MS-DOS Startup
F8 ENTER and step through each startup command to find where
the problem occurs. Repair or restore the necessary files as indicated.
• If you see text about MS-DOS but things stop before Windows starts or before
you get an MS-DOS prompt, insert the Support Utility disk or other boot disk in
the floppy drive, then press
CTRL+ALT+DEL to reboot from drive A—then
choose the Minimum Startup option. (If the unit doesn’t reboot from a floppy
boot disk, the unit probably requires service.)
If it reboots, type dir c: to see if drive C contains valid files. Then try the
following:
If drive C has valid files, try typing these commands:
scandisk c: (to repair any defects)
sys a: c: (to restore core MS-DOS files).
Last resort: The following commands delete all files on drive C, so you must
reinstall your files after running these commands:
fdisk (to reinitialize drive C)
format c: /u (to prepare drive C for storing data)
Then reinstall all of the original files on drive C using the HP Recovery CD and
Support Utility disk. See “If you need to install all original files on drive C” in this
section.
1-31
Page 32

Troubleshooting
Solving Basic Problems
If your operating system is Windows 95
• If no text is displayed during reboot, or if things stop before you see “Starting
Windows 95...”, the unit probably requires service.
• If you see “Starting Windows 95...” during startup followed by error messages,
reboot again—but when you see “Starting Windows 95...”, press
F8 to get the
startup menu. Choose a startup option that might help you discover or fix the
problem.
Use the “safe mode” option to start Windows with a basic configuration.
Run ScanDisk (in System Tools) to fix problems with drive C. You can also
make other changes to repair your startup files.
Use the “step-by-step” option to step through each startup command to find
where problems occur, so you can repair or restore any files indicated.
• If drive C (the hard disk) isn’t working properly, insert the Support Utility floppy
disk in the floppy drive, then press
CTRL+ALT+DEL to reboot from drive A—then
choose the Minimum Startup option. At the MS-DOS prompt, type
scandisk c: to fix certain problems with drive C. You can use other
commands on drive A to try to repair drive C. Then remove the floppy disk and
try rebooting again. If it still doesn’t start, you could try reinstalling all of the
original files on drive C—see “If you need to reinstall all original files on drive C”
below.
1-32
Page 33

3
Specifications and Regulatory
Information
1-33
Page 34

Specifications and Regulatory Information
Your OmniBook accessories are designed to provide trouble-free operation. The
following suggestions can help you while working with your OmniBook:
♦ Observe the temperature limits and other specifications listed in the next
section.
♦ If you have problems, see the problem-solving suggestions and references
listed in chapter 2.
♦ If you think your OmniBook might need repair service, see the warranty and
service information in the Support and Service booklet.
To contact Hewlett-Packard
If you have questions that the OmniBook manuals don't answer (even after looking
in the contents and index), you can contact Hewlett-Packard at the address or
phone number listed in the Support and Service booklet or in OmniBook Support in
the online OmniBook Library. Please have your OmniBook with you.
1-34
Page 35

Hardware Specifications
Floppy disk drive
Modular 3.5 inch 1.44-MB floppy disk drive with self-contained parallel cable for internal
or external use with OmniBook 5500 series. Can be exchanged with a second battery or
CD-ROM drive module.
Hard disk drive
Modular 2.5-inch IDE drive. Available capacities: 810 MB, 1.35 GB, and 2.0 GB.
CD-ROM drive
Modular 4x or 6x speed drive. Photo-CD and CD-plus multi-session specification
compliant, multimedia PC-3 specification compliant, supports 1x, 2x, 4x, and 6x rotational
speed, 4x and 6x sampling and digital filter for CD audio, software and manual eject. Can
be exchanged with second battery or floppy disk drive module.
Lithium battery
Capacity
Charging time
Operating hours
Small pack
35 Watt-Hr
6 hours (with unit on)
4 hours (with unit off)
2.3 hours (typical)
1.7 hours (heavy use)
Large pack
52 Watt-Hr
9 hours (with unit on)
6 hours (with unit off)
3.5 hours (typical)
2.4 hours (heavy use)
Temperature
Operating: 10 to 35 ºC (50 to 95°F) on TFT,
5 to 35 ºC (41 to 95 ºF) on DSTN.
Storage: -40 to 60 °C (-40 to 140 °F).
The unit may not operate properly below 5 °C (41 °F), but it can be stored at
temperatures down to -40°C (-40°F) without damaging the hardware.
Humidity
Operating: 90% relative humidity at 35 °C (95°F) maximum.
Storage: 90% relative humidity at 60 °C (140 °F) maximum.
Specifications and Regulatory Information
Hardware Specifications
1-35
Page 36

Specifications and Regulatory Information
Regulatory Information
Regulatory Information
This section presents information that shows how the HP F1195A complies with
regulations in certain regions. Any modifications to the OmniBook not expressly
approved by Hewlett-Packard could void the authority to operate the OmniBook in
these regions.
U.S.A.
The HP F1195A generates and uses radio frequency energy and may interfere with
radio and television reception. The floppy drive complies with the limits for a Class
B computing device as specified in Part 15 of FCC Rules, which provide reasonable
protection against such interference in a residential installation. The “FCC ID”
number for this product is listed on the bottom of the unit. In the unlikely event that
there is interference to radio or television reception (which can be determined by
removing the unit's batteries and ac adapter), try the following:
• Reorienting or relocating the receiving antenna.
• Relocating the floppy drive with respect to the receiver.
• Connecting the OmniBook ac adapter to another power outlet.
Connections to Peripheral Devices
To maintain compliance with FCC Rules and Regulations, use properly shielded
cables with this device.
For more information, consult your dealer, an experienced radio/television
technician, or the following booklet, prepared by the Federal Communications
Commission: How to Identify and Resolve Radio-TV Interference Problems. This
booklet is available from the U.S. Government Printing Office, Washington, DC
20402, Stock Number 004-000-00345-4. At the first printing of this manual, the
telephone number was (202) 512-1800.
1-36
Page 37

Specifications and Regulatory Information
Regulatory Information
Canada
This digital apparatus does not exceed the Class B limits for radio noise emissions
from digital apparatus as set out in the radio interference regulations of the
Canadian Department of Communications.
Le présent appareil numérique n'émet pas de bruits radioélectriques dépassant les
limites applicables aux appareils numériques de Classe B prescrites dans le
règlement sur le brouillage radioélectrique édicté par le Ministère des
Communications du Canada.
Japan
1-37
Page 38

Specifications and Regulatory Information
Manufacturer:
Hewlett-Packard Company
Address:
Hewlett-Packard Co.
Mobile Computing Division
1000 NE Circle Blvd.
Corvallis, OR 97330
declares that the following products
Product name:
HP F1195A internal/external floppy disk drive
Options:
conforms to the following product specifications
Safety:
IEC 950:1991+A1,A2 / EN 60950 (1992)+A1,A2
EMC:
CISPR 22:1993 / EN 55022 (1994): Class B [1 ]
EN 50082-1:1992
IEC 801-2:1991 / prEN 55024-2 (1992): 4kV CD, 8kV AD
IEC 801-3:1984 / prEN 55024-3 (1991): 3V/m
IEC 801-4:1988 / prEN 55024-4 (1992): 0.5 kV signal lines, 1.0kV power
lines
Supplementary Information:
The product herewith complies with the requirements of the EMC
Directive 89/336/EEC.
The HP F1044B ac adapter used with this product is disconnected from
the power by unplugging the power cord from the power outlet or from
the ac adapter. Therefore, the power outlet should be located close to
the product and be easily accessible.
[1] The product was tested in a typical configuration with Hewlett-
Packard personal computer peripherals.
Quality Department
Hewlett-Packard Company
Mobile Computing Division
Regulatory Information
Europe
Products sold in Europe by Hewlett-Packard and its authorized dealers meet the
specifications listed below.
Declaration of Conformity (according to ISO/IEC Guide 22 and EN 45014)
All
1-38
Page 39

Specifications and Regulatory Information
Manufacturer:
Hewlett-Packard Company
Address:
Hewlett-Packard Co.
Mobile Computing Division
1000 NE Circle Blvd.
Corvallis, OR 97330
declares that the following products
Product name:
HP F1319A or HP F1336A CD-ROM drive
Options:
conforms to the following product specifications
Safety:
IEC 950:1991+A1,A2 / EN 60950 (1992)+A1,A2
IEC 825/IEC 825-1 (EN60825/EN60825-1:1994)
EMC:
CISPR 22:1993 / EN 55022 (1994): Class B [1 ]
EN 50082-1:1992
IEC 801-2:1991 / prEN 55024-2 (1992): 4kV CD, 8kV AD
IEC 801-3:1984 / prEN 55024-3 (1991): 3V/m
IEC 801-4:1988 / prEN 55024-4 (1992): 0.5 kV signal lines, 1.0kV power
lines
Supplementary Information:
The product herewith complies with the requirements of the EMC
Directive 89/336/EEC.
The HP F1044B ac adapter used with this product is disconnected from
the power by unplugging the power cord from the power outlet or from
the ac adapter. Therefore, the power outlet should be located close to
the product and be easily accessible.
[1] The product was tested in a typical configuration with Hewlett-
Packard personal computer peripherals.
Quality Department
Hewlett-Packard Company
Mobile Computing Division
Regulatory Information
Europe
Products sold in Europe by Hewlett-Packard and its authorized dealers meet the
specifications listed below.
Declaration of Conformity (according to ISO/IEC Guide 22 and EN 45014)
All
1-39
Page 40

 Loading...