

Page 1

HP ProLiant iSCSI Boot for Linux User Guide
Part Number 599738-001
March 2010 (First Edition)
Page 2

© Copyright 2010 Hewlett-Packard Development Company, L.P.
The information contained herein is subject to change without notice. The only warranties for HP products and services are set forth in the express
warranty statements accompanying such products and services. Nothing herein should be construed as constituting an additional warranty. HP
shall not be liable for technical or editorial errors or omissions contained herein.
Confidential computer software. Valid license from HP required for possession, use or copying. Consistent with FAR 12.211 and 12.212,
Commercial Computer Software, Computer Software Documentation, and Technical Data for Commercial Items are licensed to the U.S.
Government under vendor’s standard commercial license.
Intended audience
This document is for the person who installs, administers, and troubleshoots servers and storage systems.
HP assumes you are qualified in the servicing of computer equipment and trained in recognizing hazards
in products with hazardous energy levels.
Page 3

Contents
Overview..................................................................................................................................... 4
iSCSI boot overview .................................................................................................................................. 4
System requirements ..................................................................................................................................4
Limitations ................................................................................................................................................ 5
Installation and configuration ......................................................................................................... 8
Summary of installation and configuration .................................................................................................... 8
Download drivers and software................................................................................................................... 8
Updating the iSCSI boot option ROM ..........................................................................................................8
About the iSCSI boot option ROM ..................................................................................................... 8
Updating the iSCSI boot option ROM................................................................................................. 9
Installing iSCSI boot ................................................................................................................................ 13
Red Hat installations ......................................................................................................................13
SLES installations........................................................................................................................... 22
Performing an iSCSI boot............................................................................................................. 32
Booting from the iSCSI drive..................................................................................................................... 32
bnx2 driver update ..................................................................................................................... 33
Upgrading the bnx2 driver ....................................................................................................................... 33
Red Hat 4..................................................................................................................................... 33
SLES 9 ......................................................................................................................................... 33
Red Hat 5 and SLES 10.................................................................................................................. 33
Uninstalling the RPM packages..................................................................................................... 34
Uninstalling linux-iSCSI-install RPM............................................................................................................. 34
Uninstalling hp-iSCSI-boot install RPM ........................................................................................................34
Troubleshooting.......................................................................................................................... 35
ProLiant BL685c servers fail to finish boot sequence..................................................................................... 35
Option ROM not shown during POST ........................................................................................................ 35
Using a diagnostic monitor for troubleshooting............................................................................................ 35
Target connection problems...................................................................................................................... 35
Target login problems.............................................................................................................................. 36
LUN access problems .............................................................................................................................. 36
OS problems .......................................................................................................................................... 36
Technical support........................................................................................................................ 38
Before you contact HP.............................................................................................................................. 38
HP contact information............................................................................................................................. 38
Free automated customer support services ..................................................................................................38
Acronyms and abbreviations........................................................................................................ 40
Index......................................................................................................................................... 42
Page 4
Overview
iSCSI boot overview
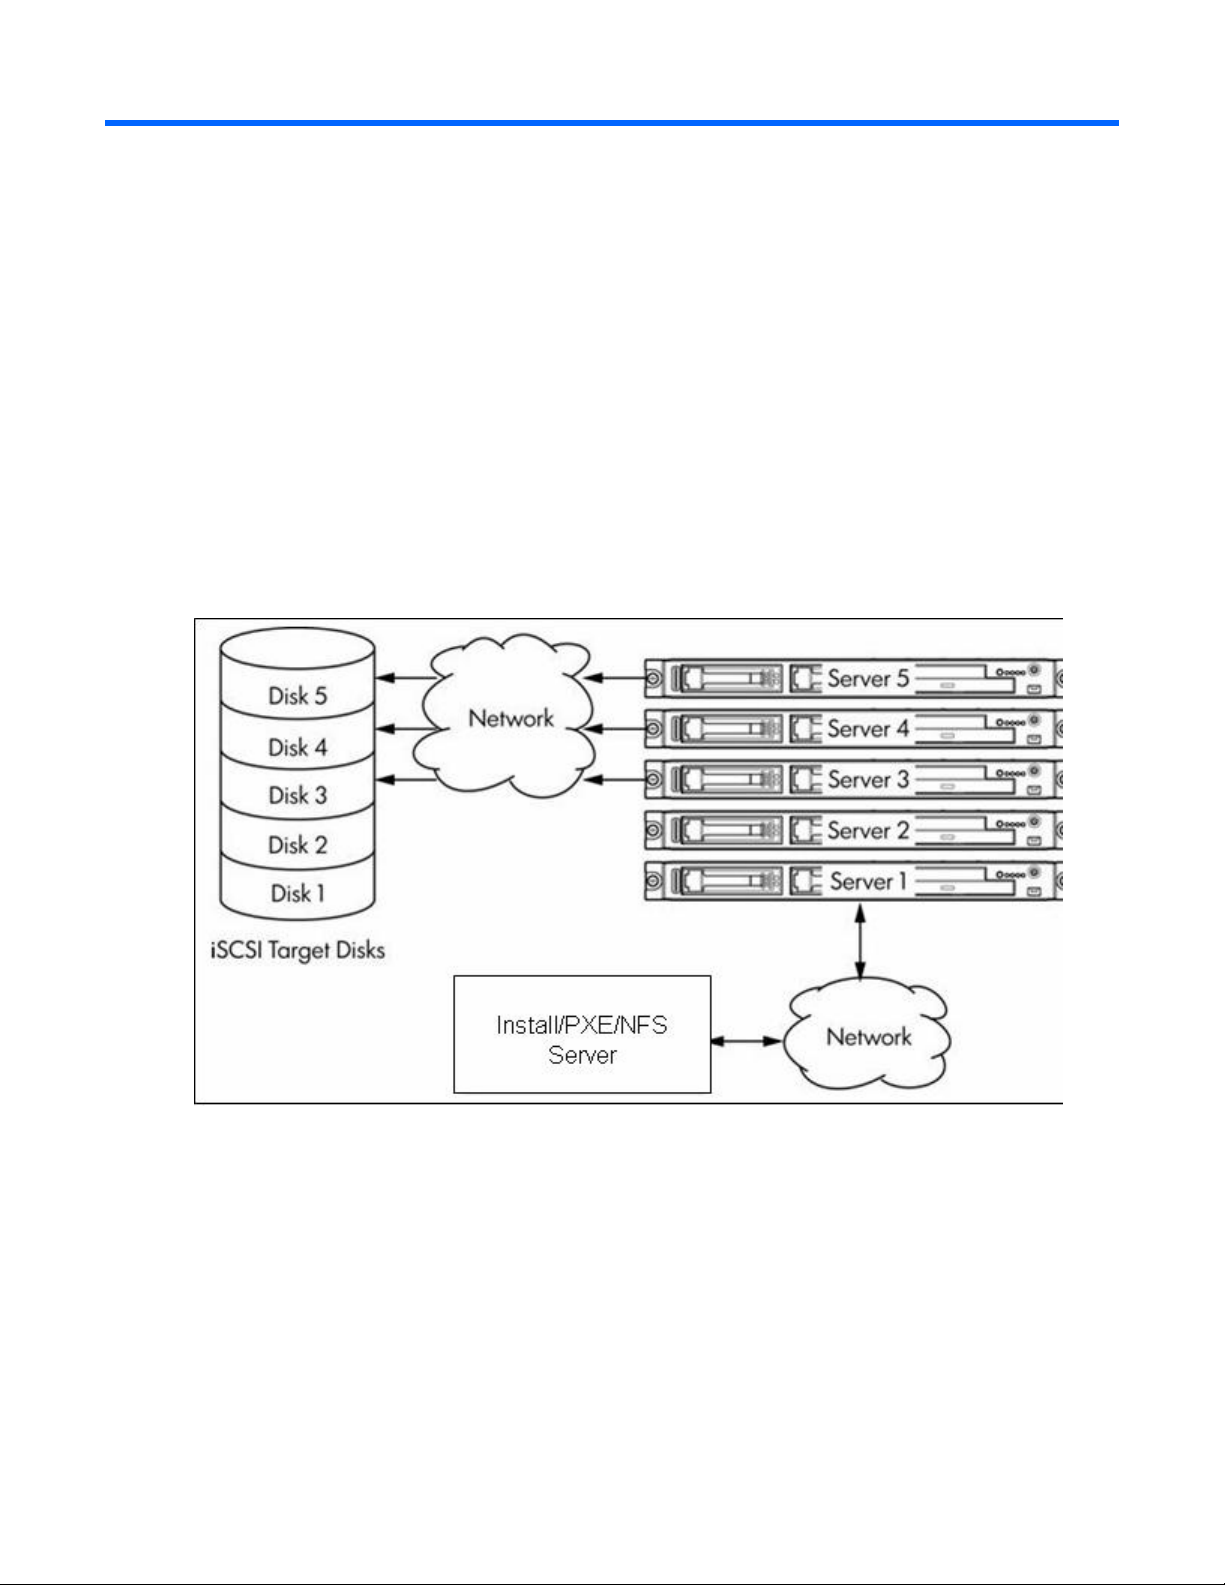
The HP iSCSI boot feature allows a server to boot from a remote disk (known as the iSCSI target) on a
Storage Area Network (SAN) without having to directly attach a boot disk.
Booting from a remote disk on a SAN allows the boot process to be centralized and consolidates
equipment resources. Unlike other implementations, iSCSI boot does not require a separate DHCP server
or a PXE server.
iSCSI boot allows a Linux system with a standup, mezzanine, or embedded HP ProLiant Gigabit Ethernet
Multifunction server adapter to start up from a remote storage device. All iSCSI commands are handled
by the Linux operating system.
The following diagram depicts an iSCSI boot implementation.
This guide provides information about installing and using iSCSI boot in Linux-based environments.
System requirements
The following software and hardware support HP iSCSI boot implementations.
Supported operating systems
• Red Hat Enterprise Linux 5 ES/AS for x86
• Red Hat Enterprise Linux 5 ES/AS for x86_64
• Red Hat Enterprise Linux 4 ES/AS for x86 (Update 4, 5, and 6)
Overview 4
Page 5

• Red Hat Enterprise Linux 4 ES/AS for x86_64 (Update 4, 5, and 6)
• SUSE Linux Enterprise Server 10 for x86
• SUSE Linux Enterprise Server 10 for x86_64
• SUSE Linux Enterprise Server 9 (SP3, SP4) for x86
• SUSE Linux Enterprise Server 9 (SP3, SP4) for x86_64
Supported hardware
• Servers. ProLiant servers that include an iLO or RILOE management device with a minimum of 256
MB memory with any of the supported operating systems and with access to an iLO virtual floppy
drive, CD drive, or USB device.
• Adapters. The following HP ProLiant Gigabit Ethernet Multifunction server adapters are supported.
o HP NC370T PCI-X Multifunction Gigabit Server Adapter
o HP NC370F PCI-X Multifunction Gigabit Server Adapter
o HP NC370i PCI-X Multifunction Gigabit Server Adapter
o HP NC371i PCI-X Multifunction Gigabit Server Adapter
o HP NC373T PCI Express Multifunction Gigabit Server Adapter
o HP NC373F PCI Express Multifunction Gigabit Server Adapter
o HP NC373i PCI Express Multifunction Gigabit Server Adapter
o HP NC373m PCI Express Dual Port Multifunction Gigabit Server Adapter for c-Class BladeSystem
o HP NC374m PCI Express Dual Port Multifunction Gigabit Server Adapter
o HP NC380T PCI Express Dual Port Multifunction Gigabit Server Adapter
iSCSI targets
All iSCSI targets supported by the Linux software initiator are supported by HP. Among HP branded
targets, those supporting iSCSI Boot are as follows:
o AiO family (http://www.hp.com/go/aiostorage)
o MSA SAN Storage Array product line (http://www.hp.com/go/msa)
o EVA4400 with the mpx 100b iSCSI Connectivity Kit (http://www.hp.com/go/eva)
For more information on iSCSI see the iSCSI (http://www.hp.com/go/iscsi)website.
Limitations
The following are limitations to iSCSI boot for Linux.
• VLANs are not supported
• Mutual CHAP is not supported
• LiLO boot loader is not supported
• Discovery protocols, such as Dynamic Host Configuration Protocol (DHCP), Internet Storage Name
Service (iSNS), and Service Location Protocol (SLP) are not supported.
Installation
• On some c-Class BladeSystems, certain USB devices cause the SLES 9 installation to hang when
loading the USB driver. The workaround is to use iLO virtual floppy to install.
Overview 5
Page 6

• On some blade systems, after the system is booted and the GUI is started, the system console on a
KVM switch may report that it is in an unsupported mode. The iLO2 integrated remote console works
fine. This is a problem with the SLES 10 installation procedure and not with the iSCSI boot
installation procedure.
• After booting a system over iSCSI, if the SmartStart Linux PSP is installed it changes the default boot
kernel in the boot loader conf file /boot/grub/menu.lst. The PSP default kernel does not support
iSCSI boot. Update the /boot/grub/grub.conf to make the default boot kernel point to the entry 0.
• If PXE is used to install the operating system on an iSCSI target for a c-Class BladeSystem, disable
the internal disk controller with RBSU (F9 during POST). After the install is complete, the internal
controller can be re-enabled.
• If the HP StorageWorks SB40c Storage Blade is used with a c-Class BladeSystem, remove the SB40c
before installing the operating system. It can be placed back in the system after the install completes.
System hangs
• In RH5 only, performing a system shutdown on an iSCSI booted system results in a hang and the
system must be reset by using the power button. This defect is fixed in the next version of the RHEL5
iSCSI initiator (U1).
• After a server is booted over iSCSI, do not bring down the network interface that iSCSI is using or a
system hang results.
• Attempting to boot from an iSCSI disk that has no operating system installed on it may result in a
system hang.
• If the system crashes, the diskdump utility that would normally take a system dump will not work on
an iSCSI booted system.
Other
• Multiple LUNs have varying problems depending on the release; therefore, it is recommended that
you add additional LUNs for the data disks after the server is booted over iSCSI.
• In RH4 only, the released iSCSI initiator driver no longer supports limiting the LUNs associated with
a target that are available to the initiator (for example, if you specify LUN=<number> in
/etc/iscsi.conf on RH4, it is ignored). This means that all LUNs configured for a target name will be
visible to the initiator when it connects to the target. This causes problems for iSCSI boot and Direct
Install, since the drive /dev/sda is always used as the boot device. If multiple LUNs are visible to the
initiator, they will be enumerated as /dev/sda, /dev/sdb, etc. and the boot device will be
unknown. Therefore, the iSCSI target configuration has limits on the way it can be configured. Some
iSCSI targets support limiting the LUNs that are visible to the target. In that case, you must configure
the target such that only the LUN for the boot disk is visible to the initiator. If the iSCSI target does
not support that option, you must configure your target with only 1 LUN per target name.
• The ibootcfg utility for updating EVs only works on an iLO running firmware version 1.48 or later. If
you have trouble with the ibootcfg utility, please use the supplied DOS ev utility to update the EVs.
• Errors from the use of the ibootcfg utility are not reported correctly. As a precaution, always use
ibootcfg -P to verify the proper setting of the iSCSI boot parameters after using ibootcfg -i to set them.
If the utility is not setting the iSCSI boot parameters, turn off power to the server and run the ibootcfg
utility again. No problems have been seen when using ibootcfg to set parameters on a machine that
is powered off.
Overview 6
Page 7

• If CHAP is used with SLES10 for the root disk, the same CHAP user name and password must be
used for all additional data disks being connected to the system. This is a limitation on the SLES10
open-iscsi initiator.
• If the RBSU utility is used to reset system defaults, the iSCSI boot parameters will be lost. You will
need to rerun the DOS EV utility or the Linux ibootcfg utility to reset the parameters.
Overview 7
Page 8

Installation and configuration
Summary of installation and configuration
Currently the method for setting up an iSCSI boot implementation consists of the following.
1. Install a HP ProLiant Gigabit Ethernet Multifunction server adapter in your server.
2. Update the firmware to the latest iSCSI boot option ROM and the latest boot code.
3. Initialize the iSCSI boot option ROM data.
4. Install the binary RPM on the iSCSI boot install server.
5. Create installation diskettes for your operating system and add the ks.cfg or autoinst.xml files.
6. Use the server that has the updated iSCSI boot option ROM to install the operating system directly on
the iSCSI target.
HP updates networking software frequently to include new functionality and features. For the latest driver,
firmware, and documentation updates go to the HP website
(http://h18004.www1.hp.com/products/servers/networking/index.html).
Download drivers and software
To download drivers and software for the adapter:
1. Go to the HP website (http://www.hp.com/#Support).
2. Select Download drivers and software (and firmware).
3. Type the adapter name in the For product box, and then click Go.
Updating the iSCSI boot option ROM
About the iSCSI boot option ROM
The HP Multifunction Upgrade Utility modifies an adapter's ROM to support iSCSI boot natively by
installing a special iSCSI boot firmware image on HP ProLiant Gigabit Ethernet Multifunction server
adapters (NC37xx and NC380x family). The iSCSI boot option ROM provides disk access to configured
iSCSI targets. The iSCSI boot option ROM conforms to the BIOS Boot Specification, which enables a
ROM-based PCI component to participate in the IPL boot sequence.
During the iSCSI boot process, the option ROM connects to an iSCSI target to facilitate the loading of the
operating system directly from the iSCSI target, which eliminates the need for DHCP and PXE. The option
ROM then provides the information that is needed to connect to the iSCSI targets and to locate the root
and boot partitions thus allowing the boot sequence to complete.
The HP Multifunction Gigabit Server Adapters support either iSCSI boot or PXE boot but not both.
Updating to iSCSI boot capability eliminates PXE as an alternate IPL (initial program load) device.
Updating the PXE boot eliminates iSCSI boot capability. This is applicable only to stand up and
Installation and configuration 8
Page 9

mezzanine adapters. For embedded adapters, both can be updated and co-exist but at any point of time
only one can be used.
The HP iSCSI option ROM offers the following:
• PCI compatible option ROM header that identifies the ROM code to BIOS
• System BIOS Interrupt 13 Disk Interface that translates BIOS disk I/O to iSCSI
• HP iSCSI Data Mover that performs iSCSI PDU Protocol
• Binary image of an UNDI implementation
• Firmware component to perform TCP/IP encapsulation
Updating the iSCSI boot option ROM
The HP NC-Series Broadcom Online Firmware Upgrade Utility for Linux (CP00xxxx.scexe) upgrades the
iSCSI boot option ROM firmware image on all iSCSI-capable adapters:
• HP NC370x Multifunction Gigabit Server Adapter
• HP NC371x Multifunction Gigabit Server Adapter
• HP NC373x Multifunction Gigabit Server Adapter
• HP NC374x Multifunction Gigabit Server Adapter
• HP NC380T Multifunction Gigabit Server Adapter
• HP NC370i Multifunction Gigabit Server Adapter
• HP NC373i Multifunction Gigabit Server Adapter
Updating using CP00xxxx.scexe
• HP NC373m Multifunction Gigabit Server Adapter
To update the iSCSI boot option ROM on all iSCSI capable adapters, HP NC-Series Broadcom Online
Firmware Upgrade Utility for Linux called CP00xxxx.scexe is provided in the \linux\fwupgrade folder in
the HP ProLiant Networking SoftPaq. Two components are provided in the directory, one for x86 and one
for x86_64. Read the CP00xxxx.txt file to determine the component needed for the required system
architecture.
The HP NC-Series Broadcom Online Firmware Upgrade Utility for Linux does not install iSCSI firmware. It
only upgrades iSCSI if iSCSI is already installed on the adapter. It can also update to iSCSI if PXE is
already installed.
Updating iSCSI option ROM
To update to latest iSCSI boot option ROM image, complete the following steps.
1. The firmware utility requires the adapter interface to be up and running. Bring up a network adapter
interface using the following command:
# ifup ethx
or
# ifconfig ethx up
2. Update the firmware using the following command:
#./CPXXXXXX.scexe -s
Replacing PXE option ROM
Installation and configuration 9
Page 10

To replace the PXE image with iSCSI, complete the following steps.
1. The firmware utility requires the adapter interface to be up and running. Bring up a network adapter
interface using the following command:
# ifup ethx
or
# ifconfig ethx up
2. Update the firmware using the following command:
#./CPXXXXXX.scexe
3. The utility discovers all network adapters in the system and prompts you to upgrade the specified
firmware image. Select n for images that do not require an upgrade and select y to upgrade iSCSI
on the adapter that has PXE installed.
Replacing iSCSI boot option ROM
To replace the iSCSI boot image with PXE, complete the following steps.
1. The firmware utility requires the adapter interface to be up and running. Bring up a network adapter
interface using the following command:
# ifup ethx
or
# ifconfig ethx up
2. Update the firmware using the following command:
#./CPXXXXXX.scexe
3. The utility discovers all network adapters in the system and prompts you to upgrade the specified
firmware image. Select n for images that do not require an upgrade and select y to upgrade PXE on
the adapter that has iSCSI installed.
Common installation log file
The upgrade installation activity is written to an installation log file called ./nicfwupg.log.
Initialize the iSCSI boot path
1. Create a configuration file. The configuration file contains the boot path that the iSCSI Initiator needs
to connect to the iSCSI targets from which it will boot. This information includes the names of the
initiator and target, IP addresses, and so on. Create a configuration file by executing the following
command on a system running any supported Linux version.
vi evinput
2. Define iSCSI boot path variables. Enter the following variables and values in the EVINPUT file using
this format: "<variable>=<value>". Variable names and values are case sensitive. Comments can
be prefixed with a "#" character.
Variable name Description
InitiatorName The name to be used for the iSCSI initiator on the booting system.
TargetName The name of the target from which to boot.
InitiatorNetmask The IP network mask to be used by the iSCSI initiator. This value is in dotted
decimal format.
InitiatorRoute The default IP route to be used by the iSCSI initiator. This value is in dotted decimal
format.
LAA The Locally Assigned Address (MAC address) to be used by the iSCSI initiator. The
value is specified as 12 hex digits. A value of all zeros indicates that the initiator
Installation and configuration 10
Page 11

Variable name Description
should use the MAC address assigned to the hardware.
LUN The logical unit number for the target. Some targets do not start numbering iSCSI
target data LUNs at 0.
ForceBoot This value specifies that the iSCSI initiator should override the IPL boot order for
disk controllers and install itself as the boot disk. "True", "TRUE", "true", or "1"
indicates that the iSCSI boot option ROM should install itself as the handler for the
boot device. Any other value is equivalent to "False". Platforms with updated
System ROM versions that support network adapters in the RBSU "Boot controller
order" should have Forceboot=False.
Checksum (Digests) Digests enable the checking of end-to-end, non-cryptographic data integrity beyond
the integrity checks provided by the link layers and the covering of the whole
communication path including all elements that may change the network level PDUs
such as routers, switches, and proxies.
If the parameters don't match on the end points, iSCSI won't establish a session.
DataDigest Enable checksum (digest) of data fields within a PDU. The default value is None
HeaderDigest Enable checksum (digest) of data header within a PDU. The default value is None.
UseBIOSInterface When this value is set to "True" the int13 interface remains enabled during long
periods of inactivity to prevent TCP/IP timeouts and dropped connections. For the
Linux OS set the value to "False" or do not use the variable.
AuthMethod The authentication method to use. The initiator and target must agree on a mutually
agreeable authentication method or the iSCSI initiator will not be able to log in to
the target. The AuthMethod values are “None”, “CHAP”, and “MutualCHAP”. If
CHAP is specified, the target may still select “None” as the authentication method.
If “CHAP” is specified as the AuthMethod value, CHAPUsername and CHAPSecret
must also be specified. If “MutualCHAP” is specified as the AuthMethod value,
CHAPUsername, CHAPSecret and CHAPMSecret must also be specified.
CHAPUsername The username for CHAP authentication.
CHAPSecret The secret (password) for CHAP authentication. Specified either as a string or a
long hex value (starting with "0x"). This value must be at least 96 bits (12 bytes, 24
hex digits) long.
CHAPMSecret The secret (password) for mutual (reverse) CHAP authentication. Specified either as
a string or a long hex value (starting with "0x"). This value must be at least 96 bits
(12 byte, 24 hex digits) long.
VLAN The VLAN number that the iSCSI initiator should use for all packets sent and
received. This is specified either as the VLAN number or "Disabled" if no VLAN is
used.
WindowsHBAMode Installation switch. Set to False for Linux.
The following is a sample configuration file.
# Copyright 2006-2008 Hewlett-Packard Development Company, L.P.
# All Rights Reserved
# 06/15/06
#
# Consult the IETF iSP iSCSI for details of these items.
#
##
# Name of the iSCSI Target. Must match what the target offers.
Installation and configuration 11
Page 12

# Hard coded Target IP .. No DNS support
#
TargetName=iqn.2003-05.com.hp1510i:Target01
TargetIP=10.10.10.13
#
# local name the iSCSI client will present to the Target
# and local IP settings. No DNS or DHCP support
#
InitiatorName=iqn.client01
InitiatorIP=10.10.10.02
InitiatorNetmask=255.255.255.0
InitiatorRoute=10.10.10.1
TargetPort=3260
## Locally Admin Address (MAC address) and VLAN (Enabled/Disabled)
#
LAA=000000000000
VLAN=Disabled
## LUN Mapping. This should match what the target LUN offers.
#
LUN=0
## Make this persistent BIOS int 13 IPL routine. Replaces Embedded HD
C:\ (if present).
#.
#Exceptions: Platforms with updated System ROM versions that support
#network adapters in the RBSU "Boot controller order" should have
#ForceBoot=False
#
ForceBoot=True
## Enable Checksum (digest) of Data header or Checksum Data fields
within a PDU. Value must match the target setting, if the parameters
don't match on the end points, iSCSI won't establish a session.
#
DataDigest=False
HeaderDigest=False
## Account Login information
# . The AuthMethod values are: None, CHAP, and (TwoWay) MutualCHAP,
#
AuthMethod=None
##
# If AuthMethod is None, These are ignored.
CHAPUsername=iqn.1991-05.com.microsoft:comfort.txn.cpqcorp.net
CHAPSecret=Some12day123
CHAPMSecret=BetterThanThat
3. Write the boot path to the target server. The boot path configuration file may be written to the target
server with the ev DOS utility or written using the ibootcfg utility.
o To write the boot path using the ev DOS utility, boot to DOS and change directories to the ev
DOS utility. The ev DOS utility is packaged with the HP iSCSI boot feature.
Installation and configuration 12
Page 13

o
Execute the following on the server with the option ROM.
ev -c <evinput.txt
o To use the iLO interface to write the iSCSI boot path parameters to the target server for RH4 and
SLES9, install the linux-iscsi-install RPM on the install server (see "Installing the binary RPM ("NFS
install" on page 17, on page 22)") and execute the following command on the install server.
/opt/hp/iboot_install/utils/optrom/ibootcfg -I <input file> -s <iLO IP
address> -u <iLO username> -p <iLO password>
To use the iLO interface to write the iSCSI boot path parameters to the target server for RH 5 and
SLES 10, install the hp-iscsi-boot-<version>.i386.rpm on the install server and execute the
following command on the install server.
/opt/hp/hp-iscsi-boot/utils/optrom/ibootcfg -I <input file> -s <iLO IP
address> -u <iLO username> -p <iLO password>
All command line arguments are required. The <input file> is the file created in the previous step.
Argument Description
-I <input file> The name of the boot path input file.
-s <iLO IP address> The IP address of the HP Integrated Lights Out management port from which to boot
the iSCSI target
-u <iLO username> The username of the HP Integrated Lights Out management port from which to boot
the iSCSI target.
-p <iLO password> The password for the user name of the HP Integrated Lights Out management port
from which to boot the iSCSI target.
For more information about the ibootcfg command, see the man page for ibootcfg(1) located on the
install server.
Installing iSCSI boot
Red Hat installations
RH4 installations
The following describes how to install Red Hat 4 on iSCSI boot targets.
Installing the binary RPM
To install the binary RPM for Red Hat Red Hat EL4 or SLES 9 enter the following command on the install
server:
# rpm -ihv /<rpmpath>/linux-iscsi-install.<version>.rpm
The following files are installed:
/opt/hp/iboot_install/scripts/configure.sh
/opt/hp/iboot_install/scripts/install_bnx2.sh
/opt/hp/iboot_install/scripts/install_iscsi.sh
/opt/hp/iboot_install/scripts/prep_iscsi_boot.sh
/opt/hp/iboot_install/scripts/setup_kernel_tree.sh
/opt/hp/iboot_install/scripts/ks.cfg
Installation and configuration 13
Page 14

/opt/hp/iboot_install/scripts/autoinst.xml
/opt/hp/iboot_install/utils/optrom/ibootcfg
Additionally, the directory /opt/hp/iboot_install/ddimages contains driver diskette images for all
supported releases of Linux.
Customizing the control file
Before installing an operating system on your iSCSI boot target drive, you must first customize the sample
ks.cfg file for Red Hat installations. The ks.cfg file copies the required scripts and RPMs to a target disk
and contains the steps to be executed during post-installation. Additionally, it loads and starts the iSCSI
Initiator and connects to the target.
1. Copy the linux-iscsi-boot source RPM and bnx2 driver source RPM to the
/opt/hp/iboot_install/SRPMS directory.
# mkdir /opt/hp/iboot_install/SRPMS
# cp <rpmpath>/linux-iscsi-boot<version>.src.rpm
/opt/hp/iboot_install/SRPMS
# cp <rpmpath>/bnx2-<version>.src.rpm /opt/hp/iboot_install/SRPMS
2. Open the ks.cfg file on the iSCSI boot install server.
# vi /opt/hp/iboot_install/scripts/ks.cfg
3. Modify the following variables as needed to update the hostname and boot loader type. You may
use the default variables if you do not wish to set the hostname. The available values for boot loader
type are GRUB and LiLO and the default value is GRUB.
SYSNAME=<hostname>
BOOT_LOADER=<boot-loader-type>
4. The driver diskette images can be copied to a removable diskette or USB device, or they can be
accessed through the network using NFS or PXE. Modify the following variables as needed.
a. For diskette installations, do not modify the COPYMETHOD, NFSSERVER, or NFSSHARE
variables.
b. For NFS installations, modify the COPYMETHOD, NFSSERVER, and NFSSHARE variables.
COPYMETHOD=nfs
NFSSERVER=<NFS-server-IP>
NFSSHARE=<share-point>
c. Uncomment the following lines before the %post section.
install
nfs --server=<NFS Server IP> --dir=<path-to-OS-distro-dir>
Creating iSCSI boot driver images (Disk 1 and Disk 2)
1. Copy the driver diskette images (Disk 1) to a network or storage device
a. For network installs, skip this step and go to step 5.
b. For diskette or USB devices execute the following on the iSCSI boot install server:
# cd /opt/hp/iboot_install/ddimages
# mount -o loop iboot_install_<release>_driver.dd /mnt
# cp /opt/hp/iboot_install/scripts/ks.cfg /mnt/ks.cfg
# umount /mnt
2. Insert a diskette or USB device in the iSCSI boot install server and execute the following:
# umount /dev/fd0 (Ignore any mount error messages)
# dd if=iboot_install_<release>_driver.dd of=/dev/fd0
Installation and configuration 14
Page 15

3.
Upon completion, safely remove the diskette or USB device (Disk 1).
4. Insert a second diskette or USB device and execute the following to copy the iSCSI boot and
configuration scripts, bnx2 source RPM (the bnx2 source RPM is packaged with the iSCSI boot
feature), and linux-iscsi-boot source RPM. This diskette or USB device (Disk 2) is inserted during the
post-installation stage of the operating system install.
a. For network installs, skip this step and go to step 5.
b. For diskette or USB devices, execute the following on the iSCSI boot install server:
# umount /dev/fd0 (Ignore any mount error messages)
# mkfs -t ext2 /dev/fd0
# mount /dev/fd0 /mnt
# cp -r /opt/hp/iboot_install/scripts /mnt
# cp -r /opt/hp/iboot_install/SRPMS /mnt
# cp /rpmpath/linux-iscsi-boot-<version>.i386.rpm /mnt/SRPMS
# cp /rpmpath/bnx2-<version>.src.rpm /mnt/SRPMS
# sync
# umount /mnt
5. For network installs only, copy the linux-iscsi-boot source RPM and bnx2 source RPM to the SRPMS
directory by executing the following command.
# cp /rpmpath/linux-iscsi-boot-<version>.src.rpm
/opt/hp/iboot_install/SRPMS
# cp /rpmpath/bnx2-<version>.src.rpm /opt/hp/iboot_install/SRPMS
Export the folder /opt/hp/iboot_install for NFS sharing (as described in nfsd and exportfs man
pages). If you want an alternate NFS share folder to be used during the install, copy the files in the
/opt/hp/iboot_install directory to /<NFS share folder>.
Converting disks for iLO Virtual Floppy setup
If you are using iLO Virtual Floppy, convert the Disk 1 and Disk 2 iSCSI boot diskette images to driver
images as follows:
1. Insert the driver diskette (Disk 1) into the drive on the install server and issue the following command:
# dd if=/dev/fd0 of=driver_disk1.img
2. Remove the diskette from the drive.
3. Insert the linux-iscsi-boot rpm diskette (Disk 2 used during post-installation stage) into the drive and
issue the following command:
# dd if=/dev/fd0 of=post_install_disk2.img
4. Copy the diskette images (driver_disk1.img and post_install_disk2.img) to the system where you are
planning to use iLO console by completing the following steps:
a. Go to Virtual Devices on the iLO Web page, select Virtual Media and then select Virtual Media
Applet.
b. In the Virtual Floppy/USB Key box, select Local Image File.
c. Click Browse and select first disk image driver_disk1.img and then click Connect to activate
Virtual Floppy.
5. Start the installation.
6. When prompted for the second diskette during Post-Installation, click Disconnect and select the
second disk image post_install_disk2.img then click Connect.
Installation and configuration 15
Page 16

iSCSI Boot target install method
The iSCSI target disks must be installed with one of the supported operating systems described in System
requirements. Targets can be installed using any of the following methods in conjunction with the
operating system distribution files:
• Diskettes or USB devices
• NFS network installs
• PXE network installs
The iSCSI boot target drives are installed using the following sources: driver diskette images in the
/opt/hp/iboot_install/ddimages directory; the linux-iscsi-boot source RPM on the designated iSCSI boot
install server; and the operating system installation CD-ROMs.
After the installation completes, reboot the system for an iSCSI boot to occur.
Diskette or USB install
1. Power on the server and insert disk one of the operating system installation CDs in the CD-ROM
drive. During POST review the iSCSI option ROM messages to ensure that the iSCSI boot option
ROM initialized successfully and is able to log in successfully onto the target disk.
2. If you are using a local CDROM to install the operating system, execute the following at the boot
prompt:
boot: linux dd noprobe ks=floppy
If you are using USB or iLO virtual floppy drive OR you are installing RHEL4 32-bit then type the
following at the boot prompt:
boot: linux dd ks=hd:sda:/ks.cfg
3. When prompted insert the Disk 1 driver diskette or USB device (containing the driver diskette images
you created in an earlier step) then select OK and press the Enter key. Note that if you are using a
USB or iLO virtual floppy, select sda from the list of devices then select OK and press the Enter key.
4. When prompted select the manually choose option and press the Enter key.
5. At the Select Device Driver to Load window, select the iBOOT_install driver (iboot_install) from the list
then press the Enter key. The driver name is located near the end of the list of drivers. The
iboot_install driver will read the option ROM data and connect to the target disk.
6. Upon successful connection to the target disk, the target disk mounts as /dev/sda (or /dev/sdb if
using USB or an iLO virtual floppy drive), which makes it appear as a local disk. At the following
prompt, "Do you want to load another driver?" select No then press the Enter key.
7. If there are no hard drives on your server, the following message appears "No hard drives have
been found. Would you like to select drivers now?" Select No then press the Enter key. If you have a
hard disk on the system, this message is not displayed.
8. When prompted, create partitions on /dev/sda (or /dev/sdb if using a USB or iLO virtual floppy
drive) and proceed with the installation.
Post installation
When the installation completes, you are prompted to insert Disk 2 (linux-iscsi-boot diskette or USB device)
unless you modified the ks.cfg file to use NFS share.
1. Insert Disk 2 then press the Enter key. If you are using the iLO Virtual Floppy, see Converting disks
for iLO Virtual Floppy setup (on page 15).
Installation and configuration 16
Page 17

2.
After the target disk is configured for iSCSI boot, complete the standard operating system installation
as prompted.
NFS install
1. Power on the iSCSI boot target and insert disk one of the operating system installation CDs in the
CD-ROM drive. During POST, review the iSCSI option ROM messages to ensure that the iSCSI boot
option ROM initialized successfully and is able to log in onto the target disk.
At the boot: prompt execute the following
boot: linux dd=nfs:<nfs ip>:/opt/hp/iboot_install/ddimages/<dd_img>
ks=nfs:<nfs ip>:/opt/hp/iboot_install/scripts/ks.cfg
For RHEL4 32-bit:
boot: linux dd=nfs:<nfs ip>:/opt/hp/iboot_install/ddimages/<dd_img>
ks=nfs:<nfs ip>:/opt/hp/iboot_install/scripts/ks.cfg
The driver diskette images are read from NFS and the iboot_install module is inserted automatically.
The iboot_install driver reads the option ROM data and connects to the target disk. Upon successful
connection to the target disk, the target disk mounts as /dev/sda, which makes it appear as a local
disk.
2. Follow the traditional operating system installation procedure and create partitions on /dev/sda. The
installation copies the packages to be installed from the NFS server. To automate the complete
install, refer to RedHat manuals for Kickstart installation details.
NOTE: If you have any local SCSI disks attached, then those will be listed first (as /dev/sda,
/dev/sdb…) and the iSCSI target disks will be listed last (for example, /dev/sdc). Ensure that
you choose the iSCSI target disk (/dev/sdc) for partitioning and not the local disk.
PXE install
If the system to be installed contains a network adapter card with Pre-Execution Environment (PXE)
support, then direct install over PXE is possible.
Execute the following command on the PXE server.
Setting up PXE
The following steps must be performed to prepare for a PXE installation:
1. Configure the NFS server to export the installation source.
2. Configure the TFTP server required for PXE booting.
3. Start or enable the TFTP service.
4. Configure DHCP.
These steps are not described in this guide. See your vendor's respective documentation for details.
5. Configure the NFS server to export the install diskette image of the iSCSI boot and configuration-
related code and utilities. See "NFS install (on page 17)."
6. Execute the following command on the PXE server.
# vi /tftpboot/linux-install/pxelinux.cfg/default
In this file add the following lines:
label <number>
kernel <path-to-OS-distro-dir>/images/pxeboot/vmlinuz
Installation and configuration 17
Page 18

append initrd=<path-to-OS-distro-dir>/images/pxeboot/\
initrd.img ramdisk_size=10000 dd=nfs:<nfs ip>:/opt/hp/\
iboot_install/ddimages/iboot_install_<release>.dd \
ks=nfs:<nfs ip>:/opt/hp/iboot_install/scripts/ks.cfg
7. Optionally, you can modify /tftpboot/linux-install/msgs/boot.msg to use custom boot messages.
Installing targets using PXE
1. Power up the server.
2. Immediately review the iSCSI option ROM messages during POST to confirm that the Option ROM
initialized successfully and is able to login onto the target disk.
3. When prompted, press <F12> for PXE installation.
4. Enter the label number (specified in the above section) at the PXE boot prompt and press the Enter
key. The installation starts pulling the installation sources from the NFS server.
RH5 installations
The following describes how to install RH5 on iSCSI boot targets.
Installing the binary RPM
To install the binary RPM for Red Hat EL5 or SLES 10, enter the following command on the install server:
# rpm -ihv /<rpmpath>/hp-iscsi-boot-<version>.i386.rpm
If HP linux-iscsi-install-<version>.rpm (for Red Hat EL4, and SLES9) is installed on the system, use the --force
option with the rpm command:
# rpm --force -ihv <rpmpath>/hp-iscsi-boot-<version>.i386.rpm
The following files are installed:
/opt/hp/hp-iscsi-boot/scripts/configure
/opt/hp/hp-iscsi-boot/scripts/install_bnx2
/opt/hp/hp-iscsi-boot/scripts/connect_iscsi_target
/opt/hp/hp-iscsi-boot/scripts/prep_iscsi_boot
/opt/hp/hp-iscsi-boot/scripts/get_interface
/opt/hp/hp-iscsi-boot/scripts/get_iscsi_conf
/opt/hp/hp-iscsi-boot/scripts/autoinst.xml
/opt/hp/hp-iscsi-boot/scripts/ks.cfg
/opt/hp/hp-iscsi-boot/scripts/network_iscsi_init
/opt/hp/hp-iscsi-boot/scripts/network_iscsi_up
/opt/hp/hp-iscsi-boot/scripts/rhel5ipconfig
/opt/hp/hp-iscsi-boot/scripts/rhel5mkinitrd
/opt/hp/hp-iscsi-boot/utils/optrom/ibootcfg
/opt/hp/hp-iscsi-boot/utils/bin/rebuild_initrd
Customizing the control file
Before installing an operating system on your iSCSI boot target drive, you must first customize the sample
ks.cfg file for Red Hat installations. The ks.cfg file copies the required scripts and RPMs to a target disk
and contains the steps to be executed during post-installation. Additionally, it loads and starts the iSCSI
Initiator and connects to the target.
1. Open the sample ks.cfg file on the iSCSI boot install server.
# vi /opt/hp/hp-iscsi-boot/scripts/ks.cfg
Installation and configuration 18
Page 19

2.
The driver diskette images can be copied to a removable diskette or USB device, or they can be
accessed through the network using NFS or PXE. Modify the following variables as needed.
a. For diskette installations, do not modify the COPYMETHOD, NFSSERVER, or NFSSHARE
variables.
b. For NFS installations, modify the COPYMETHOD, NFSSERVER, and NFSSHARE variables.
COPYMETHOD=nfs
NFSSERVER=<NFS-server-IP>
NFSSHARE=<share-point>
Creating an installation diskette
Skip this section if you are doing any type of network installation, such as PXE or NFS.
Prior to beginning the install of the OS, copy the iSCSI boot configuration scripts to a diskette. This
diskette is inserted during the pre-installation stage of the OS installation. Place an empty diskette in the
drive and perform the following commands:
For SLES 10:
# umount /dev/fd0 (If the diskette is automatically mounted)
# mkfs -t vfat /dev/fd0
For RHEL5:
# umount /dev/fd0 (If the diskette is automatically mounted)
# mkfs -t ext2 /dev/fd0
# cp -r /opt/hp/hp-iscsi-boot/scripts /mnt
# For SLES 10 and RHEL5:
# mount /dev/fd0 /mnt
# cp -r /opt/hp/hp-iscsi-boot/scripts /mnt
# sync
# umount /mnt
Converting disks for iLO Virtual Floppy setup
If you are using iLO virtual floppy, then convert the diskette containing the hp-iscsi-boot-disk.img image
into a disk image.
1. Insert the hp-iscsi-boot disk.img diskette into the drive and issue the following command:
# dd if=/dev/fd0 of=hp-iscsi-boot-disk.img
2. Copy this disk image to the system where you are planning to use the iLO console.
3. On the iLO Web page go to Virtual Devices->Virtual Media-> Virtual Media Applet.
4. In the Virtual Floppy/USB Key box, select Local Image File.
5. Click Browse and select the disk image hp-iscsi-boot-disk.img.
6. Click Connect to activate Virtual floppy.
iSCSI Boot target install method
The iSCSI target disks must be installed with one of the supported operating systems described in System
requirements. Targets can be installed using any of the following methods in conjunction with the
operating system distribution files:
• Diskettes or USB devices
• NFS network installs
Installation and configuration 19
Page 20

• PXE network installs
The iSCSI boot target drives are installed using the following sources: driver diskette images in the
/opt/hp/iboot_install/ddimages directory; the linux-iscsi-boot source RPM on the designated iSCSI boot
install server; and the operating system installation CD-ROMs.
After the installation completes, reboot the system for an iSCSI boot to occur.
Diskette or USB install
Skip this section if you are doing a network installation, such as PXE or NFS.
Installing targets using a diskette or USB device
1. Power on the server with the first OS installation CD in the CD-ROM drive.
2. Immediately review the iSCSI option ROM messages during POST to confirm that the Option ROM
initialized successfully and is able to login onto the target disk.
3. If you are using a local CD-ROM to install then enter the following at the boot: prompt.
linux ks=floppy
Or, if you are using a USB device or Virtual Floppy then enter the following at the boot: prompt.
linux ks=hd:sda:scripts/ks.cfg
4. Insert the installation diskette, USB or virtual floppy created in "Creating an installation diskette (on
page 19)" while the system is booting from the CD. The scripts are copied into the root file system
then the scripts read the option ROM data and connect to the target disk.
5. Upon successful connection, the target disk is mounted as shown.
/dev/sda
Or, if you are using a USB device or virtual floppy drive it appears as the local disk and the target
disk is mounted as /dev/sdb.
6. If the USB device or virtual floppy is mounted on a device other than /dev/sda, the installation may
be unable to find the control file and you are prompted to provide the location. Enter the correct
location and select OK.
7. Follow the traditional installation procedure as prompted. The installation automatically sets up the
disk for iSCSI boot during post installation. After the disk is configured for iSCSI boot, the standard
OS installation screen appears and the system reboots.
NFS install
Prior to beginning the NFS install, set up the NFS server with iSCSI boot and configuration-related code
and utilities.
1. Verify that you installed the binary RPM hp-iscsi-boot on the NFS Server as described in "Installing
the binary RPM (on page 18, on page 27)."
2. Export the folder /opt/hp/hp-iscsi-boot for NFS sharing (See the NFS documentation). You may
copy the contents under /opt/hp/hp-iscsi-boot to some other folder and then NFS share that folder.
The directory structure under the NFS share folder must be the same as that of the /opt/hp/hp-iscsi-
boot directory.
3. Modify the ks.cfg control file as described in "Customizing the control file (on page 18)." Ensure that
you select NFS for COPYMETHOD and set NFSSHARE to the /opt/hp/hp-iscsi-boot directory.
4. Ensure that the OS distribution files to be installed are present on the NFS server and are exported
using NFS.
Installing targets using NFS
Installation and configuration 20
Page 21

1.
Power on the server with the first OS installation CD in the CD-ROM drive.
2. Immediately review the iSCSI option ROM messages during POST to confirm that the Option ROM
initialized successfully and is able to login onto the target disk.
3. At the boot: prompt type the following:
linux ks=nfs:<nfs ip>:/opt.hp/hp-iscsi-boot/scripts/ks.cfg
install=nfs://<nfs ip>://<path-to-OS-distro-dir>
The modules from the install image are pulled through NFS and copied into memory, the scripts read
the option ROM data and connect to the target disk.
Upon successful connection, the target disk is mounted as shown.
/dev/sda
4. If you have any SCSI local disks attached then those are listed first as /dev/sda, /dev/sdb, and so
on. The iSCSI target disk is listed last as /dev/sdc, for example. Make sure that you select the iSCSI
target disk (/dev/sdc) for partitioning and not the local disk.
5. After the modules are successfully loaded, the installation continues by pulling sources from NFS
server. For customizing the ks.cfg file for Kickstart installations see the Red Hat manuals for Auto-
installation using Kickstart.
PXE install
If the system to be installed contains a network adapter card with Pre-Execution Environment (PXE)
support, then direct install over PXE is possible.
Setting up PXE
The following steps must be performed to prepare for a PXE installation:
1. Configure the NFS server to export the installation source.
2. Configure the TFTP server required for PXE booting.
3. Start or enable the TFTP service.
4. Configure DHCP.
These steps are not described in this guide. See your vendor's respective documentation for details.
5. Configure the NFS server to export the install diskette image of the iSCSI boot and configuration-
related code and utilities. See "NFS install (on page 20)."
6. Execute the following command on the PXE server.
# vi /tftpboot/linux-install/pxelinux.cfg/default
7. Add the following lines to this file:
label <number>
kernel <path-to-OS-distro-dir>/images/pxeboot/vmlinuz
append initrd=<path-to-OS-distro-dir>/images/pxeboot/\
initrd.img ramdisk_size=10000 ks=nfs:<nfs ip>:/opt/hp/\
hp-iscsi-boot/scripts/ks.cfg
8. Optionally, you can modify /tftpboot/linux-install/msgs/boot.msg to use custom boot messages.
Installing targets using PXE
1. Power up the server.
2. Immediately review the iSCSI option ROM messages during POST to confirm that the Option ROM
initialized successfully and is able to login onto the target disk.
3. When prompted, press <F12> for PXE installation.
Installation and configuration 21
Page 22

4.
Enter the label number (specified in the above section) at the PXE boot prompt and press the Enter
key. The installation starts pulling the installation sources from the NFS server.
SLES installations
SLES 9 installations
The following describes how to install SLES 9 on iSCSI boot targets.
Installing the binary RPM
To install the binary RPM for Red Hat EL4 or SLES 9 enter the following command on the install server:
# rpm -ihv /<rpmpath>/linux-iscsi-install.<version>.rpm
The following files are installed:
/opt/hp/iboot_install/scripts/configure.sh
/opt/hp/iboot_install/scripts/install_bnx2.sh
/opt/hp/iboot_install/scripts/install_iscsi.sh
/opt/hp/iboot_install/scripts/prep_iscsi_boot.sh
/opt/hp/iboot_install/scripts/setup_kernel_tree.sh
/opt/hp/iboot_install/scripts/ks.cfg
/opt/hp/iboot_install/scripts/autoinst.xml
/opt/hp/iboot_install/utils/optrom/ibootcfg
Additionally, the directory /opt/hp/iboot_install/ddimages contains driver diskette images for all
supported releases of Linux.
Customizing the control file
Before installing an operating system on your iSCSI boot target drive, you must first customize the
autoinst.xml file for SLES installations. The Autoyast control file copies the required scripts and RPMs to a
target disk and contains the steps to be executed during preinstallation and post-installation.
1. Copy the linux-iscsi-boot source RPM and bnx2 driver source RPM to the
/opt/hp/iboot_install/SRPMS directory.
# mkdir /opt/hp/iboot_install/SRPMS
# cp <rpmpath>/linux-iscsi-boot<version>.src.rpm
/opt/hp/iboot_install/SRPMS
# cp <rpmpath>/bnx2-<version>.src.rpm /opt/hp/iboot_install/SRPMS
2. Open the autoinst.xml file on the install server.
a. For SLES 9, execute the vi command.
# vi /opt/hp/iboot_install/scripts/autoinst.xml
b. For SLES 10, execute the vi command.
# vi /opt/hp/hp-iscsi-boot/scripts/autoinst.xml
3. Modify the following variable to update the hostname. You may use the default hostname if you do
not want to set a new name. The available value for boot loader type is GRUB. LiLO is not supported
in this release.
SYSNAME=<hostname>
BOOT_LOADER=<boot-loader-type>
Installation and configuration 22
Page 23

4.
The driver diskette images can be copied to a removable diskette or USB device, or they can be
accessed through the network using NFS or PXE. Modify the following variables as needed.
a. For diskette installations, do not modify the COPYMETHOD, NFSSERVER, or NFSSHARE
variables.
b. For NFS installations, modify the COPYMETHOD, NFSSERVER, and NFSSHARE variables.
COPYMETHOD=nfs
NFSSERVER=<NFS-server-IP>
NFSSHARE=<share-point>
5. The root password is set to root123 in the autoinst.xml file. To modify the root password, search for
the following line in the autoinst.xml file and change it to the new password.
<user_password>root123</user_password>
Creating iSCSI boot driver images (Disk 1 and Disk 2)
1. Copy the driver diskette images (Disk 1) to a network or storage device
a. For network installs, skip this step and go to step 5.
b. For diskette or USB devices execute the following on the iSCSI boot install server:
# cd /opt/hp/iboot_install/ddimages
# mount -o loop iboot_install_<release>_driver.dd /mnt
# cp /opt/hp/iboot_install/scripts/autoinst.xml /mnt/autoinst.xml
# umount /mnt
2. Insert a diskette or USB device in the iSCSI boot install server and execute the following:
# umount /dev/fd0 (Ignore any mount error messages)
# dd if=iboot_install_<release>_driver.dd of=/dev/fd0
3. Upon completion, safely remove the diskette or USB device (Disk 1).
4. Insert a second diskette or USB device and execute the following to copy the iSCSI boot and
configuration scripts, bnx2 source RPM (the bnx2 source RPM is packaged with the iSCSI boot
feature), and linux-iscsi-boot source RPM. This diskette or USB device (Disk 2) is inserted during the
post-installation stage of the operating system install.
# umount /dev/fd0 (Ignore any mount error messages)
# mkfs -t ext2 /dev/fd0
# mount /dev/fd0 /mnt
# cp -r /opt/hp/iboot_install/scripts /mnt
# cp -r /opt/hp/iboot_install/SRPMS /mnt
# cp /rpmpath/linux-iscsi-boot-<version>.i386.rpm /mnt/SRPMS
# cp /rpmpath/bnx2-<version>.src.rpm /mnt/SRPMS
# sync
# umount /mnt
5. For network installs only, copy the linux-iscsi-boot source RPM and bnx2 source RPM to the SRPMS
directory by executing the following command.
# cp /rpmpath/linux-iscsi-boot-<version>.i386.rpm
/opt/hp/iboot_install/SRPMS
# cp /rpmpath/bnx2-<version>.src.rpm /opt/hp/iboot_install/SRPMS
a. Export the folder /opt/hp/iboot_install for NFS sharing (as described in nfsd and exportfs man
pages). If you want an alternate NFS share folder to be used during the install, copy the files in
the /opt/hp/iboot_install directory to /<NFS share folder>.
b. Create the Driver Diskette layout in the root directory of the OS installation source:
# cd /opt/hp/iboot_install/ddimages
Installation and configuration 23
Page 24

# mount –o loop iboot_install_<release>_driver.dd /mnt
# cp –r /mnt/01 <path-to-OS-distro-dir>/
# find <path-to-OS-distro-dir>/01 -name "bnx2.*o" -exec rm {} \;
# umount /mnt
Converting disks for iLO Virtual Floppy setup
If you are using iLO Virtual Floppy, convert the Disk 1 and Disk 2 iSCSI boot diskette images to driver
images as follows:
1. Insert the driver diskette (Disk 1) into the drive on the install server and issue the following command:
# dd if=/dev/fd0 of=driver_disk1.img
2. Remove the diskette from the drive.
3. Insert the linux-iscsi-boot rpm diskette (Disk 2 used during post-installation stage) into the drive and
issue the following command:
# dd if=/dev/fd0 of=post_install_disk2.img
4. Copy the diskette images (driver_disk1.img and post_install_disk2.img) to the system where you are
planning to use iLO console by completing the following steps:
a. Go to Virtual Devices on the iLO Web page, select Virtual Media and then select Virtual Media
Applet.
b. In the Virtual Floppy/USB Key box, select Local Image File.
c. Click Browse and select first disk image driver_disk1.img and then click Connect to activate
Virtual Floppy.
5. Start the installation.
6. When prompted for the second diskette during Post-Installation, click Disconnect and select the
second disk image post_install_disk2.img then click Connect.
iSCSI Boot target install method
The iSCSI target disks must be installed with one of the supported operating systems described in System
requirements. Targets can be installed using any of the following methods in conjunction with the
operating system distribution files:
• Diskettes or USB devices
• NFS network installs
• PXE network installs
The iSCSI boot target drives are installed using the following sources: driver diskette images in the
/opt/hp/iboot_install/ddimages directory; the linux-iscsi-boot source RPM on the designated iSCSI boot
install server; and the operating system installation CD-ROMs.
After the installation completes, reboot the system for an iSCSI boot to occur.
Diskette or USB install
1. Power up the server with the first installation CD of the operating system's Service Pack. During
POST, review the iSCSI option ROM messages to ensure that the iSCSI boot option ROM initialized
successfully and is able to log in successfully onto the target disk.
2. When prompted insert the Disk 1 driver diskette or USB device (containing the driver diskette images
you created in an earlier step) then select OK and press the Enter key.
Installation and configuration 24
Page 25

3.
If you are using a local CDROM for the install, select Manual installation when prompted and pass
the following boot options:
autoyast=floppy:///autoinst.xml
Or, if you are using a USB or iLO virtual floppy drive, then pass the following boot options:
autoyast=device://sda/autoinst.xml
4. The modules from the driver diskette (Disk 1) will be copied to memory. The iSCSI boot install driver
will read the option ROM data and connect to the target disk. Upon successful connection to the
target disk the target disk mounts as /dev/sda (or /dev/sdb if you are using a USB or iLO virtual
floppy drive), which makes it appear as a local disk.
5. On some servers, the installation will prompt "Make sure that CD number 1 is in your drive." Select
OK then press the Enter key to continue. Do not replace the CD at this time.
6. The installation prompts you with a warning message "Could not find SUSE Linux Enterprise Server 9
Installation Source." Press the Enter key to continue.
7. The installation prompts you to select your language and keyboard layout. Select your installation
language (such as English) then press the Enter key.
8. Select the layout of your keyboard (for example, English (US)) then press the Enter key. Continue by
selecting Main Menu then press the Enter key.
9. Select Start Installation or System from the Main Menu and press the Enter key.
10. Select Start Installation or Update from the submenu and press the Enter key.
11. You are prompted for the installation source. Select the appropriate method and proceed with the
SLES installation.
12. Insert the SLES Initial Release CD 1 in the CD drive at the following installation prompt: "Make sure
that CD number 1 is in your drive."
13. During the Installation Settings prompt, choose /dev/sda (or /dev/sdb if a USB or iLO virtual floppy
drive is used) for partitioning.
14. If the installation is unable to find the 'autoinst.xml' file, then you are prompted to provide the correct
location of autoinst.xml. Enter the correct location of autoinst.xml and select OK. This may happen if
the USB floppy is mounted on a device other than /dev/sda. You are not prompted if the
'autoinst.xml' file is located at the location given in step 3.
Post installation
When the installation completes, you are prompted to insert Disk 2 (linux-iscsi-boot diskette or USB device)
unless you modified the autoinst.xml file to use NFS share.
1. Insert Disk 2 then press the Enter key. If you are using the iLO Virtual Floppy, see Converting disks
for iLO Virtual Floppy setup (on page 15).
2. After the target disk is configured for iSCSI boot, complete the standard operating system installation
as prompted.
NFS install
The NFS installation requires the driver diskette (Disk 1) that you created in an earlier step. For more
information, see "Creating iSCSI boot driver images (Disk 1 and Disk 2) (on page 23)."
1. Power on the server with the first OS installation CD in the CD-ROM drive. Immediately review the
iSCSI option ROM messages during POST to confirm that the Option ROM initialized successfully
and is able to login onto the target disk.
2. When the first boot installation window appears, insert Disk 1 and select Installation.
Installation and configuration 25
Page 26

3.
At the boot: prompt execute the following commands.
autoyast=nfs://<nfs ip>://opt/hp/iboot_install/scripts/autoinst.xml
install=nfs://<nfs ip>:<//path-to-OS-distro-dir>
netdevice=eth<N>
a. If the LOMs are not HP ProLiant Gigabit Ethernet Multifunction server adapters, then pass the
following boot options at the boot: prompt.
autoyast=nfs://<nfs ip>://opt/hp/iboot_install/scripts/autoinst.xml
install=nfs://<nfs ip>:<//path-to-OS-distro-dir>
netdevice=eth<N> insmod=tg3 insmod=bnx2
b. If the LOMs are Intel adapters, then replace tg3 with e1000 in the above line.
The modules from the install image are pulled through NFS and copied into memory, the scripts read
the option ROM data and connect to the target disk.
Upon successful connection, the target disk is mounted as shown.
/dev/sda
4. If you have any SCSI local disks attached then those are listed first as /dev/sda, /dev/sdb, and so
on. The iSCSI target disk is listed last as /dev/sdc, for example. Make sure that you select the iSCSI
target disk (/dev/sdc) for partitioning and not the local disk.
5. After the modules are successfully loaded, the installation continues by copying sources from the NFS
server. To automate the complete installation, see the SUSE documentation for Auto-Installation using
AutoYast.
PXE install
If the system to be installed contains a network adapter card with Pre-Execution Environment (PXE)
support, then direct install over PXE is possible.
Setting up PXE
The following steps must be performed to prepare for a PXE installation:
1. Configure the NFS server to export the installation source.
2. Configure the TFTP server required for PXE booting.
3. Start or enable the TFTP service.
4. Configure DHCP.
These steps are not described in this guide. See your vendor's respective documentation for details.
5. Configure the NFS server to export the install diskette image of the iSCSI boot and configuration-
related code and utilities. See "NFS install (on page 25)."
6. Execute the following command on the PXE server.
# vi /tftpboot/linux-install/pxelinux.cfg/default
7. Add the following lines to this file:
label <number>
kernel <path-to-OS-distro-dir>/boot/loader/linux
append initrd=<path-to-OS-distro-dir>/boot/loader/\
initrd.img load_ramdisk=1 autoyast=nfs:<nfs ip>:/opt/hp/\
iboot_install/scripts/autoinst.xml \
install=nfs:<nfs ip>:<path-to-OS-distro-dir>
If the LOMs are not HP ProLiant Gigabit Ethernet Multifunction adapters, add the following argument
to the boot options: "insmod=bnx2"
Installation and configuration 26
Page 27

8.
Optionally, you can modify /tftpboot/linux-install/msgs/boot.msg to use custom boot messages.
Installing targets using PXE
1. Power up the server.
2. Immediately review the iSCSI option ROM messages during POST to confirm that the Option ROM
initialized successfully and is able to login onto the target disk.
3. When prompted, press <F12> for PXE installation.
4. Enter the label number (specified in the above section) at the PXE boot prompt and press the Enter
key. The installation starts pulling the installation sources from the NFS server.
SLES 10 installations
The following describes how to install SLES 10 on iSCSI boot targets.
Installing the binary RPM
To install the binary RPM for Red Hat EL5 or SLES 10, enter the following command on the install server:
# rpm -ihv /<rpmpath>/hp-iscsi-boot-<version>.i386.rpm
If HP linux-iscsi-install-<version>.rpm (for Red Hat EL4 and SLES9) is installed on the system, use the --force
option with the rpm command:
# rpm --force -ihv <rpmpath>/hp-iscsi-boot-<version>.i386.rpm
The following files are installed:
/opt/hp/hp-iscsi-boot/scripts/configure
/opt/hp/hp-iscsi-boot/scripts/install_bnx2
/opt/hp/hp-iscsi-boot/scripts/connect_iscsi_target
/opt/hp/hp-iscsi-boot/scripts/prep_iscsi_boot
/opt/hp/hp-iscsi-boot/scripts/get_interface
/opt/hp/hp-iscsi-boot/scripts/get_iscsi_conf
/opt/hp/hp-iscsi-boot/scripts/autoinst.xml
/opt/hp/hp-iscsi-boot/scripts/ks.cfg
/opt/hp/hp-iscsi-boot/scripts/network_iscsi_init
/opt/hp/hp-iscsi-boot/scripts/network_iscsi_up
/opt/hp/hp-iscsi-boot/scripts/rhel5ipconfig
/opt/hp/hp-iscsi-boot/scripts/rhel5mkinitrd
/opt/hp/hp-iscsi-boot/utils/optrom/ibootcfg
/opt/hp/hp-iscsi-boot/utils/bin/rebuild_initrd
Customizing the control file
The Autoyast Control file contains the steps to be executed during pre-install and post-install stages.
During pre-install, it brings up the network interface connected to the iSCSI target. It also loads and starts
the iSCSI initiator and connects to the target. During post-install, it copies the required scripts to the target
disk and prepares the disk for iscsi boot. These files can be provided through diskette or NFS share. The
copymethod can be specified through the Autoyast control file. By default the COPYMETHOD is set to
floppy.
1. Open the autoinst.xml file on the install server.
a. For SLES 9, execute the vi command.
# vi /opt/hp/iboot_install/scripts/autoinst.xml
b. For SLES 10, execute the vi command.
# vi /opt/hp/hp-iscsi-boot/scripts/autoinst.xml
Installation and configuration 27
Page 28

2.
Modify the following variable to update the hostname. You may use the default hostname if you do
not want to set a new name. The available value for boot loader type is GRUB. LiLO is not supported
in this release.
SYSNAME=<hostname>
BOOT_LOADER=<boot-loader-type>
3. The driver diskette images can be copied to a removable diskette or USB device, or they can be
accessed through the network using NFS or PXE. Modify the following variables as needed.
a. For diskette installations, do not modify the COPYMETHOD, NFSSERVER, or NFSSHARE
variables.
b. For NFS installations, modify the COPYMETHOD, NFSSERVER, and NFSSHARE variables.
COPYMETHOD=nfs
NFSSERVER=<NFS-server-IP>
NFSSHARE=<share-point>
4. The root password is set to root123 in the autoinst.xml file. To modify the root password, search for
the following line in the autoinst.xml file and change it to the new password.
<user_password>root123</user_password>
Creating an installation diskette
Skip this section if you are doing any type of network installation, such as PXE or NFS.
Prior to beginning the install of the OS, copy the iSCSI boot configuration scripts to a diskette. This
diskette is inserted during the pre-installation stage of the OS installation. Place an empty diskette in the
drive and perform the following commands:
For SLES 10:
# umount /dev/fd0 (If the diskette is automatically mounted)
# mkfs -t vfat /dev/fd0
For RHEL5:
# umount /dev/fd0 (If the diskette is automatically mounted)
# mkfs -t ext2 /dev/fd0
# cp -r /opt/hp/hp-iscsi-boot/scripts /mnt
# For SLES 10 and RHEL5:
# mount /dev/fd0 /mnt
# cp -r /opt/hp/hp-iscsi-boot/scripts /mnt
# sync
# umount /mnt
Converting disks for iLO Virtual Floppy setup
If you are using iLO virtual floppy, then convert the diskette containing the hp-iscsi-boot-disk.img image
into a disk image.
1. Insert the hp-iscsi-boot disk.img diskette into the drive and issue the following command:
# dd if=/dev/fd0 of=hp-iscsi-boot-disk.img
2. Copy this disk image to the system where you are planning to use the iLO console.
3. On the iLO Web page go to Virtual Devices->Virtual Media-> Virtual Media Applet.
4. In the Virtual Floppy/USB Key box, select Local Image File.
5. Click Browse and select the disk image hp-iscsi-boot-disk.img.
6. Click Connect to activate Virtual floppy.
Installation and configuration 28
Page 29

iSCSI Boot target install method
The iSCSI target disks must be installed with one of the supported operating systems described in System
requirements. Targets can be installed using any of the following methods in conjunction with the
operating system distribution files:
• Diskettes or USB devices
• NFS network installs
• PXE network installs
The iSCSI boot target drives are installed using the following sources: driver diskette images in the
/opt/hp/iboot_install/ddimages directory; the linux-iscsi-boot source RPM on the designated iSCSI boot
install server; and the operating system installation CD-ROMs.
After the installation completes, reboot the system for an iSCSI boot to occur.
Diskette or USB install
Skip this section if you are doing a network installation, such as PXE or NFS.
Installing targets using a diskette or USB device
1. Power on the server with the first OS installation CD in the CD-ROM drive.
2. Immediately review the iSCSI option ROM messages during POST to confirm that the Option ROM
initialized successfully and is able to login onto the target disk.
3. If you are using the local CD-ROM for the installation, then select Installation at the first screen and
pass the following boot options:
autoyast=floppy:///scripts/autoinst.xml
If you are using a USB device or virtual floppy then pass the following boot options:
autoyast=device://sda/scripts/autoinst.xml
4. Insert the installation diskette, USB or virtual floppy created in "Creating an installation diskette (on
page 19)" while the system is booting from the CD.
On some servers, the installation returns the following message:
Error - no hard disks and no hard disk controllers were found for this
installation. Check your hardware.
5. Ignore this message and select OK. The scripts are copied into the root file system then the scripts
read the option ROM data and connect to the target disk.
6. Upon successful connection, the target disk is mounted as shown.
/dev/sda
Or, if you are using a USB device or virtual floppy drive it appears as the local disk and the target
disk is mounted as /dev/sdb.
7. If the USB device or virtual floppy is mounted on a device other than /dev/sda, the installation may
be unable to find the control file and you are prompted to provide the location. Enter the correct
location and select OK.
8. Follow the traditional installation procedure as prompted. The installation automatically sets up the
disk for iSCSI boot during post installation. After the disk is configured for iSCSI boot, the standard
OS installation screen appears and the system reboots.
Installation and configuration 29
Page 30

NFS install
Prior to beginning the NFS install, set up the NFS server with iSCSI boot and configuration-related code
and utilities.
Setting up NFS
1. Verify that you installed the binary RPM hp-iscsi-boot on the NFS Server as described in "Installing
the binary RPM (on page 18, on page 27)."
2. Export the folder /opt/hp/hp-iscsi-boot for NFS sharing (See the NFS documentation). You may
copy the contents under /opt/hp/hp-iscsi-boot to some other folder and then NFS share that folder.
The directory structure under the NFS share folder must be the same as that of the /opt/hp/hp-iscsi-
boot directory.
3. Modify the autoinst.xml control file as described in "Customizing the control file (on page 27)."
Ensure that you select NFS for COPYMETHOD and set NFSSHARE to the /opt/hp/hp-iscsi-boot
directory.
4. Ensure that the OS distribution files to be installed are present on the NFS server and are exported
using NFS.
Installing targets using NFS
1. Power on the server with the first OS installation CD in the CD-ROM drive. Immediately review the
iSCSI option ROM messages during POST to confirm that the Option ROM initialized successfully
and is able to login onto the target disk.
2. Select Installation at the first screen and pass the following boot options:
autoyast= nfs://<nfs ip>://opt/hp/hp-iscsi-boot/scripts/autoinst.xml
install=nfs://<nfs ip>://<path-to-OS-distro-dir>
3. On some servers, the installation returns the following message:
Error - no hard disks and no hard disk controllers were found for this
installation. Check your hardware.
Ignore this message and select OK. The modules from the install image are pulled through NFS and
copied into memory, the scripts read the option ROM data and connect to the target disk.
Upon successful connection, the target disk is mounted as shown.
/dev/sda
4. If you have any SCSI local disks attached then those are listed first as /dev/sda, /dev/sdb, and so
on. The iSCSI target disk is listed last as /dev/sdc, for example. Make sure that you select the iSCSI
target disk (/dev/sdc) for partitioning and not the local disk.
5. After the modules are successfully loaded, the installation continues by pulling sources from NFS
server. For customizing the Autoyast installation, see the SUSE manuals for auto-installation using
Autoyast.
PXE install
If the system to be installed contains a network adapter card with Pre-Execution Environment (PXE)
support, then direct install over PXE is possible.
Setting up PXE
The following steps must be performed to prepare for a PXE installation:
1. Configure the NFS server to export the installation source.
2. Configure the TFTP server required for PXE booting.
3. Start or enable the TFTP service.
Installation and configuration 30
Page 31

4.
Configure DHCP.
These steps are not described in this guide. See your vendor's respective documentation for details.
5. Configure the NFS server to export the install diskette image of the iSCSI boot and configuration-
related code and utilities. See "NFS install (on page 30)."
6. Execute the following command on the PXE server.
# vi /tftpboot/linux-install/pxelinux.cfg/default
7. Add the following lines to this file:
label <number>
kernel <path-to-OS-distro-dir>/boot/<arch>/loader/linux
append initrd=<path-to-OS-distro-dir>/boot/<arch>/loader/\
initrd load_ramdisk=1 autoyast=nfs:<nfs ip>:/opt/hp/\
hp-iscsi-boot/scripts/autoinst.xml devfs=nomount \
install=nfs:<nfs ip>:<path-to-OS-distro-dir>
8. Optionally, you can modify /tftpboot/linux-install/msgs/boot.msg to use custom boot messages.
Installing targets using PXE
1. Power up the server.
2. Immediately review the iSCSI option ROM messages during POST to confirm that the Option ROM
initialized successfully and is able to login onto the target disk.
3. When prompted, press <F12> for PXE installation.
4. Enter the label number (specified in the above section) at the PXE boot prompt and press the Enter
key. The installation starts pulling the installation sources from the NFS server.
5. On some servers, the installation returns the following message:
Error - no hard disks and no hard disk controllers were found for this
installation. Check your hardware.
Ignore this message and select OK.
Installation and configuration 31
Page 32

Performing an iSCSI boot
Booting from the iSCSI drive
The following sequence describes the iSCSI boot sequence.
At server boot
1. On power up, system BIOS detects the iSCSI boot option ROM.
2. iSCSI boot option ROM obtains iSCSI boot parameters from iLO/RILOE memory using the iSCSI
environment variables.
3. iSCSI boot option ROM establishes an iSCSI session with the iSCSI targets defined in the
environment variables.
4. Upon session creation, iSCSI boot option ROM establishes the iSCSI target as the local hard disk.
5. The iSCSI boot option ROM leaves the iSCSI target parameters on the adapter scratch pad for the
operating system to use.
6. The iSCSI boot option ROM loads the operating system.
7. System BIOS continues to perform I/O requests that are translated to ISCSI messages by the iSCSI
boot option ROM.
When the operating system loads
1. Network driver is loaded and network interface is configured.
2. iSCSI initiator driver is loaded and initialized.
3. iSCSI initiator driver reads target parameters from adapter scratch pad.
4. Connects to the iSCSI target.
5. iSCSI session is established and the system boots.
Performing an iSCSI boot 32
Page 33

bnx2 driver update
Upgrading the bnx2 driver
If a newer version of the bnx2 driver needs to be installed on an iSCSI booted system, execute the
following commands on the iSCSI booted server. A system reboot is required for the changes to take
Red Hat 4
affect.
# rpm -e bnx2-<old version>
# rpm -ivh bnx2-<new version>.src.rpm
# rpmbuild -bb /usr/src/redhat/SPECS/bnx2.spec
# rpm -ivh --force /usr/src/redhat/RPMS/<arch>/bnx2-<new version>.rpm
# cd /opt/hp/iboot/bin
# ./iboot_config --config /opt/hp/iboot/etc/iboot.conf -r
# reboot
SLES 9
# rpm -e bnx2-<old version>
# rpm -ivh bnx2-<new version>.src.rpm
# rpmbuild -bb /usr/src/package/SPECS/bnx2.spec
# rpm -ivh --force /usr/src/package/RPMS/<arch>/bnx2-<new version>.rpm
# cd /opt/hp/iboot/bin
# ./iboot_config --config /opt/hp/iboot/etc/iboot.conf -r
# reboot
Red Hat 5 and SLES 10
# rpm -ihv <rpmpath>/hp-iscsi-boot-<version>.i386.rpm
# rpm -e bnx2-<old version>
# rpm -ivh <rpmpath>/bnx2-<new version>.src.rpm
# rpmbuild -bb /usr/src/packages/SPECS/bnx2.spec
# rpm -ivh --force /usr/src/packages/RPMS/<arch>/bnx2-<new version>.rpm
# cd /opt/hp/hp-iscsi-boot/utils/bin
# ./rebuild_initrd
# reboot
Do not issue the command rmmod bnx2 for it results in system hang.
The command rebuild_initrd does not take any argument. It updates the /boot/initrd-<kernel-
version> image with the currently installed version of the bnx2 driver. Please see the man page for
rebuild_initrd(8) for details.
bnx2 driver update 33
Page 34

Uninstalling the RPM packages
Uninstalling linux-iSCSI-install RPM
To remove the install RPM packages, complete the following on the install sever.
For RH4 and SLES 9
1. Prior to removing the linux-iscsi-boot RPM on a server that is not iSCSI booted, stop all iSCSI
sessions, stop the iscsid daemon, and unload the following iscsi modules
iscsi_sfnet
scsi_transport_iscsi
iscsi
2. To uninstall the iSCSI install RPM, execute the following on the install server:
#rpm -e linux-iscsi-install
Uninstalling hp-iSCSI-boot install RPM
For RH5 and SLES 10
To uninstall the iSCSI install RPM, execute the following on the install server:
# rpm -e hp-iscsi-boot
Uninstalling the RPM packages 34
Page 35

Troubleshooting
ProLiant BL685c servers fail to finish boot sequence
Symptom
On some ProLiant BL685c servers with more than 4 GB of memory, the system fails to finish the boot
sequence after a SLES10 install.
Resolution
Add the parameter "numa=off" to the list of parameters given for boot options or in the PXE configuration
Option ROM not shown during POST
file depending on the type of install.
Symptom
When installing iSCSI boot targets using PXE and when using Port 1 on an NC373m to iSCSI boot, PXE
option ROM may not show during POST after the iSCSI target is found and logged into the system.
Resolution
First disable the array controller in RBSU and then reboot to see the PXE screen post during POST.
Using a diagnostic monitor for troubleshooting
If the client is not able to boot from the target server and the problem is not discernable from the
immediately available information, you may need to use a network monitor that is capable of parsing the
iSCSI protocol to troubleshoot the information.
If the iSCSI target is software running on a server, you may be able to run a software network monitor
such as Ethereal directly on the target system. Otherwise, you may need to configure a network switch
with port mirroring and direct the mirrored packets to a port where either a hardware or software network
monitor can be attached.
Target connection problems
Symptoms:
The initiator is unable to make a connection to the target.
Possible causes:
• The initiator and target are not connected to the same network
• The initiator and target are not in the same VLAN (if any)
• The IP configurations for the initiator and target are not correct
• The initiator's boot path information is not correct
Troubleshooting 35
Page 36

• The target service is not running on the target server
• Target's firmware is outdated. Update to the latest firmware version
Target login problems
Symptoms:
The iSCSI initiator is able to connect to the target but is unable to log in successfully.
Possible causes:
• The initiator is not configured with the right target name
• The initiator is not configured with the right target IP address
• The initiator is not configured with the right initiator name
• The initiator and target are not configured for the same authentication method
• The initiator and target are using CHAP or Mutual CHAP authentication so they may not be
configured with matching user name and secret(s)
• If the target implements some form of Access Control Lists (ACL), the target may not be configured to
allow it on the initiator
LUN access problems
Symptoms:
The initiator is able to connect to and log in to the target, but the system doesn't see a disk present (it
attempts to boot from an internal disk or PXE).
Possible causes:
• The initiator is not configured with the correct LUN from which to boot (Some targets start numbering
at 1 instead of 0)
• The target is not configured to allow access to the specified LUN by the initiator
OS problems
Symptoms:
The initiator is able to connect to and log in to the target and the system sees the disk, but you are unable
to install the OS.
Possible causes:
• There are multiple NC37xx adapters enabled in the system
• The drivers are not being loaded in the right order during installation
• The target disk provided is not large enough
• The initiator is not configured with the correct LUN from which to boot (some targets start numbering
data devices at 1, not 0)
• The target is not configured to allow access to the specified LUN by the initiator
Troubleshooting 36
Page 37

Symptoms:
Post installation fails to read the iSCSI install scripts from the iLO virtual floppy.
Resolution:
On the iLO web page select Virtual Devices > Virtual Media and then select Virtual Media Applet. In the
Virtual Floppy/USB Key box, disconnect and reconnect the Virtual Floppy Drive by first clicking disconnect
and then clicking connect.
Symptoms:
After successful OS installation, the server will not boot Linux from the iSCSI target.
Resolution:
Check the RBSU settings for the adapter that is connected to the target. On some servers and with some
versions of the BIOS, you may have to enable iSCSI boot or modify the boot controller order.
Symptoms:
During post-install of the OS for RH4 or SLES 9, the bnx2 rpm fails to install or the kernel tree cannot be
set up.
Resolution:
The kernel source rpm must be installed during the OS installation so that the bnx2 rpm and the iscsi-boot
rpm can be built during post install. Choose the kernel source rpm when installing the OS.
Symptoms:
On some BL685c servers with more than 4 Gb of memory, the system fails to finish the boot sequence
after a SLES 9 or SLES 10 install.
Resolution:
Add the parameter "numa=off" to the list of parameters given for "Boot options" or in the PXE
configuration file, depending on the type of install.
Symptoms:
During a SLES 9 install over a previous RH4 install a message of "cannot create swap partition" or
"running low on disk space" appears.
Resolution:
Reboot and restart the install. The problem will not occur on subsequent installs.
Troubleshooting 37
Page 38

Technical support
Before you contact HP
Be sure to have the following information available before you call HP:
• Technical support registration number (if applicable)
• Product serial number
• Product model name and number
• Product identification number
• Applicable error messages
• Add-on boards or hardware
• Third-party hardware or software
• Operating system type and revision level
HP contact information
For the name of the nearest HP authorized reseller:
• See the Contact HP worldwide (in English) webpage
(http://welcome.hp.com/country/us/en/wwcontact.html).
For HP technical support:
• In the United States, for contact options see the Contact HP United States webpage
(http://welcome.hp.com/country/us/en/contact_us.html). To contact HP by phone:
o Call 1-800-HP-INVENT (1-800-474-6836). This service is available 24 hours a day, 7 days a
week. For continuous quality improvement, calls may be recorded or monitored.
o If you have purchased a Care Pack (service upgrade), call 1-800-633-3600. For more
information about Care Packs, refer to the HP website (http://www.hp.com/hps).
• In other locations, see the Contact HP worldwide (in English) webpage
(http://welcome.hp.com/country/us/en/wwcontact.html).
Free automated customer support services
The following sites offer troubleshooting information, compatibility notes, and software upgrades
(including Softpaqs and drivers).
HP Worldwide Web Server
• Navigate to a specific product, and then look for support information from the list of support
resources at the HP support website (http://h18007.www1.hp.com/support/files/server).
Technical support 38
Page 39

• For downloadable support software for HP Digital Networking Products, Hubs, Integrated Access
Devices, Modems and ISDN, Adapters, Remote Access Concentrators/Servers, Software, and
Switches, go to the HP software and drivers website
(http://h18007.www1.hp.com/support/files/server).
• All SoftPaqs sorted by SoftPaq number can be found at the HP ftp support website
(ftp://ftp.compaq.com/pub/softpaq/).
An ASCII version of a SoftPaq can be found by selecting a SoftPaq at the HP ftp support website.
(ftp://ftp.compaq.com/pub/softpaq/)
• An index of available software sorted by product can be found at the HP software and drivers
website (http://h18007.www1.hp.com/support/files/server).
HP FTP Server
Navigate to a specific product, and then look for support information from the list of support resources at
the HP ftp support website (ftp://ftp.compaq.com/pub/softpaq/).
Technical support 39
Page 40

Acronyms and abbreviations
BIOS
Basic Input/Output System
CHAP
Challenge Handshake Authentication Protocol
DHCP
Dynamic Host Configuration Protocol
EFI
extensible firmware interface
HBA
host bus adapter
iLO
Integrated Lights-Out
IP
Internet Protocol
IPL
initial program load
iSCSI
Internet Small Computer System Interface
LAA
locally administered address
LUN
logical unit number
NFS
network file system
Acronyms and abbreviations 40
Page 41

PDU
power distribution unit
PXE
Preboot Execution Environment
RBSU
ROM-Based Setup Utility
RDP
Remote Desktop Protocol
RILOE
Remote Insight Lights-Out Edition
ROM
read-only memory
SAN
storage area network
SSL
Secure Sockets Layer
TCP
Transmission Control Protocol
UNDI
Universal Network Driver Interface
VLAN
virtual local-area network
Acronyms and abbreviations 41
Page 42

Index
A
autoinst.xml 22, 27
B
bnx2 driver 33
boot commands 32
D
disk image files 14, 19, 23
downloading files 38
F
firmware, updating 9
I
iLO (Integrated Lights-Out) 15, 19
installation 8, 13
iSCSI boot Option ROM 8, 9, 10, 35
iSCSI boot targets 13, 16, 18, 22, 27, 35, 36
S
SLES (SUSE Linux Enterprise Server) 22, 27
support 38
supported hardware 4
supported operating systems 4
system requirements 4
T
teaming limitations 5
technical support 38
troubleshooting 35
U
uninstalling 34
USB devices 16, 20, 24, 29
V
virtual floppy 15, 19
K
ks.cfg 14, 18
N
NFS 17, 20, 26, 30
O
overview 4
P
PXE (preboot execution environment) 17, 21, 26,
30, 36
R
Red Hat kickstart 14, 18
Index 42
 Loading...