

Page 1

HP ProLiant Essentials RDMA for HP Multifunction Network Adapters User Guide
Part Number 432562-00B
February 2007 (Second Edition)
Page 2

© Copyright 2007 Hewlett-Packard Development Company, L.P.
The information contained herein is subject to change without notice. The only warranties for HP products and services are set forth in the express
warranty statements accompanying such products and services. Nothing herein should be construed as constituting an additional warranty. HP
shall not be liable for technical or editorial errors or omissions contained herein.
Confidential computer software. Valid license from HP required for possession, use or copying. Consistent with FAR 12.211 and 12.212,
Commercial Computer Software, Computer Software Documentation, and Technical Data for Commercial Items are licensed to the U.S.
Government under vendor’s standard commercial license.
Microsoft, Windows, and Windows NT are U.S. registered trademarks of Microsoft Corporation. Windows Server 2003 is a trademark of
Microsoft Corporation.
Audience assumptions
This document is for the person who installs, administers, and troubleshoots servers and storage systems. HP assumes you are qualified in the
servicing of computer equipment and trained in recognizing hazards in products with hazardous energy levels.
Page 3

Contents
Overview..................................................................................................................................... 4
About HP ProLiant Essentials RDMA for HP Multifunction Network Adapters...................................................... 4
HP RDMA environment and configuration requirements.................................................................................. 4
Supported operating systems ......................................................................................................................5
Installation ................................................................................................................................... 6
HP NCU software installation...................................................................................................................... 6
HP ProLiant Essentials RDMA Networking Pack license installation ................................................................... 6
Configuration............................................................................................................................... 9
Enabling RDMA devices............................................................................................................................. 9
Testing HP RDMA functionality using the Microsoft wsdping.exe utility............................................................ 14
Disabling an HP RDMA device.................................................................................................................. 15
Statistics .................................................................................................................................... 19
Displaying RDMA Statistics....................................................................................................................... 19
Acronyms and abbreviations........................................................................................................ 22
Index......................................................................................................................................... 23
Contents 3
Page 4

Overview
In this section
About HP ProLiant Essentials RDMA for HP Multifunction Network Adapters.................................................... 4
HP RDMA environment and configuration requirements ................................................................................ 4
Supported operating systems ..................................................................................................................... 5
About HP ProLiant Essentials RDMA for HP Multifunction Network Adapters
Remote Direct Memory Access (RDMA) is a communications protocol that provides direct transmission of
data from the memory of one computer to the memory of another with minimal demands on the host CPU.
RDMA technology is implemented in hardware on the network server adapter to accommodate everincreasing network speeds. RDMA provides a high-speed, high-performance connection between servers
on the same network. This advanced feature can be activated through the purchase and installation of the
HP ProLiant Essentials RDMA pack license. HP RDMA pack licenses are port based; the licensed seats are
available to individual ports on multifunction adapters.
RDMA is supported on Windows Server 2003 (SP1 or later) or Windows Server 2003 x64 (SP1 or later)
only.
HP RDMA environment and configuration requirements
The following environment and configuration requirements apply to the HP ProLiant Essentials RDMA
Pack.
• The Network Driver Interface Specification (NDIS) stack must not contain any non-HP or non-
Broadcom intermediate drivers or filter drivers.
• HP highly recommends that you upgrade all Multifunction Gigabit Server Adapter firmware
bootcode to version 1.9.6 using the Multifunction Firmware Upgrade Utility found on the HP ProLiant
Networking Software CD in the \apps directory.
• RDMA supports subnet-only traffic (traffic between adapters connected within the same subnet).
RDMA does not support off-subnet connections.
• RDMA does not support teaming.
• RDMA does not support IPv6.
• RDMA does not support VLANs.
• RDMA does not support generic filter drivers inserted on the NDIS API.
• RDMA performance may drop significantly if an application stresses the system with large numbers
of short-lived connections.
• Microsoft Windows Firewall must not be enabled.
• Multi-threaded applications may not run correctly when RDMA is enabled.
Overview 4
Page 5

For optimal performance on any system with an HP RDMA-enabled multifunction server adapter, HP
recommends downloading and installing Microsoft support files (WindowsServer2003-KB910481-x86-
ENU.exe for Microsoft Windows Server 2003 x86 and WindowsServer2003.WindowsXP-KB910481x64-ENU.exe for Windows Server 2003 x64 operating systems) located on the Microsoft website
(http://www.support.microsoft.com/kb/910481
KB924286 and contacting Microsoft Product Support Services to obtain the related hotfix.
). Additionally, HP recommends reading Microsoft article
Supported operating systems
HP ProLiant Essentials RDMA allows you to configure and monitor RDMA functionality on an HP
Multifunction Gigabit Server Adapter running x86 or x64 versions of the Microsoft® Windows Server
2003 SP1 or later operating system.
Overview 5
Page 6

Installation
In this section
HP NCU software installation .................................................................................................................... 6
HP ProLiant Essentials RDMA Networking Pack license installation ................................................................. 6
HP NCU software installation
If you do not have HP NCU software installed on your server, use the included HP ProLiant Networking
Software CD to install the NCU for Windows operating systems.
1. Insert the CD and open the appropriate folder for your Windows operating system.
2. Double-click the cmponent.htm file.
3. Click the Network Teaming and Configuration link.
4. Install the component according to the directions.
HP updates networking software frequently to include new functionality and features. For the latest driver,
firmware, and documentation updates go to the HP website
(http://h18004.www1.hp.com/products/servers/networking/index.html
).
HP ProLiant Essentials RDMA Networking Pack license installation
These installation instructions assume that the HP Network Configuration Utility (NCU), release 8.40 or
higher is installed on an HP ProLiant system running Microsoft Windows 2003 or Windows 2003 x64
SP1 or later. If you do not have HP NCU software installed on your server, see the HP NCU software
installation (on page 6) section.
The ProLiant Essentials Network License Manager dialog box allows you to manually install a single
license key or install multiple license keys from a license key file, and allows you to track network licenses
on your system.
To install a single license key:
1. Click the NCU tray icon. The NCU window appears.
Installation 6
Page 7
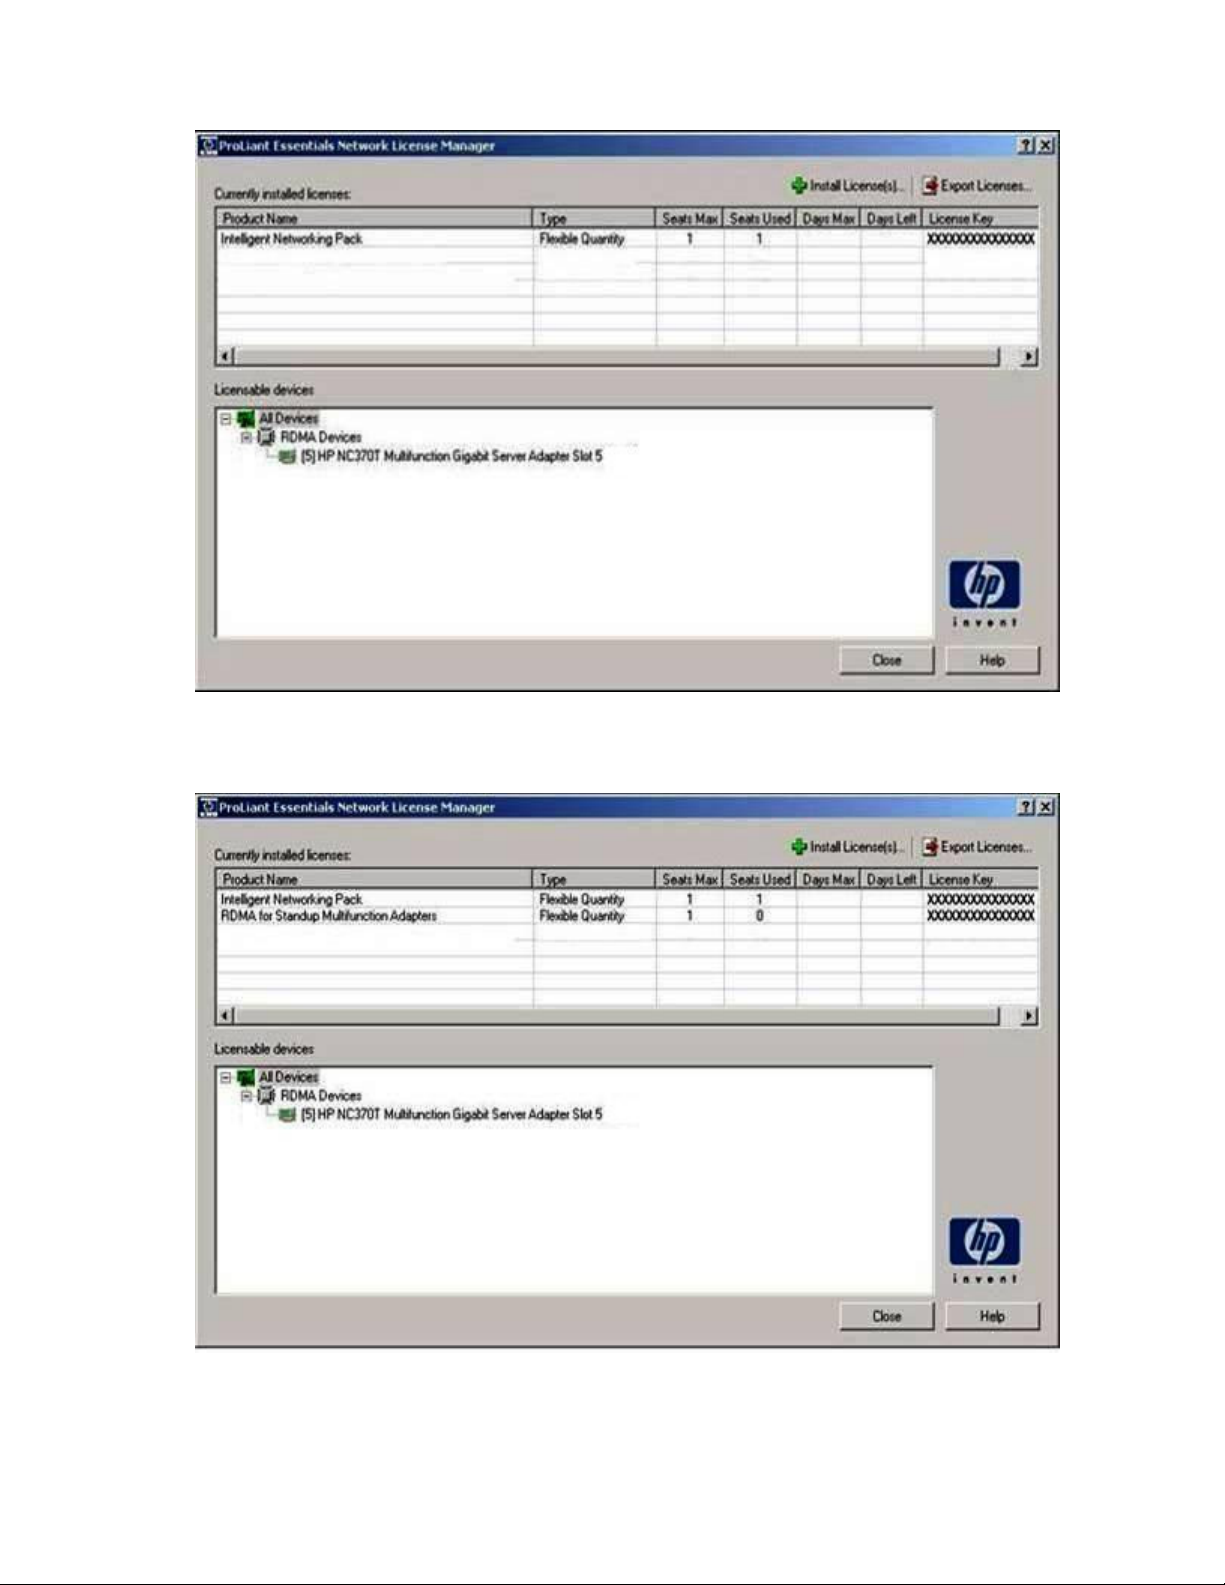
Click License Manager. The License Manager appears.
2.
3. Click Install License(s)….
4. Select the Install a single license key option and enter the license key string.
5. Click Install. The installed license appears in the Currently installed licenses window.
To install multiple license keys from a key file:
Installation 7
Page 8

Follow steps 1—3 above, selecting the Install license keys from a file option and click Open License
1.
Key File.... The Open dialog box appears.
2. Select the [filename].key file and click Open. A list of keys available for installation displays in
the "Install ProLiant Essentials License Key(s)" window.
3. Select the license keys to install by clicking the check boxes. Selecting Invert all reverses all check
box selections.
4. Click Install to install all selected licenses.
After the license key is installed on the system, the advanced features are activated and ready for
configuration through the NCU and several command-line scripting utilities. Retain the license key for
future reference. The key is needed for technical support and future upgrades.
See the HP RDMA configuration through the NCU section for instructions to enable RDMA.
Installation 8
Page 9

Configuration
In this section
Enabling RDMA devices............................................................................................................................ 9
Testing HP RDMA functionality using the Microsoft wsdping.exe utility.......................................................... 14
Disabling an HP RDMA device ................................................................................................................ 15
Enabling RDMA devices
When enabling RDMA devices, keep the following guidelines (conditions) in mind:
• Microsoft Windows Firewall must be disabled before HP RDMA functionality can be enabled. If
RDMA is enabled when Microsoft Windows Firewall is enabled, RDMA connectivity fails. No error
message appears.
• When TOE is enabled, RDMA cannot be enabled.
• If the Maximum Frame Size setting is more than 1514 bytes, RDMA cannot be enabled.
• RDMA cannot be enabled on a Multifunction adapter that has one or more VLANs enabled.
• When RDMA is enabled, non-HP filter drivers are not supported. If a non-HP filter driver is inserted in
the NDIS stack shared with the RDMA stack, RDMA connections are no longer created and existing
RDMA connections are terminated. No error message appears.
To enable a Multifunction Server Adapter as an RDMA device, complete the following steps:
Configuration 9
Page 10

On the NCU Main window, select an HP Multifunction Server Adapter. The Properties option
1.
appears.
NOTE: HP BladeSystem servers report an IO Bay number instead of a Slot number.
2. Click Properties. The Multifunction Adapter Properties window appears with the Settings tab
selected.
3. Select the Enable Remote Direct Memory Access (RDMA) checkbox. (Optional: Type a user-defined
MAC address to be used for the RDMA device in the Locally Administered Address text box. The
default MAC address is used if an address is not entered.)
An available RDMA Pack license is required. See the HP ProLiant Essentials value pack licenses
section.
Configuration 10
Page 11

NOTE: When iSCSI is enabled, RDMA cannot be enabled.
Configuration 11
Page 12

Click OK. The HP Network Configuration Utility Properties window appears.
4.
Configuration 12
Page 13

Click the RDMA Enabled Devices tab to view the configured RDMA device.
5.
6. Click OK to save the new RDMA device configuration. The following window appears.
7. Click Yes to continue with the configuration. The following window appears.
8. Click Yes to reboot the system. The Multifunction Server Adapter is now configured for RDMA
functionality.
After a Multifunction Server Adapter is enabled as an RDMA device, the device is displayed on the
RDMA Enabled Devices tab off the NCU Main window.
NOTE: When RDMA is enabled, multi-threaded applications may have reduced performance, such
as limited system resources or a lack of system responsiveness. No error message appears if this
situation occurs.
Configuration 13
Page 14

Testing HP RDMA functionality using the Microsoft wsdping.exe utility
After completing RDMA installation and configuration, use the Microsoft wsdping.exe utility to verify that
RDMA is installed correctly and to verify connectivity between two RDMA-enabled adapters located on
separate servers.
Obtaining the Microsoft wsdping.exe utility
Complete the following steps to install the Microsoft Windows Hardware Compatibility Test (HCT) 12.1 kit
on a server. Microsoft HCT 12.1 kit installation is required to obtain the wsdping.exe utility.
NOTE: The Microsoft Windows HCT 12.1 kit is required to be installed on only one of the servers in
the network and that server does not have to be a target for RDMA functionality.
1. Go to the Microsoft website (http://www.microsoft.com) and search for the Windows HCT 12.1 kit.
2. Download the HCT 12.1.01 disk image (HCT12101 ISO Files.exe).
3. Create an HCT 12.1.01 CD from the downloaded image. See the Microsoft
HCT12.1.01BurnReadme.doc for details about creating the CD.
4. To install the HCT 12.1.01 kit on a server, insert the CD into the server's CD drive. The HCT
installation screen appears automatically.
5. Read and accept the terms in the HCT kit version 12.1 license agreement, and then click Next.
6. Type a user name and a company or organization name, and then click Next.
7. Click Install the Hardware Compatibility Test Kit. Follow the instructions in the "Windows HCT 12.1 -
InstallShield Wizard" to complete the installation. Take note of the drive location where the HCT kit
installs (for example, C:\HCT). This information is required to locate the wsdping.exe utility in step
11.
8. After the Custom Setup window appears, select Test Categories, Network Devices, and Winsock
Direct. Then click Next.
9. Click Install to begin the HCT kit installation.
10. After the InstallShield Wizard Completed screen appears, click Finish.
11. After the HCT kit is installed, go to the drive location where the HCT kit was installed, and open the
\HCT\testbin\ndistest\wsdbin folder. The wsdping.exe utility is available for X86, IA64 or AMD64
architectures.
12. To select the correct version of the wsdping.exe utility for the target server, open the X86, IA64, or
AMD64 folder that is appropriate for the operating system on the server.
Using the wsdping.exe utility
The following example demonstrates how the wsdping command can be used in DOS with two RDMA-
enabled servers.
1. To list all of the IP addresses, enter ipconfig at the command prompt, and then note the IP address
for the RDMA multifunction adapter.
ipconfig
2. Enter the wsdping command and the IP address for the RDMA multifunction adapter.
wsdping -s <IP address for RDMA adapter from ipconfig>
3. On the first server, enter the RDMA adapter IP address obtained from the wsdping command:
wsdping -s <RDMA adapter IP address from ipconfig>
4. On second server, enter the following command using the RDMA adapter IP address obtained in
step 1:
wsdping -c <IP address of RDMA adapter on the first server>
5. The following sample output indicates a successful wsdping.exe utility test for HP RDMA functionality:
Configuration 14
Page 15

WinSock Direct Pinging 169.59.141.159 over SAN path with 32 bytes of
data:
Reply from 169.59.141.159: bytes=32 time= 238
Reply from 169.59.141.159: bytes=32 time= 126
Reply from 169.59.141.159: bytes=32 time= 119
Reply from 169.59.141.159: bytes=32 time= 124
Ping statistics for 169.59.141.159:
Packets: Sent = 4, Received = 4, Lost = 0 (0 percent loss)
Examine the first server screen for the following successful client connection information:
Waiting for clients to connect to: 169.59.141.159 : 11177
Client connected over SAN : 169.59.142.11 : 1069
Client disconnected : 169.59.142.11 : 1069
A wsdping.exe test for RDMA functionality that does not return data similar to the output listed above
indicates that RDMA is not functioning correctly.
Failed wsdping.exe RDMA functionality test
Possible reasons for a failed wsdping.exe RDMA functionality test include:
1. The SAN hardware interface drivers may not be installed correctly.
Solution: Contact the vendor to verify that you have the correct drivers installed and the driver setup
is correct.
2. The server may be running a Windows operating system version that does not support WinSock
Direct.
Solution: Verify that the current Windows operating system supports WinSock Direct.
If you do not have SAN hardware, but still want to run the wsdping.exe utility, then:
Launch both client and server side with the wsdping.exe -f option.
Type wsdping -? for more details.
Disabling an HP RDMA device
To disable an RDMA device, complete the following steps.
Configuration 15
Page 16

Select the HP Multifunction Server Adapter in the RDMA Enabled Devices tab. The Properties option
1.
appears.
NOTE: HP BladeSystem servers report an IO Bay number instead of a Slot number.
2. Click Properties. The Multifunction Adapter Settings tab appears.
Configuration 16
Page 17

Deselect the Enable Remote Direct Memory Access (RDMA) check box to remove the RDMA option for
3.
the adapter.
Configuration 17
Page 18

Click OK. The RDMA Enabled Devices tab appears showing that the Multifunction Server Adapter
4.
has been removed.
5. Click OK to save the new device configuration. The following window appears.
6. Click Yes to complete the configuration change. RDMA functionality is disabled for the selected
Multifunction Server Adapter.
7. A reboot is required after the last RDMA device on the system has been disabled. The following
window appears.
8. Click Yes to reboot the system.
Configuration 18
Page 19

Statistics
In this section
Displaying RDMA Statistics...................................................................................................................... 19
Displaying RDMA Statistics
To view RDMA statistics:
1. On the NCU Main window or on the RDMA Enabled Devices tab, select the Multifunction Adapter.
2. Click Properties. The Multifunction Adapter Properties window appears.
3. Select the RDMA Information and Statistics tab. The Multifunction Adapter Properties RDMA
Information and Statistics tab appears showing activity on the RDMA device since it was last
initialized.
Statistics 19
Page 20

The following read-only statistics are available.
RDMA Information
o Hardware State. Displays Fault if the RDMA hardware has encountered a problem and is no
longer functional, otherwise displays Active.
o Teaming State. Displays Teamed when an RDMA-enabled adapter is teamed and displays Un-
Teamed when the adapter is not teamed. Currently, RDMA-enabled adapters cannot be teamed
so the teaming state is always Un-Teamed.
RDMA Performance Statistics
o Number of Active Connections. Displays the total number of active connections.
o Number of Active Completion Queues. Displays the number of completion queues currently in
use.
o Active Registered Local Memory Bytes. Displays the number of pages that are currently registered
with local access privileges enabled.
o Active Registered Local Memory Regions. Displays the number of memory regions (for example,
virtual buffers) currently registered with local access privileges enabled.
o Active Registered RDMA Memory Bytes. Displays the number of pages that are currently
registered with remote access privileges enabled.
o Active Registered RDMA Memory Regions. Displays the number of memory regions (for example,
virtual buffers) that are currently registered with remote access privileges enabled.
o Bytes Transmitted. Displays the total number of non-RDMA bytes transmitted.
o Bytes Received. Displays the total number of non-RDMA bytes received.
o Peak Number of Connections. Displays the highest number of connections in use at any given
time.
RDMA Basic Statistics
o Maximum Outstanding WQE per Send Queue. Displays the maximum number of uncompleted
Work Queue Elements (WQEs) that can be posted to a send queue.
o Maximum Send Scatter Gather List Elements. Displays the maximum number of send
scatter/gather list elements that are allowed.
o Maximum Receive Scatter Gather List Elements. Displays the maximum number of receive
scatter/gather list elements that are allowed.
o Maximum Queue Pairs per Completion Queue. Displays the maximum number of queue pairs
that can be associated with a completion queue.
o Maximum Local Memory Regions. Displays the maximum number of memory regions that can be
allocated.
o Maximum Send Queue Size
. Displays the maximum number of completed and uncompleted
WQEs that can be found on a send queue.
o Maximum Receive Queue Size. Displays the maximum number of completed and uncompleted
WQEs that can be found on a receive queue.
o Maximum Completion Queue Size. Displays the maximum number of Completion Queue
Elements (CQEs) that can be posted on a completion queue.
o Maximum Hardware Message Transfer Size. Displays the maximum size limit that the hardware
can support for message transfers.
o Maximum Software Message Transfer Size. Displays the maximum size limit that the software can
support for message transfers.
o Maximum Window Size. Displays the maximum size memory window allowed.
o Maximum Completion Queues Available. Displays the maximum number of completion queues
that are available.
Statistics 20
Page 21

o Maximum Connections Available. Displays the maximum number of RDMA connections
available.
o Maximum RDMA Reads per Connections. Displays the maximum number of concurrent RDMA
reads allowed per connection.
Statistics 21
Page 22

Acronyms and abbreviations
CPU
central processing unit
IP
Internet Protocol
NCU
Network Configuration Utility
NDIS
network driver interface specification
RDMA
Remote Direct Memory Access
WSD
Windows Socket Direct or Winsock Direct
Acronyms and abbreviations 22
Page 23

Index
C
configuration 9
D
disabling RDMA 15
E
enabling RDMA devices 9
environmental requirements 4
I
Install ProLiant Essentials License Key(s) 6
installation, NCU 6
installation, RDMA license 6
R
RDMA Pack for Multifunction Gigabit Server
Adapters 6
S
statistics 19
supported operating systems 5
W
wsdping.exe, testing rdma functionality 14
Index 23
 Loading...