

Page 1

Multimedia
User Guide
Page 2

© Copyright 2008 Hewlett-Packard
Development Company, L.P.
Microsoft, Windows, and Windows Vista are
U.S. registered trademarks of Microsoft
Corporation.
The information contained herein is subject
to change without notice. The only
warranties for HP products and services are
set forth in the express warranty statements
accompanying such products and services.
Nothing herein should be construed as
constituting an additional warranty. HP shall
not be liable for technical or editorial errors
or omissions contained herein.
First Edition: November 2008
Document Part Number: 506246-001
Product notice
This user guide describes features that are
common to most models. Some features
may not be available on your computer.
Page 3

Table of contents
1 Multimedia features
Identifying your multimedia components .............................................................................................. 2
Using the DVD button (select models only) .......................................................................................... 4
Adjusting the volume ............................................................................................................................ 5
Using the media activity functions ........................................................................................................ 7
Using the media activity hotkeys ......................................................................................... 7
2 Multimedia software
Using DVD Play software ..................................................................................................................... 8
Using other preinstalled multimedia software ....................................................................................... 8
Installing multimedia software from a disc ............................................................................................ 9
3 Audio
Connecting external audio devices .................................................................................................... 11
Checking your audio functions ........................................................................................................... 12
4 Video
Connecting an external monitor or projector ...................................................................................... 14
Connecting an HDMI device ............................................................................................................... 15
5 Optical drive
Identifying the installed optical drive ................................................................................................... 17
Using optical discs .............................................................................................................................. 18
Selecting the right disc ....................................................................................................................... 19
Playing music ..................................................................................................................................... 21
Watching a movie ............................................................................................................................... 22
Changing DVD region settings ........................................................................................................... 23
Creating or “burning” a CD or DVD .................................................................................................... 24
Removing an optical disc (CD or DVD) .............................................................................................. 25
Configuring the audio using HDMI ..................................................................................... 15
Determining the type of graphics card installed on your computer ................... 15
Setting HDMI as the default audio playback device .......................................... 16
CD-R discs ......................................................................................................................... 19
CD-RW discs ..................................................................................................................... 19
DVD±R discs ..................................................................................................................... 19
DVD±RW discs .................................................................................................................. 19
LightScribe DVD+R discs .................................................................................................. 19
Blu-ray Disc ....................................................................................................................... 20
iii
Page 4

6 Webcam
Webcam tips ....................................................................................................................................... 27
Adjusting webcam properties ............................................................................................................. 28
7 Troubleshooting
The optical disc tray does not open for removal of a CD or DVD ....................................................... 30
The computer does not detect the optical drive ................................................................................. 31
A disc does not play ........................................................................................................................... 32
A disc does not play automatically ..................................................................................................... 33
A DVD movie stops, skips, or plays erratically ................................................................................... 33
A DVD movie is not visible on an external display ............................................................................. 34
The process of burning a disc does not begin, or it stops before completion .................................... 35
A DVD playing in Windows Media Player produces no sound or display ........................................... 35
A device driver must be reinstalled .................................................................................................... 36
Obtaining the latest HP device drivers ............................................................................... 36
Obtaining the latest Windows device drivers ..................................................................... 37
Index ................................................................................................................................................................... 38
iv
Page 5

1 Multimedia features
Your computer includes multimedia features that allow you to listen to music, watch movies, and view
pictures. Your computer may include the following multimedia components:
Optical drive for playing audio and video discs
●
Integrated speakers for listening to music
●
Integrated microphone for recording your own audio
●
Integrated webcam that allows you to capture and share video
●
Preinstalled multimedia software that allows you to play and manage your music, movies, and
●
pictures
Multimedia buttons and hotkeys that provide fast access to multimedia tasks
●
NOTE: Your computer may not include all of the components listed.
The following sections explain how to identify and use the multimedia components included with your
computer.
1
Page 6
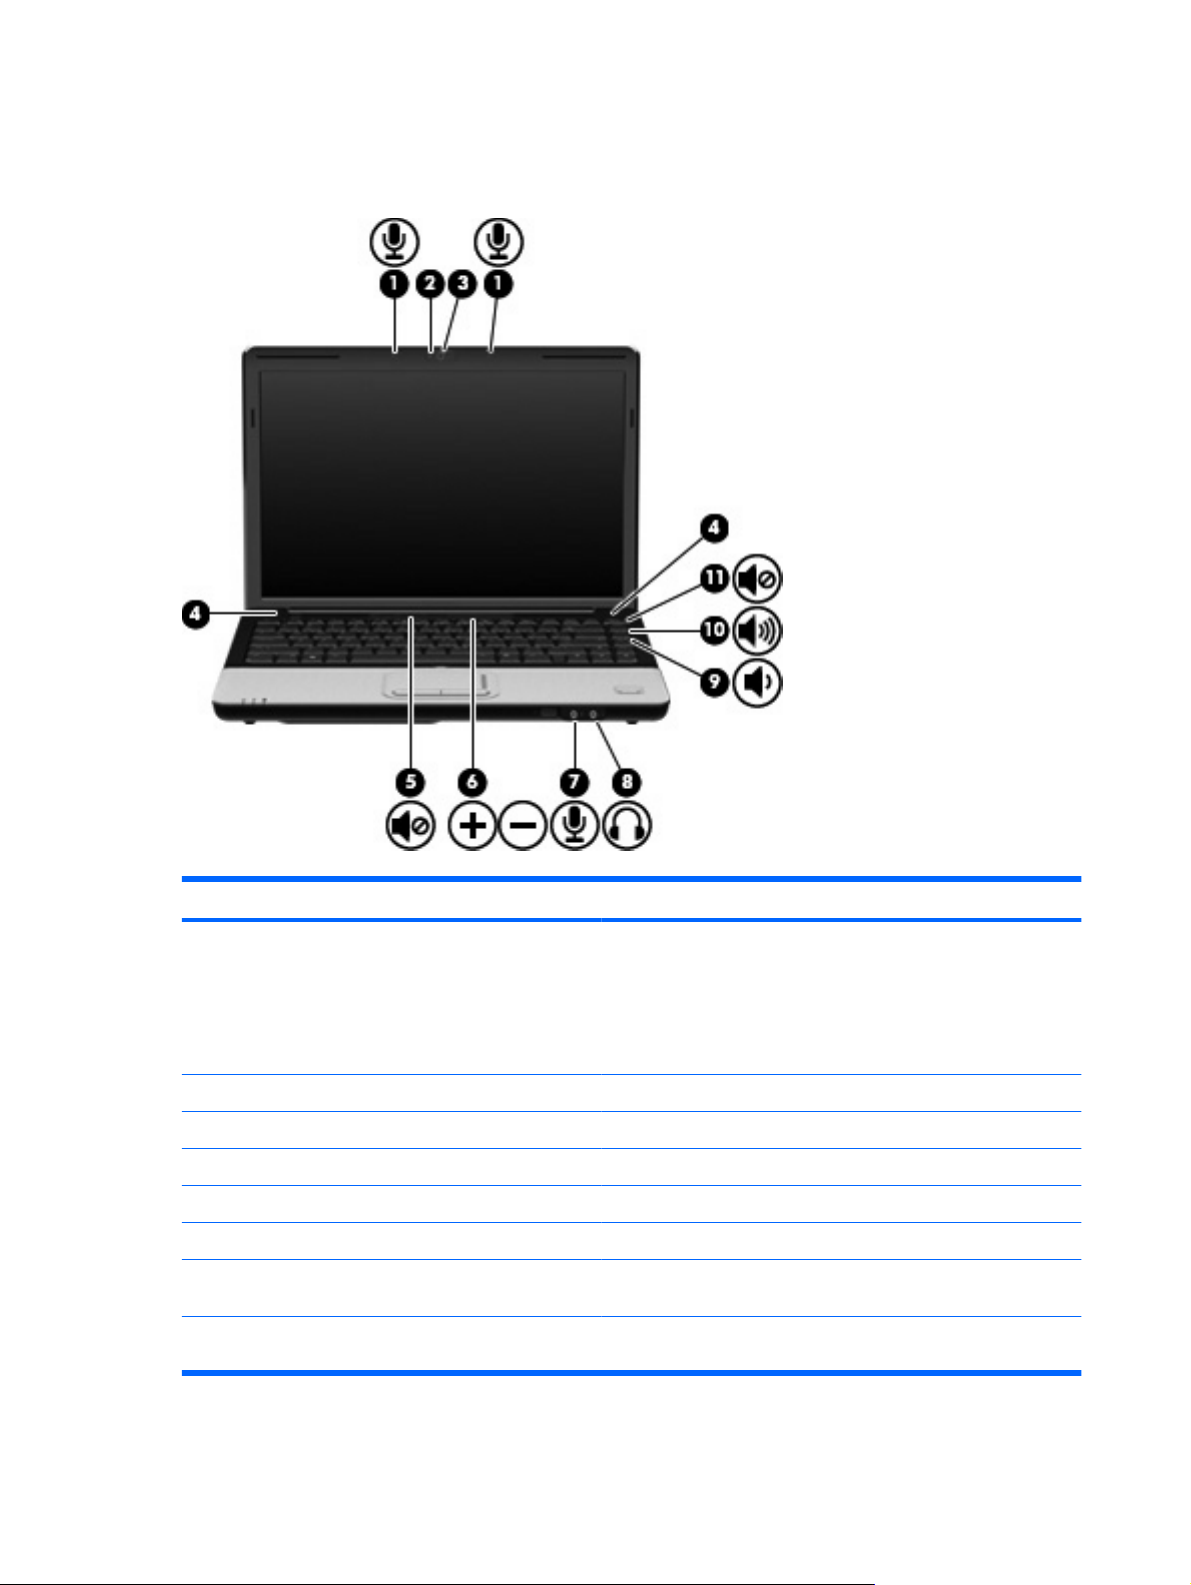
Identifying your multimedia components
Refer to the illustration that most closely matches your computer.
Component Description
(1) Internal microphone Records sound.
NOTE: If there is a microphone icon next to each microphone
opening, your computer has internal microphones.
Depending on your computer model, the computer may have 1 or
2 internal microphones.
(2) Webcam light Turns on when video software accesses the webcam.
(3) Webcam Captures video.
(4) Speakers (2) Produce sound.
(5) Volume mute button Mutes and restores speaker sound.
(6) Volume scroll zone Adjusts speaker volume.
(7) Audio-in (microphone) jack Connects an optional computer headset microphone, stereo array
microphone, or monaural microphone.
(8) Audio-out (headphone) jack Produces sound when connected to optional powered stereo
speakers, headphones, ear buds, a headset, or television audio.
2 Chapter 1 Multimedia features
Page 7

Component Description
WARNING! To reduce the risk of personal injury, adjust the
volume before putting on headphones, earbuds, or a headset. For
additional safety information, refer to the Regulatory, Safety and
Environmental Notices.
NOTE: When a device is connected to the headphone jack, the
computer speakers are disabled.
(9) Volume down hotkey (pg dn) Decreases speaker sound when pressed in combination with the
fn key.
(10) Volume up hotkey (pg up) Increases speaker sound when pressed in combination with the
fn key.
(11) Volume mute hotkey (home) Mutes and restores speaker sound when pressed in combination
with the fn key.
Identifying your multimedia components 3
Page 8
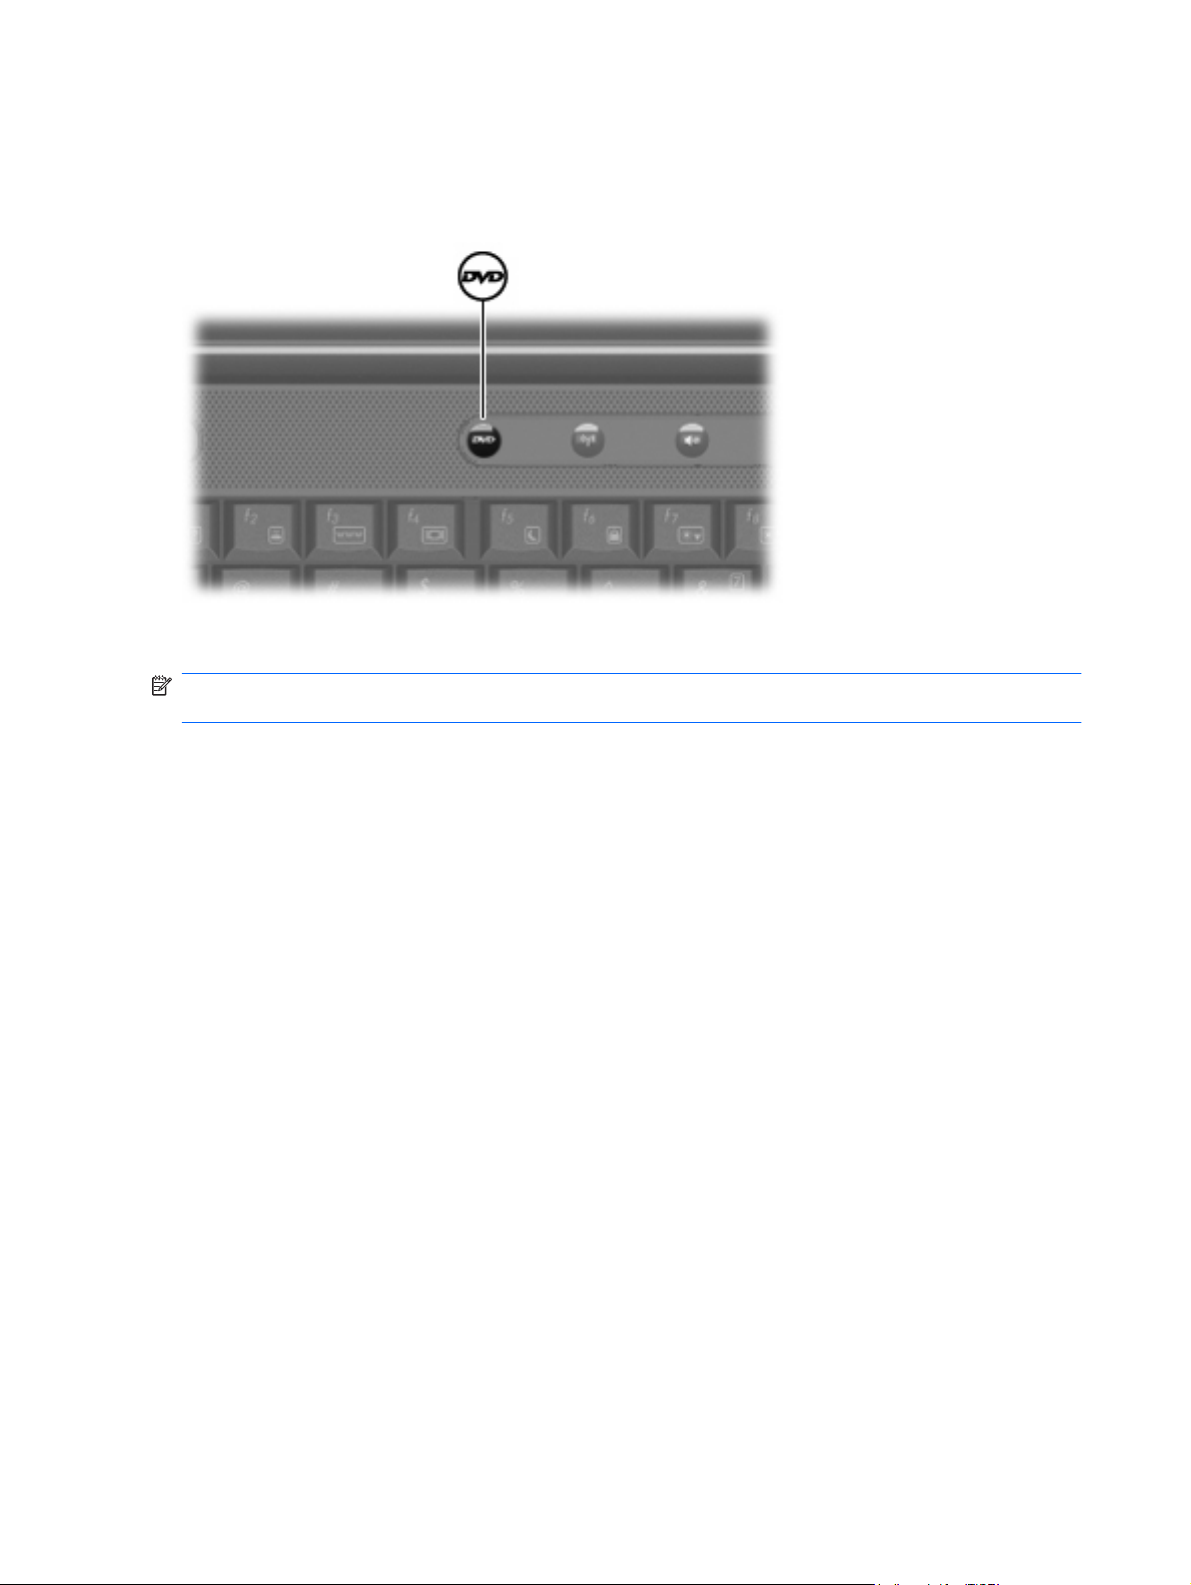
Using the DVD button (select models only)
The function of the DVD button varies by model and installed software. With this button, you can watch
movies and listen to music.
Pressing the DVD button launches the DVD Play program.
NOTE: If the computer has been set up to require a logon password, you may be asked to log on to
Windows. DVD Play opens after you log on. Refer to the DVD Play software Help for more information.
4 Chapter 1 Multimedia features
Page 9
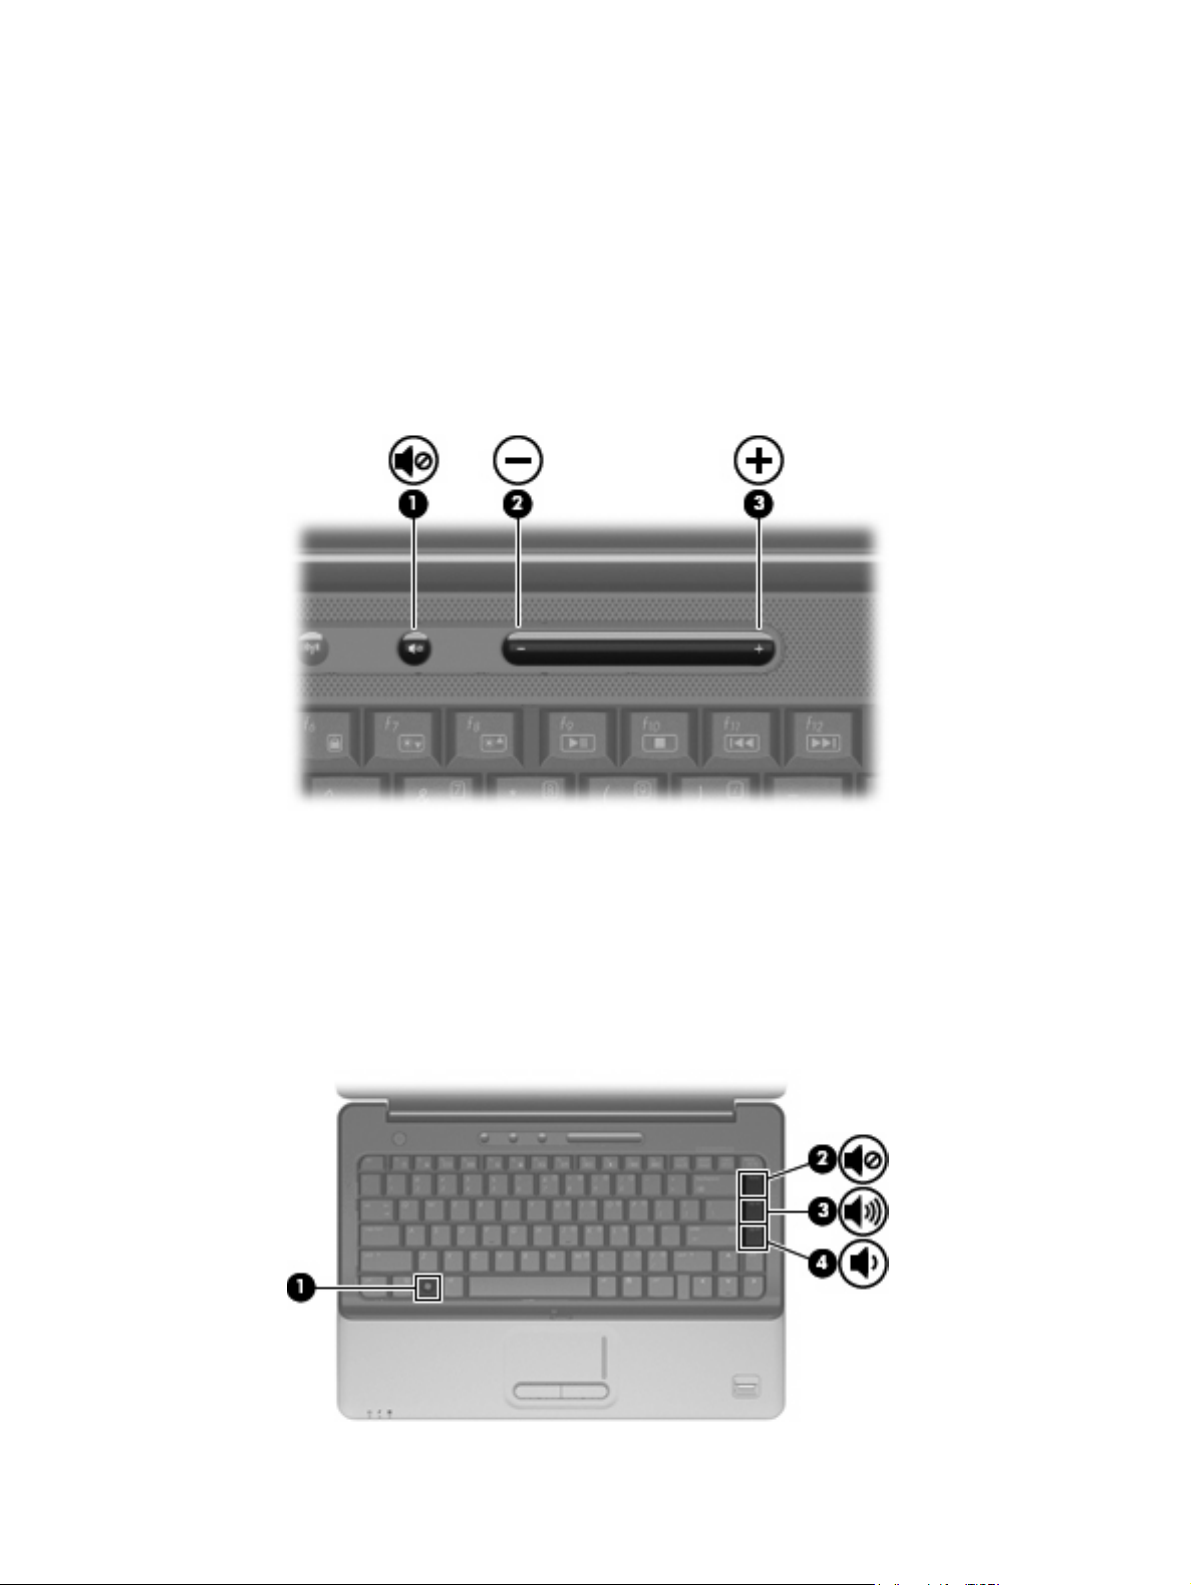
Adjusting the volume
You can adjust the volume using the following controls:
Computer volume buttons (select models only):
●
To mute or restore volume, press the mute button (1).
◦
To decrease volume, slide your finger across the volume scroll zone from right to left, or press
◦
the volume down button (2).
To increase volume, slide your finger across the volume scroll zone from left to right, press
◦
the volume up button (3).
Computer volume hotkeys—A combination of the fn (1) key and either the home (2), pg up (3), or
●
pg dn (4) keys on the right side of the keyboard:
Computer volume hotkeys:
To mute or restore volume, press fn+home.
◦
To increase volume, press fn+pg up.
◦
To decrease volume, press fn+pg dn.
◦
Adjusting the volume 5
Page 10

Windows® volume control:
●
a. Click the Volume icon in the notification area, at the far right of the taskbar.
b. Increase or decrease the volume by moving the slider up or down. Click the Mute icon to mute
the volume.
– or –
a. Right-click the Volume icon in the notification area, and then click Open Volume Mixer.
b. In the Master Volume column, you can increase or decrease the volume by moving the
Volume slider up or down. You can also mute the volume by clicking the Mute icon.
If the Volume icon is not displayed in the notification area, follow these steps to add it:
a. Right-click in the notification area, and then click Properties.
b. Click the Notification Area tab.
c. Under System icons, select the Volume check box.
d. Click OK.
Program volume control:
●
Volume can also be adjusted within some programs.
6 Chapter 1 Multimedia features
Page 11
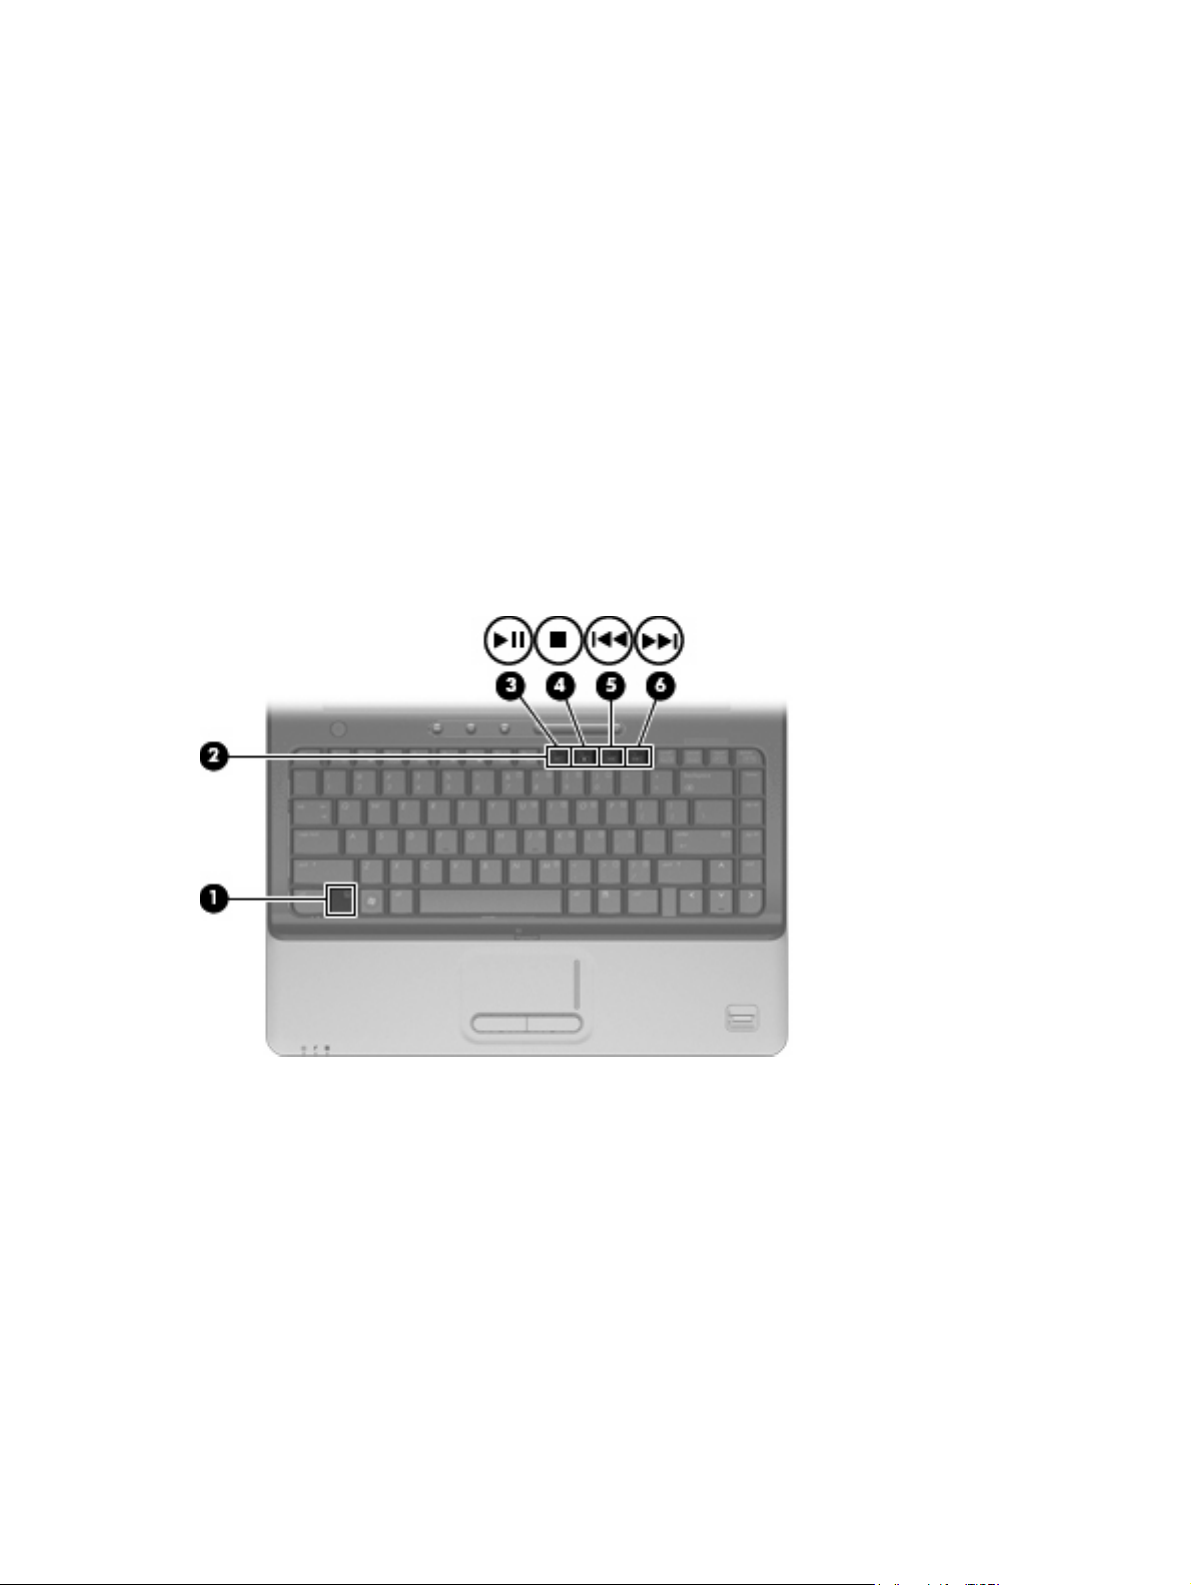
Using the media activity functions
The media activity hotkeys control the play of an audio CD or a DVD that is inserted into the optical
drive.
Using the media activity hotkeys
A media activity hotkey is a combination of the fn key (1) and a function key (2).
When an audio CD or a DVD is not playing, press fn+f9 (3) to play the disc.
●
When an audio CD or a DVD is playing, use the following hotkeys:
●
To pause or resume playing the disc, press fn+f9 (3).
◦
To stop the disc, press fn+f10 (4).
◦
To play the previous track of an audio CD or the previous chapter of a DVD, press fn+f11
◦
(5).
To play the next track of an audio CD or the next chapter of a DVD, press fn+f12 (6).
◦
Using the media activity functions 7
Page 12

2 Multimedia software
Your computer includes preinstalled multimedia software that allows you to play music and watch
movies. The following sections provide details about DVD Play and other preinstalled multimedia
software.
Using DVD Play software
DVD Play turns your computer into a mobile entertainment center. With DVD Play, you can enjoy music
and DVD movies.
To start DVD Play:
Press the DVD button on your computer.
▲
For more information on using DVD Play, refer to the software Help.
Using other preinstalled multimedia software
To locate other preinstalled multimedia software:
Select Start > All Programs, and then open the multimedia program you want to use. For example,
▲
if you want to use Windows Media Player to play an audio CD, click Windows Media Player.
NOTE: Some programs may be located in subfolders.
8 Chapter 2 Multimedia software
Page 13

Installing multimedia software from a disc
To install any multimedia software from a CD or DVD, follow these steps:
1. Insert the disc into the optical drive.
2. When the installation wizard opens, follow the on-screen instructions.
3. Restart the computer if you are prompted to do so.
NOTE: For details about using software included with the computer, refer to the software
manufacturer’s instructions, which may be provided on disc, in the software Help, or on the
manufacturer's Web site.
Installing multimedia software from a disc 9
Page 14

3 Audio
Your computer enables you to use a variety of audio features:
Play music using your computer speakers and/or connected external speakers
●
Record sound using the internal microphone or connect an external microphone
●
Download music from the Internet
●
Create multimedia presentations using audio and images
●
Transmit sound and images with instant messaging programs
●
Stream radio programs (select models only) or receive FM radio signals
●
Create or “burn” audio CDs
●
10 Chapter 3 Audio
Page 15

Connecting external audio devices
WARNING! To reduce the risk of personal injury, adjust the volume before putting on headphones,
earbuds, or a headset. For additional safety information, refer to the Regulatory, Safety and
Environmental Notices.
To connect external devices such as external speakers, headphone, or a microphone, refer to the
information provided with the device. For best results, remember the following tips:
Be sure that the device cable is securely connected to the correct jack on your computer. (Cable
●
connectors are normally color-coded to match the corresponding jacks on the computer.)
Be sure to install any drivers required by the external device.
●
NOTE: A driver is a required program that acts like a translator between the device and the
programs that use the device.
Connecting external audio devices 11
Page 16

Checking your audio functions
To check the system sound on your computer, follow these steps:
1. Select Start > Control Panel.
2. Click Hardware and Sound.
3. Click Sound.
4. When the Sound window opens, click the Sounds tab. Under Program, select any sound event,
such as a beep or alarm, and click the Test button.
You should hear sound through the speakers or through connected headphones.
To check the record functions of the computer, follow these steps:
1. Select Start > All Programs > Accessories > Sound Recorder.
2. Click Start Recording and speak into the microphone. Save the file to your desktop.
3. Open Windows Media Player or DVD Play and play back the sound.
NOTE: For best results when recording, speak directly into the microphone and record sound in a
setting free of background noise.
To confirm or change the audio settings on your computer, right-click the Sound icon on the
▲
taskbar, or select Start > Control Panel > Hardware and Sound > Sound icon.
12 Chapter 3 Audio
Page 17

4Video
Your computer enables you to use a variety of video features:
Watch movies
●
Play games over the Internet
●
Edit pictures and video to create presentations
●
Connect external video devices
●
Watch TV, including high-definition TV (select models only)
●
13
Page 18

Connecting an external monitor or projector
The external monitor port connects an external display device such as an external monitor or a projector
to the computer.
To connect a display device, connect the device cable to the external monitor port.
▲
NOTE: If a properly connected external display device does not display an image, press fn+f4 to
transfer the image to the device. Repeatedly pressing fn+f4 alternates the screen image between the
computer display and the device.
14 Chapter 4 Video
Page 19

Connecting an HDMI device
The computer includes an HDMI (High Definition Multimedia Interface) port. The HDMI port connects
the computer to an optional video or audio device, such as a high-definition television, or any compatible
digital or audio component.
The computer can support one HDMI device connected to the HDMI port, while simultaneously
supporting an image on the computer display or any other supported external display.
NOTE: To transmit video signals through the HDMI port, you need an HDMI cable (purchased
separately), available from most electronic retailers.
To connect a video or audio device to the HDMI port:
1. Plug one end of the HDMI cable into the HDMI port on the computer.
2. Connect the other end of the cable to the video device, according to the device manufacturer’s
instructions.
3. Press fn+f4 on the computer to switch the image between the display devices connected to the
computer.
Configuring the audio using HDMI
For best results, connect an audio or video device, such as a high-definition TV, to the HDMI port on
your computer, and use DVD Play as your media program.
You must also determine what type of graphics card is installed on your computer, and then configure
the default audio playback device according to that graphics card.
Determining the type of graphics card installed on your computer
Check the label on the computer keyboard.
▲
– or –
1. Select Start > Computer > System properties.
2. In the left pane, click Device Manager, and then click the plus sign (+) next to Display
adapters.
Connecting an HDMI device 15
Page 20

Setting HDMI as the default audio playback device
1. Select Start > Control Panel > Hardware and Sound > Sound icon.
2. If you have an Intel integrated graphics card or an ATI or NVIDIA graphics card, click the
Playback tab, click Digital Output Device (HDMI), and then click Set Default.
3. Click OK.
4. Start DVD Play (or restart it if it is already running).
16 Chapter 4 Video
Page 21

5 Optical drive
Your computer includes an optical drive that expands the functionality of the computer. Identify what
kind of device is installed in your computer to see its capabilities. The optical drive allows you to read
data discs, play music, and watch movies. If your computer includes a Blu-ray Disc ROM Drive, then
you can also watch high-definition video from disc.
Identifying the installed optical drive
Select Start > Computer.
▲
You will see a list of all the devices installed on your computer, including your optical drive. You may
have one of the following types of drives:
DVD-ROM Drive
●
DVD±RW/R and CD-RW Combo Drive
●
DVD±RW/R and CD-RW Combo Drive with Double-Layer (DL) support
●
LightScribe DVD±RW/R and CD-RW Combo drive with Double-Layer (DL) support
●
Blu-ray Disc ROM Drive with SuperMulti DVD±R/RW Double Layer (DL) support
●
NOTE: Some of the drives listed above may not be supported by your computer.
Identifying the installed optical drive 17
Page 22

Using optical discs
An optical drive, such as a DVD-ROM drive, supports optical discs (CDs and DVDs). These discs store
information, such as music, photos, and movies. DVDs have a higher storage capacity than CDs.
Your optical drive can read standard CD and DVD discs. If your optical drive is a Blu-ray Disc ROM
Drive, it can also read Blu-ray discs.
NOTE: Some of the optical drives listed may not be supported by your computer. The listed drives are
not necessarily all of the supported optical drives.
Some optical drives can also write to optical discs as described in the following table.
Optical drive type Write to CD-RW Write to DVD±RW/R Write to DVD+R DL Write label to
LightScribe CD or
DVD±RW/R
DVD/CD-RW Combo
Drive
SuperMulti DVD±RW
and CD-RW Combo
Drive with DL support
SuperMulti LightScribe
DVD±RW and CD-RW
Combo Drive with DL
support
Blu-ray Disc ROM with
SuperMulti DVD±R/
RW Double Layer
Yes No No No
Yes Yes Yes No
Yes Yes Yes Yes
Yes Yes Yes No
CAUTION: To prevent possible audio and video degradation, loss of information, or loss of audio or
video playback functionality, do not initiate Sleep or Hibernation while reading or writing to a CD or DVD.
18 Chapter 5 Optical drive
Page 23

Selecting the right disc
An optical drive supports optical discs (CDs and DVDs). CDs, used to store digital data, are also used
for commercial audio recordings and are convenient for your personal storage needs. DVDs are used
primarily for movies, software, and data backup purposes. DVDs are the same form factor as CDs but
have 6 to 7 times the storage capacity.
NOTE: The optical drive on your computer may not support all the types of optical discs discussed in
this section.
CD-R discs
Use CD-R (write-once) discs to create permanent archives and to share files with virtually anyone.
Typical uses include the following:
Distributing large presentations
●
Sharing scanned and digital photos, video clips, and written data
●
Making your own music CDs
●
Keeping permanent archives of computer files and scanned home records
●
Offloading files from your hard drive to free up disk space
●
After data is recorded, it cannot be erased or written over.
CD-RW discs
Use a CD-RW disc (a rewritable version of a CD) to store large projects that must be updated frequently.
Typical uses include the following:
Developing and maintaining large documents and project files
●
Transporting work files
●
Making weekly backups of hard drive files
●
Updating photos, video, audio, and data continuously
●
DVD±R discs
Use blank DVD±R discs to permanently store large amounts of information. After data is recorded, it
cannot be erased or written over.
DVD±RW discs
Use DVD+RW discs if you want to be able to erase or write over data that you saved earlier. This type
of disc is ideal for testing audio or video recordings before you burn them to a CD or DVD that cannot
be changed.
LightScribe DVD+R discs
Use LightScribe DVD+R discs for sharing and storing data, home videos, and photos. These discs are
read-compatible with most DVD-ROM drives and DVD video players. With a LightScribe-enabled drive
and LightScribe software, you can write data to the disc and then add a designer label to the outside of
the disc.
Selecting the right disc 19
Page 24

Blu-ray Disc
Also called BD, Blu-ray Disc is a high-density optical disc format for the storage of digital information,
including high-definition video. A single-layer Blu-ray Disc can store 25 GB, over five times the size of
a single-layer DVD at 4.7 GB. A dual-layer Blu-ray Disc can store 50 GB, almost 6 times the size of a
dual-layer DVD at 8.5 GB.
Typical uses include the following:
Storage of large amounts of data
●
High-definition video playback and storage
●
20 Chapter 5 Optical drive
Page 25

Playing music
1. Turn on the computer.
2. Press the release button (1) on the optical drive bezel to release the disc tray.
3. Pull out the tray (2).
4. Hold the disc by the edges and position the disc label-side up over the tray spindle.
NOTE: If the tray is not fully accessible, tilt the disc carefully to position it over the spindle.
5. Gently press the disc (3) down onto the tray spindle until the disc snaps into place.
6. Close the disc tray.
7. If you have not yet configured AutoPlay, the AutoPlay dialog box opens and asks how you want to
use the media content. Choose DVD Play or Windows Media Player, both preinstalled on your
computer.
NOTE: After you insert a disc, a short pause is normal.
If Sleep or Hibernation is initiated during playback of a disc, you may experience the following behaviors:
Your playback may be interrupted.
●
You may see a warning message asking if you want to continue. If this message is displayed, click
●
No.
You may need to restart the CD or DVD to resume playback.
●
Playing music 21
Page 26

Watching a movie
Your optical drive allows you to watch movies from a disc. You can also watch high-definition movies
from a disc if your computer includes an optional Blu-ray Disc ROM Drive.
1. Turn on the computer.
2. Press the release button (1) on the optical drive bezel to release the disc tray.
3. Pull out the tray (2).
4. Hold the disc by the edges and position the disc label-side up over the tray spindle.
NOTE: If the tray is not fully accessible, tilt the disc carefully to position it over the spindle.
5. Gently press the disc (3) down onto the tray spindle until the disc snaps into place.
6. Close the disc tray.
7. Launch the DVD playback feature in DVD Play by pressing the DVD button.
8. Then click the DVD icon and follow the instructions on the screen.
NOTE: To watch a high-definition movie, you must use DVD Play. To watch standard format movies,
you can use DVD Play or other multimedia software.
22 Chapter 5 Optical drive
Page 27

Changing DVD region settings
Most DVDs that contain copyrighted files also contain region codes. The region codes help protect
copyrights internationally.
You can play a DVD containing a region code only if the region code on the DVD matches the region
setting on your DVD drive.
CAUTION: The region settings on your DVD drive can be changed only 5 times.
The region setting you select the fifth time becomes the permanent region setting on the DVD drive.
The number of region changes remaining is displayed on the DVD Region tab.
To change settings through the operating system:
1. Select Start > Computer > System properties.
2. In the left pane, click Device Manager.
NOTE: Windows includes the User Account Control feature to improve the security of your
computer. You may be prompted for your permission or password for tasks such as installing
applications, running utilities, or changing Windows settings. Refer to Windows Help for more
information.
3. Click the plus sign (+) next to DVD/CD-ROM drives.
4. Right-click the DVD drive for which you want to change region settings, and then click
Properties.
5. Make the desired changes on the DVD Region tab.
6. Click OK.
Changing DVD region settings 23
Page 28

Creating or “burning” a CD or DVD
If your computer includes a CD-RW, DVD-RW, or DVD±RW optical drive, you can use software such
as Windows Media Player or CyberLink Power2Go to burn data and audio files, including MP3 and WAV
music files. To burn video files to a CD or DVD, use MyDVD.
Observe the following guidelines when burning a CD or DVD:
Before burning a disc, save and close any open files and close all programs.
●
A CD-R or DVD-R is usually best for burning audio files because after the information is copied, it
●
cannot be changed.
NOTE: You cannot create an audio DVD with CyberLink Power2Go.
Because some home and car stereos will not play CD-RWs, use CD-Rs to burn music CDs.
●
A CD-RW or DVD-RW is generally best for burning data files or for testing audio or video recordings
●
before you burn them to a CD or DVD that cannot be changed.
DVD players used in home systems usually do not support all DVD formats. Refer to the user guide
●
that came with your DVD player for a list of supported formats.
An MP3 file uses less space than other music file formats, and the process for creating an MP3
●
disc is the same as the process for creating a data file. MP3 files can be played only on MP3 players
or on computers with MP3 software installed.
To burn a CD or DVD, follow these steps:
1. Download or copy the source files into a folder on your hard drive.
2. Insert a blank CD or DVD into the optical drive.
3. Select Start > All Programs and the name of the program you want to use.
NOTE: Some programs may be located in subfolders.
4. Select the kind of CD or DVD you want to create—data, audio, or video.
5. Right-click Start, click Explore, and navigate to the folder where the source files are stored.
6. Open the folder, and then drag the files to the drive that contains the blank optical disc.
7. Initiate the burning process as directed by the program you have selected.
For specific instructions, refer to the software manufacturer's instructions, which may be provided with
the software, on disc, or on the manufacturer's Web site.
CAUTION: Observe the copyright warning. It is a criminal offense, under applicable copyright laws,
to make unauthorized copies of copyright-protected material, including computer programs, films,
broadcasts, and sound recordings. Do not use this computer for such purposes.
24 Chapter 5 Optical drive
Page 29

Removing an optical disc (CD or DVD)
1. Press the release button (1) on the drive bezel to release the media tray, and then gently pull out
the tray (2) until it stops.
2. Remove the disc (3) from the tray by gently pressing down on the spindle while lifting the outer
edges of the disc. Hold the disc by the edges and avoid touching the flat surfaces.
NOTE: If the tray is not fully accessible, tilt the disc carefully as you remove it.
3. Close the media tray and place the disc in a protective case.
Removing an optical disc (CD or DVD) 25
Page 30

6 Webcam
Your computer includes an integrated webcam, located at the top of the display. The webcam is an input
device that allows you to capture and share video. Preinstalled CyberLink YouCam software provides
new features that expand the webcam experience.
To access the webcam and CyberLink YouCam software, select Start > All Programs > CyberLink
YouCam > YouCam.
NOTE: The first time you access the YouCam software, you may experience a brief delay as the
software loads.
Using YouCam as your default webcam software enables you to experiment with the following features:
Video—Record and play back webcam video. You can also e-mail or upload video to YouTube,
●
using the icon on the software interface.
Streaming video—When you open your instant message program, YouCam displays a floating
●
toolbar that lets you add graphic effects.
Special effects—Add frames, filters, and emoticons to your snapshots and video.
●
Snapshots—Take single frame or “burst” webcam shots in rapid succession.
●
Connect—E-mail photos and video using the icon on the software interface.
●
NOTE: For details about using webcam software, refer to the software manufacturer's instructions,
which may be provided with the software, on disc, or on the manufacturer's Web site.
26 Chapter 6 Webcam
Page 31

Webcam tips
For optimum performance, observe the following guidelines while using the webcam:
Be sure that you have the latest version of an instant message program before starting a video
●
conversation.
The webcam may not work properly across some network firewalls.
●
NOTE: If you are having trouble viewing or sending multimedia files to someone on another LAN
or outside your network firewall, temporarily disable the firewall, perform the task you want to
perform, and then reenable the firewall. To permanently resolve the problem, reconfigure the
firewall as necessary, and adjust the policies and settings of other intrusion detection systems. For
additional information, contact your network administrator or IT department.
Whenever possible, place bright light sources behind the camera and out of the picture area.
●
Webcam tips 27
Page 32

Adjusting webcam properties
You can adjust webcam properties using the Properties dialog box, which is accessible from various
programs that use the integrated camera, usually from a configuration, settings, or properties menu:
Brightness—Controls the amount of light that is incorporated into the image. A higher brightness
●
setting creates a brighter image; a lower brightness setting creates a darker image.
Contrast—Controls the difference between lighter and darker areas on the image. A higher
●
contrast setting intensifies the image; a lower contrast setting maintains more of the original
information’s dynamic range but leads to a flatter image.
Hue—Controls the aspect of color that distinguishes it from another color (what makes a color red,
●
green, or blue). Hue is distinct from saturation, which measures the intensity of the hue.
Saturation—Controls the strength of color in the final image. A higher saturation setting creates a
●
bolder image; a lower saturation setting creates a more subtle image.
Sharpness—Controls the definition of edges in an image. A higher sharpness setting creates a
●
more defined image; a lower sharpness setting creates a softer image.
Gamma—Controls the contrast affecting the mid-level grays or midtones of an image. Adjusting
●
the gamma of an image allows you to change the brightness values of the middle range of gray
tones without dramatically altering the shadows and highlights. A lower gamma setting makes
grays look black, and makes dark colors even darker.
Backlight Comp—Compensates in cases where a subject with a large amount of background light
●
would otherwise be obscured by blooming or silhouetting.
For information about using the webcam, select Start > Help and Support.
28 Chapter 6 Webcam
Page 33

7 Troubleshooting
The following sections describe several common issues and resolutions.
29
Page 34

The optical disc tray does not open for removal of a CD or DVD
1. Insert the end of a paper clip (1) into the release access in the front bezel of the drive.
2. Press in gently on the paper clip until the disc tray is released, and then pull out the tray (2) until it
stops.
3. Remove the disc (3) from the tray by gently pressing down on the spindle while lifting the outer
edges of the disc. Hold the disc by the edges and avoid touching the flat surfaces.
NOTE: If the tray is not fully accessible, tilt the disc carefully as you remove it.
4. Close the disc tray and place the disc in a protective case.
30 Chapter 7 Troubleshooting
Page 35

The computer does not detect the optical drive
If Windows does not detect an installed device, the device driver software may be missing or corrupted.
If you suspect that the optical drive is not being detected, verify that the optical drive is listed in the
Device Manager utility.
1. Remove any discs from the optical drive.
2. Click Start and type device manager in the Start Search box.
As you type, search results are listed in the pane above the box.
3. In the results pane, click Device Manager. If prompted by User Account Control, click Continue.
4. In the Device Manager window, click the plus sign (+) next to DVD/CD-ROM drives, unless a minus
sign (-) is already showing. Look for an optical drive listing.
If the drive is not listed, install (or reinstall) the device driver as instructed in the following section.
The computer does not detect the optical drive 31
Page 36

A disc does not play
Save your work and close all open programs before playing a CD or a DVD.
●
Log off the Internet before playing a CD or a DVD.
●
Be sure that you insert the disc properly.
●
Be sure that the disc is clean. If necessary, clean the disc with filtered water and a lint-free cloth.
●
Wipe from the center of the disc to the outer edge.
Check the disc for scratches. If you find scratches, treat the disc with an optical disc repair kit
●
available at many electronics stores.
Disable Sleep mode before playing the disc.
●
Do not initiate Hibernation or Sleep while playing a disc. Otherwise, you may see a warning
message asking if you want to continue. If this message is displayed, click No. After you click No,
the computer may behave in either of the following ways:
Playback may resume.
◦
– or –
The playback window in the multimedia program may close. To return to playing the disc, click
◦
the Play button in your multimedia program to restart the disc. In rare cases, you may need
to exit the program and then restart it.
Increase system resources:
●
Turn off external devices such as printers and scanners. Disconnecting these devices frees
◦
up valuable system resources and results in better playback performance.
Change desktop color properties. Because the human eye cannot easily tell the difference
◦
between colors beyond 16 bits, you should not notice any loss of color while watching a movie
if you lower system color properties to 16-bit color, as follows:
1. Right-click on a blank area of the computer desktop, and select Personalize > Display
Settings.
2. Set Colors to Medium (16 bit), if this setting is not already selected.
32 Chapter 7 Troubleshooting
Page 37

A disc does not play automatically
1. Click Start and type autoplay in the Start Search box.
As you type, search results are listed in the pane above the box.
2. In the results pane, click AutoPlay. If prompted by User Account Control, click Continue.
3. Select the check box for Use AutoPlay for all media and devices, and then click Save.
A CD or DVD should now start automatically when it is inserted into the optical drive.
A DVD movie stops, skips, or plays erratically
Clean the disc.
●
Conserve system resources by trying the following suggestions:
●
Log off the Internet.
◦
Change the color properties of the desktop:
◦
1. Right-click on a blank area of the computer desktop, and select Personalize > Display
Settings.
2. Set Colors to Medium (16 bit), if this setting is not already selected.
Disconnect external devices, such as a printer, scanner, camera, or handheld device.
◦
A disc does not play automatically 33
Page 38

A DVD movie is not visible on an external display
1. If both the computer display and an external display are turned on, press fn+f4 one or more times
to switch between the 2 displays.
2. Configure the monitor settings to make the external display primary:
a. Right-click on a blank area of the computer desktop, and select Personalize > Display
Settings.
b. Specify a primary display and a secondary display.
NOTE: When using both displays, the DVD image will not appear on any display designated as
the secondary display.
To get information about a multimedia question not covered in this guide, go to Start > Help and
Support.
34 Chapter 7 Troubleshooting
Page 39

The process of burning a disc does not begin, or it stops before completion
Be sure that all other programs are closed.
●
Turn off Sleep mode and Hibernation.
●
Be sure that you are using the right kind of disc for your drive. See your user guides for more
●
information about disc types.
Be sure that the disc is inserted properly.
●
Select a slower write speed and try again.
●
If you are copying a disc, save the information on the source disc to your hard drive before trying
●
to burn the contents to a new disc, and then burn from your hard drive.
Reinstall the disc-burning device driver located in the DVD/CD-ROM drives category in Device
●
Manager.
A DVD playing in Windows Media Player produces no sound or display
Use DVD Play to play a DVD. DVD Play is installed on the computer, and is also available from the HP
Web site at
http://www.hp.com.
The process of burning a disc does not begin, or it stops before completion 35
Page 40

A device driver must be reinstalled
1. Remove any discs from the optical drive.
2. Click Start and type device manager in the Start Search box.
As you type, search results are listed in the pane above the box.
3. In the results pane, click Device Manager. If prompted by User Account Control, click Continue.
4. In Device Manager, click the plus sign (+) next to the type of driver you want to uninstall and reinstall
(for example, DVD/CD-ROMs, Modems, and so on) unless the minus sign (-) is already showing.
5. Click a listed driver, and press the delete key. When prompted, confirm that you want to delete the
driver, but do not restart the computer.
Repeat for any other drivers you want to delete.
6. In the Device Manager window, click the Scan for hardware changes icon in the toolbar. Windows
scans your system for installed hardware and installs default drivers for any devices requiring
drivers.
NOTE: If you are prompted to restart the computer, save all open files, and then continue with
the restart.
7. Reopen Device Manager, if necessary, and then verify that the drivers are once again listed.
8. Try running your program again.
If uninstalling and reinstalling the default device drivers does not correct the problem, you may need to
update your drivers using the procedures in the following sections.
Obtaining the latest HP device drivers
You can obtain the latest HP device drivers in either of the following ways:
Using the HP Update Utility
●
Using the HP Web site
●
To use the HP Update Utility:
1. Select Start > All Programs > HP > HP Update.
2. On the HP Welcome screen, click Settings and select a time when the utility should check for
software updates on the Web.
3. Click Next to immediately check for HP software updates.
36 Chapter 7 Troubleshooting
Page 41

To use the HP Web site:
1. Open your Internet browser, go to
Downloads link.
2. On the Software & Driver downloads page, select the task, type your computer model number
as instructed, and then press enter.
– or –
If you want a specific SoftPaq, enter the SoftPaq number in the Search box, press enter, and follow
the instructions provided. Proceed to step 6.
3. Click your specific product from the models listed.
4. Click the Windows Vista® operating system.
5. When the list of drivers is displayed, click an updated driver to open a window containing additional
information.
6. Click Install now to install the updated driver without downloading the file.
– or –
Click Download only to save the file to your computer. When prompted, click Save and then select
a storage location on your hard drive.
After the file is downloaded, navigate to the folder where the file was stored, and double-click the
file to install.
http://www.hp.com, and then click the Software & Driver
7. If prompted to do so, restart your computer after the installation is complete, and then verify the
operation of the device.
Obtaining the latest Windows device drivers
You can obtain the latest Windows device drivers by using Microsoft® Update. This Windows feature
can be set to automatically check for and install updates for the Windows operating system and other
Microsoft products.
To use Microsoft Update:
1. Open your Internet browser and go to
2. Click Security & Updates.
3. Click Microsoft Update to get the latest updates for your computer operating system, programs,
and hardware.
4. Follow the on-screen instructions to install Microsoft Update. If prompted by User Account Control,
click Continue.
5. Click Change settings and select a time for Microsoft Update to check for updates to the Windows
operating system and other Microsoft products.
6. If prompted to do so, restart your computer.
http://www.microsoft.com.
A device driver must be reinstalled 37
Page 42

Index
A
audio devices, connecting
external 11
audio features 10
audio functions, checking 12
audio-in (microphone) jack 2
audio-out (headphone) jacks 2
B
Blu-ray disc 20
buttons
DVD 4
volume mute 5
C
CD
inserting 21
removing 25
CD drive 18
checking audio functions 12
configuring HDMI 15
D
device drivers
HP drivers 36
Windows drivers 37
drives, optical drive 18
DVD
changing region setting 23
inserting 21
removing 25
DVD button 4
DVD drive 18
DVD Play
starting 4, 8
using 8, 22
DVD Play software 8
DVD region settings 23
E
earbuds 2
external audio devices,
connecting 11
external monitor port 14
H
HDMI
configuring 15
HDMI, connecting a device 15
headphone (audio-out) jacks 2
headphones 2
hotkeys
volume down 3
volume mute 3
volume up 3
I
internal microphone, identifying 2
issues, resolving 29
J
jacks
audio-in (microphone) 2
audio-out (headphone) 2
M
media activity hotkeys 7
microphone, internal 2
monitor, connecting 14
movie, watching 22
multimedia components,
identifying 2
multimedia software 8
multimedia software, installing 9
mute button 5
O
optical disc
Blu-ray 20
inserting 21
removing 25
optical discs, using 18
optical drive 18
optical drive, using 17
P
ports, external monitor 14
projector, connecting 14
R
region codes, DVD 23
S
speakers 2
T
tips, webcam 27
troubleshooting
disc burning 35
disc play 32, 33
DVD movie play 33
external display 34
HP device drivers 36
optical disc tray 30
optical drive detection 31
Windows device drivers 37
V
video, using 13
volume down button 5
volume down hotkey 3
volume mute button 5
volume mute hotkey 3
volume up hotkey 3
volume, adjusting 5
W
webcam 2
webcam light 2
38 Index
Page 43

webcam properties, adjusting 28
webcam tips 27
webcam, using 26
Index 39
Page 44

 Loading...