

Configuration
Configuration Planning Worksheet
Overview
hp StorageWorks
Modular Smart Array 1000
(MSA1000)
© Copyright 2003 Hewlett-Packard Development Company, L.P.
Hewlett-Packard Company makes no warranty of any kind with regard to this material,
including, but not limited to, the implied warranties of merchantability and fitness for a
particular purpose. Hewlett-Packard shall not be liable for errors contained herein or for
incidental or consequential damages in connection with the furnishing, performance, or
use of this material.
This document contains proprietary information, which is protected by copyright. No part of
this document may be photocopied, reproduced, or translated into another language
without the prior written consent of Hewlett-Packard. The information contained in this
document is subject to change without notice.
Product names mentioned herein may be trademarks of their respective companies as
reflected by an associated footnote.
Hewlett-Packard Company shall not be liable for technical or editorial errors or omissions
contained herein. The information is provided “as is” without warranty of any kind and is
subject to change without notice. The warranties for Hewlett-Packard Company products
are set forth in the express limited warranty statements for such products. Nothing herein
should be construed as constituting an additional warranty.
Printed in the U.S.A.
HP StorageWorks MSA1000
Configuration Overview
Fourth Edition (September 2003)
Part Number: 230935-004
Hewlett-Packard Company
230935-004
Use tUse t
Use t
Use tUse t
your MSA1000 installation.your MSA1000 installation.
your MSA1000 installation.
your MSA1000 installation.your MSA1000 installation.
This checklist supports most MSA1000 configurations—from the simple to
the relatively complex. If your configuration is relatively simple, you will
only need some of the items on checklist. If your configuration is more
complex, you will need most of the items.
Note: Please note that this worksheet and the companion worksheets in the HP
StorageWorks MSA1000 Installation Guide are not prerequisites for installing your
MSA1000, but some of the information on the worksheets is required for zoning,
multi-pathing, future configuration changes, and troubleshooting purposes.
his Whis W
his W
his Whis W
11
1
11
CC
hh
ecec
h
hh
ec
ecec
k tk t
k t
k tk t
C
CC
First, place a check in all of the left-most boxes in the checklist — these items are
required for all MSA1000 configurations.
Second, place a check next to any additional items needed for your configuration,
such as “Items for Multi-Path Configurations” and “Items for Clustered Servers”.
22
2
22
Record information about the itemsRecord information about the items
Record information about the items
Record information about the itemsRecord information about the items
Go through the checklist and write down information about the items needed for
your MSA1000 configuration.
Gather and record as much information as you can, but be sure to find the
information for the items marked with an “*”.
Note: You do not need to complete the entire worksheet at this time. Some information is easiest
to obtain during the process of installing your MSA1000.
oror
or
oror
hh
e boe bo
h
e bo
hh
e boe bo
kshksh
ksh
kshksh
eet teet t
eet t
eet teet t
xx
es fes f
x
es f
xx
es fes f
o ho h
o h
o ho h
or tor t
or t
or tor t
elp yelp y
elp y
elp yelp y
ou prou pr
ou pr
ou prou pr
hh
e items ye items y
h
e items y
hh
e items ye items y
eparepar
epar
eparepar
ou nou n
ou n
ou nou n
e fe f
e f
e fe f
oror
or
oror
eedeed
eed
eedeed
Additional Resources about theAdditional Resources about the
Additional Resources about the
Additional Resources about theAdditional Resources about the
MSA1000 and Storage Area NetworksMSA1000 and Storage Area Networks
MSA1000 and Storage Area Networks
MSA1000 and Storage Area NetworksMSA1000 and Storage Area Networks
(SANs)(SANs)
(SANs)
(SANs)(SANs)
MSA1000 website:
http://www.hp.com/go/msa1000
Go to the MSA1000 website for the most current and up-to-date information
about your MSA1000.
Navigate through the site to obtain the following reference documents:
● MSA1000 QuickSpecs
● MSA1000 Compatibility Guide
Secure Path website:
http://www.hp.com/go/securepath
Go to the Secure Path website for information about Secure Path multipathing software, used in Windows, Linux, and NetWare environments.
SAN Infrastructure website:
http://www.hp.com/go/SAN
Go to the SAN Infrastructure website for information about HP SANs,
switches, and HBAs.
Note: In addition to the other information available on the SAN website, please
navigate to the SAN Design Guide and print out a hardcopy of this guide to review.
33
3
33
VV
erer
ifif
y ty t
V
er
if
VV
erer
ifif
After you have indicated your MSA1000 configuration type and the items that you
need to use to install the MSA1000 in your SAN, you must verify that the items you
plan to use are approved for use with the MSA1000 in your operating system
environment.
Go to the MSA1000 website: http://www.hp.com/go/msa1000.
Locate, print, and read the MSA1000 Compatibility Guide on the Technical
Documentation page of the MSA1000 website to confirm your installation plans.
During this process, you may need to obtain some new items and adjust your plans.
Proceed with installing your MSA1000 only after obtaining all of
the necessary hardware and software components and verifying
that the models and versions you plan to use are supported.
44
4
44
y t
y ty t
hat that t
hat t
hat that t
hh
e items are items ar
h
e items ar
hh
e items are items ar
e suppore suppor
e suppor
e suppore suppor
tedted
ted
tedted
High Availability website:
http://h18000.www1.hp.com/solutions/enterprise/highavailability/
index.html
Go to the High Availability website for information about clustering.
Read the other side of this posterRead the other side of this poster
Read the other side of this poster
Read the other side of this posterRead the other side of this poster
Now that you have gathered all of the items required for your MSA1000
configuration, please read the other side of this poster for an overview of the
installation process and some MSA1000 best practices.
MM
y MSy MS
M
y MS
MM
y MSy MS
A1000 ConfA1000 Conf
A1000 Conf
A1000 ConfA1000 Conf
igurigur
igur
igurigur
ationation
ation
ationation
❑ Single-path, non-clustered ❑ Single-path, clustered ❑ Multi-path, non-clustered ❑ Multi-path, clustered
PP
oo
ss
siblsibl
e Ae A
P
o
s
sibl
PP
oo
ss
siblsibl
dditional Items in a mordditional Items in a mor
e A
dditional Items in a mor
e Ae A
dditional Items in a mordditional Items in a mor
e Comple Compl
e Compl
e Comple Compl
ee
e
ee
x Sx S
x S
x Sx S
ANAN
AN
ANAN
❑ MSA1000
MSA1000 Serial number _________________________
MSA1000 WWNN _________________________
MSA1000 WWPN _________________________
* MSA1000 Controller firmware version _________________________
* MSA1000 Support Software CD version _________________________
Optional storage enclosures, model _________________________
❑ Additional MSA1000 Controller for Multi-Path Configurations
MSA1000 WWNN _________________________
MSA1000 WWPN _________________________
❑ Fibre Interconnect Device
(Standard I/O Module, Switch 2/8, Hub 2/3, or External SAN device)
* Device make and model _________________________
Switch firmware version _________________________
Switch IP address _________________________
Switch WWNN _________________________
Switch WWPN _________________________
❑ Additional Interconnect Device for Multi-Path Configurations
❑ An Additional MSA1000
MSA1000 Serial number ______________________
MSA1000 WWNN ______________________
MSA1000 WWPN ______________________
MSA1000 Controller firmware version ______________________
MSA1000 Support Software CD version ______________________
Optional storage enclosures, model ______________________
❑ The Additional MSA1000 Controller for Multi-Path Configurations
MSA1000 WWNN ______________________
MSA1000 WWPN ______________________
❑ An Additional Interconnect Device
(Standard I/O Module, Switch 2/8, Hub 2/3, or External SAN device)
Device make and model ______________________
Switch firmware version ______________________
Switch IP address ______________________
Switch WWNN ______________________
Switch WWPN ______________________
❑ The Additional Interconnect Device in Multi-Path Configurations
Device make and model (same as the primary device)___
Switch firmware version (same as the primary device)___
Switch IP address _________________________
Switch WWNN _________________________
Switch WWPN _________________________
❑ Server
* Server make and model _________________________
* Operating system & version _________________________
* Operating system service pack / errata _________________________
Server name _________________________
* HBA model _________________________
HBA slot location _________________________
* HBA driver version _________________________
* HBA firmware version _________________________
HBA boot BIOS firmware (boot from SAN) _________________________
HBA WWNN _________________________
HBA WWPN _________________________
❑ Additional Server-Related Items for Multi-Path Configurations
Device make and model (same as the primary device)
Switch firmware version (same as the primary device)
Switch IP address ______________________
Switch WWNN ______________________
Switch WWPN ______________________
❑ An Additional Sever
Server make and model ______________________
Operating sytem & version ______________________
Operating sytem service pack / errata ______________________
Server name ______________________
HBA model ______________________
HBA slot location ______________________
HBA driver version ______________________
HBA firmware version ______________________
HBA boot BIOS firmware (boot from SAN) ______________________
HBA WWNN ______________________
HBA WWPN ______________________
❑ The Additional Server-Related Items for Multi-Path Configurations
Secure Path software version _________________________
2nd HBA model (same as the primary HBA)____
2nd HBA slot location (same as the primary HBA)____
2nd HBA firmware versions (same as the primary HBA)____
2nd HBA WWNN _________________________
2nd HBA WWPN _________________________
❑ Additional Server-Related Items for Clustered Servers
Clustering software version _________________________
Cluster cabling _________________________
❑ Fibre Cables, for MSA1000, interconnect device, and HBA connections
❑ SCSI Cables, for additional storage enclosure connections
❑ Hard Drives
Secure Path software version ______________________
2nd HBA make and model (same as the primary HBA)_
2nd HBA slot location (same as the primary HBA)_
2nd HBA firmware versions (same as the primary HBA)_
2nd HBA WWNN ______________________
2nd HBA WWPN ______________________
❑ Additional Server-Related Items for Clustered Servers
Clustering software version ______________________
Cluster cabling ______________________
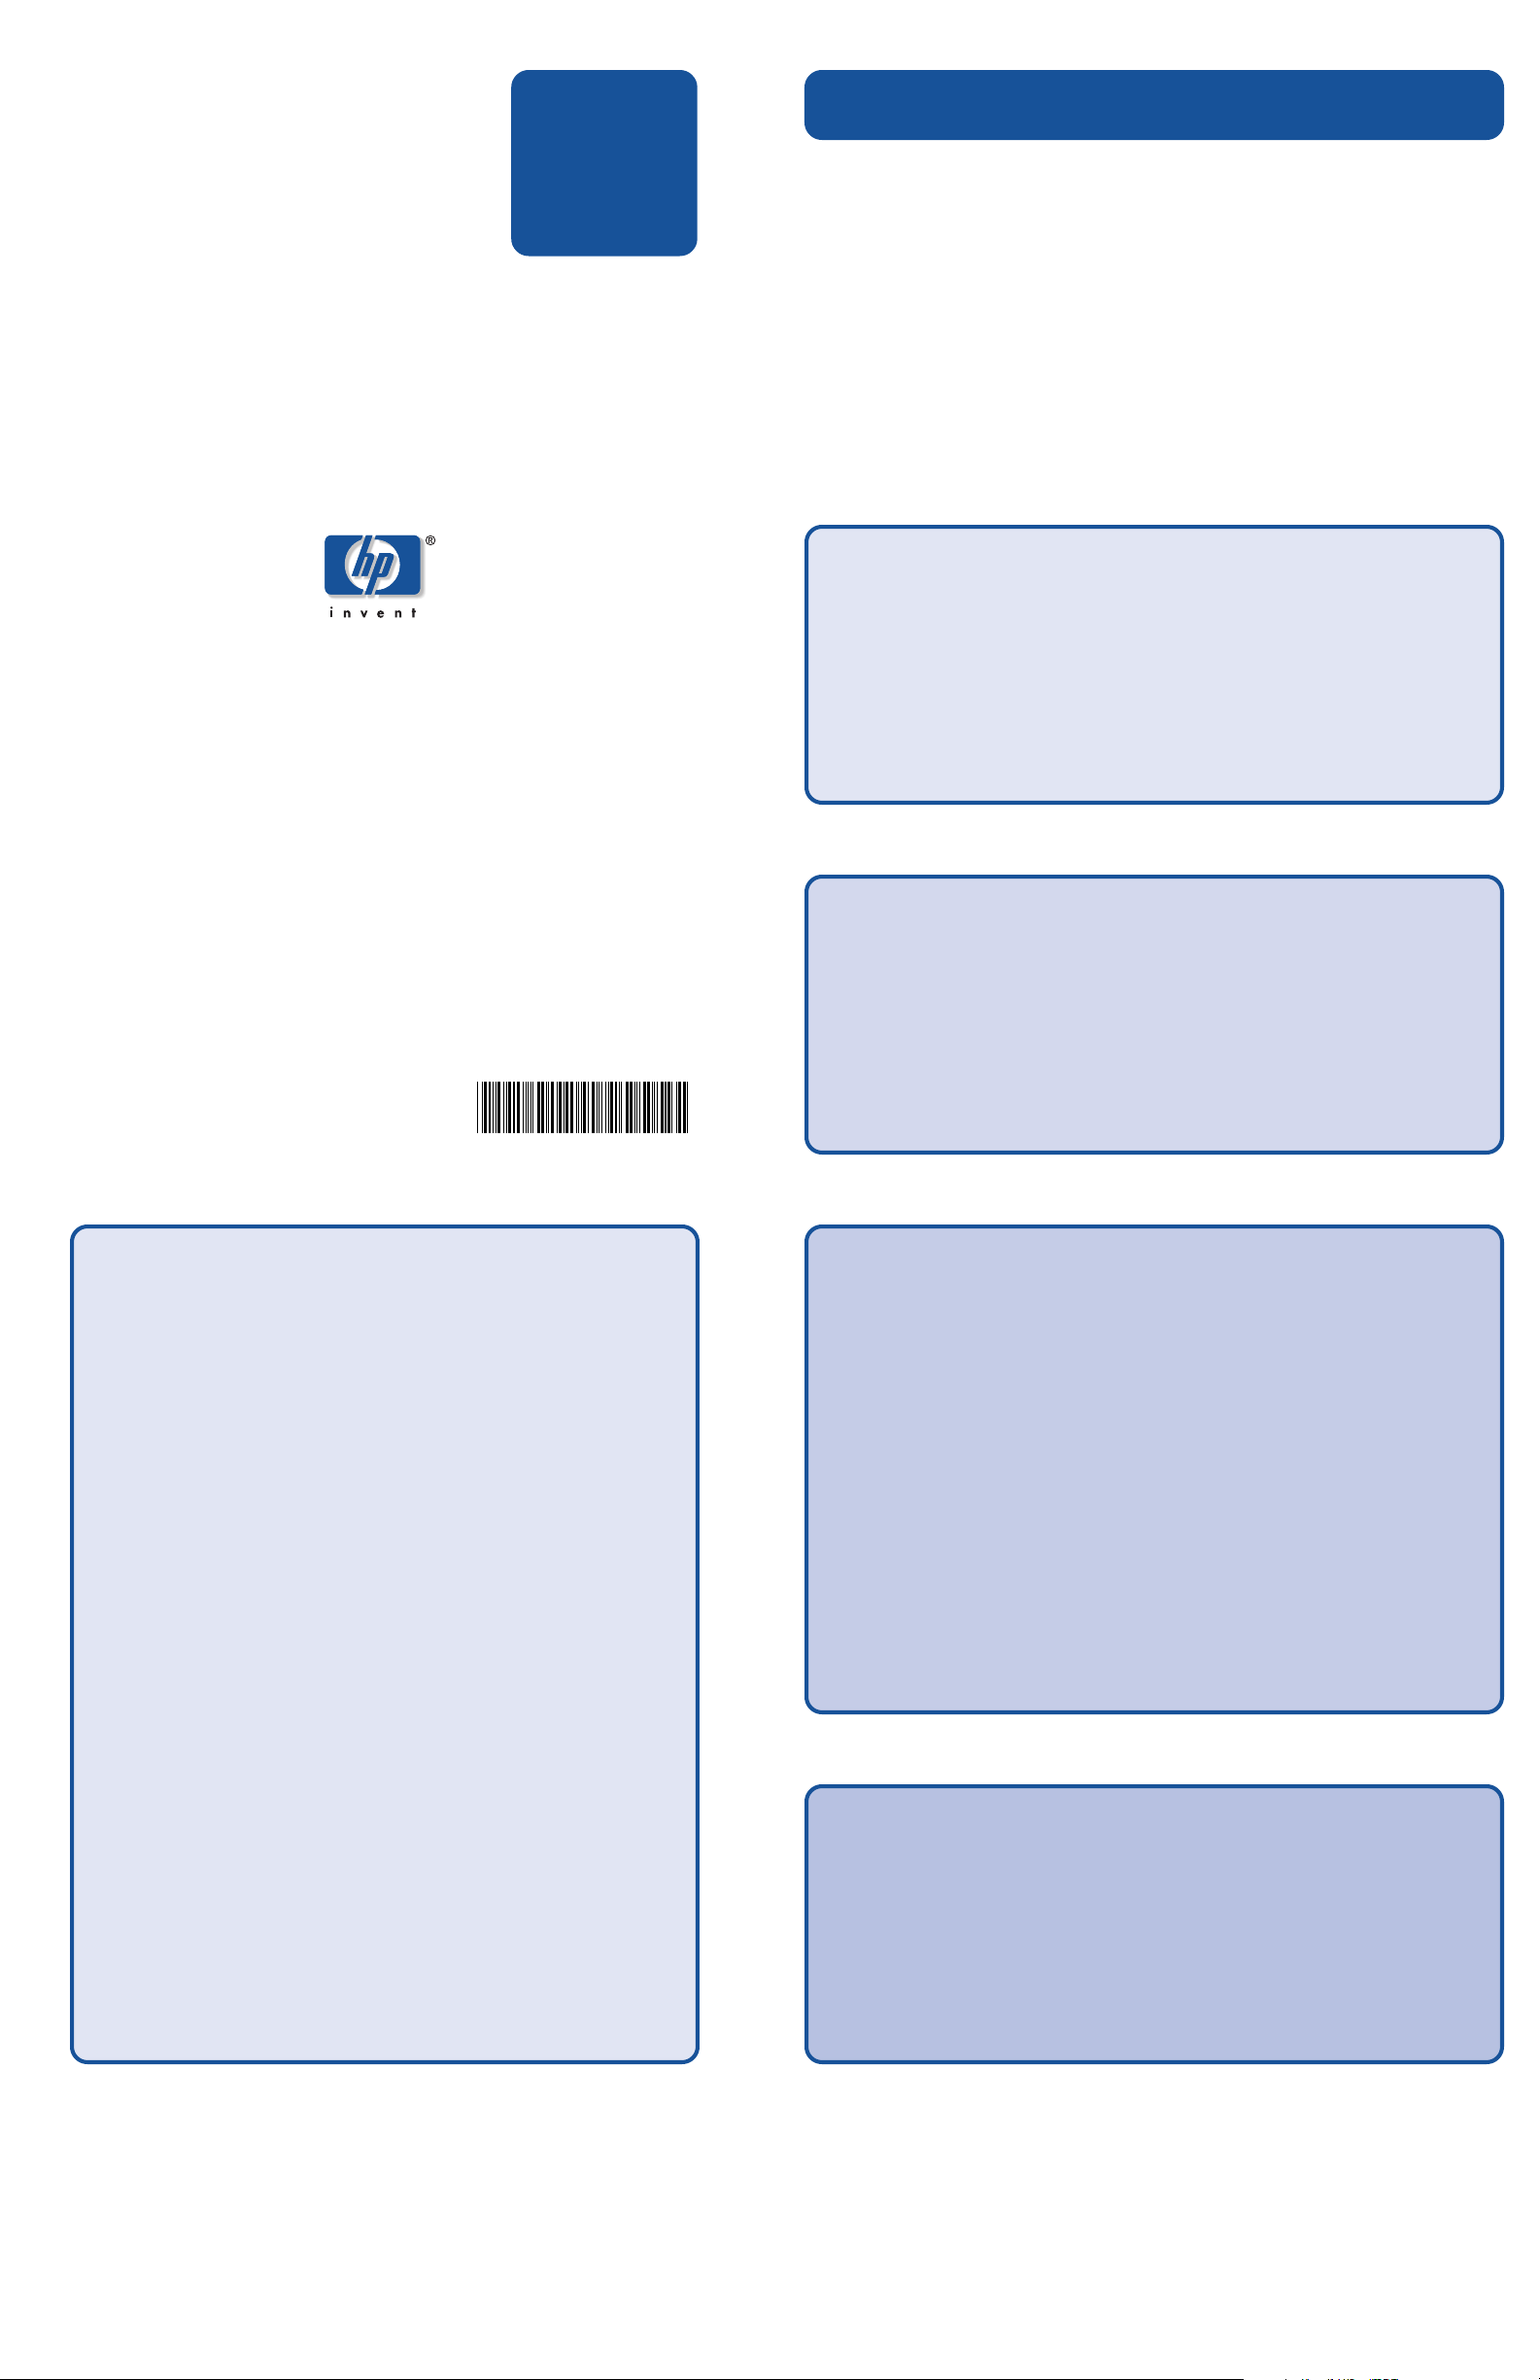
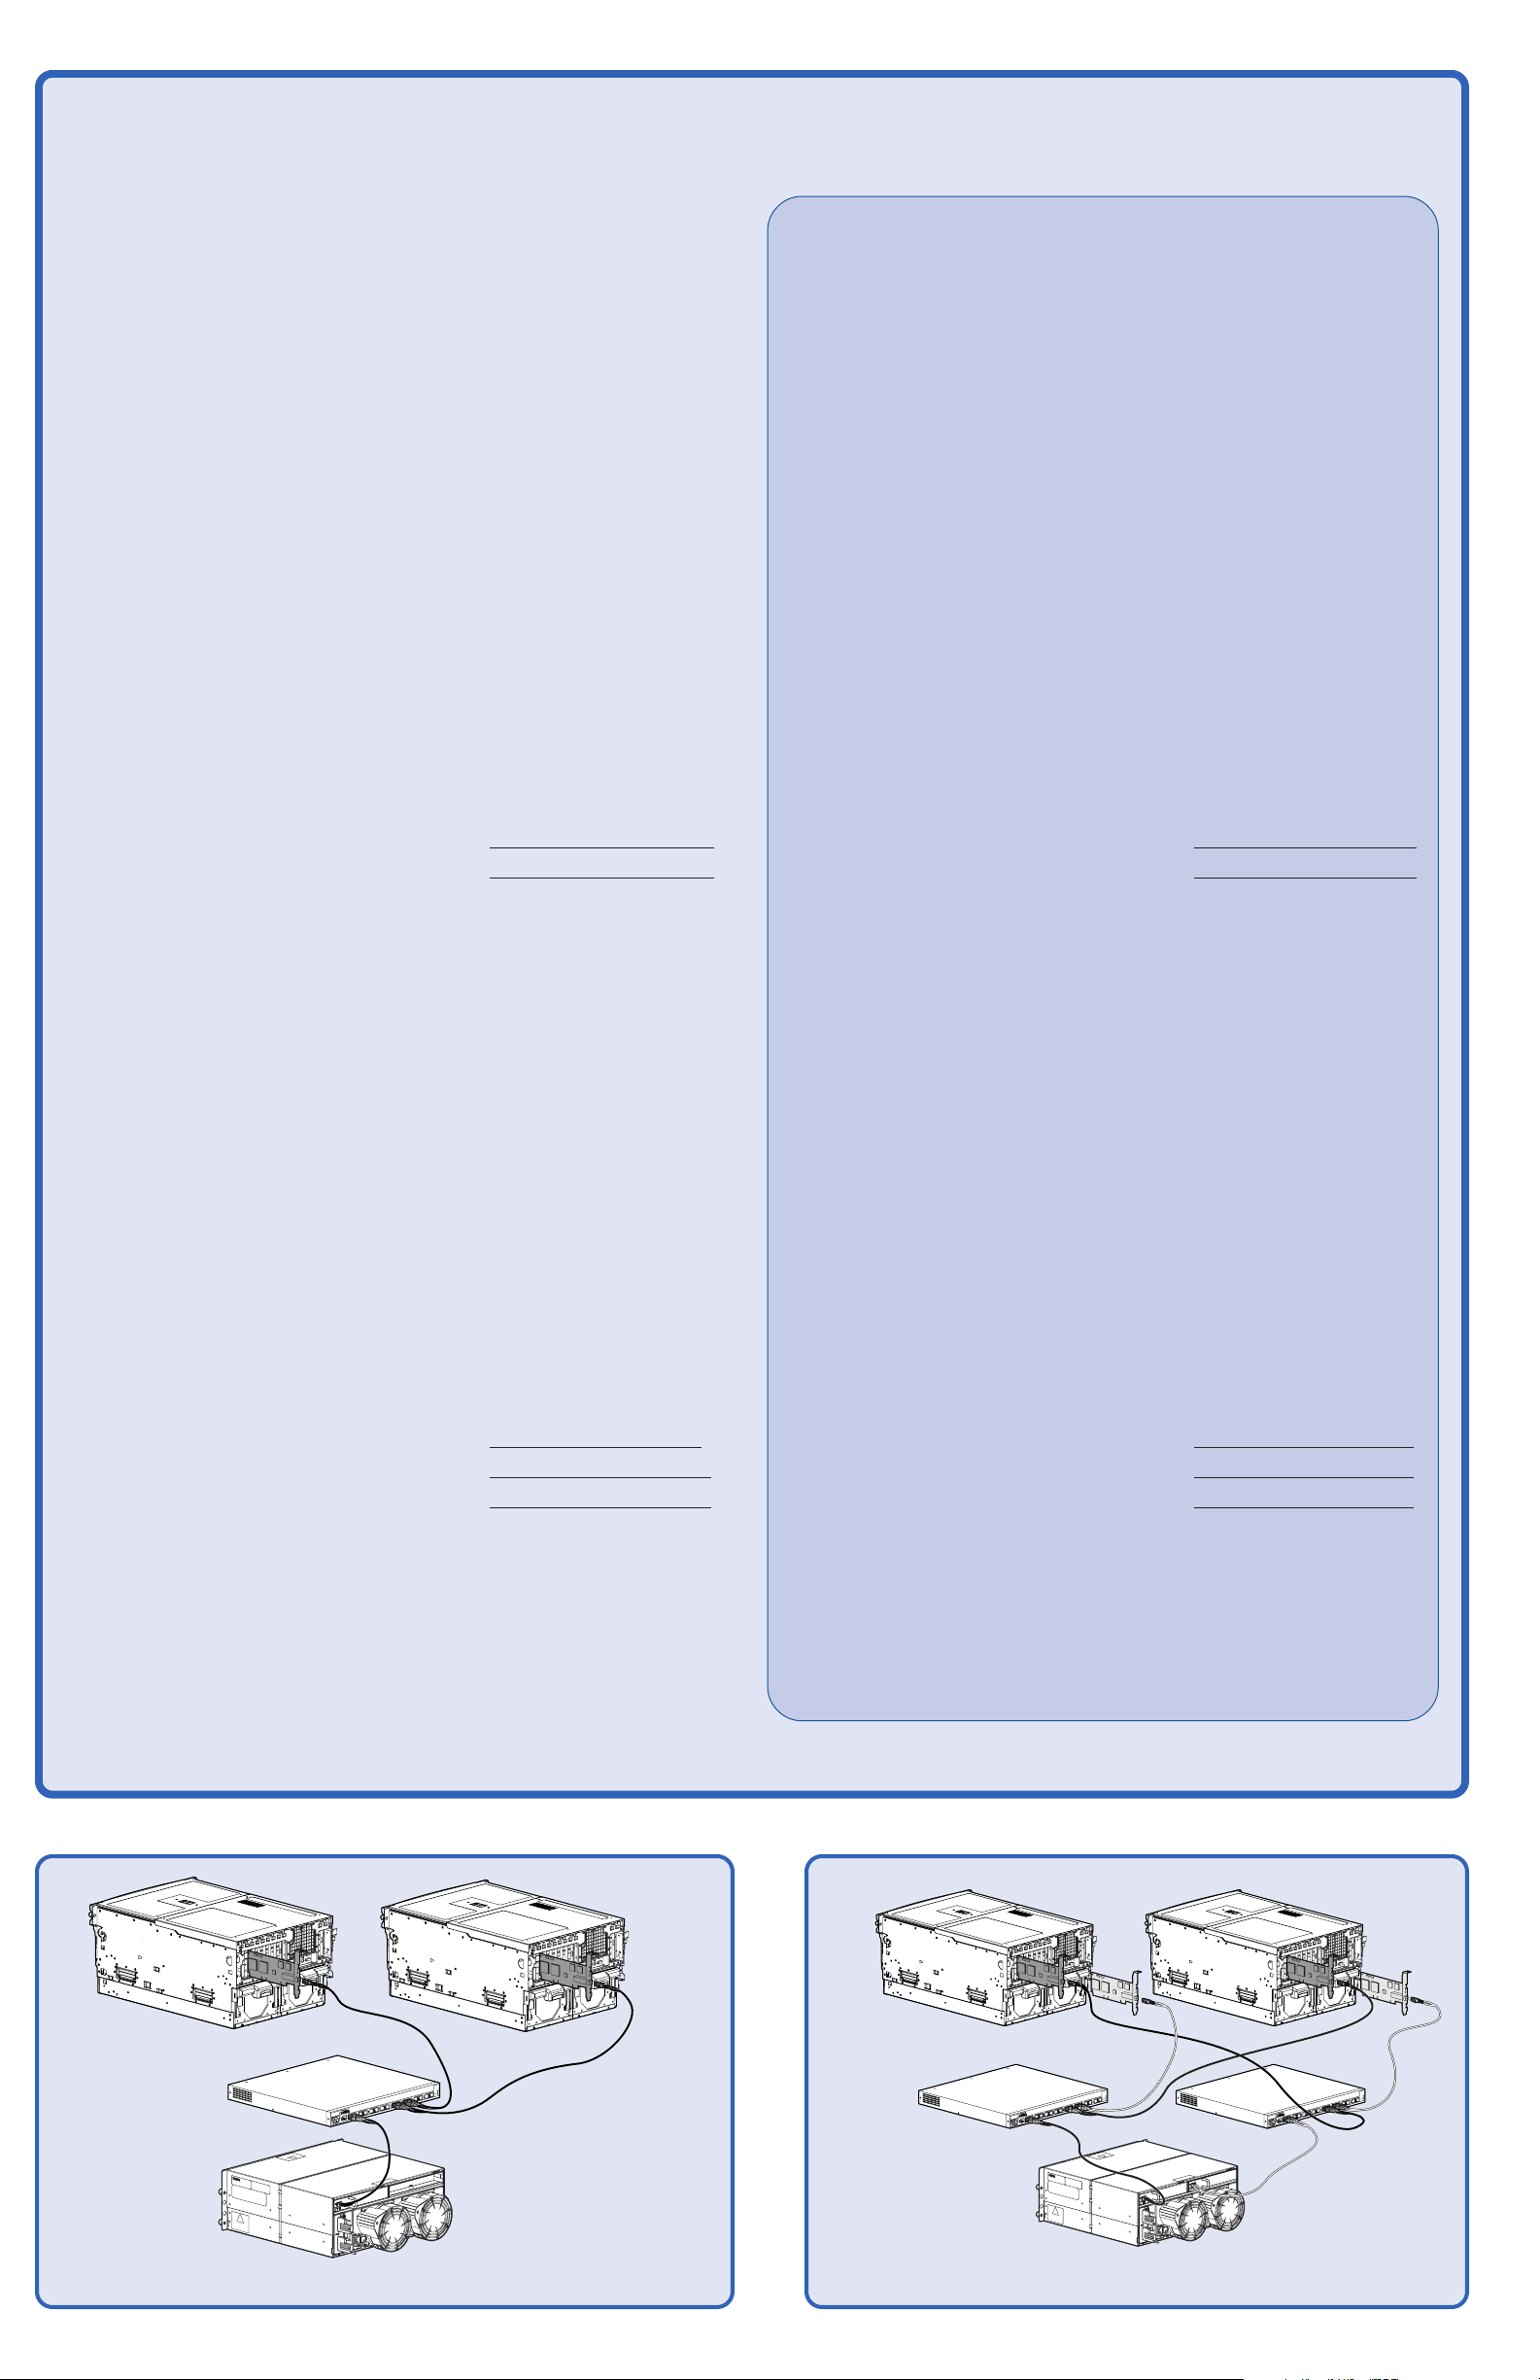
Sample Multi-Path MSA1000 ConfigurationSample Single-Path, MSA1000 Configuration with Two Stand-Alone Servers

Installation Overview Master Checklist
This section introduces the steps of installing an MSA1000 and may be used as a master checklist, butThis section introduces the steps of installing an MSA1000 and may be used as a master checklist, but
This section introduces the steps of installing an MSA1000 and may be used as a master checklist, but
This section introduces the steps of installing an MSA1000 and may be used as a master checklist, butThis section introduces the steps of installing an MSA1000 and may be used as a master checklist, but
please use the please use the
please use the
please use the please use the
Note: The MSA1000 must be installed in the sequence listed here and in the HP StorageWorks MSA1000 Installation Guide.
There are specific dependencies; if you deviate from this sequence, you may have to uninstall and reinstall your MSA1000,
beginning at step 1.
MSA1000 Installation GuideMSA1000 Installation Guide
MSA1000 Installation Guide
MSA1000 Installation GuideMSA1000 Installation Guide
to actually install your MSA1000. to actually install your MSA1000.
to actually install your MSA1000.
to actually install your MSA1000. to actually install your MSA1000.
1 Review your configuration plan1 Review your configuration plan
1 Review your configuration plan
1 Review your configuration plan1 Review your configuration plan
Before you install your MSA1000, it is important that you first thoroughly
research, study, and establish a configuration and installation plan for your
specific environment.
HP suggests that you go to the MSA1000 website for configuration
specifications and late-breaking information and complete the Configuration
Planning Worksheet on the reverse side of this poster.
As part of the planning process, now is the time to determine how you need to
configure the MSA1000 storage.
Installation Guide section: Step 1: Reviewing your Plans
2 Prepare your site2 Prepare your site
2 Prepare your site
2 Prepare your site2 Prepare your site
Before you install you MSA1000, select a location that meets the environmental
standards described in the MSA1000 Installation Guide.
Site requirements include adequate sources of power, airflow, and temperature
control.
6 Install option kits in your MSA10006 Install option kits in your MSA1000
6 Install option kits in your MSA1000
6 Install option kits in your MSA10006 Install option kits in your MSA1000
If your plans include adding any of the available option kits for the MSA1000,
install them now. It is easier to install these options before you install your
MSA1000 in the rack.
Some of the MSA1000 option kits include a redundant controller, additional
controller cache, redundant Fibre Channel I/O Module, embedded MSA SAN
Switch 2/8, and an embedded MSA Hub 2/3.
Note: Do not install any hard drives into the MSA1000 until after the MSA1000 installed
in the rack.
Installation Guide section: Step 6: Installing Option Kits
7 Install the MSA1000 in the rack7 Install the MSA1000 in the rack
7 Install the MSA1000 in the rack
7 Install the MSA1000 in the rack7 Install the MSA1000 in the rack
At this point in the process of installing your MSA1000, you have prepared your
SAN for the MSA1000 and are ready to physically install your MSA1000.
After you install the MSA1000 and any additional storage enclosures in the
rack, you can install the hard drives into the units.
Installation Guide section: Step 2: Preparing your Site
3 Prepare your servers3 Prepare your servers
3 Prepare your servers
3 Prepare your servers3 Prepare your servers
Depending on your plans, you will connect your MSA1000 to either a new or an
existing server. In both scenarios, it is important that your server is operating
properly before adding any MSA1000-specific components to it.
If more than one server will be accessing the MSA1000, HP recommends
designating one of the servers as a management server. It is on this server that
you will load management software (such as the ACU) and from this server that
you will perform your SAN management tasks.
Installation Guide section: Step 3: Preparing your Servers
4 Install the HBA in your servers4 Install the HBA in your servers
4 Install the HBA in your servers
4 Install the HBA in your servers4 Install the HBA in your servers
Because the MSA1000 can be deployed into a variety of operating system
environments and configurations (including single-path and multi-path),
specific HBA are required for the different deployments. Obtain the correct HBA
for your environment and install the HBA into each server that will access the
MSA1000.
Note: Be sure to follow the procedure as detailed in the HP StorageWorks MSA1000
Installation Guide.
Installation Guide section: Step 7: Installing your MSA1000 in the Rack
8 Connect the cables8 Connect the cables
8 Connect the cables
8 Connect the cables8 Connect the cables
With the MSA1000 and any additional storage enclosures installed in the rack,
you can now connect the SCSI, Fibre, and power cables.
Note: Multi-path configurations have exacting cable requirements.
Installation Guide section: Step 8: Connecting the Cables
9 P9 P
9 P
9 P9 P
At this point in the installation process, you have prepared your servers and
Fibre interconnect devices for the MSA1000 and have connected your
MSA1000 to your SAN. With your SAN ready to go and the MSA1000 installed
and ready to go, you can now power up your MSA1000.
Note: Be sure to follow the procedure as detailed in the HP StorageWorks MSA1000
Installation Guide.
oo
ww
er on yer on y
o
w
er on y
oo
ww
er on yer on y
our MSour MS
our MS
our MSour MS
A1000A1000
A1000
A1000A1000
Installation Guide section: Step 4: Installing the HBA in your Servers
5 Prepare your switches and hubs5 Prepare your switches and hubs
5 Prepare your switches and hubs
5 Prepare your switches and hubs5 Prepare your switches and hubs
In an existing SAN, your switches and hubs are already set up and configured,
but if you are deploying your MSA1000 into a new SAN, you need to install and
configure your Fibre interconnect devices at this time.
Installation Guide section: Step 5: Preparing your Switches and Hubs
Installation Guide section: Step 9: Powering On your MSA1000:
10 Configure your MSA100010 Configure your MSA1000
10 Configure your MSA1000
10 Configure your MSA100010 Configure your MSA1000
After the servers and interconnect devices are set up and the MSA1000 is
physically installed, connected and powered up, you can configure the
MSA1000 for your operating system environment.
These configuration steps vary for each operating system.
Note: Be sure to follow the procedure as detailed in the HP StorageWorks MSA1000
Installation Guide.
Installation Guide section: Step 10: Configuring your MSA1000

MSA1000 Installation and Configuration Best Practices
Consider the following when planning for and installing your MSA1000:Consider the following when planning for and installing your MSA1000:
Consider the following when planning for and installing your MSA1000:
Consider the following when planning for and installing your MSA1000:Consider the following when planning for and installing your MSA1000:
● Complete the Planning Worksheet on the opposite side of this document to
help you gather all of the items required for installing your MSA1000.
● Go to the MSA1000 website at http://www.hp.com/go/msa1000 to confirm
your plans and review current information about your MSA1000.
● When planning your LUNs, customize the RAID type and striping method to
the type of data that will be stored on the array.
For example, for non-critical data, you may want to use RAID 0, which
provides no fault tolerance, but provides rapid storage of large amounts of
data. For critical data, use RAID 1 (RAID 1+0), RAID 5, or RAID ADG,
choosing the RAID type the offers the desired combination of fault-tolerance,
I/O performance, and capacity utilization.
Note: Depending on the number of drives that you include in an array, the ACU
automatically assumes a default RAID type of ADG, which maximizes fault tolerance and
capacity utilization, but at a significant cost of I/O performance. For comparable fault
tolerance but higher performance, consider using RAID 1+0.
● When planning your LUNs, set the drive rebuild priority of your LUNs to
“high” to minimize exposure during a drive failure.
● When planning your LUNs, to optimize performance and redundancy in a
mirrored environment (RAID 1 or RAID 1+0), stripe the drives in the array
across the separate buses within the MSA1000 and any attached enclosures.
For example, because drive bays 1-7 in the MSA1000 are located on bus 1 and
bays 8-14 are located on bus 2, when creating a mirrored array with 6 drives,
include the drives in bays 1, 2, 3, and 8, 9, 10.
● In a SAN with multiple-servers, HP recommends designating one of the servers
as a management server, to centralize your management tasks.
It is on this server that you will install management software such as the ACU,
and it is from this server that you will perform your SAN management tasks.
● Use the HP StorageWorks MSA1000 Installation Guide to actually install and
configure your MSA1000.
Details are available in the guide that are not provided in this Overview poster.
● Install your MSA1000 in the sequence listed in the installation guide.
Several installation and configuration steps include dependencies and if you
deviate from the listed sequence, you may have to un-install and then
re-install your MSA1000, beginning at step 1.
● Before installing your MSA1000, consider redundancies of power, storage, and
data paths.
To provide redundant power, be sure to plug the two power supplies on the
MSA1000 into separate Uninterruptable Power Supplies (UPS) on separate power
sources. If you only have 1 UPS, maintain separate power paths by plugging one
MSA1000 power supply to the UPS on one power source and plug the other
MSA1000 power supply to a separate power source.
To provide redundant storage, configure your LUNs using fault-tolerant RAID
levels and striping methods.
To provide redundant data paths, you must include two isolated fibre channel
fabrics and the associated hardware and software components in the
configuration. (For example, you must include two MSA1000 controllers, two
interconnect devices, and two HBAs in each server. Environments using Secure
Path software must install the software on each server.)
● When installing or updating the HBA drivers, always use the drivers and the
installation scripts provided on the MSA1000 Support Software CD or the
MSA1000 website.
Your MSA1000 will not operate as intended if you update your HBA driver
manually or use drivers obtained from the HBA manufacturer.
● After installing your MSA1000, remember to set your host mode to identify your
operating system to the MSA1000.
● If you need to install Secure Path software, be sure to follow every server reboot
prompt that is presented.
Failure to acknowledge a server reboot prompt may result in your path redundancy not functioning properly. Be sure to reboot your server after the server
portion of the install and again after the client portion of the install.
MSA1000 Features
Two views of the MSA1000 are shown, with the key components identified.
2
1
8
3
4
1
2
5
3
6
4
7
5
9
8
6
7
MSA1000 (Front View)
Reference # Identifier
1 Redundant Controller Slot Blank
2 Primary MSA1000 Controller
3 Display Buttons
4 Display Panel
5 Display Indicators
6 Status Indicators
7 Power Switch
8 Drive Bay(s)
MSA1000 (Rear View)
Reference # Identifier
1 2-Gb Small Form Factor Pluggable (SFP) Transceiver
2 Fibre Channel I/O Module
3 Redundant Fibre Channel I/O Module Slot (Blank)
4 Power Supply Indicators
5 Blowers Attached to Power Supply
6 SCSI Expansion Port A
7 SCSI Expansion Port B
8 Environmental Monitoring Unit Indicators
9 Environmental Monitoring Unit
 Loading...