

Page 1

H
hp
mp3130 series
digital projector
Ceiling Mount
Installation Card
Be sure to install the projector
into a solid, structural ceiling
member:
Ceiling Mounting Procedure:
4
!
Before installation, refer to the
user manual for the projection
distance based upon the desired
image size. Use this projection
distance to locate the ceiling
mount.
!
HP recommends that a competent carpenter or electrician
install this ceiling mount.
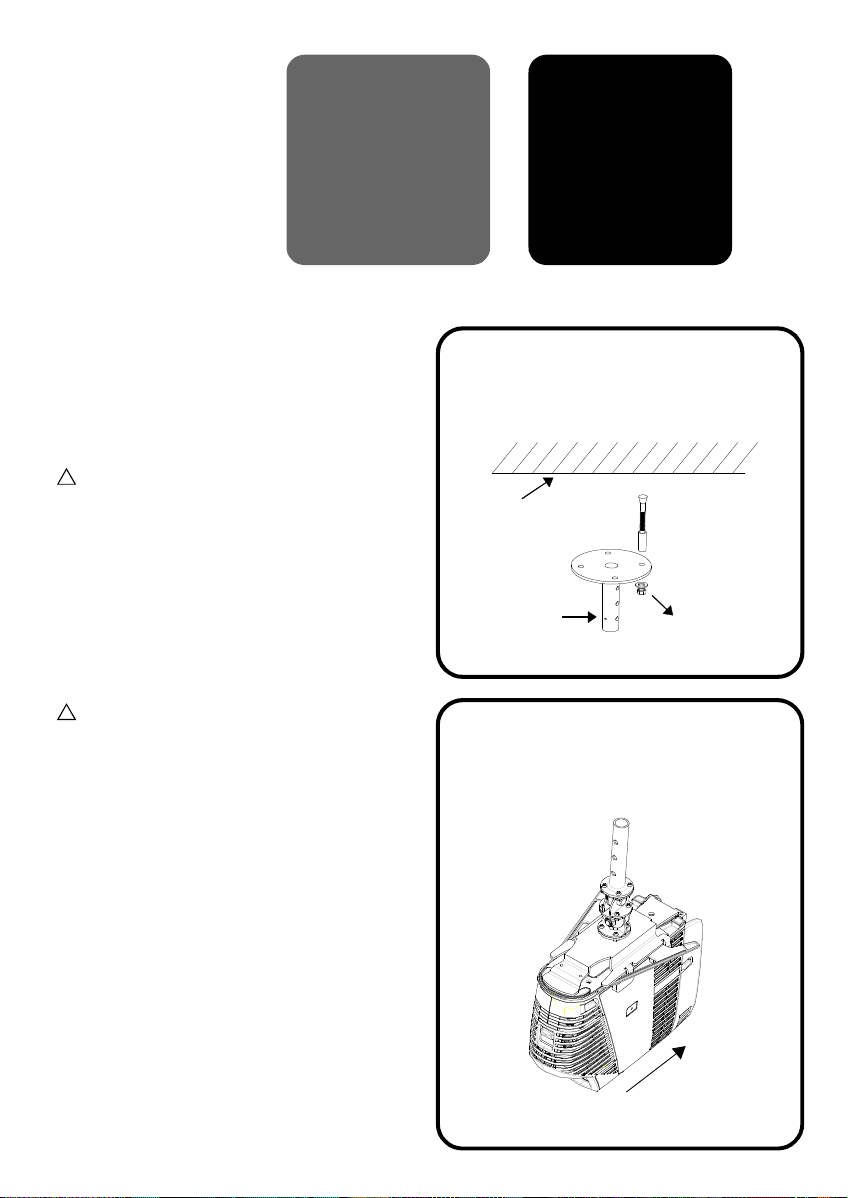
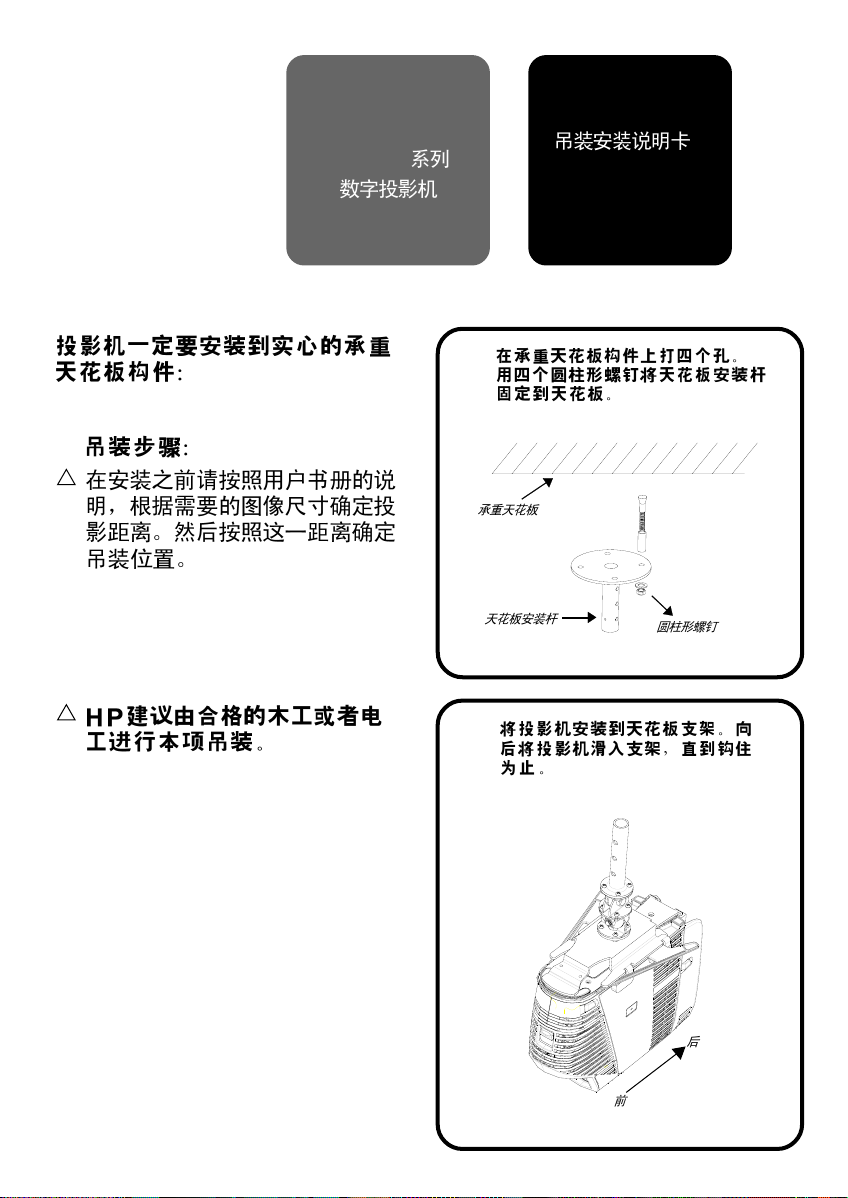
Drill four holes into the structural ceiling
u
member.
Attach the ceiling rod to the ceiling
with the four cylinder screws.
Structural Ceiling
Ceiling Rod
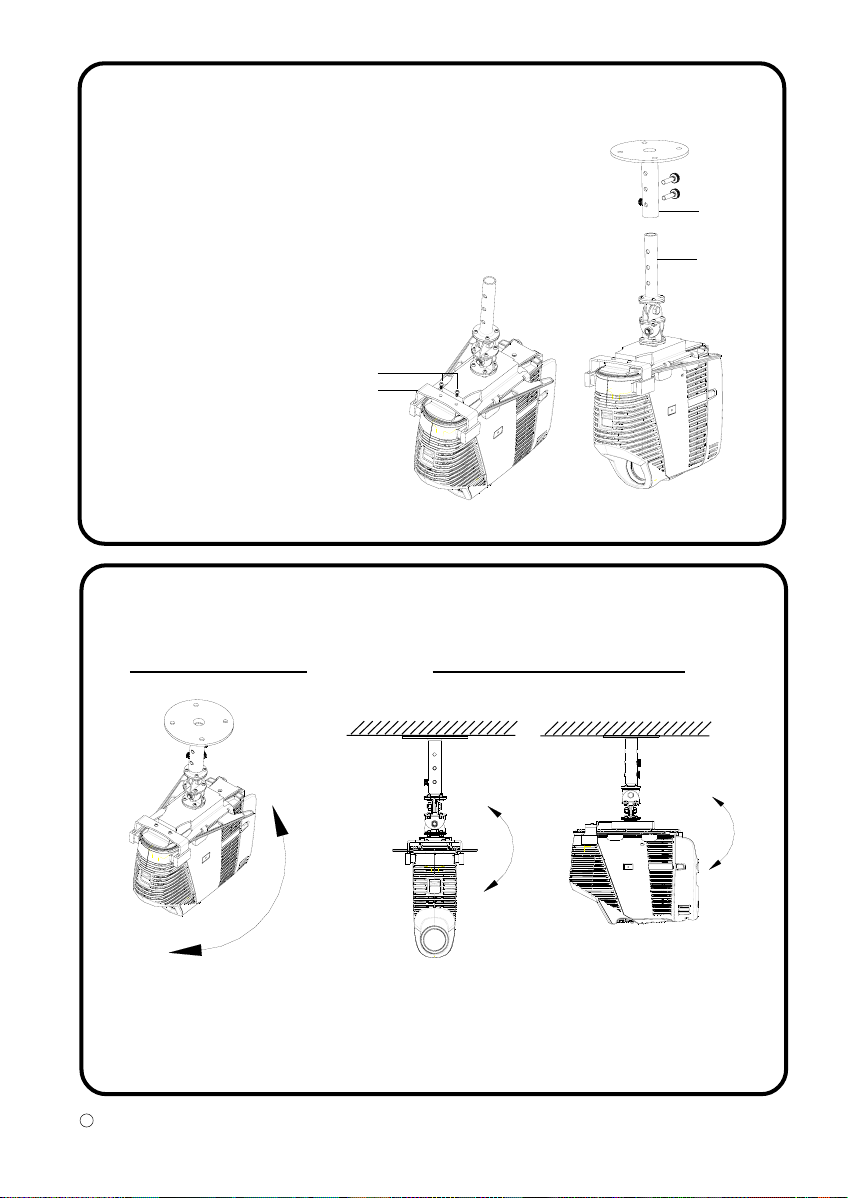
Mount the projector to the ceiling
v
bracket. Slide the projector
backwards into the bracket so the
hooks engage.
Cylinder Screw
Front
Back
Page 2

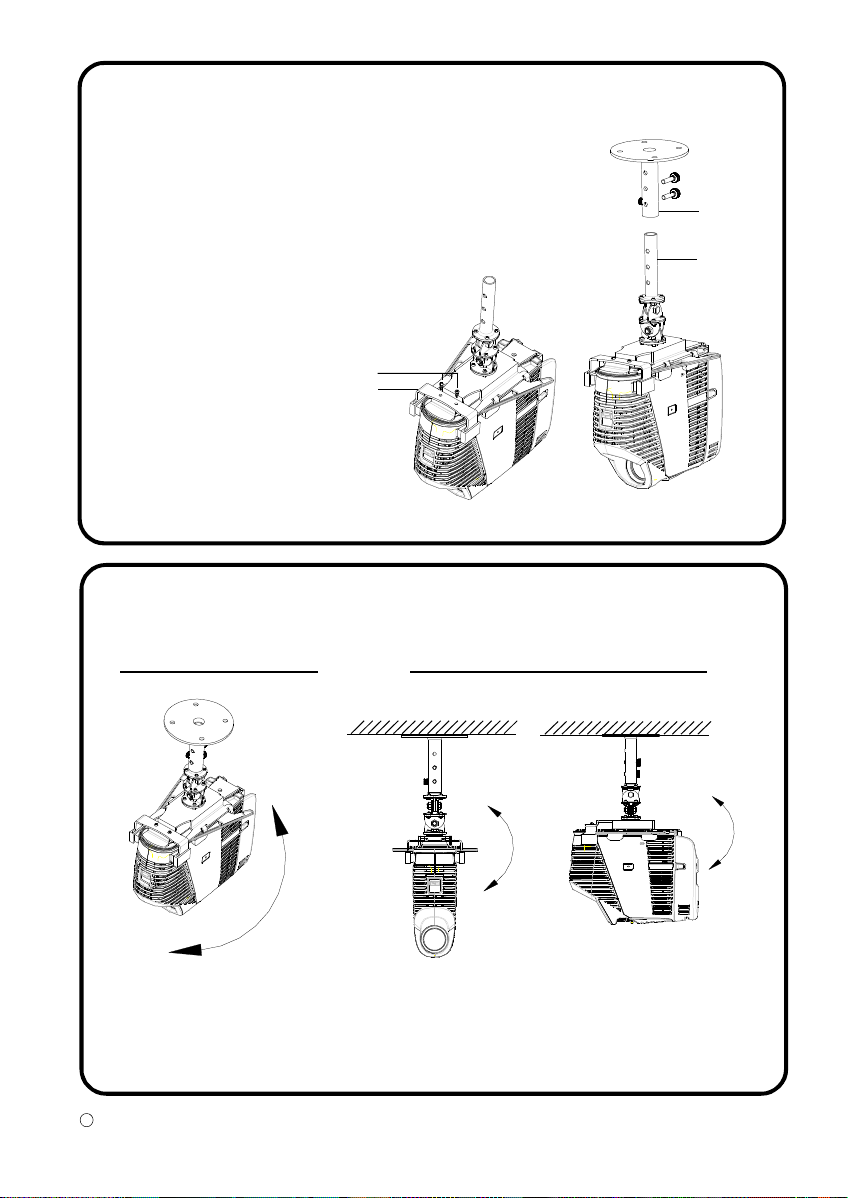
w
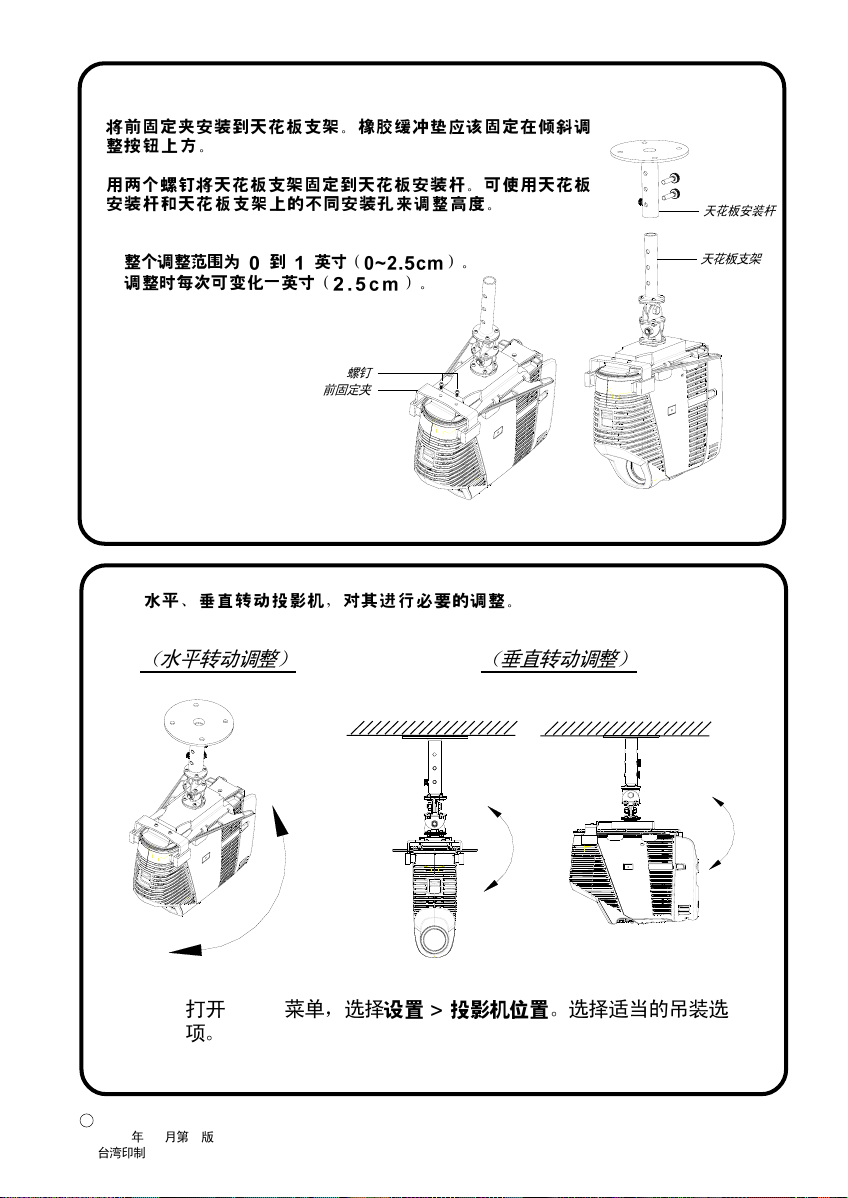
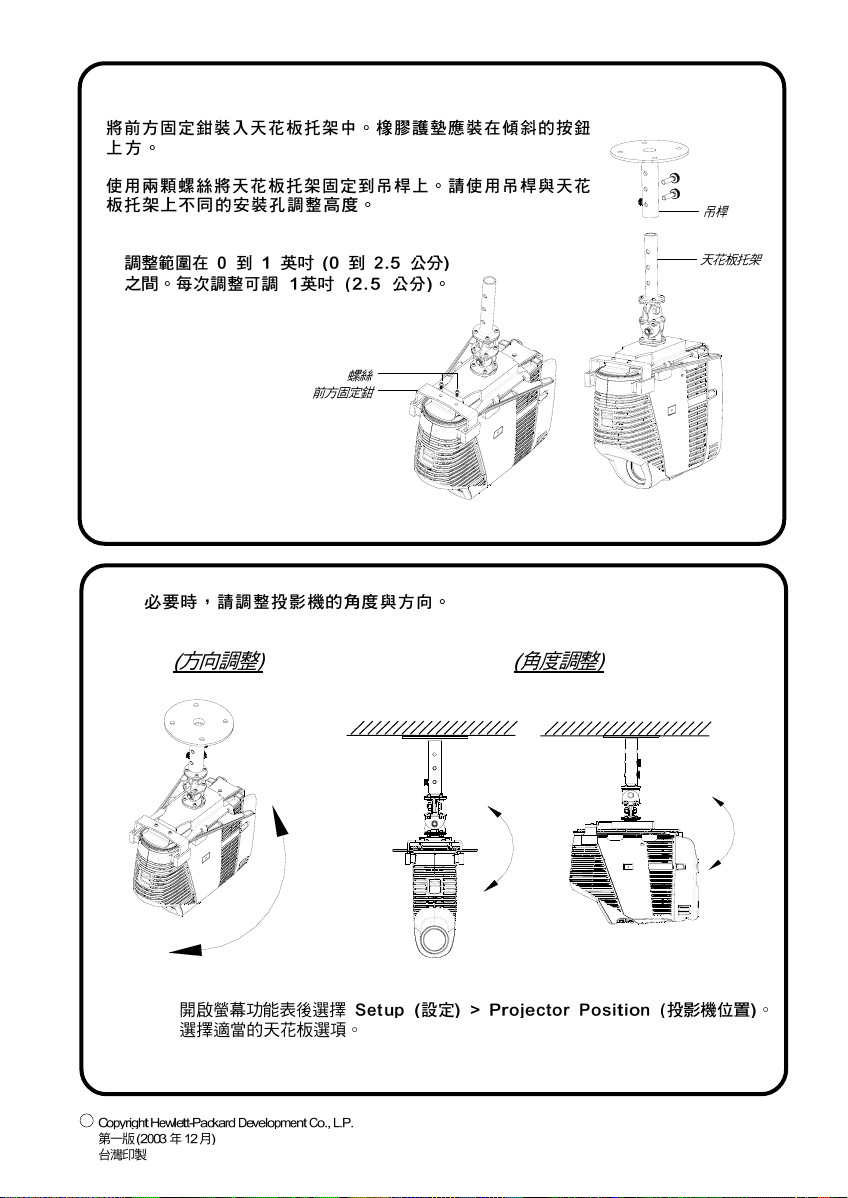
Install the front clamp onto the ceiling bracket. The rubber bumper
should fit over the tilt button.
Attach the ceiling bracket to the ceiling rod with the two screws.
Height adjustments can be made by using different holes on the
ceiling rod and ceiling bracket.
The total adjustment range is 0 to 1 inches
vv
v
vv
(0~2.5cm). Adjustment can be made in one
inch (2.5cm) increment.
Screws
Front Clamp
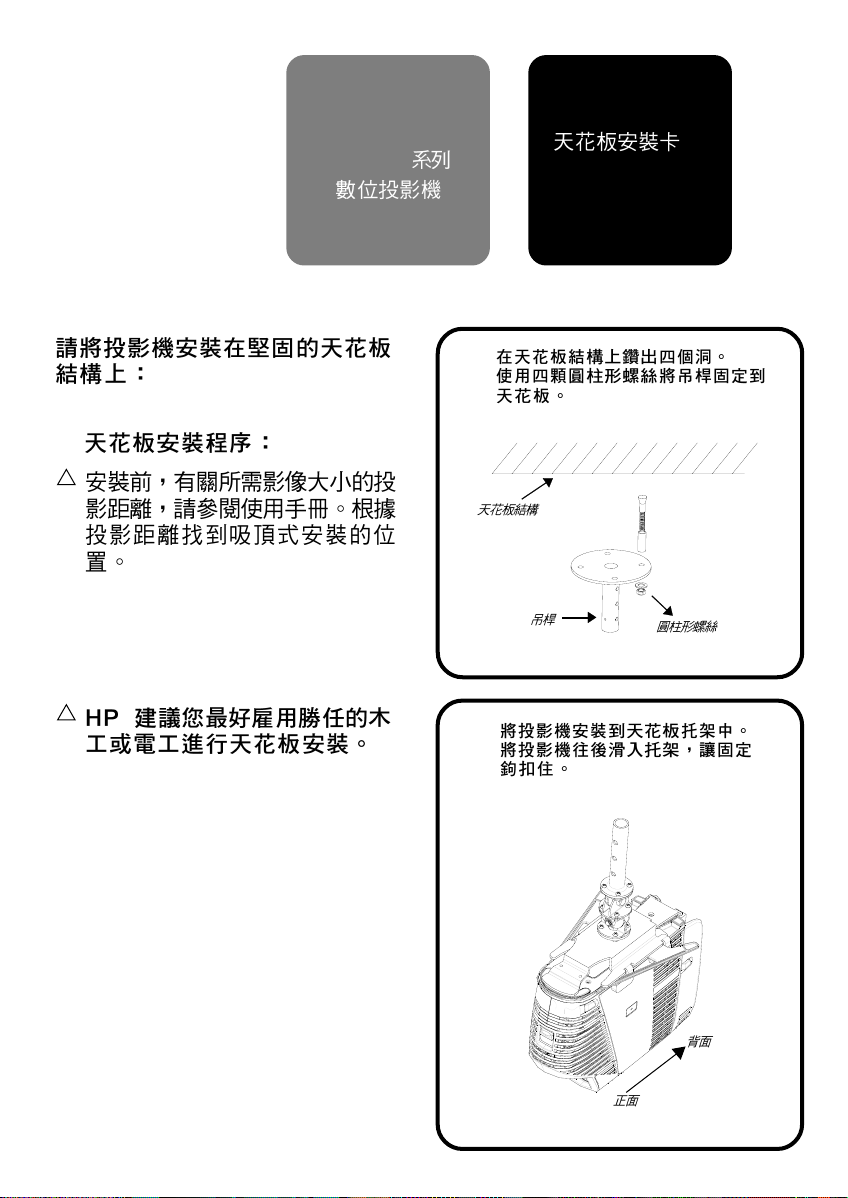
Make necessary roll and yaw adjustments to the projector.
x
(YAW ADJUSTMENT)
(ROLL ADJUSTMENT)
Ceiling Rod
Ceiling
Bracket
180°
Open the on-screen menu and select Setup > Projector Position. Select the
v v
v
v v
appropriate ceiling option.
C
Copyright Hewlett-Packard Development Co., L.P.
First Edition (November 2003)
Printed in Taiwan
±20°
±60°
Page 3
H
digitální projektror
HP
série mp3130
Strucný pruvodce
upevnením
stropního držáku
Ujistete se, že projektor
upevnujete na strope na pevný
nosný konstrukcní prvek:
Postup pri upevnování na strop:
4
!
Pred upevnením nahlédnete do
uživatelské prírucky a podle
požadované velikosti obrazu
urcete projekcní vzdálenost.
Použijte tuto projekcní vzálenost
pri urcování polohy stropního
držáku.
!
Firma HP doporucuje, aby
stropní držák upevnil
kvalifikovaný tesar nebo
elektrikár.
Do nosného konstrukcního
u
prvku vyvrtejte ctyri otvory.
Pomocí ctyr válcových šroubu
uchytte stropní tyc ke stropu.
Stropní konstrukce
Stropní tyc
Upevnete projektor do stropní
v
konzoly. Zasunte projektor
pozpátku do konzoly tak, až
skoby pevne zapadnou.
Válcový šroub
Prední strana
Zadní strana
Page 4
w
Upevnete na konzolu prední svorku. Gumový chránic by
mel dosedat na tlacítko náklonu.
Pomocí dvou šroubu uchytte stropní konzolu ke stropní
tyci. Pomocí ruzných otvoru na stropní tyci a konzoli
mužete prizpusobit výšku.
Stropní tyc
Celkový rozsah nastavení je od 0 do 2,5 cm.
v
Nastavení je možné po 2,5 cm krocích.
Šrouby
Prední svorka
Upravte prícný náklon a vybocení projektoru.
x
(ÚPRAVA VYBOCENÍ)
180°
(ÚPRAVA PRÍCNÉHO NÁKLONU)
±20°
Stropní konzola
±60°
Otevrete obrazovkové menu a vyberte Nastavení > Pozice projektoru.
v
Vyberte príslušné stropní umístení.
C
Copyright Hewlett-Packard Development Co., L.P.
První vydání (prosinec 2003)
Vytišteno na Taiwanu
Page 5
H
Digitaler Projektor
der Serie
hphp
hp mp3130
hphp
Installationskarte
für die
Deckenmontage
Der Projektor muss an einer
stabilen Deckeneinheit montiert
werden:
Montage des Projektors:
4
!
Je nach gewünschter
Bildgröße, die durch den
Abstand des Projektors vom
Projektionsschirm bestimmt
wird, müssen Sie anhand der
Angaben im Benutzerhandbuch
die Position für die Montage
wählen.
!
HP empfiehlt, die
Deckenmontage von
Fachleuten (Elektriker oder
Maurer) durchführen zu
lassen.
Bohren Sie vier Löcher in die Decke.
X
Befestigen Sie die Deckenhalterung mit
den vier Zylinderschrauben an der
Decke.
Decke
Deckenhalterung
Montieren Sie den Projektor an der
Y
Deckenschiene. Schieben Sie den
Projektor nach hinten auf die
Schiene, so dass die Haken
einrasten.
Zylinderschraube
Vorne
Hinten
Page 6
Z
Setzen Sie die Frontklemme auf die Deckenschiene auf. Der
Gummipuffer sollte auf die Schwenktaste passen.
Befestigen Sie die Deckenschiene mit den zwei Schrauben an der
Deckenhalterung. Die Höhe kann eingestellt werden, indem Sie
verschiedene Löcher der Deckenhalterung und Deckenschiene wählen.
Deckenhalterung
Der gesamte einstellbare Höhenunterschied
beträgt 0 bis 2,5 cm. Der Abstand kann in
Schritten von 2,5 cm eingestellt werden.
Schrauben
Frontklemme
Stellen Sie den Projektor auf eine geeignete waagerechte und senkrechte
[
Position ein.
(WAAGERECHTE EINSTELLUNG)
180°
(SENKRECHTE EINSTELLUNG)
±20°
Deckenschiene
±60°
Öffnen Sie das OSD-Menü und wählen Setup > Projector Position. Wählen Sie die
geeignete Deckenoption.
C
Copyright Hewlett-Packard Development Co., L.P.
Erste Ausgabe (Dezember 2003)
Gedruckt in Taiwan
Page 7

H
Proyector digital
de la serie
hphp
hp mp3130
hphp
Tarjeta de
instalación para
montaje en la
pared
Asegúrese de instalar el
proyector en un lugar sólido de
la estructura del techo:
Proceso de instalación en el techo:
4
!
Antes de la instalación, consulte
el manual del usuario para
averiguar la distancia de
proyección basándose en el
tamaño de imagen deseado.
Utilice esta distancia de
proyección para ubicar el montaje
en el techo.
!
HP recomienda que el
montaje en el techo lo realice
un carpintero o electricista.
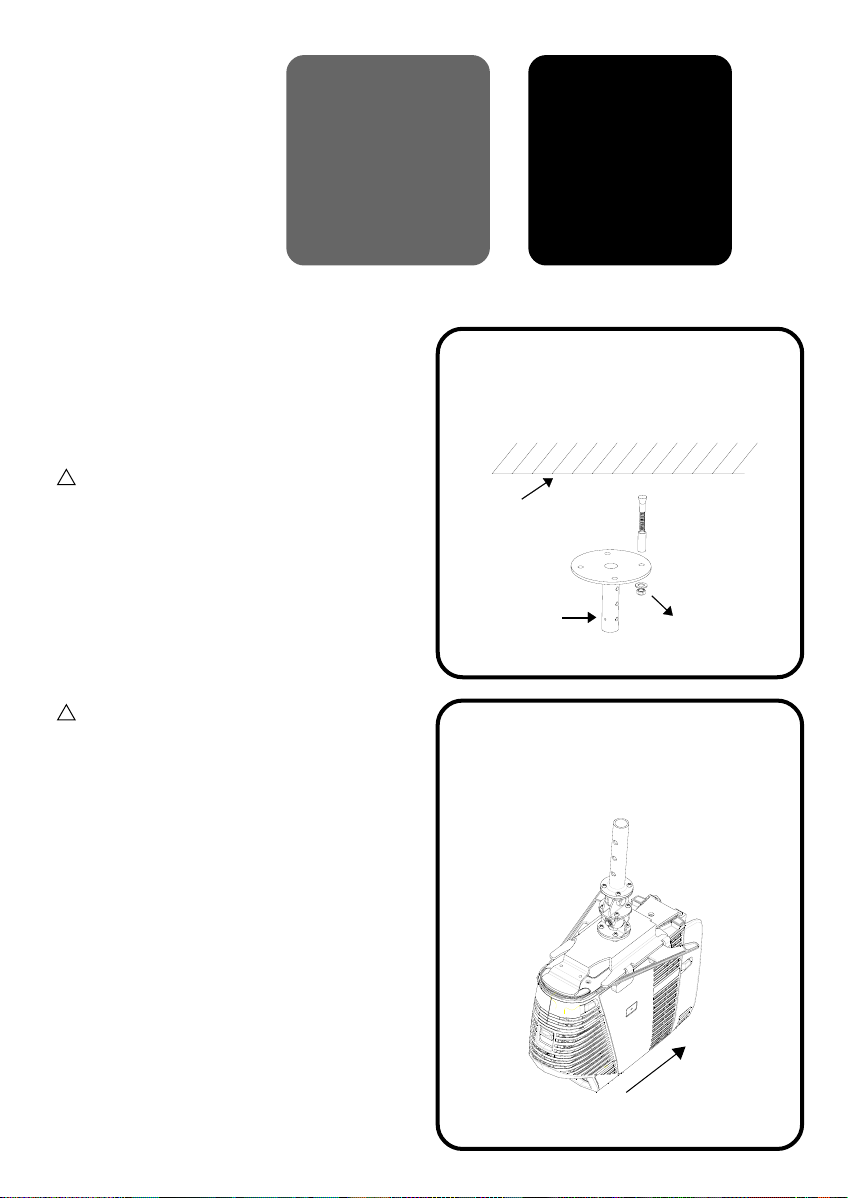
Perfore cuatro agujeros en la
X
estructura del techo.
Una la varilla del techo al techo con los
cuatro tornillos del cilindro.
Estructura del techo
Varilla del techo
Monte el proyector en el soporte del
Y
techo. Deslice el proyector hacia
atrás en el soporte hasta que los
ganchos queden fijos.
Tornillo del cilindro
Frontal
Posterior
Page 8
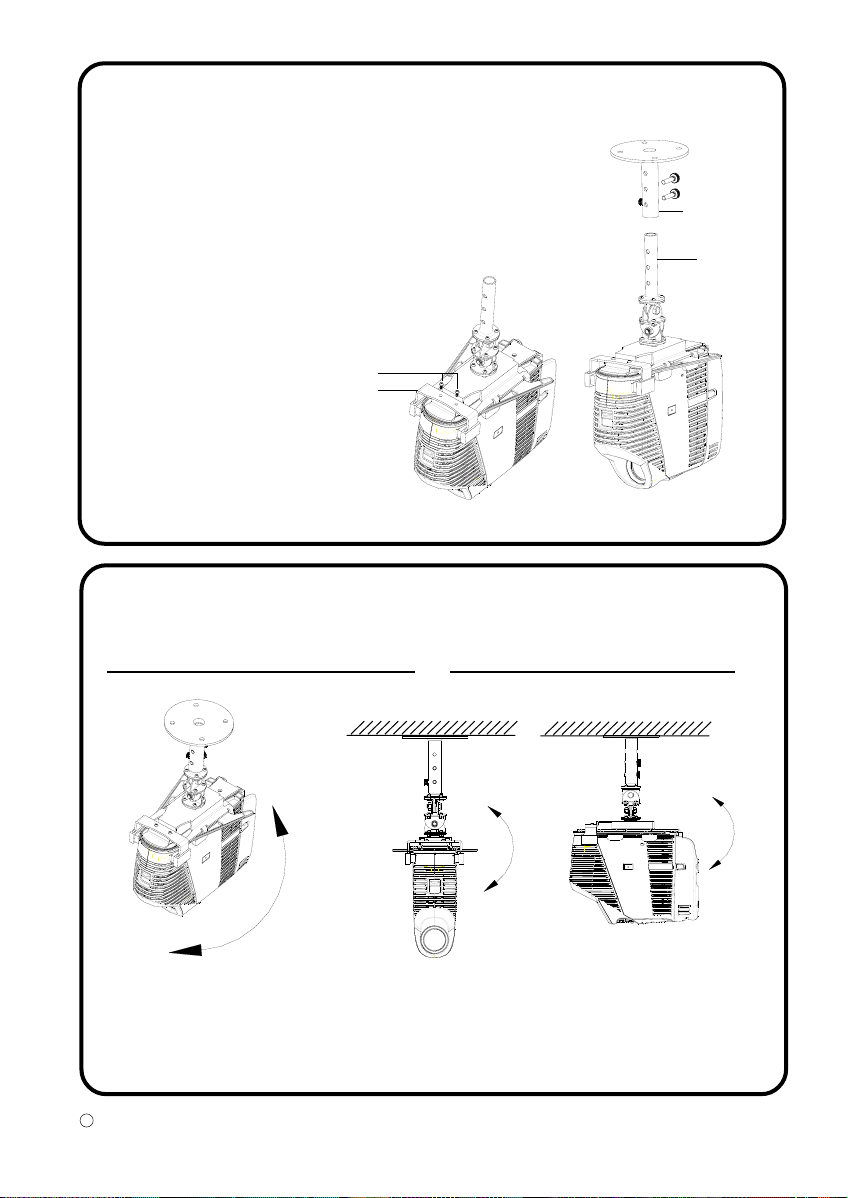
Z
Instale la abrazadera frontal en el soporte del techo. El tope de goma
debería ajustarse sobre el botón de inclinación.
Una el soporte del techo a la varilla del techo con los dos tornillos.
Puede realizar los ajustes de altura usando los distintos agujeros de
la varilla del techo y del soporte.
El alcance total de ajuste es de 0 a 1 pulgada
(0~2.5cm). Puede realizar el ajuste en
incrementos de una pulgada (2.5cm).
Tornillos
Abrazadera frontal
Realice los ajustes necesarios de inclinación y giro del proyector.
[
Varilla del
techo
Soporte del
techo
(AJUSTE DE GIRO)
180°
Abra el menú en pantalla y seleccione Configuración > Posición del proyector.
Seleccione la opción de techo apropiada.
C
Copyright Hewlett-Packard Development Co., L.P.
Primera edición (diciembre de 2003)
Impreso en Taiwán
(AJUSTE DE INCLINACIÓN)
±20°
±60°
Page 9

H
Projecteur
numérique
mp3130 series
hphp
hp
hphp
Carte d’Installation
pour Montage au
Plafond
Prenez soin d’installer le
projecteur dans un élément
plein de la structure du plafond:
Procédure de Montage au Plafond:
4
!
Avant l’installation, reportez-vous
au manuel utilisateur pour la
distance de projection en fonction
de la taille d’image désirée.
Utilisez cette distance de projection pour repérer le montage au
plafond.
!
HP recommande de faire
appel à un charpentier ou à
un électricien compétant
pour installer ce montage de
plafond.
Percez quatre trous dans la structure
X
de renfort de plafond.
Fixez la tige de plafond au plafond à
l’aide des quatre vis de cylindre.
Plafond avec structure
Tige de Plafond
Montez le projecteur sur le support
Y
de plafond. Faites coulissez le
projecteur en arrière dans le support
afin d’engager les crochets.
Vis de Cylindre
Avant
Dos
Page 10

Z
Installez la pince avant sur le support de plafond. Le butoir en
caoutchouc doit s’ajuster sur le bouton d’inclinaison.
Fixez le support de plafond à la tige de plafond avec les deux vis. Huit
réglages peuvent être réalisés en utilisant différents trous sur la tige
de plafond et le support de plafond.
Tige de Plafond
La plage de réglage totale va de 0 à 1 pouce
(0~2.5cm). Le réglage peut être faits par
incrémentation d’un pouce (2.5cm).
Vis
Pince Avant
Effectuez les réglages d’inclinaison et de direction nécessaires au projecteur.
[
(RÉGLAGE DE DIRECTION)
180°
(RÉGLAGE D’INCLINAISON)
±20°
Support de
Plafond
±60°
Ouvrez le menu d’affichage d’écran et sélectionnez Réglage > Position du Projecteur.
Sélectionnez les options de plafond appropriées.
C
Copyright Hewlett-Packard Development Co., L.P.
Première Edition (Décembre 2003)
Imprimé à Taïwan
Page 11

H
Proiettore digitale
hphp
hp
hphp
serie mp3130
Scheda per il
montaggio a muro
Accertarsi di installare il
proiettore in un punto solido del
soffitto:
Procedura di montaggio a soffitto:
4
!
Prima dell’installazione, fare
riferimento al manuale dell’utente
per la proiezione a distanza sulla
base delle dimensioni
dell’immagine desiderate.
Utilizzare la distanza del
proiettore per individuare il punto
di montaggio a soffitto.
!
HP consiglia di far eseguire il
montaggio a parete da un
muratore o da un elettricista
professionista.
Praticare con il trapano quattro fori
X
nella parte strutturale del soffitto.
Fissare l’apposita asta al soffitto con le
quattro viti cilindriche.
Soffitto
Staffa
Montare il proiettore alla staffa. Far
Y
scorrere il proiettore verso dietro
nella staffa in modo da far scattare in
posizione i ganci.
Vite cilindrica
Avanti
Dietro
Page 12

Z
Installare la morsa frontale sulla staffa. Il tacchetto di gomma
dovrebbe adattarsi sul pulsante inclinato.
Fissare la staffa all’asta con le due viti. È possibile eseguire le
regolazioni in altezza utilizzando differenti fori sull’asta e la staffa.
Asta
L’intervallo di regolazione totale è da 0 a 2.5
cm. La regolazione può essere eseguita con
incrementi da 2,5 cm.
Morsa frontale
Eseguire tutte le regolazioni di inclinazione e beccheggio necessarie sul proiettore.
[
(BECCHEGGIO)
180°
Viti
(INCLINAZIONE)
±20°
Staffa
±60°
Aprire il menu a schermo e selezionare Configurazione > Posizione proiettore.
Selezionare l’opzione appropriata.
C
Copyright Hewlett-Packard Development Co., L.P.
Prima edizione (dicembre 2003)
Stampato a Taiwan
Page 13

H
Projetor
HPHP
HP
HPHP
digital série mp 3130
Instruções de
Instalação para
Montagem no
Teto
Assegure-se de instalar o
projetor em parte sólida da
estrutura do teto:
Procedimentos para Instalação no Teto:
4
!
Antes de instalar, consulte o
manual do usuário para a
distância de projeção, baseada
no tamanho da imagem
desejada. Use essa distância de
projeção para localizar o ponto
de montagem no teto.
!
A HP recomenda que a
instalação no teto seja
realizada por um carpinteiro
ou eletricista competente.
Faça quatro furos em uma parte sólida
X
da estrutura do teto.
Prenda a haste de teto ao teto com os
quatro parafusos cilíndricos.
Estrutura do Teto
Haste de Teto
Monte o projetor no suporte de teto.
Y
Mova o projetor pra trás no suporte
até que a presilha se encaixe.
Parafuso Cilíndrico
Parte frontal
Parte traseira
Page 14

Z
Instale a braçadeira frontal sobre o suporte no teto. O protetor de
borracha deve se ajustar sobre o botão de inclinação.
Prenda o suporte de teto à haste de teto com os dois parafusos.
Ajustes de altura podem ser feitos usando os diferentes furos da haste
e do suporte de teto.
Haste de Teto
O intervalo de ajuste varia de 0 a 2,5 cm
(0 a 1 polegada). Os ajustes podem ser feitos
em segmentos de 2,5 cm (uma polegada).
Parafusos
Braçadeira Frontal
Faça os ajustes necessários de rotação e ângulo do projetor.
[
(AJUSTE DE ROTAÇÃO)
180°
(AJUSTE DE ÂNGULO)
±20°
Suporte de Teto
±60°
Abra o menu da tela e selecione Configuração > Posição do Projetor. Selecione a
opção de teto apropriada.
C
Copyright Hewlett-Packard Development Co., L.P.
Primeira Edição (Dezembro 2003)
Impresso em Taiwan
Page 15
H
4
!
hphp
hp
hphp
mp3130
X
!
Y
Page 16
Z
[
180°
OSD
C
Copyright Hewlett-Packard Development Co., L.P.
2003
12 1
±20°
±60°
Page 17
H
4
!
hphp
hp
hphp
mp3130
X
!
Y
Page 18
Z
[
180°
±20°
C
±60°
Page 19

H
4
!
hphp
hp
hphp
mp3130
X
!
Y
Page 20

Z
4
0~1 (0~2.5cm)
1
[
( )
180°
C
Copyright Hewlett-Packard Development Co., L.P.
2003 12
(
Printed in Taiwan
]
)
( )
±20°
[ ] [
±60°
Page 21

H
4
!
hphp
hp
hphp
mp3130
X
!
Y
Page 22

Z
[
180°
±20°
C
±60°
Page 23

Page 24

P/N 36.88008.001-A
 Loading...