

Page 1

kug-titl Page 1 Thursday, March 6, 1997 4:42 PM
LN17 and LN17ps
Printers
User Guide
Order Number: EK–LN17P–UG. A02
Digital Equipment Corporation
Maynard, Massachusetts
Page 2

kug-titl Page 2 Thursday, March 6, 1997 4:42 PM
Second Printing, May 1996
Digital Equipment Corporation makes no representations that the
use of its product in the manner described in this publication will not
infringe on existing or future patent rights, nor do the descriptions
contained in this publication imply the granting of licences to make,
use, or sell equipment or software in accordance with the
description.
Possession, use, or copying of the software described in this
publication is authorized only pursuant to a valid written license
from Digital or an authorized sublicensor.
© Digital Equipment Corporation 1996. All rights reserved.
Copyright protection claimed includes all forms of matters of
copyrightable materials and information now allowed by statutory or
judicial law or hereinafter granted, including without limitation,
material generated from the software programs which are displayed on
the screen such as styles, templates, icons, screen displays, looks, etc.
The following are trademarks of Digital Equipment Corporation:
DECprint, Digital, OpenVMS, VAX, VT, and the DIGITAL logo.
Adobe and PostScript are trademarks of Adobe Systems
Incorporated, which may be registered in certain jurisdictions.
TrueRes is a trademark of DP-Tek. PCL, HP, and LaserJet are
registered trademarks of Hewlett-Packard Company. Microsoft,
Windows, and MS-DOS are registered trademarks of Microsoft
Corporation. Univers is a trademark of Linotype AG or its
subsidiaries. WordPerfect is a trademark of WordPerfect
Corporation. Centronics is a trademark of Centronics Corporation.
Macintosh and TrueT ype are trademarks or registered trademarks of
Apple Computer, Incorporated.
PCL and PCL 5e are trademarks of Hewlett-Packard Company. This
printer contains an emulation of the Hewlett-Packard PCL 5e
command language, recognizes HP PCL 5e commands, and
processes these commands in a manner comparable with
Hewlett-Packard LaserJet printer products.
All other trademarks and registered trademarks are the property of
their respective holders.
Notice
Specifications described in this publication are subject to change
without notice. Use of some features may be limited by your
hardware or software configuration. Contact your dealer or Digital
for details.
Page 3

kug.toc Page i Thursday, March 6, 1997 4:42 PM
Chapter 1 LN17 Printer Quick Tour ...................................................... 1-1
LN17 and LN17ps Printer Models ......................................... 1-3
Table of Contentsi
How Much of This Book Must I Read? ................................. 1-4
Printer Components . ................................... .... ...................... 1-5
Special Features .................................................................... 1-6
Power Saver .................... ... ... ... .................................... ... ... 1-6
High Resolution Printing ................................................... 1-6
Edge to Edge Printing ....................................................... 1-7
Automatic Tray Switching ................................................. 1-7
Automatic Language Sensing and Switching .................. 1-7
State Saving ....................................................................... 1-8
Printer Generated Reports ............. ... ................................ 1-8
LN17 and LN17ps Printers User Guide ❖ i
Page 4

kug.toc Page ii Thursday, March 6, 1997 4:42 PM
Table of Contents
Optional Features ................................................................. 1-9
PostScript Option ............................................................... 1-9
Duplex Printing .................................................................. 1-9
Increased Paper Handling ................................................. 1-9
Collating and Offsetting ................................................. 1-10
Memory Expansion .......................................................... 1-10
Hard Drive ............................................................. ........... 1-10
Memory Considerations ..................................................... 1-11
Maintaining the Printer ...................................................... 1-13
Cleaning the Printer ............................. ........................... 1-13
Replacing the EP Cartridge ............................................. 1-13
Recycling the EP Cartridge .............................................. 1-13
Replacing the Fuser Cartridge/Bias Transfer Roll ........... 1-14
Technical Support ............................................................... 1-15
Before Calling for Service ................................................ 1-15
Transporting the P rin ter ................ .... ... ... ... ........................ 1-16
Chapter 2 Paper Handling ................................................ ...................... 2-1
Selecting Paper ..................................................................... 2-3
Storing Paper ........................................ ............................. 2-4
Using the Main Tray or Lower Tray ..................................... 2-5
Adjusting the Main Tray for Paper Size ........................... 2-7
Adjusting the Lower Tray for Pape r Size ......................... 2-8
Using the Front Tray ............................................................. 2-9
Loading the Front Tray ......................................... ........... 2-11
Automatic Tray Switching .................................................. 2-13
PostScript Tray Switching ............................................ .... 2-13
PCL Tray Switching (Source Mapping) ............................ 2-14
ii ❖ LN17 and LN17ps Printers User Guide
Page 5

kug.toc Page iii Thursday, March 6, 1997 4:42 PM
Using the Mailbox/Collator ................................................ 2-19
Printing to the Mailbox/Collato r .................................... 2-20
Password Protecting Jobs ................................................ 2-20
Opening Bins ...... ... ... ... .... ................................... ... ... .... .... 2-25
Using the Offset Catch Tray (OCT) ..................................... 2-26
Using the Envelope Feeder ................................................ 2-27
Loading the Envelope Feeder ......................................... 2-28
Duplex (Two-Sided) Printing .............................................. 2-29
Print Orientation and Control Panel Settings ................ 2-30
Chapter 3 Using the Control Panel ...................................................... 3-1
Control Panel Features ......................................................... 3-2
The Display ......................................................................... 3-2
The Keys ............................................................................. 3-3
Table of Contents
Navigating the Menu System ............................................ ... 3-6
Menu Indicators ................................................................. 3-8
Setting a Menu Option ..................................................... 3-9
Main Menu ........ .................................... .............................. 3-11
Language Menu .... ................................... ........................... 3-12
Mailbox Menu ....... ................................... ........................... 3-13
PCL Emulat Menu ..... ... ... .................................... ... ... ... ........ 3-14
PostScript Menu ................. ................................... .............. 3-17
Interface Menu ........................................... ........................ 3-20
LocalTalk Menu Options ............ .................................... . 3-23
Ethernet Menu Options .................... .............................. 3-23
System Menu ............ ................................... ........................ 3-24
Test Menu ....................................... .................................... . 3-25
Reset Menu ........... ... ................................... .... .................... 3-26
Chapter 4 LN17 Printer Driving Software .......................................... 4-1
LN17 PCL 5e Emulation Printer Drivers ................................ 4-2
LN17 PostScript Printer Drivers ............................................ 4-3
LN17 and LN17ps Printers User Guide ❖ iii
Page 6

kug.toc Page iv Thursday, March 6, 1997 4:42 PM
Table of Contents
DECprint Supervisor (DCPS) Software .................................. 4-4
Chapter 5 Using the Hard Drive/ Downloading Fonts ..................... 5-1
Hard Drive Considerations ................................................... 5-2
Print/Disk Spooling ............................................................ 5-2
State Saving ....................................................................... 5-2
Formatting the Hard Drive ................................................ 5-3
Downloading Fonts and Macros .......................................... 5-4
Chapter 6 Troubleshooting ................................. ............................. ...... 6-1
Printer Operation Problems ........................... ... ................... 6-2
Control Panel Messages ........................................................ 6-6
Paper Jams .......................................... ................................. 6-26
What Causes a Paper Jam? ................................... ........... 6- 26
Clearing Paper Jams ........................................................ 6-26
Print Quality Problems ....................... ................................. 6-33
Appendix A Ordering Printer Options ................................................... A-1
Appendix B Replacing Consumables ................................. ................ ...... B-1
Replacing the EP Cartridge .................................................. B-2
Replacing the Fuser Cartridge/BTR ...................................... B-5
Appendix C Installing and Removing Printer Options ........................ C-1
Precautions ..................... ............................................. .......... C-3
Memory SIMMs ..................................................................... C-4
Installing a Memory SIMM ................................................ C-5
Removing a Memory SIMM ............................................... C-8
PostScript SIMM .................................................................. C-10
Installing the PostScript SIMM ........................................ C-10
Removing the PostScript SIMM ....................................... C-13
Hard Drive ........................................................................... C-16
Installing the Hard Drive ................................................. C-16
Removing the Hard Drive ................................................ C-19
iv ❖ LN17 and LN17ps Printers User Guide
Page 7

kug.toc Page v Thursday, March 6, 1997 4:42 PM
Duplex Module ................................................................... C-21
Installing the Duplex Module ......................................... C-21
Removing the Duplex Module ........................................ C-23
500-sheet Paper Deck and Cassette ................................... C-24
Installing One 500-sheet Paper Deck and Cassette ....... C-24
Installing Two 500-sheet Paper Decks and Cassettes .... C-27
Removing a 500-sheet Paper Deck and Cassette ........... C-31
Offset Catch Tray (OCT) ...................................................... C-33
Installing the OCT ............................................................ C-33
Removing the OCT ........................................................... C-36
Mailbox/Collator ................................................................. C-38
Installing the Mailbox/Collator ....................................... C-38
Removing the Mailbox/Collator ...................................... C-41
Envelope Feeder ................................................................. C-43
Table of Contents
Installing the Envelope Feeder ....................................... C-43
Removing the Envelope Feeder ...................................... C-46
Digital Network Interface Card (DNIC) .............................. C-48
Installing the DNIC ........................................................... C-49
Removing the DNIC ......................................................... C-53
Appendix D Control Panel Options ................................................ .... ..... D-1
Appendix E Printer Resident Fonts ......................................................... E-1
Base Printer Fonts ................................................................. E-2
Printing a PCL Font List ..................................................... E-3
PostScript Fonts ..................................................................... E-4
Appendix F Printer Specifications ................. ............. ............. ................ F-1
Appendix G LN17 Unique Printer Commands ........... ............. ............... G-1
Overview ............................................................................... G-2
Paper Size ....................... .................................... ................... G-3
Output Trays ............ ... ... .... ................................... ... ... .... ...... G-5
LN17 and LN17ps Printers User Guide ❖ v
Page 8

kug.toc Page vi Thursday, March 6, 1997 4:42 PM
Raster Resolution ............................................... ................... G-6
Appendix H Environmental Specifications ........................................... H-1
EPA Energy Star .... ................................... .... ... ... ................ H-2
Acoustic Noise Figures ............. ... .... ... ... ............................. H-2
Acoustic Noise Figures for Germany ....... .... ... ... ... ... .... ... ... H-3
FCC Compliance Statement for United States Users ........ H-4
Compliance Statement for Intern ational Users ............... H-5
Operational Safety ............................................................ H-6
Laser Safety .............................................................. .......... H-8
Laser Safety Warning for Finland and Sweden ............ ... H-8
vi ❖ LN17 and LN17ps Printers User Guide
Page 9

kug-ch01 Page 1 Thursday, March 6, 1997 4:44 PM
Chapter 1
LN17 Printer Quick Tour Chapter1
LN17 and LN17ps Printer Models ........................................ 1-3
How Much of This Book Must I Read? ................................ 1-4
Printer Components ............................................................. 1-5
Special Features .................................................................... 1-6
Power Saver ......................................................................... 1-6
High Resolution Printing ....................................................... 1-6
Edge to Edge Printing ........................................................... 1-7
Automatic Tray Switching ..................................................... 1-7
Automatic Language Sensing and Switching ........................ 1-7
State Saving ......................................................................... 1-8
Printer Generated Reports .............................. ... ... ... ... .......... 1-8
Chapter 1: LN17 Printer Quick Tour ❖ 1-1
Page 10

kug-ch01 Page 2 Thursday, March 6, 1997 4:44 PM
LN17 Printer Quick Tour
Optional Features ................................................................. 1-9
PostScript Option ................................................................. 1-9
Duplex Printing .............. .................................... ... ... ... .......... 1-9
Increased Paper Handling ..................................................... 1-9
Collating and Offsetting ..................................................... 1-10
Memory Expansion ............................................... .............. 1-10
Hard Drive ......................... ................................... ... ... .... .... 1-10
Memory Considerations ............. ........................................ 1-11
Maintaining the Printer ........................... ................... ........ 1-13
Cleaning the Printer ............................................................ 1-13
Replacing the EP Cartridge ................................................. 1-13
Recycling the EP Cartridge .................................................. 1-13
Replacing the Fuser Cartridge/Bias Transfer Roll .................. 1-14
Technical Support ............................................................... 1-15
Before Calling for S ervice ...................... .............................. 1-15
Transporting the Printer .................................................... 1-16
1-2 ❖ LN17 and LN17ps Printers User Guide
Page 11

kug-ch01 Page 3 Thursday, March 6, 1997 4:44 PM
LN17 Printer Quick Tour
LN17 and
LN17ps
Printer Models
This book is for use with both the Digital LN17 and LN17ps
High Performance Network Printers. The LN17p s prin ter
contains all the components of the LN17 printer, plus the
following options:
• Adobe PostScript Level 2
• 4 MB additional memory
• DNIC-E’NET (Digital Network Interface Card for
Ethernet)
As this guide serves both printers, the LN17ps printer will
hereafter be referred to as the LN17 print er.
Chapter 1: LN17 Printer Quick Tour ❖ 1-3
Page 12

kug-ch01 Page 4 Thursday, March 6, 1997 4:44 PM
LN17 Printer Quick Tour
How Much of
This Book
Must I Read?
You do not have to read any of this guide to use your LN17
printer. The LN17 printer is ready to go after you set it up
following the instructions in the Setting Up Guide.
Use this guide as a reference for:
• Learning about special printer features [“Special
Features” (page 1-6)]
• Tips on ta king care of the printer [“Maintaining the
Printer” (page 1-13)]
• Paper specifications, loading paper, and duplex printing
(Chapter 2: Paper Handling)
• Instructions on using the Control Panel (Chapter 3: Using
the Control Panel and Appendix D: Control Panel
Options)
• Installing printer drivers (Chapter 4: LN17 Printer Driving
Software)
• Downloading fonts (Chapter 5: Using the Hard Drive/
Downloading Fonts)
• Troubleshooting printing problems if they occur
(Chapter 6: Troubleshooting)
• Ordering printer options (Appendix A: Ordering Printer
Options)
• Replacing consumables (Appendix B: Replacing
Consumables)
• Installing and removing printer options
(Appendix C: Installing and Removing Printer Options)
• Printer specifications (Appendix F: Printer Specificat ions)
1-4 ❖ LN17 and LN17ps Printers User Guide
Page 13
kug-ch01 Page 5 Thursday, March 6, 1997 4:44 PM
LN17 Printer Quick Tour
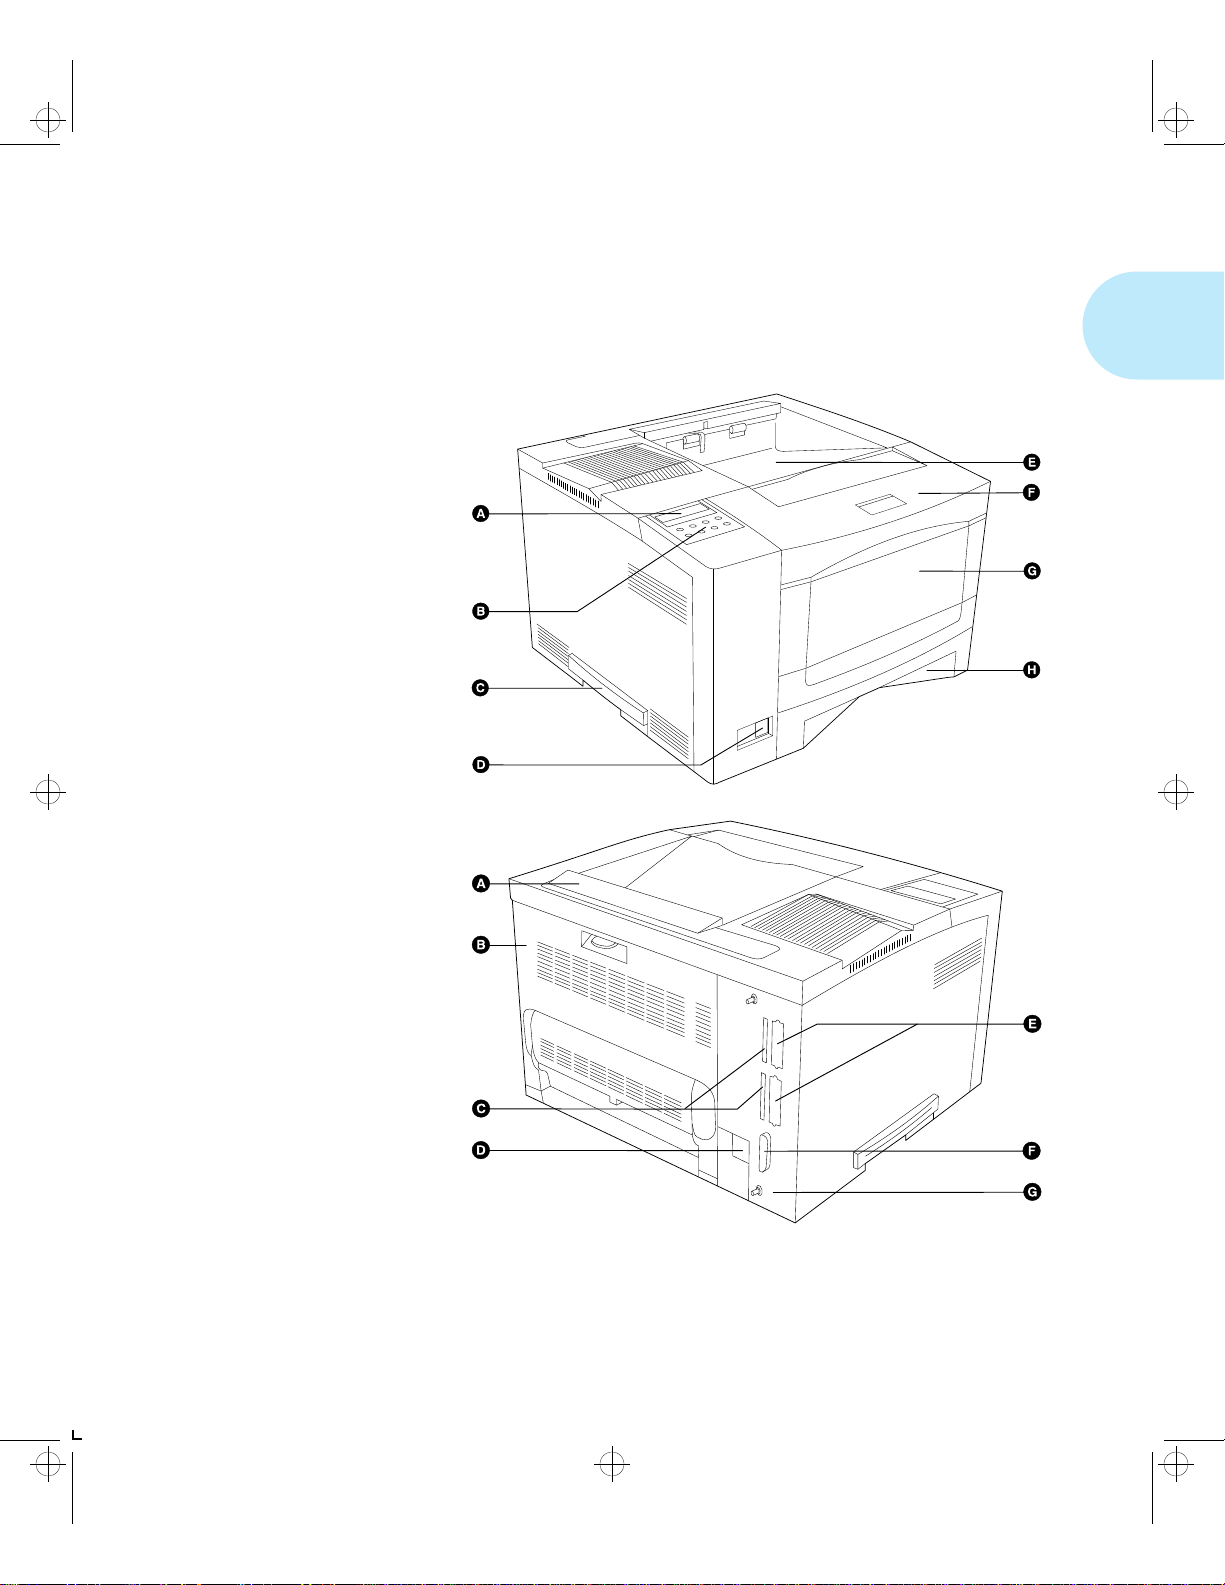
Printer
Components
Front View
A Control Panel Display
B Control Panel Keypad
C Recessed Grip
D Power Switch
E Standard Output Tray
F Front Cover
G Front Tray
(Multi-sheet
Bypass Tray)
H Main Tray
The major printer components are indicated below.
Figure 1.1 Major printer component s
Rear View
A Option Interface Cover
B Rear Cover
C Reserve
D Power Inlet
E Network Ports (Options)
F Parallel Port
G Controller Assembly
Chapter 1: LN17 Printer Quick Tour ❖ 1-5
Page 14

kug-ch01 Page 6 Thursday, March 6, 1997 4:44 PM
LN17 Printer Quick Tour
Special
Features
Power Saver
High Resolution
Printing
Several features have been designed into the LN17 printer to
enhance your printing environment. Using the printer’s
Control Panel menu system, you can tailor printer settings to
match your printing requirements.
See Chapter 3: Using the Control Panel for more information
about the Control Panel and its menu system.
After 60 minutes of inactivity, the printer automatically turns
off internal components to reduce the amount of electricity
used. The printer automatically turns those parts back on
when it receives a print job.
Using the printer’s Control Pane l me nu syst em , you can send
the printer into Power Saver mode after your choice of 15, 30,
60, 90 or 120 minutes of ina ctivity (or Power Saver mo d e ca n
be disabled).
See the section “System Menu” (page 3-24) in
Chapter 3: Using the Control Panel.
The LN17 printer is set to print at 600 x 600 dpi (dots per
inch). You can change this setting to 1200 x 600 dpi to
enhance grayscale image s .
For professional quality printouts, the Print Quality option (in
the PCL Emulat and PostSc ript menus) is set to TrueRes. The
TrueRes setting smooths edges to prod uce a crisper looking
printout.
If you want to print draft-quality jobs, set Print Quality to
Toner Saving. The printer automatically reduces the amount
of toner used (and prints a lower-quality output).
See Chapter 3: Usi ng th e Control Pane l for instructions on
changing Control Panel settings.
1-6 ❖ LN17 and LN17ps Printers User Guide
Page 15

kug-ch01 Page 7 Thursday, March 6, 1997 4:44 PM
Special Features
Edge to Edge
Printing
Automatic Tray
Switching
For those instances when you need to print P CL 5e Emulation
(hereafter referred to as PCL) jobs all the way to the edge of
the page, turn on the Edge to Edge option in the PCL Emulat
Menu. Edge to edge printing is always available for
PostScript jobs and requires no setting. Just format your
document to the edge of the page.
See Chapter 3: U si ng th e Control Panel for instructions on
changing Control Panel settings.
The LN17 printer allows you to set automatic tray switching
for both PCL and PostScript (when PostScript is installed)
jobs. When tray switching is on, and the paper tray runs out of
paper, the printer automatically switches to another paper
tray (if another tray is loaded with the same size paper). That
means you don’t have to load paper as often. You can also
install one or two optional 500-sheet Paper Deck and
Cassettes (lower trays) to extend your printing capacity.
For more information on tray switching, see the section
“Automatic Tray Switching” (page 2-13) in Chapter 2: Paper
Handling.
Automatic
Language Sensing
and Switching
When you have installed the PostScript option, the printer can
process both PCL and PostScript jobs. When the printer’s
Language Sensing option is on, the LN17 printer samples the
incoming data stream to determin e whi ch langua g e th e prin t
job requires. The LN17 printer then switches to the proper
language for that job.
The LN17 printer can have up to three active ports when you
install two optional network interface cards. Turn the
Language Sensing option on for all the ports, and the printer
automatically samples each print job and switches to the
appropriate processing language.
For more information about language sensing and switching,
see Appendix D: Co n tro l Pa ne l Options.
Chapter 1: LN17 Printer Quick Tour ❖ 1-7
Page 16

kug-ch01 Page 8 Thursday, March 6, 1997 4:44 PM
Special Features
State Saving
Printer Generated
Reports
When you are printing both PostScript and PCL jobs, the
printer clears any downloaded fonts, macros, and PostScript
headers when it switches between PostScript and PCL 5e
Emulation. However, you can set the printer’s State Saving
option to On, and the printer will save downloaded fonts,
macros, and PostScript headers when it switches PDLs
(Printer Description Language). This saves you from having
to download fonts, macros, and headers every time the printer
switches between PostScript an d PC L 5e Em ula t io n.
Using the printer’s Control Pane l, yo u can print five sepa rat e
reports.
•The Demo Page provides a sample of the printer’s
capabilities and lists the printer’s key features.
•The Configuration Sheet lists the options you have
installed and the current settings for each option in the
Control Panel’s menu system.
•The PCL Font List shows which PCL fonts are currently
available. The list includes resident fonts and
downloaded fonts.
• When PostScript is installed on the LN17 printer, the
PostScript Font Lis t shows which PostScript fonts are
currently available. The list includes both resident an d
downloaded fonts.
•The Test Print is used by service and repair technicians if
problems occur with the pri nter.
See Appendix D: Control Panel Options for more information
about these reports.
1-8 ❖ LN17 and LN17ps Printers User Guide
Page 17

kug-ch01 Page 9 Thursday, March 6, 1997 4:44 PM
Optional Features
Optional
Features
PostScript Option
Duplex Printing
Several optional features are available to enhance your
printing capabilities.
Tabl e 1. 1 Locating Information on Printer Options
For Information on: Look in:
Installing options Appendix D: Control Panel Options
Using paper handling options Chapter 2: Paper Handling
Associated menu options Chapter 3: Using the Control Panel
Installing the PostScript option adds PostScript Level 2
capability and additional memory to your printer.
See Appendix A: Ordering Printer Options to order the
PostScript SIMM.
The LN17 printer can print two-sided documents when you
install the optional Duplex Module. After installing the
Duplex Module and an LN17 printer driver, printing a
two-sided document is as easy as printing a one-sided job.
Increased Paper
Handling
See Appendix A: Ordering Printer Options to order a Duplex
Module.
An optional 500-sheet lower tray (the 500-sh eet Paper Deck
and Cassette) is available for the LN17 printer. Install two
lower trays and you increase the input capacity for the LN17
printer by 1,000 sheets.
See Appendix A: Ordering Printer Options to order a Lower
Tray.
Chapter 1: LN17 Printer Quick Tour ❖ 1-9
Page 18

kug-ch01 Page 10 Thursday, March 6, 1997 4:44 PM
Optional Features
Collating and
Offsetting
Memory
Expansion
Tw o op tio na l ou tpu t trays a re av ai la bl e fo r t he LN17 printer
that provide a second output destination for your print jobs.
Send your print job to the standard output tray or either
optional output tray.
• The Offset Catch Tray (OCT) sits above the standard
output tray. It increases the output tray capacity for the
printer and offsets jobs from each other.
• The 10-bin Mailbox/Collator si ts atop the standard output
tray. You can use this as a 10-bin privacy-protected
mailbox for multiset collation.
See Chapter 2: Paper Handling for more informat ion about
using the Offset Catch Tray and Mailbox/Collator.
See Appendix A: Ordering Printer Options to order an Offset
Catch Tray or a Mailbox/Collator.
The LN17 base printer has 2 MB resident memory and can be
increased with available 4 MB, 16 MB, and 32 MB SIMMs.
See Appendix A: Ordering Printer Options to order more
printer memory.
Hard Drive
1-10 ❖ LN17 and LN17ps Printers User Guide
A hard drive is also available for the printer. The hard drive
can be used for print spooling, font storage, macro storage,
and state saving.
See Chapter 5: Using the Hard Drive/ Downloading Fonts for
more information about the hard drive.
See Appendix A: Ordering Printer Options to order a hard
drive.
Page 19

kug-ch01 Page 11 Thursday, March 6, 1997 4:44 PM
LN17 Printer Quick Tour
Memory
Considerations
In today’s printing environments, technologies have
advanced greatly. Corresponding memory requirements have
increased too.
• LN17 printing features such as Page Protection and State
Saving, when on, use available printer memory—memory
that is otherwise used for processing jobs.
• Downloading fonts also uses availabl e pri nt er memory.
If you plan to print highly complex jobs or need features like
State Saving and Page Protection, you may need to add
printer memory.
Table 1.2 on pa ge 1-12 lists the memo ry requi red when
printing one-sided jobs at both 60 0 x 60 0 dpi and
1200 x 600 dpi.
Table 1.3 on page 1-12 lists the memory required when
printing two-sided jobs at both 600 x 600 dpi and
1200 x 600 dpi.
Chapter 1: LN17 Printer Quick Tour ❖ 1-11
Page 20

kug-ch01 Page 12 Thursday, March 6, 1997 4:44 PM
Memory Considerations
Ta ble 1.2 Minimum memory requirements for printing one-sided jobs
at 600 x 600 dpi and at 1200 x 600 dpi
Option Settings 600 x 600 dpi 1200 x 600 dpi
Page Protection OFF 2 MB 2 MB
PCL Emulat Page Protection LETTER size 5 MB 9 MB
PCL Emulat Page Protection A4 size 6 MB 10 MB
PCL Emulat Page Protection LEGAL size 6 MB 12 MB
PostScript Page Protection ON, printing Letter size 7 MB 11 MB
PostScript Page Protection ON, printing A4 size 7 MB 12 MB
PostScript Page Protection ON, printing Legal size 8 MB 14 MB
PCL Emulat and PostScript Page Protection and
State Saving Enabled
9 MB 14 MB
Table 1.3 Minimum memory requirements for printing two-sided jobs
at 600 x 600 dpi and at 1200 x 600 dpi
Option Settings 600 x 600 dpi 1200 x 600 dpi
Page Protection OFF 4 MB 4 MB
PCL Emulat Page Protection LETTER size 9 MB 17 MB
PCL Emulat Page Protection A4 size 10 MB 18 MB
PCL Emulat Page Protection LEGAL size 12 MB 22 MB
PostScript Page Protection ON, printing Letter size 11 MB 21 MB
PostScript Page Protection ON, printing A4 size 12 MB 22 MB
PostScript Page Protection ON, printing Legal size 14 MB 28 MB
PCL Emulat and PostScript Page Protection and
State Saving Enabled
14 MB 30 MB
1-12 ❖ LN17 and LN17ps Printers User Guide
Page 21

kug-ch01 Page 13 Thursday, March 6, 1997 4:44 PM
LN17 Printer Quick Tour
Maintaining
the Printer
Cleaning the
Printer
Replacing the
EP Cartridge
Maintaining the printer in good operating condition is
essential to having a reliable, well-ru nnin g mac hi ne.
For optimum performance, do not place the printer near vents
or dust-producing equipment. Particles in the air may enter
the printer and cause failures in internal mechanisms.
For best results, clean the outside of the printer with a damp
cloth. Power the printer off before cleaning. Do not use
detergents.
An EP (electronic printing) cartridge will print approximately
10,000 pages of A4 or 8.5 x 11 paper under average operating
conditions (5% image area coverage). The number of prints
per cartridge will decrease if you routinely:
• Print dense text and graphics.
• Set Print Density (in the System Menu) to a dark setting.
• Exceed five percent area coverage.
Replace the EP cartridge as soon as you see the following
message at the printer’s Control Panel disp la y:
Recycling the
EP Cartridge
Toner Low
See Appendix A: Ordering Printer Options for ordering a new
EP cartridge.
The LN17 printer EP cartridge can be recycled free of charge
to you. Follow the instructions packaged with your new EP
cartridge to recycle the old one.
Chapter 1: LN17 Printer Quick Tour ❖ 1-13
Page 22

kug-ch01 Page 14 Thursday, March 6, 1997 4:44 PM
Maintaining the Printer
Replacing the
Fuser Cartridge/
Bias Transfer Roll
The Fuser Cartridge and Bias Transfer Roll (BTR) have
expected useful lives of 200,000 prints. When this point is
reached, you will see the following message at the printer’s
Control Panel display:
Replace
Fuser Cartridge
Although printing can continue, to ensure optimum print
quality, you should order and replace these parts as soon as
possible. See Appendix A: Ordering Printer Options for
ordering information .
1-14 ❖ LN17 and LN17ps Printers User Guide
Page 23

kug-ch01 Page 15 Thursday, March 6, 1997 4:44 PM
LN17 Printer Quick Tour
Technical
Support
Before Calling
for Service
If you are unable to resolve a printin g prob le m using the
instructions in Chapter 6: Troubleshooting, contact the dealer
from which you bought your printer or contact Dig i ta l.
Before contacting your dealer or Digital, please have the
following information available:
• Printer serial number.
• A Configuration Sheet
• Any error code or message displayed on the Control
Panel
• A description of the problem
• Type of network (if problem is network related)
Chapter 1: LN17 Printer Quick Tour ❖ 1-15
Page 24

kug-ch01 Page 16 Thursday, March 6, 1997 4:44 PM
LN17 Printer Quick Tour
Transporting
the Printer
When transporting the printer more than a short distance, use
the original shipping box and packaging materials. If the
original shipping box or materials are not avail ab le, use a
sturdy packing box and a generous amount of cushioning or
packing materials.
To prepare your printer for transportation, follow the
instructions below.
Power off the printer and disconnect the power cord and all
1
interface cables.
Remove any paper handing options and repack each in its
2
original packaging.
Remove the hard drive (if it is installed), and repack it in its
3
original packaging. See Appendix C: Installing and
Removing Printer Options.
Remove the EP cartridge and pack it in its original
4
packaging.
Pack the printer with the sealed EP cartridge and power cord
5
in the original printer box.
If you need to return the printer for service, follow the
instructions of your service provider for packing and
shipping.
1-16 ❖ LN17 and LN17ps Printers User Guide
Page 25

kug-ch02 Page 1 Thursday, March 6, 1997 4:45 PM
Chapter 2
Paper Handling Chapter2
Selecting Paper ..................................................................... 2-3
Storing Paper ....................................................................... 2-4
Using the Main Tray or Lower Tray .................................... 2-5
Adjusting the Main Tray for Paper Size ................................. 2-7
Adjusting the Lower Tray for Paper Size ............................. ... 2-8
Using the Front Tray ................ ....................... ................... ... 2-9
Loading the Front Tray ...................................................... . 2-11
Automatic Tray Switching ................................................. 2-13
PostScript Tray Switching .................................................... 2-13
PCL Tray Switching (Source Mapping) ...... ........................... 2-14
Default Source Mapping Settings .................................... 2-16
Customizing Source Mapping Settings ............................ 2-16
Example: Main Tray-Front Tray ....................................... . 2-17
Example: Lower Tray-Main Tray ....................................... 2-18
Chapter 2: Paper Handling ❖ 2-1
Page 26

kug-ch02 Page 2 Thursday, March 6, 1997 4:45 PM
Paper Handling
Using the Mailbox/Collator ........... ..................................... 2-19
Printing to the Mailbox/Collator .......................................... 2-20
Password Protecting Jobs ........ ... ... .... ................................. 2-20
Enabling Passwords .............................................. ........... 2-21
Disabling Passwords .................................................... .... 2-23
Opening Bins ...................................................................... 2-25
Opening Password-Enabled Bins ...................................... 2-25
Opening Password-Disabled Bins ..................................... 2-25
Using the Offset Catch Tray (OCT) .................................... 2-26
Using the Envelope Feeder ................................................ 2-27
Loading the Envelope Feeder .............................................. 2-28
Duplex (Two-Sided) Printing ............................................. 2-29
Print Orientation and Control Panel Settings ....................... 2-30
2-2 ❖ LN17 and LN17ps Printers User Guide
Page 27
kug-ch02 Page 3 Thursday, March 6, 1997 4:45 PM
Paper Handling
Selecting
Table 2.1 lists the size paper, envelopes, and other print
media you can use with all LN17 printer input and output
Paper
trays. Using sizes other than those listed below, or paper not
recommended for laser printers, may result in paper jams.
Ta bl e 2.1 Acceptable paper sizes for all LN17 printer paper tra ys
Front Tray
†‡
Paper Size
A4 (210x297 mm) • • •
Letter (8.5x11 in / 216x279 mm) • • •
Folio (Legal 13 in)
(8.5x13 in / 216x330 mm)
Legal (Legal 14 in)
(8.5x14 in / 216x356 mm)
Executive (7.25x10.5 in / 184x267 mm)
Statement (5.5x8.5 in / 140x216 mm) •
ISO B5 (176x250 mm) •
Main Tray
Lower Tray
†
••
••
††
OCT
Standard
Output Tray
•
Mailbox /
Collator
†
Envelope
Feeder
†
Envelope
COM-10 (4.12x9.5 in / 105x241 mm)
Monarch (3.87x7.5 in / 98x191 mm)
DL (4.33x8.66 in / 110x220 mm)
C5 (6.38x9.01 in / 162x229 mm)
C6 (4.49x6.38 in / 114x162 mm)
Transparency
A4 (210x297 mm)
Letter (8.5x11 in / 216x279 mm)
Label
A4 (210x297 mm)
Letter (8.5x11 in / 216x279 mm)
A6 (International Postcard)
(100 x 148 mm)
† Optional paper handler. See Appendix A for ordering information.
‡ Although the OCT will accept all paper sizes listed, it can only offset A4, Letter, Folio, and Legal.
†† Only the main tray accepts Executive.
Chapter 2: Paper Handling ❖ 2-3
•
•
•
•
•
•
•
•
•
•
•
•
•
•
•
Page 28

kug-ch02 Page 4 Thursday, March 6, 1997 4:45 PM
Selecting Paper
Storing Paper
The LN17 printer’s print quality is optimized when paper and
other print media are properly stored. Proper storage ensures
optimum print quality and trouble-free printer options.
• Store the paper on a flat surface, in a relatively low
humidity environment.
• Do not unwrap paper until you are ready to use it, and
rewrap any paper you are not using.
• Do not expose paper to direct sunlight or high humidity.
2-4 ❖ LN17 and LN17ps Printers User Guide
Page 29
kug-ch02 Page 5 Thursday, March 6, 1997 4:45 PM
Paper Handling
Using the
Main Tray or
Lower Tray
Paper and other print media are loaded into the main and
lower trays identically. Refer to Table 2.1 on page 2-3 for
acceptable paper sizes.
2 (
• The main tray holds 250 sheets of 75 g/m
• The optional lower tray holds 500 sheets of 75 g/m
(20lb)paper.
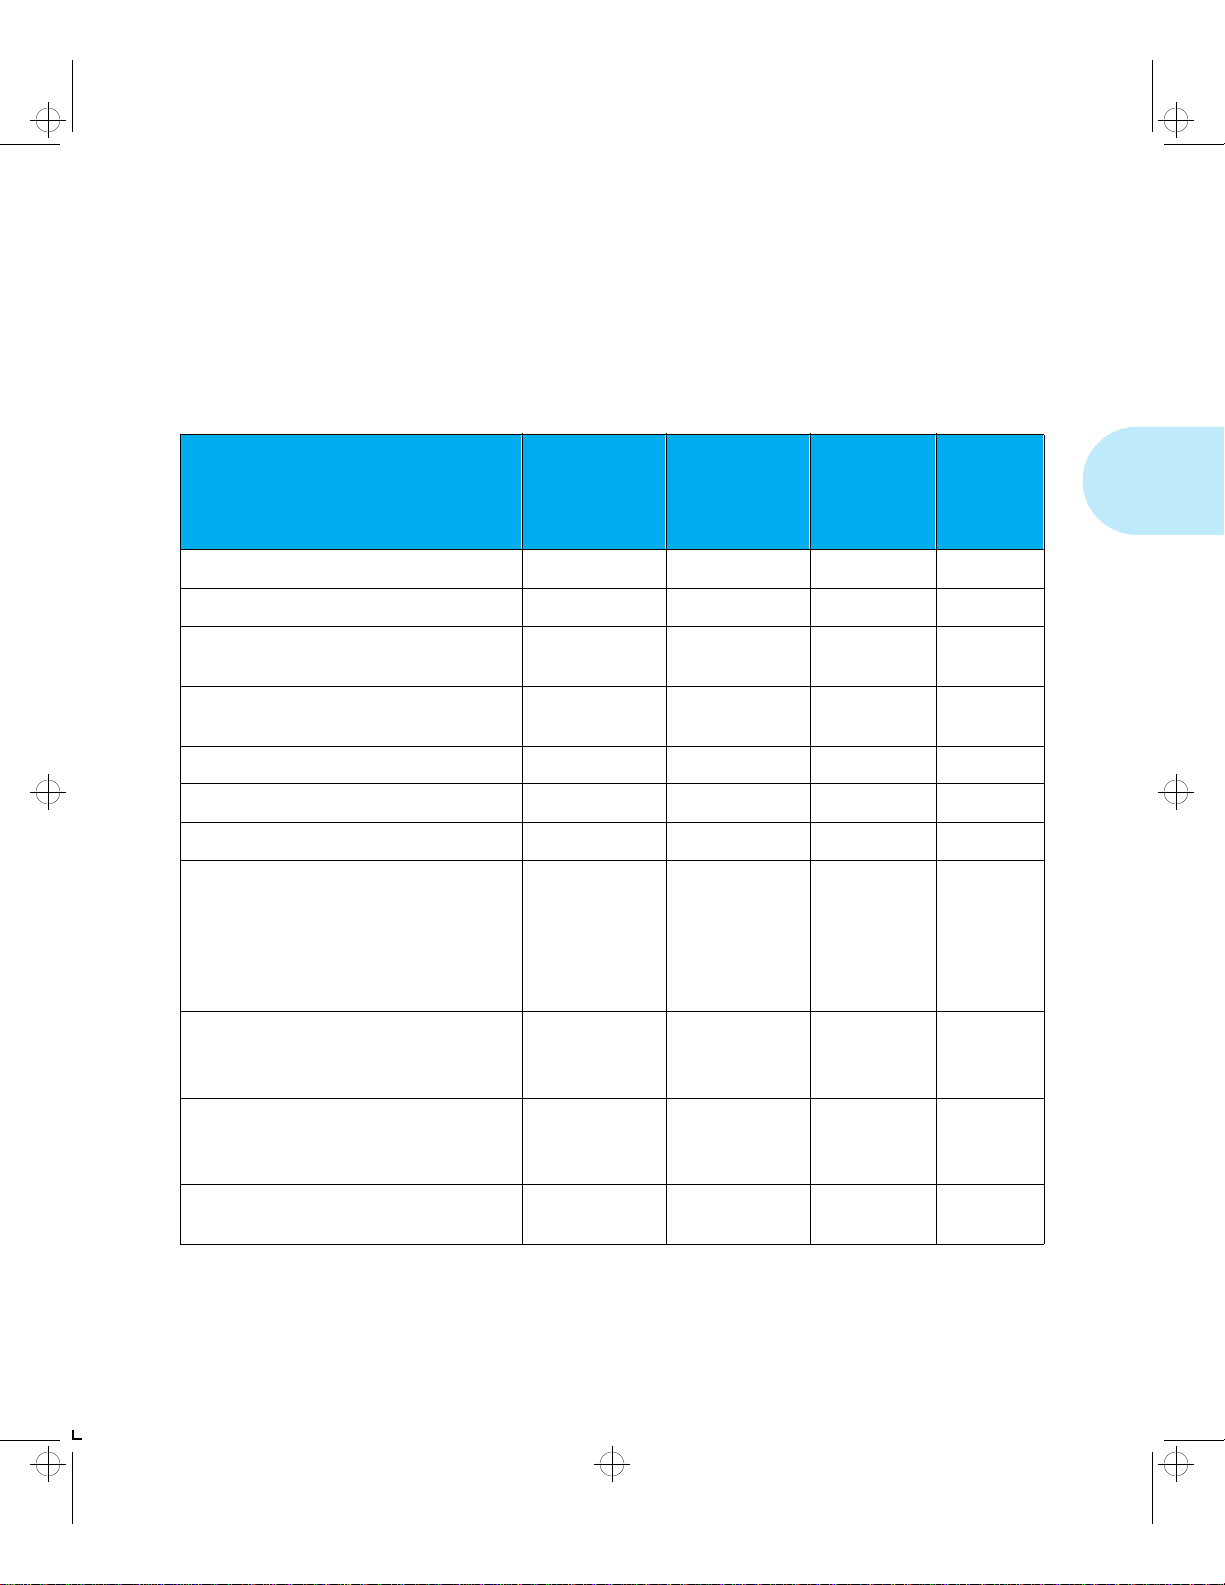
Consult Figure 2.1 for proper orientation of letterhead and
drilled paper.
Figure 2.1 Main/lower tray paper orientation
Letterhead
(Simplex)
20 lb) paper.
2
Letterhead
(Duplex)
Chapter 2: Paper Handling ❖ 2-5
Page 30
kug-ch02 Page 6 Thursday, March 6, 1997 4:45 PM
Using the Main Tray or Lower Tray
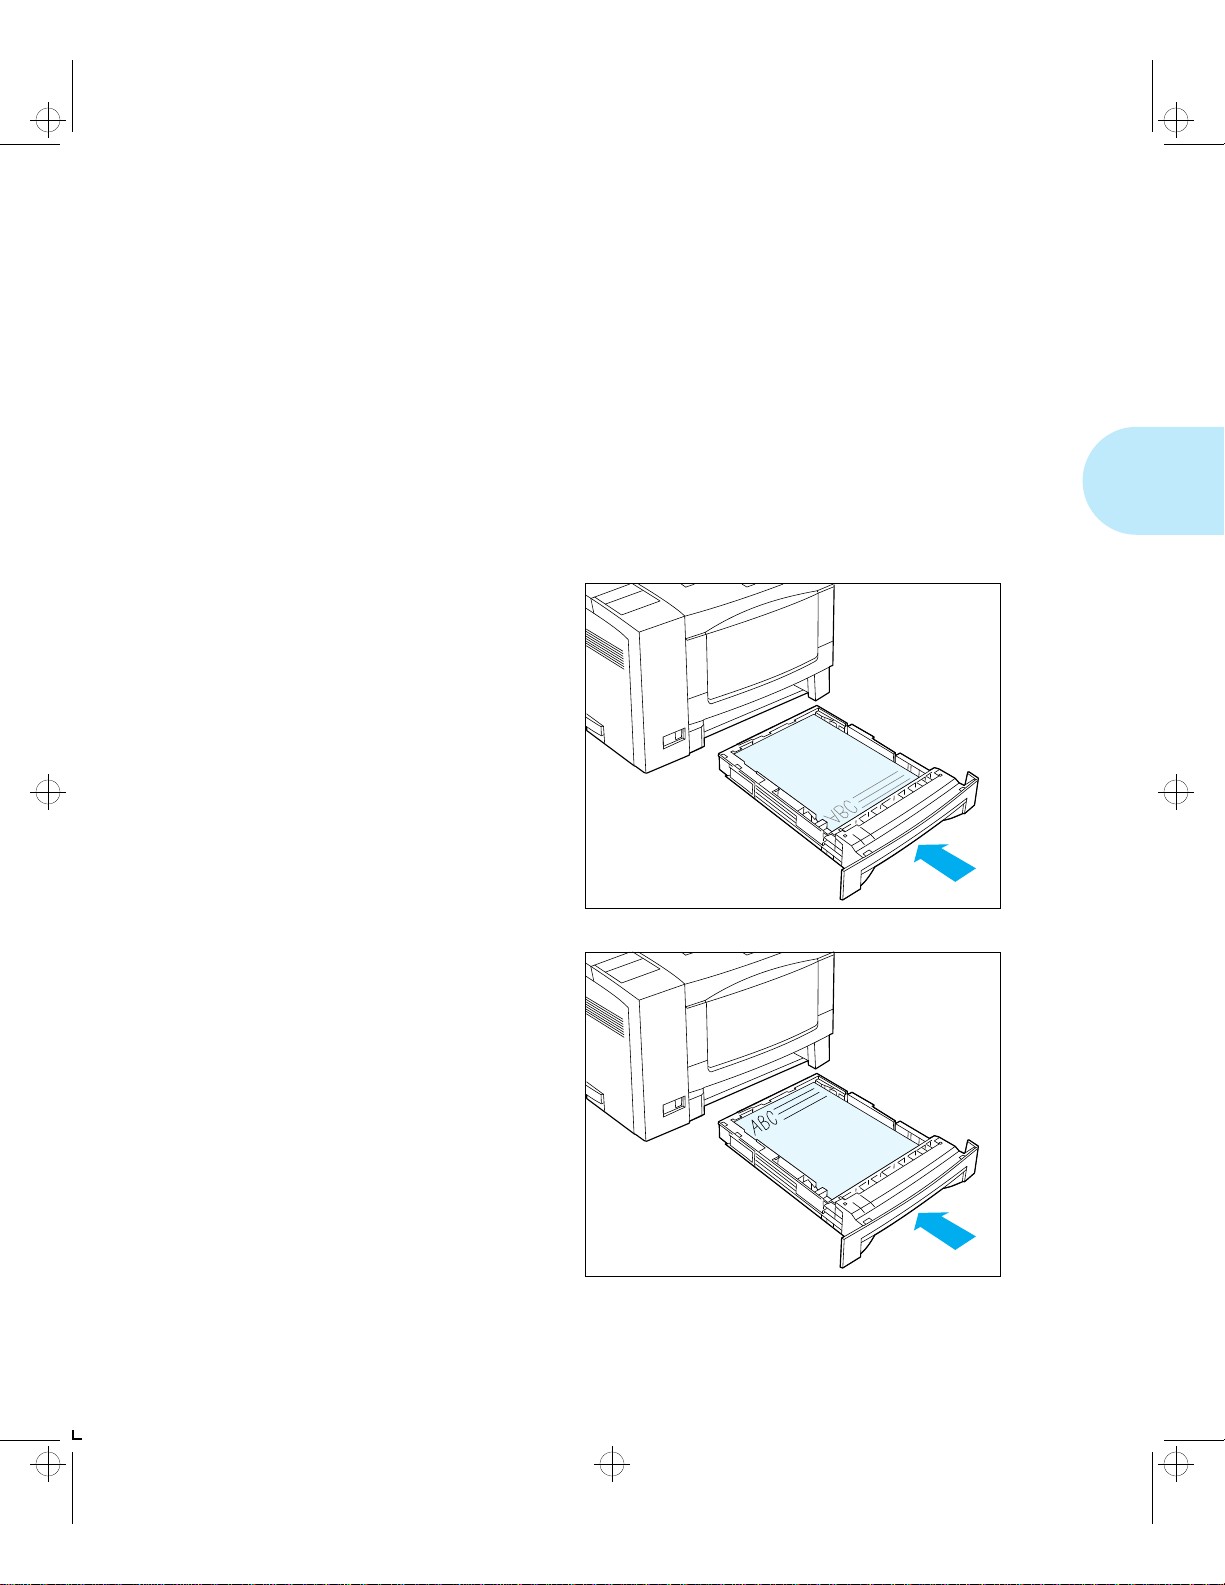
Figure 2.1 Main/lower tray paper orientation (continued)
Drilled Paper
(Simplex or Duplex)
Caution
Do not load the main tray or lower tray during printing.
2-6 ❖ LN17 and LN17ps Printers User Guide
Page 31

kug-ch02 Page 7 Thursday, March 6, 1997 4:45 PM
Adjusting the
Main Tray for
Paper Size
Figure 2.2 Main tray paper adjustment guides
A End guide A
B End guide B
C Width guide
D Size lock button
Using the Main Tray or Lower Tray
End guides (A) and (B) slide to fit the length of the paper.
• When going from smaller to larger, slide end guide (A) first.
• When going from larger to smaller, slide end guide (B) first.
The width guide (C) slides to fit the width of the paper.
The size lock button (D) depresses to release end guide (A).
Chapter 2: Paper Handling ❖ 2-7
Page 32

kug-ch02 Page 8 Thursday, March 6, 1997 4:45 PM
Using the Main Tray or Lower Tray
Adjusting the
Lower Tray for
Paper Size
Figure 2.3 Lower tray paper adjustment guides
A End guide
B Width guide
The end guide (A) slides to fit the length of the paper.
• First lift up one side of the end guide at the rear of the tray.
• Then lift up the other side of the end guide at the rear of the tray.
• Then pull out the tray to lengthen it, or push it in to shorten it.
The width guide (B) slides to fit the width of the paper.
2-8 ❖ LN17 and LN17ps Printers User Guide
Page 33

kug-ch02 Page 9 Thursday, March 6, 1997 4:45 PM
Paper Handling
Using the
Front Tray
Note
Figure 2.4 Front tray paper orientation
The front tray accepts all paper sizes and types listed in
Table 2.1 on page 2-3. The front tray holds:
• 100 sheets of 75 g/m
• 50 sheets of 180 g/m
• 30 transparencies or 25 sheets of label paper
• 10 envelopes
Consult Figure 2.4 for proper orientation of letterhead, drilled
paper, envelopes and postcards in the front tray.
The size of paper loaded in the front tray of the printer should
match the size entered as “Manual Size” in the PostScript or
PCL menu at the front panel.
A paper jam may result if the printer expects longer or shorter
media than is actually loaded. When you load a new size
paper in the front tray, change the “Manual Size” entry in the
PostScript or PCL menu to match this new size.
2
(20 lb) paper
2
card stock
Letterhead (Simplex) Letterhead (Duplex)
Chapter 2: Paper Handling ❖ 2-9
Page 34

kug-ch02 Page 10 Thursday, March 6, 1997 4:45 PM
Using the Front Tray
Figure 2.4 Front tray paper orientation (continued)
Envelopes (PCL Jobs) Envelopes (PostScript Jobs)
Postcards (PCL Jobs)
† Orientation may differ for PostScript jobs.
Test your application.
2-10 ❖ LN17 and LN17ps Printers User Guide
†
Drilled Paper (Simplex or Duplex)
Page 35

kug-ch02 Page 11 Thursday, March 6, 1997 4:45 PM
Loading the
Front Tray
Using the Front Tray
Press the top of the front tray to open it,
1
then pull out the tray extension.
Fan transparencies and label paper
3
before loading in the tray.
Slide the side guide (A) to the far right.
2
Flip open the extension bar (B) if feeding
long paper. Pull out the envelope stopper
(C) if feeding envelopes.
Insert paper along the left side of the tray ,
4
under the plastic maximum fill tab (A).
Chapter 2: Paper Handling ❖ 2-11
Page 36

kug-ch02 Page 12 Thursday, March 6, 1997 4:45 PM
Using the Front Tray
Adjust the side guide to the size of the
5
paper loaded in the front tray.
When feeding envelopes, slide the end of
6
the envelope stopper over the end of the
envelope stack.
The envelope stopper keeps
envelopes from backing out of the
stack while feeding.
Because the front tray does not have a
7
paper size sensor, you must tell the
printer which size paper is loaded. Set
the following options after loading paper
in the front tray:
• For PCL jobs, set the Front Tray Size
option to the size paper loaded in the
front tray.
• For PostScript jobs, set the Manual Size
option to the size paper loaded in the
front tray.
See Chapter 3: Using the C ontrol Panel for
instructions on accessing the PCL Emulat
and PostScript menus.
2-12 ❖ LN17 and LN17ps Printers User Guide
Page 37

kug-ch02 Page 13 Thursday, March 6, 1997 4:45 PM
Paper Handling
Automatic
Tray Switching
PostScript Tray
Switching
Automatic tray switching is available for both PCL emulation
and PostScript jobs. Tray switching is useful for:
• Increasing paper capacity.
When the current paper tray runs out of paper, the printer
automatically switches to the next tray in the sequence,
provided the paper size in the next tray is the same size as
that in the current tray.
• Searching for the correct pap e r size .
If the paper size specified in your soft ware application
does not match the size paper loaded in the current paper
tray, the printer automatically searches the next tray in
the sequence for a paper size that matches.
The Tray Switching option (in the PostScript Menu) can be
set to any of the settings shown in Table 2.2 below.
Table 2.2 Tray switching settings
Tray Switching Setting Description
Off
Main-Front Tray
Standard Tray Switching selections for
PostScript jobs
Lower 1-Main Additional Tray Switching setting that
appears when a 500-sheet Paper Deck
and Cassette is installed
Lower 2-Main
Lower 1-Lower 2
Lwr1-Lwr2-Main
For example, when Tray Switching is off, no tray switching
occurs. When set to Main-Front the printer automatically
switches to the front tray when the main tray beco mes empty
(provided the correct size paper is in both trays).
Chapter 2: Paper Handling ❖ 2-13
Additional Tray Switching settings that
appear when a second 500-sheet Paper
Deck and Cassette is installed
Page 38

kug-ch02 Page 14 Thursday, March 6, 1997 4:45 PM
Automatic Tray Switching
PCL Tray
Switching
(Source Mapping)
Tray switching for PCL em u la t io n jo bs is c on tro lled by the
settings for Source Mapping (in the PCL Emulat Menu). (See
Chapter 3: Using the Control Panel for information on using
the Control Panel.)
• If you are familiar with the concept of source mapping,
skip to “Default Source Mapping Settings” (page 2-16)
and “Customizing Source Mapping Settings” (page 2-16).
• If source mapping is a new concept to you, continue
reading.
When you send a PCL job to the printer, commands in the
data stream tell the printer what logic al pape r source to use
and on what size paper to print. The way in which the printer
interprets the PCL command for paper source and page size
depends on the PCL Emulat Menu settings for Source
Mapping and Paper Size.
If the printer receives no paper tray or paper size information
from your software application, it uses the PCL Emulat Menu
settings for Paper Size and Default Source.
PCL recognizes the six paper sources shown in Table 2.3.
(These PCL paper sources may, or may not, appear in your
software application, or they may appear under alternate
names.)
Ta bl e 2.3 Six PCL paper sources
PCL Paper Source Alternate Names
Upper Main Tray, Paper Tray, Paper Cassette
Manual Front Tray, Manual Feed
Manual Envelope Envelope Manual Feed
Lower Lower Tray
Large Capacity Paper Deck
Envelope Feeder N/A
2-14 ❖ LN17 and LN17ps Printers User Guide
Page 39

kug-ch02 Page 15 Thursday, March 6, 1997 4:45 PM
When you choose, for example, “Main Tray” or “Paper Tray”
as the paper source in your application, the PCL data stream
tells the printer to print using paper from the “Upper” paper
source.
The printer’s Source Mapping option maps the PCL paper
source command to the paper tra ys on the printer. If, for
example, the “Upper” source is mapped to the printer’s main
tray, the printer will feed paper from the main tray whenever
you choose “Upper,” “Main Tray,” or “Paper Cassette” in
your application.
Table 2.4 lists the Source Mapping settings that can be set for
each of the PCL paper sources in Table 2.3.
Tabl e 2. 4 Source Mapping settings
Automatic Tray Switching
Source Mapping
Setting
Main Tray
Front Tray
Main-Front Tray
Lower 1
Lower 1-Main
Lower 2
Lower 2-Main
Lower 1-Lower 2
Lwr1-Lwr2-Main
Description
T ray or tray sequence to be used for each
of the six PCL paper sources
Additional Source Mapping settings that
appear when a 500-sheet Paper Deck
and Cassette is installed
Additional Source Mapping settings that
appear when a second 500-sheet Paper
Deck and Cassette is installed
Chapter 2: Paper Handling ❖ 2-15
Page 40

kug-ch02 Page 16 Thursday, March 6, 1997 4:45 PM
Automatic Tray Switching
Default Source Mapping Settings
Table 2.5 shows the Source Mapping settings in effect with
the base printer, as well as those when one or two Lower
Trays are installed.
Table 2.5 Default Source Mapping settings
Base
PCL Paper Source
Upper Main Tray Main Tray Main Tray Main Tray
Manual Front Tray Front Tray Front Tray Front Tray
Manual Envelope Front Tray Front Tray Front Tray Envelope Feeder
Lower Main Tray Lower 1 Tray Lower 2 Tray Main Tray
Large Capacity Main-Front Lower 1-Main Lwr1-Lwr2-Main Main-Front
Envelope Feeder Front Tray Front Tray Front Tray Envelope Feeder
Configuration
One
Lower Tray
Two
Lower Trays
Envelope
Feeder
Customizing Source Mapping Settings
You may change the Source Mapping settings to best fit your
printing needs. For example, you may want the printer to
automatically feed from the front tray when the main tray
becomes empty. The Source Mapping examples shown next
in this guide can help you customize Source Ma ppin g
settings for your printing environment.
2-16 ❖ LN17 and LN17ps Printers User Guide
Page 41

kug-ch02 Page 17 Thursday, March 6, 1997 4:45 PM
Example: Main Tray-Front Tray
Table 2.6 below shows how to set the Source Mapping
settings so that the printer pulls paper first from the main tray
and then from the front tray.
Regardless of the source you choose from your application,
the printer will always pull paper first from the main tray.
When the main tray is empty, the printer will pull paper from
the front tray.
Table 2.6 Source Mapping settings for tray switching
between the main and front trays
PCL Paper Source Source Mapping Setting
Upper Main-Front Tray
Manual Main-Front Tray
Automatic Tray Switching
†
Manual Envelope Main-Front Tray
Lower Main-Front Tray
Large Capacity Main-Front Tray
Envelope Feeder Main-Front Tray
† Set this to Front if you want to print special paper through the front tray.
Chapter 2: Paper Handling ❖ 2-17
Page 42

kug-ch02 Page 18 Thursday, March 6, 1997 4:45 PM
Automatic Tray Switching
Example: Lower Tray-Main Tray
Suppose you have a lower tray installed and you want to
maximize the paper supply . But you also want to print special
paper, such as envelopes or labels, through the front tray.
Table 2.7 bel ow illustrates how to set the Source Mapping
settings so that the printer switches between the lower and
main trays as one tray becomes empty, yet leaves the front
tray available.
Table 2.7 Source Mapping settings for tray switching
between the lower and main trays
PCL Paper Source Source Mapping Setting
Upper Lower 1-Main
Manual Front Tray
Manual Envelope Front Tray
Lower Lower 1-Main
Large Capacity Lower 1-Main
Envelope Feeder Front Tray
When using the settings in T able 2.7, choose Upper, Lower , or
Large Capacity (or an equivalent paper source, as shown in
Table 2.3 on page 2-14) to engage tray switching. To print a
job on special paper, choose Manual, Manual Envelope, or
Envelope Feeder as the paper source in your application.
2-18 ❖ LN17 and LN17ps Printers User Guide
Page 43

kug-ch02 Page 19 Thursday, March 6, 1997 4:45 PM
Paper Handling
Using the
Mailbox/
Collator
A Bin Unlock button
B Open bin indicators
C Power switch
The Mailbox/Collator (Figure 2.5) is an optional output
device available for the LN17 printer. It accepts only A4 and
Letter paper sizes.
(See Appendix A for ordering information; Appendix B for
installation instructions.)
Figure 2.5 Mailbox/Collator (front view)
The Mailbox/Collator offers the following capabilities:
• Printing multiple collated sets (2 to 10 sets) of a job. See
“Printing to the Mailbox/Collator” (page 2-20).
• Directing output to a specific mailbox bin. See “Printing
to the Mailbox/Collator” (page 2-20).
• Printing secure jobs. See “Password Protecting Jobs”
(page 2-20).
With the Mailbox/Collator installed, the standard output tray
still functions normally. The Mailbox/Collator gives you
approximately 50 sheets per bin of letter/A4, 20 lb (75 g/m
weight paper for a maximum output of 500 sheets. The
standard output tray adds another 250 sheets.
Chapter 2: Paper Handling ❖ 2-19
2
)
Page 44

kug-ch02 Page 20 Thursday, March 6, 1997 4:45 PM
Using the Mailbox/Collator
Printing to the
Mailbox/Collator
Password
Protecting Jobs
Using an LN17 printer driver, select a specific “Bin” or
“Collator” as the paper output destination for your job, then
print your job.
• Bins are numbered from 1 - 10 (top to bottom).
2
• Each bin can hold up to 50 sheets of 20 lb (75 g/m
When a bin becomes full:
— the remainder of the print job is diverted to the top
output tray when the Bin Full option (in the Mailbox
Menu) is set to Send to Standard.
— printing stops when the Bin Full option is set to Stop
Printing. Once you remove the output, the printer
resumes printing.
Using the LN17 Control Panel, you can set a different
password for each mailbox bin and one password for the
collator mode. A job sent to a password-enabled bin can only
be removed by the individual with the bin password; a job sent
to the collator can only be removed from the password-enabled
collator mode by the individual with the collator password.
) paper .
Digital recommends that you use the Mailbox/Collator
exclusively in either collator mode or bin mode, not both, if
you plan to set passwords. The only way to control the mode
in which it is used is through the use of passwords. If
passwords are enabled for bins but disabled for collator, jobs
sent to password-enabled bi n s ca n b e rem ov e d b y an y on e
who chooses “collator” as the output tray (because no
password is needed). For this reason, Digital recommends
you either enable or disable passwords for both bins and
collator mode.
• If you plan to use passwords for bins, also set a password
for collator mode. Distribute individual bin passwords to
the appropriate users. Do not distribute the password for
collator mode.
• If you plan to use a password for collated job s, also set
passwords for each bin. Distribute the collator password
2-20 ❖ LN17 and LN17ps Printers User Guide
Page 45

kug-ch02 Page 21 Thursday, March 6, 1997 4:45 PM
to the appropriate users. Do not distribute individual bin
passwords.
See “Enabling Passwords” (below) and “Disabling
Passwords” (page 2-23) for instructions.
Enabling Passwords
Follow the instructions below to set passwords.
Power ON the printer.
1
The printer will complete its self-test and display the
following message at the Control Panel Display:
Online
Ready
Press Online , then Menu and you will see:
2
Main Menu
Language
Using the Mailbox/Collator
Press Down until you see:
3
Main Menu
Mailbox Menu
Press Enter and the display changes to:
4
Mailbox Menu
Collator
To set a collator password, continue to Step 5.
To set a bin password, skip to Step 6.
Press Enter and the display changes to:
5
Collator
Enable Password
Skip to Step 9.
Press Down until you see:
6
Mailbox Menu
Mailbox
Chapter 2: Paper Handling ❖ 2-21
Page 46

kug-ch02 Page 22 Thursday, March 6, 1997 4:45 PM
Using the Mailbox/Collator
Press Enter and the display changes to:
7
Mailbox
Bin 1
Press Down or Up to select the appropriate bin. Then
8
press Enter .
The display changes to:
Bin
Enable Password
Press Enter again and the display changes to:
9
Enter Password
>> XXXX
Enter the existing password using th e numb ered keys on the
10
Control Panel.
N
The initial passwords for each bin after installing the Mailbox /
Collator for the first time are:
Collator: 0000
Bin 1: 0001 Bin 6: 0006
Bin 2: 0002 Bin 7: 0007
Bin 3: 0003 Bin 8: 0071
Bin 4: 0004 Bin 9: 0072
Bin 5: 0005 Bin 10: 0010
After entering the correct password, the display changes to:
New Password
>> XXXX
To enable the existing password, enter it again. T o set a new
11
password, enter a new password, then press Enter .
The password is now enabled.
Press Online to bring the printer back online.
12
The Mailbox/Collator is now set up for use. The display
should read:
Online
Ready
2-22 ❖ LN17 and LN17ps Printers User Guide
Page 47

kug-ch02 Page 23 Thursday, March 6, 1997 4:45 PM
Disabling Passwords
Follow the instructions below to disa ble passwords.
Power ON the printer.
1
The printer will complete its self-test and display the
following message at the Control Panel Display:
Online
Ready
Press Online , then Menu and you will see:
2
Main Menu
Language
Press Down until you see:
3
Main Menu
Mailbox Menu
Using the Mailbox/Collator
Press Enter and the display changes to:
4
Mailbox Menu
Collator
To disable a collator password, continue to Step 5 on page
2-23.
To disable a bin password, skip to Step 7 on page 2-23.
Press Enter and the display changes to:
5
Collator
Enable Password
Press Down until you see:
6
Collator
Disable Password
Skip to Step 11.
Press Down until you see:
7
Mailbox Menu
Mailbox
Chapter 2: Paper Handling ❖ 2-23
Page 48

kug-ch02 Page 24 Thursday, March 6, 1997 4:45 PM
Using the Mailbox/Collator
Press Enter and the display changes to:
8
Mailbox
Bin 1
Press Down or Up to select the appropriate bin. Then
9
press Enter .
The display changes to:
Bin
Enable Password
Press Down until you see:
10
Bin
Disable Password
Press Enter again and the display changes to:
11
Enter Password
>> XXXX
N
N
Enter the existing password using th e numb ered keys on the
12
Control Panel.
The initial passwords for each bin after installing the Mailbox /
Collator for the first time are:
Collator: 0000
Bin 1: 0001 Bin 6: 0006
Bin 2: 0002 Bin 7: 0007
Bin 3: 0003 Bin 8: 0071
Bin 4: 0004 Bin 9: 0072
Bin 5: 0005 Bin 10: 0010
Press Online to bring the printer back online.
13
The Mailbox/Collator is now set up for use. The display
should read:
Online
Ready
2-24 ❖ LN17 and LN17ps Printers User Guide
Page 49

kug-ch02 Page 25 Thursday, March 6, 1997 4:45 PM
Using the Mailbox/Collator
Opening Bins
Follow the appropriate instructions for opening eithe r a
password-enabled or password-disab l ed bin.
Opening Password-Enabled Bins
To open a bin (or the collator) for which a password has been
enabled:
1. Push the Bin Unlock button.
You are prompted to enter your password at the Control
Panel.
2. Using the numbered Control Panel keys, enter your
password.
If you enter an invalid password, the printer returns to its
ready state, and you must start the unlocking process
again.
A light appears to indicate each unlocked bin. Open all
unlocked bins, then remove the output. You have
approximately 30 seconds to open the bin(s). If the
Mailbox/Collator re-locks, push the Bin Unlock button
again immediately.
Opening Password-Disabled Bins
Push the Bin Unlock button and a light appears to indicate
each unlocked bin. Open all full bins, then remove the
printouts.You have approximately 30 seconds to open the
bin(s). If the Mailbox/Collator re-locks, push the Bin Unlock
button again immediately.
Chapter 2: Paper Handling ❖ 2-25
Page 50

kug-ch02 Page 26 Thursday, March 6, 1997 4:45 PM
Paper Handling
Using the
Offset Catch
Tray (OCT)
The Offset Catch Tray (Figure 2.6)—hereafter referred to as
OCT—is an optional output device available for the LN17
printer. (See Appendix A for ordering information and
Appendix B for installation instructions.)
Figure 2.6 Offset Catch Tray (front view)
After installing the OCT, submit your print jobs as usu al.
You can set the OCT to operate in three different manners:
• Set the Output Bin option (in both the PCL Emulat and
PostScript menus) to OCT No Offset, and the OCT will not
offset jobs.
• Set the Output Bin option to OCT On Job, and the OCT
will offset jobs from one another.
• Set the Output Bin option to OCT On Job/Copy, and the
OCT will offset jobs from one another. It will also offset
each set of copies of individual pages of an uncollated
multiple copy job.
With the OCT installed, the standard output tray still
functions normally. The OCT gives you approximately
500 sheets of letter/A4 20 lb (75 g/m
output. The standard output tray adds another 250 sheets.
2-26 ❖ LN17 and LN17ps Printers User Guide
2
) maximum collated
Page 51

kug-ch02 Page 27 Thursday, March 6, 1997 4:45 PM
Paper Handling
Using the
Envelope
Feeder
The Envelope Feeder (Figure 2.7) is an optional paper
handling device available for the LN17 printer.
(See Appendix A for ordering information and Appendix B for
installation instructions.)
Figure 2.7 Envelope Feeder (front view)
The Envelope Feeder supports all envelo pe size s listed in
Table 2.1 on page 2-3.
Chapter 2: Paper Handling ❖ 2-27
Page 52

kug-ch02 Page 28 Thursday, March 6, 1997 4:45 PM
Using the Envelope Feeder
Loading the
Envelope Feeder
Lift the envelope holder and stack the
1
envelopes in the feeder.
Refer to Figure 2.4 on page 2-9 for the
proper orientation.
Digital
Lower the envelope holder to hold the
2
envelopes firmly in place.
Digital
2-28 ❖ LN17 and LN17ps Printers User Guide
Page 53

kug-ch02 Page 29 Thursday, March 6, 1997 4:45 PM
Paper Handling
Duplex
(Two-Sided)
Printing
Note
Once the optional Duplex Module is installed, you can print
two-sided (duplex) jobs. (See Appendix A: Ordering Printer
Options for ordering information and Appendix C: Installing
and Removing Printer Options for installation instructions.)
At least 6 MB of printer memory is recommended (but not
required) for duplex printing. See Appendix A for ordering
additional memory.
Use only the size paper listed in Table 2.8 for two-sided jobs.
Do not use envelopes, postcards, transparencies, or label
paper for duplex jobs.
Table 2.8 Paper sizes that can be used with the
Duplex Module
Paper Size Weight
A4
(210x297 mm)
Letter
(8.5x11 in / 216x279 mm)
Folio (Legal 13 in)
(8.5x13 in / 216x330 mm)
Legal (Legal 14 in)
(8.5x14 in / 216x356 mm)
Refer to Figures 2.1 (page 2-5) and 2.4 (page 2-9) for the
proper orientation of letterhead when printing duplex.
Chapter 2: Paper Handling ❖ 2-29
20 lb (75 g/m2) to 24 lb (90 g/m2)
20 lb (75 g/m
20 lb (75 g/m
20 lb (75 g/m2) to 24 lb (90 g/m2)
2
) to 24 lb (90 g/m2)
2
) to 24 lb (90 g/m2)
Page 54

kug-ch02 Page 30 Thursday, March 6, 1997 4:45 PM
Duplex (Two-Sided) Printing
Print Orientation
and Control Panel
Settings
Figure 2.8 Duplex binding orientation and Control Panel menu settings
To ensure that duplex jobs print in the proper orientation, set
the Duplex option (in the Control Panel’s PCL Emulat and
PostScript menus) to the appropriate settings (see Figure 2.8).
The LN17 printer driver setting should be as follows (identical
for PCL and PostScript):
Duplex = Short Edge, or
Duplex = Long Edge
PCL Emulat Menu: set Duplex to Long Edge Bind
PostScript Menu: set Duplex to Regular
PCL Emulat Menu: set Duplex to Long Edge Bind
PostScript Menu: set Duplex to Tumble
2-30 ❖ LN17 and LN17ps Printers User Guide
PCL Emulat Menu: set Duplex to Short Edge Bind
PostScript Menu: set Duplex to Tumble
PCL Emulat Menu: set Duplex to Short Edge Bind
PostScript Menu: set Duplex to Regular
Page 55

kug-ch03 Page 1 Thursday, March 6, 1997 4:43 PM
Chapter 3
Using the Control Panel Chapter3
Control Panel Features ......................................................... 3-2
The Display ........................................................................... 3-2
The Keys .............................................................................. 3-3
Navigating the Menu System .............................................. 3-6
Menu Indicators ...................................... ... .......................... 3-8
Setting a Menu Option ......................... ................................ 3-9
Main Menu ......................... ............................................. .... 3-11
Language Menu ................................................. ................. 3-12
Mailbox Menu .................... ...................... ....................... .... 3-13
PCL Emulat Menu ........... .................... ................... .............. 3-14
PostScript Menu ................................. ...................... ........... 3-17
Interface Menu ................................................................... 3-20
LocalTalk Menu Optio ns .... ... ... ... .................................... ... . 3-23
Ethernet Menu Options ...................................................... 3-23
System Menu ...................................................................... 3-24
Test Menu ........................................................................... 3-25
Reset Menu ......................................................................... 3-26
Chapter 3: Using the Control Panel ❖ 3-1
Page 56

kug-ch03 Page 2 Thursday, March 6, 1997 4:43 PM
Using the Control Panel
Control Panel
Features
A 2-line by 16-character display
B Indicator lights
C Control key s (8)
The LN17 printer Control Panel (Figure 3.1) serves two
purposes:
1. It displays information about the status of the printer (or
the job in process) and
2. It provides the means for changing printer settings to
control how the LN17 printer operates.
Figure 3.1 LN17 Printer Control Panel
The Display
3-2 ❖ LN17 and LN17ps Printers User Guide
The Control Panel’s display performs two functions.
• It informs you of printer status conditions, such as when
toner is low, when a paper tray is empty, when a job is in
process, and so on.
For example, when you turn on the printer, you see the
following message on the display:
Online
Ready
This message appears whenever the printer is online and
ready to accept print jobs.
Page 57

kug-ch03 Page 3 Thursday, March 6, 1997 4:43 PM
• It presents a hierarchy of menu options and settings to
configure and control the printer.
Control Panel Features
The Keys
For example, when you press Menu
printer offline, you see the following message on the
display:
Main Menu
Language >
Note that the > in this example is one of three indicators
you will see in the menu systems. See “Menu Indicators”
(page 3-8) for more information on indicators .
See “Navigating the Menu System” (page 3-6) for
information on the menu system hierarchy.
The Control Panel keypad consists of eight keys, identified
with international symbols and labeled in English.
The keys are also numbered 0 - 7. When you install the
optional Mailbox / Collator, these same eight keys are used to
enter numeric passwords for each of the mailbox bins.
Table 3.1 on page 3-4 describes the function of each key.
after taking the
Chapter 3: Using the Control Panel ❖ 3-3
Page 58

kug-ch03 Page 4 Thursday, March 6, 1997 4:43 PM
Control Panel Features
Table 3.1 Control Panel keys and their functions
Key Description
Online
Reset
Form Feed
Menu
Toggles between online and offline.
When online, the printer is able to receive and print pages. When offline, page processing
and printing halts, but the printer is still able to respond to status requests.
You must take the printer offline to:
• Access the menu system with Menu or Reset ..
• Perform tasks such as forcing a form feed for a partially printed page.
The printer goes offline automatically when it has a fault condition such as a paper jam or
an open cover. Use Online to put the printer back online after correcting such
conditions.
Displays the Reset Menu and the first reset function: Reset Printer.
Press Up or Down repeatedly to scroll through the other Reset Menu functions.
See “Reset Menu” (page 3-26).
The printer must be offline for Reset to function.
Prints a partial page of a PCL emulation job, if one exists in the printer.
The printer must be offline for Form Feed to function.
Displays the Main Menu and its first submenu: Language.
The printer must be offline for Menu to function.
From any submenu, press Menu to go to the top of the Main Menu. See “Main Menu”
(page 3-11) for a full description.
Esc
3-4 ❖ LN17 and LN17ps Printers User Guide
In the menu system, exits the current menu level and returns to the previous one.
Press Esc at any time in the menu system to go to the previous level. No changes to
values will be saved unless you first press Enter .
Press Esc while at Reset Menu (or the top level of Main Menu) to exit either menu.
Table 3.1 Page 1 of 2
Page 59

kug-ch03 Page 5 Thursday, March 6, 1997 4:43 PM
Table 3.1 Control Panel keys and their functions (continued)
Key Description
Control Panel Features
Enter
Up
Down
When in the menu system, accesses, sets, or invokes the displayed submenu, value, or
function.
• When a submenu is displayed, press Enter to access the submenu.
• When a printer setting is displayed, such as Copies, press Enter to set the current
value as the default value.
• In PCL emulation, press Enter to override a paper mismatch.
• When a printer action is displayed, such as any of the “Test Menu” (page 3-25) or
“Reset Menu” (page 3-26) functions, press Enter to invoke the action.
When not in the menu system, acts as a Continue key.
• After certain error conditions when Auto Continue is Off, press Enter to continue
the printing process. See Appendix D: Control Panel Options, for more information.
In the menu system, scrolls backward (up) through submenus or through the current list of
values or functions.
For numeric values such as number of Copies, press Up to increase the number.
Scrolling wraps—if the first item in a list is displayed, press Up
the list.
Press Up for more than two seconds to scroll continuously.
When the hard disk option has been installed, press Up to respond to a disk failure err or
message. Pressing Up will reformat the hard disk. See Chapter 6: Troubleshooting for
more information on hard disk failure error messages.
In the menu system, scrolls forward (down) through the submenus or through the current
list of values or actions.
For numeric values such as number of Copies, press Down to decrease the number.
Scrolling wraps—if the last item in a list is displayed, press Down to display the first
item in the list.
Press Down for more than two seconds to scroll continuously.
When the hard disk option has been installed, press Down to respond to a disk failure
error message. Hard disk usage will be aborted when Down is pressed. See
Chapter 6: Troubleshooting for more information on hard disk failure error messages.
to display the last item in
Table 3.1 Page 2 of 2
Chapter 3: Using the Control Panel ❖ 3-5
Page 60

kug-ch03 Page 6 Thursday, March 6, 1997 4:43 PM
Using the Control Panel
Navigating the
Menu System
The LN17 printer Control Panel contains two menu
structures.
• Main Menu and its submenus:
—Language
— Mailbox Menu
(This menu appears only when the Mailbox / Collator
option is installed.)
— PCL Emulat Menu
— PostScript Menu
(This menu appears only when the PostScript option is
installed.)
— Interface Menu
— Syst em Menu
— Test Menu
Press Online then Menu
Each of the submenus may have other submenus,
settings, or functions. See “Main Menu” (page 3-11) for
more information.
to access the Main Menu.
3-6 ❖ LN17 and LN17ps Printers User Guide
Page 61

kug-ch03 Page 7 Thursday, March 6, 1997 4:43 PM
• Reset Menu and its functions:
— Reset Printer
— Reset Menus
— Reset Ethernet
(This function appears only when the optional
Ethernet card is installed.)
— Reset LocalTalk
(This function appears only when the optional
LocalTalk card is installed.)
— Reset All
— Cancel PS Job
(This function appears only when the PostScript option
is installed and a PostScript job is sent.)
Navigating the Menu System
Press Online then Reset
See “Reset Menu” (page 3-26).
to access the Reset Menu.
Chapter 3: Using the Control Panel ❖ 3-7
Page 62

kug-ch03 Page 8 Thursday, March 6, 1997 4:43 PM
Navigating the Menu System
Menu Indicators
Three menu indicators (>, = and *) are used to furnish
information about menus and settings. The purpose of
each indicator is described in Table 3.2 below .
Table 3.2 Indicators found in the Control Panel menu systems
Indicator Purpose Example
>
=
*
Indicates another menu level below this one.
The example at the right tells you that there is
another level below the Language option in the Main
Menu. Press Enter to move to the next level.
This indicator only appears after options which take a
specific setting—it indicates that a value or setting
follows the option.
The example at the right tells you that Language is an
option that takes a specific setting. One setting for
the Language option is Français. Another setting is
English. (The list of available settings is displayed one
at a time on the bottom line of the display as you
press Up or Down .)
This indicator identifies the current option setting.
The example at the right tells you that Language is
currently set to English.
Main Menu
Language >
Language =
Français
Language =
English *
3-8 ❖ LN17 and LN17ps Printers User Guide
Page 63

kug-ch03 Page 9 Thursday, March 6, 1997 4:43 PM
Navigating the Menu System
Setting a
Menu Option
To set an option, or to invoke a function, follow the steps
below:
Press Online to take the printer offline.
1
You will see:
Offline _/_
Press a key...
Press Menu to access the Main Menu or press Reset
2
to access the Reset Menu.
Press Down or Up to scroll through the list of
3
submenus, options, or function s.
When you see the submenu, option, or function you want,
4
press Enter .
If you selected a submenu or option you did not want, press
Esc to return to the previous level. Then make the
selection you want and press Enter to accept it.
If necessary , repeat Step 3 and Step 4 to go through submenu
5
levels to reach all desired options or functions.
If many possibilities exist, such as 1 through 99 for number of
Copies, you can scroll quickly by holding down the key.
After pressing Enter to accept a setting, you will briefly
see on the top line of the display:
* saved *
This indicates the value has been saved as the current setting.
Chapter 3: Using the Control Panel ❖ 3-9
Page 64

kug-ch03 Page 10 Thursday, March 6, 1997 4:43 PM
Navigating the Menu System
You may either continue to work in the menu system by
6
repeating the steps above, or exit and return to normal
operation by pressing Online .
If you press Online before Enter the value will
not be saved.
Other ways to exit a menu option or exit the menu system
completely are as follows:
• In the Main Menu, press Menu to return to the top of
the Main Menu.
•Press Esc from the Main Menu or Reset Menu to exit
the menu system and display the following message:
Offline _/_
Press a key. . .
3-10 ❖ LN17 and LN17ps Printers User Guide
Page 65

kug-ch03 Page 11 Thursday, March 6, 1997 4:43 PM
Using the Control Panel
Main Menu
Note
The Main Menu is a cascading system of submenus, each
containing other submenus or options designed to configure
the printer for your environment. The Main Men u hierarc hy
is depicted in Figure 3.2.
In this chapter, a boldfaced menu item means it is a factory
setting. A menu item followed by an asterisk (*) means a reset
will default to this value.
On the Control Panel, the curren t set ti ng for each option
always appears first and is followed by an asterisk (*). The
other possible settings are located by pressing Up
or
Down to scroll through the list.
See “Reset Menu” (page 3-26) for information on how to
revert to factory settings.
Figure 3.2 Main Menu hierarchy
Language Menu
Menu
Deutsch
English
Español
Français
Italiano
Português (BRA)
Mailbox Menu
PCL Emulat Menu
PostScript Menu
Interface Menu
System Menu
Test Menu
†
Appears only when the option is installed.
†
†
See Figure 3.3 on page 3-13
See Figure 3.4 on page 3-15
See Figure 3.5 on page 3-19
See Figure 3.6 on page 3-21
See Figure 3.7 on page 3-24
See Figure 3.8 on page 3-25
Chapter 3: Using the Control Panel ❖ 3-11
Page 66

kug-ch03 Page 12 Thursday, March 6, 1997 4:43 PM
Using the Control Panel
Language
Menu
Note
The setting for Language Menu determines which language
is used to display messages on the Control Panel and to print
text on the Configuration Sheet and PCL Font List.
Table 3.3 shows the Language Menu options and their
English equivalent. See “Setting a Menu Option” (page 3-9)
for the steps to find and change the language setting.
The setting for Language Menu does not revert to the factory
setting when you initiate a Reset Menu option.
Table 3.3 Language Menu options
Option English Equivalent
Deutsch German
English International English
Español Spanish
Français French
Italiano Italian
Português (BRA) Brazilian Portuguese
3-12 ❖ LN17 and LN17ps Printers User Guide
Page 67

kug-ch03 Page 13 Thursday, March 6, 1997 4:43 PM
Using the Control Panel
Mailbox Menu
Mailbox Menu options allow you to enable and disable
passwords for individual mailbox bins and for the collator.
The Mailbox Menu hierarchy is depicted in Figure 3.3.
(Menu options are described in Appendix D: Control Panel
Options, where they are listed in alphabetical order.)
Figure 3.3 Mailbox Menu hierarchy showing factory setting
Enter Password
>> xxxx
Enter Password
>> xxxx
Enable Password
Disable Passwrd
Menu
Language
Mailbox Menu
PCL Emulat Menu
PostScript Menu
Interface Menu
System Menu
Test Menu
†
Enable Password
Collator
Mailbox
†
Disable Passwrd
Bin 1
Bin 2
Bin 3
Bin 4
Bin 5
Bin 6
Bin 7
Bin 8
Bin 9
Bin 10
New Password
>> xxxx
New Password
>> xxxx
Enter Password
>> xxxx
Enter Password
>> xxxx
Bin Full
†
Appears only when the option is installed.
Stop Printing*
Send to Standrd
Chapter 3: Using the Control Panel ❖ 3-13
Page 68

kug-ch03 Page 14 Thursday, March 6, 1997 4:43 PM
Using the Control Panel
PCL Emulat
Menu
PCL Emulat Menu options establish the default configuration
for the printer when printing PCL emulation jobs.
You may use your software application to override default
settings for certain PCL Emulat Menu options. Table 3.4 lists
the options whose settings you may normally override.
Table 3.4 PCL Emulat Menu settings normally overridden by
the settings in the data stream
The setting you choose in
your software application
for:
Copies Copies
Duplex Duplex
Edge to Edge Edge to Edge
Font Font Source
Font Size Pitch
…will override the
PCL Emulat Menu setting
for:
Font Number
Symbol Set
Point Size
Output Bin Output Bin
Paper Source Default Source
Paper Size Paper Size
Paper Orientation Orientation
Page Protection
Print Resolution
† You can change the setting for this feature through your software application only
when using the Digital printer driver.
†
†
The PCL Emulat Menu hierarchy is depicted in Figure 3.4
starting on page 3-15. (M en u op ti on s are describ ed in
Appendix D: Control Panel Options, where they are listed in
alphabetical order.)
3-14 ❖ LN17 and LN17ps Printers User Guide
Form Length
Page Protection
Resolution
Page 69

kug-ch03 Page 15 Thursday, March 6, 1997 4:43 PM
Figure 3.4 PCL Emulat Menu hierarchy showing factory settings
PCL Emulat Menu
Menu
Language
Mailbox Menu
†
PCL Emulat Menu
PostScript Menu
Interface Menu
System Menu
Test Menu
Appears only when
the default font is
scalable.
†
Appears only when
the option is installed.
‡
Appears when
downloaded fonts
are available.
Copies
Font Source
†
Font Number
Pitch
1* - 99
Internal*
‡
Soft
0* - 999
0.44 - 99.9 by.01
(10.00*)
Point Size
4.00 - 999.75 by .25
(12.00*)
Default Source
Upper*
Manual
Manual Envelope
Lower
Large Capacity
Envelope Feeder
Source Mapping
Paper Size
Upper
Manual
Manual Envelope
Lower
Large Capacity
Envelope Feeder
Legal (8.5x14)
Folio (8.5x13)
Letter (8.5x11)* (USA)
Main Tray
Front Tray
Main-Front Tray
Lower 1 Tray
Lower 2 Tray
Lower 1-Main
Lower 2-Main
†
†
†
†
Lower 1-Lower 2
Lwr1-Lwr2-Main
Envelope Feeder
†
†
†
A4 (210x297)* (Europe)
Front Tray Size
Exec (7.25x10.5)
ISO B5 (176x250)
Statement (5.5x8.5)
A6 (105x148)
Com-10
C5
DL
Monarch
C6
Chapter 3: Using the Control Panel ❖ 3-15
Page 70

kug-ch03 Page 16 Thursday, March 6, 1997 4:43 PM
PCL Emulat Menu
Figure 3.4 PCL Emulat Menu hierarchy showing factory settings (continued)
†
Appears only when
the option is installed.
++
Appears only with
enough memory or a
hard disk installed.
Env Feeder Size
Output Bin
Orientation
Form Length
Symbol Set
Edge to Edge
Page Protection
Jam Recovery
Resolution
Print Quality
State Saving
Duplex
++
†
Page Size Cont
Com-10* (USA)
C5
DL* (Europe)
Monarch
C6
Portrait*
Landscape
005 - 128
60* (USA)
64* (Europe)
Off*
On
Off*
Letter
Legal
A4
Off*
On
600x600*
1200x600
Normal
TrueRes*
Toner Saving
Off*
On
Off*
Short Edge Bind
Long Edge Bind
Standard*
OCT No Offset
OCT On Job
OCT On Job/Copy
Collator
†
Bin1
†
Bin2
†
Bin3
†
Bin4
†
Bin5
†
Bin6
†
Bin7
†
Bin8
†
Bin9
†
Bin10
†
†
†
Desktop
ISO L1
ISO L2
ISO L5
ISO-4 UK
ISO-6 ASCII
ISO-11 Swedish
ISO-15 Italian
ISO-17 Spanish
ISO-21 German
ISO-60 Norw. v1
ISO-69 French
Legal
Math-8
Microsoft Publ.
PC-8
PC-8 DN
PC-8 Tk
PC-850
PC-852
Pi Font
PS Math
PS Text
Roman-8*
Ventura Int’l.
Ventura Math
Ventura US
Win 3.0
Win L1
Win L2
Win L5
Off*
On
†
3-16 ❖ LN17 and LN17ps Printers User Guide
Page 71

kug-ch03 Page 17 Thursday, March 6, 1997 4:43 PM
Using the Control Panel
PostScript
Menu
Note
Note
PostScript Menu options establish the default configuration
for the printer when printing PostScript jobs. PostScript may
be used by software applications to send information and
instructions to the printer.
PostScript is availabl e as an option for the LN17 printer. See
Appendix A: Ordering Printer Options.
Windows Users:
The Windows PostScript driver for the LN17 printer allows the
user to either download the PostScript heade r wit h ev ery job
or download it only once. If the printer is used in a network or
other shared environment where both PCL emulation and
PostScript jobs are printed, the header will be deleted when
the printer switches from PostScript to PCL emulation.
• Banner sheets printed from Novell networks cause the
printer to switch between PostScript and PCL emulation. If
banner sheets are printed, ensure that the Language
Sensing option is set to ON and the default System
Language (for each enabled port) is set to PCL Emulation.
• To avoid the loss of the PostScript header:
— select Download Each Job in the PostScript driver, or
— set State Saving to On in the PostScript Menu.
You must downlo ad th e header at least once for each
power on cycle. If several different PostScript applications
are used, the “Download Each Job” option will guarantee
that the correct header is always available.
Chapter 3: Using the Control Panel ❖ 3-17
Page 72

kug-ch03 Page 18 Thursday, March 6, 1997 4:43 PM
PostScript Menu
Macintosh Users:
The Macintosh driver is installed by opening the driver disk
and double-clicking the OnPAGE installer icon.
Note
You may use your software application to override default
settings for certain PostScript Menu options. Table 3.5 lists
the PostScript Menu options whose settings you may
normally override.
Table 3.5 PostScript Menu settings normally overridden by
the setting in the data stream
The setting you choose
in your software application
for:
Copies Copies
Duplex Duplex
Paper Source Default Tray
Paper Size The size paper currently in the
Print Resolution
Print Quality
† You can change the setting for this feature through your software application only
when using a Digital LN17 printer driver.
†
†
…will override the
PostScript Menu setting
for:
default tray
Resolution
Print Quality
Figure 3.5 on page 3-19 shows the Post Sc rip t Me nu
hierarchy. The PostScript Menu appears on ly when the
PostScript option is installed.
(Menu options are described in Appendix D: Control Panel
Options, where they are listed in alphabetical order.)
3-18 ❖ LN17 and LN17ps Printers User Guide
Page 73

kug-ch03 Page 19 Thursday, March 6, 1997 4:43 PM
Figure 3.5 PostScript Menu hierarchy showing factory settings
PostScript Menu
Menu
Language
Mailbox Menu
†
PCL Emulat Menu
PostScript Menu
Interface Menu
System Menu
Test Menu
Copies
Default Tray
1* - 99
Main Tray*
Front Tray
Lower 1 Tray
Lower 2 Tray
†
†
Envelope Feeder
Legal (8.5x14)
Folio (8.5x13)
Letter (8.5x11)*
†
(USA)
A4 (210x297)*
(Europe)
†
Tray Switching
Off*
Main-Front Tray
Lower 1-Main
Lower 2-Main
†
†
Lower 1-Lower 2
Lwr1-Lwr2-Main
†
†
Exec (7.25x10.5)
ISO B5 (176x250)
Statement (5.5x8.5)
A6 (105x148)
Com-10
C5
DL
Monarch
Manual Size
Env Feeder Size
Com-10* (USA)
C6
C5
DL* (Europe)
Monarch
C6
Output Bin
Print Errors
Page Protection
Jam Recovery
Resolution
Off*
On
Off*
On
Off*
On
600x600*
Standard*
OCT No Offset
OCT On Job
OCT On Job/Copy
Collator
†
Bin1
†
Bin2
†
Bin3
†
Bin4
†
Bin5
†
Bin6
†
Bin7
†
Bin8
†
Bin9
†
Bin10
†
†
†
†
1200x600
†
Appears only when the
option is installed.
++
Appears only with enough
memory or a hard disk
installed.
Print Quality
State Saving
†
Duplex
Normal
TrueRes*
Toner Savings
++
Off*
On
Off*
Tumble
Regular
Chapter 3: Using the Control Panel ❖ 3-19
Page 74

kug-ch03 Page 20 Thursday, March 6, 1997 4:43 PM
Using the Control Panel
Interface
Menu
The Interface Menu contain s su bme nus for th e pa rallel port
on the printer. It also includes submenus for network
interface ports when one or more network interface cards are
installed.
The Interface Menu may include submenus for the following:
• Parallel Menu (see page 3-21)
• LocalTalk Menu (see page 3-22)
• Ethernet Menu (see page 3-22)
Figure 3.6 starting on page 3-21 shows the Interface Menu
hierarchy.
(Menu options are described in Appendix D: Control Panel
Options, where they are listed in alphabetical order.)
3-20 ❖ LN17 and LN17ps Printers User Guide
Page 75

kug-ch03 Page 21 Thursday, March 6, 1997 4:43 PM
Figure 3.6 Interface Menu hierarchy showing factory settings
Menu
Interface Menu
Language
Mailbox Menu
PCL Emulat Menu
PostScript Menu
Interface Menu
System Menu
Test Menu
† Appears only when the option is installed.
†
†
Parallel Menu
Port Enable
Port Timeout
System Language
Lang. Sensing
Auto Job End
Bidirectional
Off
On*
5- 999 secs (30*)
PCL Emulation*
PostScript
Off
On*
Off
On*
Off
On*
†
Chapter 3: Using the Control Panel ❖ 3-21
Page 76

kug-ch03 Page 22 Thursday, March 6, 1997 4:43 PM
Interface Menu
Figure 3.6 Interface Menu hierarchy showing factory settings (continued)
LocalTalk Menu
Ethernet Menu
†
†
Port Enable
Port Timeout
Port Enable
Port Timeout
System Language
Lang. Sensing
Auto Job End
Off
On*
5 - 999 secs (30*)
Off
On*
5 - 999 secs (30*)
PCL Emulation*
PostScript
Off
On*
Off
On*
†
†
Appears only when the option is installed.
3-22 ❖ LN17 and LN17ps Printers User Guide
Page 77

kug-ch03 Page 23 Thursday, March 6, 1997 4:43 PM
Interface Menu
LocalTalk
Menu Options
Ethernet
Menu Options
The LocalTalk Menu, a submenu of the Interface Menu,
contains options for configuring the printer’s LocalTalk port
when the LocalTalk option (DNIC-L’T ALK) has been
installed.
For detailed information on the DNIC-L’TALK, refer to the
DNIC-L’TALK Configuration Guide in the DNIC-L’TALK
option kit.
The Ethernet Menu, a submenu of the Interface Menu,
contains options for configuring the printer’s Ethernet port
when the Ethernet option (DNIC-E’NET) has been insta lled.
The Ethernet option supports the following pro to co ls:
• Novell NetWare, Version 2.x, 3.x, and 4.x (BEM)
• TCP/IP
• EtherTalk
•LAT
• Microsoft Windows NT
• SNMP
For more information on the supported protocols, refer to the
DNIC-E’NET Configuration Guide in the DNIC-E’NET option
kit.
Chapter 3: Using the Control Panel ❖ 3-23
Page 78

kug-ch03 Page 24 Thursday, March 6, 1997 4:43 PM
Using the Control Panel
System Menu
The System Menu options set ge ne ral printer features.
Figure 3.7 highlights the System Menu hierarchy.
(Menu options are described in Appendix D: Control Panel
Options, where they are listed in alphabetical order.)
Figure 3.7 System Menu hierarchy showing factory settings
Hex Dump
Menu
Power Saver
Language
Mailbox Menu
PCL Emulat Menu
PostScript Menu
Interface Menu
System Menu
Test Menu
†
†
Auto Continue
Print Density
Off*
On
Off
120 Minutes
90 Minutes
60 Minutes
30 Minutes
15 Minutes
Off *
On
12
11
10
9
8
7
6
5
4
3*
2
1
0
Defaults
†
†
Appears only when the option is installed.
‡ Europe is the default setting on the 240 V
machines and USA is the default on 120 V
machines.
Disk Spooling
Perform Enhance
3-24 ❖ LN17 and LN17ps Printers User Guide
Europe‡
USA ‡
Off*
On
Off
On*
Page 79

kug-ch03 Page 25 Thursday, March 6, 1997 4:43 PM
Using the Control Panel
Test Menu
Test Menu options are used to gene rate printer reports. All
options other than Memory Check cause the printer to
generate a printed report. (Results of the Memory Check are
displayed on the Control Panel.)
Figure 3.8 shows the Test Menu hierarchy.
(Menu options are described in Appendix D: Control Panel
Options, where they are listed in alphabetical order.)
Figure 3.8 Test Menu hierarchy
Menu
Language
Mailbox Menu
PCL Emulat Menu
PostScript Menu
Interface Menu
System Menu
Test Menu
†
†
Config. sheet
Demo Page
PCL Font List
PS Font List
Test Print
Memory Check
Format the Disk
†
†
Caution
†
Appears only when the option is installed.
Never generate a printer report or a memory check while the
printer is busy. This will cause the printer to reset to its power-on
state. As a consequence, you will lose all or part of the job currently
being processed and any temporary fonts/macros downloaded to
printer memory.
Chapter 3: Using the Control Panel ❖ 3-25
Page 80

kug-ch03 Page 26 Thursday, March 6, 1997 4:43 PM
Using the Control Panel
Reset Menu
Note
The Reset Menu is used to reset various printer functions.
Selecting Reset Printer resets the printer to its power-on state,
while Reset Menus resets the menu settings to their factory
settings. Selecting Reset Ethernet or Reset LocalTalk resets
the respective network interface card to its power-on state.
Figure 3.9 shows the Reset Menu hierarchy.
(Menu options are described in Appendix D: Control Panel
Options, where they are listed in alphabetical order.)
The printer clears downloaded fonts and print macros from
RAM, and ejects any partially printed pages when you select
Reset Printer, Reset Menus, or Reset All.
Figure 3.9 Reset Menu hi erarchy
Reset Printer
Reset
Reset Menus
Reset LocalTalk
Reset Ethernet
Reset All
Cancel PS Job
†
†
††
†
Appears only when a Digital
Network Interface Card is
installed.
††
Appears only when the
PostScript option is installed.
3-26 ❖ LN17 and LN17ps Printers User Guide
Page 81

Chapter 4
LN17 Printer Driving
Software
LN17 PCL 5e Emulation Printer Drivers ............................... 4-2
LN17 PostScript Printer Drivers ............................... ............. 4-3
DECprint Supervisor (DCPS) Software ................................ 4-4
Chapter4
Chapter 4: LN17 Printer Driving Software ❖ 4-1
Page 82

LN17 Printer Driving Software
LN17 PCL 5e
Emulation
Printer Drivers
Ta bl e 4.1 LN17 PCL 5e Emulation printer drivers
Environment Printer Driver Diskette
†
DOS
Windows Windows 3.1 /
† If you are using a DOS application other than Microsoft Word, WordPerfect, or AutoCAD, use the HP LaserJet 4si printer
driver supplied with your application software.
Microsoft Word Ver. 6.0 Printer Drivers for MS-DOS
WordPerfect Ver. 6.0 Printer Drivers for MS-DOS
AutoCAD Rel. 12, 13 Printer Drivers for MS-DOS
Windows 95
Windows NT 3.5 PCL5e Emulation Printer Driver
The base LN17 printer supports the PCL printer drivers listed
in Table 4.1. T o take full advantage of all the prin ter’s features
when printing PCL jobs, install the appropriate LN17 PCL 5e
emulation printer driver(s). (Consult your operating system
user manual for instructions on installing a new printer
driver.)
PCL5e Emulation Printer Driver
for Microsoft Windows 3.1 and Windows 95
for Microsoft Windows NT
4-2 ❖ LN17 and LN17ps Printers User Guide
Page 83

LN17 Printer Driving Software
LN17
PostScript
Printer Drivers
Ta bl e 4.2 LN17 PostScript printer drivers
Environment Printer Driver Diskette
Windows Windows 3.1 /
Windows 95
Windows NT 3.5 PostScript Printer Driver
Macintosh System 6.x PostScript Printer Driver and Utilities
System 7.x PostScript Printer Driver and Utilities
The PostScript option supports the PostScript drivers listed in
Table 4.1. To take full advantage of all the printer’s features
when printing PostScript jobs, install the appropriate LN17
PostScript printer driver(s). Consult yo ur op erating system
user manual for instructions on installing a new printer driver.
PostScript Printer Drivers for
Microsoft Windows 3.1 and Windows 95
for Microsoft Windows NT
for Macintosh
for Macintosh
Chapter 4: LN17 Printer Driving Software ❖ 4-3
Page 84

DECprint
Supervisor
(DCPS)
Software
DECprint Supervisor (DCPS) for OpenVMS is a family of
layered products that run on OpenVMS VAX and OpenVMS
Alpha systems to provide access to selected PostScript Level 1
and Level 2 print devices.
The DCPS software and documentation are available in the
standard OpenVMS CDROM libraries, an d ma y al so be
ordered separately from Digital.
The license rights to use the basic printing features of DCPS
with Digital PostScript printers are inclu ded wit h th e
OpenVMS operating system.
You can find more information about the DCPS products,
including pricing and support of optional features, and
ordering informat io n, in the DECprint Supervisor (DCPS) for
OpenVMS Software Product Description (AE–PUM0*–TE).
For DCPS installation information, refer to the DECprint
Supervisor for OpenVMS Software Intallation Guide.
4-4 ❖ LN17 and LN17ps Printers User Guide
Page 85

kug-ch05 Page 1 Thursday, March 6, 1997 4:47 PM
Chapter 5
Using the Hard Drive/
Downloading Fonts
Hard Drive Considerations ............ ....................................... 5-2
Print/Disk Spooling ............................................................... 5-2
State Saving ......................................................................... 5-2
Formatting the Hard Drive .................................................... 5-3
Downloading Fonts and Macros ......................................... 5-4
Chapter5
Chapter 5: Using the Hard Drive/ Downloading Fonts ❖ 5-1
Page 86

kug-ch05 Page 2 Thursday, March 6, 1997 4:47 PM
Using the Hard Drive/ Downloading Fonts
Hard Drive
Considerations
Print/Disk
Spooling
If you install the optional hard drive on the LN17 printer, it
will significantly increase the amount of memor y available for
processing jobs and storing downloaded information (such as
fonts and macros).
The hard drive can function as a print spooler when you set
the Disk Spooling option to On. With disk spooling
enabled, the hard drive simultaneously accepts print jobs
from all enabled ports, then processes and prints them in the
order in which they are first received.
Disk spooling is useful for both standalone and networked
systems:
• When the printer is busy processing a long or complex
print job, successive print jobs from the same or other
ports can be accepted by the printer and spooled to the
hard disk. Accordingly, the printer will free the computer
that is submitting print jobs so it can subsequently switch
to tasks other than printing.
• While most networks provide spooling outside the printer,
spooling to a disk inside the printer will remove network
related overhead. Acceptin g prin t jobs from a disk in the
printer is more efficient than accepting print jobs one at a
time from networks.
The number of jobs that can be spooled is limited by the
amount of hard drive space available. Also, spooling from
networks will not be supported for AppleTalk jobs and from
ports where DS/P (Document Services for Printing) is
enabled. The DECprint Supervisor (DCPS) for OpenVMS
software does not support spooling.
State Saving
5-2 ❖ LN17 and LN17ps Printers User Guide
When the State Saving option is set to On, the printer
saves downloaded information when it switches between the
PCL and PostScript PDLs (Printer Descrip tion Language).
Installing a hard drive increases the amount of memory the
printer has available for saving downloaded fonts and macros
when it switches between PDLs.
Page 87

kug-ch05 Page 3 Thursday, March 6, 1997 4:47 PM
Hard Drive Considerations
Formatting the
Hard Drive
When a new unformatted hard disk drive is installed in the
printer , it must be fo rmatted before it will b e available for use.
Formatting can be done when the printer is powered on aft er
the installation.
The disk can be reformatted at any time. This is useful when
it is desired to erase everything on the disk—all fonts, macros,
and spooled print data. Also, in the unusual cas e of a problem
with the disk, it may be desirable to reformat it, again at the
expense of erasing everything on it.
Formatting is accomplished by selecting the Format the
Disk option in the Test Menu. You will be warned of losing
data and asked two times to confirm the formatting by
pressing Up .
Chapter 5: Using the Hard Drive/ Downloading Fonts ❖ 5-3
Page 88

kug-ch05 Page 4 Thursday, March 6, 1997 4:47 PM
Using the Hard Drive/ Downloading Fonts
Downloading
Fonts and
Macros
Digital LN17 printer drivers provide you with the ability to
download fonts and PCL 5e macros to the printer.
Fonts can be downloaded to printer memory or to the optional
hard drive. Macros can be downloaded to printer memory or
the optional hard drive.
• To download fonts, you must first install the appropriate
LN17 Windows 3.1/Windows 95, Macintosh, W indowsNT,
or UNIX drivers. To download macros, you must inst all
the LN17 Windows PCL 5e driver.
The DECprint Supervisor (DCPS) for OpenVMS software
includes a sample Digital Command Language (DCL)
procedure that you can use to add, list, and remove
Postscript fonts from the printer’s hard drive.
SYS$COMMON:[SYSHLP.EXAMPLES.DCPS] FONT_DOWNLOADER.COM is this procedure.
• Fonts and macros downloaded to the hard drive are
stored on the hard drive until you delete them. Turning
the printer power off does not clear these fonts/macros
from the hard drive.
You can only delete a macro from the hard drive if you
know the name of the macro. Y ou should therefore keep a
record of downloaded macros. (You cannot print out a list
of macros.).
• “Temporary” fonts/macros downloaded to printer
memory, on a job basis, are cleared from the printer’s
memory after each job.
• “Permanent” fonts downloaded to printer memory are
cleared from the printer’ s memory whenever the printer is
powered off, and when the printer switches PDLs and the
State Saving option is set to Off.
(When State Saving is set to On, “permanent” fon ts/
macros are only cleared from printer memory when you
turn off the printer.)
5-4 ❖ LN17 and LN17ps Printers User Guide
Page 89

kug-ch06 Page 1 Thursday, March 6, 1997 4:48 PM
Chapter 6
Troubleshooting Chapter6
Printer Operation Problems ................................................. 6-2
Control Panel Messages ....................................................... 6-6
Paper Jams .......................................................................... 6-26
What Causes a Paper Jam? ............ .... ................................. 6-26
Clearing Paper Jams ................ ................................... ........ 6-26
Print Quality Problems ....................................................... 6-33
Chapter 6: Troubleshooting ❖ 6-1
Page 90

kug-ch06 Page 2 Thursday, March 6, 1997 4:48 PM
Troubleshooting
Printer
Operation
Problems
Consult Table 6 .1 starting on page 6-3 for correcti ve actions
when the printer will not print or when the printed outp ut is
not what you expect.
6-2 ❖ LN17 and LN17ps Printers User Guide
Page 91

kug-ch06 Page 3 Thursday, March 6, 1997 4:48 PM
Ta bl e 6.1 Printer operation problems
Problem Action
The printer will not print. 1. Power the printer OFF, then ON.
2. Print a Configuration Sheet.
• If it prints, the printer is okay.
• If it does not print, contact your dealer or Digital.
Printer Operation Problems
A file sent from the host
does not print.
1. Make sure the printer is online.
2. Send a plain text file (i.e., one without printing commands embedded in it) to
the printer.
• If the file prints correctly in the default font, with all of the characters in the
original file, the printer is seeing the same data that the host is sending,
and the interface or communication line is functioning correctly.
• If no data prints (or the last page indicator does not come on):
A. Make certain the printer is configured properly.
B. The port (parallel or network) may be disabled on the printer. Check the
Configuration Sheet for the port you are using to see if the Port Enable
option in the appropriate Interface Menu is set to On. If it is set to Off,
set it to On and try again.
C. If using an optional Digital Network Interface Card (DNIC) for Ethernet
or LocalTalk, check the Configuration Sheet to see if the printer is
acknowledging that the DNIC is present. (Refer to DNIC installation
instructions in Appendix C: Installing and Removing Printer Options.)
• If the Configuration Sheet shows the DNIC as “failed,” or does not
show the DNIC as present, power OFF the printer and unplug it. Pull
out the controller board, remove the DNIC, and check that the
connector pins are not bent. If bent, straighten. Reseat the DNIC
securely, put the controller board back in the printer, power ON and
print another Configuration Sheet. If the Configuration Sheet still
shows the DNIC as “failed,” the DNIC has failed. If the Configuration
Sheet still does not show the DNIC as present, then either the DNIC
has failed or the interface between the DNIC and the printer
controller has failed. Contact your dealer or Digital.
• If the Configuration Sheet shows the network card as present, check
if the printer is recognized by the host. (Refer to the Troubleshooting
chapter of the respective DNIC Configuration Guide.)
D. If there is garbled data, check the Configuration Sheet to confirm that
the correct emulation is selected or that the Language Sensing option is
set to On.
Table 6.1 Page 1 of 3
Chapter 6: Troubleshooting ❖ 6-3
Page 92

kug-ch06 Page 4 Thursday, March 6, 1997 4:48 PM
Printer Operation Problems
Ta bl e 6.1 Printer operation problems (continued)
Problem Action
A printed page does not
look like it should.
The requested font for
the PCL job does not
print.
PostScript commands are
printed instead of the
PostScript job.
1. Make certain that the software application you are using to create your print
job is configured properly. Refer to your software documentation.
2. Send a file containing PCL or PostScript commands to the printer.
• If your page prints as it should, your printer and interface are functioning
properly.
• If your information prints correctly, but doesn’t look right, you may have:
• An error in your command sequence/operator
• A missing downloaded font
• A mismatched printer option against your host formatting
• Command errors may be identified by looking at your input file or by using
the Hex Dump feature on the printer. You can determine which fonts are in
the system by printing a PCL or PS Font List. You can verify your data setup
by printing a Configuration Sheet and checking your printer setup.
Print a PCL Font List. If fonts print on the Font List, your print job may need
correcting.
1. Make certain that the software application you are using to create your job is
configured properly. Refer to your software documentation.
2. If the Lang. Sensing option in the appropriate Interface Menu is set to On, the
job sent to the printer might have included an incorrect header and therefore
not have indicated that a PostScript job was being sent.
• Set the System Language option in the appropriate Interface Menu to
PostScript and try sending the job again.
• Check your software to make sure the PostScript header file is being sent
to the printer.
A PostScript job does not
print in the requested
font.
The bottom edge of the
page is cut off, or there
are white bands.
A PCL job prints, but the
edges are cut off.
6-4 ❖ LN17 and LN17ps Printers User Guide
Check the spelling of the requested font in your PostScript file. Many times a typo
is the problem. If the font is spelled correctly, print a PS Font List to check if the
font is present. If it is not, download the font and resend the job.
For PCL jobs, set the Page Protection option in the PCL Emulat Menu to the size of
the paper for the job (or to the next larger size).
For PostScript jobs, set the Page Protection option in the PostScript Menu to On.
Set the Edge to Edge option in the PCL Emulat Menu to On.
Table 6.1 Page 2 of 3
Page 93

kug-ch06 Page 5 Thursday, March 6, 1997 4:48 PM
Ta bl e 6.1 Printer operation problems (continued)
Problem Action
Printer Operation Problems
A PostScript job fails to
print.
Jobs printed from the
front tray are skewed
with respect to the
sheet/envelope.
1. Check that PostScript is installed; also check that you are using an LN17
PostScript printer driver.
2. If the Lang. Sensing option in the appropriate Interface Menu is set to On, set
the System Language option to PostScript and re-send the job.
3. Set the Print Errors option in the PostScript Menu to On and resend the job.
• If an error page prints, there is a problem in the PostScript coding. Correct
the coding problem and resend the job.
• If the job does not print and no error page was printed, set the Page
Protection option in the PostScript Menu to Off.
• If the job still does not print, the job may require additional memory.
Check the side guide to be sure that it is snug against the right side of the sheet
but not so tight as to buckle it.
Table 6.1 Page 3 of 3
Chapter 6: Troubleshooting ❖ 6-5
Page 94

kug-ch06 Page 6 Thursday, March 6, 1997 4:48 PM
Troubleshooting
Control Panel
Messages
Listed in Table 6.2 are Control Panel messages that either:
• Cause the printer to stop printing.
• Require the user to call for service.
Also included in Table 6.2 are common, non-error messages
you are likely to see. The messages are listed in alphabetical
order, preceded by numerical diagnostic error codes.
Table 6.2 Control Panel messages
Message
†
0001
†
Appears in the upper left
corner of the display.
†
0040
†
Appears in the upper left
corner of the display.
†
0100
†
Appears in the upper left
corner of the display.
†
0101
†
Appears in the upper left
corner of the display.
A fault condition has occurred.
ACTION: Reseat the controller board and test the printer again. If the problem
A fault condition has occurred.
ACTION: Reseat the controller board and test the printer again. If the problem
A fault condition has occurred.
ACTION: If there is a memory SIMM in slot SIM3, remove it. Move the memory
A fault condition has occurred.
ACTION: If there is a memory SIMM in slot SIM2, remove it. Move the memory
Description/Corrective Action
continues, reseat the ROM SIMM(s) on the controller board and test
the printer again. If the problem still continues, observe the diagnostic
LED at power on. If the LED does not glow, or glows continuously,
contact your dealer or Digital. If the LED flashes, refer to Table 6.3 on
page 6-25 for further information.
continues, observe the diagnostic LED at power on. If the LED does
not glow, or glows continuously, contact your dealer or Digital. If the
LED flashes, refer to Table 6.3 on page 6-25 for further information.
SIMM in slot SIM2 into SIM3, then test the printer again. If code 0101
is displayed at power on, replace the SIMM. If code 0101 is not
displayed at power on, move the SIMM back to SIM2 and test the
printer again. If code 0100 again displays at power on, contact your
dealer or Digital.
SIMM in slot SIM3 into SIM2, then test the printer again. If code 0100
is displayed at power on, replace the SIMM. If code 0100 is not
displayed at power on, move the SIMM back to SIM3 and test the
printer again. If code 0101 again displays at power on, contact your
dealer or Digital.
6-6 ❖ LN17 and LN17ps Printers User Guide
Table 6.2 Page 1 of 19
Page 95

kug-ch06 Page 7 Thursday, March 6, 1997 4:48 PM
Table 6.2 Control Panel messages (continued)
Control Panel Messages
Message
*****
Clear Paper Path
Close Bin
N
Close Bins
Close Covers
Comm. Error
Description/Corrective Action
The printer is in power on diagnostics.
ACTION: None, if there is no failure during power on diagnostics. After other
diagnostic messages, the final message will be the one that the printer
is online and waiting for data.
A paper jam has occurred. The message alternates with a message that specifies
the location of the jam.
ACTION: See Table 6.4 on page 6-27.
The bin numbered N is pulled out.
ACTION: Close the bin.
Two or more bins are pulled out.
ACTION: Close the bins.
Either the front or rear cover (or both) is open.
ACTION: Close the cover, and press Online to resume normal operation.
The printer is not able to communicate with the host using bidirectional parallel.
ACTION: Check the parallel cable to make sure it is connected properly on both
the printer and the host. Inspect the parallel cable for any defects; if
wires are broken or the cable appears to be damaged, replace the
cable. Check the host to be certain that it is configured properly.
Under the Parallel Menu, turn the Bidirectional option to Off if your
host’s parallel port is not bidirectional. If problem persists, contact your
dealer or Digital.
Comm. Error:
nn
Config. Sheet
Printing...
Confirm: OK To
Lose All Data
Demo Page
Printing…
A LocalTalk error has occurred. nn is the AppleTalk error number.
The Configuration Sheet is printing.
See the Config. sheet option, page D-4.
ACTION: Remove the Configuration Sheet from the output tray when it has
finished printing.
Second level warning message prior to formatting the hard disk.
ACTION: Press Up to format the disk or press Down to abort.
The Demo Page is printing.
ACTION: Remove the Demo Page from the output tray when it finishes printing.
Table 6.2 Page 2 of 19
Chapter 6: Troubleshooting ❖ 6-7
Page 96

kug-ch06 Page 8 Thursday, March 6, 1997 4:48 PM
Control Panel Messages
Table 6.2 Control Panel messages (continued)
Message
Disk
Disk Failure
Disk Format Bad
Disk Not In Use
Description/Corrective Action
A hard disk error has occurred.
ACTION: Power cycle the printer. If this message reappears, power off the
printer and contact your dealer or Digital.
A general failure of the hard disk has occurred.
Under this message, the following message is displayed:
Press *
ACTION: Press Enter . The printer displays the following message:
Disk Not In Use
Printing resumes without use of the hard disk.
The hard disk high level format (FAT tables) cannot be understood. This is NOT
because a new disk has been installed.
ACTION: Either initialize the disk format procedure by pressing Up , or abort
the procedure by pressing Down .
This message flashes alternately with the two-line message:
Press ↑ to init
Press ↓ to Abort
A failure of the hard disk has occurred and been acknowledged. Printing resumes
without use of the hard disk.
ACTION: Make sure the hard disk is properly seated on the controller board. If
the problem remains, contact your dealer or Digital.
Disk Read Error
Disk Write Error
6-8 ❖ LN17 and LN17ps Printers User Guide
The printer cannot read data from the hard disk.
ACTION: Try powe ring the printer OFF then ON again. Make sure the hard disk
is properly seated on the controller board. If the problem remains,
contact your dealer or Digital.
The printer cannot write data to the hard disk.
ACTION: Press Enter . The printer will mark the disk sector as bad and retry
the write operation at another location on the disk. Make sure the
hard disk is properly seated on the controller board. If the problem
remains, contact your dealer or Digital.
Table 6.2 Page 3 of 19
Page 97

kug-ch06 Page 9 Thursday, March 6, 1997 4:48 PM
Table 6.2 Control Panel messages (continued)
Control Panel Messages
Message
Duplex Unit Fail
Enter Password
>> xxxx
Envelope Feeder
Env Feeder Empty
Env. Feeder Fail
Description/Corrective Action
The Duplex Module has failed. Duplex (two-sided) printing cannot continue. You
can, however, still print simplex (single-sided) prints.
ACTION: Remove and reinstall the Duplex Module following the instructions in
Appendix C: Installing and Removing Printer Options. If it still fails,
contact your dealer or Digital.
The bin unlock button has been pressed on the Mailbox/Collator and a password
has been enabled.
ACTION: Enter the password for the bin or collator that you wish to open.
This message can also occur while enabling a password for a bin or the collator.
ACTION: Enter the password used last time that bin or collator had its password
enabled (or the factory default password the first time). Then you will
be allowed to proceed with enabling the password.
Envelopes need to be loaded in the Envelope Feeder.
ACTION: The message on the bottom line of the Control Panel display advises
what envelopes to load.
The Envelope Feeder is empty.
ACTION: Load envelopes in the Envelope Feeder.
The Envelope Feeder has failed. Printing from the Envelope Feeder cannot
continue.
ACTION: Remove and reinstall the Envelope Feeder following the instructions in
Appendix C: Installing and Removing Printer Options. If it still fails, you
still have the option of feeding envelopes through the front tray.
Contact your dealer or Digital.
EnvelFeeder JamRemove All Envel
Ethernet Fail
An envelope has jammed feeding from the Envelope Feeder. The message
alternates with:
Open Front Cover
Remove Jam Envel
ACTION: See “Envelope Feeder Jam” (page 6-29).
The Ethernet card (DNIC-E’NET) has failed and cannot be used.
ACTION: Press Enter to allow the printer to continue as if the Ethernet
card were not installed. This error is not subject to Auto Continue
(page D-3). Print a Configuration Sheet. If the sheet does not show
Ethernet as present, contact your dealer or Digital.
Table 6.2 Page 4 of 19
Chapter 6: Troubleshooting ❖ 6-9
Page 98

kug-ch06 Page 10 Thursday, March 6, 1997 4:48 PM
Control Panel Messages
Table 6.2 Control Panel messages (continued)
Message
Fan Failure
Power Off NOW!
Feed A4
Feed A6
Feed Com-10
Feed C5
Feed C6
Feed DL
Feed Exec
Feed Folio
Description/Corrective Action
The printer’s fan has failed.
ACTION: Power cycle the printer. If this message reappears, power off the
printer and contact your dealer or Digital.
ACTION: Feed A4 paper through the front tray, as indicated on the top line of
the display.
ACTION: Feed A6 paper (international postcard) through the front tray, as
indicated on the top line of the display.
ACTION: Feed Com-10 envelope through the front tray, as indicated on the top
line of the display.
ACTION: Feed C5 envelope through the front tray, as indicated on the top line
of the display.
ACTION: Feed C6 envelope through the front tray, as indicated on the top line
of the display.
ACTION: Feed DL envelope through the front tray, as indicated on the top line
of the display.
ACTION: Feed Executive paper through the front tray, as indicated on the top
line of the display.
ACTION: Feed Folio paper through the front tray, as indicated on the top line of
the display.
Feed ISO B5
Feed Legal
Feed Letter
Feed Monarch
Feed Statement
6-10 ❖ LN17 and LN17ps Printers User Guide
ACTION: Feed ISO B5 paper through the front tray, as indicated on the top line
of the display.
ACTION: Feed Legal paper through the front tray , as indicated on the top line of
the display.
ACTION: Feed Letter paper through the front tray, as indicated on the top line
of the display.
ACTION: Feed Monarch size envelopes through the front tray, as indicated on
the top line of the display.
ACTION: Feed Statement size paper through the front tray, as indicated on the
top line of the display .
Table 6.2 Page 5 of 19
Page 99

kug-ch06 Page 11 Thursday, March 6, 1997 4:48 PM
Table 6.2 Control Panel messages (continued)
Control Panel Messages
Message
Flushing...
Formatting Disk
Please Wait...
Front Tray
Front Tray Empty
Front Tray JamRemove All Paper
Fuser Failure
Service Required
Description/Corrective Action
The PostScript print job was cancelled from the Reset Menu and is being parsed
out and discarded.
ACTION: None.
The hard disk is being partitioned and high level formatted.
ACTION: None.
Your application specifies “Manual” (or “Front Tray”) as the paper source so you
need to load paper in the front tray.
ACTION: The message on the bottom line of the Control Panel display advises
what paper size to load or feed.
The front tray is empty.
ACTION: Reload the correct size of paper.
Paper has jammed feeding from the front tray. The message alternates with:
Open Front Cover
Remove Jam Sheet
ACTION: Remove all paper from the front tray , open the front cover and pull out
the jammed paper. Then close the front cover and reload the front
tray. See “Front Tray Jam” (page 6-27).
The fuser assembly has failed; printing cannot resume.
ACTION: Cycle power on the printer. If you have just replaced the Fuser
Cartridge, reseat it. If the problem persists, contact your dealer or
Digital.
Hex Dump
I/O Initializing
Please Wait...
Install
Print Cartridge
Hex dump mode is On.
ACTION: None.
The Digital Network Interface Card is being initialized.
ACTION: Wait until you see the following message before taking other actions:
Online ___
Ready
The EP (print) cartridge is missing or not installed correctly.
ACTION: Reinstall the existing EP cartridge or install a new EP cartridge. If
problem continues, contact your dealer or Digital.
Table 6.2 Page 6 of 19
Chapter 6: Troubleshooting ❖ 6-11
Page 100

kug-ch06 Page 12 Thursday, March 6, 1997 4:48 PM
Control Panel Messages
Table 6.2 Control Panel messages (continued)
Message
Invalid Password
IOT NVM Fail
Service Required
Laser Failure
Service Required
Last Page
Load A4
Load A6
Load C5
Load C6
Description/Corrective Action
An invalid password has been entered for the mailbox password.
ACTION: Re-enter the password when prompted.
Nonvolatile Memory (NVM) has failed on the print engine (also called the
IOT—Image Output Terminal). Printing cannot resume.
ACTION: Contact your dealer or Digital.
The laser assembly has failed; printing cannot continue.
ACTION: Contact your dealer or Digital.
The last page of the document has not finished printing.
ACTION: None. The last page will print when the printer receives more data, or
when the port times out.
ACTION: Load A4 paper into the tray(s) indicated on the top line of the display.
ACTION: Load A6 paper (international postcard) into the front tray as indicated
on the top line of the display.
ACTION: Load C5 envelope(s) into the tray(s) indicated on the top line of the
display.
ACTION: Load C6 envelope(s) into the tray(s) indicated on the top line of the
display.
Load Com-10
Load DL
Load Exec
Load Folio
Load ISO B5
Load Legal
6-12 ❖ LN17 and LN17ps Printers User Guide
ACTION: Load Com-10 envelopes into the tray(s) indicated on the top line of
the display.
ACTION: Load DL envelopes into the tray(s) indicated on the top line of the
display.
ACTION: Load Executive paper into the tray(s) indicated on the top line of the
display.
ACTION: Load Folio paper into the tray(s) indicated on the top line of the
display.
ACTION: Load ISO B5 paper into the front tray as indicated on the top line of
the display.
ACTION: Load Legal paper into the tray(s) indicated on the top line of the
display.
Table 6.2 Page 7 of 19
 Loading...