

Page 1

HP LCD HDTV
User’s Guide
HP LC3760N 37-Inch (94-Centimeter) LCD High-Definition Television
Page 2

The only warranties for HP products and services are set forth in the
express warranty statements accompanying such products and
services. Nothing herein should be construed as constituting an
additional warranty. HP shall not be liable for technical or editorial
errors or omissions contained herein.
HP assumes no responsibility for the use or reliability of its software
on equipment that is not furnished by HP.
This document contains proprietary information that is protected by
copyright. No part of this document may be photocopied,
reproduced, or translated to another language without the prior
written consent of HP.
Hewlett-Packard Company
P.O. Box 4010
Cupertino, CA 95015-4010
USA
Copyright © 2006 Hewlett-Packard Development Company, L.P.
May be licensed in the United States by one or both of U.S. Patents
Nos. 4,930,158 and 4,930,160 until August 28, 2008.
Manufactured under license from Dolby Laboratories. Dolby, and the
double-D symbol are trademarks of Dolby Laboratories.
HDMI, the HDMI logo and High-Definition Multimedia Interface are
trademarks or registered trademarks of HDMI Licensing LLC.
HP supports lawful use of technology and does not endorse or
encourage the use of our products for purposes other than those
permitted by copyright law.
The information in this document is subject to change without notice.
.
n
Text set off in this manner indicates
information you need.
!
Text set off in this manner indicates
important information you need.
c
CAUTION: Text set off in this manner
indicates that failure to follow directions
could result in damage to equipment or
loss of information.
w
WARNING: This symbol is intended to alert
the user to the presence of important
operating and maintenance (servicing)
instructions in the literature accompanying
the appliance.
e
DANGEROUS VOLTAGE: Text set off in this
manner indicates the presence of
uninsulated voltages within the product
enclosure that may be of sufficient
magnitude to constitute a risk of electrical
shock to persons.
Page 3

Important Safeguards
WARNING: TO REDUCE THE RISK OF FIRE OR ELECTRICAL SHOCK, DO NOT EXPOSE THIS APPLIANCE
TO RAIN OR MOISTURE.
e CAUTION: RISK OF ELECTRICAL SHOCK w
DO NOT OPEN
CAUTION: TO REDUCE THE RISK OF ELECTRICAL SHOCK, DO NOT REMOVE COVER (OR BACK).
NO USER SERVICEABLE PARTS INSIDE.
REFER SERVICING TO QUALIFIED SERVICE PERSONNEL.
e
THIS SYMBOL IS INTENDED TO ALERT THE USER TO THE PRESENCE OF UNINSULATED
“DANGEROUS VOLTAGES” WITHIN THE PRODUCT’S ENCLOSURE THAT MAY BE OF
SUFFICIENT MAGNITUDE TO CONSTITUTE A RISK OF ELECTRICAL SHOCK TO PERSONS.
REFER SERVICING TO QUALIFIED SERVICE PERSONNEL.
w
THIS SYMBOL IS INTENDED TO ALERT THE USER TO THE PRESENCE OF IMPORTANT
OPERATING AND MAINTENANCE (SERVICING) INSTRUCTIONS IN THE LITERATURE
ACCOMPANYING THE APPLIANCE.
CAUTION: TO PREVENT ELECTRICAL SHOCK, DO NOT USE THIS POLARIZED AC PLUG WITH AN
EXTENSION CORD, RECEPTACLE, OR OTHER OUTLET UNLESS THE BLADES CAN BE FULLY
INSERTED TO PREVENT BLADE EXPOSURE.
CAUTION: TO PREVENT ELECTRICAL SHOCK, MATCH WIDE BLADE OR PLUG TO WIDE SLOT, AND
FULLY INSERT.
CAUTION: DO NOT PLACE THIS PRODUCT ON AN UNSTABLE CART, STAND, TRIPOD,
BRACKET, OR TABLE. THE PRODUCT MAY FALL CAUSING SERIOUS
PERSONAL INJURY AND SERIOUS DAMAGE TO THE PRODUCT. USE ONLY
WITH A CART, STAND, TRIPOD, BRACKET, OR TABLE RECOMMENDED BY
THE MANUFACTURER OR SOLD WITH THE PRODUCT. FOLLOW THE
MANUFACTURER’S INSTRUCTIONS WHEN INSTALLING THE PRODUCT
AND USE MOUNTING ACCESSORIES RECOMMENDED BY THE
MANUFACTURER. A PRODUCT AND CART COMBINATION SHOULD BE
MOVED WITH CARE. QUICK STOPS, EXCESSIVE FORCE, AND UNEVEN
SURFACES MAY CAUSE THE PRODUCT AND CART COMBINATION TO
OVERTURN.
iii
Page 4

INFORMATION:
This equipment has been tested and found to comply with the limits for a Class B digital device, pursuant to Part 15 of
the FCC Rules. These limits are designed to provide reasonable protection against harmful interference in a residential
installation. This equipment generates, uses, and can radiate radio frequency energy and, if not installed and used in
accordance with the instructions, may cause harmful interference to radio communications. However, there is no
guarantee that interference will not occur in a particular installation. If this equipment does cause harmful interference
to radio or television reception, which can be determined by turning the equipment off and on, the user is encouraged
to try to correct the interference by one or more of the following measures:
■ Reorient or relocate the receiving antenna.
■ Increase the separation between the equipment and receiver.
■ Connect the equipment into an outlet on a circuit different from that to which the receiver is connected.
■ Consult the dealer or an experienced radio/TV technician for help.
Closed caption notice
This television receiver provides display of television closed captioning in accordance with § 15.119 of the FCC Rules.
FCC Radiation Exposure Statement
This equipment complies with FCC radiation exposure limits set forth for an uncontrolled environment. This equipment
should be installed and operated with a minimum distance of 20 cm between the radiator and your body.
Modifications
The FCC requires the user to be notified that any changes or modifications made to this device that are not expressly
approved by Hewlett-Packard Company may void the authority to operate the equipment.
Cables
Connections to this device must be made with shielded cables with metallic RFI/EMI connector hoods in order to
maintain compliance with FCC Rules and Regulations.
RESPONSIBLE PARTY:
Hewlett-Packard Company
Attn: Product Regulations Manager
10955 Tantau Avenue
Building 45NL
Cupertino, CA 95014 USA
iv HP LCD HDTV User’s Guide
Page 5

Important Safety Instructions
Electricity is used to perform many useful functions, but it can also cause personal injuries and property damage if
improperly handled. This product has been engineered and manufactured with the highest priority on safety. However,
improper use can result in electric shock and/or fire. In order to prevent potential danger, please observe the following
instructions when installing, operating, and cleaning the product. To ensure your safety and prolong the service life of
your television, please read the following precautions carefully before using the product.
1 Read these instructions.
2 Keep these instructions.
3 Heed all warnings.
4 Follow all instructions.
5 Do not use this apparatus near water.
6 Clean only with dry cloth.
7 Do not block any ventilation openings. Install in
accordance with the manufacturer’s instructions.
8 Do not install near any heat sources such as
radiators, heat registers, stoves, or other
apparatus (including amplifiers) that
produce heat.
9 Do not defeat the safety purpose of the polarized
or grounding-type plug. A polarized plug has two
blades with one wider than the other. A
grounding-type plug has two blades and a third
grounding prong. The wide blade or the third
prong are provided for your safety. If the provided
plug does not fit into your outlet, consult an
electrician for replacement of the obsolete outlet.
10 Protect the power cord from being walked on or
pinched particularly at plugs, convenience
receptacles, and the point where they exit from
the apparatus.
11 Only use attachments/accessories specified by
the manufacturer.
12 Use only with the cart, stand,
tripod, bracket, or table specified
by the manufacturer, or sold with
the apparatus. When a cart is
used, use caution when moving
the cart/apparatus combination
to avoid injury from tip-over.
13 Unplug this apparatus during lightning storms or
when unused for long periods of time.
14 Refer all servicing to qualified service personnel.
Servicing is required when the apparatus has
been damaged in any way, the power-supply cord
or plug is damaged, liquid has been spilled or
objects have fallen into the apparatus, the
apparatus has been exposed to rain or moisture,
does not operate normally, or has been dropped.
15 Power sources — This product should be operated
only from the type of power source indicated on
the marking label. If you are not sure of the type of
power supply to your home, consult your product
dealer or local power company. For products
intended to operate from battery power, or other
sources, refer to the operating instructions.
16 Overloading — Do not overload wall outlets,
extension cords, or integral convenience
receptacles as this can result in a risk of fire or
electric shock.
17 Replacement parts — When replacement parts
are required, be sure the service technician has
used replacement parts specified by the
manufacturer or have the same characteristics as
the original part. Unauthorized substitutions may
result in fire, electric shock, or other hazards.
18 Safety check — Upon completion of any service
or repairs to this product, ask the service
technician to perform safety checks to determine
that the product is in proper operating condition.
19 The apparatus shall not be exposed to dripping or
splashing and that no objects filled with liquids,
such as vases, shall be placed on apparatus.
20 WARNING: Plug the power cord into a power
outlet where access to the power cord connector is
readily accessible in case power disconnection is
required.
v
Page 6

21 Servicing: The user should not attempt to service
the appliance beyond that described in the
operating instructions. All other servicing should
be referred to qualified service personnel.
■ Water and moisture — Do not use this product near water; for example, near a bath tub, wash bowl, kitchen sink,
or laundry tub; in a wet basement; or near a swimming pool; and the like.
■ Stand — Do not place the product on an unstable cart, stand, tripod, or table. Placing the product on an unstable
base can cause the product to fall, resulting in serious personal injuries as well as damage to the product. Use
only a cart, stand, tripod, bracket, or table recommended by the manufacturer or sold with the product.
■ Selecting the location — Select a place with no direct sunlight and good ventilation.
■ Ventilation — The vents and other openings in the cabinet are designed for ventilation. Do not cover or block
these vents and openings since insufficient ventilation can cause overheating and/or shorten the life of the
product. Do not place the product on a bed, sofa, rug, or other similar surface, since they can block ventilation
openings. This product is not designed for built-in installation; do not place the product in an enclosed place such
as a bookcase or rack, unless proper ventilation is provided or the manufacturer’s instructions are followed.
■ The display panel used in this product is made of glass. Therefore, it can break when the product is dropped or
applied with impact. Be careful not to be injured by broken glass pieces in case the panel breaks.
■ Heat — The product should be situated away from heat sources such as fireplaces, chimneys, radiators, heat
registers, stoves, or other products (including amplifiers) that produce heat.
■ Occasionally, a few non-active pixels may appear on the screen as a fixed point of blue, green, or red. Please
note that this does not affect the performance of your product.
■ Cautions regarding use in high- and low-temperature environments:
When the unit is used in low-temperature space (e.g., room, office), the picture may leave trails or appear slightly
delayed. This is not a malfunction, and the unit will recover when the temperature returns to normal.
Do not leave the unit in a hot or cold location. Also, do not leave the unit in a location exposed to direct sunlight
or near a heater, as this may cause the cabinet to deform and the display panel to malfunction. Storage
temperature: –4
■ Precautions when transporting the TV — When transporting the TV, be sure to always carry the TV by two people
o
F to +140o F (–20o C to +60o C).
holding it with two hands — one hand on each side of the Display.
■ Lightning — For added protection for this television equipment during a lightning storm, or when it is left
unattended and unused for long periods of time, unplug it from the wall outlet and disconnect the antenna. This
will prevent damage to the equipment due to lightning and power-line surges.
■ Power lines — An outside antenna system should not be located in the vicinity of overhead power lines or other
electric light or power circuits, or where it can fall into such power lines or circuits. When installing an outside
antenna system, extreme care should be taken to keep from touching such power lines or circuits as contact with
them might be fatal.
vi HP LCD HDTV User’s Guide
Page 7
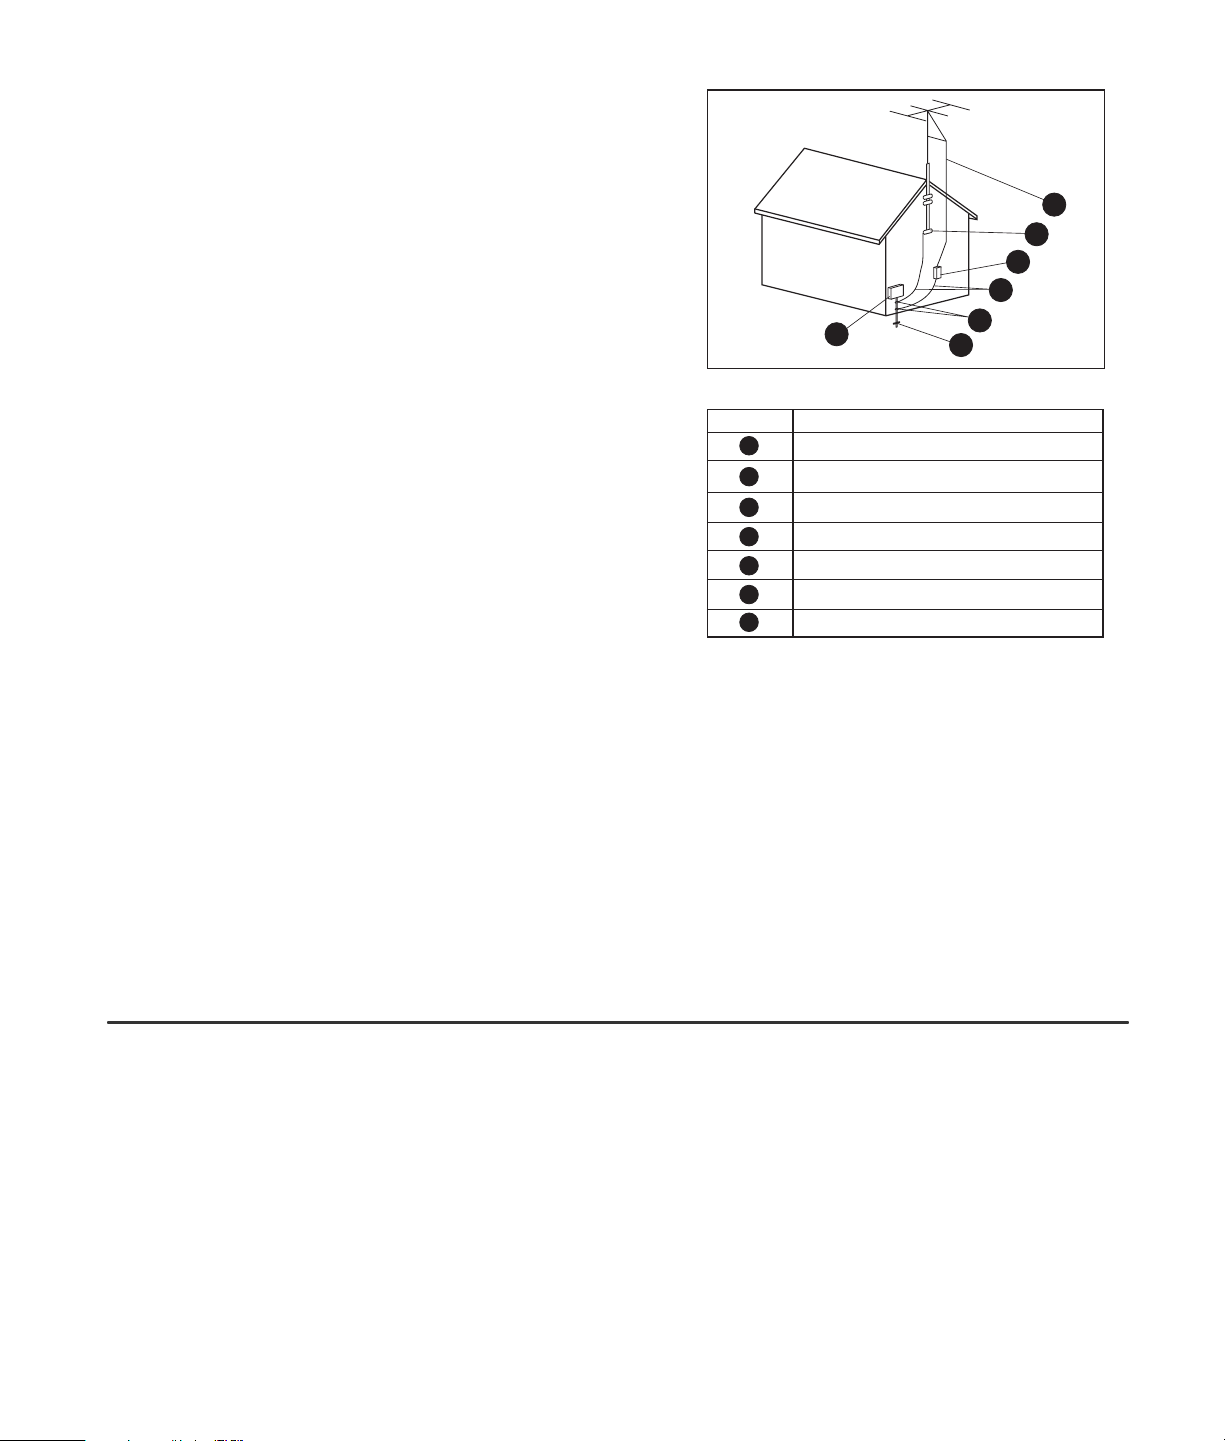
■ Outdoor antenna grounding — If an outside
antenna is connected to the television equipment,
be sure the antenna system is grounded so as to
provide some protection against voltage surges
and built-up static charges. Article 810 of the
National Electrical Code, ANSI/NFPA 70,
provides information with regard to proper
grounding of the mast and supporting structure,
grounding of the lead-in wire to an antenna
discharge unit, size of grounding conductors,
location of antenna-discharge unit, connection to
grounding electrodes, and requirements for the
grounding electrode.
■ To prevent fire, never place any type of candle or flames on the top or near the TV set.
■ To prevent fire or shock hazard, do not expose this product to dripping or splashing. No objects filled with liquids,
Antenna Grounding
Reference
1
2
3
4
5
6
7
1
Antenna Grounding
Grounding Component
Electric Service Equipment
Power Service Grounding Electrode System
(NEC Art 250, Part H)
Ground Clamps
Grounding Conductors (NEC Section 810-21)
Antenna Discharge Unit (NEC Section 810-20)
Ground Clamp
Antenna Lead in Wire
3
2
7
6
5
4
such as vases, should be placed on the product.
■ To prevent fire or shock hazard, do not place the AC power cord under the TV set or other heavy items.
■ Turn off the main power and unplug the AC cord from the wall outlet before handling.
■ Use a soft cloth and gently wipe the surface of the TV panel. Using a hard cloth may scratch the panel surface.
■ Use a soft damp cloth to gently wipe the panel when it is really dirty. (It may scratch the panel surface when
wiped strongly.)
■ If the panel is dusty, use an anti-static brush, which is commercially available, to clean it.
■ To protect the panel, do not use a dirty cloth, liquid cleaners, or chemical cloth to clean it; such materials may
damage the panel surface.
vii
Page 8

Important Information
The TV must be serviced by an authorized service
technician. The TV is not user serviceable.
Changes can damage your TV and void your
warranty. Changes or modifications not expressly
approved by the manufacturer could void the user’s
authority to operate the equipment.
Recycling Information
For information about how to recycle this product
through HP, see:
http://www.hp.com/recycle
Other recycling options may also be available in your
area. If located within the U.S. and Canada, you may
also call (1) (888) 485-1849.
Materials disposal
This HP product contains the following materials that
might require special handling at end-of-life:
■ Mercury in the fluorescent lamp in the LCD.
Disposal of mercury may be regulated because of
environmental considerations. For disposal or
recycling information, please contact your local
authorities or the Electronic Industries Alliance (EIA)
(http://www.eia.org).
Cleaning precautions
Unplug the TV before cleaning the screen.
Using solvents, such as alcohol, or abrasive material,
such as a premoistened or chemically treated towel,
may affect the TV or bezel paint.
Do not expose the product to volatile gas or fluid such
as a pesticide.
Do not put the TV in contact with vinyl or rubber
products for a long period of time. Extended contact
may result in the removal of or degradation of the
surface.
Lifting precautions
The TV is heavy; be sure to use ergonomically correct
lifting procedures when moving the TV.
Due to the size and weight of the TV, it is
recommended that a minimum of two people move it.
For transport, grasp the display in the area under and
above the screen.
Never place the display with the glass screen facing
downward, unless it is protected with pads.
viii HP LCD HDTV User’s Guide
Page 9

Table of Contents
Important Safeguards ..................................... iii
Modifications .................................................iv
Cables ..........................................................iv
Important Safety Instructions ..............................v
Important Information ....................................viii
Getting to Know Your TV................. 1
Identifying Items in the Box .................................... 2
Locating TV Buttons and Connectors........................2
Cleaning ............................................................. 6
Cleaning precautions ......................................6
Cleaning the TV.............................................. 6
Setting Up....................................... 7
Selecting a Good Location.....................................7
Unpacking..................................................... 8
Lifting the TV .................................................. 8
Attaching or removing the stand ....................... 8
Setting Up the TV.................................................. 9
Connecting the TV signal source.......................9
Connecting the cable TV or the
air antenna.................................................. 10
Connecting cable or satellite with a
set-top box................................................... 10
Connecting a DVD player, VCR, DVR,
game console, or camcorder..........................11
Connecting a VCR for recording..................... 15
Connecting an external sound system.............. 15
Connecting power to the TV........................... 16
Turning On the TV..........................17
Turning the TV On and Off (Standby) ....................17
Using the First-Time Setup
Wizard..........................................19
Initial Setup........................................................19
Using the Remote Control ..............21
Operating the TV................................................21
Using universal remote controls.......................21
Installing or replacing remote control
batteries.......................................................21
Identifying the remote control buttons...............22
Adjusting the Volume ..........................................24
Muting the sound ..........................................24
Changing the Picture Mode..................................24
Changing Channels ............................................24
Selecting the last channel...............................24
Displaying program information......................25
Selecting the Input Source....................................25
Changing the View with the Aspect Button .............25
Turning On Captions...........................................25
Setting SAP/MTS stereo mode..............................26
Changing Audio Mode........................................26
Setting the Sleep Timer ........................................26
Adjusting TV Settings...........................................26
Opening and exiting the OSD ........................26
Table of Contents
Table of Contents ix
Page 10

Changing the TV Settings...............27
Using the OSD Menus......................................... 27
Using the Picture Menu........................................ 28
Adjusting the picture settings .......................... 28
Using the Audio Menu ........................................ 29
Adjusting the audio....................................... 29
Using the Power Control Menu.............................29
Using the Setup Menu ......................................... 30
Starting EZ Setup.......................................... 30
Using CH Setup............................................ 30
Using Antenna Setup — Digital ...................... 31
Using Parental CTRL...................................... 31
Setting Input Skip.......................................... 31
Setting Position.............................................31
Setting Input Label ........................................ 31
Setting Picture Flip ........................................ 31
Setting Standby Mode................................... 32
Setting Language.......................................... 32
Using Reset.................................................. 32
Using the Option Menu ....................................... 32
Using the Digital Setup Menu............................... 33
Using Audio Setup........................................33
Selecting the view aspect .................................... 33
Using Closed Caption......................................... 34
Selecting closed caption options..................... 35
Using Parental Controls ....................................... 35
Secret number setting for parental control ........ 35
Setting the parental control
V-Chip level ................................................. 36
How to temporarily release a blocked
program...................................................... 40
Reactivating parental controls after a
temporary release......................................... 40
Finding Answers to Questions ....... 41
Understanding TV Terms......................................41
What are analog TV, digital TV, and
high-definition (HDTV)?..................................41
What is the difference between progressive
and interlaced signal formats for digital TVs? ...41
What is variable aspect ratio?........................41
What is HDMI?.............................................42
Identifying Cable Usage ......................................42
Specifications................................ 45
Troubleshooting ............................ 49
x HP LCD HDTV User’s Guide
Page 11

Getting to Know Your TV
Thank you for purchasing an HP LCD High-Definition
Television. HP’s array of high-definition televisions
delivers a world-class picture in a design that is sleek
and stylish.
Features:
■ Premium LCD panel technology that delivers a
contrast ratio of up to 1,200:1 for rich detail, and
as fast as 6 ms response time for no-smear motion
video and ultra wide viewing angles with a
minimum of color shift. HP LCD TVs deliver the
detail and color that HP is known for.
■ Fantastic sound that emanates from the integrated
speaker design, which provides 20 watts of
power. HP’s high-fidelity speaker system is
complemented by 3D surround sound audio
technology, which emulates a 5.1-channel
surround sound system for an enhanced home
theater experience.
■ A comprehensive array of digital and analog
inputs, including an integrated HDTV tuner, two
HDMI, and two component video ports. Analog
and digital audio output connectors enable
seamless connectivity to external audio speakers
or an audio receiver.
■ Dolby Digital 5.1 channel digital audio output that
enables a full home theater sound experience
when attached to an external Dolby Digital
decoder and a multi-channel amplifier.
■ A classic black-finish panel that blends with any
décor. The tabletop stand is sleek, stylish, and
detachable.
■ 3D color enrichment system that reproduces
vibrant colors and natural skin tones.
■ Photorealistic sharpness enhancement that yields
crystal-clear and sharp pictures.
■ HP Visual Fidelity technologies combine scene-by-
scene contrast adaptation with information about
your room’s ambient lighting to deliver an
optimum picture.
■ Motion adaptive noise reduction, which greatly
reduces visual noise without reducing detail.
■ Advanced scaling and film-processing technology,
which enables enjoyment of DVDs and standarddefinition TV on a big screen.
■ Integrated digital HDTV/analog tuner — for HD
shows from cable or off-the-air sources.
■ Two HDMI ports that provide digital video and
audio through a single cable.
■ Ultra-long-life panel that provides up to
60,000 hours of operation.
All specifications represent the typical specifications provided by
HP’s component manufacturers; actual performance may vary either
higher or lower.
The panel life is determined as the time at which luminance is 50%
compared to that of initial value at the typical lamp current on
condition of continuous operation at 25 +/–° C. 60,000 hours
equates to more than twenty-three years at seven hours a day
viewing.
Getting to Know Your TV
Getting to Know Your TV 1
Page 12
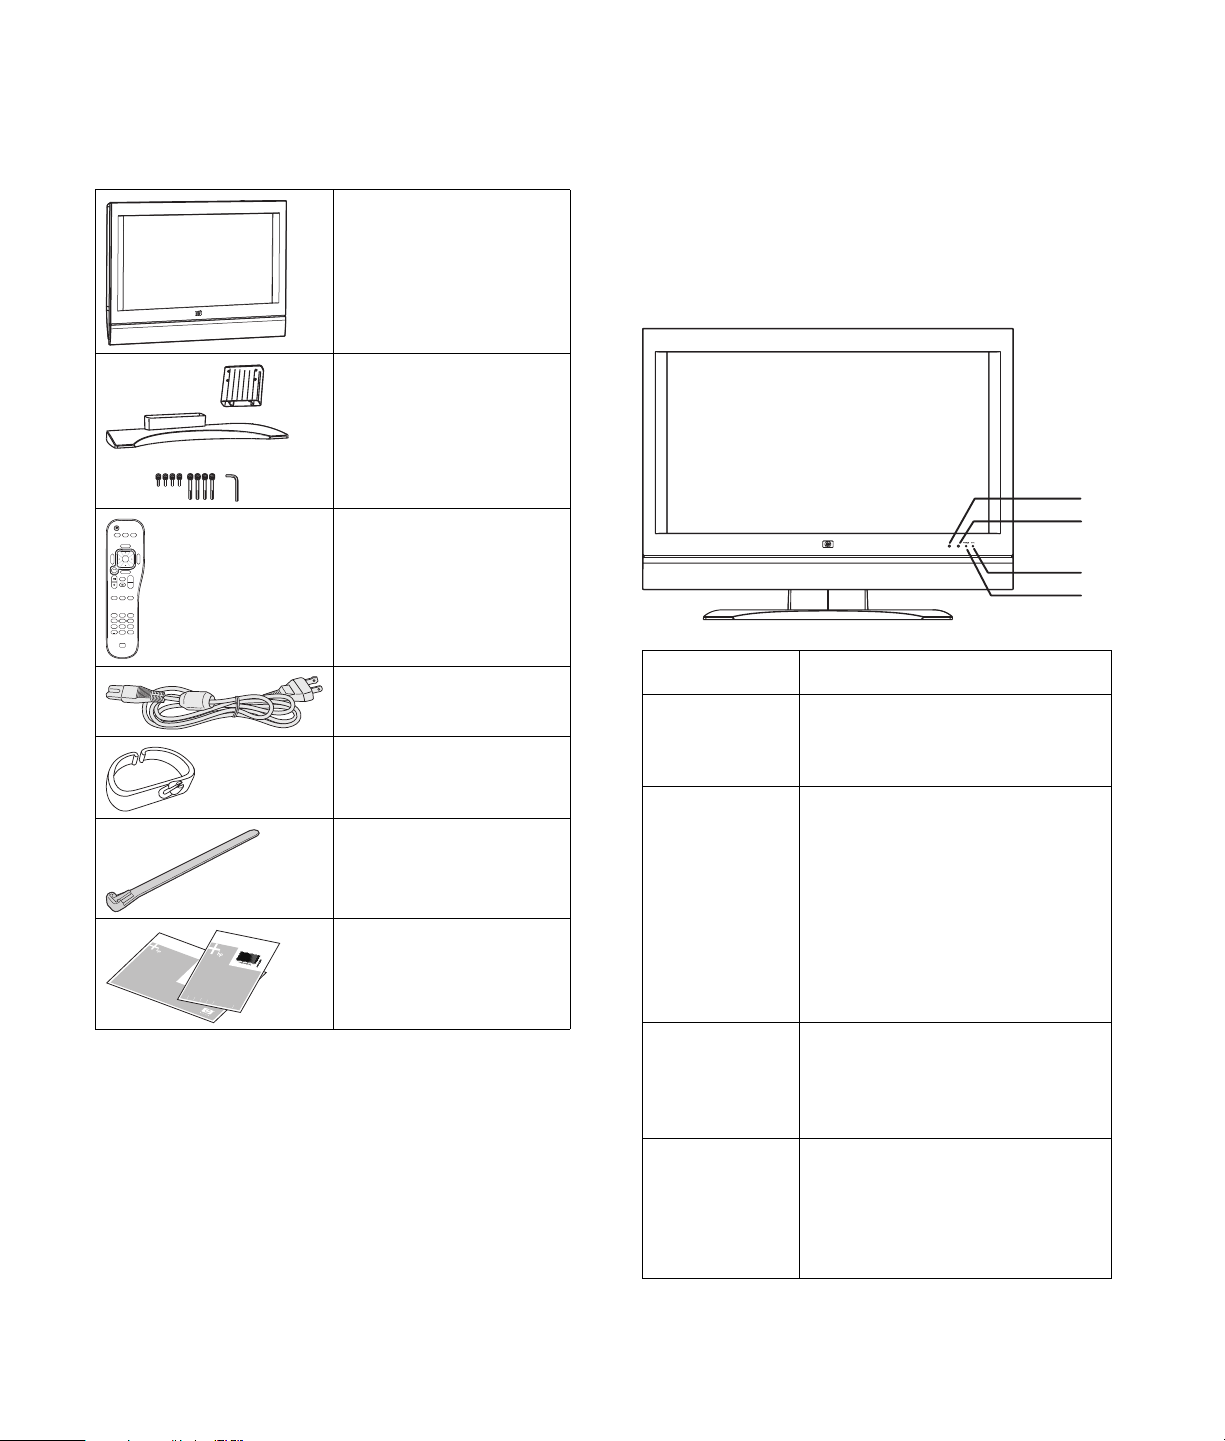
Identifying Items
Locating TV Buttons and
in the Box
SAP
Sound
Picture
MTS
Source
OK
Menu
Aspect
back
Info
Ch+
Last
Ch-
CC Sleep Ant
3
1
2
6
4
5
89
7
Enter
0
Television (with stand
detached)
TV stand (two pieces)
with mounting
hardware and tool
Remote control unit
AC cord
Cable clamp
Connectors
The TV contains controls, indicators, and connectors.
The TV indicators are located on the front of the TV,
and the controls are located on the top.
TV Front
TV front Description
A: Remote
control sensor
Remote control sensor is
the location where to point the
remote control unit.
A
B
D
C
Cable tie
Basic Se
Connect your system to the bac
Your connector locations and system components may var
tup
k panel.
y.
Documentation
2 HP LCD HDTV User’s Guide
B: OPC
sensor
C: Power
indicator
D: OPC
indicator
Optical picture control
(OPC) sensor senses the
surrounding light and
automatically adjusts the
backlight brightness. Make sure
no object obstructs the OPC
sensor, which could affect its
ability to sense surrounding
light.
Power indicator light is
green when TV is on and is off
when TV is in off/standby
mode.
OPC indicator indicates
status when the OPC is on. For
information on the OPC, refer
to “Turning On the TV” on
page 17.
Page 13
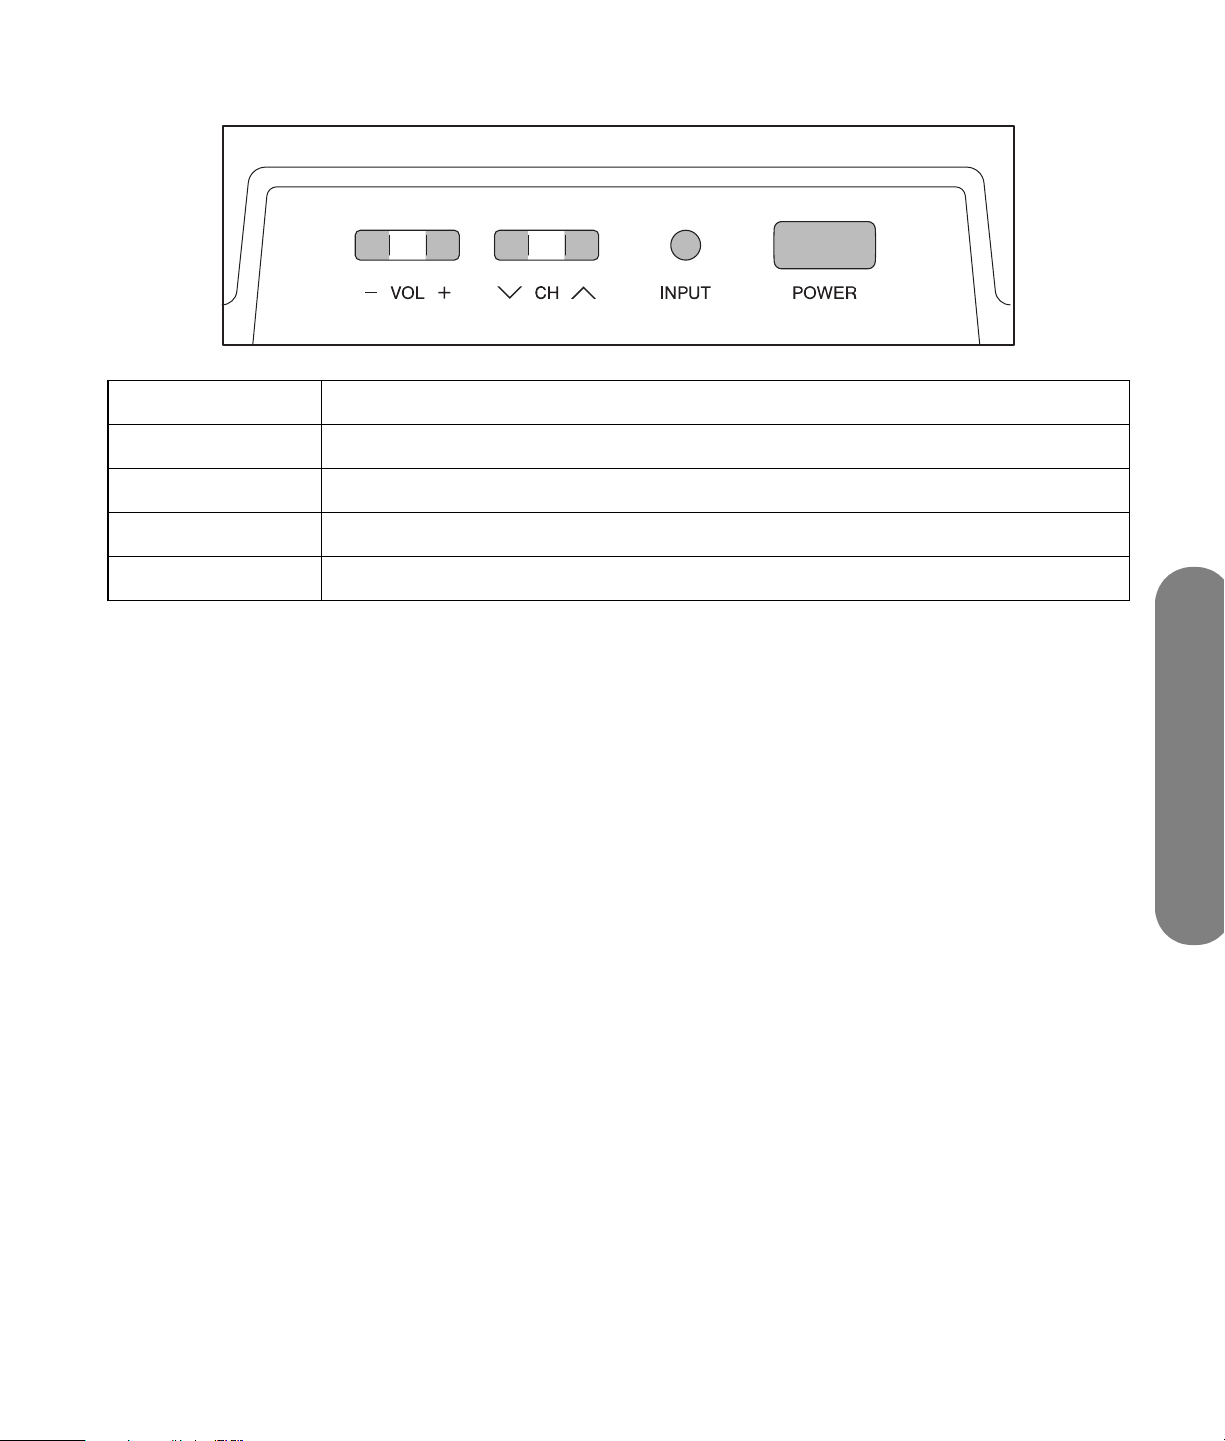
Top TV controls
TV top control Description
Vol Volume lowers or raises the sound level.
CH Channel selects the next lower or higher channel.
Input Input selects the TV input source.
Power Power turns on the TV or places it in standby mode.
Getting to Know Your TV 3
Getting to Know Your TV
Page 14
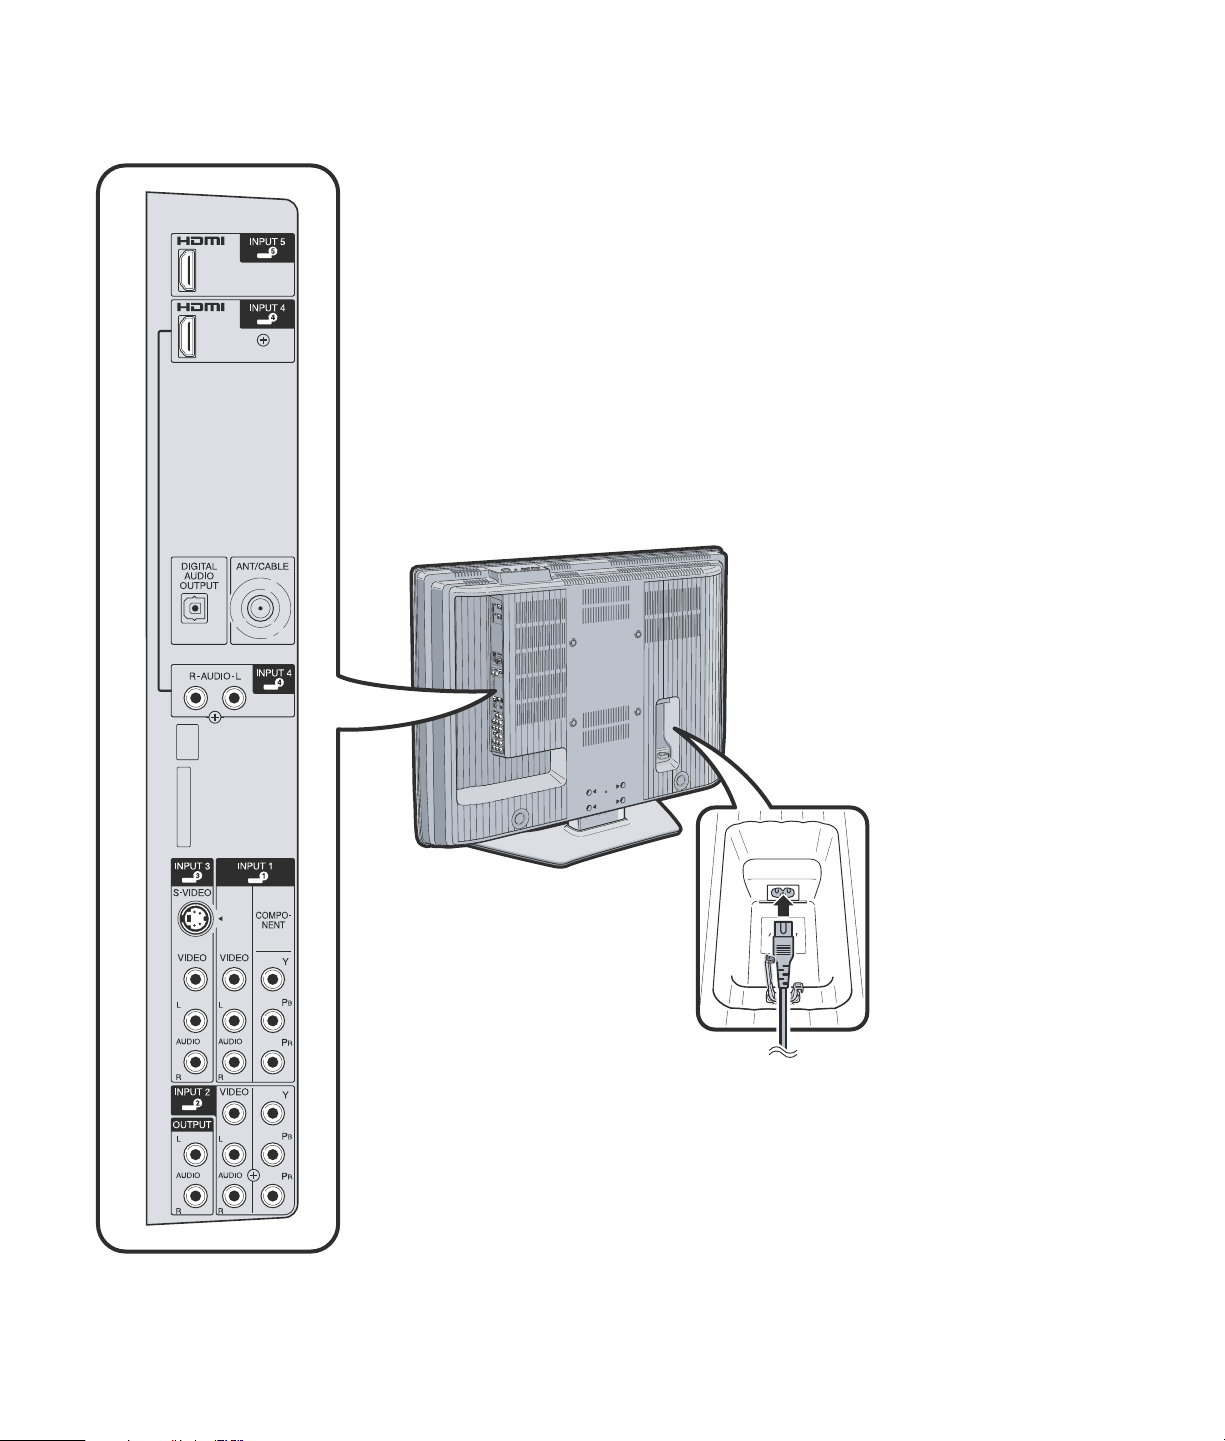
Rear TV connectors
The connectors are located on the rear of the TV.
4 HP LCD HDTV User’s Guide
Page 15
TV (rear)
connector Item name Description
■ HDMI
■ HDMI
Digital Audio
Output
Ant/Cable
Input 4 (audio)
Input 3:
■ S-video
■ Video
■ Audio L/R
■ Input 5
HDMI
■ Input 4
HDMI
■ Optical
digital
audio
output
■ TV signal
input
■ Input 4
audio
■ Input 3
Input 5 or Input 4, HDMI in: Connect an HDMI cable from optional
digital, high-definition equipment.
Use Input 4 audio R and L only when using an DVI-to-HDMI converter at
HDMI Input 4.
Digital audio output, optical: Connect an optical cable for digital
sound out to an optional external digital audio system.
Antenna or cable in: Connect a coaxial cable from an air antenna or
a cable signal source.
Input 4 audio in: Connect left and right audio cables only when using
a DVI-to-HDMI converter at HDMI Input 4.
Input 3 audiovisual in:
■ Connect an S-video cable and left and right audio cables from
optional equipment.
Or
■ Connect a composite video cable and left and right audio cables from
optional equipment.
(Audio connectors are shared.)
Input 1:
■ Component
■ Video
■ Audio L/R
Or
Input 2:
■ Component
■ Video
■ Audio L/R
Audio Output
AC In
■ Input 1
■ Input 2
■ Audio
output,
analog
■ AC power
Input 1 or Input 2 in:
■ Connect a component video cable and left and right audio cables
from optional equipment. Supports standard inputs 480i, 480p,
720p, and 1080i. Some set-top boxes must be set for a specific
resolution.
Or
■ Connect a composite video cable and left and right audio cables from
optional equipment.
(Audio connectors are shared.)
Audio output, analog: Connect left and right audio cables for analog
stereo sound out to an optional external audio system. Use the left (white)
connector for mono sound (single cable).
AC power: Connect the included power cord. NOTE: Use only the
provided power cord.
Getting to Know Your TV 5
Getting to Know Your TV
Page 16

Cleaning
Cleaning precautions
Unplug the TV before cleaning the screen.
A special antiglare coating is applied to the screen of
your TV. Using solvents, such as alcohol, or abrasive
material, such as a premoistened or chemically treated
towel, may affect the screen coating or bezel paint.
Do not expose the product to volatile gas or fluid such
as a pesticide.
Do not put the TV in contact with vinyl or rubber
products for a long period of time. Extended contact
may result in the removal of the coating or degradation
of the surface.
Cleaning the TV
Clean the screen by spraying a soft lint-free cloth with
water to lightly moisten it. Gently wipe the screen, and
avoid pressing on the screen.
To clean the outer cabinet, use the same method.
Do not use liquid or aerosol cleaners.
6 HP LCD HDTV User’s Guide
Page 17
8
Setting Up
HP recommends professional installation from an
authorized installer to ensure maximum enjoyment of
your HP LCD HDTV. Be sure to read all the safety
information and precautions before starting installation.
See these topics:
■ “Important Safeguards” on page iii.
■ “Important Safety Instructions” on page v.
Selecting a Good Location
Select the location for your HP LCD HDTV. Consider the
following situations when positioning the TV:
■ Power cord length: Choose a location with easy
access to an AC power outlet.
■ Cable lengths and distances to attached units:
Check that cables can reach the TV.
■ Do not install the TV on an unstable cart or stand;
the unit may fall over and cause injury.
■ Do not install the TV where it has a protruding
edge, such as on a small table where the display
overhangs the table surface.
■ Do not hang the TV from the ceiling; the unit may
fall and cause injury.
■ Avoid direct sunlight that may damage the display
or interfere with the operation of the remote
control.
■ Avoid areas of high humidity or damp conditions
that may cause fire or electrical shock.
■ Do not install TV near appliances, such as a
microwave, or near a heat source, such as a
fireplace or radiator.
■ Provide adequate ventilation clearance around
the TV.
■ “Important Information” on page viii.
A
B
B
C
Setting Up
A 1.4 in. (3.5 cm) minimum above TV
B 1.4 in. (3.5 cm) minimum at sides
C 1.4 in. (3.5 cm) minimum behind TV
Setting Up 7
Page 18
Unpacking
Attaching or removing the stand
Be sure to read through “Lifting the TV” for important
information.
Unpack the TV and put it on a stable surface:
1 Use the cardboard holders on either side of the TV
to remove it from the box.
2 Remove the cardboard; however, keep the
wrapping on the TV to protect it while moving.
3 Lift the TV onto the installation location.
Lifting the TV
The TV is heavy; be sure to use ergonomically correct
lifting procedures when moving the TV.
Due to the size and weight of the TV, it is
recommended that a minimum of two people move it.
To transport the TV, grasp the display in the area under
and above the screen.
Your TV comes with a stand that must be attached to
the display. Reverse these steps to remove the stand.
c
CAUTION: Use two people to assemble
the TV.
Before attaching the stand, unplug the AC cord from
the AC input.
1 Locate the TV stand (two pieces), eight screws of
mounting hardware, and tool from the box.
2 Place the base onto the pedestal, insert four short
screws, and tighten using the provided tool.
Move the product gently. Never place the TV with the
glass screen facing downward, unless it is protected
with pads.
8 HP LCD HDTV User’s Guide
3 Carefully place the TV panel with the glass screen
facing downward on a padded, stable table.
Position the bottom of the TV near the edge of the
table.
w
WARNING: Do not drop the stand onto
the TV.
Page 19

Insert the assembled stand into the opening on the
4
bottom of the TV.
5 Insert four long screws into the holes on the back
of the TV and tighten using the provided tool.
Connecting the TV signal source
w
WARNING: Before connecting the TV to any
other electronic device, unplug the TV and
electronic device AC cords from the AC
input.
The following is an explanation of the types of
connections that are used for a coaxial cable. If your
outdoor antenna uses a 75-ohm coaxial cable with an
F-type connector, plug it into the antenna/cable
terminal at the rear of the TV set.
■ A 75-ohm system is generally a round cable with
an F-type connector that can easily be attached to
a terminal without tools (sold separately).
■ A 300-ohm system is a flat, twin-lead cable that
can be attached to a 75-ohm terminal through a
300/75-ohm adapter (sold separately).
6 Carefully lift the TV and set it upright.
Setting Up the TV
Set up the TV by connecting cables and connecting the
power cord.
n
An F-type connector should be fingertightened only. When connecting the RF
cable to the TV set, do not use tools to
tighten the F-type connector, as it may
cause damage to your TV set.
C
A
B
A: 75-ohm coaxial cable, round
B: 300-ohm twin-lead cable, flat
C: F-type connector
Setting Up
Setting Up 9
Page 20

Connect the input source to the TV according to the
type of connection:
■ Antenna or basic cable (TV cable or satellite)
without using a set-top box; see “Connecting the
cable TV or the air antenna” on page 10.
■ Cable or satellite with a separate set-top box; see
“Connecting cable or satellite with a set-top box”
on page 10.
Connecting the cable TV or the
air antenna
Use standard 75-ohm coaxial cable to connect a
ground antenna or cable TV input source to the TV. Use
shielded coaxial cable to reduce radio frequency (RF)
interference.
Optional equipment, cable TV service, and all cables
are sold separately.
n
■ To connect an external sound system, see
“Connecting an external sound system”
on page 15.
■ To connect a device that records TV, see
“Connecting a VCR for recording” on
page 15.
About the Emergency Alert System (EAS)
■ In the case of a national emergency, natural
disaster, or other emergency situation, an EAS
message broadcasts. When this unit receives an
EAS message, if the level of emergency is
comparatively low, an alert text message displays
on screen. If the level of emergency is high, the
receiver is forced-tuned to a details channel.
■ Alert text messages display, and forced tuning
occurs, even during paid programming. Even
when forced tuning is active, the user can still
change the channel.
■ If the unit is forced-tuned to a channel that has
been blocked by Parental Control, the Parental
Control setting is given priority, and the EAS
message is not broadcast.
■ EAS messages may be broadcast not only through
digital cable, but also through analog cable or
over-the-air analog transmission. EAS alert
messages broadcasted through cable are not
received on this TV.
c
CAUTION: Unplug power for the TV and all
connected components before connecting
the antenna or cable.
1 Connect the input source coaxial cable to the
Ant/Cable connector on the back of the TV.
2 Connect power to the TV; see “Connecting power
to the TV” on page 16.
3 Turn on the TV; see “Turning the TV On and Off
(Standby)” on page 17.
Connecting cable or satellite
with a set-top box
Connecting your TV directly to the audio and video
output of your set-top box assures a more vivid picture
and enhances your viewing enjoyment.
Optional equipment and all cables are sold separately.
You can connect a digital TV set-top box (air or cable)
and other audiovisual equipment by using:
■ Component video and audio cables connected to
Input 1 or Input 2 connectors on the TV.
■ S-video and audio cables connected to Input 3
connectors on the TV.
10 HP LCD HDTV User’s Guide
Page 21

■ Video (composite) and audio cables connected to
Input 1, 2, or 3 connectors on the TV.
■ HDMI cable connected to Input 4 or 5 connectors
on the TV.
■ DVI video cable with a DVI-to-HDMI converter and
audio cables connected to the Input 4 (HDMI) and
audio connectors on the TV.
c
CAUTION: Unplug power for the TV and all
connected components before connecting
the set-top box.
1 Connect the set-top box input source cable(s) to
the back of the TV using one of the connector sets.
■ HDMI cable connected to Input 4 or 5
connectors on the TV.
■ DVI video cable with a DVI-to-HDMI converter
and audio cables connected to the Input 4
(HDMI) and audio connectors on the TV.
n
The Video (composite) connector in each of
the Inputs 1, 2, and 3 connector sets shares
audio connectors with the Component or
the S-video connector in the set. If cables
are connected to both video connectors in a
set, the Component or S-video connector
has priority over the Video connector.
2 Connect the cables to the set-top box.
3 Turn on the set-top box.
4 Connect power to the TV; see “Connecting power
to the TV” on page 16.
■ Component video and audio cables
connected to Input 1 or Input 2 connectors on
the TV.
■ S-video and audio cables connected to Input 3
connectors on the TV.
■ Video (composite) and audio cables
connected to Input 1, 2, or 3 connectors on
the TV.
5 Turn on the TV; see “Turning the TV On and Off
(Standby)” on page 17.
6 Open the OSD and specify settings as needed;
see “Changing the TV Settings” on page 27.
Connecting a DVD player, VCR,
DVR, game console, or
camcorder
You can connect optional equipment (sold separately),
such as a DVD player, VCR, DVR, and so on to the TV
by using the AV input connectors.
Optional equipment, including an external sound
system, and all cables are sold separately.
You can connect a DVD by using:
■ Component video and audio cables connected to
Input 1 or Input 2 connectors on the TV.
■ S-video and audio cables connected to Input 3
connectors on the TV.
■ Video (composite) and audio cables connected to
Input 1, 2, or 3 connectors on the TV.
Setting Up
Setting Up 11
Page 22

■ HDMI cable connected to Input 4 or 5 connectors
on the TV.
■ DVI video cable with a DVI-to-HDMI converter and
audio cables connected to the Input 4 (HDMI) and
audio connectors on the TV.
You can connect a VCR by using Input 3 terminals with
either S-video or composite video connections for
playback. To connect a VCR for recording, see
“Connecting a VCR for recording” on page 15.
Choosing the AV connection to use
You can connect a game console, camcorder, and
some other AV equipment by using Input 3 terminals
with either S-video or composite video connections.
You can connect HDMI equipment by using Input 4 or
Input 5 terminal with an HDMI connection.
You can connect DVI equipment by using a DVI video
cable with a DVI-to-HDMI converter and audio cables
connected to the Input 4 (HDMI) and audio connectors
on the TV.
When connecting optional equipment as signal
sources, the connectors on the equipment may limit the
type of connection you can use.
When your optional equipment has more than one
type of output connector, choose the connection that
provides the best-quality playback image.
For best results, choose the best-quality connection type
that is supported by your optional equipment.
AV connection to use, listed from best to good video playback
Connector types on
Connection description
optional equipment Cable plug
HDMI transmits an all-digital signal and is the
recommended choice for playback from a digital DVD
or DVR.
DVI transmits an all-digital video signal for playback from
a digital DVD or DVR.
(At the TV, use a DVI video cable with a DVI-to-HDMI
converter and audio cables connected to the Input 4
HDMI and audio connectors.)
Component (Y, Pb, Pr) transmits video as separate
red, green, and blue signals. Use this connection for
high-definition video signals in 480i, 480p, 720p, or
1080i format from a progressive scan DVD or other
equipment.
S-video transmits video in separate color and black-andwhite image signals and delivers a sharper image than a
composite video connection.
Composite video transmits video as a single signal.
12 HP LCD HDTV User’s Guide
Page 23

The procedures that follow, presented in the order
listed in the table, describe connecting optional
equipment, including the audio connections when
applicable.
c
CAUTION: Unplug power for the TV and all
connected components before connecting
optional equipment. Ensure that the
optional equipment is powered off.
Connecting an HDMI device
This is the recommended connection for video and
audio. The HDMI cable is sold separately.
1 Connect the HDMI cable to Input 4 or Input 5.
(There are no separate audio inputs for HDMI.)
Connecting a DVI device
The DVI cable, DVI-to-HDMI converter, and audio
cables are sold separately.
1 Connect the DVI video cable with a DVI-to-HDMI
converter and the audio cables to the DVI
equipment.
2 Connect the HDMI end of the converter to Input 4
on the TV. Connect the audio cables to the audio
connectors for Input 4 on the TV.
2 Connect the cable to the HDMI device.
3 Turn on the device, and start play.
4 Connect power to the TV; see “Connecting power
to the TV” on page 16.
5 Turn on the TV; see “Turning the TV On and Off
(Standby)” on page 17.
6 Define the HDMI Setup items in the Option menu;
refer to “Using the Option Menu” on page 32.
3 Turn on the DVI device, and start play.
4 Connect power to the TV; see “Connecting power
to the TV” on page 16.
5 Turn on the TV; see “Turning the TV On and Off
(Standby)” on page 17.
6 Define the HDMI Setup items in the Option menu;
refer to “Using the Option Menu” on page 32.
Setting Up
Setting Up 13
Page 24

Connecting a component device
Cables are sold separately.
!
Input 1 and 2 each have both Component
and Video connectors, which share L/R
audio connectors. Connect only one video
input for each input set.
1 Connect the component cable to the Component
(Y, Pb, Pr) connectors. There are two sets of
Component connectors you can use: Input 1 or
Input 2.
6 Turn on the TV; see “Turning the TV On and Off
(Standby)” on page 17.
7 Define the Input Select for the connector in the
Option menu; refer to “Using the Option Menu”
on page 32.
Connecting an S-video or video device
A VCR, game console, camcorder, or some other
audiovisual equipment can be connected using Input 3
terminals.
!
Input 3 has both S-video and Video
connectors, which share L/R audio
connectors. Connect only one video input
for Input 3.
Cables are sold separately.
1 Connect the video equipment to the Input 3
connectors:
2 Connect the component audio cable to the L/R
audio connectors for Input 1 or Input 2.
3 Connect the cables to the component device.
4 Turn on the device, and start play.
5 Connect power to the TV; see “Connecting power
to the TV” on page 16.
■ For a VCR, DVR, or other device that has an
S-video connector, use an S-video cable and
the S-video connector.
Or
■ For a VCR, DVR, or other device that has a
composite video connector, use a composite
video cable and the Video connector.
14 HP LCD HDTV User’s Guide
Page 25

Connect the audio cable connectors to the left and
2
right audio connectors for Input 3.
3 Connect the cables to the device.
4 Turn on the device, and start play.
5 Connect power to the TV; see “Connecting power
to the TV” on page 16.
6 Turn on the TV; see “Turning the TV On and Off
(Standby)” on page 17.
Connecting a VCR for recording
1 Connect the external sound system to the TV:
■ For a digital audio connection, connect an
optical cable to the Digital Audio Out
connector on the back of the TV and to an
external sound system.
The TV does not output a signal for recording.
Connect a VCR or other device for recording to the
signal source (antenna or cable), and then connect the
device to the Ant/Cable connector on the TV. See
“Connecting the cable TV or the air antenna” on
page 10. Use the recording device to tune to the
channel you want to record.
Connecting an external sound
system
You can connect an external sound system to the TV
using a digital audio or an analog audio signal:
■ Use the Digital Audio Out connector on the back
of the TV to provide a digital audio signal to an
optional external sound system, such as a digital
receiver or a surround sound system.
■ Use the Audio Out left and right connectors on the
back of the TV to provide an analog audio signal
to an optional external sound system, such as an
analog amplifier or stereo system.
Cables are sold separately.
Or
■ For an analog connection, connect audio
cables to the Audio Out left and right
connectors on the back of the TV and to an
external sound system.
2 Connect power to the TV; see “Connecting power
to the TV” on page 16.
3 Turn on the TV; see “Turning the TV On and Off
(Standby)” on page 17.
4 Connect power and turn on the external sound
system.
c
CAUTION: Unplug power for the TV and all
connected components before connecting
an external sound system. Ensure that the
external sound system is powered off.
5 Define the digital audio format in the Option
menu; refer to “Using the Option Menu” on
page 32.
Setting Up
Setting Up 15
Page 26
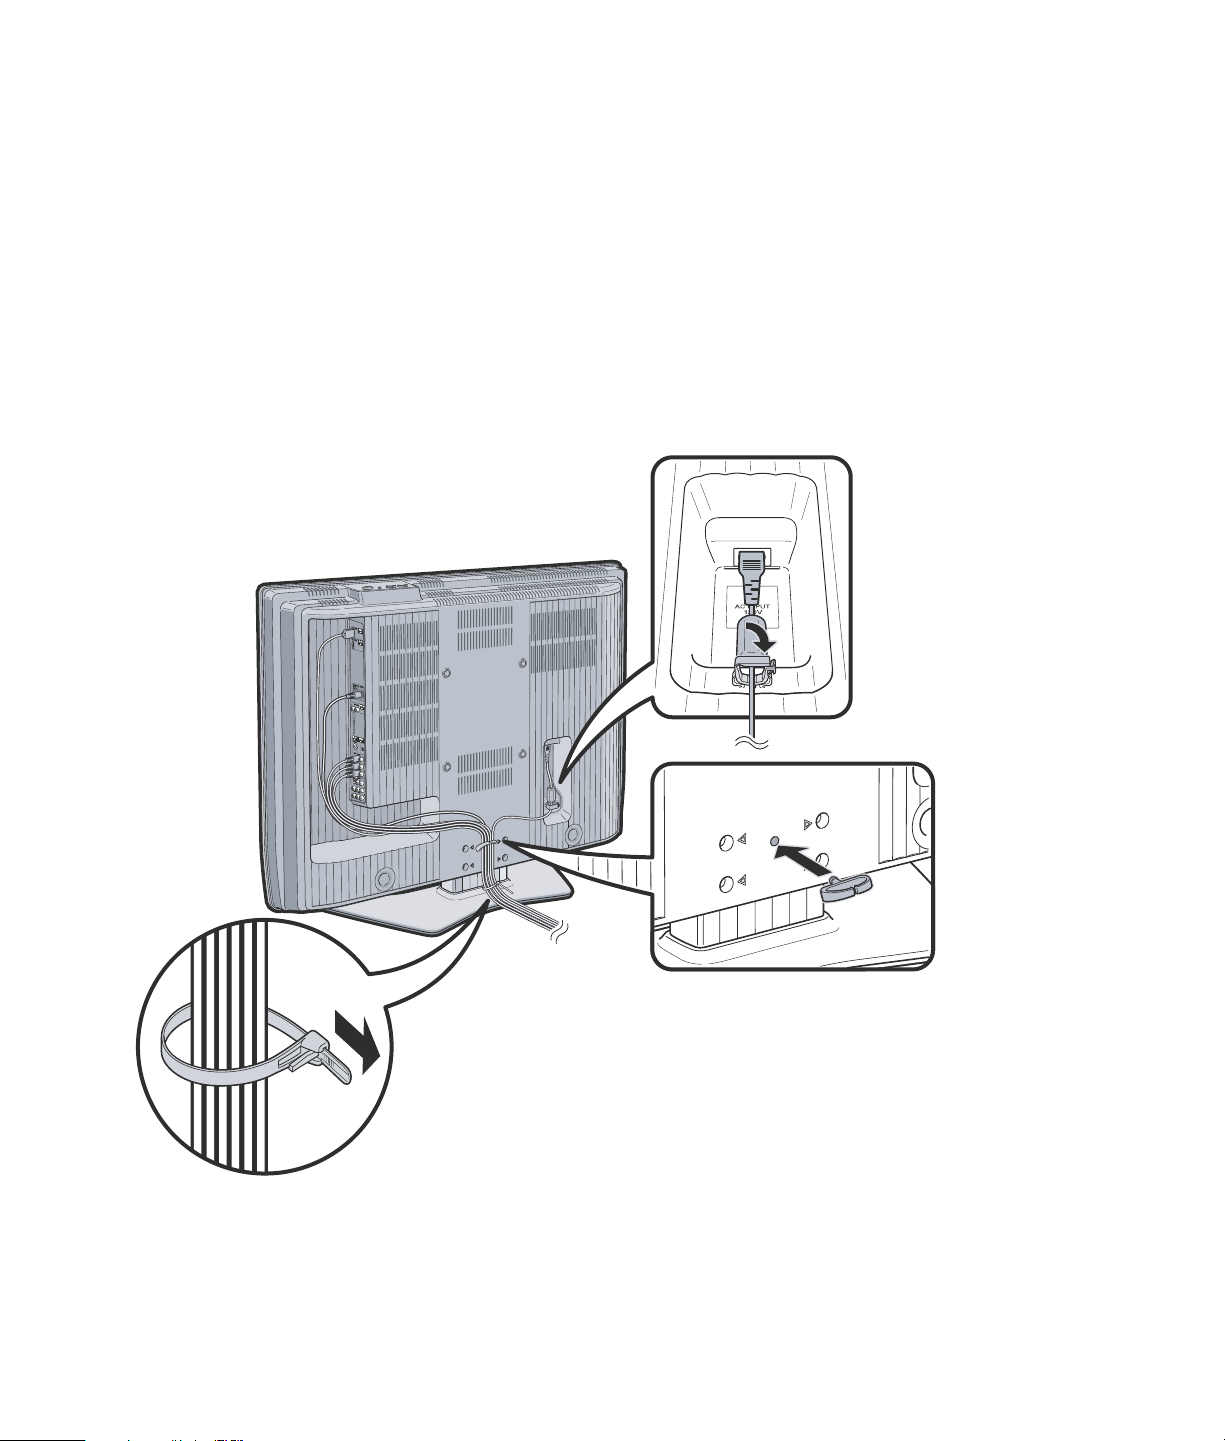
Connecting power to the TV
Use these steps to attach the cable clamp, bundle cords
with the cable clamp and the cable tie, and connect the
AC power cord.
1 Connect the power cord to the connector on the back
of the TV, and secure it in the clamp.
2 Insert the cable clamp from the box into the hole on
the back of the TV.
3 Route the cords through the cable clamp, and bundle
the cords in the cable tie from the box.
4 Connect the power cord to the AC power outlet.
16 HP LCD HDTV User’s Guide
Page 27

Turning On the TV
Turning the TV On and Off (Standby)
The TV has a Power button on the top of the display.
You can also use the remote control Power button to
turn on the TV.
Pressing the Power button either turns the TV on or
places it into standby, which is a reduced power state.
The Power indicator light on the front of the TV shows
the power status of the TV.
A
B
D
C
A: Remote control sensor
If the TV is not used for an extended period of time,
press the Power button to place the TV into standby,
and then unplug the power cord.
The optical picture control (OPC) indicator on the front
of the display shows the TV OPC status for backlight
brightness control.
Turning On the TV
OPC
indicator TV OPC status
Off OPC disabled (Off)
Lights green OPC enabled (On or On:Display)
When enabled, the OPC sensor on the front of the TV
senses the surrounding light and automatically adjusts
the backlight brightness. For more information, see
“Choosing OPC” on page 28.
Using the TV buttons
1 Press the Power button on the top of the TV.
The TV is on or in standby.
2 Press the Input button as needed to select the TV
input source to view.
B: OPC sensor
C: Power indicator
D: OPC indicator
Power indicator Power status
Off Standby (off)
Lights green Ready (on)
Turning On the TV 17
Page 28

Using the remote control buttons
1 Point the remote control at the remote control
sensor on the display, and press the remote
control Power button.
The TV is on or in standby.
2 Press the Source button as needed to select the TV
input source to view.
Source
n
The initial setup starts when the TV powers
on for the first time. If the TV has been
turned on before, the EZ setup does not
start. See “Using the First-Time Setup
Wizard” on page 19.
18 HP LCD HDTV User’s Guide
Page 29

Using the First-Time Setup Wizard
Initial Setup
When turning on the TV for the first time, it
automatically memorizes the channels where you live.
Perform the following steps before you press TV Power
on the remote control unit:
1 Insert the batteries into the remote control unit.
2 Connect the antenna cable to the TV.
3 Plug in the AC cord to the AC outlet.
Language setting
Select from among three languages: English, French,
or Spanish:
1 Press the up arrow and down arrow buttons on the
remote control to select the desired language
listed on the screen.
2 Press OK.
Standby mode setting
1 Select the standby mode setting.The default setting
is Mode 2.
■ Mode 1: Starting TV is quick from standby.
■ Mode 2: Power consumption is low when in
standby.
Language
Standby Mode
Air/Cable
CH Search
Mode 1
Mode 2
2 Press OK.
Antenna setting
1 Press the left arrow and right arrow buttons on the
remote control to select Air or Cable.
2 Press OK.
Using the First-Time Setup Wizard
Using the First-Time Setup Wizard 19
Page 30

Channel search
Example
Channel search automatically searches for a signal
from all available channels:
1 Press the left arrow and right arrow buttons on the
remote control to select Yes or No for Air Analog
& Digital, and then press the down button to move
down.
2 Press the left arrow and right arrow buttons on the
remote control to select Yes or No for Cable
Analog, and then press the down button to move
down.
3 Press the left arrow and right arrow buttons on the
remote control to select Yes or No for Cable
Analog & Digital, and then press the down button
to move down.
4 Select Search Start, and then press OK.
...
[
Setup
Setup
Setup
CH Setup
...
CH Setup
...
CH Setup
MENU
ANALOG [ ]25 [ ]20
MENU
DIGITAL [ ]25 [ ]20
MENU
DIGITAL [ ]25 [ ]25
[
[
...
CH Search
...
CH Search
...
CH Search
]
FoundAir
]
FoundAir
]
FoundCable
Air ANALOG
2
Audio : MONO
20 HP LCD HDTV User’s Guide
n
If no channel is found, check the input
connection to your TV, and run the EZ setup
again using the Setup menu; see “Starting
EZ Setup” on page 30.
Page 31

Using the Remote Control
Operating the TV
The remote control operates the
TV. To use the remote control,
point the remote control at the
remote control sensor on the
display.
30º
E
T
U
M
V
CT
I
PH
RA
R
G
E
H
W
C
P
PO
M
3
CO
P
U
6
2
ET
S
L
O
5m
V
9
5
1
E
N
D
T
I
R
W
CH
8
4
P
A
W
SA
S
T
M
R
E
0
T
7
10
EN
P
/
I
B
P
I
P
0
J
P
I
AD
P
U
N
E
P
M
E
LE
S
L
A
E
E
V
Z
E
E
R
E
J
FR
E
C
L
AD
T
I
T
P
Y
I
B
A
CH
SU
V
SPL
I
Y
D
D
L
O
D
H
R
E
CC
X
MI
G
TT
X
NDE
I
R
T
I
EX
n
Use the remote control within a distance of
16.4 feet (5 meters) from the front of the TV
remote control sensor window and at the
maximum horizontal and vertical angles of
30 degrees.
Using universal remote controls
When you want to program a universal remote control
to operate your HP TV, if HP is not listed in the
supported brand codes, use a Philips TV code. The
HP remote control transmits Philips-licensed remote
control codes.
After programming your universal remote control with
a Philips TV code, it can operate your HP TV functions
for volume, mute, power, and input source.
Installing or replacing remote
control batteries
Insert two AAA non-rechargeable batteries into the
remote control, ensuring that you place them with the
proper polarity.
1 Press and open the cover on the back of the
remote control.
2 Insert the batteries into the remote control, and
make sure that you match polarities.
3 Close the cover.
Do not mix different types of batteries together (for
example, alkaline and carbon-zinc) or old batteries
with fresh ones.
Be sure to follow the correct polarity when installing
the batteries as indicated in the battery compartment.
Reversed batteries may cause damage to the device.
When not using the remote for a long period of time,
remove the batteries to prevent damage or injury from
possible battery leakage.
Do not try to recharge batteries that are not intended to
be recharged; they can overheat and rupture. Follow
the battery manufacturer’s directions for the batteries
you are using.
Always remove batteries as soon as they become
weak. Weak batteries can leak and severely damage
the unit. The battery life depends on how much the
remote control is used. Replace batteries when remote
control operation becomes erratic.
Do not take apart the batteries, heat them, or throw
them into a fire.
Using the Remote Control
Using the Remote Control 21
Page 32

Identifying the remote control buttons
Q
Name Description Icon
A
Menu
SAP
MTS
Sound
Source
OK
Picture
Aspect
N
O
P
B
C
D
E
F
APower Press Power to turn
the TV on or off.
BSAP/MTSPress SAP/MTS to
select an available
secondary audio
program.
CSound Press Sound to select
an audio mode.
DSource Press Source to open
the input source list.
SAP
MTS
Sound
Source
Press Source again as
G
H
I
back
Last
Info
Ch+
Ch-
R
S
EMenu Press Menu to open
needed to select the
desired input source.
the onscreen display
(OSD).
Press Menu again to
exit the menu and
Menu
return to your TV
J
CC Sleep Ant
T
display.
K
1
L
M
4
7
2
5
89
Enter
0
22 HP LCD HDTV User’s Guide
FOK Press OK to choose
the current menu
OK
option.
3
6
GBack Press Back to go back
one level within a
menu.
back
HVol Press a Volume button
to raise (or lower) the
U
sound.
IMute Press Mute to turn
sound off or on.
Page 33

Name Description
(Continued)
Icon
Name Description
(Continued)
Icon
JCC Press CC to select a
closed caption mode.
KSleep Press Sleep to open
the timer; press Sleep
again as needed to
set the time: Off, 30,
60, 90, or 120
minutes.
LNumber Press number buttons
(0–9) to directly select
the channel, and then
press Enter.
M– (Dash) Press – (dash) to enter
a dash for a
subchannel number of
a digital channel. For
example, channel
14–2.
NPicture Press Picture as
needed to select the
AV mode: Standard,
Movie, Game, User,
Dynamic (fixed) or
Dynamic.
OUp/
down/
left/right
Press the arrow keys
to move the cursor in
the menu screens.
arrows
CC
Sleep
1
Picture
PAspect Press Aspect to
change the
dimensions of your
picture image. The
options depend on
the current input
source.
QInfo Press Info to view a
channel banner
containing
information on your
current program.
Press Info again to
see more information.
RLast Press Last to recall the
previous channel you
were viewing.
SCh+
Ch–
Press Ch+ (or Ch–) to
select the next higher
(or lower) channel.
TAnt Press Ant to view TV if
currently viewing
DVD or other input
source.
UEnter Press Enter after
entering a channel
number.
Aspect
Info
Last
Ch+
Ch-
Ant
Enter
Using the Remote Control 23
Using the Remote Control
Page 34

Adjusting the Volume
Changing Channels
Press the volume buttons on the remote control to
increase or decrease the sound. The indicator bar on
the TV shows the increase or decrease.
Muting the sound
1 Press the Mute button to temporarily turn off the
sound.
2 Press the Mute button again to restore the sound
back to the previous level.
Changing the Picture
Mode
Pressing the Picture button displays the AV Mode
currently selected. Keep pressing the Picture button to
change the video mode until you reach a desired
picture.
■ Standard: Good for normal viewing conditions
with normal room lighting.
■ Movie: Good for watching movies in a
darkened room.
■ Game: Good for playing games: Lowers image
brightness for easier viewing.
■ User: Displays the custom settings you configure
in the OSD. For more information on defining the
picture settings, see “Using the Picture Menu” on
page 28.
■ Dynamic (fixed): Uses factory preset values for
image and sound settings. Allows no adjustments.
■ Dynamic: Enhances contrast and sharpness for a
clear image in a well-lit room, useful for viewing
sports.
Press the Ch+ or Ch– buttons on the remote control to
change the channel up or down. The TV allows you to
select up to 135 channels (1 to 135). To select a
channel, enter a one-digit, two-digit, or three-digit
number, or use the channel up or down buttons.
To select a channel number (for example, channel 25):
Complete the following procedure within 4 seconds.
1 Press the 2 button on the remote control.
2 Press the 5 button.
3 Press Enter.
To select a subchannel number, such as 14–2,
complete the following procedure within 4 seconds:
1 Press the 1 button on the remote control.
2 Press the 4 button.
3 Press the – (dash) button.
4 Press the 2 button.
5 Press Enter.
Selecting the last channel
Press the Last button on your remote control to view the
previous channel you were viewing.
24 HP LCD HDTV User’s Guide
Page 35

Displaying program information
Pressing the Info button displays a banner with
information about the current program you are
viewing.
n
Sometimes the name of the program is not
included in the broadcast. In that case, the
program name is not displayed.
Selecting the Input
■ Smart Stretch (S.Stretch): Horizontally
stretches the TV picture, if necessary, to fill the
screen; the center of the screen has aspect
correction. Suitable for stretching normal 4:3
programs to fill the screen.
■ Zoom: Proportionally stretches the TV picture, but
clips the top and bottom of the image to fit the
screen. Eliminates black bars.
Source
1 Pressing the Source button displays the input
source.
2 Press the Source button as needed to select the
desired input source.
Changing the View with
the Aspect Button
Pressing the Aspect button scrolls through the Aspect
modes. The options depend on the current input
source.
■ Side Bar: Shows the standard 4:3 ratio picture
image in the center of the TV with dark bars on the
left and right.
■ Stretch: Shows high-definition TV in its normal
format, and standard-definition TV at full-screen
without aspect correction applied to the center of
the screen. Recommended for anamorphic
pictures.
Turning On Captions
Pressing the CC button scrolls through the closed
caption modes. With the desired option selected, press
Menu to close the menu.
To assign your preferences for captions, see “Selecting
closed caption options” on page 35.
Using the Remote Control 25
Using the Remote Control
Page 36

Setting SAP/MTS stereo
Changing Audio Mode
mode
Pressing the SAP/MTS button scrolls through the
available Secondary Audio Programs (SAP)/Multichannel Television Sound (MTS) features: STR (stereo),
SAP, or Mono.
SAP receives mono sound, stereo sound, and
Secondary Audio Programs. The MTS feature allows a
TV station to broadcast other information, such as
another language or weather information.
You can enjoy hi-fi stereo sound or SAP broadcasts
where available.
■ Stereo broadcasts
Hear programs such as live sporting events,
shows, and concerts in dynamic stereo sound.
■ SAP broadcasts
Select to hear either Main or SAP sound.
Main sound: The normal program soundtrack
(either in mono or stereo).
SAP sound: Listen to second language,
supplementary commentary, and other
information. (SAP is mono sound.)
If stereo sound is difficult to hear, obtain a clearer
sound by manually switching to fixed mono-sound
mode.
Pressing the Sound button displays the Audio menu.
Select Surround to enjoy surround sound. For more
information, see “Adjusting the audio” on page 29.
Setting the Sleep Timer
Press the Sleep button to start a timer for the TV to
automatically turn off. Press Sleep again as needed to
set the time before sleep: 30, 60, 90, or 120 minutes.
Setting the Sleep Timer to 30 means your TV
automatically turns off in 30 minutes.
To clear the timer, set the time to Off.
Adjusting TV Settings
Use the onscreen display to adjust your picture, audio,
and other settings. For more information, see “Using
the OSD Menus” on page 27.
Opening and exiting the OSD
Pressing Menu displays the OSD menu. Pressing the
Menu button again leaves the current menu and returns
you to the TV display. Pressing Back within a submenu
takes you back one menu level.
n
MTS operates only while in TV mode.
26 HP LCD HDTV User’s Guide
Page 37

Changing the TV Settings
Change the TV settings by using the onscreen display
(OSD) menus.
Using the OSD Menus
Operate the OSD menus using the buttons on the
remote control to highlight, adjust, and enter items as
described here.
Source
+
Remote
control Description
Menu Menu (Exit) displays (or closes)
the OSD.
Changing the TV Settings
Last
OK
Aspect
Info
Ch+
Ch-
Menu
back
1 Press the Source button as needed to select the
input signal source for the TV. The OSD menus
and options you see depend on the type of input
selected.
2 Open the OSD by pressing the Menu button. The
available menus appear as a list.
3 Press the direction buttons to highlight the menu
you want, and then press the OK button to
move to it.
OK OK selects highlighted item in the
OSD.
Arrow
buttons
Source Source selects the input source.
Back Back moves up (back) one item or
The Direction buttons move right,
left, up, or down in the menu or
adjusts an item.
Choose the input source before
displaying the OSD.
menu level.
4 Press the direction buttons to move within the
menu and highlight an option, and then press the
OK button to move into the option.
5 Continue using the direction buttons to highlight
and adjust an item and the OK button to enter the
change. You can press the Back button to move
out of an option or to move up one menu level.
6 When you are finished, press the Menu button to
close the menu.
Changing the TV Settings 27
Page 38

The OSD menus are:
■ Picture
■ Audio
■ Power Control
■ Setup (includes EZ Setup, channel setup, and
parental controls setup)
■ Option
■ Digital Setup
n
Make sure no object obstructs the OPC
sensor, which could affect its ability to
sense surrounding light.
Adjusting the picture settings
In the following section, a table lists each menu and
the available options.
Using the Picture Menu
The Picture menu controls the look of the image on the
screen for the selected picture mode. For example,
when you adjust Brightness, the screen image changes
as you adjust the scale.
Because the Picture menu maintains settings for each
input, select (view) the input source, and then make
Picture menu changes. The following table shows the
Picture menu.
Picture menu Options
OPC (optical picture
control)
Backlight [scale]
Contrast [scale]
Brightness [scale]
Color [scale]
Tint [scale]
Sharpness [scale]
Advanced Color Temp
Off/On/On:Display
Choosing OPC
The optical picture control (OPC) adjusts the overall
brightness of the screen.
With OPC set to Off, the brightness is fixed at the
value set in Backlight. With OPC set to On or
On:Display, the OPC sensor on the front of the TV
senses the surrounding light and automatically adjusts
the backlight brightness. On:Display also causes a
label to appear on the screen while the OPC is
adjusting the screen brightness.
Adjusting the image
These settings adjust the image you are watching, so
select the correct input source before adjusting values.
■ Backlight sets the overall screen brightness
when OPC is off.
■ Contrast sets the image contrast.
■ Brightness sets the image brightness.
■ Color sets the image color intensity.
■ Tint sets tones; decrease to make skin tones more
purple, or increase to make skin tones more
green.
■ Sharpness sets the image sharpness.
■ Advanced are individual settings; see the
following section.
Black
3D-Y/C
Monochrome
Film Mode
Range of OPC
Reset No/Yes
28 HP LCD HDTV User’s Guide
Page 39
Adjusting Advanced settings
The Advanced options depend on the input source.
■ Color Temp sets the white balance in increments
from High to Low; choose High for white with blue
tones and Low for white with red tones.
■ Black sets the viewing depth automatically by
adjusting the dark portion of an image; set to On
for high detail in black portions of the image.
■ 3D-Y/C sets the response for minimal dot crawl
and cross-color noise for video input signals from
Composite Video or Analog In. Choose Standard
for normal adjustment, Fast for a movie image, or
Slow for a still image.
■ Monochrome sets color to monochrome for
viewing video without color. Set to On for
monochrome.
■ Film mode automatically detects a film-based
source (originally encoded at 24 frames per
second), analyzes, and then recreates each still
film frame for high-definition picture quality. Set to
On for automatic conversion of a film source.
■ Range of OPC selects the image brightness
minimum and maximum range for the OPC sensor
automatic adjustments. OPC must be set to On.
Using Reset
To return all adjustment options to the factory preset
values, highlight Reset and press OK, and then
highlight Yes and press OK.
Adjusting the audio
In the Audio menu, select an item and adjust the scale
for Treble, Bass, or Balance. These options are not
selectable when Surround is set to On.
Set Surround to On to enjoy surround sound.
To control the audio output, including muting the
speakers, refer to the Output Select option in “Using
the Option Menu” on page 32.
Using Reset
To return all adjustment options to the factory preset
values, highlight Reset and press OK, and then
highlight Yes and press OK.
Changing the TV Settings
Using the
Power Control Menu
The Power Control menu sets options to allow you to
save energy by choosing to turn off the TV:
■ When there is no signal for 15 minutes.
■ When there is no operation for 3 hours.
Power control menu Options
No Signal Off Disable/Enable
No Operation Off Disable/Enable
Using the Audio Menu
The Audio menu sets the sound levels and the option
for the Surround Sound setting.
The Audio menu is not selectable when the Output
Select option in the Option menu is set to Variable.
Audio menu Options
Treble [scale]
Bass [scale]
Balance [scale]
Surround Off/On
Reset Yes/No
Changing the TV Settings 29
Page 40

Using the Setup Menu
The Setup menu options depend on the current input
source; items appear that apply for the selected input.
For example, Parental CTRL (used to select a secret
number and set the values for parental controls by TV
rating, TV content, and movie ratings) does not appear
when the selected input is Input 4 or 5 (HDMI).
Starting EZ Setup
Select EZ Setup to start the first-time setup wizard.
To start EZ Setup:
1 Press Menu on the remote control.
2 Press the up or down arrow buttons to highlight
Setup. Press OK.
Setup menu Description
EZ Setup Starts guided setup.
CH Setup Scans for channels.
Antenna
Setup — Digital
Parental CTRL Enables and defines parental
Input Skip Sets the TV to skip the HDMI
Position Adjusts image position on the
Input Label Selects a name (from a list)
Picture Flip Sets the orientation of the
Standby Mode Sets the TV mode for standby.
Language Sets the OSD language.
Reset Sets Setup options to the
Displays air-broadcasted
digital TV signal and channel
strength.
controls for TV and movies.
connectors (Input 4 or Input 5)
when selecting the input
source.
screen.
for the input source.
picture.
factory preset values. Does
not change the Channel
Setup, Parental CTRL
password, or Language
settings.
3 Highlight EZ Setup, and then press OK.
4 If you set the Secret No., enter your 4-digit secret
number. See “Secret number setting for parental
control” on page 35.
5 Follow the setup wizard instructions. For more
information, refer to “Using the First-Time Setup
Wizard” on page 19.
Using CH Setup
If the initial setup does not find all the channels, use
CH Setup to manually select the antenna and search
for each missing channel.
Setting the antenna using the Air/Cable
option
The Air/Cable option defines what type of antenna or
cable is connected to the TV input.
If channels are missing, or no channels are found after
running CH Search, check your antenna connection,
and then perform CH Setup again.
Scanning for channels using the
CH Search option
The CH Search option makes the TV look for all
channels viewable from the signal cable connected to
the TV input.
1 In the CH Search menu, highlight Yes for Air
Analog & Digital, Cable Analog, or Cable
Analog & Digital.
2 Highlight Search Start, and press OK.
30 HP LCD HDTV User’s Guide
The scan automatically searches the selected
inputs for channels.
Page 41

Removing channels using the
CH Memory option
Use the CH Memory option to remove channels from
the list of found channels. The removed channel does
not appear when using the Channel buttons.
1 Highlight CH Memory, and press OK.
2 Highlight Analog (Air), Analog (Cable),
Digital (Air), or Digital (Cable), and then
press OK.
3 Highlight the channel, and press OK.
4 Select Skip, highlight On, and press OK.
■ On skips the channel.
■ Off does not skip the channel.
Using Antenna Setup — Digital
To receive air-broadcasted digital television signals,
you need a digital antenna. You can set the antenna
configuration through the Antenna Setting screen.
Adjust for digital TV signal and channel strength using
the Antenna Setup — Digital option.
■ Signal Strength shows the current and
maximum signal strength.
■ Channel Strength, available for Digital (Air)
channels only, helps you adjust the direction of the
digital antenna.
Setting Input Skip
This option sets the TV to skip the HDMI connectors
(Input 4 or Input 5) when selecting the input source.
Setting Position
Use this Setup menu option to position the image on
the screen by setting horizontal and vertical values.
Settings depend on the input source; this option is for
AV inputs only.
Select (view) the input source before selecting the menu
option and adjusting the image position.
Setting Input Label
This option selects a name (from a list) for the input
source. You cannot change the TV label.
Setting Picture Flip
This Setup option sets the orientation of the picture.
Select (view) the input prior to setting the Picture
Flip mode.
Picture Flip mode Example
Standard (normal image)
ABC
Changing the TV Settings
Using the Channel Strength option
1 With the Antenna set (refer to “Setting the antenna
using the Air/Cable option” in the previous topic),
view the digital channel on the TV.
2 Press Menu on the remote control, and select
Channel Strength in the Setup/Antenna Setup
— Digital menu. Press OK.
3 Move or adjust the direction of the digital antenna
until you obtain the maximum signal strength.
Press OK.
Using Parental CTRL
This option defines settings for Parental Control,
including setting the Secret Number (Secret No.); refer
to “Using Parental Controls” on page 35.
Mirror (mirror image)
Upside Down (upside down
image)
Rotate (rotated image)
Changing the TV Settings 31
ABC
ABC
ABC
Page 42

Setting Standby Mode
This option sets the TV mode for standby.
Standby Mode may be set to Mode 1, which starts the
TV quickly from standby, or to Mode 2, which
conserves energy while on standby.
Setting Language
This option sets the OSD language; choose English,
French, or Spanish.
Using Reset
To return Setup options to the factory preset values,
highlight Reset and press OK, and then highlight Yes
and press OK.
Using Reset does not change the Channel Setup, the
Parental CTRL password, or the Language settings.
Using the Option Menu
The Option menu items shown depend on the current
input source:
■ HDMI Setup sets options for the device
connected to Input 4 and Input 5: Signal Type,
Audio Select, and Auto View.
HDMI
Setup Selectable items
Signal
Type
RGB/YCbCr 4:4:4/
YCbCr 4:2:2
Select the signal type from an
HDMI terminal.
■ Audio Only, when set to On, turns off the video
to the display and only audio is output. Use this
setting to hear audio only when listening to music
from a music program.
■ Digital Noise Reduction, when set to High or
Low, minimizes analog noise or interference on an
analog channel.
■ Input Select sets the default type of signal or
connectors for the device connected to Input 1 or
Input 2.
For Input 1 and Input 2, you can select Auto,
Component, or Video.
■ Output Select selects what controls the audio
output:
Fixed, the default setting, provides a constant
volume level to the Audio Out terminals, and the
speakers adjust using the Volume buttons.
Variable provides a volume level to the Audio
Out terminals controlled by the TV volume; as you
adjust the TV volume, the volume level to the
external system also adjusts. Speakers are muted.
■ Quick Shoot, when set to On, provides a
clearer image for fast-action video. If video noise
occurs, set the function to Off.
■ Caption Setup selects options for Closed
Caption; refer to “Using Closed Caption” on
page 34.
■ Color System, selects the optimum color system:
Auto, NTSC, PAL-M, or PAL-N. Choose the video
signal system compatible with your equipment.
■ Title Display Type, when set to No, does not
show program information when you change the
channel.
Auto
View
Audio
Select
Enable/Disable
Set whether or not to use Aspect
based on signal recognition,
including an HDMI signal.
Digital (HDMI)/Analog (R and L
audio)
This setting applies to Input 4
only.
32 HP LCD HDTV User’s Guide
Page 43

Using the
Selecting the view aspect
Digital Setup Menu
This menu allows you to set the Audio Setup for the
Digital Audio Output connector.
Digital Setup menu Description
Audio Setup Sets the Digital Audio
Output mode.
Using Audio Setup
The TV provides digital audio output for an AV
amplifier or similar device connected to the Digital
Audio Output terminal on the TV. Select an audio
output format compatible with the audio format of the
program you are watching and the connected
equipment.
Audio
Setup menu Description
PCM The optical output terminal
outputs audio signal in PCM
form. Choose this option when
your digital audio system does
not support Dolby Digital, or
when the source is analog, such
as from an analog channel.
For non-tuner input sources, select how the picture
appears by choosing the Aspect option. You use this
menu by pressing the Aspect button on the remote
control to change the dimensions of the picture image.
The options depend on the current input source.
■ Side Bar — shows the standard 4:3 ratio picture
image in the center of the TV with dark bars on the
left and right.
■ Smart Stretch (S.Stretch) — horizontally
stretches the TV picture, if necessary, to fill the
screen; the center of the screen has aspect
correction. Suitable for stretching normal 4:3
programs to fill the screen.
■ Zoom — proportionally stretches the TV picture,
but clips the top and bottom of the image to fit the
screen. Eliminates black bars.
Changing the TV Settings
Dolby
Digital
The optical output terminal
outputs audio signal in Dolby
Digital form from digital
programming.
■ Stretch — shows high-definition TV in its normal
format, and standard-definition TV at full-screen
without aspect correction applied to the center of
the screen. Recommended for anamorphic
pictures.
Changing the TV Settings 33
Page 44

Using Closed Caption
Your TV is equipped with an internal closed caption
decoder. It allows you to view conversations,
narration, and sound effects as subtitles on your TV.
Closed captions are available on some TV programs
and on some VHS home videotapes, at the election of
the program provider.
Digital Closed Caption service is a caption service
available only on digital TV programs (also at the
election of the service provider). It is a more flexible
system than the original closed caption system,
because it allows a variety of caption sizes and font
styles. When the Digital Closed Caption service is in
use, it is indicated by a three-letter abbreviation that
also indicates the language of the Digital Closed
Captions: ENG (English), SPA (Spanish), FRA (French),
and so on.
Not all programs and VHS videotapes offer closed
captioning. Look for the symbol to ensure that captions
appear.
n
When you have the signal source
equipment connected using an HDMI or a
component video connection, closed
caption information may not always be
available because the source equipment
may not pass the information to the TV
across these connectors.
In the closed caption system, there can be more than
one caption service provided. Each is identified by its
own number. CC1 and CC2 services display subtitles
of TV programs superimposed over the program
picture.
In the closed caption system, the Text1 or Text2
services display text that is unrelated to the program
being viewed, such as weather or news. These
services are also superimposed over the program
currently being viewed.
■ Depending on the number of caption services
in the signal being received, you see
information such as 1/2 or 1/4 displayed.
1/2 means “the first of two services.”
■ Example: If a program has three services
(Digital CC (ENG), CC1, and Text1), the
closed caption display toggles in sequence.
■ The CC button keeps a record of the last
service selected in its memory. If the last
closed caption mode you selected is not
available for the next program, or on another
channel, the closed caption service that is
available is automatically selected, and this
service appears in parentheses. Closed
caption services that appear in parentheses
are not retained in the CC button memory as
your last selected service. Only services that
you have selected with the CC button are
retained.
n
When the program contains no closed
caption, “--” displays in the closed caption
information.
If the language code, such as ENG, is not
found on digital TV programs, “--” is
shown.
All types of closed caption service (CC1,
Text1, and so on) are potentially available,
but a broadcast may contain none or only
some of these services, at the election of
the program provider.
34 HP LCD HDTV User’s Guide
The defaults for CC may be specified by the
broadcasting station.
Page 45

Selecting closed caption options
In the Option menu, select Caption Setup and press
OK. Select an option to adjust:
■ Caption Size selects a caption size.
■ Font Style selects a font style.
Font style Description
Default The font specified by the
broadcasting station or
default font.
Type 0 Proportional font used in the
Menu screen.
Type 1 Monospaced with serifs.
Type 2 Proportionally spaced with
serifs.
Using Parental Controls
Secret number setting for
parental control
Allows you to use a secret number to protect certain
settings from being accidentally changed.
!
IMPORTANT: Three conditions must be met
to enable V-Chip parental controls:
■ Secret number is entered.
■ V-Chip settings have been made.
■ Parental Control Status is set to On.
Changing the TV Settings
Type 3 Monospaced without serifs.
Type 4 Proportionally spaced
without serifs.
Type 5 Casual font type.
Type 6 Cursive font type.
Type 7 Small capitals.
■ Foreground Color selects a character
foreground color.
■ Foreground Opacity selects a foreground
opacity value.
■ Background Color selects a character
background color.
■ Background Opacity selects a background
opacity value.
■ Character Edge selects a character edge.
Setting a secret number
In the Setup menu, select Parental CTRL, Secret
No., and then enter the new 4-digit secret number by
using the 0–9 buttons on the remote control. Enter the
same digits for Reconfirm, and then press OK.
!
IMPORTANT: As a precautionary measure,
write down your secret number.
Setting parental control status
Status is used to enable or disable the parental control
function. Select On to enable and Off to disable
parental control.
!
IMPORTANT: If the TV is forced-tuned to a
channel that has been blocked by Parental
Control, the Parental Control setting is
given priority, and the EAS message is not
broadcast.
Changing the TV Settings 35
Page 46

Changing the secret number
New Secret No. in the Secret No. menu allows you to
change your current secret number.
Clearing the secret number
Secret No. Clear in the Secret No. menu allows you to
clear your secret number.
n
As a precautionary measure, make a note
of your secret number and keep it in a
familiar place.
If you lose or forget your secret number, do
these steps to clear the secret number:
a) Press Menu on the remote control to
open the OSD.
b) Press the up or down arrow buttons to
highlight Setup. Press OK.
c) Press the up or down arrow buttons to
highlight Parental CTRL, and then press
OK. (You can select EZ Setup, CH Setup,
or Reset instead of Parental CTRL.) The
Secret No. window displays.
Setting the parental control
V-Chip level
V-Chip is an electronic filtering device built into your
TV. This tool gives parents a great degree of control
over broadcasts accessed by their children. It allows
parents to select programs judged suitable for child
viewing while blocking ones judged not suitable. It
does so automatically once you activate the V-Chip
feature in your television.
V-Chip and Status are not selectable from the menu if
you do not first configure your secret number.
The U.S. has two rating systems for viewing content:
TV Parental Guidelines and movie ratings.
■ TV Parental Guidelines work in conjunction
with the V-Chip to help parents screen out
inappropriate television shows from their children.
■ Movie ratings are used for original movies
rated by the Motion Picture Association of
America (MPAA) as watched on cable TV and not
edited for television. The V-Chip can also be set to
block MPAA-rated movies.
■ The “V-Chip (DTV only)” will only be selectable
when a new rating system can be downloaded
via digital broadcasting in the U.S.
d) On the top of the TV, press and hold at
the same time both the CH^ (Channel Up)
and VOL+ (Volume Up) buttons until a
message appears on the screen.
If the secret number is cleared, the Status
setting automatically sets to Off. V-Chip
and Status are not selectable from
the menu.
36 HP LCD HDTV User’s Guide
Page 47

Voluntary movie rating system (MPAA)
To select MPAA ratings:
Select V-Chip in the Parental CTRL menu, and press
OK. Then highlight MPAA, and press OK. Adjust
the item.
The setting automatically enters Block for any ratings
below your selection.
Example: If you select PG-13, this automatically blocks
the higher ratings R, NC-17, and X.
Voluntary movie rating system (MPAA)
MPAA rating Description
G General audiences. All ages admitted.
PG Parental guidance suggested. Some material may not be suitable for children.
PG-13 Parents strongly cautioned. Some material may be inappropriate for children under 13.
Age
R Restricted. Under 17 requires accompanying parent or adult guardian (age varies in some
jurisdictions).
NC-17 No one 17 and under admitted.
X X is an older rating that is unified with NC-17 but may be encoded in the data of older
movies.
n
Voluntary movie rating system only uses
an age-based rating.
Changing the TV Settings
Changing the TV Settings 37
Page 48

TV Parental Guidelines (TV Guidelines)
To select TV Guidelines:
Select V-Chip in the Parental CTRL menu, press OK,
highlight TV Guidelines, and then press OK. Adjust
the item.
The setting automatically enters Block for any ratings
below your selection.
You can set an individual content-based rating item.
TV Parental Guidelines
FV
(Fantasy
TV Guidelines rating
TV-Y (All
Children)
violence)V(Violence)
Content
S
(Sexual
situation)
L
(Adult
language)
D
(Sexually
suggestive
dialog)
Suggested
Age
TV-Y7
(Directed to
older children)
TV-G (General
Audience)
TV-PG
(Parental
Guidance
suggested)
TV-14 (Parents
strongly
cautioned)
TV-MA (Mature
audience only)
Rating can
be set
Rating can
be set
Rating can
be set
Rating can
be set
Rating can
be set
Rating can
be set
Rating can
be set
Rating can
be set
Rating can
be set
Rating can
be set
Rating can
be set
Rating can
be set
38 HP LCD HDTV User’s Guide
Page 49

Canadian rating systems
The TV rating systems in Canada are based on the
Canadian Radio-Television and Telecommunications
Commission (CRTC) policy on violence in television
programming.
While violence is the most important content element to
be rated, the structure developed takes into
consideration other program content like language,
nudity, sexuality, and mature themes.
When setting the V-Chip on the Canadian system, you
can choose either the Canadian English ratings or the
Canadian French ratings.
Canadian English ratings
CE rating Description
E Exempt: Includes news, sports, documentaries and other information programming, talk shows,
music videos, and variety programming.
C Children: Intended for younger children under the age of 8 years. Pays careful attention to
themes that could threaten their sense of security and well-being.
C8+ Children over 8 years old: Contains no portrayal of violence as the preferred, acceptable, or
only way to resolve conflict; nor encourages children to imitate dangerous acts which they may
see on the screen.
G General: Considered acceptable for all age groups. Appropriate viewing for the entire family;
Age
PG Parental Guidance: Intended for a general audience, but may not be suitable for younger
14+ Over 14 Years: Could contain themes where violence is one of the dominant elements of the
18+ Adults: Intended for viewers 18 years and older and might contain depictions of violence, which
contains very little violence — physical, verbal, or emotional.
children (under the age of 8) because it could contain controversial themes or issues.
storyline, but it must be integral to the development of plot or character. Language usage could
be profane and nudity present within the context of the theme.
while related to the development of plot, character, or themes, are intended for adult viewing.
Could contain graphic language and portrayals of sex and nudity.
Changing the TV Settings
Changing the TV Settings 39
Page 50

Canadian French ratings
CF rating Description
E Exempt programming.
G General: All ages and children; contains minimal direct violence, but may be integrated
into the plot in a humorous or unrealistic manner.
8ans + General but inadvisable for young children: May be viewed by a wide public audience,
but could contain scenes disturbing to children under 8 who cannot distinguish between
Age
13ans + Over 13 years: Could contain frequent violent scenes and therefore recommended for
16ans + Over 16 years: Could contain frequent violent scenes and intense violence.
18ans + Over 18 years: Only for adult viewing. Could contain frequent violent scenes and
imaginary and real situations. Recommended for viewing with parent.
viewing with parent.
extreme violence.
How to temporarily release a
blocked program
When the parental controls rating censors a
broadcast, a message displays.
1 Press OK, and then the secret number setting
menu displays.
2 Enter your 4-digit secret number to temporarily
release the program block.
Reactivating parental controls
after a temporary release
You can reactivate parental controls for a temporarily
released program.
■ Select a status setting from the Parental CTRL
menu.
■ Select a V-Chip setting (MPAA, TV Guidelines,
Can. English Ratings, or Can. French Ratings)
from the Parental CTRL menu.
■ Switch off the TV power.
40 HP LCD HDTV User’s Guide
Page 51

Finding Answers to Questions
Understanding TV Terms
What are analog TV, digital TV,
and high-definition (HDTV)?
Devices such as monitors, tuners, and integrated
monitor/tuner combinations are designed to handle
any of the 18 formats officially sanctioned by the
industry-led standard setting, Advanced Television
Systems Committee (ATSC), for the digital transmission
of video signals. There are three subgroups of digital
televisions depending on their capabilities:
High-definition (HDTV), enhanced-definition (EDTV),
and standard-definition (SDTV).
In contrast, U.S. analog television has been available
for over 50 years in the single National Television
Standards Committee (NTSC) format. This is the signal
that has been broadcast over the air and through
cable systems. NTSC television offers slightly more
than 480 interlaced lines of resolution.
What is the difference between
progressive and interlaced
signal formats for digital TVs?
There are 18 standard digital TV signal formats. Each
one provides a different picture quality. Digital TV
formats are named using a number followed by either
progressive (p) or interlaced (i). The letter refers to the
way the TV uses the signals to create the picture:
■ Progressive (p) scanning presents all the
horizontal lines of the picture in one frame. This
provides a sharper picture to the eye and looks
much better than an interlaced image of the same
resolution.
■ Interlaced (i) means that the picture appears in
two segments: every other horizontal line of the
picture is displayed in one frame, and the other
half of the horizontal lines are drawn in the next
frame of the picture. This works because it
happens so fast that the eye is deceived into
believing that only one picture is being shown.
The number refers to the number of lines of resolution,
and generally the higher the number, the better the
picture. For example, with digital TV (DTV) there are
two progressive formats for broadcasters to choose
from: 480p and 720p. A 480p image is much sharper
than a regular TV broadcast, although it is only
considered a DTV signal and not a true high-definition
signal. 720p has 720 horizontal scan lines and is
considered to be true HDTV. 720p can rival a 1080i
picture, which is 1,080 horizontal scan lines displayed
as an interlaced image. This is because of the sharper
and more accurate (progressive) 720p picture, even
though a 1080i picture has many more scan lines and
a much higher resolution.
What is variable aspect ratio?
The aspect ratio describes the relationship of screen
width to screen height. Standard TV signals are based
on the aspect ratio of 4:3 (four units wide by three
units high). HDTV signals are based on the aspect ratio
of 16:9, making the image 33 percent wider than a
normal TV and allowing viewing TV and movies as if
you were watching them in a theater.
In addition, many DVDs look better on the widescreen
display because most movies made in the last 50 years
were filmed in an aspect ratio of either 1.85:1
(very close to 16:9, which is equal to 1.78:1) or
2.35:1 (even wider than 16:9).
Variable aspect ratio support enables scaling of 4:3
and anamorphic video to fill the screen.
Finding Answers to Questions
Finding Answers to Questions 41
Page 52

What is HDMI?
High-Definition Multimedia Interface (HDMI) is the first
industry-supported, uncompressed, all-digital audio/
video interface. HDMI components can transmit both
digital audio and video over a single cable with
improved quality over traditional analog connections
due to an all-digital transmission. Transferring digital
sources to display, such as DVDs and HDTV
programming, can now be done without analog
conversions that can degrade the original signal.
Identifying Cable Usage
The following section lists all of the cable types
available for the TV. It shows a side view of each with
its respective connector.
Cable type/
connection Description
RCA Red and white audio connectors connect to the red and white (L and R) audio inputs.
HDMI HDMI is capable of transmitting both uncompressed digital audio and digital video
signals because it has video, audio, and control signals.
Coaxial antenna RF used mainly for antennas. Often used with cable TV, or a cable or satellite
decoder set-top box. May be used with set-top boxes if no other choice is available.
42 HP LCD HDTV User’s Guide
Page 53

Cable type/
connection Description (Continued)
S-video Used with equipment such as DVD players, VCRs, cable or satellite tuners or
decoders, camcorders, and digital cable boxes.
Power cord Connects the TV to the power outlet.
Composite Used with equipment such as a VCR or DVD. Cable plugs into AV input or output.
Component Three- or five-headed cable: One red for Pr signal, one green for Y signal, and one
blue for Pb signal. Some component cables also come with red and white audio
cables attached. Used for HDTV receivers, DVD players, and other devices
equipped with a YPbPr component output connector.
Finding Answers to Questions
Finding Answers to Questions 43
Page 54

44 HP LCD HDTV User’s Guide
Page 55

Specifications
HP LC3760N 37-Inch (94-Centimeter) LCD High-Definition Television
Display
LCD panel 37 in. Advanced Super View and Black TFT LCD
Dimensions with stand
(h x w x d)
Dimensions without stand
(h x w x d)
Number of pixels Up to 1,049,088 color pixels
Picture resolution 1366 x 768
Brightness Up to 450 cd/m
Backlight life Up to 60,000 hours (at backlight standard position)
Viewing angles H: 176
Audio out 20 W
OSD language English/French/Spanish
Power requirement AC 120 V , 60 Hz
Power consumption 186 W
Ventilation clearance requirements 1.4 in. (3.5 cm)
28.6 in. (72.6 cm) x 37.3 in. (94.7 cm) x 12.0 in. (30.4 cm)
26.3 in. (66.7 cm) x 37.3 in. (94.7 cm) x 4.7 in. (12.0 cm)
2
o
V: 176
o
Specifications 45
Specifications
Page 56

TV function
TV standard (CCIR) American TV Standard ATSC/NTSC system
Receiving channel VHF: 2–13
UHF: 14–69
CATV: 1–135
Digital Terrestrial Broadcast (8VSB): 2–69
Digital cable (64/256 Clear-QAM): 1–135
Audio multiplex BTSC system
Rear connectors
Input 1 Component and Video input with share left and right audio
Input 2 Component and Video input with share left and right audio
Input 3 S-video and Video input with share left and right audio
Input 4 HDMI input (Type A) with HDCP, and left and right audio for
DVI-to-HDMI converter use
Input 5 HDMI input (Type A) with HDCP
Audio Out Analog left and right audio output
Digital Audio Output (optical) Digital audio optical output (PCM/Dolby Digital)
ANT (Ant/Cable) 75-ohm unbalance, F-type for antenna or cable VHF/UHF/CATV input
signals
Weight
TV (no stand) 47.18 lb. (21.4 kg)
TV with stand 52.91 lb. (24.0 kg)
46 HP LCD User’s Guide
Page 57

Accessories
In the box Documentation, remote control unit, AC cord, cable clamp, cable tie
Recommended solution additions HP Digital Entertainment Center
HP Media Center PC
HP Media Center Extender
Certification and compliance UL, C-UL, FCC, BETS-7
Warranty 1 year, parts and labor
All specifications represent the typical specifications provided by
HP’s component manufacturers; actual performance may vary either
higher or lower.
The panel life is determined as the time at which luminance is 50%
compared to that of initial value at the typical lamp current on
condition of continuous operation at 25 +/–° C. 60,000 hours
equates to more than twenty-three years at seven hours a day
viewing.
Specifications 47
Specifications
Page 58

48 HP LCD User’s Guide
Page 59

Troubleshooting
Refer to this section if you have viewing, picture, sound, remote, or startup problems with your TV.
Startup questions
Symptom Remedy
I do not hear sound at power-on
even though there is an image.
I do not see an image at power-on.
There is no power.
■ Is the volume too low? Press the Volume button.
■ Is mute turned on? Press the Mute button or the Volume button.
■ Is an external sound system connected and turned on? Are the
speakers turned off in the OSD Option menu? (See the Output Select
option in “Using the Option Menu” on page 32.)
■ Are the connections to the input signal source component correct?
Double-check that the cables are properly inserted in the color-coded
connectors.
■ Is the input source powered on? Turn on the set-top box, DVD player,
or other component you are trying to view.
■ Is the correct input signal source selected? Press the Source button on
the remote control and confirm the source is selected.
■ Press the Menu button on the remote control:
■ If the OSD appears, check the cables to the input source, and
press the Source button on the remote control to choose the input
source.
■ If the OSD does not display, see the next symptom, “There is no
power.”
■ Press the Power button on the remote control unit.
■ If the indicator on the TV is off, press the Power button on the TV.
■ Is the AC cord disconnected? Make sure both ends of the power cord
are plugged in.
■ Is there power coming from the outlet? Plug in a functional lamp or
other electrical device into the same outlet as the TV to make sure
there is power coming from the outlet.
■ If using a power strip, make sure it is turned on.
Troubleshooting
Troubleshooting 49
Page 60

Symptom (Continued) Remedy
The unit cannot be operated.
■ External influences such as lightning and static electricity may cause
improper operation. In this case, operate the unit after first turning on
the power of the TV or unplugging the AC cord and replugging it in
after 1 or 2 minutes.
The color is strange, faded, or
misaligned.
■ Adjust the picture tone.
■ Is the room too bright? The picture may look dark in a room that is
too bright.
■ Check the input signal setting.
■ If watching a component device, make sure the red, blue, and green
cables are fully inserted into the proper connectors on both ends.
The power suddenly turned off.
■ Is the sleep timer set?
■ Check the power control settings.
■ The unit’s internal temperature has increased. Remove any objects
blocking the vent, or clean the vent.
Viewing questions
Symptom Remedy
I get a poor picture with video signal
input.
Check the following: Improper control setting. Local interference. Cable
interconnections. Adjust picture control as needed. Try another location
for the TV. Be sure that all connections are secure.
There is no picture or a black screen,
and I have an external device
controlling the TV.
The picture, with a component input
source connected, is too red, blue,
or green.
50 HP LCD HDTV User’s Guide
■ Press the Source button on the remote control, and confirm the source
is selected.
■ Verify that the external device power is turned on.
■ Check to see whether the source component is connected.
■ Check the power management function. Is it in standby mode?
■ Connect the source to the TV. Operate the external device.
■ Check to make sure each cable is plugged into the correct color-
coded connector on the TV conncectors and input source connectors.
■ Make sure the cables are plugged in all the way.
Page 61

Picture quality questions
Symptom Remedy
Part of my picture is cut off, or the
picture is not centered.
My picture image is too large or
Check the position adjustment settings, and adjust the screen settings
accordingly.
Press the Aspect button on the remote control, and adjust properly.
too small.
My picture is unstable. Verify that the external device resolution setting is correct. Adjust to the
appropriate resolution.
There are bright spots on my screen. In some cases, an LCD panel may have pixels that do not operate
properly. This is common to all LCD displays used in products supplied
by all vendors and is not specific to this product.
Remote control questions
Symptom Remedy
The remote control does not work. Check the following, and try the proposed solution:
■ Batteries are inserted with polarity aligned.
■ Make sure the remote control batteries are fresh. If they are worn out,
replace the batteries with new batteries.
■ Make sure the remote control is within correct operating range.
■ Make sure the remote sensor window is not under too much light,
direct sunlight, or strong artificial light.
■ Make sure there are no obstacles; check that there is nothing between
the remote control and the sensor window on the display.
■ Make sure the remote control is aimed at your TV and is not farther
than 16.4 feet (5 meters) away.
Troubleshooting
The remote control does not control
other home entertainment equipment.
My universal remote control does not
find an HP TV code.
This is not a universal remote control. It only works with your HP
television.
When you want to program a universal remote control to operate your
HP TV, if HP is not listed in the supported brand codes, use a Philips TV
code. The HP remote control transmits Philips-licensed remote control
codes.
After you program your universal remote control with a Philips TV code,
it can operate your HP TV functions for volume, mute, power, and input
source.
Troubleshooting 51
 Loading...