

Page 1

HP Latex R Printer Series Substrate Edge
Holder Kit
User Guide
Page 2

© Copyright 2018 HP Development Company,
L.P.
Edition 1
Legal notices
The information contained herein is subject to
change without notice.
The only warranties for HP products and
services are set forth in the express warranty
statements accompanying such products and
services. Nothing herein should be construed as
constituting an additional warranty. HP shall not
be liable for technical or editorial errors or
omissions contained herein.
Page 3

Table of contents
1 Introduction ............................................................................................................................................................................................... 1
Usage considerations ............................................................................................................................................................... 1
Substrate edge holders setup ................................................................................................................................................ 1
2 Using the substrate edge holders with rigid substrates ..................................................................................................................... 4
How to install shims ................................................................................................................................................................. 4
How to position the edge holders .......................................................................................................................................... 7
Install the edge holders ........................................................................................................................................................ 10
Uninstall the edge holders .................................................................................................................................................... 15
3 Using the substrate edge holders with exible substrates ............................................................................................................. 18
Install the edge holders ........................................................................................................................................................ 18
Uninstall the edge holders .................................................................................................................................................... 20
4 Main maintenance tasks ........................................................................................................................................................................ 23
Replace a strap ....................................................................................................................................................................... 23
Replace part of an edge holder ............................................................................................................................................ 23
ENWW iii
Page 4

iv ENWW
Page 5

1 Introduction
Usage considerations
Once the substrate edge holders are installed on the printer, the maximum width of the loaded substrate (rigid or
exible) is as follows:
● HP Latex R2000: 2425 mm (95.5 in)
● HP Latex R1000: 1532 mm (60.3 in)
IMPORTANT: To use substrate of this maximum width, you must raise the left and right alignment bars.
The maximum thickness of the substrate is 18 mm (0.7 in).
HP strongly recommends that you clean the edge holders regularly.
Substrate edge holders setup
The purpose of the substrate edge holders is to prevent the substrate edges from lifting up and jamming while
printing. If you experience this kind of problem while printing, you can try using the edge holders to overcome it.
The substrate edge holders are provided already assembled for use with exible substrates. If you intend to use
rigid substrates, you must install the central modules suitable for rigid substrates.
See a video of edge holders setup and usage at http://www.hp.com/go/latexRseries/use_edge_holders.
ENWW Usage considerations 1
Page 6
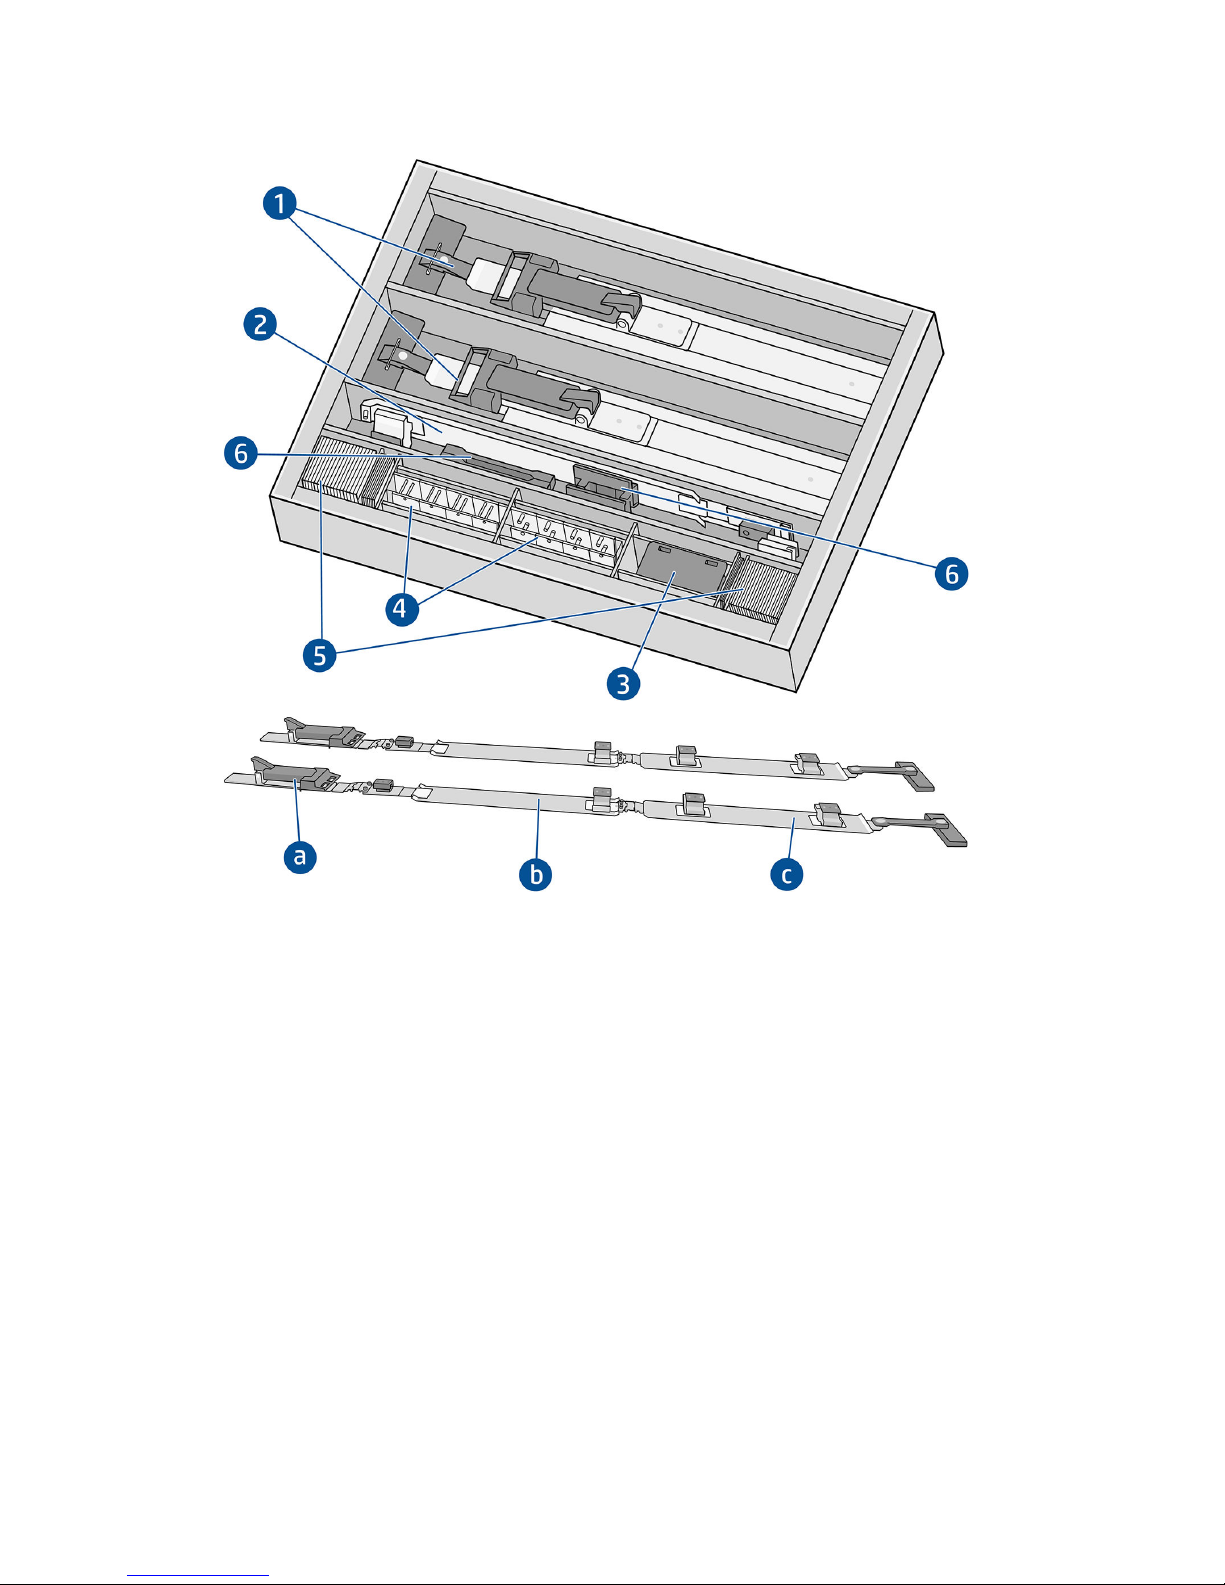
Contents of the kit
1. Substrate edge holders assembled for exible substrates:
a. Input module
b. Central module for exible substrates
c. Output module
2. Central modules for rigid substrates (2)
3. Alignment-bar extenders (4)
4. Bases for shims
5. Shims
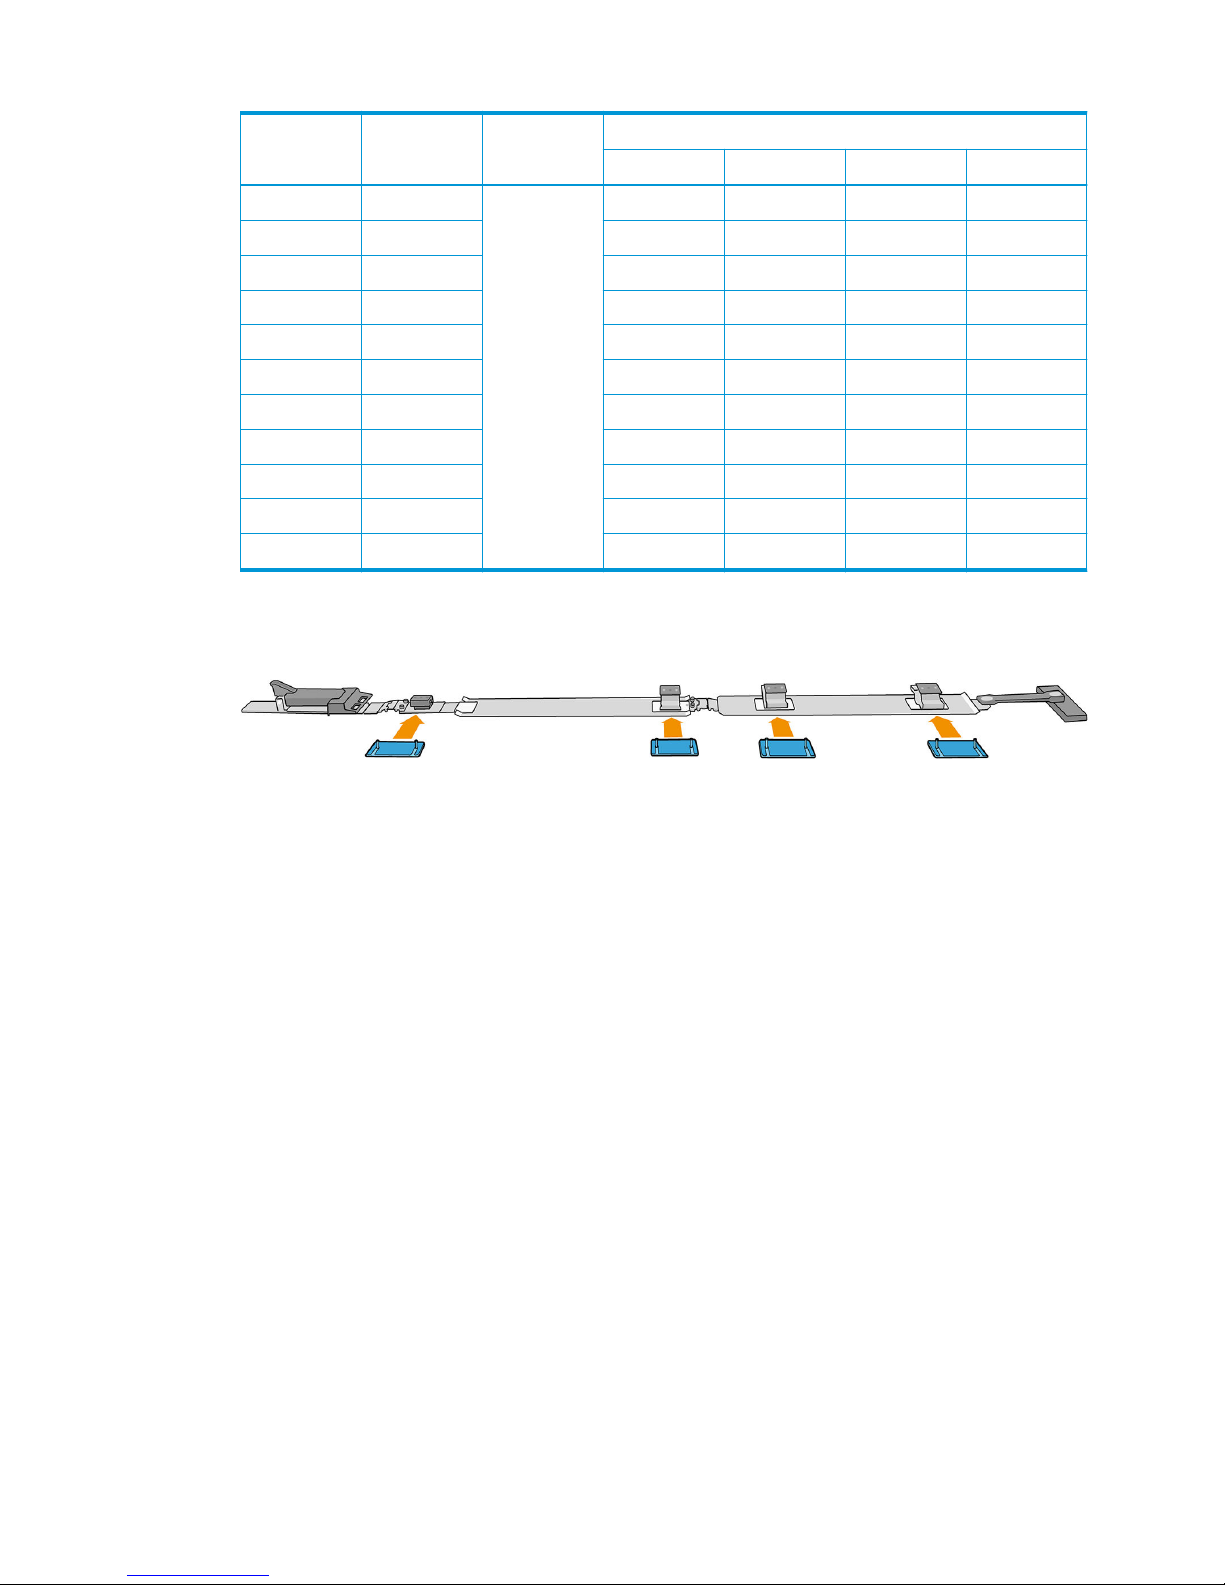
6. Extra straps
7. Back ends (2)
Setup procedure
The edge holders must be assembled before use.
2 Chapter 1 Introduction ENWW
Page 7
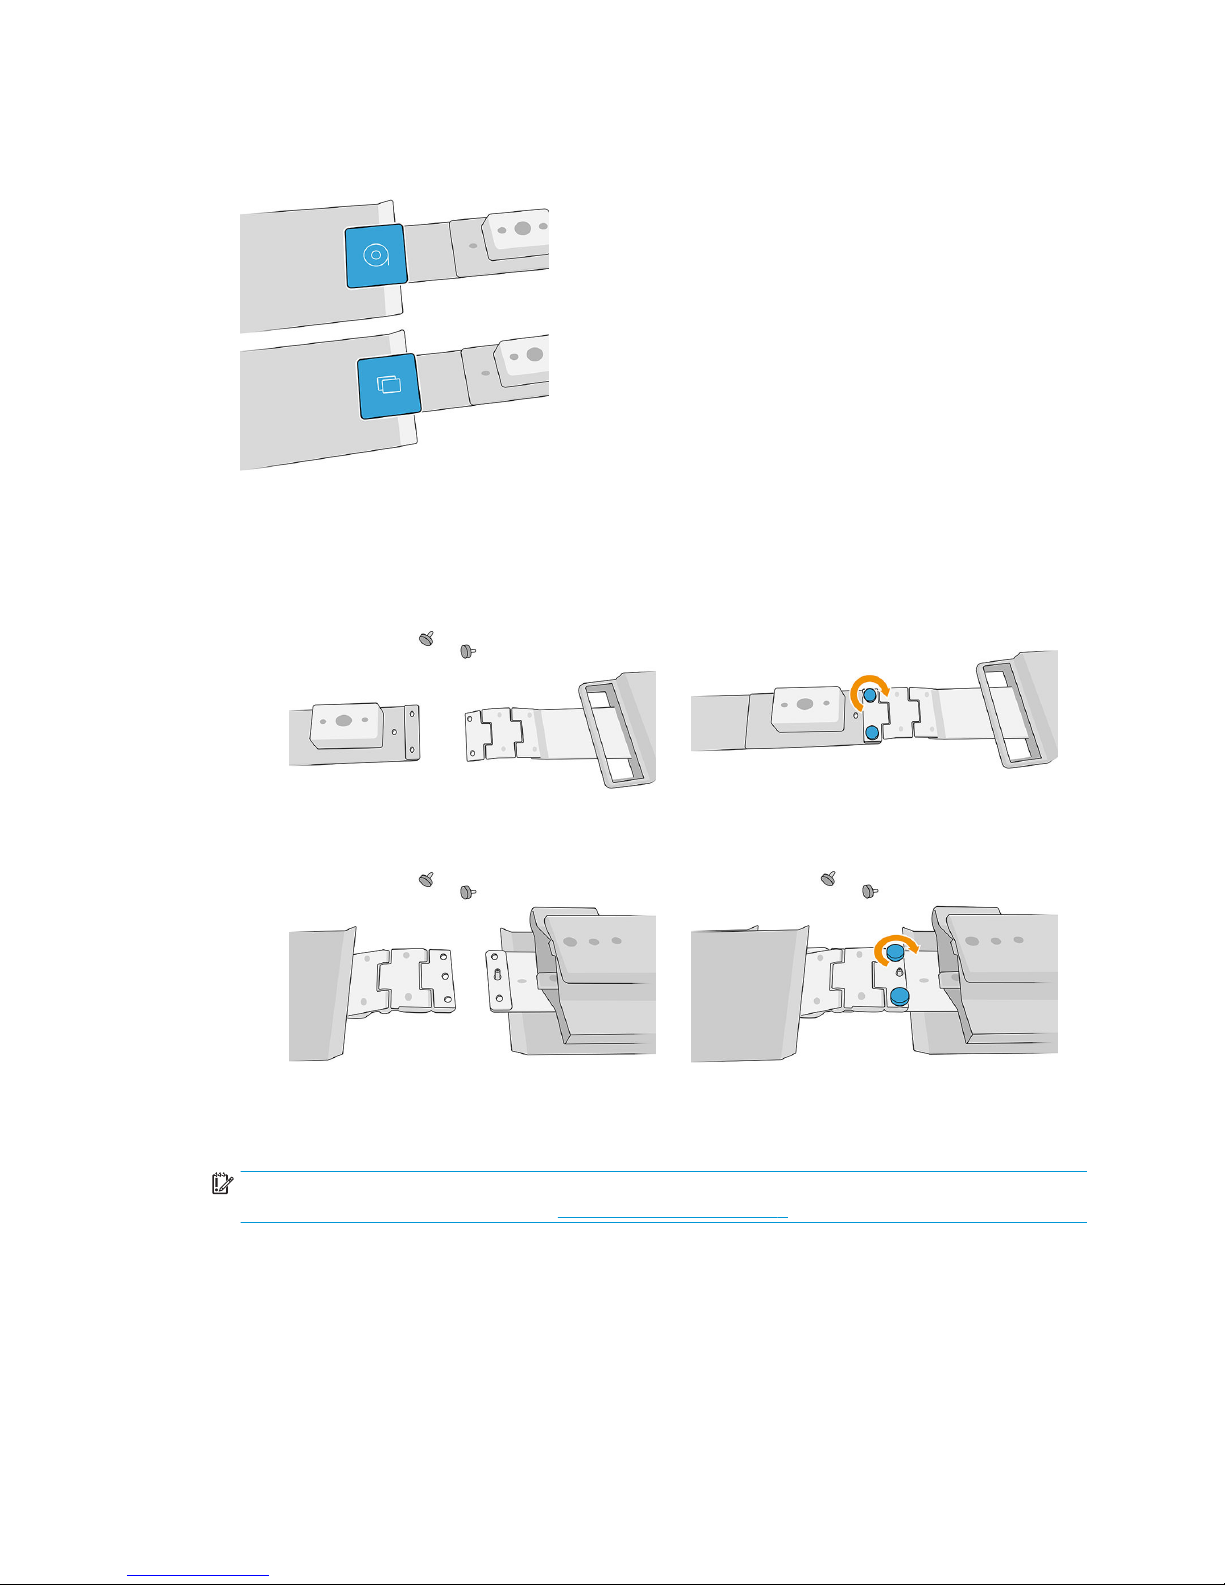
The parts shown in the illustrations are provided in the substrate edge holder kit. The print-zone module should
be chosen according to the intended use, for exible or rigid substrate. Look at the icon on each print-zone
module to identify the type of substrate for which it is intended.
To assemble the edge holders, look for a at surface on which to place the parts. Decide whether you will use the
exible or rigid print-zone module.
1. Take one input module and unfold the hinge.
2. Overlap the input module and attach the two parts with the screws provided.
3. Repeat the operation at the other end of the print-zone module, to attach it to the output module.
4. Repeat both operations to assemble the second edge holder.
Once the edge holders are assembled, they can be kept in the box provided, you have only to remove the foam.
IMPORTANT: If you are working with rigid substrates, there are shims to be installed on the edge holders that
help you to handle thicker substrates. See How to install shims on page 4.
ENWW Substrate edge holders setup 3
Page 8

2 Using the substrate edge holders with rigid
substrates
How to install shims
Shims are provided with the substrate edge holders kit so that the edge holders can accommodate thicker rigid
substrates.
Before installing the shims, rst decide on the height that the edge holders will need, depending on the thickness
of the substrate. There is a base to which shims are added to reach the required height. Use the table below to
decide which base and which shims you will need.
Substrate
thickness (mm)
Edge holder
height (mm) Type of base
Shim thickness
0.5 mm 1 mm 3 mm 5 mm
2.1–2.5 2.5 Up to 9.5 mm
2.6–3.0 3.0 1
3.1–3.5 3.5 1
3.6–4.0 4.0 1 1
4.1–4.5 4.5 2
4.6–5.0 5.0 1 2
5.1–5.5 5.5 1
5.6–6.0 6.0 1 1
6.1–6.5 6.5 1 1
6.6–7.0 7.0 1 1 1
7.1–7.5 7.5 1
7.6–8.0 8.0 1 1
8.1–8.5 8.5 2
8.6–9.0 9.0 1 2
9.1–9.5 9.5 1 2
9.6–10.0 10.0 Above 9.5 mm 2
10.1–10.5 10.5 1 2
10.6–11.0 11.0 1 2
11.1–11.5 11.5 1 1 2
11.6–12.0 12.0 1 1
12.1–12.5 12.5 1 1 1
4 Chapter 2 Using the substrate edge holders with rigid substrates ENWW
Page 9
Substrate
thickness (mm)
Edge holder
height (mm) Type of base
Shim thickness
0.5 mm 1 mm 3 mm 5 mm
12.6–13.0 13.0 3
13.1–13.5 13.5 1 3
13.6–14.0 14.0 2
14.1–14.5 14.5 1 2
14.6–15.0 15.0 1 2
15.1–15.5 15.5 1 1 2
15.6–16.0 16.0 2 2
16.1–16.5 16.5 1 2 2
16.6–17.0 17.0 1 2
17.1–17.5 17.5 1 1 2
17.6–18.0 18.0 1 1 2
Install the base and the shims at all points shown in the illustration below: two assemblies at the central module
and two more at the output module.
Installation process
1. Calculate the required height and take the base and shims that you need.
ENWW How to install shims 5
Page 10

2. Attach the assembly (base and shims) to the bottom of the edge holder.
IMPORTANT: The shims should be aligned with each other.
3. On top of the edge holder, fasten the assembly in place.
Repeat wherever shims need to be installed.
IMPORTANT: When the required height is up to 9.5 mm, screws should be installed from above; when the
required height is above 9.5 mm, screws should be installed from below, as shown below.
6 Chapter 2 Using the substrate edge holders with rigid substrates ENWW
Page 11

Above 9.5 mm in height
How to position the edge holders
There are two ways to position the edge holders, described below. For the detailed process of edge-holder
assembly, see Substrate edge holders setup on page 1.
Using the Internal Print Server
1. In the Internal Print Server, tap the Substrate widget.
ENWW How to position the edge holders 7
Page 12

2. Set the size and position of the sheet manually.
3. You will see in the preview window a representation of the substrate, outlined with discontinuous lines.
8 Chapter 2 Using the substrate edge holders with rigid substrates ENWW
Page 13

4. Enable the edge holders for rigid substrate.
5. The edge holders appear in the preview window, with an indicator showing their position on the ruler. Place
the edge holders accordingly on the substrate-advance belt.
Using the left edge holder as a reference
1. Place the left edge holder where you want it. See the installation chapter for more information.
2. When you have installed the left edge holder, install the right edge holder as follows:
● Place the right edge holder at the width of the substrate plus 60 mm (2.4 in).
IMPORTANT: Measurements should be made using the ruler built into the printer.
● Alternatively, place the substrate on the belt, level with the left edge holder, and install the right edge
holder level with the substrate. Once installed, move the right edge holder 20 mm (0.8 in) to the right.
IMPORTANT: Measurements should be made using the ruler built into the printer.
ENWW How to position the edge holders 9
Page 14

Install the edge holders
1. In the Internal Print Server, tap Topmost in the Scan Beam menu. This moves the scan-axis beam and the
curing module to their highest positions.
10 Chapter 2 Using the substrate edge holders with rigid substrates ENWW
Page 15

2. In the Edge Holders menu, tap the substrate type that you intend to use. In this case, rigid substrate.
TIP: The Internal Print Server will suggest the correct position of the edge holders based on the position
of the substrate, if loaded or congured.
ENWW Install the edge holders 11
Page 16

3. Add the height of the edge holders (do not confuse it with the substrate thickness). See How to install
shims on page 4 for more information.
4. Standing at the input side of the printer, unfold and place the edge holder onto the substrate-advance belt
going through the print zone to the output side of the printer.
5. Remaining at the input side of the printer, place the edge holder locator against the ruler. The Internal Print
Server suggests where to place the edge holders.
IMPORTANT: If you install them in a place other than that suggested by the Internal Print Server, note the
location on the ruler, as you will need it when installing the edge holders on the output side of the printer.
TIP: The space between the substrate and the edge of the edge holder should be 10 mm (0.39 in).
12 Chapter 2 Using the substrate edge holders with rigid substrates ENWW
Page 17

6. At the output side of the printer, install the back end at the ruler, inserting it by the edge and sliding it to the
correct position: that suggested by the Internal Print Server, or the same position that you used on the
input side of the printer.
7. Pull the handle and insert it into the back end. Visually check through the print zone that the edge holders
are straight when pulling the handle.
8. Take the alignment-bar extenders and install them on the alignment bar. Here is the installation process in
detail:
a. Insert the anges at the bottom edge of the alignment bar, then press at the top against the
extension bar.
ENWW Install the edge holders 13
Page 18

b. Place two of the alignment-bar extenders at the edges of the alignment bar.
c. Place two more alignment-bar extenders between each pair of edge holders that are going to be
used.
IMPORTANT: Do not place the extenders over the large holes in the alignment bar.
If an edge holder is at the edge of the alignment bar, then you do not need to place an extender at this
edge.
If the edge holders are placed at the edges of the substrate-advance belt due to the size of the substrate,
install only two alignment-bar extenders as shown below.
14 Chapter 2 Using the substrate edge holders with rigid substrates ENWW
Page 19

The above illustrations may also help you to install the alignment-bar extenders when using the edge
holders in multi-sheet printing.
NOTE: The complete set of these features will be available by the end of 2018.
9. Load the substrate between the edge holders, leaving a 10 mm (0.39 in) space between the substrate and
each edge holder.
You can now load and print as usual.
Uninstall the edge holders
1. In the Internal Print Server, tap Topmost in the Scan Beam menu. This moves the scan-axis beam and the
curing module to their highest positions.
ENWW Uninstall the edge holders 15
Page 20

2. At the output side of the printer, unhook the handle from the back end.
3. Go to the input side of the printer, pull the edge holder from the locator, and fold it as it comes out of the
print zone.
4. Uninstall the alignment-bar extender from the alignment bar. Remove it rst from the top edge, then from
the bottom.
16 Chapter 2 Using the substrate edge holders with rigid substrates ENWW
Page 21

5. In the Internal Print Server, tap the no-edge-holders option.
When you have uninstalled the edge holders, you can resume printing as normal.
ENWW Uninstall the edge holders 17
Page 22

3 Using the substrate edge holders with exible
substrates
Install the edge holders
IMPORTANT: You must load the substrate into the printer, and advance it as far as the curing module, before
installing the edge holders.
1. In the Internal Print Server, tap Topmost in the Scan Beam menu. This moves the scan-axis beam and the
curing module to their highest positions.
2. In the Edge Holders menu, tap the substrate type that you intend to use. In this case, exible substrate.
18 Chapter 3 Using the substrate edge holders with exible substrates ENWW
Page 23

3. Standing at the input side of the printer, unfold and place the edge holder onto the substrate-advance belt
going through the print zone to the output side of the printer.
4. Remaining at the input side of the printer, place the edge holder locator against the ruler. The Internal Print
Server suggests where to place the edge holders.
TIP: The space between the substrate and the edge of the edge holder should be 10 mm (0.39 in).
ENWW Install the edge holders 19
Page 24

5. At the output side of the printer, install the back end at the ruler, inserting it by the edge and sliding it to the
correct position: that suggested by the Internal Print Server, or the same position that you used on the
input side of the printer.
6. Pull the handle and insert it into the back end. Visually check through the print zone that the edge holders
are straight when pulling the handle.
7. In the same way, install the other edge holder on the other side of the substrate.
You can now print as normal.
Uninstall the edge holders
1. In the Internal Print Server, tap Topmost in the Scan Beam menu. This moves the scan-axis beam and the
curing module to their highest positions.
20 Chapter 3 Using the substrate edge holders with exible substrates ENWW
Page 25

2. At the output side of the printer, unhook the handle from the back end.
3. Go to the input side of the printer, pull the edge holder from the locator, and fold it as it comes out of the
print zone.
ENWW Uninstall the edge holders 21
Page 26

4. In the Internal Print Server, tap the no-edge-holders option.
When you have uninstalled the edge holders, you can resume printing as normal.
22 Chapter 3 Using the substrate edge holders with exible substrates ENWW
Page 27

4 Main maintenance tasks
Replace a strap
The edge-holder straps must be replaced if broken or damaged.
1. Remove the two screws, then remove the strap from the edge holder.
IMPORTANT: Keep the screws and washers.
2. Take the new strap and install it using the removed screws and washers.
IMPORTANT: Only one of the two holes in the strap has a bushing. This is the one that should be attached
to the handle.
Replace part of an edge holder
Any parts of an edge holder that are broken or damaged should be replaced.
To install a new part, see Substrate edge holders setup on page 1.
ENWW Replace a strap 23
 Loading...