

Page 1

HP df750 Series
Digital Picture Frame
Cadre Photo Numérique
Marco de Fotos Digital
User Manual
Manuel de l’utilisateur
Manual del Usuario
Revision 1.0a
Page 2

FCC Compliance Statement
Note: This equipment has been tested and found to comply with the
limits for a Class B digital device, pursuant to Part 15 of the FCC Rules.
These limits are designed to provide reasonable protection against
harmful interference in a residential installation. This equipment
generates, uses, and can radiate radio frequency energy and, if not
installed and used in accordance with the instructions, may cause
harmful interference to radio communications. However, there is no
guarantee that interference will not occur in a particular installation.
If this equipment does cause harmful interference to radio or television
reception, which can be determined by turning the equipment off and
on, the user is encouraged to try to correct the interference by one of
the following measures:
• Reorient or relocate the receiving antenna.
• Increase the separation between the equipment and receiver.
• Connect the equipment into an outlet on a circuit different from that
to which the receiver is connected.
• Consult the dealer or an experienced radio/TV technician for help.
FCC Caution: To assure continued compliance, (example – use only
shielded interface cables when connecting to computer or peripheral
devices). Any changes or modifications not expressly approved by
the party responsible for compliance could void the user’s authority to
operate this equipment.
This device complies with Part 15 of the FCC Rules. Operation is
subject to the following two conditions: (1) this device may not cause
harmful interference, and (2) this device must accept any interference
received, including interference that may cause undesired operation.
Page 3
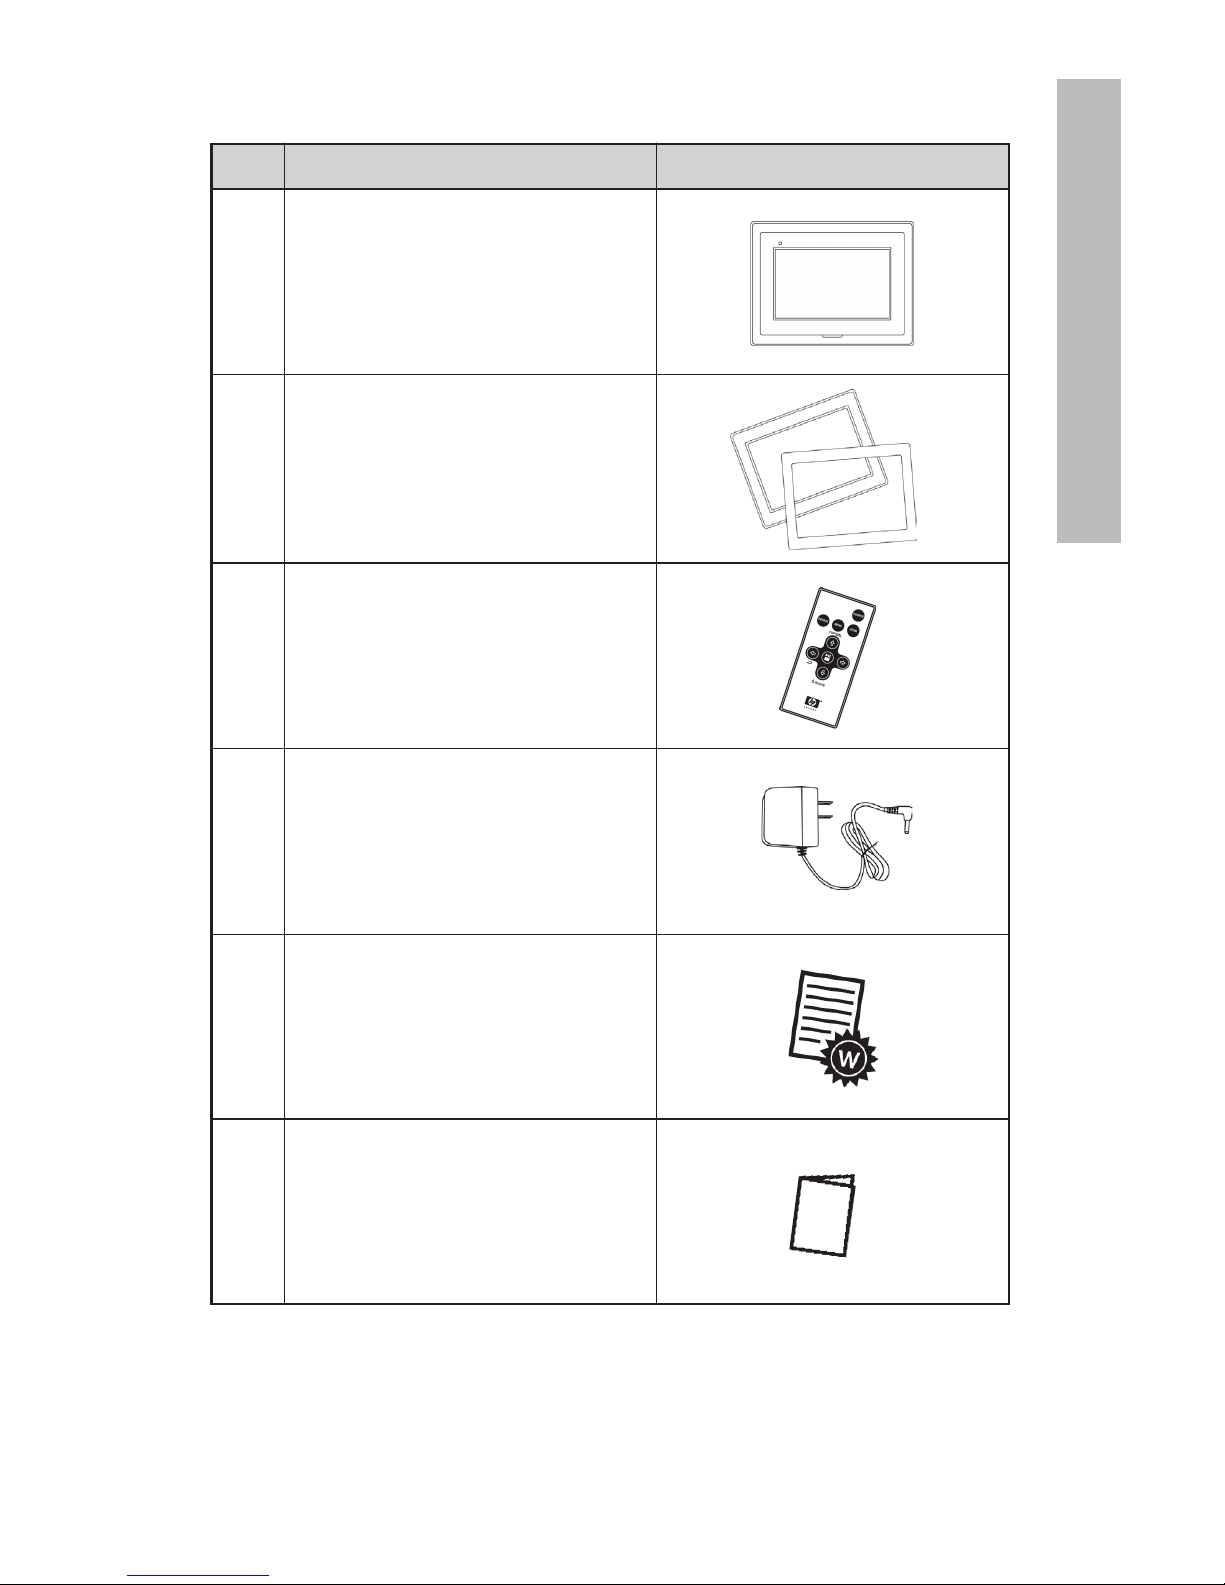
1
Qty Item Image
1 Digital Picture Frame
2 Additional Frames
1 Remote Control
1 Universal Power Adapter
(9V, 1 A, 3W, 100/240 switching)
1 Warranty Document
1 User Manual
What’s in the Box
English
Page 4
2
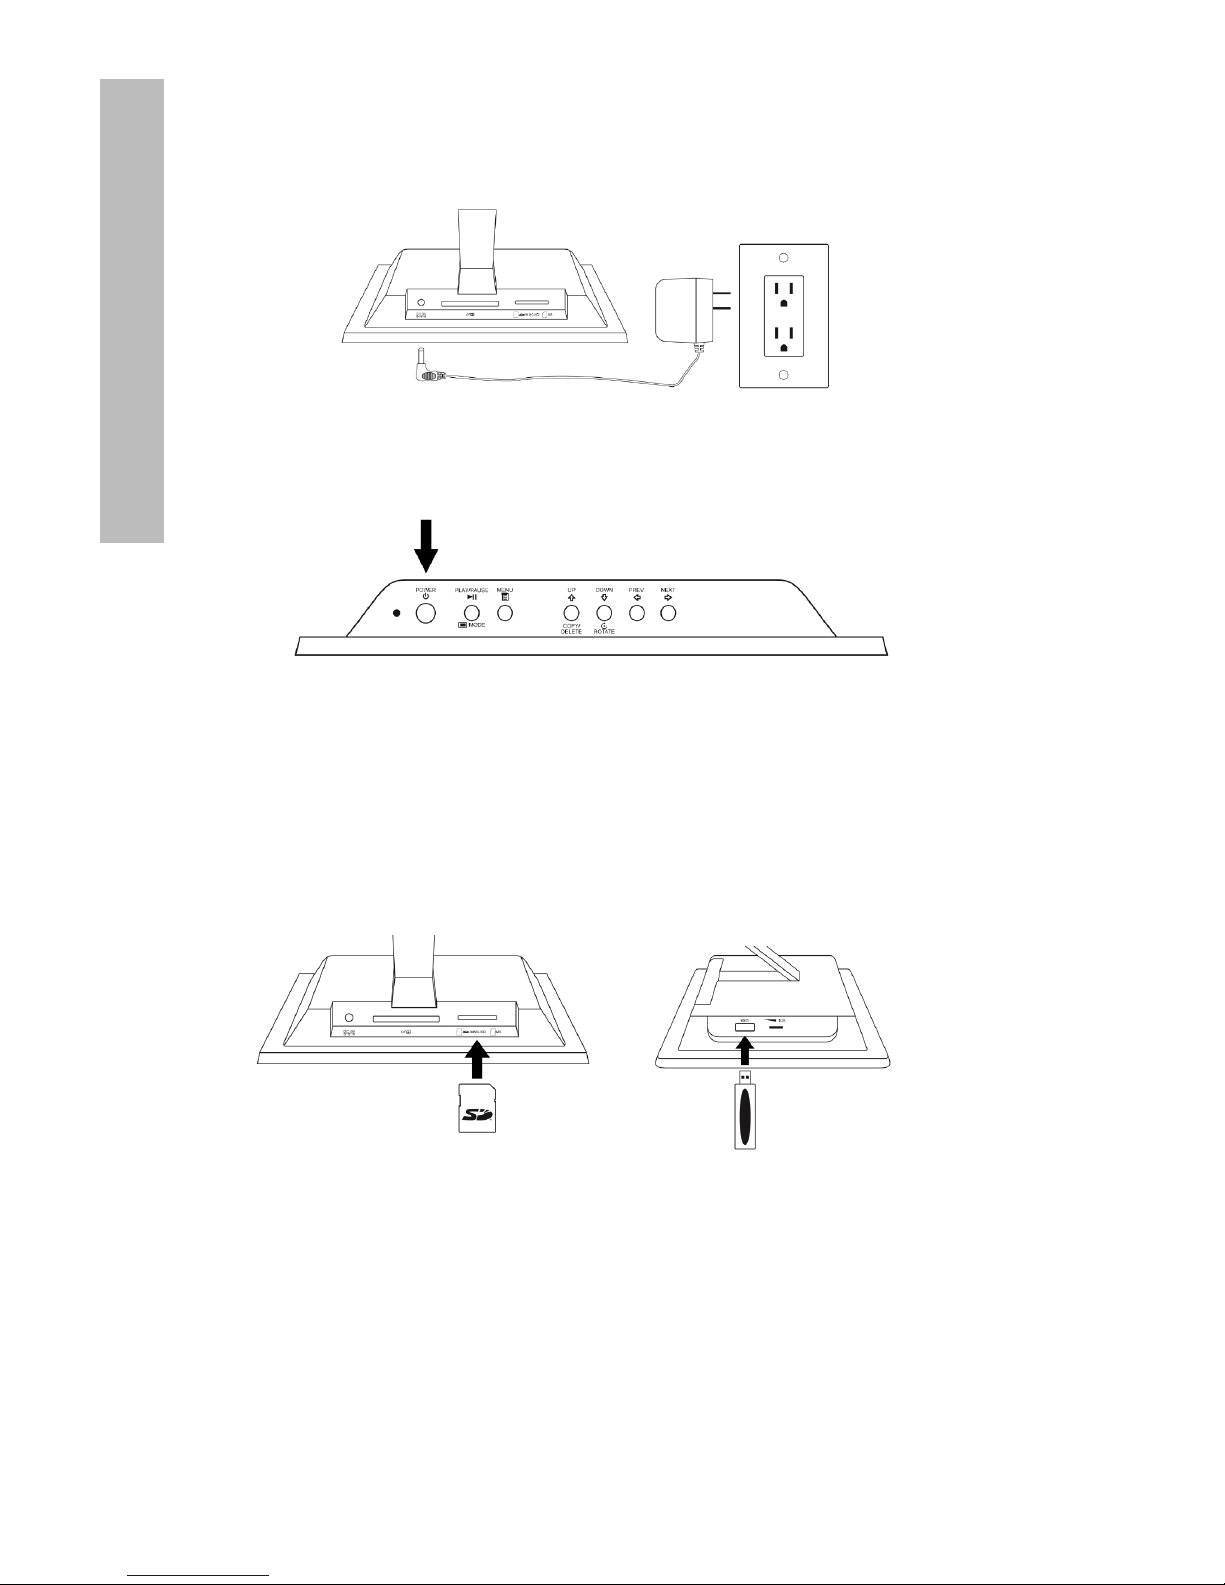
Getting Started
1. Connect the power cord into the DC input of the digital picture
frame and plug the adapter into a power outlet.
2. Unfold the attached stand to its extended position and push the
POWER button on the top of the digital picture frame.
3. Insert your memory card or USB storage device (external memory)
containing desired photos, music, and/or video into the appropriate
card slot or USB port as illustrated below. Note: Memory cards and
USB storage devices must be orientated correctly. Generally,
labels on these cards or USB devices must be facing outward as
illustrated below.
4. A slide show of your photos will automatically begin in a few
seconds. If music tracks are available on the same external
memory card, the slide show will be displayed with background
music unless disabled in Settings. Enjoy it and have fun!
English
Page 5
3
Remote Control (please refer to page 10 for details regarding the viewing modes)
SOURCE: Press to select among memory card(s)
and/or USB storage device as the source of pictures
and other media files.
Note: Internal memory can only be accessed by
removing all external memory sources!
REPEAT: During playback of audio or video files,
press to select the mode of repeating playback.
MENU: Press to access menu mode.
ZOOM: Press to enlarge picture in browse mode.
UP or COPY/DEL: Press to move up in thumbnail
mode or copy/delete in browse mode.
PREV or RETURN: Press to move left in browse,
thumbnail or menu mode, or return to previous screen
in slide show mode.
PLAY/PAUSE or MODE: Press to change display
mode (slide show, browse, or thumbnail). Press to
play or pause music or video files. Press to make
selections in menu or settings mode.
NEXT: Press to move right in browse, thumbnail or
menu mode.
DOWN or ROTATE: Press to move down in thumbnail
mode or when setting options. Press to rotate the
picture during slide show or browse mode.
English
Page 6
4
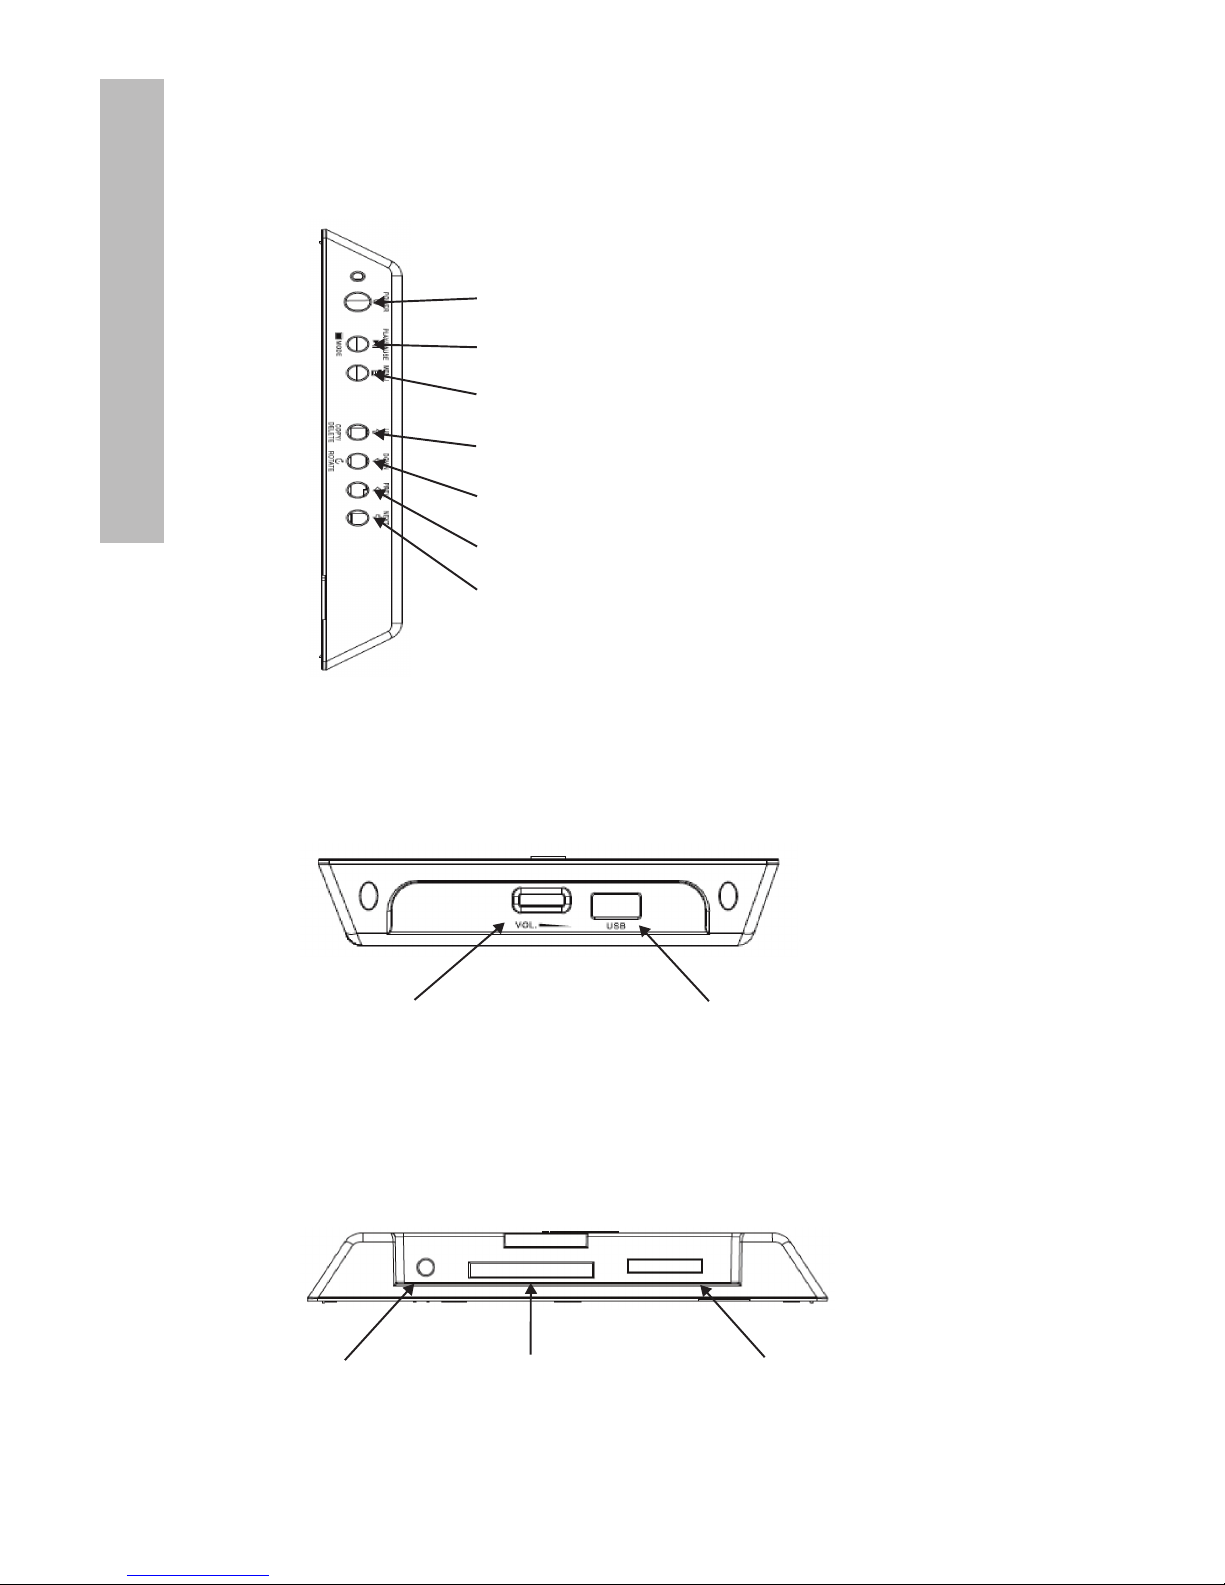
Picture Frame
Top View: Power and Transport
Power button & LED
PLAY/PAUSE/MODE button
MENU button
UP/Copy/Delete button
DOWN/ROTATE button
PREV/RETURN button
NEXT button
Left Side View: Volume Control & USB Port
Volume Adjustment USB Slot
Underside View: External Memory Slots
Power Input CF Card Slot SD/MMC/xD/MS Card Slot
English
Page 7

5
Feature External Memory Internal Memory
(Cards and or Flash Drives)
Photo slide show with music
Photo slide show
without music
Photo auto-rotation with
frame orientation
Delete photos from memory
Playback music/audio files
Playback video clips
View Photo thumbnails
Photo Zoom
Browse Photos/Images
Widescreen View
Key Features
√
√ √
√
√
√
√
√
√
√ √
√
English
Page 8
6
Initial Setup
NOTE: The following instructions are shown using the remote control
unit. Most of these functions can also be conducted via the same
control keys located on the top side of the picture frame. The keys are
labeled with the same icon/text.
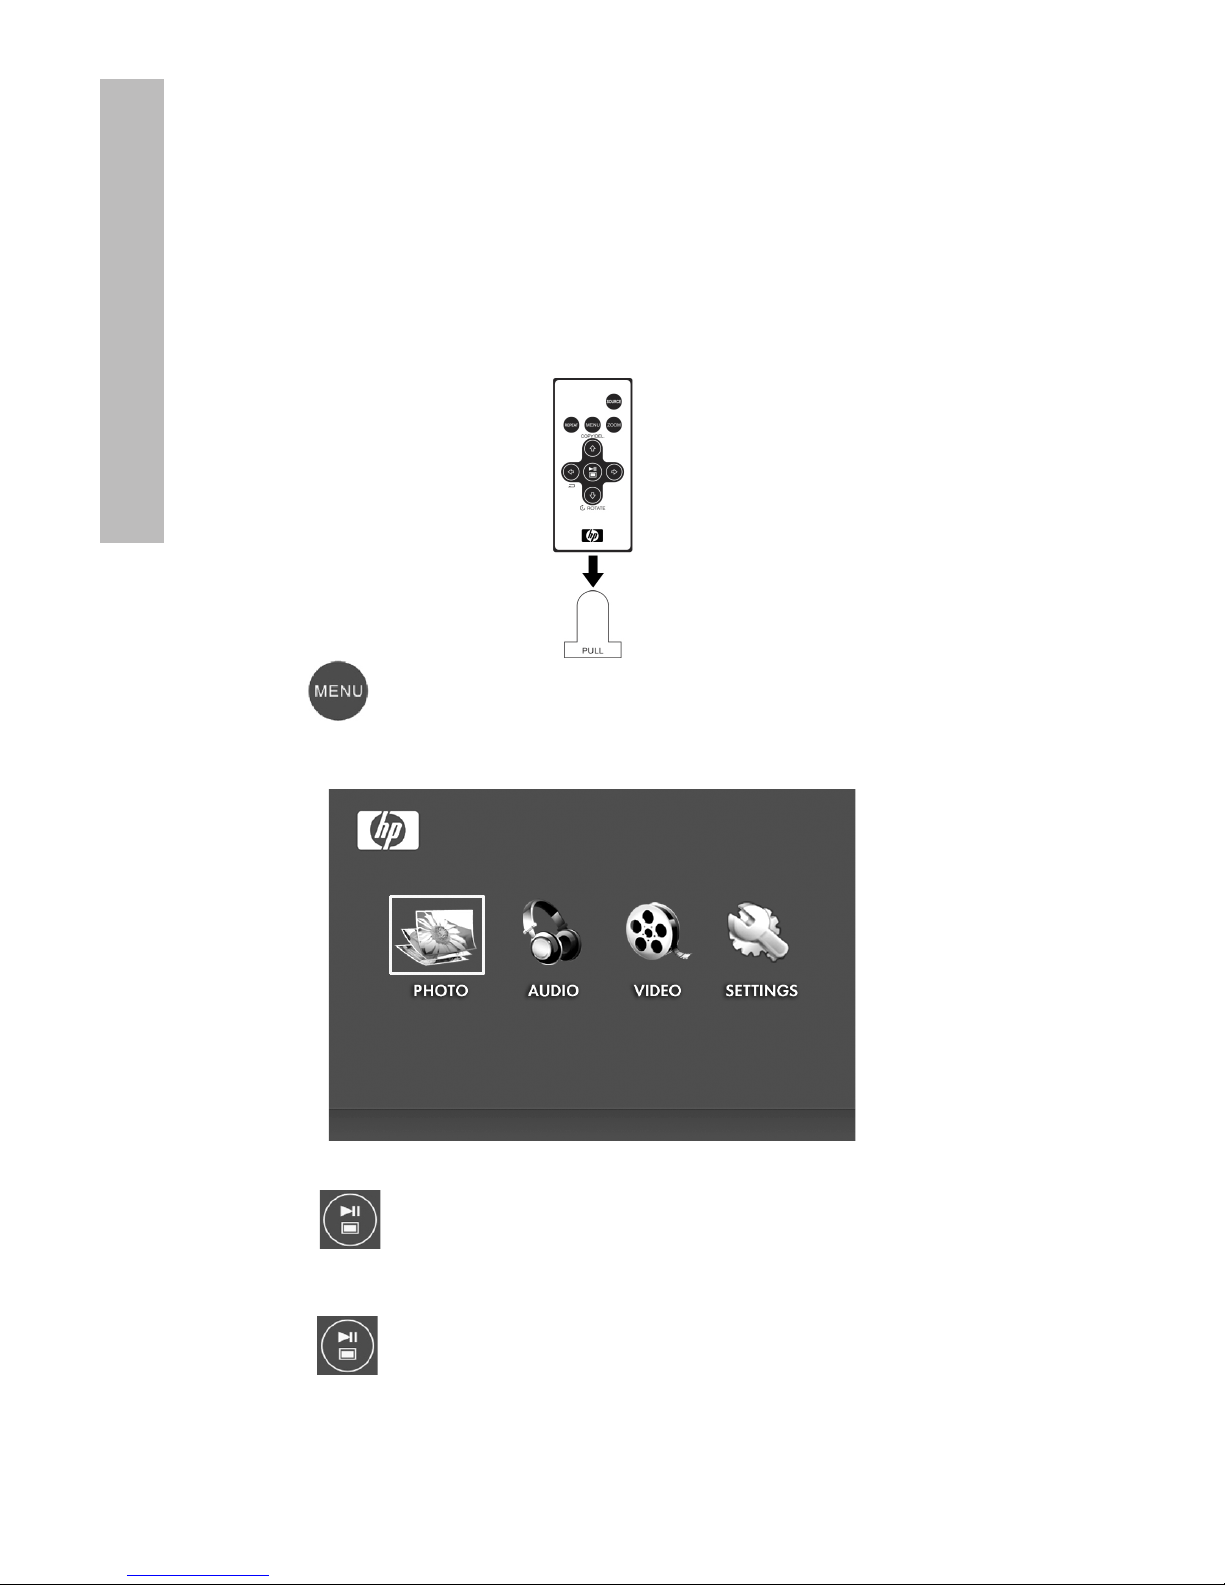
1. Pull tab from remote control to activate. (Note: If a replacement
battery is required, purchase model #CR2025)
2. Press button and use the directional arrows to highlight
“SETTINGS” icon.
3. Press button and use the directional arrows to highlight
“OSD LANGUAGE”.
4. Press button again and select the On-Screen-Display
language you want.
English
Page 9

7
5. Change other settings by using the directional keys to highlight
the desired option.
BRIGHTNESS: Adjust brightness from –10 to +10
SLIDE SHOW TIME: Select how long a picture is displayed in slide
show mode: 5, 10, 30, 60 seconds and 1 hour.
SLIDE WITH MP3: Turn background music on or off during the slide
show. (You need to have a supported music track in order to playback)
OSD LANGUAGE: Select desired text translation.
PHOTO MODE: Select between the following two modes:
Normal: Display photo in full height in normal aspect ratios.
Many photos may not fill the screen, and leave
space on both sides.
Wide Screen: Photo will enlarge to fit the full width
of the screen.
DEFAULT: Restore all options to factory default settings.
EXIT SETUP: Return to the main menu.
English
Page 10
8
Photo/Picture Slide Show and Browse
Slide show modes
Slide show mode will begin automatically a few seconds after the
frame is powered on or when an external memory card/USB Flash
drive is inserted. There are two slide show modes, one with
background music and the other without.
Slide show with music – This is only possible with
photos/pictures and music files on an external
memory card or USB Flash drive. The default frame
setting is for music to play with slide show. This can
be changed in the settings option.
Slide show without music – This is possible with photos/pictures
on either internal or external memory sources.
Browse mode
To exit slideshow mode, press once. Browse mode will be displayed on the screen. This allows forward and previous photo
viewing as well as a copy option from an external memory source
onto internal memory (limit of 15 photos/pictures). Browse mode on
internal memory will also allow for deleting of photos. See next
section Managing Photos/Pictures for details.
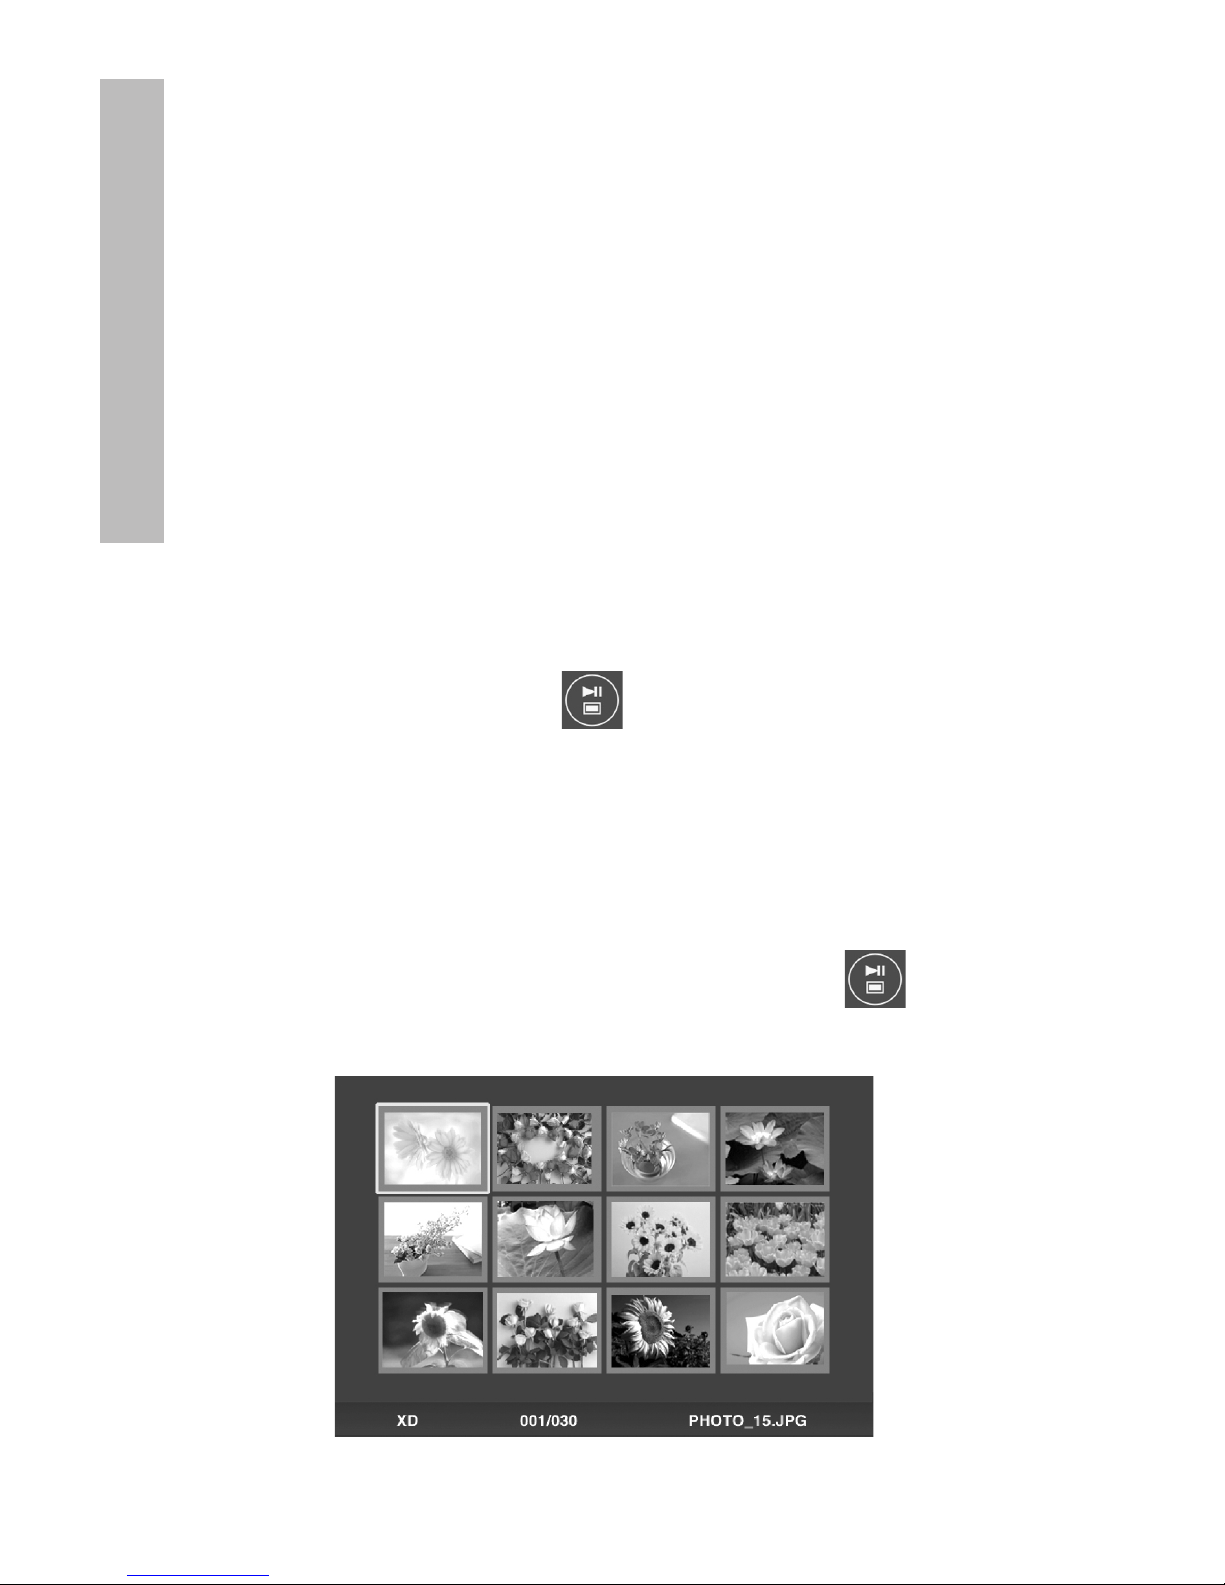
Thumbnail mode
View photos/pictures in thumbnail mode by pressing the twice
in slide show mode or once in browse mode
English
Page 11
9
Managing Photos/Pictures
Rotate Photo/Picture:
If desired, photos/pictures can be rotated 90 degrees to the
right by pressing the button. Continue to press
this button until the photo is oriented properly.
Auto Rotation:
This feature will automatically rotate all photos/pictures to
match the orientation of the digital picture frame stand.
(Note: This feature only available with external memory
source!)
Copy Photos/Pictures onto Internal Memory:
Must be In BROWSE mode and photo/picture is from an
external memory card or USB storage device.
The option of copying a displayed photo onto the internal
memory is possible by pressing the button, and
following the on-screen instructions.
Delete Pictures from Internal memory:
Press when in browse mode and follow the
on-screen instructions.
NOTE:
a. Frame only allows copies from external memory
cards or USB storage devices onto internal memory!
b. Frame only allows deletion from internal memory.
It will not delete photos/pictures from external
memory cards or USB storage devices.
English
Page 12
10
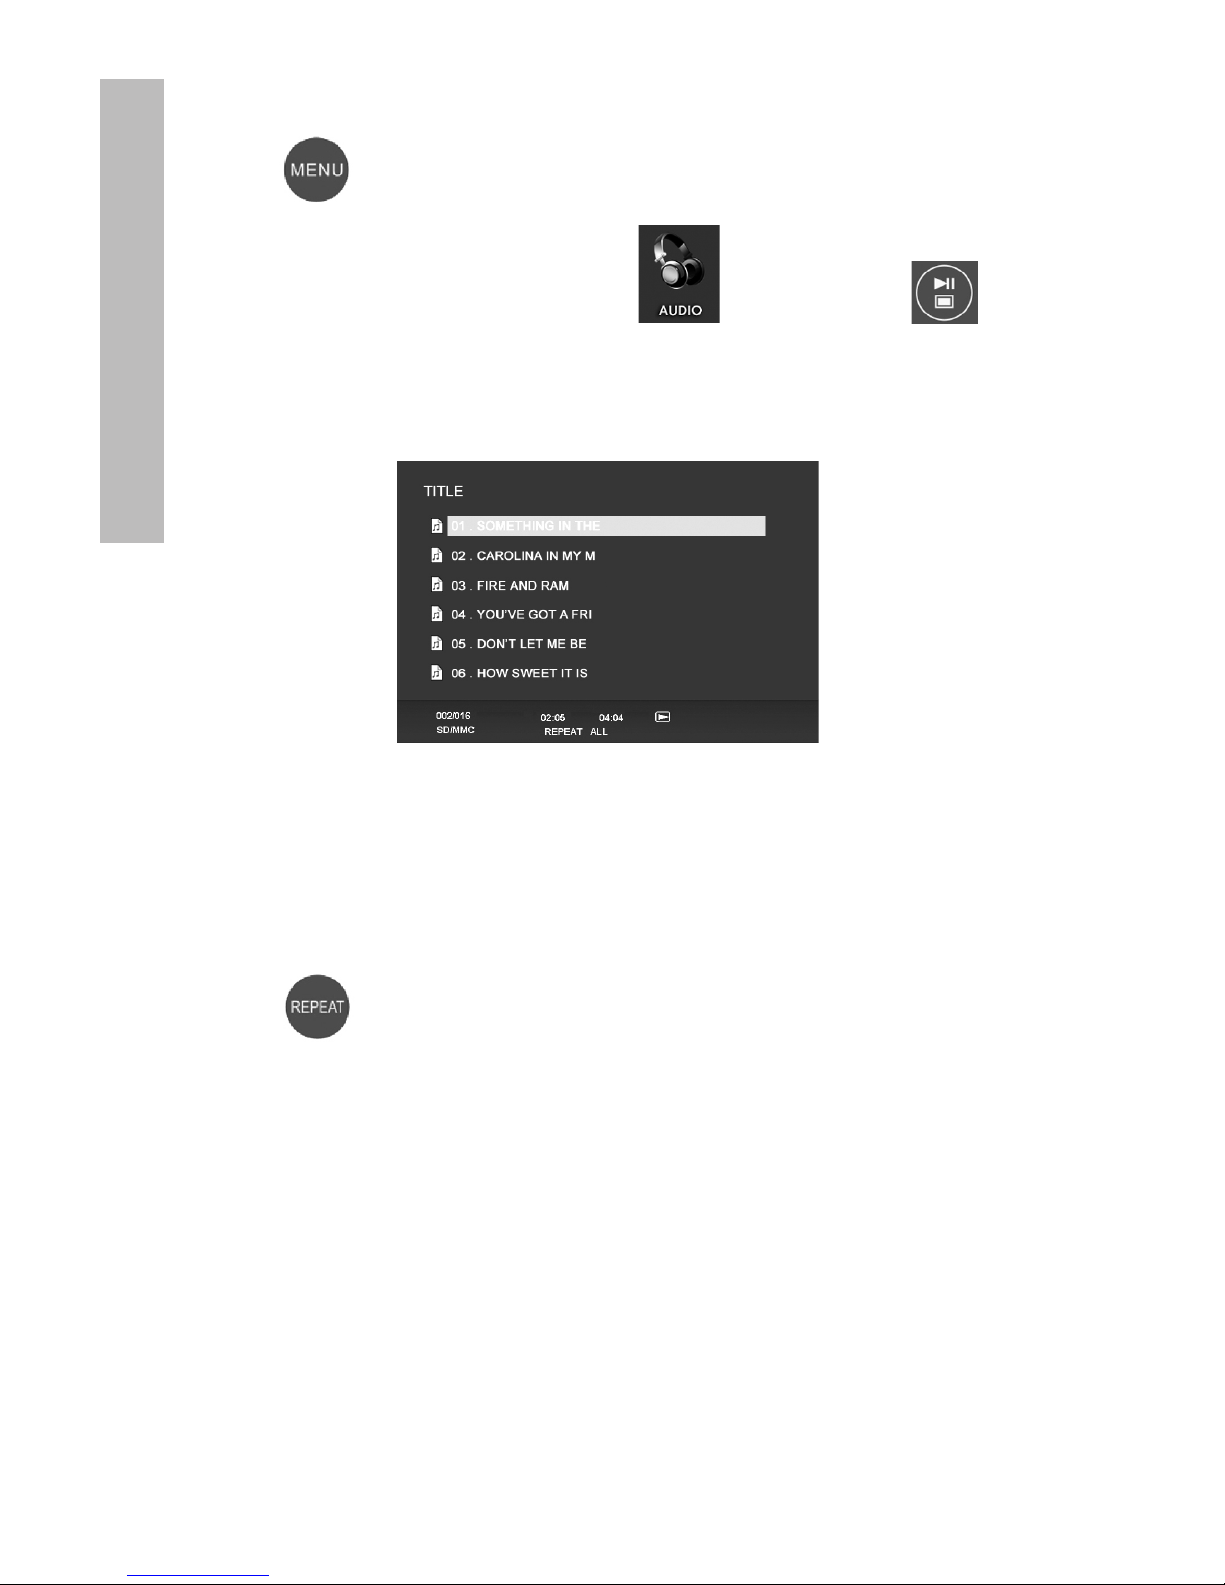
Music Playback
Press to access the menu screen.
Use the directional arrows to select the icon then press .
The frame will display a list of music/audio files found on the selected
external memory source as illustrated below.
The first music track in the list will begin to play.
• The default playback mode is to play from first to last track
then repeat from the first track.
Press at any time to change playback mode.
• The available modes are REPEAT-ALL (Default),
REPEAT-ONE (Repeat the same track), REPEAT-OFF (Play
till the end of tracks then stop), and RANDOM (play back
tracks in a shuffled mode).
Supported audio format: MP3
English
Page 13
11
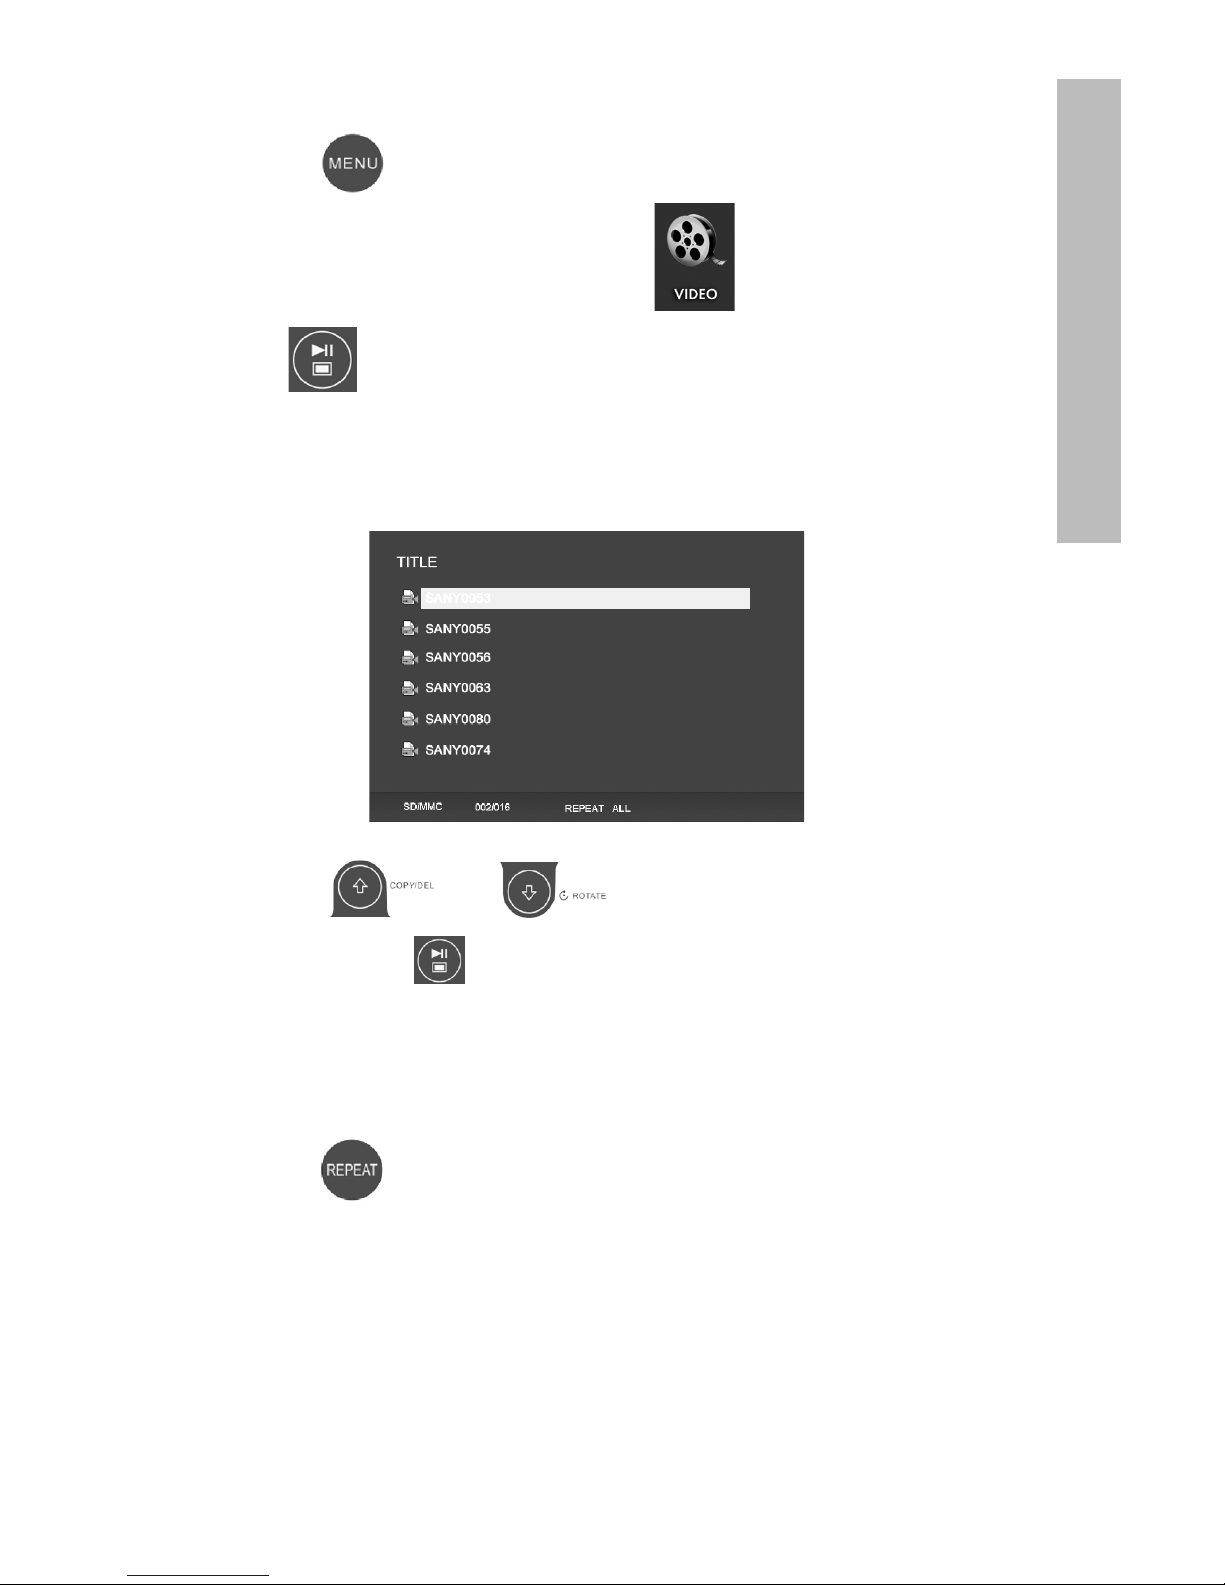
Video Playback
Press the button to access menu screen of the frame.
Use the directional arrows to select the icon then
press to confirm.
The frame will display a list of supported video clips/files found on the
selected external memory source as illustrated below.
Press the and buttons to select a desired
video clip. Press to start playback.
• The default playback mode will automatically play the
next video clip until the end of the list, and then start over
from the beginning.
Press the button at any time to change playback mode.
• The available playback modes are REPEAT-ALL (Default),
REPEAT-ONE (Repeat the same clip), REPEAT-OFF (Play till the
end of clips then stop), and RANDOM (play back clips in a
shuffled mode).
Supported Video format: MPEG 1, MP4 (ISO MP4 ASP ; .mp4, .avi)
English
Page 14
12
Specifications
Panel Specification
Size
Aspect ratio
Resolution
Contrast ratio
Power
External Power Adapter
Audio
Internal speakers
Connectivity
USB Ports
Storage/Media
Internal memory
Memory cards supported:
CF – CompactFlash®
MS – Memory Stick Pro™
MMC – MultiMedia Card
SDTM – Secure Digital
SDHC™ – High Capacity
Secure Digital
xD – xD Picture Card™
Memory cards slot 1
Memory cards slot 2
Media Files Supported:
Video file formats
Photo file formats
Audio file formats
User Interface/Control
Buttons at the Top of digital
picture frame
Remote control
Vertical Image Switch
Auto image rotate with
frame orientation
7”
16:9
800x480 pixels
400:1
+9V, 1A
Stereo
1 (STD 2.0 Host)
15 photos MAX
Yes
Yes
Yes
Yes
No
Yes
SD/MMC/MS/xD
CF
MPEG 1, MP4 (ISO MP4 ASP ; .mp4, .avi)
JPEG - (Baseline, extended-sequential
and progressive JPEG)
MP3
Yes
Yes
Yes
English
Page 15

13
Frequently Asked Questions
Question
How far away can I use the
remote control?
Why can’t I display some of
my Photos?
Why can’t I play some of my
music tracks?
Why can’t I play some of my
video clips?
Can I delete photos from
external memory cards or
flash drives?
Can I delete photos from
internal memory?
How can I switch to the
internal memory?
I have lost or damaged my
remote and/or power adapter.
Can I order replacements?
How can I find the latest
information/FAQs about my
HP Digital Picture Frame?
Answer
Up to 30ft (10m)
Some photo/image file formats are
not supported. Please refer to the
specifications.
Some music file formats are
not supported. Please refer
to the specifications.
Some video file formats are
not supported. Please refer
to the specifications.
Not at this time.
Yes, refer to the “Delete Pictures
from Internal memory” section of
this document.
Remove all external memory cards
and USB flash drives. The picture
frame will automatically switch to
internal memory.
Yes. Visit www.hp.com/support for
more details.
Visit www.hp.com/support for more
details and the latest information.
English
Page 16

14
Cleaning and Care Tips
√ Please power off the HP Digital Picture Frame before cleaning.
√ DO NOT spray or pour liquid cleaning agents directly on the
screen or frame.
√ DO NOT use ammonia, alcohol, or abrasive detergent
cleaning agents.
Cleaning the Screen:
1. Wipe screen with a clean, soft, lint-free cloth to remove dust
and loose particles.
2. If further cleaning is required, apply an appropriate cleaning
agent (approved for LCD displays) to a clean, soft, lint-free
cloth and wipe the screen.
• NOTE: do not apply too much pressure on the screen to
avoid damaging it.
Cleaning the Frame and Backing:
1. Use a clean, soft, lint-free cloth to remove dust and
loose particles.
2. If desired, apply an appropriate cleaning agent to a clean,
soft, lint-free cloth and wipe the appropriate surfaces.
English
Page 17

15
Qté Élément Image
1 Cadre Photo Numérique
2 Cadres supplémentaires
1 Télécommande
Adaptateur d’alimentation
1 universel
(9V, 1 A, 3W, sélecteur 100/240)
1 Document de garantie
1 Manuel de l’utilisateur
Contenu de l’emballage
Français
Page 18

16
Pour commencer
1. Connectez le cordon d’alimentation sur l’entrée DC du cadre
photo numérique et branchez la prise de l’adaptateur sur la prise
d’alimentation secteur.
2. Déployez le support fixé au cadre et appuyez sur le bouton POWER
sur le dessus du cadre photo numérique.
3. Insérez votre carte mémoire ou votre appareil de stockage USB (mémoire externe) contenant les photos, les musiques et/ou les vidéos
désirées dans la fente ou dans le port USB prévu à cet effet comme
illustré ci-dessous. Remarque: Les cartes mémoire et les appareils
de stockage USB doivent être orientés correctement. Généralement,
les étiquettes présentes sur ces cartes/appareils USB doivent être
orientées vers l’extérieur.
4. Un diaporama de vos photos commencera automatiquement dans
quelques secondes. Si des morceaux de musique sont disponibles
sur la même carte mémoire externe, le diaporama affichera le
diaporama avec la musique en fond sonore, à moins que cela n’ait
été désactivé dans les Paramètres. Amusez-vous bien!
Français
Page 19

17
Télécommande (veuillez consulter la page 11 pour plus de détails concernant les
modes d’affichage)
SOURCE: Appuyez sur ce bouton pour choisir parmi les
cartes mémoires et/ou les appareils de stockage USB
disponibles pour déterminer la source des fichiers image ou
des autres fichiers de contenu multimédia.
Remarque: L’accès à la mémoire interne n’est possible qu’en
déconnectant toutes les sources de mémoires externes!
REPEAT: Pendant la lecture des fichiers audio ou vidéo, appuyez sur ce bouton pour sélectionner le mode de répétition
de la lecture.
MENU: Appuyez sur ce bouton pour accéder au mode
menu.
ZOOM: Appuyez sur ce bouton pour agrandir l’image en
mode browse (parcourir).
UP ou COPY/DEL: Appuyez sur ce bouton pour aller vers le
haut en mode thumbnail (miniature) ou pour copy/delete
(copier/supprimer) en mode browse (parcourir).
PREV ou RETURN: Appuyez sur ce bouton pour aller vers la
gauche en mode browse (parcourir), thumbnail (miniature)
ou menu (menu), ou pour revenir à l’écran précédent en
mode slide show (diaporama).
PLAY/PAUSE ou MODE: Appuyez sur ce bouton pour modifier le
mode d’affichage (slide show (diaporama), browse (parcourir), ou
thumbnail (miniature)). Appuyez pour lire ou mettre la musique ou
la vidéo en pause. Appuyez sur ce bouton pour effectuer une sélection en mode menu (menu) ou settings (paramètres).
NEXT: Appuyez pour aller vers la droite en mode browse
(parcourir), thumbnail (miniature) ou menu (menu).
DOWN ou ROTATE: Appuyez pour aller vers le bas en
mode thumbnail (miniature) ou lors de la configuration des
options. Appuyez pour faire pivoter l’image pendant un
diaporama ou en mode browse (parcourir).
Français
Page 20

18
Le cadre photo
Vue du dessus: Alimentation et transport
Bouton et DEL POWER
Bouton PLAY/PAUSE/MODE
Bouton MENU
Bouton UP/Copy/Delete
Bouton DOWN/ROTATE
Bouton PREV/RETURN
Bouton NEXT
Vue latérale gauche: Réglage du volume et port USB
Réglage du volume Port USB
Vue du dessous: Fentes pour mémoire externe
Français
Entrée alimentation Fente carte CF Fente carte SD/MMC/xD/
MS Slot
Page 21

19
Principales caractéristiques
Caractéristiques
Mémoire externe
(Lecteur de cartes et/ou Flash)
Mémoire interne
Diaporama de photos avec
musique
√
Diaporama de photo sans
musique
√ √
Rotation automatique des
photos en fonction de
l’orientation du cadre
√
Suppression des photos de la
mémoire
√
Lecture de fichiers audio
√
Lecture de clips vidéo
√
Affichage des photos en
miniature
√
Zoom des photos
√
Parcourir les photos/images
√ √
Affichage écran large
√
Français
Page 22

20
Configuration initiale
REMARQUE: Les instructions suivantes sont affichées en utilisant la
télécommande. La plupart de ces fonctions peuvent également être
contrôlées à partir des mêmes touches de contrôle localisées sur le
dessus du cadre photo. Les touches sont étiquetées avec les mêmes
icônes/textes.
1. Tirez sur l’onglet de la télécommande pour l’activer. (remarque: si
vous devez remplacer la pile, le modèle à acheter est le CR2025)
2. Appuyez sur le bouton et utilisez les flèches directionnelles
pour mettre l’icône « SETTINGS » (« PARAMÈTRES ») en surbrillance.
3. Appuyez sur le bouton et utilisez les flèches directionnelles
pour mettre « OSD LANGUAGE » (« LANGUE OSD ») en surbrillance.
4. Appuyez à nouveau sur le bouton et sélectionnez la langue
d’affichage à l’écran (OSD) que vous voulez.
Français
Page 23

21
5. Modifiez les autres paramètres en utilisant les touches directionnelles
pour mettre en surbrillance l'option souhaitée.
BRIGHTNESS (LUMINOSITÉ): Ajustez la luminosité de –10 à +10
SLIDE SHOW TIME (DURÉE D’AFFICHAGE DIAPO): Sélectionnez la durée
d’affichage de chaque photo en mode slide show (diaporama): 5, 10,
30, 60 secondes et 1 heure.
SLIDE WITH MP3 (DIAPO AVEC MP3): Activez ou désactivez la musique de fond pendant le diaporama. (Pour cela vous devez avoir un
morceau de musique à lire).
OSD LANGUAGE (LANGUE OSD): Sélectionnez la langue souhaitée
pour l’affichage à l’écran.
PHOTO MODE (MODE PHOTO): Choisissez entre les deux modes:
modes:
Normal (Normal): Affiche les photos en taille normale avec
les formats d'écrans normaux. Beaucoup de photos
peuvent ne pas complètement remplir l’écran et laisser
un espace sur les côtés.
Wide Screen (Écran large): Les photos seront agrandies pour
remplir complètement l’écran.
DEFAULT (DÉFAUT): Pour restaurer toutes les options aux paramètres
d’usine.
EXIT SETUP (QUITTER CONFIGURATION): Pour revenir au menu principal
Français
Page 24

22
Diaporama de photos/images et Parcourir
Diaporama
Le mode slide show (diaporama) commencera automatiquement quelques
secondes après avoir allumé le cadre ou quand une carte mémoire/flash
USB est insérée. Il y a deux modes de slide show (diaporama), un avec
fond sonore et un autre sans.
Diaporama avec musique – Ceci est uniquement possible avec des
photos/images et des fichiers de musique sur une carte mémoire externe ou sur une mémoire flash USB. La configuration
du cadre par défaut est pour lire la musique avec le diaporama. Ceci peut être changé dans les options des paramètres.
Diaporama sans musique – Ceci est possible avec des photos/im-
ages provenant de sources internes ou externes.
Parcourir
Pour quitter le mode slideshow (diaporama), appuyez une fois sur .
Le mode browse (parcourir) apparaîtra à l’écran. Ceci permet d’aller à
la photo suivante ou précédente ainsi que de copier des photos d’une
source externe vers la mémoire interne (limitée à 15 photos/images). Le
mode browse (parcourir) sur la mémoire interne permettra également de
supprimer des photos. Veuillez consulter la section suivante « Gérer les
photos/images » pour plus de détails.
Miniature
Affichez les photos/images en mode miniature en appuyant deux fois
sur en mode slide show (diaporama) ou une fois en mode browse
(parcourir).
Français
Page 25

23
Gérer les photos/images
Rotation de photo/image:
Si vous le désirez, vous pouvez faire pivoter des photos/images de 90
degrés vers la droite en appuyant sur le bouton . Continuez
d’appuyer sur ce bouton jusqu’à ce que la photo soit orientée correctement..
Rotation automatique:
Cette fonctionnalité effectuera automatiquement la rotation de toutes
les photos/images pour correspondre à l’orientation du cadre photo
numérique. (Remarque: Cette fonctionnalité est disponible uniquement
pour une utilisation avec une source de mémoire externe!)
Copier des photos/images vers la mémoire interne:
Vous devez être en mode BROWSE (PARCOURIR) et les photos/images doivent provenir d'une carte mémoire externe ou d'un appareil de
stockage USB.
Cette option de copie d'une photo affichée vers la mémoire
interne est possible en appuyant sur le bouton et en suivant
les instructions à l’écran.
Supprimer des images de la mémoire interne:
Appuyez sur lorsque vous êtes en mode browse (parcourir)
et suivez les instructions à l’écran.
REMARQUE:
a. Le cadre vous permet d’effectuer uniquement des copies de cartes
mémoires externes ou d’appareil de stockage USB vers la mémoire interne!
b. Le cadre permet uniquement la suppression d’éléments dans la mé-
moire interne. Il ne supprimera pas de photos/images à partir des cartes
mémoires externes ou des appareils de stockage USB.
Français
Page 26

24
Lecture de fichiers audio
Appuyez sur pour accéder à l’écran du menu.
Utilisez les flèches directionnelles pour sélectionner les icônes
puis appuyez sur .
Le cadre affichera la liste des fichiers audio détectés sur la source de
mémoire externe sélectionnée comme illustré ci-dessous.
Le premier morceau de musique de la liste commencera à être joué.
• Le mode de lecture par défaut est de lire à partir du premier
morceau jusqu’au dernier puis de recommencer à partir du
premier morceau.
Appuyez sur à tout moment pour changer le mode de playback
(lecture).
• Les modes disponibles sont REPEAT-ALL (RÉPÉTER TOUT) (Dé-
faut), REPEAT-ONE (RÉPÉTER UN) (Répétition de la même piste),
REPEAT-OFF (ARRÊT RÉPÉTITION) (Lecture jusqu’à la fin des
morceaux puis arrêt) et RANDOM (ALÉATOIRE) (Lecture des
morceaux suivant une sélection aléatoire).
Format de fichier audio pris en charge: MP3
Français
Page 27

25
Lecture Vidéo
Appuyez sur le bouton pour accéder à l’écran du menu du
cadre.
Utilisez les flèches directionnelles pour sélectionner l’icône puis
appuyez sur pour confirmer.
Le cadre affichera une liste des fichiers/clips vidéo détectés sur la
source de mémoire externe comme illustré ci-dessous.
Appuyez sur les boutons et pour sélectionner
le clip vidéo souhaité. Appuyez sur pour commencer la lecture.
• Le mode de lecture par défaut lira automatiquement le clip
vidéo suivant jusqu’à la fin de la liste puis recommencera au
début.
Appuyer sur le bouton à tout moment pour changer le mode de
playback (lecture).
• Les modes de lecture disponibles sont REPEAT-ALL (RÉPÉTER
TOUT) (Défaut), REPEAT-ONE (RÉPÉTER UN) (Répétition du
même clip), REPEAT-OFF (ARRÊT RÉPÉTITION) (Lecture jusqu’à
la fin des clips puis arrêt) et RANDOM (ALÉATOIRE) (lecture
des clips suivant une sélection aléatoire).
Format vidéo pris en charge: MPEG 1, MP4 (ISO MP4 ASP ; .mp4, .avi)
Français
Page 28

26
Spécifications
Spécification de l’écran
Taille
Format de l’écran
Résolution
Rapport de contraste
Alimentation
Adaptateur d’alimentation externe
Audio
Haut-parleurs internes
Connectivité
USB Ports
Stockage/Média
Mémoire interne
Types de cartes mémoire pris en charge:
CF – CompactFlash®
MS – Memory Stick Pro™
MMC – MultiMedia Card
SD™ – Secure Digital
SDHC™ – High Capacity
Secure Digital
xD – xD Picture Card™
Fente carte mémoire 1
Fente carte mémoire 2
Fichiers de contenu multimédia supportés:
Formats de fichiers vidéo
Formats de fichiers photo
Formats de fichier audio
Interface de l’utilisateur/Contrôle
Boutons en haut du cadre photo
Télécommande
Sélecteur d’image
Rotation automatique de l’image en
fonction de l’orientation du cadre
7”
16:9
800x480 pixels
400:1
+9V, 1A
Stéréo
1 (STD 2.0 Host)
15 photos MAX
Oui
Oui
Oui
Oui
Non
Oui
SD/MMC/MS/xD
CF
MPEG 1, MP4 (ISO MP4 ASP ; .mp4, .avi)
JPEG - (Baseline, extended-sequential
and progressive JPEG)
MP3
Oui
Oui
Oui
Français
Page 29

27
Questions Fréquemment Posées
Questions Réponses
Jusqu’à quelle distance est-ce
que je peux utiliser la télécommande?
Jusqu’à 30 pieds (10 mètres)
Pourquoi est-ce que je ne peux
pas afficher certaines de mes
photos?
Certains fichiers photo/image ne sont
pas pris en charge. Veuillez consulter les
spécifications.
Pourquoi est-ce que je ne
peux pas lire certains de mes
morceaux de musique?
Certains formats de fichiers audio ne sont
pas pris en charge. Veuillez consulter les
spécifications.
Pourquoi est-ce que je ne peux
pas lire certains de mes clips
vidéo?
Certains formats vidéo ne sont pas pris
en charge. Veuillez consulter les spécifications.
Est-ce que je peux supprimer
des photos des cartes de mémoire externe ou flash?
Non.
Est-ce que je peux supprimer
des photos de la mémoire
interne?
Oui, consultez la section “Supprimer des
images de la mémoire interne” dans ce
document.
Comment est-ce que je peux
basculer sur la mémoire
interne?
Déconnectez toutes les mémoires externes
et mémoires flash USB. Le cadre photo
basculera automatiquement sur la mémoire
interne.
J’ai perdu ou endommagé
ma télécommande et/ou
l’adaptateur. Est-ce que je peux
les remplacer?
Oui. Visitez www.hp.com/support pour
plus de détails.
Où puis-je trouver les dernières
informations/Questions
fréquemment posées concernant
mon Cadre Photo Numérique
de HP?
Visitez www.hp.com/support pour plus de
détails concernant les informations les plus
récentes.
Français
Page 30

28
Astuces pour le soin et le nettoyage
√ Veuillez éteindre le Cadre Photo Numérique HP avant de le net-
toyer.
√ NE PAS vaporiser ou verser du liquide de nettoyage directement sur
l’écran ou le cadre.
√ NE PAS utiliser d’ammoniac, d’alcool ou de détergent abrasif pour
le nettoyage.
Nettoyage de l’écran:
1. Essuyez l’écran avec un chiffon propre, doux et non pelucheux
pour retirer la poussière et les particules.
2. Si un nettoyage plus en profondeur est nécessaire, appliquez
un liquide de nettoyage adéquat (approuvé pour les écrans
LCD) sur un chiffon propre, doux et non pelucheux, et essuyez
l’écran.
• REMARQUE: ne pas exercer une pression trop forte sur l'écran
pour éviter de l'endommager.
Nettoyage du cadre et du support:
1. Utilisez un chiffon propre, doux et non pelucheux pour retirer la
poussière et les particules.
2. Si vous le désirez, appliquez un liquide de nettoyage sur un
chiffon propre, doux et non pelucheux, et essuyez les surfaces
nécessitant un nettoyage.
Français
Page 31

29
Ctd Elemento Imagen
1 Marco de fotos digital
2 Marcos adicionales
1 Mando a distancia
Adaptador de alimentación
1 universal
(9V, 1 A, 3W, 100/240 conmutable)
1 Documento de garantía
1 Manual del usuario
Qué hay en la caja
Español
Page 32

30
Primeros pasos
1. Conecte el cable de alimentación en la entrada DC del marco de
fotos digital y enchufe el adaptador en una toma de corriente.
2. Despliegue el soporte unido a su posición extendida y presione el
botón POWER (ALIMENTACIÓN) de la parte superior del marco de
fotos digital.
3. Inserte su tarjeta de memoria o dispositivo de almacenamiento
USB (memoria externa) con las fotos deseadas, música y/o vídeo
en la ranura para tarjetas apropiada o puerto USB como se ilustra
más abajo. Nota: Las tarjetas de memoria y dispositivos de almacenamiento USB deben estar orientados correctamente. Generalmente, las etiquetas de estas tarjetas o dispositivos USB deben estar
mirando hacia el exterior como se ilustra más abajo.
4. En unos segundos comenzará una presentación de sus fotos automáticamente. Si las pistas de música están disponibles en la
misma tarjeta de memoria, la presentación aparecerá con música de
fondo a menos que la haya desactivado en Settings (Configuración).
¡Diviértase y disfrútelo!
Español
Page 33

31
Mando a distancia (consulte la página 11 para detalles sobre los modos de
visualización)
SOURCE: Pulse para seleccionar entre tarjeta(s) de memoria
y/o dispositivos de almacenamiento USB como fuentes de
imágenes y otros archivos de medios.
Remarque: ¡La memoria interna sólo puede accederse quitando todas las fuentes de memoria externas!
REPEAT: Durante la reproducción de archivos de audio o
vídeo, pulse para seleccionar el modo de reproducción
repetida.
MENU: Pulse para acceder al modo menú.
ZOOM: Pulse para agrandar la imagen en modo explor-
ación.
ARRIBA o COPY/DEL : Pulse para subir en modo miniaturas
o copiar/eliminar en modo exploración.
PLAY/PAUSA o MODO: Pulse para cambiar el modo de pantalla
(presentación, explorar o miniaturas). Pulse para reproducir o pausar música o archivos de vídeo. Pulse para realizar selecciones en
el modo menú o configuración.
SIGUIENTE: Pulse para mover a la derecha en el modo
exploración, miniaturas o menú.
ABAJO o ROTATE: Pulse para mover abajo en el modo miniaturas o en las opciones de configuración. Pulse para girar
la imagen en el modo presentación o exploración.
ANT. o ATRÁS: Pulse para moverse a la izquierda en el modo
explorador, miniaturas o menú o para volver a la pantalla anterior
en el modo presentación de diapositivas.
Español
Page 34

32
Marco de fotos
Vista superior: Alimentación y transporte
Botón POWER y LED
Botón PLAY/PAUSE/MODE (REPR./PAUSA/MODO)
Botón MENU (MENÚ)
Botón UP/Copy/Delete (ARRIBA/Copiar/Eliminar)
Botón DOWN/ROTATE (ABAJO/GIRAR)
Botón PREV/RETURN (ANT. / ATRÁS)
Botón NEXT (SIGUIENTE)
Vista lateral izquierda: Control del volumen y puerto USB
Ajuste del volumen Ranura USB
Vista inferior: Ranuras para memoria externa
Entrada corriente Ranura tarjetas CF Ranura tarjetas
SD/MMC/xD/MS
Español
Page 35

33
Características principales
Características
Memoria externa
(tarjetas y o unidades Flash)
Memoria interna
Presentación de diapositivas
con música
√
Presentación de diapositivas
sin música
√ √
Giro automático de fotos con
la orientación del marco
√
Eliminar fotos de la memoria
√
Reproducir archivos de
música/audio
√
Reproducir vídeos
√
Ver miniaturas de fotos
√
Ampliación de fotos
√
Explorar fotos o imágenes
√ √
Vista en pantalla ancha
√
Español
Page 36

34
Configuración inicial
NOTA: Las instrucciones siguientes se muestran utilizando el mando a
distancia. La mayoría de estas funciones pueden realizarse también a
través de las mismas teclas de control ubicadas en la parte superior del
marco de fotos digital. Las teclas están etiquetadas con el mismo icono
o texto.
1. Tire de la lengüeta del mando a distancia para activarlo. (nota: Si
necesita una batería de recambio, compre el modelo CR2025)
2. Pulse el botón y utilice las flechas de dirección para resaltar
el icono “SETTINGS” (CONFIGURACIÓN).
3. Pulse el botón y utilice las flechas de dirección para resaltar
el icono “OSD LANGUAGE” (IDIOMA OSD).
4. 4. Pulse el botón de nuevo y seleccione el idioma deseado
para el menú en pantalla.
Español
Page 37

35
5. Cambie otra configuración utilizando las teclas de dirección para
resaltar la opción deseada.
BRIGHTNESS (BRILLO): Ajuste el brillo de -10 a +10
SLIDE SHOW TIME (TIEMPO DE DIAPOSITIVAS): Seleccione cuánto
tiempo se muestra una imagen en modo presentación de diapositivas:
5, 10, 30, 60 segundos y 1 hora.
SLIDE SHOW WITH MP3 (PRESENTACIÓN CON MP3): Activa y desactiva la música de fondo durante la presentación de diapositivas.
(Necesita tener una pista de música soportada para reproducirla)
OSD LANGUAGE (IDIOMA OSD): Seleccione la traducción de texto
deseada.
PHOTO MODE (MODO FOTO): Seleccione entre los dos modos
siguientes:
Normal (Normal): Muestra la foto con una altura total a
relación de aspecto normal. Muchas fotos pueden no
rellenar la pantalla y dejar espacio a ambos lados.
Wide Screen (Pantalla ancha): La foto se ampliará para
ajustarse al ancho de la pantalla.
DEFAULT (PREDETERMINADO): Restaura todas las opciones a sus valores
de fábrica.
EXIT SETUP (SALIR DE CONFIGURACIÓN): Regresa al menú principal.
Español
Page 38

36
Presentación y exploración de fotos/imágenes
Modos de presentación
El modo presentación comenzará automáticamente unos segundos
después del encendido o cuando se inserta una tarjeta de memoria
externa o una unidad USB Flash. Hay dos modos de presentación, uno
con música de fondo y otro sin música.
Presentación con música – Sólo es posible con fotos/imágenes
y archivos de música en una tarjeta de memoria externa o
unidad USB Flash. La configuración del marco predeterminada es reproducir la música con la presentación. Puede
cambiarlo en las opciones de configuración.
Presentación sin música – Esto es posible con fotos/imágenes en
fuentes de la memoria interna o externa.
Modo explorar
Para salir del modo presentación, pulse una vez. El modo
explorar aparecerá en pantalla. Esto permite pasar adelante o atrás la
visualización de fotos y una opción de copia de una fuente de memoria
externa en la memoria interna (límite de 15 fotos/imágenes). El modo
exploración de la memoria interna también permite eliminar fotos.
Consulte la sección siguiente Gestionar fotos/imágenes para más
detalles.
Modo miniaturas
Vea fotos/imágenes en modo miniatura pulsando dos veces en
modo presentación o una vez en modo exploración.
Español
Page 39

37
Gestionar fotos/imágenes
Girar foto/imagen:
Si lo desea, puede girar las fotos/imágenes 90 grados a la derecha
pulsando el botón . Continúe pulsando este botón hasta
que la foto quede bien orientada.
Giro automático:
Esta característica girará automáticamente todas las fotos/imágenes)
para coincidir con la orientación del soporte del marco digital. (Nota:
¡Esta característica sólo está disponible con fuente de memoria externa!)
Copiar fotos/imágenes en la memoria interna:
Debe estar en modo EXPLORACIÓN y la foto/imagen debe ser de una
tarjeta de memoria externa o dispositivo de almacenamiento USB.
La opción de copia de una foto mostrada en la memoria interna es
posible pulsando el botón y siguiendo las instrucciones en
pantalla.
Eliminar fotos de la memoria interna:
Pulse cuando esté en modo exploración y siga las instrucciones en pantalla.
NOTA:
a. ¡El marco sólo permite copiar de tarjetas de memoria externas o dis-
positivos de almacenamiento USB a la memoria interna!
b. El marco sólo permite la eliminación en la memoria interna. No elimi-
nará fotos/imágenes de tarjetas de memoria externas o dispositivos de
almacenamiento USB.
Español
Page 40

38
Reproducción de música
Pulse para acceder a la pantalla del menú.
Utilice las flechas de dirección para seleccionar el icono y pulse
.
El marco mostrará una lista de archivos de música/audio encontrados en
la fuente de memoria externa seleccionada como se muestra a continuación.
Comenzará la reproducción de la primera pista de música de la lista.
• El modo de reproducción predeterminado es para reproducir
desde la primera hasta la última pista y repetir desde la primera
pista.
Pulse en cualquier momento para cambiar el modo de reproducción.
• Los modos disponibles son REPEAT-ALL (REPETIR TODAS) (prede-
terminado), REPEAT-ONE (REPETIR UNA) (repite la misma pista),
REPEAT-OFF (REPETIR APAGADO) (reproduce todas las pistas y
se detiene) y RANDOM (ALEATORIO) (reproduce las pistas en
modo aleatorio).
Formatos de audio soportados: MP3
Español
Page 41

39
Reproducción de vídeo
Pulse el botón para acceder a la pantalla del menú del marco.
Utilice las flechas de dirección para seleccionar el icono y
pulse para confirmar.
El marco mostrará una lista de clips/archivos de vídeo soportados
encontrados en la fuente de memoria externa seleccionada como se
muestra a continuación.
Pulse los botones y para seleccionar el vídeo
deseado. Pulse para iniciar la reproducción.
• El modo de reproducción predeterminado reproducirá automáticamente el vídeo siguiente hasta el final de la lista y
luego volverá a comenzar desde el principio..
Pulse el botón en cualquier momento para cambiar el modo de
reproducción.
• Los modos de reproducción disponibles son REPEAT-ALL (REPETIR TODAS) (predeterminado), REPEAT-ONE (REPETIR UNA)
(repite el mismo clip), REPEAT-OFF (REPETIR APAGADO) (reproduce todos los clips y se detiene) y RANDOM (ALEATORIO)
(reproduce los clips en modo aleatorio).
Formato de vídeo soportado: MPEG 1, MP4 (ISO MP4 ASP ; .mp4, .avi)
Español
Page 42

40
Especificaciones
Especificaciones de la pantalla
Tamaño
Relación de aspecto
Resolución
Relación de contraste
Alimentación
Adaptador de corriente externo
Audio
Altavoces internos
Conectividad
Puertos USB
Medio de almacenamiento
Memoria interna
Tarjetas de memoria soportadas:
CF – CompactFlash®
MS – Memory Stick Pro™
MMC – MultiMedia Card
SD™ – Secure Digital
SDHC™ – High Capacity
Secure Digital
xD – xD Picture Card™
Tarjetas de memoria ranura 1
Tarjetas de memoria ranura 2
Archivos de medios soportados:
Formatos de archivos de vídeo
Formatos de archivos de fotos
Formatos de archivos de audio
Interfaz/control de usuario
Botones en la parte superior del
marco de fotos digital
Mando a distancia
Cambio de imagen vertical
Giro de imagen automático según
orientación del marco
7”
16:9
800x480 pixels
400:1
+9V, 1A
Estéreo
1 (STD 2.0 Host)
15 fotos MÁX
Sí
Sí
Sí
Sí
No
Sí
SD/MMC/MS/xD
CF
MPEG 1, MP4 (ISO MP4 ASP ; .mp4, .avi)
JPEG - (Baseline, secuencial extendido y
JPEG progresivo)
MP3
Sí
Sí
Sí
Español
Page 43

41
Preguntas más frecuentes
Pregunta Respuesta
¿Cuál es el alcance del mando
a distancia?
Hasta 10m (30 pies)
¿Por qué no aparecen algunas
de mis fotos?
Algunos formatos de archivos de fotos/
imágenes no son soportados. Consulte las
especificaciones.
¿Por qué no se reproducen algunas de mis pistas de música?
Algunos formatos de archivos de música
no son soportados. Consulte las especificaciones.
¿Por qué no se reproducen
algunos de mis vídeos?
Algunos formatos de archivos de vídeo no
son soportados. Consulte las especificaciones.
¿Puedo eliminar fotos de las
tarjetas de memoria externa o
unidades flash?
Por ahora no.
¿Puedo eliminar fotos de la
memoria interna?
Sí, consulte la sección “Eliminar fotos de la
memoria interna” en este manual.
¿Cómo puedo cambiar a la
memoria interna?
Quite todas las tarjetas de memoria y
unidades USB flash. El marco de fotos
cambiará automáticamente a la memoria
interna.
He perdido o dañado mi mando y/o adaptador de corriente.
¿Puedo mandar a pedir uno?
Sí. Visite www.hp.com/support para más
detalles.
¿Cómo puedo encontrar la
última información y solución
de problemas para mi marco
de fotos digital HP?
Visite www.hp.com/support para más
detalles y la última información.
Español
Page 44

42
Consejos para la limpieza y cuidados
√ Apague el marco de fotos digital HP antes de limpiarlo.
√ NO rocíe ni vierta limpiadores líquidos directamente en la pantalla
o en el marco.
√ NO utilice amoníaco, alcohol o limpiadores con detergentes abrasi-
vos.
Limpieza de la pantalla:
1. Limpie la pantalla con un trapo limpio, suave y sin pelusa para
quitar el polvo y partículas sueltas.
2. Si necesita una limpieza más profunda, aplique un limpiador
apropiado (aprobado para pantallas LCD) en un trapo limpio,
suave y sin pelusa y limpie la pantalla.
• NOTA: no aplique demasiada presión sobre la pantalla para
evitar dañarla.
Nettoyage du cadre et du support:
1. Utilice un trapo limpio, suave y sin pelusa para quitar el polvo
y partículas sueltas.
2. Si lo desea, aplique un limpiador apropiado en un trapo
limpio, suave y sin pelusa y limpie la superficie.
Español
Page 45

Page 46

 Loading...