


R
HP
JetDirect
Print Servers
HP JetDirect
Print Servers
600N/400N/500X/300X
Administrator's Guide


Administrator’s Guide
HP JetDirect Print Servers
(600N/400N/500X/300X)

©Copyright
Hewlett-Packard Company 2000
All rights reserved. Reproduction,
adaptation, or translation without prior
written permission is prohibited, except
as allowed under the copyright laws.
Publication number
5969-3521
First Edition,
February 2000
Warra nty
The information contained in this
document is subject to change without
notice.
HEWLETT-PACKARD COMPANY
MAKES NO WARRANTY OF ANY
KIND WITH REGARD TO THIS
MATERIAL, INCLUDING, BUT
NOT LIMITED TO, THE IMPLIED
WARRANTIES OF
MERCHANTABILITY AND
FITNESS FOR A PARTICULAR
PURPOSE.
Hewlett-Packard shall not be liable for
errors contained herein or for incidental
or consequential damages in connection
with the furnishing, performance, or
use of this material.
This product is based in whole or in part
on technology developed by Novell, Inc.
Hewlett-Packard assumes no
responsibility for the use or reliability
of its software on equipment that is not
furnished by Hewlett-Packard.
MICROSOFT CORPORATION
MAKES NO REPRESENTATIONS OR
WARRANTIES WITH RESPECT TO
THE CONTENTS OR USE OF THIS
MANUAL, AND SPECIFICALLY
DISCLAIMS ANY EXPRESSED OR
IMPLIED WARRANTIES OF
MERCHANTABILITY OR FITNESS
FOR ANY PARTICULAR PURPOSE.
Further, Microsoft Corporation makes
no representations or warranties with
respect to any Microsoft Corporation
Server software, and specifically
disclaims any express or implied
warranties of merchantability or fitness
for any particular purpose. Further,
Microsoft Corporation reserves the
right to make changes to any and all
parts of Microsoft Corporation Server
software, at any time, without
obligation to notify any person or entity
of such changes.
NOVELL, INC. MAKES NO
REPRESENTATIONS OR
WARRANTIES WITH RESPECT TO
THE CONTENTS OR USE OF THIS
MANUAL, AND SPECIFICALLY
DISCLAIMS ANY EXPRESS OR
IMPLIED WARRANTIES OF
MERCHANTABILITY OR FITNESS
FOR ANY PARTICULAR PURPOSE.
Trademark Credits
Microsoft Windows®, Microsoft
Windows® 95/98,Microsoft Windows for
Workgroups®, and Microsoft Windows
NT® are U.S. registered trademarks of
Microsoft Corporation. NetWare® and
Novell® are registered trademarks of
Novell Corporation. IBM®, IBM Warp
Server®, Operating System/2® are
registered trademarks of International
Business Machines Corp. Ethernet is a
registered trademark of Xerox
Corporation. PostScript is a trademark
of Adobe Systems, Incorporated, which
may be registered in certain
jurisdictions. UNIX® is a registered
trademark in the United States and
other countries, licensed exclusively
through X/Open Company Limited.
Hewlett-Packard Company
11311 Chinden Boulevard
Boise, Idaho 83714
Hewlett-Packard Company
8000 Foothills Blvd.
Roseville, CA 95747

Table of Contents
1. Introducing the HP JetDirect Print Server
Introduction ............................................................................. 1
Support Materials.................................................................... 3
Software, Driver, and Flash Image Upgrades ....................... 3
2. HP Software Solutions Summary
Software Solutions Table ........................................................ 5
HP Web JetAdmin ................................................................... 8
Internet Printer Connection Software.................................. 10
HP IP/IPX Printer Gateway for NDPS................................. 14
EtherTalk or LocalTalk Networks (Mac OS) ....................... 16
3. TCP/IP Configuration
Introduction ........................................................................... 23
Using BOOTP/TFTP.............................................................. 25
Using DHCP........................................................................... 33
Using RARP ........................................................................... 41
Using the arp and ping Commands...................................... 43
Using Telnet........................................................................... 45
Using the Embedded Web Server ......................................... 51
Using the Printer Control Panel........................................... 52
Moving to Another Network.................................................. 55
4. Configuring for LPD Printing
Introduction ........................................................................... 57
LPD Setup Overview ............................................................. 60
LPD on UNIX Systems.......................................................... 62
LPD on Windows NT/2000 Systems ..................................... 66
LPD on Mac OS Systems....................................................... 72
5. FTP Printing
Introduction ........................................................................... 75
Requirements......................................................................... 75
Print Files .............................................................................. 76
Using FTP Printing ............................................................... 76
Example of an FTP Session................................................... 80
EN
i

6. Troubleshooting the HP JetDirect Print Server
Introduction ........................................................................... 81
Resetting to Factory Defaults ............................................... 83
General Troubleshooting....................................................... 84
Troubleshooting an LPD UNIX Configuration .................... 94
Understanding the Ethernet Configuration Page
(Internal MIO and EIO Print Servers) .............................. 96
Understanding the Token Ring Configuration Page
(Internal MIO and EIO Print Servers) .............................. 99
Understanding the Ethernet and Token Ring Configuration
Pages (External Print Servers) ........................................ 103
7. HP JetDirect Configuration Page Messages
Introduction ......................................................................... 109
A. TCP/IP Overview
Introduction ......................................................................... 131
IP Address............................................................................ 132
Configuring IP Addresses.................................................... 135
Subnets................................................................................. 136
Gateways.............................................................................. 137
B. Using the Embedded Web Server
Introduction ......................................................................... 139
Requirements....................................................................... 140
Viewing the Embedded Web Server ................................... 141
C. Printing on Windows NT DLC/LLC Networks
Introduction ......................................................................... 143
Installing the DLC Transport and Driver Software .......... 144
Configuring a Printer .......................................................... 145
D. HP JetDirect Year 2000 Compliance
Introduction ......................................................................... 147
Hewlett-Packard Year 2000 Warranty............................... 147
ii
EN

1
Introducing the HP JetDirect
Print Server
Introduction
HP JetDirect print servers allow you to connect printers and other
devices directly to a network. By attaching directly to a network,
devices can be conveniently located near users. In addition, a
network connection allows data transfers to or from the device at
network speeds.
HP JetDirect
have a compatible input/output (I/O) slot. HP JetDirect
print servers connect printers to the network by adapting the
printer’s parallel port to a network port. Depending on the model,
HP JetDirect external print servers can connect up to three printers
to a network.
Note Unless otherwise specified, the term print server in
internal
print servers are installed in HP printers that
external
this manual refers to the HP JetDirect print servers
and not a separate computer running print server
software.
EN
1

Supported Print Servers
Unless otherwise specified, the features described in this guide
support the following HP JetDirect print servers with firmware
version x.08.03 or later.
●
HP JetDirect 600N/400N internal print servers
●
HP JetDirect 500X/300X external print servers
Supported Networks
HP JetDirect print servers support a variety of network protocol
suites, including TCP/IP, IPX/SPX, DLC/LLC, and AppleTalk
protocols. In addition, HP provides software for network
configuration on the following networks:
●
Novell NetWare (including systems with NDPS)
●
Microsoft Windows 95/98
●
Microsoft Windows NT 4.0
●
Microsoft Windows 2000
●
Apple EtherTalk and LocalTalk
●
UNIX (HP-UX and Solaris)
●
Internet (via Internet Printer Connection software)
●
Linux (RedHat and SuSE)
Note If not supplied with this product, HP network
configuration and management software for
supported systems may be obtained from
HP Customer Care Online
(http://www.hp.com/support/net_printing).
For software to set up network printing on other
systems, consult your system vendor.
2 Introducing the HP JetDirect Print Server
EN
Support Materials
The manuals listed below are shipped with your print server or with
printers that have factory-installed print servers.
Getting Started Guide
●
or equivalent printer documentation
(shipped with printers that have factory-installed HP JetDirect
print servers).
●
This manual, the
●
HP JetDirect Print Server Hardware Installation Guide
The
HP JetDirect Administrator’s Guide
.
(shipped with non-factory-installed print servers).
Software, Driver, and Flash Image Upgrades
Hewlett-Packard offers downloadable electronic upgrades for
HP JetDirect print servers containing internal Flash memory. The
electronic upgrades are available on the World Wide Web and
various online services.
Current information about drivers, software versions, and
HP JetDirect Flash images are available through the following
areas:
Table 1.1 HP Customer Care Online
World Wide
Web
America
Online
HP
Distribution
Center
FTP Site Download printer drivers and upgrades from HP's
EN
Access HP Customer Care Online at:
http://www.hp.com/support/net_printing
Receive drivers and upgrades by downloading them to
your computer from the HP Forum.
Order drivers and upgrades for HP printers by calling the
HP Distribution Center at (805) 257-5565 (USA only).
anonymous FTP site at:
ftp.hp.com/pub/networking/software
Introducing the HP JetDirect Print Server 3

4 Introducing the HP JetDirect Print Server
EN

2
HP Software Solutions Summary
Software Solutions Table
HP provides a variety of software solutions to set up or manage your
HP JetDirect-connected network devices. See Table 2.1 to help you
determine which software is best for you:
EN
5

Table 2.1 Software Solutions (1 of 2)
Operating Environment Function Remarks
Install Network Printer wizard (Windows)
Windows 95, 98, 2000
Windows NT 4.0
NetWare 3.x, 4.x, 5.0
HP JetDirect Printer Installer for UNIX
HP-UX 10.10, 10.20, 11.0,
11.10
Solaris 2.5.x, 2.6, 7
TCP/IP
HP Web JetAdmin
Windows NT 4.0
HP-UX
Solaris
Red Hat Linux, SuSE Linux
NetWare*
*Supports queue creation
(NetWare), and peripheral
management from HP Web
JetAdmin hosted on
Windows NT 4.0
Install a single network
printer on a peer-to-peer or
client-server network
Fast and easy installation
of HP JetDirect-connected
printers
Remote installation,
configuration, and
management of HP
JetDirect-connected print
servers, non-HP printers
that support the standard
MIBs, and printers with
embedded web servers
Alerts and consumables
management
Remote firmware
upgrades for HP JetDirect
print servers
Simple printer installation
Runs from CD-ROM
More information:
http://www.hp.com/
support/net_printing
More information:
http://www.hp.com/
support/net_printing
HP’s preferred solution for
ongoing management and
installation of multiple
printers-anywhere on your
intranet
Browser-based
management
More information:
http://www.hp.com/
support/net_printing
Asset tracking and
utilization analysis
6 HP Software Solutions Summary
EN
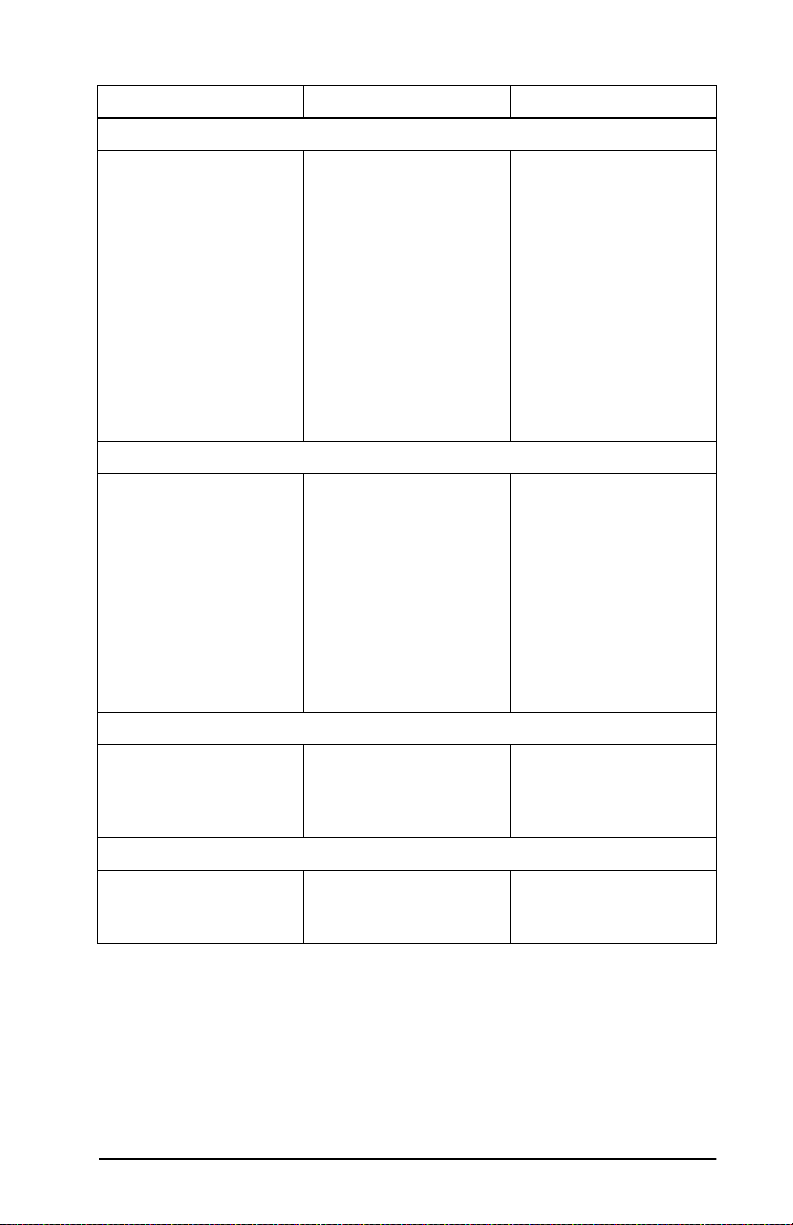
Table 2.1 Software Solutions (2 of 2)
Operating Environment Function Remarks
Internet Printer Connection
Windows NT 4.0 (Intel)
TCP/IP only
Note: Internet printing
software is included with
Windows 2000.
HP IP/IPX Printer Gateway for NDPS
NetWare 4.11, 4.2, 5.0 Simplified installation,
HP LaserJet Utility for Mac OS
Mac OS 7.5 or later Installation and
HP Network Port for NT (DLC/LLC)
Windows NT (DLC/LLC) Windows NT network
Printing via the Internet to
Internet Printing Protocol
(IPP)-enabled HP
JetDirect-connected
printers
printing, and bidirectional
management of HP
JetDirect-connected
printers under Novell
Distributed Print Services
(NDPS)
Allows automatic discovery
and installation of HP
JetDirect-connected
printers into NDPS via IPX
management of HP
JetDirect-connected
printers
printer setup on DLC/LLC
networks
Allows economical
distribution of high-quality
hardcopy documents over
the Internet, replacing fax,
mail, and overnight
services
Requires HP JetDirect
print server (firmware
version X.07.16 or later)
More information:
http://www.hp.com/
support/net_printing
Frees up user licenses
Allows disabling of SAPs to
reduce network traffic
For IPX printing, requires
HP JetDirect firmware
version X.03.06 or later
More information:
http://www.hp.com/
support/net_printing
More information:
http://www.hp.com/
support/net_printing
More information:
See Appendix C
EN
HP Software Solutions Summary 7

HP Web JetAdmin
HP Web JetAdmin allows you to use a Web browser to install, view,
manage, and diagnose devices connected to an HP JetDirect print
server or any standard printer MIB devices.
For information about a procedure or window in the HP Web
JetAdmin software, see the online help.
System Requirements
HP Web JetAdmin software runs on Microsoft Windows NT 4.0,
HP-UX, Solaris, Red Hat Linux, and SuSE Linux systems. For
information on supported operating systems and browser versions,
access HP Customer Care Online at
http://www.hp.com/go/webjetadmin/.
Note When installed on a supported host server,
HP Web JetAdmin can be accessed from any client
through a supported web browser by browsing to
the HP Web JetAdmin host. This allows printer
installation and management on Novell NetWare,
and other networks.
8 HP Software Solutions Summary
EN

Installing HP Web JetAdmin
Before installing the HP Web JetAdmin software, you must have
domain administrator or root privileges:
1. Download the installation files from HP Customer Care Online
at http://www.hp.com/go/webjetadmin/.
2. Follow the instructions on the screen to install the HP Web
JetAdmin software.
Note Installation instructions are also contained in the
HP Web JetAdmin install file.
Verifying Installation and Providing Access
●
Verify that the HP Web JetAdmin software is correctly installed
by navigating to it with your browser as shown in the following
example:
http://server.domain:port/
where
port
●
Provide users access to HP Web JetAdmin software by adding a
server.domain
is the host name of your web server and
is the port number assigned during installation.
link to your web server’s home page that is addressed to HP Web
JetAdmin’s URL. For example:
http://server.domain:port/
EN
HP Software Solutions Summary 9

Configuring and Modifying a Device
Using your browser, navigate to HP Web JetAdmin’s URL. For
example:
http://server.domain:port/
Follow the instructions on the appropriate home page to configure
or modify your printer.
Note You can also substitute the
the TCP/IP address.
server.domain
with
Removing HP Web JetAdmin Software
To remove HP Web JetAdmin software from your web server, use
the uninstall program provided with the software package.
Internet Printer Connection Software
HP JetDirect print servers (firmware version x.07.16 or later)
support the Internet Printing Protocol (IPP). Using the appropriate
software on your system, you can create an IPP print path from your
system to any HP JetDirect-connected printer over the Internet.
Note For incoming print path requests, the network
administrator must configure the firewall to accept
incoming IPP requests. Security features available
in the software are currently limited.
Windows NT 4.0
For Windows NT 4.0, you can use the HP Internet Printer
Connection software.
10 HP Software Solutions Summary
EN

●
Use a supported Web Browser (such as Netscape Navigator or
Microsoft Internet Explorer) to view the embedded web server on
the HP JetDirect print server. Contact your network
administrator to get the IP address or URL of the printer and
browse to the print server’s web page. Click on the
Printing Install Wizard
link. This link executes an installation
Internet
wizard that automatically sets up a print path between your
computer and the printer.
●
Download the HP Internet Printer Connection software from
HP Customer Care online at:
http://www.hp.com/go/print_connect.
To install the software and set up the print path to the printer,
follow the instructions provided with the software. Contact your
network administrator to get the IP address or URL of the printer
to complete the setup.
Windows 2000
For Windows 2000, the HP Internet Printer Connection software is
included with the system.
To set up a print path from a Windows 2000 system to an HP
JetDirect-connected Internet printer, proceed as follows:
1. Open the Printers folder (click
Printers
).
Start
, select
2. Run the Add Printer wizard (double-click
Next
click
3. Select
4. Select
.
Network Printer
and click
Next
Connect to a printer on the Internet
Settings
Add Printer
.
and enter the
, and select
print server’s URL:
http://
IP_address
/ipp/[port#]
where IP_address is the IP address configured on the HP
JetDirect print server, and [
port#
] is an optional parameter that
identifies the port number on the multi-port HP JetDirect
external print server (port1, port2, or port3) that the printer is
connected to. The default is port1.
(Example: http://15.24.227.113/ipp/port2)
Then click
EN
Next
.
HP Software Solutions Summary 11
), then

5. You will be prompted for a printer driver (the HP JetDirect print
server does not contain printer drivers, so your system cannot
automatically obtain the driver). Click OK to install the printer
driver onto your system and follow the instructions on the
screen. (You may need your printer CD-ROM to install the
driver.)
6. To complete the print path setup, follow the instructions on the
screen.
Features
Features and benefits provided by Internet printing include:
●
High-quality, time-sensitive documents.
●
Full-color or black-and-white documents.
●
A fraction of the cost of current methods (such as fax, mail, or
overnight delivery services).
●
Extends the traditional LAN printing model to that of an Internet
Printing Model.
●
IPP requests can be transmitted outbound through firewalls.
12 HP Software Solutions Summary
EN

System Requirements
●
Computer running Microsoft Windows NT 4.0 (Intel based) or
Windows 2000
●
IPP-enabled HP JetDirect print server (firmware must be at
revision x.07.16 or later)
Supported Browsers
Windows NT
●
Microsoft Internet Explorer 4.0 with SP1 or later
●
Netscape Navigator 4.06 or later
Windows 2000
●
Microsoft Internet Explorer 5
Supported Proxies
●
Web proxy with support for HTTP v1.1 or later (may not be
needed if printing over an intranet)
EN
HP Software Solutions Summary 13

HP IP/IPX Printer Gateway for NDPS
NDPS (Novell Distributed Print Services) is a printing architecture
developed by Novell, in partnership with Hewlett-Packard. NDPS
simplifies and streamlines the administration of network printing.
It eliminates the need to set up and link print queues, printer
objects, and print servers. Administrators can use NDPS to manage
networked printers within the NetWare 4.11, NetWare 4.2,
intraNetWare, and NetWare 5 environments.
The HP IP/IPX Printer Gateway is an NLM developed by HP to
provide functionality and compatibility with Novell's NDPS. It
seamlessly integrates HP JetDirect-attached printers into the
NDPS environment. Using the HP Gateway, an administrator can
view statistics, configure gateway settings, and configure printing
for HP JetDirect-connected printers.
Features
Features and benefits provided by the HP Gateway and NDPS are:
●
Smart detection of printers in the NetWare 4.11, 4.2,
intraNetWare, and NetWare 5 environments
●
Automatic installation of printers using IPX/SPX
●
Tight integration with Novell's NDS and NWAdmin
●
Status updates from printers
●
Simplified Automatic Driver Download
●
Reduced SAP Traffic
●
Reduces the number of required NetWare User Licenses
●
Native TCP/IP printing with NetWare 5
14 HP Software Solutions Summary
EN

Supported Clients
Clients supported by the HP IP/IPX Printer Gateway:
NetWare 5 with NDPS
●
Novell Client 3.0 (or greater) for Windows 95/98
●
Novell Client 4.5 (or greater) for Windows NT
NetWare 4.11, 4.2 with NDPS
●
Novell Client 2.2 (or greater) for Windows 95
●
Novell Client 2.2 (or greater) for DOS and Windows (for Windows
3.1x support)
The HP IP/IPX Printer Gateway is included with Novell NetWare 5
and supports NDPS 2.0. It also supports NetWare 4.11, 4.2, and
intraNetWare, both with NDPS already installed.
Note For more information (including access to the HP
IP/IPX Printer Gateway software and the User
Guide), access HP Customer Care Online
(http://www.hp.com/support/net_printing).
EN
HP Software Solutions Summary 15

EtherTalk or LocalTalk Networks
(Mac OS)
This section describes installing printer software for
Mac OS-compatible computer systems. It also explains how to use
the HP LaserJet Utility to configure HP printers connected to an
AppleTalk network through an HP JetDirect print server. This
section also explains how to use the Chooser to select and set up a
Mac OS computer to print to your HP printer.
Installing the Printer Software
If the HP LaserJet Utility was included on your printer’s CD-ROM,
see your printer documentation for installation instructions, then
skip to the next section to configure the printer.
If you are installing the HP LaserJet Utility from the
CD-ROM, use the following installation instructions.
Note If you are installing the HP LaserJet Utility from a
source other than the CD-ROM, see the README
file that accompanies the software for installation
instructions.
Note Automatic virus detection programs might interfere
with the installation of this software. Turn off any
such programs that are active on your Mac OS
computer before proceeding with the installation
process.
HP JetDirect
16 HP Software Solutions Summary
EN

1. Insert the CD-ROM into the CD-ROM drive.
2. In the
HP Installer
window, double-click the installation icon
for the software in the language you want.
3. Follow the instructions on the screen.
For more information about configuring your printer driver, see the
online documentation provided on the CD-ROM that came with the
printer.
Configuring the Printer
The HP LaserJet Utility allows printer settings such as printer
name and preferred zone to be configured from your Mac OS system.
Hewlett-Packard recommends that only network administrators
use the printer configuration capabilities of this utility.
If this printer is to be serviced by a print spooler, set up the printer's
name and zone before configuring the spooler to capture the printer.
Running the HP LaserJet Utility
1. With the printer turned on and online, and the print server
connected to the printer and to the network, double-click the
HP LaserJet Utility icon.
2. If the printer’s name is not listed as the target printer, click
Select Printer. The
Select a Target Printer
window appears.
■
Select the zone, if necessary, from the
AppleTalk Zones
which the printer resides. The zone the printer is in is shown
on the configuration page. See the hardware installation guide
for your print server or your printer's getting started guide for
instructions on printing a configuration page.
■
Select the printer from the
Available Printers
list and
click OK.
EN
HP Software Solutions Summary 17
list in

Verifying Network Configuration
To verify your current network configuration, print a configuration
page. If you have not printed a configuration page from your printer,
see the hardware installation guide for your print server or your
printer’s getting started guide for instructions. If your printer has
READY
a control panel, make sure a
message appears on the control
panel for at least 1 minute, then print the page. The current
configuration is listed under AppleTalk Status on the configuration
page.
Note If you have multiple printers on your network, you
need to print a configuration page to identify the
printer’s name and zone.
Renaming the Printer
The factory supplies a default name for your printer.
Hewlett-Packard highly recommends that you rename your
printer to avoid having multiple printers with similar
.
names on your network
you like—for example, “Michael’s LaserJet 5M.” The HP LaserJet
Utility has the ability to rename devices located in different zones,
as well as the local zone (no zones need to be present in order to use
the HP LaserJet Utility).
You can name your printer anything
1. Select the Settings icon from the scrolling icon list. The
Please select a setting:
dialog appears.
2. Select Printer Name in the list.
18 HP Software Solutions Summary
EN

3. Click
Edit
Set Printer Name
. The
dialog box appears.
4. Type the new name.
Note The name may be up to 32 characters in length.
A warning beep indicates that an illegal character
was typed.
5. Click OK.
Note If you try to name your printer the same name as
another printer, an alert dialog box appears
directing you to select another name. To select
another name, repeat steps 4 and 5.
6. If your printer is on an EtherTalk network, continue with the
next section, “Selecting a Zone.”
7. To exit, select
Quit
from the
File
menu.
Notify everyone on your network of the new name for your printer
so they can select the printer in the Chooser.
EN
HP Software Solutions Summary 19

Selecting a Zone
The HP LaserJet Utility allows you to select a preferred zone for
your printer on a Phase 2 EtherTalk network. Instead of your
printer remaining on the default zone, which is set by the router,
this utility lets you select the zone on which your printer appears.
The zones on which your printer can reside are limited by your
network configuration. The HP LaserJet Utility only enables
you to select a zone that is already configured for your
network.
Zones are groups of computers, printers, and other AppleTalk
devices. They can be grouped by physical location (for example,
Zone A may contain all the printers on the network in building A).
They may also be grouped logically (for example, all printers used
in the finance department).
If you are using LocalTalk, skip this section, select Quit from the
File
menu, then go to “Selecting Your Printer.”
1. Select the Settings icon from the scrolling icon list. The
Select a Setting:
dialog box appears.
2. Select Printer Zone in the list and click Edit. The
Please
Select a Zone
dialog box appears.
3. Select your preferred network zone from the
Select a Zone:
list
and click Set Zone.
4. To exit, select Quit from the
File
menu.
Notify everyone on your network of the new zone for your printer
so they can select the printer in the Chooser.
20 HP Software Solutions Summary
EN

Selecting Your Printer
1. Select the Chooser from the
Apple
menu.
2. Select the printer icon for use with your printer. If the
appropriate printer icon does not appear in the Chooser, or you
are not sure which icon to select for your printer, see “Installing
the Printer Software” in this chapter.
3. If AppleTalk is not active, an alert dialog box appears on your
screen. Select OK. The
If your network is linked to other networks, the
Active
button turns on.
AppleTalk Zones
list dialog box appears in the Chooser.
4. If applicable, select the zone in the
AppleTalk Zones
scrolling
list where your printer is located.
5. Select the printer name you want to use from the list of printer
names in the upper-right area of the Chooser. If the printer's
name does not appear in the list, make sure the following tasks
have been performed:
■
the printer is turned on and is online.
■
the print server is connected to the printer and to the network.
■
the printer cable connections are secure.
READY
A
message should appear if the printer has a control panel
display. See the chapter on “Troubleshooting the HP JetDirect
Print Server” for more information.
Note
EN
If your printer is the only name listed in the
dialog box, you must still select it.
Your printer
remains selected until you select a different printer
with the Chooser.
HP Software Solutions Summary 21

6. Click
Setup
or
Create
in the Chooser; then, if prompted, select
the appropriate PostScript Printer Description file (PPD) for the
printer. For more information, see the online documentation
(HP LaserJet Printing Guide)
.
7. Set
Background Printing to ON
If background printing is turned
OFF
or
OFF
.
when you send a print job
to the printer, status messages appear on your screen and you
have to wait until the messages clear before continuing your
work. If background printing is turned ON, the messages are
redirected to the PrintMonitor and you can continue working
while the printer is printing your job.
8. Exit the Chooser.
To display your user name on the network when you are printing
documents, go into the Control Panel on your Mac OS computer,
Sharing Setup
select
, then type your owner name.
Testing the Configuration
1. Select
open, select
The
2. Click
Print Window
Print Desktop
Print
dialog box appears.
Print
.
from the
If the printer prints the job, you have connected your printer to
your network correctly. If your printer does not print, see the
chapter on “Troubleshooting the HP JetDirect Print Server.”
File
menu, or if no window is
.
22 HP Software Solutions Summary
EN

3
TCP/IP Configuration
Introduction
To operate properly on a TCP/IP network, the HP JetDirect print
server must be configured with valid TCP/IP network configuration
parameters, such as an IP address. Depending on your printer and
system, this can be done in the following ways:
Note When shipped from the factory, the HP JetDirect
print server has no IP address. If the HP JetDirect
print server is not configured with a valid IP
address within two minutes after power up, a
factory default value of 192.0.0.192 will be
automatically assigned. This address must be
reconfigured with a valid address for use on your
TCP/IP network. For more information on TCP/IP
networks, see appendix A.
●
By downloading the data from a network-based UNIX server
using BOOTP (Bootstrap Protocol) and TFTP (Trivial File
Transfer Protocol) each time the printer is turned on.
Note The BOOTP daemon, bootpd, must be running on a
BOOTP server that is accessible by the printer.
EN
23

●
By using Dynamic Host Configuration Protocol (DHCP). This
protocol is supported in HP-UX, Solaris, Red Hat Linux, SuSE
Linux, Windows NT/2000 and Mac OS systems. (Refer to your
network operating system manuals to verify that your operating
system supports DHCP.)
Note Linux and UNIX systems: For more information,
see the bootpd man page.
On HP-UX systems, a sample DHCP configuration
file (dhcptab) may be loaded in the
/etc
directory.
Since HP-UX presently does not provide Dynamic
Domain Name Services (DDNS) for its DHCP
implementations, HP recommends that you set all
print server lease durations to
infinite
. This ensures
that print server IP addresses remain static until
such time as Dynamic Domain Name Services are
provided.
●
By a network-based server using RARP (Reverse Address
Resolution Protocol) answering the print server's RARP request
and supplying the print server with the IP address. The RARP
method only allows you to configure the IP address.
●
By using the
●
By setting configuration parameters using Telnet. In order to set
arp
and
ping
commands from your system.
configuration parameters, set up a Telnet connection from your
UNIX system to the HP JetDirect print server using the default
IP address. The default IP address takes effect two minutes after
the printer is turned on (if none of the other configuration
methods have been used). (Older products may take longer for
the IP address to take effect.) The default IP address is
192.0.0.192. If Telnet is used, the print server saves the
configuration even if the printer or print server is turned off.
24 TCP/IP Configuration
EN

●
By browsing to the embedded Web server on the HP JetDirect
print server and setting the configuration parameters.
●
By manually entering the configuration data using the printer
control panel keys. The control panel method allows you to
configure only a limited subset of configuration parameters
(IP address, subnet mask, default gateway address, and idle
timeout). Therefore, control panel configuration is recommended
only during troubleshooting or for simple installations. If control
panel configuration is used, the print server saves the
configuration over power cycles.
Using BOOTP/TFTP
This section describes how to configure the print server using
BOOTP (Bootstrap Protocol) and TFTP (Trivial File Transfer
Protocol) services on UNIX servers. BOOTP and TFTP are used to
download network configuration data from a server to the HP
JetDirect print server over the network.
Note On Windows NT/2000 server systems, use the
Microsoft DHCP utilities to set up HP JetDirect
configuration via BOOTP. For more information,
see “Using DHCP”.
Note If the JetDirect print server and BOOTP/DHCP
server are located on different subnets, IP
configuration may fail unless the routing device
supports “BOOTP Relay” (allows the transfer of
BOOTP requests between subnets).
EN
TCP/IP Configuration 25

Why Use BOOTP/TFTP
Using BOOTP/TFTP to download configuration data has the
following benefits:
●
Enhanced configuration control of the HP JetDirect print server.
Configuration by other methods, such as a printer control panel,
are limited to select parameters.
●
Ease of configuration management. Network configuration
parameters for the entire network can be in one location.
●
Ease of HP JetDirect print server configuration. Complete
network configuration can be automatically downloaded each
time the print server is powered on.
The factory-default state of the HP JetDirect print server is to
operate through BOOTP/TFTP.
Systems That Use Network Information Service (NIS)
If your system uses NIS, you may need to rebuild the NIS map with
the BOOTP service before performing the BOOTP configuration
steps. Refer to your system documentation.
Configuring the BOOTP Server
For the HP JetDirect print server to obtain its configuration data
over the network, the BOOTP/TFTP servers must be set up with
the appropriate configuration files. BOOTP is used by the print
server to obtain entries in the
server, while TFTP is used to obtain additional configuration
information from a configuration file on a TFTP server.
26 TCP/IP Configuration
/etc/bootptab
file on a BOOTP
EN

When the HP JetDirect print server is powered on, it broadcasts a
BOOTP request that contains its MAC (hardware) address. A
BOOTP server daemon searches the
/etc/bootptab
file for a
matching MAC address, and if successful, sends the corresponding
configuration data to the JetDirect print server as a BOOTP reply.
The configuration data in the
/etc/bootptab
file must be properly
entered. For a description of entries, see “Bootptab File Entries”.
The BOOTP reply may contain the name of a configuration file
containing enhanced configuration parameters. If the HP JetDirect
print server finds such a file, it will use TFTP to download the file
and configure itself with these parameters. For a description of
entries, see “TFTP Configuration File Entries“. Configuration
parameters retrieved via TFTP are optional.
Note HP recommends that the BOOTP server be located
on the same subnet as the printers it serves.
BOOTP broadcast packets may not be
forwarded by routers unless the routers are
properly configured.
CAUTION Community names (passwords) for your printer are
not secure. If you specify a community name for
your printer, select a name that is different from
passwords used for other systems on your network.
EN
TCP/IP Configuration 27

Bootptab File Entries
An example of a
/etc/bootptab
file entry for an HP JetDirect
print server is provided below:
picasso:\
:hn=picasso:ht=ether:vm=rfc1048:\
:ha=0060b0123456:\
:ip=13.10.10.248:\
:sm=255.255.255.0:\
:gw=13.10.10.1:\
:lg=13.10.10.3:\
:T144=“hpnp/picasso.cfg”:
Note that the configuration data contains “tags” to identify the
various HP JetDirect parameters and their settings. The tags are
identified in Table 3.1.
Table 3.1 Tags in the “bootptab” file (1 of 2)
nodename The name of the peripheral. This name identifies an entry
point to a list of parameters for a specific peripheral.
nodename
example above,
hn The host name tag. This tag causes the BOOTP daemon
to download the host name to the HP JetDirect print
server. The host name will be printed on the JetDirect
configuration page, or returned on an SNMP sysName
request by a network application.
must be the first field in an entry. (In the
nodename
is “picasso”.)
ht The hardware type tag. For the HP JetDirect print server,
set this to ether (for Ethernet) or token (for Token Ring).
This tag must precede the ha tag.
vm The BOOTP report format tag (required). Set this
parameter to rfc1048.
ha The hardware address tag. The hardware (MAC) address
is the link-level, or station address of the HP JetDirect print
server. It can be found on the HP JetDirect configuration
page as the LAN HW ADDRESS. On HP JetDirect
external print servers, it is printed on a label attached to
the print server.
ip The IP address tag (required). This address will be the HP
JetDirect print server’s IP address.
28 TCP/IP Configuration
EN

Table 3.1 Tags in the “bootptab” file (2 of 2)
gw The gateway IP address tag. This address identifies the
IP address of the default gateway (router) that the HP
JetDirect print server will use for communications with
other subnets.
sm The subnet mask tag. The subnet mask will be used by
the HP JetDirect print server to identify the portions of an
IP address that specify the network/subnetwork number
and the host address.
lg The syslog server’s IP address tag. It specifies the server
that the HP JetDirect print server sends syslog messages
to.
T144 A vendor-specific tag that specifies the relative path name
of the TFTP configuration file. Maximum length of the path
name is 33 characters. The path name must be in double
quotes (for example,
/usr/tftpdir
information, refer to “TFTP Configuration File Entries“.
“pathname”
is prepended to the path. For file format
). On HP-UX systems,
A colon (:) indicates the end of a field, and a backslash (\) indicates
that the entry is continued on the next line. Spaces are not allowed
between the characters on a line. Names, such as host names, must
begin with a letter and can contain only letters, numbers, periods,
or hyphens.The underline character (_) is not allowed. Refer to your
system documentation or online help for more information.
TFTP Configuration File Entries
To provide additional configuration parameters for your HP
JetDirect print server, such as SNMP (Simple Network
Management Protocol) or non-default settings, an additional
configuration file can be downloaded using TFTP. This TFTP
configuration file’s relative path name is specified in the BOOTP
reply using the
/etc/bootptab
file’s T144 vendor-specific tag
entry. An example of a TFTP configuration file is provided below
(the symbol ‘#’ denotes a remark and is not included in the file).
EN
TCP/IP Configuration 29

#
# Example of an HP JetDirect TFTP Configuration File
#
# Allow only Subnet 13.10.10 access to peripheral.
# Up to four ‘allow’ entries can be written via TFTP.
# Up to 10 ‘allow’ entries can be written via SNMP.
# ‘allow’ may include single IP addresses.
#
allow: 13.10.10.0 255.255.255.0
#
#
# Disable Telnet
#
telnet: 0
#
# Enable the embedded web server
#
ews-config: 1
#
# Detect SNMP unauthorized usage
#
authentication-trap: on
#
# Send Traps to 13.10.10.1
#
trap-dest: 13.10.10.1
#
# Specify the Set Community Name
#
set-community-name: 1homer2
#
# End of file
30 TCP/IP Configuration
EN

Table 3.2 describes parameters that may be included in the TFTP
configuration file.
Table 3.2 TFTP Configuration File Parameters (1 of 3)
ews-config: Enables or disables the embedded web server on the HP
JetDirect print server. To enable, set to 1. To disable, set
to 0.
idle-timeout: The number of seconds that an idle print data connection
is allowed to remain open. Since the card supports only
a single TCP connection, the idle timeout balances the
opportunity of a host to recover or complete a print job
against the ability of other hosts to access the printer.
The acceptable values range from 0 to 3600 (1 hour). If
“0” is typed, the timeout mechanism is disabled. The
default is 90 seconds.
allow: netnum
[mask]
tcp-mss: Specifies the maximum segment size (MSS) that the HP
location: Identifies the physical location of the printer (SNMP
Provides an entry into the host access list stored on the
HP JetDirect print server. Each entry specifies a host or
network of hosts that are allowed to connect to the
printer. The format is “allow: netnum [mask]” where
netnum is a network number or host IP address, and
mask is an address mask of bits applied to the network
number and host address to verify access. Up to 10
access list entries are allowed. If there are no entries, all
hosts are permitted access. For example:
allow: 10.0.0.0 255.0.0.0 allows hosts on network 10.
allow: 15.1.2.3 allows a single host. In this case, the
default mask 255.255.255.255 is assumed and is not
required.
JetDirect print server will advertise for use when
communicating with local subnets (MSS=1460 bytes or
more) or remote subnets (MSS=536 bytes):
0 (default) All networks are assumed to be local
(MSS=1460 bytes or more).
1 Use MSS=1460 bytes (or more) for subnets, and
MSS=536 bytes for remote networks.
2 All networks are assumed to be remote (MSS=536
bytes), except the local subnet.
sysLocation object). Only printable ASCII characters are
allowed. The maximum length is 64 characters. The
default location is undefined. (Example:
south wall
)
1st floor,
EN
TCP/IP Configuration 31

Table 3.2 TFTP Configuration File Parameters (2 of 3)
contact: ASCII character string that identifies the person who
administers or services the printer (SNMP sysContact
object). This may include how to contact this person. The
default contact is undefined.
get-communityname:
Specifies a password that determines which SNMP
GetRequests the HP JetDirect print server will respond
to. This is optional. The community name must be ASCII
characters. The maximum length is 32 characters.
set-communityname:
Specifies a password that determines which SNMP
SetRequests (control functions) the HP JetDirect print
server will respond to. The community name of an
incoming SNMP SetRequest must match the print
server’s “set community name” for the print server to
respond. SetRequests must come from hosts that are
configured in the print server’s host access list.
Community names must be ASCII characters. The
maximum length is 32 characters.
trap-dest: Enters a host’s IP address into the HP JetDirect print
server’s SNMP trap destination list. If the list is empty,
the print server does not send SNMP traps. The list may
contain up to four entries. The default SNMP Trap
Destination List is empty. To receive SNMP traps, the
systems listed on the SNMP trap destination list must
have a trap daemon to listen to those traps.
trap-community
-name:
Community name (password) included with SNMP traps
that are sent by the HP JetDirect print server to a host
computer. The default community name is
public
Community names must be ASCII characters. The
maximum length is 32 characters.
.
authenticationtrap:
Configures the print server to send (on) or not send (off)
SNMP authentication traps. Authentication traps indicate
that an SNMP request was received, but the community
name check failed. The default is “off.” Newer
HP JetDirect EIO cards will not support the separate
SNMP authentification trap setting. (All SNMP traps will
be set in the SNMP Trap Destination List.)
32 TCP/IP Configuration
EN

Table 3.2 TFTP Configuration File Parameters (3 of 3)
telnet: If set to 0, this parameter instructs the print server not to
allow incoming Telnet connections. To regain access,
change the setting in the TFTP configuration file and
power cycle the print server, or cold reset the print server
to factory default values. If this parameter is set to 1,
incoming Telnet connections are allowed.
port: For multiport JetDirect print servers, identifies the port (1,
2, or 3) for port-specific commands. The default is 1.
banner: A port-specific parameter that specifies printing an LPD
banner page. 0 disables banner pages. 1 (default)
enables banner pages.
Using DHCP
Dynamic Host Configuration Protocol (DHCP, RFC 2131/2132) is
one of several auto configuration mechanisms that the HP JetDirect
print server uses. If you have a DHCP server on your network, the
HP JetDirect print server automatically obtains its IP address from
that server and registers its name with any RFC 1001 and
1002-compliant dynamic name services.
Note DHCP services must be available on the server.
Refer to your system documentation or online help
to install or enable DHCP services.
Note If the JetDirect print server and BOOTP/DHCP
server are located on different subnets, IP
configuration may fail unless the routing device
supports “BOOTP Relay” (allows the transfer of
BOOTP requests between subnets).
EN
TCP/IP Configuration 33

UNIX Systems
For more information on setting up DHCP on UNIX systems, see
the bootpd man page.
On HP-UX systems, a sample DHCP configuration file (dhcptab)
may be located in the
/etc
directory.
Since HP-UX presently does not provide Dynamic Domain Name
Services (DDNS) for its DHCP implementations, HP recommends
that you set all print server lease durations to
infinite
. This ensures
that print server IP addresses remain static until dynamic name
services are provided.
Windows Systems
HP JetDirect print servers support IP configuration from a
Windows NT or 2000 DHCP server. This section describes how to
set up a pool, or “scope,” of IP addresses that the Windows server
can assign or lease to any requester. When configured for
BOOTP/DHCP operation (factory default), the HP JetDirect print
server makes a request to the DHCP server for its IP configuration
when the print server is turned on.
Note This information is provided as an overview. For
specific information or for additional support, see
the information supplied with your DHCP software.
Note To avoid problems resulting from IP addresses that
change, HP recommends that all printers be
assigned IP addresses with infinite leases or
reserved IP addresses.
34 TCP/IP Configuration
EN

Windows NT 4.0 Server
To set up a DHCP scope on a Windows NT 4.0 server, perform the
following steps:
1. At the Windows NT server, open the
and double-click the
2. Double-click the
3. Select
Server
and select
Network Administrator
DHCP Manager
Server Add
Program Manager
window
icon.
icon to open this window.
.
4. Type the server IP address, then click OK to return to the
DHCP Manager
window.
5. In the list of DHCP servers, click on the server you have just
added, then select
6. Select
Set up the IP Address Pool
Scope
and select
Create
. In the
.
IP Address Pool
section, set up the IP address range by typing the beginning IP
address in the
End Address
the
Start Address
box and the ending IP address in
box. Also type the subnet mask for the subnet
to which the IP address pool applies.
The starting and ending IP addresses define the end points of
the address pool assigned to this scope.
Note If desired, you can exclude ranges of IP addresses
within a “scope.”
7. In the
Lease Duration
section, select
Unlimited
, then
selectOK.
HP recommends that all printers be assigned infinite leases to
avoid problems resulting from IP addresses that change. Be
aware, however, that selecting an unlimited lease duration for
the scope causes all clients in that scope to have infinite leases.
If you want clients on your network to have finite leases, you
can set the duration to a finite time, but you should configure
all printers as reserved clients for the scope.
EN
TCP/IP Configuration 35

8. Skip this step if you have assigned unlimited leases in the
previous step. Otherwise, select
Reservations
to set up your printers as reserved clients. For
Scope
and select
each printer, perform the following steps in the
Clients
window to set up a reservation for that printer:
Add
Add Reserved
a. Type the selected IP address.
b. Obtain the MAC address or hardware address from the
configuration page, and type this address in the
Identifier
box.
Unique
c. Type the client name (any name is acceptable).
d. Select
reservation, in the
and select
Add
to add the reserved client. To delete a
DHCP Manager
Active Leases
. In the
window, select
Active Leases
Scope
window,
click on the reservation you want to delete and
Delete
select
9. Select
Close
.
to return to the
DHCP Manager
window.
10. Skip this step if you are not planning to use WINS (Windows
Internet Naming Service). Otherwise perform the following
steps when configuring your DHCP server:
a. From the
DHCP Manager
window, select
DHCP Options
and select one of the following:
Scope
— if you want Name Services only for the
selected scope.
Global
b. Add the server to the
Options
the
— if you want Name Services for all scopes.
window, select
Unused Options
Active Options
WINS/NBNS Servers (044)
list. Select
list. From the
Add
, then select OK.
DHCP
from
A warning may appear requesting that you set the node
type. You do this in step 10d.
36 TCP/IP Configuration
EN

c. You must now provide the IP address of the WINS server
by doing the following:
d. Select
Value
e. From the
, then
IP Address Array Editor
Edit Array
.
, select
Remove
to delete
any undesired addresses previously set. Then type in the
IP address of the WINS server and select
Add
.
f. Once the address appears in the list of IP addresses, select
OK
. This returns you to the
DHCP Options
window. If the
address you have just added appears in the list of IP
addresses (near the bottom of the window) return to step
10d. Otherwise, repeat step 10c.
g. In the
11. Click
DHCP Options
Type (046)
from the
window, select
Unused Options
add the node type to the
0x4
type
Close
to indicate a mixed node, and select OK.
to exit to
Program Manager
Active Options
WINS/NBT Node
list. Select
list. In the
Add
Byte
to
box,
.
Windows 2000 Server
To set up a DHCP scope on a Windows 2000 server, perform the
following steps:
1. Run the Windows 2000 DHCP manager utility. Click
Settings
select
Tools
folder and run the
Control Panel
and
DHCP
. Open the
utility.
Administrative
Start
,
2. In the DHCP window, locate and select your Windows 2000
server in the DHCP tree.
If your server is not listed in the tree, select
Action
the
menu to add the server.
3. After selecting your server in the DHCP tree, click the
menu and select
New Scope
. This runs the
DHCP
and click
Action
Add New Scope
Wizard.
4. In the
Add New Scope
Wizard, click
5. Enter a Name and Description for this scope, then click
EN
Next
.
Next
TCP/IP Configuration 37
.

6. Enter the range of IP addresses for this scope (beginning IP
address and ending IP address). Also, enter the subnet mask.
then click
Next
.
Note If subnetting is used, the subnet mask defines
which portion of an IP address specifies the subnet
and which portion specifies the client device. For
more information, see Appendix A.
7. If applicable, enter the range of IP addresses within the scope
to be excluded by the server. Then click
Next
.
8. Set the IP address lease duration for your DHCP clients. Then
Next
click
.
HP recommends that all printers be assigned reserved IP
addresses. This can be accomplished after you set up the scope
(see step 11).
9. Select
click
To configure DHCP options now, select
No
to configure DHCP options for this scope later. Then
Next
.
Yes
and click
Next
.
a. If desired, specify the IP address of the router (or default
gateway) to be used by clients. Then click
Next
.
b. If desired, specify the Domain Name and DNS (Domain
Name System) servers for clients. Click
Next
.
c. If desired, specify WINS server names and IP addresses.
Next
Click
d. Select
Next
.
Yes
to activate the DHCP options now, and click
.
10. You have successfully set up the DHCP scope on this server.
Finish
Click
to close the wizard.
38 TCP/IP Configuration
EN

11. Configure your printer with a reserved IP address within the
DHCP scope:
a. In the DHCP tree, open the folder for your scope and select
Reservations
.
b. Click the
Action
menu and select
New Reservation
.
c. Enter the appropriate information in each field, including
the reserved IP address for your printer. (Note: the MAC
address for your HP JetDirect-connected printer is
available on the HP JetDirect configuration page.)
d. Under “Supported types”, select
Add
. (Note: Selecting
Both
DHCP only
BOOTP only
or
, then click
will result in
a BOOTP configuration due to the sequence in which HP
JetDirect print servers initiate configuration protocol
requests.)
e. Specify another reserved client, or click
Close
. The
reserved clients added will be displayed in the
Reservations folder for this scope.
12. Close the DHCP manager utility.
Enabling or Disabling DHCP
If you do not want your HP JetDirect print server configured via
DHCP, you must disable DHCP configuration. There are three
methods for enabling or disabling DHCP:
1. If you use the printer control panel to disable BOOTP on the HP
JetDirect print server, then DHCP is disabled.
2. You can use Telnet to enable or disable DHCP operation on the
HP JetDirect print server. When you disable a DHCP
configuration via Telnet, the print server automatically releases
any names and IP addresses associated with the DHCP server
and re-initializes the TCP/IP protocol for the print server. At
this point, the print server is unconfigured and begins to send
BOOTP and RARP requests to acquire new (non-DHCP)
configuration information.
EN
TCP/IP Configuration 39

3. You can modify the TCP/IP parameters via HP Web JetAdmin.
If you manually provide an IP address when disabling DHCP via
Telnet, the print server still releases its DHCP-provided IP address
but does not send BOOTP and RARP configuration requests.
Instead, it uses the configuration information you have provided.
Therefore, if you provide the IP address you should also
manually set all of the configuration parameters, such as
subnet mask, default gateway, and idle timeout.
Note If the DHCP configuration state is changed from
disabled to enabled, the print server assumes it
should acquire its configuration information from a
DHCP server. This means that when the Telnet
session is completed, the TCP/IP protocol for the
print server is re-initialized and all current
configuration information is deleted. The print
server then attempts to acquire new configuration
information by sending DHCP requests on the
network to a DHCP server.
For DHCP configuration via Telnet, refer to “Using Telnet” in this
chapter.
40 TCP/IP Configuration
EN

Using RARP
This subsection describes how to configure the print server using
the Reverse Address Resolution Protocol (RARP) on UNIX and
Linux systems.
This setup procedure enables the RARP daemon running on your
system to respond to a RARP request from the HP JetDirect print
server and to supply the IP address to the print server.
1. Turn the printer off.
2. Log onto your UNIX or Linux system as a superuser.
3. Make sure the RARP daemon is running on your system by
typing the following command at the system prompt:
ps -ef | grep rarpd
ps ax | grep rarpd
(Unix)
(BSD or Linux)
4. The system response should be similar to the following:
861 0.00.2 24 72 5 14:03 0:00 rarpd -a
860 0.00.5 36 140 5 14:03 0:00 rarpd -a
5. If the system does not display a process number for the RARP
daemon, see the
rarpd
man page for instructions on starting the
RARP daemon.
6. Edit the
/etc/hosts
file to add your designated IP address and
node name for the HP JetDirect print server. For example:
13.32.11.24 laserjet1
EN
TCP/IP Configuration 41

7. Edit the
/etc/ethers
/etc/rarpd.conf
file (
file in HP-UX
10.20) to add the LAN hardware address/station address (from
the configuration page) and the node name for the HP JetDirect
print server. For example:
00:60:b0:a8:b0:00 laserjet1
Note If your system uses Network Information Service
(NIS), you need to incorporate changes to the NIS
host and ethers databases.
8. Turn the printer on.
9. To verify that the card is configured with the correct IP address,
use the ping utility. At the prompt, type:
ping <IP address>
where
<IP address>
is the assigned address from RARP. The
default IP address is 192.0.0.192.
10. If ping does not respond, see the chapter “Troubleshooting the
HP JetDirect Print Server.”
42 TCP/IP Configuration
EN

Using the arp and ping Commands
You can configure an HP JetDirect print server with an IP address
using an ARP (Address Resolution Protocol) command from a
supported system. The protocol is not routable, that is, the
workstation from which the configuration is made must be located
on the same network segment as the HP JetDirect print server.
Using the arp and ping commands with HP JetDirect print servers
requires the following:
●
Windows NT/2000 or UNIX system configured for TCP/IP
operation
●
HP JetDirect firmware version x.08.03 or later
●
The LAN hardware (MAC) address of the HP JetDirect print
server (specified on an HP JetDirect configuration page, or on a
label attached to HP JetDirect external print servers)
Note On some systems, superuser rights may be required
for the
arp
command.
After an IP address is assigned via
arp
and
ping
commands, use
other tools (such as Telnet, embedded web server, or HP Web
JetAdmin software) to configure other IP parameters.
To configure a JetDirect print server, use the following commands.
Depending on the system, the LAN hardware address requires a
specific format.
●
From a DOS prompt (Windows NT/2000):
arp -s
ping
●
From a UNIX command prompt:
arp -s
ping
EN
<IP address> <LAN hardware address>
<IP address>
<IP address> <LAN hardware address>
<IP address>
TCP/IP Configuration 43

where <IP address> is the desired IP address to be assigned to the
print server. The
on the workstation, and the
arp
command writes the entries to the arp cache
ping
command configures the IP
address on the print server.
For example:
●
In Windows NT 4.0 or Windows 2000
arp -s 13.32.8.98 00-b0-60-a2-31-98
ping 13.32.8.98
●
In UNIX
arp-s 13.32.8.98 00:b0:60:a2:31:98
ping 13.32.8.98
Note Once the IP address has been set on the print server,
additional
arp
Once the IP address is configured,
and
ping
commands will be ignored.
arp
and
ping
cannot be used unless the print server is reset to
factory values.
On UNIX systems, the
arp -s
command may vary
between different systems.
Some BSD-based systems expect the IP address (or
host name) in reverse order. Other systems may
require additional parameters. See your system
documentation for specific command formats.
44 TCP/IP Configuration
EN

Using Telnet
This subsection describes how to configure the print server
using Telnet.
Note To use Telnet commands with the HP JetDirect
print server, a route must be available from your
workstation to the print server. Simplistically, this
means that there must be a match between the
network identification of your system to that of the
HP JetDirect print server.
On Windows 95/98 and NT/2000 systems, you can
use the following
to add a route to the print server:
route add <IP address JetDirect>
<IP address workstation>
route
command at a DOS prompt
where
<IP address JetDirect>
is the IP address
configured on the HP JetDirect print server, and
<IP address workstation>
is the IP address of
the workstation's network card that is attached to
the same physical LAN as the print server.
CAUTION Using Telnet to change dynamically-configured
JetDirect print servers (for example, using BOOTP,
RARP, DHCP), may result in a static configuration
depending on the parameter being changed.
EN
TCP/IP Configuration 45

To set configuration parameters, you must set up a Telnet
connection from your system to the HP JetDirect print server.
1. Type the following at the system prompt:
telnet <IP address>
where
<IP address>
may be the assigned address from
BOOTP, RARP, DHCP, the printer control panel, or the default
IP address. The default IP address is 192.0.0.192. The
<IP address>
2. When the server responds
[Enter]
twice to make sure that the Telnet connection is
is listed on the JetDirect configuration page.
connected to IP address
, press
initialized.
3. If you are prompted for a password, type the correct password.
By default, Telnet does not require a password, but you can set
up to a 14-character password by using the password command
(passwd). Once a password is set, password protection is
enabled. You can disable password protection by typing 0 (zero)
when prompted for a new password, or by performing a cold
reset on the print server.
Note Any time during the Telnet session you can type:?
then press
[Enter]
to view available configuration
parameters, the correct command format, and a list
of additional commands to display. To print current
configuration information, type / then press
[Enter]
.
46 TCP/IP Configuration
EN

Note The Present Config field in the
menu describes how the HP JetDirect print server
is configured. For example, if the HP JetDirect
print server is configured by your BOOTP server,
the menu will contain the line, “present
config=BOOTP.” Other possible configuration types
are RARP, DHCP, or Telnet/Front Panel.
Telnet Configuration
Note On Windows systems
selected. To determine if
local echo
local echo
should be
is enabled,
perform the following:
●
Windows 95/98/NT: Click
Preferences
●
Windows 2000: Run Microsoft Telnet and enter
display
the
.
command.
Terminal
and
On UNIX systems, it is not necessary to select
echo
.
4. At the Telnet prompt “>” type:
parameter: value
then press
[Enter]
, where
parameter you are defining, and
parameter
value
refers to the configuration
refers to the definitions
you are assigning to that parameter. Each parameter entry is
followed by a carriage return.
See Table 3.3 for examples on assigning configuration
parameters.
local
EN
TCP/IP Configuration 47

5. Repeat step 4 to set any additional configuration parameters.
6. When you have finished typing the configuration parameters,
type:
quit
.
[Enter]
to activate the configuration parameters.
exit
and press
and press
To exit without activating parameters, type
[Enter]
Telnet Configuration Parameter Examples
The examples in Table 3.3 show how to use Telnet configuration
commands.
Note If a parameter is supplied by the DHCP server, its
value cannot be changed using Telnet without
disabling DHCP.
48 TCP/IP Configuration
EN

Table 3.3 Telnet Configuration Parameter Examples (1 of 2)
IP Address
Parameter
Example
Subnet Mask
Example
Default Gateway
Example
Syslog Server
Example
ip:
13.32.11.24
subnet-mask:
255.255.255.0
default-gw:
13.32.11.85
syslog-server:
13.32.11.85
where ip identifies the parameter
and 13.32.11.24 specifies the
address for the printer. By typing
this parameter, you can overwrite
the IP address used to make the
Telnet connection with one you
have selected.
where subnet-mask identifies the
parameter and 255.255.255.0
specifies the subnet mask.
where default-gw identifies the
parameter and 13.32.11.85
specifies the IP address of the
gateway.
Note: If the HP JetDirect print
server is configured by DHCP and
you change the subnet mask or the
default gateway address (using
front-panel, Telnet, or other tool),
you should change the IP address
to release the present IP address
back to the DHCP server IP
address pool.
where syslog-server identifies
the parameter and 13.32.11.85
specifies the IP address of that
server.
Protocol
Enabling/Disabling
Example
Idle Timeout
Parameter
Example
Banner Page
Parameter
Example
EN
IPX/SPX: 1
dlc-llc: 1
ethertalk: 1
idle-timeout:
120
(1 enables, 0 disables)
(1 enables, 0 disables)
(1 enables, 0 disables)
where idle-timeout identifies
the parameter and 120 specifies
the number of seconds an idle print
data connection is allowed to
remain open. If you set this
parameter to 0, the connection
does not terminate and no other
host is able to make a connection.
banner: 1 (1 enables, 0 disables)
TCP/IP Configuration 49

Table 3.3 Telnet Configuration Parameter Examples (2 of 2)
Port and Banner
Page Example
Set Community
Name Example
DHCP Parameter
Example
Host Name
Example (to
assign or change
a name)
port:2
banner:0
set-cmntyname:
my_network
dhcp-config:
1
host-name:
MY_PRINTER
For multiport JetDirect print
servers, ‘port’ specifies the port
that you want to enable or disable
a banner page. (In this example,
disable banner page on port 2.)
The default port is port 1.
where set-cmnty-name
identifies the parameter and
my_network specifies the name
you want to set.
The Set Community Name
parameter is a network
management security mechanism
that enables external network
management entities to set internal
print server management (mib)
values. The name can be from 1 to
32 alpha and numeric characters
and can include the underscore (_)
symbol.
where dhcp-config: identifies
the Dynamic Host Configuration
Protocol. (1 enables, 0 disables)
where MY_PRINTER is an
alphanumeric string and must be
all uppercase letters.
50 TCP/IP Configuration
EN

Using Telnet to Erase the Existing IP Address
To erase the IP address during a Telnet session:
1. Type
2. Type
Note This procedure resets all TCP/IP parameters, but
cold-reset
quit
, then press
only affects the TCP/IP subsystem. After this has
been done the print server should be power cycled.
Parameters for other subsystems such as IPX/SPX
(Novell NetWare) or AppleTalk are not affected.
, then press
[Enter]
[Enter]
.
to exit Telnet.
Using the Embedded Web Server
You can set IP parameters on HP JetDirect print servers that
support the embedded web server. For more information, refer to
Appendix B.
EN
TCP/IP Configuration 51

Using the Printer Control Panel
This subsection describes how to configure the HP JetDirect
internal print server using the printer's control panel.
If configuration of the HP JetDirect print server is supported from
your printer control panel, you can set the network configuration
parameters listed below.
●
IP address of the print server
●
Subnet mask
●
Default gateway address
●
Syslog server address
●
Idle timeout period
If the printer control panel configuration is supported, see the
hardware installation guide for your print server or the user guide
for your printer for instructions on how to configure the print server
from the printer control panel.
If you need to configure other parameters, use BOOTP/TFTP to
configure all the parameters for the print server.
If the HP JetDirect print server is configured to receive its
configuration from the printer control panel, the configuration is
saved on the print server over power cycles. For information on
these parameters see Table 3.4.
52 TCP/IP Configuration
EN

Table 3.4 Print Server Parameters (1 of 2)
JetDirect Internal
Description
Print Server Menu
Item
CFG NETWORK=NO* Selects whether or not you want to access the
JetDirect menu items. NO* (default) indicates you
do not want to access the menu. You must change
this to YES* each time you want to access the
JetDirect EIO menu.
IPX/SPX=ON*
DLC/LLC=ON*
TCP/IP=ON*
Identifies whether the protocol stack is enabled or
disabled. The default is ON*. Change this to OFF*
to disable this protocol.
ETALK=ON*
CFG IPX/SPX=NO* Selects whether you want to access the IPX/SPX
menu and set IPX/SPX protocol parameters.
In the IPX/SPX menu, you can specify the
parameter used on your network.
Type
■
The default is AUTO, to automatically set and
Frame
limit the frame type to the one detected.
■
For Ethernet cards, frame type selections
include EN_8023, EN_II, EN_8022,
EN_SNAP.
■
For Token Ring cards, frame type selections
include TR_8022, TR_SNAP.
In the IPX/SPX menu for Token Ring cards, you
can also specify
NetWare Source Routing
parameters, which include SRC RT=AUTO
(default), OFF, SINGLE R, or ALL RT.
EN
TCP/IP Configuration 53

Table 3.4 Print Server Parameters (2 of 2)
JetDirect Internal
Description
Print Server Menu
Item
CFG TCP/IP=NO* Selects whether you want to access the TCP/IP
menu and set TCP/IP protocol parameters.
In the TCP/IP menu, you can specify
BOOTP=YES* for TCP/IP parameters to be
automatically configured by a BootP or DHCP
server when the printer is turned on.
If you specify BOOTP=NO, you can manually set
the following TCP/IP parameters from the control
panel:
■
Each byte of the IP address (IP)
■
Subnet Mask (SM)
■
Syslog Server (LG)
■
Default Gateway (GW)
■
Idle Timeout period (default is 90 seconds, 0
disables the timeout)
CFG ETALK=NO* Selects whether you want to access the EtherTalk
menu and set the AppleTalk phase parameter
(ETALK PHASE=1 or 2) for your network.
54 TCP/IP Configuration
EN

Moving to Another Network
When moving an HP JetDirect print server that is configured with
an IP address to a new network, make sure that the IP address does
not conflict with addresses on the new network. You may change
the IP address of the print server to one that can be used on the new
network, or erase the current IP address and configure another
address after you are installed on the new network. Cold reset the
print server (see Chapter 6, “Troubleshooting the HP JetDirect
Print Server,” for instructions).
If the current BOOTP server is not reachable, you may need to
locate a different BOOTP server and configure the printer to this
server.
If the print server was configured using BOOTP, DHCP or RARP,
edit the appropriate system files with updated settings. If the IP
address was manually set (for example, from the printer control
panel or Telnet), reconfigure IP parameters as described in this
chapter.
EN
TCP/IP Configuration 55

56 TCP/IP Configuration
EN

4
Configuring for LPD Printing
Introduction
The HP JetDirect print server contains an LPD (Line Printer
Daemon) Server module to support LPD printing. This chapter
describes how to configure the HP JetDirect print server for use
with various systems that support LPD printing. These instructions
include:
●
LPD on UNIX Systems
Configuring BSD-based UNIX systems using LPD
■
Configuring print queues using the SAM utility (HP-UX
■
systems)
●
LPD on Windows NT/2000 Systems
●
LPD on Mac OS Systems
EN
57

About LPD
Line Printer Daemon (LPD) refers to the protocol and programs
associated with line-printer spooling services that may be installed
on various TCP/IP systems.
Some of the widely used systems in which the HP JetDirect print
server functionality supports LPD include:
●
Berkeley-based (BSD) UNIX systems
●
HP-UX
●
Solaris
●
IBM AIX
●
Linux
●
Windows NT/2000
●
Mac OS
The UNIX configuration examples in this section show the syntax
for BSD-based UNIX systems. The syntax for your system may vary.
See your system documentation for the correct syntax.
Note The LPD functionality can be used with any host
implementation of LPD that complies with the
RFC 1179 document. The process for configuring
printer spoolers, however, may differ. See your
system documentation for information on
configuring these systems.
58 Configuring for LPD Printing
EN

The LPD programs and protocol include the following:
Table 4.1 LPD Programs and Protocols
Program Name Purpose of Program
lpr Queues jobs for printing
lpq Displays print queues
lprm Removes jobs from print queues
lpc Controls print queues
lpd Scans and prints the files if the specified
printer is connected to the system.
If the specified printer is connected to another
system, this process forwards the files to an
lpd process on the remote system where the
files are to be printed.
Requirements for Configuring LPD
Before you can use LPD printing, your printer must be properly
connected to the network through the HP JetDirect print server,
and you must have print server status information. This
information is listed on the HP JetDirect printer configuration
page. If you have not printed a configuration page from your printer,
see the hardware installation guide for your print server or your
printer’s getting started guide for instructions. You must also have
the following:
●
An operating system that supports LPD printing.
●
Superuser (root) or Administrator access to your system.
EN
Configuring for LPD Printing 59

●
The LAN hardware address (or station address) of the print
server. This address is printed with print server status
information on the HP JetDirect configuration page and is of the
form:
LAN HW ADDRESS: xxxxxxxxxxxx
where x is a hexadecimal digit (for example, 001083123ABC).
●
An IP address configured on the HP JetDirect print server.
LPD Setup Overview
The following steps are necessary to configure the HP JetDirect
print server for LPD printing:
1. Setting up IP parameters.
2. Setting up print queues.
3. Printing a test file.
The following sections provide detailed descriptions for each step.
Step 1. Setting Up IP Parameters
To set up IP parameters on the HP JetDirect print server, refer to
chapter 3. For more information on TCP/IP networks, refer to
appendix A.
60 Configuring for LPD Printing
EN

Step 2. Setting Up Print Queues
You must set up a print queue for each printer or printer personality
(PCL or PostScript) you use on your system. Also, different queues
are required for formatted and unformatted files. The queue names
text
meanings.
Table 4.2 Supported Queue Names
and
raw
in the following examples (see rp tag) have special
raw, raw1, raw2, raw3
text, text1, text2, text3
auto, auto1, auto2, auto3
no processing
carriage return added
automatic
The line printer daemon on the HP JetDirect print server treats
data in the
text
queue as unformatted text or ASCII, and adds a
carriage return to each line before sending it to the printer. (Note
that the actual observed behavior is that a PCL line termination
command (value of 2) is issued at the beginning of the job.) The line
printer daemon treats data in the
raw
queue as formatted files in
PCL, PostScript, or HP-GL/2 languages and sends the data without
change to the printer. Data in the
auto
queue will be automatically
processed as text or raw, as appropriate. If the queue name is not
one of the above, the HP JetDirect print server assumes it to be
raw1
.
Step 3. Printing a Test File
Print a test file using the LPD commands. For instructions, see the
information provided for your system.
EN
Configuring for LPD Printing 61

LPD on UNIX Systems
Configuring Print Queues for BSD-based Systems
Edit the
where
node_name
remote_printer_name_argument
designation.
For more information on printcap see the
Example 1
(suggested name for an ASCII or text printer):
/etc/printcap
printer_name|short_printer_name:\
:lp=:\
:rm=node_name:\
:rp=remote_printer_name_argument:\
text, raw
:lf=/usr/spool/lpd/error_log_filename:\
:sd=/usr/spool/lpd/printer_name:
printer_name
lj1_text|text1:\
:lp=:\
:rm=laserjet1:\
:rp=text:\
:lf=/usr/spool/lpd/lj1_text.log:\
:sd=/usr/spool/lpd/lj1_text:
auto
, or
identifies the printer on the network, and
file to include the following entries:
)
identifies the printer to the user,
is the print queue
printcap
(this should be
man page.
Example 2
(suggested name for PostScript, PCL, or HP-GL/2 printers):
lj1_raw|raw1:\
:lp=:\
:rm=laserjet1:\
:rp=raw:\
:lf=/usr/spool/lpd/lj1_raw.log:\
:sd=/usr/spool/lpd/lj1_raw:
62 Configuring for LPD Printing
EN

If your printer does not support automatic switching between
PostScript, PCL, and HP-GL/2 languages, use the printer's control
panel (if the printer has one) to select the printer language or rely
on the application to select the printer language via commands
embedded in the print data.
Make sure your users know the printer names for the printers, since
they must type those names on the command line for printing.
Create the spooling directory by making the following entries. At
the root directory, type:
mkdir /usr/spool/lpd
cd /usr/spool/lpd
mkdir printer_name_1 printer_name_2
chown daemon printer_name_1 printer_name_2
chgrp daemon printer_name_1 printer_name_2
chmod g+w printer_name_1 printer_name_2
where
printer_name_1
printer_name_2
and
refer to the
printers to be spooled. You may spool several printers. The following
example shows the command to create the spooling directories for
printers used for text (or ASCII) printing and for PCL or PostScript
printing.
Example:
mkdir /usr/spool/lpd
cd /usr/spool/lpd
mkdir lj1_text lj1_raw
chown daemon lj1_text lj1_raw
chgrp daemon lj1_text lj1_raw
chmod g+w lj1_text lj1_raw
EN
Configuring for LPD Printing 63

Configuring Print Queues Using SAM (HP-UX systems)
On HP-UX systems you can use the SAM utility to configure remote
print queues for printing “text” (ASCII) files or “raw” (PCL,
PostScript, or other printer language) files.
Before you execute the SAM program, select an IP address for the
HP JetDirect print server and set up an entry for it in the
/etc/hosts
file on your system running HP-UX.
1. Start the SAM utility as a superuser.
2. Select
3. Select
4. Select
5. Select
Peripheral Devices
Printers/Plotters
Printers/Plotters
from the
from the
from the
Add a Remote Printer
from the
Main
menu.
Peripheral Devices
Printers/Plotters
Actions
list, then select
menu.
menu.
a printer name.
Examples: my_printer or printer1
6. Select a remote system name.
Example: jetdirect1
(node name of the HP JetDirect print
server)
7. Select a remote printer name.
Type
text
for ASCII or
raw
for PostScript, PCL, or HP-GL/2.
8. Check for a remote printer on a BSD system. You must type Y.
9. Click OK at the bottom of the menu. If the configuration is
successful, the program prints the message:
The printer has been added and is ready to accept
print requests
.
64 Configuring for LPD Printing
EN

10. Click OK and select
Exit
from the
List
menu.
11. Select
Exit Sam
.
Note By default, the lpsched is not running. Make sure
you turn the scheduler on when you set up your
print queues.
Printing a Test File
To verify that the printer and print server connections are correct,
print a test file.
1. At the UNIX system prompt type:
lpr -Pprinter_name file_name
where
file_name
Examples
Text File:
PCL File:
PostScript File:
HP-GL/2 File:
printer_name
is the designated printer and
refers to the file to be printed.
(for BSD-based systems):
lpr -Ptext1 textfile
lpr -Praw1 pclfile.pcl
lpr -Praw1 psfile.ps
lpr -Praw1 hpglfile.hpg
For HP-UX systems, substitute
EN
lp -d for
Configuring for LPD Printing 65
lpr -P.

2. To get print status, type the following at the UNIX prompt:
lpq -Pprinter_name
where
Examples
printer_name
is the designated printer.
(for BSD-based systems):
lpq -Ptext1
lpq -Praw1
For HP-UX systems, substitute
lpstat
for lpq -P to get print
status.
This completes the process for configuring the HP JetDirect print
server to use LPD.
LPD on Windows NT/2000 Systems
This section describes how to configure Windows NT/2000 networks
to use the HP JetDirect LPD (Line Printer Daemon) services.
The process consists of two parts:
●
Installing TCP/IP software (if not already installed).
●
Configuring a network LPD printer .
Installing TCP/IP Software
This procedure lets you check whether you have TCP/IP installed
on your Windows NT system, and to install the software if
necessary.
Note You may need your Windows System distribution
files or CD-ROMs to install TCP/IP components.
66 Configuring for LPD Printing
EN

1. To check whether you have Microsoft TCP/IP Printing protocol
and TCP/IP printing support:
■
Windows 2000—Click
double-click the
Select the
click the
Local Area Connection
File
menu and select
Start, Settings, Control Panel
Network and Dial-up Connections
for your network, then
Properties
.
If Internet Protocol (TCP/IP) is listed and enabled in the list
of components used by this connection, the necessary software
is already installed. (Proceed to “Configuring a Network
Printer for Windows 2000 Systems”). if not, go to step 2.
■
NT 4.0—Click
double-click the
Start, Settings, Control Panel
Network
option to display the
. Then
Network
dialog box.
If TCP/IP Protocol is listed in the Protocols tab, and Microsoft
TCP/IP Printing is listed in the Services tab, you have already
installed the necessary software. (Proceed to “Configuring a
Network Printer for Windows NT 4.0 Systems.”) If not, go to
step 2.
2. If you have not previously installed the software:
■
Windows 2000—In the
window, click
window, select
Install
Protocol
Protocol (TCP/IP)
Local Area Connection Properties
. In the
Select Network Component Type
and click
Add
to add the
.
. Then
folder.
Internet
Follow the instructions on the screen.
■
NT 4.0—Click the
TCP/IP Protocol
Add
button for each tab and install the
and the
Microsoft TCP/IP Printing
service.
Follow the instructions on the screen.
When prompted, type the full path to the Windows NT
distribution files (you may need your Windows NT workstation
or server CD-ROM).
EN
Configuring for LPD Printing 67

3. Enter TCP/IP configuration values for the computer:
■
Windows 2000—On the
Connection Properties
(TCP/IP)
■
NT 4.0—You may be automatically prompted for TCP/IP
and click
General
window, select
Properties
.
tab in the
Internet Protocol
configuration values. If not, select the
Networks
window and select
Properties
.
TCP/IP Protocol
Local Area
Protocols
. Then click
tab in the
If you are configuring a Windows server, type the IP address,
default gateway address, and subnet mask in the appropriate
spaces.
If you are configuring a client, check with your Network
Administrator to learn whether you should enable automatic
TCP/IP configuration or whether you should type a static IP
address, default gateway address, and subnet mask in the
appropriate spaces.
4. Click
OK
to exit
5. If prompted, exit Windows and restart your computer for the
changes to take effect.
68 Configuring for LPD Printing
EN

Configuring a Network Printer for Windows 2000
Systems
Set up the default printer by performing the following steps.
1. Verify that the Print Services for Unix is installed (required for
LPR port availability):
a. Click Start, Setup, and Control Panel. Double-click the
Network and Dial-up Connections folder.
b. Click the Advanced menu and select Optional
Networking Components.
c. Select and enable Other Network File and Print
Services.
d. Click Details, and verify that Print Services for Unix is
enabled. If not, enable it.
e. Click Okay, and then Next.
2. Open the Printers folder (from the Desktop, click Start,
Settings, and Printers).
3. Double-click Add Printer. From the Add Printer Wizard
welcome screen, click Next.
4. Select Local printer, and disable automatic detection for Plug
and Play printer installation. Click Next.
5. Choose Create a new port, and select LPR Port. Click Next.
6. In the
■
Add LPR compatible printer
window:
Enter the DNS name or IP address of the HP JetDirect print
server.
■
Enter (in lower case) raw, text, or auto for the name of the
printer or print queue on the HP JetDirect print server.
Then click OK.
EN
Configuring for LPD Printing 69

Note The HP JetDirect print server treats text files as
unformatted text or ASCII files. Files that are raw
are formatted files in PCL, PostScript, or HP-GL/2
printer languages.
For HP JetDirect external print servers with three
ports, use
auto1, auto2, auto3
or
raw1, raw2, raw3, text1, text2, text3
to specify the port.
7. Select the Manufacturer and Printer model. (If necessary, click
Have Disk
driver.) Click
and follow the instructions to install the printer
Next
.
8. Choose to keep the existing driver, if prompted. Click
Next
.
9. Enter a printer name, and choose whether this printer will be
the default printer. Click
Next
.
10. Choose whether this printer will be available to other
computers. If shared, enter a share name that identifies the
printer to other users. Click
Next
.
11. If desired, enter a location and other information for this printer.
Next
Click
12. Choose whether to print a test page, and click
13. Click
.
Finish
to close the wizard.
Next
.
Configuring a Network Printer for
Windows NT 4.0 Systems
At the Windows NT 4.0 system, set up the default printer by
performing the following steps.
1. Click
Start
window opens.
2. Double-click
3. Select
My Computer
, select
Settings
Add Printer
, and click
.
, then click
Next
Printers
.
. The
Printers
4. Click
70 Configuring for LPD Printing
Add Port
.
EN

5. Select
LPR Port
, and click
New Port
.
6. In the
Name or address of server providing lpd
box, type the IP
address or name of the HP JetDirect print server.
Note NT clients can enter the IP address or name of the
NT server that is configured for LPD printing.
7. In the
Name of printer or print queue on that server
lower case)
raw, text
, or
auto
. Then click OK.
box, type (in
The HP JetDirect print server treats “text” files as unformatted
text or ASCII files. Files that are “raw” are formatted files in
PCL, PostScript, or HP-GL/2 printer languages.
Note For HP JetDirect external print servers with three
ports, use
auto1, auto2, auto3
or
8. Ensure that the port is selected in the
available ports, then click
raw1, raw2, raw3, text1, text2, text3
to specify the port.
Next
Add Printer
.
list of the
9. Follow the remaining instructions on the screen to complete the
configuration.
EN
Configuring for LPD Printing 71

Verifying the Configuration
From within Windows NT, print a file from any application. If the
file prints correctly, the configuration was successful.
If the print job is not successful, try printing directly from DOS
using the following syntax:
lpr -S<ipaddress> -P<queuename> filename
where
is the name “raw” or “text” and
print.If the file prints correctly, the configuration was successful. If
the file does not print, or prints incorrectly, see the chapter
“Troubleshooting the HP JetDirect Print Server.”
ipaddress
is the IP address of the print server,
filename
is the file you wish to
queuename
Printing from Windows Clients
If the LPD printer on the NT/2000 server is shared, Windows clients
can connect to the printer on the NT/2000 server using the Windows
Add Printer utility in the Printers folder.
LPD on Mac OS Systems
LaserWriter 8 version 8.5.1 or higher is required in order to support
IP printing on computers running any of the following:
●
Mac OS 8.1 or higher
●
Mac OS 7.5 through Mac OS 7.6.1 (NEW LOCATION)
●
Desktop Printer Utility 1.0 or later
Note IP printing in LaserWriter 8 is not available on Mac
OS 8.0.
Assigning an IP Address
Before you can set up a printer for LPR printing, assign an IP
address to the printer or print server. Use the HP LaserJet Utility
to configure the printer IP address as follows:
72 Configuring for LPD Printing
EN

1. Double-click
HP LaserJet Utility
in the HP LaserJet folder.
2. Click the
3. Select
Settings
TCP/IP
button.
from the scrolling list and then click
Edit
.
4. Select the desired option. You can automatically obtain the
TCP/IP configuration from either the DHCP server or the
BOOTP server, or you can manually specify the TCP/IP
configuration.
Setting Up Mac OS
To configure a computer for LPR printing, do the following:
1. Launch the
2. Select
3. In the
Change...
4. In the
your version of the Desktop Printer Utility, click
Desktop Printer Utility
Printer (LPR)
and click OK.
.
PostScript Printer Description (PPD) File
and select the PPD for your printer.
Internet Printer
or the
LPR Printer
section, depending on
section, click
Change...
.
EN
Configuring for LPD Printing 73

5. Enter the printer's IP address or domain name for
Address
.
Printer
6. Enter the queue name, if used. Otherwise, leave it blank.
Note The queue name is typically
raw
. For a three-port
HP JetDirect external print server, the name
should be
raw1, raw2
, or
raw3
depending on the
port to which the printer is attached.
7. Click
8. Click OK or
Verify
to verify that the printer was found.
Create
, depending on your version of the Desktop
Printer Utility.
9. Go to the
File
menu and select
Save
or use the resulting save
dialog, depending on your version of the Desktop Printer Utility.
10. Enter a name and location for the desktop printer icon and click
OK
. The default name is the printer's IP address, and the
default location is on the desktop.
11. Exit the program.
For the latest information on using the HP JetDirect LPD services
from Mac OS systems, search for “LPR printing” at Apple
Computer's Tech Info Library web site at http://til.info.apple.com.
74 Configuring for LPD Printing
EN

5
FTP Printing
Introduction
FTP (File Transfer Protocol) is a basic TCP/IP connectivity utility
to transfer data between systems. FTP printing is a way to use FTP
to send print files from a client system to an HP JetDirect-connected
printer. In an FTP printing session, the client connects and sends
a print file to the HP JetDirect FTP server which in turn passes the
print file to the printer.
The HP JetDirect FTP server can be enabled or disabled through a
configuration utility, such as Telnet.
Requirements
FTP printing requires the following:
●
HP JetDirect print servers with firmware version x.08.03 or
later.
●
TCP/IP client systems with FTP that complies with RFC 959.
Note For the most recent list of tested systems, visit the
HP Customer Care Online at
www.hp.com/support/net_printing.
EN
75

Print Files
The HP JetDirect FTP server transfers print files to the printer but
does not interpret them. For proper printing, print files must be in
a language recognized by the printer (such as PostScript, PCL, or
unformatted text). For formatted print jobs, you must first print to
a file from your application using the driver for the selected printer,
then transfer the print file to the printer through an FTP session.
For formatted print files, use binary (image) type transfers.
Using FTP Printing
FTP Connections
Similar to standard FTP file transfers, FTP printing uses two TCP
connections: a control connection and a data connection.
Once an FTP session is opened, it remains active until either the
client closes the connection or the data and control connections are
idle for 900 seconds (15 minutes). (This setting cannot be
configured.)
Control Connection
Using standard FTP, a control connection is opened by the client to
the FTP server on the HP JetDirect print server. FTP control
connections are used to exchange commands between the client and
the FTP server. The HP JetDirect print server supports up to three
control connections (or FTP sessions) simultaneously. If the number
of allowed connections is exceeded, a message indicating that
service is not available will be displayed.
FTP control connections use TCP port 21.
76 FTP Printing
EN

Data Connection
A second connection, a data connection, is created each time a file
is transferred between the client and the FTP server. The client
controls the creation of a data connection by issuing the commands
that require a data connection (such as FTP ls,
dir
or
put
commands).
Although the ls and
dir
commands are always accepted, the HP
JetDirect FTP server supports only one data connection for printing
at a time.
The transmission mode for an FTP data connection with the HP
JetDirect print server is always in stream mode, which marks the
end-of-file by closing the data connection.
Once a data connection is established, the file transfer type (ASCII
or binary) can be specified. Although some clients may attempt to
autonegotiate a transfer type, the default is ASCII. To specify the
transfer type, enter the
bin
or
ascii
command at the FTP prompt.
FTP Login
To start an FTP session, enter the following command from a
MS-DOS or UNIX command prompt:
ftp <IP address>
where
configured for the HP JetDirect print server.
<IP address>
is the valid IP address or node name
EN
FTP Printing 77

If the connection is successful, the HP JetDirect model and
firmware version will be displayed.
After a successful connection, the user is prompted for a login name
and password. The default is the client’s login name. The JetDirect
FTP server will allow any user name. Passwords are ignored.
If login is successful, a message “230” will be displayed on the client
system. In addition, the available HP JetDirect ports for printing
will be displayed. HP JetDirect external print servers with multiple
ports will display all available ports, with Port1 the default port. To
change ports, use the FTP cd (change directory) command. For an
example of a successful login, see “Example of an FTP Session.”
Ending the FTP Session
To end an FTP session, type
quit
or
bye
.
Commands
Table 5.1 summarizes commands available to the user during an
FTP printing session.
78 FTP Printing
EN

Table 5.1 User Commands for HP JetDirect FTP Server
Command Description
user <username> <username> specifies a user. Any user will be
accepted and can print to the selected port.
cd <port#> <port#> selects a port number for printing. For
HP JetDirect single-port print servers, only port1 is
available. For multiport print servers, specify port1
(default), port2, or port3.
cd/ / specifies the root directory of the HP JetDirect FTP
server.
quit quit or bye terminates the FTP session with the
bye
dir dir or ls displays the contents of the current
ls
pwd Displays the current directory or the current JetDirect
put <filename> <filename> specifies the file to send to the
HP JetDirect print server.
directory. If this command is typed in the root
directory, a list of available ports for printing is
displayed. For multiport print servers, the available
ports for printing are PORT1 (default), PORT2, and
PORT3.
printing port.
selected HP JetDirect print server port. For multiport
print servers, a different port can be specified in the
command: put <filename> <port#>
bin Configures an FTP binary (image) file transfer.
ascii Configures an FTP ASCII file transfer. HP JetDirect
print servers support only non-print format control for
character transfers (standard values for spacing and
margins are used).
[Ctrl-C]
rhelp Displays the FTP commands supported.
EN
Press the
simultaneously to abort the FTP service command
and any transfer of data. The data connection is
closed.
[Ctrl]
and
[C]
keyboard keys
FTP Printing 79

Example of an FTP Session
This is an example of a typical FTP printing session:
System> ftp 150.10.2.101
Connected to 150.10.2.101.
220 JD FTP Server Ready
Name (150.10.2.101:root): Kelli
331 Username OK, send identity (email name) as password.
Password:
230- Hewlett-Packard J3265A FTP Server Version 1.0
Directory: Description:
--------------------------PORT1 (default) Print to port 1 (HP LaserJet 4000)
PORT2 Print to port 2 (HP Color LaserJet 4500)
PORT3 Print to port 3 (unknown device)
To print a file use the command: put <filename> [portx]
or 'cd' to desired port and use: put <filename>
Ready to print to PORT1
230 User logged in.
Remote system type is UNIX.
Using binary mode to transfer files.
ftp> pwd
257 "/" is current directory. (default port is PORT1: HP
LaserJet 4000)
ftp> cd port1
250 CWD command successful
ftp>pwd
257 "/PORT1" is current directory. (HP LaserJet 4000)
ftp> bin
200 Type set to I
ftp> put test
200 PORT command successful
150 Opening data connection...
226 Transfer complete.
18 bytes sent in 0.00 seconds (37.40 Kbytes/s)
ftp> quit
221 Goodbye
System>
script done on Mon Apr 12 16:50:24 1999
80 FTP Printing
EN

6
Troubleshooting the HP JetDirect
Print Server
Introduction
This chapter describes how to diagnose and correct problems
associated with the HP JetDirect print server.
A flowchart guides you to the correct procedures for troubleshooting
the following:
●
Printer problems
●
HP JetDirect hardware installation and connection problems
●
Network related problems
This chapter also helps you to understand your HP JetDirect print
server configuration page.
To troubleshoot your HP JetDirect print server, you may need the
following items:
●
Your printer’s user guide
●
Your printer's getting started guide
●
The hardware and software installation manuals for your
print server
EN
81

●
The diagnostics tools and utilities provided with your network
software (such as the PCONSOLE or NWADMIN utility provided
with Novell NetWare software, or the ping command provided
with UNIX systems)
●
A printer configuration page
Note Frequently asked questions about installing and
configuring HP JetDirect print servers can be found
at HP Customer Care Online at
http://www.hp.com/support/net_printing.
82 Troubleshooting the HP JetDirect Print Server
EN

Resetting to Factory Defaults
Parameters on the HP JetDirect print server (for example, the
IP address) can be reset to factory default values using the following
procedures:
HP LaserJet Printer with Internal (MIO/EIO) Print
●
Server
Reset the HP JetDirect internal print server by resetting the
printer. For instructions on resetting your printer, see the printer
manuals.
CAUTION Resetting the printer will reset
all
printer settings
to their factory defaults. After resetting the printer,
you may need to use the printer's control panel to
reconfigure printer settings that are required by
users.
HP JetDirect External Print Servers
●
Reset the HP JetDirect external print server by holding down the
[Test]
button on the print server while connecting the power cord.
After resetting the HP JetDirect print server, you may need to
reconfigure your computers for printing.
EN
Troubleshooting the HP JetDirect Print Server 83

General Troubleshooting
Troubleshooting Chart - Assessing the Problem
Figure 6.1 Assessing the Problem
84 Troubleshooting the HP JetDirect Print Server
EN

Procedure 1: Verifying that the Printer is On and Online
Check the following items to make sure the printer is ready to print.
1. Is the printer plugged in and turned on?
Make sure the printer is plugged in and turned on. If the
problem persists, you may have a defective power cable, power
source, or printer.
2. Is the printer online?
The online light should be lit. If it is not, press the appropriate
key to place the printer online.
3. Is the printer’s control panel display blank (on printers
with displays)?
■
Make sure the printer is turned on.
■
Make sure the HP JetDirect print server is installed correctly.
4. Is the form feed light on (where applicable)?
If the form feed light is on, it may indicate that a Form Feed was
not sent with the print data, and that data is waiting for a Form
Feed to print. Take the printer offline, press
put the printer back online.
[Form Feed]
, then
5. Does a message other than READY appear on the printer control
panel display?
■
See Procedure 3 in this section for a list of network-related
error messages and corrective actions.
■
See your printer documentation for a complete list of control
panel messages and corrective actions.
EN
Troubleshooting the HP JetDirect Print Server 85

Procedure 2: Printing an HP JetDirect Configuration Page
The HP JetDirect configuration page is an important
troubleshooting tool. The information on this page reveals the
status of your network and the HP JetDirect print server. The
ability to print a configuration page provides an indication that the
printer is operating correctly. See the end of this chapter for
descriptions of the information on the configuration pages.
Check the following items if the configuration page does not print.
1. Did you perform the correct steps on the printer to print the
configuration page?
The steps required to print a configuration page vary between
different printers. See your printer manual or the hardware
installation guide for your HP JetDirect print server for specific
instructions on how to print a configuration page.
2. Is there a print job in process?
You cannot print an HP JetDirect configuration page to the
printer while a print job is in process. Wait until the print job is
complete, then print the configuration page.
3. Does an error message appear on the printer control panel
display?
■
See Procedure 3 in this section for a list of network-related
error messages and corrective actions.
■
See your printer documentation for a complete list of control
panel messages and corrective actions.
86 Troubleshooting the HP JetDirect Print Server
EN

Procedure 3: Resolving Printer Display Error Messages
Check the following information to resolve network related error
messages that appear on the printer control panel display.
information assumes you have already printed a configuration page.
1. Does 18 MIO NOT READY or 23 MIO NOT READY appear on the printer
display?
■
If you are using thin Ethernet coaxial cable, a cabling problem
has been detected. Verify the network cabling, connections,
and router configurations.
■
If you downloaded Flash images recently, turn off the printer,
then turn it back on.
■
Verify that the correct print server name appears next to
NODE NAME on the configuration page. If not, see the chapter
for your network operating system for installation
information.
2. Does NOT READY, UPPER MIO, or LOWER MIO appear on the display?
■
Make sure that the print server is connected to the network.
■
See if any error messages appear on the configuration page.
See the end of this chapter for descriptions of the information
on the configuration pages or the chapter “HP JetDirect
Configuration Page Messages” for error message information.
This
3. Does EIO# INITIALIZING/DO NOT POWER OFF appear on the
display?
Wait for ten minutes to see if it clears. If it does not, you may
need to replace the HP JetDirect print server.
EN
Troubleshooting the HP JetDirect Print Server 87

4. Does a 40 ERROR appear on the display?
The HP JetDirect print server detected a break in the data
communications. When this error occurs, the printer
goes offline.
A break in communications may result from the physical
network connection being disrupted or the server going down.
If your printer has “auto continue” and it is set to “OFF,” you
must press the appropriate key (
[Continue]
, for example) on the
printer after the communications problem is solved to put the
printer back online. Setting auto continue to ON forces the
printer to reconnect without user intervention. However, this
does not solve the disconnect problem.
5. Does an initializing (INIT) message appear on the display?
This is a normal message. Wait about 3 minutes for the message
to clear, or another message to appear. If another message
appears, see the printer manual or the configuration page for
additional information.
6. Does an 80 SERVICE message appear on the display?
Turn the printer off, then on again. If the message reappears,
reinstall the HP JetDirect print server. If the service message
persists try the following procedure:
■
Turn the printer off.
■
Remove the HP JetDirect print server from the printer.
■
Turn the printer on again.
88 Troubleshooting the HP JetDirect Print Server
EN

If the message persists after you have removed the HP JetDirect
print server, the problem may be with the printer. See the
printer manual for more information. If the message does not
persist, and it was an 80 SERVICE message, the problem is with
the HP JetDirect print server and you may need to replace it.
See the replacement instructions in your warranty. For
information on other messages, see the printer manual.
Depending on the type of problem that causes the 80 SERVICE
message, the print server may send a diagnostics page to the
printer when the error occurs. If you get multiple diagnostics
pages for a single failure, forward these pages to your
HP authorized dealer for further analysis. If you need to replace
the print server, include the diagnostics pages with the old
print server.
7. Does EIO NOT FUNCTIONAL appear on the display?
■
Try a different slot, if available.
■
Call for printer support.
8. Does a message other than READY or the messages listed in this
section appear on the display?
See your printer documentation for a complete list of control
panel messages and corrective actions.
EN
Troubleshooting the HP JetDirect Print Server 89

Procedure 4: Resolving Printer Communication Problems with the Network
Check the following items to verify that the printer is communicating
with the network.
printed a configuration page.
1. Is there any physical connection problems between the
workstation or file server and the HP JetDirect print server?
Verify network cabling, connections, and router configurations.
2. Are your network cables connected properly?
Make sure that the printer is attached to the network using the
appropriate HP JetDirect print server port and cable. Check
each cable connection to make sure it is secure and in the right
place. If the problem continues, try a different cable or ports on
the hub or transceiver.
3. Is the network terminated correctly?
If you are using a ThinLAN (thin Ethernet coaxial cable), your
network must form a line, not a loop. If your printer is the end
node, the BNC connector must have a 50-ohm terminator
attached to one end.
4. Have any software applications been added to the network?
This information assumes you have already
Make sure they are compatible and that they are installed
correctly with the correct printer drivers. Refer to the
appropriate chapter for your network operating system to verify
the connection.
90 Troubleshooting the HP JetDirect Print Server
EN

5. Are other users able to print?
The problem may be workstation specific. Check the
workstation network drivers, printer drivers, and redirection
(capture in Novell NetWare).
6. If other users are able to print, are they using the same network
operating system?
Check your system for proper network operating system setup.
7. Is your protocol enabled?
Check the STATUS line for your protocol on the JetDirect
configuration page. See the end of this chapter for descriptions
of the information on the configuration page.
8. Is there an error message in the protocol’s section on the
configuration page?
See the chapter “HP JetDirect Configuration Page Messages”
for a list of error messages.
9. If you are using Token Ring, is the data rate correct?
Check the configuration page for the current settings. If they
are incorrect, refer to the Token Ring settings in the print server
hardware installation guide.
10. If you are using Novell NetWare, does the printer (node address)
appear in the HP Web JetAdmin software?
■
Verify network and HP JetDirect settings on the configuration
page. See the end of this chapter for descriptions of the
information on the configuration page.
■
Confirm the network settings for the printer using the printer
control panel (for printers with control panels).
■
See the troubleshooting section in the online help included
with the HP Web JetAdmin software for your network
operating system.
EN
Troubleshooting the HP JetDirect Print Server 91

11. If you are using Apple EtherTalk or LocalTalk, does the printer
appear in the Chooser?
■
Verify network and HP JetDirect settings on the configuration
page. See the end of this chapter for descriptions of the
information on the configuration page.
■
Confirm the network settings for the printer using the printer
control panel (for printers with control panels).
■
See the troubleshooting section in the online help for the
HP LaserJet Utility.
■
Verify the printer has the PostScript option installed.
12. If you are on a TCP/IP network, can you use Telnet to print
directly to the printer?
■
Use the following Telnet command:
telnet <IP address> <port>
where
HP JetDirect print server and
<IP address>
is the IP address assigned to the
<port>
is 9100. (HP JetDirect
data port 9101 or 9102 can also be used for ports 2 or 3
respectively, of a JetDirect multiport external print server.)
■
In the Telnet session, type in data and press
■
The data should print to the printer (a manual form feed may
[Enter]
.
be required).
13. If you are using Microsoft Windows NT, does the printer appear
in the HP Web JetAdmin or HP JetAdmin software?
■
Verify network and HP JetDirect settings on the configuration
page. See the end of this chapter for descriptions of the
information on the configuration page.
■
Confirm the network settings for the printer using the printer
control panel (for printers with control panels).
■
See the troubleshooting section in the online help included
with the HP Web JetAdmin software for your network
operating system.
92 Troubleshooting the HP JetDirect Print Server
EN

14. If you are using Microsoft Windows NT 4.0, does the printer
appear in the
Add a Hewlett-Packard Network Peripheral Port
dialog box?
■
Verify network and HP JetDirect settings on the configuration
page. See the end of this chapter for descriptions of the
information on the configuration page.
■
Confirm the network settings for the printer using the printer
control panel (for printers with control panels).
■
See the troubleshooting section in the online help included
with the HP Web JetAdmin software for your network
operating system.
15. If you are using HP-UX, Solaris, or Linux, does the printer
respond to HP Web JetAdmin?
■
Verify network and HP JetDirect settings on the configuration
page. See the end of this chapter for descriptions of the
information on the configuration page.
■
Confirm the network settings for the printer using the printer
control panel (for printers with control panels).
■
See the troubleshooting section in the online help included
with the HP Web JetAdmin software for your network
operating system.
EN
Troubleshooting the HP JetDirect Print Server 93

Troubleshooting an LPD UNIX Configuration
The troubleshooting steps below describe how to troubleshoot
printing problems you may have with the HP JetDirect print server.
1. Print a JetDirect configuration page.
2. Verify that the IP configuration values are correct. If they are
not, reconfigure the HP JetDirect print server.
3. Log onto the host system and type:
ping <IP address>
where
<IP address>
is the IP Address assigned to the printer.
4. If ping fails, make sure the IP Address on the configuration page
is correct. If it is correct, the problem is in the network.
5. If the ping test passes, print a test file. At the UNIX prompt,
type:
lpr -Pprinter_name test_file
(BSD-based and Linux
systems)
where
test_file
HP-GL/2, or text) for the printer defined in the
printer_name
is the name of your printer and
is an appropriate file (ASCII, PCL, PostScript,
:rp
tag in the
printcap file.
6. If the test file does not print, do the following:
■
Check printcap entries.
■
Check printer status (using LPC or a similar process).
■
Examine the contents of the logfile for this printer, such as
/usr/spool/lpd/error_log_filename
■
Check other log files, such as
HP-UX:
/usr/adm/syslog
94 Troubleshooting the HP JetDirect Print Server
EN
 Loading...