

Page 1

®
User’s Guide
hp iPAQ Navigation System
September 2003
Part Number 348773-001
Page 2

© 2003 Hewlett-Packard Company
Microsoft, MS-DOS, Windows, Windows NT, ActiveSync, and Outlook are trademarks of
Microsoft Corporation in the U.S. and other countries.
Intel, Pentium, Intel Inside, and Celeron are trademarks of Intel Corporation in the U.S. and other
countries.
Adobe, Acrobat, and Acrobat Reader are trademarks or registered trademarks of
Adobe Systems Incorporated.
SD is a trademark of Secure Digital.
All other product names mentioned herein may be trademarks of their respective
companies.
Hewlett-Packard Company shall not be liable for technical or editorial errors or
omissions contained herein or for incidental or consequential damages in connection with the furnishing, performance, or use of this material. The information
in this document is provided “as is” without warranty of any kind, including, but
not limited to, the implied warranties of merchantability and fitness for a particular
purpose, and is subject to change without notice. The warranties for HP products
are set forth in the express limited warranty statements accompanying such
products. Nothing herein should be construed as constituting an additional
warranty.
This document contains proprietary information that is protected by copyright. No
part of this document may be photocopied, reproduced, or translated to another
language without the prior written consent of Hewlett-Packard Company.
WARNING: Text set off in this manner
indicates that failure to follow directions
could result in bodily harm or loss of life.
Caution: Text set off in this manner
indicates that failure to follow directions
could damage to equipment or loss of
information.
User’s Guide
hp iPAQ Navigation System
First Edition September 2003
Part Number 348773-001
Page 3

Table of Contents
Getting Started
What Is In the Box? ............................................................................................................... 1-2
System Requirements.............................................................................................................1-3
Loading the Navigation System Software ............................................................................. 1-4
Selecting and Downloading a Map by Region ............................................................... 1-5
Selecting and Downloading a Map By City .................................................................... 1-6
Downloading Additional Maps........................................................................................ 1-7
Closing the Navigation System.............................................................................................. 1-8
Using the HP iPAQ GPS Bluetooth Receiver
Learning About Bluetooth GPS Features .............................................................................. 2-1
Setting Up the Bluetooth GPS Receiver................................................................................ 2-2
Manually Partnering for Windows Mobile 2002 Operating System ............................... 2-3
Establishing a Connection................................................................................................ 2-3
Manually Partnering for Windows Mobile 2003 Operating System ............................... 2-5
Establishing a Connection................................................................................................ 2-5
Checking the GPS Connection Status.............................................................................. 2-8
Receiving Satellite Signals .............................................................................................. 2-9
Getting Acquainted with Navigation System
Moving Around the Map ....................................................................................................... 3-3
Panning the Map .............................................................................................................. 3-3
Zooming the Map............................................................................................................. 3-3
Using Menus.......................................................................................................................... 3-4
Main Menu.......................................................................................................................3-5
File Menu......................................................................................................................... 3-6
Tools Menu......................................................................................................................3-7
View Menu.......................................................................................................................3-8
Pop Up Menu................................................................................................................... 3-9
User’s Guide i
Page 4

Setting Options..................................................................................................................... 3-10
Selecting the Map Display View ................................................................................... 3-10
Map View................................................................................................................. 3-10
Map View Modes..................................................................................................... 3-11
Guidance View......................................................................................................... 3-13
Setting Voice Guidance ................................................................................................. 3-14
Setting Route Options.................................................................................................... 3-15
Setting Safety Options ................................................................................................... 3-16
Recording a Route.......................................................................................................... 3-18
Replaying Route Instructions................................................................................... 3-19
Using The Navigation System
Entering a Start Location .......................................................................................................4-1
Entering a Destination............................................................................................................ 4-2
Setting a Destination by Address..................................................................................... 4-3
Setting a Destination by Intersection.............................................................................. 4-6
Setting a Destination by Point of Interest ........................................................................ 4-9
Selecting a POI Alphabetically................................................................................ 4-11
Selecting a POI By Distance.................................................................................... 4-12
Selecting a POI By City........................................................................................... 4-13
Setting a Destination From the Contacts List ................................................................ 4-15
Setting a Destination From the Favorites Location List................................................ 4-17
Setting a Destination from the Recent Destinations List............................................... 4-18
Managing the Destination and Route................................................................................... 4-19
Entering a Detour........................................................................................................... 4-20
Entering Stopovers......................................................................................................... 4-22
Clearing a Selected Destination..................................................................................... 4-22
Navigating the Vehicle......................................................................................................... 4-23
Using Day vs. Night Display ......................................................................................... 4-23
Viewing the Route List.................................................................................................. 4-25
User’s Guide ii
Page 5

Software Technical Support
General Definition.................................................................................................................. 5-1
Obtaining Support.................................................................................................................. 5-1
Performing a Soft Reset.........................................................................................................5-1
Troubleshooting................................................................................................. 6-1
Appendix................................................................................................................... A-1
User’s Guide iii
Page 6

Getting Started
HP iPAQ Navigation System is a full featured software using the latest in satellite technology and
detailed street maps from Navigation Technologies. This software guides you through the most
complex streets with ease.
The HP iPAQ Navigation System is referred to as Navigation System in this
User’s Guide.
The Navigation System is designed for the HP iPAQ PocketPC. Since the map of the United States
and Canada is very large, it does not fit on the HP iPAQ PocketPC. You can transfer map data by
city or state, but not both at the same time. To transfer the portion of the map you want to your
iPAQ PocketPC, use the companion map loading software on your desktop (or laptop). The time
needed to download a map varies based on system capabilities.
When you travel to a different area of the country, the map loader lets you easily change the maps
on your iPAQ PocketPC, as needed.
CAUTION! You should limit the size of the map data downloaded to your iPAQ
PocketPC to <100 MB. If you download too much data, Navigation System
may not run. You must then perform a soft reset and remove the maps from
the SD or CF card.
In the following sections, you learn about:
What’s in the Navigation System Box.
System Requirements.
Installing the Navigation System Software
.
User’s Guide 1-1
Page 7

What is in the Box?
The Navigation System box includes the following items:
What is in the Box?
3
4
1
2
3
4
iPAQ Bluetooth™ GPS Receiver.
12 V DC Adapter for charging in the car.
CD ROM 1 including:
Navigation application (Desktop and Pocket PC application).
Western U.S. and Canada map data.
User’s Guide.
CD ROM 2 including Eastern U.S. and Canada map data.
If you are missing any items, contact your dealer.
User’s Guide 1-2
Page 8

System Requirements
The Navigation System is designed to run on any HP iPAQ Bluetooth enabled pocket PC, including:
HP iPAQ 1940/45
HP iPAQ 2210/1
HP iPAQ 5450/55
HP iPAQ 5450/55
HP iPAQ 3870/75
HP iPAQ 3970/75
h4100
h4300
Desktop or Laptop PC system requirements include:
Microsoft
266 MHZ Intel Pentium
64 MB RAM
80 MB available hard drive space.
CD ROM drive
5
®
Windows 98, ME, 2000 Professional, or XP operating system.
.
.
®
II microprocessor with MMX™ or equivalent.
System Requirements
Handheld PC system requirements include:
®
Microsoft
tem.
64 MB RAM.
64 MB storage space on SD card, CF card, or main memory.
Windows Pocket PC 2002 or Microsoft Windows Mobile 2003 Operating Sys-
User’s Guide 1-3
Page 9

Loading the Navigation System Software
Loading the Navigation System Software
To install the Navigation System Software on your Desktop:
1. Synchronize the iPAQ PocketPC with your computer using ActiveSync.
For information on synchronizing your PC, refer to the iPAQ User’s Guide.
2. Connect the iPAQ PocketPC to your computer using the iPAQ cradle or synchronization cable.
3. Close all other applications running on the Desktop and Pocket PC.
4. Obtain the two Navigation System installation discs.
5. Insert Disk 1 in the CD drive.
The Installer should start immediately. If the setup program does not auto-
matically start, click on the Start tab and select the Run option. Type the following in the dialog box: D:\setup.exe and click on the OK button. Follow
the directions in the dialog boxes.
6. Click on the Next button on the Welcome to Install Shield Wizard window.
Read through the End User License Agreement.
7. Click on the Yes button if you accept the License Agreement terms.
Setup installs the Navigation System files onto your computer.
8. Click on the Finish button.
User’s Guide 1-4
Page 10
Loading the Navigation System Software
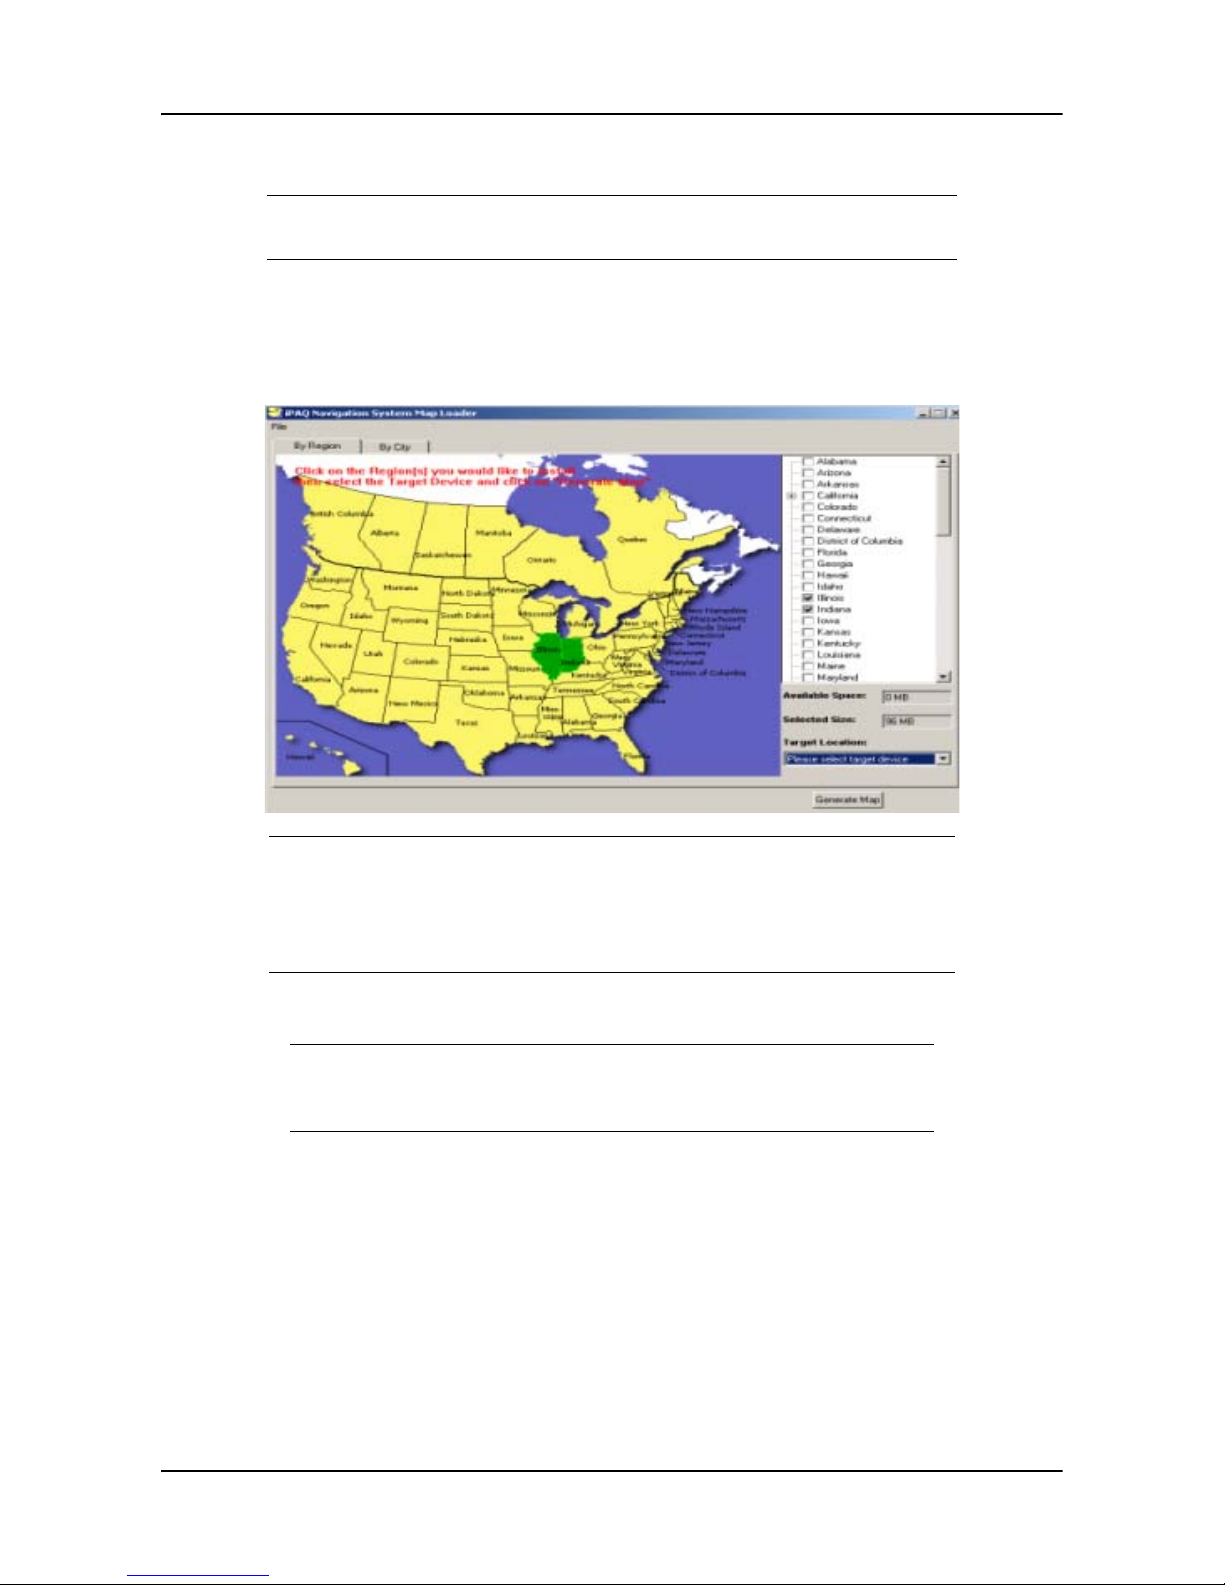
Selecting and Downloading a Map by Region
Selecting and Downloading a Map by Region
The Navigation System allows you to install maps by region/state, or by city.
You can not store multiple cities, or cities and states in the same location.
On the Map Loader window,
1. Click on each state to download to your iPAQ PocketPC, or click on the check box next to
each state name.
A region consists of one or more states. Each selected state is highlighted on
the map. A check mark is entered next to each state name on the right side of
the window. You deselect a state by tapping on it on the map, or by tapping
on the box to remove the checkmark. The size of the selected region appears
in the Selected Size box.
2. Select Pocket PC Main Memory from the Target Location pop up box.
The default target location for maps is the Pocket PC main memory. If there
is an SD or CF card installed in your Pocket PC, you can select this as the target location for maps.
3. Click on the Generate Map button.
4. Insert the appropriate disk in the CD drive, when prompted.
5. Click on the OK button after the map is downloaded onto your iPAQ PocketPC.
6. Remove the disk from the CD drive.
User’s Guide 1-5
Page 11

Selecting and Downloading a Map By City
Selecting a map by radius around a city is preferred since it lets you create a
customized map using a small amount of memory. This is helpful if you do
not have additional removable storage cards.
On the Map Loader window,
1. Click on the By City tab for the options to create a map around a city.
Loading the Navigation System Software
Selecting and Downloading a Map By City
2. Enter a state in the Region box. Click on the down arrow next to the box to display a list of
states.
3. Enter a city in the City box. Click on the down arrow next to the box to display a list of cities.
4. Click on the bar in the Map Radius box to enter a radius for the selected city.
You can increase the radius from 25 miles to 125 miles by moving the indicator to the right. A message displays if the selected map size exceeds the iPAQ
available memory.
5. Select Pocket PC Main Memory from the Target Location pop up box.
6. Click on the Generate Map button.
7. Insert the appropriate disk when prompted.
8. Click on the OK button after the map is downloaded onto your iPAQ PocketPC.
9. Remove the disk from the CD drive.
User’s Guide 1-6
Page 12
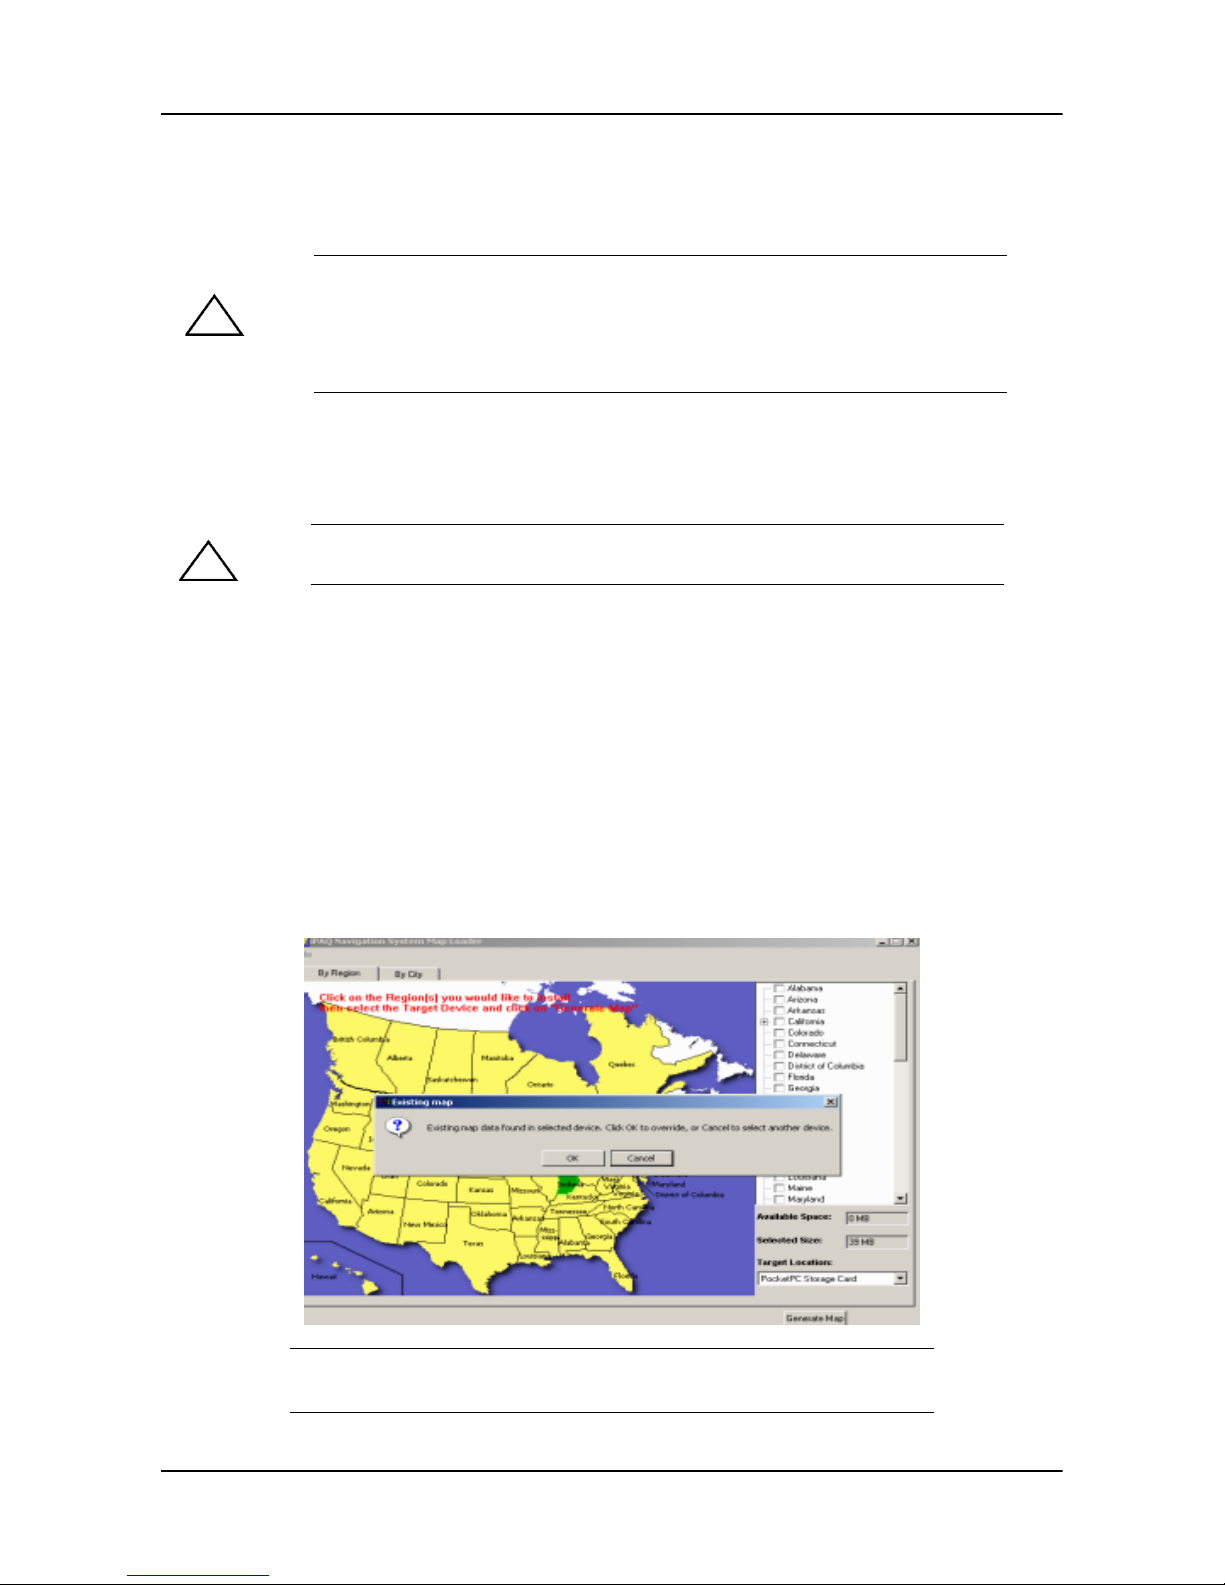
Downloading Additional Maps
The Navigation System easily lets you change map information stored on you r iPAQ PocketPC or
removable storage cards.
CAUTION: If you install additional maps, Navigation System warns that any existing
map information is erased from the storage location. This is to prevent the maps
from occupying a considerable amount of storage space.
If you need to store a number of maps, you can use different removable SD or CF
cards.
To access the map installer after Navigation System is installed on your Desktop and iPAQ PocketPC, do the following:
Loading the Navigation System Software
Downloading Additional Maps
1. Connect the iPAQ PocketPC to your Desktop
CAUTION: Verify the Navigation System is closed before installing additional maps.
For more information refer to the Closing the Navigation System section.
.
2. Double click the Navigation system icon on your Desktop screen.
The Map Loader screen is displayed.
3. Select a download method, as follows:
By State - Click on each state to download, or click the check box next to each state name
For more information, refer to the Downloading a Map by Region section.
By City - Enter the State, City, and radius around the selected city. For more information,
refer to the Downloading a Map by City section.
The selected state or city size displays in the Selected Size box on the Map Loader screen.
4. Select the storage location (i.e., iPAQ Pocket PC Main Memory or SD Card) from the Target
Location pop up box on the Map loader screen.
5. Click on the Generate Map button.
If you accept the removal of existing maps, the new selected map(s) are
downloaded to your iPAQ PocketPC.
User’s Guide 1-7
Page 13
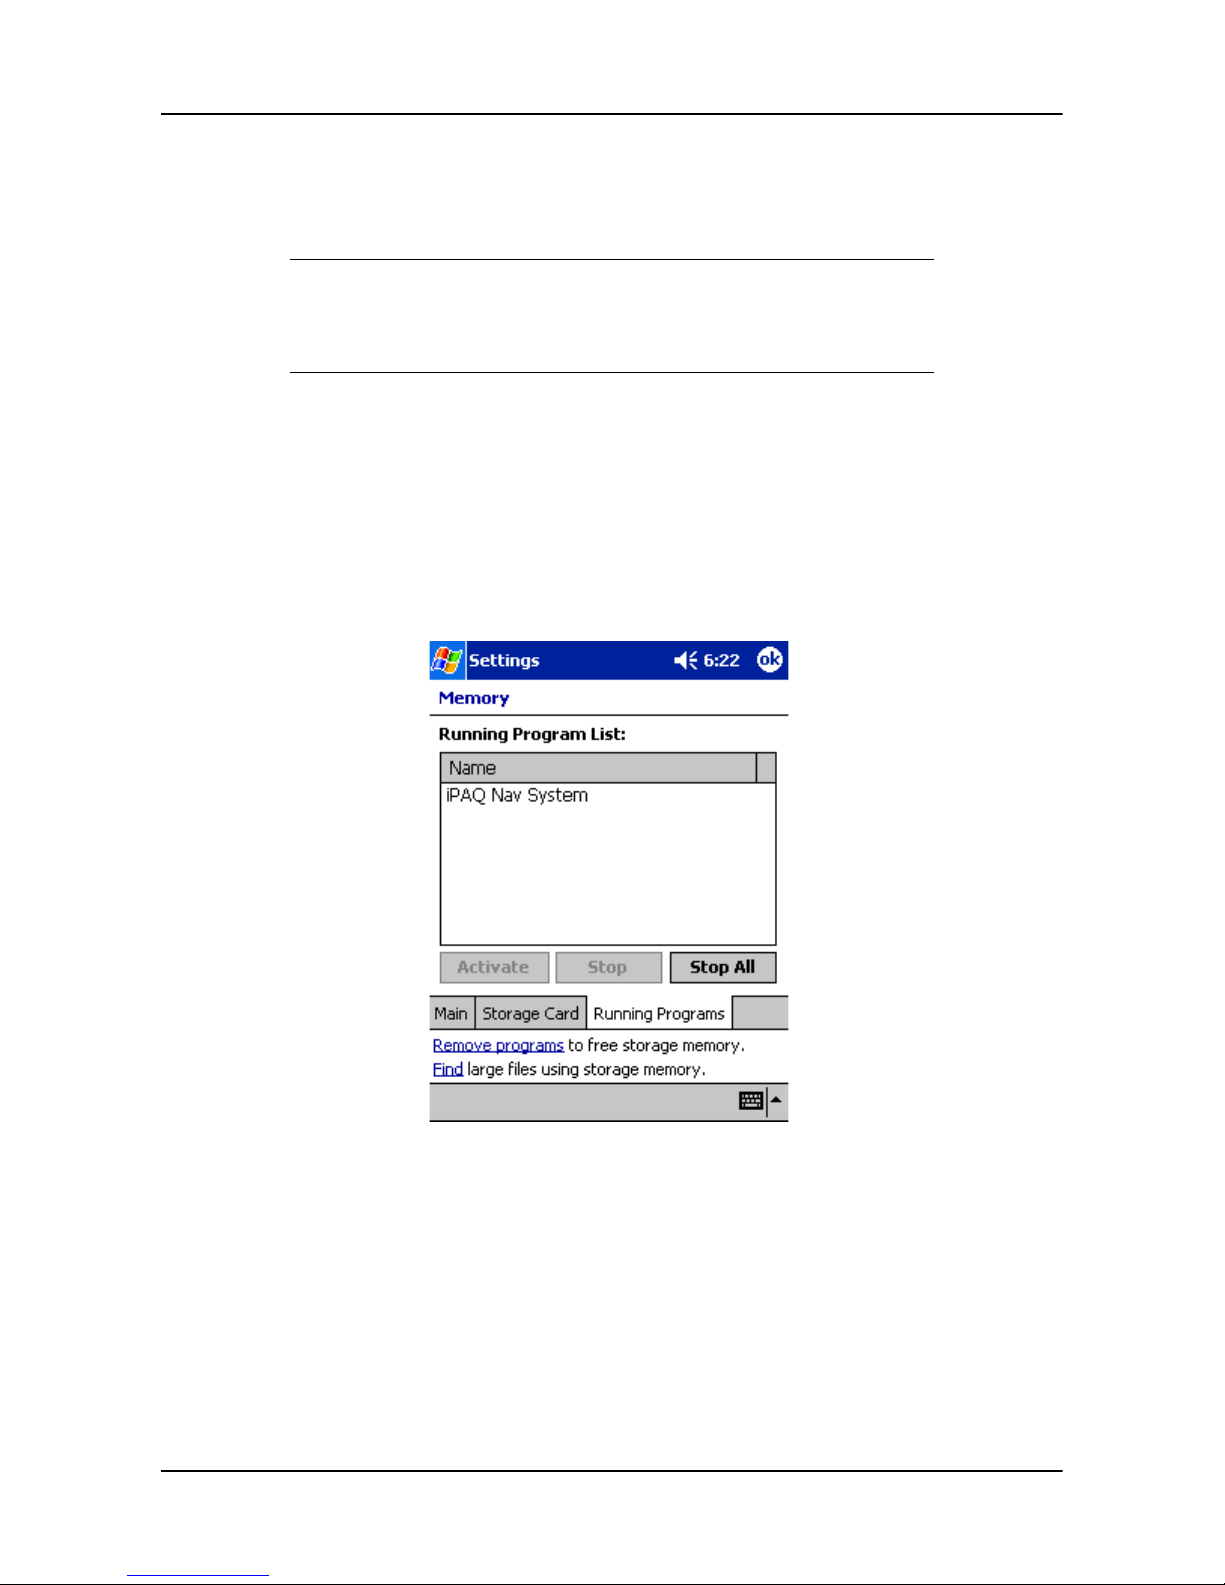
Closing the Navigation System
When you open Navigation System, it runs in the background of your iPAQ PocketPC. To stop it
from running in the background, you should manually close it.
If you do not manually close Navigation System, your iPAQ PocketPC may
freeze when it is switched off. You must perform a soft reset before you can
switch the iPAQ PocketPC on, again. This procedure does not harm any data
or settings.
To manually close Navigation System:
1. Tap the blue x in the upper right corner of the map.
2. Tap Start >Settings.
3. Tap the System tab at the bottom of the screen.
4. Tap the Memory icon on the System screen.
The Memory screen displays.
5. Tap the Running Programs tab at the bottom of the Memory screen.
The Running Programs list displays.
Closing the Navigation System
Downloading Additional Maps
6. Tap iPAQ Navigation System in the list.
7. Tap the Stop button.
8. Close your iPAQ PocketPC.
User’s Guide 1-8
Page 14

Learning About Bluetooth GPS Features
Using the HP iPAQ GPS Bluetooth Receiver
The HP iPAQ Navigation System Bluetooth GPS receiver gets GPS signals from satellites orbiting
the earth. It identifies your position to an accuracy of less than 10 meters.
The HP iPAQ Navigation System Bluetooth GPS receiver is referred to as
the Bluetooth GPS receiver in this User’s Guide.
Learning About Bluetooth GPS Features
An illustration of the Bluetooth GPS receiver with features follows.
External Antenna
Power Jack
Feature Description
Power Switch Power is On or Off.
Power Jack The Power Jack connects a DC car power charger (included) or
Bluetooth Status
LED (Blue)
GPS Status LED
(Green)
Battery Status LED
(Red/Yellow)
AC power charger to recharge the internal battery.
Blinking Slowly - There is not a Bluetooth connection.
Blinking Quickly - There is a connection to another Bluetooth
receiver.
Blinking - The GPS position is fixed.
Steady Light - The GPS position is not fixed.
Red - Battery power is extremely low. Charge immediately.
Yellow - Battery is currently charging.
LED Off - Battery is partially or fully charged.
External Antenna Connects an external antenna. This is usually not required since
User’s Guide 2-1
the GPS has an internal antenna.
Page 15
Setting Up the Bluetooth GPS Receiver
The Navigation System requires set up with the Bluetooth GPS receiver in order to operate. For the
initial set up, do the following:
1. Charge the Bluetooth GPS receiver using the DC adapter (included) or the AC adapter for the
HP iPAQ PocketPC.
The first time you charge the Bluetooth GPS receiver, it can take up to three
hours.
2. Turn on the Bluetooth GPS receiver using the Power switch on the left side of the receiver.
The blue LED flashes when the receiver is turned on.
3. Partner the Bluetooth GPS receiver with the iPAQ PocketPC, as follows:
nTap Start at the top of the Today screen of the iPAQ PocketPC.
nTap Programs on the Start menu
4. Tap the iPAQ Navigation System icon on the Programs screen.
.
Setting Up the Bluetooth GPS Receiver
This is a one time procedure. After this, you just tap the Navigation Sys-
tem icon at the top of the Start menu.
The following warning displays:
5. Tap on the I Accept button.
User’s Guide 2-2
Page 16
Setting Up the Bluetooth GPS Receiver
Manually Partnering for Windows® Mobile 2002 Operating System
Partnering between the Bluetooth GPS receiver and the iPAQ PocketPC automatically occurs.
Some devices require you manually partner the Bluetooth GPS receiver and
®
the iPAQ PocketPC. This includes devices using Microsoft
Windows
Pocket PC 2002 operating system. For more information, refer to the Manu-
ally Partnering the Bluetooth GPS Receiver and the iPAQ PocketPC section.
Manually Partnering for Windows® Mobile 2002 Operating System
To partner the Bluetooth GPS receiver with the iPAQ PocketPC requires:
Navigation System software installed on your iPAQ PocketPC
.
Bluetooth GPS receiver is charged.
iPAQ PocketPC is turned on.
Bluetooth GPS receiver is turned on.
Bluetooth GPS receiver and iPAQ PocketPC are between 5-10 meters apart.
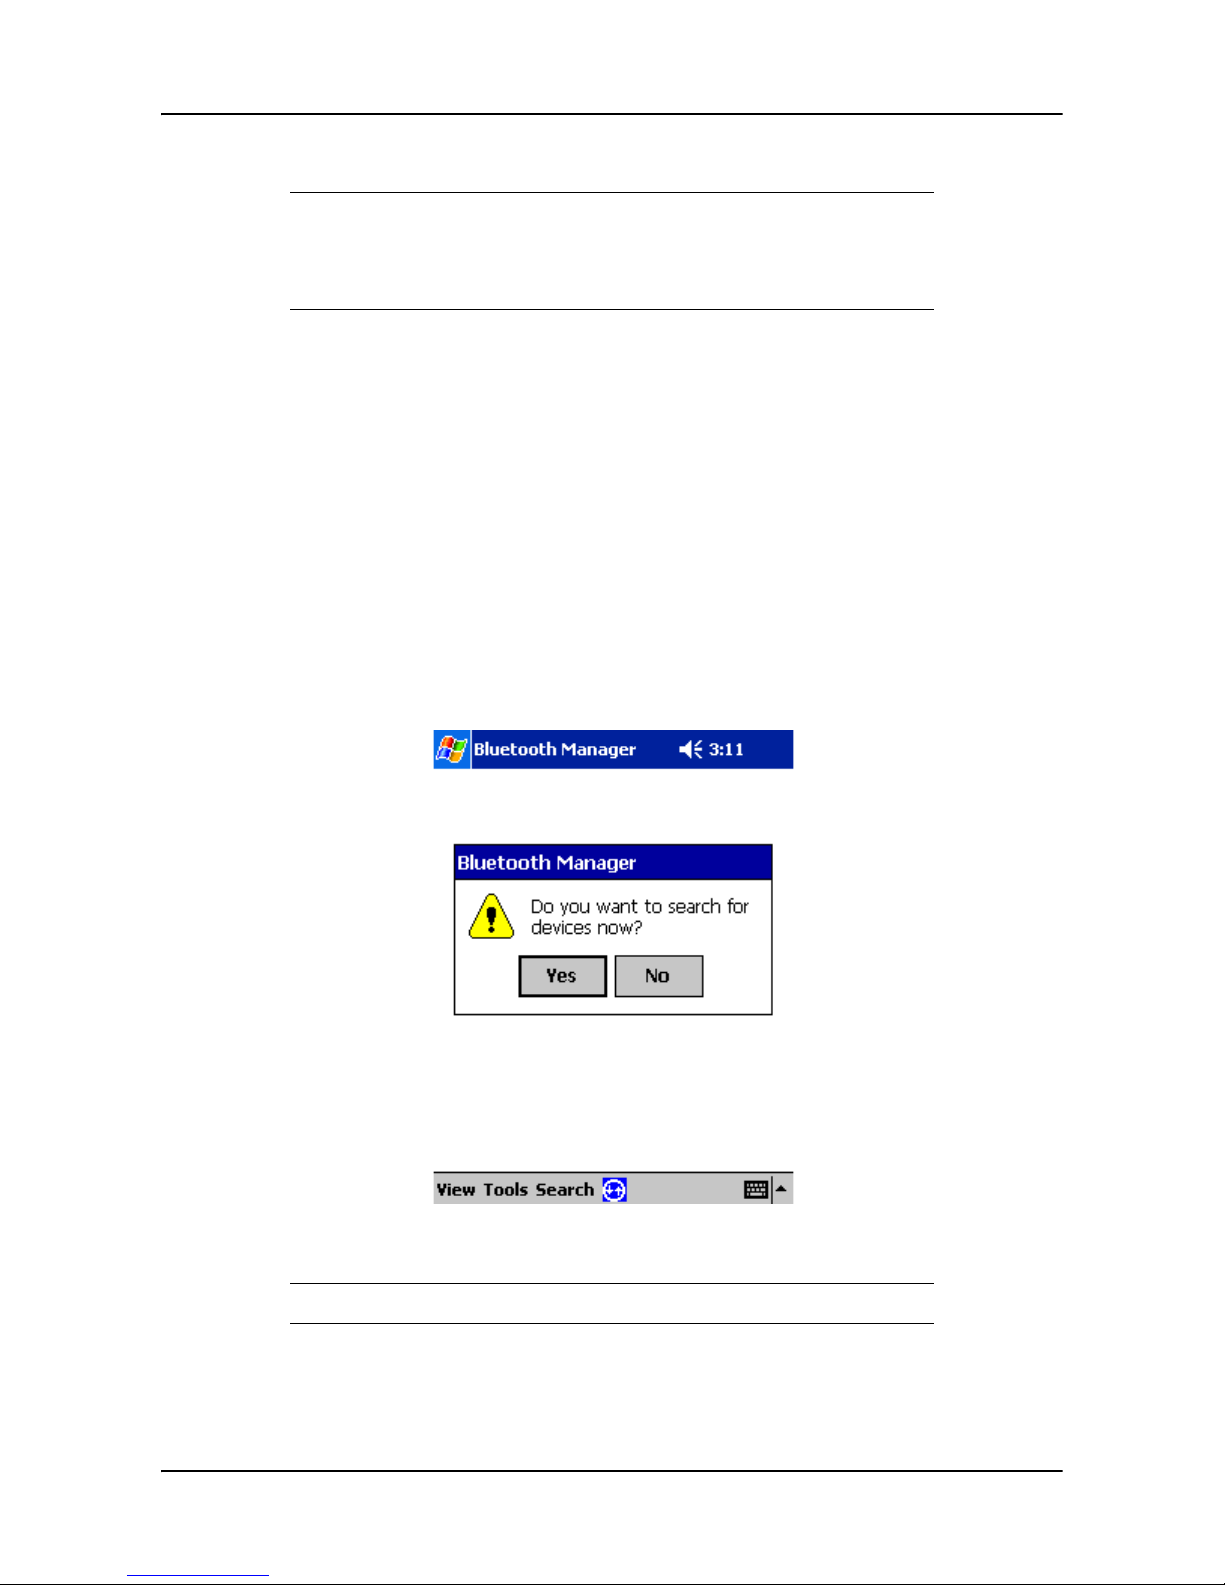
Establishing a Connection
1. Tap Start at the top of the Today screen on the iPAQ PocketPC.
2. Tap Bluetooth Manager from the pop up menu.
The Bluetooth Manager screen displays.
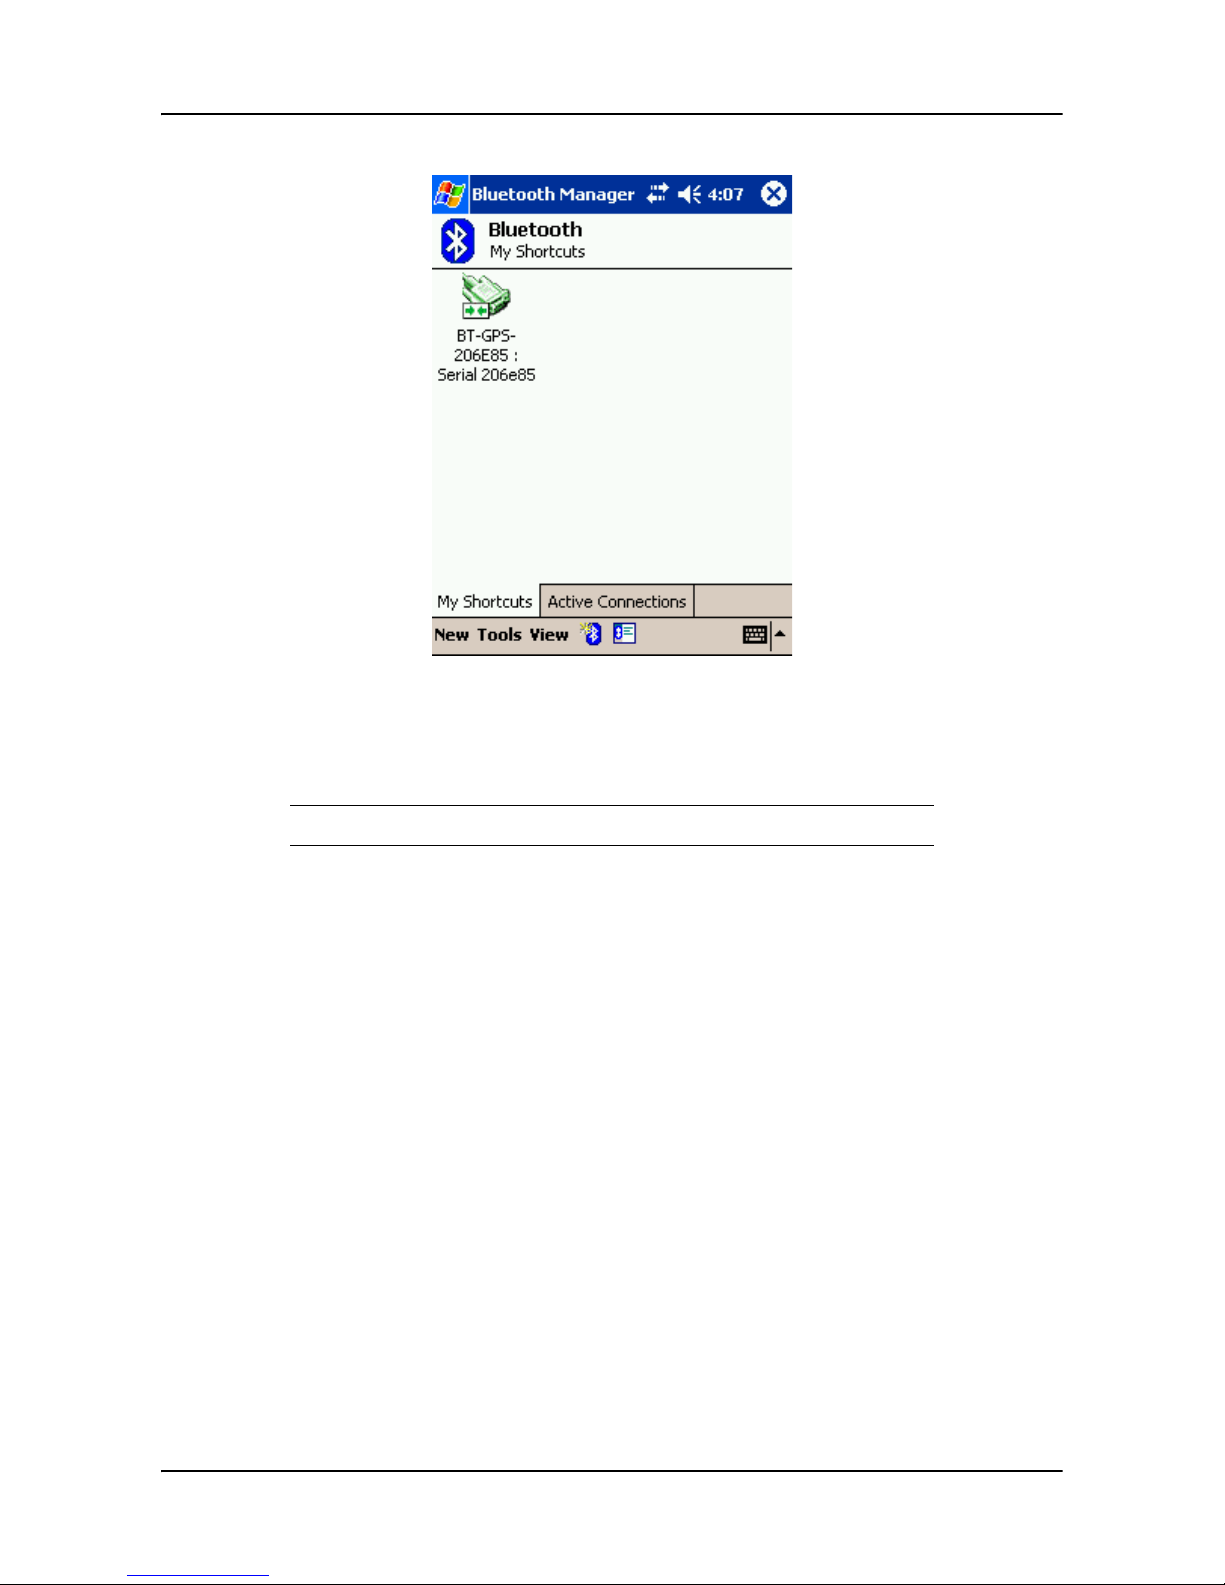
3. Tap the Yes tab to search for devices.
iPAQ searches for and displays a list of Bluetooth devices.
User’s Guide 2-3
Page 17
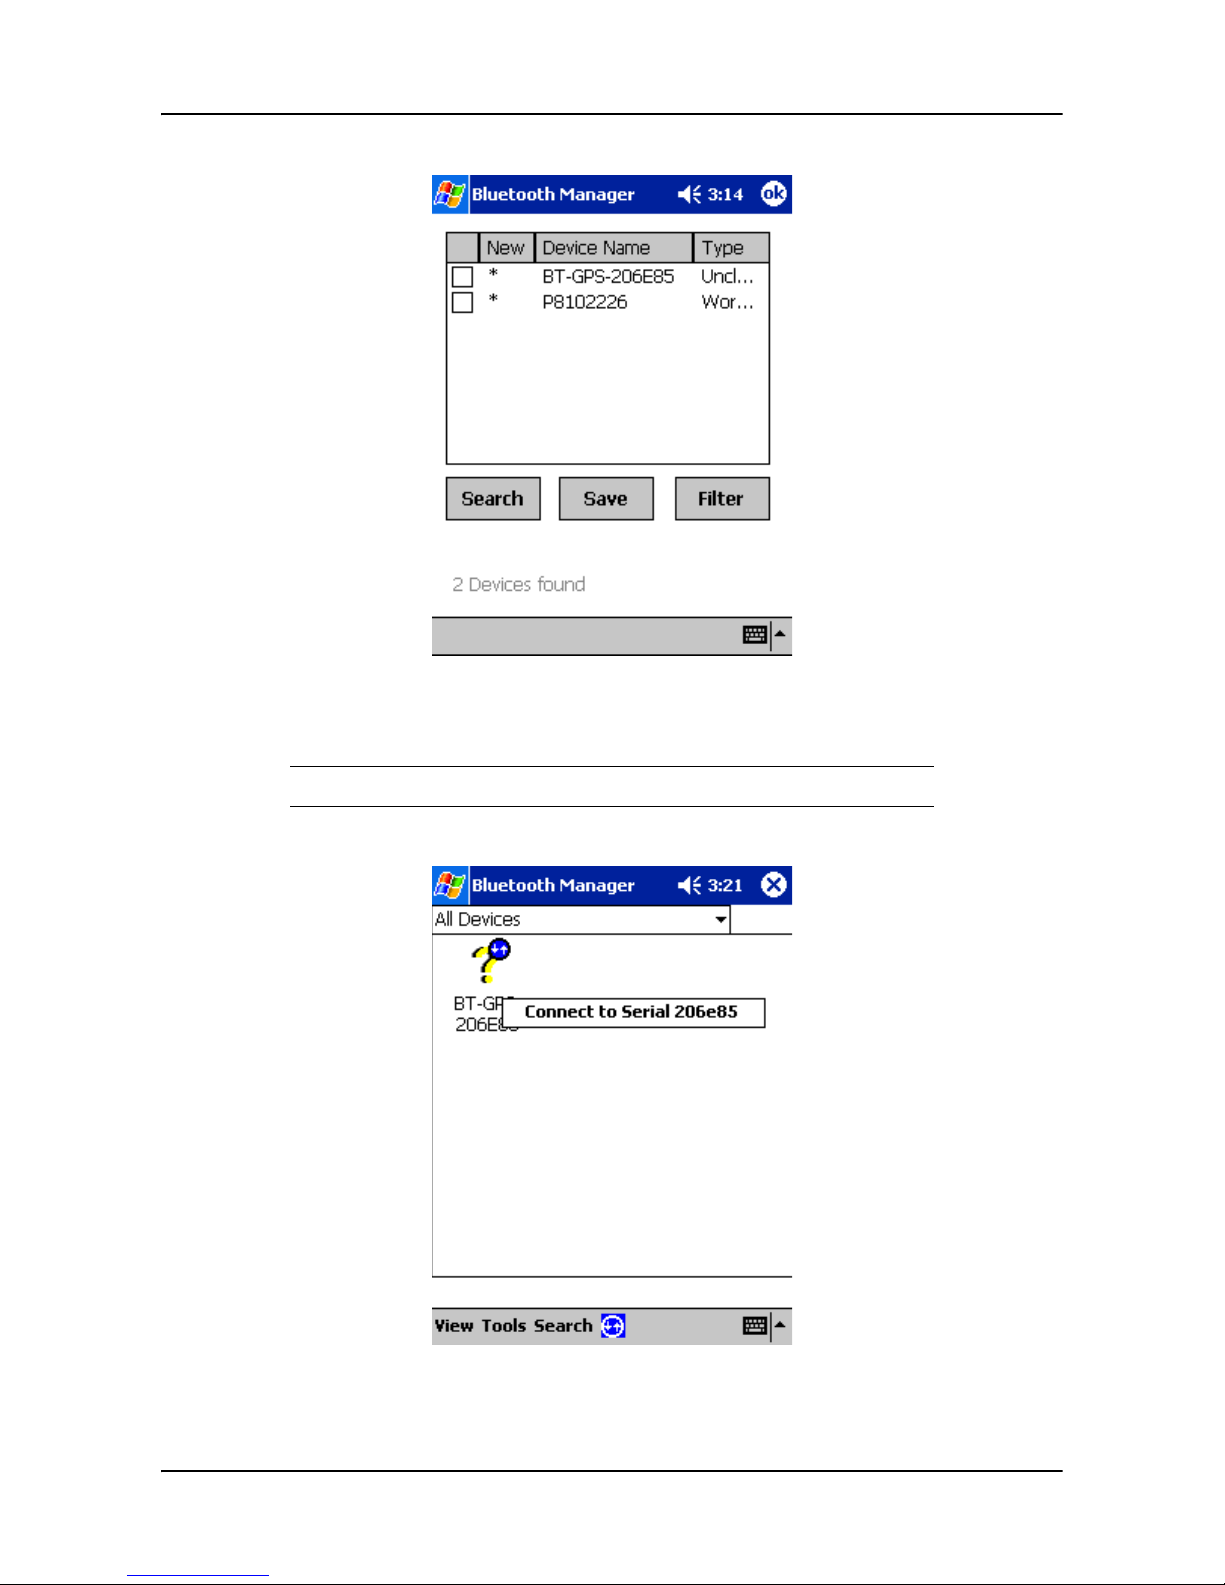
Setting Up the Bluetooth GPS Receiver
Establishing a Connection
4. Tap the check box to the left of the BT-GPS-xxxxxx device in the list.
5. Tap the OK button on the upper right side of the screen.
A Bluetooth GPS icon displays on the Bluetooth Manager screen.
6. Tap and hold the pointer on the BT-GPSxxxxxx icon.
7. Tap on Connect to Serial xxxxxx to establish a connection with the Bluetooth GPS receiver.
User’s Guide 2-4
Page 18

Setting Up the Bluetooth GPS Receiver
Manually Partnering for Windows® Mobile 2003 Operating System
Two blue arrows display on the GPS Bluetooth receiver icon to indicate a
connection.
Partnering between the Bluetooth GPS receiver and the iPAQ PocketPC immediately occurs.
Manually Partnering for Windows® Mobile 2003 Operating System
To partner the Bluetooth receiver with the iPAQ PocketPC requires:
Navigation System Software installed on your iPAQ PocketPC.
Bluetooth GPS Receiver is charged.
iPAQ PocketPC is turned on.
Bluetooth GPS Receiver is turned on.
Bluetooth GPS receiver and iPAQ PocketPC are between 5-10 meters of each other.
Establishing a Connection
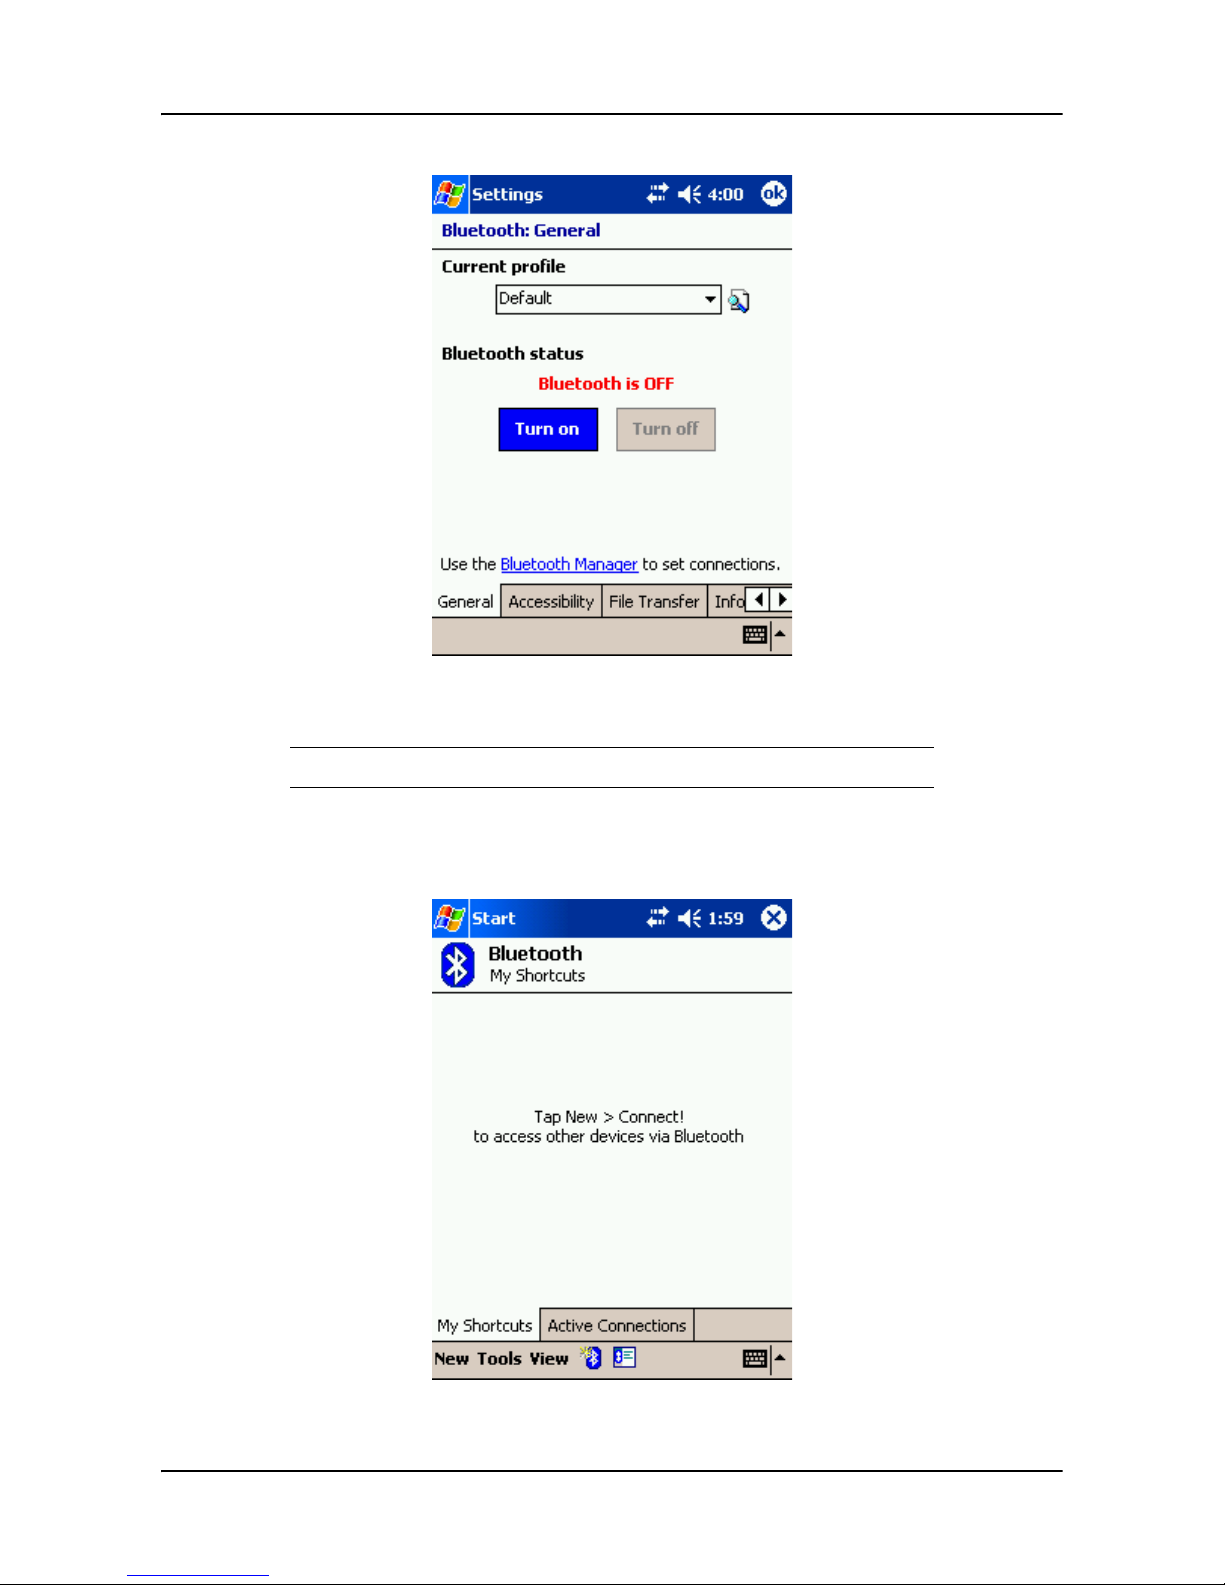
1. Tap Start at the top of the Today screen on the iPAQ PocketPC.
2. Tap the Settings option on the pop up menu.
3. Tap the System tab at the bottom of the Settin gs menu.
4. Tap the Bluetooth icon on the System menu.
The Bluetooth General screen displays.
User’s Guide 2-5
Page 19
Setting Up the Bluetooth GPS Receiver
Establishing a Connection
5. Tap the Turn On tab below the Bluetooth status.
The message “Bluetooth is On” displays.
6. Tap Bluetooth Manager to set the connections.
The Bluetooth screen displays.
User’s Guide 2-6
Page 20
Setting Up the Bluetooth GPS Receiver
Establishing a Connection
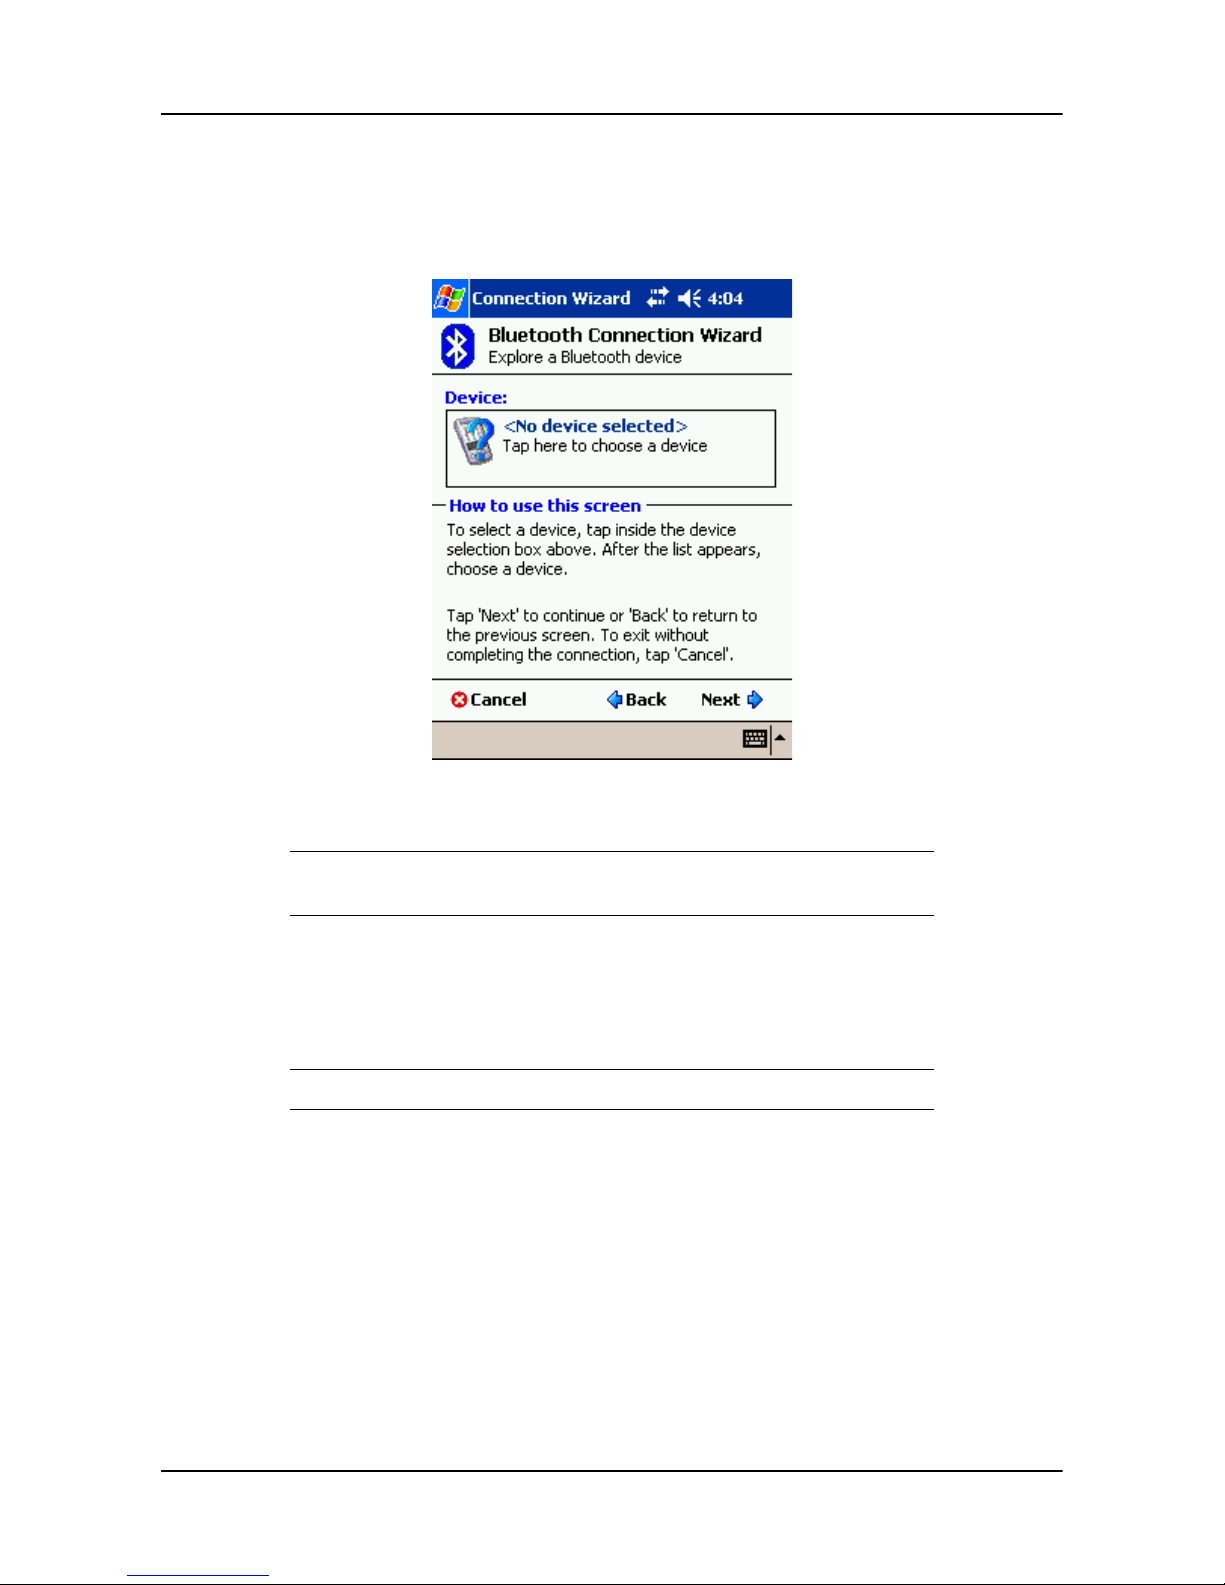
7. Tap the New tab at the bottom of the Bluetooth screen.
8. Tap Connect! to display the Connection Wizard.
9. Tap Explore a Bluetooth Device from the Connection Wizard options.
10. Tap the Next tab at the bottom of the Connection Wizard screen
11. Tap inside the Device box to display a list of available Bluetooth Devices.
The Bluetooth GPS receiver displays a list of available devices. This creates a
shortcut for the GPS receiver
12. Tap the icon labeled BT-GPS-XXXXXX.
13. Tap Serial XXXXXX on the Service Selection screen to highlight it.
14. Tap the Next tab at the bottom of the Service Selection screen.
15. Tap the Finish tab at the bottom of the Connection Wizard screen.
A box with the connections displays.
16. Tap the BT-GPS-XXXXXX icon, twice, to establish a connection between the iPAQ Pock-
etPC and the Bluetooth GPS receiver.
Green arrows on the icon indicate an active connection.
User’s Guide 2-7
Page 21
Setting Up the Bluetooth GPS Receiver
Checking the GPS Connection Status
Checking the GPS Connection Status
1. To check the status for the Bluetooth GPS receiver and the iPAQ PocketPC, tap the Bluetooth
icon on the Today screen.
The Bluetooth icon is located on the lower right side of the screen.
2. Tap Bluetooth Manager.
The Bluetooth Manager screen displays.
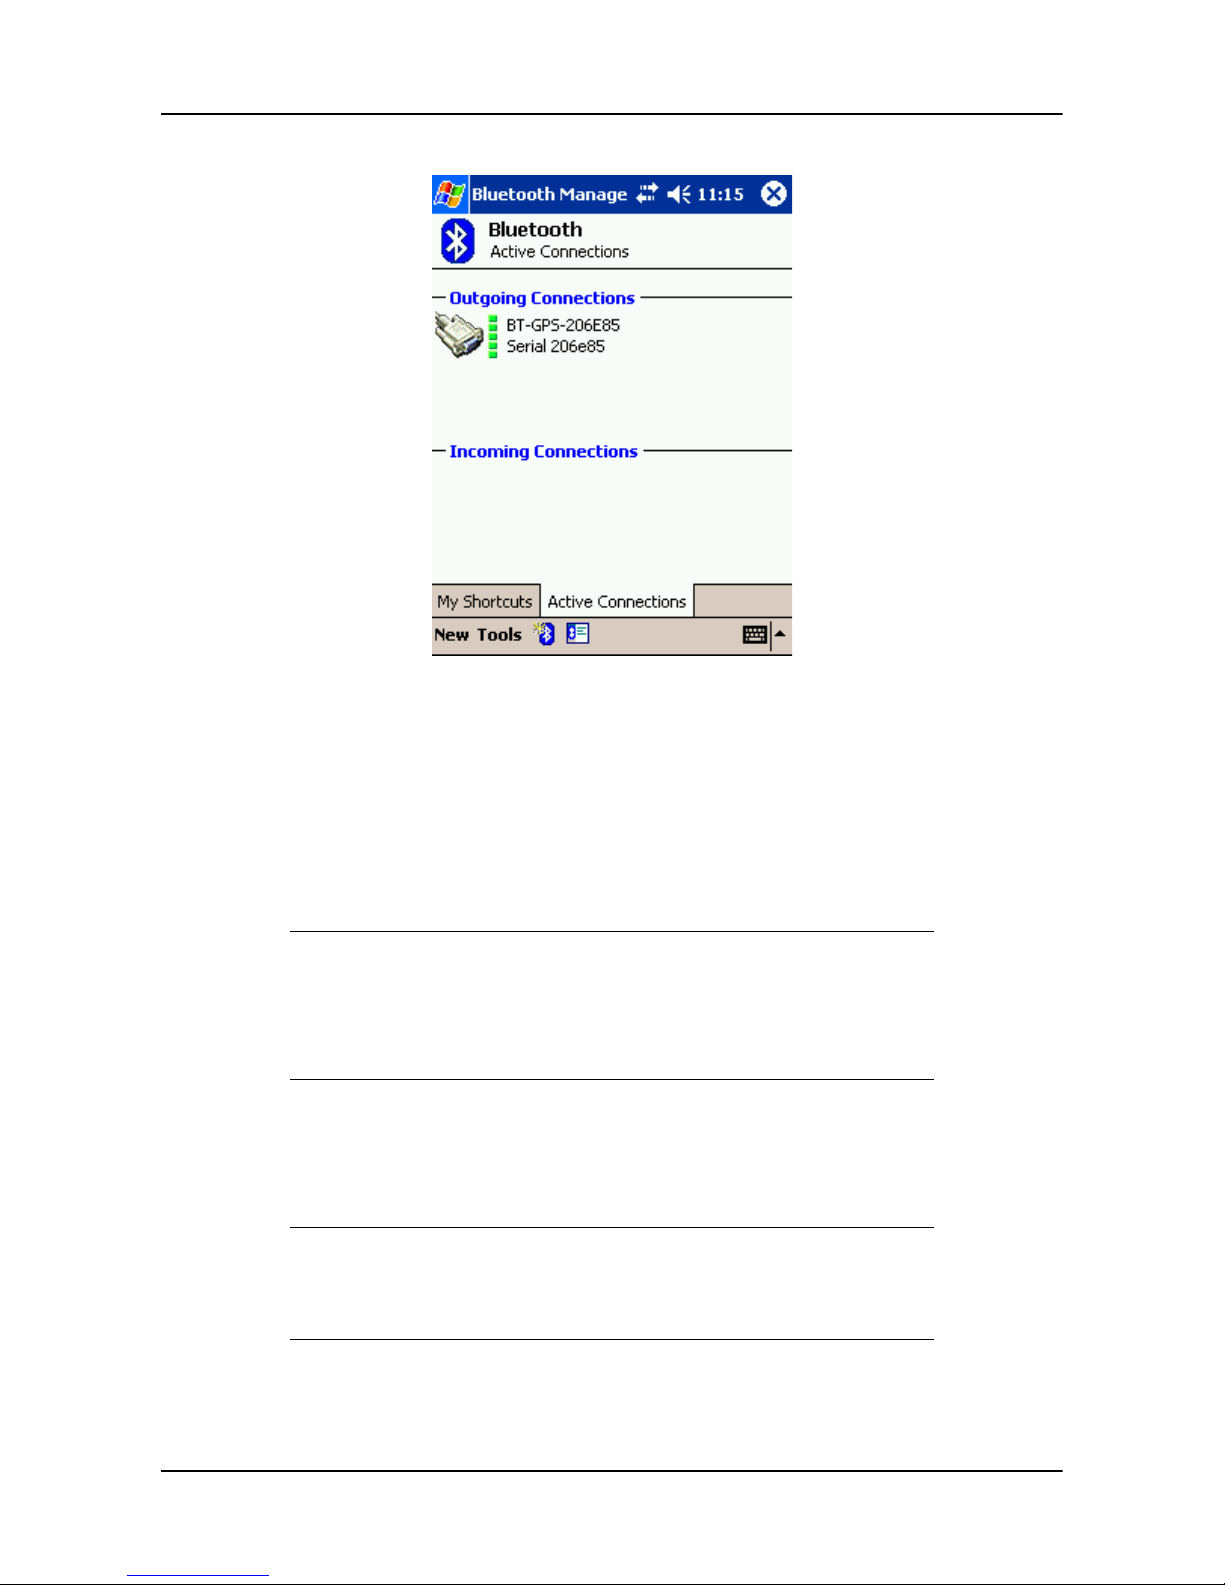
3. Tap the Active Connections tab at the bottom of the screen.
If a connection is established, an icon with the label “BT-GPS-XXXXXX” displays. The green line
next to the icon indicates an active connection.
User’s Guide 2-8
Page 22
Setting Up the Bluetooth GPS Receiver
Receiving Satellite Signals
If the connection is not active, manually partner the Bluetooth GPS receiver with the iPAQ PocketPC. For more information, refer to Manually Partnering the Bluetooth GPS Receiver with the
iPaQ PocketPC section.
Receiving Satellite Signals
The Bluetooth GPS Receiver gets satellite signals only when there is a clear view of the sky. Trees
and tall buildings can block the view. Generally, you do not receive signals inside a building.
The Bluetooth GPS Receiver should be placed on the front or back dashboard
of the vehicle.
A wireless connection between the Bluetooth GPS Receiver and iPAQ PocketPC is established through the receiver radio. The Bluetooth GPS receiver
and the iPAQ PocketPC should be no further than 5-10 meters apart.
Once a connection is established between the Bluetooth GPS Receiver and iPAQ PocketPC, satellite signals are received. When you first use the Bluetooth GPS Receiver, it can take from five to
fifteen minutes to receive a satellite signal. Thereafter, it should take approximately 90 seconds to
receive signals.
Some days, you receive a GPS signal quicker than on other days. Although
GPS signals orbit the earth in set patterns, they are not always over the same
position on earth. There is more extensive coverage over lower latitudes and
less near the poles.
Based on satellite position, geographic location, and heading, you can experience the following:
User’s Guide 2-9
Page 23
Setting Up the Bluetooth GPS Receiver
Receiving Satellite Signals
Satellite signals are received quicker at specific times of the day. For example, at 10 A.M., you
can receive signals under a minute since there are more satellites visible in the sky. At 3 P.M.,
you may not receive signals because only two satellites are visible in the sky
.
Buildings can block satellite signals. Setting up the GPS receiver in a vertical window blocks at
least 50% of the sky. Trees also can block satellite signals.
A window with a Southern view, rather than Northern view, should be used to receive signals.
The Bluetooth GPS Receiver needs at least three satellite connections. Using Navigation Sys-
tem, check the GPS Receiver status as follows:
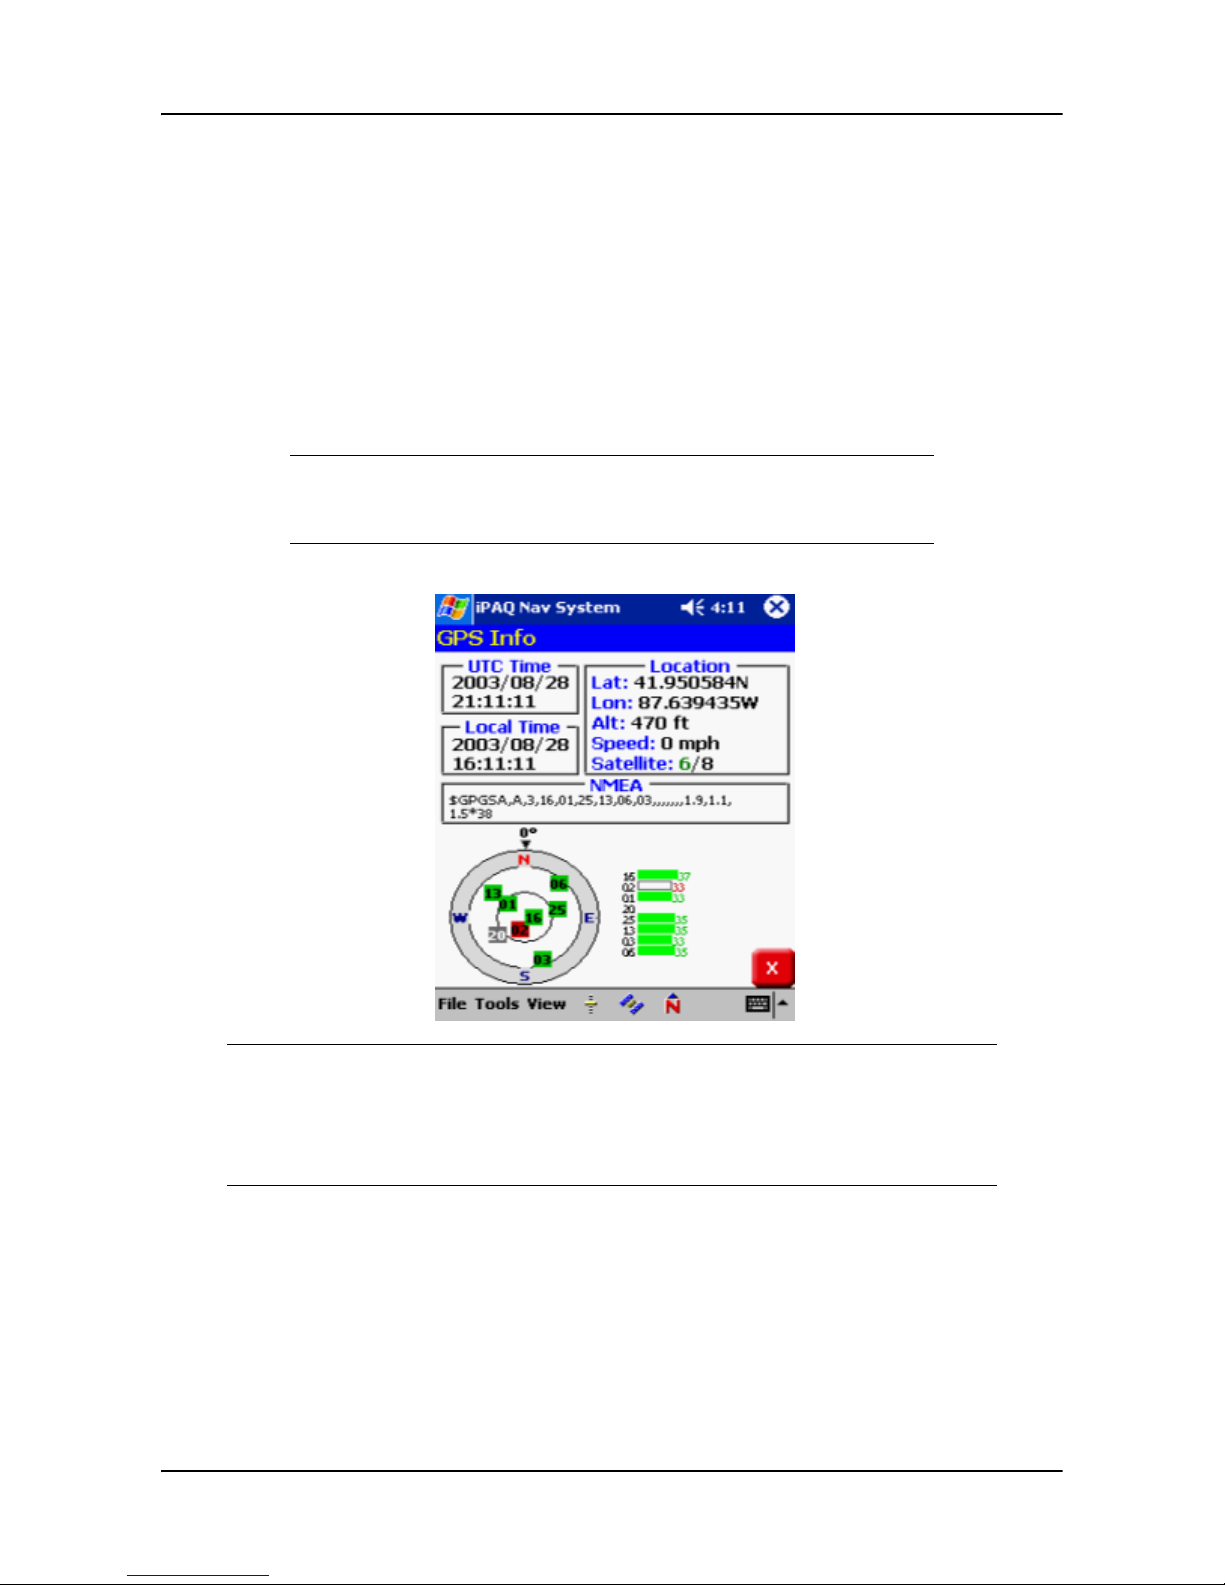
Tap the View tab > GPS Info.
Tap the Menu button > GPS icon.
The GPS Info screen displays.
The Bluetooth GPS receiver performs at its best when the battery is fully
charged. If you are at a location receiving weak signals, verify the Bluetooth
GPS receiver is connected to the DC power charger.
The strongest GPS connection has 4 or more satellites available and the vehicle position displays in green on the map. If there are 3 satellites available, the vehicle displays in yellow on
the map. If less than three satellites, the vehicle displays in red on the map.
If the iPAQ PocketPC loses connection with a GPS device, tap Tools > GPS Options > Auto
Detect > OK for Navigation System to search for GPS Devices.
User’s Guide 2-10
Page 24

Getting Acquainted with Navigation System
When you start Navigation System, the downloaded map displays in Map View. This provides an
expanded view of the map area around the vehicle location.
Map View is the default selection. You can also select Guidance View to
center in on the map location. For more information, ref e r to Selecting the
Map Display View.
If you have a GPS signal, the map defaults to the current location.
If you do not have a GPS signal, the map defaults to the last location.
The vehicle icon displays as a green, yellow, or red arrow on the map. The color indicates the num-
ber of available satellites. At the bottom of the map is the vehicle location.
User’s Guide 3-1
Page 25

To see detailed information, for the vehicle location, do one of the following:
Tap on the location description at the bottom of the map
.
Tap on the map location and select Info from the Pop Up menu.
User’s Guide 3-2
Page 26

Moving Around the Map
You can easily move around the map by:
Panning the map in the direction you want it to move.
Zooming in and out of the map display.
Panning the Map
You can tap the pointer on the map and drag it in the direction you want it to move: up down, right
or left. When you remove the pointer from the map, it centers in on the selected location. This lets
you have considerable control over your viewing area
Moving Around the Map
Panning the Map
The Map View changes to Map Panning mode. To return to the default map view,
tap the red x on the bottom right side of the Map Panning screen.
Zooming the Map
Navigation System lets you zoom in and out of the map within a 100 feet- 25 mile range. To zoom
the map, do one of the following:
Tap the + (zoom in) or - (zoom out) buttons at the bottom of the screen.
Tap View> Zoom+ or Zoom - to move in or out of the map display.
The map zooms in or out by one unit.
User’s Guide 3-3
Page 27

Using Menus
Navigation System is based on a menu structure, including:
Main Menu
File Menu
Tools Menu
View Menu
Pop UP Menu
The File, Tools, View and Pop Up menus provide short cuts to features on the
Main Menu.
Using Menus
Zooming the Map
User’s Guide 3-4
Page 28

Main Menu
The Main Menu contains all of the options necessary to create and monitor your destination and
route. To access this menu, tap the Menu button on the lower left side of the screen.
.
Using Menus
Main Menu
Options Description
Destinations Sets the destination by address, intersection, points of
Map View Displays an expanded view of the map area around the
Display Opts Sets the map orientation, screen color on the iPAQ Pock-
Record Records GPS information and street maneuvers.
GPS Info Displays GPS status information.
Volume Sets the guidance volume on or off and sets the volume
Speed Alert Sets an automatic or fixed speed alert.
Route Options Manages your route calculation preferences.
interest, contacts, favorite locations, or recent locations.
vehicle location.
etPC, automatic or manual guidance, and the display of
POI icons.
level.
User’s Guide 3-5
Page 29

File Menu
The File menu helps you to manage your destination and route. To access the File menu, tap on the
File tab at the bottom of the screen.
Using Menus
File Menu
Option Description
Enter Destination Displays the Set Destination screen to select a destina-
Save Current Location Enters the current location on the Favorites List.
Cancel Route Deletes a route.
Record Track/Stop Recording Records and stops recording GPS and street maneuvers
Play Track/ Stop Playback/ Replays and stops the playback of guidance information
About iPAQ Navigation System Displays release version and copyright information for the
Help Displays help for Navigation System features.
Exit Exits Navigation System.
tion option.
for your destination. This is a toggle feature.
for the recorded route.This is a toggle feature.
software.
User’s Guide 3-6
Page 30

Tools Menu
The Tools menu helps you to set destination options. To access the Tools menu, tap on the Tools
tab at the bottom of the screen.
Using Menus
Tools Menu
If an option has an arrow to the right of it, there are additional options.
Option Description
Safety Features Warns if vehicle is exceeding the speed limit, and pro-
vides safety warnings during foggy weather conditions.
Distance Units Displays distances in:
• Miles and Feet (English)
• Miles and Yards (English)
• Kilometers (Metric)
Route Options Manages the route calculation preferences.
Display Options Sets the map orientation, screen color on the iPAQ Pock-
etPC, automatic or manual guidance, and the display of
POI icons.
Input Options Sets the Pocket PC Keyboard or the iPAQ Navigation
GPS Options Automatically or manually sets the COM Port and Baud
Guidance Volume Sets the guidance volume on or off and sets the volume
System Keyboard as the input method.
Rate.
level.
User’s Guide 3-7
Page 31

View Menu
The View menu lets you display specific information about your destination route. To access the
View menu, tap on the View tab at the bottom of the screen.
Map Displays an expanded view of the map area around the
Using Menus
View Menu
Option Description
vehicle position.
Guidance Centers in on the vehicle position and displays a smaller
view of the map area.
Route List Displays the maneuvers in a route, beginning with the
start location and ending with the destination.
GPS Info Displays GPS status information and local time.
Almanac Displays sunrise and sunset times, and phases of the
Zoom + Zooms the map in.
Zoom - Zooms the map out.
moon for the vehicle location.
You can only zoom in or out in Map View. Zoom varies from 100 feet to a 25
mile radius around the vehicle.
User’s Guide 3-8
Page 32

Pop Up Menu
The Pop Up Menu provides easy access to options for a specific location. To display the pop up
menu, tap on the screen.
Location Displays the street, address, intersection, or location
Using Menus
Pop Up Menu
Option Description
type.
Set Start Location Sets this location as the vehicle start position.
Set Stopover Sets this location as a stopover on the route.
Set Destination Sets this location as the destination.
Save This Location Adds this location to your list of favorite locations.
Info Displays detailed information for this location.
Cancel Closes the Pop up menu.
User’s Guide 3-9
Page 33

Setting Options
Through Navigation System, you can set the following preferences:
Map Display View
Voice Guidance
Routing Options
Safety Options
Selecting the Map Display View
Navigation System provides two views for map display: Map View and Guidance View. Map
View is designed to give a broader view around the current location of the vehicle. Guidance View
displays a smaller distance around the vehicle and also displays the distance to the next maneuver.
You can select the view you want for your route, or switch between the two views.
Map View
1. To display the map in Map View, do one of the following:
Tap the Menu button > Map View icon.
Tap the View menu > Map option.
.
.
Setting Options
Selecting the Map Display View
The Map View screen displays.
.
Map View displays an expanded view of the map area around the vehicle position.
You can easily select an address by tapping on the screen with the pointer.
2. Do one of the following:
Tap the Menu button > Display Options icon.
Tap the Tools menu > Display Options.
User’s Guide 3-10
Page 34

3. From the Display Options screen select a map orientation, as follows:
Heading Up to automatically orient the map in the direction of vehicle travel.
North Up to maintain the map in a North/South position.
The red arrow in the upper right corner of the menu indicates a North direc-
tion.
Map View Modes
Map View has three view modes as follows:
Connected to a GPS Receiver - Routing
Setting Options
Selecting the Map Display View
Next Intersection for
Maneuver
Next Maneuver
Instruction
Destination
Current Vehicle Position
Current Location
Distance to Next
Maneuver
Toggle for:
Distance to Destination
Remaining Time (Estimated)
Estimated Time of Arrival
Speed
User’s Guide 3-11
Page 35

No Destination Selected
Current Vehicle Position
Setting Options
Selecting the Map Display View
Currrent Location
Panning Mode -Manually Scrolling the Map
Exit Panning Mode
User’s Guide 3-12
Page 36

Guidance View
To display the map in Guidance View, tap the View menu > Guidance option.
The Guidance screen displays.
.
.
Next Maneuver
Setting Options
Selecting the Map Display View
Intersection for Next
Maneuver
Distance to Maneuver Box
(Changes as Turn Approaches)
Current Location
Guidance View centers in on the vehicle location, displaying a narrower
view of the map.You can not pan or zoom the map in Guidance View.
4. Do one of the following:
Tap the Menu button > Display Options icon.
Tap the Tools menu > Display Options.
5. From the Display Options screen, select a Guidance Screen option, as follows:
Auto for the map to automatically switch between Map and Guidance View when
approaching a turn maneuver.
Manual to switch from map to guidance view only when selected.
User’s Guide 3-13
Page 37

Setting Voice Guidance
Voice Guidance provides verbal instructions for each maneuver in your route. A Speaker icon
appears on the menu bar at the bottom of the map to indicate voice guidance is turned on.
WARNING: For safety purposes, Voice Guidance should be on when operating the vehicle.
1. To Set the Voice Guidance Level, do one of the following:
Tap on the Menu button > Volume icon.
Tap the Tools menu > Guidance Volume.
The Guidance Volume screen displays.
.
Setting Options
Setting Voice Guidance
A volume level bar displays in the middle of the screen.
2. Do one of the following:
Tap the + button on the volume bar to increase the volume level.
Tap the - button on the volume bar to decrease the volume level.
3. Tap the Test button to listen to the volume level.
4. Tap on the OK button.
You can turn off Voice Guidance by tapping on the Speaker icon at the bottom of the map. A red x appears on the Speaker icon. Or, you can tap the
Mute button on the Guidance Volume screen. To turn Voice Guidance back
on, tap the Speaker icon or Mute button, again.
User’s Guide 3-14
Page 38

Setting Route Options
Routing options let you set up preferences for route calculation.
1. To set up route preferences, do one of the following:
Tap the Menu Button> Route Opts icon.
Tap the Tools menu > Route Options.
The Route Options screen displays.
Setting Options
Setting Route Options
2. Tap on one of the following route methods:
Quickest Route to calculate a route with minimum travel time.
Shortest Route to calculate a route with minimum travel distance.
3. For the type of roads to include in the route, tap on one of the following:
Major to include major roads, such as highways.
Local for local streets.
4. For reduced turns, tap on one of the following:
Enable to calculate routes that reduce the number of required turns.
Disable to turn off this feature.
5. For toll roads, tap on one of the following:
Include to include toll roads in the route.
Exclude to omit toll roads from the route.
6. For carpool lanes, tap on one of the following:
Include to include carpool lanes in the route.
Exclude to omit carpool lanes from the route.
7. Click on the OK button.
User’s Guide 3-15
Page 39

Setting Safety Options
Safety Options notify you of:
Approaching dangerous intersecti ons (useful with foggy weather conditions).
Exceeding Speed Limits.
For foggy weather conditions,
Tap File menu > Safety Features > Fog Driving.
This alerts you to traffic signals and incoming traffic, which is helpful at intersections.
When you select the Fog Driving option, a check mark displays to the left of
it. You can cancel this option, by tapping on it, again.
For exceeding speed limits,
1. Do one of the following:
Tap Menu button > Speed Alert icon.
Tap File menu > Safety Features > Speed Alert.
The Speed Alert screen displays.
Setting Options
Setting Safety Options
CAUTION: The Map database includes the speed limits posted on all roads.
At times, speed limits can change. HP and its licensors do not guarantee that
the speed alert function always provides accurate warning.
You should obey local driving laws and use good judgment for safe driving at
all times.
User’s Guide 3-16
Page 40

Setting Options
Setting Safety Options
2. Do one of the following:
Tap the Enable Auto Speed Alert box for a warning when you exceed the road speed
limit.
Tap the Enable Fixed Speed Alert box for a warning when you exceed the fixed speed
limit entered in the mph box.
You enter the Fixed Speed Limit using the key pad on the Speed Alert
screen.
3. Tap the OK button.
User’s Guide 3-17
Page 41

Recording a Route
You can record voice guidance instructions for any route.
1. Before you begin your destination, do one of the followi ng:
Tap the Menu button > Record icon.
Tap File m e nu > Record Track.
The Save As screen displays.
Setting Options
Recording a Route
2. Enter the following information:
Field Name Description
Name The route name.
Folder The name of the folder for storing the route instructions.
Type The type of file to save (GPS Log Files).
Location The folder location.
A down arrow appears to the left of some fields. Tap on the down arrow to
display a list of selections.
3. Click on the OK button.
REC displays in the upper right corner of the map to indicate the recording of
information. You can stop recording information by tapping File menu> Stop
Recording or tapping the Menu button > Record icon.
User’s Guide 3-18
Page 42

Replaying Route Instructions
To replay route instructions to a destination,
1. Tap File > Play Track.
2. The Open screen displays.
Setting Options
Recording a Route
3. Enter the name of the folder storing the destination instructions in the Folder field.
4. Enter GPS Log Files in the Type field.
A down arrow appears to the left of each field. Tap on the down arrow to display a list of selections.
A list of the files in the selected folder displays.
5. Tap on a file.
Tap on the Up and Down arrows at the top of the column to move through the
list.
Navigation System replays the details for the selected route.
You can stop the playback of route instructions by tapping on File >Stop
Playback option.
User’s Guide 3-19
Page 43

Using The Navigation System
The Navigation System is designed to guide you to your destination in the most efficient manner.
Easy-to-use- features let you:
Enter a Destination by address, intersection, point of interest, favorite location, or a recent location.
Set up Stopovers along the route.
Indicate areas to avoid along the route.
The calculated route for a destination displays in blue on the map. If you miss a turn in the
route, Navigation System recalculates the route and briefly displays “Recalculating Route”
on the map display.
Before Using the System:
Clock and time settings are accurate by tapping Start >Settings >System>Clock.
Bluetooth GPS Device is on by tapping the Bluetooth icon at the bottom of the Start
screen.
Entering a Start Location
The Navigation System defaults to the current location as the starting point for route calculation, as
specified by the GPS signal. You can enter a start location if you are not connected to a GPS
receiver, do not have a GPS signal, or want another point of origin.
To enter a start location, do one of the following:
Tap and hold the pointer on the map location. A pop up menu with the selected address displays.
Tap the Set Start Location option on the pop up menu.
You can pan the map to the location by moving the map with the pointer.
Tap the Menu button > Destinations icon. Enter the destination information. For more informa-
tion, refer to the Entering a Destination section.
User’s Guide 4-1
Page 44

Entering a Destination
To enter a destination, do one of the following:
Tap the Menu button > Destinations icon.
Tap and hold the pointer on the map location. When a dialog box with the location address dis-
plays, tap the Set Destination option.
The Set Destination screen with options displays.
Entering a Destination
User’s Guide 4-2
Page 45

Setting a Destination by Address
1. Tap Address on the Set Destination screen.
The Select Input Method screen displays.
Entering a Destination
Setting a Destination by Address
In the left top corner of the screen is the map region or area. If this is not correct, click on the
Change button to select the correct one.
2. Select an Input Method as follows:
Tap Street First to enter a street address, including the house number.
Tap City First to enter the city name and street address, including the house number.
A search by City First is faster than a search by Street First.
When you enter a street or city, dialog boxes similar to the following display:
User’s Guide 4-3
Page 46

Entering a Destination
Setting a Destination by Address
.
At the top of the screen is a list of valid entries (cities, streets, or house numbers). When you
enter an address, do not enter the street type, such as Ave or St.
3. Select an entry, as follows:
Scroll through the list by using the scroll keys at the right of the list .
Tap in characters using the keypad at the bottom of the screen.
4. Tap on the OK button after each entry.
As you tap in characters, the system updates and displays the Select Address List.
User’s Guide 4-4
Page 47

5. To select an entry, tap on it in the Select Address List.
Entering a Destination
Setting a Destination by Address
You can use the Up and Down arrows at the bottom of the screen to move through the list of
addresses.
6. Tap on one of the following buttons at the bottom of the screen:
Nav to calculate the route and center in on the map location.
Fav to add this location to your list of favorit e locatio ns.
Map to set this location as the starting route point for your destination.
User’s Guide 4-5
Page 48

Setting a Destination by Intersection
1. Tap Intersection on the Set Destination screen.
The Select Input Method screen displays.
2. Select an Input Method as follows:
Tap Street First to enter the names of two intersecting streets.
Tap City First to enter the city name and two intersecting streets.
When entering an address, do not enter the street type, such as ave or st.
User’s Guide 4-6
Page 49

Entering a Destination
Setting a Destination by Intersection
When you enter a street or city, dialog boxes similar to the following display:
For an intersection, there are two address dialog boxes for the two intersecting streets.
3. To select an entry, do one of the following:
Scroll through the list using the scroll keys at the right of the list.
Tap in the characters using the keypad at the bottom of the screen.
4. Tap on the OK button after each entry .
As you tap in characters, the system updates and displays the Select Address List.
User’s Guide 4-7
Page 50

5. To select an entry, tap on it in the Select Address List.
Entering a Destination
Setting a Destination by Intersection
6. Tap on one of the following buttons at the bottom of the screen:
Nav to calculate the route and center in on the map location.
Fav to add this location to your list of favorit e locatio ns.
Map to set this location as the starting route point for your destination.
User’s Guide 4-8
Page 51

Setting a Destination by Point of Interest
The map database contains over one million points of interest (POIs) within the U.S. and Canada.
POIS are divided into categories and represented by icons on the map.
To select a POI:
1. Tap Points of Interest on the Set Destination screen.
The Select Input Method screen displays.
Entering a Destination
Setting a Destination by Point of Interest
You can turn on or off the display of POI icons on the map through the Display options on
the Tools menu. You can navigate to a POI even if it is not displayed on the map.
2. Tap on a Points of Interest category.
3. Tap on the OK button.
User’s Guide 4-9
Page 52

The Points of Interest Options is displayed.
Entering a Destination
Setting a Destination by Point of Interest
At the bottom of the screen is the map region or area. If this is not correct, click on the
Change button to select the correct one.
4. Do one of the following:
Select a POI alphabetically, within a 25 mile radius. For more information, refer to the
Selecting a POI Alphabetically section.
Select a POI by distance, within a 25 mile radius. For more information refer to the Select-
ing a POI By Distance section.
Select a POI By City.For more information, refer to the Selecting a POI By City section.
User’s Guide 4-10
Page 53

Selecting a POI Alphabetically
1. Tap Alphabetically on the Points of Interest Options screen.
The Enter POI Name screen displays.
Entering a Destination
Setting a Destination by Point of Interest
2. Select an entry, as follows:
Scroll through the list by using the scroll keys at the right of the list.
Tap in characters using the keypad on the screen.
3. Tap on the OK button.
The POI Select screen displays.
4. Tap on one of the following buttons at the bottom of the screen:
Nav to calculate the route and center in on the map location.
Fav to add this location to your list of favorit e locatio ns.
Map to set this location as the starting route point for your destin at ion.
User’s Guide 4-11
Page 54

Selecting a POI By Distance
1. Tap By Distance on the Points of Interest Options screen.
A POI List with the points of interest within a 25 mile radius displays.
.
Entering a Destination
Setting a Destination by Point of Interest
Select an entry by scrolling through the list and tapping on it.
2. Tap on one of the following buttons at the bottom of the screen:
Nav to calculate the route and center in on the map location.
Fav to add this location to your list of favorit e locatio ns.
Map to set this location as the starting route point for your destin at ion.
User’s Guide 4-12
Page 55

Selecting a POI By City
1. Tap By City on the Points of Interest Options screen.
The Enter City Name screen displays.
Entering a Destination
Setting a Destination by Point of Interest
2. Select a city, as follows:
Scroll through the list using the scroll keys at the right of the list.
Tap in characters using the keypad at the bottom of the screen.
3. Tap on the OK button.
The Enter POI Name screen displays.
User’s Guide 4-13
Page 56

Setting a Destination by Point of Interest
4. Select a POI as follows:
Scroll through the list by using the scroll keys at the right of the list.
Tap in characters using the keypad at the bottom of the screen.
5. Tap on the OK button.
The POI Select screen displays.
Entering a Destination
6. Tap on one of the following buttons at the bottom of the screen:
Nav to calculate the route and center in on the map location.
Fav to add this location to your list of favorit e locatio ns.
Map to set this location as the starting route point for your destin at ion.
User’s Guide 4-14
Page 57

Setting a Destination From the Contacts List
Setting a Destination From the Contacts List
1. Tap Contacts on the Set Destination screen.
The Enter Contact Name screen displays.
Entering a Destination
The name must appear in the Contact List on your iPAQ PocketPC. The contact information
must be accurate and in the correct format for Navigation System to make a match.
2. Select a contact name, as follows:
Scroll through the list using the scroll keys at the right of the list.
Tap in the characters using the keypad at the bottom of the screen.
Since Navigation System enters the contact names alphabetically by last name, you should
enter the last name, or first character of the last name when searching for a contact.
3. Tap on the OK button.
User’s Guide 4-15
Page 58

The Select Address screen displays.
Entering a Destination
Setting a Destination From the Contacts List
This screen contains the contact’s home address, business address and/or any additional
address entered.
4. Tap the address.
Navigation System sets the selected contact location as the destination and calculates the
route.
User’s Guide 4-16
Page 59

Setting a Destination From the Favorites Location List
Setting a Destination From the Favorites Location List
1. Tap Favorites on the Set Destination screen.
The Favorite Destination screen displays.
Entering a Destination
This screen lists all locations that you saved as favorites. You can use the up and down arrows
at the bottom of the screen to move through the list.
You can also tap on the map location and tap Save This Location from the pop up menu.
2. Tap on one of the following buttons at the bottom of the screen:
Nav to calculate the route and center in on the map location.
Map to set this location as the starting route point for your destin at ion.
To change information for a favorite location, tap the Edit button. Or, tap the Del button to
remove a location from your Favorite Destinations list.
User’s Guide 4-17
Page 60

Setting a Destination from the Recent Destinations List
Setting a Destination from the Recent Destinations List
1. Tap Recent on the Set destinations screen.
The Recent Destinations screen displays.
Entering a Destination
This screen lists all of your recent destinations. You can use the up and down arrows at the
bottom of the screen to move through the list.
2. Tap on one of the following buttons at the bottom of the screen:
Nav to calculate the route and center in on the map location.
Map to set this location as the starting route point for your destin at ion.
To change information for a recent location, tap the Edit button. Or, tap the Del button to
remove a location from your Recent Destinations list.
User’s Guide 4-18
Page 61

Setting a Destination from the Recent Destinations List
Managing the Destination and Route
After you enter a destination, Navigation System calculates the route. To manage your destination
and route, do one of the following:
Tap on the Menu button > Destinations icon.
Tap File > Destinations.
The Destination Options screen displays.
.
Managing the Destination and Route
Tap on one of the following buttons:
Deto ur to enter roads to avoid along the route. For more information, refer to the Entering
Detours section.
Stopover to enter places to stop along the route. For more information, refer to the Entering
Stopovers section.
Clear Dest to clear the current destination and enter a new destination. For more information,
refer to the Clearing a Destination section.
New to clear the current destination and enter a new destination. For more information, refer to
the Entering a Destination section.
Back to display the map view.
User’s Guide 4-19
Page 62

Entering a Detour
After your route is calculated, you can enter a section to avoid on the route. Navigation System
recalculates the route to exclude the detour area.
A warning displays if there is no detour for the current route.
1. Tap the Detour button at the bottom of the screen.
The Avoid Roads list displays.
Managing the Destination and Route
Entering a Detour
2. Tap the road to avoid.
3. Tap on the Avd button.
User’s Guide 4-20
Page 63

Managing the Destination and Route
A red x displays in the column to the left of the selected road.
Entering a Detour
4. Repeat steps 1-3 for each road to avoid.
5. Tap on the Nav button to recalculate the route.
To cancel a selection, tap on it and tap the Clr button.To cancel all selections, tap the Rst
button.
User’s Guide 4-21
Page 64

Entering Stopovers
A stopover is an intermediate location on your route. This feature guides you to the intermediate
location and then continues to the destination.
To enter a stopover:
1. Tap the Stopover Button on the Destination Options screen.
The Set Stopover screen displays.
Managing the Destination and Route
Entering Stopovers
You can also tap on the map location and tap Set Stopover from the pop up menu.
2. Tap on a Stopover Category.
3. Enter the Stopover information.
Refer to the Entering a Destination section for the steps to enter informati on for a specific
category.
Clearing a Selected Destination
To cancel a selected destination, do one of the following:
1. Tap on the Menu button > Destinations option.
2. Tap on the Clear Dest button on the Destination Options screen.
The screen displays in Map View mode.
User’s Guide 4-22
Page 65

Navigating the Vehicle
After you have entered a destination and selected the Nav option, Navigation System quickly calculates a route based on your preferences and guides you to your destination. The guidance includes:
A map that automatically scrolls as the vehicle moves.
Voice instructions for each maneuver.
A list of route instructi ons.
Map View is the default for guidance. Depending on the preferences you select, the view automatically changes to Guidance View as you approach a maneuver.
Using Day vs. Night Display
The Navigation System can display the map or guidance view in one of the following modes:
Day Mode to set the screen color for daylight driving conditions.
Navigating the Vehicle
Using Day vs. Night Display
User’s Guide 4-23
Page 66

Night Mode to set the screen color for nighttime driving conditions.
Navigating the Vehicle
Using Day vs. Night Display
If you have a GPS signal, Navigation System automatically switches between views at the
appropriate time of day.
You can set your preferences through the Color Scheme option on the Display Options
menu.
User’s Guide 4-24
Page 67

Viewing the Route List
You can view the route instructions for your destination at anytime. To view route instructions, do
one of the following:
Tap the View menu > Route List.
Tap the mane uver location at the top of the map.
The Route List displays.
Navigating the Vehicle
Viewing the Route List
You can return to Map View by tapping on the red x at the bottom of the screen. You can
also center on a specific section of the map by scrolling through the list, tapping on the location, and tapping on the map. The map displays in map panning mode.
User’s Guide 4-25
Page 68

Software Technical Support
General Definition
Software technical support may be available for the software provided with your iPAQ Navigation
System. For more information, please review the warranty statement included on Disk 1 of the
iPAQ Navigation System CD set.
Information may also be found online at www.hp.com/go/ipaqnavigatio n.
Obtaining Support
In the United States and Canada, call the HP iPAQ Navigation System Technical Phone Support
Center at 1.866.4HP.NAV1 (1-866-447-6281). This number is available 8am-8pm Eastern Standard Time.
To obtain assistance outside these hours, please visit www.hp.com/go/ipaqnavigation.
Performing a Soft Reset
For many problems associated with the iPAQ Navigation System, the resolution will be to perform
a Soft Reset. This is a standard procedure that will not harm the data or settings stored on your
Navigation System or your iPAQ PocketPC.
General Definition
Performing a soft reset will vary by device, and for full instructions please consult your relevant
iPAQ User’s Guide.
User’s Guide 5-1
Page 69

Troubleshooting
Troubleshooting
Problem Solution
I cannot get a GPS signal Ensure your GPS receiver is switched on and fully charged up.
Take your GPS receiver outside so you have a clear view of the
sky.
Allow 5-10 minutes to receive a GPS signal. If GPS receiver has a
valid signal, the green LED flashes.
I cannot connect my GPS
receiver to my PocketPC
I cannot install the maps Ensure your iPAQ PocketPC is connected via Microsoft Active-
Check your GPS receiver and your iPAQ PocketPC are within 5-
10 yards apart.
Check the Bluetooth Radio on your iPAQ PocketPC is switched on
by tapping the Bluetooth icon at the bottom right side of the Start
screen.
Check your GPS receiver is switched on and charged.
Switch on the power switch; if the GPS receiver is not charged up
the power LED is red.
Switch on Navigation system. The GPS receiver should automati-
cally connect with the iPAQ PocketPC. If this does not happen,
follow the instructions in the User’s Guide to connect the GPS
receiver with the iPAQ PocketPC.
sync with your Desktop.
Ensure Navigation System is installed on the iPAQ PocketPC.
(There should be an icon in the Start> Programs menu).
Perform a soft reset on your iPAQ PocketPC before trying to
install any maps. (Refer to your iPAQ PocketPC User’s Guide for
details. All data and settings are retained).
Ensure Navigation System is closed. From the Start menu select
Settings > System > Memory >Running Programs > iPAQ Nav
System > Stop.
Verify there is sufficient memory in your selected target location.
Verify the correct CD-Rom is inserted in your CD drive
My GPS receiver has asked me
for a passkey to connect
I cannot find a location Check the address is entered correctly.
User’s Guide 6-1
The GPS receiver has a default passkey of 2003.
The Bluetooth Manager may be set to require a passkey.
Tap on the Bluetooth icon > Bluetooth Settings.
Tap the right arrow key at the bottom of the screen to the Serial
Port tab.
Ensure the Authentication (Passkey) required check box is
unchecked.
Check the appropriate map for the address is loaded.
Sometimes an address is not stored in the database. Navigation
Technologies is always updating the map content. To provide feedback and add a new address complete a Feedback Form on
www.hp.com/go/ipaqnavigation
Page 70

Problem Solution
Troubleshooting
I cannot hear the guidance
instructions
Check the volume is not muted. From the map view click the
Speaker icon in the menu bar at the bottom of the map.
From Tools select Guidance Volume. Increase the volume, as
required.
My map is stuck in map panning mode
To exit Map Panning Mode tap on the red circle with a white x at
the bottom right hand side of the screen.
I cannot load an additional map Before installing additional maps, verify Navigation System is not
running. From the Start menu, tap Settings >System > Memory.
From the Running Programs, tap iPAQ Nav System > Stop.
Verify there is sufficient memory available on your PocketPC or
selected storage card.
There is not enough memory to
install my map
Remove programs from your PocketPC main memory to make
space available
Select a smaller map to install. Install maps by City rather than by
Region (state).
Install an additional SD or CF card in the expansion slot.
How do I know my GPS
receiver is working
Verify the GPS receiver has a flashing blue light.(Bluetooth radio
is switched on.)
Verify the GPS receiver has a green light. A solid light indicates
there is no valid GPS signal; a flashing light indicates there is a
valid GPS signal.
From the Navigation System Main Menu select GPS info. The
number of satellites delivering a signal to the GPS receiver displays.
I cannot find the POI I am looking for on the map
I cannot switch on my device
The application has frozen my
device
The display mode on my device
is incorrect for the time of day.
Verify the POI icons are enabled. From the Tools menu select Dis-
play options. Turn on POI icons by tapping the appropriate box.
POI icons only display when the map is zoomed in to the four
closest zoom levels (1,000 ft or closer).
Some POIs are hidden on the map by other POI icons.
To display POIs, tap the Main button > Destinations > Points of
Interest. Tap on the POI > Map to center the map on the POI.
Verify the PocketPC is charged. Connect the PocketPC to a
charger.
A soft reset is often necessary for the device to switch on. (Refer to
your iPAQ PocketPC User’s Guide for details. All data and settings
are retained).
Perform a soft reset. See your iPAQ PocketPC User’s Guide for
instructions. (All data and settings are retained.)
From the Tools menu select Display Options. Switch Color to the
appropriate display mode (Day or Night mode).
If the mode is set to Auto, verify the PocketPC clock is set correctly.
User’s Guide 6-2
Page 71

Appendix
Regulatory Notices
Federal Communications Commission
Notice
This equipment has been tested and found to comply with the limits for a Class B digital device,
pursuant to Part 15 of the FCC Rules. These limits are designed to prov ide reasonable protection
against harmful interference in a residential installation. This equipment generates, uses, and can
radiate radio frequency energy and, if not installed and used in accordance with the instructions,
may cause harmful interference to radio communications. However, there is no guarantee that interference will not occur in a particular installation. If this equipment does cause harmful interference
to radio or television reception, which can be determined by turning the equipment off and on, the
user is encouraged to try to correct the interference by one or more of the following measures:
Reorient or relocate the receiving antenna
Increase the separation between the equipment and receiver
Connect
is connected
Consult the dealer or an experienced radio or television technician for help
the equipment into an outlet on a circuit different from that to which the receiver
Regulatory Notices
Modifications
The FCC requires the user to be notified that any changes or modifications made to this device that
are not expressly approved by Hewlett-Packard Company may void the authority to operate the
equipment.
Cables
Connections to this device must be made with shielded cables with metallic RFI/EMI connector
hoods in order to maintain compliance with FCC Rules and Regulations.
Declaration of Conformity for products marked with the FCC logo United States only
This device complies with Part 15 of the FCC Rules. Operation is subject to the following two conditions: (1) this device may not cause harmful interference, and (2) this device must accept any
interference received, including interference that may cause undesired operation.
For questions regarding your product, contact:
Hewlett-Packard Company
P. O. Box 692000, Mail Stop 530113
Houston, Texas 77269-2000
Or, call 1-800-652-6672
For questions regarding this FCC declaration, contact:
Hewlett-Packard Company
P. O. Box 692000, Mail Stop 510101
Houston, Texas 77269-2000
Or, call (281) 514-3333
User’s Guide A-1
Page 72

Canadian Notice
To identify this product, refer to the Part, Series, or Model number found on the product.
Canadian Notice
This Class B digital apparatus meets all requirements of the Canadian Interference-Causing Equipment Regulations.
Avis Canadien
Cet appareil numérique de la classe B respecte toutes les exigences du Règlement sur le matériel
brouilleur du Canada.
Battery Warning.
WARNING: This computer contains a lithium ion rechargeablebattery pack. To reduce the risk of fire or
burns, do not disassemble, crush, puncture, short externalcontacts, or dispose of in fire or water.
Equipment Warning
WARNING: To reduce the risk of personal injury, electrical shock, fire or damage to the equipment:
Plug the AC adapter into a grounded (earthed) electrical outlet that is easily accessible at all
times.
Disconnect power from the equipment by unplugging the AC adapter from the electrical outlet or
unplugging the
Do not place anything on the AC adapter cord or any of the other cables. Arrange them so that no one may
accidentally step
Do not pull on a cord or cable. When unplugging from the electrical outlet, grasp the cord by the plug
or, in the case of theAC adapter, grasp the AC adapter and pull out from the electrical
Synchronization cable from the host computer.
on or trip over them.
outlet.
Airline Travel Notice
Use of electronic equipment aboard commercial aircraft is at the discretion of the airline.
Wireless Notices
In some situations or environments, the use of wireless devices may be restricted. Such restrictions
may apply aboard airplanes, in hospitals, near explosives, in hazardous locations, etc. If you are
uncertain of the policy that applies to the use of this device, please ask for authorization to use it
prior to turning it on.
U.S. Regulatory Wireless Notice
This products emits radio frequency energy, but the radiated output power of this device is far
below the FCC radio frequency exposure limits. Nevertheless, the device should be used in such a
manner that the potential for human contact with the antenna during normal operation is minimized.
Canadian Regulatory Wireless Notice
Operation is subject to the following two conditions: (1) this device may not cause interference, and
(2) this device must accept any interference, including interference that may cause undesired operation of the device.The term “IC” before the certification/registration numberonly signifies that the
Industry Canada technical specifications were met.
User’s Guide A-2
Page 73

Specifications
System Specifications
Electrical Characteristics (Receiver)
Accuracy
Position Horizontal 15m 2D RMS (SA off)
WAAS enabled 10m 2D RMS (SA off)
Time 1 micro-second synchronized to GPS time
Velocity 0.1m/sec 95% (SA off)
Datum
Datum WGS-84
Specifications
System Specifications
Frequency L1, 1575.42 MHz
C/A Code 1.023 MHz chip rate
Channels 12
Sensitivity -170 dBW
Acquisition Rate
Hot start 8 sec., average (with ephemeris and almanac valid)
Warm start 38 sec., average (with almanac but not ephemeris)
Cold start 45 sec., average (neither almanac nor ephemeris)
Reacquisition 0.1 sec., average (interruption recovery time)
Protocol
GPS Output Data NMEA 0183 protocol, and supports command:
GGA, GSA, GSV, RMC, VTG, GLL (VTG and GLL
are optional.
GPS transfer rate 38400, N,8,1
Dynamic Condition
Acceleration Limit Less than 4g
Altitude Limit 18,000 meters (60,000 feet) max.
Velocity Limit 515 meters/sec. (1,000 knots) max.
Jerk Limit 20 m/sec**3
External antenna
Power 3.3V
Connector MMCX
Power
Voltage Built-in rechargeable battery (900 mAh) and 5V DC
input charging circuit.
Operation Time 8 hr. After fully recharged, in continuous mode
> 10 hr in trickle power mode
User’s Guide A-3
Page 74

Physical Characteristics
Dimension 85 mm x 47mm x 26mm
Weight 98g
Temperature
Operating -20° ~ 70°C
Storage -30° ~ 80°C
Humidity Up to 90% non-condensing
Bluetooth Specification
• Bluetooth V1.1 Compliant
• Supply Voltage: 2.8-3.3V
• Frequency Range: 2.402 2.480GHz
• Receiver Sensitivity: -80dBm
• transmit Power: Class 2
• Transmitting Range: 5~10m (typical)
• Power Consum ption: 45 mA (typical)
Specifications
Bluetooth Specification
User’s Guide A-4
Page 75

Index
B
Bluetooth GPS
connection
establish 2-3, 2-5
status 2-8
features 2-1
manually partnering 2-3, 2-5
setting up 2-2
C
carpool lanes 3-15
D
day mode 4-23
destination
clear 4-22
enter 4-2
set
by address 4-2
by intersection 4-6
by point of interest 4-9
set from
favorite locations 4-17
contacts 4-15
recent destinations 4-18
detour
enter 20
downloading
additional maps 1-6
by city 1-5
by region 1-4
F
file menu 3-6
foggy weather 3-16
G
guidance view 3-13
downloading 1-4
map view 3-10
modes 3-11
menu
file 3-6
main 3-5
pop up 3-9
tools 3-7
view 3-8
N
Navigation System
closing 1-7
loading 1-3
night mode 4-24
P
panning 3-3
partnering
manually 2-3, 2-5
POI
select
alphabetically 4-11
by city 4-13
by distance 4-12
pop up menu 3-9
Q
quickest route 3-15
R
road type 3-15
route
instructions 4-25
options 3-15
record 3-18
replay 3-19
M
main menu 3-5
map
day display 4-23
night display 4-24
User’s Guide Index-1
S
safety options 3-16
satellite signals 2-9
screen color 4-23
set
route options 3-15
safety options 3-16
Page 76

voice guidance 3-14
setting options 3-10
shortest route 3-15
speed limits 3-16
start location 4-1
stopover 4-22
system requirements
T
technical support 5-1
toll roads 3-15
tools menu 3-7
troubleshooting 6-1
V
view
guidance 3-13
map 3-10
view menu 3-8
voice guidance 3-14
Z
zooming 3-3
1-2
User’s Guide Index-2
 Loading...