

Page 1

HP Integrity Support Pack
and Deployment Utilities
User Guide
May 2004 (First Edition)
Part Number 371826-001
Page 2

© Copyright 2004 Hewlett-Packard Development Company, L.P.
Confidential computer software. Valid license from HP required for possession, use or copying. Consistent with
FAR 12.211 and 12.212, Commercial Computer Software, Computer Software Documentation, and Technical
Data for Commercial Items are licensed to the U.S. Government under vendor’s standard commercial license.
The information contained herein is subject to change without notice. The only warranties for HP products and
services are set forth in the express warranty statements accompanying such products and services. Nothing
herein should be construed as constituting an additional warranty. HP shall not be liable for technical or editorial
errors or omissions contained herein.
Microsoft®, MS Windows®, Windows®, and Windows NT® are U.S. registered marks of Microsoft Corporation.
Intel®, Pentium®, Intel Inside®, and the Intel Inside logo are trademarks or registered trademarks of Intel
Corporation or its subsidiaries in the United States and other countries. UNIX® is a trademark of The Open
Group.
Printed in the U.S.A.
HP Integrity Support Pack and Deployment Utilities User Guide
May 2004 (First Edition)
Part Number 371826-001
Page 3

Contents
About This Guide
Audience Assumptions..................................................................................................................................v
Where to Go for Additional Help..................................................................................................................v
Reference Documentation.......................................................................................................................v
Operating System Information................................................................................................................v
Telephone Numbers................................................................................................................................v
Chapter 1
Introduction
ISP Deployment Scenarios........................................................................................................................ 1-1
Benefits of the ISP Deployment Utilities .................................................................................................. 1-2
Obtaining the ISP Deployment Utilities.................................................................................................... 1-3
HP Website ......................................................................................................................................... 1-3
HP CD Media...................................................................................................................................... 1-3
Updating the ISP Deployment Utilities..................................................................................................... 1-3
HP Subscriber’s Choice ...................................................................................................................... 1-3
Version Control................................................................................................................................... 1-3
Creating a Centralized, Network-Based Software Repository .................................................................. 1-4
Chapter 2
Deploying Integrity Support Packs in Microsoft Windows
Overview ................................................................................................................................................... 2-1
Minimum Requirements for Windows Servers .................................................................................. 2-2
Remote Deployment Utility for Microsoft Windows................................................................................ 2-3
Main Window ..................................................................................................................................... 2-4
Menu Bar ............................................................................................................................................ 2-5
Repository Toolbar ............................................................................................................................. 2-5
Target Machine Toolbar ..................................................................................................................... 2-6
Support Pack Selected for Installation Toolbar ..................................................................................2-6
Repository View Tree......................................................................................................................... 2-7
Target Computer List.......................................................................................................................... 2-8
Revision History and Properties ......................................................................................................... 2-9
Component Preconfiguration............................................................................................................ 2-10
Deploying Components or ISPs........................................................................................................ 2-13
Installation Results............................................................................................................................ 2-14
Remote Deployment Console Utility for Microsoft Windows................................................................ 2-17
Command Line Syntax ..................................................................................................................... 2-17
Command Line Arguments............................................................................................................... 2-18
Command Line Examples................................................................................................................. 2-20
HP Integrity Support Pack and Deployment Utilities User Guide iii
Page 4

Contents
Installing Single Components..................................................................................................................2-21
Command Line Syntax......................................................................................................................2-22
Command Line Arguments ...............................................................................................................2-22
Command Line Examples .................................................................................................................2-23
Return Codes .....................................................................................................................................2-23
Deployment Utilities Usage Scenarios for Windows-Based Systems .....................................................2-24
Scenario 1: Graphical Deployment on a Single-Target System Using the RDU ..............................2-26
Scenario 2: Command Line Deployment on a Single-Target System Using the
Remote Deployment Console Utility ................................................................................................2-31
Scenario 3: Command Line Deployment on Multiple-Target Systems Using the
Remote Deployment Console Utility ................................................................................................2-33
Scenario 4: Command Line Deployment on Multiple-Target Systems Managed by HP Systems
Insight Manager.................................................................................................................................2-35
Index
iv HP Integrity Support Pack and Deployment Utilities User Guide
Page 5

This user guide is designed as a reference for implementing and using the Integrity Support
Pack (ISP) deployment utilities for Microsoft® Windows Server 2003 64-bit server
environments.
Audience Assumptions
Because of the potential risk of data loss, the ISP deployment utilities should be used
only by individuals who are experienced and knowledgeable in the use of such utilities.
Where to Go for Additional Help
In addition to this guide, the following information sources are available:
Reference Documentation
About This Guide
For information about HP Subscriber’s Choice, refer to:
http://www.hp.com/go/subscriberschoice.
For information about the Integrity Essentials Rapid Deployment Pack, refer to:
http://www.hp.com/servers/rdp.
NOTE: The HP Integrity Support pack and its components are derived from the ProLiant Support pack
model. Therefore, even though some of the website addresses and Figures shown in this document
refer specifically to ProLiant components, they apply to Integrity components as well.
Operating System Information
For information about Microsoft Windows operating systems, refer to:
http://www.microsoft.com.
Telephone Numbers
For the name of your nearest HP authorized reseller:
• In the United States, call 1-800-345-1518.
• In Canada, call 1-800-263-5868.
HP Integrity Support Pack and Deployment Utilities User Guide v
Page 6

About This Guide
For HP technical support:
• In the United States and Canada, call 1-800-652-6672.
• Outside the United States and Canada, refer to: http://www.hp.com.
vi HP Integrity Support Pack and Deployment Utilities User Guide
Page 7

Each ISP consists of a deployment utility and setup and software maintenance tools designed
to provide an efficient way to manage routine software maintenance tasks. These tools
include ISP deployment utilities for Microsoft Windows Server 2003 64-bit server
environments.
ISPs and the ISP deployment utilities integrate with other software maintenance,
deployment, and operating system tools, providing the information and flexibility
needed to efficiently install, upgrade, and manage system software and reduce server
maintenance costs.
ISP Deployment Scenarios
The ISP deployment scenarios discussed in this guide are summarized as follows:
• Graphical deployment on a single-target system using the Remote Deployment Utility
1
Introduction
• Command line deployment on a single-target system using the Remote Deployment
Console Utility
• Command line deployment on multiple-target systems using the Remote Deployment
Console Utility
• Command line deployment on multiple-target systems managed by HP Systems Insight
Manager
This guide also describes additional functionality of the ISP deployment utilities and
individual support software components, including several deployment script file examples
that can be modified to fit specific Windows Server 2003 64-bit server environments.
NOTE: If you install an ISP and then install an operating system Service Pack, a Support Pack, or
other operating system updates, HP recommends reinstalling the ISP.
HP Integrity Support Pack and Deployment Utilities User Guide 1-1
Page 8

Introduction
Benefits of the ISP Deployment Utilities
The improved software features of the ISP deployment utilities make software
maintenance easier by:
• Increasing server manageability
• Enabling administrators to update systems remotely
• Reducing server maintenance costs
• Saving time
The ISP deployment utilities provide the following software maintenance benefits to system
administrators:
• Self-installable components with easy-to-understand software update descriptions
• Components that can be installed individually or as part of a Support Pack
• Installation logic and version control that automatically checks for hardware, software,
firmware, and operating system dependencies, installing only the correct software
updates and latest drivers for optimal system configuration
• Silent command line options and return codes that enable scripting and enhanced
integration of the ISP deployment utilities with HP Systems Insight Manager.
• Integration with preconfigured server script files as part of the Rapid Deployment Pack
• Common log files that provide easy access to a consolidated view of software installation
history on target servers
• Content in ready-to-run native operating system file formats that save time by installing
directly from a CD or shared network drive
By following the procedures described in this guide, the scalability of the
ISP deployment utilities is enhanced to support high-volume maintenance and
deployment of software upgrades.
CAUTION: The ISP deployment utilities, ISPs, and individual components should be used
only by individuals who are experienced and knowledgeable in the use of such software
components. Before using these utilities, ISPs, and components to deploy a server or
maintain software components, be sure to make a backup of the data on the target server and
take all other necessary precautions so that mission-critical systems are not disrupted if a
failure occurs.
1-2 HP Integrity Support Pack and Deployment Utilities User Guide
Page 9

Obtaining the ISP Deployment Utilities
You can obtain the ISP deployment utilities from the HP website or HP CD media.
HP Website
The latest ISP deployment utilities, ISPs, and individual components for supported Microsoft
Windows operating systems are available at: http://www.hp.com/support/files.
HP CD Media
When Web access is not available or download speeds are too slow, ISP deployment utilities,
ISPs, and individual components can also be obtained from:
• The Integrity Software Maintenance CD
• The Smart Setup CD 3.xx or later for Windows
Updating the ISP Deployment Utilities
Introduction
HP Subscriber’s Choice and HP version control tools can help you be sure that you have the
most current ISP deployment utilities, ISPs, and individual components.
HP Subscriber’s Choice
Keep actively informed of new releases of Smart Setup and other Foundation Pack software
with email alerts from Subscriber’s Choice. Subscriber's Choice uses a secure website to
proactively communicate product changes and Customer Advisories through e-mail to
registered customers based on a customer-provided profile. Register for this free service at:
www.hp.com/go/subscriberschoice.
Version Control
The Version Control Repository Manager and Version Control Agent are Web-enabled
Insight Management Agents. HP Systems Insight Manager uses these Insight Management
Agents to facilitate software update tasks. The Version Control Agent can be configured to
point to a repository being managed by the Version Control Repository Manager, allowing
easy version comparison and software update. For more information about version control
tools, refer to:
• The HP Systems Insight Manager Help Guide at:
http://h18013.www1.hp.com/products/servers/management/hpsim/infolibrary.html
HP Integrity Support Pack and Deployment Utilities User Guide 1-3
Page 10
Introduction
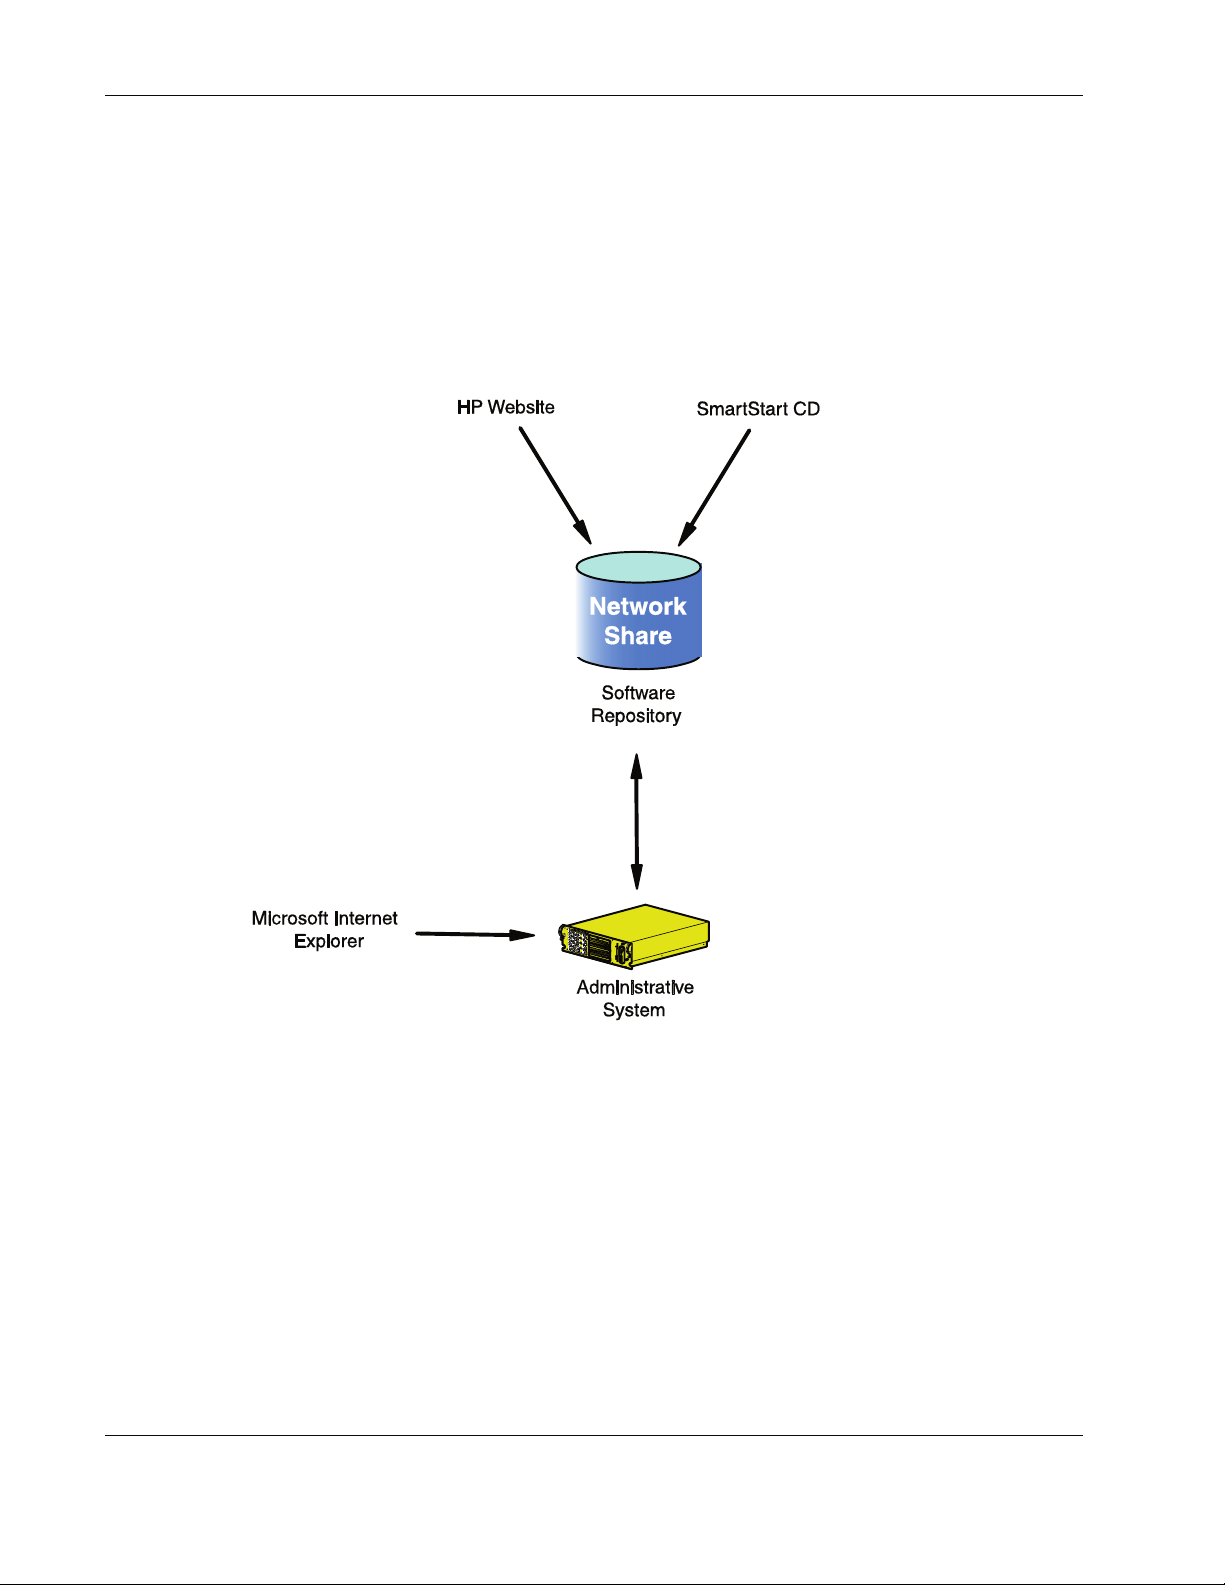
Creating a Centralized, Network-Based Software Repository
The practice of deploying ISPs and individual components from a centralized, networkbased software repository saves time and standardizes software maintenance and
deployment procedures.
For maximum flexibility across operating system platforms, the software repository
must be on a Windows shared network drive. The repository can be updated in any of
the ways shown in Figure 1-1.
Figure 1-1: Sources for updating the network-based software repository
1-4 HP Integrity Support Pack and Deployment Utilities User Guide
Page 11

2
Deploying Integrity Support Packs in Microsoft Windows
This chapter discusses how to use ISPs for Microsoft Windows. HP provides the following
tools for configuring components and deploying ISPs for Windows:
• Remote Deployment Utility for Microsoft Windows
• Remote Deployment Console Utility for Microsoft Windows
Several usage scenarios are provided as examples at the end of this chapter.
Overview
ISPs are operating system-specific bundles of HP server support software. Each ISP includes
multiple self-installable components known as Smart Components (optimized drivers,
management agents, and utilities). This ISP design improves and simplifies operating system
integration, flexibility, and system configuration.
HP recommends the following procedure when working with ISPs:
1. Obtain the ISP, and place it on a software repository or other medium.
IMPORTANT: HP recommends that the ISP files are present on a non-read-only medium so that
the various Smart Components in the ISP can be configured before deployment. For example, the
Support Packs and components cannot be configured when they are on a CD-ROM.
2. Be sure the Smart Components do not have the read-only attributes set.
IMPORTANT: When a Smart Component is copied from the Smart Setup or Software
Maintenance CD, the read-only attribute is set by default. Use Microsoft Windows Explorer or the
attrib command to remove the read-only attributes of Smart Components copied from a Smart
Setup or Software Maintenance CD.
3. Configure the components using the configuration functionality in the Remote
Deployment Utility for Windows.
NOTE: Components must be configured only once. The configuration information is stored inside
each Smart Component so that it is available when the component is installed. You do not need to
configure components each time they are deployed. However, configuration is independent of the
target computer you select. If you change the configuration of a component after deployment, you
must redeploy the component.
HP Integrity Support Pack and Deployment Utilities User Guide 2-1
Page 12

Deploying Integrity Support Packs in Microsoft Windows
4. Deploy the ISP, using a deployment tool such as the Remote Deployment Utility for
Windows or the Remote Deployment Console Utility for Windows.
NOTE: Smart Components can also be installed individually. For more information, refer to the
“Installing Single Components” section in this chapter.
Minimum Requirements for Windows Servers
IMPORTANT: Before deploying software updates on a target system, be sure that a recent backup of
the target system is available in the event the deployment procedure fails.
For successful component deployments on Windows-based target systems, the following
minimum requirements must be met:
• A local administrative system with Windows Server 2003 must be available.
• One or more remote target servers running Windows Server 2003 in need of a software
upgrade must be available. If the local administrative system is the only server that must
be upgraded, remote target servers are not necessary.
• Sufficient hard drive space must be available on the target system. As a standard practice,
sufficient hard drive space equals at least twice the file size of the ISP or individual
components to be deployed.
• All remote target servers must be connected to the same network and use TCP/IP to
enable the systems to be seen from the administrative system.
• There must be an account with administrator privileges on each target server. It is
recommended that the user name and password for the administrator account on each
target server are the same as on the local administrative system. If administrator
privileges are not set up in this way, you must have the user name and password for
each remote server.
Alternatively, you can use a domain account on the local administrative system that has
administrator privileges on the target servers.
To run the Remote Deployment Utility, the local administrative system must be running:
• Microsoft Internet Explorer 5.5 or later
• Microsoft XML Parser 3.0 or later
NOTE: If you obtain the Support Pack from a Smart Setup CD, a Software Maintenance CD, or the
HP website, the appropriate version of the Microsoft XML Parser is stored in the msxml3.cab
file. The Remote Deployment Utility automatically installs the parser if it is not currently present on
your system. A supported version of the Microsoft XML Parser is also available as part of Internet
Explorer 6.0.
2-2 HP Integrity Support Pack and Deployment Utilities User Guide
Page 13

Deploying Integrity Support Packs in Microsoft Windows
Remote Deployment Utility for Microsoft Windows
HP has developed the Remote Deployment Utility (RDU) for Windows as a graphical
application that provides enhanced ISP deployment capabilities. Using a point-and-click
interface, the utility enables you to deploy and maintain ISPs and Smart Components on
a local server or remote server accessible over a network connection.
NOTE: The RDU is located with the rest of the Support Pack contents on the Integrity Software
Maintenance CD and in the \Contents\Supportpack subdirectory on the Smart Setup CD. The
executable file that launches the utility is SETUP.EXE.
In most instances, installing a Support Pack with the RDU is a simple three-step process:
1. Select a target machine in the Target Machine toolbar.
2. Select a Support Pack from the dropdown menu on the Support Pack Selected for
Installation toolbar.
3. Click Install on the Target Machine toolbar, and follow the instructions that appear.
IMPORTANT: Be sure that all components that require configuration are configured before
deploying them.
For more information on deploying components and Support Packs, refer to the following
sections.
HP Integrity Support Pack and Deployment Utilities User Guide 2-3
Page 14

Deploying Integrity Support Packs in Microsoft Windows
Main Window
When the RDU is launched, a main control window similar to Figure 2-1 appears.
Repository
View Tree
Computer List
Target
Figure 2-1: Remote Deployment Utility main control window
After startup, the RDU automatically selects the latest applicable Support Pack for the
operating system of the target computer if one exists in the repository.
NOTE: When selecting a new target computer, the RDU does not automatically select the latest
applicable Support Pack for the new target computer. The previous contents of the target computer list
are preserved.
2-4 HP Integrity Support Pack and Deployment Utilities User Guide
Page 15

Menu Bar
Deploying Integrity Support Packs in Microsoft Windows
The main window consists of the following elements:
• Menu bar
• Repository toolbar
• Target Machine toolbar
• Support Pack Selected for Installation toolbar
• Repository view tree
• Target computer list
The following sections describe each element of the main window in more detail.
The menu bar consists of the following menu items:
• The File menu item enables you to exit the RDU.
• The Repository menu item provides options for browsing to the software repository and
configuring and viewing details about ISPs and components.
• The Target menu item provides options for setting or rebooting the target machine and
installing components.
• The Help menu item provides access to help files about the RDU.
Repository Toolbar
The Repository toolbar contains the Repository field, which enables you to enter the path to
the software repository where the ISPs and other Smart Components are located.
NOTE: The Repository field defaults to the directory containing the RDU.
The toolbar also contains the following buttons.
Table 2-1: Repository Toolbar Buttons
Icon Description
Enables you to browse the network for the repository
Rescans the repository for any changes that might have occurred since the previous
scan and then repopulates the repository view tree
Configures the selected repository item
Displays the revision history for the selected repository item
Displays the properties of the selected repository item
HP Integrity Support Pack and Deployment Utilities User Guide 2-5
Page 16

Deploying Integrity Support Packs in Microsoft Windows
Target Machine Toolbar
The Target Machine toolbar contains the Target Machine field, which enables you to
enter the path to the target server on which the ISP and other Smart Components will be
deployed. The Target Machine field defaults to the name of the server that launches the RDU.
If you are deploying to a remote server, change the Target Machine field to the remote server
name.
The toolbar also contains the following buttons.
Table 2-2: Target Machine Toolbar Buttons
Icon Description
Enables you to browse the network for the target machine
Reboots the target machine
Displays the target installation log file
Deploys the selected components or ISPs on the target machine
Deletes selected components from the target computer list
Support Pack Selected for Installation Toolbar
The Support Pack Selected for Installation toolbar consists of a dropdown list that contains all
available ISPs in the current repository that are applicable to the target machine.
Selecting a Support Pack from the dropdown list clears the current contents of the target
computer list and populates the list with all components contained in that Support Pack.
2-6 HP Integrity Support Pack and Deployment Utilities User Guide
Page 17

Repository View Tree
The repository view tree is the pane on the left side of the main RDU window, as shown in
Figure 2-1.
The repository view tree displays a categorized view of all Support Packs and Smart
Components contained in the selected software repository. The Support Packs and
components are sorted, with the most recent version listed first. The tree has three levels:
• Operating system level—If the repository contains Support Packs or components for
multiple operating systems, the repository view tree shows a folder for each one. The
All Configurable Components folder, which contains all the components that require
or support configuration, is also at this level.
TIP: The folder for the operating system that is applicable to the target machine is in bold text.
The All Configurable Components folder is in bold text when it contains a component that requires
configuration.
• Category level—This level contains folders of Smart Components grouped by categories
(such as Network, Management Agents, or Storage). A Support Pack folder that contains
all Support Packs is also available at this level.
Deploying Integrity Support Packs in Microsoft Windows
• Component level—The individual Smart Components reside at this level. Refer to the
following table for descriptions of the icons for each component.
Table 2-3: Component Configuration Icons
Icon Description
The component requires configuration but has not yet been configured.
The component is configurable but has not yet been configured.
The component is configurable and has been configured.
The component does not require configuration.
Folders or files at any level in the repository view tree can be added to the target computer
list by any of the following methods:
• Drag selected items or folders from the repository view tree, and drop them in the target
computer list. The items are added to the end of the list.
• Select an item or folder in the repository view tree, then press the Insert key. The item is
added to the end of the list.
HP Integrity Support Pack and Deployment Utilities User Guide 2-7
Page 18

Deploying Integrity Support Packs in Microsoft Windows
Target Computer List
The target computer list is the pane on the right side of the main RDU window, as shown
in Figure 2-1.
The target computer list contains all components that have been selected for installation
on the target computer.
This panel has three columns:
• The Description of Software to be Installed column lists the names of components
selected for installation.
• The Installed Version column indicates the version number of any components that are
currently installed on the target machine.
• The New Version column lists the version number of the components from the software
repository that have been selected for installation.
Items can be added to the target computer list by any of the following methods:
• Select a Support Pack from the Support Pack Selected for Installation toolbar to add all
components in the Support Pack to the target computer list.
• Drag selected items or folders from the repository view tree and drop them in the target
computer list. The items are added to the end of the list.
• Select an item or folder in the repository view tree, then press the Insert key. The item is
added to the end of the list.
Items can be removed from the target computer list in either of the following ways:
• Click the Remove selected items chosen for installation button on the Target Machine
toolbar to remove selected items from the target computer list.
• Select the items to be removed, then press the Delete key.
NOTE: The target computer list supports multiple selections using the mouse. Multiple items can be
selected using the standard Windows combinations of Ctrl+click or Shift+click.
2-8 HP Integrity Support Pack and Deployment Utilities User Guide
Page 19

Revision History and Properties
The Revision History and Properties options enable you to view additional information about
a component or ISP in the repository view tree.
To view the revision history for a component, right-click the component and select View
Revision History, or click the revision history icon (
revision history is shown in Figure 2-2. The revision history provides details about software
enhancements and fixes.
Deploying Integrity Support Packs in Microsoft Windows
) on the Repository toolbar. A sample
Figure 2-2: Sample revision history
HP Integrity Support Pack and Deployment Utilities User Guide 2-9
Page 20

Deploying Integrity Support Packs in Microsoft Windows
To view the properties of a component, right-click the component and select Properties, or
click the properties icon ( ) on the Repository toolbar. The Properties window displays the
properties of ncluding file name, version number, and operating
the component or ISP, i
system information. A sample Properties window is shown in Figure 2-3.
Figure 2-3: Sample properties
Component Preconfiguration
Some of the Smart Components included as part of an ISP must be configured before being
deployed. If any components require configuration, the All Configurable Components folder
in the repository view tree appears in bold text.
IMPORTANT: Components must be configured only once. The configuration information is stored
inside each Smart Component so that it is available when the component is installed. You do not need
to configure components each time they are deployed. However, configuration is independent of the
target computer you select. If you change the configuration of a component after deployment, you must
redeploy the component.
2-10 HP Integrity Support Pack and Deployment Utilities User Guide
Page 21

Deploying Integrity Support Packs in Microsoft Windows
Icons next to each component in the repository view tree indicate whether the component
must be configured. Refer to Table 2-3 for descriptions of each of the icons. Configurable
components include, but are not limited to, the following:
• HP Insight Management Agents
• Version Control Agent
IMPORTANT: The Web-based Management portion of the Insight Management Agents requires that a
user ID, password, and trust level be configured in the Smart Component before installation if this is the
first time the agents are being installed. If the agents are being updated and are already configured on
the target system, the new agent component does not need to be configured before being deployed.
For more information, refer to the HP Systems Insight Manager Installation and User Guide on the HP
website at:
http://h18013.www1.hp.com/products/servers/management/hpsim/infolibrary.html.
Figure 2-4: Configurable components in the RDU
HP Integrity Support Pack and Deployment Utilities User Guide 2-11
Page 22

Deploying Integrity Support Packs in Microsoft Windows
To configure a Smart Component:
1. Select a component in the repository view tree.
2. Select Repository>Configure from the menu bar, or right-click the component and
select Configure. The configuration information screen for the selected component
appears. An example is shown in Figure 2-5.
Figure 2-5: Sample component configuration settings
3. From the component configuration screen, set the configuration features that you want
and click Save. To return to the component list without saving, click Cancel.
4. After the configuration is saved, the main window appears again. If the configuration
operation is not successful, an error message appears.
2-12 HP Integrity Support Pack and Deployment Utilities User Guide
Page 23

Deploying Components or ISPs
The RDU allows local and remote non-scripted deployments only.
To deploy Smart Components or ISPs:
1. Select the components to be installed by dragging them from the repository view tree
into the target computer list or by selecting an ISP from the Support Pack Selected for
Installation dropdown list.
2. Click Install on the Target Machine toolbar. The following screen appears.
Deploying Integrity Support Packs in Microsoft Windows
Figure 2-6: Software installation confirmation
3. Modify the installation options, if desired, and click Next. A confirmation screen appears.
4. Click Next to begin the installation. An installation progress window appears.
HP Integrity Support Pack and Deployment Utilities User Guide 2-13
Page 24

Deploying Integrity Support Packs in Microsoft Windows
Installation Results
After deploying the ISP on the target server, the RDU displays an installation
confirmation screen. Click Finish to exit.
Figure 2-7: Installation confirmation
2-14 HP Integrity Support Pack and Deployment Utilities User Guide
Page 25

Deploying Integrity Support Packs in Microsoft Windows
If one or more components are not installed successfully, a screen similar to the following
appears.
Figure 2-8: Installation failure
Each component writes an installation activity report (including errors) to a common
installation log file called CPQSETUP.LOG on every target server. To view the
installation log file, select Target from the menu bar and select View Installation Log,
or click View target installation log on the Target toolbar. Figure 2-9 shows a sample
installation log file.
HP Integrity Support Pack and Deployment Utilities User Guide 2-15
Page 26

Deploying Integrity Support Packs in Microsoft Windows
Information regarding installation activity is appended to the same log file, providing
a chronological history of all component installation activity on the target server.
NOTE: The installation log file CPQSETUP.LOG is always located in the \CPQSYSTEM\LOG
subdirectory on the boot partition of the target system.
Figure 2-9: ISP installation log example
2-16 HP Integrity Support Pack and Deployment Utilities User Guide
Page 27

Deploying Integrity Support Packs in Microsoft Windows
Remote Deployment Console Utility for Microsoft Windows
The Remote Deployment Console Utility for Microsoft Windows is a command line version
of the RDU. The functionality of the command line-based Remote Deployment Console
Utility is identical to the graphical RDU but enables unattended scripted deployment. The
Remote Deployment Console Utility allows both local and single or multiple remote scripted
deployments.
NOTE: The Remote Deployment Console Utility is located along with the rest of the Support Pack
contents on the Integrity Software Maintenance CD and in the \Contents\Supportpack subdirectory on
the Smart Setup CD. The executable file that launches the utility is SETUPC.EXE.
Some components must be configured before being deployed. Use the Remote
Deployment Utility for Microsoft Windows to preconfigure components. For more
information, refer to the “Component Preconfiguration” section in this chapter.
For more information about deployment using the Remote Deployment Console
Utility, refer to Scenarios 2 and 3 in the “Deployment Utilities Usage Scenarios for
Windows-Based Systems” section of this chapter.
All installation activity is logged by each component in the log file found at
C:\CPQSYSTEM\LOG\CPQSETUP.LOG on the target system.
Command Line Syntax
The general command line syntax for the Remote Deployment Console Utility is:
setupc [/?] [/help] [/use-latest] [/t[arget]:computer]
[/f[orce]] [/r[eboot][:timeout]] [/reboot-always[:timeout]]
[/use-location:fileshare] [/user:username] [/passwd:password]
[/override-existing-connection] [component] [support pack]...
If no command line arguments are passed on the command line, the Help information
appears.
NOTE: All arguments and information enclosed in brackets are optional. Refer to the “Command Line
Arguments” section for a full description of the arguments the Remote Deployment Console Utility
accepts.
HP Integrity Support Pack and Deployment Utilities User Guide 2-17
Page 28

Deploying Integrity Support Packs in Microsoft Windows
Command Line Arguments
The following table lists the arguments recognized by the Remote Deployment
Console Utility.
Table 2-4: Command Line Arguments
Command Line Argument Description
/help
/?
/use-latest
/t[arget]:computer
/f[orce]
/r[eboot][:timeout]
/reboot-always[:timeout]
Displays command line Help information.
Is identical to the /help argument.
Instructs SETUPC to automatically install the latest
available Support Pack for the target operating
system. Any additional components or Support
Packs passed on the command line are ignored.
“Latest available” means the latest available version
for the target operating system that can be found in
either the file share specified by the
/use-location parameter or in the directory
containing SETUPC.EXE.
Specifies the name of the computer to use as the
target for the deployment operation.
Changes the behavior of a component installation in
one of the following ways:
• If the component is already installed and
current, it will reinstall itself, and the installed
version number will remain the same.
• If a newer version of the component is already
installed, the component will install itself and
downgrade the component to the older version
number.
Causes the target system to reboot if the installation
requires a reboot to complete installation. A timeout
in seconds can be specified. The default timeout is
15 seconds.
The timeout value must be between 15 and 3600
(1 hour).
The reboot will only take place if no installation
errors occur.
Causes the target system to reboot after
installation, even if a reboot is not required to
complete installation. A timeout in seconds can
be specified. The default timeout is 15 seconds.
The timeout value must be between 15 and 3600
(1 hour).
continued
2-18 HP Integrity Support Pack and Deployment Utilities User Guide
Page 29

Deploying Integrity Support Packs in Microsoft Windows
Table 2-4: Command Line Arguments continued
Command Line Argument Description
/use-location:fileshare
/user:username
/passwd:password
/override-existing-connection
Instructs SETUPC to look in the specified directory
or file share for the Support Pack and components.
If this parameter is not specified, the directory
containing SETUPC.EXE is used by default.
The current logged-in account must already have
access to this location.
/user: and /passwd: arguments do not
The
have any effect when attempting to access the file
share. They are only used when connecting to a
target computer.
Refer to the “Command Line Examples” section for
a usage example.
Sets the user name to use to connect to the target
computer.
Sets the password to use to connect to the target
computer.
Instructs SETUPC.EXE to connect to the target
computer and override any existing connection
that might be present.
It is not recommended that this flag be used as a
default. It overrides important safety checks that
ensure that only one client at a time is connected
to a target computer.
Use this parameter only for recovery in a situation
where the Remote Deployment Console Utility is
reporting that a connection to a target computer is
present, even if no connection exists. This situation
can occur if one of the remote deployment utilities
does not shut down properly.
HP Integrity Support Pack and Deployment Utilities User Guide 2-19
Page 30

Deploying Integrity Support Packs in Microsoft Windows
Command Line Examples
The following table lists examples of command line input for the Remote Deployment
Console Utility.
NOTE: Although lowercase letters are used in these examples, the Remote Deployment Console Utility
is not case sensitive, and either uppercase or lowercase letters can be used. However, the operating
system environment variable is case sensitive. For example, %I is not the same as %i.
Table 2-5: Command Line Examples
Command Line Input Result
setupc /target:COMPUTER1 /use-latest
setupc /target:COMPUTER1 BP000001.XML
setupc /target:COMPUTER2 BP000001.XML
CP000150.EXE
setupc /target:HPSYS1 /use-latest
/use-location:\\SWREPOS\SupportSoftware
@echo off
for %%I in <HPSYS1 HPSYS2 HPSYS3> do
setupc /t:%%I BP000002.XML
*For additional information about the syntax of the FOR ... IN ... DO operating system
command, refer to the operating system documentation.
Installs the latest available version of
the Support Pack that is located in
the current directory and is
applicable to the computer named
COMPUTER1.
Installs the Support Pack defined by
BP000001.XML from the current
directory on the computer named
COMPUTER1.
Installs the Support Pack defined by
BP000001.XML and an additional
component named CP000150.EXE
located in the current directory on
the computer named COMPUTER2.
Installs the latest available Support
Pack from
\\SWREPOS\SupportSoftware on
the computer named HPSYS1.
A Windows .CMD script that installs
the Support Pack defined by
BP000002.XML on the following
computers: HPSYS1, HPSYS2, and
HPSYS3.*
2-20 HP Integrity Support Pack and Deployment Utilities User Guide
Page 31

Installing Single Components
In some instances, you might want to install a single component manually, rather than install
an entire Support Pack. To install a single component on your local system:
1. Double-click the component to be installed (cpxxxxxx.EXE). A screen similar to the
following appears.
Figure 2-10: Component installation
Deploying Integrity Support Packs in Microsoft Windows
2. Click the Install button. A screen similar to the following appears.
Figure 2-11: Component installation confirmation
3. Click the Install button, then follow the instructions on the screen to complete
the installation.
HP Integrity Support Pack and Deployment Utilities User Guide 2-21
Page 32

Deploying Integrity Support Packs in Microsoft Windows
Command Line Syntax
The general command line syntax for single-component installation is:
cpxxxxxx [/h[elp]] [/?] [/s[ilent]] [/f[orce]] [/r[eboot]]
CPxxxxxx
is the file name of the Smart Component; the Xs represent the component number.
NOTE: All arguments and information enclosed in brackets are optional. Refer to the “Command Line
Arguments” section for a full description of the arguments the Smart Components accept.
If no command line arguments are passed on the command line, the component GUI appears.
Command Line Arguments
The following table lists the arguments recognized by Smart Components.
Table 2-6: Command Line Arguments
Command Line Argument Description
/h[elp]
/?
/s[ilent]
/f[orce]
/r[eboot]
Displays command line Help information.
Is identical to the /help argument.
Specifies whether the GUI appears. Use this argument when
scripting the Smart Components to suppress the GUI. If this
argument is omitted from the command line, the GUI appears.
When used with the /silent command, installs the component in
one of the following ways:
• If the component is already installed and current, it will be
reinstalled, and the installed version number will remain the
same.
• If a newer version of the component is already installed, the
component will install itself and downgrade the originally
installed component to the older version number.
If this argument is omitted from the command line, the installation is
not forced.
When used with the /silent command, causes the target system
to reboot if the installation requires a reboot to complete the
installation. If this argument is omitted from the command line, the
server must be rebooted manually for the installation to take effect.
The reboot will only take place if no installation errors occur.
2-22 HP Integrity Support Pack and Deployment Utilities User Guide
Page 33

Command Line Examples
The following table lists examples of command line input for single-component installation.
NOTE: Although lowercase letters are used in these examples, either uppercase or lowercase letters
can be used.
Table 2-7: Examples of Single-Component Installations
Command Line Input Result
Deploying Integrity Support Packs in Microsoft Windows
cp002575
cp002575 /s
cp002575 /s /f /r
Return Codes
When each Smart Component has finished running, the component reports a return code to
the operating system or the calling application.
These return codes are used to determine the status of the component installation. You can
also use return codes in a script to control the execution of the script and determine any
branching that is required. Table 2-8 summarizes the Smart Component return codes.
Table 2-8: Return Codes
Error Level Meaning
Starts installation of the CP002575.EXE component.
Installs the CP002575.EXE component on the target server, using the
defaults of the component. The GUI does not appear.
Installs the CP002575.EXE component, forcing the component to
install over an existing version and allowing the server to reboot
automatically if needed. The GUI does not appear.
0 The Smart Component failed to install. Refer to the log file for more details.
1 The Smart Component installed successfully.
2 The Smart Component installed successfully, but the system must be restarted.
3 The installation was not attempted because the required hardware was not
present or the software was current.
HP Integrity Support Pack and Deployment Utilities User Guide 2-23
Page 34

Deploying Integrity Support Packs in Microsoft Windows
Deployment Utilities Usage Scenarios for Windows-Based Systems
This section discusses deployment scenarios for ISPs and components stored in a centralized,
network-based software repository.
All of the ISP deployment examples described in this guide assume a centralized,
network-based software repository. The same deployment principles are applicable to ISP
software that is stored locally on the administrative system, target system, Smart Setup CD,
or Software Maintenance CD.
TIP: To facilitate the use of the ISP deployment utilities, copy the executable and Help files of the
utilities to the hard drive of the administrative system. Place the executable and Help files in their own
subdirectory.
The overall ISP and component deployment strategy for Windows-based systems is
illustrated in Figure 2-12.
Figure 2-12: Deployment strategy on Windows-based systems
2-24 HP Integrity Support Pack and Deployment Utilities User Guide
Page 35

Deploying Integrity Support Packs in Microsoft Windows
Table 2-9 summarizes the deployment scenarios on Windows-based systems and the
utilities to use in each scenario.
Table 2-9: Deployment Scenarios on Windows-Based Systems
Scenario Type of Deployment Deployment Utility Used
1
• User is not familiar with operating system
command line tools or does not need to deploy
Remote Deployment Utility
(SETUP.EXE)
from a command line.
• User must deploy on a single local or remote
target system.
• User does not need scripting capabilities.
2
• User is familiar with operating system
command line tools.
• User must deploy on a single local or remote
Remote Deployment Console
Utility (SETUPC.EXE)
target system.
• User needs scripting capabilities.
3
• User is familiar with operating system
command line tools.
• User must deploy on a few remote target
Remote Deployment Console
Utility (SETUPC.EXE)
systems.
• User needs scripting capabilities.
4
• User is an expert with operating system tools,
including command line scripting.
• User is knowledgeable about HP Systems
Remote Deployment Console
Utility with HP Systems
Insight Manager*
Insight Manager.
• User must deploy on a multitude of remote
target systems, all managed by HP Systems
Insight Manager.
IMPORTANT: When using HP Systems Insight Manager in conjunction with the ISP deployment
utilities, HP recommends deploying to no more than 100 remote target systems with any given
Application Launch task.
*For information on using HP Systems Insight Manager with the Version Control Repository
Manager and the Version Control Agent, refer to the HP Systems Insight Manager Help Guide at:
http://h18013.www1.hp.com/products/servers/management/hpsim/infolibrary.html.
HP Integrity Support Pack and Deployment Utilities User Guide 2-25
Page 36

Deploying Integrity Support Packs in Microsoft Windows
Scenario 1: Graphical Deployment on a Single-Target System Using the RDU
IMPORTANT: Be sure that all components that require configuration are configured before
deploying them.
Both the RDU and the Remote Deployment Console Utility can be used to maintain and
deploy ISPs and individual components on a local or remote target system. However, the
graphical RDU is the easiest utility to use when deploying on a single-target system.
Figure 2-13 illustrates the basic single-target system deployment process with
the RDU.
Figure 2-13: Single-target deployment process
When to Use This Scenario
Use the ISP deployment scenario described in this section when you:
• Are not familiar with operating system command line tools or do not need to deploy from
a command line
• Are deploying ISPs or individual components on a single-target system that is either local
or remote
• Do not have a need for scripting
2-26 HP Integrity Support Pack and Deployment Utilities User Guide
Page 37

Deploying an ISP
To deploy an ISP stored in a centralized, network-based software repository using the
graphical RDU:
1. Be sure that all requirements are fulfilled as listed in the section “Minimum
2. Be sure that the centralized, network-based software repository can be accessed by the
3. Launch the RDU on the administrative system. It does not matter where the utility resides
Deploying Integrity Support Packs in Microsoft Windows
Requirements for Windows Servers.”
administrative system.
on the host system. However, HP recommends placing the utility in its own subdirectory.
If no ISPs or components are in the same directory as the RDU or if no applicable
Support Packs are found, a blank screen similar to Figure 2-14 appears when the utility
opens.
Figure 2-14: Blank RDU main window
4. Click Browse on the Repository toolbar to navigate to the location of the centralized,
network-based software repository.
5. Configure components by right-clicking a component in the repository view tree and
selecting Configure. Icons next to each component indicate whether the icon must be
configured. Refer to Table 2-3 for descriptions of the icons.
HP Integrity Support Pack and Deployment Utilities User Guide 2-27
Page 38

Deploying Integrity Support Packs in Microsoft Windows
6. Select components to be installed:
— To install all components in the applicable Support Pack, select a Support Pack from
the Support Pack Selected for Installation toolbar. All the components in the Support
Pack appear in the target computer list, as shown in Figure 2-15.
IMPORTANT: To install an ISP, all files that comprise the ISP must be present in the same
directory.
— To select individual components or categories, drag selected files or folders from the
repository view tree and drop them in the target computer list. You can also select a
file or folder in the repository view tree, and then press the Insert key to move the
file or folder to the target computer list.
— To remove any components that you do not want to install, select them in the target
computer list and press the Delete key or click the Remove selected items chosen
for installation button (
) on the Target Machine toolbar.
Figure 2-15: Selecting an ISP to be deployed from the dropdown menu
2-28 HP Integrity Support Pack and Deployment Utilities User Guide
Page 39

Deploying Integrity Support Packs in Microsoft Windows
If error text appears under a Support Pack in the repository view tree (refer to Figure 2-16
for an example), a component referenced in the Support Pack is not available in the
software repository.
To correct the situation, obtain the missing component from the HP website, Smart Setup
CD, or Software Maintenance CD and copy it to the software repository.
Figure 2-16: Component missing from the ISP
7. Select the target machine. By default, the RDU selects the system that launches the
utility as the target system.
If the target system is the local administrative system, there is no need to modify the
Target Machine field. However, if the target system is a remote system accessible
over the network, enter or browse to the name of the network target system in the
Target Machine field and press the Enter key to connect to the target. You can also click
Target, and use the Browse for Computer window to navigate to the system accessible
over the network connection. Click OK to select the target and return to the RDU main
window.
NOTE: To assist with entry of the target system name, the RDU maintains a history of servers
on which software has been deployed. Access this history from the Target Machine list.
If the user name and password for the target machine do not match those for the machine
running the RDU, you are prompted to enter the user name and password for the target
machine.
HP Integrity Support Pack and Deployment Utilities User Guide 2-29
Page 40

Deploying Integrity Support Packs in Microsoft Windows
8. Deploy all components displayed in the target computer list by clicking Install after
the RDU identifies the target system. A progress window tracks the progress of the
deployment.
9. Click Cancel at any time to stop deployment. There might be a slight delay
before the installation is canceled while the RDU finishes the last initiated task.
IMPORTANT: Clicking Cancel does not cancel the entire installation procedure and restore the
target system to its previous driver versions. Instead, clicking Cancel stops the installation of the
ISP at the point when Cancel is clicked, and the target server might end up with a partially installed
ISP.
10. View the installation results. When the deployment process is complete, after deploying
the ISP on the target server, the RDU displays an installation confirmation screen.
If one or more components are not installed successfully, a screen similar to the
following appears.
Figure 2-17: Installation failure
Each component writes installation activity (including errors) to a common
installation log file called CPQSETUP.LOG on every target server. To view
the installation log file, select Target from the menu bar and select View
Installation Log, or click View target installation log on the Target toolbar.
2-30 HP Integrity Support Pack and Deployment Utilities User Guide
Page 41

Deploying Integrity Support Packs in Microsoft Windows
11. If necessary, reboot the target server to complete the installation by clicking Reboot and
confirming when prompted by the system. The deployment is complete.
NOTE: If the target system is the local administrative system, clicking Reboot causes the system
to reboot, and the RDU must be restarted to deploy components or ISPs on another target system.
12. Close the Installation Results window to deploy components or ISPs on another target
server.
Scenario 2: Command Line Deployment on a Single-Target System Using the Remote Deployment Console Utility
IMPORTANT: Be sure that all components that require configuration are configured before
deploying them.
Figure 2-18 illustrates the basic, single-target system deployment process with the
Remote Deployment Console Utility.
Figure 2-18: Single-target deployment process
When to Use This Scenario
Use the ISP deployment scenario described in this section when you:
• Are familiar with operating system command line tools
• Require deployment of ISPs or individual components on a single-target
system that is either local or remote
• Have a need for scripting
HP Integrity Support Pack and Deployment Utilities User Guide 2-31
Page 42

Deploying Integrity Support Packs in Microsoft Windows
Deploying an ISP
To deploy an ISP stored in a centralized, network-based software repository from a command
line prompt on a single-target system:
1. Be sure that all requirements are fulfilled as listed in the section “Minimum
Requirements for Windows Servers.”
2. Be sure that the software repository can be accessed by the administrative system.
3. Map a drive letter to the network-based software repository that contains the ISP files.
4. Preconfigure components using the RDU (SETUP.EXE). For more information, refer to
the “Component Preconfiguration” section in this chapter.
5. Launch a command line prompt on the administrative system, and change to the
subdirectory containing the Remote Deployment Console Utility.
6. Launch the Remote Deployment Console Utility. For more information, refer
to “Command Line Examples” in the “Remote Deployment Console Utility for
Microsoft Windows” section in this chapter.
NOTE: Command line help for the utility is accessible by running the file SETUPC.EXE from
the command line. A screen displays all possible parameters that the utility accepts.
7. Deploy the specified ISP file on the target system by pressing the Enter key.
When the utility deploys an ISP or individual components to the target system, each
component writes installation information to the file CPQSETUP.LOG on the target system.
Be sure that the target system is accessible over the network connection and that all files that
make up an ISP are present in the same directory. If the target system is not accessible over
the network connection, one of the following error messages might appear:
• Unable to connect to the target computer. All available connection methods were
attempted with no success. A possible reason is that the operating system of the target
computer is not supported.
• Access to the target computer was denied, possibly due to incorrect authentication
information or permissions.
• The target computer could not be found. Please check the spelling of the computer name
or the network connection and try again.
If installation errors occur, the command line window might display an error message
followed by a list of components and the errors that occurred.
IMPORTANT: You can stop a command line deployment on a local server at any time by pressing
the Ctrl+C keys.
When the deployment process ends, control is returned to the command line prompt to run
the Remote Deployment Console Utility on the next target server that must be deployed.
TIP: You can view the centralized installation log file on the remote target system by connecting to the
remote target system over the network with Windows Explorer and opening the CPQSETUP.LOG file.
You can also view the file in a command prompt window on the administrative system by using the
TYPE or MORE commands, followed by the network path and name of the remote installation log file.
2-32 HP Integrity Support Pack and Deployment Utilities User Guide
Page 43

Deploying Integrity Support Packs in Microsoft Windows
Scenario 3: Command Line Deployment on Multiple-Target Systems Using the
Remote Deployment Console Utility
IMPORTANT: Be sure that all components requiring configuration are configured before
deploying them.
Figure 2-19 illustrates the basic, multiple-target system deployment process with the
Remote Deployment Console Utility.
Figure 2-19: Multiple-target deployment process
When to Use This Scenario
Use the ISP deployment scenario described in this section when you:
• Are familiar with operating system command line tools
• Require deployment of ISPs or individual components on a few remote target systems
• Have a need for scripting
Deploying an ISP
Deploying software on multiple-target systems with the Remote Deployment Console Utility
follows the same basic procedures outlined in the section “Scenario 2: Deploying Software on
a Single-Target System with the Remote Deployment Console Utility.”
IMPORTANT: If multiple-target server deployment requirements are for very high volumes, refer to the
section “Scenario 4: Deploying Software on Multiple-Target Systems Managed by HP Systems Insight
Manager.” Using the Remote Deployment Console Utility from the command line to deploy to multipletarget servers is recommended only for a few target servers.
HP Integrity Support Pack and Deployment Utilities User Guide 2-33
Page 44

Deploying Integrity Support Packs in Microsoft Windows
To deploy an ISP stored in a centralized, network-based software repository from a
command line prompt on multiple-target servers:
1. Follow steps 1 through 5 in the section “Scenario 2: Deploying Software on a SingleTarget System with the Remote Deployment Console Utility.”
2. Launch the Remote Deployment Console Utility, using command line parameters to
specify each of the target systems. For more information, refer to “Command Line
Examples” in the “Remote Deployment Console Utility for Microsoft Windows” section
in this chapter.
IMPORTANT: The target systems must be accessible over the network connection, and the
account that is running the Remote Deployment Console Utility must have administrative access
to the target system.
NOTE: Command line help for the utility is accessible by running the file SETUPC.EXE from the
command line. A screen displays all possible parameters that the utility will accept.
3. Complete the deployment. Refer to step 7 in the section, “Scenario 2: Deploying
Software on a Single-Target System with the Remote Deployment Console Utility,” for
the remainder of the deployment process and any error messages that might appear.
TIP: Although each component that is run will write installation information to the installation log
file CPQSETUP.LOG on the target system, you can redirect screen output to text files that are local
to the administrative system. This capability provides convenient local access to multiple-target
server deployment information from one location. Refer to the operating system documentation for
more information about output redirection.
2-34 HP Integrity Support Pack and Deployment Utilities User Guide
Page 45

Deploying Integrity Support Packs in Microsoft Windows
Scenario 4: Command Line Deployment on Multiple-Target Systems Managed by HP Systems Insight Manager
IMPORTANT: Be sure that all components that require configuration are configured before
deploying them.
For initial ISP deployment on multiple-target systems managed by HP Systems Insight
Manager, use the Remote Deployment Console Utility. As in the previous scenarios, HP
recommends that all deployments be performed from a centralized, network-based software
repository.
After initial ISP deployment, HP recommends that you use the software deployment support
in HP Systems Insight Manager.
Figure 2-20 illustrates the basic, multiple-target system deployment process with HP
Systems Insight Manager and the Remote Deployment Console Utility.
Figure 2-20: Multiple-target deployment process with HP Systems Insight
Manager
When to Use This Scenario
Use the ISP deployment scenario described in this section when you are:
• Knowledgeable about operating system tools, including command line scripting
• Knowledgeable about HP Systems Insight Manager
• Deploying ISPs or individual components on many remote target systems that are all
managed by HP Systems Insight Manager
HP Integrity Support Pack and Deployment Utilities User Guide 2-35
Page 46

Deploying Integrity Support Packs in Microsoft Windows
Deploying an ISP
For information on using HP Systems Insight Manager with the Version Control Repository
Manager and the Version Control Agent, refer to the
• The HP Systems Insight Manager Help Guide at:
http://h18013.www1.hp.com/products/servers/management/hpsim/infolibrary.html
IMPORTANT: When using HP Systems Insight Manager in conjunction with the ISP deployment
utilities, HP recommends deploying to no more than 100 remote target systems with any given
Application Launch task.
For detailed information about using HP Systems Insight Manager, refer to the HP Systems
Insight Manager Installation and User Guide available on the Management CD, in every HP
Systems Insight Manager download from the Web, or at:
http://h18013.www1.hp.com/products/servers/management/hpsim/infolibrary.html.
Alternatively, click Help from within HP Systems Insight Manager.
2-36 HP Integrity Support Pack and Deployment Utilities User Guide
Page 47

C
command line
arguments, Windows 2-18, 2-22
examples, Windows 2-20, 2-23
syntax, Windows 2-17, 2-22
components
adding to target computer list 2-7
configuration icons 2-7
configuring in Windows 2-10
deploying individually 2-21
deploying with Remote Deployment Console
Utility 2-17
deploying with Remote Deployment
Utility 2-13
installing individually 2-21
installing with Remote Deployment Console
Utility 2-17
installing with Remote Deployment
Utility 2-13
missing 2-29
properties 2-10
removing from target computer list 2-8
revision history 2-9
configuration icons 2-7
configuring components 2-10
CPQSETUP.LOG 2-15, 2-17, 2-30, 2-32
D
deployment
individual components 2-21
multiple-target 2-33, 2-35
overview, Windows 2-1
scenarios for Windows 2-24, 2-25
single-target 2-26, 2-32
with Remote Deployment Console Utility 2-17
with Remote Deployment Utility 2-13
deployment utilities
features 1-2
obtaining 1-3
Windows, Remote Deployment Console
Utility 2-17
Windows, Remote Deployment Utility 2-3
Index
directory tree See repository view tree
E
error messages
Windows 2-12, 2-15, 2-29, 2-32
G
graphical user interface (GUI)
Remote Deployment Utility 2-4
GUI See graphical user interface (GUI)
H
help
technical support v
Windows, command line 2-18, 2-22
help resources v
HP authorized reseller v
I
Insight Manager 7
multiple-target deployment 2-35
with version control software 2-25
installation
component 2-13
error 2-15
installation log
location 2-16
viewing 2-15
Integrity Support Pack (ISP)
deploying individual components 2-21
deploying with Remote Deployment Console
Utility 2-17
deploying with Remote Deployment
Utility 2-13
downloads 1-3
installing individual components 2-21
installing with Remote Deployment Console
Utility 2-17
installing with Remote Deployment
Utility 2-13
ISP See Integrity Support Pack (ISP)
HP Integrity Support Pack and Deployment Utilities User Guide Index-1
Page 48

Index
L
log file
installation 2-15
location 2-16
viewing 2-15
M
menu bar, Remote Deployment Utility 2-5
Microsoft website v
Microsoft Windows See Windows
multiple-target deployment 2-33, 2-35
P
properties, component
example 2-10
viewing 2-10
R
RDU See Remote Deployment Utility (RDU)
Remote Deployment Console Utility 2-17
command line arguments 2-18
command line examples 2-20
command line syntax 2-17
Remote Deployment Utility (RDU)
main window 2-4
menu bar 2-5
Repository toolbar 2-5
repository view tree 2-7
Support Pack Selected for Installation
toolbar 2-6
target computer list 2-8
Target Machine toolbar 2-6
repository
creating 1-4
updating 1-4
Repository toolbar 2-5
repository view tree
configuration icons 2-7
error text in 2-29
levels 2-7
Remote Deployment Utility 2-7
requirements, minimum
Windows 2-2
return codes 2-23
revision history, component
example 2-9
viewing 2-9
S
scenarios
multiple-target deployment with Insight
Manager 7 2-35
multiple-target deployment with Remote
Deployment Console Utility 2-33
single-target deployment with Remote
Deployment Console Utility 2-32
single-target deployment with Remote
Deployment Utility 2-26
Windows 2-24, 2-25
scripting
Windows 2-17
SETUP.EXE 2-3, 2-17
SETUPC.EXE 2-32, 2-34
single component installation
command line arguments 2-22
command line examples 2-23
command line syntax 2-22
return codes 2-23
single-target deployment 2-26, 2-32
software repository See repository
Subscriber’s Choice
website v, 1-3
Support Pack Selected for Installation toolbar 2-6
T
target computer list, using 2-7
Target Machine toolbar, buttons 2-6
telephone numbers v
toolbars
menu bar 2-5
Remote Deployment Utility 2-5
Repository 2-5
Support Pack Selected for Installation 2-6
Target Machine 2-6
V
Version Control Agent 2-25, 2-36
Version Control Repository Manager 2-25, 2-36
W
websites
Insight Manager 7 2-25, 2-36
ISP 1-3
Microsoft v
Subscriber’s Choice v, 1-3
Version Control Agent 2-25, 2-36
Version Control Repository Manager 2-25,
2-36
Windows
command line usage 2-17, 2-22
deployment overview 2-1
minimum requirements 2-2
Remote Deployment Console Utility 2-17
Remote Deployment Utility 2-3
Index-2 HP Integrity Support Pack and Deployment Utilities User Guide
 Loading...