

Page 1

Ignite-UX Administration Guide
HP-UX 11i
Abstract
This guide describes installing, configuring, and using Ignite-UX to install and recover HP-UX. It is intended for administrators
with in-depth knowledge of HP-UX operating system concepts, commands, and configuration; HP computer hardware and
software; upgrading software, applying patches, and troubleshooting problems; and knowledge of TCP/IP networking concepts
and network configuration.
HP Part Number: 762791-001
Published: March 2014
Edition: 41
Page 2

© Copyright 1999, 2014 Hewlett-Packard Development Company, L.P.
Confidential computer software. Valid license from HP required for possession, use or copying. Consistent with FAR 12.211 and 12.212, Commercial
Computer Software, Computer Software Documentation, and Technical Data for Commercial Items are licensed to the U.S. Government under
vendor's standard commercial license.
The information contained herein is subject to change without notice. The only warranties for HP products and services are set forth in the express
warranty statements accompanying such products and services. Nothing herein should be construed as constituting an additional warranty. HP shall
not be liable for technical or editorial errors or omissions contained herein.
Acknowledgements
Intel® Itanium® Logo, Intel, Intel Inside and Itanium are trademarks or registered trademarks of Intel Corporation or its subsidiaries in the United
States and other countries.
Microsoft® and Windows® are U.S. registered trademarks of Microsoft Corporation.
Java® is a US trademark of Sun Microsystems, Inc.
UNIX® is a registered trademark of The Open Group.
Revision History
Table 1 Revision History
Number
Operating Systems SupportedDocument Manufacturing Part
Edition No.
Publication Date
March 201441HP-UX 11i v1, 11i v2, 11i v3762791-001
November 201340HP-UX 11i v1, 11i v2, 11i v3B3921-90080
October 201339HP-UX 11i v1, 11i v2, 11i v3B3921-90079
March 201338HP-UX 11i v1, 11i v2, 11i v3B3921-90077
March 201338HP-UX 11i v1, 11i v2, 11i v3B3921-90073
March 201238HP-UX 11i v1, 11i v2, 11i v3B3921-90070
September 201137HP-UX 11i v1, 11i v2, 11i v3B3921-90066
March 201136HP-UX 11i v1, 11i v2, 11i v3B3921-90050
September 201035HP-UX 11i v1, 11i v2, 11i v3B3921-90032
March 201034HP-UX 11i v1, 11i v2, 11i v3B3921-90006
September 200933HP-UX 11i v1, 11i v2, 11i v35992-6584
November 200832HP-UX 11i v1, 11i v2, 11i v35992-5309
September 200831HP-UX 11i v1, 11i v2, 11i v35992-4731
March 200830HP-UX 11i v1, 11i v2, 11i v35992-3336
December 200729HP-UX 11i v1, 11i v2, 11i v35992-1959
September 200728HP-UX 11i v1, 11i v2, 11i v35992-0602
June 200727HP-UX 11.00, 11i v1, 11i v2, 11i v35991-7999
February 200726HP-UX 11.00, 11i v1, 11i v2, 11i v35991-6440
December 200625HP-UX 11.00, 11i v1, 11i v2B2355-91049
September 200624HP-UX 11.00, 11i v1, 11i v2B2355-90997
June 200623HP-UX 11.00, 11i v1, 11i v2B2355-90970
March 200622HP-UX 11.00, 11i v1, 11i v2B2355-90959
December 200521HP-UX 11.00, 11i v1, 11i v2B2355-90941
September 200520HP-UX 11.00, 11i v1, 11i v1.6, 11i v2B2355-90893
Page 3

Table 1 Revision History (continued)
Number
Operating Systems SupportedDocument Manufacturing Part
Edition No.
Publication Date
June 200519HP-UX 11.00, 11i v1, 11i v1.6, 11i v2B2355-90875
December 200418HP-UX 11.00, 11i v1, 11i v1.6, 11i v2B2355-90872
September 200417HP-UX 11.00, 11i v1, 11i v1.6, 11i v2B2355-90849
June 200416HP-UX 11.00, 11i v1, 11i v1.6, 11i v2B2355-90837
March 200415HP-UX 11.00, 11i v1, 11i v1.6, 11i v2B2355-90834
December 200314HP-UX 11.00, 11i v1, 11i v1.6, 11i v2B2355-90831
September 200313HP-UX 11.00, 11i v1, 11i v1.6, 11i v2B2355-90788
September 200312HP-UX 11.00, 11i v1, 11i v1.6B2355-90829
June 200311HP-UX 11.00, 11i v1, 11i v1.5, 11i v1.6B2355-90810
March 200310HP-UX 10.x, 11.00, 11i v1 , 11i v1.5, 11i v1.6B2355-90772
December 20029HP-UX 10.x, 11.00, 11i v1, 11i v1.5, 11i v1.6B2355-90767
October 20028HP-UX 10.x, 11.00, 11i v1, 11i v1.5, 11i v1.6B2355-90770
September 20027HP-UX 10.x, 11.00, 11i v1, 11i v1.5, 11i v1.6B2355-90765
September 20026HP-UX 10.x, 11.00, 11i v1, 11i v1.5B2355-90758
June 20025HP-UX 10.x, 11.00, 11i v1, 11i v1.5B2355-90750
March 20024HP-UX 10.x, 11.00, 11i v1, 11i v1.5B2355-90749
June 20013HP-UX 10.x, 11.00, 11i v1, 11i v1.5B2355-90738
December 20002HP-UX 10.x, 11.00, 11i v1B2355-90704
March 19991HP-UX 10.x, 11.00, 11i v1B2355-90677
Page 4

Contents
HP secure development lifecycle....................................................................10
1 Ignite-UX overview....................................................................................11
Ignite-UX features...................................................................................................................11
Getting the Ignite-UX software .................................................................................................13
Ignite-UX commands and manpages.........................................................................................14
Introduction to the Ignite-UX GUI...............................................................................................15
How Ignite works....................................................................................................................18
The Ignite-UX install environment..........................................................................................19
Boot sources......................................................................................................................19
Installation versus recovery..................................................................................................19
Network booting and IP addresses.......................................................................................19
Phases of operation............................................................................................................20
Startup........................................................................................................................20
Phase 1.......................................................................................................................21
Phase 2.......................................................................................................................21
Phase 3.......................................................................................................................22
Ignite-UX server requirements...................................................................................................22
Supported peripherals ............................................................................................................24
Disks and other I/O...........................................................................................................24
Firmware..........................................................................................................................24
Disk arrays........................................................................................................................24
Client terminals..................................................................................................................24
2 Making configuration decisions for Ignite servers..........................................25
Boot and install client from media.............................................................................................25
Simple network solutions..........................................................................................................25
Alternate boot with network server installation............................................................................27
Complex networks..................................................................................................................28
Diagnosing network boot issues................................................................................................28
HP-UX diagnosing and debugging.......................................................................................29
Simple network debugging.............................................................................................29
Logging to syslog.log.....................................................................................................29
Using bootpquery.........................................................................................................29
RDP diagnosing and debugging..........................................................................................30
3 Simple network: creating a server for registered clients..................................31
Configuring the Ignite-UX server for PA-RISC clients.....................................................................31
Launch Ignite-UX................................................................................................................31
Launch the server setup wizard............................................................................................32
Register the PA-RISC clients with the server.............................................................................34
Skip DHCP setup...............................................................................................................35
Go to the software setup section..........................................................................................35
Configuring the Ignite-UX server for Itanium-based clients.............................................................35
Register the Itanium-based clients with the server....................................................................35
Use the server setup wizard to proceed to software depot setup...............................................36
Setting up software from OE depots..........................................................................................36
More server setup options........................................................................................................37
Configuring server options..................................................................................................37
Configuring session options.................................................................................................39
Setting up additional software on the server...............................................................................41
SD software......................................................................................................................41
Non-SD software...............................................................................................................41
4 Contents
Page 5

4 Simple network: creating a server for anonymous clients................................43
Overview of anonymous clients.................................................................................................43
Configuring an Ignite server to boot anonymous PA-RISC clients....................................................43
Using the server setup wizard..............................................................................................43
Editing the instl_boottab file................................................................................................43
Configuring an Ignite server to boot anonymous Itanium-based clients...........................................44
Working with DHCP...........................................................................................................44
Understanding PXE booting of Itanium-based systems.........................................................44
Ignite-UX server and boot helper setup for DHCP...............................................................44
Isolating Ignite-UX from noncontrollable DHCP servers .......................................................46
5 Complex networks: challenges and solutions................................................48
How to use this chapter...........................................................................................................48
Complex network challenges....................................................................................................48
Multiple subnets.................................................................................................................49
Remote systems..................................................................................................................49
Multiple boot servers..........................................................................................................50
Avoiding complex network issues..............................................................................................50
An Ignite-UX server for each subnet......................................................................................51
A Multi-capable server for each subnet.................................................................................51
Extend the local subnet.......................................................................................................51
Using virtual LANs properly for Ignite-UX..............................................................................51
Complex network solutions.......................................................................................................52
Automating HP-UX OS version selection................................................................................52
Limit network response by system class..................................................................................53
Directed boot....................................................................................................................53
Server selection.................................................................................................................53
Limit network boot response by network interface address.......................................................53
Control network boot via response timing..............................................................................54
Install remote clients through a network router........................................................................54
Multiple NICs attach the Ignite server to multiple subnets........................................................55
Getting the client the correct networking information..........................................................55
Having the client contact the correct server.......................................................................55
Ignite-UX bootp boot helper................................................................................................56
HP-UX DHCP PXE Next server boot helper for integrity systems............................................57
Configuring a Next server boot helper for Integrity systems............................................57
Forwarding boot requests via bootp relay.........................................................................58
Multi-capable subnet boot server..........................................................................................60
Non-HP-UX Next server boot helper.................................................................................60
Non-HP-UX bootp boot helper.........................................................................................60
6 Complex networks: multi-capable servers.....................................................61
Configuring an RDP server for specific MAC addresses................................................................61
Configuring an RDP server to delay PXE response.......................................................................61
Configuring an RDP server to initiate HP-UX installation................................................................62
Setting up RDP MenuOptions via Windows commands...........................................................62
Setting up RDP MenuOptions via interactive UI......................................................................63
Using an RDP MenuOption for HP-UX...................................................................................66
Linux DHCP PXE Next server boot helper for HP-UX installation.....................................................66
Configuring an HP-UX server to support Linux boot and installation...............................................67
RedHat installation from an HP-UX server..............................................................................69
SuSE installation from an HP-UX server..................................................................................70
Configuring an HP-UX server to support Windows installation.......................................................70
7 Managing I/O for installation and recovery.................................................71
Introducing multipathing..........................................................................................................71
Contents 5
Page 6

Agile view concepts................................................................................................................71
Practical considerations...........................................................................................................73
System installation configuration...........................................................................................73
Support for >2 TB boot disk................................................................................................77
Identifying devices for other tasks.........................................................................................78
Important characteristics of the agile view.............................................................................78
Recovery and the agile view....................................................................................................80
Legacy DSFs and device matching.......................................................................................80
Persistent DSFs and device matching.....................................................................................80
Controlling the I/O configuration process..................................................................................81
Agile view questions and answers.............................................................................................82
8 Security...................................................................................................84
Ignite-UX server ports..............................................................................................................84
Modifying a Bastille-hardened system to operate with Ignite-UX....................................................89
Enabling Ignite-UX server requirements.................................................................................90
Enabling Ignite-UX client requirements..................................................................................91
Configuring Ignite to replace TFTP with NFS...............................................................................92
Overview..........................................................................................................................92
Procedure.........................................................................................................................92
9 Booting and installing HP-UX from the server using the client console...............95
Preparing the client for installation ...........................................................................................95
Making boot decisions when using the client console..................................................................96
Boot using the network.......................................................................................................96
Boot using media...............................................................................................................97
Using bootsys on the client console...........................................................................................98
Booting PA-RISC clients from the console ...................................................................................99
Booting Itanium-based clients using the network........................................................................100
Direct boot profiles for Itanium-based systems...........................................................................102
The dbprofile command....................................................................................................103
The lanboot command......................................................................................................104
Installing HP-UX from the client console....................................................................................105
Managing speed and duplexing of LAN interfaces executing network boots.................................108
Examples........................................................................................................................108
10 Booting and installing HP-UX on clients using the server.............................110
Methods of installing client systems.........................................................................................110
Installation using bootsys.......................................................................................................110
Installation using the Ignite-UX GUI.........................................................................................112
Prepare the client for installation........................................................................................112
Starting Ignite-UX.............................................................................................................112
Adding clients.................................................................................................................112
Booting a client...............................................................................................................113
Configuring the installation....................................................................................................116
New installation..............................................................................................................116
Initializing the installation.............................................................................................117
The client installation configuration interface...................................................................117
Basic tab...............................................................................................................118
Software tab .........................................................................................................125
System tab ............................................................................................................130
File System tab ......................................................................................................137
Advanced tab........................................................................................................144
Repeat an installation.......................................................................................................145
Executing the installation.......................................................................................................146
Viewing and printing a manifest ............................................................................................149
6 Contents
Page 7

11 Golden images.....................................................................................151
Advantages of golden images................................................................................................151
Creating a golden image......................................................................................................151
Installing the HP-UX operating system .................................................................................152
Installing critical patches onto the operating system..............................................................152
Installing optional software................................................................................................153
Customizing the system ....................................................................................................153
Creating the golden archive..............................................................................................153
Configuring the Ignite-UX server to recognize the golden image..................................................154
Creating and using golden images using GUI and CLI..............................................................157
Creating golden image using GUI.....................................................................................157
Creation of a golden image using CLI................................................................................159
Examples on using make_golden_image script:....................................................................159
Enabling the client................................................................................................................159
Installing the golden image on the client..................................................................................160
12 Customizing your installation..................................................................161
Using configuration files........................................................................................................161
Classes of configuration files.............................................................................................161
Combining configuration files using INDEX entries................................................................164
Example configuration files................................................................................................166
Customizations based on the client hardware.......................................................................168
Customizations based on user selection...............................................................................169
Avoid archiving patch files ....................................................................................................170
Debugging configuration files.................................................................................................171
Using post-installation scripts..................................................................................................171
How the installation functions............................................................................................172
Adding a post-installation script.........................................................................................172
13 Automating installations.........................................................................174
Starting a non-interactive installation with bootsys.....................................................................174
Using a saved configuration...................................................................................................174
Specifying defaults in the config.local file.................................................................................175
Setting defaults with instl_adm................................................................................................175
Using the per-client configuration file.......................................................................................175
Scheduling installations.........................................................................................................177
Setting installation parameters dynamically..............................................................................177
Checking modified files for errors.......................................................................................179
14 Creating your own boot and installation media.........................................180
Why use custom boot and installation media?..........................................................................180
Building PA-RISC boot and installation tape..............................................................................180
Possible tape contents.......................................................................................................180
Logical interchange format...........................................................................................181
Archives and depots....................................................................................................182
Creating and modifying an archive configuration file for tape................................................182
Creating and Modifying a Serial Depot and its Configuration file for tape...............................183
PA-RISC installation tape creation example..........................................................................183
Assumptions...............................................................................................................183
Example PA-RISC installation tape creation.....................................................................184
Creating a boot CD/DVD or an installation DVD......................................................................185
Assumptions....................................................................................................................185
File and ISO image size considerations...............................................................................185
Boot and archive-based CD/DVDs.....................................................................................185
Boot CD/DVD examples..............................................................................................186
Create HP-UX 11i v3 bootable CD/DVD media for two-step media recovery...................186
Contents 7
Page 8

Create HP-UX 11i v2 bootable media on USB DVD drive for two-step media recovery......186
Installation archive-based DVD examples........................................................................186
Put an Itanium-based HP-UX 11i v3 golden archive on a DVD.......................................186
Put a PA-RISC HP-UX 11i v2 golden archive on a DVD..................................................187
Put two HP-UX 11i v2 golden archives, one Itanium-based and one PA-RISC, on a DVD....187
Create a recovery DVD...........................................................................................187
Create an HP-UX 11i v2 Itanium-based recovery DVD using an existing network recovery
image...................................................................................................................187
Error messages...........................................................................................................187
No DVD available..................................................................................................187
No DVD special files...............................................................................................188
Missing -c argument on HP-UX 11i v2 USB DVD drive..................................................188
Depot-based DVDs...........................................................................................................188
HP-UX 11i v2 Depot-based installation DVDs...................................................................188
HP-UX 11i v3 Depot-based installation DVDs...................................................................190
15 Recovery..............................................................................................191
Overview............................................................................................................................191
System recovery....................................................................................................................191
System recovery tools.......................................................................................................192
Recovery tool comparison............................................................................................192
Considerations when using Veritas Volume Manager from Symantec..................................193
Recovery image contents..................................................................................................193
Recovery image configuration policies................................................................................194
Reconciling client and server Ignite-UX versions for recovery..................................................194
Recovery image creation process.......................................................................................195
Examining recovery image contents...............................................................................197
Verifying recovery image results....................................................................................199
Creating and using recovery tapes.....................................................................................201
Recovery tape creation examples..................................................................................201
Tape recovery for PA-RISC systems.................................................................................202
Tape recovery for Itanium-based systems........................................................................203
Tape recovery for Integrity Blade systems........................................................................208
Creating and using network recovery images......................................................................209
Adding clients for recovery ..........................................................................................210
Examples of network recovery image creation.................................................................212
Recovering using the network for PA-RISC clients..............................................................212
Recovering using the network for Itanium-based clients.....................................................213
Retaining recovery images................................................................................................214
Making recovery configuration file additions.......................................................................216
Using the recovery config.local file................................................................................216
Adding a depot..........................................................................................................216
Selecting file systems during recovery.................................................................................217
Tape recovery with no tape boot support — two-step media recovery.....................................217
Notes on cloning systems..................................................................................................219
Cloning a system using make_net_recovery....................................................................220
System recovery questions and answers..............................................................................221
16 Support and other resources...................................................................224
Contacting HP......................................................................................................................224
Before you contact HP......................................................................................................224
HP contact information.....................................................................................................224
Documentation feedback..................................................................................................224
Related information...............................................................................................................224
Documents......................................................................................................................224
Websites........................................................................................................................225
8 Contents
Page 9

Typographic conventions.......................................................................................................226
17 Documentation feedback.......................................................................227
A Troubleshooting ....................................................................................228
Errors and warnings..............................................................................................................228
Ignite-UX server problems .....................................................................................................228
Installing systems with Ignite-UX..............................................................................................228
Installing from media.............................................................................................................233
Installing from golden images.................................................................................................233
Common network booting errors.............................................................................................234
Creation of archive...............................................................................................................235
B Configuring DHCP services .....................................................................236
Overview of DHCP services ..................................................................................................236
DHCP usage examples..........................................................................................................237
Manage clients that will use DHCP during and after installation.............................................237
Manage clients with temporary IP addresses during installation..............................................237
Using bootptab as an alternative to DHCP ..............................................................................238
Background information on DHCP design ...........................................................................238
C LIF volume contents.................................................................................239
A Description of the files in the LIF volume................................................................................239
D Using Integrated Lights Out Virtual Media with Ignite-UX.............................242
E Expert recovery......................................................................................249
Expert recovery preparation...................................................................................................249
The Expert recovery procedure...............................................................................................249
F Terminal keyboard shortcuts.....................................................................255
Basic keyboard shortcuts........................................................................................................255
Advanced keyboard navigation..............................................................................................255
HP terminals....................................................................................................................255
vt100 terminals................................................................................................................256
Glossary..................................................................................................258
Index.......................................................................................................267
Contents 9
Page 10

HP secure development lifecycle
Starting with HP-UX 11i v3 March 2013 update release, HP secure development lifecycle provides
the ability to authenticate HP-UX software. Software delivered through this release has been digitally
signed using HP's private key. You can now verify the authenticity of the software before installing
the products, delivered through this release.
To verify the software signatures in signed depot, the following products must be installed on your
system:
• B.11.31.1303 or later version of SD (Software Distributor)
• A.01.01.07 or later version of HP-UX Whitelisting (WhiteListInf)
To verify the signatures, run: /usr/sbin/swsign -v –s <depot_path>. For more information,
see Software Distributor documentation at http://www.hp.com/go/sd-docs.
NOTE: Ignite-UX software delivered with HP-UX 11i v3 March 2014 release or later supports
verification of the software signatures in signed depot or media, during cold installation.
For more information, see Ignite-UX documentation at http://www.hp.com/go/ignite-ux-docs.
10
Page 11

1 Ignite-UX overview
Welcome to Ignite-UX!
This chapter contains information for new and experienced users alike.
Introductory information:
• “Ignite-UX features” (page 11)
• “Getting the Ignite-UX software ” (page 13)
• “Ignite-UX commands and manpages” (page 14)
• “Introduction to the Ignite-UX GUI” (page 15)
Details about Ignite-UX:
• “How Ignite works” (page 18)
• “Ignite-UX server requirements” (page 22)
• “Supported peripherals ” (page 24)
Ignite-UX features
Client and server control
The installation sessions for multiple targets can be controlled from a single Ignite-UX server in a
true client/server model. A GUI is provided to run on the server and manage multiple simultaneous
client installation sessions. Alternatively, a single installation session can be controlled from the
client machine. A single Ignite-UX installation server can serve multiple releases of HP-UX for different
clients.
Easy-to-use GUI
The Ignite-UX GUI uses tabs and dialog boxes for task navigation. The Ignite-UX GUI only runs on
an Ignite-UX server.
Terminal User Interface
Ignite-UX uses a terminal user interface (TUI) with keyboard navigation when run from a client.
Ignite may also be run in TUI mode from the server.
Command Line Interface
Commands that power Ignite-UX can be executed directly from the operating system's command
shell on an Ignite-UX server or client. For the list of commands, see “Ignite-UX commands and
manpages” (page 14).
Multi-sourced installations
Installations can use multiple Software Distributor (SD) depots in a single installation session. For
example, you can install your base OS from one SD depot, a set of patches from another SD depot,
and the applications you want from a third SD depot; all in one session.
Multiple archive formats
Ignite-UX supports tar, cpio, and pax format archives. (To use the pax format with 11i v2, you
must have the PAX-Enh™ product installed. The pax format is not available for 11i v1.) Tools are
provided to help you create a golden image if you wish to install from an archive. You can use
one archive along with one or more depots containing patches or additional software.
Ignite-UX features 11
Page 12

One-step installation
Once you configure a system with a common configuration you want replicated to other systems,
use Ignite-UX to either manually or automatically install each client system. This common configuration
can include any supported HP-UX 11i operating system, and you can add any required patches
and applications.
Custom installations
It is easy to create a system that is ready to go as soon as the installation session completes. Many
of the tasks that are typically done as separate steps after an installation have been incorporated
into the installation process. Ignite-UX allows you to specify kernel parameters you want set and
user-supplied scripts you would like to run as part of the session. In addition, the host and networking
information normally supplied at first boot can be specified at install time.
Golden images
A system that has been installed and tuned may be used to create an image. That image may be
used as a custom configuration that may be applied in installations to other systems.
Automated installations
Set up a configuration and then install it on a client with no further user interaction. This is possible
for both the initial installation and the reinstallation cases.
Create a system manifest
Scan a system and produce a report detailing what hardware is present, how the disks are used,
what kernel modifications have been made, and what software has been installed. This report can
be customized to meet your needs.
Create custom installation media
Construct your own customized, bootable installation media. An example script,
make_media_install, is provided that can help you create bootable media (tapes, CDs, and
DVDs) with or without golden archives and SD depots. The example script can be found at /opt/
ignite/data/scripts/examples/make_media_install.
System recovery
Ignite-UX provides consistent, reliable recovery in the event of catastrophic hardware or software
failure by creating recovery images on tape (with client access to a tape drive) or on any Ignite-UX
server in your environment (with client access to the network).
Support for multiple architectures
Ignite-UX supports both the Precision Architecture Reduced Instruction Set Computing (PA-RISC)
and the Intel®Itanium® (Itanium®-based) hardware architectures.
Support for HP Servicecontrol manager
Ignite-UX supports installing HP-UX clients in the HP Servicecontrol Manager environment. For
details, see the HP Servicecontrol Manager 3.0 User's Guide.
Support for new hardware
Each new release of the Ignite-UX product supports the new hardware included in the corresponding
release of HP-UX.
12 Ignite-UX overview
Page 13
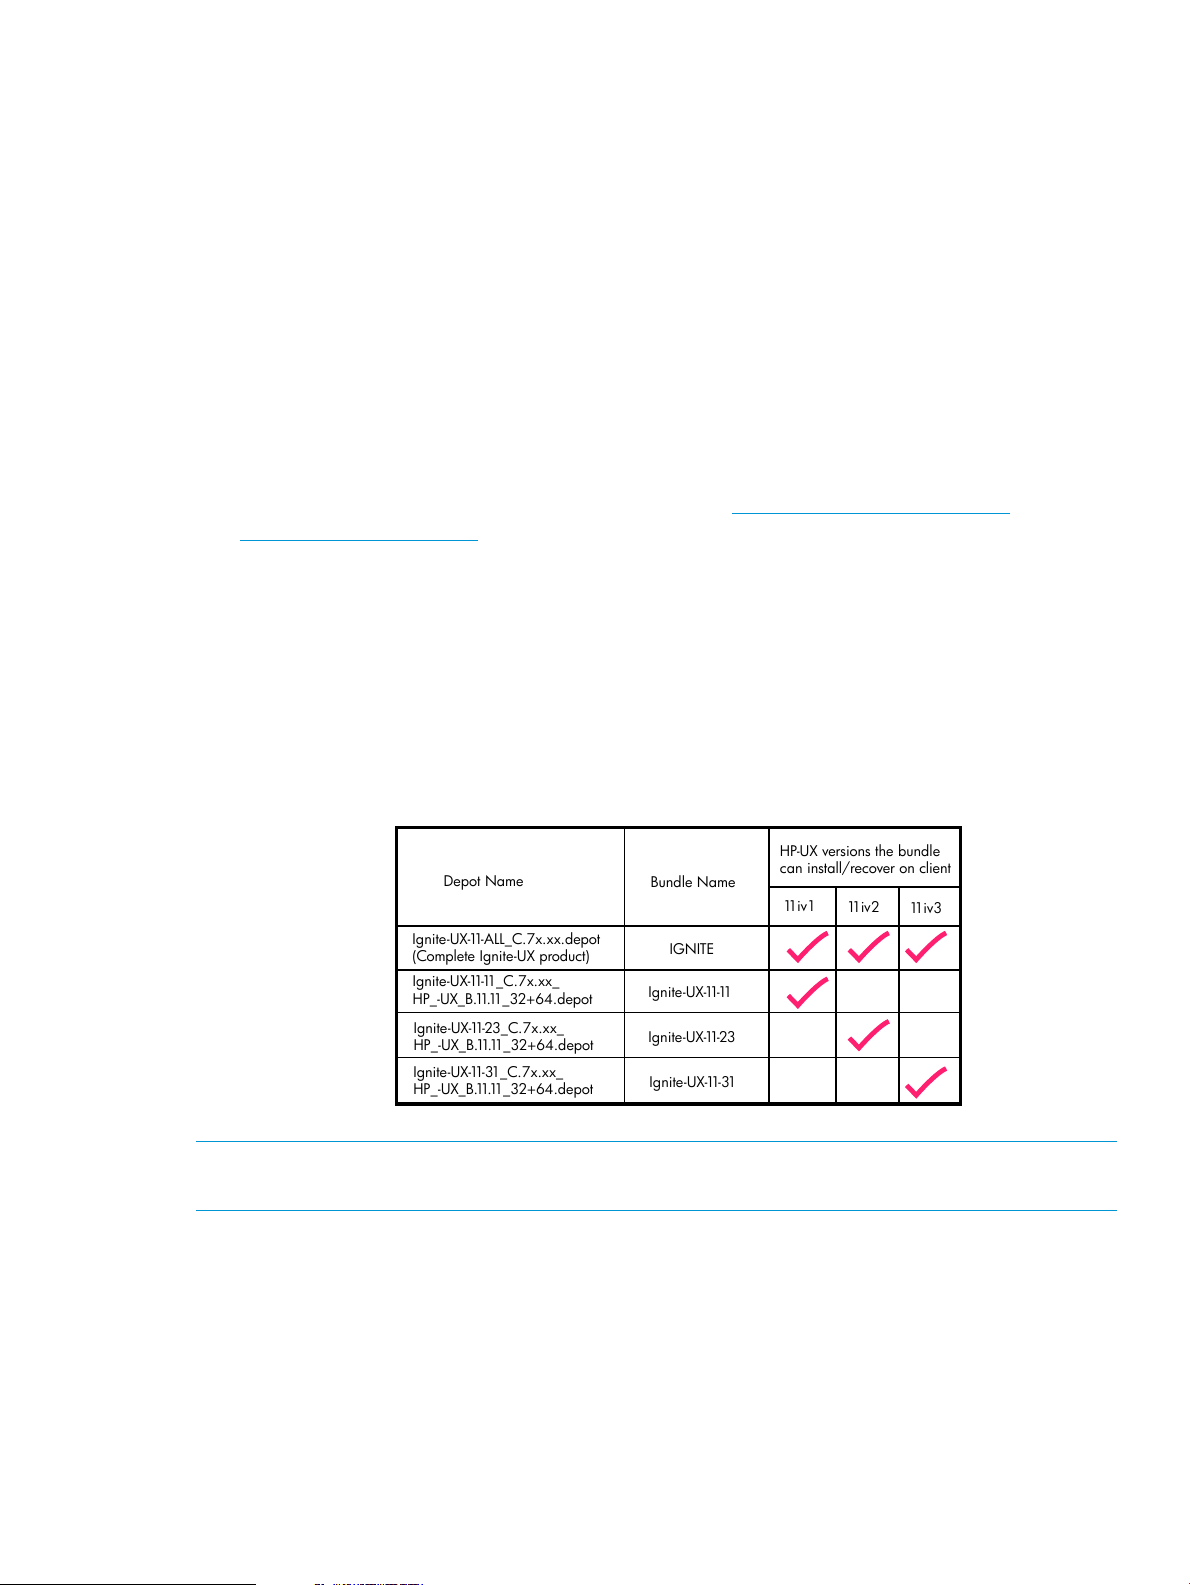
Getting the Ignite-UX software
Ignite-UX-11-11_C.7x.xx_
HP_-UX_B.11.11_32+64.depot
Ignite-UX-11-23_C.7x.xx_
HP_-UX_B.11.11_32+64.depot
Ignite-UX-11-31_C.7x.xx_
HP_-UX_B.11.11_32+64.depot
Ignite-UX-11-ALL_C.7x.xx.depot
(Complete Ignite-UX product)
IGNITE
Depot Name
Bundle Name
HP-UX versions the bundle
can install/recover on client
11iv1
11iv2
11iv3
Ignite-UX-11-11
Ignite-UX-11-23
Ignite-UX-11-31
Ignite-UX is available in standard SD (Software Distributor) depot format from OE and AR media,
and from the HP Software Depot Website.
Any Ignite-UX bundle is safe to install at any time. None of the filesets in Ignite-UX bundles will
cause a reboot to occur.
• OE and AR Media
Ignite-UX released on OE or AR media can only be installed on a server running the HP-UX
version supported by the OE or AR media.
This Ignite-UX is the complete product. (The Ignite complete product is capable of installing
and recovering all supported versions of HP-UX.)
If you require a version of Ignite-UX that can be installed onto any supported version of HP-UX,
read the next section about downloading Ignite-UX from the HP Software Depot Website.
• HP Software Depot Website
Follow this link for Ignite-UX on HP Software Depot: http://www.hp.com/go/
ignite-ux-download
The Ignite-UX depots available at Software Depot contain the latest Ignite-UX version and can
be installed on servers running any supported version of HP-UX.
• Support for Installation and Recovery of all Supported HP-UX Operating System Versions
Each Ignite-UX bundle contains the Ignite-UX tools, plus the data files required to install and
recover the particular HP-UX operating systems indicated by the bundle name.
See the figure below for a list of available bundles and the HP-UX versions the bundles can
install and recover.
Figure 1 Ignite-UX bundles available in the Ignite-UX product
NOTE: As of Ignite-UX version C.7.1, the name of the Ignite-UX complete product bundle that
installs all supported versions of HP-UX has changed from B5725AA to IGNITE.
Each bundle can be installed on a server running any version of HP-UX. For example,
Ignite-UX-11-23 can be installed on a server running HP-UX 11i v1 (B.11.11). You can install one
or more of the individual Ignite-UX-11-xx bundles onto your system.
HP recommends you install the complete Ignite-UX product (IGNITE) unless you want to block the
use of a specific version of HP-UX, increase the download speed from the Software Depot website,
or conserve disk space on the server.
As a best practice, do not swremove Ignite-UX before updating to a new version. Doing so will
cause some files to be reset, including the INDEX file, thus you will lose any customizations.
Getting the Ignite-UX software 13
Page 14

IMPORTANT: Installing individual bundles instead of the complete product might cause problems
for Ignite-UX if the complete product was installed previously. See the Installing and Updating
Ignite-UX white paper if you are unsure of what to install to upgrade Ignite-UX. Links to the Ignite-UX
white papers are found at http://www.hp.com/go/ignite-ux-docs.
Ignite-UX commands and manpages
The manual pages (manpages) associated with Ignite-UX commands are in the /opt/ignite/
share/doc/ directory, are available in the HP-UX Reference at http://www.hp.com/go/
ignite-ux-docs, and are listed in Table 2 according to the directory the commands are in.
Table 2 Ignite-UX command manpages
DescriptionIgnite-UX Command Manpages
Commands in /opt/ignite/bin :
add_new_client(1M)
auto_adm(4)
check_net_recovery(1M)
check_tape_recovery(1M)
Add a client to an Ignite-UX server without requiring a client boot from
the Ignite-UX server.
Manage logical interchange format (LIF) AUTO configuration files.auto_adm(1M)
Description of auto_adm file formats
Reboot and install systems using Ignite-UX.bootsys(1M)
Compare the files on a running system with a recovery archive made
with make_net_recovery.
Compare the files on a running system with a recovery archive made
with make_tape_recovery.
Replicate a PA-RISC boot tape.copy_boot_tape(1M)
Configure, install, and recover HP-UX systems.ignite(5)
Manage Ignite-UX configuration files.instl_adm(1M)
Description of configuration file syntax.instl_adm(4)
Parse and debug a client's configuration files.instl_dbg(1M)
Create a boot tape for a PA-RISC system.make_boot_tape(1M)
Create Software Distributor (SD) bundles in a depot.make_bundles(1M)
Generate a configuration file for software in an SD depot.make_config(1M)
Commands in /opt/ignite/lbin:
ansitape(1M)
ansitape(5)
14 Ignite-UX overview
Create SD depots from SD bundles for use by Ignite-UX.make_depots(1M)
Create a bootable ANSI labeled tape for Itanium-based systems.make_ipf_tape(1M)
Create bootable Ignite-UX LIFmedia image file.make_medialif(1M)
Create recovery images and store them on a network system.make_net_recovery(1M)
Create recovery images and store them on tape.make_tape_recovery(1M)
Manage Ignite-UX INDEX files without directly editing them.manage_index(1M)
Print a system manifest.print_manifest(1M)
Create hardware configuration file.save_config(1M)
Read and write magnetic tapes conforming to the ANSI standard for
magnetic tape labelling.
Description of ANSI-labeled tape format.
Page 15
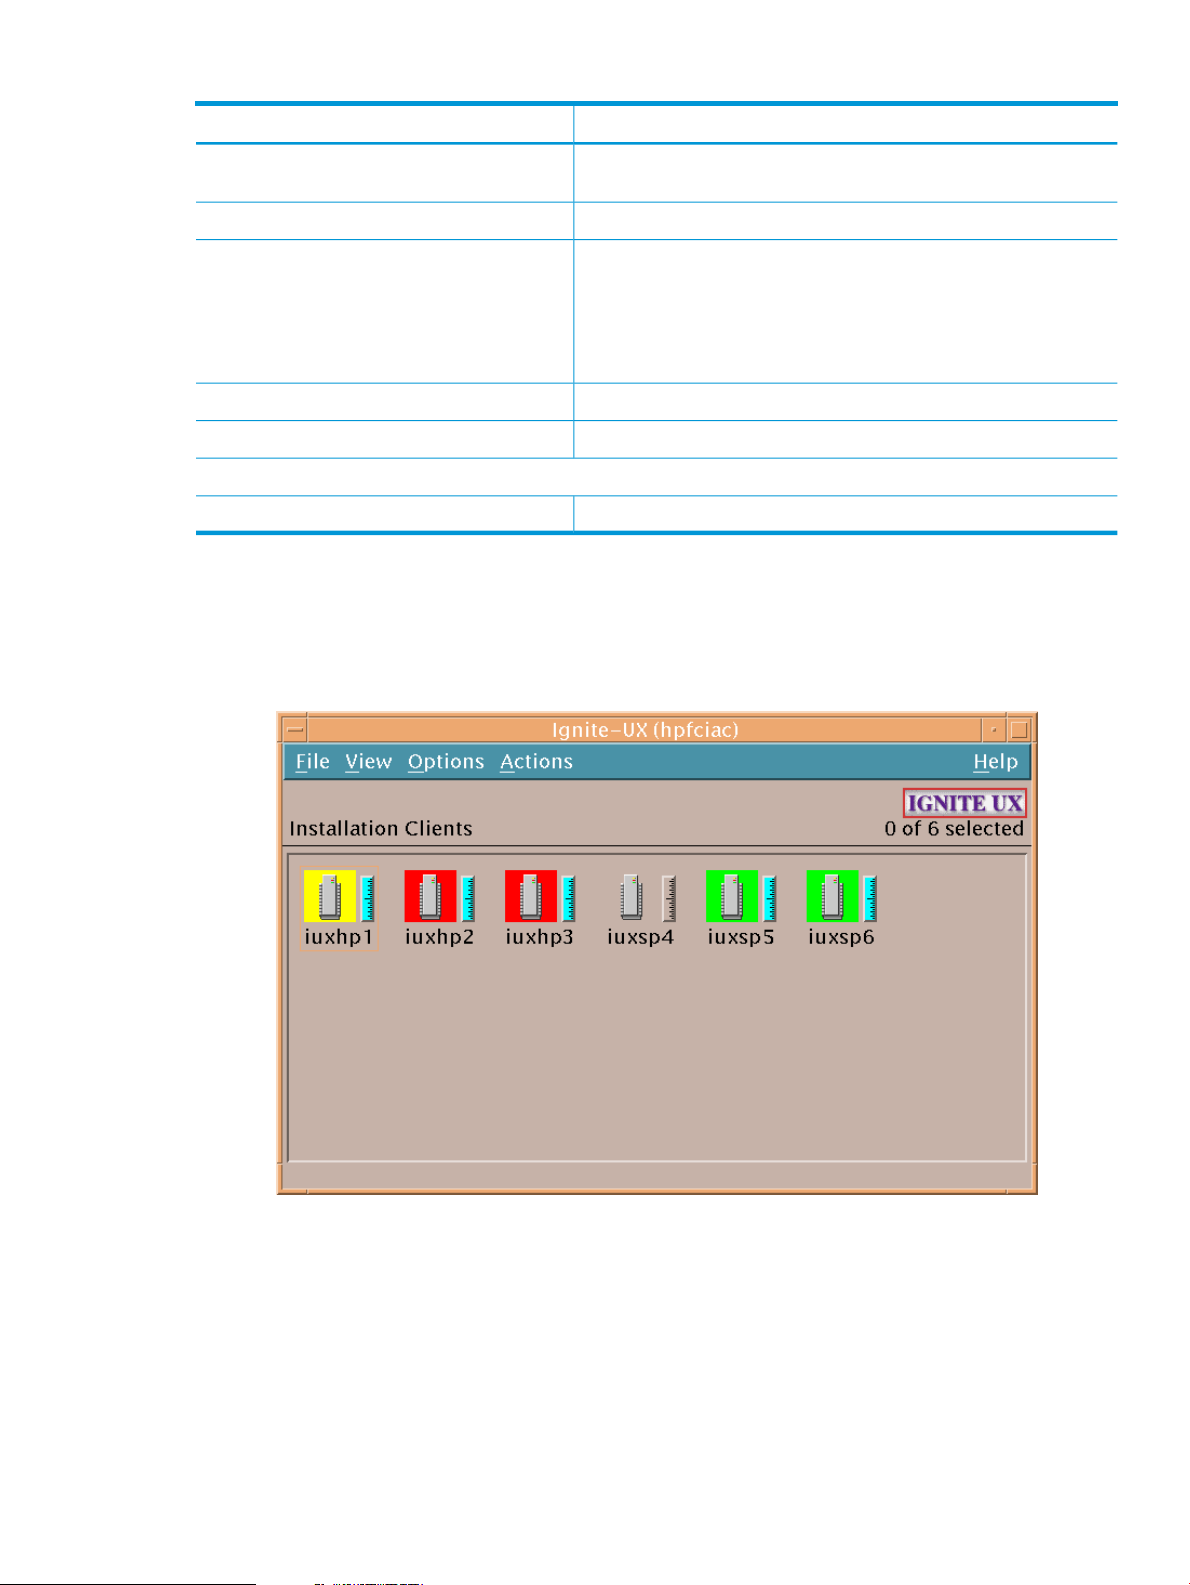
Table 2 Ignite-UX command manpages (continued)
DescriptionIgnite-UX Command Manpages
archive_impact(1M)
instl_combine(1M)
Commands in /opt/ignite/data/scripts:
Introduction to the Ignite-UX GUI
The Ignite-UX GUI workspace provides access to all management tasks using the menu bar and
context-sensitive menus.
Figure 2 Ignite-UX GUI
Calculate the per file system disk space for tar, cpio, and tar archives,
and create the impacts statements for use in configuration files.
Boot protocol server for Ignite-UX clients.instl_bootd(1M)
Combine a LIF volume and file system for use on CD/DVD. This
command is used to construct custom, bootable, installation media.
An example script, /opt/ignite/data/scripts/examples/
make_media_install, is provided that can help you create
bootable media (PA-RISC tapes, CDs, and DVDs) with or without
golden archives and/or SD depots included.
Create a depot containing Ignite-UX recovery filesets.pkg_rec_depot(1M)
Perform some administration tasks for an Ignite-UX server.setup_server(1M)
Create an archive of a client.make_sys_image(1M)
The Ignite-UX GUI workspace graphically represents clients as icons labeled with the clients’
hostnames. You can:
• Click a client icon to select it for further actions.
• Double-click the client icon to display the Client Status dialog box.
• Right-click to activate the Actions menu. You must select the client before right-clicking; any
selections made from the Actions menu apply to the selected client.
For more information about these actions, see Chapter 10: “Booting and installing HP-UX on clients
using the server” (page 110), or click Help.
Introduction to the Ignite-UX GUI 15
Page 16

Each client’s installation status is indicated by the colored border around its icon, and the installation
gauge shows the relative progress:
• Green: The operating system is completely installed, booted, and running with no errors or
warnings.
• Yellow: A warning condition exists and must be investigated.
• Red: An error condition is present. The operating system is partially installed, or the installation
has stopped.
• No color: Installation has not yet started or the client has been stopped.
Client icons are shown for all booted clients and those that can be used as recovery systems. These
systems are known to Ignite-UX by their existence in the /var/opt/ignite/clients file.
File menu
The File menu contains basic Ignite-UX functionality:
• Search - Find clients that match a text string.
• Print - To print a listing of systems, the display must be set with View->By Properties
• Exit - Quit Ignite-UX.
View menu
Use the View menu to customize the Ignite-UX GUI display:
• Columns - Choose which client attributes to display in which column. These selections are
apparent only when the object list is displayed by properties.
• Filter - View a subset of clients by selected criteria.
• Sort - Orders the displayed clients by sort criteria.
• By Name and Icon - Displays clients graphically.
• By Properties - Displays clients in a text format rather than in the default graphical
representation.
TIP: Using the By Properties view and sorting the list makes it easier to scan for clients that
have finished installing. For example, to view the clients by the percentage of completion,
select View->Sort->% Complete: Descending. The list of clients will then appear with the clients
closest to completion first, as shown in Figure 3.
16 Ignite-UX overview
Page 17

Figure 3 Ignite-UX GUI by properties view
• Save View as Default - Saves the current Ignite-UX GUI View settings.
Options menu
Use the Options menu to set server configuration variables and to control the refresh rate of the
Ignite-UX display.
• Server Configuration - Identify and set up your installation server. The selections here are
covered in detail in “More server setup options” (page 37).
• Change Refresh Interval - Select how frequently you want the client display updated.
• Refresh List - Update the client display immediately.
Actions menu
To view available actions for a client, select its icon, then select the Actions menu. The actions
displayed are dependent on the status of the client, so all actions may not be available. You can
use the following actions to manage clients:
• View Install History... - Lists details of all successfully installed clients.
• Boot Client... - Boots the selected client. If no client is selected, one will be prompted for.
• Add New Client for Recovery... - Selects a client to be recovered. For more information, see
“Adding clients for recovery ” (page 210).
• Run Tutorial/Server Setup... - Displays the Welcome dialog box. From there, you can run the
Tutorial and Demo, or click Server Setup... to launch the Server Setup Wizard.
• Client Status... - The status of the selected client is polled and displayed, as in Figure 4
(page 18).
Introduction to the Ignite-UX GUI 17
Page 18
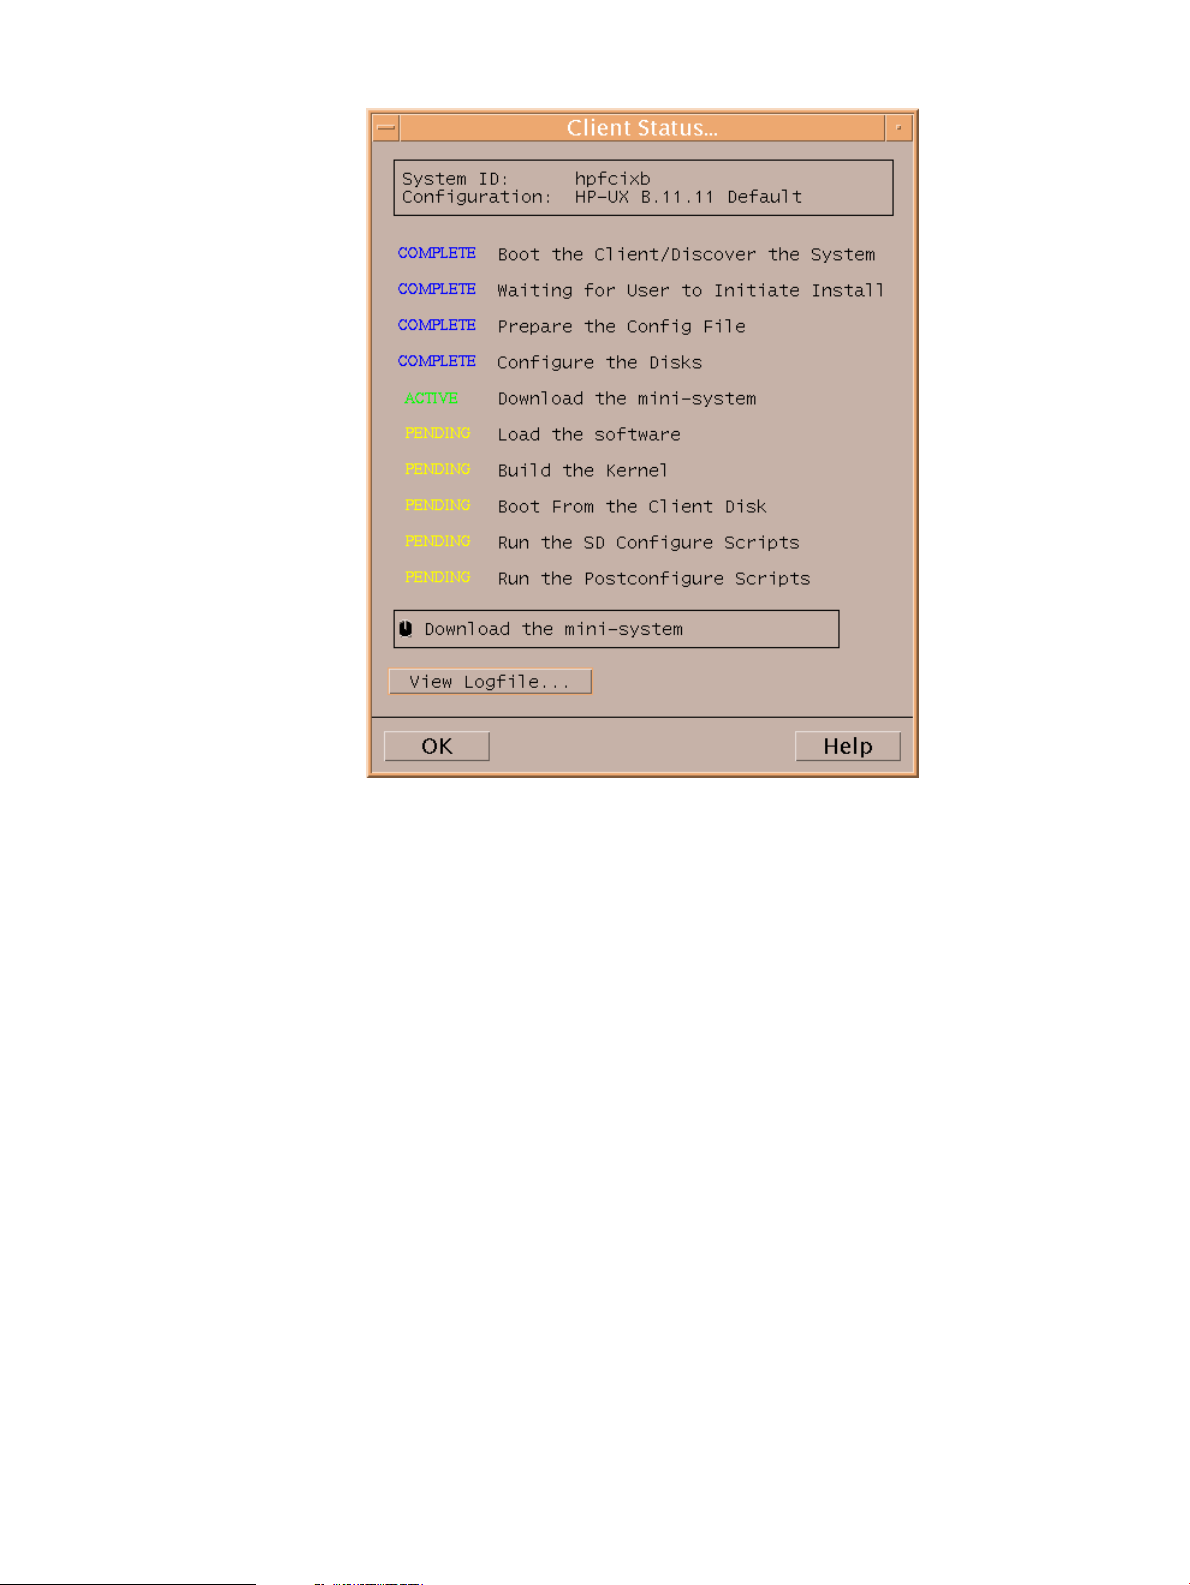
Figure 4 Client status dialog box
• Install Client - Starts the HP-UX installation process for the selected client. This process is
explained in Chapter 10: “Booting and installing HP-UX on clients using the server” (page 110).
• Stop Install... - Stops the installation process on the selected client. After stopping an install,
you can reboot or halt the client.
• Create Network Recovery Archive - Creates a network recovery image using the
make_net_recovery command. See Chapter 15: “Recovery” (page 191) for more information.
• Create Tape Recovery Archive - Creates a recovery image using the make_tape_recovery
command. See Chapter 15: “Recovery” (page 191) for more information.
• Move to History... - Saves critical files for the client, adds them to the history file, and removes
the client. The client installation must successfully complete for the configuration to be moved
to the history file.
• Remove Client... - Deletes the selected client configuration. All client data, except for the
recovery image, is removed. Recovery information in the client’s directories will be removed.
• View Hardware... - Lists the hardware associated with the selected client.
• View/Print Manifest... - Allows you to view and print the manifest for the selected client. The
manifest file details the client’s installation and is available on the client and Ignite-UX server
after the installation. For more information, see “Viewing and printing a manifest ” (page 149).
• Change Icon Name... - Launches a dialog box for renaming the selected icon.
How Ignite works
When deciding the best way to use Ignite in your data center, it might be useful to understand the
structure of Ignite – how it gets started on the client and the functional steps it performs. This section
18 Ignite-UX overview
Page 19

describes the major components of Ignite and where they come from. Ignite installation and recovery
is described in terms of phases, with each phase described in detail.
The Ignite-UX install environment
HP-UX installation and recovery is accomplished using the Ignite-UX install environment.
The Ignite install environment is a small subset of the HP-UX operating system that allows HP-UX to
install itself onto a system. During the initial phases of installation and recovery, the install
environment runs in client memory without any disk-based storage. A memory-based RAM disk
holds the initial root file system needed for HP-UX operation. While operating with a memory-based
root disk file system, file system space is very limited. On smaller memory systems, memory for the
HP-UX kernel and processes might also be limited. Command libraries and other files must be
loaded and removed as needed. (Increasing the size of the memory-based root disk to make more
space would result in insufficient memory being available for the processes that accomplish
installation and recovery.) Once the correct disks are identified, volumes and file systems are
created. The install environment then switches to a disk-based file system. When that is completed,
some of the RAM disk space is freed.
The Ignite install environment consists of:
• [W|V|I]INSTALL – The HP-UX install kernel, which is statically linked and includes a wide
variety of I/O and other modules so it is able to run on all supported systems.
• [W|V|I]INSTALLFS – The initial HP-UX install file system, which is copied into the root RAM
disk during boot. The first 8 KB can contain Ignite-UX configuration content.
• INSTCMDS or INSTCMDSIA, SYSCMDS or SYSCMDSIA, and RECCMDS or RECCMDSIA –
Archives of commands, libraries, and other files needed to accomplish installation and recovery,
but are not needed to initially get the install environment running. These are loaded as needed
during installation and recovery.
The Ignite-UX install kernel and install file system are loaded into system memory by the standard
HP-UX boot loader or virtual system boot loader software. Note that there are a number of boot
sources where the Ignite install environment may reside. Also, the details of booting vary according
to your Ignite data center configuration.
Boot sources
Ignite always retrieves the install kernel and install file system from the boot source. By default,
Ignite retrieves INSTCMDS[IA], SYSCMDS[IA], and RECCMDS[IA] from that same boot source,
but can get these command archives from a different source if requested to. Ignite can determine
the boot source by querying the HP-UX kernel.
Ignite can switch its source for command archives and depots if configuration information in the
install file system instructs it to, or if instructed to by the Ignite user interface.
Ignite will operate in the same manner, regardless of the boot source.
Installation versus recovery
Ignite internally uses the same approach, regardless of whether you are performing an installation
or recovery. The terms “installation” and “recovery” are valuable to describe intended use, but
Ignite's internal operation make it possible to blur the distinction between the two, such as when
you use golden images.
This design is quite powerful, and allows Ignite to handle significant system differences during
recovery by adapting as needed and regressing to more install-like behavior if required.
Network booting and IP addresses
When a system boots HP-UX from an Ignite-UX server, it needs an IP address to get the operating
system kernel. This first IP address is not necessarily the same IP address the system will be assigned
How Ignite works 19
Page 20

for networking when its kernel is up and running. The mechanisms for distributing the first and
second IP addresses are sometimes different.
PA-RISC Systems
When a PA-RISC system boots from an Ignite-UX server, the first IP address request is answered
by the instl_bootd daemon. This communication uses ports 1067 and 1068. The file /etc/
opt/ignite/instl_boottab is referenced to assign the first IP address to the booting system
whether it is registered or anonymous.
After HP-UX is running on a PA-RISC system, it requests a second IP address for networking. This
request is answered by bootpd using ports 67 and 68. The /etc/bootptab file is referenced
for registered clients; DHCP services are used for anonymous clients.
Itanium-Based Systems
When an Itanium-based system boots from an Ignite-UX server, the first IP address request is
answered by the bootpd daemon. This communication uses ports 67 and 68. The file /etc/
bootptab is referenced to assign the first IP address to a registered booting system. If the system
is not registered, and you are running HP-UX 11i v2 or HP-UX 11i v3 on the Ignite-UX server, DHCP
is used to assign the booting IP address.
When Itanium-based systems request a second IP address for networking, it uses the same daemon,
file and ports described above. Configuring DHCP for booting is separate from configuring DHCP
for assigning network IP addresses. See “Configuring an Ignite server to boot anonymous
Itanium-based clients” (page 44) for information about how to configure DHCP for assigning first
(boot) and second (networking) IP addresses without conflict.
Phases of operation
Ignite uses the sequence of high-level phases outlined below to accomplish installation and recovery.
Depending on configuration information, some steps within these phases might be skipped. At a
very high level, Ignite operates in four phases:
• Startup – The install environment is loaded from the boot source to the client memory. Ignite
runs in client memory. The operation is configured and launched. If the installation or recovery
is interactive, the user interface is run to create a configuration.
• Phase 1 – Storage is set up and Ignite moves to the client disk.
• Phase 2 – HP-UX archives and depot software are installed. The HP-UX kernel is built. A reboot
is required to start the final HP-UX kernel and make the new file system the root file system.
• Phase 3 – Software is configured. The system is now fully installed or recovered after a reboot
or halt.
Startup
Ignite-UX software is started and the Ignite user interface is run to select, create, or modify the
configuration that will be used to control installation or recovery. The result of this phase is a
detailed system configuration to be used for installation or recovery. Processing for this phase is
done on a RAM file system.
1. The install kernel and install file system are loaded from the boot source to the client memory
via boot loader functionality. The HP-UX install kernel is started.
2. The Ignite software is started by the install kernel as an application process running on the
install file system.
3. Additional RAM file systems are created to allow enough file system space for loading system
setup content.
4. If the system has SAS disks, the I/O configuration is modified as needed to make the mapping
between bays and HW paths consistent. This aids consistent installation and recovery.
20 Ignite-UX overview
Page 21

(Improved agile device selection and recovery has eliminated the need for this feature and
might result in this step being removed in the future.)
5. Configuration content from the install file system is loaded to determine if the Ignite TUI should
be started and if special inventory control is needed. (The Ignite TUI is started by default.)
6. A system I/O inventory is performed. This identifies devices where HP-UX may be installed,
and identifies devices and networks used to accomplish installation. Install file system
configuration and boot loader option content may be used to control inventory. The boot
source is also determined.
7. Unless configuration information directs otherwise, the Ignite TUI is launched on the client.
• The operation to be performed is set. (Advanced Install is the default operation.)
• Networking configuration information is determined, if the installation requires the network.
• The complete set of Ignite configuration files is read and parsed. Note that changing the
Configuration or Environment will result in rereading and parsing config content, since
these changes generally result in changes to the set of config files.
• System, software, file system, and other configuration changes are gathered via the
interface.
• When Go! is selected from the user interface, the requested installation or recovery is
launched.
• Configuration sanity checking is performed. If there are problems, you are returned to
the TUI.
Phase 1
• The modified configuration is saved to control installation or recovery processing.
8. If the TUI was not selected to launch, sanity checking is done on the selected config.
Storage is set up and Ignite relocates to the new disk file system. The result of this phase is the
install or recovery functionality running on what appears to be a normal disk-based file system,
and if recovery, an I/O configuration that appears to be restored. Some aspects of the configuration
cannot be fully restored until reboot. Processing for this phase is done on a RAM file system.
1. During a recovery, the original I/O configuration is restored if I/O instance data is present
in the config. Some aspects of the configuration might be instantly changed. Some aspects
are temporarily changed and will be finalized during reboot. If the current system is different,
some aspects of the I/O configuration will be impossible to restore.
2. Create disk partitions if needed (Integrity systems only).
3. Create volume manager volumes as needed.
4. Create and mount file systems.
5. Determine software sources and selections.
6. Run pre-config control scripts.
7. Set boot path.
8. Set up and enable swap space.
9. Save final volume configuration data to disk file system.
10. Set locale.
11. Move needed content from RAM file system to disk file system. Load the complete set of
commands, libraries, and other files required to accomplish installation and recovery from
Ignite command archives to the new disk file system (SYSCMDS or SYSCMDSIA).
12. Change the root directory to the disk file system with chroot.
Phase 2
File content is installed or restored. The result of this phase is the final disk file system and content.
Some cleanup and processing that must be done after system reboot is still required. For the HP-UX
How Ignite works 21
Page 22

Phase 3
install kernel, the RAM file system is still the root disk. For the commands in this phase, the new
disk file systems is the root file system. A reboot is required to change the HP-UX kernel root disk
from the RAM disk to the final disk.
1. Release RAM disk space to accommodate software installation and kernel build processes to
be done later.
2. Load the archive if indicated in the config (for recovery and golden image installation).
3. Update mnttab so it appears to be correct during installation and kernel build.
4. Create device special files.
5. If needed, rename device files to make the I/O configuration appear fully restored.
6. Update bootconf.
7. Change I/O configuration files to match final instance config using ioinit and ioscan
-M.
8. Load depot-based software if indicated in the configuration.
9. Save configuration so it is available for reuse.
10. Build final system kernel.
11. Set up the inittab file so final Ignite-UX processing will be done after reboot.
12. Reboot system.
Software is configured and final installation or recovery cleanup is done. The result of this phase
is a fully installed or recovered system, ready for use after reboot. If configuration has been deferred,
the system will be set up to run FIRST-BOOT set_parms on initial boot so you may choose the
hostname, IP address, and other settings. Processing for this phase is done using the final disk-based
file system.
1. Update the AUTO boot file.
2. Configure software.
3. Configure final networking.
4. Generate a system manifest.
5. Save the installation information for deferred configuration.
6. Perform final cleanup.
7. Reboot or halt system.
Ignite-UX server requirements
Hardware requirements
An Ignite-UX server supporting boot, installation and recovery for clients requires the following
hardware:
• Computer: An HP 9000 (PA-RISC) system running HP-UX 11i v1, HP-UX 11i v2, or HP-UX 11i
v3; or an Itanium®-based system running HP-UX 11i v2 or HP-UX 11i v3 is required.
• Memory: Client installation and recovery performance is typically limited by network throughput.
Normally, no special consideration for system memory is needed.
• DVD drive: A DVD device is recommended to simplify copying HP-UX release depots directly
from installation media to the Ignite-UX server.
• Tape device: As part of your overall disaster recovery plan, you must consider how the Ignite-UX
server itself would be recovered. A tape drive allows the Ignite-UX server to use tape media
to save the server’s own recovery archive. Note that depots, saved client recovery archives,
and other client-specific content typically should not be included in the recovery archive saved
to tape. This client content must be saved using backup software. Not all systems support tape
boot and so require two-step media recovery. See “Tape recovery with no tape boot support
22 Ignite-UX overview
Page 23

— two-step media recovery” (page 217) and the Ignite-UX Installation Booting white paper
available at http://www.hp.com/go/ignite-ux-docs for more information.
• Network interface: One or more network adapters to support network boot and installation
is required. A network adapter directly connected to each supported subnet is preferred. Note
that multiple simultaneous network installations and recovery operations can create significant
network traffic.
• Disk space: An Ignite-UX server might need considerable disk space.
Ignite-UX servers must have at least 2 GB of free disk space available in /opt/ignite
◦
to support installation of all HP-UX releases (B.11.11, B.11.23, and B.11.31).
To save space, you can support only those HP-UX releases you plan to install or recover.
◦ Ignite-UX servers might require significant space in /var/opt/ignite to support clients’
systems, store software depots, and save recovery archives. Default HP-UX file system
sizes are unlikely to be sufficient for an Ignite-UX server. You must consider the number
of client systems you intend to support and the maximum number of recovery archives to
be saved for each client.
The size of a recovery archive depends on the content being saved. A recovery archive
will normally include at least a full set of HP-UX operating system software.
◦ File system space is needed to hold depots required for installation. You must consider
how many different OS releases the server might need to support. Note that you might
also want to support different OE versions of each HP-UX revision on your Ignite server,
such as the HP-UX 11i v2 September 2004 OE release and the 11i v2 September 2006
OE release, or the 11i v3 Base OE (BOE) and the 11i v3 Virtual Server OE (VSE-OE) of
a particular release. Space will also be needed to store additional application and patch
depots.
◦ If you use golden images, file system space is needed to hold them. Consider the size
and number of images you will require.
◦ See the HP-UX Installation and Update Guide available from http://www.hp.com/
go/hpux-core-docs-11iv3 for a detailed description of the disk space required for
all Operating Environments for your version of HP-UX.
Other considerations
An Ignite-UX server might also require software, utilities, and configuration:
• Use of TFTP: Ignite-UX transfers some files using TFTP. A list of the minimum directories needed
for file transfer is kept in the /etc/inetd.conf file. You might need to add directories to
the list if you place configuration scripts in nonstandard locations.
For example, the Ignite server must have the following entry in its /etc/inetd.conf file.
tftp dgram udp wait root /usr/lbin/tftpd\
tftpd /opt/ignite /var/opt/ignite
If you are using HP Serviceguard clusters or systems with multiple IP addresses on a LAN
interface, use the -s option with tftp and install the patch PHNE_28762 11.11.
• Use of ssh: With Ignite-UX version C.6.8 and later, bootsys can use ssh, and ignite can
use ssh for make_[tape|net]_recovery. With Ignite-UX version C.7.1 and later, the
ignite command can use ssh when calling bootsys. To use ssh, it must be available on
the Ignite server and on the client, and you must have an existing public/private key pair.
• Optional use of an X11 display server: An X11 display server allows you to use the GUI to
configure and start Ignite. Your Ignite-UX server can use an X server to display the Ignite GUI,
or you can redirect the display to another X terminal by entering the following command:
Ignite-UX server requirements 23
Page 24

export DISPLAY=system_name:0.0
If DISPLAY is not set on the server, the Ignite TUI will run.
• Software: Get Ignite-UX and any software depots you plan to distribute to clients from the
product media (CD or DVD). Ignite-UX can also be downloaded from the web; see “Getting
the Ignite-UX software ” (page 13) for more information.
• Client access to server: There are multiple methods of having clients contact the Ignite server,
each suited to a different environment. See Chapter 2 (page 25) for more details.
Supported peripherals
Disks and other I/O
If a disk device is visible, it does not mean it is supported for installation. It is important to verify
that the disk is supported by the system, the host bus adaptor (HBA) Shell and is accessible from
the system console.
Computer system hardware documentation must be consulted for supported I/O configurations.
See the HP Support Center http://www.hp.com/go/hpsc for HP computer system hardware
documentation.
VxVM support is provided for a specific set of devices. The list of supported devices must be
consulted – see http://www.hp.com/go/hpux-LVM-VxVM-docs . Look for the section Support
Matrixes, and the document entitled Device Support Information for Veritas Products on HP-UX.
LVM supports all the devices HP-UX supports. See the HP-UX Supported Mass Storage Devices
Matrix for a table of I/O devices supported for each version of HP-UX.
Firmware
At times you might need new firmware to support a new device or HBA. Ensure that the client’s
firmware supports the devices and HBAs to be used for boot and root. For example, after the
HP9000 rp8400 system was first released, firmware changes enabled the system to boot from
disks connected to Ultra 160 HBAs. Check the Installation and Update Guide for your HP-UX
release, available at http://www.hp.com/go/hpux-core-docs-11iv3, for instructions on finding
firmware information.
Additionally, firmware support for Fibre Channel, tape devices, and LAN cards might vary. In
some cases, devices are supported for data use, but device boot is not supported.
Disk arrays
You can install disk arrays using HP-UX, but Ignite-UX does not directly support configuring an
array. The disk array must be configured first; see your array documentation for configuration
instructions. In some cases, system firmware may be used to set up disk arrays. The Ignite-UX install
environment contains tools that are also used to help configure disk arrays. To use these tools in
the install environment, you will need to use the expert recovery functionality to start an install
environment shell. It might also be necessary to load files that are not normally included in the
install environment by using the Ignite-UX loadfile command. When array configuration is
complete, it is necessary to reboot the system in order to use the newly configured disk LUNs during
install.
Client terminals
The Ignite-UX client-side operating system installation tools support VT100 and Wyse 60 terminals,
compatible terminal emulators, and all HP terminals. Additional information regarding how to
navigate within the Ignite-UX GUI with the keyboard is found in Appendix F (page 255).
24 Ignite-UX overview
Page 25

2 Making configuration decisions for Ignite servers
Ignite is flexible when configuring networking options and even allows options that don't require
networking. Also, you can switch to a source other than the boot source for install content. These
features allow you to choose from a variety of installation and recovery solutions.
Below are installation solutions, starting with the most simple and progressing to those more
complex. This chapter finishes with network booting debugging techniques.
Boot and install client from media
These options do not require a network:
• Cold install or update a single system directly from media kit DVDs
You can use the HP-UX 11i media kit DVDs with Ignite-UX to cold install or update a system.
For more information, see the HP-UX Installation and Update Guide for your version of HP-UX,
available at http://www.hp.com/go/hpux-core-docs-11iv3.
• Cold install from custom media
This option assumes you have already created custom installation media. Custom installation
media can be a tape or DVD with either a golden image or a recovery image on it. All
installation media are bootable. After you boot from media, choose Media only installation
as a Source Location Option from the Ignite-UX User Interface and Media Options screen. For
more information, see Chapter 14 (page 180).
• Recovery from tape
This option assumes you have already created a recovery tape. For more information, see
“Creating and using recovery tapes” (page 201).
Simple network solutions
These solutions use a single Ignite server that supports network boot, installation, and recovery.
The Ignite server and the client systems must be on the same subnet, and no other boot or installation
servers can be on that subnet.
Questions you will have to answer when configuring a simple network are:
• Are my clients PA-RISC or Itanium-based?
• Do I want to network boot all my clients?
• Do I want my clients to have their MAC addresses registered with the server to always boot
to the same assigned IP address (registered clients), or do I want an available IP address
assigned to them when they boot (anonymous clients) ?
• Do I want the booting IP address to be the same IP address used for networking after installation
is complete?
• Do I have DHCP running on my subnet?
Decision trees for Ignite-UX server configuration follow. Do not treat them as strictly yes-or-no
exercises. Your environment may require choosing multiple methods from the decision trees, and
although you may be able to use an option, you might reject it because it is not the best answer
for your environment. Also, keep in mind that these decision trees cover booting, so only the initial
IP address is affected. For more information, see “Network booting and IP addresses” (page 19).
A decision tree for network booting PA-RISC systems is shown in Figure 5. A decision tree for
network booting Itanium-based systems is shown in Figure 6 (page 27). The decision trees assume
the network boot clients are on the same subnet as the Ignite-UX server, and that you will always
use the install option to the boot console handler (BCH) boot command for PA-RISC systems.
Boot and install client from media 25
Page 26
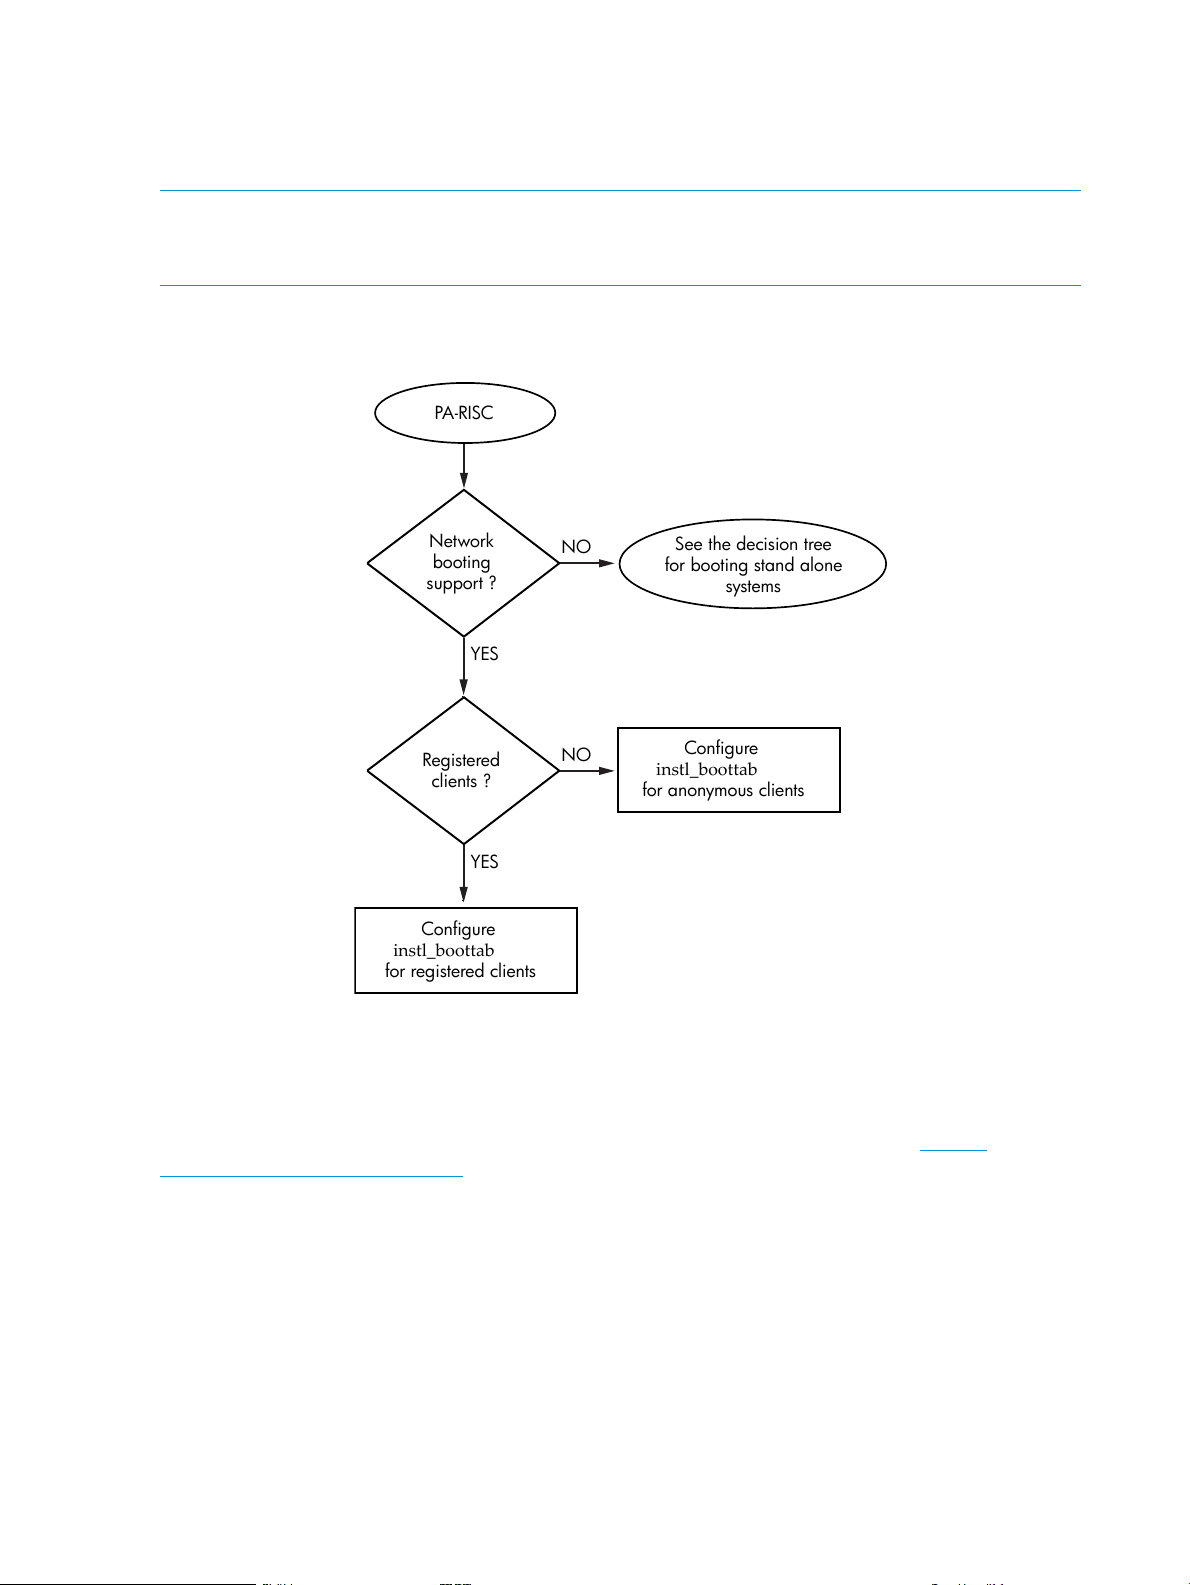
Further, the decision tree for network booting Itanium-based systems assumes there is only one
YES
NO
NO
Network
booting
support ?
YES
Registered
clients ?
PA-RISC
Configure
instl_boottab
for registered clients
Configure
instl_boottab
for anonymous clients
See the decision tree
for booting stand alone
systems
DHCP server on your subnet configured to answer boot requests, and that it is running HP-UX.
If you want to boot a system without using the network and your Ignite-UX server, see the decision
tree shown in Figure 34 (page 98).
NOTE: A lot of clients can only be booted using their built-in LAN interfaces. Other LAN interfaces
might not be supported for boot. For more information about LAN interface boot support, consult
the hardware documentation for the system or the add-in LAN card.
Use the following decision tree when configuring an Ignite-UX server for PA-RISC clients:
Figure 5 Decision Tree When Configuring a Server for Booting PA-RISC Systems
Configure instl_boottab for registered clients - To network boot registered PA-RISC clients, the
server uses the instl_bootd daemon to answer boot requests, and has clients’ IP addresses and
LAN addresses registered in /etc/opt/ignite/instl_boottab. The process of configuring
an Ignite-UX server for registered PA-RISC clients is described in “Configuring the Ignite-UX server
for PA-RISC clients” (page 31). See the Ignite-UX Quick Start Guide available at http://
www.hp.com/go/ignite-ux-docs if you are new to HP-UX.
Configure instl_boottab for anonymous clients - Network booting anonymous PA-RISC clients
is similar to booting registered PA-RISC clients; the difference is that some IPs in the /etc/opt/
ignite/instl_boottab file are not associated with any clients’ MAC addresses, and so may
be assigned to clients as requests come in. See “Configuring an Ignite server to boot anonymous
PA-RISC clients” (page 43) for more information.
See the decision tree for booting stand alone systems - This decision tree can be found in Figure 34.
26 Making configuration decisions for Ignite servers
Use the decision tree below when configuring an Ignite-UX server for Itanium-based clients.
Page 27
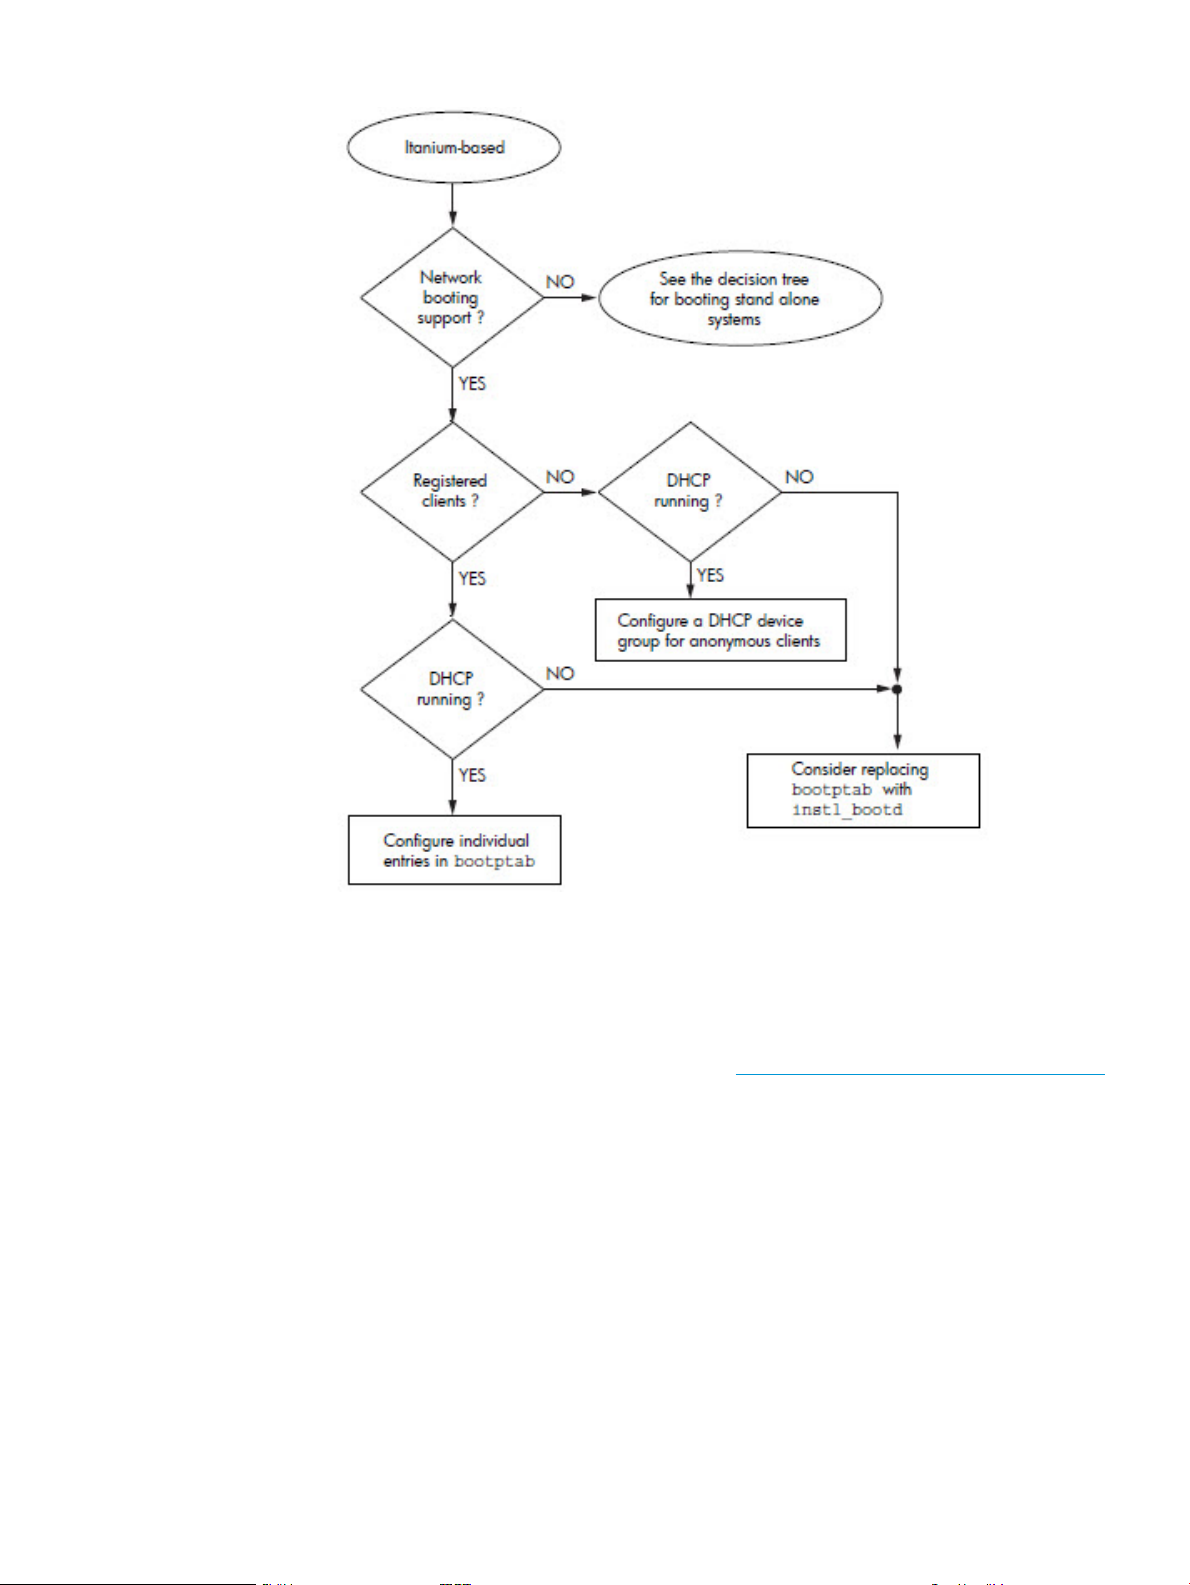
Figure 6 Decision Tree When Configuring a Server for Booting Itanium-Based Systems
Configure individual entries in bootptab — To network boot registered Itanium-based clients, the
server uses the bootpd daemon to answer boot requests, and has clients’ IP addresses and LAN
addresses registered in /etc/bootptab. One drawback to this option is that you must configure
an entry for every system that needs to boot. The advantage of this method is that it works on all
versions of HP-UX. See “Configuring the Ignite-UX server for Itanium-based clients” (page 35) for
details. See the Ignite-UX Quick Start Guide available at http://www.hp.com/go/ignite-ux-docs
if you are new to HP-UX.
Configure a DHCP device group for anonymous clients - Configuring an Ignite-UX server to boot
anonymous Itanium-based clients requires sophisticated considerations; see “Configuring an Ignite
server to boot anonymous Itanium-based clients” (page 44). This option is only available for Ignite
servers running HP-UX 11i v2 and later.
See the decision tree for booting stand alone systems - This decision tree can be found in Figure 34.
Alternate boot with network server installation
A simple way to avoid boot issues in complex network configurations is to avoid network boot.
Network installation may be started via non-network boot. The Ignite install environment may be
Alternate boot with network server installation 27
Page 28

booted from a source local to the client system. Regardless of how Ignite-UX is started, it has the
same network capabilities once it is running.
• Use bootsys to boot a system already running HP-UX
If the client system is already running HP-UX, the Ignite-UX bootsys command may be used
to copy the install kernel and install file system to the client system's HP-UX file system. After
reboot, the HP-UX boot loader can boot for installation using that copied content. Ignite config
content in the install file system may be used to cause Ignite to automatically switch to use the
master Ignite server. Because the initial install environment is copied from the Ignite server,
you can be confident the Ignite versions of the initial boot content and software on the Ignite
server have the same versions. See “Using bootsys on the client console” (page 98).
• Use DVD media to boot a system for network installation
Ignite supports booting for network installation using standard HP installation media or custom
boot media. The version of the Ignite on the media must match the version of Ignite running
on the master Ignite server. The simplest way to ensure the versions match is to use
make_media_install on the Ignite server to create custom boot media. This custom boot
media may be constructed to include [W|V|I]INSTALLFS config content, which automatically
switches to using the Ignite server on startup. Standard HP-UX installation media may also be
used to boot the system, as long as the Ignite version on the media matches the master server
Ignite version. Standard HP-UX media config content cannot be modified to automatically
switch to your Ignite server. See “Creating a boot CD/DVD or an installation DVD” (page 185)
and “Tape recovery with no tape boot support — two-step media recovery” (page 217).
• Use vMedia USB DVD to boot a system for network installation
Many Integrity systems support Integrated Lights Out (iLO) Virtual Media (vMedia). This feature
must be enabled using a license key. Once enabled, a DVD device or an ISO DVD image on
a remote system, such as a PC, may be used. In either case, the client system will appear to
have a local USB DVD device.
For more information, see Appendix D (page 242) and the HP Integrity iLO 2 MP Operations
Guide available at http://www.hp.com/go/hpsc.
• Boot your Integrity system from a USB memory stick device
It is possible to configure your Integrity system and a USB flash drive in order to boot HP-UX
directly from a memory stick device. Once the system is booted to the HP-UX Ignite-UX install
environment, you can perform a variety of installation or recovery actions. See the Ignite-UX
USB Memory Stick Boot white paper, available at http://www.hp.com/go/ignite-ux-docs,
for more information.
Complex networks
Setting up an Ignite server on a simple network assumes there is a single subnet with only one
Ignite server that supports network boot and installation. Often, real network environments are
significantly more complex. Configuring an Ignite server to operate correctly while avoiding
interference with other boot and installation servers on the network requires special consideration.
For a detailed discussion, see Chapter 5 (page 48).
Diagnosing network boot issues
When configuring a network, sometimes boot and installation will not work at all or will not work
as expected. Especially when configuring a complex network, you can expect to spend time
diagnosing and resolving issues due to the complexity of the network and interactions between
servers. You may also expect problems to occur in the future as the complex network changes.
This section includes suggested tools and techniques for diagnosing problems.
28 Making configuration decisions for Ignite servers
Page 29

HP-UX diagnosing and debugging
Simple network debugging
If network boot is used on a local subnet and the Ignite-UX server is not found, check these items:
• Verify the client is on the same subnet as the Ignite-UX server or boot helper.
• Investigate instl_bootd errors in /var/adm/syslog/syslog.log.
• In the /var/adm/inetd.sec file, ensure the service instl_boots exists, and that the IP
address 0.0.0.0 is allowed. (Normally, all addresses are allowed via 0.0.0.0.) The entry
must look like:
instl_boots allow 0.0.0.0
• If /etc/services comes from NIS, make sure the NIS server has instl_boot* entries.
Logging to syslog.log
The bootpd and tftpd daemons have the ability to log requests and responses. The /etc/
inetd.conf file may be modified to enable logging. The bootpd -d option and tftpd -l
option control logging. For example:
# tftp dgram udp wait root /usr/lbin/tftpd tftpd \
-l /opt/ignite /var/opt/ignite
# bootps dgram udp wait root /usr/lbin/bootpd bootpd -d 9
The daemons log to the HP-UX syslog file located at /var/adm/syslog/syslog.log.
NOTE: Logging should normally be disabled since it can consume a significant amount of disk
space.
If the boot configuration includes multiple boot servers (for bootp relay, for example) it is often
useful to enable logging on all servers.
Using bootpquery
To save time when configuring an HP-UX system boot, the bootpquery command may be used
to simulate a network boot request by requesting bootpd to indicate how it would respond to
boot requests for a specific MAC address. This is normally much faster and simpler than attempting
to boot using a real client system.
To use bootpquery, add the ba option to the appropriate entries in the /etc/bootptab file.
Without this option, bootpd will send responses only to the client system making the boot request.
The ba option requests the response be broadcast on the subnet, so any system is able to see the
response, including the system where you are using bootpquery. For more information, see
bootpquery(1M).
NOTE: The ba option must be removed once testing is completed.
The bootpquery output includes valuable debug information:
# bootpquery 0011855F549E
Received BOOTREPLY from hpignite.xyzco.com (10.1.1.11)
Hardware Address: 00:11:85:5f:54:9e
Hardware Type: Ethernet
IP Address: 10.1.1.110
Boot file: /opt/ignite/boot/nbp.efi
RFC 1048 Vendor Information:
Subnet Mask: 255.255.255.0
Gateway: 10.1.1.1
Bootfile Size: 24576 512 byte blocks
Diagnosing network boot issues 29
Page 30
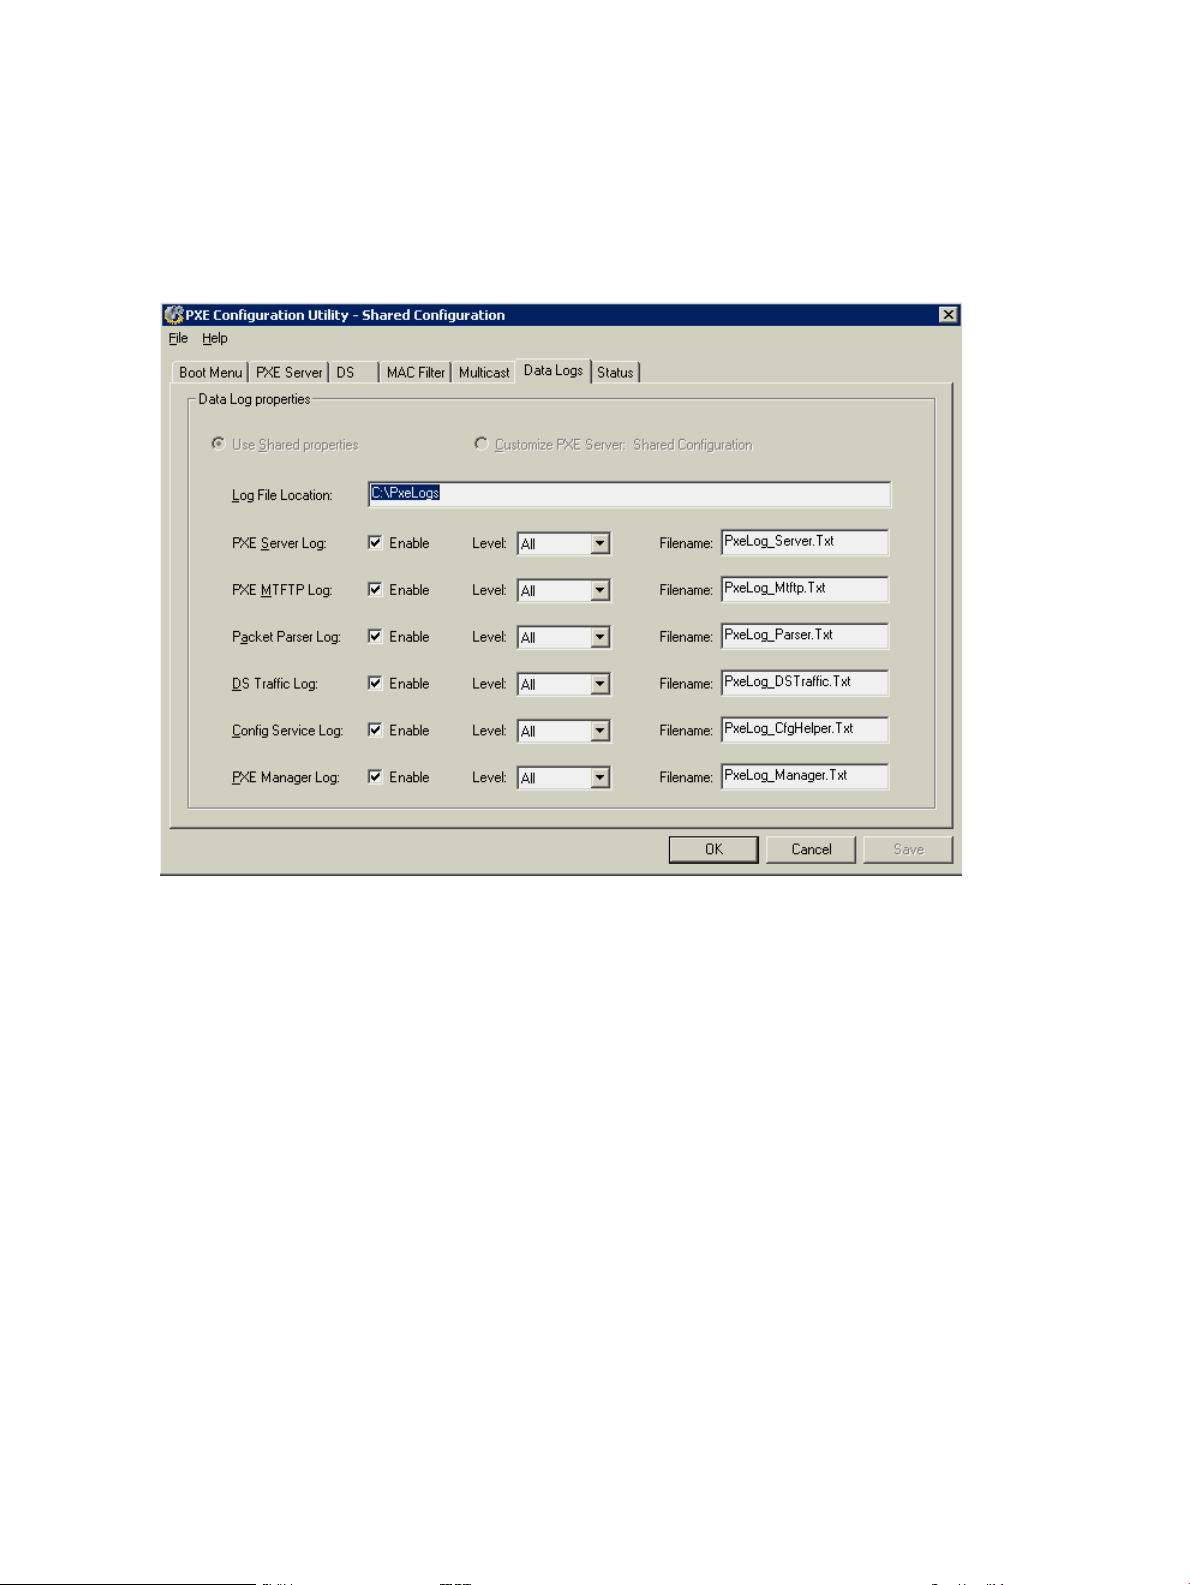
Domain Name Server: 10.1.1.1
Host Name: hpuxsys1
Domain Name: xyzco.com
RDP diagnosing and debugging
An RDP server can be configured to log PXE boot and TFTP activity. The PXE Configuration Utility
may be used to control logging. Logging must be disabled when you are finished diagnosing and
debugging.
30 Making configuration decisions for Ignite servers
Page 31

3 Simple network: creating a server for registered clients
This chapter describes how to install a basic Ignite-UX server configuration for network booting
and installing HP-UX on clients registered with the server. This chapter does not discuss support for
anonymous clients. For information about how to set up anonymous clients, see Chapter 4 (page 43).
See the Ignite-UX Quick Start Guide available at http://www.hp.com/go/ignite-ux-docs if you
are new to HP-UX.
For PA-RISC clients, a basic server setup will use the instl_bootd daemon to answer boot
requests, will not use DHCP for initial system boot, and will register clients’ IP addresses and LAN
addresses in /etc/opt/ignite/instl_boottab.
For Itanium-based clients, a basic server setup will use the bootpd daemon to answer boot requests,
will not use DHCP for initial system boot, and will have clients’ IP addresses and LAN addresses
registered in /etc/bootptab.
For more information on how systems get IP addresses for booting, see “Network booting and IP
addresses” (page 19).
Setting up software depots is the same for PA-RISC and Itanium-based systems.
Configuring the Ignite-UX server for PA-RISC clients
Launch Ignite-UX
As superuser, start Ignite-UX by entering the following command:
ignite
Because this is the first time Ignite-UX is launched, there are no clients and the message in Figure 7
appears. You must boot a client before it can be recognized and managed by Ignite-UX.
Acknowledge the message by clicking OK.
Figure 7 Ignite-UX First launch message
The Ignite-UX Welcome dialog box is displayed, as shown in Figure 8.
Configuring the Ignite-UX server for PA-RISC clients 31
Page 32

Figure 8 Ignite-UX GUI welcome dialog box
To learn more about the Ignite-UX GUI now, click Tutorial and Demo... Once the Ignite server is
configured, you can access the tutorial by selecting Actions→Run Tutorial/Server Setup→Tutorial
and Demo from the Ignite-UX interface.
To bypass this welcome the next time you start Ignite-UX, click the Do not show this screen again
check box.
Launch the server setup wizard
To begin configuring your Ignite-UX server, click Server Setup... to launch the Server Setup Wizard,
as shown in Figure 9.
32 Simple network: creating a server for registered clients
Page 33

Figure 9 Server setup wizard
To set up an Ignite-UX server for PA-RISC clients, complete step 1 (Set up IP addresses), skip step
2 (Set up DHCP addresses), and complete step 3 (Set up software).
Click Next to advance to the Server Setup: IP Addresses dialog box (Figure 10).
NOTE: To end the setup process at any time and leave the system unchanged, click Cancel.
Figure 10 Server setup: IP addresses
Configuring the Ignite-UX server for PA-RISC clients 33
Page 34

Register the PA-RISC clients with the server
Select Configure Booting IP Addresses Now from the Server Setup: IP Addresses dialog box
(Figure 10 (page 33)), then click Next to proceed to the Configure Booting IP Addresses dialog
box shown in Figure 11 (page 34).
Figure 11 Configure booting IP addresses
Use the Configure Booting IP Addresses dialog box to register client IP addresses with their physical
MAC addresses. The IP addresses and corresponding reserved MAC addresses are read from the
/etc/opt/ignite/instl_boottab file on the server to display in the Booting IP Addresses
window. IP addresses with blank reserved MAC addresses are not currently reserved for any client.
If you want to add a new IP address to reserve for a client, click in the IP text box and enter the IP
address intended for your client. Then click in the reserved for: 0x text box and enter the client’s
MAC address. Click Add to enter the IP address/MAC address pair into the Booting IP Addresses
window. The MAC address given here must be the MAC address of the network interface to be
used to boot the system over the network.
If the IP address you want to reserve for a client is already listed in the Booting IP Addresses
window, select that line. The IP address will appear in the IP text box, and the current MAC address
it is reserved for, if there is one, will appear in the reserved for: 0x box. Enter the client MAC
address in the reserved for: 0x box, then click Modify. The IP address will then appear in the
Booting IP Addresses window with the client MAC you just entered.
You can remove sets of IP addresses/MACs from the Booting IP Addresses window by selecting
the line and then clicking Remove.
Continue assigning IP addresses to clients’ MACs until all the clients to be booted from the Ignite-UX
server are registered. You can modify this information in the future by editing the /etc/opt/
ignite/instl_boottab file, or via the Ignite-UX GUI under Options→Server Configuration.
When you have completed registering clients, click OK to write the contents of the Booting IP
Addresses window to the /etc/opt/ignite/instl_boottab file.
34 Simple network: creating a server for registered clients
Page 35

Once you exit the Configure Booting IP Addresses dialog box, a registered client’s boot request
is answered by instl_bootd, and the client will boot to the reserved IP address listed in the
Booting IP Addresses window.
NOTE: No intervention is required to have instl_bootd pick up changes to the /etc/opt/
ignite/instl_boottab file. When a boot request is received, instl_bootd always checks
whether the file was modified since last read, and rereads it before answering any boot request.
Care must be taken if you edit the /etc/opt/ignite/instl_boottab file manually. For the
correct procedure see instl_bootd(1M).
Skip DHCP setup
After exiting the Configure Booting IP Addresses dialog box, the Server Setup: DHCP (optional)
dialog box appears. Select Skip DHCP Setup, then click Next.
A dialog box is displayed to tell you how to configure DHCP services later. Click OK.
The Server Setup: Software Depot Setup dialog box is then displayed (Figure 12 (page 37)).
Go to the software setup section
Proceed to “Setting up software from OE depots” (page 36) to complete the Ignite-UX server setup.
Configuring the Ignite-UX server for Itanium-based clients
Register the Itanium-based clients with the server
Registered Itanium-based clients must be entered in the /etc/bootptab file manually; they cannot
be registered using the Server Setup Wizard. The /etc/bootptab file acts as the database for
the bootpd daemon on the Ignite-UX server. All registered clients you intend to boot from the
Ignite-UX server must be entered in the bootptab file.
A typical bootptab file has a generic, default client specification defined. The individual clients
use this default definition and make their specific modifications to it, such as the IP address and
the hardware address (MAC address). In the following example, IADEF is the default configuration
for Itanium-based clients on the subnet, and iuxclient1 is the specific entry for that particular
client.
IADEF:\
ht=ethernet:\
hn:\
dn=domain_name.com
gw=190.1.48.1:\
sm=255.255.248.0:\
ds=190.1.48.11 190.1.48.12:\
vm=rfc1048:\
bf=/opt/ignite/boot/nbp.efi:\
bs=48:
iuxclient1:\
tc=IADEF:\
ip=15.1.52.204:\
ha=00306E4A3391
The tc tag indicates the use of a template for common defaults, so all the values from IADEF are
assumed for iuxclient1 unless specifically overridden in the client’s definition. The ip tag
indicates the client’s IP address, and the ha tag indicates the MAC address. For more information
on the bootptab file syntax, see bootpd(1m).
For each client you intend to boot from the Ignite-UX server, enter their respective IPs and MAC
addresses in the bootptab file.
Configuring the Ignite-UX server for Itanium-based clients 35
Page 36

From now on, when a registered client’s boot request is answered by bootpd, it will boot to the
reserved IP address you entered in the /etc/bootptab file. You can make changes to the
bootptab file at any time.
IMPORTANT: The server that sends the response to the boot request is the same system from
which the client will attempt to tftp the boot file. If you are not using an HP-UX system to reply
to a request, you must make the required boot files available and current with new releases of
Ignite-UX. HP does not provide support for this kind of configuration.
Use the server setup wizard to proceed to software depot setup
Follow the steps outlined in the section “Configuring the Ignite-UX server for PA-RISC clients”
(page 31) from “Launch Ignite-UX” (page 31) through “Launch the server setup wizard” (page 32).
When you get to the Server Setup: IP Addresses dialog box (Figure 10) select Skip Booting IP
Setup, and then click Next.
A note appears instructing you how to configure IP addresses in the future. Click OK, and the
Server Setup: DHCP (optional) dialog box is displayed. Select Skip DHCP Setup, then click Next.
A dialog box is displayed to tell you how to configure DHCP services later. Click OK.
The Server Setup: Software Depot Setup dialog box now appears (Figure 12 (page 37)).
Setting up software from OE depots
Before starting the software depot installation, you must have on hand either a set of OE media
or information about a remote system that contains a previously installed OE depot.
If you are using media, you will need a locally attached optical drive: a DVD-ROM for DVD or CD
media, or a CD-ROM drive for CD media. The media must not be mounted before starting if you
are planning to create a local depot. The media can be mounted before starting if you are planning
to install directly from the media. For performance reasons, HP does not recommend installing
directly from media when more than one system will be attempting to access the media.
If you are using a previously installed OE depot, it needs to have been installed using the process
described below, or by using the make_depots command.
Regardless of the source of the OE depot, the full OE must be installed, not a subset.
36 Simple network: creating a server for registered clients
Page 37

Figure 12 Software depot setup page
Select the depot source (media or installed depot) and then click Next.
For media, you are prompted to insert the media and select a device.
For an installed depot, you are prompted for the hostname of the system containing the operating
system depots. Enter the hostname, then click Show Depots.... Select a depot containing a core
operating system from the list, and then click OK.
You are then asked to confirm your choices. A Server Setup Logfile dialog box is then displayed
so you can monitor the depot installation progress. This process is lengthy and can take up to two
hours. During this time this dialog box remains active and is updated when new information is
written to the log file.
Upon completion, either click OK to continue installing additional depots by repeating this process,
or click Finish to complete the server setup.
NOTE: To install additional software depots once the server is set up, see “Setting up additional
software on the server” (page 41).
More server setup options
Once your Ignite server is up and running, you can set general options by accessing the Server
Configuration dialog box from Options→Server Configuration.
Configuring server options
General server settings are available on the Server Options tab.
More server setup options 37
Page 38

Figure 13 Ignite-UX server configuration tabs
The following options are available:
• Default Configuration – Click the button next to Default Configuration to select from the list of
available configurations. The selected configuration is the default that will be used when
installing clients. You can override this default setting on a per-client basis with Ignite-UX.
• Default Printer – Click the button next to Default Printer, then select one of the available
(configured) printers. This is the printer used for printing a manifest or installation history. The
printer IP address is verified by Ignite-UX before a job is sent.
• Client Timeout(minutes) – Click the button next to Client Timeout (minutes):, then select the
number of minutes or off. Status information is written into the client’s install.log file
during the installation, and this log is actively monitored by Ignite-UX on the server. Setting
this value configures Ignite-UX to display a warning message if the install.log file has
not been updated in the selected number of minutes. HP recommends you use the default
value.
Setting Client Timeout to off disables this notification and does not affect the outcome of the
installation.
• Run client installation UI on – Use the Run client installation UI on: menu to designate where
you want to run the client UI for this installation. If you have an Ignite-UX server configured,
you can run the client installation interface from the target system using a terminal user interface
(TUI), or from the server using whatever UI is set up there (the Ignite-UX GUI or TUI). If the
client installation is to be noninteractive (no user intervention), select none.
The default is for the UI to be displayed on the Ignite-UX server.
• Use ssh to gather client data – For all clients, ssh will be used instead of remsh, rlogin,
and rcp.
38 Simple network: creating a server for registered clients
Page 39

• The Configure Booting IP Addresses... button gives you access to the Configure Booting IP
Addresses dialog previously described in “Register the PA-RISC clients with the server”
(page 34).
• Add DHCP Addresses... –
The assignment of DHCP IP addresses for booting is only used for anonymous clients. See
Chapter 4 (page 43) for more information.
The IP addresses you provide here are used during boot and installation. These addresses are
in use for most of the Ignite-UX download to a client. One address is required for each
simultaneous download. For more information see “Network booting and IP addresses”
(page 19).
Figure 14 Add DHCP addresses dialog box
This provision of DHCP capability is for the boot and installation only. You will have to
coordinate with the administrator of regular DHCP services, which distributes networking IP
addresses, to make sure you use a set of available IP addresses that will not cause a conflict
with regular DHCP services. See Appendix B (page 236) for information on configuring regular
DHCP services on your Ignite-UX server. Unless you are familiar with DHCP services, do not
modify the DHCP Class ID field or the DHCP Addresses are temporary check box.
Provide a range of available IP addresses in the DHCP Addresses fields from lowest number
to highest:
10.2.73.21 10.2.73.40
Other ways to set these IP address values are: when prompted by Ignite when it's first run are
instl_adm, and SMH or SAM.
For more information about setting up DHCP functions, addresses, and class IDs, see “Ignite-UX
server and boot helper setup for DHCP” (page 44), setup_server(1M), and instl_adm(4).
Configuring session options
Ignite-UX allows you to choose how client installation sessions behave. For example, you can
decide whether or not to display the Welcome dialog each time you start Ignite-UX, and whether
clients are halted on completion of the installation.
The following options are accessible from the Server Configuration dialog box (Options→Server
Configuration) Session Options tab.
More server setup options 39
Page 40

Figure 15 Session options tab
The options you can configure on this tab are explained as follows:
• Confirm new clients – Controls whether a confirmation dialog box appears each time a new
client is booted from the Ignite-UX server.
• Ask for customer information during client installation – Controls whether an input window
appears to enable entry of customer name, system serial number, and order number. This
information is stored in the manifest.seed file in the /var/opt/ignite/local/
manifest directory. It is used when you are viewing and printing a manifest (see “Viewing
and printing a manifest ” (page 149)) with print_manifest(1M). The information entered has no
effect on the outcome of an installation.
• Show the welcome screen for the install server – Controls whether the WELCOME TO IGNITE
UX dialog box appears. The default behavior is to display this dialog box.
• Halt the client after installation – Controls whether the client system is halted (rather than
rebooted, the default) after installation.
• Automatically move completed clients to history – Controls whether completed clients are
automatically added to the end of the history log, /var/opt/ignite/clients/history/
history.log. As part of this action, client configuration and manifest files are automatically
moved to the history directory on the Ignite-UX server for future reference. The client icon is
removed from the GUI workspace. The client must be COMPLETE (fully installed) for this to
take place.
• Show all the information for network recovery image creation – Controls the amount of
information that appears during network recovery image creation and installation. The default
behavior is to hide this information.
• Show all the information for tape recovery image creation – Controls the amount of information
that appears during tape recovery image creation and installation. The default behavior is to
hide this information.
40 Simple network: creating a server for registered clients
Page 41

Setting up additional software on the server
After you have successfully installed and configured your Ignite-UX server, you might want to set
up additional software on the server for installation on clients. Commands written for this task
handle Software Distributor (SD) depots and bundles, but it is possible to configure Ignite to install
non-SD software.
The commands that make SD software available for Ignite are capable of sweeping actions, such
as packaging an entire software CD/DVD and then making additions to all configuration clauses
of a specified release. These commands may also be used to fine tune a single configuration clause
with a single software addition. Care must be taken when using these commands to get the results
you want.
This section is limited in scope and does not attempt to fully address what can quickly become a
complex task.
For a complete discussion, see Ignite-UX Custom Configuration Files available on http://
www.hp.com/go/ignite-ux-docs. Look for the sections “Configuration for software to be installed”
and “Installation configurations using Software Distributor depots.”
SD software
Generally speaking, all software supplied by HP for HP-UX is packaged in SD form. Use the steps
below to make SD software available to Ignite-UX for installation on clients.
1. If the software is not in a depot, put it in one. The make_depots command copies SD bundles
to a depot for use by Ignite-UX. See make_depots(1M) for more information. For ease of
maintenance, HP recommends copying the depots to disk rather than using CD/DVD drives
as the source for installation.
2. Run make_config on all the depots you plan to use. The make_config command creates
configuration files for software in a depot. See make_config(1M). You must run make_config
each time you add or modify software in your depot. Be aware that any customizations you've
made to a configuration file are lost when you recreate a configuration file with make_config.
NOTE: Make sure to invoke the make_config command on registered depots only. Users
need to run swreg command explicitly to register a depot when the automatic behavior of
swcopy, swinstall, and swpackage do not suffice.
3. Use manage_index to add configuration files to configuration clauses in the INDEX file. See
manage_index(1M).
Example: Create a configuration for compiler software
Given an SD depot of complier software on another server, this example creates a configuration
file for that software and adds it to all configuration clauses for the B.11.31 release.
# make_config -s server:/depots/compiler \
-c /var/opt/ignite/data/Rel_B.11.31/compiler_cfg
# manage_index -a -f /var/opt/ignite/data/Rel_B.11.31/compiler_cfg
IMPORTANT: Inclusion of multiple versions of Veritas Volume Manager from Symantec (VxVM)
in the same installation depot, or in separate depots that are used together in a single
cold-installation session, is not supported. Doing so generates errors when attempting to use the
installation depot or during reboot when using non-SD depots. For more information, see
“Considerations when using Veritas Volume Manager from Symantec” (page 193).
Non-SD software
To make non-SD software sources (tar, cpio, or pax archives) available to Ignite-UX, use the
example configuration file /var/opt/data/examples/noncore.cfg.
Setting up additional software on the server 41
Page 42

1. Make a copy of the /var/opt/data/examples/noncore.cfg file and edit it for your
particular software. The file contains extensive comments to help you make the changes you
need.
2. Use manage_index to add configuration files to configuration clauses in the INDEX file. See
manage_index(1M).
IMPORTANT: Do not use archives with files in /var/adm/sw/* as software sources. Delivering
files to /var/adm/sw/* can corrupt the SD Installed Product Database.
42 Simple network: creating a server for registered clients
Page 43

4 Simple network: creating a server for anonymous clients
This chapter describes how to configure your server to network boot and install HP-UX on anonymous
clients.
Overview of anonymous clients
When booting registered PA-RISC clients, the clients’ IP addresses and MAC addresses were
entered in the /etc/opt/ignite/instl_boottab file. If the clients were Itanium®-based,
they were registered in the /etc/bootptab file.
An anonymous client can be booted from an Ignite-UX server without an IP address previously
mapped to its MAC address. Anonymous clients boot using an IP address provided by the server.
Using anonymous client booting on a network is useful when you have many different systems that
must be booted, installed, or recovered. It relieves you from the task of configuring for each specific
system and eliminates the errors inherent in typing IP addresses and MAC addresses. Such an
error can cause IP addresses to be accidentally assigned to more than one computer at a time.
The /etc/opt/ignite/instl_boottab file is used to provide PA-RISC systems with anonymous
client booting. Within the instl_boottab file, if there are IP addresses not assigned to any
MAC address, those IP addresses are available to lease to requesting anonymous clients.
Itanium-based clients use DHCP to boot anonymously.
Configuring an Ignite server to boot anonymous PA-RISC clients
Using the server setup wizard
If you know you want to use anonymous client boot when you start up your Ignite-UX server, you
can set it up that way using the Server Setup Wizard.
Start Ignite-UX and the Server Setup Wizard as described in “Configuring the Ignite-UX server for
PA-RISC clients” (page 31) until you get to the Configure Booting IP Addresses dialog box as shown
in Figure 11 (page 34).
Enter individual or a range of valid IP addresses. Instead of entering a MAC address in the reserved
for: 0x box, leave it blank. When the instl_bootd daemon requests an IP address for your
anonymous PA-RISC client to boot from, it will be given an IP address not registered with any
specific MAC address.
Editing the instl_boottab file
You can enter IP addresses in the instl_boottab file for anonymous PA-RISC client booting.
The instl_boottab file contains comments with instructions on syntax. To add an IP address
for anonymous PA-RISC booting, simply add that IP address to the file on its own line. Since the
IP address is not explicitly marked as reserved or assigned to a MAC address, it is usable by any
client. For more information, see instl_bootd(1M).
NOTE: No intervention is required to have instl_bootd pick up changes to the /etc/opt/
ignite/instl_boottab file. When a boot request is received, instl_bootd always checks
whether the file was modified since last read, and rereads it before answering any boot request.
Overview of anonymous clients 43
Page 44

Configuring an Ignite server to boot anonymous Itanium-based clients
Working with DHCP
Even on a simple network, there can be devices such as printers requesting network boot. This
section describes the challenges involved and solutions for DHCP booting and then acquiring IP
addresses for networking.
NOTE: If you are using your Ignite-UX server for DHCP booting, you can set DHCP boot IP
addresses from the Ignite-UX GUI by selecting Options→Server Configuration as described in
“Configuring server options” (page 37).
Understanding PXE booting of Itanium-based systems
When an Itanium-based system boots over the network, it sends out a PXE boot request. The PXE
protocol is built on top of DHCP. This can cause confusion if there is more than one DHCP server
configured to respond to PXE boot requests.
It is not possible for an Itanium-based system to specify the server from which to accept DHCP boot
services, ignoring boot offers from all other servers. In other words, there is not an Itanium-based
equivalent for the PA-RISC boot command, boot lan.192.10.10.10 install, which causes
the system to ignore any response except from the IP address 192.10.10.10. This functionality is
known as server selection.
It is possible for many Itanium-based systems to perform directed boot, where server and client
networking information is stored in client firmware and DHCP is not used. For more information
on directed boot, see “Direct boot profiles for Itanium-based systems” (page 102).
When an Itanium-based system sends out a PXE boot request, it tries to boot from the first PXE
response it gets. If no PXE responses are received within a certain time, the system uses the first
DHCP response it gets. If any of these responses are inadequate for network booting, the PXE boot
attempt fails and an error message is displayed on the console of the requesting system. The
information displayed with PXE errors is usually not explicit enough to determine the cause of the
problem (see “Common network booting errors” (page 234)).
For any network where there will be PXE boot requests from Itanium-based systems, only DHCP
servers that can supply enough information for a successful boot must be configured to respond.
If you have a DHCP server that responds to every DHCP request, regardless of whether it is a PXE
request or not, it almost definitely interferes with PXE boot requests from Itanium-based servers. The
boot request fails when a normal DHCP response is received in response to a PXE boot request.
In addition to boot failure, the inability to select a boot server can lead to installation of the wrong
operating system. Having PXE servers that respond with different boot content on the same network
can cause confusion. For example, if there is a system supporting Linux boot and a system supporting
HP-UX boot on the same network, they can each send a response to a PXE boot request, and the
first server to respond will be used. It is not predictable which server would be used for boot.
Interference with a PXE request from a DHCP server is a configuration issue on the DHCP server
side. This issue is not specific to HP-UX or Ignite-UX, but rather is related to the way firmware
performs a PXE boot.
IMPORTANT: When you configure DHCP servers, make sure there is only one DHCP server on
the network that is configured to respond to Itanium-based system PXE boot requests, and that the
server is running HP-UX if you want to install HP-UX.
Ignite-UX server and boot helper setup for DHCP
HP-UX 11i v3 and 11i v2 supports dhcp_device_group options that improve anonymous client
DHCP booting for Itanium-based clients. The two configuration keywords re and ncid are used
in a DHCP device pool group for this purpose.
44 Simple network: creating a server for anonymous clients
Page 45

Make sure that at a minimum, HP-UX 11i v2 is installed on your Ignite-UX server or boot helper
system.
Add your device pool group entry to the /etc/dhcptab file on your Ignite-UX server or boot
helper system.
You do not need to restart bootpd if it is already running. When a new bootp DHCP request is
received, bootp checks to see whether it must reread any configuration files. If you want to force
bootp to reread the configuration file, send it the SIGHUP signal.
The following example DHCP device group is the best way to support anonymous Itanium-based
clients:
dhcp_device_group:\
re:\
ncid:\
class-id="PXEClient:Arch:00002":\
lease-time=300:\
subnet-mask=255.255.255.0:\
addr-pool-start-address=192.168.1.10:\
addr-pool-last-address=192.168.1.20:\
bf=/opt/ignite/boot/nbp.efi
The options in the dhcp_device_group clause are:
dhcp_device_group Starts a DHCP device pool group for allocating a range of
IP addresses to assign to clients with a matching class-id
in their boot requests.
re A binary option that sets regular expression matching on the
class-id rather than a default literal match. This is a new
option for HP-UX 11i v2.
ncid A binary option that sets removal of the class-id from
message responses. Since bootpd does not support the full
Intel Preboot Execution Environment (PXE) protocol, it must
not send back a class-id in the response. This is a new
option for HP-UX 11i v2.
class-id Different kinds of systems may make PXE boot requests. For
example, Itanium-based systems and industry standard servers
such as HP ProLiant servers may each make a PXE boot
request. It is unlikely the same configuration can be used for
these different requests. The class-id may be used to
respond to PXE requests from the correct clients, while ignoring
the wrong ones.
All Itanium-based servers send a 32 character PXE boot
request in the following format:
PXEClient:Arch:00002:UNDI:xxxyyy
where xxxyyy are major and minor numbers for the Universal
Network Device Interface revision.
An industry standard server, such as an HP ProLiant server,
sends a PXE boot request in this format:
PXEClient:Arch:00000:UNDI:xxxyyy
where xxxyyy are the same as described above.
The class-id in the dhcp_device_group example above
tells the bootpd daemon to respond only to clients with a
boot request containing PXEClient:Arch:00002. Requests
from industry standard servers are ignored.
Configuring an Ignite server to boot anonymous Itanium-based clients 45
Page 46

A DHCP server or boot helper system configured to respond
to any DHCP boot request containing PXEClient will
respond to both Itanium-based servers and industry standard
servers. A PXE response suitable for an industry standard
server is unlikely to allow an Itanium-based system to boot.
lease-time How long in seconds the IP address may be used to boot a
system. The example value is 300 seconds (5 minutes) but
you may need more time if your network is a busy one.
Booting on high-traffic networks may take 10 or 15 minutes
since the install kernel and install file system must be
downloaded. The problem with increasing the lease-time
is the possibility of running out of IP addresses to use for
booting. If you increase this number, make sure you have
enough IP addresses in the pool to accommodate systems
that might boot simultaneously.
subnet-mask The subnet mask used by clients.
addr-pool-start-address The first IP address for this address pool.
addr-pool-last-address The last IP address for this address pool.
IMPORTANT: The use of the ncid option is critical because it instructs the DHCP server to exclude
the DHCP class-id in the response to the client’s boot request. If a DHCP server responds to a
PXE boot request with the DHCP class-id in the response, the booting PXE client attempts to
communicate with a PXE proxy server on the same host. Since HP-UX does not supply a PXE proxy
server, the boot fails. The ncid option resolves this issue.
With the device pool group added to the /etc/dhcptab file, your HP-UX 11i v2 or 11i v3
Ignite-UX server is now configured to respond to anonymous Itanium-based clients.
IMPORTANT: The server that sends the response to the PXE boot request is the system that the
PXE client will attempt to tftp the boot file from. If you are not using an HP-UX system to reply to
an Itanium-based PXE request, you must make the required boot files available and current with
new releases of Ignite-UX. HP does not provide support for this kind of configuration.
Isolating Ignite-UX from noncontrollable DHCP servers
Once Ignite-UX starts running, a DHCP request will be used to obtain an IP address used for
installation or recovery if needed. Ignite-UX can be configured to specify a class-id for this request.
For more information see Appendix B and bootpd(1M).
If you have DHCP servers on your network that you have no control over, it is possible to completely
isolate Ignite-UX from them. This is done by adding a class-id to the dhcp_class_id keyword
in the install file system. See instl_adm(1M) and instl_adm(4) for additional information.
When the network boot process completes and the install kernel is running, Ignite-UX will use DHCP
again to obtain an IP address. This is done because Ignite-UX has no way to determine the IP
address used by firmware.
If you are running HP-UX 11i v2 or 11i v3 and have configured a DHCP device group for
Itanium-based server PXE requests, you can reuse this device group for isolation purposes. If you
added the following into the install file system:
dhcp_class_id="IgniteDHCPDeviceGroup",
you can change the class-id in the DHCP device group that responds to anonymous
Itanium–based PXE boot requests to read:
class-id="PXEClient:Arch00002|IgniteDHCPDeviceGroup"
46 Simple network: creating a server for anonymous clients
Page 47

IMPORTANT:
The class-id entry above is a regular expression designed to allow a response to a class-id
of an Itanium-based system performing a network boot or an IgniteDHCPDeviceGroup in
/etc/dhcptab. This is not a valid class-id for use in an Ignite-UX install file system. Systems
using a DHCP device group for installing anonymous Itanium-based systems must have
is_net_info_temporary set to TRUE to prevent systems from using the IP address gained via
DHCP after installation.
Since regular expression matching is used, | means "or" and allows response to an incoming
class-id that matches either expression. This example entry would support responding to the
initial Itanium-based system boot request as well as subsequent DHCP requests during Ignite-UX
operation.
The DHCP servers that respond to any DHCP class-id must be reconfigured or isolated to a different
subnet.
The information in this section will not help you isolate a system booting Ignite-UX from other DHCP
or PXE boot servers when attempting to network boot from EFI. This information does help you stop
other DHCP servers from communicating with the installed system after it has already performed
a network boot and downloaded an install kernel and install file system.
If you wish to only accept DHCP offers from a specific server after the install kernel and file system
loads, consider using the dhcp_server keyword in the install file system. The use of the
dhcp_server keyword has no effect on the EFI/PXE boot process.
Configuring an Ignite server to boot anonymous Itanium-based clients 47
Page 48

5 Complex networks: challenges and solutions
Most information about Ignite server set up assumes a simple network consisting of one subnet
where the server supports network boot and installation. This simple network configuration is
assumed so documentation can be clear and concise.
Often, real network environments are significantly more complex. Configuring an Ignite server to
operate correctly in a complex network configuration requires special consideration of network
topology.
This chapter identifies some types of complex network challenges and approaches to handle these
challenges.
This chapter focuses on Integrity systems only.
How to use this chapter
Data centers have unique requirements, constraints, and network topology. It is likely you will have
multiple challenges when creating a total solution for system installation and recovery, which will
require you to implement multiple solutions for your site.
To help explain network topology, an example complex network diagram will be used that presents
multiple challenges. This example network will be referenced throughout the complex networking
chapters.
Knowledge of network boot and OS installation steps will help you understand this chapter. Most
often, boot and installation is performed by one server. When considering complex network
solutions, it sometimes make sense to use separate systems for boot and installation, or to switch
servers during the boot process. See the “How Ignite works” (page 18) section for network boot
and OS installation steps information.
Network boot and installation relies on several protocols that are not detailed here. See “Ignite-UX
server ports” (page 84) for protocol and port information related to Ignite phases of operation.
It is assumed you have a working knowledge of DHCP, PXE, bootp, and TFTP.
Complex network challenges
In a complex network configuration, it is often preferable to manage one master Ignite server and
use that server to support installation for all subnets. A central server simplifies administration and
helps ensure all systems are managed with consistent installation and recovery. The challenge is
to have a central Ignite server support network boot for all your required subnets, handle installation,
and coexist with any other network boot servers.
The following diagram illustrates a complex network with multiple subnets (10.1.1 and 10.2.1)
connected to the Ignite server (hpignite), remote systems (hpuxsysa and hpuxsysb) that use a boot
helper system (iuxboot), a system (hpuxsysz) on a separate subnet without a boot helper, and
another boot server (sysrdp) on the same subnet as the Ignite server. Systems on the same subnet
(10.1.1 or 10.2.1) as the Ignite server are HP-UX systems (hpuxsys1, hpuxsys2, and hpuxsysx), a
Linux system (linuxsys2) and a Windows system (winsys1). This diagram will be used as an example
network configuration throughout the complex network chapters.
48 Complex networks: challenges and solutions
Page 49

Multiple subnets
The challenge with an Ignite server connected to multiple subnets is ensuring the server is correctly
configured to handle client network interfaces for boot and installation on the different subnets. If
subnets are isolated or performance is a concern, you will need to ensure that installation traffic
is correctly routed to the Ignite server.
The following diagram shows the example systems used when outlining solutions for a complex
network with multiple subnets.
Remote systems
Network boot is based on broadcast protocols. These broadcasts are normally constrained to one
subnet. When client systems are on a subnet that is not directly connected to an Ignite server
broadcast network, packets used for boot will not be able to reach the Ignite server. If there are
remote systems on other subnets (hpuxsysa and hpuxsysb), you must determine how network boot
will be supported on each subnet for these systems. You will also need to ensure that installation
traffic is correctly routed.
The following diagram shows the systems that will be referenced when solutions for remote systems
are discussed.
Complex network challenges 49
Page 50

Multiple boot servers
If there are multiple servers that support boot and installation on a subnet (sysrdp and hpignite),
these systems are very likely to interfere with each other. This is common when systems running
different operating systems coexist on the same subnet and network installation is used to manage
these systems.
Network boot and installation servers are typically designed with the assumption that they are the
only such server on the subnet. Product documentation generally does not include details on how
to have multiple servers coexist.
Note that PXE has been designed to assume multiple boot servers provide redundant, identical
functionality. The first server to respond to a boot request will be used for system boot. In general,
it is not possible to predict which server will respond first.
Often, an administrator wants separate boot and installation servers to provide, for example,
different operating systems. In this case, using the correct server is important. As a result, some
means of selecting the correct boot and installation server is vital. There is not a simple solution
using basic DHCP PXE functionality.
Great care is required to properly set up a network configuration where there are multiple boot
servers on a subnet. Each boot server must be configured to correctly coexist with other boot servers
and support the desired overall administration solution.
Avoiding complex network issues
The purpose of this section is to provide solutions that avoid the inherent issues in a complex network
configuration by modifying the network topology or using boot techniques that avoid boot protocol
issues.
50 Complex networks: challenges and solutions
Page 51

An Ignite-UX server for each subnet
If your organization has separate groups that have distinct needs and compute resources, the
simplest approach to deal with complex networks might in fact be to manage distinct subnets rather
than set up a central Ignite server.
An Ignite server can be placed on each subnet. You may manage each server separately. This
avoids the complexities of multiple subnets. Similarly, boot servers for other operating systems can
have their own subnets.
Note that newer Integrity systems support HP Virtual Connect technology that permits the remote
“rewiring” of network connectivity. This allows systems to be “moved” between subnets via VC
profiles, which include network switch configurations. These may be used to avoid issues with
managing multiple Ignite servers and subnets.
For information on configuring an Ignite server for a simple subnet, see Chapter 3 (page 31) and
Chapter 4 (page 43).
A Multi-capable server for each subnet
Issues with multiple boot servers on a subnet might be avoided or resolved by having only one
boot server on each subnet. Normally, that implies the subnet would have limited boot and
installation support for one operating system instead of the ability to support various types of
installations.
Depending on the boot server ability for nonstandard configuration, it might be possible to configure
a single boot server to initiate or even fully support the installation of a variety of operating systems
including HP-UX. Such a configuration is clearly complex and requires expertise in the details of
boot and installation support for all the systems and operating systems involved. For more
information, see “Multi-capable subnet boot server” (page 60).
Extend the local subnet
In some cases, it is possible to avoid multiple subnet issues by changing the network topology
related to network boot functionality. It might be possible to use network tunneling or configure
routers to forward some broadcast packets beyond the local subnet.
This results in a larger, single subnet instead of multiple subnets and very effectively avoids issues
with multiple subnets. Changing the network topology might work well if data center policies allow
and one group manages this larger subnet.
Take care to consider how any network products change network performance and timing, as they
might cause boot and installation issues in some cases.
This guide does not include details regarding network infrastructure hardware and software products,
and their use. Consult network hardware and software products' information used to extend the
local subnet.
Using virtual LANs properly for Ignite-UX
If you use Virtual Local Area Networks (VLANs) and you encounter problems during network boot,
you need to discover how the VLANs are configured between your Ignite server and client. It is
possible to configure VLANs in multiple ways, and some methods might cause issues for Ignite-UX.
The simplest, and possibly the most common, configuration is a single VLAN presented to a single
LAN interface where all traffic, including any untagged traffic, travels on the one VLAN. (This
method of configuring VLANs is often used to limit the size of a broadcast domain.) This type of
configuration does not cause any problems for Ignite-UX because it logically appears as if the
client and Ignite server were connected via a switch. The Ignite server will have access to all the
network traffic that originates with the client.
A slightly less common, but equally valid, configuration has multiple VLANs configured on a network
switch port. Untagged traffic can be presented to only one VLAN, often called the native VLAN.
Avoiding complex network issues 51
Page 52

The native VLAN is defined in the configuration of the switch. In this situation, the Ignite server
might not have access to the native VLAN of the client.
If the Ignite server does not have access to the native VLAN, it will not have access to any of the
untagged traffic from the client. This becomes a problem, since during an Ignite-UX installation or
recovery, no network traffic is tagged until the session is complete and the final system is running.
This includes two-step media recovery.
Problems with VLAN configuration can be difficult to detect, since a system can be configured to
use a nonnative VLAN when the operating system is running. This would, for example, allow you
to create a recovery archive for the client on an Ignite server, but not allow you to recover the
client from that same Ignite server.
To remedy this problem, you must provide routing between the VLANs for systems that use nonnative
VLANs.
Complex network solutions
The approaches outlined in this section can be used to resolve the challenges outlined previously.
In some cases, one solution will resolve multiple challenges. Other challenges might require multiple
solutions.
Automating HP-UX OS version selection
During HP-UX boot for installation, it is necessary to select the HP-UX OS version to be installed. It
might be desirable to set up an Ignite server or boot helper to provide different default settings for
client systems in order to help automate installation.
The boot loader AUTO file controls the menu of HP-UX OS versions and the default selection. The
Ignite server may be configured to use separate AUTO files for each HP-UX OS release, as shown
below.
ln -s /opt/ignite/boot/nbp.efi \
/opt/ignite/boot/Rel_B.11.23/nbp.efi
ln -s /opt/ignite/boot/hpux.efi \
/opt/ignite/boot/Rel_B.11.23/hpux.efi
ln -s /opt/ignite/boot/fpswa.efi \
/opt/ignite/boot/Rel_B.11.23/fpswa.efi
ln -s /opt/ignite/boot/IINSTALL \
/opt/ignite/boot/Rel_B.11.23/IINSTALL
ln -s /opt/ignite/boot/IINSTALLFS \
/opt/ignite/boot/Rel_B.11.23/IINSTALLFS
cp /opt/ignite/boot/AUTO \
/opt/ignite/boot/Rel_B.11.23/AUTO
ln -s /opt/ignite/boot/nbp.efi \
/opt/ignite/boot/Rel_B.11.31/nbp.efi
ln -s /opt/ignite/boot/hpux.efi \
/opt/ignite/boot/Rel_B.11.31/hpux.efi
ln -s /opt/ignite/boot/fpswa.efi \
/opt/ignite/boot/Rel_B.11.31/fpswa.efi
ln -s /opt/ignite/boot/IINSTALL \
/opt/ignite/boot/Rel_B.11.31/IINSTALL
ln -s /opt/ignite/boot/IINSTALLFS \
/opt/ignite/boot/Rel_B.11.31/IINSTALLFS
cp /opt/ignite/boot/AUTO \
/opt/ignite/boot/Rel_B.11.31/AUTO
The B.11.23 and B.11.31 AUTO files must be edited to have different boot defaults. It is
recommended you keep the other boot menu entries so users have the ability to interactively select
their desired HP-UX OS version during boot. Alternatively, it is possible to constrain boot options
via this approach.
52 Complex networks: challenges and solutions
Page 53

To use this approach, modify bootptab entries to use the appropriate boot loader. The boot
loader will use the AUTO file in the same directory where nbp.efi is located.
Ignite requires the HP-UX version of the install kernel and install file system to match the HP-UX OS
version to be installed. By having different defaults in the AUTO files, the correct install kernel and
file system will be automatically selected.
Limit network response by system class
A subnet might include a variety of systems and devices. Systems that cannot run HP-UX, such as
x86 systems and printers, might request network boot. If the subnet includes various systems and
devices, HP-UX boot servers must be configured to respond only to device classes they can support.
Note that this approach does not resolve issues with handling client systems that are able to
successfully boot and install from different boot servers. The device class is a constant attribute of
the system. Thus, this approach will not help resolve issues with multiple boot and installations
servers intended to support Integrity systems, since all Integrity systems report the same device
class.
For information on how to configure this solution for booting, see “Ignite-UX server and boot helper
setup for DHCP” (page 44).
For information on how to configure this solution for networking IP address allocation, see “Isolating
Ignite-UX from noncontrollable DHCP servers ” (page 46).
Directed boot
If client system firmware supports directed network boot, that is a simple way to avoid complex
network boot issues. Directed boot support is not available in some older Integrity systems. Also,
directed boot requires interaction with the system console. Finally, directed boot requires specifying
the network configuration. In most cases, this configuration needs to be consistent with DHCP or
boot server configuration for the client.
Directed boot is provided by the EFI commands dbprofile and lanboot. These commands
make it possible to specify the network configuration to be used for boot (IP address, netmask,
gateway, etc.). For convenience, a dbprofile may be associated with one or more EFI boot
menu options so subsequent boot for installation from the master Ignite server is simplified. Because
the direct boot profile may include a gateway, it is possible to directly boot from an Ignite server
on a separate subnet without using a local subnet boot helper.
For detailed information on directed boot, see “Direct boot profiles for Itanium-based systems”
(page 102).
Server selection
PA-RISC clients can specify the boot server to use for DHCP/bootp services and ignore all other
boot offers. The client system network configuration is supplied by the boot helper or Ignite server
located on the same subnet. It is also possible for PA-RISC systems to “search” for network boot
options and build a list that may be used to select the desired boot server. For more information,
see “Booting PA-RISC clients from the console ” (page 99).
Limit network boot response by network interface address
When a system broadcasts a request for boot, the request includes the NIC network address (also
known as the MAC address).
Boot servers are often configured to respond to all systems that broadcast a boot request since that
approach simplifies administration. However, most boot servers have the ability to selectively
respond to boot requests.
You can typically configure boot servers to use the network address to decide whether to respond
to the client system or not. If the server responds, the network address is typically used to determine
the correct client-specific network configuration (IP address, netmask, gateway, etc.).
Complex network solutions 53
Page 54

When using this approach, boot servers typically have configuration content that allows them to
respond to a set of MAC addresses. For HP-UX servers, the /etc/bootptab file is used to identify
the clients to respond to. Listed MAC addresses will receive a response using the client-specific
details in the bootptab file. For more information, see Chapter 3 (page 31).
Some non-HP-UX boot servers may be configured to ignore a set of network addresses and respond
to others. Note that HP-UX does not support this capability.
NOTE: HP Virtual Connect (VC) network technology allows MAC addresses to be changed via
profiles. It is possible to allocate a range of MAC addresses for different boot servers, configure
an HP-UX server to manage that block of MAC addresses, and then use profiles to select the boot
server. Thus, instead of changing the boot server configuration content, the MAC addresses of a
system can be changed with VC profiles to effectively choose the correct boot server.
Control network boot via response timing
Since a client system uses the first network boot response it receives, response timing may be used
to help select the boot server. One boot server that responds to any MAC address may be configured
to respond only after a delay, while all other servers are configured to respond to specific MAC
addresses.
Because a number of factors might influence network boot response timing, and servers might
respond more slowly in some cases, this approach has a risk of intermittent failures caused when
the delayed server responds first because the delay is set too short.
Care is required in deciding the appropriate response delay. Note that a one-to-two second delay
for other boot server responses might be large enough to cause an HP-UX server responding to a
specific MAC address to normally win. However, a larger delay of eight seconds or more is
recommended. You will need to decide the correct delay for your subnets and servers. These
recommendations are intended to emphasize that the delay must not be set to “just large enough
to work” based on limited testing.
Install remote clients through a network router
By default, Ignite configures IINSTALLFS configuration content without network routing information.
If the Ignite server and depot server are on a remote subnet accessed via gateway, and registered
IP addresses are used instead of DHCP, the IINSTALLFS configuration content must include network
routing information.
The server keyword specifies the IP address for your Ignite-UX server. It refers to a specific LAN
interface on the Ignite-UX server. The same is true for the sd_server keyword that specifies the
depot server IP address for any depots needed for installation.
server = "10.2.1.11"
sd_server = "10.2.1.11"
54 Complex networks: challenges and solutions
Page 55

netmask[] = "255.255.255.0"
route_gateway[0] = "10.3.1.1"
route_destination[0] = "default"
disable_dhcp = "true"
If DHCP is used, this will not be required since the DHCP server must provide appropriate routing
information.
IMPORTANT: The sd_server IP address setting in the installation file system will be overridden
by sd_server settings in configuration files created by make_config. To use IINSTALLFS to
control the sd_server setting you must comment-out or remove the sd_server settings within
each sw_source clause in the affected configuration files.
For more information about changing IINSTALLFS content, see instl_adm(1M) and instl_adm(4).
Multiple NICs attach the Ignite server to multiple subnets
It is possible to connect one Ignite server to multiple subnets using multiple network interface cards
(NICs). The Ignite server can then be used to support network boot and installation on each of
these separate subnets. The following diagram is an example of a multiple subnet complex network.
There are some special Ignite configuration considerations for supporting multiple subnets from
one server. You must be careful to configure the server so it sends the client correct networking
information for its subnet, and you must configure the client so it contacts the correct Ignite-UX
server.
Getting the client the correct networking information
The HP-UX Ignite server needs to be configured so the client receives a response from the server
with the correct network configuration for its subnet.
The bootptab content for each MAC address needs to have correct networking configuration for
the system's subnet. In particular, IP addresses, netmasks, and gateways need to be valid from the
client system's perspective. Thus, bootptab will need to include information for all the different
subnets used by clients supported by the master Ignite server.
If anonymous network boot is used, care is needed to ensure boot responses are correct. See
Chapter 4 (page 43) for more information.
Having the client contact the correct server
The server keyword in the IINSTALLFS configuration information specifies the IP address for your
Ignite-UX server. It refers to a specific LAN interface on the Ignite-UX server. The same is true for
the sd_server keyword that specifies the depot server IP address for any depots needed for
installation.
Complex network solutions 55
Page 56

If a client is on a subnet that does not have a route to the IP address specified by server, then it
will not be able to contact the server after it boots.
For performance reasons, you might want to use the IP address of the Ignite-UX server LAN interface
directly connected to the same subnet as the client.
If packets are not routed between different subnets connected to the Ignite-UX server, the client
must use the IP address of the Ignite-UX server LAN interface on the same subnet.
Individual clients might use different IP addresses to access the Ignite server due to performance
reasons or routing reasons as described in “Install remote clients through a network router”
(page 54). To customize the IP address used to access the Ignite server on a per client basis, use
the LLA keyword as described below.
Workarounds to specify the IP address of the Ignite server are:
• Correct the server's IP address on the Ignite-UX network setup screen that appears on the client
console when you boot the client.
• Change the configuration content in IINSTALLFS to select the Ignite-UX server and depot server
IP addresses connected to their local subnet.
server = "10.1.1.11"
sd_server = "10.1.1.11"
LLA[] == "00306E4A03C2" {server = "10.1.1.11" sd_server = "10.1.1.11"}
LLA[] == "00306E4A03C3" {server = "10.2.1.11" sd_server = "10.2.1.11"}
IMPORTANT: The sd_server IP address setting in the installation file system will be overridden
by sd_server settings in configuration files created by make_config. To use IINSTALLFS to
control the sd_server setting you must comment-out or remove the sd_server settings within
each sw_source clause in the affected configuration files.
For more information about changing IINSTALLFS content, see instl_adm(1M) and instl_adm(4).
Ignite-UX bootp boot helper
An HP-UX server may be used as a boot helper to support boot on a subnet while installation is
accomplished via a master Ignite server connected to a different subnet.
A system with Ignite software installed may be located on each subnet to support initial boot. This
subnet-local Ignite server may be set up with IINSTALLFS configuration content to specify the single
Ignite master server.
Using this approach, all the HP-UX installation and recovery content may be managed on one
system. However, each local subnet Ignite boot helper server must be configured to support network
boot for all the clients on that subnet. The boot helper server may be configured for promiscuous
network boot or via selective MAC address response.
The advantage of this approach is there can be a single Ignite server that handles all HP-UX
installation and recovery content. A significant disadvantage of this approach is that Ignite software
must be installed on each boot helper. The version of Ignite installed on these boot helpers must
always match the version installed on the master Ignite server.
The Ignite product content located in /opt/ignite/boot must be present on the Ignite boot
helper so it may be used to accomplish network boot.
Follow these steps to set up an Ignite-UX boot helper system on the local subnet:
1. Install the Ignite-UX minimum core functionality onto the helper system. The
Ignite-UX_server:/depot is the same Ignite product software depot or media used to
set up the master Ignite server.
# swinstall -s Ignite-UX_server:/depot Ignite-UX.MinimumRuntime
2. On the boot helper system, set the default Ignite-UX server. Make sure the correct server is set
and any network routing is configured as described in “Having the client contact the correct
56 Complex networks: challenges and solutions
Page 57

server” (page 55) and “Install remote clients through a network router” (page 54). This changes
the configuration content in [W|V|I]INSTALLFS. For more information, see instl_adm(1M).
# instl_adm -t Ignite-UX_server_IP
3. Verify that the server is set to the correct Ignite-UX server and gateway for your subnet.
# instl_adm -d
4. If the gateway value is incorrect, you can use instl_adm -g yourgatewayIP to correct
it. This value is set by swinstall when the Ignite-UX product is installed.
5. On the boot helper system, configure the /etc/opt/ignite/instl_boottab file as
described in “Getting the client the correct networking information” (page 55).
For more information, see /etc/opt/ignite/instl_boottab on your Ignite-UX server.
HP-UX DHCP PXE Next server boot helper for integrity systems
To support Integrity systems, a lightweight Next Server boot helper may be set up on each subnet.
A DHCP PXE response includes a Server Address (SiAddr) field that indicates where to get additional
network boot content. Normally, the value in a response informs the client to get subsequent boot
content from the same boot server. The /etc/bootptab file can be configured to inform the client
to switch to the master Ignite server for other boot content. The bootptab sa option is used to
indicate the value. This is commonly described as a Next Server value, since the Server Address
value is typically only given when the value differs from the initial boot server. The master Ignite
server IP address must be used.
In this approach, each subnet must have a DHCP PXE server, but Ignite does not need to be installed
on that system. Therefore, there is no need to have multiple systems with the same Ignite software
version installed on them. The HP-UX bootp server may use the Next Server field to direct the
client system to get the HP-UX OS content from an Ignite server on a different subnet.
Using this approach, all the HP-UX installation and recovery content may be managed on one
system. However, each local subnet Next Server DHCP PXE boot helper must be configured to
support network boot for all the clients on that subnet. The boot helper server may be configured
for promiscuous network boot or selective response using client-specific network configurations.
Note that this Next Server boot helper does not have to be an HP-UX system. If it's not an HP-UX
system, care must be taken to make sure the PXE response is consistent with the Ignite server. In
particular, the boottab bf option provided from the Next Server boot helper must be consistent
with where the boot content is located on the master Ignite server. Symbolic links may be used to
allow a nonstandard location to be supported on the master Ignite server, if needed.
Configuring a Next server boot helper for Integrity systems
A Next Server boot helper does not require Ignite-UX software.
If the DHCP PXE server is an HP-UX system, it must be running 11i v2 (B.11.23) or later. If 11i v2
is used, PHNE_36209 or a superseding bootpd patch must be used to enable the configuration
of Next Server response.
The nbp.efi boot loader file must be present on the Next Server boot helper:
# cp /usr/lib/efi/EFI/HPUX/nbp.efi /opt/ignite/boot/nbp.efi
If the Next Server boot helper is a PA-RISC system, this boot loader file will have to be copied from
an Integrity system. Note that the Ignite-UX product may be installed instead of copying this file in
place.
The Next Server response is configured in /etc/bootptab using the sa option. The IP address
given with the sa option must be the DHCP PXE Next Server (SiAddr) IP address for additional
boot content.
This example configuration is for the following complex network diagram.
Complex network solutions 57
Page 58

A sample /etc/bootptab for Next Server boot helper configuration follows:
next-server:\
bf=/opt/ignite/boot/nbp.efi:\
ht=ethernet:\
hn=:\
bs=48:\
dn=xyzco.com:\
gw=15.1.128.1:\
sm=255.255.255.0:\
ds=10.2.1.11
hpuxsysa:\
tc=next-server:\
ha=00306E4A03C2:\
ip=10.4.1.140:\
sa=10.2.1.11:
During DHCP PXE boot, the boot helper server provides the network configuration (IP address,
netmask, gateway, etc.). The boot helper also provides the initial boot loader (nbp.efi ). All
other boot content is taken from the master Ignite-UX server. Thus, this boot helper server requires
no Ignite-UX product content.
Note that the bf option path must match the path where other boot content is located on the master
Ignite server. The bf path must be valid on the boot helper and the Ignite master server.
Make sure the correct server is set and any network routing is configured as described in “Having
the client contact the correct server” (page 55) and “Install remote clients through a network router”
(page 54).
Forwarding boot requests via bootp relay
The HP-UX bootp server has the ability to forward boot requests. With this approach, each subnet
must have a bootp relay boot helper, but that system does not need to have Ignite software
installed. Therefore, there is no need to have multiple systems with the same Ignite software version
on them.
When a client system broadcasts a request for network boot, the bootp relay boot helper will
forward the request to the master bootp server indicated in the bootptab. The master bootp
server will respond to the bootp relay boot helper, which will then forward the response back to
the client system. The master Ignite boot server and master bootp server must be the same system.
The bp option must be specified in the bootp relay boot helper's /etc/bootptab file to forward
boot requests to the master bootp server. The bp value must be the IP address of the master bootp
server. The ip option must not be specified since that value will be provided from the master bootp
server. Often an hm option is also specified so a single bootptab relay configuration may be
58 Complex networks: challenges and solutions
Page 59

used for many or any clients. The hm option is a MAC address mask used to determine if the MAC
address of the requestor matches the MAC address of the ha bootptab option.
ha=000000000000:\
hm=000000000000:\
bp=10.2.1.11
Note that care is needed if the system is connected to multiple subnets, since the bootp relay
helper will respond to boot requests detected on any NIC. Make sure the correct server is set and
any network routing is configured as described in “Having the client contact the correct server”
(page 55) and “Install remote clients through a network router” (page 54)
See bootpd(1M) for details of configuration.
Note that this approach works for PA-RISC systems but might not work for Integrity systems. For
Integrity systems, the HP-UX boot loader configures the bootp relay boot helper as a gateway
system for network configuration. If that system does not route packets between subnets, this might
impede successful use of this approach. If the system routes packets, it will be attached to multiple
subnets and therefore respond to boot requests detected on multiple subnets.
Ignite-UX software does not have to be installed on the bootp boot helper.
The following is an example of a local bootp relay boot helper /etc/bootptab content to
respond to any client MAC address:
bootp-relay:\
ht=ether:\
ha=000000000000:\
hm=000000000000:\
bp=15.2.1.11
The following is an example of selective, MAC-specific /etc/bootptab content:
hpfcixa:
ht=ether:\
ha=001083352de5:\
bp=15.2.1.11
A block of MAC addresses may be specified using the ha and hm options. This approach might
be very useful with HP systems supporting HP Virtual Connect technology.
The master Ignite server needs to have entries for the client system boot requests forwarded from
the bootp forward boot helper:
ignite-defaults:\
bf=/opt/ignite/boot/nbp.efi:\
ht=ethernet:\
hn:\
bs=48:\
dn=xyzco.com:\
gw=10.4.1.1:\
sm=255.255.255.0:\
ds=10.2.1.11
hpfcixa:\
ht=ignite-defaults:\
ha=001083352de5:\
ip=10.4.1.100:\
bp=10.2.1.11
To use the bootp relay boot helper with PA-RISC systems, boot using standard ports, such as:
boot lan.10.2.1.11
The installation option to use HP-UX specific network ports might not work:
boot lan.10.2.1.11 install
Complex network solutions 59
Page 60

Multi-capable subnet boot server
It is possible to set up a boot server that supports boot for multiple operating systems, including
HP-UX. The multi-capable boot server may be an HP-UX system or a non-HP-UX system. If this boot
server is an HP-UX system, the challenge becomes: how do I configure the HP-UX boot server to
support non-HP-UX boot and installation. If the system is not an HP-UX system, the challenge
becomes: how do I set up HP-UX boot and installation on the non-HP-UX system.
The information in this section is intended to provide general information to assist those setting-up
a multi-capable boot server to initiate or fully support the installation of a variety of systems, including
HP-UX installation. There is no general recipe for configuring these systems. In all cases, expertise
is required to adapt these approaches to practical solutions.
For more detailed information about setting up specific types of boot/installation servers to support
specific operating systems, see Chapter 6 (page 61).
Non-HP-UX Next server boot helper
If the non-HP-UX boot server supports configuration of the DHCP PXE Server Address (SiAddr)
response data, the simplest approach is to have the response specify the master Ignite server (Next
Server) to be used for all additional boot content. The non-HP-UX boot server will still need to be
configured to determine when boot control needs to be passed to the Ignite server for HP-UX
installation, and when control needs to be retained to perform other installations. This can be
accomplished by using MAC addresses or with a menu of boot options, for example.
Note that the directory where the nbp.efi boot loader is located must match the location of other
HP-UX boot content on the Ignite master server. If necessary, a symbolic link may be used from the
directory path matching the non-HP-UX server location to the standard HP-UX location for boot
content.
For more information, see “HP-UX DHCP PXE Next server boot helper for integrity systems”
(page 57).
Non-HP-UX bootp boot helper
If the non-HP-UX boot server cannot be configured to support a custom DHCP PXE Server Address
value, it is necessary for the server to provide the initial Ignite install environment content. To make
this approach work, copy content in the /opt/ignite/boot directory to the non-HP-UX boot
server.
While best practice might be to use the same directory path, there is no particular need for the
path to be the same. The path where the Ignite install environment is located on the non-HP-UX
boot server must match the DHCP PXE Boot File response value, but does not need to match the
default location on an Ignite server. The initial install environment will be entirely taken from the
non-HP-UX bootp boot helper system.
Note that the version of any Ignite content copied to a non-HP-UX boot server must match the
version of the content on the Ignite master server; it will have to be updated when a new version
of Ignite is installed.
Also, note that the AUTO file and IINSTALLFS files include Ignite-UX configuration content. It is
important to keep this configuration content consistent with the Ignite-UX server.
Keeping versions and configuration content consistent between these servers can be difficult. If
these servers are managed by different groups, ongoing administration might make this approach
impractical.
60 Complex networks: challenges and solutions
Page 61

6 Complex networks: multi-capable servers
This chapter presents a variety of ideas for using servers in a complex network. There is no one
solution when configuring servers in a complex environment – look for the solutions that work in
your data center.
This chapter focuses on Integrity systems only.
Configuring an RDP server for specific MAC addresses
Conflicts between multiple boot servers on a subnet may be avoided if each boot server only
responds to the MAC addresses of client systems which it has to manage. The RDP PXE server may
be configured to selectively respond to network boot requests based on the MAC addresses of
client systems. If there are more Windows and Linux systems than HP-UX systems, it makes more
sense to configure the RDP server to ignore the MAC addresses of HP-UX systems instead of
configuring the RDP server to respond to the MAC addresses of its client systems.
To do this, use the MAC Filter tab on the PXE Configuration Utility as shown in the figure below.
The Interactive UI may be started using the Windows Start Menu:
Start→All Programs→Altiris→PXE Services→PXE Configuration Utility
It may also be started from the RDP Deployment Solutions Console.
Configuring an RDP server to delay PXE response
The RDP PXE server may be configured to delay responding to network boot requests. This gives
a chance for an HP-UX network boot server to consistently respond first. The HP-UX boot server
must be configured to only respond to specific MAC addresses via bootptab content, allowing
the RDP server to manage the non-HP-UX systems.
The PXE Configuration Utility on the RDP server may be used to specify the response delay. Use
the PXE Server tab as shown in the figure below.
The Interactive UI may be started using the Windows Start Menu:
Configuring an RDP server for specific MAC addresses 61
Page 62

Start→All Programs→Altiris→PXE Services→PXE Configuration Utility
It may also be started from the RDP Deployment Solutions Console.
IMPORTANT: The recommended Minimum delay is 9 seconds and the Maximum delay is 10
seconds. These values must be large enough to provide predictable results considering some
possibility of HP-UX boot server delays due to the server being busy and possible network congestion.
Configuring an RDP server to initiate HP-UX installation
An HP ProLiant Essentials Rapid Deployment Pack (RDP) boot server may be configured to act as
an HP-UX boot helper. You can do this by adding RDP MenuOptions for the initiation of HP-UX
boot for install and placing the Ignite install environment on the RDP server. The RDP server may
then be used to initiate an Ignite-UX installation of HP-UX.
To set up boot for HP-UX installation, use the PXE Configuration Utility to create the necessary
MenuOptions and copy the Ignite install environment content into the proper locations on the RDP
server.
The PXE Configuration Utility program is typically located on the RDP server at
C:\Program Files\Altiris\eXpress\Deployment Server\PXE\PxeConfig.exe
Setting up RDP MenuOptions via Windows commands
A Windows command line may be used to automate Ignite support set up. To create a MenuOption
on an RDP server for HP-UX installation, or to update it with new Ignite install environment content,
the following command line arguments may be used:
PxeConfig.exe -create -other "HP-UX Managed" -ia64 \
-pathia64 <ignite_content_dir> -save
The ignite_content_dir directory needs to contain the following HP-UX boot and Ignite install
environment files:
• .\MenuOption160.0 (nbp.efi renamed as required by the RDP server)
• .\MenuOption161.0 (nbp.efi renamed as required by the RDP server)
62 Complex networks: multi-capable servers
Page 63

• .\MenuOption162.0 (nbp.efi renamed as required by the RDP server)
• .\MenuOption163.0 (nbp.efi renamed as required by the RDP server)
• .\Rel_B.11.23
• .\Rel_B.11.23\IINSTALLFS
• .\Rel_B.11.23\IINSTALL
• .\Rel_B.11.31
• .\Rel_B.11.31\IINSTALL
• .\Rel_B.11.31\IINSTALLFS
• .\fpswa.efi
• .\hpux.efi
• .\AUTO
The RDP server requires the file name of the initial boot loader file and the name of the MenuOption
to match. Normally, MenuOption160 will be used by the RDP server. However, if there are
existing custom MenuOptions, another file name might be required. Copying the small nbp.efi
boot loader to the first few custom MenuOption names the PXE Configuration Utility uses for
MenuOptions must simplify the automatic set up of the RDP server. For HP-UX, this file is actually
the nbp.efi network boot loader.
The Ignite-UX version for this content on the RDP server must be kept consistent with the Ignite-UX
product version on the Ignite server. Note that IINSTALLFS includes config file content typically
modified via use of instl_adm. Since these files will reside on the RDP server, a data center
administration process for updating these files must be created to keep the RDP files consistent with
the Ignite server.
The Ignite install environment on the RDP server needs to be updated when:
• The IINSTALLFS config content is changed
• A new version of Ignite software is installed on the Ignite server
• Changes are made to the AUTO file boot menu
• The HP-UX boot loader is patched
Setting up RDP MenuOptions via interactive UI
The RDP server PXE Configuration Utility may be used to interactively create a MenuOption for
HP-UX boot and Ignite installation.
Before starting the interactive UI, put the Ignite-UX boot and install environment files in a directory
as specified in “Setting up RDP MenuOptions via Windows commands” (page 62). Any convenient
method may be used to transfer the required content from the Ignite server to the RDP server (FTP,
Samba share, key chain drive, etc.). You must consider how this content will be updated in the
future to stay consistent with the Ignite server.
The Interactive UI may be started using the Windows Start Menu:
Start→All Programs→Altiris→PXE Services→PXE Configuration Utility
It may also be started from the RDP Deployment Solutions Console.
Once started, the PXE Configuration Utility will display a window similar to the following:
Configuring an RDP server to initiate HP-UX installation 63
Page 64

On the Boot Menu tab, select the New... button to create a MenuOption for HP-UX boot and
installation.
You must validate that the selected MenuOption number in the Final Location on PXE Server text
box is consistent with the HP-UX Ignite content provided.
Configure the MenuOption as follows:
64 Complex networks: multi-capable servers
Page 65

1. Enter the name of the MenuOption to be created in the Name: text box.
For HP-UX, the name “HP-UX Managed” is recommended. If HP-UX release-specific
MenuOptions are created by using different AUTO content, a name such as “HP-UX 11.31
Managed” is recommended.
2. Configure the Pre-boot Image Properties.
• Select Operating System type Other.
• Select only the ia64 Processor Option, since HP-UX only supports ia64 systems. Make
sure x86 and x64 are unselected.
• Select User supplied for the Image Creation Method, and then select Manual Boot Image.
In the PXE Boot Files text box, enter the directory containing the Ignite-UX boot and install
environment files, then select OK.
3. Select OK from the New Shared Menu Option dialog box.
4. Select Save on the Boot Menu tab of the PXE Configuration Utility – Shared Configuration
menu.
IMPORTANT: You must select Save to enable the new boot menu option before selecting
OK to exit.
Once set up is complete, the PXE Configuration Utility will show the new MenuOption for HP-UX.
Configuring an RDP server to initiate HP-UX installation 65
Page 66

Using an RDP MenuOption for HP-UX
Once the HP-UX MenuOption is set up using either the PXE Configuration Utility command or UI,
the RDP PXE server will include “HP-UX Managed” as an option during network boot of ia64 client
systems.
When a client system is booted from an RDP PXE server, the system will prompt you to “Press [F8]
to select a boot option.” When booting on a serial console, function keys are typically not available.
The m key may be used to bring up the boot menu instead of the F8 function key.
Loading.: Core LAN Gb A
Running LoadFile()
CLIENT MAC ADDR: 00 30 6E 4C AA A5
CLIENT IP: 10.1.1.100 MASK: 255.255.255.0
DHCP IP: 10.1.1.22 PROXY IP: 10.1.1.22
GATEWAY IP: 10.1.1.1
Press [F8] to Select a boot option: iuxrdp (9)
Linux Managed
Next Device (BIOS/EFI)
HP-UX Managed
Linux DHCP PXE Next server boot helper for HP-UX installation
A Linux boot server, such as an HP Insight Control Environment for Linux (ICE-Linux) server, may
be configured to act as an HP-UX boot helper. The Linux server's dhcpd daemon may be configured
to selectively respond to client network requests and to provide a PXE Next Server value that
indicates the Ignite server's IP address. This Next Server value will cause boot to switch to the
master Ignite server. Additional HP-UX boot loader and install content will be accessed from this
Ignite Next Server.
NOTE: DHCP or this PXE boot server is responsible for providing complete network configuration
for boot and installation for the client system, including gateway, etc.
The dhcp.conf file controls dhcpd daemon operation. The next-server value is typically
associated with specific MAC addresses. For example:
allow booting;
allow bootp;
ddns-update-style none;
subnet 10.1.1.0 netmask 255.255.255.0 {
option routers 10.1.1.1;
option subnet-mask 255.255.255.0;
option domain-name "xyzco.com";
option broadcast-address 10.1.1.255;
option domain-name-servers 10.1.1.11;
group {
host linuxsys2 {
hardware ethernet 00:0C:29:A1:E9:E5;
fixed-address 10.1.1.221;
next-server 10.1.1.11;
filename "/opt/ignite/boot/nbp.efi";
}
}
}
Linux server DHCP and PXE boot configuration details for your Linux distribution need to be consulted
for correct set up.
Note that the HP-UX network boot loader needs to be copied to the Linux system. This file may be
obtained from the Ignite-UX server at /opt/ignite/boot/nbp.efi.
66 Complex networks: multi-capable servers
Page 67

This file must be located on the Linux system at /opt/ignite/boot/nbp.efi. This file needs
to be accessible via TFTP.
Configuring an HP-UX server to support Linux boot and installation
By using HP-UX network services configuration files, an HP-UX server can be set up to support Linux
network boot and installation if you place Linux boot and install content on the HP-UX server. You
must acquire the boot and install content from a Linux distribution or Open Source website. Ignite-UX
software does not include any Linux support. The information in this section describes use of HP-UX
features not directly related to Ignite-UX.
It is not possible to provide all the details for setting up Linux installations here, due to differences
between Linux releases. Documentation for network installation for the specific Linux releases being
enabled must be consulted for the correct setup.
To enable network boot for Linux installation, proper boot content must be placed on the HP-UX
server. The elilo boot loader may be obtained from a Linux distribution or the Open Source elilo
website at http://sourceforge.net/projects/elilo/. The IA64 binary is needed for HP-UX Integrity
systems.
Linux install kernels and install file system images must be obtained from the appropriate Linux
distributions.
The message file hplinux.msg controls the appearance of the Linux boot menu. This file must
be created with Linux tools.
The boot content may be placed anywhere on the HP-UX system, provided TFTP access is enabled.
The location must be consistent with /etc/bootptab content. In this example, the Linux boot
content is located in the same directory as the HP-UX Ignite boot content.
/opt/ignite/boot/LINUX/elilo-ia64.conf
/opt/ignite/boot/LINUX/elilo-ia64.efi
/opt/ignite/boot/LINUX/hpuxlinux.msg
/opt/ignite/boot/LINUX/images/SLES9/initrd
/opt/ignite/boot/LINUX/images/SLES9/Linux
/opt/ignite/boot/LINUX/images/RHEL5UP1
/opt/ignite/boot/LINUX/images/RHEL5UP1/initrd-rhel5.1.img
/opt/ignite/boot/LINUX/images/RHEL5UP1/vmlinuz-rhel5.1
The elilo-ia64.conf configuration file specifies the set of Linux installation menu options that
are provided during network boot. In this example, SuSE 9 and RedHat 5 Update 1 are enabled:
chooser=textmenu
message=hplinux.msg
prompt
image=images/SLES9/Linux
label=SLES9
description="Install SLES9"
initrd=images/SLES9/initrd
append="install=nfs://10.1.1.11/ISOimages/SLES9"
read-only
image=images/RHEL5UP1/vmlinuz-rhel5.1
label=RHEL5UP1
description="Install RHEL5 Update 1"
initrd=images/RHEL5UP1/initrd-rhel5.1.img
read-only
The Linux distribution content must be made available via NFS or FTP. In this example, the same
HP-UX server is used for both boot and installation. Alternatively, Linux install content may be
located on another server.
SuSE Linux expects distribution install content to be unpacked as if the distribution media were
mounted, and the media contents copied via the file system and made available for NFS or FTP
access. RedHat expects ISO images to be available as if the distribution media were downloaded
Configuring an HP-UX server to support Linux boot and installation 67
Page 68

or copied to the server from media via dd(1) and then made available for NFS or FTP access. For
example:
RedHat:
/ISOimages/RHEL5UP1
/ISOimages/RHEL5UP1/RHEL5.1-Server-20071017.0-ia64-disc1-ftp.iso
/ISOimages/RHEL5UP1/RHEL5.1-Server-20071017.0-ia64-disc2-ftp.iso
/ISOImages/RHEL5UP1/RHEL5.1-Server-20071017.0-ia64-disc3.ftp-iso
/ISOImages/RHEL5UP1/RHEL5.1-Server-20071017.0-ia64-disc4.ftp-iso
/ISOImages/RHEL5UP1/RHEL5.1-Server-20071017.0-ia64-disc5.ftp-iso
/ISOImages/RHEL5UP1/RHEL5.1-Server-20071017.0-ia64-disc6.ftp-iso
SuSE:
/ISOimages/SLES9
/ISOimages/SLES9/ARCHIVES.gz
/ISOimages/SLES9/autorun.inf
/ISOimages/SLES9/boot
/ISOimages/SLES9/boot/directory.yast
/ISOimages/SLES9/boot/image
/ISOimages/SLES9/boot/initdisk.gz
/ISOimages/SLES9/boot/rescue
/ISOimages/SLES9/boot/rescuefloppy
/ISOimages/SLES9/boot/root
/ISOimages/SLES9/boot/ChangeLog
/ISOimages/SLES9/boot/content
/ISOimages/SLES9/boot/control.xml
.
.
.
The information presented here gives some general guidance on Linux installation set up. Specific
Linux release information must be consulted for getting boot and install content, setting up content
on an installation server, and required options in the EFI boot configuration file.
The /etc/bootptab content to enable Linux boot for installation might look like the following.
linuxsys2:\
ht:=ether:\
ha=001560045A4A:\
ip=10.1.1.221:\
hn:\
sm=255.255.255.0:\
gw=10.1.1.1:\
nt=10.1.1.11:\
ds=10.1.1.11:\
bf=/opt/ignite/boot/LINUX/elilo-ia64.efi:\
bp=10.1.1.11
Once all the content has been set up, the HP-UX server must have Linux boot and installation
enabled.
Use EFI network boot to start the boot and installation process.
Installation options specified in the elilo-ia64.conf file will be displayed as formatted by the
hplinux.msg file.
IMPORTANT: If the message file is missing or incorrect, the system might display a blank screen
when elilo boots. If this happens, you must be able to use CTRL-c to exit the boot loader and return
to the EFI boot menu.
Select the desired distribution for boot and installation.
/-------------------| Linux Install from an HP-UX Server |-------------------\
| |
| This image enables Linux installation from an HP-UX system. Select a |
| menu option, enter kernel options at the prompt if desired, and press |
68 Complex networks: multi-capable servers
Page 69

| <return>. USE AT YOUR OWN RISK! ^C to go back to EFI; ESC does nothing. |
| |
| /------------------------------------------------\ |
| | Install SLES9 | |
| | Install RHEL5 Update 1 | |
| | | |
| | | |
| | | |
| | | |
| | | |
| | | |
| \------------------------------------------------/ |
| |
| Kernel Options: ________________________________________________________ |
| |
| ^C now to go back to EFI; ESC does nothing. Once started, there's no |
| turning back (i.e. you have to reboot to get back to EFI). |
\----------------------------------------------------------------------------/
RedHat installation from an HP-UX server
The RedHat installation process normally starts with language selection.
Welcome to Red Hat Enterprise Linux Server
+---------+ Choose a Language +---------+
| |
| What language would you like to use |
| during the installation process? |
| |
| Catalan ^ |
| Chinese (Simplified) : |
| Chinese (Traditional) # |
| Croation : |
| Czech : |
| Danish : |
| Dutch : |
| English v |
| |
| +----+ |
| | OK | |
| +----+ |
| |
+---------------------------------------+
<Tab>/<Alt-Tab> between elements | <Space> selects | <F12> next screen
Next, the source and method of transport must be selected. In this example, NFS network installation
is used.
Welcome to Red Hat Enterprise Linux Server
+------+ Installation Method +----- | |
| What type of media contains the |
| packages to be installed? |
| |
| Local CDROM |
| Hard drive |
| NFS image |
| FTP |
| HTTP |
| |
| +----+ +------+ |
| | OK | | Back | |
| +----+ +------+ |
| |
Configuring an HP-UX server to support Linux boot and installation 69
Page 70

| |
+-----------------------------------|
<Tab>/<Alt-Tab> between elements | <Space> selects | <F12> next screen
Then you must specify the location of Linux install content.
Welcome to Red Hat Enterprise Linux Server
+----------------------------+ NFS Setup +----------------------------+
| |
| Please enter the following information: |
| |
| o the name or IP number of your NFS server |
| o the directory on that server containing |
| Red Hat Enterprise Linux Server for your architecture |
| |
| NFS server name: 10.1.1.11_______________ |
| Red Hat Enterprise Linux Server directory: /ISOimages/RHEL5UP1_____ |
| |
| +----+ +------+ |
| | OK | | Back | |
| +----+ +------+ |
| |
| |
+---------------------------------------------------------------------+
<Tab>/<Alt-Tab> / between elements | <Space> selects | <F12> next screen
RedHat installation continues presenting additional configuration screens specific to the distribution.
Documentation regarding RedHat installation and configuration for client system set up must be
consulted.
SuSE installation from an HP-UX server
The SuSE installation process normally starts with terminal selection.
What type of terminal do you have ?
1) VT100
2) VT102
3) VT220
4) X Terminal Emulator (xterm)
5) X Terminal Emulator (xterm-vt220)
6) X Terminal Emulator (xterm-sun)
7) screen session
8) Linux VGA or Framebuffer Console
9) Other
Type the number of your choice and press Return:
The installation continues to present additional configuration screens specific to the distribution. In
this case, the location of install content was specified in the elilo configuration file. Documentation
regarding SuSE installation and configuration for client system set up must be consulted.
Configuring an HP-UX server to support Windows installation
In theory, it might be possible to configure an HP-UX server to enable Windows installation.
However, Windows installation from an HP-UX server has not been investigated. One of the possible
challenges for enabling installation is to provide Boot Information Negotiation Layer (BINL) from
the server. A solution for Linux servers that might be adaptable is provided via Windows Remote
Installation Service (RIS).
70 Complex networks: multi-capable servers
Page 71

7 Managing I/O for installation and recovery
LUN
Legacy DSFs Legacy Hardware Paths
/dev/dsk/c9t0d1
0/0/6/0/0.1.18.73.0.0.1
/dev/dsk/c11t0d1
0/0/6/0/0.1.19.75.0.0.1
/dev/dsk/c17t0d1
0/0/10/0/0.1.18.73.0.0.1
/dev/dsk/c19t0d1
0/0/10/0/0.1.19.75.0.0.1
/dev/dsk/c29t0d1
1/0/2/0/0.1.19.75.0.0.1
/dev/dsk/c27t0d1
1/0/2/0/0.1.18.73.0.0.1
/dev/dsk/c37t0d1
1/0/14/0/0.1.18.73.0.0.1
/dev/dsk/c33t0d1
1/0/14/0/0.1.19.75.0.0.1
This chapter introduces Ignite-UX I/O concepts and describes how multi-path concepts enhance
Ignite-UX. This chapter also assists the user moving from the legacy naming model to the agile
naming model by touching on changes found in multi-path aware Ignite.
Introducing multipathing
In its current implementation, beginning with C.7.1.x, Ignite-UX is aware of multiple paths to I/O
devices. Ignite-UX now supports agile view on HP-UX 11i v3.
One of the features of HP-UX 11i v3 and later is the ability to tolerate I/O path changes. For HP-UX
11i v2 and earlier releases of HP-UX, Ignite-UX is aware that multiple device special files (DSFs)
and hardware paths may refer to the same device logical unit (LUN).
Previous to HP-UX 11i v3, I/O addressing looks like Figure 16, where a DSF is specific to one
hardware path, which in turn points to an I/O device’s LUN.
Figure 16 Legacy I/O stack addressing model
Any of the legacy DSFs can be used to access the I/O device. Care must be taken to prevent the
simultaneous use of multiple DSFs for conflicting purposes. For example, two DSFs for the same
LUN might be used for different volume or disk groups. Ignite-UX will detect such an invalid
configuration created with the Ignite user interface and prevent installation. A final validation is
Agile view concepts
also done during sanity checking, which takes place after starting an installation.
Starting with HP-UX 11i v3, HP-UX is aware of multiple paths to devices and provides multipathing
functionality automatically. Important new concepts related to this functionality are: persistent DSF,
LUN hardware path, lunpath hardware path, device identifier, and agile addressing.
Agile view I/O addressing logic looks like Figure 17.
Introducing multipathing 71
Page 72

Figure 17 Agile multiple path I/O stack addressing model
Persistent DSF
Lunpath
hardware path
Lunpath
hardware path
Lunpath
hardware path
Lunpath
hardware path
Legacy DSF
Hardware path
Legacy DSF
Hardware path
LUN
hardware
path
LUN
64000/0xfa00/0x6
LUN: WWID 0x50060b000015330f0001000000000032
Persistent DSF
Legacy DSFs Legacy Hardware Paths
LUN
Hard-
ware
Path
Lunpath Hardware Path
/dev/dsk/c9t0d1
/dev/disk/disk55
0/0/6/0/0.1.18.73.0.0.1
0/0/6/0
0.0x50060b000019bc98.0x4001
0/0/6/0
0.0x50060b000019c8a6.0x4001
0/0/10/0
0.0x50060b000019bc98.0x40010
0/0/10/0
0.0x50060b000019c8a6.0x40010
1/0/2/0
0.0x50060b000019c8a6.0x4001
1/0/2/0
0.0x50060b000019bc98.0x4001
1/0/14/0
0.0x50060b000019c8a6.0x40010
1/0/14/0
0.0x50060b000019bc98.0x40010
/dev/dsk/c11t0d1
0/0/6/0/0.1.19.75.0.0.1
/dev/dsk/c17t0d1
0/0/10/0/0.1.18.73.0.0.1
/dev/dsk/c19t0d1
0/0/10/0/0.1.19.75.0.0.1
/dev/dsk/c29t0d1
1/0/2/0/0.1.19.75.0.0.1
/dev/dsk/c27t0d1
1/0/2/0/0.1.18.73.0.0.1
/dev/dsk/c37t0d1
1/0/14/0/0.1.18.73.0.0.1
/dev/dsk/c33t0d1
1/0/14/0/0.1.19.75.0.0.1
The persistent DSF represents the device, regardless of its location in the I/O configuration. With
the new model, legacy DSFs and hardware paths enjoy multi-path capabilities because after device
open, I/Os use every path associated with the I/O device.
The LUN hardware path is virtualized, representing all the lunpath hardware paths to a device.
The lunpath hardware path is the path typically displayed in the Ignite user interface. Lunpath
hardware paths do not have device special files - they are associated with a LUN hardware path
and are accessed via the persistent DSF associated with a LUN hardware path. The Ignite user
interface displays the lunpath hardware path so the actual device can be discerned from it; you
cannot identify the physical device from looking at the LUN hardware path or the persistent DSF.
Sample agile addressing model values for the DSFs and paths are shown below.
Figure 18 Agile naming example
72 Managing I/O for installation and recovery
Identification of devices in a multiple path I/O configuration can be challenging. The I/O stack
(driver) identifies devices using unique LUN IDs. Often this is a WWID value.
By identifying a device using the unique LUN ID, any of its hardware paths can be used to access
it, and agile addressing is supported.
The unique LUN ID might be difficult for a user to associate with a specific physical or logical
device. For example, often the device WWID is on a device label (e.g. on a sticker) or available
via storage management software used to set up a virtual LUN – those values are difficult to
remember and type correctly. It might be easier to select a device using one of its hardware paths.
Page 73

However, if you can remember part of the WWID, you can use the Ignite user interface Disk
Selection dialog box Filter text box to limit displayed devices to those with WWIDs containing the
text you can remember.
Agile addressing means the hardware path actually used by the system to access a device is
independent of the path used to select the device. Selecting a disk via one hardware path might
result in the system choosing some other, better hardware path. For example, this can happen
when selecting a disk for boot, and when volume managers determine the appropriate set of paths
to use for device access.
NOTE: For HP-UX 11i v3, the one hardware path used for selection has no special significance
in most Ignite-UX user interfaces. Ignite-UX will allow HP-UX system software to select the best path
when a particular path is needed. For example, boot paths will be selected by system software
when the boot device is selected.
A more user-friendly approach is to identify I/O devices with a device identifier. A device identifier
is a human-readable device ID defined by the user. It can be written to the device and read back.
Data centers may want to create some standard policy for device IDs (e.g. LAB2CAB23LUN15).
In the current implementation, the device ID can be set, checked, and read at installation. The
device identifier is stored on the device, so it remains available if the disk is moved to a different
system or connected to multiple systems. Not all devices support the use of a device identifier.
See the scsimgr(1M) command for more information on how to set and read a device identifier.
When identifying I/O hardware for Ignite-UX configuration files, see Table 5 (page 81) for the
format of I/O variables.
NOTE: Your data center may use separate processes or groups to administer systems and storage.
It is important to record WWID, Device ID, and other details of LUNs assigned to your systems.
Access control or protection zones may be used to control the systems permitted to use a LUN; it
is important to record which systems have access to LUNs.
For more details on agile view HP-UX, see the white paper Overview: The Next Generation Mass
Storage Stack available at http://www.hp.com/go/hpux-core-docs.
Practical considerations
Ignite-UX uses hardware paths to help you identify I/O devices such as disks, CD/DVD drives and
tape drives during installation and recovery. The format of the hardware path used to identify I/O
devices will depend on the version of HP-UX you are using and other factors. Also, depending on
your configuration, multiple paths might be displayed for a single device.
For HP-UX 11i v3, Ignite-UX will allow HP-UX system software to select the best path when a
particular path is needed. For example, boot paths will be selected by system software when the
boot device is selected.
Note that horizontal scrolling might be required to read the entire hardware path and associated
data in Ignite-UX GUI screens.
IMPORTANT: Due to application dependencies, HP-UX software deployment tools such as Ignite-UX
expect legacy DSFs to be present and the legacy naming model to be enabled. Therefore, HP
recommends only partial migration be performed, as detailed in the HP-UX 11i v3 Persistent DSF
Migration Guide, available at http://www.hp.com/go/hpux-core-docs.
System installation configuration
When using Ignite to install HP-UX on a client, a root disk must be identified. Ignite-UX selects a
default disk, but it may be changed using the Root Disk... button on the Basic tab on the client
installation configuration interface shown below.
Practical considerations 73
Page 74

Figure 19 Ignite-UX client installation configuration tabs
The hardware path displayed in the Root Disk text box is the lunpath hardware path for HP-UX 11i
v3 and later, or the legacy hardware path for HP-UX 11i v2 and earlier.
By selecting Root Disk..., the Disk Selection – Root Disk dialog box is displayed (Figure 20
(page 74)).
Figure 20 Disk Selection – Root Disk Dialog Box
The Disk Selection – Root Disk dialog box displays every path for each disk, therefore disks with
multiple paths are listed multiple times. Set View By: to Disks/Paths (the default is I/O Protocol) to
see what paths go to each disk. For more information on using the Disk Selection – Root Disk dialog
box, see “Root disk... button” (page 119).
74 Managing I/O for installation and recovery
Page 75

NOTE: Inventory blocking may be used to reduce the time required to discover devices during
Ignite-UX start-up. Devices blocked from inventory will not be listed in the Disk Selection dialog
boxes. For more information on using Ignite-UX variables such as inventory_block_path and
inventory_block_protocols, see instl_adm(4), “Controlling the I/O configuration process”
(page 81), and “Additional... button” (page 124). For more information on the agile naming model,
see Figure 18 (page 72).
If you have a SAS device, physical locations will be displayed in the Disk Selection – Root Disk
dialog box as shown in Figure 21 (page 75).
Figure 21 Disk Selection – Root Disk Dialog Box With Physical Locations
To get a concise listing of all the paths for a single device, select the path of interest and then click
the More Info button, or use the Disks/Paths View. If a LUN has multiple paths, you may select any
of them to get to the same More Info screen. For example, you may select either of the lunpath
hardware paths below since they both reference the same LUN.
0/0/6/0/0.0x50060b000019c8a6.0x4001000000000000
0/0/10/0/0.0x50060b000019c8a6.0x4001000000000000
Use the More Info screen to help make the transition from legacy hardware paths to the lunpath
hardware paths. The More Info screen supplies details about a LUN to help you verify that the
selected LUN is the one intended. Note that the legacy hardware path is also shown to the very
right in the Path/Location window of the Disk Selection dialog box – use horizontal scrolling to
see it.
Practical considerations 75
Page 76

Figure 22 More Info dialog box
For HP-UX 11i v3 and later, the More Info screen displays all the lunpath hardware paths for a
device. (Note that the paths can be long - horizontal scrolling may be needed to see the entire
path.) The Legacy HW Path displayed depends on the lunpath hardware path currently selected
in the selection list window. One legacy hardware path is listed. For a concise list of all the legacy
hardware paths leading to the device, select the All Paths... button (Figure 23 (page 76)).
The Legacy HW Path window and the All Paths... button are not available on systems running
HP-UX 11i v2 and earlier.
Figure 23 All paths dialog box
Accessed from the File System tab of the client installation configuration interface, the Disk Selection
– Add/Remove Disks dialog box displays the lunpath hardware path, the legacy hardware path,
or the physical location. See Figure 21 (page 75) for the display format of physical location
hardware paths.
76 Managing I/O for installation and recovery
Page 77

Figure 24 Disk selection – add/remove disks dialog box
The More Info screen is made available on the Disk Selection – Add/Remove Disks dialog box
too, to validate selections and help make the change to the agile naming model.
Support for >2 TB boot disk
Starting with the HP-UX 11i v3 OE Update March 2013 release, the maximum size of the boot
disk has been increased from 2 TB to 16 TB on HP Integrity systems. (HP 9000 systems have
supported the boot disk or root volume group up to the 2 TB maximum size since the initial HP-UX
11i v3 OE February 2007 release.)
The >2 TB boot disk support is available with Logical Volume Manager (LVM) layout and currently
not available on VxVM and Whole Disk layouts. To configure >2 TB disk as boot disk, you have
to navigate to Basic tab -> Filesystem -> select Logical Volume Manager (LVM) with VxFS from the
itool interface.
Update the Ignite-UX software on the Ignite-UX servers with the Ignite-UX bits.
NOTE: The Ignite-UX software is delivered with the HP-UX 11i v3 OE Update March 2013
release or higher for configuring the boot disk >2 TB in size.
NOTE: Support for >2 TB boot disk support is available with HP-UX 11i v3 OE Update March
2013 release or higher to HP Integrity systems, and this feature is not available and supported on
the HP-UX versions earlier than OE Update March 2013 release.
During the cold installation, the default LVM Volume Group Version set by Ignite-UX is 1.0. This
limits the size of the boot size to 2 TB, and the remaining space on the disk will be unused. To
utilize the full disk capacity beyond 2 TB (and up to 16 TB max) for boot disk with LVM, you have
to update the LVM’s Volume Group Version to 2.2 or later versions. You can do this by navigating
to Filesystem tab > Advanced Tasks > Group parameters tab > LVM Version in the Ignite-UX itool
user interface. For more information, see LVM Volume Group Version 2.2 at: http://www.hp.com/
go/hpux-core-docs
The VxFS File System size chosen for configuring any volume is limited to 2 TB during the installation
and any size configured beyond 2 TB will be capped to a maximum of 2 TB. You can manually
extend the size of the VxFS File System to >2 TB, post installation, if Online JFS License product is
installed on the system.
Practical considerations 77
Page 78

Starting with HP-UX 11i v3 OE Update March 2013 release, Ignite-UX supports the size of Swap,
Dump, and unused logical volumes up to 1 TB instead of the previous limit of 128 GB on 11i v2
and 11i v3. During a cold installation or recovery, larger amounts of swap, dump, or swap volumes
can be utilized in disk or volume groups by defining multiple swap, dump, or swap volumes. The
limit for unused volumes on 11i v1 is 1 TB; however, the limit for swap and dump has not been
increased.
Identifying devices for other tasks
There are a number of other Ignite tasks that require the identification of I/O devices:
• When building installation media, you must use the ioscan command to find the tape, CD,
or DVD drive. Note that some of the CD/DVD writing SW included with Ignite-UX but not
developed by HP only works with legacy device special files.
• When performing a system recovery on Itanium-based systems, you must find the tape device’s
hardware path to create an EFI boot option. (This must be done at the time the tape is created.)
• During two-step media recovery, you must select the hardware path of the tape drive to recover
from.
• When in expert recovery mode, you must have the hardware path of the disk you are attempting
to recover.
• When identifying disks in configuration files to define them or combine them in a single volume
group, you must supply the hardware paths of the disks.
Important characteristics of the agile view
The following points will help you move from the legacy view to the agile view:
• When using the new persistent DSFs, be sure to use the new directory structure:
Table 3 Mass storage DSF directories
• Both legacy and persistent DSFs can be created during installation and recovery of HP-UX 11i
v3 depending on your volume manager. When Ignite-UX creates file system content for HP-UX
11i v3, persistent DSFs are used for LVM volumes and VxVM 5.0 layout, and legacy DSFs
are used for VxVM 4.1.
NOTE: The VxVM components in the Ignite-UX install environment and the installation depot
must be version 5.0 or higher in order to use persistent DSFs.
• Keep in mind that persistent DSFs endure with recovery if Ignite recovers to the same hardware
or can map to replacement hardware, but are not guaranteed to remain the same between
installations. See Figure 25 for an overview regarding consistency of I/O addressing.
Legacy DSF DirectoryPersistent DSF Directory
/dev/dsk/dev/disk
/dev/rdsk/dev/rdisk
/dev/rmt/dev/rtape
• If hardware is replaced and recovery is not needed, you might want to run io_redirect_dsf
to correct the system configuration. For more information, see io_redirect_dsf(1M).
78 Managing I/O for installation and recovery
Page 79

Figure 25 Consistency of I/O addressing
Reboot
Installation with other hardware changes
C C C C C CC
Persistent DSF
LUN H/W Path
Lunpath H/W Path
Legacy DSF
Legacy H/W Path
Device ID
WWID
Installation with replacement of system and/or HBAs
with same model and config using the same devices
Installation with same system and config using
replacement devices
C C C CN N N
N N
NNN
N N N N N N
NN
N
* *
C N C C C
Recovery with same system and devices
NRC
R
C C C
Recovery with replacement of system and/or HBAs
with same model and config using the same devices
R
N C
R
C C C
Recovery with same system and config using
R
N
*
R
*
N N
Recovery with other hardware changes N
N N N N N N
System Event
Device Addressing Identification
Reinstallation on same system and devices.
replacement devices
Use the following key for the “Consistency of I/O Addressing” figure above.
C = Consistent — Device addressing id value is saved in HP-UX config content and the correlation
between these values and devices does not change as a result of the event.
N = New Value — Device addressing id value is newly created as a result of the event. The device
addressing id value for a device might or might not change as a result of the event.
R = Recovered — Ignite-UX will restore the association between device addressing id values and
devices when possible. The process used to match previous and current devices is handled by
Ignite-UX recovery matching methods. Matching might not be possible if the system configs differ.
* — Might be a consistent value for some I/O protocols such as parallel SCSI, and might be a
new value for some I/O protocols such as fibre channel.
Practical considerations 79
Page 80

Recovery and the agile view
During recovery, Ignite-UX C.7.x makes changes to the new system I/O configuration to match
the original system I/O configuration. This is necessary because some aspects of a system
configuration depend on the unpredictable order of system I/O inventory.
The overall goal of this process is to make the system I/O configuration appear as if the system
simply rebooted at the time the recovery archive was created. This process is complex, and Ignite-UX
might be unable to fully restore the I/O configuration. Ignite might not be able to restore aspects
of the I/O configuration due to hardware changes, limitations of system I/O software, and limitations
of Ignite-UX.
The system I/O configuration must be verified during and after recovery so configuration adjustments
can be made if needed.
One part of restoring the I/O configuration is the appropriate matching of device special files
(DSFs) and devices. There is one approach used for legacy DSFs in HP-UX 11i v3 and previous
releases, and another approach used for HP-UX 11i v3 persistent DSFs.
Legacy DSFs and device matching
Matching legacy DSFs and mass storage devices is done based on hardware paths. Generally,
legacy DSFs are associated with a particular hardware path. During recovery, a device is associated
with its hardware path's DSF. (See Figure 16 (page 71) for a description of the legacy addressing
model.)
Hardware configuration changes are handled by assuming a new device is intended to replace
the device originally at that hardware path.
Note that some I/O protocols, such as SAS and USB, associate legacy DSFs with specific devices
using unique LUN IDs, and so behave like persistent DSF matching described below.
SAS devices are a special case, since their legacy DSF/unique LUN ID association can change
as a result of I/O configuration changes. If you change a SAS configuration (physically move a
SAS device to another bay or remove a SAS device) the hardware path associated with that and
other SAS devices can change during an installation or recovery. In such a case, hardware paths
are reassigned to SAS devices. Since legacy DSFs are associated with a particular hardware path,
a change in a device's hardware path breaks the association between its previous legacy DSF
and its unique LUN ID. Note that the way SAS devices are associated during recovery might
change in future versions of Ignite-UX to use the agile addressing approach described below.
Only certain SAS configuration changes cause remapping of hardware paths. For more information
see the white paper, “Ignite-UX and SAS Devices” available at http://www.hp.com/go/
ignite-ux-docs.
Persistent DSFs and device matching
Matching persistent DSFs and mass storage devices is relatively complex due to agile addressing.
Ignite-UX will attempt to simulate agile addressing during recovery, while also dealing with hardware
replacement. This matching is accomplished using the methods described below:
• WWID — Matching is done based on the unique LUN ID of the device. Most often, this is the
device's WWID. This method matches a device's original persistent DSF with the same device
in the recovered system configuration.
• Device ID — (Future) Matching is done based on a user-definable identifier written to the
device. This method matches a device's original persistent DSF with the device that has the
same device ID in the recovered system configuration. This method allows user-provided
identification to control device matching. Note that some mass storage devices do not support
the device ID feature.
• Physical Location — Matching is done based on device physical location. This method matches
the original persistent DSF associated with a particular physical location (e.g. same enclosure
80 Managing I/O for installation and recovery
Page 81

and bay) with the device at that location in the recovered system configuration. This method
is intended to handle replacement of devices. Note that not all I/O protocols support physical
location addressing.
• Lunpath — Matching is done based on lunpath hardware path. This method matches the
original persistent DSF associated with a lunpath hardware path with the device at that lunpath
hardware path in the recovered system configuration. This method is intended to handle
replacement of devices. Some protocols such as fibre channel have lunpath hardware paths
and legacy hardware paths that are functionally different (use different hardware attributes).
• Legacy hardware path — Matching is done based on the legacy hardware path. This method
matches the original persistent DSF associated with a legacy hardware path with the device
at that legacy hardware path in the recovered system. This method matches devices using the
same approach used for typical legacy DSFs.
Not all methods are appropriate for all protocols. The following are the ordered lists of persistent
DSF-to-device matching methods by protocol. The order in which these methods are applied is
important. Matching will be done in the order listed.
Table 4 Persistent DSF-to-device matching methods by protocol
Ordered ListProtocol
WWID, lunpathparallel SCSI
WWID, physical location, lunpathfibre channel
lunpathide
WWID, physical location, lunpathSAS
no matching will be doneother
NOTE: There might be devices in the original system configuration that can not be matched with
devices in the new system configuration. There might also be devices in the new system configuration
that do not match devices in the original configuration. In these cases, the HP-UX operating system
I/O drivers will assign legacy and persistent DSFs for the non-matching devices.
Controlling the I/O configuration process
It is possible to control the I/O configuration process associated with installation and recovery by
using variables in the configuration file. These variables allow you to select disks that may be
replaced with other disks, hide disks from the I/O configuration process, and control DSF naming.
By controlling the I/O configuration process, you can make configuration files that are general
enough to use with clients having different hardware paths, protect disks from modification, and
increase the performance of the I/O inventory process.
This section introduces the variables and value types associated with I/O configuration for use in
configuration files. Further details can be found in instl_adm(4).
Table 5 I/O Configuration variables
allow_disk_remap
hide_boot_disk
DescriptionI/O Configuration Variable
(boolean) Setting this to true allows Ignite to substitute a disk that was specified in the
configuration files but does not exist on the system with a disk that does exist and was
not specified to be used, hidden, or blocked. Default for this value is false for a
noninteractive installation, and true for an interactive installation. This is useful when
creating configuration files for use with multiple clients.
(boolean) Setting this to true prevents the installation process from allowing the boot
disk to be configured and/or “cleaned”. This is useful only when the Ignite kernel is
booted from a dedicated hard disk you wish to protect from being modified.
Controlling the I/O configuration process 81
Page 82

Table 5 I/O Configuration variables (continued)
DescriptionI/O Configuration Variable
_hp_hide_other_disks
hw_instance_number
inventory_block_path
inventory_block_protocols
(string) This may be set to one or more space-separated hardware paths of disks that
must be “hidden” from being configured or otherwise modified during the installation.
This is useful for hiding multiple disks.
(string) Setting this keyword forces a specific instance number assignment for the
specified hardware device. This is useful for producing client configurations consistent
with others regardless of variations in hardware configurations.
(string) This keyword is used to control Ignite inventory functionality by instructing Ignite
to not collect inventory information for the devices specified. This is useful when you
want devices hidden and not available for selection during installation.
(string) This keyword is used to control Ignite inventory functionality by instructing Ignite
to not collect inventory information for the devices of the protocol type specified. This
is useful when you want to increase the performance of the I/O inventory process by
ignoring all devices of a certain protocol. These devices will not be available for
selection during installation.
Below are listed the value types for use with the I/O configuration variables.
Table 6 I/O Configuration value types
DescriptionI/O Configuration Value Type
Hardware Path
For keywords that take a hardware path as an index parameter or value, the hardware
path may be a series of more than one decimal or hexadecimal numbers separated
by the period ( . ) or the forward slash ( / ) characters. A complex string or string
variable may also be used where a hardware path is expected.
Physical Location
World-Wide Name / WWID
A physical location may be a series of alphanumeric values separated by the colon (
: ) character.
The format of this value varies depending on the protocol and device. This value is
often a standard IEEE value in hexadecimal format, however this value may have some
other format. This value may not contain white space.
The valid protocol values are:I/O Protocol
• fibre_channel
• parallel_scsi
• sas
• usb
Agile view questions and answers
What are the requirements for the use of persistent DSFs? Must I use them exclusively or can I mix
them with legacy DSFs?
Ignite-UX will use persistent DSFs for installation and recovery on systems running HP-UX 11i v3.
Internally, VxVM volume management software controlling installation and recovery uses persistent
or legacy DSFs as appropriate for the VxVM version used. See “Important characteristics of the
agile view” (page 78) for more information.
Can the user switch from persistent to legacy DSFs and back if desired?
Switching between persistent and legacy DSFs is specific to the volume manager. See your volume
manager documentation for more details.
Does the Ignite–UX interface enforce a particular use model with respect to persistent and legacy
DSFs?
No, but persistent DSFs will be used for HP-UX 11i v3 installation and recovery.
If a persistent DSF is specified, is the equivalent legacy DSF added as well? And vice versa?
82 Managing I/O for installation and recovery
Page 83

Ignite-UX will use persistent DSFs for installation and recovery. VxVM installation support software
will create VxVM volumes using appropriate DSFs for the VxVM version used. See “Important
characteristics of the agile view” (page 78) for more information.
Agile view questions and answers 83
Page 84

8 Security
The purpose of this chapter is to assist system and network administrators in understanding the
network ports and protocols used by Ignite-UX during its various phases of operation, and to assist
in configuring the HP-UX Bastille and IPFilter products. HP is not able to provide support for
configuring third-party firewalls to work with Ignite-UX.
Ignite-UX server ports
Ignite-UX server network port usage is described below by server activity. Diagrams follow that
describe the port activity by network communication task and timing. See the product documentation
to get the protocol for your system when the protocol is listed as tcp/udp.
• Initiate LAN Boot for Itanium-Based clients, Figure 26 (page 85): ports 67 and 68.
• Initiate LAN Boot for PA-RISC clients, Figure 27 (page 85): ports 1067, 1068.
• Cold boot and installation initiated from client, Figure 28 (page 86): 69, 2049, 2121, an
SD dynamically allocated port.
• Live system reinstall via bootsys initiated from the server, Figure 29 (page 87): 2049, 69,
2121, an SD dynamically allocated port, and 514 or 22.
• make_net_recovery initiated from client, Figure 30 (page 88): 69, 2121, an SD
dynamically allocated port, 2049.
• make_net_recovery initiated from the server, Figure 31 (page 89): 69, 2121, an SD
dynamically allocated port, 2049, and 514 or 22.
• make_sys_image initiated from client, Figure 32 (page 89): 514 or 2049.
84 Security
Page 85

Figure 26 Port usage: initiate LAN boot for Itanium-based clients
PXE/DHCP (udp)
Client Timeline
Server
67
68
68
67
Initiate LAN Boot: Itanium-Based Systems
[Request IP address for boot]
DHCP/bootp (udp)
[Network boot information]
1
bootp (udp)
bootp (udp)
Client Timeline
Server
1067
Initiate LAN Boot: PA-RISC Systems
[Request IP address for boot]
[Network boot information]
1068 1068
1067
2
1. The client sends a boot request to the server over port 67. The request is handled by the
bootpd daemon on the server. If the client is registered, the /etc/bootptab file is referenced
for the boot IP address; if the client is anonymous, DHCP services are used to assign the boot
IP address. The server then sends the networking information to the client on port 68. For more
information on booting registered Itanium-based clients, see “Configuring the Ignite-UX server
for Itanium-based clients” (page 35). For more information on booting anonymous Itanium-based
clients, see “Configuring an Ignite server to boot anonymous Itanium-based clients” (page 44).
For more information on bootpd, see bootpd(1M).
Figure 27 Port usage: Initiate LAN boot for PA-RISC clients
2. The client sends a boot request to the server over port 1067. The request is handled by the
instl_bootd daemon on the server. The /etc/opt/ignite/instl_boottab file is
referenced whether the client is registered or anonymous. The server then sends the networking
information to the client on port 1068. For more information on booting registered PA-RISC
clients, see “Configuring the Ignite-UX server for PA-RISC clients” (page 31). For more
information on booting anonymous PA-RISC clients, see “Configuring an Ignite server to boot
anonymous PA-RISC clients” (page 43). For more information on instl_bootd, see
instl_bootd(1M).
Ignite-UX server ports 85
Page 86

Figure 28 Port usage: client cold boot and installation
Client Timeline
Server
Client Cold Boot and Installation
Initiated from Client Firmware
[Depots]
swinstall (tcp/udp)
NFS (tcp/udp)
[Record log information on server]
tftp (udp)
[INSTCMDS, SYSCMDS]
NFS (tcp/udp)
[Image]
tftp (udp)
[Initial boot content]
swinstall @ server (tcp/udp)
[Port to listen to]
Initiate LAN Boot - see the diagram for your hardware
P
P
69
2049
2049
69
2121
Common to all Server-based
Download and
Boot Kernel
Installations
swinstall depot sequence
3
6
4
5
3. The initial boot content (kernel, file system, and required files) is downloaded from the server
to the client, then the client is booted. For Itanium-based systems, these files are downloaded
in the order listed: nbp.efi, AUTO, fpswa.efi, hpux.efi, IINSTALL, and IINSTALLFS.
PA-RISC systems download these files in the order listed: boot_lif, AUTO, WINSTALL, and
WINSTALLFS.
4. The file install.log is updated on the server in the /var/opt/ignite/clients/client
directory. A compressed tar archive of commands to set up disk volumes and file systems is
downloaded (INSTCMDS for PA-RISC, and INSTCMDSIA for Itanium-based systems). The TUI
is run on the client console. The user selects the installation configuration via the TUI and selects
Go!. A compressed tar archive of commands required to complete the installation is
downloaded (SYSCMDS for PA-RISC and SYSCMDSIA for Itanium-based systems). Ports used
by NFS to make RPC (Remote Procedure Call) calls are not discussed here.
5. If the installation is from an image, it is downloaded. Ports used by NFS to make RPC calls
6. If the installation configuration requires software to be installed from depots on the server, a
are not discussed here.
swinstall request is sent to the server's Software Distributor (SD) daemon, swagentd, on
port 2121. An SD agent, swagent, is then spawned on the server that acquires a dynamically
allocated communication port for the download. That communication port is then reported to
the client on port 2121. The client then spawns a new swagent processes that communicates
with the server on the acquired communication port P, where the depot download takes place.
For more information on SD, see the Software Distributor Administration Guide available at
http://www.hp.com/go/sd-docs.
86 Security
Page 87

NOTE: Although swinstall is illustrated here, the install can use one or more of
P
P
swinstall depot sequence
[Depots]
Environment
Get Install
Kernel Boot Sequence
remsh (tcp)
[bootsys_prep, OS & hardware information]
514
22
514
22
ssh (tcp)
[bootsys_prep, OS & hardware information]
Client Timeline
Server
rcp (tcp)
[*INSTALL, ISL, AUTO, HPUX, *INSTALLFS]
2049
2049
NFS (tcp/udp)
[Record log information on server]
69
tftp (udp)
[INSTCMDS, SYSCMDS]
Common to all Server-based
Installations
NFS (tcp/udp)
[Image]
2121
Live System Reinstall via bootsys from Server
or
or
Run bootsys
scp (tcp)
[*INSTALL, ISL, AUTO, HPUX, *INSTALLFS]
swinstall @ server (tcp/udp)
[Port to listen to]
ping (icmp)
swinstall (tcp/udp)
7
8
6
4
5
swinstall with remsh (port 514), NFS (ports 49152–65535), ftp data (port 20), and
ftp (port 21).
Figure 29 Port usage: live system reinstall
7. The server pings the client with an ICMP type 8 echo request. The client answers the ping with
an ICMP type 0 echo reply. Files required for bootsys are transferred from the server to the
client. These files are transferred with remsh by default, or by ssh if the bootsys -S option
is used.
8. The kernel, file system, and required files are downloaded from the server to the client, then
the client is booted. These files are transferred with rcp by default, or by scp if the bootsys
-S option is used.
NOTE:
The client can specify to use privileged ports (1–1023) or not via the ssh_config directive. The
default is non-privileged ports. If you want to configure ssh to use privileged ports, you have to
make the client an suid program.
Ignite-UX server ports 87
Page 88

Figure 30 Port usage: make_net_recovery initiated from the client
swinstall (tcp/udp)
swinstall (tcp/udp)
check_version
tftp (udp)
[/opt/ignite/data/Version from server to client]
69
2121
2121
Pn
PnPn
Pn
swlist@server (tcp/udp)
Client Timeline
Server
2049
[Output of swlist]
[IUX-Recovery depot]
NFS (tcp/udp)
[Recovery image]
make_net_recovery Initiated from Client
[Port to listen to]
[Port to listen to]
ping (icmp)
(tcp/udp)
9
10
11
5
9. The server pings the client with an ICMP type 8 echo request. The client answers the ping with
an ICMP type 0 echo reply. If tftp is enabled, the version check is done with the file /opt/
ignite/data/Version.
10. If tftp is not enabled, the version check is done with swlist using the swinstall depot
sequence described in Figure 28 (page 86).
11. If the client has a lower version of Ignite than the server, a depot of recovery commands is
transferred to the client using the swinstall depot sequence described in Figure 28
(page 86).
NOTE: Although swinstall is illustrated here, the install can use one or more of
swinstall with remsh (port 514), NFS (ports 49152–65535), ftp data (port 20), and
ftp (port 21).
88 Security
Page 89

Figure 31 Port usage: make_net_recovery initiated from the server
remsh (tcp)
[Run make_net_recovery command]
Proceed as make_net_recovery initiated from client
514
22
ssh (tcp)
[Run make_net_recovery command]
Client Timeline
Server
make_net_recovery Initiated from Server
or
12
or
13
remsh (tcp)
514
Client
Server
make_sys_image Initiated from Client
NFS (tcp/udp)
[Golden archive]
[Golden archive]
2049
12. The server remotely executes make_net_recovery from the client. The command is run via
remsh by default, or by ssh if the client was added for recovery on the server with the ssh
option.
NOTE:
The client can specify to use privileged ports (1–1023) or not via the ssh_config directive.
The default is non-privileged ports. If you want to configure ssh to use privileged ports, you
have to make the client an suid program.
Figure 32 Port usage: make_sys_image initiated from the client
13. The golden archive is written to the destination server via remsh or NFS. Note that
Modifying a Bastille-hardened system to operate with Ignite-UX
make_sys_image does not need networking if the archive is written locally to the client.
HP-UX Bastille is a security hardening/lockdown tool that can be used to enhance the security of
the HP-UX operating system. It provides customized lockdown on a system-by-system basis by
encoding functionality similar to the Center for Internet Security (CIS) Level 1 Benchmark for HP-UX
and other hardening/lockdown checklists. The Bastille technology is available in HP-UX 11i v1
and later versions of HP-UX.
This section describes how to make sure Ignite-UX requirements are enabled on your Bastille system.
For more information on HP-UX Bastille, see bastille(1M) , bastille_drift(1M), the HP-UX System
Administrator's Guide: Security Management if you are running HP-UX 11i v3, and Managing
Modifying a Bastille-hardened system to operate with Ignite-UX 89
Page 90

Systems and Workgroups: A Guide for HP-UX System Administrators for systems running HP-UX
11i v2 and earlier.
CAUTION: The configuration processes in this section change the security properties of your
system. When enabling services, protocols, and ports, careful consideration must be given to the
impact to your network and system security.
Enabling Ignite-UX server requirements
To make sure Ignite-UX requirements are enabled on the server, you must first discover your current
lockdown state and then modify that state, if necessary, to allow selected daemons and services
to run. You must also allow access to certain ports used by an Ignite-UX server.
1. Discover your current lockdown state.
• If you are using Bastille 3.0 or later, create a configuration report. The report will be
created in /var/opt/sec_mgmt/bastille/log/Assessment/
assessment-log.config.
# bastille --assessnobrowser
• If you are using a version of Bastille earlier than 3.0, get the latest configuration file used
by Bastille.
# bastille -l
NOTE: If you get the message
NOTE: The system is in its pre-bastilled state.
there is no need to proceed with this configuration, as daemons, services, and ports required
by Ignite-UX are not locked-down in the pre-bastille state.
2. Copy the last configuration file used or the assessment report to a place of your choice.
3. Bring up the latest configuration in the Bastille GUI.
# bastille --os [HP-UX11.00 | HP-UX11.11 | HPUX11.23 | HPUX11.31] -f filename
4. Make sure the settings in your configuration file for the following daemons and services are
set to No. Note that if you have to change a setting from Yes to No, you will likely be required
to enable that daemon or service on your system in order to use it. After you have made
changes, save the configuration file to a place of your choice.
Would you like to deactivate the NFS server on this system
Would you like to deactivate NIS client programs?
Should Bastille ensure inetd's bootp service does not run on this system?
Should Bastille ensure inetd's TFTP service does not run on this system?
5. To update your firewall or have Bastille create a new one:
a. Backup your /etc/opt/ipf/ipf.conf file to a place of your choice.
b. Update the port information for the Bastille-enabled HP-UX IPFilter firewall by editing the
file /etc/opt/sec_mgmt/bastille/ipf.customrules and making the following
changes:
• Add the words keep frags to the end of the udp outgoing rule line so it looks like
pass out quick proto udp all keep state keep frags
90 Security
• Remove or comment-out the following line.
block in quick proto udp from any to any port = portmap
• Add the following lines after the End allow outgoing rules section.
# ports required for Ignite-UX
############################################################
pass in log quick proto udp from any to any port = 69 keep state
pass in log quick proto udp from any port = 68 to any port = 67 keep state
pass in log quick proto udp from any port = 1068 to any port = 1067 keep state
pass in log quick proto tcp/udp from any to any port = 2049 keep frags
Page 91

pass in log quick proto tcp/udp from any to any port = 2121
pass in log quick proto tcp/udp from any to any port 49152 >< 65535
pass in log quick proto tcp from any to any port = 20
pass in log quick proto tcp from any to any port = 21
pass in log quick proto tcp from any to any port = 22
pass in log quick proto tcp from any to any port = 514
pass in log quick proto icmp from any to any icmp-type 8 keep state
pass in log quick proto tcp from any port = 514 to any keep state
c. In the IPFilter Module of Bastille, change the following line to Yes if it is not already.
Should Bastille setup basic firewall rules with these properties?
d. Run Bastille.
# bastille -b -f your_configuration_file
6. If a Bastille baseline had been created for the system, update that baseline.
# bastille_drift --save_baseline baseline
Enabling Ignite-UX client requirements
To make sure Ignite-UX requirements are enabled on the client, you must first discover your current
lockdown state and then modify that state, if necessary, to allow the NFS daemon and rtools
services to run. You must also allow access to certain ports used by an Ignite-UX client.
1. Discover your current lockdown state.
• If you are using Bastille 3.0 or later, create a configuration report. The report will be
created in /var/opt/sec_mgmt/bastille/log/Assessment/
assessment-log.config.
# bastille --assessnobrowser
• If you are using a version of Bastille earlier than 3.0, get the latest configuration file used
by Bastille.
# bastille -l
NOTE: If you get the message
NOTE: The system is in its pre-bastilled state.
there is no need to proceed with this configuration, as daemons, services, and ports required
by Ignite-UX are not locked-down in the pre-bastille state.
2. Copy the last configuration file used or the assessment report to a place of your choice.
3. Bring up the latest configuration in the Bastille GUI.
# bastille --os [HP-UX11.00 | HP-UX11.11 | HPUX11.23 | HPUX11.31] -f filename
4. Make sure the settings in your configuration file for the NFS daemon and rtools service are
set to No. Note that if you have to change a setting from Yes to No, you will likely be required
to enable that daemon or service on your system in order to use it. After you have made
changes, save the configuration file to a place of your choice.
Would you like to deactivate the NFS client daemons?
Should Bastille ensure that the login, shell, and exec services do not run on this system?
5. To update your firewall or have Bastille create a new one:
a. Backup your /etc/opt/ipf/ipf.conf file to a place of your choice.
b. Update the port information for the Bastille-enabled HP-UX IPFilter firewall by editing the
file /etc/opt/sec_mgmt/bastille/ipf.customrules and making the following
changes:
• Add the words keep frags to the end of the udp outgoing rule line so it looks like
pass out quick proto udp all keep state keep frags
• Add the following lines after the End allow outgoing rules section.
Modifying a Bastille-hardened system to operate with Ignite-UX 91
Page 92

# ports required for Ignite-UX
############################################################
pass in log quick proto icmp from any to any icmp-type 8 keep state
pass in log quick proto tcp from any to any port = 512
pass in log quick proto tcp from any to any port = 514
pass in log quick proto tcp/udp from any port = 2049 to any keep frags
pass in log quick proto tcp/udp from any to any port 49152 >< 65535
c. In the IPFilter Module of Bastille, change the following line to Yes if it is not already.
Should Bastille setup basic firewall rules with these properties?
d. Run Bastille.
# bastille -b -f your_configuration_file
6. If a Bastille baseline had been created for the system, update that baseline.
# bastille_drift --save_baseline baseline
Configuring Ignite to replace TFTP with NFS
Beginning with Ignite-UX version C.7.9, it is possible to configure the Ignite-UX loadfile utility
to use NFS instead of TFTP for network access to the Ignite server. This allows users to avoid use
of TFTP except during direct network boot of the install kernel. The TFTP protocol can be avoided
entirely if the system being installed is booted from media (including vMedia) or via the bootsys
command.
Overview
In order to use this functionality, minor modifications to Ignite-UX configuration files might have be
made to the Ignite-UX server system. These modifications fall into the following categories:
• Add a keyword to the appropriate configuration files instructing Ignite to use NFS instead of
TFTP.
• Ensure config files are located in an acceptable directory that is NFS-mounted during the
installation. Make sure the INDEX file refers to the config files in their new (C.7.9 and later)
locations as outlined below.
• Disable the TFTP daemon.
NOTE: Because of changes necessary to replace TFTP with NFS, beginning with C.7.9 the
locations of three Ignite product files have moved. Ignite automatically creates symbolic links from
the old file to the new file location. These files are:
Table 7 Ignite Product Files Moved in Version C.7.9 and Later
C.7.9 and Later LocationPre-C.7.9 Location
/opt/ignite/data/Version/opt/ignite/Version
/var/opt/ignite/data/INDEX/var/opt/ignite/INDEX
/var/opt/ignite/data/config.local/var/opt/ignite/config.local
Procedure
1. Add the _hp_loadfile_use_nfs keyword.
92 Security
HP recommends placing this in the config section of the install file system. Use your
environment’s HP-UX version and install file system in the following commands.
First, change the working directory to the release-specific boot directory and grab the config
content:
# cd /opt/ignite/boot/Rel_B.11.31
# instl_adm -d > /tmp/ifs.cfg
Page 93

Use vi to add _hp_loadfile_use_nfs=”true” to the file:
# cat /tmp/ifs.cfg
# instl_adm defaults:
# NOTE: Manual additions between the line containing "instl_adm defaults
# and "end instl_adm defaults" will not be preserved.
server="10.1.54.230"
netmask[]="255.255.248.0"
route_gateway[0]="10.1.48.1"
route_destination[0]="default"
# end instl_adm defaults.
_hp_loadfile_use_nfs="true"
Now use instl_adm to update the install file system:
# instl_adm -f /tmp/ifs.cfg
2. Set up NFS exports and check custom configuration files.
Because of preexisting Ignite-UX file system layouts, the locations of certain files are
automatically moved when Ignite-UX Version C.7.9 or later is installed. These files are /opt/
ignite/Version, /var/opt/ignite/INDEX, and /var/opt/ignite/config.local.
In addition, certain other customer-created config files might need to be moved or edited.
First, edit /etc/exports or /etc/dfs/dfstab as appropriate for the version of HP-UX
running on the Ignite-UX server.
For Ignite servers running HP-UX 11i v2 or earlier:
# cat /etc/exports
/opt/ignite/data -ro
/var/opt/ignite/config -ro
/var/opt/ignite/data -ro
/var/opt/ignite/clients -anon=2
# exportfs -a
For Ignite servers running HP-UX 11i v3:
# cat /etc/dfs/dfstab
share -F nfs -o ro /opt/ignite/data
share -F nfs -o ro /var/opt/ignite/data
share -F nfs -o anon=2 /var/opt/ignite/clients
# shareall
If there are any customer-created config files that are outside of the directories exported by
NFS, they must be moved under /var/opt/ignite/data.
3. Edit the /var/opt/ignite/INDEX file to refer to /var/opt/ignite/data.
Some customers will need to modify the config.local entry in /var/opt/ignite/data/
INDEX. For example, the INDEX clause
cfg "HP-UX B.11.31 Default" {
description "Example HP-UX 11i v3 (11.31) configuration."
"/opt/ignite/data/Rel_B.11.31/config"
"/opt/ignite/data/Rel_B.11.31/hw_patches_cfg"
"/var/opt/ignite/data/Rel_B.11.31/core_cfg"
"/var/opt/ignite/config.local"
}
would need to be modified to be
cfg "HP-UX B.11.31 Default" {
description "Example HP-UX 11i v3 (11.31) configuration."
"/opt/ignite/data/Rel_B.11.31/config"
"/opt/ignite/data/Rel_B.11.31/hw_patches_cfg"
"/var/opt/ignite/data/Rel_B.11.31/core_cfg"
"/var/opt/ignite/data/config.local"
}
Configuring Ignite to replace TFTP with NFS 93
Page 94

4. Disable TFTP on the Ignite-UX server (optional).
Unless you need to initiate installations via network boot, you may now disable TFTP on the
Ignite-UX server. You may remove or comment out the "tftp" entry from /etc/inetd.conf.
If the system to be installed is running any version of HP-UX, booting from the network can be
avoided by using the bootsys command or by booting from media and switching to the
Ignite-UX server.
In the boot-from-media case, it will be necessary to either specify the _hp_loadfile_use_nfs
keyword on the boot loader command line or create custom media with that keyword built
into it.
For PA-RISC systems, interrupt the autoboot sequence at the prompt
Interact with IPL (Y, N, or Cancel)?> y
and enter the following (substitute 11.31 for 11.23 depending on the release).
ISL> hpux -i_hp_loadfile_use_nfs=\"true\" Rel_B.11.23/WINSTALL
For Integrity systems, interrupt the autoboot sequence at the prompt
Press Any Key to interrupt Autoboot
and enter the following (substitute 11.31 for 11.23 depending on the release).
HPUX> boot Rel_B.11.23/IINSTALL -i_hp_loadfile_use_nfs=\"true\"
If you do need to preserve the ability to perform network boot, but otherwise wish to take
advantage of the NFS loadfile functionality, you may remove the /var/opt/ignite
directory from the "tftp" entry in /etc/inetd.conf, leaving only /opt/ignite.
When Ignite-UX is installed, it automatically enables the TFTP daemon. If you reinstall Ignite-UX,
you will need to reapply these changes.
For information on booting from media and then switching to an Ignite-UX server over the
network, see “Alternate boot with network server installation” (page 27). For information about
changing configuration content in the install file system, see instl_adm(1M) and instl_adm(4).
5. Verify that the configuration works.
Perform an installation, and watch the console output or the install.log file for the
“Ignite-UX will use NFS for loadfile.” message:
* Preparing to execute init...
======= 03/02/09 20:39:20 EST HP-UX Installation Initialization.
@(#)Ignite-UX Revision C.7.8.201
@(#)ignite/launch (opt) Revision:
/branches/IUX_RA0903/ignite/src@76987 Last Modified: 2009-02-05
15:45:55 -0700 (Thu, 05 Feb 2009)
* Configuring RAM filesystems...
NOTE: Ignite-UX will use NFS for loadfile.
94 Security
Page 95

9 Booting and installing HP-UX from the server using the
client console
This chapter discusses booting and installing HP-UX on clients from the server using the client
console. Ignite-UX can be run in terminal user interface (TUI) mode on the client system.
See the HP-UX Installation and Update Guide available from http://www.hp.com/go/
hpux-core-docs-11iv3 for instructions on how to install HP-UX from the Operating Environment
DVD media.
Preparing the client for installation
For bootsys — The bootsys command is used to reboot a client system, already running HP-UX,
using a kernel and file system from a server. The bootsys command will copy the [W|V|I]INSTALL
install kernel and the [W|V|I]INSTALLFS file system from the server to the /stand directory on
the client, and then use them when rebooting.
Make sure there is enough disk space in the /stand directory on the client to hold the install
kernel and file system before you run bootsys.
For V-class PA-RISC clients the files on the server are:
• /opt/ignite/boot/Rel_release/VINSTALL
• /opt/ignite/boot/Rel_release/VINSTALLFS
For 64-bit PA-RISC clients the files on the server are:
• /opt/ignite/boot/Rel_release/WINSTALL
• /opt/ignite/boot/Rel_release/WINSTALLFS
For Itanium-based clients the files on the server are:
• /opt/ignite/boot/Rel_release/IINSTALL
• /opt/ignite/boot/Rel_release/IINSTALLFS
where release is the release identifier.
For HP-UX 11i v3 — If you are installing HP-UX 11i v3 onto a client, its boot disk must be at least
30 GB. HP-UX 11i v3 requires more space on the HP-UX boot disk than prior HP-UX releases.
Minimum Memory Size — During installation and recovery, Ignite-UX uses system memory to hold
a RAM-based install environment with a subset of HP-UX. Ignite-UX requires installation and recovery
client systems to have at least a minimum amount of RAM to hold this install environment while
leaving enough space to run HP-UX. The minimum required RAM size is specific to the HP-UX
version to be installed or recovered. See the Ignite-UX Release Notes under “Minimum Memory
Size” for the current client memory requirements. You can find the Ignite-UX Release Notes via the
Ignite-UX website, http://www.hp.com/go/ignite-ux, and also at /opt/ignite/share/doc/
release_note on your system.
If Ignite-UX detects there is not enough RAM on the client system, you will see these errors:
ERROR: RAMFS Setup memory issue.
ERROR: The system does not contain the minimum supported amount of
memory needed to install and run HP-UX. HP-UX requires minimum_amount
of available memory for the “B.xx.xx” release. The system has only
actual_amount of memory available for HP-UX use (this may be less than
physical memory installed due to space reserved by system firmware).
The amount of memory in the system must be increased if this release
is to be installed successfully.
Preparing the client for installation 95
Page 96

ERROR: The system install or recovery session cannot continue. The
system will now reboot.
If Ignite-UX detects only the minimum amount of RAM on the client system, you will see these
messages:
WARNING: RAMFS Setup memory issue.
WARNING: The system does not contain the minimal amount of memory needed
for install or recovery. Ignite-UX requires minimum_amount of available
memory for the “B.xx.xx” release. The system has only actual_amount of
memory available for use (this may be less than physical memory installed
due to space reserved by system firmware). The install or recovery may
or may not complete, and it may take an extraordinary amount of time
to complete. It is advised to increase the amount of memory in the
system.
NOTE: The system install or recovery session will now continue.
CAUTION: Any data on the client disks that are used for installation, including the operating
system, are removed entirely as part of this installation process.
IMPORTANT: During HP-UX 11i v3 installation and recovery, connected Active/Passive devices
will cause long delays (one hour or more) or may cause a system to hang. Similarly, connecting
an Active/Passive device before installing the Active/Passive Switch (APSW) plug-in can cause
some commands to take a long time. Disconnect any Active/Passive devices connected to your
system before installing or recovering HP-UX 11i v3. After installation or recovery, it is important
that the APSW plug-in be installed before connecting an Active/Passive device to the system.
Making boot decisions when using the client console
When deciding which method to use when operating from the client console, you must take your
server/client configuration into consideration. See Chapter 2 (page 25) for information on
configuring your Ignite-UX server for your environment.
This section provides an overview of options when booting from the client console.
Boot using the network
A decision tree for booting and installing HP-UX from the client console using the server is shown
in Figure 33. If you want to boot a client without using an Ignite-UX server, see Figure 34 (page
98).
Use the decision tree below when you want to install from the Ignite-UX server and control the
installation from the client console.
96 Booting and installing HP-UX from the server using the client console
Page 97

YES YESYES
NO
Is HP-UX
running ?
NO
Itanium-based
and dbprofile
support ?
Local server
or boot
helper ?
Using the Client Console
Use bootsys -c
Use dbprofile
Boot from
local server
or
boot helper
See the decision tree
for stand alone systems
Figure 33 Decision Tree for Booting and Installing HP-UX From the Server Using the Client Console
Use bootsys -c - If the client system is currently running HP-UX, you can use bootsys -c on
the client console to boot from the Ignite-UX server. See “Using bootsys on the client console”
(page 98) and the bootsys(1M) manpage for more information.
Boot from local server or boot helper - You can boot your client from a server or boot helper system
using the client console by interrupting the reboot process and invoking the boot from the firmware
interface. Details vary depending whether your client is a PA-RISC or Itanium-based. See “Booting
PA-RISC clients from the console ” (page 99), or “Booting Itanium-based clients using the network”
(page 100), depending on the hardware of your client.
Use dbprofile - All partitionable Itanium-based systems allow the definition of direct boot profiles.
This EFI functionality is also found in other, non-partitionable systems. With these profiles, you can
supply all the networking information needed to contact an Ignite-UX server and perform an install
or recovery.
Some systems might require firmware updates to provide support for direct boot profiles. If your
system does not provide the dbprofile command, check for any firmware updates that might
enable it. You can also consult the system's hardware documentation to determine if dbprofile
is supported.
For more information, see “Direct boot profiles for Itanium-based systems” (page 102).
See the decision tree for booting stand alone systems - This decision tree can be found below in
figure Figure 34.
Boot using media
Use the following decision tree if you do not have support for network boot. The methods described
in Figure 34 use media content to boot for install.
Once you have booted the system, you will be able to communicate with an Ignite-UX server to
perform an installation or recovery. Note that if you do not have an active DHCP server to provide
networking IP address requests, you will need to manually provide networking information before
you can communicate with the server.
See “How Ignite works” (page 18) for more information on the network booting process.
Making boot decisions when using the client console 97
Page 98

Figure 34 Decision Tree for Booting From Media and Installing HP-UX From the Server
YES
YES
YES
DVD
drive?
iLO vMedia
support?
OE install
media matches
server?
NO
NO
NO
Create matching
installation
media on server
Boot from HP-UX
OE install DVD,
then switch to
network server
Boot from
installation media
then switch to
network server
Stand alone systems
See the decision trees
for network server
installation
Boot from HP-UX OE install DVD, then switch to network server - This option requires the system
to have a CD or DVD drive attached, or iLO vMedia support. The version of Ignite-UX on the OE
media must match the Ignite-UX version on the server. For more information on iLO vMedia, see
Appendix D (page 242) and the HP Integrity iLO 2 MP Operations Guide available at http://
www.hp.com/go/hpsc.
Create matching installation media on server - It is possible to create installation media for booting
purposes. This type of installation media does not include a full archive. See Chapter 14: “Creating
your own boot and installation media”, for more information.
Boot from installation media then switch to network server - This option assumes you have created
installation media for booting purposes. See Chapter 14: “Creating your own boot and installation
media”, for more information. This option requires the system to have a CD or DVD drive attached,
or iLO vMedia support. For more information on iLO vMedia, see Appendix D (page 242) and the
HP Integrity iLO 2 MP Operations Guide available at http://www.hp.com/go/hpsc.
See the decision trees for network server installation - These decision trees are: Figure 5: “Decision
Tree When Configuring a Server for Booting PA-RISC Systems”, and Figure 6, "Decision Tree
When Configuring a Server for Booting Itanium-Based Systems.”
Using bootsys on the client console
The bootsys command may be run from the client console if you use the -c Ignite-UX Server
option. This option directs bootsys to contact the specified Ignite-UX server, and then perform a
local reboot.
For more information on bootsys, see bootsys(1M) and the section describing its use from the
server: “Installation using bootsys” (page 110).
98 Booting and installing HP-UX from the server using the client console
Page 99

After booting the system, see “Installing HP-UX from the client console” (page 105) for information
on installing HP-UX from the client console.
Booting PA-RISC clients from the console
This section describes how to boot HP-UX on PA-RISC clients from the client console using an
Ignite-UX server.
See the "Preparing the client for installation " section for important notes.
If you need further help with the boot process, enter:
BOOT ADMIN>help boot
1. Obtain the IP address of the Ignite-UX server you intend to use.
2. Cycle the power (perform a cold reset) on the client to bring it to a known state.
NOTE: If you have the AUTOBOOT flag set, you will have to interrupt the boot sequence by
pressing Esc when the Processor Dependent Code (PDC) offers the opportunity with this
message:
To stop selection process, press and hold ESCAPE key.
For detailed information regarding the boot sequence, see the HP-UX System Administrator’s
Guide for HP-UX 11i v3, or Managing Systems and Workgroups: A Guide for HP-UX System
Administrators.
During the boot sequence, status messages are displayed on the client console. Depending
on the type of machine, server or workstation model, a boot administration menu and/or
firmware prompt may appear.
3. Boot the client using your Ignite-UX server’s IP address by entering this command at the client
console:
firmware prompt> boot lan.n.n.n.n install
where: n.n.n.n is the IP address of the Ignite-UX server.
The client then begins to download the install kernel from the network server. This will take
approximately 5 minutes.
TIP: To search for Ignite-UX servers, enter the following at the client console (workstations
only):
firmware prompt>search lan install
The list of servers you can boot the client from is displayed with their corresponding IP
addresses, similar to:
Searching for potential boot devices(s)... on Path LAN
This may take several minutes.
To discontinue search, press any key (termination may not be immediate).
Path Number Device Path Device Type
----------- ----------- -----------
P0 LAN.15.1.46.117.3.254 lp2 100/Full Dx
P1 LAN.15.1.41.70.3.254 lp4 100/Full D
You may need to run the nslookup command on another running system to determine which
address corresponds to your Ignite-UX server.
Booting PA-RISC clients from the console 99
Page 100

4. When an Ignite-UX server responds, the installation begins with the following query:
hpux KernelPrompt "Choose Operating System to Install :"
1. target OS is B.11.11
2. target OS is B.11.23 PA
3. target OS is B.11.31 PA
4. Exit
Choose an operating system to install that your hardware supports :
Select the operating system version that you want to install on the client by typing the
appropriate number, and then press Enter to continue the installation.
After booting the system, see “Installing HP-UX from the client console” (page 105) for information
on configuring the HP-UX installation from the client console.
Booting Itanium-based clients using the network
This section describes how to boot HP-UX on Itanium-based clients from an Ignite-UX server using
the network.
See the "Preparing the client for installation " section for important notes.
1. Cycle the power (perform a cold reset) on the client to bring it to a known state.
NOTE: If you have the AUTOBOOT flag set, you must interrupt the boot sequence by pressing
Esc when the Processor Dependent Code offers the opportunity with this message:
Press Any Key to interrupt Autoboot
Next, you will need to enter exit at the prompt to invoke the extensible firmware interface
(EFI) Boot Manager menu.
For detailed information regarding the boot sequence, see the HP-UX System Administrator’s
Guide for HP-UX 11i v3, or Managing Systems and Workgroups: A Guide for HP-UX System
Administrators, and the hardware documentation for your system.
During the boot sequence, status messages are displayed on the client console. Depending
on what type of machine, server or workstation model, the EFI Boot Manager menu appears
and looks similar to:
EFI Boot Manager ver 1.10 [14.60]
Please select a boot option
HP-UX Primary Boot: 0/2/2/0.0.0.0
EFI Shell [Built-in]
Boot option maintenance menu
Security/Password Menu
Use ^ and v to change option(s). Use Enter to select an option
TIP: On some machines, the up-arrow and down-arrow keys may not work. If this is the
case, you can use Shift-6 (^) for up and v for down.
2. Select Boot option maintenance menu using the up and down arrows, which advances you
to the EFI Boot Maintenance Manager Main Menu, similar to the following example:
EFI Boot Maintenance Manager ver 1.10 [14.60]
Main Menu. Select an Operation
Boot from a File
Add a Boot Option
Delete Boot Option(s)
100 Booting and installing HP-UX from the server using the client console
 Loading...