

Page 1

System Fault Management Administrator’s
Guide
HP-UX 11i v1
Edition 1
Manufacturing Part Number: 5991-5475
E0604
© Copyright 2006 Hewlett-Packard Development Company, L.P.
Page 2

Legal Notices
The information in this document is subject to change without notice.
Hewlett-Packard makes no warranty of any kind with regard to this manual, including, but not limited to, the
implied warranties of merchantability and fitness for a particular purpose. Hewlett-Packard shall not be held
liable for errors contained herein or direct, indirect, special, incidental or consequential damages in
connection with the furnishing, performance, or use of this material.
Warranty
A copy of the specific warranty terms applicable to your Hewlett-Packard product and replacement parts can
be obtained from your local Sales and Service Office.
U.S. Government License
Proprietary computer software. Valid license from HP required for possession, use or copying. Consistent with
FAR 12.211 and 12.212, Commercial Computer Software, Computer Software Documentation, and Technical
Data for Commercial Items are licensed to the U.S. Government under vendor's standard commercial license.
Trademark Notices
Linux is a U.S. registered trademark of Linus Trovalds. Windows is a U.S. registered trademark of Microsoft
Corporation.
2
Page 3

About This Document
1. Introduction
Overview. . . . . . . . . . . . . . . . . . . . . . . . . . . . . . . . . . . . . . . . . . . . . . . . . . . . . . . . . . . . . . 13
Features and Benefits . . . . . . . . . . . . . . . . . . . . . . . . . . . . . . . . . . . . . . . . . . . . . . . . . . . 14
Providers. . . . . . . . . . . . . . . . . . . . . . . . . . . . . . . . . . . . . . . . . . . . . . . . . . . . . . . . . . . . . . 15
Instance Providers . . . . . . . . . . . . . . . . . . . . . . . . . . . . . . . . . . . . . . . . . . . . . . . . . . . . 16
Indication Providers . . . . . . . . . . . . . . . . . . . . . . . . . . . . . . . . . . . . . . . . . . . . . . . . . . . 18
User Interfaces. . . . . . . . . . . . . . . . . . . . . . . . . . . . . . . . . . . . . . . . . . . . . . . . . . . . . . . . . 19
HP Systems Insight Manager . . . . . . . . . . . . . . . . . . . . . . . . . . . . . . . . . . . . . . . . . . . 19
HP System Management Homepage . . . . . . . . . . . . . . . . . . . . . . . . . . . . . . . . . . . . . . 19
Architecture . . . . . . . . . . . . . . . . . . . . . . . . . . . . . . . . . . . . . . . . . . . . . . . . . . . . . . . . . . . 20
2. Installing the SFM Software
Prerequisites . . . . . . . . . . . . . . . . . . . . . . . . . . . . . . . . . . . . . . . . . . . . . . . . . . . . . . . . . . 25
Installing the SFM Software from the Web . . . . . . . . . . . . . . . . . . . . . . . . . . . . . . . . . . 26
Verifying the Installation . . . . . . . . . . . . . . . . . . . . . . . . . . . . . . . . . . . . . . . . . . . . . . . . 27
Verifying the Installation Using the TUI . . . . . . . . . . . . . . . . . . . . . . . . . . . . . . . . . . 27
Verifying the Installation Using the CLI. . . . . . . . . . . . . . . . . . . . . . . . . . . . . . . . . . . 28
Removing the SFM Software. . . . . . . . . . . . . . . . . . . . . . . . . . . . . . . . . . . . . . . . . . . . . . 30
Removing the Software Using the TUI . . . . . . . . . . . . . . . . . . . . . . . . . . . . . . . . . . . . 30
Removing the Software Using the CLI . . . . . . . . . . . . . . . . . . . . . . . . . . . . . . . . . . . . 36
Verifying Removal of the SFM Software. . . . . . . . . . . . . . . . . . . . . . . . . . . . . . . . . . . . . 38
Verifying Removal Using the TUI . . . . . . . . . . . . . . . . . . . . . . . . . . . . . . . . . . . . . . . . 38
Verifying Removal Using the CLI . . . . . . . . . . . . . . . . . . . . . . . . . . . . . . . . . . . . . . . . 38
Configuring Indication Filters. . . . . . . . . . . . . . . . . . . . . . . . . . . . . . . . . . . . . . . . . . . . . 40
Configuring Error Logging in SFM. . . . . . . . . . . . . . . . . . . . . . . . . . . . . . . . . . . . . . . . . 41
Contents
3. Administering Indications and Instances Using HP SIM
Creating Subscriptions and Viewing Indications Using HP SIM . . . . . . . . . . . . . . . . 45
Creating Subscriptions . . . . . . . . . . . . . . . . . . . . . . . . . . . . . . . . . . . . . . . . . . . . . . . . . 45
Viewing Indications . . . . . . . . . . . . . . . . . . . . . . . . . . . . . . . . . . . . . . . . . . . . . . . . . . . 56
Viewing Instances . . . . . . . . . . . . . . . . . . . . . . . . . . . . . . . . . . . . . . . . . . . . . . . . . . . . . . 62
Viewing Information About Processors . . . . . . . . . . . . . . . . . . . . . . . . . . . . . . . . . . . . 62
3
Page 4

Contents
Viewing Information About Memory . . . . . . . . . . . . . . . . . . . . . . . . . . . . . . . . . . . . . . 64
Viewing Information About Cooling Devices and Power Supplies. . . . . . . . . . . . . . . 64
Viewing Information About Temperature and Voltage Status. . . . . . . . . . . . . . . . . . 67
4. Administering Indications and Instances Using HP SMH
Viewing Instances . . . . . . . . . . . . . . . . . . . . . . . . . . . . . . . . . . . . . . . . . . . . . . . . . . . . . . 71
Viewing Information About Processors . . . . . . . . . . . . . . . . . . . . . . . . . . . . . . . . . . . . 71
Viewing Information About Cooling Devices. . . . . . . . . . . . . . . . . . . . . . . . . . . . . . . . 72
Viewing Information About Physical Memory . . . . . . . . . . . . . . . . . . . . . . . . . . . . . . 72
Viewing Information About Power Supplies . . . . . . . . . . . . . . . . . . . . . . . . . . . . . . . . 72
Viewing Information About Temperature and Voltage. . . . . . . . . . . . . . . . . . . . . . . . 73
Administering Indications Using EVWEB . . . . . . . . . . . . . . . . . . . . . . . . . . . . . . . . . . . 74
Overview . . . . . . . . . . . . . . . . . . . . . . . . . . . . . . . . . . . . . . . . . . . . . . . . . . . . . . . . . . . . 74
Launching EVWEB for Administration. . . . . . . . . . . . . . . . . . . . . . . . . . . . . . . . . . . . 75
Configuring Email Consumer . . . . . . . . . . . . . . . . . . . . . . . . . . . . . . . . . . . . . . . . . . . 76
Creating EVWEB Event Subscriptions . . . . . . . . . . . . . . . . . . . . . . . . . . . . . . . . . . . . 77
Modifying EVWEB Event Subscriptions . . . . . . . . . . . . . . . . . . . . . . . . . . . . . . . . . . . 81
Deleting EVWEB Event Subscriptions . . . . . . . . . . . . . . . . . . . . . . . . . . . . . . . . . . . . 85
Viewing Event Subscriptions . . . . . . . . . . . . . . . . . . . . . . . . . . . . . . . . . . . . . . . . . . . . . 87
Overview . . . . . . . . . . . . . . . . . . . . . . . . . . . . . . . . . . . . . . . . . . . . . . . . . . . . . . . . . . . . 87
Viewing EVWEB Event Subscriptions . . . . . . . . . . . . . . . . . . . . . . . . . . . . . . . . . . . . 88
Viewing External Event Subscriptions . . . . . . . . . . . . . . . . . . . . . . . . . . . . . . . . . . . . 90
Viewing Indications . . . . . . . . . . . . . . . . . . . . . . . . . . . . . . . . . . . . . . . . . . . . . . . . . . . . . 92
Launching EVWEB for Viewing WBEM Indications . . . . . . . . . . . . . . . . . . . . . . . . . 92
Searching WBEM Events . . . . . . . . . . . . . . . . . . . . . . . . . . . . . . . . . . . . . . . . . . . . . . . 93
Viewing Summary Information About WBEM Events. . . . . . . . . . . . . . . . . . . . . . . . 95
Viewing Detailed Information About WBEM Events . . . . . . . . . . . . . . . . . . . . . . . . . 96
Deleting WBEM Events from the Event Archive . . . . . . . . . . . . . . . . . . . . . . . . . . . . 97
Tracing EVWEB. . . . . . . . . . . . . . . . . . . . . . . . . . . . . . . . . . . . . . . . . . . . . . . . . . . . . . . 100
Overview . . . . . . . . . . . . . . . . . . . . . . . . . . . . . . . . . . . . . . . . . . . . . . . . . . . . . . . . . . . 100
Enabling Tracing Using EVWEB GUI . . . . . . . . . . . . . . . . . . . . . . . . . . . . . . . . . . . 103
Enabling Tracing Using EVWEB CLI . . . . . . . . . . . . . . . . . . . . . . . . . . . . . . . . . . . . 104
Modifying Tracing Using EVWEB GUI. . . . . . . . . . . . . . . . . . . . . . . . . . . . . . . . . . . 104
Modifying Tracing Using EVWEB CLI . . . . . . . . . . . . . . . . . . . . . . . . . . . . . . . . . . . 105
Disabling Tracing Using EVWEB GUI . . . . . . . . . . . . . . . . . . . . . . . . . . . . . . . . . . . 105
Disabling Tracing Using EVWEB CLI . . . . . . . . . . . . . . . . . . . . . . . . . . . . . . . . . . . 106
4
Page 5

Contents
5. Troubleshooting SFM
Troubleshooting Instance Providers . . . . . . . . . . . . . . . . . . . . . . . . . . . . . . . . . . . . . . . 109
Troubleshooting Indication Providers. . . . . . . . . . . . . . . . . . . . . . . . . . . . . . . . . . . . . . 113
Troubleshooting EVWEB. . . . . . . . . . . . . . . . . . . . . . . . . . . . . . . . . . . . . . . . . . . . . . . . 119
Glossary . . . . . . . . . . . . . . . . . . . . . . . . . . . . . . . . . . . . . . . . . . . . . . . . . . . . . . . 123
Index . . . . . . . . . . . . . . . . . . . . . . . . . . . . . . . . . . . . . . . . . . . . . . . . . . . . . . . . . . 127
5
Page 6

Contents
6
Page 7

About This Document
This document describes how to install, administer, and troubleshoot the System Fault Management (SFM)
software and its components.
Document updates may be issued between editions to correct errors or to document product changes. To
ensure that you receive the updated or new editions, subscribe to the appropriate product support service.
Contact your local HP sales representative for more information.
This document can also be found online at:
http://docs.hp.com/en/diag
Intended Audience
This document is intended for system administrators responsible for installing, and managing remote
systems using SFM. This document is also intended for users working on the client systems. Administrators
and users are expected to have knowledge of operating system concepts, commands, and online diagnostics
tools.
This document is not a tutorial.
Publishing History
Table 1 lists the publishing history for this document.
Table 1 Publishing History
Document
Manufacturing
Part Number
5991-5475 11i Version 1 April 2006
Operating
Systems
Supported
Publication
Date
Document Organization
System Fault Management Administrator’s Guide is divided into several chapters. Each chapter contains
information on installing and administering SFM.
Chapter 1 Introduction Introduces the SFM software, SFM features and benefits, SFM providers,
user interfaces, EVWEB, and the architecture of SFM.
Chapter 2 Installing the SFM Software Instructs how to install, verify, and remove the SFM
software.
Chapter 3 Administering Indications and Instances Using HP SIM Describes how to use the HP
Systems Insight Manager (HP SIM) GUI to administer indications and view instances on
remote systems.
Chapter 4 Administering Indications and Instances Using HP SMH Describes how to use the
HP System Management Homepage (HP SMH) GUI to administer indications and view
instances on the local system.
Chapter 5 Troubleshooting SFM Describes how to troubleshoot SFM providers and EVWEB.
7
Page 8

Typographic Conventions
This document uses the following conventions:
audit (5) An HP-UX manpage. In this example, audit is the name and 5 is the section in the HP-UX
Reference. On the Web and on the Instant Information CD, it may be a link to the manpage
itself. From the HP-UX command line, you can enter “man audit” or “man 5 audit” to view
the manpage. See man (1).
Book Title The title of a book. On the Web and on the Instant Information CD, it may be a link to the
book itself.
KeyCap The name of a keyboard key. Note that Return and Enter both refer to the same key.
Emphasis Text that is emphasized.
Bold The defined use of an important word or phrase.
ComputerOutput Text displayed or generated by the system.
UserInput Commands and other text that you type.
Command A command name or qualified command phrase.
Variable The name of a variable that you can replace in a command or function or information in a
display that represents several possible values.
[] The contents are optional in formats and command descriptions. If the contents are a list
separated by |, you can choose one of the items.
{} The contents are required in formats and command descriptions. If the contents are a list
separated by |, you must choose one of the items.
... The preceding element can be repeated an arbitrary number of times.
| Separates items in a list of choices.
HP-UX Release Name and Release Identifier
Each HP-UX 11i release has an associated release name and release identifier. The uname (1) command with
the -r option returns the release identifier. Table 2 shows the releases available for HP-UX 11i.
Table 2 HP-UX Releases
Release
Identifier
B.11.11 HP-UX 11i v1.0 PA-RISC
Release Name
Supported Processor
Architecture
Related Information
Additional information about SFM is available at:
http://docs.hp.com/en/diag
Following lists the other documents on SFM:
System Fault Management Release Notes
System Fault Management Frequently Asked Questions
System Fault Management Provider Data Sheets
8
Page 9

HP Welcomes Your Comments
HP welcomes your comments concerning this document. We are truly committed to providing documentation
that meets your needs.
Send your comments or suggestions to:
diag_lp@presskit.rsn.hp.com
Include the document title, manufacturing part number, and any comment, error found, in this document.
Also, please include what we did right, so we can incorporate it into other documents.
9
Page 10

10
Page 11

1Introduction
This chapter introduces you to the System Fault Management (SFM)
software and the tools that SFM includes.
The chapter discusses the following topics:
Chapter 1 11
Page 12

Introduction
• “Overview” on page 13
• “Features and Benefits” on page 14
• “Providers” on page 15
• “User Interfaces” on page 19
• “Architecture” on page 20
Chapter 112
Page 13

Introduction
Overview
Overview
The SFM software is a collection of tools used to monitor the health of
HP servers running HP-UX. SFM retrieves information about a system’s
hardware devices such as CPU, memory, power supply, and cooling
devices. SFM operates within the Web-Based Enterprise Management
(WBEM) environment.
WBEM is an industry-wide standards-based initiative to aid the
management of large scale systems. WBEM has the following
components:
• A WBEM infrastructure, such as HP WBEM services. SFM uses the
Common Information Model Object Manager (CIMOM) WBEM
service to route query requests and responses between WBEM
providers and clients. Clients must be compliant with the Common
Information Model (CIM) (2.7) schema of the Distributed
Management Task Force (DMTF).
• A WBEM-based network management application, such as the HP
Systems Insight Manager (HP SIM) and HP System Management
Homepage (HP SMH), a user interface for controlling and monitoring
resources within a large-scale system. SFM can use HP SIM to
display query information for local and remote systems.
• WBEM providers that obtain information. SFM includes instance
and indication providers, which are one set of WBEM providers
among many. SFM providers query and provide system hardware
property and event information.
Chapter 1 13
Page 14

Introduction
Features and Benefits
Features and Benefits
SFM dynamically queries on request property information about a
hardware device on a local or remote system. It offers the following
features and benefits:
• Displays information on standards-compliant graphical and
command-line system management applications, such as HP SIM
and HP SMH.
• Operates within the WBEM environment.
• Supports the Central Management Server (CMS) running on HP-UX,
Linux®, or Windows®.
• Enables you to view and administer WBEM indications.
• Provides the same features and benefits as those found in the EMS
Hardware Monitors.
NOTE SFM is the future replacement of EMS Hardware Monitors.
Chapter 114
Page 15

Introduction
Providers
Providers
SFM providers can be classified as instance providers or as indication
providers. This section describes these providers.
Chapter 1 15
Page 16

Introduction
Providers
Instance Providers
On request, an SFM instance provider dynamically queries the local or
remote system for the property information described in Table 1-1 and
reports the information to the CIMOM.
Table 1-1 Instance Providers
Instance Provider Description
CPU The CPU Instance Provider gathers the
following types of information:
• Logical processor information, such as:
— Current clock speed
— Processor family
— Processor status information,
including configuration and
deconfiguration, failure status, and
active and inactive status
— Load percentage
• Physical processor chip information,
such as chip revisions and architecture
revisions
• Location details, such as:
— Location attributes such as cabinet
number, cell number, slot number,
and so on. Only information for
filled slots is available.
— Processor IDs
The CPU Instance Provider depends on the
EMS Wrapper Provider to update the
processor inventory.
Chapter 116
Page 17

Table 1-1 Instance Providers (Continued)
Instance Provider Description
Memory The Memory Instance Provider gathers the
following types of information:
• Memory slot information
• Memory module information, such as:
— Serial number
—Part number
—Memory capacity
— Module form factor
— Module status (for example,
The Memory Instance Provider depends on
the EMS Wrapper Provider to update the
memory inventory.
Introduction
Providers
configuration status, failure status)
Environmental The Environmental Instance Provider
gathers information about the following
hardware components:
•Fans
• Power supply
• Bulk power supply
• AC input lines
Filter Metadata (FMD) The FMD Instance Provider does the
following:
• Provides the ability to predefine a filter
in a repository
• Ensures that chosen indications are
logged to the Event Archive
• Creates HP-advised subscriptions
when SFM is installed
Chapter 1 17
Page 18

Introduction
Providers
Indication Providers
SFM includes one indication provider called the EMS Wrapper Provider.
This provider converts hardware events received from EMS Hardware
Monitors into WBEM indications. The EMS Hardware Monitors
constantly monitor the system hardware resources for any unusual
activity. When any unusual activity is detected on a monitored resource,
the EMS monitor that is monitoring the resource generates an event that
includes details of the problem and notify the EMS Wrapper Provider
through the EMS framework. The EMS Wrapper Provider receives these
events and converts them into WBEM indications.
The EMS Wrapper Provider then reports these indications to the
CIMOM. Using a WBEM-based management application, such as HP
SIM, you can subscribe to and receive Event Monitoring Service (EMS)
events generated on a remote system. On the system on which SFM is
installed, you can use an SFM tool called EVWEB to view and
administer events through the HP SMH interface.
NOTE The terms events and indications are used interchangeably.
Chapter 118
Page 19

Introduction
User Interfaces
User Interfaces
You can use two types of interfaces to view SFM provider queries: HP
SIM and HP SMH. This section describes these interfaces.
HP Systems Insight Manager
HP SIM is a WBEM-based user interface for controlling and monitoring
resources within a large-scale system. You can use HP SIM to create
subscriptions and to view indications and instances on a remote system.
You must install HP SIM on the CMS. You can use HP SIM to launch HP
SMH.
HP System Management Homepage
HP SMH is a secure, Web-based management application. You must
install HP SMH on a local system to view hardware configuration, status
data, performance metrics, system thresholds, and software version
control information. You can also launch HP SMH from HP SIM
remotely.
Chapter 1 19
Page 20
Introduction
Architecture
Architecture
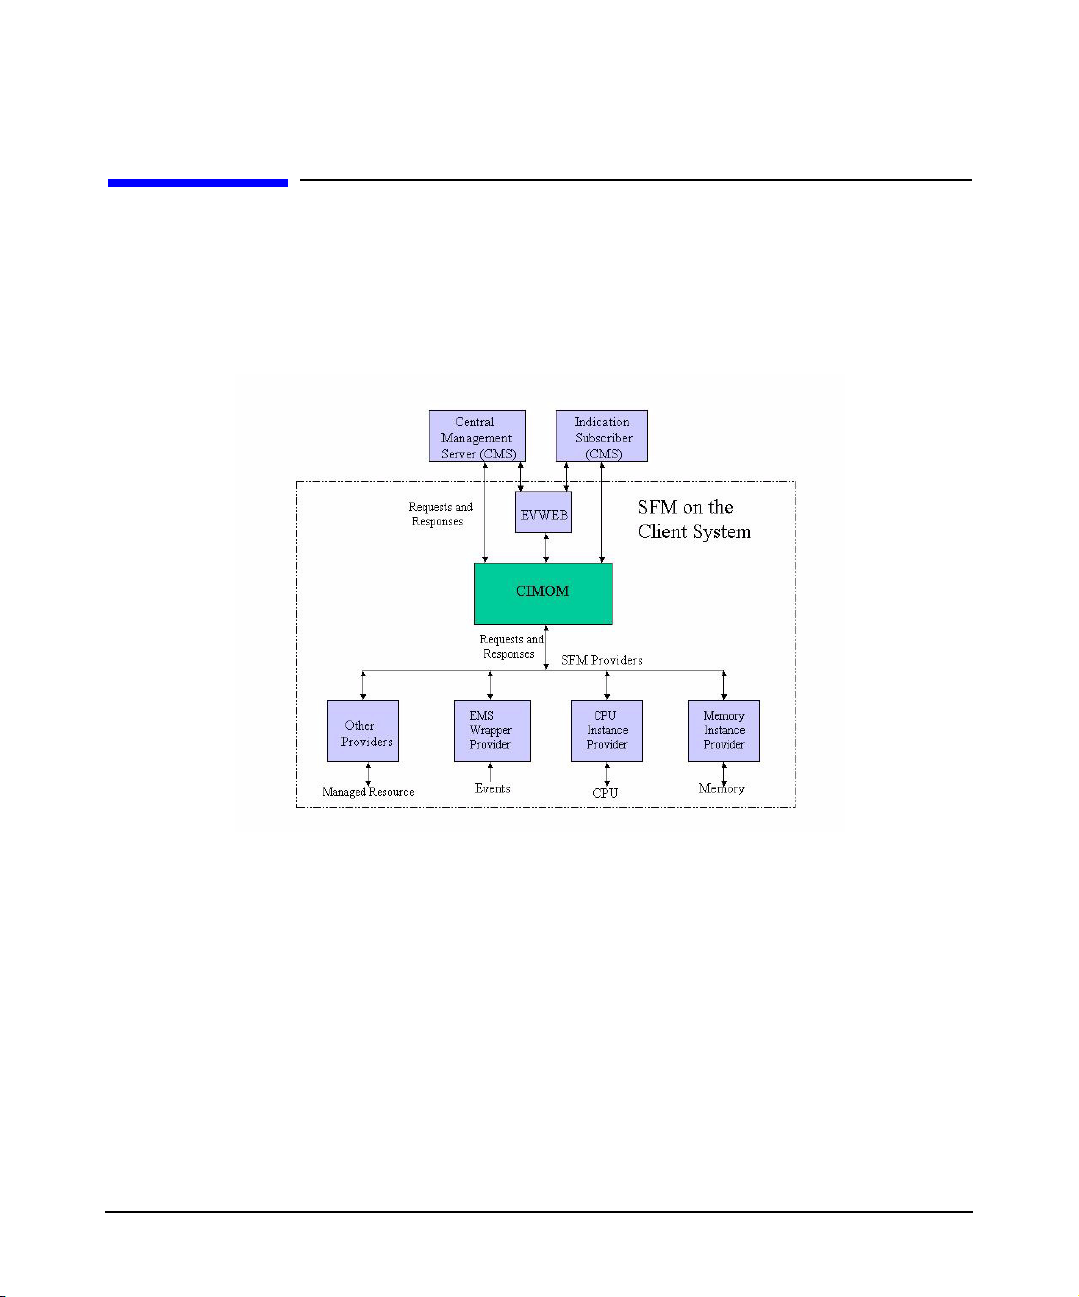
Figure 1-1 illustrates the architecture of SFM installed on a
PA-RISC-based client system. The client system is managed by the CMS.
Figure 1-1 Block Diagram of SFM on PA-RISC-Systems
The following list describes the sequence of events when a request is
made for information:
1. The CIMOM receives requests from the CMS for device information.
2. The CIMOM converts the requests to a format that is deciphered by
the SFM providers and directs the requests to the appropriate SFM
provider, for example, the CPU Instance Provider.
3. The SFM provider queries the associated hardware device for
property information.
4. The SFM provider returns the query information to the CIMOM.
5. The CIMOM conveys the responses from the provider to the CMS.
Chapter 120
Page 21

Introduction
Architecture
Information can be viewed using HP SIM on the remote system and
HP SMH on the local system.
The following list describes the sequence of events when an event is
generated from an EMS monitor:
1. The EMS Wrapper Provider receives events generated by the EMS
monitors through the EMS framework.
2. The provider converts these events into WBEM indications and
reports these indications to the CIMOM.
3. The CIMOM directs these indications to EVWEB and to the CMS
that has created subscriptions for indications. EVWEB then stores
the indications either in the Event Archive or in your E-mail box, or
both, depending on your configuration.
Indications can be viewed using HP SIM on the remote system and
HP SMH on the local system.
Chapter 1 21
Page 22

Introduction
Architecture
Chapter 122
Page 23

2 Installing the SFM Software
For HP-UX 11i v1, the System Fault Management (SFM) software is
available only on the Software Depot. This chapter describes how to
install the SFM software on the HP-UX 11i v1 operating system.
Chapter 2 23
Page 24

Installing the SFM Software
This chapter discusses the following topics:
• “Prerequisites” on page 25
• “Installing the SFM Software from the Web” on page 26
• “Verifying the Installation” on page 27
• “Removing the SFM Software” on page 30
• “Verifying Removal of the SFM Software” on page 38
• “Configuring Indication Filters” on page 40
• “Configuring Error Logging in SFM” on page 41
Chapter 224
Page 25

Installing the SFM Software
Prerequisites
Prerequisites
Following are the prerequisites for installing the SFM software:
• HP-UX 11i v1 September 2005 Operating Environment Update
Release (OEUR) or later
• OpenSSL Version A.00.09.07e.012 or later
• WBEM Services Version A.02.00.09 or later
• SysMgmtWeb Version A.2.2.2 (HP-UX Web-Based System
Management User Interface)
• Online Diagnostics (OnlineDiag bundle B.11.11.16.xx)
Table 1-1 lists the versions of Online Diagnostics that support the
SFM software. All later versions of Online Diagnostics will support
the SFM software in the future.
Table 2-1 Online Diagnostics Versions
EMS Version A.04.20
STM Version A.49.10
• PHSS_33033
• PHCO_31903
• PHCO_31923
NOTE All the prerequisites are available in the Software Depot. All the patches
are available at:
http://itrc.hp.com
The PHCO_31903 patch depends on the PHCO_24402 patch.
HP recommends that you install HP Systems Insight Manager (HP SIM)
version 5.0.01 to remotely administer indications and instances.
Chapter 2 25
Page 26

Installing the SFM Software
Installing the SFM Software from the Web
Installing the SFM Software from the Web
To install the SFM software from the Software Depot, complete the
following steps:
Step 1. Go to HP Software Depot at:
http://www.hp.com/go/softwaredepot
Step 2. Search for SysFaultMgmt. The Overview page is displayed.
Step 3. Go to the Installation page and review Prerequisites to ensure that your
system meets the requirements.
Step 4. Select the Receive for Free >> option at the bottom right of the page.
Step 5. Select the appropriate release of the HP-UX operating system.
Step 6. Enter your registration information. Read and accept the terms and
conditions.
Step 7. Click Next >> at the bottom right of the page.
Step 8. Click the appropriate link under Download Software to download the
software. Save the software in a local directory on your system, for
example, /tmp/SysFaultMgmt.depot.
Step 9. To install the product, login as superuser and enter the following
command:
# swinstall -s <full path of depot> SysFaultMgmt
For example,
# swinstall -s /tmp/SysFaultMgmt.depot SysFaultMgmt
Step 10. To verify whether the SFM software is installed properly, enter the
following command at the HP-UX prompt:
# swlist | grep SysFaultMgmt
If the SFM software is installed properly, SysFaultMgmt and the version
number appear in the output. If the SFM software is not installed
properly, you must repeat the installation procedure. For more
information, see “Verifying the Installation” on page 27.
Chapter 226
Page 27
Installing the SFM Software
Verifying the Installation
Verifying the Installation
This section describes how to verify the SFM software installation using
the TUI and the CLI.
NOTE The version numbers of the products shown in the figures may be
different from the version you are installing.
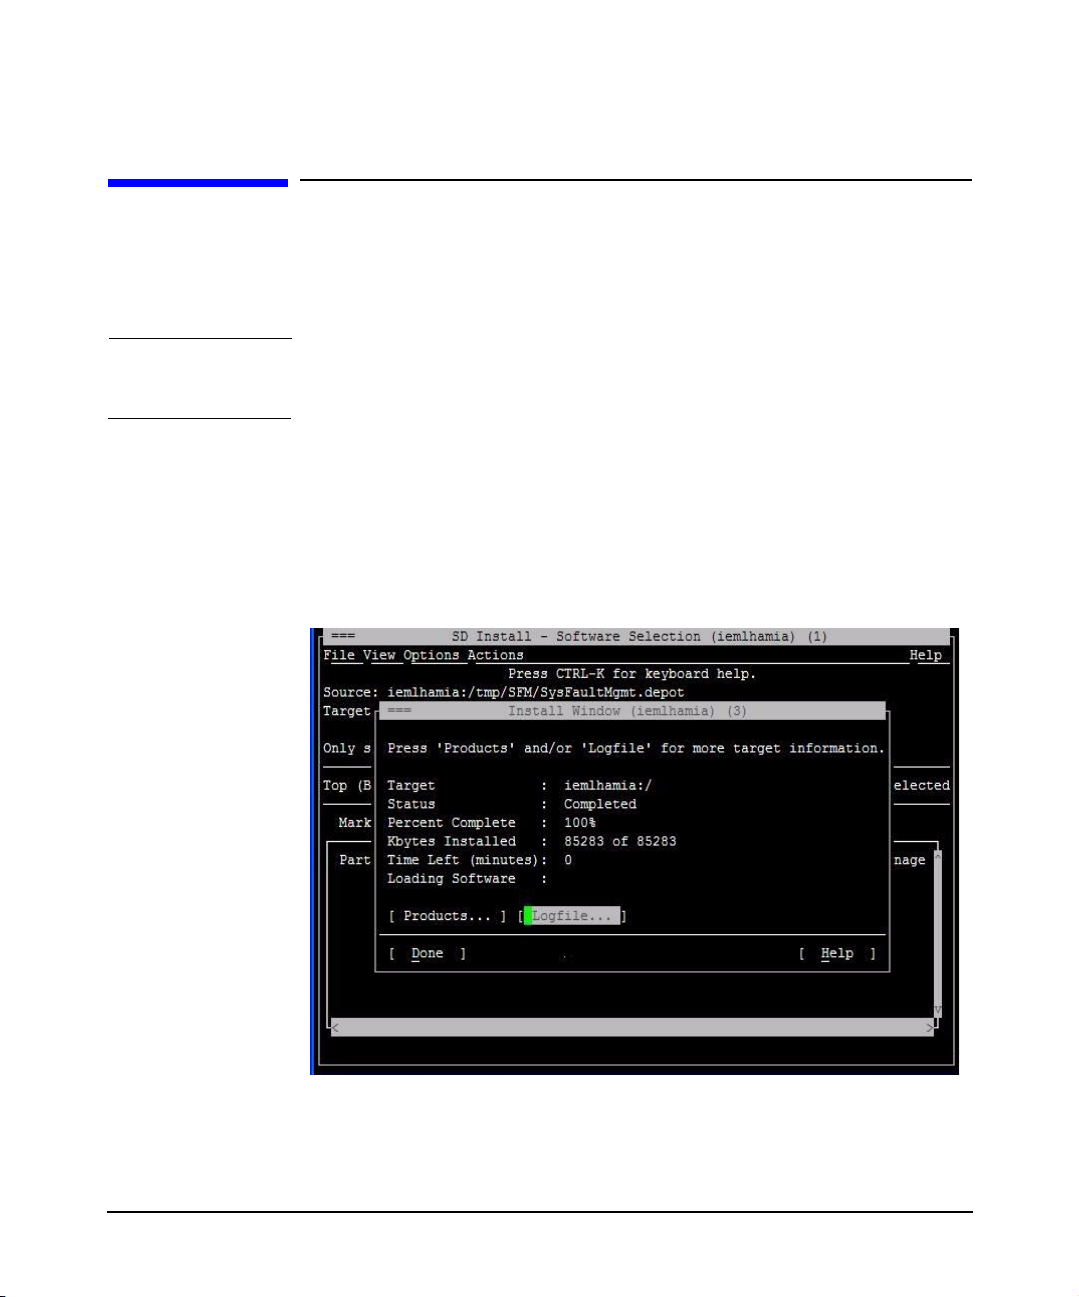
Verifying the Installation Using the TUI
To verify the SFM software installation, complete the following steps:
Step 1. Log in to the system as a superuser.
Step 2. Click Logfile in the Install window, as shown in the following figure:
Chapter 2 27
Page 28

Installing the SFM Software
Verifying the Installation
Step 3. For information about errors related to installation, enter the following
The Logfile, which includes details about the installation, is displayed.
If there are no errors in the Logfile, the SFM software is installed
properly. If the SFM software is not installed properly, you must repeat
the installation procedure.
command at the HP-UX prompt:
# swjob -a log <jobid> @ <system name>:/
The jobid is available in the Logfile, as underlined in the Logfile
window, in the following figure:
For example, enter the following command at the HP-UX prompt:
# swjob -a log iemlhamia-0013 @ iemlhamia.india.hp.com:/
Verifying the Installation Using the CLI
To verify your installation using the CLI, complete the following steps:
Step 1. Log in to the system as a superuser.
Chapter 228
Page 29
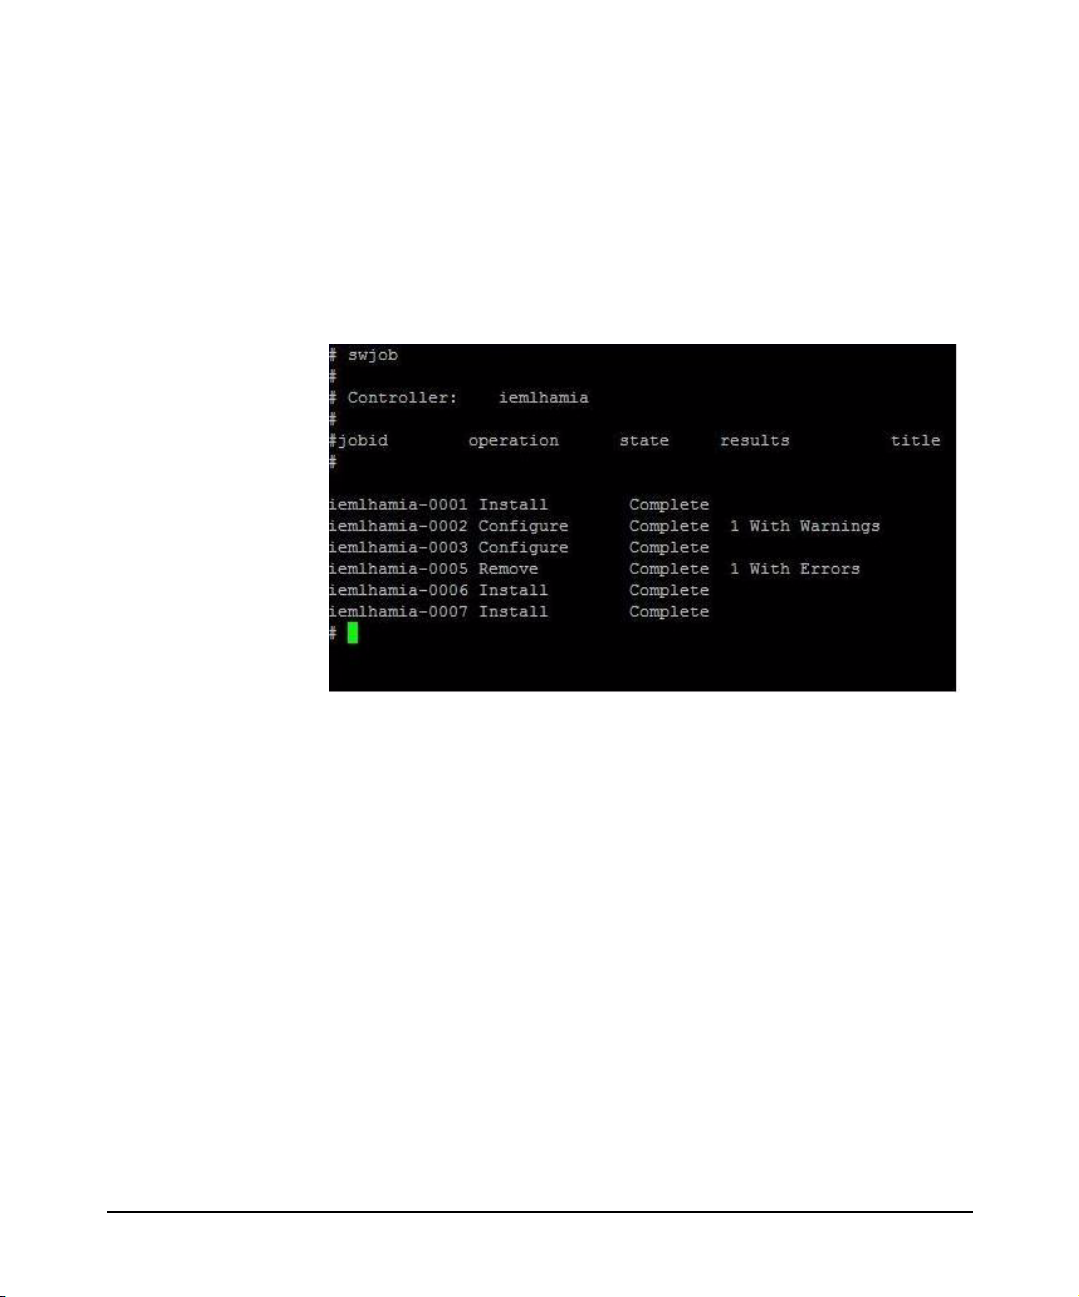
Step 2. Enter the following command at the HP-UX prompt:
# swjob
If the output contains no errors, the SFM software is installed properly.
Otherwise, you must install the SFM software again.
A sample output is shown in the following figure:
Installing the SFM Software
Verifying the Installation
Step 3. For information about installation-related errors, enter the following
command at the HP-UX prompt:
# swjob -a log <jobid> @ <system name>:/
Chapter 2 29
Page 30

Installing the SFM Software
Removing the SFM Software
Removing the SFM Software
This section describes how to remove of the SFM software using the TUI
and the CLI.
CAUTION Removing the SFM software makes your system vulnerable to failure.
Also, all the software products that depend on the SFM software may not
work properly.
NOTE The version numbers of the products shown in the figures may be
different from the version you are installing.
Removing the Software Using the TUI
To remove the SFM software from your system, complete the following
steps:
Step 1. Log in to the system as a superuser.
Step 2. Enter the following command at the HP-UX prompt:
# swremove
Chapter 230
Page 31

Installing the SFM Software
Removing the SFM Software
Step 3. Select SysFaultMgmt in the SD Remove window, as shown in the
following figure:
Chapter 2 31
Page 32

Installing the SFM Software
Removing the SFM Software
Step 4. Select Actions->Mark for Remove in the SD Remove window, as shown in
the following figure:
Chapter 232
Page 33

Installing the SFM Software
Removing the SFM Software
Step 5. Select Actions->Remove, as shown in the following figure:
Chapter 2 33
Page 34

Installing the SFM Software
Removing the SFM Software
Step 6. Click OK in the Remove Analysis window to confirm the removal of the
SFM software, as shown in the following figure:
Chapter 234
Page 35

Installing the SFM Software
Removing the SFM Software
The following figure is a sample of the removal process in progress:
Chapter 2 35
Page 36

Installing the SFM Software
Removing the SFM Software
Step 7. When the SFM software is removed, the Remove Window is displayed, as
shown in the following figure:
Step 8. To verify whether the SFM software is removed properly, enter the
following command at the HP-UX prompt:
# swlist | grep SysFaultMgmt
If the SFM software is removed properly, SysFaultMgmt and the version
number of the SFM software does not appear in the output. If the SFM
software is not removed properly, you must repeat the removal
procedure. For more information, see “Verifying Removal of the SFM
Software” on page 38.
Removing the Software Using the CLI
To remove the SFM software from your system, complete the following
steps:
Step 1. Log in to the system as a superuser.
Step 2. Enter the following command at the HP-UX command prompt:
Chapter 236
Page 37

Installing the SFM Software
Removing the SFM Software
# swremove SysFaultMgmt
Step 3. To verify whether the SFM software is removed properly, enter the
following command at the HP-UX prompt:
# swlist | grep SysFaultMgmt
If the SFM software is removed properly, SysFaultMgmt and the version
number of the SFM software do not appear in the output. If the SFM
software is not removed properly, you must repeat the removal
procedure. For more information, see “Verifying Removal of the SFM
Software” on page 38.
Chapter 2 37
Page 38

Installing the SFM Software
Verifying Removal of the SFM Software
Verifying Removal of the SFM Software
This section describes how to use the TUI and the CLI to verify whether
the SFM software is removed successfully.
Verifying Removal Using the TUI
To verify whether the SFM software is removed successfully, complete
the following steps:
Step 1. Log in to the system as a superuser.
Step 2. Click Logfile in the Remove Window.
If there are no errors in the Logfile, the SFM software is removed
successfully. If the SFM software is not removed properly, you must
repeat the removal procedure. See “Removing the SFM Software” on
page 30 for instructions on how to remove the SFM software.
Step 3. For information about errors related to the removal of SFM, enter the
following command at the HP-UX prompt:
# swjob -a log <jobid> @ <system name>:/
The jobid is available in the Logfile.
Verifying Removal Using the CLI
To verify if the SFM software is removed successfully, complete the
following steps:
Step 1. Log in to the system as a superuser.
Step 2. Enter the following command at the HP-UX prompt:
# swjob
If the output contains no errors, the SFM software is removed
successfully. If the SFM software is not removed properly, you must
repeat the removal procedure. See “Removing the SFM Software” on
page 30 for instructions on how to remove the SFM software.
Step 3. For information about errors related to the removal of the SFM software,
enter the following command at the HP-UX prompt:
Chapter 238
Page 39

Installing the SFM Software
Verifying Removal of the SFM Software
# swjob -a log <jobid> @ <system name>:/
The jobid is available in the output of the swjob command.
Chapter 2 39
Page 40

Installing the SFM Software
Configuring Indication Filters
Configuring Indication Filters
You must configure indication filters to view desired indications. The
Filter Metadata Provider (FMD) helps configure indication filters that
deliver important or desired indications, for example, indications with a
certain severity. The provider also ensures that all the indications
recommended by HP for system management are logged in the Event
Archive, available at /var/opt/sfmdb/pgsql. Logging indications in the
archive helps track all the events that are generated.
Filters are classified as follows:
• HP-Defined Filters
HP-Defined filters are defined by HP, and are present in the FMD
repository at the time of installation. You can enable or disable
HP-Defined filters. To enable HP-Defined filters, run fmdcontrol
enable at the HP-UX prompt. To disable HP-Defined filters, run
fmdcontrol disable at the HP-UX prompt. Indications fulfilling
the conditions in the HP-Known HP-Defined filters are logged in the
Event Archive. These subscriptions ensure that all the indications
recommended by HP for system management are logged in the Event
Archive.
• Admin-Defined Filters
You can create, delete, and modify Admin-Defined filters by using the
fmdcontrol command. You can also enable or disable
Admin-Defined filters. HP does not provide any Admin-Defined filter.
You must create filters. By default, the FMD Provider does not log
indications fulfilling the conditions in the Admin-Defined filters, in
the Event Archive. You must modify the Admin-Defined filters to log
indications in the Event Archive.
For more information about the fmdcontrol command and its
options, run man fmdcontrol at the HP-UX prompt.
Chapter 240
Page 41

Installing the SFM Software
Configuring Error Logging in SFM
Configuring Error Logging in SFM
You can configure such error logging parameters as severity, location of
logs, and the number of backup files using the fmControl command. To
configure these parameters, complete the following steps:
Step 1. Modify the /opt/sfm/conf/FMLoggerConfig.xml configuration file
using a text editor.
Step 2. Run the /opt/sfm/bin/fmControl
/opt/sfm/conf/FMLoggerConfig.xml command for the changes in the
/opt/sfm/conf/FMLoggerConfig.xml configuration file to take effect.
For more information about the fmcontrol command, enter man
fmControl at the HP-UX prompt.
NOTE You can configure parameters using the command-line interface (CLI)
only.
Chapter 2 41
Page 42

Installing the SFM Software
Configuring Error Logging in SFM
Chapter 242
Page 43

3 Administering Indications and
Instances Using HP SIM
This chapter describes System Fault Management (SFM) administration
on a remote system using HP Systems Insight Manager (HP SIM).
Chapter 3 43
Page 44

Administering Indications and Instances Using HP SIM
NOTE You can perform similar tasks using other management applications that
are compliant with the Common Information Model (CIM) (2.7) schema
of the Distributed Management Task Force (DMTF).
The terms events and indications are used interchangeably in this
document.
This chapter addresses the following topics:
• “Creating Subscriptions and Viewing Indications Using HP SIM” on
page 45
• “Viewing Instances” on page 62
Chapter 344
Page 45

Administering Indications and Instances Using HP SIM
Creating Subscriptions and Viewing Indications Using HP SIM
Creating Subscriptions and Viewing Indications
Using HP SIM
To view instances and events generated on a managed system, you must
create subscriptions. When you create subscriptions on the Central
Management Server (CMS) using HP SIM, indications are delivered to
the CMS whenever an event occurs on the managed system.
This section discusses the following topics:
• “Creating Subscriptions” on page 45
• “Viewing Indications” on page 56
NOTE The version numbers of the products shown in the figures may be
different from the version you are installing.
Creating Subscriptions
To create subscriptions using HP SIM, complete the following steps:
Step 1. Enter the following URL to launch HP SIM on your browser:
http://<system name>:<port number>/
The system name is the name of the CMS.
For example:
http://abc.com:280/
The HP SIM home page is launched.
Step 2. To create subscriptions, select Options-->Protocol Settings-->Global
Protocol Settings in the HP SIM Home page, as shown in Figure 3-1.
Chapter 3 45
Page 46

Administering Indications and Instances Using HP SIM
Creating Subscriptions and Viewing Indications Using HP SIM
Figure 3-1 HP SIM Home Page
The Global Protocol Settings window is displayed, as shown in Figure
3-2.
Chapter 346
Page 47

Creating Subscriptions and Viewing Indications Using HP SIM
Figure 3-2 Global Protocol Settings
Administering Indications and Instances Using HP SIM
Step 3. In Figure 3-2, under Default WBEM settings, select Enable WBEM.
Click OK to save your settings.
Step 4. Select Configure->Configure or Repair Agents, as shown in Figure
3-3.
Chapter 3 47
Page 48

Administering Indications and Instances Using HP SIM
Creating Subscriptions and Viewing Indications Using HP SIM
Figure 3-3 Configuration
The Configure or Repair Agents window is displayed, as shown in Figure
3-4.
Chapter 348
Page 49

Creating Subscriptions and Viewing Indications Using HP SIM
Figure 3-4 Configure or Repair Agents
Administering Indications and Instances Using HP SIM
Step 5. From the Add targets by selecting from: list in Figure 3-4, select All
Systems to view and select the systems. Selecting the name of the
system enables you to view indications occurring on the selected system.
The list of systems is displayed in the Select Target Systems window, as
shown in Figure 3-5.
Chapter 3 49
Page 50

Administering Indications and Instances Using HP SIM
Creating Subscriptions and Viewing Indications Using HP SIM
Figure 3-5 Select Target Systems
Step 6. To select all the systems in the network, select the Select “All Systems”
itself check box, as shown in Figure 3-5. Click Apply. The Verify Target
Systems window is displayed, as shown in Figure 3-6.
Chapter 350
Page 51

Creating Subscriptions and Viewing Indications Using HP SIM
Figure 3-6 Verify Target Systems
Administering Indications and Instances Using HP SIM
Step 7. Select the appropriate check box to verify the target systems and click
Next, as shown in Figure 3-6. The Enter Credentials window is
displayed, as shown in Figure 3-7.
Chapter 3 51
Page 52

Administering Indications and Instances Using HP SIM
Creating Subscriptions and Viewing Indications Using HP SIM
Figure 3-7 Enter Credentials
Step 8. Enter your credentials in the given fields, as shown in Figure 3-7. Click
Next. The Configure or Repair Settings window is displayed, as shown
in Figure 3-8.
Chapter 352
Page 53

Administering Indications and Instances Using HP SIM
Creating Subscriptions and Viewing Indications Using HP SIM
Figure 3-8 Configure or Repair Settings
Step 9. On the Configure or Repair Settings window, click Run Now. The Task
Results window is displayed, as shown in Figure 3-9. The Task Results
window states that the Indication Subscription is successfully created.
The next time an event is generated on the selected system, you can view
the event in the events list.
Chapter 3 53
Page 54

Administering Indications and Instances Using HP SIM
Creating Subscriptions and Viewing Indications Using HP SIM
Figure 3-9 Task Results
Step 10. To obtain a printable report of the indication subscription details, click
View Printable Report. The report is displayed, as shown in Figure
3-10.
Chapter 354
Page 55

Administering Indications and Instances Using HP SIM
Creating Subscriptions and Viewing Indications Using HP SIM
Figure 3-10 Printable Report of the Indication Subscription
NOTE For more information, see the HP Systems Insight Manager Installation
and User’s Guide at:
http://docs.hp.com/en/netsys.html
Chapter 3 55
Page 56

Administering Indications and Instances Using HP SIM
Creating Subscriptions and Viewing Indications Using HP SIM
Viewing Indications
To view the list of events generated on the selected systems, complete the
following steps:
Step 1. Select All Events in the left pane of the HP SIM window. The list of
events is displayed, as shown in Figure 3-11.
Chapter 356
Page 57

Figure 3-11 Events list
Administering Indications and Instances Using HP SIM
Creating Subscriptions and Viewing Indications Using HP SIM
Step 2. To view the details of an event, select the event. The details are
displayed at the bottom of the same window, as shown in Figure 3-12.
Chapter 3 57
Page 58

Administering Indications and Instances Using HP SIM
Creating Subscriptions and Viewing Indications Using HP SIM
Figure 3-12 Event Details
Step 3. To obtain the printable version of the event details, click View
Printable Details at the bottom of the window. The printable report is
displayed in a new window, as shown in Figure 3-13.
Chapter 358
Page 59

Creating Subscriptions and Viewing Indications Using HP SIM
Figure 3-13 Printable Event Details
Administering Indications and Instances Using HP SIM
To create subscriptions and view indications using the CLI, see “Creating
Event Subscription Using the CLI” on page 79.
The ProviderName in the Event Details window indicates the monitor
that generated the event. Table 3-1 maps the monitors and providers.
Table 3-1 Representation of Monitors
Monitor Provider
cmc_em CMC_IndicationProviderIA
Chapter 3 59
Page 60

Administering Indications and Instances Using HP SIM
Creating Subscriptions and Viewing Indications Using HP SIM
Table 3-1 Representation of Monitors (Continued)
Monitor Provider
cpe_em CPE_IndicationProviderIA
dm_core_hw CoreHardwareIndicationProvid
erPA
dm_chassis ChassisIndicationProviderPA
dm_memory MemoryIndicationProviderPA
disk_em DiskIndicationProvider
fpl_em FPL_IndicationProvider
ia64_corehw CoreHardwareIndicationProvid
erIA
lpmc_em LPMC_IndicationProviderPA
ha_disk_array HA_DiskArrayIndicationProvid
er
Table 3-2 compares the EMS Hardware Monitors properties with the
equivalent EMS Wrapper Provider properties.
Table 3-2 Property Representation
EMS Hardware Monitors EMS Wrapper Provider
Event Time EventTime
Severity PerceivedSeverity
Event EventID
System SystemName
Summary Summary
Description of Error Description
Probable Cause/ Recommended
Action
ProbableCauseDescription and
RecommendedAction (these two
are separate fields)
Chapter 360
Page 61

Administering Indications and Instances Using HP SIM
Creating Subscriptions and Viewing Indications Using HP SIM
Table 3-2 Property Representation (Continued)
EMS Hardware Monitors EMS Wrapper Provider
System Serial Number SystemSerialNumber
InquiryVendorID HWManufacturer
Physical Device Path HWLogicalLocation
InquiryProductID DeviceModel
PhysicalDevicePath DeviceControllerLogicalLocat
ion
NOTE For more information, see the HP Systems Insight Manager Installation
and User’s Guide at:
http://docs.hp.com/en/netsys.html
Chapter 3 61
Page 62

Administering Indications and Instances Using HP SIM
Viewing Instances
Viewing Instances
This section describes the tasks you must perform to view instances. This
section discusses the following topics:
• “Viewing Information About Processors” on page 62
• “Viewing Information About Memory” on page 64
• “Viewing Information About Cooling Devices and Power Supplies” on
page 64
• “Viewing Information About Temperature and Voltage Status” on
page 67
NOTE The version numbers of the products shown in the figures may be
different from the version you are installing.
Viewing Information About Processors
To obtain information about processors using the CPU Instance Provider,
complete the following steps:
Step 1. On the System Page of HP SIM, click Properties, as shown in
Figure 3-14 on page 63.
Chapter 362
Page 63

Figure 3-14 System Page
Administering Indications and Instances Using HP SIM
Viewing Instances
The Properties window is displayed. This window provides details about
the system.
Step 2. To view information about the processor status, click the Status tab.
Step 3. To view information about the status of the processors on the system,
select Processor(s).
Step 4. To view information about the processor configuration, click the
Configuration tab. The Configuration window is displayed.
Step 5. To view information about the configuration of the processors, select
Processor(s).
Chapter 3 63
Page 64

Administering Indications and Instances Using HP SIM
Viewing Instances
NOTE There is no CLI to view information about processors.
For more information, see the HP Systems Insight Manager Installation
and User’s Guide at:
http://docs.hp.com/en/netsys.html
Viewing Information About Memory
To obtain information about memory using the Memory Instance
Provider, complete the following steps:
Step 1. On the System Page of HP SIM, select Properties, as shown in
Figure 3-14 on page 63.
The Properties window is displayed. This window provides details about
the system.
Step 2. To view information about the memory status, click the Status tab. The
Status window is displayed.
Step 3. To view information about the status of the physical memory, select
Physical Memory.
Step 4. To view information about the memory configuration, click the
Configuration tab. The Configuration window is displayed.
Step 5. To view information about the configuration of the physical memory,
select Physical Memory.
NOTE There is no CLI to view information about memory.
For more information, see the HP Systems Insight Manager Installation
and User’s Guide at:
http://docs.hp.com/en/netsys.html
Viewing Information About Cooling Devices and Power Supplies
This section discusses the following topics:
Chapter 364
Page 65

• “Viewing Cooling Device Instances” on page 65
• “Viewing Power Supply Instances” on page 66
Viewing Cooling Device Instances
To view information about the cooling devices on the system, complete
the following steps:
Step 1. On the System Page, select System Management Homepage, as
shown in Figure 3-15 on page 65.
Figure 3-15 System Page
Administering Indications and Instances Using HP SIM
Viewing Instances
Chapter 3 65
Page 66

Administering Indications and Instances Using HP SIM
Viewing Instances
Step 2. Select Home->System->Cooling under System Status Summary.
Information about cooling devices on the system such as the status,
location, and the type of fans is displayed in the Cooling Status window.
Step 3. To return to the System Management Homepage home, select Home at
the top of the window.
NOTE There is no CLI to view information about cooling devices.
For more information, see the HP Systems Insight Manager Installation
and User’s Guide at:
http://docs.hp.com/en/netsys.html
Viewing Power Supply Instances
To view information about the power supplies, complete the following
steps:
Step 1. On the System Page, select System Management Homepage, as
shown in Figure 3-15 on page 65.
Step 2. Select Home->System->Power under System Status Summary on the
System Management Homepage.
Information about the power status is displayed in the Power Status
window.
Step 3. To return to the System Management Homepage home, select Home at
the top of the window.
NOTE There is no CLI to view information about power supplies.
For more information, see the HP Systems Insight Manager Installation
and User’s Guide posted at:
http://docs.hp.com/en/netsys.html
Chapter 366
Page 67

Administering Indications and Instances Using HP SIM
Viewing Instances
Viewing Information About Temperature and Voltage Status
This section discusses the following topics:
• “Viewing the Temperature Status” on page 67
• “Viewing Voltage Status” on page 67
Viewing the Temperature Status
To view the temperature status of the system, complete the following
steps:
Step 1. Select 2 items not shown under System on the System Management
Homepage.
The system page is displayed.
Step 2. To view the temperature status of the system, select Temperature on
the system page.
The temperature status of the system is displayed in the Temperature
Status window.
Step 3. To return to the System Management Homepage home, select Home at
the top of the window.
NOTE There is no CLI to view information about the temperature status.
For more information, see the HP Systems Insight Manager Installation
and User’s Guide at:
http://docs.hp.com/en/netsys.html
Viewing Voltage Status
To view the voltage status of the system, complete the following steps:
Step 1. Select 2 items not shown under System on the System Management
Homepage.
Step 2. Select Voltage on the system page.
Chapter 3 67
Page 68

Administering Indications and Instances Using HP SIM
Viewing Instances
The voltage status of the system is displayed in the Voltage Status
window.
Step 3. To return to the System Management Homepage home, select Home at
the top of the window.
NOTE There is no CLI to view information about the voltage status.
For more information, see the HP Systems Insight Manager Installation
and User’s Guide at:
http://docs.hp.com/en/netsys.html
Chapter 368
Page 69

4 Administering Indications and
Instances Using HP SMH
This chapter describes the SFM administration tasks that you can
perform locally using HP SMH.
Chapter 4 69
Page 70

Administering Indications and Instances Using HP SMH
This chapter discusses the following topics:
• “Viewing Instances” on page 71
• “Administering Indications Using EVWEB” on page 74
• “Viewing Event Subscriptions” on page 87
• “Viewing Indications” on page 92
• “Tracing EVWEB” on page 100
Chapter 470
Page 71

Administering Indications and Instances Using HP SMH
Viewing Instances
Viewing Instances
This section describes the tasks you must perform to view instances. This
section discusses the following topics:
• “Viewing Information About Processors” on page 71
• “Viewing Information About Cooling Devices” on page 72
• “Viewing Information About Physical Memory” on page 72
• “Viewing Information About Power Supplies” on page 72
• “Viewing Information About Temperature and Voltage” on page 73
Viewing Information About Processors
To obtain information about processors using the CPU Instance Provider,
complete the following steps:
Step 1. On the System Management Homepage, under System, select
Processors, as shown in Figure 4-1.
Figure 4-1 System Management Homepage
Chapter 4 71
Page 72

Administering Indications and Instances Using HP SMH
Viewing Instances
Information about processors is displayed.
Step 2. Select Home to return to the System Management Homepage.
Viewing Information About Cooling Devices
To obtain information about cooling devices using the Environmental
Provider, complete the following steps:
Step 1. On the System Management Homepage (Figure 4-1), under System,
select Cooling.
Information about cooling devices is displayed.
Step 2. Select Home to return to the System Management Homepage.
Viewing Information About Physical Memory
To obtain information about the physical memory using the Memory
Provider, complete the following steps:
Step 1. On the System Management Homepage (Figure 4-1), under System,
select Physical Memory.
Information about physical memory is displayed.
Step 2. Select Home to return to the System Management Homepage.
Viewing Information About Power Supplies
To obtain information about the power supplies using the Environmental
Provider, complete the following steps:
Step 1. On the System Management Homepage (Figure 4-1), under System,
select Power.
Information about power supplies is displayed.
Step 2. Select Home to return to the System Management Homepage.
Chapter 472
Page 73

Administering Indications and Instances Using HP SMH
Viewing Instances
Viewing Information About Temperature and Voltage
To obtain information about the temperature and voltage using the
Environmental Provider, complete the following steps:
Step 1. On the System Management Homepage (Figure 4-1), under System,
select ...2 items not shown.
The System page is displayed.
Step 2. To view voltage status, Under System, select Voltage.
Information about voltage is displayed.
Step 3. To view temperature status, Under System, select Temperature.
Information about temperature is displayed.
Step 4. Select Home to return to the System Management Homepage.
Chapter 4 73
Page 74

Administering Indications and Instances Using HP SMH
Administering Indications Using EVWEB
Administering Indications Using EVWEB
This section describes how to use EVWEB for administrative tasks, such
as creating and managing subscriptions.
This section discusses the following tasks:
• “Overview” on page 74
• “Launching EVWEB for Administration” on page 75
• “Configuring Email Consumer” on page 76
• “Creating EVWEB Event Subscriptions” on page 77
• “Modifying EVWEB Event Subscriptions” on page 81
• “Deleting EVWEB Event Subscriptions” on page 85
NOTE You must be an administrator to create, modify, and delete event
subscriptions.
Overview
SFM includes a user component called EVWEB that enables you to
administer and view WBEM indications generated on the system on
which SFM is installed.
EVWEB includes the following components:
• Event Subscription Administration – to subscribe to indications
• Event Viewer – to view indications present in the Event Archive
• Indication Consumer for Event Archive – to store indications in the
Event Archive
• Indication Consumer for Email – to send indications to your email
address
• Event Archive database – to include indications you have subscribed
to
Chapter 474
Page 75

Administering Indications and Instances Using HP SMH
Administering Indications Using EVWEB
EVWEB provides the following user interfaces to create and manage
event subscriptions and view indications:
• Browser-based Graphical User Interface (GUI)
• Command-Line Interface (CLI)
EVWEB supports the following user groups:
• Administrator
• Non-administrator
In the CLI, any user with root privileges is an administrator. However,
in the HP SMH GUI, the user groups in EVWEB are mapped to the user
groups defined in HP SMH.
The Administrator user group in HP SMH maps to administrators in
EVWEB. The Operator and the User user group in HP SMH map to
non-administrators in EVWEB.
NOTE For information on how to configure user groups in HP SMH, see the HP
System Management Homepage User’s Guide at:
http://www.docs.hp.com
Launching EVWEB for Administration
You can launch EVWEB either through the CLI or through the HP SMH
GUI.
To Launch EVWEB using the CLI, enter the following command at the
HP-UX prompt:
# /opt/sfm/bin/evweb subscribe
NOTE To avoid the use of the absolute path for the command, you must add
/opt/sfm/bin to the PATH variable in the .profile file. Alternatively,
you can enter the following command at the HP-UX prompt:
# export PATH=$PATH:/opt/sfm/bin
Chapter 4 75
Page 76

Administering Indications and Instances Using HP SMH
Administering Indications Using EVWEB
To use HP SMH GUI to launch EVWEB for administering event
subscription, complete the following steps:
Step 1. Log in to HP SMH.
To log in to HP SMH, enter http://<hostname>: 2301 in the address bar of
the Web browser. The HP SMH login screen is displayed.
Step 2. Enter your user name and password in the appropriate text boxes.
Step 3. Click Sign In on the login screen.
The HP SMH home page is displayed.
Step 4. Select Tools in the main menu.
The Tools page is displayed. This page displays the applications that are
plugged into HP SMH.
Step 5. Select Subscription Administration in Evweb.
The Event Subscription Administration page is displayed.
You can perform various administrative tasks, such as creating,
modifying, and deleting event subscriptions on this page.
Configuring Email Consumer
The Email Consumer is a component of EVWEB that receives indications
from the WBEM Services, and redirects them to an SMTP server.
Normally, the local system itself is the email server. In such cases, you
need not configure the Email Consumer.
If the email server is not on the local system, you must configure the
Email Consumer.
To configure the Email Consumer, complete the following steps:
Step 1. Open the /opt/sfm/conf/evweb.conf file on the system.
Step 2. Change the IP address, FULLNAME, and the FROMADDR (From Address) of
the host and save the file.
The IP address is the address of the email server. The FULLNAME refers
to the complete name of the email server. The FROMADDR refers to your
email address.
Chapter 476
Page 77

Administering Indications and Instances Using HP SMH
Administering Indications Using EVWEB
Following is a sample evweb.conf file with IP address, FULLNAME, and
the FROMADDR configured:
<EVWEB>
<CONSUMER>
<EMAILCONSUMER>
<EMAILSERVER>
<IP>
127.0.0.1
</IP>
<FULLNAME>
localhost
</FULLNAME>
</EMAILSERVER>
<FROMADDR>
evweb@hp.com
</FROMADDR>
</EMAILCONSUMER>
</CONSUMER>
</EVWEB>
Creating EVWEB Event Subscriptions
You can create event subscriptions for the WBEM indications you are
interested in monitoring. You can create the following types of event
subscriptions using EVWEB:
• Admin-Defined event subscriptions – Event Subscriptions created
using the fmdcontrol command are called Admin-Defined event
subscriptions. You can modify and delete Admin-Defined event
subscriptions using the fmdcontrol command. You cannot use the
evweb_list, evweb_subscribe, or the evweb_eventviewer
command to create and delete Admin-Defined event subscriptions.
For more information on the fmdcontrol command, see
“Configuring Indication Filters” on page 40.
Chapter 4 77
Page 78

Administering Indications and Instances Using HP SMH
Administering Indications Using EVWEB
• Event subscriptions created using the HP SMH GUI (Event
Subscription Administration) – You can create these event
subscriptions using the GUI or the CLI. You can modify and delete
the event subscriptions that are created using Event Subscription
Administration.
To create an event subscription using Event Subscription
Administration, you must specify the following:
— A unique name for the event subscription
— Criteria such as device, event ID, and the severity of the event
— The location where the event must be stored
You can create an event subscription using the following methods:
• Create a completely new event subscription.
• Copy an existing event subscription and modify it.
Creating an Event Subscription Using the GUI
To create a new event subscription, complete the following steps:
Step 1. Log in to the System Management Homepage.
To log in to HP SMH, enter http://<hostname>: 2301 in the address
bar of a Web browser. The HP SMH login screen is displayed.
Step 2. Enter your user name and password in the appropriate text boxes.
Step 3. Click Sign In on the login screen.
The HP SMH home page is displayed.
Step 4. Select Tools on the main menu.
The Tools page is displayed. This page displays the applications that are
plugged into HP SMH.
Step 5. Select Subscription Administration in the Evweb box.
The Event Subscription Administration page is displayed.
Step 6. Select Create subscription in the action pane on the top right corner of
the page.
The Create Subscription page is displayed.
Chapter 478
Page 79

Administering Indications and Instances Using HP SMH
Administering Indications Using EVWEB
Step 7. Enter appropriate information in the fields present in the Create
Subscription page.
Step 8. Select Create.
EVWEB creates the event subscription and displays a confirmation
message.
Step 9. Click OK on the confirmation message window.
For more information on creating subscription using the HP SMH GUI,
select Help on the action pane of the Create Subscription page.
Creating Event Subscription Using the CLI
To create an event subscription using CLI, enter the following command
at the HP-UX prompt:
# evweb subscribe -C -n <subscription name> -v <comma
separated event category names>
Where:
-C is an option used to create event subscriptions.
-n is a switch used to specify a name for an event.
-v is a switch used to specify the category of an event.
A message stating that the execution of the evweb subscribe command
was successful is displayed on the screen.
NOTE The -n and the -v switches are mandatory.
You can also use the following switches with the -C option:
• (-e [eq\ne\le\ge\bw] [:] <severity level1>[,<severity
level2>])
• (-v <comma separated event category names>)
• (-i <comma separated EventID>)
• (-t (archive\email) [<handler properties>])
• -r
Chapter 4 79
Page 80

Administering Indications and Instances Using HP SMH
Administering Indications Using EVWEB
For more information on creating event subscriptions using CLI, see
evweb_subscribe (1).
Copying and Creating a New Event Subscription Using the GUI
To create a new event subscription by copying an existing event
subscription, complete the following steps:
Step 1. Log in to the System Management Homepage.
To log in to HP SMH, enter http://<hostname>: 2301 in the address
bar of a Web browser. The HP SMH login screen is displayed.
Step 2. Enter your user name and password in the appropriate text boxes.
Step 3. Click Sign In on the login screen.
The HP SMH home page is displayed.
Step 4. Select Tools on the main menu.
The Tools page is displayed. This page displays the applications that are
plugged into HP SMH.
Step 5. Select Subscription Administration in the Evweb box.
The Event Subscription Administration page is displayed.
Step 6. Select the event subscription you want to copy, from the event
subscription table.
Step 7. Select Copy and create subscription in the action pane on the top
right corner of the page.
The Copy and create subscription page is displayed.
Step 8. Modify the required fields.
IMPORTANT The subscription criteria is not copied when you
copy an HP-Advised event subscription. Therefore,
ensure that you specify the subscription criteria in
the Copy and Create Subscription page.
Step 9. Select Create.
Chapter 480
Page 81

Administering Indications and Instances Using HP SMH
Administering Indications Using EVWEB
EVWEB creates the event subscription and displays a confirmation
message.
Step 10. Click OK on the confirmation message window.
For more information on creating an event subscription by copying an
existing event subscription using the GUI, select Help on the action
pane of the Copy and Create Subscription page.
Modifying EVWEB Event Subscriptions
You can modify an event subscription by modifying the criteria and
location. However, the fields that you are allowed to modify depend on
the type of event subscription you select.
NOTE The HP-Known event subscriptions are classified as HP-Advised and
Admin-Defined.
In HP-Advised event subscriptions, you can change only the event
archive location.
In Admin-Defined event subscriptions, you can change both event
archive and email addresses.
In event subscriptions created through EVWEB, you can change all
criteria except the subscription name.
You can modify an event subscription in the following ways:
• Modify a single event subscription.
You can modify a single event subscription using the modify feature
by selecting the event subscription from the event subscription table.
• Modify similar criteria in multiple event subscriptions.
You can modify similar criteria in multiple event subscriptions by
using the Copy and Modify subscription feature.
Modifying an Event Subscription Using the GUI
To modify an event subscription, complete the following steps:
Step 1. Log in to the System Management Homepage.
Chapter 4 81
Page 82

Administering Indications and Instances Using HP SMH
Administering Indications Using EVWEB
To log in to HP SMH, enter http://<hostname>: 2301 in the address
bar of a Web browser. The HP SMH login screen is displayed.
Step 2. Enter your user name and password in the appropriate text boxes.
Step 3. Click Sign In on the login screen.
The HP SMH home page is displayed.
Step 4. Select Tools on the main menu.
The Tools page is displayed. This page displays the applications that are
plugged into HP SMH.
Step 5. Select Subscription Administration in the Evweb box.
The Event Subscription Administration page is displayed.
Step 6. Select Modify subscription in the action pane on the top right corner of
the page.
The Modify subscription page is displayed.
Step 7. Modify the required fields.
Step 8. Select Modify.
EVWEB modifies the event subscription and displays a confirmation
message.
Step 9. Click OK on the confirmation message window.
For more information on modifying an event subscription using the HP
SMH GUI, select Help on the action pane of the Modify Event
Subscription page.
Modifying an Event Subscription Using the CLI
To modify an event subscription using CLI, enter the following command
at the HP-UX prompt:
# evweb subscribe -M -n <subscription name> -v <comma
separated event category names> -t <E-mail address>
Where:
-M is an option used to modify event subscriptions.
-n is a switch used to specify a name for an event.
Chapter 482
Page 83

Administering Indications and Instances Using HP SMH
Administering Indications Using EVWEB
-v is a switch used to specify the category of an event.
-t is a switch used to specify the location (email address
or Event Archive) to store an event.
A message stating that the execution of the evweb subscribe command
was successful is displayed on the screen.
NOTE The -n and the -v switches are mandatory.
You can also use the following switches with the -M option:
• (-e [eq\ne\le\ge\bw] [:] <severity level1>[,<severity
level2>])
• (-v <comma separated event category names>)
• (-i <comma separated EventID>)
• (-t (archive\email) [<handler properties>])
• -r
To modify an event subscription, you must specify the criteria and the
location. Following are the ways in which you can modify an event
subscription:
• If you do not specify the -r option and the location, the current
location is retained and the subscription criteria are updated.
• If you specify the -r option but not the location, the current location
is removed and only the subscription criteria is updated.
• If you specify both subscription criteria and location, both of them
are updated.
• If you specify the location but not the criteria, the location is updated
but the original criteria is retained.
For more information on creating event subscriptions using the CLI, see
evweb_subscribe (1).
Copying and Modifying an Event Subscription Using the GUI
To modify an event subscription by copying an existing event
subscription, complete the following steps:
Chapter 4 83
Page 84

Administering Indications and Instances Using HP SMH
Administering Indications Using EVWEB
Step 1. Log in to the System Management Homepage.
To log in to HP SMH, enter http://<hostname>: 2301 in the address
bar of a Web browser. The HP SMH login screen is displayed.
Step 2. Enter your user name and password in the appropriate text boxes.
Step 3. Click Sign In on the login screen.
The HP SMH home page is displayed.
Step 4. Select Tools on the main menu.
The Tools page is displayed. This page displays the applications that are
plugged into HP SMH.
Step 5. Select Subscription Administration in the Evweb box.
The Event Subscription Administration page is displayed.
Step 6. Select the event subscriptions you want to modify by selecting the
respective check boxes.
Step 7. Select Copy and modify subscription in the action pane on the top
right corner of the page.
The Copy and modify subscription page is displayed.
Step 8. Modify the required fields.
Step 9. Select Create.
EVWEB modifies the event subscriptions and displays a confirmation
message.
Step 10. Click OK on the confirmation message window.
IMPORTANT The subscription criteria is not copied when you copy an HP-Advised
event subscription. Therefore, make sure that you specify the
subscription criteria in the Copy and modify subscription page.
For more information on copying and modifying an event subscription
using the HP SMH GUI, select Help on the action pane of the Copy and
Modify Event Subscription page.
Chapter 484
Page 85

Administering Indications and Instances Using HP SMH
Administering Indications Using EVWEB
Deleting EVWEB Event Subscriptions
You must periodically delete event subscriptions that are not required.
You can delete a single event subscription or multiple event
subscriptions at a time.
Deleting an Event Subscription Using the GUI
To delete an event subscription, complete the following steps:
Step 1. Log on to the System Management Homepage.
To log in to HP SMH, enter http://<hostname>: 2301 in the address
bar of a Web browser. The HP SMH login screen is displayed.
Step 2. Enter your user name and password in the appropriate text boxes.
Step 3. Click Sign In on the login screen.
The HP SMH home page is displayed.
Step 4. Select Tools on the main menu.
The Tools page is displayed. This page displays the applications that are
plugged into HP SMH.
Step 5. Select Subscription Administration in the Evweb box.
The Event Subscription Administration page is displayed.
Step 6. Select Delete subscription in the action pane on the top right corner of
the page.
The Delete subscriptions page is displayed.
Step 7. Select the event subscriptions you want to delete, by selecting the
appropriate check boxes.
Step 8. Select Delete.
The event subscriptions are deleted and a confirmation message is
displayed.
Step 9. Click OK on the confirmation message window.
Chapter 4 85
Page 86

Administering Indications and Instances Using HP SMH
Administering Indications Using EVWEB
NOTE You cannot delete HP-Advised event subscriptions and Admin-Defined
event subscriptions.
For more information on deleting an event subscription using the HP
SMH GUI, select Help on the action pane of the Delete Event
Subscription page.
NOTE HP recommends deleting all unwanted event subscriptions. Retaining a
large number of event subscriptions may increase the size of the archive,
and may affect the tasks you perform using Event Subscriptions
Administration.
Deleting an Event Subscription Using the CLI
To delete an event subscription using the CLI, enter the following
command at the HP-UX prompt:
# evweb subscribe -D -f -n <subscription name>
NOTE The -n switch is mandatory.
Where:
-D is an option used to delete event subscriptions.
-n is a switch used to specify a name for an event.
-f is a switch used to force the command. This switch can
be used only with the -D option. If the -f switch is not
used, EVWEB prompts for a confirmation before
deleting an event subscription.
A message stating that the execution of the evweb subscribe command
was successful is displayed on the screen.
For more information on deleting event subscriptions using the CLI, see
evweb_subscribe (1).
Chapter 486
Page 87

Administering Indications and Instances Using HP SMH
Viewing Event Subscriptions
Viewing Event Subscriptions
This section describes how to perform non-administration tasks, such as
viewing event subscriptions.
This section discusses the following topics:
• “Overview” on page 87
• “Viewing EVWEB Event Subscriptions” on page 88
• “Viewing External Event Subscriptions” on page 90
Overview
You can view HP-Known event subscriptions and event subscriptions
that are created using EVWEB. You can also view event subscriptions
that are created using tools other than EVWEB. The event subscriptions
that are created using tools other than EVWEB are referred to as
external subscriptions.
HP provides some event subscriptions with EVWEB. These event
subscriptions are known as HP-Advised event subscriptions and are
stored by default in the Event Archive.
You can view summary of event subscriptions in the Event Subscription
Administration page. You can view details of an event subscription by
selecting the subscription in the summary table.
The main page of Event Subscription Administration displays the
summary of the event subscriptions.
The information in the event subscription table is listed in alphabetical
order of the subscription name. You can, however, sort by any of the
column headings. To sort the event subscriptions by a column heading,
select the heading.
Chapter 4 87
Page 88

Administering Indications and Instances Using HP SMH
Viewing Event Subscriptions
Viewing EVWEB Event Subscriptions
Viewing a Summary of the EVWEB Event Subscriptions Using the GUI
To view summary of the event subscriptions, complete the following
steps:
Step 1. Log in to the System Management Homepage.
To log in to HP SMH, enter http://<hostname>: 2301 in the address
bar of a Web browser. The HP SMH login screen is displayed.
Step 2. Enter your user name and password in the appropriate text boxes.
Step 3. Click Sign In on the login screen.
The HP SMH home page is displayed.
Step 4. Select Tools on the main menu.
The Tools page is displayed. This page displays the applications that are
plugged into HP SMH.
Step 5. Select Subscription Administration in the Evweb box to open the
Event Subscription Administration page.
The Event Subscription Administration page displays summary of the
the event subscriptions.
For more information on viewing the summary of an EVWEB event
subscription using the HP SMH GUI, select Help on the action pane of
the Event Subscription page.
Viewing a Summary of the EVWEB Event Subscriptions Using the CLI
To view the summary of an EVWEB event subscription using the CLI,
enter the following command at the HP-UX prompt:
# evweb subscribe -L -b internal
Where:
-L is an option used to list all the event subscriptions.
-b is a switch used to display information about event
subscriptions in brief.
Chapter 488
Page 89

Administering Indications and Instances Using HP SMH
Viewing Event Subscriptions
internal is an argument used to display information about
HP-Known event subscriptions and event subscriptions
created using EVWEB.
A summary of event subscriptions is displayed in a tabular format. For
information on various fields in the table, select Help on the Event
Subscription Administration page on GUI.
For information on viewing the summary of EVWEB event subscriptions
using the CLI, see evweb_subscribe (1).
Viewing Details of an Event Subscription Using the GUI
To view details of an event subscription, complete the following steps:
Step 1. Log in to the System Management Homepage.
To log in to HP SMH, enter http://<hostname>: 2301 in the address
bar of a Web browser. The HP SMH login screen is displayed.
Step 2. Enter your user name and password in the appropriate text boxes.
Step 3. Click Sign In on the login screen.
The HP SMH home page is displayed.
Step 4. Select Tools on the main menu.
The Tools page is displayed. This page displays the applications that are
plugged into HP SMH.
Step 5. Select Subscription Administration in the Evweb box.
The Event Subscription Administration page is displayed.
The Event Subscription Administration page displays the event
subscription table.
Step 6. Select the event subscription from the event subscription table.
The details of the event subscription appear at the end of the event
subscription table.
For more information on viewing the details of an EVWEB event
subscription using the HP SMH GUI, select Help on the action pane of
the Event Subscription page.
Chapter 4 89
Page 90

Administering Indications and Instances Using HP SMH
Viewing Event Subscriptions
Viewing Details of an Event Subscription Using the CLI
To view the details of an EVWEB event subscription using CLI, enter the
following command at the HP-UX prompt:
# evweb subscribe -E -n <subscription name>
Where:
-E is an option used to display details of an event
subscription.
-n is a switch used to specify the name of an event
subscription.
At the HP-UX command prompt, a table with detailed information about
event subscriptions is displayed. For more information, select Help on
the Event Subscription Administration page on GUI.
Viewing External Event Subscriptions
Event subscriptions created by tools and interfaces other than EVWEB
are called external event subscriptions. This section describes how to
view external event subscriptions using EVWEB.
Viewing External Event Subscriptions Using the GUI
To view external event subscriptions, complete the following steps:
Step 1. Log in to the System Management Homepage.
To log in to HP SMH, enter http://<hostname>: 2301 in the address
bar of a Web browser. The HP SMH login screen is displayed.
Step 2. Enter your user name and password in the appropriate text boxes.
Step 3. Click Sign In on the login screen.
The HP SMH home page is displayed.
Step 4. Select Tools on the main menu.
The Tools page is displayed. This page displays the applications that are
plugged into HP SMH.
Step 5. Select Subscription Administration in the Evweb box.
The Event Subscription Administration page is displayed.
Chapter 490
Page 91

Administering Indications and Instances Using HP SMH
Viewing Event Subscriptions
Step 6. Select View external subscription in the action pane on the top right
corner of the page.
The View external subscriptions page is displayed.
For more information on viewing external event subscription using the
HP SMH GUI, select Help on the action pane of the View External
Event Subscription page.
Viewing External Event Subscriptions Using the CLI
To view the summary of an EVWEB event subscription using CLI, enter
the following command at the HP-UX prompt:
# evweb subscribe -L -b external
Where:
-L is an option used to list all the event subscriptions.
-b is a switch used to display information about event
subscriptions in brief.
external is an argument used to display information about
external event subscriptions.
A list of event subscriptions is displayed in a tabular format. For
information on various fields in the table, select Help on the View
External Subscription page on the HP SMH GUI.
For information on viewing external subscriptions using the CLI, see
evweb_subscribe (1).
Chapter 4 91
Page 92

Administering Indications and Instances Using HP SMH
Viewing Indications
Viewing Indications
This section describes how to perform non-administration tasks related
to viewing WBEM indications using EVWEB.
This section discusses the following topics:
• “Launching EVWEB for Viewing WBEM Indications” on page 92
• “Searching WBEM Events” on page 93
• “Viewing Summary Information About WBEM Events” on page 95
• “Viewing Detailed Information About WBEM Events” on page 96
• “Deleting WBEM Events from the Event Archive” on page 97
NOTE EVWEB enables both administrators and non-administrators to search
and view WBEM events. However, only administrators can delete
WBEM events.
Launching EVWEB for Viewing WBEM Indications
You can launch EVWEB either through the CLI or the GUI.
To Launch EVWEB using the CLI, enter the following command at the
HP-UX prompt:
# /opt/sfm/bin/evweb <eventviewer|list>
NOTE To avoid the use of the absolute path for the command, you must add
/opt/sfm/bin to the PATH variable in the .profile file. Alternatively,
you can enter the following command at the HP-UX prompt:
# export PATH=$PATH:/opt/sfm/bin
To Launch EVWEB for viewing event subscriptions using the HP SMH
GUI, complete the following steps:
Step 1. Log in to the System Management Homepage.
Chapter 492
Page 93

Administering Indications and Instances Using HP SMH
Viewing Indications
To log in to HP SMH, enter http://<hostname>: 2301 in the address bar of
the Web browser. The HP SMH login screen is displayed.
Step 2. Enter your user name and password in the appropriate text boxes.
Step 3. Click Sign In on the login screen.
The HP SMH home page is displayed.
Step 4. Select Logs in the main menu.
The Logs page is displayed. This page displays various applications that
are plugged into HP SMH.
Step 5. Select Event Viewer in Evweb.
The Event Viewer page is displayed.
You can view and delete WBEM indications using the Event Viewer.
Searching WBEM Events
You can search for WBEM events that are stored in the Event Archive
using either the GUI or the CLI.
Searching WBEM Events Using the GUI
The Event Viewer GUI provides quick search and advanced search
options to search for WBEM events.
To do a quick search of WBEM events, based on the severity of the event,
complete the following steps:
Step 1. Log on to the System Management Homepage.
To log in to HP SMH, enter http://<hostname>: 2301 in the address
bar of a Web browser. The HP SMH login screen is displayed.
Step 2. Select Logs on the main menu.
The Logs page is displayed.
Step 3. Enter your user name and password in the appropriate text boxes.
Step 4. Click Sign In on the login screen.
Chapter 4 93
Page 94

Administering Indications and Instances Using HP SMH
Viewing Indications
The HP SMH home page is displayed.
Step 5. Select Event Viewer in the Evweb box.
The List Events page is displayed.
Step 6. Select Critical to search for critical events.
Similarly, select Major, Minor, Warning, Information, Other,
Normal, or Unknown to search for the respective WBEM events.
Step 7. To view all events, select All Events.
For more information on performing a quick search of WBEM events
using the HP SMH GUI, select Help on the action pane of the List
Events page.
To do a quick search of WBEM events, based on the severity of the event,
complete the following steps:
Step 1. Log in to the System Management Homepage.
To log in to HP SMH, enter http://<hostname>: 2301 in the address
bar of a Web browser. The HP SMH login screen is displayed.
Step 2. Select Logs on the main menu.
The Logs page is displayed.
Step 3. Select Event Viewer in the Evweb boxes.
The List Events page is displayed.
Step 4. Select Advanced Search in the action pane on the top right corner of
the page.
The Search for events from event archive page is displayed.
Step 5. Enter appropriate criteria for searching the events you want to view. You
can select just one criterion or you can select a combination of criteria.
Step 6. Select Search.
The List Events page displays WBEM events, if found, for the search
criteria that you specified.
For more information on searching WBEM events using Advanced
Search from the HP SMH GUI, select Help on the action pane of the
Advanced Search page.
Chapter 494
Page 95

Administering Indications and Instances Using HP SMH
Viewing Indications
Searching WBEM Events Using the CLI
To search WBEM events using the CLI, enter the following command at
the HP-UX prompt:
# evweb eventviewer -L
Where:
-L is an option used to list all the WBEM event.
A list of WBEM events is displayed on the screen.
You can also use the following switches with the -L option:
• -e [eq\ne\le\ge\bw] [:] <severity level1>[,<severity
level2>]
• -v <comma separated event category names>
• -i <comma separated EventID>
• -r[is\be\en\co][:](<string to be searched>)
•-a(<number for age>(:)(yy\mm\dd\hh)
• -t[eq\le\ge\bw]
(<mm:dd:yyyy:hh:mi:ss>)[,<mm:dd:yyyy:hh:mi:ss>]
• -s[asc\desc] (<summary list column name>)
• -o(<offset number>) -c(<count of events>)
For information on searching WBEM events, using the CLI, see
evweb_eventviewer (1).
Viewing Summary Information About WBEM Events
You can view summary information about events stored in the Event
Archive database.
Viewing Summary Information Using the GUI
To view summary information about WBEM events, complete the
following steps:
Step 1. Log on to the System Management Homepage.
To log in to HP SMH, enter http://<hostname>: 2301 in the address
bar of a Web browser. The HP SMH login screen is displayed.
Chapter 4 95
Page 96

Administering Indications and Instances Using HP SMH
Viewing Indications
Step 2. Enter your user name and password in the appropriate text boxes.
Step 3. Click Sign In on the login screen.
The HP SMH home page is displayed.
Step 4. Select Logs on the main menu.
The Logs page is displayed.
Step 5. Select Event Viewer in the Evweb box.
The List Events page is displayed. The List Event tables displays
summary information about WBEM events that are stored in the event
archive.
For more information on viewing summary information of WBEM events
using GUI, select Help on the action pane of the List Events page.
Viewing Summary Information Using the CLI
To search WBEM events using the CLI, enter the following command at
the HP-UX prompt:
# evweb eventviewer -L
Where:
-L is an option used to list all the WBEM events.
A list of WBEM events is displayed on the screen.
Viewing Detailed Information About WBEM Events
You can view the details of an WBEM event using EVWEB. The details of
an event appear at the end of the List Events table only when you select
an event from the List Events table.
Viewing Detailed Information Using the GUI
To view detailed information about WBEM events, complete the
following steps:
Step 1. Log in to the System Management Homepage.
To log in to HP SMH, enter http://<hostname>: 2301 in the address
bar of a Web browser. The HP SMH login screen is displayed.
Chapter 496
Page 97

Administering Indications and Instances Using HP SMH
Viewing Indications
Step 2. Enter your user name and password in the appropriate text boxes.
Step 3. Click Sign In on the login screen.
The HP SMH home page is displayed.
Step 4. Select Logs on the main menu.
The Logs page is displayed.
Step 5. Select Event Viewer in the Evweb box.
The List Events page is displayed. The List Events table displays
summary information about WBEM events that are stored in the event
archive.
Step 6. Select the desired WBEM event in the List Events table.
The Details of the Event page is displayed. This includes a table that
details the WBEM events.
For information on viewing detailed information of WBEM events using
GUI, select Help on the action pane of the List Events page.
Viewing Detailed Information Using the CLI
To view detailed information on WBEM events using the CLI, enter the
following command at the HP-UX prompt:
# evweb eventviewer -E -n <event ID>
Where:
-L is an option used to list all the WBEM events.
-n is a switch used specify the event ID of the WBEM
event.
The screen displays detailed information about the WBEM events.
For information on viewing detailed information of WBEM events using
the CLI, see evweb_eventviewer (1).
Deleting WBEM Events from the Event Archive
You can delete a single event or multiple events at a time.
Chapter 4 97
Page 98

Administering Indications and Instances Using HP SMH
Viewing Indications
Deleting an Event Using the GUI
To delete an event, complete the following steps:
Step 1. Log on to the System Management Homepage.
To log in to HP SMH, enter http://<hostname>: 2301 in the address
bar of a Web browser. The HP SMH login screen is displayed.
Step 2. Enter your user name and password in the appropriate text boxes.
Step 3. Click Sign In on the login screen.
The HP SMH home page is displayed.
Step 4. Select Logs on the main menu.
The Logs page is displayed.
Step 5. Select Event Viewer in the Evweb box.
The List Events page is displayed.
Step 6. Select Delete Events in the action pane on the top right corner of the
page.
The Delete Events page is displayed.
Step 7. Select the event you want to delete by selecting the appropriate check
box.
Step 8. Select Delete.
EVWEB deletes the event from the event archive database and displays
a confirmation message.
Step 9. Click OK on the confirmation message window.
For information on deleting WBEM events using the HP SMH GUI,
select Help on the action pane of the Delete Events page.
Deleting an Event Using the CLI
To view detailed information on WBEM events using the CLI, enter the
following command at the HP-UX prompt:
# evweb eventviewer -D
Where:
Chapter 498
Page 99

Administering Indications and Instances Using HP SMH
Viewing Indications
-D is an option used to delete all the WBEM event.
You can also use the following switches with the -D option:
• -e [eq\ne\le\ge\bw] [:] <severity level1>[,<severity
level2>]
• -v <comma separated event category names>
• -i <comma separated EventID>
• -r[is\be\en\co][:](<string to be searched>)
• -a(<number for age>(:)(yy\mm\dd\hh)
• -t[eq\le\ge\bw]
(<mm:dd:yyyy:hh:mi:ss>)[,<mm:dd:yyyy:hh:mi:ss>]
• -s[asc\desc] (<summary list column name>)
• -f
• -n <comma separated Event Numbers>
For information on deleting WBEM events using the CLI, see
evweb_eventviewer (1).
Chapter 4 99
Page 100

Administering Indications and Instances Using HP SMH
Tracing EVWE B
Tracing EVWEB
This section provides an overview of tracing and information about the
various trace levels in EVWEB. This section also describes
administrative tasks, such as enabling, modifying, and disabling tracing.
This section discusses the following topics:
• “Overview” on page 100
• “Enabling Tracing Using EVWEB GUI” on page 103
• “Modifying Tracing Using EVWEB GUI” on page 104
• “Disabling Tracing Using EVWEB GUI” on page 105
Overview
Tracing is an error logging and reporting facility. You can use this facility
to log information about problems encountered while using EVWEB. All
information about errors is logged in sfm.log. The default location of the
sfm.log file is /opt/sfm/log/sfm.log.
You can send these log files to the HP support center whenever you
encounter a problem.
Following is a sample of the information logged in sfm.log.
01/04/06 06:50:08 EVMAN_COMMANDS ERROR 1069627450 1
Subscription with this name already exist, Please choose
different name and try again.
Table 4-1 describes the various fields included in the sfm.log file.
Table 4-1 Entries in sfm.log
Field Description
Date Displays the date when the
message was logged in the
sfm.log file.
Time Displays the time when the
message was logged in the
sfm.log file.
Chapter 4100
 Loading...