

Page 1

Distributed Systems Administration Utilities User's Guide
HP Part Number: T2786-90327
Published: March 2009
Edition: 1.5
Page 2

© Copyright 2009 Hewlett-Packard Development Company, L.P.
Legal Notices
Confidential computersoftware. Valid license from HP required for possession, use or copying. Consistent with FAR 12.211 and 12.212, Commercial
Computer Software, Computer Software Documentation, and Technical Data for Commercial Items are licensed to the U.S. Government under
vendor’s standard commercial license.
The informationcontained hereinis subject to change without notice. Theonly warranties for HP products and servicesare setforth inthe express
warranty statements accompanying such products and services. Nothing herein should be construed as constituting an additional warranty. HP
shall not be liable for technical or editorial errors or omissions contained herein.
HP-UX Release 10.20 and later and HP-UX Release 11.00 and later (in both 32-bit and 64-bit configurations) on all HP 9000 computers are Open
Group UNIX 95 branded products.
UNIX is a registered trademark of The Open Group.
Java is a U.S. trademark of Sun Microsystems, Inc.
Intel and Itanium are trademarks or registered trademarks of Intel Corporation or its subsidiaries in the United States and other countries.
Microsoft and Windows are U.S. registered trademarks of Microsoft Corporation.
Page 3

Table of Contents
About this Document..........................................................................................................7
Intended Audience.................................................................................................................................7
Typographic Conventions......................................................................................................................7
Related Information................................................................................................................................7
Publishing History..................................................................................................................................7
Product Support......................................................................................................................................8
HP Encourages Your Comments............................................................................................................8
1 Introduction......................................................................................................................9
1.1 Distributed Systems Administration Utilities Commands.............................................................10
1.2 Open Source Components...............................................................................................................11
1.3 Distributed Systems Administration Utilities Manual Pages.........................................................12
2 Configuration Synchronization....................................................................................13
2.1 cfengine Overview...........................................................................................................................13
2.1.1 cfengine Daemons and Commands........................................................................................14
2.2 cfengine Master Server Deployment Models..................................................................................15
2.3 Configuring cfengine.......................................................................................................................16
2.3.1 Using the Configuration Synchronization Wizard.................................................................16
2.3.1.1 Using the Wizard to Configure a Standalone Synchronization Server...........................17
2.3.1.2 Using the Wizard to Configure a Serviceguard Cluster Synchronization Server..........19
2.3.1.3 Cluster Configuration Notes for cfengine.......................................................................23
2.3.1.4 Serviceguard Automation Features................................................................................23
2.3.1.5 Using the Wizard to Configure a Synchronization Client..............................................25
2.3.2 Manual Configuration ............................................................................................................26
2.3.2.1 Manually Configuring a Standalone Synchronization Server........................................27
2.3.2.2 Manually Configuring a Serviceguard Cluster Synchronization Server........................29
2.3.2.3 Configuring a Synchronization Managed Client............................................................35
2.3.2.4 Choosing a Synchronization Invocation Method...........................................................36
2.4 Security Notes..................................................................................................................................36
2.4.1 Key Exchange..........................................................................................................................37
2.4.2 csync Network Port Usage......................................................................................................37
2.4.3 Encryption...............................................................................................................................37
2.4.4 Checksum Alerts.....................................................................................................................38
2.5 Disabling Use of cfengine................................................................................................................38
2.6 Logging Options..............................................................................................................................38
2.7 cfengine Troubleshooting................................................................................................................39
3 Consolidated Logging.................................................................................................41
3.1 Introduction to syslog.....................................................................................................................41
3.1.1 syslog Message Format...........................................................................................................41
3.1.2 Message Filtering....................................................................................................................42
3.2 Log Consolidation Overview..........................................................................................................42
3.2.1 Improved Log Consolidation .................................................................................................42
3.2.2 syslog Co-existence.................................................................................................................43
3.3 Log Consolidation Configuration...................................................................................................45
3.3.1 Using the Log Consolidation Wizard......................................................................................46
3.3.1.1 Configuring a Log Consolidation Standalone Server with clog_wizard........................46
Table of Contents 3
Page 4

3.3.1.2 Configuring a Serviceguard Cluster as a Log Consolidation Server with
clog_wizard................................................................................................................................49
3.3.1.3 Cluster Configuration Notes for clog..............................................................................52
3.3.1.4 Serviceguard Automation Features................................................................................52
3.3.1.5 Minimizing Message Loss During Failover....................................................................53
3.3.1.6 Configuring a Log Forwarding Client Using clog_wizard.............................................54
3.3.2 Manually Configuring Log Consolidation..............................................................................56
3.3.2.1 Manually Configuring a Standalone Log Consolidation Server.....................................56
3.3.2.2 Manually Configuring a Serviceguard Cluster as a Log Consolidation Server.............59
3.3.2.2.1 Creating the clog Package.......................................................................................63
3.3.2.2.2 Testing and Starting the clog Package.....................................................................65
3.3.2.2.3 Using VxVM Instead of LVM..................................................................................66
3.3.2.3 Manually Configuring Log Forwarding Clients.............................................................66
3.3.2.3.1 Manually Configuring a Standalone Log Forwarding Client.................................66
3.3.2.3.2 Manually Configuring a Serviceguard Cluster as a Log Forwarding Client..........68
3.3.2.3.3 Forwarding ASCII Log Data...................................................................................72
3.3.2.4 Consolidating Package Logs on the Log Consolidation Server......................................74
3.4 Disabling Log Consolidation...........................................................................................................75
3.4.1 Disabling a Standalone Log Consolidation System................................................................75
3.4.2 Disabling a Serviceguard Cluster Log Consolidation System................................................76
3.4.3 Disabling a Standalone Log Forwarding Client......................................................................76
3.4.4 Disabling a Serviceguard Cluster Log Forwarding Client......................................................77
3.5 Securing Consolidated Logs............................................................................................................78
3.5.1 Log File Protections.................................................................................................................78
3.5.2 ssh Port Forwarding................................................................................................................78
3.5.2.1 ssh Port Forwarding to a Serviceguard Cluster Log Consolidator.................................78
3.5.3 clog Network Port Usage........................................................................................................79
3.5.4 Using Bastille to Harden the System.......................................................................................79
3.6 Viewing System and Consolidated Logs.........................................................................................80
3.6.1 Starting System Management Homepage...............................................................................80
3.6.2 Using the System and Consolidated Log Viewer....................................................................80
4 Command Fanout.........................................................................................................83
4.1 Parallel Distributed Shell.................................................................................................................83
4.2 pdsh Utility Wrappers.....................................................................................................................84
4.3 Security Configuration....................................................................................................................85
4.3.1 Remote Shell Security Setup....................................................................................................85
4.3.2 ssh Security Setup....................................................................................................................85
4.3.3 Security Notes.........................................................................................................................85
4.4 Command Fanout Troubleshooting................................................................................................86
A HP-Supported Open Source pdsh Options...............................................................87
Index.................................................................................................................................89
4 Table of Contents
Page 5

List of Figures
2-1 cfengine Overview.........................................................................................................................15
3-1 syslog-ng Log-Forwarding Configuration....................................................................................44
3-2 syslog-ng Log Consolidator Configuration...................................................................................45
4-1 pdsh Architecture .........................................................................................................................84
5
Page 6

List of Tables
1 Conventions.....................................................................................................................................7
2 DSAU Publishing History...............................................................................................................7
1-1 Configuration Synchronization Command...................................................................................10
1-2 Consolidated Logging Commands...............................................................................................10
1-3 Command Fanout Commands......................................................................................................10
1-4 Utility Setup Command................................................................................................................11
1-5 Open Source cfengine Commands................................................................................................11
1-6 Open Source pdsh Commands......................................................................................................11
1-7 Open Source syslog-ng Command................................................................................................12
1-8 DSAU Manual Page Sections.........................................................................................................12
2-1 Configuration Data for csync_wizard...........................................................................................17
3-1 syslog Priority Levels....................................................................................................................41
3-2 syslog Facilities Messages.............................................................................................................41
3-3 Configuration Data for clog_wizard.............................................................................................46
4-1 ssh Command Messages..............................................................................................................86
4-2 rsh Command Messages..............................................................................................................86
4-3 Target Node Error Messages.........................................................................................................86
6 List of Tables
Page 7

About this Document
Distributed SystemsAdministration Utilities provide tools to simplify the management of groups
of systemsand of Serviceguard clusters. This document provides informationon each component
tool in separate chapters.
Intended Audience
This document is written for system administrators to assist them in learning about Distributed
Systems Administration Utilities and how to use them.
Typographic Conventions
Table 1 Conventions
Title of a book or other document.Book Title
command
user input
computer output
Enter
value
find(1)
Related Information
The following documents will also be useful in extending your knowledge of Distributed Systems
Administration Utilities (DSAU).
• DSAU manpages
• DSAU GUI online help
• DSAU Release Notes
Command name or qualified command phrase.
Commands and other text that you type.
Text displayed by the computer.
The name of a keyboard key. Note that Return and Enter both refer to the same
key. A sequence such as Ctrl+A indicates that you must hold down the key
labeled Ctrl while pressing the A key.
The name of an environment variable, for example PATH or errno.variable
A value that you replace in a command or function, or information in a display
that represents several possible values.
Manual page (manpage). In this example, “find” is the manpage name and “1”
is the manpage section.
Publishing History
Table 2 DSAU Publishing History
Publication DateDocument EditionDSAU VersionManufacturing Part Number
March 20091.52.4T2786-90327
September 20081.42.2T2786-90291
March 20081.32.0T2786-90265
September 20071.21.5T2786-90137
February 20071.11.2/1.3T2786-90090
September 20061.01.2/1.3T2786-90003
Intended Audience 7
Page 8

For specific versions of HP-UX , Serviceguard, and open source components, see the Distributed
Systems Administration Utilities V2.4 Release Notes for HP-UX 11i v3 March 2009 available on the
HP Technical Documentation web site at http://www.docs.hp.com.
Product Support
For product support, contact your HP Support Representative, your HP Services Representative,
or your authorized HP reseller. For more information about support services, see the HP Support
web site at http://www.hp.com/go/support.
HP Encourages Your Comments
HP encourages your comments concerning this document. We are truly committed to providing
documentation that meets your needs. Please submit comments to:
http://docs.hp.com/assistance/feedback.html
Please include the following information:
• Document title (Distributed Systems Administration Utilities User’s Guide )
• Manufacturing part number (T2786-90327)
• Any comment, error found, or suggestion for improvement you have concerning this
document.
8
Page 9

1 Introduction
The Distributed Systems Administration Utilities provide several tools for simplifying the
management of groups of systems and of Serviceguard clusters.
There are three utilities:
• Configuration Synchronization: - with this utility, based on the open source tool cfengine
or “configuration engine,” the administrator can centrally define management actions to be
applied to a set of managed systems. cfengine is a client/server based tool. The central
configuration master system hosts the configuration description file that defines the
management actions to be performed on each managed client. The configuration master
also hosts the “golden image” files, which are master copies of files that are distributed to
the clients. The administrator can use cfengine to perform tasks such as:
— Ensure that client systems are using a correct set of configuration files
— Disable inappropriately configured files on the client
— Check file permissions, ownership, and track checksum changes
— Perform edits to files
— Execute arbitrary shell commands on each client
— Check for processes, signal processes
A Configuration Synchronization Wizard is available to help the administrator quickly
configure cfengine for managing a set of distributed systems or configuring it as a highly
available service in a Serviceguard cluster. This wizard is described in Chapter 2:
“Configuration Synchronization” (page 13). For additional information, see the cfengine
and csync_wizard manpages.
• Consolidated Logging: standard UNIX syslogd offers UDP-based log forwarding to a
central log consolidator today. The DSAU utilities provide the open source tool syslog-ng
or “syslog next-generation.” syslog-ng offers additional features that make it a powerful
tool for log forwarding, log centralization and log consolidation.
The Configuration Synchronization Wizard helps to configure syslog-ng on a log
consolidation server and log forwarding clients. Centralized log consolidation offers the
following benefits:
— Easier log file analysis
A centralized log provides a single location for the administrator to perform log file
analysis. It offers a single view of events that impact multiple systems.
The DSAU utilities are specifically designed to optimize this method for managing a
Serviceguard cluster. Member syslogs and package logs can be centralized for simpler
log file access and analysis. DSAU utilities also allow the cluster to offer a highly available
consolidated logging service.
— Increased security
A security breach might compromise the local logs but not the centralized copy.
— Simplified archiving of logs
It is usually simpler to archive a set of centralized logs rather than per-system logs.
This wizard is described in Chapter 3: “Consolidated Logging” (page 41). For additional
information, refer to the clog_wizard and syslog-ng manpages.
• Command fanout is based on the open source tool Parallel Distributed Shell (pdsh). pdsh
enables the administrator to execute shell commands in parallel across a set of systems. It
can use remsh or ssh as the network transports. The csshsetup tool is provided to simplify
the distribution of ssh keys. The companion utility Parallel Distributed Copy (pdcp) enables
9
Page 10
file and directory copies to be performed in parallel to a set of remote systems. The dshbak
filter allows the output from multiple systems to be formatted and consolidated for better
on-screen presentation.
The cexec, ccp, ckill, cps, and cuptime tools are wrappers around the pdsh and
pdcp commands optimized for use in a Serviceguard cluster. They default to executing
commands cluster-wide. These wrappers do the following:
— cexec - Like pdsh but with additional reporting and retry features
— ccp - Copies files cluster-wide
— ckill - Kills the named process cluster-wide or on the specified systems
— cps - Issues a ps command cluster-wide or on the specified systems
— cuptime - Runs the uptime command cluster-wide
These commands can also be used outside a cluster, but like pdsh and pdcp, the user must
specify a list of target hosts. The cexec command operates like pdsh and adds reporting
capabilities. Saved reports can be used to reissue previous commands and target only those
systems where the command originally failed, originally succeeded, or both. Command
fanout is more fully described in Chapter 4: “Command Fanout” (page 83).
IMPORTANT: On HP-UX 11i v3 Integrity systems, pdsh requires an additional software,
LibcExt, to make use of the functions that are not shipped with the standard Library Routines,
libc in HP-UX 11i v3. LibcExt contains setegid() and seteuid() POSIX APIs, which the
pdsh tool requires to function properly.
LibcExt forms part of the Portability Package (Product # PortPkg) depot. You can download
Portability Package from the HP Software Depot web site at www.software.hp.com
The next section describes the commands provided with each DSAU component.
1.1 Distributed Systems Administration Utilities Commands
Table 1-1 Configuration Synchronization Command
When to Use itWhat it DoesCommand
csync_wizard
Table 1-2 Consolidated Logging Commands
clog
clog_wizard
clients.
Table 1-3 Command Fanout Commands
ccp
Copies files to multiple hosts in parallel.
In a Serviceguard cluster, copies files
cluster-wide.
When setting up the configuration master.Helps set up the cfengine environment.
When to Use itWhat it DoesCommand
To examine log files.Displays log files.
When setting up log consolidation.Helps set up log consolidation servers and
When to Use itWhat it DoesCommand
To perform on-demand synchronization of
files across a set of systems or a
Serviceguard cluster.
cexec
ckill
10 Introduction
Issues commands to multiple hosts in
parallel. In a Serviceguard cluster, issues
command cluster-wide.
Distributes a kill command to multiple
hosts in parallel. In a Serviceguard cluster,
issues command cluster-wide by default.
Toexecute anon-interactive shellcommand
across a set of systems or cluster. To
consolidate identical output, pipe the
output to dshbak -c.
To send a signal to a named process across
multiple systems or a cluster.
Page 11

Table 1-3 Command Fanout Commands (continued)
When to Use itWhat it DoesCommand
cps
cuptime
cwall
Distributes aps(1) command tomultiple
hosts in parallel. In a Serviceguard cluster,
issues command cluster-wide by default.
Reports uptime(1) information for
multiple systems. In a Serviceguard
cluster, issues command cluster-wide by
default.
Displays a wall(1M) broadcast message
on multiple hosts. In a Serviceguard
cluster, issues command cluster-wide by
default.
Table 1-4 Utility Setup Command
csshsetup
For the current user, performs a secure
shell (ssh) public key distribution to
multiple systems.
Tocollect processinformation from groups
of systems simultaneously.
To check uptime, users, and load averages.
To broadcast a message to all logged-in
users across a group of systems.
When to Use itWhat it DoesCommand
To greatly simplify ssh key distribution.
pdsh and the command fanout
(cexec-related) commands all rely on a
proper ssh key distribution. The
csync_wizard requires ssh access to
managed clients. For example, in a
Serviceguard cluster, this allows ssh access
from any member to any other member, so
pdsh and cexec can be used from any
cluster member.
1.2 Open Source Components
The open source components and their commands are described in the following table. These
open source components used by DSAU are based on the high level cfengine language. For
additional information on cfengine, see the cfengine manpage; for the individual commands,
see theirrespective manpages and open source documentation at /opt/dsau/doc. For supported
open source options, refer Appendix A (page 87) HP-Supported Open Source pdsh Options.
Table 1-5 Open Source cfengine Commands
What it DoesCommand
cfagent
cfexecd
cfkey
cfservd
Table 1-6 Open Source pdsh Commands
System configuration agent that performs the configuration actions defined in a
configuration policy file.
A scheduling and report service. This is an optional component.
Security key generation tool. cfkey is run once on every host to create a
public/private key pair.
Tool to activate a remote cfagent.cfrun
A file server and remote activation service.
What it DoesCommand
dshbak
pdcp
pdsh
Formats outputfrom pdshcommands; consolidatesidentical output from multiple
hosts.
Tool to make file and directory copies in parallel to a set of remote systems.
Tool to execute shell commands in parallel across a set of systems.
1.2 Open Source Components 11
Page 12

Table 1-7 Open Source syslog-ng Command
What it DoesCommand
syslog-ng
Tool that performs consolidated logging.
1.3 Distributed Systems Administration Utilities Manual Pages
In addition to the open source manual pages (man pages) for DSAU’s open source components,
DSAU also provides the following manual pages:
Table 1-8 DSAU Manual Page Sections
SectionManpage
ccp
cexec
ckill
clog
clog_wizard
cps
csshsetup
csync_wizard
cuptime
1
1
1
1m
1
1
1m
1
cwall
1m
12 Introduction
Page 13

2 Configuration Synchronization
Managing the configuration and configuration drift of a set of distributed systems is a constant
challenge for systemadministrators. There are a variety of tools availableto help manage various
aspects of multi-system configuration management. For example, for account management,
standard solutions include the Network Information System (NIS) and Lightweight Directory
Access Protocol (LDAP). For file level synchronization, tools like rdist (see the rdist(1) manpage)
and rsync are available. HP Systems Insight Manager helps to discover, monitor and manage
groups of systems.
A new tool in this toolkit is Configuration Engine (cfengine). cfengine is a popular open source
tool for configuration synchronization. It allows policy-based or goal-based configuration
management that allows the administrator to define the management actions to be applied to
groups of systems so those systems reach a desired state.
cfengine is a client/server based tool. A central configuration master system or policy server hosts
a configuration policy file which defines the management actions to be performed on each
managed client. The configuration master also hosts the“golden image” files, or reference copies
of files that should be distributed to the clients. The administrator can use cfengine to perform
tasks such as:
• Ensure that client systems are using a correct set of configuration files by copying over
reference files or directories.
• Disable inappropriately configured files on the client.
• Check file permissions, ownership, and track checksum changes.
• Edit files.
• Execute specified shell commands on each client.
• Check for processes or signal processes.
• Check for specific filesystem mounts.
A Configuration Synchronization Wizard (csync_wizard) is available to help the administrator
quickly configure cfengine for managing a set of distributed systems or configuring it as a highly
available service in a Serviceguard cluster.
2.1 cfengine Overview
The administrator starts by defining a central system or Serviceguard cluster to act as the master
configuration server or policy server. The Configuration Synchronization Wizard (csync_wizard)
is a user-friendly front-end to the initial configuration process. This central system will house
the master policy files (for example, cfagent.conf) which define the desired configuration
policies, and also reference copies or master copies of files that should be distributed to the
managed clients.
Each managed client copies down the master copies of the policy files from the central
configuration server and evaluates its current state versus the desired state defined by the policy
file. Any differences cause configurations rules to run in order to resynchronize the client. The
administrator can initiate synchronization operations on the managed clients in two ways, using
either a push or a pull operation.
• Using the cfrun command (see the cfrun(1) manpage for more information) from the master
configuration server, the administratorcan push changes. cfrun reads the file cfrun.hosts
to determine the list of managed clients. It then invokes the cfagent command on each
managed client to perform a synchronization run. Thus, push operations are really requests
to the managed clients to perform an immediate pull.
• Pull operations are performed using cron or cfengine’s own cron-like cfexecd daemon.
Either technique invokes the cfagent command at fixed intervals in order to perform
client-initiated configuration synchronization. The administrator defines what interval is
2.1 cfengine Overview 13
Page 14

appropriate for each group of managed clients. For example, every five minutes, once an
hour, or once a day. The administrator can also invoke cfagent directly for on-demand
synchronization runs.
2.1.1 cfengine Daemons and Commands
cfengine employs several daemons and commands to perform configuration synchronization
operations. The following list describes the primary cfengine components.
• cfagent -- the cfagent command is cfengine’s workhorse. It runs on each managed client,
and bootstraps itself using the file update.conf, which describes the set of files to transfer
from the master server to the local managed client. The files transferred include the main
policy file, cfagent.conf, and any related policy files. In the DSAU implementation,
cfagent.conf imports the file cf.main which has examples of many cfengine features.
After the configuration files are transferred, cfagent evaluates the configuration instructions
in these files. If the client system’s current configuration deviates from the desired
configuration, cfagent executes the defined actions to return the client to the proper state.
• cfservd -- cfservd daemon has two roles:
— cfservd runs on the master configuration server and is the clearinghouse for file
transfer requests from the managed clients. cfagent on the managed clients contacts
the master server’s cfservd and requests copies of the master policy files and copies
of any reference files that are needed as part of the defined configuration synchronization
operations. The master cfservd is responsible for authenticating remote clients using
a public/private key exchange mechanism and optionally encrypting the files that are
transferred to the managed clients.
— cfservd can optionally run on each managed client in order to process cfrun requests.
cfrun allows the administrator to push changes to the managed clients instead of waiting
for the clients to synchronize using some client-defined time interval. The cfrun
command must be initiated from the master configuration server. It contacts each
managed client listed in the cfrun.hostsfiles and connects to the managed client’s
cfservd asking it to invoke cfagent to perform the synchronization work.
cfservd is configured using cfservd.conf and started using /sbin/init.d/
cfservd.
• cfexecd -- cfexecd is a scheduling and reporting tool. If the administrator uses cron to
perform synchronization runs at fixed intervals, cfexecd is the command placed in the
crontab file to wrap the invocation of cfagent. It stores the output of the cfagent run
in the outputs directory (see cfagent.conf for details) and optionally sends email.
cfexecd has it’s own cron-like features based on cfengine’s time classes. The administrator
can choose to run cfexecd in daemon mode and use it to invoke cfagent at defined
intervals instead of cron. The default is to invoke cfagent every hour. HP recommends
adding an entry for cfexecd in the crontab file for the initial configuration.
• cfrun -- the cfrun command contacts the managed clients asking each to perform an
immediate synchronization run. Specifically, it connects to the optional cfservd on each
managed client which in turn launches cfagent.
Figure 2-1: “cfengine Overview” illustrates the relationship of the cfengine commands and
daemons, and shows an example of the administrator using cfrun. The dashed lines in the
diagram indicate calling sequences (for example, A calls B). Solid lines indicate that data is being
read from configuration files.
14 Configuration Synchronization
Page 15
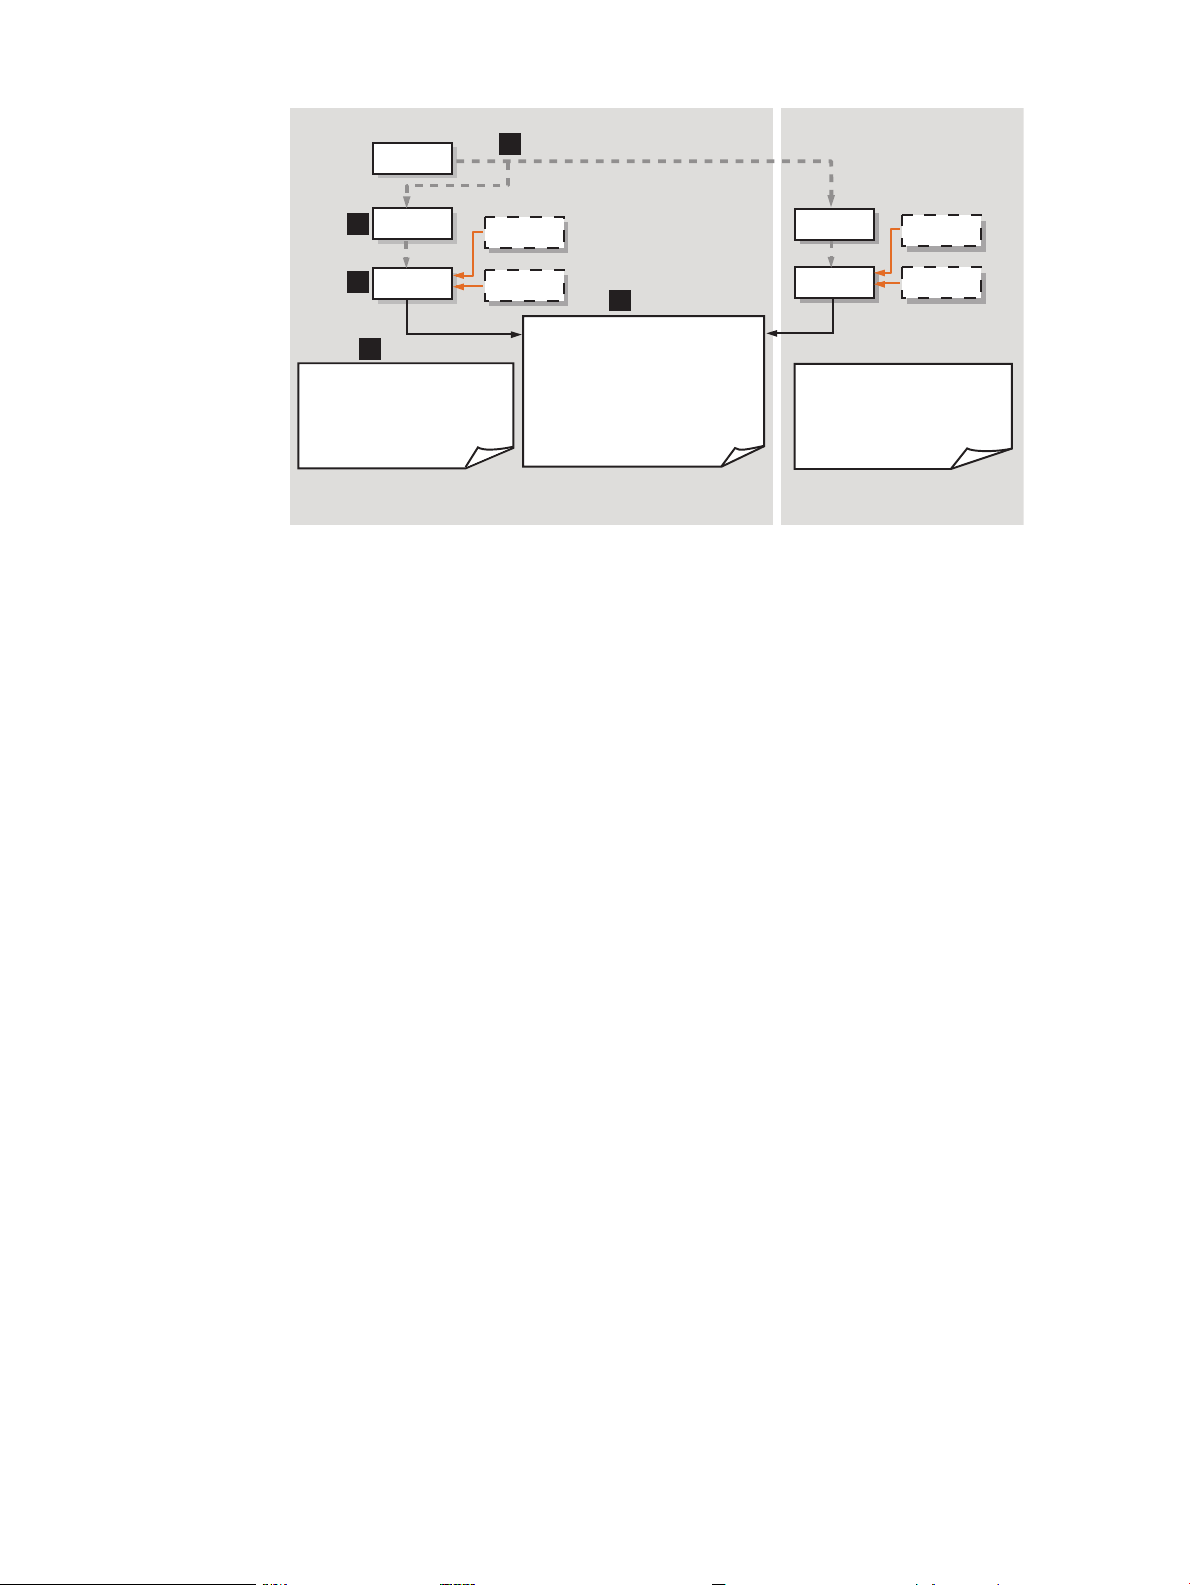
Figure 2-1 cfengine Overview
1
3
4
5
2
cfexecd
cron
+ /var/opt/dsau/cfengine/inputs
-update.conf
-cfagent.conf
-cfservd.conf
-cfrun.hosts
+ /var/opt/dsau/cfengine/inputs
-update.conf
-cfagent.conf
-cfservd.conf
-cfrun.hosts
cfservd
cfservd
cfagent
cfrun
Master Server
Client
cfagent
cfexecd
cfron
Master Policy Files:
+/dir/cfengine_master/master_files/
-<reference files>
+/dir/cfengine_master/inputs/
-update.conf
-cfagent.conf
-cfservd.conf
-cfrun.hosts
1. The administrator is logged into the master configuration synchronization server and makes
a change to be propagated out to the managed clients, using the cfrun command. cfrun
checks the file cfrun.hosts for the list of managed clients. Note that the master server
can be a client of itself. In this diagram, there are two clients, the master server and a remote
client.
2. cfrun contacts cfservd on each managed client, which in turn invokes cfagent.
3. cfagent first checks the master server for an updated copy of theupdate.conf file and
transfers it to the client if needed.
4. If a standalone system is the master server, by default the master copy of update.conf is
located in /var/opt/dsau/cfengine_master/inputs/. The master copies of other
configuration files such as cfagent.conf, cfservd.conf, cf.main, and cfrun.hosts
are also located here. If the master server is a Serviceguard cluster, the master configuration
files are located in the mount point associated with the package. For example, if this mount
point is named csync, the path would be /csync/dsau/cfengine_master/inputs.
5. When copying the configuration files to the local system, cfagent places them in /var/
opt/dsau/cfengine/inputs for both standalone systems and clusters. cfagent first
evaluates the contents of update.conf in order to update any changed cfengine binaries
(if any) and gets the latest version of the policy files (cfagent.conf and related files).
2.2 cfengine Master Server Deployment Models
The cfengine master server can be a standalone HP-UX system servicing groups of distributed
clients. The clients can themselves be standalone systems or members of a Serviceguard cluster.
If you are already using a Systems Insight Manager central management server, this can be an
ideal system to use as a cfengine master server. Master servers can also act as clients and the
configuration synchronization tasks can be performed on these systems as well as the remote
clients.
If you are managing Serviceguard clusters, cfengine can be deployed strictly for intra-cluster use
to synchronize the members of a single cluster. In this configuration, cfservd is configured as
a package for high availability but the only cfengine clients are the cluster members themselves.
The package’s DNS name/IP address is the name for the cfengine master server.
In addition to providing configuration synchronization as an intra-cluster service, another
Serviceguard configuration has the cluster providing the highly available configuration
cfagent then evaluates cfagent.conf to determine if the client is in the desired state. If
there are deltas, cfagent performs the defined actions to correct the client’s configuration.
2.2 cfengine Master Server Deployment Models 15
Page 16

synchronization service to groups of remote client systems. Those clients can be standalone
systems or Serviceguard clusters. The cluster providing the cfengine service can be a client of
itself and also take advantage of cfengine’s configuration synchronization features. A possible
but somewhat unusual configuration is to have a fixed member of a Serviceguard cluster act as
the master server but no package is configured so cfservd will not be highly available. This
configuration is valid but not recommended.
2.3 Configuring cfengine
The following sections provide detailed instructions for setting up a configuration synchronization
master server and its clients. The quickest way to get started is to use the Configuration
Synchronization Wizard (csync_wizard), described in the next section. Completely manual
configurations are also described.
Configuring Synchronization Master (csync master) Server in Cross-Subnet Cluster
Environments
In a cluster environment, if all the nodes are within the same subnet, then you can configure a
server within that cluster environment as the csync master server.
However, in a cross-subnet cluster environment, the csync master server must be an external
system, preferably a quorum server, outside the cross-subnet cluster. A cross-subnet cluster can
be configured only as client, with an external system acting as the cfengine master. After you
configure an external system as the csync master, you can configure the cross-subnet cluster
nodes as cfengine managed clients.
2.3.1 Using the Configuration Synchronization Wizard
The csync_wizard (see csync_wizard(1)) automates the task of setting a configuration
synchronization master server and its managed clients. It supports setting up a standalone system
or a Serviceguard cluster as the master server. The wizard configures all managed clients to run
a cfservd so that cfrun (see cfrun(8)) can be used on the master server.
When you run the csync_wizard on a cross-subnet cluster, the system displays a message
indicating that the csync master must be an external system outside the cross-subnet cluster.
Depending on whether the csync master is already configured, one of the following is possible:
• If the csync master is already configured outside the cross-subnet cluster, the system displays
the hostname or the IP address of the csync master.
• If the csync master is not configured outside the cross-subnet cluster, then you must configure
an external system, preferably a quorum server, as the csync master server and later proceed
to run the csync_wizard on the cross-subnet cluster.
With the csync_wizard, you perform the following tasks:
• Set up a master server
• Add a client
• Remove a client
• Manage keys for cfengine clients
• Display the current configuration
See the appropriate sections below for details. Table 2-1 lists the information you will need to
gather before running the csync_wizard to set up the master server.
When running the wizard on a Serviceguard cluster, the default is to set up cfengine as a highly
available service (Serviceguard package). The administrator must provision the storage
environment for the package and the required package IP address and DNS name registration.
The wizard supports LVM storage configurations. Non-LVM configurations must be completed
manually. The package information that the wizard requires is given in Table 2-1.
16 Configuration Synchronization
Page 17
Table 2-1 Configuration Data for csync_wizard
Your ValueExampleConfiguration Data
LVM volume group
Logical volume
Filesystem mount point
Mount options
Filesystem type
Package IP Address (a registered DNS
name)
Package subnet
/dev/vgcsync
/dev/vcgsync/lvol1
/csync
-o rw, largefiles
vxfs
192.10.25.12
192.10.25.0
NOTE: If you have used the wizard previously to configure a cfengine master server and rerun
it to reconfigure the master server, stop the currently running configuration first. For example,
use the following command to stop the running cfservd: /sbin/init.d/cfservd stop
If you have cfagent in cron or are using cfexed, disable them so they do not run while the
wizard reconfigures the system.
Configuring a single node in a Serviceguard cluster as a master server is not a highly available
configuration and is not recommended. The default configuration to create for a cluster is to
create a package for cfengine’s cfservd. (To rerun the wizard in a Serviceguard cluster and
change your configuration from one that is highly available to one that is not, halt the existing
csync package (use cmhaltpkg) and delete it before running the wizard.)
2.3.1.1 Using the Wizard to Configure a Standalone Synchronization Server
To configure a synchronization server for a standalone system, run the csync_wizard(1) on the
standalone system you wish to configure as the master synchronization server:
# /opt/dsau/sbin/csync_wizard
The wizard displays the following introductory screen:
Querying the system local_hostname for current status, one moment...
This Configuration Synchronization Wizard (csync_wizard) helps you set
up the Configuration Engine (cfengine) environment. Cfengine is a powerful
tool for performing policy-based management for groups of systems and
cluster environments.
csync_wizard is a client/server based utility. With csync_wizard, the
user can configure a standalone system or Serviceguard cluster as the
cfengine “master”. The master contains the configuration description and
configuration files that will be used by all the clients. Clients copy the
configuration description from the master and apply it to themselves.
The configuration description supports a rich set of management actions
such as copying configuration files from the master to the client,
performing edits to files, checking file ownerships, permissions, and
checksums, executing shell commands, checking for processes, etc.
For a detailed description of the cfengine management actions,
please refer to the cfengine man page.
The csync wizard helps you set up this system as a cfengine master,
add or remove cfengine-managed clients, and perform the required
security setup.
Press “Enter” to continue...
2.3 Configuring cfengine 17
Page 18

Press Enter to continue; choose item 1 from the menu below to configure a master server:
Configuration Synchronization Wizard Menu
=========================================
(1) Set up a cfengine master server
(2) Add a client
(3) Remove a client
(4) Manage keys for cfengine clients
(5) Display current configuration
(9) Exit
Enter choice: 1
The cfengine master server is being configured on:
local_hostname
The wizard then asks if you would like to additionally configure managed clients immediately
after configuring the server. For this example, answer no. Managed clients will be added later.
You can optionally specify additional remote clients to manage at this
time. If you are running in an HA environment, you do not need to specify the
cluster members.
Would you like to manage clients? [N]: n
The wizard proceeds to configure the system as a master server:
******* WARNING!!!! ********
To protect against possible corruption of sensitive configuration files,
control-c has been disabled for the remainder of this configuration.
Configuration of the cfengine master server is starting.
Configuration files have been saved at
/var/opt/dsau/cfengine/backups
cfengine keys are being created...
cfengine keys have been created, now distributing....
Verifying that the master has an entry in the /etc/hosts file
on each client...
Starting cfengine on the master server and any managed clients. This may
take a few minutes....
When the configuration is completed, the wizard displays the following summary screens which
direct the administrator to the main policyfile, /var/opt/dsau/cfengine_master/inputs/
cf.main, and the recorded answer file for this run of the wizard.
The Configuration Synchronization Wizard has completed the
configuration of cfengine:
- The master configuration description template is here:
</csync/dsau/cfengine_master/inputs/cf.main>
This default template has examples of typical configuration
synchronization actions performed in a cluster. For example,
18 Configuration Synchronization
Page 19

synchronizing critical files such as /etc/hosts, package
scripts, etc.
All the actions in the template are disabled by default
(commented out). Uncomment the lines corresponding to the desired
synchronization actions for the cluster. See the cfengine
reference documentation for a description of additional cfengine
features: /opt/dsau/doc/cfengine/
Press “Enter” to continue...
The cfengine environment consists of:
Master server (policy host):
local_hostname
Managed clients:
Note that when configuring a master server but not adding any managed clients during the
server configuration, the members entry (list of managed clients), is empty, as shown in the
above example.
A file containing the answers for this run of the Configuration
Synchronization Wizard is stored here...
/var/opt/dsau/cfengine/tmpdir/csync_wizard_input.txt
This configuration can be reestablished by issuing the following command:
/opt/dsau/sbin/csync_wizard \
-f /var/opt/dsau/cfengine/tmpdir/csync_wizard_input.txt
2.3.1.2 Using the Wizard to Configure a Serviceguard Cluster Synchronization Server
To configure a synchronization server for a Serviceguard cluster, there are two configuration
choices:
• Create a Serviceguard package for the configuration service to ensure high availability.
• Configure a single member of the cluster as if it is a standalone system. The configuration
synchronization service will not be highly available, and this configuration will also not
work properly with the Serviceguard automation features discussed in “Serviceguard
Automation Features” (page 23) and is not recommended.
This section focuses on using the wizard to configure a highly available configuration
synchronization service.
NOTE: Before starting the wizard, all the current cluster members should be up and running
in the cluster. Make sure that this cluster’s MAX_CONFIGURED_PACKAGES value can
accommodate the additional package. For more information on this setting, refer to the Managing
Serviceguard manual that is part of the Serviceguard documentation set.
Start by running the Configuration Synchronization Wizard, csync_wizard(1) by issuing the
following command:
# /opt/dsau/sbin/csync_wizard
Querying the system local_hostname for current status, one moment...
This Configuration Synchronization Wizard (csync_wizard) helps you set
up the Configuration Engine (cfengine) environment. Cfengine is a powerful
tool used to perform policy-based management for groups of systems and
cluster environments.
csync_wizard is a client/server based utility. With csync_wizard, the
user can configure a standalone system or Serviceguard cluster as the
2.3 Configuring cfengine 19
Page 20

cfengine “master”. The master contains the configuration description and
configuration files that will be used by all the clients. Clients copy the
configuration description from the master and apply it to themselves.
The configuration description supports a rich set of management actions
such as copying configuration files from the master to the client,
performing edits to files, checking file ownerships, permissions, and
checksums, executing shell commands, checking for processes, etc.
For a detailed description of the cfengine management actions,
please refer to the cfengine man page.
The csync_wizard helps you set up this system as a cfengine master,
add or remove cfengine-managed clients, and perform the required
security setup.
Press “Enter” to continue...
Press Enter to continue and choose item 1 from the menu below to configure a master server:
Configuration Synchronization Wizard Menu
=========================================
(1) Set up a cfengine master server
(2) Add a client
(3) Remove a client
(4) Manage keys for cfengine clients
(5) Display current configuration
(9) Exit
Enter choice: 1
After you choose 1 and press Enter, the wizard displays the following text:
This system is a member of a Serviceguard cluster. The cfengine
configuration will be defined as a package for high availability
unless you answer no to the question below. If you answer no, for the
purposes of cfengine control, this machine will be treated as a single
machine without failover capability for cfengine.
If you accept the default answer of ‘HA’ to the question below,
cfengine will be configured as a highly available Serviceguard package.
This ensures that your cfengine master server is available as long
as one of the cluster members that can run the package is also available.
You will need a free IP address for this package and you must
configure storage for the package before proceeding. For details
on creating highly available file systems, please refer to the
Managing Serviceguard manual.
Will this master server be Highly Available (HA) [Y]:
The wizard names the package name “csync” for configuration synchronization. This specific
package name is required. The LVM storage configuration and network configuration for the
package must be set up before continuing or before running the wizard. All the cluster members
should also be up and available. For details, refer to the Managing Serviceguard manual, under
“Building an HA Cluster Configuration”, “Creating a Storage Infrastructure with LVM.”
20 Configuration Synchronization
Page 21

NOTE: The wizard only supports creating packages based on LVM volume groups. When
using CFS or VxVM, manual configuration is required. See the section on “Manually Configuring
a Serviceguard Cluster Synchronization Server” (page 29) for details on manually configuring
the csync package.
The wizard prompts for the following, all of which should have already been configured:
• LVM volume group name (for example, /dev/vgcsync)
• Logical volume in the volume group; must be the full path name of the logical volume (for
example, /dev/vgcsync/lvol1)
• The filesystem mount point (for example, /csync)
• The filesystem mount options (for example, -o rw,largefiles). The mount options are
used verbatim in the Service package control script’s FS_MOUNT_OPT[0] field. Note that
the mount options must agree with the filesystem you created on the logical volume. For
example, if the filesystem was created with largefiles support, the largefiles mount option
should be specified.
• The filesystem type (for example, vxfs)
• The package IP address. This should also be a registered DNS name so the configuration
synchronization is easy to configure on client systems.
• The package subnet. (Use netstat -i to determine the correct subnet.)
Once the storage infrastructure is configured and the IP address obtained, press return to access
the default answer of ‘yes’ and proceed with creating the package. The wizard now prompts for
the package information:
Configuring the csync Serviceguard package for a
highly available cfengine master.
The cfengine master server is being configured as a
HA Serviceguard Package on this cluster.
Please provide the following information for the package:
Enter the Volume group [/dev/vgcsync]:
Enter the Logical Volume [/dev/vgcsync/lvol1]:
Enter the Filesystem (Mount Point) [/csync]:
Enter the Mount Options [-o rw, largefiles]:
Enter the Filesystem Type [vxfs]:
Enter the IP address [192.10.25.12]:
Enter the Subnet [192.10.25.0]:
The wizard now asks if you would like to manage additional remote clients, that is, systems
outside the cluster. The wizard automatically configures the current members of the cluster. This
is why all members must be up and accessible when running the wizard. In the example shown
below, the administrator chose ‘no’ so only cluster members are configured as clients initially.
Additional remote clients can easily be added later using the wizard. When adding members to
the cluster, it is not necessary to run the wizard to specify the new members as new client systems.
They are automatically configured to participate in the current cfengine configuration. Refer to
“Serviceguard Automation Features” (page 23) for details.
You can optionally specify additional remote clients to manage at this
time. If you are running in an HA environment, you do not need to
specify the cluster members.
2.3 Configuring cfengine 21
Page 22

Would you like to manage clients? [N]:
The wizard now has all the data it needs to configure the cluster and proceeds to do so:
******* WARNING!!!! ********
To protect against possible corruption of sensitive configuration files,
control-c has been disabled for the remainder of this configuration.
Configuring the “csync” Serviceguard package.
Applying the “csync” Serviceguard package configuration file.
This will take a moment.
Starting the “csync” Serviceguard package. This will take a few moments...
The “csync” Serviceguard package has been started on local_hostname.
Configuration of the cfengine master server is starting.
Configuration files have been saved at:
/var/opt/dsau/cfengine/backups
cfengine keys are being created...
cfengine keys have been created, now distributing....
Verifying that the master has an entry in the /etc/hosts file
on each client...
Starting cfengine on the master server and any managed clients.
This may take a few minutes....
When the configuration is done, the wizard displays the following summary screens which direct
the administrator to the main policy file,
/mount_point/cfengine_master/inputs/cf.main, and the recorded answer file for this
run of the wizard. The policy file is located on the newly configured filesystem associated with
the package. In our example, the administrator chose to mount the filesystem for the package as
/csync.
If the administrator had previously configured cfengine, before overwriting any existing
configuration files, the wizard creates backups in the directory:
/var/opt/dsau/cfengine/backups
The top level files in this directory are the most recent backup files. Any configurations before
that are saved in timestamped subdirectories named v_timestamp.
The Configuration Synchronization Wizard has completed the
configuration of cfengine:
- The master configuration description template is here:
</csync/dsau/cfengine_master/inputs/cf.main>
This default template has examples of typical configuration
synchronization actions performed in a cluster. For example,
synchronizing critical files such as /etc/hosts, package
scripts, etc.
All the actions in the template are disabled by default
(commented out).
Uncomment the lines corresponding to the desired
synchronization actions for this cluster. See the cfengine
reference documentation for a description of additional cfengine
features: /opt/dsau/doc/cfengine/
22 Configuration Synchronization
Page 23

Press “Enter” to continue...
The cfengine environment consists of:
Master server (policy host): package_hostname
Master clients:
cluster_member_1, cluster_member_2, ...
A file containing the answers for this run of the Configuration
Synchronization Wizard is stored here:
/var/opt/dsau/cfengine/tmpdir/csync_wizard_input.txt
This configuration can be reestablished by issuing the following command:
/opt/dsau/sbin/csync_wizard \
-f /var/opt/dsau/cfengine/tmpdir/csync_wizard_input.txt
2.3.1.3 Cluster Configuration Notes for cfengine
This section describes the details of a high availability configuration of cfengine in a Serviceguard
cluster. For more information on the role of the various cfengine daemons and commands, refer
to “cfengine Daemons and Commands” (page 14). The Serviceguard package ensures that
cfengine's cfservd daemon remains highly available. The cfengine configuration files
update.conf and cfagent.conf define the master configuration synchronization server to
be the registered DNS name for the relocatable IP address of the package. When managed clients
run cfagent (see cfagent(8)), cfagent connects to cfservd on the package’s adoptive node.
Thus the cluster members themselves are all managed clients. The member hosting the package
additionally acts as the master server for the policy files.
When booting the cluster, each member will start a client cfservd. This is the cfservd that
responds to cfrun requests. When the package starts on a member, that cfservd now has
access to the filesystem of the package and becomes the master cfservd that serves the policy
files to all managed clients. This cfservd is monitored by the package. If cfservd fails, the
package will attempt to restart on another member. That member’s cfservd will then become
the master cfservd.
Halting the package does not stop the cfservd daemon on the adoptive member since the
expectation is that the daemon is present to respond to future cfrun requests. Also, unlike some
other high availability services, if the csync package is down or unavailable, remote clients are
not adversely impacted. The clients continue to run with their currently defined configurations.
The administrator would need to make sure the package is up and running in order to distribute
any new configuration instructions to the managed clients.
The wizard automates cfengine key distribution to all cluster members. For a detailed description
of key distribution steps performed, refer to “Security Notes” (page 36).
2.3.1.4 Serviceguard Automation Features
The Distributed Systems Administration Utilities require Serviceguard 11.17 or later. With
Serviceguard 11.17 or later, when members are added to or deleted from the cluster, the
configuration synchronization tools automatically take the appropriate configuration actions.
Specifically:
• When adding a member to the cluster, the new member is automatically configured to
participate in configuration synchronization. The following configuration actions occur
automatically on the added member:
1. /etc/rc.config.d/cfservd is changed to set CSYNC_CONFIGURED to 1.
2. The appropriate cfengine public/private keys are created for the new member and
placed in the member's /var/opt/dsau/cfengine/ppkeys directory. The new keys
2.3 Configuring cfengine 23
Page 24

for this member are also distributed to the /var/opt/dsau/cfengine/ppkeys
directories on the other cluster members.
3. The new member’s /var/opt/dsau/cfengine/inputs directory is populated.
4. cfservd is started on the new member.
5. The package files are copied to /etc/cmcluster/csync/ on the new member.
6. A cfagent synchronization run is performed on the master to populate the master’s
/var/opt/dsau/cfengine/inputs directory.
7. A cfagent synchronization run is performed on the newly added member.
If there are any errors when performing these automated actions, messages are posted to
syslog on the master server. Use cmviewcl -p csync to determine which member is
currently the master server. Alternatively, if the cluster is using consolidated logging, check
for messages in the consolidated syslog.
• When deleting a member from a cluster, the public key of the deleted member is deleted
from the /var/opt/dsau/cfengine/ppkeys directory cluster-wide.
• The administrator can define cfengine groups or classes that enumerate all the members of
a particular Serviceguard cluster. These class definitions are not updated automatically and
the administrator must manually update the cfagent.conf and related files for cluster
membership changes.
24 Configuration Synchronization
Page 25

NOTE: When adding members to a cluster, consider the following:
• When adding a member to a cluster that is configured as a highly available master server,
the csyncpackage must be running when the member is added.The add member processing
task copies the configuration data from the package’s mounted filesystem to the new
member’s /var/opt/dsau/cfengine directories. If the package is not running, the
filesystem will not be accessible and the new member will not be properly configured. In
that case, the administrator can manually configure the new member as follows:
1. Make sure that the csync package is running. If not, start it.
2. Log in to the member running the package.
3. Execute the following command exactly as shown:
/opt/dsau/bin/csync_dispatcher MEMBER_ADDED: member_hostname
For example, if the new member’s unqualified hostname is newhost, use the following
command:
/opt/dsau/bin/csync_dispatcher MEMBER_ADDED: newhost
• When adding a member to the cluster that is configured as a highly available master server,
the cfengine security key of the new member is distributed cluster-wide. This enables the
new member to operate as an adoptive node. If the csync package fails over to the new
member, the new member will correctly handle cfagent requests from all managed clients.
However, a cfrun executed from the new member will fail when contacting the managed
clients. For cfrun to work properly, each managed client must have a copy of each cluster
member’s key. (This is unlike cfagent on the managed client which needs only the key
that corresponds to the IP address of the csync package.)
For the new member to issue cfrun requests, its key must be manually created on each
managed client. There are two ways to distribute the key:
— Use the csync_wizard “Manage keys for cfengine clients” function, which regenerates
keys for all systems. All managed clients must be reachable for the regeneration to
complete.
— Copy existing member keys to the new member. This approach takes advantage of the
fact that the new member’s key is identical to the keys for the other cluster members.
On the managed client, any of the existing cluster member’s keys can be copied to the
proper name for the newly added member.
For example,
# cd /var/opt/dsau/cfengine/ppkeys
# cp root-existing_member_IP_address.pub \
root-new_member_IP_address.pub
2.3.1.5 Using the Wizard to Configure a Synchronization Client
You can use the Configuration Synchronization Wizard to add managed clients to an existing
cfengine configuration. Run the wizard on the master server, not the client system. When a
Serviceguard cluster is the master server, run the wizard on the adoptive node for the csync
package. When a Serviceguard cluster is configured as a highly available master server, adding
new members to the cluster does not require using the wizard to configure those new members.
They will be configured automatically. For more information, see “Serviceguard Automation
Features” (page 23).
If the client is not a cluster member, to distribute cfengine keys securely, the client must be
configured fornon-interactive ssh access by theroot account of the master server. The csshsetup
tool (see csshsetup(1)) makes it easy to configure ssh access to a remote system. The csshsetup
tool is used in the examples below.
2.3 Configuring cfengine 25
Page 26

A remote Serviceguard cluster can be configured as a managed client. However, each member
must be configured individually. Repeat the configuration tasks described below for each member
of the cluster.
Start by logging in as root on the master server and configure ssh access to the remote system:
# csshsetup hostname_of_managed_client
csshsetup first tests ssh access to the remote system. If it is not configured, ssh prompts for
the managed client’s password.
Run the Configuration Synchronization Wizard and choose option 2 to add a new client:
Configuration Synchronization Wizard Menu
=========================================
(1) Set up a cfengine master server
(2) Add a client
(3) Remove a client
(4) Manage keys for cfengine clients
(5) Display current configuration
(9) Exit
Enter choice: 2
When prompted, enter the name of the client to add:
This option will configure additional clients to the cfengine domain.
Enter the name of the client to add: new_client
The wizard then proceeds to configure the client and report on its progress:
Verifying that the master has an entry in the /etc/hosts file on each client...
cfengine keys are being created...
cfengine keys have been created, now distributing....
The client new_client has been added to the cfengine domain
The wizard configures each new client to run cfservd so it can respond to cfrun requests and
adds the client to the master’s cfrun.hosts file.
2.3.2 Manual Configuration
The following sections describe the steps required to configure cfengine master configuration
synchronization servers or managed clients manually. Note that it is typically easier to start by
using the csync_wizard (see csync_wizard(1m)) and then modifying the resulting configuration
instead of starting from scratch. This is especially true in a Serviceguard cluster where the wizard
helps set up the package and takes care of propagating the correct configuration files to all
members of the cluster.
When performing manual configurations, it is possible to create configurations that cannot
subsequently be managed by the csync_wizard. Here are two examples:
• The wizard requires that all managed clients havessh configured so that cfengine’s security
keys can be initially distributed or subsequently changed.
• The wizard places all managed clients in the cfrun.hosts file. This list of managed clients
is used to identify systems for operations such as regenerating cfengine’s keys on all machines.
cfrun.hosts is an optional cfengine configuration file used by the cfrun command.
Manual configurations need not use this file but the wizard requires it.
26 Configuration Synchronization
Page 27

NOTE: You can use csshsetup to configure a trust relationship between the master server
and the managed clients. This will allow you to use command fanout commands such as cexec
and ccp (see cexec(1) and ccp(1)). Using these commands can simplify the configuration steps
described below when files need to be distributed to managed clients.
2.3.2.1 Manually Configuring a Standalone Synchronization Server
Perform the following one-time steps to configure a standalone system as a cfengine master
server:
1. Start by creating the master copies of the cfengine configuration files. These files are placed
in a well known directory and are distributed to each managed client. The default directory
is /var/opt/dsau/cfengine_master/inputs, referenced in the default templates.
Start by creating the directory:
# mkdir -p /var/opt/dsau/cfengine_master/inputs
2. Copy the default template files to the following directories:
# cd /var/opt/dsau/cfengine_master/inputs
# cp /opt/dsau/share/cfengine/templates/cf.main.template cf.main
# cp /opt/dsau/share/cfengine/templates/update.conf.template update.conf
# cp /opt/dsau/share/cfengine/templates/cfagent.conf.template cfagent.conf
# cp /opt/dsau/share/cfengine/templates/cfrun.hosts.template cfrun.hosts
# cp /opt/dsau/share/cfengine/templates/cfservd.conf.template cfservd.conf
3. Next, edit update.conf. This file has a format similar to cfengine’s main configuration file
cfagent.conf. It is used to transfer and update cfengine binaries and any updated
configuration definitions files (for example, cfagent.conf) to the managed clients. It is
critical to keep this file very simple and avoid errors. Errors in this file will require manually
copying a new version to each managed client.
The file contains tokens in the form <%token-name%> that are replaced by the
csync_wizard with the administrator’s answers to questions. Replace the tokens as follows:
a. Replace the <%POLICYHOST_NAME%> token with the fully qualified domain name of
the master server. Note that it is critical that this be a fully qualified domain name. This
file is copied to and evaluated on the managed clients. If a managed client is in a different
DNS domain from the master server, the client will be unable to communicate with the
master server if the hostname is not fully qualified.
b. Note that the cfengine domain variable is set as follows:
domain = ( ExecResult(/bin/sh -c ${dblquote}nslookup ‘hostname‘|
awk ${quote}/Name:/ {print $2}${quote} | cut -d . -f
2-${dblquote}) )
The domain variable is used by cfagent’s “resolve” action. The ExecResult command
above assumes that the client’s /etc/resolve.conf and /etc/nsswitch.conf are already
appropriately configured. The command expects to get a fully qualified hostname when
using nslookup of the client’s own hostname. If this assumption is not appropriate for
your environment, other techniques for setting the domain are possible. For example,
the client’s domain could be determined based on the client’s IP address or subnet, as
follows:
classes:
# host in these ip address ranges
xyz_domain = ( IPRange(10.0.0.1-15) )
abc_domain = ( IPRange(192.0.0.1-254) )
control:
xyz_domain::
domain = ( “xyz.example.com” )
abc_domain::
domain = ( “abc.example.com”)
2.3 Configuring cfengine 27
Page 28

Use the cfagent -p (or --parse-only) flag to verify the syntax of update.conf.
4. Distribute the master update.conf to each managed client. This step is described in
“Configuring a Synchronization Managed Client” (page 35).
5. Create the master server’s security keys. cfengine uses a public/private key exchange to
authenticate remote clients. A public/private key pair is generated on the master server and
all managed clients. The public key for each managed client is copied to the master server
and from the master server to the managed clients. It is important to exchange keys securely
using a tool like secure copy, (see scp(1)) or using tape or CD-ROM. Start by generating the
keys for the master server:
# /opt/dsau/sbin/cfkey
# /var/opt/dsau/cfengine/ppkeys
This creates the files localhost.pub and localhost.priv.
Copy the public key to root-master_server_IP_address.pub. For example, assuming
this system’s IP address is 10.0.0.5, use this command:
# cp localhost.pub root-10.0.0.5.pub
See “Configuring a Synchronization Managed Client” (page 35) for details on copying the
client keys to this master server.
6. On the master server, configure the cfservd daemon to start at system startup. Edit /etc/
rc.config.d/cfservd and change the line CSYNC_CONFIGURED=0 to
CSYNC_CONFIGURED=1. Optionally, if you want to be able to push changes out to the
managed clients using cfrun, replicate this change on all of the managed clients.
7. cfrun requires that the managed clients be listed in the file cfrun.hosts. In the default
configuration, this file is located in /var/opt/dsau/cfengine_master/inputs. Edit
it and add the hostnames of each managed client, one per line. It is simplest to make sure
that all the host names are fully qualified. Whenusing fully qualified hostnames, the "domain
= " line is not required and can be deleted. If using unqualified hostnames, find the line
"domain = " variables and replace the token with the DNS domain of the master system.
This restricts all of the unqualified clients to be members of that single domain.
8. The file /var/opt/dsau/cfengine_master/inputs/cfagent.conf is the master
policy file. The default cfagent.conf includes the default cf.main template file with
examples of common synchronization actions for both standalone systems and Serviceguard
clusters. cf.main contains the POLICY HOST_NAME and “domain = “ variables. Perform
the same edits described in Step 3 above.
Note that this default cf.main file performs no management actions. All the action lines
are commented out. This is a starting point for creating a custom set of cfengine policies and
actions for your managed clients. The cfengine reference manual that documents the syntax
and allthe management actions defined in this file is located in /opt/dsau/doc/cfengine.
Other example cfengine configuration files that are included with the open source cfengine
distribution are located in /opt/dsau/share/cfengine/examples.
28 Configuration Synchronization
Page 29
9. The file /var/opt/dsau/cfengine_master/inputs/cfservd.conf controls which
managed clientshave access to the filesserved by cfservd on the master. Make the following
edits to cfservd.conf:
• Replace the “<%CFSERVD_DOMAIN_LISTS%>“token with a comma-separated list of
wildcard DNS domains or hostnames for the systems that are allowed to access this
server. For example:
domain_list = ( “*.abc.xyz.com,*.cde.xyz.com“ )
This statement allows all hosts in the abc.xyz.com and cde.xyz.com domains to access
the master server.
IMPORTANT: No spaces are allowed in this comma-separated list.
Prefix each domain name with the “*.” wildcard.
NOTE: The csync_wizard only supports specifying wildcard domain names in
cfservd.conf. If you manually edit cfservd.conf and include a combination of specific
hostnames or IP address and wildcard domains, then subsequent runs of csync_wizard
will replace this line with a list of wildcard domains based on the list of hosts present
in cfrun.hosts.
10. On the master server, start cfservd:
# /sbin/init.d/cfservd start
Repeat this for each managed client.
NOTE: cfservd.conf must be present in /var/opt/dsau/cfengine/inputs
before executing this command.
11. Test the configuration by performing the following steps:
a. On a managed client, use the command:
# cfagent --no-lock --verbose --no-splay
The verbose output will display the client checking for updated copies of the master
policy files, copying them down to /var/opt/cfengine/inputs if needed, and then
executing the contents of cfagent.conf/cf.main.
b. On the master server, test the cfrun command:
# cfrun -- --inform
The --inform syntax instructs the remote cfagent to use the --inform flag which
will produce messages for all changes cfengine performs on the system. For additional
information, the --verbose can also be helpful:
# cfrun -v -- --verbose
The -v instructs cfrun itself to be more verbose and the --verbose is passed on to
the remote cfagent.
For additional troubleshooting information, refer to “cfengine Troubleshooting” (page 39).
2.3.2.2 Manually Configuring a Serviceguard Cluster Synchronization Server
Configuring cfengine for high availability in a Serviceguard cluster is similar to configuring it
for a standalone machine, which is described in the section “Using the Wizard to Configure a
Standalone Synchronization Server” (page 17). The primary differences are the creation of the
2.3 Configuring cfengine 29
Page 30

Serviceguard package and the mechanism used to distribute cfengine’s security keys. Follow all
the steps described below.
• Initial Serviceguard Package Preparation
1. Start by obtaining an IP address for the package. This address is typically registered in
DNS to simplify management of remote clients. If you are using cfengine for intra-cluster
use only, it is sufficient to make sure the address is added to each member’s /etc/
hosts file.
2. Next, create the storage infrastructure required for a new package. The instructions for
doing this are documented in the Managing Serviceguard manual, under “Building an
HA Cluster Configuration”, “Creating a Storage Infrastructure.” For example, if using
an LVM storage infrastructure, that would include the following steps:
a. Create the LVM volume group (VG) and logical volumes (LV) (for example, /dev/
vgcsync/lvol1).
b. Exporting/importing the volume group cluster-wide.
c. Setting up a filesystem on the logical volumes.
d. Creating the filesystem’s mount point (for example, /csync) cluster-wide.
The default templates assume you are using LVM-based storage. To use VxVM or other
cluster-wide storage and filesystems, make the appropriate changes to the package
templates described below. Also note that the Disks and Filesystems Tool (fsweb),
available from the System Management Homepage, can help simplify volume group
and filesystem setup.
3. Make sure the filesystem for the package is mounted on the current member. For
example, if using LVM do the following:
# vgchange -a e /dev/vgcsync
# mount -o rw,largefiles /dev/vgcsync/lvol1 /csync
• Initial Policy File Customization
1. Create a subdirectory for the master policy files and reference files. For example:
# mkdir -p /csync/dsau/cfengine_master/master_files
These example directories are those used by the csync_wizard.
2. Copy the default templates into the master inputs directory:
# cd /csync/dsau/cfengine_master/inputs
# cp /opt/dsau/share/cfengine/templates/cf.main.template cf.main
# cp /opt/dsau/share/cfengine/templates/update.conf.template update.conf
# cp /opt/dsau/share/cfengine/templates/cfagent.conf.template cfagent.conf
# cp /opt/dsau/share/cfengine/templates/cfrun.hosts.template cfrun.hosts
# cp /opt/dsau/share/cfengine/templates/cfservd.conf.template cfservd.conf
3. Edit update.conf. This file has a format similar to cfengine’s main configuration file
cfagent.conf. It is used to transfer and update cfengine binaries and any updated
configuration definitions files (for example, cfagent.conf) to the managed clients.
30 Configuration Synchronization
Page 31

It is critical to keep this file very simple and avoid errors. Errors in this file will require
manually copying a new version to each managed client.
The file contains tokens in the form <%token-name%> which are replaced by the
csync_wizard with the administrator’s answers to questions. Replace the tokens as
follows:
— Replace the <%POLICYHOST_NAME%> token with the fully qualified domain
name of the Serviceguard csync package. For example:
policyhost = ( “csync.abc.xyz.com” )
— Refer to “Manually Configuring a Standalone Synchronization Server” (page 27)
for a discussion on setting the cfagent domain variable, which is used by cfagent’s
resolve action.
• List Managed Clients in cfrun.hosts
cfrun requires that all managed clients be listed in the file cfrun.hosts. Since each cluster
member is considered a client, make sure each member is listed in /csync/dsau/
cfengine_master/inputs/cfrun.hosts.
Edit it and add the hostnames of each member, one per line. It is simplest to make sure that
all the host names are fully qualified. When using fully qualified hostnames, the “domain
=“ line is not required and can be deleted. This domain specification is concatenated on any
unqualified hostnames. If using unqualified hostnames, replace the
“<%DEFAULT_CLIENT_DNS_DOMAIN%>” token with the simple domain name. For example:
domain = xyz.abc.com
Note that the csync_wizard will always write fully qualified hostnames when adding
managed clients to this file.
• Edit the Master Policy File
The file /var/opt/dsau/cfengine_master/inputs/cfagent.conf is the master
policy file. The default cfagent.conf includes the default template cf.main which is a
commented template file with examples of common synchronization actions for both
standalone systems and Serviceguard clusters. Edit cf.main to replace the
<%POLICYHOST_NAME%> token as described in a previous list bullet “Initial Policy File
Customization.” The “domain =” declaration used by the resolve action is also discussed
in the same section.
Note that this default template performs no management actions. All the action lines are
commented out. It does contain many examples specific to synchronizing files in a
Serviceguard cluster. This is a starting point for creating a custom set of cfengine policies
and actions for your cluster and other managed clients.
The cfenginereference manual which documentsthe syntax and all the possible management
actions defined in this file is located in /opt/dsau/doc/cfengine/.
Other example cfengine configuration files which are included with the open source cfengine
distribution are located in /opt/dsau/share/cfengine/examples.
2.3 Configuring cfengine 31
Page 32

• Edit the cfservd.conf File
The file /var/opt/dsau/cfengine_master/inputs/cfservd.conf controls which
managed clientshave access to the filesserved by cfservd on the master. Make the following
edits to cfservd.conf:
— Replace the “<%CFSERVD_DOMAIN_LIST%>” token with a comma-separated list of
wildcard DNS domains or hostnames for the systems that are allowed to access this
server. For example:
domain_list = ( “*.abc.xyz.com,*.cde.xyz.com” )
This statement allows all hosts in the abc.xyz.com and cde.xyz.com domains to access
the master server. No spaces are allowed in this comma-separated list. Each domain
must be prefixed with the “*.” wildcard.
NOTE: The csync_wizard only supports specifying wildcard domain names in
cfservd.conf. If you manually edit cfservd.conf and include a combination of specific
hostnames or IP address and wildcard domains, then subsequent runs of csync_wizard
will replace this line with a list of wildcard domains based on the list of hosts present
in cfrun.hosts.
This example allows all hosts in the listed domains to access files on the master server.
You can also specify lists of specific host, IP address ranges, and so on. Refer to the cfengine
reference manual for additional information.
• Distribute the Master update.conf to Each Cluster Member
Use the following commands:
# cd /var/opt/dsau/cfengine_master/inputs
# ccp update.conf /var/opt/dsau/cfengine/inputs/
cfengine itself will take care of distributing the remaining files both cluster-wide and to all
managed clients.
• Distribute the cfengine Security Keys
Since cfengine uses a public/private key exchange model to validate the authenticity of
managed clients, a key must be configured that is associated with the relocatable IP address
of the package. That address is the one that remote clients see as the master server. Since
any cluster member can become the adoptive node, this key must be identical across all
cluster members. cfengine’s cfkey generates a public/private key pair for the current system.
cfkey creates the files localhost.priv and localhost.pub.
cfengine expects keys to be named using the following convention:
username-IP_address.pub
For example,
root-10.0.0.3.pub
The administrator copies the localhost.pub key to the correct name based on the system’s
IP address. For the case of a cluster, the keys for the current member are used to generate
the keys cluster-wide using the following steps:
1. Use cfkey to create the public and private key pair for this cluster member:
# /opt/dsau/sbin/cfkey
32 Configuration Synchronization
Page 33

This will create keys named localhost.priv and localhost.pub in the directory
/var/opt/dsau/cfengine/ppkeys.
2. The public key, localhost.pub is thencopied to root-package IP address.pub.
For example,
# cp localhost.pub root-192.10.25.12.pub
where 192.10.25.12 is the relocatable IP address of the csync package.
3. This member’s localhost.pub is then used to create the member-specific keys for
each member:
# cp localhost.pub root-member1 IP address.pub
# cp localhost.pub root-member2 IP address.pub
# cp localhost.pub root-member3 IP address.pub
…
# cp localhost.pub root-memberN IP address.pub
4. Finally, all the keys are copied to each member.
# ccp * /var/opt/dsau/cfengine/ppkeys
NOTE: ccp, a command-fanout command, performs a cluster copy, copying a
command to all cluster members.
• Configure and start cfservd
1. Configure the cfservd daemon to start at system startup. Edit /etc/rc.config.d/
cfservd and change the line CSYNC_CONFIGURED=0 to CSYNC_CONFIGURED=1.
2. Propagate this change cluster-wide:
# ccp /etc/rc.config.d/cfservd /etc/rc.config.d/cfservd
3. On the master server, start cfservd:
# /sbin/init.d/cfservd start
4. Repeat for the remaining cluster members. If you have configured the cluster for use
with theDSAU command fanout tools, use the following command to start the daemons
cluster-wide:
# cexec /sbin/init.d/cfservd start
• Create the csync Package
To create the configuration synchronization package, modify the default package template
files as appropriate for your Serviceguard environment. Note that the package must be
called csync. Failure to do so will cause the Serviceguard automated operations to fail. For
more information, refer to the section “Serviceguard Automation Features” (page 23).
Start by making the following changes:
1. Create the package directory cluster-wide:
# cexec mkdir /etc/cmcluster/csync
2. Copy the template package ASCII file and package control script to the /etc/
cmcluster/csync directory on the current member:
# cd /etc/cmcluster/csync
# cp /opt/dsau/share/serviceguard/templates/csync.conf.template
csync.conf
# cp /dsau/share/serviceguard/templates/csync.script.template
csync
# chmod +x csync
2.3 Configuring cfengine 33
Page 34

3. Edit the csync.conf package ASCII configuration file to replace the placeholder tokens
with the appropriate values. The tokens are in the form <%token-name%>. Find the
line
"SUBNET <%SG_PKG_SUBNET%>"
and replace the token with the subnet for the csync package. Use netstat -i to help
identify the subnet.
4. Edit the package control script, and substitute appropriate values for the placeholder
tokens.
NOTE: The default script template assumes you are using an LVM-based storage
configuration. If you are using VxVM or CFS, refer to the Managing Serviceguard
documentation for more information on configuring packages using those technologies.
You will have to comment out the LVM parts of the template described below and
substitute the appropriate VxVM or CFS stanzas.
a. Find the line "VG[0]="<%SG_PKG_VOL_GRP%>"" and replace the token with the
name of the LVM volume group for the package. For example,
VG[0]=“/dev/vgcsync”.
b. Find the line "LV[0]=“<%SG_PKG_LOG_VOL%>”" and replace the token with the
full name of the logical volume. For example, LV[0]=“/dev/vgcsync/lvol1”.
c. Find the line "FS[0]=“<%SG_PKG_FS%>”" and replace the token with the name
of the filesystem mount point created for this package. For example,
FS[0]=“/csync”.
Note that this mount point should have been created on each cluster member as
part of the storage configuration described above.
d. Find the line "FS_MOUNT_OPT[0]=“<%SG_PKG_MNT_OPT%>”" and replace the
token with the filesystem’s mount options. For example, FS_MOUNT_OPT[0]=“-o
rw,largefiles”.
e. Find the line "FS_TYPE[0]=“<%SG_PKG_FS_TYPE%>”" and replace the token
with the filesystem type. For example, FS_TYPE[0]=“vxfs”.
f. Find the line "FS_UMOUNT_OPT[0]=“<%SG_PKG_FS_UMOUNT_OPT%>”" and
replace the token with any filesystem umount options. The token can be removed
and this option left blank if there are no special umount options. For example,
FS_UMOUNT_OPT[0]=“”.
g. Find the line "FS_FSCK_OPT[0]=“<%SG_PKG_FS_FSCK_OPT%>”" and replace
the token with any filesystem specific fsck options. As above, the token can be
deleted and this option left blank. For example, FS_FSCK_OPT[0]=“”.
h. Find theline IP[0]=“<%SG_PKG_IP%>” and replacethe token with the IP address
of the csync package. For example, IP[0]= 123.456.789.3.
i. Find the line "SUBNET[0]=“<%SG_PKG_SUBNET%>”" and replace the token with
the subnet for the package’s IP address. Use netstat -i to help determine the
subnet. For example, SUBNET[0]= 123.456.789.0.
5. Distribute the package control script and package ASCII configuration files cluster-wide:
# ccp csync csync.conf /etc/cmcluster/csync/
6. Apply the package and start it:
# cmapplyconf -P csync.conf
# cmmodpkg -e csync
• Test the csync Package Configuration
Test the configuration by performing the following steps:
34 Configuration Synchronization
Page 35

1. On a managed client, use the command:
# cfagent --no-lock --verbose --no-splay
The verbose output will display the client, checking for updated copies of the master
policy files, copying them into /var/opt/dsau/cfengine/inputs if needed, and
then executing the contents of cfagent.conf/cf.main.
2. On the master server, test the cfrun command:
# cfrun -- --inform
--inform instructs the remote cfagent to use the --inform flag which will produce
messages for all changes cfengine performs on the system. For additional information,
the --verbose command can also be helpful:
# cfrun -v -- --verbose
The -v instructs cfrun itself to be more verbose and the --verbose is passed on to the
remote cfagent.
For additional troubleshooting information, refer to “cfengine Troubleshooting”
(page 39).
2.3.2.3 Configuring a Synchronization Managed Client
When manually configuring managed clients, the basic steps are:
• Exchanging security keys. This establishes the trust relationship between the managed client
and master server.
• Copying update.conf from the master server to the managed client.
• Setting a schedule for which cfagent will perform synchronization operations.
For a Serviceguard cluster, each member must be individually configured as a cfengine client.
After configuring each member, if you add new members to the cluster, you must manually
configure each new member as well. Repeat the configuration tasks described below on each
cluster member.
For all othernewly managed clients, start by configuring the trust relationship between the client
and the master server. The masterand client systems exchange security keys to authenticate each
other. The master server’s public key needs to be copied to the client and the client’s public key
is copied to the master server:
1. As root, use cfkey to create the public and private key pair for this cluster member:
# /opt/dsau/sbin/cfkey
This creates keys named localhost.priv and localhost.pub in the directory
/var/opt/dsau/cfengine/ppkeys.
2. Copy this client’s key to the master server. The master server uses the following naming
convention for the client keys: username-client_IP_address.pub.
Using this naming convention, push the client’s public key to the master server’s ppkeys
directory using the following naming convention:
# scp localhost.pub master_server:\
/var/opt/cfengine/ppkeys/root-client_IP_address.pub
It is important to use a utility such as secure copy (see scp(1)) when transferring the key in
order to protect its integrity.
3. Finally, copy the master server’s key to this managed client:
# scp master_server:/var/opt/cfengine_master/ppkeys/localhost.pub
root-master_IP_address.pub
4. Next, copy the master server update.conf to the managed client:
2.3 Configuring cfengine 35
Page 36

# mkdir -p /var/opt/dsau/cfengine/inputs
# cd /var/opt/dsau/cfengine/inputs
# scp master_server:/var/opt/dsau/cfengine/inputs/update.conf
./update.conf
To allow this client to accept cfrun requests, do the following:
1. Edit /etc/rc.config.d/cfservd and set the CSYNC_CONFIGURED variable to "1" --
this will start cfservd at system boot time.
2. Start cfservd:
# /sbin/init.d/cfservd start
3. Test the configuration with cfagent (see cfagent(8)):
# cfagent --no-lock --verbose --no-splay
The verbose output will display the client, checking for updated copies of the master policy
files, copying them down to /var/opt/cfengine/inputs if needed, and then executing
the contents of cfagent.conf/cf.main.
For additional troubleshooting information, refer to the section “cfengine Troubleshooting”
(page 39).
2.3.2.4 Choosing a Synchronization Invocation Method
As the administrator, you can push changes out to managed clients by using the cfrun command
(see cfrun(8)). cfrun contacts the cfservd daemon on each managed client and cfservd
invokes cfagent which does the actual synchronization work. You can also choose to have
cfagent run at intervals on the client. There are two approaches:
• Run cfagent from a cron job.
When running cfagent from cron, invoke it using cfexecd -F. An example crontab
entry is shown below:
0 * * * * /var/opt/dsau/cfengine/bin/cfexecd -F
This crontab entry will cause cfagent to be run every hour.
In this example, cfexecd (see cfexecd(8)) acts a wrapper for cfagent and collects any output
and places it in /var/opt/dsau/cfengine/outputs. cfexecd can also cause mail to
be sent to the administrator if specified in the cfagent.conf file. For details, refer to the
cfengine reference manual in /opt/dsau/doc/cfengine.
Note that the default cf.main has an example for automatically adding the above line to
the crontab file of each managed client.
• Run cfexecd in daemon mode.
cfexecd has cron-like features based on cfengine’s time classes and can be used instead
of cron to run cfagent. cfexecd defaults to running cfengine every hour. When first
getting started with cfengine, it is probably easiest to use cron for scheduling client side
synchronization. Fordetails on using cfexecd in daemon-mode, refer to the cfengine tutorial
located in /opt/dsau/doc/cfengine/.
2.4 Security Notes
cfengine has many security features that range from parameters that control denial-of-service
attacks to access control lists that prevent managed clients from accessing reference file directories
on the server. For details on cfengine security features, refer to the reference manual located in
/opt/dsau/doc/cfengine/. The security topics discussed below include:
• Key exchange
• Network port usage
36 Configuration Synchronization
Page 37

• Encryption
• Checksum alerts
2.4.1 Key Exchange
All the key exchange examples shown thus far have used scp to securely transfer the master
server public key to the managed client and the managed client’s public key to the master server.
This scheme provides the highest level of security but can be inconvenient in certain situations.
Other key distribution alternatives include the following:
• When connecting to a new client, cfrun has an interactive mode similar to ssh, where the
administrator is prompted to accept the remote system’s key. For example:
cfrun(0): .......... [ Hailing remote-host.abc.xyz.com ] ..........
WARNING - You do not have a public key from host remote-host.abc.xyz.com =
192.10.25.12
Do you want to accept one on trust? (yes/no)
-> yes
cfrun:master-server-name: Trusting server identity and willing to accept key
from remote-host.abc.xyz.com=192.10.25.12
• For large numbers of new clients, interactive mode can be inefficient. cfrun supports a -T
option which tells cfengine to trust all new keys from the hosts listed in cfrun.hosts.
• cfservd.conf supports a TrustKeysFrom control clause. For example:
control:
TrustKeysFrom = ( 128.39.89.76 ) # A trusted host
TrustKeysFrom = ( 128.39.89.76/24 ) # A trusted subnet
The enumerated host or subnet addresses will be implicitly trusted and their keys
automatically accepted.
All of these key exchange alternatives should be used with extreme caution and only in a secure
environment where the LAN is trusted and the remote hosts are trusted. Once a public key is
accepted it will not be updated unless it is deleted by hand from the master server’s /var/opt/
dsau/cfengine/ppkeys directory, manually replaced with a new key, or the csync wizard is
run to update it.
2.4.2 csync Network Port Usage
cfservd uses TCP port 5308 by default. You can instruct cfagent to connect to cfservd using
a different port by specifying a port in the cfrun.hosts file. For example:
host1.abc.xyz.com # Use standard port
host2.abc.xyz.com # Use standard port
host3.abc.xyz.com:4444 # Use port 4444
Also, cfenginewill honor a cfengine tcp port defined in /etc/services. There are corresponding
changes in /etc/services.
2.4.3 Encryption
In general, file transfer traffic between the master server and a managed client is not encrypted.
For many system management related configuration files this is acceptable. For certain files, an
encrypted file transfer is desirable. The copy action in cfagent.conf has an "encrypt =
true" option to encrypt the specified file. For additional encryption options, refer to the cfengine
reference manual located in /opt/dsau/doc/cfengine.
2.4 Security Notes 37
Page 38

2.4.4 Checksum Alerts
cfengine has a checksum alert feature. To monitor changes to a file’s checksum, do the following:
• Add the following stanza to /var/opt/dsau/cfengine_master/inputs/
cfagent.conf:
ChecksumUpdates = ( “on” )
• In cfagent.conf’s "files" actionsequence, add checksum = md5 or checksum =
sha options for the files to monitor. For example,
files:
class::
/etc/example
mode = 644
checksum = md5
Note that this checksum option is different from the checksum = true option used in the
copy actionsequence. That option tells cfengine to use checksums instead of timestamps
when deciding if files need to be copied.
cfagent creates the checksum database on the client if it does not already exist. When
ChecksumUpdates is set to "on" or "true", then the current checksum for the monitored files
is added to or updated in the checksum database. After this initial run to populate the checksum
database, change ChecksumUpdates to "off". At this point, any changes to a checksum of a
monitored file causes a security warning. For example:
host1: !!!!!!!!!!!!!!!!!!!!!!!!!!!!!!!!!!!!!!!!!!!!!!
host1: SECURITY ALERT: Checksum for /etc/example changed!
host1: !!!!!!!!!!!!!!!!!!!!!!!!!!!!!!!!!!!!!!!!!!!!!!
2.5 Disabling Use of cfengine
The csync_wizard does not have an unconfigure option to stop a system from being a master
server. To disable a master server, simply stop cfservd:
# /sbin/init.d/cfservd stop
To prevent cfservd from starting at system startup, edit /etc/rc.config.d/cfservd and
change CSYNC_CONFIGURED to "0".
If the csync_wizard was used to create the cfengine configuration and add managed clients,
it can be used to remove managed clients. Run the wizard on the master server and select the
"Remove a client" option. The wizard requires that non-interactive ssh access to the managed
client has been configured as described in the section “Using the Wizard to Configure a
Synchronization Client” (page 25). The specified client will be deleted from cfrun.hosts, its
public key deleted from the master ppkeys directory, and the master’s key deleted from the
client’s ppkeys directory.
2.6 Logging Options
cfengine is intentionally silent about most configuration changes but there are several
configuration options to increase the verbosity of cfengine output, as follows:
• Most cfagent.conf actions suchas "copy," "editfiles," and "processes," support
a syslog = true option to cause the specific action to be logged to syslog.
• Similarly, most actions support an "inform = true" option to cause cfagent to report
any changes.
• cfagent.conf’s control section supports global "inform = (true)" and "syslog =
true" options.
• cfagent (see cfagent(8)) supports the --inform switch on the command line. For more
information, refer to the cfengine reference manual in /opt/dsau/doc/cfengine or the
cfagentmanpage.
38 Configuration Synchronization
Page 39

2.7 cfengine Troubleshooting
The following are some troubleshooting hints for working with cfengine.
1. Run cfservd on the master server using the --no-fork (-F) and the --verbose (-v) options.
This will provide useful information for any troubleshooting efforts.
2. You may see authentication errors. When performing a "cfagent -K" operation, the
following messages are displayed:
cfengine:: BAD: key could not be accepted on trust
cfengine:: Authentication dialogue with master-server.
abc.xyz.com failed
cfengine:client:/var/opt/dsau/cfengine/inputs/update.conf:194: Warning:
actionsequence is empty
cfengine:client:/var/opt/dsau/cfengine/inputs/update.conf:194: Warning: perhaps
cfagent.conf/update.conf have not yet been set up?
This problem is most likely due to the cfengine security setup. To resolve the problem, you
will need to exchange cfengine public keys between the managed client and master server.
The csync_wizard (see csync_wizard(8)) automates this process when adding clients. See
the section “Configuring a Synchronization Managed Client” (page 35) for instructions on
manually distributing keys to managed clients.
3. “Warning: actionsequence is empty” errors
Use the cfagent -v option to get more information. One possible cause of this message
is that update.conf has not been added to the client’s /var/opt/dsau/cfengine/
inputs directory.
4. Syntax error due to missing or superfluous spaces
#cfagent -K
cfengine::/var/opt/dsau/cfengine/inputs/update.conf:39: syntax error
cfengine::/var/opt/dsau/cfengine/inputs/update.conf:
Execution terminated after parsing due to errors in program
In the first line of the example above, cfengine is reporting a syntax error on line 39 of the
file update.conf. The error reported may be caused by a space in line 38, the previous
line in the file update.conf.
Check for extra spaces in the configuration files. As a general rule, using spaces can improve
readability. One common problem is missing spaces within parentheses. For example, a
function should have no space between the function name and its leading parenthesis but
the function itself requires leading and trailing spaces within its enclosing parentheses. For
example, the following snippet shows the use of required leading and trailing spaces for
the function ExecResult.
control:
my_variable = ( ExecResult(/bin/ls -l) )
5. Unable to connect to a cfengine client or master.
# cfrun
cfrun(0): .......... [ Hailing host1 ] ..........
cfrun(0): .......... [ Hailing host2 ] ..........
cfrun:host2: Couldn’t open a socket
cfrun:host2: socket: Connection refused
Check that the cfservd daemon on host2 is configured and running.
Use /sbin/init.d/cfservd start to start cfservd if it is not running.
6. “Can’t stat” messages
When running using either cfrun or cfagent, you might get “can’t stat” errors. For
example,
host1: Can’t stat
/var/opt/dsau/cfengine_master/master_files/etc/test in copy
2.7 cfengine Troubleshooting 39
Page 40

Check your master file repository and ensure that the file in question is available and has
the right permissions.
7. “Couldn’t open a socket ” or “unable to establish connection:” errors
cfagent and cfrun can display errors such as:
cfengine:: Couldn’t open a socket
cfengine:: Unable to establish connection with host1 (failover)
host2: Couldn’t open a socket
If the master server cfservd is running, this error could indicate that a there is a firewall
or port issue such that the client cannot reach port TCP 5308 on the master server. When
using cfrun, the master server must also be able to reach TCP port 5308 on the remote
client. Ensure that any firewall rules allow access to these ports.
8. cfengine command line arguments are case-sensitive. For example, cfagent supports both
the -k and -K options which have different meanings:
• -k instructs cfagent to ignore the copy actionsequence
• -K instructs cfagent to ignore locks when running
9. How do I make cfengine more verbose?
Most cfengine tools and daemons accept a verbose (-v) option and several debugging
(-d) options. For example:
cfagent -d, -d1, -d2, or -d3
cfservd -v
cfrun -v
40 Configuration Synchronization
Page 41

3 Consolidated Logging
Distributed Systems Administration Utilities offers consolidated logging features, including the
standard logging features offered by syslogd, and syslog Next Generation (syslog-ng)
features in standalone and cluster log consolidation environments.
The next sections of this document describe their use.
3.1 Introduction to syslog
syslogd is a ubiquitous component of UNIX systems that performs system logging activities.
syslogd reads from a set of log sources such as /dev/log and /dev/klog and processes the
log messages as instructed in /etc/syslog.conf. Applications log messages to syslog using
the syslog call (see syslog(3C)).
For more information on syslogd, see syslogd(1M).
3.1.1 syslog Message Format
A syslog message has a standard format that includes an optional priority level and facility.
The priority level indicates the urgency of the message. The facility indicates the subsystem that
posted the message. Table 3-1 lists the priority level and facilities defined in /usr/include/
syslog.h.
Table 3-1 syslog Priority Levels
DescriptionMessage
Take action immediately,LOG_ALERT
Critical conditions have occurred.LOG_CRIT
Debug-level message.LOG_DEBUG
System is unusable.LOG_EMERG
Error conditions.LOG_ERR
Informational message.LOG_INFO
Normal but significant conditions that warrant attention.LOG_NOTICE
Warning conditions.LOG_WARNING
Table 3-2 describes syslog Facilities Messages.
Table 3-2 syslog Facilities Messages
DescriptionMessage
LOG_AUTH
Security and authorization messages (DEPRECATED; use
LOG_AUTHPRIV instead).
Security and authorization messages (private).LOG_AUTHPRIV
Clock daemon (cron and at).LOG_CRON
System daemons without separate facility values.LOG_DAEMON
Ftp daemon.LOG_FTP
Kernel messages.LOG_KERN
Reserved for local use.LOG_LOCAL0 through LOC_LOCAL7
Line printer subsystem.LOG_LPR
3.1 Introduction to syslog 41
Page 42

Table 3-2 syslog Facilities Messages (continued)
DescriptionMessage
Mail subsystem.LOG_MAIL
USENET news subsystem.LOG_NEWS
LOG_SYSLOG
3.1.2 Message Filtering
Using /etc/syslog.conf, messages can be filtered based on their priority level and facility.
Messages can be directed to:
• Specific log files
• The console
• A specified user. The message is sent to the user's terminal if the user is logged in.
• All logged-in users
• Forwarded to remote systems. For more information, see the “Log Consolidation Overview”
(page 42).
For more information on configuring message filters, see the syslogd(8) manpage.
3.2 Log Consolidation Overview
Log forwarding is a feature of the standard UNIX syslogd. In addition to logging messages to
the local host's log files, syslogd can forward log messages to one or more remote systems.
These systems are referred to as log sinks or log consolidation servers.
Log consolidation offers benefits such as the following:
• Easier log file analysis - The centralized log provides a single location for the administrator
to perform log file analysis. It offers single view of events that impact multiple systems.
• Increased security - A security breach might compromise the local logs but not the centralized
copy. The log consolidation system can be hardened in ways that are likely to be inappropriate
for log forwarding clients.
• Simplified archiving of logs - It is sometimes simpler to archive a set of centralized logs
rather than per-system logs.
Messages generated internally by syslogd.
Generic user-level messages.LOG_USER (default)
UUCP subsystem.LOG_UUCP
There are several disadvantages of using the standard syslogd on a log consolidation server:
• syslogd supports forwarding using UDP only. The Universal Datagram Protocol (UDP)
is a "connectionless" protocol and does not offer flow control or guaranteed delivery of
messages. As such, it is possible for forwarded log messages to be lost.
• The filtering features of syslogd are quite simple: you can filter only on a message’s facility
and priority.
• A log consolidation system represents a single point of failure. If the system is unavailable,
the messages forwarded from clients are lost. Note that the messages still exist on the
individual client systems. They are lost only from the consolidated log.
3.2.1 Improved Log Consolidation
The Distributed Systems Administration Utilities (DSAU) use syslog-ng, or syslog “Next
Generation,” to address the weaknesses of the traditional syslogd mentioned above.
syslog-ng is an open sourcesyslogd replacement. It performs all the functions of the standard
syslogd in addition to providing features such as the following:
42 Consolidated Logging
Page 43

• Improved filtering functionality. In addition to syslog's facility/priority level filtering,
syslog-ng can perform regular expression filtering against the program name, hostname,
text of the message itself, the sender's IP address, and so on.
• TCP transport - In addition to syslogd’s UDP transport, syslog-ng supports a TCP
transport which offers better delivery guarantees.
NOTE: syslog-ng's support for a TCP transport does not imply that it safeguards against
all message loss. For example, if the log consolidation server is down, the remote forwarding
clients will indeed experience packet loss once their buffers are exceeded (the client-side
buffer size is configurable with syslog-ng). TCP can offer better reliability in general,
however, and can offer increased security. For example, TCP-based log traffic can be
encrypted using ssh.
• Log rotation based on output filenames - Log output filenames can be based on templates
names whichsupport macro expansion. For example, if the output filename template contains
the month macro, a new filename will created each month.
• Launching programs- A message can trigger a program to be launched, sending the message
to its standard input.
• Log forwarding for arbitrary text-based logs - In conjunction with DSAU's clog_tail tool,
syslog-ng can be used to forward and consolidate arbitrary text-based application log
files such as Serviceguard’s package log files.
3.2.2 syslog Co-existence
The Distributed Systems Administration Utilities configures syslog-ng to co-exist and work
alongside the standard syslogd. syslogd continues to handle all the local logging for the
system. syslog-ng is used when forwarding messages to a log consolidation system and is
used on the log consolidator to receive and filter messages. The following diagrams illustrate
the relationship between syslogd and syslog-ng. Figure 3-1 depicts the configuration on a
syslog-ng client system that is forwarding logs to a remote log consolidation server.
3.2 Log Consolidation Overview 43
Page 44

Figure 3-1 syslog-ng Log-Forwarding Configuration
1. The grey area represents standard syslogd operation. Applications such as Serviceguard’s
cmcld daemon call syslog (see syslog(3C)) to send messages to syslogd. syslog writes
messages to the local system’s /var/adm/syslog/syslog.log and related files.
Applications also frequently have application-specific log files. In this example, Serviceguard
maintains a log of package operations in
/etc/cmcluster/package-name/package-name.log.
2. The clog_tail daemon of DSAU, labeled “Log reader” in the diagram, monitors text-based
logs and sends new log lines to syslog-ng for processing. In a Serviceguard cluster,
clog_tail defaults to monitoring all the package logs.
3. The log_reader sends all new log messages to a named pipe
(log_consolidation_fifo), which is one of the log sources for syslog-ng.
4. The syslog-ng reads any new data from the named pipe and forwards it to the log
consolidation server.
5. The local syslogd, in addition to writing log messages to the local /var/adm/syslog/
syslog.log, is configured to additionally forward all messages to the local instance of
syslog-ng. syslog-ng in turn, forwards these messages to the log consolidator. The
administrator can choose to use UDP, TCP, or TCP with ssh when forwarding messages.
Figure 3-2 illustrates the configuration on the log consolidation server.
44 Consolidated Logging
Page 45

Figure 3-2 syslog-ng Log Consolidator Configuration
1. The syslog-ng server reads the incoming log data from the UDP or TCP connected clients.
Note: gray arrows indicate a read operation; black arrows, a write.
2. The grey area is identical to the client configuration in Figure 3-1: “syslog-ng Log-Forwarding
Configuration”. In terms of the local system, syslog-ng acts as a client and processes
locally forwarded syslog messages and clog_tail messages.
3. The syslog-ng server processes all messages and filters them into the appropriate
consolidated log files. In this specific example, the administrator has created a filesystem
named “/clog” to house the consolidated logs. /clog/syslog/ would contain the
consolidated syslog-related file. /clog/packages would contain consolidated package
logs for a Serviceguard cluster.
3.3 Log Consolidation Configuration
The following sections describe how to configure log consolidation servers and log forwarding
clients. Configuring a consolidation server is a multi-step process. The clog_wizard tool vastly
simplifies the configuration process. If you choose not to use the wizard, the manual configuration
steps are also described below.
Configuring Log Consolidation Server in Cross-Subnet Cluster Environments
In a cluster environment, if all the nodes are within the same subnet, then you can configure a
server within that cluster environment as the log consolidation server.
However, in a cross-subnet cluster environment, the logconsolidation server must be an external
system, preferably a quorum server, outside the cross-subnet cluster. You can configure a
cross-subnet cluster only as a log forwarding client, with an external system acting as the log
consolidation master server. After you configure an external system as the log consolidation
master server, the cross-subnet cluster nodes can be configured as log forwarding clients.
3.3 Log Consolidation Configuration 45
Page 46

3.3.1 Using the Log Consolidation Wizard
The Log Consolidation Wizard is installed as /opt/dsau/sbin/clog_wizard. The wizard
supports creating the following configurations:
• a standalone log consolidation server
• a highly-available log consolidation server for use within a single Serviceguard cluster
(intra-cluster use only)
• a highly-available log consolidation server for use by the local Serviceguard cluster and
remote systems, including Serviceguard cluster clients
• a standalone system forwarding logs to a remote log consolidation server
• a Serviceguard cluster forwarding logs to a remote log consolidation server
Choose the appropriate configuration option.
The wizard detects whether you are running on a standalone system or a Serviceguard cluster.
IMPORTANT: When you run the clog_wizard on a cross-subnet cluster, the system prompts
you to respond to the following question:
Do you want to configure log consolidation? (y/n) [y]:
If you respond with y, the system displays a message indicating that the log consolidation master
server must be an external system outside the cross-subnet cluster, and prompts you to enter
the hostname or the IP address of the log consolidation server.
If the log consolidation server is not configured outside the cross-subnet cluster, then you must
configure an external system, preferably a quorum server, as the log consolidation master server
and later proceed to run the clog_wizard on the cross-subnet cluster node.
When running the wizard on a Serviceguard cluster, the default is to set up clog as a highly
available service (Serviceguard package). The administrator must provision the storage
environment for the package and the required package IP address and DNS name registration.
The wizard supports LVM storage configurations. Non-LVM configurations must be done
manually. The required package information that the wizard requires is listed in the following
table.
Table 3-3 Configuration Data for clog_wizard
Your ValueExampleConfiguration Data
LVM volume group
Logical volume
Filesystem mount point
Mount options
Filesystem type
Package IP Address (a registered DNS
name)
Package subnet
Free ports for tcp and ssh
/dev/vgclog
/dev/vgclog/lvol1
/clog
-o rw, largefiles
vxfs
192.10.25.12
192.10.25.0
1775
3.3.1.1 Configuring a Log Consolidation Standalone Server with clog_wizard
To start the log consolidation wizard, issue the following command:
/opt/dsau/sbin/clog_wizard
For a standalone system, the wizard first displays introductory paragraphs explaining log
consolidation and then asks:
46 Consolidated Logging
Page 47

Do you want to configure log consolidation? (y/n) [y]:
Answer yes (y) or press Enter. The next question is:
You can configure this system hostname as either a:
- Consolidation server
- Client that forwards logs to a remote consolidation server
Do you want to configure hostname as a Consolidation
Server? (y/n) [y]:
Answer yes (y). The wizard then prompts:
Enter the fully qualified directory where the consolidated
logs should be stored []:
It is typically best to select a dedicated filesystem for the consolidated logs. Since consolidated
logs like syslog can grow rapidly, HP also recommends that the filesystem be configured for
“largefiles.” For this example, a filesystem named “/clog” is used.
Next, the wizard prompts for the client’s transport:
You can choose to have the clients forward logs to this
consolidation server using either the UDP protocol or the TCP protocol (recommended).
Do you want to use the TCP protocol? (y/n) [y]:
Selecting TCP does not necessarily preclude the use of UDP forwarded log messages by clients.
Whether the log consolidator allows TCP log messages exclusively, depends on whether the
system is consolidating its own local syslog file. See below for details.
You need to choose a free port on this system for receiving logs. The port chosen
should be free on all cluster nodes.
Note: When configuring log consolidation on the clients,
this port will need to be specified.
Enter the TCP port to be used for receiving logs [1776]:
There is no reserved port for the TCP transport of syslog-ng. Any port that is not in use can
be chosen. HP recommends that the administrator choose a port from the reserved range, that
is, ports below 1024. Only privileged processes on a remote system can connect to privileged
ports. This provides only a weak security guarantee because it implies that the administrator
trusts the remote system. See the ssh section in the log forwarding client section for establishing
stronger security guarantees “Manually Configuring a Standalone Log Forwarding Client”
(page 66).
The /etc/services file documents the well-known reserved ports. When choosing a reserved
port, the wizard will check both /etc/services and use “netstat -an” to check that the
port is not in use.
Note that syslogd uses UDP port 514. TCP port 514 is reserved for use by remsh. remsh is not
a secure protocol and is disabled at many sites. If remsh has been disabled on the consolidator,
you could use TCP port 514. This has the advantage that it is a privileged port and it is the same
as the UDP port number so it is easy to remember and manage. However, if the administrator
changes the system to re-enable the use of remsh, syslog-ng would have to be reconfigured
to use anew port and all the client systemsthat forward tothis system would have to be updated.
Unlike UDP, TCP is a connection-oriented protocol. Each log forwarding client using TCP will
have a connection to the log consolidation server. In order to avoid denial of service attacks, the
default number of TCP connections accepted by syslog-ng is limited to 10 connections. For
larger numbers of clients, edit the consolidation server’s /etc/syslog-ng.conf.server file.
Find the TCP source line in the file:
source s_syslog_tcp { tcp(port(tcp_port) keep-alive(yes));};
and add a max-connections attribute as follows:
source s_syslog_tcp { tcp(port(tcp_port) keep-alive(yes)
max-connections(N)); };
where N is the expected number of clients.
3.3 Log Consolidation Configuration 47
Page 48

Next, the wizard prompts for which local logs should be consolidated:
Log files that reside on this system can be consolidated.
Would you like to consolidate this system's syslogs? (y/n) [y]:
Answering yes places this log consolidation system’s own local syslog data in the consolidated
log along with the client system's syslog data. To preserve the priority and facility of syslog
entries, UDP local loopback is used, and syslog is configured to also forward entries to its local
UDP port 514. syslog-ng is configured to read from this port. Thus, consolidating this system’s
syslogs allows clients to also connect to this log consolidation server via UDP port 514, even
if TCP transport is specified earlier. If you choose not to consolidate this system’s syslogs, then
choosing a TCP transport earlier will require that all log forwarding clients be configured to use
the TCP transport. The wizard displays a summary of all the configuration choices made by the
administrator:
Summary of Log Consolidation Configuration:
You have chosen to configure hostname as a Log
Consolidation Server.
Logs will be forwarded from the remote consolidation
clients to local port 1776 using the TCP protocol.
The consolidated logs will be stored under directory:
/clog
The following logs from the local system will be
consolidated:
Syslog
If these choices are correct, continue:
Do you want to continue? (y/n) [y]: y
The wizard displays its progress by describing which files are being modified and warns that
Ctrl/C is disabled until configuration is done. For a complete description of the modified files,
refer to “Manually Configuring Log Consolidation” (page 56).
Copying files that will be modified by the wizard to
/var/opt/dsau/root_tmp/clog. These files will be used to
restore the system to its current log consolidation
configuration, in the event of a failure.
Configuring hostname as a log consolidation server.
Creating the /etc/syslog-ng.conf.server configuration
file.
Creating a symbolic link from /etc/syslog-ng.conf to the
/etc/syslog-ng.conf.server configuration file.
Creating /etc/rc.config.d/syslog-ng, the log
consolidation configuration file.
Updating the syslog configuration:
Updating the /etc/rc.config.d/syslogd file to add
-N SYSLOGD_OPTS. This stops syslogd from
listening to UDP port 514.
Updating the /etc/syslog.conf file for UDP local
loopback.
Starting syslogd for the configuration changes to
take effect.
Registering the log consolidation ports in the
/etc/services file.
48 Consolidated Logging
Page 49

Starting syslog-ng.
Successfully configured hostname as a log consolidation
server.
3.3.1.2 Configuring a Serviceguard Cluster as a Log Consolidation Server with clog_wizard
When running the clog_wizard (see clog_wizard(1M)) in a cluster, first make sure that all the
cluster members are up and available. The wizard needs to perform configuration operations
on each member. It only needs to be run once, from any member of the cluster. If you run the
wizard more than once, additional prompts may appear.
The wizard will set up and create a Serviceguard package for the consolidated logging service.
Make sure that this cluster’s MAX_CONFIGURED_PACKAGES value can accommodate the
additional package. For more information on this setting, please refer to the Managing Serviceguard
manual which is part of the Serviceguard documentation set.
The wizard first displays introductory paragraphs explaining log consolidation (wizard output
may wrap differently from what is shown here):
Consolidated logging (clog) lets you combine the log entries from multiple
remote systems into a single file. This feature is used to
consolidate syslog data from several systems. Each remote system
continues to write entries to its local syslog.log and additionally
forwards the entries to the consolidating host. The systems forwarding
log entries are consolidation clients. The system to which they send
entries is the consolidation server. In addition to syslog data,
clog can also consolidate arbitrary text log files.
In a Serviceguard cluster, clog can help you automate package log
file consolidation. Log consolidation is especially useful in a
Serviceguard cluster, because it enables you to look at a single
consolidated file instead of the per-member logs. The clog wizard needs
to be run only once in the cluster and not on each cluster member.
All cluster members should be up when running this wizard.
clog_wizard will prompt you for information to configure log file
consolidation. Some questions display a default answer in square
brackets. If you press <Return/Enter>, the clog_wizard uses the
default answer.
Press “Enter” to continue...
Press Enter.
Querying the system cluster_member for current status, one moment...
The next prompt is:
You can configure this cluster clustername as either a:
- Consolidation server
- Client that forwards logs to a remote consolidation server
Do you want to configure cluster_member as a Consolidation
Server? (y/n) [y]:
To configure this cluster as a log consolidation server, the wizard
will create a Serviceguard package called “clog”. The package
requires the following:
- Dedicated storage for failover between cluster members. The
consolidated logs will be stored here. This includes an LVM
volume group, LVM logical volume, a filesystem, filesystem
mount point, and the desired mount options. this storage
infrastructure needs to be configured cluster-wide before
3.3 Log Consolidation Configuration 49
Page 50
proceeding.
- An IP address and subnet address pair for the package. IPv4
or IPv6 addresses can be used. The IP address should be registered
in DNS, if this cluster will consolidate logs from remote clients.
This should be appropriately configured on each cluster member before
proceeding with the consolidation server configuration.
Answer yes (y).
In a cluster, the wizard configures syslog-ng to be highly available using a Serviceguard
package. For consolidated logging, the package name is clog. The LVM storage configuration
and network configuration for the package must be set up before continuing or before running
the wizard. For additional details, refer to the section “Creating a Storage Infrastructure with
LVM” in the chapter “Building an HA Cluster Configuration,” in the Managing Serviceguard
manual.
NOTE: The wizard only supports creating packages based on LVM volume groups. When
using CFS or VxVM, manual configuration is required. See the section “Manually Configuring
Log Consolidation” (page 56) for details.
The wizard prompts for the following, all of which should have already been configured:
1. LVM volume group name (for example, /dev/vgclog).
2. Logical volume in the volume group (for example, /dev/vgclog/lvol1).
3. The filesystem’s mount point (for example, /clog).
4. The filesystem’s mount options (for example, –o rw,largefiles). The mount options
are used verbatim in the Service package control script’s FS_MOUNT_OPT[0] field. Note
that the mount options must agree with the filesystem you created on the logical volume.
For example, if the filesystem was created with largefiles support, the largefiles mount option
should be specified. Since consolidated logs tend to be large, it is recommended to configure
VxFS filesystems with the largefiles option.
5. The filesystem type (for example, vxfs).
6. The package IP address. This should also be a registered DNS name so the log forwarding
is easy to configure on client systems.
7. The package subnet. (Use the netstat -i command to determine the proper subnet.)
Next, the wizard prompts for the clients' transport.
You can choose to have the clients forward logs to this consolidation
server using either the UDP or the TCP protocol (recommended).
Do you want to use the TCP protocol? (y/n) [y]: y
You need to choose a free port on this cluster for receiving logs. The
port chosen should be free on all cluster nodes.
Note: When configuring log consolidation on the clients, this port
will need to be specified.
Enter the TCP port to be used for receiving logs []: 1776
Note that selecting TCP does not necessarily preclude the use of UDP forwarded log messages
by clients. Whether the log consolidator allows TCP log messages exclusively depends on whether
the system is consolidating its own local syslog file. See below for details.
When answering Yes to TCP, you must select a free TCP port. This port must be free on all cluster
members. See the section “Configuring a Log Forwarding Client Using clog_wizard” (page 54)
using the clog_wizard for details on choosing a TCP port.
Next the wizard prompts for which local logs should be consolidated:
Log files that reside on this cluster can be consolidated.
50 Consolidated Logging
Page 51

Would you like to consolidate this cluster's syslogs? (y/n) [y]:
Would you like to consolidate this cluster's package logs? (y/n) [y]:
In a Serviceguard cluster, you can consolidate all the member-specific syslog files into a single
consolidated syslog containing syslog.log, mail.log and syslog-ng.log. Each
member-specific package log can also be consolidated.
Note that if you choose to consolidate the cluster’s syslogs, the remote clients can also forward
UDP syslog messages to the cluster, regardless of the answer to the “Do you want to use the
TCP protocol” question. If you choose not to consolidate this cluster’s syslogs, then choosing
a TCP transport earlier requires that all log forwarding clients be configured to use the TCP
transport.
The consolidated logs are placed in the filesystem associated with the package. Using the example
above, the consolidated syslog.log would be located here:
/clog/syslog/syslog.log,mail.log,syslog-ng.log
The consolidated package logs would be located here:
/clog/package/package1.log,package2.log, ...,packageN.log
The wizard now has all the data it needs to configure the consolidated logging package. It displays
a summary confirmation screen and then performs the configuration:
Summary of Log Consolidation Configuration:
You have chosen to configure clustername as a Log Consolidation Server.
Logs will be forwarded from the remote consolidation clients
to local port port_number using the TCP protocol.
For high availability the Serviceguard package "clog" will be
configured with the following attributes:
Volume Group: /dev/vgclog
Logical Volume: /dev/vgclog/lvol1
Filesystem: /clog
Mount Options: -o rw,largefiles
Filesystem Type: vxfs
IP Address: 192.10.25.12
Subnet: 192.10.25.0
The following logs on this cluster will be consolidated:
Syslog
Serviceguard package logs
Do you want to continue? (y/n) [y]:
******* WARNING!!!! ********
To protect against possible corruption of sensitive configuration files,
control-c has been disabled for the remainder of this configuration.
Copying files that will be modified by the wizard
to /var/opt/dsau/root_tmp/clog on each cluster node.
These files will be used to restore the cluster to its
current log consolidation configuration, in the event
of a failure.
Configuring cluster_member as a log consolidation server.
The configuration will be done on all cluster nodes.
It will take a few minutes....
Creating the /etc/syslog-ng.conf.server configuration file.
Creating the /etc/syslog-ng.conf.client configuration file.
Creating a symbolic link from /etc/syslog-ng.conf to the
/etc/syslog-ng.conf.client configuration file.
[Halting the "clog" Serviceguard package if it is up.]
3.3 Log Consolidation Configuration 51
Page 52

Creating /etc/rc.config.d/syslog-ng, the log consolidation
configuration file.
Updating the syslog configuration:
Updating the /etc/rc.config.d/syslogd file to add -N to
SYSLOGD_OPTS. This stops syslogd from listening to UDP port
514.
Updating the /etc/syslog.conf file for UDP local loopback.
Starting syslogd for the configuration changes to take effect.
Registering the log consolidation ports in the /etc/services file.
Starting syslog-ng.
Setting up the log consolidation server to be highly available.
Configuring the "clog" Serviceguard package.
Applying the "clog" Serviceguard package configuration file.
This will take a moment.
Starting the "clog" Serviceguard package. This will take a few moments...
The "clog" Serviceguard package has been started on cluster_member.
Successfully created the "clog" Serviceguard package.
Successfully configured cluster_member as a log consolidation server.
3.3.1.3 Cluster Configuration Notes for clog
In a Serviceguard cluster, the adoptive node for the clog package performs the log consolidation
functions. All the other cluster members participate as log forwarding clients and send log
messages to the relocatable IP address of the clog package.
DSAU maintains two configuration files that control whether the instance of syslog-ng on a
particular cluster member operates as a consolidation server or a log forwarding client:
/etc/syslog-ng.conf.server and /etc/syslog-ng.conf.client. The symbolic link
/etc/syslog-ng.conf points to one of the configuration files. When the cluster is booted, all
the members start as log forwarding clients with syslog-ng running on each member. The
/sbin/init.d/syslog-ng startup script sets the symbolic link /etc/syslog-ng.conf to
point to /etc/syslog-ng.conf.client.
When the clog package starts, the adoptive node restarts that instance of syslog-ng as a log
consolidation server instance. The package script resets the /etc/syslog-ng.conf symbolic
link to point to /etc/syslog-ng.conf.server. If the clog package is halted, the symlink
is changed to point to /etc/syslog-ng.conf.client and the syslog-ng instance on that
member restarted. Note that when a cluster is a log consolidation server, and the package is
down, no log consolidation occurs and forwarded log messages are lost.
Cluster members can forward log messages to the consolidator using either UDP or TCP. Within
a Serviceguard cluster, ssh port forwarding is not used. ssh port forwarding can be used to
secure the log traffic forwarded by remote clients outside the cluster. For additional information,
refer to “ssh Port Forwarding” (page 78).
3.3.1.4 Serviceguard Automation Features
The Distributed Systems Administration Utilities require Serviceguard 11.17 or later. With
Serviceguard 11.17 or later, when members are added to or deleted from cluster or packages are
52 Consolidated Logging
Page 53

added and deleted, the DSAU consolidated logging tools will automatically take the appropriate
configuration actions. Specifically:
• When adding a member to the cluster, the new member is automatically configured to
participate in log consolidation according to the cluster’s configuration. The following files
are automatically configured on the added member:
— /etc/rc.config.d/syslog-ng
— /etc/rc.config.d/syslogd
— /etc/syslog.conf
— /etc/syslog-ng.conf.client, /etc/syslog-ng.conf.server, andthe /etc/
syslog-ng.conf symbolic link
— /etc/services
• When deleting a member from a cluster:
— The member is still configured as a log-forwarding client and will continue to forward
syslog messages to the cluster if that option had been chosen during the initial run of
the clog_wizard. If the system should no longer forward log messages to the cluster,
rerun the wizard to configure the system to forward to a different consolidator, or
disable log consolidation entirely. Refer to “Disabling Log Consolidation” (page 75)
for additional information.
— The package logs on the deleted member are still monitored until a reboot. Since this
member is no longer part of the cluster, the package logs will not be active.
• When adding or deleting a package, the following automated actions occur:
— The package isadded to or deleted from /etc/syslog-ng.conf.servercluster-wide.
There is a reserved section of these files dedicated for use by the DSAU tools. The
configuration stanzas added in this section direct syslog-ng to filter package log
messages into the appropriate consolidated package logs.
— The clog_tail log monitor adds or deletes the package log file from its list of files to
monitor.
3.3.1.5 Minimizing Message Loss During Failover
When there is a failure on the adoptive node, it takes a finite amount of time for the clog package
to fail over to another cluster member. The longer this failover time, the more likely that messages
could be lost from the consolidated log. Use the following guidelines to minimize message loss
during failover.
• Configure clients to use the TCP transport instead of the UDP transport. UDP messages will
be lost unconditionally when the package is down. The TCP protocol contains retry
mechanisms, congestion control, and so on, that help minimize message loss.
• syslog-ng can buffer TCP messages on the client side. The number of messages buffered
is controlled by the syslog-ng log_fifo_size setting. This sets an upper limit on the
number of messages that can be buffered. The default/etc/syslog-ng.conf file sets
log_fifo_size to 10000.
• syslog-ng has a time_reopen() option to configure the time to wait before a dead
connection is reestablished. The /etc/syslog-ng.conf file has time_reopen() set to
10 seconds.
• Serviceguard offers various configuration options to improve failover times such as
HEARTBEAT_INTERVAL and NODE_TIMEOUT. Serviceguard Extension for Faster Failover
(SGeFF) is also available to optimize failover times for two-node clusters. Since syslog-ng
itself starts quickly, SGeFF is an ideal candidate for improving failover times and minimizing
message loss.
3.3 Log Consolidation Configuration 53
Page 54

3.3.1.6 Configuring a Log Forwarding Client Using clog_wizard
There are two ways to configure a log forwarding client: as a standalone machine or as a
Serviceguard cluster. When configuring a cluster as a log forwarding client, all the members of
the cluster will be configured identically as clients. The wizard asks the same questions and
performs the same configuration actions for single systems and for clusters. The examples below
show use of the clog wizard on a Serviceguard cluster. After starting clog_wizard, answer
“yes” to the following question:
Do you want to configure log consolidation? (y/n) [y]:
or press Enter. The next question is:
You can configure this cluster cluster_member as either a:
- Consolidation server
- Client that forwards logs to a remote consolidation server
Do you want to configure cluster_member as a Consolidation Server? (y/n) [y]: n
Answer “No” here. At this point you are configuring a log forwarding client. The wizard displays
the following:
You now need to specify which system will be the
consolidator. If the consolidator is a Serviceguard
cluster, specify the IP address of the "clog"
Serviceguard package for this question. The "clog"
package makes log consolidation highly
available on the consolidator.
The consolidation server must already be configured.
Enter the hostname or IP address of the consolidator
[]: clog.usa.xyz.com
After entering the hostname or IP address of the log consolidation server, the wizard asks if you
want to use the TCP transport when forwarding log messages:
You can choose to forward logs to the consolidator using either
the UDP protocol or the TCP protocol (recommended).
Do you want to use the TCP protocol? (y/n) [y]:
Standard syslogd forwards messages using the UDP protocol. UDP is a high-performance,
broadcast-oriented protocol with no flow control or message delivery verification. syslog-ng
supports syslogd’s UDP protocol and a TCP protocol. The TCP transport offers both flow
control and message delivery checks. However, since TCP is a connection-oriented protocol, it
requires additional resources on the log consolidation server. The consolidation server’s
max-connections attribute must be set according to the maximum number of expected clients.
Refer to the section “Configuring a Log Consolidation Standalone Server with clog_wizard”
(page 46) for a discussion of the max-connections setting.
If you answer “yes” to using TCP, the next question asks for the TCP port to forward messages
to:
Ask the administrator of the consolidation server which TCP
port was configured for receiving logs.
Enter the TCP port configured on the CONSOLIDATOR for
receiving logs []: 1776
You must use the TCP port selected by the system administrator of the log consolidation server.
If the clog_wizard was used to configure the server, the port number is saved in
/etc/rc.config.d/syslog-ng as the variable CLOG_TCP_PORT. In this example, TCP port
1776 was used. If you answer “yes” to the TCP question, the following question is displayed:
The TCP protocol can be used together with Secure
Shell port forwarding to enhance security. Each member
of this cluster must already have non interactive Secure
54 Consolidated Logging
Page 55

Shell Authentication set up with the consolidator. You
can use the tool /opt/dsau/bin/csshsetup to configure
non interactive Secure Shell Authentication.
Do you want to configure Secure Shell port forwarding? (y/n) [y]:
Choose yes in order to use ssh port forwarding. This will encrypt all the traffic sent from this
local log forwarding client to the log consolidator.
NOTE: A special ssh security configuration is required on the server when a Serviceguard
cluster is the log consolidation server. For details, refer to “ssh Port Forwarding” (page 78).
ssh port forwarding requires an additional free TCP port on the local client system:
You need to choose a free port on this cluster for ssh port forwarding. The port chosen should
be free on all cluster nodes.
Enter the ssh port to be used for port forwarding []: 1775
The same guidelines for choosing a free syslog-ng TCP port apply to this port. For details,
refer to “Configuring a Log Consolidation Standalone Server with clog_wizard” (page 46). In
this example, the local port 1775 was used. For a Serviceguard cluster log forwarding client, the
cluster’s syslogs and package logs can be forwarded to the log consolidation server. For a
standalone system, the wizard asks only about forwarding syslog messages:
Log files that reside on this cluster can be forwarded to the
consolidator.
Would you like to forward this cluster's syslogs? (y/n) [y]:
Would you like to forward this cluster's package logs? (y/n) [y]:
When forwarding a cluster’s package logs, manual configuration is required on the consolidation
server in order to add the syslog-ng filtering lines to cause these package logs to be consolidated
into their own unique files. See “Manually Configuring a Serviceguard Cluster as a Log
Forwarding Client” (page 68) for details.
After all the questions have been answered, the clog_wizard displays the following summary
screen:
Summary of Log Consolidation Configuration:
You have chosen to configure clustername as a Log Consolidation Client.
Logs will be forwarded to the remote consolidation server
clog.usa.xyz.com on port 1776 using the TCP protocol.
The TCP protocol will be used together with Secure Shell
Port Forwarding using port 1775, for added security.
The following logs will be forwarded for consolidation:
Syslog
Serviceguard package logs
Do you want to continue? (y/n) [y]:
Confirm your answers with a“yes” responseand the wizard summarizes the configuration steps
that it performs:
Copying files that will be modified by the wizard to /var/opt/dsau/root_tmp/clog
on each cluster node.
These files will be used to restore the cluster to its current log consolidation
configuration, in the event of a failure.
Configuring clustername as a log consolidation client.
The configuration will be done on all cluster nodes.
It will take a few minutes....
Creating the /etc/syslog-ng.conf.client configuration file.
3.3 Log Consolidation Configuration 55
Page 56

Creating a symbolic link from /etc/syslog-ng.conf to the
/etc/syslog-ng.conf.client configuration file.
Creating /etc/rc.config.d/syslog-ng, the log consolidation configuration file.
Updating the syslog configuration:
Updating the /etc/rc.config.d/syslogd file to add -N to SYSLOGD_OPTS.
This stops syslogd from listening to UDP port 514.
Updating the /etc/syslog.conf file for UDP local loopback.
Starting syslogd for the configuration changes to take effect.
Registering the log consolidation ports in the /etc/services file.
Starting syslog-ng.
Successfully configured clustername as a log consolidation client.
For additional information on the configuration actions performed by the clog_wizard, refer
to “Manually Configuring a Serviceguard Cluster as a Log Consolidation Server” (page 59).
3.3.2 Manually Configuring Log Consolidation
If you choose not to use the Consolidated Logging Wizard, use the following sections for the
manual steps required to configure a log consolidation server and log forwarding clients. Because
there are many steps required to set up clients and servers, HP recommends using the
clog_wizard.
Manual configuration is required for the following cases:
• When a cluster is a log forwarding client and forwarding package logs, manual configuration
is required on the consolidation server (standalone or cluster) to filter the package logs
appropriately.
• When configuring a Serviceguard Cluster as a log consolidator and you require:
— Special customization of the clog package
— Use of VxVM instead of LVM
— Use of the Cluster File System (CFS)
It is often simplest to run the wizard and let it complete the basic configuration and then
customize, starting from that point.
The following sections describe the steps required to configure log consolidation systems
manually. The systems you can configure manually are:
• Standalone log consolidation server
• Serviceguard cluster log consolidation server
3.3.2.1 Manually Configuring a Standalone Log Consolidation Server
Start by configuring the standard syslogd to co-exist with a syslog-ng consolidator. By
default, syslogd listens for incoming log messages on UDP port 514. If you want to accept UDP
syslog messages from remote clients or consolidate this server’s local syslogs, syslog-ng
must listen on UDP port 514. Edit /etc/rc.config.d/syslogd and change SYSLOGD_OPTS
to add the -N switch, which prevents syslogd from listening on port 514. For example:
SYSLOGD_OPTS=“-D -N”
If you want the local syslog messages from the log consolidation server itself to be part of the
consolidated syslog, edit the consolidator’s /etc/syslog.conf file to forward log messages
to port 514 on the local host where they will be read by syslog-ng. Using the HP-UX default
/etc/syslog.conf as an example, add the following lines:
mail.debug @log-consolidation-server
*.info;mail.none @log-consolidation-server
56 Consolidated Logging
Page 57

where log-consolidation-server is the fully qualified domain name of the consolidation
server. The name must be fully qualified or syslogd will not forward the messages properly.
NOTE: There must be a <tab> before each @ sign.
If you have customized syslog.conf, make sure to add the forwarding lines for your
customizations as well.
syslogd must be stopped and restarted for these changes to take effect, using the following
commands:
# /sbin/init.d/syslogd stop
# /sbin/init.d/syslogd start
With syslogd appropriately configured, now configure syslog-ng.
Start with the same syslog-ng.conf templates usedby the clog_wizard. Copy /opt/dsau/
share/clog/templates/syslog-ng.conf.server.template to /etc/
syslog-ng.conf.server. This file has tokens named <%token-name%> that are replaced
by the wizard based on the administrator’s answers to the wizard’s questions.
Replace the tokens as follows:
• When using the TCP protocol and configuring the consolidation server to consolidate its
own syslogs, replace the <%UDP_LOOPBACK_SOURCE%> token with:
source s_syslog_udp { udp(port(514)); };
Replace the <%UDP_LOOPBACK_LOG%> token with:
log { source(s_syslog_udp); destination(d_syslog_tcp); };
This causes the syslog-ng consolidator to read the local syslogd’s UDP messages and
send them to syslog-ng on the local TCP port. Optionally, the destination could be set to
be the local consolidation file directly, (destination(d_syslog) in this default template),
but this configures the consolidation server client components in the same manner as a
remote client. In other words, when the consolidator is a client of itself, it’s configured
identically to remote clients.
If using the UDP protocol or not consolidating the local syslogs of this server, delete
the<%UDP_LOOPBACK_SOURCE%> and <%UDP_LOOPBACK_LOG%> tokens.
• Replace the <%TYPE%> tokens with either udp or tcpdepending on the desired log transport
to support. Note that even when using TCP clients, UDP clients are also supported if the
consolidation of the server’s local syslogs is configured. There are multiple lines with the
<%TYPE%> token and all must be edited appropriately.
• For the “source s_syslog_<%TYPE%>”line, replace the <%PORT%> and<%KEEP_ALIVE%>
tokens with appropriate values, as follows:
source s_syslog_<%TYPE%> { <%TYPE%>(port(<%PORT%>) <%KEEP_ALIVE%>); };
For TCP, the port needs to be an available TCP port. See section “Configuring a Log
Consolidation Standalone Server with clog_wizard” (page 46) for a discussion of selecting
an available port. For UDP, use port 514.
<%KEEP_ALIVE%> applies only when selecting TCP as the log transport. Replace this token
with “keep-alive(yes) ” which instructs syslog-ng to keep connections open when
it is rereading its configuration file. If using UDP, delete this token.
• For the “destination d_syslog_<%TYPE%>” line, replace the <%IP%> and<%PORT%>
tokens:
destination d_syslog_<%TYPE%> { <%TYPE%>(“<%IP%>” port(<%PORT%>)); };
For example, for TCP:
destination d_syslog_tcp { tcp(“local_hostname” port(1776)); };
3.3 Log Consolidation Configuration 57
Page 58

where the <%IP%> is replaced by the server’s IP address or local hostname and the <%PORT%>
is replaced by the selected TCP port number.
For UDP:
destination d_syslog_udp { udp(“local_hostname” port(514)); }
where <%IP%> is replaced by the server’s IP address or local hostname and the <%PORT%>
token is replaced by 514, the standard syslog UDP port.
• Replace the<%FS%> token with the filesystem or directory where the consolidated logs will
be kept. For example,
destination d_syslog { file(“<%FS%>/syslog/syslog.log”); };
becomes:
destination d_syslog { file(“/clog/syslog/syslog.log”); };
Make sure that this directory exists or the appropriate filesystem is mounted. Since
consolidated logs can grow quite large, HP recommends that this filesystem use the largefiles
option and that there is sufficient room for growth.
• When using TCP, record the port number you choose above in the /etc/services file.
For example, add the line:
clog_tcp 1776/tcp # Consolidated logging with syslog-ng
• Create the following symbolic link:
ln -sf /etc/syslog-ng.conf.server /etc/syslog-ng.conf
• The syslog-ng startup procedure, /sbin/init.d/syslog-ng, relies on several
configuration variables. Edit /etc/rc.config.d/syslog-ng as follows:
— Change the CLOG_CONFIGURED line to:
CLOG_CONFIGURED=1
— Add the following lines:
CLOG_CONSOLIDATOR=1
CLOG_FS=directory where the consolidated logs will be stored
If using the TCP protocol, add:
CLOG_TCP=1
CLOG_TCP_PORT=tcp port chosen for log consolidation
otherwise, if using the UDP protocol, add:
CLOG_TCP=0
If consolidating the local syslogs, add:
CLOG_SYSLOG=1
otherwise add:
CLOG_SYSLOG=0
For a standalone consolidator, add the following:
CLOG_SYSTEM_LOG_CONSOLIDATION_DIR=<consolidated log directory/syslog>
CLOG_SERVICEGUARD_PACKAGE_LOG_CONSOLIDATION_DIR=<consolidated log directory/packages>
— Add the following two values that are used by the System and Consolidated Log Viewer:
CLOG_LAYOUTS_DIR=/var/opt/dsau/layouts
CLOG_ADDITIONAL_LOG_DIRS[0]=/var/adm/syslog
• Test the configuration by performing the following steps:
58 Consolidated Logging
Page 59

1. Run /opt/dsau/sbin/syslog-ng with the -s or --syntax-only option to verify
the syntax of the /etc/syslog-ng.conf file. This should be a symbolic link to /etc/
syslog-ng.conf.server as described previously.
2. Start syslog-ng using /sbin/init.d/syslog-ng start.
3. If consolidating the local syslogs, use logger test-message and make sure this
message is in the consolidated syslog.log. If you are not consolidating the local logs,
use the logger command from a log forwarding client. Note that the logger messages
are first sent to the local syslog which forwards them to syslog-ng. syslogd by
default suppresses duplicate messages. If you issue multiple logger test messages, make
sure each is unique.
3.3.2.2 Manually Configuring a Serviceguard Cluster as a Log Consolidation Server
Configuring a Serviceguard cluster as a log consolidation server is similar to the steps for a single
system. All cluster members must be up and accessible before proceeding.
Create the configuration files described below on every cluster member. The simplest approach
is to configure one member completely and then copy each configuration file cluster-wide. The
cexec and ccp tools can simplify replicating changes cluster-wide.
For a cluster configuration, syslog-ng is configured as a package so the log consolidation
service is highly available. The package must be named clog and the package configuration
files require the following information:
• Registered IP address and DNS name for the clog package
• The subnet associated with that IP address
• Cluster-wide storage configuration using LVM or VxVM
• A filesystem configured on the cluster-wide storage, that can be VxFS or CFS. Since
consolidated logs grow rapidly, HP recommends that the filesystem be configured using
the largefiles option and that there is room for growth.
Complete IP address registration and storage/filesystem configuration before continuing. For
additional information on creating the Serviceguard storage/filesystem configuration for a
package, refer to the Managing Serviceguard manual.
For an overview of how to configure consolidated logging in a cluster, see the section “Cluster
Configuration Notes for clog” (page 52).
3.3 Log Consolidation Configuration 59
Page 60

1. If you want the local syslog messages for the cluster itself to be part of the consolidated
syslog, complete the following tasks:
a. Start by configuring the standard syslogd to co-exist with a syslog-ng consolidator.
By default, syslogd listens for incoming log messages on UDP port 514. To use the
UDP protocol or consolidate this server’s local syslogs, syslog-ng must listen on
UDP port 514. Edit/etc/rc.config.d/syslogd and change SYSLOGD_OPTS to add
the -N switch to prevent syslogd from listening on port 514. For example:
SYSLOGD_OPTS=“-D -N”
b. Edit the/etc/syslog.conf file to forward log messages to UDP port 514 on the local
host where they will be read by syslog-ng. Using the HP-UX default /etc/
syslog.conf as the example, add the following lines:
mail.debug @log-consolidation-server
*.info;mail.none @log-consolidation-server
where log-consolidation-server is the fully qualified domain name of the local
cluster member. The name mustbe fully qualified orsyslogd will not forward messages
properly.
If you have customized syslog.conf, make sure to add the forwarding lines for your
customizations as well.
c. Since /etc/rc.config.d/syslogd is generic, it can be distributed cluster-wide
using ccp, as follows:
# cpp /etc/rc.config.d/syslogd /etc/rc.config.d/
d. The /etc/syslog.conf is specific to each member and the edits described previously
must be performed on each cluster member.
e. Once you have made the above changes on each cluster member, syslogd must be
restarted for these changes to take effect. Use cexec to do this on all members of the
cluster:
# cexec “/sbin/init.d/syslogd stop;/sbin/init.d/syslogd start”
2. To configure syslog-ng, start with the same syslog-ng.conf templates used by the
clog_wizard. On one cluster member, copy
/opt/dsau/share/clog/templates/syslog-ng.conf.server.template
to /etc/syslog-ng.conf.server. Then copy an
/opt/dsau/share/clog/templates/syslog-ng.conf.client.template
to /etc/syslog-ng.conf.client. Both files have tokens named <%token-name%>
that are replaced by the wizard based on the administrator’s answers to the wizard’s
questions.
Manually replace the tokens in /etc/syslog-ng.conf.server as follows:
60 Consolidated Logging
Page 61

a. When using the TCP protocol and configuring the consolidation server to consolidate
its own syslogs, replace the <%UDP_LOOPBACK_SOURCE%> token with:
source s_syslog_udp { udp(port(514)); };
Replace the <%UDP_LOOPBACK_LOG%> token with:
log { source(s_syslog_udp); destination(d_syslog_tcp); };
This causes the syslog-ng consolidator to read the local syslogd’s UDP messages
and send them to syslog-ng on the local TCP port. Optionally, the destination could
be set to be the local consolidation file directly (destination(d_syslog) in this
default template), but the above configuration sets the consolidation server client
components inthe same manner asa remote client. Inother words, when the consolidator
is a client of itself, it is configured identically to remote clients.
If using the UDP protocol or not consolidating the local syslogs of this cluster, delete
the <%UDP_LOOPBACK_SOURCE%> and <%UDP_LOOPBACK_LOG%> tokens.
b. Replace the <%TYPE%> tokens with either udp or tcp depending on the desired log
transport to support. Note that even when using TCP clients, UDP clients are also
supported, if the consolidation of the cluster’s local syslogs is configured. There are
multiple lines with the <%TYPE%> token and all must be edited appropriately.
c. For the “source s_syslog_<%TYPE%>” line, replace the <%PORT%> and
<%KEEP_ALIVE%> tokens with appropriate values:
source s_syslog_<%TYPE%> {<%TYPE%>(port(<%PORT%>)<%KEEP_ALIVE%>); };
For TCP, the port needs to be an available TCP port on all cluster members. See the
section “Configuringa Log Consolidation Standalone Server with clog_wizard” (page 46)
for a discussion of selecting an available port. For UDP, use port 514.
<%KEEP_ALIVE%> applies only when selecting TCP as the log transport. Replace this
token with “keep-alive(yes)” which instructs syslog-ng to keep connections
open when it is rereading its configuration file. If using UDP, delete this token.
d. For the destination d_syslog_<%TYPE%> line, replace the <%IP%>and <%PORT%>
tokens:
destination d_syslog_<%TYPE%> { <%TYPE%>(“<%IP%>” port(<%PORT%>)); };
For example, for TCP:
destination d_syslog_tcp { tcp(“package IP” port(1776)); };
where the <%IP%> is replaced by the clog package IP address or hostname and the
<%PORT%> is replaced by the selected TCP port number.
For UDP:
destination d_syslog_udp { udp(“package IP” port(514)); };
where <%IP%> is replaced by the clog package IP address or hostname and the
<%PORT%> token is replaced by 514, the standard syslog UDP port.
3.3 Log Consolidation Configuration 61
Page 62

e. Replace the <%FS%> token with the filesystem or directory where the consolidated logs
will be kept.This filesystem/directory is the one managed by the Serviceguardpackage.
For example:
destination d_syslog { file(“<%FS%>/syslog/syslog.log”); };
becomes:
destination d_syslog { file(“/clog/syslog/syslog.log”); };
Make sure that this filesystem mount point exists cluster-wide and that the storage fails
over correctly cluster-wide. Since consolidated logs can grow quite large, HP
recommends that this filesystem use the largefiles option and that there is sufficient
room for growth.
For additional information on creating the Serviceguard storage/filesystem configuration
for a package, refer to the Managing Serviceguard manual.
3. Manually replace the tokens in /etc/syslog-ng.conf.client as follows:
a. If configuring the cluster to consolidate its own syslogs, replace the
<%UDP_LOOPBACK_SOURCE%> token with:
source s_syslog_udp { udp(port(514)); };
Replace the <%UDP_LOOPBACK_LOG%> token with:
log { source(s_syslog_udp); destination(d_syslog_<type>); };
where <type> is either tcp or udp depending on the desired log transport. Thiscauses
syslog-ng to read the local syslogd’s UDP messages and send them to the log
consolidation server.
If you do not want to consolidate the local syslogs of this cluster, delete the
<%UDP_LOOPBACK_SOURCE%> and <%UDP_LOOPBACK_LOG%> tokens.
b. Replace all the <%TYPE%> tokens with either tcp or udp depending on the desired log
transport.
c. Find the line: “destination d_syslog_<%TYPE%>{
<%TYPE%>(“<%IP%>”port(<%PORT>%>)); };.”
Replace <%IP%> with the IP address of the clog package. For TCP, replace <%PORT%>
with the TCP port used for log forwarding (selected above). For UDP, replace <%PORT%>
with 514, the standard UDP port.
62 Consolidated Logging
Page 63

4. The syslog-ng startup procedure, /sbin/init.d/syslog-ng, relies on several
configuration variables. Edit /etc/rc.config.d/syslog-ng as follows:
a. Change the CLOG_CONFIGURED line to:
CLOG_CONFIGURED=1
b. Add the following lines:
CLOG_CONSOLIDATOR=1
If using the TCP protocol, add:
CLOG_TCP=1
CLOG_TCP_PORT=tcp port chosen for log consolidation
otherwise, if using the UDP protocol, add:
CLOG_TCP=0
If consolidating the local syslogs, add:
CLOG_SYSLOG=1
otherwise, add:
CLOG_SYSLOG=0
If consolidating package logs of this cluster, add:
CLOG_PACKAGE=1
otherwise
CLOG_PACKAGE=0
c. Add the following two values which are used by the System and Consolidated Log
Viewer:
CLOG_LAYOUTS_DIR=/var/opt/dsau/layouts
CLOG_ADDITIONAL_LOG_DIRS[0]=/var/adm/syslog
5. All the files edited thus far need to be distributed cluster-wide:
# ccp /etc/syslog-ng.conf.server /etc/
# ccp /etc/syslog-ng.conf.client /etc/
# ccp /etc/rc.config.d/syslog-ng /etc/rc.config.d/
6. When using TCP, record the port number you chose above in the /etc/services file. For
example, add the line:
clog_tcp 1776/tcp # Consolidated logging with syslog-ng
Add this line to /etc/services for each member of the cluster.
3.3.2.2.1 Creating the clog Package
To create the consolidated logging or clog package, start by copying the package templates:
# mkdir /etc/cmcluster/clog
# cd /etc/cmcluster/clog
# cp /opt/dsau/share/serviceguard/templates/clog.conf.template clog.conf
# cp /opt/dsau/share/serviceguard/templates/clog.script.template clog
# chmod +x clog
Both the clog.conf package configuration file and the clog package control script need to be
edited to replace marker tokens with the correct values.
For clog.conf, there is only one token to replace, <%SG_PKG_SUBNET%>. This identifies the
package’s subnet. It is the same as the subnet value in the package control script. Use netstat
-i to help identify the proper subnet for the package’s IP address.
For the package control script, clog, make the changes described below.
The default script template assumes you are using an LVM-based storage configuration. Replace
the volume group/filesystem related tokens as appropriate for the package’s storage configuration
as follows:
3.3 Log Consolidation Configuration 63
Page 64

1. Find the line “VG[0]=“<%SG_PKG_VOL_GRP%>”” and replace the token with the name of
the VM volume group for the package. For example:
VG[0]=“vgclog”
If using VxVM, comment out the LVM Volume Group line
VG[0]=”<%SG_PKG_VOL_GRP%>”. Uncomment the line “VXVM_DG[0]=” and put in the
VxVM Disk Group.
2. Find the line “LV[0]=“<%SG_PKG_LOG_VOL%>”” and replace the token with the full name
of the logical volume. For example:
LV[0]=“/dev/vgclog/lvol1”
3. Find the line “FS[0]=“<%SG_PKG_FS%>”” and replace the token with the name of the
filesystem created for this package. For example:
FS[0]=“/clog”
All the consolidated logs will reside on this filesystem. The specific location for the
consolidated package logs and the consolidated syslogs is specified in the /etc/
syslog-ng.conf.server file. Using /clog as the example, the default locations based
on the template /etc/syslog-ng.conf.server file are:
/clog/syslog/syslog.log
/clog/packages/package name.log
4. Find the line “FS_MOUNT_OPT[0]=“<%SG_PKG_MNT_OPT%>”:” and replace the token
with the filesystem’s mount options. For example:
FS_MOUNT_OPT[0]=-o rw,largefiles
5. Find the line “FS_TYPE[0]=“<%SG_PKG_FS_TYPE%>”” and replace the token with the
filesystem type. For example:
FS_TYPE[0]=vxfs
6. Find the line “FS_UMOUNT_OPT[0]=“<%SG_PKG_FS_UMOUNT_OPT%>”” and replace the
token with any filesystem umount options. The token can be removed and this option left
blank if there are no special umount options. For example:
FS_UMOUNT_OPT[0]=“”
7. Find the line “FS_FSCK_OPT[0]=“<%SG_PKG_FS_FSCK_OPT%>”” and replace the token
with any filesystem specific fsck options. The token can be deleted and this option left blank.
For example:
FS_FSCK_OPT[0]=
8. Find the line “IP[0]=“<%SG_PKG_IP%>”” and replace the token with the IP address of
the clog package. For example:
IP[0]= 192.119.152.3
9. Find the line “SUBNET[0]=“<%SG_PKG_SUBNET%>”” and replace the token with the subnet
for the packages IP address. Use netstat -i to help determine the subnet. For example:
SUBNET[0]= 192.119.152.0
You next need to distribute the package files cluster-wide. To do this, perform the following
steps:
1. First, create the package directory on all the other members:
# cexec mkdir /etc/cmcluster/clog
2. Copy the package control script and package ASCII configuration file:
# ccp clog clog.conf /usr/local/cmcluster/conf/clog/
3. Update the /etc/rc.config.d/syslog-ng file, by adding the following lines:
CLOG_PKG_VOL_GRP=LVM-volume-group
CLOG_PKG_LOG_VOL=logical-volume(full path)
64 Consolidated Logging
Page 65

CLOG_PKG_FS=filesystem mount point where the consolidated logs are stored
CLOG_PKG_MNT_OPT=file systems mount options such as -o rw,largefiles
CLOG_PKG_FS_TYPE=file system type
CLOG_PKG_IP=IP address of the clog package
CLOG_PKG_SUBNET=subnet of the clog package’s IP address
CLOG_SYSTEM_LOG_CONSOLIDATION_DIR=file system mount point/syslog
CLOG_SERVICEGUARD_PACKAGE_LOG_CONSOLIDATION_DIR=file system mount point/packages
CLOG_PKG_RETRY_TIMES=1
CLOG_PKG_MONITOR_INTERVAL=5
4. Distribute it cluster-wide:
# ccp /etc/rc.config.d/syslog-ng /etc/rc.config.d/
3.3.2.2.2 Testing and Starting the clog Package
Before starting the package, test the configuration thus far:
1. Run /opt/dsau/sbin/syslog-ng with the -s or --syntax-only option to verify the
syntax of the/etc/syslog-ng.conf.server and/etc/syslog-ng.conf.client
files. For the package’s adoptive node, a symbolic link will be created named /etc/
syslog-ng.conf and this symbolic link will point to the .server file. For the remaining
cluster members, the symbolic link will point to the.client file. Since the package is not
yet running, use syslog-ng to check each file explicitly as follows:
# /opt/dsau/sbin/syslog-ng --syntax-only --cfgfile /etc/syslog-ng.conf.server
# /opt/dsau/sbin/syslog-ng --syntax-only --cfgfile /etc/syslog-ng.conf.client
If all the edits have been applied correctly, no errors should be displayed.
2. Start syslog-ng on each cluster member. Each syslog-ng will start as a log forwarding
client:
# cexec /sbin/init.d/syslog-ng start
Use the cluster-wide ps command, cps, to validate that all the daemons started correctly:
# cps -ef grep syslog-ng
You should see a syslog-ng daemon running on each cluster member.
3. Create the clog package:
# cd /etc/cmcluster/clog/
# cmapplyconf -P clog.conf
Serviceguard will validate the package configuration and report any errors. Correct any
errors and try again.
4. Start the clog package:
# cmmodpkg -e clog
Then use cmviewcl to make sure it is running:
# cmviewcl -p clog
If there are problems running the package, check the /etc/cmcluster/clog/clog.log
files on each member to help troubleshoot the problem.
3.3 Log Consolidation Configuration 65
Page 66

5. Validate that log forwarding is working properly. If consolidating the cluster’s local syslogs,
use “logger test-message” and make sure this message is in the consolidated
syslog.log. If you are not consolidating local logs, use the logger command from a log
forwarding client.
Note that logger messages are first sent to the local syslogd, which forwards them to
syslog-ng. By default, syslogd suppresses duplicate messages. If you issue multiple
logger test messages, make sure each is unique. The logger message should appear in
the consolidated syslog.log located in the directory specified in the /etc/
syslog-ng.conf.server file. For the examples above, that directory would be /clog/
syslog/syslog.log.
If consolidating package logs for this cluster, any package actions that generate package log
information, such as a package failover, should cause a consolidated package log to appear
in /clog/packages.
3.3.2.2.3 Using VxVM Instead of LVM
The default clog package script template assumes that you are using LVM based storage. To use
VxVM storage instead, you must edit the clog package script under /usr/local/cmcluster/
conf/clog/clog. Comment out the LVM Volume Group line “VG[0]=“xxx””, uncomment
the line “VXVM_DG[0]=”, and enter the VxVM Disk Group.
3.3.2.3 Manually Configuring Log Forwarding Clients
You can configure either a standalone system or a Serviceguard cluster as log forwarding clients.
You can also manually configure Serviceguard package logs as if they were syslog data. For
each case, you set up both syslogd and syslog-ng.
3.3.2.3.1 Manually Configuring a Standalone Log Forwarding Client
1. Start by configuring the standard syslogd to co-exist with a syslog-ng forwarder.
a. By default, syslogd listens for incoming log messages on UDP port 514. If you want
to forward this system's syslogs, syslog-ng must listen on UDP port 514. Edit /etc/
rc.config.d/syslogd and change SYSLOGD_OPTS to add the-N switch which
prevents syslogd from listening on port 514. For example:
SYSLOGD_OPTS=“-D -N”
b. Edit the system’s /etc/syslog.conf file to forward log messages to port 514 on the
local host where they will be read by syslog-ng. Using the HP-UX default /etc/
syslog.conf as the example, add the following lines:
mail.debug @fully qualified hostname
*.info;mail.none @fully qualified hostname
where fully qualified hostname is the fully qualified hostname of this system.
The name must be fully qualified or syslogd will not forward the messages properly.
If you have customized syslog.conf, make sure to add the forwarding lines for your
customizations as well.
c. Stop and restart syslogd for these changes to take effect:
# /sbin/init.d/syslogd stop
# /sbin/init.d/syslogd start
2. To configure syslog-ng, start with the same syslog-ng.conf templates used by the
clog_wizard.
Copy /opt/dsau/share/clog/templates/syslog-ng.conf.client.template
to /etc/syslog-ng.conf.client. This file has tokens named <%token-name%> that
are replaced by the wizard based on the administrator’s answers to the wizard’s questions.
Manually replace the tokens in /etc/syslog-ng.conf.client as follows:
66 Consolidated Logging
Page 67

a. If configuring the system to forward its syslogs to the consolidation server, replace
the <%UDP_LOOPBACK_SOURCE%> token with:
source s_syslog_udp { udp(port(514)); };
Replace the <%UDP_LOOPBACK_LOG%> token with:
log { source(s_syslog_udp); destination(d_syslog_type); };
where type is either tcp or udp depending on the desired log transport. This causes
syslog-ng to read the local syslogd’s UDP messages and send them to the log
consolidation server. If you do not want to consolidate the local syslogs of this system,
delete the <%UDP_LOOPBACK_SOURCE%> and <%UDP_LOOPBACK_LOG%> tokens.
b. Replace all the <%TYPE%> tokens with either tcp or udp depending on the desired log
transport.
c. Find the line
“destination d_syslog_<%TYPE%>{<%TYPE%>(“<%IP%>” port(<%PORT%>)); };”
If using the UDP protocol, replace <%IP%> with the IP address of the log consolidation
server and <%PORT%> with 514, the standard UDP port.
If using the TCP protocol with ssh port forwarding, replace <%IP%> with 127.0.0.1 and
<%PORT%> with the port chosen for ssh port forwarding. The same guidelines for
choosing a free syslog-ng TCP port apply to this port. For details, refer to “Configuring
a Log Consolidation Standalone Server with clog_wizard” (page 46).
Non-interactive secure shell authentication must be set up between this system and the
log consolidator (you can use the /opt/dsau/bin/csshsetup tool for the
configuration). For details, refer to “ssh Port Forwarding” (page 78).
If using the TCP protocol without ssh port forwarding, replace <%IP%> with the IP
address of the log consolidation server and <%PORT%> with TCP port chosen on the
log consolidator used for log consolidation.
d. Create the following symbolic link:
ln -sf /etc/syslog-ng.conf.client /etc/syslog-ng.conf
3.3 Log Consolidation Configuration 67
Page 68

3. The syslog-ng startup procedure, /sbin/init.d/syslog-ng, relies on several
configuration variables. Edit /etc/rc.config.d/syslog-ng as follows:
a. Change the CLOG_CONFIGURED line to:
CLOG_CONFIGURED=1
b. Add the following lines:
CLOG_CONSOLIDATOR=0
CLOG_CONS_IP=IP address of the log consolidator
c. If using the TCP protocol add the following lines:
CLOG_TCP=1
CLOG_TCP_PORT=log consolidation server tcp port
If using ssh port forwarding add:
CLOG_SSH=1
CLOG_SSH_PORT=ssh port chosen
otherwise , use:
CLOG_SSH=0
otherwise, if using the UDP protocol, use:
CLOG_TCP=0
If consolidating the local syslogs, use:
CLOG_SYSLOG=1
otherwise, use:
CLOG_SYSLOG=0
4. When using TCP with ssh port forwarding, record the ssh port number you chose above
in the /etc/services file. For example, add the line:
clog_ssh 1776/tcp # Consolidated logging with ssh port forwarding
Add this line to the /etc/services file of this system.
5. Test the configuration by performing the following steps:
a. Run/opt/dsau/sbin/syslog-ng with the -s or --syntax-only option to verify
the syntax of the /etc/syslog-ng.conf file. This should be a symbolic link to /etc/
syslog-ng.conf.client as described above.
b. Start syslog-ng using the following command:
# /sbin/init.d/syslog-ng start
c. If consolidating the local syslogs, use “logger test-message” and make sure this
message is in the consolidated syslog.log on the log consolidation server. Note that
the logger messages are first sent to the local syslog which forwards them to
syslog-ng. By default, syslogd suppresses duplicate messages. If you issue multiple
logger test messages, make sure each is unique.
3.3.2.3.2 Manually Configuring a Serviceguard Cluster as a Log Forwarding Client
Configuring a Serviceguard cluster as a log forwarding client is similar to configuring a single
system. All cluster members must be up and accessible before proceeding. You will first configure
syslogd, then syslog-ng.
Create the configuration files described below on every cluster member. The simplest approach
is to completely configure one member and then copy each configuration file cluster-wide. The
cexec and ccp tools can simplify replicating changes cluster-wide.
68 Consolidated Logging
Page 69

1. If you want the syslog messages for the cluster to be forwarded to the log consolidator,
do the following:
a. Start by configuring the standard syslogd to co-exist with a syslog-ng forwarder.
By default, syslogd listens for incoming log messages on UDP port 514. To forward
this cluster’s syslogs, syslog-ng must listen on UDP port 514. Edit
/etc/rc.config.d/syslogd and change SYSLOGD_OPTS to add the-N switch; this
prevents syslogd from listening on port 514. For example,
SYSLOGD_OPTS=“-D -N”
b. Edit the system’s /etc/syslog.conf file to forward log messages to port 514 on the
local host where they will be read by syslog-ng. Using the HP-UX default
/etc/syslog.conf as the example, add the following lines:
mail.debug @fully qualified hostname
*.info;mail.none @fully qualified hostname
where fully qualified hostname is the fully qualified hostname of this cluster
member. This name must be fully qualified or syslogd will not forward the messages
properly.
If you have customized syslog.conf, make sure to add the forwarding lines for your
customizations as well.
c. Stop and restart syslogd as follows for these changes to take effect:
# /sbin/init.d/syslogd stop
# /sbin/init.d/syslogd start
d. Since /etc/rc.config.d/syslogd is generic, it can be distributed cluster-wide
using ccp:
# cpp /etc/rc.config.d/syslogd /etc/rc.config.d/
e. The /etc/syslog.conf is specific to each member and the edits described above
must be performed on each cluster member.
f. Making the above changes on each cluster member, syslogd must be restarted for
these changes to take effect. Use cexec to do this on all members of the cluster:
# cexec “/sbin/init.d/syslogd stop;/sbin/init.d/syslogd start”
3.3 Log Consolidation Configuration 69
Page 70

2. To configure syslog-ng, start with the same syslog-ng.conf templates used by the
clog_wizard.
On one cluster member, copy the /opt/dsau/share/clog/templates/
syslog-ng.conf.client.template to /etc/syslog-ng.conf.client. This file
contains tokens named <%token-name%> which are replaced by the wizard based on the
administrator’s answers to the wizard’s questions.
Manually replace the tokens in /etc/syslog-ng.conf.client as follows:
a. If configuring the cluster to forward its syslogs to the consolidation server, replace
the <%UDP_LOOPBACK_SOURCE%> token with:
source s_syslog_udp { udp(port(514)); };
Replace the <%UDP_LOOPBACK_LOG%> token with:
log { source(s_syslog_udp); destination(d_syslog_type); };
where type is either tcp or udp depending on the desired log transport. This causes
syslog-ng to read the local syslogd’s UDP messages and send them to the log
consolidation server. If you do not want to consolidate the local syslogs of this cluster,
delete the <%UDP_LOOPBACK_SOURCE%> and <%UDP_LOOPBACK_LOG%> tokens.
b. Replace all the <%TYPE%> tokens with either tcp or udp depending on the desired log
transport.
c. Find the line
“destination d_syslog_<%TYPE%> {<%TYPE%>(“<%IP%>”port(<%PORT%>)); };”
If using the UDP protocol, replace <%IP%> with the IP address of the log consolidation
server and <%PORT%> with 514, the standard UDP port. If using TCP protocol with ssh
port forwarding, replace <%IP%> with 127.0.0.1 and <%PORT%> with the port chosen
for ssh port forwarding. The same guidelines for choosing a free syslog-ng TCP port
apply to this port. For details, refer to “Configuring a Log Consolidation Standalone
Server with clog_wizard” (page 46). (Note that the ssh port chosen should be a free
port on all cluster members). Non-interactive secure shell authentication must be set
up between each member of this cluster and the log consolidator (can use
/opt/dsau/bin/csshsetup tool for the configuration). For details, refer to “ssh Port
Forwarding” (page 78).
If using the TCP protocol without ssh port forwarding, replace <%IP%> with the IP
address of the log consolidation server and <%PORT%> with TCP port chosen on the
log consolidator used for log consolidation.
70 Consolidated Logging
Page 71

3. The syslog-ng startup procedure, /sbin/init.d/syslog-ng, relies on several
configuration variables. Edit /etc/rc.config.d/syslog-ng as follows:
a. Change the CLOG_CONFIGURED line to:
CLOG_CONFIGURED=1
b. Add the following lines:
CLOG_CONSOLIDATOR=0
CLOG_CONS_IP=IP address of the log consolidator
c. If using the TCP protocol, add the following lines:
CLOG_TCP=1
CLOG_TCP_PORT=log consolidation server tcp port
If using ssh port forwarding, add:
CLOG_SSH=1
CLOG_SSH_PORT=ssh port chosen
otherwise, add:
CLOG_SSH=0
otherwise, if using the UDP protocol, add:
CLOG_TCP=0
If consolidating the local syslogs, add:
CLOG_SYSLOG=1
otherwise add:
CLOG_SYSLOG=0
If consolidating this cluster’s package logs, add:
CLOG_PACKAGE=1
otherwise, add:
CLOG_PACKAGE=0
4. All the files edited thus far need to be distributed cluster-wide:
# ccp /etc/syslog-ng.conf.client /etc/
# ccp /etc/rc.config.d/syslog-ng /etc/rc.config.d/
Create the following symbolic link on each cluster member:
# ln -sf /etc/syslog-ng.conf.client /etc/syslog-ng.conf
5. When using TCP with ssh port forwarding, record the ssh port number you chose above
in the /etc/services file. For example, add the line:
clog_ssh 1776/tcp # Consolidated logging with ssh port forwarding
Add this line to the /etc/services file of each cluster member.
6. To consolidate this cluster’s package logs, additional manual steps are needed on the log
consolidation server. Each time a package is created or deleted on this cluster, these steps
need to be done. Refer to “Consolidating Package Logs on the Log Consolidation Server”
(page 74).
3.3 Log Consolidation Configuration 71
Page 72

7. Test the configuration by performing the following steps:
a. Run /opt/dsau/sbin/syslog-ng with the -s or --syntax-only option to verify
the syntax of the/etc/syslog-ng.conf file. This should be a symbolic link to /etc/
syslog-ng.conf.client as described above.
b. Start syslog-ng on all cluster members using
# cexec “/sbin/init.d/syslog-ng start”
c. If consolidating the local syslogs, use “logger test-message” and make sure this
message is in the consolidated syslog.log on the log consolidation server. Note that
the logger messages are first sent to the local syslog which forwards them to syslog-ng.
By default, syslogd suppresses duplicate messages. If you issue multiple logger test
messages, make sure each is unique.
3.3.2.3.3 Forwarding ASCII Log Data
The Consolidated Logging Wizard can automatically configure Serviceguard package logs to be
monitored and forwarded as if they were syslog data. These logs are standard ASCII log files.
For manual configurations, settingCLOG_PACKAGE=1, as described in “Manually Configuring
a Serviceguard Cluster as a Log Forwarding Client” (page 68), automatically takes care of package
log forwarding.
You can manually configure log consolidation for arbitrary ASCII log files using the following
procedures for:
• Forwarding text logs for consolidation
• Consolidating text logs on the log consolidation server
3.3.2.3.3.1 Forwarding Text Logs for Consolidation
This procedure contains several steps:
1. Make sure the system is configured as a log consolidation client or server. (Check the /etc/
rc.config.d/syslog-ng file: if CLOG_CONFIGURED=1, the system is configured.) If
not, use the Consolidated Logging wizard or the manual configuration methods described
in this document to configure the system for log consolidation.
2. Edit the system’s /etc/rc.config.d/syslog-ng file. For each ASCII log file you plan
to consolidate, do the following:
• Add an entry to the CLOG_TEXT_LOG[]array, starting at array index 0. The value for
the array entry must be a complete path to the ASCII log file. For example,
CLOG_TEXT_LOG[0]=/var/opt/myapp/myapp.log
CLOG_TEXT_LOG[1]=/var/adm/logs/mylog.log
• By default, as each line of the text log is forwarded to the log consolidator, values for
several parameters are prepended to each record make the record compatible with
syslog record format.
— If the system is part of a Serviceguard cluster, the following values are prepended:
date timestamp hostname clustername_logfilename
— If the system is not part of a Serviceguard cluster, the following values are
prepended: date timestamp hostname hostname_logfilename
This is equivalent to specifying the following: CLOG_TEXT_FORMAT[n]="custom"
For example, assuming the log files myapp.logand mylog.logare not in syslog
format, the original example could have been fully specified as the following:
CLOG_TEXT_LOG[0]=/var/opt/myapp/myapp.log
CLOG_TEXT_FORMAT[0]="custom"
CLOG_TEXT_LOG[1]=/var/adm/logs/mylog.log
CLOG_TEXT_FORMAT[1]="custom"
72 Consolidated Logging
Page 73

If the text file is already formatted using the syslog-compatible format shown above,
then add the corresponding CLOG_TEXT_FORMAT[n]entry with a value of “syslog”.
For example,
CLOG_TEXT_LOG[2]=/var/adm/app/logs/app.log
CLOG_TEXT_FORMAT[2]="syslog"
If no CLOG_TEXT_FORMAT[]entry is made for a corresponding
CLOG_TEXT_LOG[]entry, the default is “custom”.
For an example of a file in syslogformat, see the actual system log file /var/adm/
syslog/syslog.log.
3. After completing the required edits, there are two ways to initiate forwarding for the new
log files:
• Restarting syslog-ng (recommended if not in a production environment)
• Manual restart, that does not disrupt syslog-ng
The procedures are the following:
• Restart syslog-ng. For example, issue the following command:
/sbin/init.d/syslog-ng restart
This will disrupt syslog-ng and may cause loss of messages that are being forwarded
or consolidated. If your system is not in a production environment, and losing some
messages is acceptable, this method is preferable to using the more difficult manual
restart.
• Start the clog_tail process manually for the text log file.
If the text log file is in syslog format, use the following command:
/opt/dsau/bin/clog_tail -q -n 0 -p log_file_path
If the text log file is in a custom format, use the following command:
/opt/dsau/bin/clog_tail -q -n 0 -p -a log_file_path
where log_file_path is the complete path to the ASCII log file.
For example, for a log called myapp.log in custom format, the following command
starts clog_tail:
# /opt/dsau/bin/clog_tail -q -n 0 -p -a /var/opt/myapp/myapp.log
If the system is a Serviceguard cluster, copy the edited /etc/rc.config.d/
syslog-ng file cluster-wide with the following command:
# ccp /etc/syslog-ng.conf.server /etc/
Either restart syslog-ng or start the clog_tail of the text-log on all cluster
nodes.
3.3.2.3.3.2 Consolidating Text Logs on the Log Consolidation Server
To consolidate the text logs forwarded from clients to a Log Consolidation Server, complete the
following tasks on the Log Consolidation Server:
1. For each text log that will be forwarded from a client, add the following destination, filter
and log lines to the file syslog-ng.conf.server, after the section called
HP_AUTOMATED_LOG_FILE_CONSOLIDATION:
For the destination line:
destination d_node1_text1{ file(“fs/textdir/node1_text1.log”); };
For the filter line:
filter f_node1_text1{ program(node1_text1.log); };
3.3 Log Consolidation Configuration 73
Page 74

For the log line:
log { source(s_syslog_type); filter (f_node1_text1);destination(d_node1_text1); flags(final);};
where text1 is the text logfile name, node1 is the relocatable IP address (for a Serviceguard
cluster) or hostname (for a non-Serviceguard cluster) that is forwarding this text log, fs is the
filesystem on the log consolidator where the consolidated logs will be stored, type is the
“s_source” definition, either _tcp or _udp, depending on the log transport selected, and
textdir is the name of the directory where you plan to store all text logs.
2. If the log consolidator is a Serviceguard cluster, make sure to copy the edited /etc/
syslog-ng.conf.server file cluster-wide with the following command:
# ccp /etc/syslog-ng.conf.server /etc/
3. sighup syslog-ng on the log consolidator so that it rereads its configuration file. (sighup
is a UNIX method for restarting a process.) On a Serviceguard log consolidator, sighup
syslog-ng only on the adoptive node of the clog package.
3.3.2.3.3.3 Stopping Consolidation of Text Logs
To stop consolidation of text logs, complete the following tasks for each system where you plan
to stop log consolidation:
1. Edit the system’s /etc/rc.config.d/syslog-ng file. For each ASCII log file you plan
to stop consolidating, do the following:
• Remove the CLOG_TEXT_LOG[] and the corresponding CLOG_TEXT_FORMAT[]
entry for that text log, if present.
For example, to stop consolidation of the text log myapp.log, remove the following
entries from the /etc/rc.config.d/syslog-ng file:
CLOG_TEXT_LOG[4]=/var/opt/myapp.log
CLOG_TEXT_FORMAT[4]="syslog"
2. After making the required edits, restart syslog-ng using the command:
/sbin/init.d.syslog-ng restart so that the changes to the /etc/rc/config.d/
syslog-ng file take effect.
If the system is a Serviceguard cluster, copy the edited /etc/rc.config.d/syslog-ng
file cluster-wide with the following command:
# ccp /etc/syslog-ng.conf.server /etc/
Restart syslog-ng on all cluster nodes.
3. For each text log that is deleted from a client that is forwarding its text logs, delete the
corresponding destination, filter and log lines from the /etc/syslog-ng.conf.server
file of the log consolidator. syslog-ng on the log consolidator must be sighup’d so that it
rereads this configuration file.
On a Serviceguard log consolidator, the updated /etc/syslog-ng.conf.server file
must be distributed cluster-wide. However, the sighup of syslog-ng needs to be done
only on the adoptive node of the clog package.
3.3.2.4 Consolidating Package Logs on the Log Consolidation Server
When remote Serviceguard clusters forward package log data to a log consolidation server, the
default is to place all forwarded log messages in the consolidated syslog.log file on the
consolidation server. It can be much more convenient to place these messages in cluster-specific
consolidated package log files instead of in the consolidated syslog.log file. This can be
achieved using syslog-ng’s filtering rules as follows:
74 Consolidated Logging
Page 75

1. For each package that will be forwarded from a cluster client, add the following destination,
filter and log lines to the syslog-ng.conf.server file, after the
HP_AUTOMATED_LOG_FILE_CONSOLIDATION section.
destination d_<clu1>_<pkg1> { file(“<fs>/packages/<clu1>_<pkg1>.log”); };
filter f_<clu1>_<pkg1> { program(<clu1>_<pkg1>.log); };
log { source(s_syslog_<type>);
filter(f_<clu1>_<pkg1>);destination(d_<clu1>_<pkg1>); flags(final);};
where <pkg1> is the package name, <clu1> is the package’s relocatable IP address that is
forwarding this package log, <type> is either _tcp or _udp, depending on the log transport
selected, and <fs> is the filesystem on the log consolidator where the consolidated logs will
be stored.
2. If the log consolidator is a Serviceguard cluster, make sure to copy the edited /etc/
syslog-ng.conf.server file cluster-wide as follows:
# ccp /etc/syslog-ng.conf.server /etc/
3. sighup syslog-ng on the log consolidator, so that it re-reads its configuration file. (sighup
is a UNIX method for restarting a process.) On a Serviceguard log consolidator, sighup
syslog-ng only on the adoptive node of the clog package.
4. For each package that is deleted from a cluster client that is forwarding its package logs,
delete the corresponding destination, filter and log lines from the /etc/
syslog-ng.conf.server file of thelog consolidator. syslog-ng on the log consolidator
will need to be sighup’d so that it re-reads this configuration file. On a Serviceguard log
consolidator, the updated /etc/syslog-ng.conf.server file will need to be distributed
cluster-wide. However, the sighup of syslog-ng only needs to be done on the adoptive
node of the clog package.
3.4 Disabling Log Consolidation
The clog_wizard enables log consolidation configurations but does not have an unconfigure
or deconfigure option. Thus you must disable a system from participating in log consolidation
manually, using the following instructions for each system type to:
• Disable a standalone log consolidation system
• Disable a Serviceguard cluster log consolidation system
• Disable a standalone log forwarding client
• Disable a Serviceguard log forwarding client
3.4.1 Disabling a Standalone Log Consolidation System
Perform the following steps to disable log consolidation:
1. If the local syslogs were being consolidated, or the UDP protocol was used, edit /etc/
rc.config.d/syslogd and change SYSLOGD_OPTS to remove the-N switch. Forexample,
make the following edit:
SYSLOGD_OPTS=“-D”
2. If the local syslogs were being consolidated, also edit the system’s /etc/syslog.conf file
to remove the following lines:
mail.debug @fully qualified hostname
*.info;mail.none @fully qualified hostname
where fully qualified hostname is the fully qualified hostname of this system.
NOTE: A <tab> precedes each @ sign.
3. Stop and restart syslogd using the following commands:
#/sbin/init.d/syslogd stop
3.4 Disabling Log Consolidation 75
Page 76

#/sbin/init.d/syslogd start
4. Stop syslog-ng:
# /sbin/init.d/syslog-ng stop
5. Edit the /etc/rc.config.d/syslog-ng file, as follows:
a. Change the CLOG_CONFIGURED line to CLOG_CONFIGURED=0.
b. Remove all other CLOG lines except for the following:
CLOG_LAYOUTS_DIR=/var/opt/dsau/layouts
CLOG_ADDITIONAL_LOG_DIRS[0]=/var/adm/syslog
6. If the TCP protocol was used, remove the following line from /etc/services:
clog_tcp port/tcp # Consolidated logging with syslog-ng
3.4.2 Disabling a Serviceguard Cluster Log Consolidation System
Perform the following steps to disable log consolidation in a Serviceguard cluster. Perform these
steps on each cluster member:
1. If local syslogs were being consolidated or the UDP protocol was used, edit /etc/
rc.config.d/syslogd and change SYSLOGD_OPTS to remove the -N switch. Forexample:
SYSLOG_OPTS="-D"
2. Stop and restart syslogd with the following commands:
# /sbin/init.d/syslogd stop
# /sbin/init.d/syslogd start
3. If the local syslogs were being consolidated, edit the system’s /etc/syslog.conf file to
remove the following lines:
mail.debug @fully qualified hostname
*.info;mail.none @fully qualified hostname
Where fully qualified hostname is the fully qualified hostname of this system. Note
that a <tab> precedes each @ sign.
4. Halt the clog package with the command:
#/usr/sbin/cmhaltpkg clog
5. Stop syslog-ng with the following command:
# /sbin/init.d/syslog-ng stop
(This stops the syslog-ng daemon and package log consolidation if configured.)
6. Edit the /etc/rc.config.d/syslog-ng file and change the CLOG_CONFIGURED line to
the following:
CLOG_CONFIGURED=0
Remove all other CLOG lines except for:
CLOG_LAYOUTS_DIR=/var/opt/dsau/layouts
CLOG_ADDITIONAL_LOG_DIRS[0]=/var/adm/syslog
7. Delete the clog package with the following command:
# cmdeleteconf -p clog
3.4.3 Disabling a Standalone Log Forwarding Client
Perform the following steps to disable log forwarding on a standalone client:
76 Consolidated Logging
Page 77

1. If syslog messages were being forwarded to the log consolidator, edit
/etc/rc.config.d/syslogd and change SYSLOGD_OPTS to remove the -N switch. For
example,
SYSLOGD_OPTS=“-D”
2. Edit the systems /etc/syslog.conf file to remove the following lines:
mail.debug @fully qualified hostname
*.info;mail.none @fully qualified hostname
where fully qualified hostname is the fully qualified hostname of this system.
NOTE: A <tab> precedes each @ sign.
3. Stop and restart syslogd with the following commands:
#/sbin/init.d/syslogd stop
#/sbin/init.d/syslogd start
4. Stop syslog-ng with the following command:
# /sbin/init.d/syslog-ng stop
This stops the syslog-ng daemon and also ssh port forwarding if configured.
5. Edit the /etc/rc.config.d/syslog-ng file and change the CLOG_CONFIGURED line to
the following:
CLOG_CONFIGURED=0
Remove all other CLOG lines except for the following:
CLOG_LAYOUTS_DIR=/var/opt/dsau/layouts
CLOG_ADDITIONAL_LOG_DIRS[0]=/var/adm/syslog
6. If ssh port forwarding had been configured, remove the following line from /etc/
services:
clog_ssh port/tcp # Consolidated logging with ssh port forwarding
3.4.4 Disabling a Serviceguard Cluster Log Forwarding Client
Perform the following steps to disable log forwarding. Complete these steps on each cluster
member:
1. If syslog messages were being forwarded to the log consolidator, edit /etc/rc.config.d/
syslogd and change SYSLOGD_OPTS to remove the -N switch. For example,
SYSLOGD_OPTS=“-D”.
2. Edit the system’s /etc/syslog.conf file to remove the following lines:
mail.debug @fully qualified hostname
*.info;mail.none @fully qualified hostname
where fully qualified hostname is the fully qualified hostname of this system.
NOTE: A <tab> precedes each @ sign.
3. Stop and restart syslogd with the following commands:
# /sbin/init.d/syslogd stop
# /sbin/init.d/syslogd start
4. Stop syslog-ng:
# /sbin/init.d/syslog-ng stop
This stops the syslog-ng daemon, stops ssh port forwarding if configured, and stops
package log forwarding if configured.)
3.4 Disabling Log Consolidation 77
Page 78

5. Edit the /etc/rc.config.d/syslog-ng file and change the CLOG_CONFIGURED line to
CLOG_CONFIGURED=0. Remove all other CLOG lines except for the following:
CLOG_LAYOUTS_DIR=/var/opt/dsau/layouts
CLOG_ADDITIONAL_LOG_DIRS[0]=/var/adm/syslog
6. If ssh port forwarding had been configured, remove the following line from /etc/
services:
clog_ssh port/tcp # Consolidated logging with ssh port forwarding
3.5 Securing Consolidated Logs
On a standard HP-UX system, all users can view the system’s local /var/adm/syslog/
syslog.log. Access to consolidated logs is typically restricted. The log consolidation server
system itself is usually a restricted access system with strict security policies in place.
3.5.1 Log File Protections
One level of protection is the permissions on the consolidated log files themselves. This is
controlled using the syslog-ng.conf.server file. Each syslog-ng “file” destination can have
specific permissions specified. If the log directory for a consolidated file does not exist, syslog-ng
can be instructed to create it (create_dirs(yes)) and set the directory’s ownership and permissions
on the directory as well. For example,
destination d_file { file(“/clog/test/example.log” );
dir_owner(root);
dir_group(sys);
dir_perm(0600);
owner(root);
group(sys);
perm(0600);
};
3.5.2 ssh Port Forwarding
ssh port forwarding sets up a tunnel for the log traffic between the syslog-ng log forwarding
client and the syslog-ng log consolidation server. This ssh-based tunnel is only available when
using the TCP transport, not UDP. Also, ssh port forwarding is not used when forwarding log
traffic within a Serviceguard cluster (member to member). Standard TCP or UDP is used for
intra-cluster log traffic.
ssh port forwarding is transparent to syslog-ng. The /etc/syslog-ng.conf.client file is
configured so that syslog-ng forwards log traffic to a local port managed by ssh. The local
ssh connects to the remote sshd on the log consolidation server and sshd opens the standard
syslog-ng TCP port. The remote log consolidation believes it has a standard log forwarding
client and is unaware of the tunneling taking place.
One problem with ssh tunneling is failure of the log consolidation server. If the syslog-ng
server stops or crashes, the remote ssh tunnels disconnect. The client ssh tunnels will try to
reconnect at one minute intervals. The reconnect time is configurable.
Each failed reconnect attempt is logged to the client’s local syslog.log. During this time,
syslog-ng’s client log (/var/adm/syslog/syslog-ng.log) will show it trying to reconnect
to the tunnel. The default reconnect time is 10 seconds. This is configurable using syslog-ng’s
global setting "time_reopen(seconds)" parameter. See thesyslog-ng open source reference
manual (/opt/dsau/doc/syslog-ng) for details.
3.5.2.1 ssh Port Forwarding to a Serviceguard Cluster Log Consolidator
When using ssh port forwarding with a Serviceguard cluster as the log consolidation server, a
special ssh configuration is required.
78 Consolidated Logging
Page 79

In general, using ssh port forwarding requires that the log consolidation server perform a key
exchange with the log forwarding client. Specifically, the ssh public key for the remote log
forwarding client must be added to the consolidation server’s authorized keys file. Also, the
fingerprint for the log consolidation server is added to the log forwarding client’s /.ssh/
known_hosts file. The client log forwarder is a trusted system after this key exchange, and the
consolidation server does not need to prompt for any ssh passwords at this point.
Since the consolidation server is a package, it can potentially run on every member of the cluster.
This key exchange between the remote log forwarding client and a cluster member must be
replicated for each cluster member. Each cluster member has to establish the same trust
relationship to the log forwarding clients.
A problem can arise with the log forwarding client’s known_host fingerprints. When using a
package’s relocatable IP address for the initial ssh key exchange, the client will have the adoptive
node’s fingerprint added to its local /.ssh/known_hosts file. When the package fails over
and the ssh connection is reestablished, the new adoptive node will have a different fingerprint
and ssh will detect this as a man-in-the-middle attack and refuse to reestablish the ssh tunnel.
In order to prevent this, each cluster member must look like the same system from the perspective
of the log forwarding clients. This can be achieved by having each cluster member use an identical
host key. The ssh host keys are located in /opt/ssh/etc and contained in the following files:
• ssh_host_key
• ssh_host_key.pub
• ssh_host_dsa_key
• ssh_host_dsa_key.pub
• ssh_host_rsa_key
• ssh_host_rsa_key.pub
Pick one of the cluster members and copy these files to the same directory on the other cluster
members. Using the “cluster copy” or ccp tool is a quick way to do this, using the following
commands:
# cd /opt/ssh/etc/
# ccp ssh_host_* /opt/ssh/etc/
Then from each log consolidation client,perform a standard ssh key exchange with the relocatable
IP address of the clog package. One way to do this is using the csshsetup tool (see csshsetup(1)),
as follows:
# csshsetup DNS name of the clog package
csshsetup will prompt for the password of the cluster in order to do the initial key exchange.
3.5.3 clog Network Port Usage
syslog and syslog-ng require specific network ports to be available for correct operation.
These ports are the following:
• UDP 514 – this port is used by syslogd clients for forwarding log messages
• TCP port selected port - the administrator chooses which TCP port a syslog-ng log
consolidator uses to receive messages.
• TCP port 22 – When using ssh port forwarding to create encrypted tunnels, the remote
clients communicate with the log consolidation server’s sshd daemon. In a default
configuration, this daemon listens on TCP port 22.
3.5.4 Using Bastille to Harden the System
Bastille is a security-hardening lockdown tool that can be used to enhance the security of the
HP-UX operating system. It provides customized lockdown on a system-by-system basis by
3.5 Securing Consolidated Logs 79
Page 80

allowing the administrator to choose which security features to enable or disable from
hardening/lockdown checklists.
Bastille can be used to harden a log consolidation server by enabling security tools such as IP
filtering. If IP filtering is enabled, the ports described in “clog Network Port Usage” (page 79)
must not be blocked.
Additionally, Bastille asks the following questions that impact a log consolidation system:
Do you want to BLOCK incoming Secure Shell connections with IPFilter?
When configuring a log consolidation server, answer No to the question if you plan to support
clients using the tcp transport and ssh tunneled connections to the server.
Would you like to restrict the system logging daemon to local
connections?
Answering yes to this question adds the -N option to /etc/syslog.conf. When configuring
a log consolidation server, this option is required. The clog_wizard adds it automatically; the
manual configuration instructions also explain the appropriate edits to /etc/syslog.conf.
3.6 Viewing System and Consolidated Logs
Use the System Management Homepage’s System and Consolidated Log Viewer to filter and
view a system’s local syslog log files. For a system that is also a log consolidator, the System
and Consolidated Log Viewer also filters and displays the consolidated logs.
3.6.1 Starting System Management Homepage
To log in to the System Management Homepage, navigate to:
http://hostname:2301
Enter a username and password. Root logins are enabled by default. For additional information
on starting and logging into the System Management Homepage, refer to the HP System
Management Homepage User Guide.
After logging in to System Management Homepage, choose the Logs tab and then System and
Consolidated Log Viewer.
3.6.2 Using the System and Consolidated Log Viewer
The System and Consolidated Log Viewer will display the syslog-related logs for the system.
By default, this includes the local logs for the system from /var/adm/syslog. If this system is
also a log consolidator, the consolidated logs will also be listed.
NOTE: In a Serviceguard cluster configured as a log consolidation server, the consolidated logs
are placed on the filesystem associated with the “clog” package. See “Cluster Configuration
Notes for clog” (page 52) for additional details. When using LVM and VxVM storage failover
configurations, this means that the consolidated logs are only accessible to a single cluster member
at a time. When using the http://hostname:2301 technique for starting SMH in a cluster,
the administrator needs to know which cluster member is currently hosting the package, and
should use that hostname in the URL.
Fortunately, there is a simpler solution: System Management Homepage supports virtual IP
addresses such as those used by Serviceguard packages. This allows the administrator to use the
package’s virtual IP address or DNS name in the auto-start URL
(http://virtual_IP_address:2301) to launch the viewer on the system hosting the consolidated
logs. For additional information, refer to the HP System Management Homepage User Guide.
Choose a log to view from the main Select tab. Use the Filter tab to specify filter expressions to
search for specific entries, and then choose the Display tab to display the contents of the log. For
80 Consolidated Logging
Page 81

additional information on using the System and Consolidated Log Viewer, use the help available
from within the application.
3.6 Viewing System and Consolidated Logs 81
Page 82

82
Page 83

4 Command Fanout
Command fanout utilities allow the system administrator to replicate shell commands across
multiple systems. Traditionally, administrators have created wrappers around tools such as
remote shell (see remsh(1)) and secure shell (see ssh(1)) to provide command fanout functions.
4.1 Parallel Distributed Shell
The Distributed Systems Administration Utilities (DSAU) include the open source tool Parallel
Distributed Shell (pdsh). pdsh formalizes the use of remsh and ssh for distributing commands
to groups of systems. Unlike remsh/ssh wrappers, pdsh offers the following benefits:
• High performance
Commands are issued in parallel to groups of target system. pdsh supports a sliding window
or fanout setting to control the number of concurrent commands.
• Command timeout settings
pdsh supports a command execution timeout which controls how long a remote command
can execute before being disconnected (to prevent problem commands from hanging). It
also supports a connect timeout which prevents blocking when remote systems are
unreachable.
• Output processing and return status
pdsh correctly handles stdout and stderr processing and supports returning a “worst of”
return status so the caller can detect errors from remote systems.
• Flexible target system specifications
pdsh supports several mechanismsfor specifying the target hosts on whichto operate. They
can be specified on the command line, on stdin, in a well known file (/etc/machines)
or in a file pointed to by the WCOLL environment variable. Specific systems can be excluded
from the command line as well.
• Hostlist expressions
For groups of systems using a prefixNNN naming convention (for example, h1, h2, ..., hN),
pdsh allows target nodes specification using hostlist expressions such as “h[1-10]” which
would fan out a command to hosts named h1 through h10.
• Intelligent output filtering
pdsh prefaces each line of output with the hostname of originating system. dshbak (see
dshbak(8)) is a filter that can format the standard pdsh output in several different ways. The
dshbak -c flag looks for output from different hosts that is identical and consolidates the
output instead of duplicating it. The header will indicate the hosts to which the consolidated
output applies.
• Choice of command transports
pdsh can use either remote shell rcmd (see rcmd(3)) or ssh as a command transport. Note
that the ssh transport offers greatly improved security. See “Security Configuration”
(page 85) for details.
• Parallel copy command
The pdcp command provides a parallelized copy command to copy a local source file to
multiple targets.
Figure 4-1: “pdsh Architecture ”, shows the components of pdsh and its architecture.
4.1 Parallel Distributed Shell 83
Page 84

Figure 4-1 pdsh Architecture
For more information on pdsh and dshbak, refer to their reference manpages.
4.2 pdsh Utility Wrappers
Administrators can build wrapper commands around pdsh for commands that are frequently
used across multiple systems and Serviceguard clusters. Several such wrapper commands are
provided with DSAU. These wrappers are Serviceguard cluster-aware and default to fanning
out cluster-wide when used in a Serviceguard environment. These wrappers support most
standard pdsh command line options and also support long options (--option syntax) .
cexec cexec is a general purpose pdsh wrapper. In addition to the standard pdsh features,
cexec includes a reporting feature. Use the --report_loc option to have cexec
display the report location for a command. The command report records the
command issued in addition to the nodes where the command succeeded, failed,
or the nodes that were unreachable. The report can be used with the --retry option
to replay the command against nodes that failed, succeeded, were unreachable, or
all nodes.
ccp ccp is a wrapper for pdcp and copies files cluster-wide or to the specified set of
systems.
cps cps fans out a ps command across a set of systems or cluster.
ckill ckill allows the administrator to signal a process by name since the pid of a specific
process will vary across a set of systems or the members of a cluster.
cuptime cuptime displays the uptime statistics for a set of systems or a cluster.
cwall cwall displays a wall(1M) broadcast message on multiple hosts.
All the wrappers support the CFANOUT_HOSTS environment variable when not executing in
a Serviceguard cluster. The environment variable specifies a file containing the list of hosts to
target, one hostname per line. This will be used if no other host specifications are present on the
command line. When no target nodelist command line options are used and CFANOUT_HOSTS
is undefined, the command will be executed on the local host.
For more information on these commands, refer to their reference manpages.
84 Command Fanout
Page 85

4.3 Security Configuration
The command fanout tools support both remote shell (rsh or rcmd) and ssh transports. Each
requires specific security setup steps in order to authorize the user initiating the command fanout
operation to execute a command on the remote target systems. The command fanout tools require
that the remote system not prompt for a password. Both rsh and ssh transports must be
preconfigured on each remote system to allow non-interactive access. The following sections
describe the required setup steps to enable command fanout operations for each transport.
4.3.1 Remote Shell Security Setup
When using the remote shell command transport, the local user must have a $HOME/.rhosts
file configured on each remote target system. Refer to the rhosts(4) reference manpage for details
on configuring the $HOME/.rhosts file.
4.3.2 ssh Security Setup
ssh uses public host keys to authenticate remote hosts and supports public key authentication
to authenticate users. When users’ public keys are properly configured on a set of remote systems,
they can access those systems without being prompted for a password. Manually configuring
ssh for non-interactive access is a multistep process where ssh configuration files are edited on
each system. The csshsetup tool greatly simplifies configuring ssh trust relationships. For
example, when using the command fanout tools in a Serviceguard cluster, you typically want
to be able to issue commands from any member and target any other member. This requires an
n^2 distribution of ssh public keys. Start by creating a text file listing the members the cluster,
one per line. Invoke csshsetup using this file. Note that this command needs to be issued only
once since it configures each member of the cluster:
# csshsetup -r -f members_list.txt
The -r option instructs csshsetup to distribute the keys in a round-robin or n^2 fashion. The
user will be prompted for his password on each remote host. csshsetup then automates the
entire public key distribution process.
Note that csshsetup is not specific to Serviceguard clusters; it can be used for arbitrary groups
of systems. Also, the trust relationship does not have to be bidirectional. Omit the -r option
when setting up a one-way trust relationship between the current host and a set of remote target
hosts. For additional details, refer to the csshsetup(1) reference manpage.
4.3.3 Security Notes
The remote shell protocol is an inherently insecure protocol. It is the protocol used by the Berkeley
“r commands,” rlogin, rcp, remsh, and so on. Many system administrators disable the use of
the “r” commands as a matter of policy. For example, the Bastille security hardening tool offers
a default option to disable these insecure services. If disabled, the pdsh -R rsh option to use
the remote shell transport will not work.
If the “r” services are not disabled, use of the pdsh -R rsh option by unprivileged users is still
disabled by default because of the inherent security risk. By default, only users with root privileges
can use the pdsh -R rsh option. This is because the remote shell rcmd library call requires the
use of a privileged port. Even though privileged users can use -R rsh, the ssh transport is still
preferred.
If the hosts and users are trusted in your environment, you can enable the use of the pdsh -R
rsh option for unprivileged users with the following commands:
# cd /opt/dsau/bin/pdsh
# chown root:bin pdsh
# chmod u+s pdsh
4.3 Security Configuration 85
Page 86

4.4 Command Fanout Troubleshooting
This section contains troubleshooting tips for common error messages produced by pdsh and
the wrapper commands.
You may see the following error messages when using command fanout:
Table 4-1 ssh Command Messages
To CorrectCauseMessage
pdsh@local_hostname:
target_hostname:ssh exited
with exit code 1
pdsh@local_hostname:
target_hostname:ssh exited
with exit code 255
Table 4-2 rsh Command Messages
pdsh@local_hostname:
gethostbyname(“target_hostname”)
failed
pdsh@local_hostname:
target_hostname:connect:
Connection refused
pdsh@local_hostname:
target_hostname:connect:
timed out
The target hostname is unknown.
The target system is unreachable, or
the r services may be disabled for this
system.
The hostname exists (that is, IP
address lookup succeeded) but the
target systemis down or unreachable.
The target system is unreachable.
This messageoccurs when the target
hostname is unknown, the target
host’s IP address in /etc/hosts is
incorrect, or the user does not have
permissions to use the target host.
Note that 255 is the exit code used
by sshwhen ssh itself encounters an
error.
Ensure that the target system is up
and connected.
Obtain the correct hostname or IP
address or set ssh permissions
appropriately and try again.
To CorrectCauseMessage
Determine thetarget hostname and try
again.
Check the r services and whether the
target system is up and connected.
Check that the system is up, connected
and reachable.
rresvport: bind: Permission
denied pdsh@local_hostname:
local_hostname:rcmd: socket:
Permission denied
target_hostname: remshd:
Login incorrect. remote
An unprivileged user attempted to
use the remote shell transport.
The user’s $HOME/.rhosts on the
remote systemis not allowing access.
Table 4-3 Target Node Error Messages
target_hostname:sh:command_name:not
found
target node. The remote shell
invoked by pdsh hasonly a minimal
path, and a user's login scripts are
not executed on remote nodes.
See the Security Notes section for
details on allowing unprivileged users
to use pdsh with the remote shell
transport.
Ensure that the user’s $HOME/.rhosts
on the remote system gives access.
To CorrectCauseMessage
Use full paths to specify commands.The command does not exist on the
86 Command Fanout
Page 87

A HP-Supported Open Source pdsh Options
This release of DSAU includes open source pdsh code that was compiled with the following
options:
• readline support.
• The secure shell (ssh) remote command module (pdsh —R ssh).
• The remote shell (rsh) remote command module (pdsh —R rsh).
Because of security concerns, this option is disabled by default at installation time. For
information on Parallel Distributed Shell, see the Chapter 4 (page 83) chapter.
• The machines module (pdsh —a option).
The command pdsh —V provides a summary of the options, and pdsh —L lists details on each
module.
87
Page 88

88
Page 89

Index
A
adoptive node, 25, 52
alert
checksum, 38
authentication errors, 39
B
backup file, 22
Bastille, 79
Berkeley commands, 85
C
can’t stat messages, 39
ccp, 33
central management server, 15
cf.main, 18, 36
cfagent, 14, 15, 36
cfagent.conf, 15, 27, 30
CFANOUT_HOSTS
environment variable, 84
cfengine, 13, 15, 22, 25
configuring, 16
disabling, 38
error, 40
security keys, 26
security setup, 39
troubleshooting, 39
cfengine_master, 15
cfexecd, 36
cfrun, 16, 36
cfrun command, 13
cfrun.hosts, 26
CFS, 21
cfservd, 14, 15
daemon, 33
checksum alert, 38
class definitions, 24
client
log forwarding, 54
managed, 25, 35
remote, 21
clog_wizard, 45
cluster
clog master, 45
csync master, 16
members, 21
Serviceguard, 15, 19, 26
CMS, 15
command fanout, 83
commands
Berkeley, 85
configuration synchronization wizard, 13
consolidated logs
securing, 78
viewing, 80
consolidator
syslog-ng, 56
copy
secure, 35
cross-subnet
configuring, 16, 45
csshsetup, 26, 27
tool, 85
csync package, 33
csync_wizard, 13, 16, 26
D
daemon
cfservd, 33
sshd, 79
definitions
class, 24
disabling
log consolidation, 75
log forwarding, 76, 77
DNS name, 21, 23
dshbak, 83
E
encryption, 37
environment variable
CFANOUT_HOSTS, 84
WCOLL, 83
errors
authentication, 39
cfengine, 40
TCP port, 40
expressions
hostlist, 83
F
file
backup, 22
master policy, 35
policy, 22
filesystem
package, 22
fingerprint
known host, 79
free port, 55
H
HA services, 23
hostlist expressions, 83
I
intra-cluster log traffic, 78
IP address
package, 21
relocatable, 52
89
Page 90

K
key
exchange, 37
integrity, 35
public/private, 23, 32
security, 26, 35
known host fingerprint, 79
L
lockdown tool
Bastille, 79
log consolidation, 52
configuration, 45
disabling, 75
overview, 42
log forwarding, 52
client, 54
disabling, 76
log traffic
intra-cluster, 78
logs
package, 71
loss
message, 43
LVM
storage configuration, 20
volume groups, 21
M
managed
client, 25, 35
marker tokens, 63
master
policy files, 35
server, 25, 28
update.conf, 28
members
cluster, 21
message loss, 43
messages
can’t stat, 39
N
node
adoptive, 25, 52
nsswitch.conf, 27
P
package
configuration files, 34
control script, 34
csync, 33
filesystem, 22
IP address, 21
logs, 71
Serviceguard, 23
parallel distributed shell, 83
pdcp, 83
pdsh, 83
policy file, 22, 35
POLICYHOST_NAME, 27
port
free, 55
TCP, 37, 47
TCP or UDP, 79
UDP, 48, 56, 66
port forwarding
ssh, 78
process restart, 75
protocol
TCP, 54
UDP, 54
public/private key, 23, 32
R
rcmd, 83
relocatable IP address, 52
remote
client, 21
shell, 83, 85
remsh, 83
resolve.conf, 27
restart process, 75
S
secure
copy, 35
shell, 83
securing consolidated logs, 78
security keys, 28, 35
cfengine, 26
security setup
cfengine, 39
server
master, 25
Serviceguard
automation features, 23
package, 23
Serviceguard cluster, 15, 19, 26, 29
configuring manually, 29
sighup, 75
SIM, 15
SMH, 80
space
white, 39
ssh, 83
port forwarding, 78
transports, 85
sshd daemon, 79
standalone HP-UX, 15
storage configuration
LVM, 20
subdirectories
timestamped, 22
synchronization client
configuring, 25
syslog
introduction, 41
90 Index
Page 91

message format, 41
syslog-ng, 43
consolidator, 56
syslogd, 41, 43
System Management Homepage, 80
Systems Insight Manager, 15
T
TCP
port, 37
port errors, 40
protocol, 54
transport, 78
TCP port, 47
timestamped subdirectories, 22
tokens
marker, 63
transport
TCP or UDP, 78
troubleshooting
cfengine, 39
trust relationships, 85
U
UDP
port, 48, 56, 66
protocol, 54
unconfigure, 38
update.conf, 15, 28, 30, 35
V
variable
environment
CFANOUT_HOSTS, 84
WCOLL, 83
verbose cfengine, 40
volume groups
LVM, 21
VxVM, 21
W
WCOLL
environment variable, 83
white space, 39
91
Page 92

 Loading...