

Page 1

HP-UX Whitelisting A.01.00 Administrator Guide
HP-UX 11iv3
HP Part Number: 5992-5210
Published: September 2010
Edition: 1
Page 2

© Copyright 2010 Hewlett-Packard Development Company, L.P.
Confidential computersoftware. Valid license from HP required for possession, use or copying. Consistent with FAR 12.211 and 12.212, Commercial
Computer Software, Computer Software Documentation, and Technical Data for Commercial Items are licensed to the U.S. Government under
vendor's standardcommercial license.The informationcontained hereinis subject to change without notice. The only warranties forHP products
and services are set forth in the express warranty statements accompanying such products and services. Nothing herein should be construed as
constituting an additional warranty. HP shall not be liable for technical or editorial errors or omissions contained herein.
Itanium™, Xeon™, and Pentium™ are trademarks of Intel Corporation in the U.S. and other countries. UNIX® is a registered trademark of The
Open Group.
Page 3

Table of Contents
1 Security features..............................................................................................................9
1.1 File access policies.............................................................................................................................9
1.1.1 File lock access controls.............................................................................................................9
1.1.2 Identity-based access controls.................................................................................................10
1.2 Capabilities......................................................................................................................................10
1.2.1 mem...........................................................................................................................................10
1.2.2 wmd...........................................................................................................................................10
1.2.3 dlkm........................................................................................................................................10
1.2.4 api...........................................................................................................................................11
2 Product overview..........................................................................................................13
2.1 WLI architecture..............................................................................................................................13
2.1.1 Commands..............................................................................................................................14
2.1.1.1 Application API...............................................................................................................14
2.1.1.2 Applications....................................................................................................................15
2.1.1.3 Stackable file system module..........................................................................................15
2.1.1.4 Policy enforcement manager...........................................................................................15
2.1.1.5 File systems.....................................................................................................................16
2.2 WLI database...................................................................................................................................16
2.3 WLI metadata files..........................................................................................................................16
2.3.1 .$WLI_FSPARMS$..................................................................................................................17
2.3.2 .$WLI_POLICY$.....................................................................................................................17
2.3.3 .$WLI_SIGNATURE$..............................................................................................................17
3 Key usage.....................................................................................................................19
3.1 Generating keys...............................................................................................................................19
3.2 User keys.........................................................................................................................................20
3.3 Administrator keys..........................................................................................................................20
4 Installing, removing, and upgrading..........................................................................21
4.1 Installation requirements................................................................................................................21
4.2 Installing WLI..................................................................................................................................21
4.3 Removing WLI................................................................................................................................22
4.4 Upgrading WLI...............................................................................................................................23
5 Configuring...................................................................................................................25
5.1 Authorizing the recovery key..........................................................................................................25
5.2 Authorizing administrator keys......................................................................................................25
5.3 Signing DLKMs...............................................................................................................................26
5.4 Backing up the WLI database..........................................................................................................26
5.5 Rebooting to restricted mode............................................................................................................27
6 Enhancing security with WLI.......................................................................................29
6.1 Signing an executable binary..........................................................................................................29
6.2 Creating a FLAC policy...................................................................................................................29
6.3 Creating an IBAC policy..................................................................................................................30
6.4 Removing a file access policy..........................................................................................................30
Table of Contents 3
Page 4

6.5 Enabling DLKMs to load during boot.............................................................................................30
6.6 Loading unsigned DLKMs..............................................................................................................31
7 Backup and restore considerations............................................................................33
7.1 Overview.........................................................................................................................................33
7.2 WLI database files...........................................................................................................................33
7.2.1 Write protected........................................................................................................................34
7.2.2 Read/write protected files.......................................................................................................34
7.2.3 Recommendations...................................................................................................................34
7.3 Policy protected and metadata files................................................................................................34
7.3.1 FLAC policies..........................................................................................................................35
7.3.2 IBAC policies...........................................................................................................................35
7.3.3 Metadata files..........................................................................................................................35
7.3.4 Recommendations...................................................................................................................35
8 HP Serviceguard considerations.................................................................................37
8.1 Overview.........................................................................................................................................37
8.2 Administration................................................................................................................................37
8.2.1 WLI database...........................................................................................................................37
8.2.2 Policy protected files...............................................................................................................38
9 Troubleshooting and known issues.............................................................................39
9.1 Software distributor issues..............................................................................................................39
9.2 WLI reinstallation............................................................................................................................39
9.3 Lost WLI administrator key or passphrase ....................................................................................39
9.4 WLI database corruption.................................................................................................................39
10 Support and other resources.....................................................................................41
10.1 Contacting HP...............................................................................................................................41
10.1.1 Before you contact HP...........................................................................................................41
10.1.2 HP contact information.........................................................................................................41
10.1.3 Subscription service...............................................................................................................41
10.1.4 Documentation feedback.......................................................................................................41
10.2 Related information.......................................................................................................................41
10.3 Typographic conventions..............................................................................................................42
A libwliapi example.................................................................................................45
A.1 Instructions.....................................................................................................................................45
A.2 makefile.......................................................................................................................................45
A.3 FLAC add and delete program......................................................................................................46
A.4 IBAC add and delete program.......................................................................................................46
B Administration examples.............................................................................................49
C Quick setup examples.................................................................................................53
C.1 Installing WLI.................................................................................................................................53
C.2 Configuring WLI............................................................................................................................53
C.2.1 Authorizing an administrator key..........................................................................................53
C.2.2 Authorizing a user key...........................................................................................................53
C.3 FLAC policies..................................................................................................................................54
4 Table of Contents
Page 5

C.3.1 Creating a FLAC policy..........................................................................................................54
C.3.2 Enabling a FLAC policy..........................................................................................................54
C.3.3 Testing a FLAC policy............................................................................................................54
C.3.4 Disabling a FLAC policy........................................................................................................55
C.3.5 Removing a FLAC policy.......................................................................................................55
C.4 IBAC policies..................................................................................................................................55
C.4.1 Creating an IBAC policy.........................................................................................................55
C.4.2 Enabling an IBAC policy........................................................................................................55
C.4.3 Testing an IBAC policy...........................................................................................................55
C.4.4 Disabling an IBAC policy.......................................................................................................56
C.4.5 Removing an IBAC policy......................................................................................................56
Glossary............................................................................................................................57
Index.................................................................................................................................59
Table of Contents 5
Page 6

List of Figures
2-1 WLI architecture............................................................................................................................14
6 List of Figures
Page 7

List of Examples
B-1 Execute manual WLI configuration..............................................................................................49
B-2 Backing up policy protected files..................................................................................................49
B-3 Restoring policy protected files.....................................................................................................50
B-4 Backup and restore without wliwrap..........................................................................................51
7
Page 8

8
Page 9

1 Security features
HP-UX Whitelisting (WLI) provides security features complementary to discretionary access
controls, sometimes referred to as DAC restrictions. DAC restrictions are based on defined users
and groups, and the ownership and permission bits associated with every type of file. DAC
restrictions are generated through user commands and enforced within the kernel domain on
the processes comprising every application.
WLI is a cryptographic key-based product. Whitelisting security features are based on RSA key
ownership andencryption technology. WLI security features are imposed through RSA signatures
and enforced through signature verification. Therefore, regular files and directories may be
protected from access by any user including superuser.
Whitelisting security features are divided into the following categories:
File access policies WLI users can restrict access to regular and directory files by
Capabilities When WLI is installed, certain system resources known to be
generating policies that are enforced within the kernel domain.
WLI then grants access only to applications meeting the policy
requirements for the protected files.
security risks are prevented from access by all applications. A
user owning an administrator key can authorize a WLI-signed
application to access these resources. Other users, as well as the
owner of the administrator key, can then execute the signed
application and access the protected resource. In WLI
terminology, a capability is granted to an application to permit
access to a protected resource.
1.1 File access policies
WLI file access policies are generated with the wlipolicy command and enforced by WLI
kernel components when access is requested by application threads. Enforcement of these policies
does not include alteration of ownership, permissions bits, and other file status information
stored on physical media. Enforcement is accomplished by cryptographic verification of
application and policy signatures stored in metadata, followed by access denial to threads that
do not meet policy rules.
User ID and group ID values are not factors within WLI policy enforcement. However, the
traditional UNIX ownership and permission bit restrictions are not avoided by files with WLI
file access policies. After WLI allows access to a policy-restricted file, the executing thread
continues into file-system-specific processing as if WLI is not installed.
1.1.1 File lock access controls
This policy type is abbreviated as FLAC in WLI manpages and other literature. A FLAC policy
assigned to a regular file prevents it from being modified, deleted, or renamed within the parent
directory. A FLAC policy permits read access if allowed by file permission bits.
A FLAC policy assigned to a directory prevents its content from changing; files cannot be added
to or deleted from the directory. A FLAC policy on a directory also locks all its files against
modification or renaming. Files in subdirectories of a FLAC-protected directory are not affected.
The user ID or effective user ID of a process is not a factor for enforcement of this policy type.
Even root or the file owner may not override a FLAC policy. A FLAC policy does not replace
file permission bit restrictions. The policy is enforced in addition to permission bit restrictions.
Read and execute permission for a FLAC protected file is controlled entirely by its permission
bits.
1.1 File access policies 9
Page 10

A FLAC policy prevents modification of file status information such as modification time,
permission bits, owner ID, and group ID stored within the file inode.
1.1.2 Identity-based access controls
Abbreviated as IBAC, this policy type denies access to a designated file or directory for all
executables except those specifically authorized. File or directory access is normally granted to
an executing binary if all access restrictions are met. In addition to traditional UNIX restrictions,
an IBAC policy identifies a specific executable binary that, once authenticated, is permitted to
access the protected file. A single file can have multiple IBAC policies, each one identifying a
particular executable.
An IBAC policy prevents unauthorized executables from opening a file. An executable specified
in an IBAC policy is sometimes referred to as an authorized executable for the IBAC-protected
file. If access to an IBAC protected file is permitted by WLI, then read, write, and execute
permissions are determined by the file permission bits and effective userid. Other restrictions
imposed outside of WLI, such as ACLs, are not be affected by WLI.
The user ID or effective user ID of a process is not directly involved in the enforcement of this
policy type as well. A binary executable must have a valid WLI signature for it to be included
in an IBAC policy. When an IBAC protected file is opened, the signature on the binary executing
the open() is verified through the corresponding public key.
1.2 Capabilities
The WLI A.01.00 release provides the following capabilities corresponding to system operations
that are protected when WLI security mode is restricted. Capabilities may be granted to binary
executables on a permanent basis using wlisign, or only for a single execution with wliwrap.
1.2.1 mem
WLI does not allow read or write operations on the memory image files /dev/mem and /dev/
kmem unless mem capability is granted to the binary executable attempting the open(). Some
commands like adb open the memory image files to query and update kernel memory. Because
these are device special files, WLI file access policies cannot be assigned to them.
If mem capability is granted to an executing process that is attempting to open one of the memory
image files, the open() is still subject to failure from traditional open() restrictions such as those
imposed by file permission bits.
1.2.2 wmd
WLI does not allow its metadata to be created or written to unless wmd capability is granted to
the executable requesting access. The wmd capability also allows read access on metadata files
with WLI read protection. These restrictions are enforced whetherthe metadata is stored in VxFS
name streams or protected metadata files. For more information about WLI metadata files, see
Section 2.3 (page 16). This capability is useful for backup and restore commands like tar.
1.2.3 dlkm
WLI permits the system to load a DLKM if the DLKM has been signed with wlisign using an
authorized key. The signature on the DLKM is not required to include dlkm capability. The
authorized key used for the signing also does not require dlkm capability.
Unsigned DLKMs can also be loaded. If the key authorizing wliwrap execution is granted dlkm
capability, the wliwrap command grants dlkm capability to its child process. The child process
can be an executing instance of kcmodule. The command file /usr/sbin/kcmodule must
also be signed to be recognized as an authorized executable. The signature on /usr/sbin/
kcmodule is not required to include dlkm capability.
10 Security features
Page 11

This capability is intended to alleviate a security issue associated with dynamic loading. The
user must have root authority to dynamically load, and a WLI administrator key must grant
dlkm capability directly or through another authorized key.
1.2.4 api
WLI permits an application to execute functions contained within the shared object library /opt/
wli/lib/libwliapi.so by granting api capability. This library provides functions to
programmatically create, delete, and update policies described in Section 1.1 (page 9). The key
signing the executable that invokes libwliapi.so functions must be granted api capability
through wlicert. The executable is not required to have api capability.
The services provided by libwliapi are also provided by the wlipolicy command to users
holding an authorized key. For an implementation example using libwliapi, see “libwliapi
example” (page 45).
1.2 Capabilities 11
Page 12

12
Page 13
2 Product overview
WLI is a security enhancement product that relies on RSA keys and cryptographic algorithms
to restrict access to regular files, directories, and certain protected resources. WLI is complementary
to the traditional access restrictions imposed by file ownership and permission bits. An executable
permitted by WLI to access a file does not bypass permission bit checks, ACLs, or other security
mechanisms.
For more detail on WLI commands and files, see the manpages installed with WLI. For a complete
list of manpages and more technical information, see wli(5).
In discussionsinvolving RSA, “key” is synonymous with “private key” throughout this document,
because a private key holds all key information and the public key is merely a subset.
IMPORTANT: WLI requires OE B.11.31.0909 or later.
For more information, see Section 4.2 (page 21).
IMPORTANT: WLI is supportedon VxFS file systems at revision 4.1 or laterand on other HP-UX
11iv3 non-VxFS file systems such as HFS.
WLI file access policy enforcement is supported only for regular files and directories residing
on HFS, VxFS, and NFS file systems. Some applications access physical storage directly, bypassing
the supported file systems. Examples are Oracle ASM and Veritas CFS.
2.1 WLI architecture
For an illustration of WLI architecture, see Figure 2-1 (page 14). WLI commands restrict access
to designated files by generating access policies. Some system resources are also restricted. WLI
kernel software enforces access restrictions by examining policy information in real time during
access requests on files.
2.1 WLI architecture 13
Page 14
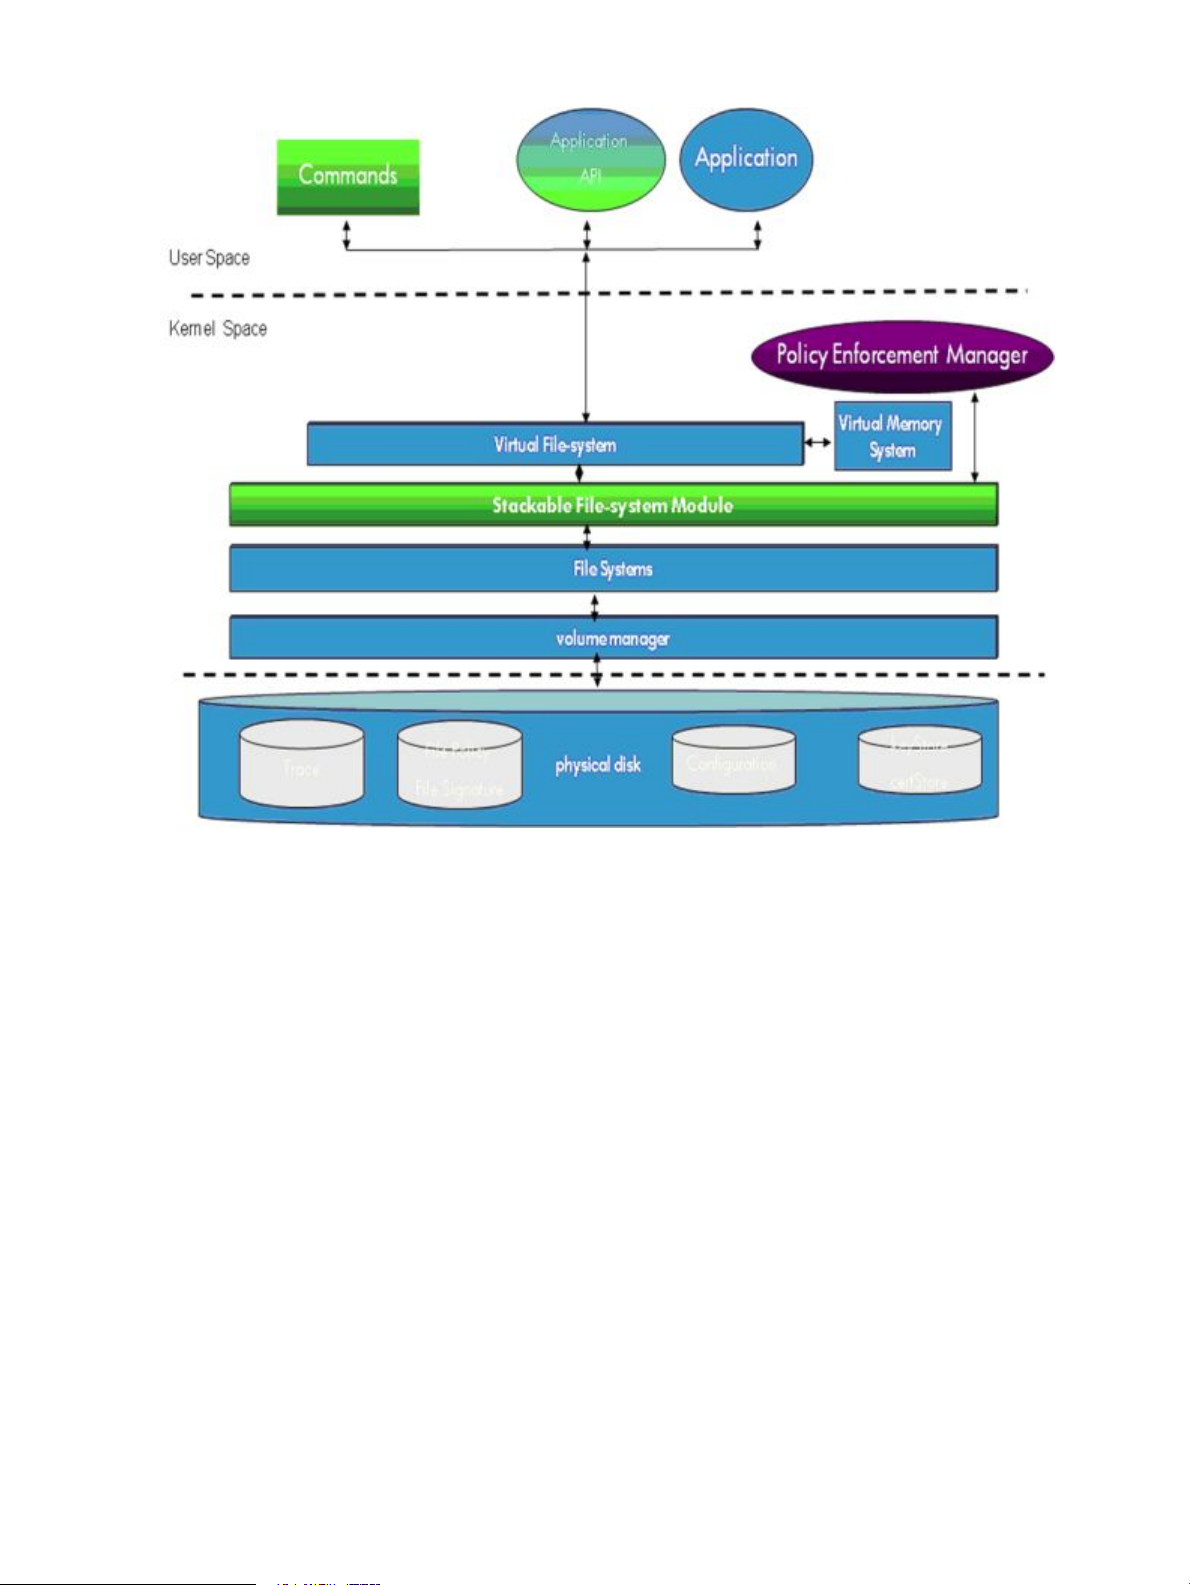
Figure 2-1 WLI architecture
2.1.1 Commands
WLI commandsare described in detail throughthe HP-UX manpage facilityon installed platforms,
and are not reproduced here. The following briefly describes these commands:
wlipolicy
wlisign
wlitool
wliwrap
wlixfr
wliadm
wlicert
wlisys
wlisyspolicy
wlitrace
2.1.1.1 Application API
The shared library /opt/wli/lib/libwliapi.so provides API functions for applications to
add, delete, and verify access rights for WLI file access policies. For details on libwliapi
functions, see libwliapi(3).
Manage WLI file access policies
Manage WLI signatures on binary executables
Sign ELF executable files with or without WLI installed
Run commands with WLI capabilities
Transfer WLI file access policies from one file to another
Manage WLI administrator keys
Manage WLI user keys and capabilities
Manage WLI configuration attributes
Manage WLI security attributes
Unsupported diagnostic tool for HP support personnel only
14 Product overview
Page 15

The ability to execute functions within this library is a resource protected by WLI. As with other
resources protected by WLI, access must explicitly be granted through WLI using authorized
RSA keys.
2.1.1.2 Applications
Enforcement of WLI file access policies and resource restrictions is imposed on all applications
and commands.Application binaries and files have no requirements for modification or relinking.
A user may restrict application access to local files and directories through WLI commands.
Applications arepermitted access to files andresources protected by WLIthrough WLI commands.
When the WLI security mode is restricted, access policies on all local regular files and directories
are enforced. All user applications, including those invoked by root user (uid 0), are not permitted
to override access restrictions imposed by WLI.
WLI also provides the security mode maintenance. This mode is unsecure and only recommended
when the system is inaccessible to all but administration personnel. WLI policy enforcement and
resource protection are not enabled in this mode.
WLI uses FIPS 140-2 certified OpenSSL 1.1.2 archive libcrypto.a, based on OpenSSL
A.00.09.07m. This archive is stored at /opt/openssl/fips/0.9.7/lib/hpux64/
libcrypto.a when included with an OpenSSL version such as A.00.09.08l.003. For more
information about FIPS 140-2 (Federal Information Processing Standard 140-2), see http://
www.openssl.org/docs/fips.
Because functions from this archive are statically linked into WLI commands, the archive is not
required to be present on platforms where WLI is installed. WLI uses libcrypto.a functions
to parse RSA key files generated by all OpenSSL versions. The OpenSSL license is stored at
/opt/ wli/OpenSSL.LICENSE as part of the WLI installation.
2.1.1.3 Stackable file system module
The HP-UX Stackable File System allows modification of the kernel file system stack through
inclusion of one or more executable modules that conform to the VFS interface. A module can
be inserted into the file system stack between the VFS layer and one or more file system type
modules such as VxFS (JFS) or HFS.
Modifing existing filesystem type modules is not necessary; the kernel is relinked and rebooted.
When the relinked kernel becomes active, the inserted module becomes a component in the file
system stack.
When WLI installs, its file system module is inserted between VFS and the local file system type
modules that handle local data storage. When a file is opened by an application for read or write
access, the WLI file system module causes the open() to fail if a WLI policy on the file would be
violated.
2.1.1.4 Policy enforcement manager
This componentenforces WLI file access rules. Only the following access policy types are provided:
• A FLAC policy limits access to a specific WLI-signed binary executable.
• An IBAC policy limits access to a designated set of executables.
A WLI administrator key may also allow access to specific system resources protected by WLI,
such as the /dev/mem and /dev/kmem special files.
WLI maintains a database of file access policies and resource restrictions generated by users and
administrators. This database is referenced by the Policy Enforcement Manager from within the
kernel domain. The Policy Enforcement Manager is called by the WLI file system module to
determine if a restriction imposed by WLI should prevent access.
2.1 WLI architecture 15
Page 16

2.1.1.5 File systems
WLI security features are imposed on all directories and regular files that reside in file systems
called through the VFS layer.
WLI generates metadata to keep track of its file access policies. Policy metadata might become
scattered in files throughout a file system. VxFS (aka JFS) at revision 5.0.1 or later is an exception
because metadata can be stored within a named stream. A named stream is associated with a
file inode, but is not accessible through the usual open() on the file.
Because a proprietary utility like Symantec NetBackup is required for backing up named streams,
the administrator may choose to have metadata stored on files only.
WLI also generates signature metadata for signed executable binaries. For native ELF binaries,
the metadata is stored within a special section of the file. PA-RISC binaries are also executable
on IA platforms, but their metadata is stored in files similar to policy metadata files.
Special device files within file systems are not affected by WLI with the exception of /dev/mem
and /dev/kmem. In restricted mode, access to these files is denied except to applications explicitly
granted the mem capability. For more information on WLI capabilities, see “Security features”
(page 9) and wli(5).
2.2 WLI database
WLI maintains a set of regular files and directories under /etc/wli. Some files contain
configuration data referenced during system boot, and others maintain user and administrator
key associations within WLI. These files are installed with WLI or are generated when WLI is
initialized, as described in “Configuring” (page 25). WLI prohibits write access to these files in
restricted mode. In maintenance mode, the entire database can be read or written without WLI
restrictions.
The following directories are under /etc/wli:
/etc/wli/keys
/etc/wli/certificates
The following files are under /etc/wli:
/etc/wli/wlicert.conf
/etc/wli/wlisyspolicy.conf
/etc/wli/wlisys.conf
2.3 WLI metadata files
WLI generates at least one metadata file. The number of metadata files generated depends on
file system version, value of the wmdstoretype attribute, and file system type.
The following sections describe the metadata file types. All metadata file types have WLI write
protection in restricted mode. To override WLI protection for file backup, see Section 1.2.2
(page 10).
Directory containing password-encrypted administrator
private keys, one per file. In maintenance mode, the directory
can be read and written. Read/write access is prohibited for
all files in this directory in restricted mode.
Directory containing public keys authorized for run-time
verification of file access policies.
File mapping WLI capabilities to authorized public keys.
For details on content, see wlicert.conf(4). WLI does not
permit write access to this file in restricted mode.
File containing security parameters read into kernel
memory early in the HP-UX boot process. For details on
content, see wlisys(1M) and wlisyspolicy(1M).
File containing initialization parameters for WLI kernel
components. For details on content, see wlisys(1M).
16 Product overview
Page 17

2.3.1 .$WLI_FSPARMS$
These metadata files are regular files containing metadata storage types for the file system where
they reside. This file always appears in the root directory of a file system that also contains WLI
metadata. The metadata storage type is indicated by the wmdstoretype parameter. For details, see
wlisys(1M). The following storage types are available:
auto If the file system is VxFS at revision 5.0.1 or later, metadata is stored in a named
stream. A named stream is associated with the protected file inode and not accessible
to most commands. For VxFS file systems at revision 5.0 or earlier and all other file
system types, metadata storage is the same as described in the following entry for
pseudo.
pseudo Metadata is stored separately in files within directories always named
.$WLI_POLICY$, described in the following section. These metadata directories
always reside in the parent directory of the policy protected files.
2.3.2 .$WLI_POLICY$
Directories named.$WLI_POLICY$ contain policy metadata files, and appear if the wmdstoretype
parameter has value pseudo, or the file system type is VxFS 5.0 or earlier. These directories also
appear for all non-VxFS file systems. In addition to write protection, WLI does not allow read
access to all files under directories with this name.
Each file in this directory has the same name as a file that is assigned an access policy through
wlipolicy in the parent directory. For example, if /tmp contains the following files with WLI
access policies:
% ls -l /tmp/JdMB4NJ1 /tmp/T1df07xe
-rw------- 1 joe users 2723 May 4 14:49 /tmp/JdMB4NJ1
-rw------- 1 joe users 8199 Jun 3 20:46 /tmp/T1df07xe
Then, /tmp/ .$WLI_POLICY$ contains the corresponding policy metadata files:
% ls -l /tmp/.\$WLI_POLICY\$
-rw------- 1 joe users 2048 Jul 15 15:29 JdMB4NJ1
-rw------- 1 joe users 2048 Jun 3 20:47 T1df07xe
NOTE: The ’\’ escape character is used to escape ‘$’, a special character to shell interpreters.
2.3.3 .$WLI_SIGNATURE$
Directories named .$WLI_SIGNATURE$ contain signature metadata files. In addition to write
protection, WLI does not allow read access to all files under directories with this name.
Each file in this directory has the same name as a non ELF binary that is signed with wlisign
in the parent directory. For example, if /tmp contains non ELF binaries:
% ls -l CXkiELYm wpSzpxzI
-rw------- 1 joe users 1809 Dec 9 2009 /tmp/CXkiELYm
-rw------- 1 joe users 1809 Mar 21 03:13 /tmp/wpSzpxzI
Then, /tmp/ .$WLI_SIGNATURE$ contains the corresponding signature metadata files:
% ls -l /tmp/.\$WLI_SIGNATURE\$
-rw------- 1 joe users 2048 Jul 15 01:33 /tmp/CXkiELYm
-rw------- 1 joe users 2048 Jul 15 01:36 /tmp/wpSzpxzI
NOTE: The ’\’ escape character is used to escape ‘$’, a special character to shell interpreters.
ELF-formatted binaries signed by wlitool or wlisign store their signature metadata within
a section of the binary file and do not have separate metadata files.
2.3 WLI metadata files 17
Page 18

18
Page 19

3 Key usage
WLI defines two key types. User keys can sign executable binaries and generate file access policies.
Administrator keys have all the authority of user keys, but also can be used to authorize changes
to the WLI database.
WLI dependson RSA keys for authorization of many of its command operations. A WLI command
with the “1M” manpage designation means an administrator key is required to execute at least
one command option, not the traditional root user (user ID 0). A “1” manpage indicates the
command options can be authorized with a user key. Except for wliadm -i, WLI does not
reference user or group ID for command operations.
Because an RSA private key contains all the information held within the corresponding public
key, the term “key” is synonymous with “private key”. This terminology is common in
cryptographic literature.
3.1 Generating keys
WLI administrator and user keys are generated with the openssl command tool installed on
HP-UX as part of the OpenSSL product. For the highest level of security, a 2048 bit key length
is recommended. Other supported key lengths are 512, 1024, and 1536 bits. Files with RSA keys
in PEM format are required for WLI command operations that require keys.
The openssl command also provides several cipher options for passphrase encryption of RSA
keys. The aes256 cipher is among the ciphers offered by OpenSSL. This cipher is the AES-256
cipher from the Advanced Encryption Standard chosen by the U.S. government in 2001 as a
standard for encryption. The aes256 cipher is highly recommended but not required. Any cipher
offered by OpenSSL is supported by WLI.
The genrsa subcommand creates an RSA private key. For a complete synopsis, see genrsa(1).
The following is sufficient to generate keys for WLI:
% openssl genrsa [-passout <arg>] -<cipher> -out <file> <length>
where:
<arg> is the passphrase source and value if -passout is used. Ifnot supplied, the /dev/
tty device prompts for it. For details, see openssl(1).
<cipher>
<file>
<length>
If a passphrase is not specified with genrsa, the user is prompted to enter a passphrase. Using
the cipher and length recommendations mentioned previously, an example of key creation key
is:
% openssl genrsa -aes256 -out /wli/priv.pem 2048
The rsa subcommand displays the numerical components of an RSA key. To view the key
created in the previous example:
% openssl rsa -in /wli/priv.pem -noout -text
A prompt appears for the passphrase in this example because it is not included. RSA protocol
for encrypting and decrypting messages intends that the private key and its passphrase are secret
quantities. WLI follows this convention.
is the algorithm for encrypting the private key.
is the file containing the generated private key. The default file format is PEM, the
only RSA key file format recognized by WLI.
is the number of bits in the generated private key.
The RSA public key is a subset of the information comprising the private key. For the key /wli/
priv.pem generated above, the public key /wli/pub.pem can be extracted with the following
rsa subcommand:
% openssl rsa -in /wli/priv.pem -out /wli/pub.pem -pubout
3.1 Generating keys 19
Page 20

As in the previous example, a prompt appears for the private key passphrase because it is not
included. RSA public keys are generally not considered secret quantities and are not encrypted.
Not protecting public keys does not cause a security breach. WLI follows this convention.
3.2 User keys
A user key can have no authorization for WLI operations and still suffice for creating WLI file
access policies and signing executable binaries. WLI user authorization enables a key for verifying
signatures and file access policies during run-time operations.
A WLI administrator key can authorize an RSA key to enable run-time enforcement of WLI
policies created with the key. This authorization is accomplished by copying the public key and
associated information into a file under WLI database directory /etc/wli/certificates.
For details on authorizing keys, see wlicert(1M).
User key authorization enables the following:
• An authorized key enables a WLI file access policy to be enforced for run-time access requests
on the file. The public key must verify the signature on the file access policy as part of
enforcement.
• Any key can generate a WLI policy but only an authorized key can verify a policy signature.
For details on generating file access policies, see wlipolicy(1).
• Capabilities can be grantedto an authorized key. The file /etc/wli/wlicert.conf retains
information on authorized keys that also have capabilities. An authorized key with a
capability can authorize an executable to use a particular WLI-protected resource.
• Any unauthorized key can sign and grant a capability to an executable. For the executable
to use the WLI-protected resource, the key used for its signing must be authorized as a user
key and granted the capability. For details on granting capabilities to executables, see
wlisign(1). For granting capabilities to authorized keys, see wlicert(1M).
3.3 Administrator keys
A WLI administrator key has all the authority of an authorized user key. A WLI administrator
key also has authority to execute WLI administrative commands.
Multiple WLI administrator keys can be defined. The number of administrator keys depends on
site security requirements and is left to the discretion of WLI administrators.
Administrator authority is required to:
• Grant WLI administrator authority to keys with wliadm. The key can already have WLI
user authority.
• Remove administrator authority from a key with wlicert. A key can remove its own
administrator authority.
• Grant one or more capabilities to a key. An administrator key can grant a capability to itself.
• Grant user authority to a key for file access policy enforcement with wlicert. All
administrator keys are authorized for policy enforcement without an explicit grant through
wlicert. Set the storage type for WLI metadata with wlisys. A key is not required for
storage type retrieval.
• Set WLI security attributes with wlisyspolicy. A key is not required to query these
attribute values.
• Sign executable binaries that are invoked through wliwrap to execute with one or more
capabilities. An administrator key is not required to authorize execution of wliwrap.
Execution of wliwrap can be authorized by any user key that is granted the capabilities.
20 Key usage
Page 21

4 Installing, removing, and upgrading
To install, remove, or upgrade WLI, HP recommends the following procedures.
4.1 Installation requirements
Hardware requirement
HP Integrity servers
Operating system requirements
The operating system must be HP-UX 11iv3 at level B.11.31.0909 or later.
To determine the level of HP-UX 11iv3 installed on your system:
% swlist | grep HPUX11i
For example:
% swlist | grep HPUX11i
HPUX11i-DC-OE B.11.31.0909 HP-UX Data Center Operating Environment
If your HP-UX 11iv3 system level is earlier than B.11.31.0909, download this release from:
https://h20392.www2.hp.com/portal/swdepot/try.do?productNumber=SD
Patch requirements
The following corequisite patches are required for WLI installation:
• HP-UX patch PHKL_38951—VFS cumulative patch
• HP-UX patch PHKL_39401—VM cumulative patch
• HP-UX patch PHKL_40450—DLKM cumulative patch
These patches are bundled with the WLI product and are installed if necessary.
Disk space requirements
• At least 28 MB of disk space must be available on file system “/”.
• At least 24 MB of disk space available on file system “/stand”.
System reboot
The system automatically reboots following installation.
4.2 Installing WLI
Only a root user (user ID 0) can successfully install WLI. To install WLI, use the following
procedure:
1. Review Section 4.1 (page 21)
2. Log in to the target system as the root user.
3. Go to the HP Software Depot:
http://www.hp.com/go/softwaredepot
4. Search for HP-UX Whitelisting. Read the product information webpage for the latest updates
and release information.
5. Click Receive for Free >>.
6. Enter your registration information. Read and accept the Terms and Conditions and the
Software License Agreement. Click Next.
4.1 Installation requirements 21
Page 22

7. Click Download.
8. Save the HP-UX WhiteList Infrastructure bundle as a local file on your system. Use the file
name /tmp/<wli-depotname>.depot, for example.
9. Verify the depot file is saved on your system with the following command:
# swlist -d @ /tmp/<wli-depotname>.depot
10. Install the bundle:
# swinstall -x autoreboot=true -s /tmp/<wli-depotname>.depot WhiteListInf
11. Verify the installation:
# swverify WhiteListInf
If WLI is installed correctly on the system, the swverify command includes the following text
in the reported data:
Verification succeeded
WLI relies on the OpenSSL product for RSA key generation, but the OpenSSL product is not
required for installation. The latest version of OpenSSL is recommended, but any version
installable on HP-UX 11iv3 is sufficient. You can download the latest version from:
https://h20392.www2.hp.com/portal/swdepot/displayProductInfo.do?productNumber=OPENSSL11I
OpenSSL installs by default with every HP-UX OE release, but might have been removed or not
installed with the OE. To determine the OpenSSL version and verify its content, enter:
% swlist OpenSSL
% swverify OpenSSL
4.3 Removing WLI
The administrator should consider creating a backup of policy protected files, signed binaries,
and metadata files. If reinstallation is planned, keys used for generating policies and signatures
are recognized by WLI if the keys are authorized following reinstallation.
WLI does not track access policies assigned to files and signatures generated on binaries. File
and signature metadata becomes transparent once the kernel is rebuilt without the WLI
component. WLI metadata does not impact file access or command execution once WLI is
removed.
The presence of old metadata can inhibit new policy and signature generation if WLI is reinstalled.
If reinstallation is planned, HP recommends backup and removal of all known signatures and
policies.
To remove WLI, use the following procedure:
1. Retrieve the security attributes for WLI:
% wlisyspolicy -g
If protection mode is restricted, change to maintenance.
2. Skip this step if protection mode is maintenance.
To set protection mode to maintenance:
% wlisyspolicy -s mode=maintenance -k <admin_private_key>
where:
<admin_private_key> is a WLI administrator private key. A prompt appears for the
3. If allow security downgrade is deferred, a reboot is required for protection mode to switch to
maintenance. Following reboot of the system, verify that protection mode is maintenance:
% wlisyspolicy -g
22 Installing, removing, and upgrading
key passphrase.
Page 23

4. Log in to the target system as the root user.
5. Remove WLI:
% swremove -x autoreboot=true WhteListInf
The machine automatically reboots after rebuilding the kernel without the WLI module.
6. Manual cleanup:
WLI does not keep track of metadata files generated by WLI commands. These metadata
files are listed in Section 2.3 (page 16).
4.4 Upgrading WLI
WLI upgrades will become available through revisions of WLI. If you already have WLI installed
on your system and are upgrading to a later revision, use the following procedure:
1. Change the security mode of WLI to maintenance:
% wlisyspolicy -s mode=maintenance -k <wli_admin_key>
2. This step is recommended by HP but not required. Back up the WLI database:
% tar -cvf wli_keydbxx.tar /etc/wli
NOTE: You can use an equivalent command.
3. Install the later WLI revision. For details, see Section 4.2 (page 21).
4. After reboot, configuration scripts execute automatically unless deferred by the swinstall
command. If configuration was deferred:
% swconfig WLI
5. Configuration files stored in the WLI database and preserved from the previous revision
are:
/etc/wli/wlisys.conf
/etc/wli/wlisyspolicy.conf
New versions of these files are copied to the system at the following respective locations:
/opt/wli/newconfig/etc/wlisys.conf
/opt/wli/newconfig/etc/wlisyspolicy.conf
If the new versions contain additional structure and information, copy the old versions to
a safe location. Copy the new versions to the respective database locations. The administrator
can also choose to set attribute values in the new files to match those in the old files.
6. Do not complete the manual configuration steps listed in “Configuring” (page 25). The WLI
database is identical at this time except possibly for the file replaced in step 5.
7. If the configuration files were modified or replaced in step 5, refresh the backup archive to
contain the newer file versions.
8. Set the security mode to restricted. This step requires the passphrase of a WLI administrator
key:
% wlisyspolicy -s mode=restricted -k <wli_admin_key>
9. The following must be executed by root user:
# shutdown -r
4.4 Upgrading WLI 23
Page 24

24
Page 25

5 Configuring
When WLI installation completes, the system reboots. The kernel rebuilt with WLI components
becomes active, enabling WLI services. By default, SD-UX configuration scripts execute following
the reboot. SD-UX configuration can optionally be postponed by the installer. Whether SD-UX
configuration completes during or following system initialization, a few manual steps are
necessary to bring WLI to a completely operational state. To take full advantage of WLI features,
perform the following tasks:
• Authorize the recovery key
• Authorize administrator keys
• Identify and sign essential DLKMs
• Back up the WLI database
• Reboot with security mode set to restricted
5.1 Authorizing the recovery key
After WLI is installed and the server is rebooted, the wliadm command must be executed to
initialize database files and authorize the recovery key. Root user (user ID 0) authority is required
to execute the initialization command:
% wliadm -i <pub_key> -k <priv_key> [-p <src:val>]
where:
<pub_key> is the public key file extracted from <priv_key> in PEM format.
<priv_key>
<src:val> is the passphrase source and value. If the -p option is not included, A prompt
You can execute this command only once for each installation. The specified key becomes the
recovery key for WLI. The recovery key is a special key for granting administrator authority to
other RSA keys and should be stored safely. You can replace it by reinstalling WLI or restoring
the WLI database backup described in this section. After the recovery key is authorized, it can
grant WLI administrative capability to other keys. The recovery key is limited to granting
administrator capability.
is an OpenSSL-generated RSA key file in PEM format.
appears for the passphrase at the /dev/tty device.
5.2 Authorizing administrator keys
At least one administrator key is necessary to authorize the WLI administrator commands. To
simplify security maintenance, the number of authorized administrator keys should be minimal,
even though an unlimited amount is allowed. The recovery key generated in the previous
procedure must generate the first administrator key.
An administrator key can be used for all WLI operations, including granting itself capabilities.
For details on authorizing keys for WLI administration, see wliadm(1M). For details on granting
capabilities, see wlicert(1M).
HP recommends all administrator keys are authorized before the reboot because the database
file holding administrator keys cannot be backed up or restored after the system is rebooted with
WLI security mode set as restricted.
Root user (user ID 0) authority is not required to authorize a key for WLI administration. The
user must have read permission on the key and know the passphrase. To authorize an
administrator key:
% wliadm -n <user>.<instance> -k <priv_key> [-p <src:val>] <pub_key>
where:
<user> is the key identifier; user is a valid user ID.
5.1 Authorizing the recovery key 25
Page 26

<instance> is the key identifier; instance is a string chosen by an administrator.
<priv_key>
<src:val> is the passphrase source and value. If the -p option is not included, a prompt
<pub_key>
Changing administrator key passphrases does not impact WLI database files. Generating a new
WLI database backup following passphrase changes to user or administrator keys is not necessary.
5.3 Signing DLKMs
WLI protects a system against rogue DLKMs in restricted mode. For a DLKM to be loaded by the
system during boot, it must be signed with wlisign using an authorized key. The signing key
does not require dlkm capability. The signature permits the DLKM to be authenticated by WLI
before it is loaded.
One essential DLKM that loads during boot is the Kernel Random Number Generator, /usr/
conf/mod/rng. Before setting WLI to restricted mode and rebooting the system, it is necessary
to sign this DLKM. If /home/jane/jane.priv is a key with WLI administration authority,
the following procedure allows /usr/conf/mod/rng to load and initialize during boot:
IMPORTANT: This procedure must be performed as root user. Root user authority is required
to load and unload DLKMs.
is the recovery key or previously authorized administrator key.
appears for the passphrase at the /dev/tty device.
is the public key being authorized for WLI administrator authority.
1. Unload the DLKM:
# kcmodule rng=unused
2. Sign the DLKM:
# wlisign -a -k /home/jane/jane.priv /usr/conf/mod/rng
3. Load the DLKM:
# kcmodule rng=best
where:
jane
jane.priv
priv
It is important that the DLKM is reloaded after signing. Repeat these steps for all DLKMs loaded
during boot. A root user needs to repeat these steps if usr/conf/mod/rng is replaced by
software update.
is a valid user ID.
is the key identifier.
is an arbitrary string chosen by the administrator.
5.4 Backing up the WLI database
After all administrator keys are authorized, HP recommends backing up the WLI database while
the security mode is maintenance. A backup of administrator key files is not possible after WLI is
operational in restricted mode. For details of the WLI database, see Section 2.2 (page 16). For
more information about backup, see Section 7.1 (page 33). To backup the WLI database in
maintenance mode:
% tar -cf wli.tar /etc/wli
For this example, tar is used. Proprietary backup utilities or cpio also work.
No procedure changes are required for restoring a database backup in maintenance mode.
In restricted mode, a database backup cannot be restored because of read/write protection on
administrator key storage.
26 Configuring
Page 27

5.5 Rebooting to restricted mode
WLI installs and configures when security mode is set to maintenance. This mode disables all WLI
file and resource protection, allowing the installer to complete all the previous steps.
After all administrator keys are authorized and a WLI database backup is generated, the system
can be rebooted for WLI to operate in restricted mode:
% wlisyspolicy -s mode=restricted -k <wli_admin_key>
The following must be executed by root user:
# shutdown -r
Following reboot, WLI is completely operational in the secure restricted mode.
5.5 Rebooting to restricted mode 27
Page 28

28
Page 29

6 Enhancing security with WLI
This section describes basic operations that are intended to help the reader gain familiarity with
WLI. This section assumes:
• WLI is successfully initialized.
• At least one administrator key is created.
• The WLI security mode is restricted.
• Both ibac and flac security attributes are enabled.
For details on setting WLI security attributes, see wlisyspolicy(1M).
6.1 Signing an executable binary
In the following example, a user wants to sign /usr/bin/vi to make it an authorized executable.
Only authorized executables can be designated to access IBAC-protected files. The user does not
have superuser authority and /usr/bin/vi permission bits do not allow the user to write a
WLI signature. The user decides to copy the binary into the home directory. This allows the user
to set permission bits and set WLI access restrictions.
User procedure:
1. Create an RSA key as described in Section 3.1 (page 19).
2. Store the private and public key files in the home directory as joepriv1 and joepub1.
3. Copy the binary:
% cd /home/joe; cp /usr/bin/vi joe_vi
4. Adjust permissions:
% chmod ug+w joe_vi
5. Sign it:
% wlisign -a -k joepriv1 joe_vi
For a process executing joe_vi to be authenticated, the public key must be stored in the WLI
database. Storing the public key in the database requires an administrator key.
Administrator procedure:
• Use the private key admin.pvt to authorize the user’s public key for signature verification:
% wlicert -i joe.key1 -k admin.pvt /home/joe/joepub1
The public key is now in the WLI database and available for verifying signatures in both signature
and policy metadata. The joe_vi command will authenticate when it is used to open files that
specify it in an IBAC policy.
6.2 Creating a FLAC policy
A user owns file /home/joe/joefile and wants to make it available to all, but protect it
against modification or deletion by all other users including superuser.
User procedure:
1. Create an RSA key as described in Section 3.1 (page 19).
2. Store the private and public key files as joepriv and joepub. The user has chosen /home/
joe for key storage in the following steps.
3. Create the FLAC policy:
% wlipolicy -f -a -k /home/joe/joepriv /home/joe/joefile
6.1 Signing an executable binary 29
Page 30

The policy metadata is created and resides in a protected file or named stream, depending on
the current value of the metadata storage attribute and possibly the file system type.
The administrator owns key admin.pvt. The administrator must authorize the user key for
policy enforcement:
% wlicert -i joe.key -k ./admin.pvt /home/joe/joepub
The administrator chose identifier joe.key to represent the user's key in the WLI database.
Now /home/joe/joefile is protected against deletion and alteration.
NOTE: The user and administrator can be the same person and user ID.
TIP: An administrator key can create the FLAC policy.
6.3 Creating an IBAC policy
In the following example, the user wants /home/joe/joefile2 accessible only through
/home/joe/joe_vi. The user adjusted the group permissions for joe_vi so that only he and
a specific group can execute joe_vi. The user's private key is joepriv.
User procedure:
1. Sign joe_vi:
% cd /home/joe
% wlisign -a -k joepriv -e joe_vi
2. Create the IBAC policy:
% wlipolicy -i -a -k joepriv -e joe_vi joefile2
The administrator must authorize the user key for policy enforcement as in Section 6.2 (page 29):
% wlicert -i joe.key -k ./admin.pvt /home/joe/joepub
NOTE: The keys used to sign joe_vi and create the IBAC policy are the same. This is not a
requirement and the keys can be different.
Now, joefile2 can only be opened by joe_vi. Any user, including superuser, receives a
“Permission denied” message if access is attempted with /usr/bin/vi or other executable.
IBAC and FLAC policies are mutually exclusive. A file can have any number of IBAC policies
assigned to it, but only one IBAC.
6.4 Removing a file access policy
In the following example, the user wants to remove the FLAC policy.
User procedure:
• Delete the policy:
% cd /home/joe
% wlipolicy -f -d -k joepriv1 -e joe_vi joefile
The same key used to create the FLAC policy is necessary to delete the policy. Any user that can
read the key and knows the passphrase can delete it.
6.5 Enabling DLKMs to load during boot
For this example, the system administrator identified /usr/conf/mod/ciss as a DLKM that
loads during boot. The DLKM must be signed now that WLI is installed to continue to load
30 Enhancing security with WLI
Page 31

during boot. To enable boot-time loading of a DLKM, it must be signed by an authorized key.
The administrator owns WLI administrator key adminpriv. Like all administrator keys,
adminpriv is authorized for signature verification automatically when it is granted WLI
administrator authority.
Following WLI installation the system reboots and WLI is initially in maintenance mode. Verify
the DLKM to be signed is unloaded:
IMPORTANT: This procedure must be performed as root user. Root user authority is required
to load and unload DLKMs.
1. Unload the DLKM:
# kcmodule ciss=unused
2. Sign the DLKM:
# wlisign -a -k /home/admin1/adminpriv /usr/conf/mod/ciss
3. Load the DLKM:
# kcmodule ciss=loaded
A root user needs to repeat these steps if usr/conf/mod/ciss is replaced by software update.
Signing with an authorized user key is also sufficient. The key does not require WLI administrator
authority.
NOTE: Granting dlkm capability to the authorizing key or to the dlkm is not necessary.
6.6 Loading unsigned DLKMs
The following example demonstrates how a WLI administrator can dynamically load /usr/
conf/mod/bigdlkm into the kernel domain, without writing a signature. The current state of
the DLKM is unused, and the administrator owns administrator key adminpriv with extracted
public key adminpub. Because WLI capabilities are not granted to keys automatically, the
administrator must grant dlkm capability to adminpriv with wlicert:
% cd /home/admin1
% wlicert -c admin1.key1 -s -k adminpriv -o -dlkm
The key adminpriv granted dlkm capability to itself.
An administrator key must also be used to sign /usr/sbin/kcmodule, the command that
loads the unsigned DLKM. Granting dlkm capability to the command is not necessary:
% wlisign -a -k adminpriv /usr/sbin/kcmodule
The wliwrap command now executes kcmodule as a child process. Because WLI doesnot affect
non-WLI restrictions, it is necessary to become root user to satisfy the effective user ID requirement
for executing /usr/sbin/kcmodule.
% su root
# wliwrap -k adminpriv -o -dlkm “/usr/sbin/kcmodule bigdlkm=loaded”
In this example, the wliwrap command temporarily added dlkm capability to the kcmodule
process.
6.6 Loading unsigned DLKMs 31
Page 32

32
Page 33

7 Backup and restore considerations
7.1 Overview
This section describes how WLI-protected files are read from and written back to their original
locations when the WLI security mode is restricted. Maintenance mode is necessary for some files
to backup and restore. Because backup and restore procedures vary considerably across HP-UX
installations, no specific commands or procedures are recommended.
With WLI installed and configured, backup and restore procedures depend on the WLI security
mode, as described in wlisyspolicy(1M). In maintenance mode, WLI access restrictions are completely
disabled. Backup and restore operations are the same as if WLI is not installed. Files produced
or installed by WLI can be read or written with only file ownership and permissions bits restricting
access.
The security downgrade from switching to maintenance mode even temporarily might be
unacceptable. To maintain a highly secure environment, both administrators and users might
need to backup and restore files with the server online and mode set to restricted only.
In restricted mode, access restrictions on WLI protected files and directories inhibits typical backup
and restore operations. Additional actions are necessary for backup and restore operations on
WLI database files and policy protected files. The system administrator needs to create new or
adjust existing backup and restore procedures.
Changing the passphrase of a WLI key, either administrator or user, does not affect any files
covered in the following sections. Guidelines for systems with high security often include
passphrase changerequirements. Such requirements do notimply more frequent WLI filebackups.
Symantec NetBackup is required for backup and restore operationsif the value of the wmdstoretype
attribute is auto and WLI protected files exist on a VxFS file system at revision 5.0.1 or later. This
attribute and file system combination causes policy protected file metadata to be stored in a
named data stream. A named data stream is associated with a file inode, but is not accessible to
traditional HP-UXcommands. For more detailsand syntax on setting wmdstoretype, see wlisys(1M).
The fundamental operations are reading protected files for backup commands and writing these
same files back to their original locations for restore commands. Difficulties encountered are
essentially the same whether traditional UNIX commands like tar and cpio are used or
proprietary tools like Symantec NetBackup.
HP recommends that administrators implement or modify backup and restore procedures that
include all files with WLI protection. For discussion of backup and restore operations, WLI
protected files can be divided into the following categories:
• WLI database files—managed through WLI administrator commands
• Policy protected and metadata files—managed through WLI user commands
7.2 WLI database files
The WLI database is described in (page 16). Files comprising this database are managed by
commands that require an administrator key:
wliadm
wlicert
wlisys
wlisyspolicy
WLI database files can have following protection classes:
write protected
read/write protected
7.1 Overview 33
Page 34

7.2.1 Write protected
WLI does not inhibit reading of write protected files. Files in this class can be read and backed
up in accordance with the file ownership and permission bits. Files in this class are:
/etc/wli/certificates/*
/etc/wli.wlicert.conf
/etc/wli/wlisys.conf
/etc/wli/wlisyspolicy.conf
For backup procedures, these files can be treated the same as other directories and regular files.
Restoration of backup archives for these files is only recommended if the WLI database is
corrupted. WLI protects against writes to these file locations in restricted mode. If the WLI database
is corrupted, the entire database should be restored from the most recent archive, for internal
consistency.
For an example of the procedure for restoring files in this class using wmd capability, see
“Administration examples” (page 49).
7.2.2 Read/write protected files
Files in this class have WLI read and write protection. Even with wmd capability granted to a
command, these files cannot be backed up or restored. Files in this class are:
/etc/wli/keys/*
These files include encrypted administrator keys that are read/write protected for security reasons.
HP recommends that all WLI administrator keys are generated during initialization, followed
by a backup, while the system is in maintenance mode. Authorizing new administrator keys
should be very uncommon. Only the wliadm command updates keys in this class.
Except for files in this class, backups can be generated in restricted mode. The recovery key, or
any administrator key can have its passphrase changed without affecting the WLI database.
7.2.3 Recommendations
• Avoid adding and deleting administrator keys as much as possible because this obsoletes
a WLI database backup. A backup archive can only be refreshed in maintenance mode if
administrator keys are added or deleted. Only the wliadm command can add or delete
administrator keys.
• Refresh WLI database backups when the wlisys, wlisyspolicy, and wlicert commands are
executed. Updates from these commands can be backed up in restricted mode.
• Do not attempt to restore a WLI database backup in restricted mode. Restoring a WLI Database
is only possible in maintenance mode. Backup in restricted mode should only be considered
as a disaster recovery operation.
• Do not restore a WLI Database on a system different than the one for which the archive was
created. Restoring a WLI database backup on a different system results in unpredictable
behavior and WLI failure.
• Do not partially restore a WLI database. Restore the archive entirely to maintain its internal
consistency. The database maintains internal relationships between different files that must
be intact for WLI to operate correctly.
7.3 Policy protected and metadata files
Files in this class include files with access protection policies and files created by WLI to store
metadata. The WLI protections are in effect only in restricted mode. For more detail on backing
up and restoringpolicy protected files and metadata, see Example B-2 (page 49) and Example B-3
(page 50). For more detail on backing up policy protected files and metadata without wliwrap,
Example B-4 (page 51).
34 Backup and restore considerations
Page 35

7.3.1 FLAC policies
A file with a FLAC policy can be read but cannot be overwritten unless wmd capability is granted
to the executing process. FLAC protection is not enforced with wmd capability. This enables the
file and its policy metadata to be restored from an archive over an existing copy of the
FLAC-protected file.
7.3.2 IBAC policies
Without wmd capability, a file with an IBAC policy can be read or written only if an IBAC policy
identifies the read or write command as an authorized executable. IBAC policies are effectively
overridden by wmd, permitting backup and restore operations to complete successfully. Therefore,
wmd capability must be granted to backup and restore operations that involve WLI policy protected
files.
7.3.3 Metadata files
WLI metadata files are described in Section 2.3 (page 16). The WLI protections are in effect only
in restricted mode. All WLI metadata file protections are overridden when wmd capability is
granted to the executing process. This permits all metadata to be archived and restored together
with the files pertaining to the metadata.
7.3.4 Recommendations
• HP recommends using wliwrap to grant wmd capability. The wliwrap command grants
wmd only during execution of a backup or restore operation. A key that is granted wmd is
then always necessary to execute backup and restore operations.
• Refresh backups of policy protected files immediately following creation of new policies.
Archives on policy protected files and metadata can easily be created and refreshed in
restricted mode.
7.3 Policy protected and metadata files 35
Page 36

36
Page 37

8 HP Serviceguard considerations
8.1 Overview
HP Serviceguard provides clustering services at the application level for HA. If a critical
component failureoccurs on the designated primary node of a product, HP Serviceguard activates
the product on an alternate node through failover package scripting.
The failed-over product requires the same resources on the alternate nodes as were available on
the primary node before the critical failure. These resources can include a set of loaded binaries,
awakened processes, andreconfigured telecommunication ports. Foran HA product to be entirely
compatible with HP Serviceguard, enabling resources must be automated through the failover
scripting.
WLI has no associated processes in user or kernel space. Therefore, failover packaging is not
required for WLI by itself. However, a product that accesses files protected by WLI access policies
might need some adjustments to its failover packaging.
WLI does not affect device special files with the exception of /dev/mem and /dev/kmem. A
failover package does not need modification for WLI services with regard to the transitioning
of communication and storage links between nodes.
The WLI database contains certain files unique to each platform that cannot be shared among
cluster nodes. The WLI database must also reside on the root file system, which is mounted early
following the kernel initialization phase of boot. Because the WLI database is not sharable among
nodes, successful product failover depends on WLI administrative command operations being
executed identically on each node following the initial installation.
Veritas Storage Foundation CFS is not supported by WLI. Policies assigned to files residing on
CFS file systems are not enforced.
The shared library functions in /opt/wli/lib/libwliapi.so are not supported on HP
Serviceguard clusters in this release.
8.2 Administration
Items for consideration are divided into the following general categories:
• The WLI database
• Policy protected files
8.2.1 WLI database
To ensure the initial configuration of the WLI database is consistent across all nodes, HP
recommends performing the following procedure:
1. Install WLI on all cluster nodes where it will be used, following the procedure in Section 4.2
(page 21).
2. On a single node only, complete the tasks described in “Configuring” (page 25), including
generating a backup of the WLI database in /etc/wli.
3. Copy the WLI database generated in the previous step to all other cluster nodes where WLI
is installed.
4. Copy the set of RSA keys to be authorized as WLI recovery and administrator keys to all
nodes if they do not reside on a CFS file system. If the keys are copied, passphrases might
vary but the RSA keys must be identical.
5. Restore the WLI database backup on all nodes where WLI is installed. Do not complete any
of the “Configuring” (page 25) tasks.
6. The WLI configuration on the cluster nodes is complete. Execute the final configuration
tasks of switching to restricted mode and rebooting on all nodes with WLI.
8.1 Overview 37
Page 38

WLI installation and configuration on the cluster is now complete. Following reboot of all nodes,
WLI is operational in restricted mode. To maintain the WLI database consistently and ensure
product failovers will be successful, HP recommends the following procedure:
1. Execute WLI administrative commands wliadm, wlicert, wlisys, and wlisyspolicy
identically on all nodes. This ensures the WLI database that includes all authorized user
keys, granted capabilities and associations is uniform.
2. After WLI is initialized and configured, the WLI databases on different nodes contains
different information if administrative commands are not identically executed across the
cluster.
3. To minimize the need to switch WLI to restricted mode, avoid using wliadm. Deleting and
adding administrator keys requires refreshment of an archive in maintenance mode, whereby
all WLI restrictions are not enforced.
4. Minimize the use of WLI administrative commands and the total time taken to execute these
commands across nodes. The WLI database differs between nodes while WLI administrator
command operations are in progress. This could adversely affect product failover and
multi-node product behavior.
5. If a failover occurs, the WLI database on the primary node can be unavailable for updates.
Before failback of any applications, you must update the recovered node with all WLI
commands executed after the failure.
8.2.2 Policy protected files
WLI policy enforcement must appear consistent across all nodes. To ensure file access policies
are enforced with the same results across all nodes, HP recommends performing the following
tasks:
• Examine product failover scripting for instances of non shared files protected by WLI file
access policies. An example might be configuration data residing under /etc. Because user
keys can generate polices on non shared files, the policies must be verified as identical across
all nodes to avoid potential failover problems.
• Sign binary executables identically across all nodes using the same keys. If the commands
are on shared storage file systems for failover or on CFS for multinode applications, only
one copy of the binary executable is necessary for all nodes.
• Generate file access policies identically across all nodes on nonshared file systems. A file
access policy for a file residing in a file system on shared media, such as a member of the
HP StorageWorks EVA family, is enforced on all nodes.
• Verify user IDs (/etc/passwd entries) and group IDs (/etc/group entries) are consistent
across all nodes. File permissions and ownership restrictions are not affected by WLI and
can cause file access variations across nodes on WLI protected nodes.
38 HP Serviceguard considerations
Page 39

9 Troubleshooting and known issues
9.1 Software distributor issues
Signing an ELF formatted binary adds a signature metadata section to the binary file. This action
has the side effect of changing the file modification time and size. If the binary happens to be
delivered as part of a product, the swverify command registers errors.
If error free swverify analysis on a product is important, sign and use a duplicate of the
command whenever practical. If using a copy is not practical, the SD-UX product database can
be updated with swmodify so that swverify errors are not reported.
For example, if /usr/bin/ssh and /usr/sbin/sshd are signed, clear the swverify error
with the following:
% wlisign -a -k userkey1 /usr/bin/ssh
% wlisign -a -k userkey1 /usr/sbin/sshd
% swmodify -x files=’/usr/bin/ssh /usr/sbin/sshd” Secure_Shell.SECURE_SHELL
9.2 WLI reinstallation
Residual file access policy and signature metadata from a previous installation can interfere with
a WLI reinstallation. The metadata from a previous installation can prevent generation of new
file access policies and signatures.
When WLI is removed by swremove, the WLI database must be deleted to allow a possible
reinstallation to install and configure correctly. But WLI does not keep track of policies and
signed files, and they are not removed when the product is removed.
This problem does not appear if WLI is upgraded to a later revision. The WLI database remains
intact, and the manual configuration steps should not be executed for WLI upgrades.
Consider the following habits for administrators and users:
• Minimize using administrator keys for generating policies and signatures. Removing
authorization from administrator keys has more impact than from user keys.
• Remove policies and signatures when no longer needed.
9.3 Lost WLI administrator key or passphrase
A new administrator key can always be authorized through wliadm if the recovery key is
available and its passphrase is known. Always store the recovery key and passphrase safely. The
recovery key is not useful except for authorizing administrator keys and you can store it apart
from the system where it has authority.
WLI keys are wrapped (encrypted with a cipher and passphrase) by the OpenSSL genrsa
subcommand. If the passphrase is lost, no procedure exists to recover or decrypt the wrapped
private key. For security, delete an administrator key with unknown passphrase. To delete an
administrator key with missing passphrase:
% wliadm -d <user>.<instance> -k <recovery_key>
For more information about generating RSA keys and authorizing as WLI administrative keys,
see “Key usage” (page 19) and wliadm(1).
9.4 WLI database corruption
The database can become corrupted if the underlying storage device sustains physical damage.
If the files comprising the database lose their integrity, WLI can display unpredictable behavior.
The WLI database needs to be restored from an archive.
9.1 Software distributor issues 39
Page 40

For a WLI database archive to be internally consistent, the archive must contain all files residing
under /etc/wli. These files must not have any intervening updates.
The database is updated through the wliadm, wlicert, wlisys,and wlisyspolicy commands.
The database can be restored from archive only with WLI security mode set as maintenance. The
security mode is cached within kernel space, not read from the database. The security mode in
effect can only be determined by:
% wlisyspolicy -g
To switch to maintenance mode:
% wlisyspolicy -s mode=maintenance -k <admin_key>
The command might return a message that a reboot is necessary. Following reboot, query once
more with wlisyspolicy to verify maintenance mode is in effect.
To restore the WLI database from archive:
% su root
# rm -r /etc/wli
If deletion fails for any file, reboot the system with a kernel that does not contain WLI.
# tar -xf /tmp/wlikeydb.tar
Or use an equivalent archive restore operation.
If the WLI database has been severely damaged, switching to maintenance mode might not be
possible. To maintain the highest possible security, the security mode defaults to restricted if the
initialization value cannot be read from the WLI database.
If the system cannot be switched to maintenance mode using wlisyspolicy, a kernel must be
booted that does not contain the WLI components.
To rebuild the kernel without wli:
# kcmodule wli=unused
# shutdown -r
Following reboot, all WLI file access policies and resource protections are disabled. After restoring
the WLI database, the WLI kernel can be rebuilt and rebooted:
# kcmodule wli=static
# shutdown -r
40 Troubleshooting and known issues
Page 41

10 Support and other resources
10.1 Contacting HP
10.1.1 Before you contact HP
Be sure to have the following information available before you contact HP:
• Technical support registration number (if applicable)
• Product serial number
• Product identification number
• Applicable error message
• Add-on boards or hardware
• Third-party hardware or software
• Operating system type and revision level
10.1.2 HP contact information
For the name of the nearest HP authorized reseller:
• See the Contact HP worldwide (in English) webpage (http://welcome.hp.com/country/us/
en/wwcontact.html).
For HP technical support:
• In the United States, for contact options see the Contact HP United States webpage (http://
welcome.hp.com/country/us/en/contact_us.html). To contact HP by phone:
— Call 1-800-HP-INVENT (1-800-474-6836). This service is available 24 hours aday, 7 days
a week. For continuous quality improvement, calls may be recorded or monitored.
— If you have purchased a Care Pack (service upgrade), call 1-800-633-3600. For more
information about Care Packs, refer to the HP website (http://www.hp.com/hps).
• In other locations, see the Contact HP worldwide (in English) webpage (http://
welcome.hp.com/country/us/en/wwcontact.html).
10.1.3 Subscription service
HP recommends that you register your product at the Subscriber's Choice for Business website:
http://www.hp.com/country/us/en/contact_us.html
After registering, you will receive email notification of product enhancements, new driver
versions, firmware updates, and other product resources.
10.1.4 Documentation feedback
HP welcomes your feedback. To make comments and suggestions about product documentation,
complete the form at http://www.hp.com/bizsupport/feedback/ww/webfeedback.html. Include
the document title and manufacturing part number. All submissions become the property of HP.
10.2 Related information
Documents
• OpenSSL A.00.09.08n.010, A.00.09.08n.011, and A.00.09.08n.012 Release Notes HP-UX 11i v1,
HP-UX 11i v2,and HP-UX 11i v3:
http://www.hp.com/go/hpux-security-docs
Click HP-UX OpenSSL Software.
10.1 Contacting HP 41
Page 42

• Symantec NetBackup™ Snapshots, Continuous Data Protection, and Replication:
http://eval.symantec.com/mktginfo/enterprise/white_papers/
b-techbrief_nbu_snapshots_replction_cdp_WP-20719041.en-us.pdf
• For a high level description of HP-UX file systems, see HP-UX System Administrator's Guide:
Overview HP-UX 11i Version 3:
http://bizsupport2.austin.hp.com/bc/docs/support/SupportManual/c02281492/c02281492.pdf
Websites
• HP-UX Whitelisting documentation website:
http://www.hp.com/go/hpux-security-docs
Click HP-UX Security Products and Features Software.
• HP Serviceguard Solutions for high availability and disaster recovery:
http://www.hp.com/go/serviceguardsolutions
• HP Serviceguard publications:
http://www.hp.com/go/hpux-serviceguard-docs
• Veritas Storage Foundation Cluster File System:
http://www.symantec.com/business/storage-foundation-cluster-file-system
10.3 Typographic conventions
This document uses the following typographical conventions:
%, $, or #
audit(5) A manpage. The manpage name is audit, and it is located in
Command
Computer output
Ctrl+x A key sequence. A sequence such as Ctrl+x indicates that you
ENVIRONMENT VARIABLE The name of an environment variable, for example, PATH.
[ERROR NAME]
Function()
Key The name of a keyboard key. Return and Enter both refer to the
Parameter The name of a parameter.
Term The defined use of an important word or phrase.
User input
Variable
[] The contents are optional in syntax. If the contents are a list
{} The contents are required in syntax. If the contents are a list
A percent sign represents the C shell system prompt. A dollar
sign represents the system prompt for the Bourne, Korn, and
POSIX shells. A number sign represents the superuser prompt.
Section 5.
A command name or qualified command phrase.
Text displayed by the computer.
must hold down the key labeled Ctrl while you press another
key or mouse button.
The name of an error, usually returned in the errno variable.
The name of a function.
same key.
Commands and other text that you type.
The name of a placeholder in a command, function, or other
syntax display that you replace with an actual value.
separated by |, you must choose one of the items.
separated by |, you must choose one of the items.
42 Support and other resources
Page 43

... The preceding element can be repeated an arbitrary number of
times.
Indicates the continuation of a code example.
| Separates items in a list of choices.
WARNING A warning calls attention to important information that if not
understood or followed will result in personal injury or
nonrecoverable system problems.
CAUTION A caution calls attention to important information that if not
understood or followed will result in data loss, data corruption,
or damage to hardware or software.
IMPORTANT This alert provides essential information to explain a concept or
to complete a task.
NOTE A note contains additional information to emphasize or
supplement important points of the main text.
10.3 Typographic conventions 43
Page 44

44
Page 45

A libwliapi example
This example demonstrates how libwliapi functions add and delete WLI file access policies.
A.1 Instructions
This example requires an authorized WLI administrator key.
<admin_key> WLI administrator's private key
<admin_pass> Passphrase for <admin_key>
1. Copy the makefile and source files below to a test directory.
2. % su root
3. The makefile builds executables, adds user wliusr1, and generates ukey.pvt
# make all
4. # wlicert -i wliusr1.inst1 -k <admin_key> -p pass:<admin_pass> ukey.pub
5. # wlicert -c wliusr1.inst1 -s -k <admin_key> -p pass:<admin_pass> -o api
6. # su wliusr1
7. % wlisign -a -k ukey.pvt -p pass:mypasswd -o api api_flac_test
8. % wlisign -a -k ukey.pvt -p pass:mypasswd -o api api_ibac_test
9. % api_flac_test
10. % api_ibac_test
Cleanup:
1. # wlicert -d wliusr1.inst1 -k <admin_key> -p pass:<admin_pass>
2. # make clean
A.2 makefile
# Makefile for exercising libwliapi functions
SHELL = /bin/sh
CC = cc
LD = ld
CFLAGS = +DD64
INCLUDES = -I/opt/wli/include -I/usr/include/openssl
# make secure binaries
LDOPTS = +noenvvar +nodefaultrpath +b/opt/wli/lib
LDPATH = -L/opt/wli/lib
# LIBS = -lwliapi -lsec -lcrypto
LIBS = -lwliapi -lcrypto
COMPILE = $(CC) $(CFLAGS) $(INCLUDES)
.c.o:
$(COMPILE) -c $< -o $@
all: user_setup progs
progs: api_flac_test api_ibac_test
api_flac_test: api_flac_test.o
$(LD) -o $@ api_flac_test.o $(LDOPTS) $(LDPATH) $(LIBS)
echo "flac test file" >flac_test
api_ibac_test: api_ibac_test.o
$(LD) -o $@ api_ibac_test.o $(LDOPTS) $(LDPATH) $(LIBS)
echo "ibac test file" >ibac_test
ukey.pvt:
openssl genrsa -aes256 -passout pass:mypasswd -out ukey.pvt 2048
ukey.pub: ukey.pvt
A.1 Instructions 45
Page 46

openssl rsa -passin pass:mypasswd -out ukey.pub -in ukey.pvt -pubout
user_setup: api_flac_test api_ibac_test ukey.pvt ukey.pub
if ! grep -q wliusr1 /etc/passwd; then \
useradd wliusr1; \
chown wliusr1 flac_test; chmod a+w flac_test; \
chown wliusr1 ibac_test; chmod a+w ibac_test; \
chown wliusr1 api_flac_test; chmod u+w flac_test; \
chown wliusr1 api_ibac_test; chmod u+w ibac_test; \
chown wliusr1 ukey.pvt; chmod go-w ukey.pvt; \
chown wliusr1 ukey.pub; chmod go-w ukey.pub; \
clean:
rm -f *.o api_flac_test api_ibac_test
if grep -q wliusr1 /etc/passwd; then \
userdel -F wliusr1; \
fi
rm -f flac_test ibac_test
rm -f ukey.pub ukey.pvt
A.3 FLAC add and delete program
/*
* (C) Copyright 2010 Hewlett-Packard Development Company, L.P.
*
* Description:
* api_flac_test.c
*/
#include<stdio.h>
#include<fcntl.h>
#include<sys/errno.h>
#include<api.h>
#define FLAC_TEST "flac_test"
main(int argc, char *argv[])
{
wli_fap_t ptype = WLIAPI_FAP_FLAC;
wliapi_err_t err = WLIAPI_SUCCESS;
int fd = 0;
fd = open(FLAC_TEST, O_CREAT|O_TRUNC|O_RDWR, 0666);
if ( fd < 0 ) {
(void) fprintf(stderr,
"Failed to create a test file; error %d\n", errno);
return(-1);
}
close(fd);
err = wli_add_fap(FLAC_TEST, ptype);
if (err) {
(void) fprintf(stderr,
"Failed to add fap %d\n", err);
return(-1);
}
err = wli_del_fap(FLAC_TEST, ptype);
if (err) {
fprintf(stderr,
"Failed to del fap %d\n", err);
}
return(err);
}
A.4 IBAC add and delete program
/*
* (C) Copyright 2010 Hewlett-Packard Development Company, L.P.
*
* Description:
46 libwliapi example
Page 47

* wliapitest.c
*/
#include<stdio.h>
#include<fcntl.h>
#include<sys/errno.h>
#include<api.h>
#define IBAC_TEST "ibac_test"
main(int argc, char *argv[])
wli_fap_t ptype = WLIAPI_FAP_IBAC;
wliapi_err_t err = WLIAPI_SUCCESS;
int fd = 0;
fd = open(IBAC_TEST, O_CREAT|O_TRUNC|O_RDWR, 0666);
if ( fd < 0 ) {
(void) fprintf(stderr,
"Failed to create a test file; error %d\n", errno);
return(-1);
}
close(fd);
err = wli_add_fap(IBAC_TEST, ptype);
if (err) {
fprintf(stderr, "Failed to add fap %d\n", err);
return(-1);
}
err = wli_check_fap(IBAC_TEST, ptype, WLIAPI_FREAD);
if (err) {
fprintf(stderr, "Failed to check fap %d\n", err);
return(-1);
}
err = wli_del_fap(IBAC_TEST, ptype);
if (err) {
fprintf(stderr, "Failed to del fap %d\n", err);
}
return(err);
}
A.4 IBAC add and delete program 47
Page 48

48
Page 49

B Administration examples
Example B-1 Execute manual WLI configuration
The recovery key is authorized by root user:
# wliadm -i recov.pub -k recov.pvt
RSA key adm1.pvt is generated per HP recommendations and its public key extracted:
# openssl genrsa -aes256 -out adm1.pvt 2048
# openssl rsa -in adm1.pvt -out adm1.pub -pubout
RSA key adm1.pvt is granted WLI administrator authority by the recovery key:
# wliadm -n adm1.key1 -k recov.pvt adm1.pub
The public key extracted from adm1.pvt is adm1.pub. User root must know the passphrase
for recov.pvt, but does not know the passphrase for adm1.pvt. User adm1 is a user listed in
/etc/passwd, and knows the passphrase for adm1.pvt.
Because adm1.pvt has WLI administrator authority, it can authorize itself for all capabilities:
# wlicert -c adm1.key1 -o mem,wmd,dlkm,api -s -k adm1.pvt
Any user can visually verify this key as an administrator key with all capabilities:
% wlicert -l adm1.key1
The rng DLKM must be signed along with several others. The loaded DLKMs are listed and
signed (only rng signing displayed):
% kcmodule | grep loaded
% cd /usr/conf/mod
% wlisign -a -k /home/adm1/adm1.pvt rng
The systemdoes not have Symantec NetBackup installed and therefore must have policy metadata
stored in files to create policy protected file backups:
% wlisys -s wmdstoretype=pseudo -k /home/adm1/adm1.pvt
Security guidelines specify only one WLI administrator key can be authorized. Because the WLI
security mode is restricted, the read/write protected portion of the WLI database can be read and
archived:
% tar -cvf wlikeydb.tar /etc/wli/keys
The security mode can now be switched to restricted:
% wlisyspolicy -s mode=restricted -k /home/adm1/adm1.pvt
All administrative commands are now executed for the immediate future. The WLI database
archive is now updated with the WLI database files having only write protection:
% tar -rvf wlikeydb.tar /etc/wli/certificates /etc/wli/*.conf
The system is now ready for shutdown and reboot.
Example B-2 Backing up policy protected files
HP recommends using wliwrap to backup and restore policy protected files and associated
metadata when restricted mode is in effect. To avoid granting permanent wmd capability to the
backup and restore commands, use wliwrap to enable wmd only for a single execution of a
command.
The user owns key adm1.pvt which was granted administrator authority in Example B-1
(page 49).
For this example, /usr/bin/tar is used for both backup and restore. Other HP-UX or vendor
product commands, such as cpio or commands included with Symantec NetBackup, can be
substituted for tar backup and restore operations.
49
Page 50

To meet file permission bits requirements (DAC restrictions), the user must have root authority
to modify tar with wlisign. The command is signed with the administrator key:
% su root
# wlisign -a -k adm1.pvt /usr/bin/tar
The wmd capability is not granted to /usr/bin/tar. Only the key authorizing execution of
wliwrap must be granted wmd capability. File permission bits restrictions (DAC permissions)
on /usr/bin/tar must be met for wlisign, therefore the signing was executed by root user.
Signing tar with an administrator key is required because it executes as a child process of
wliwrap. If tar is signed by a WLI key without administrator privilege, wmd capability is not
granted through wliwrap.
The key authorizing wliwrap execution must have wmd capability. The key can be granted wmd
before or after the signing, but must be granted wmd before tar executes as a child process of
wliwrap. To grant wmd to key adm1.pvt:
% wlicert -s -c wli.admin1 -o wmd -k adm1.pvt
In Example B-1 (page 49), all capabilities are granted to adm1.pvt, but only the capabilities
granted in the previous command are necessary. The backup can now be generated because wmd
is granted through key adm1.pvt.
% wliwrap -k adm1.pvt -o wmd "/tar -cvf tartest.tar /tmp/tartest"
wliwrap: process capability wmd set
wliwrap: executing command: tar -cvf tartest.tar /tmp/tartest
a ./tartest/tfile1 1 blocks
a ./tartest/tfile2 1 blocks
a ./tartest/tfile3 1 blocks
a ./tartest/.$WLI_POLICY$/tfile1 4 blocks
a ./tartest/.$WLI_POLICY$/tfile2 4 blocks
a ./tartest/.$WLI_POLICY$/tfile3 4 blocks
The wmd capability granted to the executing process overrides any IBAC, allowing tar to read
all files. Granting an IBAC policy to any file to allow the backup to proceed is not necessary.
Protected files and associated metadata files are now stored on the archive tartest.tar. The
metadata storage is either pseudo or the file system is not VxFS 5.0.1 or later. If VxFS named data
streams are used for metadata storage, the .$WLI_POLICY$ directory and its files do not appear.
For details on setting metadata storage type, see wlisys(1M).
The administrator key is used to authorize wliwrap execution and grant wmd capability to the
tar child process in this example. This is done only for convenience because it is likely the same
user would sign the backup command and generate backups. A WLI user key without
administrator authority is sufficient to authorize wliwrap execution.
The tar command is executed with the effective user ID of the login user in this example. The
owner and group IDs of the generated archive matches the login values of owner and group, as
if tar is executed directly.
This preparation for backing up policy protected files can be applied to backing up non ELF
binary executables with associated metadata in .$WLI_SIGNATURE$ directories. A
.$WLI_FSPARMS$ file can also be backed up. This procedure can be applied to backing up an
entire file system containing policy protected files and signed executables.
Example B-3 Restoring policy protected files
HP recommends using wliwrap to backup and restore policy protected files and associated
metadata. Granting permanent wmd capability to a command with wliwrap is not necessary, as
demonstrated in Example B-2 (page 49).
This example demonstrates how to restore the backup archive generated in Example B-2(page 49).
As with the generation of the archive, the WLI security mode is restricted so all WLI file access
policies are enforced. Guidelines for the server do not allow security to be downgraded at any
time.
50 Administration examples
Page 51

Using the administrator key adm1.pvt for authorization, tar is invoked as a child process of
wliwrap. For details about the key signing and granting wmd, see Example B-2 (page 49).
You must restore the archive onto a file system with the same type of metadata storage as the
generated archive. Otherwise, WLI can not enforce the policies.
If the archive metadata storage type is unknown, execute the following to look for policy metadata
files:
% tar -vtf tartest.tar
rwxrwxrwx 0/0 0 Aug 8 02:32 2010 ./tartest/.$WLI_POLICY$/
rwxrwxrwx 0/0 2048 Aug 8 02:52 2010 ./tartest/.$WLI_POLICY$/tfile1
rw-r--r-- 0/3 2048 Aug 6 03:21 2010 ./tartest/.$WLI_POLICY$/tfile2
rw-r--r-- 0/3 2048 Aug 8 02:47 2010 ./tartest/.$WLI_POLICY$/tfile3
The archive contains metadata stored in regular files, not VxFS named streams.
To determine which policy protected files are already on the file system and the storage type,
locate the file system root directory and query the metadata storage type:
% bdf mydir
Filesystem kbytes used avail %used Mounted on
/dev/vg00/lvol4 5242880 85192 5117472 2% /tmp
% cat /tmp/'.$WLI_FSPARMS$'
wmdtype=pseudo
The file system and archive storage types match, and it is safe to proceed.
If the file system root directory does not contain a .$WLI_FSPARMS$ file, the file system cannot
contain policy protected files. If the file system hasno policy protected files, the metadata storage
type is determined by the value of the wmdstoretype attribute set with wlisys, not the metadata
files restored from the archive. The user can set the correct storage type if necessary:
% wlisys -k adm1.pvt -s wmdstoretype=pseudo
The archive is now restored:
% wliwrap -k adm1.pvt -o wmd "/tar -xvf wrap.tar /tmp/tartest"
wliwrap: process capability wmd set
wliwrap: executing command: tar -xvf wrap.tar /tmp/tartest
x ./tartest/tfile1 1 blocks
x ./tartest/tfile2 1 blocks
x ./tartest/tfile3 1 blocks
x ./tartest/.$WLI_POLICY$/tfile1 4 blocks
x ./tartest/.$WLI_POLICY$/tfile2 4 blocks
x ./tartest/.$WLI_POLICY$/tfile3 4 blocks
Similar to Example B-2 (page 49), metadata files under .$WLI_SIGNATURE$ directories and
.$WLI_FSPARMS$ files can also be restored with the wliwrap command. Therefore, an entire
file system can be restored with this procedure.
Example B-4 Backup and restore without wliwrap
The alternative to temporarily granting wmd capability with wliwrap is to permanently grant
wmd with wlisign. This example describes how to create an archive containing policy protected
files with a backup command granted permanent wmd capability. The archive is then restored
with a restore command also granted permanent wmd capability.
For this example, the platform has VxFS 5.0.1 file systems installed and the wmdstoretype attribute
has value auto, set by the wlisys command. This combination implies that named data streams
are used to store policy protected metadata. Veritas NetBackup is then required to backup files
with named data streams. The bpbackup and bprestore commands are installed for backup
and restore operations respectively.
The commands are signed and granted wmd:
% wlisign -a -k adm1.pvt -o wmd /usr/openv/netbackup/bin/bpbackup
% wlisign -a -k adm1.pvt -o wmd /usr/openv/netbackup/bin/bprestore
51
Page 52

To grant wmd to the commands, the adm1.pvt key must be a WLI administrator key. This key
was granted administrator privilege in Example B-1 (page 49).
The bpbackup and bprestore commands are now able to backup and restore metadata in
named data streams as well as in regular files. These commands have wmd capability that grants
read/write access to all metadata, whether stored in named streams or in regular files under
.$WLI_POLICY$ directories. The wmd capability also permits bpbackup and bprestore to
access policy protected files without permanent regard to policy restrictions. Due to security
concerns, HP does not recommend granting a command permanent wmd capability.
For example, to start a user backup of the files listed in backup_list:
% bpbackup -f backup_list
To restore the files in backup_list:
% bprestore -f backup_list
File ownership and permissions bits must also allow access to bpbackup and bprestore.
52 Administration examples
Page 53

C Quick setup examples
This guide offers quick setup examples for installing WLI and creating file access policies.
C.1 Installing WLI
1. Go to the HP Software Depot:
http://www.hp.com/go/softwaredepot
2. Click Security and manageability.
3. Scroll down and select HP-UX Whitelisting.
4. Click Installation at the bottom of the page.
5. Review the software requirements.
6. Click Receive for Free >> at the bottom of the page.
7. Sign in as a registered user. You need to register as a new user if you are not already
registered.
8. Select WLI A.01.00 for HP-UX 11iv3 and complete the required fields.
9. Click Next >>.
10. Click Get Software at the bottom of the page.
11. On the Get Software tab, click Download Directly >> to receive the WLI depot.
12. On the Get Documentation tab, click Download Directly >> to receive the installation
instructions.
13. For installation on platforms without HP-UX Serviceguard, complete the steps in “HP-UX
WLI Installation Procedure” included with the installation instructions.
14. On HP-UX Serviceguard clusters, consider cluster-wide installation. For details, consult “HP
Serviceguard considerations” (page 37).
C.2 Configuring WLI
For details on configuring WLI, follow the procedure in “Configuring” (page 25), including
generating the first administrator key as described in Section 5.2 (page 25). An administrator
key can authorize execution of all WLI commands.
C.2.1 Authorizing an administrator key
The procedure to authorize an administrator key is described in “Configuring” (page 25). For
example, assume adm is a user listed in /etc/passwd and owns the recovery key /home/adm/
recov.pvt authorized during WLI configuration. User adm enters the following to authorize
/home/adm/adm.pvt as an administrator key:
% wliadm -n adm.admin1 -k /home/adm/recov.pvt /home/adm/adm.pub
A prompt appears for the passphrase for the recovery key.
As mentioned in “Configuring” (page 25), reboot the system to complete WLI configuration.
C.2.2 Authorizing a user key
You can optionally authorize user keys to generate file access policies and signatures. Authorizing
the user key is necessary for WLI to enforce file access policies generated by a user key. To
authorize a user key:
% wlicert -i <user>.<instance> -k <privkey> <pubkey>
where:
<user> A valid user from /etc/passwd
<instance>
<privkey>
An arbitrary string chosen by the user
Any administrator private key
C.1 Installing WLI 53
Page 54

<pubkey>
For example, user adm uses administrator key /home/adm/adm.pvt to authorize /home/usr1/
usr.pub as a WLI user key:
% wlicert -i usr1.key1 -k /home/adm/adm.pvt /home/usr1/usr.pub
Public key being authorized
C.3 FLAC policies
A FLAC policy prevents a regular file or directory from being modified, deleted, or renamed. It
also prevents change of ownership and permission bits, modification time, and other persistent
information associated with the file. These restrictions apply to all users including root user. A
file is locked when it has a FLAC policy actively being enforced by WLI. A user must own a file
to assign it a FLAC policy.
C.3.1 Creating a FLAC policy
In this example, the file /tmp/passwd is locked. The administrator private key is /home/adm/
adm.pvt. The user private key file is /home/usr1/usr.pvt. The user public key file is /home/
usr1/usr.pub. To generate the FLAC policy:
% wlipolicy -f -a -k /home/usr1/usr.pvt /tmp/passwd
A prompt appears for the passphrase for /home/usr1/usr.pvt.
C.3.2 Enabling a FLAC policy
If /home/usr1/usr.pvt is authorized as a WLI user key, as in the example in Section C.2.2
(page 53), no further action is necessary. The key can be authorized after policy generation with
the identical command:
% wlicert -i usr1.key1 -k /home/adm/adm.pvt /home/usr1/usr.pub
A prompt appears for the passphrase for /home/adm/adm.pvt.
C.3.3 Testing a FLAC policy
For example, the FLAC created and enabled in the previous example is tested. Verify that
system-wide policy enforcement is in effect:
% wlisyspolicy -g
The returned messages must include:
“Values in effect currently:”
write lock protection (FLAC): enabled
protection mode: restricted
If either or both of the above settings are not in effect, system-wide FLAC policy enforcement
can be enabled with:
% wlisyspolicy -s mode=restricted,flac=enabled -k /home/adm/adm.pvt
Any user, including root, cannot modify, rename, or delete /tmp/passwd:
% mv /tmp/passwd /tmp/x
mv: /tmp/x: rename: Permission denied
% rm /tmp/passwd
/tmp/passwd: 666 mode ? (y/n) y
rm: /tmp/passwd not removed. Permission denied
% echo hello >> /tmp/passwd
ksh: /tmp/passwd: cannot create
Any user with read permission on the file can still read its content:
% cat /tmp/passwd
hi there
54 Quick setup examples
Page 55

C.3.4 Disabling a FLAC policy
After reboot of the system, the final task for WLI configuration, WLI is in the highest security
state. To disable FLAC policy enforcement:
1. The administrator removes system-wide enforcement:
% wlisyspolicy -s flac=disabled -k /home/adm/adm.pvt
or
% wlisyspolicy -s mode=maintenance -k /home/adm/adm.pvt
The wlisyspolicy command returns a message indicating a reboot is necessary for the
security downgrade to be in effect if the downgrade attribute has value deferred.
2. The administrator removes /home/usr1/usr.pub authorization:
% wlicert -d usr1.key1 -k /home/adm/adm.pvt
C.3.5 Removing a FLAC policy
To remove a FLAC policy as user:
% wlipolicy -f -d -k /home/usr1/usr.pvt /tmp/passwd
To remove a FLAC policy as administrator:
% wlipolicy -f -d -k /home/adm/adm.pvt /tmp/passwd
C.4 IBAC policies
An IBAC policy prevents a regular file or directory from being accessed by all binary executables
except those explicitly identified. The access restrictions apply to all users including root user.
Multiple IBAC policies can be assigned to a file. A user must own a file to assign it an IBAC
policy. In the following example, the file /tmp/secret is assigned an IBAC policy allowing
/usr/bin/cat access. The administrator private key is /home/adm/adm.pvt. The user private
key file is /home/usr1/usr.pvt and the user public key file is /home/usr1/usr.pub.
C.4.1 Creating an IBAC policy
A binary executable must be signed to be specified in an IBAC policy. To sign /usr/bin/cat:
% wlisign -a -k /home/usr1/usr.pvt /usr/bin/cat
The user must have write permission on /usr/bin/cat. Normally only root with user ID 0 can
generate this signature.
To generate the IBAC policy:
% wlipolicy -i -a -k /home/usr1/usr.pvt -e /usr/bin/cat /tmp/secret
A prompt appears for the passphrase for /home/usr1/usr.pvt in both previous operations.
C.4.2 Enabling an IBAC policy
To enforce the IBAC policy:
% wlicert -i usr1.key1 -k /home/adm/adm.pvt /home/usr1/usr.pub
A prompt appears for the passphrase for /home/adm/adm.pvt.
C.4.3 Testing an IBAC policy
For example, the IBAC created and enabled in the previous example is tested. Assume /tmp/
secret has only the IBAC policy for /usr/bin/cat, as assigned in the previous example.
Verify system-wide policy enforcement is in effect:
% wlisyspolicy -g
The returned messages must include:
C.4 IBAC policies 55
Page 56

“Values in effect currently:”
write lock protection (IBAC): enabled
protection mode: restricted
If either of the above settings are not in effect, IBAC policy enforcement can be enabled with:
% wlisyspolicy -s mode=restricted,ibac=enabled -k /home/adm/adm.pvt
Access to all other executables is denied:
% /usr/bin/more /tmp/secret
/tmp/secret: Permission denied
% /usr/bin/head /tmp/secret
/tmp/secret: Permission denied
Any user with read permission on /tmp/secret can read it:
% cat /tmp/secret
hi there
C.4.4 Disabling an IBAC policy
After reboot of the system, the final task for WLI configuration, WLI is in the highest security
state. To disable IBAC policy enforcement:
1. The administrator removes system-wide enforcement:
% wlisyspolicy -s ibac=disabled -k /home/adm/adm.pvt
or
% wlisyspolicy -s mode=maintenance -k /home/adm/adm.pvt
The wlisyspolicy command returns a message indicating a reboot is necessary for the
security downgrade to be in effect if the downgrade attribute has value deferred.
2. The administrator removes key /home/usr1/usr.pub authorization:
% wlicert -d usr1.key1 -k /home/adm/adm.pvt
C.4.5 Removing an IBAC policy
To remove an IBAC policy as user:
% wlipolicy -i -d -k /home/usr1/usr.pvt /tmp/secret
To remove an IBAC policy as administrator:
% wlipolicy -i -d -k /home/adm/adm.pvt /tmp/secret
56 Quick setup examples
Page 57

Glossary
ASM Oracle Automatic Storage Management
authorized
executable
CFS Veritas Cluster File System
DAC Discretionary Based Access Controls. A traditional file access control used on Unix-based
DLKM Dynamically Loadable Kernel Module
FAP File Access Policy. WLI metadata that restricts access to a regular file or directory. IBAC and
FLAC File Lock Access Control. This file access policy restricts access to read-only for all executables.
HA High Availability
IBAC Identity Based Access Control. This file access policy restricts accessto an authorized executable.
maintenance
mode
named stream VxFS feature that allows a single file inode to be associated with multiple data streams. On
restricted mode WLI enforces file access policies and resource restrictions in accord with other security attributes.
rng The HP-UX kernel random number generator. Strong random numbers are generated from the
RSA Rivest, Shamir & Adleman. Algorithms and protocol for generating asymmetric cryptographic
VFS Virtual File System.The kernel component that virtualizes file system operations for NFS, HFS,
A signed binary executable specified in an IBAC policy. The executable is permitted access to
the protected file also specified in the IBAC.
operating systems.
FLAC policies are FAPs. A file can have multiple IBAC policies but only one FLAC.
WLI does notenforce file access policies and resource restrictions. All readand write protection
on WLI database files is disabled.
VxFS 5.0.1 and later VxFS revisions, WLI stores policy and signature metadata in a named
stream associated with the file for which the policy or signature applies.
Read and write protection on WLI database files is enabled.
informational entropy in system interrupt arrival times from networking and other external
sources.
keys and establishing secure communications.
and VxFS for storage management on physical media.
57
Page 58

58
Page 59

Index
Symbols
.$WLI_FSPARMS$, 17
.$WLI_POLICY$, 17
.$WLI_SIGNATURE$, 17
FLAC policy, 29
G
generating keys, 19
glossary, 57
A
access controls
file lock, 9
identity-based, 10
administrator key
lost, 39
administrator keys, 20
authorizing, 25
API, 14
api, 11
applications, 15
architecture, 13
B
backup, 26, 33
backup recommendations, 34, 35
C
configuring, 25
contacting HP, 41
D
database, 16
database corruption, 39
database files, 33
DLKM, 26
loading, 30
unsigned loading, 31
dlkm, 10
E
example
backing up policy protected files, 49
backup and restore without wliwrap, 51
libwliapi, 45
manual configuration, 49
restoring policy protected files, 50
F
file access policies, 9
file access policy
removing, 30
file lock access controls, 9
file systems, 16
files
database, 33
metadata, 34, 35
protected, 34, 38
FLAC, 9, 46
FLAC policies, 35
I
IBAC, 10, 46
IBAC policies, 35
IBAC policy, 30
identity-based access controls, 10
installation requirements, 21
installing, 21
K
known issues, 39
L
libwliapi, 45
M
mem, 10
metadata files, 16, 34, 35
P
passphrase
lost, 39
policies
FLAC, 35
IBAC, 35
policy enforcement manager, 15
product overview, 13
protected files, 34, 38
Q
quick setup examples, 53
configuration, 53
FLAC policies, 54
IBAC policies, 55
installation, 53
R
rebooting, 27
recommendations
backup, 34, 35
restore, 34, 35
recovery key
authorizing, 25
reinstallation, 39
related information, 41
removing, 21, 22
resources, 41
restore, 33
restore recommendations, 34, 35
restricted mode, 27
59
Page 60

S
security enhancement, 29
security features, 9
serviceguard, 37
administration, 37
overview, 37
wli database, 37
signing executable binary, 29
software distributor issues, 39
stackable file system module, 15
support, 41
T
troubleshooting, 39
typographic conventions, 42
U
upgrading, 21, 23
user keys, 20
W
wmd, 10
60 Index
Page 61

61
Page 62

 Loading...