

Page 1

HP HARD DISK DRIVE
TROUBLESHOOTING GUIDE
HDD Troubleshooting Guide Page 1 of 48
Page 2

TABLE OF CONTENTS
1 Drive Self Test (DST) ...................................................................... 3
1.1 Introduction..................................................................................................... 3
1.2 Tools and Diagnostics: Drive Self Test – DST............................................ 3
1.3 DST Benefits.................................................................................................... 3
2 Running the Drive Self Test - DST .................................................. 5
2.1 Option 1: Run DST using Drive Protection System from the system
BIOS 5
2.1.1 Run DST from system BIOS -- HP notebook examples.................... 7
2.1.2 Run DST from system BIOS -- HP workstation example............... 15
2.1.3 Run DST from system BIOS -- HP desktop example...................... 18
2.2 Option 2: Run DST from HP Instant Support Web Site.......................... 21
2.3 Option 3: Run DST from HP Insight Diagnostics Offline Edition........... 26
3 Hard disk drive troubleshooting flow charts ................................ 33
3.1 FLOW CHART 1: Run the Short Drive Self Test....................................... 33
3.2 FLOW CHART 2: HDD error and operating system will not boot -- with
video........................................................................................................................ 34
3.3 FLOW CHART 3: No OS boot and HDD makes clicking noise................ 35
3.4 FLOW CHART 4: Noisy HDD and OS boots..............................................36
3.5 FLOW CHART 5: Operating System Will Not Boot................................... 37
3.6 FLOW CHART 6: Hangs during operation................................................. 38
3.7 FLOW CHART 7: Drive error during operation......................................... 39
3.8 FLOW CHART 8: HDD utilities report errors.............................................40
3.9 FLOW CHART 9: Blue screens.................................................................... 41
3.10 FLOW CHART 10: Cannot run Drive Self Test due to failure................. 42
3.11 FLOW CHART 11: Drive Self Test is Not Enabled in BIOS setup.......... 43
4 Operating system and CMOS help ................................................ 44
How to do a System Restore......................................................................44
4.1
4.2 How to re-install the Operating System.................................................... 46
4.3 How to Clear and Reset the CMOS on Desktop Computers................... 47
HDD Troubleshooting Guide Page 2 of 48
Page 3

1 Drive Self Test (DST)
1.1 Introduction
The troubleshooting flow charts presented in section 3 are to be used to improve the
use of the Drive Self Test (DST). The purpose of these flow charts is to increase
solution/resolution accuracy in order to increase customer satisfaction with higher
system uptime. Use of the flow charts will decrease the need for re-repairs and will
decrease no fault found rates. It is critical that these flow charts are followed w hen a
hard disk drive (HDD) may be the cause of the failure and the failure may result in the
replacement of the hard disk drive. Below are some definitions and explanations for
using tools associated with these flows charts.
1.2 Tools and Diagnostics: Drive Self Test – DST
The Drive Self Test (DST) is an integral part of most hard disk drives shipped today.
Depending on the product, DST can be launched in several ways including from DPS in
the BIOS, from HP Insight Off-line Diagnostics and from HP Instant Support.
DST consists of 2 tests:
¾ There is a short (“quick”) test that takes 2 to 5 minutes to complete from
start to finish and tests the basic functionality of the drive.
¾ There is a long (“comprehensive”) test that takes much longer to complete.
The length of the test varies depending on the size of the drive and can tak e
anywhere from 20 minutes for smaller drives up to a couple of hours for larger
drives.
1.3 DST Benefits
• This test does not erase data when a failure is found.
• Accuracy: failure of either of these two tests assumes 100% failure of HDD and
the HDD must be replaced. Successful passing of the quick test gives a 90%
assurance that the drive is good. Successful passing of the long test is a close to
100% assurance that the drive is good.
• This test is developed by each hard disk drive manufactur er based on common
industry standards. It is loaded on the hard disk drive during manufacturing.
• Predictive ability: this test can detect potential failure that could occur if the user
continues to use the hard di sk drive.
HDD Troubleshooting Guide Page 3 of 48
Page 4

• It can be invoked in 3 different ways: from the system BIOS, from the HP web
site (HP Instant Support) and from a bootable CDROM (H P Insight Diagnostics
Off-line Edition). It is available for customers and support partners on the HP
Web site during the life of the product.
• The DST is available for:
- Most desktops built from 2000
- Most workstations built from 2002
- All notebooks built from 2003
• DST results are logged on the hard disk drive itself for analysis by th e HP repair
vendor when the hard disk drive is returned for repa ir.
NOTE: Troubleshooting help for many HP desktops and workstations can be found in
the troubleshooting guides located on the HP Web site.
- Go to http://www.hp.com.
- Select “Support & Troubleshooting”.
- Select “See support and troubleshooting”, then desired product
- Within the self-help resources section, select “ manuals”.
- Select the appropriate manual.
HDD Troubleshooting Guide Page 4 of 48
Page 5

2 Running the Drive Self Test - DST
There are three different ways to run DST on supported hard disk drives. Not all HP
computers support all three options. (See the DST Product Support Matrix on the CSN
Diagnostic Tools page (speedcode TDIA) for details.)
Option 1: Run DST using Drive Protection System from the system BIOS.
Option 2: Run DST from HP Instant Support Web site.
Option 3: Run DST from the HP Insight Diagnostics Offline Edition.
2.1 Option 1: Run DST using Drive Protection System from the system BIOS
Most HP computers contain DPS in the BIOS which will allow the launch of the DST for
most hard disk drives. DPS does not support SCSI and will not be available for these
drives. Most SATA and IDE hard disk drives support DST. Most DPS systems launch
both Quick and Comprehensive tests on the hard disk drive. The first test is the Quick
test. The Comprehensive test may launch automatically after the completion of the
Quick test and can be aborted if only the Quick test is desired.
Procedure: to access DPS through computer setup, follow these steps:
1. Turn on or restart the computer.
2. During POST, when the F10 Setup message appears in the lower portion of the
screen, press the F10 key to enter Computer Set-up.
(For some computers you will need to press the F2 function key instead of the
F10 function key to get into setup. Your computer will display a message
identifying the appropriate function key.)
If you do not press the F10 (or F2) key while the message is displayed, you
must restart the computer to access the utility.
Select language.
A choice of headings appears in the Computer Setup Utilities menu; some of
these may be:
“File, Storage, Security, Power, Advanced” or
“File, Security, Tools, Advanced” …
3. Under “Storage” or “Tools” or possibly another heading you will find
“IDE DPS Self-Test” or “HDD Self-Test”.
The screen will display the list of DPS-capable hard disk drive that are installed
on the computer.
HDD Troubleshooting Guide Page 5 of 48
Page 6

If no DPS-capable hard disk drive are installed, the “IDE DPS Self-Test” or
“HDD Self-Test” option will not appear on the screen. (Note: SCSI drives are
not DPS-capable drives)
4. Select the hard disk drive to be tested using the up and down arrow keys.
Press F10 to accept selection
Follow the menu screens to run the desired test.
For some computers, the Quick and Comprehensive tests are run consecutively.
To run the Quick test only, allow the Quick test to complete and once the
Comprehensive test has started, press “esc” to abort the test. A failure message
will appear after the Quick test if there are any failures.
When either test has been completed, one of three messages will be displayed:
• Test Succeeded. Completion Code 0.
• Test Aborted. Completion Code 1 or 2.
• Test Failed. Drive replacement recommended. Completion Code 3-14.
(e.g. Test Failed. Drive replacement recommended. Completion Code 7.)
The completion code, if available, should be recorded for use on the warranty
claim and utilized in diagnosing the computer problem.
If the Comprehensive Test is aborted after the hard disk drive passes the Quick
test, only the “Test Aborted” message will appear.
HDD Troubleshooting Guide Page 6 of 48
Page 7
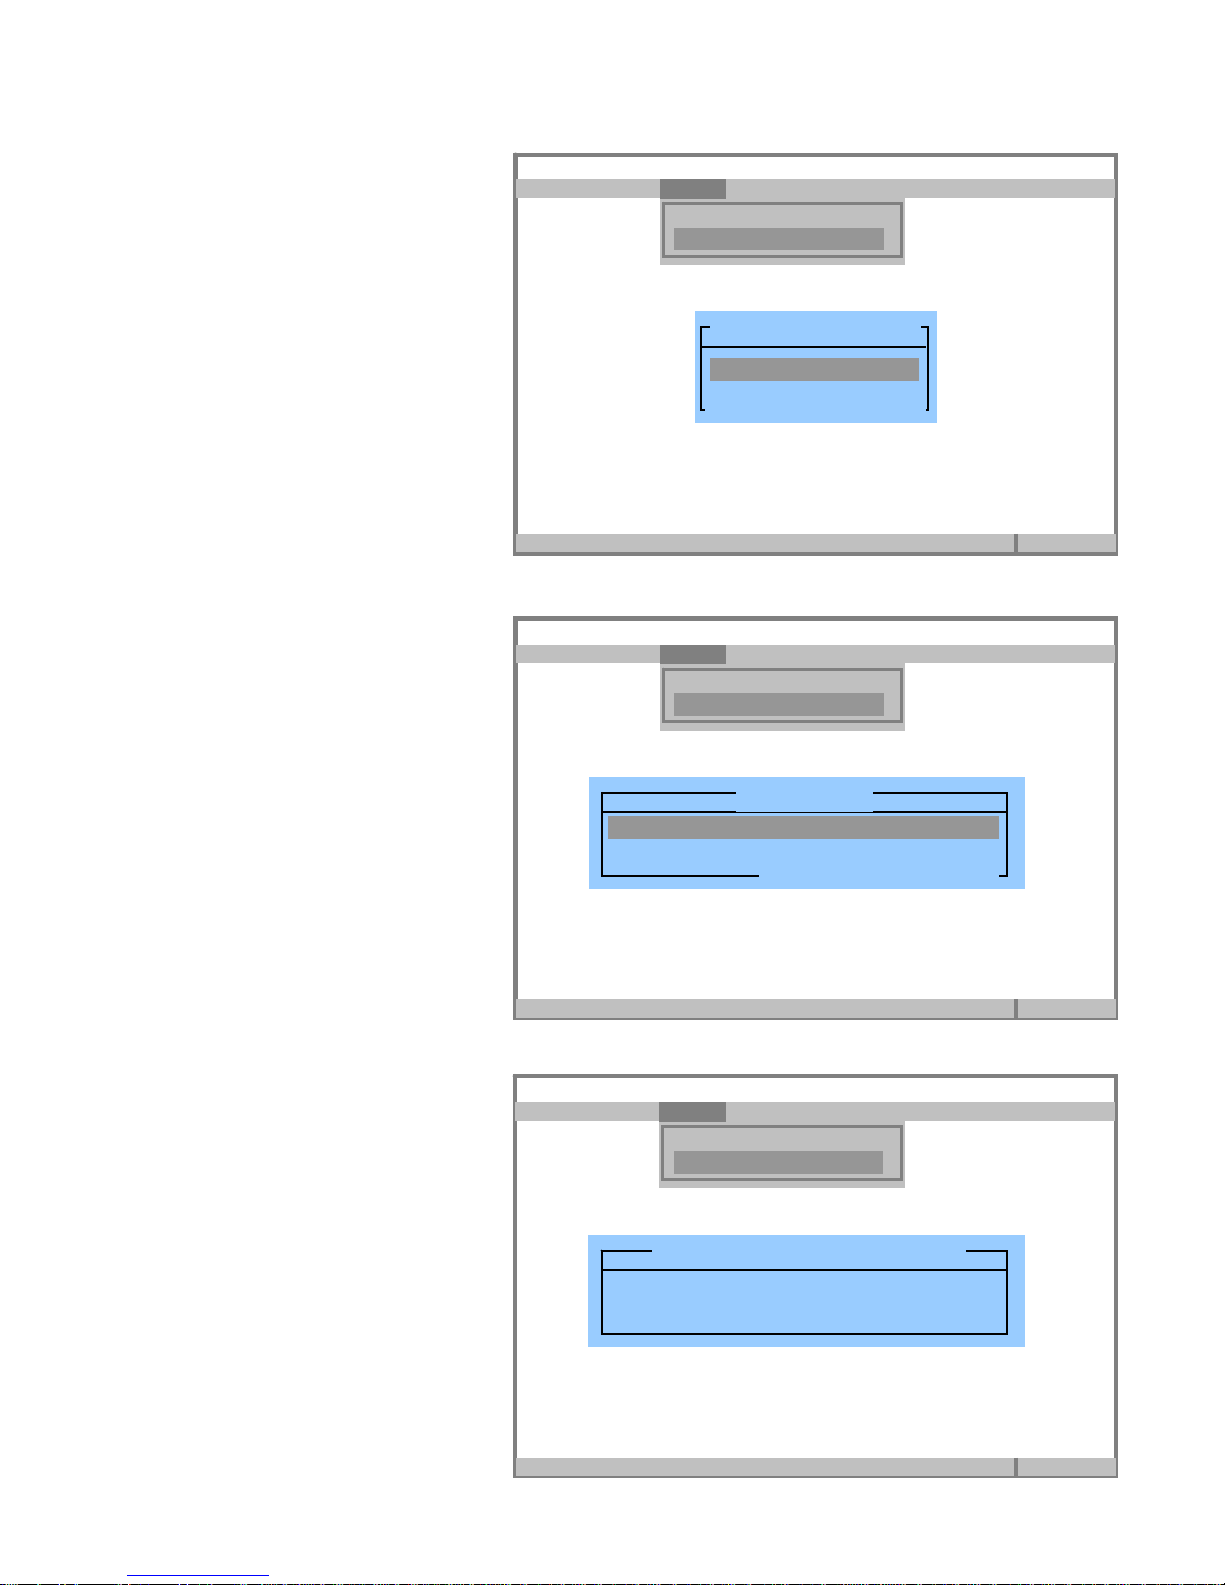
2.1.1 Run DST from system BIOS -- HP notebook examples
A
<
>
CASE 1: Quick DST & Comprehensive DST automatically run consecutively
During POST
• Press the [F10] key
• Select:
Tools HDD Self-Test options
File Security Tools Advanced
F10=ROM Base Setup
Computer Setup
Tools
HDD Self-Test options
Battery Status
ctivate HDD Self-Test Options
Bios Version
F1=Help
HDD Troubleshooting Guide Page 7 of 48
Page 8
Select the listed hard disk drive
A
<
>
A
<
>
A
<
>
• Press [F10] = Select
• You will see a message like
“Estimated execution time
(min): 48”
NOTE: The displayed time is
the sum of the Quick + the
Comprehensive tests.
• Press [F10] = Continue
The Quick DST starts first.
- If the hard disk drive has a
failure, the test stops and an
error message pops up.
Computer Setup Bios Version
File Security Tools Advanced
ctivate HDD Self-Test Options
Computer Setup Bios Version
File Security Tools Advanced
ctivate HDD Self-Test Options
Computer Setup Bios Version
File Security Tools Advanced
ctivate HDD Self-Test Options
Tools
HDD Self-Test options
Battery Status
HDD Self-Test options
Notebook hard drive
F10=Select, ESC=Cancel
F1=Help
Tools
HDD Self-Test options
Battery Status
HDD Self-Test
Estimated execution time (min): 48
F10=Continue, ESC=Cancel
F1=Help
Tools
HDD Self-Test options
Battery Status
HDD Self Test
Test 1 (Quick)
Self test in progress …………… x% complete
ESC=Cancel
F1=Help
HDD Troubleshooting Guide Page 8 of 48
Page 9
- If the hard disk drive is good,
A
<
>
A
<
>
A
<
>
the test finishes within 2
minutes.
Then Comprehensive DST
starts automatically.
- If the hard disk drive has a
failure, the test stops and an
error message pops up.
NOTE: user can stop the test
at any time by pressing the
[ESC] = Cancel key.
- If the hard disk drive is good,
the test finishes within 40 to
120 minutes.
Press any key to go back to the
starting menu.
Computer Setup Bios Version
File Security Tools Advanced
ctivate HDD Self-Test Options
Computer Setup Bios Version
File Security Tools Advanced
ctivate HDD Self-Test Options
Computer Setup Bios Version
File Security Tools Advanced
Tools
HDD Self-Test options
Battery Status
HDD Self Test
Test 1 (Quick)
Test succeeded
Test 2 (Comprehensive)
Self test in progress …………… x% complete
ESC=Cancel
F1=Help
Tools
HDD Self-Test options
Battery Status
HDD Self Test
Test 1 (Quick)
Test succeeded
Test 2 (Comprehensive)
Test succeeded
Press any key to continue
F1=Help
Tools
HDD Self-Test options
Battery Status
HDD Self-Test options
Notebook hard drive
F10=Select, ESC=Cancel
HDD Troubleshooting Guide Page 9 of 48
ctivate HDD Self-Test Options
F1=Help
Page 10
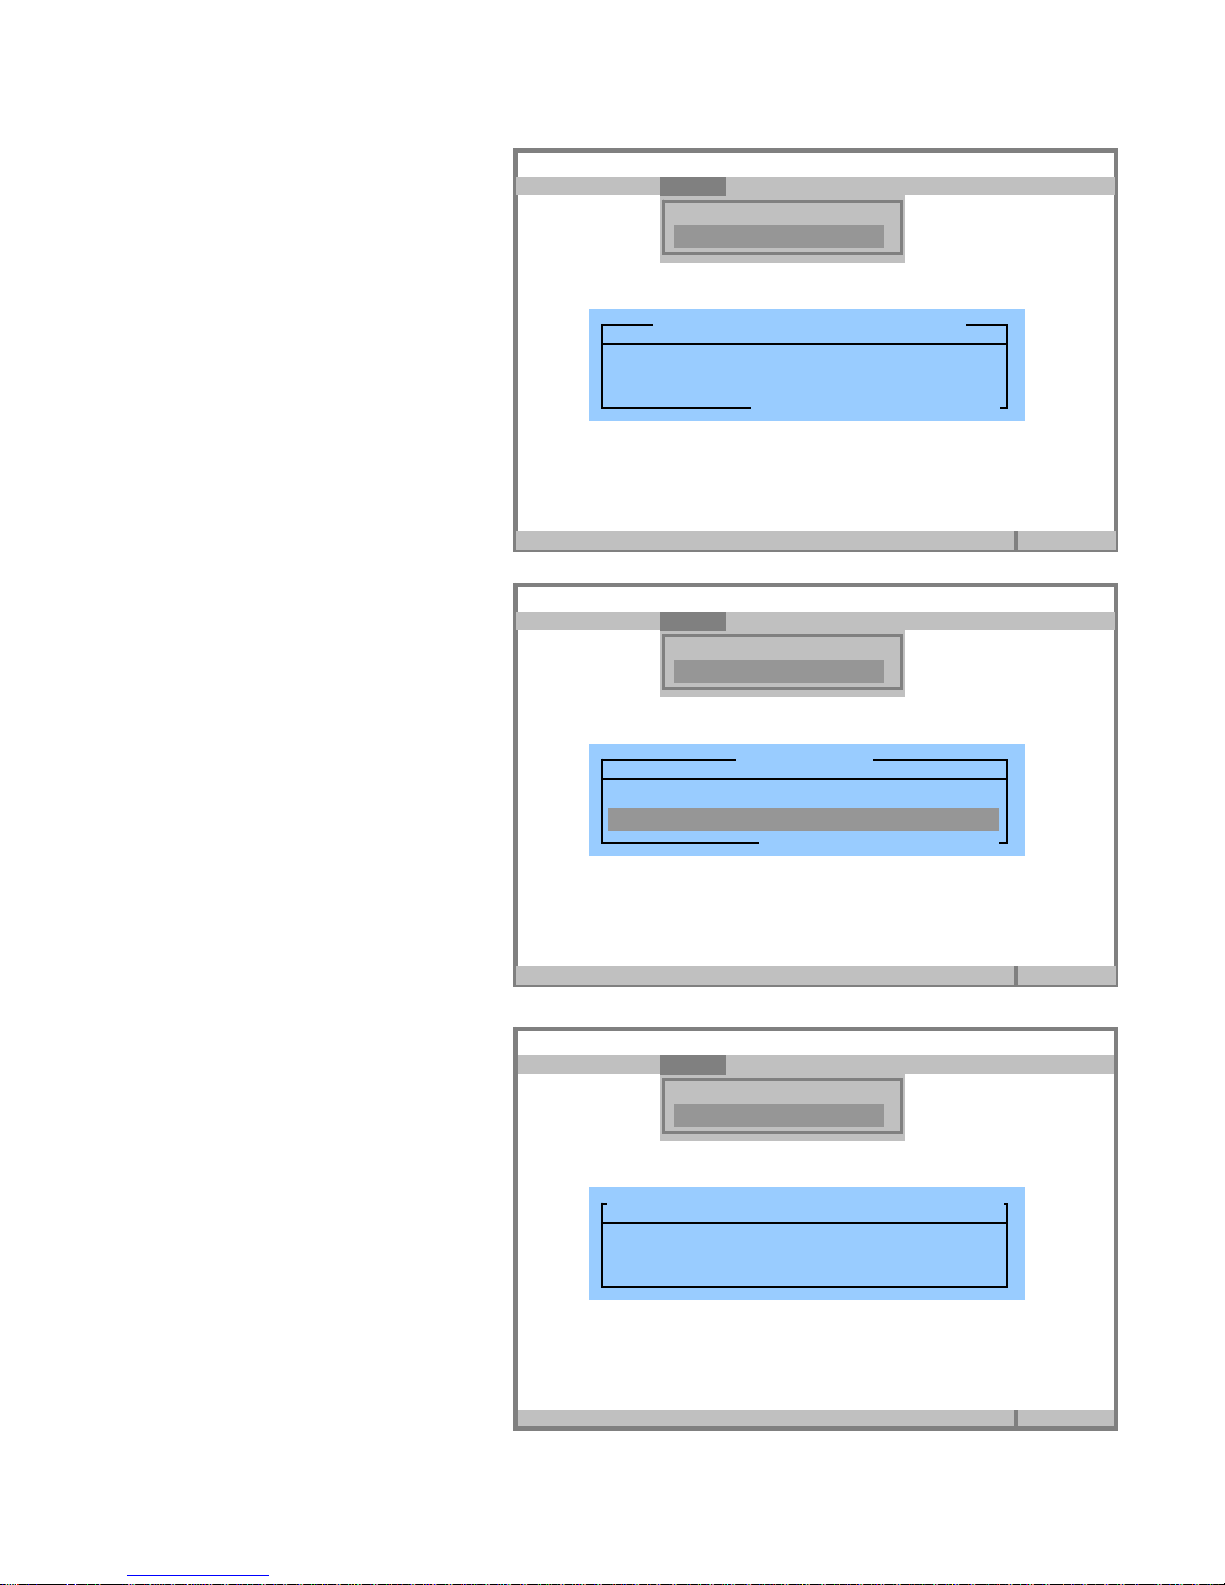
User stops Comprehensive
A
<
>
A
<
>
DST
The “Aborted” message is
displayed.
The “Aborted” message could
also look like this.
Computer Setup Bios Version
File Security Tools Advanced
ctivate HDD Self-Test Options
Computer Setup Bios Version
File Security Tools Advanced
ctivate HDD Self-Test Options
Tools
HDD Self-Test options
Battery Status
HDD Self Test
Test 1 (Quick)
Test succeeded
Test 2 (Comprehensive)
Aborted
ESC=Cancel
F1=Help
Tools
HDD Self-Test options
Battery Status
HDD Self Test
Test 1 (Quick)
Test succeeded
Test 2 (Comprehensive)
Test stopped by host
Press any key to continue
F1=Help
HDD Troubleshooting Guide Page 10 of 48
Page 11
CASE 2: Quick DST & Comprehensive DST are not combined
A
<
>
During POST
• Press the [F10] key
F10=ROM Base Setup
• Select:
Tools HDD Self-Test options
File Security Tools Advanced
Tools
HDD Self-Test options
Battery Status
ctivate HDD Self-Test Options
Bios Version
F1=Help
HDD Troubleshooting Guide Page 11 of 48
Page 12
Select the listed hard disk drive
A
<
>
A
<
>
• Press [F10] = Select
• Select “HDD Self Test
(Quick: 2 minutes)”
• Press [F10]=Continue
to run the Quick DST.
Test in progress…
- If the hard disk drive has a
failure, the test stops and an
error message pops up.
Computer Setup Bios Version
File Security Tools Advanced
ctivate HDD Self-Test Options
Computer Setup Bios Version
File Security Tools Advanced
ctivate HDD Self-Test Options
Computer Setup Bios Version
File Security Tools Advanced
Tools
Battery Calibration
HDD Self-Test options
HDD Self-Test options
Notebook hard drive
F10=Select, ESC=Cancel
F1=Help
Tools
Battery Calibration
HDD Self-Test options
HDD Self-Test
HDD Self Test (Quick: 2 minutes)
HDD Self Test (Comprehensive: 32 minutes)
F10=Continue, ESC=Cancel
F1=Help
Tools
Battery Calibration
HDD Self-Test options
HDD Self Test (Quick: 2 minutes)
Self test in progress …………… x% complete
HDD Troubleshooting Guide Page 12 of 48
Page 13
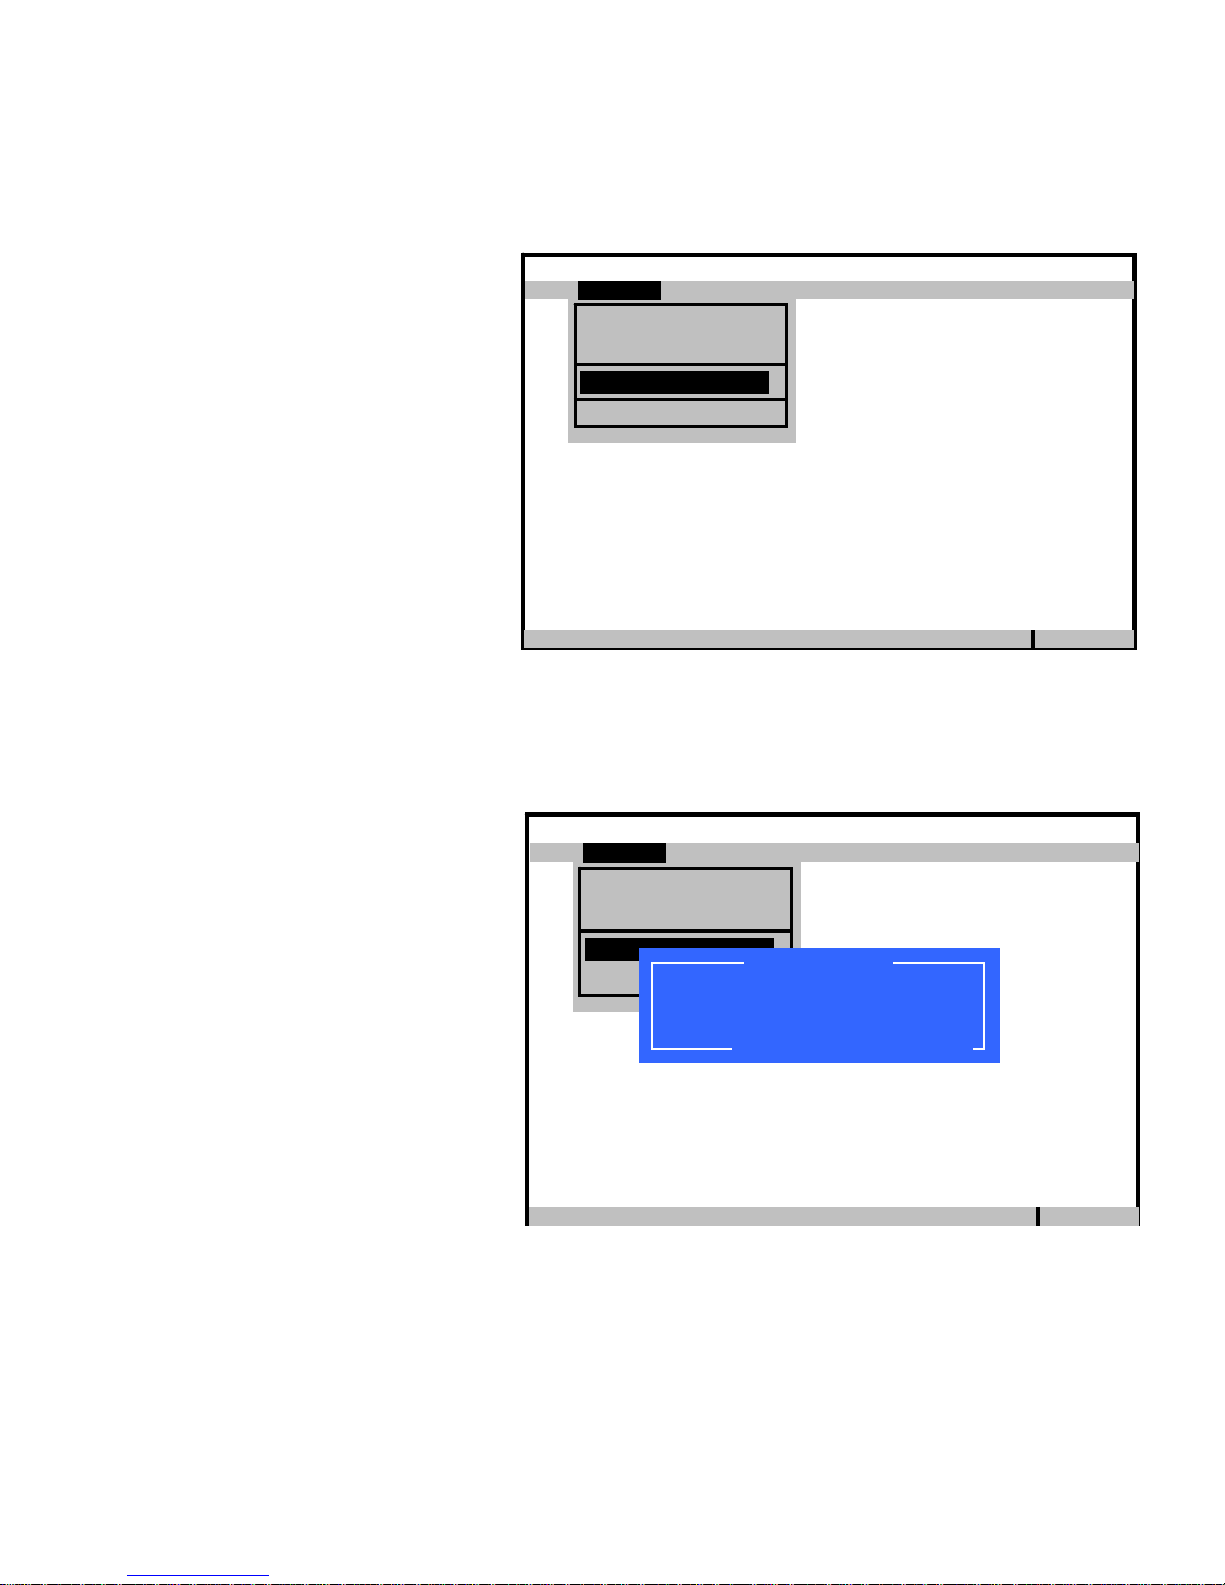
If the hard disk drive is good,
A
<
>
A
<
>
A
<
>
the test finishes within 2
minutes.
At the end of the Quick test,
the DST selection page is
displayed again.
If you want to run the
Comprehensive test:
• Select « HDD Self Test
(Comprehensive : xx
minutes)”
• Press [F10]=Continue to
run the Comprehensive DST.
Test in progress…
- If the hard disk drive has a
failure, the test stops and an
error message pops up.
Computer Setup Bios Version
File Security Tools Advanced
ctivate HDD Self-Test Options
Computer Setup Bios Version
File Security Tools Advanced
ctivate HDD Self-Test Options
Computer Setup Bios Version
File Security Tools Advanced
ctivate HDD Self-Test Options
Tools
Battery Calibration
HDD Self-Test options
HDD Self Test (Quick: 2 minutes)
Self test completed OK ……… 100% complete
Press any key to continue
F1=Help
Tools
Battery Calibration
HDD Self-Test options
HDD Self-Test
HDD Self Test (Quick: 2 minutes)
HDD Self Test (Comprehensive: 32 minutes)
F10=Continue, ESC=Cancel
F1=Help
Tools
Battery Calibration
HDD Self-Test options
HDD Self Test (Comprehensive: 32 minutes)
Self test in progress …………… x% complete
F1=Help
HDD Troubleshooting Guide Page 13 of 48
Page 14

- If the hard disk drive is good,
A
<
>
A
<
>
the test finishes in 40 to 120
minutes.
At the end of the
Comprehensive test, the test
selection page is displayed
again.
• Press [ESC]=Cancel to go
back to the main menu.
Computer Setup Bios Version
File Security Tools Advanced
ctivate HDD Self-Test Options
Computer Setup Bios Version
File Security Tools Advanced
ctivate HDD Self-Test Options
Tools
Battery Calibration
HDD Self-Test options
HDD Self Test (Comprehensive: 32 minutes)
Self test completed OK ……… 100% complete
Press any key to continue
F1=Help
Tools
Battery Calibration
HDD Self-Test options
HDD Self-Test
HDD Self Test (Quick: 2 minutes)
HDD Self Test (Comprehensive: 32 minutes)
F10=Continue, ESC=Cancel
F1=Help
HDD Troubleshooting Guide Page 14 of 48
Page 15
2.1.2 Run DST from system BIOS -- HP workstation example
d
d
During POST
• Press the [F10] key
• Select: Language
• Select:
Storage DPS Self-Test
Select the listed hard disk drive
• Press [F10] = Accept
File Storage Security Power Advance
Storage
Device Configuration
Storage Options
DPS Self-test
Boot Order
File Storage Security Power Advance
Storage
Device Configuration
Storage Options
DPS Self-test
Boot Order
Hewlett-Packard Setup Utility
Hewlett-Packard Setup Utility
DPS Self-test
Select a drive:
► 40.0 GB xxxxx
F10=Accept, ESC=Cancel
<F1=Help>
<F1=Help>
HDD Troubleshooting Guide Page 15 of 48
Page 16

• You will see a message like
d
d
d
“Estimated execution time
(min): 32”
NOTE: The displayed time is
the sum of the Quick + the
Comprehensive tests.
Press [F10] = Accept to launch
both tests.
The Quick DST starts first.
- If the hard disk drive has a
failure, the test stops and an
error message pops up.
- If the hard disk drive is good,
the test finishes within 2
minutes.
Then the Comprehensive DST
starts automatically.
- If the hard disk drive has a
failure, the test stops and an
error message pops up.
NOTE: the user can stop the test
at any time by pressing the
[ESC] = Cancel key.
Hewlett-Packard Setup Utility
Storage
File St Security Power Advance
Device Configuration
Storage Options
DPS Self-test
Boot Order
Estimated execution time (in minutes): 32
Pres F10 to continue, or ESC to cancel
File Storage Security Power Advance
Storage
Device Configuration
Storage Options
DPS Self-test
Boot Order
File Storage Security Power Advance
Storage
Device Configuration
Storage Options
DPS Self-test
Boot Order
DPS Self-test
F10=Accept, ESC=Cancel
<F1=Help>
Hewlett-Packard Setup Utility
DPS Self-test
Performing test 1 …
……………………………
40%
ESC=Cancel
Hewlett-Packard Setup Utility
DPS Self-test
Performing test 2 …
……………………………
40%
ESC=Cancel
<F1=Help>
HDD Troubleshooting Guide Page 16 of 48
<F1=Help>
Page 17

d
d
M
If the hard disk drive is good,
the test finishes within 40 to
120 minutes.
Press any key to go back to
the starting menu.
Hewlett-Packard Setup Utility
File Storage Security Power Advance
Storage
Device Configuration
Storage Options
DPS Self-test
Boot Order
DPS Self-test
Test succeede
Completion Code: 0
Drive Information:
Size 40.0 GB
odel xxxxxxxxxx
Firmware 3.20
Serial Number ssssssss
Location SATA 0
Pres any key to continue
<F1=Help>
HDD Troubleshooting Guide Page 17 of 48
Page 18

2.1.3 Run DST from system BIOS -- HP desktop example
d
During POST
• Press the [F10]
key
• Select:
Storage DPS Self-Test
Bios Version
File Storage Security Power Advance
<F9=Boot menu> <F10=Setup> <F12=Network Service Boot>
Hewlett-Packard Setup Utility
Storage
Device Configuration
Storage Options
DPS Self-test
Boot Order
<F1=Help>
HDD Troubleshooting Guide Page 18 of 48
Page 19

Select the listed HDD.
d
d
d
• Press [F10] = Accept
• You will see a message like
“Estimated execution
time (min): 32”
NOTE: The displayed time
is the sum of the Quick +
Comprehensive tests.
Press [F10] = Accept to
launch both tests.
The Quick DST starts first.
- If the hard disk drive has a
failure, the test stops and an
error message pops up.
- If the hard disk drive is
good, the test finishes within
2 minutes.
Hewlett-Packard Setup Utility
File Storage Security Power Advance
Storage
Device Configuration
Storage Options
DPS Self-test
Boot Order
File Storage Security Power Advance
File Storage Security Power Advance
Storage
Device Configuration
Storage Options
DPS Self-test
Boot Order
Estimated execution time (in minutes): 32
Pres F10 to continue, or ESC to cancel
Storage
Device Configuration
Storage Options
DPS Self-test
Boot Order
Select a drive:
► 40.0 GB xxxxx
Hewlett-Packard Setup Utility
DPS Self-test
Hewlett-Packard Setup Utility
DPS Self-test
F10=Accept, ESC=Cancel
F10=Accept, ESC=Cancel
<F1=Help>
DPS Self-test
Performing test 1 …
……………………………
40%
ESC=Cancel
<F1=Help>
HDD Troubleshooting Guide Page 19 of 48
<F1=Help>
Page 20

Then the Comprehensive DST
d
d
d
M
starts automatically.
- If the hard disk drive has a
failure, the test stops and an
error message pops up.
NOTE: the user can stop the
test any time by pressing the
[ESC] = Cancel key.
If the hard disk drive is good,
the test finishes within 40 to
120 minutes.
Press any key to go back to the
starting menu.
Hewlett-Packard Setup Utility
File Storage Security Power Advance
Storage
Device Configuration
Storage Options
DPS Self-test
Boot Order
Hewlett-Packard Setup Utility
File Storage Security Power Advance
Storage
Device Configuration
Storage Options
DPS Self-test
Boot Order
DPS Self-test
Performing test 2 …
……………………………
40%
DPS Self-test
Test succeede
Completion Code: 0
Drive Information:
Size 40.0 GB
odel xxxxxxxxxx
Firmware 3.20
Serial Number ssssssss
Location SATA 0
Pres any key to continue
ESC=Cancel
<F1=Help>
<F1=Help>
HDD Troubleshooting Guide Page 20 of 48
Page 21

2.2
Option 2: Run DST from HP Instant Support Web Site
HP Instant Support Professional Edition: this is a tool that is available on the HP Web
site and is supported on HP desktops, workstations and notebooks running MicroSoft
Windows. This tool can launch both the Quick and Comprehensive DST hard disk drive
tests.
Note: this tool is also available through the Help and Support Center (HSC is supported only
on XP OS); from your desktop, select “START” and select “Help and Support” from the menu
on the right side, select the Troubleshoot a Problem Icon and then follow the steps below.
HP recently introduced a video to aid customers and partners in learning how to use this
powerful diagnostic tool. The video is now available in English is available from the
Features page of the Business & IT Services link from the home page of www.hp.com.
Procedure: to launch the DST from HP Instant Support, follow these steps:
1. Connect to the HP Instant Support Website
diagnostic session.
The URL for Instant Support is -
http://instantsupport.hp.com or
http://www.hp.com/go/ispe.
and select Launch an online
HDD Troubleshooting Guide Page 21 of 48
Page 22

2. On the Advice Disclaimer page, click the I Accept button to allow HP to
collect data to assist with the analysis of the failing system.
3. On the Customer Information Page, select Region, Country, Product
Category, and Connection type and then click Next.
Note: Connection selection must be ”locally connected” to run diagnostics.
HDD Troubleshooting Guide Page 22 of 48
Page 23

4. On the Device Detection page, click on the Run System Health Scan button.
The System Health Scan will run and may take up to 90 seconds to complete.
5. Using information on the Health Scan Complete page, correct any critical
issues that are identified. If the problem still exists, click the Hardware Diagnostics
tab to get access to the hard disk drive diagnostic (DST Quick test).
HDD Troubleshooting Guide Page 23 of 48
Page 24

6. On the Hardware Diagnostics page, select the IDE hard disk test and then click
the Run Selected Diagnostic button.
Note: The typical test time is around 2 to 5 minutes for the quick test.
7. If hard disk drive test fails, log the error code. Contact H P to obtain a replacement
drive.
8. To run the Comprehensive test, click on the Advanced Diagnostics tab, select the
IDE hard disk test and then click on the Run Selected Diagnostic button. This
test may run for over an hour depending on the hard disk drive capacity.
Note: The typical test time is around 1 minute for every 1 Gigabyte of
capacity (e.g. a 40GB drive should take approximately 40 minutes to test).
HDD Troubleshooting Guide Page 24 of 48
Page 25

9. If hard disk drive test fails, log the error code. Contact HP to obtain a replacement
drive.
HDD Troubleshooting Guide Page 25 of 48
Page 26

2.3
Option 3: Run DST from HP Insight Diagnostics Offline
Edition
HP Insight Diagnostics Offline Edition is a set of offline diagnostic tools that boots from
its own Linux OS. It is shipping today and is included on the Documentation and
Diagnostics CD for desktops and workstations. It is shipping with desktops
beginning with desktops introduced in May, 2005. It is available for all workstations
shipping from June, 2004. It is not available for notebook computers. These diagnostics
can also be downloaded from the www.hp.com
supported products. This is an “ISO image file” package that can be downloaded, saved
to a temporary folder and burned to a CDROM (a file of approximately 100 MB in size).
This tool will launch the DST for all supported hard disk drives (IDE, SATA, SCSI are
supported).
It includes:
Quick diagnostics
Comprehensive diagnostics
Custom diagnostics
Interactive and non-in teractive diagnostics
for a full set of components (in addition to the hard disk drive), for example:
• Memory
• Processor
• Storage devices
• Multimedia devices
• Input devices (mouse, etc.)
Web site under “Driver Downloads” for
HDD Troubleshooting Guide Page 26 of 48
Page 27

To launch the DST tests from HP Insight Diagnostics, follow these steps:
1. Boot from HP Insight Diagnostics CDROM.
Safe Mode Graphic Option is offered here.
There is a 5 second timer. Default is: Normal Drivers
2. HP Insight Diagnostics is loading.
HDD Troubleshooting Guide Page 27 of 48
Page 28

3. Select language, keyboard model and layout, then press [continue].
HDD Troubleshooting Guide Page 28 of 48
Page 29

4. Accept the Standard License Agreement.
5. HP Insight Diagnostics starts to load all components.
After each component loads, status will change from “Loading” to “Completed” with a green checkmark
to the left.
HDD Troubleshooting Guide Page 29 of 48
Page 30

6. When all are completed, the Survey Screen will be displayed.
HDD Troubleshooting Guide Page 30 of 48
Page 31

7. Select the “Test” tab.
8. Select “Custom” and “Unattended” test.
9. Select “+” on storage and select “+” for the HDD testing.
10. To run the DST Quick test, select only the “Short Offline Self Test”.
11. To run the DST Comprehensive test, select only the “Extended Offline Self
Test”.
12. Select “Begin Test”. The test will run and will report any errors that are
found.
13. Diagnostics log saving
To save the result, select Save and Save to Floppy will appear or Save to USB key if
installed.
HDD Troubleshooting Guide Page 31 of 48
Page 32

HDD Troubleshooting Guide Page 32 of 48
Page 33

3 Hard disk drive troubleshooting flow charts
3.1 FLOW CHART 1: Run the Short Drive Self Test
HDD Troubleshooting Guide Page 33 of 48
Page 34

3.2
FLOW CHART 2: HDD error and operating system will not boot -- with
video
This flow chart is used when
HDD error and system hangs during
POST (Power On Self Test) prior to OS
loading; there is video; OS doesn’t boot.
Check and reseat
cables for HDD
OS boot fails and OS is not
initiated. Video is working
and symptoms tend to point
to HDD.
Resolved?
NO
Clear CMOS
Resolved?
NO
Move HDD to
another system
Does failure
follow HDD?
NO
Proceed with
normal hardware
troubleshooting for
failures in other
hardware
YES
YES
Cannot move to
another system
YES
Do not replace HDD
Do not replace HDD
Run Long Drive Self Test
· from BIOS or
· from HP Insight Off-line
Diagnostics CDROM
PASSED?
YES
Re-install OS
using HP Restore/
Restore Plus/OS
CD or OEM media
NO
code; replace HDD
Record failure
HDD Troubleshooting Guide Page 34 of 48
Resolved?
YES
Do not replace
HDD
NO
troubleshooting for
Proceed with
normal hardware
failures in other
hardware
Page 35

3.3
FLOW CHART 3: No OS boot and HDD makes clicking noise
This flow chart is used when
HDD passes short
test but OS will not
boot and HDD
makes clicking
noise
Power system off,
disconnect HDD
cables (power and
data); turn system
on.
Does the
clicking noise
continue?
NO
Proceed with
normal hardware
YES
troubleshooting for
failures in other
hardware
OS does not boot, OS is not
initiated and HDD makes a
clicking noise. Symptoms
tend to point to HDD.
Replace HDD
HDD Troubleshooting Guide Page 35 of 48
Page 36

3.4
FLOW CHART 4: Noisy HDD and OS boots
HDD Troubleshooting Guide Page 36 of 48
Page 37

3.5
FLOW CHART 5: Operating System Will Not Boot
No Successful Boot of OS
(locks up during boot of OS)
This flow chart is used when
the HDD passes the short
drive self test but the OS
does not boot and locks up
during boot of OS.
· from BIOS setup or
· from HP Insight Off-line Diagnostics CDROM
Cannot move to
another system
Repair Install
Operating System
(Windows XP Only)
Resolved?
YES
Run Long DST
Failed?
NO
Move HDD to
another system
Does failure
follow HDD?
Do not replace
HDD.
YES
Record failure code;
replace HDD
Proceed with
normal hardware
NOYES
troubleshooting for
failures in other
hardware
NO
Re-install
Operating System
using HP Restore/
Restore Plus/OS
CD or OEM media
Resolved?
Proceed with normal hardware troubleshooting for failures in other hardware.
Ideas:
· Run HP Insight Diagnostics to identify other failed components.
· As a last resort, replace motherboard
YES
NO
HDD Troubleshooting Guide Page 37 of 48
Do not replace
HDD.
Page 38

3.6
FLOW CHART 6: Hangs during operation
HDD Troubleshooting Guide Page 38 of 48
Page 39

3.7
FLOW CHART 7: Drive error during operation
(computer continues to function, but there are HDD errors)
Run Long Drive Self Test
· from BIOS or
· from HP Insight Off-line Diagnostics CDROM or
· from HP Instant Support
Drive error during operation.
Failed?
YES
code; replace HDD
This flow chart is used when
the HDD passes the short
drive self test and computer
continues to function but
there are disk errors.
Record failure
Cannot move to
another system
Do Windows XP
System Restore
(Windows XP Only)
Resolved?
NO
Do Repair Install OS
(Windows XP Only)
Resolved?
Re-install OS using HP
Restore/Restore Plus/OS
CD or OEM media
YES
NO
YES
NO
Move HDD to
another system
Does failure
follow HDD?
Do not replace
HDD.
Do not replace
HDD.
Proceed with
normal hardware
NOYES
troubleshooting for
failures in other
hardware
YES
Resolved?
NO
Proceed with normal hardware troubleshooting for failures in other hardware.
Ideas:
· Run HP Insight Diagnostics to identify other failed components.
· As a last resort, replace motherboard.
HDD Troubleshooting Guide Page 39 of 48
Do not replace
HDD.
Page 40

3.8
FLOW CHART 8: HDD utilities report errors
HDD Troubleshooting Guide Page 40 of 48
Page 41

3.9
FLOW CHART 9: Blue screens
System blue screens and HDD is
suspected to be the cause of the
Run Long Drive Self test
· from BIOS or
· from HP Insight Off-line Diagnostics CDROM or
· from HP Instant Support
Cannot move to
another system
failure
Failed?
NO
Move HDD to
another system
YES
Record failure
code; replace HDD
This flow chart is used when
HDD passes the short drive
self test and the computer
shows blue screens.
Do Windows XP
System Restore
(Windows XP Only)
Resolved?
NO
Do Repair Install OS
(Windows XP Only)
Resolved?
NO
Re-install OS using HP
Restore/Restore Plus/
OS CD or OEM media
Resolved?
NO
YES
YES
YES
Does failure
follow HDD?
Do not replace
HDD.
Do not replace
HDD.
Do not replace
HDD.
Proceed with
normal hardware
NOYES
troubleshooting for
failures in other
hardware
Proceed with normal hardware troubleshooting for failures in other hardware.
Ideas:
· Run HP Insight Diagnostics to identify other failed components.
· As a last resort, replace motherboard.
HDD Troubleshooting Guide Page 41 of 48
Page 42

3.10
FLOW CHART 10: Cannot run Drive Self Test due to failure
HDD Troubleshooting Guide Page 42 of 48
Page 43

3.11
FLOW CHART 11: Drive Self Test is Not Enabled in BIOS setup
Cannot Run Short or Long Drive Self Test from BIOS Setup as DST Is Not Enabled
DPS is not in BIOS setup so DST
is not enabled.
System POSTs successfully.
HDD is suspected to be the
failure
Run HP Insight Off-line
Diagnostics from CD or download
from HP support Web site
HP Insight
Diagnostics
Available?
YES
Run short test under Custom
Unattended Storage:
“Hard Drive Short Offline
SelfTest”
Proceed with normal
hardware
NO
troubleshooting for
failures in other
hardware
Cannot move to
another system
So Windows XP
System Restore
(Windows XP Only)
This flow chart is used when
neither the short nor the long
drive self test can be run.
DPS is not in BIOS setup so
DST in not enabled.
Symptoms tend to point to
HDD.
Move HDD to
another system
Does failure
follow HDD?
Proceed with
normal hardware
troubleshooting for
NOYES
failures in other
hardware
Passed?
Run long test under Custom
Unattended Storage:
“Hard Drive Extended Offline
SelfTest”
Passed?
YES
YES
NO
Record failure
code; replace HDD
Record failure
NO
code; replace HDD
Resolved?
NO
Do Repair Install OS
(Windows XP Only)
Resolved?
Re-install OS using HP
Restore/Restore Plus/OS
Proceed with normal hardware troubleshooting for failures in other hardware.
Ideas:
Run HP Insight Diagnostics to identify other failed components.
As a last resort, replace moth erboard.
NO
CD or OEM media
Resolved?
NO
YES
YES
YES
Do not replace
HDD.
Do not replace
HDD.
Do not replace
HDD.
HDD Troubleshooting Guide Page 43 of 48
Page 44

4 Operating system and CMOS help
4.1 How to do a System Restore
System Restore Procedure in Windows XP
1. Log on to Windows as Administrator.
2. Click Start, point to All Programs, point to Accessories, point to System
Tools, and then click System Restore. System Restore starts.
3. On the Welcome to System Restore page, click Restore my computer to
an earlier time (if it is not already selected), and then click Next.
4. On the Select a Restore Point page, click the most recent system checkpoint
in the On this list, click a restore point list, and then click Next. A System
Restore message may appear that lists configuration changes that System
Restore will make. Click OK.
HDD Troubleshooting Guide Page 44 of 48
Page 45

5. On the Confirm Restore Point Selection page, click Next. System Restore
restores the previous Windows XP configuration and then restarts the computer.
HDD Troubleshooting Guide Page 45 of 48
Page 46

6. Log on to the computer as Administrator. The System Restore Restoration
Complete page appears. Click OK.
7. If the problem still exists, then run HP self-help diagnostics from HP Instant
Support (instantsupport.hp.com
).
4.2 How to re-install the Operating System
1. Insert the HP Restore CD (desktops) or the HP Restore Plus CD (workstations)
or the OS CD/DVD of the 2-CD/DVD set (notebooks) in the CD drive of the
computer, power the system on and follow the prompts to restore the system to
its factory shipping condition.
2. If the problem still exists, follow standard hardware troubleshooting for failures
in other hardware.
HDD Troubleshooting Guide Page 46 of 48
Page 47

4.3
How to Clear and Reset the CMOS on Desktop Computers
The computer’s configuration memory (CMOS) stores password information and
information about the computer’s configuration.
Using the CMOS Button
1. Turn off the computer and any external devices, and disconnect the power cord from
the power outlet.
2. Disconnect the keyboard, monitor, and any other external equipment connected to
the computer.
WARNING: To reduce the risk of personal injury from electrical shock and/or hot
surfaces, be sure to disconnect the power cord from the wall outlet and allow the
internal system components to cool before touching.
CAUTION: When the computer is plugged in, the power supply always has voltage
applied to the system board even when the unit is turned off. Failure to disconnect the
power cord can result in damage to the system.
CAUTION: Static electricity can damage the electronic components of the computer or
optional equipment. Before beginning these procedures, ensure that you are discharged
of static electricity by briefly touching a grounded metal object. See the
Regulatory Information
product, manuals under self-help resources) for more information.
3. Remove the computer cover or access panel.
CAUTION: Pushing the CMOS button will reset CMOS values to factory defaults and will
erase any customized information including passwords, asset numbers, and special
settings. It is important to back up the com puter CMOS settings before resetting them in
case they are needed later. Backup is easily done through Computer Setup. See the
Computer Setup (F10) Utility Guide
(www.hp.com
help resources)
4. Locate, press, and hold the CMOS button in for five seconds.
Make sure you have disconnected the AC power cord from the wall outlet. The CMOS
button will not clear CMOS if the power cord is connected.
, Support and Troubleshooting, select your product, manuals under self-
guide (www.hp.com, Support and Troubleshooting, select y our
for information on backing up the CMOS settings.
Safety &
HDD Troubleshooting Guide Page 47 of 48
Page 48

CMOS button
For assistance locating the CMOS button and other system
board components on desktop computers, see the Illustrated
Parts Map (IPM) for that particular desktop computer. It is
available on the HP support web site. (www.hp.com
, Support
and Troubleshooting, select your product, select manuals under
self-help resources)
Replace the computer cover or access panel.
End of document
HDD Troubleshooting Guide Page 48 of 48
 Loading...