


Guide de l’utilisateur
Guida per l’utente
User Guide

Copyright 1999. Hewlett-Packard Company. Tutti i diritti riservati.
Hewlett-Packard è un marchio depositato della Hewlett-Packard Company. Microsoft e Windows sono marchi depositati
negli Stati Uniti della Microsoft Corporation. Pentium è un marchio depositato negli Stati Uniti della Intel Corp. I nomi
dei prodotti citati nel presente documento sono usati unicamente a scopo identificativo e possono essere marchi di
fabbrica e/o depositati delle rispettive aziende.
Hewlett-Packard Company, 800 S. Taft Ave., Loveland, CO 80537
Copyright 1999. Hewlett-Packard Company. Tous droits réservés.
Hewlett-Packard est une marque déposée de Hewlett-Packard Company. Microsoft et Windows sont des marques déposées
américaines de Microsoft Corporation. Pentium est une marque déposée américaine de Intel Corp. Les noms des produits
mentionnés dans le présent manuel sont utilisés uniquement dans un but d’identification et peuvent être des marques de
leurs sociétés respectives.
Copyright 1999. Hewlett-Packard Company. All rights reserved.
Hewlett-Packard is a registered trademark of the Hewlett-Packard Company. Microsoft and Windows are U.S. registered
trademarks of Microsoft Corporation. Pentium is a U.S. registered trademark of Intel Corp. Names of products mentioned
herein are used for identification purposes only and may be trademarks and/or registered trademarks of their respective
company.

Certificat du produit
UL, cUL, TÜV, CE, C-TICK, conforme ou supérieur aux spécifications FCC Classe B
Laser : CDRH
Certificazioni del prodotto
UL, cUL, TÜV, CE, C-Tick soddisfa o supera i requisiti della classe B FCC
Laser: CDRH
Product Certifications
UL, cUL, TÜV, CE, C-Tick, meets or exceeds FCC Class B Requirements
Laser: CDRH
Consignes de sécurité concernant le laser
Cette unité est équipée d’un laser. Ne pas retirer le couvercle, ni essayer de réparer cette unité
pendant son utilisation, au risque d’encourir de graves lésions oculaires.
Sicurezza laser
Questa unità utilizza tecnologia laser. Non rimuovere il coperchio e non tentare di riparare il
dispositivo mentre è connesso, perché può danneggiare gli occhi.
Laser Safety
This unit employs a laser. Do not remove the cover or attempt to service this device when
connected due to the possibility of eye damage.
ATTENTION
L’utilisation de commandes, de réglages ou de procédures autres que celles spécifiées dans le
manuel peut conduire à une dangereuse exposition aux radiations.
i
AVVERTENZA:
L'uso di controlli o regolazioni o l’esecuzione di procedure con modalità diverse da quanto
specificato possono esporre a pericolose radiazioni laser.
CAUTION
Use of controls or adjustments or performance of procedures other than those specified herein
may result in hazardous laser radiation exposure.
Produit laser classe 1
Prodotto laser Classe 1
Class 1 Laser Product
DANGER : RADIATIONS INVISIBLES DU LASER EN CAS D’OUVERTURE. EVITER TOUTE
EXPOSITION DIRECTE AU FAISCEAU.
PERICOLO: RADIAZIONI LASER INVISIBILI ALL’APERTURA. EVITARE ESPOSIZIONE DIRETTA
AL RAGGIO.
DANGER: INVISIBLE LASER RADIATION WHEN OPEN. AVOID DIRECT EXPOSURE TO BEAM.

ii
Laser
Laser
Laser
Avis:
Avviso:
Type: laser semi-conducteur GaAlAs
Longueur d’onde: 778~787 nm (à 25°C)
Puissance: 2,5mW (lecture), 35mW (écriture)
Divergence du faisceau: 60 degrés
Tipo: Semiconduttore laser GaAlAs
Lunghezza d’onda: 778~787 nm (a 25°C)
Potenza in uscita: 2,5 mW (lettura), 35 mW (scrittura)
Divergenza raggio: 60 gradi
Type: Semiconductor laser GaAlAs
Wave length: 778~787 nm (at 25°C)
Output power: 2.5 mW (read), 35 mW (write)
Beam divergence: 60 degrees
Europe : Ce graveur doit être installé exclusivement avec une alimentation électrique approuvée
EN60950 (IEC950).
Europa: questo dispositivo deve essere installato esclusivamente con un alimentatore EN60950
(IEC950) di tipo approvato.
Notice:
Europe: This drive shall be installed only with an EN60950 (IEC950) approved power supply.

Nom du fabricant :
iii
DECLARATION DE CONFORMITE
selon Guide 22 ISO/IEC et EN 45014
Hewlett-Packard Company
Colorado Personal Storage Solutions Division
Adresse du fabricant :
déclare que le produit :
Nom du produit :
Numéro du produit :
Options du produit :
est conforme aux spécifications suivantes :
Sécurité :
EMC :
Informations complémentaires
Le présent produit est conforme aux directives EMC 89/336/EEC et porte en conséquence le label
«CE».
2 novembre 1998 Todd Hammel, directeur de la production
Contact européen : Votre agence locale et fournisseur de maintenance Hewlett-Packard ou HewlettPackard GmbH, Department HQ-TRE, Herrenberger Strab
143143).
800 S. Taft Ave.
Loveland, Colorado 80537
HP CD-Writer Plus 7550i, 7570i
C4411A, C4410A
Toutes
EN60950 A4 : 1995
EN60825-1 : 1994
CISPR 22 : 1993/EN 55022 : 1994 Class B
EN 50082-1 : 1992
IEC 801-2 : 1991 - 4kV CD, 8kV AD
IEC 801-3 : 1984 - 3V/m
IEC 801-4 : 1988
1kV Lignes électriques
0,5kV Lignes de signaux
ENV 50140 : 1993 - 3V/m
FCC Part 15 Class B
AS/NZS 3548 : 1995
IEC 555-2
ε 130, D-71034 Böblingen (FAX : +49-7031-

iv
Nome del produttore:
DICHIARAZIONE DI CONFORMITÀ
ai sensi della Guida ISO/IEC 22 e di EN 45014
Hewlett-Packard Company
Colorado Personal Storage Solutions Division
Indirizzo del produttore:
dichiara che il prodotto:
Nome del prodotto:
Numero del prodotto:
Opzioni del prodotto:
è conforme alle seguenti specifiche:
Sicurezza:
EMC:
Informazioni supplementari
Il presente prodotto è conforme ai requisiti della Direttiva EMC 89/336/EEC e di conseguenza reca il
marchio “CE”.
2 novembre 1998 Todd Hammel, direttore produzione
Contatto in Europa: filiale locale dell’ufficio Vendite e Assistenza della Hewlett-Packard oppure
Hewlett-Packard GmbH, Department HQ-TRE, Herrenberger Stra
+49-7031-143143).
800 S. Taft Ave.
Loveland, Colorado 80537
HP CD-Writer Plus 7550i, 7570i
C4411A, C4410A
Tutte
EN60950 A4:1995
EN60825-1:1994
CISPR 22:1993/EN 55022:1994 Classe B
EN 50082-1:1992
IEC 801-2:1991 - 4 kV CD, 8 kV AD
IEC 801-3:1984 - 3 V/m
IEC 801-4:1988
Alimentazione 1 kV
Segnale 0,5 kV
ENV 50140:1993 - 3 V/m
FCC Parte 15 Classe B
AS/NZS 3548: 1995
IEC 555-2
βe 130, D-71034 Böblingen (FAX:

Manufacturer’s Name:
v
DECLARATION OF CONFORMITY
according to ISO/IEC Guide 22 and EN 45014
Hewlett-Packard Company
Colorado Personal Storage Solutions Division
Manufacturer’s Address:
declares that the product:
Product Name:
Product Number:
Product Options:
conforms to the following Product Specifications:
Safety:
EMC:
Supplementary Information
The product herewith complies with the requirements of the EMC Directive 89/336/EEC and carries
the “CE” mark accordingly.
November 2, 1998 Todd Hammel, Manufacturing Manager
European contact: Your local Hewlett-Packard Sales and Service Office or Hewlett-Packard GmbH,
Department HQ-TRE, Herrenberger Stra
800 S. Taft Ave.
Loveland, Colorado 80537
HP CD-Writer Plus 7550i, 7570i
C4411A, C4410A
All
EN60950 A4:1995
EN60825-1:1994
CISPR 22:1993/EN 55022:1994 Class B
EN 50082-1:1992
IEC 801-2:1991 - 4kV CD, 8kV AD
IEC 801-3:1984 - 3V/m
IEC 801-4:1988
1kV Power Lines
0.5kV Signal Lines
ENV 50140:1993 - 3V/m
FCC Part 15 Class B
AS/NZS 3548: 1995
IEC 555-2
βe 130, D-71034 Böblingen (FAX: +49-7031-143143).
Notice de copyrights pour le Danemark:
Copyright per la Danimarca
Copyright notice for Denmark:
VIGTIGT!
Copyright ved brug af CD-Writer 7550i, 7570i enheder solgt i Danmark
I henhold til gældende dansk lov om ophavsret er det forbudt at foretage digital kopiering af et
digitalt værk. CD-RW brænderen må derfor IKKE anvendes til at kopiere en musik-CD. CD-RW
brænderen må desuden kun benyttes til at kopiere et digitalt EDB-program, når en sådan
kopiering tjener til at fremstille et sikkerhedseksemplar af programmet eller hvor kopiering er
nødvendig, for at programmet kan anvendes efter dets formål. Hvis De selv har ophavsretten til
værket, har De også retten til at foretage digital kopiering med CD-RW brænderen.

vi

Français-1 Installation du graveur CD-Writer Plus et du logiciel
Installation du graveur CD-Writer Plus et du logiciel
1. Insérez le CD intitulé «Software Disc 1 » dans votre lecteur de CD-ROM
(différent du graveur CD-Writer Plus). Le menu principal s’affiche. Dans
le cas contraire, lancez le programme d’installation depuis la disquette
d’installation.
2. Consultez la vidéo d'installation (environ 6 minutes) en cliquant sur
l’icône Regarder la vidéo d’installation.
3. Suivez les recommandations d’installation de l’Assistant d’installation
depuis la disquette d’installation.
Remarque: l’Assistant d’installation vous propose des recommandations
d’installation, mais il n’est en aucun cas requis pour l’installation.
Si vous êtes équipé d’un lecteur de CD-ROM, retournez au menu
principal et cliquez sur l'icône d'installation du graveur
CD-Writer Plus.
Icône d’installation du graveur
CD-Writer Plus
Si votre ordinateur n’est pas équipé d’un lecteur de CD-ROM,
créez une disquette Assistant d’installation depuis le lecteur de CDROM d’un autre ordinateur. Insérez le CD «Software Disc 1» dans ce
lecteur. Dans le menu principal, cliquez sur Parcourir le CD. Cliquez
deux fois sur le dossier CopyDisk, puis sur Copydisk.exe.
Sélectionnez ensuite Assistant d’installation. Retirez la disquette et
insérez-la dans le lecteur de disquette de votre ordinateur. Lancez
ensuite A:\ASSIST.
4. Suivez les instructions qui s'affichent.

Installation du graveur CD-Writer Plus et du logiciel Français-2
Français
5. Lorsque l’écran de l’Assistant d’installation apparaît, cliquez sur
Imprimer. Si vous ne possédez pas d’imprimante, notez les informations
par écrit afin de les avoir à disposition lorsque vous procéderez à
l’installation.
6. Si vous remplacez un lecteur de CD-ROM existant, retirez le CD
«Software Disc1» de votre lecteur de CD-ROM.
7. Après avoir noté les recommandations d’installation, vous devez éteindre
votre ordinateur à l’invite, ainsi que le moniteur et toutes les autres
connexions. Retirez les cordons d’alimentation des prises murales.
8. Otez le capot de l’ordinateur.
9. Préparez la baie du lecteur :
Si vous installez le lecteur dans une baie d’unité vide, retirez le
couvercle d’une baie d’unité demi-hauteur (environ 6” x 1,75”/15cm x
4,5cm).
Si vous remplacez un lecteur de CD-ROM existant, retirez l'unité.
Mémorisez les raccordements des câbles et mettez ces derniers de côté
afin de pouvoir les connecter au graveur CD-Writer Plus. Vous n'aurez pas
besoin du câble de données fourni avec le graveur CD-Writer Plus.
Déconnectez tous les rails et tous les équipements de montage du lecteur,
et mettez-les de côté.
10. Reconnectez les rails et les équipements de montage à votre graveur CDWriter Plus.
11. Inscrivez le numéro de série du graveur CD-Writer Plus dans l'espace
suivant. L’étiquette portant le numéro se trouve sur le haut du graveur.
Numéro de
série :
12. Les recommandations d'installation vous indiquent si le cavalier du
graveur CD-Writer Plus doit être configuré en tant que Master ou Slave
pour votre ordinateur.
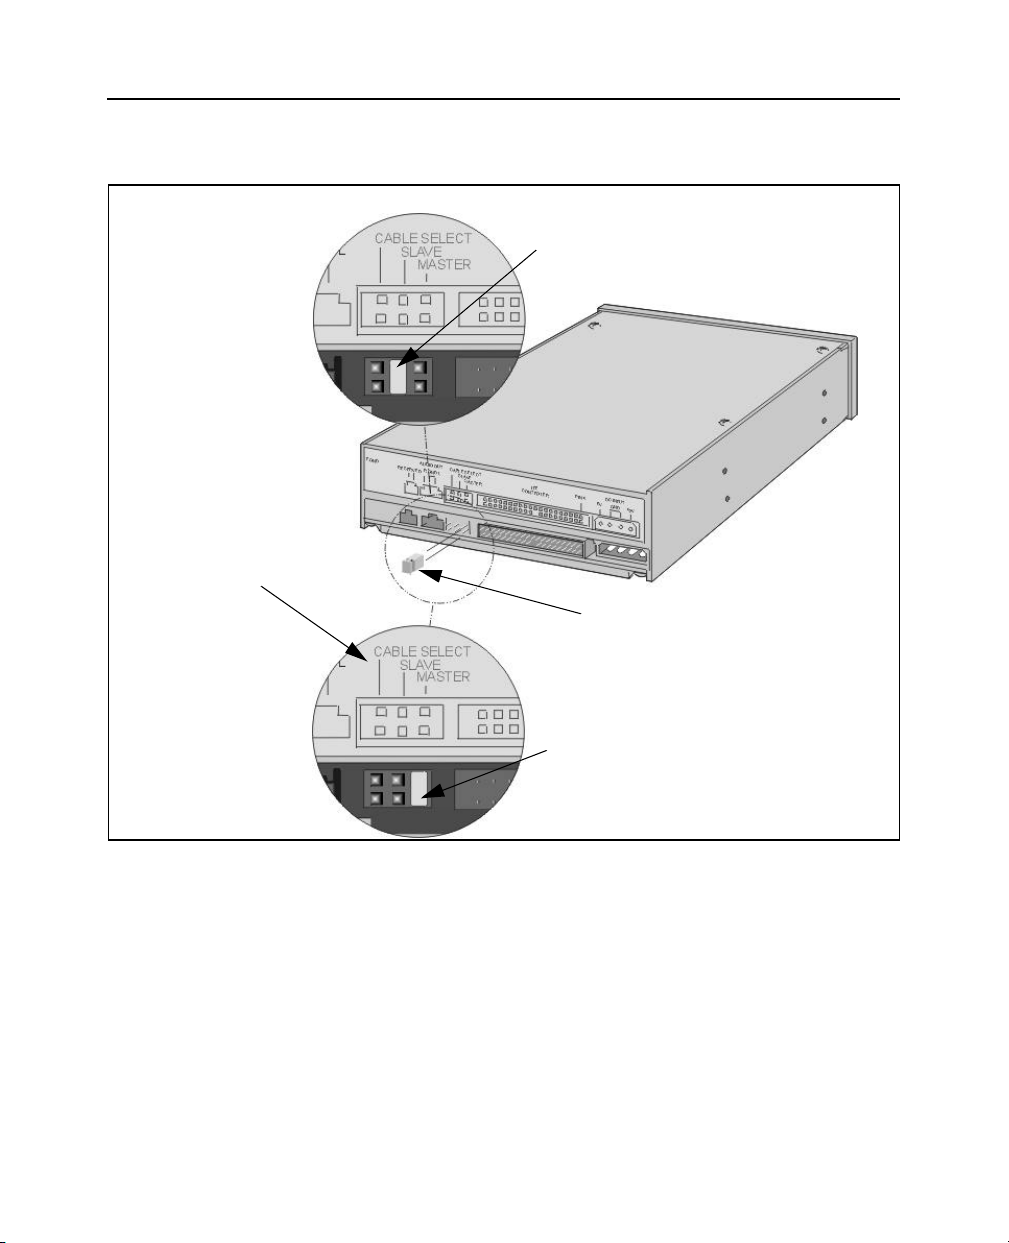
Français-3 Installation du graveur CD-Writer Plus et du logiciel
13. Placez le cavalier sur le graveur CD-Writer Plus comme il vous est indiqué
dans les recommandations d'installation.
Slave
Vérifiez que le cavalier est correctement
configuré au centre (Slave).
Ne pas
utiliser Cable
Select
Le cavalier. Vous pouvez le
retirer et le placer sur deux
autres broches pour changer la
configuration.
Master
Vérifiez que le cavalier est correctement
configuré à droite (Master).
14. Insérez le graveur dans la baie d’unité sélectionnée.
Si vous remplacez un lecteur CD-ROM existant, passez à l’étape 18,
page 4.
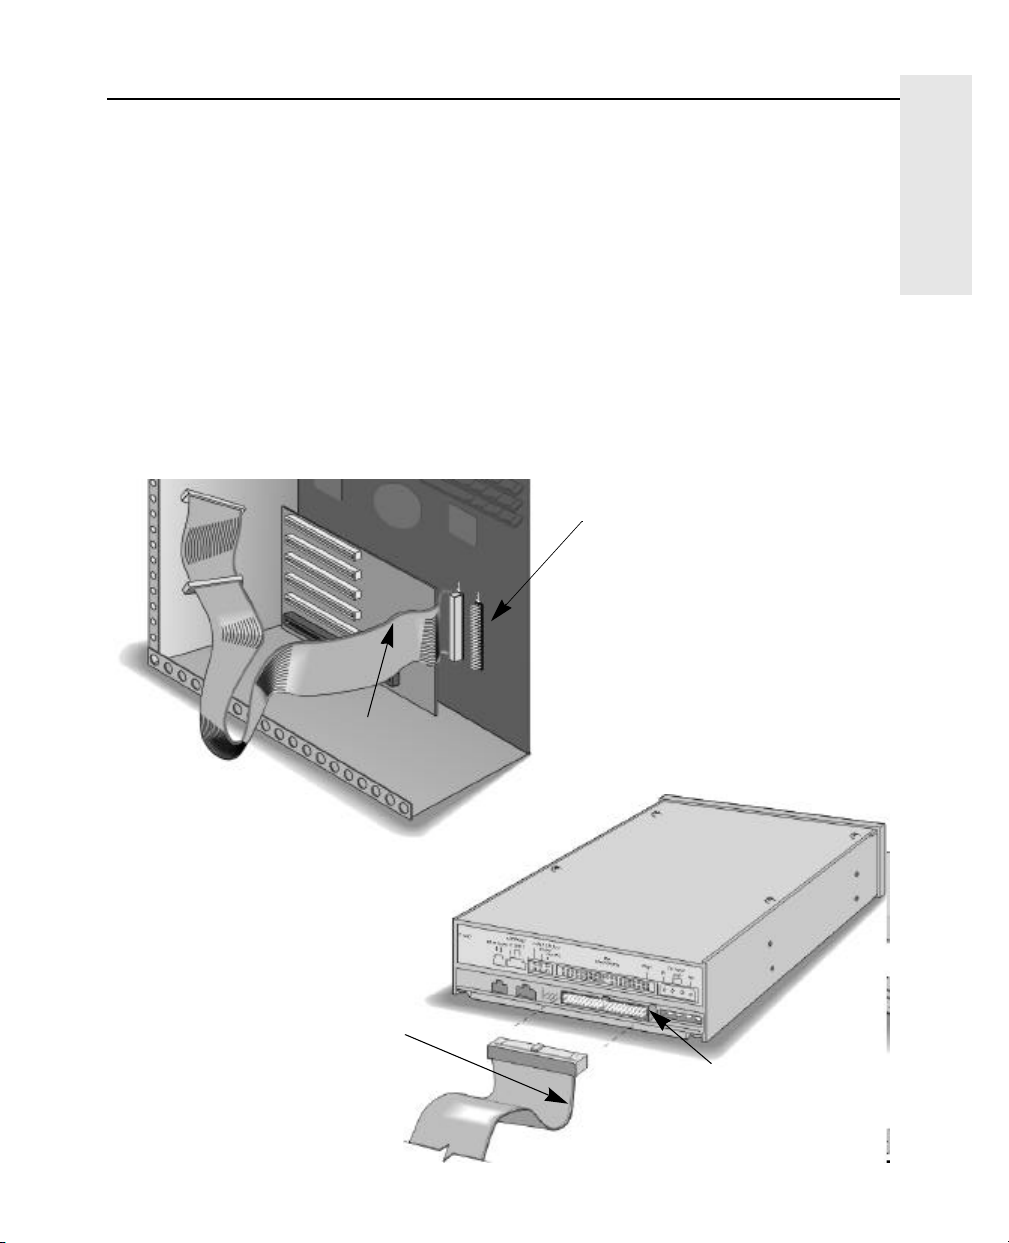
15. Si vous installez le graveur dans une baie d'unité vide, reportez-vous
aux recommandations d'installation et déterminez si le câble de données
doit être raccordé au contrôleur IDE principal ou secondaire de votre
ordinateur.
16. Localisez le contrôleur IDE 40 broches recommandé (principal ou
secondaire) sur la carte mère de votre ordinateur. Les connecteurs IDE
vont généralement par paire et ils peuvent être dissimulés par des câbles
ou autres équipements.
Installation du graveur CD-Writer Plus et du logiciel Français-4
Français
Si votre ordinateur est équipé d'un disque dur ou d'un lecteur de CDROM IDE, vous pouvez suivre le câble de données depuis l'arrière de ces
unités pour trouver le contrôleur IDE. Les connecteurs IDE sont appelés:
PRI et SEC, IDE-0 et IDE-1, IDE-1 et IDE-2, HD et CD-ROM ou encore PCIIDE et ISA-IDE.
17. Reportez-vous aux recommandations d'installation que vous avez
imprimées pour savoir si une ou deux unités sera connectée au câble de
données. Reportez-vous à la page 5 pour obtenir des exemples
d’installation pour une unité et pour deux.
18. Effectuez les connexions aux câbles de données nécessaires pour votre
système. Assurez-vous que la bande colorée latérale du câble est alignée
sur les broches 1 du lecteur et du contrôleur IDE. Si le câble est mal
raccordé, l’ordinateur ne s’amorce pas.
Broche1
Recherchez l'étiquette identifiant la
broche1 à côté du connecteur IDE.
Le bord coloré du câble est aligné
avec la broche 1 sur le connecteur
IDE. Cette illustration représente un
ordinateur spécifique. Le vôtre est
peut-être différent. La broche 1 peut
se trouver d’un côté ou de l’autre du
connecteur IDE.
Bande colorée du câble
de données
Bande colorée du câble de données
Broche1
Le bord coloré du câble est
aligné avec la broche 1 sur
le graveur CD-Writer Plus.
Français-5 Installation du graveur CD-Writer Plus et du logiciel
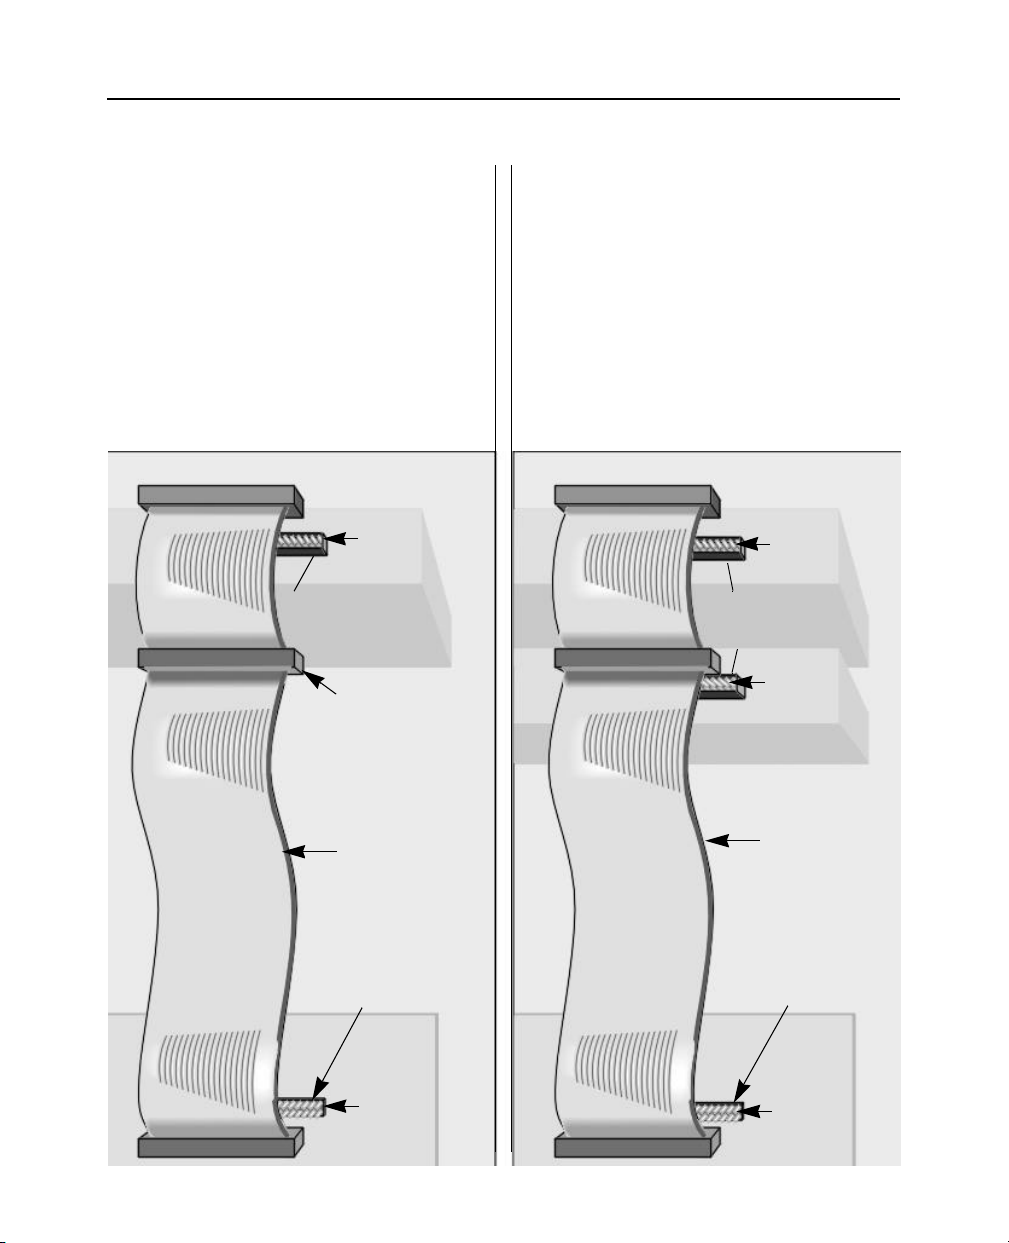
Une unité
Le câble de données FACULTATIF livré avec le
graveur CD-Writer Plus est uniquement utilisé
s’il n’y a pas de câble déjà connecté au
contrôleur IDE recommandé dans le système
de l’ordinateur ou si le câble fourni avec
l’ordinateur n’est pas assez long.
Utilisez les connecteurs aux deux extrémités
du câble.
Broche1
Lecteur
Graveur CD-Writer
Plus (connecteur
de sortie)
Connecteur non utilisé
Deux unités
Raccordez le graveur CD-Writer Plus au
connecteur non utilisé (milieu ou extrémité) sur le
câble de données déjà installé dans
l’ordinateur (N’ECHANGEZ PAS de
connecteur).
Le câble de données FACULTATIF livré avec le
graveur CD-Writer Plus est uniquement utilisé
s’il n’y a pas de connecteur de rechange pour
le graveur CD-Writer Plus sur le câble ou si le
câble n’est pas assez long.
Broche1
Lecteur
Graveur CD-Writer
Plus (connecteur
non utilisé)
Broche1
Lecteur
Bande
colorée
alignée avec
chaque
broche1
Contrôleur IDE
situé à l’intérieur de
votre ordinateur
Broche1
Carte mère
Suivez le
câble de
données relié
aux autres
unités IDE de
votre
ordinateur
pour situer le
contrôleur
IDE.
Bande
colorée
alignée avec
chaque
broche1
Contrôleur IDE
situé à l’intérieur de
votre ordinateur
Broche1
Carte mère
Installation du graveur CD-Writer Plus et du logiciel Français-6
Français
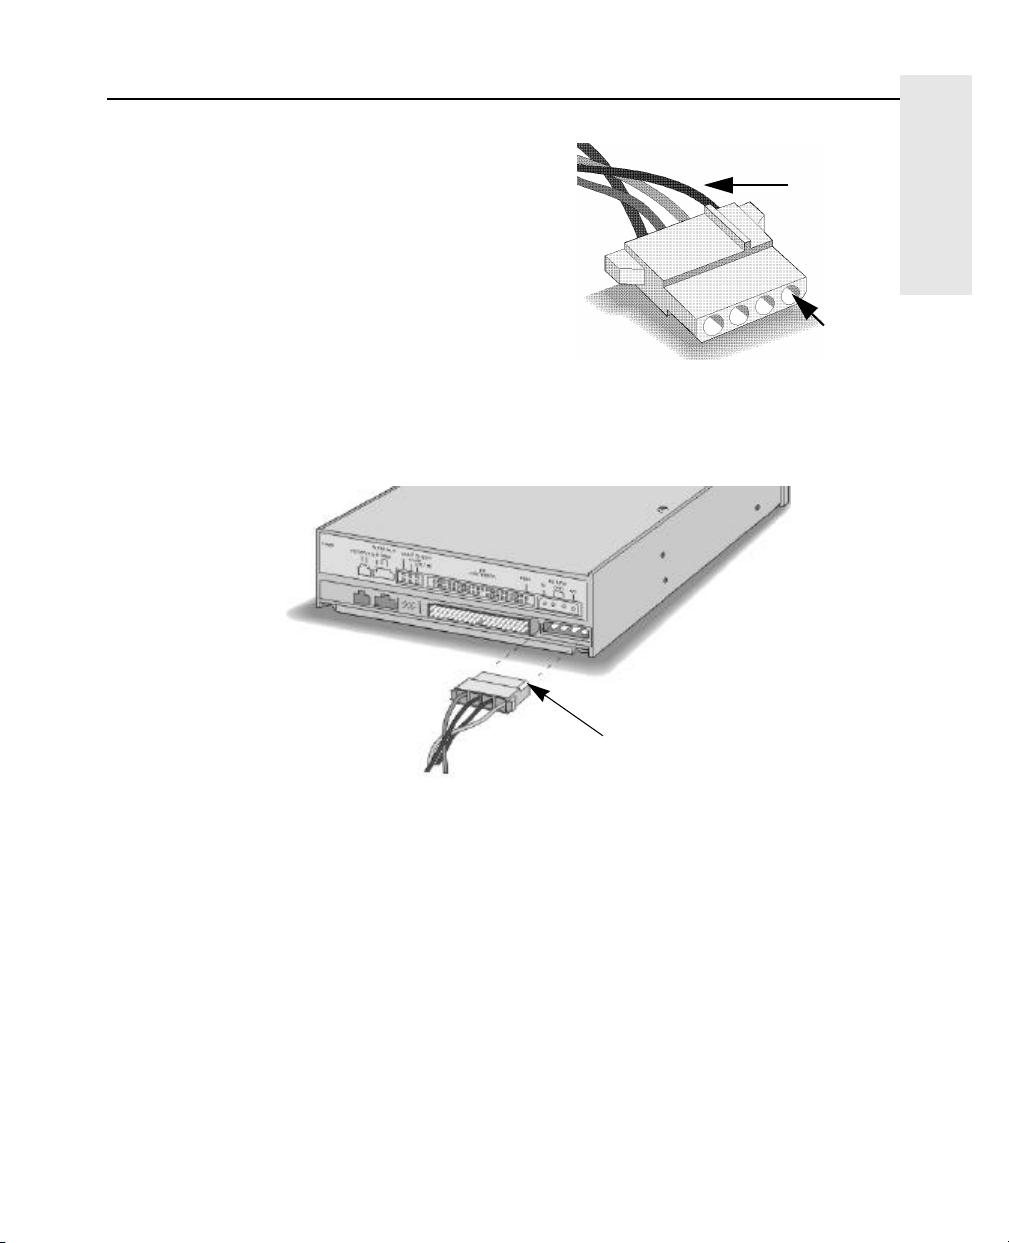
19. Recherchez un câble
d'alimentation inutilisé dans votre
ordinateur. Généralement, des
cordons d’alimentation comme
Cordon d’alimentation
Câbles rouge,
jaune et noir
ceux montrés précédemment sont
présents dans la plupart des
ordinateurs.
Bord
biseauté
20. Branchez le câble d’alimentation à l’arrière du graveur, en dirigeant le
bord biseauté vers le haut.
Bord biseauté vers le haut
21. Pour pouvoir écouter de la musique par les haut-parleurs de l’ordinateur,
reliez un câble audio au connecteur MPC-2. Pour enregistrer de la
musique, il n’est pas nécessaire que l’ordinateur soit équipé d’un câble
audio. Le câble audio vous sert à écouter des CD de musique par
l’intermédiaire du système sonore de votre ordinateur. Lorsque le graveur
CD-Writer Plus enregistre de la musique ou des données, il utilise le câble
de données, pas le câble audio.
Si votre carte son possède déjà le câble audio adéquat, raccordez le
connecteur à la sortie audio (Audio Out) située à l’arrière du graveur
CD-Writer Plus.
22. Montez le graveur dans la baie à l’aide des vis fournies avec votre graveur
ou des vis métriques M3 x 0,5 x 6 mm (n'utilisez pas de vis de plus de
6mm).

Français-7 Installation du graveur CD-Writer Plus et du logiciel
Si l’ordinateur est équipé de rails ou de supports de montage, vous n’avez
pas besoin de vis pour insérer les rails dans la baie.
23. Utilisez les quatre vis.
24. Branchez l’ordinateur, le moniteur et les autres unités à une prise murale
ou un boîtier multiprise et allumez l’ordinateur.
25. Insérez le CD Disc 1 dans le lecteur de CD-ROM ou dans le graveur CDWriter Plus. Lors du démarrage de votre ordinateur, le logiciel vérifie si la
communication se fait correctement.
26. L'installation du logiciel se déroule automatiquement. Suivez les
instructions à l’écran pour installer le logiciel dont vous avez besoin.
En cas de problèmes...
Lire les instructions de configuration dans les recommandations
d’installation.
Impossible de trouver le contrôleur IDE dans l’ordinateur
Consultez le manuel livré avec votre ordinateur ou contactez le fabricant
de ce dernier. NE RACCORDEZ PAS LE GRAVEUR CD-WRITER PLUS A UN
CONTROLEUR IDE DE LA CARTE SON.
L’ordinateur ne s’initialise pas.
■ Eteignez l’ordinateur puis rallumez-le.
■ Une fois l’ordinateur éteint, vérifiez de nouveau les connecteurs du
câble. Redressez les broches courbées, assurez-vous que le connecteur
recouvre toutes les broches et alignez la bande colorée du câble avec la
broche 1 de chaque connecteur.
■ Si vous avez inversé l’ordre des connecteurs du câble de données sur
l’unité IDE pour faire de la place au graveur, replacez le connecteur
qui se trouvait à l’origine sur l’unité et reliez le graveur au connecteur
libre.
Le graveur CD-Writer Plus ne s’affiche pas dans le Poste de travail ni
dans l’Explorateur.
■ Eteignez l’ordinateur puis rallumez-le.
■ Appuyez sur le bouton d’éjection pour vérifier que le graveur CD-
Writer Plus est alimenté.

Installation du graveur CD-Writer Plus et du logiciel Français-8
Français
■ Eteignez l’ordinateur et débranchez-le. Vérifiez de nouveau les
connecteurs du câble. Redressez les broches courbées, assurez-vous
que le connecteur recouvre toutes les broches et alignez la bande
colorée du câble avec la broche 1 de chaque connecteur.
■ Si vous avez inversé l’ordre des connecteurs du câble de données sur
l’unité IDE pour faire de la place au graveur, replacez le connecteur
qui se trouvait à l’origine sur l’unité et reliez le graveur au connecteur
libre.
Vous n’êtes pas sûr de la lettre d’unité affectée au graveur CD-Writer
Plus ?
Le graveur CD-Writer Plus a une icône similaire à l’icône du lecteur de
CD-ROM. Cliquez deux fois sur l’icône Poste de travail. Cliquez ensuite
sur l’icône du lecteur de CD-ROM avec le bouton droit de la souris et
sélectionnez Ejecter. Le tiroir du lecteur sélectionné s’ouvre alors.
L’unité qui partage le câble de données IDE avec le graveur CD-Writer
Plus ne s’affiche pas dans l’Explorateur ou ne fonctionne plus.
■ Eteignez l’ordinateur et débranchez-le.
■ Vérifiez que les câbles d’alimentation sont bien raccordés aux deux
unités.
■ Si vous avez inversé l’ordre des connecteurs du câble de données sur
l’unité IDE pour faire de la place au graveur, replacez le connecteur
qui se trouvait à l’origine sur l’unité et reliez le graveur au connecteur
libre.
■ Pour les lecteurs de CD-ROM Sony et Goldstar, essayez de configurer
le graveur CD-Writer Plus sur Master et le lecteur de CD-ROM sur
Slave.
Message d’erreur lorsque je clique deux fois sur l’icône du graveur
CD-Writer Plus
■ Il n’y a pas de CD dans le graveur CD-Writer Plus. Insérez un CD et
réessayez.
■ Après l’insertion du CD, attendez que le voyant situé sur le lecteur
cesse de clignoter et reste en grisé, puis cliquez sur l’icône du graveur
CD-Writer Plus.
■ Le CD est peut-être inséré à l’envers dans le tiroir ou légèrement
décentré ; réinsérez-le. L’étiquette doit être dirigée vers le haut.
■ Vous essayez de lire les données d’un CD-Enregistrable vierge.
Recommencez après avoir copié des données sur le CD.

Français-9 Installation du graveur CD-Writer Plus et du logiciel
J’ai déjà placé le CD du logiciel (Software Disc 1) dans l’unité CDWriter Plus, mais le programme continue à me demander d’insérer le
CD.
■ Assurez-vous que le cavalier sur le graveur CD-Writer Plus est réglé
conformément aux recommandations d'installation de votre
ordinateur.
■ Vérifiez le câble de données et assurez-vous que la bande colorée
latérale du câble est alignée sur la broche1 du graveur CD-Writer Plus.
Tableau d’échange des disquettes
Le tableau suivant présente brièvement les lecteurs de CD pouvant lire les
disques créés avec certaines applications/combinaisons de support.
Application
utilisée pour
créer un CD
DirectCD CDRW Lecteurs de CD-ROM MultiRead avec
CD Copier CDRW Lecteurs de CD-ROM MultiRead
Easy-CD Creator
(audio)
Easy-CD Creator
(données)
Type de CD
utilisé
CDR
(fermé)
CDR Tout lecteur de CD-ROM
CDRW Lecteurs de CD-ROM MultiRead
CDR Tout lecteur de CD (de voiture, ou
CDRW Lecteurs de CD-ROM MultiRead
CDR Tout lecteur de CD-ROM
Lecteurs pouvant lire le CD
UDF
Windows 95, 98 et NT 4.0
*La plupart des lecteurs de CD-ROM
Windows 95, 98 et NT 4.0
personnel)
* Votre lecteur de CD-ROM doit pouvoir lire les CD écrits en paquets. La plupart des lecteurs
de CD-ROM reconnaissent les paquets. Si vous rencontrez des problèmes, consultez la
documentation accompagnant le lecteur ou contactez le fabricant de ce dernier.

Installation du graveur CD-Writer Plus et du logiciel Français-10
Français
Support clientèle de HP
Si vous avez besoin d’aide pour l’utilisation de votre graveur HP SureStore CD-Writer
Plus, contactez votre revendeur local. Si le revendeur ne peut pas vous aider, vous
pouvez directement contacter le service de support clientèle HP par le biais de services
électroniques interactifs gratuits 24/24h ou par téléphone (appel gratuit pendant la
durée de la garantie). Pour obtenir de l’aide sur le logiciel fourni avec le graveur CDWriter Plus, composez le numéro adéquat figurant dans la liste ci-dessous (appel gratuit
durant la période de garantie).
Si votre produit Hewlett-Packard doit être réparé ou remplacé, composez le numéro
correspondant à votre pays pour recevoir des instructions.
America Online . . . . . . . . . . . . . . . . . . . . . . . . Mot de passe : hpstor
CompuServe . . . . . . . . . . . . . . . . . . . . . . . . . . . . . . . . . . . . Go HPSYS
World Wide Web . . . . . . . . http://www.hp.com/isgsupport/cdplus
BBS (8,N,1,F, 1200-28.8Ko bauds)
Europe . . . . . . . . . . . . . . . . . . . . . . . . . . . . . . . . . +31 (0)495 546909
Service HPFirst Faxback
Il vous suffit de composer le numéro de fax sur un téléphone à touches ou un
télécopieur de groupe 3 et de suivre les instructions vocales pour sélectionner l’index
des documents d’informations disponibles relatifs au service de support clientèle et au
produit.
Europe
Allemagne (appel gratuit) . . . . . . . . . . . . . . . . . . 0130 810 061
Autriche (appel gratuit) . . . . . . . . . . . . . . . . . . . . . . . 0660 8128
Belgique (appel gratuit)
- Néerlandais. . . . . . . . . . . . . . . . . . . . . . . . . . . . . . . 0800 11906
- Français . . . . . . . . . . . . . . . . . . . . . . . . . . . . . . . . . 0800 17043
Danemark (appel gratuit). . . . . . . . . . . . . . . . . . . . . . 800 10453
Espagne (appel gratuit). . . . . . . . . . . . . . . . . . . . . . . 900 993123
Finlande (appel gratuit) . . . . . . . . . . . . . . . . . . . . . . 9800 13134
France (appel gratuit) . . . . . . . . . . . . . . . . . . . . . . . . . 05 905900
Italie (appel gratuit) . . . . . . . . . . . . . . . . . . . . . . . . . 1678 59020
Norvège (appel gratuit) . . . . . . . . . . . . . . . . . . . . . . .800 11319
Pays-Bas (appel gratuit) . . . . . . . . . . . . . . . . . . . . . 06 022 2420
Royaume-Uni (appel gratuit) . . . . . . . . . . . . . . . . . 0800 960271
Suède (appel gratuit) . . . . . . . . . . . . . . . . . . . . . . . .020 795743
Suisse (appel gratuit)
- Français . . . . . . . . . . . . . . . . . . . . . . . . . . . . . . . . . . . 155 1526
- Allemand . . . . . . . . . . . . . . . . . . . . . . . . . . . . . . . . . . 155 1527
Autres pays d’Europe (appel payant) . . . . . .+31 (0)20 681 5792
Courrier électronique . . . . . . . . . . . . SureStore_Support@hp.com

Français-11 Installation du graveur CD-Writer Plus et du logiciel
Site FTP . . . . . . . . . . . . . . . . . . . . . . . . . . . . . . . . . . . . . . . . ftp.hp.com
Connexion : . . . . . . . . . . . . . . . . . . . . . . . . . . . . . . anonymous
Mot de passe : . . . . . . . . . . . . . . . . (Votre adresse électronique)
Répertoire : /pub/information_storage/surestore/cd-writer_plus
Téléphone
Pour obtenir les mises à jour des numéros de téléphones:
http://www.hp.com/cpso-support/guide/psd/cscinfo.html
Europe (L-V, 8h30-18h Heure de l’Europe centrale) Support technique gratuit pendant
la période de garantie. Par incident, facturation après période de garantie.
Allemagne. . . . . . . . . . . . . . . . . . . . . . . . . . . . . . 0180 52 58 143
Austriche . . . . . . . . . . . . . . . . . . . . . . . . . . . . . . . . . 06 60 63 86
Belgique
- Néerlandais. . . . . . . . . . . . . . . . . . . . . . . . . . . . . . 02 626 88 06
- Français . . . . . . . . . . . . . . . . . . . . . . . . . . . . . . . . 02 626 88 07
Danemark. . . . . . . . . . . . . . . . . . . . . . . . . . . . . . . . . 39 29 40 99
Finlande . . . . . . . . . . . . . . . . . . . . . . . . . . . . . . . . . 02 03 47 288
France . . . . . . . . . . . . . . . . . . . . . . . . . . . . . . . . . .01 43 62 3434
Hongrie. . . . . . . . . . . . . . . . . . . . . . . . . . . . . . . . . 36 1 252 4505
Irlande . . . . . . . . . . . . . . . . . . . . . . . . . . . . . . . . . .01 662 55 25
Italie . . . . . . . . . . . . . . . . . . . . . . . . . . . . . . . . . . . 02 2 641 0350
Norvège . . . . . . . . . . . . . . . . . . . . . . . . . . . . . . . . . .22 11 62 99
Pays-Bas . . . . . . . . . . . . . . . . . . . . . . . . . . . . . . . . 020 606 87 51
Portugal . . . . . . . . . . . . . . . . . . . . . . . . . . . . . . . . .01 44 17 199
République Tchèque. . . . . . . . . . . . . . . . . . . . . . . 42 2 471 7321
Royaume-Uni . . . . . . . . . . . . . . . . . . . . . . . . . . . 0171 512 52 02
Russie . . . . . . . . . . . . . . . . . . . . . . . . . . . . . . . . . 7095 923 5001
Espagne. . . . . . . . . . . . . . . . . . . . . . . . . . . . . . . . . . 90 23 21 123
Suède . . . . . . . . . . . . . . . . . . . . . . . . . . . . . . . . . . . 08 61 92 170
Suisse (Français, Italien et Allemand) . . . . . . . . 08 48 80 11 11
Turquie . . . . . . . . . . . . . . . . . . . . . . . . . . . . . . . . .90 1 224 5925
Support en langue anglaise des autres pays. +44 171 512 52 02
FAX
USA. . . . . . . . . . . . . . . . . . . . . . . . . . . . . . . . . . . . . . . . 970-667-0997

Installation du graveur CD-Writer Plus et du logiciel Français-12
Français
Déclaration de garantie limitée Hewlett-Packard
Graveur HP CD-Writer Plus
DUREE DE GARANTIE Matériel - 1 an Logiciel - 90 jours
1. HP garantit à l’Acquéreur que le logiciel exécute la programmation normalement sous réserve
d’une installation correcte, à compter de la date d’achat, durant la période spécifiée ci-dessus. Si
HP prend connaissance de défauts durant la période de garantie, HP pourra remplacer le logiciel
défectueux. Les produits de remplacement sont neufs ou en très bon état.
2. HP garantit que le logiciel exécute la programmation normalement, sous réserve d’une
installation correcte, à compter de la date d’achat, durant la période spécifiée ci-dessus. Si HP
prend connaissance de défauts durant la période de garantie, HP pourra remplacer le logiciel
défectueux.
3. HP ne garantit pas l’indéfectibilité des produits HP. Si HP se trouve dans l’impossibilité de
réparer ou de remplacer dans un délai raisonnable en fonction des conditions de garantie,
l’Acquéreur sera remboursé du montant correspondant à l’achat du produit sur retour du produit.
4. HP se réserve le droit d’utiliser des pièces reconditionnées, de performance équivalant aux
neuves, pour les produits HP.
5. Cette garantie n’est valable que pour une utilisation correcte du produit par l’Acquéreur et ne
couvre pas: (a) une utilisation inappropriée, (b) l’utilisation de logiciels, d’accessoires, de
supports non fournis par HP, (c) une modification non autorisée du produit, (d) l’utilisation en
dehors des conditions d’environnement spécifiées pour le produit ou (e) une maintenance
inadéquate.
6. HP EXCLUT TOUTE AUTRE FORME DE GARANTIE EXPLICITE, QU’ELLE SOIT ECRITE OU
ORALE. DANS LES LIMITES AUTORISEES PAR LA LOI DU PAYS, TOUTE GARANTIE IMPLICITE
OU CONDITION DE COMMERCIALISATION, DE QUALITE SATISFAISANTE OU
D’ADEQUATION A UN USAGE PARTICULIER EST LIMITEE A LA DUREE DE LA GARANTIE
EXPRESSE MENTIONNEE CI-DESSUS. Certains Etats ou juridictions n’imposent pas de limitation
de durée pour la garantie impliquée, il se peut donc que la présente exclusion ne s’applique pas à
votre égard. Cette garantie vous octroie des droits spécifiques, vous pouvez également disposer
d’autres droits selon les Etats ou les juridictions.
7. LES RECOURS MENTIONNES CI-DESSUS SONT LES SEULS RECOURS DONT DISPOSE
L’ACQUEREUR. HP NE SERA EN AUCUN CAS TENU RESPONSABLE DES DOMMAGES DIRECTS,
INDIRECTS, SPECIAUX OU ACCESSOIRES (Y COMPRIS LA PERTE DE PROFITS) QUE CE SOIT
SUR LA BASE D’UN CONTRAT, D’UN DOMMAGE OU DE TOUTE FORME JURIDIQUE. Certains
Etats ou juridictions n’autorisent pas la limitation ou l’exclusion des dommages accessoires ou
indirects, il se peut donc que la présente exclusion ou limitation ne s’applique pas à votre égard.
CONCERNANT LES TRANSACTIONS DES CLIENTS EN AUSTRALIE ET EN NOUVELLE-ZELANDE,
LES TERMES DE GARANTIE COMPRIS DANS CETTE DECLARATION, SAUF DANS LES LIMITES
AUTORISEES PAR LA LOI, NE SONT NI EXCLUS NI LIMITES ET S’AJOUTENT AUX DROITS
STATUTAIRES ET MANDATAIRES APPLICABLES A LA VENTE DE CE PRODUIT.
GARANTIE AN 2000 HEWLETT-PACKARD
POUR LES PRODUITS GRAND PUBLIC DISTRIBUES PAS DES REVENDEURS
Sous réserve des termes et restrictions de la déclaration de garantie limitée fournie avec cet
appareil, Hewlett-Packard garantit que ce produit HP, s'il est utilisé conformément à la
documentation (y compris toutes les instructions relatives à l'installation de correctifs ou
d'extensions) fournie par HP, pourra traiter (y compris, entre autres, calculer, comparer et classer)
correctement les dates depuis, dans et entre les vingtième et vingt-et-unième siècles et les années
1999 et 2000, y compris gérer les calculs de changement d'année, pourvu que tous les autres
produits (par exemple, les matériels, logiciels et microprogrammes) utilisés avec ce produit HP
puissent échanger correctement les données de date avec ce dernier. La durée de la garantie An
2000 est valable jusqu'au 31 janvier 2001.

Installazione del CD-Writer Plus e del software Italiano-1
Italiano
Installazione del CD-Writer Plus e del software
1. Inserire il CD “Disco software 1” nell’unità CD-ROM (non nell’unità CDWriter Plus). Dovrebbe apparire il menu principale. Se non appare,
eseguire SETUP dal disco di installazione.
2. Guardare il filmato di installazione (circa 6 minuti) facendo clic
sull’icona Guarda il filmato di installazione.
3. Per consigli sull’installazione, utilizzare il programma Assistente
d’installazione fornito sul disco d’installazione.
Nota: Assistente d’installazione contiene consigli per l’installazione, ma non è
indispensabile per poter eseguire l’installazione.
Se si dispone di un CD-ROM, passare al menu principale di
configurazione del software e fare clic sull’icona Installa CD-Writer
Plus.
Icona Installa CD-Writer Plus
Se il computer non è dotato di un’unità per CD-ROM: Creare un
dischetto Assistente d’installazione dal CD-ROM di un altro
computer. Inserire il “Disco software 1” nell’unità CD-ROM dell’altro
computer. Dal menu principale, fare clic su Sfoglia questo CD, fare
doppio clic sulla cartella Copia Disco, fare doppio clic su
Copydisk.exe, quindi selezionare Assistente d’installazione. Inserire
questo dischetto nell’unità disco floppy del proprio computer ed
eseguire A:\ASSIST.

Italiano-2 Installazione del CD-Writer Plus e del software
4. Seguire le istruzioni sullo schermo.
5. Quando compare la schermata Raccomandazioni per l’installazione di
CD-Writer Plus, fare clic su Stampa. Oppure, se non si dispone di una
stampante, copiare le informazioni riportate e tenerle a portata di mano
mentre si procede con le istruzioni.
6. Se si sostituisce un’unità CD-ROM esistente, estrarre il Disco software 1
dall’unità CD-ROM.
7. Una volta visualizzata la schermata Raccomandazioni per l’installazione,
spegnere il computer quando viene richiesto, quindi spegnere il monitor
ed ogni eventuale periferica connessa. Estrarre i cavi di alimentazione
dalle prese di corrente.
8. Rimuovere il coperchio del computer.
9. Preparare il vano per l’unità:
Se si sta installando l’unità in un vano per unità vuoto, rimuovere la
piastra di copertura da un vano per unità grande a mezza altezza (circa 15
cm x 4,5 cm o 6 x 1,75 pollici)
.
Se si sta sostituendo un'unità CD-ROM esistente, rimuovere l'unità.
Prendere nota dei punti in cui sono connessi i cavi e metterli da parte per
poterli riconnettere al CD-Writer Plus. Il cavo dei dati fornito con il CDWriter Plus non sarà necessario. Rimuovere eventuali guide di montaggio
o altro hardware dall’unità e metterle da parte.
10. Se necessario, connettere eventuali guide o altro hardware di montaggio
all’unità CD-Writer Plus.
11. Copiare il numero di serie del CD-Writer Plus nello spazio sottostante. Il
numero di serie è riportato sull’etichetta principale, sul lato superiore
dell’unità.
Numero di
serie:
12. Leggere le Raccomandazioni per l’installazione per verificare se il
ponticello dell’unità CD-Writer Plus deve essere impostato come Master o
Slave.

Installazione del CD-Writer Plus e del software Italiano-3
Italiano
13. Impostare il ponticello sul retro dell’unità CD-Writer Plus come
consigliato nelle Raccomandazioni per l’installazione.
Slave
Assicurarsi che il ponticello sia
sull’impostazione centrale (Slave).
Non usare
Cable Select
Questo è un ponticello. Può
essere estratto ed inserito in un
altro paio di piedini per
cambiarne l’impostazione.
Master
Assicurarsi che il ponticello sia
sull’impostazione di destra (Master).
14. Inserire l'unità nel vano selezionato.
Se si sta sostituendo un’unità CD-ROM esistente, passare
direttamente al punto 18 a pagina 4.
15. Se si sta installando l’unità in un vano vuoto, consultare le
Raccomandazioni per l’installazione per verificare se il cavo dei dati deve
essere connesso al controller IDE primario o secondario del computer.
16. Individuare il connettore del controller IDE da 40 piedini (primario o
secondario) sulla scheda madre del computer. I connettori IDE si trovano
solitamente in coppie e possono essere nascosti da cavi o altro hardware.

Italiano-4 Installazione del CD-Writer Plus e del software
Oppure, se il computer ha un un’unità CD-ROM o un disco rigido IDE,
seguire il cavo dei dati dal retro di una delle unità fino a trovare il
controller IDE. I connettori IDE potrebbero essere etichettati PRI e SEC,
IDE-0 e IDE-1, IDE-1 e IDE-2, HD e CD-ROM, oppure PCI-IDE e ISA-IDE.
17. Consultare le Raccomandazioni per l’installazione per controllare se al
cavo dei dati sarà connesso un dispositivo o due dispositivi. Vedere gli
esempi di installazioni con uno o due dispositivi a pagina 5.
18. Connettere i cavi dei dati necessari per il sistema. Accertarsi che il bordo
colorato del cavo sia allineato sia con il piedino 1 dell’unità che con il
piedino 1 del controller IDE. Se il cavo non è connesso in modo corretto,
il computer potrebbe non avviarsi.
PIEDINO 1
Cercare la dicitura che identifica il
piedino 1 accanto al connettore IDE.
Il bordo colorato del cavo è allineato
al piedino 1 del connettore IDE.
Questa illustrazione mostra un
computer specifico: il proprio
computer potrebbe essere diverso. Il
piedino 1 potrebbe trovarsi sull’uno o
sull’altro lato del connettore IDE.
Striscia colorata sul cavo
dei dati
Striscia colorata sul cavo dei dati
PIEDINO 1
Il bordo colorato del cavo
allineato al piedino 1
dell’unità CD-Writer Plus.

Installazione del CD-Writer Plus e del software Italiano-5
Italiano
Un dispositivo
Il cavo dei dati OPZIONALE fornito con
l’unità CD-Writer Plus viene utilizzato solo se
non vi è nessun cavo già connesso al
controller IDE consigliato nel proprio
computer, o se il cavo fornito con il computer
non è abbastanza lungo.
Utilizzare i connettori alle due estremità del
cavo.
PIEDINO 1
Unità
Unità CD-Writer
Plus (all’estremità
del connettore)
Connettore non utilizzato
Due dispositivi
Connettere l’unità CD-Writer Plus a qualsiasi
connettore libero (intermedio o terminale) del
cavo dei dati già installato nel computer
(NON scambiare i connettori).
Il cavo dei dati OPZIONALE fornito con
l’unità CD-Writer Plus viene utilizzato solo se
non vi sono connettori liberi sul cavo oppure
se il cavo disponibile non è abbastanza lungo.
PIEDINO 1
Unità
Unità CD-Writer
Plus (posizioni
non utilizzate)
PIEDINO 1
Unità
Striscia colorata
allineata ad
ogni piedino 1
Controller IDE
all’interno del
computer
PIEDINO 1
Scheda madre
Seguire il
cavo dei dati
già connesso
all’altro
dispositivo
IDE presente
nel computer
fino a
individuare il
controller
IDE.
Striscia colorata
allineata ad
ogni piedino 1
Controller IDE
all’interno del
computer
PIEDINO 1
Scheda madre

Italiano-6 Installazione del CD-Writer Plus e del software
19. Cercare un cavo di alimentazione
non utilizzato all'interno del
computer. All’interno della
maggior parte dei computer si
Cavo di alimentazione
Cavi rosso, giallo
e nero
trovano solitamente dei cavi di
alimentazione non utilizzati,
come quello qui illustrato.
20. Inserire il cavo di alimentazione sul retro dell’unità, con il bordo
smussato rivolto verso l’alto.
Bordo
smussato
Bordo smussato verso l’alto
21. Se si desidera ascoltare la musica utilizzando il sistema audio del
computer, connettere il cavo audio ad uno dei connettori MPC-2. Il cavo
audio non è necessario per registrare musica: viene utilizzato solo per
ascoltare CD audio attraverso il sistema audio del computer. Per registrare
brani audio o dati, l’unità CD-Writer Plus utilizza il cavo dei dati, non il
cavo audio.
Se la scheda audio dispone già di un cavo audio corretto, inserire il
connettore nell’apertura Audio Out situata sul retro dell’unità CD-Writer
Plus.
22. Fissare l’unità nel vano utilizzando le viti fornite in dotazione o altre viti
metriche di tipo M3x0,5x6 mm (non usare viti più lunghe di 6 mm).
Se il computer utilizza guide o staffe di montaggio, potrebbe non essere
necessario utilizzare le viti per fissare le guide nel vano.

Installazione del CD-Writer Plus e del software Italiano-7
Italiano
23. Rimontare il coperchio esterno del computer.
24. Connettere il computer, il monitor e gli altri dispositivi alla presa di
alimentazione e accendere il computer
25. Inserire il Disco 1 nell’unità CD-ROM o CD-Writer Plus. All’avvio del
computer, il software CD-Writer Plus controllerà se è in grado di
comunicare in modo corretto.
26. L’installazione del software prosegue automaticamente. Seguire le
istruzioni sullo schermo per installare il software desiderato.
In caso di problemi
Leggere ed utilizzare le Raccomandazioni per l’installazione.
Non si riesce a trovare il controller IDE sul computer.
Consultare la documentazione del computer o contattare il servizio di
assistenza del produttore. NON CONNETTERE L’UNITÀ CD-WRITER
PLUS AL CONTROLLER IDE DI UNA SCHEDA AUDIO.
Il computer non si avvia.
■ Spegnere il computer e riaccenderlo.
■ Con il computer spento, verificare i connettori di ogni cavo.
Raddrizzare eventuali piedini piegati, accertarsi che tutti i piedini
siano ricoperti dal connettore ed allineare la striscia colorata del cavo
al piedino 1 di ogni connettore.
■ Se per fare posto all’unità CD-Writer è stato cambiato l’ordine dei
connettori del cavo dei dati su un dispositivo IDE, ripristinare il
connettore originale del dispositivo e connettere l’unità CD-Writer ad
un connettore libero.
L’unità CD-Writer Plus non compare in Risorse del computer o
Esplora risorse (Gestione risorse in Windows 95/NT).
■ Spegnere il computer e riaccenderlo.
■ Premere il pulsante di espulsione per accertarsi che l’unità CD-Writer
Plus sia dotata di alimentazione.
■ Spegnere e disconnettere il computer dalla rete elettrica. Verificare
ogni connettore lungo il cavo dei dati, raddrizzare eventuali piedini
piegati, accertarsi che tutti i piedini siano ricoperti dal connettore ed
allineare la striscia colorata del cavo al piedino 1 di ogni connettore.
■ Se per fare posto all’unità CD-Writer è stato cambiato l’ordine dei
connettori del cavo dei dati su un dispositivo IDE, ripristinare il
connettore originale del dispositivo e connettere l’unità CD-Writer ad
un connettore libero.

Italiano-8 Installazione del CD-Writer Plus e del software
Non si è sicuri di quale lettera sia stata assegnata all’unità CD-Writer
Plus.
L’icona CD-Writer Plus è identica all’icona dell’unità CD-ROM. Fare clic
sull’icona Risorse del computer, fare clic con il pulsante destro del
mouse sull’icona dell’unità CD quindi scegliere Espelli. Si aprirà il
cassetto dell’unità selezionata.
Il dispositivo che condivide il cavo dati IDE con l’unità CD-Writer
Plus non compare in Esplora risorse (Gestione risorse in Windows 95/
NT) o non funziona più.
■ Spegnere e disconnettere il computer dalla rete elettrica.
■ Verificare che i cavi di alimentazione siano connessi saldamente a
entrambi i dispositivi.
■ Se per fare posto all’unità CD-Writer è stato cambiato l’ordine dei
connettori del cavo dei dati su un dispositivo IDE, ripristinare il
connettore originale del dispositivo e disconnettere l’unità CD-Writer
ad un connettore libero.
■ Per unità CD-ROM Sony e Goldstar, provare a configurare il CD-
Writer Plus come “Master” e l’unità CD-ROM come “Slave”.
Facendo doppio clic sull’icona CD-Writer Plus si riceve un messaggio
di errore.
■ L’unità CD-Writer Plus non contiene un CD. Inserire un CD e
riprovare.
■ Dopo l’inserimento di un CD, attendere che la spia sul pannello
frontale dell’unità smetta di lampeggiare e diventi verde, quindi fare
clic sull’icona dell’unità CD-Writer Plus.
■ Il CD potrebbe essere capovolto o non essere posizionato
correttamente nel cassetto; provare a reinserirlo. L’etichetta deve
essere rivolta verso l’alto.
■ Si sta cercando di leggere un CD registrabile vuoto. Riprovare dopo
aver copiato dei dati sul CD.
Il Disco software 1 è già stato inserito nell’unità CD-Writer Plus, ma
continua ad essere richiesto l’inserimento del CD.
■ Accertarsi che il ponticello dell’unità CD-Writer Plus sia impostato
secondo le Raccomandazioni per l’installazione.
■ Controllare il cavo dei dati e assicurarsi che il bordo colorato del cavo
sia allineato al piedino 1 sull'unità CD-Writer Plus.

Installazione del CD-Writer Plus e del software Italiano-9
Italiano
Sommario sulla compatibilità dei dischi
Nella seguente tabella sono riassunte le informazioni sulle unità per CD
in grado di leggere i dischi creati con varie combinazioni di tipi di
supporto e applicazioni.
Applicazione
utilizzata per
creare il CD
DirectCD CD-R CD-ROM MultiRead con lettore UDF
CD Copier CD-R CD-ROM MultiRead
Easy-CD Creator
(Audio)
Easy-CD Creator
(Dati)
Tipo di CD
utilizzato
CD-R
(chiuso)
CD-R Qualsiasi CD-ROM
CD-R CD-ROM MultiRead
CD-R Qualsiasi CD-ROM o lettore personale
CD-R CD-ROM MultiRead
CD-R Qualsiasi CD-ROM
Unità in grado di leggere il CD
Windows 95, 98 e NT 4.0
* La maggior parte dei lettori per CDROM
Windows 95, 98 e NT 4.0
di CD audio
* L’unità CD-ROM deve essere in grado di leggere CD registrati a pacchetti. La maggior parte
delle unità CD-ROM sono in grado di leggere i pacchetti. In caso di problemi, consultare la
documentazione dell’unità o contattare il produttore.

Italiano-10 Installazione del CD-Writer Plus e del software
Assistenza clienti HP
Se occorre assistenza per l’unità CD-Writer Plus, il rivenditore locale dovrebbe essere in
grado di fornire le informazioni più aggiornate sui prodotti HP e l’ampia gamma di
servizi di assistenza forniti da HP ai rivenditori. Se il rivenditore non fosse in grado di
fornire tali informazioni, si può contattare direttamente HP, tramite i servizi elettronici
di assistenza attivi 24 ore al giorno oppure per mezzo dell’assistenza telefonica (gratuita
nel periodo di garanzia). Per ottenere l’assistenza per il software fornito insieme al CDWriter Plus, chiamare il numero appropriato riportato in basso (il servizio è gratuito
durante il periodo di garanzia).
Se un prodotto Hewlett-Packard necessita di riparazione o sostituzione, chiamare il
numero telefonico per il proprio paese e richiedere istruzioni sulla procedura da
seguire.
America Online . . . . . . . . . . . . . . . . . . . . . . . . . . . . Keyword: hpstor
CompuServe . . . . . . . . . . . . . . . . . . . . . . . . . . . . . . . . . . . . Go HPSYS
World Wide Web . . . . . . . . . . . . . .www.hp.com/isgsupport/cdplus
Bulletin board (8,N,1,F, 1200-28800 baud)
Europa . . . . . . . . . . . . . . . . . . . . . . . . . . . . . . . . . . . . . +31 (0)495 546909
Servizio Fax HP First
Comporre il numero di fax utilizzando un telefono con tasti a toni o un fax Gruppo 3 e
seguire le indicazioni fornite dalla voce per selezionare il servizio o i documenti
informativi sui prodotti.
Europa
Austria (gratuito) . . . . . . . . . . . . . . . . . . . . . . . . . . . . 0660 8128
Belgio (gratuito)
- olandese . . . . . . . . . . . . . . . . . . . . . . . . . . . . . . . . . 0800 11906
- francese . . . . . . . . . . . . . . . . . . . . . . . . . . . . . . . . . 0800 17043
Danimarca (gratuito) . . . . . . . . . . . . . . . . . . . . . . . . . 800 10453
Finlandia (gratuito) . . . . . . . . . . . . . . . . . . . . . . . . . 9800 13134
Francia (gratuito) . . . . . . . . . . . . . . . . . . . . . . . . . . . . 05 905900
Germania (gratuito) . . . . . . . . . . . . . . . . . . . . . . . 0130 810 061
Italia (gratuito) . . . . . . . . . . . . . . . . . . . . . . . . . . . . . 1678 59020
Norvegia (gratuito). . . . . . . . . . . . . . . . . . . . . . . . . . . 800 11319
Olanda (gratuito) . . . . . . . . . . . . . . . . . . . . . . . . . . 06 022 2420
Spagna (gratuito) . . . . . . . . . . . . . . . . . . . . . . . . . . . 900 993123
Svezia (gratuito) . . . . . . . . . . . . . . . . . . . . . . . . . . . . 020 795743
Svizzera (gratuito)
- francese . . . . . . . . . . . . . . . . . . . . . . . . . . . . . . . . . . . 155 1526
- tedesco . . . . . . . . . . . . . . . . . . . . . . . . . . . . . . . . . . . . 155 1527
Gran Bretagna (gratuito) . . . . . . . . . . . . . . . . . . . . 0800 960271
Altri paesi europei (a pagamento) . . . . . . . .+31 (0)20 681 5792
E-mail . . . . . . . . . . . . . . . . . . . . . . . . . . . . SureStore_Support@hp.com

Installazione del CD-Writer Plus e del software Italiano-11
Italiano
Sito FTP . . . . . . . . . . . . . . . . . . . . . . . . . . . . . . . . . . . . . . . . ftp.hp.com
Login:. . . . . . . . . . . . . . . . . . . . . . . . . . . . . . . . . . . .anonymous
Password:. . . . . . . . . . . . . . . . . . . .(indirizzo e-mail del cliente)
Directory:. /pub/information_storage/surestore/cd-writer_plus
Telefono
Per un elenco di numeri telefonici sempre aggiornato:
http://www.hp.com/cpso-support/guide/psd/cscinfo.html
Europa (Lun-ven, 08,30-18,00, ora dell’Europa centrale)
I seguenti numeri di Assistenza tecnica sono utilizzabili durante e dopo il periodo di
garanzia. Durante la garanzia non verranno effettuati addebiti. Dopo la scadenza della
garanzia verrà applicata una tariffa fissa per incidente.
Austria . . . . . . . . . . . . . . . . . . . . . . . . . . . . . . . . . . . 06 60 63 86
Belgio
- olandese . . . . . . . . . . . . . . . . . . . . . . . . . . . . . . . . 02 626 88 06
- francese . . . . . . . . . . . . . . . . . . . . . . . . . . . . . . . . 02 626 88 07
Danimarca . . . . . . . . . . . . . . . . . . . . . . . . . . . . . . . . 39 29 40 99
Finlandia . . . . . . . . . . . . . . . . . . . . . . . . . . . . . . . . 02 03 47 288
Francia . . . . . . . . . . . . . . . . . . . . . . . . . . . . . . . . . 01 43 62 3434
Germania . . . . . . . . . . . . . . . . . . . . . . . . . . . . . . 0180 52 58 143
Gran Bretagna . . . . . . . . . . . . . . . . . . . . . . . . . . 0171 512 52 02
Irlanda . . . . . . . . . . . . . . . . . . . . . . . . . . . . . . . . . . 01 662 55 25
Italia . . . . . . . . . . . . . . . . . . . . . . . . . . . . . . . . . . . 02 2 641 0350
Olanda . . . . . . . . . . . . . . . . . . . . . . . . . . . . . . . . . 020 606 87 51
Norvegia . . . . . . . . . . . . . . . . . . . . . . . . . . . . . . . . . .22 11 62 99
Portogallo . . . . . . . . . . . . . . . . . . . . . . . . . . . . . . . . 01 44 17 199
Repubblica Ceca . . . . . . . . . . . . . . . . . . . . . . . . . . 42 2 471 7321
Russia . . . . . . . . . . . . . . . . . . . . . . . . . . . . . . . . . 7095 923 5001
Spagna . . . . . . . . . . . . . . . . . . . . . . . . . . . . . . . . . .90 23 21 123
Svezia . . . . . . . . . . . . . . . . . . . . . . . . . . . . . . . . . . . 08 61 92 170
Svizzera (francese, italiano e tedesco) . . . . . . . . 08 48 80 11 11
Turchia . . . . . . . . . . . . . . . . . . . . . . . . . . . . . . . . . 90 1 224 5925
Ungheria. . . . . . . . . . . . . . . . . . . . . . . . . . . . . . . . 36 1 252 4505
Assistenza in inglese per altri paesi . . . . . . . +44 171 512 52 02
FAX
USA. . . . . . . . . . . . . . . . . . . . . . . . . . . . . . . . . . . . . . . . 970-667-0997

Italiano-12 Installazione del CD-Writer Plus e del software
Garanzia limitata Hewlett-Packard
Unità HP CD-Writer Plus
DURATA DELLA GARANZIA LIMITATA Hardware - 1 anno Software - 90 giorni
1 HP garantisce all’utente finale che l’hardware, gli accessori e i materiali di consumo sono
esenti da difetti di materiale e manodopera a partire dalla data dell’acquisto per il periodo
summenzionato. Qualora vengano notificati difetti di questo tipo durante il periodo di garanzia,
HP provvederà, a sua discrezione, alla riparazione o alla sostituzione dei prodotti che si saranno
dimostrati difettosi. I prodotti sostitutivi potranno essere nuovi o come nuovi.
2. HP garantisce che il software HP è in grado, se installato e usato correttamente, di eseguire le
istruzioni di programmazione dopo la data di acquisto per il periodo summenzionato, essendo
esente da difetti di materiali o manodopera. Qualora vengano notificati difetti di questo tipo
durante il periodo di garanzia, HP provvederà alla sostituzione dei supporti del software non in
grado di eseguire le istruzioni di programmazione per effetto dei difetti summenzionati.
3. HP non garantisce che il funzionamento dei prodotti HP sarà ininterrotto ed esente da errori.
Qualora HP non fosse in grado, entro un ragionevole periodo di tempo, di riparare o sostituire
qualsiasi prodotto alle condizioni garantite, il cliente otterrà un risarcimento pari al prezzo di
acquisto su restituzione del prodotto difettoso.
4. I prodotti HP possono contenere parti ricostruite, equivalenti nelle prestazioni alle
corrispondenti parti nuove, o che possono essere state oggetto di utilizzo incidentale.
5 La garanzia non è valida per difetti derivanti da (a) manutenzione o calibrazione improprie o
inadeguate, (b) impiego di software, interfacce, ricambi o materiali di consumo non forniti da HP,
(c) modifiche non autorizzate o uso improprio, (d) funzionamento al di fuori delle specifiche
ambientali del prodotto o (e) preparazione o manutenzione impropria del sito.
6. HP NON RILASCIA ALTRA GARANZIA O CONDIZIONE ESPLICITA, SCRITTA O ORALE.
QUALSIASI GARANZIA IMPLICITA RELATIVA ALLA COMMERCIABILITÀ O ALL’IDONEITÀ A
UNO SCOPO PARTICOLARE È LIMITATA ALLA DURATA DELLA GARANZIA ESPLICITA
SUMMENZIONATA. Alcuni stati non ammettono limiti alla durata della garanzia implicita. In
tali giurisdizioni i limiti o l’esclusione su esposti sono da intendersi non applicabili. Questa
garanzia assicura al cliente specifici diritti legali oltre ai diritti che possono variare da stato a
stato.
7. NEI LIMITI CONSENTITI DALLE LEGGI LOCALI, I RIMEDI FISSATI DA QUESTA GARANZIA
SONO I SOLI RIMEDI DEL CLIENTE. AD ECCEZIONE DI QUANTO INDICATO SOPRA, HP NON
SARÀ RESPONSABILE IN ALCUN CASO PER LA PERDITA DI DATI O PER DANNI DIRETTI,
INDIRETTI, SPECIALI, INCIDENTALI O CONSEQUENZIALI (INCLUSA LA PERDITA DI PROFITTI
O DI DATI), BASATI SU CONTRATTO, ILLECITO CIVILE O QUALSIASI ALTRA TEORIA LEGALE.
Alcuni stati o province non consentono l'esclusione o la limitazione di danni accidentali o
consequenziali, quindi la limitazione o l'esclusione descritta nel paragrafo precedente potrebbe
non essere valida in alcuni casi.
TRANSAZIONI PER CONSUMATORI IN AUSTRALIA E NUOVA ZELANDA: I TERMINI DELLA
GARANZIA CONTENUTI IN QUESTO DOCUMENTO NON ESCLUDONO, RIDUCONO O
MODIFICANO MA SI AGGIUNGONO AI DIRITTI STABILITI PER IL CONSUMATORE, ECCETTO
CHE NEI CASI PREVISTI DALLA LEGGE.
GARANZIA HEWLETT-PACKARD ANNO 2000
PER PRODOTTI DI CONSUMO DISTRIBUITI TRAMITE RIVENDITORI
Nei limiti di quanto stabilito in tutti i termini e le limitazioni della Dichiarazione di garanzia
limitata HP fornita con questo prodotto, HPgarantisce che questo Prodotto HP sarà in grado di
elaborare correttamente i dati relativi alle date (compresi, ma non a titolo esclusivo, calcolo,
confronto e ordinamento) a partire da, durante e tra il ventesimo e il ventunesimo secolo e gli
anni 1999 e 2000, compresi i calcoli di anni bisestili, se utilizzato come illustrato nella
documentazione HP (comprese le eventuali istruzioni per l'installazione di correzioni o
aggiornamenti), a condizione che tutti gli altri prodotti (ad es. hardware, software, firmware)
scambino correttamente i dati con il prodotto in questione. La garanzia Anno 2000 è valida fino
al 31 gennaio 2001.

English-1 Installing CD-Writer Plus and Software
Installing CD-Writer Plus and Software
1. Insert the CD labeled Software Disc 1 into your CD-ROM drive (not the
CD-Writer Plus drive). The main menu should appear. If it does not
appear automatically, run SETUP from the installation disc.
2. Watch the installation video (about 6 minutes) by clicking on the Watch
Installation Video icon.
3. Get installation recommendations using the Install Assistant that came
on your installation disc.
Note: Install Assistant provides installation recommendations, but is not
required for installation.
If you have a CD-ROM, go to the main software setup menu and
click on the Install CD-Writer Plus icon.
Install CD-Writer Plus icon
If your computer does not have a CD-ROM drive: Create an Install
Assistant diskette from another computer’s CD-ROM. Insert “Software
Disc 1” into the other computer’s CD-ROM . From the main menu,
click Browse this CD, double-click the CopyDisk folder, double-click
Copydisk.exe, and select Install Assistant. Take this diskette to your
computer and insert it into the floppy drive. Run A:\ASSIST.
4. Follow the instructions on the screen.
5. When the CD-Writer Plus Install Recommendation screen appears, click
Print. Or, if you don’t have a printer, copy the information and have it
available as you proceed through these instructions.
6. If you are replacing your CD-ROM drive, remove Software Disc 1 from
your CD-ROM drive.

Installing CD-Writer Plus and Software English-2
English
7. After getting the Install Recommendation, you must shut down your
computer when prompted, and turn off your computer, monitor, and
connected devices. Unplug the power cords from power outlets.
8. Remove the cover from your computer.
9. Prepare the drive bay:
If you are installing the drive into an empty drive bay, remove the
cover plate from a larger half-height drive bay (approx. 6” x 1.75”/15cm x
4.5 cm)
.
If you are replacing an existing CD-ROM drive, remove the drive. Take
note of where the cables are attached and lay them aside to reconnect to
the CD-Writer Plus. You will not need the data cable that came with your
CD-Writer Plus. Remove any mounting rails or hardware from the drive
and set them aside.
10. Attach any required rails or mounting hardware, if any, to your CDWriter Plus drive.
11. Write the CD-Writer Plus’ serial number in the space below. The serial
number is on the main label on the top of the drive.
Serial
number:
12. Read the Install Recommendation to learn if the jumper on the CDWriter Plus should be set as Master or Slave.

English-3 Installing CD-Writer Plus and Software
13. Set the jumper on the back of the CD-Writer Plus as advised in your
Install Recommendation.
Slave
Make sure the jumper is on the center
setting (Slave).
Don’t use
Cable Select
This is a jumper. You can pull it
off and place it on another pair
of pins to change the setting.
Master
Make sure the jumper is on the right
setting (Master).
14. Insert the drive into the selected drive bay.
If you are replacing an existing CD-ROM, skip to step 18 on page 4.
15. If you are installing in an empty drive bay, look at your Install
Recommendation to learn whether the data cable should be connected to
the computer’s primary or secondary IDE controller.
16. Locate the recommended 40-pin IDE controller connector (primary or
secondary) on your computer’s motherboard. IDE connectors are usually
found in pairs and may be hidden by cables or other hardware.

Installing CD-Writer Plus and Software English-4
English
The cable’s colored edge i
Or, if your computer has an IDE hard drive or CD-ROM drive, follow the
data cable from the back of a drive to find the IDE controller. IDE
connectors may be labeled as PRI and SEC, IDE-0 and IDE-1, IDE-1 and
IDE-2, HD and CD-ROM, or PCI-IDE and ISA-IDE.
17. Refer to the Install Recommendation Printout to see if you will have one
or two devices connected to the data cable. See page 5 for examples of
one- and two-device installations.
18. Make the necessary data cable connections for your system. Make sure
the cable’s colored edge is aligned with both PIN-1 on the drive and PIN1 on the IDE controller. If the cable is attached incorrectly, your
computer may not boot up.
PIN-1
Look for a label identifying PIN-1 next
to the IDE connector. The data cable’s
colored edge is aligned with PIN-1 of
the IDE connector. This illustration
shows a specific computer. Yours may
look different. PIN-1 could be on
either side of the IDE connector.
Colored stripe on the
data cable
Colored stripe on the data cable
PIN-1
aligned with PIN-1 on the
CD-Writer Plus drive.

English-5 Installing CD-Writer Plus and Software
One Device
The OPTIONAL data cable that came with the
CD-Writer Plus drive is only used if there is no
cable already attached to the recommended
IDE controller in your computer, or the cable
supplied with your computer is not long
enough.
Use the connectors at the two ends of the
cable.
PIN-1
Drive
CD-Writer Plus
drive (on end connector)
Unused connector
Two Devices
Attach the CD-Writer Plus to whichever
connector is not in use (center or end) on the
data cable already installed in your computer
(DO NOT swap connectors).
The OPTIONAL data cable that came with the
CD-Writer Plus is only used if there is no spare
connector for the CD-Writer Plus on your
cable or your cable is not long enough.
PIN-1
Drive
CD-Writer Plus
drive (either location
not in use)
PIN-1
Drive
Colored
stripe aligned
with each
IDE controller
located inside
your computer
PIN-1
Motherboard
Follow the
data cable
already
attached to the
other IDE
device in your
computer to
locate the IDE
controller.
Colored
stripe aligned
with each
IDE controller
located inside
your computer
PIN-1
Motherboard

Installing CD-Writer Plus and Software English-6
English
edge
19. Find an unused power cable inside
your computer. There are usually
available unused power cables like
the one shown inside most
Power cable
Red, yellow, and
black wires
computers.
Beveled
20. Plug the power cable into the back of the drive, with the beveled edge up.
Beveled edge up
21. To listen to music through computer speakers, attach an audio cable with
an MPC-2 connector. You do not need an audio cable to record music.
The audio cable is used only for listening to music CDs through your
computer’s sound system. When the CD-Writer Plus drive records music
or data, it uses the data cable, not the audio cable.
If your sound board already has the correct audio cable, plug the
connector into the Audio Out opening on the back of the CD-Writer
Plus.
22. Secure the drive into the bay, using the screws included with your drive
or any M3x0.5x6mm metric screw. (Do not use a screw longer than 6
mm.)
If your computer uses rails or mounting brackets you may not need
screws to secure the rails in the bay.
23. Replace your computer's cover.

English-7 Installing CD-Writer Plus and Software
24. Plug your computer, monitor, and other devices into a wall outlet or
power strip, and turn ON your computer.
25. Insert Disc 1 into either the CD-ROM drive or the CD-Writer Plus. When
your computer starts, the CD-Writer Plus software will make sure that it is
communicating properly.
26. Software installation will automatically continue. Follow the instructions
on the screen to install the software you want.
If You Have Problems
Read and use the setting created by the Install Recommendation.
Can’t find the IDE controller in your computer.
Check your computer’s manual or call the manufacturer for assistance.
DO NOT ATTACH CD-WRITER PLUS TO A SOUND BOARD’S IDE
CONTROLLER.
Computer won’t boot.
■ Turn your computer off and then back on.
■ With the computer off, double-check each cable’s connector.
Straighten any bent pins, make sure all pins are covered by the
connector, and align the cable’s colored stripe with PIN-1 of each
connector.
■ If you changed the order of the data cable’s connectors on an IDE
device to make room for your CD Writer, replace the connector that
was originally on the device and attach the CD-Writer to a free
connector.
The CD-Writer Plus doesn’t appear in My Computer or Explorer.
■ Turn your computer off and then back on.
■ Press the eject button to ensure the CD-Writer Plus drive has power?
■ Turn off and unplug your computer. Double-check each connector
along the data cable, straighten any bent pins, make sure all pins are
covered by the connector, and align the cable’s colored stripe with
PIN-1 of each connector.
■ If you changed the order of the data cable’s connectors on an IDE
device to make room for your CD Writer, replace the connector that
was originally on the device and attach the CD-Writer to a free
connector.

Installing CD-Writer Plus and Software English-8
English
Not sure which drive letter was assigned to the CD-Writer Plus.
The CD-Writer Plus icon will be identical to a CD-ROM drive icon.
Double-click on the My Computer icon, right-click on the CD drive’s
icon, and select Eject. The tray of the selected drive will open.
The device that is sharing the IDE data cable with my CD-Writer Plus
drive doesn’t show up in Explorer or doesn’t work any more.
■ Turn off and unplug your computer.
■ Make sure that the power cables are securely attached to both devices.
■ If you changed the order of the data cable’s connectors on an IDE
device to make room for your CD Writer, replace the connector that
was originally on the device and attach the CD-Writer to a free
connector.
■ For Sony and Goldstar CD-ROMs, try configuring the CD-Writer Plus
as Master and the CD-ROM as Slave.
Error message when I double-click on the CD-Writer Plus icon.
■ There is no CD in the CD-Writer Plus drive. Insert a CD and try again.
■ After inserting a CD, wait until the light on the front of the drive
stops flashing and stays green, then click on the CD-Writer Plus icon.
■ The CD may be in the tray upside-down or a little off-center; try
reinserting the CD. The label should be facing up.
■ You are trying to read from a blank recordable CD. Try again after
copying some information to the CD.
I already placed Software Disc 1 in the CD-Writer Plus, but it
continues to prompt me to insert the CD.
■ Make sure the jumper on the CD-Writer Plus is set as advised in the
Install Recommendations.
■ Check the data cable and make sure the cable’s colored edge is aligned
with PIN-1 on the CD-Writer Plus drive.

English-9 Installing CD-Writer Plus and Software
Disc Interchange Summary
The following table is a brief summary of which CD drives can read discs
created with certain application/media combinations.
Application
used to make
a CD
DirectCD CD-RW MultiRead CD-ROM with UDF reader
CD Copier CD-RW MultiRead CD-ROM
Easy-CD Creator
(Audio)
Easy-CD Creator
(Data)
Type of CD
used
CD-R
(closed)
CD-R Any CD-ROM
CD-RW MultiRead CD-ROM
CD-R Any CD-ROM, home or car CD player
CD-RW MultiRead CD-ROM
CD-R Any CD-ROM
Drives that can read the CD
Windows 95, 98, and NT 4.0
*Most CD-ROMs
Windows 95, 98, and NT 4.0
* Your CD-ROM drive must be capable of reading packet-written CDs. Most CD-ROM drives
are packet tolerant. If you have problems, check your drive’s documentation or consult the
drive’s manufacturer.

Installing CD-Writer Plus and Software English-10
English
HP Customer Support
If you need help with your CD-Writer Plus drive, your local reseller has the latest
information regarding HP products and services and can provide support under HP's
comprehensive menu of reseller services. If your reseller is not able to help, you can
obtain support from HP directly either through free 24-hours/day interactive electronic
services or by telephone (free during warranty). To get help with the software that came
with CD-Writer Plus, call the appropriate number listed below (free during warranty).
If your Hewlett-Packard product requires repair or replacement, call the appropriate
number for your country to receive instructions.
America Online . . . . . . . . . . . . . . . . . . . . . . . . . . . . Keyword: hpstor
CompuServe . . . . . . . . . . . . . . . . . . . . . . . . . . . . . . . . . . . . Go HPSYS
World Wide Web . . . . . . . . . . . . . .www.hp.com/isgsupport/cdplus
Bulletin board site (8,N,1,F, 1200-28.8K baud)
Europe . . . . . . . . . . . . . . . . . . . . . . . . . . . . . . . . . . . . . +31 (0)495 546909
HPFirst Faxback Service
Simply dial the fax number from a touch-tone phone or Group 3 fax machine and
follow the voice prompts to select the index of available support and product
information documents.
Europe
Austria (free line) . . . . . . . . . . . . . . . . . . . . . . . . . . . . 0660 8128
Belgium (free line)
- Dutch . . . . . . . . . . . . . . . . . . . . . . . . . . . . . . . . . . . 0800 11906
- French . . . . . . . . . . . . . . . . . . . . . . . . . . . . . . . . . . 0800 17043
Denmark (free line) . . . . . . . . . . . . . . . . . . . . . . . . . . 800 10453
Finland (free line). . . . . . . . . . . . . . . . . . . . . . . . . . . 9800 13134
France (free line) . . . . . . . . . . . . . . . . . . . . . . . . . . . . 05 905900
Germany (free line) . . . . . . . . . . . . . . . . . . . . . . . 0130 810 061
Italy (free line) . . . . . . . . . . . . . . . . . . . . . . . . . . . . . 1678 59020
Netherlands (free line) . . . . . . . . . . . . . . . . . . . . . . 06 022 2420
Norway (free line) . . . . . . . . . . . . . . . . . . . . . . . . . . . 800 11319
Spain (free line) . . . . . . . . . . . . . . . . . . . . . . . . . . . . 900 993123
Sweden (free line). . . . . . . . . . . . . . . . . . . . . . . . . . . 020 795743
Switzerland (free line)
- French . . . . . . . . . . . . . . . . . . . . . . . . . . . . . . . . . . . . 155 1526
- German . . . . . . . . . . . . . . . . . . . . . . . . . . . . . . . . . . . 155 1527
United Kingdom (free line) . . . . . . . . . . . . . . . . . . 0800 960271
Other locations in Europe (toll line) . . . . . .+31 (0)20 681 5792
E-mail . . . . . . . . . . . . . . . . . . . . . . . . . . . . . . SureStore_Support@hp.com
FTP Site . . . . . . . . . . . . . . . . . . . . . . . . . . . . . . . . . . . . . . . . . . ftp.hp.com
Login: . . . . . . . . . . . . . . . . . . . . . . . . . . . . . . . . . . . anonymous
Password: . . . . . . . . . . . . . . . . . . . . . . . . . (Your email address)
Directory: /pub/information_storage/surestore/cd-writer_plus

English-11 Installing CD-Writer Plus and Software
Telephone
For telephone number updates:
http://www.hp.com/cpso-support/guide/psd/cscinfo.html
Europe (M-F, 8:30-18:00 Central European Time)
Austria . . . . . . . . . . . . . . . . . . . . . . . . . . . . . . . . . . . 06 60 63 86
Belgium
- Dutch . . . . . . . . . . . . . . . . . . . . . . . . . . . . . . . . . . 02 626 88 06
- French . . . . . . . . . . . . . . . . . . . . . . . . . . . . . . . . . 02 626 88 07
Czech Republic. . . . . . . . . . . . . . . . . . . . . . . . . . . 42 2 471 7321
Denmark. . . . . . . . . . . . . . . . . . . . . . . . . . . . . . . . . . 39 29 40 99
Finland . . . . . . . . . . . . . . . . . . . . . . . . . . . . . . . . . .02 03 47 288
France . . . . . . . . . . . . . . . . . . . . . . . . . . . . . . . . . .01 43 62 3434
Germany. . . . . . . . . . . . . . . . . . . . . . . . . . . . . . . 0180 52 58 143
Hungary . . . . . . . . . . . . . . . . . . . . . . . . . . . . . . . . 36 1 252 4505
Ireland . . . . . . . . . . . . . . . . . . . . . . . . . . . . . . . . . .01 662 55 25
Italy . . . . . . . . . . . . . . . . . . . . . . . . . . . . . . . . . . . 02 2 641 0350
Netherlands . . . . . . . . . . . . . . . . . . . . . . . . . . . . . 020 606 87 51
Norway . . . . . . . . . . . . . . . . . . . . . . . . . . . . . . . . . . . 22 11 62 99
Portugal . . . . . . . . . . . . . . . . . . . . . . . . . . . . . . . . .01 44 17 199
Russia . . . . . . . . . . . . . . . . . . . . . . . . . . . . . . . . . 7095 923 5001
Spain. . . . . . . . . . . . . . . . . . . . . . . . . . . . . . . . . . . . 90 23 21 123
Sweden . . . . . . . . . . . . . . . . . . . . . . . . . . . . . . . . . . 08 61 92 170
Switzerland (French, Italian, and German) . . . . 08 48 80 11 11
Turkey. . . . . . . . . . . . . . . . . . . . . . . . . . . . . . . . . . 90 1 224 5925
United Kingdom. . . . . . . . . . . . . . . . . . . . . . . . . 0171 512 52 02
English language support from other countries+44 171 512 52 02
FAX
USA. . . . . . . . . . . . . . . . . . . . . . . . . . . . . . . . . . . . . . . . . . . . 970-667-0997

Installing CD-Writer Plus and Software English-12
English
Hewlett-Packard Limited Warranty Statement
HP CD-Writer Plus Drive
DURATION OF LIMITED WARRANTY Hardware - 1 year Software - 90 days
1. HP warrants to you, the end-user customer, that HP hardware, accessories and supplies will be
free from defects in materials and workmanship after the date of purchase, for the period
specified above. If HP receives notice of such defects during the warranty period, HP will, at its
option, either repair or replace products which prove to be defective. Replacement products may
be either new or like-new.
2. HP warrants to you that HP software will not fail to execute its programming instructions
after the date of purchase, for the period specified above, due to defects in material and
workmanship when properly installed and used. If HP receives notice of such defects during the
warranty period, HP will replace software media which does not execute its programming
instructions due to such defects.
3. HP does not warrant that the operation of HP products will be uninterrupted or error free. If
HP is unable, within a reasonable time, to repair or replace any product to a condition as
warranted, you will be entitled to a refund of the purchase price upon prompt return of the
product.
4. HP products may contain remanufactured parts equivalent to new in performance or may
have been subject to incidental use.
5. Warranty does not apply to defects resulting from (a) improper or inadequate maintenance or
calibration, (b) software, interfacing, parts or supplies not supplied by HP, (c) unauthorized
modification or misuse, (d) operation outside of the published environmental specifications for
the product, or (e) improper site preparation or maintenance.
6. HP MAKES NO OTHER EXPRESS WARRANTY OR CONDITION WHETHER WRITTEN OR
ORAL. TO THE EXTENT ALLOWED BY LOCAL LAW, ANY IMPLIED WARRANTY OR CONDITION
OF MERCHANTABILITY, SATISFACTORY QUALITY, OR FITNESS FOR A PARTICULAR PURPOSE IS
LIMITED TO THE DURATION OF THE EXPRESS WARRANTY SET FORTH ABOVE. Some
countries, states or provinces do not allow limitations on the duration of an implied warranty, so
the above limitation or exclusion might not apply to you. This warranty gives you specific legal
rights and you might also have other rights that vary from country to country, state to state, or
province to province.
7. TO THE EXTENT ALLOWED BY LOCAL LAW, THE REMEDIES IN THIS WARRANTY
STATEMENT ARE YOUR SOLE AND EXCLUSIVE REMEDIES. EXCEPT AS INDICATED ABOVE, IN
NO EVENT WILL HP OR ITS SUPPLIERS BE LIABLE FOR LOSS OF DATA OR FOR DIRECT,
SPECIAL, INCIDENTAL, CONSEQUENTIAL (INCLUDING LOST PROFIT OR DATA), OR OTHER
DAMAGE, WHETHER BASED IN CONTRACT, TORT, OR OTHERWISE. Some countries, States or
provinces do not allow the exclusion or limitation of incidental or consequential damages, so the
above limitation or exclusion may not apply to you.
FOR CONSUMER TRANSACTIONS IN AUSTRALIA AND NEW ZEALAND: THE WARRANTY
TERMS CONTAINED IN THIS STATEMENT, EXCEPT TO THE EXTENT LAWFULLY PERMITTED,
DO NOT EXCLUDE, RESTRICT OR MODIFY AND ARE IN ADDITION TO THE MANDATORY
STATUTORY RIGHTS APPLICABLE TO THE SALE OF THIS PRODUCT TO YOU.

English-13 Installing CD-Writer Plus and Software
HEWLETT-PACKARD YEAR 2000 WARRANTY
FOR CONSUMER PRODUCTS DISTRIBUTED THROUGH RESELLERS
Subject to all of the terms and limitations of the HP Limited Warranty Statement provided with
this HP Product, HP warrants that this HP Product will be able to accurately process date data
(including, but not limited to, calculating, comparing, and sequencing) from, into, and between
the twentieth and twenty-first centuries, and the years 1999 and 2000, including leap year
calculations, when used in accordance with the Product documentation provided by HP
(including any instructions for installing patches or upgrades), provided that all other products
(e.g. hardware, software, firmware) used in combination with such HP Product(s) properly
exchange date data with it. The duration of the Year 2000 warranty extends through January 31,
2001.

FRENCH/ITALIAN/ENGLISH
7550i/7570i USER GUIDE
 Loading...