

Page 1
HP Gas Chromatography
Installing the Membrane Filter System
HP Accessory G2756A/G2757A
This Accessory is not compatible with any other Accessory that is
mounted on a bracket on the instrument’s front panel.
This kit contains:
Description Quantity
Short outlet tube 1
Long outlet tube (G2757A only) 1
accessory
Copyright© 1999
Hewlett-Packard Company
Printed in USA 7/99
HP Part No. G2890-90110 1
Genie filter assembly 1
1/4-inch male nut and ferrule set 1
Replacement membrane filters (5/pk) 1
5/16-inch female nut and ferrule set 1
Page 2

Long outlet tube
Short outlet tube
Nut and ferrule sets
Replacement membrane filters
Figure 1. Membrane filter system
Tools
5/16-inch wrench
7/16-inch wrench
1/4-inch wrench
Parts you need to supply
Genie filter assembly
G2757A G2756A
Fittings for vent tubing, if used
Sample input tubing and fittings
2
Page 3

Installing the Membrane Filter System
1. Turn off the instrument. If it is a heated model, allow the GC sample inlet fitting to
cool.
WARNING Hot surface. The sample inlet fitting may reach 90°C.
2. Remove any fittings or hardware currently installed on the GC sample fitting that
you will use with the Accessory.
3. Loosely install a 5/16-inch nut, back ferrule, and front ferrule onto the GC sample
inlet fitting. Do not tighten. You will install the tubing into this fitting later.
4. Place a 1/4-inch male nut, a back ferrule, and front ferrule on the outlet tube
provided. See Figure 2 for ferrule orientation. See Figure 5 for tube orientation.
Use the longer outlet tube on portable models.
1/4-inch male nut
Back ferrule
Front ferrule
5/16-inch female nut
Figure 2. Installing ferrules
Front ferrule
Back ferrule
3
Page 4

5. Insert the outlet tube into the output fitting on the Genie filter. Tighten 1/2 turn
past finger tight, then loosen 1/4 turn, so that the tube is loose but will not fall out.
(The tube must be loose.)
Use the longer outlet tube on portable models (G2757A only).
Install sample outlet tube here
Figure 3. Installing the sample outlet tube
6. Align the bracket horizontally on the face of the GC so that the end of the outlet
tubing is approximately over the GC inlet fitting. Then, place the lower lip of the
mounting bracket under the bottom front panel as shown below. The edge of the
GC front molding should fit into the slot in the bracket.
Sample inlet fitting
Align groove in bracket
with edge of front molding
Figure 4. Installing the membrane filter assembly
4
Page 5
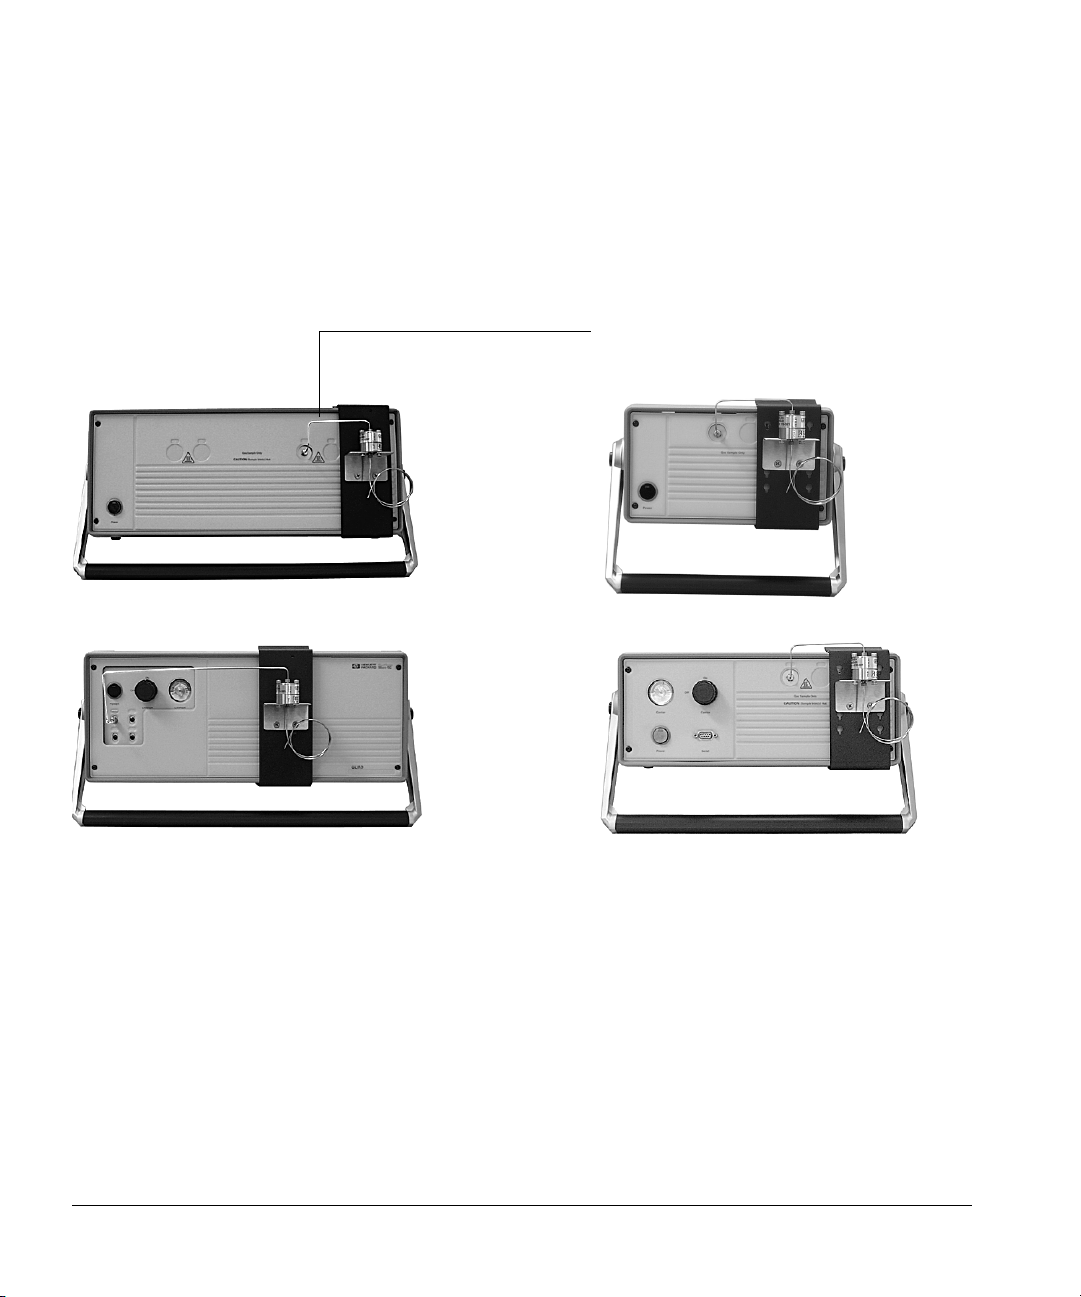
7. While checking the alignment of the outlet tubing and the GC inlet fitting, tilt the
bracket up and snap it onto the front of the instrument. When properly mounted,
the bracket should be flat against the GC frame. Insert the outlet tubing into the
fitting.
Sample outlet tube installed. Note
there is no stress on the tube.
QUAD Heated
QUAD Portable
Figure 5. Membrane filter assembly, installed
8. The outlet tubing should move freely in the GC inlet fitting. If not, slide the
Accessory along the GC frame until the outlet tubing is unstressed.
Tighten the 1/4 inch nut and the 5/16 inch nut.
M series
P Series
5
Page 6

9. Install the sample line, 1/4-inch nut, and front and back ferrules provided in the kit
onto the sample input fitting on the bottom of the filter as shown below. Connect
the open end of the tubing to your sample.
Sample
tubing
Vent tubing
Figure 6. Installing the sample tube
WARNING If a hazardous sample is used, you must connect the sample vent to an appropriate line
and vent the exhaust to a fume hood or other designated for hazardous waste disposal.
10. Uncoil the vent tubing and route the open end to a fume hood or other area
designated for hazardous waste disposal.
6
Hewlett-Packard Company
G2890-90110
 Loading...