

Page 1

User’s Guide
F8T064ukHP
HP iPAQ
Bluetooth™ Hands-Free Headset
Page 2

Page 3

Contents
Introdu ction .... ........ .............. ............. ........ .............. ............. ........ .............. ............. ........ .............. ........... 1
Headset Featu res .............. .............. ............. ........ .............. ............. ........ .............. ............. ........ ..............
Chargin g the Headset .......... ............. ........ .............. ............. ........ .............. ............. ........ .............. ...........
Wearing the Headset .......... .............. .............. ............. ........ .............. ............. ........ .............. ............. .......
Switchi ng the Heads et On/Off ... .............. .............. ............. ........ .............. ............. ........ .............. ............
Pairing the Headset .......... .............. .............. .............. ............. ........ .............. ............. ........ .............. ...... 10
Using the Headset .. ....... ....... ........ ............. ........ .............. ............. ........ .............. ............. ........ .............. 12
Accepti ng a Call .......... ....... ........ .............. ............. ........ .............. ............. ........ .............. ............. ........ ... 12
Ending a Call ....... ....... ........ .............. ............. ........ .............. ............. ........ .............. ............. ........ ........... 12
Rejecti ng a Call ........ ............. ........ .............. ............. ........ .............. ............. ........ .............. ............. ....... 13
Making a Call ........... ....... ....... ........ ............. ........ .............. ............. ........ .............. ............. ........ ............. 13
Rediali ng the Last Number ....... ....... ....... ........ ............. ........ .............. ............. ........ .............. ............. .... 15
Volume Control ........ .............. .............. .............. ............. ........ .............. ............. ........ .............. ............. 15
Transfe rring a Call between th e Headset a nd a Mobile Phone ........... ........ ............. ........ .............. ....... 15
Mute F unction .... ........ .............. ............. ........ .............. ............. ........ .............. ............. ........ .............. ..... 16
Headset LED Indicator ......... ........ .............. ............. ........ .............. ............. ........ .............. ............. ........ 16
Chargin g Base Indic ator ........ ....... ....... ........ .............. ............. ........ .............. ............. ........ .............. ..... 17
Audio Tones ..... ........ ............. ........ .............. ............. ........ .............. ............. ........ .............. ............. ...... 1 7
Specifi cations ....... ............. ........ .............. ............. ........ .............. ............. ........ .............. ............. ........ .. 18
Informa tion .............. .............. .............. .............. ............. ........ .............. ............. ........ .............. ............. .. 19
3
4
6
9
Page 4

Introduction
Congrat ulation s on your purcha se of the HP iPA Q Blu etooth Hands-Free Headset (the Headset).
The He adset is quite l ight, weighin g jus t abou t .35 ounce s (10 g). It has both Headse t and
Hands-F ree p rofiles for more functio ns, a nd is compatible with m ore B luetoot h wire less technol ogy
mobile phones. Rea d this User ’s Gui de ca refully befor e you start usin g the HP iPAQ Bl uetoot h
Hands-F ree H eadset.
Pac ka ge C onten ts
In thi s pac kage, you w ill fi nd:
HP iPA Q Blu etooth Hands-Free Headset
Adjusta ble e arhook
Retract able USB ch arging cable and car c harger
Ear cu shions
Chargin g bas e
User’s guide
1
Page 5

Blu et oo th Wirel es s Te chnol og y
Bluetoo th wi reless technology has re volutio nized the p ersonal conn ectivit y mark et by provi ding
seamles s fre edom f rom w ired c onnecti ons. It off ers a small form- factor , low- cost r adio solutio n
providi ng li nks be tween mobile compu ters, mobile phone s, an d othe r por table and ha ndheld
devices , and conne ctivity to the In ternet . The Bluetooth S pecial Interest Gr oup (S IG), compris ed of
leaders in the te lecomm unicati ons, c omputin g, an d netw ork i ndustri es, is driv ing de velopme nt of
the te chnolo gy and brin ging i t to market. The Bluetooth S IG in cludes promoter co mpanies 3Com
®
Ericsso n
, IBM®, Inte l®, Luce nt®, Micr osoft®, Moto rola®, Noki a®, and Toshiba®, and more than 2,000
adopter comp anies.
®
,
2
Page 6
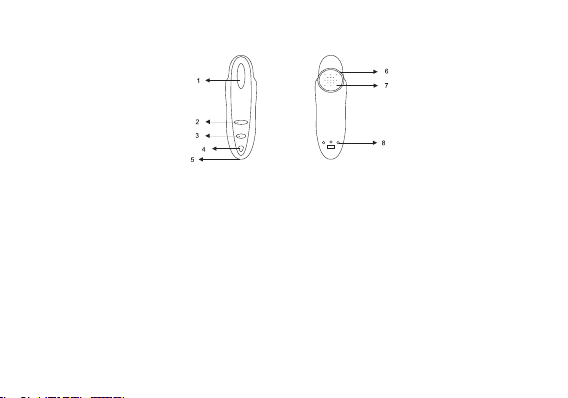
Headset Features
1. Talk B utton: Switc hes t he Hea dset o n/off, answe rs/ends a c all, p airs the He adset with a dev ice,
and is used for voice dialin g.
2. Volume Up Button: Increases t he spe aker volume.
3. Volume Down Button : Decr eases the speaker volume.
4. LED In dicato r: Dis plays the s tatus of th e Head set.
5. Microph one: Picks up ex ternal audio.
6. Earpiec e: Ho lds th e Hea dset i n the ear.
7. Speaker : Pla ys inc oming audio.
8. Chargin g Por t: Cha rges the ba ttery.
3
Page 7

Charging the Headset
The He adset has a rech argeabl e batt ery. Before using the Headset for the first time, you have t o
charge the Headset batte ry fo r appr oximate ly tw o hour s in order to g et a full charge . A f ully charged
battery prov ides u p to seven hours of talk t ime an d ove r one week of st andby time. When the battery
is low , the LED indicator fl ashes red. The l ow-batt ery-war ning i ndicati on wi ll beg in th ree mi nutes of
talk t ime b efore the H eadset runs out o f pow er. Yo u can recha rge t he Hea dset at any time witho ut
waiting for the battery to be com pletely disch arged. To keep t he bat tery in goo d con dition, alway s
recharg e the Heads et wi thin a month once it is ful ly di scharge d. Bef ore c harging , make sure that the
Headset is at roo m tem peratur e. The batt ery wi ll no t char ge in very cold or v ery ho t con ditions .
NOTE: The H eadset battery is not replace able.
4
Page 8
To charg e th e He ad set:
1. Connect the retractable USB c able i nto t he car char ger or
any US B com puter, and then p lug t he oth er en d to the
chargin g bas e.
2. Place the H eadset into the c harging base .
3. During charging, t he red indi cator light on the cha rging
base i llumin ates.
4. When t he ba ttery is fu lly ch arged, the indicat or li ght on the
charger turn s gree n.
5. You ca n now remov e the Heads et fr om the char ging b ase.
During charging, i f an incoming cal l arr ives w hile the He adset
is swi tched on, you ca n answ er th e call simp ly by removing th e
Headset from the chargi ng bas e.
5
Page 9

Wearing the Headset
The He adset can be wor n eith er on the right or l eft ea r. Th e earp iece is adj ustable , and the
90-degr ee, r otatabl e desi gn en sures a snu g yet comfortable fit in you r ear.
To put on the H eadset, pleas e fol low th e ins tructio ns as below:
1. Directl y put the earpie ce int o
your o uter ear ca nal.
2. Adjust the Headset to fit yo ur ea r.
3. The mi cropho ne sho uld b e
positio ned t oward your mouth.
The ea r cus hion s upplie d with
the He adset provides add itiona l
comfort and a better f it.
6
Page 10

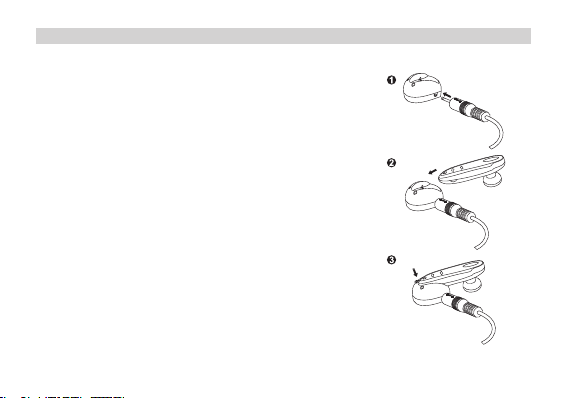
To attac h th e ea r cu sh ion :
1. Hold t he He adset firmly .
2. Cover the e arpiece with the ear c ushion.
3. The ea r cus hion i s att ached to th e read y-to-we ar He adset.
7
Page 11

Putting on the Headset
1. Put on the Headset wit h the earhook beh ind y our ea r.
2. Make s ure t he mic rophon e is pointin g tow ard yo ur mo uth.
(right)
(left)
8
Page 12

Switching the Headset On/Off
To switc h th e he ad set on:
1. Press the “ Talk” button for about five seconds unti l you hear a lo w tone
followe d by a high ton e. The LED indicator f lashes blue four times.
2. The He adset switches on and enters standby mod e. Th e LED indicator c ontinuo usly flashes blue
every three seconds.
To switc h th e he ad set off :
1. Press the “ Talk” button for about one second until you hear a high tone followed by a l ow ton e.
The LE D Ind icator flashes red four times.
2. The He adset switches off and the LED in dicator no longer blinks.
9
Page 13

Pairing the Headset
Before using the Headset , you must first pair it with a Bluet ooth w ireles s-techn ology-e nabled device,
such a s a Bluetoo th mo bile p hone. Pairing is necessary fo r two Bluet ooth devices to connect to e ach
other wirele ssly. After creati ng a paired link, you do not nee d to repeat the pairing proc ess a nd the
Headset auto matical ly lin ks to the mobile phone when both devices are switc hed o n. Par ing m ust be
perform ed ev ery ti me yo u want to use th e Hea dset w ith a diffe rent Bluetoo th mob ile p hone o r oth er
Bluetoo th wi reless- technol ogy-ena bled d evices. The Headset can be paired simultaneousl y wit h up
to eig ht mo bile p hones.
10
Page 14

To ini tiate pairing betw een t he Hea dset and a Bluetooth m obile phone in c lose p roximit y:
1. Turn o ff th e Head set.
2. Make c ertain the mobile phone is switche d on.
3. Press the “ Talk” button to s witch on the Hea dset a nd ke ep the “Tal k” but ton p ressed for seven
seconds unti l the LED indicat or alt ernates betw een bl ue an d red. The Headset is now ready for
pairing with the mobile phone .
4. Perform a d evice discov ery fr om the mobi le pho ne. ( For de tails on device discove ry, pl ease
consult your phone ’s us er’s g uide.)
5. Once t he mo bile p hone discove rs the Head set, t he te xt “HP Head set” a ppears on the
phone’s scre en.
6. Follow the phone instruc tions to accept pairing . When prom pted t o ent er the pass key, e nter the
number: 0000 .
7. If tim e run s out after 60 seconds and the pairing fails, you will have to re peat t he st eps ab ove.
You ca n vie w the status from the phone’s scr een.
8. On com pletin g pair ing, the ph one’s screen will notify you that the p airing was success ful. The
LED in dicato r cont inuousl y fla shes b lue a nd the Head set go es int o sta ndby m ode.
9. You ca n now make and answer calls throu gh th e Head set.
11
Page 15

Using the Headset
Before using the Headset , mak e sure that (1) the Headset is switched on and c onnecte d to a pai red
Bluetoo th mo bile p hone; (2) t he Hea dset is wit hin 3 3 feet (10m ) of the phone; and (3) th e phon e’s
Bluetoo th fe ature is on (see your phone’ s user ’s gu ide).
NOTE: The H eadset supports bo th Hea dset and Ha nds-Fre e pro files. Some mobile phone s do not
support all the function s lis ted be low. Please consult you r phon e’s u ser’s guide.
Accepting a Call
When r eceivi ng an incoming ca ll, th e Hea dset r ings and th e LED indic ator flashes blue at a
three-s econd interv al. To rece ive th e cal l from the Headset, pre ss th e “Tal k” bu tton o nce. You ca n
also a nswer the call b y usin g you r phon e in the normal way. Please note that if th e mob ile ph one
rings first, wait until you hear a ring tone from the Headset and then press the “Talk” button to
answer the call.
Ending a Call
To end a c all, press the “ Talk” button once on t he Hea dset or pre ss th e phon e’s “ END” k ey. Th e
Headset retu rns to stan dby mo de.
12
Page 16

Rejecting a Call
When a call comes and you do not want to answer it, you ca n pres s the “Talk ” but ton fo r two
seconds to reject the call.
Making a Call
You ca n mak e a call t hrough:
A. Voice act iv ation
To use voic e acti vation , the mobile phon e must supp ort vo ice d ialing. For details on voice dialin g,
please see your p hone’s user’s guid e.
1. Press the “ Talk” button once on your He adset.
2. After a sho rt ton e sou nds, s peak the na me of the person to whom y ou wi sh to connect
(if he or she h as a voice tag in you r pho ne).
3. The ph one a utomati cally dials the number. You can s ee the deta ils of the call from the
phone’s scre en.
13
Page 17

B. Diali ng a pho ne n um ber fro m yo ur m ob ile pho ne
1. Dial t he ph one nu mber from t he mo bile p hone’s keypad.
2. Press the “ Talk” button to s end t he cal l fro m your phon e.
3. The ca ll au tomatic ally transfe rs to the Headset .
14
Page 18

Redialing the Last Number
To red ial t he las t pho ne num ber, press and h old do wn th e “Vol ume D own” b utton for three seconds .
Volume Control
During a call, yo u can adjus t the Heads et sp eaker volume. An audio tone is pl ayed f or ea ch
volume up and vol ume d own st ep.
To inc rease the volume, press the “Volume Up” button repe atedly until you reach the
desired leve l.
To dec rease the volume, press the “Volume Down ” but ton re peatedl y unt il you reac h the
desired leve l.
Transferring a Call between the Headset and a Mobile Phone
To tra nsfer a call fro m the Headset to a mobile phone, initiate it from the mobile phone.
(Refer to your ph one’s user’s guide .)
To tra nsfer a call fro m a mobile phone to t he He adset, simply pres s the “Volume Up” butto n
once, even if the Head set is then switc hed o n afte r a call has be en in itiated .
15
Page 19

Mute Function
To mut e the Heads et so und du ring a call , pre ss the “Vol ume Up ” but ton an d the “Volu me Do wn”
button for two se conds; you will hear o ne to ne rep eated every 20 s econds. Upon activating the m ute
functio n, th e pers on on the other side won’t hear you, but yo u can hear all sound generat ed fr om
the ot her s ide. T o tur n off the mute functio n, pre ss th e “Vol ume U p” but ton o r the “Volume Dow n”
button once.
Headset LED Indicator
Status Blue L ED Red LE D Interva l Remarks
Turning on 4 time s
Turning off 4 time s
Pairing mode Flashes blue and red al ternatively until the pa iring is co mplete or t imes o ut.
Standby mode 3 time s 3 t imes 3 seco nds Flashes red when l ow bat tery
Incomin g call 3 time s 3 seco nds
Talk m ode 4 times 4 times 3 s econds Flash es red when low battery
16
Page 20

Charging-Base Indicator
Status Red LE D Gr een LED
Chargin g in process On
Chargin g comp lete On
Audio Tones
Switchi ng on Quick series of 2 tones,
Pairing mode 1 tones Incomin g call A ring to ne at a 2 -second
Mute 1 tone repeated e very 20 sec onds Turn o ff mute Single tone
Low ba ttery 5 rapid ton es every 20 seconds in standby mo de
NOTE: When using Nokia mobile phone s, al l soun ds ge nerated by the mo bile phone automat ically
transfe r to the Headset. When a c all co mes i n, the Head set us es th e same ring tone as the mob ile
phone. If the mob ile p hone i s set to vibrati on mod e, yo u won’ t hea r a ring t one f rom th e Head set.
17
low to high
Switchi ng off Quick series of 2 tones,
high t o low
interva l
Page 21

Specifications
Standar d Complia nt wit h Blue tooth specif ication v1.1 / v1.2
Chipset BlueCor e2-Audi o sing le chi pset
Profile s Supp orted Bluetoo th Hea dset & Hands-free profiles
Radio Frequency 2402 M Hz ~2480 MH z
Transmi tter P ower Class 2 (max 4dBm )
Transmi ssion Range Up to 10 met ers
Receive r Sens itivity -78 dB m
Charger Power Suppl y 5 VDC / 200 mA
Tempera ture Operating: -20º C–60º C; Storage: -20º C–60º C; Charging: 0º C–45º C
Operati on Vol tage 3 .7V
Recharg eable Battery 120mAh lithium pol ymer b attery
Chargin g Time 1.5–2 hours
Talk T ime HV1: O ver 4 hours ; HV3: Over 7 h ours
Standby Time More t han 1 week
Dimensi on 2.4 (L ) x 0.7 ( W) x 0.4 in. (H) (60 x 18 x 11 mm)
Weight 0.37 oz. (10.6g) (not inclu ding chargin g base )
18
Page 22

Information
Users are a dvised not to mak e cha nges o r mod ify th e dev ice in any way. Change s or modifi cations
not ex pressl y appr oved by HP will void the w arranty .
FCC No tices
This d evice complies wit h par t 15 of the FCC rules . Ope ration is subject to the fol lowing two
conditi ons: (1) Th is de vice m ay not caus e harm ful i nterfer ence, and ( 2) Thi s dev ice mu st ac cept a ny
interfe rence receiv ed, in cluding inte rferenc e that may cause undes ired o peratio n.
FCC RF Expo sure r equire ments: This device and its a ntenna( s) mus t not be co-loca ted or oper ating
in con juncti on wit h any other anten na or trans mitter .
NOTE: THE M ANUFACT URER IS NOT RESPO NSIBLE FOR ANY R ADIO O R TV INTERFERENCE
CAUSED BY UNAUTHOR IZED M ODIFIC ATIONS TO THIS EQ UIPMENT . SUCH MODI FICATIO NS
COULD VOID THE US ER’S AUTHORI TY TO OPERATE THE EQUI PMENT.
CE Sta tement
Importa nt No tice: This device is a 2.4GH z FHSS Blue tooth headset , int ended for o ffice and h ome
uses i n all EU and EF TA me mber s tates.
19
Page 23

Bel ki n Co rpora ti on L imite d 2- Ye ar P rod uc t Wa rr ant y
What t his w arranty cove rs.
Belkin Corporation warrants to the origina l pur chaser of this Be lkin product that the product shal l be
free o f def ects i n des ign, a ssembly , mat erial, or workmans hip.
What t he pe riod o f cov erage is.
Belkin Corporation warrants the Belk in pro duct for tw o yea rs.
What w ill w e do to correct problems?
Product Warr anty.
Belkin will repair or replace , at its option, any defecti ve pr oduct free of cha rge ( except for shippin g
charges for the product) .
What i s not cover ed by this warranty?
All ab ove w arranti es ar e null and void if th e Belk in pr oduct is no t prov ided to Bel kin C orporat ion
for in specti on upo n Bel kin’s request at the so le ex pense of th e purc haser, or if Bel kin Co rporati on
determi nes t hat th e Bel kin pr oduct has b een im proper ly ins talled, alte red in any way, or ta mpered
with. The B elkin Produc t Warr anty d oes n ot pro tect against acts of God (o ther t han l ightnin g) suc h as
flood, earthquake, war, vandali sm, t heft, normal -use w ear an d tea r, ero sion, depletion, o bsolesc ence,
abuse, damage due to low vol tage disturb ances (i.e. brownouts or sags ), non -author ized program , or
system equipment m odifica tion or alt eration .
20
Page 24

How to get service.
To get serv ice fo r you r Belk in pr oduct you m ust ta ke th e foll owing steps:
1. Contact Belk in Ltd ., Ex press Busines s Par k, Shi pton Way, R ushden, NN10 6GL, United
Kingdom , Att n: Cus tomer Servic e, or call 00 80 0 2 2355460 , wit hin 15 days of the Oc currenc e.
Be pre pared to provide the followin g inf ormatio n:
a. The part number of the B elkin product .
b. Whe re you purc hased the pr oduct.
c. Whe n you purchased t he pro duct.
d. Cop y of origin al rec eipt.
2. Your B elkin Customer Ser vice Represe ntative will then instruct yo u on how to for ward y our
receipt and Belkin produ ct an d how to proceed with your claim.
Belkin Corporation reserves the righ t to review the damaged Belk in pr oduct. All costs of sh ipping the
Belkin product to Belkin Corp oration for inspection s hall be bor ne so lely b y the purch aser. If Belkin
determi nes, in its sole discr etion, that it is impr actical to ship t he da maged equipme nt to Belki n
Corpora tion, Belkin may design ate, i n its sole discretion, an equipment repa ir fac ility to inspect and
estimat e the cost to repair such equipme nt. Th e cos t, if any, of s hipping the equipment to and from
such r epair facility and of such estimat e shal l be borne solel y by the purchase r. Da maged equipme nt
must r emain available fo r ins pection until the claim is f inalize d. Wh enever claims are settled, Be lkin
Corpora tion reserve s the right to b e sub rogated under any existing in surance polic ies t he pur chaser
may ha ve.
21
Page 25

THIS W ARRANT Y CONT AINS THE SO LE WAR RANTY OF BELKIN CORPORA TION, THERE ARE NO
OTHER WARRAN TIES, EXPRESS ED OR , EXCE PT AS REQUI RED B Y LAW, IMPLI ED, I NCLUDIN G
THE IM PLIED WARRANTY OR CONDITION O F QUA LITY, MERCHAN TABILIT Y OR FITNESS FOR A
PARTICU LAR P URPOSE, AND SUCH IMPLIED WARR ANTIES, IF ANY, A RE LIM ITED IN DUR ATION
TO THE TERM OF THIS W ARRANTY .
IN NO EVENT SHALL BELK IN COR PORATIO N BE LIABLE FOR INCIDENTAL, SPECIAL, DIR ECT,
INDIREC T, CO NSEQUEN TIAL O R MUL TIPLE DAMAGES SUCH AS, BUT N OT LIM ITED TO, LO ST
BUSINES S OR PROFITS ARIS ING O UT OF THE SALE OR USE OF ANY B ELKIN PRODUCT , EVE N IF
ADVISED OF THE PO SSIBIL ITY OF SUCH DAMAGES.
22
Page 26

© 2006 HP Corporation. All rights reserved.
The product is marketed and supported by Belkin
Corporation. For warranty suppor t or technical
support, go to www.belkin.com or call Belkin
at 00 800 2 2355460. The Bluetooth name
and the Bluetooth trademarks are owned by
Bluetooth SIG, Inc., and are used by Belkin
Corporation under license.
P75049uk-A
 Loading...