

Page 1

f558
Car Camcorder
User Manual
Page 2

1
Contents
About this Guide ........................................................................... 3
FCC Statement .............................................................................. 3
WEEE Notice .................................................................................. 4
CE Regulatory Notice .................................................................... 4
Battery warning ............................................................................ 4
Notes on Installation .................................................................... 5
Caution ......................................................................................... 5
1 Introduction ................................................................. 6
1.1 Features ............................................................................ 6
1.2 Package Contents ............................................................. 6
1.3 Product Overview .............................................................. 7
2 Getting Started ............................................................ 8
2.1 Inserting the Memory Card ............................................... 8
2.2 Installing in Vehicles ......................................................... 9
2.2.1 Mount to Windshield ............................................. 9
2.2.2 Adjust the camcorder position ............................10
2.3 Connecting to Power .......................................................11
2.4 LED Indicator ...................................................................12
2.5 Powering the Camcorder On / Off ...................................13
2.5.1 Auto Power On/Off ..............................................13
2.5.2 Manual Power On/Off and Reset .........................13
2.5.2.1 Manual Power On ................................................13
2.5.2.2 Power Off ............................................................13
2.5.2.3 Reset the camcorder ...........................................13
2.6 Initial Settings .................................................................14
2.6.1 Set the Date / Time .............................................14
2.6.2 Set Automatic Record ..........................................14
3 Using the Car Camcorder ............................................... 15
Page 3

2
3.1 Recording Videos ............................................................15
3.1.1 The Recording Screen..........................................15
3.1.2 Record videos while driving ................................16
3.1.3 Emergency Recording .........................................16
3.1.4 Stop/Start recording ...........................................17
3.1.5 Taking Snapshot ..................................................17
3.1.6 HDR (High Dynamic Range) .................................17
3.1.7 Headlight Warning ..............................................18
3.1.8 Driver Fatigue Alert .............................................18
3.1.9 Parking Mode ......................................................19
3.2 Playback Videos and Photos ...........................................20
3.2.1 Video Playback ....................................................21
3.2.2 Viewing Photos ...................................................21
3.2.3 The Playback Screen ...........................................22
3.2.4 Deleting Files ......................................................23
4 Adjusting the settings ................................................. 24
4.1 Using the menu ...............................................................24
4.2 Menu Items .....................................................................25
5 Installing the Software ................................................. 28
6 Specifications ............................................................ 29
Page 4

3
About this Guide
The content in this document is for information purpose and is subject to change
without prior notice. We made every effort to ensure that this User Guide is
accurate and complete.
However, no liability is assumed for any errors and omissions that may have
occurred.
The manufacturer reserves the right to change the technical specifications without
prior notice.
FCC Statement
This equipment has been tested and found to comply with the limits for a Class B
digital camcorder, pursuant to Part 15 of the FCC Rules. These limits are designed
to provide reasonable protection against harmful interference in a residential
installation. This equipment generates, uses and can radiate radio frequency
energy and, if not installed and used in accordance with the instructions, may cause
harmful interference to radio communications. However, there is no guarantee that
interference will not occur in a particular installation. If this equipment does cause
harmful interference to radio or television reception, which can be determined by
turning the equipment off and on, the user is encouraged to try to correct the
interference by one or more of the following measures:
• Reorient or relocate the receiving antenna.
• Increase the separation between the equipment and receiver.
• Connect the equipment into an outlet on a circuit different from that to which
the receiver is connected.
• Consult the dealer or an experienced radio/TV technician for help.
This camcorder complies with Part 15 of the FCC Rules. Operation is subject to the
following two conditions: (1) This camcorder may not cause harmful interference,
and (2) this camcorder must accept any interference received, including
interference that may cause undesired operation.
FCC Caution: Any changes or modifications not expressly approved by the party
responsible for compliance could void the user's authority to operate this
equipment.
Page 5

4
WEEE Notice
Disposal of Waste Electrical and Electronic Equipment and/or Battery
by users in private households in the European Union
This symbol on the product or on the packaging indicates that this
cannot be disposed of as a household waste. You must dispose of your
waste equipment and/or battery by handling it over to the applicable
take-back scheme for the recycling of electrical and electronic
equipment and/or battery. For more information about recycling of this
equipment and/or battery, please contact your city office, the shop
where you purchased the equipment or your household waste disposal
service. The recycling of materials will help to conserve natural resources and
ensure that it is recycled in a manner that protects human health and environment.
CE Regulatory Notice
The product herewith complies with the requirements of the Low Voltage Directive
2006/95/EC, the EMC Directive 2014/30/EU, the R&TTE Directive 1999/5/EC and the
RoHS Directive 2011/65/EC.
Battery warning
Never dismantle, crush, or pierce the battery, or allow the battery
to short-circuit. Do not expose battery being placed in high
temperature environment, if battery leaks or bulges, stop continue
to use.
Always charge using the system. Risk of explosion if battery is
replaced by an incorrect type.
Keep the battery out of reach of children.
Batteries may explode if exposed to open fire. Never dispose of
batteries in a fire.
Never replace the battery on your own; have the dealer do it for
you.
Disposed of used batteries observing local regulations.
Page 6

5
Notes on Installation
1. This product shall be installed near the rear view mirror, at the
center and top of windshield for optimal viewing.
2. Make sure that the lens is within the wiping range of the
windscreen wiper to ensure a clear view even when it rains.
3. Do not touch the lens with your fingers. Finger grease may be left
on the lens and will result in unclear videos or snapshots. Clean
the lens on a regular basis.
4. Do not install the camcorder on a tinted window. Doing so may
damage the tint film.
5. Make sure that the installation position is not hindered by the
tinted window.
6. To use the products of the attached power charger only, please do
not use other brand power charger, in order to avoid equipment
burn or cause the battery explosion.
Caution
Due to local laws and vehicles safety considerations, do not
operate the camcorder while driving.
Set up time and date accurately before you use this camcorder.
The firmware function in the camcorder is for reference only,
please follow the actual road condition.
The system is used only for non-commercial use, within the
maximum limits permitted by applicable law. Our company does
not accept any responsibility for any data loss during the
operation.
This product gets warm when in use; this is normal.
Improper use or operation of the product may result in damage of
the product or its accessories and void the warranty.
Before you start using the system, it is assumed that you
agree to the above statement.
Page 7

6
1 Introduction
Thank you for purchasing this advanced Car Recorder. This camcorder is
specifically designed for real time video recording when driving.
1.1 Features
• Full HD recording videos (1920x1440@30fps)
• 2.31” LCD color screen
• Wide angle lens
• Multifunction traffic safety reminder
• Automatic Emergency recording for collision detection
• Supports micro SDHC memory cards class 10 speed or greater up to
32GB.
1.2 Package Contents
The package contains the following items. In case there is any missing or
damaged item, contact your dealer immediately.
Car Camcorder Quick start guide
CD-ROM Bracket Car adapter
Page 8
7
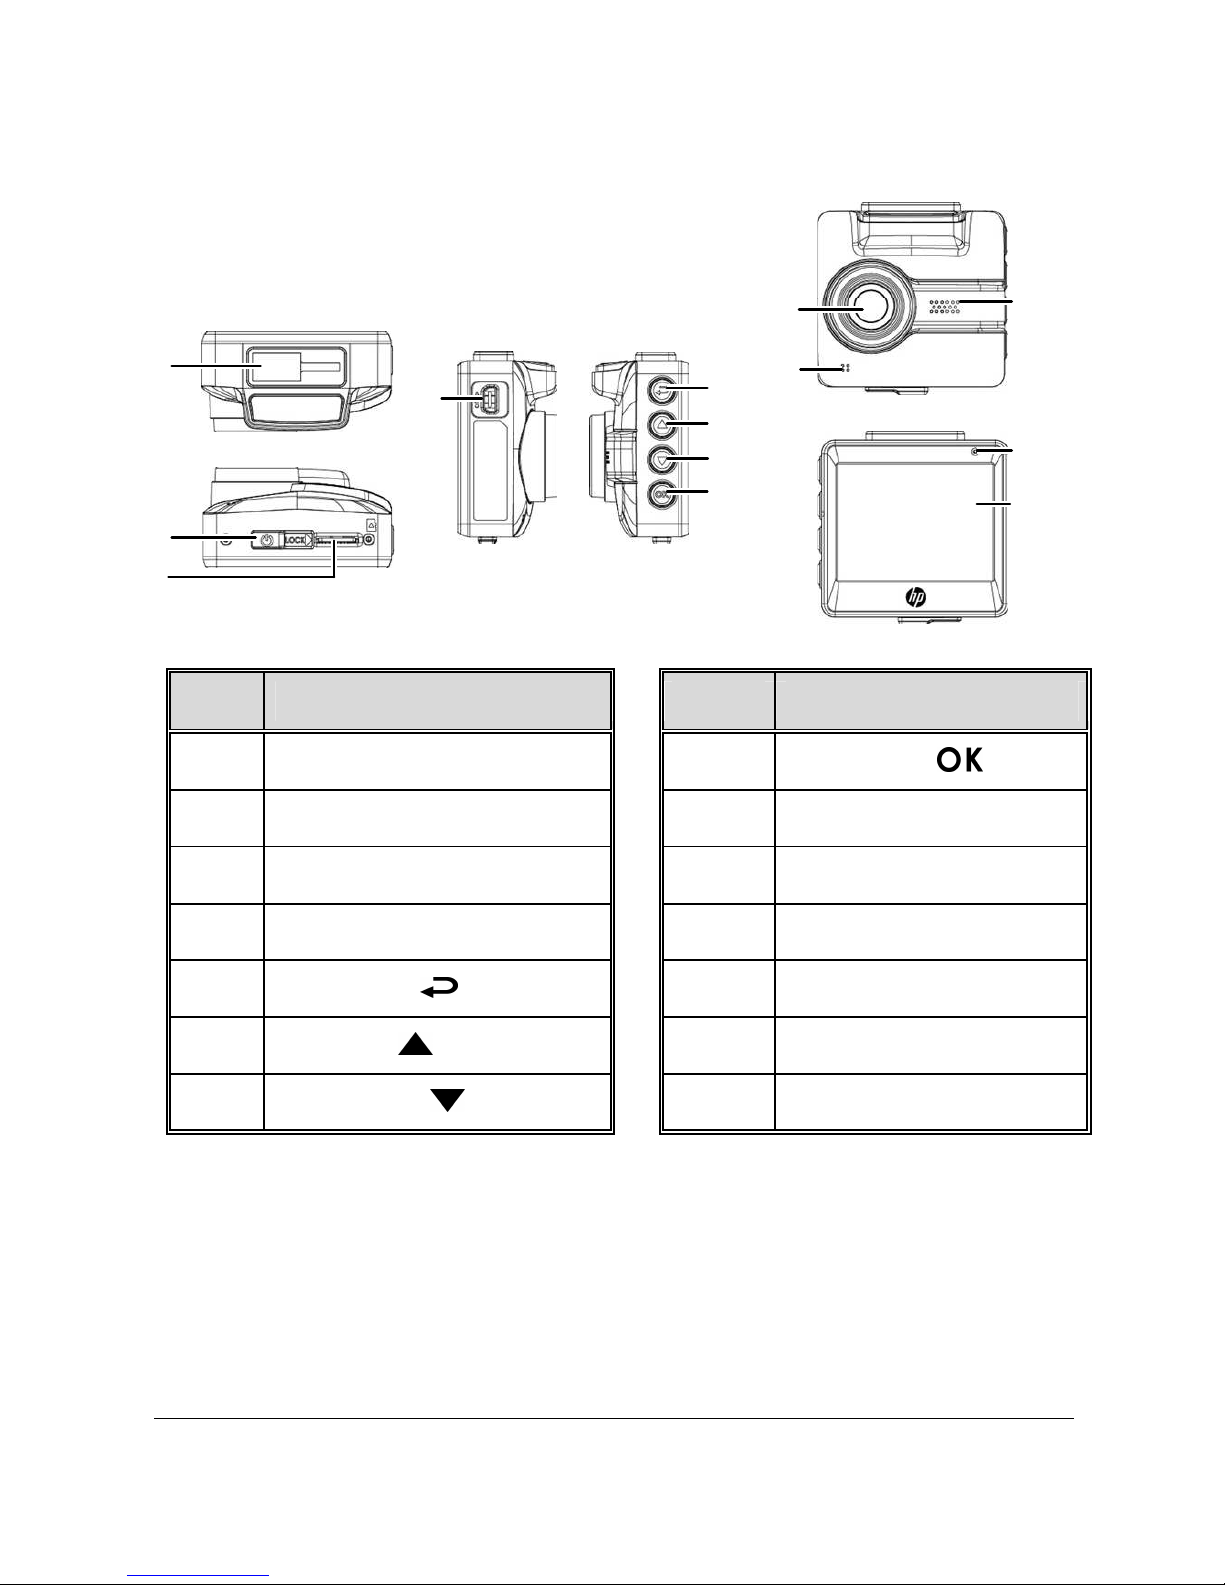
1.3 Product Overview
No. Item No. Item
1 Bracket Socket 8 Enter Button ( )
2 Power Switch 9 Speaker
3 Memory Card Slot 10 Wide Angle Lens
4 USB / Power Connector 11 Microphone
5 Back Button ( ) 12 LED Indicator
6 Up Button ( ) 13 LCD Panel
7 Down Button ( )
8
9
4
5
7
6
1
2
3
1
0
1
1
12
13
Page 9
8
2 Getting Started
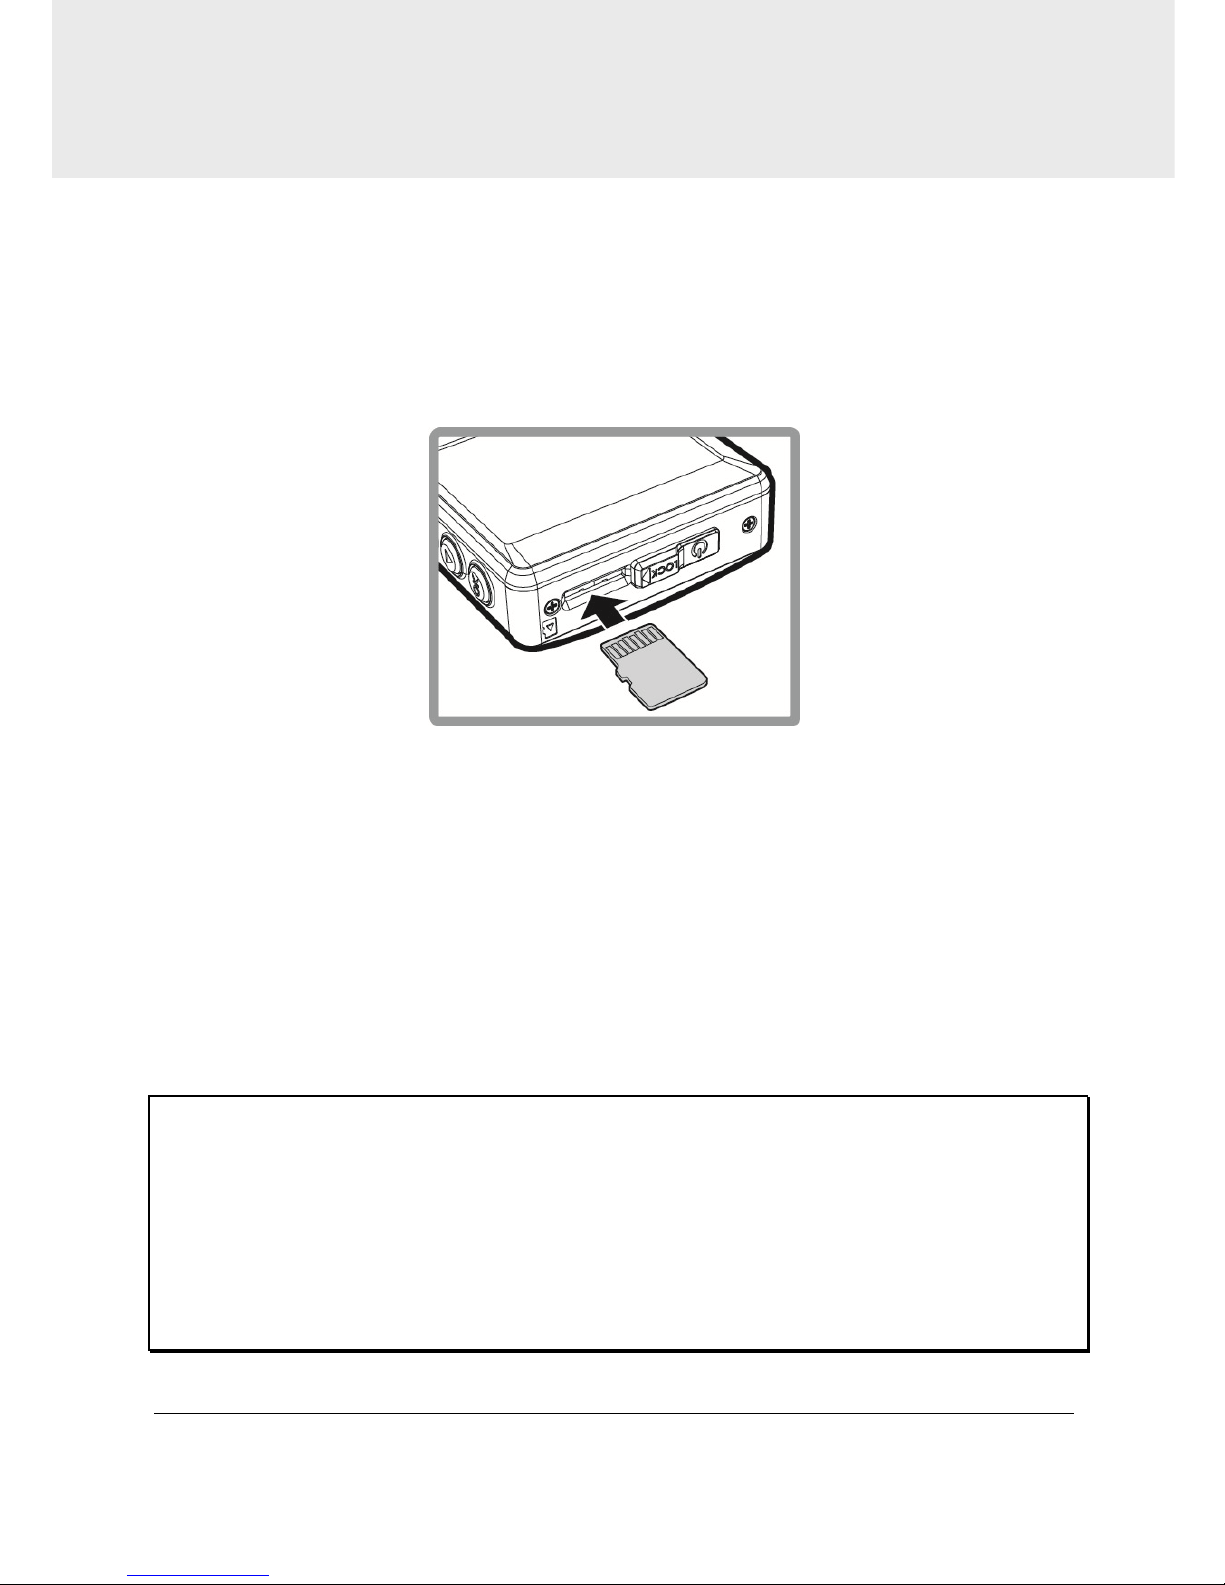
2.1 Inserting the Memory Card
Insert memory card with the gold section facing upward and the screen
of the camcorder facing upward too, as illustrated. Push the memory
card in until a click sound is heard, indicating the card is in position.
To remove the memory card
Push to eject the memory card out of the slot.
Note:
1. Do not remove or insert the memory card when the camcorder is turned on. This may damage the
memory card.
2. Please use a Class 10 or higher rating Micro SD card, max. up to 32GB.
3. Please format the micro SD cards before the initial use.
4. When removing the memory card, please take note that the memory card will be ejected quickly
and may get lost. This is a characteristic of the memory card ejection slot to facilitate easy removal
by the user.
Page 10
9
2.2 Installing in Vehicles
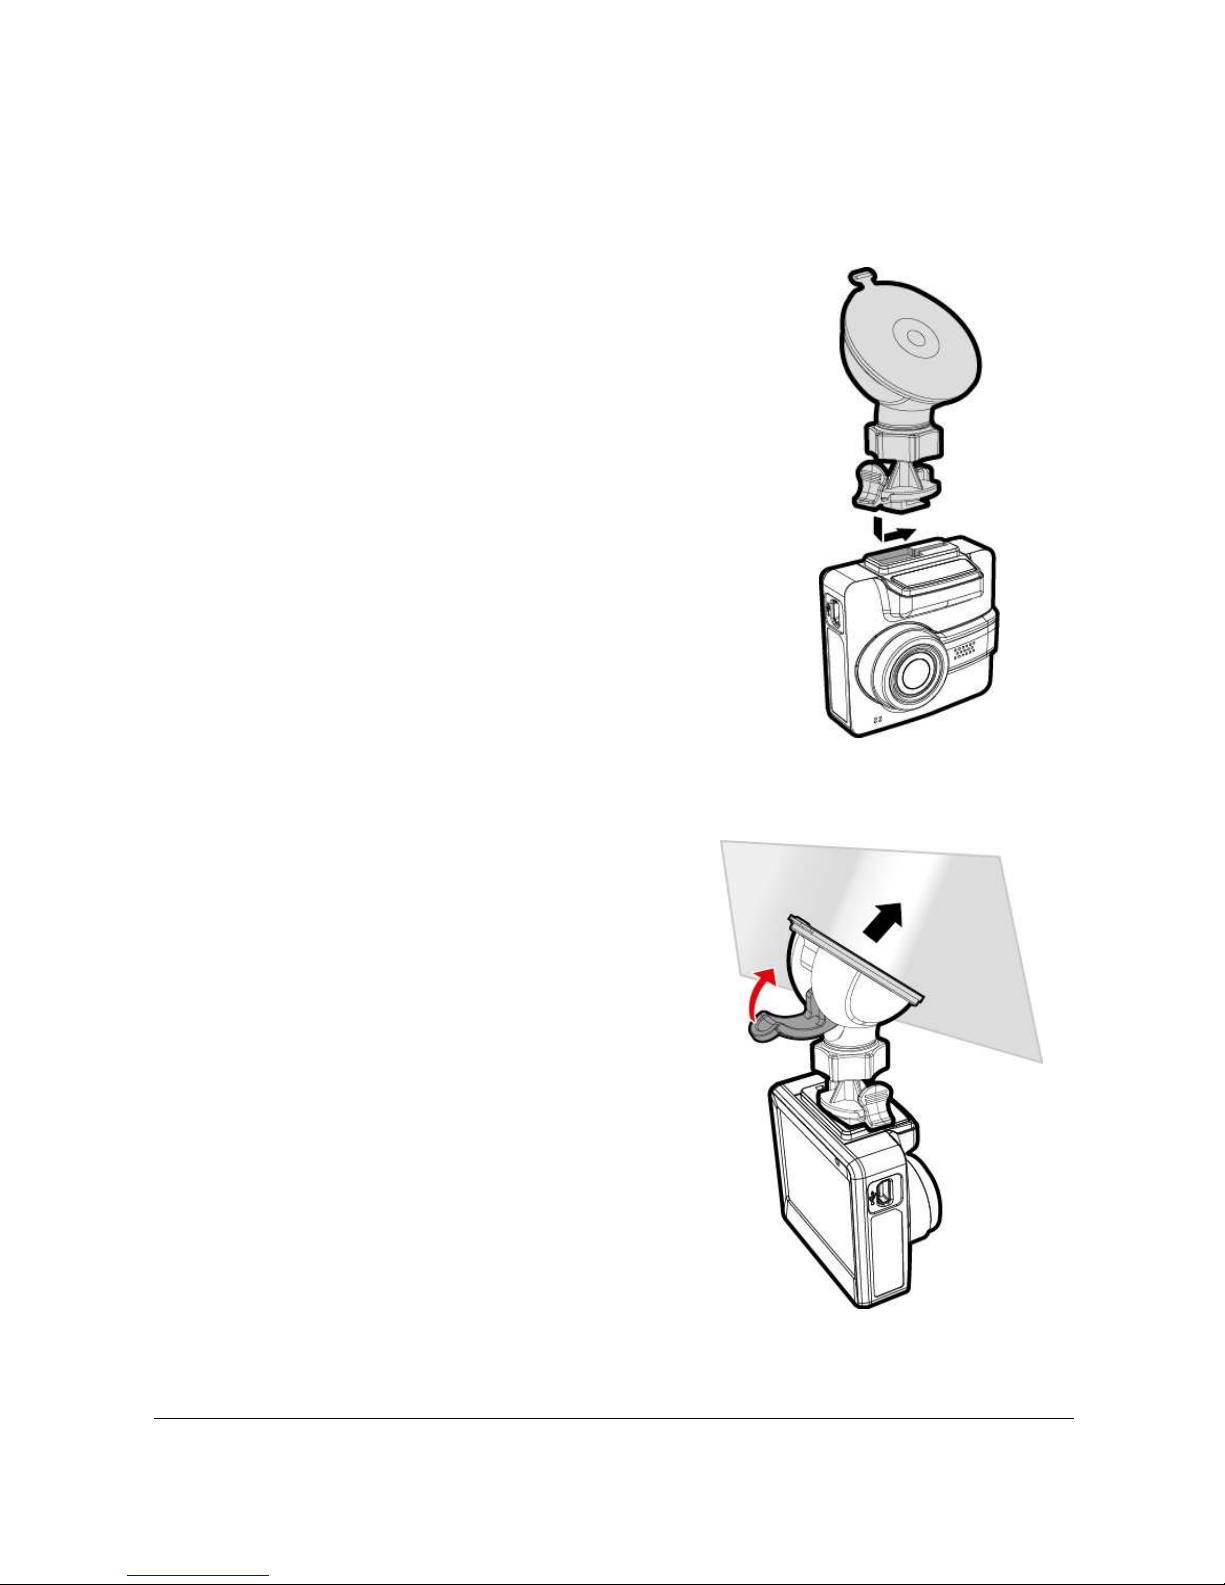
2.2.1 Mount to Windshield
1. Attach the bracket to the camcorder.
Slide it into the bracket holder until you hear
a click.
2. Before installing the bracket, please
use alcohol to clean the windshield
and suction cup of the bracket. Wait
for dry and press suction-cup on the
windshield.
3. Hold the base firmly on the
windshield and press down the
clamp to mount the car holder to the
windshield. Make sure the base is
securely locked in place.
Page 11

10
2.2.2 Adjust the camcorder position
1. Loose the knob to swivel the camcorder vertically or horizontally.
2. Then tighten the knob to make sure the camcorder is securely
locked in place.
Knob
Page 12
11
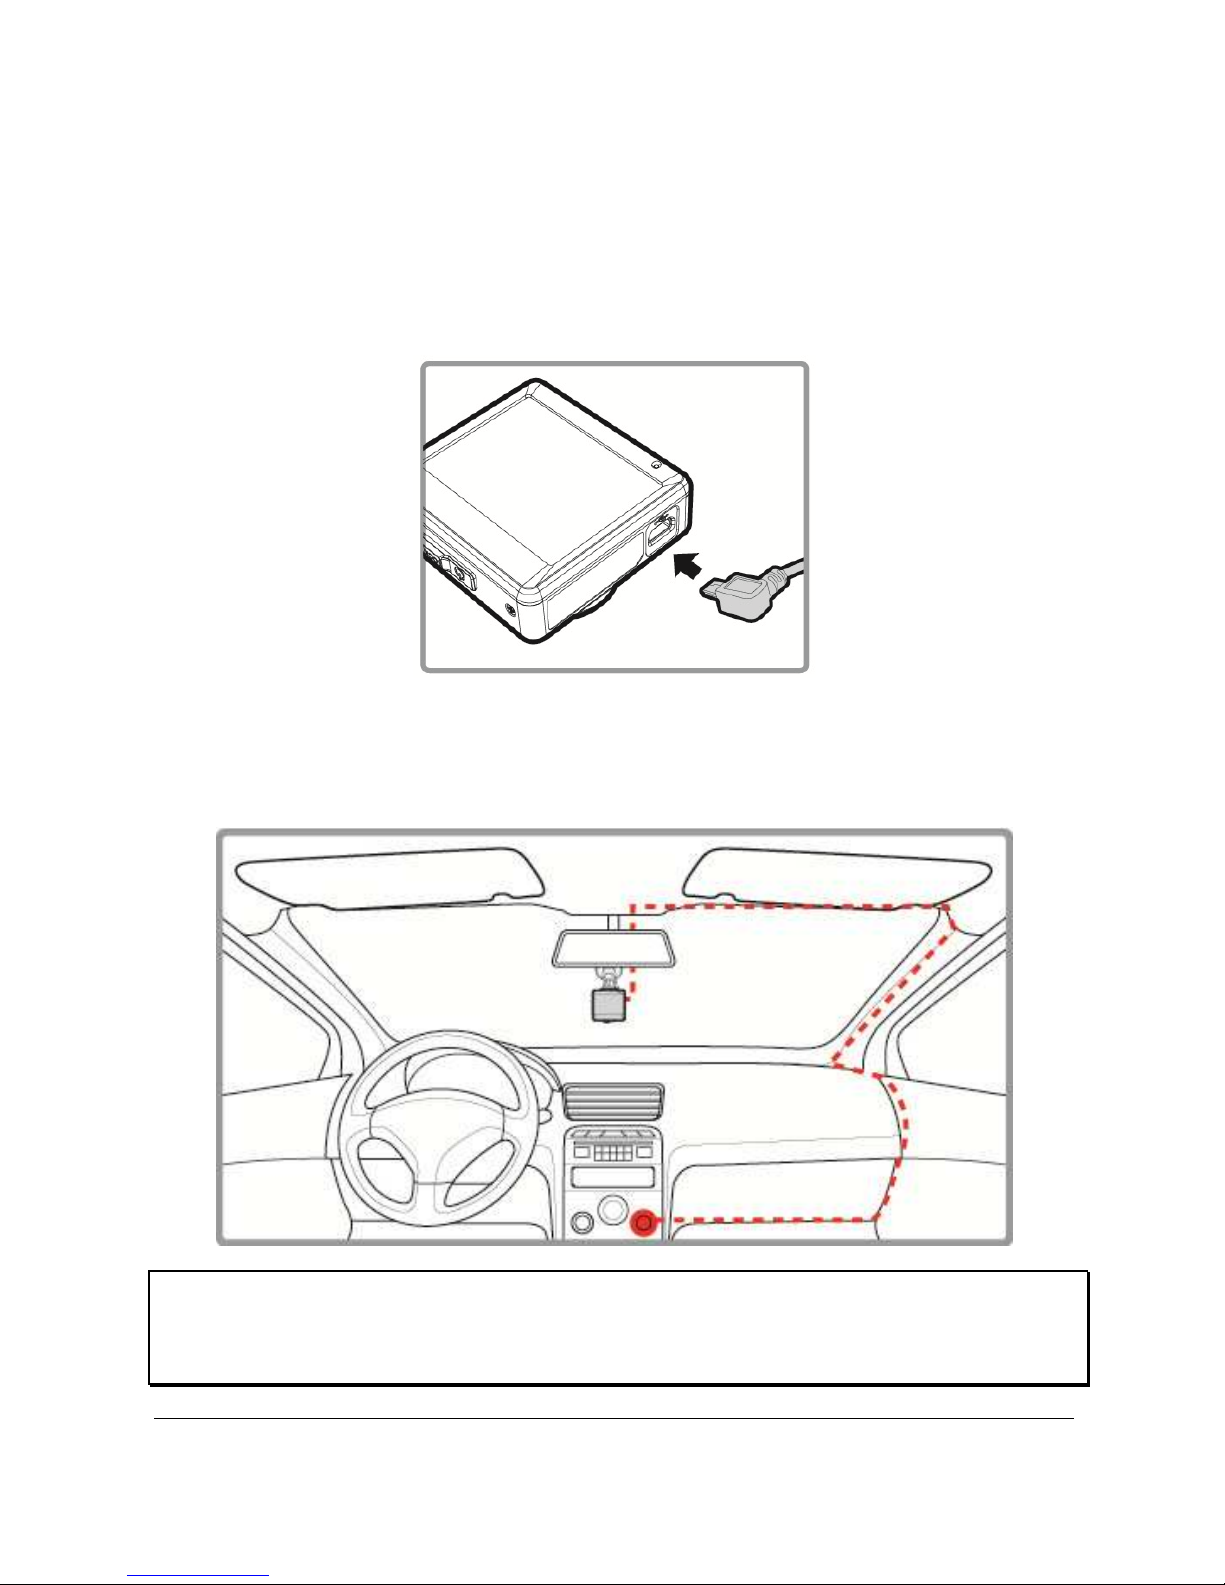
2.3 Connecting to Power
Use only the attached power connector for activating the camcorder and
charging the built-in battery.
1. Connect one end of power connector to USB/Power connector port
on the camcorder. USB port input: DC 5V / 1A.
2. Plug the other end of the car adapter to the cigarette lighter socket
of your vehicle. Once the vehicle engine is started, the camcorder
automatically turns on. Car charger input: DC 12 / 24V.
Note:
This camcorder shall be installed near the rear view mirror, at the center and top of windshield for
optimal viewing.
Page 13
12
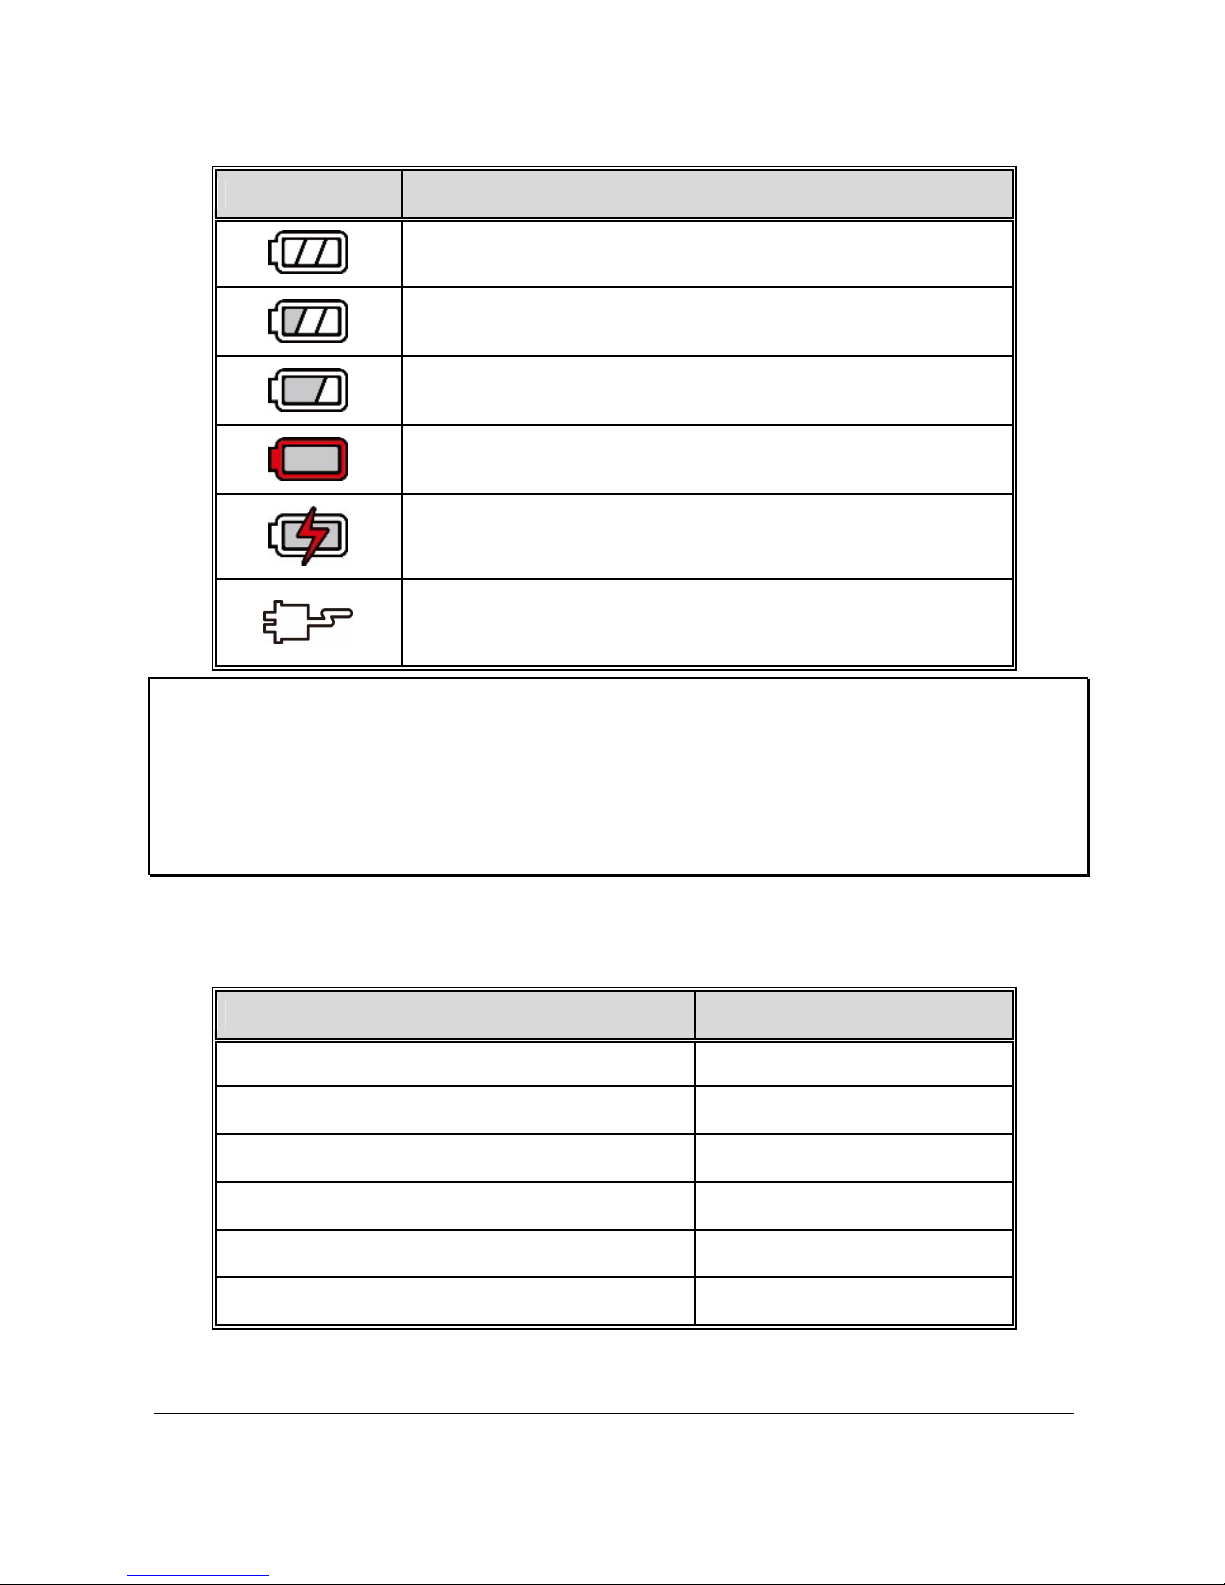
Battery Status Indicator::::
Icon Description
Full battery power.
2/3 battery power.
1/3 battery power.
Out of battery power.
Battery is charging.
Connect the car adapter to charge the battery, battery
is full charged.
Note:
1. Please take note if the environment temperature reaches 45°C or above, the car adapter still
can supply power to camcorder, but it will not charge the Lithium-ion battery. This is the
characteristic of Lithium-ion and is not a malfunction.
2. If the operation temperature is below 0 ° C, the camcorder still can power on but unable to operate.
The camcorder will start Automatic Record when the operation temperatures above 0 ° C
2.4 LED Indicator
Status Explanation LED Indicator Color
Power off, battery charging Red
Power off, battery full charged LED light off
Power on, battery charging Red
Power on, battery full charged Green
Standby / Standby and screen off Green
Recording/ Recording and screen off Flash red
Page 14
13
2.5 Powering the Camcorder On / Off
2.5.1 Auto Power On/Off
Once the vehicle engine is started, the camcorder automatically turns on.
If the Automatic Record function is enabled, the recording will
automatically start right after the camcorder turns on.
Please refer to Set Automatic Record (2.6.2)
2.5.2 Manual Power On/Off and Reset
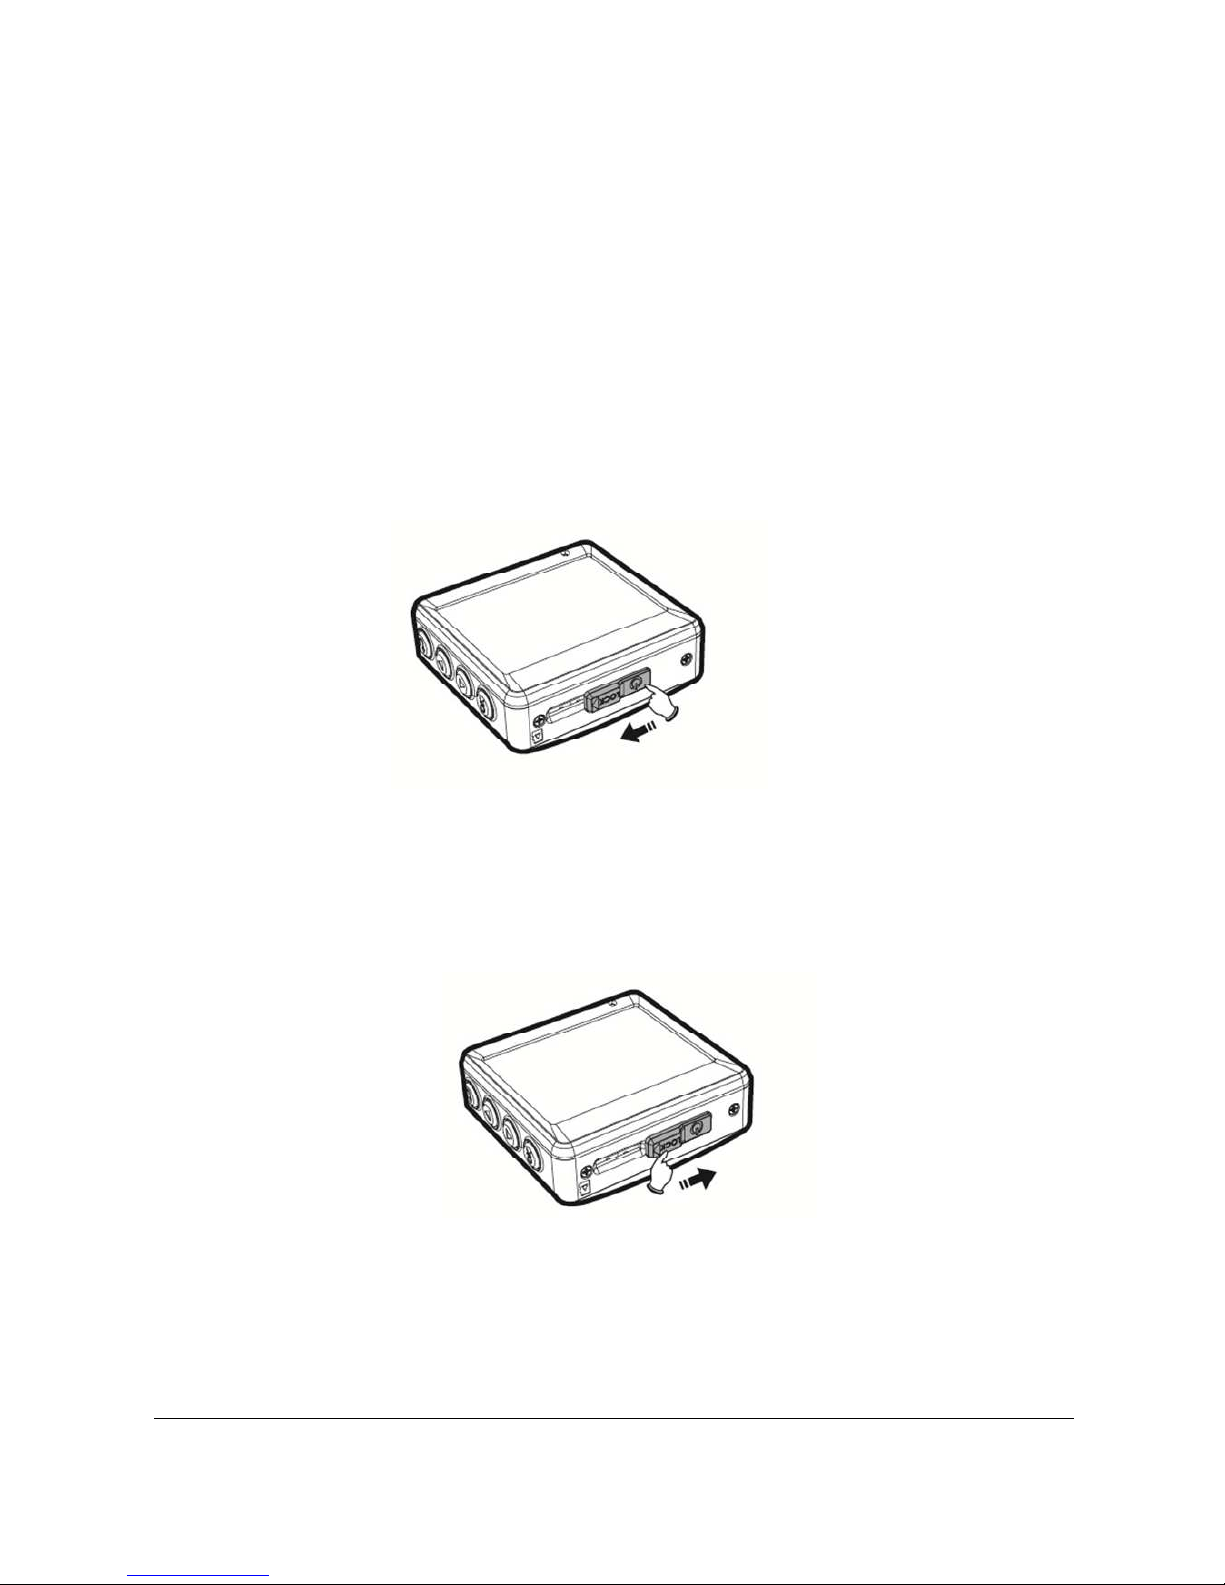
2.5.2.1 Manual Power On
Push the power switch and make sure that the power switch locks on the
memory card slot.
On
2.5.2.2 Power Off
Push the power switch and make sure that the memory slot is released
and the camcorder starts power off sequence. Do not power on the
camcorder when it is in the power-off sequence, or the recorded file may
become corrupt.
Off
2.5.2.3 Reset the camcorder
In case the camcorder fails to function normally due to unknown causes,
push the power switch and verify the memory card is in the removable
state; wait for 7 seconds and push the power switch again to restart the
camcorder.
Page 15

14
2.6 Initial Settings
Before using the camcorder, we recommend you to set up the correct
Date and Time and Automatic Record.
2.6.1 Set the Date / Time
To set the correct date and time, do the following:
1. If recording is in progress, press the
button to stop recording.
2. Press the button to enter the OSD
menu.
3. Press the / button to select Date
/ Time and press the button.
4. Press the / button to adjust the
value and press the button to move to another field.
5. Repeat step 4 until the date and time setting is complete.
2.6.2 Set Automatic Record
Default setting of Automatic Record is enabled. The camcorder will
automatically start recording when powered on. In case Automatic
Record is disabled, enable it by the following steps:
1. If recording is in progress, press the
button to stop recording.
2. Press the button to enter the OSD
menu.
3. Press the / button to select
Automatic Record and press the
button.
4. Press the
/ button to select On
and press the button.
5. Press the button to exit the menu.
Page 16
15
8
7
5
2
6
3
4
1
9
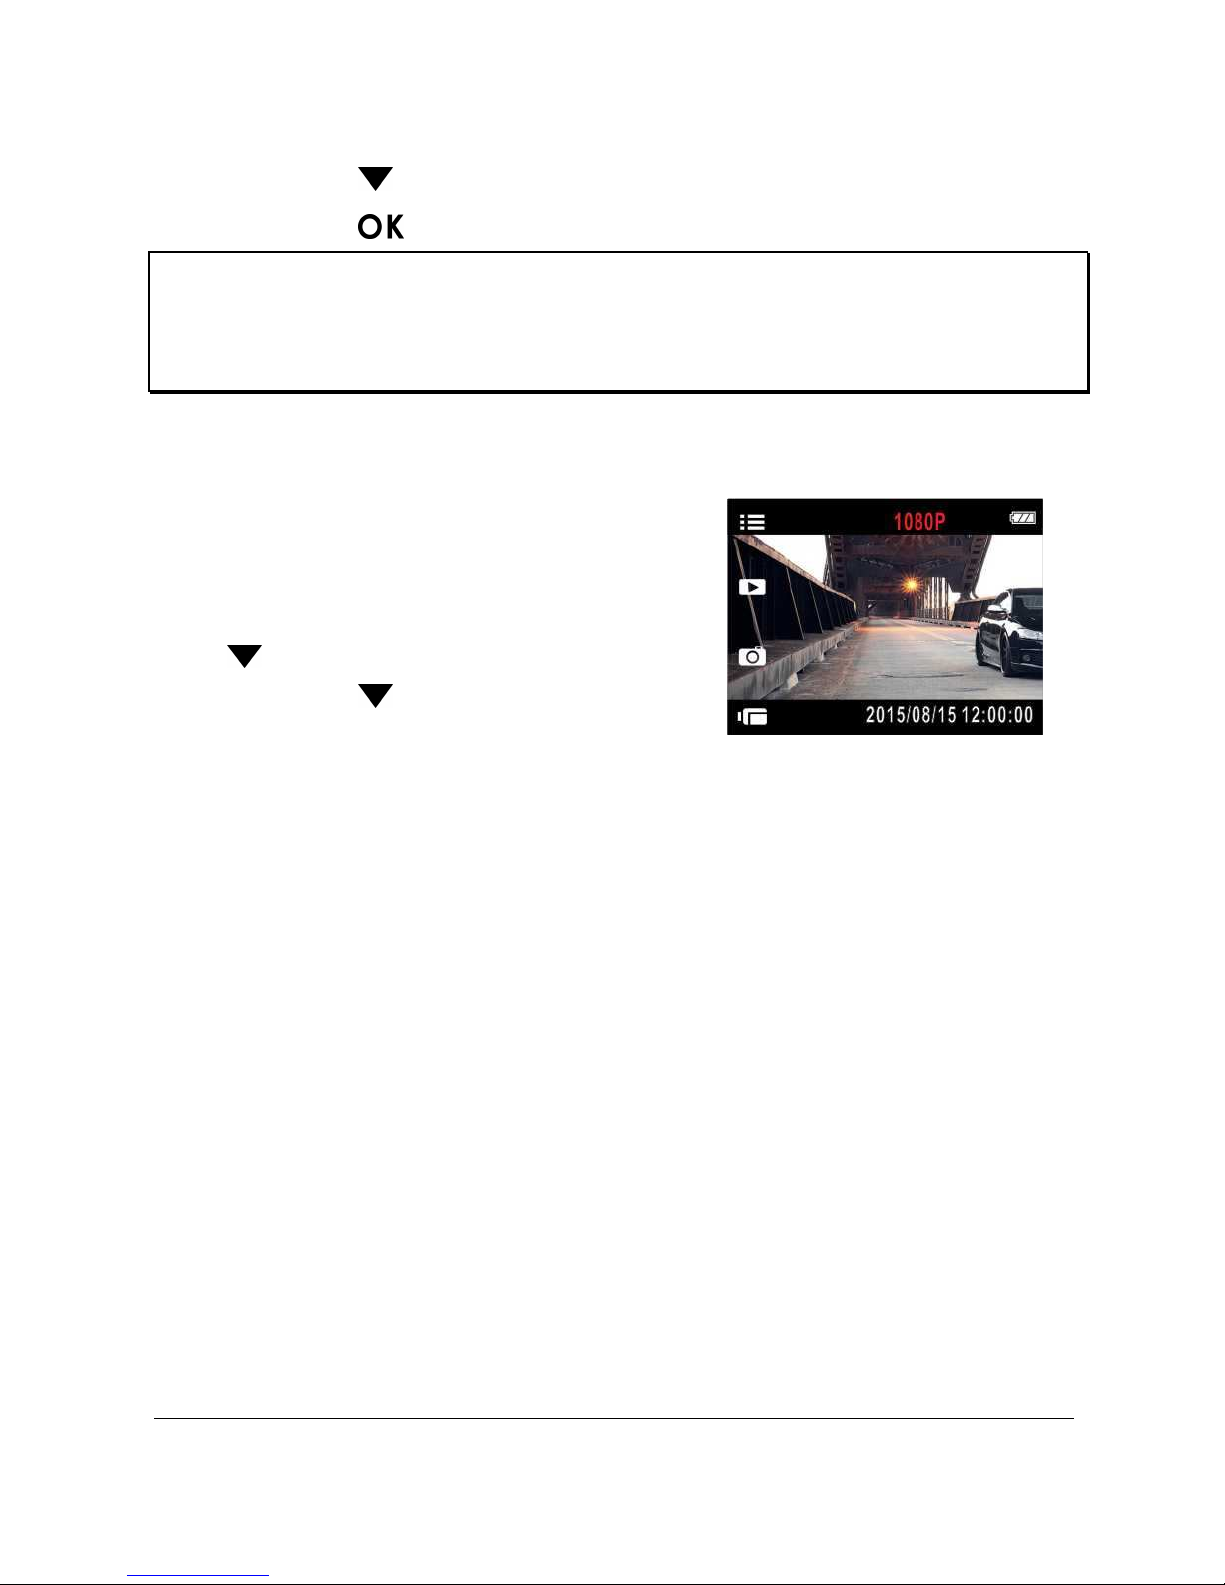
3 Using the Car Camcorder
3.1 Recording Videos
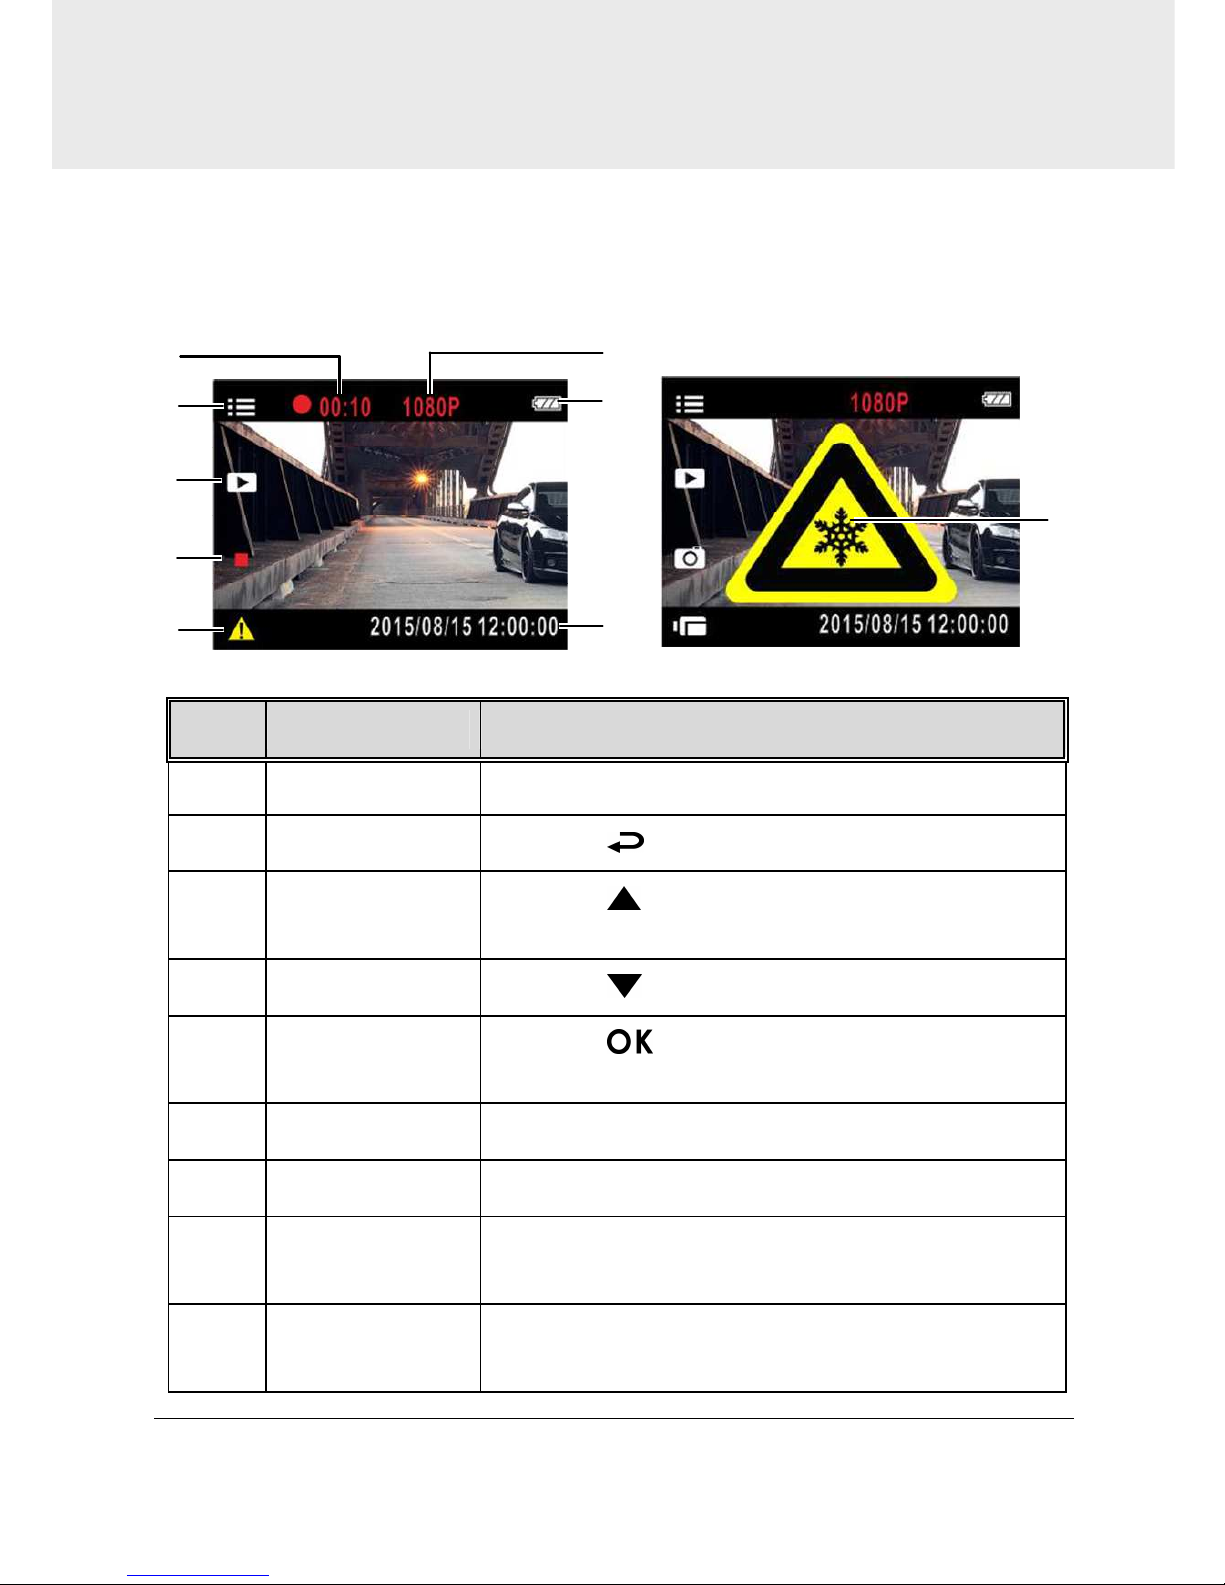
3.1.1 The Recording Screen
No. Item Description
1 Duration Indicates the recording duration.
2 Menu Press the button to enter the OSD menu.
3 Playback
Press the button to switch to Playback
mode.
4 Stop recording Press the button to stop recording.
5
Emergency
recording
Press the button to start manual emergency
recording.
6 Resolution Indicates the video resolution.
7 Battery Indicates the remaining battery power.
8 Date/Time
Refers to the prevailing date and time of
recording.
9 Temperature
Refers to when the operation temperature is
below 0 ° C, the camcorder cannot be operated.
Page 17
16
3.1.2 Record videos while driving
When the vehicle engine starts up and the Automatic Record function is
enabled, the camcorder automatically turns on and starts recording.
Recording stops and shut down after the engine is switched off.
Note:
On some cars, the recording will continue when the engine is switched off. If this happens, please
manually turn off the cigarette lighter or remove the car adapter from the cigarette lighter.
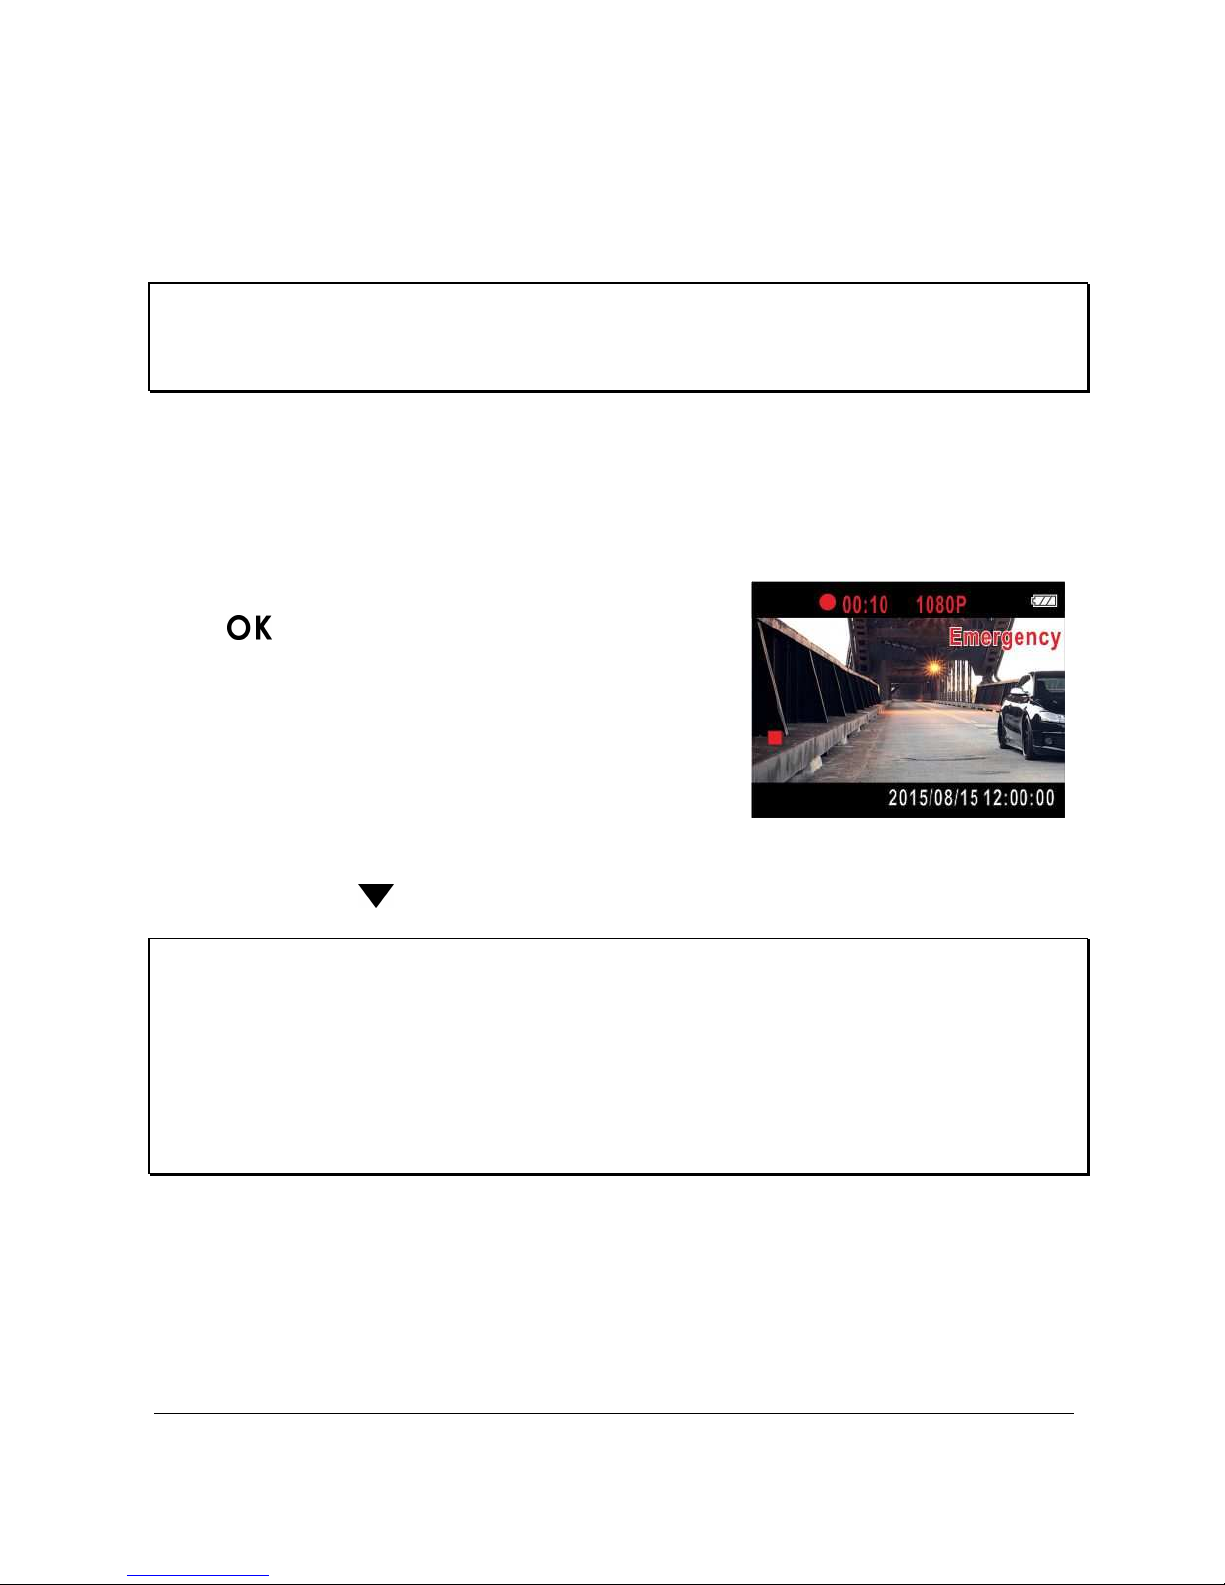
3.1.3 Emergency Recording
To start Emergency Recording, do the following:
1. During the recording period, press the
button to enter emergency
recording mode. The wordings,
“Emergency”, will be displayed on the
top right-hand corner of the display
screen. Files that are saved during the
emergency recording mode will be
protected.
2. Press the to stop recording immediately.
Note:
1. If the Collision Detection function is enabled and a collision is detected, the camcorder will
automatically trigger the emergency recording. Please refer to (4.2).
2. The emergency recording file is created as a new file, which will be protected to avoid being
overwritten by normal cycling recording. 8G (or above) memory card can save up to 10 emergency
video files. The alert message of “Emergency files are full” will pop up on the screen when the
emergency recording files are full, and the oldest emergency file will be automatically deleted
when a new emergency recording file is created.
Page 18
17
3.1.4 Stop/Start recording
1. Press the button to stop recording.
2. Press the button to start recording.
Note:
1. It can be configured to save a video file for every 3 or 5 minutes of recording. Please refer to (4.2).
2. The camcorder saves the recording in the memory card. If the memory card capacity is full, the
oldest file in the memory card is overwritten.
3.1.5 Taking Snapshot
You can also use this camcorder to take
snapshots of the current scene.
1. If recording is in progress, press the
button to stop recording.
2. Press the button to take a
snapshot.
3.1.6 HDR (High Dynamic Range)
HDR (High Dynamic Range) will be activated under the HDR 1920 x 1080
@30fps mode of the camcorder. Its purpose is to provide clear images
even under backlighting, when there are very bright and very dark areas
simultaneously in the camera's field of view.
Page 19
18
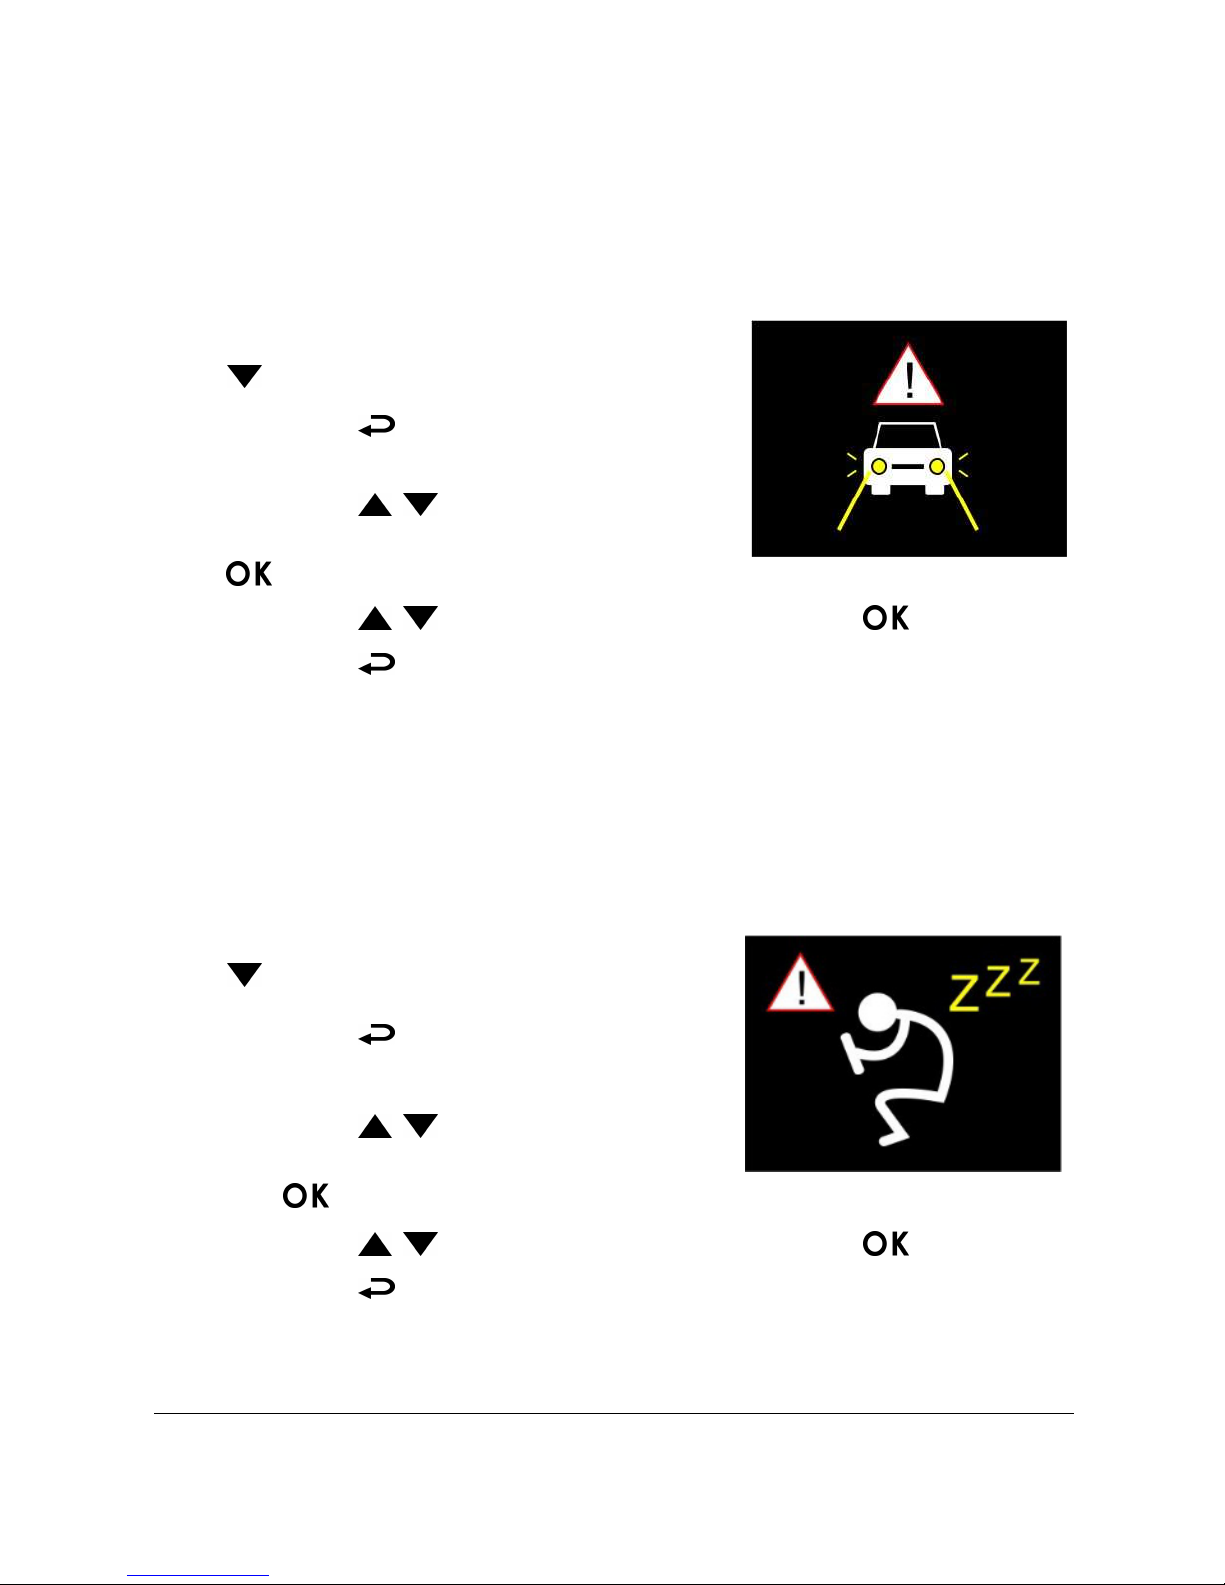
3.1.7 Headlight Warning
The Headlight Warning function produces voice and screen message
alerts when it detects poor lighting conditions through the recording
displays of this product, including driving in rainy or cloudy weather, at
night, and in basements, parking lots, and tunnels.
1. If recording is in progress, press the
button to stop recording.
2. Press the button to enter the OSD
menu.
3. Press the / button, select
Headlight Warning, and then press the
button.
4. Press the / button, select On, and press the button.
5. Press the button to exit the menu.
3.1.8 Driver Fatigue Alert
If the Driver Fatigue Alert function is enabled, this product produces
voice and screen message alerts one hour after it has begun recording
and repeats the alerts every half an hour afterwards.
1. If recording is in progress, press the
button to stop recording.
2. Press the button to enter the OSD
menu.
3. Press the / button, select
Driver Fatigue Alert, and then press
the
button.
4. Press the / button, select On, and press the button.
5. Press the button to exit the menu.
Page 20
19
3.1.9 Parking Mode
To monitor the vehicle when it is parked, you can activate Motion
Detection or Vibration Detection.
1. If recording is in progress, press the button to stop recording.
2. Press the button to enter the OSD menu.
3. Press the / button, select Parking Mode, and then press the
button.
4. Press the / button, select Vibration Detection or Motion
Detection, and then press the button.
5. Press the button to exit the menu.
Item Description
Vibration
Detection
If disconnected from power when the camcorder
is powered on, the system alert message “Wait
for 60 seconds to enter Vibration Detection or
press to cancel and power off.” This
means the system will enter Vibration Detection
automatically in 60 seconds; when the camcorder
detects any external vibration applied to the
vehicle after three minutes when all passengers
have alighted, Video Record will be 90 seconds
and the recording will be protected. If press
within 60 seconds, the camcorder will be powered
off instead of entering Vibration Detection mode.
Motion
Detection
If disconnected from power when the camcorder
is powered on, the system alert message “Wait
for 10 seconds to enter Motion Detection, or
press
to power off.” This means the
system will be displayed on the screen. This
means the system will enter Motion Detection
automatically in 10 seconds, when the camcorder
detects any motion in front of lens or detects any
external vibration, Video Record will be 10
seconds, if the screen detects any vibration, the
camcorder will keep recording next 10 seconds
until the vibration stops. If press
within 10
Page 21

20
seconds, the camcorder will be powered off
instead of entering Motion Detection mode.
Off
No parking monitoring activated.
Note:
1. When the battery is fully charged and is in good condition, Motion Detection can record
continuously for about 20 minutes
2. As the camcorder is used, the battery storage capacity will decrease gradually. This is a normal
phenomenon for the battery.
3. The recording under parking mode will be all saved in emergency recording file.
3.2 Playback Videos and Photos
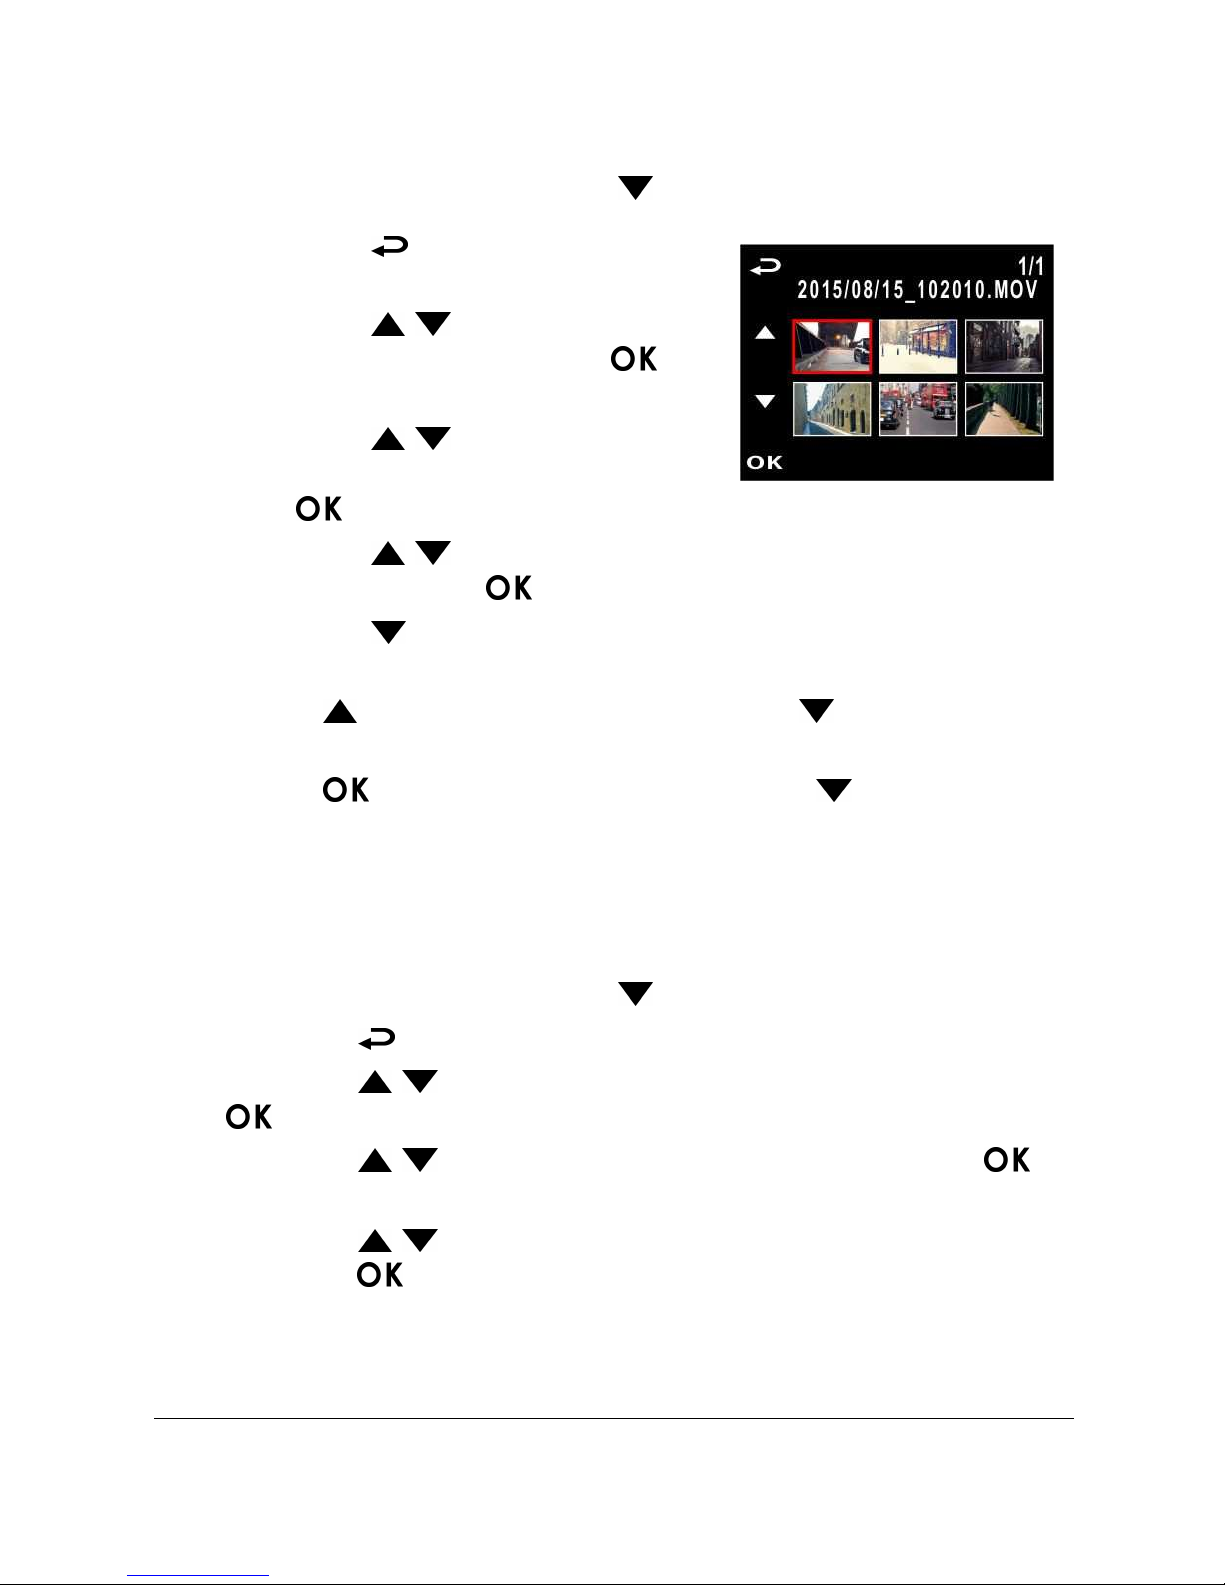
If recording is in progress, press the button to stop recording.
1. Press the button to enter the OSD
menu.
2. Press the / button, select the
File Playback and then press the
button.
3. Press the / button, select the
file type that you wish to view, and then press the button.
4. Press the / button to view the previous/next file and then
press the button to view the file on full screen.
Note:
You can press the button from the standby screen and directly enter the playback mode.
The final recoding will be shown on the screen.
Page 22
21
3.2.1 Video Playback
If recording is in progress, press the button to stop recording.
1. Press the button to enter the
OSD menu.
2. Press the / button, select File
Playback and then press the
button.
3. Press the / button, select
Video or Emergency, and then press
the button.
4. Press the / button to view the required video recording file
and then press the button, playback the video.
5. Press the button to stop playback. Press it again to resume
playback.
6. Press up to 4 times fast-forward. Press to resume
normal mode.
7. Press up to 4 times rewind speed. Press to resume
normal mode.
3.2.2 Viewing Photos
If recording is in progress, press the button to stop recording.
1. Press the button to enter the OSD menu.
2. Press the / button, select File Playback, and then press the
button.
3. Press the / button, select Picture, and then press the
button.
4. Press the
/ button to view the required picture files, and then
press the button to view the files on full screen.
Page 23
22
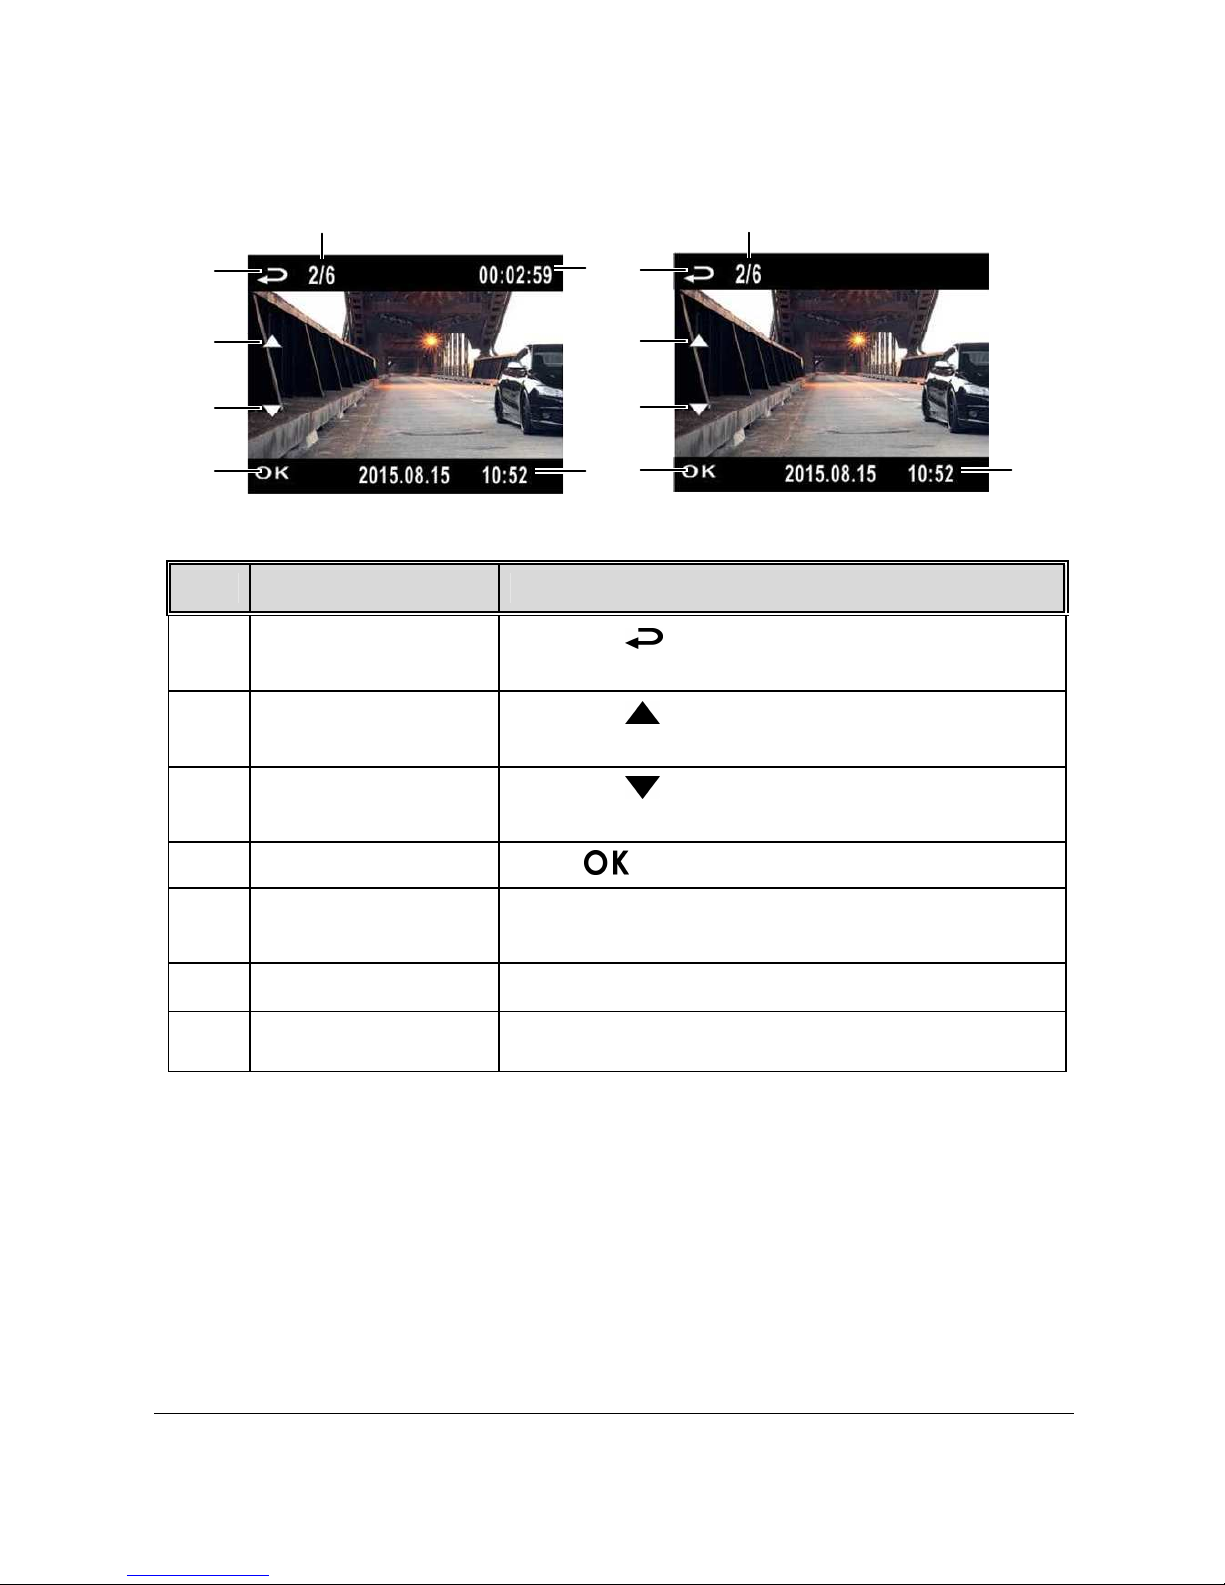
3.2.3 The Playback Screen
Video Playback Screen
Picture
Playback Screen
6
1
3
4
2
7
5
1
3
4
2
7
5
No.
Item Description
1 File selection (back)
Press the button to return back to file
selection display.
2 Previous File
Press the button to review the previous
picture/video.
3 Next File
Press the button to view the next
video/picture.
4 File Playback Press to play video (photo).
5
Playback page no. of
the file
Instructs the current file being played and the
total no. of playback files.
6
Current Duration Indicates the elapsed time.
7 Date and time Indicates the recorded date and time.
Page 24
23
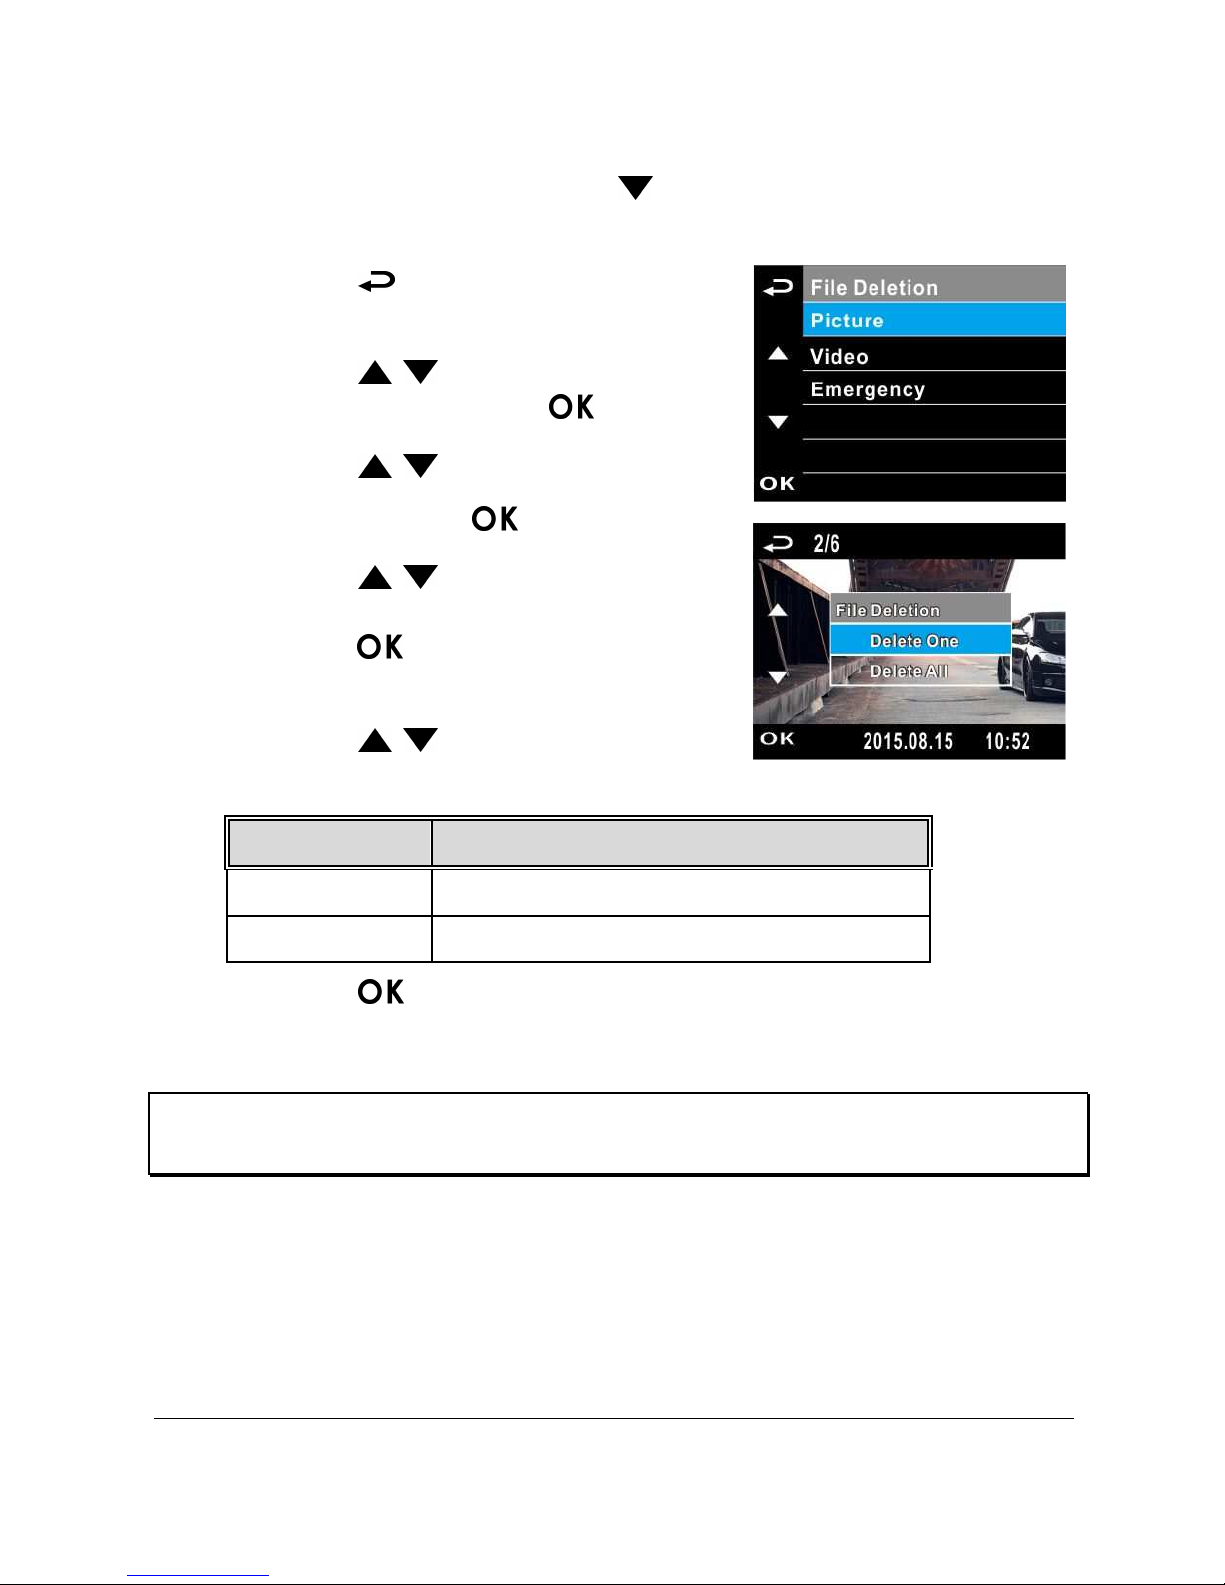
3.2.4 Deleting Files
If recording is in progress, press the button to stop recording.
1. Press the button to enter the OSD
menu.
2. Press the / button, select “File
Deletion”, and press the button.
3. Press the / button, select file
type and press the button.
4. Press the / button, select the
file that you wish to delete and then
press the button to enter the
deletion menu.
5. Press the / button to select an
item.
Item Description
Delete One Delete the current file.
Delete All Delete all files.
6. Press the button, please confirm deletion.
Note:
Deleted files cannot be restored. Please ensure that files have been backed up before deleting.
Page 25
24
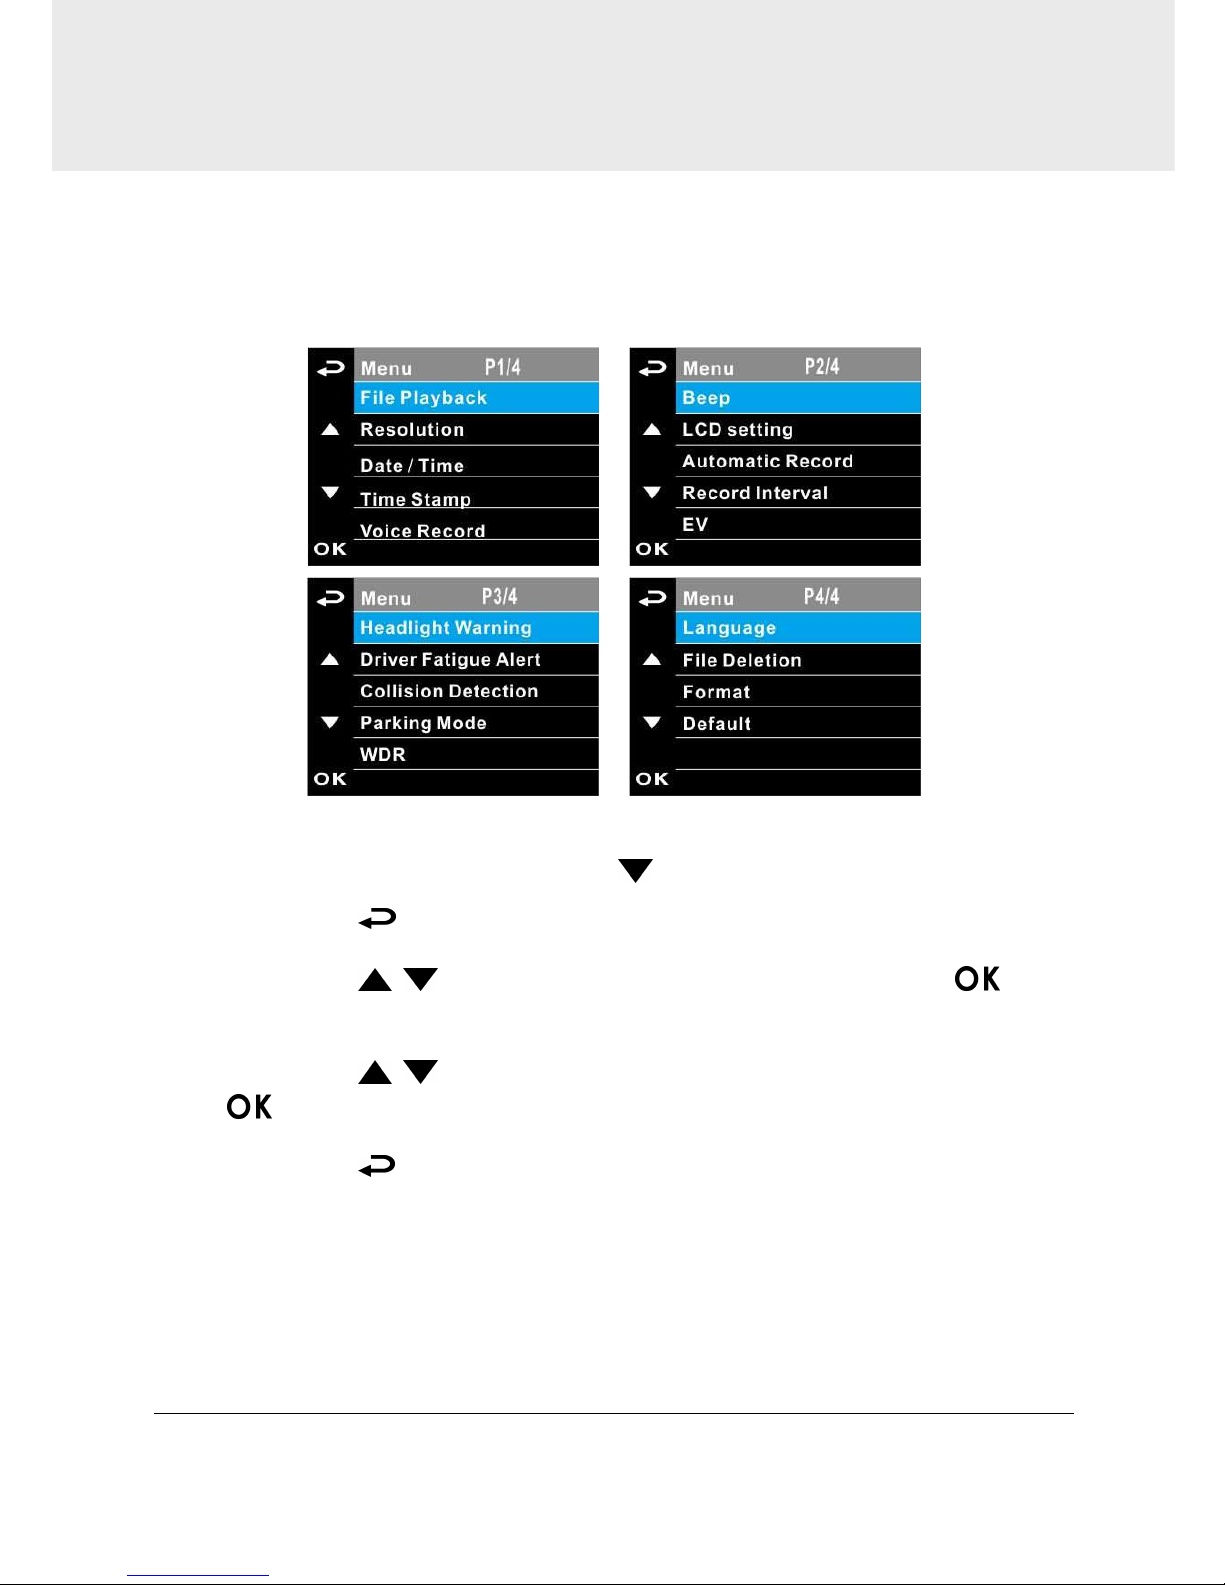
4 Adjusting the settings
4.1 Using the menu
You can customize the general settings via the on-screen display (OSD)
menus.
If recording is in progress, press the button to stop recording.
1. Press the button to open up the OSD menu.。
2. Press the / button, select menu item and press the
button, then enter the selected menu.
3. Press the / button to select to required setting and press the
button to confirm setting.
4. Press the button to exit the menu.
Page 26

25
4.2 Menu Items
Refer to the below table for details of main menu and function list.
Menu Item Description Available Option
File Playback
Select the file type that you
wish to view.
Picture / Video /
Emergency
Resolution
Set up resolution of video
recording.
1920 x 1440 / 30 fps
1920 x 1080 / 60 fps
1920 x 1080 / 30 fps
1920 x 1080 / 30 fps HDR
1280 x 720 / 120 fps
Date / Time Set up date and time.
Press the / button
to adjust the value, and
press the button to
switch the field and
confirm.
Time Stamp
Activate/suspend the use of
the date stamp.
On / Off
Voice Record
Activate/suspend the use of
voice recording.
On / Off
Beep
Activate/suspend use of sound
effects setting.
VOLUME 1 / VOLUME 2 /
VOLUME 3 / Off
LCD Setting
Set the screen auto shutdown
time after video recording has
started.
On / Turn Off After 30 sec.
/ Turn Off After 3 min. /
Off
Automatic Record
Activate/suspend use of the
automatic record function
after the camcorder is turned
on.
On / Off
Record Interval
Set the record interval for each
video recording file.
1 min. / 3 min.
Page 27

26
Menu Item Description Available Option
EV Setting of exposure value.
Press the / button
to set the exposure value.
It can be set between +1.0
to -1.0.
Headlight
Warning
The Headlight Warning
function produces voice and
screen message alerts when it
detects poor lighting
conditions through the
recording displays of this
product, including driving in
rainy or cloudy weather, at
night, and in basements,
parking lots, and tunnels.
On / Off
Driver Fatigue
Alert
If the Driver Fatigue Alert
function is enabled, this
product produces voice and
screen message alerts one
hour after it has begun
recording and repeats the
alerts every half an hour
afterwards.
On / Off
Collision
Detection
Activate/suspend use of the
collision detection function.
Emergency recording will be
activated automatically when
any collision is detected.
High Sensitivity /
Normal Sensitivity /
Low Sensitivity / Off
Parking Mode
To monitor the vehicle when it
is parked.
Vibration Detection /
Motion Detection / Off
WDR
Present a crisp and clear
picture quality with
harmonious contrast in a high
contrast, high discrepancy
environment.
On / Off
Language
Setting of display language
menu.
According to the actual
shipping regions
Page 28

27
Menu Item Description Available Option
File Deletion Delete files.
Picture / Video /
Emergency
Format Formatting of memory card Yes / No
Default
Reset all and restore to factory
default settings.
Yes / No
Page 29
28
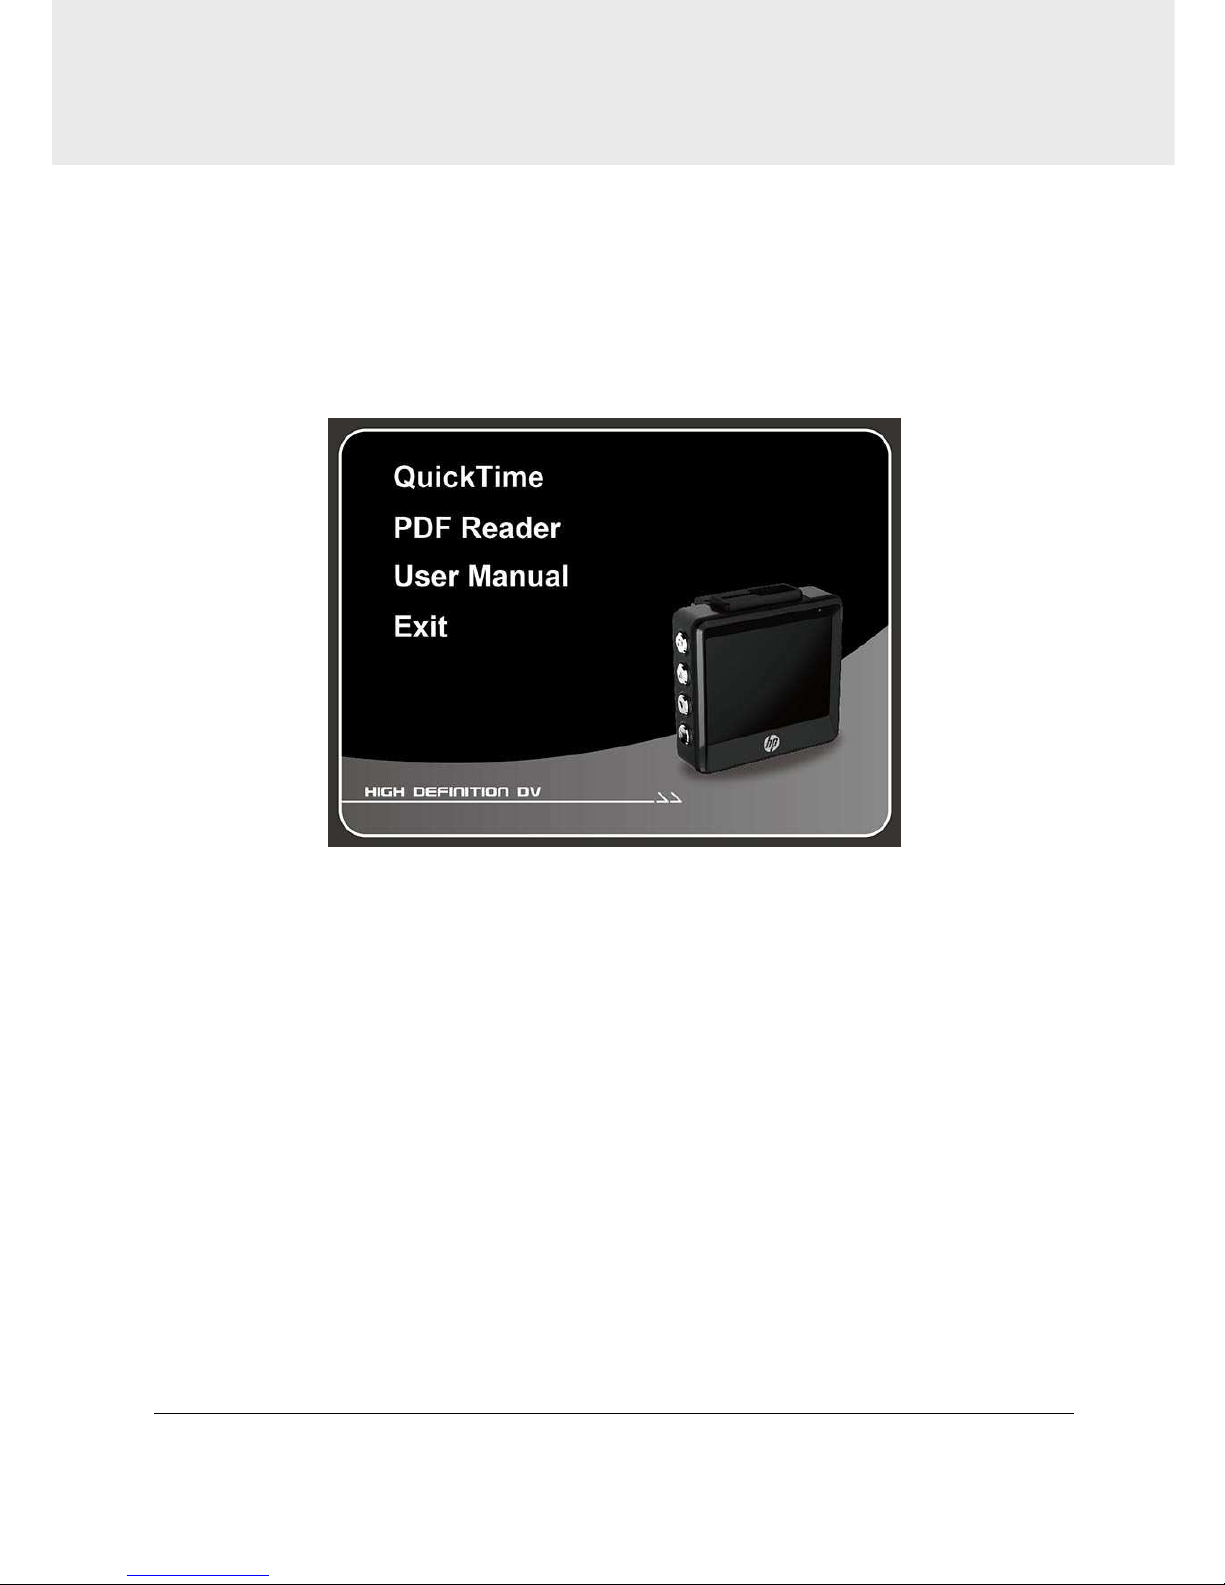
5 Installing the Software
1. Place the attached CD ROM into the CD player.
2. If the CD does not execute automatically, please use Windows File
Manager to execute the Install_CD.exe file in the CD.
The following screen will be shown up.
3. Press the [Menu] item to start the installation process according to
the instructions on-screen.
Page 30

29
6 Specifications
Item Description
Image sensor 1/3” CMOS sensor
Effective pixels 2688 (H) x 1512 (V)
Storage media Support Micro SDHC Class 10, max. up to 32GB
LCD display 2.31” LCD color screen
Lens
Wide Angle Fixed Focus lens
F1.8, f=2.94mm
Focus range 1.5m ~ Infinity
Movie Clip
Resolution: 1440P/30fps ; 1080P/60fps ; 1080P/30fps ;
1080P/30fps HDR ; 720P/120fps
Format: MOV
Still image
(Snapshot)
Resolution: 4M (2688 x 1512)
Format: JPEG
Shutter
Electronic shutter
Auto: 1/2 ~1/2000 sec
G-Sensor 3-Axis G-Force sensor
ISO Auto
White Balance Auto
Page 31

30
Item Description
Microphone
Support
Speaker
Support
Interface Mini USB
Battery
Built-in 470mAh Li-polymer rechargeable
Operating
Temperature
0° ~ 60° C
Operating Humidity 20 ~ 70% RH
Storage
Temperature
-20° ~ 70° C
Dimensions 57 x 30 x 58 mm
Weight Approx. 75g (without memory card)
 Loading...