

Page 1
f550g
f550g
f550g
完整版產品使用者手冊請至
f550g
完整版產品用戶手冊請至
Page 2

1
Battery warning
Never dismantle, crush, or pierce the battery, or allow the battery to
short-circuit. Do not expose battery being placed in high temperature
environment, if battery leaks or bulges, stop continue to use.
Always charge using the system. Risk of explosion if battery is
replaced by an incorrect type.
Keep the battery out of reach of children.
Batteries may explode if exposed to open fire. Never dispose of
batteries in a fire.
Never replace the battery on your own; have the dealer do it for
you.
Disposed of used batteries observing local regulations.
Notes on Installation
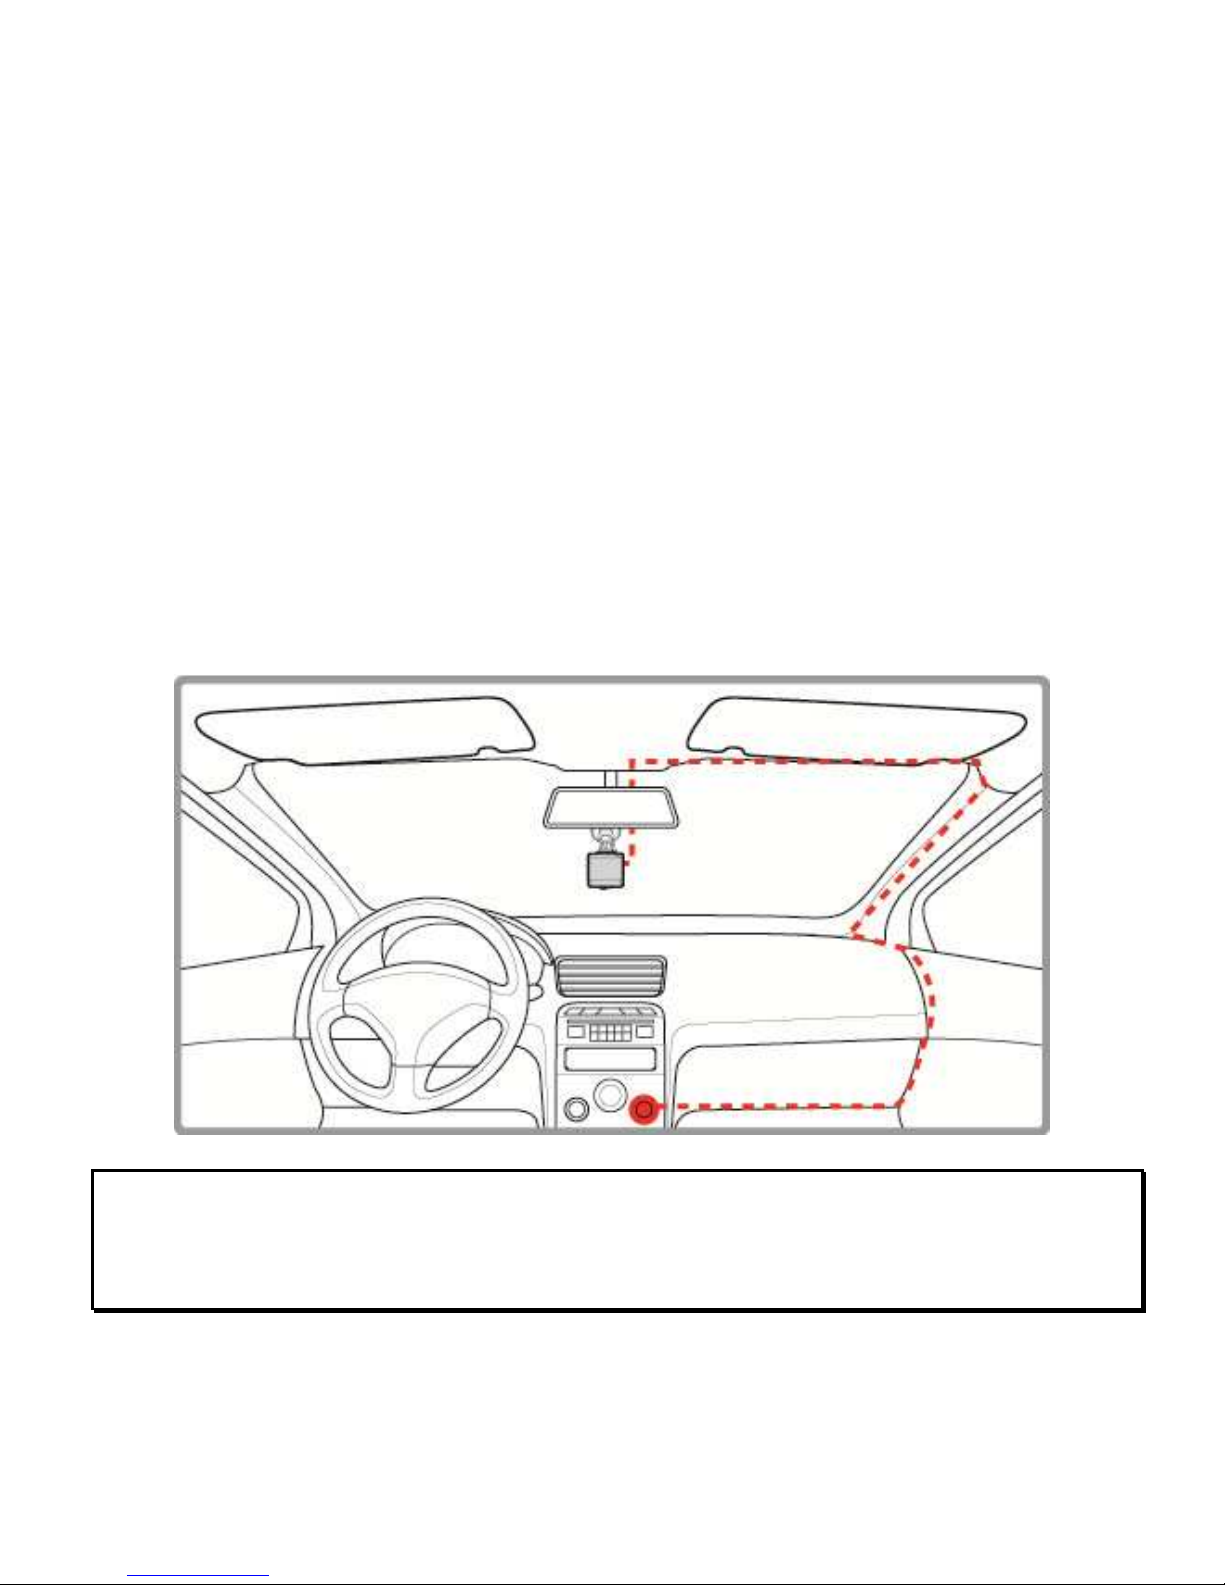
1.
This product shall be installed near the rear view mirror, at the center
and top of windshield for optimal viewing.
2.
Make sure that the lens is within the wiping range of the windscreen
wiper to ensure a clear view even when it rains.
3.
Do not touch the lens with your fingers. Finger grease may be left on
the lens and will result in unclear videos or snapshots. Clean the lens
on a regular basis.
4.
Do not install the camcorder on a tinted window. Doing so may
damage the tint film.
5.
Make sure that the installation position is not hindered by the tinted
window.
6.
To use the products of the attached power charger only, please do
not use other brand power charger, in order to avoid equipment burn
or cause the battery explosion.
For more operation details, please refer to CD-ROM.
Page 3
2
1 Introduction
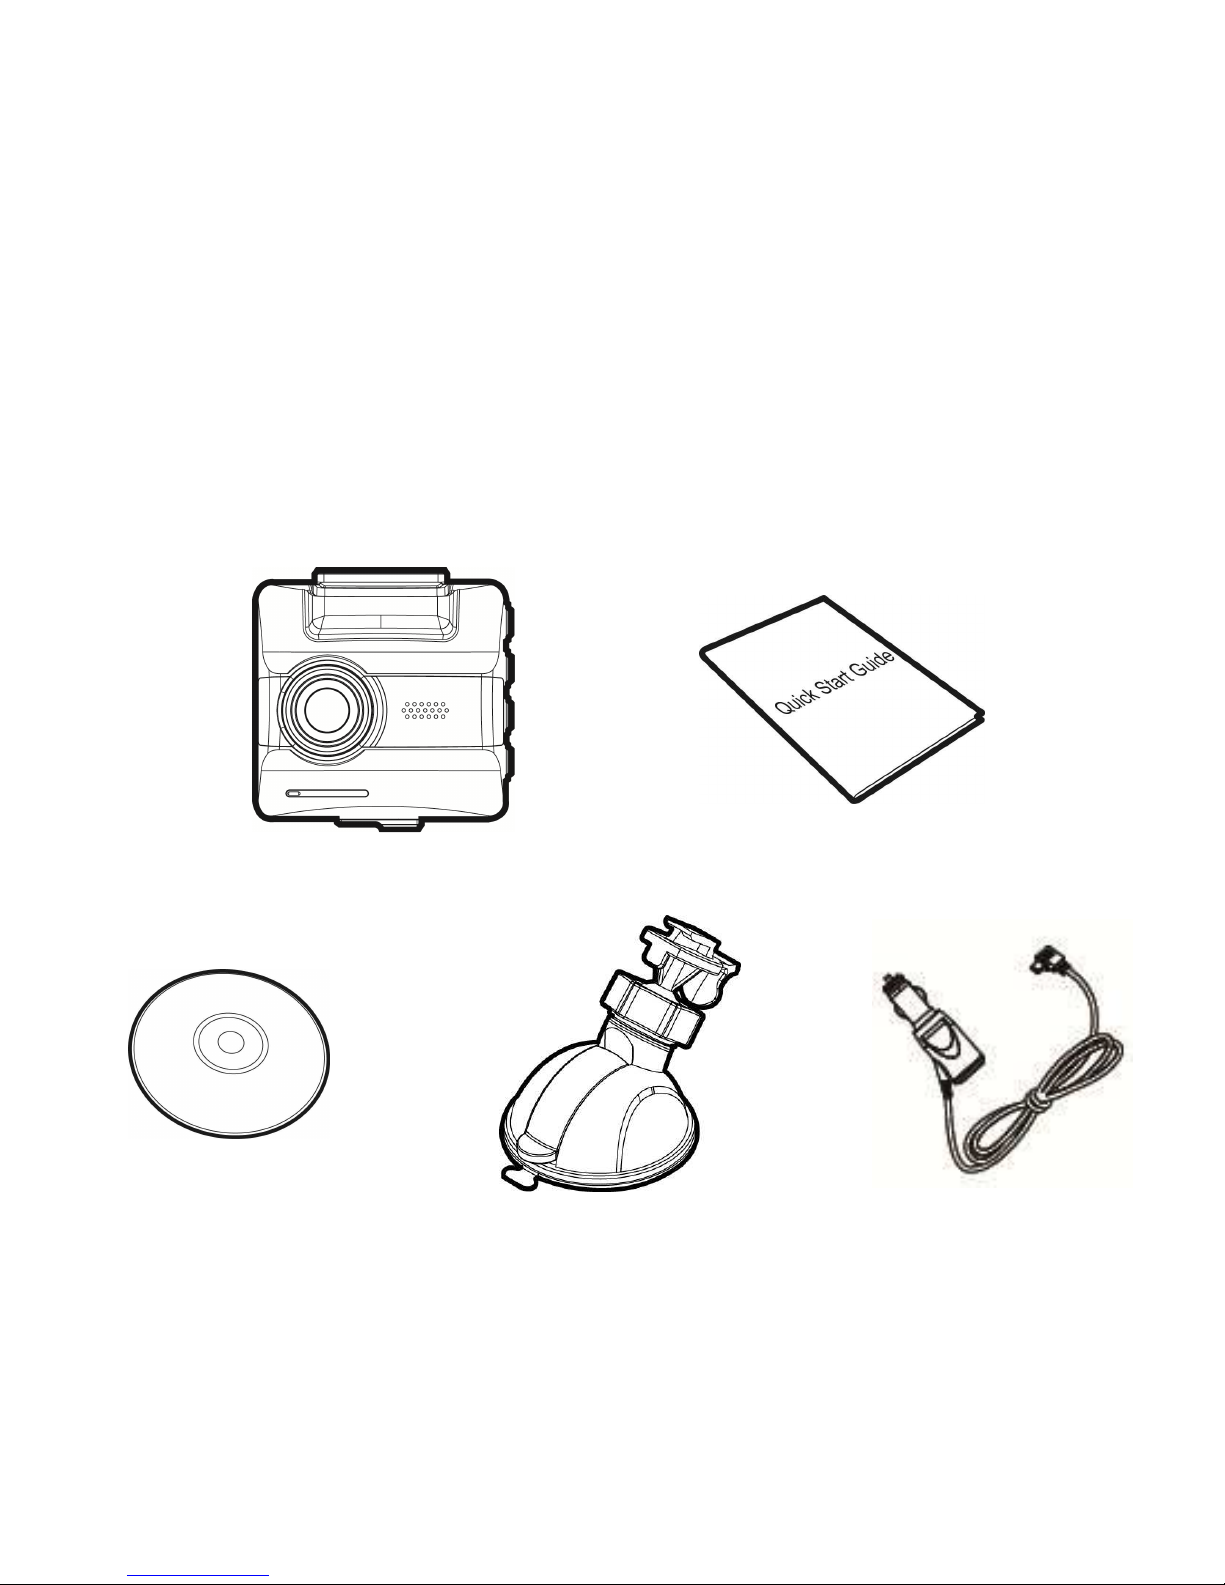
1.1 Package Contents
The package contains the following items. In case there is any missing
or damaged item, contact your dealer immediately.
Car Recorder Quick start guide
CD-ROM Bracket Car adapter
Page 4
3
1.2 Product Overview
No.
Item
No.
Item
1 Bracket Socket
8 Enter Button ( )
2 Power Switch
9 GPS Antenna
3 Memory Card Slot
10
Speaker
4 USB / Power Connector
11
Wide Angle Lens
5 Back Button ( )
12
Microphone
6 Up Button ( )
13
LED Indicator
7 Down Button ( )
14
LCD Panel
8
9
10
4
5
7
6
1
2
3
11
12
13
14
Page 5
4
2 Getting Started
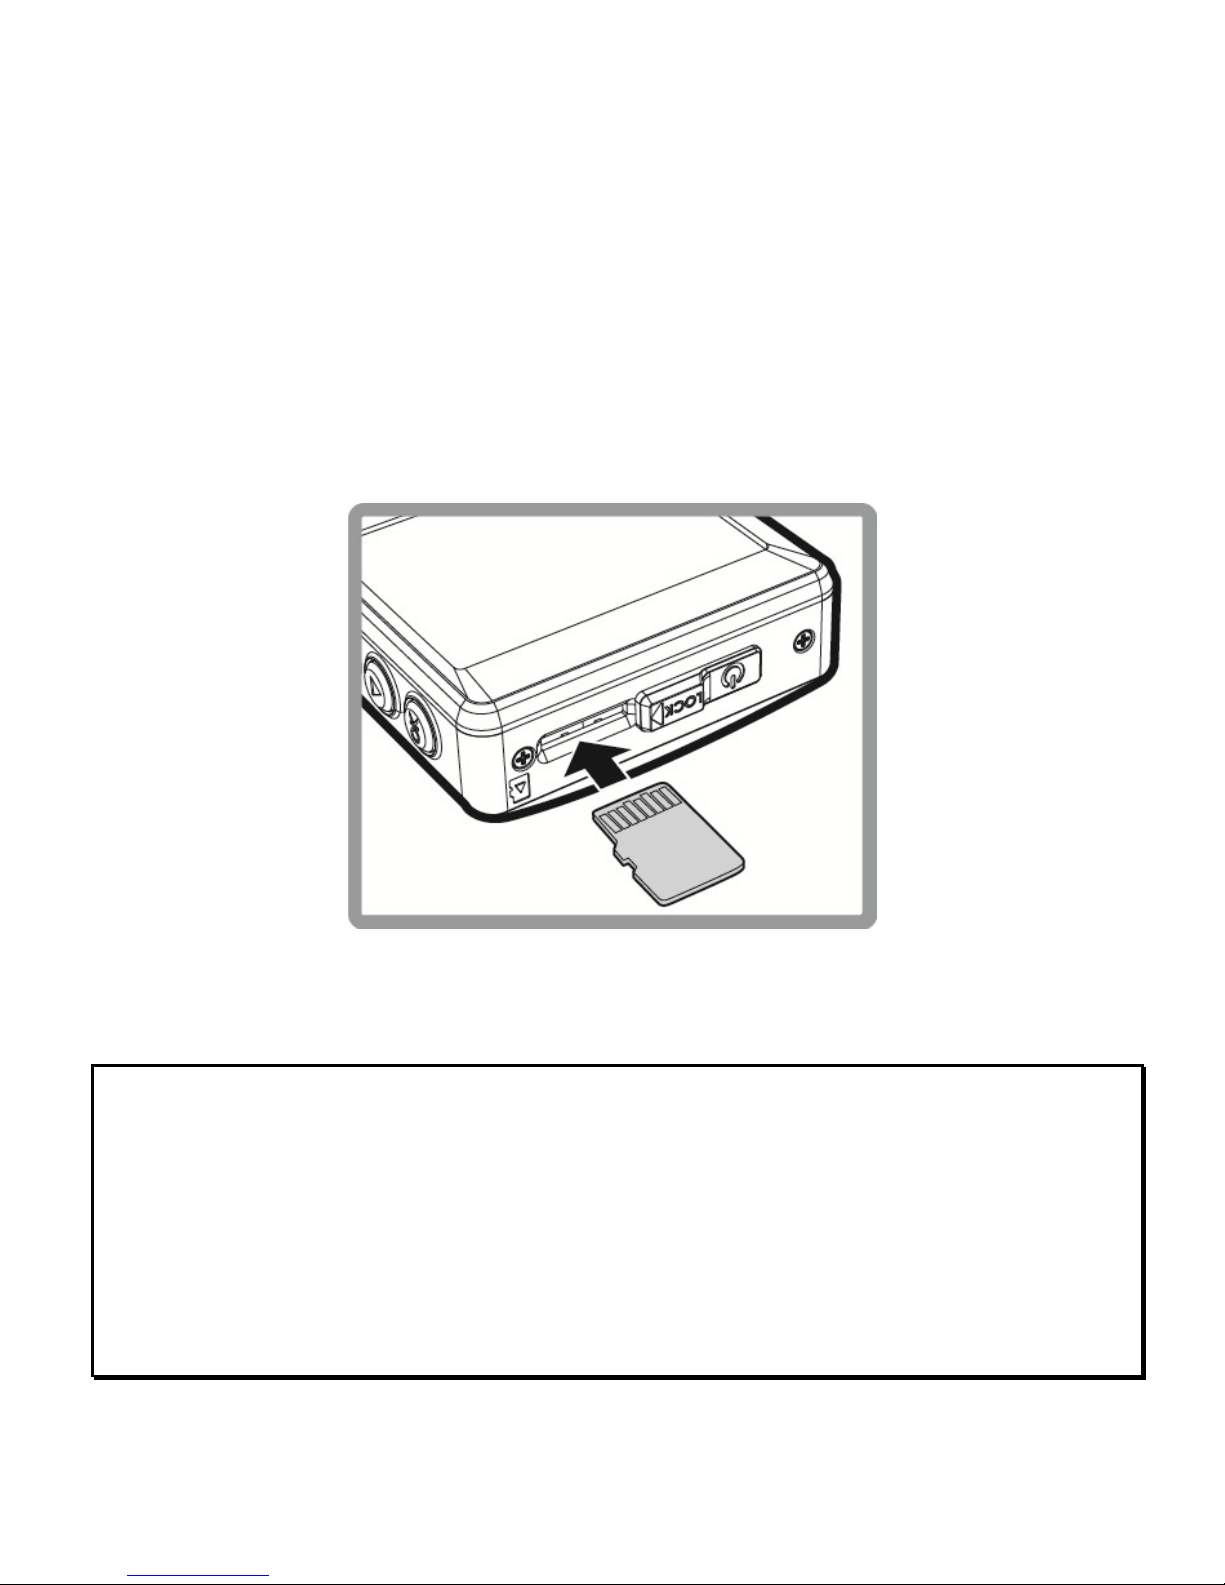
2.1 Inserting the Memory Card
Insert memory card with the gold section facing upward and the
screen of the camcorder facing upward too, as illustrated. Push the
memory card in until a click sound is heard, indicating the card is in
position.
To remove the memory card
Push to eject the memory card out of the slot.
Note:
1. Do not remove or insert the memory card when the camcorder is turned on. This
may damage the memory card.
2. Please use a Class 10 or higher rating Micro SD card, max. up to 32GB.
3. Please format the micro SD cards before the initial use.
4. When removing the memory card, please take note that the memory card will be
ejected quickly and may get lost. This is a characteristic of the memory card ejection
slot to facilitate easy removal by the user.
Page 6
5
2.2 Installing in Vehicles
2.2.1 Mount to Windshield
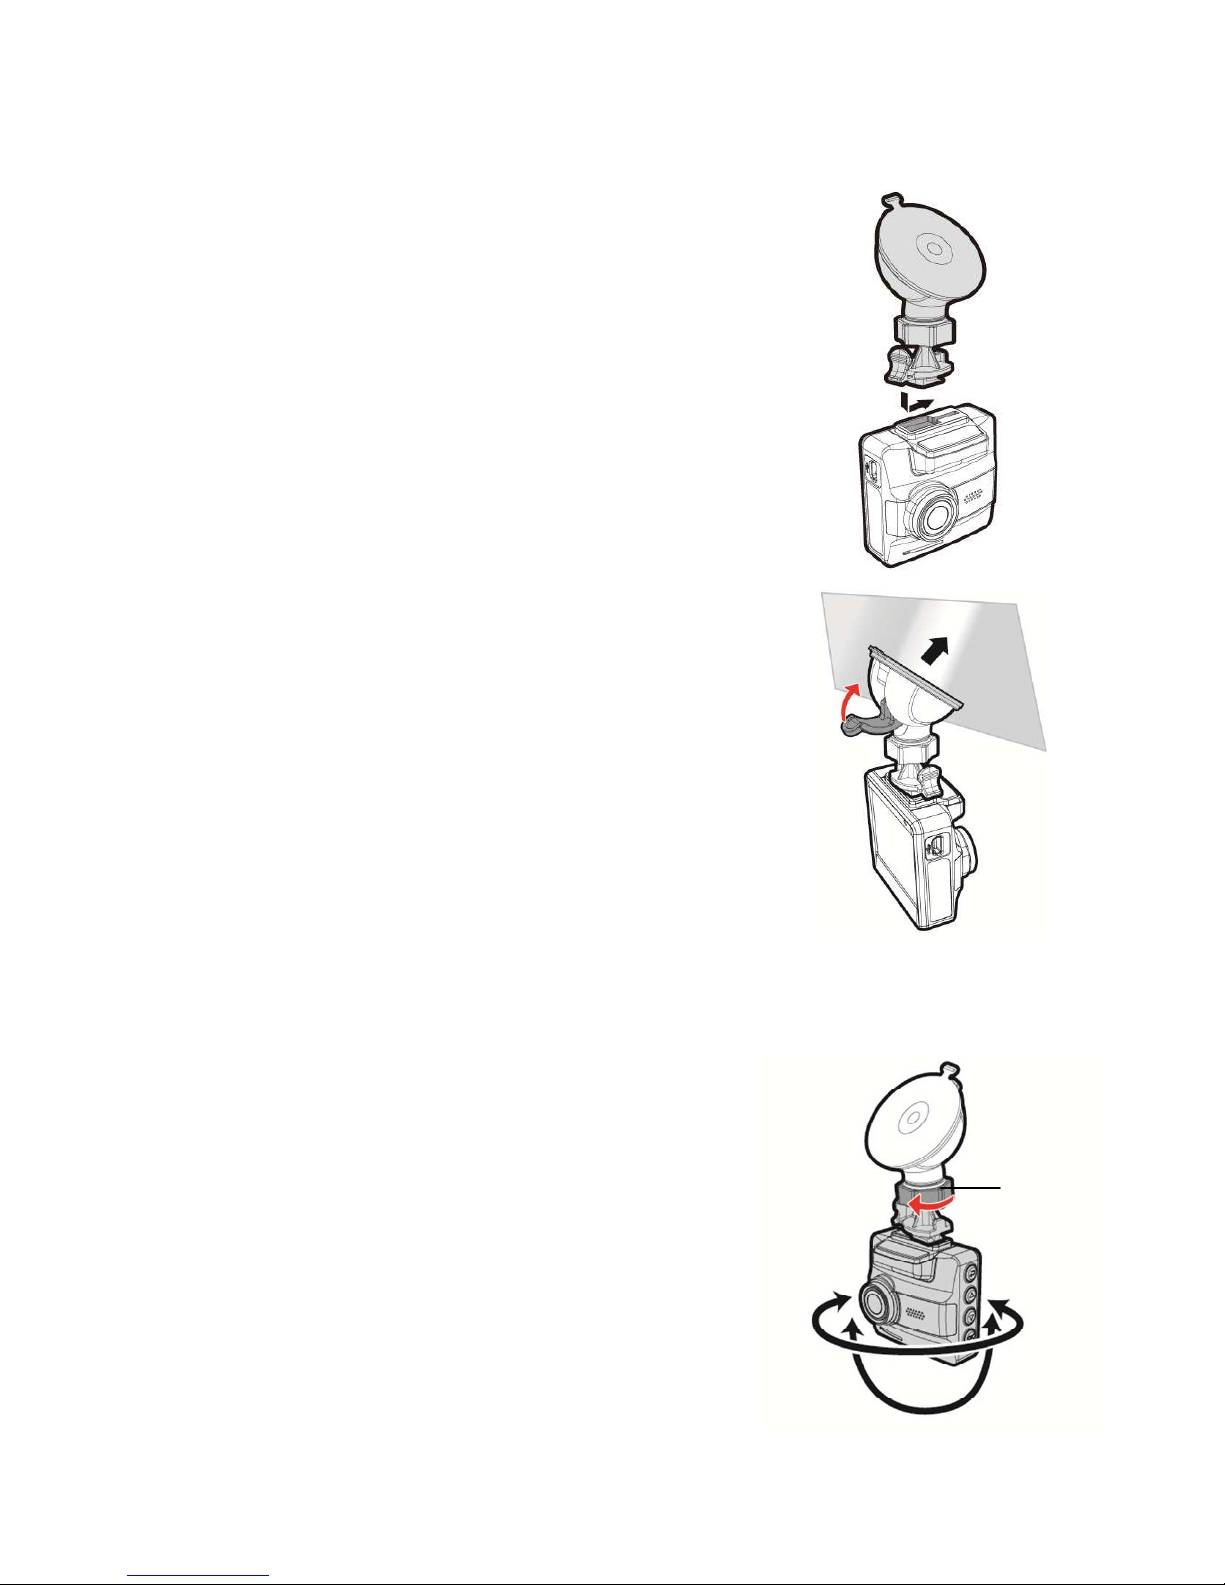
1. Attach the bracket to the camcorder.
Slide it into the bracket holder until you
hear a click.
2. Before installing the bracket, please use
alcohol to clean the windshield and
suction cup of the bracket. Wait for dry
and press suction-cup on the
windshield.
3. Hold the base firmly on the
windshield and press down the clamp to
mount the car holder to the windshield.
Make sure the base is securely locked in
place.
2.2.2 Adjust the camcorder position
1. Loose the knob to swivel the
camcorder vertically or horizontally.
2. Then tighten the knob to make sure
the camcorder is securely locked in
place.
Knob
Page 7
6
2.3 Connecting to Power
Use only the attached power connector for activating the camcorder
and charging the built-in battery.
1. Connect one end of power connector to USB/Power connector
port on the camcorder. USB port input: DC 5V / 1A.
2. Plug the other end of the car adapter to the cigarette lighter
socket of your vehicle. Once the vehicle engine is started, the
camcorder automatically turns on. Car charger input: DC 12 /
24V.
Note:
This camcorder shall be installed near the rear view mirror, at the center and top of
windshield for optimal viewing.
Page 8

7
2.4 Powering the Camcorder On / Off
2.4.1 Auto Power On/Off
Once the vehicle engine is started, the camcorder automatically turns
on. If the Automatic Record function is enabled, the recording will
automatically start right after the camcorder turns on.
2.5 Initial Settings
Before using the camcorder, we recommend you to set up the correct
Date and Time and Automatic Record.
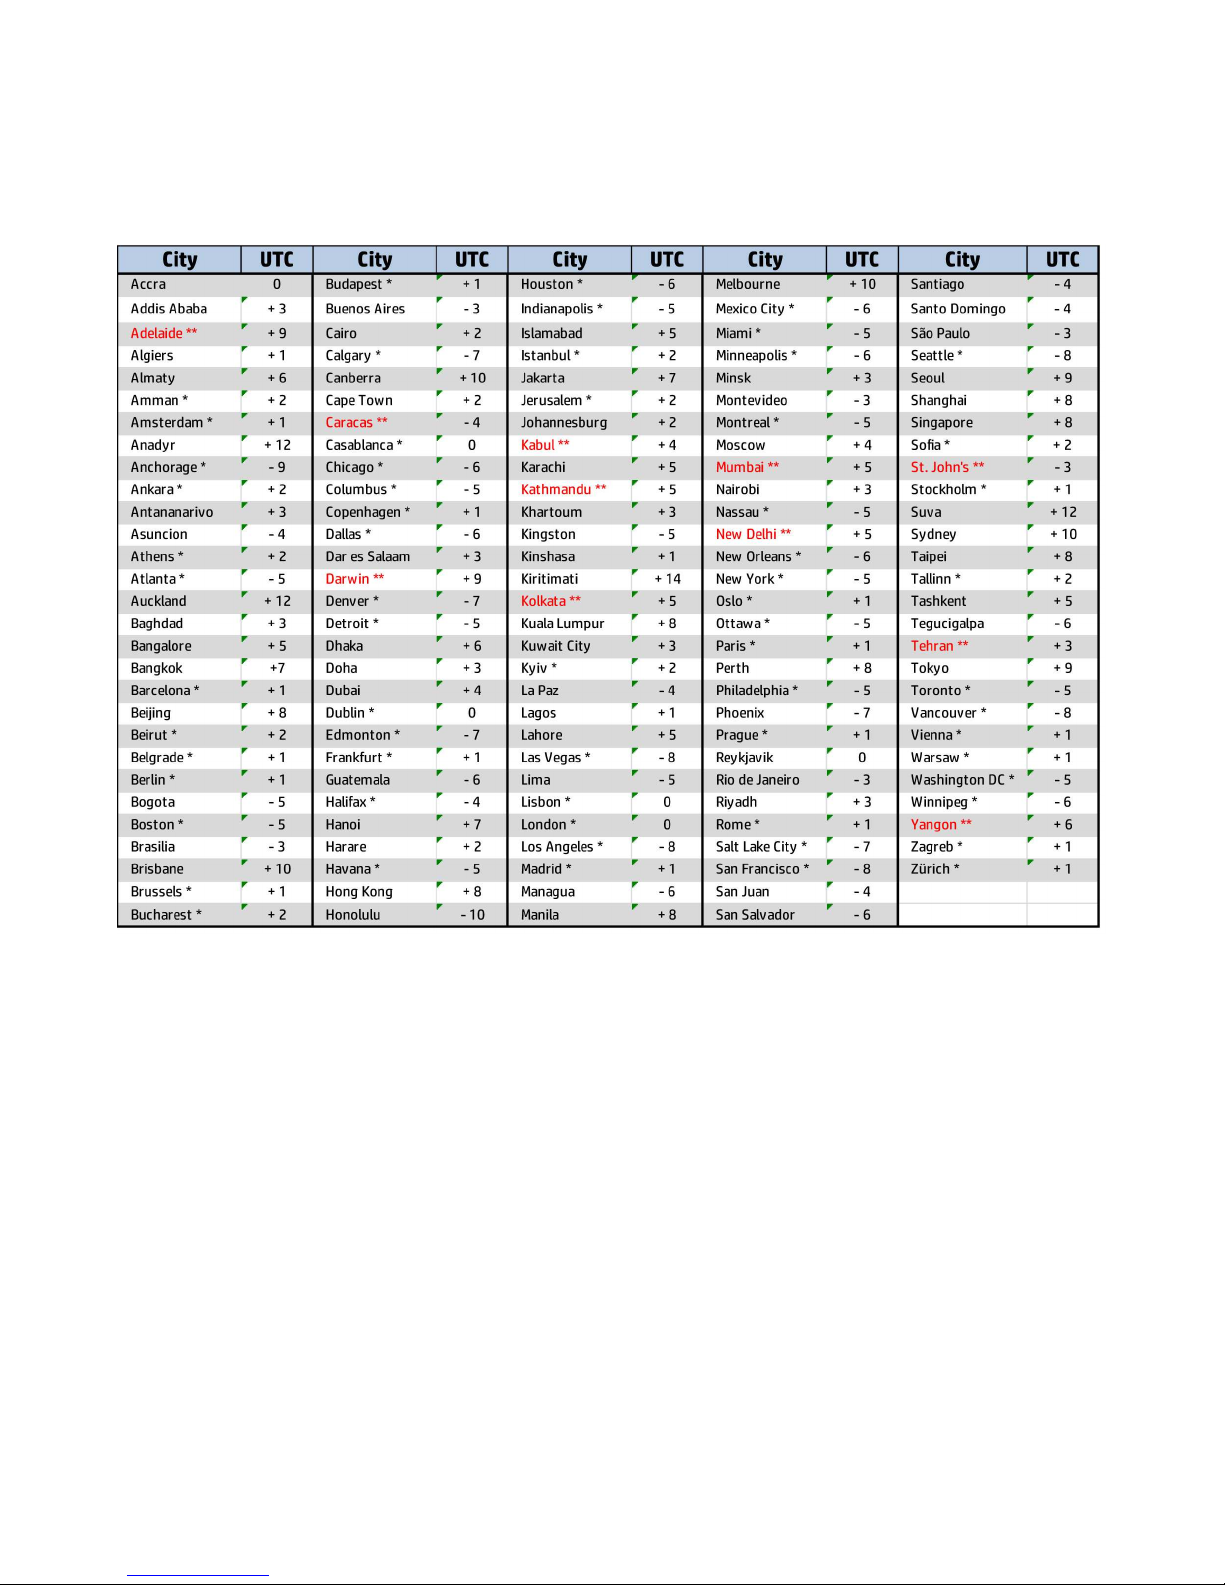
2.5.1 Setting the Universal Time Code (UTC)
Depending on your location, you may need to change the current UTC
setting of the camcorder so that the correct date and time are
updated when a GPS signal is detected.
1. If recording is in progress, press the button to stop
recording.
2. Press the button to open the OSD menu.
3. Use the
or buttons to navigate to the Satellite
Synchronization option and press the OK button. Ensure that
the On setting is selected and press the OK button again to view
the UTC setting.
4. Refer to the UTC Map below and use the or button to
select the desired setting and press the OK button to confirm
the setting.
5. Press the button to exit the menu.
Page 9
8
* Be sure to adjust for daylight saving time (DST) by adding +1 hour to
the UTC offset.
** These areas may observe half hour increments and daylight saving
time (DST).
Page 10

9
3 Using the Car Camcorder
3.1 Recording Videos
3.1.1 Record videos while driving
When the vehicle engine starts up and the Automatic Record function
is enabled, the camcorder automatically turns on and starts recording.
Recording stops and shut down after the engine is switched off.
Note:
On some cars, the recording will continue when the engine is switched off. If this
happens, please manually turn off the cigarette lighter or remove the car adapter
from the cigarette lighter.
3.1.2 Emergency Recording
To start Emergency Recording, do the following:
1. During the recording period,
press the button to enter
emergency recording mode.
The wordings, “Emergency”,
will be displayed on the top
right-hand corner of the
display screen. Files that are
saved during the emergency
recording mode will be
protected.
2. Press the
to stop recording immediately.
Page 11

10
3.1.3 Driving Safety
Menu Item Description
LDWS
Once your car’s location is determined by GPS and
the LDWS function is enabled, this product
produces voice and screen message alerts when
you drive off of or change lanes at speeds over 50
km/h (31 mile/h).
FCWS
Once your car’s location is determined by GPS and
the FCWS function is enabled, this product
produces voice and screen message alerts when
you drive at speeds over 60 km/h (37 mile/h) and
are less than 20m away from the car in front of
you.
FCMD
Once your car’s location is determined by GPS and
the FCMD function is enabled, this product starts
to detect the motion of cars in front of you after
your car remains motionless for 20 seconds. It
produces voice and screen message alerts when
the movement of the car in front of you changes
its images in the camera.
Collision
Detection
Activate/suspend use of the collision detection
function. Emergency recording will be activated
automatically when any collision is detected.
Parking Mode To monitor the vehicle when it is parked.
Speed Cam Alert
This product begins emergency recording once it
detects any vibrations caused by a collision.
Note:
The speed cam alert function must have
the speed cam datum from the country you use.
The function will be void if the product are used
Page 12
11
Menu Item Description
in any others countries. Please consult with the
shop you purchased if the function is void. The
product never guarantee the speed cam datum
will be included for the worldwide countries.
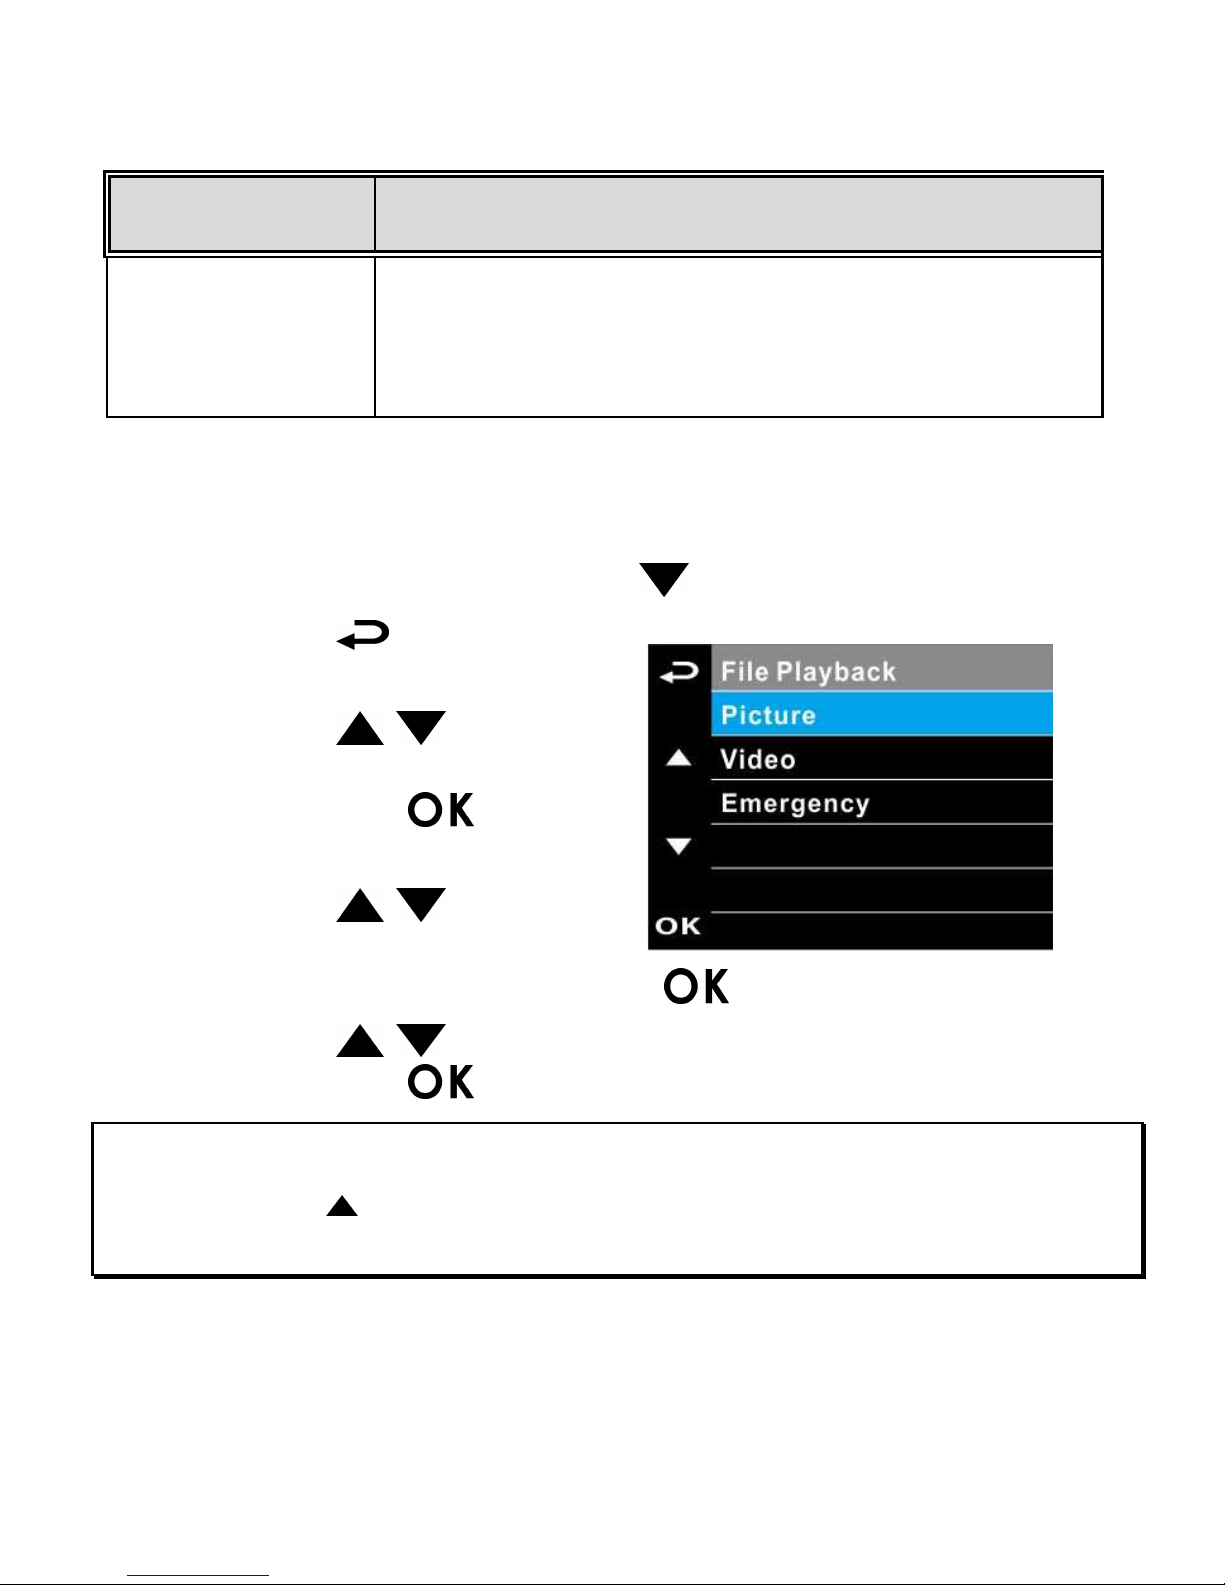
3.2 Playback Videos and Photos
If recording is in progress, press the button to stop recording.
1. Press the button to
enter the OSD menu.
2. Press the / button,
select the File Playback and
then press the
button.
3. Press the / button,
select the file type that you
wish to view, and then press the
button.
4. Press the
/ button to view the previous/next file and
then press the
button to view the file on full screen.
Note:
You can press the button from the standby screen and directly enter the playback
mode. The final recoding will be shown on the screen.
Page 13

12
3.2.1 Deleting Files
If recording is in progress, press the button to stop recording.
1. Press the button to enter
the OSD menu.
2. Press the / button, select
“File Deletion”, and press the
button.
3. Press the / button, select
file type and press the
button.
4. Press the / button, select
the file that you wish to delete
and then press the button
to enter the deletion menu.
5. Press the / button to
select an item.
Item Description
Delete One Delete the current file.
Delete All Delete all files.
6. Press the button, please confirm deletion.
Note:
Deleted files cannot be restored. Please ensure that files have been backed up before
deleting.
Page 14

1
電池注意事項
電池注意事項電池注意事項
電池注意事項
嚴禁拆解、撞擊、穿刺、擠壓電池,或使電池短路。請勿將電池
放置於高溫環境中,若電池出現漏液或鼓脹,請勿繼續使用。
請務必使用本系統進行充電。未正確處理電池或更換不正確之電
池型式會有引發爆炸的風險。
請將電池放在孩童拿不到的地方。
電池接觸明火可能會引起爆炸,請勿將電池丟棄到火中。
嚴禁自行更換電池
嚴禁自行更換電池嚴禁自行更換電池
嚴禁自行更換電池,,,,欲更換電池請洽經銷商
欲更換電池請洽經銷商欲更換電池請洽經銷商
欲更換電池請洽經銷商。
。。
。
請根據當地法規妥善處理使用過的電池。
安裝須知
安裝須知安裝須知
安裝須知
1.
本產品應安裝在靠近後視鏡之處,並盡量趨近於前擋風玻璃中央
位置,以獲得最佳的視野。
2.
確定鏡頭是在檔風玻璃雨刷的範圍內,確保視野良好,即使雨天
亦然。
3.
不要用手指碰觸鏡頭。手指上的油垢可能會留在鏡頭上,導致錄
像或攝影不清楚。定期清潔鏡頭。
4.
不要將產品安裝在有色車窗上。因為這樣會損壞淺色薄膜。
5.
確定安裝位置不會受有色車窗的阻礙。
6.
本產品僅適用產品所附之電源連接器,請勿使用其他廠牌以免設
備燒毀或導致電池爆炸。
欲瞭解更多的操作訊息
欲瞭解更多的操作訊息欲瞭解更多的操作訊息
欲瞭解更多的操作訊息,
,,
,請參閱
請參閱請參閱
請參閱 CD-ROM。
。。
。
Page 15

2
1 導論
導論導論
導論
1.1 包裝
包裝包裝
包裝內容
內容內容
內容
以下為包裝內容物。若有任何遺漏或損壞項目,請立即聯絡您的經
銷商,外觀請依內容物實際狀況為主。
行車記錄器 快速使用手冊
光碟 托架 電源連接器
Page 16

3
1.2 產品概要
產品概要產品概要
產品概要
編號
編號編號
編號
項目
項目項目
項目
編號
編號編號
編號
項目
項目項目
項目
1
托架插孔
8
輸入按鈕 ( )
2
電源開關
9
衛星定位天線
3
記憶卡插槽
10
揚聲器
4
USB / 電源連接孔
11
廣角鏡頭
5
返回按鈕 (
)
12
麥克風
6
向上按鈕 (
)
13
LED 指示燈
7
向下按鈕 (
)
14
螢幕
8
9
10
4
5
7
6
1
2
3
11
12
13
14
Page 17

4
2 開始
開始開始
開始
2.1 插入記憶卡
插入記憶卡插入記憶卡
插入記憶卡
將記憶卡之黃金接觸點面朝上,以及設備螢幕面朝上,如圖示插入
記憶卡。推入記憶卡直到咔嗒一聲,插入定位為止。
取出記憶卡
取出記憶卡取出記憶卡
取出記憶卡
推記憶卡,彈出插槽。
註註註註:
::
:
1. 設備在開機狀態時,不要取出或插入記憶卡,以免損壞記憶卡。
2. 請使用 Micro SD 卡等級 10 以上, 最高支援 32GB。
3. 使用前請先格式化 Micro SD 卡。
4. 取出記憶卡時,小心記憶卡快速彈出導致遺失記憶卡,此為記憶卡插槽
彈片特性,便於使用者易於取出。
Page 18

5
2.2 安裝於車內
安裝於車內安裝於車內
安裝於車內
2.2.1 固定在
固定在固定在
固定在擋風玻璃上
擋風玻璃上擋風玻璃上
擋風玻璃上
1. 將托架卡榫推入設備上方的托架插孔中,
直到聽到咔嗒聲固定。
2. 用酒精擦拭托架的吸盤及擋風玻璃至乾
淨,並等待酒精干透,將托架的吸盤輕壓
於擋風玻璃上,再按下托架的夾子固定
托架。
3. 確認托架已牢牢固定。
2.2.2 調整設備位置
調整設備位置調整設備位置
調整設備位置
1. 鬆開旋鈕,將設備垂直或水平方向
調整。
2. 鎖緊旋鈕,並確認設備已牢牢固
定。
旋鈕
Page 19

6
2.3 連接電源
連接電源連接電源
連接電源
限使用本設備所附之電源連接器,啟動設備以及充電。
1. 將電源連接器的一端連接到設備的 USB / 電源連接孔。電
源連接孔輸入直流電壓5V/1A。
2. 將電源連接器的另一端插接汽車內的點煙器的插孔。汽車引
擎一旦發動,設備即自動開機。車充輸入直流電壓
12/24V。
註註註註:
::
:
本設備應安裝在靠近後視鏡之處,並盡量趨近於前擋風玻璃正中央上方位
置,以獲得最佳的視野。
Page 20

7
2.4 設備開
設備開設備開
設備開////關
關關
關
2.4.1 自動開
自動開自動開
自動開/關
關關
關
汽車引擎一旦發動,則設備即自動開機。若啟動自動錄影
自動錄影自動錄影
自動錄影功能,則
在設備開機後,即開始自動錄影。
2.5 首次設定
首次設定首次設定
首次設定
在使用設備之前,我們建議先設定正確的日期與時間
日期與時間日期與時間
日期與時間,並啟動自動
自動自動
自動
錄影
錄影錄影
錄影功能。
2.5.1 設定通用時間碼
設定通用時間碼設定通用時間碼
設定通用時間碼 (UTC)
您可能要依據目前的所在位置,變更行車記錄器的 UTC 設定,以
便在偵測到 GPS 訊號時更新正確的日期和時間。
1. 若正在錄影,按下 按鈕停止錄影。
2. 按 按鈕開啟 OSD 功能表。
3. 使用
或 按鈕前往「衛星同步」選項,然後按「確
定」按鈕。確保選擇「開啟」設定值,然後再按一次「確定」
按鈕,查看 UTC 設定。
4. 請參閱下列 UTC 地圖,然後使用
或 按鈕選擇所需
的設定值,然後按「確定」按鈕確認設定。
5. 按 按鈕離開功能表。
Page 21

8
* 確保針對日光節約時間 (DST) 進行調整(在 UTC 時差上增加 1
小時)
** 這些區域可能有實施半小時增加單位以及日光節約時間 (DST)
Page 22

9
3 使用行車記錄器
使用行車記錄器使用行車記錄器
使用行車記錄器
3.1 錄影
錄影錄影
錄影
3.1.1 行駛中錄影
行駛中錄影行駛中錄影
行駛中錄影
當汽車引擎發動以及自動錄影
自動錄影自動錄影
自動錄影功能啟動時,設備會自動開機並開始
錄影。當引擎熄火時設備自動停止錄影並進行關機。
註註註註:
::
:
有些汽車當引擎熄火後仍會繼續錄影,若有這種情形請以手動方式關掉點
煙器或將電源連接器從點煙器拆下。
3.1.2 緊急錄影
緊急錄影緊急錄影
緊急錄影
啟動緊急錄影,其方式如下:
1. 在錄影中按壓 按鈕將會
進入緊急錄影模式,並於螢幕
右角會顯示 "緊急錄影" 字
樣,在緊急錄影模式中錄下的
檔案會被保護起來。
2. 按下 ▼ 即會停止錄影。
Page 23

10
3.1.3 行車安全
行車安全行車安全
行車安全
目錄選項
目錄選項目錄選項
目錄選項
說明
說明說明
說明
車道偏移警示
當衛星定位完成後,行車時速達 50 km/h (31
mile/h) 以上且偏離行駛車道或變換車道
時,設備會發出語音與警示畫面提醒。
前車車距警示
當衛星定位完成後,行車時速達
60 km/h (38
mile/h)
以上且與前方車距低於20公尺時,設
備會發出語音與警示畫面提醒。
前車起步警示
設備將在衛星定位完成且車輛處於靜止狀態
達 20 秒時啟動判定。當前方車輛移動使設
備偵測到鏡頭前的影像有所變化時,設備會
發出語音與警示畫面提醒。
碰撞偵測
當車輛發生碰撞並使設備感測到震動時,設
備會自動啟動緊急錄影。
停車模式
監控車輛停置時的狀況。
測速照相提示
當衛星定位完成且車輛接近測速照相機時,
設備會發出語音與警示畫面提醒。
註註註註:
: :
: 測速照相提示的功能必須具有該國或該
測速照相提示的功能必須具有該國或該測速照相提示的功能必須具有該國或該
測速照相提示的功能必須具有該國或該
地區的測速照相圖資
地區的測速照相圖資地區的測速照相圖資
地區的測速照相圖資,,,,若至其他國家或地區
若至其他國家或地區若至其他國家或地區
若至其他國家或地區
使用
使用使用
使用,,,,可能會造成此功能無法作用
可能會造成此功能無法作用可能會造成此功能無法作用
可能會造成此功能無法作用。。。。本產品
本產品本產品
本產品
不保證測速照相的圖資包含您所在的國家
不保證測速照相的圖資包含您所在的國家不保證測速照相的圖資包含您所在的國家
不保證測速照相的圖資包含您所在的國家,,,,
若功能無法使用請與當地經銷商確認
若功能無法使用請與當地經銷商確認若功能無法使用請與當地經銷商確認
若功能無法使用請與當地經銷商確認。。。。
Page 24

11
3.2 播放影片與照片
播放影片與照片播放影片與照片
播放影片與照片
若正在錄影,須先按 按鈕,停止錄影。
1. 按 按鈕,進入 OSD 目
錄。
2. 按 / 按鈕,選取檔案
播放,再按 按鈕。
3. 按 / 按鈕,選取您要
瀏覽的檔案類別,再按
按鈕。
4. 按 / 按鈕,檢視上一個/下一個檔案,再按 按
鈕,檢視全螢幕中檔案。
註
註註
註:
您可以從待機螢幕,按 ▲ 按鈕直接進入播放模式,最後的錄影會顯示在
螢幕上。
Page 25

12
3.2.1 檔案
檔案檔案
檔案刪除
刪除刪除
刪除
若正在錄影,須先按 按鈕,停
止錄影。
1. 按 按鈕,進入 OSD 目
錄。
2. 按 / 按鈕,選取檔案刪
檔案刪檔案刪
檔案刪
除
除除
除,再按 按鈕。
3. 按 / 按鈕,選取檔案類
別,再按 按鈕。
4. 按 / 按鈕,選取您想要
刪除的檔案,再按 按
鈕,進入刪除目錄。
5. 按 / 按鈕,選取一個選
項。
項目
項目項目
項目
說明
說明說明
說明
刪除單檔
刪除目前的檔案。
刪除全部
刪除全部檔案。
6. 按 按鈕,確認刪除。
註
註註
註:
刪除之檔案不能回復。刪除前請確認檔案留有備份。
Page 26

1
电池警告
电池警告电池警告
电池警告
禁止拆解、撞击、挤压或投入火中,切勿使电池短路。请勿将电池
放置于高温环境中,若出现严重鼓胀请勿继续使用。
请务必使用本系统进行充电。电池处置不当可能导致爆炸。
请将电池置于儿童无法触及之处。
电池暴露在明火下可能爆炸。处理电池时切勿放入火中。
切勿自行更换电池
切勿自行更换电池切勿自行更换电池
切勿自行更换电池,更换不当会有爆炸危险
更换不当会有爆炸危险更换不当会有爆炸危险
更换不当会有爆炸危险 ,请交由经销商进行更
请交由经销商进行更请交由经销商进行更
请交由经销商进行更
换。
换。换。
换。
请按照当地法规处理废电池。
安装需知
安装需知安装需知
安装需知
本产品应安装在靠近后视镜之处,并尽量接近前挡风玻璃正中央上
方位置,以获得最好的视野。
确定镜头是在挡风玻璃雨刷的范围内,确保视野良好,即使雨天也
同样好。
不要用手指触摸镜头。手指上的油脂可能会留在镜头上,导致摄像
或摄影不清楚。定期清洁镜头。
不要将产品安装在有色车窗上。因为这样会损坏浅色薄膜。
确定安装位置不会受有色车窗的阻碍。
本设备仅适用产品所附之电源适配器,请勿使用其他厂牌以免设备
烧毁或导致电池爆炸。
欲了解更多操作信息,请参阅
欲了解更多操作信息,请参阅欲了解更多操作信息,请参阅
欲了解更多操作信息,请参阅 CD-ROM。
。。
。
Page 27

2
1 介绍
介绍介绍
介绍
1.1 包
包包
包装
装装
装清
清清
清单
单单
单
以下为包装清单。如果有任何遗漏或损坏项目,请立即联系您的经
销商,外观请依内容物实际状况为主。
行车记录仪 快速入门手册
光盘 托架 电源适配器
Page 28

3
1.2 产品概要
产品概要产品概要
产品概要
编号
编号编号
编号
项目
项目项目
项目
编号
编号编号
编号 项目
项目项目
项目
1
托架插孔
8
输入按钮 ()
2
电源开关
9
卫星定位天线
3
存储卡插槽
10
扬声器
4
USB
/电源接孔
11
广角镜头
5
返回按钮 ()
12
麦克风
6
向上按钮 ()
13
LED 指示灯
7
向下按钮 ()
14
屏幕
8
9
10
4
5
7
6
1
2
3
11
12
13
14
Page 29

4
2 入门
入门入门
入门
2.1 插入
插入插入
插入存储卡
存储卡存储卡
存储卡
将存储卡之黄金接触点面朝上,以及设备屏幕面朝上,如图示插入
存储卡。推入存储卡直到咔嗒一声,插入定位为止。
取出存储卡
取出存储卡取出存储卡
取出存储卡
推存储卡,弹出插槽。
注注注注::::
1.
设备在开机状态时,不要取出或插入存储卡,以免损坏存储卡。
2.
请使用
Micro SD
卡等级
10
以上,最高支持
32GB
。
3.
使用前请先格式化
Micro SD
存储卡。
4.
取出存储卡时,小心存储卡快速弹出导致遗失存储卡,此为存储卡插槽具弹片
特性,便于使用者易于取出。
Page 30

5
2.2 安装在车内
安装在车内安装在车内
安装在车内
2.2.1 调整设备位置
调整设备位置调整设备位置
调整设备位置
1. 将托架卡榫推入设备上方的托架插孔中,
直到听到咔嗒声固定。
2. 用酒精擦试托架的吸盘及挡风玻璃, 并等
待酒精干透。 将托架的吸盘轻压于挡风玻
璃上,再按下托架的夹子固定托架。
3. 确认托架已牢牢固定。
2.2.2 调整设备位置
调整设备位置调整设备位置
调整设备位置
1. 松开旋钮,将设备垂直或水平方向调
整。
2. 锁紧旋钮,并确认设备已牢牢固定。
旋钮
Page 31

6
2.3 连接电源
连接电源连接电源
连接电源
限使用产品所附之电源适配器,启动设备以及充电。
1. 將电源适配器的一端連接到設備的 USB / 电源接孔。电源连
接孔输入直流电压5V/1A。
2. 将电源适配器的另一端插接汽车内的香烟点火器的插孔。汽车
引擎一旦发动,设备即自动开机。车充输入直流电压12/24V。
注注注注::::
本设备应安装在靠近后视镜之处,并尽量接近前挡风玻璃正中央上方位置,以获
得最好的视野。
Page 32

7
2.4 设备开
设备开设备开
设备开////关
关关
关
2.4.1 自动开
自动开自动开
自动开////关
关关
关
汽车引擎一旦发动,设备就自动开机。如果启动
自动摄像
自动摄像自动摄像
自动摄像
功能,
则在设备开机后,即开始自动摄像。
2.5 初始设置
初始设置初始设置
初始设置
在使用设备之前,在使用设备之前, 我们建议先设置正确的日期与
日期与日期与
日期与
时间
时间时间
时间, 并启动自动摄像
自动摄像自动摄像
自动摄像功能。
2.5.1 设置世界时间代码(
设置世界时间代码(设置世界时间代码(
设置世界时间代码(UTC)
))
)
根据您所在的位置,您可能需要更改行车记录仪的当前UTC设置,
以便在检测到GPS信号时更新正确的日期和时间。
1. 如果正在进行录制,请按 按钮停止录制。
2. 按
按钮打开OSD菜单。
3. 使用 或 按钮导航至 "卫星同步" 选项,并按 "确定"
(
)按钮。 确保选择 "开" 设置,并再次按 "确定" ()
按钮查看UTC设置。
4. 请参阅下面的UTC地图,使用
或 按钮选择所需设
置,并按 "确定"(
)按钮确认设置。
5. 按
按钮退出菜单。
Page 33

8
* 调整夏令时(DST)时,请确保向UTC偏差加1小时
** 以下地区可能需要向夏令时(DST)加半小时
Page 34

9
3 使用行车记录仪
使用行车记录仪使用行车记录仪
使用行车记录仪
3.1 摄像
摄像摄像
摄像
3.1.1 行驶中摄像
行驶中摄像行驶中摄像
行驶中摄像
当汽车引擎发动以及自动摄像
自动摄像自动摄像
自动摄像功能打开时,设备即自动开机并开始
摄像。当引擎熄火时设备自动停止摄像并进行关机。
注注注注::::
有些汽车当引擎熄火时还会继续摄像,若有此情况请以用手动方式关掉香烟点火
器,或将电源适配器从香烟点火器拆下。
3.1.2 紧急摄像
紧急摄像紧急摄像
紧急摄像
开启紧急摄像,其方式如下:
1. 在摄像中按压
按钮将会进入
紧急摄像模式,并于屏幕左上角
会显示"紧急摄像
紧急摄像紧急摄像
紧急摄像" 字样,在紧急
摄像模式中录下的文件会被保护
起来。
2. 按下 ▼ 即会停止摄像。
Page 35

10
3.1.3 行车安全
行车安全行车安全
行车安全
菜单选项
菜单选项菜单选项
菜单选项 说明
说明说明
说明
车道偏移侦测
当卫星定位完成后,行车时速达 50
km/h (31 mile/h) 以上且偏离行驶车道
或变换车道时,设备会发出提示音与警
示画面提醒。
前车车距侦测
当卫星定位完成后,行车时速达
60
km/h (37 mile/h)
以上且与前方车距低
于
20
米时,设备会发出语音与警示画
面提醒。
前车发动警示音
设备将在卫星定位完成且车辆处于静止
状态达 20 秒时启动判定。当前方车辆
移动使设备侦测到镜头前的影像有所变
化时,设备会发出语音与警示画面提醒。
碰撞侦测
当车辆发生碰撞并使设备感测到震动
时,设备会自动启动紧急摄像。
停车模式
备监控车辆停置时的状况。
测速照相提示
当车辆接近测速照相机时,系统发出警
示音。
注:测速照相提示的功能必须具有该国
注:测速照相提示的功能必须具有该国注:测速照相提示的功能必须具有该国
注:测速照相提示的功能必须具有该国
或该地区的测速照相图资,若至其他国
或该地区的测速照相图资,若至其他国或该地区的测速照相图资,若至其他国
或该地区的测速照相图资,若至其他国
Page 36

11
菜单选项
菜单选项菜单选项
菜单选项 说明
说明说明
说明
家或地区使用,可能造成此功能无法作
家或地区使用,可能造成此功能无法作家或地区使用,可能造成此功能无法作
家或地区使用,可能造成此功能无法作
用。本产品不保证测速照相的图资包含
用。本产品不保证测速照相的图资包含用。本产品不保证测速照相的图资包含
用。本产品不保证测速照相的图资包含
您所在的国家,若功能无法使用请与当
您所在的国家,若功能无法使用请与当您所在的国家,若功能无法使用请与当
您所在的国家,若功能无法使用请与当
地经销商确认。
地经销商确认。地经销商确认。
地经销商确认。
3.2 播放
播放播放
播放视频
视频视频
视频与照片
与照片与照片
与照片
如果正在摄像,需先按 按钮,停止摄像。
1. 按 按钮,进入 OSD 菜单。
2. 按 / 按钮,选取档案播
放,再按 按钮。
3. 按 / 按钮,选取您要浏
览的档案类别,再按 按
钮。
4. 按
/ 按钮,检视上一个/下一个档案,再按 按钮,
检视全屏幕中档案。
注注注注::::
您可以从待机屏幕,按 ▲ 按钮直接进入播放模式,最后的录影会显示在屏幕上。
Page 37

12
3.2.1 文件删除
文件删除文件删除
文件删除
如果正在摄像,需先按 按钮,
停止摄像。
1. 按 按钮,进入 OSD 菜单。
2. 按 / 按钮,选取文件删
除,再按 按钮。
3. 按 / 按钮,选取文件类
型,再按 按钮。
4. 按 / 按钮,选取您想要
删除的文件,再按 按钮,
进入删除菜单。
5. 按 / 按钮,选取一个选
项。
项目
项目项目
项目 说明
说明说明
说明
删除单档 删除目前的文件。
删除全部 删除全部文件。
6. 按 按钮,确认删除。
注注注注::::
删除的文件不能恢复。删除前确保文件留有备份。
 Loading...