

Page 1

HP ePrint Enterprise
Administration Guide
Release 4.0
Page 2

© Copyright 2010, 2011-2015 HewlettPackard Development Company, L.P.
Microsoft, Windows, Windows Server 2003,
Windows Server 2003 R2, Windows Server
2008, Windows Server 2008 R2, Windows
Server 2012, and Windows Server 2012 R2 are
U.S. registered trademarks of Microsoft
Corporation in the United States and/or other
countries.
BlackBerry®, RIM®, Research In Motion®,
SureType® and related trademarks, names and
logos are the property of Research In Motion
Limited and are registered and/or used in the
U.S. and countries around the world. Used
under license from Research In Motion Limited.
iPhone® and iPad® are registered trademarks
of Apple Inc.
Android™ is a trademark of Google Inc.
Good, Good Technology, Good Dynamics, and
Good for Enterprise are trademarks of Good
Technology Corporation and its related
entities.
January 2015
Confidential computer software. Valid license
from HP required for possession, use or
copying. Consistent with FAR 12.211 and
12.212, Commercial Computer Software,
Computer Software Documentation, and
Technical Data for Commercial Items are
licensed to the U.S. Government under
vendor's standard commercial license.
The information contained herein is subject to
change without notice. The only warranties for
HP products and services are set forth in the
express warranty statements accompanying
such products and services. Nothing herein
should be construed as constituting an
additional warranty. HP shall not be liable for
technical or editorial errors or omissions
contained herein.
Page 3

Table of contents
1 Introduction .................................................................................................................................................. 1
1.1 Login ................................................................................................................................................................ 1
2 Home section ................................................................................................................................................ 2
2.1 Overview Screen .............................................................................................................................................. 2
2.1.1 Main menu .................................................................................................................................. 2
2.1.2 Core Services Condition ............................................................................................................. 3
2.1.3 Jobs currently being processed ................................................................................................. 3
2.1.4 Last hour’s failed, cancelled, or filtered (not printed) jobs ....................................................... 3
2.1.5 Messages being processed ........................................................................................................ 3
2.1.6 Failed messages ......................................................................................................................... 3
2.1.7 Metrics from yesterday: Jobs per printer .................................................................................. 3
3 Manage printers ............................................................................................................................................ 4
3.1 View and Manage Printers ............................................................................................................................... 4
3.1.1 Batch permission assignment ................................................................................................... 5
3.1.2 Batch host assignment .............................................................................................................. 5
3.1.3 Adding/editing printers .............................................................................................................. 5
3.1.3.1 Name ..................................................................................................................... 6
3.1.3.2 Model name .......................................................................................................... 6
3.1.3.3 External ID (edit mode only) ................................................................................. 6
3.1.3.4 HP ePrint Enterprise Host ..................................................................................... 7
3.1.3.5 Printer Account (edit mode only) ......................................................................... 7
3.1.3.6 Address type ......................................................................................................... 7
3.1.3.7 Network address .................................................................................................. 7
3.1.3.8 Active .................................................................................................................... 7
3.1.3.9 Status .................................................................................................................... 7
3.1.3.10 Family ................................................................................................................. 7
3.1.3.11 Paper size ........................................................................................................... 7
3.1.3.12 Personality ......................................................................................................... 8
3.1.3.13 Capabilities ......................................................................................................... 8
3.1.3.14 Job Retention ...................................................................................................... 8
3.1.3.15 Print .................................................................................................................... 8
3.1.3.16 Permission .......................................................................................................... 8
3.1.3.17 Location Details .................................................................................................. 8
3.1.4 Deleting printers ........................................................................................................................ 9
iii
Page 4

3.2 Import Printers ................................................................................................................................................ 9
3.2.1 Controlling batch inserts and updates with ExternalID .......................................................... 10
3.2.2 Empty versus non-existent fields ........................................................................................... 10
3.3 Export Printers .............................................................................................................................................. 10
3.4 Manage Printer Properties ............................................................................................................................ 11
3.5 Adding Secure Pull Printing ........................................................................................................................... 12
3.5.1 Identifying users in a secure pull print scenario ..................................................................... 14
3.5.1.1 Controlling PJL attribute names ........................................................................ 15
3.6 Adding Job Retention feature ....................................................................................................................... 15
4 Manage Wi-Fi Printing .................................................................................................................................. 17
4.1 Add Wi-Fi Bridge user account ...................................................................................................................... 17
4.2 View and Manage Bridges ............................................................................................................................. 18
4.2.1 Bridge Details ........................................................................................................................... 18
4.2.1.1 Name ................................................................................................................... 18
4.2.1.2 Enabled ............................................................................................................... 18
4.2.1.3 User Account ....................................................................................................... 18
4.2.1.4 User Tag .............................................................................................................. 18
4.2.1.5 Create .................................................................................................................. 18
4.2.1.6 Update ................................................................................................................ 18
4.2.1.7 Delete .................................................................................................................. 18
4.2.1.8 Clear .................................................................................................................... 19
4.3 View and manage groups .............................................................................................................................. 19
4.3.1 Group Details ............................................................................................................................ 19
4.3.1.1 Name ................................................................................................................... 19
4.3.1.2 Enabled ............................................................................................................... 19
4.3.1.3 Guest Username and Password ......................................................................... 19
4.3.1.4 Show Username .................................................................................................. 19
4.3.1.5 Update ................................................................................................................ 19
4.3.1.6 Clear .................................................................................................................... 19
4.3.1.7 Delete .................................................................................................................. 20
4.3.2 Associate Groups to Bridges .................................................................................................... 20
4.3.3 Associate Printers to Groups ................................................................................................... 20
4.3.3.1 Printers Associated ............................................................................................ 21
4.3.3.2 Printers available for Association ...................................................................... 21
4.4 View and Manage Printers ............................................................................................................................. 21
5 Manage hosts .............................................................................................................................................. 22
5.1 View and Manage Hosts ................................................................................................................................ 22
5.1.1 Host details .............................................................................................................................. 23
5.1.1.1 Hostname ........................................................................................................... 23
iv
Page 5

5.1.1.2 Port number ........................................................................................................ 23
5.1.1.3 SMTP account ..................................................................................................... 23
5.1.1.4 Version ................................................................................................................ 23
5.1.1.5 Notes ................................................................................................................... 23
5.1.2 Host cleanup ............................................................................................................................ 23
5.1.3 Deleting hosts .......................................................................................................................... 23
6 Managing users ........................................................................................................................................... 24
6.1 View and Manage Users ................................................................................................................................. 24
6.1.1 User Account details ................................................................................................................ 24
6.1.1.1 Email Account ..................................................................................................... 24
6.1.1.2 NT User Account (edit mode only) ...................................................................... 24
6.1.1.3 User Group .......................................................................................................... 24
6.1.1.4 PIN ....................................................................................................................... 25
6.1.1.5 Locale .................................................................................................................. 25
6.1.1.6 Password ............................................................................................................ 25
6.1.1.7 Password Tip ...................................................................................................... 25
6.1.1.8 Active .................................................................................................................. 25
6.1.1.9 Auto-suspend ..................................................................................................... 25
6.1.1.10 Active On ........................................................................................................... 25
6.1.1.11 Suspend On ....................................................................................................... 26
6.1.2 Deleting users .......................................................................................................................... 26
6.1.3 Import Users ............................................................................................................................. 26
6.1.4 Provision settings .................................................................................................................... 27
6.1.4.1 Auto provision .................................................................................................... 27
6.1.4.2 Synchronize user accounts ................................................................................ 27
7 Manage services and data ............................................................................................................................ 29
7.1 Service Settings ............................................................................................................................................. 29
7.1.1 Load configuration file ............................................................................................................. 29
7.2 Security Realm ............................................................................................................................................... 29
7.3 LDAP Configuration setting ........................................................................................................................... 30
7.3.1 Server settings ......................................................................................................................... 31
7.3.1.1 Host name ........................................................................................................... 31
7.3.1.2 Port ..................................................................................................................... 31
7.3.1.3 Using Secure Connection (SSL) ........................................................................... 31
7.3.1.4 Protocol Version ................................................................................................. 32
7.3.1.5 Authentication .................................................................................................... 32
7.3.1.6 Verify connection ................................................................................................ 32
7.3.2 Server attributes ...................................................................................................................... 32
7.3.2.1 User Object Classes ............................................................................................ 32
v
Page 6

7.3.2.2 User Principal Name attribute ............................................................................ 32
7.3.2.3 User Email attribute ........................................................................................... 32
7.3.2.4 Group Member attribute ..................................................................................... 32
7.3.2.5 User Locale attribute .......................................................................................... 32
7.3.3 Search rules .............................................................................................................................. 32
7.3.3.1 User root Distinguished Name ........................................................................... 32
7.3.3.2 Additional filter ................................................................................................... 33
7.3.3.3 Search scope ....................................................................................................... 33
7.4 Usage Data Cleanup ...................................................................................................................................... 33
7.5 Job submission test ....................................................................................................................................... 33
7.6 Manage License ............................................................................................................................................. 34
7.6.1 Encrypted ID ............................................................................................................................. 35
7.6.2 Add License .............................................................................................................................. 35
7.6.3 License Summary ..................................................................................................................... 35
8 Manage mobile clients ................................................................................................................................. 36
8.1 Push Configurations (Blackberry specific) .................................................................................................... 36
8.1.1 Search recipients ...................................................................................................................... 36
8.1.2 Select recipients (users) .......................................................................................................... 36
8.1.3 Type recipients (groups) .......................................................................................................... 36
8.1.4 Push configurations ................................................................................................................. 36
9 Email printing ............................................................................................................................................. 37
10 Events and Tracking ................................................................................................................................... 38
10.1 Track jobs .................................................................................................................................................... 38
10.2 Track messages ........................................................................................................................................... 38
10.3 Track events ................................................................................................................................................ 39
11 Reports ..................................................................................................................................................... 41
11.1 Metrics Report ............................................................................................................................................. 41
12 New API configuration ................................................................................................................................ 42
12.1 Introduction ................................................................................................................................................. 42
12.2 API configuration ......................................................................................................................................... 42
12.2.1 DirectoryInformation (cloudprint.settings.xml) ................................................................... 42
12.2.1.1 DirectoryId ........................................................................................................ 42
12.2.1.2 DirectoryName ................................................................................................. 42
12.2.1.3 SelectableAttachments .................................................................................... 42
12.2.1.4 PrintEmailBody ................................................................................................. 42
vi
Page 7

12.2.1.5 BrandName ....................................................................................................... 42
12.2.1.6 DisclaimerDisplay ............................................................................................. 43
12.2.1.7 SecureConnections ........................................................................................... 43
12.2.2 Web application Configuration (web.config) ......................................................................... 43
12.2.2.1 httpRuntime ..................................................................................................... 43
12.2.2.2 system.serviceModel ....................................................................................... 43
12.3 Secure communications .............................................................................................................................. 43
12.3.1 HP ePrint Enterprise — Service Settings .............................................................................. 43
12.3.2 HP ePrint Enterprise — Host Details ..................................................................................... 44
12.3.3 HP ePrint Enterprise — web.config ....................................................................................... 45
12.3.4 HP ePrint Enterprise client configuration ............................................................................. 45
12.4 Disclaimers .................................................................................................................................................. 45
12.5 Messages ..................................................................................................................................................... 46
vii
Page 8

List of figures
Figure 1-1 Login screen ........................................................................................................................................................ 1
Figure 2-1 Overview Screen .................................................................................................................................................. 2
Figure 3-1 View and Manage Printers screen ....................................................................................................................... 4
Figure 3-2 Add new printer ................................................................................................................................................... 6
Figure 3-3 Import Printers tool .......................................................................................................................................... 10
Figure 3-4 Export Printers tool .......................................................................................................................................... 11
Figure 3-5 Manage Printer Properties ................................................................................................................................ 12
Figure 3-6 Secure Pull Print settings, example ................................................................................................................. 13
Figure 3-7 Manually providing user NT account ................................................................................................................ 14
Figure 3-8 Job Retention, example .................................................................................................................................... 16
Figure 4-1 Add new user ..................................................................................................................................................... 17
Figure 4-2 Wi-Fi Bridge configuration ................................................................................................................................ 18
Figure 4-3 Wi-Fi group configuration ................................................................................................................................. 19
Figure 4-4 Associate groups to bridges ............................................................................................................................. 20
Figure 4-5 Associate printers to groups ............................................................................................................................ 20
Figure 4-6 View and manage printers ................................................................................................................................ 21
Figure 5-1 Host search and editing screen ........................................................................................................................ 22
Figure 6-1 User search and editing screen ......................................................................................................................... 24
Figure 6-2 Add User Account for Regular user ................................................................................................................... 25
Figure 6-3 Import Users ...................................................................................................................................................... 26
Figure 6-4 Provision settings ............................................................................................................................................. 27
Figure 7-1 Security Realm .................................................................................................................................................. 30
Figure 7-2 Validation of Administrator user account ........................................................................................................ 30
Figure 7-3 LDAP Configuration setting .............................................................................................................................. 31
Figure 7-4 Usage data cleanup ........................................................................................................................................... 33
Figure 7-5 Job submission test .......................................................................................................................................... 34
Figure 7-6 License Information .......................................................................................................................................... 34
Figure 8-1 Push configurations tool with port ................................................................................................................... 36
Figure 9-1 Edit a printer screen .......................................................................................................................................... 37
Figure 10-1 Track jobs screen ............................................................................................................................................ 38
Figure 10-2 Track messages screen .................................................................................................................................. 39
Figure 10-3 Track events screen ........................................................................................................................................ 40
Figure 11-1 Metrics Report ................................................................................................................................................. 41
Figure 12-1 Service Settings .............................................................................................................................................. 44
Figure 12-2 Host details ..................................................................................................................................................... 45
Figure 12-3 Binding configuration ..................................................................................................................................... 45
viii
Page 9

Figure 12-4 Default disclaimers ......................................................................................................................................... 46
Figure 12-5 Adding messages ............................................................................................................................................ 46
ix
Page 10

x
Page 11
1Introduction
This guide provides an overview of the tasks that can be performed using the HP ePrint Enterprise
Administration tool. The HP ePrint Enterprise Administration tool is accessed as follows:
●
●
1.1 Login
This is the main access point for the Administration UI. After entering the default URL in web browser, the
system redirects the user to the Login screen.
Default Login name is "admin@hp.com" and Password is "admin". If password is forgotten, a password tip is
available by clicking Forgot Password.
Figure 1-1 Login screen
If Enhanced security was selected during installation, use
If Backward compatibility with low security was selected during installation, use
cloudprintadmin/
https://<hostserver>/cloudprintadmin/
http://<hostserver>/
NOTE: If upgrading from HP ePrint Enterprise 3.0 or earlier, log in with the admin credentials used during
data export. Make sure to manually change the credentials of other administrators.
Section 1.1 Login 1
Page 12
2Home section
2.1 Overview Screen
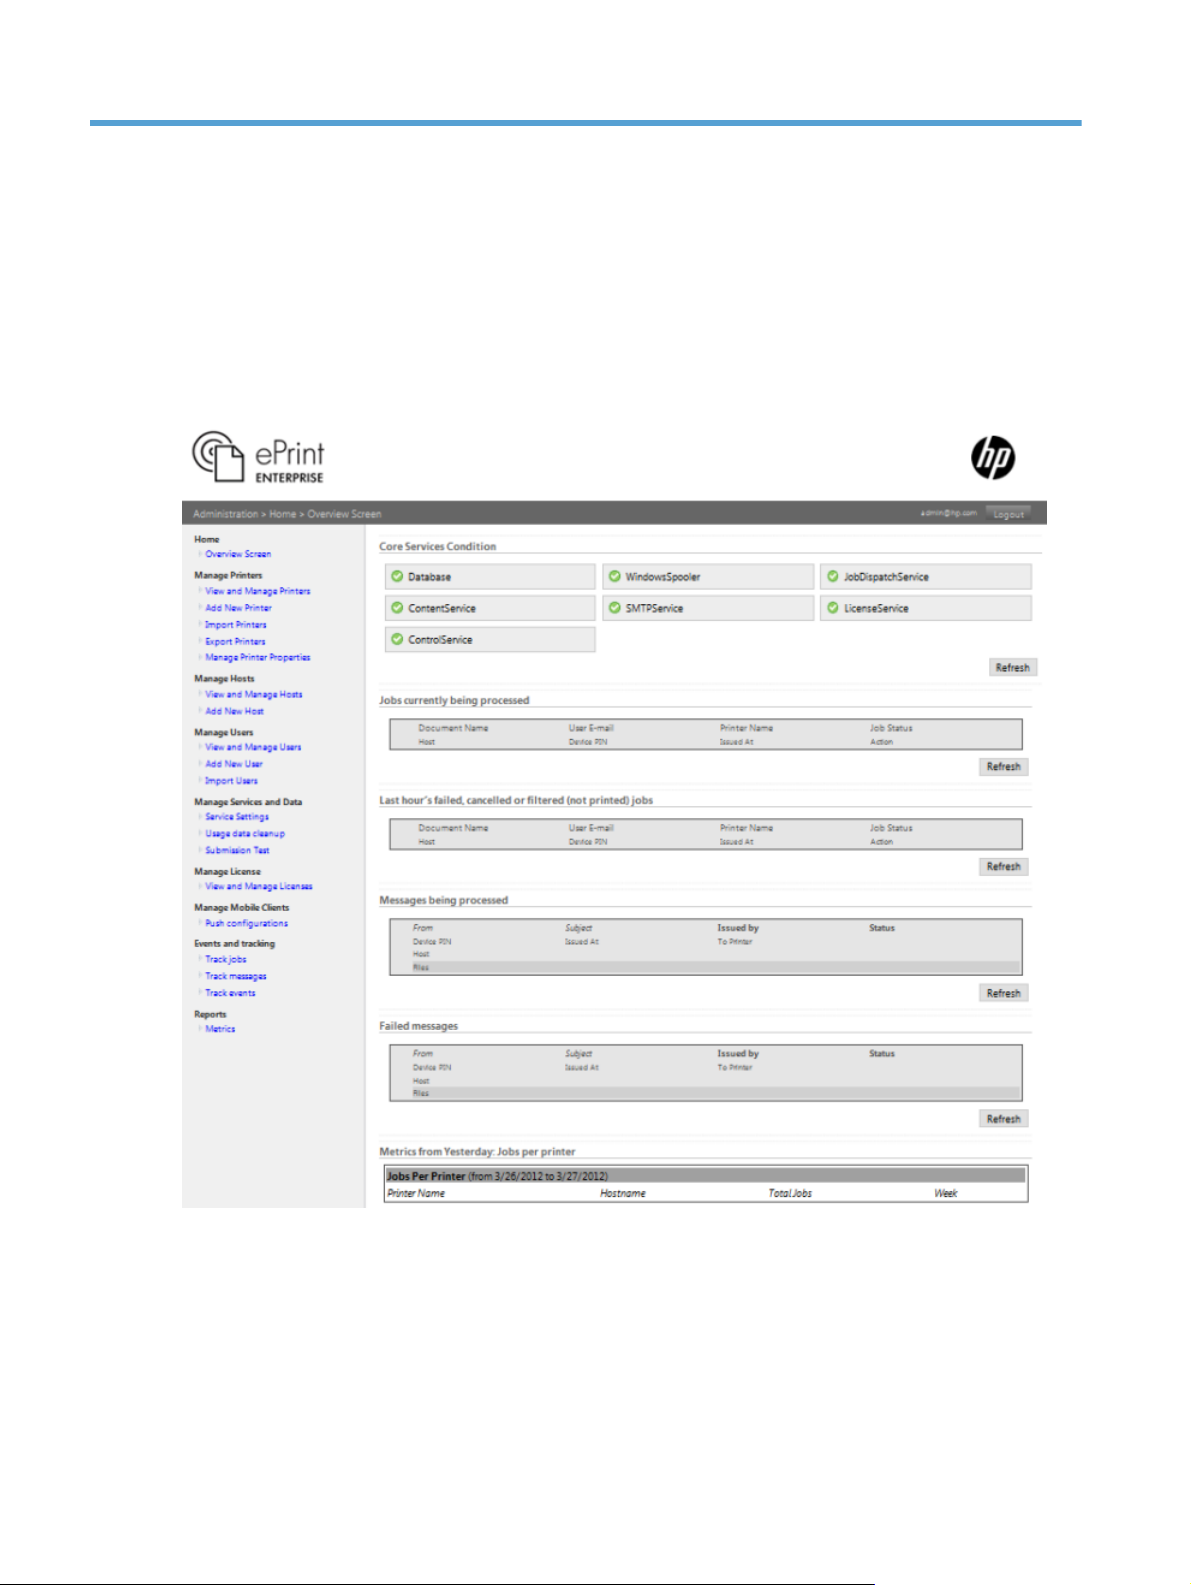
The Overview Screen shows how HP ePrint Enterprise is performing its functions. It also contains links to
other administration tasks such as adding users, printers, service settings, etc.
Figure 2-1 Overview Screen
The sections which follow provide a brief description of the Overview Screen components.
2.1.1 Main menu
The Main menu contains options to perform maintenance tasks on system tables such as Add and View, and
also includes some reports. Each menu entry is discussed later in this document.
2 Chapter 2 Home section
Page 13

2.1.2 Core Services Condition
The Core Services Condition panel provides an overview of the current state of HP ePrint Enterprise services.
A red mark next to a service name indicates that the service is unavailable or has been suspended. Note that
if any of the Core Services are suspended, print requests will fail.
The following list of Windows services are mapped to the Services listed in the Core Services Condition window.
Windows services Core Services Condition window
SQL Server Database
PrinterSpooler WindowSpooler
HP CloudPrint Service Host JobDispatcherService
HP CloudPrint Content Service ContentService
Simple Mail Transfer Protocol SMTPService
HP CloudPrint License Service LicenseService
HP CloudPrint Control Service ControlService
2.1.3 Jobs currently being processed
Displays current jobs submitted to HP ePrint Enterprise. The user can refresh this window to see an updated
status.
2.1.4 Last hour’s failed, cancelled, or filtered (not printed) jobs
Any print submission that fails will display in this window.
2.1.5 Messages being processed
Displays messages submitted during the last 15 minutes.
2.1.6 Failed messages
Displays messages that failed during the last 15 minutes.
2.1.7 Metrics from yesterday: Jobs per printer
Displays a consolidated report of jobs submitted to a specific printer.
Section 2.1 Overview Screen 3
Page 14
3 Manage printers
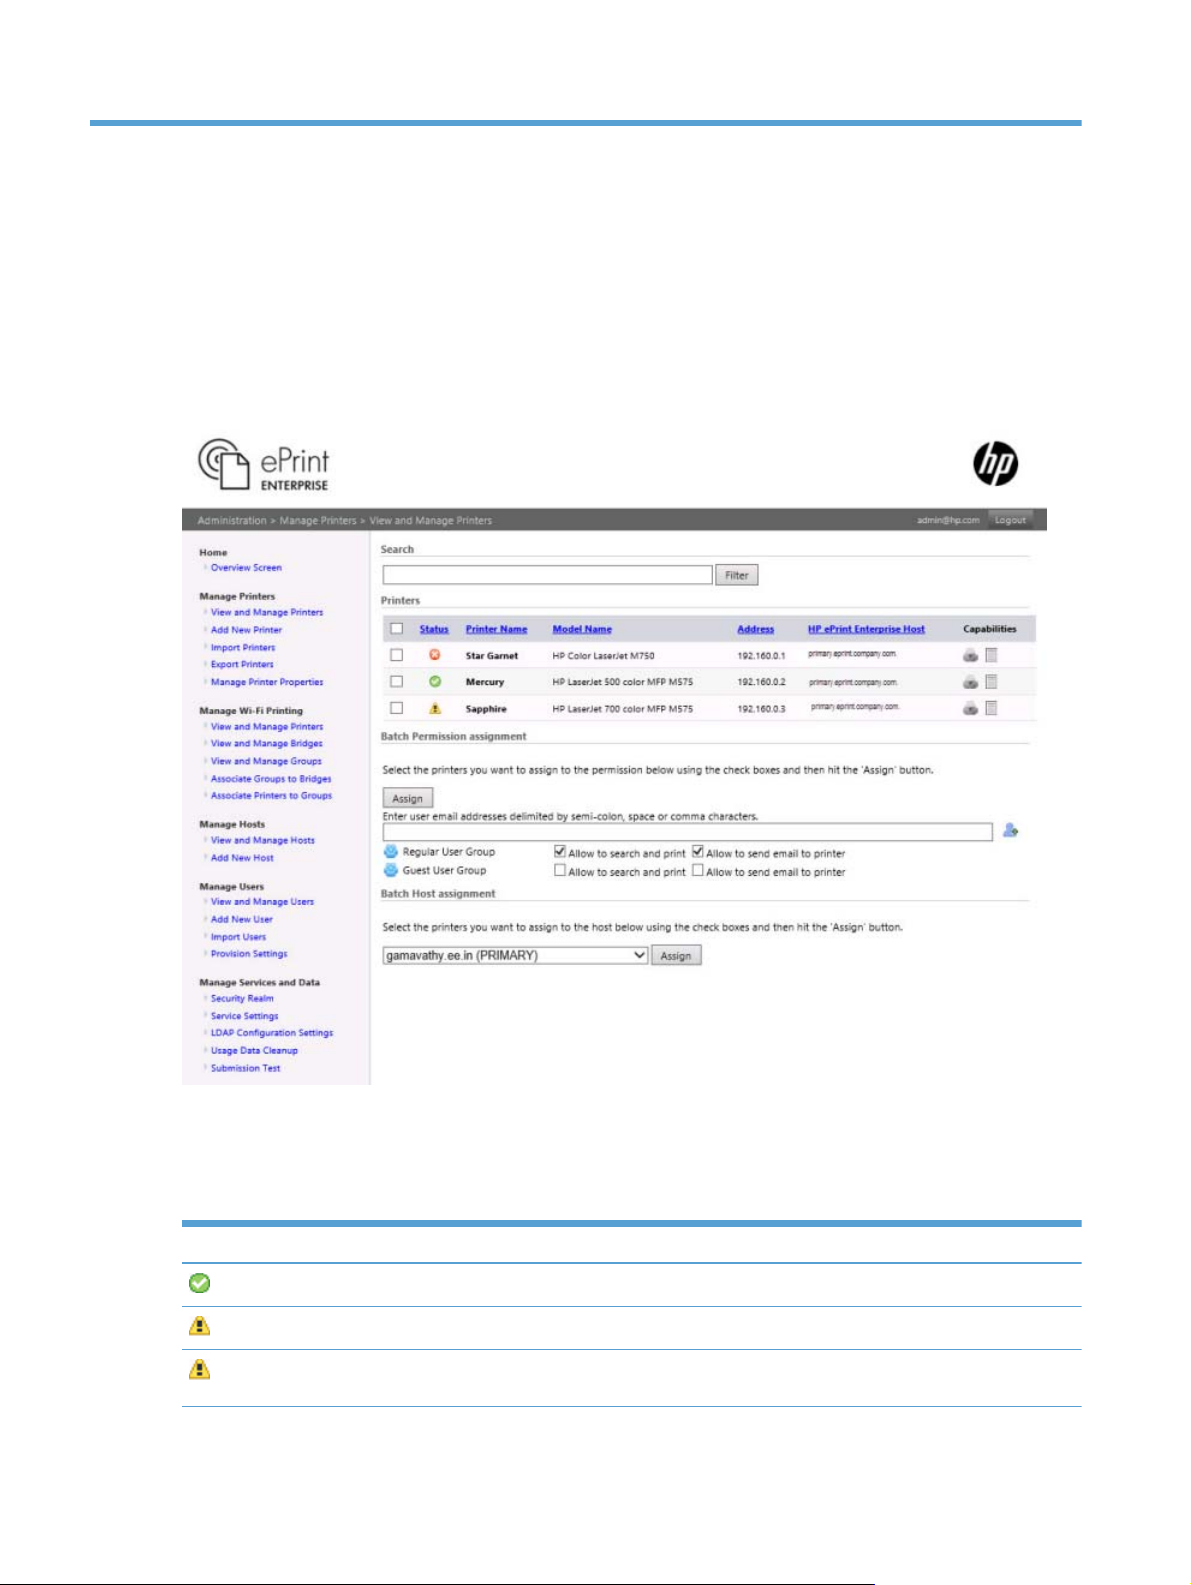
3.1 View and Manage Printers
This screen shows all printers that have been added to the system. The list can be filtered by using the
Search box. Searches are performed on all displayed columns.
Figure 3-1 View and Manage Printers screen
Click on the table row to edit a specific printer. You can point the mouse over the Address and HP ePrint
Enterprise Host column to see the Fully Qualified Domain Name (FQDN).
The status icon reflects the printer’s current state.
Table 3-1 Printer statuses
Icon Status Description
4 Chapter 3 Manage printers
Ready Printer is ready to accept jobs.
Busy Printer is processing a job.
User Intervention Printer needs user assistance due to an error condition (paper
jam, out of paper, out of toner, etc.).
Page 15

Table 3-1 Printer statuses (continued)
Unavailable Printer is not ready to accept jobs.
Unknown Printer status cannot be determined at this time.
3.1.1 Batch permission assignment
This tool assists in assigning permissions to one or more selected printers. Permissions (or access policies)
are assigned to user groups or user accounts. Current access policies are subjected to allow/deny access to a
printer. Select the required permissions to be assigned against each of the user groups/accounts and then
click the Assign button.
3.1.2 Batch host assignment
This tool assists in assigning a group of printers to a specific HP ePrint Enterprise Host. Printers are assigned
against a primary or secondary instance to manage load balance. Select the printers to be assigned and then
click the Assign button.
3.1.3 Adding/editing printers
Click a row on the View and Manage Printers screen to redirect to the printer editing form, or select Add New
Printer on the Main menu to add a new printer.
Section 3.1 View and Manage Printers 5
Page 16
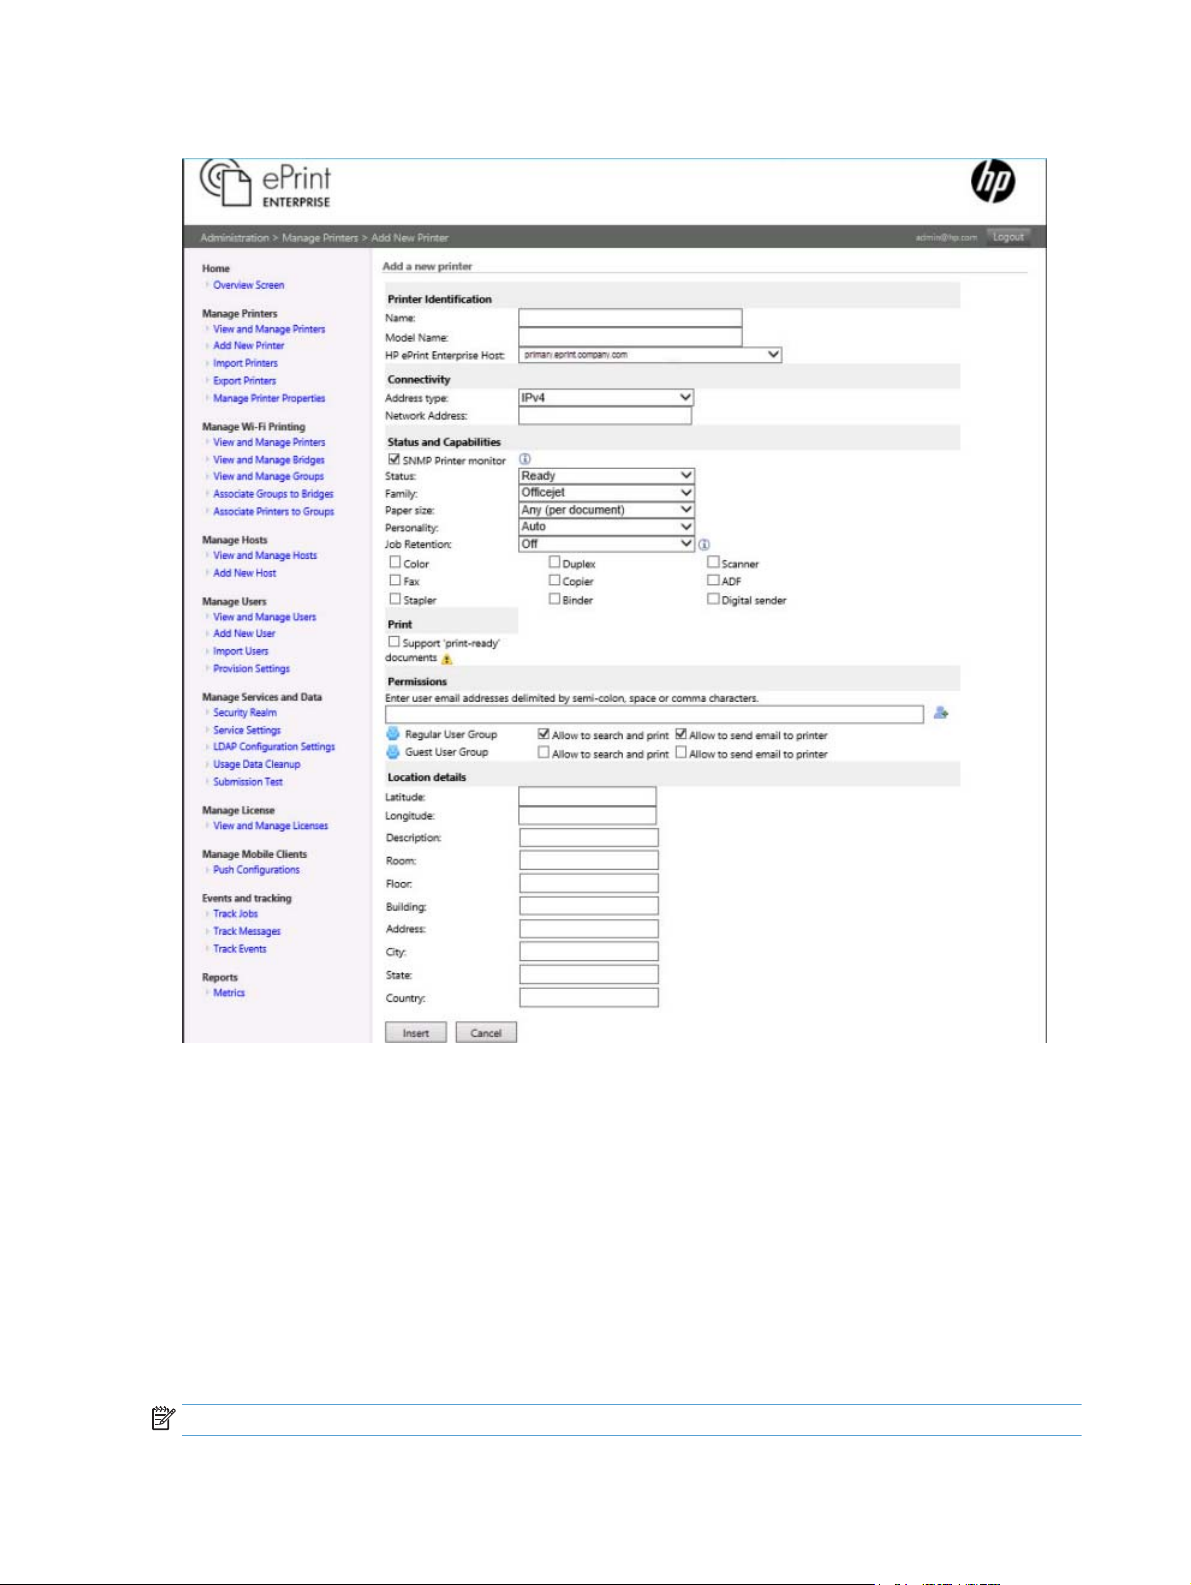
Figure 3-2 Add new printer
3.1.3.1 Name
The name used to identify this printer on the system. A friendly description is recommended. Use an easily
identifiable name.
3.1.3.2 Model name
The model name of the printer.
3.1.3.3 External ID (edit mode only)
This field is used by Import/Export routines to update printer information. The system automatically
generates this identification in the form ep + printer identifier (e.g., ep1). For more information on how to use
and manage the external ID field, see the Import Printers section of this guide.
NOTE: External ID must be unique.
6 Chapter 3 Manage printers
Page 17

3.1.3.4 HP ePrint Enterprise Host
The HP ePrint Enterprise host to which the job will be sent. Jobs are processed by the assigned primary or
secondary instance.
3.1.3.5 Printer Account (edit mode only)
This information is used by the email printing mechanism to identify the printer in the directory. The system
automatically generates this information based on the PrinterAccountPrefix setting (set in the settings
configuration file) + printer identifier. For more information, see the Email printing section of this guide. The
Printer Account value can modified to a more appropriate / friendly value when editing the printer account.
NOTE: Printer Account value must be unique.
3.1.3.6 Address type
Represents the printer address type, which can be a network node (IPv4) or a print queue/secure pull print
queue. It is important to note that a printer queue also has an IPv4 address, representing the server where
the queue is located.
3.1.3.7 Network address
Represents the network address where this printer is located.
●
Queue Name (print queue and secure pull print type only) - The queue name that identifies the
printer on the print server.
●
●
●
3.1.3.8 Active
Only printers marked as active can have submit jobs. To temporarily disable a printer, unmark this option.
Suspended or inactive printers are not listed in search results on mobile devices.
3.1.3.9 Status
Status information is automatically updated by the HP ePrint Enterprise Printer Monitor service. If a printer is
down, it gets suspended and won’t be listed in printer search.
Optionally, printer status can be manually set to “Unavailable” so that it won’t be listed in search results.
3.1.3.10 Family
This field represents the printer family type, and enhances printer search capabilities. A printer family
association strengthens rendering capabilities to the driver family to which they belong.
3.1.3.11 Paper size
Use Domain Credentials (print queue and secure pull print type only) - Mark this option to use the
Domain User/Password credentials for network authentication.
Domain User (print queue and secure pull type print only) - The user in DOMAIN\user format used
to access the print queue resource.
Domain Password (print queue and secure pull print type only) - The domain password used by
the user to access the print queue.
This field represents the paper size used by this printer, assisting printer search / printing capabilities.
Section 3.1 View and Manage Printers 7
Page 18

3.1.3.12 Personality
This field dictates the printer language (PCL or PS) to be used by the driver when sending jobs to this printer.
HP recommends using either PCL5/PCL6 or PS option.
3.1.3.13 Capabilities
Capabilities are based on properties added in Manage Printer Properties. All properties listed here will
impact printer search results based on key words named in Properties.
Alternatively, Color and Duplex properties apply print preferences for a printer. When Color is unchecked,
documents are printed in black and white. Similarly, when Duplex is checked, print preference is set to bind
mode (Long edge/short edge depending on page orientation).
3.1.3.14 Job Retention
Job Retention dictates printer job storage mode (Off, PIN Printing - Personal Job, PIN Printing – Stored Job) to
be used by the driver when sending jobs to this printer.
This feature is supported for network node (IPv4) or print queue, but not for secure pull print. Because of
variances in PJL across printer manufacturers, this feature works best with HP printer devices.
3.1.3.15 Print
This feature leverages IPv4 printer’s ready-to-print capability to render print jobs. Document content of jobs
submitted to printer accounts with ready-to-print capability are pushed directly to printer port without HP
CloudPrint driver intervention to render document. Using this feature the printer has a built-in capability to
render document content, therefore speeding up the print process and processing cost (involving Memory
usage / Performance of printer driver in the server).
Limited file formats are supported. By default, PDF and txt file formats are enabled as supported file
formats. To avoid unexpected print behavior, the administrator must carefully consider appropriate file
formats. Optionally, the supported file format can be confirmed through the embedded web server pages of
the printer (supported by most HP printers).
3.1.3.16 Permission
Permission settings dictate user permissions for printer accounts. By default, Regular users are allowed to
search and print jobs and send email to any printer account in HP ePrint Enterprise. Guest Users are denied
the same. Administrator should override default permissions for Guest users, to enable search, print, and
email features.
Permissions can also be set for a batch of users identified by their email address. For instance, we can
reserve printers (i.e., a printer in a lobby) for Guest users by selectively controlling permissions from
submitting print jobs to those printers.
3.1.3.17 Location Details
Location details are based on locations added to Manage Printer Properties.
Latitude — Defines geographic coordinate primary reference points in reference to north-south poles from
the Equator (0). In reference to the equator, a plus sign (+) denotes northern hemisphere, and a minus sign (-)
the southern hemisphere.
Example: Greenland, with latitude of 64 N degrees , has a required value of +64.
Longitude — Defines geographic coordinate specifying east-west position of a point with respect to the
meridian. A plus sign (+) denotes east longitude or the prime meridian, and a minus sign (-) denotes west
longitude or 180° meridian (opposite of the prime meridian).
8 Chapter 3 Manage printers
Page 19

Example: Greenland, with longitude of 51 W degrees, has a required value of -54.
3.1.4 Deleting printers
Click an existing printer on the View and Manage Printers screen and then click Delete. The printer can be
deleted if it no longer exists in the network.
NOTE: This action cannot be reversed. A new printer cannot be added with the same external ID. The
external ID for a printer is unique and cannot be assigned to any other printer. HP ePrint Enterprise does not
delete the printer account permanently from database, but only marks it as deleted.
3.2 Import Printers
The Import Printers tool allows adding printers in batch mode and updating their information in the database. This tool supports two file types:
●
.csv - comma-separated text file, for generic import/export.
●
.xls - Excel spreadsheet, specifically targeted at FIS (Fleet Information Sheet) file format. FIS files
contain standard HP data maintained under MPS (Managed Print Service) contracts.
This chapter describes the functionality of importing and exporting .csv files only.
NOTE: The first line of the file is the header line. This line is mandatory. Its format should reflect the printer
attributes. This header can be generated by using the HP ePrint Enterprise Printer Export tool.
The following is a .csv file header example. Each field is preceded by a qualification prefix:
[P]ExternalID,[P]Name,[P]ModelName,[P]InterfaceType,[I]NETADDIPV4,
[I]QUEUE,[P]CloudPrintHost,[L]Description,[L]Room,[L]Floor,[L]Building,
[C]Color,[C]Duplex,[J]Jobretention, [P]Permission, [P]ReadyToPrint
[P] — Refers to Printer main fields. You have no control on the naming for P-type fields, so only the following
strings can be used:
●
Mandatory: ExternalID, Name, ModelName, InterfaceType
●
Optional: CloudPrintHost, Latitude, Longitude, PaperSize, Personality, Family, AccountName,
Permisson, ReadyToPrint
[I] — Refers to printer Interface description fields. You have no control on the naming for I-type fields, so
only the following strings can be used:
●
Mandatory: NETADDIPV4, QUEUE
●
Optional: USER
[L] — Refers to printer Location tags. You do have control of the naming for L-type fields. If an existing field
name is provided, data will be attributed to the existing field. If a nonexistent field name is provided, a new
location tag will be created for all printers in the database. None of the location tag fields are mandatory.
[C] — Refers to printer Capability tags. You do have control of the naming for C-type fields. If an existing field
name is provided, data will be attributed to the existing field. If a nonexistent field name is provided, a new
capability tag will be created for all printers in the database. None of the capability tag fields are mandatory.
[J] — Refers to Job retention tag. You have no control over the naming of J-type fields. Only the following
strings can be used:
Section 3.2 Import Printers 9
Page 20

●
Off
●
PIN Printing - Personal Job
●
PIN Printing - Stored Job
To import printers, select the file to be imported and click Proceed. The import process validates the record
values, and respective success / error messages are emailed to the logged in user.
Figure 3-3 Import Printers tool
NOTE: Only ANSI characters with comma separated values files are supported for .csv extension. Field
values with spaces should be escaped with quotes (“”).
3.2.1 Controlling batch inserts and updates with ExternalID
The ExternalID field controls the behavior of inserting or updating printer records in the database. Since the
ExternalID is a mandatory header, a given printer record may fall into one of three categories:
●
Empty ExternalID — The record that contains no data for the ExternalID field means the printer
will be INSERTED in the database. If no ExternalID is provided, one is automatically assigned (“ep”
prefix + a sequential number, e.g., “eg1”). Be careful with empty ExternalIDs, as running imports
with empty ExternalIDs more than once will replicate printer records.
●
Non-existent ExternalID — The record that indicates a new ExternalID is INSERTED as a new
printer in the database, and the provided ExternalID is used.
●
Existent ExternalID — The record that indicates an ExternalID already exists in the database will
be UPDATED with the provided fields, since the ExternalID is unique.
3.2.2 Empty versus non-existent fields
When importing files with records falling in the third category (existent ExternalID) an update will occur. In
this scenario, information contained in configured fields can either be changed or deleted.
For any field, if the provided value is EMPTY the existing information will be deleted in the database for that
printer record field. However, if the field is mandatory (e.g., if you provide an empty NETADDIPV4) importing
the record will fail.
For optional fields, if field is not listed in import header the existing / current information will remain
unchanged.
3.3 Export Printers
The Export Printers tool is used to save the system printers to a comma separated value file. The main
purpose is to create a printer list backup, helping in later setup procedures, and to provide a template for
populating and importing additional printer information.
You can update the order in which fields will appear in the file by using the Move Up and Move Down buttons
for the Selected Fields list.
10 Chapter 3 Manage printers
Page 21

NOTE: The first line contains fields to assist printer import. Some fields are mandatory and must remain
selected.
Figure 3-4 Export Printers tool
Click Download to start the Export process. If there are any errors during the export process, an error
message displays in the Results panel. If the export completes successfully, the user can download/copy the
exported printers. In addition to downloading the files, there is an option to receive the exported printers via
email to the logged-in user. To receive this email notification, select the Receive exported printers through
email to the login email address check box.
3.4 Manage Printer Properties
The Manage Printer Properties screen defines the Printer Capabilities and Printer location tags that are
available on the Printer Editing form. Custom tags can be added to display in the View and Manage Printers
section, allowing them to add search criteria fields. The order and relevance of searches performed can be
updated using the Distance field for Printer location tags.
Section 3.4 Manage Printer Properties 11
Page 22

Figure 3-5 Manage Printer Properties
3.5 Adding Secure Pull Printing
Secure Pull Printing is implemented by separate solutions that accept print jobs through regular Windows
queues, and release these jobs at the printer on demand. Addressing a secure pull print queue (instead of a
physical printer) is just a matter of choosing the right connectivity and protocol parameters.
To insert a reference to a secure pull print queue, add a regular printer (with free name and description
information) and set the connectivity parameters with the following values:
●
Address type: Choose Secure pull print (PJL), Secure pull print (LPD/LPRng), or Secure pull print
(HPAC).
●
Network Address: Address of the secure pull print server.
●
Queue Name: Address of the secure pull print server.
●
Use domain credentials: Check this option if the secure queue requires authentication.
●
Domain user: Domain name of the user authorized to print on this secure queue.
●
Domain password: User password.
12 Chapter 3 Manage printers
Page 23

Figure 3-6 Secure Pull Print settings, example
HP ePrint Enterprise has been tested with the commercial pull print solutions listed below. Each requires a
specific Address Type in the connectivity parameters:
Secure Pull Print (HP AC)
●
HPACSPPE v14.0
●
Securejet Enterprise Server v7.0
NOTE: To successfully integrate HP ePrint Enterprise with Securejet, select the printer account personality
as ‘Auto.’
Secure pull print (LPD/LPRng)
●
Ringdale FollowMe® v6.0.4.6
●
VPSX Enterprise Output Management (x64) Release V1R1.0.079
NOTE: Complete the following changes in ePE Server:
●
Open the registry.
●
Go to the hive HKLM\SOFTWARE\Hewlett-Packard\HP Cloudprint.
●
Create a key of REG_DWORD type with the name DeferredLPD and set the value to 1.
VPSX will work with printer account personalities PCL5/PCL6 and PostScript. VPSX will not work with Auto
personality.
Secure pull print (PJL)
●
SafeCom G4.05
●
Pharos Blueprint® Enterprise 5.1.7838.0
●
Nuance Equitrac Express Server v4.2.3.5370
●
Papercut MF v14.2
●
Papercut NG v14.2
Section 3.5 Adding Secure Pull Printing 13
Page 24

NOTE: Complete the following changes in Papercut MF/NG Server:
●
Open the configuration file: “<Install Folder>\providers\print\win\print-provider.conf”
●
Locate the following lines in the file:
#Extract from spool files coming from our enterprise system.
#Look for a header that matches @PJL COMMENT SAP_USER="john.wayne"
●
Add the content below the following lines:
UsernameOverridePrefix=@PJL SET ePrintUsername = "
UsernameOverrideSuffix="
3.5.1 Identifying users in a secure pull print scenario
Secure pull printing guarantees only the verifiable owner of a job is capable of retrieving it at the printer. To
do so, the secure pull print solution must ask for credentials at the printer (through a PIN, password, badge,
etc.). Since the HP ePrint Enterprise server is run by a central service account, the true sender of the job must
be identified in the job package so that the secure queue can determine its real owner.
This is managed by HP ePrint Enterprise in two ways:
1. PJL headers containing user identification (DOMAIN\username) and email address.
2. LPRng protocol
Each of these solutions will embed user information (DOMAIN\user) that is automatically retrieved from the
company’s LDAP Directory – when available. If such mechanism is not available or functional for whatever
reason, domain user identification can be manually inserted with the standard user form. See the Managing
Users section of this guide.
Figure 3-7 Manually providing user NT account
14 Chapter 3 Manage printers
Page 25

3.5.1.1 Controlling PJL attribute names
Each secure pull print solution may demand that user information be tagged according to its own attribute
names in the PJL headers. In order to control how to identify the username and email address for a given
user, three system settings are available.
To access these settings, reach to %ALLUSERSPROFILE%\Application Data\Hewlett-Packard\HP CloudPrint
\conf\cloudprint.settings.xml and locate RenderService.RenderService group.
System settings attribute names:
●
PullPrintPJLemail - Identifies the user email. Default: ePrintEmail.
●
PullPrintPJLfullaccount - Identifies the full account (domain\username). Default:
ePrintNTAccount.
●
PullPrintPJLusername - Identifies just the username (no domain). Default: ePrintUsername.
Using default values and sample user previously mentioned, a print job header set to use the PJL attributes
would look like this:
%-12345X@PJL SET ePrintEmail = "john.doe@hp.com"
@PJL SET ePrintNTAccount = "AMERICAS\jdoe"
@PJL SET ePrintUsername = "jdoe"
@PJL ENTER LANGUAGE=PCL
3.6 Adding Job Retention feature
HP ePrint Enterprise mobile printing solution provides an option to retain print jobs at MFPs (printers with
hard drives), and allows releasing the job using a unique PIN.
Print Job Retention is the capability of printer firmware to store print jobs on the device. Printers in the HP
ePrint Enterprise Server solution directory can be configured to use Job Retention. Once configured to use
Job Retention, all jobs submitted to that printer will be treated as ‘personal’ and tagged with a personal
identification number (PIN). A job-specific PIN is required to release the job from printer console.
Section 3.6 Adding Job Retention feature 15
Page 26

Figure 3-8 Job Retention, example
When Job Retention is set to Personal Job OR Stored Job, HP ePrint Enterprise associates a PIN with the
user's print job, and the job gets stored on the printer memory or HDD (Hard Disk Drive). The job delivery
notification received at the mobile app contains the job release code (PIN).
NOTE: Personal print jobs are stored in MFPs until the device is restarted. These jobs are not printed until
released by entering the PIN at MFP control panel. After the job is printed, it is automatically removed from
the printer’s job storage.
Stored jobs remain in printer storage, even after printing, until printer administrator clears the job from
printer.
16 Chapter 3 Manage printers
Page 27

4 Manage Wi-Fi Printing
The Manage Wi-Fi Printing screen allows you to do the following:
●
Manage Wi-Fi Bridge users
●
Configure HP ePrint Enterprise Wi-Fi Bridges
●
Manage Wi-Fi Bridges and printers
●
Establish relation between Bridges to Groups and groups to printer accounts (printer accounts — that
are already added to the system)
4.1 Add Wi-Fi Bridge user account
Before adding an HP ePrint Enterprise Wi-Fi Bridge, add a Wi-Fi Bridge user account to be associated with the
bridge. To add a Bridge user account, select Add New User from left menu.
Figure 4-1 Add new user
HP ePrint Enterprise for Wi-Fi Printing users will be grouped into Wi-Fi Bridge account. Wi-Fi Bridge users are
added in the same way as regular users. For more information, see View and Manage Users section of this
guide.
NOTE: The user tag information is automatically generated and is an authorized device (Wi-Fi Bridge)
identifier.
Section 4.1 Add Wi-Fi Bridge user account 17
Page 28

4.2 View and Manage Bridges
A Bridge is associated with zero or more Groups. The information contained in a Bridge is used to connect to
the ePrint Enterprise server and print job(s) to printers associated with the groups.
Figure 4-2 Wi-Fi Bridge configuration
4.2.1 Bridge Details
4.2.1.1 Name
Enter a Bridge name.
4.2.1.2 Enabled
Indicates whether or not the Bridge is enabled. Default is True.
4.2.1.3 User Account
This information is automatically provided upon user addition, and represents the account with which the
Email account is associated. This field can only be updated by editing the user profile.
4.2.1.4 User Tag
This information is automatically generated in a secured form for each Bridge the user creates.
4.2.1.5 Create
Click Create to create a new Bridge.
4.2.1.6 Update
To update a Bridge, select an existing Bridge from the list. Complete the required changes and click Update.
4.2.1.7 Delete
Select an existing Bridge from the list and click Delete. The Bridge can be deleted if it is no longer required in the network.
18 Chapter 4 Manage Wi-Fi Printing
Page 29

4.2.1.8 Clear
Click Clear to remove existing Bridge record data, but keep User Account details.
4.3 View and manage groups
Groups are associated with zero or more printers. The groups also contain information about credentials
used to secure the groups.
Figure 4-3 Wi-Fi group configuration
4.3.1 Group Details
4.3.1.1 Name
Enter a Group name.
4.3.1.2 Enabled
Indicates whether the group is active or not. Default is True.
4.3.1.3 Guest Username and Password
To make the group secure, type a Guest Username and Password.
4.3.1.4 Show Username
Enable this option to show the Guest Username on clients when printing.
4.3.1.5 Update
To update a group, select an existing Bridge from the list. Complete the required changes, and click Update.
4.3.1.6 Clear
Click Clear to remove existing group record data.
Section 4.3 View and manage groups 19
Page 30

4.3.1.7 Delete
Click an existing group on the list, and then click Delete. The group(s) can be deleted if it is no longer required in the network.
4.3.2 Associate Groups to Bridges
The Associate Groups to Bridges screen is used to associate Groups to Bridges. It displays the available
bridges and groups.
Figure 4-4 Associate groups to bridges
Select an existing bridge on the list, select the group to be associated, and click Update. This process will
update the Group Count information in the Bridge list.
4.3.3 Associate Printers to Groups
The Associate Printers to Groups screen is used to associate printers to groups.
Figure 4-5 Associate printers to groups
20 Chapter 4 Manage Wi-Fi Printing
Page 31

Select an existing group, select the printers to be associated, and click Update. This process will update the
Printer Count information in the groups list.
4.3.3.1 Printers Associated
Use the Printers Associated column to view printers associated with the groups list. For more information to associate printers to the groups, see the Adding/editing printers section of this guide.
4.3.3.2 Printers available for Association
Use the Printers available for Association column to view printers available to the groups list. For more information to add printers to the groups, see the Adding/editing printers section of this guide.
IMPORTANT: When adding or editing printers to associate a group, make sure you set the following fields
with the following values:
●
Model Name: The model name must be the same name used to identify this printer on the system.
●
Address type: Represents the printer address type, which must be a network node (IPv4). It is important
to note that a printer queue also has an IPv4 address, representing the server where the queue is
located.
●
Personality: Dictates the printer language PostScript (PS) to be used by the driver when sending jobs to
this printer.
●
Job Retention: Dictates printer job storage mode (Off) to be used by the driver when sending jobs to
this printer.
4.4 View and Manage Printers
The View and Manage Printers section displays printers which are certified for use with Wi-Fi printing.
Figure 4-6 View and manage printers
Section 4.4 View and Manage Printers 21
Page 32

5 Manage hosts
5.1 View and Manage Hosts
The View and Manage Hosts screen is used to perform updates on Hosts added to the system. You can use
the Search text box to filter the list.
Figure 5-1 Host search and editing screen
Table 5-1 Host status descriptions
Status Description
Ready Host is ready to accept jobs.
22 Chapter 5 Manage hosts
Page 33

Table 5-1 Host status descriptions (continued)
Stopped Host is not ready to accept jobs.
No Service HP ePrint Enterprise is not installed on the host.
You can edit a host by clicking the table row. The Host editing form will show host data that can be updated.
For installing the Secondary Instances, the above mentioned deployment Security Token is vital.
5.1.1 Host details
5.1.1.1 Hostname
Enter the Hostname in Fully Qualified Domain Name (FQDN) format.
NOTE: The hostname must be unique.
5.1.1.2 Port number
The Port number must be an integer number between 1 and 65,535. This is the port number in which HTTP/
HTTPS requests will be done against this server.
5.1.1.3 SMTP account
The SMTP account must be a valid email address in user@domain format. It is the Blackberry print path which
will submit job request as email to this SMTP account.
5.1.1.4 Version
This field is informative only.
5.1.1.5 Notes
A text field containing information about the host. Although you can manually add and edit hosts, it is
recommended that you let the system perform this automatically.
5.1.2 Host cleanup
Use this option to clean all hosts on the system. HP ePrint Enterprise hosts should be restarted for proper
system reconfiguration. HP CloudPrint services must be stopped before cleaning the hosts. Host cleanup is
typically performed either when a host server needs to be loaded with fresh values, or when host data is
transferred from another host which could be down / nonfunctional.
5.1.3 Deleting hosts
Select a host from the list and choose Delete.
NOTE: This action cannot be reversed.
Section 5.1 View and Manage Hosts 23
Page 34

6 Managing users
6.1 View and Manage Users
The View and Manage Users screen is used to perform updates on users added to the system. The user list can be filtered using the search box.
Figure 6-1 User search and editing screen
To edit a user, click the table row and the form will show user information. To update it, choose the Edit
button.
6.1.1 User Account details
6.1.1.1 Email Account
Enter a valid email address in user@domain format.
6.1.1.2 NT User Account (edit mode only)
This information is automatically provided upon user addition, and represents an LDAP Directory domain user
account with which the Email Account is associated.
This field can only be updated by editing the user profile. This data is used to validate the user to pull and
retrieve the print job submitted to a secure print solution.
6.1.1.3 User Group
HP ePrint Enterprise users are grouped into three accounts: Administrator, Regular, and Guest. Administrator
users can access the Administration tool. From a system usage perspective, Administrators have full control
over printer permissions. Default permissions for Regular/Guest users can be overridden by Administrator
users.
24 Chapter 6 Managing users
Page 35

Figure 6-2 Add User Account for Regular user
Guest designated users become active at Active On date. Guest will be automatically disabled on Suspend On
date. Guest user default active period is three months.
6.1.1.4 PIN
The PIN associated with the user’s device. This information is required to trace the metrics of the print job
submission from a particular mobile user.
6.1.1.5 Locale
The language used to send notifications (push and email messages) to the user.
6.1.1.6 Password
The password used to access the Administration tool. Used by Administrator group only.
6.1.1.7 Password Tip
The Password Tip field provides a password reminder for the user.
6.1.1.8 Active
Only active users can search for printers and submitted jobs to the system and perform email printing.
Uncheck this field to “suspend” a user.
While an auto-suspended user account is set as Active, user has to submit a print job on the same day to
avoid getting auto-suspended again.
6.1.1.9 Auto-suspend
The HP ePrint Enterprise application allows for the tagging of Regular users with an Auto-suspend property.
The default value for the Auto Suspend checkbox is controlled through the ‘AllowAutoSuspend’ setting key.
HP CloudPrint Account Management Service will run a daily schedule to suspend those Regular group users
who are not actively using HP ePrint Enterprise print feature for a specified long duration. The duration of
inactivity is controlled through ‘RegularUserInActiveDuration’ service setting.
6.1.1.10 Active On
As they are provisioned into HP ePrint Enterprise, users become active if the Active On date is same as
today’s date. User will be in ‘suspended’ state if Active On date is on future date. HP CloudPrint Account
Management Service will run a daily schedule to activate user accounts which are future scoped.
Section 6.1 View and Manage Users 25
Page 36

6.1.1.11 Suspend On
Applies only to Guest users. A Guest user is active until the Suspend On date is reached. The default date of ‘Suspend On’ is 30 days from today. The maximum value for ‘Suspend On’ is 90 days from today.
6.1.2 Deleting users
Users cannot be deleted from the HP ePrint Enterprise database due to possible associations with job history.
To disable from printing, designate the user as Suspended.
6.1.3 Import Users
The Import Users feature allows you to add users in batch mode and update their information in the HP ePrint
Enterprise database. LDAP Directory administrators must export users in a CSV (Comma Separated Values)
file format using their application of choice or a script file. The CSV file can also be manually generated for
import of users.
HP ePrint Enterprise administrators use the admin console to batch import users from the CSV file
programmatically, as shown in Figure 15.
Users imported into the system are categorized as Regular/Guest, based on domain credentials retrieved
from their email account. Users imported into the system from a CSV file cannot be categorized under
administrator user group.
A user whose email address domain value does not belong to the allowed list of domains is added as a Guest
user in case ProvisionRestrictedToDomains service setting is set to true. When
ProvisionRestrictedToDomains is set to false, HP ePrint Enterprise imports all users’ as Regular users.
Figure 6-3 Import Users
To import users with a .csv file, select the file to import and click Proceed. The import process performs a
validation on the record values (availability if license count), and respective success and error messages are
sent in the form of an email to the logged-in user.
The following is a .csv file header example. This line is mandatory. Its format should reflect the LDAP
Directory attributes.
Table 6-1 Mandatory attributes
Attribute Name Example Description
userPrincipalName John.smith@hp.com email address
Table 6-2 Optional attributes
Attribute Name Example Description
accountDisabled True or False Indicates whether Account is active or not
NetBIOSDomain ASIAPACIFIC Domain name
26 Chapter 6 Managing users
Page 37

Table 6-2 Optional attributes (continued)
sAMAccountName sjohn NT account name
localeID English (en-US) The language used to send notifications
(push and email ) to user.
whenToActive Date format as per the culture.
whenToSuspend Date format as per the culture.
The user import procedure reads through the .csv file and updates ePrint Enterprise database.
6.1.4 Provision settings
The following settings allow selection of preferences for enrolling users in ePrint Enterprise.
Figure 6-4 Provision settings
ex. 2/25/2012
ex. 2/28/2012
Indicates when the created user becomes
active. Used to define the value for Guest
User.
Indicates when the created user becomes
inactive or suspended. Used to define the
value for Guest User.
IMPORTANT: Changing any of these variables will only take effect after all services (HP ePrint Enterprise,
IIS Admin, SMTP, and World Wide Web Publishing) are restarted.
6.1.4.1 Auto provision
Allow users on the specified list of comma-separated domains to be added to HP ePrint Enterprise as they
perform search and print. This can further be controlled through a list of LDAP groups.
6.1.4.2 Synchronize user accounts
In scenarios where enterprise user accounts are synchronized with ePrint Enterprise, configuring this option
will perform synchronization at scheduled intervals (refer to UserLDAPSynchronization.WatchDogTime in
CloudPrint.Settings.xml).
Section 6.1 View and Manage Users 27
Page 38

NOTE: It is mandatory to identify LDAP groups in enterprise directory server, users from which will be
synchronized with ePrint Enterprise. If left empty, synchronization will be skipped.
For effective synchronization, it is important to be aware of the user account status in enterprise directory
server. As LDAP schema definition could be specific to every enterprise, ePrint Enterprise defines a plug-in to
manage defining the LDAP attributes and their definitions. The default implementation in ePrint Enterprise
has the plug-in for Active Directory.
28 Chapter 6 Managing users
Page 39

7 Manage services and data
7.1 Service Settings
The Service Settings screen is used to edit the HP ePrint Enterprise system configuration. It is a visual
representation of the cloudprint.settings.xml file located in the %ALLUSERSPROFILE%/Application Data/
Hewlett-Packard/HP CloudPrint/conf folder.
For detailed descriptions of each variable, hover mouse over the text box, or check the "description" tag
inside the source XML file.
IMPORTANT: Changing any of these variables will only take effect after all services (HP ePrint Enterprise,
IIS Admin, SMTP, and World Wide Web Publishing) are restarted.
To restart all services, either restart the computer, or manually restart each of the following system services:
System Services
●
HP Account Management Service
●
HP CloudPrint Control Service
●
HP CloudPrint Content Service
●
HP CloudPrint License Service
●
HP CloudPrint Printer Monitor
●
HP CloudPrint Service Host
●
HP CloudPrint Storage Maintenance
●
IIS Admin
●
Simple Mail Transfer Protocol
●
World Wide Web Publishing
7.1.1 Load configuration file
Configuration files can be selected from Load configuration file. To make this the current settings file, click Update. An automatic backup is always generated, so you can restore previous configurations.
IMPORTANT: Settings loaded from a file will only take effect after all services (HP ePrint Enterprise, IIS
Admin, SMTP, and World Wide Web Publishing) are restarted.
7.2 Security Realm
The Security Realm screen defines the authentication model for logging in to ePrint Enterprise administration console. The system is configured to use either ePrint Enterprise User Directory or Enterprise Directory Server using LDAP.
Section 7.1 Service Settings 29
Page 40

Figure 7-1 Security Realm
For ePrint Enterprise User Directory, user authentication is performed against credentials stored in ePrint
Enterprise DB.
For Enterprise Directory Server using LDAP, user is authenticated by connecting to enterprise directory
server.
As the security realm is requested for change the HP ePrint Enterprise administration console displays a login
dialog to validate an admin user who can log in to the new realm.
Figure 7-2 Validation of Administrator user account
7.3 LDAP Configuration setting
From this page the administrator can configure the enterprise directory server, the required attributes,
search rules, and group filters used to authenticate, synchronize, and auto-provision users from a particular
group. The configuration is saved successfully upon verification of LDAP connection being configured.
30 Chapter 7 Manage services and data
Page 41

Figure 7-3 LDAP Configuration setting
7.3.1 Server settings
7.3.1.1 Host name
Fully Qualified Domain Name (FQDN) or IP address of the LDAP server.
7.3.1.2 Port
Port number for connecting through LDAP; default is 389.
7.3.1.3 Using Secure Connection (SSL)
Check to use Secure Socket Layer on connection to LDAP server.
Section 7.3 LDAP Configuration setting 31
Page 42

7.3.1.4 Protocol Version
LDAP protocol version to use - values being LDAPv2 and LDAPv3.
7.3.1.5 Authentication
Specify the Authentication method to use on an LDAP connection – values being ‘Anonymous’, ‘Basic’, ,
‘Negotiate’ and ‘Digest’.
Appropriate user credential details are required in the associated format depending on the authentication
method described for the enterprise directory server. e.g.
ldapserviceuser@mycompany.com or
domain\username or
cn=username, cn=Users, dc=mycompany, dc=com
7.3.1.6 Verify connection
Use this link to verify the LDAP server connection settings.
7.3.2 Server attributes
Identifies the LDAP attributes relating to the directory schema of an enterprise directory server.
7.3.2.1 User Object Classes
Comma separated attributes that help identify Object Classes in LDAP schema.
7.3.2.2 User Principal Name attribute
Attribute uniquely identifying a user in LDAP schema. This is used in secure pull print workflow to tag print
jobs against the user.
7.3.2.3 User Email attribute
Attribute that maps to the email address in LDAP directory schema. The value of this attribute is taken as the
email address of user in ePrint Enterprise.
7.3.2.4 Group Member attribute
Attribute distinctively representing user(s) in LDAP group. Used while synchronizing LDAP user group with HP
ePrint Enterprise.
7.3.2.5 User Locale attribute
This attribute identifies the location of the user.
7.3.3 Search rules
Search rules will enable enhanced search capabilities on the enterprise directory server.
7.3.3.1 User root Distinguished Name
Identifies the “root” distinguished name of the LDAP entry in context. Based on need, the LDAP lookup can be
limited to the listed distinguished name. If left empty, the LDAP Base Distinguished Name is considered in
place.
32 Chapter 7 Manage services and data
Page 43

7.3.3.2 Additional filter
Helps to refine search of root Distinguished Name; with general syntax followed being (Boolean-Operator
(filter) (filter)).
Boolean operators are AND (&), OR (|), and NOT (!)
e.g. (& (ou=Marketing) (objectClass=*))
7.3.3.3 Search scope
Determines the depth of the LDAP lookup on the Distinguished Name – values can be Base, OneLevel, and
Subtree.
●
Base - Searches selected root Distinguished Name.
●
OneLevel - Searches one level under the selected root Distinguished Name.
●
Subtree - Searches selected root Distinguished Name and all levels under it.
7.4 Usage Data Cleanup
Use this option to clean usage data from the system. Select the data to delete, select desired time frame, and
then click Cleanup.
NOTE: This action cannot be reversed.
Figure 7-4 Usage data cleanup
7.5 Job submission test
The Job submission test tool can be used to perform basic system tests. It generates a sample job on the system.
Section 7.4 Usage Data Cleanup 33
Page 44

Figure 7-5 Job submission test
Select the printer you want to test. Select one or more files and click Submit. Jobs can be tracked from the
Overview screen using the Track jobs tool. Job rendering is always made to master even if the printer
account is configured to use slave.
7.6 Manage License
The Instant-On feature is provided for product evaluation. This feature allows customers to use the product
for a limited period of 60 days and 51 users.
(1 user is installed for administrative purposes).
Figure 7-6 License Information
License information provides the availability and consumption of the licenses. It also shows the expiration
Date for the license. If License consumption is less or expired, the user can add/renew another license
through Add License option.
34 Chapter 7 Manage services and data
Page 45

7.6.1 Encrypted ID
The license form displays one or more Encrypted ID(s) used to node-lock licenses alternate to using MAC ID.
The Encrypted ID is a combination of server attributes including MAC ID and hard drive serial number, but is a
one-way hash and irreversible.
For systems with multiple network cards, equal numbers of Encrypted IDs are formed. Click Show All link to
view all Encrypted IDs. It is recommended, although not mandatory, to use the first Encrypted ID to node-lock
licenses.
Stacking of user licenses is not valid while different MAC and Encrypted IDs are used to node-lock licenses.
NOTE: SKUs are different for channel and subscription. SKUs are based on licensing and SKU Id will differ
for different editions of the product. Use appropriate SKU to claim Encrypted ID based licenses. Encrypted ID
based node locking does not apply for channel license.
7.6.2 Add License
Once a license is generated, users can node lock the license to a host by selecting the appropriate license file and clicking Add License.
7.6.3 License Summary
The Summary section displays a list of licenses applied, Active edition, how many licenses are used, how
many are left, and the expiration date of the license.
Icon Status Description
Active Current edition which is active.
Expired Licenses bound by dates which have expired.
Inactive License which became inactive when an active license was applied over
it.
Section 7.6 Manage License 35
Page 46

8 Manage mobile clients
8.1 Push Configurations (Blackberry specific)
Use this tool to send configurations to the HP ePrint Enterprise Blackberry clients (server URL and printing/
routing email account).
This method should only be used for testing purposes. The recommended method is to send these settings
as BES policies. For more information, see the HP ePrint Enterprise Server Installation Guide.
Figure 8-1 Push configurations tool with port
8.1.1 Search recipients
Use the Search recipients text box to filter the users list. The behavior is similar to the View and Manage Users tool.
8.1.2 Select recipients (users)
Before clicking Send, select the checkbox for each desired recipient.
8.1.3 Type recipients (groups)
Enter the BES groups to which you want to send configurations. These groups should be valid BES groups.
8.1.4 Push configurations
Select what you want to send to HP ePrint Enterprise clients. You can send a new HP ePrint Enterprise host
URL, erase last used printers, and/or send a message by clicking the Send button.
36 Chapter 8 Manage mobile clients
Page 47

9Email printing
Email printing is a capability that allows submission of print jobs by simply forwarding emails to known
printer addresses. This can be done from any email client capable of reaching the user’s corporate email
account, so the originating email address ("From") has to be compatible with the authorized email account
settings in HP ePrint Enterprise.
To do this, an email account should be assigned to the printer in the HP ePrint Enterprise database, either
from the Import tool or the regular printer editing screen. If no email is assigned during insertion, an address
auto-generates which can later be changed. To change a printer address, go to View and Manage printers,
select a printer and click the Edit button. The following screen should display:
Figure 9-1 Edit a printer screen
The printer email account consists of an account name and domain. The domain is always the same as HP
ePrint Enterprise Host field, and therefore not editable. To change the email domain you have to change the
associated host name. Emails sent to this address should be able to reach the associated HP ePrint
Enterprise host. The originating user can send this from any platform capable of using the corporate account.
As this is essentially a non-BlackBerry experience, no MDS push messages can be sent back to the user about
job status. Instead, an email is sent to the user notifying of job submission and final status (success or
failure). No searching services are available for email printing. Administrator must provide users with
address.
To enable email printing, the following settings should be set in cloudprint.settings.xml (section
EmailPrinting):
●
EmailPrinting — Set to “True” if email printing is enabled (default is True).
●
EmailPrintingPIN — Default PIN number used to identify email print jobs (to help track)
Since email printing uses email to send notifications about print jobs, the following properties should also be
configured:
●
SMTPServerAddress — Defines SMTP server IP Address or hostname for sending email
notifications.
●
SenderEmailAddress — Defines email account to use for sending notifications.
●
SMTPServerPort — Defines port on which SMTP server listens for connections. Default port is 25.
●
SMTPServerUsesSSL — Defines whether or not SMTP Server connection uses SSL.
Since email printing is a solution integrated into the customer’s network, understanding how to route emails
from the corporate email server (MS Exchange, Lotus Domino, etc.) to the HP ePrint Enterprise SMTP servers
is required.
37
Page 48

10 Events and Tracking
10.1 Track jobs
Use Track jobs to view jobs submitted to the HP ePrint Enterprise server. Jobs can be filtered by status, user (that submitted the job), document name, or printer name.
Figure 10-1 Track jobs screen
10.2 Track messages
Use Track messages to view jobs processing through the system. Jobs can be filtered by status, user (that submitted the job), message subject, printer name, or message tag.
38 Chapter 10 Events and Tracking
Page 49

Figure 10-2 Track messages screen
10.3 Track events
Use Track events to check the HP ePrint Enterprise job flow. You can filter on the module that generated the event, the event type, the user associated with the event, job ID, and message tag, and event data.
Section 10.3 Track events 39
Page 50

Figure 10-3 Track events screen
40 Chapter 10 Events and Tracking
Page 51

11 Reports
11.1 Metrics Report
Use Metrics Report to gather statistical system usage. Three report formats are available: CSV, Text, or
Screen (web).
Click Generate Report to create the report. For CSV or Text formats, a screen asking to save a file will display.
Figure 11-1 Metrics Report
Section 11.1 Metrics Report 41
Page 52

12 New API configuration
12.1 Introduction
HP ePrint Enterprise versions 1.5 and later are able to accept jobs from any client (not only from BlackBerry
smartphones) through the use of a new API.
This API is installed by default in a web application named gd inside the IIS root (e.g. C:\Inetpub\wwwroot)
folder. To test if installed and working, point a web browser to
http://<installation host>/gd/version/
Or
http://<installation host>:<port>/gd/version/ (This URL returns a number containing the
version of the API that is currently installed.)
12.2 API configuration
Since the new API is configured as a separate web application, it has its own settings. The API is configured by
editing the following files:
●
cloudprint.setttings.xml – through the section entitled DirectoryInformation.
●
web.config – inside the IIS root\gd folder
12.2.1 DirectoryInformation (cloudprint.settings.xml)
This section contains information about the HP ePrint Enterprise server that will be used by clients. Many of
these fields are for information purposes only, and can be updated through the Manage Services and Data
option in the Administration UI.
12.2.1.1 DirectoryId
The directory identification for API calls – usually eprint.
12.2.1.2 DirectoryName
Name of directory used by API calls.
12.2.1.3 SelectableAttachments
Indicates if selectable attachments are supported.
12.2.1.4 PrintEmailBody
Indicates if HP ePrint Enterprise should support printing of email bodies.
12.2.1.5 BrandName
Brand name for the directory.
42 Chapter 12 New API configuration
Page 53

12.2.1.6 DisclaimerDisplay
Indicates if disclaimers should be displayed.
12.2.1.7 SecureConnections
Indicates if client connections should use secure communication through https (see the Secure Communications section of this guide for more information).
IMPORTANT: Changing any of these variables will only take effect after IIS Admin (World Wide Web
Publishing) services are restarted.
12.2.2 Web application Configuration (web.config)
Changes to any of these settings is not recommended unless users experience issues when submitting large
jobs, or to configure secure communications.
12.2.2.1 httpRuntime
●
executionTimeout – time in seconds that clients have to submit requests to the server. The
default is 10 minutes.
●
maxRequestLength – maximum request size in bytes to submit to the server. The default value is
10MB.
12.2.2.2 system.serviceModel
●
sendTimeout – time in seconds that clients have to submit requests to the server. The default is
10 minutes.
●
maxReceivedMessageSize – maximum request size in bytes to submit to the server. The default
value is 10MB.
12.3 Secure communications
You can activate Secure communications on the web server running HP ePrint Enterprise. To activate Secure
communications (HTTPS), you must do the following configurations:
12.3.1 HP ePrint Enterprise — Service Settings
To enable client connections to use HTTPS, complete the following steps:
1. Log on to the HP ePrint Enterprise Administration tool.
2. In the main menu under Manage Services and Data, click Service Settings.
Section 12.3 Secure communications 43
Page 54

3. In Directory Information set the SecureConnections to True.
Figure 12-1 Service Settings
4. Click Update.
12.3.2 HP ePrint Enterprise — Host Details
1. In the Main menu, under Manage Hosts, click View and Manage Hosts.
2. Click the Host name. In the Host Details section, click Edit.
44 Chapter 12 New API configuration
Page 55

3. In the Host Details section, set the port specific to HTTPS binding for the respective Master and Slave
hosts.
Figure 12-2 Host details
4. Click Update.
12.3.3 HP ePrint Enterprise — web.config
To enable secure communications the bindingConfiguration must be changed from http to https in
web.config. The default installation uses http as the current configuration:
Figure 12-3 Binding configuration
NOTE: File web.config is located at c:\inetpub\wwwroot\gd\
IMPORTANT: Changing any of these variables will only take effect after IIS Admin (World Wide Web
Publishing) services are restarted.
12.3.4 HP ePrint Enterprise client configuration
Individual clients should use the HTTPS URL to connect to the HP ePrint Enterprise server.
12.4 Disclaimers
Disclaimers are legal messages that clients may display before submitting jobs to HP ePrint Enterprise
server. The configuration of disclaimers is done by editing the IIS root\gd\disclaimers\en-US.xml file.
Section 12.4 Disclaimers 45
Page 56

Figure 12-4 Default disclaimers
Disclaimer details are:
●
display — a required attribute that indicates if disclaimers should be displayed:
●
●
●
title and text — contains the disclaimer’s title and text to be presented to the user.
●
link — used to open the web browser to present the informed URL.
IMPORTANT: At least one disclaimer should be present.
12.5 Messages
ALWAYS — meaning the user will see the disclaimer every time a job is submitted.
ONCE — meaning the user can dismiss the disclaimer on future submissions.
Messages are optional informational text about the HP ePrint Enterprise server that clients may display
(typically after searches). A default HP ePrint Enterprise installation does not contain any messages.
Message configuration is done by editing the IIS root\gd\messages\en-US.xml file.
Figure 12-5 Adding messages
Enter any arbitrary text between <message></message> tags to add a message. To delete a message,
remove the associated <message> element.
46 Chapter 12 New API configuration
 Loading...