

Page 1
HP Color LaserJet Managed E65150, E65160
User Guide
www.hp.com/videos/LaserJet
www.hp.com/support/colorljE65150
www.hp.com/support/colorljE65160
Page 2

Page 3

HP Color LaserJet Managed E65150, E65160
User Guide
Page 4

Copyright and License
Trademark Credits
© Copyright 2019 HP Development Company,
L.P.
Reproduction, adaptation, or translation without
prior written permission is prohibited, except as
allowed under the copyright laws.
The information contained herein is subject to
change without notice.
The only warranties for HP products and
services are set forth in the express warranty
statements accompanying such products and
services. Nothing herein should be construed as
constituting an additional warranty. HP shall not
be liable for technical or editorial errors or
omissions contained herein.
Edition 1, 04/2019
Adobe®, Adobe Photoshop®, Acrobat®, and
PostScript
®
are trademarks of Adobe Systems
Incorporated.
Apple and the Apple logo are trademarks of
Apple Inc., registered in the U.S. and other
countries.
macOS is a trademark of Apple Inc., registered in
the U.S. and other countries.
AirPrint is a trademark of Apple Inc., registered in
the U.S. and other countries.
Google™ is a trademark of Google Inc.
Microsoft®, Windows®, Windows® XP, and
Windows Vista® are U.S. registered trademarks
of Microsoft Corporation.
UNIX® is a registered trademark of The Open
Group.
Page 5

Table of contents
1 Printer overview ........................................................................................................................................................................................ 1
Warning icons ............................................................................................................................................................................ 1
Potential shock hazard ............................................................................................................................................................ 2
Printer views .............................................................................................................................................................................. 3
Printer front view ................................................................................................................................................. 3
Printer back view .................................................................................................................................................. 4
Interface ports ...................................................................................................................................................... 5
Control-panel view ............................................................................................................................................... 6
How to use the touchscreen control panel ................................................................................. 8
Printer specications ................................................................................................................................................................ 9
Technical specications ....................................................................................................................................... 9
Supported operating systems ......................................................................................................................... 11
Printer dimensions ............................................................................................................................................ 13
Power consumption, electrical specications, and acoustic emissions .................................................... 15
Operating-environment range ........................................................................................................................ 15
Printer hardware setup and software installation ............................................................................................................ 16
2 Paper trays .............................................................................................................................................................................................. 17
Introduction ............................................................................................................................................................................. 18
Load paper to Tray 1 ............................................................................................................................................................. 18
Introduction ........................................................................................................................................................ 18
Tray 1 paper orientation ................................................................................................................................... 20
Use alternative letterhead mode .................................................................................................................... 22
Enable Alternative Letterhead Mode by using the printer control-panel menus ............... 22
Load paper to Tray 2 and the 550-sheet trays ................................................................................................................. 23
Introduction ........................................................................................................................................................ 23
Tray 2 and the 550-sheet trays paper orientation ...................................................................................... 26
Use alternative letterhead mode .................................................................................................................... 28
Enable Alternative Letterhead Mode by using the printer control-panel menus ............... 28
Load paper to the 2,000-sheet high-capacity input tray ................................................................................................ 29
Introduction ........................................................................................................................................................ 29
High-capacity input tray paper orientation ................................................................................................... 31
ENWW iii
Page 6

Use alternative letterhead mode .................................................................................................................... 33
Enable Alternative Letterhead Mode by using the printer control-panel menus ............... 33
Load and print envelopes ..................................................................................................................................................... 34
Introduction ........................................................................................................................................................ 34
Print envelopes .................................................................................................................................................. 34
Envelope orientation ......................................................................................................................................... 34
Load and print labels ............................................................................................................................................................. 35
Introduction ........................................................................................................................................................ 35
Manually feed labels ......................................................................................................................................... 35
Label orientation ............................................................................................................................................... 35
3 Supplies, accessories, and parts .......................................................................................................................................................... 37
Order supplies, accessories, and parts ............................................................................................................................... 38
Ordering .............................................................................................................................................................. 38
Replace the toner cartridges ................................................................................................................................................ 39
Toner-cartridge information ............................................................................................................................ 39
Remove and replace the cartridges ................................................................................................................ 40
Replace the toner-collection unit ........................................................................................................................................ 42
4 Print .......................................................................................................................................................................................................... 45
Print tasks (Windows) ............................................................................................................................................................ 46
How to print (Windows) .................................................................................................................................... 46
Automatically print on both sides (Windows) ............................................................................................... 46
Manually print on both sides (Windows) ........................................................................................................ 47
Print multiple pages per sheet (Windows) .................................................................................................... 47
Select the paper type (Windows) .................................................................................................................... 48
Additional print tasks ........................................................................................................................................ 49
Print tasks (macOS) ............................................................................................................................................................... 50
How to print (macOS) ........................................................................................................................................ 50
Automatically print on both sides (macOS) ................................................................................................... 50
Manually print on both sides (macOS) ........................................................................................................... 50
Print multiple pages per sheet (macOS) ........................................................................................................ 51
Select the paper type (macOS) ........................................................................................................................ 51
Additional print tasks ........................................................................................................................................ 51
Store print jobs on the printer to print later or print privately ........................................................................................ 52
Introduction ........................................................................................................................................................ 52
Create a stored job (Windows) ......................................................................................................................... 52
Create a stored job (macOS) ............................................................................................................................ 53
Print a stored job ............................................................................................................................................... 54
Delete a stored job ............................................................................................................................................ 54
Delete a job that is stored on the printer .................................................................................. 54
iv ENWW
Page 7

Change the job storage limit ....................................................................................................... 54
Information sent to printer for Job Accounting purposes ........................................................................... 55
Mobile printing solutions ....................................................................................................................................................... 56
Introduction ........................................................................................................................................................ 56
Wi-Fi Direct (wireless models only, with HP Jetdirect 3100w BLE/NFC/Wireless accessory
installed) ............................................................................................................................................................. 56
HP ePrint via email ............................................................................................................................................ 57
AirPrint ................................................................................................................................................................. 58
Android embedded printing ............................................................................................................................. 58
Print from a USB ash drive ................................................................................................................................................. 59
Introduction ........................................................................................................................................................ 59
Enable the USB port for printing ..................................................................................................................... 59
Print USB documents ........................................................................................................................................ 60
Print using high-speed USB 2.0 port (wired) ..................................................................................................................... 61
Enable the high-speed USB port for printing ................................................................................................ 61
5 Manage the printer ................................................................................................................................................................................. 63
Advanced conguration with the HP Embedded Web Server (EWS) ............................................................................. 64
Introduction ........................................................................................................................................................ 64
How to access the HP Embedded Web Server (EWS) .................................................................................. 65
HP Embedded Web Server features ............................................................................................................... 65
Information tab ............................................................................................................................. 65
General tab .................................................................................................................................... 65
Print tab .......................................................................................................................................... 66
Supplies tab ................................................................................................................................... 67
Troubleshooting tab ..................................................................................................................... 67
Security tab .................................................................................................................................... 67
HP Web Services tab ..................................................................................................................... 68
Networking tab .............................................................................................................................. 68
Other Links list ............................................................................................................................... 70
Congure IP network settings .............................................................................................................................................. 71
Printer sharing disclaimer ................................................................................................................................ 71
View or change network settings ................................................................................................................... 71
Rename the printer on a network ................................................................................................................... 71
Manually congure IPv4 TCP/IP parameters from the control panel ........................................................ 72
Manually congure IPv6 TCP/IP parameters from the control panel ........................................................ 72
Link speed and duplex settings ....................................................................................................................... 73
Printer security features ....................................................................................................................................................... 74
Introduction ........................................................................................................................................................ 74
Security statements .......................................................................................................................................... 74
IP Security ........................................................................................................................................................... 74
ENWW v
Page 8

Assign or change the system password using the HP Embedded Web Server ....................................... 74
Encryption support: HP High Performance Secure Hard Disks .................................................................. 75
Lock the formatter ............................................................................................................................................ 75
Energy-conservation settings .............................................................................................................................................. 76
Introduction ........................................................................................................................................................ 76
Set the idle settings .......................................................................................................................................... 76
Set the sleep timer and congure the printer to use 1 watt or less of power ......................................... 76
Set the sleep schedule ...................................................................................................................................... 77
HP Web Jetadmin ................................................................................................................................................................... 78
Software and rmware updates .......................................................................................................................................... 79
6 Solve problems ....................................................................................................................................................................................... 81
Customer support .................................................................................................................................................................. 82
Control panel help system .................................................................................................................................................... 83
Reset factory settings ........................................................................................................................................................... 84
Introduction ........................................................................................................................................................ 84
Method one: Reset factory settings from the printer control panel ......................................................... 84
Method two: Reset factory settings from the HP Embedded Web Server (network-connected
printers only) ...................................................................................................................................................... 84
A “Cartridge is low” or “Cartridge is very low” message displays on the printer control panel ................................. 85
Printer does not pick up paper or misfeeds ....................................................................................................................... 86
Introduction ........................................................................................................................................................ 86
The printer does not pick up paper ................................................................................................................. 86
The printer picks up multiple sheets of paper .............................................................................................. 88
Clear paper jams ..................................................................................................................................................................... 92
Introduction ........................................................................................................................................................ 92
Paper jam locations ........................................................................................................................................... 92
Auto-navigation for clearing paper jams ....................................................................................................... 93
Experiencing frequent or recurring paper jams? .......................................................................................... 93
Clear paper jams in the output bin (13.E1) .................................................................................................... 94
Clear paper jams in Tray 1 (13.A1) .................................................................................................................. 95
Clear paper jams in Tray 2 (13.A2) .................................................................................................................. 97
Clear paper jams in Tray 3, Tray 4, Tray 5 (13.A3, 13.A4, 13.A5) ............................................................ 101
Clear paper jams in the 2000-sheet paper tray (13.A) ............................................................................. 106
Clear paper jams in the fuser (13.B9, 13.B2, 13.FF) ................................................................................. 110
Clear paper jams in the right door (13.B2) .................................................................................................. 113
Resolve print-quality problems ......................................................................................................................................... 114
Introduction ...................................................................................................................................................... 114
Troubleshoot print quality ............................................................................................................................. 114
Update the printer rmware ..................................................................................................... 114
Print from a dierent software program ................................................................................ 114
vi ENWW
Page 9

Check the paper-type setting for the print job ...................................................................... 114
Check the paper type setting on the printer ..................................................... 114
Check the paper type setting (Windows) ........................................................... 115
Check the paper type setting (macOS) ............................................................... 115
Check toner-cartridge status .................................................................................................... 115
Print a cleaning page .................................................................................................................. 116
Visually inspect the toner cartridge or cartridges ................................................................. 116
Check paper and the printing environment ............................................................................ 117
Step one: Use paper that meets HP specications .......................................... 117
Step two: Check the environment ....................................................................... 117
Step three: Set the individual tray alignment .................................................... 117
Try a dierent print driver ......................................................................................................... 118
Index ........................................................................................................................................................................................................... 119
ENWW vii
Page 10

viii ENWW
Page 11

1 Printer overview
●
Warning icons
●
Potential shock hazard
●
Printer views
●
Printer specications
●
Printer hardware setup and software installation
For more information
The following information is correct at the time of publication.
For video assistance, see www.hp.com/videos/LaserJet.
For current information, see www.hp.com/support/colorljE65150 or www.hp.com/support/colorljE65160.
HP's all-inclusive help for the printer includes the following information:
● Install and congure
● Learn and use
● Solve problems
● Download software and rmware updates
● Join support forums
● Find warranty and regulatory information
Warning icons
Warning icon denitions: The following warning icons may appear on HP products. Apply appropriate caution
where applicable.
●
Caution: Electric shock
ENWW Warning icons 1
Page 12

●
Caution: Hot surface
●
Caution: Keep body parts away from moving parts
●
Caution: Sharp edge in close proximity
Potential shock hazard
Always follow basic safety precautions when using this product to reduce risk of injury from re or electric shock.
● Read and understand all instructions in the user guide.
● Observe all warnings and instructions marked on the product.
● Use only a grounded electrical outlet when connecting the product to a power source. If you do not know
whether the outlet is grounded, check with a qualied electrician.
● Do not touch the contacts on any of the sockets on the product. Replace damaged cords immediately.
● Unplug this product from wall outlets before cleaning.
● Do not install or use this product near water or when you are wet.
● Install the product securely on a stable surface.
● Install the product in a protected location where no one can step on or trip over the power cord.
2 Chapter 1 Printer overview ENWW
Page 13
Printer views
4
5
6
7
3
1
2
10
9
8
11
13
12
●
Printer front view
●
Printer back view
●
Interface ports
●
Control-panel view
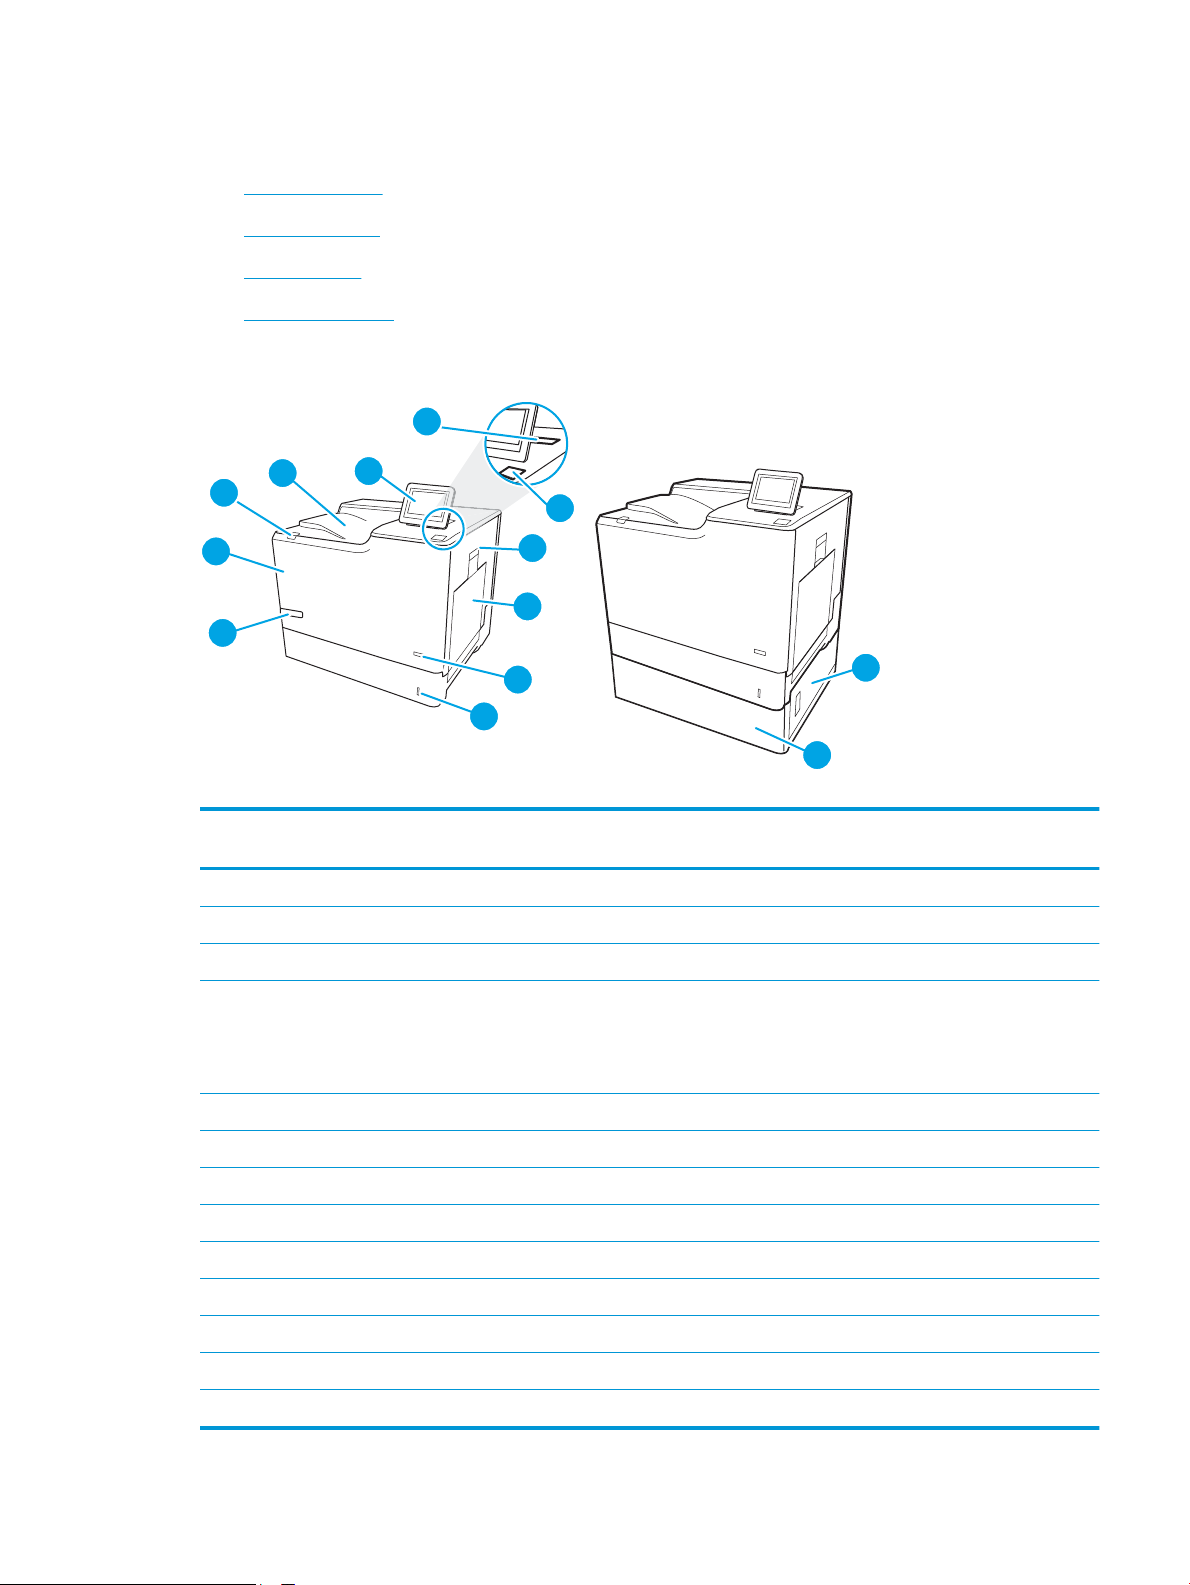
Printer front view
Table 1-1 Printer front view legend
Image
callout
1 Output bin
2 Control panel with color graphical display
3 Hardware integration pocket for connecting accessory and third-party devices
4 Easy-access USB port
5 Right door (access to the fuser and for clearing jams)
6 Tray 1
7 On/o button
8 Tray 2
9 Model name
10 Front door (access to the toner cartridges). The door will automatically unlock when a toner cartridge reaches very low status.
11 Cartridge door release button (to open the front door)
12 Lower-right door (access for clearing jams)
Printer component
Insert a USB ash drive for printing without a computer or to update the printer rmware.
NOTE: An administrator must enable this port before use.
13 1 x 550-sheet paper feeder, Tray 3 (optional)
ENWW Printer views 3
Page 14
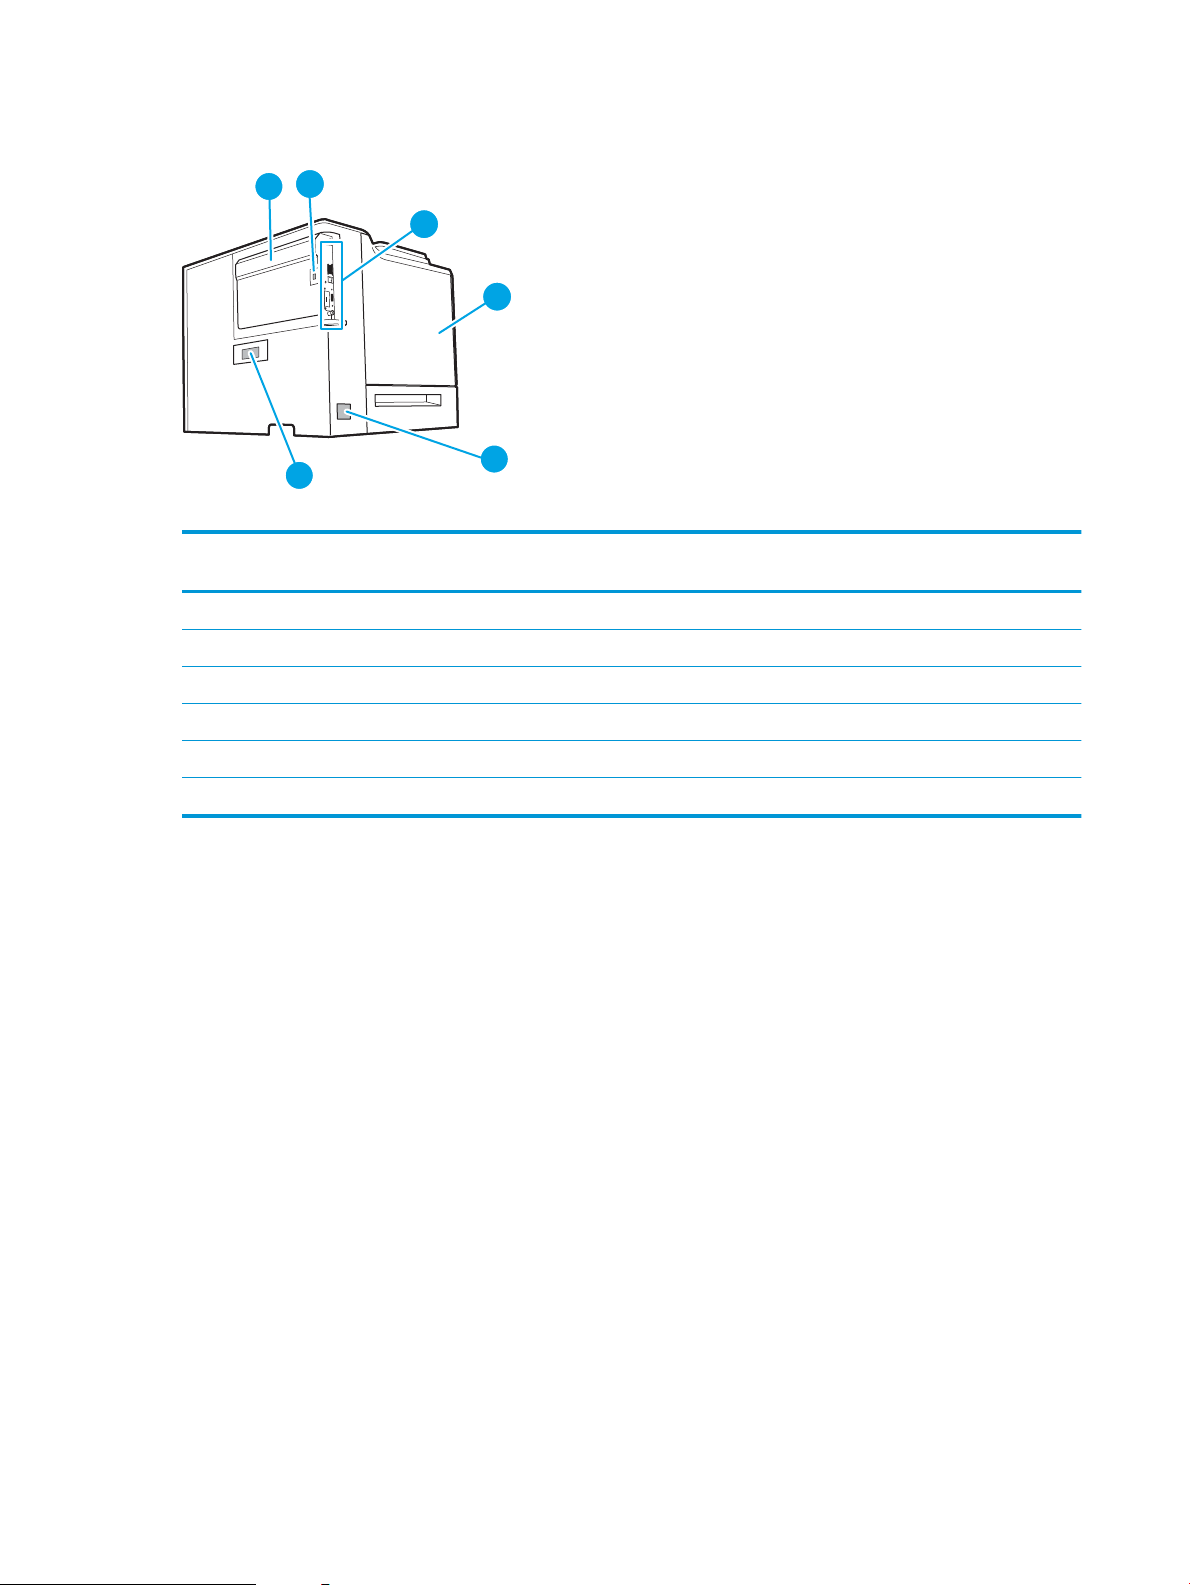
Printer back view
6
1
3
5
2
4
Table 1-2 Printer back view legend
Image
callout
1 Formatter cover
2 Slot for a cable-type security lock
3 Formatter (contains the interface ports)
4 Left door (access to the toner-collection unit)
5 Power connection
6 Serial number and product number label
Printer component
4 Chapter 1 Printer overview ENWW
Page 15
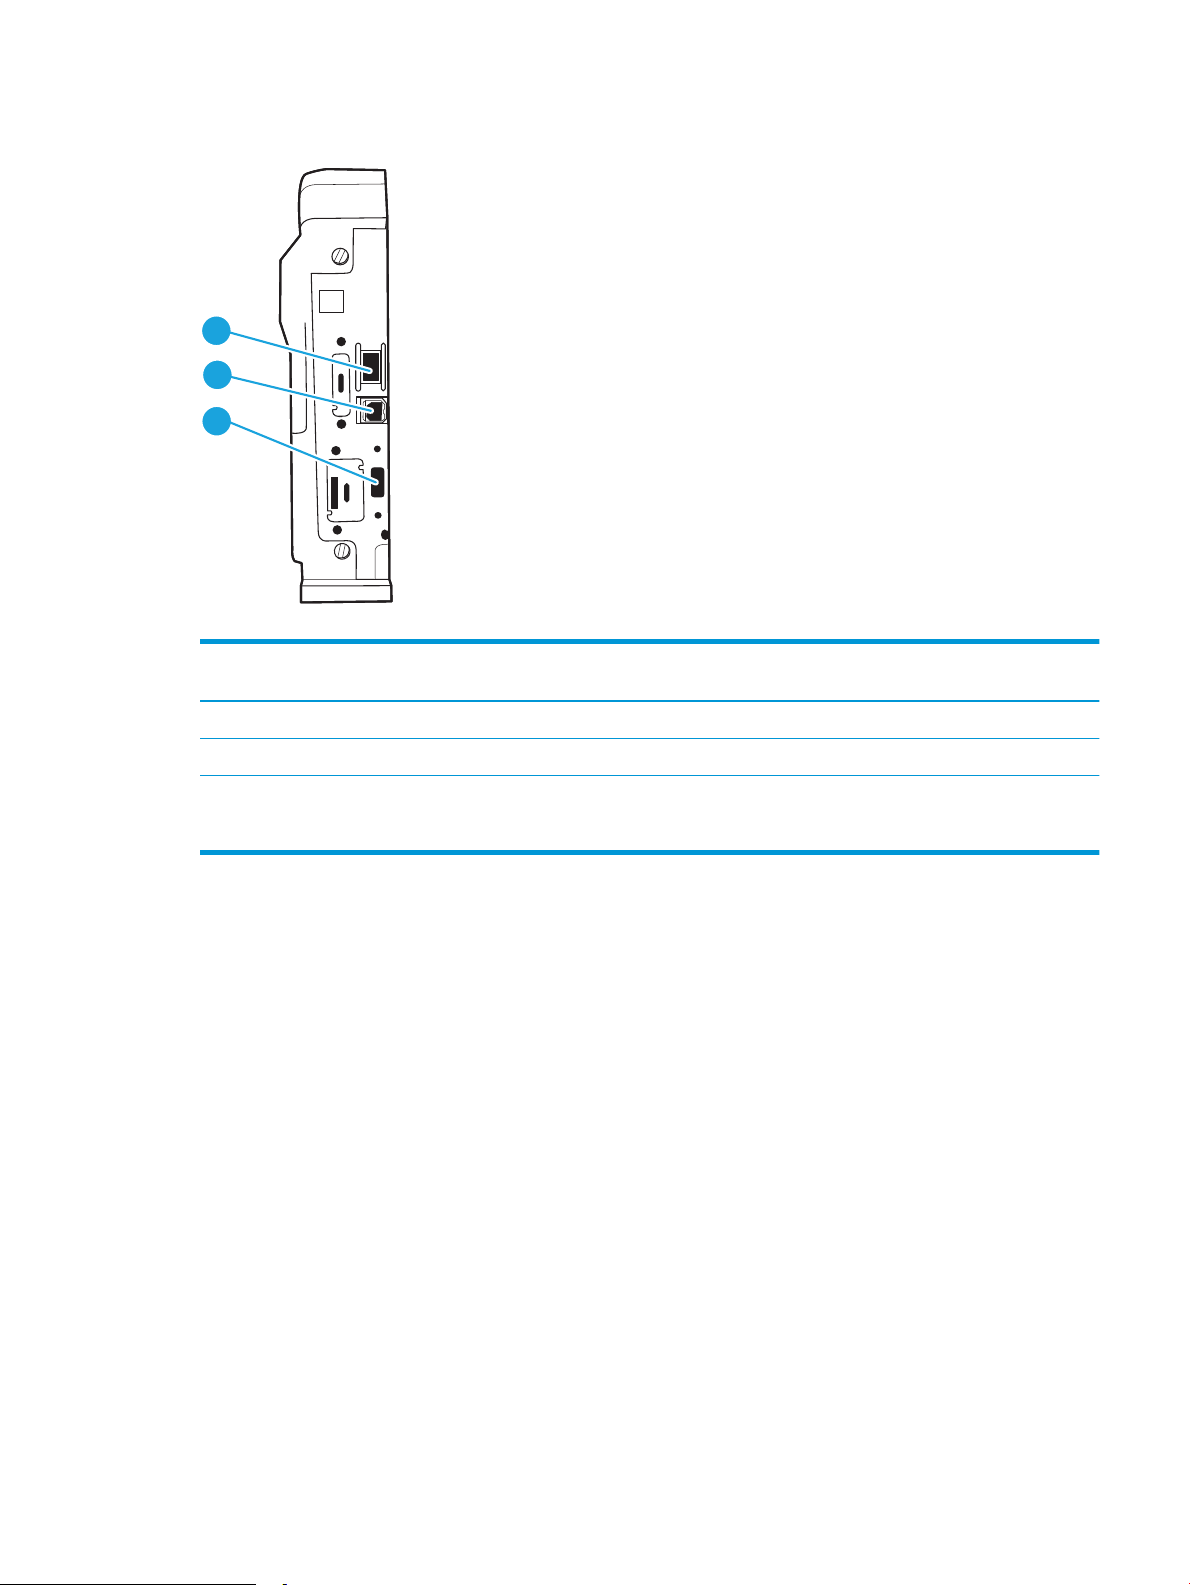
Interface ports
3
2
1
Table 1-3 Printer interface ports legend
Image
callout
1 Local area network (LAN) Ethernet 10/100/1000 network port
2 Hi-Speed USB 2.0 printing port
3 USB port for connecting external USB devices (this port might be covered)
Printer component
NOTE: For easy-access USB printing, use the USB port near the control panel.
ENWW Printer views 5
Page 16
Control-panel view
4
6
7
5
8
2
3
1
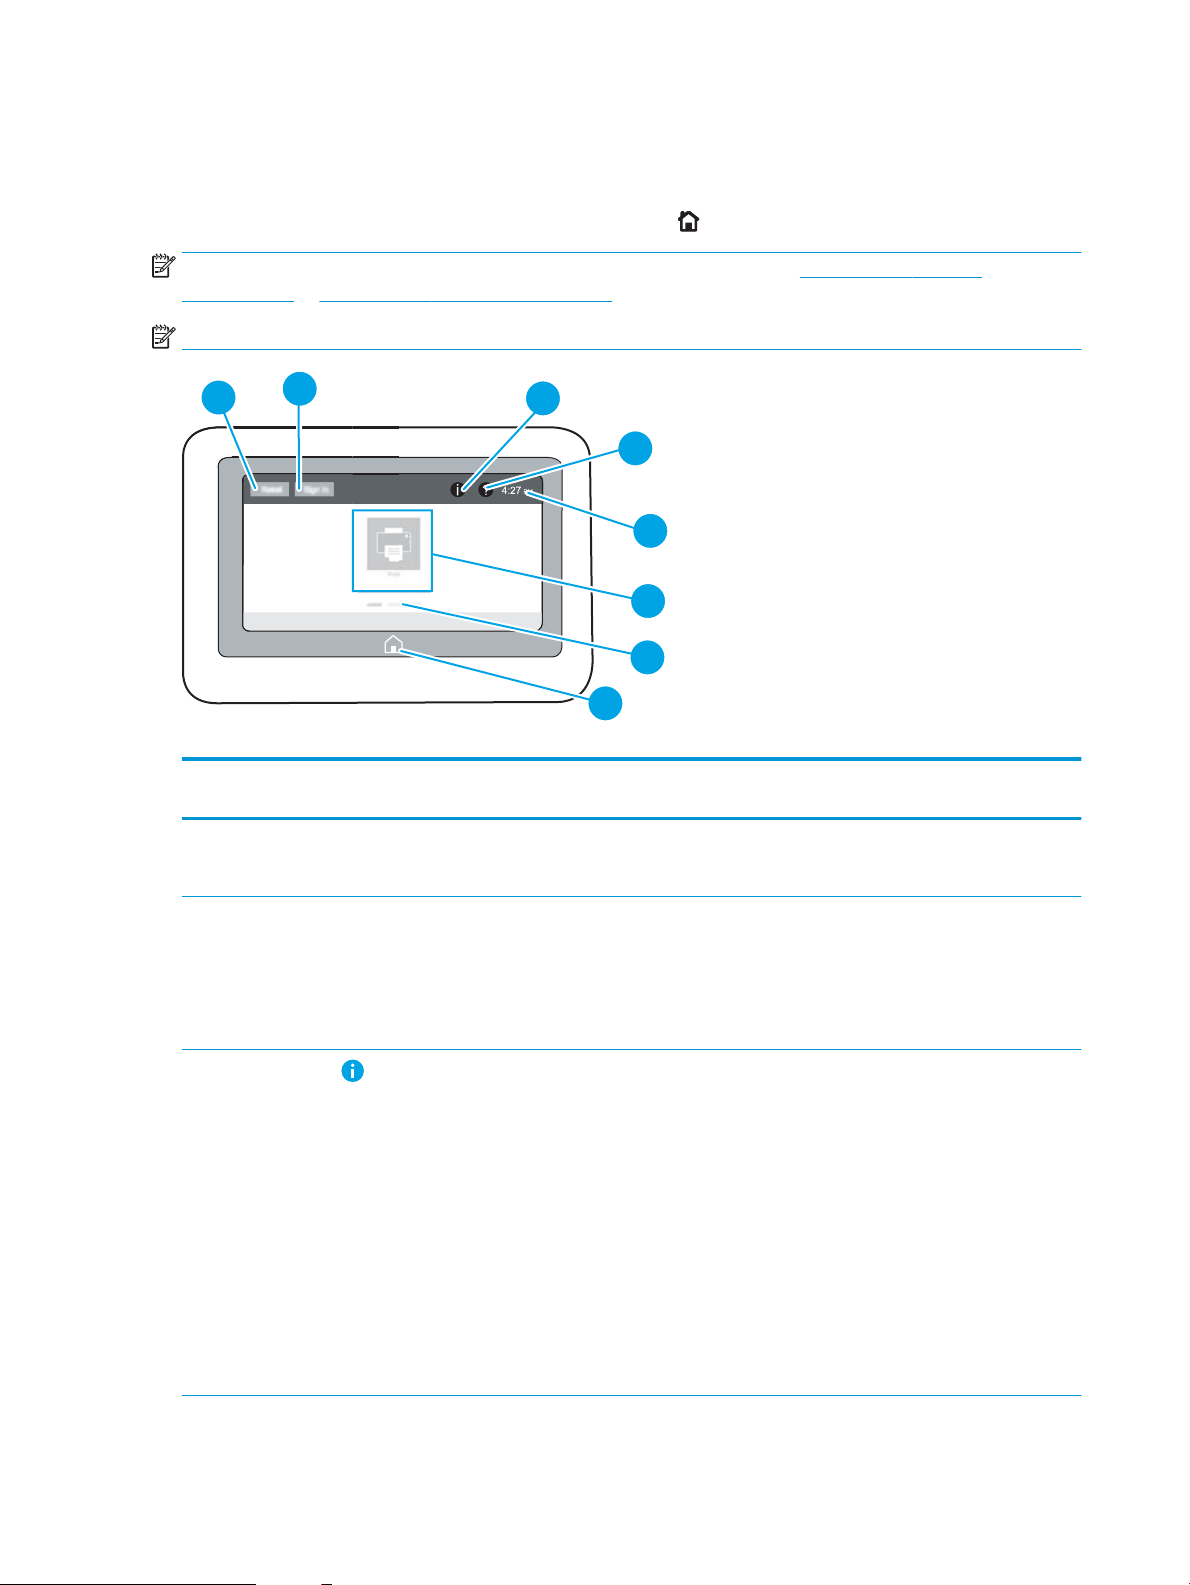
The Home screen provides access to the printer features and indicates the current status of the printer.
Return to the Home screen at any time by selecting the Home button.
NOTE: For more information about the printer-control-panel features, go to www.hp.com/support/
colorljE65150 or www.hp.com/support/colorljE65160, select Manuals, and then select General reference.
NOTE: The features that appear on the Home screen can vary, depending on the printer conguration.
Table 1-4 Printer control-panel view legend
Image
callout
1 Reset button Touch the Reset button to clear changes, release the printer from a paused state, reset the copy
2 Sign In or Sign Out
3
Component Description
count eld, display hidden errors, and restore the default settings (including the language and
keyboard layout).
Touch the Sign In button to access secured features.
button
Information button
Touch the Sign Out button to sign out of the printer. The printer restores all options to the default
settings.
NOTE: This button displays only if the administrator has congured the printer to require
permission for access to features.
Touch the information button to access a screen that provides access to several types of printer
information. Touch the buttons at the bottom of the screen for the following information:
● Display Language: Change the language setting for the current user session.
● Sleep Mode: Place the printer into sleep mode.
● Wi-Fi Direct: View information for how to connect directly to the printer using a phone, tablet,
or other device with Wi-Fi.
● Wireless: View or change wireless connection settings (only when an optional wireless
accessory is installed).
● Ethernet: View or change Ethernet connection settings.
● HP Web Services: View information to connect and print to the printer using HP Web Services
(ePrint).
6 Chapter 1 Printer overview ENWW
Page 17

Table 1-4 Printer control-panel view legend (continued)
Image
callout
4
5 Current time Displays the current time.
6 Applications area Touch any of the icons to open the application. Swipe the screen sideways to access more
7 Home-screen page
8
Component Description
Help button
indicator
Home button
Touch the Help button to open the embedded help system.
applications.
NOTE: The available applications vary by printer. The administrator can congure which
applications appear and the order in which they appear.
Indicates the number of pages on the Home Screen or in an application. The current page is
highlighted. Swipe the screen sideways to scroll between pages.
Touch the Home button to return to the Home screen.
ENWW Printer views 7
Page 18

How to use the touchscreen control panel
Use the following actions to use the printer touchscreen control panel.
Action Description Example
Touch Touch an item on the screen to select that item
or open that menu. Also, when scrolling through
menus, briey touch the screen to stop the
scrolling.
Swipe Touch the screen and then move your nger
horizontally to scroll the screen sideways.
Scroll Touch the screen and then move your nger
vertically to scroll the screen up and down. When
scrolling through menus, briey touch the screen
to stop the scrolling.
Touch the Settings icon to open the Settings app.
Swipe until the Settings app displays.
Scroll through the Settings app.
8 Chapter 1 Printer overview ENWW
Page 19

Printer specications
IMPORTANT: The following specications are correct at the time of publication, but they are subject to change.
For current information, see www.hp.com/support/colorljE65150 or www.hp.com/support/colorljE65160.
●
Technical specications
●
Supported operating systems
●
Printer dimensions
●
Power consumption, electrical specications, and acoustic emissions
●
Operating-environment range
Technical specications
Table 1-5 Paper handling specications
Model E65150dn
Paper handling features
Tray 1 (100-sheet capacity) Included Included
Tray 2 (550-sheet capacity) Included Included
1 x 550-sheet paper feeder
NOTE: The E65150dn and E65160dn models accept up to two
optional 1 x 550-sheet feeders.
1 x 550-sheet paper feeder with stand Optional Optional
3 x 550-sheet paper feeder with stand Optional Optional
High-capacity input feeder (HCI) Optional Optional
Automatic duplex printing Included Included
(Product # 3GY03A)
Optional Optional
Model E65160dn
(Product # 3GY04A)
Table 1-6 Connectivity specications
Model E65150dn
Connectivity features
10/100/1000 Ethernet LAN connection with IPv4 and IPv6 Included Included
(Product # 3GY03A)
Model E65160dn
(Product # 3GY04A)
Hi-Speed USB 2.0 Included Included
Easy-access USB port for printing without a computer and
upgrading the rmware
Hardware Integration Pocket for connecting accessory and
third-party devices
HP Internal USB Ports Optional Optional
Included Included
Included Included
ENWW Printer specications 9
Page 20

Table 1-6 Connectivity specications (continued)
Connectivity features
HP Jetdirect 2900nw Print Server accessory for wireless
connectivity
HP Jetdirect 3100w BLE/NFC/Wireless Accessory for printing
from mobile devices
NOTE: Connected via the Hardware Integration Pocket or the
rear host USB port. The HP Jetdirect 3100w BLE/NFC/Wireless
Accessory requires the HP Internal USB ports accessory.
Model E65150dn
(Product # 3GY03A)
Optional Optional
Optional Optional
Model E65160dn
(Product # 3GY04A)
Table 1-7 Print specications
Model E65150dn
Print features
Prints 50 pages per minute (ppm) on letter and 47 ppm on A4size paper
Prints 60 pages per minute (ppm) on letter and 56 ppm on A4size paper
Easy-access USB printing (no computer required) Included Included
Store jobs in the printer memory to print later or print privately Included Included
(Product # 3GY03A)
Included Included
Not supported Included
Model E65160dn
(Product # 3GY04A)
Table 1-8 Other specications
Other features
Memory
1 GB base memory
NOTE: The base memory is expandable to 2 GB by adding a
DIMM memory module.
Mass storage
500 GB FIPS140 certied hard-disk drive
Security
HP Trusted Platform Module for encrypting all data that passes
through the printer
Control-panel display and input
Color touchscreen display
Model E65150dn
(Product # 3GY03A)
Included Included
Optional Optional
Optional Optional
Included Included
(Product # 3GY04A)
Model E65160dn
10 Chapter 1 Printer overview ENWW
Page 21

Supported operating systems
Linux: For information and print drivers for Linux, go to www.hp.com/go/linuxprinting.
UNIX: For information and print drivers for UNIX®, go to www.hp.com/go/unixmodelscripts.
The following information applies to the printer-specic Windows HP PCL 6 print drivers, HP print drivers for
macOS, and to the software installer.
Windows: Download HP Easy Start from 123.hp.com/LaserJet to install the HP print driver. Or, go to the printersupport website for this printer: www.hp.com/support/colorljE65150 or www.hp.com/support/colorljE65160 to
download the print driver or the software installer to install the HP print driver.
macOS: Mac computers are supported with this printer. Download HP Easy Start either from 123.hp.com/
LaserJet or from the Printer Support page, and then use HP Easy Start to install the HP print driver.
1. Go to 123.hp.com/LaserJet.
2. Follow the steps provided to download the printer software.
Table 1-9 Supported operating systems and print drivers
Operating system Print driver (for Windows, or the installer on the web for macOS)
Windows 7, 32-bit and 64-bit The “HP PCL 6” printer-specic print driver is installed for this
Windows 8, 32-bit and 64-bit The “HP PCL 6” printer-specic print driver is installed for this
operating system as part of the software installation.
operating system as part of the software installation.
Windows 8.1, 32-bit and 64-bit The “HP PCL-6” V4 printer-specic print driver is installed for this
operating system as part of the software installation.
Windows 10, 32-bit and 64-bit The “HP PCL-6” V4 printer-specic print driver is installed for this
operating system as part of the software installation.
Windows Server 2008 R2, SP 1, 64-bit The PCL 6 printer-specic print driver is available for download from
the printer-support website. Download the driver, and then use the
Microsoft Add Printer tool to install it.
Windows Server 2012, 64-bit The PCL 6 printer-specic print driver is available for download from
the printer-support website. Download the driver, and then use the
Microsoft Add Printer tool to install it.
Windows Server 2012 R2, 64-bit The PCL 6 printer-specic print driver is available for download from
the printer-support website. Download the driver, and then use the
Microsoft Add Printer tool to install it.
Windows Server 2016, 64-bit The PCL 6 printer-specic print driver is available for download from
the printer-support website. Download the driver, and then use the
Microsoft Add Printer tool to install it.
macOS 10.12 Sierra, macOS 10.13 High Sierra Download HP Easy Start from 123.hp.com/LaserJet, and then use it
to install the print driver.
NOTE: Supported operating systems can change.
NOTE: For a current list of supported operating systems, go to www.hp.com/support/colorljE65150 or
www.hp.com/support/colorljE65160 for HP's all-inclusive help for the printer.
NOTE: For details on client and server operating systems and for HP UPD driver support for this printer, go to
www.hp.com/go/upd. Under Additional information, click the links.
ENWW Printer specications 11
Page 22

Table 1-10 Minimum system requirements
Windows macOS
● Internet connection
● Dedicated USB 1.1 or 2.0 connection or a network connection
● 2 GB of available hard-disk space
● 1 GB RAM (32-bit) or 2 GB RAM (64-bit)
● Internet connection
● Dedicated USB 1.1 or 2.0 connection or a network connection
● 1.5 GB of available hard-disk space
NOTE: The Windows software installer installs the HP Smart Device Agent Base service. The le size is
approximately 100 kb. Its only function is to check for printers connected via USB hourly. No data is collected. If a
USB printer is found, it then tries to locate a JetAdvantage Management Connector (JAMc) instance on the
network. If a JAMc is found, the HP Smart Device Agent Base is securely upgraded to a full Smart Device Agent
from JAMc, which will then allow printed pages to be accounted for in a Managed Print Services (MPS) account.
The driver-only web packs downloaded from hp.com for the printer and installed through the Add Printer wizard
do not install this service.
To uninstall the service, open the Control Panel, select Programs or Programs and Features, and then select Add/
Remove Programs or Uninstall a Program to remove the service. The le name is HPSmartDeviceAgentBase.
12 Chapter 1 Printer overview ENWW
Page 23

Printer dimensions
Table 1-11 Dimensions for the dn models
Dimension Printer fully closed Printer fully opened
Height 482 mm (19 in) 482 mm (19 in)
Depth 458 mm (18 in) 770 mm (30.3 in)
Width 510 mm (20 in) 963 mm (37.9 in)
Weight 26.8 kg (59 lb)
Table 1-12 Dimensions for the 1 x 550-sheet paper feeder
Dimension Measurement
Height 130 mm (5.1 in)
Depth Tray closed: 458 mm (18 in)
Width Door closed: 510 mm (20.7 in)
Weight 6.3 kg (13.8 lb)
Tray opened: 770 mm (30.3 in)
Door opened: 510 mm (20.7 in)
Table 1-13 Dimensions for the printer with one 1 x 550-sheet paper feeder
Dimension Printer fully closed Printer fully opened
Height dn models: 640 mm (25.1 in) dn models: 640 mm (25.1 in)
Depth 458 mm (18 in) 770 mm (30.3 in)
Width 510 mm (20.7 in) 963 mm (37.9 in)
Weight 33.1 kg (72.9 lb)
Table 1-14 Dimensions for the 1 x 550-sheet paper feeder with stand
Dimension Measurement
Height 450 mm (17.7 in)
Depth Tray closed: 657 mm (25.8 in)
Tray opened: 948 mm (37.3 in)
Width Door closed: 657 mm (25.8 in)
Door opened: 992 mm (39 in)
Weight 18.6 kg (41 lb)
ENWW Printer specications 13
Page 24

Table 1-15 Dimensions for the printer and the 1 x 550-sheet paper feeder with stand
Dimension Printer and accessories fully closed Printer and accessories fully opened
Height 932 mm (36.6 in) 932 mm (36.6 in)
Depth 657 mm (25.8 in) 948 mm (37.3 in)
Width 657 mm (25.8 in) 992 mm (39 in)
Weight 45.4 kg (100 lb)
Table 1-16 Dimensions for the 3 x 550-sheet paper feeder with stand
Dimension Measurement
Height 450 mm (17.7 in)
Depth Tray closed: 657 mm (25.8 in)
Tray open: 984 mm (37.3 in)
Width Door closed: 657 mm (25.8 in)
Door open: 992 mm (39 in)
Weight 22.7 kg (50 lb)
Table 1-17 Dimensions for the printer and the 3 x 550-sheet paper feeder with stand
Dimension Printer and accessories fully closed Printer and accessories fully opened
Height 932 mm (36.6 in) 932 mm (36.6 in)
Depth 657 mm (25.8 in) 984 mm (37.3 in)
Width 657 mm (25.8 in) 992 mm (39 in)
Weight 49.5 kg (109 lb)
Table 1-18 Dimensions for the high-capacity input feeder (HCI) with stand
Dimension Measurement
Height 450 mm (17.7 in)
Depth Tray closed: 657 mm (25.8 in)
Tray open: 967 mm (38 in)
Width Door closed: 657 mm (25.8 in)
Door open: 992 mm (39 in)
Weight 25.2 kg (55.5 lb)
14 Chapter 1 Printer overview ENWW
Page 25

Table 1-19 Dimensions for the printer and the high-capacity input feeder (HCI) with stand
Dimension Printer and accessories fully closed Printer and accessories fully opened
Height 932 mm (36.6 in) 932 mm (36.6 in)
Depth 657 mm (25.8 in) 967 mm (38 in)
Width 657 mm (25.8 in) 992 mm (39 in)
Weight 52 kg (114.6 lb)
Power consumption, electrical specications, and acoustic emissions
See www.hp.com/support/colorljE65150 or www.hp.com/support/colorljE65160 for current information.
CAUTION: Power requirements are based on the country/region where the printer is sold. Do not convert
operating voltages. This will damage the printer and void the printer warranty.
Operating-environment range
Table 1-20 Operating-environment specications
Environment Recommended Allowed
Temperature 15° to 27°C (59° to 80.6°F) 10° to 32.5°C (50° to 90.5°F)
Relative humidity 30% to 70% relative humidity (RH) 10% to 80% RH
ENWW Printer specications 15
Page 26

Printer hardware setup and software installation
For basic setup instructions, see the Hardware Installation Guide that came with the printer. For additional
instructions, go to HP support on the Web.
Go to www.hp.com/support/colorljE65150 or www.hp.com/support/colorljE65160 for HP's all-inclusive help for
the printer. Find the following support:
● Install and congure
● Learn and use
● Solve problems
● Download software and rmware updates
● Join support forums
● Find warranty and regulatory information
16 Chapter 1 Printer overview ENWW
Page 27

2 Paper trays
●
Introduction
●
Load paper to Tray 1
●
Load paper to Tray 2 and the 550-sheet trays
●
Load paper to the 2,000-sheet high-capacity input tray
●
Load and print envelopes
●
Load and print labels
For more information
The following information is correct at the time of publication.
For video assistance, see www.hp.com/videos/LaserJet.
For current information, see www.hp.com/support/colorljE65150 or www.hp.com/support/colorljE65160.
HP's all-inclusive help for the printer includes the following information:
● Install and congure
● Learn and use
● Solve problems
● Download software and rmware updates
● Join support forums
● Find warranty and regulatory information
ENWW 17
Page 28
Introduction
CAUTION: Do not extend more than one paper tray at a time.
Do not use paper tray as a step.
Keep hands out of paper trays when closing.
All trays must be closed when moving the printer.
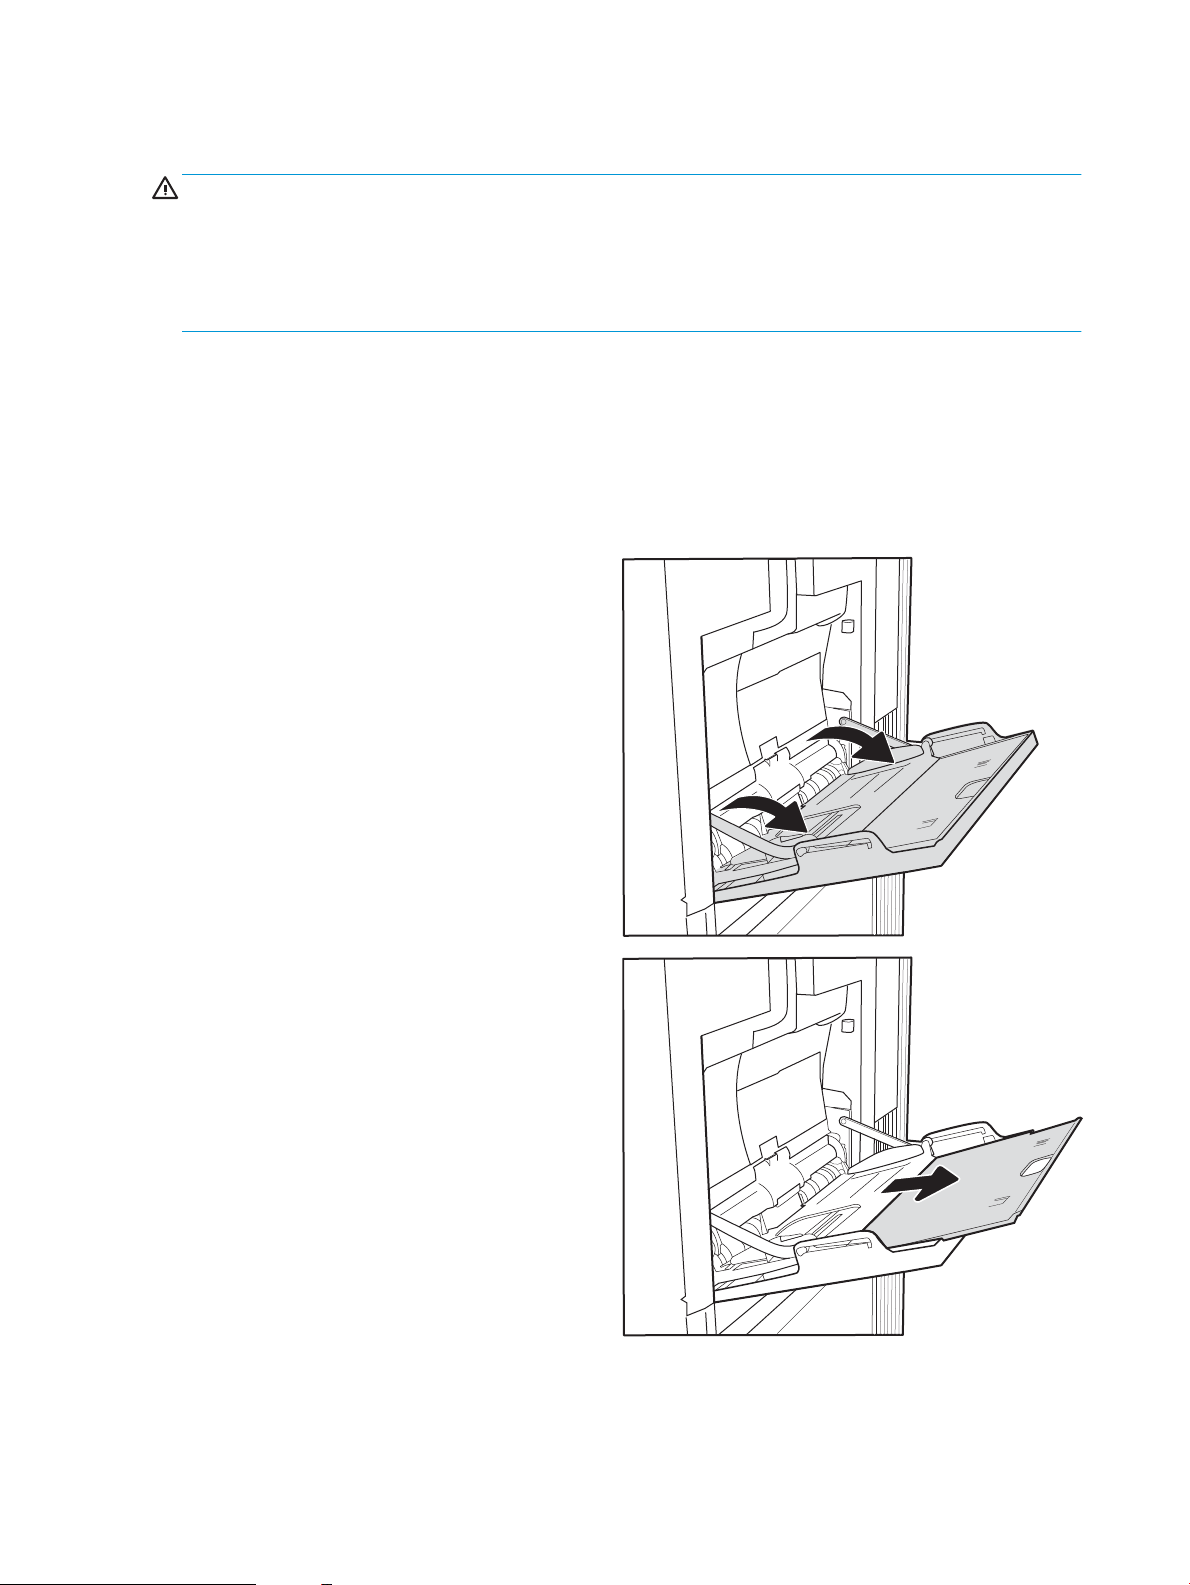
Load paper to Tray 1
Introduction
The following information describes how to load paper into Tray 1. This tray holds up to 100 sheets of 75 g/m
(20 lb) paper or 10 envelopes.
1. Open Tray 1.
2. Pull out the tray extension to support the paper.
2
18 Chapter 2 Paper trays ENWW
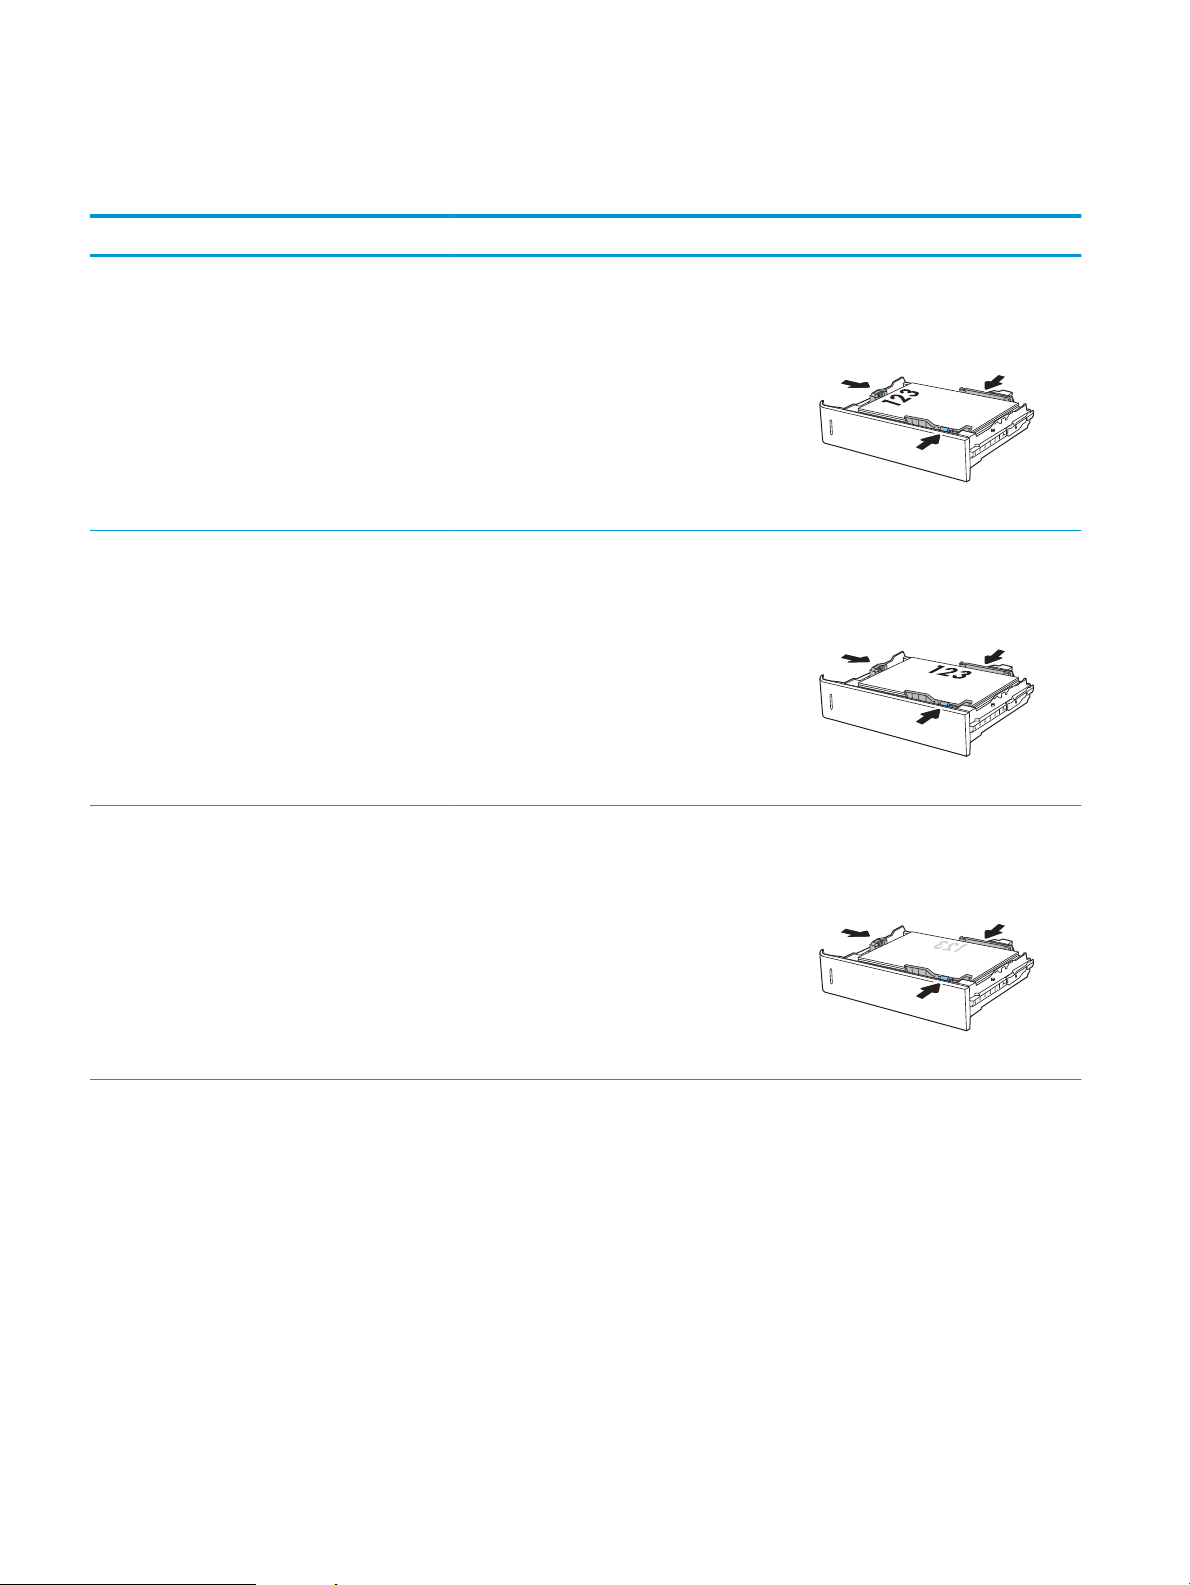
Page 29
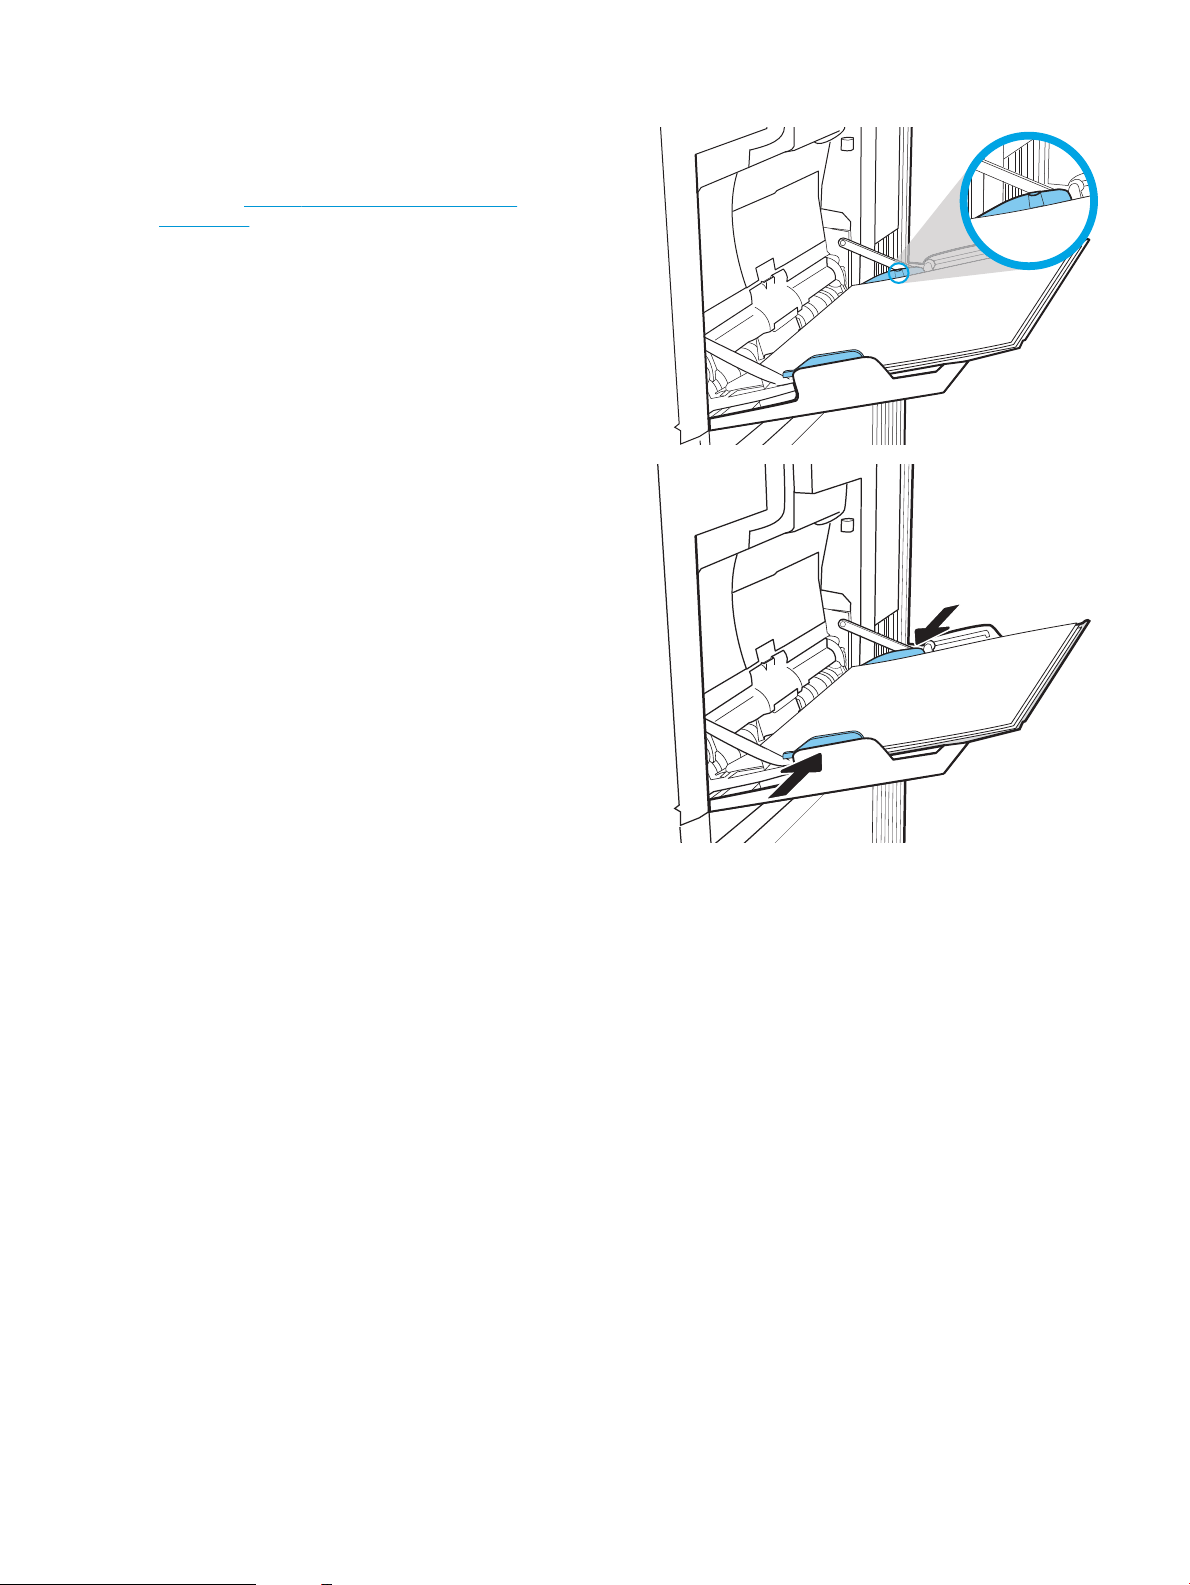
3. Use the blue adjustment latch to spread the paper
guides to the correct size, and then load paper in
the tray. For information about how to orient the
paper, see Table 2-1 Tray 1 paper orientation
on page 20.
Make sure that the paper ts under the ll line on
the paper guides.
NOTE: The maximum stack height is 10 mm (0.4
in), or approximately 100 sheets of 75 g/m2 (20 lb)
paper.
4. Using the blue adjustment latch, adjust the side
guides so that they lightly touch the paper stack,
but do not bend it.
ENWW Load paper to Tray 1 19
Page 30
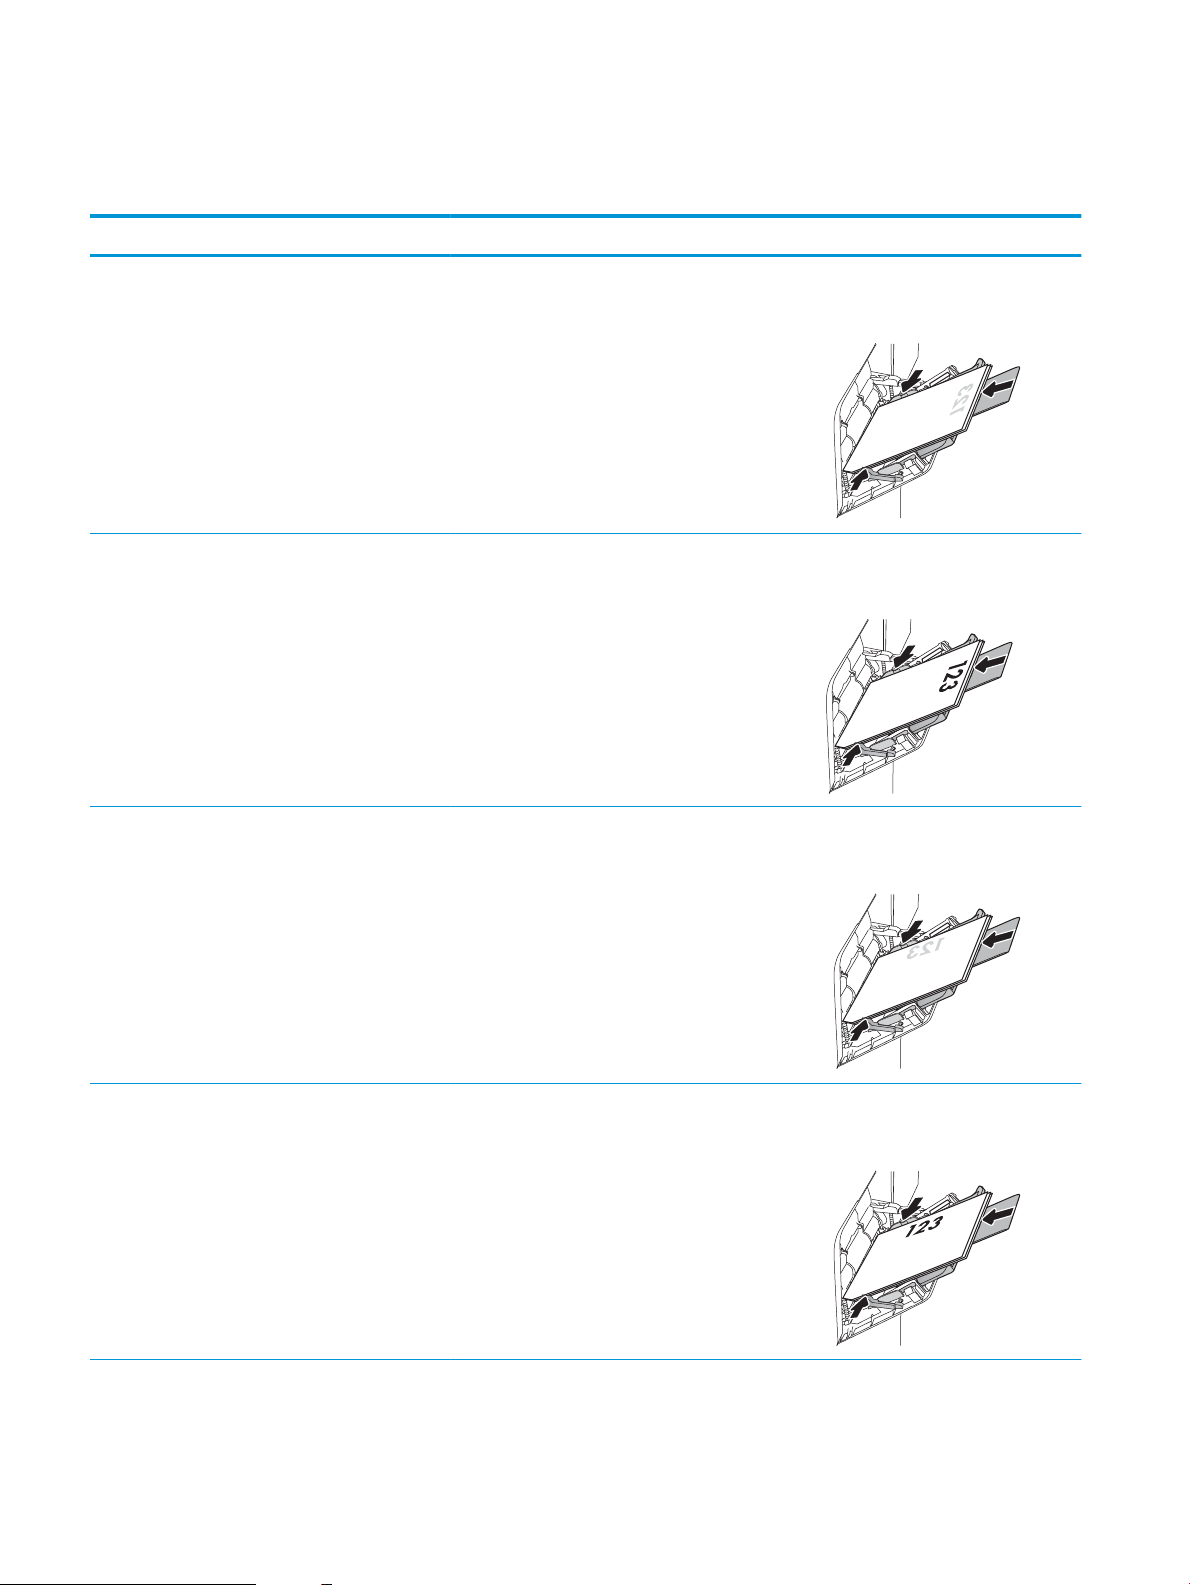
Tray 1 paper orientation
Table 2-1 Tray 1 paper orientation
Paper type Image orientation Duplex mode Paper size How to load paper
Letterhead or preprinted Portrait 1-sided printing Letter, Legal, Executive,
Statement, Ocio (8.5 x
13), 3 x 5, 4 x 6, 5 x 7, 5 x
8, A4, A5, A6, RA4, B5
(JIS), B6 (JIS), L (90 x 130
mm), 10 x 15 cm, Ocio
(216 x 340), 16K 195 x
270 mm, 16K 184 x 260
mm, 16K 197 x 273 mm,
Japanese Postcard
(Postcard (JIS)), Double
Japan Postcard Rotated
(Double Postcard (JIS))
Letterhead or preprinted Portrait Automatic 2-sided
printing or with
Alternative Letterhead
Mode enabled
Letterhead or preprinted Landscape 1-sided printing Letter, Legal, Executive,
Letter, Legal, Executive,
Ocio (8.5 x 13), A4, A5,
RA4, B5 (JIS), Ocio (216
x 340),
16K 195 x 270 mm,
16K 184 x 260 mm,
16K 197 x 273 mm
Statement, Ocio (8.5 x
13), 3 x 5, 4 x 6, 5 x 7, 5 x
8, A4, A5, A6, RA4, B5
(JIS), B6 (JIS), L (90 x 130
mm), 10 x 15 cm, Ocio
(216 x 340), 16K 195 x
270 mm, 16K 184 x 260
mm, 16K 197 x 273 mm,
Japanese Postcard
(Postcard (JIS)), Double
Japan Postcard Rotated
(Double Postcard (JIS))
Face-down
Bottom edge leading into the printer
Face-up
Bottom edge leading into the printer
Face-down
Top edge toward the back of the printer
Letterhead or preprinted Landscape Automatic 2-sided
printing or with
Alternative Letterhead
Mode enabled
Letter, Legal, Executive,
Ocio (8.5 x 13), A4, A5,
RA4, B5 (JIS), Ocio (216
x 340),
16K 195 x 270 mm,
16K 184 x 260 mm,
16K 197 x 273 mm
Face-up
Top edge toward the back of the printer
20 Chapter 2 Paper trays ENWW
Page 31

Table 2-1 Tray 1 paper orientation (continued)
Paper type Image orientation Duplex mode Paper size How to load paper
Prepunched Portrait and landscape 1-sided printing Letter, Legal, Executive,
Statement, Ocio (8.5 x
13), 3 x 5, 4 x 6, 5 x 7, 5 x
8, A4, A5, A6, RA4, B5
(JIS), B6 (JIS), L (90 x 130
mm), 10 x 15 cm, Ocio
(216 x 340), 16K 195 x
270 mm, 16K 184 x 260
mm, 16K 197 x 273 mm,
Japanese Postcard
(Postcard (JIS)), Double
Japan Postcard Rotated
(Double Postcard (JIS))
Prepunched Portrait and landscape Automatic 2-sided
printing or with
Alternative Letterhead
Mode enabled
Letter, Legal, Executive,
Ocio (8.5 x 13), A4, A5,
RA4, B5 (JIS), Ocio (216
x 340),
16K 195 x 270 mm,
16K 184 x 260 mm,
16K 197 x 273 mm
Holes toward the back of the printer
Holes toward the back of the printer
ENWW Load paper to Tray 1 21
Page 32

Use alternative letterhead mode
Use the Alternative Letterhead Mode feature to load letterhead or preprinted paper into the tray the same way
for all jobs, whether printing to one side of the sheet of paper or to both sides. When using this mode, load paper
as for automatic duplex printing.
To use the feature, enable it by using the printer control-panel menus.
Enable Alternative Letterhead Mode by using the printer control-panel menus
1. From the Home screen on the printer control panel, navigate to the Settings application, and then select
Settings icon.
the
2. Open the following menus:
a. Copy/Print or Print
b. Manage Trays
c. Alternative Letterhead Mode
3. Select Enabled, and then touch the Save button or press the OK button.
22 Chapter 2 Paper trays ENWW
Page 33

Load paper to Tray 2 and the 550-sheet trays
Introduction
The following information describes how to load paper into Tray 2 and the optional 550-sheet trays. These trays
hold up to 550 sheets of 75 g/m2 (20 lb) paper.
NOTE: The procedure to load paper for the 550-sheet trays is the same as for Tray 2. Only Tray 2 is shown
here.
NOTE: The paper guides may be locked before use and may not be adjustable.
CAUTION: Do not extend more than one paper tray at a time.
1. Open the tray.
NOTE: Do not open this tray while it is in use.
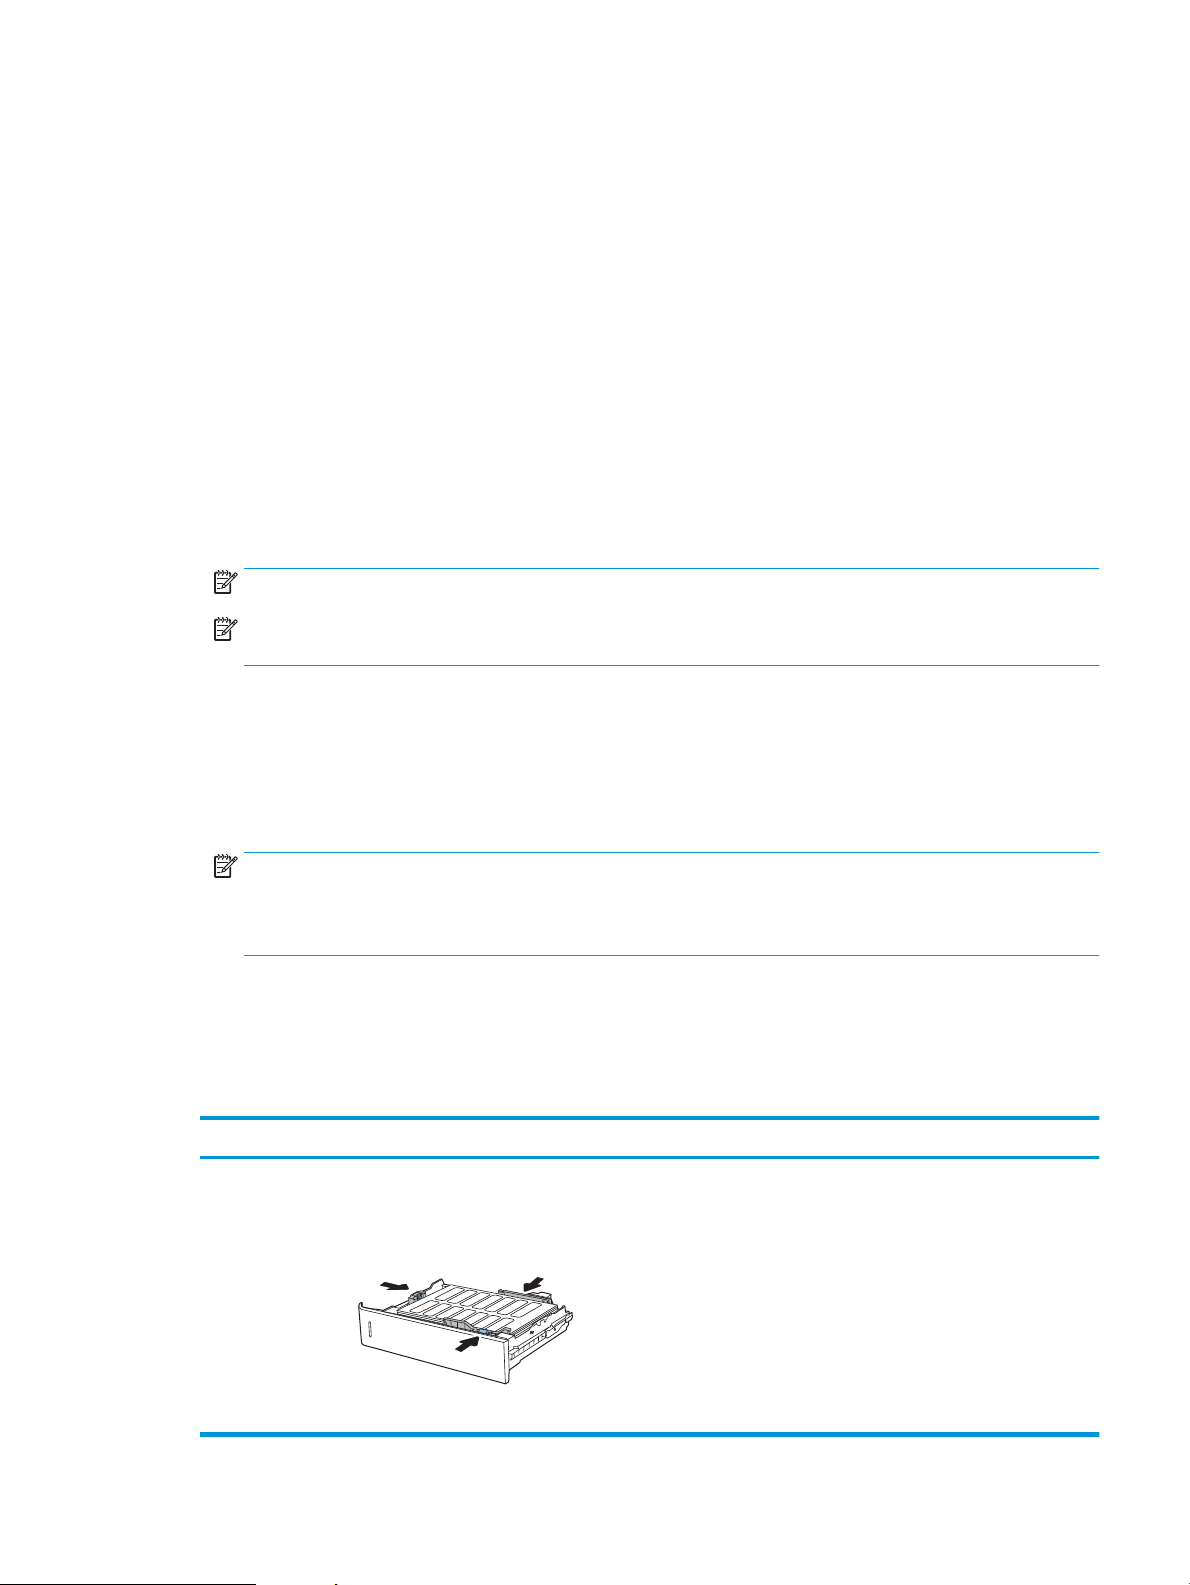
2. Before loading paper, adjust the paper-width
guides by squeezing the blue adjustment latches
and sliding the guides to the size of the paper
being used.
ENWW Load paper to Tray 2 and the 550-sheet trays 23
Page 34

3. Adjust the paper-length guide by squeezing the
adjustment latch and sliding the guide to the size
of the paper being used.
4. Load paper into the tray. Check the paper to verify
the guides lightly touch the stack, but do not bend
it. For information about how to orient the paper,
see Table 2-2 Tray 2 and the 550-sheet trays
paper orientation on page 26.
NOTE: Do not adjust the paper guides tightly
against the paper stack. Adjust them to the
indentations or markings in the tray.
NOTE: To prevent jams, adjust the paper guides
to the correct size and do not overll the tray. Be
sure that the top of the stack is below the tray full
indicator.
5. Close the tray.
6. The tray conguration message displays on the
printer control panel.
24 Chapter 2 Paper trays ENWW
Page 35

7. Select the OK button to accept the detected type
X
Y
and size, or select the Modify button to choose a
dierent paper size or type.
For custom-size paper, specify the X and Y
dimensions for the paper when the prompt
displays on the printer control panel.
8. Select the correct type and size, and then select
the OK button.
ENWW Load paper to Tray 2 and the 550-sheet trays 25
Page 36
Tray 2 and the 550-sheet trays paper orientation
Table 2-2 Tray 2 and the 550-sheet trays paper orientation
Paper type Image orientation Duplex mode Paper size How to load paper
Letterhead or preprinted Portrait 1-sided printing Letter, Legal, Executive,
Statement, Ocio (8.5 x
13), 4 x 6, 5 x 7, 5 x 8, A4,
A5, A6, RA4, B5 (JIS), B6
(JIS), L (90 x 130 mm), 10
x 15 cm, Ocio (216 x
340), 16K 195 x 270
mm, 16K 184 x 260 mm,
16K 197 x 273 mm,
Double Japan Postcard
Rotated (Double Postcard
(JIS))
Letterhead or preprinted Landscape 1-sided printing Letter, Legal, Executive,
Statement, Ocio (8.5 x
13), 4 x 6, 5 x 7, 5 x 8, A4,
A5, A6, RA4, B5 (JIS), B6
(JIS), L (90 x 130 mm), 10
x 15 cm, Ocio (216 x
340), 16K 195 x 270
mm, 16K 184 x 260 mm,
16K 197 x 273 mm,
Double Japan Postcard
Rotated (Double Postcard
(JIS))
Letterhead or preprinted Landscape Automatic 2-sided
printing or with
Alternative Letterhead
Mode enabled
Letter, Legal, Executive,
Ocio (8.5 x 13), A4, A5,
RA4, Ocio (216 x 340),
16K 195 x 270 mm,
16K 184 x 260 mm,
16K 197 x 273 mm
Face-up
Top edge at the left side of the tray
Face-up
Top edge toward the back of the tray
Face-down
Top edge toward the back of the tray
26 Chapter 2 Paper trays ENWW
Page 37

Table 2-2 Tray 2 and the 550-sheet trays paper orientation (continued)
Paper type Image orientation Duplex mode Paper size How to load paper
Prepunched Portrait or landscape 1-sided printing Letter, Legal, Executive,
Statement, Ocio (8.5 x
13), 4 x 6, 5 x 7, 5 x 8, A4,
A5, A6, RA4, B5 (JIS), B6
(JIS), L (90 x 130 mm), 10
x 15 cm, Ocio (216 x
340), 16K 195 x 270
mm, 16K 184 x 260 mm,
16K 197 x 273 mm,
Double Japan Postcard
Rotated (Double Postcard
(JIS))
Prepunched Portrait or landscape Automatic 2-sided
printing or with
Alternative Letterhead
Mode enabled
Letter, Legal, Executive,
Ocio (8.5 x 13), A4, A5,
RA4, Ocio (216 x 340),
16K 195 x 270 mm,
16K 184 x 260 mm,
16K 197 x 273 mm
Holes toward the back of the tray
Holes toward the back of the tray
ENWW Load paper to Tray 2 and the 550-sheet trays 27
Page 38

Use alternative letterhead mode
Use the Alternative Letterhead Mode feature to load letterhead or preprinted paper into the tray the same way
for all jobs, whether printing to one side of the sheet of paper or to both sides. When using this mode, load paper
as for automatic duplex printing.
To use the feature, enable it by using the printer control-panel menus.
Enable Alternative Letterhead Mode by using the printer control-panel menus
1. From the Home screen on the printer control panel, navigate to the Settings application, and then select
Settings icon.
the
2. Open the following menus:
a. Copy/Print or Print
b. Manage Trays
c. Alternative Letterhead Mode
3. Select Enabled, and then touch the Save button or press the OK button.
28 Chapter 2 Paper trays ENWW
Page 39

Load paper to the 2,000-sheet high-capacity input tray
Introduction
The following information describes how to load paper into High-capacity input tray. This tray holds up to 2,000
sheets of 75 g/m2 (20 lb) paper.
1. Open the tray.
NOTE: Do not open this tray while it is in use.
2. Before loading paper, adjust the paper-width guide
by squeezing the blue adjustment latch and sliding
it to the size of the paper being used.
ENWW Load paper to the 2,000-sheet high-capacity input tray 29
Page 40
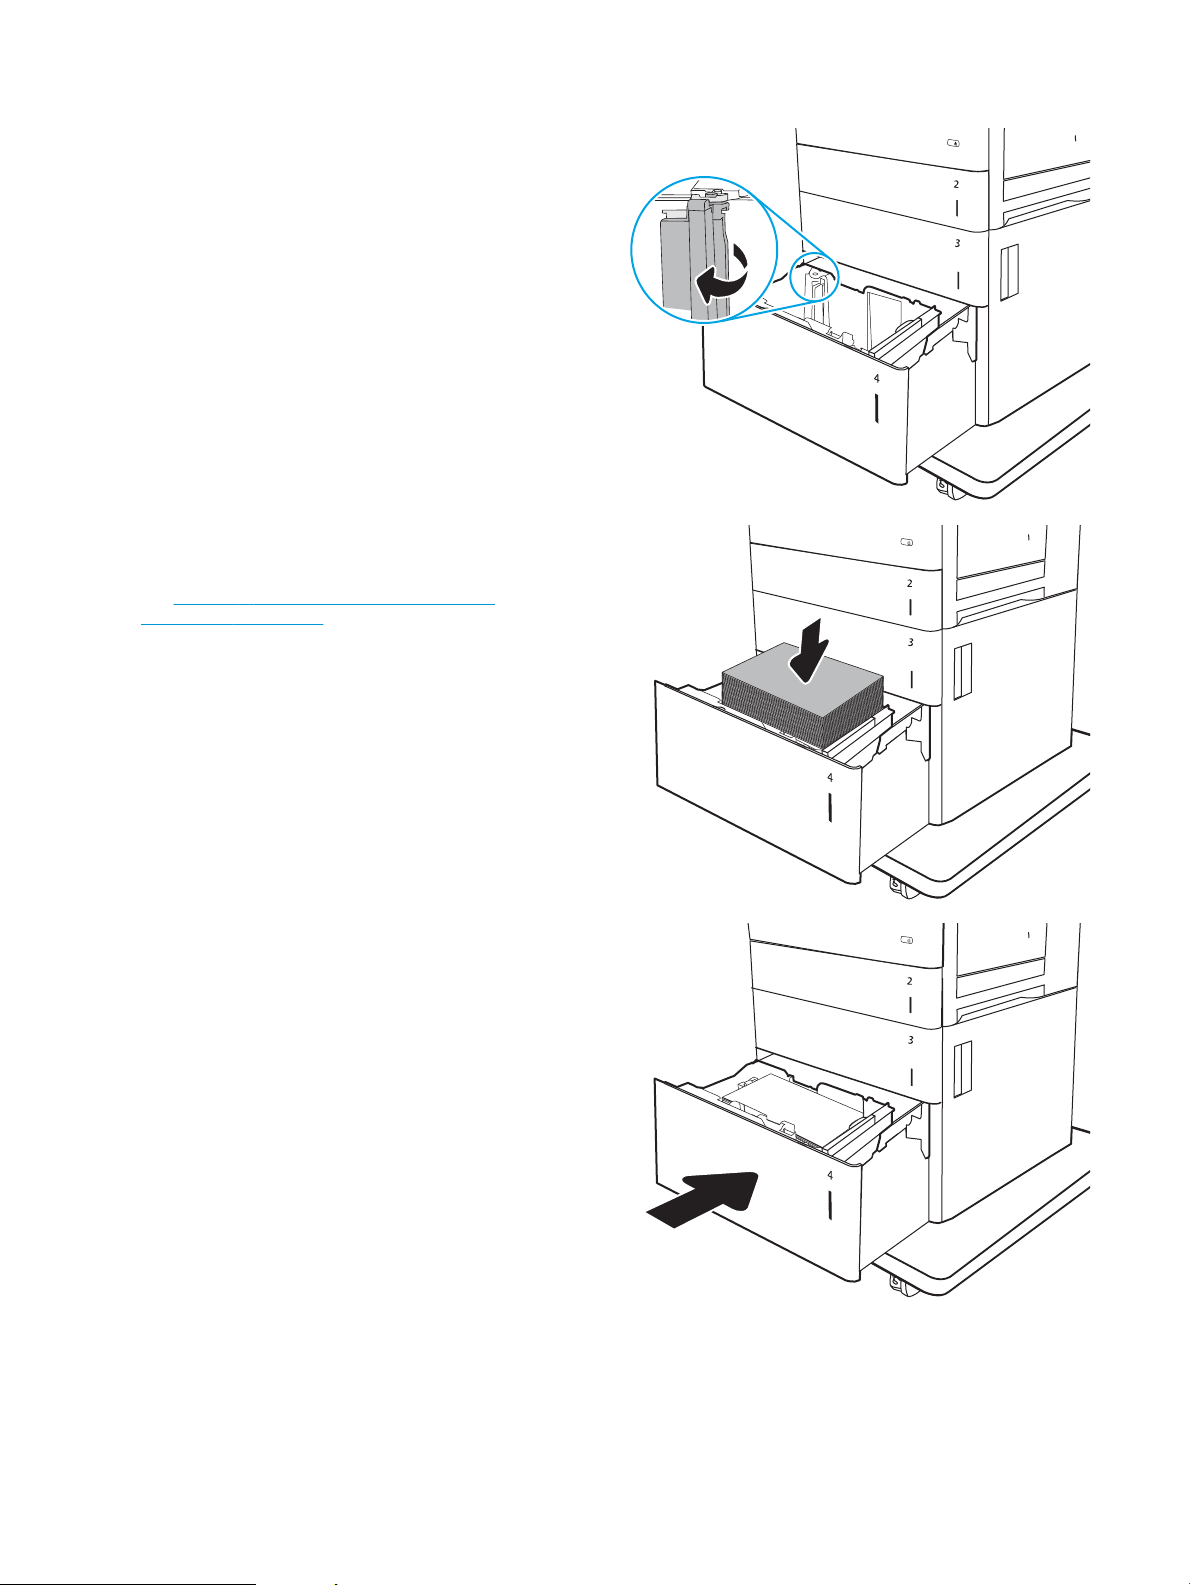
3. Rotate the paper-stop lever to the correct position
for the paper being used.
4. Load paper into the tray. Check the paper to verify
the guides lightly touch the stack, but do not bend
it. For information about how to orient the paper,
see Table 2-3 High-capacity input tray paper
orientation on page 31.
NOTE: To prevent jams, adjust the paper guides
to the correct size and do not overll the tray. Be
sure that the top of the stack is below the tray full
indicator.
5. Close the tray.
30 Chapter 2 Paper trays ENWW
Page 41

6. The tray conguration message displays on the
printer control panel.
7. Select the OK button to accept the detected type
and size, or select the Modify button to choose a
dierent paper size or type.
High-capacity input tray paper orientation
Table 2-3 High-capacity input tray paper orientation
Paper type Image orientation Duplex mode Paper size How to load paper
Letterhead or preprinted Portrait 1-sided printing Letter, Legal, A4 Face-up
Top edge at the left side of the tray
Letterhead or preprinted Portrait Automatic 2-sided
printing or with
Alternative Letterhead
Mode enabled
Letter, Legal, A4 Face-down
Top edge at the left side of the tray
Letterhead or preprinted Landscape 1-sided printing Letter, Legal, A4 Face-up
Top edge toward the back of the tray
ENWW Load paper to the 2,000-sheet high-capacity input tray 31
Page 42
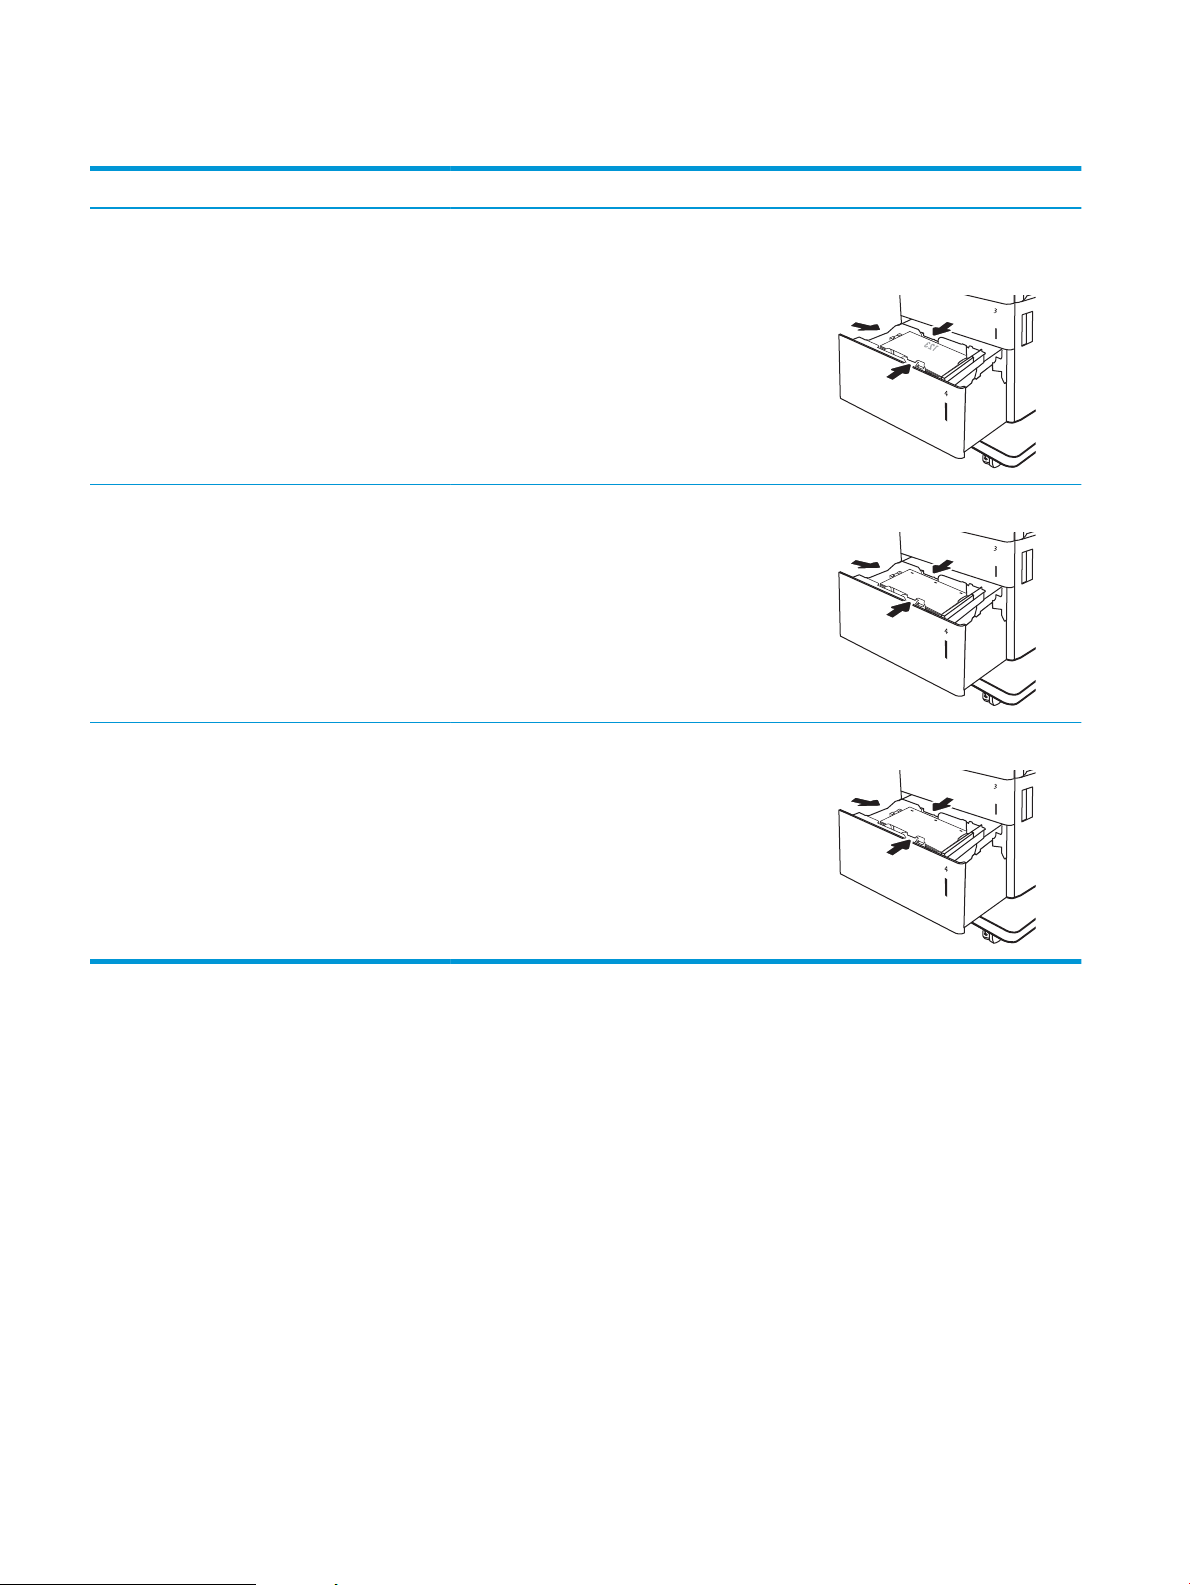
Table 2-3 High-capacity input tray paper orientation (continued)
Paper type Image orientation Duplex mode Paper size How to load paper
Letterhead or preprinted Landscape Automatic 2-sided
printing or with
Alternative Letterhead
Mode enabled
Prepunched Portrait or landscape 1-sided printing Letter, Legal, A4 Holes toward the back of the tray
Prepunched Portrait or landscape Automatic 2-sided
printing or with
Alternative Letterhead
Mode enabled
Letter, Legal, A4 Face-down
Top edge toward the back of the tray
Letter, Legal, A4 Holes toward the back of the tray
32 Chapter 2 Paper trays ENWW
Page 43

Use alternative letterhead mode
Use the Alternative Letterhead Mode feature to load letterhead or preprinted paper into the tray the same way
for all jobs, whether printing to one side of the sheet of paper or to both sides. When using this mode, load paper
as for automatic duplex printing.
To use the feature, enable it by using the printer control-panel menus.
Enable Alternative Letterhead Mode by using the printer control-panel menus
1. From the Home screen on the printer control panel, navigate to the Settings application, and then select
Settings icon.
the
2. Open the following menus:
a. Copy/Print or Print
b. Manage Trays
c. Alternative Letterhead Mode
3. Select Enabled, and then touch the Save button or press the OK button.
ENWW Load paper to the 2,000-sheet high-capacity input tray 33
Page 44

Load and print envelopes
Introduction
The following information describes how to print and load envelopes. Use only Tray 1 to print on envelopes. Tray
1 holds up to 10 envelopes.
To print envelopes using the manual feed option, follow these steps to select the correct settings in the print
driver, and then load the envelopes into the tray after sending the print job to the printer.
Print envelopes
1. From the software program, select the Print option.
2. Select the printer from the list of printers, and then click the Properties or Preferences button to open the
print driver.
NOTE: The name of the button varies for dierent software programs.
NOTE: To access these features from a Windows 8 or 8.1 Start screen app, select Devices, select Print,
and then select the printer.
3. Click the Paper/Quality tab.
4. In the Paper size drop-down list, select the correct size for the envelopes.
5. In the Paper type drop-down list, select Envelope.
6. In the Paper source drop-down list, select Manual feed.
7. Click the OK button to close the Document Properties dialog box.
8. In the Print dialog box, click the OK button to print the job.
Envelope orientation
Tray Envelope size How to load
Tray 1 Envelope #9, Envelope #10, Envelope
Monarch, Envelope B5, Envelope C5,
Envelope C6, Envelope DL
Face-down
Top edge toward the front of the printer
34 Chapter 2 Paper trays ENWW
Page 45
Load and print labels
Introduction
The following information describes how to print and load labels.
To print on sheets of labels, use Tray 2 or one of the 550-sheet trays. Tray 1 does not support labels.
To print labels using the manual feed option, follow these steps to select the correct settings in the print driver,
and then load the labels into the tray after sending the print job to the printer. When using manual feed, the
printer waits to print the job until it detects that the tray has been opened.
Manually feed labels
1. From the software program, select the Print option.
2. Select the printer from the list of printers, and then click the Properties or Preferences button to open the
print driver.
NOTE: The name of the button varies for dierent software programs.
NOTE: To access these features from a Windows 8 or 8.1 Start screen app, select Devices, select Print,
and then select the printer.
3. Click the Paper/Quality tab.
4. In the Paper size drop-down list, select the correct size for the sheets of labels.
5. In the Paper type drop-down list, select Labels.
6. In the Paper source drop-down list, select Manual feed.
NOTE: When using manual feed, the printer prints from the lowest-numbered tray that is congured for
the correct size of paper, so it is not necessary to specify a particular tray. For example, if Tray 2 is
congured for labels, the printer will print from Tray 2. If Tray 3 is installed and congured for labels, but
Tray 2 is not congured for labels, the printer will print from Tray 3.
7. Click the OK button to close the Document Properties dialog box.
8. In the Print dialog box, click the Print button to print the job.
Label orientation
Tray How to load labels
Tray 2 and the 550sheet trays
Face-up
Top edge toward the right of the printer
ENWW Load and print labels 35
Page 46

36 Chapter 2 Paper trays ENWW
Page 47

3 Supplies, accessories, and parts
●
Order supplies, accessories, and parts
●
Replace the toner cartridges
●
Replace the toner-collection unit
For more information
The following information is correct at the time of publication.
For video assistance, see www.hp.com/videos/LaserJet.
For current information, see www.hp.com/support/colorljE65150 or www.hp.com/support/colorljE65160.
HP's all-inclusive help for the printer includes the following information:
● Install and congure
● Learn and use
● Solve problems
● Download software and rmware updates
● Join support forums
● Find warranty and regulatory information
ENWW 37
Page 48

Order supplies, accessories, and parts
Ordering
Contact the HP-authorized service or support provider.
38 Chapter 3 Supplies, accessories, and parts ENWW
Page 49
Replace the toner cartridges
Toner-cartridge information
This printer indicates when the toner-cartridge level is low and very low. The actual toner-cartridge life remaining
can vary. Consider having a replacement cartridge available to install when print quality is no longer acceptable.
The printer uses four colors and has a dierent toner cartridge for each color: yellow (Y), magenta (M), cyan (C),
and black (K). The toner cartridges are inside the front door.
NOTE: High-yield toner cartridges contain more toner than standard cartridges for increased page yield. For
more information, go to www.hp.com/go/learnaboutsupplies.
Do not remove the toner cartridge from its package until it is time to replace it.
CAUTION: To prevent damage to the toner cartridge, do not expose it to light for more than a few minutes.
Cover the green imaging drum if the toner cartridge must be removed from the printer for an extended period of
time.
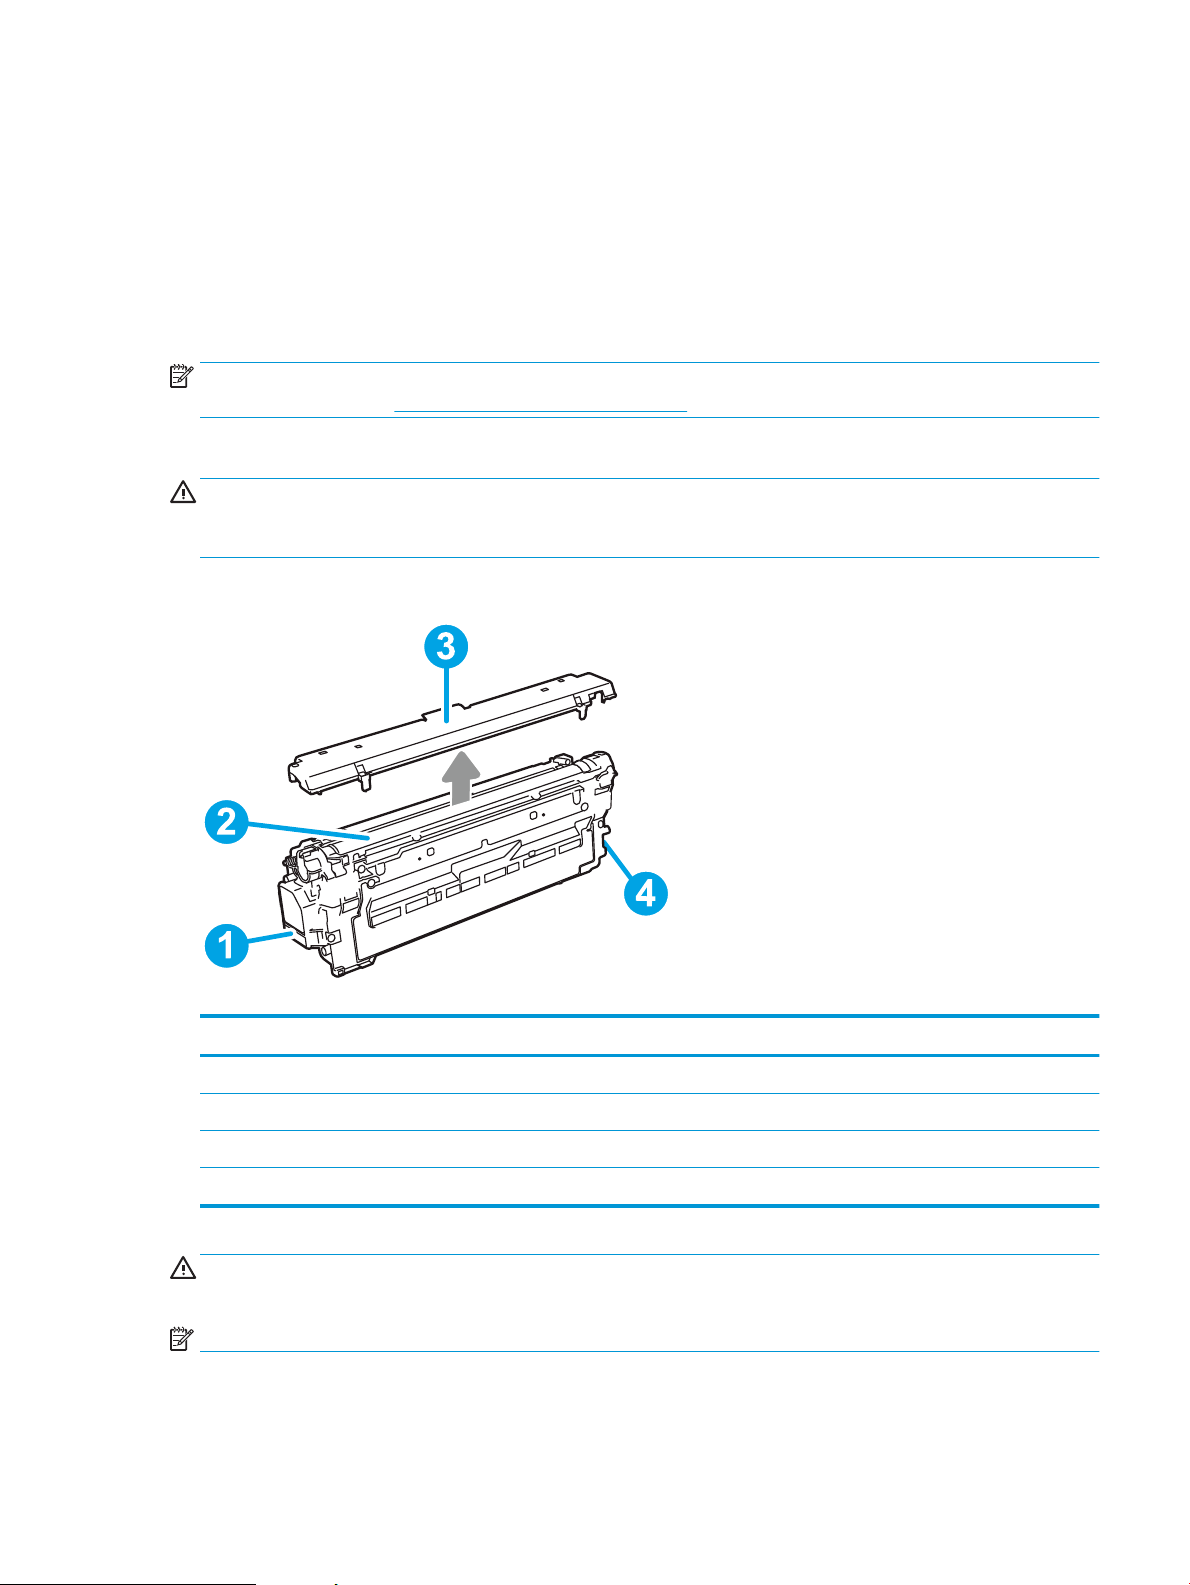
The following illustration shows the toner-cartridge components.
Table 3-1 Toner-cartridge legend
Image callout Toner-cartridge component
1 Handle
2 Imaging drum
3 Protective shield
4 Memory chip
CAUTION: If toner gets on clothing, wipe it o by using a dry cloth and wash the clothes in cold water. Hot water
sets toner into fabric.
NOTE: Information about recycling used toner cartridges is in the toner-cartridge box.
ENWW Replace the toner cartridges 39
Page 50

Remove and replace the cartridges
When a cartridge reaches very low status, a message appears on the control panel, and the cartridge door
release button unlocks to allow access to the cartridges.
1. Press the cartridge door release button to open the
door.
2. Open the front door.
3. Grasp the handle of the used toner cartridge and
pull out to remove it.
40 Chapter 3 Supplies, accessories, and parts ENWW
Page 51
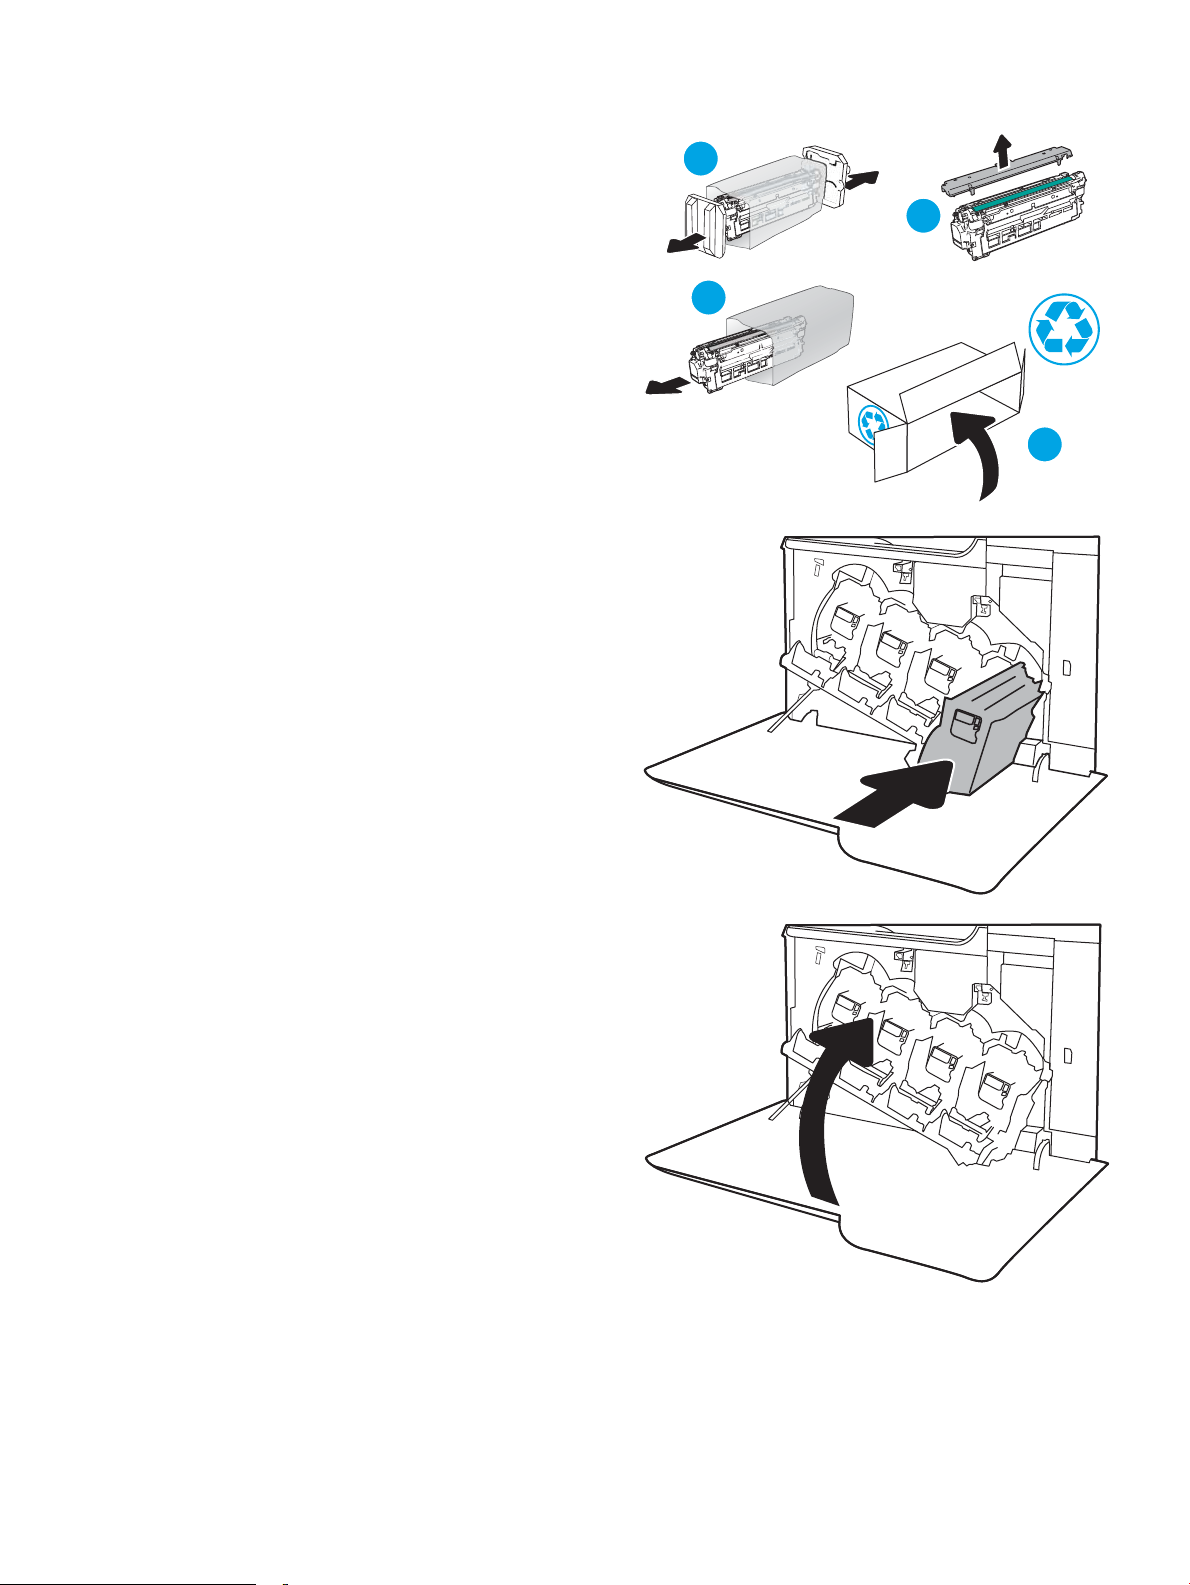
4. Remove the new toner cartridge from its
2
1
3
4
packaging by removing the plastic end caps,
removing the cartridge from the plastic bag, and
then removing the orange protective shield. Save
all packaging for recycling the used toner cartridge.
NOTE: Avoid touching the green imaging drum.
Fingerprints on the imaging drum can cause print
defects.
5. Support the toner cartridge underneath with one
hand while holding the cartridge handle with the
other. Align the toner cartridge with its slot on the
shelf, and then insert the toner cartridge into the
printer.
NOTE: Avoid touching the green imaging drum.
Fingerprints on the imaging drum can cause print
defects.
6. Close the front door.
ENWW Replace the toner cartridges 41
Page 52

Replace the toner-collection unit
When the toner-collection unit is full and needs to be replaced, a message appears on the control panel, and the
front door unlocks to allow access to the toner-collection unit.
NOTE: The toner collection unit is designed for a single use. Do not attempt to empty the toner collection unit
and reuse it. Doing so could lead to toner being spilled inside the printer, which could result in reduced print
quality. After use, return the toner collection unit to HP’s Planet Partners program for recycling.
CAUTION: If toner gets on clothing, wipe it o by using a dry cloth and wash the clothes in cold water. Hot water
sets toner into fabric.
1. Press the cartridge door release button to release
the front door.
2. Open the front door.
42 Chapter 3 Supplies, accessories, and parts ENWW
Page 53

3. Open the left door.
4. Grasp the top of the toner-collection unit and
remove it from the printer.
5. Remove the new toner-collection unit from its
packaging.
ENWW Replace the toner-collection unit 43
Page 54

6. Install the new unit into the printer. Make sure the
toner-collection unit is rmly in place.
7. Close the left door.
NOTE: If the toner-collection unit is not installed
correctly, the left door does not close completely.
To recycle the used toner-collection unit, follow the
instructions included with the new toner-collection
unit.
8. Close the front door.
44 Chapter 3 Supplies, accessories, and parts ENWW
Page 55

4 Print
●
Print tasks (Windows)
●
Print tasks (macOS)
●
Store print jobs on the printer to print later or print privately
●
Mobile printing solutions
●
Print from a USB ash drive
●
Print using high-speed USB 2.0 port (wired)
For more information
The following information is correct at the time of publication.
For video assistance, see www.hp.com/videos/LaserJet.
For current information, see www.hp.com/support/colorljE65150 or www.hp.com/support/colorljE65160.
HP's all-inclusive help for the printer includes the following information:
● Install and congure
● Learn and use
● Solve problems
● Download software and rmware updates
● Join support forums
● Find warranty and regulatory information
ENWW 45
Page 56

Print tasks (Windows)
How to print (Windows)
The following procedure describes the basic printing process for Windows.
1. From the software program, select the Print option.
2. Select the printer from the list of printers. To change settings, click the Properties or Preferences button to
open the print driver.
NOTE: The name of the button varies for dierent software programs.
NOTE: In Windows 10, 8.1, and 8, these applications will have a dierent layout with dierent features
from what is described below for desktop applications. To access the print feature from a Start screen app,
complete the following steps:
● Windows 10: Select Print, and then select the printer.
● Windows 8.1 or 8: Select Devices, select Print, and then select the printer.
NOTE: For more information, click the Help (?) button in the print driver.
3. Click the tabs in the print driver to congure the available options. For example, set the paper orientation
on the Finishing tab, and set the paper source, paper type, paper size, and quality settings on the Paper/
Quality tab.
4. Click the OK button to return to the Print dialog box. Select the number of copies to print from this screen.
5. Click the Print button to print the job.
Automatically print on both sides (Windows)
Use this procedure for printers that have an automatic duplexer installed. If the printer does not have an
automatic duplexer installed, or to print on paper types that the duplexer does not support, print on both sides
manually.
1. From the software program, select the Print option.
2. Select the printer from the list of printers, and then click the Properties or Preferences button to open the
print driver.
NOTE: The name of the button varies for dierent software programs.
NOTE: In Windows 10, 8.1, and 8, these applications will have a dierent layout with dierent features
from what is described below for desktop applications. To access the print feature from a Start screen app,
complete the following steps:
● Windows 10: Select Print, and then select the printer.
● Windows 8.1 or 8: Select Devices, select Print, and then select the printer.
3. Click the Finishing tab.
4. Select Print on both sides. Click OK to close the Document Properties dialog.
5. In the Print dialog, click Print to print the job.
46 Chapter 4 Print ENWW
Page 57

Manually print on both sides (Windows)
Use this procedure for printers that do not have an automatic duplexer installed or to print on paper that the
duplexer does not support.
1. From the software program, select the Print option.
2. Select the printer from the list of printers, and then click the Properties or Preferences button to open the
print driver.
NOTE: The name of the button varies for dierent software programs.
NOTE: In Windows 10, 8.1, and 8, these applications will have a dierent layout with dierent features
from what is described below for desktop applications. To access the print feature from a Start screen app,
complete the following steps:
● Windows 10: Select Print, and then select the printer.
● Windows 8.1 or 8: Select Devices, select Print, and then select the printer.
3. Click the Finishing tab.
4. Select Print on both sides (manually), and then click OK to close the Document Properties dialog.
5. In the Print dialog, click Print to print the rst side of the job.
6. Retrieve the printed stack from the output bin, and place it in Tray 1.
7. If prompted, select the appropriate control panel button to continue.
Print multiple pages per sheet (Windows)
1. From the software program, select the Print option.
2. Select the printer from the list of printers, and then click the Properties or Preferences button to open the
print driver.
NOTE: The name of the button varies for dierent software programs.
NOTE: In Windows 10, 8.1, and 8, these applications will have a dierent layout with dierent features
from what is described below for desktop applications. To access the print feature from a Start screen app,
complete the following steps:
● Windows 10: Select Print, and then select the printer.
● Windows 8.1 or 8: Select Devices, select Print, and then select the printer.
3. Click the Finishing tab.
4. Select the number of pages per sheet from the Pages per sheet drop-down list.
5. Select the correct Print page borders, Page order, and Orientation options. Click OK to close the Document
Properties dialog.
6. In the Print dialog, click Print to print the job.
ENWW Print tasks (Windows) 47
Page 58

Select the paper type (Windows)
1. From the software program, select the Print option.
2. Select the printer from the list of printers, and then click the Properties or Preferences button to open the
print driver.
NOTE: The name of the button varies for dierent software programs.
NOTE: In Windows 10, 8.1, and 8, these applications will have a dierent layout with dierent features
from what is described below for desktop applications. To access the print feature from a Start screen app,
complete the following steps:
● Windows 10: Select Print, and then select the printer.
● Windows 8.1 or 8: Select Devices, select Print, and then select the printer.
3. Click the Paper/Quality tab.
4. Select the paper type from the Paper type drop-down list.
5. Click OK to close the Document Properties dialog. In the Print dialog, click Print to print the job.
If the tray needs to be congured, a tray conguration message displays on the printer control panel.
6. Load the tray with the specied type and size of paper, and then close the tray.
7. Select the OK button to accept the detected type and size, or select the Modify button to choose a dierent
paper size or type.
8. Select the correct type and size, and then select the OK button.
48 Chapter 4 Print ENWW
Page 59

Additional print tasks
Go to www.hp.com/support/colorljE65150 or www.hp.com/support/colorljE65160.
Instructions are available for performing specic print tasks, such as the following:
● Create and use printing shortcuts or presets
● Select the paper size, or use a custom paper size
● Select the page orientation
● Create a booklet
● Scale a document to t a specic paper size
● Print the rst or last pages of the document on dierent paper
● Print watermarks on a document
ENWW Print tasks (Windows) 49
Page 60

Print tasks (macOS)
How to print (macOS)
The following procedure describes the basic printing process for macOS.
1. Click the File menu, and then click the Print option.
2. Select the printer.
3. Click Show Details or Copies & Pages, and then select other menus to adjust the print settings.
NOTE: The name of the item varies for dierent software programs.
4. Click the Print button.
Automatically print on both sides (macOS)
NOTE: This information applies to printers that include an automatic duplexer.
NOTE: This feature is available if you install the HP print driver. It might not be available if you are using AirPrint.
1. Click the File menu, and then click the Print option.
2. Select the printer.
3. Click Show Details or Copies & Pages, and then click the Layout menu.
NOTE: The name of the item varies for dierent software programs.
4. Select a binding option from the Two-Sided drop-down list.
5. Click the Print button.
Manually print on both sides (macOS)
NOTE: This feature is available if you install the HP print driver. It might not be available if you are using AirPrint.
1. Click the File menu, and then click the Print option.
2. Select the printer.
3. Click Show Details or Copies & Pages, and then click the Manual Duplex menu.
NOTE: The name of the item varies for dierent software programs.
4. Click the Manual Duplex box, and select a binding option.
5. Click the Print button.
6. Go to the printer, and remove any blank paper that is in Tray 1.
7. Retrieve the printed stack from the output bin and place it with the printed side facing down in the input
tray.
8. If prompted, select the appropriate control panel button to continue.
50 Chapter 4 Print ENWW
Page 61

Print multiple pages per sheet (macOS)
1. Click the File menu, and then click the Print option.
2. Select the printer.
3. Click Show Details or Copies & Pages, and then click the Layout menu.
NOTE: The name of the item varies for dierent software programs.
4. From the Pages per Sheet drop-down list, select the number of pages that you want to print on each sheet.
5. In the Layout Direction area, select the order and placement of the pages on the sheet.
6. From the Borders menu, select the type of border to print around each page on the sheet.
7. Click the Print button.
Select the paper type (macOS)
1. Click the File menu, and then click the Print option.
2. Select the printer.
3. Click Show Details or Copies & Pages, and then click the Media & Quality menu or the Paper/Quality menu.
NOTE: The name of the item varies for dierent software programs.
4. Select from the Media & Quality or Paper/Quality options.
NOTE: This list contains the master set of options available. Some options are not available on all printers.
● Media Type: Select the option for the type of paper for the print job.
● Print Quality: Select the resolution level for the print job.
● Edge-To-Edge Printing: Select this option to print close to the paper edges.
5. Click the Print button.
Additional print tasks
Go to www.hp.com/support/colorljE65150 or www.hp.com/support/colorljE65160.
Instructions are available for performing specic print tasks, such as the following:
● Create and use printing shortcuts or presets
● Select the paper size, or use a custom paper size
● Select the page orientation
● Create a booklet
● Scale a document to t a specic paper size
● Print the rst or last pages of the document on dierent paper
● Print watermarks on a document
ENWW Print tasks (macOS) 51
Page 62

Store print jobs on the printer to print later or print privately
Introduction
The following information provides procedures for creating and printing documents that are stored on the
printer. These jobs can be printed at a later time or printed privately.
●
Create a stored job (Windows)
●
Create a stored job (macOS)
●
Print a stored job
●
Delete a stored job
●
Information sent to printer for Job Accounting purposes
Create a stored job (Windows)
Store jobs on the printer for private or delayed printing.
1. From the software program, select the Print option.
2. Select the printer from the list of printers, and then select Properties or Preferences (the name varies for
dierent software programs).
NOTE: The name of the button varies for dierent software programs.
NOTE: In Windows 10, 8.1, and 8, these applications will have a dierent layout with dierent features
from what is described below for desktop applications. To access the print feature from a Start screen app,
complete the following steps:
● Windows 10: Select Print, and then select the printer.
● Windows 8.1 or 8: Select Devices, select Print, and then select the printer.
3. Click the Job Storage tab.
4. Select a Job Storage Mode option.
● Proof and Hold: Print and proof one copy of a job, and then print more copies.
● Personal Job: The job does not print until you request it at the printer control panel. For this job-
storage mode, you can select one of the Make Job Private/Secure options. If you assign a personal
identication number (PIN) to the job, you must provide the required PIN at the control panel. If you
encrypt the job, you must provide the required password at the control panel. The print job is deleted
from memory after it prints and is lost if the printer loses power.
● Quick Copy: Print the requested number of copies of a job and store a copy of the job in the printer
memory so you can print it again later.
● Stored Job: Store a job on the printer and allow other users to print the job at any time. For this job-
storage mode, you can select one of the Make Job Private/Secure options. If you assign a personal
identication number (PIN) to the job, the person who prints the job must provide the required PIN at
the control panel. If you encrypt the job, the person who prints the job must provide the required
password at the control panel.
52 Chapter 4 Print ENWW
Page 63

5. To use a custom user name or job name, click the Custom button, and then enter the user name or the job
name.
Select which option to use if another stored job already has that name:
● Use Job Name + (1-99): Append a unique number to the end of the job name.
● Replace Existing File: Overwrite the existing stored job with the new one.
6. Click the OK button to close the Document Properties dialog box. In the Print dialog box, click the Print
button to print the job.
Create a stored job (macOS)
Store jobs on the printer for private or delayed printing.
1. Click the File menu, and then click the Print option.
2. In the Printer menu, select the printer.
3. By default, the print driver displays the Copies & Pages menu. Open the menus drop-down list, and then
click the Job Storage menu.
4. In the Mode drop-down list, select the type of stored job.
● Proof and Hold: Print and proof one copy of a job, and then print more copies.
● Personal Job: The job does not print until someone requests it at the printer control panel. If the job
has a personal identication number (PIN), provide the required PIN at the control panel. The print job
is deleted from memory after it prints and is lost if the printer loses power.
● Quick Copy: Print the requested number of copies of a job and store a copy of the job in the printer
memory to print it again later.
● Stored Job: Store a job on the printer and allow other users to print the job at any time. If the job has a
personal identication number (PIN), the person who prints the job must provide the required PIN at
the control panel.
5. To use a custom user name or job name, click the Custom button, and then enter the user name or the job
name.
Select which option to use if another stored job already has that name.
● Use Job Name + (1-99): Append a unique number to the end of the job name.
● Replace Existing File: Overwrite the existing stored job with the new one.
6. If you selected the Stored Job or Personal Job option in step 4, you can protect the job with a PIN. Type a 4-
digit number in the Use PIN to Print eld. When other people attempt to print this job, the printer prompts
them to enter this PIN number.
7. Click the Print button to process the job.
ENWW Store print jobs on the printer to print later or print privately 53
Page 64

Print a stored job
Use this procedure to print a document that is in a job storage folder on the printer.
1. From the Home screen on the printer control panel, select Print, and then select Print from Job Storage.
2. Under Stored Jobs to Print, select Choose, and then select the folder where the document is saved.
3. Select the document, and then touch Select.
If the document is private, enter the four-digit PIN in the Password eld, and then select OK.
4. To adjust the number of copies, select the box to the left of the Print button, and then select the number of
copies from the keypad that opens. Select the Close button to close the keypad.
5. Select Print to print the document.
Delete a stored job
You can delete documents that have been saved to the printer when they are no longer needed. You can also
adjust the maximum number of jobs for the printer to store.
●
Delete a job that is stored on the printer
●
Change the job storage limit
Delete a job that is stored on the printer
Follow these steps to delete a job that is stored in the printer memory.
1. From the Home screen on the printer control panel, select Print, and then select Print from Job Storage.
2. Select Choose, and then select the name of the folder where the job is stored.
3. Select the name of the job.
4. Select the Trash button to delete the job.
If the job is private or encrypted, enter the PIN or password, and then select OK.
5. Select Delete Jobs on the conrmation prompt.
Change the job storage limit
When a new job is stored in the printer memory, the printer overwrites any previous jobs with the same user and
job name. If a job is not already stored under the same user and job name, and the printer needs additional
space, the printer might delete other stored jobs starting with the oldest. Follow these steps to change the
number of jobs that the printer can store:
1. From the Home screen on the printer control panel, navigate to the Settings application, and then select
the Settings icon.
2. Open the following menus:
a. Copy/Print or Print
b. Manage Stored Jobs
c. Temporary Job Storage Limit
54 Chapter 4 Print ENWW
Page 65

3. Use the keypad to enter the number of jobs that the printer stores.
4. Select Done to save the setting.
Information sent to printer for Job Accounting purposes
Printing jobs sent from drivers on the client (e.g., PC) may send personally identiable information to HP’s
Printing and Imaging devices. This information may include, but is not limited to, user name and client name
from which the job originated that may be used for job accounting purposes, as determined by the Administrator
of the printing device. This same information may also be stored with the job on the mass storage device (e.g.,
disk drive) of the printing device when using the job storage feature.
ENWW Store print jobs on the printer to print later or print privately 55
Page 66

Mobile printing solutions
Introduction
HP oers multiple mobile printing solutions to enable easy printing to an HP printer from a laptop, tablet,
smartphone, or other mobile device. To see the full list and to determine the best choice, go to www.hp.com/go/
MobilePrinting.
NOTE: Update the printer rmware to ensure all mobile printing and ePrint capabilities are supported.
●
Wi-Fi Direct (wireless models only, with HP Jetdirect 3100w BLE/NFC/Wireless accessory installed)
●
HP ePrint via email
●
AirPrint
●
Android embedded printing
Wi-Fi Direct (wireless models only, with HP Jetdirect 3100w BLE/NFC/Wireless accessory
installed)
HP provides Wi-Fi, Wi-Fi Direct Print, Near Field Communication (NFC), and Bluetooth Low Energy (BLE) printing
for printers with a supported HP Jetdirect 3100w BLE/NFC/Wireless Accessory. This accessory is available as an
option for HP LaserJet printers that include a hardware-integration pocket (HIP).
Wi-Fi, Wi-Fi Direct Print, NFC, and BLE printing enable Wi-Fi capable (mobile) devices to make a wireless network
connection directly to the printer without using a wireless router.
The printer does not need to be connected to the network for this mobile walk-up printing to work.
Use Wi-Fi Direct Print to print wirelessly from the following devices or services:
● iPhone, iPad, or iPod touch using Apple AirPrint or the HP Smart app
● Android mobile devices using the Android embedded print solution or the HP Smart app
● PC and Mac devices using HP ePrint via email (requires HP Web Services to be enabled and the printer to be
registered with HP Connected)
● HP Roam
● Google Cloud Print
For more information on wireless printing, go to www.hp.com/go/wirelessprinting.
NFC and Wi-Fi Direct Print capabilities can be enabled or disabled from the printer control panel.
1. From the Home screen on the printer control panel, navigate to the Settings application, and then select
the Settings icon.
2. Open the following menus:
a. Networking
b. Wi-Fi Direct
c. Status
3. Select On, and then select OK to enable wireless printing.
56 Chapter 4 Print ENWW
Page 67

NOTE: In environments where more than one model of the same printer is installed, it might be helpful to
provide each printer a unique Wi-Fi Direct Name for easier printer identication for Wi-Fi Direct printing. The
wireless network names, e.g., Wi-Fi, Wi-Fi Direct, etc. are available on the Information screen by pressing or
touching the Information button on the printer control panel, and then selecting the Network option or the
Wireless option.
Complete the following procedure to change the printer Wi-Fi Direct name:
1. From the Home screen on the printer control panel, navigate to the Settings application, and then select
the Settings icon.
2. Open the following menus:
a. Networking
b. Wi-Fi Direct
c. Wi-Fi Direct name
3. Use the keypad to change the name in the Wi-Fi Direct Name text eld. Select OK.
HP ePrint via email
Use HP ePrint to print documents by sending them as an email attachment to the printer's email address from
any email enabled device.
To use HP ePrint, the printer must meet these requirements:
● The printer must be connected to a wired or wireless network and have Internet access.
● HP Web Services must be enabled on the printer, and the printer must be registered with HP Connected.
Follow this procedure to enable HP Web Services and register with HP Connected:
1. Open the HP Embedded Web Server (EWS):
a. Find the printer IP address. On the printer control panel, press the button, and then use the arrow
keys to select the Ethernet menu. Press the OK button to open the menu and display the IP
address or host name.
b. From a computer on the same network as the printer, open a web browser. In the address line, type
the IP address or host name exactly as it displays on the printer control panel. Press the Enter key on
the computer keyboard. The EWS opens.
NOTE: If the web browser displays a message indicating that accessing the website might not be
safe, select the option to continue to the website. Accessing this website will not harm the computer.
2. Click the HP Web Services tab.
3. Select the option to enable Web Services.
NOTE: Enabling Web Services might take several minutes.
4. Go to www.hpconnected.com to create an HP ePrint account and complete the setup process.
ENWW Mobile printing solutions 57
Page 68

AirPrint
Direct printing using Apple’s AirPrint is supported for iOS and from Mac computers running macOS 10.7 Lion and
newer. Use AirPrint to print directly to the printer from an iPad, iPhone (3GS or later), or iPod touch (third
generation or later) in the following mobile applications:
● Mail
● Photos
● Safari
● iBooks
● Select third-party applications
To use AirPrint, the printer must be connected to the same network (sub-net) as the Apple device. For more
information about using AirPrint and about which HP printers are compatible with AirPrint, go to
www.hp.com/go/MobilePrinting.
NOTE: Before using AirPrint with a USB connection, verify the version number. AirPrint versions 1.3 and earlier
do not support USB connections.
Android embedded printing
HP's built-in print solution for Android and Kindle enables mobile devices to automatically nd and print to HP
printers that are either on a network or within wireless range for Wi-Fi Direct printing.
The print solution is built into the many versions of the operating system.
NOTE: If printing is not available on your device, go to the Google Play > Android apps and install the HP Print
Service Plugin.
For more information on how to use Android embedded printing and which Android devices are supported, go to
www.hp.com/go/MobilePrinting.
58 Chapter 4 Print ENWW
Page 69

Print from a USB ash drive
Introduction
This printer features easy-access USB printing, for quickly printing les without sending them from a computer.
The printer accepts standard USB ash drives in the USB port near the control panel. The control panel USB port
supports the following types of les:
– .pdf
– .prn
– .pcl
– .ps
– .cht
●
Enable the USB port for printing
●
Print USB documents
Enable the USB port for printing
The USB port is disabled by default. Before using this feature, enable the USB port. Use one of the following
methods to enable the port:
Method one: Enable the USB port from the printer control panel menus
1. From the Home screen on the printer control panel, navigate to the Settings application, and then select
the Settings icon.
2. Open the following menus
a. Copy/Print or Print
b. Enable Print From USB Drive
3. Select the Enabled option.
Method two: Enable the USB port from the HP Embedded Web Server (network-connected printers only)
1. Find the printer IP address: From the Home screen on the printer control panel, select the Information
icon, and then select the Network icon to display the IP address or host name.
2. Open a web browser, and in the address line, type the IP address exactly as it displays on the printer control
panel. Press the Enter key on the computer keyboard. The EWS opens.
NOTE: If the web browser displays a There is a problem with this website’s security certicate message
when attempting to open the EWS, click Continue to this website (not recommended).
Choosing Continue to this website (not recommended) will not harm the computer while navigating within
the EWS for the HP printer.
ENWW Print from a USB ash drive 59
Page 70

3. Select the Copy/Print tab for multi-function printer models, or the Print tab for single-function printer
models.
4. In the left menu, select Print from USB Drive Settings.
5. Select Enable Print from USB Drive.
6. Click Apply.
Print USB documents
1. Insert the USB ash drive into the easy-access USB port.
NOTE: The port might be covered. For some printers, the cover ips open. For other printers, pull the
cover straight out to remove it.
2. From the Home screen on the printer control panel, select Print, and then select Print from USB Drive.
3. Select Choose, select the name of the document to print, and then select Select.
NOTE: The document might be in a folder. Open folders as necessary.
4. To adjust the number of copies, select the eld for the number of copies. Use the keypad to enter the
number of copies to print.
5. Select Print to print the document.
60 Chapter 4 Print ENWW
Page 71

Print using high-speed USB 2.0 port (wired)
Enable the high-speed USB port for printing
This printer features a high-speed USB 2.0 port for wired USB printing. The port is located in the interface ports
area on the back of the printer and is disabled by default. Use one of the following methods to enable the port.
Once the port is enabled, install the product software in order to print using this port.
Method one: Enable the high-speed USB 2.0 port from the printer control panel menus
1. From the Home screen on the printer control panel, navigate to the Settings application, and then select
the Settings icon.
2. Open the following menus
a. General
b. Enable Device USB
3. Select the Enabled option.
Method two: Enable the high-speed USB 2.0 port from the HP Embedded Web Server (network-connected printers only)
1. Find the printer IP address: From the Home screen on the printer control panel, select the Information
icon, and then select the Network icon to display the IP address or host name.
2. Open a web browser, and in the address line, type the IP address exactly as it displays on the printer control
panel. Press the Enter key on the computer keyboard. The EWS opens.
NOTE: If the web browser displays a There is a problem with this website’s security certicate message
when attempting to open the EWS, click Continue to this website (not recommended).
Choosing Continue to this website (not recommended) will not harm the computer while navigating within
the EWS for the HP printer.
3. Select the Security tab.
4. On the left side of the screen, select General Security.
5. Scroll down to the Hardware Ports and select the check box to enable both of the items:
● Enable Device USB
● Enable Host USB plug and play
6. Click Apply.
ENWW Print using high-speed USB 2.0 port (wired) 61
Page 72

62 Chapter 4 Print ENWW
Page 73

5 Manage the printer
●
Advanced conguration with the HP Embedded Web Server (EWS)
●
Congure IP network settings
●
Printer security features
●
Energy-conservation settings
●
HP Web Jetadmin
●
Software and rmware updates
For more information
The following information is correct at the time of publication.
For video assistance, see www.hp.com/videos/LaserJet.
For current information, see www.hp.com/support/colorljE65150 or www.hp.com/support/colorljE65160.
HP's all-inclusive help for the printer includes the following information:
● Install and congure
● Learn and use
● Solve problems
● Download software and rmware updates
● Join support forums
● Find warranty and regulatory information
ENWW 63
Page 74

Advanced conguration with the HP Embedded Web Server (EWS)
●
Introduction
●
How to access the HP Embedded Web Server (EWS)
●
HP Embedded Web Server features
Introduction
Use the HP Embedded Web Server to manage printing functions from a computer instead of the printer control
panel.
● View printer status information
● Determine the remaining life for all supplies and order new ones
● View and change tray congurations
● View and change the printer control-panel menu conguration
● View and print internal pages
● Receive notication of printer and supplies events
● View and change network conguration
The HP Embedded Web Server works when the printer is connected to an IP-based network. The HP Embedded
Web Server does not support IPX-based printer connections. Internet access is not needed to open and use the
HP Embedded Web Server.
When the printer is connected to the network, the HP Embedded Web Server is automatically available.
NOTE: The HP Embedded Web Server is not accessible beyond the network rewall.
To use the HP Embedded Web Server, the browser must meet the following requirements:
Table
5-1 Browser requirements
Operating system Browser
Windows® 7 Internet Explorer (version 8.x or greater)
Google Chrome (version 34.x or greater)
Firefox (version 20.x or greater)
Windows® 8 or greater Internet Explorer (version 9.x or greater)
Google Chrome (version 34.x or greater)
Firefox (version 20.x or greater)
macOS Safari (version 5.x or greater)
Google Chrome (version 34.x or greater)
Linux Google Chrome (version 34.x or greater)
Firefox (version 20.x or greater)
64 Chapter 5 Manage the printer ENWW
Page 75

How to access the HP Embedded Web Server (EWS)
1. Find the printer IP address: From the Home screen on the printer control panel, select the Information
icon, and then select the Network icon to display the IP address or host name.
2. Open a web browser, and in the address line, type the IP address or host name exactly as it displays on the
printer control panel. Press the Enter key on the computer keyboard. The EWS opens.
NOTE: If the web browser displays a message indicating that accessing the website might not be safe,
select the option to continue to the website. Accessing this website will not harm the computer.
HP Embedded Web Server features
Information tab
Table 5-2 HP Embedded Web Server Information tab
Menu Description
Device Status Shows the printer status and shows the estimated life remaining of HP supplies. The page
also shows the type and size of paper set for each tray. To change the default settings, click
the Change Settings link.
Conguration Page Shows the information found on the conguration page.
General tab
Table
Supplies Status Page Shows the status of the supplies for the printer.
Event Log Page Shows a list of all printer events and errors. Use the HP Instant Support link (in the Other
Links area on all HP Embedded Web Server pages) to connect to a set of dynamic web
pages that help solve problems. These pages also show additional services available for
the printer.
Usage Page Shows a summary of the number of pages the printer has printed, grouped by size, type,
and paper print path.
Device Information Shows the printer network name, address, and model information. To customize these
entries, click the Device Information menu on the General tab.
Control Panel Snapshot Shows an image of the current screen on the control panel display.
Printable Reports and Pages Lists the internal reports and pages for the printer. Select one or more items to print or
view.
Open Source Licenses Shows a summary of the licenses for open source software programs that can be used with
the printer.
5-3 HP Embedded Web Server General tab
Menu Description
Display Settings Congure settings for sound, timeout for inactivity, clearable warnings, and continuable
events.
Control Panel Language and Keyboard
Layouts
Alerts Set up email alerts for various printer and supplies events.
Select the default language for control panel messages and the default keyboard layout for
each language.
ENWW Advanced conguration with the HP Embedded Web Server (EWS) 65
Page 76

Table 5-3 HP Embedded Web Server General tab (continued)
Menu Description
Control Panel Settings App Shows Settings app options that are available on the printer control panel.
General Settings Congure how the printer recovers from jams and whether copy jobs initiated at the printer
control panel take priority over print jobs.
AutoSend Congure the printer to send automated emails regarding printer conguration and
supplies to specic email addresses.
Edit Other Links Add or customize a link to another website. This link displays in the footer area on all
HP Embedded Web Server pages.
Ordering Information Enter information about ordering replacement cartridges. This information displays on the
supplies status page.
Device Information Name the printer and assign an asset number to it. Enter the name of the primary contact
who will receive information about the printer.
Language Set the language in which to display the HP Embedded Web Server information.
Firmware Upgrade Download and install printer rmware upgrade les.
Date/Time Settings Set the date and time or synchronize with a network time server.
Energy Settings Set or edit sleep settings that aect how much power the printer uses, the wake/sleep
time, how quickly the printer enters sleep mode, and how quickly the printer wakes up from
sleep mode.
Print tab
Backup and Restore Create a backup le that contains printer and user data. If necessary, use this le to restore
data to the printer.
Reset Factory Settings Restore printer settings to the factory defaults.
Solution Installer Install third-party software packages that extend or modify the functionality of the printer.
Job Statistics Settings Provides connection information about third-party job-statistics services.
Quota Settings Provides connection information about third-party job-quota services.
Table
5-4 HP Embedded Web Server Print tab
Menu Description
Print from USB drive settings Enable or disable the Print from USB Drive menu on the control panel.
Manage Stored Jobs Enable or disable the ability to store jobs in the printer memory.
Congure job-storage options.
Default Print Options Congure the default options for print jobs.
Restrict Color
(Color printers only)
Permit or restrict color printing.
Specify permissions for individual users or for jobs that are sent from specic software
programs.
PCL and PostScript Settings Adjust the PCL and PostScript settings for all print jobs.
66 Chapter 5 Manage the printer ENWW
Page 77

Table 5-4 HP Embedded Web Server Print tab (continued)
Menu Description
Print Quality Congure the print quality settings, including color adjustment, image registration, and
Manage Trays Congure settings for paper trays.
Supplies tab
Table 5-5 HP Embedded Web Server Supplies tab
Menu Description
Manage Supplies Congure how the printer reacts when supplies reach a Very Low state.
Troubleshooting tab
Table 5-6 HP Embedded Web Server Troubleshooting tab
Menu Description
General Troubleshooting Select from a variety of reports and tests to help solve problems with the printer.
Online Help Link to HP cloud-based online help to assist in troubleshooting printing issues.
Diagnostic Data
NOTE: This item is available only if an
administrator password is set from the
Security tab.
allowed paper types.
Export printer information to a le that can be useful for detailed problem analysis.
Security tab
Table
Calibration/Cleaning Set cleaning and calibration settings, print a cleaning page, and perform a full or partial
calibration.
Reset Factory Settings Restore printer settings to factory defaults.
Firmware Upgrade Download and install printer rmware upgrade les.
5-7 HP Embedded Web Server Security tab
Menu Description
General Security Settings for general security, including the following:
● Congure an administrator password to restrict access to certain features on the
printer.
● Set PJL password for processing PJL commands.
● Set le system access and rmware upgrade security.
● Enable or disable the Host USB port on the control panel or the USB connectivity port
on the formatter for printing directly from a computer.
● View the status of all security settings.
Account Policy Enable administrator account settings.
ENWW Advanced conguration with the HP Embedded Web Server (EWS) 67
Page 78

Table 5-7 HP Embedded Web Server Security tab (continued)
Menu Description
Access Control Congure access to printer functions for specic individuals or groups, and select the
Protect Stored Data Congure and manage the internal hard drive for the printer. This printer includes an
Manage Remote Apps Manage or whitelist remote apps by importing or deleting certicates that allow devices to
Certicate Management Install and manage security certicates for access to the printer and the network.
Web Service Security Allow resources on this printer to be accessed by web pages from dierent domains. If no
Self Test Verify that the security functions are running according to expected system parameters.
HP Web Services tab
Use the HP Web Services tab to congure and enable HP Web Services for this printer. It is necessary to enable
HP Web Services to use the HP ePrint feature.
Table
5-8 HP Embedded Web Server HP Web Services tab
Menu Description
Web Services Setup Connect this printer to HP Connected on the web by enabling HP Web Services.
method individuals use to sign in to the printer.
encrypted hard drive for maximum security.
Congure settings for jobs that are stored on the printer hard drive.
use this product.
sites are added to the list, then all sites are trusted.
Web Proxy Congure a proxy server if there are issues enabling HP Web Services or connecting the
Smart Cloud Print Enable Smart Cloud Print , which allows access to web-based apps that extend the
Networking tab
Use the Networking tab to congure and secure network settings for the printer when it is connected to an IPbased network. This tab does not display if the printer is connected to other types of networks.
Table
Menu Description
Conguration
Wi-Fi Direct Congure Wi-Fi Direct settings for printers that include embedded Wi-Fi Direct Print and
TCP/IP Settings Congure TCP/IP settings for IPv4 and IPv6 networks.
Network Settings Congure IPX/SPX, AppleTalk, DLC/LLC, and SNMP settings, depending on the print server
printer to the Internet.
capabilities of the printer.
5-9 HP Embedded Web Server Networking tab
NFC printing or that have a wireless accessory installed.
NOTE: The conguration options available depend on the print server model.
NOTE: The conguration options available depend on the print server model.
model.
68 Chapter 5 Manage the printer ENWW
Page 79

Table 5-9 HP Embedded Web Server Networking tab (continued)
Menu Description
Other Settings Congure general printing protocols and services supported by the print server. The
AirPrint Enable, set up, or disable network printing from Apple supported printers.
Select Language Change the language displayed by the HP Embedded Web Server. This page displays if the
Select Location Select a country/region for the printer.
Google Cloud Print
Setup Set up Google Cloud Print options.
Web Proxy Congure proxy settings.
Security
Settings View and restore current security settings to factory-default values.
available options depend on the print server model, but can include rmware update, LPD
queues, USB settings, support information, and refresh rate.
web pages support multiple languages. Optionally, select supported languages through
language-preference settings in the browser.
Congure security settings using the Security Conguration Wizard.
NOTE: Do not use the Security Conguration Wizard to congure security settings using
network-management applications, such as HP Web Jetadmin.
Authorization Control conguration management and use of this printer, including the following:
● Set or change the administrator password to control access to conguration
parameters.
● Request, install, and manage digital certicates on the HP Jetdirect print server.
● Limit host access to this printer through an Access Control List (ACL) (for selected print
servers on IPv4 networks only).
Secure Communication Congure security settings.
Mgmt. Protocols Congure and manage security protocols for this printer, including the following:
● Set the security management level for the HP Embedded Web Server, and control
traic over HTTP and HTTPS.
● Congure the SNMP (Simple Network Management Protocol) operation. Enable or
disable the SNMP v1/v2c or SNMP v3 agents on the print server.
● Control access through protocols that may not be secure, such as printing protocols,
print services, discovery protocols, name resolution services, and congurationmanagement protocols.
802.1X Authentication Congure 802.1X authentication settings on the Jetdirect print server as required for client
authentication on the network, and reset the 802.1X authentication settings to factorydefault values.
CAUTION: When changing the 802.1X authentication settings; the printer might lose its
connection. To reconnect, it might be necessary to reset the print server to a factorydefault state and reinstall the printer.
ENWW Advanced conguration with the HP Embedded Web Server (EWS) 69
Page 80

IPsec/Firewall View or congure a Firewall policy or an IPsec/Firewall policy.
Announcement Agent Enable or disable the HP Device Announcement Agent, set the conguration server, and
Diagnostics
Network Statistics Display network statistics that are collected and stored on the HP Jetdirect print server.
Protocol Info View a list of network-conguration settings on the HP Jetdirect print server for each
Conguration Page View the HP Jetdirect conguration page, which contains status and conguration
Other Links list
NOTE: Congure which links display in the footer of the HP Embedded Web Server by using the Edit Other Links
menu on the General tab. The following are the default links.
Table 5-10 HP Embedded Web Server Other Links list
Menu Description
HP Instant Support Connect to the HP website to nd solutions to printer problems.
congure mutual authentication using certicates.
protocol.
information.
Shop for Supplies Connect to the HP SureSupply website for information on purchasing original HP supplies,
such as cartridges and paper.
Product Support Connect to the support site for the printer to search for help on various topics.
70 Chapter 5 Manage the printer ENWW
Page 81

Congure IP network settings
●
Printer sharing disclaimer
●
View or change network settings
●
Rename the printer on a network
●
Manually congure IPv4 TCP/IP parameters from the control panel
●
Manually congure IPv6 TCP/IP parameters from the control panel
●
Link speed and duplex settings
Printer sharing disclaimer
HP does not support peer-to-peer networking, as the feature is a function of Microsoft operating systems and
not of the HP printer drivers. Go to Microsoft at www.microsoft.com.
View or change network settings
Use the HP Embedded Web Server to view or change IP conguration settings.
1. Find the printer IP address: From the Home screen on the printer control panel, select the Information
icon, and then select the Network icon to display the IP address or host name.
2. Open a web browser, and in the address line, type the IP address or host name exactly as it displays on the
printer control panel. Press the Enter key on the computer keyboard. The EWS opens.
NOTE: If the web browser displays a message indicating that accessing the website might not be safe,
select the option to continue to the website. Accessing this website will not harm the computer.
3. Click the Networking tab to obtain network information. Change settings as needed.
Rename the printer on a network
To rename the printer on a network so that it can be uniquely identied, use the HP Embedded Web Server.
1. Find the printer IP address: From the Home screen on the printer control panel, select the Information
icon, and then select the Network icon to display the IP address or host name.
2. Open a web browser, and in the address line, type the IP address or host name exactly as it displays on the
printer control panel. Press the Enter key on the computer keyboard. The EWS opens.
NOTE: If the web browser displays a message indicating that accessing the website might not be safe,
select the option to continue to the website. Accessing this website will not harm the computer.
3. Open the General tab.
4. On the Device Information page, the default printer name is in the Device Name eld. You can change this
name to uniquely identify this printer.
ENWW Congure IP network settings 71
Page 82

NOTE: Completing the other elds on this page is optional.
5. Click the Apply button to save the changes.
Manually congure IPv4 TCP/IP parameters from the control panel
Use the control-panel Settings menus to manually set an IPv4 address, subnet mask, and default gateway.
1. From the Home screen on the printer control panel, navigate to the Settings application, and then select
the Settings icon.
2. Open the following menus:
a. Networking
b. Ethernet
c. TCP/IP
d. IPV 4 Settings
e. Cong Method
3. Select the Manual option, and then select OK.
4. Open the Manual Settings menu.
5. Select the IP Address, Subnet Mask, or Default Gateway option.
6. Use the numeric keypad to enter the correct digits for the eld, and then select OK.
Repeat the process for each eld to be congured.
Manually congure IPv6 TCP/IP parameters from the control panel
Use the control-panel Settings menus to manually set an IPv6 address.
1. From the Home screen on the printer control panel, navigate to the Settings application, and then select
the Settings icon.
2. To enable manual conguration, open the following menus:
a. Networking
b. Ethernet
c. TCP/IP
d. IPV6 Settings
3. Select Enable, select On, and then select OK.
4. Open the Address menu.
5. Open the Manual Settings menu, and then select Address. Use the keypad to enter the address, and then
select OK.
72 Chapter 5 Manage the printer ENWW
Page 83

Link speed and duplex settings
NOTE: This information applies only to Ethernet networks. It does not apply to wireless networks.
The link speed and communication mode of the print server must match the network hub. For most situations,
leave the printer in automatic mode. Incorrect changes to the link speed and duplex settings might prevent the
printer from communicating with other network devices. To make changes, use the printer control panel.
NOTE: The printer setting must match the setting for the network device (a network hub, switch, gateway,
router, or computer).
NOTE: Making changes to these settings causes the printer to turn o and then on. Make changes only when
the printer is idle.
1. From the Home screen on the printer control panel, navigate to the Settings application, and then select
the Settings icon.
2. Open the following menus:
a. Networking
b. Ethernet
c. Link Speed
3. Select one of the following options:
● Auto: The print server automatically congures itself for the highest link speed and communication
mode allowed on the network.
● 10T Half: 10 megabytes per second (Mbps), half-duplex operation
● 10T Full: 10 Mbps, full-duplex operation
● 10T Auto: 10 Mbps, automatic-duplex operation
● 100TX Half: 100 Mbps, half-duplex operation
● 100TX Full: 100 Mbps, full-duplex operation
● 100TX Auto: 100 Mbps, automatic-duplex operation
● 1000T Full: 1000 Mbps, full-duplex operation
4. Select OK. The printer turns o and then on.
ENWW Congure IP network settings 73
Page 84

Printer security features
Introduction
The printer includes several security features to restrict who has access to conguration settings, to secure data,
and to prevent access to valuable hardware components.
●
Security statements
●
IP Security
●
Assign or change the system password using the HP Embedded Web Server
●
Encryption support: HP High Performance Secure Hard Disks
●
Lock the formatter
Security statements
The printer supports security standards and recommended protocols that help you keep the printer secure,
protect critical information on your network, and simplify the way you monitor and maintain the printer.
IP Security
IP Security (IPsec) is a set of protocols that control IP-based network traic to and from the printer. IPsec
provides host-to-host authentication, data integrity, and encryption of network communications.
For printers that are connected to the network and have an HP Jetdirect print server, you can congure IPsec by
using the Networking tab in the HP Embedded Web Server.
Assign or change the system password using the HP Embedded Web Server
Assign an administrator password for access to the printer and the HP Embedded Web Server so that
unauthorized users cannot change the printer settings.
1. Find the printer IP address. On the printer control panel, press the button, and then use the arrow keys
to select the Ethernet menu. Press the OK button to open the menu and display the IP address or host
name.
2. Open a web browser, and in the address line, type the IP address or host name exactly as it displays on the
printer control panel. Press the Enter key on the computer keyboard. The EWS opens.
NOTE: If the web browser displays a message indicating that accessing the website might not be safe,
select the option to continue to the website. Accessing this website will not harm the computer.
3. Click the Security tab.
4. Open the General Security menu.
5. In the area labeled Set the Local Administrator Password, enter the name to associate with the password in
the Username eld.
6. Enter the password in the New Password eld, and then enter it again in the Verify Password eld.
74 Chapter 5 Manage the printer ENWW
Page 85

NOTE: To change an existing password, rst enter the existing password in the Old Password eld.
7. Click the Apply button.
NOTE: Make note of the password and store it in a safe place. The administrator password cannot be
recovered. If the administrator password is lost or forgotten, contact HP Customer Support at
support.hp.com for the assistance required to completely reset the printer.
Some features on the printer control panel can be secured so that unauthorized people cannot use them. When
a feature is secured, the printer prompts you to sign in before you can use it. You can also sign in without waiting
for a prompt by selecting Sign In from the printer control panel.
Typically, the credentials for signing in to the printer are the same as for signing in to the network. Consult the
network administrator for this printer if you have questions about which credentials to use.
1. Keypad control panels: Press the Sign In button
Touchscreen control panels: From the Home screen on the printer control panel, select Sign In.
2. Follow the prompts to enter the credentials.
NOTE: To maintain security for the printer, select Sign Out when you have nished using the printer.
Encryption support: HP High Performance Secure Hard Disks
The hard disk provides hardware-based encryption so you can securely store sensitive data without impacting
printer performance. This hard disk uses the latest Advanced Encryption Standard (AES) and has versatile timesaving features and robust functionality.
Use the Security menu in the HP Embedded Web Server to congure the disk.
Lock the formatter
The formatter has a slot that you can use to attach a security cable. Locking the formatter prevents someone
from removing valuable components from it.
ENWW Printer security features 75
Page 86

Energy-conservation settings
Introduction
Congure sleep settings to reduce power usage when the printer is idle.
Set the idle settings
This setting aects energy use while the product is idle, not while in Sleep Mode. Start faster results in a quicker
rst-page-out time, but uses more power. Save energy conserves power, but could result in a slower rst-page-
time.
out
1. From the Home screen on the printer control panel, open the Settings menu.
2. Open the following menus:
● General Settings
● Energy Settings
● Idle Settings
3. Adjust the slider, and then select Done to save the setting.
Set the sleep timer and congure the printer to use 1 watt or less of power
The sleep settings aect how much power the printer uses, the wake/sleep time, how quickly the printer enters
sleep mode, and how quickly the printer wakes up from sleep mode.
To congure the printer to use 1 watt or less of power while in sleep mode, enter times for both the Sleep after
Inactivity and Auto O after sleep settings.
1. From the Home screen on the printer control panel, navigate to the Settings application, and then select
the Settings icon.
2. Open the following menus:
a. General
b. Energy Settings
c. Sleep Settings
3. Select Sleep after Inactivity to specify the number of minutes the printer is inactive before it enters sleep
mode. Enter the appropriate time period.
NOTE: The sleep-mode default time is 0 minutes. Zero (0) indicates that the printer will go to sleep in less
than 1 minute.
4. Select Auto O after sleep to put the printer into a deeper power save mode after a period of sleep. Enter
the appropriate time period.
NOTE: By default, the printer will wake from Auto O in response to any activity other than USB or Wi-Fi.
For greater energy settings, you can set it to wake only to the power button by selecting Shut down (wake
on power button only).
5. Select Done to save the settings.
76 Chapter 5 Manage the printer ENWW
Page 87

Set the sleep schedule
Use the Sleep Schedule feature to congure the printer to automatically wake or go into Sleep mode at specic
times on specic days of the week.
1. From the Home screen on the printer control panel, navigate to the Settings application, and then select
the Settings icon.
2. Open the following menus:
a. General
b. Energy Settings
c. Sleep Schedule
3. Select the New Event button, and then select the type of event to schedule: Wake Event or Sleep Event.
4. For a wake or sleep event, congure the time and the days of the week for the event. Select Save to save
the setting.
ENWW Energy-conservation settings 77
Page 88

HP Web Jetadmin
HP Web Jetadmin is an award-winning, industry-leading tool for eiciently managing a wide variety of networked
HP products, including printers, multifunction printers, and digital senders. This single solution allows you to
remotely install, monitor, maintain, troubleshoot, and secure your printing and imaging environment —
ultimately increasing business productivity by helping you save time, control costs, and protect your investment.
HP Web Jetadmin upgrades are periodically made available to provide support for specic product features. Go to
www.hp.com/go/webjetadmin for more information.
78 Chapter 5 Manage the printer ENWW
Page 89

Software and rmware updates
HP regularly updates software and rmware to x any issues and to add features. To take advantage of the most
current updates, download the most recent driver le, rmware le, or both from the Web.
Go to www.hp.com/support/colorljE65150 or www.hp.com/support/colorljE65160. Click Software and Drivers.
ENWW Software and rmware updates 79
Page 90

80 Chapter 5 Manage the printer ENWW
Page 91

6 Solve problems
●
Customer support
●
Control panel help system
●
Reset factory settings
●
A “Cartridge is low” or “Cartridge is very low” message displays on the printer control panel
●
Printer does not pick up paper or misfeeds
●
Clear paper jams
●
Resolve print-quality problems
For more information
The following information is correct at the time of publication.
For video assistance, see www.hp.com/videos/LaserJet.
For current information, see www.hp.com/support/colorljE65150 or www.hp.com/support/colorljE65160.
HP's all-inclusive help for the printer includes the following information:
● Install and congure
● Learn and use
● Solve problems
● Download software and rmware updates
● Join support forums
● Find warranty and regulatory information
ENWW 81
Page 92

Customer support
Table 6-1 Customer support options
Support type Contact information
Get telephone support for your country/region
Have the printer name, serial number, date of purchase, and
problem description ready
Get 24-hour Internet support, and download software utilities and
drivers
Order additional HP service or maintenance agreements www.hp.com/go/carepack
Register the printer www.register.hp.com
Country/region phone numbers are on the yer that was in the box
with the printer or at support.hp.com.
www.hp.com/support/colorljE65150 or www.hp.com/support/
colorljE65160
82 Chapter 6 Solve problems ENWW
Page 93
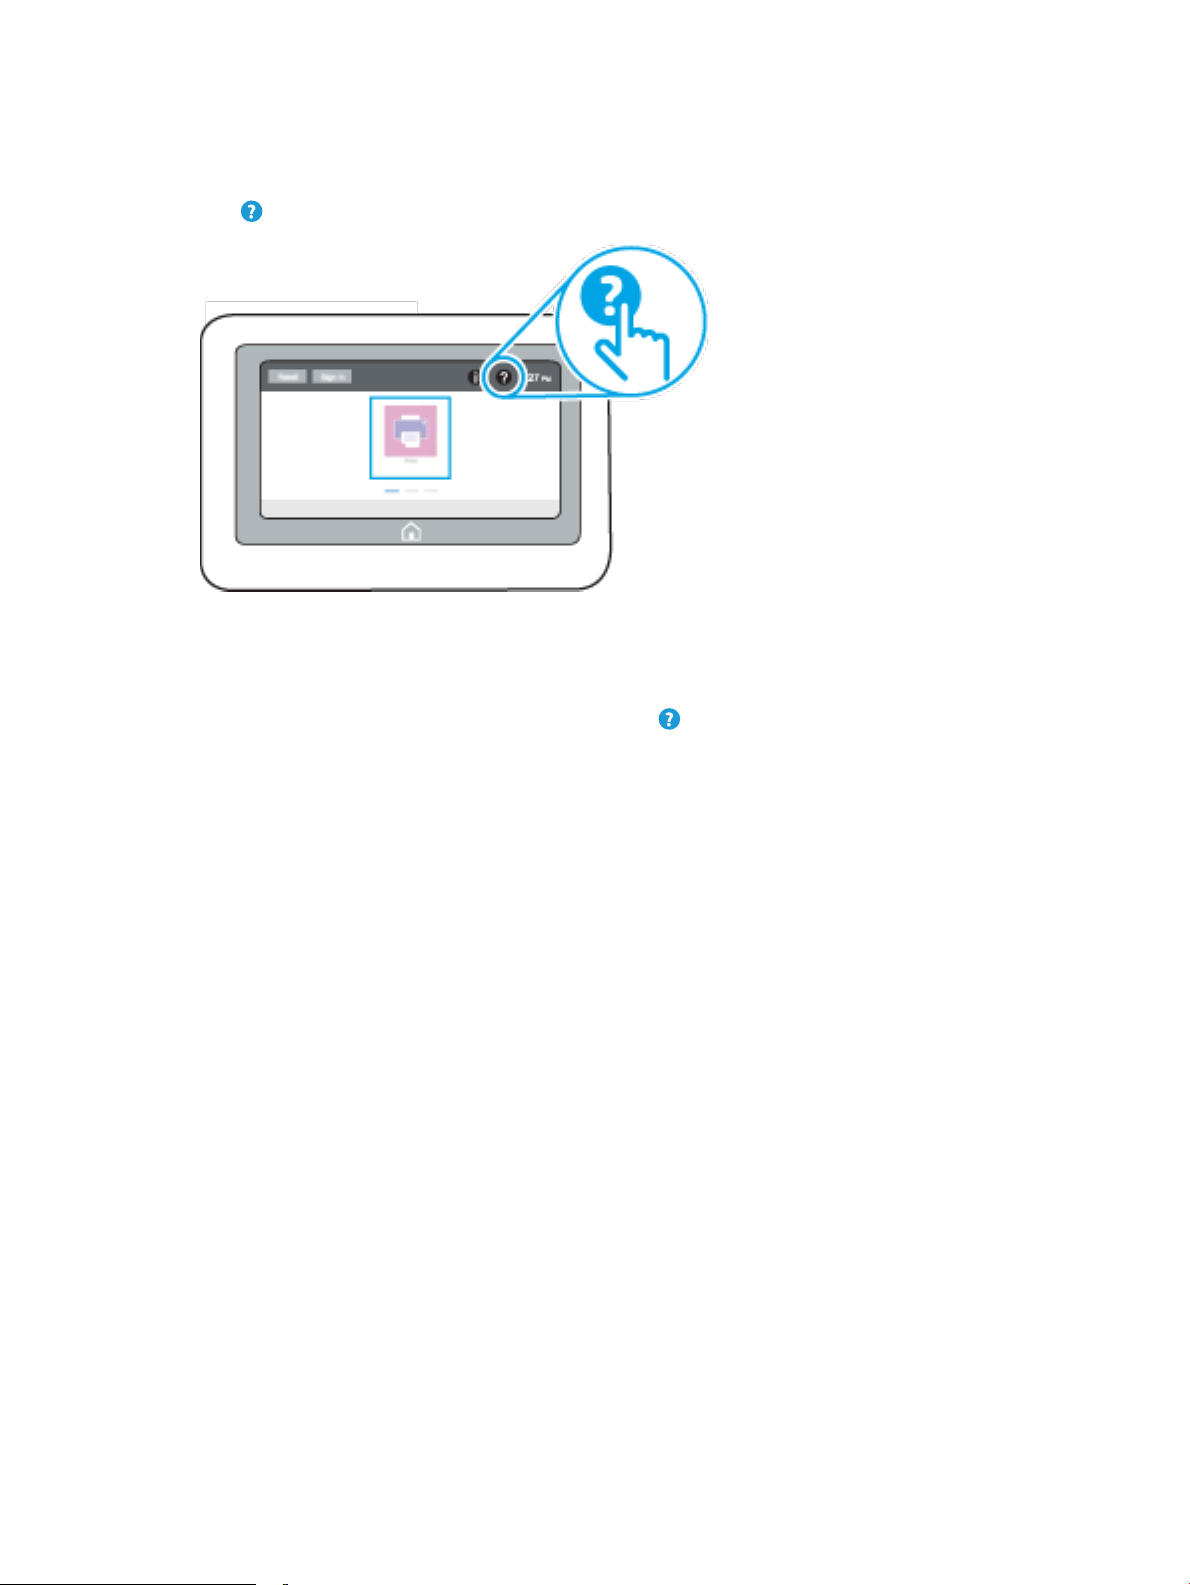
Control panel help system
The printer has a built-in Help system that explains how to use each screen. To open the Help system, select the
Help button in the upper-right corner of the screen.
For some screens, the Help opens to a global menu where you can search for
through the menu structure by selecting the buttons in the menu.
Some Help screens include animations that show specic procedures, such as clearing paper jams.
If the printer alerts of an error or warning, select the Help button to open a message that describes the
problem. The message also contains instructions to help solve the problem.
specic topics. You can browse
ENWW Control panel help system 83
Page 94

Reset factory settings
Introduction
Use one of the following methods to restore the printer to the original settings from the factory.
NOTE: Restoring factory settings sets most of the printer settings to their factory defaults. However, some
settings are not changed, such as language, date, time, and some network conguration settings.
Method one: Reset factory settings from the printer control panel
1. From the Home screen on the printer control panel, navigate to the Settings application, and then select
the Settings icon.
2. Open the following menus:
a. General
b. Reset Factory Settings
3. Select Reset.
A verication message advises that completing the reset function might result in loss of data.
4. Select Reset to complete the process.
NOTE: The printer restarts automatically after the reset operation completes.
Method two: Reset factory settings from the HP Embedded Web Server (networkconnected printers only)
1. Find the printer IP address: From the Home screen on the printer control panel, select the Information
icon, and then select the Network icon to display the IP address or host name.
2. Open a web browser, and in the address line, type the IP address or host name exactly as it displays on the
printer control panel. Press the Enter key on the computer keyboard. The EWS opens.
NOTE: If the web browser displays a message indicating that accessing the website might not be safe,
select the option to continue to the website. Accessing this website will not harm the computer.
3. Open the General tab.
4. On the left side of the screen, click Reset Factory Settings.
5. Click the Reset button.
NOTE: The printer restarts automatically after the reset operation completes.
84 Chapter 6 Solve problems ENWW
Page 95

A “Cartridge is low” or “Cartridge is very low” message displays on the printer control panel
Cartridge is low
The printer indicates when a toner cartridge level is low. Actual toner cartridge life remaining may vary. Consider
having a replacement available to install when print quality is no longer acceptable. The toner cartridge does not
need to be replaced now, and the cartridge access door remains locked until the cartridge reaches Very Low
status.
Cartridge is very low
The printer indicates when a toner cartridge level is very low. In addition, the front door of the printer unlocks so
that the door can be opened to replace the cartridge. Actual toner cartridge life remaining may vary. Consider
having a replacement available to install when print quality is no longer acceptable. The toner cartridge does not
need to be replaced now unless the print quality is no longer acceptable.
Once an HP toner cartridge has reached Very Low, HP’s Premium Protection Warranty on that toner cartridge has
ended.
ENWW A “Cartridge is low” or “Cartridge is very low” message displays on the printer control panel 85
Page 96

Printer does not pick up paper or misfeeds
Introduction
The following solutions can help solve problems if the printer is not picking up paper from the tray or is picking
up multiple sheets of paper at one time. Either of these situations can result in paper jams.
●
The printer does not pick up paper
●
The printer picks up multiple sheets of paper
The printer does not pick up paper
If the printer does not pick up paper from the tray, try these solutions.
1. Open the printer and remove any jammed sheets of paper. Verify that no torn remnants of paper remain
inside the printer.
2. Load the tray with the correct size of paper for the job.
3. Make sure the paper size and type are set correctly on the printer control panel.
86 Chapter 6 Solve problems ENWW
Page 97
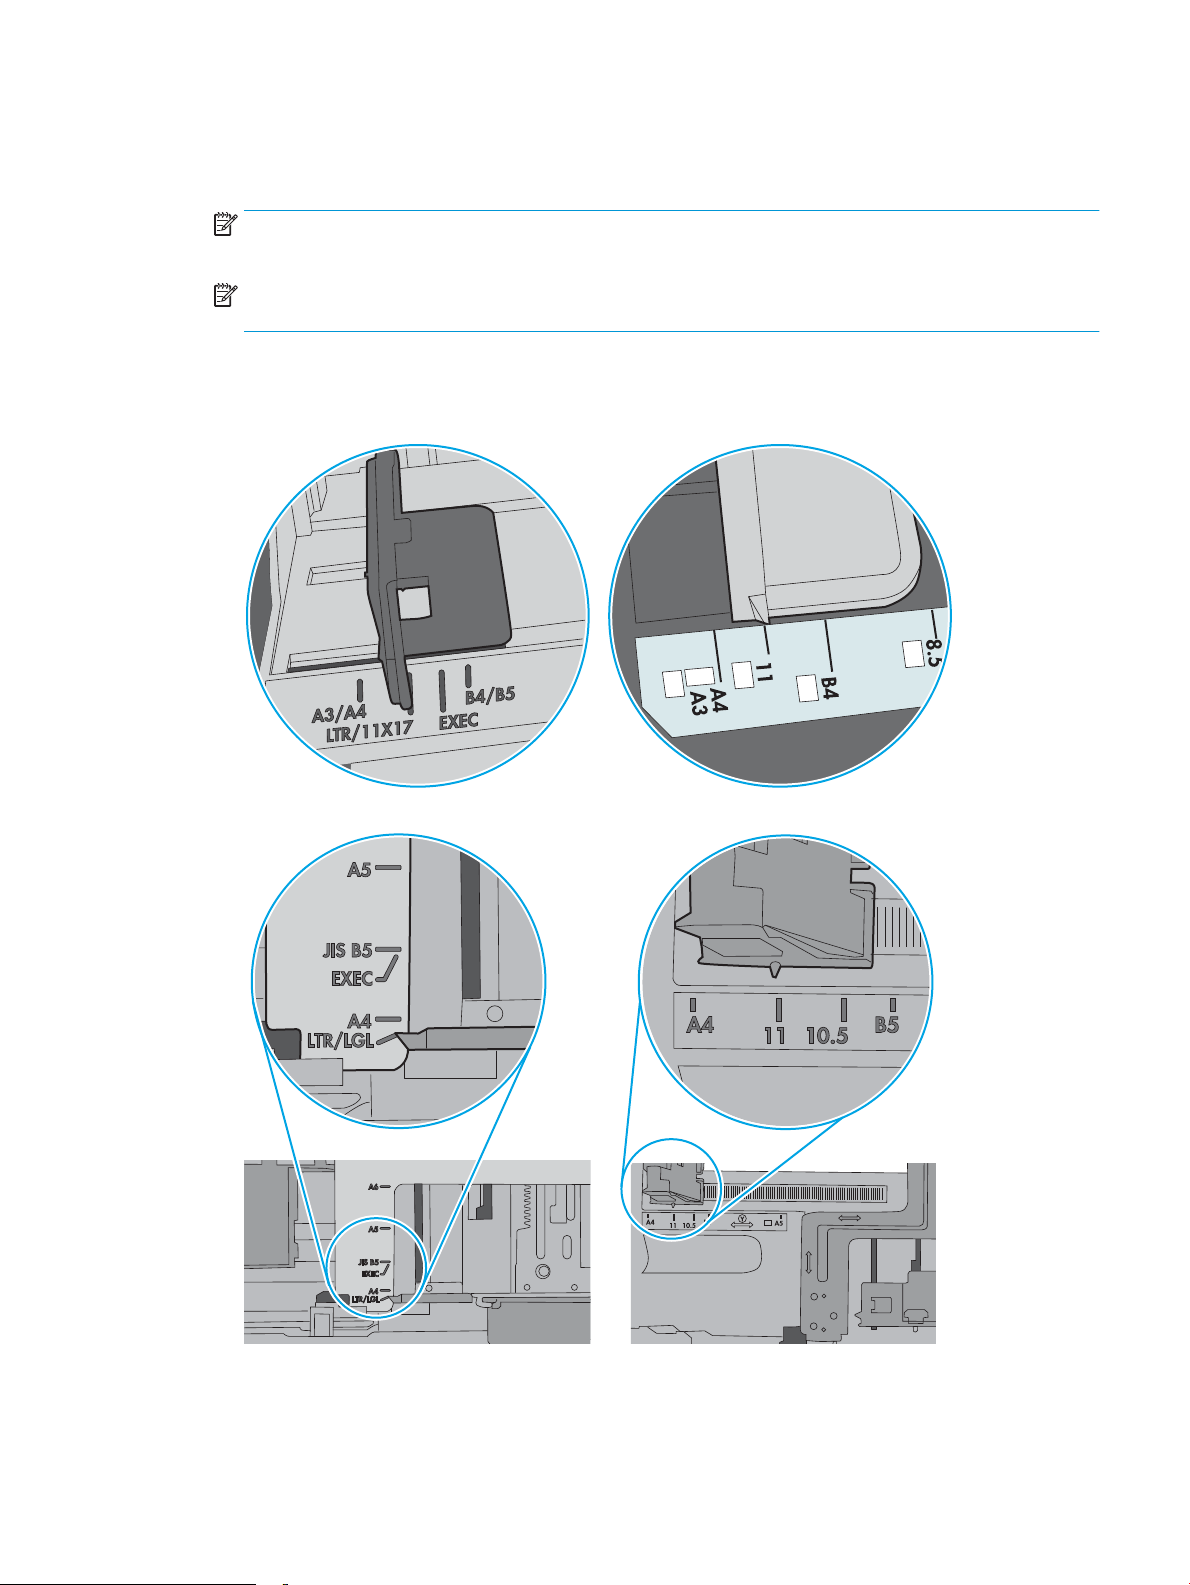
4. Make sure the paper guides in the tray are adjusted correctly for the size of paper. Adjust the guides to the
appropriate indentation in the tray. The arrow on the tray guide should line up exactly with the marking on
the tray.
NOTE: Do not adjust the paper guides tightly against the paper stack. Adjust them to the indentations or
markings in the tray.
NOTE: If the managed service provider has installed locking tray guides, these may not be adjustable.
Contact the managed service representative for more information on locking or unlocking of paper trays.
The following images show examples of the paper-size indentations in the trays for various printers. Most
HP printers have markings similar to these.
Figure 6-1 Size markings for Tray 1 or the multipurpose tray
Figure 6-2 Size markings for cassette trays
ENWW Printer does not pick up paper or misfeeds 87
Page 98
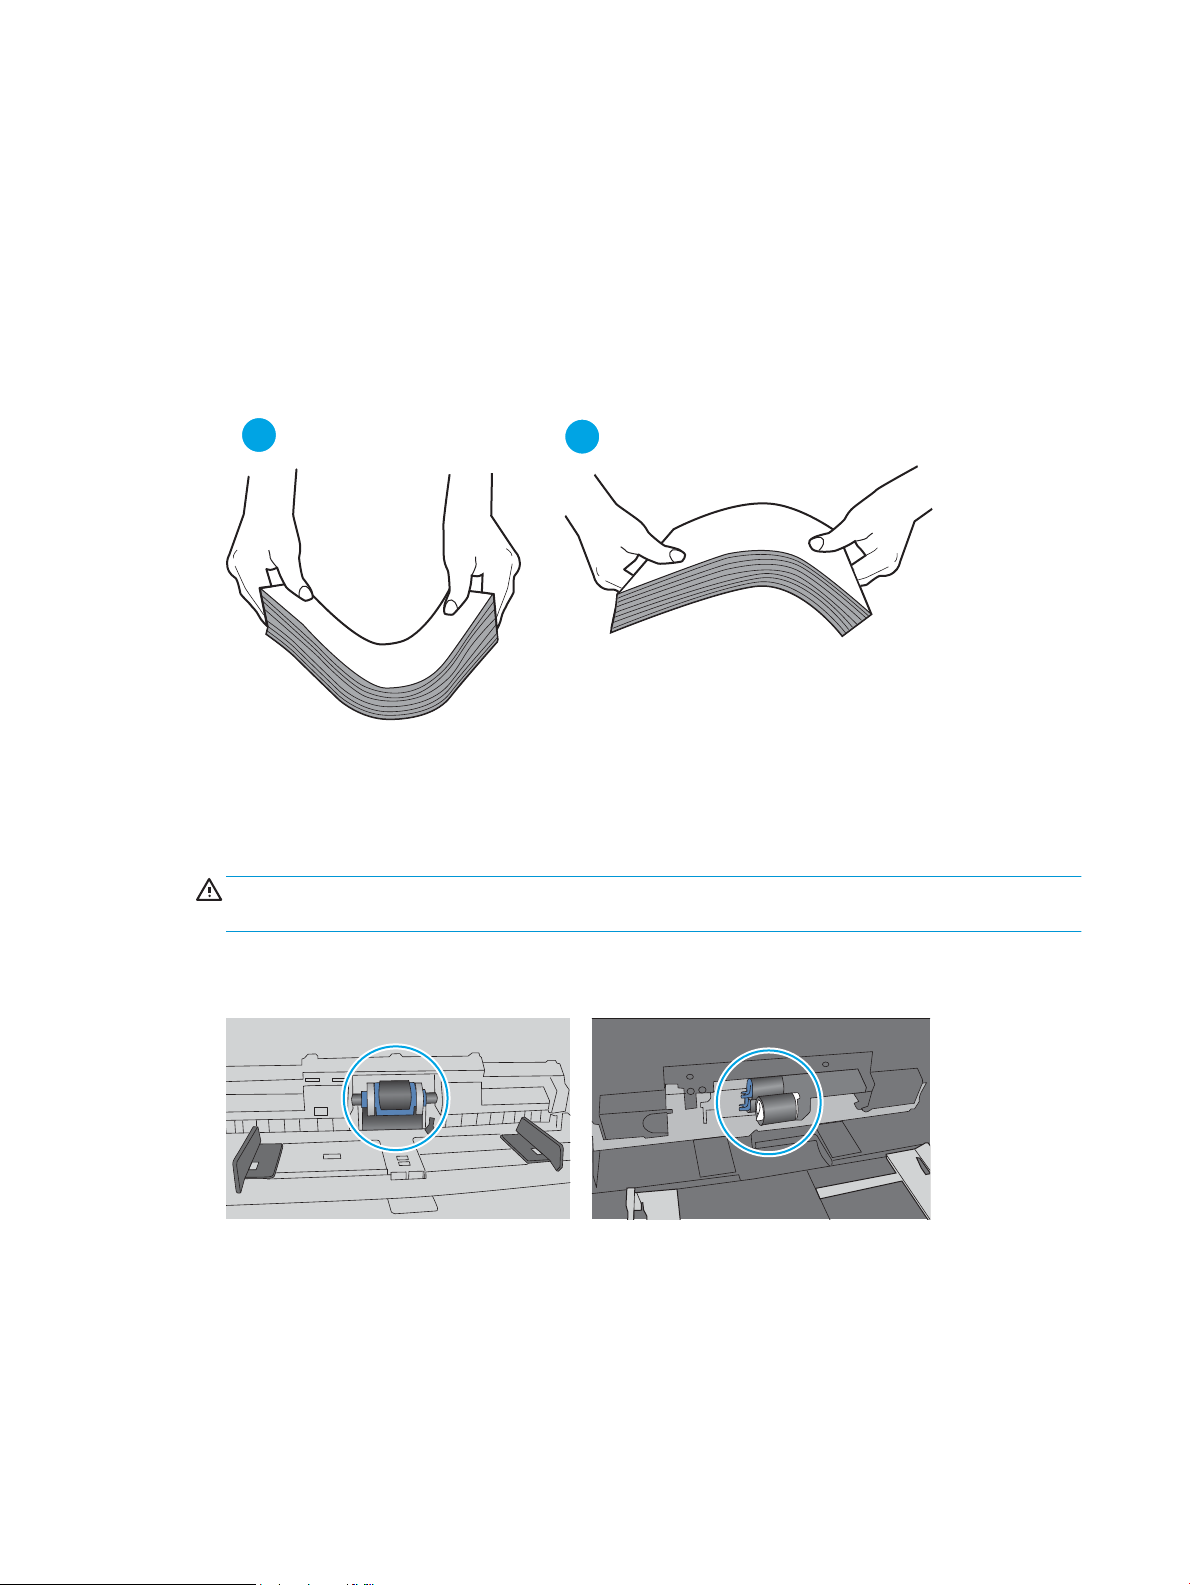
5. Verify that the humidity in the room is within specications for this printer and that paper is being stored in
1
2
unopened packages. Most reams of paper are sold in moisture-proof wrapping to keep paper dry.
In high-humidity environments, paper at the top of the stack in the tray can absorb moisture, and it might
have a wavy or uneven appearance. If this happens, remove the top 5 to 10 sheets of paper from the stack.
In low-humidity environments, excess static electricity can cause sheets of paper to stick together. If this
happens, remove the paper from the tray, and ex the stack by holding it at each end and bringing the ends
up to form a U shape. Then, rotate the ends down to reverse the U shape. Next, hold each side of the stack
of paper, and repeat this process. This process releases individual sheets without introducing static
electricity. Straighten the paper stack against a table before returning it to the tray.
Figure 6-3 Technique for exing the paper stack
6. Check the printer control panel to see if it is displaying a prompt to feed the paper manually. Load paper,
and continue.
7. The rollers above the tray might be contaminated. Clean the rollers with a lint-free cloth dampened with
warm water. Use distilled water, if it is available.
CAUTION: Do not spray water directly on to the printer. Instead, spray water on the cloth or dab the cloth
in water and wring it out before cleaning the rollers.
The following image shows examples of the roller location for various printers.
Figure 6-4 Roller locations for Tray 1 or the multipurpose tray
The printer picks up multiple sheets of paper
If the printer picks up multiple sheets of paper from the tray, try these solutions.
1. Remove the stack of paper from the tray and ex it, rotate it 180 degrees, and ip it over. Do not fan the
paper. Return the stack of paper to the tray.
88 Chapter 6 Solve problems ENWW
Page 99

NOTE: Fanning the paper introduces static electricity. Instead of fanning the paper, ex the stack by
1
2
holding it at each end and bringing the ends up to form a U shape. Then, rotate the ends down to reverse
the U shape. Next, hold each side of the stack of paper, and repeat this process. This process releases
individual sheets without introducing static electricity. Straighten the paper stack against a table before
returning it to the tray.
Figure 6-5 Technique for exing the paper stack
2. Use only paper that meets HP specications for this printer.
3. Verify that the humidity in the room is within specications for this printer, and that paper is being stored in
unopened packages. Most reams of paper are sold in moisture-proof wrapping to keep paper dry.
In high-humidity environments, paper at the top of the stack in the tray can absorb moisture, and it might
have a wavy or uneven appearance. If this happens, remove the top 5 to 10 sheets of paper from the stack.
In low-humidity environments, excess static electricity can cause sheets of paper to stick together. If this
happens, remove the paper from the tray, and ex the stack as described above.
4. Use paper that is not wrinkled, folded, or damaged. If necessary, use paper from a dierent package.
ENWW Printer does not pick up paper or misfeeds 89
Page 100

5. Make sure the tray is not overlled by checking the stack-height markings inside the tray. If it is overlled,
remove the entire stack of paper from the tray, straighten the stack, and then return some of the paper to
the tray.
The following images show examples of the stack-height markings in the trays for various printers. Most
HP printers have markings similar to these. Also make sure that all sheets of paper are below the tabs near
the stack-height marks. These tabs help hold the paper in the correct position as it enters the printer.
Figure 6-6 Stack-height markings
Figure 6-7 Tab for the paper stack
90 Chapter 6 Solve problems ENWW
 Loading...