

Page 1

HP E1433A
8-Channel 196 kSa/sec Digitizer plus DSP
User’s Guide
Part Number E1433-90008
Printed in U.S.A
Print Date: April 1999, Sixth Edition
Hewlett-Packard Company, 1996, 1997, 1998, 1999. All rights reserved.
8600 Soper Hill Road Everett, Washington 98205-1298 U.S.A.
Page 2

NOTICE
The information contained in this document is subject to change without notice.
HEWLETT-PACKARD MAKES NO WARRANTY OF ANY KIND WITH REGARD TO THIS
MANUAL, INCLUDING, BUT NOT LIMITED TO, THE IMPLIED WARRANTIES OF
MERCHANTABILITY AND FITNESS FOR A PARTICULAR PURPOSE. Hewlett-Packard
shall not be liable for errors contained herein or direct, indirect, special, incidental or
consequential damages in connection with the furnishing, performance, or use of this
material.
WARRANTY
A copy of the specific warranty terms applicable to your Hewlett-Packard product and
replacement parts can be obtained from your local Sales and Service Office.
This document contains proprietary information which is protected by copyright.
All rights are reserved. No part of this document may be photocopied, reproduced or
translated to another language without the prior written consent of Hewlett-Packard
Company. This information contained in this document is subject to change without notice.
Use of this manual and CD-ROM supplied for this pack is restricted to this product only.
Additional copies of the programs can be made for security and back-up purposes only.
© Copyright 1983, 1984, 1985, 1986, 1987, 1988 Hewlett-Packard Company.
© Copyright 1979 The Regents of the University of Colorado, a body corporate.
© Copyright 1979, 1980, 1983 The Regents of the University of California.
© Copyright 1980, 1984 AT&T Technologies. All Rights Reserved.
© Copyright 1986, 1987 Sun Microsystems, Inc.
© Copyright 1984, 1985 Productivity Products Intl.
RESTRICTED RIGHTS LEGEND
Use, duplication, or disclosure by the government is subject to restrictions as set forth in
subdivision (c) (1) (ii) of the Rights in Technical Data and Computer Software clause at
52.227-7013.
HEWLETT-PACKARD COMPANY
Rights for non-DOD U.S. Government Departments and Agencies are set forth in FAR
52.227-19 (c) (1,2)
Copyright (c) 1995, 1996, 1997, 1998, 1999 Hewlett-Packard Company. All rights Reserved.
3000 Hanover St.
Palo Alto, CA 94303
ii
Page 3

HP E1433A User's Guide
In This Book
The HP E1433A 8-Channel 196 kSa/s Digitizer plus DSP is a C-size VXI
module. “196 kSa/s” refers to the maximum sample rate of 196608 samples
per second. The HP E1433A may contain either one or two 4-channel
input assemblies so that the module may have a total of up to 8 inputs.
The module plugs into a single C-size slot in a VXI mainframe.
This book documents the HP E1433A module, including information on how
to use it. It provides:
q Installation information.
q Examples to help you get started, with information on how to use the
VXIplug&play Host Interface Library functions. There is also a chapter about the
C-Language version of the Host Interface Library. There are instructions for
printing the Function Reference for the Host Interface Library if desired. The
Function Reference can be accessed by way of online manual pages and online
help.
q Information on how to use the HP E1433A.
q A descriptions of the module.
q Descriptions of the Arbitrary Source and Tachometer options.
q Descriptions of the Break Out Boxes which can be used with the module.
q Service information (troubleshooting and replacing assemblies).
q Details about the module’s VXI registers (as an appendix for those who may want
this additional information).
iii
Page 4

Page 5

TABLE OF CONTENTS
In This Book iii
1 Installing the HP E1433A
Installing the HP E1433A 1-2
To inspect the HP E1433A 1-2
To install the HP E1433A 1-3
Install the host interface libraries 1-6
To store the module 1-6
To transport the module 1-7
2 Getting Started With the HP E1433A
Introduction 2-2
To install the VXIplug&play libraries 2-3
System Requirements (Microsoft Windows95 and NT) 2-3
System Requirements (HP-UX 9.05) 2-3
System Requirements (HP-UX 10.2) 2-3
HP E1432A Software Distribution 2-3
Getting Updates Via FTP (HP-UX) 2-4
Getting Updates Via FTP (Windows) 2-4
To install the Windows VXIplug&play drivers for the HP E1432A
(for Windows 95 and Windows NT). 2-4
To install the HP-UX VXIplug&play drivers for the HP E1433A
(for HP-UX systems): 2-6
The Resource Manager 2-6
The VXIplug&play Soft Front Panel (SFP) 2-7
Using the soft front panel. 2-7
HP VEE example programs 2-10
scope.vee 2-10
minimum.vee 2-14
Other HP VEE example programs 2-16
C-Language Host Interface Library example programs 2-17
Demo Programs 2-17
Running a demo program: semascope.c 2-18
Visual Basic example programs 2-19
v
Page 6

3 Using the HP E1433A
Introduction 3-2
What is VXIplug&play? 3-3
Overview 3-3
VXIplug&play drivers 3-3
Manufacturer and model codes 3-4
The Soft Front Panel (SFP) 3-5
Header and Library Files 3-6
Channels and groups 3-7
Channel Groups 3-7
Initialization 3-7
Creating a Channel Group 3-8
Input, Source, and Tach Channels 3-8
Multiple-module/mainframe Measurements 3-9
Grouping of Channels/Modules 3-9
Multiple-module Measurements 3-9
Possible Trigger Line Conflict 3-10
Managing Multiple-mainframe Measurements 3-11
Synchronization in Multiple-mainframe Measurements 3-14
Module Features 3-15
Data Flow Diagram and FIFO Architecture 3-15
Base Sample Rates 3-17
Measurement Process 3-23
Measurement Setup and Control 3-23
Parameter Settings 3-24
Measurement Initialization 3-24
Measurement Loop 3-25
Register-based VXI Devices 3-26
Arm and Trigger 3-27
HP E1433A Triggering. 3-28
Trigger Level 3-29
Data Transfer Modes 3-30
HP E1433A Interrupt Behavior 3-32
Data Gating 3-34
HP E1433A Parameters 3-34
New features of the HP E1432A/HP E1433A software 3-36
Averaging 3-36
Continuous re-sampled data 3-36
Fast span or range change 3-36
Peak level detection (HP E1433A only) 3-36
RMS level computation (HP E1433A only) 3-36
Time arming 3-37
Weighting filters (HP E1433A only) 3-37
Zoom (HP E1432A only) 3-37
Zoom (for the Arbitrary Source, option 1D4) 3-37
Auto range 3-37
vi
Page 7

Where to get more information 3-38
The Function Reference for VXIplug&play 3-38
The Function Reference for the Host Interface Library (C-language version)
3-38
4 The C-Language Host Interface Library
Introduction 4-2
Header and Library Files 4-3
Parameter Information 4-4
Description of HP E1433A Parameters 4-4
Parameter Lists 4-5
Channel and Group IDs 4-10
Multiple-module/Mainframe Measurements 4-12
Grouping of Channels/Modules 4-12
Multiple-module Measurements 4-12
Possible Trigger Line Conflict 4-13
Managing Multiple-mainframe Measurements 4-14
Synchronization in Multiple-mainframe Measurements 4-17
Measurement Process 4-18
Measurement Setup and Control 4-18
Parameter Settings 4-19
Measurement initialization 4-19
Measurement Loop 4-20
Register-based VXI Devices 4-21
Arm and Trigger 4-22
HP E1433A Triggering. 4-23
Data Transfer Modes 4-24
HP E1433A Interrupt Behavior 4-26
Data Gating 4-28
HP E1433A Parameters 4-29
For More Information 4-29
vii
Page 8

5 Module Description
Module Features 5-2
General Features 5-2
Arbitrary Source Features (option 1D4) 5-2
Tachometer Features (option AYF) 5-2
Other Options 5-2
Block Diagram 5-3
HP E1433A Front Panel Description 5-5
Front panels for four or eight channels 5-5
Standard Front Panel 5-6
VXI Backplane Connections 5-8
Power Supplies and Ground 5-8
Data Transfer Bus 5-8
DTB Arbitration Bus 5-8
Priority Interrupt Bus 5-8
Utility Bus 5-8
The Local Bus (Option UGV) 5-9
The HP E1433A VXI Device 5-10
Address Space 5-10
Shared Memory 5-10
Memory Map 5-10
List of A16 Registers 5-12
Trigger Lines (TTLTRG) 5-13
Providing an External Clock 5-14
Calibration Description 5-15
6 The Arbitrary Source Option (1D4)
Arbitrary Source Description 6-2
Trigger 6-2
Arbitrary Output 6-2
Source Output Modes 6-2
COLA (and Summer) 6-2
External Shutdown 6-2
Block Diagram 6-3
The Arbitrary Source Option Front Panel 6-4
LED’s and Connectors for the Arbitrary Source Option 6-5
Updating the arbitrary source firmware 6-5
viii
Page 9

7 The Tachometer
Option (AYF)
Tachometer Description 7-2
Tachometer Inputs 7-2
External Trigger Input 7-2
Trigger Level 7-2
Tachometer Monitoring 7-2
Exact RPM Triggering 7-2
Input Count Division 7-3
Holdoff Time 7-3
Block Diagram 7-3
The Tachometer Option Front Panel 7-4
LED’s and Connectors for the Tachometer Option. 7-5
8 Break Out Boxes
Introduction 8-2
Service 8-2
The HP E1432-61600 and HP E1432-61602 Break Out Boxes 8-3
HP E1432-61602 Voltage-type Break Out Box 8-4
HP E1432-61600 ICP-type Break Out Box 8-4
Break Out Box Grounding 8-4
Break Out Box Cables 8-5
Making a Custom Break Out Box Cable 8-5
Recommendations on wiring for the E1432/3A 4 Channel Input Connector
8-7
9 Troubleshooting the HP E1433A
Diagnostics 9-2
ix
Page 10

10 Replacing Assemblies
Replaceable Parts 10-2
Ordering Information 10-2
Direct Mail Order System 10-2
Code Numbers 10-3
Assemblies: without option AYF or 1D4 10-4
Assemblies: with option AYF 10-6
Assemblies: with option 1D4 10-8
Cables: without option AYF or 1D4 10-10
Cables: with option AYF 10-11
Cables: with option 1D4 10-12
Front Panel 10-13
To remove the top cover 10-14
To remove the front panel 10-15
To remove the input assemblies 10-18
To remove the option AYF assembly 10-20
To remove the option 1D4 assembly 10-21
To remove the A22/A24 assembly 10-22
To remove the A10/A11 assembly 10-23
11 Backdating
Backdating 11-2
Appendix A Register Definitions
The HP E1433A VXI Registers A-2
The A16 Registers A-2
The A24 Registers A-4
32-bit Registers A-10
Command/Response Protocol A-11
DSP Protocol A-13
DSP Bus Registers A-14
HP E1433A Technical Specifications
Glossary
Index
Need Assistance?
About this edition
Sales and Service Offices
x
Page 11

1
Installing the HP E1433A
1-1
Page 12

HP E1433A User's Guide
Installing the HP E1433A
Installing the HP E1433A
This chapter contains instructions for installing the HP E1433A 8-Channel
196 kSa/sec Digitizer plus DSP Module and its drivers. This chapter also
includes instructions for transporting and storing the module.
To inspect the HP E1433A
The HP E1433A 8-Channel 196 kSa/sec Digitizer plus DSP Module was
carefully inspected both mechanically and electrically before shipment.
It should be free of marks or scratches, and it should meet its published
specifications upon receipt.
If the module was damaged in transit, do the following:
q Save all packing materials.
q File a claim with the carrier.
q Call your Hewlett-Packard sales and service office.
1-2
Page 13

HP E1433A User's Guide
Installing the HP E1433A
To install the HP E1433A
Caution To protect circuits from static discharge, observe anti-static techniques
whenever handling the HP E1433A 8-Channel 196 kSa/s Digitizer plus DSP
Module.
1 Set up your VXI mainframe. See the installation guide for your mainframe.
2 Select a slot in the VXI mainframe for the HP E1433A module.
The HP E1433A module’s local bus receives ECL-level data from the
module immediately to its left and outputs ECL-level data to the module
immediately to its right. Every module using the local bus is keyed to
prevent two modules from fitting next to each other unless they are
compatible. If you will be using the local bus, select adjacent slots
immediately to the left of the data-receiving module. The local bus can
support up to four HP E1433A modules at full span at real time data rates.
If the VXI Bus is used, maximum data rates will be reduced but the
module can be placed in any available slot.
3 Using a small screwdriver or similar tool, set the logical address configuration
switch on the HP E1433A.
(See the illustration on the next page.) Each module in the system must
have a unique logical address. The factory default setting is 0000 1000
(8). If an HP-IB command module will be controlling the HP E1433A
module, select an address that is a multiple of 8. If your VXI system
dynamically configures logical addresses, set the switch to 255.
1-3
Page 14

HP E1433A User's Guide
Installing the HP E1433A
4 Check the settings of the Boot Source and ROM Programming switches on the
bottom of the module.
Set switches 1 and 3 (BS1 and BS3) up, and all the other switches down.
1-4
Page 15

HP E1433A User's Guide
Installing the HP E1433A
5 Set the mainframe’s power switch to standby ( O
I
).
Caution Installing or removing the module with power on may damage components in
the module.
6 Place the module’s card edges (top and bottom) into the module guides in the
slot.
7 Slide the module into the mainframe until the module connects firmly with the
backplane connectors. Make sure the module slides in straight.
8 Attach the module’s front panel to the mainframe chassis using the module’s
captive mounting screws.
1-5
Page 16

HP E1433A User's Guide
Installing the HP E1433A
Install the host interface libraries
After the hardware has been assembled, the next step in installing the
HP E1433A is to install the host interface libraries. Refer to the chapter
titled “Getting Started With the HP E1433A” to continue the installation
process.
To store the module
Store the module in a clean, dry, and static free environment.
For other requirements, see storage and transport restrictions in the
chapter titled: “Specifications.”
1-6
Page 17

HP E1433A User's Guide
Installing the HP E1433A
To transport the module
• Package the module using the original factory packaging or packaging identical
to the factory packaging.
Containers and materials identical to those used in factory packaging are
available through Hewlett-Packard offices.
• If returning the module to Hewlett-Packard for service, attach a tag describing
the following:
q Type of service required
q Return address
q Model number
q Full serial number
In any correspondence, refer to the module by model number and full serial
number.
• Mark the container FRAGILE to ensure careful handling.
• If necessary to package the module in a container other than original
packaging, observe the following (use of other packaging is not recommended):
q Wrap the module in heavy paper or anti-static plastic.
q Protect the front panel with cardboard.
q Use a double-wall carton made of at least 350-pound test material.
q Cushion the module to prevent damage.
Caution Do not use styrene pellets in any shape as packing material for the module. The
pellets do not adequately cushion the module and do not prevent the module
from shifting in the carton. In addition, the pellets create static electricity which
can damage electronic components.
1-7
Page 18

Page 19

2
Getting Started With the
HP E1433A
2-1
Page 20

HP E1433A User's Guide
Getting Started With the HP E1433A
Introduction
This chapter will help you to get your HP E1433A running and making
simple measurements. It shows how to install the software libraries and
how to run some of the example programs that are included.
For more information see the other chapters in this book and the on-line
function reference. (See “Where to get more information” in the chapter
titled “Using the HP E1433A).”
Two versions of the Host Interface Library are available. One is the HP-UX
C-Language Host Interface Library which uses SICL (the Standard
Instrument Interface Library) to communicate to the HP E1433A hardware.
The other is the HP-UX, Windows 95 and Windows NT VXIplug&play
Library which communicates with the hardware using VISA (Virtual
Instrument Software Architecture). VISA is the input/output standard upon
which all the VXIplug&play software components are based.
This chapter mainly covers the VXIplug&play version, and it also includes
some examples using the C-Language version. If you are using the
C-Language version, you should also refer to the chapter titled “The
C-Language Host Interface Library.”
2-2
Page 21

HP E1433A User's Guide
Getting Started With the HP E1433A
To install the VXIplug&play libraries
System Requirements (Microsoft Windows95 and NT)
• An IBM compatible personal computer with either Microsoft Windows 95 or
Microsoft Windows NT. (With either Windows 95 or Windows NT, use the
VXIplug&play library)
• Additional hardware and software to connect the IBM compatible computer to
a VXI mainframe.
• Software is supplied on CD-ROM.
System Requirements (HP-UX 10.20)
• One of the following workstations:
q An HP V743 VXI-embedded workstation.
q A stand-alone HP Series 700 workstation with an HP E1489I EISA-to-MXIbus
card and an HP E1482B VXI-MXI Bus Extender.
• Software is supplied on CD-ROM, so a CD-ROM drive is needed
• HP-UX Version 10.20. This version of HP-UX can use either the C-language
library or the VXIplug&play library.
• SICL/VISA (product number E2091E, version E.01.01 or later).
HP E1432A Software Distribution
The HP E1432A distribution (software) is shipped on CD-ROM with the HP
E1433A module. This software works with the E4132, E1433, and E1434
modules. This distribution includes the HP E1432A C-Language Host
Interface library for HP-UX, the HP E1432A VXIplug&play Host Interface
library for HP-UX, Windows 95, and Windows NT with associated examples,
and manual pages.
2-3
Page 22

HP E1433A User's Guide
Getting Started With the HP E1433A
Getting Updates Via FTP (HP-UX)
You can get the latest version of the HP E1432A software via FTP.
However, note that the latest version may be an interim version which has
not yet been fully tested and released. Released versions for HP-UX have
filenames beginning with E1432.A.xx.xx.depot.Z... Interim versions begin
with E1432.X.xx.xx.depot.Z...
For HP-UX, the latest version of the HP E1432A distribution can be
obtained via anonymous FTP at:
ftp://hpls01.lsid.hp.com/E1432/s700
Download file E1432.A.xx.xx.depot.Z for the latest update.
The A.xx.xx is the revision number, which will be something like
A.00.00. The file obtained via FTP has been compressed; it can be
uncompressed with the command:
uncompress E1432.A.xx.xx.depot.Z
The result will be a file E1432.A.xx.xx.depot This file is in swinstall
format, which is the same format as the file on the CD-ROM.
Getting Updates Via FTP (Windows)
You can get the latest version of the HP E1432A software via FTP.
However, note that the latest version may be an interim version which has
not yet been fully tested and released. Released versions for Windows have
filenames beginning with hpe1432.EXE.A... Interim versions begin with
hpe1432.EXE.X...
For Microsoft Windows the latest version of the HP E1432A distribution can
be obtained via anonymous FTP at:
ftp://hpls01.lsid.hp.com/E1432/pc
The README file contains information about the files in the directory.
The files corresponding to the first floppy disk of the distribution have the
form setup.EXE, click on “setup.EXE” to install.
Files of the form setup.w02 correspond to the second floppy disk of the
distribution. Files of the form setup.w03 correspond to the third floppy
disk (if any).
2-4
Page 23

HP E1433A User's Guide
Getting Started With the HP E1433A
To install the Windows VXIplug&play drivers for the HP E1432A
(for Windows 95 and Windows NT).
This procedure assumes that you have already installed a VISA (Virtual
Instrument Software Architecture) library. If not, you can still install these
drivers but you will receive an error message reminding you to install the
VISA library.
1 Insert the HP E1432A CD-ROM into your CD-ROM drive.
2 Run the program: d:\setup
(If your disk is in a drive other than “drive d,” replace “d:\” with the letter of the
drive containing your VXIplug&play Drivers disk.)
3 The setup program asks you to confirm or change the directory path. The
default directory path is recommended.
4 The setup program will ask you to confirm or change source code directory.
The default directory is recommended.
5 Setup creates a program group called “Hpe1432.” It includes:
An icon to run the Soft Front Panel
An icon for HELP text
An icon for UNISTALL
Setup can also place these icons in your “VXIplug&play” program group.
A dialog box asks if you wish to skip this step.
6 Setup asks if you want to run the Soft Front Panel (SFP).
See the next section in this chapter for more about the Soft Front Panel.
2-5
Page 24

HP E1433A User's Guide
Getting Started With the HP E1433A
To install the HP-UX VXIplug&play drivers for the HP E1433A
(for HP-UX systems):
1 Log in as root.
2 Insert the HP E1432A CD-ROM into the CD-ROM drive or obtain the latest HP
E1432A distribution.
3 Type swinstall.
See the HP-UX Reference manual for information on the swinstall command.
The HP E1432A distribution is normally installed in the
/opt/vxipnp/hpe1432/ directory. The files have extensions such as .h, .fp, .sl,
and .hlp.
The Resource Manager
The Resource Manager is a program from your hardware interface
manufacturer. It looks at the VXI mainframe to determine what modules
are installed. You need to run it every time you power up. If you get the
message: “No HP E1433A can be found in this system,” then run the
Resource Manager.
Before running the HP E1432A /HP E1433A software make sure that your
hardware is configured correctly and that the Resource Manager runs
successfully. Before using your measurement system, you must set up all
of its devices, including setting their addresses and local bus locations. No
two devices can have the same address. Usually addresses 0 and 1 are
taken by the Resource Manager and are not available.
For more information about the Resource Manager, see the documentation
with your hardware interface.
2-6
Page 25

HP E1433A User's Guide
Getting Started With the HP E1433A
The VXIplug&play Soft Front Panel (SFP)
Using the soft front panel.
If you are running the HP E1432A/HP E1433A software in Microsoft
Windows 95 or Windows NT, you can use the Soft Front Panel (SFP)
program to interface with the HP E1433A.
The Soft Front Panel can be useful for checking your system to make sure
that it is installed correctly and that all of its parts are working. However,
it is not very useful for making measurements. It cannot be controlled from
a program and it does not access all of the HP E1433A’s functionality.
Figure 2-1: The Soft Front Panel interface
2-7
Page 26

HP E1433A User's Guide
Getting Started With the HP E1433A
The buttons on the right side of the SFP display are defined as follows:
Meas
This button opens the Measurement Control dialog box. You can set:
q Measurement single/repeat
q Mode block/continuous
q Trigger auto/manual/input/source
q Frequency span
q Blocksize
Input
This button opens a dialog box in which you can set up the HP E1433A’s
inputs. You can set:
q Channel number
q Range
q AC or DC coupling
q Grounding method
q Digital anti-alias filter
q Analog anti-alias filter
q Trigger on/off
q Trigger mode level/bound
q Trigger level
q Hysteresis
q Trigger Slope
There is a checkbox to make all channels identical.
Source
This opens a dialog box for controlling the source output of the HP
E1433A’s source. This is only available for HP E1433A’s that have the
Arbitrary Source Option 1D4. You can set:
q Channel number
q Active on/off
q Mode sine/burst sine/random/burst random
q Ramp rate
q Sine frequency
q Sine phase
q Output normal/grounded/open/cal/multi
q Trigger on/off
q Cola (Constant Output Level Amplifier) off/on
q Duty Cycle
q Sum off/on
q Seed
q Range
2-8
Page 27

HP E1433A User's Guide
Getting Started With the HP E1433A
Display
This button opens a dialog box in which you can specify how the data is
displayed. For each trace you can specify an input channel (or OFF) and
an output file.
VXI
This button opens a dialog box showing the modules installed in your VXI
mainframe, and indicating which are active and inactive. The “resource
name” for each module is the interface card name that has been assigned to
it.
Go
Use the Go button to start the measurement.
Exit
Use the Exit button to exit the Soft Front Panel.
2-9
Page 28

HP E1433A User's Guide
Getting Started With the HP E1433A
HP VEE example programs
scope.vee
This program displays four channels with time record and FFT for each
channel.
The scope.vee program is located at \Hpe1432\examples\hpvee\ on a
Microsoft Windows system or at /usr/e1432/vee-examples on an HP-UX
system.
To run scope.vee, first type:
veetest
To begin using HP VEE.
In HP VEE click on File, then Open. In the Open File dialog box select
scope.vee from the list of files. Then click Ok.
2-10
Figure 2-2: HP VEE - Open File dialog box
Page 29

HP E1433A User's Guide
Getting Started With the HP E1433A
The program scope.vee starts, showing four channels, with time record and
FFT for each channel.
Figure 2-3: scope.vee - panel view
To start a measurement, click the Run button on the toolbar (triangle
symbol). To pause, click on the Pause button (two vertical bars, next to
the Run button). To stop the measurement, click the Stop button (square
symbol).
This screen is VEE’s panel view, where you can interact with the system
much as you would with the front panel of a standalone instrument. You
can also go to VEE’s detail view screen where you can configure the system
and the view panel to make your own measurements.
To look at the scope.vee program “behind the scenes,” click on the View
Detail button on the toolbar (chart symbol). To return to the original
(panel) view, click on the View Panel button (sine wave symbol).
Click on the View Detail button again to look at the detail view screen.
2-11
Page 30

HP E1433A User's Guide
Getting Started With the HP E1433A
To use and modify scope.vee you need to be familiar with using the HP
VEE program. Refer to HP VEE documentation if necessary. In View
Detail mode you can click on Help on the menu bar to get help on using
HP VEE.
2-12
Figure 2-4: HP VEE help text
Page 31

HP E1433A User's Guide
Getting Started With the HP E1433A
In detail view there are boxes representing parts of the scope.vee program.
For programs that are too large to be viewed all at one time, use the scroll
bars at the bottom and left side of the screen to scroll the display. You
can double-click on a box to see more detail, or click on the View Detail
(chart symbol) button on the top bar of the box. Some of the boxes
contain a function. If you click on the function you can view the
parameters associated with it.
Figure 2-5: scope.vee - detail view
To specify a new function, click on the blank space in the box where the
function is to be. A dialog box appears with a list of functions. After you
select a function you can choose Panel to “hard code” constants that the
function will use, or choose Parameters to allow a parameter to be input
from elsewhere (from the user or another function). The input appears as
a “pin” on the chart diagram. In the scope.vee program the user can select
the blocksize, span, and range.
You can click Add To Panel in the Edit menu to make a box in the detail
view visible on the panel view. This gives the user access to enter
parameters or view results.
2-13
Page 32

HP E1433A User's Guide
Getting Started With the HP E1433A
You can click on Alphnumeric in the Display menu to set up a box to
specify how to display the output of a function.
Use HP VEE to look at the functions that make up the simple “scope.vee”
program. This is an example of how the HP E1433A can be programmed
using HP VEE.
Click on the Panel View button (sine wave symbol) to go to panel view.
Set up your system to provide input signal to some of the input connectors
of your HP E1433A. Then use the scope.vee interface to view the time
records and FFTs of the input signals.
When you exit HP VEE, the program will ask if you want to save any
changes you made to scope.vee. Click No, or if you wish click Cancel and
then use File/Save As to save your changes with a different filename.
minimum.vee
This program provides a simple example to help you begin learning to use
the HP E1432A library, although it is not intended to be a finished
“user-friendly” program. It contains the minimum number of functions
needed (nine functions) to get data from the HP E1433A module. It does
not even include a “panel” user interface, so the first screen you will see is
the VEE View Detail screen. Use the scroll bar at the bottom of the screen
to scroll the display and see all of the detail view.
The minimum.vee program simply takes data for one channel and then
stops. You may find it useful to examine this program and use it as a
starting point for learning to write your own VEE programs for the HP
E1433A.
2-14
Page 33

HP E1433A User's Guide
Getting Started With the HP E1433A
Figure 2-6: minimum.vee (scroll to see entire display)
2-15
Page 34

HP E1433A User's Guide
Getting Started With the HP E1433A
Other HP VEE example programs
There are several other example programs that you can examine in the
same way that you looked at scope.vee. These programs are in the path
\Hpe1432\examples\hpvee\ on a Microsoft Windows system or
/usr/e1432/vee-examples on an HP-UX system.
bsrcsine.vee (Burst SouRCe SINE)
This program is similar to scope.vee. It displays eight (rather than four)
channels, with time record and FFT for each channel. It also turns on the
source in burst sine mode and ramps up the source output. The user can
specify the duty cycle, ramp rate, level of the source, and frequency of the
source. This program works with HP E1433A’s which are equipped with
the source option ID4.
bsrcrand.vee (Burst SouRCe RANDom)
This program is like bsrcsine.vee except the source is turned on in burst
random mode.
frf_rand.vee. (Frequency Response Function RANDom)
This program displays the frequency response of four channels. One way to
set up this example is to connect a cable between the channel 1 and
channel 2 inputs. Then connect channel 3 to channel 1 through a “black
box” containing the circuit to be tested (using a “T” on channel 1).
Channel 4 remains unconnected. On the display you will see a response for
channel 2 over channel 1 (a flat response for the bare cable), and a
response for channel 3 over channel 1 (representing the frequency response
of the “unknown” circuit). Channel 4 will show a random signal since it
has no input.
order.vee
This program can be used only with an HP1432A with the tachometer
option. It takes four channels of data and displays two channels. It shows
raw time domain data and resampled data for each rpm value. The raw
data can then be processed with a program such as Matlab to make order
ratio maps.
2-16
Page 35

HP E1433A User's Guide
Getting Started With the HP E1433A
C-Language Host Interface Library example programs
The HP E1432A C-Language Host Interface Library comes with several
example programs, which help demonstrate how to use the library. These
example programs are found in the “/opt/e1432/examples” directory or the
\Hpe1432\demo\ directory. The programs in this directory are all very
small, so that they will be easily understood and easy to copy into a real
application.
The files in the examples directory are:
Makefile A unix Makefile which can be used to compile all of the programs in the examples
directory.
README A file containing the information given here.
detect.c Shows how to use SICL calls to find the logical addresses of the HP E1433A modules
in a system.
example.c Shows the basics of setting up an E1433A, starting a measurement, and reading a
block of data.
intr.c Shows how to set up SICL and an HP E1433A to use interrupts for data collection.
src_intr.c Shows how to set up SICL and an HP E1433A to use interrupts with a 1D4 Source
board, for overload shutdown and overread.
tachmon.c Shows how to monitor a tach channel signal using the other inputs in the HP E1433A
module.
throughput A directory containing example programs for throughput to and post-processing from
an HP E1562A disk module.
Demo Programs
In addition to example programs, the HP E1432A Host Interface library also
comes with demo programs. These programs are found in the
“/opt/e1432/demo” directory.
One of these demo programs, called “semascope”, demonstrates that the
HP E1433A hardware and software are working properly. When run, it
identifies the HP E1433A modules in the VXI system, runs a measurement
using the HP E1433A modules that it finds, and plots the results in X11
windows. This program is not meant to be an example of how to use the
HP E1432A library, although we do provide the source code.
Other demo programs include “rpmtrig” and “rpmtrig2” and “semascope3.”
2-17
Page 36

HP E1433A User's Guide
Getting Started With the HP E1433A
Running a demo program: semascope.c
To run this program, type:
/opt/e1432/demo/semascope
This program displays the time records for 32 channels (when hooked up to
two HP E1433A modules with 16 channels each). The channel that is
active for changing the display is highlighted. To exit, double-click the
horizontal bar symbol in the upper left corner of the window.
To see a list of parameters for semascope, type:
semascope -u
To specify a parameter, type its letter code after “semascope” on the
command line.
The source code for this program is at:
/opt/e1432/demo/semascope.c
Use a text viewer or editor (such as the “more” utility in unix) to list the
source code for semaphore.c. You can examine the code to learn more
about how this example program works.
2-18
Page 37

HP E1433A User's Guide
Getting Started With the HP E1433A
Visual Basic example programs
HP VEE and the C Host Interface Library can be used on both Unix and
PC systems. In addition the PC can use Visual Basic. Visual Basic example
programs are at \Hpe1432\examples\vb\ on a Microsoft Windows system.
2-19
Page 38

Page 39

3
Using the HP E1433A
3-1
Page 40

HP E1433A User's Guide
Using the HP E1433A
Introduction
This chapter shows how to use the HP E1433A using the VXIplug&play
Host Interface Library.
The HP E1433A uses the same software as the HP E1432A 16 Channel 51.2
kSa/sec Digitizer plus DSP.
The Host Interface Library for the HP E1433A is a set of functions that
allow the user to program the register-based HP E1433A at a higher level
than register reads and writes. The library allows groups of HP E1433As to
be set up and programmed as if they were one entity
Two versions of the Host Interface Library are included. One is the HP-UX
C-Language Host Interface Library which uses SICL (the Standard
Instrument Interface Library) to communicate to the HP E1433A hardware.
It works for HP-UX 10.20. The other is the VXIplug&play Library for
Windows 95, Windows NT, and HP-UX 10.20 which communicates with the
hardware using VISA (Virtual Instrument Software Architecture). VISA is
the input/output standard upon which all the VXIplug&play software
components are based.
This chapter covers the VXIplug&play version, but it will also be useful to
users of the C-Language version. If you are using the C-Language version,
you should also refer to the chapter titled “The C-Language Host Interface
Library.”
The library includes routines to set up and query parameters, start and stop
measurements, read and write data, and control interrupts. Routines to aid
debugging and perform low-level I/O are also included.
For information on diagnostics see the chapter titled “Troubleshooting the
HP E1433A.”
3-2
Page 41

HP E1433A User's Guide
Using the HP E1433A
What is VXIplug&play?
Hewlett-Packard uses VXIplug&play technology in the HP E1433A. This
section outlines some of the details of VXIplug&play technology.
Overview
The fundamental idea behind VXIplug&play is to provide VXI users with a
level of standardization across different vendors well beyond what the VXI
standard specifications spell out. The VXIplug&play Alliance specifies a set
of core technologies centering on a standard instrument driver technology.
HP offers VXIplug&play drivers for VEE-Windows. The VXIplug&play
instrument drivers exist relative to so-called “frameworks”. A framework
defines the environment in which a VXIplug&play driver can operate. The
HP E1433A has VXIplug&play drivers for the following frameworks:
Windows 95, Windows NT, and HP-UX.
VXIplug&play drivers
The HP E1433A uses the same drivers as the HP E1432A 16 Channel 51.2
kSa/sec Digitizer plus DSP.
The HP E1432A VXIplug&play driver is based on the following architecture:
Use r Pro g ra m (.EXE & .HLP file s, suc h a s so ft fron t p a n e l)
Function Panel
(b a se d o n .F P file
In stru m e n t D rive r
(.KB, .DLL, .C , .H, .LIB, .HLP file )
VTL/VISA
I/O In te rfa c e
Figure 3-1: VXI Plug&Play driver architecture
Programm atic Developer's
In te rfa c e Lib ra ry
It is most useful to discuss this architecture from the bottom up.
The VISA/VTL I/O interface allows interoperability of the VXIplug&play
driver technology across interfaces.
3-3
Page 42

HP E1433A User's Guide
Using the HP E1433A
The actual instrument driver itself is a DLL (Dynamic Linked Library)
created from:
q A set of source (.C) files.
q A set of header (.H) files, used for compiling the file as well as to describe the
driver’s calls to any program using the driver.
q A standard driver library (.LIB) file, to provide the standard functionality all the
drivers would require.
This DLL is a set of calls to perform instrument actions — at heart, that’s
all a VXIplug&play driver is — a library of instrument calls.
This driver is accessed by Windows applications programs written in
languages such as Visual C++ or Visual BASIC, using programming
environments such as VEE or NI LabView.
A Windows Help (.HLP) file is included which provides descriptive
information and code samples for the functions in the VXIplug&play DLL.
This help file can be viewed in the standard Windows Help viewer. A
viewer for HP-UX is provided in /opt/hyperhelp - see the READ.ME file.
Manufacturer and model codes
If desired, you can read the manufacturer code, model code and name of
the VXI instruments from the file /opt/e1432/lib/vximodel.cf (on unix
systems) or :\hpe1432\lib\vximodel.cf (on PC systems).
The following are the Hewlett-Packard VXI models in this file:
Manufacturer Code Model Code Model Name
0xfff 0x200
0xfff 0x201
0xfff 0x202
0xfff 0x203
0xfff 0x210
E143xA Non-booted Substrate Board
E1432A 16 Channel 51.2 kSa/s Digitizer + DSP
E1433A 8 Channel 196 kSa/s Digitizer + DSP
E1434A 4 Channel 65 kSa/s Arbitrary Source
E1562A/B/D/E Data Disk SCSI Interface
3-4
Page 43

HP E1433A User's Guide
Using the HP E1433A
The Soft Front Panel (SFP)
The Soft Front Panel is a stand-alone Windows application, built on top of
the VXIplug&play driver DLL; it is used for instrument evaluation and
debugging and as a demo. It is not a programmable interface to the
instrument, nor can it be used to generate code.
The soft front panel also accesses the same Windows Help file as provided
with the DLL.
Figure 3-2: An example of a soft front panel (SFP)
3-5
Page 44

HP E1433A User's Guide
Using the HP E1433A
Header and Library Files
In the Windows environment, the following files are in the directory
\Vxipnp\WinXX\Hpe1432
hpe1432.fp The “FP” file used by VEE and CVI
hpe1432.hlp Windows help file
hpe1432.kb Knowledge base file
hpe1432.bas Header for Visual Basic
hpe1432.exe Soft front panel program
Bin\hpe1432_32.dll The VXIplug&play driver
Include\hpe1432.h Header for linking to the VXIplug&play driver
Lib\Msc\
hpe1432_32.lib
The following files are in the directory \Hpe1432
Read.me The latest information for the product
lib\sema.bin Firmware program for the HP E1432A
lib\sfp.ico Icon for help file
lib\sinewave.ico Icon for Soft Front Panel
source\* Source files for hpe1432_32.dll
examples\vb\* Visual Basic example programs
examples\c\* C example programs
examples\hpvee\* HP VEE example programs
In the HP-UX environment, the following files are in the directory
/opt/vxipnp/hpux/hpe1432:
hpe1432.fp The “FP” file used by VEE
.h Header file
Lib for linking C programs to VXIplug&play
.hlp Hyperhelp file (see /opt/hyperhelp/README for information on how
to view hpe1432.hpl In the HP-UX environment.)
.sl (lower-case “SL”) The VXIplug&play shared library
3-6
Page 45

HP E1433A User's Guide
Using the HP E1433A
Channels and groups
This section gives some information about using channels and groups. For
more detailed information see the HP E1432A help text.
Channel Groups
In the HP E1432A VXIplug&play driver, a channel group is the basic unit of
hardware control. Any channel you want to control must first be assigned
to a group with the hpe1432_createChannelGroup function. In addition to
creating the group, this function returns a “handle” that uniquely identifies
the group. You can then use this handle to direct functions to all channels
in the group.
When you create a channel group, all input and tach channels in the group
are automatically activated and all source channels are inactivated. But
when you delete a channel group, input and tach channels are not
automatically inactivated. Any input or tach channel that remains active
after its group is deleted will continue to supply data to its module’s FIFO
buffer during a measurement—consuming module resources. For this
reason, you should always explicitly inactivate the channels in group before
deleting it. You can inactivate channels with hpe1432_setActive. You can
delete channel groups with hpe1432_deleteChannelGroup and
hpe1432_deleteAllChanGroups.
Also when you create a channel group, channels which are not mentioned
in the new group are not turned off. You must explicitly inactivate any
channels you do not wish to be active. (An exception is a power-up when
only the channels in the initial channel group are active.)
Initialization
The command used to initialize your system is hpe1432_init. This function
initializes the VXIplug&play library and registers all HP E1433A modules. It
also checks the existence of an HP E1432 module at each of the logical
addresses given in the resource list and allocates logical channel identifiers
for each channel in all of the HP E1432s. Input channels, source channels,
and tach/trigger channels are kept logically separated.
Most other functions cannot be used until after hpe1432_init, but there are
two functions which can be used before initialization to get information
needed by hpe1432_init. These are hpe1432_find and
hpe1432_getHWConfig. hpe1432_find searches the VXI mainframe and
returns the VXI Logical Address for every HP E1433A found.
hpe1432_getHWConfig returns additional information about the hardware.
After hpe1432_init has been run you can use hpe1432_getNumChans to get
the total count of inputs, sources, and tachs for all HP E1433A modules
named in the hpe1432_init call.
3-7
Page 46

HP E1433A User's Guide
Using the HP E1433A
Creating a Channel Group
The function hpe1432_createChannelGroup creates and initializes a channel
group. A channel group allows you to issue commands to several
HP E1433A channels at once, simplifying system setup. You can overlap
channel groups. The state of an individual HP E1433A channel that is in
more than one channel group is determined by the most recent operation
performed on any group to which this channel belongs.
As a side effect, this function makes all input and tach channels in the
channel group active and all source channels in the channel group inactive.
This function does not inactivate other channels within the modules that
the channels are in and does not preset the channels in the new group.
After a channel group has been created you can use hpe1432_getGroupInfo
to get selected information about the group. hpe1432_getGroupInfo can be
set up to return the number of modules, channels, inputs, sources, or tachs
in the group. It can also return a list of the modules, channels, inputs,
sources, or tachs.
Input, Source, and Tach Channels
Channel numbers must fall in particular ranges for different types of
channels. Input channel numbers range from 1 to 4095. Source channel
numbers range from 4097 to 8191. Tach channel numbers range from 8193
to 12287.
You can have a mixture of input, source, and tach channels in one group.
However it is also important for many functions to be sent only to the
appropriate type of channel. For example, asking for a blocksize from a
tach channel can cause an error. You might find it useful to set up several
channel groups at the beginning of your program: one for input channels,
one for source channels, one for tach channels, and one that combines all
three channel types. You could then use the input handle for input-only
functions, the source for source-only functions, and the tach handle for
tach-only functions. You would use the “all-channels” handle for all other
functions.
3-8
Page 47

HP E1433A User's Guide
Using the HP E1433A
Multiple-module/mainframe Measurements
Grouping of Channels/Modules
The interface library for the HP E1433A is designed to allow programming
of several channels from one or several distinct modules, as if they were
one entity. Each HP E1433A module has up to 16 channels. The library
may control up to a maximum of 255 HP E1433A modules (8160 channels).
The function hpe1432_createChannelGroup can be used to declare any
number of groups of channels, possibly overlapping. Each group can be
uniquely identified by a group ID.
The ‘target’ of a library function is either a channel, a group, or (rarely) a
module, depending on the nature of the call. When the same library
function may be called with either a channel or a group identifier, its
‘target’ is shown by @eter named ID.
Multiple-module Measurements
A channel group that spans more than one module will need to be
configured to use the TTL trigger lines on the VXI Bus for inter-module
communications. This configuration is automatically performed in the
hpe1432_initMeasure call unless defeated using hpe1432_setAutoGroupMeas.
The following discussion outlines what hpe1432_initMeasure does
automatically. This must be done by the user if
hpe1432_setAutoGroupMeas has been used to defeat auto configuration.
There are eight VXI TTL trigger lines that can be used for multi-module
synchronization. Often, these lines are used in pairs, one for sample clock
and one for Sync/Trigger. The hpe1432_setTtltrgLines function selects
which TTL trigger lines to use; this function always uses the TTL trigger
lines in pairs. Calling hpe1432_setClockSource with the group ID will set
all modules to the same pair.
All modules need to be set to use the shared sync line rather than the
default setting of internal sync. This can be done with the
hpe1432_setMultiSync function, using the group ID.
One module of the set of modules needs to be set to output the sync pulse.
The module with the lowest VXI logical address is called the “system
module” and is assigned this duty. This can be set with the
hpe1432_setMultiSync function call, using the lowest channel ID in the
group (NOT the group ID).
3-9
Page 48

HP E1433A User's Guide
Using the HP E1433A
All modules except the “system module” need to be set to use the VXI TTL
trigger lines as the clock source. Use hpe1432_setClockSource for this.
Set the “system module” to output the clock. Use hpe1432_setClockMaster
for this. After this is done, all system sync pulses come from the “system
module” and drive the measurement state machines on all boards in the
group.
Possible Trigger Line Conflict
The following describes a scenario where HP E1433A modules might conflict
and prevent a proper measurement. The conditions allowing the conflict
are complex but must be understood by the user.
After a measurement has completed, the modules are left set up. If a
module (call it module ‘A’) is driving the TTL trigger lines and a different
group is started which also drives the TTL trigger lines (and that different
group does not include module ‘A’), then module ‘A’ will conflict and
prevent the other group from functioning. In this case make a call to
hpe1432_finishMeasure (using the old group ID which includes ‘A’) to turn
off module ‘A’ and allow the new group to function.
Note that if the new group includes all modules of the old group, the
conflict will not occur since hpe1432_initMeasure will reset all modules as
needed. Also note that single-module groups do not drive the TTL trigger
lines, so single-module groups are immune from causing or receiving this
conflict.
3-10
Page 49

8
S
0
HP E1433A User's Guide
Using the HP E1433A
Managing Multiple-mainframe Measurements
In a single-mainframe measurement, the HP E1433A communicates with
other HP E1433As through the TTLTRG lines. However, when using the
VXI-MXI bus extender modules, the TTLTRG lines, which carry the group
synchronization pulse and sample clock, are extended only in one direction.
This unidirectional signal connection restricts the types of measurements
you can make in a multiple mainframe environment.
You cannot perform the following types of multiple mainframe measurements:
q Unequal pre-trigger delay settings between mainframes
q Channel triggering by channels in Mainframe B
q Lower spans or longer blocksizes in Mainframe B
q Different digital filter settling times between HP E1433A modules
lot
Contoller
HP E1482B
Fail Acs Trigger
ExSamp
8-CHANNEL196
kSa/sDIGITIZER
+DSP
Chan
5-8
HPE1433A
Fail Acs Trigger
ExSamp
8-CHANNEL196
kSa/sDIGITIZER
+DSP
Chan
5-8
Cal
Cal
HP E1433A
Fail Acs Trigger
ExSamp
Cal
ExTrig
ExTrig
8-CHANNEL196
kSa/sDIGITIZER
+DSP
Chan
5-8
Chan
Chan
1-4
1-4
HPE1433A
VXI Mainframe A
Fail Acs Trigger
ExSamp
Cal
ExTrig
ExTrig
8-CHANNEL196
kSa/sDIGITIZER
+DSP
Chan
5-8
Chan
Chan
1-4
1-4
HPE1433A
HPE1433A
VXI Mainframe B
HP E14
2B
HP E1433A
Figure 3-3: Multiple mainframes - two mainframes
3-11
Page 50

HP E1433A User's Guide
Using the HP E1433A
In the example above, Mainframe A contains the Slot 0 Controller for a
multiple mainframe system. Mainframe A is connected to Mainframe B with
a VXI-MXI interface, HP E1482B. To successfully manage this multiple
mainframe environment, use the following guidelines.
q Locate modules with logical addresses less than 128 in Mainframe A.
q Locate modules with logical addresses greater than 127 in Mainframe B.
q Locate the highest-numbered channels in Mainframe A.
q Locate the last module in the module list specified in the call to hpe1432_init in
Mainframe A.
q Locate the module that generates the group synchronization pulse in
Mainframe A.
q Locate the channels performing channel triggering in Mainframe A.
q Locate the module with the shared sample clock in Mainframe A.
q If you do not use a groupID with the call hpe1432_readRawData or
hpe1432_readFloat64Data, empty the HP E1433As’ FIFOs in Mainframe B before
Mainframe A. In other words, do not empty the FIFOs in Mainframe A unless you
have emptied the FIFOs in Mainframe B. For more information about groupID
see “Grouping of Channels/Modules” in this chapter.
q If more than two mainframes are needed, daisy-chain them together. Treat each
mainframe after the first as a Mainframe B. See the example on the next page.
Phase Performance in Multiple Mainframe Measurements
Phase specifications are degraded by the delay that the inter-mainframe
interface gives the sample clock. This delay is insignificant for many
low-frequency applications because the phase error is proportional to
frequency. A system with two VXI-MXI modules and a one-meter cable,
typically has a 76 nanosecond (ns) sample clock delay in Mainframe B.
This corresponds to an additional 0.007 degree phase error at 256 Hz and
an additional 0.55 degree phase error at 20 kHz.
Using a four-meter cable (which adds approximately 18 ns of delay) causes
a total of 94 ns clock delay in Mainframe B. This corresponds to an
additional 0.0087 degree phase error at 256 Hz and an additional 0.68
degree phase error at 20 kHz.
The cable adds approximately 6 ns per meter of cable.
Each daisy-chained mainframe adds another increment of delay, but only for
the additional cabling length.
3-12
Page 51

S
0
HP E1433A User's Guide
Using the HP E1433A
lot
Contoller
HP E1482B
Fail Acs Trigger
ExSamp
8-CHANNEL196
kSa/sDIGITIZER
+DSP
HPE1433A
Chan
5-8
HP E1433A
Fail Acs Trigger
Cal
ExSamp
Cal
ExTrig
ExTrig
8-CHANNEL196
kSa/sDIGITIZER
+DSP
Chan
5-8
Chan
Chan
1-4
1-4
HPE1433A
VXI Mainframe A
INTX
Cable
MXI Bus
Cable
Fail Acs Trigger
ExSamp
8-CHANNEL196
kSa/sDIGITIZER
+DSP
Fail Acs Trigger
Cal
ExSamp
Cal
ExTrig
ExTrig
8-CHANNEL196
kSa/sDIGITIZER
+DSP
Chan
Chan
5-8
5-8
Chan
Chan
1-4
1-4
HPE1433A
HPE1433A
VXI Mainframe B
Cal
ExTrig
Chan
5-8
Chan
1-4
HPE1433A
HP E1433A
HP E1433A
VXI Mainframe C
HP E1482B
HP E1482B
Fail Acs Trigger
ExSamp
8-CHANNEL196
kSa/sDIGITIZER
+DSP
Figure 4: Multiple mainframes - three mainframes
3-13
Page 52

HP E1433A User's Guide
Using the HP E1433A
Synchronization in Multiple-mainframe Measurements
A TTL Trigger line between HP E1433As making group measurements
keeps all modules synchronized. This is an open-collector line where each
module holds the one designated as the SYNC line low until the module is
ready to advance to the next measurement state. Another TTL Trigger line
is designated to carry the sample clock to all modules. This shared sample
clock may come from any HP E1433A module in Mainframe A or from an
external signal routed through the Slot 0 Commander in Mainframe A.
One module is responsible for pulling the SYNC line low to start each
group’s state transition. Then, each module holds the line low until it is
ready. When all modules are ready, the SYNC line drifts high. The
unidirectional line prevents modules in Mainframe B from holding-off
modules in Mainframe A.
The lowest logical address must be in Mainframe A because of VXI-MXI and
Resource Manager (RM) constraints. Group constraints with the C-Library
force modules in Mainframe A to have their FIFOs emptied last. The
C-Library reads data in channel order, so the highest channel is read last.
To get this to work automatically, the call to hpe1432_init must list the
logical addresses in descending order.
Channel triggering must be done only by modules in Mainframe A. A
trigger in any other mainframe would not be communicated back on the
SYNC line to Mainframe A. The C-Library itself selects the HP E1433A
with the highest channel number for synchronization.
VXI-MXI Module Setup and System Configuration
To set up your multiple mainframe system, follow the “Hardware Installation
Rules” which appear in Chapter 2 of the HP E1482B VXI-MXI Bus Extender
User’s Manual. This allows the Resource Manager to configure your system.
The VXI-MXI Module setup in Mainframe A needs to be changed from those
set by the factory. The VXI-MXI module is not the Slot 0 Controller for
Mainframe A. See Table 2-1: Configuration Settings in the HP E1482B
VXI-MXI Bus Extender User’s Manual. This requires changing several
switch settings.
q Set the module as not being the Slot 0 Controller.
q Set the VME timeout to 200 µs.
q Set the VME BTO chain position to 1 extender, non-slot0.
q Do not source CLK10.
q Set the proper logical address.
3-14
Page 53

HP E1433A User's Guide
Using the HP E1433A
Module Features
Data Flow Diagram and FIFO Architecture
The illustration on the next page shows data flow in the HP E1433A. In
this example there are four 4-channel input assemblies for a total of 16
input channels. The data for all channels is sent to the FIFO. The FIFO is
divided into sections, one for each channel. The data moves through a
circular buffer (first-in-first-out) until a trigger causes it to be sent on to
the VME Bus. The data can also be sent to the Local Bus if option UGH is
present.
The size of the sections in the FIFO is flexible. The amount of DRAM
memory for each channel is the total DRAM memory divided by the number
of channels. The standard DRAM size is 4 MB; an optional 32 MB DRAM is
available.
The trigger can be programmed to trigger on the input or on information
from the software. The following are examples of ways a trigger can be
generated.
q input level or bound
q source
q external trigger
q RPM level (with tachometer option AYE)
q ttl_trigger (VXI backplane)
q freerun (automatic)
3-15
Page 54

HP E1433A User's Guide
Using the HP E1433A
ch 1
96002
trigger
ch 8
Input 1
Input 2
Static
RAM
circular
buffer
trigger
FIFO
FIFO
(DRAM)
ch 1
ch 2
to VME
or Local
96002
host
port
Local
Bus
FIFO
Bus
Bus
VME Bus
Local Bus
3-16
ch 3
ch 4
ch 5
........
Figure 3-5: Data flow and FIFO architecture
Page 55

HP E1433A User's Guide
Using the HP E1433A
Base Sample Rates
Baseband Measurement Spans
The table on the following page shows the measurement spans available for
base sample rates, for baseband measurements.
“Fs” is the sample frequency or sample rate. The value for zero
divide-by-two steps and no divide-by-5 step is the top measurement span
corresponding to the sample rate. This is with no decimation and using 400
lines to avoid alias. The other values on the table are for this top span
decimated by five and/or two.
For an HP E1433A which has option 1D4, the Arbitrary Source, the sample
rate for the source is automatically set to be the same as the sample rate
selected for the inputs. When the source is active the sample rate cannot
be greater than 65.536 kHz.
Decimation Filter Diagram
The drawing below illustrates the way the spans in the table are generated.
In the case of baseband spans (lower limit of span fixed at zero), the
frequency can (optionally) be divided by five and then (optionally) divided
by two up to sixteen times.
ADC
÷
5
ze ro o r
one time
Figure 3-6: Decimation filter diagram - baseband
÷
2
ze ro to
16 tim es
3-17
Page 56

HP E1433A User's Guide
Using the HP E1433A
Table of Baseband Measurement Spans (part 1 of 4)
All values in Hertz.
sample
frequency
48000 50000 51200
(Fs) —>
number of
divide-by-2
steps
with divide-by-5
without
divide-by-5
with divide-by-5
without
divide-by-5
with divide-by-5
without
divide-by-5
0 3750.000000 18750.000000* 3906.250000 19531.250000* 4000.000000 20000.000000*
1 1875.000000 9375.000000 1953.125000 9765.625000 2000.000000 10000.000000
2 937.500000 4687.500000 976.562500 4882.812500 1000.000000 5000.000000
3 468.750000 2343.750000 488.281250 2441.406250 500.000000 2500.000000
4 234.375000 1171.875000 244.140625 1220.703125 250.000000 1250.000000
5 117.187500 585.937500 122.070312 610.351562 125.000000 625.000000
6 58.593750 292.968750 61.035156 305.175781 62.500000 312.500000
7 29.296875 146.484375 30.517578 152.587891 31.250000 156.250000
8 14.648438 73.242188 15.258789 76.293945 15.625000 78.125000
9 7.324219 36.621094 7.629395 38.146973 7.812500 39.062500
10 3.662109 18.310547 3.814697 19.073486 3.906250 19.531250
11 1.831055 9.155273 1.907349 9.536743 1.953125 9.765625
12 0.915527 4.577637 0.953674 4.768372 0.976562 4.882812
13 0.457764 2.288818 0.476837 2.384186 0.488281 2.441406
14 0.228882 1.144409 0.238419 1.192093 0.244141 1.220703
15 0.114441 0.572205 0.119209 0.596046 0.122070 0.610352
16 0.057220 0.286102 0.059605 0.298023 0.061035 0.305176
Notes:
* For the top span the 3dB bandwidth is 1.15 times span shown.
To select a sample frequency for time domain data, first divide the desired
sample frequency by 2.56 to convert it to a measurement span. Then
locate the closest measurement span on this table and choose the
corresponding sample frequency at top of the table.
3-18
Page 57

HP E1433A User's Guide
Using the HP E1433A
Table of Baseband Measurement Spans (part 2 of 4)
All values in Hertz.
sample
frequency
64000 65536 76800
(Fs) —>
number of
divide-by-2
steps
with divide-by-5
without
divide-by-5
with divide-by-5
without
divide-by-5
with divide-by-5
without
divide-by-5
0 5000.000000 25000.000000* 5120.000000 25600.000000* 6000.000000 30000.000000*
1 2500.000000 12500.000000 2560.000000 12800.000000 3000.000000 15000.000000
2 1250.000000 6250.000000 1280.000000 6400.000000 1500.000000 7500.000000
3 625.000000 3125.000000 640.000000 3200.000000 750.000000 3750.000000
4 312.500000 1562.500000 320.000000 1600.000000 375.000000 1875.000000
5 156.250000 781.250000 160.000000 800.000000 187.500000 937.500000
6 78.125000 390.625000 80.000000 400.000000 93.750000 468.750000
7 39.062500 195.312500 40.000000 200.000000 46.875000 234.375000
8 19.531250 97.656250 20.000000 100.000000 23.437500 117.187500
9 9.765625 48.828125 10.000000 50.000000 11.718750 58.593750
10 4.882812 24.414062 5.000000 25.000000 5.859375 29.296875
11 2.441406 12.207031 2.500000 12.500000 2.929688 14.648438
12 1.220703 6.103516 1.250000 6.250000 1.464844 7.324219
13 0.610352 3.051758 0.625000 3.125000 0.732422 3.662109
14 0.305176 1.525879 0.312500 1.562500 0.366211 1.831055
15 0.152588 0.762939 0.156250 0.781250 0.183105 0.915527
16 0.076294 0.381470 0.078125 0.390625 0.091553 0.457764
Notes:
*For the top span the 3dB bandwidth is 1.15 times span shown.
To select a sample frequency for time domain data, first divide the desired
sample frequency by 2.56 to convert it to a measurement span. Then
locate the closest measurement span on this table and choose the
corresponding sample frequency at top of the table.
3-19
Page 58

HP E1433A User's Guide
Using the HP E1433A
Table of Baseband Measurement Spans (part 3 of 4)
All values in Hertz.
sample
frequency
80000 81920 96000
(Fs) —>
number of
divide-by-2
steps
with divide-by-5
without
divide-by-5
with divide-by-5
without
divide-by-5
with divide-by-5
without
divide-by-5
0 6250.000000 31250.000000* 6400.000000 32000.000000* 7500.000000 37500.000000*
1 3125.000000 15625.000000 3200.000000 16000.000000 3750.000000 18750.000000
2 1562.500000 7812.500000 1600.000000 8000.000000 1875.000000 9375.000000
3 781.250000 3906.250000 800.000000 4000.000000 937.500000 4687.500000
4 390.625000 1953.125000 400.000000 2000.000000 468.750000 2343.750000
5 195.312500 976.562500 200.000000 1000.000000 234.375000 1171.875000
6 97.656250 488.281250 100.000000 500.000000 117.187500 585.937500
7 48.828125 244.140625 50.000000 250.000000 58.593750 292.968750
8 24.414062 122.070312 25.000000 125.000000 29.296875 146.484375
9 12.207031 61.035156 12.500000 62.500000 14.648438 73.242188
10 6.103516 30.517578 6.250000 31.250000 7.324219 36.621094
11 3.051758 15.258789 3.125000 15.625000 3.662109 18.310547
12 1.525879 7.629395 1.562500 7.812500 1.831055 9.155273
13 0.762939 3.814697 0.781250 3.906250 0.915527 4.577637
14 0.381470 1.907349 0.390625 1.953125 0.457764 2.288818
15 0.190735 0.953674 0.195312 0.976562 0.228882 1.144409
16 0.095367 0.476837 0.097656 0.488281 0.114441 0.572205
Notes:
*For the top span the 3dB bandwidth is 1.15 times span shown.
To select a sample frequency for time domain data, first divide the desired
sample frequency by 2.56 to convert it to a measurement span. Then
locate the closest measurement span on this table and choose the
corresponding sample frequency at top of the table.
3-20
Page 59

HP E1433A User's Guide
Using the HP E1433A
Table of Baseband Measurement Spans (part 4 of 4)
All values in Hertz.
sample
frequency
100000 102400 128000
(Fs) —>
number of
divide-by-2
steps
with divide-by-5
without
divide-by-5
with divide-by-5
without
divide-by-5
with divide-by-5
without
divide-by-5
0 7812.500000 39062.500000* 8000.000000 40000.000000* 10000.000000 50000.000000*
1 3906.250000 19531.250000 4000.000000 20000.000000 5000.000000 25000.000000
2 1953.125000 9765.625000 2000.000000 10000.000000 2500.000000 12500.000000
3 976.562500 4882.812500 1000.000000 5000.000000 1250.000000 6250.000000
4 488.281250 2441.406250 500.000000 2500.000000 625.000000 3125.000000
5 244.140625 1220.703125 250.000000 1250.000000 312.500000 1562.500000
6 122.070312 610.351562 125.000000 625.000000 156.250000 781.250000
7 61.035156 305.175781 62.500000 312.500000 78.125000 390.625000
8 30.517578 152.587891 31.250000 156.250000 39.062500 195.312500
9 15.258789 76.293945 15.625000 78.125000 19.531250 97.656250
10 7.629395 38.146973 7.812500 39.062500 9.765625 48.828125
11 3.814697 19.073486 3.906250 19.531250 4.882812 24.414062
12 1.907349 9.536743 1.953125 9.765625 2.441406 12.207031
13 0.953674 4.768372 0.976562 4.882812 1.220703 6.103516
14 0.476837 2.384186 0.488281 2.441406 0.610352 3.051758
15 0.238419 1.192093 0.244141 1.220703 0.305176 1.525879
16 0.119209 0.596046 0.122070 0.610352 0.152588 0.762939
Notes:
*For the top span the 3dB bandwidth is 1.15 times span shown.
To select a sample frequency for time domain data, first divide the desired
sample frequency by 2.56 to convert it to a measurement span. Then
locate the closest measurement span on this table and choose the
corresponding sample frequency at top of the table.
3-21
Page 60

HP E1433A User's Guide
Using the HP E1433A
HP E1433 sample frequencies
The following is a list of all sample frequencies (in Hz) available on the
HP E1433A, including those not listed in the preceding table.
48000.0
49152.0
50000.0
51200.0
52400.852878
61440.0
62500.0
64000.0
65536.0
66666.666667
76800.0
78125.0
80000.0
81920.0
96000.0
98304.0
100000.0
102400.0
122880.0
125000.0
128000.0
For the following frequencies (in Hz), filtered and decimated spans not
available:
133333.333333
153600.0
156250.0
163840.0
192000.0
196608.0
3-22
Page 61

S
HP E1433A User's Guide
Using the HP E1433A
Measurement Process
Measurement Setup and Control
When the HP E1433A makes a measurement, the measurement itself
consists of two phases: the measurement initialization, and the
measurement loop. Each of these phases consists of several states, through
which the measurement progresses.
The transition from one state to the next is tied to a transition in the
Sync/Trigger line (one of the TTL trigger lines on the VXI back plane). A
state (such as Idle) begins when the Sync/Trigger line goes low. The
Sync/Trigger line then remains low as long as the state is in effect. When
the Sync/Trigger line goes high it signals the transition to the next state.
See the sections “Measurement Initialization” and “Measurement Loop”
below for more details about these transitions. During all the transitions of
the Sync/Trigger line, the clock line continues with a constant pulse.
The Sync/Trigger line is “wire-OR’d” such that all modules in a
multiple-module system (within one mainframe) must release it for it to go
high. Only one HP E1433A is required to pull the Sync/Trigger line low.
In a system with only one HP E1433A, the Sync/Trigger line is local to the
module and not is routed to a TTL TRIGGER line on the VXI back plane.
ync/Trigger line
Start of
state
Pre-arm
Idle
Arm
End of
state
Figure 3-7: Transitions between states
Trigger
Meas
3-23
Page 62

HP E1433A User's Guide
Using the HP E1433A
Parameter Settings
Many parameters are channel-dependent, meaning that each channel can be
set independently of the others in the module. Other parameters are
module-dependent; changing a module-dependent parameter for a channel
will change it for all channels on that module. For example, changing
blocksize, a module-dependent parameter, for input channel 3 will also
change the block size for all other channels in the same HP E1433A module
as channel 3.
When possible, parameters are written to the hardware as soon as they are
received. Sometimes, the parameter can’t be written to the hardware until
the start of a measurement; in this case the value of the parameter is saved
in RAM in the HP E1433A module until the measurement is started with
hpe1432_initMeasure. Some parameters can be changed while a
measurement is running, but many do not take effect until the next start of
a measurement.
Measurement Initialization
This section describes the measurement initialization process in the
HP E1433A.
The measurement initialization states, and the corresponding Sync/Trigger
line transitions (with ‘H’ for high, ‘L’ for Low) are:
Tested
Booting Pre-armBooted
Settling
Idle
LHLHL HLH
Sync/Trigger line
Figure 3-8: Measurement initialization
The module enters the TESTED state after a reset. In this state, all of the
module parameters may be set. The HP E1433A stays in the TESTED state
until it sees a high-to-low transition of the Sync/Trigger line.
3-24
Page 63

HP E1433A User's Guide
Using the HP E1433A
In the BOOTING state, the digital processors of the module load their
parameters, and their program. Once done, the module releases the
Sync/Trigger line and moves to the BOOTED state. The HP E1433A stays
in the BOOTED state until it sees a high-to-low transition of the
Sync/Trigger line (that is, all the HP E1433As in the system have booted).
In the SETTLING state, the digital filters are synchronized, and the digital
filter output is ‘settled’ (it waits N samples before outputting any data).
Once the module is settled, it advances to the PRE_ARM state.
In the PRE_ARM state, the module waits for a pre-arm condition to take
place. The default is to auto-arm, so the module would not wait at all in
this case. When the pre-arm condition is met, the module releases the
Sync/Trigger line and advances to the IDLE state.
This complete measurement sequence initialization, from TESTED through
BOOTING, BOOTED, SETTLING, PRE-ARM, and IDLE, can be performed
with a call to the function hpe1432_initMeasure.
Measurement Loop
This section describes the measurement loop in the HP E1433A.
The progression of measurement states and the corresponding Sync/Trigger
line transitions are:
Arm Trigger MeasureIdle
HL H
LH
L
Sync/Trigger line
Figure 3-9: Measurement loop
In the IDLE state the HP E1433A writes no data into the FIFO. The
HP E1433A remains in the IDLE state until it sees a high-to-low transition
of the Sync/Trigger line or an RPM arm/trigger point is calculated. If any of
the HP E1433As in the system is programmed for auto arming (with
hpe1432_setArmMode), the Sync/Trigger line is immediately pulled low by
that HP E1433A. The HP E1433A may also be moved to the ARM state by
an explicit call to the function hpe1432_armMeasure.
L
H
3-25
Page 64

HP E1433A User's Guide
Using the HP E1433A
Upon entering the ARM state the HP E1433A starts saving new data in its
FIFO. It remains in the ARM state until the Sync/Trigger line goes high. If
the HP E1433A is programmed with a pre-trigger delay, it collects enough
data samples to satisfy this pre-trigger delay, and then releases the
Sync/Trigger line. If no pre-trigger delay has been programmed, it releases
the Sync/Trigger line immediately. When all modules in a system have
released the Sync/Trigger line (allowing it to go high), a transition to the
TRIGGER state occurs.
Upon entering the TRIGGER state the HP E1433A continues to collect data
into the FIFO, discarding any data prior to the pre-trigger delay. The
HP E1433A remains in the TRIGGER state until it sees a high-to-low
transition of the Sync/Trigger line. The Sync/Trigger line is pulled low by
any HP E1433A which encounters a trigger condition and is programmed to
pull the Sync/Trigger line. If any HP E1433A is programmed for auto
triggering (with hpe1432_setAutoTrigger), the Sync/Trigger line is pulled
low immediately. The Sync/Trigger line may also be pulled low by an
explicit call to the function hpe1432_triggerMeasure.
Upon entering the MEASURE state the HP E1433A continues to collect
data. The HP E1433A also presents the first data from the FIFO to the
selected output port, making it available to the controller to read. The
HP E1433A holds the Sync/Trigger line low as long as it is actively
collecting data. In overlap block mode the HP E1433A stops taking data as
soon as a block of data has been collected, including any programmed preor post-trigger delays. (It starts again when another trigger occurs). In
continuous mode, the HP E1433A stops taking data only when the FIFO
overflows. When data collection stops, the HP E1433A releases the
Sync/Trigger line. When all HP E1433As are finished and the Sync/Trigger
line goes high, the HP E1433A goes into the IDLE state again.
The measurement initialization and loop may be interrupted at any time
with a call to hpe1432_resetMeasure, which puts the module in the
TESTED state.
Register-based VXI Devices
The HP E1433A is a register-based VXI device. Unlike message-based
devices which use higher-level programming using ASCII characters,
register-based devices are programmed at a very low level using binary
information. The greatest advantage of this is speed. Register-based
devices communicate at the level of direct hardware manipulation and this
can lead to much greater system throughput.
Users do not need to access the registers in order to use the HP E1433A.
The HP E1433A’s functions can be more easily accessed using the
HP E1433A Host Interface Library software. However, if you want more
information about the registers see Appendix A: Register Definitions.
3-26
Page 65

HP E1433A User's Guide
Using the HP E1433A
Arm and Trigger
This section explains some terminology relating the the “Arm” and “Trigger”
steps in the measurement loop. As an example a measurement might be
set up to arm at a certain RPM level and then subsequently trigger at an
external event corresponding to top dead center (TDC). The settings
would be:
q Arm: RPM Step Arm
q Trigger: External Trigger
If you want to begin a throughput session at this same RPM/TDC event,
then the first external trigger after a specified RPM would start a
continuous mode measurement. Now (using overlap block mode) the
settings would be:
q Pre-Arm: RPM Step Arm
q Arm: Auto
q Trigger: Auto
In the measurement loop, an arm must take place before a trigger. You can
program how many triggers to do before waiting for another arm condition.
The default is one trigger for each arm. For each trigger, a block of data
is sent to the host.
The first arm in a measurement is the pre-arm. By default, the pre-arm
condition is the same as the regular arm conditions.
Valid Arm (and Pre-Arm) conditions are:
q Auto Arm
q Manual Arm
q RPM Step Arm
Valid trigger conditions are:
q Auto Trigger
q Input Trigger
q Source Trigger
q External Trigger
q Manual Trigger
q Tachometer Edge Trigger
3-27
Page 66

HP E1433A User's Guide
Using the HP E1433A
HP E1433A Triggering.
The following is a short discussion of triggering for the HP E1433A.
Triggering is defined as the transition from the armed state to the triggered
state. This transition is caused by a low going edge on a TTL trigger line.
The function hpe1432_getTtltrgLines selects which of the eight TTL trigger
lines is to be used.
The low-going transition of the TTL trig line can be caused by any of the
following items:
trigger type enabling function
the AUTO TRIGGER circuitry hpe1432_setAutoTrigger
the hpe1432_triggerMeasure function hpe1432_triggerMeasure
a source trigger hpe1432_setTriggerChannel
a tach trigger hpe1432_setTriggerChannel
an external trigger hpe1432_setTriggerExt
an input level or bound trigger event hpe1432_setTriggerChannel
and hpe1432_setTriggerMode
Each of these trigger sources can be enabled or disabled independently, so
quite complex trigger setups are possible. In all cases, however, the first
trigger event kicks off the measurement and the following trigger events
become superfluous.
Note that for hpe1432_setAutoTrigger the setting
HPE1432_MANUAL_TRIGGER really means “don’t auto trigger” not “expect
a manual trigger”.
For single-HP E1433A systems, the TTL trigger signal is not connected to
the VXI backplane. For multiple HP E1433A systems, the
hpe1432_initMeasure function connects the HP E1433A trigger lines to the
VXI backplane, and at that point, your selection of which TTL trigger lines
through hpe1432_getTtltrgLines is relevant. Multiple mainframe systems will
need to account for the unidirectional nature of the inter-mainframe MXI
extenders which will prevent all but the “upstream” mainframe from
triggering the system.
3-28
Page 67

HP E1433A User's Guide
Using the HP E1433A
Trigger Level
To set the trigger level, use hpe1432_setTriggerMode to select “level” or
“bound” mode; and use hpe1432_setTriggerLevel twice to set both the
upper and lower trigger levels. The difference between the upper and
lower trigger levels must be at least 10% of full scale (and 10% is usually
the best amount).
Also use hpe1432setTriggerSlope to specify a positive or negative trigger
slope.
Level mode
If the mode is set to “level” and the trigger slope is positive, then the
module triggers when the signal crosses both the upper and lower trigger
levels in the positive direction. If the trigger slope is negative, the module
triggers when the signal crosses both levels in the negative direction.
Setting two trigger levels prevents the module from triggering repeatedly
when a noisy signal crosses the trigger level.
Bound mode
If the mode is set to “bound” and the trigger slope is positive, then the
module triggers when the signal exits the zone between the upper and
lower trigger levels in either direction. If the trigger slope is negative, the
module triggers when the signal enters the zone between the upper and
lower trigger levels.
3-29
Page 68

HP E1433A User's Guide
Using the HP E1433A
Data Transfer Modes
The HP E1433A can be programmed to use either of two data transfer
modes: overlap block mode and continuous mode. To help explain these
modes we will first describe block mode.
Block Mode (HP E1431A)
The HP E1433A’s overlap block mode is similar the block mode which is
used in other Hewlett-Packard instruments such as the HP E1431A. In
block mode, the input hardware acquires one block after getting an arm and
trigger. It does not allow the system to trigger until it is ready to process
the trigger, and it acquires pre-trigger data if necessary. The hardware does
not accept a new arm and trigger until the acquired block is sent to the
host. There is no provision for overlap or queuing up more than one block
when in block mode. There is also no way for a FIFO overflow to occur.
The HP E1433A’s overlap block mode can be configured to act exactly like
traditional block mode. It also has additional capabilities as described below.
Continuous Mode.
Both the HP E1433A and the HP E1431A use continuous mode. In this
mode , the input hardware waits for an arm and trigger, and then starts
acquiring data continuously. If the host is slow, several blocks can be
queued up in the input hardware. If the host gets far enough behind, a
FIFO overflow occurs and the input stops acquiring data.
The HP E1433A’s overlap block mode can be configured to act similarly to
continuous mode, but not identically. The HP E1433A can also use the
traditional continuous mode.
Overlap Block Mode
Overlap block mode combines features of both block mode and continuous
mode. The main difference between overlap block mode and traditional
block mode is that overlap block mode allows additional arms and triggers
to occur before an already-acquired block is sent to the host. A trigger can
occur before the end of the previous block, so overlapping blocks are
possible (hence the name “overlap block mode”). As in continuous mode,
there is an overlap parameter which controls how much overlap is allowed
between consecutive blocks.
3-30
Page 69

HP E1433A User's Guide
Using the HP E1433A
Limit on Queuing of Data
In overlap block mode, a number of trigger events may be queued up
before the host reads the data for those triggers. The host may get further
and further behind the data acquisition.
However, if the host gets far enough behind that the FIFO fills up, data
acquisition must momentarily stop and wait for data to get transferred to
the host. This places a limit on how far in time the host can be behind the
data acquisition. By setting the size of the FIFO, is you can control how
far behind the host can get.
Making Overlap Block Mode Act Like Traditional Block Mode
If the FIFO size is set the same as the block size, or if the number of
pending triggers is limited to zero, then overlap block mode becomes
identical to traditional block mode.
Making Overlap Block Act Like Continuous Mode
If the module is in auto-arm and auto-trigger mode, then overlap block
mode becomes nearly the same as continuous mode.
One difference is that traditional continuous mode has a single arm and
trigger, while overlap block mode may have multiple arms and triggers.
Another is that continuous mode can be configured to start at any type of
trigger event, while overlap block mode must be in auto-trigger mode to act
like continuous mode. Finally, continuous mode always stops when a FIFO
overflow occurs, but overlap block mode does not.
3-31
Page 70

HP E1433A User's Guide
Using the HP E1433A
HP E1433A Interrupt Behavior
Interrupt Setup
For an example of interrupt handling see the program event.c in the
examples directory.
The HP E1433A VXI module can be programmed to interrupt a host
computer using the VME interrupt lines. VME provides seven such lines.
Using hpe1432_setInterruptPriority, you can set up the HP E1433A module
to use any one of them.
The HP 1432A can interrupt the host computer in response to different
events. Using hpe1432_setInterruptMask you can specify a mask of events
on which to interrupt. This mask is created by OR-ing together the various
conditions for an interrupt. The following table shows the conditions that
can cause an interrupt:
Interrupt Mask Bit Definitions
Define (in e1432.h) Description
HPE1432_IRQ_BLOCK_READY Scan of data ready in FIFO
HPE1432_IRQ_MEAS_ERROR FIFO overflow
HPE1432_IRQ_MEAS_STATE_CHANGE Measurement state machine changed state
HPE1432_IRQ_MEAS_WARNING Measurement warning
HPE1432_IRQ_OVERLOAD_CHANGE Overload status changed
HPE1432_IRQ_SRC_STATUS Source channel interrupt
HPE1432_IRQ_TACHS_AVAIL Raw tach times ready for transfer to other
modules
HPE1432_IRQ_TRIGGER Trigger ready for transfer to other modules
HP E1433A Interrupt Handling
To make the HP E1433A module do the interrupt, both a mask and a VME
Interrupt line must be specified, by calling hpe1432_setInterruptMask and
hpe1432_setInterruptPriority respectively. Once the mask and line have
been set, and an interrupt occurs, the cause of the interrupt can be
obtained by reading the HPE1432_IRQ_STATUS_REG register (using
hpe1432_getInterruptReason). The bit positions of the interrupt mask and
status registers match so the defines can be used to set and check IRQ bits.
3-32
Page 71

HP E1433A User's Guide
Using the HP E1433A
Once it has done this interrupt, the module will not do any more VME
interrupts until re-enabled with hpe1432_reenableInterrupt. Normally, the
last thing a host computer’s interrupt handler should do is call
hpe1432_reenableInterrupt.
Events that would have caused an interrupt, but which are blocked because
hpe1432_reenableInterrupt has not yet been called, will be saved. After
hpe1432_reenableInterrupt is called, these saved events will cause an
interrupt, so that there is no way for the host to “miss” an interrupt.
However, the module will only do one VME interrupt for all of the saved
events, so that the host computer will not get flooded with too many
interrupts.
For things like “HPE1432_IRQ_BLOCK_READY”, which are not events but
are actually states, the module will do an interrupt after
hpe1432_reenableInterrupt only if the state is still present. This allows the
host computer’s interrupt handler to potentially read multiple scans from an
HP E1433A module, and not get flooded with block ready interrupts after
the fact.
Host Interrupt Setup
This is a summary of how to set up an HP E1433A interrupt:
q Look at the Resource Manager to find out which VME interrupt lines are available.
q Tell the HP E1433A module to use the a VME interrupt line found in step one,
using hpe1432_setInterruptPriority.
q Set up an interrupt handler routine, using hpe1432_callBackInstall. The interrupt
handler routine will get called when the interrupt occurs.
q Set up interrupt mask in the HP E1433A module, using
hpe1432_setInterruptMask.
Host Interrupt Handling
When the HP E1433A asserts the VME interrupt line, the program will
cause the specified interrupt handler to get called. Typically the interrupt
handler routine will read data from the module, and then re-enable
HP E1433A interrupts with hpe1432_reenableInterrupt. The call to
hpe1432_reenableInterrupt must be done unless the host is not interested in
any more interrupts.
Inside the interrupt handler, almost any HP E1433A Host Interface library
function can be called. This works because the Host Interface library
disables interrupts around critical sections of code, ensuring that
communication with the HP E1433A module stays consistent. Things that
are not valid in the handler are:
3-33
Page 72

HP E1433A User's Guide
Using the HP E1433A
q Calling hpe1432_createChannelGroup to delete a group that is simultaneously
being used by non-interrupt-handler code.
q Calling one of the read data functions (hpe1432_readRawData or
hpe1432_readFloat64Data), if the non-interrupt-handler code is also calling one
of these functions.
q Calling hpe1432_init to reset the list of channels that are available to the
HP E1433A library.
As is always the case with interrupt handlers, it is easy to introduce bugs
into your program, and generally hard to track down these bugs. Be careful
when writing this function.
Data Gating
Sometimes you may wish to monitor data from some input channels and not
others. The function hpe1432_setEnable enables or disables data from an
input channel (or group of channels). If data is enabled, then the data can
be read using hpe1432_blockAvailable and hpe1432_readRawData or
hpe1432_readFloat64Data. If data is disabled, data from the specified
channel is not made available to the host computer.
This parameter can be changed while a measurement is running, to allow
the host computer to look at only some of the data being collected by the
HP E1433A module. While data from a channel is disabled the input
module continues to collect data but it is not made available to the host
computer. The host can then switch from looking at some channels to
looking at others during the measurement. In contrast, the function
hpe1432_setActive completely enables or disables a channel and can’tbe
changed while a measurement is running.
For order tracking measurements this function can be used to switch
between receiving order tracking data, ordinary time data, or both.
HP E1433A Parameters
Some parameters, such as range or coupling, apply to specific channels.
When a channel ID is given to a function that sets a channel-specific
parameter, only that channel is set to the new value.
Some parameters, such as clock frequency or data transfer mode, apply
globally to a module. When a channel ID is used to change a parameter
that applies to a whole module, the channel ID is used to determine which
module. The parameter is then changed for that module.
Starting and stopping a measurement is somewhat like setting a global
parameter. Starting a measurement starts each active channel in each
module that has a channel in the group.
3-34
Page 73

HP E1433A User's Guide
Using the HP E1433A
After firmware is installed, and after a call to hpe1432_preset, all of the
parameters (both channel-specific and global) in an HP E1433A module are
set to their default values. For channel-specific parameters, the default
value may depend on the type of channel. Some channel-specific
parameters apply only to a specific type of channel. For example, tach
holdoff applies only to tach channels. Setting such a parameter for a
channel that doesn’t make sense will result in an error.
At the start of a measurement, the HP E1433A firmware sets up all
hardware parameters, and ensures that the input hardware is settled before
starting to take data. The firmware also ensures that any digital filters have
time to settle. This ensures that all data read from the module will be valid.
However, after a measurement starts, HP E1433A parameters can still be
changed. The effect of this change varies, depending on the parameter.
For some parameters, changing the value aborts the measurement
immediately. For other parameters, the measurement is not aborted, but
the changed parameter value is saved and not used until a new
measurement is started. For still other parameters, the parameter change
takes place immediately, and the data coming from the module may contain
glitches or other effects from changing the parameter. See the chapter
titled “The C-Language Host Interface Library” for Parameter Lists showing
the effects for each parameter. Parameter names for the VXIplug&play
library are similar to those for the C-Language Host Interface Library.
You cannot tell the module to wait for settling when changing a parameter
in the middle of a measurement. The only way to wait for settling is to
stop and re-start the measurement. Also, you cannot disable the settling
that takes place at the start of a measurement.
Refer to the (on-line) HP E1433A Function Reference for the parameters
needed for each function. (See “Where to get more information” in this
chapter.)
3-35
Page 74

HP E1433A User's Guide
Using the HP E1433A
New features of the HP E1432A/HP E1433A software
The following features have been added to the HP E1432A/HP E1433A
software since the previous edition of this manual. These and other
features are documented in the online Function Reference. For more
information look in the Function Reference entries for the functions that are
used by the feature.
Auto range
Auto range calculates the best range for each channel so that the signal is
full scale but not overloaded. Auto range works only while the
measurement is running.
Averaging
Averaging can be done for resampling measurements on frequency or order
data. It uses the function hpe1432_setAvgMode. You can set several
averaging modes: RMS averaging, linear averaging, exponential averaging, or
peak hold averaging.
Continuous re-sampled data
Continuous re-sampling forces the blocks of data to be contiguous, with no
gaps between them. It uses the existing function hpe1432_setArmMode.
(Without continuous re-sampling, each block of data follows the previous
block after some interval, depending on the next trigger event.
Fast span or range change
You can now change the span or range while the measurement is running,
using the existing functions hpe1432_setSpan or hpe1432_setRange.
Previously if you sent the command while a measurement was running, it
would wait until the next measurement. Now it will change the span or
range when the command is sent.
Time arming
This uses a new function hpe1432_setArmTimeInterval. It allows you to
specify a time interval for arming. For example you could set it to get a
block of data every second.
Weighting filters (HP E1433A only)
For the HP E1433A, you can set any of three weighting filters (A-weighting,
B-weighting, or C-weighting). This feature uses the function
hpe1432_setWeighting.
3-36
Page 75

HP E1433A User's Guide
Using the HP E1433A
Zoom (HP E1432A only)
Up to now the HP E1432A has made only baseband measurements (from
zero to some frequency.) Zoom allows you to set a center frequency and
look at a window of frequencies around it. It uses two new functions:
hpe1432_setZoom (turns zoom on/off) and hpe1432_setCenterFreq. (Zoom
has not been implemented for the HP E1433A).
Zoom (for the Arbitrary Source, option 1D4)
This is similar to zoom for the HP E1432A input. Zoom for the source
allows you to set a center frequency and a span for the output signal. It
uses the existing function hpe1432_setSourceMode with a new zoom
parameter.
Zoom applies to random burst source mode and continuous source mode,
for both the HP E1432A and the HP E1433A. When used with the
HP E1432A, if you set the source center frequency to zero, the source
center frequency will be the same as the center frequency set for the
HP E1432A input. This is also true for the span.
3-37
Page 76

HP E1433A User's Guide
Using the HP E1433A
Where to get more information
There is more information available about the HP E1433A. This section will
tell you how to access it and print it, if desired.
The HP E1433A uses the same software as the HP E1432A 16 Channel 51.2
kSa/sec Digitizer plus DSP.
The Function Reference for VXIplug&play
On a PC: The HP E1432A Function Reference is in Microsoft Help text.
Select the Help icon in the “VXIPNP” folder. Refer to Microsoft Windows
documentation (including Help text) for information on using and printing
Help.
On a unix system, look at the README file at opt/hyperhelp. It includes
instructions on how to install and use the VXIplug&play help.
The Function Reference for the Host Interface Library (C-language
version)
The HP E1432A distribution includes manual pages for the HP E1432A Host
Interface library. These manual pages can be examined on-line, using the
“ptman” command that is shipped in “/opt/e1432/bin”. For example, you
can read the manual page for the “e1432_init_measure” function by typing:
ptman e1432_init_measure
The distribution also includes a nicely formatted set of these manual pages,
that can be printed on any postscript printer. This manual in postscript
form is in file “/opt/e1432/man/man.ps”. Typically, this manual can be
printed by typing:
lp -opostscript /opt/e1432/man/man.ps
Alternatively, if there is no postscript printer available, a plain text version
of the manual is in file “/opt/e1432/man/man.txt”. This can be printed on
any line printer.
Users of the C-language library will also find useful information about the
HP E1433A in the HP E1432A help text (see above).
3-38
Page 77

4
The C-Language Host
Interface Library
4-1
Page 78

HP E1433A User's Guide
The C-Language Host Interface Library
Introduction
The Host Interface Library for the HP E1433A is a set of functions that
allow you to program the register-based HP E1433A at a higher level than
register reads and writes. The library allows groups of HP E1433As to be
set up and programmed as if they were one entity.
The HP E1433A uses the same software as the HP E1432A 16 Channel 51.2
kSa/sec Digitizer plus DSP.
Two version of the Host Interface Library are available. One is the HP-UX
C-Language Host Interface Library which uses SICL (the Standard
Instrument Interface Library) to communicate to the HP E1433A hardware.
The other is the VXIplug&play Library which communicates with the
hardware using the VXIplug&play standard. This chapter covers the
C-Language version. If you are using the VXIplug&play version, you will not
need this chapter. Instead, see the chapters titled “Getting Started With
the HP E1433A” and “Using the HP E1433A”
The library includes routines to set up and query parameters, start and stop
measurements, read and write data, and control interrupts. Routines to aid
debugging and perform low-level I/O are also included.
For information on diagnostics see the chapter titled “Troubleshooting the
HP E1433A.”
Almost all functions in this library return 0 if they complete successfully
and a negative error number if there is a problem. The return value of the
function should always be checked and appropriate action taken for
non-zero values. See the on-line man pages for more information on error
messages.
4-2
Page 79

HP E1433A User's Guide
The C-Language Host Interface Library
Header and Library Files
The /opt/e1432/lib directory contains several versions of the HP E1432A
Host Interface library:
lib1432.a A normal HP-UX archive library, used by host programs wanting to talk to HP
E1433A hardware.
lib1432.sl An HP-UX shared library, used by host programs wanting to talk to HP E1433A
hardware. This and the above archive library do exactly the same things.
Usually, host programs would use the shared library, because it makes the host
program smaller.
libd1432.a An HP E1485A downloadable library. This is untested and not supported at this
time.
llib-l1432.ln A lint library for the HP E1432A C-Language Host Interface Library. If you don’t
use lint (a unix tool for checking your source code for problems), you won’t care
about this file.
An application using the HP E1432A C-Language Host Interface Library
must link in one of these libraries, typically lib1432.sl. The HP-UX versions
of the HP E1432A library use SICL to communicate with the HP E1433A
hardware, so an application using the HP E1432A library must also link in
the SICL library. Normally, this is found in /usr/lib/libsicl.sl.
Any application source code which uses any of the HP E1432A C-Language
Host Interface Library functions must include the e1432.h include file, found
in /opt/e1432/include. Internally, this file includes machType.h, which is
also found in /opt/e1432/include. If the application refers to specific HP
E1433A error numbers, it must also include err1432.h.
4-3
Page 80

HP E1433A User's Guide
The C-Language Host Interface Library
Parameter Information
Description of HP E1433A Parameters
Some parameters, such as range or coupling, apply to specific channels.
When a channel ID is given to a function that sets a channel-specific
parameter, only that channel is set to the new value.
Some parameters, such as clock frequency or data transfer mode, apply
globally to a module. When a channel ID is used to change a parameter
that applies to a whole module, the channel ID is used to determine which
module. The parameter is then changed for that module.
Starting and stopping a measurement is somewhat like setting a global
parameter. Starting a measurement starts each active channel in each
module that has a channel in the group.
After firmware is installed, and after a call to e1432_preset, all of the
parameters (both channel-specific and global) in an HP E1433A module are
set to their default values. For channel-specific parameters, the default
value may depend on the type of channel. Some channel-specific
parameters apply only to a specific type of channel. For example, tach
holdoff applies only to tach channels. Setting such a parameter for a
channel that doesn’t make sense will result in an error.
At the start of a measurement, the HP E1433A firmware sets up all
hardware parameters, and ensures that the input hardware is settled before
starting to take data. The firmware also ensures that any digital filters have
time to settle. This ensures that all data read from the module will be valid.
However, after a measurement starts, HP E1433A parameters can still be
changed. The effect of this change varies, depending on the parameter.
For some parameters, changing the value aborts the measurement
immediately. For other parameters, the measurement is not aborted, but
the changed parameter value is saved and not used until a new
measurement is started. For still other parameters, the parameter change
takes place immediately, and the data coming from the module may contain
glitches or other effects from changing the parameter.
You cannot tell the module to wait for settling when changing a parameter
in the middle of a measurement. The only way to wait for settling is to
stop and re-start the measurement. Also, you cannot disable the settling
that takes place at the start of a measurement.
4-4
Page 81

HP E1433A User's Guide
The C-Language Host Interface Library
Parameter Lists
This section shows which parameters are global parameters, which are
channel-specific, and what types of channels the channel-specific parameters
apply to. Default values are shown for all of these parameters. In addition,
each parameter is categorized as “abort”, “wait”, “immediate”,or“glitch”
depending on the behavior when this parameter is changed during a
running measurement. Those with “abort” cause the measurement to abort.
Those with “wait” don’t take effect until the start of the next measurement.
Those with “immediate” take effect immediately. Those with “glitch” take
effect immediately, and may cause glitches in the data that is read back, or
on the source output if the parameter is applied to a source channel.
Global Parameters
Parameter Default Value Changes
append_status Off Immediate
arm_channel None Immediate
arm_mode Auto Arm Immediate
arm_time_interval 1 Sec Immediate
auto_group_meas On Wait
avg_mode None Wait
avg_number 10 Wait
auto_trigger Auto Trigger Abort
avg_update 10 Wait
avg_weight 1 Immediate
blocksize 1024 Abort
cal_dac 0 Immediate
cal_voltage 0 Volts Immediate
calin Grounded Immediate
center_freq 2 kHz Immediate
clock_freq 51.2 kHz Abort
clock_master Off Abort
clock_source Internal Abort
data_mode Block Mode Abort
4-5
Page 82

HP E1433A User's Guide
The C-Language Host Interface Library
Parameter Default Value Changes
data_port VME Abort
data_size 16 Bit Integer Abort
decimation_output Single Pass Wait
decimation_oversample Off Wait
decimation_undersamp 1 Wait
delta_order 0.1 Wait
fifo_size 0 (Use All DRAM) Wait
filter_settling_time 64 samples Wait
internal_debug 0x100 Immediate
interrupt_mask 0 Immediate
interrupt_priority None Immediate
lbus_mode Pipe Immediate
lbus_reset Off (Not Reset) Immediate
max_order 10 Wait
meas_time_lengh 0 (run forever) Immediate
mmf_delay 0 Immediate
multi_sync Off Abort
overlap 0 Wait
pre_arm_mode Auto Arm Immediate
ramp Off Immediate
span 20000 Hz Wait
sumbus Off Immediate
trigger_delay 0 Wait
trigger_ext Off Immediate
trigger_master Off Immediate
triggers_per_arm 1 Immediate
ttltrg_clock TTLTRG1 Abort
ttltrg_gclock TTLTRG1 Abort
ttltrg_satrg TTLTRG0 Abort
4-6
Page 83

The C-Language Host Interface Library
Parameter Default Value Changes
ttltrg_trigger TTLTRG0 Abort
window Uniform Glitch
xfer_size 0 (Use Blocksize) Wait
zoom Off Waitt
HP E1433A User's Guide
4-7
Page 84

HP E1433A User's Guide
The C-Language Host Interface Library
196.608 kHz 4-channel Input Parameters
Parameter Default Value Changes
active Off Abort
anti_alias_digital(*) On Abort
auto_range_mode Up/Down Immediate
calc_data Time Wait
coupling DC Glitch
enable On Immediate
filter_freq 200 kHz Immediate
input_high Normal Glitch
input_low Floating Glitch
input_mode(*) Volt Glitch
range 10 Volts Glitch
range_charge 50,000 pico Coulombs Glitch
range_mike 10 Volts Glitch
trigger_channel Off Immediate
trigger_level_lower -10% Immediate
trigger_level_upper 0% Immediate
trigger_mode Level Immediate
trigger_slope Positive Immediate
(*) Input mode is listed as channel-specific, but it actually applies to all
channels within an SCA (such as a 4-channel input assembly).
4-8
Page 85

The C-Language Host Interface Library
Option 1D4 Single-channel Source Parameters
Parameter Default Value Changes
active Off Abort
amp_scale 1.0 Immediate
anti_alias_digital On Wait
duty_cycle 0.5 Immediate
filter_freq 25.6 kHz Wait
ramp_rate 1 Second Wait
range 0.041567 Volt Immediate
sine_freq 1000 Hz Immediate
sine_phase 0 Degrees Immediate
source_blocksize 0 (Use Input Blocksize) Wait
source_centerfreq 0 Hz Wait
HP E1433A User's Guide
source_cola Off Wait
source_mode Sine Abort
source_output Normal Abort
source_speed 3 Wait
source_span 0 (Use Input Span) Wait
source_sum Off Wait
srcbuffer_init Empty Wait
srcbuffer_mode Periodic_A Wait
srcbuffer_size 1024 Wait
srcparm_mode Immediate Immediate
trigger_channel Off Wait
4-9
Page 86

HP E1433A User's Guide
The C-Language Host Interface Library
Option AYF Tachometer Parameters
Parameter Default Value Changes
active Off Abort
input_high Normal Immediate
pre_arm_rpm 600 RPM Immediate
rpm_high 6000 RPM Immediate
rpm_interval 25 RPM Immediate
rpm_low 600 RPM Immediate
rpm_smoothing 0 Immediate
tach_decimate 0 Immediate
tach_holdoff 10 Microseconds Immediate
tach_max_time 30 seconds Immediate
tach_ppr 1 Immediate
trigger_channel Off Wait
trigger_level_lower -0.05 Volts Immediate
trigger_level_upper 0 Volts Immediate
trigger_slope Positive Immediate
4-10
Page 87

HP E1433A User's Guide
The C-Language Host Interface Library
Channel and Group IDs
Most functions in the HP E1432A C-Language Host Interface Library take
an ID parameter which specifies what channel or group of channels the
function should apply to. The ID can either be a channel ID or a group ID.
If a group ID is used, then the function is applied to each channel
contained in the group.
Channel IDs
Channel IDs are logical IDs which are created by a call to
e1432_assign_channel_numbers. The e1432_assign_channel_numbers
function must be called exactly once, following the call to
e1432_init_io_driver, in order to declare to the library the logical addresses
of the HP E1433A modules that will be used.
This function checks the existence of an HP E1433A module at each of the
logical addresses given in a list of logical addresses, and allocates logical
channel identifiers for each channel in all of the HP E1433As. Input
channels, source channels, and tach/trigger channels are kept logically
separated. Channel numbers for each type of channel are numbered
starting from one, so there will be input channels 1 through M, source
channels 1 through N, and tach/trigger channels 1 through P, where M is
the number of input channels, N is the number of source channels, and P is
the number of tach/trigger channels.
As an example, suppose two logical addresses 100 and 101 are passed to
the function, and the logical address 100 has two 4-channel input SCAs and
a 2-channel tach/trigger board, while logical address 101 has three 4-channel
input SCAs and a 1-channel source board. In this case, input channel IDs 1
through 8 are assigned to the eight input channels at logical address 100,
while input channel IDs 9 through 20 are assigned to the twelve input
channels at logical address 101. Tach/trigger channel IDs number 1 and 2
are assigned to the two tach/trigger channels at logical address 100, and
Source channel ID number 1 is assigned to the source channel at logical
address 101.
To use the ID of an input channel, the input channel number is given as an
argument to the E1432_INPUT_CHAN() macro. (For backwards
compatibility with theHP E1431A, the macro does nothing.) To use the ID
of a source channel, the source channel number is given as an argument to
the E1432_SOURCE_CHAN() macro. To use the ID of a tach/trigger
channel, the tach/trigger channel number is given as an argument to the
E1432_TACH_CHAN() macro. A channel ID is always positive.
For example, to set the range of the third input channel to 10 volts, the
source code would look something like:
status = e1432_set_range(hwid, E1432_INPUT_CHAN(3), 10.0);
4-11
Page 88

HP E1433A User's Guide
The C-Language Host Interface Library
Group IDs
Group IDs are logical IDs which are created by a call to
e1432_create_channel_group. This function can be called multiple times to
create multiple groups, and each group can contain any combination of
channels, including mixtures of different types of channels. The channel
groups can overlap as well.
This function creates and initializes a channel group. A channel group
allows you to issue commands to several HP E1433A channels at once,
simplifying system setup. The state of an individual HP E1433A channel
that is in more than one channel group, is determined by the most recent
operation performed on any group to which this channel belongs.
If successful, this function returns the ID of the group that was created,
which is then used to reference the channel group in most other functions
in this library. A group ID is always negative.
As a side effect, this function makes all input channels in the channel group
active, and all source and tach channels in the channel group inactive.
Unlike the HP 1431A library, this function does not inactivate other
channels within the modules that the channels are in. Also unlike the HP
1431A library, this function does not preset the channels in the new group.
As an example, to create a group consisting of the first three input
channels and the eighth and ninth input channels, the code would like
something like this:
SHORTSIZ16 chan_list[5];
SHORTSIZ16 input_group;
chan_list[0] = E1432_INPUT_CHAN(1);
chan_list[1] = E1432_INPUT_CHAN(2);
chan_list[2] = E1432_INPUT_CHAN(3);
chan_list[3] = E1432_INPUT_CHAN(8);
chan_list[4] = E1432_INPUT_CHAN(9);
input_group = e1432_create_channel_group(hw, 5, chan_list);
To create a group consisting of the first two source channels, the code
would look something like this:
SHORTSIZ16 chan_list[2];
SHORTSIZ16 source_group;
chan_list[0] = E1432_SOURCE_CHAN(1);
chan_list[1] = E1432_SOURCE_CHAN(2);
source_group = e1432_create_channel_group(hw, 2, chan_list);
4-12
Page 89

HP E1433A User's Guide
The C-Language Host Interface Library
Multiple-module/Mainframe Measurements
Grouping of Channels/Modules
The interface library for the HP E1433A is designed to allow programming
of several channels from one or several distinct modules, as if they were
one entity. Each HP E1433A module has up to 16 channels. The library
may control up to a maximum of 255 HP E1433A modules (8160 channels).
When initializing the interface library, all module logical addresses are
passed in the call to e1432_assign_channel_numbers. This function
associates a logical channel ID with each channel. From then on, library
functions use these logical IDs rather than the logical address.
The function e1432_create_channel_group can be used to declare any
number of groups of channels, possibly overlapping. Each group can be
uniquely identified by a group ID.
The ‘target’ of a library function is either a channel, a group, or (rarely) a
module, depending on the nature of the call. When the same library
function may be called with either a channel or a group identifier, it’s
‘target’ is shown by a parameter named ID.
Multiple-module Measurements
A channel group that spans more than one module will need to be
configured to use the TTL trigger lines on the VXI Bus for inter-module
communications. This configuration automatically performed in the
e1432_init_measure call unless defeated using e1432_set_auto_group_meas.
The following discussion outlines what e1432_init_measure does
automatically. This must be done by the user if
e1432_set_auto_group_meas has been used to defeat auto configuration.
There are eight VXI TTL trigger lines that can be used for multi-module
synchronization. Often, these lines are used in pairs, one for sample clock
and one for Sync/Trigger. The e1432_set_ttltrg_lines function selects which
TTL trigger lines to use; this function always uses the TTL trigger lines in
pairs. Calling e1432_set_clock_source with the group ID will set all modules
to the same pair.
4-13
Page 90

HP E1433A User's Guide
The C-Language Host Interface Library
All modules need to be set to use the shared sync line rather than the
default setting of internal sync. This can be done with the
e1432_set_multi_sync function, using the group ID.
One module of the set of modules needs to be set to output the sync pulse.
Tthe module with the lowest VXI logical address is called the “system
module” and assigned this duty. This can be set with the
e1432_set_multi_sync function call, using the lowest channel ID in the
group (NOT the group ID).
All modules except the “system module” need to be set to use the VXI TTL
trigger lines as the clock source. Use e1432_set_clock_source for this.
Set the “system module” to output the clock. Use e1432_set_clock_master
for this. After this is done, all system sync pulses come from the “system
module” and drive the measurement state machines on all boards in the
group.
Possible Trigger Line Conflict
The following describes a scenario where HP E1433A modules might conflict
and prevent a proper measurement. The conditions allowing the conflict
are complex but must be understood by the user.
After a measurement has completed, the modules are left set up. If a
module (call it module ‘A’) is driving the TTL trigger lines and a different
group is started which also drives the TTL trigger lines (and that different
group does not include module ‘A’), then module ‘A’ will conflict and
prevent the other group from functioning. In this case make a call to
e1432_finish_measure (using the old group ID which includes ‘A’) to turn
off module ‘A’ and allow the new group to function.
Note that if the new group includes all modules of the old group, the
conflict will not occur since e1432_init_measure will reset all modules as
needed. Also note that single module groups do not drive the TTL trigger
lines, so single modules groups are immune from causing or receiving this
conflict.
4-14
Page 91

8
S
0
HP E1433A User's Guide
The C-Language Host Interface Library
Managing Multiple-mainframe Measurements
In a single mainframe measurement, the HP E1433A communicates with
other HP E1433As through the TTLTRG lines. However, when using the
VXI-MXI bus extender modules, the TTLTRG lines, which carry the group
synchronization pulse and sample clock, are extended only in one direction.
This unidirectional signal connection restricts the types of measurements
you can make in a multiple mainframe environment.
You cannot perform the following types of multiple mainframe measurements:
q Unequal pre-trigger delay settings between mainframes
q Channel triggering by channels in Mainframe B
q Lower spans or longer blocksizes in Mainframe B
q Different digital filter settling times between HP E1433A modules
lot
Contoller
HP E1482B
Fail Acs Trigger
ExSamp
8-CHANNEL196
kSa/sDIGITIZER
+DSP
Fail Acs Trigger
ExSamp
8-CHANNEL196
kSa/sDIGITIZER
+DSP
Chan
5-8
HPE1433A
Chan
5-8
HP E1433A
Fail Acs Trigger
Cal
ExSamp
Cal
ExTrig
ExTrig
8-CHANNEL196
kSa/sDIGITIZER
+DSP
Chan
5-8
Chan
Chan
1-4
1-4
HPE1433A
VXI Mainframe A
Fail Acs Trigger
Cal
ExSamp
Cal
ExTrig
ExTrig
8-CHANNEL196
kSa/sDIGITIZER
+DSP
Chan
5-8
Chan
Chan
1-4
1-4
HPE1433A
HPE1433A
VXI Mainframe B
HP E14
2B
HP E1433A
Figure 4-1: Multiple mainframes - two mainframes
4-15
Page 92

HP E1433A User's Guide
The C-Language Host Interface Library
In the example above, Mainframe A contains the Slot 0 Controller for a
multiple mainframe system. Mainframe A is connected to Mainframe B with
a VXI-MXI interface, HP E1482B. To successfully manage this multiple
mainframe environment, use the following guidelines.
q Locate modules with logical addresses less than 128 in Mainframe A.
q Locate modules with logical addresses greater than 127 in Mainframe B.
q Locate the highest-numbered channels in Mainframe A.
q Locate the last module in the module list specified in the call to
e1432_assign_channels() in Mainframe A.
q Locate the module that generates the group synchronization pulse in
Mainframe A.
q Locate the channels performing channel triggering in Mainframe A.
q Locate the module with the shared sample clock in Mainframe A.
q If you do not use a groupID with the call e1432_read_data(), empty the HP
E1433As’ FIFOs in Mainframe B before Mainframe A. In other words, do not
empty the FIFOs in Mainframe A unless you have emptied the FIFOs in
Mainframe B. For more information about groupID see “Grouping of
Channels/Modules.”
q If more than two mainframes are needed, daisy-chain them together. Treat each
mainframe after the first as a Mainframe B. See the example on the next page.
Phase Performance in Multiple Mainframe Measurements
Phase specifications are degraded by the delay that the inter-mainframe
interface gives the sample clock. This delay is insignificant for many
low-frequency applications because the phase error is proportional to
frequency. A system with two VXI-MXI modules and a 1 meter cable,
typically has a 76 nanosecond (ns) sample clock delay in Mainframe B.
This corresponds to an additional 0.007 degree phase error at 256 Hz and
an additional 0.55 degree phase error at 20 kHz.
A 4-meter cable adds approximately 18 ns of delay for a total of 94 ns
clock delay in Mainframe B. This corresponds to an additional 0.0087
degree phase error at 256 Hz and an additional 0.68 degree phase error at
20 kHz.
The cable adds approximately 6 ns per meter of cable.
Each daisy-chained mainframe adds another increment of delay, but only for
the additional cabling length.
4-16
Page 93
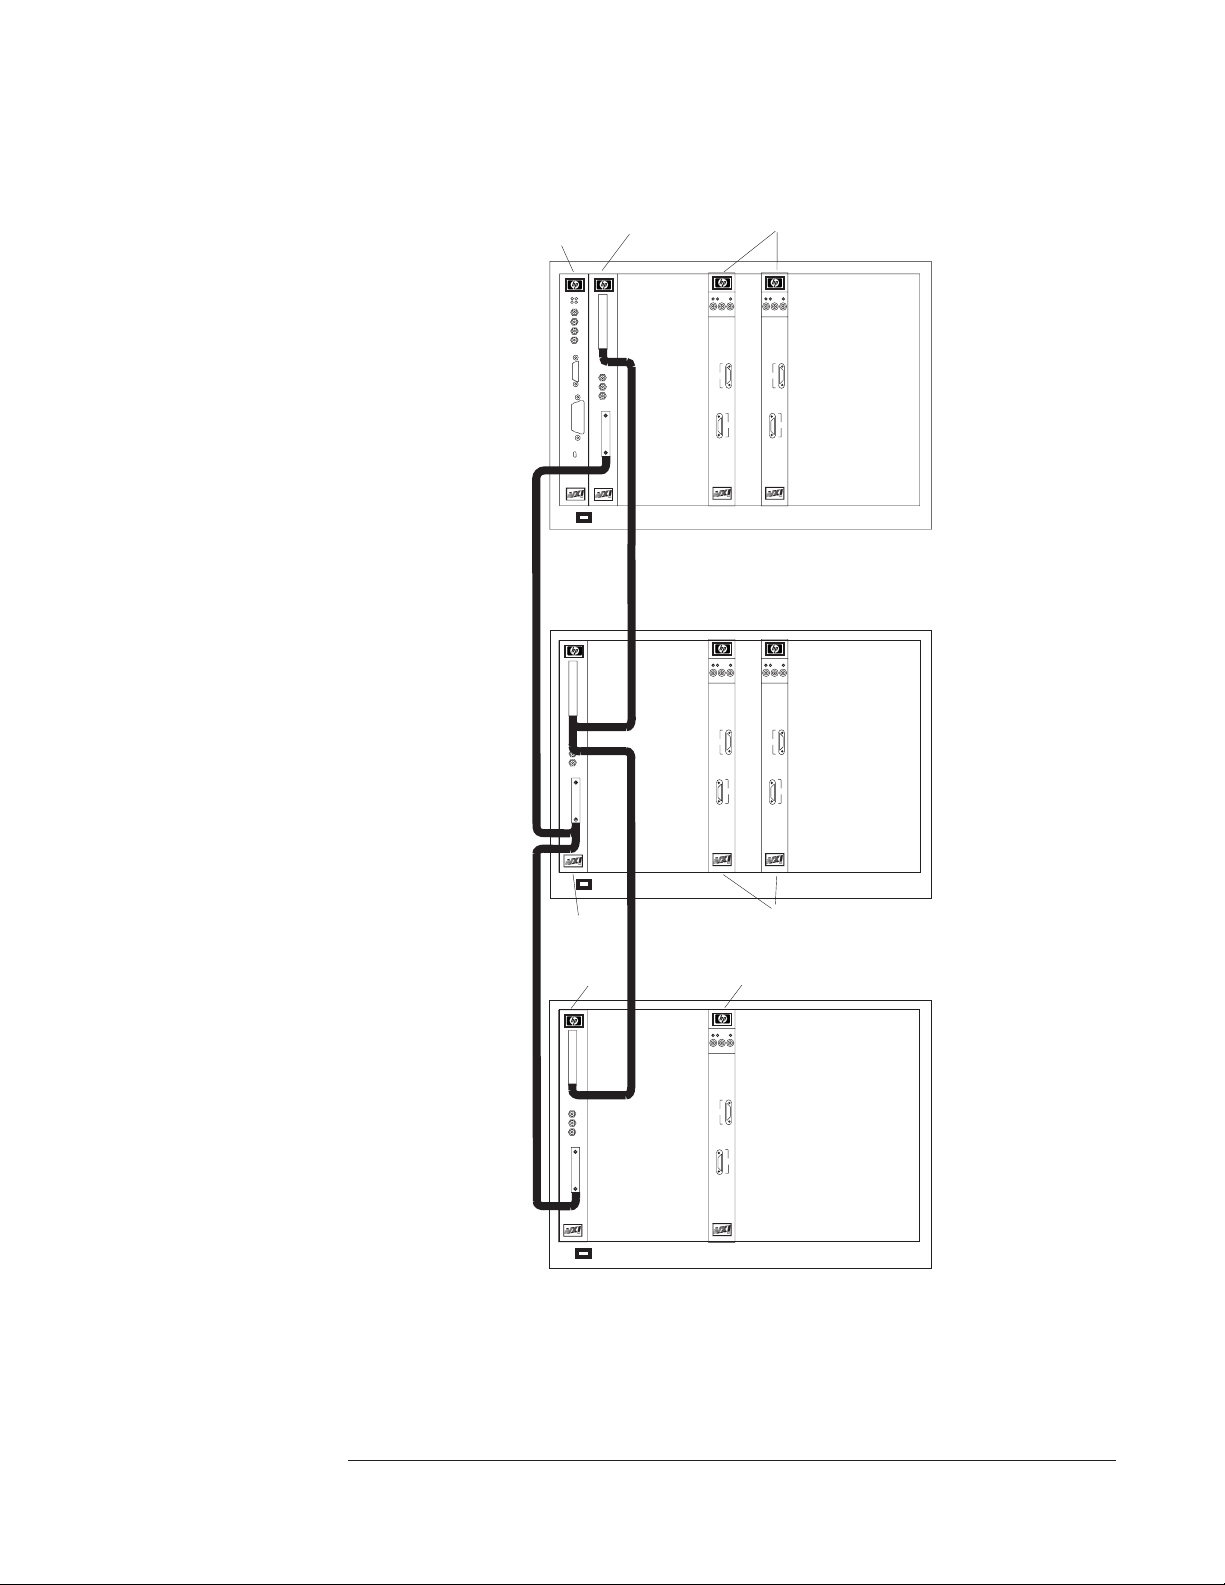
S
0
HP E1433A User's Guide
The C-Language Host Interface Library
lot
Contoller
HP E1482B
Fail Acs Trigger
ExSamp
8-CHANNEL196
kSa/sDIGITIZER
+DSP
Chan
5-8
HPE1433A
Cal
HP E1433A
Fail Acs Trigger
ExSamp
Cal
ExTrig
ExTrig
8-CHANNEL196
kSa/sDIGITIZER
+DSP
Chan
5-8
Chan
Chan
1-4
1-4
HPE1433A
VXI Mainframe A
INTX
Cable
MXI Bus
Cable
Fail Acs Trigger
Fail Acs Trigger
ExSamp
Cal
ExSamp
Cal
ExTrig
8-CHANNEL196
kSa/sDIGITIZER
+DSP
Chan
5-8
ExTrig
8-CHANNEL196
kSa/sDIGITIZER
+DSP
Chan
5-8
Chan
Chan
1-4
1-4
HPE1433A
HPE1433A
VXI Mainframe B
Cal
ExTrig
Chan
5-8
Chan
1-4
HPE1433A
HP E1433A
HP E1433A
VXI Mainframe C
HP E1482B
HP E1482B
Fail Acs Trigger
ExSamp
8-CHANNEL196
kSa/sDIGITIZER
+DSP
Figure 4-2: Multiple mainframes - three mainframes
4-17
Page 94

HP E1433A User's Guide
The C-Language Host Interface Library
Synchronization in Multiple-mainframe Measurements
A TTL Trigger line between HP E1433As making group measurements
keeps all modules synchronized. This is an open-collector line where each
module holds the one designated as the SYNC line low until the module is
ready to advance to the next measurement state. Another TTL Trigger line
is designated to carry the sample clock to all modules. This shared sample
clock may come from any HP E1433A module in Mainframe A or from an
external signal routed through the Slot 0 Commander in Mainframe A.
One module is responsible for pulling the SYNC line low to start each
group’s state transition. Then, each module holds the line low until it is
ready. When all modules are ready, the SYNC line drifts high. The
unidirectional line prevents modules in Mainframe B from holding-off
modules in Mainframe A.
The lowest logical address must be in Mainframe A because of VXI-MXI and
Resource Manager (RM) constraints. Group constraints with the C-Library
force modules in Mainframe A to have their FIFOs emptied last. The
C-Library reads data in channel order, so the highest channel is read last.
To get this to work automatically, the call to e1432_assign_channels() must
list the logical addresses in descending order.
Channel triggering must be done only by modules in Mainframe A. A
trigger in any other mainframe would not be communicated back on the
SYNC line to Mainframe A. The C-Library itself selects the HP E1433A
with the highest channel number for synchronization.
VXI-MXI Module Setup and System Configuration
To set up your multiple mainframe system, follow the “Hardware Installation
Rules” which appear in Chapter 2 of the HP E1482B VXI-MXI Bus Extender
User’s Manual. This allows the Resource Manager to configure your system.
The VXI-MXI Module setup in Mainframe A needs to be changed from those
set by the factory. The VXI-MXI module is not the Slot 0 Controller for
Mainframe A. See Table 2-1. Configuration Settings in the HP E1482B
VXI-MXI Bus Extender User’s Manual. This requires changing several
switch settings.
q Set the module as not being the Slot 0 Controller.
q Set the VME timeout to 200 µs.
q Set the VME BTO chain position to 1 extender, non-slot0.
q Do not source CLK10.
q Set the proper logical address.
4-18
Page 95

HP E1433A User's Guide
The C-Language Host Interface Library
Measurement Process
Measurement Setup and Control
When the HP E1433A makes a measurement, the measurement itself
consists of two phases: the measurement initialization, and the
measurement loop. Each of these phases consists of several states, through
which the measurement progresses.
The transition from one state to the next is tied to a transition in the
Sync/Trigger line (one of the TTL trigger lines on the VXI back plane). A
state (such as Idle) begins when the Sync/Trigger line goes low. The
Sync/Trigger line then remains low as long as the state is in effect. When
the Sync/Trigger line goes high it signals the transition to the next state.
See the sections “Measurement Initialization” and “Measurement Loop”
below for more details about these transitions. During all the transitions of
the Sync/Trigger line, the clock line continues with a constant pulse.
The Sync/Trigger line is “wire-OR’d” such that all modules in a
multiple-module system (within one mainframe) must release it for it to go
high. Only one HP E1433A is required to pull the Sync/Trigger line low.
In a system with only one HP E1432A, the Sync/Trigger line is local to the
module and not is routed to a TTL TRIGGER line on the VXI back plane.
Sync/Trigger line
Start of
state
Pre-arm
Idle
Arm
End of
state
Figure 4-3: Transitions between states
Tr i g g e r
Meas
4-19
Page 96

HP E1433A User's Guide
The C-Language Host Interface Library
Parameter Settings
Many parameters are channel-dependent, meaning that each channel can be
set independently of the others in the module. Other parameters are
module-dependent; changing a module-dependent parameter for a channel
will change it for all channels on that module. For example, changing
blocksize, a module-dependent parameter, for input channel 3 will also
change the block size for all other channels in the same HP E1433A module
as channel 3.
When possible, parameters are written to the hardware as soon as they are
received. Sometimes, the parameter can’t be written to the hardware until
the start of a measurement; in this case the value of the parameter is saved
in RAM in the HP E1433A module until the measurement is started with
e1432_init_measure. Some parameters can be changed while a
measurement is running, but many do not take effect until the next start of
a measurement.
Measurement initialization
This section describes the measurement initialization process in the HP
E1433A.
The measurement initialization states, and the corresponding Sync/Trigger
line transitions (with ‘H’ for high, ‘L’ for Low) are:
Tested
Booting Pre-armBooted
Settling
Idle
LHLHL HLH
Sync/Trigger line
Figure 4-4: Measurement initialization
The module enters the TESTED state after a reset. In this state, all of the
module parameters may be set. The HP E1433A stays in the TESTED state
until it sees a high-to-low transition of the Sync/Trigger line.
4-20
Page 97

HP E1433A User's Guide
The C-Language Host Interface Library
In the BOOTING state, the digital processors of the module load their
parameters, and their program. Once done, the module releases the
Sync/Trigger line and moves to the BOOTED state. The HP E1433A stays
in the BOOTED state until it sees a high-to-low transition of the
Sync/Trigger line (that is, all the HP E1433As in the system have booted).
In the SETTLING state, the digital filters are synchronized, and the digital
filter output is ‘settled’ (it waits N samples before outputting any data).
Once the module is settled, it advances to the PRE_ARM state.
In the PRE_ARM state, the module waits for a pre-arm condition to take
place. The default is to auto-arm, so the module would not wait at all in
this case. When the pre-arm condition is met, the module releases the
Sync/Trigger line and advances to the IDLE state.
This complete measurement sequence initialization, from TESTED through
BOOTING, BOOTED, SETTLING, PRE-ARM, and IDLE, can be performed
with a call to the function e1432_init_measure.
Measurement Loop
This section describes the measurement loop in the HP E1433A.
The progression of measurement states and the corresponding Sync/Trigger
line transitions are:
Arm Trigger MeasureIdle
HL H
LH
L
Sync/Trigger line
Figure 4-5: Measurement loop
In the IDLE state the HP E1433A writes no data into the FIFO. The HP
E1433A remains in the IDLE state until it sees a high-to-low transition of
the Sync/Trigger line or an RPM arm/trigger point is calculated. If any of
the HP E1433As in the system is programmed for auto arming (with
e1432_set_auto_arm), the Sync/Trigger line is immediately pulled low by
that HP E1433A. The HP E1433A may also be moved to the ARM state by
an explicit call to the function e1432_arm_measure.
L
H
4-21
Page 98

HP E1433A User's Guide
The C-Language Host Interface Library
Upon entering the ARM state the HP E1433A starts saving new data in its
FIFO. It remains in the ARM state until the Sync/Trigger line goes high. If
the HP E1433A is programmed with a pre-trigger delay, it collects enough
data samples to satisfy this pre-trigger delay, and then releases the
Sync/Trigger line. If no pre-trigger delay has been programmed, it releases
the Sync/Trigger line immediately. When all modules in a system have
released the Sync/Trigger line (allowing it to go high), a transition to the
TRIGGER state occurs.
Upon entering the TRIGGER state the HP E1433A continues to collect data
into the FIFO, discarding any data prior to the pre-trigger delay. The HP
E1433A remains in the TRIGGER state until it sees a high-to-low transition
of the Sync/Trigger line. The Sync/Trigger line is pulled low by any HP
E1433A which encounters a trigger condition and is programmed to pull the
Sync/Trigger line. If any HP E1433A is programmed for auto triggering
(with e1432_set_auto_trigger), the Sync/Trigger line is pulled low
immediately. The Sync/Trigger line may also be pulled low by an explicit
call to the function e1432_trigger_measure.
Upon entering the MEASURE state the HP E1433A continues to collect
data. The HP E1433A also presents the first data from the FIFO to the
selected output port, making it available to the controller to read. The HP
E1433A holds the Sync/Trigger line low as long as it is actively collecting
data. In overlap block mode the HP E1433A stops taking data as soon as a
block of data has been collected, including any programmed pre- or
post-trigger delays. (It starts again when another trigger occurs). In
continuous mode, the HP E1433A stops taking data only when the FIFO
overflows. When data collection stops, the HP E1433A releases the
Sync/Trigger line. When all HP E1433As are finished and the Sync/Trigger
line goes high, the HP E1433A goes into the IDLE state again.
The measurement initialization and loop may be interrupted at any time
with a call to e1432_reset_measure, which puts the module in the TESTED
state.
Register-based VXI Devices
The HP E1433A is a register-based VXI device. Unlike message-based
devices which use higher-level programming using ASCII characters,
register-based devices are programmed at a very low level using binary
information. The greatest advantage of this is speed. Register-based
devices communicate at the level of direct hardware manipulation and this
can lead to much greater system throughput.
You will not need to access the registers in order to use the HP E1433A.
The HP E1433A’s functions can be more easily accessed using the HP
E1432A Host Interface Library software. However, if you want more
information about the registers see Appendix A: Register Definitions.
4-22
Page 99

HP E1433A User's Guide
The C-Language Host Interface Library
Arm and Trigger
This section explains some terminology relating the the “Arm” and “Trigger”
steps in the measurement loop. As an example a measurement might be
set up to arm at a certain RPM level and then subsequently trigger at an
external event corresponding to top dead center (TDC). The settings
would be:
q Arm: RPM Step Arm
q Trigger: External Trigger
If you want to begin a throughput session at this same RPM/TDC event,
then the first external trigger after a specified RPM would start a
continuous mode measurement. Now (using overlap block mode) the
settings would be:
q Pre-Arm: RPM Step Arm
q Arm: Auto
q Trigger: Auto
In the measurement loop, an arm must take place before a trigger. You can
program how many triggers to do before waiting for another arm condition.
The default is one trigger for each arm. For each trigger, a block of data
is sent to the host.
The first arm in a measurement is the pre-arm. By default, the pre-arm
condition is the same as the regular arm conditions.
Valid Arm (and Pre-Arm) conditions are:
q Auto Arm
q Manual Arm
q RPM Step Arm
Valid trigger conditions are:
q Auto Trigger
q Input Trigger
q Source Trigger
q External Trigger
q Manual Trigger
q Tachometer Edge Trigger
4-23
Page 100

HP E1433A User's Guide
The C-Language Host Interface Library
HP E1433A Triggering.
The following is a short discussion of triggering for the HP E1433A.
Triggering is defined as the transition from the armed state to the triggered
state. This transition is caused by a low going edge on a TTL trigger line.
Which one of the eight TTL trigger line is chosen by
e1432_get_ttltrg_lines().
The low-going transition of the TTL trig line can be caused by any of the
following items:
trigger type enabling function
the AUTO TRIGGER circuitry e1432_set_auto_trigger()
the e1432_trigger_measure() function e1432_trigger_measure()
a source trigger e1432_set_trigger_channel()
a tach trigger e1432_set_trigger_channel()
an external trigger e1432_set_trigger_ext()
an input level or bound trigger event e1432_set_trigger_channel()
and e1432_set_trigger_mode()
Each of these trigger sources can be enabled or disabled independently, so
quite complex trigger setups are possible. In all cases, however, the first
trigger event kicks off the measurement and the following trigger events
become superfluous.
Note that for e1432_set_auto_trigger() the setting E1432_MANUAL_ARM
really means “don’t auto trigger” not “expect a manual trigger”.
For single HP E1433A systems, the TTL trigger signal is not connected to
the VXI backplane. For multiple HP E1433A systems, the
e1432_init_measure() function connects the HP E1433A trigger lines to the
VXI backplane, and at that point, your selection of which TTL trigger lines
through e1432_get_ttltrg_lines() is relevant. Multiple mainframe systems
will need to account for the unidirectional nature of the inter-mainframe
MXI extenders which will prevent all but the “upstream” mainframe from
triggering the system.
4-24
 Loading...