

Page 1

Kerberos Server Version 3.1
Administrator’s Guide
HP-UX 11i v2
Edition 5
Manufacturing Part Number: T1417-90009
E0905
United States
© Copyright 2005 Hewlett-Packard Development Company, L.P.
Page 2

Legal Notices
The information contained herein is subject to change without notice.
Hewlett-Packard makes no warranty of any kind with regard to this
manual, including, but not limited to, the implied warranties of
merchantability and fitness for a particular purpose. Hewlett-Packard
shall not be held liable for errors contained herein or direct, indirect,
special, incidental or consequential damages in connection with the
furnishing, performance, or use of this material.
Warranty
A copy of the specific warranty terms applicable to your Hewlett-Packard
product and replacement parts can be obtained from your local Sales and
Service Office.
U.S. Government License
Proprietary computer software. Valid license from HP required for
possession, use, or copying. Consistent with FAR 12.211 and 12.212,
Commercial Computer Software, Computer Software Documentation,
and Technical Data for Commercial Items are licensed to the U.S.
Government under vendor's standard commercial license.
Trademark Notices
UNIX is a registered trademark in the United States and other
countries, licensed exclusively through The Open Group.
MS-DOS, Microsoft and Windows are U.S. registered trademarks of
Microsoft Corporation.
Intel and Itanium are trademarks or registered trademarks of Intel
Corporation in the United States and other countries.
Copyright Notices
© Copyright 2001-2005 Hewlett-Packard Development Company L. P.
© Copyright 1979, 1980, 1983, 1985-93 Regents of the University of
California
2
Page 3

This software is based in part on the Fourth Berkeley Software
Distribution under license from the Regents of the University of
California.
© Copyright 1983-2005 Hewlett-Packard Co., All Rights Reserved
© Copyright 1979, 1980,1983, 1985-1993 The Regents of the Univ. of
California
© Copyright 1980, 1984, 1986 Novell, Inc.
© Copyright 1986-1992 Sun Microsystems, Inc.
© Copyright 1985-2002 Massachusetts Institute of Technology
© Copyright 1989-93 The Open Software Foundation, Inc.
© Copyright 1986 Digital Equipment Corporation
© Copyright 1990 Motorola, Inc.
© Copyright 1990, 1991, 1992 Cornell University
© Copyright 1989-1991 The University of Maryland
© Copyright 1988 Carnegie Mellon University
© Copyright 1984-2002 FairCom Corporation
© Copyright 1998-2002 Cybersafe Corporation
© Copyright 1991-2002 Mentat, Inc.
© Copyright 1996 Morning Star Technologies, Inc.
© Copyright 1996 Progressive Systems, Inc.
© Copyright 1991-2000 Isogon Corporation, All Rights Reserved.
© Copyright 1996 OpenVision Technologies, Inc., All Rights Reserved.
3
Page 4

4
Page 5

Contents
1. Overview
Introduction . . . . . . . . . . . . . . . . . . . . . . . . . . . . . . . . . . . . . . . . . . . . . . . . . . . . . . . . . . . 25
How the Kerberos Server Works. . . . . . . . . . . . . . . . . . . . . . . . . . . . . . . . . . . . . . . . . . . 26
Authentication Process . . . . . . . . . . . . . . . . . . . . . . . . . . . . . . . . . . . . . . . . . . . . . . . . . . 27
DES Versus 3DES Key Type Settings. . . . . . . . . . . . . . . . . . . . . . . . . . . . . . . . . . . . . . . 31
Introduction to LDAP . . . . . . . . . . . . . . . . . . . . . . . . . . . . . . . . . . . . . . . . . . . . . . . . . . . 32
LDAP Advantages. . . . . . . . . . . . . . . . . . . . . . . . . . . . . . . . . . . . . . . . . . . . . . . . . . . . . 32
Integrating Kerberos Server v3.1 with LDAP. . . . . . . . . . . . . . . . . . . . . . . . . . . . . . . 33
How is the Kerberos Principal Integrated in to the LDAP Directory?. . . . . . . . . . 34
2. Installing the Kerberos Server v3.1
Prerequisites . . . . . . . . . . . . . . . . . . . . . . . . . . . . . . . . . . . . . . . . . . . . . . . . . . . . . . . . . .37
System Requirements . . . . . . . . . . . . . . . . . . . . . . . . . . . . . . . . . . . . . . . . . . . . . . . . . . . 38
Hardware Requirements . . . . . . . . . . . . . . . . . . . . . . . . . . . . . . . . . . . . . . . . . . . . . . . 38
Software Requirements . . . . . . . . . . . . . . . . . . . . . . . . . . . . . . . . . . . . . . . . . . . . . . . . 38
Version Compatibility . . . . . . . . . . . . . . . . . . . . . . . . . . . . . . . . . . . . . . . . . . . . . . . . 38
Installing the Server . . . . . . . . . . . . . . . . . . . . . . . . . . . . . . . . . . . . . . . . . . . . . . . . . . . . 39
3. Migrating to a Newer Version of the Kerberos Server
Migrating from Kerberos Server Version 1.0 to 3.0 . . . . . . . . . . . . . . . . . . . . . . . . . . . . 43
Migrating from Kerberos Server Version 2.0 to Version 3.0 . . . . . . . . . . . . . . . . . . . . . 47
Migrating from Kerberos Server Version 3.0 to Version 3.1 . . . . . . . . . . . . . . . . . . . . . 49
4. Interoperability with Windows 2000
Understanding the Terminology . . . . . . . . . . . . . . . . . . . . . . . . . . . . . . . . . . . . . . . . . . . 53
Kerberos Server and Windows 2000 Interoperability . . . . . . . . . . . . . . . . . . . . . . . . . . 55
Establishing Trust Between Kerberos Server and Windows 2000 . . . . . . . . . . . . . . . . 56
Single Realm (Domain) Authentication . . . . . . . . . . . . . . . . . . . . . . . . . . . . . . . . . . . . . 58
Interrealm (Interdomain) Authentication . . . . . . . . . . . . . . . . . . . . . . . . . . . . . . . . . . . 59
Special Considerations for Interoperability . . . . . . . . . . . . . . . . . . . . . . . . . . . . . . . . . . 60
Database Considerations . . . . . . . . . . . . . . . . . . . . . . . . . . . . . . . . . . . . . . . . . . . . . . . 60
Encryption Considerations. . . . . . . . . . . . . . . . . . . . . . . . . . . . . . . . . . . . . . . . . . . . . . 60
Postdated Tickets . . . . . . . . . . . . . . . . . . . . . . . . . . . . . . . . . . . . . . . . . . . . . . . . . . . . . 60
5. Configuring the Kerberos Server With C-Tree Backend
5
Page 6

Contents
Configuration Files for the Kerberos Server . . . . . . . . . . . . . . . . . . . . . . . . . . . . . . . . . 64
The krb.conf File. . . . . . . . . . . . . . . . . . . . . . . . . . . . . . . . . . . . . . . . . . . . . . . . . . . . . . 65
The krb.conf File Format . . . . . . . . . . . . . . . . . . . . . . . . . . . . . . . . . . . . . . . . . . . . . 65
The krb.realms File. . . . . . . . . . . . . . . . . . . . . . . . . . . . . . . . . . . . . . . . . . . . . . . . . . . . 66
The krb.realms File Format . . . . . . . . . . . . . . . . . . . . . . . . . . . . . . . . . . . . . . . . . . . 67
Autoconfiguring the Kerberos Server . . . . . . . . . . . . . . . . . . . . . . . . . . . . . . . . . . . . . . 69
Configuring the Kerberos Server with C-Tree . . . . . . . . . . . . . . . . . . . . . . . . . . . . . . 71
6. Configuring the Kerberos Server with LDAP
Configuration Files for LDAP Integration . . . . . . . . . . . . . . . . . . . . . . . . . . . . . . . . . . . 74
The krb5_ldap.conf File . . . . . . . . . . . . . . . . . . . . . . . . . . . . . . . . . . . . . . . . . . . . . . . . 74
The krb5_ldap.conf File Format . . . . . . . . . . . . . . . . . . . . . . . . . . . . . . . . . . . . . . . . 75
The krb5_schema.conf File. . . . . . . . . . . . . . . . . . . . . . . . . . . . . . . . . . . . . . . . . . . . . . 77
The krb5_schema.conf File Format . . . . . . . . . . . . . . . . . . . . . . . . . . . . . . . . . . . . . 78
The krb5_map.conf File . . . . . . . . . . . . . . . . . . . . . . . . . . . . . . . . . . . . . . . . . . . . . . . . 81
The krb5_map.conf File Format . . . . . . . . . . . . . . . . . . . . . . . . . . . . . . . . . . . . . . . . 81
Planning Your LDAP Configuration . . . . . . . . . . . . . . . . . . . . . . . . . . . . . . . . . . . . . . . . 83
Before You Begin. . . . . . . . . . . . . . . . . . . . . . . . . . . . . . . . . . . . . . . . . . . . . . . . . . . . . . 83
Setting up Your LDAP Configuration . . . . . . . . . . . . . . . . . . . . . . . . . . . . . . . . . . . . . . . 84
Autoconfiguring the Kerberos Server With LDAP Integration . . . . . . . . . . . . . . . . . . . 88
Configuring the Kerberos Server with LDAP . . . . . . . . . . . . . . . . . . . . . . . . . . . . . . . 88
Manually Configuring the Kerberos Server with LDAP . . . . . . . . . . . . . . . . . . . . . . . . 92
Editing the Configuration Files . . . . . . . . . . . . . . . . . . . . . . . . . . . . . . . . . . . . . . . . . . 92
7. Configuring the Primary and Secondary Security Server
Configuring the Primary Security Server. . . . . . . . . . . . . . . . . . . . . . . . . . . . . . . . . . . . 96
Create the Principal Database After Installation. . . . . . . . . . . . . . . . . . . . . . . . . . . . 96
Add an Administrative Principal. . . . . . . . . . . . . . . . . . . . . . . . . . . . . . . . . . . . . . . . . 97
To add an Administrative Principal Using the HP Kerberos Administrator . . . . 97
To Add an Administrative Principal Through the Command Line . . . . . . . . . . . . 98
Create the host/<fqdn> Principal and Extracting the Service Key . . . . . . . . . . . . . . 98
Start the Kerberos Daemons . . . . . . . . . . . . . . . . . . . . . . . . . . . . . . . . . . . . . . . . . . . . 99
Define Secondary Security Server Network Locations. . . . . . . . . . . . . . . . . . . . . . . 100
Security Policies . . . . . . . . . . . . . . . . . . . . . . . . . . . . . . . . . . . . . . . . . . . . . . . . . . . . . . . 101
Password Policy File . . . . . . . . . . . . . . . . . . . . . . . . . . . . . . . . . . . . . . . . . . . . . . . . . . 101
The admin_acl_file . . . . . . . . . . . . . . . . . . . . . . . . . . . . . . . . . . . . . . . . . . . . . . . . . . . 101
6
Page 7

Starting the Security Server . . . . . . . . . . . . . . . . . . . . . . . . . . . . . . . . . . . . . . . . . . . . . 102
Configuring the Secondary Security Servers with C-Tree. . . . . . . . . . . . . . . . . . . . . . 103
Creating the Principal Database . . . . . . . . . . . . . . . . . . . . . . . . . . . . . . . . . . . . . . . . 103
Copying the Kerberos Configuration File . . . . . . . . . . . . . . . . . . . . . . . . . . . . . . . . . 103
Creating a host/<fqdn> Principal and Extracting the Key. . . . . . . . . . . . . . . . . . . . 104
Configuring the Secondary Security Servers with LDAP . . . . . . . . . . . . . . . . . . . . . . 105
Copying the Kerberos Configuration File . . . . . . . . . . . . . . . . . . . . . . . . . . . . . . . . . 105
Creating a stash file using the kdb_stash utility . . . . . . . . . . . . . . . . . . . . . . . . . . . 105
Using Indexes to Improve Database Performance . . . . . . . . . . . . . . . . . . . . . . . . . . . 107
8. Administering the Kerberos Server
Administering the Kerberos Database . . . . . . . . . . . . . . . . . . . . . . . . . . . . . . . . . . . . . 111
The kadmind Command . . . . . . . . . . . . . . . . . . . . . . . . . . . . . . . . . . . . . . . . . . . . . . . . 112
The admin_acl_file File . . . . . . . . . . . . . . . . . . . . . . . . . . . . . . . . . . . . . . . . . . . . . . . . . 113
Assigning Administrative Permissions . . . . . . . . . . . . . . . . . . . . . . . . . . . . . . . . . . . 114
Adding Entries to admin_acl_file. . . . . . . . . . . . . . . . . . . . . . . . . . . . . . . . . . . . . . . . 116
Creating Administrative Accounts . . . . . . . . . . . . . . . . . . . . . . . . . . . . . . . . . . . . . . 117
Using Restricted Administrator. . . . . . . . . . . . . . . . . . . . . . . . . . . . . . . . . . . . . . . . . 117
How the r/R Modifiers Work. . . . . . . . . . . . . . . . . . . . . . . . . . . . . . . . . . . . . . . . . . 117
Password Policy File. . . . . . . . . . . . . . . . . . . . . . . . . . . . . . . . . . . . . . . . . . . . . . . . . . . . 119
Editing the Default File . . . . . . . . . . . . . . . . . . . . . . . . . . . . . . . . . . . . . . . . . . . . . . . 119
Principals . . . . . . . . . . . . . . . . . . . . . . . . . . . . . . . . . . . . . . . . . . . . . . . . . . . . . . . . . . . . 121
Adding User Principals. . . . . . . . . . . . . . . . . . . . . . . . . . . . . . . . . . . . . . . . . . . . . . . . 123
Adding New Service Principals . . . . . . . . . . . . . . . . . . . . . . . . . . . . . . . . . . . . . . . . . 123
Reserved Service Principals . . . . . . . . . . . . . . . . . . . . . . . . . . . . . . . . . . . . . . . . . . 124
Removing User Principals . . . . . . . . . . . . . . . . . . . . . . . . . . . . . . . . . . . . . . . . . . . 127
Removing Special Privilege Settings . . . . . . . . . . . . . . . . . . . . . . . . . . . . . . . . . . . 127
Protecting a Secret Key. . . . . . . . . . . . . . . . . . . . . . . . . . . . . . . . . . . . . . . . . . . . . . 128
Removing Service Principals . . . . . . . . . . . . . . . . . . . . . . . . . . . . . . . . . . . . . . . . . 128
The kadmin and kadminl Utilities . . . . . . . . . . . . . . . . . . . . . . . . . . . . . . . . . . . . . . . . 130
Administration Utilities . . . . . . . . . . . . . . . . . . . . . . . . . . . . . . . . . . . . . . . . . . . . . . . 131
HP Kerberos Administrator . . . . . . . . . . . . . . . . . . . . . . . . . . . . . . . . . . . . . . . . . . . . . 132
Standard Functionality of the Administrator . . . . . . . . . . . . . . . . . . . . . . . . . . . . . . 133
Local Administrator – kadminl_ui . . . . . . . . . . . . . . . . . . . . . . . . . . . . . . . . . . . . . . . . 134
Using kadminl_ui . . . . . . . . . . . . . . . . . . . . . . . . . . . . . . . . . . . . . . . . . . . . . . . . . . . . 134
Principals Tab. . . . . . . . . . . . . . . . . . . . . . . . . . . . . . . . . . . . . . . . . . . . . . . . . . . . . . . . . 136
Contents
7
Page 8

Contents
General Tab (Principal Information Window) . . . . . . . . . . . . . . . . . . . . . . . . . . . . . . . 139
Adding Principals to the Database . . . . . . . . . . . . . . . . . . . . . . . . . . . . . . . . . . . . . . . . 143
Adding Multiple Principals with Similar Settings . . . . . . . . . . . . . . . . . . . . . . . . . . 145
Creating an Administrative Principal . . . . . . . . . . . . . . . . . . . . . . . . . . . . . . . . . . . . . 146
Searching for a Principal . . . . . . . . . . . . . . . . . . . . . . . . . . . . . . . . . . . . . . . . . . . . . . . . 149
Deleting a Principal . . . . . . . . . . . . . . . . . . . . . . . . . . . . . . . . . . . . . . . . . . . . . . . . . . . . 151
Loading Default Values for a Principal. . . . . . . . . . . . . . . . . . . . . . . . . . . . . . . . . . . . . 152
Restoring Previously Saved Values for a Principal . . . . . . . . . . . . . . . . . . . . . . . . . . . 153
Changing Ticket Information . . . . . . . . . . . . . . . . . . . . . . . . . . . . . . . . . . . . . . . . . . . . 154
Rules for Setting Maximum Ticket Lifetime . . . . . . . . . . . . . . . . . . . . . . . . . . . . . . . . 155
Rules for Setting Maximum Renew Time. . . . . . . . . . . . . . . . . . . . . . . . . . . . . . . . . . . 156
Changing Password Information. . . . . . . . . . . . . . . . . . . . . . . . . . . . . . . . . . . . . . . . . . 158
Password Tab (Principal Information Window) . . . . . . . . . . . . . . . . . . . . . . . . . . . . . . 160
Change Password Window (Password Tab). . . . . . . . . . . . . . . . . . . . . . . . . . . . . . . . 162
Changing a Key Type. . . . . . . . . . . . . . . . . . . . . . . . . . . . . . . . . . . . . . . . . . . . . . . . . . . 165
Changing a DES-CRC or DES-MD5 Principal Key Type to 3DES . . . . . . . . . . . . . 165
Changing Principal Attributes . . . . . . . . . . . . . . . . . . . . . . . . . . . . . . . . . . . . . . . . . . . 167
Attributes Tab (Principal Information Window) . . . . . . . . . . . . . . . . . . . . . . . . . . . . . 168
LDAP Attributes Tab (Prinicpal Information Window). . . . . . . . . . . . . . . . . . . . . . . . 175
Deleting a Service Principal . . . . . . . . . . . . . . . . . . . . . . . . . . . . . . . . . . . . . . . . . . . . . 177
Extracting Service Keys. . . . . . . . . . . . . . . . . . . . . . . . . . . . . . . . . . . . . . . . . . . . . . . . . 178
Extracting a Service Key Table. . . . . . . . . . . . . . . . . . . . . . . . . . . . . . . . . . . . . . . . . . . 180
Using Groups to Control Settings . . . . . . . . . . . . . . . . . . . . . . . . . . . . . . . . . . . . . . . . . 182
Editing the Default Group . . . . . . . . . . . . . . . . . . . . . . . . . . . . . . . . . . . . . . . . . . . . . 182
Group Information Window (Principal Information Window). . . . . . . . . . . . . . . . . . . 184
Principal Attributes . . . . . . . . . . . . . . . . . . . . . . . . . . . . . . . . . . . . . . . . . . . . . . . . . . 186
Setting the Default Group Principal Attributes . . . . . . . . . . . . . . . . . . . . . . . . . . 186
Default Principal Attributes. . . . . . . . . . . . . . . . . . . . . . . . . . . . . . . . . . . . . . . . . . 186
Setting Administrative Permissions. . . . . . . . . . . . . . . . . . . . . . . . . . . . . . . . . . . . . . . 188
Administrative Permissions . . . . . . . . . . . . . . . . . . . . . . . . . . . . . . . . . . . . . . . . . . . . . 189
Realms Tab. . . . . . . . . . . . . . . . . . . . . . . . . . . . . . . . . . . . . . . . . . . . . . . . . . . . . . . . . . . 193
Realm Information Window . . . . . . . . . . . . . . . . . . . . . . . . . . . . . . . . . . . . . . . . . . . . 195
Adding a Realm . . . . . . . . . . . . . . . . . . . . . . . . . . . . . . . . . . . . . . . . . . . . . . . . . . . . . . . 196
Deleting a Realm . . . . . . . . . . . . . . . . . . . . . . . . . . . . . . . . . . . . . . . . . . . . . . . . . . . . . . 197
Remote Administrator – kadmin_ui . . . . . . . . . . . . . . . . . . . . . . . . . . . . . . . . . . . . . . . 198
Manual Administration Using kadmin. . . . . . . . . . . . . . . . . . . . . . . . . . . . . . . . . . . . . 202
8
Page 9

Contents
Adding a New Principal . . . . . . . . . . . . . . . . . . . . . . . . . . . . . . . . . . . . . . . . . . . . . . . 204
Adding a Random Key . . . . . . . . . . . . . . . . . . . . . . . . . . . . . . . . . . . . . . . . . . . . . . . . 205
Specifying a New Password . . . . . . . . . . . . . . . . . . . . . . . . . . . . . . . . . . . . . . . . . . . . 205
Changing Password to a New Randomly Generated Password . . . . . . . . . . . . . . . . 206
Deleting a Principal . . . . . . . . . . . . . . . . . . . . . . . . . . . . . . . . . . . . . . . . . . . . . . . . . . 206
Extracting a Principal . . . . . . . . . . . . . . . . . . . . . . . . . . . . . . . . . . . . . . . . . . . . . . . . 207
Listing the Attributes of a Principal . . . . . . . . . . . . . . . . . . . . . . . . . . . . . . . . . . . . . 208
Modifying a Principal . . . . . . . . . . . . . . . . . . . . . . . . . . . . . . . . . . . . . . . . . . . . . . . . . 208
Number of Authentication Failures (fcnt) . . . . . . . . . . . . . . . . . . . . . . . . . . . . . . . 209
Key Version Number Attribute . . . . . . . . . . . . . . . . . . . . . . . . . . . . . . . . . . . . . . . 210
LDAP DN. . . . . . . . . . . . . . . . . . . . . . . . . . . . . . . . . . . . . . . . . . . . . . . . . . . . . . . . . 210
Policy Name. . . . . . . . . . . . . . . . . . . . . . . . . . . . . . . . . . . . . . . . . . . . . . . . . . . . . . . 211
Attributes. . . . . . . . . . . . . . . . . . . . . . . . . . . . . . . . . . . . . . . . . . . . . . . . . . . . . . . . . 211
Allow Postdated Attribute . . . . . . . . . . . . . . . . . . . . . . . . . . . . . . . . . . . . . . . . . . . 211
Allow Renewable Attribute. . . . . . . . . . . . . . . . . . . . . . . . . . . . . . . . . . . . . . . . . . . 212
Allow Forwardable Attribute . . . . . . . . . . . . . . . . . . . . . . . . . . . . . . . . . . . . . . . . . 213
Allow Proxy Attribute . . . . . . . . . . . . . . . . . . . . . . . . . . . . . . . . . . . . . . . . . . . . . . . 214
Allow Duplicate Session Key Attribute . . . . . . . . . . . . . . . . . . . . . . . . . . . . . . . . . 215
Require Preauthentication Attribute. . . . . . . . . . . . . . . . . . . . . . . . . . . . . . . . . . . 216
Require Password Change Attribute . . . . . . . . . . . . . . . . . . . . . . . . . . . . . . . . . . . 216
Lock Principal Attribute . . . . . . . . . . . . . . . . . . . . . . . . . . . . . . . . . . . . . . . . . . . . . 217
Allow As Service Attribute . . . . . . . . . . . . . . . . . . . . . . . . . . . . . . . . . . . . . . . . . . . 218
Require Initial Authentication Attribute. . . . . . . . . . . . . . . . . . . . . . . . . . . . . . . . 219
Set As Password Change Service Attribute. . . . . . . . . . . . . . . . . . . . . . . . . . . . . . 220
Password Expiration Attribute. . . . . . . . . . . . . . . . . . . . . . . . . . . . . . . . . . . . . . . . 221
Principal Expiration Attribute . . . . . . . . . . . . . . . . . . . . . . . . . . . . . . . . . . . . . . . . 222
Key Type Attribute . . . . . . . . . . . . . . . . . . . . . . . . . . . . . . . . . . . . . . . . . . . . . . . . . 223
Principal Database Utilities . . . . . . . . . . . . . . . . . . . . . . . . . . . . . . . . . . . . . . . . . . . . . 224
Kerberos Database Utilities . . . . . . . . . . . . . . . . . . . . . . . . . . . . . . . . . . . . . . . . . . . . . 225
Database Encryption . . . . . . . . . . . . . . . . . . . . . . . . . . . . . . . . . . . . . . . . . . . . . . . . . 227
Database Master Password . . . . . . . . . . . . . . . . . . . . . . . . . . . . . . . . . . . . . . . . . . . . 228
Destroying the Kerberos Database . . . . . . . . . . . . . . . . . . . . . . . . . . . . . . . . . . . . . . . . 229
Dumping the Kerberos Database . . . . . . . . . . . . . . . . . . . . . . . . . . . . . . . . . . . . . . . . . 231
Loading the Kerberos Database . . . . . . . . . . . . . . . . . . . . . . . . . . . . . . . . . . . . . . . . . . 232
Stashing the Master Key . . . . . . . . . . . . . . . . . . . . . . . . . . . . . . . . . . . . . . . . . . . . . . . . 233
Starting and Stopping Daemons . . . . . . . . . . . . . . . . . . . . . . . . . . . . . . . . . . . . . . . . . . 235
9
Page 10

Contents
Maintenance Tasks . . . . . . . . . . . . . . . . . . . . . . . . . . . . . . . . . . . . . . . . . . . . . . . . . . . . 236
Protecting Security Server Secrets . . . . . . . . . . . . . . . . . . . . . . . . . . . . . . . . . . . . . . 236
host/fqdn@REALM . . . . . . . . . . . . . . . . . . . . . . . . . . . . . . . . . . . . . . . . . . . . . . . . . 236
Master Password. . . . . . . . . . . . . . . . . . . . . . . . . . . . . . . . . . . . . . . . . . . . . . . . . . . 236
Backing Up primary security server Data . . . . . . . . . . . . . . . . . . . . . . . . . . . . . . . . 237
Backing Up the Principal Database. . . . . . . . . . . . . . . . . . . . . . . . . . . . . . . . . . . . 237
Removing Unused Space from the Database . . . . . . . . . . . . . . . . . . . . . . . . . . . . . . . . 239
9. Propagating the Kerberos Server
Propagation Hierarchy. . . . . . . . . . . . . . . . . . . . . . . . . . . . . . . . . . . . . . . . . . . . . . . . . . 243
Propagation Relationships . . . . . . . . . . . . . . . . . . . . . . . . . . . . . . . . . . . . . . . . . . . . . 243
Service Key Table. . . . . . . . . . . . . . . . . . . . . . . . . . . . . . . . . . . . . . . . . . . . . . . . . . . . . . 244
Maintaining Secret Keys in the Key Table File . . . . . . . . . . . . . . . . . . . . . . . . . . . . 244
Extracting a Key to the Service Key Table File. . . . . . . . . . . . . . . . . . . . . . . . . . . 244
Creating a New Service Key Table File . . . . . . . . . . . . . . . . . . . . . . . . . . . . . . . . . 245
Deleting Older Keys from the Service Key Table File. . . . . . . . . . . . . . . . . . . . . . 245
Propagation Tools. . . . . . . . . . . . . . . . . . . . . . . . . . . . . . . . . . . . . . . . . . . . . . . . . . . . . . 246
The kpropd Daemon. . . . . . . . . . . . . . . . . . . . . . . . . . . . . . . . . . . . . . . . . . . . . . . . . . . . 248
The mkpropcf Tool . . . . . . . . . . . . . . . . . . . . . . . . . . . . . . . . . . . . . . . . . . . . . . . . . . . . . 249
The kpropd.ini File. . . . . . . . . . . . . . . . . . . . . . . . . . . . . . . . . . . . . . . . . . . . . . . . . . . . . 251
Sections . . . . . . . . . . . . . . . . . . . . . . . . . . . . . . . . . . . . . . . . . . . . . . . . . . . . . . . . . . . . 252
The [default_values] Section. . . . . . . . . . . . . . . . . . . . . . . . . . . . . . . . . . . . . . . . . . 252
The [secsrv_name] Section . . . . . . . . . . . . . . . . . . . . . . . . . . . . . . . . . . . . . . . . . . . 254
Examples . . . . . . . . . . . . . . . . . . . . . . . . . . . . . . . . . . . . . . . . . . . . . . . . . . . . . . . . . 255
The prpadmin Administrative Application. . . . . . . . . . . . . . . . . . . . . . . . . . . . . . . . . . 257
Setting Up Propagation . . . . . . . . . . . . . . . . . . . . . . . . . . . . . . . . . . . . . . . . . . . . . . . . . 258
Monitoring Propagation. . . . . . . . . . . . . . . . . . . . . . . . . . . . . . . . . . . . . . . . . . . . . . . . . 263
Monitoring the Log File . . . . . . . . . . . . . . . . . . . . . . . . . . . . . . . . . . . . . . . . . . . . . . . 263
Critical Error Messages . . . . . . . . . . . . . . . . . . . . . . . . . . . . . . . . . . . . . . . . . . . . . 263
Monitoring Propagation Queue Files. . . . . . . . . . . . . . . . . . . . . . . . . . . . . . . . . . . 264
Monitoring Old File Date and Large File Size . . . . . . . . . . . . . . . . . . . . . . . . . . . 264
Updating the principal.ok Time Stamp . . . . . . . . . . . . . . . . . . . . . . . . . . . . . . . . . 265
Comparing the Database to Its Copies . . . . . . . . . . . . . . . . . . . . . . . . . . . . . . . . . 265
The kdb_dump Utility. . . . . . . . . . . . . . . . . . . . . . . . . . . . . . . . . . . . . . . . . . . . . . . 267
Restarting Propagation Using a Simple Process . . . . . . . . . . . . . . . . . . . . . . . . . . . 268
Restarting Propagation Using the Full Dump Method . . . . . . . . . . . . . . . . . . . . . . 268
10
Page 11

Propagation Failure . . . . . . . . . . . . . . . . . . . . . . . . . . . . . . . . . . . . . . . . . . . . . . . . . . 269
Converting a secondary security server to a primary security server. . . . . . . . . . . 270
Restarting Services. . . . . . . . . . . . . . . . . . . . . . . . . . . . . . . . . . . . . . . . . . . . . . . . . . . 271
Cleaning the Temp Directory. . . . . . . . . . . . . . . . . . . . . . . . . . . . . . . . . . . . . . . . . . . 271
Configuring Multirealm Enterprises . . . . . . . . . . . . . . . . . . . . . . . . . . . . . . . . . . . . . . 272
Number of Realms per Database . . . . . . . . . . . . . . . . . . . . . . . . . . . . . . . . . . . . . . . . 272
primary security servers Supporting Multiple Realms . . . . . . . . . . . . . . . . . . . . . . 272
Multiple primary security servers Supporting a Single Realm . . . . . . . . . . . . . . . . 273
Adding More Realms to a Multirealm Database. . . . . . . . . . . . . . . . . . . . . . . . . . . . 273
Database Propagation for Multirealm Databases. . . . . . . . . . . . . . . . . . . . . . . . . . . 274
10. Managing Multiple Realms
Considering a Trust Relationship . . . . . . . . . . . . . . . . . . . . . . . . . . . . . . . . . . . . . . . . . 277
One-Way Trust . . . . . . . . . . . . . . . . . . . . . . . . . . . . . . . . . . . . . . . . . . . . . . . . . . . . . . 277
Two-Way Trust . . . . . . . . . . . . . . . . . . . . . . . . . . . . . . . . . . . . . . . . . . . . . . . . . . . . . . 277
Hierarchical Trust . . . . . . . . . . . . . . . . . . . . . . . . . . . . . . . . . . . . . . . . . . . . . . . . . . . 278
Other Types of Trust. . . . . . . . . . . . . . . . . . . . . . . . . . . . . . . . . . . . . . . . . . . . . . . . . . 278
Configuring Direct Trust Relationships . . . . . . . . . . . . . . . . . . . . . . . . . . . . . . . . . . . . 279
Hierarchical Interrealm Trust . . . . . . . . . . . . . . . . . . . . . . . . . . . . . . . . . . . . . . . . . . . 281
Hierarchical Chain of Trust . . . . . . . . . . . . . . . . . . . . . . . . . . . . . . . . . . . . . . . . . . . . 281
Hierarchical Interrealm Configuration . . . . . . . . . . . . . . . . . . . . . . . . . . . . . . . . . . . 282
Configuring the Local Realm . . . . . . . . . . . . . . . . . . . . . . . . . . . . . . . . . . . . . . . . . 284
Configuring the Intermediate Realm . . . . . . . . . . . . . . . . . . . . . . . . . . . . . . . . . . . 285
Configuring the Target Realm . . . . . . . . . . . . . . . . . . . . . . . . . . . . . . . . . . . . . . . . 286
Contents
11. Troubleshooting
Characterizing a Problem . . . . . . . . . . . . . . . . . . . . . . . . . . . . . . . . . . . . . . . . . . . . . . . 291
Diagnostic Tools Summary . . . . . . . . . . . . . . . . . . . . . . . . . . . . . . . . . . . . . . . . . . . . . . 293
Troubleshooting Kerberos . . . . . . . . . . . . . . . . . . . . . . . . . . . . . . . . . . . . . . . . . . . . . . . 294
Error Messages . . . . . . . . . . . . . . . . . . . . . . . . . . . . . . . . . . . . . . . . . . . . . . . . . . . . . . 294
Logging Capabilities. . . . . . . . . . . . . . . . . . . . . . . . . . . . . . . . . . . . . . . . . . . . . . . . . . 294
UNIX Syslog File. . . . . . . . . . . . . . . . . . . . . . . . . . . . . . . . . . . . . . . . . . . . . . . . . . . 295
Services Checklist. . . . . . . . . . . . . . . . . . . . . . . . . . . . . . . . . . . . . . . . . . . . . . . . . . . . 296
Troubleshooting Techniques. . . . . . . . . . . . . . . . . . . . . . . . . . . . . . . . . . . . . . . . . . . . 296
General Errors . . . . . . . . . . . . . . . . . . . . . . . . . . . . . . . . . . . . . . . . . . . . . . . . . . . . . . . . 303
Forgotten Passwords. . . . . . . . . . . . . . . . . . . . . . . . . . . . . . . . . . . . . . . . . . . . . . . . . . 303
11
Page 12

Contents
Locking and Unlocking Accounts. . . . . . . . . . . . . . . . . . . . . . . . . . . . . . . . . . . . . . . . 304
Clock Synchronization . . . . . . . . . . . . . . . . . . . . . . . . . . . . . . . . . . . . . . . . . . . . . . . . 304
User Error Messages . . . . . . . . . . . . . . . . . . . . . . . . . . . . . . . . . . . . . . . . . . . . . . . . . . . 305
Decrypt Integrity Check Failed . . . . . . . . . . . . . . . . . . . . . . . . . . . . . . . . . . . . . . . . . 305
Password Has Already Been Used or Is Too Close to Current One . . . . . . . . . . . . . 305
Administrative Error Messages . . . . . . . . . . . . . . . . . . . . . . . . . . . . . . . . . . . . . . . . . . 306
Password Has Expired While Getting Initial Ticket . . . . . . . . . . . . . . . . . . . . . . . . 306
Service Key Not Available While Getting Initial Ticket. . . . . . . . . . . . . . . . . . . . . . 306
Reporting Problems to Your HP Support Contact . . . . . . . . . . . . . . . . . . . . . . . . . . . . 308
The services File. . . . . . . . . . . . . . . . . . . . . . . . . . . . . . . . . . . . . . . . . . . . . . . . . . . . . . . 317
12
Page 13

Tables
Table 1. HP-UX 11i Releases. . . . . . . . . . . . . . . . . . . . . . . . . . . . . . . . . . . . . . . . . . . . 20
Table 2. Publishing History Details . . . . . . . . . . . . . . . . . . . . . . . . . . . . . . . . . . . . . . 20
Table 4-1. Table of Analogous Terms. . . . . . . . . . . . . . . . . . . . . . . . . . . . . . . . . . . . . . 54
Table 5-1. Security Server Files That Require Configuration . . . . . . . . . . . . . . . . . . 64
Table 5-2. Wildcard Characters. . . . . . . . . . . . . . . . . . . . . . . . . . . . . . . . . . . . . . . . . . 68
Table 6-1. LDAP Configuration Files . . . . . . . . . . . . . . . . . . . . . . . . . . . . . . . . . . . . . 74
Table 6-2. krb5_ldap.conf File Format . . . . . . . . . . . . . . . . . . . . . . . . . . . . . . . . . . . . 75
Table 8-1. Configuration Files Required for kadmind . . . . . . . . . . . . . . . . . . . . . . . 112
Table 8-2. Administrative Permission Settings . . . . . . . . . . . . . . . . . . . . . . . . . . . . 114
Table 8-3. Default Password Policy Settings for the Base Group . . . . . . . . . . . . . . 119
Table 8-4. Administration Utilities . . . . . . . . . . . . . . . . . . . . . . . . . . . . . . . . . . . . . . 131
Table 8-5. Function of OK, Apply, and Cancel Buttons . . . . . . . . . . . . . . . . . . . . . . 133
Table 8-6. Principals Tab Components . . . . . . . . . . . . . . . . . . . . . . . . . . . . . . . . . . . 137
Table 8-7. Principal Information Window Components . . . . . . . . . . . . . . . . . . . . . . 139
Table 8-8. General Tab Components . . . . . . . . . . . . . . . . . . . . . . . . . . . . . . . . . . . . . 140
Table 8-9. Search Criteria . . . . . . . . . . . . . . . . . . . . . . . . . . . . . . . . . . . . . . . . . . . . . 149
Table 8-10. Password Tab Components. . . . . . . . . . . . . . . . . . . . . . . . . . . . . . . . . . . 160
Table 8-11. Change Password Window Components . . . . . . . . . . . . . . . . . . . . . . . . 163
Table 8-12. Attributes Tab Components . . . . . . . . . . . . . . . . . . . . . . . . . . . . . . . . . . 168
Table 8-13. Extract Service Key Table Components . . . . . . . . . . . . . . . . . . . . . . . . 181
Table 8-14. Group Information Window Components . . . . . . . . . . . . . . . . . . . . . . . 185
Table 8-15. Group Information Window Components . . . . . . . . . . . . . . . . . . . . . . . 190
Table 8-16. Realms Tab Components . . . . . . . . . . . . . . . . . . . . . . . . . . . . . . . . . . . . 194
Table 8-17. Realm Information Window Components . . . . . . . . . . . . . . . . . . . . . . . 195
Table 8-18. Require Initial Authentication Attribute Settings . . . . . . . . . . . . . . . . 220
Table 8-19. Principal Database Utilities. . . . . . . . . . . . . . . . . . . . . . . . . . . . . . . . . . 224
Table 8-20. Starting and Stopping Daemons and Services . . . . . . . . . . . . . . . . . . . 235
Table 9-1. Propagation Tools . . . . . . . . . . . . . . . . . . . . . . . . . . . . . . . . . . . . . . . . . . . 246
Table 9-2. primary security server Services and Daemons . . . . . . . . . . . . . . . . . . . 259
Table 11-1. Diagnostic Tools . . . . . . . . . . . . . . . . . . . . . . . . . . . . . . . . . . . . . . . . . . . 293
Table 11-2. Troubleshooting Scenarios . . . . . . . . . . . . . . . . . . . . . . . . . . . . . . . . . . . 296
Table 11-3. Troubleshooting Scenarios for your LDAP-based Kerberos server . . . 299
Table A-1. Configuration Worksheet . . . . . . . . . . . . . . . . . . . . . . . . . . . . . . . . . . . . . 312
13
Page 14

Tables
Table A-2. Configuration Worksheet Explanation . . . . . . . . . . . . . . . . . . . . . . . . . . 312
14
Page 15

Authentication Process 28
Integrating a Kerberos Principal in to the LDAP Directory 34
Principals Tab 137
Principal Information Window 139
Change Password Window 144
Administrative Permissions Window 147
Password Tab 160
Change Password Window 163
Attributes Tab 168
LDAP Attributes Tab 176
Extract Service Key Table Window 180
Group Information Window 185
Administrative Permissions Window 189
Realms Tab 194
Realm Information Window 195
Logon Screen 199
Change Password Screen 200
Warning Message 200
Hierarchical Interrealm Configuration 283
Figures
15
Page 16

Figures
16
Page 17

About This Manual
This manual describes how to install, configure, administer, and
troubleshoot the Kerberos server on HP Integrity servers running the
HP-UX 11i v2 operating system.
Intended Audience
HP intends this manual for system managers or administrators
responsible for configuring and maintaining the Kerberos server running
HP-UX 11i v2.
This manual is based on the assumption that you meet the following
prerequisites:
• Understand distributed network concepts and client/server
computing
• UNIX operating system
• Understand the Kerberos basics
• Understand LDAP concepts
What Is in This Document
Kerberos Server Version 3.1 Administrator’s Guide is divided into the
following chapters, which contain information about installing,
configuring, and administering the Kerberos server:
• Chapter 1, “Overview,” on page 23: Provides an introduction to the
Kerberos server, outlines the new features in this release, and
highlights the key advantages of using the Kerberos server. It also
provides an introduction to LDAP, and provides details on
integrating Kerberos v3.1 with LDAP.
• Chapter 2, “Installing the Kerberos Server v3.1,” on page 35:
Describes how to install the Kerberos server on the HP-UX 11i v2
operating system.
• Chapter 3, “Migrating to a Newer Version of the Kerberos Server,” on
page 41: Explains the migration process from earlier versions of the
Kerberos server to v3.1.
17
Page 18

• Chapter 4, “Interoperability with Windows 2000,” on page 51:
Contains information specific to establishing interoperability with
Windows 2000 Kerberos implementations.
• Chapter 5, “Configuring the Kerberos Server With C-Tree Backend,”
on page 63: Provides information on the configuration files required
to configure the Kerberos server with C-tree as the backend
database.
• Chapter 6, “Configuring the Kerberos Server with LDAP,” on
page 73: Provides information on the configuration files required to
configure the Kerberos server with LDAP as the backend database.
• Chapter 7, “Configuring the Primary and Secondary Security
Server,” on page 95: Describes the procedure for configuring the
primary and secondary servers.
• Chapter 8, “Administering the Kerberos Server,” on page 109:
Describes the procedures for administering the Kerberos server
database. It also discusses principals and their attributes.
• Chapter 9, “Propagating the Kerberos Server,” on page 241: Describes
how to propagate the Kerberos server database from the primary
security server to the secondary security servers.
• Chapter 10, “Managing Multiple Realms,” on page 275: Explains
interrealm authentication and interoperability trust. In addition, it
gives you an overview of the additional server configuration
requirements in deployments that use multiple realms and
interrealm authentication.
18
• Chapter 11, “Troubleshooting,” on page 289: Describes how to
troubleshoot the common problems encountered while using the
Kerberos server. In addition, it contains a brief note on reporting
problems to your Hewlett-Packard Support Contact.
• Appendix A, “Configuration Worksheet,” on page 311: Provides a
worksheet that will help you configure the Kerberos server with
LDAP as the backend database.
• Appendix B, “Sample krb.conf File,” on page 317: Provides a sample
krb.conf file.
• Appendix C, “Sample krb.realms File,” on page 319: Provides a
sample krb.realms file.
• Glossary
Page 19

• Index
Typographic Conventions
The following conventions are used throughout this manual:
Text Conventions
italic Identifies book titles.
bold Identifies options, command buttons, and menu
items.
Syntax Conventions
fixed width Identifies file names, system prompts, operating
system commands, and UNIX error and system
messages.
italic fixed width Identifies variables that you need to replace
according to your environment.
bold fixed
width
| Separates mutually exclusive parameters; only
[ ] Indicate that the enclosed parameters are
{ } Indicate that only one of the enclosed parameters
\ Indicates that a command line, parameter, or code
# Precedes a UNIX command that must be
% Precedes a UNIX command that must be
Identifies the default in a series of parameters.
one of the parameters separated by the bar is
allowed.
optional.
are required.
continues on the following line.
performed as a root user.
performed as an ordinary user.
19
Page 20

HP-UX Release Name and Release Identifier
Each HP-UX 11i release has an associated release name and release
identifier. The uname (1) command with the -r option returns the release
identifier. Table 1 lists the releases available for HP-UX 11i.
Table 1 HP-UX 11i Releases
Release
Identifier
B.11.11 HP-UX 11i v1 PA-RISC
B.11.20 HP-UX 11i v1.5 Intel Itanium
B.11.22 HP-UX 11i v1.6 Intel Itanium
B.11.23 HP-UX 11i v2 Intel Itanium
Release Name
Publishing History
Table 2 provides, for a particular document, the manufacturing part
number, the respective operating systems, and the publication date.
Table 2 Publishing History Details
Document
Manufacturing
Part Number
T1417-90001 HP-UX 11.0 and 11i v1 September 2001
T1417-90003 HP-UX 11.0 and 11i v1 June 2002
Operating System
Supported
Supported
Processor
Architecture
Publication Date
20
T1417-90007 HP-UX 11i v2 October 2003
T1417-90009 HP-UX 11i v2 April 2004
Related Software Products
Following are the products related to the Kerberos server:
• PAM Kerberos on HP-UX 11i v2, delivered as part of the HP-UX
Internet operating environment component.
Page 21

• KRB5 Client Software on HP-UX 11i v2, delivered as part of the core
operating system.
• GSS-API on HP-UX 11i v2, delivered as part of the core operating
system.
Related Documentation
For more information on the Kerberos server, see the following manuals:
• Configuration Guide for Kerberos Client Products on HP-UX
(T1417-90006)
• PAM Kerberos Release Notes for HP-UX 11i v2 (J5849-90011)
• PAM Kerberos Release Notes for HP-UX 11i (J5849-90002)
• KRB5 Client Software Release Notes for HP-UX 11.0 (J5849-90005)
• GSS-API Release Notes for HP-UX 11.0 (J5849-90006)
• HP-UX Internet Services Administrator’s Guide (B2355-90774)
• Using HP-UX Internet Services (B2355-90827)
•
HP-UX 11i v2 Installation and Update Guide
operating system v11i v1 or later) (5187-2725)
(for HP-UX
Accessing the World Wide Web
See the following web sites for more information on the Kerberos server:
• HP Technical Documentation and White Papers
— http://docs.hp.com
— http://www.unixsolutions.hp.com/products/hpux/
hpux11/whitepapers/netsecur.pdf
• HP-UX IT Resource Center
— http://us-support.external.hp.com (America and Asia
Pacific)
— http://europe-support.external.hp.com (Europe)
Related Request for Comments (RFCs)
See the following RFCs for more information on the Kerberos server:
21
Page 22

• RFC 1510 - The Kerberos Network Authentication Service (V5)
• RFC 1964 - The Kerberos v5 GSS-API Mechanism
• RFC 2743 - Generic Security Service Application Program Interface
• RFC 2744 - Generic Security Service API
You can access these RFCs at the following Web site:
http://www.ietf.org/rfc.html
HP Encourages Your Comments
HP welcomes any comments and suggestions you have on this manual.
You can send your comments in the following ways:
• Internet electronic mail: netinfo_feedback@cup.hp.com
• Using a feedback form located at the following URL:
http://docs.hp.com/assistance/feedback.html
Please include the following information along with your comments:
• The full title of the manual and the part number. (The part number
appears on the title page of printed and PDF versions of a manual.)
• The section numbers and page numbers of the information on which
you are commenting.
22
• The version of HP-UX that you are using.
Page 23

1 Overview
This chapter provides an introduction to the Kerberos server v3.1,
available on the HP-UX 11i v2 operating system.
Chapter 1 23
Page 24

Overview
This chapter discusses the following topics:
• “How the Kerberos Server Works” on page 26
• “Authentication Process” on page 27
• “DES Versus 3DES Key Type Settings” on page 31
• “Introduction to LDAP” on page 32
— “Integrating Kerberos Server v3.1 with LDAP” on page 33
Chapter 124
Page 25

Overview
Introduction
Introduction
The term Kerberos was derived from the Greek mythology. Cerberus is
the latin variant of Kerberos, who guarded the entrance of Hades, the
Greek hell. The Kerberos security system, on the other hand, guards
electronic transmissions that are sent across a network.
Kerberos is a mature network authentication protocol based on the RFC
1510 (The Kerberos Network Authentication Service (V5)) specification of
the Internet Engineering Task Force (IETF). It is designed to provide
strong authentication for client or server applications using the shared
secret key cryptography.
The Kerberos server is based on a distributed client/server architecture.
It ensures secure communication in a networked environment by
leveraging individual trust relationships. It then brokers that trust
across enterprise wide, distributed client/server networks.
Chapter 1 25
Page 26

Overview
How the Kerberos Server Works
How the Kerberos Server Works
The basic currency of Kerberos is the ticket, which the user presents to
use a specific service. Each service, be it a login service or an FTP
service, requires a different kind of ticket. The applications on the
Kerberos server keep track of all the various kinds of tickets.
When you first log on to Kerberos each day, you enter your Kerberos
password. In return, the Kerberos server gives you an initial ticket,
which you use to request additional tickets from the Kerberos server for
all the other services. For this reason, the initial ticket is also called the
ticket-granting ticket, or TGT.
Use the Kerberos protocol to secure the communication between the
client and server. Thus, client programs make authentication requests to
an authentication server, and server programs in turn service those
client requests. Based on your user credentials, the server program
grants or denies your request to access network applications and
services. The Kerberos server allows entities to authenticate themselves,
without having to transmit their passwords in clear text form over the
network.
For more information on the basics of Kerberos, see Installing,
Configuring and Administering the Kerberos Server on HP-UX 11i
(T1417-0001), available at
http://www.docs.hp.com/hpux/internet/index.html#Kerberos.
Chapter 126
Page 27

Overview
Authentication Process
Authentication Process
The Kerberos server grants tickets to your user principal to access
secured network services. You must log on to the server by providing
your user name and password. When the server authenticates you, it
returns a set of initial credentials for you, including a TGT and a session
key.
The Kerberos server grants a service ticket for a specific service principal
that can be associated with one or more Kerberos-secured services on the
same system. A client application uses your service ticket to authenticate
you to a Kerberos-secured network service. The secured client
application automatically handles the transactions with the server and
the secured application server. Service tickets and associated session
keys are generally cached in your user credentials cache along with the
TGT of the user.
Chapter 1 27
Page 28

Overview
Authentication Process
Figure 1-1 illustrates the actions of the components and the Kerberos
protocol in a secured environment.
Figure 1-1 Authentication Process
The following is a description of how a client and server authenticate
each other using Kerberos:
Step 1. You can begin to use a Kerberos-secured application by entering your
principal name and password. Optionally, you can request specific ticket
flags and specify the key type to be used to construct the secret key. You
can also accept the default values configured for the client.
You can send the following information to the Authentication Service
(AS) to obtain credentials:
Chapter 128
Page 29

Overview
Authentication Process
• Client-indicates the user name, also referred to as the principal
name
• Server-indicates the Application Server
• Time stamp
• Nonce
Step 2. If the AS decrypts the message successfully, it authenticates the
requesting user and issues a TGT. The TGT contains the user name, a
session key for your use, and name of the server to be used for any
subsequent communication. The reply message is encrypted using your
secret key.
Step 3. The client decrypts the message using your secret key. The TGT and the
session key from the message are stored in the client’s credential cache.
These credentials are used to obtain tickets for each network service the
principal wants to access.
The Kerberos protocol exchange has the following important features:
• The authentication scheme does not require that the password be
sent across the network, either in encrypted form or in clear text.
• The client (or any other user) cannot view or modify the contents of
the TGT.
Step 4. To obtain access to a secured network service such as rlogin, rsh, rcp,
ftp, or telnet, the requesting client application uses the previously
obtained TGT in a dialogue with the TGS to obtain a service ticket. The
protocol is the same as used while obtaining the TGT, except that the
messages contain the name of the server and a copy of the previously
obtained TGT.
Step 5. The TGS returns a new service ticket that the application client can use
to authenticate the service.
Step 6. The application client tries to authenticate to the service on the
application server using the service ticket obtained from the TGS.
The secure application validates the service ticket using the service key
of the server that is present in the key tab file. Using the session key, the
server decrypts the authenticator and verifies the identity of the user. It
Chapter 1 29
Page 30

Overview
Authentication Process
Step 7. (Optional) At the client’s request, the application server can also return
also verifies that the user’s service ticket has not expired. If the user does
not have a valid service ticket, then the server will return an appropriate
error code to the client.
the timestamp sent by the client, encrypted in the session key. This
ensures a mutual authentication between the client and the server.
Chapter 130
Page 31

Overview
DES Versus 3DES Key Type Settings
DES Versus 3DES Key Type Settings
In the processes outlined in the section “Authentication Process” on
page 27, if the user principal and the service principal do not use the
same key type, the process continues as described.
The Kerberos server acts as the only trusted party, and the client or the
service does not accept a message encrypted by the client or the service
key. Both the client application and the service share a secret key only
with the server.
The authenticator data that the service and client encrypt or decrypt is
encrypted in session keys. The server sends the required session keys to
the client and service in packets that are encrypted with their respective
keys. The Kerberos server checks the key type settings for the user
principals and service principals and determines the most secure
encryption allowed for the session key. If the user principals and service
principals have a 3DES key stored in the database, the session key type
that is returned is of type 3DES. If only one has a 3DES key and the
other has a DES key, then the session key that is returned is of type
DES.
The server never returns a session key in the service ticket packet that
uses stronger encryption than the session key included with a TGT
packet. If a user principal has both 3DES and DES keys and uses the
DES key to obtain a TGT, all service tickets obtained using this TGT
contain DES session keys.
IMPORTANT The krbtgt/<REALM NAME> is the ticket-granting principal. This is a
reserved principal that is automatically created when you add a realm to
the database. You must assign a key type for the krbtgt/<REALM NAME>
principal or the default key, issued by the Kerberos server, uses the
3DES encryption type.
Chapter 1 31
Page 32

Overview
Introduction to LDAP
Introduction to LDAP
The Lightweight Directory Access Protocol (LDAP) is a lightweight
protocol for accessing directory services. LDAP defines a message
protocol used by directory clients and directory servers. It is a
fast-growing technology for accessing common directory information.
LDAP has been embraced and implemented in most network-oriented
middleware. LDAP has gained wide acceptance as the directory access
method of the Internet and is therefore becoming strategic within
corporate intranets.
As the number of different networks and applications has grown, the
number of specialized directories of information has also grown,
resulting in islands of information that are difficult to maintain. LDAP,
an open industry standard, has evolved to meet these needs of providing
access to a common directory infrastructure. LDAP defines a standard
method for accessing and updating information in a directory.
LDAP Advantages
LDAP has evolved as a lightweight protocol for accessing information in
X.500 directory services. It has since become more independent of X.500,
and servers that specifically support the LDAP protocol rather than the
X.500 Directory Access Protocol. The success of LDAP has been largely
due to the following characteristics that make it simpler to implement
and use, compared to X.500 and DAP:
• Omits duplicate, rarely used, and esoteric features. This makes
LDAP easier to understand and to implement.
• Runs over TCP/IP rather than the OSI protocol stack. TCP/IP is less
resource-intensive and is widely available.
• Encodes data for transport over networks by using a simplified
version of the same encoding rules that is used by X.500.
• Uses strings to represent data rather than complicated structured
syntax such as ASN.1 (Abstract Syntax Notation One).
Chapter 132
Page 33

Overview
Introduction to LDAP
Integrating Kerberos Server v3.1 with LDAP
You can configure Kerberos server v3.1 with LDAP as the backend
database. By integrating the Kerberos principals with the corresponding
users in the LDAP directory, you store data for mechanisms, such as
UNIX and Kerberos in a common repository. Also, you can secure user
credentials by mandating users to use LDAP credentials.
Implementing this solution involves the following steps:
— Modifying the configuration files on the Kerberos server
— Extending the LDAP directory schema
The Kerberos Server v3.1 Administrator’s Guide first details the design
specifications in terms of the Kerberos Server requirements and the
LDAP directory requirements. It then covers the actual implementation
guidelines and procedures used to accomplish this solution.
You must use the krb_2_ldap utility to migrate your existing Kerberos
database to LDAP. See “Migrating to a Newer Version of the Kerberos
Server”, on page 41.
You can configure your Kerberos server with LDAP by either using the
autoconfiguration tool, krbsetup, or manually editing the LDAP
configuration files located in the /opt/krb5/examples directory. For
more information see Chapter 6, “Configuring the Kerberos Server with
LDAP,” on page 73. HP recommends that you use the krbsetup tool to
configure your Kerberos server with the LDAP.
You can administer and maintain the Kerberos database by either using
the HP Kerberos Administrator, a graphical user interface, or the
command-line administrator. See “Administering the Kerberos Server”,
on page 109.
NOTE Kerberos server v3.1 supports only Netscape Directory server 6.0
(J4258CA) and later, as the LDAP backend database. You must have the
LDAP-UX product installed on the Kerberos server to setup a Kerberos
server with LDAP as the backend database.
Chapter 1 33
Page 34
Overview
Introduction to LDAP
How is the Kerberos Principal Integrated in to the LDAP Directory?
A directory contains a collection of objects organized in a tree structure.
You can arrange entries within the DIT based on their Distinguished
Names (DNs). A DN is composed of a sequence of RDNs separated by
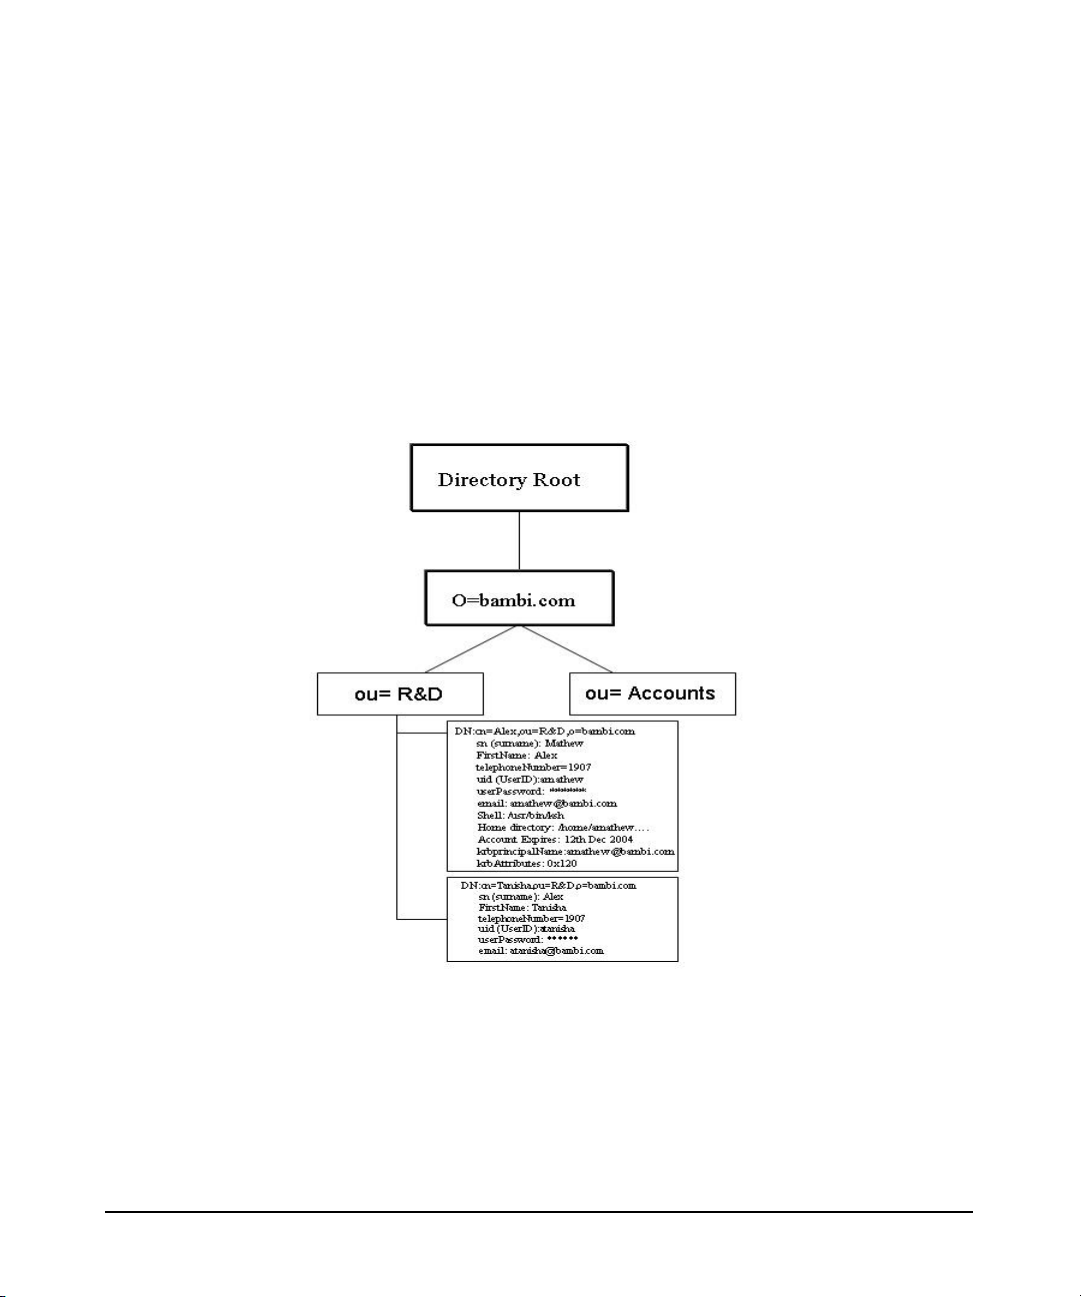
commas, such as cn=alex,ou=R&D,o=bambi.
Figure 1-2, displays how a Kerberos principal is integrated in to the
LDAP directory.
Figure 1-2 Integrating a Kerberos Principal in to the LDAP Directory
Figure 1-2 illustrates data related to the user Alex Mathew, who is
located in the LDAP directory at cn=Alex, ou=accounts, o=BAMBI.COM.
With both the POSIX account and LDAP information integrated, like
Alex’s UNIX identity, his Kerberos identity, and any other attributes
related to Alex under a single LDAP directory entry.
Chapter 134
Page 35

2 Installing the Kerberos Server
v3.1
This chapter describes how to install the Kerberos server v3.1 on the
HP-UX 11i v2 operating system.
Chapter 2 35
Page 36

Installing the Kerberos Server v3.1
This chapter contains the following sections:
• “Prerequisites” on page 37
• “System Requirements” on page 38
• “Installing the Server” on page 39
Chapter 236
Page 37

Installing the Kerberos Server v3.1
Prerequisites
Prerequisites
Before you install the server, ensure that:
• You have installed the HP-UX 11i v2 operating system on your
system. To check the version of the HP-UX operating system, run the
uname -r command at the HP-UX prompt.
• The Kerberos server is installed on a system that is physically secure
and has restricted access to it. If necessary, verify that the system on
which you install the Kerberos server is kept under lock and key.
• All the network services, such as ftp, telnet, rlogin, and finger,
are disabled by restricting access to the machine. Edit the
/etc/inetd.conf file to deactivate the non-kerberos services.
Restart the inetd daemon after you modifying the /etc/inetd.conf
file.
• The file system is protected with proper permissions in order to
restrict the non root users from accessing and manipulating the files
maintained by the Kerberos server, such as cache files and stash
files.
Chapter 2 37
Page 38

Installing the Kerberos Server v3.1
System Requirements
System Requirements
This section describes the hardware and software requirements for the
Kerberos server software for HP-UX server systems.
Hardware Requirements
The hardware requirement for installing the Kerberos server is 12 MB of
free disk space.
You can install the Kerberos server v3.1 software when your system is
up, and you need not reboot the system after installing the software. HP
does not recommend the single-user state.
Software Requirements
Before installing the Server product, ensure that the following software
is installed on your system:
• KRB5-Client Software, delivered as part of the HP-UX 11i v1 core
operating system.
• LDAP-UX Client product, if you plan to enable LDAP as the backend
database.
• Netscape Directory server 6.0 (J4258CA), if you plan to enable LDAP
as the backend database.
For more information about any of these products, see “Related
Documentation” on page 21. If you cannot find the software or
information you need, contact your HP representative or log on to
Website, http://www.software.hp.com.
Version Compatibility
The version of the Kerberos server you are installing must be compatible
with the version of HP-UX you are running.
Chapter 238
Page 39

Installing the Kerberos Server v3.1
Installing the Server
Installing the Server
To install the Kerberos server, complete the following steps:
Step 1. Insert the software media (tape or disk) in the appropriate drive.
Step 2. Type the swinstall command at the HP-UX prompt.
For more information on the swinstall command, type man 1M
swinstall at the HP-UX prompt.
Step 3. In the Specify Source window, select the appropriate path of the depot
and click OK.
Step 4. Highlight T1417AA in the Software Selection dialog box, and select
Mark For Install from the Actions menu to install all filesets in the
bundle.
Step 5. When you have marked the product components you want to install,
select Install (analysis) from the Actions menu.
Step 6. When you have successfully completed the analysis, click OK in the
Analysis dialog to load the Kerberos server filesets.
The swinstall utility loads the filesets. The estimated time for
processing is 5 minutes.
If the installation is not successful, an error message is displayed. The
cause of the failure will appear at the end of the
/var/adm/sw/swagent.log file.
For more information, see Managing HP-UX Software with SD-UX at
http://www.docs.hp.com.
Kerberos server v3.1 is ready for use.
To configure the server to act as either the primary security server or one
of the secondary security servers, see Chapter 7, “Configuring the
Primary and Secondary Security Server,” on page 95 for more
information.
Chapter 2 39
Page 40

Installing the Kerberos Server v3.1
Installing the Server
Chapter 240
Page 41

3 Migrating to a Newer Version of
the Kerberos Server
This chapter describes how to migrate from the Kerberos server v1.0 to
v3.0, from the Kerberos server v2.0 to v3.0, and from the Kerberos server
Chapter 3 41
Page 42

Migrating to a Newer Version of the Kerberos Server
v3.0 to v3.1. The Kerberos database formats of v2.0 and v3.0 are
compatible with each other, but the database formats of Kerberos server
v1.0 and v3.0 are not compatible with each other. Therefore, migrate the
database format from v1.0 to v3.0.
The Kerberos server v1.0 database contains information related both to
principal and policy. However, the Kerberos server v3.0 database
contains only the principal-related information, and contains the
policy-related information in a separate file, password.policy. The
Kerberos server v3.0 supports a tool to migrate the principal-related
information from v1.0 to v3.0.
To migrate from the Kerberos server v2.0 database to v3.0, dump the
v2.0 database using the kdb_dump utility, and load this dump file into the
v3.0 database using the kdb_load utility. If you are migrating the
Kerberos database from v1.0 to v3.0 or from v2.0 to v3.0, create a dump
file of the older Kerberos database before installing the new version of
the Kerberos server. For more information, see “Migrating from Kerberos
Server Version 1.0 to 3.0” on page 43, and “Migrating from Kerberos
Server Version 2.0 to Version 3.0” on page 47.
To migrate from the Kerberos server v3.0 to v3.1, dump the v3.0
database using the krb_2_ldap utility, and load this dump file into the
v3.1 database using the ldapmodidfy command. For more information,
see “Migrating from Kerberos Server Version 3.0 to Version 3.1” on
page 49.
NOTE You must manually migrate the policy information from v1.0 to v3.0.
However, while migrating from v2.0 to v3.0, you need not migrate the
password.policy file that contains the policy-related information.
This chapter discusses the following topics:
• “Migrating from Kerberos Server Version 1.0 to 3.0” on page 43
• “Migrating from Kerberos Server Version 2.0 to Version 3.0” on
page 47
• “Migrating from Kerberos Server Version 3.0 to Version 3.1” on
page 49
Chapter 342
Page 43

Migrating to a Newer Version of the Kerberos Server
Migrating from Kerberos Server Version 1.0 to 3.0
Migrating from Kerberos Server Version 1.0 to
3.0
If you want to use the Kerberos server with C-tree as the backend
database, migrate your existing Kerberos server to Kerberos server v3.0.
In the Kerberos server v1.0, you can create a policy with any name and
attribute value. Any principal can subscribe to any of the policies in the
database.
In the Kerberos server v2.0, the password policy is based on the instance
name of the principal. The instance name is part of the principal name.
For example, in the principal, user1/admin@hp.com, admin is the
instance name. The principals having the admin instance inherit the
values defined for the admin policy in the password.policy file.
In the new version of the Kerberos server, v3.0, the password policies are
based on the policy subscribed to by the principal.
The policy information is available as a dump file after you have
migrated the dump file from v1.0 to v3.0. After the migration, the policy
information is not migrated automatically, that is, the policy to which a
principal is subscribed, is not updated in the database. The
administrator needs to explicitly classify the principals and add the
policies to the password.policy file, according to the site policy.
IMPORTANT You must modify the principals with the new policy. The instance-based
rules apply if you do not specify the policy.
You need to perform the task of manually migrating the
admin_acl_file from v1.0 to v3.0. For more information, see “The
admin_acl_file File” on page 113.
To migrate from Kerberos server v1.0 to v3.0, complete the following
steps:
Step 1. Dump the database on the v1.0 server.
On the Kerberos server v1.0, dump the database with the default dump
version. The dump file must contain the default header, “kdb5_util
load_dump version 5”.
Chapter 3 43
Page 44

Migrating to a Newer Version of the Kerberos Server
Migrating from Kerberos Server Version 1.0 to 3.0
# kdb5_util dump /opt/krb5/dumpfilev1.0
Step 2. Copy the dump file to the new system where you are installing the
Kerberos server v3.0.
Step 3. Install the v3.0 Kerberos daemons on the new system.
Step 4. Migrate the v1.0 dump file to the v3.0 dump file.
To generate the v3.0 dump file, run the kdb_migrate tool on the system
where Kerberos server v3.0 is installed:
# kdb_migrate -i /opt/krb5/dumpfilev1.0 -o
=> /opt/krb5/dumpfilev3.0 -p /opt/krb5/polv3 -1
=> /tmp/kdb_migrate.log
NOTE The lines beginning with => are continuations of the previous line.
If the /var/adm/krb5/krb5kdc/kdc.conf file does not exist and the
master key name is not the default (K/M), specify this as an argument in
kdb_migrate by specifying the -M option.
If the /var/adm/krb5/krb5kdc/kdc.conf file does not exist and the -e
option is not specified, the encryption type is the encryption type of the
master principal obtained from the dumpfilev1.0.
If the /etc/krb5.conf file does not exist, the migration process fails.
You can change the password of the master key while executing the
migration tool. The tool prompts you for a password change. If you want
to change the password, type yes at the command prompt. If you do not
want to change the password, type no at the command prompt.
NOTE You must use the same password while creating the minimal database
for v3.0 of the Kerberos server, as described in step 5.
The policy information is available in the /opt/krb5/polv2 directory
and the logs are available in /tmp/kdb_migrate.log file.
Step 5. Configure the Kerberos server v3.0.
Chapter 344
Page 45

Migrating to a Newer Version of the Kerberos Server
Migrating from Kerberos Server Version 1.0 to 3.0
You can configure Kerberos server manually or by using the krbsetup
tool.
Ensure that the following values are the same in both versions of the
Kerberos server:
• Realm name
• Master key name
The master key password must be identical to the one that was used in
v1.0. This is applicable if you have not opted to change the password, as
mentioned in step 3. If you have changed the password, use the same
new password while creating the Kerberos server v3.0 database.
If you used the -e option to change the master key encryption type from
v1.0 to v3.0 in step 3, use the same new encryption type for the master
key while creating the database in v3.0.
If you did not specify the -e option in step 3, then the encryption type
with which the v3.0 database was created must be the same as the one
specified while creating the v1.0 database. For more information, type
man 4 kdc.conf at the HP-UX prompt and see the master_key_entry.
The krbsetup interactive tool prompts for the required parameters. For
more information, type man 1M krbsetup at the HP-UX prompt or see
“Auto-Configuration of the Kerberos Server” on page 63.
Step 6. Load the new version of the dump file generated in step 3.
Use the kdb_load tool to load the database from the dump file,
/opt/krb5/dumpfilev3.0:
# kdb_load -f /opt/krb5/dumpfilev3.0
Upon success, the following message appears:
“Load Successful”
The migration process of the principal information is now completed.
Consider the following points:
• The principal information is migrated from v1.0 to v3.0.
• The /opt/krb5/polv2 file contains the policy-related information.
You need to decide on the policies and add the policies to the
/opt/krb5/password.policy file.
Chapter 3 45
Page 46

Migrating to a Newer Version of the Kerberos Server
Migrating from Kerberos Server Version 1.0 to 3.0
The policy applicable to the principal that is migrated from v1.0 to
v3.0 is based on the instance name of the principals. To modify the
policy, edit the principal to change the policy name field to the new
policy.
• You cannot migrate the admin_acl_file. You need to add the
appropriate ACLs to the /opt/krb5/admin_acl_file using the old
admin_acl_file. For more information, see “The admin_acl_file
File” on page 113.
• The /tmp/kdb_migrate.log file contains the log messages of step 3.
The log messages inform you of the failure ([ERR] message),
successful migrations ([LOG] messages), and so forth.
If you encounter any problem while loading the new version of the
dump file, analyze the dump file.
Copy the /etc/krb5.conf file of the v1.0 server to the new system,
where you are installing the v3.0 server. In addition, copy the
/var/adm/krb5/krb5kdc/kdc.conf file if the master key principal
name is not the default K/M. If only the master key principal name differs
from the default, avoid copying the kdc.conf file by specifying the -M
option while using the kdb_migrate tool.
Chapter 346
Page 47

Migrating to a Newer Version of the Kerberos Server
Migrating from Kerberos Server Version 2.0 to Version 3.0
Migrating from Kerberos Server Version 2.0 to
Version 3.0
If you want to use the Kerberos server with C-tree as the backend
database, migrate your existing Kerberos server to Kerberos server v3.0.
In the Kerberos server v2.x, the password policy was based on the
instance name to which the principal belongs. Starting with the
Kerberos server v3.0, the password policy is not based on the instance
name but is based on the policy subscribed to the principal, which
provides the flexibility for a principal to subscribe to any policy in the
/opt/krb5/password.policy file.
You must securely copy the adm_acl_file from the Kerberos server v2.0
to the v3.0 system.
IMPORTANT After migrating the v2.0 database to the v3.0 server, you must modify the
v2.0 principals with the appropriate policy names (policy names are
present in the /opt/krb5/password.policy file). The instance-based
rules apply if you do not specify the policy name.
To retain the v2.0 policies, copy the password.policy file to the v3.0
server before creating a new principal.
You can change the policy name using one of the administrative tools:
kadminl, kadmin, kadminl_ui or kadmin_ui.
When you migrate the v2.0 database to the v3.0 server, the default
principal of the v2.0 database does not contain the policy name field.
Therefore, the default policy applicable to the created principals is * (the
default policy), until you modify the default policy of the principal.
To migrate from Kerberos server v2.0 to v3.0, complete the following
steps:
Step 1. Dump the database on the v2.0 server.
On the Kerberos server v2.0, dump the database with the default dump
version. The dump file must contain the default header, “kdb5_util
load_dump version 5.0”.
Chapter 3 47
Page 48

Migrating to a Newer Version of the Kerberos Server
Migrating from Kerberos Server Version 2.0 to Version 3.0
# kdb_dump -f /opt/krb5/dumpfilev2.0
Step 2. Copy the dump file to the system on which you are installing the v3.0
Kerberos server
Step 3. Install the v3.0 Kerberos daemons on the new system.
Step 4. Configure the Kerberos server v3.0.
NOTE Ensure that the following values are the same on both the versions of the
Kerberos server:
• Realm name
• Master key name
Ensure that the master key password is identical to the one that was
used in v2.0:
# krbsetup
The instance-based policy applies if you do not subscribe principals to a
specific policy.
You can configure the Kerberos server manually or by using the
krbsetup tool. This is an interactive tool that prompts you for the
required parameters. For more information, type man 1M krbsetup at
the HP-UX prompt or see “Auto-Configuration of the Kerberos Server” on
page 63.
Step 5. Load the dump file generated in step 1 using the following command:
#kdb_load -f
<dump_filename>
On successful completion, the following message is displayed:
Load Successful
Now, the migration process of the principal information is completed.
Chapter 348
Page 49

Migrating to a Newer Version of the Kerberos Server
Migrating from Kerberos Server Version 3.0 to Version 3.1
Migrating from Kerberos Server Version 3.0 to
Version 3.1
If you want to use the Kerberos server with LDAP as the backend
database, migrate your existing Kerberos server to Kerberos server v3.0.
Use the krb_2_ldap utility to migrate information of the previous
version of the Kerberos server to the LDAP database. The krb_2_ldap
utility performs the following tasks, while migrating information:
• Converts each entry of the version 2.0 or 3.0 dumpfile to ldif file
entry. The new entries are dumped into an LDIF file.
• Logs any log messages or errors and displays it in stdout format.
Complete the following steps to migrate from Kerberos server v3.0 to
v3.1:
Step 1. Dump the database on the v3.0 server.
On the Kerberos server v3.0, dump the database with the default dump
version. The dump file must contain the default header, “kdb5_util
load_dump version 5.0”.
# kdb_dump -f /opt/krb5/dumpfilev3.1
Step 2. Use the krb_2_ldap utility to create the LDIF file.
# krb_2_ldap -d <dump filename> -l <ldif filename>
Step 3. You must manually edit the LDIF file.
Uncomment the first two lines of the LDIF file. Replace the DN name and
the changetype, if necessary.
Step 4. Load the LDIF file using the following command:
/opt/ldapux/bin/ldapmodify -d “cn=amathew” -w eso! -h
<hostname> -p <port number> -f <ldif filename>
On successful completion, the following message is displayed:
Load Successful
Now, the migration process of the principal information is completed.
Chapter 3 49
Page 50

Migrating to a Newer Version of the Kerberos Server
Migrating from Kerberos Server Version 3.0 to Version 3.1
Chapter 350
Page 51

4 Interoperability with Windows
2000
When you configure interoperability between the Kerberos server and
the Windows 2000 operating system, you must set certain configuration
Chapter 4 51
Page 52

Interoperability with Windows 2000
parameters. This chapter discusses what you need to know about
configuring such an environment. This chapter contains information
specific to establishing interoperability with Windows 2000 Kerberos
implementations. Before reading this chapter, ensure that you are
familiar with the concepts in Chapter 10, “Managing Multiple Realms,”
on page 275.
This chapter discusses the following topics:
• “Understanding the Terminology” on page 53
• “Kerberos Server and Windows 2000 Interoperability” on page 55
• “Establishing Trust Between Kerberos Server and Windows 2000” on
page 56
• “Single Realm (Domain) Authentication” on page 58
• “Interrealm (Interdomain) Authentication” on page 59
• “Special Considerations for Interoperability” on page 60
Chapter 452
Page 53

Interoperability with Windows 2000
Understanding the Terminology
Understanding the Terminology
Both the Kerberos server and Microsoft provide Kerberos security for
your network. While the technology is the same, the terminology varies.
Kerberos authentication depends upon establishing trust between users
and services through a trusted third party called a Key Distribution
Center (KDC). HP provides a KDC on the security server, and Windows
2000 provides a KDC on the domain controller.
Each KDC stores information about trusted users and services in a
central database called the principal database in HP terms and the
Active Directory of the domain in Microsoft terms. Each database
contains a collection of users. In HP terms, the database contains a
collection called a realm and each entry is called a principal. In Microsoft
terms, the database contains a collection called a domain and each entry
is called an account.
The most important information associated with any principal in the
Kerberos model is its unique symmetric key, that is, the key used to
encrypt and decrypt information on behalf of the principal. HP uses the
term, secret key; Microsoft uses the terms long-term key or shared
principal key. The KDC, as the trusted third party, shares a unique
secret key with all of its principals. When a principal and the KDC
exchange information to establish trust, the principal uses its secret key
to encrypt the message. The KDC decrypts the message using the secret
key of the principal stored in the database and then attempts to
authenticate the principal.
During logon, if KDC successfully authenticates the user, it responds
with a special message, called a ticket granting ticket (TGT). The ticket
entitles you to request access to other services known to the KDC.
The client system stores the ticket in memory. In HP terminology, the
client system stores the ticket in the credentials cache and uses it to
request service tickets to authenticate the applications or services on the
network. In Microsoft terminology, the client system stores the ticket in
the secure cache and uses it to request session tickets to authenticate to
applications or services.
The HP and Microsoft implementations of Kerberos have virtually
identical conceptual frameworks, but mechanical differences exist. For
example, the HP implementation uses configuration files to locate host
Chapter 4 53
Page 54

Interoperability with Windows 2000
Understanding the Terminology
systems and the Microsoft implementation uses a DNS lookup to resolve
host names. But both implementations are written to RFC 1510 (The
Kerberos Network Authentication Service (V5)) and RFC 1964 (The
Kerberos Version 5 GSS-API Mechanism), and hence they can
interoperate.
Table 4-1 summarizes analogous terminology in the Kerberos server and
Windows 2000 Kerberos implementations.
Table 4-1 Table of Analogous Terms
Kerberos Server Windows 2000
Realm Domain
Interrealm Interdomain
Secret key Longterm key
Credentials cache Secure cache
Crossdomain
Crossrealm
Shared principal key
Principal database Active directory
Service ticket Session ticket
Security server Domain controller
Principal names Account names
Chapter 454
Page 55

Interoperability with Windows 2000
Kerberos Server and Windows 2000 Interoperability
Kerberos Server and Windows 2000
Interoperability
Following are the possible interrealm interoperability scenarios between
the Kerberos server software and Windows 2000, each with its own
configuration requirements.
Scenario 1
A Windows 2000 user needs access to services in a Kerberos server
realm. Here, the Kerberos server realm is the target realm and the
Windows 2000 domain is the source realm. The Kerberos server must
trust the Windows 2000 domain controller to perform secure
authentication.
Scenario 2
A Kerberos server principal needs access to services in a Windows 2000
domain. Here, the Windows 2000 domain is the target realm and the
Kerberos server realm is the source realm. The Windows 2000 domain
controller must trust the Kerberos server to perform secure
authentication.
Scenario 3
The Kerberos server principals and Windows 2000 users must access
services in the realm or domain. Two-way trust must exist between the
Kerberos server and the Windows 2000 domain controller.
Chapter 4 55
Page 56

Interoperability with Windows 2000
Establishing Trust Between Kerberos Server and Windows 2000
Establishing Trust Between Kerberos Server
and Windows 2000
To establish trust between Kerberos server KRB.REALM and Windows
2000 W2K.DOMAIN, complete the following steps:
Step 1. Add interrealm service principals to the Kerberos server realm. For more
information, see “HP Kerberos Administrator” on page 132.
• If the realm is the source realm, the name of the principal is
krbtgt/W2K.DOMAIN@KRB.REALM.
• If the realm is the target realm, the name of the principal is
krbtgt/KRB.REALM@W2K.DOMAIN.
Step 2. On the Windows 2000 domain controller, use the Active Directory
Domains and Trusts snap-in to create the trust relationship.
• If the domain trusts the Kerberos server realm, add the realm name
to the Domains that this domain trusts field.
• If the Kerberos server realm trusts the Windows 2000 domain, add
the realm name to the Domains that trust this domain’ field. Keep in
mind that the passwords in steps 1 and 2 must be identical for the
corresponding principals.
Step 3. Update the client configuration files or the DNS configuration with the
name of the foreign KDC.
• For the Kerberos server clients, perform the following steps:
a. Add the Windows 2000 domain controller domain name and fully
qualified domain name to the /etc/krb5.conf file of the client.
b. Configure the [capaths] section for the direct trust relationship
between the realms.
c. Add the host-to-realm name mapping data for each available
Windows 2000 service to the /etc/krb5.conf file of the client.
• To invoke the Windows 2000 Ksetup tool on the Windows 2000 client,
execute the following command:
Ksetup/addkdc KRB.REALM <fqdn>
Chapter 456
Page 57

Interoperability with Windows 2000
Establishing Trust Between Kerberos Server and Windows 2000
NOTE The fqdn qualifier specifies the fully qualified domain name of the
Kerberos KDC.
Step 4. Reboot the Windows 2000 domain controller. You need not reboot the
Kerberos server or client.
Chapter 4 57
Page 58

Interoperability with Windows 2000
Single Realm (Domain) Authentication
Single Realm (Domain) Authentication
Single realm interoperability scenarios involve one or more client
systems in a given realm or domain that authenticate to a single KDC.
Following are the interoperability scenarios that do not require
interrealm authentication:
• Kerberos server principals and Windows 2000 users can
authenticate to a Kerberos server and access services registered in
that realm.
• Kerberos server principals and Windows 2000 users can
authenticate to a Windows 2000 domain controller and access
services registered in that domain.
Single realm authentication requires all Kerberos server principals and
Windows 2000 users to be entered in the same database regardless of
whether that is a principal database on a Kerberos server or a Windows
2000 domain controller.
IMPORTANT In single realm authentication, principals can only access resources in
their native realm. If a principal needs access to resources in a different
realm, you must configure interrealm authentication.
Chapter 458
Page 59

Interoperability with Windows 2000
Interrealm (Interdomain) Authentication
Interrealm (Interdomain) Authentication
If two distinct realms share common keys, the realms trust one another.
With that trust in place, principals can securely access services in their
native realm as well as those in the trusted realm. HP calls such an
access interrealm authentication, and Microsoft calls it inter-domain
authentication or cross-realm authentication.
The following are examples of interrealm interoperability scenarios:
• A Kerberos principal can authenticate to a Kerberos server with
access services registered in its native realm and trusted Windows
2000 domains.
• A Kerberos principal can authenticate to a Windows 2000 domain
controller with access services registered in its native domain and in
trusted foreign domains or realms.
• A Windows 2000 principal can authenticate to a Kerberos server
with access services registered in its native realm and in trusted
foreign realms or domains.
• A Windows 2000 principal can authenticate to a Windows 2000 KDC
with access services registered in its native domain and in trusted
foreign domains or realms.
Interrealm authentication relies on secure authentication between users
and the KDC in a single realm. The shared interrealm key between
trusted KDCs provides the extra link to create a chain of trust that
allows a principal in one realm to authenticate to a service in a trusted
foreign realm.
Chapter 4 59
Page 60

Interoperability with Windows 2000
Special Considerations for Interoperability
Special Considerations for Interoperability
You must consider the following issues related to interoperability with
Windows 2000 implementations.
Database Considerations
Your network can contain more than one server, but only one master
copy of the database is propagated to all secondary security servers. In a
Windows 2000 Kerberos implementation, an enterprise can contain more
than one domain controller, and each domain controller contains a
writable copy of the database. Therefore, the two Kerberos
implementations cannot share the same database.
You cannot propagate database entries between Kerberos servers and
Windows 2000 domain controllers. Do not attempt to set a Windows 2000
domain controller as a secondary security server to a Kerberos primary
security server, or vice versa.
Encryption Considerations
In the Kerberos authentication protocol, critical information is never
sent in clear text over the network. Instead, the information is encrypted
using a specified algorithm. Although the Kerberos server supports
3DES encryption, Windows 2000 requires DES encryption when it
interoperates with other Kerberos implementations. Thus, principals in
these realms that want to access resources in Windows 2000 domains
must use a DES key type.
Postdated Tickets
The Kerberos server and client supports postdated tickets, but the
Windows 2000 domain controller and client do not. If you use postdated
tickets to run batch procedures over time, be sure the procedure does not
need access to Windows 2000 services.
Chapter 460
Page 61

Interoperability with Windows 2000
Special Considerations for Interoperability
Chapter 4 61
Page 62

Interoperability with Windows 2000
Special Considerations for Interoperability
Chapter 462
Page 63

5 Configuring the Kerberos
Server With C-Tree Backend
This chapter describes the configuration files and procedures used to
configure the Kerberos Server with C-tree backend.
Chapter 5 63
Page 64

Configuring the Kerberos Server With C-Tree Backend
Configuration Files for the Kerberos Server
Configuration Files for the Kerberos Server
You must install all the critical Kerberos server files on the system before
you start configuring the Kerberos Server. You must configure these files
on the primary security server and copy these files to all the secondary
security servers on the network. Table 5-1 briefly describes the server
files that you need to configure.
Table 5-1 Security Server Files That Require Configuration
Configuration File Function
/opt/krb5/krb.conf Describes the default realm of the
primary security server and the
roles of each server for that
particular realm.
/opt/krb5/krb.realms Provides a way to map the host
name or domain name to the
associated realm name.
/opt/krb5/admin_acl_file Controls the administrative
permissions for administrators. See
“The admin_acl_file File” on
page 113 for more information.
/opt/krb5/password.policy Controls password policy for the
entire security network. See
“Password Policy File” on page 119
for more information.
/opt/krb5/kpropd.ini Contains the configuration
information that is used for
propagation. This is a text file. See
“The kpropd.ini File” on page 251 for
more information.
This chapter contains detailed descriptions of the krb.conf and
krb.realms configuration files. If you have opted to configure LDAP as
the backend, see “Planning Your LDAP Configuration” on page 83.
Chapter 564
Page 65

Configuring the Kerberos Server With C-Tree Backend
Configuration Files for the Kerberos Server
The krb.conf File
The krb.conf configuration file contains information about the default
realm of the host, the administration server, and security servers for
known realms. HP recommends that you copy the krb.conf.sample file
from the /opt/krb5/examples directory to the /opt/krb5 directory.
This file must reside in the /opt/krb5 directory and must have the
following permissions:
-rw-r--r-- root 3
The configuration file identifies the servers that support authentication
for the designated realm, and defines the default realm for the host
where the file is stored.
The krb.conf file lists the default realm of the host system. It also maps
known realms to their primary and secondary security servers by host
name, and network location.
Assuming that your network environment performs load-balancing and
redundancy, you must create multiple versions of the krb.conf file. You
must also configure secondary security servers to act as authentication
servers. This allows the primary security server to be available for tasks
other than authentication.
The krb.conf file is used during propagation configuration. The realm
specified in the first line of the configuration file is considered as the
default realm of the server. This has to be the first realm created in the
database containing the K/M principal.
The krb.conf File Format
Use the format shown below to create an entry in the krb.conf file. See
Appendix B, “Sample krb.conf File,” on page 315 to see how a sample
krb.conf file looks.
Your_Realm_Name
Your_Realm_Name Your_Secondary_Server1
Your_Realm_Name Your_Secondary_Server2
Your_Realm_Name your_primary_server admin server
The first line of the krb.conf file identifies the host system’s default
realm. By convention, realm names are in uppercase letters to visually
distinguish them from domain names.
Chapter 5 65
Page 66

Configuring the Kerberos Server With C-Tree Backend
Configuration Files for the Kerberos Server
NOTE Realm names are case sensitive; you must type the realm name correctly
if your site does not follow the uppercase convention.
The subsequent lines require fields that identify the security server host
names. Each field in the line must be separated by a space or a tab. The
second field indicates the Fully Qualified Domain Name (FQDN) of the
host security server for that realm.
The order of entries in the krb.conf file is important on the client
system, because it is used to identify the intended order of redundant
security servers. Applications attempting to connect to the security
server use this file to read the entries in the listed order. Redundant
security servers are used when higher priority security servers are
unavailable or when a network timeout has occurred.
To create comments, use the hash sign(#). Ignore blank lines, leading or
trailing white spaces in a line, and characters after a hash (#) symbol.
The krb.realms File
The krb.realms file defines host-to-realm or domain-to-realm name
mapping data. The krb.realms file is located only on Kerberos server
systems in the /opt/krb5 directory.
The krb.realms file ensures that all systems on the network can identify
the other systems that reside in each realm.
Because, the realm name is case sensitive, the Kerberos Server looks for
a domain name that is in uppercase characters. If you decide to follow
the default realm naming convention, the realm names are already in
uppercase characters, and you need not configure and maintain the
krb.realms file on your client system.
Secure applications initially search for a matching host name and then a
matching domain name in the krb.realms file. If a match is not found,
the application initiates a wildcard match.
If no translation entry applies or the file does not exist, the realm name
of the host is considered as the domain name of the host’s domain. This
domain name is converted to the uppercase equivalent.
Chapter 566
Page 67

Configuring the Kerberos Server With C-Tree Backend
Configuration Files for the Kerberos Server
The krb.realms file must contain sufficient entries to define the realm
used by every service a client computer must access. You can create a
krb.realms file that contains all the required entries for your enterprise.
If you support inter-realm authentication, the krb.realms file must
contain the required entries to locate the foreign realms.
NOTE The krb.realms file does not identify systems as primary or secondary
security servers. It does not define the relationship between the primary
and secondary security servers. These definitions exist in the krb.conf
configuration file.
The krb.realms File Format
Use the format below to add entries in the krb.realms file. See
Appendix C, “Sample krb.realms File,” on page 319to see how a sample
krb.realms file looks.
Your_Primary_Security_Server Your_Realm_Name
.Your_Secondary_Security_Server Your_Realm_Name
*.Your_Domain_Name Your_Realm_Name
You can add entries to the file to identify various translations from host
names to realm names. The order of the entries is insignificant.
Each entry in the file requires two fields that are separated either by a
space or by a tab. The following format is generally used:
• The first field specifies a name. You can either specify a single host
name or specify multiple host names with one entry using the
wildcards . (period) or * (asterisk), respectively, as described in
Table 5-2.
• The second field specifies the associated realm. By convention, realm
names must be in uppercase letters to visually distinguish realm
names from domain names.
NOTE Realm names are case sensitive. You must type the correct case for the
realm name if you are not following the uppercase convention.
Chapter 5 67
Page 68

Configuring the Kerberos Server With C-Tree Backend
Configuration Files for the Kerberos Server
To create comments, use the hash sign (#). Any characters after a # sign
are ignored. Blank lines and any leading or trailing white spaces in a
line are also ignored.
To identify multiple hosts that belong to the same realm in a single entry,
use one of the wildcard characters described in Table 5-2.
Table 5-2 Wildcard Characters
Wildcard Character Description
. (period) Begin the name field with a period
* (asterisk) Begin the name field with an asterisk (*)
followed by a domain name to designate
that all hosts in the specified domain
belong to the indicated realm.
For example, to indicate that the hosts
sales.bambi.com and mrkt.bambi.com
belong to REALM1, add the following entry
in your krb.realms file:
.bambi.com REALM1
followed by a parent domain name to
designate all hosts in subdomains that
belong to the indicated realm.
For example, to indicate that hosts
bob.sales.bambi.com and
man.john.sales.bambi.com belong to
REALM2, add the following entry in your
krb.realms file:
*.sales.com REALM2
Chapter 568
Page 69

Configuring the Kerberos Server With C-Tree Backend
Autoconfiguring the Kerberos Server
Autoconfiguring the Kerberos Server
An automated tool named krbsetup is provided to autoconfigure your
Kerberos server. Use this tool to:
• Configure the Kerberos Server with either LDAP or C-Tree as the
backend database.
• Unconfigure the server.
• Start the kdcd and the kadmind daemons.
NOTE You must start the kpropd daemon manually if you have opted for
C-Tree as the backend database.
• Stop the kdcd, kadmind, and kpropd daemons.
The krbsetup tool is installed in the following directory:
/opt/krb5/sbin
This tool automatically creates the following files and places them in the
/opt/krb5 directory:
• krb.conf
• krb.realms
• krb5_ldap.conf
• krb5_schema.conf
• krb5_map.conf
This tool allows you to:
• Specify whether you want to configure your Kerberos server with
either LDAP or C-Tree as the backend database.
• Specify whether you want to configure your Kerberos server as either
a primary security server or a secondary security server.
• Customize your realm name.
• Provide an option to create a stash file.
Chapter 5 69
Page 70

Configuring the Kerberos Server With C-Tree Backend
Autoconfiguring the Kerberos Server
• Specify the encryption type.
• Specify a different location for the log messages if you do not want to
store the log messages in the default syslog file.
• Specify the security mechanism for your LDAP-based Kerberos
server.
• Specify the Directory server host name of the LDAP-based Kerberos
server.
• Specify the TCP port number of the LDAP-based Kerberos server.
• Specify the Proxy user DN of your LDAP-based Kerberos server.
• Extend your Kerberos schema on the Directory server.
• Specify the Default base DN for search of the LDAP-based Kerberos
server.
• Specify the default principal subtree DN of the LDAP-based
Kerberos server.
• Specify the object class template of the LDAP-based Kerberos server.
The other sections in the configuration files are set to the default values.
If you want to customize these sections, manually edit the configuration
files and restart the kdcd and kadmind daemons using this tool.
NOTE HP recommends that you use the krbsetup tool to configure your basic
Kerberos server.
Following steps show you how to autoconfigure your Kerberos server:
Step 1. Run the /opt/krb5/sbin/krbsetup utility.
Step 2. Select one of the following options:
1) Configure the server
2) Start the Kerberos daemons
3) Stop the Kerberos daemons
4) Un-configure the Server
5) Exit
6) Help
Step 3. To configure the server, select option 1.
Chapter 570
Page 71

Configuring the Kerberos Server With C-Tree Backend
Autoconfiguring the Kerberos Server
• To configure your Kerberos Server with C-Tree, select option 1. See
“Configuring the Kerberos Server with C-Tree” on page 71 to
continue configuring your Kerberos Server with C-Tree.
• To configure your Kerberos Server with LDAP, select option 2. See
“Configuring the Kerberos Server with LDAP” on page 88 to continue
configuring your Kerberos Server with LDAP.
• To return to the main menu, select option 0.
Step 4. To start the Kerberos daemons, kadmind and kdcd, select option 2. You
must manually start the kpropd daemon. Press Return to return to the
main menu.
Step 5. To stop the Kerberos daemons, select option 3. Press Return to return to
the main menu.
Step 6. To unconfigure the Kerberos daemons, select option 4. You are prompted
with a message to confirm this action. Press y to unconfigure the
Kerberos server and n to return to the main menu.
Step 7. To exit the tool, select option 5.
Step 8. To view the help contents, select option 6.
Configuring the Kerberos Server with C-Tree
Complete the following procedure to autoconfigure your Kerberos server
with C-Tree:
Step 1. Run the /opt/krb5/sbin/krbsetup utility.
Step 2. Select one of the following options:
1) Configure the server
2) Start the Kerberos daemons
3) Stop the Kerberos daemons
4) Un-configure the Server
5) Exit
6) Help
Step 3. To configure the Kerberos Server, select option 1.
Step 4. To configure the Kerberos Server with C-Tree backend, select option 1.
Chapter 5 71
Page 72

Configuring the Kerberos Server With C-Tree Backend
Autoconfiguring the Kerberos Server
Step 5. To remove the existing Kerberos server configuration, press y and press
n to retain the existing database.
Step 6. Configure your Kerberos server as either a primary security server or a
secondary security server:
1. To configure your Kerberos server as a primary security server, select
option 1.
2. To configure your Kerberos server as a secondary security server,
select option 2. Before you log on to the Remote Administrator, stop
the daemons that are already running on the secondary security
server.
Step 7. Specify the encryption type. If you do not specify a value, the default
value, DES-MD5, is selected.
Step 8. To stash the principal database key file on your local disk, press y at the
prompt. Press n if you do not want to stash the principal database key
file.
Step 9. Enter names for other servers:
• If you had chosen to configure your primary security server, you are
prompted for the names of your secondary security servers.
• If you had chosen to configure your secondary security server, you are
prompted for the name of your primary security server.
Step 10. Enter the realm name. The default value is displayed. To use the default,
press Return; otherwise, enter your realm name.
Step 11. Enter the location where you want to store log messages. By default, log
messages are stored in the syslog file. To change the default location,
enter y and specify the absolute directory name for the log messages.
Step 12. Enter the database master password.
Step 13. Re-enter the database master password to verify the password.
Step 14. Your configuration is now complete and your Kerberos daemons are up
and running. To return to the main menu, press Return.
Chapter 572
Page 73

6 Configuring the Kerberos
Server with LDAP
This chapter describes the configuration files and procedures used to
configure the Kerberos Server with LDAP backend.
Chapter 6 73
Page 74

Configuring the Kerberos Server with LDAP
Configuration Files for LDAP Integration
Configuration Files for LDAP Integration
You must configure the LDAP configuration files listed in Table 6-1,
before setting up your Kerberos server. This chapter contains detailed
descriptions of these configuration files.
The krbsetup autoconfiguration tool generates these files, based on your
input. Alternatively, you can manually edit the sample configuration
files available in the /opt/krb5/examples directory. HP recommends
that you use the autoconfiguration tool to generate these files.
Table 6-1 LDAP Configuration Files
File Function
krb5_ldap.conf Contains the LDAP configuration
parameters and values. This file is used by
the Kerberos server to connect to the
Directory server.
krb5_schema.conf Describes the object and attribute
definitions that define the structure of the
kerberos principal entries in the LDAP
database.
krb5_map.conf Defines the mapping from the default
kerberos attributes to the user defined
attributes.
The krb5_ldap.conf File
The krb5_ldap.conf file is the primary configuration file. It contains
information about the LDAP configuration parameters and values for
the Kerberos server.
If the krb5_ldap.conf file is not present in the /opt/krb5 directory,
then the Kerberos Server assumes that C-tree is the backend database.
Chapter 674
Page 75

Configuring the Kerberos Server with LDAP
Configuration Files for LDAP Integration
This file is generated automatically based on the input provided by you
while autoconfiguring the Kerberos server. Alternatively, a sample file is
available in the /opt/krb5/examples directory. You can copy this file to
the /opt/krb5 directory, and manually edit it. HP recommends that you
use the autoconfiguration tool to generate this file.
This file must reside in the /opt/krb5 directory and must have the
following permissions:
-rw------- root 3 sys
The krb5_ldap.conf File Format
Following is the format of the krb5_ldap.conf file:
ldap_enabled = 1
directory_servers = fox.bambi.com:389
base_dn_for_search = o=bambi.com
security_mech = password
proxy_user=cn = Directory Manager
proxy_user_password = <#$%^&*0#$0^&@1!$^%#10^0%>
default_object_template = account
default_princ_subtree = ou=People,o=bambi.com
default_objcls_attr = uid
Use the krb5_encrypt tool to modify the proxy_user_password field in the
/opt/krb5/krb5_ldap.conf file. You must change the proxy field
whenever you change the password of the proxy user or the master key.
Ensure that the encryption key type and the master key type are the
same; else the Kerberos server will not connect to the LDAP server.
Table 6-2 provides a detailed description of the various parameters in the
krb5_ldap.conf file.
Table 6-2 krb5_ldap.conf File Format
Parameter Description
ldap_enabled This line indicates whether you
have enabled LDAP.
1 indicates that you have enabled
LDAP and 0 indicates that you
have not enabled LDAP as the
backend database.
Chapter 6 75
Page 76

Configuring the Kerberos Server with LDAP
Configuration Files for LDAP Integration
Table 6-2 krb5_ldap.conf File Format (Continued)
Parameter Description
directory_server This line indicates a space
separated list of LDAP Servers.
Example: fox.bambi.com:389
deer.bambi.com
base_dn_for_search This line indicates the default
base DN for search is the root of
the directory tree on the Directory
server, where the Kerberos server
searches for kerberos principals.
Example: ou=People,
o=bambi.com
default_princ_subtree The default principal subtree DN
is where all Kerberos principals
are added by default, if no LDAP
entry is specified while creating
the kerberos principal. The
default principalsubtree DN must
be located under the default base
DN for search functionality.
Example: ou=people,
o=bambi.com
security_mech This line specifies the security
mechanism used to connect to the
LDAP server. Currently, the
supported mechanisms are
Password and Secure Sockets
Layer (SSL).
default_object_template This line specifies the structural
class, which is added by default.
Example: posixaccount
Chapter 676
Page 77

Configuring the Kerberos Server with LDAP
Configuration Files for LDAP Integration
Table 6-2 krb5_ldap.conf File Format (Continued)
Parameter Description
default_objcls_attr This line specifies the mandatory
attribute of the default object
class.
Example: uid
When the Kerberos server creates
a default object it uses the first
attribute specified in this field, as
the naming attribute. When
adding a principal, an error
message is displayed if duplicate
entries are found.
You can change the default
settings of the naming attribute
by changing the order of entries in
the krb5_ldap.conf file. Save
these changes and restart the
Kerberos server application.
proxy_user This line specifies the DN of the
proxy user. The Kerberos server
binds to the Directory server as
the proxy user. The proxy user
must have the appropriate
privileges to create, modify and
delete Kerberos principals.
Example: cn=Anne
The krb5_schema.conf File
A schema is a collection of object and attribute definitions that defines
the structure of the entries in a database. The krb5_schema.conf file is
the kerberos schema file that contains the object and attribute
definitions of the kerberos principal entries. LDAP objects are
standardized in order to provide interoperability with a variety of
directory services servers. The krb5_schema.conf file defines the
following:
Chapter 6 77
Page 78

Configuring the Kerberos Server with LDAP
Configuration Files for LDAP Integration
• Type of object classes
• Attributes of the object classes
• Optional attributes
• Syntax of each attribute
For example, a schema can define a person object class. The person
schema might require that a person have a surname attribute that is a
character string. It also specifies that a person entry can optionally have
a telephoneNumber attribute that is a string of numbers with spaces
and hyphens.
The krb5_schema.conf file is automatically generated based on the
input provided by you while autoconfiguring the Kerberos server.
Alternatively, a sample file is available in the /opt/krb5/examples
directory. You can copy this file to the /opt/krb5 directory, and manually
edit it. HP recommends that you use the autoconfiguration tool to
generate this file.
This file must reside in the /opt/krb5 directory and must have the
following permissions:
-rw-r--r-- root 3
The krb5_schema.conf File Format
Following is the format of the krb5_schema.conf file:
dn: cn=schema
changetype: modify
add: attributetypes
attributetypes: ( hpKrbPrincipalName-oid
NAME ’hpKrbPrincipalName’
DESC ’Kerberos principal identity for a user in the form
<principal>@<realm>’
EQUALITY caseExactMatch
SYNTAX 1.3.6.1.4.1.1466.115.121.1.15
SINGLE-VALUE )
attributetype: ( hpKrbMaxTicketAge-oid
NAME ’hpKrbMaxTicketAge’
DESC ’Value defining the maximum lifetime of a user ticket’
SYNTAX 1.3.6.1.4.1.1466.115.121.1.27
SINGLE-VALUE )
attributetypes: ( hpKrbMaxRenewAge-oid
NAME ’hpKrbMaxRenewAge’
DESC ’Value defining the maximum renewable lifetime of a
Chapter 678
Page 79

Configuring the Kerberos Server with LDAP
Configuration Files for LDAP Integration
ticket’
SYNTAX 1.3.6.1.4.1.1466.115.121.1.27
SINGLE-VALUE )
attributetypes: ( hpKrbAccountExpires-oid
NAME ’hpKrbAccountExpires’
DESC ’Value used to compute date and time when account will
expire’
SYNTAX 1.3.6.1.4.1.1466.115.121.1.27
SINGLE-VALUE )
attributetypes: ( hpKrbPasswordExpireTime-oid
NAME ’hpKrbPasswordExpireTime’
DESC ’A value indicating the date and time when the password
expires’
SYNTAX 1.3.6.1.4.1.1466.115.121.1.27
SINGLE-VALUE )
attributetypes: ( hpKrbPwdLastSet-oid
NAME ’hpKrbPwdLastSet’
DESC ’A value that stores the date and time when the password
was last set’
SYNTAX 1.3.6.1.4.1.1466.115.121.1.27
SINGLE-VALUE )
attributetypes: ( hpKrbLastLogon-oid
NAME ’hpKrbLastLogon’
DESC ’A value used to compute date and time of last
successfullogon’
SYNTAX 1.3.6.1.4.1.1466.115.121.1.27
SINGLE-VALUE )
attributetypes: ( hpKrbBadPasswordTime-oid
NAME ’hpKrbBadPasswordTime’
DESC ’Value used to compute date and time of last unsuccessfu
logon attempt’
SYNTAX 1.3.6.1.4.1.1466.115.121.1.27
SINGLE-VALUE )
attributetypes: ( hpKrbBadPwdCount-oid
NAME ’hpKrbBadPwdCount’
DESC ’Number of unsuccessful attempts to authenticate with this
account’
SYNTAX 1.3.6.1.4.1.1466.115.121.1.27
SINGLE-VALUE )
attributetypes: ( hpKrbModifiersName-oid
NAME ’hpKrbModifiersName’
DESC ’The last modifier of any attribute associated with a
principal entry’
EQUALITY caseExactMatch
SYNTAX 1.3.6.1.4.1.1466.115.121.1.15
SINGLE-VALUE )
Chapter 6 79
Page 80

Configuring the Kerberos Server with LDAP
Configuration Files for LDAP Integration
attributetypes: ( hpKrbModifyTimestamp-oid
NAME ’hpKrbModifyTimestamp’
DESC ’The date and time when the identity specified in the
hpKrbModifiersName attribute made the last modification’
SYNTAX 1.3.6.1.4.1.1466.115.121.1.27
SINGLE-VALUE )
attributetypes: ( hpKrbAttributes-oid
NAME ’hpKrbAttributes’
DESC ’A value containing one or more flags’
SYNTAX 1.3.6.1.4.1.1466.115.121.1.27
SINGLE-VALUE )
attributetypes: ( hpKrbPolicyName-oid
NAME ’hpKrbPolicyName’
DESC ’The Kerberos password policy to which this principal
subscribes to’
EQUALITY caseExactMatch
SYNTAX 1.3.6.1.4.1.1466.115.121.1.15
SINGLE-VALUE )
attributetypes: ( hpKrbKeyVersion-oid
NAME ’hpkrbAuthzData’
DESC ’Other Authorization Data.’
SYNTAX 1.3.6.1.4.1.1466.115.121.1.40
SINGLE-VALUE )
add: objectClasses
objectClasses: ( hpKrbPrincipal-oid
NAME ’hpKrbKeyVersion’
DESC ‘Version of a secret key; a monotomic increasing number
beginning with 1’
SYNTAX 1.3.6.1.4.1.1466.115.121.1.27
SINGLE-VALUE )
attributetypes: ( hpKrbKeyData-oid
NAME ’hpKrbKeyData’
DESC ’A set of values with each value containing an encrypted
key and information about the encrypted key.’
SYNTAX 1.3.6.1.4.1.1466.115.121.1.40 )
attributetypes: ( hpkrbAuthzData-oid
NAME ’hpKrbPrincipal’
DESC ’An auxiliary class for use in configuring an entry to
represent a Kerberos principal.’
SUP top Auxiliary MAY ( hpKrbPrincipalName $ hpKrbMaxTicketAge
$ hpKrbMaxRenewAge $ hpKrbAccountExpires $
hpKrbPasswordExpireTime $ hpKrbPwdLastSet $ hpKrbLastLogon $
hpKrbBadPasswordTime $ hpKrbBadPwdCount $ hpKrbModifiersName $
hpKrbModifyTimestamp $ hpKrbAttributes $ hpKrbPolicyName $
hpkrbAuthzData) )
Chapter 680
Page 81

Configuring the Kerberos Server with LDAP
Configuration Files for LDAP Integration
objectClasses: ( hpKrbKey-oid
NAME ’hpKrbKey’
DESC ’An structural object class used for configuring the
principal name of an associated principal entry.’ SUP top
STRUCTURAL MUST ( hpKrbPrincipalName ) MAY ( hpKrbKeyVersion $
hpKrbKeyData ) )
The krb5_map.conf File
The krb5_map.conf mapping file defines the mapping of the default
kerberos attributes to user defined attributes, to support the Kerberos
server schema. The Kerberos server uses this map file for translating
Kerberos attribute names to LDAP attribute names. Each entry in the
mapping file represents a translation for an attribute.
The krb5_map.conf file is automatically generated based on the input
provided by you while autoconfiguring the Kerberos server.
Alternatively, a sample file is available in the /opt/krb5/examples
directory. You can copy this file to the /opt/krb5 directory, and manually
edit it. HP recommends that you use the autoconfiguration tool to
generate this file.
This file must reside in the /opt/krb5 directory and must have the
following permissions:
-rw-r--r-- root 3
The krb5_map.conf File Format
Following is the format of the default mapping file:
hpKrbPrincipalName = hpKrbPrincipalName
hpKrbMaxTicketAge = hpKrbMaxTicketAge
hpKrbMaxRenewAge = hpKrbMaxRenewAge
hpKrbAccountExpires = hpKrbAccountExpires
hpKrbPasswordExpireTime = hpKrbPasswordExpireTime
hpKrbPwdLastSet = hpKrbPwdLastSet
hpKrbLastLogon = hpKrbLastLogon
hpKrbBadPasswordTime = hpKrbBadPasswordTime
hpKrbBadPwdCount = hpKrbBadPwdCount
hpKrbModifiersName = hpKrbModifiersName
hpKrbModifyTimestamp = hpKrbModifyTimestamp
hpKrbAttributes = hpKrbAttributes
hpKrbPolicyName = hpKrbPolicyName
Chapter 6 81
Page 82

Configuring the Kerberos Server with LDAP
Configuration Files for LDAP Integration
hpKrbAuthzData = hpKrbAuthzData
hpKrbKeyVersion = hpKrbKeyVersion
hpKrbKeyData = hpKrbKeyData
Chapter 682
Page 83

Configuring the Kerberos Server with LDAP
Planning Your LDAP Configuration
Planning Your LDAP Configuration
The following sections of this chapter describe how to plan and configure
your Kerberos Server to work with the Directory server.
Before You Begin
Remember the following points when you plan your LDAP setup:
• Use the Configuration Worksheet (see Appendix A, “Configuration
Worksheet,” on page 311) to record your decisions and other
information that you need later for configuration.
• You must have an LDAP directory. You can obtain the Netscape
Directory server 6.0 (J4258CA) for HP-UX from your local HP sales
office or http://www.hp.com and view the documentation at
http://docs.hp.com/hpux/internet/#Netscape%20Directory%20Server.
• See the white paper Preparing Your Directory for HP-UX Integration
at http://docs.hp.com/hpux/internet for advice on how to set up and
configure your directory to work with HP-UX.
• Most examples here use the Netscape Directory server 6.0 (J4258CA)
for HP-UX and assume you have some working knowledge of this
directory and its tools, such as the Directory Console and ldapsearch.
If you have another directory, consult your directory’s documentation
for specific information.
• The examples use a base DN of o=bambi.com for illustrative
purposes.
Chapter 6 83
Page 84

Configuring the Kerberos Server with LDAP
Setting up Your LDAP Configuration
Setting up Your LDAP Configuration
Plan how to set up and verify your LDAP directory and your Kerberos
server environment, before you put them into production. Consider the
following questions and record your decisions and other information that
you will need later in the Configuration Worksheet found in Appendix A,
“Configuration Worksheet,” on page 311.
• What is the host name of your directory server?
Write down your directory server host name in the Configuration
Worksheet. This is where your Kerberos principals reside. Enter
either the FQDN or the IP address.
For example, fox.bambi.com or 18.13.118.130.
• What is the port number of your directory server?
Write down the port number of your directory server in the
Configuration Worksheet.
— If you have opted for SSL as the security mechanism the default
TCP port number is 636.
— If you have opted for Password as the security mechanism the
default TCP port number is 389.
• Have you decided to extend the schema?
A schema is the collection of object class and attribute type
definitions. A server uses these definitions to determine how to
match a filter or attribute against the attributes of a specific entry
and whether to grant permissions to any given attributes.
You must have administrative privileges to extend the schema. If you
do not have these privileges contact your LDAP administrator. You
need to extend the LDAP schema with Kerberos specific object
classes and attributes.
• Have you decided on the security mechanism?
To access the information stored in the directory, you must
authenticate to the directory first. Once authenticated, and
depending on the authorization information stored in the directory
Chapter 684
Page 85

Configuring the Kerberos Server with LDAP
Setting up Your LDAP Configuration
you can access the information in the directory. Hence, you need to
choose an authentication method. Currently, the supported
mechanisms are Password and SSL.
The SSL protocol was devised to provide both authentication and
data security. SSL encapsulates the TCP/IP socket so that every
TCP/IP application can use it to secure its communication. This
enables clients to verify the identity of the server and to encrypt
communication of the basic authentication from the clients to the
server on insecure networks. To ensure message integrity and
privacy, SSL has the following features:
— Provides a hashing algorithm
— Provides for the creation and use of an encrypted communication
channel
If you choose Password as the security mechanism then the client
authenticates to an LDAP server by sending a bind request to the
server.
NOTE In the Password security mechanism, passwords are transmitted in
clear text and are vulnerable to snooping.
The primary advantage of using Password is that it is the required
authentication method as defined in the LDAP standard, and all
directory servers support it.
• What is the name of your default base DN for search?
Entries are organized in a tree-like structure called the Directory
Information Tree (DIT). Entries are arranged within the DIT based
on their DNs. Distinguished Name (DN) is a unique name that
unambiguously identifies a single entry. DNs are made up of a
sequence of Relative Distinguished Names (RDNs). Each RDN in a
DN corresponds to a branch in the DIT leading from the root of the
DIT to the directory entry. A DN is composed of a sequence of RDNs
separated by commas.
For example, ou=people, o=bambi.com
The default base DN for search is the root of the directory tree on the
Directory server, where the Kerberos server searches for kerberos
principals.
Chapter 6 85
Page 86

Configuring the Kerberos Server with LDAP
Setting up Your LDAP Configuration
• What is the name of your default principal subtree DN?
Each RDN in a DN corresponds to a branch in the DIT leading from
the root of the DIT to the directory entry. The search base node
subtree designates all the containers for the various information
types under the base DN.
For example, ou=accounts, ou=people, o=bambi.com
By default, all Kerberos principals are added in the default principal
subtree, if no LDAP entry is specified while creating the kerberos
principal. The default principal subtree DN must be located under
the default base DN for search.
NOTE To effectively search for data you must add all subtree entries under
the default base DN.
• Where are your certificates located?
This path defines the location of the database that contains the
certificates for your client. The database must contain the cert7.db
certificate, which is used by Mozilla or Netscape client.x. You must
specify the path to the directory containing the certificate database.
For example, /.netscape/cert7.db.
• What is the name of your proxy user?
Write down the distinguished name of the proxy user, if needed. The
Kerberos server binds to the Directory server as the proxy user. This
user must have the appropriate privileges to create, modify and
delete Kerberos principals.
For example, cn=Anne.
• What is the name of your default object class template?
The Kerberos principal must be associated with at least one
structural object class on the Directory server. The Kerberos server
uses this template for those Kerberos principals who do not have an
existing object class to be associated with on the Directory server.
For example, posixaccount.
• What are the attributes of your object class?
Chapter 686
Page 87

Configuring the Kerberos Server with LDAP
Setting up Your LDAP Configuration
This line specifies the mandatory attributes of the default object
class.The object class attribute determines the attributes the entry
must have and can have. When the Kerberos server creates a default
object it uses the first attribute specified in this field, as the naming
attribute.
For example, uid. cn, homedirectory, gidnumber, uidnumber.
Chapter 6 87
Page 88

Configuring the Kerberos Server with LDAP
Autoconfiguring the Kerberos Server With LDAP Integration
Autoconfiguring the Kerberos Server With
LDAP Integration
An automated tool named krbsetup is provided to autoconfigure your
Kerberos server. For more information on the krbsetup tool, see
“Autoconfiguring the Kerberos Server” on page 69.
Configuring the Kerberos Server with LDAP
Complete the following procedure to autoconfigure your Kerberos server
with LDAP:
Step 1. Run the /opt/krb5/sbin/krbsetup utility.
Step 2. Select one of the following options:
1) Configure the server
2) Start the Kerberos daemons
3) Stop the Kerberos daemons
4) Un-configure the Server
5) Exit
6) Help
Step 3. To configure the Kerberos Server, select option 1.
Step 4. To configure the Kerberos Server with LDAP backend, select option 1.
Step 5. To remove the existing Kerberos server configuration, press y and press
n to retain the existing database.
NOTE Ensure that you have a dump of the existing Kerberos database, before
you configure the Kerberos server with LDAP. “Migrating to a Newer
Version of the Kerberos Server” on page 41, for more information.
Step 6. Select one of the following options to configure the security mechanism of
your LDAP-based Kerberos server:
1. SSL
2. Password
Chapter 688
Page 89

Configuring the Kerberos Server with LDAP
Autoconfiguring the Kerberos Server With LDAP Integration
Step 7. Enter the host name of the directory server. The default value is
displayed. To use the default, press Return; otherwise, enter your fully
qualified host name or the IP address.
Step 8. Enter the port number of the directory server. If you do not specify any
value the following default values are selected:
• If you have opted for SSL as the security mechanism the default
value 636 is selected.
• If you have opted for Password as the security mechanism the
default value 389 is selected.
Step 9. Enter the DN of the proxy user. The default value is displayed. To use the
default, press Return.
NOTE The proxy user must have the privileges to add, modify, and delete
Kerberos information on the Directory server.
Step 10. Enter the Proxy User password.
Step 11. Enter the Certificate db path, if you have opted to configure SSL as the
security mechanism of your LDAP-based Kerberos server.
Step 12. To extend the existing schema in the directory, press y. Press n if you do
not want to extend the schema.
NOTE You must have administrative privileges to extend the schema. Contact
your LDAP administrator if you do not have these privileges.
If you have pressed y, that is, opted to extend the schema, you are
prompted for the following input:
a. Enter the DN of the Admin user. The default value is displayed. To
use the default, press Return; otherwise, enter your DN name.
b. Enter the password.
c. Select the following object classes to remap the attributes:
1. hpKrbPrincipal
Chapter 6 89
Page 90

Configuring the Kerberos Server with LDAP
Autoconfiguring the Kerberos Server With LDAP Integration
2. hpKrbKey
To remap the attributes of the object class hpKrbPrincipal, select
option 1.
To remap the attributes of the object class hpKrbKey, select option 2.
NOTE HP recommends that you use the default attributes of the
hpKrbPrincipal and hpKrbKey object classes.
Step 13. Enter the default base DN for search. The default value is displayed. To
use the default, press Return.
Step 14. Enter the default principal subtree DN. The default value is displayed.
To use the default, press Return.
Step 15. Enter the default template object class. The default value is displayed.
To use the default, press Return.
Step 16. Configure your Kerberos server as either a primary security server or a
secondary security server:
1. To configure your Kerberos server as a primary security server, select
option 1.
2. To configure your Kerberos server as a secondary security server,
select option 2. Before you log on to the Remote Administrator, stop
the daemons that are already running on the secondary security
server.
Step 17. Specify the encryption type. If you do not specify a value, the default
value, DES-MD5, is selected.
Step 18. To stash the principal database key file on your local disk, press y at the
prompt. Press n if you do not want to stash the principal database key
file.
Step 19. Enter names for other servers:
• If you chose to configure your primary security server, you are
prompted for the names of your secondary security servers.
• If you chose to configure your secondary security server, you are
prompted for the name of your primary security server.
Chapter 690
Page 91

Configuring the Kerberos Server with LDAP
Autoconfiguring the Kerberos Server With LDAP Integration
Step 20. Enter the realm name. The default value is displayed. To use the default,
press Return; otherwise, enter your realm name.
Step 21. Enter the location where you want to store log messages. By default, log
messages are stored in the syslog file. To change the default location,
enter y and specify the absolute directory name where you want to store
the log messages.
Step 22. Enter the database master password.
Step 23. Re-enter the database master password to verify the password.
Step 24. Your configuration is now complete and your Kerberos daemons are up
and running. To return to the main menu, press Return.
Chapter 6 91
Page 92

Configuring the Kerberos Server with LDAP
Manually Configuring the Kerberos Server with LDAP
Manually Configuring the Kerberos Server
with LDAP
This section describes how to manually configure your Kerberos server
with LDAP. HP recommends that you use the autoconfiguration tool to
set up your basic Kerberos security server with LDAP. For more
information on autoconfiguration, see “Autoconfiguring the Kerberos
Server With LDAP Integration” on page 88.
The subsequent sections describe the configuration files and the steps
required to manually configure your Kerberos security server with
LDAP.
Editing the Configuration Files
You can manually edit the following files to configure the Kerberos
security server with LDAP:
• LDAP-based Kerberos configuration file - krb5_ldap.conf.
• Kerberos schema file - krb5_schema.conf.
• Kerberos mapping file krb5_map.conf.
• Kerberos configuration file – krb.conf.
• Kerberos realms file – krb.realms.
The krb5_ldap.conf configuration file specifies the LDAP configuration
information. See “The krb5_ldap.conf File” on page 74 for more
information on the configuration parameters.
NOTE You must use the krb5_encrypt tool to set the value of
proxy_user_password field. Refer the krb5_encrypt(1m) manpage for
more information on the krb5_encrypt tool.
The krb5_schema.conf schema file is the default schema. HP
recommends keeping the default schema. If you choose to extend the
Kerberos schema, follow the guidelines listed below:
Chapter 692
Page 93

Configuring the Kerberos Server with LDAP
Manually Configuring the Kerberos Server with LDAP
• Never delete any element of your Kerberos schema as this affects the
compatibility of your schema to other LDAP services (servers and
clients).
• Never change the Kerberos schema of your directory by modifying
the existing elements as this also affects the compatibility of your
schema to other LDAP services.
• Never map an existing attribute name to a kerberos attribute name.
This may result in an error when configuring the schema.
• Never edit the Kerberos mapping file, krb5_map.conf, after
configuring the server.
• If you want to modify an element in the existing schema, you must
also ensure that the changes are reflected in the krb5_map.conf
mapping file.
• If you want to manually load the Kerberos schema, use the default
schema located at /opt/krb5/examples.
• Always save your current schema before you start this process.
The Kerberos mapping file, krb5_map.conf, defines the mapping of the
default kerberos attributes to user defined attributes, to support the
Kerberos server schema. See “The krb5_map.conf File” on page 81, for
more information.
The Kerberos configuration file, krb.conf, specifies the security servers
available for client authentication and defines the default realm for the
host.
The Kerberos realms file, krb.realms, defines the host-to-realm or
domain-to-realm mapping data.
These files are available in the /opt/krb5/examples directory. You can
copy these files to the /opt/krb5 directory, and manually edit them.
Modify the configuration files /opt/krb5/krb5_ldap.conf,
/opt/krb5/krb5_schema.conf, and /opt/krb5/krb5_map to reflect the
correct information.
For more information about modifying the configuration files, see
“Configuring the Primary Security Server” on page 96.
Chapter 6 93
Page 94

Configuring the Kerberos Server with LDAP
Manually Configuring the Kerberos Server with LDAP
Chapter 694
Page 95

7 Configuring the Primary and
Secondary Security Server
This chapter describes the procedure to configure the primary and
secondary security server.
Chapter 7 95
Page 96

Configuring the Primary and Secondary Security Server
Configuring the Primary Security Server
Configuring the Primary Security Server
The following sections describe the initial configuration tasks you need
to perform to get your primary and secondary security server up and
running.
The primary security server requires the following basic configuration
tasks:
1. Execute the krb5_encrypt command to generate the master key.
NOTE If you have opted to configure your Kerberos with LDAP as the
backend, specify the master key, generated by executing the
krb5_encrypt command, in the proxy_user field in the
krb5_ldap.conf file.
2. “Create the Principal Database After Installation” on page 96
3. “Add an Administrative Principal” on page 97
4. “Create the host/<fqdn> Principal and Extracting the Service Key”
on page 98
5. “Start the Kerberos Daemons” on page 99
6. “Define Secondary Security Server Network Locations” on page 100
Create the Principal Database After Installation
If you choose not to create the principal database during installation,
create it before configuring the security server. To create the principal
database, execute the following command:
kdb_create -s
NOTE The kdb_create command uses the 3DES encrypted database by
default.
Chapter 796
Page 97

Configuring the Primary and Secondary Security Server
Configuring the Primary Security Server
If you are using Kerberos server v2.0 or v3.0, and want to migrate the
principal database to Kerberos server v3.1, see Chapter 3, “Migrating to
a Newer Version of the Kerberos Server,” on page 41.
Add an Administrative Principal
Use the HP Kerberos Administrator (kadminl_ui) instead of the
command-line administrator (kadminl) to add the principal account. For
more information on using the HP Kerberos Administrator and the
command-line administrator, see “The kadmin and kadminl Utilities” on
page 130.
Though it is possible to use the kadmin option to create an
administrative principal, you cannot use kadmin to assign
administrative privileges. If you want to use the kadmin utilities to
manage your administrative principals, use a text editor to add the
required entries to the file.
NOTE You must log on as a root user, on the primary security server, to add an
administrative principal.
For the first administrative principal, HP recommends that you assign
all permissions, indicated by * in admin_acl_file. For more
information, see “The admin_acl_file File” on page 113.
You can add an administrative principal through the HP Kerberos
Administrator GUI, or through the command-line interface.
To add an Administrative Principal Using the HP Kerberos Administrator
Following steps show you how to add an administrative principal using
the HP Kerberos Administrator:
Step 1. Invoke the HP Kerberos Administrator using the command kadminl_ui.
Step 2. Add a new principal to the default realm using the following syntax:
# identifier/admin@DEFAULT_REALM
Step 3. Assign the password.
Chapter 7 97
Page 98

Configuring the Primary and Secondary Security Server
Configuring the Primary Security Server
Step 4. Use the Edit>Edit Administrative Permissions menu to assign ALL
administrative permissions to the principal.
Step 5. On the Attributes tab, clear the Require Password Change checkbox
to disable the password change requirement.
You can also disable the password change requirement by setting the
NoReqChangePwd setting in the principal’s password policy file to 1.
NOTE By default, the principal account requires a password change at the first
logon. However, kadmin does not permit password changes, unless you
have explicit permissions to change your password.
Step 6. Save your changes and close the HP Kerberos Administrator.
For more information on using the HP Kerberos Administrator, see “HP
Kerberos Administrator” on page 132.
To Add an Administrative Principal Through the Command Line
Following steps show how to add an administrative principal through the
command-line interface:
Step 1. Run the kadmin command-line administrator.
Step 2. Add a new principal to the default realm using the following syntax:
command: add
Name of Principal to add: admin
Enter password:password
Re-enter password for verification:password
Enter policy name (Press enter key to apply default policy):
Principal added
For more information on assigning administrative privileges to
principals, see “Manual Administration Using kadmin” on page 202.
Create the host/<fqdn> Principal and Extracting the Service Key
To allow principal database propagation, the primary security server
must have a host/<fqdn> principal and the service key for this principal
must be extracted to the service key table file of the server.
Chapter 798
Page 99

Configuring the Primary and Secondary Security Server
Configuring the Primary Security Server
The host/<fqdn> principal is not automatically added to the principal
database during security server software installation; you must
manually add the host/<fqdn> principal using the kadminl_ui or
kadminl command.
NOTE You must log on as a root user, on the primary security server, to add the
host/<fqdn> principal to the database.
HP recommends that you create a host/<fqdn> principal and extract its
service key using the ktutil command. To do this, type the following
command at the prompt:
# kadminl -R “ext host/<fqdn>”
The host/<fqdn> is added to the principal database, along with a
random key. The random key is added to the service key table. To verify
that these operations are successful, use the ktutil-k command to list
the contents of the key table file. The existence of a host/entry file
indicates that the principal has been successfully added to the database
with a random key.
NOTE Propagation is disabled if you select LDAP as your backend database.
Check with your LDAP administrator, for more information about
propagation of information on the LDAP Server.
Start the Kerberos Daemons
You can use the krbsetup tool to start the following Kerberos daemons:
• kdcd
• kadmind
NOTE You cannot use the krbsetup tool to start the kpropd daemon. Start the
kpropd daemon manually.
Chapter 7 99
Page 100

Configuring the Primary and Secondary Security Server
Configuring the Primary Security Server
Alternatively, you can use the following command to start the Kerberos
daemons kdcd and kadmind:
/sbin/init.d/krbsrv start
To start the kpropd daemon, use the following command:
/opt/krb5/sbin/krpopd
NOTE Propagation is disabled if you select LDAP as your backend database.
Check with your LDAP administrator, for more information about
propagation of information on the LDAP Server.
Define Secondary Security Server Network Locations
To configure propagation, alter the Kerberos configuration files to define
server network locations. For more information, see Chapter 9,
“Propagating the Kerberos Server,” on page 241.
For each secondary security server installed on your network, edit the
krb.conf file on the primary security server by adding an entry to define
the role of this secondary security server in the realm. For more
information on the configuration files, see “The krb.conf File” on page 65.
Chapter 7100
 Loading...