

Page 1

HP Data Vault User's Guide
Page 2

Page 3

Table of Contents
Chapter 1. Welcome to the HP Data Vault 1
Chapter 2. Set up and Installation 3
What's in the Box? 3
The Server at a Glance 3
Find a Home for Your Server 5
Server Location 5
Network Requirements 5
Supported Operating Systems 6
Wireless Support 7
Turn on the Server 7
Install the Software 9
Update Your Firewall's Trusted Program List 9
Install Software on the First PC 20
Install Software on Additional PCs 28
Install the Software on a Mac 31
Troubleshooting a Mac Connection to the Server 32
Uninstall the Software 39
Uninstall the PC Client Software 39
Uninstall the Mac Client Software 39
HP Software Updates 40
HP Update Settings 40
Update and Roll Back the Server 42
Update and Roll Back Client PCs 46
Update and Roll Back Mac Clients 51
Chapter 3. Start Using Your Server 55
Guided Tour 55
HP Home Page 55
Windows Home Server Console 57
First Steps 59
PC Backup and Restore 59
Mac Time Machine Backup 60
Using Shared Folders 63
Enable Guest Account or Set up User Accounts 66
Configure Remote Access 69
Secure your Server from Intruders 71
Add Shared Folders to Network Places 75
Install HP Add-ins for Windows Home Server 77
Register Your Server 78
Configure Server Settings 78
Getting Help for Using Your Server 85
Chapter 4. HP Media Collector 89
About HP Media Collector 89
Configuring Media Collector 91
Configuring Media Collector General Settings 91
Configuring Media Collector for Photos 91
Configuring Media Collector for Music 94
Configure Media Collector for Videos 97
Media Collector Status 98
HP Media Collector Troubleshooting 98
iii
Page 4

HP Data Vault User's Guide
Chapter 5. HP Video Converter 103
Configure Video Converter 103
Video Converter Status 109
Troubleshooting and FAQs 110
Examples of Video Converter Profiles 110
Using Media Collector with Video Converter 112
Converting Non-Copy Protected DVDs 112
Giving Users Access to the Converted Videos Folder 113
Enabling Converted Videos for TwonkyMedia 114
Supported Video Formats 114
Video Conversion Fails 115
Network Bandwidth 116
Chapter 6. Media Streaming 117
About Streaming Media 117
In-home Streaming 118
Web/iPhone Streaming 121
TwonkyMedia for Media Sharing 125
About TwonkyMedia 125
Configure TwonkyMedia for Streaming Media 128
Troubleshooting and FAQs 129
Server for iTunes 130
Settings for iTunes 130
Troubleshooting and FAQs 131
HP Media Streamer 132
About the HP Media Streamer 132
HP Media Streamer Music Page 133
HP Media Streamer Photos Page 139
HP Media Streamer Videos Page 143
Troubleshooting and FAQs 149
Streaming Media to a Device 154
Why does the server show up twice on my DMA list? 154
Media Files (Audio/Video) of Supported Format Aren't Seen by Device. 155
My Files Do Not Show Up on My DMA 155
Why do I see duplicate songs, pictures, or videos on my DMA list? 157
Windows Media Connect 2.0 and TwonkyMedia Comparison 158
Chapter 7. HP Photo Publisher and HP Photo Viewer 163
HP Photo Publisher 163
About HP Photo Publisher 163
Log on to HP Photo Publisher 164
Log on to Photo Sharing Site 166
Select Existing Album or Create an Album 171
Select Photos 172
Server Continues Uploading 173
Troubleshooting HP Photo Publisher 175
HP Photo Viewer 187
HP Photo Viewer Home Page 187
HP Photo Viewer Slideshow 188
Select Existing Album or Create an Album 193
Select Photos 193
Troubleshooting HP Photo Viewer 195
Chapter 8. Backup, Restore, and Recover 203
Choose a Backup Strategy 203
iv
Page 5

Table of Contents
PC Backup, Restore, and Recover 204
PC Backup and Restore 204
Restore an Entire PC Hard Drive 205
Mac Backup and Recover 205
Mac Time Machine Backup 205
Recover an Entire Mac Hard Drive 209
Server Backup, Recover, and Reset 211
Back up Server to a Device 211
Server Recovery and Factory Reset 213
Chapter 9. Server Storage 219
Expand Server Storage 219
Internal SATA Drives 219
Add an Internal SATA Drive 219
Remove an Internal SATA Drive 221
USB Drives, eSATA Drives, and Port Multipliers 224
Add and Remove an External USB Drive, eSATA Drive, or SATA Port Multiplier 224
Detach and Reattach a USB Drive 225
A USB Drive Accidentally Detaches from the Server 227
Add and Remove Drives from Server Storage 229
Replace the System Drive 230
Chapter 10. Network and Firewall 235
Network Connection Issues 235
Network Health 239
Check that the Router is Correctly Configured for DHCP 240
Check the Network is Set Up Properly for TCP/IP 240
Check the Network NetBIOS Properties 241
Network Frequently Asked Questions 242
What are Optimum Data Throughput Speeds for Different Network Interfaces? 243
The First Backup is Taking a Long Time 243
Uninterruptible Power Supply is not Supported 244
The Firewall is Blocking the Connection 244
Update Your Firewall's Trusted Program List 244
Chapter 11. Errors and Lights 257
Server is Unresponsive 257
Power Indicator is Off 258
Light-Bar Breathing Aqua White 258
Health Light is Red 258
Light-Bar is Red 259
Hardware Warning Messages 259
File Transfer Failure 261
Health Indicator Codes 261
Network Connection Light is Off 262
Network Connection Light Blinking Aqua White 263
Server Not Showing Up on Your DMR 263
Windows Home Server Frequently Asked Questions 264
Hubs and Network Health Light 265
Chapter 12. Product Information 267
Product Specifications 267
Regulatory Statements 271
WM-DRM 10 Licensed Technology 275
Limited Warranty and Technical Support Statement 275
HP Data Vault 3.0 Update Read me 279
v
Page 6

HP Data Vault User's Guide
Chapter 13. Licenses, Copyrights and Notices for Open Source
Components 283
Copyrights 283
Firefly: GPL License 283
ImageMagick: Compatible with GPL 288
MiscUtil.dll: MiscUtil 291
Sample Code: WPF Calculator 292
Libsmbclient.dylib From SAMBA 3.0.38 GPLv2 292
Sqlite-dotnet2: Public Domain License 297
Tftpd32 Artistic License 298
PacketVideo 299
Yahoo ASTRA Components for Flash: BSD License 299
PureMVC Framework: Creative Commons Attribution License 3.0 307
ScaleFilter: Software License Agreement (BSD License) 308
Glossary 313
Index 317
vi
Page 7
Chapter 1. Welcome to the HP Data Vault
The HP Data Vault protects and shares digital content—providing an easy-to-use, central
repository for digital photos, music, videos, and documents. The HP Data Vault supports
computers running Microsoft® Wind o ws® and Apple® Mac® OS X, enabling a more protected
and reliable way of managing media and files.
The HP Data Vault Provides
• Mac and Windows Supported Operating Systems
Support for networks that have a mix of Microsoft Windows
and Mac OS X 10.5 or later computers.
• HP Photo Viewer and HP Photo Publisher
A simple photo management and sharing tool that lets you
share photos directly from the server or through popular
photo sharing web sites like snapfish, facebook, flickr, and
Picasa Web Albums.
Photo web site services are subject to change without notice and some services may not be
available at the time of product purchase. The available service providers may vary in your
country/region.
• Media Collector
Media Collector automatically collects photos, music, and video files from computers on the
network and organizes them on the server.
• Media Streaming and Remote Media Streaming
Photos, videos, and music can be streamed to PCs or TVs on the network. Furthermore, you can
enjoy your photos, music, and videos—while on the network or away—with remote media
streaming to any Internet-connected computer.
• PC Backup and Mac Backup
An automatic backup process for Windows PCs and Apple Macs on your home network.
Automatic backup of computers running Microsoft Windows® Vista (32 & 64 bit), XP Home
(SP2), XP Professional (SP2), Media Center Edition 2004 (SP2) or later, and Macs running Time
Machine.
• Remote Computer Access
Remote access to media and files with an easy-to-use, browser-based interface. With proper
authorization, a remote user can log into their network and perform functions as if they were
sitting at their networked computer.
• iTunes Music Server
1
Page 8

HP Data Vault User's Guide
Any computer on the network that runs iTunes can access music on the server as an iTunes shared
library.
• Disk Duplication and Storage Expansion
A way to transparently duplicate selected folders on separate disk drives to help protect against a
hard disk failure. Plus, it's easy to add storage as needs grow.
Folder duplication requires at least two hard disks .
2
Page 9
Chapter 2. Set up and Installation
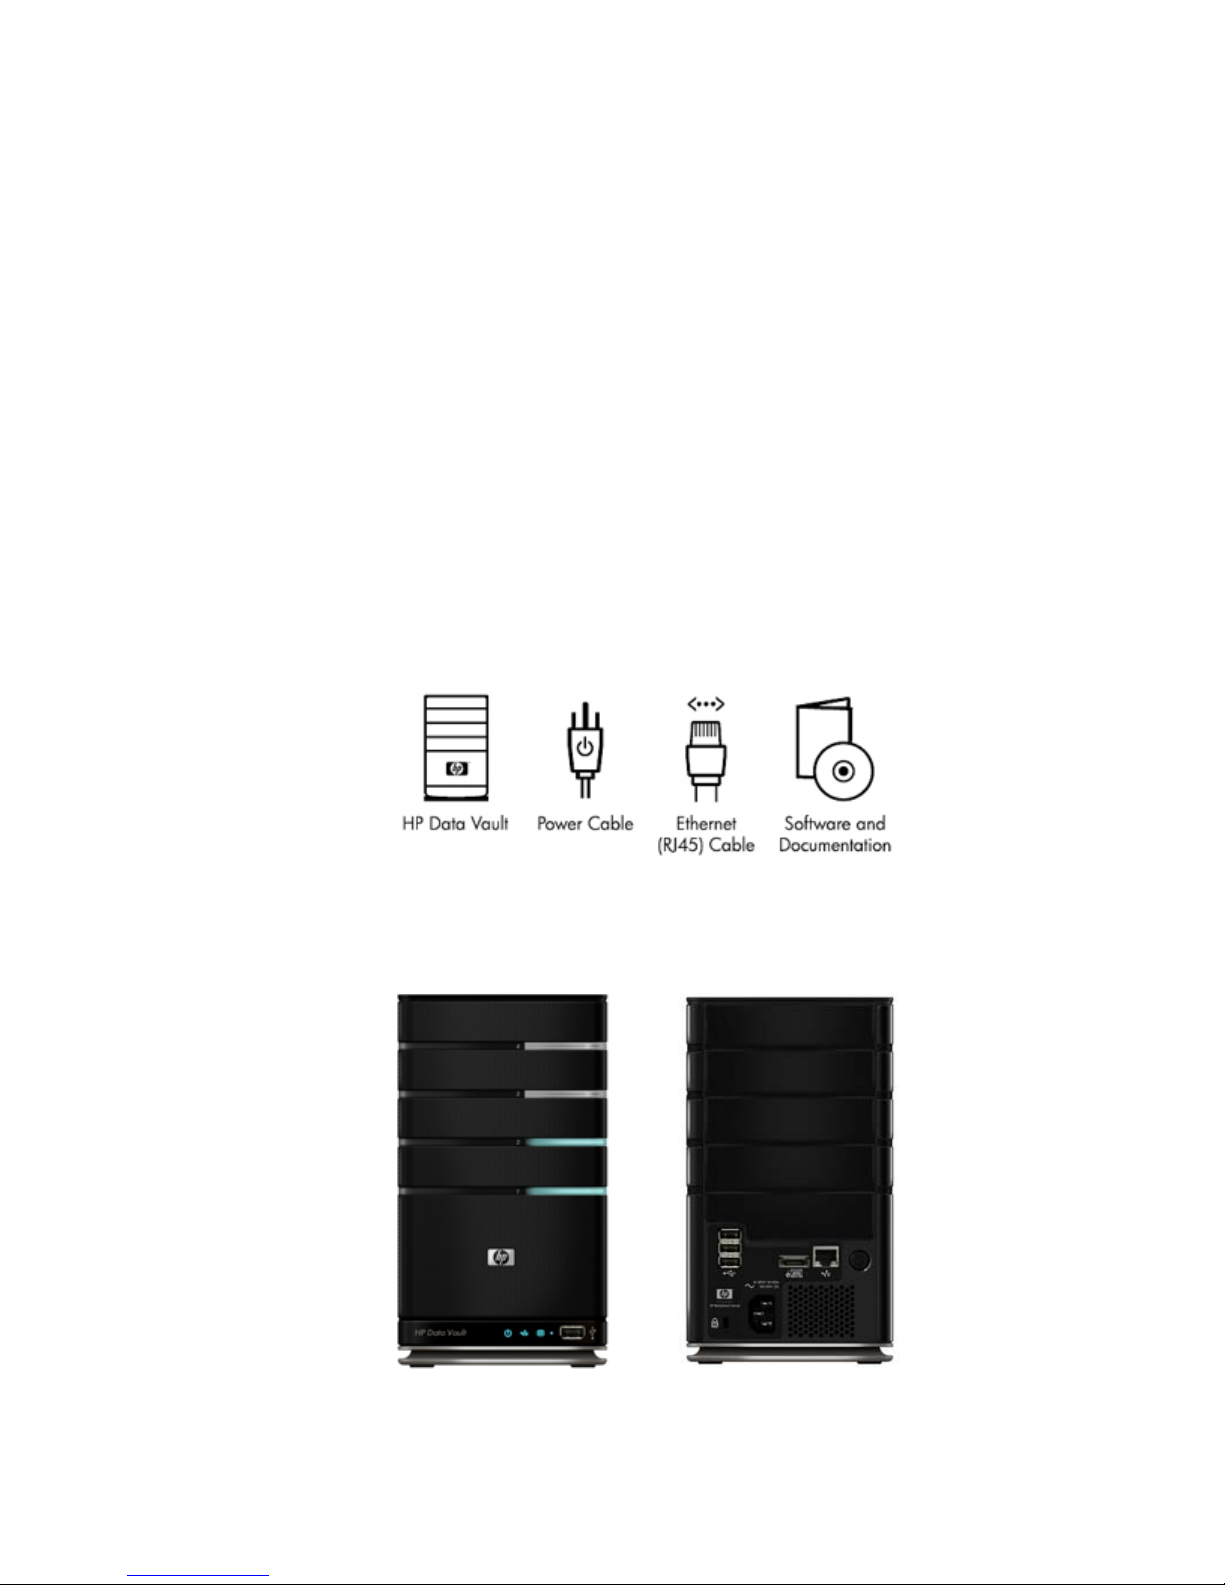
WHAT'S IN THE BOX?
In the box you will find:
• HP Data Vault
• Power cord
• Ethernet (RJ-45) cable
• Software and Documentation
For warranty and support information, see the Warranty and Support Guide on the Software
Installation Disc.
THE SERVER AT A GLANCE
The following lights and symbols are found on the front and back of the HP Data Vault.
3
Page 10

HP Data Vault User's Guide
The Front of the Server
Light Bar. There is one light bar for each internal SATA disk in the HP
Data Vault. The server can hold up to four disks.
Power Light. The power light is solid aqua white when the server is
turned on.
Network Connection Light. The network connection light is solid aqua
white when the server is connected to the network via a router or switch.
Health Light. The health light is solid aqua white when the server is
operating correctly.
USB Port. Plug up to four USB 2.0 or later disk drives into the USB
ports to expand your storage space. There is one USB port on the front
and three on the back of the server.
The Back of the Server
USB Port. Plug up to four USB 2.0 or later disk drives into the USB ports
to expand your storage space. There is one USB port on the front and
three on the back of the server.
HP Data Vault User's Guide
Health Indicator Codes
Health Light is Red
Hubs and Network Health Light
eSATA Port. Plug an eSATA (external SATA) hard drive into the eSATA
port to expand your storage space.
Ethernet Port. Connect the HP Data Vault to your network using an
Ethernet cable.
Power Switch. Press to turn the HP Data Vault on.
Power Port. Plug the included AC power cord into the HP Data Vault.
Related Topics
4
Page 11
Set up and Installation
Light-bar is Pulsating Aqua White
Light-bar is Red
Network Connection Light Blinking
Network Connection Light off
Power Indicator is Off
FIND A HOME FOR YOUR SERVER
Server Location
Find a suitable place to locate your HP Data Vault before you install the software on your
computers. The location you choose must have either an available wired network connection to
your broadband router or a switch connected to your broadband router.
The server also requires adequate ventilation to ensure it does not get too hot:
• Do not locate the server in an unventilated space.
• Make sure that the server’s front and back panels are not blocked.
• Check that the location of the server is not too hot. Maximum environmental temperature for
operating the server is 35 °C (95 °F).
Network Requirements
To successfully use the HP Data Vault , your network must meet the following requirements:
Network Requirements
Requirement Recommended
Server connection 100 Mbps to 1000 Mbps (Gigabit Ethernet) wired
connection
Home computers One or more computers running a supported
operating system with a wired or wireless network
connection. For a list of supported operating
systems, see Supported Operating Systems.
The first installation must be on a Windows
computer. Subsequent installations can be on a
Windows or Mac computer.
Internet connection Broadband connection, such as DSL or cable,
required for remote access functionality.
5
Page 12

HP Data Vault User's Guide
Requirement Recommended
Internet browser An Internet browser is required to run the HP Data
Router An external Internet broadband rout er wi t h 1 00
Network Requirements
Vault software. Choose one from the following
options.
• Download Internet Explorer from
http://www.microsoft.com/downloads.
• Download Firefox from
http://www.firefoxdownload.com/.
• Download Safari from
http://www.apple.com/safari/download/.
Mbps (or faster) Ethernet connection to the server
for remote access functionality and wired or
wireless connections to the computers on the
network.
Additionally, your router must have DHCP enabled
to provide an automatic IP address to the server.
Supported Operating Systems
The following operating systems are supported to work with the HP Data Vault.
Supported Operating Systems
Operating System Automatic Backup
Linux X
Mac OS X 10.5 or later X X
Windows Vista Business 32-bit or 64-bit
SP2
Windows Vista Business N 32-bit or 64bit (European Union Only)
Windows Vista Enterprise 32-bit or 64-bit
SP2
of Computers
Running...
X X X
X X X
X X X
File Sharing for
Computers
Running...
Remote Access to
Computers
Running...
Windows Vista Home Basic 32-bit or 64bit SP2
Windows Vista Home N 32-bit or 64-bit
(European Union Only)
6
X X
X X
Page 13

Supported Operating Systems
Set up and Installation
Operating System Automatic Backup File Sharing for Remote Access to
Windows Vista Home Premium 32-bit or
64-bit SP2
Windows Vista Ultimate 32-bit or 64-bit
SP2
Windows XP Home SP3 X X
Windows XP Professional SP3 X X X
Windows XP Media Center Edition 2005
with SP2 and Rollup 2
of Computers
Running...
X X
X X X
X X
Computers Computers
Running... Running...
Wireless Support
You must connect the HP Data Vault to your router (or switch) with an Ethernet cable. The server
does not support wireless connection to your router. However, computers connected wirelessly to
a wireless access point or router are supported.
Turn on the Server
In this article...
The Server in Your Network
Turn on the Server
Check the Server Lights
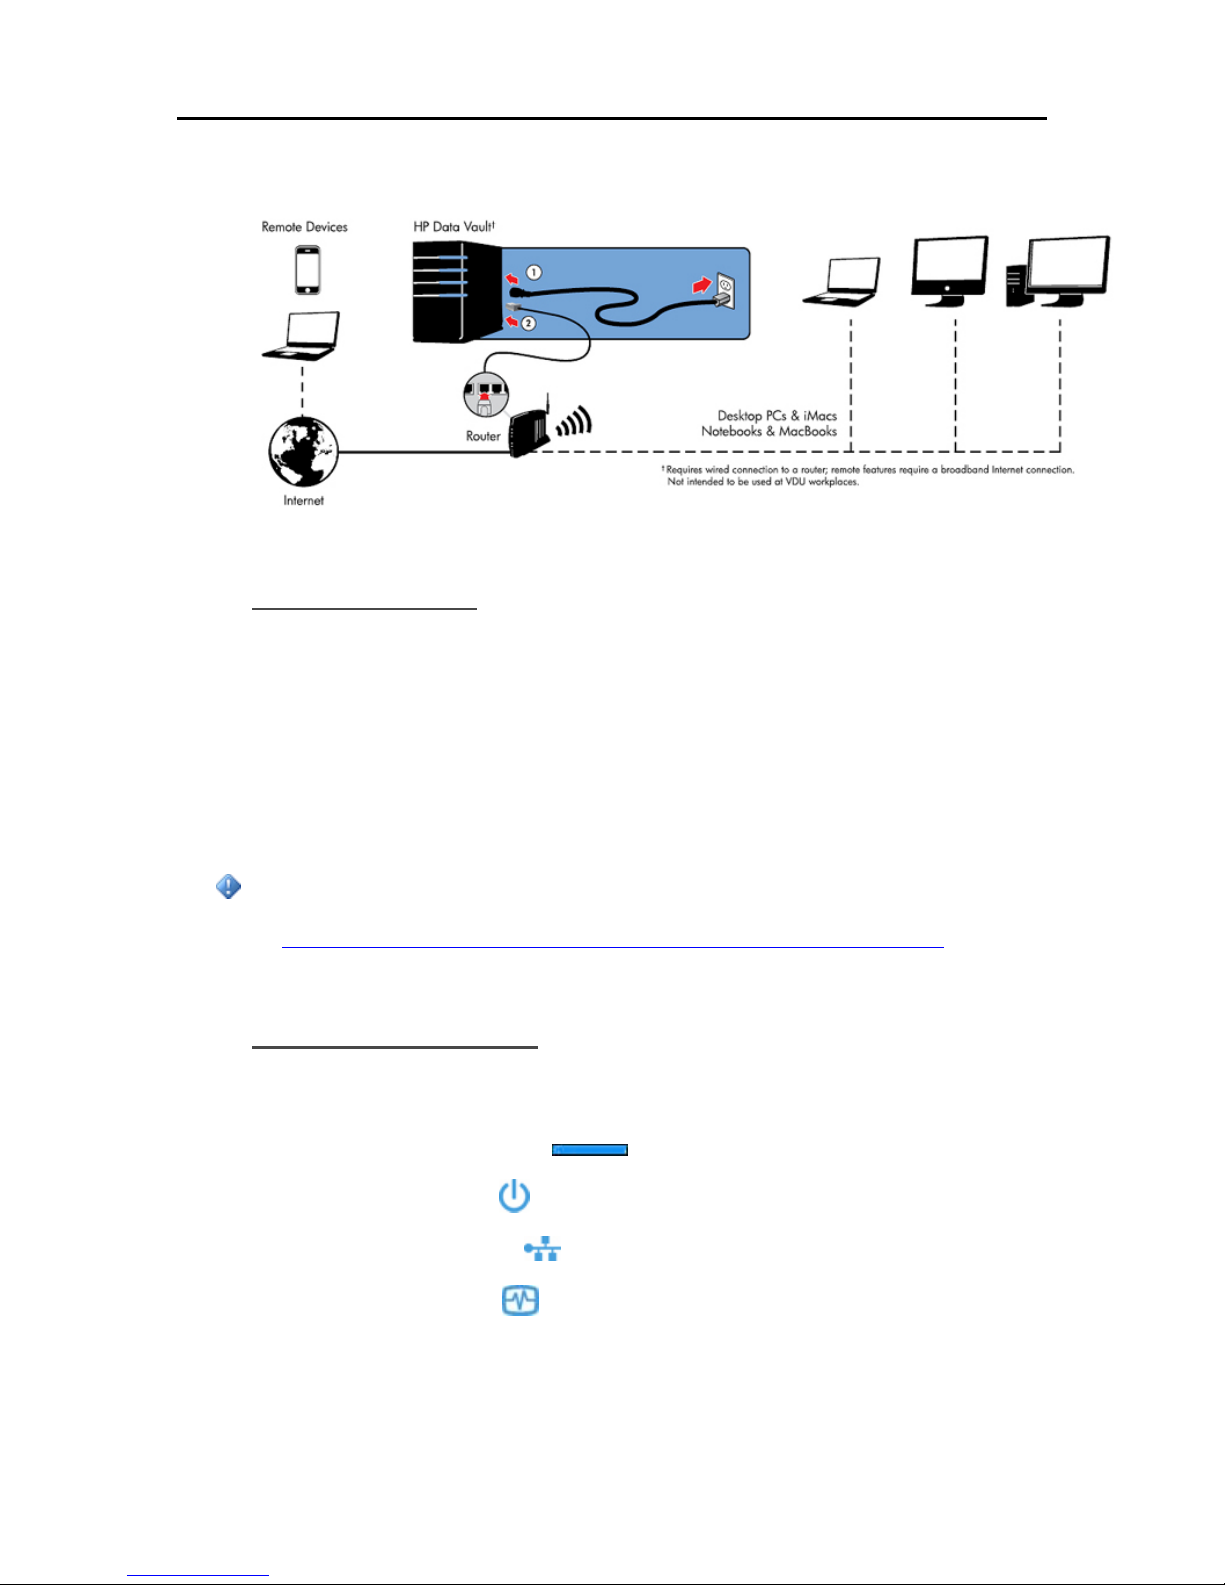
The Server in Your Network
How you connect the HP Data Vault to your network depends on the network configuratio n.
This example shows a broadband router connecting the follo wing:
• HP Data Vault (Requires wired connection to a router, and remote features require a broadband
Internet connection.)
• Wired and wireless network devices such as notebooks, desk computers, TVs and gaming
consoles
• Remote devices such as notebooks and iPhones
The server requires a DHCP-enabled router to get its IP address. By default, most routers include a
DHCP server. For more information, check your router documentation.
Caution
If you have wireless functionality on your network, be sure to enable your router’s security
7
Page 14
HP Data Vault User's Guide
settings, such as WPA or WEP, to protect your network. See the documentation that came with
your router.
Turn on the Server
1. Plug in. Plug one end of the power cord into the server’s power receptacle and the other end into
an electrical outlet.
2. Connect. Connect one end of the Ethernet cable to the server and the other end to an available
Ethernet port on your router or to a switch that is connected to your router .
3. Power on. Press the Power button on the back of the server.
The server takes approximately 60 seconds to start up. The indicator lights blink and change color
throughout the startup process. Wait for all of the server lights to be pulsing before proceeding
with the software installation.
Important
Do not attach USB devices to the HP Data Vault during initial setup. For additional information,
see Add and Remove an External USB Drive, eSATA Drive, or SATA Port Multiplier
.
Check the Server Lights
The lights on the front of the HP Data Vault indicate the status of the server. After the HP Data
Vault startup completes but prior to the first software installation, the indicator lights show:
• Hard drives—breathing aqua white
• Power—breathing aqua white
• Network—breathing aqua white
• Health—breathing aqua white
After you complete the software installation, all lights should be solid aqua white.
8
Page 15
Related Topics
HP Data Vault User's Guide
Set up and Installation
Health Indicator Codes
Health Light is Red
Hubs and Network Health Light
Light-bar is Pulsating Aqua White
Light-bar is Red
Network Connection Light Blinking
Network Connection Light off
Power Indicator is Off
INSTALL THE SOFTWARE
Update Your Firewall's Trusted Program List
The Software Installation Disc installs several programs that enable your computer to
communicate with the HP Data Vault over your network. Software firewalls installed on your
computer can block this communication and prevent the computer from locating the HP Data
Vault on your network.
Note
If Media Collector is not collecting music, photos, or videos and you use a third party firewall, add
a firewall exception for port 21 TCP/outbound within the local subnet. Consu lt your software's
documentation for details on how to do this.
In this article...
Set Your Firewall or Anti-Virus Programs to Automatically "Learn" New Programs
Manually Add Programs to Your Firewall or Anti-Virus Program's Trusted List
Set Your Firewall or Anti-Virus Programs to Automatically
"Learn" New Programs
It is recommended that you set your firewall and anti-virus programs to "Learn" new programs
before installing the HP Data Vault software. After the HP Data Vault software is installed, the
firewall should prompt you to allow the installed programs to communicate with the server.
Allow the following HP Data Vault programs to co mmunicate through your firewall or anti-virus
program:
C:\Program Files\Windows Home Server\
9
Page 16

HP Data Vault User's Guide
MountBackup.exe
RestoreOffProc.exe
WHSTrayApp.exe
WHSConsoleClient.exe
WHSConnector.exe
BackupEngine.exe
WHSOOBE.exe
C:\Program Files\Hewlett-Packard\HP MediaSmart Server\
MediaCollectorClient.exe
MSSConnectorService.exe
ControlCenter.exe
C:\Program Files\HP\HP Software Update\
HPWUCli.exe
Manually Add Programs to Your Firewall or Anti-Virus Program's
Trusted List
Some firewall or anti-virus programs may not automatically update their trusted programs list.
Instructions for manually updating several common firewall and anti-virus programs are listed
below. If your firewall or anti-virus program is not listed, please contact the vendor to find out
how to manually add programs to the trusted programs list. Additionally, see the documentation
that came with your firewall or anti-virus program for the latest information.
Click the vendor to expand and view the instructions on updatin g their trusted programs list. Click
again to hide the instructions.
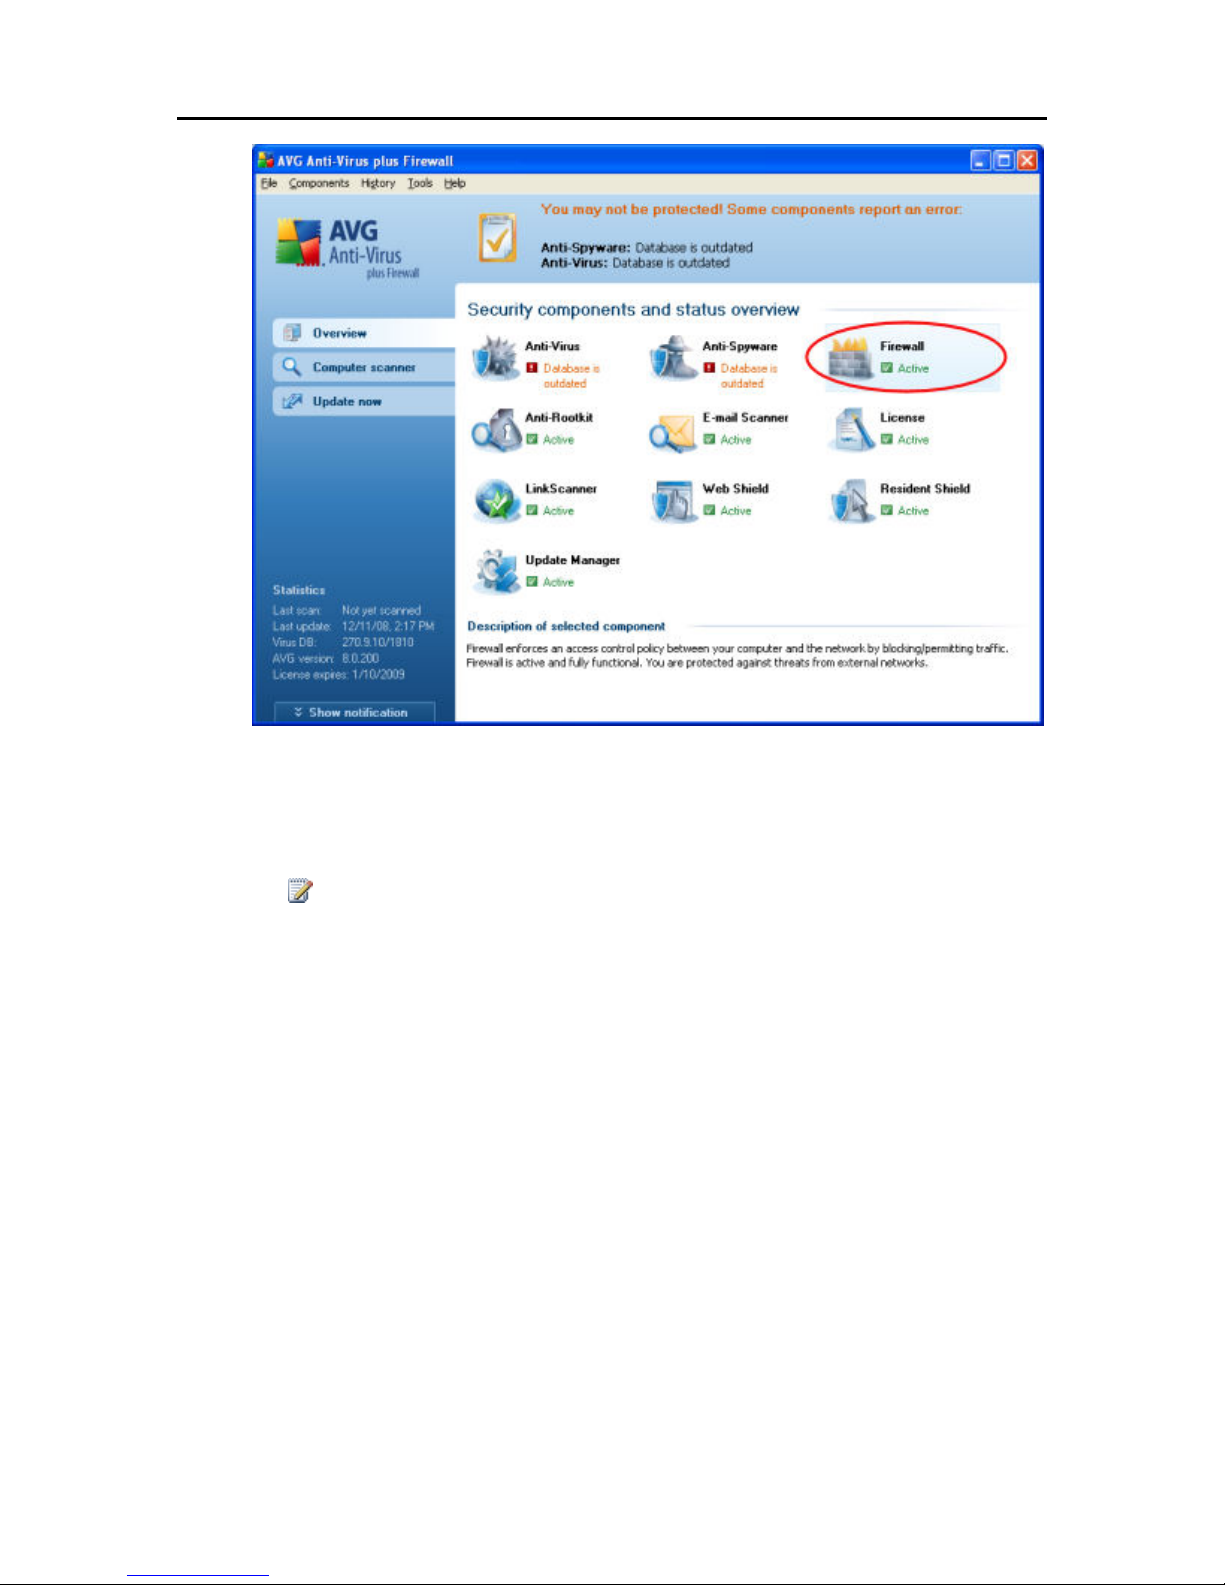
• AVG
Open the AVG Anti-Virus plus Firewall. Double-click the Firewall button to configure the
Firewall. Add the programs listed at the of this page.
10
Page 17
Set up and Installation
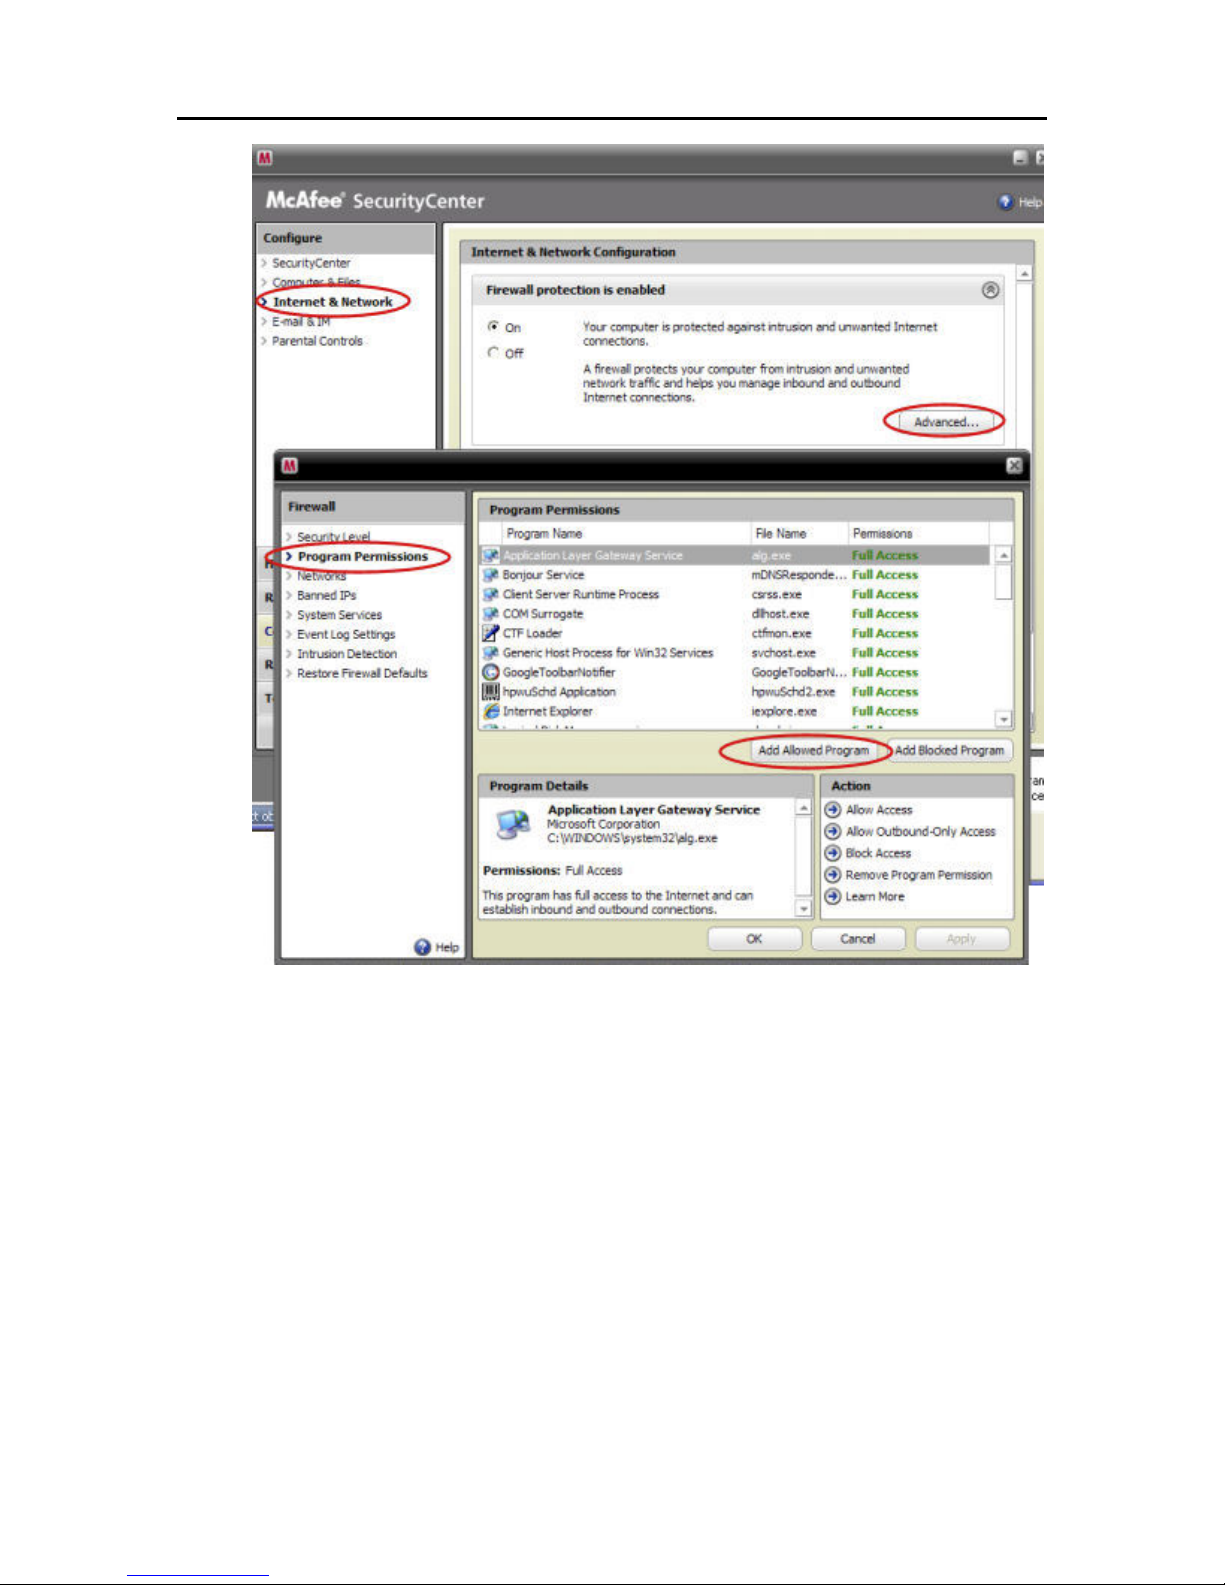
• McAfee
Open your McAfee Security Center, click Internet and Netw ork , and then click the Advanced
button in the firewall section. Click Program Permissions, then click Add Allowed Program.
Add the programs listed at the of this page.
Note
McAfee's firewall automatically disables Windows Firewall and sets itself as your default
firewall.
11
Page 18
HP Data Vault User's Guide
• Microsoft Windows Vista
To add exceptions to your firewall using Windows Vista, preform the following steps:
12
Page 19
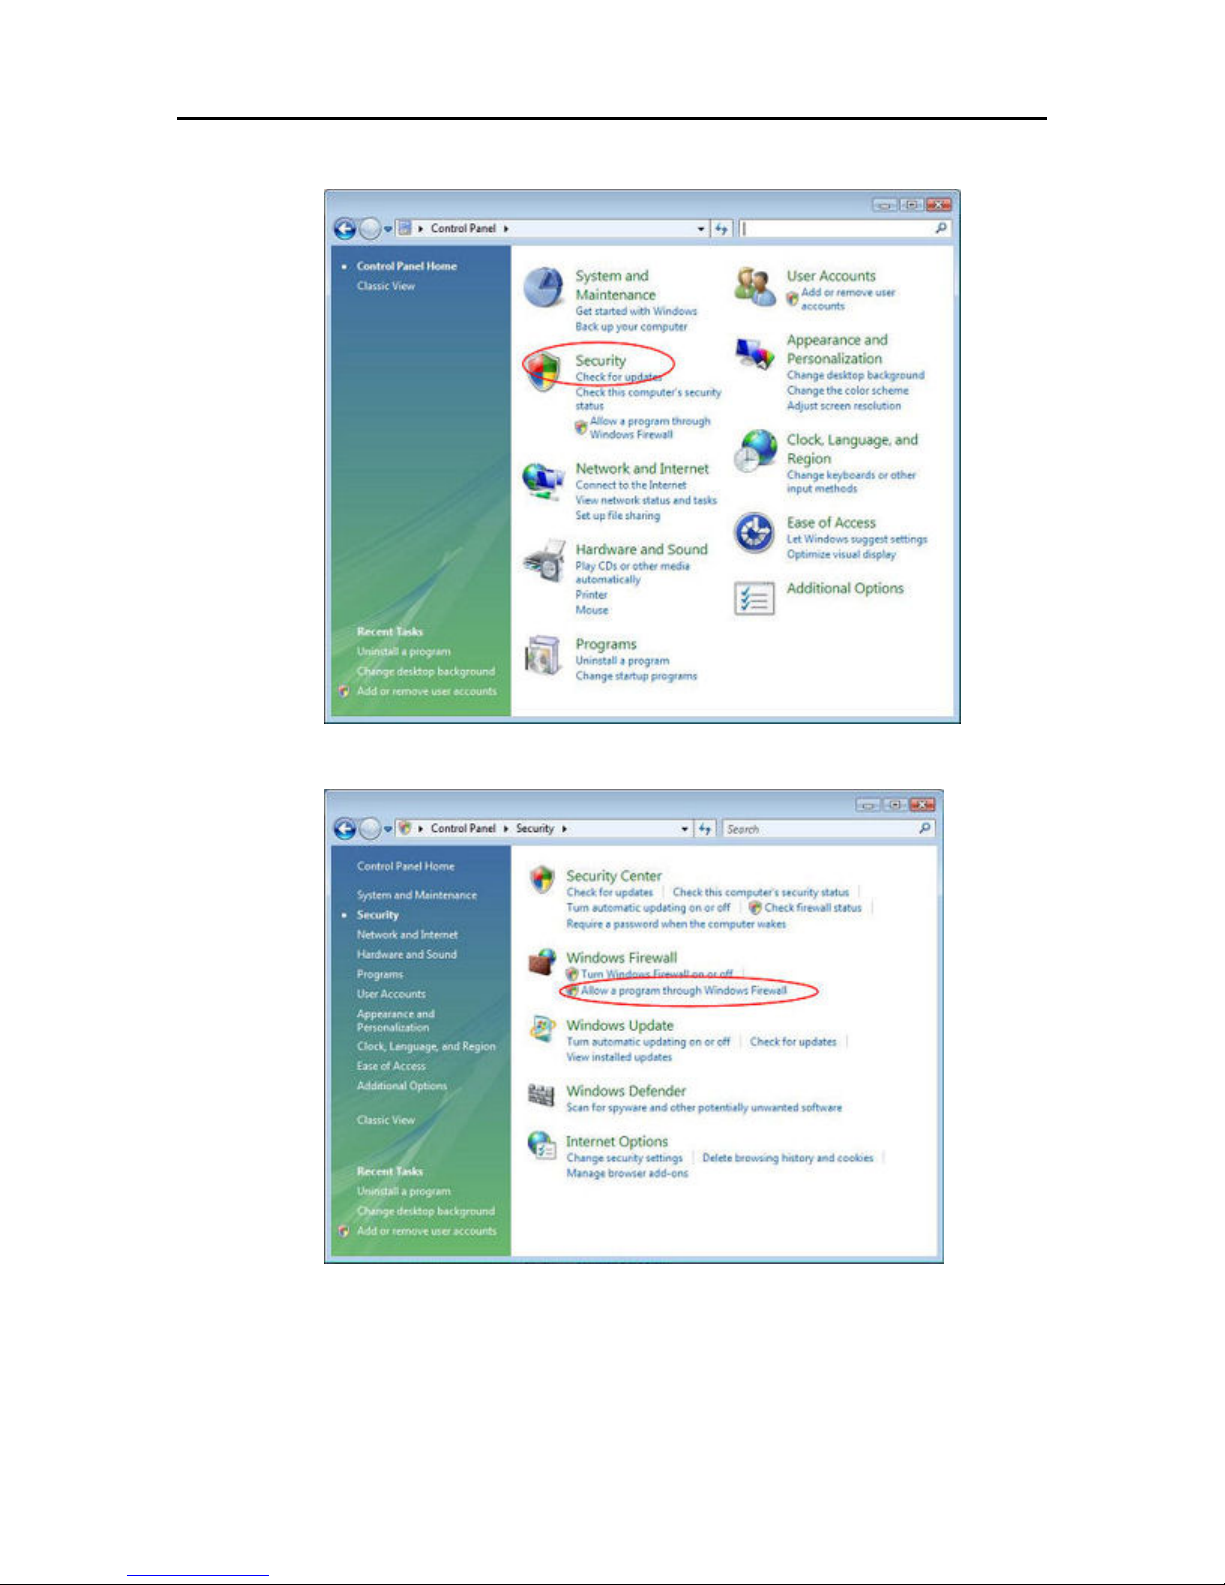
1. Click Start, Control Panel, and then Security Center.
Set up and Installation
2. Click Allow a program through Windows Firewall.
13
Page 20
HP Data Vault User's Guide
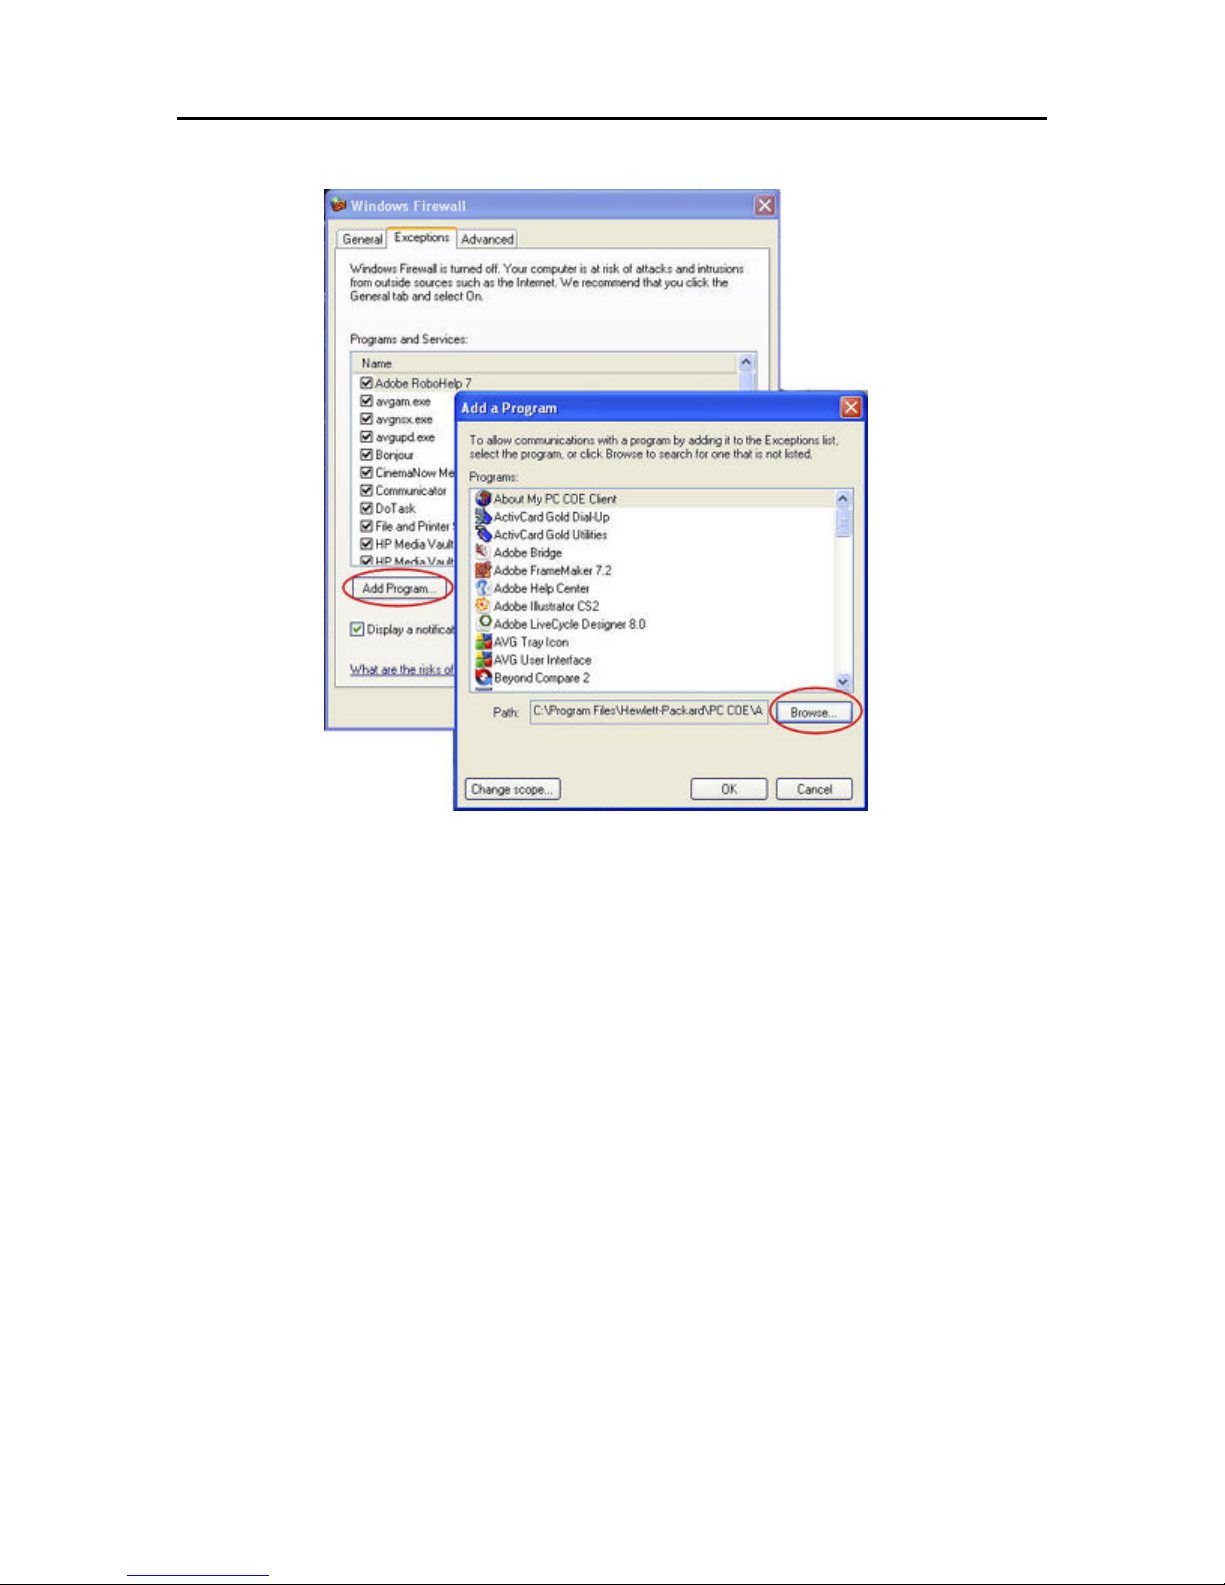
3. Select the Exceptions tab and then click Add Program.
4. In the Add a Program dialog box, click Browse. Add the programs listed at the of this
page.
5. Click OK.
• Microsoft Windows XP
To add exceptions to your firewall using Windows XP, preform the following steps:
14
Page 21
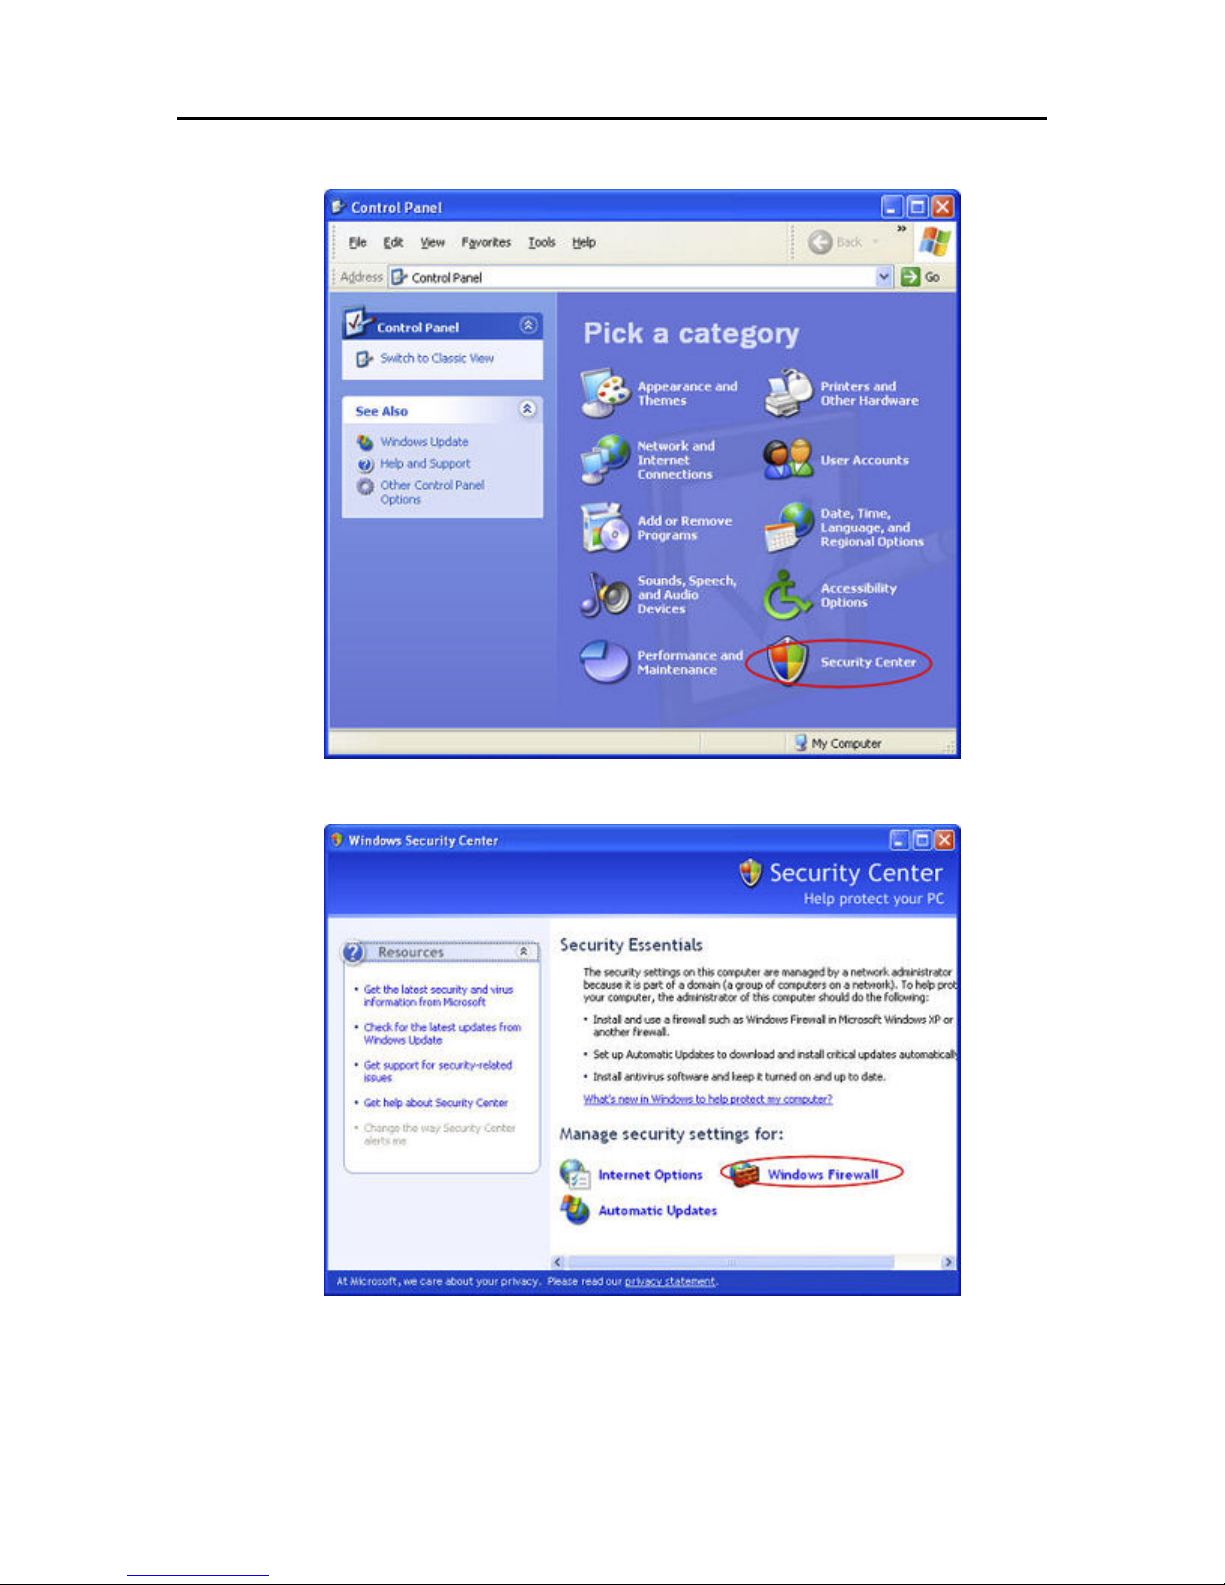
1. Click Start, Control Panel, and then Security Center.
Set up and Installation
2. Click Windows Firewall.
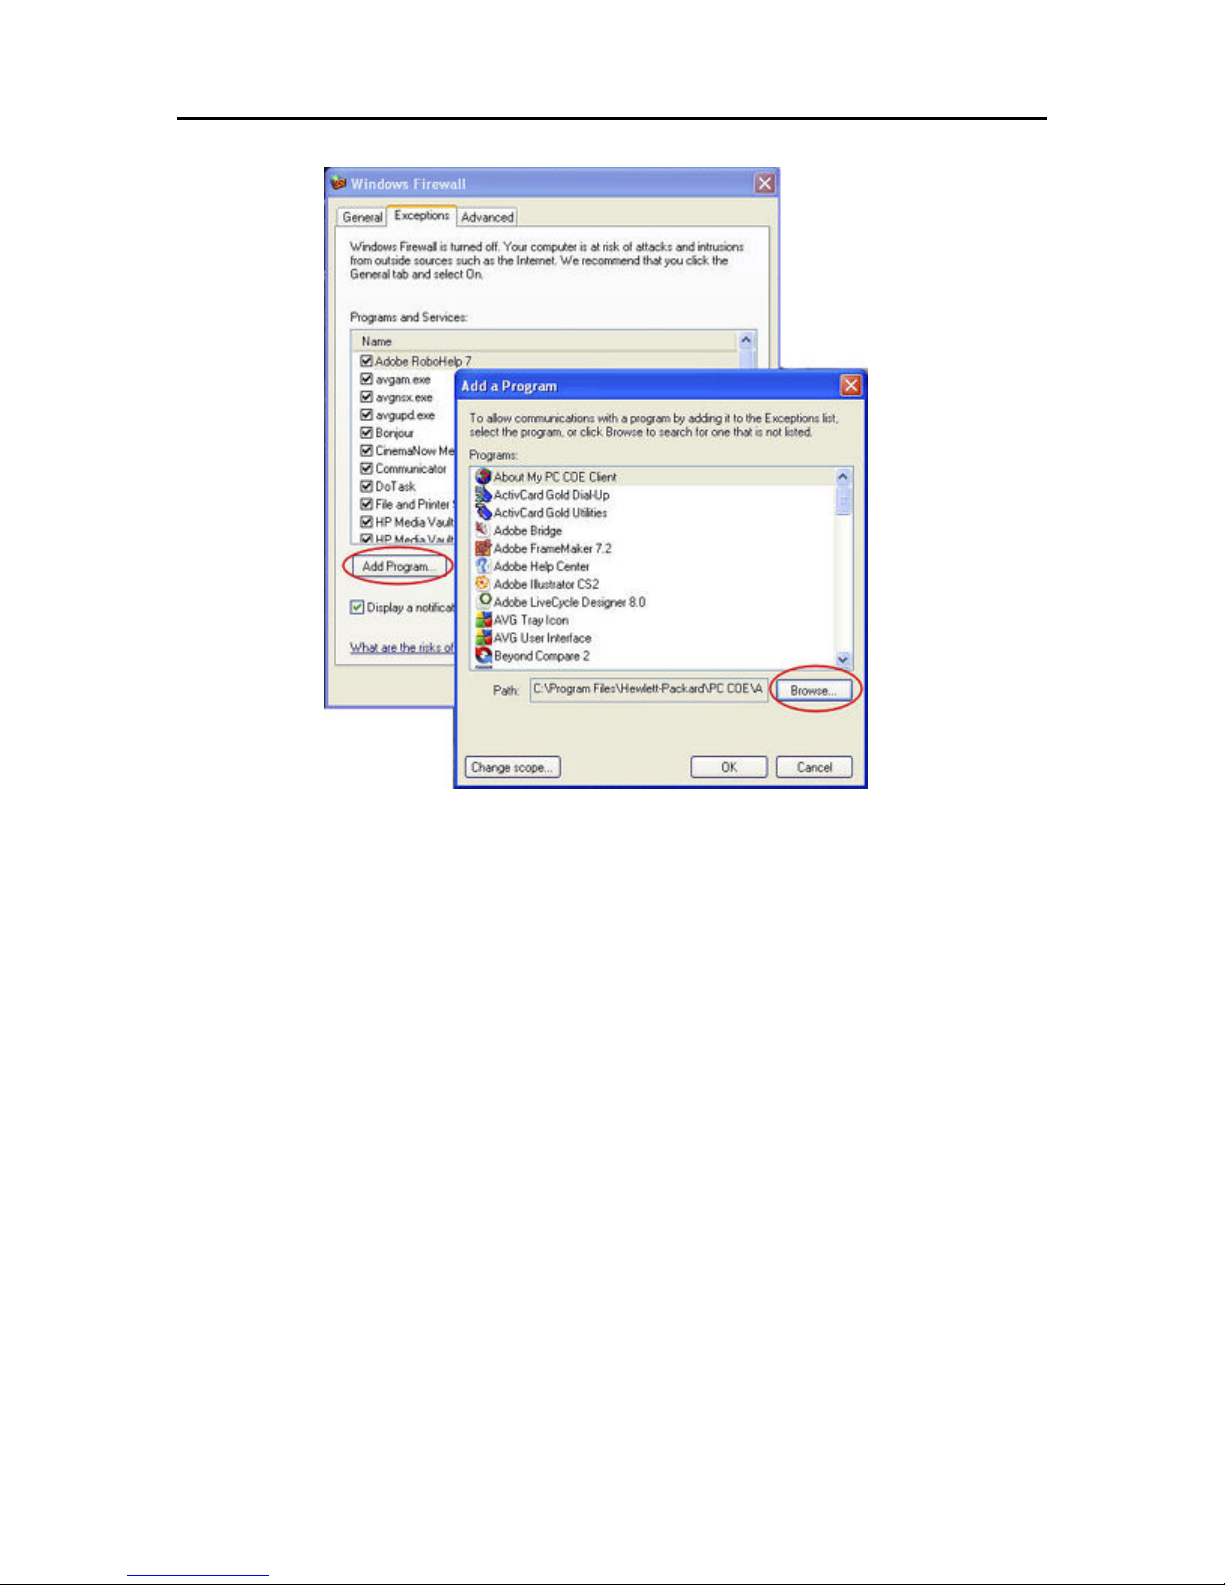
3. Select the Exceptions tab and then click Add Program.
4. In the Add a Program dialog box, click Browse. Add the programs listed at the of this
page.
15
Page 22
HP Data Vault User's Guide
5. Click OK.
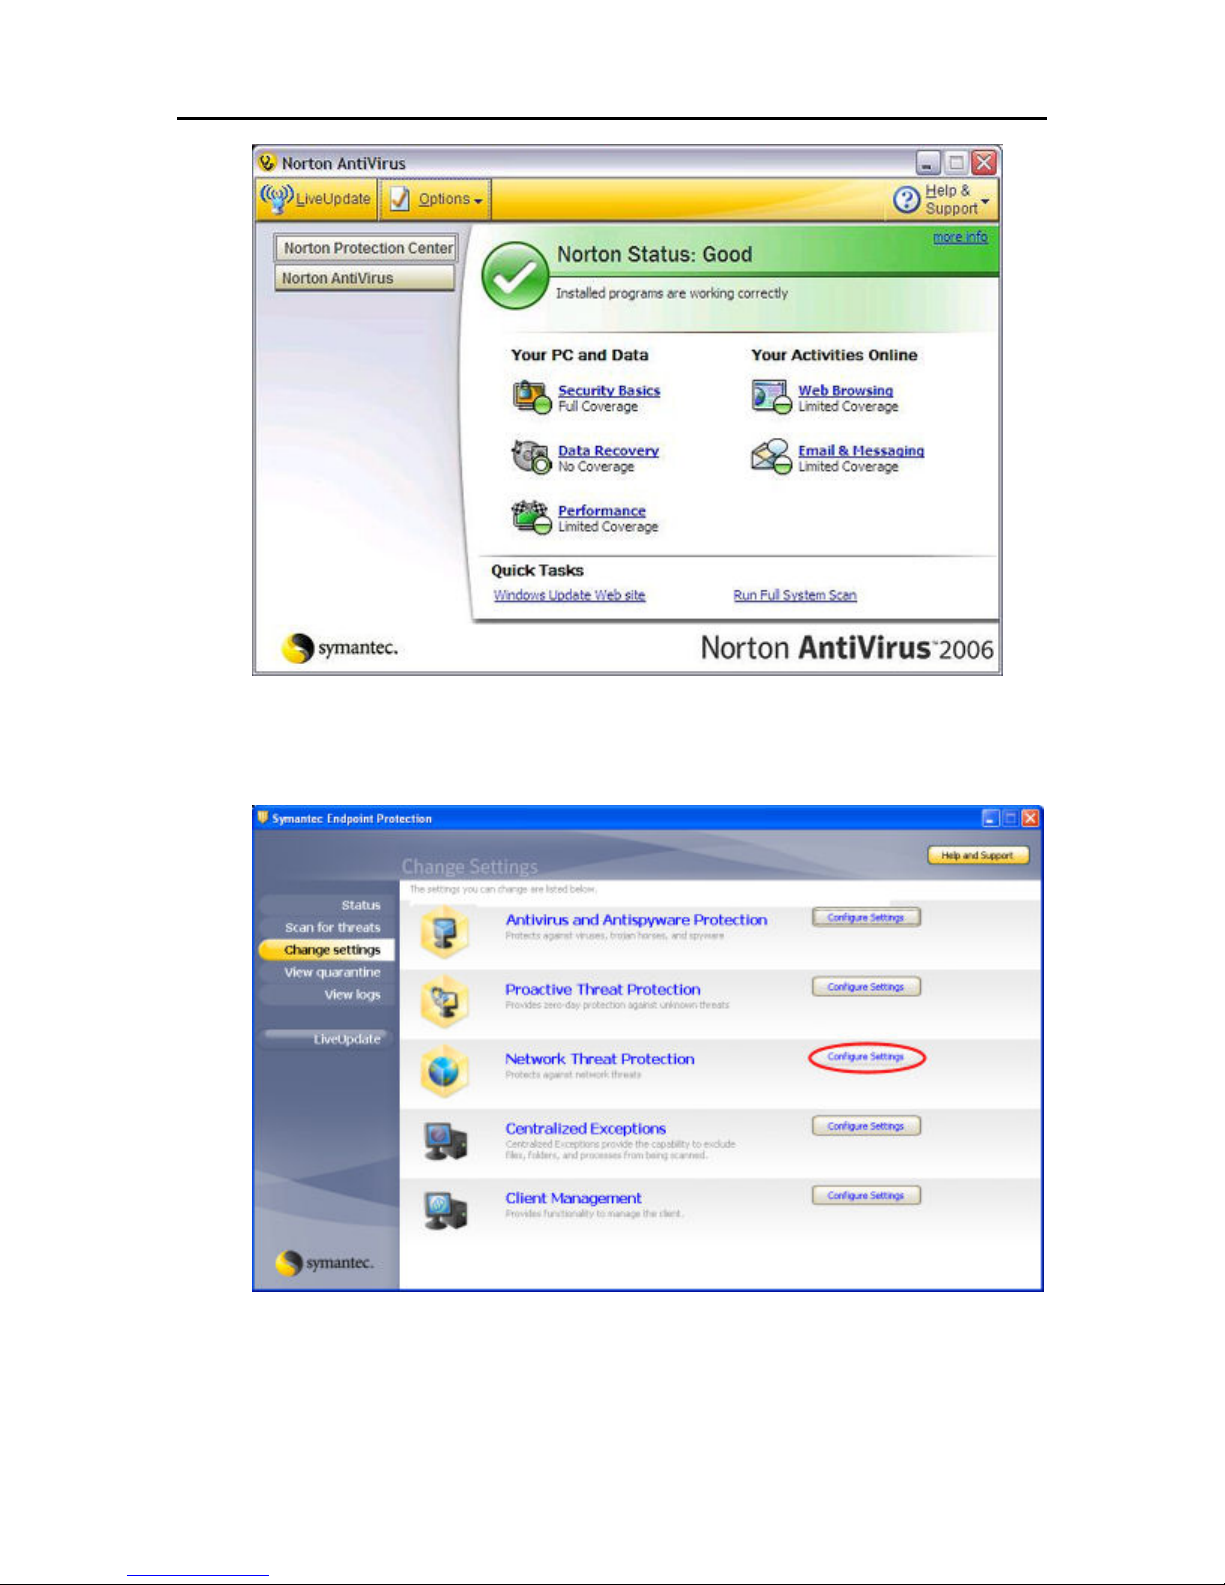
• Norton
Click Options in Norton to change the firewall settings. Add the programs listed at the of this
page.
16
Page 23
Set up and Installation
• Symantec
Open Symantec Endpoint Protection, click Change Settings, and then click Configure Settings
for Network Threat Protection. Add the programs listed at the of this page.
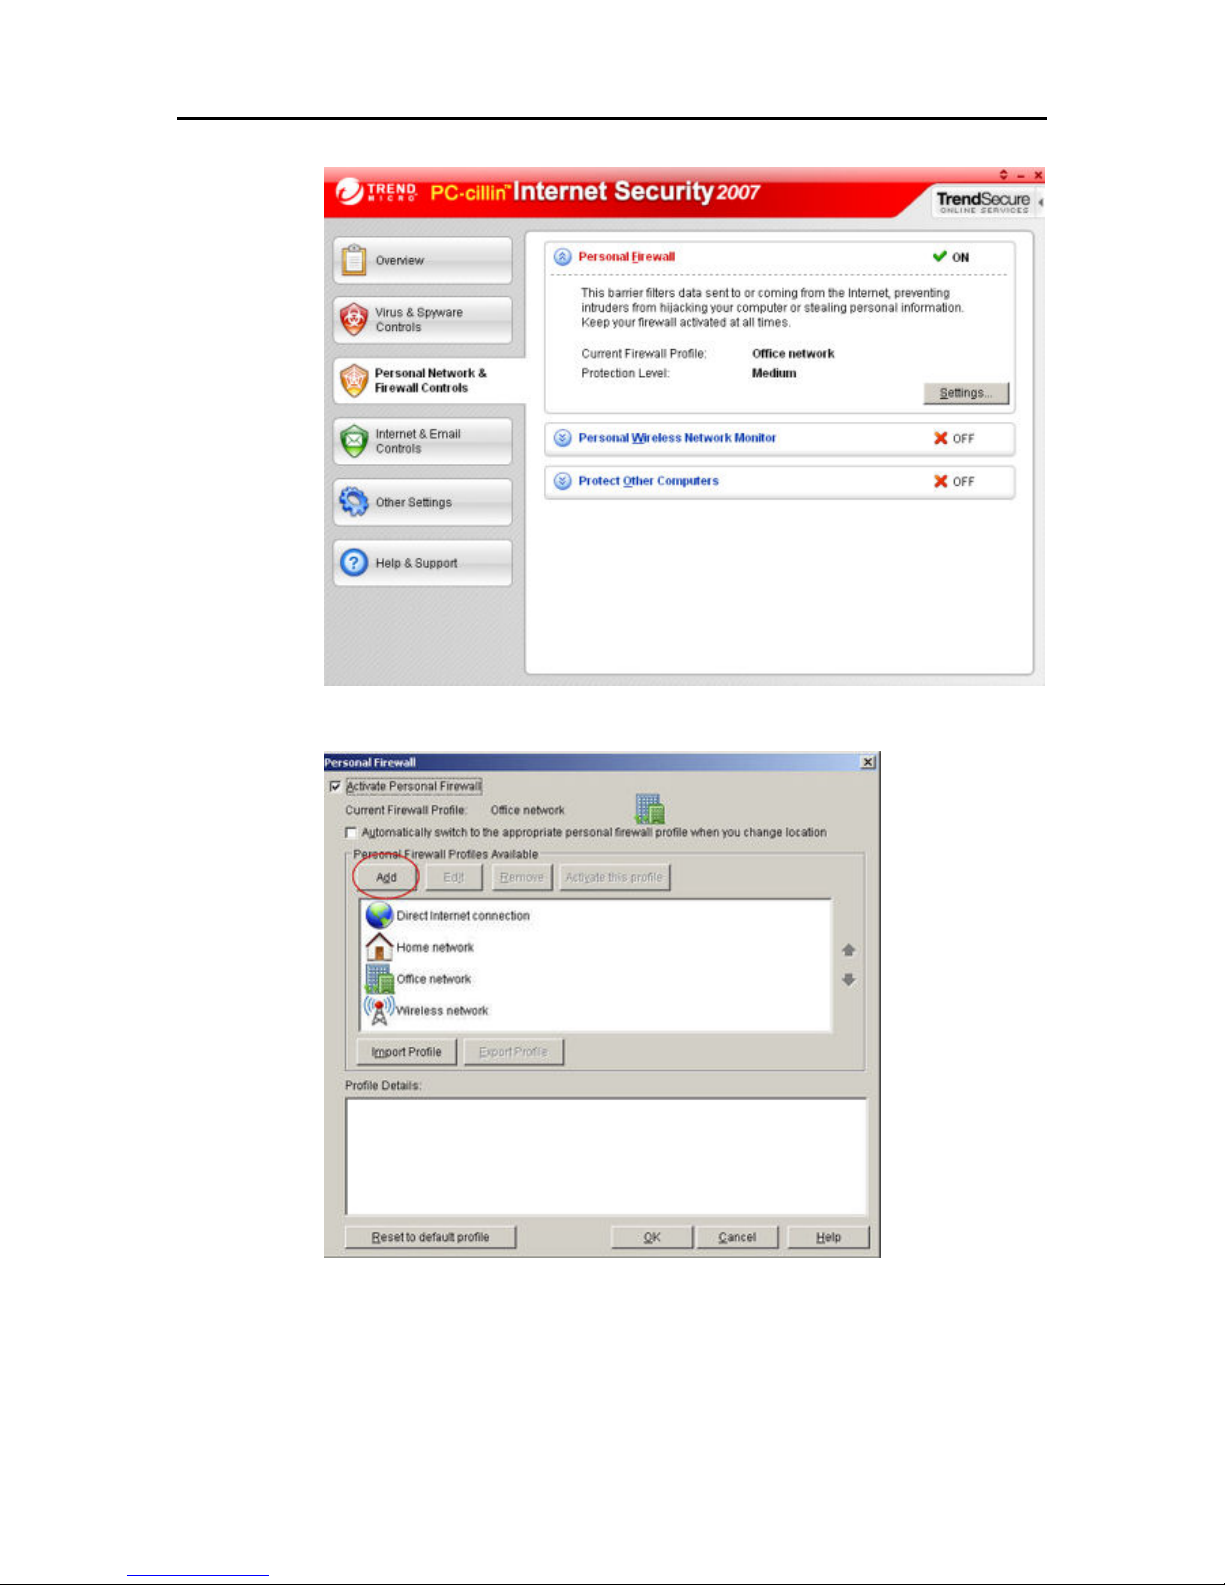
• Trend Micro
1. Open the Trend Micro Main Console, select the Personal Network and Fi rew all
Controls tab, and then click Settings.
17
Page 24
HP Data Vault User's Guide
2. On the Personal Firewall page, click Add.
18
Page 25
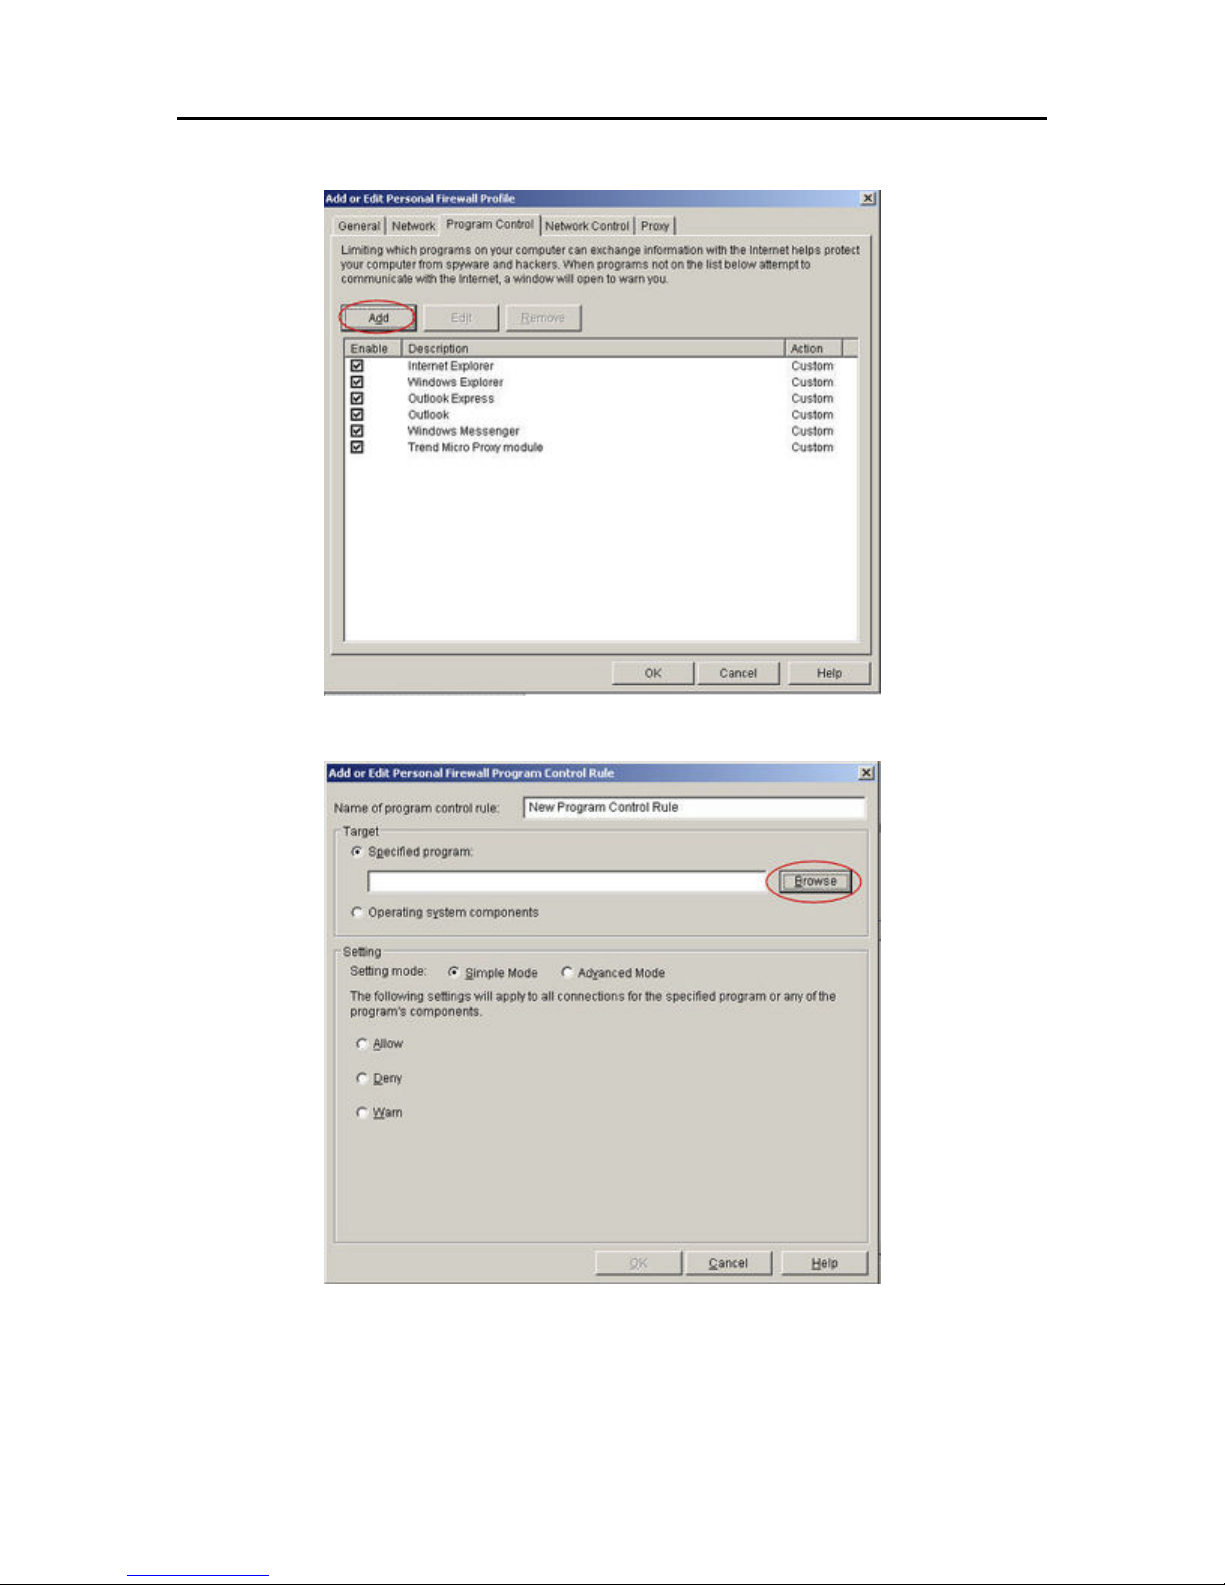
3. Select the Program Control tab and then click Add.
Set up and Installation
4. Click Browse and add the programs listed at the of this page.
5. Click OK.
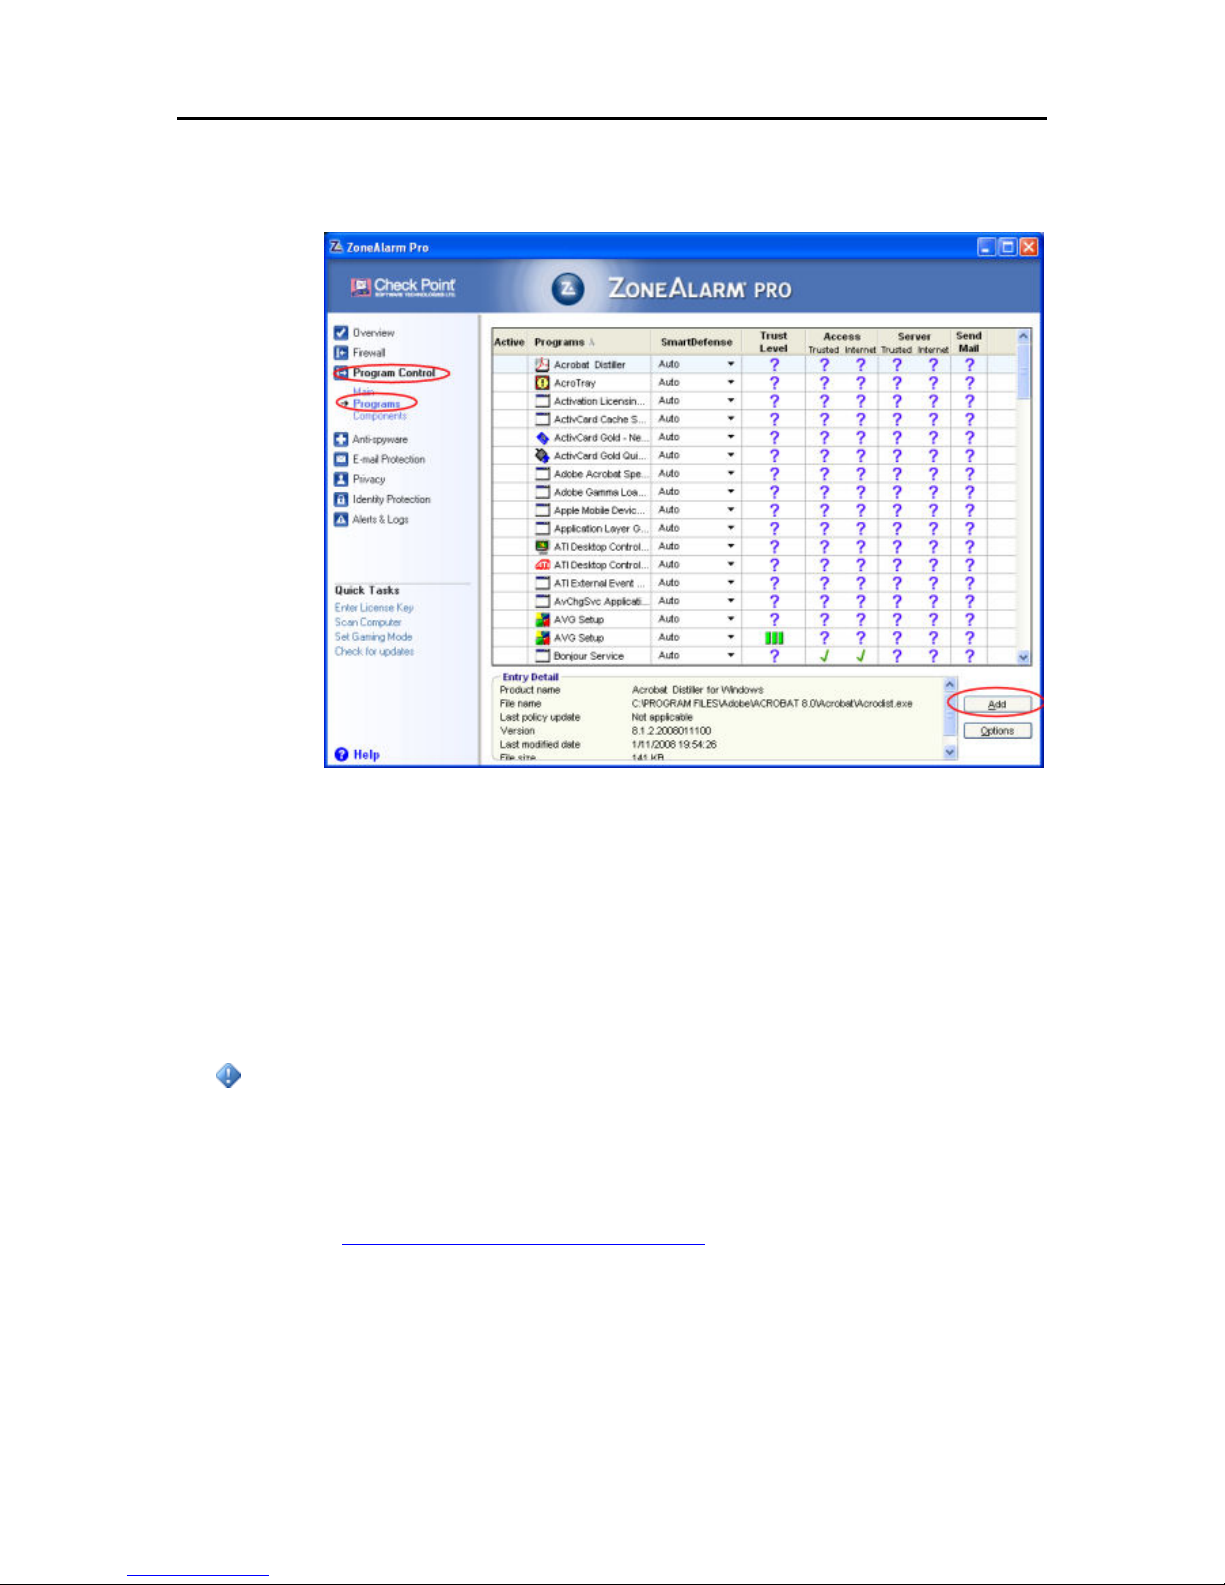
• ZoneAlarm
19
Page 26
HP Data Vault User's Guide
1. Open ZoneAlarm Security.
2. Click Program Control, Programs, and then Add.
3. Add the programs listed at the of this page.
Install Software on the First PC
The following steps outline the key decision points during the software installation. Click each
step to expand it and see additional information.
Important
To ensure a smooth software installation,
• The first installation must be on a Windows computer. Subsequent installations can be
on a Windows or Mac computer.
• Update Your Firewall's Trusted Program List
• Verify that you have administrator privileges on the co mpu ter where you are doing the
install (step 1 below).
• Write down your server name (step 6 below).
• Write down your server password (step 7 below).
20
Page 27
Set up and Installation
1. Check for Administrator Privileges.
You must have administrative privileges on your computer to install the software. Complete the
following steps to view or change user account settings.
On Windows Vista,
Click Start, Control Panel, and then User Accounts and Family Safety
On Windows XP,
Click Start, Control Panel, and then double-click User Accounts
On Mac OS X 10.5 or Later,
Click System Preferences, Accounts, and check Allow user to administer this
computer
2. Insert the Software Installation Disc into a network PC.
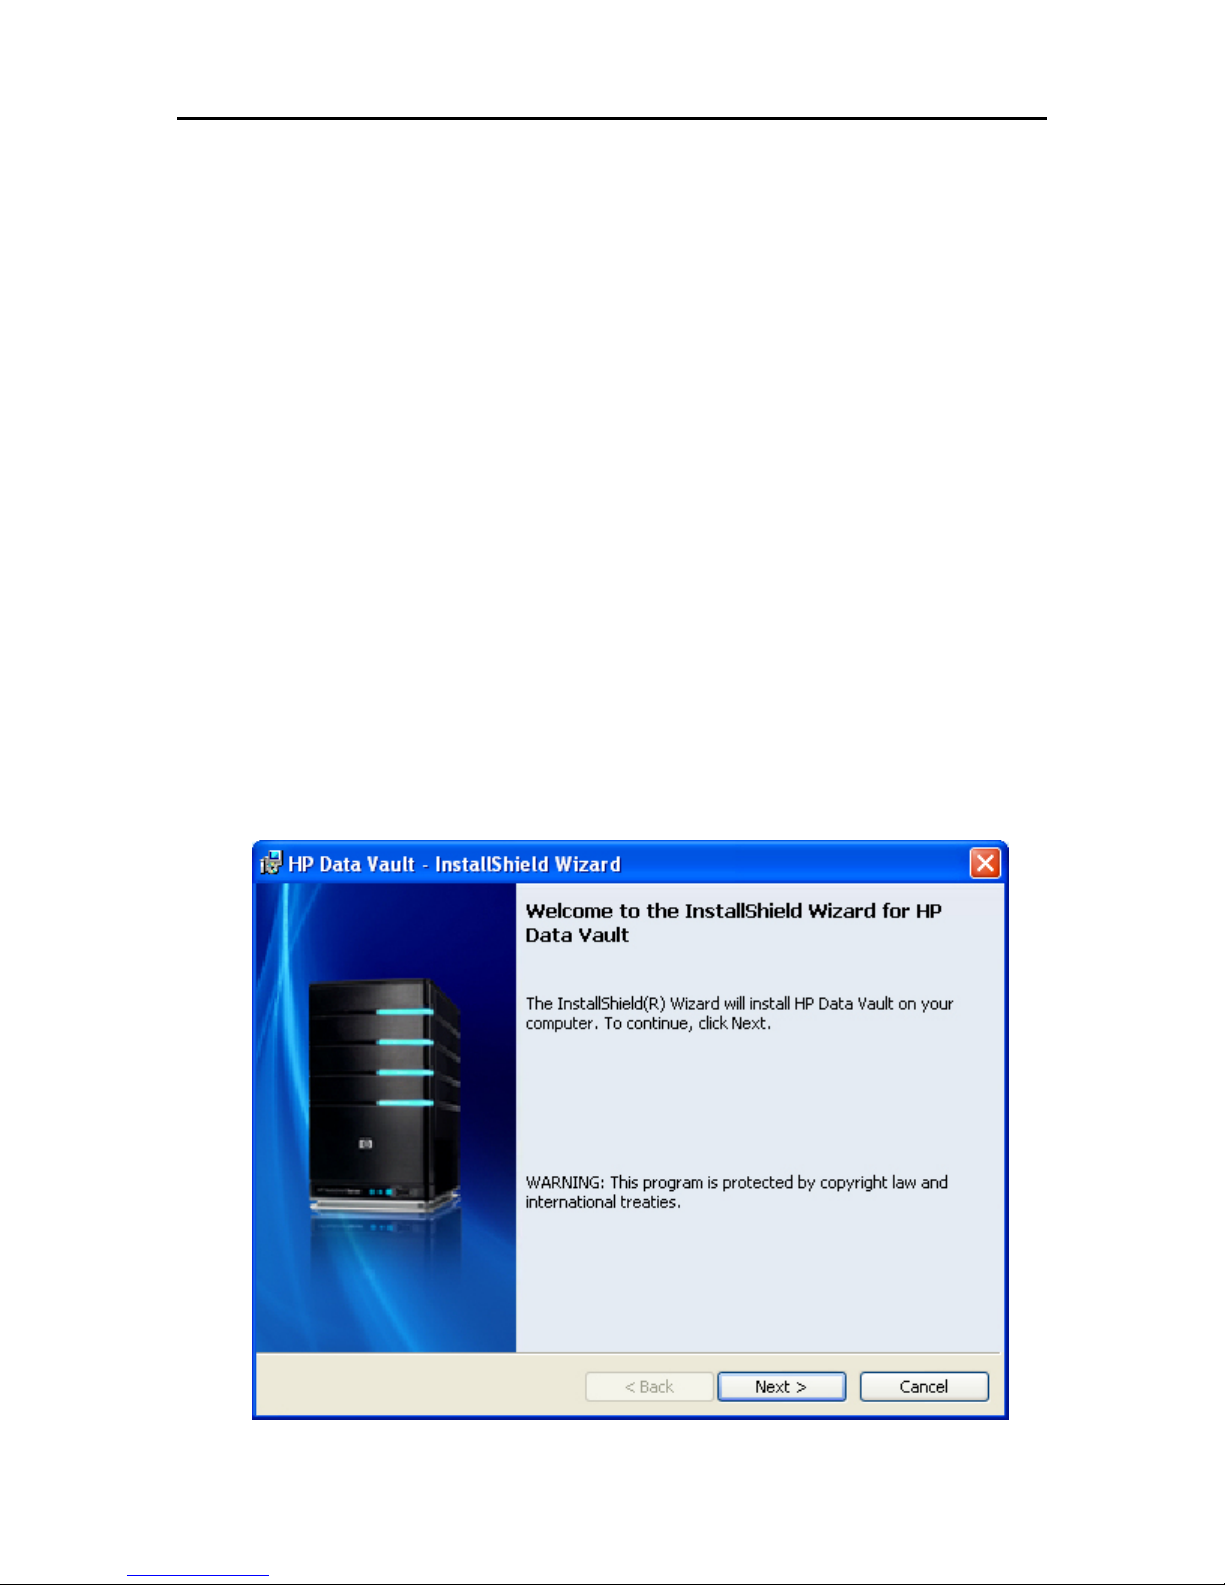
3. Click Next to progress through the Install Wizard and install the HP Data Vault client software.
The HP Data Vault software installs first. This software is used to
Provide a single point of access for all of the server's features,
Share photos and videos easily over the Internet using HP Photo Publisher and HP Photo
Viewer
Centralize your photo, video, and music libraries using HP Media Collector
21
Page 28
HP Data Vault User's Guide
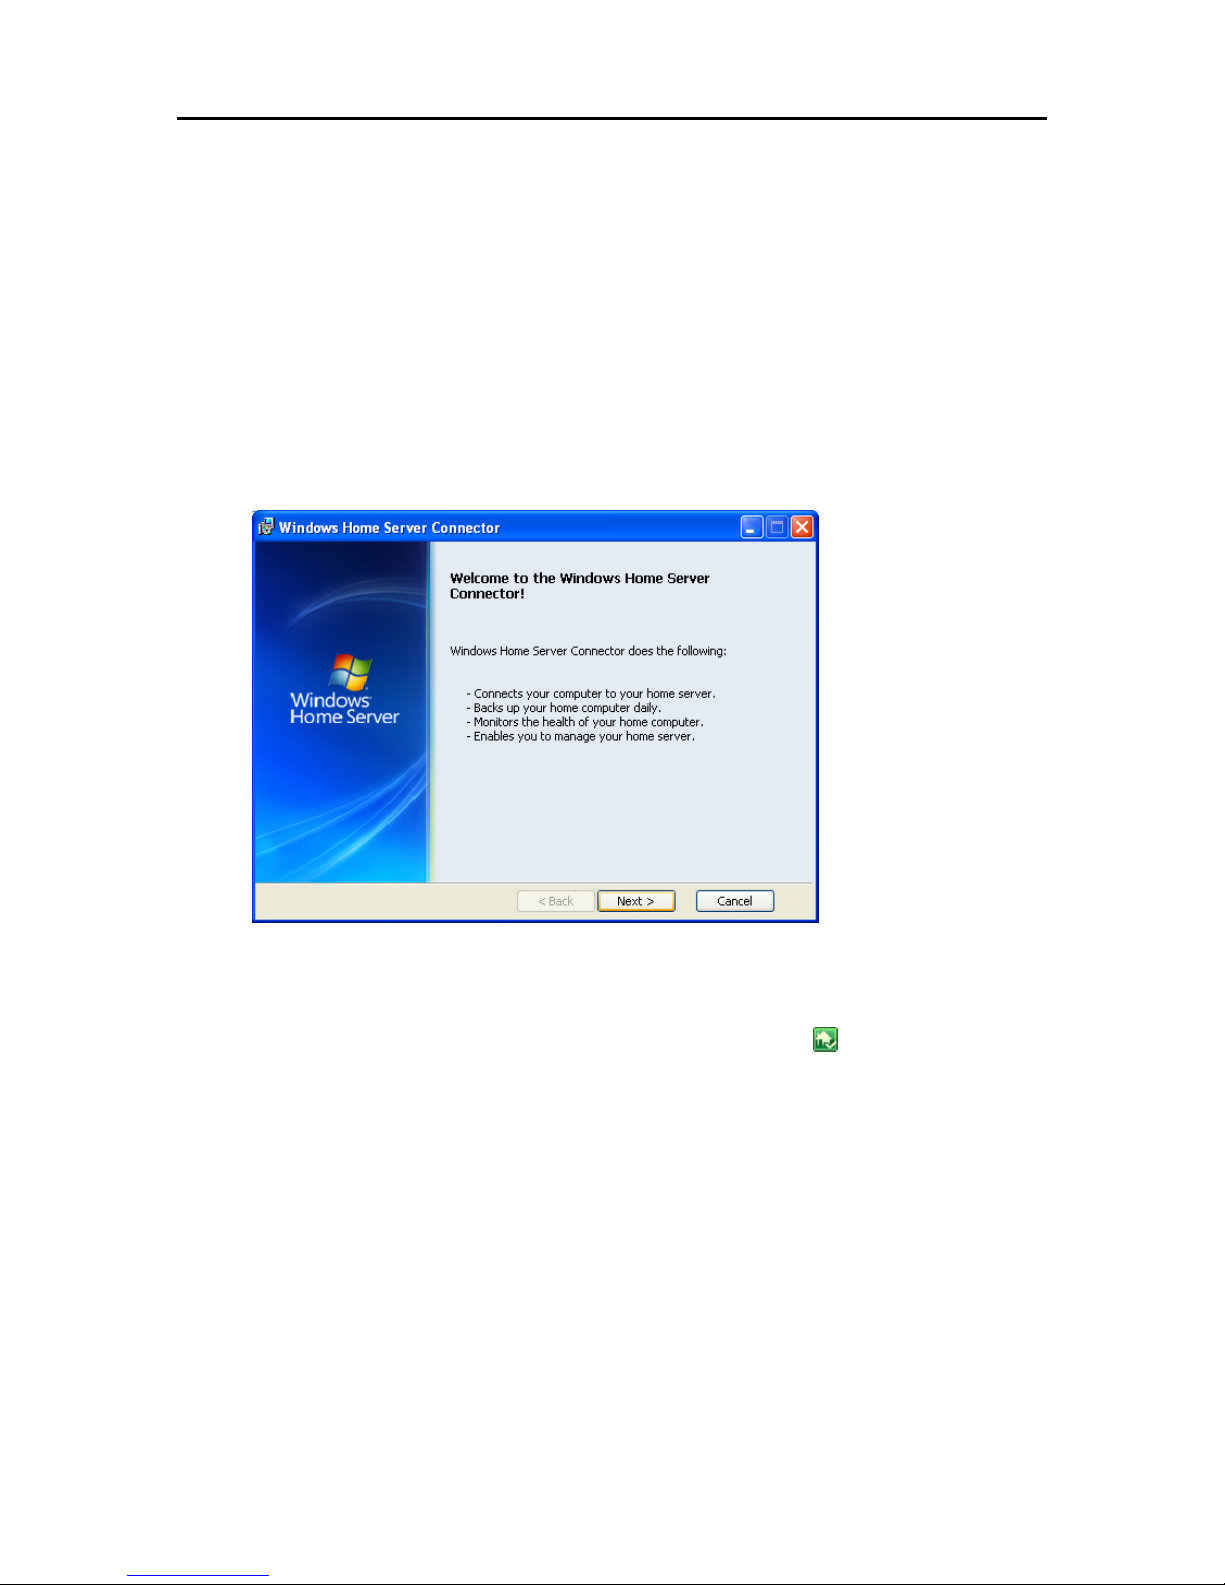
4. The Windows Home Server Connector installs next.
The Windows Home Server Connector:
Connects your computer to the server
Automatically backs up your computer every night
Monitors the health of the network and computers running Windows Vista
Enables configuration of the server from your computer
The Windows Home Server software installation runs only once—on the first computer where you
run the Software Installation Disc.
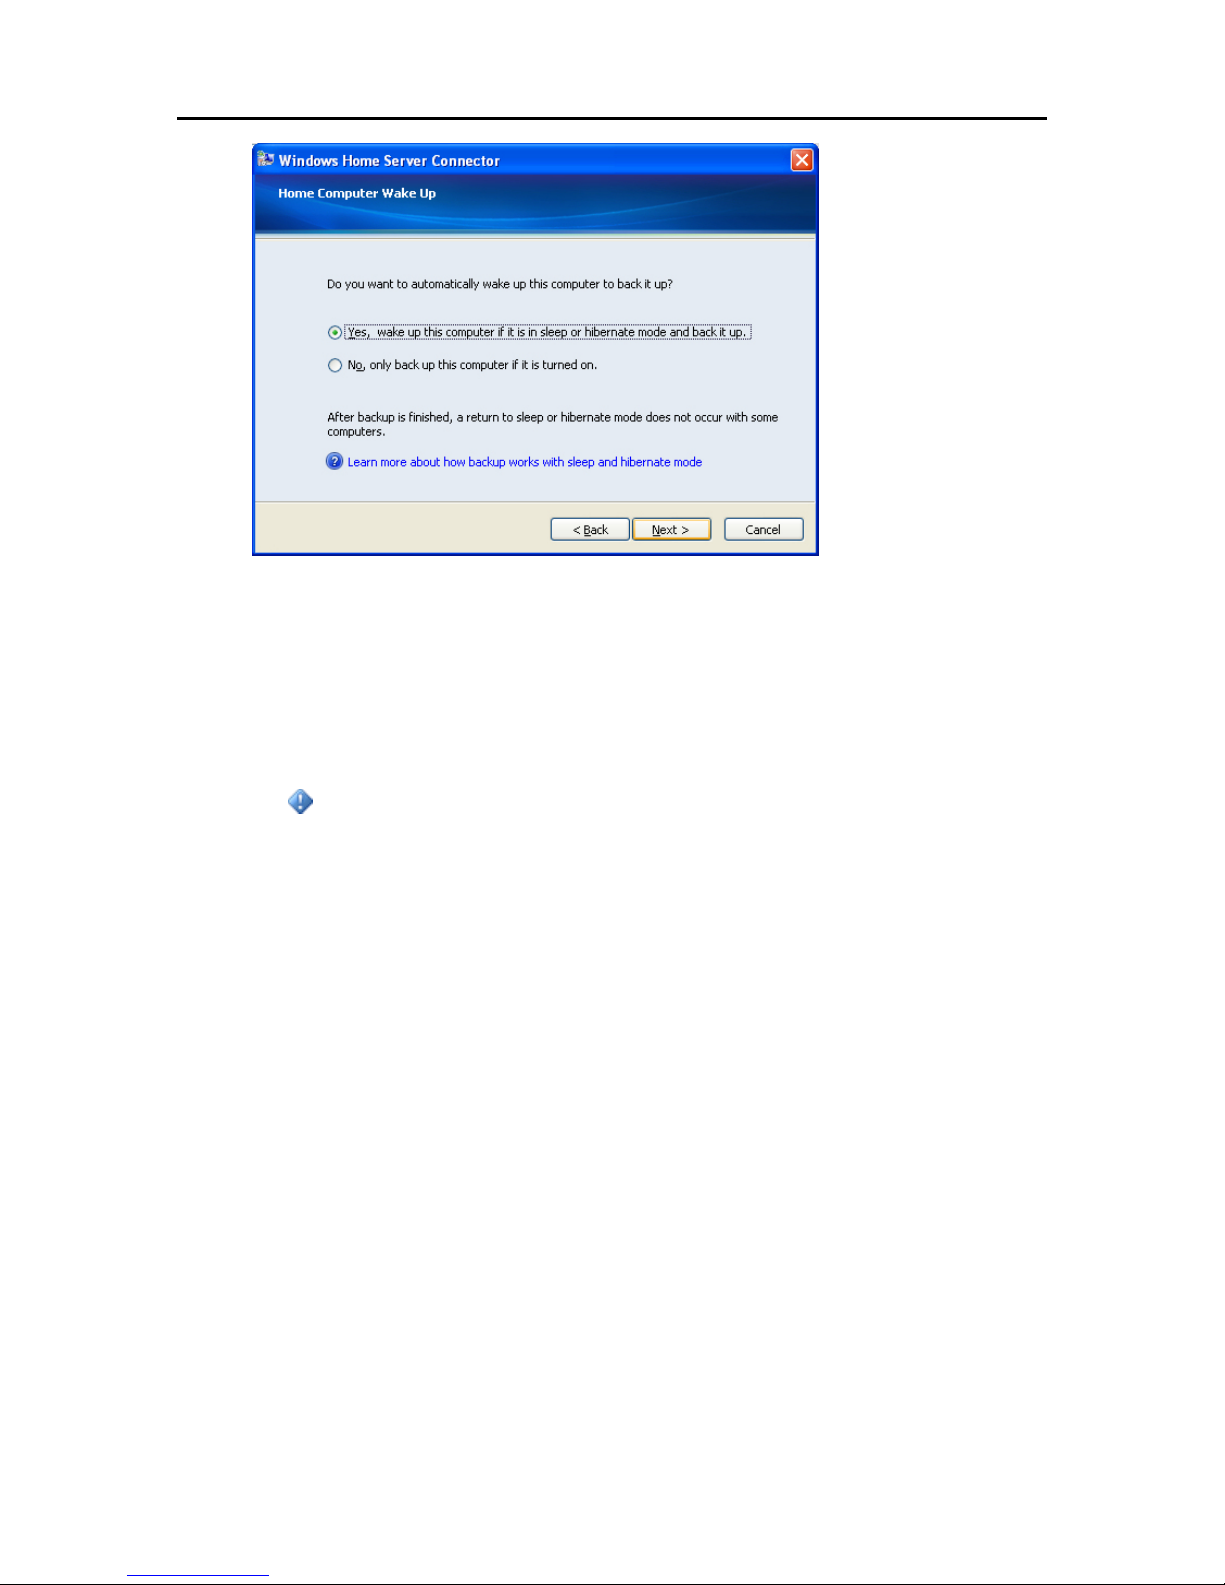
5. Select to wake up this computer if it is in sleep or hibernate mode to run a scheduled backup.
If you do not turn on this option now, you can enable it later.
a. At th e computer, right-click the Windows Home Server icon
in the system tray.
b. Check Wake this Computer for Backup in the shortcut menu.
22
Page 29
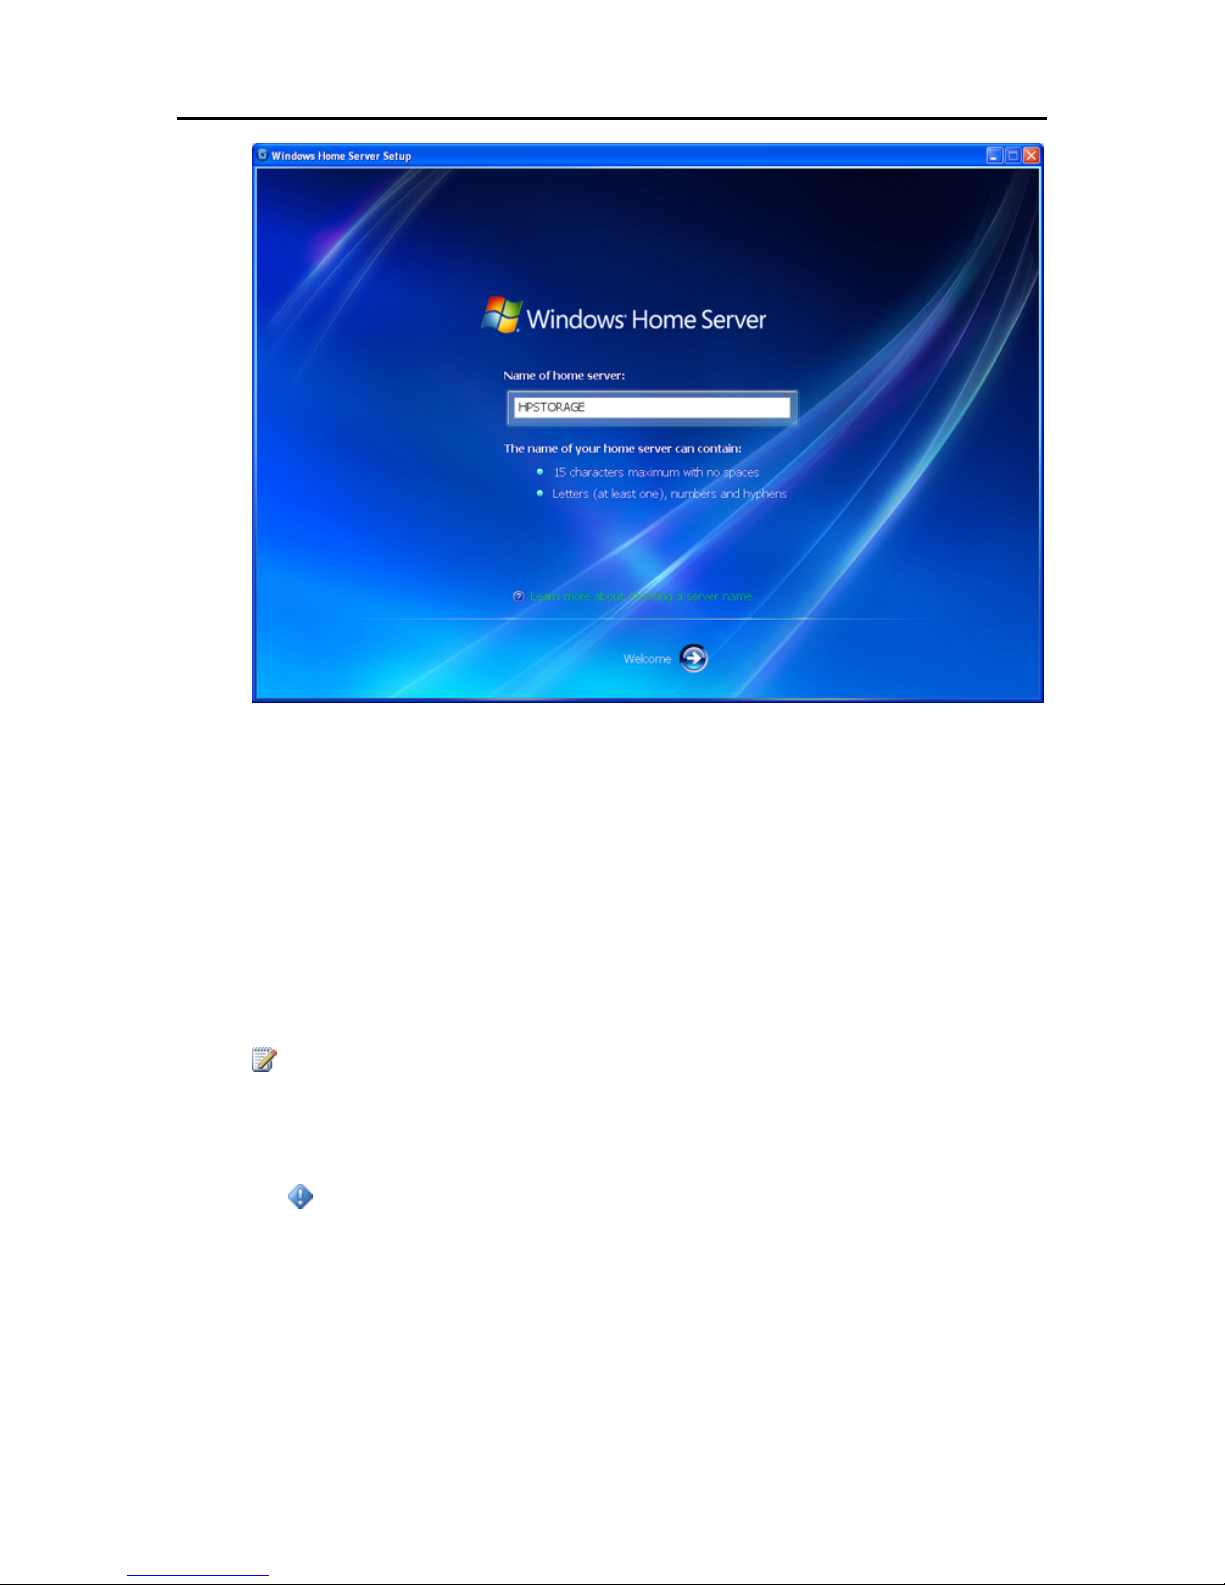
6. Name the HP Data Vault.
Type a name for your server. Server names can be:
15 characters maximum with no spaces
Set up and Installation
Letters (at least one), numbers and hyphens
Important
This is the only time you can name your server. It cannot be changed later. Write down
your server name. The default name is hpstorage.
23
Page 30
HP Data Vault User's Guide
7. Set the server password.
Create a strong password. A strong password must be at least 7 characters long and must fulfill
three of the following requirements:
Uppercase characters
Lowercase characters
Numbers
Symbols (such as !, @, and #)
Note
The password hint can be seen by anyone who clicks the Password hint button on the Windows
Home Server Connector logon window.
Important
This is the only opportunity you will have to set the server password.
The server password is not the same as a user password. User accounts and passwords are
setup in the Windows Home Server Console.
24
Page 31

Set up and Installation
8. The install checks for Windows Home Server Updates.
The Windows Home Server installation checks for any relevant important updates. This may take
some time to complete, but does not require additional information from you.
Important
Do not restart or turn off your home server during the up d a te process .
25
Page 32

HP Data Vault User's Guide
9. Type the password you created above and log on to the Windows Home Server.
10. The install checks for HP Data Vault updates.
The HP Data Vault installation checks for any updates. Installing updates ensures that you
experience the full functionality and optimal performance of the HP Data Vault.
26
Page 33

Set up and Installation
Note
This check only occurs the first time you run the Software Installation Disc. If you want
to check for updates at a later time, see Updating and Rolling Back the Server
.
11. Install server updates if they are available.
If there is an update, select it and complete the instructions on the screen to install it.
Important
Do not restart or turn off your home server during the up d a te process .
27
Page 34

HP Data Vault User's Guide
12. The Windows Home Server Console opens.
The Windows Home Server console opens. Use the console to set up user accounts and configure
HP Data Vault features. Click Help in the upper right corner of the Console to get additional
assistance.
Related Topics
HP Data Vault User's Guide
Update Your Firewall's Trust Program List
Install Software on Additional PCs
Install Software on a Mac
Install Software on Additional PCs
You can install the client software through a web browser or you can use the Software Installation
Disc to install the HP Data Vault client software and Windows Home Server Connector on the
other computers on the network. Install the software on one computer at time.
Note
If you misplaced or damaged your Software Installation Disc, you can also install the client
software directly from the server. For more information, see To install from the server using
Windows XP or Windows Vista below.
In this article...
Install from the Software Installation Disc
Install from the Server using Windows XP or Windows Vista
28
Page 35

Set up and Installation
Install from the Server using a Browser Window
Set up Additional Computers
Install from the Software Installation Disc
1. Insert the Software Installation Disc into a computer connected to the network.
You must have administrative privileges to install. For additional information, see Installing the
Software on the First Computer.
2. Follow the instructions on the installation wizard.
The installation process is identical to installing on the first computer except for the following:
• The Windows Home Server Setup does not run.
• Your server password is required to install, as shown in the following figure:
Install the from the Server using Windows XP or Windows Vista
1. At the computer, click Start, and then Run.
Type the following (UNC) network address:
\\hpstorage\Software\Home Server Connector Software\setup.exe
The network address will be different if you renamed your server. In this case type,
\\<server name>\Software\Home Server Connector Software\setup.exe
2. Click OK.
Install from the Server using a Browser Window
1. Open a web browser and type the following address http://hpstorage:55000.
The address will be different if you renamed your server. In this case, type http://<server
name>:55000. The Windows Home Server Connector Set up wi nd o w op ens.
29
Page 36

HP Data Vault User's Guide
2. Click Download Now.
Note
You can come back later to get the toolkit or contact information. Type the address,
http://<server name>:55000, in a browser window.
3. A file download security warning and a Internet Explorer dialog box may pop up. Click Run.
4. A dialog box opens stating that software is being downloaded from your server. Click Next, when
the download is complete.
5. The Install Wizard opens and gives you the rest of the installation instructions.
Set up Additional Computers
After installing the software on the Software Installation Disc, there are a few setup options for
you to consider.
• The computer is automatically set up to be backed up each night. If you want to customize back up
settings for this computer, see Computer Backups
• If you created individual user accounts in Windows Home Server for one or more network
members that use this computer, you also need to set up computer user accounts for them if you
want them to be able to access features on the server without logging on. For additional
information, see User Accounts in the Windows Home Server help.
.
• If there are photos, music, or videos on this computer that you want collected on the server, set up
media collection for this computer. For additional information, see Configuring Media Collector
General Settings.
30
Page 37

Set up and Installation
Install the Software on a Mac
In this article...
Install using the Software Installation Disc
Install from the Server
Install using the Software Installation Disc
The first client installation must be on a PC. Subsequent installations can be on a Mac or PC.
Note
You must have administrative privileges on your computer to install the software. Click System
Preferences, Accounts, and check Allow user to administer this computer.
1. Insert the Software Installation Disc.
2. Double-click Install HP Data Vault Software.pkg.
3. Click Continue on the Welcome to the HP Data Vault Software page.
4. Click Continue and Agree on the End User License Agreement.
5. Choose a location to install the client software or click Install to continue with the default
location.
You may be asked to type your Mac computer administrator password.
6. The summary screen notifies you that the software installed successfully. Click Close.
The Server Preferences dialog opens.
7. Type your server name and password.
Your server name will be hpstorage unless you changed it during the first PC client installation.
31
Page 38

HP Data Vault User's Guide
8. Once your credentials have been authenticated, click Apply.
Note
Server Name and Password have to be authenticated prior to using the HP Home Page, or entering
preferences for BackUp.
Install from the Server
1. At the Mac computer, open a Finder window.
2. Click hpstorage in the Shared category of the left Sidebar.
If you renamed the HP Data Vault during the first installation, select that name in the Shared
category. You are connected to the server. If you experience problems connecting to the server
see, Troubleshooting a Mac Connection to the Server
3. Open the Software folder.
4. Open the Mac folder.
5. Double-click HP MSS Client.dmg.
6. Double-click Install HP Data Vault Software.pkg and follow the instructions on the screen.
.
Troubleshooting a Mac Connection to the Server
File sharing is a key advantage of having a server. The HP Data Vault enables you to place
documents, music, photos, or videos on the server and share them with all of the Macs and PCs on
your network. This document explains how to connect your Mac to the server so you can access
shared folder contents.
32
Page 39

Set up and Installation
In this article...
Before Connecting to the Server
Connection Method A: Using the Finder
Connection Method B: Using Connect to Server and the Server Name
Connection Method C: Using Connect to Server and the Server's IP Address
Pinging the Server
Before Connecting to the Server
Some set up and decisions are required before connecting your Mac computer to the server and
accessing shared folders.
• The client software is installed on one PC.
• The client software is installed on the Mac you are trying to connect to the server.
• Decide how you will connect the Mac to the server—administrator account, user account, or guest
account.
Types of Accounts
Type of
Account
Guest Account The guest account is useful
when people are visiting your
and need temporary access to
your server. In these cases, it
probably does not make sense
to create a user account for each
person. Instead, you can create
a single guest account that all
visitors use. The guest account
may or may not have a
password.
Description Server Account Creation
1. From the Server menu
Launch Home Server Console.
2. Select the User Accounts tab.
3. Double-click the Guest account and
click Enable Account… on the
Properties dialog.
You have the option to create a
password for the guest account or
leave it blank.
4. Click the Shared Folder tab to
define folder access.
, select
33
Page 40

HP Data Vault User's Guide
Type of Description Server Account Creation
Account
Types of Accounts
User Account The server pairs user accounts
on the server with those on a
1. From the Server menu , select
Launch Home Server Console.
computer to identify who is
connecting to the server and to
2. Select the User Acco unts tab.
maintain security. Each server
user account has a unique user
name and password that should
match their computer log on
name and password. Each user
3. Click Add from the Windows Home
Server Console User Accounts tab.
Complete the information in the Add
User Account wizard.
account on the server can have
their own shared folder access
levels.
Administrator
Account
Connecting as the server
administrator gives you access
to all shared folders on the
server. The administrator
account's user name is always
The server administrator account is
created the first time you install the client
software on a PC. You enter a password
during the installation. See Installing
Software on the First PC.
Administrator.
• If you created a User Account on the server, create a matching User Account on the Mac (if it does
not already exist). The Mac user account should have the same user name and password as the
server user account.
On the Mac computer, choose Apple menu > System Preferences > Accounts. On the Accounts
dialog, verify the dialog features are unlocked
and click "+" to add a user account. Complete
the information on the Accounts dialog.
Connection Method A: Using the Finder
Connecting to the HP Data Vault using the Finder is quick and easy. The Finder can also
remember your server logon settings so subsequent connections are effortless.
1. At the Mac computer, choose File > New Finder Window.
2. Click hpstorage in the Shared category of the left Sidebar. If you renamed the HP Data Vault
during the first installation, select that name in the Shared category.
34
Page 41

Set up and Installation
Note
The same Sidebar shows up in Save and Open dialog boxes of your programs too,
making your server available to you for opening and saving files.
If you don’t see the server in the Finder window’s Shared category,
• The server may not be connected to the network,
• The Mac computer may not be connected to the network,
• Or maybe the check box is turned off for Connected Servers and Bonjour Computers
in Finder > Preferences... > Sidebar.
3. If you are not automatically connected to the server, click Connect As....
Precisely how you connect to the server depends on what kind of server account you are using:
Guest, User Account, or Administrator.
• Guest account with no password—You are automatically connected to the server when
you click the server name in the Finder.
• Guest account with a password—In the dialog that opens, select Registered User, type
the server's Guest account Password, and click Connect. You do not need to change the
Name. Check Remember this password in my keychain to remember your settings and
automatically connect to the server in the future.
35
Page 42

HP Data Vault User's Guide
• User account— If you have a User Account on the server, select Registered User, type
the Name and Password that was created in the server's user account in the Windows
Home Server Console, and click Connect. Check Remember this password in my
keychain to remember your settings and automatically connect to the server in the future.
• Administrator account—Alternately, you can connect to the server using the server's
administrator account. Select Registered User, type Administrator for the Name, and
type the server's Password. The server's password was created the first time you installed
the server software on a PC.
4. Navigate to the folder you want on the server.
The folders that display depend on the Shared Folder Access settings for the guest account or
user account that you used to connect to the server. To change Shared Folder Access settings,
select Launch Home Server Console from the Server menu
double-click the guest account or user account. Select the Shared Folder Access tab to change
settings. Click OK to accept the changes.
If you connected to the server using the Administrator account, you will see all of the server's
shared folders.
. Click the User Accounts tab and
Connection Method B: Using Connect to Server and the Server
Name
Follow these steps to connect to Windows File Sharing (SMB) from Mac OS X 10.5 or later. SMB
is the native sharing protocol for Microsoft Windows operating systems.
1. At the Mac computer, choose Go > Connect to Server… on the Apple m e nu bar .
2. Type the following Server Address:
smb://ServerName/ShareName
For example, type the following server address to connect to the music shared folder:
smb://hpstorage/music
36
Page 43

Set up and Installation
If you renamed your server during the first software installation, remember to use that server name
instead of hpstorage. A shared folder name is required. The shared folder name cannot contain
spaces; type %20 instead of spaces. Additionally, you cannot connect to a shared folder name that
contains a hyphen.
Connection Method C: Using Connect to Server and th e Server's IP Address
The Mac computer may not recognize the server's name in some cases. If that happens, connect to
the server using its IP address instead of the server name. If you are unsure of your server's IP
address, you can log on to your router to see a list of IP addresses for all network connected
devices.
To log on to your router, open an Internet browser window, type the router's IP address in the
address bar and press Enter. The router's IP address will be one of the following,
192.168.1.1,
192.168.0.1, or
Obtain your router's IP address from a Mac by selecting Apple menu > System
Preferences > Network. Select Built-in Ethernet on the left menu. The router IP
address is on the right side of the Network dialog.
37
Page 44

HP Data Vault User's Guide
To obtain the router's IP address from a PC, select Start > Run. Type cmd and click OK.
In the DOS window, type ipconfig and press Enter. Use the Default Gateway IP address
to log on to your router.
2. Once logged in to the router, look for a list of connected devices. Each router is different. See
your router's documentation if you do not find the server's IP address right away.
3. Once you find your server's IP address, choose Go > Connect to Server… on the Apple menu
bar.
4. Type the Server Address.
Your address will be different but will look similar to the following,
smb://192.168.0.180/music
38
Page 45

Set up and Installation
Note
Click "+" to add the server address to your list of favorites.
5. Click Connect.
6. Log on to the server using either a guest account, user account, or administrator account.
Pinging the Server
To troubleshoot a connection failure, you can ping the server.
1. Open a Finder window and choose Applications > Utilities > Network Utility.
2. Select the Ping tab.
3. Type the server's IP address.
4. Click Ping.
A successful ping verifies a connection between the Mac computer and the server.
If you are unable to ping the server, check that the server is on and that all network cables are
securely connected. You may also need to reset your router.
UNINSTALL THE SOFTWARE
Uninstall the PC Client Software
1. Click the Start menu, Control Panel, and Add or Remove Programs.
2. Select HP Data Vault and click Remove.
3. Select Windows Home Server Connector and click Remove.
4. Close Add or Remove Programs.
Uninstall the Mac Client Software
In this article...
Uninstall using the Software Installation Disc
Uninstall from the Server
Uninstall using the Software Installation Disc
1. Insert the Software Installation Disc.
39
Page 46

HP Data Vault User's Guide
2. Double-click Uninstall HP Data Vault Software.
3. Follow the instructions on the screen.
Uninstall from the Server
1. At the Mac computer, open a Finder window.
2. Click hpstorage in the Shared category of the left Sidebar.
If you renamed the HP Data Vault during the first installation, select that name in the Shared
category. You are connected to the server. If you experience problems connecting to the server
see, Troubleshooting a Mac Connection to the Server
3. Open the Software folder.
4. Open the Mac folder.
.
5. Double-click HP MSS Client.dmg.
6. Double-click Uninstall HP Data Vault Software and follow the instructions on the screen.
HP SOFTWARE UPDATES
HP Update Settings
Use the HP Data Vault software update to keep your server and networked computer s current with
the latest HP software, online help, and new features.
HP Data Vault software update does not update the Microsoft Windows Home Server operating
system. For information about updating Windows Home Server, see Configuring Windows
Update in the Windows Home Server Console Help.
In this article...
Configure HP Update
Version Information
Configure HP Update
1. At the PC, double-click the Windows Home Server icon in the system tray and log on.
At the Mac, Select Launch Home Server Console from the Server menu
2. Click Settings in the upper right of the Console.
40
.
Page 47

3. Select HP Data Vault in the left menu and click the HP Update tab.
Set up and Installation
4. The following choices are available in the Configure section. HP recommends that you select
Automatically download and install updates.
Configure HP Software Update Options
Option Additional information
Automatically download and install updates
Requires no user action.
(recommended)
Downloads and installs updates on the server in the
background. If necessary the server will automatically
reboot.
Download updates and let me choose when
Requires user action.
to install
Your computer notifies you that an update has been
downloaded and is ready to install on the server.
Additionally, the Install link turns blue under HP Data
Vault software updates.
To update the server after an update is downloaded, click
Install under HP Data Vault software updates in the
Windows Home Server Console
41
Page 48

HP Data Vault User's Guide
Option Additional information
Configure HP Software Update Options
Turn off automatic updates
5. Click OK.
Not recommended.
To get updates with this choice you will have to
click Check for updates located in the Version
section.
Version Information
The following information and options are in the Version section of the HP Update dialog.
• The server software version number and date are shown.
• Click Check for updates to immediately check for available software updates, regardless of the
configuration settings you selected above.
• The Install link becomes active when an update has been downloaded, but not installed. Click
Install to run the server update.
• The Rollback link becomes active when a software update has been installed. Use this link to
uninstall the update on the server and revert to the previous server software version.
Important
Clicking Install or Rollback only makes changes to the server software. Each networked
computer still needs to be updated or rolled back so that the server and client computers are
running the same version of software. See Updating and Rolling Back Client PCs
Rolling Back Mac Clients for more information.
or Updating and
Update and Roll Back the Server
Use HP Update to keep your server and networked computers current with the latest HP software,
online help, and new features.
Important
The server must be updated before client PCs and Macs are updated. The server and the client
computers must be running the same version of the HP Data Vault software.
In this article...
Update the Server
Roll Back the Server
42
Page 49

Set up and Installation
Update the Server
The method you use to update the server depends on how you configured HP Update. Click on a
bullet to see additional information.
• To automatically check for updates
If you selected Automatically download and install updates when you configured HP Update,
then you do not need to take further action. The server will install updates in the background as
they are available.
• To manually check for updates
Note
If you have never restarted your HP Data Vault, you may need to turn it off and back on
before you check for updates.
1. At the computer, double-click the Windows Home Server icon
in the system tray and
log on.
2. Click Settings in the upper right of the Console.
3. Select HP Data Vault in the left menu and click the HP Update tab.
4. Click the Check for updates link.
5. If an update is found it will be listed as below. Click Next to start the install process and
follow default choices to complete the software install.
• To manually install an update copied to the server
1. If you downloaded a software update from the www.hp.com site, you can manually
install it by copying the software update package to your server. Once the update is on
the server, complete the following steps.
43
Page 50

HP Data Vault User's Guide
2. At the computer, double-click the Windows Home Server icon
in the system tray and
log on.
3. Click Settings in the upper right of the Console.
4. Select HP Data Vault in the left menu andclick the HP Update tab.
5. Click the Check for updates link. After the install wizard checks for pending u pdat es on
your server, you will see the select package page where you can select the Search button.
6. Click Select file.
7. Type the full path to the file that you copied to the server or select the Browse button
navigate to the file and select OK.
44
Page 51

Set up and Installation
8. Click Finish to start the install process and follow the default choices to complete the
server software install.
Roll Back the Server
1. At the PC, double-click the Windows Home Server icon in the system tray and log on.
At the Mac, select Launch Home Server Console from the Server menu
2. Click Settings in the upper right of the Console.
3. Select HP Data Vault in the left menu and click the HP Update tab.
4. Click Rollback and then click Yes in the confirmation screen.
Note
If you updated the client software, it must also be uninstalled so that the server and the
client are running the same version of the HP Data Vault software.
.
45
Page 52

HP Data Vault User's Guide
Note
HP Update does not update the Microsoft Wind ows Home Server operating system. For
information about updating Windows Home Server, see Configuring Windows Update in
the Windows Home Server Console Help.
Update and Roll Back Client PCs
Note
Update the server software prior to updating the client software. If your server does not have the
correct software version, you will get an error message when you try to install the client software.
See Updating and Rolling Back the Server
In this article...
Update Client PCs
Roll Back Client PCs
Check the Client PC Version Number
for more information.
Check the Server Version Number
46
Page 53

Set up and Installation
Update Client PCs
There are multiple ways of updating your client PCs. Once the server is updated, the client PC
software update file is on the server and can be run from the software folder. The client PC update
can also be downloaded and run from HP Update. The following sections describe various
methods for installing the client PC update. Click an option to expand and view the instructions
for updating your client. Click again to hide the instructions.
• To Update Client PCs Using Run Programs
1. At the computer, click Start, and then Run.
Type the following (UNC) network address.
\\hpstorage\Software\Home Server Connector Software\setup.exe
If you renamed your server during the initial software installation the path will be \\<server
name>\Software\Home Server Connector Software\setup.exe.
2. Follow the instructions on your computer for installing the update.
• To Update Client PCs Using HP Update
1. Click the Start menu, HP, and HP Update.
2. Click Settings to configure HP Update.
3. Click Next to immediately check for a client PC update.
4. Follow the instructions on your computer for installing the update.
• To Update Client PCs Using the Software Installation Disc
The Software Installation Disc runs an executable file that is on your server. When the server
software is updated, the new client executable file is placed on the server but not installed. As
long as you run the Software Installation Disc after you update the server, the CD will find the
new client executable file on the server and install it.
• To Update Client PCs Using a Browser
1. Open a Web Browser and type the following address http://hpstorage:55000.
If you renamed your server during the initial installation the URL will be http://<server
name>:55000.
The Windows Home Server Connector Setup window opens.
2. Click Download Now.
47
Page 54

HP Data Vault User's Guide
Roll Back Client PCs
Important
You must roll back your server prior to rolling back the client PC. See Updating and Rolling Back
the Server.
1. Click the Start menu, Control Panel, and Add or Remove Programs.
2. Select HP Data Vault and click Remove.
3. Select Windows Home Server Connector and click Remove.
4. Close Add or Remove Programs.
5. At the computer, click Start, and then Run.
Type the following (UNC) network address.
\\hpstorage\Software\Home Server Connector Software\setup.exe
The network address will be different if you renamed your server. In this case type,
\\<server name>\Software\Home Server Connector Software\setup.exe
6. Click OK.
Install the software on one computer at a time.
Check the Client PC Version Number
It is important for the server software and the PC client software to be on the same version in order
for them to work together properly. Complete the following steps to confirm that the server and
the client are on the same version.
On Windows XP
1. To check the PC client software version number on Windows XP, click Start and Control Panel.
2. Click Add or Remove Programs.
3. Select HP Data Vault and then Click here for information support.
The About dialog opens.
48
Page 55

Set up and Installation
On Windows Vista
1. To check the client software version number on Wind o ws V i st a, cli ck Start and Control Panel.
2. Select Programs and then Programs and Features.
3. If the details are not displayed, from the Organize menu select Layout and Details Pane.
4. Select HP Data Vault to see the version number.
49
Page 56

HP Data Vault User's Guide
Check the Server Version Number
1. To check the server software version number on a PC, double-click the Windows Home Server
icon
At the Mac, select Launch Home Server Console from the Server menu
2. Click Settings in the upper right of the Console.
3. Select HP Data Vault in the left menu and click the HP Update tab.
The version number is at the bottom of the HP Update tab.
in the system tray and log on.
.
The server and client software should have compatible version numbers. The following table lists
the version numbers that work together.
Server Version PC Client Version Mac Client Version
1.3.6.21622 1.2.1.18999, 1.3.6.21622 N/A
1.3.8.25155 1.2.1.18999, 1.3.6. 21 6 22,
2.1.7.24261 2.1.7.24261 1.0.0b20
50
Compatible Software Version Numbers
N/A
1.3.8.25155
Page 57

Set up and Installation
Compatible Software Version Numbers
Server Version PC Client Version Mac Client Version
2.5.10.26972, 2.5.10.2 7366 2.5.10.26972 2.5.0b51
3.0 3.0 3.0
Update and Roll Back Mac Clients
This article describes how to manually check for a Mac client update or roll back. Mac computers
connected to the network automatically check for changes to the HP MSS Client.dmg file once a
day and notify you if it has changed.
In this article...
Update Mac Clients
Roll Back Mac Clients
Check the Mac Client Version Number
Check the Server Version Number
Update Mac Clients
Important
Update the server software prior to updating the client software. The server update and the Mac
client update are downloaded at the same time through the HP Update mechanism in the Windows
Home Server Console. Updating the server ensures that the most recent copy of the HP MSS
Client.dmg is on your server and ready to install. See Updating and Rolling Back the Server
more information.
1. From the HP Data Vault menu, choose Open Preferences.
2. Click the Software Update tab.
3. Click Check Now.
If the HP MSS Client.dmg file on the server has changed, you will be prompted to install the file.
The HP MSS Client.dmg may have changed because an update was downloaded from HP or
because the server administrator rolled back the server software.
4. Follow the instructions on the screen for installing the file.
for
Roll Back Mac Clients
1. First, roll back the server software.
When the server is rolled back using the HP Update mechanism in the Windows Home Server
Console, it also rolls back the HP MSS Client.dmg file that is located on the server. See
Updating and Rolling Back the Server
for more information.
51
Page 58

HP Data Vault User's Guide
2. On the Mac, choose Open Preferences from the HP Data Vault menu.
3. Click the Software Update tab.
4. Click Check Now.
If the server roll back completed successfully, the HP MSS Client.dmg file on the server will
have changed and you will be prompted to install the file.
5. Follow the instructions on the screen for installing the file.
Check the Mac Client Version Number
It is important for the Server software and the Mac client software to be on the same version in
order for them to work together properly. Complete the following steps to confirm that the server
and the client are on the same version.
1. To check the Mac client software version number, go to the HP Data Vault menu and select
About.
The Mac client version number is displayed in the About dialog.
Check the Server Version Number
1. To check the server software version number on a PC, double-click the Windows Home Server
icon
At the Mac, select Launch Home Server Console from the Server menu
2. Click Settings in the upper right of the Console.
3. Select HP Data Vault in the left menu and click the HP Update tab.
The version number is at the bottom of the HP Update tab.
Note
Server version 2.1.7.24261 and Mac client v ersi o n 1.0.0b20 work together. Starting with version
2.5, the server and the client version numbers will have the same first two numbers.
in the system tray and log on.
.
52
Page 59

Set up and Installation
The server and client software should have compatible version numbers. The following table lists
the version numbers that work together.
Compatible Software Version Numbers
Server Version PC Client Version Mac Client Version
1.3.6.21622 1.2.1.18999, 1.3.6.21622 N/A
1.3.8.25155 1.2.1.18999, 1.3.6. 21 6 22,
N/A
1.3.8.25155
2.1.7.24261 2.1.7.24261 1.0.0b20
2.5.10.26972, 2.5.10.2 7366 2.5.10.26972 2.50b51
3.0 3.0 3.0
53
Page 60

Page 61

Chapter 3. Start Using Your Server
GUIDED TOUR
HP Home Page
The HP Home Page is the starting point for accessing the features of the HP Data Vault.
In this article...
Open the HP Home Page on a PC
Open the HP Home Page on a Mac
The HP Home Page Icons
Open the HP Home Page on a PC
The HP Home Page can be accessed from the following:
Windows Start menu—At the computer, click Start, All Programs, and
then select HP Data Vault.
Desk icon—At the computer, double-click the HP Data Vault icon on the
desk.
Open the HP Home Page on a Mac
The HP Home Page can be accessed from the following:
Using the Finder—At the Mac, click Finder, Applications, and then
select HP Data Vault Home.
Server Menu—Select Open Home Page from the HP Data Vault menu
at the of the screen.
If the Server menu is hidden, open System Preferences from the Apple
menu, and then select HP Data Vault. Check Show HP Data Vault in
the menu bar.
55
Page 62

HP Data Vault User's Guide
The HP Home Page Icons
Media Streamer—Opens a web application for streaming music, videos,
and photos in your home. For more information, see About Media
Streamer.
HP Photo Publisher—Publish photos from your Server to your favorite
photo-sharing site. Friends and family can see your photos on the
Internet. For more information, see About HP Photo Publisher
.
HP Photo Viewer—View the photo albums that are shared from this
server. For more information, see HP Photo Viewer Home
.
Access Files on Server—Browse the folders and files on your server.
This feature is optimized for remote browsing and is enabled when you
open the HP Home Page from a remote location.
Computer Access—Remotely connect to your server or a computer on
your home network. This feature is enabled when you open the HP
Home Page from a remote location.
Server—Opens a folder that displays a list of all your shared folders.
Music—Opens a folder that displays a list of music and music
subfolders.
Photos—Opens a folder that displays a list of photos and photo
subfolders.
Video—Opens a folder that displays a list of videos and video
subfolders.
Backup Now (PC) or Time Machine (Mac)—Backup your computer to
the server.
User’s Guide—Contains installation information, setup instructions,
how to use the server, tutorials, and other important information.
Online support—Go to the HP Support web site, where you can get
more information about the HP Data Vault.
Registration—Click to go to https://register.hp.com
and register your
HP Data Vault. Registering your Server ensures that your infor mation is
on file with HP if you should need technical support services.
Shop HP—Get accessories for your server and shop HP Home & Home
Office.
56
Page 63

Start Using Your Server
Windows Home Server Console
PEN THE WINDOWS HOME SERVER CONSOLE
O
The Windows Home Server Console is where you manage and configure the HP Data Vault. You
can access the Windows Home Server Console from a PC in the following ways. The Windows
Home Server Console cannot be opened on a Mac.
In this article...
Open the WHS Console from the Start Menu
Open the WHS Console from the HP Data Vault Desk Icon
Open the WHS Console from the System Tray
Open the WHS Console from a Mac
Open the WHS Console from the Start Menu
1. At the computer, click Start, All Programs, and then select Windows Home Server Console.
2. Log on to the Windows Home Server Console.
Open the WHS Console from the HP Data Vault Desk Icon
1. From the computer desk, double-click HP Data Vault icon.
2. In the HP Home Page, click the Tools tab.
3. Click Home Server Console.
4. Log on to the Windows Home Server Console.
Open the WHS Console from the System Tray
1. At the computer, double-click the Windows Home Server icon in the system tray.
2. Log on to the Windows Home Server Console.
Open t he WHS Console from a Mac
1. At the Mac, Select Launch Home Server Console from the Server menu .
THE SERVER TOUR
1. At the PC, double-click the Windows Home Server icon in the system tray and log on.
At the Mac, select Launch Home Server Console from the Server menu
.
57
Page 64

HP Data Vault User's Guide
2. Click Overview and then Tour in the left menu.
The following features are illustrated.
The HP Data Vault includes many features and applications designed to help you secure, store and
share your information.
Feature Description
HP Data Vault Features
Storage
Shared Folders Shared folders are locations to organize and store files on your home
Remote Access
Backup
User Accounts
Access PCs and
Files
Online Backup
(optional)
Shop Online
Use the Server Storage tab on the Windows Home Server Consol e to
view status, capacity, available space, add, repair, and remove hard
drives. Easily add drives, even while your system is powered on.
server to make available to others on your network. Shared folders can
be seen by other supported devices on the network.
Access files on your server and supported computers plus stream photos,
music and videos while away from home.
Automatically backs up multiple Windows PCs and Macs on your home
network. Sophisticated PC backup software provides efficient and
compact backups to help save time and disk space on the server.
To access information on your HP Data Vault or PCs on home networks
from remote locations, user accounts are required.
Access files on your server and supported computers plus stream photos,
music and videos while away from home.
Save important files to an Amazon S3 account on the Internet.
Visit the HP Applications store to shop for additional software for your
server and computer.
THE WINDOWS HOME SERVER TABS
The Windows Home Server enables you to share, store, access, and automatically protect your
pictures, videos, music, and files. It contains the following tabs:
• HP Data Vault—Access HP features and functionality.
• Computers & Backups—View and customize backups. Also, view the status of your home
computers. For more information, see Computers & Backup in the Windows Home Server
Console Help.
• User Accounts—Add, remove, and modify user accounts. For more information, see User
Accounts in the Windows Home Server Console Help.
58
Page 65

Start Using Your Server
Shared Folders—Add, open, remove, and view the properties of the shared folders on your server.
For more information, see Shared Folders in the Windows Home Server Console Help.
• Server Storage—View, add, repair, and remove hard drives from server storage. For more
information, see Server Storage in the Windows Home Server Console Help.
• Network—Displays health notifications from your server and your home computers. For more
information, see Network Health in the Windows Home Server Console Help.
• Settings—Configure general settings, such as date and time, backups, passwords, media sharing,
remote access, add-ins, resources, and more. For more information, see Server Settings in the
Windows Home Server Console Help.
• Help—Access the Windows Home Server Console Help.
FIRST STEPS
PC Backup and Restore
After running the Software Installation Disc on a computer it is automatically added to the list of
computers that are backed up by the HP Data Vault each night. The entire computer is backed up
by default.
Complete the following steps to customize the hard drive volumes to back up, or to exclude
folders from the backup.
1. At the PC, double-click the Windows Home Server icon
At the Mac, select Launch Home Server Console from the Server menu
2. Click the Computers & Backups tab.
3. Select a computer and click Configure Backup.
Follow the instructions in the Backup Configuration Wizard.
Related Topics
Windows Home Server Console Help
Computers & Backup
How does backup work?
Managing and Configuring Backups
Restoring Computer Backups
Removing a Computer
in the system tray and log on.
.
Troubleshooting Computers & Backup
59
Page 66

HP Data Vault User's Guide
Mac Time Machine Backup
In this article...
Determine Used Space on Your Local Disk
Configure Time Machine Backups
Change the Backup Disk Size
Delete a Backup Disk
Determine Used Space on Your Local Disk
Begin by finding out how much space your data currently occupies on your Local disk. When you
set up Time Machine, the minimum backup disk size is automatically calculated for you.
However, you may want to increase the backup disk size depending on how often you create or
change files on your Mac.
1. Open a Finder window and select the Local disk.
2. On the Apple menu bar, choose File > Get Info.
3. In the Local Info window, look in the General section next to find the Used disk space.
Multiply the used disk space by 1.5. The result is the minimum amount of disk space Time
Machine can work with (That’s because Time Machine needs space for all of your files plus some
extra room to enable it to store new data and multiple copies of files that change.). However, more
space is always better, because it enables Time Machine to retain backups that go further into the
past. A backup disk with at least 1.5 times as much free space as the amount occupied on your
local disk is recommended, and more if possible.
60
Page 67

Start Using Your Server
Configure Time Machine Backups
Before you begin,
• The HP Data Vault software has to be installed on your Mac. See Installing and Uninstalling Mac
Software.
• You must be logged on to the Mac with an account that has administrator privileges.
To configure the HP Data Vault as a valid Time Machine backup device,
1. From the HP Data Vault menu, select Open Preferences.
2. On the Server tab, verify that the server name and the server’s administrator password are
authenticated.
This information is used by Time Machine to set up the backup destination, as well as the links to
the shares on the server. This information may have been entered at the end of the Mac software
install. If so, you will be authenticated automatically.
3. Select the Backup tab and type a Backup Disk Size.
The suggested minimum disk space size displays in the dialog based on approximately 1.5 times
the size of your used disk space. However, HP recommends creating a backup disk that is at least
as large as your total local disc capacity, or larger if possible. When choosing a backup disk size,
you may want to consider how much you use your Mac and how much disk space you have
available on your server. The backup disk size cannot exceed the amount of free space that you
have available on one server disk.
Important
You can resize your backup disk later if you need more room. Resizing the backup disk
overwrites the current backup disk and causes all data to be lost. See Change the Backup Disk
Size.
61
Page 68

HP Data Vault User's Guide
Note
The location for the backup is on the server at \\hpstorage\Mac\Backup. If the Mac shared folder
has been deleted from the server , you must create it. At a PC, double-click the Windows Home
Server icon
from the Server menu
in the system tray and log on. Or at a Mac, select Launch Home Server Console
. Click the Shared Folders tab and Add a shared folder named Mac.
4. Click Apply.
This process can take quite some time based on the size of the backup disk and server activity.
Once the formatting process is complete, the Backup Disk Status changes to Started.
Note
The backup file will be located at \\<server name>\Mac\Backup. The file name is based on the
serial number of the Mac system, and cannot be changed. Do not manually delete or rename this
file.
5. Click Open Time Machine Preferences, click Choose Backup Disk and select Backup to HP
Data Vault as the backup disk.
Backup to HP Data Vault may already be selected. You may have to change the backup location
to the HP Data Vault if you had a previous Time Machine backup that pointed to a different
location.
Change the Backup Disk Size
1. From the HP Data Vault menu, select Open Preferences.
2. Click the Backup tab.
62
Page 69

Start Using Your Server
3. In the Backup Disk Status, click S.
The Backup Disk Status changes to Sped and the virtual disk icon on the desk goes away after
the backup disk ss.
Note
You may have to wait several minutes for the backup disk to s. Please be patient. If the backup
disk does not s and it appears to hang, it could be because an application or other process is
accessing the backup disk in the background. If this is the case, attempt to eject the disk using
Finder.
4. Enter a new value in the Backup Disk Size and select Resize from the action menu.
You cannot select Resize until the disk is sped and the disk size is changed.
5. Click Apply.
6. A pop up warning appears informing you the file already exists and that continuing will erase the
existing backup data and start over. To continue with the new size click Delete and Continue.
Delete a Backup Disk
You may want to delete a backup disk if you need to free up space on your server for other things
or if you are no longer using your Mac.
1. From the HP Data Vault menu, select Open Preferences.
2. Click the Backup tab.
3. In the Backup Disk Status, click S.
The Backup Disk Status changes to Sped and the virtual disk icon on the desk goes away after
the backup disk is sped.
Note
You may have to wait several minutes for the backup disk to s. Please be patient. If the backup
disk does not s and it appears to hang, it could be because an application or other process is
accessing the backup disk in the background. If this is the case, attempt to eject the disk using
Finder.
4. Select Delete from the action menu next to the Backup Disk Size.
Using Shared Folders
Shared folders are places for you to organize and store files on your server so that you can share
them with other people on your network. Start copying digital assets from your computer to shared
folders on the HP Data Vault.
Important
Do not delete the shared folders that come with the HP Data Vault: Converted Videos, Mac,
Music, Photos, Public, Recorded TV, Software, Users, Videos.
In this article...
63
Page 70

HP Data Vault User's Guide
Copy Files to Shared Folders
Access Shared Folders from the Run Dialog
Access Shared Folders from the HP Home Page
Access Shared Folders from the Desk Shortcut
Access Shared Folders from the System Tray
Access Shared Folders from My Network Places in Windows XP
Access Shared Folders from Network in Windows Vista
Access Shared Folders using the Finder
Copy Files to Shared Folders
1. Use one of the methods listed below to open shared folders.
2. Copy files to the appropriate shared folder or create shared folders for other digital content.
Note
From the Media Sharing page on the Windows Home Server Settings tab, you can turn on digital
media streaming for the Photos, Music, or Videos shared folders. Click On for each folder that
you want to stream from.
Access Shared Folders from the Run Dialog
At the computer, click Start and Run. Type \\hpstorage or the name of your server and click OK.
Access Shared Folders from the HP Home Page
1. At the computer, click Start, All Programs, and then select HP Data Vault.
2. Click one of the following:
• Server—opens a folder that contains all your shared folders.
• Photos—opens a folder for sharing photos.
• Music—opens a folder for sharing music.
• Videos—opens a folder for sharing videos.
64
Page 71

Start Using Your Server
Access Shared Folders from the Desk Shortcut
1. At the computer, go to the desk, and then double-click the Shared Folders on Server shortcut
.
2. Double-click the shared folder you want to open.
Access Shared Folders from the System Tray
1. Right-click the Windows Home Server icon and log on.
2. Click Shared Folders.
3. Double-click the shared folder you want to open.
Access Shared Folders from My Network Places in Windows XP
1. At the computer, click Start, and then click My Network Places.
2. Double-click the shared folder you want to open.
3. If the shared folders are not in My Network places, you can add them manually.
Access Shared Folders from Network in Windows Vista
1. At the computer, click Start, and then Network.
2. In Network, double-click the computer icon next to SERVER
If you changed the default name of the server, that name appears next to the computer icon
instead.
3. Double-click the shared folder you want to open.
.
Access Shared Folder using the Finder
1. At the Mac computer, choose File > New Finder Window.
2. Click hpstorage in the Shared category of the left Sidebar. If you renamed the HP Data Vault
during the first installation, select that name in the Shared category.
3. If you are not automatically connected to the server, click Connect As.... and log on.
4. Double-click the shared folder you want to open.
65
Page 72

HP Data Vault User's Guide
HP Data Vault User's Guide
Related Topics
Troubleshooting a Mac Connection to the Server
Windows Home Server Console Help
Shared Folder
Adding a shared f older
Viewing shared folder properties
Opening a shared folder
Removing a shared folder
Viewing shared folder history
What is Folder Duplication?
Enable Guest Account or Set up User Accounts
In this article...
Enable the Guest Account
Create PC and Mac User Accounts
Create Matching Server Accounts
Enable the Guest Account
If you want everyone to use the same logon account to access the HP Data Vault, enable the guest
account. If the Guest account is enabled with no password, network users are not required to logon
to the server when they use networked computers. Additionally, all network users can be set up to
have Full access to all shared folders through the Guest account.
Important
If you enable the Guest account, everyone that connects to the network has the same privileges.
That may mean that they all have full access to shared folders and other resources on your server.
To protect your network from unwanted connections, see Securing your server from intruders
Notes
The Guest account cannot be used to access the server using remote access.
66
.
Page 73

Start Using Your Server
1. At the PC, double-click the Windows Home Server icon
At the Mac, select Launch Home Server Console from the Server menu
in the system tray and log on.
.
2. Click the User Accounts tab.
3. Click Enable Guest on the User Accounts Setup dialog or on the Properties for Guest dialog.
Create PC and Mac User Accounts
If network users want to access information on your network from an Internet café, coffee shop, or
other location outside of your network, they need individual user accounts with strong passwords
on their computer or lap and on the server.
Important
When you create user accounts on the server, use logon names and passwords that match the logon
names and passwords of existing user accounts on your networked computers. Creating matching
user accounts enables network members to automatically log on to the server when they log on to
their computer.
If the user accounts and passwords do not match, you will be prompted to type a user name and
password when you open the server’s shared folders.
If your computer does not have a password or if the computer uses a factory default user name, you
can change these parameters to eliminate the need to ente r y ou r user nam e and pass wo r d whe n y ou
access a shared folder.
Create a User Account for a PC Running Windows XP
1. At the computer, click Start, Control Panel, and then User Accounts.
2. Click Add to create a user account.
-orClick Change an Account to change a logon name or password for an existing account.
A strong password is suggested to ensure security and is required to use remote access. A strong
password must be at least 7 characters long and must fulfill three of the following four character
criteria:
• Uppercase characters
• Lowercase characters
• Numbers
• Symbols (such as !, @, #, and so on.)
A password hint helps you remember your password. The password hint can be seen by anybody
who clicks the link to display it.
Create a User Account for a PC Running Windows Vista
1. At the computer, click Start and then Control Panel.
67
Page 74

HP Data Vault User's Guide
2. Under User Accounts and Family Safety, select Add or remove user accounts.
3. Add user accounts or make changes to existing user accounts.
A strong password is suggested to ensure security and is required to use remote access. A strong
password must be at least 7 characters long and must fulfill three of the following four character
criteria:
• Uppercase characters
• Lowercase characters
• Numbers
• Symbols (such as !, @, #, and so on.)
A password hint helps you remember your password. The password hint can be seen by anybody
who clicks the link to display it.
Create a Mac User Account
1. On the Apple menu, click System Preferences.
2. Click Accounts.
3. If the accounts page is locked, click the lock
and enter you credentials to unlock the page.
4. Click + to open the new account page.
Enter the user information.
A strong password is suggested to ensure security and is required to use remote access. A strong
password should be at least 7 characters long and fulfill three of the following four character
criteria:
• Uppercase characters
• Lowercase characters
• Numbers
• Symbols (such as !, @, #, and so on.)
A password hint helps you remember your password.
5. Click Create Account.
Create a Matching User Account on the Server
1. At the PC, double-click the Windows Home Server icon in the system tray and log on.
At the Mac, select Launch Home Server Console from the Server menu
.
2. Click the User Accounts tab at the of the page. If the User Accounts Setup dialog displays click
OK.
68
Page 75

Start Using Your Server
3. Click Add, this will open the Add User Account screen. enter user information. Check the
Enable Remote Access for this user check box. Make an appropriate choice concerning allowing
access to computer and folders.
4. Click Next.
5. Enter and confirm a strong password. A strong password is suggested to ensure security and is
required to use remote access. A strong password must be at least 7 characters long and must
fulfill three of the following four character criteria:
• Uppercase characters
• Lowercase characters
• Numbers
• Symbols (such as !, @, #, and so on.)
7. Click Next.
8. Select access to shared folders
9. Click Finish.
10. Click Done.
Repeat for each user account that you want to add.
Related Topics
Windows Home Server Console Help
User Accounts
Configure Remote Access
To easily access your server files and network PCs from a computer that is not attached to the
network, you must configure remote access.
In this article...
Configure Remote Access
About HP Personal Domain Name by TZO.COM
About TZO.COM Custom Domain Names
About Windows Live Personalized Domain Name
What Value does TZO Domain Names Provide Beyond the Microsoft Live Option
69
Page 76

HP Data Vault User's Guide
Configure Remote Access
1. At the PC, double-click the Windows Home Server icon in the system tray and log on.
At the Mac, select Launch Home Server Console from the Server menu
2. Click Settings in the upper right of the Console.
3. Click Remote Access in the left menu.
Click to Turn on remote access.
The Remote Access wizard starts and attempts to configure your router. If you encounter
problems, see Configuring your broadband router in the Windows Home Server Console help.
4. The wizard then prompts you to select a Domain Name Provider and create a domain name.
A domain name is a web address. It allows you to access your HP Data Vault from the Internet.
For instance, if you registered MyFamily.hpshare.net for your HP Data Vault, you would use this
address to connect to your server using remote access. Additionally, this address is part of the
URL for accessing an album on the HP Photo Viewer.
The HP Data Vault provides three alternatives for setting up a domain name:
HP Personal Domain Name by TZO.COM
TZO.COM Custom Domain Name
.
Windows Live Custom Domains
When choosing which service to use, consider the following:
TZO domains names allow easy remote access, even if your broadband ISP blocks port 80.
Blocking port 80 prevents a Web browser from reaching the server.
With the TZO.COM Custom Domain Name option, you can create a domain name with
any name that is not already registered.
See additional information on domain names below.
6. Once the wizard is complete, customize Web site settings as desi red.
7. Click OK.
About HP Personal Domain Name by TZO.COM
HP Personal domain name is free for the first year. After the first year, there is a charge.
An HP personal domain name has two parts:
Personalized name—enter a name of your choice. TZO.COM will check your choice against
existing names. If the name you picked already exists, TZO provides a list of alternatives.
Second part of the name—choose from an assortment of domain names such as
hphomeserver.com or hpshare.net.
Each part is combined so the Domain Name looks like MyFamily.hphomeserver.com.
70
Page 77

Start Using Your Server
About TZO.COM Custom Domain Names
With this option, you can create a domain name with any name you want, like MyName.com, as
long as that name is not already registered.
A domain name has several components:
-level or first-level domain names—all domain names end in a small list of generic names, such as
.com or .net, or in a country code, such as .es or .fr.
Second-level domain names—the part or parts of the domain name located to the left of the -level
domain name. For example, “MyName” in MyName.com.
About Windows Live Personalized Domain Name
Microsoft also offers a service to get a personalized domain name for your server.
What Value does TZO Domain Names Provide Beyond the
Microsoft Live Option
• Some broadband ISPs block Port 80 which is required for easy remote access. The TZO service
allows you to obtain easy remote access even if Port 80 is blocked.
• With the Microsoft domain name, if you don't already have a Microsoft Live account, you'll have
to set that up.
• With TZO custom domain name option, you can get your own domain name (e.g.,
smithfamily.com).
• TZO customer support and troubleshooting
Related Topics
Windows Home Server Console Help
Remote Access
Secure your Server from Intruders
The HP Data Vault is designed as a device that is always on, which comes in handy for accessing
files any time your network users need or want them. Additionally, remote access network users to
view, add, and delete files on the server from remote locations. If not properly secured, these
features present security risks, so you’ll want to ensure that unauthorized users can’t access your
server and the files stored on it.
71
Page 78

HP Data Vault User's Guide
In this article...
Firewall Protection
Wireless Security
Anti-virus Software
User Name and Password Protection
Remote Access Security
Firewall Protection
A firewall is a hardware device or software program that protects your network from unauthorized
access. It protects your system from hackers running programs, sending email, and gaining access
to your private information. The following types of firewalls protect your network and computers:
Broadband Router Firewall
Windows Home Server Firewall
Personal Firewall
Firewall Ports
Broadband Router Firewall
The HP Data Vault requires a broadband router. Broadband routers allow multiple computers and
devices to share an Internet connection using NAT (Network Address Translation) technology.
NAT allows all the computers and devices on your network to use a single Internet connection (IP
address). NAT acts as a firewall by masking the real IP addresses of your network components—
including the HP Data Vault—which kee ps them from being seen outside the network.
Some broadband routers implement Stateful Packet Inspection (SPI), which adds enhanced
security by examining each packet of information before allowing it into the network. SPI can
prevent advanced forms of incursions like Denial of Service attacks.
Windows Home Server Firewall
Windows Home Server includes Windows Firewall, which protects communications between the
server and the computers on your network. This firewall is configured to allow remote access. It is
not configurable by the user.
Personal Firewall
A personal firewall is a software application that protects an individual computer. Because a
personal firewall is behind the broadband firewall, it protects the computer on which it is installed
from attacks from other computers within the network.
Firewall Ports
The following table lists the ports used by the server.
72
Page 79

Start Using Your Server
Ports used by the server
Type Port numbers Description
TCP 80, 443 Standard Web site
TCP 55000, 56000 internal (subnet only) Web sit e
for Windows Home Server Web
services
TCP 1138 Transport
TCP 8912 Backup and beacon
UDP 8912 Backup and beacon
TCP 2869 UPnP (Universal Plug and Play)
UDP 1900 UPnP
TCP 3389 Remote desk
TCP 4125 Remote access (when enabled)
TCP 139, 445 File and print sharing
UDP 137, 138 File and print sharing
UDP 10284, 10283, 10282, 10281,
Media connection
10280, 10243
Wireless Security
If your router comes with wireless capability, it has a piece of equipment called a Wireless Access
Point (WAP). A WAP can come within an all-in-one-gateway, router, or as a standalone unit. In
many cases, WAP’s security settings are toggled off by default and you must manually turn on the
security settings. If the security settings are toggled off, anyone can access your network and may
be able to get into the server and any computer or other device on your network. Firewalls and
anti-virus software do not keep intruders out of wireless networks.
Most wireless networking equipment supports two forms of data encryption as security features:
Wired Equivalent Privacy (WEP)
Wi-Fi Protected Access (WPA)
For more information on how to configure the security for your wireless network, see the user’s
guide that came with your networking equipment.
73
Page 80

HP Data Vault User's Guide
Anti-virus Software
You should install anti-virus software on all the computers on your ne twork, and configure the
software from one of the computers to scan all the shared folders on the server. You might be
required to assign (map) drive letters to all your shared folders to enable the anti-virus software to
scan the server.
Important
Remember to keep your anti-virus definitions up-to-date.
User Name and Password Protection
User names and passwords help secure the server by requiring authentication for managing the
server, accessing shared files, and using remote access.
Server password - during the first install of the HP Data Vault, you are asked to create a strong
password to allow access for managing your server from the Windows Home Server Console. This
password protects the server from unwanted changes.
• User account passwords - it is recommended that each person who uses your network has a user
account so they can access shared folders on the server or, if configured, use remote access.
• Computer passwords - by using the same user name and password for logging onto a computer
as for the server user account, you can avoid having to enter the user name and password when
accessing a shared folder. Requiring logon to each computer on your network adds a level of
security.
Remote Access Security
By default Remote Access is turned off.
Using a computer to remotely access the files on your server is protected in several ways:
• Security certificate
HTTPS (encrypted Secure Sockets Layer (SSL) protocol)
• User account with strong password
Security Certificate
When you install the HP Data Vault software on your network computers, the Windows Home
Server Connector software adds the Windows Home Server security certificate to the computer’s
trusted certificate list. This security certificate helps secure the information that is exchanged
between the server and your computer’s Web browser. The best way to access the files on the
server from a computer that is not attached to the network is using a browser with Internet access.
Using remote access to access your server from public or other untrusted computers is not
recommended. Doing so can potentially expose your server to malicious software and viruses.
74
Page 81

Start Using Your Server
HTTPS
Remote Access is secure because the connection between the remote computer and the server is
done over HTTPS. HTTPS uses the encrypted Secure Sockets Layer (SSL) protocol, the same
protocol used for banking transactions and retail commerce.
User Account with Strong Password
Remote access does not allow logging on from the Guest or Administrator account. Moreover,
user accounts must be enabled for remote access, which requires a strong password to ensure that
authentication is as secure as possible.
Note
If you have configured a Domain name to your server, any photos that are placed into the HP
Photo Viewer are viewable by any one that finds your domain. The Photos that are fou nd and
seen in this manner cannot be deleted or modified. Deleting photos can only be done by users that
have successfully logged into the server with a user account and password.
Related Topics
Windows Home Server Console Help
Configuring your broadband router
Why can't I connect to some computers?
Learn more about router configuration
User Accounts
Setting User Accounts Password Policy
Why should logon names match?
Add Shared Folders to Network Places
In this article...
Add Shared Folders to My Network Places in Windows XP
Add a Network Place in Windows Vista
Add Shared Folders to My Network Places in Windows XP
1. At the computer, click Start and then click My Computer.
Note
If you use the classic start menu, click My Computer on the desk.
2. Under Other Places, click My Network Places.
3. Under Network Tasks, click Add a network place.
75
Page 82

HP Data Vault User's Guide
4. In the Add Network Place Wizard, click Next.
5. Highlight Choose another network location, and then click Next.
6. To add the network place, you have two options:
In the Internet or network address box, enter the path to the shared folder you want to map, and
then click Next.
For example, enter \\hpstorage\Music
Where hpstorage is the default name. If you changed the name of the server, use that name.
Music is the shared folder’s name.
• Click Browse and then use Windows Explorer to locate the network place.
The path is usually: Entire Network, Microsoft Windows Network, Workg roup, <Name
of Server>.
7. After locating the shared folder, click to highlight it, and then click OK.
The location appears in the Folder box.
8. Specify whether you want to reconnect every time that you log on to your computer, and then
click Finish.
Once you create a network place for one of the shared folders, the other shared folders on the
server will be available on My Network Places.
Add a Network Place in Windows Vista
Note
Network discovery must be turned on to add a shared folder to Network places in Windows Vista.
1. At the computer, click Start, and then click Network.
2. Under Network Tasks, click Add a network place.
3. In the Network Place Wizard, click Next.
4. Highlight Choose another network location and then click Next.
5. To add the network place, you have two options:
• In the Internet or network address box, enter the path to the shared folder you want to
map and then click Next.
For example, enter \\hpstorage\Software
Where hpstorage is the default name. If you changed the name of the server, use that
name. Software is shared folder’s name.
• Click Browse and then use Windows Explorer to locate the network place.
The path is usually: Entire Network, Microsoft Windows Network, Workg roup, <Name
of Server>.
After locating the shared folder, click to highlight it, and then click OK. The location will
appear in the Internet or network address box.
6. To create a name for the network place, enter a name in the Type a name for this
network place box, and then click Next.
76
Page 83

Start Using Your Server
7. Specify whether you want to reconnect every time that you log on to your computer, and
then click Finish.
Install HP Add-ins for Windows Home Server
HP add-ins are software programs that extend the functionality of Windows Home Server. The
McAfee add-in delivers server side anti-virus protection.
In this article...
McAffe Anti-virus Protection
Install Add-ins
McAfee Anti-virus Protection
To receive McAfee Anti-virus protection, you must activate the service. The McAfee anti-virus
add-in with Total Protection Service is a comprehensive security management solution that:
• Checks for viruses, spyware, unwanted programs, and other potential threats. Every time a file is
accessed on your Windows Home Server, Total Protection Service scans the file to make sure it is
free of viruses and spyware.
• Sends security status information for your server to an administrative web site that is unique to
your account, known as the McAfee SecurityCenter. You can visit the SecurityCenter to check
detection reports or to set up security rules, known as policies, to define the types of programs that
do not pose a security threat.
• Updates itself automatically at regular intervals with the latest versions of components and
detection definition (dat) files. This ensures that Total Protection Service is always able to protect
you against the latest threats.
Total Protection Service typically operates in the background without an y interaction on your part.
To learn more about the McAfee anti-virus add-in, see their online documentation in one of the
following languages:
• English—http://us.mcafee.com/root/campaign.asp?cid=39906&l=enu&action=whshelp
• French—http://us.mcafee.com/root/campaign.asp?cid=39906&l=fra&action=whshelp
• German—http://us.mcafee.com/root/campaign.asp?cid=39906&l=deu&action=whshelp
• Spanish—http://us.mcafee.com/root/campaign.asp?cid=39906&l=esp&action=whshelp
After you activate McAfee antivirus protection, you receive a 90-day trial period. Internet access
is required to receive updates. Subscription is required for updates after seven months.
77
Page 84

HP Data Vault User's Guide
Install Add-ins
1. At the PC, double-click the Windows Home Server icon in the system tray and log on.
At the Mac, select Launch Home Server Console from the Server menu
2. Click Settings in the upper right corner of the Console.
3. Click Add-ins in the left menu.
4. Click the Available tab.
5. Click Install to install an add-in.
6. Click OK on the Installation succeeded dialog box to restart the console.
For additional information, see Add-ins in the Windows Home Server help.
.
Register Your Server
1. On a PC, click Start, All Programs, and then select HP Data Vault.
On a Mac, click Open Home Page on the HP Data Vault menu.
2. Click Registration to go to https://register.hp.com
Registering your server ensures that your information is on file with HP if you should need
technical support services.
and register your HP Data Vault.
Configure Server Settings
P
OWER SETTINGS
The Power Management screen allows you to put the Server into a sleep mode to save power.
1. At the PC, double-click the Windows Home Server icon
At the Mac, select Launch Home Server Console from the Server menu
2. Click Settings in the upper right corner of the Console.
3. Click HP Data Vault in the left menu.
in the system tray and log on.
.
78
Page 85

4. Click the Power tab.
Start Using Your Server
5. Select options.
Enable Daily Sleep Time—The Enable Daily Sleep Time checkbox allows the Server to be put
into a sleep mode and wake up based on times entered into the Sleep time and Wake time fields.
The server will wake up for a scheduled backup.
Sleep Now— Clicking the Sleep Now button puts the Server into sleep mode. The server will
wake up for a backup, input from the HP Home Page, or pressing the power but t o n on the Server .
6. Click OK.
HP UPDATE SETTINGS
Use the HP Data Vault software update to keep your server and networked computer s current with
the latest HP software, online help, and new features.
HP Data Vault software update does not update the Microsoft Windows Home Server operating
system. For information about updating Windows Home Server, see Configuring Windows
Update in the Windows Home Server Console Help.
In this article...
Configure HP Update
Version Information
79
Page 86

HP Data Vault User's Guide
Configure HP Update
1. At the PC, double-click the Windows Home Server icon in the system tray and log on.
At the Mac, Select Launch Home Server Console from the Server menu
2. Click Settings in the upper right of the Console.
3. Select HP Data Vault in the left menu and click the HP Update tab.
.
4. The following choices are available in the Configure section. HP recommends that you select
Automatically download and install updates.
Option Additional information
Automatically download and install updates
(recommended)
Download updates and let me choose when to
install
80
Configure HP Software Update Options
Requires no user action.
Downloads and installs updates on the server in the
background. If necessary the server will automatically
reboot.
Requires user action.
Your computer notifies you that an update has been
downloaded and is ready to install on the server.
Page 87

Start Using Your Server
Additionally, the Install link turns blue under HP Data
Vault software updates.
To update the server after an update is downloaded,
click Install under HP Data Vault software updates in
the Windows Home Server Console
Turn off automatic updates
5. Click OK.
Not recommended.
To get updates with this choice you will have to click
Check for updates located in the Version section.
Version Information
The following information and options are in the Version section of the HP Update dialog.
• The server software version number and date are shown.
• Click Check for updates to immediately check for available software updates, regardless of the
configuration settings you selected above.
• The Install link becomes active when an update has been downloaded, but not installed. Click
Install to run the server update.
• The Rollback link becomes active when a software update has been installed. Use this link to
uninstall the update on the server and revert to the previous server software version.
Important
Clicking Install or Rollback only makes changes to the server software. Each networked
computer still needs to be updated or rolled back so that the server and client computers are
running the same version of software. See Updating and Rolling Back Client PCs
Rolling Back Mac Clients for more information.
NOTIFICATION SETTINGS
The Notifications screen gives you control of which notifications will show up as messages in
your system tray.
1. At the computer, double-click the Windows Home Server icon
At the Mac, select Launch Home Server Console from the Server menu
2. Click Settings in the upper right corner of the Console.
3. Click HP Data Vault in the left menu.
or Updating and
in the system tray and log on.
.
81
Page 88

HP Data Vault User's Guide
4. Click the Notifications tab.
5. Select options.
The following is an example of a notification message.
6. Click OK.
LED SETTINGS
The LED screen gives you control of two different LED behaviors.
1. At the PC, double-click the Windows Home Server icon
At the Mac, select Launch Home Server Console from the Server menu
2. Click Settings in the upper right corner of the Console.
3. Click HP Data Vault in the left menu.
in the system tray and log on.
.
82
Page 89

4. Click the LEDs tab.
Start Using Your Server
5. Select options.
LED brightness control—The LED brightness control allows you to adjust the brightness of all
LEDs on the front panel of the Server. Grab the slider and move for a brighter or dimmer LED.
Health LED Behavior—The Health LED Behavior checkbox allows for the Server’s health
LED to show red you for any Critical Windows Home Server health notifications.
6. Click OK.
HARDWARE INFORMATION
1. At the PC, double-click the Windows Home Server icon in the system tray and log on.
At the Mac, select Launch Home Server Console from the Server menu
2. Click Settings in the upper right corner of the Console.
3. Click HP Data Vault in the left menu.
4. Click the Hardware tab.
Information presented on this screen is gathered from various sensors within the Server Solution.
.
83
Page 90

HP Data Vault User's Guide
Fan Speed
Temperature (PECI)
3.3V
5.0V
12.0V
5. Click OK.
Hardware Status Levels
Green Yellow Red
Greater than or equal to
800 rpm
Between 600 rmp and
800 rpm
Less than 600 rpm
Less than 85 Between 85 and 100 Greater than or equal to
100
Between 3.069V and
3.531V
Between 4.650V and
5.350V
Between 10.200V and
13.800V
7-10% greater or lesser
than 3.3V
7-10% greater or lesser
than 5.0V
15-20% greater or
lesser than12.0V
More than 10% greater
or lesser than 3.3V
More than 10% greater
or lesser than 5.0V
More than 20% greater
or lesser than 12.0V
84
Page 91

Start Using Your Server
SUPPORT INFORMATION
1. At the PC, double-click the Windows Home Server icon in the system tray and log on.
At the Mac, select Launch Home Server Console from the Server menu
2. Click Settings in the upper right corner of the Console.
3. Click HP Data Vault in the left menu.
4. Click the Support tab.
.
5. Click OK.
GETTING HELP FOR USING YOUR SERVER
The HP Data Vault enables multiple computers on a network to enjoy their digital experiences
when and where they want. The HP Data Vault includes remote access to files, automatic
computer backups, virtually unlimited storage expandability, and media streaming to the
entertainment center.
Help is available from most windows on the HP Data Vault.
In this article...
HP Server Help
Windows Home Server Console Help
85
Page 92

HP Data Vault User's Guide
HP Server Help
HP Server Help includes the types of help shown in the following table. Additionally, the online
User’s Guide includes references to ics in the Windows Home Server Help.
User’s Guide—Contains online help, installation instructions, guidance for set up,
using the product, tutorials, recovery information, and other important information.
Online Help—A Help button is available on most pages.
HP Support Web site—Additional support and informational articles are available
at http://www.hp.com/support
Windows Home Server Console Help
Some tasks, such as creating users and using s hared folders, are done through the Windows Home
Server Console.
.
1. At the PC, double-click the Windows Home Server icon
At the Mac, select Launch Home Server Console from the Server menu
2. Click Help in the upper right corner when you are not on the HP Data Vault tab. The help button
is indicated by a
Welcome to the Windows Home Server
Console
Computers & Backup Explains how backups work and how to configure,
User Accounts How to add users to your server.
Shared Folders Adding, opening, removing, viewi ng the history of
Server Storage View, add, repair, and remove hard drives from
icon. Or click Help buttons on Microsoft dialog boxes in the Console.
Windows Home Server Console Help
Main Topics Description
Learn what the Windows Home Server tray icon
colors mean. This ic also provides an overview of
adding user accounts, organizing files, configuring
backups, and customizing server settings.
restore, and troubleshoot backups.
shared folders, and using folder duplication.
total storage.
in the system tray and log on.
.
Network Health What health notifications mean and what to do
Windows Home Server Settings How to configure backups, passwords, media
86
about them.
sharing, remote access, add-ins, resources, and
more.
Page 93

Start Using Your Server
Windows Home Server Console Help
Main Topics Description
Remote Access How to set up the server to easily access your files
on your server using an Internet connection from a
remote location.
87
Page 94

Page 95

Chapter 4. HP Media Collector
ABOUT HP MEDIA COLLECTOR
The HP Media Collector takes media files from the computers on your network and copies them to
your HP Data Vault. This allows you to maintain a comprehensive library of music, photos, and
videos in one location in your home. You can stream media to your television and stereo. You can
share music with iTunes applications on other computers in your network. You can even stream
media to the Internet where any computer with a Web browser can play it.
Note
Media Collector copies only media files. It does not collect other file types, such as Microsoft
Office documents.
In this article...
Media Collection
HP Media Collector Default Settings
Organization Opt i o ns and Defaults
Ignored Directories and Skipped Files
Supported Fil e Formats
Media File Duplication
Media Collection
HP Media Collector scans your network computers for music, image, and video files and it copies
them to the server. You can choose how, where, and when Media Collector gathers your media.
For example:
• You can tell Media Collector to look for videos in all folders or only in your My Videos folders.
• You can tell Media Collector to look for music and not to look for photos and video.
• You can tell Media Collector to gather photos from your computer and not from your children’s
computers.
Schedule
Media Collector scans the computers in your network on an automatic schedule th at you choose.
After you enable media collection and set the schedule, Media Collector collects new media files
when you add them to your computers.
Media Collection Order
When all media types are enabled for collection, Media Collector collects photo files first; then
music files, and it takes video files last.
89
Page 96

HP Data Vault User's Guide
HP Media Collector Default Settings
Media Collector is disabled by default. Before Media Collector can begin to copy media to your
HP Data Vault, you must enable the media types you want to collect.
Media Collector copies media files only from computers that are installed as clients on your
Windows Home Server network. For example, if you have a computer that you use only for
gaming and you have not made it part of your Windows Home Server network, this computer is
not available for Media Collection.
Organization Options and Defaults
You can tell HP Media Collector how you want to organize your media on your HP Data Vault.
For example, you can organize media in these ways:
Photos
• By date taken, or existing file structure
• Default is existing file structure
Music
• By Artist/Album or existing file structure
• Default is Artist/Album
Videos
• By existing file structure
Ignored Directories and Skipped Files
HP Media Collector skips picture files that are less than 45 K in size. Media Collector ignores
some directories for each media. See the list below:
Photos
temporary Internet files, My Music folder, windows system directories
Music
temporary Internet files, windows system directories
Videos
temporary Internet files, windows system directories, mov files located under My Pictures,
Pictures
90
Page 97

HP Media Collector
Supported File Formats
The files and types listed below are compatible for Media Collection:
Photos
jpg, gif, tif, pct, mov files located under My Pictures, Pictures
Music
mp3, wma, m4a, aac, wav, playlists (m3u, wpl), album art
Videos
AVI, MOV, m4v, MPEG, MP2, WMV, FLV, DIVX, DVR -M S, M 2TS, VOB file colle ctions
Media File Duplication
Note
When HP Media Collector copies media files from all your computers and users, it
attempts to reduce duplicates. For example, if two users have the same media file, Media
Collector copies only one file to the Server.
CONFIGURING MEDIA COLLECTOR
Configuring Media Collector General Settings
1. At the PC, double-click the Windows Home Server icon in the system tray and log on.
At the Mac, select Launch Home Server Console from the Server menu
2. Click Media and then HP Media Collector in the left menu.
3. Click Configuration.
The HP Media Collector General Settings panel opens.
4. On General Settings, move available computers to enabled for collection.
When enabled, Media Collector automatically scans the enabled for collection computers for
media. Media Collector does not scan computers in the available computers box. Move a
computer out of the enabled for collection box and into available computers if you want to
disable media collection for that computer.
Configuring Media Collector for Photos
.
1. At the PC, double-click the Windows Home Server icon in the system tray and log on.
At the Mac, select Launch Home Server Console from the Server menu
2. Click Media and then HP Media Collector in the left menu.
.
91
Page 98

HP Data Vault User's Guide
3. Click Configuration.
The HP Media Collector General Settings panel opens.
4. Click Photo Settings in the left menu.
You can configure these settings in this tab:
• Photo Collection Status—Enable or Disable photo collection
• Photo Organization—Organize by date or by PC folder structure
• Photo Source—Double-click a computer name to select either My Pictures folders or All
Folders as the source .
Note
If you select All folders, Media Collector may collect graphics and images from your
computer that are not a part of your photo collection, such as graphics associated with
software applications.
Example of Photos Collected by Date and by PC Folder Structure
First of all, it’s helpful to understand the underlying data used to build the two examples below.
In this case, the files that are being shown are based on two groups of photos. One group is
located under user Susan’s home Pictures folder, with a number of uploaded photos and a sing le
named photo (Beach_sunrise.jpg). This group of photos could be on any particular computer in
the network (or even split across two computers). The second group of photos is on a particular
computer (LapDad), but not under a user’s home Pictures folder. In this case, it’s under D:\Photo
Collection\... Also, note that all of the photos on LapDad are organized and named with
meaningful names, including a copy of the Beach_sunrise.jpg file that also exists on Susan's group
of files.
92
Page 99

HP Media Collector
The photo example shows two panes with different file/folder organizations for the same group of
sample photos.
Things to Consider
Organize by Date Organize by PC Folder Structure
Uses Date Picture Taken tag or Modified Date to
Sorts files by user or source computer
organize files
Good for organizing large groups of unsorted image
Good for maintaining original photo sorting
files
Reduces duplication of photos
On the left, the files are organized by date
There are two things of interest
1. The photos from the two groups are now grouped t ogether based on date, and
2. The one photo that was duplicated between the two groups is only present once.
The single grouping is what the Organize by Date option accomplishes – it uses the Date Picture
Taken tag within the file to place the photos by date. If this is not set, the system will use the file
property Modified Date to place the photo. Be aware that this model ignores your folder
structure, so it’s most useful in the case where you don’t have a meaningful folder structure (e.g.
unsorted groups of folders or groups based on the camera software’s defaults). Regarding the
duplicate file, only one copy is kept as shown in the example. If two duplicate files are different,
the newest one is retained on the server.
93
Page 100

HP Data Vault User's Guide
In contrast, the right pane is organized by PC folder structure
If photos are found under a user’s home Pictures folder, then they will be grouped just under the
user’s name with the underlying folder organization. This still may include some simplification in
that photos for user Susan on computer1 and user Su san on computer2 will be coalesced into a
single group. This may result in some duplicate photos being represented once.
On the other hand, if the photos were found on a computer in a folder other than a user’s home
Pictures folder, they will be grouped under the computer name, with a path showing their
placement on the computer. In general, the “by folder” organization is most helpful if you have
already organized your photos and don't want to lose your folder structure.
Configuring Media Collector for Music
To Configure Media Collector for Music, follow the steps below:
1. At the PC, double-click the Windows Home Server icon
At the Mac, select Launch Home Server Console from the Server menu
2. Click Media and then HP Media Collector in the left menu.
3. Click Configuration.
The HP Media Collector General Settings panel opens.
4. Click Music Settings in the left menu.
You can configure these settings in this tab:
• Music Collection Status—Enable or Disable music collection
• Music Organization—Organize by Artist/Album or by PC folder structure
• Music Source—Double-click a computer name to select either My Music folders, iTunes
libraries, Windows Media Player libraries, or All Folders as the source.
Note
If you select All folders, Media Collector may collect sound files from your computer
that are not a part of your music collection, such as sound files that are associated with
software applications.
in the system tray and log on.
.
94
 Loading...