

Page 1

HP
Data Protector
software
A.06.00
Installation and Integration Guidelines for Data Protector
Cell Manager on HP UX 11.23 with Veritas Cluster
Page 2

Index
Introduction......................................................................................................................................... 3
Installation of Veritas Cluster products .................................................................................................... 3
Configuring SSH or remsh before installing products ............................................................................ 3
Enabling SSH............................................................................................................................... 4
Enabling remsh ............................................................................................................................ 5
Installation methods for Veritas Cluster products ...................................................................................... 6
Using Product Installer................................................................................................................... 6
Installation options........................................................................................................................ 8
Invoking product installation scripts from the command line ............................................................... 8
Installation of Data Protector Cell Manager on a cluster............................................................................ 8
Veritas Cluster Integration ................................................................................................................. 9
Licensing and VERITAS Cluster........................................................................................................... 9
Installation of Cell Manager on Veritas Cluster .................................................................................... 9
Prerequisites for Installation............................................................................................................ 9
Steps before installation of Cell Manager........................................................................................ 9
Prerequisites .............................................................................................................................. 10
Setting Kernel Parameters............................................................................................................ 11
Installation Procedure.................................................................................................................. 11
Installing a Cluster-Aware Client................................................................................................... 13
Prerequisites .............................................................................................................................. 13
Installation procedure.................................................................................................................. 14
Importing a Cluster Aware Client.................................................................................................. 14
Configuration of Data Protector Cell Manager on cluster ........................................................................ 14
Prerequisites for Configuration ..................................................................................................... 14
Configuring the Primary and Secondary Cell Managers ......................................................................... 15
Configuring the Primary Cell Manager ................................................................................................. 15
Configuring the secondary Cell Manager ............................................................................................. 15
For More Information ......................................................................................................................... 16
2
Page 3
Introduction
This document describes how to install and configure Data Protector 06.00 Cell Manager with Veritas
Cluster on an HP-UX 11.23 platform.
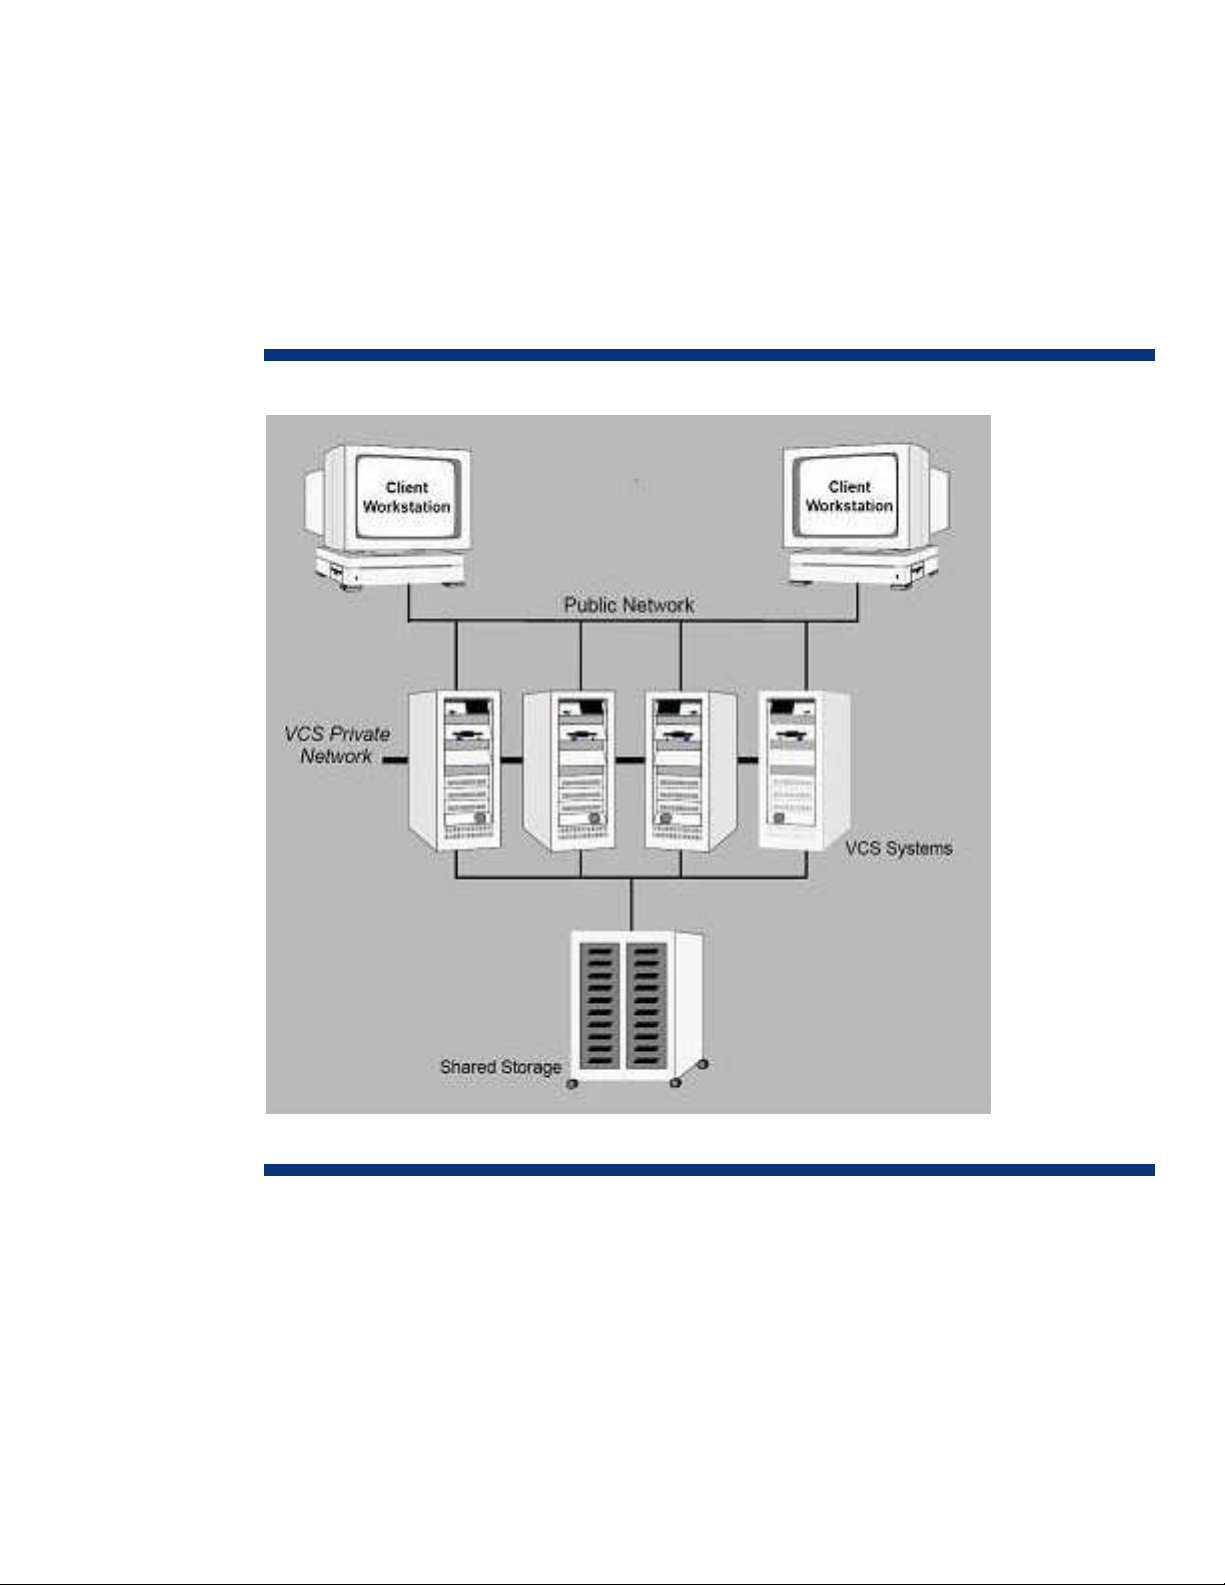
Veritas Cluster Server by Symantec software is a high-availability solution for cluster configuration.
Veritas Cluster Server (VCS) monitors system and application services, and restart services when
hardware or software fails, See Figure 1 for more details.
Figure 1: Veritas Cluster Server Configuration
Installation of Veritas Cluster products
The following section describes the installation of Veritas cluster products.
Configuring SSH or remsh before installing products
You can install Veritas products to a remote system by using secure shell (SSH) or remote shell
(remsh). SSH is the default and recommended method of installation.
Page 4

Enabling SSH
The SSH program enables you to log into and execute commands on a remote system. SSH enables
encrypted communications and an authentication process between two un-trusted hosts over an
insecure network. SSH is the preferred method of remote communication because it provides a
greater level of security than the remote shell suite of protocols. The following is an example of an
SSH setup procedure:
1. Log in as root on the source system from which you want to install the Veritas product.
2. To generate a DSA key pair on the source system, enter:
# ssh-keygen -t dsa S
The system displays the following output:
Generating public/private dsa key pair.
Enter file in which to save the key (//.ssh/id_dsa):
3. Press Enter to accept the default location of /.ssh/id_dsa.
System output similar to the following is displayed:
Enter pass phrase (empty for no pass phrase):
4. Do not enter a pass phrase.
Press Enter: Enter same pass phrase again:
Press Enter again.
5. Ensure that the /.ssh directory is on all the target installation systems. If that directory is missing,
create it on the target system and set the write permission to root only:
# mkdir /.ssh# chmod go-w /.ssh
6. Ensure that the Secure file transfer program (SFTP) is enabled on all the target installation systems.
To enable SFTP, the /opt/ssh/etc/sshd_config file must contain the following two lines:
PermitRootLogin yes Subsystem
sftp /opt/ssh/libexec/sftp-server If the lines are not there, add them
7. Restart SSH:
# /sbin/init.d/secsh start
8. To copy the public DSA key, /.ssh/id_dsa.pub to each target system, type the following
commands:
# sftp target_sys
If this is the first time this command is run on a system, the following output is displayed:
Connecting to target_sys...
The authenticity of host 'target_sys (10.182.00.00)' can't be established. DSA key fingerprint is
fb:6f:9e:61:91:9e:44:6b:87:86:ef:68:a6:fd:87:7d.
Are you sure you want to continue connecting (yes/no)?
9. Enter yes. Output similar to the following is displayed:
Warning: Permanently added 'target_sys,10.182.00.00'(DSA) to the list of known
hosts.root@target_sys password:
10.Enter the root password.
11.At the sftp prompt, type the following command:
sftp> put /.ssh/id_dsa.pub
The following output is displayed:
Page 5

Uploading /.ssh/id_dsa.pub to /id_dsa.pub
12.To quit the SFTP session, enter:
sftp> quit
13.To begin the ssh session on the target system, enter:
# ssh target_sys
14.Enter the root password at the prompt: password:
15.After logging in, enter the following command to append the authorization key to the id_dsa.pub
file:
# cat /.ssh/id_dsa.pub >> /.ssh/authorized_keys
16.To delete the id_dsa.pub public key file after it is copied to the target (host) system and added to
the authorized keys file, enter:
# rm /id_dsa.pub
17.To log out of the ssh session, enter:
# exit
18.When installing from a source system that is also an installation target, add the local system
id_dsa.pub key to the local /.ssh/authorized_key file:
# cat /.ssh/id_dsa.pub >> /.ssh/authorized_keys
The installation can fail if the installation source system is not authenticated
19.Run the following commands on the source installation system. These commands bring the private
key into the shell environment and make the key globally available for the user root:
# exec /usr/bin/ssh-agent $SHELL# ssh-addIdentity added: /.ssh/identity
This is a shell-specific step and is valid only while the shell is active. You must execute the
procedure again if you close the shell during the session.
20.To verify that you can connect to the target system, Enter:
# ssh -l root target_sys uname –a
The commands are executed on the remote system without the system requesting a pass phrase or
password.
For more information about enabling SSH, see the
pages” and OpenSSH website
.
SSH documentation and online manual
Contact your OS support provider for issues regarding SSH configuration.
Enabling remsh
Remote shell functionality is automatically enabled after the installation of the VERITAS Cluster
Products on an HP-UX system.
To enable remote installation modify the .rhosts file in the $HOME directory for each user to remotely
access the system using remsh.
Each line in the .rhosts file must contain a fully qualified domain name or IP address for each remote
system that has access to the local system.
For example, if the root user must remotely access system1 from system2, add an entry for
system2.companyname.com to the .rhosts file on system1.
# echo "system2.companyname.com" >> $HOME/.rhosts
After completion of the installation procedure, to ensure security, delete the .rhosts file from each
user’s $HOME directory.
# rm -f $HOME/.rhosts
Page 6

For more information about remote shell configuration, see the
documentation and the remsh (1M) manual page
Operating System
.
Installation methods for Veritas Cluster products
There are two ways to install Veritas products:
Using the product installer
Invoking product installation scripts from the command line
For more information about the other installation methods, see the product installation guide.
Do not make /opt a VxFS file system
There are two installation modes:
Single node local
Multiple remote target systems
You can install products remotely by using SSH or RSH.
For shell configuration information, see Configuring SSH or remsh before installing
products on Using the product installer
The product installer displays a menu that simplifies the selection of installation and upgrade options.
Selecting a product to install or upgrade from the menu invokes that product’s installation script. HP
recommends this method.
If you use the Veritas Enterprise Administrator (VEA) GUI on your system, stop the VEA service before
performing a new installation, uninstall, or an upgrade.
To stop the VEA service, on each system type the following command:
# /opt/VRTS/bin/vxsvcctrl stop
Using Product Installer
1. Locate the name of the product to install on the product software disc. Insert the disc into a drive
attached to your system and mount it.
2. Change to the directory where the software disc is mounted.
3. From the mount directory, do one of the following.
To invoke the installer script using SSH (recommended), type the following command:
#. /installer
To invoke the installer script using remsh, type the following command:
#. /installer –rsh
4. The product installer displays a list of products, their installation, and licensing status as displayed
in the following example. A list of tasks to perform follows the product status:
Storage Foundation and High Availability Solutions 5.0
Page 7

Symantec Product Version Installed Licensed
no
Veritas Cluster Server 4.1 yes
Veritas Volume Replicator
Veritas Storage Foundation
Veritas Storage Foundation for Oracle
Veritas Storage Foundation Cluster File System
Veritas Storage Foundation for Oracle RAC
I) Install/Upgrade a Product
C) Configure an Installed Product
L) License a Product
P) Perform a Pre-installation Check
U) Uninstall a Product
no no
4.1 yes
no no
no no
no
D) View a Product Description
Q) Quit
?) Help
Enter a Task: [I, C, L, P, U, D, Q,?] i
Select a task. Enter (?) to display option descriptions.
HP recommends that you run the pre-installation check for all systems before installing a product.
5. Select I, to display the list of products and options.
Storage Foundation and High Availability Solutions 5.0
1) Veritas Cluster Server
2) Veritas Volume Manager
3) Veritas Volume Replicator
4) Veritas Storage Foundation
5) Veritas Storage Foundation for Oracle
6) Veritas Storage Foundation Cluster File System
7) Veritas Storage Foundation for Oracle RAC
8) Veritas Cluster Management Console
Page 8

9) Symantec Product Authentication Service
b) Back to previous menu
Select a product to install: [1-9, b, and q] q
Select “b” (“back”) to return to a previous section of an installation procedure. This feature is contextsensitive, so it returns to the beginning of a grouped section of questions. If an installation procedure
does not respond, use Control–c to stop and exit the program.
6. Enter the number of the product to install and press Return. Follow the instructions described in
the product installation guide.
Installation options
The installer provides three installation options:
Install required packages: This option installs the packages required to operate the licensed
product.
Install required and optional packages: This option installs optional packages such as
documentation and client features that are not required to operate the licensed product.
Install additional packages to allow easy upgrade to higher product level: This option installs all
packages of higher product level. For example, if you install Storage Foundation for Oracle, you
can install additional packages for Storage Foundation for Oracle RAC. This enables you to
upgrade by entering an additional product license key. Although the extra packages are installed,
only the selected product and its licensed options are configured. This is the default option.
Invoking product installation scripts from the command line
You can also install Veritas products by running the following installation scripts from the command
line Interface:
installcmc Veritas Cluster Server Management Console
installsf
installsfcfs
installsfora
installsfrac
installvcs
installvm
installvvr
Before you begin an installation using a command-line script, read the product release notes and
installation guide.
For further information see “Veritas™ Storage Foundation and High Availability Solutions
Getting Started Guide HP-UX 5.0”.
Veritas Storage Foundation
Veritas Storage Foundation Cluster File System
Veritas Storage Foundation for Oracle
Veritas Storage Foundation for Oracle RAC
Veritas Cluster Server
Veritas Volume Manager
Veritas Volume Replicator
Installation of Data Protector Cell Manager on a cluster
The following section describes the installation of Data Protector Cell Manager on Veritas Cluster
Page 9

See the concepts guide:
http://bizsupport.austin.hp.com/bc/docs/support/SupportManual/c00751562/c00751562.pdf
and to installation guide:
http://bizsupport.austin.hp.com/bc/docs/support/SupportManual/c00751873/c00751873.pdf
Veritas Cluster Integration
As part of its high-availability support, Data Protector provides a full integration of the Data Protector
Cell Manager with Veritas Cluster on HP-UX systems.
For information about supported operating system versions, supported configurations, and level of
cluster support, see official support matrix:
www.hp.com/go/dataprotector
Support matrices
HP Data Protector V6.0 Software
DP 6.0 Platform & Integration Support Matrices
This section provides specific information for integration of Data Protector and Veritas Cluster and
assumes that you are familiar with clustering concepts and concepts related to Veritas Cluster.
Licensing and VERITAS Cluster
When you purchase a license for the Data Protector Cell Manager, the license will be bound to a
virtual server and will work regardless of any physical node inside a Veritas cluster, the Data Protector
Cell Manager executes as long as the package is running on one of the nodes. If the Cell Manager is
installed on a cluster using the same virtual IP address for all nodes within the cluster, only one starter
pack is required.
Installation of Cell Manager on Veritas Cluster
Prerequisites for Installation
To install Data Protector Cell Manager on Veritas Cluster, the server must meet the following
requirements:
Obtain the following information from the network administrator:
– Virtual server name (the hostname specified in the cluster package)
– Package IP or virtual IP-address
Create a shared disk which is accessible on both the nodes at the same time (ACTIVE-ACTIVE).
Ensure that the cluster nodes and the package IP (virtual IP) are on the same subnet.
Ensure that all the cluster nodes and the package IP are registered with the DNS server.
If you need to add additional software components on cluster nodes using the Data Protector GUI,
ensure that the node to which you add the components is active.
If the Cell Manager is to be cluster-aware, the virtual server IP address must be used for licenses.
Steps before installation of Cell Manager
Before you install a Data Protector Cell Manager on Veritas Cluster, check the following:
Page 10
Decide which systems are going to be the Primary Cell Manager and the Secondary Cell
Managers. All of them must have Veritas Cluster Software installed and must be configured as
cluster members.
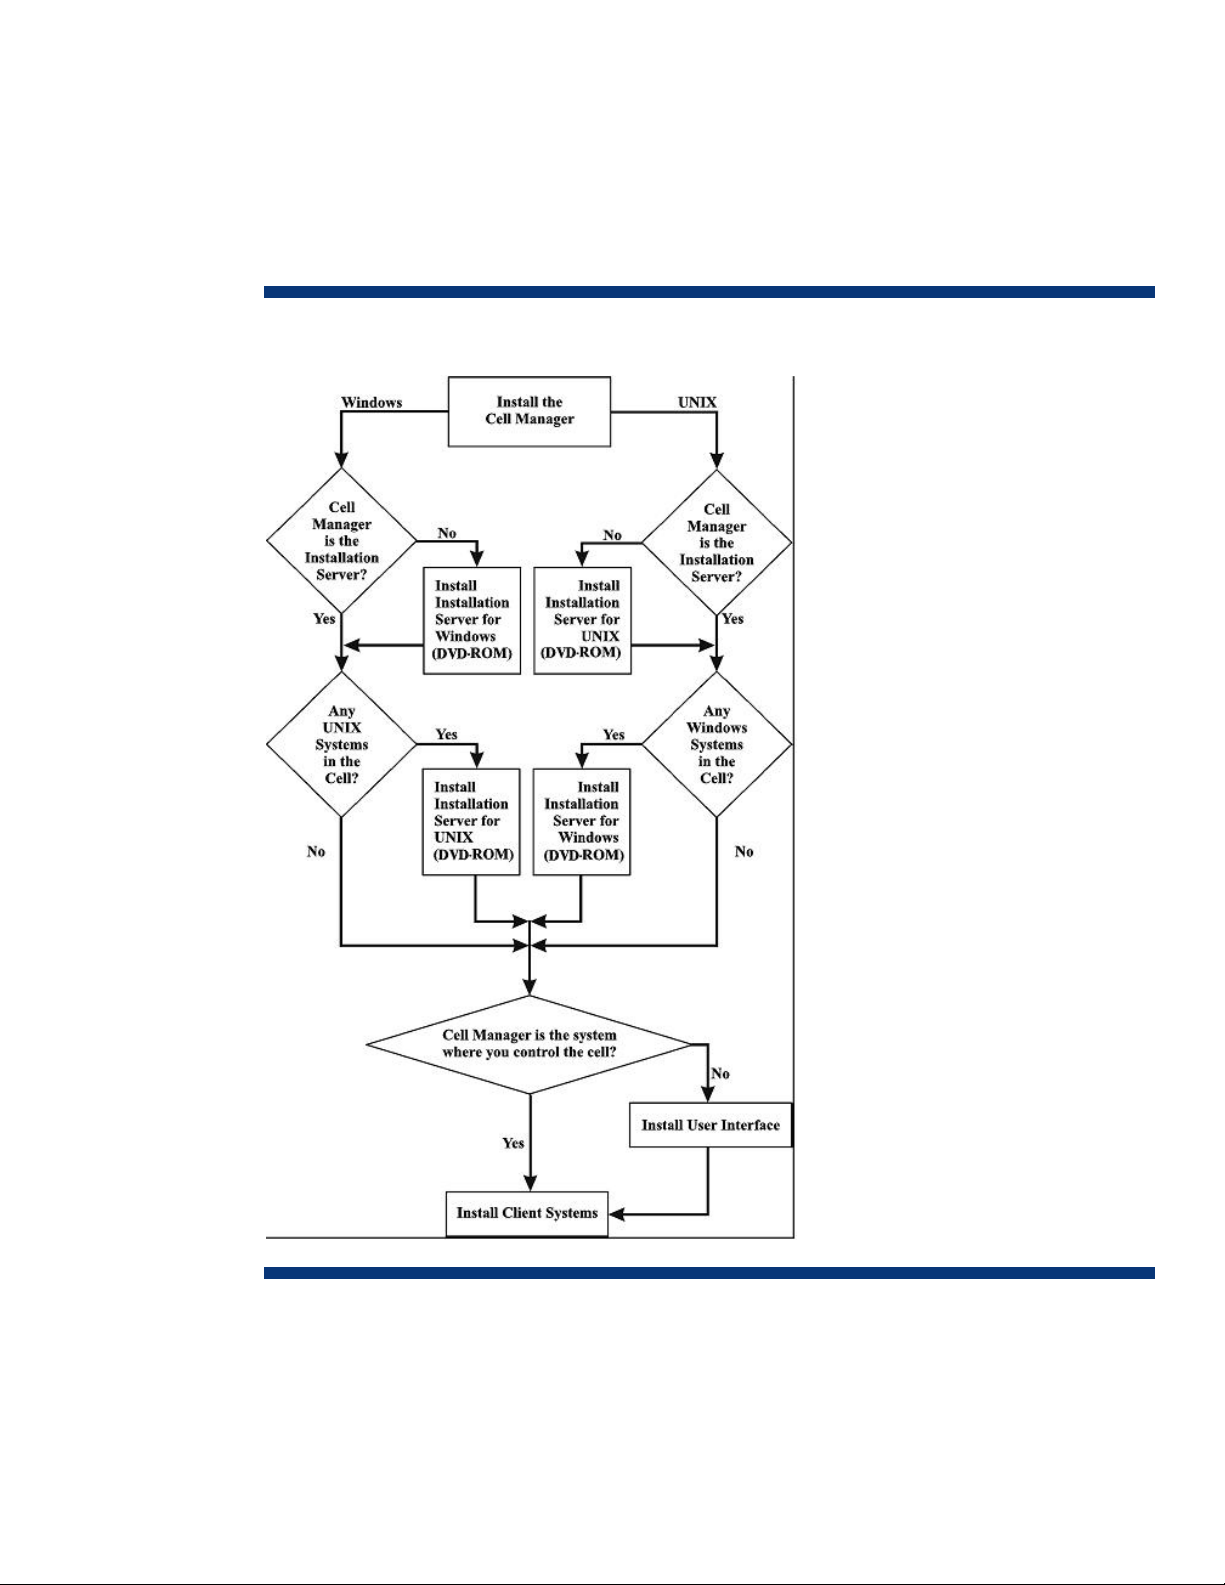
Data Protector Cell Manager with recommended patches and all other Data Protector Software
components required for the integrations in the cluster must be installed on the primary node and
each of the Secondary nodes. . See figure 2 for the complete flow chart of installation and
configuration of Data Protector on Veritas Cluster.
Figure 2: Flow chart of installation and configuration of Data Protector on Veritas Cluster
This section provides step-by-step instructions for installing a UNIX Cell Manager.
Prerequisites
The Cell Manager on HP-UX, Solaris or Linux System must meet the following requirements:
Have sufficient disk space for the Data Protector software.
Page 11

For more information, see HP OpenView Storage Data Protector Product
Announcements, Software Notes, and References.
Install Data Protector to the linked directories to overcome the shortage of space in the server.
Have sufficient disk space (about 2% of the planned data to be backed up) for the Internal
Database. See HP OpenView Storage Data Protector Product Announcements,
Software Notes, and References.
The IDB design enables the database binary files to relocate if growth in database size makes it
necessary. See the online Help index: IDB, calculating the size of.
Support for long filenames. To find out whether your file system supports long filenames, use the
getconf NAME_MAX <directory> command.
inetd daemon running.
Port number 5555 (default) free.
The Microsoft implementation of the TCP/IP protocol must be installed and running.
The protocol must be able to resolve hostnames. The computer name and the hostname must be
identical.
For information on the installation and configuration of the TCP/IP protocol, see “Setting Up the
TCP/IP Protocol on Windows Systems” in the installation guide.
Access to a DVD-ROM drive.
Must recognize the Cell Manager, if NIS server is used.
ksh shell installed.
You must have root permissions on the target system.
Setting Kernel Parameters
On an HP-UX server, HP recommends setting the kernel parameter maxdsiz (Max Data Segment Size)
to at least 134217728 bytes (128 MB), and the kernel parameter semmnu (Number of Semaphore
Undo Structures) to at least 256. After committing these changes, recompile the kernel and reboot the
system.
On Solaris, HP recommends setting the kernel parameter shmsys:shminfo_shmmax (maximum shared
memory segment size (SHMMAX)) in /etc/system to at least 67108864 bytes (64 MB). After
committing this change, reboot the system.
Installation Procedure
TIP If you install the Cell Manager and Installation Server on the same system, you can perform
the installation in one step by executing omnisetup.sh -CM -IS. For a description of the omnisetup.sh
command, see the README file located in the <Mount_point>/LOCAL_INSTALL directory on the DVDROM or the “HP OpenView Storage Data Protector Command Line Interface Reference” located in the
<Mount_point>/DOCS/C/MAN directory on the DVD-ROM.
To install the Cell Manager on an HP-UX, Solaris, or Linux system:
1. Insert and mount the UNIX installation DVD-ROM to a mount point.
Example:
# mkdir /dvdrom
# mount /dev/dsk/c0t0d0 /dvdrom
Page 12

Optionally, you can install Data Protector from a depot on the disk:
To copy the DP_DEPOT, AUTOPASS, and LOCAL_INSTALL directories, where the installation files
are stored, to your local disk, run:
# mkdir <directory>
# cp -r /dvdrom/<platform_dir>/DP_DEPOT <directory>
# cp -r /dvdrom/<platform_dir>/AUTOPASS <directory>
# cp -r /dvdrom/<platform_dir>/LOCAL_INSTALL <directory>
Where <platform_dir> is:
hpux_ia for HP-UX 11.23 on IA-64 systems
hpux_pa for HP-UX on PA-RISC systems
linux_x86_64 for Linux systems on AMD64/Intel EM64T
solaris for Solaris systems
To copy the whole DVD-ROM to your local disk, run:
# cp -r /dvdrom <dvd_image_dir>
2. Run the omnisetup.sh command. To run this command from the DVD-ROM, type:
# cd /dvdrom/LOCAL_INSTALL
# ./omnisetup.sh –CM
To start the installation from disk:
If you have copied the DP_DEPOT, AUTOPASS, and LOCAL_INSTALL directories to your local disk
in the directory <directory>, run:
# cd <directory>/LOCAL_INSTALL
# ./omnisetup.sh -source <directory> -CM
If you have copied the whole DVD-ROM to <dvd_image_dir>, run the omnisetup.sh command with
the -CM parameter:
# cd <dvd_image_dir>/LOCAL_INSTALL
# ./omnisetup.sh -CM
3. On HP-UX and Solaris, omnisetup.sh prompts you to install or upgrade the HP OpenView AutoPass
utility if you want to download and install passwords for the purchased licenses directly through
the internet from the HP password delivery center web server. HP recommends installation of
AutoPass. If AutoPass is installed on a Veritas cluster, it must be installed on all nodes. When
prompted, press Return to install or upgrade AutoPass. If you do not need to install or upgrade
AutoPass, press n.
On Linux, HP OpenView AutoPass is not installed.
If you have installed or upgraded the Cell Manager on Solaris 9 or Solaris 10, remotely install the
Disk Agent on the Cell Manager after the installation or upgrade is complete, using an Installation
Server. This replaces the generic Solaris Disk Agent with the Solaris 9 or Solaris 10 Disk Agent.
If you need to install an Installation Server for UNIX on your Cell Manager, perform this task at this
point.
When the installation completes, the core Data Protector software is located in the /opt/omni/bin
directory and the Installation Server for UNIX in the /opt/omni/databases/vendor directory. The
following list shows the Data Protector subdirectories and their contents:
IMPORTANT
To install Data Protector to linked directories, for instance:
Page 13

# /opt/omni/ -> /<prefix>/opt/omni/
# /var/opt/omni/ -> /<prefix>/var/opt/omni/
# /etc/opt/omni/ -> /<prefix>/etc/opt/omni/
You must create the links before the installation and ensure that the destination directories exist.
/opt/omni/bin for All commands
/opt/omni/gui for GUI items
/opt/omni/gui/help for Online Help files
/opt/omni/lbin for Data Protector internal commands
/opt/omni/sbin for Superuser commands
/opt/omni/sbin/install for Installation scripts
/etc/opt/omni for Configuration information
/opt/omni/lib for Shared libraries for compression, data encoding, and device handling
/opt/omni/doc/C for Online documentation (optional)
/var/opt/omni/log and /var/opt/omni/server/log for Log files
/opt/omni/lib/nls/C for Message catalog files
/opt/omni/lib/man for Man pages
/var/opt/omni/tmp for Temporary files
/var/opt/omni/server/db40 for IDB files
Installing a Cluster-Aware Client
The Data Protector cluster-aware clients must be installed on all the cluster nodes.
The installation procedure is standard procedure for installing Data Protector on an UNIX client.
Data Protector cluster-aware clients must be installed locally, from a DVD-ROM, on every node within
the cluster. The nodes (Data Protector cluster clients) are imported to the specified cell during the
installation process and the virtual server hostname has to be manually imported to the Data Protector
cell.
You can import a cluster to a Data Protector cell that is managed either by the standard Cell Manager
or by the cluster-aware Cell Manager
Prerequisites
If you need an application backup to be cluster-aware, that is, accessible through its virtual server,
check the following:
An application integration module must be installed on all application-preferred owners (nodes).
Only in this way the Data Protector Integration agents start the backup on the cluster node where
the application currently resides.
A cluster must be installed properly with all of its functionality on all cluster nodes. For example, you
must be able to move groups from one to another node as many times as needed with no problems
with shared disks.
Each system of the cluster must be up and running properly. If a system in the cluster has the Data
Protector software installed, you must to uninstall it prior to the setup.
Page 14

If Oracle8 is installed on cluster nodes, HP recommends stopping Oracle8 database services on the
cluster nodes.
Installation procedure
The cluster client setup is the same as for the Windows local client setup, except that the cluster
Administrator account is required to perform the installation.
In addition to the Data Protector client components such as Disk Agents and Media Agents, install
the Cluster Integration component, which is selected by default during the installation.
For information about how to locally install a Data Protector Windows client system, see the HP
OpenView Storage Data Protector Installation and Licensing Guide.
During the installation, Data Protector detects the cluster and prompts to specify the Cell Manager
(cell) for the Data Protector cluster clients.
After the installation, verify that the Data Protector software has been properly installed.
To see the name of the cluster-aware client system, execute
# <Data_Protector_home>\bin\omnirsh <cluster_client_system> INFO_CLUS
If the output returns 0 “NONE”, Data Protector is not installed in the cluster-aware mode.
Import the virtual server hostname (a cluster client system) to the Data Protector cell.
Importing a Cluster Aware Client
When the installation is completed, you must import the virtual server (the hostname specified in the
cluster package) to the Data Protector cell.
To import a specific cluster node or a virtual server, right click its cluster in the Scoping Pane and click
Import Cluster Node or Import Cluster Virtual Server. Steps to import MC/Service Guard, Veritas,
Tru64, and Novell NetWare Cluster Services are described below.
Steps
In the Context List, click Clients.
In the Scoping Pane, right-click Clients and click Import Client.
Type the hostname of the virtual server as specified in the application cluster package, or browse
the network to select the virtual server (on Windows GUI only) you want to import.
Select the Virtual Host option to indicate that this is a cluster virtual server.
Click Finish to import the virtual server.
The Results Area displays the name of the imported cluster client.
Configuration of Data Protector Cell Manager on cluster
Prerequisites for Configuration
Before configuring Data Protector with Veritas Cluster, check the following:
The cluster must be installed and running.
Identify the Primary Cell Manager and the Secondary Cell Manager(s) systems.
Systems chosen to be the Primary Cell Manager and the Secondary Cell Manager(s) must have
Veritas cluster installed, with recommended patches, and must be configured as members of the
same cluster.
Data Protector Cell Manager, with recommended patches, and all other Data Protector Software
components for the integrations you want to have in the cluster must be installed on the primary
node and each of the Secondary nodes.
Page 15

See the HP OpenView Storage Data Protector Installation and Licensing Guide for
instructions.
Configuring the Primary and Secondary Cell Managers
The following sections describe how to configure the Primary and Secondary Cell Managers.
The following sections provide step-by-step examples to configure the Primary and Secondary Cell
Managers. Directory and file names, numbers, and other variables will differ from the following
examples according to the environment.
The shared volume group will contain the IDB and configuration files to be used when considering
the size of the shared disk.
The SHARED_DISK_ROOT variable must contain the name of the mount point directory (for
example, SHARED_DISK_ROOT=/omni_shared). The CS_SERVICE_HOSTNAME variable must
contain the name of the virtual Cell Manager, as it is known to the network. Each package in the
cluster requires its own virtual IP address and its virtual server network name (for example,
CS_SERVICE_HOSTNAME=ob2cl.company.com).
Configuring the Primary Cell Manager
To configure the Primary Cell Manager, first mount the share disk on both servers. Mount the logical
volume to a directory (for example, /omni_shared), with the following steps:
1. Create a mount point directory:
$ mkdir /omni_shared
2. Mount the filesystem to the mount point directory with cluster option.
$mount -F vxfs -o cluster /dev/vx/dsk/vmdg/sh_vol /OMNI_SHARE
3. Modify the /etc/opt/omni/server/sg/sg.conf template file.
4. Configure the Primary Cell Manager. Make sure not to be positioned in the /etc/opt/omni or
/var/opt/omni directory or their subdirectories when running the script. Make also sure to have
no mounted subdirectories in the /etc/opt/omni or /var/opt/omni.
$ /opt/omni/sbin/install/omniforsg.ksh –primary
After running this script, the Data Protector services are stopped.
Configuring the secondary Cell Manager
To configure the secondary Cell Manager on system2:
1. Create the same mount point directory as you have created on the Primary Cell Manager
(/omni_shared):
$ mkdir /omni_shared
2. Mount the filesystem to the mount point directory with cluster option.
$mount -F vxfs -o cluster /dev/vx/dsk/vmdg/sh_vol /OMNI_SHARE
3. Configure the Secondary Cell Manager:
$ /opt/omni/sbin/install/omniforsg.ksh -secondary
$ /omni_shared
Page 16

For More Information
HP Data Protector software
www.hp.com/go/dataprotector
HP Data Protector software support matrix
http://h20000.www2.hp.com/bizsupport/TechSupport/DocumentIndex.jsp?lang=en&cc=us&taskId=101&prod
ClassId=1&contentType=SupportManual&docIndexId=179911&prodTypeId=18964&prodSeriesId=3241176
© Copyright 2008 Hewlett-Packard Development Company, L.P. The
information contained herein is subject to change without notice. The
only warranties for HP products and services are set forth in the
express warranty statements accompanying such products and
services. Nothing herein should be construed as constituting an
additional warranty. HP shall not be liable for technical or editorial
errors or omissions contained herein.
Microsoft and Windows are U.S. registered trademarks of Microsoft
Corporation. UNIX is a registered trademark of The Open Group.
4AA1-xxxxENW, April 2008
 Loading...