

Page 1

HP StorageWorks
D2D Backup System
User Guide
Par t number: EH 880-90950
hird edition: October 2007
T
Page 2

Legal and notice information
© Copyright 2006 Hewlett-Packard Development Company, L.P.
Confidential computer software. Valid license from HP required for possession, use or copying. Consistent with FAR 12.211 and
12.212, Commercial Computer Software, Computer Software Documentation, and Technical Data for Commercial Items are
licensed to the U.S. Government under vendor’s standard commercial license.
The information contained herein is subject to change without notice. The only warranties for HP products and services are set forth
in the express warranty statements accompanying such products and services. Nothing herein should be construed as constituting
an additional warranty. HP shall not be liable for technical or editorial errors or omissions contained herein.
Linear Tape-Open, LTO, LTO Logo, Ultrium and Ultrium Logo are trademarks of Quantum Corp, HP and IBM in the US, other
countries or both.
Patented under one or more of U.S. Patents Nos. 5,003,307; 5,016,009; 5,463,390; 5,506,580; held by Hi/fn, Inc.
Microsoft, Windows, Windows NT, and Windows XP are U.S. registered trademarks of Microsoft Corporation.
Intel and Itanium are trademarks or registered trademarks of Intel Corporation or its subsidiaries in the United States and other
countries.
AMD is a registered trademark of Advanced Micro Devices, Inc.
Page 3

Contents
Aboutthisguide ......................... 11
Intendedaudience..................................... 11
Relateddocumentation................................... 11
Documentconventionsandsymbols ............................. 11
HPtechnicalsupport.................................... 12
Customerselfrepair .................................... 12
Productwarranties..................................... 12
Registeringyourtapedrive ................................. 12
Subscriptionservice .................................... 13
HPwebsites........................................ 13
Documentationfeedback .................................. 13
1Beforeyoustart......................... 15
Overview......................................... 15
Optionaltapeattach.................................... 15
Softwareandhardwarerequirements............................. 16
Terminology ....................................... 16
Autoloaders...................................... 16
Backupdevicesandslots................................ 16
Hosts ........................................ 16
Import/ExportandCopy ................................ 18
iSCSI ........................................ 18
Mailslots(import/exportelements)............................ 18
Physicaltapedrives .................................. 19
RAID......................................... 19
Storagecapacity ..................................... 19
Physicalstorage.................................... 19
Actualstorageused .................................. 19
Considerations when configuringcartridgesandslots.................... 19
Taperotationstrategies................................. 20
Compression ....................................... 21
2ConnectingandinstallingtheHPD2DBackupSystem ........ 23
Connectthehardware ................................... 23
DHCP and static IP addressing . . . . . . . . . . . . . . . . . . . . . . . . . . . . . . 24
OptionalTapeAttach ................................. 24
Supported network configurations .............................. 24
AsadeviceonaGigabitEthernetnetwork ........................ 24
Directlyconnectedtoabackupserveronyourmainnetwork................. 25
Software installation, discovery and configuration ....................... 26
Recommendedwebbrowsersettings ............................. 26
InternetExplorer7.X .................................. 27
InternetExplorer6.X.................................. 27
MozillaFirefox1.5andFirefox2.X............................ 27
3Attachingaphysicaltapedrive(optional).............. 29
HardwarerequirementsforTapeAttach............................ 29
Tapedriveinstallationoverview ............................... 29
Removingtheaccesspanelandbezel ............................ 30
D2D Backup System
3
Page 4

InstallingtheHBA ..................................... 31
Installinganinternaltapedrive ............................... 33
Replacingtheaccesspanelandbezel ............................ 35
Connectinganexternaltapedrive .............................. 36
4 The Installation wizard...................... 39
Before you install the firsthost ................................ 39
RuntheInstallationwizard ................................. 40
5 Advanced installation ...................... 45
UsingDHCPtodiscovertheHPD2DBackupSystem ...................... 45
UsingtheDiscoveryEnginetodiscovertheHPD2DBackupSystem................ 45
Beaconmode..................................... 46
If the HP D2D Backup System is new a nd not yet configured ................. 46
If the HP D2D Backup System has been configuredincorrectly ................ 46
Ifthenetworksetuphasbeenchanged .......................... 46
MicrosoftiSCSIInitiator................................... 46
ManualiSCSIinitiatorinstallation ............................ 47
TheiSCSIInitiator ................................... 47
Generaltab.................................... 48
Discoverytab................................... 48
Targetstab.................................... 49
PersistentTargetstab................................ 50
BoundVolumes/Devicestab............................. 51
LinuxiSCSIinitiator .................................... 51
Manualdriverinstallation.................................. 51
HPLTOTapedriver .................................. 52
Mediumchangerdriver................................. 52
6LEDs.............................. 53
UnderstandingtheLEDs................................... 53
BootupLEDsequence ................................. 53
FirmwareLEDsequence................................. 53
Beaconmode....................................... 53
7BackupscenariosusingtheHPD2DBackupSystem ......... 55
Simplebackup ...................................... 55
Officebackup....................................... 56
Fileserver....................................... 56
Databaseserver.................................... 57
DesktopPC...................................... 58
Summary....................................... 59
High-performanceworkstationbackup ............................ 60
Mainbackuptoautoloader............................... 60
Additionalbackuptotapedrive ............................. 60
Summary....................................... 61
Incorporatingarchivetotapeintoarotationstrategy ...................... 61
8TheWebManagementInterface.................. 63
WhatistheWebManagementinterface?........................... 63
ToruntheWebManagementInterface............................ 63
Summary(Home) ..................................... 64
Statusicons...................................... 65
Devices (Configuration)................................... 65
Toviewdevicedetails ................................. 65
Toeditdevicedetails.................................. 66
Tocreateanewdevice................................. 66
4
Page 5

Todeleteadevice................................... 67
Cartridges (Configuration) ................................. 67
Emptyslots...................................... 69
Toremoveacartridge ................................. 69
Towriteprotectacartridge ............................... 70
Toeditmaximumsize ................................. 70
Tocreateacartridge.................................. 70
Network (Configuration) .................................. 71
Network configuration ................................. 72
Toeditnetworksettings............................... 72
Resettingnetworksettingstofactorydefaults........................ 73
Beaconmode..................................... 73
Email Alerts (Configuration)................................. 74
To configureMicrosoftExchangeServer.......................... 75
Disk&RAID(Status) .................................... 76
RAIDstatus...................................... 76
Diskusage...................................... 76
Physicaldisks..................................... 77
iSCSI(Status) ....................................... 77
Log(Status)........................................ 78
TapeAttachpages..................................... 79
Shutdown(Admin)..................................... 79
Administration(Admin)................................... 80
Resettingthepassword................................. 80
Firmware(Admin) ..................................... 81
Support(Admin)...................................... 82
9 Export, import and copy using an attached tape drive . . . . . . . . 83
RequirementsforconnectingatapedrivetotheHPD2D..................... 83
Anoteaboutterminology.................................. 83
Archivingmethods..................................... 84
Cartridgecopy .................................... 84
WhyusetheCopyfunctionality?........................... 85
WhenwouldCopybeused? ............................ 85
Whenisitnecessarytorestorefromacopiedcartridge? ................ 85
DisadvantagesofCopy............................... 86
Cartridgeexport.................................... 86
WhyusetheExportfunctionality? .......................... 87
WhenwouldExportbeused?............................ 87
WhenwouldIrestorefromanexportedcartridge? ................... 87
DisadvantagesofExport .............................. 87
Cartridgeimport.................................... 88
Tapespanning .................................... 88
Using the Web M anag em ent interface to copy/export/import cartridges . . . . . . . . . . . . . 88
Configuration(TapeAttach)............................... 89
Addingtapedrivestothelist ............................ 89
Upgrading tape drive firmware ........................... 89
Copy/Export/Import(TapeAttach)............................ 89
Tocopytoattachedtapedrive............................ 90
Toexporttoattachedtapedrive........................... 91
Toimportfromattachedtapedrive.......................... 93
Status(TapeAttach) .................................. 94
Tocancelajob .................................. 95
Ifanerroroccurs ................................. 95
Schedule(TapeAttach)................................. 95
Tocreateaschedule................................ 96
Toview,editordeleteexistingschedules ....................... 97
JobHistory(TapeAttach)................................ 97
Compression ....................................... 98
D2D Backup System
5
Page 6

10Copyusingatapedriveattachedtothehost............ 99
Requirements ....................................... 99
Tapedrivessupported ................................. 99
Archivefromhosttotapeprocess .............................. 99
Furtherinformation................................... 100
Compression ....................................... 100
11Restoreprocesses ....................... 101
Restorescenarios ..................................... 101
RestoringfromtheHPD2DBackupSystem........................... 102
ReconnectingtotheHPD2Dafterhostfailure ......................... 102
12 Troubleshooting . . . . .................... 105
Connectingthehardware.................................. 105
MynetworkdoesnothaveaspareGigabitport ...................... 105
Thesuppliedcableistooshort.............................. 105
Iamconnectingdirectlytoa10/100Base-Tportonastorageserver............. 105
DHCPisnotworking.................................... 105
RunningtheInstallationwizard................................ 106
Driversfailtoinstallusingtheinstallwizard ........................ 106
Device discovery fails to finddevice ........................... 106
iSCSIInitiatorfailstodownload ............................. 107
Thewizardhasnotcreatedanautoloaderformyhost.................... 107
Manualinstallation .................................... 108
HPD2DBackupSystemtroubleshooting............................ 108
PoweringuptheHPD2DBackupSystem ......................... 108
ShuttingdowntheHPD2DBackupSystem......................... 108
Disconnectinghosts .................................. 109
Devicetroubleshooting................................... 109
HostcannotconnecttothedevicefromWebManagementInterface.............. 109
Backupapplicationfailstoseedevice .......................... 109
Icannotcreateadevice ................................ 110
Icannotseeanewlycreateddevice ........................... 110
I cannot see additional slots from the backup application . . . . . . . . . . . . . . . . . . 110
Adeleteddevicekeepsreappearing ........................... 110
Ifbackupisslow.................................... 110
Cartridgetroubleshooting.................................. 110
Icannotresizecartridges................................ 110
Mytapedrivedevicehasrunoutofspace......................... 111
Thecartridgesformyattachedtapedrivearesmallerthan200GB.............. 111
Attachedtapedrivetroubleshooting ............................. 111
An attached tape drive does n ot appear on the Web interface . . . . . . . . . . . . . . . . 111
Cartridgecopyorexportfails.............................. 111
Cartridgeimportfails.................................. 111
Emailalertstroubleshooting................................. 112
Disktroubleshooting .................................... 112
IftheHPD2DBackupSystemrunsoutofspace ...................... 112
Ifadiskfails ..................................... 112
13Harddiskreplacement ..................... 113
Replaceableparts..................................... 113
RAID5........................................ 113
HowdoIknowadiskhasfailed? .............................. 113
Ifmorethanonediskfails................................ 114
Electrostaticdischargeinformation .............................. 115
Replacingtheharddisk................................... 115
Replacingacompleteunit.................................. 122
6
Page 7

Index .............................. 123
D2D Backup System
7
Page 8

Figures
1
FrontandrearviewoftheHPD2DBackupSystem.................. 15
2
Device configur
3
Device configurationwithmultiplehosts ...................... 18
Storage capacity . . . . . . . . . . . . . . . . . . . . . . . . . . . . . . . . 20
4
5
Networkandpowerconnectors.......................... 23
6
AttachingatapedrivetotheHPD2DBackupSystem ................ 24
7
Connectingtoabusinessserveronthemainnetwork ................ 25
8
Connecting
9
Connectingtoanetworkserver.......................... 26
10
AttachingatapedrivetotheHPD2DBackupSystem ................ 29
11
Removingtheaccesspanel............................ 30
12
Removing
13
Removingtheslotcoverretainer.......................... 31
14
Removingthetopexpansionslotcover....................... 32
15
InstallingtheHBA................................ 32
16
ReplacingthePCIslotcover ........................... 33
17
Removing the fillerpanel............................. 33
ationwithonehost ........................ 17
toadedicatedbackupnetwork..................... 25
thefrontbezel............................. 31
18
Selectingthecorrectscrews ........................... 34
19
Attachingthescrewsandmetalshims ....................... 34
20
Installingtheinternaltapedrive(exampleshowsaSCSItapedrive) .......... 35
21
Removingtheblankplateinthebezel....................... 35
22
23
24
25
26
27
28 LE
29
0
3
31
2
3
33
acingthebezel............................... 36
Repl
Replacingtheaccesspanel ........................... 36
Connectingthecables(SCSItapedrive) ...................... 37
PoweringontheHPD2DBackupSystem...................... 40
Creatingthebackupdevice ........................... 43
iSCSIInitiatordownloadpage .......................... 47
Ds ..................................... 53
Simplebackupfromasinglehost......................... 56
HP D2D Backup System after the firsthostisconfigured................ 57
HP D2D Backup System after the second host is configured.............. 58
HP D2D Backup System after the third host is configured ............... 59
Option remains to configuremorehosts ...................... 60
8
Page 9

34
HPD2DBackupSystemwithonehostandtwodevices................ 61
35
Copyingtophysicaltapeaspartofarotationstrategy................ 62
36
Cartridge copy
37
Cartridgeexport ................................ 87
38
Cartridgeimport ................................ 88
39
Archivingtotape................................ 100
40
FewerhostsaresupportedbecauseHosts1,2and3havetwodevices......... 108
41
Removingtheaccesspanel............................ 117
42
Removing th
43
Removingthediskcover............................. 118
44
Identifyingtheharddisk............................. 118
45
Removingtheharddrive............................. 119
46
47
48
49
ngaharddrive.............................. 119
Installi
Replacingthedrivecover ............................ 120
Replacingthebezel............................... 120
Replacingtheaccesspanel ........................... 121
................................. 85
efrontbezel............................. 117
D2D Backup System
9
Page 10

Tables
1 Documentconventions.............................. 11
2
3 Deviceparameters ............................... 67
4
5
6
7
8
9 Restorescenarios................................ 101
Summarypagelayout.............................. 65
Cartridge parameters . . . . . . . . . . . . . . . . . . . . . . . . . . . . . . 69
Network parameters . . . . . . . . . . . . . . . . . . . . . . . . . . . . . . 73
Emailparameters................................ 75
Physicaldiskparameters............................. 77
Jobscheduleparameters............................. 97
10
Page 11

About this guide
This gu ide provides information about:
• Installing the HP StorageWorks D 2 D Backup System
• Using the HP StorageWorks D2D Backup System
• Troubleshooting the HP StorageWorks D2D Backup System
Intended audi
This guide is intended for users who install, operate and maintain the HP StorageWorks D2D Backup
System.
ence
Related documentation
In addition to this guide, the following document provides related information:
• ‘Starthere’posterforanoverviewoftheinstallationinformationinthisguide(availablein
English, French, German and Japanese)
You can find these documents from the Manuals page of the HP Business Support Center website:
h
ttp://www.hp.com/support/manuals
In the Storage section, click Storage Solutions and then select your product.
h
ttp://www.hp.com/support/manuals
Document conventions and symbols
Table 1 Docu
Convention
Blue text: Table 1
Blue, unde
Bold text
ment conventions
rlined text: h
ttp://www.hp.com website addresses
Element
Cross-reference links and e-mail addresses
• Keys that are pressed
• Text typed into a GUI element, such as a box
• GUI elements that are clicked or selected, such as
menu and list items, buttons, tabs, and check boxes
Italic text Text emphasis
• File and directory names
Monosp
Monospace, italic text
Monospace, bold text
ace text
• System output
• Code
• Commands, their arguments, and argument values
• Code variables
• Command variables
Emphasized monospace text
D2D Backup System
11
Page 12

WARNING!
Indicates that failure to follow directions could result in bodily harm or death.
CAUTION:
Indicates that failure to follow directions could result in damage to equipment or data.
IMPORTANT:
Provides clarif
NOTE:
Provides additional information.
ying information or specific instructions.
HP technical support
For worldwide technical support information, see the HP support website:
h
ttp://www.hp
Before contacting HP, collect the following information:
• Product model names and numbers
• Technical supp
• Product serial numbers
• Error messages
• Operating sys
• Detailed questions
.com/support
ort registration number (if applicable)
tem type and revision level
Customer self repair
HP customer self repair (CSR) programs allow you to repair your StorageWorks product. If a CSR
part needs replacing, HP ships the part directly to you so that you can install it at your convenience.
Some par ts do not qualify for CSR. Your HP-authorized service provider will determine whether a repair
can be accomplished by CSR.
For more information about CSR, contact your local service provider. For North America, see the CSR
website:
h
ttp://www.hp.com/go/selfrepair
Product warranties
For informa
h
tion about HP StorageWorks product warranties, see the warranty information website:
ttp://www
.hp.com/go/storagewarranty
Registering your tape drive
Once you have installed and tested your HP D2D Backup System please take a few minutes to register
your product. You can register via the web (w
12
About this guide
ww.register.hp.com).
Page 13

To ensure your registration is complete, there are a number of questions on the electronic form that are
mandatory. Other questions are optional. However, the more you feel able to complete, the better HP
can meet your needs.
Subscription service
HP recommends that you register your product at the Subscriber’s Choice for Business website:
h
ttp://www.hp.com/go/e-updates
After registering, you will receive e-mail notification of product enhancements, new driver versions,
firmware updates, and other product resources.
HP websites
For additional information, see the following HP websites:
•h
ttp://www.hp.com
•http://www.hp.com/go/storage
•http://www.hp.com/service_locator
•http://www.hp.com/support/manuals
•http://www.hp.com/support/downloads
Documenta
HP welcomes your feedback.
To make comments and suggestions about product documentation, please send a message to
storagedocs.feedback@hp.com. All submissions become the property of HP.
tion feedback
D2D Backup System
13
Page 14

14
About this guide
Page 15
1 Before you star t
In this chapter:
• “Overview” on page 15
• “Optional tape attach one” on page 15
•
“Software and hardware requirements” on page 16
•
“Terminology” on page 16
•
“Storage capacity” on page 19
• “Compression” on page 21
Overview
The HP StorageWorks D2 D Backup System is an iSCSI disk-based storage appliance that emulates up to
six tape devices; these tape devices can be used to back up a maximum of six host network servers or
PCs. Each ta
Drive). Au
pe device is configured as an 1x8 G2 Ultrium Tape Autoloader (or standalone Ultrium Tape
toloaders may be configured with between 8 and 24 slots.
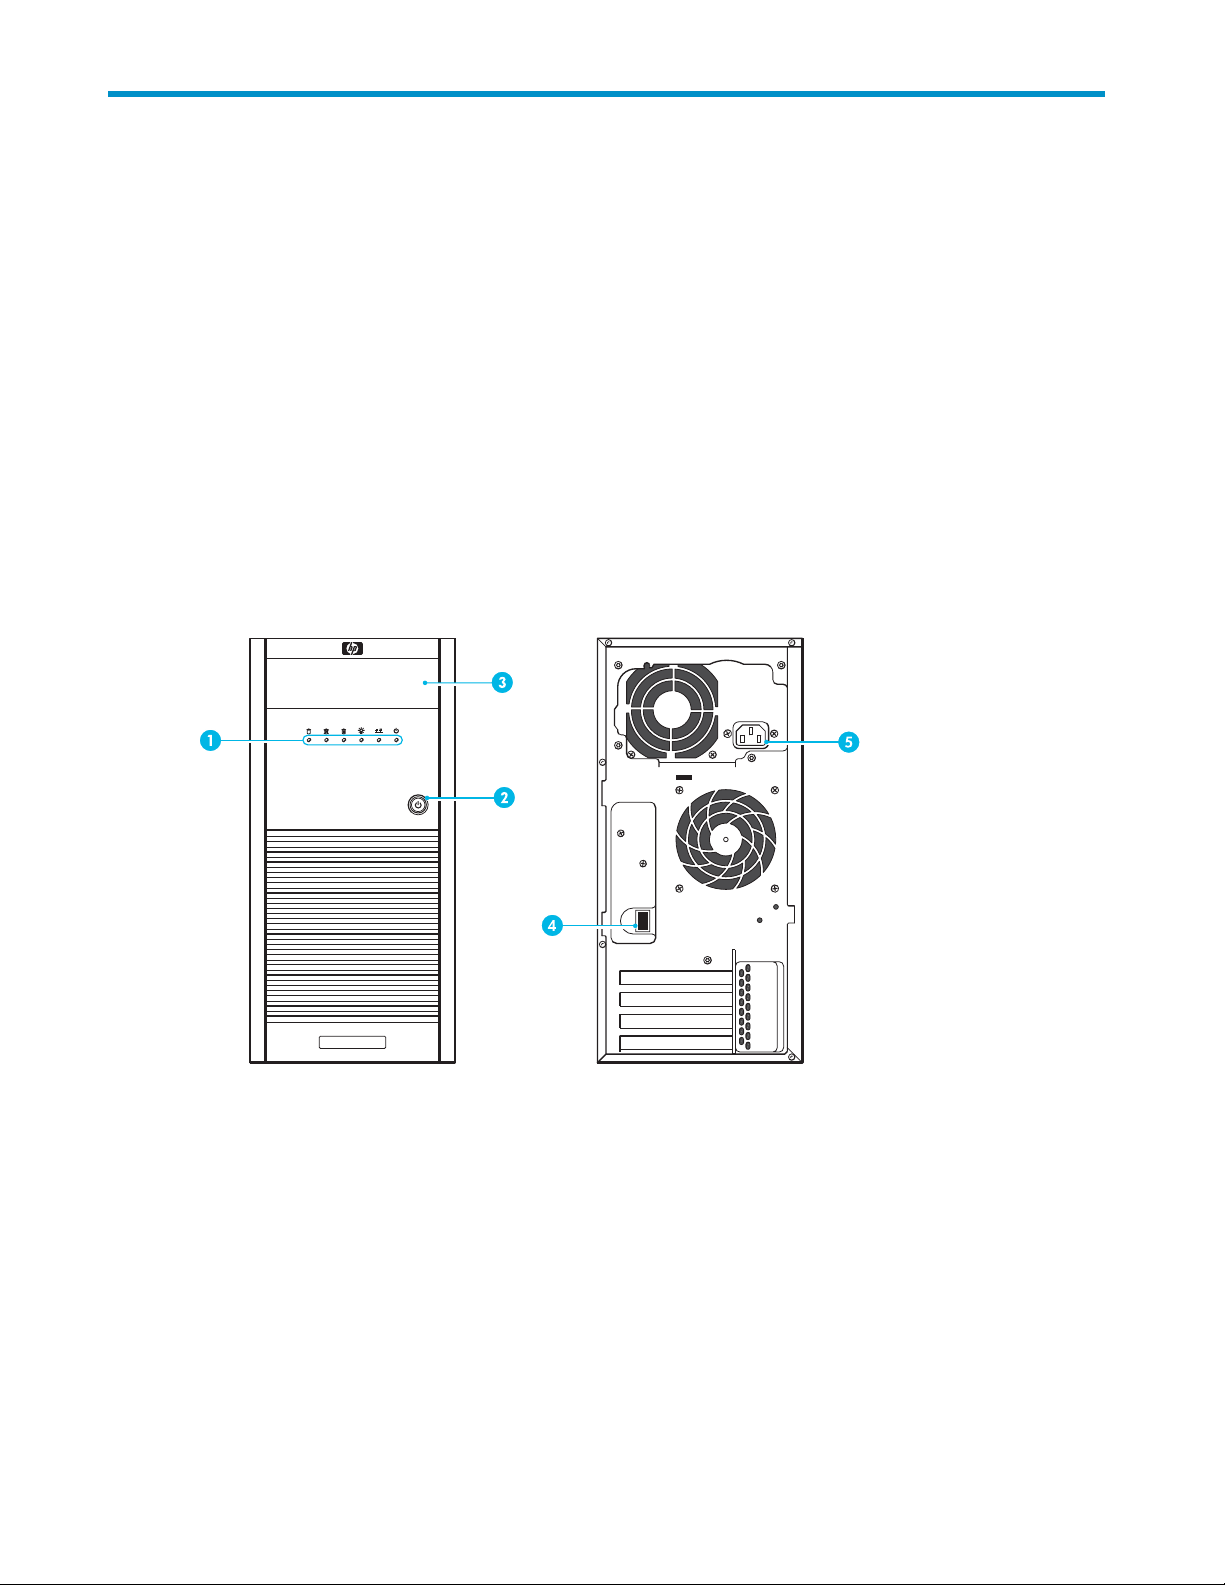
1. LEDs
er On button
2. Pow
3. Location for optional attached tape drive (see “Attaching a physical tape drive”onpage29)
Figure 1 Front and rear view of t he HP D2D Backup System
Optional tape attach
An Ultrium Tape Drive may be attached directly to the HP D2D Backup System, allowing the user to store
backups offsite. An internal tape drive must be half-height and is installed in the half-height bay above
the LEDs, labeled 3 on Figure 1. External tape drives may be half-height or full-height. Both SAS and
SCSI tape drives are supported and require installation of a host bus adapter (HBA).
4. Network connector
er connector
5. Pow
D2D Backup System
15
Page 16

To find out which Ultrium Tape Drive models and HBAs and are supported, refer to
w
ww.hp.com/go/connect .
Software and hardware requirements
Refer to www.hp.com/go/co nnect for the latest connectivity and compatibility information.
• The HP D2D Backup System sho uld be connected to a Gigabit Ethernet network. 100 Base-T
Ethernet will lim it performance; 10 Base-T Ethernet will severely lim it performance. For example
network topol
• For backup and restore you need software that supports tape autoloaders. This software resides
on the host, not the HP D2D Backup System. A CD-ROM containing HP Data Protector Express
software is supplied with the HP D2D B ackup System. The device may also be used with the major
backup appl
• Windows Backup is only supported with standalone tape drives created on the HP D2D Backup
System. It is not supported for use with autoloader backup devices created on the HP D2D
Backup Syst
ogies, see “Supported network configurations” on page 24.
ications from HP, Symantec, EMC, Computer Associates and others.
em.
Terminology
Autoloaders
An autoloader is a backup device that has multiple storage slots. Each storage slot contains a cartridge.
This has tw
• The overall storage capacity is much greater.
• More impor tantly, each cartridge can be allocated to a specific backup task; for example,
one cartr
way, backup applications are able to implement tape rotation strategies that accommodate
differing backup requirements for daily, weekly, monthly, yearly backups. Please see
“Backup scenarios using the HP D2D Backup System” on page 55 for worked examples.
o a dvantages over standalone tape drives:
idge can hold Monday’s data, another can hold Tuesday’s data, and so on. In this
Backup devices and slots
Backup devices appear to the host as locally-attached tape devices, but physically, they use disk space on
the HP D2D Backup System which, as in tape terminology, is referred to as slots or cartridges.
Depending on your data protection strategy, you may configure each backup device as a standalone HP
StorageWorks Ultrium Tape Drive or, more typically, as an HP StorageWorks 1x8 G2 Tape Autoloader
with attached Ultrium Tape Drive.
• When you configure your HP D2D Backup System with a standalone tape drive, 200 GB of
physical disk space is made available for that tape drive. This is the equivalent of a permanentlymounted 200 GB tape cartridge, which cannot be unloaded. Tape spanning is impossible, so the
data to be backed up must not exceed 200 GB.
• When you configure your HP D2D Backup System with a tape autoloader, up to 200 GB of
physical disk space can be made available for each configured slot. This is the equivalent of an
autoloader with multiple slots, each containing a 200 G B cartridge. Both tape spanning and,
more importantly, flexible tape rotation strategies are possible.
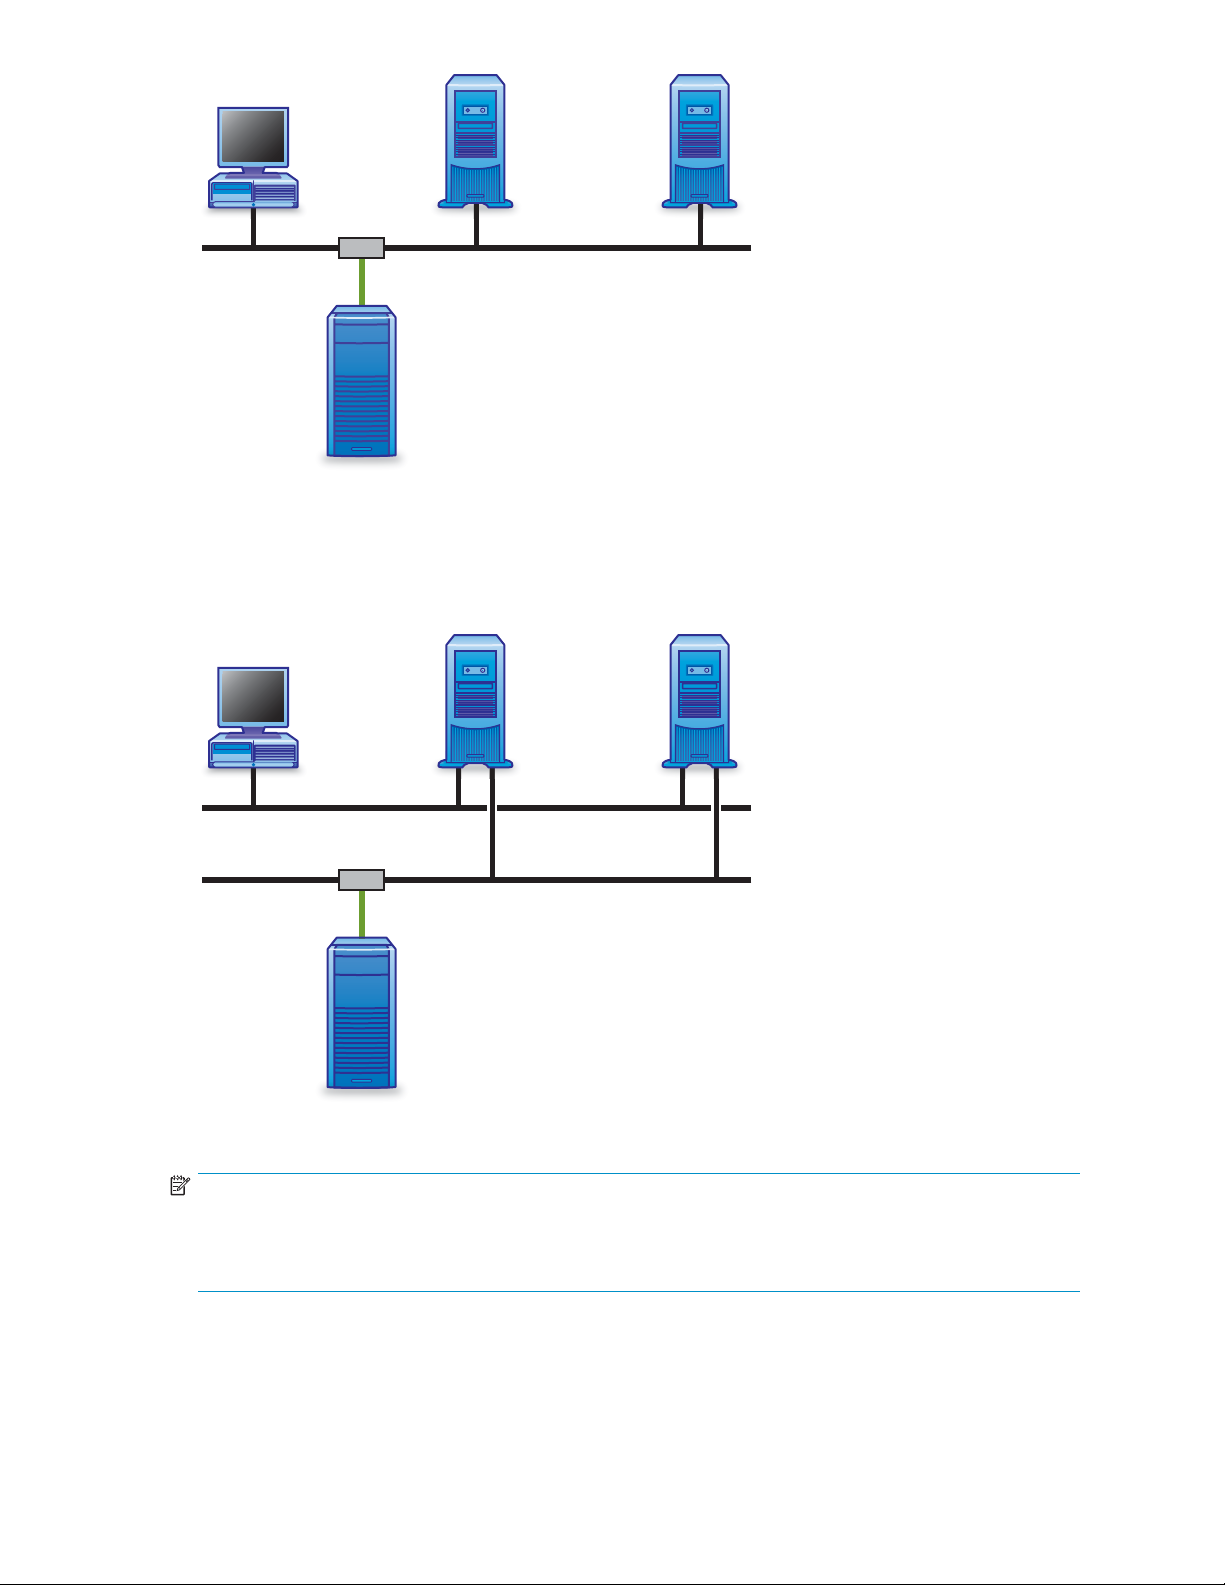
ts
Hos
Each emulated tape device is uniquely mapped to an individual host; this is the network server or
PC that you wish to back up.
• The
• The tape device is accessed and managed from the backup software running on the host.
• Thetapedeviceisnotvisibletootherdevicesonthenetwork.
tape device appears to the host as a locally-attached tape autoloader or tape drive.
16
Before you start
Page 17

• Multiple servers may not back up to a single tape device.
Figure 2 on page 17 shows a configuration with a single host. Figure 3 on page 18 shows a
configuration with six hosts. See “Connecting and installing the HP D2D Backup System”onpage23for
more example configurations.
Host3Host2 Host4/5/6Host1
LAN
1
2
3
4
5
6
7
8
Autoloader 1
HP StorageWorks D2D Backup System
1. The Ins
tallation wizard has been run on Host 1.
2. The HP D2D Backup System automatically generates an autoloader for the host. The user may specify
the number of slots during installation.
Figure 2 Device configuration with one host
• By default, the host sees only one device, the autoloader that has been configured for it during
installation. Data from each host goes to its corresponding autoloader.
• Each backup device is visible only to the host for which it has been configured.
• A host may have multiple devices configured for it on the HP D2D Ba ckup System, but this means
fewer hosts m ay be connected (not illustrated, see Figure 34 on page 61 for an example of
one host with two devices).
D2D Backup System
17
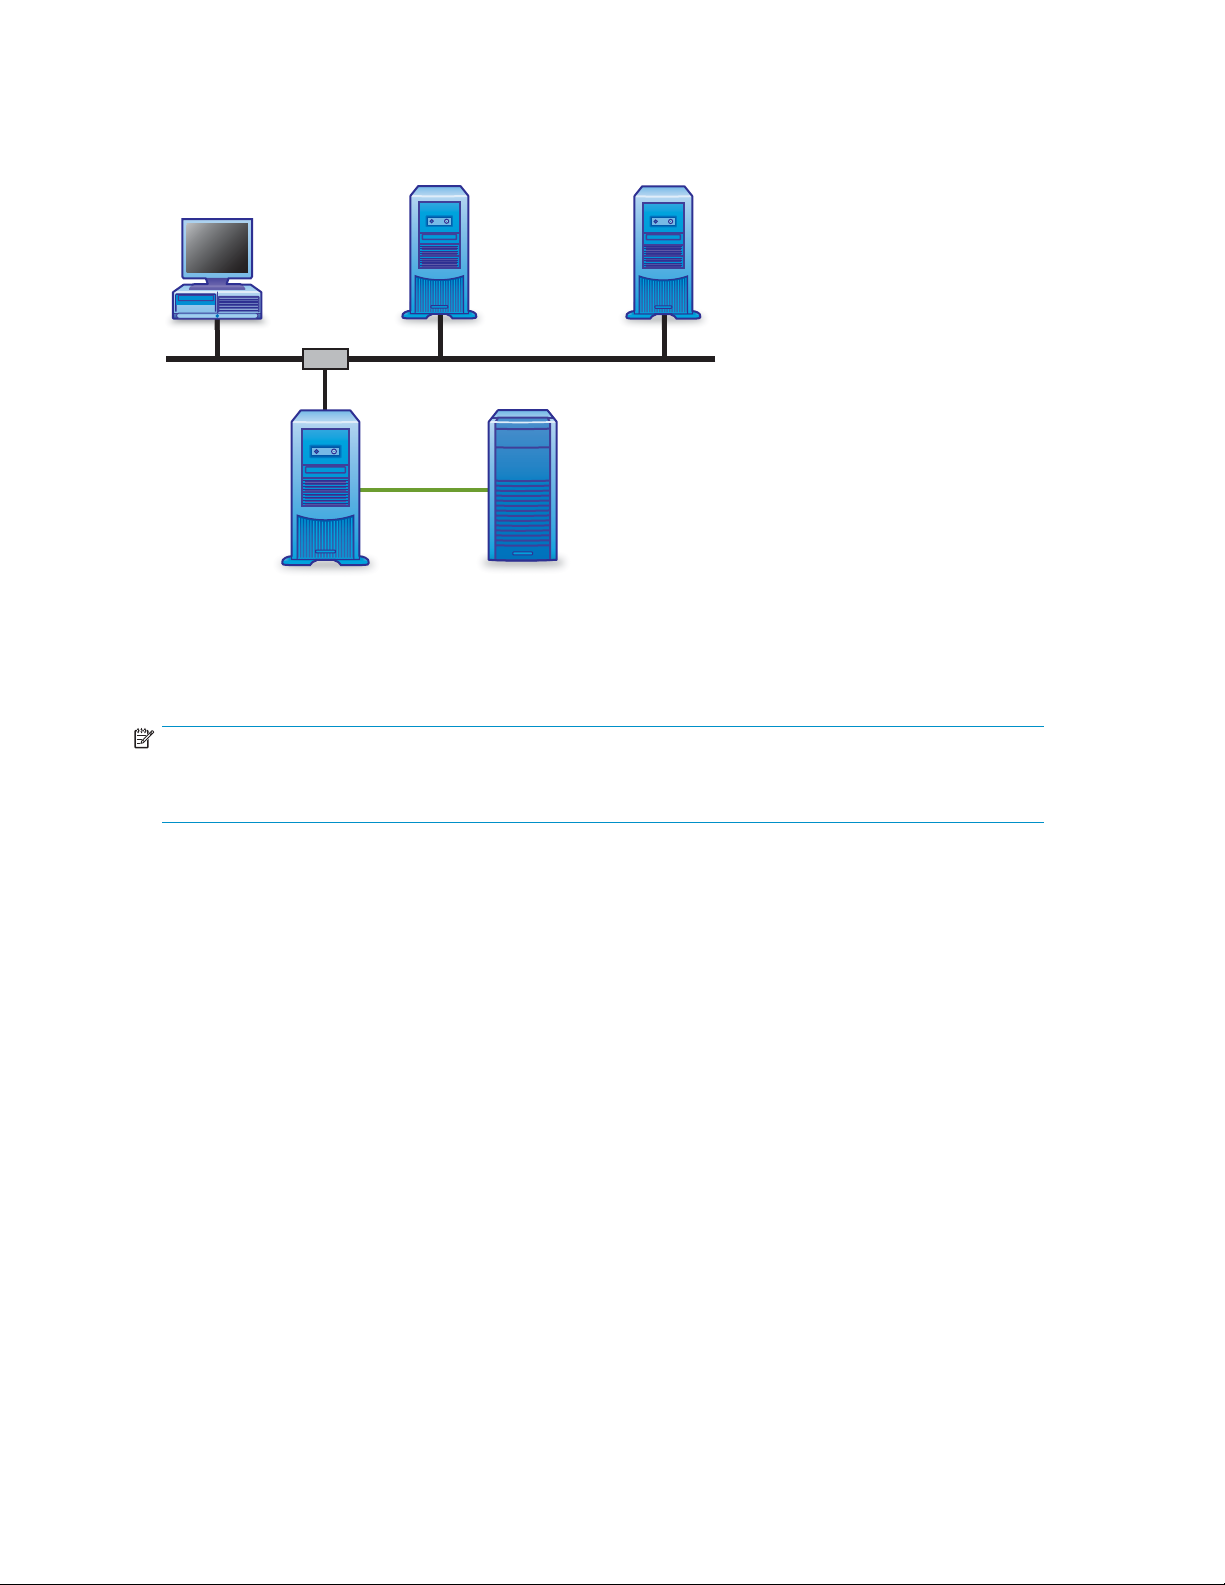
Page 18
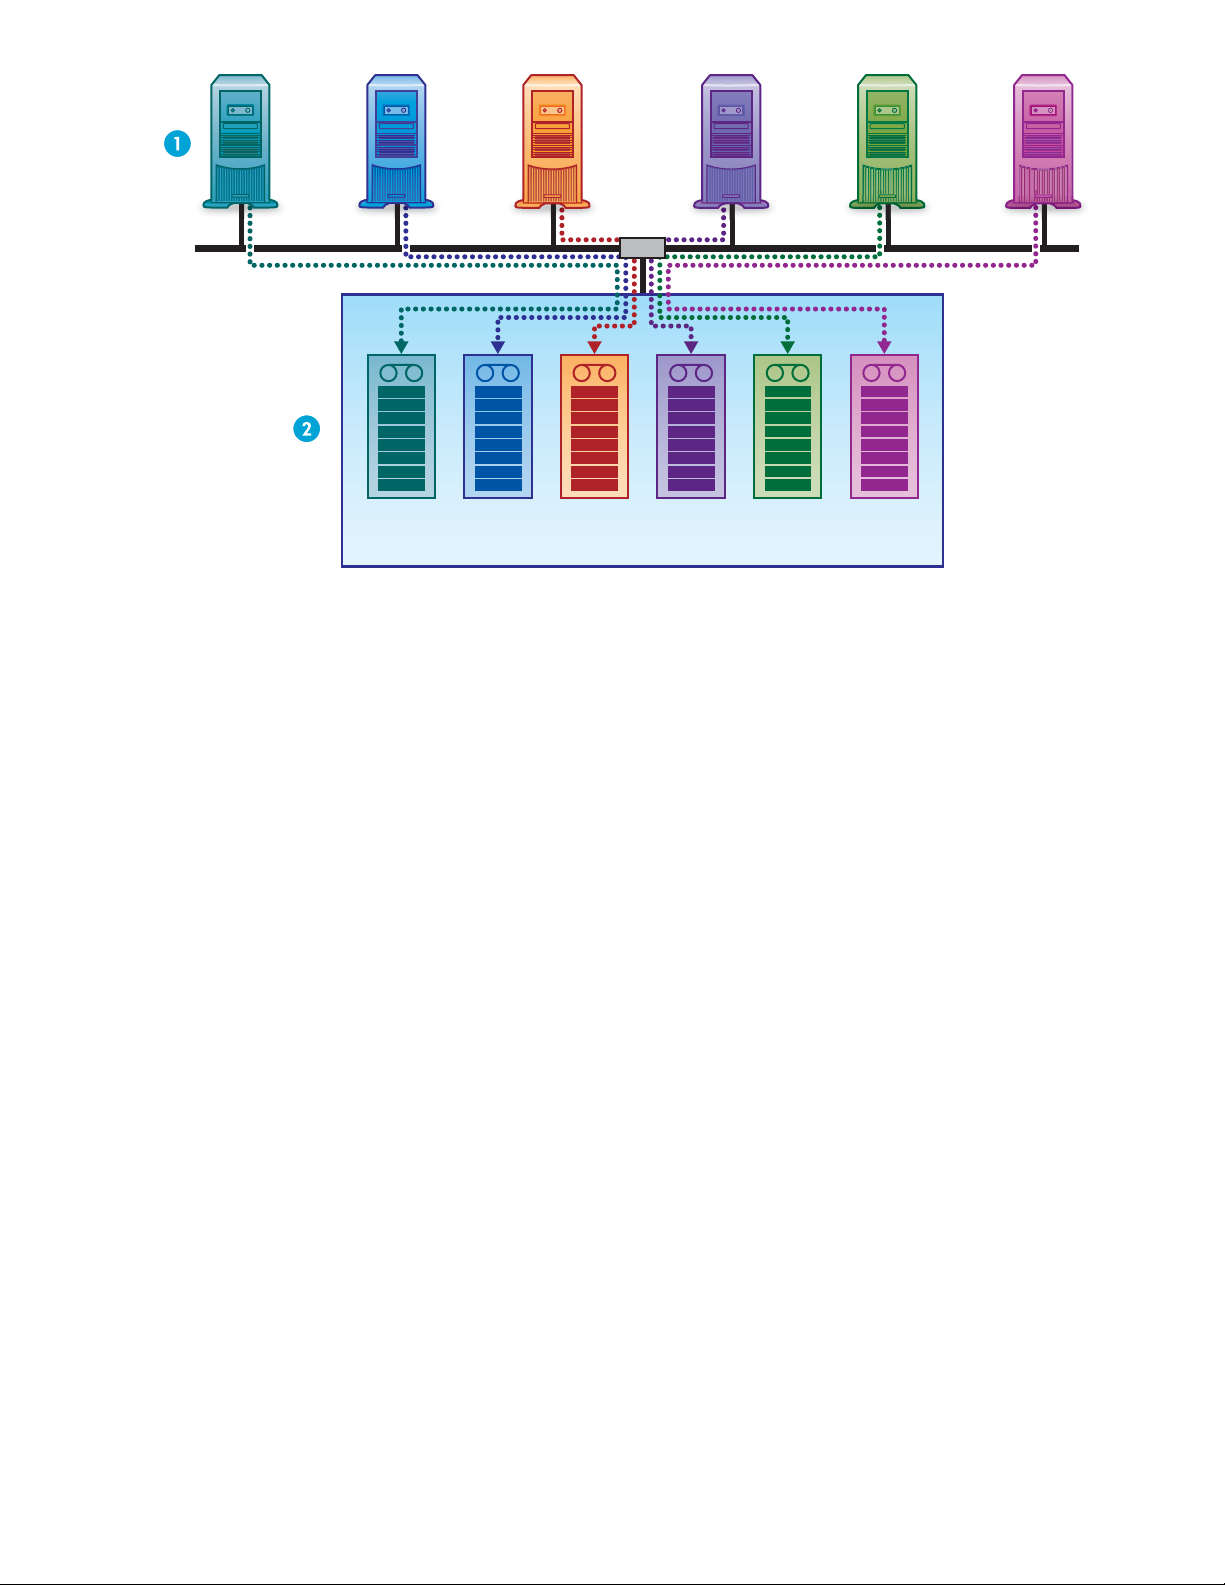
Host4Host3Host2Host1
Host5
Host6
LAN
1. The HP D2D Backup System can be used to back up a maximum of six hosts
2. The Installation wizard automatically generates an autoloader for each host. The user may specify
the number of slots during installation.
Figure 3 Device configuration with multiple hosts
Import/Export and Copy
If you attach a supported, physical tape drive directly to your HP D2D Backup System, you will be
able to copy or export data to the physical tape drive so that backups can be stored offsite. This is an
important requirement for Disaster Recovery strategies. The main difference between copy and export
is that copied data remains on the HP D2 D Backup System; exported data is removed from it, but can
be imported easily when required. These functions are grouped under the Tape Attach section of the
Web Interface. Please see “Export, impor t and copy to an attached tape drive” on page 83 for more
details about working with Tape Attach.
1
2
3
4
5
6
7
8
Autoloader 1
1
2
3
4
5
6
7
8
1
2
3
4
5
6
7
8
1
2
3
4
5
6
7
8
1
2
3
4
5
6
7
8
1
2
3
4
5
6
7
8
Autoloader 2 Autoloader 3 Autoloader 4 Autoloader 5 Autoloader 6
HP StorageWorks D2D Backup System
iSCSI
The HP D2D Backup System is an iSCSI device. This means that the HP D2D Backup System plugs directly
he network, but it presents devices as directly-attached SCSI autoloaders to host machines. In order
into t
to function, it requires an iSCSI initiator. On Windows systems, this is normally downloaded by the
Installation wizard, as described in “Connecting and installing the HP D2D Backup System” on page 23.
For more information about iSCSI, see “Advanced installation” on page 45. Linux users should also refer
to the “Linux Configuration Guide” on the HP StorageWorks Tape CD-ROM for more information.
Mail slots (import/export elements)
A mail slot is a term borrowed from tape terminology to identify a dedicated slot that is used specifically to
import and export cartridges. They are sometimes called import/export elements by backup applications.
Backup applications that support this feature move cartridges from the mail slot when the user runs an
Export job, and look for cartridges in the mail slot when the user runs an Import job.
18
Before you start
Page 19

Physical tape dr
ives
Aphysicaltape
so that data can be moved from the HP D2D Backup System and stored offsite. (It should not be
confused with the tape drive device that can be configured as one of the backup d evices on the HP
D2D Backup Syst
RAID
RAID stands for Redundant Array of Inexpensive (or Independent) Devices, which is a data storage
scheme that divides data among multiple hard drives, increasing data reliability and throughput. The
HP D2D Backup System is a RAID5 device, which offers the best combination of data protection and
capacity. It has four hard disks, but if one of the disks fails, no data is lost and the HP D2D Backup
System continues to operate correctly. (The failed disk should be replaced as soon as p ossible, as
described in “Replacing the hard disk” on page 115.)
Storage capa
Physical storage
The physical storage capacity of the HP D2D Backup System 130 is 3.0 TB (3000 GB), of the HP
D2D Backup System 120 is 2.0 TB (2000 GB) and of the HP D2D Backup System 110 is 1 TB (1000
GB). However, in order to ensure a high level of data integrity, the disks use RAID 5 protection. This
reduces the available capacity but ensures that, in the event of a single disk failure in the device, there
will be no data loss.
Actual storage capacity is approximately:
• 2.25 TB for the HP D2D Backup System 130
• 1.5 TB for the HP D2D Backup System 120
• 750 GB for the HP D2D Backup System 110
You cannot add physical disk space, but you may be able to create some space. Options for creating
space, if the disks start to get full, are:
drive is a tape drive that is attached to the HP D2D Backup System or the host computer,
em.)
city
• Review your backup jobs to see if you can reduce the size of backup or retention time.
• Use the backup application job settings to overwrite or erase data.
• Export cartridges to physical tape.
Actual storage used
The default maximum car tridge size is 200 GB, but the HP D2D Backup System only allocates spac e as it
is required for backup. Individual backup jobs rarely use a whole cartridge and you are unlikely to use all
the available disk capacity. However, when configuring the HP D2D Backup System for extremely flexible
tape rotation schemes, it may be necessary to exercise a little care. You should take the following factors
into consideration to ensure that you do not over-commit physical storage space:
• The nu
• The number of devices that you have created. It is possible to create up to six tape autoloaders,
mber of slots that you have configuredinanautoloader.Thedefaultconfiguration is 8, but
you can edit that to be any number up to 24 (24 x 200 GB = 4.8 TB, which is greater than the
physical disk capacity. Therefore, you could not fill all of these slots with the capacity available.)
with 24 slots. You could not fill all of these slots with the physical disk capacity available.
each
Considerations when configuring cartridges and slots
Each slot configured commits 2 GB of physical disk space, regardless of what value has been configured
for the maximum cartridge size. The remainder of the configured maximum capacity is used only as
needed, but the initial 2 GB is permanently committed. Therefore, only configure the number of slots
D2D Backup System
19
Page 20
that you actually require. If you configure six 24-slot autoloaders, you should be aware that you have
committed 192 GB of disk space. Only do this, if you are sure all slots will be used. Once added,
slotscannotberemoved.
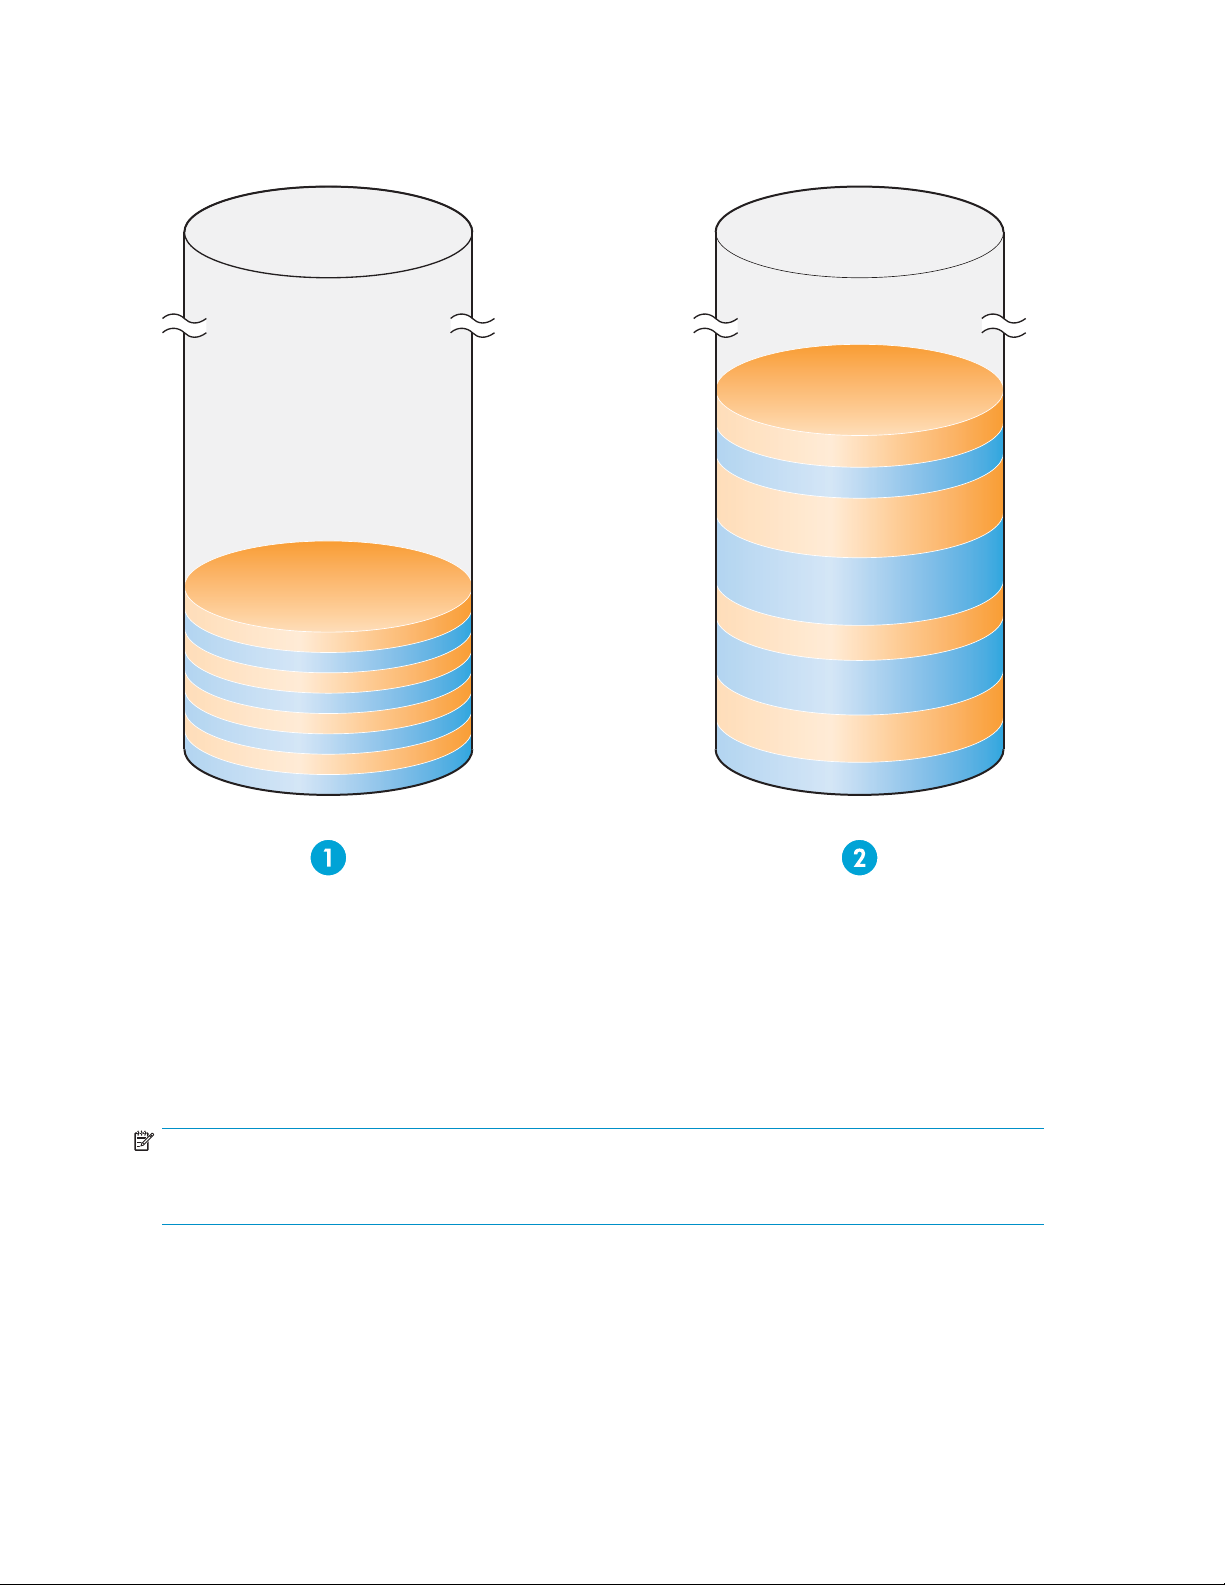
8
7
6
5
8
7
6
5
4
3
2
1
1.8x2GBofphysicaldiskspacehasbeencommitted.
2. The remainder of the configured maximum capacity is used only as needed, but the initial 2 GB is
permanently committed.
Figure
The exa
how you
that y
4 Storage capac it y
mple configurations in “Backup scenarios using the HP D2D Backup System” on page 55 illustrate
can make full use of the available slots in designing your backup rotation strategy and ensure
oudonotcreateabackupschemethatwouldresultinrunningoutofphysicaldiskspace.
4
3
2
1
NOTE:
The LED indicators and the Status pages on the Web Management Interface will warn you when disks
in the HP D2D Backup System exceed 90% full.
Tape rotation strategies
Tape rotation strategies determine when backups are run, the number of cartridges that a re required and
how they are reused. The HP D2D Backup System is a very flexible device that can e asily be incorporated
into most tape rotation strategies. If your organization does not yet have a tape rotation strategy in pla ce,
see “Backup scenarios using the HP D2D Backup System” on page 55 for example configurations.
20
Before you start
Page 21

Compression
The HP D2D Backu
moving data from the HP D2D to physical tape, bear in mind that HP StorageWorks tape drives do apply
compression. Therefore, 200 GB of data on the HP D2D Backup System will require less space on a
physical tape cartridge. If moving data to a physical cartridge for offsite storage, there is no need for
concern if the data seem s to utilize less space.
Some users may
the storage space available to the backup application, but this can make backup jobs slower to run.
However, once software compression has been applied, the data is not further compressed when it is
exported to a physical tape directly attached to the HP D2D Backup System. This ensures that the user
knows exactl
p System does not apply hardware compression to backed-up data, but if you are
choose to enable software compression from their backup application to increase
y how much physical cartridge space is required for export or copy.
D2D Backup System
21
Page 22

22
Before you star t
Page 23
2 Connecting and installing the HP D2D Backup System
In this chapter:
•
“Connect the hardware”onpage23
• “Supported network configurations”onpage24
•
“Software installation, discovery and configuration” on page 26
•
“Web browser settings” on page 26
Connect the hardware
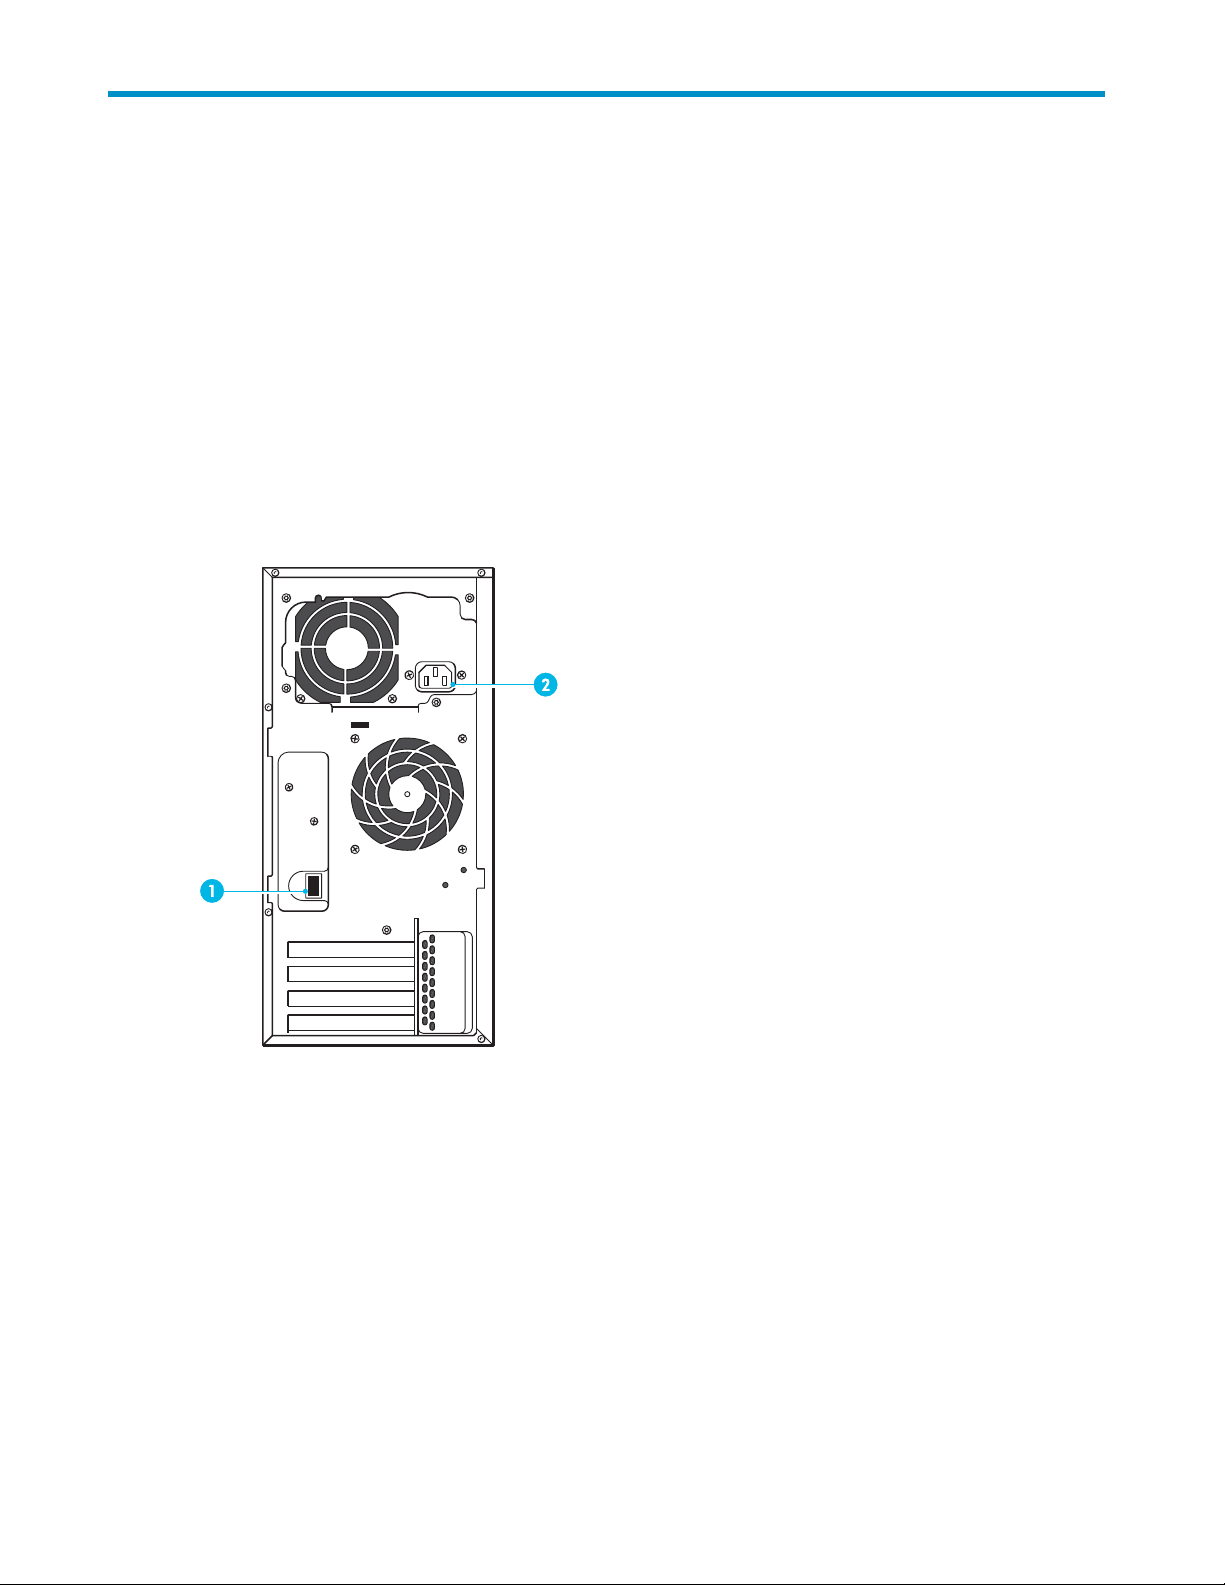
1. Network connector
2. Power connector
Figure 5 Network and power connectors
1. Always use the supplied power cord to connect the HP D2D Backup System to the main power
y. This HP-approved cord is appropriate for your specificgeographicregion.
suppl
tailed safety information, see the Safety Guide on the HP StorageWorks CD-ROM.
For de
2. Use the supplied network cable to connect to a Gigabit network switch. 100 Base-T Ethernet will limit
performance; 10 Base-T Ethernet will severely limit performance. For example network topologies,
see “Supported network configurations”onpage24.
D2D Backup System
23
Page 24

DHCP and static I
Paddressing
DHCP network ad
settings are assigned automatically when you connect the HP D2D Backup System to a network that has
a DHCP ser ver. If preferred, you can use static IP addressing and assign settings manually during
the installation process.
In both instanc
host machine connecting to it. This is normally the case because, typically, the HP D2D Backup System is
connected to the same Gigabit network switch as the host machines backing up to it.
es, the HP D2D Backup System should be on the same logical and physical network as the
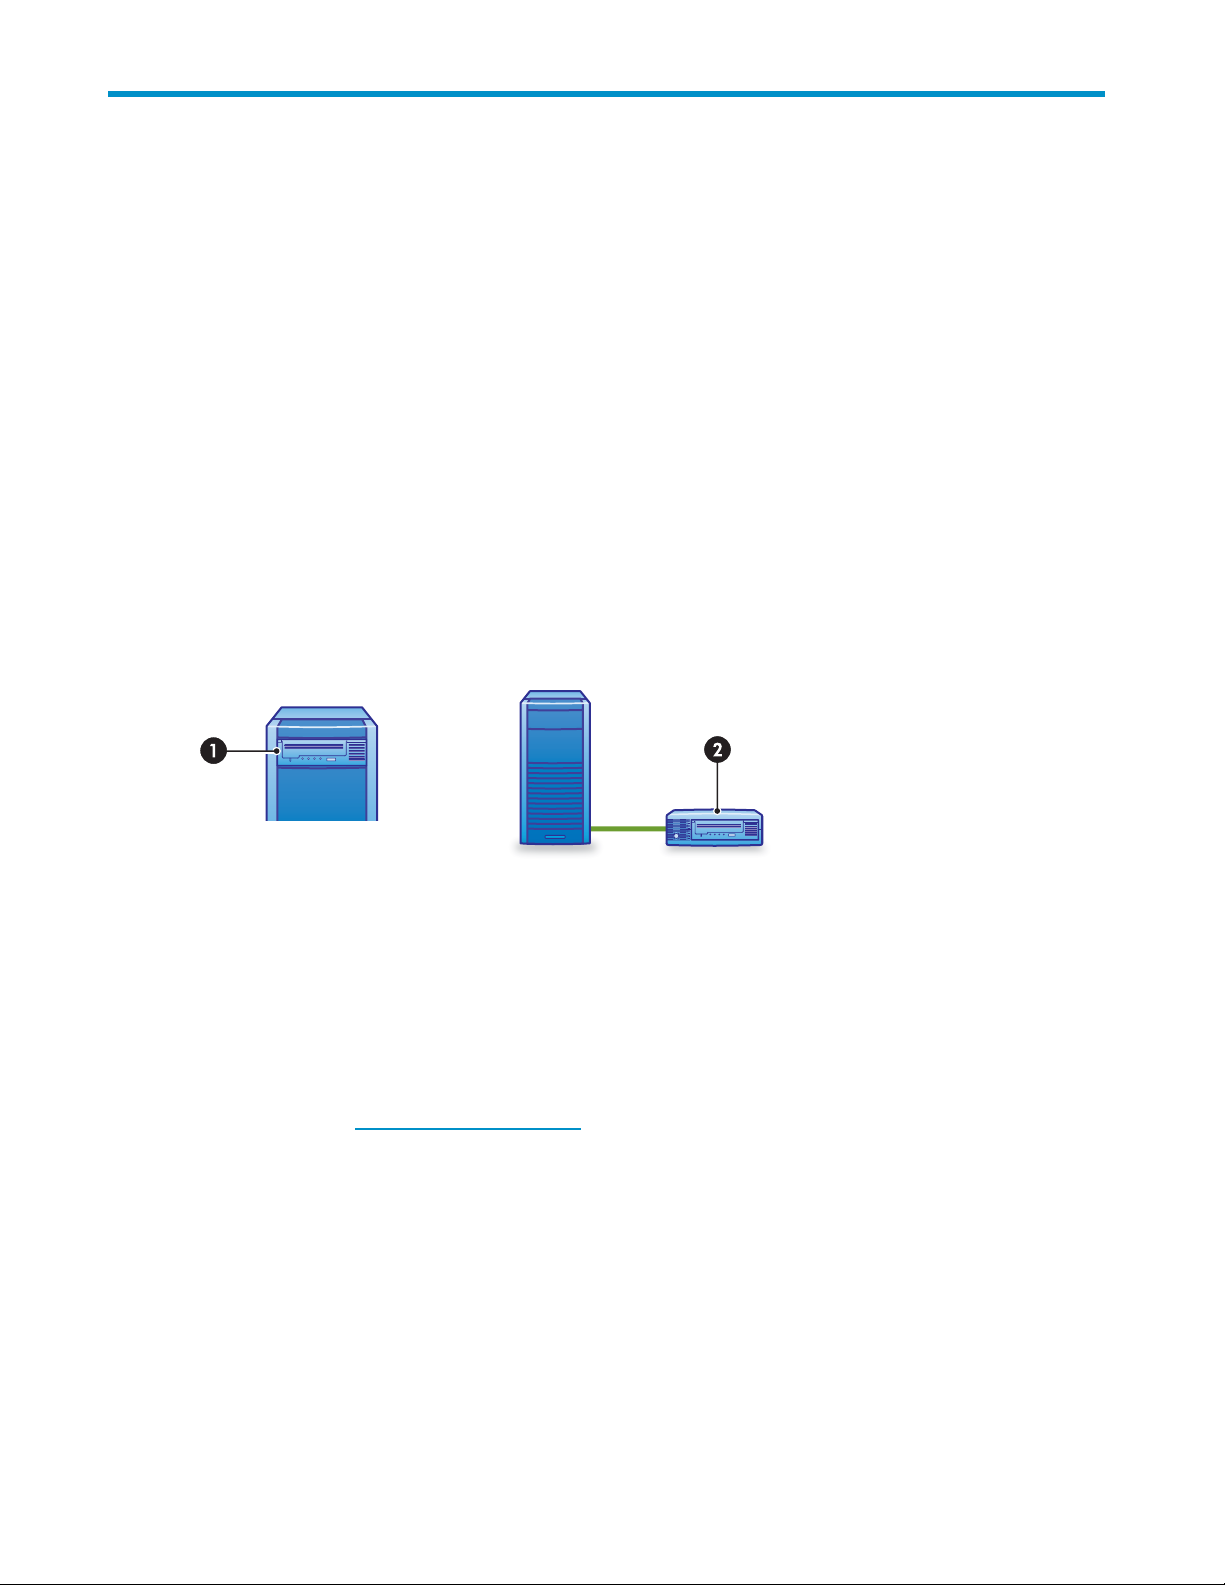
Optional Tape Attach
A tape drive may be attached directly to your HP D2D Backup System, allowing you to store backups
offsite. Please refer to “Attaching a physical tape drive” on page 29 for further details.
Figure6AttachingatapedrivetotheHPD2DBackupSystem
1. Internal tape drive 2. External tape drive
dressing is enabled by default, which means that an IP address and other network
Supported network configurations
TherearetwowaysofconnectingtheHPD2DBackupSystemtoyournetwork:
• By connecting it directly to a network switch on your network
• By connecting it to a backup server that is already on the network
AsadeviceonaGigabitEthernetnetwork
The HP D2
This may
such as PCs, servers, workstations and printers, or a dedicated backup network that is used solely
for clients that need to be backed up.
The confi
assuming that Gigabit networking is a lready in place, and requires no additional hardware. The only
disadvantage to the configuration is that a high volume of traffic may impact network performance during
backup and backups may take longer to complete. H owever, if backups are scheduled to run outside of
normal business hours, the volume of data trafficisunlikelytobeaproblem.
DBackupSystemisconnectedtoaspareportonanexistingGigabitnetworkswitch.
be your main network, which is also used to connect a number of different types of devices,
guration, illustrated in Figure 7 on page 25, is the simplest and most common configuration,
24
Connecting and installing the HP D2D Backup System
Page 25
r
PC Server
r
Switch
Serve
Supplied cable
LAN
HP StorageWorks D2D
Backup System
Figure 7 Connecting to a business server on the main network
In some environments, backup data is kept separate from day-to-day office network traffic, as illustrated
in Figure 8 on page 25. There is a separate, dedicated IP network for all hosts that need data to be
backed up.
PC Server
LAN
Switch
Serve
Supplied cable
Storage Network
HP StorageWorks D2D
Backup System
Figure 8 Connecting to a dedicated backup network
NOTE:
Our example shows one PC that is connected to the LAN, but not to the Storage Network. This PC will
notbeabletoruntheInstallationwizardorconnecttotheHPD2DBackupSystemfromtheweb.No
data from this PC can be directly backed up to the HP D2D Backup System.
Directly connected to a backup ser ver on your main network
In this configuration, a specific server on the network is being used as a backup server. The HP D2D
Backup System has a dedicated connection directly to the storage server and not to the business network.
D2D Backup System
25
Page 26
This ensures good backup performance. However, only the backup server can be backed up; other
devices on the network must be configured as clients that back up to the designated backup server over
the business network, which may impact performance.
PC
Switch
Storage
Server
Figure 9 Connecting to a network s er ver
This configuration, illustrated in Figure 9 on page 26, requires a spare Gigabit network port or card on
the storage server to support the direct connection to the HP D2 D Backup System. Use the c able supplied
with the HP D2D Backup System to connect to the Gigabit network card on the server.
NOTE:
If the server has a 10/100 Base-T network card, you will need a cross-over network cable (not supplied).
A better solution, to ensure optimum performance, is to purchase and install a Gigabit network card.
Supplied
cable
Server
LAN
HP StorageWorks D2D
Backup System
Server
Software installation, discovery and configuration
There are three stages to installation:
• Install all the required drivers
• Discover the HP D2D Backup System on the network, give it a name and, if DHCP is not
supported, assign network settings
• Create a base configuration to get started
Dynamic (DHCP) addressing is enabled by default on the H P D2D Backup System. If your network
supports DHCP, all the required network parameters will be assigned automatically. If your net work uses
static IP addressing, you will need to assign network settings manually (IP address, subnet mask and
gateway).
For Windows users, the recommended way to set up the HP D2D Backup System network is to run the
Installation wizard from the HP StorageWorks CD-ROM, as described in “Installation wizard” on page 39.
Linux users should download the latest patches for their operating system and refer to the “Linux
Configuration Guide” on the HP StorageWorks CD-ROM for con fi guration instructions.
Recommended web browser settings
The web browser used to communicate with the D2D Backup System must have Active Scripting or JAVA
scripting enabled. If it does not, some of the browser buttons may not be displayed.
26
Connecting and installing the HP D2D Backup System
Page 27

Internet Explor
er 7.X
1. Click on the Too
2. Select Internet Options.
3. Click on the Security tab.
4. Click on the Cu
5. Set the option Active scripting to Enable and click OK.
6. Click Yes.
7. Refresh the p
ls button located in the upper right part of the screen (next to the gear icon).
stom Level... button.
age.
Internet Explorer 6.X
1. Select Tools from the top menu.
2. Select Internet Options.
3. Click on the Security tab.
4. Click on the Custom Level.
5. Scroll down until you see the section labeled Scripting.
6. Under Active sc ripting select Enable and click OK.
Mozilla Firefox 1.5 and Firefox 2.X
1. Select Options from the Tools menu.
2. Click on Content.
3. Check th
4. Click OK.
5. Refresh the page.
eboxnexttoEnable JavaScript.
D2D Backup System
27
Page 28

28
Connecting and installing the HP D2D Backup System
Page 29
3Attachingaphysicaltapedrive (optional)
In this chapter:
•
“Hardware requirements” on page 29
•
“Tape drive installation overview” on page 29
•
“Removing the access panel and bezel” on page 30
•
“Installing the HBA” on page 31
•
“Installing an internal tape drive” on page 33
•
“Replacing the access panel and bezel”onpage35
•
“Attaching an external tape drive” on page 36
Hardware requirements for Tape Attach
A tape drive may be attached directly to your HP D2D Backup System, allowing you to store backups
offsite.
Tape
Figure 1
1. Internal tape drive 2. External tape drive
To use this facility you need :
• Atapedrive,suchasanHPStorageWorksUltriumdevice. Thisshouldbeahalf-heighttapedrive,ifit
• A host bus adapter, HBA for the tape drive connection (because there are no embedded SAS or SCSI
• Please refer to w
Please refer to “Export, import and copy to an attached tape drive” on page 83 more information
about transferring data to the tape drive.
0 Attaching a tape drive to the HP D2D Backup System
is to be installed internally. Both SAS and SCSI tape drives are supported.
ports). If the tape drive is pre-installed, an appropriate HBA is already installed. If not, you must
purchase and install the HBA before connecting the tape drive.
ww.hp.com/go/connect for a list of all s upp orted host bus adapters and tape drives.
No additional drivers are required for recommended HBAs and tape drives; they are included in
the HP D2D Backup System firmware.
drive installation overview
re connecting either an internal or internal tape drive, you must install an HBA. All necessary cables
Befo
connecting to the HBA are supplied with the tape drive. The instructions in this chapter provide the
for
lowing information that is specific to the HP D2D Backup System:
fol
D2D Backup System
29
Page 30
1. If you have already powered up the HP D2D Backup System, power it down and disconnect the
cables before you start.
2. Remove the access panel from the HP D2D Backup System.
3. Install the HBA.
4. Install an internal tape drive and connect it to the HBA (if required).
5. Replace the access panel on the HP D2D Backup System.
6. Connect an external tape drive (if required).
Please refer to the “User Guide” that is supplied with the tape drive for more detailed information about
tape drive cabling and LED troubleshooting.
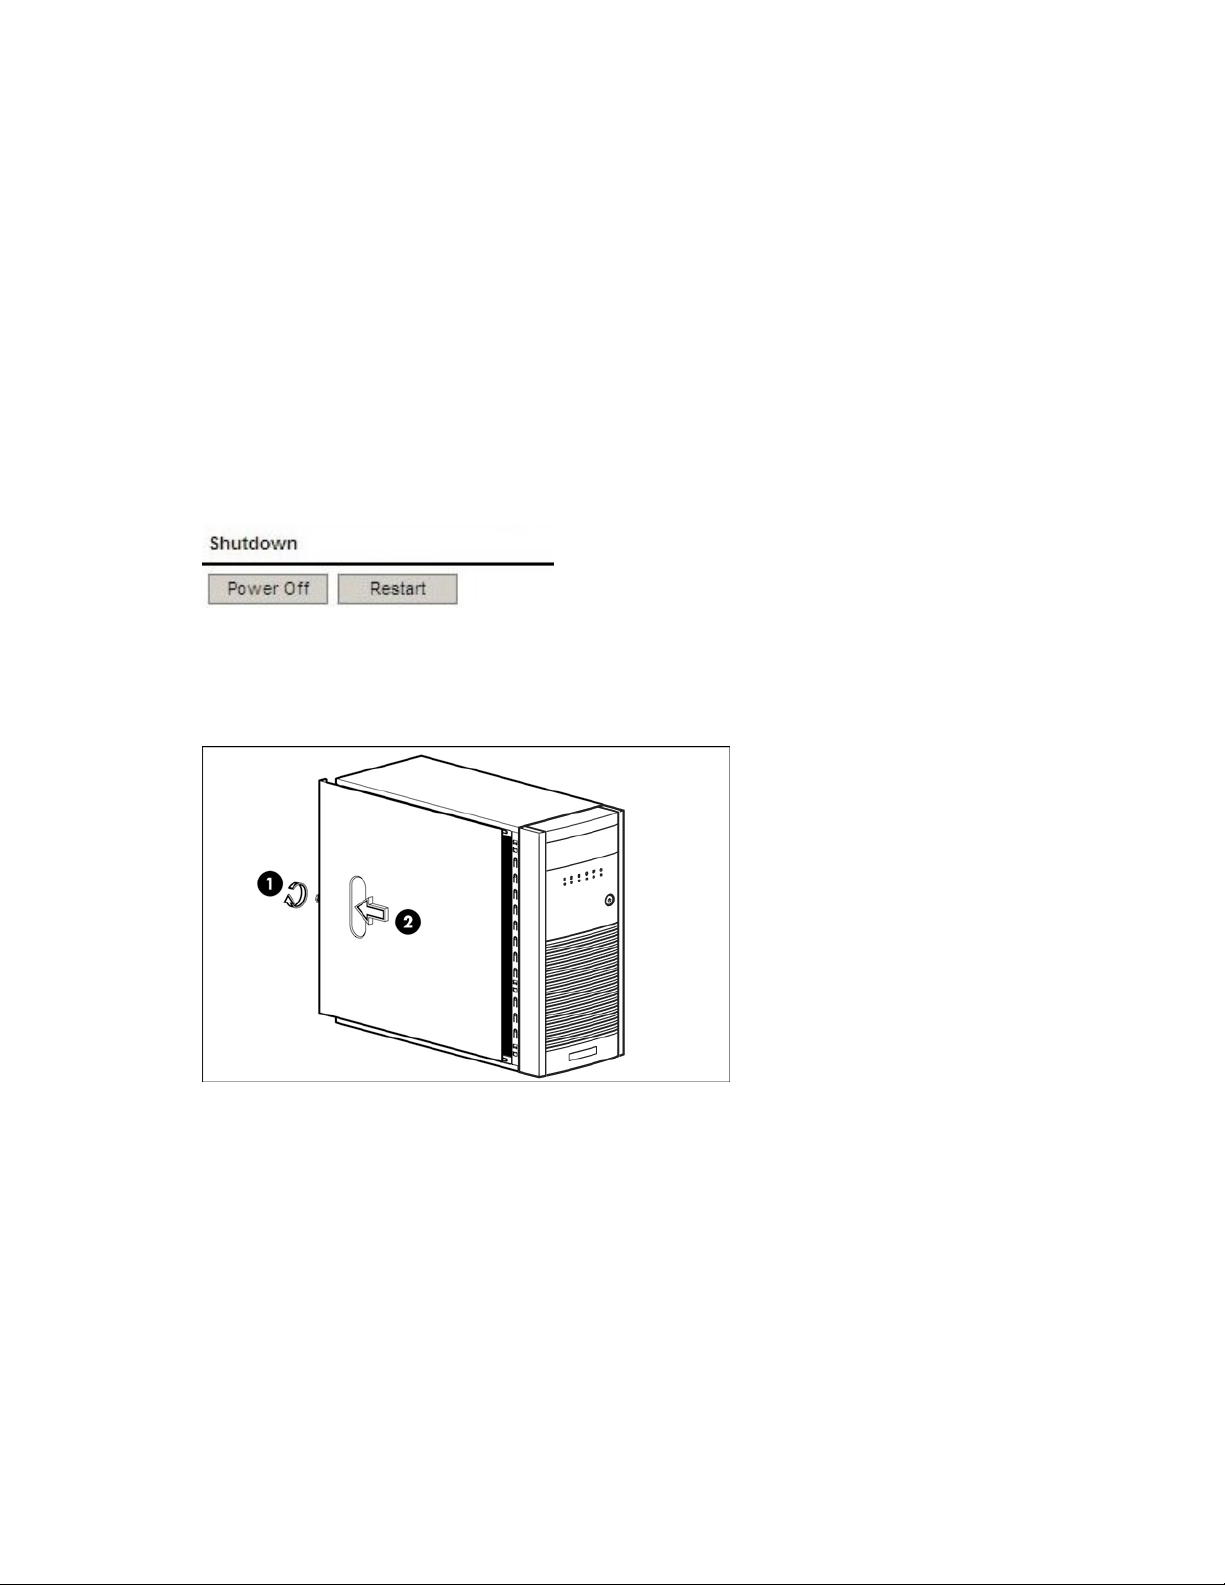
Removing the access panel and bezel
1. If you are ins
powered on t
are no backup or restore jobs in progress and that no future jobs are scheduled to start whilst the
system is shut down. Select Shutdown on the Web Management interface and click Power Off to
power down the HP D2D Backup System safely.
2. Disconne
3. Loosen the captive thumbscrew (1) located on the rear edge of the access panel and slide (2)the
panel back about 2.5 cm (1.0 in). Remove the access panel.
talling the tape drive as part of the initial installation, go to step 3. If you have already
he HP D2D Backup System, it must be shut down before you start. Make sure there
ct the network cable and the power cord from the HP D2D Backup System.
Figure 11 Removing the access panel
4. Pressinonthetwobottomtabs(1) on the side of the bezel so that they release from the chassis.
Press in on the upper tab on the side of the bezel so that it releases from the chassis. The bezel will
rotate out slightly (2). Pull the bezel away from the front panel (3).
30
Attaching a physical tape drive (optional)
Page 31

Figure 12 Removing the front bezel
Installing the HBA
CAUTION:
Static electricity can damage electronic components. Always wear an antistatic wriststrap i f one is
available. If not, after you have disconnected power from the server and removed the cover, touch a bare
metal part of the chassis. Similarly, touch a bare metal part of the drive before installing it.
The supported PCI-Express HBA should be installed in the top PCI slot. Please refer to
w
ww.hp.com/go/connect for a list of all supported host bus adapters and tape drives. No additional
drivers are required for recommended HBAs and tape drives; they are included in the HP D2D Backup
System firmware.
1. Undo the retaining screw (1) and remove the slot cover retainer (2).
Figure 13 Removing th e slot cover retainer
2. Remove the cover from the top expansion slot.
D2D Backup System
31
Page 32
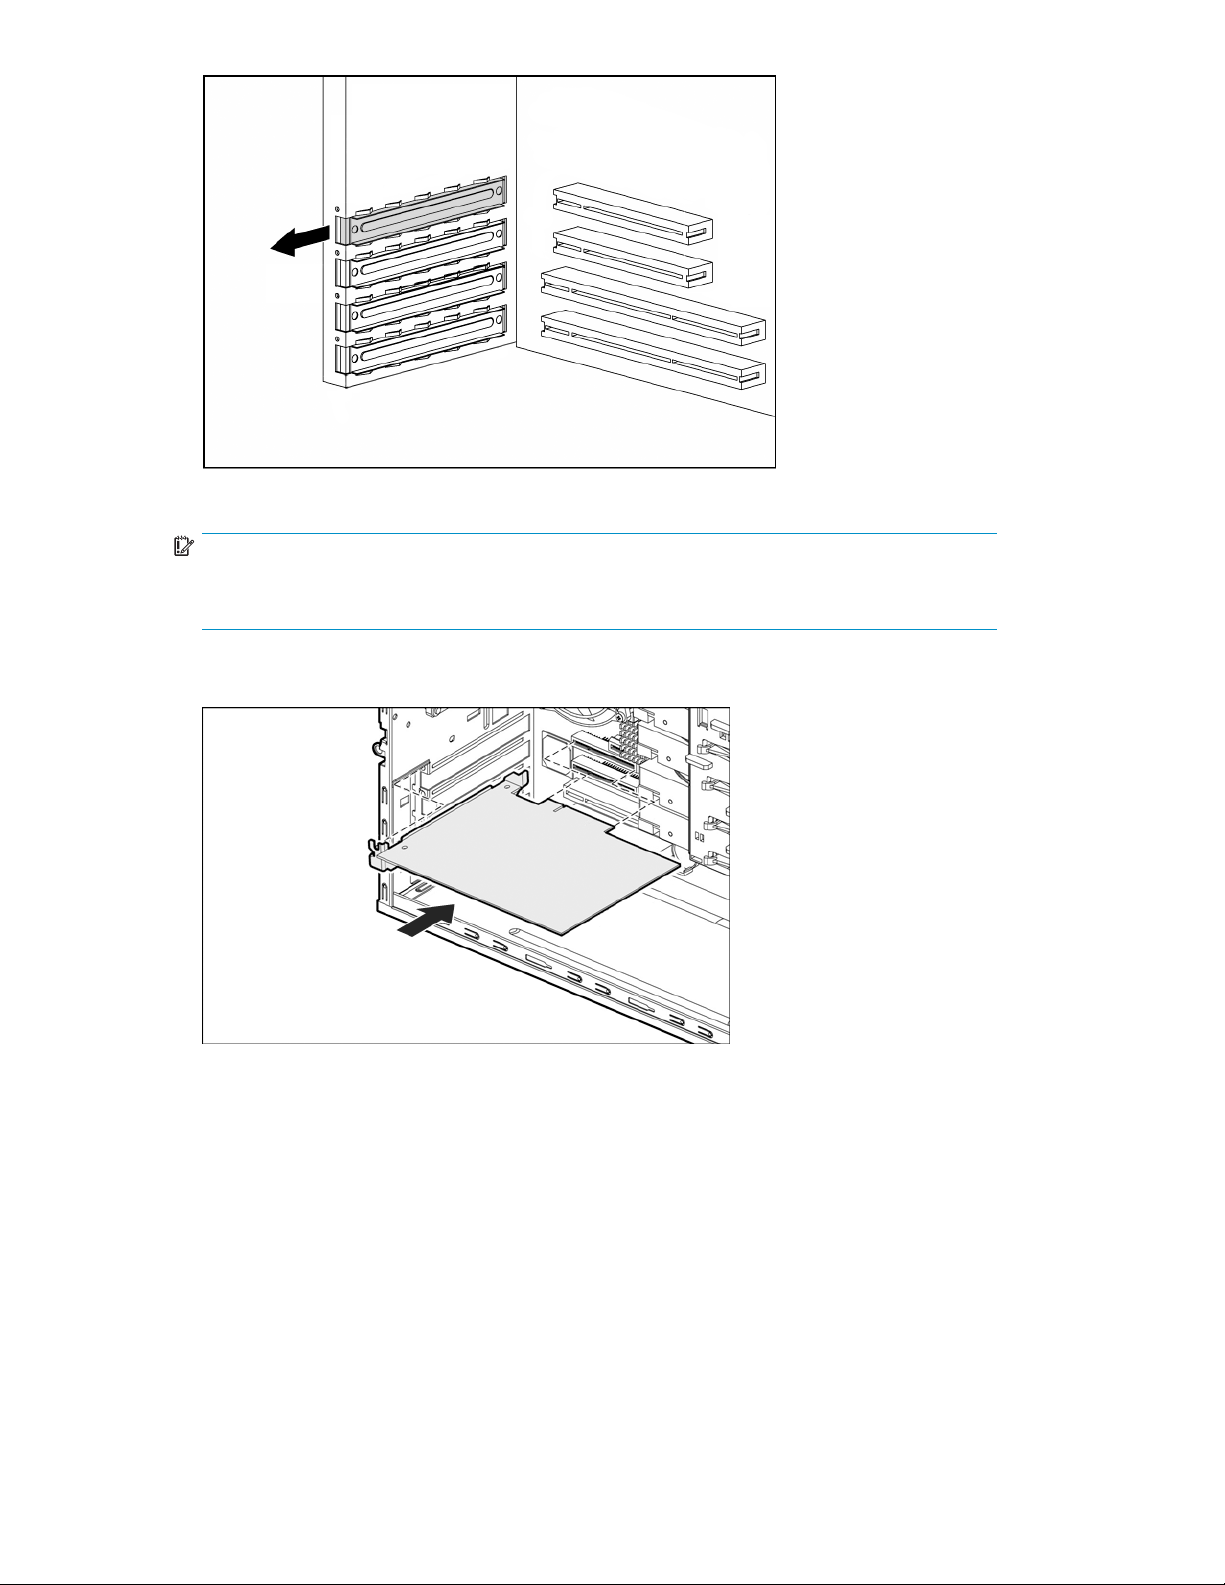
Figure 14 Removing the top expansion slot cover
IMPORTANT:
It may be necessary to temporarily remove the slot cover next to the slot in which you are
installing the HBA.
3. Install the new HBA in the top slot.
Figure 15 Installing the HBA
4. Reinstall the slot cover retainer (1) and secure it with the screw that you removed earlier (2).
32
Attaching a physical tape drive (optional)
Page 33

Figure 16 Replacing the PCI slot cover
Installing an internal tape drive
Read this section if your are installing an internal tape drive. If you are connecting an external tape drive,
go to “Replacing the access panel and bezel” on page 35.
WARNIN G!
To avoid personal injury or damage to the server or tape drive, ensure that the server is disconnected
from the mains power supply while you install the drive.
CAUTION:
Static electricity can damage electronic components. Always wear an antistatic wriststrap i f one is
available. If not, after you have disconnected power from the server and removed the cover, touch a bare
metal part of the chassis. Similarly, touch a bare metal part of the drive before installing it.
1. Access the removable media cage (1)andremovethefiller panel (2).
Figure 17 Removing the filler panel
2. Mount
ing screws and shims are provided in the Mounting Hardware pack, which is supplied with
pe drive. Locate the pack of short, cylindrical-headed screws and shims.
the ta
D2D Backup System
33
Page 34

CAUTION:
The Ultrium half-height tape drive allows only 3 mm engagement of the screw into the tape
drive. To avoid damage to the tape drive, it is important to use the correct screws, which
have a slightly thicker head than general mounting screws, and the metal shims. The shims
prevent overtightening of the screws which may cause the drive mounts to sheer.
Figure 18 Sel
ecting the correct screws
3. Attachthescrewsandshimstothetapedriveasillustrated(1).
Figure 19 Attaching the screws and metal shims
4. Slidethehalf-heighttapedrivemostofthewayintothebay(1) and attach a spare power cable from
the server’s internal power supply to the power connector on the tape drive. Connect the device
cable (SCSI or SAS) to the appropriate ports on the HBA and tape drive (2).
NOTE:
Please refer to the documentation supplied with your tape drive for more information
about cabling.
34
Attaching a physical tape drive (optional)
Page 35

Figure 20 In
stalling t h e internal tape drive (example shows a SCSI tape drive)
5. Slide the t
ape drive fully into the bay until it is seated securely.
Replacing the access panel and bezel
1. Remove the blank plate (1) at the top of the bezel.
Figure
21Removingtheblankplateinthebezel
2. Inser
t the two hooks (1) on the right side of the bezel into the rectangular holes on the chassis.
e(2) the bezel into place so that the three tabs on the left side of the bezel snap into the
Rotat
slots on the chassis.
D2D Backup System
35
Page 36
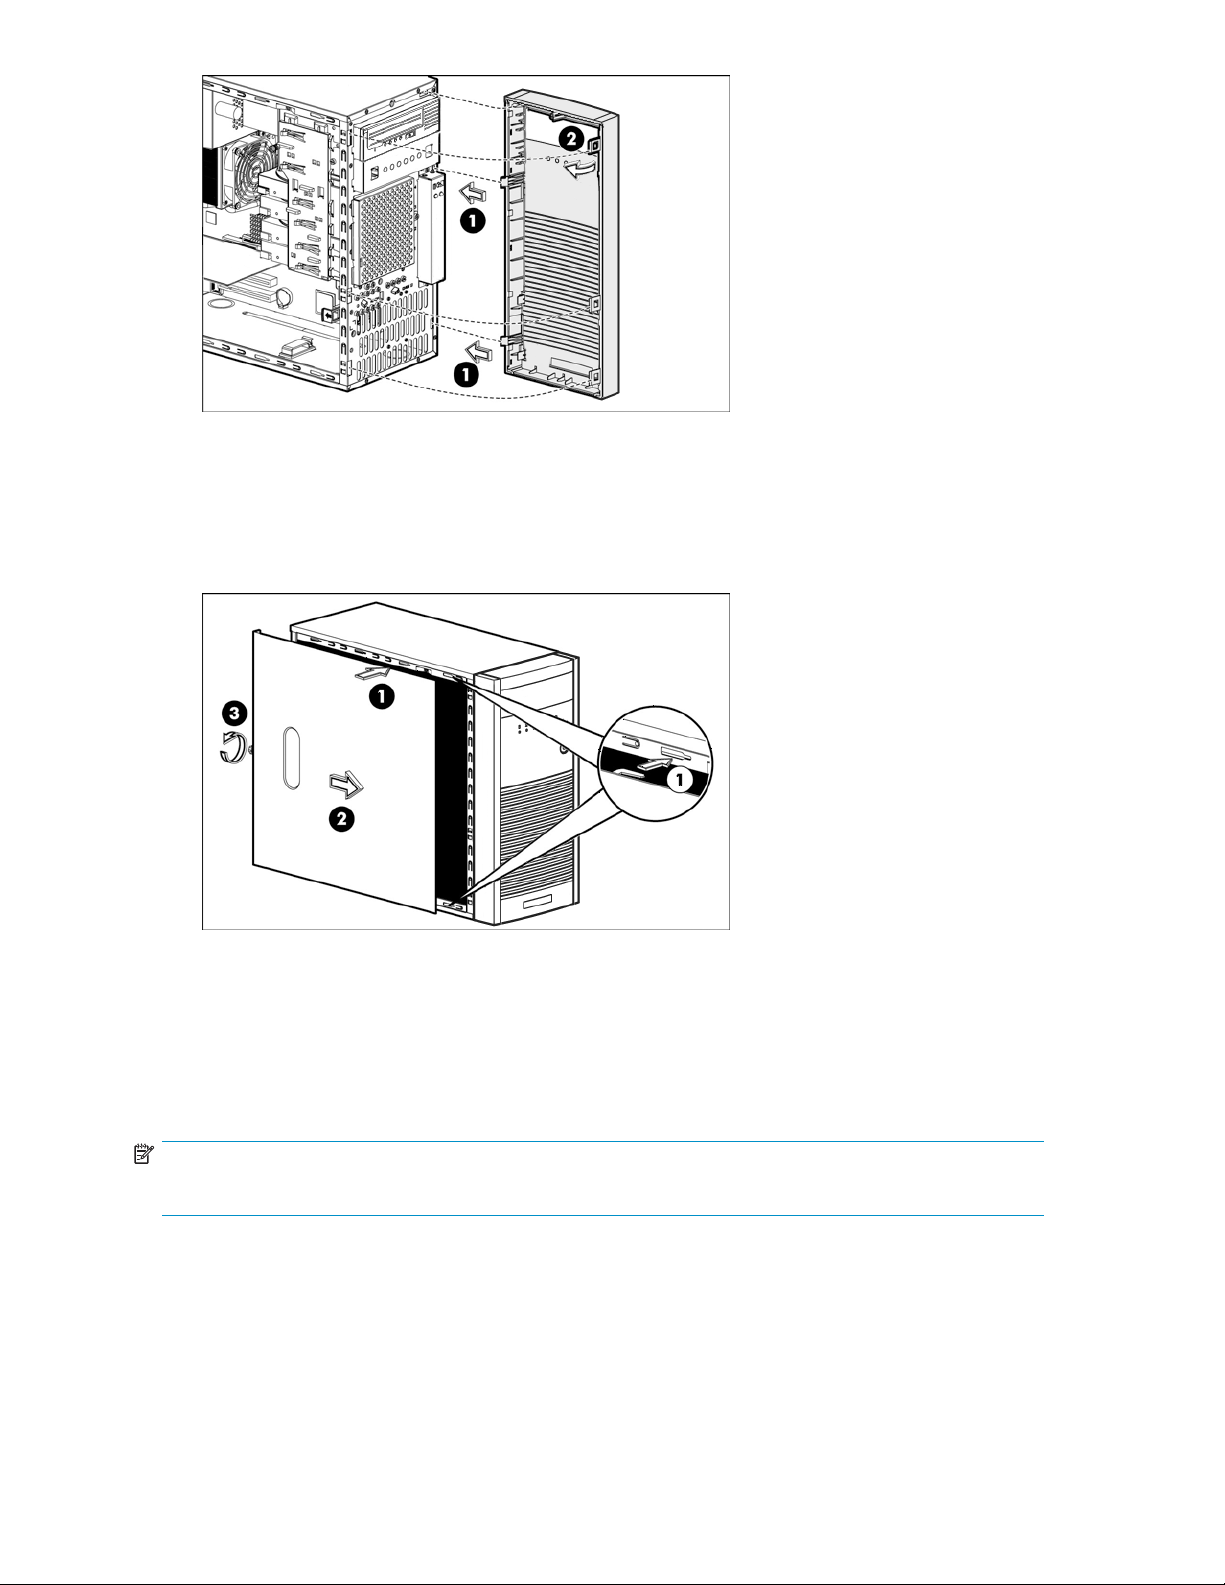
Figure 22 Replacing the bezel
3. Use two hands to place the access panel flat against the chassis (1), the back of the access panel
extending about 2.5 cm (1.0 in) behind the back of the server. Make sure the hooks on the access
panel align with the holes on the edges of the chassis. Slide (2) the access panel toward the front of
the chassis to position it into place. Tighten the captive thumbscrew (3) to secure the access panel.
Figure 23 Replacing the access panel
4. Reconnect the network cable and the power cord.
Connec
Read th
NOTE:
You can only connect an external tape drive, if you have already installed a recommended HBA.
1. Connect the device cable (SCSI or SAS) to the appropriate ports on the HBA and tape drive. The
2. Plug the power cable (1)ecurely into the socket on the rear pa nel of the drive and plug the other end
36
ting an external tape drive
is section if your are connecting an external tape drive.
example shows a SCSI tape drive.
ofthepowercableintothepoweroutlet.Thepoweron/offswitch(2)is on the front panel.
Attaching a physical tape drive (optional)
Page 37

Figure 24 Connecting the cables (SCSI tape drive)
D2D Backup System
37
Page 38

38
Attaching a physical tape drive (optional)
Page 39

4TheInstallationwizard
This chapter is relevant for users installing on a Windows host. If you are installing on a Linux system,
please refer to the “Linux Configuration Guide” on the HP StorageWorks Tape C D-ROM.
In this chapter:
•
“Before you install the first host”onpage39
•
“Run the Installation wizard” on page 40
If you are installing on a Windows system, the Installation wizard is the recommended way to set up a host
machine to work with the HP D2D Backup System, particularly if you are configuring the host for the first
time. The wizard automatically configures all the software components needed to connect and use the HP
D2D Backup System. It should be run on all hosts that are to be backed up to the HP D2D Backup System.
If you are not using the Installation wizard to install on a Windows system, please see
“Advanced installation”onpage45.
Before you install the first host
You must have the necessary administrative rights on the host to run the Installation wizard successfully.
1. Make sure t
access. If
“Microsoft iSCSI Initiator” on page 46.
he host machine on which you are running the Installation wizard has Internet
it does not, you will have to download the Microsoft ® iSCSI Initiator manually. See
2. Press the Power on but ton on the front of your HP D 2D Backup System. During power on the LEDs will
perform a self-test sequence; all LEDs with the exception of the status LED will then be extinguished
until the boot sequence is completed.
D2D Backup System
39
Page 40

1. LEDs
2. Power On button
Figure 25 Powering on the HP D2D Backup System
Run the Ins
TheHPD2DBackupSystemcanbeusedtobackupamaximumofsixhosts. Youshouldrunthe
Installation wizard on each host that will provide a source of data for backup. The host may be a
server, wo
1. Insert the CD-ROM supplied with your HP D2D Backup System into the host machine. It should launch
automatically. If it does not, locate the D2DInstallationWizard.exe file and run it manually.
2. Select St
by pressing Next.
The Installation wizard will automatically configure all the software components required for setup
and use of the HP D2D Backup System. There are three main phases:
• Install the tape drivers: Theseallowyoursystemtorecognizethetapedrivescreatedonthe
tallation wizard
rkstation or PC.
art the wizard and follow the onscreen instructions to step through the installation, normally
HP D2D B
ackup System.
40
The Installation wizard
Page 41

• Discovery: This will allow you to locate your HP D2D Backup System on the network and
configure
network settings. If you have multiple devices on your network, a list is displayed
so that you can select the required HP D2D Backup System.
The configuration page for the device is displayed. DHCP is enabled by default. If you wish
to use static IP addressing, disable DHCP and enter the IP address details.
D2D Backup System
41
Page 42

TIP:
If more than one HP D2D Backup System is being configured at the same time, it may be useful
to physically identify a D2D device. Use Beacon mode to flash the LEDs on the selected device.
• iSCSI installation and configuration: If required, this step retrieves and installs the Microsoft
iSCSI initiator, connects this host to the HP D2D Backup System and configures an autoloader,
as defined by the user. The second option presented in this dialog is appropriate for most
backup applications and is the recommended option. You may edit the number of slots, if
required.
42
The Installation wizard
Page 43

Figure 26 Creating the backup device
3. The Installation wizard sets up a link to the Web Management Interface on the host’s desktop and
gives you the option of launching it.
Once it ha
“The Web M
s been assigned network settings, the HP D2D Backup System is ready to use. See
anagement Interface ” on page 63.
The HP D2D Backup System does not appear as a device under My Computer and it is not mapped
to a drive letter (although it can be seen as a tape drive (1) and medium changer (2)fromDevice
Manager
). Use a backup application on the host machine to back up and restore data.
4. Run the Installation wizard on any other hosts that are to be backed up—six is the maximum. On
running the wizard on subsequent hosts, you only need to select the HP D2D Backup System; its
network settings have already been assigned.
D2D Backup System
43
Page 44

44
The Installation wizard
Page 45

5 Advanced installation
Although the Installation wizard is the recommended way to install the HP D2D Backup System, it is
possible to install it manually. You may also need to run phases independently when troubleshooting.
This chapter describes:
•
“Using DHCP to discover the HP D2D” on page 45
•
“Using the Discovery Engine to discover the HP D2D” on page 45
•
“Microsoft iSCSI Initiator”onpage46
• “Linux iSCSI initiator” on page 51
• “Manual driver installation” on page 51
Using DHCP to discover the HP D2D Backup System
If you are connecting the HP D2D Backup System to a network that has a DHCP server, DHCP addressing
is enabled by default. The IP address and other network settings are assigned automatically when you
connect the HP D 2D Backup System to the network. You only need to know the name of the HP D2D
Backup Sys
the forma
In the web browser type in: D2DBS-<serial number>
NOTE:
Depending on network settings, you may need to enter the full domain path.
tem to complete the installation and create an 8–slot autoloader confi guration. The name is in
t D2DBS-<serial number> and can be found on the label on the front of the unit.
Once the HP D2D Backup System has been discovered on the network, you must configure the Microsoft
iSCSI Initiator on the host, so that the autoloader devices on the HP D2D are visible to the backup
application. See “Micr osoft iSCSI Initiator” on page 46.
Using the Discovery Engine to discover the HP D2D Backup System
If your network does not have a DHCP server, the Discovery Engine allows you to locate the HP
D2D Backup System on your network and assign network settings, such as the IP address. It is the
recommended way to locate and configure the HP D2D Backup System on your network, if you are
using static IP addressing. It also allows you to select your required base configuration and specify
the number of slots for an autoloader.
TheDiscoveryEnginecanberunaspartoftheInstallationwizardorasastandaloneutilityfromtheHP
StorageWorks Tape CD-ROM.
D2D Backup System
45
Page 46

Beacon mode
The HP D2D Backup System supports a Beacon LED sequence, which helps a user identify which unit is
being configured, if several are connected to the network. See also “LEDs ”onpage53.
If the HP D2D Backup System is new and not yet configured
When installing the HP D2D Backup System for the first time, this step must be completed successfully
before you can connect from your host. Select the appropriate HP D2D Backup System from the list
and m ake a note of its IP address because you will need this when you configure the Microsoft iSCSI
or, see “Discovery tab” on page 48.
Initiat
If the HP D2D Backup System has been configured incorrectly
If you cannot connect to the HP D2D Backup System using the Web Management interface, it may have
been configured incorrectly. Run the Discovery Engine to check the IP address of the HP D2D Backup
System and, if necessary, select it again from the list of available HP D2D Backup Systems. If you
still cannot connect to it, check that you have configured the Microsoft iSCSI Initiator correctly, see
“Discovery tab” on page 48.
If the network setup has been changed
If the network infrastructure changes, you may need to update the HP D2D Backup System network
settings to allow hosts to continue to connect. Run the Discovery Engine and change the network settings
in accordance with your new infrastructure.
You ca
Syst
n also use the Web Manag em ent Interface to modify these settings directly on the HP D2D Backup
em,aslongasthisisdonebeforetheinfrastructurechangesaremade.
the network settings of the HP D2D Backup System have been changed, you must also change the
Once
osoft iSCSI Initiator for each host.
Micr
Microsoft iSCSI Initiator
iSCSI is a protocol for sending SCSI commands via Ethernet. It defines how SCSI packets are translated to
Ethernet packets and connects to the required devices. An iSCSI initiator may be hardware or software.
The HP D2D Backup System supports the Microsoft software iSCSI initiator and requires it to be running
46
Advanced installation
Page 47

on each host. If the host does not have the Microsoft iSCSI initiator, it will not be able to connect to the
autoloader (or tape drive) configured on H P D2D Backup System and will not be able to perform backups.
The Microsoft iSCSI initiator must be retrieved from the Microsoft website.
Figure 27 iSCS I Initiator download page
1,amd64
2,ia64
3,x86
Use with amd ® 64-bit processors and with Intel ® em64t processors, when
running a 64-bit version of the Windows operating system.
Use with ia-64 processors, such as Itanium and HP Integrity.
Use with 32-bit processors or 64-bit processors running 32-bit Windows, such as
Windows XP and Server 2003.
If you download the wrong version, it will not install. The simplest way of ensuring you download
the correct version is to run the Installation wizard from the HP StorageWorks CD-ROM because it
automatically checks which is the appropriate version for your host.
NOTE:
The Microsoft Vista operating system includes the Microsoft iSCSI Initiator. It can be run from the Control
Panel in C
lassic Mode.
Manual iSCSI initiator installation
The Installation wiz ard could fail for the following reasons:
• The host machine does not have an internet connection
• Firewall restrictions prevent this process
• Microsoft has relocated the iSCSI initiator files to a different address on its website.
• Theprocesstimesoutduetoaslowconnection
If the process fails:
1. On a machine that supports an external internet connection, go to the Microsoft website and
search on "iSCSI initiator"
2. Select the result that takes you to the Download page and choose the download that is appropriate
foryourhost.
3. Download the iSCSI initiator and install it on the host, accepting all the default settings.
The iSCSI Initiator
The Microsoft iSCSI initiator contains a number of tabs. This section describes the information that must
be provided in order to connect the host to a device on the HP D2D Backup System. It does not provide
a comprehensive description of all the tabs; please download the “User Guide” from the Microsoft
website for more information.
D2D Backup System
47
Page 48

General tab
You do not norm a l
generated auto
relate to authe
to by your IT policy. (If you use Secret toenteranencryptionstringinthisdialogtoauthenticate
targets, you must also enter the same string on the Web Management interface in the iSCSI page. (See
“iSCSI (Status)”onpage77.)
ly need to make any changes on the General tab. The Initiator Node Name is
matically, which guarantees that it will be unique on your network. The other fields
ntication and are not needed for the HP D2D Backup System. Only use them if required
NOTE:
When you use the Web Management Interface to create an additional device for your host, you must
provide the iSCSI Initiator Name.ThisistheInitiator N ode Name found on the General tab.
Discovery tab
You must enter the IP address or fully qualifi ed domain name of the HP D2D Backup System (for example,
myhpd2d.mydomain.com)toadditasatargetportalforthehostontheDiscovery tab. Do not change
the Port; it should be 3260.
48
Advanced installation
Page 49

• If this is the first time that the iSCSI Initiator has been configured and the Installation wizard has
• If target devices have already been configured for the host in the past, they appear in the list;
Targets tab
This tab contains a list of all available devices. When you run the iSCSI Initiator manually, new devices
have a status of Inactive. You must log on to the appropriate targets for your host. Remember that each
autol
not been run, it will automatically create an 8-slot autoloader with t wo target devices (loader
and tape drive).
no more are created.
oader has two devices and you must log onto e ach one separately.
D2D Backup System
49
Page 50

We recommend that you also select the Automatically restore this conn ection when the system boots
option
in the Log On dialog.
Persistent Targets tab
The Persistent Targets tab shows the targets that have been configured to restore automatically on reboot.
During initial configuration, it is for information only. However, if you want to stop the host automatically
necting to a device, you must select the device on this tab and Remove it. To disconnect the device
con
hout rebooting, go back to the Targets tab, select the device, click Details and log off.
wit
50
Advanced installation
Page 51

Bound Volumes/Devices tab
No configuration is required on the Bound Volumes/Devices tab.
Linux iSCSI initiator
An iSCS
on the H
the lat
I initiator is embedded in the operating system. Please refer to the “Linux Configuration Guide”
P StorageWorks Tape CD-ROM for instructions on using it. Make sure that you have downloaded
est operating system patches before you configu re your system.
Manual driver installation
Two drivers are required; an HP LTO Tape driver and a medium changer driver.
NOTE:
Certain backup applications require you to use their own drivers for both the tape device and medium
changer. For many applications these will be installed automatically during the software installation
process. If the backup software is already installed, you may need to manually update the drivers after
installing the HP D2D Backup System.
D2D Backup System
51
Page 52

HP LTO Tape driv
er
The HP LTO Tape d
the HP D2D Backup System.
Tape drivers can be installed from the drivers directory on the HP StorageWorks CD-ROM, where they
are supplied as an installer application and as driver files for manual installation. Also check the HP
website for dr
The tape drive is reported to your backup application (and Windows Device Manager) as an LTO-3
device. This is the default behavior of the tape drive and there is no need and no way to change it on
the HP D2D Backup System. It is important not to confuse emulation type with cartridge size. Emulation
type is totally independent from cartridge size. The HP D2D Backup System allows you to pick whatever
cartridgesizeyoulike(upto800GB).
In earlier versions of the HP D2D Backup System firmware, the tape drive was reported as an LTO-2
device. Onc
identify ex
no impact o
new ones; the new ones will be LTO-3.
isting backup devices as LTO-2 and identifies new tape d evices as LTO-3, but this has absolutely
river must be installed to allow your system to recognize the Ultrium devices created by
iver updates at w
e you upgrade to the latest version of the firmware, the backup application continues to
n h ow the device behaves or functions. If you delete existing devices (LTO-2) and create
Medium changer driver
No additional medium changer driver is required because Microsoft Windows provides a suitable
generic driver and all backup applications provide their own changer drivers.
ww.hp.com/support.
52
Advanced installation
Page 53

6LEDs
In this chapter:
•
“Understanding the LEDs”onpage53
•
“Beacon mode” on page 53
Understanding the LEDs
Figure 28 LE
1
Disk Activity Flashing Green = Disk activity in progress.
2
Disk Status
3
Disk Capacity
4Status
5
Network
Power
6
Ds
Bootup LED sequence
During power on, the LEDs will perform a self-test sequence. All LEDs with the exception of the status
LED will then be extinguished until the boot sequence is completed.
Firmwar
eLEDsequence
Solid Green
Flashing Orange = A disk has failed.
Solid Green = Normal operation and disk space is available.
Solid Orange = Disk threshold c apacity exceeded, device is nearly full.
Solid Green = System is booted and operating normally.
Flashing Green = System is powering up or shutting down.
Flashing Orange = System has failed.
Off = No net
Solid Gree
Solid Orange = A 10/100Base-T connection is made.
Solid Green = Power on.
= All disks are working correctly.
work connection or network not configured.
n = A Gigabit Ethernet connection is made.
During a firmware upgrade, all LEDs apart from the Power LED flashwithanalternategreenandorange.
Beacon mode
The HP D2D Backup System also supports a Beacon LED sequence, which helps a user identify which
unit is being configured, if several are connected to the network.
D2D Backup System
53
Page 54

Use the Network page of the Web Management Interface to turn Beacon Mode on and off. This flashes
the LEDs on the selected device. If you do not switch off Beacon Mode from the Network page, it
will continue for 5 minutes.
54
LEDs
Page 55

7 Backup scenarios using t he HP D2D Backup System
The HP D2D Backup System combines all the traditional benefits of tape technology, such as support for
complexmediarotationschemes,withtherapidbackupandrestoretimethatisonlypossiblefromdisk.
Backup applications allow users to configure rotation schemes that use tapes for specificdays,weeks
and months of a year, often applying different retention policies to each backup job. Such rotation
schemes require an autoloader as the backup device.
Using a tape autoloader configured on your HP D2D Backup System enables you to use the same tape
rotation schemes that you would use with physical tape. To your backup application the tape autoloader
configuredontheHPD2DBackupSystemisaphysicaltapeautoloaderdeviceandyoucanconfigure
backup jobs from your backup application in exactly the same way as you would for tape. But you benefit
from much faster performance because you are writing to or reading from disk.
Read this chapter for example backup scenarios. It will also give you a clearer understanding of how you
can calculate the number of slots required and ensure that disk space is used effectively.
• “Example 1: Simple backup” on page 55
•
“Example 2: Office backup”onpage56
•
“Example 3: High-performance workstation” on page 60
•
“Incorporating archive to tape into a rotation strategy” on page 61
Simple backup
• On Friday: carry out a full backup to one cartridge to capture the week’s work and keep that
cartridge for four weeks before overwriting. Assuming a separate cartridge for each week’s full
backup, four autoloader slots are required.
• For the other weekdays, Monday to Thursday: carry out incremental backups to capture that day’s
change
Assumi
slots are required.
• On Friday overnight: run a copy job to copy Friday’s full backup to physical tape for offsite
stora
s (one cartridge for each day) and keep each cartridge for a week before overwriting.
ng a separate cartridge for each day’s incremental backup, another four autoloader
ge.
D2D Backup System
55
Page 56

Host
Tape Drive
LAN
Mon
Tues
Wed
Thurs
Wk1
Wk2
Wk3
Wk4
HP StorageWorks D2D Backup System
Figure 29 Simple backup from a single host
This scenario provides fast restore times for individual files, with the added security of offsite tape storage.
It requires 8 autoloader slots. The examples in the rest of this chapter illustrate more complex scenarios.
Office backup
The office has three hosts that must be backed up:
• A fileserver
• ADataba
• A high-performance desktop PC
Each device will be backed up to an autoloader on the HP D2D Backup System. You must run the
ation wizard on each host that is to be backed up. The following examples illustrate how you decide
Install
how man
you run
number
Fileserver
This is used by all the people in the office who have access to a file share on the server for storing
office documents, such as word processing files and spreadsheets. These filesmustbebackedupdaily,
retained for a month and copied once a week to a tape drive attached to the fileserver for offsite storage.
Thestartingsizeofthedataonthefile share is 60 GB. Daily changes are approximately 500 MB.
Number of slots required
4x1fullweeklybackups
4 x1 incremental daily backup
8 sl
y slots should be allocated to each autoloader. You can either assign these during installation, if
the Installation wizard, or use the Web Management interface after i nstallation to increase the
of slots, as described in “To edit device details” on page 66.
ots required
se server
Physical disk space required on
HP D2D Backup System
4x60GB=240GB
4x500MB=2GB
242 GB in week 1
Increments by 2 GB a week
Offsite storage requirements
4 x 60 GB = 240 GB
Tapes will be rotated on a
4-weekly basis; backup size
increments by 2 GB per week
56
Backup scenarios using the HP D2D Backup System
Page 57

Mon
Tues
Wed
Thurs
Wk1
Wk2
Wk3
Wk4
Total
242 GB
HP StorageWorks D2D Backup System: 1.5 TB
Figure 30 HP D2D Backup System after the first host is configured
Database server
This is us
12 months. Data will be copied offsite once a month and retained for 7 years.
Thesizeofthedatabaseis10GB.
ed to hold the customer database. It must be backed up weekly and monthly and retained for
Fileserver
60 GB
Database
Server
10 GB
Desktop PC
250 GB
LAN
Number of slots required
3x1fullweeklybackups
12 x 1 full monthly backups
Physical disk space required on
HP D2D Backup System
3x10GB=30GB
12 x 10 GB = 120 GB
15 slots required 150 GB (in itially)
Offsite storage requirements
12 x 10 MB = 120 GB
Tapes will be rotated after 7 years
D2D Backup System
57
Page 58

Fileserver
60 GB
Database
Server
10 GB
Desktop PC
250 GB
LAN
Figure 31 HP D2D Backup System after the second host is configured
Desktop PC
This is used by engineers to store drawings, specifications and similar working documents. The backup
requirement is for o n e full weekly backup and a daily incremental backup, retained for one week.
Thesizeofthedailyincrementalbackupis10GB.Thesizeofthefullbackupis250GB,which
exceeds t
two autoloader slots.
Number of slots required
1 x 2 for the full weekly backup
4x1fortheincrementaldailybackups
M1
M2
M3
M4
Total
150 GB
M5
M6
M7
M8
M9
M10
M11
M12
Mon
Tues
Wed
Thurs
Wk1
Wk2
Wk3
Wk4
Total
242 GB
Wk1
Wk2
Wk3
HP StorageWorks D2D Backup System: 1.5 TB
he disk space that can be allocated to a single slot. Therefore, each full backup requires
Physical disk space required on HP D2D Bac kup
System
1x250=250GB
4x10GB=40GB
6 slots
assign
58
required (8 is the minimum that can be
ed)
290 GB
Backup scenarios using the HP D2D Backup System
Page 59

Fileserver
60 GB
Database
Server
10 GB
Desktop PC
250 GB
LAN
Figure 32 HP D2D Backup System after the third host is configured
Summary
This is within the capacity of the HP D2D Backup System and still leaves the option of backing up
additional hosts, par ticularly on the HP D2D Backup System 130 and 120.
Mon
Tues
Wed
Thurs
Wk1
Wk2
Wk3
Wk4
Total
242 GB
Wk1
Wk2
Wk3
M1
M2
M3
M4
Total
150 GB
M5
M6
M7
M8
M9
M10
M11
M12
Wk1
Wk1
Mon
Tues
Wed
Thurs
Total
290 GB
HP StorageWorks D2D Backup System: 1.5 TB
Fileserver requires
Exchange server requires
Desktop PC requires
Approximate capacity required = 682 GB at the end of week 1
242 GB
150 GB
290 GB
Approx capacity
used = 682 GB
D2D Backup System
59
Page 60

Fileserver
80 GB
Database
Server
10 GB
Desktop PC
250 GB
Host
4/5/6
LAN
Figure 33 Option remains to configure more hosts
High-per
This is a h
be fully b
data wil
Additio
backed u
backed up to a standalone tape drive configured on the HP D2D Backup System.
You can specify the number of slots to meet the backup requirements for the workstation when you run the
Installation wizard, or from the Web Management interface after installation. You must use the Devices
pageoftheWebManagementinterfacetocreateanadditionalstandalonetapedrivedeviceforthe
‘IMPORTANT’ folder. (See “To create a new device” on page 66 for further details.)
Mon
Tues
Wed
Thurs
Wk1
Wk2
Wk3
Wk4
Total
242 GB
Wk1
Wk2
Wk3
M1
M2
M3
M4
Total
150 GB
M5
M6
M7
M8
M9
M10
M11
M12
Wk1
Wk1
Mon
Tues
Wed
Thurs
Total
290 GB
Autoloader
3/4/5/6
HP StorageWorks D2D Backup System: 1.5 TB
formance workstation backup
igh-performance graphics workstation, used by an architect, who has 250 GB of data that must
acked up every week and approximately 10 GB of changes to be backed up each day. This
l be backed up to an autoloader configured on the HP D2D Backup System.
nally, there is an ‘IMPORTANT’ folder that relates to current, high-priority projects that must be
p daily and m oved from the HP D2D to physical tape at the end of each week. This data will be
Main backup to autoloader
The data at 250 GB exceeds the disk space that can be allocated to a single slot. Therefore, each
full backup requires two autoloader slots. You must also make sure that tape spanning is enabled
in your backup application.
Number of slots required
4x2foreachfullweeklybackup
4x1incrementaldailybackups
12 slots required
Additional backup to tape drive
The ‘IMPORTANT’ folder starts at 10 GB and has 4 incremental backups to a s ingle cartridge on a
standalone tape drive. The final data size is approximately 60 GB, which is moved from the HP D2D to
physical tape weekly.
60
Backup scenarios using the HP D2D Backup System
ical disk space required on HP D2D Backup
Phys
em
Syst
4x250GB=1000GB
4x10GB=40GB
1.04 TB
Page 61

After configuration, the host has access to two devices on the HP D2D Backup System.
Graphics
workstation
250 GB
LAN
Wk1
Mon
Wk1
Tues
Wk2
Wed
Wk2
Thurs
Wk3
Wk3
Wk4
Wk4
Total
1.04 TB
HP StorageWorks D2D Backup System: 1.5 TB
Total
60 GB
Approx capacity
used = 1.1 TB
Figure 34 HP D2D Bac kup System with one host and two devices
Summary
Main backup to autoloader requires
Additional backup to tape drive
requires
Approximate capacity required =
This is within the capacity of the HP D2D Backup System 130 and 120.
1040 GB
60 GB
1.1 TB
Incorporating a rchive to tape into a rotation strategy
Two methods are provided for archive a cartridge to the directly attached tape device, these are Copy
and Exp
• Copy retains the data cartridge on the HP D2D system and creates an exact c opy onto a physical
• Expor
Each method has advantages and disadvantages, as described in more detail in
“Archiving methods”onpage84. Referalsotothewhitepapersonh
examples of using these functions with specific backup applications.
This example shows how to incorporate copy to a tape drive connected to the HP D2D Backup System
into
• On Friday: carry out a full backup to one cartridge to capture the week’s work and keep that
ort.
cartridge in the attached tape drive.
t removes the data cartridge from the autoloader on the D2D once data has been
ssfully copied to the physical cartridge in the attached tape drive.
succe
ttP://www.hp.com/support for
a tape rotation strategy.
cartridge for four weeks before overwriting. Assuming a separate cartridge for each week’s full
backup, four autoloader slots are required.
D2D Backup System
61
Page 62

• For the other weekdays, Mond ay to Thursday: carry out incremental backups to capture that day’s
changes (one cartridge for each day) and keep each cartridge for a week before overwriting.
Assuming a separate c artridge for each day’s incremental backup, another four autoloader
slots are required.
• On the last day of the month:
• From the host (1) carry out a full backup to one cartridge to capture the month’s work ready
for archiving, this requires one extra slot on the autoloader device (2)
• From the HP D2D Web interface schedule a copy to physical cartridge job (3)torunonthe
last day of the month. See “Cartridge copy” on page 84 for further details.
Figure 35 Copying to physical tape as part of a rotation strategy
This scenario requires nine slots on the autoloader device and a physical cartridge in the attached tape
drive on the last day of the month. The cartridge data remains on both the HP D2D Backup System and
the copy on the physical tape drive can be stored offsite.
62
Backup scenarios using the HP D2D Backup System
Page 63

8 The Web Management Interface
In this chapter:
•
“Web management interface” on page 63
•
“To run the Web Management Interface”onpage63
•
“Summary (Home)”onpage64
•
“Devices (Configuration)” on page 65
•
“Cartridges (Configuration)” on page 67
• “Network (Configuration)” on page 71
•
“Email Alerts (Configuration)” on page 74
•
“Disk & RAID (Status)” on page 76
• “iSCSI (Status)”onpage77
•
“Log (Status)” on page 78
•
“Shutdown (Admin)”onpage79
•
“Administration (Admin)”onpage80
•
“Firmware (Admin)” on page 81
•
“Support (Admin)” on page 82
What is the Web Management interface?
TheWebManagementInterfaceisthemaininterfacefor:
• Monitoring the status and health of the HP D2D Backup System and all configured backup devices
• Changi
drives
• Managing movement of data to and from a physical tape drive attached to the HP D2D (if
one has been installed)
ng the number of cartridge slots or creating additional autoloaders, or standalone tape
,forahost
To run the Web Management Interface
There are two ways of logging on:
• FromthehostserverorPC:Use the desktop shortcut created by the Installation wizard.
• From any machine connected to the network: Enter the IP add ress or fully qualified domain name
(for example, myhpd2d.mydomain.com) of the HP D2D Backup System into the web browser.
The Web Management Interface displays the Login prompt:
The Login is Administrator with an initial password of Admin.
Both names are case sensitive. The password can subsequently be changed from the Administration menu
on, see “Administration (Admin)” on page 80.
opti
D2D Backup System
63
Page 64

NOTE:
The web browser used to communicate with the D2D Backup System must have Active Scripting or
JAVA scripting enabled. If it does not, some of the browser buttons may not be displayed. See
“Web browser settings” on page 26.
Summary (Home)
Whenever you log in, the Summary page is displayed.
Use this page:
• To display information about your HP D2D Backup System and the backup devices that have
been configured for it.
• To monitor system health and status.
• To display status information about any physical tape drives tha t are a ttached directly to the
D2D Backup System.
64
The Web Management Interface
Page 65

Table2Summarypagelayout
1
Navigation bar
2
Help and logout
Select the appropriate option from the side bar.
The Help option opens the h elp pages.
Logout closes your session on the HP D2D Backup System. If somebody else
logs in, you will be automatically logged out.
3
4
5
Status icons
Device information
Status details
Configured backup
devices
Indicates a healthy system or system component.
This section provides the information that identifies your HP D2D Backup
System. It shows the IP Address and Network Name of the HP D2D Backup
System.
This section provides details about overall system status and the status of
system components. Additional information is provided if the status is not
OK. See also “Status icons” on page 65.
Network, Disk Usage and RAID all link directly to the relevant pages for
more information.
If a tape drive is connected directly to the HP D2D Backup System, its status
is also displayed in this section with a link to job history.
This section shows the devices that have been configured and their
connection status. Our example shows one autoloader and no tape drives.
Note that when a tape drive is shown, it is the tape drive that has been
configured on the HP D2D Backup System and not the physical tape drive
that may be attached to it.
Theiconforthedevicechangestoindicateacopyorexporttophysicaltape
by showing the cartridge partially ejected.
To configure the devices, select Devices from the navigation side bar. Or:
• Click on the relevant Edit Config, iSCSI or Cartridges link to view specific
information for the selected device.
Indicates a warning or error state.
Devices (Configuration)
By default, one autoloader is created automatically when a new host connects to the HP D2D Backup
System. Use this page to view and configure the default autoloader and to create additional devices, if
required, for the host.
The top half of the page shows the six possible devices available on the HP D2D Backup System. None
or all of these may be populated depending on how many devices have been created.
To view device details
Click on Select to view the details for a selected device in the bottom half of the page, where you can
also edit a n d delete details.
There are also links on the Name, Cartridges and Connection fields that take you directly to the relevant
information for that device.
NOTE:
If a device is shown as not connected, this indicates that the iSCSI Initiator on the host has not logged on.
For more information, see “Targets tab”onpage49.
D2D Backup System
65
Page 66

To edit device details
1. Click on S
2.
Amend details as appropriate and click Update to apply them. See “Device parameters” on page 67
elect to view the details for the required device and then click on Edit.
To create a new device
1. To create a new device, select the appropriate device type (Autoloader or Tape Drive) from the
drop-down menu and click on Create to create a new device for the host.
2. Enter the appropriate details and click Create.Youcanfind the iSCSI Initiator Name by running the
iSCSI Initiator on the host and copying the Initiator Node Name from the General tab. See also
“To edit device details” on page 66.
66
The Web Management Interface
Page 67

Table 3 Devic
eparameters
Autoloader Name or
Tape Drive Name:
Total No of
Slots:
Emulation Type:
iSCSI Initiator Name:
Cartridge
This is the name that is used to identify that device (autoloader or tape drive).
You may like to enter a name that identifies the host or backup job with which it
is associated.
This is wher
strategy. F
pull-down m
drives onl
You can change the maximum size of the cartridge as long as it is blank. This
means that
and before it has been accessed by the backup application. See “Cartridges
(Configur
This is the emulation type used by the backup software. The default of 1x8 G2
Autoloader is correct for most applications. An alternative of D2DBS G eneric is
available for cer tain applications. Consult your backup application technical
support information for further details.
If you have created an autoloader on an earlier version of the HP D2D Backup
System, it will have an emulation type of ThinStor. This emulation type does not
support mail slots and tape attach. If you want to connect a tape drive to the HP
D2D Backup System, you must change the emulation type. (Once changed, you
cannot revert to ThinStor.)
This is the Initiator Node Name of the host that will back up to this device
(autoloader or tape drive). It is provided automatically for the default autoloader
that is created when you run the Installation wizard on a host for a first time. But you
must enter it manually if you are creating a new device on this page. You can find
the name by running the iSCSI Initiator on the host and copying the Initiator Node
Name from the General tab. See “Manual driver installation”onpage51.
eyoudefine the number of slots that you require for your tape rotation
or autoloaders you can select a number between 8 and 24 from the
enu; each slot will initially be assigned a 200 GB cartridge. Tape
y have one cartridge, which is always assigned a 200 GB cartridge.
you can only change the value immediately after the device is created
ation)”onpage67.
To de
lete a device
Click on Selec t to view the details for the required device and then click on Delete to delete it. You will be
prompted to confirm that this is what you wish to do.
NING!
WAR
ata on the device will be deleted.
All d
Cartridges (Configuration)
Usethispagetoviewandconfigure cartridge settings. The number of slots configured on the Devices
page for an autoloader determines the number of cartridge rows that are available to edit on this page;
tape drives have only one cartridge.
D2D Backup System
67
Page 68

68
The Web Management Interface
Page 69

Table 4 Cartridge parameters
The Location column identifies each element of the autoloader that is available to
hold a cartridge. There are three elements:
• Slot n: which is one of the standard autoloader slots
Location
Bar Code:
• Mail slot: which is a dedicated slot that is used to hold a cartridge that is ready
for exporting to or importing from physical tape. Cartridges can only be moved
into the mail slot by the backup application on the host machine.
• Tape drive: which indicates that a physical cartridge is inserted in an attached
tape drive and is ready for import.
A bar code is an 8–digit, alphanumeric, unique identifier for a cartridge within
the HP D2D Backup System. Bar codes are shared with the backup application,
if requested. The backup application may also choose to assign its own internal
identifier to the cartridge but, if it does so, it cannot assign this identifier to the
Cartridge bar code.
Bar codes are generated automatically but may be edited by the user. If you
choose to edit the bar code:
• It must be unique and must not start with the letters “CLN” or “DG” because
these are reserved designations for cleaning and diagnostic cartridges.
• It should be a minimum of 4 characters. Valid ASCII characters are A-Z, a-z,
0–9, space and hyphen. Anything less than 8 characters will be appended
with space characters.
Used Size:
Max Size:
Write Protected:
Last Written:
Empty slots
Empty slots are slots that contain no cartridges; all the fields contain dashes or hyphens.
• Tape drive row: An autoloader consists of two devices; a tape drive and changer device. This
• Mail slot row: This location refers to the slot that is used for importing and exporting data.
• Numbered slot row: This slot is empty after a Remove operation or after the backup application
This shows the actual used capacity in MB or GB. If this is Blank,thecartridge
may be removed, see below.
defaults to 200 GB. This value may be changed if the Used Size is Blank, see
below. The maximum value allowed is 800 GB.
is a check box that allows you to enable (checked) and disable (unchecked) write
protection, see below.
tells you when the cartridge was last written to and is useful when identifying data
for copying or exporting.
locationreferstothetapedriveelementoftheautoloader. Itisonlypopulatedwhenthebackup
application on the host is writing to or reading from the autoloader.
It is only populated:
• When the backup application on the host moves data into it for export to a tape drive
attached to the HP D2D Backup System. Once the export has been run successfully from the
Web Interface, the slot becomes empty again.
• When the Web Interface is used to import data from a tape drive attached to the HP D2D.
The backup application on the host is used to move the data back into a numbered slot and
the mail slot becomes empty again.
has moved data to the mail slot for export.
Once a mail slot or numbered slot is empty, a Create button is available to create a new, blank cartridge.
See “To create a cartridge” on page 70.
To remove a cartridge
If the Used Size of a cartridge is Blank, you will be able to remove it. Click on the Remove button. This
button is not displayed, if the cartridge is not blank.
D2D Backup System
69
Page 70

To write protect
acartridge
Click Edit for t
backup application will not be able to write any more data to it.
he appropriate ca r tridge. Check the Write Protected check box for the cartridge. Your
To edit maximum size
Theonlytimeyoucanresizecartridgesiswhenyoufirst create an autoloader or add slots and they are
blank. Once the cartridges are made available to the backup application, it formats them ready for use
and they are no longer blank, even if you have not yet written data to them. Sim ilarly, the erase function
on most backup applications does not return the cartridge to a completely blank state.
The Max Size defaults to 200 GB, but if the Used Size is Blank, you can edit this value. The maximum
value allowed is 800 GB.
Click Edit for the appropriate slot. Select a value from the drop-down menu and click Update.
NOTE:
The maximum size indicates the physical disk space available for that slot; it will only be committed
when data is written to it. Changing the maximum space does not affect actual disk usage or save
disk space, but may be useful if you know you will be moving data to a physical tape with a smaller
cartridge capacity.
To create a cartridge
Slots that are empty have an extra button, called Create.
70
The Web Management Interface
Page 71

• If you use the Create button on an empty slot, the backup application needs to inventory it (add it
to its database or catalog) before it can access it.
• If you use t
theblank,newcartridgetoanemptycartridgeslot,withouthavingtorunaninventory. This
saves some processing time.
NOTE:
When you i
applicat
been exp
Cartridge Slots on the Devices page, see “To edit device details”onpage66.
he Create button on a n empty mail slot, you can use the backup application to move
mport a cartridge, you need an empty mail slot and an empty cartridge to which the backup
ion can move the imported data. Therefore, you may wish to leave a slot whose cartridge has
orted empty, rather than creating a new cartridge. Or to create a slot, edit the Total No Of
Network ( Configuration)
This page is used to view and edit network settings. It is also used to turn Beacon Mode on and off.
D2D Backup System
71
Page 72

Network configuration
The details in this section reflect the IP settings that were specified during installation. The HP D2D Backup
System supports DHCP and this is turned on by default.
You may need to edit the details if there is a conflict in the IP address, or you m ove the host to a different
network
connect
the new a
To edit network settings
1. Click Edit to make the details editable.
2. Make the required changes and click Update.
3. You must now reconnect to the HP D2D Ba ckup System using the new settings.
node. Be aware that any changes you make to the network settings could affect how you
again to the HP D2D Backup System. For example, if you change the IP address, you must use
ddress to log in from a web browser.
• If you have changed the IP address, you must use the new add ress to log in from a web
browser.
• You will also need to edit the iSCSI Initiator on all hosts that are connected to the HP D2D
Backup System, if you change the IP address. See “The iSCSI Initiator” on page 47.
72
The Web Management Interface
Page 73

Table 5 Network parameters
Network Name:
DHCP:
IP Address:
Subnet Mask:
Gateway:
Domain:
DNS Server Name
1/2/3:
This is the name of the HP D2D Backup System. You can use the network name,
instead of the IP address, to log on to the Web Management Interface.
Check or uncheck the box to enable or disable this feature. If DHCP is turned off,
you must manually specify all the network settings for the HP D2D Backup System. If
DHCP is turned on, the majority of the network settings are obtained automatically.
However, even when DHCP is on the Network Name must be specified. Other
parameters, such as Domain Name and DNS Server Address, become optional.
You can override the automatic settin gs and enter your own values, if required,
but this is not usually necessary.
This is the IP address for the device. The HP D2D Backup System supports both
dynamic (DHCP) and static IP addressing. The IP Address must be unique on the
network. If you are using static IP addressing, you must also provide the subnet
mask, default gateway and, optionally, domain name.
This deter
only.)
This is the node that connects the HP D2D Backup System to the network that is
servicing the web pages. (Static IP addressing only.)
This is the group of devices on the network to which the HP D2D Backup System
belongs. (Static IP addressing only.)
These are
automat
mines the subnet to which the IP address belongs. (Static IP addressing
the DNS IP addresses. When using DHCP these may be obtained
ically. Ask your network administrator to advise what you should enter.
Resetting network settings to factory defaults
There are some conditions in which a previously configured device may fail to be discovered on a
network and, therefore, may be unreachable if the network parameters are invalid for the network to
which the device is at tached. In this case, it may be necessary to reset the networking parameters
and device name to factory defaults.
To reset the network settings:
1. Ensure that there are no backup or restore jobs in progress to the device.
2. Press the Power On button on the front of the HP D2D Backup System three times in quick succession
to reset it.
After approximately 5 seconds, the HP D2D Backup System will begin its reboot sequence.
NOTE:
The HP D2D Backup System will be reset to factory networking settings and the Administrator password
will be reset to Admin. No user data will be lost.
3. After the reboot, the device will be in DHCP mode and also available for discovery using the
Installation wizard provided on the StorageWorks CD.
Beacon mode
Beacon mode flashes the LEDs on the HP D2D Backup System. It is useful if you have several HP D2D
Backup Systems on your network and want to confirm which u nit is being configured.
• Click Turn Beacon On to activate beacon mode.
• If you do not switch off Beacon Mode from the Network page, it will continue for 5 minutes.
D2D Backup System
73
Page 74

Email Alerts (Co
nfiguration)
This page is use
D2D Backup Syst
reaches its thr
hardware failure. Email alerts are also generated for tape at tach activities, when there is a separate
tape drive connected to the HP D2D Backup System and the user is importing data from it, copying or
exporting data to it, or scheduling tasks to carry out these activities.
The HP StorageWorks D2D Backup System uses Simple Mail Transfer Protocol (SMTP), which is the
established standard for transferring mail over the internet. Microsoft Exchange has a virtual SMTP server
available which can be used to receive these emails and forward onward if necessary. Unix operating
systems, su
and, if nece
To configure
server that it can use.
• Click Edit to make the fields editable. Make changes, as appropriate and click Update.
• Once you ha
be sent successfully.
d to set up details of the em ail servers that will be used to route messages about the HP
em and to specify up to four email recipients. Messages are generated if a disk fails or
eshold capacity, if the system reboots, if there are net work problems or if there is a critical
ch as Linux, have a Sendmail program included. Sendmail uses the SMTP protocol to receive
ssary, forward on e-mail messages.
email settings, the HP D2D Backup System must be on the same network as an SMTP
ve created a recipient’s email address, use the Test button to make sure emails can
74
The Web Management Interface
Page 75

Table 6 Email parameters
SMTP Server:
Username and
Password:
Sender’s Email
Account:
Recipient’s Email
Address 1/2/3/4:
This is the IP address of the email server.
Some email servers require authentication to send email alerts. If required, enter
aUsernameandaPasswordherethatarevalidontheSMTPserverenteredin
the previous box.
This is the email account to which the email will be attributed in the recipient’s
inbox. The account must exist on the email server. For example, you may like to
create an account called “MyD2D@MyServer.com”.
This is the em
email addresses may be specified.Youmayonlyenteroneaddressperline. Once
you have configured an email recipient, there is a Test button that you can use to
sendateste
ail address of the person who should receive the message. Up to four
mail to the specified address.
To configure Microsoft Exchange Server
NOTE:
Please refer to the Linux Configuration Guide on the CD-ROM for information abut configuring SMTP
with Linux.
It is important to check the SMTP server’s security configuration parameters to ensure that the Sender’s
Email Account can be recognized. Security configuration parameters are found within the SMTP virtual
server’s property pages. To view or modify them:
1. Open the Exchange Management console.
2. Click on Servers and then the server you wish to confi gure.
3. Click on Protocols and then SMTP.
4. You will see the default virtual SMTP server. Right click on this and select Properties.
5. Select the Access Control tab and then select Authentication.
6. TheHPD2DBackupSystemmaybeusedwithoneofthefollowingsettings:
D2D Backup System
75
Page 76

• Anonymous Authentication (anyone can log on, you do not need to provide a Username and
Password when you configure email alerts)
• Basic Authentication, where a user name and password are required and should be provided
when you configure em ail alerts
NOTE:
Integrated Windows Authentication is not supported with the HP D2D Backup System.
If your SMTP Server requires this form of authentication and you have a spare network
port, we recommend that you create a new virtual SMTP server, allowing connection only
to the HP D2D Backup System. In this instance, you may lock the SMTP server to use
only the HP D2D Backup System’s IP address and authentication may safely be set to
anonymous for the dedicated SMTP server.
Disk & RAID (Status)
This page provides information about the RAID status, disk usage and status of the physical disks.
Use it to identify disks that may be failing or disks that are approaching capacity.
RAID status
In normal operation, this shows green, OK.
Ifoneormoredisksfail,itshowsawarningicon.
Disk usage
This section shows you how much disk space has been used.
Total Disk Usage: The green area is the amount of disk space committed. This always shows
some value because it includes the default 2 GB space committed for each cartridge slot (see
“Considerations when configuring cartridges and slots”onpage19).
76
The Web Management Interface
Page 77

The red area indicates the threshold capacity. The system will send warning messages to email recipients
that the disks are reaching capacity. The Disk Usage icon on the Summar y page will also indicate that
disk space is running out and the Disk Capacity LED will flash.
You cannot add physical disk space, but you may be able to create some space. Options for creating
space, if the disks start to get full, include:
• Review your backup jobs to see if you can reduce the size of backup or retention time.
• Use the backup application job settings to overwrite or erase data.
• Export a cartridge to tape, see
“Using the Web Management interface to copy/export/import cartridges” on page 88.
Autoloader 1/2 /...: This is the amount of data backed up to each device. (This does not include the
default 2 GB space committed for each cartridge slot. If no data has been backed up, the value is 0
GB). Each autoloader and tape drive is shown separately.
Physical disks
This section provides information about the physical disks. If you need to replace a disk, it is very
important to obtain the serial number and the physical location of the failed disk from this page before
you replac
Table 7 Physical disk parameters
eit.
Disk:
Description:
Serial No
FW Version:
Size:
State:
:
iSCSI (Status)
This page shows the iSCSI details for all the devices that are configuredontheHPD2DBackupSystem.It
also shows any active connections. All available devices are shown in the top half of the page. Click on
Select to view more detailed information on that device in the bottom ha lf of the screen.
This page is mainly for information and is useful in troubleshooting. The Edit facility is provided only for
users who need to enable authentication. It displays additional fields in the iSCSI Authentication section.
We do not recommend that you use authentication, but it will be necessary if you have enabled the Secret
feature on the General tab in the iSCSI Initiator. Click Edit to make the fields editable.
If a device is showing as not connected, this indicates that the iSCSI Initiator on the host has not logged
on. Log on using the iSCSI Initiator and set the device as a Persistent Target for that host. This ensures that
itwillautomaticallylogonagain,ifthehostisrebooted. See“Microsoft i SCSI Initiator” on page 46.
This indicates the physical location of the disk and is useful if you need to replace a
disk. It should relate to the wiring diagram on the access panel, but always double
check against the serial number after removing a disk.
This is the product number of the disk.
This is the serial number of the disk. Always make a note of this before replacing
afailedd
This is the firmware version of the disk. It may be useful for troubleshooting and
when replacing a disk.
This is 750 GB for the HP D2D Backup System 130, 500 GB for the HP D2D Backup
System 120 or 250 GB for the HP D2D Backup System 110.
This ind
isk.
icates the state of the disk. Green indicates OK, amber indicates a warning.
D2D Backup System
77
Page 78

Log (Status)
This page presents a time and date stamped list of significant system events. The most recent information
is shown at the top of the list. The icons identify whether the messages are information, error or warning
messages.
The Log is ma intained even if the HP D2D Backup System is power cycled. Use the Clear Log button
to clear the log.
78
The Web Management Interface
Page 79

Tape Attach pages
These pages allow you to manage copy, export and impor t activities between the
HP D2D Backup System and an attached tape drive. They are described in detail in
“Export, import and copy to an attached tape drive” on page 83.
Shutdo
This option allows you to shut down the HP D2D Backup System cleanly. It is the only recommended
way of powering off the device. If you remove the power in any other way and a host is carrying out a
backu
Click Power Off and Yes to confirm.
wn (Admin)
p or restore, you may lose or corrupt data.
D2D Backup System
79
Page 80

WARNING!
Before shutting down always ensure that there are no backup or restore jobs in progress and that no
future jobs are scheduled to start whilst the system is shut down. If hosts do not automatically reconnect
to the HP D2D Backup System when it restarts, you must reconnect manually from the iSCSI Initiator on
each host, see “Targets tab” on page 49.
Administration (Admin)
This page allows you to manage the Administrator’s password and amend the d ate and time settings.
When you first log on the Administrator user has a password of Admin. For security reasons, you
may wish to change this.
• Click Edit to make the fields editable.
• Make the required changes and click Update to apply the changes (or Cancel to discard them).
Resetting the password
If you forget your password, you can reset the HP D2D Backup System as follows:
NOTE:
Resetting the password will reset the networking settings to the factory defaults and reset the Administrator
password to Admin.Nouserdatawillbelost.
1. Make sure nobody is using the HP D2D Backup System before you attempt the reset.
2. Press the Power button on the front of the HP D2D Backup System three times in quick succession.
Approximately 5 seconds later the HP D2D Backup System will reboot.
3. Use the device discovery tool on the HP StorageWorks CD-ROM to re-configure the network settings
of the HP D2D Backup System.
80
The Web Management Interface
Page 81

Firmware (Admin)
This page provides information about the firmware version of your HP D2D Backup System and allows
you to upgrade the firmware.
1. Check www.hp.com/support for the latest firmwareanddownloadittoyourharddisk.
2. Select Firmware from the Web Management Interface and click Upgrade.
3. Make su re that there are no backup or restore jobs in progress and that no future jobs are scheduled
tostartwhilstthefirmware is upgrading. Click Yes.
4. Click Browse... and locate the upload filethatyouhavejustdownloaded.
5. Click Upload to upgrade the firmware. A progress meter is displayed while the upgrade takes
place. The system will reboot once it has been updated. Configuration information and data are
unaffected by this process.
D2D Backup System
81
Page 82

WARNING !
Once you have started to upgrade the firmware, it is important that you allow it to
complete. Do not attempt to cancel the upgrade process, or power off the machine.
NOTE:
The tape drive is reported to your b a ckup application (and Windows Device Manager) as an LTO-3
device. This is the default behavior of the tape drive and there is no need and no way to change it on
the HP D2D Backup System. In earlier versions of the HP D2D Backup System firmware, the tape drive
was reported as an LTO-2 device. Once you upgrade to the latest version of the firmware, the backup
application continues to identify existing backup devices as LTO-2 and identifies new tape devices
as LTO-3, but this has absolutely no impact on how the device behaves or functions. If you delete
existing devices (LTO-2) and create new ones; the new ones will be LTO-3. (It is important not to confuse
emulation type with cartridge size. Emulation type is totally independent from cartridge size. The HP
D2D Backup System allows you to pick whatever cartridge size you like, up to 800 GB.)
Support (Admin)
If you have problems, HP Support will ask you to generate a support ticket to help with troubleshooting.
It provides a log of everything that has happened on your system.
NOTE:
Please ensure that your browser security settings allow files to be transferred from the HP D2D Backup
System to your host machine.
1. Use this page to Generate a support ticket.
2. At the prompt, save the file to disk.
82
The Web Management Interface
Page 83

9 Export, import and copy using an attached tape drive
If your organization’s backup strategy also requires the ability to archive backed-up data for offsite
storage, there are two ways of achieving this:
• Attach an HP Ultrium tape drive directly to the HP D2D Backup System and use the copy,
export and import facilities in the Web Management Interface to transfer data manually or to
schedule jobs.
• Attach a supported tape drive to a host machine on the storage network. If your backup
application supports the copying of data between devices, you can then use the backup
application to move data from the HP D2D Backup System to physical tape. This option is
described in “Copy using a tape drive attached to the host” on page 99.
In this chapter:
•
“Requirements for co nnecting a tape drive to the HP D2D”onpage83
•
“A note about terminology”onpage83
•
“Archiving methods” on page 84
•
“Using the Web Management interface to copy/export/import cartridges”onpage88
•
“Using a tape drive connected to host” on page 99
•
“Compression” on page 98
NOTE:
Always refer to h
ttp://www.hp.com/go/connectto find out which tape drive models are supported.
Requirements for connecting a tape drive to the HP D2D
To use this facility you need :
• Atapedrive,suchasanHPStorageWorksUltriumdevice. Thisshouldbeahalf-heighttapedrive,ifit
is to be installed internally. Both SAS and SCSI tape drives are supported.
• A host bus adapter, HBA, for the tape drive connection (because there are no embedded SAS or
SCSI por ts). If the tape drive is pre-installed, an appropriate HBA is already installed. If not, you must
purchase and install the HBA before connecting the tape drive.
Anot
Please refer to w
instructions on attaching the tape drive, please refer to “Attaching a physical tape drive”onpage29.
NOTE:
Physical tape drives attached to the HP D2D Backup System can only be accessed by the HP D2D Backup
System, using the Tape Attach pages. They do not appear as attached network devices to the host system.
e about terminology
Within this g uide:
• Export refers to the process that moves the car tridge from the HP D2D Backup System to the attached
ical tape drive.
phys
ww.hp.com/go/connect for a list of all supported host bus adapters and tape drives. For
D2D Backup System
83
Page 84

• Import refers to the process that returns the cartridge from the attached tape drive to the HP D2D
Backup System.
• Copy refers to the process that creates an additional copy of the cartridge on the physical tape drive.
Backup applications may use similar terminology to describe the processes for transferring data to a
slot where it can be exported to a backup device a nd for restoring it to the application’s database or
catalog after loss or failure. Please refer to the white papers on h
clarification.
Archiving methods
Two methods are provided for archiving data to the directly attached tape device, these are Copy
and Export.
• Copy retains the data cartridge on the HP D2D Backup system and creates an exact copy onto a
physical cartridge in the attached tape drive.
• Export remo
has been su
Each method has advantages and d isadvantages, as described in more detail below.
NOTE:
As a general recommendation, Copy is the easier of the two options to use because it does not remove
the data from the HP D2D Backup sy st em and can be managed completely from the Web Management
Interface. Only use the Export option, if you need to free up some disk space. Export (and Impor t)require
addition
al steps in the backup application.
ves the data cartridge from the autoloader on the HP D2D Backup System once data
ccessfully copied to the physical cartridge in the attached tape drive.
ttp://www.hp.com/support for further
Cartridge copy
The backup application on the host is used to back up data to a cartridge on the autoloader device (or to
a standalone tape drive device) in the HP D2D Backup System. The Web Management Interface on the
HP D2D Backup System is used to Copy the cartridge from the HP D2D Backup System to the attached
tape drive, leaving the data on the HP D2D Backup System so that it is available for quick restore.
84
Export, import and copy using an attached tape drive
Page 85

Step 1
Use backup application on
host to write to cartridge.
1
2
3
4
5
6
7
8
Autoloader
HP StorageWorks D2D Backup System
Figure 36 C artridge copy
WhyusetheCopyfunctionality?
Copy creates two instances of the same cartridge; one stored on the HP D2 D, the other on physical tape.
Logically these are the same cartridge and the backup application has no awareness that there are two
copies. If da ta from this cartridge is required for restore, the backup application will always restore the
data from the HP D2D if it is available. The physical cartridge is, therefore, an additional copy that will
be required only if the HP D2D is not available.
Step 2
Use HP D2D Web
Management Interface to
copy to tape drive.
1
2
3
4
5
6
7
8
Autoloader
HP StorageWorks D2D Backup System
Physical
Tape Drive
Cartridge
When would Copy be used?
Cartridge copies are likely to be appropriate when the user wishes to use the HP D2D Backup System for
all foreseeable restore processes but requires an additional offsite copy for insurance or data security
purposes. This may mean that weekly, monthly and yearly cartridges are copied. Weekly and monthly
physical cartridges may be rotated; the cartridges on the HP D2D Backup System are overwritten after a
period of time. Yearly cartridges may be kept indefinitely. Clear labeling of the cartridges in this case is
essential because the backup application may overwrite the cartridge on the HP D2D Backup System
and, therefore, lose any knowledge of the existence of the physical tape cartridge.
When
is it necessary to restore from a copied cartridge?
e are three situations where it may be necessary to restore from the copied cartridge:
Ther
• The cartridge stored in the autoloader device on the HP D2D is overwritten (accidentally) by the
backup application. The backup application database is updated to reflect the new contents of
the cartridge and all knowledge of the old data is lost. If the backup administrator becomes
re that this has happened, it is possible to import the physical cartridge back into the HP D2D
awa
tem, from where its data can be "imported" back into the application database for restore, if
sys
required. In this case, because the backup application has overwritten the database entry for the
cartridge, some external knowledge of what is on the copied cartridge is required in order to be
able to decide whether the data on the copied cartridge is useful.
ewholeHPD2DBackupSystemoracompleteautoloaderontheHPD2Disaccidentally
• Th
removed from the Web Management interface. The physical copy of the cartridge is the only
copy now in existence. The backup application is still aware of the cartridge’s existence because
it was not aware of the loss of the D2D system. The backup administrator has two options; if there
is no required restore at this point, the administrator can deploy a new HP D2D system or create
new autoloader on the existing D2D and then import any copied cartridges back into the new
a
D2D Backup System
85
Page 86

device for use with restores at a later date. If a restore is urgently required, the administrator can
put the copied cartridge into a physical tape drive attached to the host and restore directly from
that. In either case, the backup application is aware of the cartridge’s existence.
• Both the D2D system and the host are lost. In this case, the physical cartridge copy (as long as it
was a full system backup) can be used for disaster recovery onto new or repaired server hardware
using a tape device attached to the host server.
Disadvantages of Copy
1. Data is left o
cartridge.
2. It is possible for the backup application to overwrite the cartridge on the HP D2D Backup System
and thus b ecome unaware of the data that has been copied to the physical cartridge.
Cartridge export
The backup application on the host is used to back up data to a slot on the autoloader device (or to a
standalone tape drive device) in the HP D2D Backup System. It is also used to move the data from the slot
into the mail slot. This creates an empty slot where the data was moved.
The Web interface on the HP D2D is used to Export cartridge data from the mail slot on the HP D2D
Backup System to the attached tape drive. After a successful export, the data is removed from the HP
D2D Backup System and the mail slot becomes empty. (If the export fails, the data remains in the mail
slot.) Export removes the data and frees up disk space on the HP D2D Backup System and is useful for
long term archival (for example in a yearly tape in a rotation scheme). If restore is needed, data can be
imported (or moved back) into the HP D2D Backup System.
CAUTION:
Do not export cartridges that the backup application uses on a frequent basis as part of a rotation
strategy because it will not be able to write to the empty slot.
n the HP D2D Backup System; no disk space is freed by copying to physical
86
Export, import and copy using an attached tape drive
Page 87

Step 1
Use backup application on
host to move cartridge to mail
slot.
1
2
3
4
5
6
7
8
Autoloader
HP StorageWorks D2D Backup System
Figure 37 Cartridge export
Why use the Export functionality?
ThemainreasonforusingExport is to create more space on the HP D2D Backup System. If space is not
an issue, Copy is the recommended method for creating offsite backups, because it is controlled solely
from the Web Management Interface and will not impact any tape rotation strategy. Export involves use
of the backup application. It is directly analogous to moving a cartridge in a physical autoloader to a mail
slot (import/export element) so that the backup administrator can take it offsite or put it into a firesafe.
Only a single copy of the car tridge exists. It is on physical tape and no longer on the cartridge in the HP
D2D Backup System. The backup application is fully aware that the cartridge location is now offsite, so
cannot overwrite it without explicitly asking for the cartridge to be moved back into the autoloader.
Step 2
Use HP D2D Web
Management Interface to
export to tape drive.
Physical
slotMail
HP StorageWorks D2D Backup System
1
2
3
4
5
6
7
8
Autoloader
Mailslot
Tape Drive
Cartridge
The main advantage of Export is that it frees up disk space on the HP D2D Backup System. However,
care must be taken to ensure that future backups do not fail. For example, if a weekly backup tape is
rted", it will not be available for append or overwrite the next time it is required. Depending on
"expo
ckup application configuration it may be possible to simply create a new blank cartridge in the
the ba
loader for use the next time a weekly backup is required, however, in some configurations it will be
auto
ssary to re-import the physical copy in order for the next backup to o ccur successfully.
nece
When would Export be used?
Cartridge exports are likely to be used when the user wishes to free up space on the HP D2D Backup
System by exporting to physical tape a car tridge that is used infrequently. For example, if a rotation
scheme uses twelve monthly tapes, it is safe to export a monthly tape from two months ago because it will
not now be required (except for infrequent restores) for another ten months. The same applies to yearly
tapes which may never be required again as they are kept forever.
en would I restore from an exported cartridge?
Wh
storing from an "exported" cartridge has a higher likelihood than from a copied cartridge, because
Re
he data no longer resides on the HP D 2 D Backup System. If a restore from an "exported" cartridge is
t
equired, the backup application will ask for the cartridge to be re-imported into the HP D2D before it can
r
e used for restore. Exported cartridges may also be used for disaster recovery, as with copied cartridges.
b
Disadvantages of Export
1. Restores may take longer if a physical cartridge is required for the restore.
D2D Backup System
87
Page 88

2. Backup applications may require the exported cartridge for the next job in their rotation scheme.
Cartridge import
TheWebinterfaceontheHPD2DisusedtoImport car tridge data from the attached tape drive to the
mail slot on the
from the mail slot back into one of the autoloader slots.
HP D2D Backup System. The backup application on the host is used to move the data
Step 1
Use HP D2D Web
Management Interface to
import from tape drive.
Step 2
Use backup application on
host to move the mail slot
cartridge back to autoloader
slot.
Physical
Tape Drive
Cartridge
Mailslot
HP StorageWorks D2D Backup System
1
2
3
4
5
6
7
8
Autoloader
Mailslot
HP StorageWorks D2D Backup System
Figure 38 Cartridge import
When you i
mport a cartridge:
• If it is less than 200 GB, the cartridge Max Size is set to 200 GB.
• If it is over 200 GB, the cartridge Max Size is set to 400 GB.
• If it is ov
Cartridges over 800 GB are not writeable.
•
The Used
er 400 GB, the cartridge Max Size is set to
Size is always reported correctly.
800 GB.
1
2
3
4
5
6
7
8
Autoloader
Tape spanning
Spanning of multiple physical cartridges from a single cartridge in the HP D2D Backup System is not
supported. The data from the cartridge on the HP D2D Backup System must not exceed the capacity of
the physical cartridge on the attached tape drive. Data from only one cartridge on the HP D2D Backup
System can be copied or exported at a time; it is not possible to select multiple slots and copy them to
a single physical cartridge.
Using
cartr
the Web Management interface to copy/export/import
idges
pe Attach web pages allow you to configure attached tape drives, run jobs manually or schedule
The T a
them, view status and job history.
88
Export, import and copy using an attached tape drive
Page 89

Configuration (Tape Attach)
This page allow
shows you the Ve
Click Select ne
firmware revision. If there is a cartridge loaded in the tape drive, its bar code and cartridge size are
also displayed (these fields have hyphens if no cartridge is loaded).
s you to view physical tape drives that are attached to the HP D2D Backup System. It
ndor Name, Product ID, serial number and information about any cartridge loaded.
xt to a specific tape drive to display more information about its serial number and
Adding tape drives to the list
If you subsequently attach an additional external tape drive after power on, click Rescan to add it
to the list of devices.
NOTE:
If an attached tape drive is not detected, refer to “Attached tape drive troubleshooting” on page 111
Upgrading tape drive firmware
Firmware for supported HP Ultrium tape drives may also be updated from this page. Please refer to
w
ww.hp.com/support for details of the latest firmware for your HP Ultrium Tape Drive and download
required files to a location on your host machine before you use this page.
Copy/Export/Import (Tape Attach)
This page allows you to initiate a manual export/import or copy operation.
D2D Backup System
89
Page 90

T o copy to attached tape drive
A copy operation may be performed upon any non blank cartridge in any numbered slot in an
autoloa
copied f
1. In the Web interface select Copy/Export/Import and locate the cartridge that you wish to copy in
der device or upon a non blank cartridge in a standalone tape drive device. The car tridge data is
rom the HP D2D Backup System to the physical tape drive.
the Cartridge list and click on the Copy button next to it. This displays the Setup page. (Or reports
an error if no tape drives are currently attached to the HP D2D Backup System.)
90
Export, import and copy using an attached tape drive
Page 91

2. Select the attached tape drive from the pull-down list, the required verify/compare option and
whether the physical car tridge should be u n lo aded after the operation completes. Click Start.
NOTE:
A Full Verify reads the data back after copy and compares it byte-by-byte with the original.
A Quick Verify also reads back the data, but only ensures that it can be read. It may save
some time if another tape device on the HP D2D Backup System is being accessed at the
same time as the copy operation. No Verify is the fastest option.
3. The process checks that media is loaded in the attached tape drive and that it is blank. If it is
not blank, you are given the option of overwriting it or canceling the job. (It is not possible to
append data.)
4. To view job p rogress information and any error messages, select the Status navigation topic.
To export to attached tape drive
An export operation may be performed upon any non blank cartridge in the Mail slot in an autoloader
device. The cartridge data is first copied from the HP D2D Backup System to the physical tape drive
and then subsequently deleted from the HP D2D Backup System. However, if an error occurs during the
process, the data is not deleted. It remains on the cartridge located in the Mail slot.
CAUTION:
Do not export cartridges that the backup application uses on a frequent basis as part of a rotation
strategy.
1. Use the backup application on the host to move the cartridge into the mail slot. This action removes
the cartridge from the numbered slot and leaves the slot empty. Backup applications have a number
of terms to describe this action, such as remove or eject. Refer to the documentation supplied with
your backup application for further details.
2. In the Web interface select Copy/Export/Import and locate the cartridge that you wish to export in
the Cartridge list. Click on the Export button next to it.
D2D Backup System
91
Page 92

3. This displays the Setup page. (Or reports an error if no tape drives are currently attached to the
HP D2D Backup System.) Select the attached tape drive from the pull-down list, the required
verify/compare option and whether the p hysical cartridge should be unloaded after the operation
completes. Click Start.
:
NOTE
lVerifyreads the data back after copy and compares it byte-by-byte with the original.
A Ful
ck Verify also reads back the data, but only ensures that it can be read. It may save
A Qui
some time if another tape device on the HP D2D Backup System is being accessed at the
same time as the copy operation. No Verify is the fastest option.
4. The process warns you that the cartridge data on the HP D2D Backup System will be removed once
it has been exported. You must click OK to continue. It also checks that media is loaded in the
attached tape drive and that it is blank. If it is not blank, you are given the option of overwriting it
or canceling the job.
92
Export, import and copy using an attached tape drive
Page 93

NOTE:
If you cancel the process, remember to use the backup application to move the car tridge
back from the mail slot to the cartridge slot.
5. To view job progress information and any error messages, select the Status navigation topic.
6. Once the export completes successfully, the cartridge is removed from the mail slot.
To import from attached tape drive
An import operation may be performed on a physical cartridge in the attached tape drive. The cartridge
is copied to the target device on the HP D2D Backup System. The operation will either automatically
create a new cartridge in the mail slot of an autoloader device or replace the d ata on a cartridge in a
standalone tape drive device. The m ail slot or cartridge must be empty.
NOTE:
Only one copy, export or import job may be run at a time, regardless of the number of physical tape drives
that are connected to the HP D2D Backup System. If a job is currently in progress, a warning message will be
displayed when you try to set up the new job. You must wait for the current job to complete.
1. For importing to an autoloader, locate the Mail slot in the Cartridge list and click on the Import button
next to it. (The Import button is only displayed if the Mail slot is empty - all the other fields contain
hyphens.) For importing to a standalone tape drive, click on the Import button in the cartridge row.
2. Once Import has been clicked, the Setup page is displayed. (O r an error is reported if no tape
drives are currently attached to the HP D2D Backup System.) Select the attached tape drive from the
D2D Backup System
93
Page 94

pull-down list, the required verify/compare option and whether the physical cartridge should be
unloaded after the operation completes. Click Start.
NOTE:
A Full Verify reads the data back after copy and compares it byte-by-byte with the original. A Quick
Verify also reads back the data, but only ensures that i t can be read. It may save some time if another
tape device on the HP D2D Backup System is being accessed at the same time as the copy operation.
No Verify is the fastest option.
3. The process warns you that when importing cartridge data to a tape drive device on the HP D2D
that contains a non blank cartridge, the data on the cartridge will be overwritten. You must click
OK to continue.
4. To view job progress information and any error messages, select the Status navigation topic.
5. Once the import has completed successfully, the cartridge is in the mail slot. Use the backup
application to move the data back into the autoloader slots. Backup applications have a number of
terms to describe this action, such as insert. Refer to the documentation supplied with your backup
application for further details.
• If it is less than 200 GB, the cartridge Max Size is set to 200 GB.
•Ifitisover200GB,thecartridgeMax Size is set to 400 GB.
• Ifitisover400GB,thecartridgeMax Size issetto
writeable.
•TheUsed Size is always reported correctly.
Status (Tape Attach)
This page displays the status of any current tape import/export or copy operations.
If a job is in progress, it shows cartridge barcode and target tape drive details and relevant p rogress
bars. The percentage completion is the amount of progress for all relevant activities in the operation,
such as export and verify (if requested).
800GB.Cartridgesover800GBarenot
94
Export, import and copy using an attached tape drive
Page 95

Onceanexportjobhascompletedsuccessfully,thecartridgeisremovedfromtheHPD2DBackup
System and the mail slot will have hyphens on the Cartridges page to show that it is empty (with the
option to Create ablankcartridge).
NOTE:
If no operations are currently in progress, a link will be provided to the Tape Attach Job History page.
To cancel a job
To cancel a job in progress, click Cancel .Youareaskedtoconfirm that you wish to cancel the job.
If a job is canceled during the copy, export or import phase, this cancels the transfer of data.
• For export and copy jobs, the data remains in the m ail slot or slot on the HP D2D Backup System
and the physical tape on the tape drive is rewound and erased.
• For import jobs, the data remains on the attached tape d rive.
If a job is canceled during the verify phase, the data has already been moved and it is only the verify
process that is canceled.
If an error occurs
Errors may o ccur if there is a tape read/write media problem, if there is not enough capacity on the
physical cartridge or if there is a verify error. Errors may also occur if the backup application accesses
the cartridge that is being exported/imported or copied.
Errors are reported as a dialog box on this page, which requires you to click OK to clear it.
If an error occurs during export or copy, you do not lose any data. The original data remains unaltered in
its original location on the HP D2D Backup System.
Schedule (Tape Attach)
This page allows you to create, edit and delete schedules for export and copy operations.
D2D Backup System
95
Page 96

• Four types of schedule are allowed: daily, weekly monthly by day and monthly by week.
• Up to 12 schedules may be created.
When an export or copy scheduled job is run, it automatically overwrites the car tridge in the tape d rive.
If the cartridge is not blank, there is no warning and no record in the job log.
NOTE:
The backup application is not automatically updated with any schedules created on the HP D2D Backup
System. The two are independent of each other. If you want the backup application schedules to work in
conjunction with a schedule on the HP D2D Backup System, you must co-ordinate them manually.
To create a schedule
1. Select Schedule from the Tape Attach section of the navigation side bar.
2. A scrollable list of existing schedules is displayed together with details of the next scheduled tape job.
3. From the pull-down lists below this list, select:
• The HP D2D Backup System device (autoloader or tape drive) that contains the data for which
you want to create a scheduled job.
• The frequency of the job: daily, weekly, monthly by day or monthly by week .
4. Click Create. Appropriate scheduling parameters for the backup device and job frequency are
displayed below.
NOTE:
The Create button is not present if you have already created 1 2 schedules. You must edit or delete
existing schedules if you want to create new ones.
96
Export, import and copy using an attached tape drive
Page 97

5. Enter the appropriate scheduling information and click Create.
Table8Jobscheduleparameters
This field is not relevant for daily jobs. For weekly jobs, select the day of the
Day:
week. For monthly by day, select a day between 1 and 31. For months with less
than 31 days, the job is always run on the last day of the month. For monthly by
week, select First/Second/Third/Fourth/Last week and then the day of the week.
Slot:
Time:
Active:
Unload After
Completion:
Attached tape drive:
Verify:
This is the
job, sele
applicab
Enter the time at which the job is to run. The system uses a 12-hour clock and you
must select am or pm.
Use this check box to control whether a schedule is active. The default is active
(box is checked).
Use this
scheduled job completes. The default is to remain loaded (the box is not checked).
Select the physical tape drive that is the target for the job.
This determines how the data that has been created on the physical car tridge is
to be verified with the original data on the HP D2D Backup system. There are
three options: None, Quick and Full. The default is Full.
slot that holds the d ata that is to be copied or exported. For a copy
cttheslotnumber.Foranexportjob,selectMailslot.(Thisfield is only
le to autoloaders as tape drives contain only a single cartridge.)
check box you to control whether the cartridge is unloaded once the
To view, edit or delete existing schedules
• LocatethescheduleinthescrollablelistandclickSelect to display the schedule details.
• Click Edit to make schedule details editable. Make the required changes and click Update.
(You cannot edit the schedule Type.)
• Click Delete to delete the schedule completely. You will b e prompted to confirm the delete action.
(Remember that you can also disable the job temporarily by editing the Active checkbox.)
Job History (Tape Attach)
page provides details of the last 50 tape export/import and copy jobs. The job type, bar code,
This
rt time, duration, verify options, data size, and job status are displayed. The most recent job is
sta
shown at the top of a scrollable list.
D2D Backup System
97
Page 98

Compression
The HP D2D
tape driv
will require less space o n a physical 200 GB tape cartridge. If moving data to a physical cartridge for
offsite storage, there is no need for concern if the data seems to utilize less space.
The capacity quoted for physical media assumes that the tape drive will be able to compress your data
and reduce the file sizes by 50%, but this can be achieved only if your data is not already compressed.
For exa
text files, high-resolution graphics are not. Most users have a mixture of compressed and uncompressed
data and seldom achieve 50% compression.
Some us
the storage space available to the backup application, but this can make backup jobs slower to run.
However, once software compression has been applied, the data is not further compressed when it is
exported to a physical tape directly at tached to the HP D2D Backup System. This ensures that the user
knows
Backup System does not apply hardware compression to backed-up data; HP StorageWorks
es do apply hardware compression. Therefore, 200 GB of data on the HP D2D Backup System
mple,JPEGpictures,movies,musicorZIPfiles, are already in compressed formats: spreadsheets,
ers may choose to enable software compression from their backup application to increase
exactly how much physical cartridge space is required for export or copy.
98
Export, import and copy using an attached tape drive
Page 99

10 Copy using a tape drive attach ed to the host
In this chapter:
•
“Requirements” on page 99
•
“Using a tape drive connected to host” on page 99
•
“Compression” on page 100
Requirement
If you wish to
you need:
• A separate tape device, such as an HP StorageWorks Ultrium 460 or 448 tape drive, that can
be connecte
• A backup application, running on the host, that allows you to copy data from the cartridge on
your HP D2D Backup System to the physical cartridge.
NOTE:
It is not po
supported on tape drives that are connected directly to the HP D2D Backup System. See
“Export, import and copy to an attached tape drive”onpage83
s
copy data from the HP D2D Backup System to a tape drive connected to the host machine,
d directly to your host.
ssible to export and import data using this method. Export and import are only
Tape drives supported
The HP StorageWorks Ultrium 448 or 460 tape drive is the ideal device for all copying processes
because the physical cartridge size matches the maximum configured cartridge size on the HP D2D
Backup System. However, by spanning across several tapes, you can also use a tape drive with a lower
capacity, such as an HP StorageWorks DAT 72 tape drive. If your backup application will not allow you
to span tapes, you may want to use the Web Management Interface to reduce the maximum configured
cartridge size on the HP D2D Backup System. However, you must do this when you firstcreatethe
autoloader or additional slots and before you have used the autoloader in any way with your backup
application. See “To edit maximum size” on page 70.
NOTE:
Always refer to h
ttp://www.hp.com/go/connectto find out which tape drive models are recommended.
Archivefromhosttotapeprocess
This process is controlled by the backup application. For example, HP StorageWorks Data Protector
Express calls it a Copy job.
D2D Backup System
99
Page 100

PC Server
Server
SCSI
Card
LAN
Figure 39 Ar
Further information
It is not possible to describe how to carry out this operation because it is controlled solely from the backup
application and different applications operate in different ways. HP provides a number of white papers
that describe show to use this function with specific applications; see h
refer to the documentation that was supplied with your backup application.
Compression
The HP D2D
tape driv
will require less space o n a physical 200 GB tape cartridge. If moving data to a physical cartridge for
offsite storage, there is no need for concern if the data seems to utilize less space.
Backup System does not apply hardware compression to backed-up data; HP StorageWorks
es do apply hardware compression. Therefore, 200 GB of data on the HP D2D Backup System
Switch
HP StorageWorks D2D
Backup System
chiving to tape
Backup Data
Copy Data
Tape Drive
ttp://www.hp.com/support.Or
The capacity quoted for physical media assumes that the tape drive will be able to compress your data
and reduce the file sizes by 50%, but this can be achieved only if your data is not already compressed.
For exa
text files, high-resolution graphics are not. Most users have a mixture of compressed and uncompressed
data and seldom achieve 50% compression.
Some us
the storage space available to the backup application, but this can make backup jobs slower to run.
However, once software compression has been applied, the data is not further compressed when it is
exported to a physical tape directly at tached to the HP D2D Backup System. This ensures that the user
knows
mple,JPEGpictures,movies,musicorZIPfiles, are already in compressed formats: spreadsheets,
ers may choose to enable software compression from their backup application to increase
exactly how much physical cartridge space is required for export or copy.
100
Copy using a tape drive attached to the host
 Loading...