

Page 1

334244-001.book Page i Monday, August 11, 2003 2:12 PM
Startup Guide
HP Tablet PC Series Docking Station
Document Part Number: 334244-001
October 2003
This guide provides information on docking the tablet PC in the
portrait position, enabling the default desktop video profiles, and
undocking the tablet PC. It also provides operating instructions
and troubleshooting procedures for common docking problems.
Page 2

334244-001.book Page iii Monday, August 11, 2003 2:12 PM
© 2003 Hewlett-Packard Development Company, L.P.
Microsoft and Windows are trademarks of Microsoft Corporation in the
U.S. and/or other countries.
The information contained herein is subject to change without notice. The
only warranties for HP products and services are set forth in the express
limited warranty statements accompanying such products and services.
Nothing herein should be construed as constituting an additional warranty.
HP shall not be liable for technical or editorial errors or omissions
contained herein.
Startup Guide
HP Tablet PC Series Docking Station
First Edition October 2003
Reference Number: TC1100/TR1105
Document Part Number: 334244-001
Page 3
334244-001.book Page iii Monday, August 11, 2003 2:12 PM
1 Getting Started
Unpacking the Box. . . . . . . . . . . . . . . . . . . . . . . . . . . . . . 1–2
Identifying the Docking Station Components . . . . . . . . . 1–3
Front View. . . . . . . . . . . . . . . . . . . . . . . . . . . . . . . . . 1–3
Right Side View. . . . . . . . . . . . . . . . . . . . . . . . . . . . . 1–4
Back View . . . . . . . . . . . . . . . . . . . . . . . . . . . . . . . . . 1–5
Left Side View. . . . . . . . . . . . . . . . . . . . . . . . . . . . . . 1–6
Using This Product Safely . . . . . . . . . . . . . . . . . . . . . . . . 1–7
Contents
2 Docking and Undocking the Tablet PC
Connecting to a Power Source . . . . . . . . . . . . . . . . . . . . . 2–2
Docking the Tablet PC in the Portrait Position . . . . . . . . 2–3
Keyboard Considerations . . . . . . . . . . . . . . . . . . . . . 2–3
Changing the Orientation and Viewing Angle. . . . . . . . . 2–9
Changing the Orientation. . . . . . . . . . . . . . . . . . . . . . 2–9
Changing the Viewing Angle of the Tablet PC. . . . 2–11
Using an External Keyboard and Mouse . . . . . . . . . . . . 2–13
Using MultiBay Devices . . . . . . . . . . . . . . . . . . . . . . . . 2–15
Inserting and Removing Devices. . . . . . . . . . . . . . . 2–16
Undocking the Tablet PC. . . . . . . . . . . . . . . . . . . . . . . . 2–19
Turning the System On and Off. . . . . . . . . . . . . . . . . . . 2–20
3 Enabling the Default Desktop Video Profiles
Setting Up the Hardware . . . . . . . . . . . . . . . . . . . . . . . . . 3–2
Enabling the Default Profiles. . . . . . . . . . . . . . . . . . . . . . 3–3
Startup Guide iii
Page 4

334244-001.book Page iv Monday, August 11, 2003 2:12 PM
Contents
4 Getting Help
HP Customer Care . . . . . . . . . . . . . . . . . . . . . . . . . . . . . . 4–1
HP Web Site. . . . . . . . . . . . . . . . . . . . . . . . . . . . . . . . . . . 4–2
HP Authorized Reseller . . . . . . . . . . . . . . . . . . . . . . . . . . 4–2
Troubleshooting Problems, Causes and Solutions. . . . . . 4–3
Docking Problems . . . . . . . . . . . . . . . . . . . . . . . . . . . 4–3
Tablet PC Orientation Problems . . . . . . . . . . . . . . . . 4–4
MultiBay Device Problems . . . . . . . . . . . . . . . . . . . . 4–4
Index
iv Startup Guide
Page 5

334244-001.book Page 1 Monday, August 11, 2003 2:12 PM
This chapter lists the contents of the packing box and helps you to
identify the Tablet PC Docking Station components.
For information on specific tablet PC components, refer to the
✎
Hardware Guide provided with your tablet PC or the Reference
Guide on the Documentation Library CD included with this
product.
1
Getting Started
Before docking your tablet PC to the Docking Station, read the
safety instructions in “Using This Product Safely” later in this
chapter and the Important Safety Information document included
with this product.
Startup Guide 1–1
Page 6
334244-001.book Page 2 Monday, August 11, 2003 2:12 PM
Getting Started
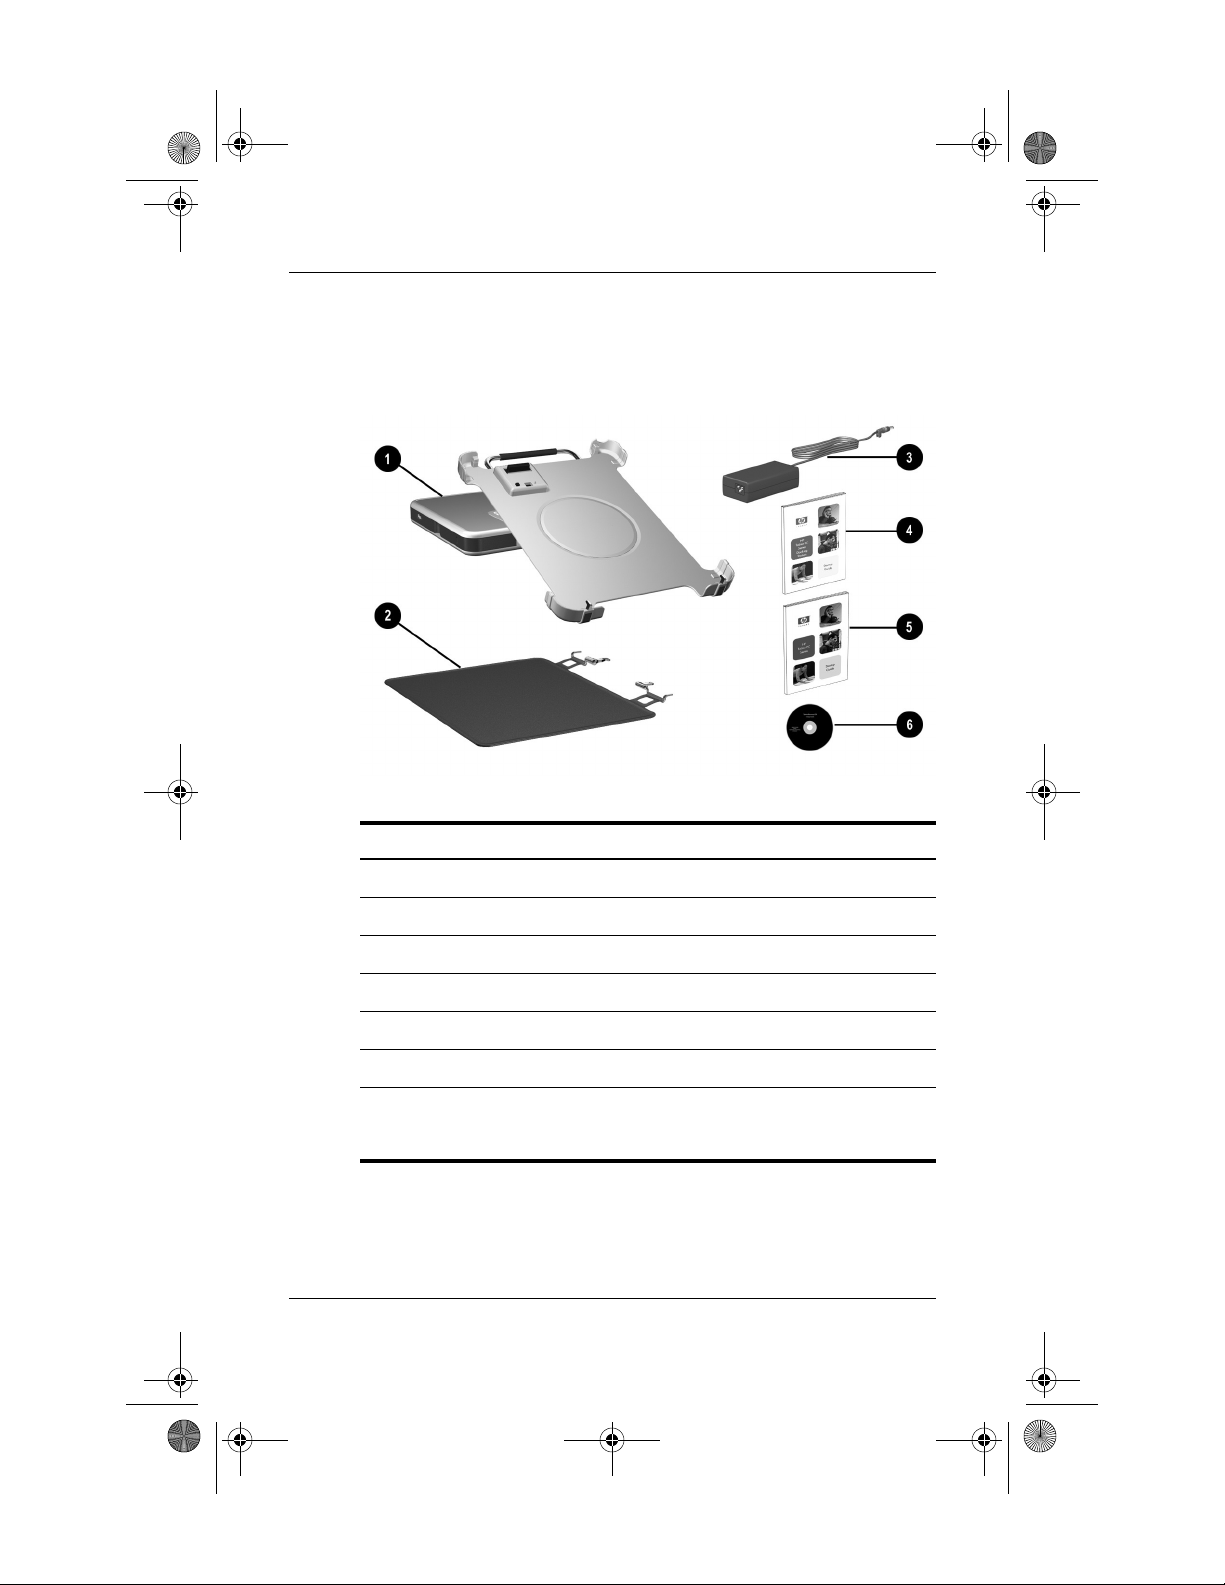
Unpacking the Box
Make sure you unpack the following items.
Item Description
Tablet PC Docking Station
1
Screen protector
2
AC adapter
3
Warranty and service information
4
This guide,
5
Documentation Library
6
The
✎
1–2 Startup Guide
Documentation Library
documentation, such as the
Comfort Guide,
Tablet PC Docking Station Startup Guide
CD
CD provides additional product
and
Regulatory Agency Notices
Reference Guide, Safety &
.
Page 7
334244-001.book Page 3 Monday, August 11, 2003 2:12 PM
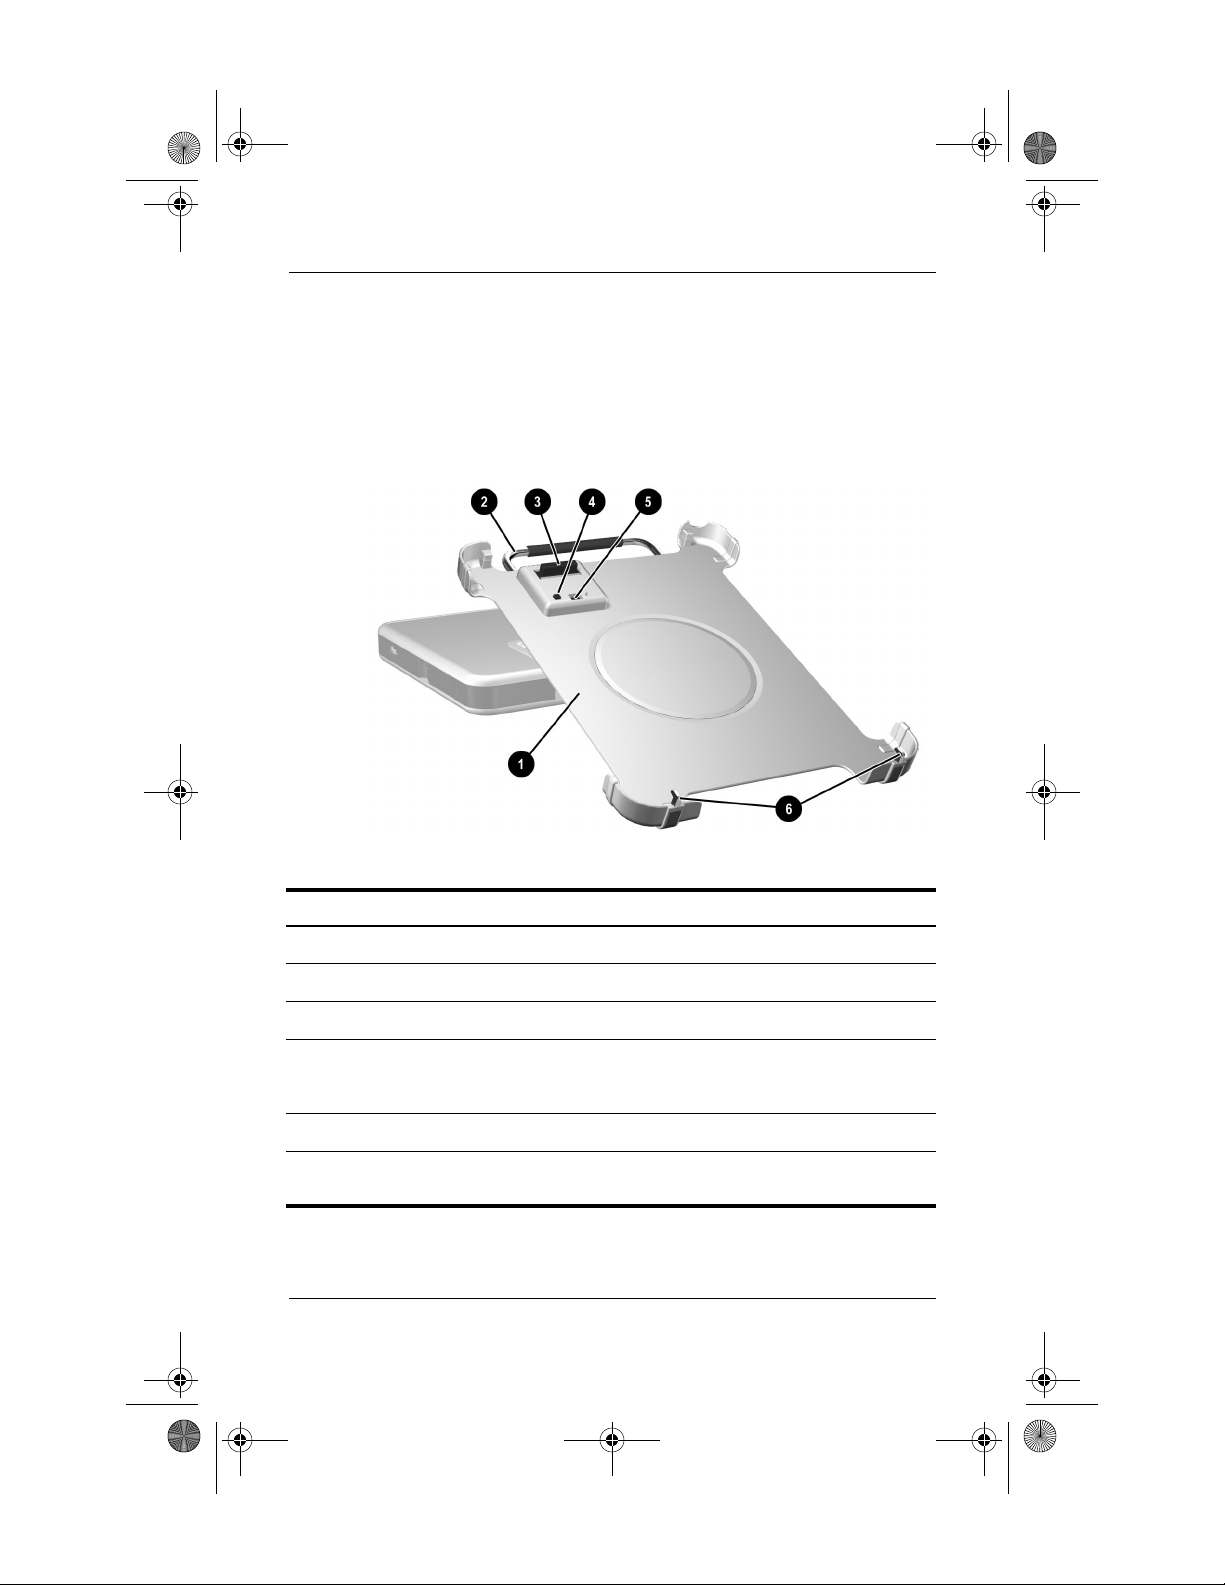
Identifying the Docking Station
Components
Front View
Getting Started
Component Description
Docking stand Holds the tablet PC when it is docked.
1
Release handle Ejects the tablet PC from the docking stand.
2
Docking connector Connects to the tablet PC.
3
Docking eject pin Disconnects the tablet PC from the docking
4
Docking restraint latch Secures the tablet PC to the docking stand.
5
Docking alignment
6
brackets (2)
Startup Guide 1–3
stand docking connectors when the release
handle is pulled.
Fit into the tablet PC docking alignment slots
to align the tablet PC in the docking stand.
Page 8
334244-001.book Page 4 Monday, August 11, 2003 2:12 PM
Getting Started
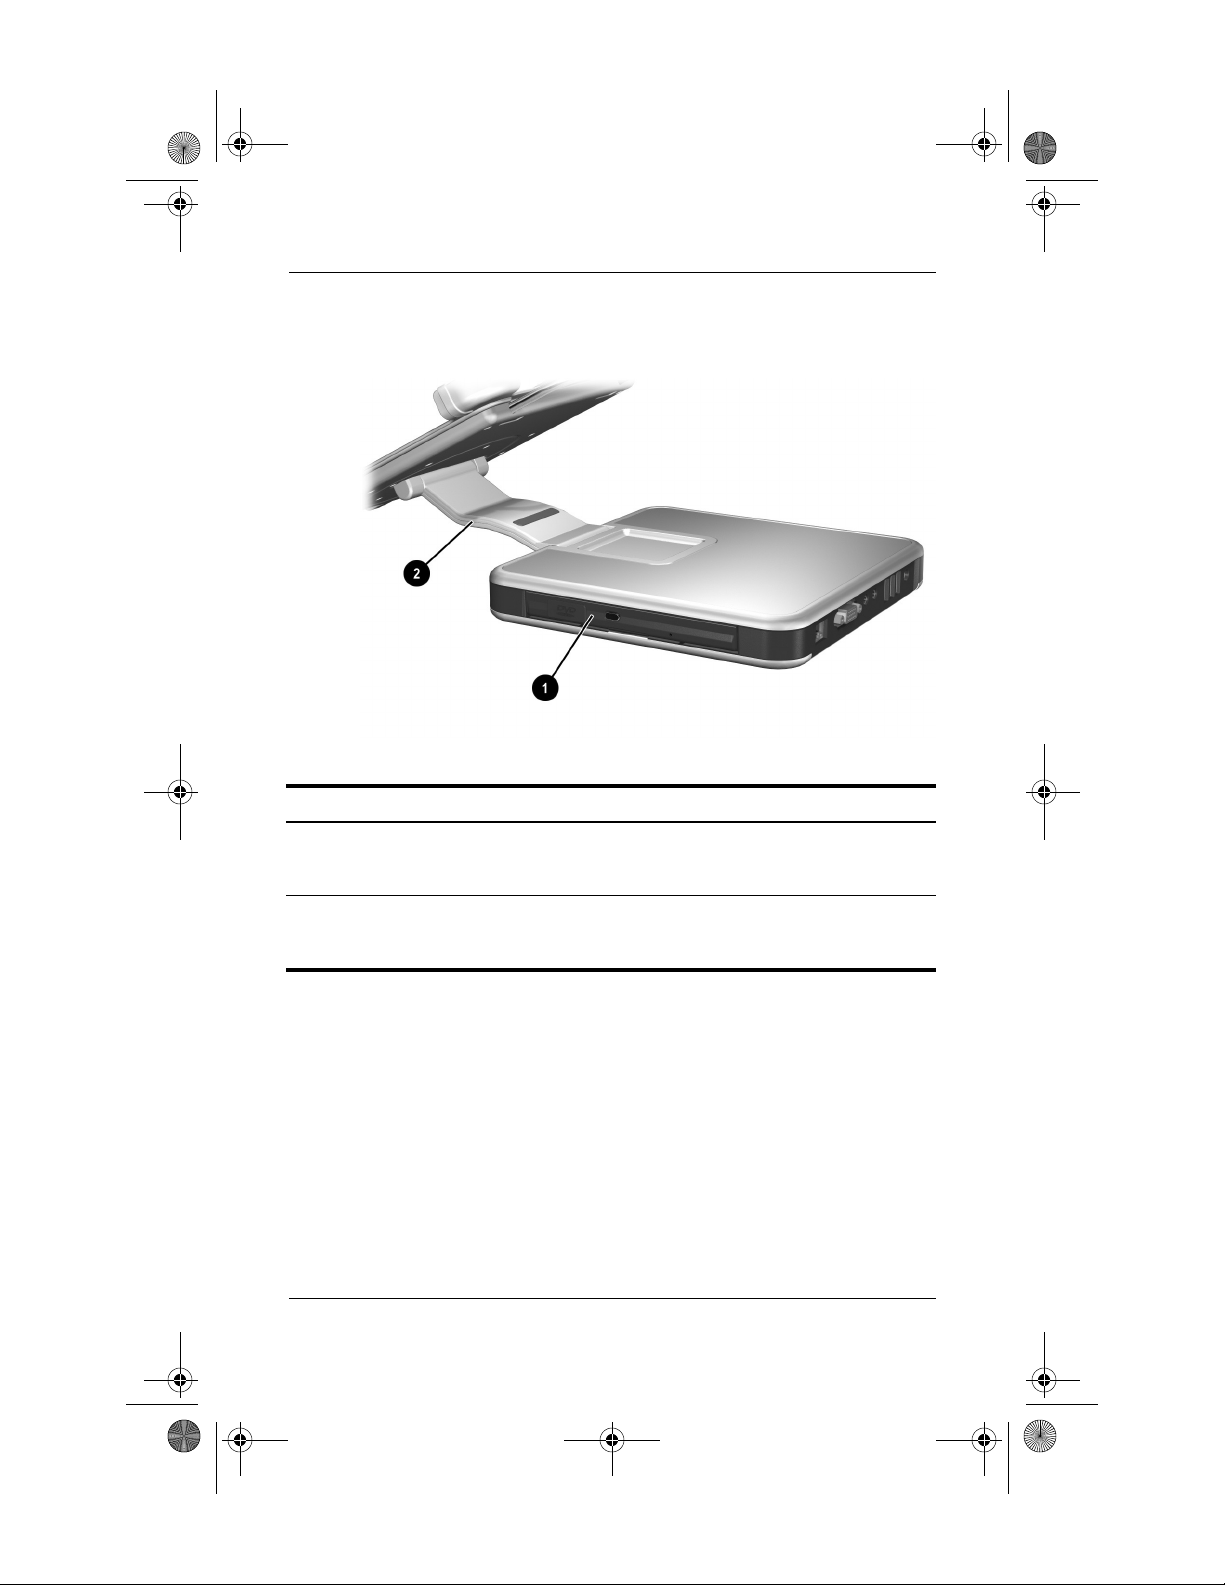
Right Side View
Component Description
MultiBay Supports a diskette drive, CD-ROM or
1
Pivot arm Tilts the docking stand forward and backward
2
1–4 Startup Guide
CD-RW drive, DVD drive, DVD/CD-RW drive,
or second hard drive.
to enable different viewing angles and
different docking modes.
Page 9

334244-001.book Page 5 Monday, August 11, 2003 2:12 PM
Back View
Getting Started
Component Description
RJ-45 network jack Connects a network cable.
1
External monitor
2
connector
Audio line-out jack Connects optional stereo headphones or
3
Audio line-in jack Connects the stereo audio function of
4
USB connectors (3) Connect optional USB devices.
5
AC power connector Connects an AC adapter.
6
When the tablet PC is docked, the RJ-45 network cable must be
✎
connected to the Docking Station and
information, refer to the
Library
CD.
Startup Guide 1–5
Connects an optional external monitor or
overhead projector.
powered stereo speakers, and connects the
audio function of an audio/video device such
as a television or VCR.
optional audio devices such as CD players.
not
to the tablet PC. For more
Reference Guide
on the
Documentation
Page 10

334244-001.book Page 6 Monday, August 11, 2003 2:12 PM
Getting Started
Left Side View
Component Description
External MultiBay
1
connector
MultiBay release lever Ejects a MultiBay device from the bay.
2
Security cable slot Attaches an optional security cable that
3
If an optional External MultiBay device is connected to a USB
✎
connector, the device must also be connected to AC power. See the
“Right Side View” section earlier in this chapter. If an External MultiBay
device is connected to the External MultiBay connector, it is not
necessary to connect the External MultiBay device to AC power.
1–6 Startup Guide
Connects optional USB devices.
secures the Docking Station to an immovable
object and disables the MultiBay release
lever.
Page 11
334244-001.book Page 7 Monday, August 11, 2003 2:12 PM
Using This Product Safely
This equipment has been tested and found to comply with the
limits for a Class B digital device, pursuant to part 15 of the
FCC Rules. For more information, refer to the Regulatory Agency
Notices guide on the Documentation Library CD.
WARNING: To reduce the risk of electric shock or damage to your
equipment:
Å
■ Plug the power cord into an electrical outlet that is easily accessible
at all times.
■ Disconnect power from the product by unplugging the power cord
from the electrical outlet.
■ If provided with a three-pin attachment plug on your power cable,
plug the cable into a grounded (earthed) three-pin outlet. Do not
disable the power cord grounding pin. The grounding pin is an
important safety feature.
Getting Started
WARNING: To reduce the risk of serious injury, read the Safety &
Comfort Guide. It describes proper workstation setup, posture, and
Å
health and work habits for computer users, and provides important
electrical and mechanical safety information. This guide is located on
the Web at http://www.hp.com/ergo and on the Documentation Library
CD that is included with the product.
For additional safety instructions, read the Important Safety
Information document included with this product.
Startup Guide 1–7
Page 12

334244-001.book Page 8 Monday, August 11, 2003 2:12 PM
Getting Started
1–8 Startup Guide
Page 13
334244-001.book Page 1 Monday, August 11, 2003 2:12 PM
Docking and Undocking
This chapter provides the following procedures:
■ Connecting to a power source
■ Docking the tablet PC (in portrait position with or without the
keyboard attached)
■ Changing the tablet PC orientation and viewing angle
2
the Tablet PC
■ Using an external keyboard and mouse
■ Using optional MultiBay devices
■ Turning the system on and off
This guide provides instructions for docking the tablet PC in the
✎
portrait position. Refer to the Reference Guide on the
Documentation Library CD for additional docking instructions,
such as docking the tablet PC in the landscape position.
Startup Guide 2–1
Page 14

334244-001.book Page 2 Monday, August 11, 2003 2:12 PM
Docking and Undocking the Tablet PC
Connecting to a Power Source
The Docking Station must be connected to external power for
operation.
WARNING: To reduce the risk of electric shock or damage to the
Å
equipment:
■ Do not disable the power cord grounding plug. The grounding plug
is an important safety feature.
■ Plug the power cord into a grounded (earthed) electrical outlet that
is easily accessible at all times.
■ Disconnect power from the Docking Station by unplugging the
power cord from the electrical outlet.
■ Do not place anything on power cords or cables. Arrange them so
that no one can accidentally step on or trip over them. Do not pull
on a cord or cable. When unplugging from the electrical outlet,
grasp the cord by the plug.
To connect to a power source:
1. Connect the AC adapter cable to the AC power connector on
the back of the Docking Station 1.
2. Connect the power cord to the AC adapter 2.
3. Plug the power cord into an electrical outlet 3.
Connecting to a power source
2–2 Startup Guide
Page 15

334244-001.book Page 3 Monday, August 11, 2003 2:12 PM
Docking and Undocking the Tablet PC
Docking the Tablet PC in the Portrait
Position
When docking the tablet PC, the tablet PC can be:
■ Powered on or off
■ Docked with or without the optional keyboard
If the screen protector is attached, it must be resting on the
tablet PC screen, and not folded back, to prevent blocking the
docking connector. For more information on the screen protector,
refer to the Reference Guide on the Documentation Library CD.
To ensure that the docking connector on the tablet PC is correctly
✎
connected to the docking connector on the Docking Station,
follow the procedures in this section carefully.
Keyboard Considerations
The docking stand is designed to accommodate the tablet PC with
or without the keyboard attached.
Without the Keyboard Attached
When the tablet PC is correctly docked without the keyboard
attached, the tablet PC will not be flush against the docking stand.
Startup Guide 2–3
Page 16

334244-001.book Page 4 Monday, August 11, 2003 2:12 PM
Docking and Undocking the Tablet PC
With the Keyboard Attached
The optional keyboard includes a docking connector pass-through
so that the tablet PC can be docked with the keyboard attached.
Before docking with the keyboard attached, close the tablet PC
and keyboard, then slide the keyboard latch to the right to lock
them together.
Securing the keyboard to the tablet PC
Docking and undocking the tablet PC with the keyboard attached
✎
and opened is not supported.
2–4 Startup Guide
Page 17

334244-001.book Page 5 Monday, August 11, 2003 2:12 PM
To dock the tablet PC in the portrait position:
Before you begin, place the Docking Station and the docking
✎
stand on a firm, flat surface.
1. Align the docking alignment slots on the lower edge of the
tablet PC with the alignment brackets on the docking stand.
Then, while supporting the back of the docking stand with
one hand, lower the tablet PC into the docking stand until the
lower edge of the tablet PC is firmly seated.
To prevent misdocking:
Ä
❏
Lower
the tablet PC
the tablet PC
❏ Lower the 2 alignment slots on the tablet PC onto the 2
alignment brackets on the docking stand simultaneously
and with equal pressure.
❏ The non-skid rubber pads on the bottom edge of the
docking stand should rest against a firm, flat surface,
such as a desk.
against
Docking and Undocking the Tablet PC
into
the docking stand; do not
the docking stand.
push
Seating the lower edge of the tablet PC in the docking stand in the
portrait position
Startup Guide 2–5
Page 18

334244-001.book Page 6 Monday, August 11, 2003 2:12 PM
Docking and Undocking the Tablet PC
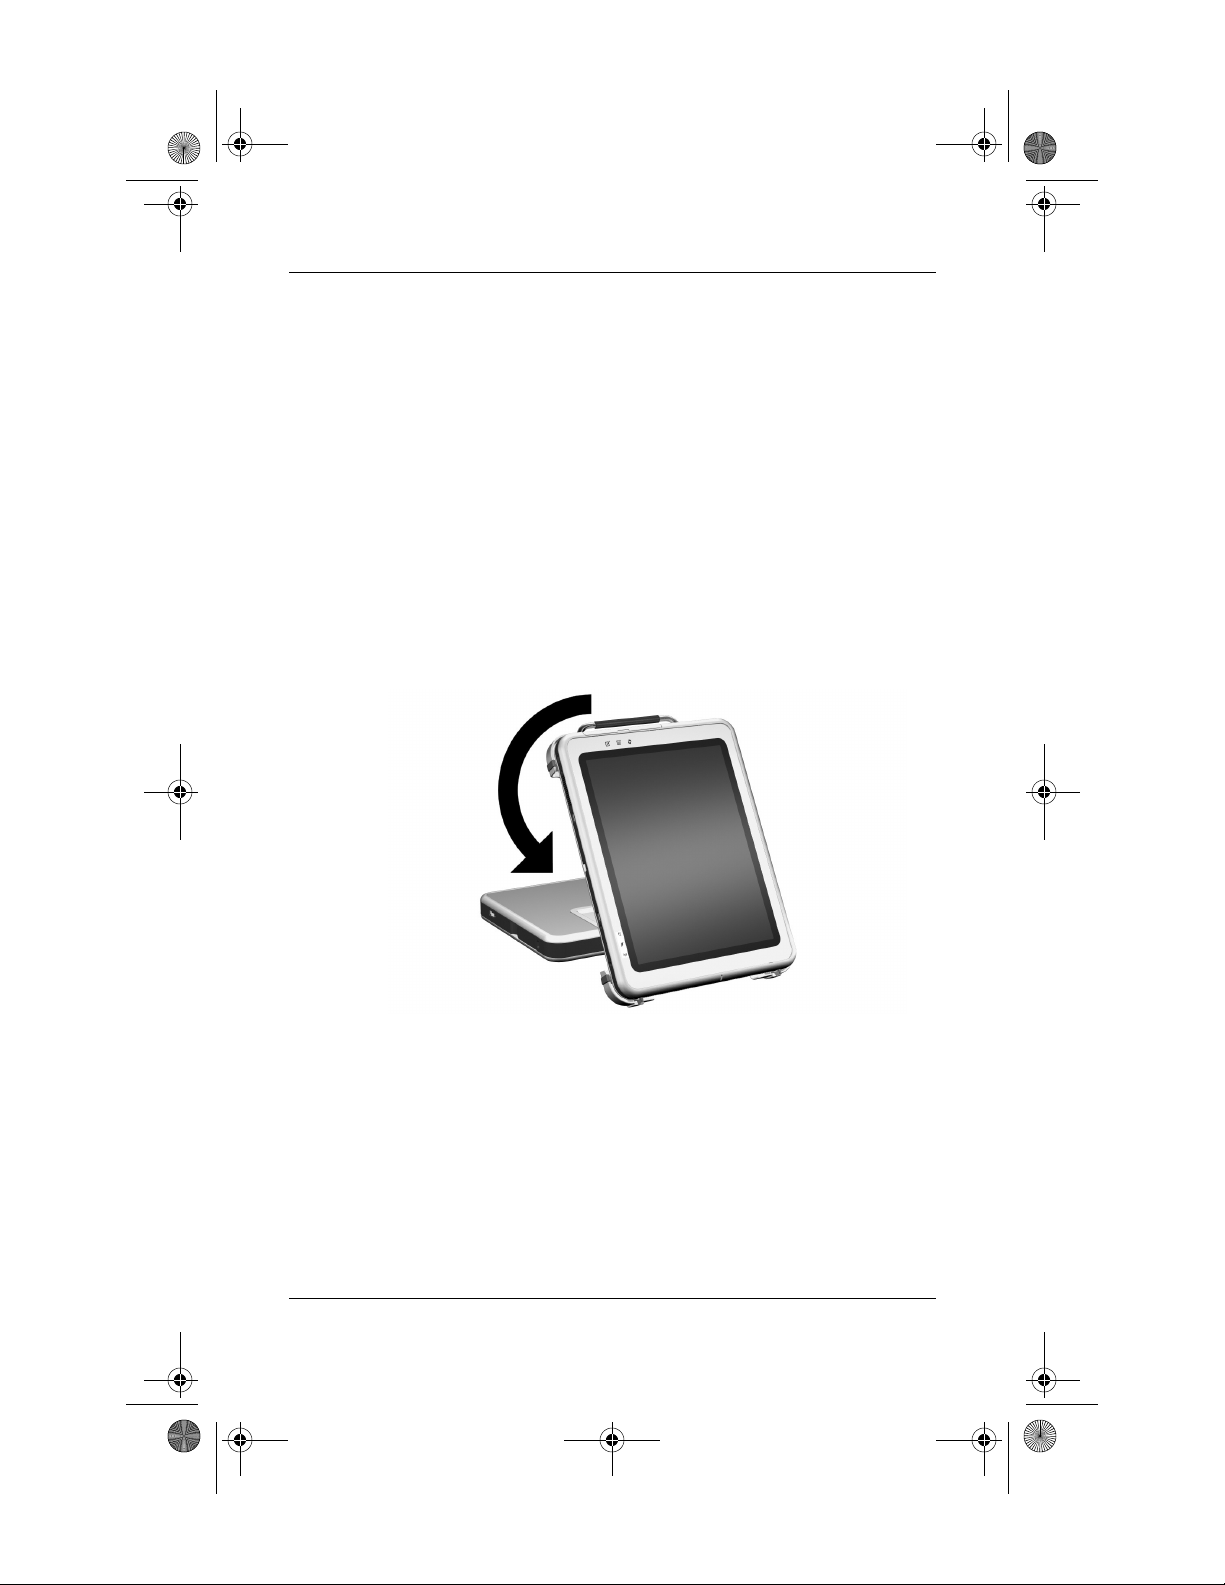
2. Align the docking connector on the back of the tablet PC with
the docking connector on the docking stand. Then pivot the
top of the tablet PC toward the top of the docking stand until
the connectors are positioned for the connection.
To prevent misdocking, be sure the alignment slots on the
Ä
lower edge of the tablet PC are correctly inserted into the
alignment brackets on the docking base before positioning
the docking connectors for the connection.
Aligning and positioning the docking connectors in the portrait
position
2–6 Startup Guide
Page 19

334244-001.book Page 7 Monday, August 11, 2003 2:12 PM
3. Using both hands, place your thumbs on the pressure points
shown below on the front of the tablet PC and your fingers on
the pressure points shown below on the back of the docking
stand. Then squeeze the tablet PC and docking stand
connectors together firmly. Be sure to apply equal and
simultaneous pressure on all 4 pressure points. A snap and
click can be heard when the attachment and connection are
secure.
Docking and Undocking the Tablet PC
Identifying the pressure points on the tablet PC and the docking
stand in the portrait position
Startup Guide 2–7
Page 20

334244-001.book Page 8 Monday, August 11, 2003 2:12 PM
Docking and Undocking the Tablet PC
If the docking stand is positioned in writing mode, simply press
the tablet PC into place. For more information on writing mode,
refer to the Reference Guide on the Documentation Library CD.
Docking the tablet PC in writing mode
To set your desktop video profiles for the first time or customize
✎
your settings, see Chapter 3, “Enabling the Default Desktop
Video Profiles.”
2–8 Startup Guide
Page 21
334244-001.book Page 9 Monday, August 11, 2003 2:12 PM
Docking and Undocking the Tablet PC
Changing the Orientation and Viewing
Angle
The Docking Station enables you to change the orientation of the
tablet PC. You can change the orientation from portrait (vertical)
to landscape (horizontal). You can also change the angle of the
tablet PC from a viewing position (viewing mode) to a
handwriting position (writing mode).
Changing the Orientation
To change the tablet PC orientation from portrait to landscape:
» Turn the tablet PC counterclockwise.
Changing the tablet PC from portrait to landscape
Startup Guide 2–9
Page 22

334244-001.book Page 10 Monday, August 11, 2003 2:12 PM
Docking and Undocking the Tablet PC
To change the tablet PC orientation from landscape to portrait:
» Turn the tablet PC clockwise.
Changing the tablet PC from landscape to portrait
Changing the orientation also automatically changes the
orientation of the images on the tablet PC screen.
The docking handle should only be on the top or left.
✎
2–10 Startup Guide
Page 23

334244-001.book Page 11 Monday, August 11, 2003 2:12 PM
Docking and Undocking the Tablet PC
Changing the Viewing Angle of the
Tablet PC
The pivot arm that connects the docking stand to the base of the
Docking Station enables you to change the angle of the tablet PC
from viewing mode to writing mode.
Tablet PC in viewing mode
Startup Guide 2–11
Page 24

334244-001.book Page 12 Monday, August 11, 2003 2:12 PM
Docking and Undocking the Tablet PC
Tablet PC in writing mode
Changing the tablet PC between viewing mode and writing
mode activates the NVIDIA nView Desktop Manager utility that
automatically changes the mode of the tablet PC. For more
information, see Chapter 3, “Enabling the Default Desktop Video
Profiles.”
2–12 Startup Guide
Page 25

334244-001.book Page 13 Monday, August 11, 2003 2:12 PM
Docking and Undocking the Tablet PC
Using an External Keyboard and
Mouse
To use a keyboard and pointing device while the tablet PC is
docked:
» Connect an external USB keyboard and mouse to the
Docking Station.
Make sure that your desktop video profiles are enabled. See
✎
Chapter 3, “Enabling the Default Desktop Video Profiles,” for
more information.
Tablet PC correctly docked with the keyboard attached
Startup Guide 2–13
Page 26

334244-001.book Page 14 Monday, August 11, 2003 2:12 PM
Docking and Undocking the Tablet PC
Docking and undocking the tablet PC with the keyboard attached
and opened is not supported.
Tablet PC incorrectly docked with the keyboard attached
2–14 Startup Guide
Page 27

334244-001.book Page 15 Monday, August 11, 2003 2:12 PM
Using MultiBay Devices
The following MultiBay devices can be used with the
docking station:
■ Diskette drive
■ CD-ROM or CD-RW drive
■ DVD drive
■ DVD/CD-RW drive
■ Hard drive
CAUTION: Static electricity can damage electronic components. Before
beginning the following procedures, make sure you are grounded
Ä
(discharged of static electricity) by briefly touching a grounded,
unpainted metal object or surface.
Docking and Undocking the Tablet PC
Startup Guide 2–15
Page 28

334244-001.book Page 16 Monday, August 11, 2003 2:12 PM
Docking and Undocking the Tablet PC
Inserting and Removing Devices
Device Action Power State
■ Diskette
Inserting Off
■ Hard drive
■ CD-RW
Removing Off
■ DVD /CD- RW
■ CD
■ DVD
Inserting Off or on (Not Standby or Hibernation)
Removing Off or on (Not Standby or Hibernation)
To insert a MultiBay device:
» Slide the device into the bay.
Inserting a MultiBay device
2–16 Startup Guide
Page 29

334244-001.book Page 17 Monday, August 11, 2003 2:12 PM
To eject a MultiBay device:
CAUTION: Be sure all MultiBay activity has stopped before removing a
drive from the MultiBay. Removing a drive before MultiBay activity has
Ä
stopped can result in data loss.
1. Pull the MultiBay release lever.
Docking and Undocking the Tablet PC
Pulling the MultiBay release lever
If a security cable is inserted in the security cable slot, the cable
✎
must be removed before the release lever can be pulled.
Startup Guide 2–17
Page 30

334244-001.book Page 18 Monday, August 11, 2003 2:12 PM
Docking and Undocking the Tablet PC
2. Pull the device out of the bay.
Removing a MultiBay device
2–18 Startup Guide
Page 31

334244-001.book Page 19 Monday, August 11, 2003 2:12 PM
Undocking the Tablet PC
When undocking, the tablet PC can be powered on or off.
To undock the tablet PC:
1. Pull the release handle.
Docking and Undocking the Tablet PC
Pulling the release handle
Startup Guide 2–19
Page 32

334244-001.book Page 20 Monday, August 11, 2003 2:12 PM
Docking and Undocking the Tablet PC
2. Pull the tablet PC away and out of the docking stand.
Removing the tablet PC from the docking stand
Turning the System On and Off
When the tablet PC is docked in the Tablet PC Docking Station,
turn the system on or off using the power button on the tablet PC.
Power to the tablet PC can be on or off when docking or
undocking.
2–20 Startup Guide
Page 33

334244-001.book Page 1 Monday, August 11, 2003 2:12 PM
Enabling the Default Desktop
The tablet PC desktop video profiles enable you to optimize your
work environment for your preferred work style. The NVIDIA
nView Desktop Manager utility automatically changes the video
profile (settings) of the tablet PC when you dock and undock it in
the Docking Station.
3
Video Profiles
The tablet PC is shipped with only the undocked profile enabled.
✎
All additional profiles are disabled. HP recommends that you
enable the profiles when you add a Tablet PC Docking Station,
full-sized monitor, or external keyboard and mouse to the system.
To begin using the desktop video profiles:
■ Set up the hardware.
■ Enable the default profiles.
For information on customizing the desktop video profiles, refer
✎
to the Reference Guide on the Documentation Library CD.
Startup Guide 3–1
Page 34

334244-001.book Page 2 Monday, August 11, 2003 2:12 PM
Enabling the Default Desktop Video Profiles
Setting Up the Hardware
Ensure that the hardware is arranged so that the tablet PC display
and the external monitor are in a comfortable viewing position
and so that the keyboard, mouse, and Docking Station are easy to
reach.
Tablet PC docked in viewing mode with external monitor, keyboard,
and mouse
To set up the hardware:
1. Connect a full-sized monitor, USB keyboard, and USB
mouse to the Docking Station (optional).
2. With the tablet PC turned off, dock the tablet PC in the
Docking Station. (See Chapter 2, “Docking and Undocking
the Tablet PC.”)
3. Turn on the tablet PC.
3–2 Startup Guide
Page 35

334244-001.book Page 3 Monday, August 11, 2003 2:12 PM
Enabling the Default Desktop Video Profiles
Enabling the Default Profiles
To enable the default profiles:
1. Select Start > Control Panel > Other Control Panel Options >
NVIDIA > nView Desktop Manager icon > Profiles tab.
Alternatively, you can right-click on the desktop, then
✎
select nView Properties > nView Desktop Manager icon >
Profiles tab.
2. In the upper portion of the Profiles tab, select the check boxes
for the profiles you want to activate.
3. Select the OK button.
4. Test the default video profile:
a. Undock the tablet PC.
b. Dock the tablet PC.
It is normal for the screen to flicker or be dark momentarily or for
✎
the orientation to be different than expected until a profile is
completely activated.
When you dock the tablet PC, the default video profile is
activated:
■ The image on the external monitor is displayed in
landscape view.
■ The image on the external monitor is an extension of the
Windows desktop from the tablet PC.
■ The taskbar is displayed on the external monitor.
■ Application windows may be dragged from one monitor to
another.
Experiment with the default profiles to determine whether they
are suitable for your work style.
Startup Guide 3–3
Page 36

334244-001.book Page 4 Monday, August 11, 2003 2:12 PM
Enabling the Default Desktop Video Profiles
3–4 Startup Guide
Page 37

334244-001.book Page 1 Monday, August 11, 2003 2:12 PM
HP Customer Care
In North America, call HP Customer Care at 1-800-474-6836.
This service is available 24 hours a day, 7 days a week.
For continuous quality improvement, calls may be recorded or
✎
monitored.
4
Getting Help
Outside North America, call the nearest HP Customer Care.
Telephone numbers for HP Customer Care are listed on the HP
Web site. Access the HP Web site by logging on to the Internet at
http://www.hp.com. Select your country or region from the
drop-down list.
Be sure to have the following items and information available
before you call HP:
■ Your Tablet PC Docking Station
■ Serial numbers of all HP hardware (located on the product
identification labels attached to the hardware)
■ Conditions under which the problem has occurred
■ Hardware and software you are using (if applicable)
■ A list of the devices and error messages received
Startup Guide 4–1
Page 38

334244-001.book Page 2 Monday, August 11, 2003 2:12 PM
Getting Help
HP Web Site
The HP Web site has the latest information on this product as well
as the latest drivers. You can access the HP Web site by logging
on to the Internet at
http://www.hp.com.
HP Authorized Reseller
For the name of your nearest HP authorized reseller:
■ In the United States, call 1-800-345-1518.
■ In Canada, call 1-800-263-5868.
■ In other regions, refer to the HP Web site for locations and
telephone numbers or the Worldwide Telephone Numbers
booklet (in English only) included with the tablet PC.
4–2 Startup Guide
Page 39

334244-001.book Page 3 Monday, August 11, 2003 2:12 PM
Getting Help
Troubleshooting Problems, Causes and
Solutions
This section provides common problems, causes, and solutions
when docking the tablet PC, changing the orientation, and
inserting a multibay device. For additional troubleshooting
information, see the Reference Guide on the Documentation
Library CD.
Docking Problems
Problem Possible Cause Solution
Tablet PC is not
properly docked.
Tablet PC will
not undock.
The tablet PC is not
fully seated.
The tablet PC is not
aligned with the
docking stand
alignment brackets.
The eject pin may not
have exerted enough
force.
Be sure to support the back of the
docking stand with your hand when
you dock the tablet PC. Squeeze
the upper corners of the tablet PC
and the docking stand together to
seat the docking connectors.
Realign the tablet PC and squeeze
the upper corners of the tablet PC
and the docking stand together
while supporting the back of the
docking stand.
Pull the release handle farther out.
Applying excessive force
Ä
may damage system
components.
Startup Guide 4–3
Page 40

334244-001.book Page 4 Monday, August 11, 2003 2:12 PM
Getting Help
Tablet PC Orientation Problems
Problem Possible Cause Solution
Tablet PC is not
the primary
display.
The tablet PC is in
viewing mode.
Change the tablet PC to writing
mode. See “Changing the Viewing
Angle of the Tablet PC” in this
guide. For more information
regarding the tablet PC viewing
and writing modes, refer to
the
Software Guide
Documentation LIbrary
Default
applications are
not showing
when the
tablet PC is
in viewing or
writing modes.
Desktop Video Profile
has been disabled.
The applications have
been removed from
the profile.
Enable Desktop Video Profiles.
See Chapter 3, “Enabling the
Default Desktop Video Profiles.”
Reset the default applications in
the profile preferences. See
Chapter 3, “Enabling the Default
Desktop Video Profiles.”
MultiBay Device Problems
Problem Possible Cause Solution
MultiBay drive is
not recognized
as part of the
system.
The drive is not
properly inserted in the
MultiBay.
Remove the drive, then reinsert it
as shown in “Using MultiBay
Devices” in Chapter 2.
on the
CD.
4–4 Startup Guide
Page 41

334244-001.book Page 1 Monday, August 11, 2003 2:12 PM
Index
A
AC adapter 2–2
AC power connector
aligning the tablet PC
alignment brackets
alignment slots
angle, changing tablet PC
2–11
audio line-in jack
audio line-out jack
1–5
2–5
1–3, 2–5
1–6, 2–5
1–5
1–5
B
brackets, alignment 1–3
C
CD-ROM drive 2–15
CD-RW drive
components
back
front
left side
right side
connectors and connecting
AC adapter
docking
external devices
external MultiBay
power
USB devices
2–15
1–5
1–3
1–6
1–4
2–2
1–3
1–6
1–6
2–2
1–5
D
Desktop Video Profiles 2–12
diskette drive
docking
connector
problems
stand
tablet PC
with keyboard
docking eject pin
docking restraint latch
DVD drive
DVD/CD-RW drive
2–15
1–3
4–3
1–3
2–3, 2–7
2–13
1–3
1–3
2–15
2–15
E
electric shock warning 2–2
external devices, connectors
and connecting
1–5
H
handle, release 1–3
hard drive
help resources
horizontal orientation
HP authorized reseller
2–15
4–1
2–9
4–2
J
jacks, connection 1–5
Startup Guide Index–1
Page 42

334244-001.book Page 2 Monday, August 11, 2003 2:12 PM
Index
L
landscape orientation 2–9
M
MultiBay devices
connector
inserting
problems
release lever
removing
1–6
2–16
4–4
1–6
2–16, 2–17
N
network jack 1–5
O
orientation
changing
problems
2–9, 2–10
4–4
P
pivot arm 1–4
portrait orientation
power connector
power cord
power source
problems
2–2
4–3
2–9
2–2
2–2
R
release handle, docking stand
1–3, 2–19
release lever, MultiBay
2–17
RJ-45 network jack
1–6,
1–5
S
screen protector, docking with
2–3
security cable slot
static electricity
1–6
2–15
T
tablet PC
docking alignment slots
1–6
orientation
technical support
troubleshooting
turning system on/off
2–9, 2–10
4–1
4–1
2–20
U
undocking 2–19
USB connector location
1–5
V
vertical orientation 2–9
viewing mode
2–10
views
2–9, 2–11
W
writing mode 2–9, 2–11
Index–2 Startup Guide
 Loading...