

Page 1

White Paper
October 1999
117G-1099-A-WWEN
Prepared by Industry Standard
Server Division
Compaq Computer Corporation
Contents
Overview.....................................3
Equipment Requirements...........3
System under Test....................3
Creation of Polygraph
Client/Server Pairs......................4
Polygraph Simulation................4
Installation of FreeBSD 3.2........4
Installing Needed FreeBSD
Packages .................................9
Getting a copy of Web
Polygraph...............................10
Running the Polygraph
Bake-off Test............................15
Appendix A - How to
interpret the results ..................22
Appendix B – Useful UNIX
Hints and Commands ...............25
Appendix C - Running the
netperf change .........................26
About the Author.....................26
Deploying Web Polygraph to
Benchmark and Qualify Proxy Cache
Compaq TaskSmart C-Series Servers
Abstract: The purpose of this paper is to describe how to create a
minimal Web Polygraph™ test bed to do performance &
qualification testing using the Compaq TaskSmart C-Series Servers
in Client Acceleration mode. This technical paper is intended for
Customers evaluating TaskSmart C-Series Servers and Field Service
Engineers supporting their efforts.
Proxy caching is a new area for performance measurement and
qualification testing. Currently, there are more than a handful of
tools for testing client accelerators. Many of the tools available
today were created by the Proxy caching vendors including
Inktomi’s Large Scale Benchmark, CacheFlow’s Performance Tool,
and Network Appliance’s NetCache Load generator. Other tools
available are from independent sources such as University of
Wisconsin’s Proxy Benchmark and IRCache Web Polygraph. The
most promising of the independent sources is IRCache’s Web
Polygraph.
The purpose of this paper is to help those who wish to, deploy Web
Polygraph to benchmark and qualify Proxy Cache Compaq
TaskSmart C-Series Servers. The sample deployment in this paper
will be for testing TaskSmart C1200R Proxy Caching server in
Client acceleration mode.
1
2
1
Web Polygraph was created by Alex Rousskov. For questions, e-mail him at
polygraph@ircache.net or rousskov@ircache.net
2
Note: This manual is not an official Polyteam manual; the manual assists with the procedure,
but does not guarantee correct results. The manual concentrates on reproducing first IRCache
bake-off tests; there are other tests available to run. There are also other ways of
benchmarking TaskSmart C-Series Server proxy. Following this manual is not required to
achieve correct results.
Page 2

Deploying Web Polygraph to Benchmark and Qualify Proxy Cache Compaq TaskSmart C-Series Servers 2
Notice
The information in this publication is subject to change without notice and is provided “AS IS” WITHOUT
WARRANTY OF ANY KIND. THE ENTIRE RISK ARISING OUT OF THE USE OF THIS
INFORMATION REMAINS WITH RECIPIENT. IN NO EVENT SHALL COMPAQ BE LIABLE FOR
ANY DIRECT, CONSEQUENTIAL, INCIDENTAL, SPECIAL, PUNITIVE OR OTHER DAMAGES
WHATSOEVER (INCLUDING WITHOUT LIMITATION, DAMAGES FOR LOSS OF BUSINESS
PROFITS, BUSINESS INTERRUPTION OR LOSS OF BUSINESS INFORMATION), EVEN IF
COMPAQ HAS BEEN ADVISED OF THE POSSIBILITY OF SUCH DAMAGES.
The limited warranties for Compaq products are exclusively set forth in the documentation accompanying
such products. Nothing herein should be construed as constituting a further or additional warranty.
This publication does not constitute an endorsement of the product or products that were tested. The
configuration or configurations tested or described may or may not be the only available solution. This test
is not a determination or product quality or correctness, nor does it ensure compliance with any federal
state or local requirements.
Product names mentioned herein may be trademarks and/or registered trademarks of their respective
companies.
Compaq, Contura, Deskpro, Fastart, Compaq Insight Manager, LTE, PageMarq, Systempro, Systempro/LT,
ProLiant, TwinTray, ROMPaq, LicensePaq, QVision, SLT, ProLinea, SmartStart, NetFlex, DirectPlus,
QuickFind, RemotePaq, BackPaq, TechPaq, SpeedPaq, QuickBack, PaqFax, Presario, SilentCool,
CompaqCare (design), Aero, SmartStation, MiniStation, and PaqRap, registered United States Patent and
Trademark Office.
Netelligent, Armada, Cruiser, Concerto, QuickChoice, ProSignia, Systempro/XL, Net1, LTE Elite,
Vocalyst, PageMate, SoftPaq, FirstPaq, SolutionPaq, EasyPoint, EZ Help, MaxLight, MultiLock,
QuickBlank, QuickLock, UltraView, Innovate logo, Wonder Tools logo in black/white and color, and
Compaq PC Card Solution logo are trademarks and/or service marks of Compaq Computer Corporation.
Microsoft, Windows, Windows NT, Windows NT Server and Workstation, Microsoft SQL Server for
Windows NT are trademarks and/or registered trademarks of Microsoft Corporation.
NetWare and Novell are registered trademarks and intraNetWare, NDS, and Novell Directory Services are
trademarks of Novell, Inc.
Pentium is a registered trademark of Intel Corporation.
Copyright ©1998 Compaq Computer Corporation. All rights reserved. Printed in the U.S.A.
Deploying Web Polygraph to Benchmark and Qualify Proxy Cache Compaq TaskSmart C-Series Servers
White Paper prepared by Industry Standard Server Division
First Edition (October 1999)
Document Number 117G-1099-A-WWEN
117G-1099-A-WWEN
Page 3

Deploying Web Polygraph to Benchmark and Qualify Proxy Cache Compaq TaskSmart C-Series Servers 3
Overview
Proxy caching is a new area for performance measurement and qualification testing. Proxy cache
servers are devices installed between web client browsers and web servers to store and serve web
objects. They can function as web server or client browser accelerators. For TaskSmart C-Series
Servers that will be deployed in client acceleration configurations, traditional web benchmarking
tools are not adequate for customer qualification testing and benchmarking. The workload
characteristics of traditional tools like WebBench and SpecWeb96 use a small finite data set that
is repeated throughout the test. Testing Proxy Caches with these tools will only test one
dimension of caching and represent a 100% hit rate. Therefore, other tools are necessary to test
the performance of proxy caching severs.
Currently, there are more than a handful of tools for testing client accelerators. Many of the tools
available today were created by the Proxy caching vendors including Inktomi’s Large Scale
Benchmark, CacheFlow’s Performance Tool, and Network Appliance’s NetCache Load
generator. Other tools available are from independent sources such as University of Wisconsin’s
Proxy Benchmark and IRCache Web Polygraph. The most promising of the independent sources
is IRCache’s Web Polygraph.
Equipment Requirements
The following is recommended for Polygraph:
• FreeBSD 3.2 (Walnut Creek 4 CD Set).
• Pentium II 400MHZ/128MB RAM/3.2GB Hard Disk with CD-ROM & 100TX NIC
(Compaq Deskpro EN SFF with embedded Compaq 10/100 Intel PCI NIC or equivalent)
• Compaq 5708TX Fast Ethernet Switch or equivalent with network cables
System under Test
1 - Compaq TaskSmart C1200R
1 - Windows 95/98 workstation with a Web browser and NIC
1 – Null Ethernet cable
Follow the instructions provided with your Compaq TaskSmart C-Series Server to connect a
Windows NT/95/98 workstation (configured with 10.1.1.2 IP address) via NULL modem cable to
the 10.1.1.1 management interface. The Windows workstation is necessary to for monitoring
when the cache is filled and configuring the proxy cache to the example 200.100.50.253 proxy
address using port 8080. If the ICS software complains about no DNS server, enter the 10.1.1.1
address for a DNS server address.
3
3
Other UNIX operating systems such as Linux, True64, IRIX, and Solaris x86 also support Web Polygraph. Also, another alternative
to the Walnut Creek CD Set is Cheapbytes. A two CD Set of FreeBSD 3.2 may be purchased online at http://www.cheapbytes.com
for $7.99 (Catalog No. 0070010381).
117G-1099-A-WWEN
Page 4
Deploying Web Polygraph to Benchmark and Qualify Proxy Cache Compaq TaskSmart C-Series Servers 4
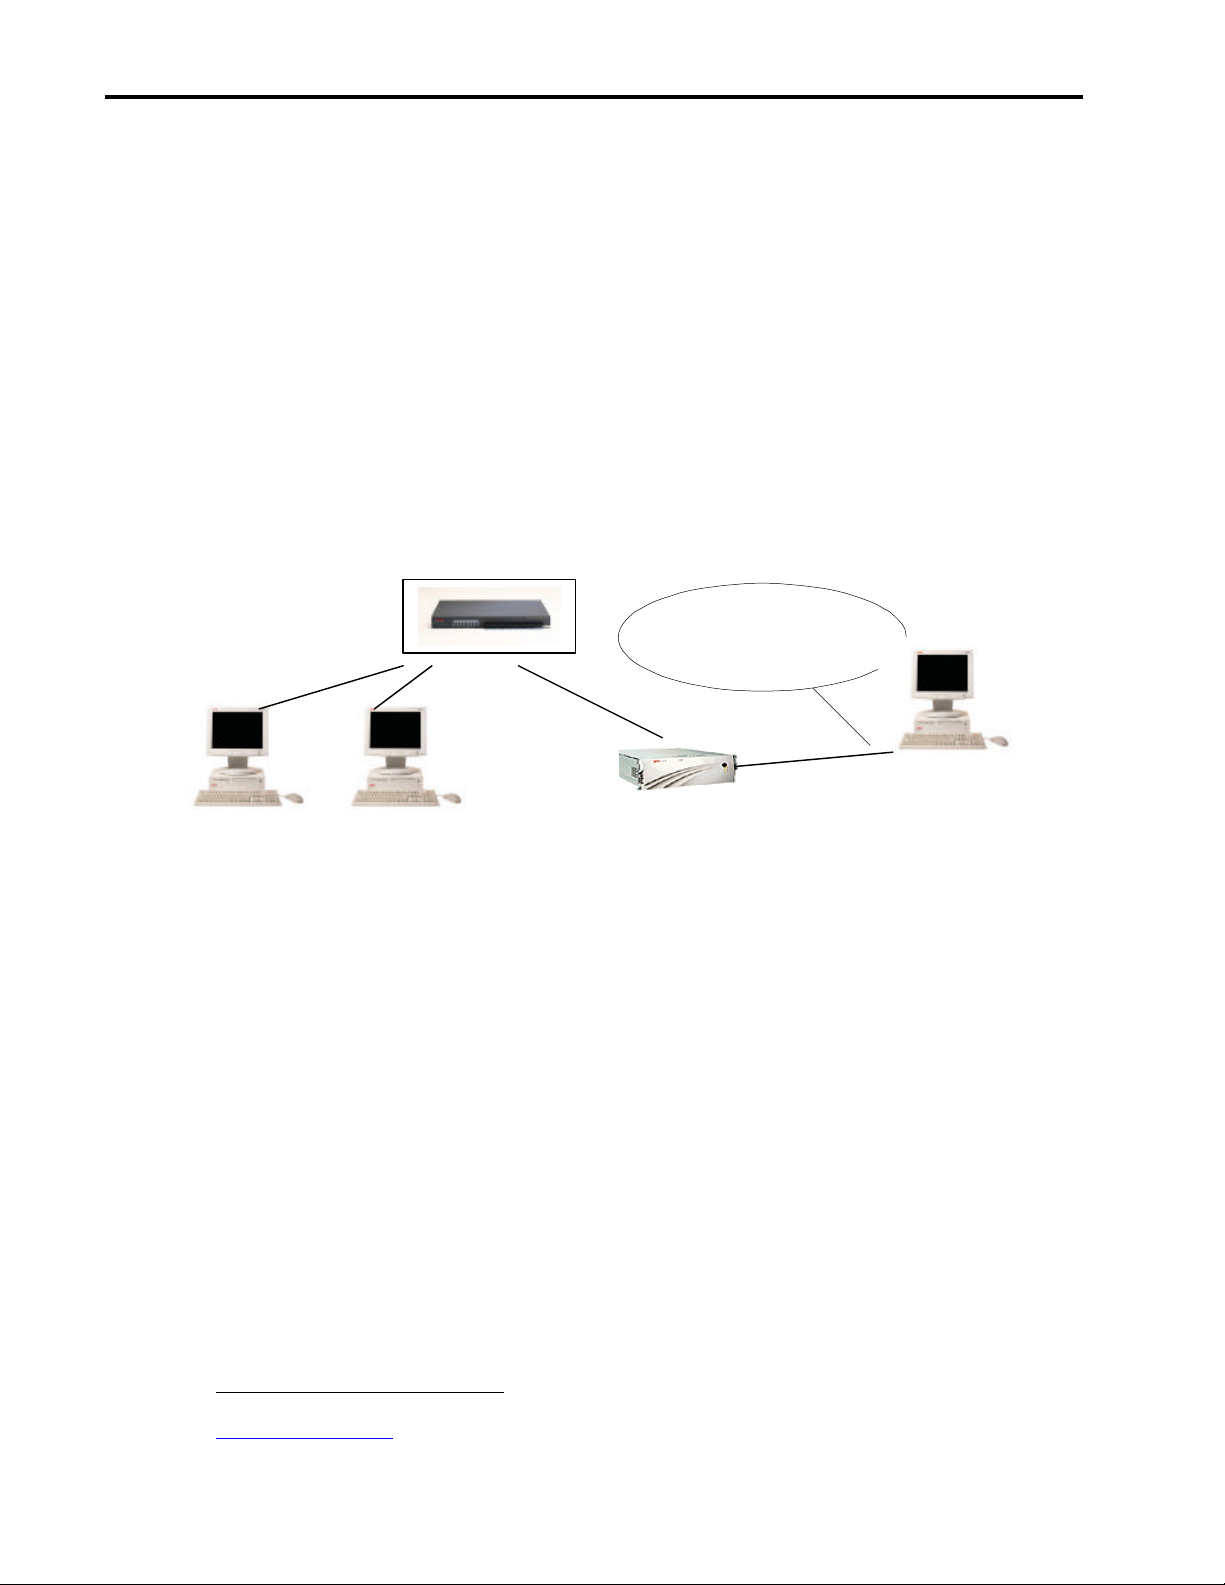
FreeBSD 3.2
(Polygraph Server)
FreeBSD 3.2
(Polygraph Client)
TaskSmart C1200R
Windows NT/95/98
Creation of Polygraph Client/Server Pairs
Polygraph Simulation
Web Polygraph 1.x uses a simulated real world environment. The simulated environment
consists of a Web server simulator and client browser simulator software programs. These
simulations are run in client/server pairs. In other words, each client only talks to the server it is
paired up with. If two pairs are used, one client will talk to one server, and the other client will
talk to the other server. This one-to-one relationship is maintained regardless of the quantity of
Polygraph pairs. In simplest terms, the Polygraph simulators are software programs called
“polysrv” for the server simulator and “polyclt” for the client simulator.
Installation of FreeBSD 3.2
Null Ethernet Cable to TaskSmart
Embedded Controller
4
Computer with Browser
and Ethernet Adapter
poly 1
200.100.50.10
poly 2
200.100.50.10
200.100.50.253
(Proxy Cache)
In order to run the simulation, the client and server machine should have the FreeBSD UNIX
operating system installed and patched for Web Polygraph. Both the client and server simulation
computers will be configured identically. To install FreeBSD on the Deskpro EN simply follow
the following step by step instructions:
4 Step 1. Save your data
Compaq Deskpro EN is factory configured with a Windows product. In order to install FreeBSD
you must overwrite your configuration. Backup any programs or data on the hard disk, because
following these instructions will install FreeBSD on your hard disk.
4
The heart of the simulation is called the workload. For the first Bake-off, the simulation workload was called PolyMix-1. See
http://polygraph/ircache.net for more information on simulated workloads.
117G-1099-A-WWEN
Page 5

Deploying Web Polygraph to Benchmark and Qualify Proxy Cache Compaq TaskSmart C-Series Servers 5
4 Step 2. Remove conflicting device drivers (Configure the kernel)
Boot the Compaq Deskpro with the FreeBSD Intel Installation Boot CD (Disk 1) in the
CD–ROM drive. A “Kernel Configuration Menu” will be presented. Choose “Start Kernel
Configuration in full-screen visual mode” and press <enter>. Note that each system will vary, but
Deskpro EN shows “13 conflicts” at the top of screen. Also, note that all “Active Drivers” are
“(Collapsed)”. To clear the conflicts, use the arrow keys to highlight each item and press <enter>
to reveal all the items in the collapsed menu. For example, highlight “Storage (Collapsed)” and
press <enter>. Use the arrow keys to highlight and delete those devices that are not installed in
your system. For the Compaq Deskpro EN SFF all devices are deleted except the following:
Table 1. Devices not deleted for the Compaq Deskpro EN SFF
Storage Drivers Dev IRQ Port
Floppy Disk Controller fdc0 6 0x3f0
IDE/ESDI/MFM Disk Controller wdc0 14 0x1F0
IDE/ESDI/MFM Disk Controller wdc1 15 0x170
Table 2. All ISA/EISA Network drivers removed:
Network Drivers Dev IRQ Port
None for Deskpro EN N/A N/A N/A
Table 3. Standard printer & serial port drivers:
Communications Drivers Dev IRQ Port
Parallel Port chipset ppc0 7 N/A
8250/16450/16550 Serial Port sio0 4 0x3f8
8250/16450/16550 Serial Port sio1 3 0x2f8
Table 4. Standard keyboard & mouse device drives:
Input Drivers Dev IRQ Port
Keyboard Atkbd0 1 N/A
PS/2 Mouse Psm0 12 N/A
Syscons console driver sc0 N/A N/A
Multimedia, PCI, and miscellaneous devices should not be changed unless the system has a sound
board, which should be removed. The FreeBSD Kernel configuration program will NOT allow
PCI devices to be deleted.
Once configuring the kernel is complete, type the letter <Q> to quit and <Y> to save the changes.
This should start the FreeBSD boot process. The screen will fill with lines containing
information about the hardware in the system and start the System Installation Menu
(/stand/sysinstall) Utility.
4 Step 3. Choose Novice Install
Use the arrow keys to highlight selection number 2 Novice for beginners and press <enter>. The
program should display a message describing the “fdisk” process. Read the instructions and press
<enter> to continue.
117G-1099-A-WWEN
Page 6

Deploying Web Polygraph to Benchmark and Qualify Proxy Cache Compaq TaskSmart C-Series Servers 6
4 Step 4. Delete existing partitions and create a BSD SLICE on the disk
If you have a unit previously containing Windows partitions, highlight each one using the arrow
keys and press the <D> key to delete them. Once all partitions are removed, press the <C> key
and create a slice that uses most of or the entire disk. When creating the slice, accept the defaults
provided by pressing <enter>. Once the slice is created, press the <Q> key to finish.
4 Step 5. Install default Boot Manager
Next, the Boot Manager Menu will be displayed. Press <enter> to select the default FreeBSD
BootMgr on the hard disk. A message will be displayed discussing creating partitions on the
disk. Press <enter> to continue.
4 Step 6. Create the ‘root’ or ‘/’ partition on the BSD SLICE
Type the <C> key to create the first partition. A dialog box with a long number will be displayed.
Use the <backspace> key to delete the number and type in 42M (42 Megabytes). Choose the
partition type of “FS A file system” by highlighting it and pressing <enter>. Type in the “/”
character and press <enter>. The dialogs should clear and the new partition information should
be displayed.
4 Step 7. Create the SWAP partition on the BSD SLICE
Type the <C> key to create the next partition. A dialog box with a long number will be
displayed. Use the <backspace> key to delete the number and type in 256M (256 Megabytes).
Choose the partition type of “Swap A swap partition” by highlighting it and pressing <enter>.
The dialogs should clear and the new partition information should be displayed.
4 Step 8. Create the ‘/var’ partition on the BSD SLICE (“/var” is all lowercase)
Type the <C> key to create the first partition. A dialog box with a long number will be displayed.
Use the <backspace> key to delete the number and type in 42M (42 Megabytes). Choose the
partition type of “FS A file system” by highlighting it and pressing <enter>. Type in the “/var”
characters and press <enter>. The dialogs should clear and the new partition information should
be displayed.
4 Step 9. Create the ‘/usr’ partition on the BSD SLICE (“/usr” is all lowercase)
Type the <C> key to create the first partition. A dialog box with a long number will be displayed.
Accept the default by pressing <enter> Choose the partition type of “FS A file system” by
highlighting it and pressing <enter>. Type in the “/usr” characters and press <enter>. The
dialogs should clear and the new partition information should be displayed.
117G-1099-A-WWEN
Page 7

Deploying Web Polygraph to Benchmark and Qualify Proxy Cache Compaq TaskSmart C-Series Servers 7
If all of the partition information looks reasonable, press <Q> to finish. This will display the
Partition Table.
Table 5. Partition Table
Mount Point Size of partition Type Purpose
/ 42MB UFS UNIX Root
256MB SWAP Virtual Memory/SWAP File (2 x RAM)
/var 42MB UFS Area for log & message files
/usr 5809MB UFS Area User Programs/Data (depends on actual disk size)
4 Step 10. Load full kernel sources for use later
Use the arrow keys to highlight choice number “1 Developer Full Sources, binaries, and doc but
no games”. The Cryptography information screen will be presented. Choose “YES” by pressing
<enter> key.
4 Step 11. Skip adding cryptography
Use arrow keys to move to highlight Exit and press <enter>. No cryptography is needed.
4 Step 12. Load Ports collection
Press <enter> to load the ports collection on the CD. It creates a standard installation hierarchy on
your hard drive. The Distributions menu will reappear again. Press <enter> to continue and
choose installation media.
4 Step 13. Choose CD-ROM installation media
Use arrow keys to highlight selection “1 CROM Install from a FreeBSD CD-ROM” and press
<enter>. Read the warning, and press <enter> to continue.
This should start the installation process. The System Installation will create file systems, mount
them, and load the operating system with the ports collection. The loading process takes about an
hour depending on the CD-ROM speed. When complete, a message will be displayed with
congratulations. Press <enter> to move to final configuration questions.
4 Step 14. Configure Ethernet Devices
Press highlight “YES” and press <enter> to configure Ethernet or SLIP/PPP network devices. A
menu of network devices will be presented. Choose the network device by highlighting it and
pressing <enter>. In the case of the Deskpro EN, choose the “fxp0 Intel EtherExpress Pro/100B
PCI Fast Ethernet card” because it is the closest equivalent.
4 Step 15. Configure host information and IP addresses
Choose any host and domain name or use “poly1.acme.com”, and type in the domain of your
choice or “acme.com”. The Gateway option should be “NO”. If a DNS or name server is
available type in its IP address; otherwise, just leave it blank. Choose the IP address for the
network interface or enter “200.100.50.10” with a Netmask of “255.255.255.0” and leave Extra
options for ifconfig blank. Highlight the “OK” and press <enter> when done. If not, use the
<tab> key to move to information needing changes. Finally, the next message box will ask to
start or “bring up” the interface. Highlight “YES” and press <enter> to continue. For those
customers using FreeBSD3.1 per web polygraph website on Deskpro SFF, highlight “NO” and
consult http://www.freebsd.org mailing list archive for patch information for the Compaq Intel
10/100 embedded Network Controller (dev fxp0) or send an e-mail to Jeff.Potter@Compaq.com.
117G-1099-A-WWEN
Page 8

Deploying Web Polygraph to Benchmark and Qualify Proxy Cache Compaq TaskSmart C-Series Servers 8
4 Step 16. Disable routing, Anonymous FTP, NFS server, and NFS client
When asked if the machine will be an IP gateway , choose “NO” by highlighting it and pressing
<enter>. Also, when asked about anonymous FTP connections, NFS server, and NFS client
choose “NO”, and press <enter> to continue. None of these services are necessary for Web
Polygraph.
4 Step 17. Customize your console settings
To setup a screen saver, choose “YES” and highlight “Saver Configure the screen saver” option
in the menu and press <enter>. Choose a favorite or select “Warp” by highlighting it and
pressing the <space> key. To change the screen saver Timeout, highlight it, press <space> key,
and change it to “1200” or the desired number of seconds and press <enter> to continue. When
complete, highlight “OK” and press <enter> to continue. Finally, highlight “Exit Exit this
menu” and press <enter> to continue.
4 Step 18. Select your Time Zone
To select Time Zone, highlight “YES” and press <enter> to continue. The next dialog will ask
about your clock. Choose what applies in your area or highlight “NO” and press <enter> to
continue. Select your region or choose “2 America – North & South” by highlighting it and
pressing the <enter> key. Select your country or choose “45 United States” by scrolling down
with the arrow keys, highlighting, and pressing <enter> to continue. Next, select a time zone or
choose “8 Central Time”, and press <enter> to continue. Confirm the Time Zone of your choice
by pressing <enter> to continue.
4 Step 19. Disable Mouse
When asked about a mouse, choose “NO” and press <enter> to continue.
4 Step 20. Installation of packages
When asked about installing additional packages, choose “NO” because the Walnut Creek
FreeBSD 3.2 distribution CD number 1 does not have any useful packages. Later steps will
outline how to load packages from CD number 3.
5
4 Step 21. Adding initial accounts and ‘root’ password
When asked to add users, select “NO” and press <enter> to continue. Read the message about the
user manager called “root” and press <enter> to continue. Choose a password for the root user
and press <enter> to continue. Pressing the <enter> key at the password prompt will disable
login password.
4 Step 22. Revisit the general configuration menu
When requested to visit the general configuration menu, highlight the “NO” option and press
<enter> to continue. The System Installation utility will be displayed. Use the arrow keys to
highlight the “Exit Install” option and press <enter> to continue. Remove any CD-ROMs and
diskette and confirm by pressing the enter <key> to continue.
5
Cheapbytes CDs may be arranged differently; however, the same principle applies. Cheapbytes will be CDs 1 and 2.
117G-1099-A-WWEN
Page 9

Deploying Web Polygraph to Benchmark and Qualify Proxy Cache Compaq TaskSmart C-Series Servers 9
4 Step 23. System reboot and login
The system should automatically reboot and load FreeBSD operating system. The boot process is
complete when the following prompt or something similar is displayed on the screen:
FreeBSD/i386 (poly1.acme.com) (ttyv0)
login:
Once the login prompt is displayed, type the word ‘root’ as the user and <press> enter. The
system will prompt for a password. Use the password typed in during Step 21. If successful,
FreeBSD will display a ‘poly1#’ prompt on the screen.
6
The generic FreeBSD operating system is now installed and the system manager is logged in to
the system.
Installing Needed FreeBSD Packages
The Polygraph developers suggest that certain utilities be loaded to verify the network. Most of
the useful utilities for FreeBSD are in a package format on the Walnut Creek FreeBSD
distribution CD number 3. To load the utility packages from the CD follow the steps below:
4 Step 1. Run System Installation program
Place the FreeBSD CD-ROM number 3 Packages/Ports in the CD-ROM drive. To run the
System Installation program type ‘/stand/sysinstall’ at the system prompt and press <enter>. The
menu should be familiar. Use the arrow keys to highlight option “5 Configure. Do post-install
configuration of FreeBSD and press <enter> to get the next menu. Select the “P Packages Install
pre-packaged software for FreeBSD” option on the menu and press <enter> to get the next menu.
Be sure the CD is in the drive and select “1 CDROM Install from a FreeBSD CD-ROM” and
press <enter> to get the next menu.
7
4 Step 2. Selecting packages
The package selection menu should appear with an alphabetical listing of categories. Each
category contains one or more packages. Selecting ‘All’ is not advised. Please note that some
packages on the CD are dependent on others. Therefore, the selection of one package may force
the lading of another. Also, Polygraph developers do not suggest installing unzip and zip
packages.
To browse each category, highlight it using the arrow keys and press <enter>. Once a category is
selected, it will display a menu of packages. Select packages by highlighting and pressing the
<space> key. To deselect press the <space> key a second time. To move to another category,
highlight “OK” and press <enter>.
6
If the login is not successful, retrace the steps. Reboot the computer, and look for error messages or devices that don’t load. Also, be
sure to check the hardware. Make two devices, install on the other unit, and check for similar actions. (Device names are in Table 1
under Step 2).
7
Cheapbytes CDs will be 1 and 2.
117G-1099-A-WWEN
Page 10

Deploying Web Polygraph to Benchmark and Qualify Proxy Cache Compaq TaskSmart C-Series Servers 10
Polygraph developers suggest the following packages be selected:
benchmarks
netperf-2.1.3
Compaq recommends the zip and unzip packages for moving the log files via the floppy to
Microsoft Windows-based computers for spread sheet analysis:
archivers
unzip-5.40
zip-2.2
Once all packages are selected, highlight the “Install” option and press <enter> to continue.
System installation utility will ask for confirmation of package selections. Press <enter> to
continue.
All the packages will be loaded onto the hard disk, and control will be returned to the
Configuration menu. Press <esc> to return to System Installation menu, and highlight “Exit
Install” and press <enter> to return to the FreeBSD command prompt (poly1#). Remove the CD
from the drive.
Getting a copy of Web Polygraph
To obtain a copy of Web Polygraph you should use a Windows NT/95/98 workstation connected
to the internet. You can get the latest copy of Web Polygraph from the following URL:
http://polygraph.ircache.net/sources
As of this writing, Polygraph version 1.3.2 stable is available. For reproducing the First Bake-off
results, download Polygraph version 1.0p7 stable with its patch file to a 1.44 MB formatted
diskette on the workstation. Once the file is on the diskette, remove it from the Windows
NT/95/98 workstation. Place the diskette into the FreeBSD unit and follow the steps below:
4 Step 1. Create a poly107 directory in /usr
Type the following commands:
poly1# mkdir /usr/poly107 <enter>
poly1# chmod 777 /usr/poly107 <enter>
4 Step 2. Mount the diskette as a filesystem under /mnt
Type the following commands:
poly1# mount –t msdos /dev/fd0 /mnt <enter>
poly1# cd /usr/poly107 <enter>
poly1# ls /mnt <enter>
polygraph-1.0p7.patches.htm polygraph-1_0p7-src_tar.tar
poly1# tar –xvzf /mnt/polygraph-1_0p7-src_tar.tar <enter>
poly1# ls <enter>
polygraph
117G-1099-A-WWEN
Page 11

Deploying Web Polygraph to Benchmark and Qualify Proxy Cache Compaq TaskSmart C-Series Servers 11
4 Step 3. Patch the Polygraph Source files
To see the files on the diskette unit, type the following command:
poly1# ls /mnt <enter>
polygraph-1_0p7-src_tar.tar polygraph-1.0p7.patches.htm
poly1#
Type the following commands:
poly1# cd /polygraph/src <enter>
poly1# pwd <enter>
/usr/poly107/polygraph/src
poly1# patch </mnt/polygraph-1.0p7.patches.htm <enter>
Hmm… Looks like a unified diff to me
Patching file StatPhase.cc using Plan A…
Hunk #1 succeeded at 1
Hunk #2 succeeded at 2
Done
8
4 Step 4. Compile the Polygraph Source files
poly1# make <enter>
c++ -Wall –Wwrite-strings …
4 Step 5. Copy the newly created program executables up to the /usr/poly107 directory
poly1# cp polysrv ../../ <enter>
poly1# cp polyclt ../../ <enter>
poly1# cp lr ../../ <enter>
poly1# cp lx ../../ <enter>
poly1# cd ../../ <enter>
poly1# pwd <enter>
/usr/poly107
poly1# ls <enter>
lr lx polyclt polygraph polysrv
4 Step 6. Dismount the diskette from the /mnt directory
poly1# umount /mnt <enter>
4 Step 7. Test the programs to make sure they work
Now all of the Web Polygraph files are created and are loaded in the /usr/poly107 directory. To
make sure the programs actually run, type the following commands:
poly1# ./polysrv <enter>
poly1# ./polyclt <enter>
The Polygraph server and client simulator programs should display usage information and return
to the command prompt (poly1#).
8
*.htm was automatically placed on the end of the patch file by IE 4.0.
117G-1099-A-WWEN
Page 12

Deploying Web Polygraph to Benchmark and Qualify Proxy Cache Compaq TaskSmart C-Series Servers 12
Patching FreeBSD for Web Polygraph benchmarking
The Polygraph team has published several “adjustments” to FreeBSD for use as a Polygraph
client or server. To adjust FreeBSD you must modify kernel source files, recompile the kernel,
and modify (& create) configuration files. Although it sounds like a difficult and complex task, it
really isn’t. FreeBSD comes with a full screen editor called ‘ee’ that can be used to modify and
save changes to various files. Further, make files automate the process of kernel rebuilding.
Therefore, the task of rebuilding the kernel is very much like creating the Polygraph executables.
For further information on the patches for FreeBSD please refer to
http://polygraph.ircache.net/Tips/
To patch the FreeBSD kernel do the following:
4 Step 1. Copy the GENERIC configuration file to a file named CPQ1
The GENERIC configuration file is in /usr/src/sys/i386/conf directory
poly1# cd /usr/src/sys/i386/conf <enter>
poly1# cp GENERIC CPQ1 <enter>
4 Step 2. Edit using the ee full screen editor
poly1# ee CPQ1 <enter>
4 Step 3. Add the following lines to the CPQ1 kernel configuration file
options "MAXDSIZ=(512*1024*1024)"
options "DFLDSIZ=(128*1024*1024)"
options "NMBCLUSTERS=40960"
After adding these lines, press the <esc> key and the ee editor will provide a menu to leave the
editor and save the contents of the CPQ1 file.
4 Step 4. Edit the /sys/conf/param.c file and change the following lines
poly1# ee /sys/conf/param.c <enter>
#define MAXFILES (16384)
int maxfilesperproc = 12288;
After editing these lines, press the <esc> key and the ee editor will provide a menu to leave the
editor and save the contents of the /sys/conf/param.c file.
4 Step 5. Edit the /usr/src/sys/netinet/tcp_timer.h and change the TCPTV_MSL value
from 30 to 3
poly1# ee /usr/src/sys/netinet/tcp_timer.h <enter>
#define TCPTV_MSL ( 3*PR_SLOWHZ) /* max seg lifetime
(hah!) */
After editing the line, press the <esc> key and the ee editor will provide a menu to leave the
editor and save the contents of the /usr/src/sys/netinet/tcp_timer.h file.
117G-1099-A-WWEN
Page 13

Deploying Web Polygraph to Benchmark and Qualify Proxy Cache Compaq TaskSmart C-Series Servers 13
4 Step 6. Edit the /usr/src/sys/kern/uipc_socket.c file and add the atomic=1 line
Using the ee editor in FreeBSD, search (ctrl-y) for MCLBYTES and add the “atomic=1;” line
after the “else {“ and before the “nopages:” label.
mlen = MCLBYTES;
len = min(min(mlen, resid), space);
} else {
atomic = 1; /* added for Polygraph */
nopages:
len = min(min(mlen, resid), space);
After editing these lines, press the <esc> key and the ee editor will provide a menu to leave the
editor and save the contents of the /usr/src/sys/kern/uipc_socket.c file.
4 Step 7. Create an /etc/rc.local file using ee and add the following three lines:
poly1# ee /etc/rc.local <enter>
sysctl -w net.inet.ip.portrange.last=30000
sysctl -w kern.ipc.somaxconn=1024
sysctl –w net.inet.tcp.delayed_ack=0
After adding these lines, press the <esc> key and the ee editor will provide a menu to leave the
editor and save the contents of the /etc/rc.local file.
4 Step 8. Edit the /etc/rc.conf file using ee and add the following lines
poly#1 ee /etc/rc.conf <enter>
cron_enable=”NO”
inetd_enable=”NO”
sendmail_enable=”NO”
portmapper_enable=”NO”
After adding these lines, press the <esc> key and the ee editor will provide a menu to leave the
editor and save the contents of the /etc/rc.conf file.
4 Step 9. Create configuration files and rebuild the kernel
To create the new configuration files, return to the /usr/src/sys/i386/conf directory:
poly1# cd /usr/src/sys/i386/conf <enter>
poly1# pwd <enter>
/usr/src/sys/i386/conf
Type the following commands to create new configuration and make files for the modified
kernel:
poly1# config CPQ1 <enter>
Do a “make depend’’
Kernel build directory is ../../compile/CPQ1
Next move to the new CPQ1 directory by typing the following:
poly1# cd ../../compile/CPQ1 <enter>
poly1# pwd <enter>
/usr/src/sys/compile/CPQ1
117G-1099-A-WWEN
Page 14

Deploying Web Polygraph to Benchmark and Qualify Proxy Cache Compaq TaskSmart C-Series Servers 14
To create the new FreeBSD kernel, type the following commands:
poly1# make depend <enter>
cc –c –O –Wreturn-type …
mv –f .newdep .depend
Next, build the kernel:
poly1# make <enter>
cc –c –O –Wreturn-type –Wcomment …
loading kernel
text data bss dec hex filename
185005 122520 137052 2134577 209231 kernel
poly1#
If the message on the screen is similar to the one above, the kernel rebuild was successful.
4 Step 10. Install the newly rebuilt kernel and reboot to make it active. To do this follow
the instructions below. (If you haven’t removed the CD from the drive, you should do that
now).
poly1# make install <enter>
chflags noschg /kernel
mv /kernel /kernel.old
install –c –m 555 –o root –g wheel –fschg kernel /
poly1# reboot <enter>
If the system reboots and allows the ‘root’ system manager to login, the system is ready to do
Web Polygraph testing. To create the second unit, repeat all of the steps mentioned above.
IMPORTANT: Please remember Web Polygraph works with a pair of computers. One
simulates a web server the other a client browser. In other words, the result should be two
computers with similar hardware capabilities, Polygraph 1.0p7, and an identical “adjusted” copy
of FreeBSD 3.2 on each of them. For the second unit, please use a different IP address and host
name to avoid conflicts. Choose poly2 with IP address of 200.100.50.11 to match the example
system above.
If you are not successful, and you have working hardware that is compatible with FreeBSD,
retrace the steps above and look for typing errors or missed steps. For difficulties with FreeBSD,
check their web site at http://www.freebsd.org for documentation, FAQ, and mailing list
information. For difficulties with Web Polygraph, check the IRCache web site at
http://polygraph.ircache.net for information and mailing lists.
117G-1099-A-WWEN
Page 15

Deploying Web Polygraph to Benchmark and Qualify Proxy Cache Compaq TaskSmart C-Series Servers 15
Running the Polygraph Bake-off Test
Running the Polygraph tests consist of two sections. The first section is to use the client & server
pair to fill the cache with objects. The second section of testing uses the same client & server pair
to run the one-hour Polymix-1 work load for ten different constant request per second rates with
10 minute idle periods. The first section takes less than an hour for a TaskSmart C1200R and the
second section takes about 12 hours. Each section will be described further below.
If the TaskSmart C1200R can reliably sustain 250 request/second peak using Polymix-1, then 10
request/second rates between 1 and 250 will be chosen for each one-hour test. The 250
request/second peak is determined experimentally. For this example, use 250, 25,
225,50,200,80,100,180,130,160 in that order with 10 minute idle periods between each one-hour
test.
Polygraph Cache Fill Section Procedures
To complete the cache fill procedure, choose one computer to be the web server simulator,
choose the other to be the client browser simulator, and create a script file called “fill” on each.
In the example below, we choose host (computer) poly1 at IP address 200.100.50.10 to be the
web server simulator, and the host (computer) poly2 at IP address 200.100.50.11 to be the client
browser simulator.
Server fill script (sfill)
9
The server sfill script will execute the polysrv simulation program to listen for requests from the
client simulator on the standard web server port 80. Also, the detail level for messages sent to the
screen (verbosity level) is set to 2. On the server computer, use the ee editor to create a plain text
script file with the following lines:
Poly1# ee sfill <enter>
#!/bin/csh
#Fill server script file for Poly1 host at 200.100.50.10
./polysrv - - port 80 \
--verb_lvl 2 \
-- goal 1hr
After adding the lines, press the <esc> key and the ee editor will provide a menu to leave the
editor and save the contents of the sfill file.
Note: The TaskSmart C1200R will need a ½ hr goal whereas the C2000R will need more than
an hour goal. If more time is needed, remove the “–goal 1hr” from the script and stop the fill
procedure manually. To stop the scripts manually, type <ctrl-c> on the client and server units.
9
The Bake-off has a no-proxy test. Also, netperf utility was used to verify the total network throughput. If network problems are
suspected, refer to Appendix C to use the netperf utility to validate the network’s capability.
117G-1099-A-WWEN
Page 16

Deploying Web Polygraph to Benchmark and Qualify Proxy Cache Compaq TaskSmart C-Series Servers 16
Client fill script (cfill)
The client cfill script will execute the polyclt simulation program to send requests to the web
server simulator through the proxy cache. In this case, the origin server is the poly1 host with the
200.100.50.10 IP address and the TaskSmart C-Series Server is setup to 200.100.50.253 listening
on port 8080. Also, the detail level for messages sent to the screen (verbosity level) is set to 2.
On the client computer use the ee editor to create a plain text script file with the following lines:
Poly2# ee cfill <enter>
#!/bin/csh
#Fill client script for Poly2 host at 200.100.50.11 with TaskSmart
C-Series Server at 200.200.50.253
./polyclt -- ports 1024:30000 \
--proxy 200.100.50.253:8080 \
--origin 200.100.50.10:80 \
--verb_lvl 2 \
--robots 1 \
--rep_cachable 100p \
--goal 1hr
After adding the lines, press the <esc> key and the ee editor will provide a menu to leave the
editor and save the contents of the cfill file.
117G-1099-A-WWEN
Page 17

Deploying Web Polygraph to Benchmark and Qualify Proxy Cache Compaq TaskSmart C-Series Servers 17
The best way to determine if the cache is full is to use the Windows NT/95/98 workstation to
browse the TaskSmart C-Series Server and watch the Monitoring Summary screen. When
“Disk space utilization %” is at 100% the cache is considered full (see screen shot below). To
stop the fill procedure before the one-hour goal, press <ctrl-c> on the client and then the server,
and begin the Polymix-1 test procedures.
Figure 1. Monitoring Summary Screen
Polygraph Polymix-1 Section Procedures
To complete the Polymix-1 workload procedure, choose one computer to be the web server
simulator and choose the other to be the client browser simulator and create a script file called
“mix1” on each one. In the example below we choose host poly1 at IP address 200.100.50.10 to
be the web server simulator, and the host poly2 at IP address 200.100.50.11 to be the client
browser simulator.
117G-1099-A-WWEN
Page 18

Deploying Web Polygraph to Benchmark and Qualify Proxy Cache Compaq TaskSmart C-Series Servers 18
Server Polymix-1 script (smix1)
The server smix script will execute the polysrv simulation program to listen for requests from the
client simulator on the standard web server port 80. Also, the detail level for messages sent to the
screen (verbosity level) is set to 2. On the server computer use the ee editor to create a plain text
script file with the following lines:
Poly1# cd /usr/poly107 <enter>
Poly1# ee smix1 <enter>
#!/bin/csh
#Polymix-1 server script file for Poly1 host at 200.100.50.10
./polysrv--port 80 \
--xact_think norm:3s,1.5s \
--verb_lvl 1 \
--goal–1:1hr:0.30
After adding the lines, press the <esc> key and the ee editor will provide a menu to leave the
editor and save the contents of the smix1 file.
Client Polymix-1 script (cmix1)
The client cmix script will execute the polyclt simulation program to send requests to the web
server simulator through the proxy cache. In this case, the origin server is the poly1 host with the
200.100.50.10 IP address and the TaskSmart C-Series Server is setup to 200.100.50.253 listening
on port 8080. Also, the detail level for messages sent to the screen (verbosity level) is set to 2.
On the client computer, use the ee editor to create a plain text script file with the following lines:
Poly2# cd /usr/poly107 <enter>
Poly2# ee cmix1 <enter>
#!/bin/sh
#Polymix-1 client script for Poly2 at 200.100.50.11with TaskSmart
C-Series Server at 200.200.50.253
./polyclt -- ports 1024:30000 \
--proxy 200.100.50.253:8080 \
--origin 200.100.50.10:80 \
--verb_lvl 2 \
--robots 1 \
--rep_cachable 80p \
--dhr 55p \
--req_rate $1/sec
--pop_model unif \
--tmp_loc none \
--cool_phase 1min \
--log $2 \
--goal –1:1hr:0.30
After adding the lines, press the <esc> key and the ee editor will provide a menu to leave the
editor and save the contents of the cmix1 file. If the script files will not run from the command
prompt, execute the chmod command to make them executable:
poly1# chmod 777 sfill <enter>
poly1# chmod 777 smix1 <enter>
poly2# chmod 777 cfill <enter>
poly2# chmod 777 cmix1 <enter>
117G-1099-A-WWEN
Page 19

Deploying Web Polygraph to Benchmark and Qualify Proxy Cache Compaq TaskSmart C-Series Servers 19
Once the scripts are created, the fill procedure can be invoked by starting the server first and then
the client by typing the following commands:
On the server computer: poly1# ./sfill <enter>
On the client computer: poly2# ./cfill <enter>
The Polymix-1 procedure can be invoked by starting the server first, and then the client by typing
the commands listed below for each. The client script is invoked with 250 requests/second, and
will log the test information in the my250run.log file.
On the server computer: poly#1 ./smix1 <enter>
On the client computer: poly#1 ./cmix1 250 my250run.log <enter>
Once the first 250 request/second test is complete, wait 10 minutes, and repeat the Polymix-1
procedure again with cmix1 parameters at 25 request/second with my25run.log file name.
During the test, the polyclt simulation programs will display information on the console screen.
The output below represents a test with a 32 request/second rate with 56% hit ratio and 50 open
TCP sockets.
920863899.589571 i-warm 164 40.97 56.10 0 50
920863900.667568 i-warm 198 31.54 56.10 0 50
920863901.546893 p-warm 232 38.42 56.10 0 50
920863901.727303 i-meas 164 33.03 56.10 0 50
…
920863952.825227 i-meas 1807 24.55 56.10 1 50
920863953.828185 i-meas 1847 40.97 56.10 0 50
920863954.830550 i-meas 1862 40.97 56.10 0 50
…
920863955.554980 p-meas 1885 30.61 54.23 1
920863956.624414 i-cool 1900 15.03 56.10 0 10
• The first column is the UNIX timestamp with millisecond resolution. UNIX time stamps
represent a second counter value since January 1, 1970 00:00 GMT.
• The second column represents the interval and phase names (warm, meas, or cool).
• The third column represents the total number of replies received up to that point.
• The fourth column represents the number of replies received in the last interval (replies per
second).
• The fifth column represents the hit ratio % (client side only).
• The sixth column represents the number of errors during the last interval or phase.
• Finally, the last column displays the number of open TCP sockets for each interval. A more
detailed description of the polygraph console output can be found at
http://polygraph.ircache.net/doc/console.html .
117G-1099-A-WWEN
Page 20

Deploying Web Polygraph to Benchmark and Qualify Proxy Cache Compaq TaskSmart C-Series Servers 20
Gathering Polygraph Statistics
In order to obtain the Polygraph test results, the lx utility must be used. The Polygraph
simulation program stores a lot of detailed information in the log files, but it is not in human
readable format. To get a summary of the statistics, create the following script file using the ee
editor on the client unit in the /usr/poly107 directory:
poly#2 ee report <enter>
./lx \
--out $1.out \
--phase meas \
--objects all \
--prn_names yes \
$1
tail $1.out
After adding the lines, press the <esc> key and the ee editor will provide a menu to leave the
editor and save the contents of the report file. If the script file will not run from the command
prompt execute the chmod command to make them executable:
poly2# chmod 777 report <enter>
To run the report script on the my250run.log file, type the command as shown below. The report
script will create a new test file called my250run.log.out and display the summary statistics:
poly2# ./report my250run.log <enter>
log_cnt: 1
req_rate: 250.00
rep_rate: 250.03
resp_tm_mean: 1567.01
conn_ttl_mean: 1567.01
req_dhr: 55.09
rep_dhr: 55.09
err_cnt: 0
err_pct: 0.00
In order to plot the entire response time –vs- request/second curve, each log file will have to be
processed separately.
117G-1099-A-WWEN
Page 21

Deploying Web Polygraph to Benchmark and Qualify Proxy Cache Compaq TaskSmart C-Series Servers 21
Table 6. Log files
Statistic Value Meaning
log_cnt 1 Number of logs in the file (always 1)
req_rate 250.00 Measured request rate (should closely match value passed to cmix1 script)
rep_rate 250.03 Measured reply rate (should closely match value passed to cmix1 script)
resp_tm_mean 1567.01 Measured mean response time value in milliseconds
conn_ttl_mean 1567.01 Actual calculated mean connection time-to-live value in milliseconds
req_dhr 55.09 Measured request document hit rate percentage (should closely match the
55 % value in the cmix1 script)
rep_dhr 55.09 Measured reply document hit ratio percentage (should closely match the
55% value in the cmix1 script)
err_cnt 4 Number of request/reply errors encountered during the test
err_pct 0.00 Percentage of total number of requests/replays that were errors
117G-1099-A-WWEN
Page 22

Deploying Web Polygraph to Benchmark and Qualify Proxy Cache Compaq TaskSmart C-Series Servers 22
Appendix A - How to interpret the results
Using the reported information from the 250, 25, 225,50,200, 80,100,180,130,160 logs, a table
can be created to show the request rate, mean response time, and document hit ratio percentage.
A “passing” test for TaskSmart C-Series Server shows response times under 3 seconds.
Document hit ratios equal to 55% as defined in cmix1script, and request/reply rate match the
values passed to the cmix1 script. The table below shows a sample of all 10 points from log files
run at IRCache PolyLab in June under first Bake-off conditions.
Sample of 10 points from log files at IRCache PolyLab
Request
Rate
(per second)
25 1.37 55.16
50 1.39 55.22
80 1.40 55.26
100 1.40 55.19
130 1.41 55.14
160 1.42 55.09
180 1.43 55.08
200 1.45 55.09
225 1.67 55.11
250 1.72 55.12
Mean
Response
Time
(seconds)
Hit Ratio
(percent)
117G-1099-A-WWEN
Page 23

Deploying Web Polygraph to Benchmark and Qualify Proxy Cache Compaq TaskSmart C-Series Servers 23
Below are 14 points of test data for IRCache SQUID at the first Bake-off. Note at the anomalous
jump in response time and reduced document hit ratio at 75 request /second. Also notice, at 78
request /second, and above, the SQUID cache is no longer able to maintain the 55% document hit
ratio, and response times climb to 6.05 seconds. Clearly, the SQUID cache is no longer
competitive with TaskSmart C-Series Server from a performance perspective at or above 80
request/second.
Table 7. 14 points of test data for IRCache Squid
Request
Rate
(per second)
14 1.37 55.1
40 1.43 55.2
62 1.46 55.1
65 1.49 55.1
70 1.60 55.2
72 1.48 55.1
74 1.78 54.8
75 3.64 51.1
76 1.94 54.3
78 2.42 53.5
80 3.02 51.4
84 3.63 49.9
88 4.44 46.8
96 6.05 39.3
Mean
Response
Time
(seconds)
Hit Ratio
(percent)
117G-1099-A-WWEN
Page 24

Deploying Web Polygraph to Benchmark and Qualify Proxy Cache Compaq TaskSmart C-Series Servers 24
Below are 11 points of test data for InfoLibria DynaCache at the first Bake-off. Note that at 300
requests/second, response time more than doubles. The 55% document hit ratio is no longer
being maintained. Also, note that at or above 300 request/second the response time averaged
about 3.7 seconds, but the document hit ratio declined to 9.3%. Clearly, the InfoLibria
DynaCache was no longer competitive with TaskSmart C-Series Server from a performance
perspective after 300 requests/second. This test was considered a pass because of InfoLibria’s
“fail-safe” or bypass mode started at request values above 260 request /second.
Table 8. 11 points of test data for InfoLibria DynaCache
Request
Rate
(per second)
80 1.41 55.1
150 1.43 55.1
200 1.45 55.0
260 1.56 55.0
300 3.53 48.5
360 3.58 36.2
450 3.70 22.3
520 3.72 16.6
590 3.66 13.4
630 3.64 12.0
690 3.73 9.3
Mean
Response
Time
(seconds)
Hit Ratio
(percent)
Unfortunately, a failed Web Polygraph test usually results in a core dump on the Polygraph client
(polyclt) program. In the case of a core dump, the logs are unusable. The peak value is found
experimentally by running with the highest request/second rate that doesn’t cause the polyclt to
core dump. A core dump can be avoided if the test is stopped by using <ctrl-c> on the client
machine. A good indicator that the test is failing or going to core dump will be the pending
connection counter (7th column) constantly climbing into the thousands. The console will look
similar to the list below:
920863952.825227 i-meas 1807 24.55 56.10 1 700
920863953.828185 i-meas 1847 40.97 42.10 0 900
920863954.830550 i-meas 1862 40.97 56.10 0 1304
920863955.825227 i-meas 1902 40.55 46.10 1 2400
920863956.828185 i-meas 1947 44.97 44.10 0 3260
920863957.830550 i-meas 1988 40.97 46.10 0 4800
Once the number of pending connections reach more than FreeBSD operating system can handle
the polyclt program will core dump.
117G-1099-A-WWEN
Page 25

Deploying Web Polygraph to Benchmark and Qualify Proxy Cache Compaq TaskSmart C-Series Servers 25
Appendix B – Useful UNIX Hints and
Commands
FreeBSD is a derivative of the Berkeley UNIX distribution from the University of California. It
uses the csh command interpreter by default. The commands used to install & patch FreeBSD
and Web Polygraph are standard UNIX commands. For those used to Microsoft-based operating
systems, UNIX commands require space and are case sensitive (mostly lowercase). Below is a
table of the UNIX commands used in the paper with a simple explanation.
Table 9. UNIX commands and explanations
UNIX command Explanation
ee
ls Command to list the contents of the disk directory.
pwd Command to print the working directory.
chmod 777 Set file attributes to read, write, and execute for
make
configure
cd Change current directory. Same as DOS cd.
mkdir Create a new directory. Same as DOS md.
rmdir Remove a directory. Same as DOS rd.
patch
./ Means current directory. UNIX will only execute
reboot Shutdown everything now and reboot the computer.
mount –t msdos /dev/fd0 /mnt
umount /mnt
tar –xvzf /polygraph-1_0p7.tar.gz Command to extract a gzipped tape archive file to the
shutdown –h now Shutdown the computer. Same as Windows95 shutdown
A full screen Editor program similar to one found on
Microsoft operating systems. Most UNIX admins use vi
or emacs.
Similar to DOS dir command.
everyone. Similar to DOS attrib command.
A general purpose utility used to build programs by a
specific set of rules.
A script (or batch) file to prepare the kernel files to be
compiled with the make utility.
A utility to apply diff (difference) files to create an upated
version of an existing file.
programs on the search path. If the current directory is
not in the path, a ‘./’ must be prepended to the command.
Command to mount a DOS formatted diskette as a UNIX
file system under the /mnt directory.
Command to dismount the DOS formatted diskette from
/mnt directory.
current directory. Similar to UNZIPping an archive in
DOS.
command. Always shut down before powering the
FreeBSD units down.
117G-1099-A-WWEN
Page 26

Deploying Web Polygraph to Benchmark and Qualify Proxy Cache Compaq TaskSmart C-Series Servers 26
Appendix C - Running the netperf change
If network problems are suspected regarding the Bake-off, use the netperf utility to validate the
network’s capability:
• To run netperform, change to the /usr/local/netperf directory on both machines.
• On machine Poly 1 (200.100.50.10), run the ./netserver program.
• On machine Poly 2 (200.100.50.11), run the ./netperf-h 200.100.50.10. The default test will
take about 20 seconds.
Note: 100TX Switch 94.89Mb/s (10^6 bits/second)
100TX HUB 72.80Mb/s (10^6 bits/second)
Reboot after the network check.
About the Author
Jeff Potter is a Senior System Engineer in the Enterprise Appliance and Communication Group in
the Industry Standard Server Division (ISSD) for Compaq Computer Corporation. E-mail
questions to Jeff at Jeff.Potter@Compaq.com
117G-1099-A-WWEN
 Loading...