

Hp COMPAQ PROLIANT 3000, COMPAQ PROLIANT 5000, COMPAQ PROLIANT 800, COMPAQ PROSIGNIA 200 SMART-2DH Array Controller Reference Guide
Page 1

SMART-2DH Array Controller
Reference Guide
Second Edition (
Part Number
Compaq Computer Corporation
March 1998)
295469-002
Page 2

Notice
The information in this publication is subject to change without notice.
COMPAQ COMPUTER CORPORATION SHALL NOT BE LIABLE FOR TECHNICAL OR
EDITORIAL ERRORS OR OMISSIONS CONTAINED HEREIN, NOR FOR INCIDENTAL OR
CONSEQUENTIAL DAMAGES RESULTING FROM THE FURNISHING, PERFORMANCE, OR
USE OF THIS MATERIAL. THIS INFORMATION IS PROVIDED “AS IS” AND COMPAQ
COMPUTER CORPORATION DISCLAIMS ANY WARRANTIES, EXPRESS, IMPLIED OR
STATUTORY AND EXPRESSLY DISCLAIMS THE IMPLIED WARRANTIES OF
MERCHANTABILITY, FITNESS FOR PARTICULAR PURPOSE, GOOD TITLE AND AGAINST
INFRINGEMENT.
This publication contains information protected by copyright. No part of this publication may be
photocopied or reproduced in any form without prior written consent from Compaq Computer
Corporation.
1998 Compaq Computer Corporation.
All rights reserved. Printed in the U.S.A.
The software described in this guide is furnished under a license agreement or nondisclosure
agreement. The software may be used or copied only in accordance with the terms of the agreement.
Compaq, Deskpro, Fastart, Compaq Insight Manager, Systempro, Systempro/LT, ProLiant, ROMPaq,
Qvision, SmartStart, QuickFind, PaqFax, ProSignia, registered United States Patent and Trademark
Office.
Netelligent, Systempro/XL, SoftPaq, QuickBlank, QuickLock are trademarks and/or service marks of
Compaq Computer Corporation.
Microsoft, MS-DOS, Windows, and Windows NT are registered trademarks of Microsoft Corporation.
Other product names mentioned herein may be trademarks and/or registered trademarks of their
respective companies.
SMART-2DH Array Controller Reference Guide
Second Edition (March 1998)
Part Number 295469-002
Page 3

Contents
About This Guide
Text Conventions..................................................................................................................ix
Symbols in Text.....................................................................................................................x
Symbols on Equipment..........................................................................................................x
Getting Help .........................................................................................................................xi
Compaq Web Site ..........................................................................................................xi
Telephone Numbers.......................................................................................................xi
Chapter 1
Features
Overview of Features......................................................................................................... 1-1
SMART-2DH Array Controller................................................................................... 1-2
Drive Arrays ............................................................................................................... 1-3
Fault Tolerance........................................................................................................... 1-3
Capacity Expansion..................................................................................................... 1-4
Drive Movement......................................................................................................... 1-4
Wide-Ultra SCSI, Fast-Wide SCSI-2, and Fast-SCSI-2 ............................................... 1-5
Array Accelerator........................................................................................................ 1-5
Array Configuration Utility Features.................................................................................. 1-7
iii
Chapter 2
Guidelines for Making Changes to Current Installation
Multiple SMART-2DH Controller Installation................................................................... 2-1
Drive Considerations.......................................................................................................... 2-2
Determining the Maximum Storage ................................................................................... 2-2
Expanding the Capacity of an Array................................................................................... 2-3
Changing the Fault Tolerance ............................................................................................ 2-4
Moving Drives................................................................................................................... 2-4
Moving Arrays................................................................................................................... 2-6
Restoring an Array to Its Original Controller ..................................................................... 2-9
SMART-2DH Array Controller Reference Guide
Writer: Pamela King Project: SMART-2DH Array Controller Reference Guide Comments: 295469-002
File Name: A-FRNT.DOC Last Saved On: 4/1/98 1:31 PM
COMPAQ CONFIDENTIAL - NEED TO KNOW REQUIRED
Page 4

iv
Chapter 3
Updating the Firmware
ROMPaq Diskettes............................................................................................................. 3-1
Materials Needed........................................................................................................ 3-2
Creating Diskettes....................................................................................................... 3-2
Running System ROMPaq.................................................................................................. 3-3
Running Option ROMPaq.................................................................................................. 3-4
Chapter 4
Running the System Configuration Utility
System Configuration Utility ............................................................................................. 4-1
System Configuration Diskettes .................................................................................. 4-2
Running the System Configuration Utility......................................................................... 4-3
Configuring the Controller................................................................................................. 4-4
Chapter 5
Running the Array Configuration Utility
Before You Begin.............................................................................................................. 5-2
Starting the Array Configuration Utility............................................................................. 5-2
Accessing Online ........................................................................................................ 5-2
System Partition.......................................................................................................... 5-3
SmartStart and Support Software CD .......................................................................... 5-3
Array Configuration Utility Diskettes.......................................................................... 5-3
Configuration Wizards....................................................................................................... 5-4
Online Help ....................................................................................................................... 5-5
Configuration Procedures................................................................................................... 5-5
Creating a New Array ................................................................................................. 5-5
Array Configuration Utility Screens..................................................................................5-16
Main Configuration Screen ........................................................................................5-16
Controller Settings Screen..........................................................................................5-21
Create Array Screen...................................................................................................5-23
Create Logical Drive Screen ......................................................................................5-24
Error and Warning Messages ............................................................................................5-25
Writer: Pamela King Project: SMART-2DH Array Controller Reference Guide Comments: 295469-002
File Name: A-FRNT.DOC Last Saved On: 4/1/98 1:31 PM
COMPAQ CONFIDENTIAL - NEED TO KNOW REQUIRED
Page 5

Chapter 6
Installing the Operating System Drivers
Novell NetWare/intraNetWare........................................................................................... 6-2
Materials Needed........................................................................................................ 6-2
Creating Novell SSD Diskettes.................................................................................... 6-2
Additional Information................................................................................................ 6-3
Installing the Driver.................................................................................................... 6-4
Updating the Compaq Insight Manager Agents .......................................................... 6-5
Using Array Configuration Utility for NetWare/intraNetWare (CPQONLIN).............. 6-6
Optimizing Array Controller Performance................................................................... 6-6
Using the Compaq Drive Array Optimization Utility (CPQDAOPT)........................... 6-7
Software Drive Mirroring with NetWare/intraNetWare.............................................6-10
Handling Disk Drive Failures.....................................................................................6-11
Microsoft Windows NT.....................................................................................................6-19
Materials Needed.......................................................................................................6-19
Creating the Windows NT SSD Diskettes...................................................................6-19
Additional Information...............................................................................................6-20
Installation Procedures...............................................................................................6-21
Updating the Compaq Insight Manager Agents .........................................................6-27
SCO OpenServer 5............................................................................................................6-28
Getting the Driver and Installation Information.........................................................6-28
Materials Needed.......................................................................................................6-28
Creating the EFS Diskettes......................................................................................... 6-29
Accessing the Information..........................................................................................6-29
Updating the Compaq Insight Manager Agents .........................................................6-30
SCO UnixWare 2.1 or Later..............................................................................................6-31
Getting the Driver and Installation Information.........................................................6-31
Materials Needed.......................................................................................................6-31
Creating the EFS Diskettes......................................................................................... 6-31
Accessing the Information..........................................................................................6-32
Updating the Compaq Insight Manager Agents .........................................................6-32
v
SMART-2DH Array Controller Reference Guide
Writer: Pamela King Project: SMART-2DH Array Controller Reference Guide Comments: 295469-002
File Name: A-FRNT.DOC Last Saved On: 4/1/98 1:31 PM
COMPAQ CONFIDENTIAL - NEED TO KNOW REQUIRED
Page 6

vi
Installing the Operating System Drivers
IBM OS/2 .........................................................................................................................6-34
Materials Needed.......................................................................................................6-34
Creating an SSD Diskette...........................................................................................6-34
Additional Information...............................................................................................6-35
Installing the Driver...................................................................................................6-36
Controller Ordering....................................................................................................6-36
Partitioning ................................................................................................................6-37
Booting OS/2 from a SMART-2DH Array Controller Drive.......................................6-38
Command Line Switches............................................................................................6-39
Important Information................................................................................................6-41
Updating the Compaq Insight Manager Agents .........................................................6-41
Banyan VINES 6.0 or Later..............................................................................................6-42
Materials Needed.......................................................................................................6-42
Creating the Peripheral Adapter Support Software Diskettes......................................6-42
Additional Information...............................................................................................6-43
Installing the Driver...................................................................................................6-43
Microsoft Windows 95......................................................................................................6-44
Getting the Driver and Installation Information.........................................................6-44
Materials Needed.......................................................................................................6-44
Creating the Windows 95 Diskettes............................................................................6-45
Installing the SMART-2DH Array Controller with Windows 95.................................6-45
continued
Appendix A
Electrostatic Discharge
Preventing Electrostatic Damage........................................................................................A-1
Grounding Methods ........................................................................................................... A-2
Appendix B
Specifications
SMART-2DH Controller....................................................................................................B-1
Wide SCSI Connector Pin Assignments...........................................................................B-2
Writer: Pamela King Project: SMART-2DH Array Controller Reference Guide Comments: 295469-002
File Name: A-FRNT.DOC Last Saved On: 4/1/98 1:31 PM
COMPAQ CONFIDENTIAL - NEED TO KNOW REQUIRED
Page 7

Appendix C
Things You Should Know
Option Kit Contents...........................................................................................................C-1
SMART-2DH Controller Option Kit Contents.............................................................C-1
SCSI Termination..............................................................................................................C-2
SCSI IDs............................................................................................................................ C-2
SCSI Cabling.....................................................................................................................C-2
SCSI Cable Connectors......................................................................................................C-3
Migrating to/from Other SMART Array Controllers ..........................................................C-5
Appendix D
Understanding Drive Arrays
What is a Drive Array? ......................................................................................................D-1
Drive Arrays ...............................................................................................................D-3
Logical Drives.............................................................................................................D-4
Drive Array Benefits..........................................................................................................D-5
Data Protection ...........................................................................................................D-5
Performance Enhancement...............................................................................................D-11
Distributing Data and Data Striping...........................................................................D-11
Array Accelerator......................................................................................................D-12
Concurrent I/O Request Servicing.............................................................................D-14
Optimized Request Management...............................................................................D-14
Bus Master Data Transfers........................................................................................D-15
Expanding Storage Capacity ............................................................................................D-15
Online Capacity Expansion.......................................................................................D-17
Disk Drive Upgrades.................................................................................................D-18
Other Fault Management Features....................................................................................D-18
Auto Reliability Monitoring......................................................................................D-19
Dynamic Sector Repairing ........................................................................................D-19
Drive Parameter Tracking .........................................................................................D-19
Drive Failure Alert Features......................................................................................D-19
Interim Data Recovery..............................................................................................D-20
Automatic Data Recovery.........................................................................................D-20
Hot-Pluggable Drives................................................................................................D-21
Controller Duplexing.................................................................................................D-23
Software-Based Drive Mirroring...............................................................................D-23
vii
SMART-2DH Array Controller Reference Guide
Writer: Pamela King Project: SMART-2DH Array Controller Reference Guide Comments: 295469-002
File Name: A-FRNT.DOC Last Saved On: 4/1/98 1:31 PM
COMPAQ CONFIDENTIAL - NEED TO KNOW REQUIRED
Page 8

viii
Appendix E
Upgrading or Replacing the Array Accelerator
Accessing the SMART-2DH Controller ...........................................................................E-2
Removing the Array Accelerator Board .............................................................................E-2
Array Accelerator Installation............................................................................................E-3
Array Accelerator Switch................................................................................................... E-4
Appendix F
Upgrading from the SMART SCSI Array Controller
Appendix G
Recovering from Drive Failure
Recognizing a Drive Failure...............................................................................................G-1
Fault Tolerance and Drive Failure......................................................................................G-2
A Non-Fault-Tolerant (RAID 0) Logical Drive ...........................................................G-2
A RAID 1 (Mirroring) Logical Drive ..........................................................................G-2
Spare Drives................................................................................................................G-3
Replacing a Failed Drive....................................................................................................G-3
Automatic Data Recovery...........................................................................................G-4
Automatic Data Recovery Failure ...............................................................................G-5
Compromised Fault Tolerance ...........................................................................................G-6
Appendix H
POST Error Messages
Appendix I
Questions and Answers
Index
Writer: Pamela King Project: SMART-2DH Array Controller Reference Guide Comments: 295469-002
File Name: A-FRNT.DOC Last Saved On: 4/1/98 1:31 PM
COMPAQ CONFIDENTIAL - NEED TO KNOW REQUIRED
Page 9

About This Guide
This guide is designed to be used as a reference for operation, troubleshooting,
and future upgrades.
Text Conventions
This document uses the following conventions to distinguish elements of text:
Keys
ix
Keys appear in boldface. A plus sign (+) between two
keys indicates that they should be pressed
simultaneously.
USER INPUT
FILENAMES
Menu Options,
Command Names,
Dialog Box Names
COMMANDS,
DIRECTORY
NAMES, and DRIVE
NAMES
Type When you are instructed
Enter When you are instructed
User input appears in a different typeface and in
uppercase.
File names appear in uppercase italics.
These appear in initial capital letters.
These always appear in uppercase.
information
information and then press the
without
pressing the
information, type the
to type
Enter
to enter
information, type the
key.
Enter
key.
SMART-2DH Array Controller Reference Guide
Writer: Pamela King Project: SMART-2DH Array Controller Reference Guide Comments: 295469-002
File Name: A-FRNT.DOC Last Saved On: 4/1/98 1:31 PM
COMPAQ CONFIDENTIAL - NEED TO KNOW REQUIRED
Page 10

x About This Guide
Symbols in Text
These symbols may be found in the text of this guide. They have the
following meanings.
WARNING:
!
could result in bodily harm or loss of life.
CAUTION:
damage to equipment or loss of information.
IMPORTANT:
: Presents commentary, sidelights, or interesting points of information.
NOTE
Indicates that failure to follow directions could result in
Presents clarifying information or specific instructions.
Symbols on Equipment
These icons may be located on equipment in areas where hazardous conditions
may exist.
Any surface or area of the equipment marked with these
symbols indicates the presence of electrical shock hazards.
Enclosed area contains no operator serviceable parts.
WARNING:
hazards, do not open this enclosure.
Indicates that failure to follow directions in the warning
To reduce the risk of injury from electrical shock
Any RJ-45 receptacle marked with these symbols indicates a
Network Interface Connection.
WARNING:
damage to the equipment, do not plug telephone or
telecommunications connectors into this receptacle.
Writer: Pamela King Project: SMART-2DH Array Controller Reference Guide Comments: 295469-002
File Name: A-FRNT.DOC Last Saved On: 4/1/98 1:31 PM
COMPAQ CONFIDENTIAL - NEED TO KNOW REQUIRED
To reduce the risk of electrical shock, fire, or
Page 11
Any surface or area of the equipment marked with these
symbols indicates the presence of a hot surface or hot
component. If this surface is contacted, the potential for injury
exists.
WARNING:
allow the surface to cool before touching.
Power Supplies or Systems marked with these symbols
indicate the equipment is supplied by multiple sources of
power.
To reduce the risk of injury from a hot component,
xi
Getting Help
If you have a problem and have exhausted the information in this guide, you
can get further information and other help in the following locations.
Compaq Web Site
The Compaq Web Site has information on this product as well as the latest
drivers and Flash ROM images. You can access the Compaq Web Site by
logging on to the Internet at
Telephone Numbers
For the name of your nearest Compaq Authorized Reseller:
In the United States, call 1-800-345-1518
In Canada, call 1-800-263-5868
For Compaq technical support:
In the United States and Canada, call 1-800-386-2172
For Compaq technical support phone numbers outside the United States and
Canada, visit the Compaq Web Site at
WARNING:
shock, remove all power cords to completely disconnect
power from the system.
To reduce the risk of injury from electrical
http://www.compaq.com
http://www.compaq.com
.
.
SMART-2DH Array Controller Reference Guide
Writer: Pamela King Project: SMART-2DH Array Controller Reference Guide Comments: 295469-002
File Name: A-FRNT.DOC Last Saved On: 4/1/98 1:31 PM
COMPAQ CONFIDENTIAL - NEED TO KNOW REQUIRED
Page 12

Chapter 1
Features
The Compaq SMART-2DH Array Controller is a dual-channel, 32-bit array
controller with many advanced features. The controller supports all SCSI hard
drives: Wide-Ultra SCSI, Fast-Wide SCSI-2, and Fast-SCSI-2. Included with
the SMART-2DH Array Controller is the Compaq Array Configuration Utility,
which provides easy drive array setup and configuration changes.
Overview of Features
Listed below are some of the features of the SMART-2DH Array Controller
option board:
■ Support for RAID 0, 1, 4, and 5 fault tolerance options
■ Online capacity expansion
■ Supports Wide-Ultra SCSI; a 16-bit, 20-MHz bus providing a 40-
Mbytes/sec data transfer rate
■ Support for Wide-Ultra SCSI, Fast-Wide SCSI-2, and Fast-SCSI-2
hard drives
■ Dual channels on a single board to support up to 14 drives (7 per channel)
1-1
■ Wide-Ultra SCSI/Fast-SCSI-2 (Wide SCSI) internal connector
■ Wide-Ultra SCSI/Fast-SCSI-2 (Wide SCSI) external connector
■ Removable Array Accelerator - battery-backed 16-MB Read/Write
Cache with ECC (Error Checking and Correcting) memory
■ Performance monitoring through Compaq Insight Manager
■ Automatic performance tuning
■ Pre-failure notification
■ Read-ahead caching
■ Tagged command queuing
■ Multiple logical drives per drive array
■ Support for drive and array movement
■ Available in 32-bit PCI Bus Master interface
SMART-2DH Array Controller Reference Guide
Writer: Pamela King Project: SMART-2DH Array Controller Reference Guide Comments: 295469-002
File Name: B-CH01.DOC Last Saved On: 2/27/98 11:23 AM
COMPAQ CONFIDENTIAL - NEED TO KNOW REQUIRED
Page 13
1-2
Features
SMART-2DH Array Controller
The SMART-2DH Array Controller interface to the server is a Peripheral
Component Interface (PCI) bus. The PCI bus is a high-performance, 32-bit
bus with multiplexed address and data lines, and includes a parity signal. It
provides a high-speed (up to 132 Megabytes/sec) path between the system
board and the SMART-2DH Array Controller.
The SMART-2DH Array Controller is a PCI Bus Master device and conforms
to Rev. 2.0 or greater of the PCI Local Bus Specification.
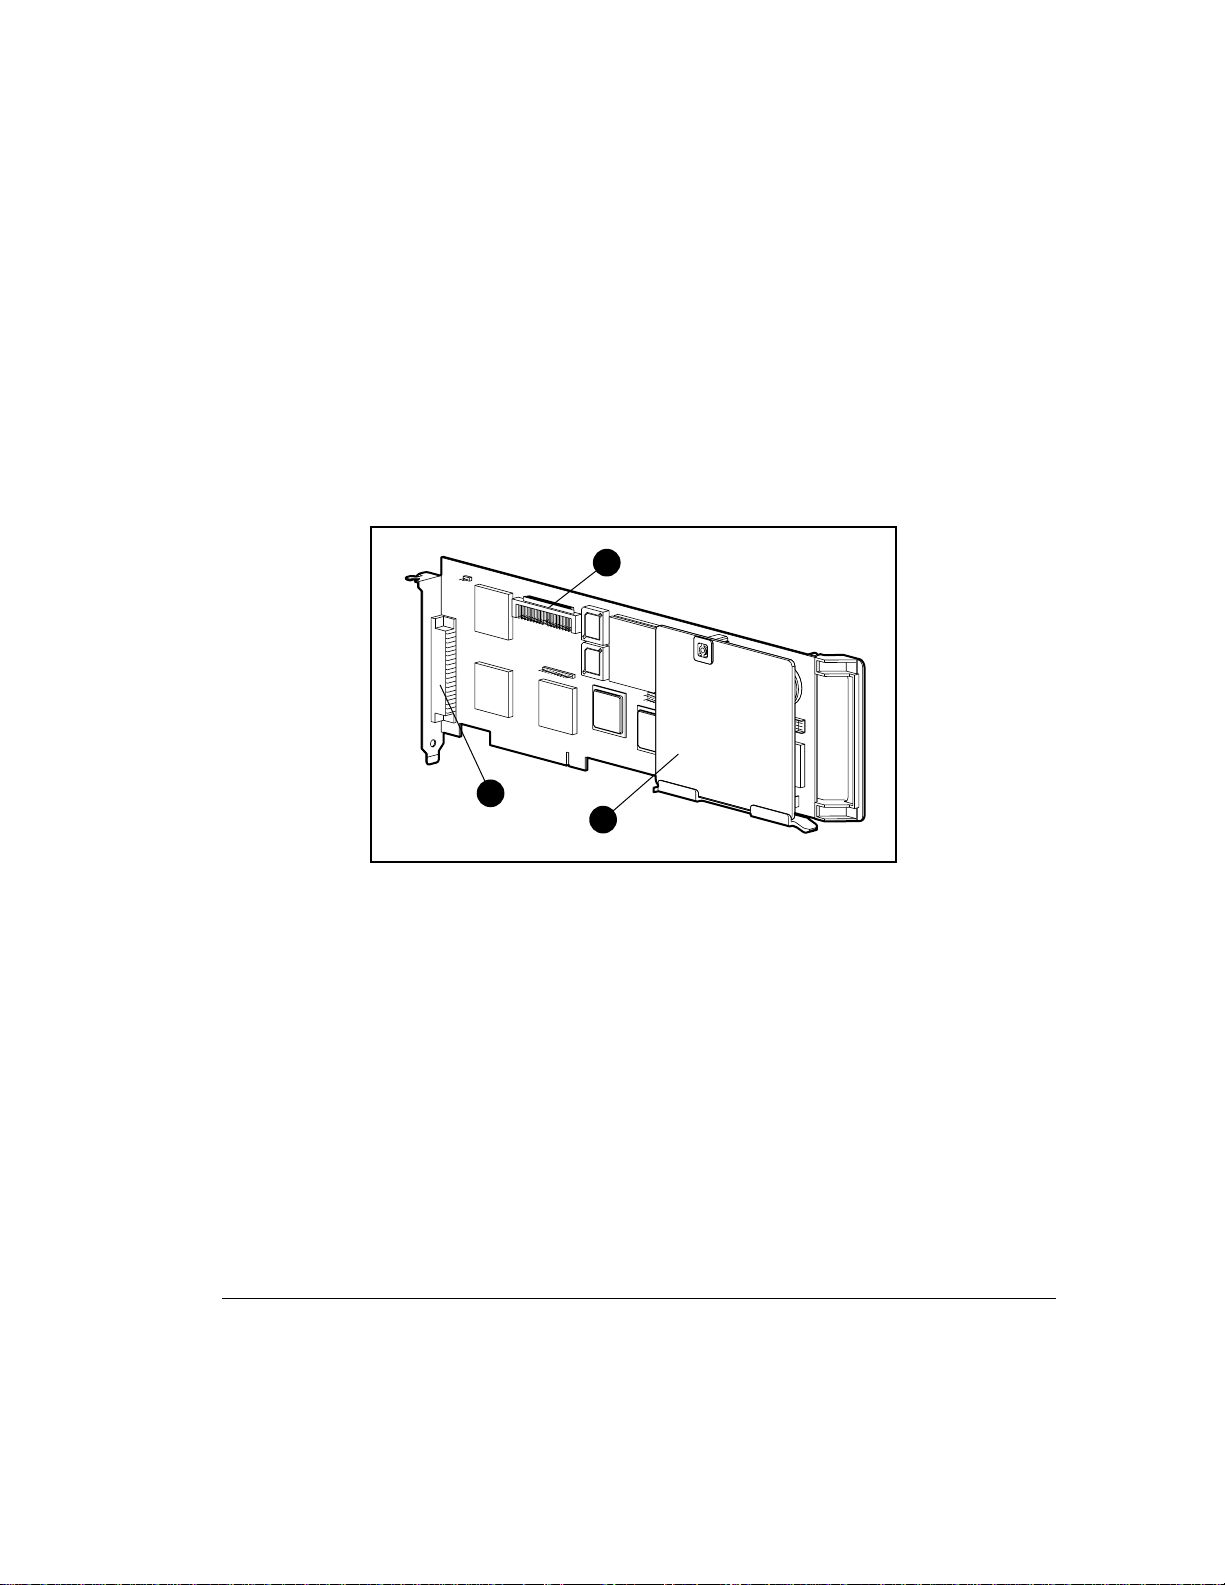
DAZ1-1.EPS
Figure 1-1.
1
3
2
SMART-2DH Array Controller
Major components of the SMART-2DH Array Controller include:
Internal Wide-Ultra SCSI Port 1 connector
➊
Array Accelerator board
➋
External Wide-Ultra SCSI Port 2 connector
➌
Writer: Pamela King Project: SMART-2DH Array Controller Reference Guide Comments: 295469-002
File Name: B-CH01.DOC Last Saved On: 2/27/98 11:23 AM
COMPAQ CONFIDENTIAL - NEED TO KNOW REQUIRED
Page 14

Drive Arrays
Drive array technology distributes data across a series of hard drives to unite
these physical drives into one or more higher performance logical drives.
Distributing the data makes it possible to access data concurrently from
multiple drives in the array, yielding I/O rates faster than non-arrayed drives.
Each logical drive in the array may be set to a different fault tolerant
configuration. The SMART-2DH Array Controller manages the drive array
independent of the host processor.
There may be several possible ways to configure each set of hardware. The
Array Configuration Utility is used to help you configure the hardware in the
way that best suits your needs.
1-3
See Appendix D for more information on drive arrays. See Chapter 5,
“Running the Array Configuration Utility,” for information on configuring
your drive arrays using the Compaq Array Configuration Utility.
Fault Tolerance
Fault tolerance refers to several possible methods used to protect data from
being lost in the event of a hardware failure somewhere in the storage system.
Each method has its advantages, so choosing one requires careful planning for
your particular requirements.
The fault tolerance methods supported by the SMART-2DH Array Controller
and the Compaq Array Configuration Utility include:
■ Distributed data guarding (RAID 5)
■ Data guarding (RAID 4)
■ Drive mirroring (RAID 1)
■ No fault tolerance (RAID 0)
CAUTION:
It is recommended that any time you move drive
arrays or change your configuration you should back up data.
SMART-2DH Array Controller Reference Guide
Writer: Pamela King Project: SMART-2DH Array Controller Reference Guide Comments: 295469-002
File Name: B-CH01.DOC Last Saved On: 2/27/98 11:23 AM
COMPAQ CONFIDENTIAL - NEED TO KNOW REQUIRED
Page 15

1-4
Features
Further data protection can be achieved by assigning an online spare to any
RAID 1, RAID 4, or RAID 5 configuration. See Appendix D for more
information on these fault-tolerance methods. See Chapter 5 for information on
configuring your system for one of the fault tolerance methods.
Capacity Expansion
Capacity Expansion refers to the ability to change an existing data storage
configuration. This change usually involves adding drives to provide more
storage space.
Using the Array Configuration Utility, changing your storage configuration is
easy, even in fault-tolerant configurations, without requiring a data backup
and restore cycle. If you are using Microsoft Windows NT or Novell NetWare
operating systems with hot-pluggable drives, storage expansion can also be
performed online, without shutting down the server operating system. For
more information on storage expansion, see Appendix D, “Understanding
Drive Arrays.”
Drive Movement
An array of drives can be moved from one system to another as long as the
relative order of the drives is maintained. For more information, see Chapter
2.
Writer: Pamela King Project: SMART-2DH Array Controller Reference Guide Comments: 295469-002
File Name: B-CH01.DOC Last Saved On: 2/27/98 11:23 AM
COMPAQ CONFIDENTIAL - NEED TO KNOW REQUIRED
Page 16

Wide-Ultra SCSI, Fast-Wide SCSI-2, and Fast-SCSI-2
The SMART-2DH Array Controller complies with ANSI SCSI-2 standards,
supporting 16-bit Wide-Ultra SCSI, 16-bit Fast-Wide SCSI-2, and 8-bit FastSCSI-2 (standard SCSI) devices.
Wide-Ultra SCSI
Wide-Ultra SCSI technology provides SCSI data transfer rates of up to
40-Mbytes/sec at a 20-MHz bus rate. This combination allows high
throughput in many network application environments, including resource
sharing and database servicing.
Fast-Wide SCSI-2 and Fast-SCSI-2
Fast-Wide SCSI-2 provides two bytes of data at each bus transfer, providing a
maximum of 20-Mbytes/sec data rate between SCSI devices while still
maintaining a 10-MHz bus rate.
Compaq Fast-Wide SCSI-2 controllers and devices are able to communicate
using Fast-SCSI-2 protocol when required. Therefore, Fast-SCSI-2 drives may
also be used with SMART-2DH Array Controller using the appropriate cable
adapter.
1-5
Array Accelerator
The SMART-2DH Controller Array Accelerator provides a 16-MB onboard
write cache. The result is improved performance on data access to the drive
array by serving as a posted-write cache and read-ahead cache. The write
cache can accept data from the server at 60 megabytes per second. At the
same time, read and writes caches can be accommodated by the drivers. The
read-ahead cache uses a multi-threaded algorithm to predict the next likely
read operation for the array. That data is then read into the Array Accelerator
from the drives. When the SMART-2DH Array Controller receives a read
request for the cached data, it can be brought immediately into system
memory bus speeds. The Array Accelerator feature may be disabled by
software if desired.
Writer: Pamela King Project: SMART-2DH Array Controller Reference Guide Comments: 295469-002
SMART-2DH Array Controller Reference Guide
File Name: B-CH01.DOC Last Saved On: 2/27/98 11:23 AM
COMPAQ CONFIDENTIAL - NEED TO KNOW REQUIRED
Page 17

1-6
Features
: The SMART-2DH Controller Array Accelerator is equipped with a
NOTE
switch that may be activated to fine tune system performance. See Appendix
E for further information.
The Array Accelerator is made of ECC (Error Checking and Correcting)
memory, providing a high level of data integrity. ECC memory detects and
corrects hard and soft memory errors without affecting performance.
The Array Accelerator is backed up with onboard rechargeable batteries,
ensuring that the data temporarily held (cached) there is safe even with
equipment failure or power outage. This is particularly important for data that
has been cached by a posted-write, but has not yet been written to the hard
drives. The batteries preserve data in the Array Accelerator for up to four days.
IMPORTANT:
The rechargeable batteries on a new SMART-2DH Array
Controller may be discharged when the board is first installed. During
server power up with discharged Array Accelerator batteries, Power-On
Self-Test (POST) displays the code “1794,” indicating that the Array
Accelerator is disabled. This is not a problem that requires action on your
part. The Array Accelerator is automatically enabled when the batteries are
charged to 90% of their capacity.
It may take up to 36 hours for the internal circuitry to charge the batteries
fully. During this time, the Array Accelerator will be disabled, but the
SMART-2DH Array Controller will function properly, although without the
performance advantage of the Array Accelerator.
The Array Accelerator, with backup batteries, is located on a removable
daughter board. In the unlikely event of failure, the Array Accelerator can be
detached from the failed SMART-2DH Array Controller and attached to a
replacement SMART-2DH Array Controller. If the configuration information
stored in the Array Accelerator matches that stored on the drives, any valid
posted-write data being held in the cache is automatically written to the drives
attached to the replacement Array controller. Thus, data being held in the
Array Accelerator memory can be recovered despite failure of the main
SMART-2DH Array Controller board.
Writer: Pamela King Project: SMART-2DH Array Controller Reference Guide Comments: 295469-002
File Name: B-CH01.DOC Last Saved On: 2/27/98 11:23 AM
COMPAQ CONFIDENTIAL - NEED TO KNOW REQUIRED
Page 18

Array Configuration Utility Features
The Compaq Array Configuration Utility is an easy-to-use graphical
configuration utility to help you set up and change drive array configurations.
This utility:
■ Provides a graphical view of Compaq drive array configurations
■ Provides express or custom initial configuration
■ Supports easy capacity expansion
■ Supports RAID 0, 1, 4, and 5 fault-tolerant configurations
■ Helps optimize your array configuration with configuration Wizards
■ Sets drive rebuild and capacity expansion priorities
■ Allows online spare (hot spare) configuration
■ Allows separate fault tolerance configuration on a logical drive basis
1-7
SMART-2DH Array Controller Reference Guide
Writer: Pamela King Project: SMART-2DH Array Controller Reference Guide Comments: 295469-002
File Name: B-CH01.DOC Last Saved On: 2/27/98 11:23 AM
COMPAQ CONFIDENTIAL - NEED TO KNOW REQUIRED
Page 19

Chapter 2
Guidelines for Making Changes
to Current Installation
Multiple SMART-2DH Controller
Installation
When you install more than one SMART-2DH Array Controller in the same
server, the following considerations apply:
■ Each SMART-2DH Controller has two independent SCSI channels,
each of which supports up to seven drives.
■ Each SCSI channel has its own set of unique SCSI IDs (from 0 to 6).
You must assign each peripheral on the bus a unique ID for that bus.
Since only one of the two SCSI ports is available on its external connector, the
other internal port must be brought out to an external connector if it is to be
used for external storage. In some servers, a connector panel is provided for
this purpose, but in others the internal port is brought out through an unused
option slot using a special connector bracket.
2-1
SMART-2DH Array Controller Reference Guide
Writer: Pamela King Project: SMART-2DH Array Controller Reference Guide Comments: 295469-002
File Name: C-CH02.DOC Last Saved On: 2/27/98 11:25 AM
COMPAQ CONFIDENTIAL - NEED TO KNOW REQUIRED
Page 20

2-2
Guidelines for Making Changes to Current Installation
Drive Considerations
If you will be installing or replacing drives in your Compaq server, keep in
mind that:
■ Drives may be Fast-SCSI-2, Fast-Wide SCSI-2, Wide-Ultra SCSI, or a mixture
of the three in servers and storage systems supporting hot-pluggable drives.
■ Drives should not contain termination. Compaq servers and internal
cabling provide the required termination of the SCSI bus.
■ Compaq hard drives supported by the SMART-2DH Controller
include:
1.05-GB Fast-SCSI-2
2.1-GB Fast-SCSI-2
2.1-GB Fast-Wide SCSI-2
2.1-GB Wide-Ultra SCSI
4.3-GB Fast-SCSI-2
4.3-GB Fast-Wide SCSI-2
4.3-GB Wide-Ultra SCSI
9.1-GB Wide-Ultra SCSI
9.1-GB Fast-SCSI-2
18.2-GB Wide-Ultra SCSI 3
■ Drives should be of the same capacity to provide the greatest storage space
efficiency when grouped together into the same drive array.
■ Except on hot-plug drives in ProLiant servers and storage systems, you must
manually set the SCSI ID on each drive to a unique value in the range of 0 to
6 for each SCSI bus. Consult the documentation that came with the drive for
instructions on setting the SCSI ID.
Determining the Maximum Storage
Maximum storage capacity factors of a server include:
■ subtract any option slots used for other purposes
■ available internal drive bays
■ availability of external connectors for SCSI Bus 1 (requires connector
panel location or vacant option slot)
Writer: Pamela King Project: SMART-2DH Array Controller Reference Guide Comments: 295469-002
File Name: C-CH02.DOC Last Saved On: 2/27/98 11:25 AM
COMPAQ CONFIDENTIAL - NEED TO KNOW REQUIRED
Page 21

■ some operating systems limit number of logical drives or drive controllers
The maximum number of controllers and drives supported depends on several
factors. To determine the number of drives supported by your server, refer to
the Setup and Installation Guide, or Reference Guide, that accompanied your
server. Server specifications are also available at our website,
www.compaq.com.
Expanding the Capacity of an Array
Below is an overview of procedures for expanding the capacity of an array.
1. Review. See Appendix D, “Adding Storage Capacity,” for information
on expanding the storage capacity of an existing SMART-2DH array.
2. Back up data. Although data loss is not anticipated during a normal
capacity expansion, it is a good idea to back up all data in the array
you will be expanding. This backup may also be used to return to the
original configuration, if necessary.
3. Add drives. If you are using a server or storage system that does not
support hot-pluggable drives, you will need to power down the server
or storage system to add new drives. If you are using a server or
storage system that does support hot-pluggable drives, do not power
down the system or take it offline. Simply plug the new drives into
vacant bays.
2-3
4. Configure drive array. See “Capacity Expansion” in Chapter 5 for
instructions on using the Compaq Array Configuration Utility to
reconfigure your drive array to make use of the added capacity. If your
operating system supports it, run the Array Configuration Utility online
to guide you through the process. The controller automatically
redistributes the data.
SMART-2DH Array Controller Reference Guide
Writer: Pamela King Project: SMART-2DH Array Controller Reference Guide Comments: 295469-002
File Name: C-CH02.DOC Last Saved On: 2/27/98 11:25 AM
COMPAQ CONFIDENTIAL - NEED TO KNOW REQUIRED
Page 22

2-4
Guidelines for Making Changes to Current Installation
Changing the Fault Tolerance
An overview of the procedures to change the fault tolerance is provided
below.
1. Decide on a fault-tolerance method. Review Appendix D,
“Understanding Drive Arrays,” and choose the fault-tolerance method
that best suits your needs.
2. Back up data. Changing the fault tolerance will destroy the data on
that logical drive. You must back up all data in the logical drive that
you will be changing.
3. Configure drive array. Proceed to Chapter 5, “Running the Array
Configuration Utility,” for information on reconfiguring your drive
array with the new fault-tolerance method.
4. Restore data. Copy the backed-up data into the same logical drive.
Your system automatically redistributes the data according to the new
fault-tolerance method.
Moving Drives
Drives can be moved to alternate ID positions on the same array controller as
long as their relative positions remain unchanged. (For information on moving
arrays from one controller to another, see the section in this chapter, “Moving
Arrays.”) Although data loss is not anticipated during drive movement, it is
recommended you back up data before moving drives. To move drives, the
following conditions must be met:
■ Controller firmware is the latest revision (currently 2.02).
■ System power is OFF (includes all system components).
■ The move will not result in more than 7 physical drives and/or 32
logical drives (volumes) connected to a single controller.
■ No failed drives identified. The array should be in its original
configuration with no active spare drives.
■ Capacity expansion is not running.
■ Drives in each array must maintain same the same relative positions
before and after drive movement as shown in Figure 2-1.
Writer: Pamela King Project: SMART-2DH Array Controller Reference Guide Comments: 295469-002
File Name: C-CH02.DOC Last Saved On: 2/27/98 11:25 AM
COMPAQ CONFIDENTIAL - NEED TO KNOW REQUIRED
Page 23

The original configuration in Figure 2-1 shows drive positions 0, 3, and 6
filled. The drives are moved to positions 0, 1, and 2. In both configurations,
the relative order of the drives stays the same: a, then b, then c. This example
would not work if the new configuration changed the relative orders of the
drives, that is, b, then a, then c. The new positions can also span multiple
buses as long as the relative order remains the same; in this case, think of
drive IDs 0 and 1 on SCSI port 2 as IDs (positions) 7 and 8. SCSI cables
cannot be interchanged if an array spans the two ports.
2-5
Original
Configuration
ID6 c ID6
ID5 ID5
ID4 ID4
ID3 b ID3
ID2 ID2 c
ID1 ID1 b
ID0 a ID0 a
Figure 2-1.
Maintaining relative drive order while moving drives within or between arrays
➔
New
Configuration
When the above conditions are met, follow these steps to move drives:
1. Power system OFF.
2. Move drives.
3. Power system ON. A 1724 POST message should indicate that drive
positions were changed and the configuration was updated. If the
system comes up with a 1785 (Not Configured) POST message, turn
the system off immediately to avoid data loss and return the drives to
their original locations.
4. Run Array Configuration Utility to view the new drive configuration
(optional).
SMART-2DH Array Controller Reference Guide
Writer: Pamela King Project: SMART-2DH Array Controller Reference Guide Comments: 295469-002
File Name: C-CH02.DOC Last Saved On: 2/27/98 11:25 AM
COMPAQ CONFIDENTIAL - NEED TO KNOW REQUIRED
Page 24

2-6
Guidelines for Making Changes to Current Installation
Moving Arrays
Moving arrays refers to consolidating arrays that exist on more than one
controller onto a single controller. To move an array to another controller, the
conditions listed previously for moving drives, and the following additional
restrictions must be met:
■ All of the drives in the array must be moved at the same time.
■ Positions of drives on the destination controller should not be moved at
the same time.
If any drives are missing or have failed, all data on the moved arrays could be
lost. To protect against data loss, data should be backed up before moving an
array. If you have previously moved an array and plan to restore it to its
original controller, see the following section, “Restoring an Array to Its
Original Controller.”
Figure 2-2 shows an original distributed configuration with two controllers,
each having one array: drive IDs 0, 1, 2, and 3 constitute Array A on
Controller 1 and drive IDs 0, 1, and 2 constitute Array A on Controller 2.
Figure 2-3 shows that after removing the array from Controller 2 and adding it
to Controller 1, Controller 1 has two arrays: drive IDs 0, 1, 2, and 3 constitute
Array A and drive IDs 4, 5, and 6 constitute Array B. Controller 2 has no
arrays.
: A spare can be added as part of an array during this process.
NOTE
However, it will not be restored as a spare until you run Array Configuration
Utility on the newly configured array.
Writer: Pamela King Project: SMART-2DH Array Controller Reference Guide Comments: 295469-002
File Name: C-CH02.DOC Last Saved On: 2/27/98 11:25 AM
COMPAQ CONFIDENTIAL - NEED TO KNOW REQUIRED
Page 25

Controller 1 Controller 2
ID6 ID6
ID5 ID5
ID4 ID4
ID3 d ID3
ID2 c ID2 z
ID1 b Array A ID1 y Array A
ID0 a ID0 x
2-7
Figure 2-2.
Configuration with two arrays, two controllers
Controller 1 Controller 2
ID6 z ID6
ID5 y Array B ID5
ID4 x ID4
ID3 d ID3
ID2 c ID2
ID1 b Array A ID1
ID0 a ID0
Figure 2-3.
Arrays consolidated to one controller
To move an array, make sure all required conditions are satisfied, then:
1. Power system OFF.
2. Move array (include all drives in the array).
SMART-2DH Array Controller Reference Guide
Writer: Pamela King Project: SMART-2DH Array Controller Reference Guide Comments: 295469-002
File Name: C-CH02.DOC Last Saved On: 2/27/98 11:25 AM
COMPAQ CONFIDENTIAL - NEED TO KNOW REQUIRED
Page 26

2-8
Guidelines for Making Changes to Current Installation
3. Power system ON. A 1727 POST message should indicate that logical
drives were added to the configuration. If the system comes up with a
1785 (Not Configured) POST message, turn the system off
immediately to avoid data loss and return the drives to their original
locations.
: If you move arrays from a dual-channel controller to a single-
NOTE
channel controller, you may get an error message indicating a configuration
error. If you get this error message:
❏ Return to the previous dual-channel controller configuration.
❏ Back up data on the array.
❏ Move the drives to the single-channel controller.
❏ Run Array Configuration Utility on the single-channel controller to
configure the array.
❏ Restore data to the array.
4. Run Array Configuration Utility to view the new drive configuration or
to assign spare drives (optional).
Writer: Pamela King Project: SMART-2DH Array Controller Reference Guide Comments: 295469-002
File Name: C-CH02.DOC Last Saved On: 2/27/98 11:25 AM
COMPAQ CONFIDENTIAL - NEED TO KNOW REQUIRED
Page 27

Restoring an Array to Its Original
Controller
If you have moved an array from one controller to another, you can restore it
to its original controller. Figures 2-4 through 2-6 show the consecutive
configurations required to restore an array to its original controller (or to a
replaced controller in the event of controller failure). Figure 2-4 shows the
consolidated configuration that includes Array A with drive IDs 0 through 3
and Array B with drive IDs 4, 5, and 6. Moving Array B back to Controller 2
creates an interim four-array state, with Array B on Controller 1 and Array A
on Controller 2 appearing as failed. Running Array Configuration Utility
removes the “failed” arrays and restores the original two-array configuration.
Controller 1 Controller 2
ID6 z ID6
ID5 y Array B ID5
ID4 x ID4
ID3 d ID3
ID2 c ID2
2-9
ID1 b Array A ID1
ID0 a ID0
Figure 2-4.
Arrays A and B both attached to Controller 1
Controller 1 Controller 2
ID6 ID6 z
ID5 Array A ID5 y Array B
ID4 “Failed
”
ID3 d ID3
ID2 c ID2
ID1 b Array A ID1 Array A
ID0 a ID0 “Failed”
ID4 x
SMART-2DH Array Controller Reference Guide
Writer: Pamela King Project: SMART-2DH Array Controller Reference Guide Comments: 295469-002
File Name: C-CH02.DOC Last Saved On: 2/27/98 11:25 AM
COMPAQ CONFIDENTIAL - NEED TO KNOW REQUIRED
Page 28

2-10
Guidelines for Making Changes to Current Installation
Figure 2-5.
Figure 2-6.
Interim four-array state
Controller 1 Controller 2
ID6 ID6 z
ID5 ID5 y Array A
ID4 ID4 x
ID3 d ID3
ID2 c ID2
ID1 b Array A ID1
ID0 a ID0
Failed arrays removed; arrays on separate controllers
To restore an array to its original controller, make sure the conditions for
moving drives are met. Then:
IMPORTANT:
These steps must be followed EXACTLY. Any deviation or
mistake could result in the loss of all data across all moved arrays.
1. Power system OFF.
2. Move the array back to its original controller, but retain its drive
position as it was in the consolidated configuration.
3. Power system ON.
4. Each controller will indicate a 1789 POST message that drives are
missing. Press F2 to fail the missing drives.
5. Run Array Configuration Utility and remove the appropriate “failed”
arrays.
6. Reboot the system.
Writer: Pamela King Project: SMART-2DH Array Controller Reference Guide Comments: 295469-002
File Name: C-CH02.DOC Last Saved On: 2/27/98 11:25 AM
COMPAQ CONFIDENTIAL - NEED TO KNOW REQUIRED
Page 29

Chapter 3
Updating the Firmware
The ROMs on all Compaq servers and most Compaq options can be updated
easily. This is done by flashing the ROM using a special Compaq utility called
ROMPaq, which replaces the existing contents of the ROM with another
version stored in a disk file. This is a convenient way to distribute new
firmware to keep Compaq products updated with the latest capabilities.
There are two ROMPaq utilities:
System ROMPaq for updating the system ROM in all Compaq servers
supporting Flash ROM. Use System ROMPaq when
installing a new SMART-2DH Controller in a Compaq
server to be sure that the server can utilize all the
capabilities of the SMART-2DH Array Controller.
Option ROMPaq for updating the onboard ROM on all Compaq options that
support flashing. Use Option ROMPaq when new versions
of the SMART-2DH Array Controller firmware or SCSI
drive firmware become available to take advantage of
expanded capabilities.
3-1
IMPORTANT:
your server, you must run System ROMPaq to update the system firmware.
Use the instructions below to create diskettes with the latest version of
System ROMPaq from the Compaq SmartStart and Support Software CD
supplied with the SMART-2DH Controller.
ROMPaq Diskettes
The ROMPaq utilities must be run from diskette(s). The latest version of the
ROMPaq diskettes may be created from the Compaq SmartStart and Support
Software CD that was supplied in the SMART-2DH Controller Option Kit.
We recommend that you initially use this version of ROMPaq because it is the
latest one that supports your new SMART-2DH Controller.
Writer: Pamela King Project: SMART-2DH Array Controller Reference Guide Comments: 295469-002
File Name: D-CH03.DOC Last Saved On: 2/27/98 11:26 AM
Before you install the new SMART-2DH Array Controller in
SMART-2DH Array Controller Reference Guide
COMPAQ CONFIDENTIAL - NEED TO KNOW REQUIRED
Page 30

3-2
Updating the Firmware
Materials Needed
Creating Diskettes
You will need the following items to create ROMPaq utility diskette(s):
■ Compaq SmartStart and Support Software CD (supplied in the SMART-
2DH Array Controller Option Kit)
■ One blank diskette (for System ROMPaq) or three or four blank
diskettes (for Option ROMPaq), depending upon your server
■ Access to a server or workstation with a bootable CD-ROM drive. This
may be the system in which you are installing the SMART-2DH
Controller.
To create ROMPaq diskettes:
1. Boot the server from the Compaq SmartStart and Support Software CD.
2. From the Compaq System Utilities screen, select Create Support Software.
3. From the Diskette Builder screen, scroll down the list and select one of the
following three ROMPaq selections: System ROMPaq Firmware Upgrade
Diskette for Compaq ProLiant Servers, System ROMPaq Firmware
Upgrade Diskette for Compaq Systempro/XL and Compaq ProSignia
Servers, or Option ROMPaq.
4. Follow the instructions on the screen to create the ROMPaq diskette(s).
Writer: Pamela King Project: SMART-2DH Array Controller Reference Guide Comments: 295469-002
File Name: D-CH03.DOC Last Saved On: 2/27/98 11:26 AM
COMPAQ CONFIDENTIAL - NEED TO KNOW REQUIRED
Page 31

Running System ROMPaq
System ROMPaq is used to update the firmware in Compaq servers. The
SMART-2DH Controller has enhanced drive array capabilities; many existing
servers may not be able to take advantage of these capabilities without
updated firmware. Since it is difficult to determine when the firmware needs
to be updated, Compaq recommends that you run the latest System ROMPaq
on all servers when installing a new SMART-2DH Controller. If you
purchased your server with the SMART-2DH Controller already installed, you
do not need to run System ROMPaq at the time of server installation.
3-3
CAUTION:
If you are replacing an existing array controller,
such as the Compaq SMART Array Controller, with the SMART2DH Controller, the system may not boot after hardware
installation. It may not boot if the old array controller was the
primary controller containing the boot disk.
To avoid this problem when replacing an existing array controller
with a SMART-2DH Controller you should run System ROMPaq
before
you make the hardware installation. This will ensure that
the server will recognize the SMART-2DH Controller and not hang
up on boot.
To run System ROMPaq:
1. Place the System ROMPaq diskette in the server diskette drive.
2. Boot the server by turning on the power.
3. Press Enter at the Welcome screen.
4. At the Select A Device screen, select the server from the list of the
programmable devices. This may be the only item in the list. Press Enter.
5. At the Select An Image screen you will see:
Device to reprogram:
Current ROM revision:
Select Firmware Images:
your server
date of existing ROM version
date of latest ROM version
Press Enter.
SMART-2DH Array Controller Reference Guide
Writer: Pamela King Project: SMART-2DH Array Controller Reference Guide Comments: 295469-002
File Name: D-CH03.DOC Last Saved On: 2/27/98 11:26 AM
COMPAQ CONFIDENTIAL - NEED TO KNOW REQUIRED
Page 32

3-4
Updating the Firmware
6. Review the information on the Caution screen:
Device to reprogram:
Current ROM revision:
Selected ROM revision:
your server
date of existing ROM version
date of ROM version to be installed
Press Enter to reprogram the system ROM or Esc to discontinue
reprogramming and return to the Select An Image screen.
7. “Reprogramming Firmware” indicates that the system ROM is being
reprogrammed. DO NOT INTERRUPT.
IMPORTANT:
Do not interrupt this cycle. Interrupting the ROM
reprogramming will leave the firmware in an unknown state. You may not
be able to boot the server if this happens. You will be notified that
reprogramming is completed.
8. When ROMPaq is finished reprogramming the system ROM, press Esc
to exit the System ROMPaq Utility.
9. Remove the System ROMPaq diskette and reboot the server by cycling
the power (cold boot).
If you have not yet installed your new SMART-2DH Controller, you may do
so at this time.
Running Option ROMPaq
Option ROMPaq is used to update the firmware on Compaq options. Use
Option ROMPaq to update the capabilities of the SMART-2DH Controller and
drives whenever an updated version is available in the future. Since it is
difficult to determine when to update the firmware, Compaq recommends that
you run the latest Option ROMPaq on all SMART-2DH Controllers whenever
it becomes available.
Writer: Pamela King Project: SMART-2DH Array Controller Reference Guide Comments: 295469-002
File Name: D-CH03.DOC Last Saved On: 2/27/98 11:26 AM
COMPAQ CONFIDENTIAL - NEED TO KNOW REQUIRED
Page 33

The latest version of firmware for the SMART-2DH Controller firmware has
already been installed. If you have older SMART-2DH Controllers or other
Compaq options, such as drives, create the Option ROMPaq diskettes and
check that the firmware on these options is at the latest revision.
To run Option ROMPaq:
1. Place the Option ROMPaq diskette 1 in the server floppy drive.
2. Boot the server by turning on the power.
3. Press Enter at the Welcome screen.
4. At the Select A Device screen, select:
ALL COMPAQ SMART-2DH Controller(s)
from the list of programmable devices. Press Enter.
5. If the ROM firmware in the SMART-2DH Controller is the same or
newer than that on the Option ROMPaq diskette, you will get the
message:
The ROM image files found for the device selected
are not newer than the current ROM image
Press Enter to go to step 9.
OR
If the ROM firmware in the SMART-2DH Controller is older than that
on the Option ROMPaq diskette, you will get the Select An Image
screen:
3-5
Device to reprogram: ALL COMPAQ SMART-2DH Controller(s)
Current ROM revision: COMPAQ SMART-2DH Controller x.xx
Select Firmware Images: COMPAQ SMART-2DH Controller y.yy
Press Enter.
SMART-2DH Array Controller Reference Guide
Writer: Pamela King Project: SMART-2DH Array Controller Reference Guide Comments: 295469-002
File Name: D-CH03.DOC Last Saved On: 2/27/98 11:26 AM
COMPAQ CONFIDENTIAL - NEED TO KNOW REQUIRED
Page 34

3-6
Updating the Firmware
6. Review the information on the Caution screen:
Device to reprogram: ALL COMPAQ SMART-2DH Controller(s)
Current ROM revision: COMPAQ SMART-2DH Controller x.xx
Selected ROM revision: COMPAQ SMART-2DH Controller y.yy
Press Enter to reprogram the SMART-2DH Controller ROM or Esc
to discontinue the reprogramming and return to the Select An
Image screen.
7.
Reprogramming Firmware
indicates that the SMART-2DH Controller ROM is being
reprogrammed. DO NOT INTERRUPT.
CAUTION:
Do not interrupt this cycle. Interrupting the ROM
reprogramming will leave the firmware in an unknown state. If
this
happens you may not be able to reprogram the ROM and the
SMART-2DH Controller ROM may have to be replaced. You will
be notified that reprogramming is completed.
8. When Option ROMPaq is finished reprogramming the SMART-2DH
Controller ROM, press Enter if you wish to reprogram another
Compaq option. Repeat steps 4 - 7.
9. If you are finished with reprogramming options, press Esc to exit the
ROMPaq Utility.
10. Remove the Option ROMPaq diskette and reboot the server by cycling
the power (cold boot). To upgrade additional options in the server, repeat
steps 2 - 9 by booting from each Option ROMPaq diskette in succession.
The SMART-2DH Controller ROM has been updated; you can take advantage
of the new or increased capabilities, if any, available with the new firmware.
Writer: Pamela King Project: SMART-2DH Array Controller Reference Guide Comments: 295469-002
File Name: D-CH03.DOC Last Saved On: 2/27/98 11:26 AM
COMPAQ CONFIDENTIAL - NEED TO KNOW REQUIRED
Page 35

Chapter 4
Running the System
Configuration Utility
The Compaq System Configuration Utility is used to configure the hardware
installed in or connected to the server easily. This utility allows
the server to know how each piece of hardware should be handled when
communicating with it.
The System Configuration Utility performs a wide range of configuration
activities, including the following:
■ Configures PCI boards automatically
■ Provides switch and jumper settings
■ Resolves resource conflicts in areas such as memory, port addresses,
and interrupts (IRQs)
■ Manages the installation of memory, processor upgrades, and mass
storage devices such as hard drives, tape drives, and diskette drives
4-1
■ Sets and stores power-on features like date and time
■ Stores configuration information in nonvolatile memory
■ Assists in the installation of the operating system
■ Assists in running diagnostic tools such as TEST and INSPECT
System Configuration Utility
The Compaq System Configuration Utility can be run directly from the Compaq
SmartStart and Support Software CD supplied with the SMART-2DH Array
Controller Option Kit and the Compaq server. You may already have a version of
this utility in the system partition of the boot disk; however, you will need
Compaq SmartStart and Support Software CD version 3.40 or later. Compaq
recommends that you use the version of the utility supplied on the CD because it
is the latest one that supports the SMART-2DH Controller.
SMART-2DH Array Controller Reference Guide
Writer: Pamela King Project: SMART-2DH Array Controller Reference Guide Comments: 295469-002
File Name: E-CH04.DOC Last Saved On: 2/27/98 11:28 AM
COMPAQ CONFIDENTIAL - NEED TO KNOW REQUIRED
Page 36

4-2
Running the System Configuration Utility
If your server does not have a bootable CD-ROM drive, you can create
diskettes of the latest version of the System Configuration Utility from the
Compaq SmartStart and Support Software CD. See the following section,
“System Configuration Diskettes,” for instructions on creating these diskettes.
If your server has a bootable CD-ROM drive, proceed to “Running the System
Configuration Utility.”
System Configuration Diskettes
The latest version of the Compaq System Configuration Utility can be created
from the Compaq SmartStart and Support Software CD that was supplied in
the SMART-2DH Controller Option Kit.
Materials Needed
You will need the following items to create Compaq System Configuration
Utility diskettes:
■ Compaq SmartStart and Support Software CD (supplied in the SMART-
2DH Controller Option Kit)
■ At least four blank diskettes
■ Access to a server or workstation with a bootable CD-ROM drive. This
may be the system in which you are installing the SMART-2DH
Controller.
Creating Diskettes
To create System Configuration Utility diskettes:
1. Boot the computer from the Compaq SmartStart and Support Software CD.
2. From the main menu screen, select Create Support Software.
3. Scroll down the list and select Compaq System Configuration Utility.
4. Follow the instructions on the screen to create the utility diskette(s).
Writer: Pamela King Project: SMART-2DH Array Controller Reference Guide Comments: 295469-002
File Name: E-CH04.DOC Last Saved On: 2/27/98 11:28 AM
COMPAQ CONFIDENTIAL - NEED TO KNOW REQUIRED
Page 37

Running the System
Configuration Utility
To run the System Configuration Utility:
1. Place the Compaq SmartStart and Support Software CD in the server
CD-ROM drive.
or
Place the System Configuration Utility diskette 1 in the server
floppy drive.
2. Reboot the server.
3. During the boot process, several messages are displayed. Among these
will be a notice that one or more SMART-2DH Controllers were
detected in option slots, and a recommendation to run the System
Configuration Utility.
4. If prompted, press F1 to resume booting.
5. If you are using the Compaq SmartStart and Support Software CD,
select Run the System Configuration Utility from the main menu
screen.
4-3
6. If you are given a choice of Auto Configuration, choose Yes.
7. The system loads configuration files for all detected devices.
8. In the Configuration Complete screen, be sure to choose Review or
modify hardware settings.
9. From the next screen, Steps In Configuring Your Computer, select
Step 3: View or edit details.
10. The View Or Edit Details screen is where you will set the SMART2DH Controller(s) configuration parameters. Scroll down to the option
slot for the first SMART-2DH Controller and edit each parameter
according to the following information.
SMART-2DH Array Controller Reference Guide
Writer: Pamela King Project: SMART-2DH Array Controller Reference Guide Comments: 295469-002
File Name: E-CH04.DOC Last Saved On: 2/27/98 11:28 AM
COMPAQ CONFIDENTIAL - NEED TO KNOW REQUIRED
Page 38

4-4
Running the System Configuration Utility
Configuring the Controller
1. Edit these parameters for SMART-2DH Controller:
Controller Order
Under Advanced Features:
Online Recovery Server Status
PCI Memory Overlay Setting
Press Enter to select the parameter to edit.
To help you make the correct selections, explanations of these
parameters are included below.
Controller Order
Select the order in which you want this SMART-2DH Controller to be
recognized. All hard disk controllers, including the integrated
controller on the system board, must be assigned a unique order
number.
First The primary disk controller that contains the boot disk.
The first disk drive on this controller is the one that the
server will boot from.
Second The second disk controller.
.
.
Fifteenth The fifteenth disk controller.
When installing a SMART-2DH Controller, you must determine if the
boot disk is to be handled by a SMART-2DH Controller or the
integrated SCSI controller. If this SMART-2DH Controller will be the
primary controller, choose First; a Configuration Changes screen is
presented, indicating that if you accept this change, the integrated SCSI
controller will be changed to Second automatically. Press Enter to
accept these changes.
Writer: Pamela King Project: SMART-2DH Array Controller Reference Guide Comments: 295469-002
File Name: E-CH04.DOC Last Saved On: 2/27/98 11:28 AM
COMPAQ CONFIDENTIAL - NEED TO KNOW REQUIRED
Page 39

If you want the order of the integrated SCSI controller to be something
other than Second, scroll (usually down) to the Embedded Compaq
Integrated Controller and set the Controller Order manually, as
described above.
When installing a SMART-2DH Controller in a system with an
existing array controller, you can either place the new controller at the
end of the controller order or reorder the controllers. Reordering
changes the current drive letter assignments for all drives on the
system. To avoid changing the drive letter assignments, place the new
controller at the end of the controller order and do not create a primary
partition on any of the added disks.
Online Recovery Server Status
This function indicates whether the SMART-2DH Controller is able to
participate in Online Recovery and is available only in Advanced
Features (Ctrl+A at the main menu).
Select:
Disabled Online recovery is disabled
Primary SMART-2DH Controller manages the local storage
device.
Recovery SMART-2DH Controller is able to adopt a storage device
from another system that has had an online recovery
event occur.
4-5
PCI Memory Overlay Setting
This function indicates whether the allocated memory associated with
multiple SMART-2 Array Controllers is overlaid or not.
: This feature is not compatible with Windows NT. For Windows NT,
NOTE
PCI Memory Overlay should be set to No Overlay.
This feature is available in Advanced Features (Ctrl + A at the main
menu). This feature applies only to systems that:
❏ Contain more than 3 GB of RAM
❏ Contain more than one SMART-2 controller
SMART-2DH Array Controller Reference Guide
Writer: Pamela King Project: SMART-2DH Array Controller Reference Guide Comments: 295469-002
File Name: E-CH04.DOC Last Saved On: 2/27/98 11:28 AM
COMPAQ CONFIDENTIAL - NEED TO KNOW REQUIRED
Page 40

4-6
Running the System Configuration Utility
If your SMART-2 Array Controllers have 4-MB Array Accelerator
boards, each installed SMART-2 Array Controller will consume
32-MB of physical memory space. If your SMART-2 Array Controllers
have 16-MB Array Accelerator boards, each installed SMART-2 Array
Controller consumes 128-MB of physical memory space. The amount
of consumed address space may be reduced by modifying the PCI
Memory Overlay Setting or changing the switch setting on the Array
Accelerator board.
a. Modifying the PCI Memory Overlay Setting:
❏ No Overlay: Select this to not use the overlaying feature.
❏ Overlay 32 MB: Select this if your controller has a 4-MB
❏ Overlay 128 MB: Select this if your controller has a 16-MB
b. Changing the Switch on the Array Accelerator Board
Array Accelerator board to reduce the amount of consumed
physical memory to 32 MB, regardless of the number of
SMART-2 Array Controllers installed.
Array Accelerator board to reduce the amount of consumed
physical memory to 128 MB, regardless of the number of
SMART-2 Array Controllers installed.
❏ If your SMART-2DH Array Controller has a 16-MB Array
Accelerator board, the amount of memory consumed per
controller can be reduced to 32 MB by changing the switch
setting on the Array Accelerator from 16 MB to 4 MB, as
shown in Figure 4.1. This change works for all operating
systems.
Writer: Pamela King Project: SMART-2DH Array Controller Reference Guide Comments: 295469-002
File Name: E-CH04.DOC Last Saved On: 2/27/98 11:28 AM
COMPAQ CONFIDENTIAL - NEED TO KNOW REQUIRED
Page 41

16 MEG
4 MEG
4-7
Figure 4-1.
Array Accelerator switch positions
2. Review and edit the Controller Characteristics of all other SMART2DH Controllers shown in the View or Edit Details screen, as
described in Step 11 above.
3. Press F10 when finished editing the View or Edit Details screen.
4. Select Step 5: Save and Exit on the Steps in Configuring Your
Computer screen.
5. Choose Save The Configuration and restart the computer on the Save
and Exit screen.
6. Press Enter at the Reboot screen.
7. Remove the CD or System Configuration diskette and verify that the
server will boot normally without POST errors.
System hardware configuration is complete. Proceed to Chapter 5, “Running
the Array Configuration Utility,” to configure drive arrays.
SMART-2DH Array Controller Reference Guide
Writer: Pamela King Project: SMART-2DH Array Controller Reference Guide Comments: 295469-002
File Name: E-CH04.DOC Last Saved On: 2/27/98 11:28 AM
COMPAQ CONFIDENTIAL - NEED TO KNOW REQUIRED
Page 42

Chapter 5
Running the Array Configuration
Utility
This chapter provides instructions for using the Compaq Array Configuration
Utility and describes methods (wizards) you can use to configure your
controller quickly and easily. The chapter is divided into the seven sections, as
listed below. You should read the first five sections and use the last two
sections as reference material when needed.
■ Before You Begin
■ Starting the Compaq Array Configuration Utility
■ Configuration Wizards
■ Online Help
■ Configuration Procedures
■ Array Configuration Utility screens
■ Errors and Warnings
5-1
The Array Configuration Utility, which is located on the SmartStart and Support
Software CD, is a graphics-based application that helps you configure the
Compaq SMART-2DH Array Controller. You can use the Array Configuration
Utility to configure the SMART-2DH Array Controller initially, to add
additional disk drives to an existing configuration, or to reconfigure your array
controller.
The Array Configuration Utility provides the following configuration benefits:
■ Illustrates the controller configuration in an easy-to-understand,
graphical format
■ Provides descriptions of various configuration errors
■ Contains configuration wizards that walk you through the configuration
process
■ Suggests optimal configuration and fault tolerance for unconfigured
controllers
SMART-2DH Array Controller Reference Guide
Writer: Pamela King Project: SMART-2DH Array Controller Reference Guide Comments: 295469-002
File Name: F-CH05.DOC Last Saved On: 2/27/98 11:38 AM
COMPAQ CONFIDENTIAL - NEED TO KNOW REQUIRED
Page 43

5-2
Running the Array Configuration Utility
Before You Begin
During a first-time installation and configuration of the SMART-2DH Array
Controller, you should complete the following tasks:
1. Install the SMART-2DH Array Controller board.
2. Update the system ROM with System ROMPaq.
3. Run Option ROMPaq to update the controller firmware, option ROM,
and drive firmware.
4. Run the System Configuration Utility to verify the controller order
settings.
5. Decide which fault-tolerance method and array configuration you want
to use.
Starting the Array Configuration
Utility
You can access and start version 1.10 of the Array Configuration Utility in the
following ways: online, system partition, SmartStart and Support Software
CD, and, diskettes.
Accessing Online
If the server you are configuring is running under Windows NT or NetWare,
you can install and run the configuration utility online.
Windows NT
When you install the Windows NT Software Support Diskette (SSD), it
prompts you to insert the second Array Configuration Utility diskette to install
the utility. A program icon is automatically created. Select the icon to run the
Array Configuration Utility. The Windows NT online Array Configuration
Utility requires that at least one logical drive was previously configured while
offline.
Writer: Pamela King Project: SMART-2DH Array Controller Reference Guide Comments: 295469-002
File Name: F-CH05.DOC Last Saved On: 2/27/98 11:38 AM
COMPAQ CONFIDENTIAL - NEED TO KNOW REQUIRED
Page 44

NetWare
The Compaq Array Configuration Utility for NetWare (CPQONLIN.NLM), is
available on the NetWare Programs from Compaq (NPFC) diskettes in the
\DRV_ARRY directory. Generate the NPFC diskettes using the Diskette
Builder feature in SmartStart. The NPFC diskettes have an ARRAY.RDM
readme file to access instructions on loading and using CPQONLIN.NLM.
System Partition
If SmartStart has been run on the server before, the Array Configuration
Utility program should already be installed on the system partition.
1. Power off, then power on the server.
2. When the cursor is in the upper-right hand corner of the screen, press
10.
3. Navigate through the menus to the Array Configuration Utility program.
SmartStart and Support Software CD
5-3
You can run the Array Configuration Utility directly from the SmartStart and
Support Software CD.
1. Insert the SmartStart and Support Software CD in the CD drive and
power up the server. A menu is displayed.
2. Select Configure Hardware from the menu, then select the Array
Configuration Utility.
3. After completing the configuration, remove the CD and restart the server.
Array Configuration Utility Diskettes
You can run the Array Configuration Utility from diskettes made using the
Diskette Builder feature on the SmartStart and Support Software CD.
1. Boot the server from the Compaq SmartStart and Support Software CD.
SMART-2DH Array Controller Reference Guide
Writer: Pamela King Project: SMART-2DH Array Controller Reference Guide Comments: 295469-002
File Name: F-CH05.DOC Last Saved On: 2/27/98 11:38 AM
COMPAQ CONFIDENTIAL - NEED TO KNOW REQUIRED
Page 45

5-4
Running the Array Configuration Utility
2. From the Compaq System Utilities screen, select Create Support
Software.
Writer: Pamela King Project: SMART-2DH Array Controller Reference Guide Comments: 295469-002
File Name: F-CH05.DOC Last Saved On: 2/27/98 11:38 AM
COMPAQ CONFIDENTIAL - NEED TO KNOW REQUIRED
Page 46

3. From the Diskette Builder screen, scroll down the list and select Compaq
Array Configuration Utility for Microsoft Windows and Windows NT.
4. Follow the instructions on the screen to create the diskette(s). (See
“Using the Array Configuration Utility Diskettes.”)
Using the Array Configuration Utility
Diskettes
To use the Array Configuration Utility diskettes:
1. Insert the Array Configuration Utility diskette number 1 into the disk
drive.
2. Restart the server.
Configuration Wizards
When you start the Array Configuration Utility, the software checks the
configuration of each SMART-2DH Array Controller board and its drive
arrays. If the arrays are unconfigured or if the configuration is less than
optimal, the configuration wizard takes over to guide you through the
configuration process. The configuration wizard recognizes the following
conditions:
5-5
■ Unconfigured controller - When the Array Configuration Utility
detects an unconfigured controller, the configuration wizard takes you
through the controller configuration process.
■ Unused physical drives - When the Array Configuration Utility detects
unused physical drives, the configuration wizard provides an easy way to
add them to an array. The “capacity expansion” capability of the SMART2DH Array Controller allows the Array Configuration Utility to add the
new physical drives to an existing array without destroying the data on the
existing logical drives.
■ Unused space on an array - If the Array Configuration Utility detects
unused capacity in an array, the configuration wizard takes you through the
process of configuring the space into one or more logical drives.
SMART-2DH Array Controller Reference Guide
Writer: Pamela King Project: SMART-2DH Array Controller Reference Guide Comments: 295469-002
File Name: F-CH05.DOC Last Saved On: 2/27/98 11:38 AM
COMPAQ CONFIDENTIAL - NEED TO KNOW REQUIRED
Page 47

5-6
Running the Array Configuration Utility
Online Help
Press the F1 key or the click the Help button to activate context-sensitive help
for each screen. A status bar at the bottom of the screen also provides
immediate help messages describing the current selection.
Configuration Procedures
Creating a New Array
If you are configuring a new array, the configuration wizard leads you through
the process. If you want to bypass the wizard, use the following procedures to
create your array.
Creating a New Array—Procedure
Creating a new array involves the following general steps:
1. Choose a controller for the array.
2. Group physical drives of the same size into an array.
3. Subdivide the array into one or more logical drives.
The following example illustrates using the Array Configuration Utility to
carry out these steps.
Creating a New Array—Example
For this example, make the following assumptions:
■ Four 1.05-GB drives and two 4.3-GB drives are connected to the
SMART-2DH Array Controller.
■ There will be two arrays. Array A consists of three 1.05-GB drives
with the fourth 1.05-GB drive used as a spare. Array B is the two 4.3GB drives.
Writer: Pamela King Project: SMART-2DH Array Controller Reference Guide Comments: 295469-002
File Name: F-CH05.DOC Last Saved On: 2/27/98 11:38 AM
COMPAQ CONFIDENTIAL - NEED TO KNOW REQUIRED
Page 48

■ The fault-tolerance method for all logical drives on Array A is RAID 5,
Distributed Data Guarding. The fault tolerance method for all logical
drives on Array B is RAID 1, Drive Mirroring.
5-7
SMART-2DH Array Controller Reference Guide
Writer: Pamela King Project: SMART-2DH Array Controller Reference Guide Comments: 295469-002
File Name: F-CH05.DOC Last Saved On: 2/27/98 11:38 AM
COMPAQ CONFIDENTIAL - NEED TO KNOW REQUIRED
Page 49

5-8
Running the Array Configuration Utility
Choose a controller for the array
1. In the Array Configuration Utility Main Configuration Screen, select
the Controller Select box. You can also select Controller/Select... from
the main menu.
2. Select one of the listed controllers.
Figure 5-1.
Controller Select list
3. Click the Controller Settings button shown in Figure 5-2.
Figure 5-2.
Controller buttons
The controller settings screen is displayed, as shown in Figure 5-3.
Writer: Pamela King Project: SMART-2DH Array Controller Reference Guide Comments: 295469-002
File Name: F-CH05.DOC Last Saved On: 2/27/98 11:38 AM
COMPAQ CONFIDENTIAL - NEED TO KNOW REQUIRED
Page 50

4. Select the correct operating system on the controller settings screen.
5-9
Figure 5-3.
Controller Settings screen
SMART-2DH Array Controller Reference Guide
Writer: Pamela King Project: SMART-2DH Array Controller Reference Guide Comments: 295469-002
File Name: F-CH05.DOC Last Saved On: 2/27/98 11:38 AM
COMPAQ CONFIDENTIAL - NEED TO KNOW REQUIRED
Page 51

5-10
Running the Array Configuration Utility
Group physical drives of the same size
into an array
5. Click the Create Array... button. The Create Array screen is displayed.
Figure 5-4.
NOTE
Create Array screen
: Always group physical drives of the same size. The SMART-2DH
Array Controller treats all the drives as the same size as the smallest drive in
the same array. If you mix drive sizes, the capacity of the larger drives is
wasted.
6. Select the three drives you want to make up the array from the drives
on the left. For this example, select the following drives:
Port 1:SCSI ID 0
Port 1:SCSI ID 1
Port 1:SCSI ID 2
Click the Assign Drive(s) to Array button.
Writer: Pamela King Project: SMART-2DH Array Controller Reference Guide Comments: 295469-002
File Name: F-CH05.DOC Last Saved On: 2/27/98 11:38 AM
COMPAQ CONFIDENTIAL - NEED TO KNOW REQUIRED
Page 52

5-11
7. Select the drive at Port 1:SCSI ID 3 and click the
Assign Spare to Array
button. The right side of the Create Array screen should now look
similar to the following figure.
Figure 5-5.
NOTE
Example Array A
: The same spare drive may be assigned to multiple arrays. However,
spare drives should have the same or larger capacity than the drives in the
array.
SMART-2DH Array Controller Reference Guide
Writer: Pamela King Project: SMART-2DH Array Controller Reference Guide Comments: 295469-002
File Name: F-CH05.DOC Last Saved On: 2/27/98 11:38 AM
COMPAQ CONFIDENTIAL - NEED TO KNOW REQUIRED
Page 53

5-12
Running the Array Configuration Utility
8. Click the Done button to return to the Main Configuration screen. The
Logical Configuration View area should now look similar to the
following figure.
Figure 5-6.
Example Array - Logical Configuration View with 1 Array
9. Select the controller, then click the Create Array button to create
Array B.
10. Assign both 4.3-GB drives to the array. Click the Done button.
: In this example, each array was created using drives from the same
NOTE
SCSI Port. You can achieve better performance by selecting drives from both
ports for an array, assuming you installed the correct drives in both ports
before you ran the Array Configuration Utility.
Writer: Pamela King Project: SMART-2DH Array Controller Reference Guide Comments: 295469-002
File Name: F-CH05.DOC Last Saved On: 2/27/98 11:38 AM
COMPAQ CONFIDENTIAL - NEED TO KNOW REQUIRED
Page 54

Create logical drives across the physical
drives in the array
When creating a logical drive, you can select a fault-tolerance (RAID level)
option and provide information regarding the drive size and array accelerator.
1. Select Array A or the Unused Space icon under Array A in the Logical
Configuration View.
2. Click the Create Logical Drive button. A screen similar to the
following figure is displayed.
5-13
Figure 5-7.
Create Logical Drive screen
3. In the upper-left area of this screen, click the Distributed Data
Guarding (RAID 5) button.
4. Click the Array Accelerator Enable button.
5. The Logical Drive Size area shows a graphical representation of the
storage capacity available. To create a single logical drive across this
array, accept the default values. See the section titled “Create Logical
Drive Screen” later in this chapter for a detailed description of this screen.
SMART-2DH Array Controller Reference Guide
Writer: Pamela King Project: SMART-2DH Array Controller Reference Guide Comments: 295469-002
File Name: F-CH05.DOC Last Saved On: 2/27/98 11:38 AM
COMPAQ CONFIDENTIAL - NEED TO KNOW REQUIRED
Page 55

5-14
Running the Array Configuration Utility
6. Click the Done button.
7. Select Array B or the Unused Space icon under Array B in the Logical
Configuration View.
8. Repeat steps 12 through 16 to create a single logical drive on Array B,
this time selecting RAID 1 fault tolerance.
9. The Configuration View screen should now look like the following figure.
Figure 5-8.
Writer: Pamela King Project: SMART-2DH Array Controller Reference Guide Comments: 295469-002
Example array - Configuration View screen with two arrays
File Name: F-CH05.DOC Last Saved On: 2/27/98 11:38 AM
COMPAQ CONFIDENTIAL - NEED TO KNOW REQUIRED
Page 56

Capacity Expansion
Capacity expansion involves adding storage capacity to an array that has
already been configured. If an existing array is nearly full of data, you can
expand the capacity without disturbing the existing data. The SMART-2DH
Array Controller capacity expansion feature provides a way to add a new
physical drive to the array.
When you run the Array Configuration Utility, the program checks the drive
hardware and configuration. If the Array Configuration Utility discovers a
physical drive that is not being used, the configuration wizard leads you
through the steps of adding the drive.
: You cannot use the Capacity Expansion feature if the disk controller
NOTE
is configured for use with the Recovery Server option. In order to expand an
array when the controller is configured for the Recovery Server option:
1. Use the System Configuration Utility to turn off the Recovery Server feature,
2. Enter the Array Configuration Utility and use the capacity expansion feature,
3. After the expansion is complete, use the System Configuration Utility to
enable the Recovery Server feature.
5-15
Capacity Expansion Procedure
If you wish to bypass the configuration wizard for some reason, you may use the
procedures that follow to expand your array.
■ Install the new physical drive(s).
■ Assign the new physical drive(s) to an existing array. Existing logical
drive(s) will automatically expand across all of the physical drives,
including the newly added one(s).
■ Create a new logical drive to use the extra space on the expanded
array.
SMART-2DH Array Controller Reference Guide
Writer: Pamela King Project: SMART-2DH Array Controller Reference Guide Comments: 295469-002
File Name: F-CH05.DOC Last Saved On: 2/27/98 11:38 AM
COMPAQ CONFIDENTIAL - NEED TO KNOW REQUIRED
Page 57

5-16
Running the Array Configuration Utility
Capacity Expansion Example
In this example, assume a configuration similar to the previous example
except that the fourth 1.05-GB drive was added later. Now you want to
expand Array A to include the fourth drive. This scenario is shown in the
following figure with a single 1.05-GB drive unassigned.
Figure 5-9.
Array expansion example - Configuration View screen
To expand the capacity of Array A and create logical drive 2, complete the
following steps:
1. Select Array A.
2. Click the Expand button.
3. Select the unassigned 1.05-GB drive.
4. Click Assign Drive(s) to Array button.
Writer: Pamela King Project: SMART-2DH Array Controller Reference Guide Comments: 295469-002
File Name: F-CH05.DOC Last Saved On: 2/27/98 11:38 AM
COMPAQ CONFIDENTIAL - NEED TO KNOW REQUIRED
Page 58

5. Click the Next button at the bottom of the screen. A screen similar to
the following figure is displayed.
5-17
Figure 5-10.
Expansion Wizards - Logical Drive Screen
6. Click the Create Logical Drive button.
7. Set the fault tolerance, array accelerator, and size for logical drive 2.
8. Click the Next button.
9. Click the Done button.
10. At the main screen, select Controller, Save. This will save the new
settings for logical drive 2 and start the capacity expansion process.
: Logical drive 2 will not be accessible until the capacity expansion
NOTE
process has completed on logical drive 1.
CAUTION:
In case of power loss, capacity expansion process
information is temporarily stored in the array accelerator memory.
Do not interchange SMART-2DH Controllers or Array Accelerator
boards during a capacity expansion process to prevent the loss of
SMART-2DH Array Controller Reference Guide
Writer: Pamela King Project: SMART-2DH Array Controller Reference Guide Comments: 295469-002
File Name: F-CH05.DOC Last Saved On: 2/27/98 11:38 AM
COMPAQ CONFIDENTIAL - NEED TO KNOW REQUIRED
Page 59

5-18
Running the Array Configuration Utility
data in the expanding logical drive.
Array Configuration Utility Screens
Main Configuration Screen
The main configuration screen is the first screen displayed after the
configuration wizard has been completed. As you select certain items, some
areas are highlighted while others appear gray. You cannot select grayed-out
areas until you select an item in the list box providing that option.
Figure 5-11.
Elements of the Main Configuration screen are described in the following
paragraphs.
Main Configuration screen
Menu Bar
The menu bar contains the following pull-down menus:
Writer: Pamela King Project: SMART-2DH Array Controller Reference Guide Comments: 295469-002
File Name: F-CH05.DOC Last Saved On: 2/27/98 11:38 AM
COMPAQ CONFIDENTIAL - NEED TO KNOW REQUIRED
Page 60

■ Controller - lets you to perform tasks such as selecting a controller,
saving a configuration, creating an array, and exiting the program.
■ Array - lets you to delete, change, or expand the capacity of an array;
also you to create logical drives.
■ Drive - lets you to delete or change logical drives, assign physical
drives to arrays, and create online spares.
■ View - lets you to switch between the Physical Drive View or the
Logical Drive View in the list box.
■ Help - lets you to select the help contents, search, and other online
help.
Controller Selection Box
The Controller Selection box is located in the top left corner of the main
configuration screen. When you select this, a drop-down box lists all the
controllers installed in the present system. You can select which controller
you would like to view or configure. The highlighted controller is shown in
detail in the View Configuration list box.
5-19
Figure 5-12.
Writer: Pamela King Project: SMART-2DH Array Controller Reference Guide Comments: 295469-002
Controller Selection box
SMART-2DH Array Controller Reference Guide
File Name: F-CH05.DOC Last Saved On: 2/27/98 11:38 AM
COMPAQ CONFIDENTIAL - NEED TO KNOW REQUIRED
Page 61

5-20
Running the Array Configuration Utility
Logical/Physical Configuration View
List Box
The Logical Configuration View list box provides a graphical representation
of all the drives and arrays associated with the selected controller. Located
next to each controller icon is the name of the controller and the slot in which
it is installed.
For each controller, the drive arrays, logical drives, and physical drives
associated with that controller are listed. Use the Drive View buttons, located
below the Logical Configuration View list box, to select either the Physical or
Logical view.
Figure 5-13.
Writer: Pamela King Project: SMART-2DH Array Controller Reference Guide Comments: 295469-002
View Configuration List box
File Name: F-CH05.DOC Last Saved On: 2/27/98 11:38 AM
COMPAQ CONFIDENTIAL - NEED TO KNOW REQUIRED
Page 62

Figure 5-13 shows an example of a physical view of a SMART-2DH Array
Controller in slot 3. Listed below the controller are two unassigned drives, one
4.3-GB drive and one 1.05-GB drive. This controller has two drive arrays,
named Array A and Array B, along with a number of drives within each array.
Array A has an online spare.
: When viewing the configuration list box, selecting an item—a
NOTE
controller, array, logical drive, or physical drive—will cause the drive tray
LEDs to blink. Use this feature to identify a specific physical drive, i.e., the
spare, or to identify the external drives attached to a controller. This feature
works with firmware versions 1.50 or greater.
More Information Button
The More Information button, shown in Figure 5-14, is located at the bottom
right side of the screen. Click this button to display a list of all the controller,
drive, and array configuration details available for the selected items.
Drive View Buttons
This box, shown in Figure 5-14, is located at the bottom left side of the
screen. The Drive View box lets you to switch between the logical and
physical drive views. Select which representation you would like to see in the
View Configuration list box.
5-21
Figure 5-14.
More Information and Drive View buttons
Controller Buttons
The top right corner of the screen contains the Controller box, which becomes
active after you select a controller in the Controller Select box.
SMART-2DH Array Controller Reference Guide
Writer: Pamela King Project: SMART-2DH Array Controller Reference Guide Comments: 295469-002
File Name: F-CH05.DOC Last Saved On: 2/27/98 11:38 AM
COMPAQ CONFIDENTIAL - NEED TO KNOW REQUIRED
Page 63

5-22
Running the Array Configuration Utility
Figure 5-15.
Controller box
Click the Settings button to display the Controller Settings screen (see the
section titled “Controller Settings Screen,” later in this chapter). Click the
Create Array button to display the Create Array screen (see the section titled
“Create Array Screen” later in this chapter).
Array Buttons
The Array box is located on the right side of the screen, under the Controller
box. It becomes active after you select an array in the View Configuration list
box.
Figure 5-16.
Array buttons
Logical Drive Buttons
This box is located on the right side under the Array box. It becomes active
after you select a logical drive in the Configuration View list box.
Figure 5-17.
Logical Drive buttons
Writer: Pamela King Project: SMART-2DH Array Controller Reference Guide Comments: 295469-002
File Name: F-CH05.DOC Last Saved On: 2/27/98 11:38 AM
COMPAQ CONFIDENTIAL - NEED TO KNOW REQUIRED
Page 64

Controller Settings Screen
In this screen (Figure 5-18), select the operating system and set the Rebuild
Priority, Expand Priority, and Accelerator Ratio. Rebuild and expand priority
selections have no impact on an “idle” system but will impact performance on a
“busy” system.
The Rebuild Priority affects the amount of time the controller spends
rebuilding data after a failed drive has been replaced. Select High if rebuilding
data should take precedence over handling requests from the operating system.
Select Low if the controller should rebuild data only when it is idle.
The Expand Priority affects when the controller moves data after you have
chosen to expand the capacity of an array. Select High if expanding the array
capacity should take precedence over handling requests from the operating
system. Select Low if the controller should expand the array capacity only
when it is idle.
The Accelerator Ratio determines the amount of memory allocated to the read
and write caches. Some applications may perform better with a larger write
cache and others may perform better with a larger read cache.
5-23
: This feature works with both 4-MB and 16-MB Array Accelerator
NOTE
boards.
Use the Controller Settings Screen to select the Operating System, set the
Rebuild Priority, Expand Priority, and Accelerator Ratio.
SMART-2DH Array Controller Reference Guide
Writer: Pamela King Project: SMART-2DH Array Controller Reference Guide Comments: 295469-002
File Name: F-CH05.DOC Last Saved On: 2/27/98 11:38 AM
COMPAQ CONFIDENTIAL - NEED TO KNOW REQUIRED
Page 65

5-24
Running the Array Configuration Utility
Figure 5-18.
Controller Settings screen
Writer: Pamela King Project: SMART-2DH Array Controller Reference Guide Comments: 295469-002
File Name: F-CH05.DOC Last Saved On: 2/27/98 11:38 AM
COMPAQ CONFIDENTIAL - NEED TO KNOW REQUIRED
Page 66

Create Array Screen
In this screen, all of the available drives attached to the selected controller are
listed in the Port columns. The rows in the columns correspond to the SCSI ID
of the drives.
To create an array, select the drives to be part of the array, then click the
Assign Drive to Array button. To assign a spare, select the drive to be the
spare and then click the Assign Spare to Array button.
Always group physical drives of the same size. If you mix drive sizes, the
SMART-2DH Array Controller treats all the drives as the same size as the
smallest drive in the array. This results in wasted capacity in the larger drives.
To increase performance, select drives from both ports and install the correct
drives on both ports before running the Array Configuration Utility.
5-25
Figure 5-19.
Writer: Pamela King Project: SMART-2DH Array Controller Reference Guide Comments: 295469-002
Create Array screen
SMART-2DH Array Controller Reference Guide
File Name: F-CH05.DOC Last Saved On: 2/27/98 11:38 AM
COMPAQ CONFIDENTIAL - NEED TO KNOW REQUIRED
Page 67

5-26
Running the Array Configuration Utility
Create Logical Drive Screen
In this screen, you can select the fault-tolerance method, enable the array
accelerator, and set the logical drive size.
Figure 5-20.
Create Logical Drive screen
The Logical Drive Size area shows a scale marked with the amount of drive
capacity available for a logical drive. The utility does not allow you to create a
logical drive larger than the maximum supported by the operating system.
The purple (left) band above the scale indicates the fraction of the total that is
available for data. The red (right) band indicates the fraction required for storing
the parity or mirrored information, depending on the fault-tolerance method used.
The red (right) band is only needed for RAID 1, RAID 4, or RAID 5.
This screen is first displayed showing the maximum-sized logical drive that can
be created for your drive array. You can reduce this amount if you want to create
more than one logical drive on the array. To reduce the size, type the number in or
drag the pointer to the left. Fine tune the size with the arrow buttons to the left of
the scale.
Writer: Pamela King Project: SMART-2DH Array Controller Reference Guide Comments: 295469-002
File Name: F-CH05.DOC Last Saved On: 2/27/98 11:38 AM
COMPAQ CONFIDENTIAL - NEED TO KNOW REQUIRED
Page 68

5-27
Error and Warning Messages
When you start the Array Configuration Utility, the software checks each
controller to detect errors in its configuration. If a problem is found, the Array
Configuration Utility displays an error or warning message that describes the
problem. Error and warning messages include instructions to correct
configurations. If a warning message indicates “Internal Error Has Occurred” and
cites an error code number, the problem requires assistance from Compaq
technical support. See “About This Guide” at the beginning of this book for
technical support phone numbers.
SMART-2DH Array Controller Reference Guide
Writer: Pamela King Project: SMART-2DH Array Controller Reference Guide Comments: 295469-002
File Name: F-CH05.DOC Last Saved On: 2/27/98 11:38 AM
COMPAQ CONFIDENTIAL - NEED TO KNOW REQUIRED
Page 69

Chapter 6
Installing the Operating System
Drivers
This chapter outlines the driver installation steps to set up the SMART-2DH
Array Controller in a server running any of the following operating systems:
■ Novell NetWare/intraNetWare
■ Microsoft Windows NT
■ SCO OpenServer 5
■ SCO UnixWare 2.1 or later
■ IBM OS/2
■ Banyan VINES
■ Microsoft Windows 95
This chapter also contains related information for using the SMART-2DH
Array Controller with these operating systems. If you are setting up a new
system, we encourage you to use SmartStart, supplied with the server, to
install both the operating system software and the device drivers for the
SMART-2DH Array Controller.
6-1
: If you install the operating system software from the SmartStart and
NOTE
Support Software CD, all of the software, including device drivers, will be
automatically installed and configured for the SMART-2DH Controller. In
addition, the optimization supplied by the CPQDAOPT.NLM will occur
automatically. The SMART-2DH Controller is supported by SmartStart 3.40 or
later. See the documentation that came with SmartStart for installation
instructions.
Before installing the drivers, you should have:
■ Updated your system firmware by running System ROMPaq
■ Installed the SMART-2DH Controller option board
■ Configured the hardware by running the System Configuration Utility
SMART-2DH Array Controller Reference Guide
Writer: Pamela King Project: SMART-2DH Array Controller Reference Guide Comments: 295469-002
File Name: G-CH06.DOC Last Saved On: 2/27/98 12:01 PM
COMPAQ CONFIDENTIAL - NEED TO KNOW REQUIRED
Page 70

6-2
Installing the Operating System Drivers
■ Used the Array Configuration Utility to configure your drive array(s)
Writer: Pamela King Project: SMART-2DH Array Controller Reference Guide Comments: 295469-002
File Name: G-CH06.DOC Last Saved On: 2/27/98 12:01 PM
COMPAQ CONFIDENTIAL - NEED TO KNOW REQUIRED
Page 71

Novell NetWare/intraNetWare
Use the instructions in this section to install the driver for a new SMART-2DH
Controller installation or to upgrade the driver in a server running
NetWare/intraNetWare and using the SMART-2DH Controller. If you use
SmartStart to install NetWare/intraNetWare and drivers, you do not need to
create the Novell Support Software Diskettes (SSD) and can skip to the section
“Handling Disk Drive Failures.”
Materials Needed
You will need the following items to manually install the SMART-2DH
Controller driver on your server:
■ Compaq SmartStart and Support Software CD (supplied in the SMART-
2DH Array Controller Option Kit)
■ Up to four blank diskettes
■ Any server or workstation with a bootable CD-ROM drive
6-3
Creating Novell SSD Diskettes
Two NetWare/intraNetWare drivers for the SMART-2DH Array Controller—
CPQDA386.DSK v 3.10 or later and CPQARRAY.HAM—are located on the
Compaq SmartStart and Support Software CD that was supplied in the
SMART-2DH Array Controller Option Kit.
: To determine the appropriate driver—CPQDA386.DSK or
NOTE
CPQARRAY.HAM—for your version of NetWare/intraNetWare see the online
help file on Disk 2 of Novell SSD.
Use Disk 4 of Novell SSD to access the latest drivers and documentation for
Compaq options in a NetWare/intraNetWare environment. To create the
diskettes:
1. Boot the server from the Compaq SmartStart and Support Software
CD.
2. From the Compaq System Utilities screen, select Create Support Software.
SMART-2DH Array Controller Reference Guide
Writer: Pamela King Project: SMART-2DH Array Controller Reference Guide Comments: 295469-002
File Name: G-CH06.DOC Last Saved On: 2/27/98 12:01 PM
COMPAQ CONFIDENTIAL - NEED TO KNOW REQUIRED
Page 72

6-4
Installing the Operating System Drivers
3. From the Diskette Builder screen, select Create Support Software
Diskettes from CD only.
4. Scroll down the list and select Support Software for Novell Products.
5. You may create all of the disks in the Novell SSD set or create only
disk 4, which contains the driver for the SMART-2DH Controller. We
recommend you create all disks to obtain the support documentation.
Follow the instructions on the screen to create the Novell SSD
diskette(s).
Additional Information
Novell SSD Disk 2 contains the latest information about using Compaq
options in a NetWare/intraNetWare environment, including the driver
installation procedure. Locate and read this procedure. If the procedure differs
from the one shown here, use the one in the STORAGE.RDM file on the
Novell SSD diskette.
To read these text files:
1. Execute README.COM to view and print the readme files.
C:\readme
2. Select the file(s) to read or print. Important readme files include:
❏ READ1ST.RDM
❏ STORAGE.RDM
Writer: Pamela King Project: SMART-2DH Array Controller Reference Guide Comments: 295469-002
File Name: G-CH06.DOC Last Saved On: 2/27/98 12:01 PM
COMPAQ CONFIDENTIAL - NEED TO KNOW REQUIRED
Page 73

Installing the Driver
The following steps outline the procedure to install the SMART-2DH
Controller driver on your NetWare/intraNetWare server.
1. Boot the server.
2. From the DOS prompt, copy the CPQDA386.DSK (version 3.10 or
later) or the CPQARRAY.HAM driver file from the \DRV_ARRY
directory on the fourth Novell SSD diskette to the primary DOS
partition on the boot drive in the server. This is where the
NetWare/intraNetWare server files are located, usually drive c:
copy A:\drv_arry\cpqda386.dsk C:\nwserver
3. Edit the STARTUP.NCF file so that the driver loads automatically at
system startup. With any DOS editor, add the following line:
load cpqda386
4. Refer to NetWare/intraNetWare installation documentation for
information about installing and mounting volumes associated with
your new disk subsystem.
6-5
Driver installation is complete. If you are using Compaq Insight Manager, see
the following section for information on updating the Insight Agents.
Latest Drivers
The latest drivers for future upgrades may be obtained from the Internet:
World Wide Web Go to http://www.compaq.com.
CompuServe Enter GO COMPAQ or go directly to the Compaq Forum.
America Online Use the navigation keyword COMPAQ.
Prodigy Use the JUMP navigation command followed by the
keyword COMPAQ.
SMART-2DH Array Controller Reference Guide
Writer: Pamela King Project: SMART-2DH Array Controller Reference Guide Comments: 295469-002
File Name: G-CH06.DOC Last Saved On: 2/27/98 12:01 PM
COMPAQ CONFIDENTIAL - NEED TO KNOW REQUIRED
Page 74

6-6
Installing the Operating System Drivers
Internet Go to FTP.COMPAQ.COM to access the Compaq
Download Facility Dial 281-518-1418. Compaq offers direct modem access
Updating the Compaq Insight
Manager Agents
If you are using Compaq Insight Manager, you will need to update the Insight
Agents to support the new SMART-2DH Controller. If you used SmartStart
3.40 or later to install the operating system on a new SMART-2DH Controller
installation or upgrade your driver in an existing installation, the agents were
automatically updated for you by SmartStart. You will not have to manually
update the agents.
If you did not use SmartStart 3.40 or later as part of your SMART-2DH
Controller installation, you must manually update the Insight Agents. The
correct agents can be obtained from your local Compaq Reseller or
Authorized Compaq Service Provider. Refer to the documentation included
with Compaq Insight Manager for the correct procedure for updating agents.
anonymous FTP site. Enter “anonymous” for user name at
the login prompt. Enter your full Internet E-mail address
for the password.
for downloading drivers and other software. A SoftPaq
manager is available to provide information on the latest
files.
Installation of the Compaq SMART-2DH Array Controller is complete.
Reboot the server to begin using the array controller.
Writer: Pamela King Project: SMART-2DH Array Controller Reference Guide Comments: 295469-002
File Name: G-CH06.DOC Last Saved On: 2/27/98 12:01 PM
COMPAQ CONFIDENTIAL - NEED TO KNOW REQUIRED
Page 75

Using Array Configuration Utility for
NetWare/intraNetWare
(CPQONLIN)
The Compaq Array Configuration Utility is an NLM that allows you to
configure your drive arrays without shutting down your server.
CPQONLIN.NLM is located in the ONLINE directory of Novell SSD Disk 1.
Load the NLM and follow the instructions on the screen to use this online
utility to configure your drive arrays.
: The Compaq Array Configuration Utility requires CPQDA386.DSK v
NOTE
3.10 or later or CPQARRAY.HAM.
Optimizing Array Controller Performance
To increase the performance of your disk subsystem(s) under NetWare 4.x,
follow each of these steps before installing NetWare volumes or partitions.
■ If you selected a fault-tolerance option, such as mirroring or distributed
data guarding when using the Compaq System Configuration Utility,
do not select mirroring while using INSTALL.NLM. The faulttolerance capabilities of the SMART-2DH Controller provide
performance improvements and automatic data recovery features.
6-7
■ Novell recommends that you create volumes with a 64-KB block size
and that you use the Block Sub-Allocation feature of intraNetWare.
Using a large block size decreases the amount of RAM required to
mount the volume, while Block Sub-Allocation allows intraNetWare to
allocate disk space more efficiently.
■ Use of linear memory provides the best performance in the
intraNetWare environment. When you use the Compaq System
Configuration Utility to configure your server with intraNetWare, the
memory options default so that linear memory is used. To verify the
setting, run the Compaq System Configuration Utility and view the
Compaq Memory settings. Make sure that a linear option has been
selected under the Base Memory option.
SMART-2DH Array Controller Reference Guide
Writer: Pamela King Project: SMART-2DH Array Controller Reference Guide Comments: 295469-002
File Name: G-CH06.DOC Last Saved On: 2/27/98 12:01 PM
COMPAQ CONFIDENTIAL - NEED TO KNOW REQUIRED
Page 76

6-8
Installing the Operating System Drivers
Using the Compaq Drive Array Optimization
Utility (CPQDAOPT)
Compaq recommends that you use the Compaq Drive Array Optimization
Utility (CPQDAOPT.NLM) to optimize your drive arrays before creating
partitions. CPQDAOPT is a utility designed to assist you in optimizing
performance and can increase drive array performance by 20 to 40 percent.
This is accomplished by adjusting the size of the Hot Fix Redirection Area of
a partition to reduce the number of disk accesses. CPQDAOPT provides you
with a formula specific to your configuration. You must use this information
as you create a partition using INSTALL.NLM. If you installed
NetWare/intraNetWare using SmartStart, it is not necessary to run this utility.
Using CPQDAOPT On New NetWare/intraNetWare
Servers
Before you load CPQDAOPT on your new NetWare/intraNetWare server,
make sure you have followed the instructions for installing
NetWare/intraNetWare from CD found in the INSTALL.RDM file on Novell
SSD Disk 1.
: Back up existing data before applying new settings to data volumes.
NOTE
1. Start your NetWare/intraNetWare server.
2. Copy the CLIB.NLM and STREAMS.NLM files from the
NetWare/intraNetWare Installation CD-ROM (D:\NW410\BOOT or
D:\INTRANETWARE.312\________\C; where the line represents
eight underscores) to the server’s DOS partition before you begin
installation.
3. Start the NetWare/intraNetWare installation. When loading drivers, be
sure that you have the CPQDA386.DSK (version 3.10 or later) or
CPQARRAY.HAM driver loaded.
4. When the “Create NetWare Partition” option appears, use the Alt+Esc
key sequence to change to the console prompt and load CLIB:
load clib.nlm
5. Load CPQDAOPT.NLM from Novell SSD Disk 3:
Writer: Pamela King Project: SMART-2DH Array Controller Reference Guide Comments: 295469-002
File Name: G-CH06.DOC Last Saved On: 2/27/98 12:01 PM
COMPAQ CONFIDENTIAL - NEED TO KNOW REQUIRED
Page 77

load A:\drv_arry\cpqdaopt
6. CPQDAOPT displays the registered disk devices it has located. Select
the device where you will create a partition by using the cursor keys
and press Enter.
7. CPQDAOPT determines if it is possible to optimize the alignment of
data on the selected device. If so, it provides you with a formula for
determining the size of the Hot Fix Redirection Area you should select
when creating this partition. Make a note of the formula: even, odd,
and so on.
8. In some cases, it may not be possible to optimally align the data on the
partition by sizing the Hot Fix Redirection Area alone. CPQDAOPT
may instruct you to create a small DOS partition on the device. If so:
a. Exit from NetWare/intraNetWare before creating the partition.
b. Use the DOS FDISK utility to create the smallest DOS
partition allowed.
c. Start the server and load CPQDAOPT.NLM again.
9. Use the Alt+Esc keys to return to the NetWare/intraNetWare
installation process and select the option to create disk partitions. Use
the formula recommended by CPQDAOPT to determine the number of
Hot Fix Redirection Blocks for the partition installed on the selected
device. Make sure that the number of blocks is the same as described
by the formula. For example, if the formula was “even”, any number
that is even will work.
6-9
10. After the SYS volume is optimized and the NetWare/intraNetWare
files are installed, copy the CPQDAOPT.NLM to the server’s SYSTEM
partition so that it is easily accessible for future optimizations. In the
following example, F: is mapped to the server’s SYSTEM partition.
From a client logged into the server, type:
copy A:\drv_arry\cpqdaopt.nlm f:\system\cpqdaopt.nlm
SMART-2DH Array Controller Reference Guide
Writer: Pamela King Project: SMART-2DH Array Controller Reference Guide Comments: 295469-002
File Name: G-CH06.DOC Last Saved On: 2/27/98 12:01 PM
COMPAQ CONFIDENTIAL - NEED TO KNOW REQUIRED
Page 78

6-10
Installing the Operating System Drivers
Using CPQDAOPT on Existing
NetWare/intraNetWare Servers
If CPQDAOPT is already installed in the server’s SYSTEM directory, use the
following steps to run the NLM.
1. Load the Compaq Drive Array Optimization NLM by executing the
following server console command:
load cpqdaopt
2. If you receive an error while loading CPQDAOPT, it may indicate that
your version of CLIB is earlier than v3.11c. Otherwise
CPQDAOPT.NLM displays the registered disk devices it has located.
Select the device where you will create a partition by using the cursor
keys and press Enter.
3. CPQDAOPT determines if it is possible to optimize the alignment of
data on the selected device. If so, it provides a formula for determining
the size of the Hot Fix Redirection Area you should select when
creating this partition. Make a note of the formula: even, odd, and so
on.
4. In some cases, it may not be possible to optimally align the data on the
partition by sizing the Hot Fix Redirection Area alone. CPQDAOPT
may instruct you to create a small DOS partition on the device. If so:
a. Shut down the server before creating the partition.
b. Use the DOS FDISK program to create the smallest DOS
partition allowed.
c. Start the server and load CPQDAOPT.NLM again.
5. Use the formula recommended by CPQDAOPT to determine the
number of Hot Fix Redirection Blocks to assign for the partition
installed on the selected device. Make sure that the number of blocks is
the same as described by the formula. For example, if the result of the
formula was “even,” any even number will work.
6. If you have already created a partition on a device, CPQDAOPT may
be used to determine if the data is optimally aligned.
Writer: Pamela King Project: SMART-2DH Array Controller Reference Guide Comments: 295469-002
File Name: G-CH06.DOC Last Saved On: 2/27/98 12:01 PM
COMPAQ CONFIDENTIAL - NEED TO KNOW REQUIRED
Page 79

7. You may receive a warning about changing the cache buffer size on
your server. In some cases, increasing the size of the cache buffers on a
NetWare/intraNetWare server may slow I/O performance.
8. If you must enlarge the cache buffer size and it takes the partition out
of optimal alignment, or if CPQDAOPT informs you that the existing
partition on a device is not optimally aligned, it is still possible to
configure the partition optimally.
a. Make a backup of the data on your server to avoid data loss.
b. Use INSTALL.NLM Disk Options, Partition Tables, and Change
Hot Fix Option to change the size of the Hot Fix Redirection
Area using the formula provided by CPQDAOPT.
c. Recreate your volume(s).
d. Restore your data.
Software Drive Mirroring
with NetWare/intraNetWare
If you use drive mirroring fault tolerance, be aware that
NetWare/intraNetWare recognizes each logical drive in an array as a separate
physical drive. If you mirror logical drives on the same array and a physical
drive fails, both logical drives in the mirrored pair will fail and your data will
be lost.
6-11
To avoid this problem, you must mirror logical drives on separate arrays. Use
the Compaq Array Configuration Utility for NetWare/intraNetWare
(CPQONLIN.NLM) on Novell SSD Disk 3 to view the logical configuration
for the SMART-2DH Array Controller. Record which logical drives reside on
which arrays. When configuring NetWare/intraNetWare for drive mirroring,
select equally sized logical drives on different arrays.
IMPORTANT:
NetWare will not be able to warn you if you mirror logical
drives which share a physical drive because NetWare cannot distinguish the
individual physical drives. If you do not have at least two arrays, you should
not use NetWare drive mirroring.
SMART-2DH Array Controller Reference Guide
Writer: Pamela King Project: SMART-2DH Array Controller Reference Guide Comments: 295469-002
File Name: G-CH06.DOC Last Saved On: 2/27/98 12:01 PM
COMPAQ CONFIDENTIAL - NEED TO KNOW REQUIRED
Page 80

6-12
Installing the Operating System Drivers
Handling Disk Drive Failures
Although drive failures are not common, they may occur; it is important to
protect your critical data. The best way to recover from a failed drive is to
configure your drive system with some form of fault-tolerance.
To ensure a quick and transparent recovery, Compaq recommends that you
configure your SMART-2DH Controller with hardware fault tolerance. An
advantage of hardware fault tolerance is that the controller is able to perform a
background surface analysis on the hard drives to monitor for bad sectors and
remap data to a new location on the media. This feature enhances the
reliability and availability of your data. Compaq also recommends that you
use good backup procedures, in case of catastrophic failure.
If you discover a failed drive, perform the following steps:
■ Identify and document which physical drive has failed. Note the drive
type and capacity.
■ Note which partition and volume, if any, has failed. This information is
provided in the error message on the server console. It is also recorded
in the server error log file which may be viewed using the SYSCON
utility (intraNetWare 3.12) or NWADMIN utility (NetWare 4.x).
■ Make sure that you have a recent backup. If the drive is part of a fault-
tolerant mirrored volume, or a hardware fault-tolerant volume, you will
be able to backup the data again in case of a second drive failure.
■ Locate a replacement drive of the same type and capacity.
■ Follow the instructions in the sections below for replacing a drive for
your particular server configuration.
DOS Partitions and
NetWare/intraNetWare Fault Tolerance
NetWare/intraNetWare does not mirror information on DOS partitions. Only
hardware fault tolerance supports mirrored DOS partitions. If you have a
mirrored drive containing a DOS partition, you need to restore the DOS
partition information from another backup source.
Writer: Pamela King Project: SMART-2DH Array Controller Reference Guide Comments: 295469-002
File Name: G-CH06.DOC Last Saved On: 2/27/98 12:01 PM
COMPAQ CONFIDENTIAL - NEED TO KNOW REQUIRED
Page 81

If the failed drive contains a DOS partition, NetWare/intraNetWare will not
be able to access information on that partition. For example, files on the DOS
partition include STARTUP.NCF and Novell disk drivers. To prevent
NetWare/intraNetWare from attempting to read from or write to the failed
device, execute the following command from the console.
REMOVE DOS
Recovering a DOS Partition Without Hardware
Fault Tolerance
If your server is not configured for hardware fault tolerance, and if the drive
that failed contained the DOS partition used to boot your server, you will not
be able to restart the server once it has been powered off. Schedule
maintenance time as soon as possible and complete the following:
1. Power down your server.
2. Replace the failed drive.
3. Reboot the system with the Compaq System Configuration
Utility diskette.
6-13
4. Select the option to install a System Partition on your DOS boot
device. This partition should contain the Compaq System
Configuration Utility and the Compaq Diagnostic Utility. Exit the
System Configuration Utility.
5. Locate a DOS bootable diskette that contains the DOS FDISK and
FORMAT programs.
6. Use the FDISK program to create a primary DOS partition on the
replaced drive. Compaq recommends that your DOS partition be at
least 15 megabytes.
7. Set the active partition to the DOS partition you just created.
8. Use the FORMAT command to format the DOS partition to include the
necessary files to make the partition bootable. For example:
FORMAT C: /s
SMART-2DH Array Controller Reference Guide
Writer: Pamela King Project: SMART-2DH Array Controller Reference Guide Comments: 295469-002
File Name: G-CH06.DOC Last Saved On: 2/27/98 12:01 PM
COMPAQ CONFIDENTIAL - NEED TO KNOW REQUIRED
Page 82

6-14
Installing the Operating System Drivers
9. If you have a backup of your DOS partition, use it to recreate the
previous image. Otherwise, use your NetWare/intraNetWare server
diskettes and copy the following files to a NetWare/intraNetWare
directory on your DOS partition:
SERVER.EXE
INSTALL.NLM
VREPAIR.NLM
MONITOR.NLM
CLIB.NLM
STREAMS.NLM
10. Copy the required disk drivers, LAN drivers, and utility NLMs that
should reside on the DOS partition from the Novell SSD.
11. Copy any other necessary information to the DOS partition and then
reboot your system. You are now ready to start your
NetWare/intraNetWare server. You may need to recreate your
STARTUP.NCF file.
Recovering Drives Configured for
Hardware Fault Tolerance
If you configure your SMART-2DH Array Controller with hardware fault
tolerance, complete the following steps after a disk drive failure.
1. Determine which physical drive failed. On hot-pluggable drives in a
ProLiant server or storage system this is done by observing the amber
Drive Failure LED on each drive tray.
2. If the unit containing the failed drive does not
support hot-pluggable
drives, perform a normal system shutdown.
3. Remove the failed drive and replace it with a drive that is of the same
capacity. For hot-pluggable drives, after you secure the drive in the
bay, the LEDs on the drive will all light once in an alternating pattern
to indicate that the connection was successful. The Online LED will
blink indicating that the controller has recognized the drive
replacement and begun the recovery process.
4. Power on the server, if applicable.
Writer: Pamela King Project: SMART-2DH Array Controller Reference Guide Comments: 295469-002
File Name: G-CH06.DOC Last Saved On: 2/27/98 12:01 PM
COMPAQ CONFIDENTIAL - NEED TO KNOW REQUIRED
Page 83

5. The SMART-2DH Controller firmware will reconstruct the information
on the new drive based on information from the remaining physical
drives in the logical drive. While reconstructing the data on hotpluggable drives, the Online LED will blink. The controller will signal
that it has completed rebuilding the information on the drive by
lighting the Online LED.
6. NetWare/intraNetWare has no knowledge of a single physical drive
failure when using hardware-based fault tolerance; intraNetWare will
find that the data is still valid and accessible during the rebuilding
process.
Recovering Drives Configured for
NetWare/intraNetWare
Fault Tolerance
If you have chosen no fault tolerance for the drives connected to your
SMART-2DH Controller and have configured NetWare/intraNetWare
mirroring or NetWare/intraNetWare controller duplexing, use the following
procedure to recover the data after a drive failure:
1. Identify the failed physical drive that caused the
NetWare/intraNetWare device to be deactivated due to drive failure.
Record the device number and device name of the failed logical drive.
For example:
6-15
Device #1 (47000) Slot 1 Disk 1 NFT
The failure messages are recorded on the server console and also in the
server error log file, which may be viewed using the SYSCON utility
(3.12) or the NWADMIN utility (4.x). This information will be used
later to recreate a valid partition.
2. Load the INSTALL.NLM and select the Disk Options Mirroring menu.
Select the mirrored logical partition that was affected by the drive failure
(step 1 above). Record the device number and partition number of the
operational logical drive in this mirrored group. This information will be
used later to remirror the repaired logical drive.
For example:
NetWare 386 Partition 3 on Device #2 (47110)
SMART-2DH Array Controller Reference Guide
Writer: Pamela King Project: SMART-2DH Array Controller Reference Guide Comments: 295469-002
File Name: G-CH06.DOC Last Saved On: 2/27/98 12:01 PM
COMPAQ CONFIDENTIAL - NEED TO KNOW REQUIRED
Page 84

6-16
Installing the Operating System Drivers
3. Delete the unavailable (possibly out of sync) device from the Mirror
Partition group. This device is unavailable due to the drive failure.
4. Record the drive bay location of the failed physical drive. This is the
location is where the new physical drive must be inserted.
5. If the failed drive is hot-pluggable, skip to step 6. Otherwise, schedule
server down time, bring down the server, and power off the unit.
6. Insert the replacement physical drive in the same drive bay where the
failed drive was located. The physical drive must be the same capacity as
the failed drive. Be sure that all cable connections are securely in place.
For replacements in a ProLiant server or storage system, after you
secure the drive in the bay, the LEDs on the drive will all light once in
an alternating pattern to indicate that the connection was successful. The
Online LED will turn green, indicating that the controller has
recognized and successfully initialized the replacement drive. If the
Online LED does not light after a few minutes, verify that you added the
new drive in the same slot as the failed drive and that the drive capacity
is the same as the failed drive it is replacing.
7. Activate the replaced device. Use MONITOR.NLM Disk Information
option to select the device. Some versions of NetWare/intraNetWare
will cause a “device activate” to occur automatically when this option
is chosen. Other versions of NetWare/intraNetWare require manual
activation of the device by changing the operating status to active. A
console alert will be sent by the driver if attempts to reactivate the
failed logical drive are successful.
8. Use the INSTALL.NLM option Change Hot Fix (look at the information
provided about the mirrored drive
, not the failed drive) to determine
the number of Hot Fix Redirection blocks set up for this partition. See
the section “Using CPQDAOPT on Existing NetWare/intraNetWare
Servers” in this chapter for more information about optimizing the
performance.
9. Use the INSTALL.NLM to delete and recreate the partition on the
repaired logical drive.
Writer: Pamela King Project: SMART-2DH Array Controller Reference Guide Comments: 295469-002
File Name: G-CH06.DOC Last Saved On: 2/27/98 12:01 PM
COMPAQ CONFIDENTIAL - NEED TO KNOW REQUIRED
Page 85

: Although the logical drive may have a valid partition table, the data
NOTE
on this logical drive is NO LONGER VALID. Some data may appear valid
because the failed physical drive was only a portion of the arrayed logical
drive. However, there is a hole in the logical drive data at this point. Delete
any old, invalid data and recreate a new partition on the logical drive.
6-17
SMART-2DH Array Controller Reference Guide
Writer: Pamela King Project: SMART-2DH Array Controller Reference Guide Comments: 295469-002
File Name: G-CH06.DOC Last Saved On: 2/27/98 12:01 PM
COMPAQ CONFIDENTIAL - NEED TO KNOW REQUIRED
Page 86

6-18
Installing the Operating System Drivers
10. Return to the INSTALL.NLM Disk Options menu. If you are not
running intraNetWare SFT III or NetWare 4.x, you may be able to skip
to step 11. Use the Mirroring selection to locate the Out of Sync
partition. The device number for the Out of Sync partition should
match the previously failed device number. Select the Out of Sync
partition. Use the Insert key to resynchronize this partition.
NetWare/intraNetWare requires you to resynchronize before deleting
the partition. Allow INSTALL to resynchronize this partition. You may
receive warning messages that the selected partition contains an
already-defined volume and ask if you want to rename the volume.
Select No and press Esc. Since you plan to delete this partition, there is
no reason to salvage the volume. You should be able to proceed with
deleting the partition table.
11. Using the INSTALL.NLM Disk Options menu, select the Partition
Tables Option. In the INSTALL.NLM Available Disk Drives menu,
select the previously failed logical drive, which has now been repaired.
The device information should have been recorded in step 1 above. For
example:
Device #1 (47000) Slot 1 Dsk 1 NFT
Select the Delete Partition option. INSTALL may show several error
messages. Do not update any Volume Definition Table information
because you will delete this partition anyway. Continue until the
partition on this device has been deleted.
If INSTALL reports that it cannot delete the partition because another
process has it locked, load MONITOR and look at the System
Resources option to determine which NLM has locked the device. It
may be MONITOR.NLM, so you will need to unload MONITOR and
any other NLMs that have the partition locked. After you have
recreated the partition and volume information, reload those NLMs.
12. Recreate the partition on the same logical drive.
13. Return to the Disk Options Mirroring menu. Select the NetWare 386
Partition number that was previously mirrored. This partition was
recorded in step 2 above.
NetWare 386 Partition 3 on Device #2 (47110)
Writer: Pamela King Project: SMART-2DH Array Controller Reference Guide Comments: 295469-002
File Name: G-CH06.DOC Last Saved On: 2/27/98 12:01 PM
COMPAQ CONFIDENTIAL - NEED TO KNOW REQUIRED
Page 87

14. Press Insert for a list of partitions available to remirror. Select the
partition associated with the device (step 1) that was repaired. This step
causes NetWare/intraNetWare to begin resynchronizing the mirrored
partitions.
15. A console message indicates successful completion of the
resynchronization step.
Recovering Drives Configured for No
Fault Tolerance
If you have configured no fault tolerance, you must recover the data from a
backup media. Perform the following steps:
1. Identify the failed physical drive that caused the logical drive to be
deactivated due to drive failure. Record the device number and device
name of the failed logical drive. For example:
Device #1 (47000) Slot 1 Dsk 1 NFT
The failure messages are recorded on the server console. They are also
recorded in the server error log file, which may be viewed using the
SYSCON utility (NetWare 3.12) or the NWADMIN utility (intraNetWare).
This information will be used later to recreate a valid partition.
6-19
For hot-pluggable drives in a ProLiant server or storage system, record the
location drive bay of the failed physical drive. The failed physical device
can be identified by the illumination of the amber LED on the drive tray.
Note that this is where the new physical drive must be inserted.
2. Remove the failed drive.
3. Insert the replacement physical drive in the same drive bay where the
failed drive was located. The physical drive must be the same capacity
as the failed drive.
SMART-2DH Array Controller Reference Guide
Writer: Pamela King Project: SMART-2DH Array Controller Reference Guide Comments: 295469-002
File Name: G-CH06.DOC Last Saved On: 2/27/98 12:01 PM
COMPAQ CONFIDENTIAL - NEED TO KNOW REQUIRED
Page 88

6-20
Installing the Operating System Drivers
For hot-pluggable drives, after you secure the drive in the bay, the LEDs
on the drive will all light once in an alternating pattern to indicate that
the connection was successful. The Online LED will turn green,
indicating that the controller has recognized and successfully initialized
the replacement drive. If the Online LED does not light after a few
minutes, verify that you added the new drive in the same slot as the
failed drive and that the drive capacity is the same as the failed drive it
is replacing.
Writer: Pamela King Project: SMART-2DH Array Controller Reference Guide Comments: 295469-002
File Name: G-CH06.DOC Last Saved On: 2/27/98 12:01 PM
COMPAQ CONFIDENTIAL - NEED TO KNOW REQUIRED
Page 89

4. It may be possible to use the INSTALL.NLM option Change Hot Fix to
determine the number of Hot Fix Redirection blocks set up for this
partition. Otherwise, see the section “Using CPQDAOPT on Existing
NetWare/intraNetWare Servers” in this chapter for more information
about optimizing the performance.
: Even though the logical drive may have a valid partition table, the
NOTE
data on this logical drive is NO LONGER VALID. Some data may appear valid
because the failed physical drive is only a portion of the arrayed logical drive.
However, there is a hole in the logical drive data at this point. Delete any old,
invalid data and recreate a new partition on the logical drive.
5. Return to the INSTALL.NLM Disk Options menu. Select the Partition
Tables Option. At this point the driver should reactivate the failed
logical drive. A console alert will be sent by the driver if attempts to
reactivate the failed logical drive are successful. In the INSTALL.NLM
Available Disk Drives menu, select the previously failed logical drive,
which has now been repaired. The device information should have
been recorded in step 1 above. For example:
Device #1 (47000) Slot 1 Dsk 1 NFT
Select the Delete Partition option. INSTALL may present several error
messages. Delete the volume associated with this partition. Do not
update any Volume Definition Table information because you will
delete this partition. Continue until the partition on this device has been
deleted.
6-21
If INSTALL reports that it cannot delete the partition because another
process has it locked, load MONITOR and look at the System Resources
option to determine which NLM has locked the device. It may be
MONITOR.NLM, so you will need to unload MONITOR and any other
NLMs that have the partition locked. After you have recreated the
partition and volume information, reload these NLMs.
6. Recreate the partition on the same logical drive.
7. Recreate and mount the volume.
8. Locate the recent backup media and restore the data to this server
volume.
SMART-2DH Array Controller Reference Guide
Writer: Pamela King Project: SMART-2DH Array Controller Reference Guide Comments: 295469-002
File Name: G-CH06.DOC Last Saved On: 2/27/98 12:01 PM
COMPAQ CONFIDENTIAL - NEED TO KNOW REQUIRED
Page 90

6-22
Installing the Operating System Drivers
Microsoft Windows NT
This section includes instructions for installing the initial driver for a new
SMART-2DH Controller installation or upgrading the driver in an existing
Windows NT server/SMART-2DH Controller system. If you use SmartStart to
install Windows NT and drivers on a new server you do not need to make the
Support Software Diskette (SSD) utility diskettes and can skip this section.
: Windows NT supports using the Compaq Array Configuration Utility
NOTE
to reconfigure your drive arrays online. However, the first use of the Array
Configuration Utility on a Windows NT server must be offline to initially set up
at least one array. After that, the utility can be used online to change the array
configuration.
Materials Needed
You will need the following items to manually install the SMART-2DH
Controller Windows NT driver on your server:
■ Compaq SmartStart and Support Software CD (supplied in the SMART-
2DH Array Controller Option Kit)
■ Blank diskettes
■ Access to a server or workstation with a bootable CD-ROM drive. This
may be the system in which you are installing the SMART-2DH
Controller.
Creating the Windows NT SSD Diskettes
The Windows NT driver for the SMART-2DH Controller is located on the
Compaq SmartStart and Support Software CD that was supplied in the
SMART-2DH Controller Option Kit. To access to the driver you will first
need to create the Windows NT SSD diskettes. These diskettes contain the
latest operating system software, drivers, and support documentation for all
Compaq equipment supported by Windows NT. To create the diskettes:
1. Boot the server from the Compaq SmartStart and Support Software
CD.
Writer: Pamela King Project: SMART-2DH Array Controller Reference Guide Comments: 295469-002
File Name: G-CH06.DOC Last Saved On: 2/27/98 12:01 PM
COMPAQ CONFIDENTIAL - NEED TO KNOW REQUIRED
Page 91

2. From the Compaq System Utilities screen, select Create Support Software.
3. From the Diskette Builder screen, select Create Support Software
Diskettes from CD only.
4. Scroll down the list and select Compaq Support Software for Windows
NT.
5. Follow the instructions on the screen to create the Windows NT SSD
diskettes.
Additional Information
Included on the Windows NT SSD diskettes is an NTREADME.HLP WinHelp
file that contains the latest information about Windows NT, including the
driver installation procedure. We encourage you to review this information
and, where different from the instructions shown here, use the instructions
provided in NTREADME.HLP on the Compaq SmartStart and Support
Software CD (via the Windows NT SSD diskettes) that was supplied with
your SMART-2DH Controller.
To read the NTREADME.HLP WinHelp file you will need a server running
Windows NT or a PC running Windows:
6-23
1. Place the Windows NT SSD diskettes, one at a time, in the diskette
drive.
2. Open a Command Prompt, make A: the current drive and type:
readme.bat
or
From the File pull-down menu in Windows Program Manager, select
Run and enter:
A:\readme.bat
3. Select the help topic(s) to read or print. Important readme files are:
❏ Compaq SSD for Windows NT Installation Methods
❏ Using the Compaq SSD for Windows NT Setup Program
SMART-2DH Array Controller Reference Guide
Writer: Pamela King Project: SMART-2DH Array Controller Reference Guide Comments: 295469-002
File Name: G-CH06.DOC Last Saved On: 2/27/98 12:01 PM
COMPAQ CONFIDENTIAL - NEED TO KNOW REQUIRED
Page 92

6-24
Installing the Operating System Drivers
❏ Windows NT Device Driver Specifics
❏ Compaq SCSI Controller Support
❏ Compaq Drive Array Support
❏ Installing the Compaq Drive Array Driver during
Windows NT Installation
❏ Installing the Compaq Drive Array Driver after
Windows NT Installation
❏ Updating the Compaq Drive Array Driver
❏ Removing the Compaq Drive Array Driver
Installation Procedures
Device drivers may be installed in a Windows NT server using:
■ The Windows NT SSD Setup program installation method
■ The standard Windows NT device driver installation methods
Although both are outlined in this chapter, we recommend the Windows NT
SSD Setup program installation method.
Windows NT SSD Setup Program
Installation Method
The Windows NT SSD Setup program installation method refers to device
drivers that can be installed via the Setup program located on the Windows
NT Support Software Diskettes. The Setup program provides a unified
approach to device driver installation under Windows NT. The program
identifies hardware components installed in the machine and suggests device
drivers needing installation.
Use the following steps to run the Windows NT SSD Setup program:
1. Start Windows NT 3.51 or NT 4.0 and log into an account with
administrative privileges.
2. Insert the Windows NT Support Software Diskettes, one at a time, into
the diskette drive.
Writer: Pamela King Project: SMART-2DH Array Controller Reference Guide Comments: 295469-002
File Name: G-CH06.DOC Last Saved On: 2/27/98 12:01 PM
COMPAQ CONFIDENTIAL - NEED TO KNOW REQUIRED
Page 93

6-25
3. From the Program Manager, select File
4. Enter the following:
A:\setup
Run.
SMART-2DH Array Controller Reference Guide
Writer: Pamela King Project: SMART-2DH Array Controller Reference Guide Comments: 295469-002
File Name: G-CH06.DOC Last Saved On: 2/27/98 12:01 PM
COMPAQ CONFIDENTIAL - NEED TO KNOW REQUIRED
Page 94

6-26
Installing the Operating System Drivers
5. A list of drivers that can be installed on your server will appear. The
highlighted drivers represent detected systems that will be installed by
default. If you have previously installed the SMART-2DH Controller
board in this server the Compaq SCSI Controllers Support Install/Remove option will be highlighted.
If you have not previously installed the SMART-2DH Controller board
in this server you can still install the SMART-2DH Controller driver.
The driver will appear on the list but will not be highlighted. Highlight
the driver.
6. After highlighting all the drivers you wish to install, select Continue.
Setup will install the selected drivers or prompt you for more
information to install, remove, or update a driver.
7. Select Continue. In the SCSI Adapter Setup window, select Add. A
Setup dialog box ask you to confirm the addition of a SCSI controller
(adapter). Select OK.
8. Scroll through the Adapter list and select Other.
9. When prompted for the path to the SCSI Adapter files, enter:
A:\scsi\array
Select Continue.
10. Select Compaq Drive Array from the list of drivers to install.
Select OK.
11. After the driver has been copied to the system, Setup will return to the
SCSI Adapter Setup dialog box. Compaq Drive Array should appear in
the list of installed SCSI controllers. Select Close.
12. Exit the program.
13. Remove the Windows NT SSD diskette, shut down Windows NT, and
reboot the server to load the driver.
Writer: Pamela King Project: SMART-2DH Array Controller Reference Guide Comments: 295469-002
File Name: G-CH06.DOC Last Saved On: 2/27/98 12:01 PM
COMPAQ CONFIDENTIAL - NEED TO KNOW REQUIRED
Page 95

Standard Windows NT Device Driver
Installation Methods
Standard Windows NT device driver installation methods include different
ways to install different device drivers on a Windows NT system. Some
device drivers are installed during initial Windows NT installation. Others can
be installed through a number of different programs: the Windows NT Setup
program, the Network icon in the Windows Control Panel, or the Drivers
icon in the Windows Control Panel.
Installing the SMART-2DH Controller
Driver during Windows NT Installation
This section describes how to install the driver using the Windows NT
Support Software Diskette utility during the initial installation of Windows
NT 3.51 or NT 4.0. To install the driver after Windows NT has already been
installed, see the section, “Installing the SMART-2DH Controller Driver after
Windows NT Installation.”
1. Begin the Windows NT 3.51 or NT 4.0 installation process.
2. When prompted to do either an Express or a Custom installation, select
Custom.
6-27
3. When prompted to let Setup detect mass storage devices or to manually
select them, press S to skip detection.
4. At the next screen, press S to specify additional SCSI controllers.
5. From the displayed list, highlight Other (Requires disk provided by a
hardware manufacturer) by clicking on that line and press Enter.
6. As prompted, insert the Windows NT SSD diskettes, and press Enter.
7. Highlight Compaq Drive Array in the list of displayed controllers and
press Enter.
8. After the driver has been loaded into memory, the Setup program will
return to the screen displayed in step 4. Compaq Drive Array should
now appear in the list of recognized mass storage devices. If it is
necessary to install additional device support, repeat steps 4-8.
Otherwise, continue with step 9.
9. Press Enter and continue installation of Windows NT.
SMART-2DH Array Controller Reference Guide
Writer: Pamela King Project: SMART-2DH Array Controller Reference Guide Comments: 295469-002
File Name: G-CH06.DOC Last Saved On: 2/27/98 12:01 PM
COMPAQ CONFIDENTIAL - NEED TO KNOW REQUIRED
Page 96

6-28
Installing the Operating System Drivers
10. Later during Windows NT installation, reinsert the Windows NT SSD
diskettes when prompted. The Setup program will copies the drivers to
the system.
11. Finish installing Windows NT.
Installing the Compaq SMART-2DH Controller
Driver after Windows NT Installation
Execute the Setup program in the root directory of the Windows NT Support
Software Diskette utility to install or update the driver. This installation
program will copy the appropriate driver and configure the system to use this
driver.
1. Start Windows NT 3.51 or NT 4.0 and log in to an account with
administrative privileges.
2. Insert the Windows NT SSD diskettes, one at a time, into the diskette
drive.
3. From the Program Manager, select File Run.
4. Enter the following:
A:\setup
5. The Setup program presents a list of drivers that can be installed.
Select Compaq SCSI Controllers Support - Install/Remove.
6. Select Continue. In the SCSI Adapter Setup window, select Add. A
Setup dialog box will be displayed asking you to confirm the addition
of a SCSI controller (adapter). Select OK.
7. Scroll through the Adapter list and select Other.
8. When prompted for the path to the SCSI Adapter files, enter:
A:\scsi\array
Select Continue.
9. Select Compaq Drive Array from the list of drivers to install. Select OK.
Writer: Pamela King Project: SMART-2DH Array Controller Reference Guide Comments: 295469-002
File Name: G-CH06.DOC Last Saved On: 2/27/98 12:01 PM
COMPAQ CONFIDENTIAL - NEED TO KNOW REQUIRED
Page 97

10. After the driver has been copied to the system, Setup will return to the
SCSI Adapter Setup dialog box. Compaq Drive Array should appear in
the list of installed SCSI controllers. Select Close.
11. Exit the program.
12. Remove the Windows NT SSD diskette from the drive, shut down
Windows NT, and reboot the server to load the driver.
Updating the SMART-2DH Controller
Driver
Updating the SMART-2DH Controller driver is a two-step process: removing
the driver, then re-adding the driver. With the new Compaq Support Software
Diskette for Windows NT Setup program, you no longer have to perform the
Remove/Add steps. You can simply update the driver by following these
steps:
1. Start Windows NT and log in to an account with administrative
privileges.
2. Insert the Windows SSD diskette (Diskette #1) into the diskette drive.
3. Start Setup by entering
6-29
A:\setup
where A: is the letter of the diskette drive.
4. Select Custom Setup.
: The Compaq Array Driver will only be displayed in the Custom Setup
NOTE
menu if the Array driver is detected. It will only be displayed in the Express
Setup menu if the Array driver is detected
not installed or not current.
and
5. Select the Mass Storage tabbed panel on the Custom Installation
screen.
6. Select Compaq Drive Array; then, choose the Update button.
Next, the Setup program updates the driver on your system from the
Windows NT SSD diskettes.
SMART-2DH Array Controller Reference Guide
Writer: Pamela King Project: SMART-2DH Array Controller Reference Guide Comments: 295469-002
File Name: G-CH06.DOC Last Saved On: 2/27/98 12:01 PM
COMPAQ CONFIDENTIAL - NEED TO KNOW REQUIRED
Page 98

6-30
Installing the Operating System Drivers
7. Select Close and exit the Setup program or select other tabbed sections
to install/update/remove other software components.
8. Remove the Windows NT SSD diskette, shut down Windows NT, and
reboot the system to load the driver.
Removing the SMART-2DH Controller
Driver
IMPORTANT: DO NOT
device attached to a SMART-2DH Array Controller, you will get a dialog box
stating,
cause the system not to boot.
1. Start Windows NT and log in to an account with administrative
privileges.
2. Insert the Windows SSD diskette (Diskette #1) into the diskette drive.
3. Start Setup by entering
A:\setup
where A: is the letter of the diskette drive.
remove this driver if the system is booting from a
The selected controller is marked as a boot device. Removing it may
4. Select Custom Setup.
: The Compaq Array Driver will only be displayed in the Custom Setup
NOTE
menu if the Array driver is detected. It will only be displayed in the Express
Setup menu if the Array driver is detected
not installed or not current.
and
5. Select the Mass Storage tabbed panel on the Custom Installation
screen.
6. Select Compaq Drive Array; then, choose the Remove button.
After the driver has been removed from your system, Setup returns to
the Custom Installation window.
7. Select Close and exit the Setup program or select other tabbed sections
to install/update/remove other software components.
8. Remove the Windows SSD diskette, shut down Windows NT, and
reboot the system to load the driver.
Writer: Pamela King Project: SMART-2DH Array Controller Reference Guide Comments: 295469-002
File Name: G-CH06.DOC Last Saved On: 2/27/98 12:01 PM
COMPAQ CONFIDENTIAL - NEED TO KNOW REQUIRED
Page 99

Updating the Compaq Insight
Manager Agents
If you are using Compaq Insight Manager, you will need to update the Insight
Agents for this monitoring utility for support of the new SMART-2DH
Controller.
If you used SmartStart 3.40 or later to install the operating system on a new
SMART-2DH Controller installation or upgrade your driver in an existing
installation the agents were automatically updated for you by SmartStart, you
will not have to manually update the agents.
If you did not use SmartStart 3.40 or later as part of your SMART-2DH
Controller installation, you must manually update the Insight Agents. The
correct agents can be obtained from your local Compaq Reseller or
Authorized Compaq Service Provider. Refer to the documentation included
with Compaq Insight Manager for the correct procedure for updating agents.
Installation of the SMART-2DH Array Controller is now complete. Reboot
the server to begin using the array controller.
6-31
SMART-2DH Array Controller Reference Guide
Writer: Pamela King Project: SMART-2DH Array Controller Reference Guide Comments: 295469-002
File Name: G-CH06.DOC Last Saved On: 2/27/98 12:01 PM
COMPAQ CONFIDENTIAL - NEED TO KNOW REQUIRED
Page 100

6-32
Installing the Operating System Drivers
SCO OpenServer 5
This section includes instructions for getting the latest driver and support
information for installing the driver. If you use SmartStart to install SCO
OpenServer 5 and drivers, you can skip this section and do not need to create
the Extended Feature Supplement (EFS) diskettes.
If your system has an older SCO operating system or if you are setting up a
new system with SCO OpenServer 5, we encourage you to use SmartStart to
upgrade your operating system. SmartStart is supplied with the server or may
be obtained from your local Compaq Reseller or Authorized Compaq Service
Provider.
Getting the Driver and
Installation Information
The latest drivers and support files for SCO OpenServer 5 and information
about installing the driver are on the Compaq SmartStart and Support
Software CD supplied with the SMART-2DH Array Controller Option Kit. To
access these files you will need to create a set of Compaq EFS for OpenServer
5 diskettes from the Compaq SmartStart and Support Software CD.
Materials Needed
You will need the following items to create a set of Compaq EFS for
OpenServer 5 diskettes:
■ Compaq SmartStart and Support Software CD (supplied in the SMART-
2DH Array Controller Option Kit)
■ Blank diskettes
■ Access to a server or workstation with a bootable CD-ROM drive. This may
be the system in which you are installing the SMART-2DH Array
Controller.
Writer: Pamela King Project: SMART-2DH Array Controller Reference Guide Comments: 295469-002
File Name: G-CH06.DOC Last Saved On: 2/27/98 12:01 PM
COMPAQ CONFIDENTIAL - NEED TO KNOW REQUIRED
 Loading...