

Hp COMPAQ PROLIANT 2500, COMPAQ PROLIANT 800, COMPAQ PROLIANT 1000, COMPAQ PROLIANT 4000, COMPAQ PROLIANT 1500 IDE CD-ROM Drive for Servers and Workstations Installation and User Guide
Page 1

IDE CD-ROM Drive for Servers and Workstations
Installation and User Guide
Second Edition (
Part Number
Compaq Computer Corporation
November 1997)
242699-002
Page 2

Notice
The information in this publication is subject to change without notice.
COMPAQ COMPUTER CORPORATION SHALL NOT BE LIABLE FOR TECHNICAL OR
EDITORIAL ERRORS OR OMISSIONS CONTAINED HEREIN, NOR FOR INCIDENTAL OR
CONSEQUENTIAL DAMAGES RESULTING FROM THE FURNISHING, PERFORMANCE, OR
USE OF THIS MATERIAL. THIS INFORMATION IS PROVIDED “AS IS” AND COMPAQ
COMPUTER CORPORATION DISCLAIMS ANY WARRANTIES, EXPRESS, IMPLIED OR
STATUTORY AND EXPRESSLY DISCLAIMS THE IMPLIED WARRANTIES OF
MERCHANTABILITY, FITNESS FOR PARTICULAR PURPOSE, GOOD TITLE AND AGAINST
INFRINGEMENT.
This publication contains information protected by copyright. No part of this publication may be
photocopied or reproduced in any form without prior written consent from Compaq Computer
Corporation.
1997 Compaq Computer Corporation.
All rights reserved. Printed in the U.S.A.
The software described in this guide is furnished under a license agreement or nondisclosure agreement.
The software may be used or copied only in accordance with the terms of the agreement.
Compaq, Deskpro, Fastart, Compaq Insight Manager, Systempro, Systempro/LT, ProLiant, ROMPaq,
Qvision, SmartStart, NetFlex, QuickFind, PaqFax, ProSignia, registered United States Patent and
Trademark Office.
Netelligent, Systempro/XL, SoftPaq, QuickBlank, QuickLock are trademarks and/or service marks of
Compaq Computer Corporation.
Microsoft, MS-DOS, Windows, and Windows NT are registered trademarks of Microsoft Corporation.
Other product names mentioned herein may be trademarks and/or registered trademarks of their
respective companies.
IDE CD-ROM Drive for Servers and Workstations Installation and User Guide
Second Edition(November 1997)
Part Number 242699-002
Page 3

iii
Contents
About This Guide
Text Conventions.................................................................................................................vii
Symbols in Text ................................................................................................................. viii
Product Safety Information................................................................................................. viii
Symbols on Equipment................................................................................................ viii
Laser Precautions ...........................................................................................................ix
Rack Warnings and Precautions.............................................................................................x
Interlock Switches.................................................................................................................xi
Getting Help..........................................................................................................................xi
Compaq Web Site...........................................................................................................xi
Telephone Numbers...................................................................................................... xii
Chapter 1
Introduction
Features ............................................................................................................................. 1-2
Compatibility ..................................................................................................................... 1-2
Front Panel Controls.......................................................................................................... 1-3
Rear Panel Components .....................................................................................................1-4
Chapter 2
Installing an Optional CD-ROM Drive
Tools Needed .....................................................................................................................2-1
Components Included in the Option Kit ............................................................................ 2-2
Recommended Configurations............................................................................................ 2-3
Installation Summary......................................................................................................... 2-5
Installation Sequence ......................................................................................................... 2-6
Step 1 - Setting the Jumpers........................................................................................ 2-6
Step 2 - Installing the Drive Rails................................................................................ 2-8
Step 3 - Inserting the Drive ......................................................................................... 2-9
Step 4 - Connecting the Cables...................................................................................2-10
Completing the Installation...............................................................................................2-13
Configuring Your New Drive............................................................................................2-13
IDE CD-ROM Drive for Servers and Workstations Installation and User Guide
Page 4

iv
Chapter 3
Operating the Drive
Front Panel Controls.......................................................................................................... 3-1
Loading a Disc................................................................................................................... 3-2
Precautions......................................................................................................................... 3-3
For the Drive............................................................................................................... 3-3
For the Disc................................................................................................................. 3-4
Appendix A
Regulatory Compliance Notices
Federal Communications Commission Notice ....................................................................A-1
Class A Equipment......................................................................................................A-1
Class B Equipment......................................................................................................A-2
Declaration of Conformity for Products Marked with FCC Logo, United States Only...A-3
Modifications .............................................................................................................. A-3
Cables .........................................................................................................................A-3
Canadian Notice (Avis Canadien) .....................................................................................A-4
Class A Equipment......................................................................................................A-4
Class B Equipment......................................................................................................A-4
European Union Notice......................................................................................................A-4
Japanese Notice..................................................................................................................A-5
Australian Notice...............................................................................................................A-5
Laser Devices.....................................................................................................................A-5
Laser Safety Warnings.................................................................................................A-6
Compliance with CDRH Regulations........................................................................... A-6
Compliance with International Regulations.................................................................A-6
Laser Product Label..................................................................................................... A-6
Laser Information........................................................................................................A-7
Battery Replacement Notice ...............................................................................................A-7
Mouse Compliance Statement ............................................................................................A-8
IDE CD-ROM Drive for Servers and Workstations Installation and User Guide
Page 5

v
Appendix B
Electrostatic Discharge
Grounding Methods ...........................................................................................................B-1
Appendix C
Specifications
Compact Disc.....................................................................................................................C-1
IDE CD-ROM Drive ..........................................................................................................C-2
Appendix D
Getting Help
Self-Help Tools ..................................................................................................................D-1
Telephone Support.............................................................................................................D-2
Index
IDE CD-ROM Drive for Servers and Workstations Installation and User Guide
Page 6

vii About This Guide
About This Guide
This User Guide is designed to be used as step-by-step instructions for
installation, and as a reference for operation, troubleshooting, and future
upgrades.
Text Conventions
This document uses the following conventions to distinguish elements of text:
Keys Keys appear in boldface. A plus sign (+) between two
USER INPUT User input appears in a different typeface and in
FILENAMES File names appear in uppercase italics.
keys indicates that they should be pressed
simultaneously.
uppercase.
Menu Options,
Command Names,
Dialog Box Names
COMMANDS,
DIRECTORY
NAMES, and DRIVE
NAMES
Type When you are instructed to type information, type the
Enter When you are instructed to enter information, type the
These appear in initial capital letters.
These always appear in uppercase
information without pressing the Enter key.
information and then press the Enter key.
IDE CD-ROM Drive for Servers and Workstations Installation and User Guide
Page 7
viii About This Guide
Symbols in Text
These symbols may be found in the text of this guide. They have the
following meanings.
WARNING:
!
result in bodily harm or loss of life.
CAUTION:
damage to equipment or loss of information.
IMPORTANT:
: Presents commentary, sidelights, or interesting points of information.
NOTE
Indicates that failure to follow directions in the warning could
Indicates that failure to follow directions could result in
Presents clarifying information or specific instructions.
Product Safety Information
Symbols on Equipment
These icons may be located on equipment in areas where hazardous conditions
may exist.
Any surface or area of the equipment marked with these
symbols indicates the presence of electrical shock hazards.
Enclosed area contains no operator serviceable parts.
WARNING:
hazards, do not open this enclosure.
To reduce the risk of injury from electrical shock
Any RJ-45 receptacle marked with these symbols indicates a
Network Interface Connection.
WARNING:
damage to the equipment, do not plug telephone or
telecommunications connectors into this receptacle.
To reduce the risk of electrical shock, fire, or
IDE CD-ROM Drive for Servers and Workstations Installation and User Guide
Page 8
ix About This Guide
Any surface or area of the equipment marked with these
symbols indicates the presence of a hot surface or hot
component. If this surface is contacted, the potential for injury
exists.
WARNING:
allow the surface to cool before touching.
Power Supplies or Systems marked with these symbols
indicate the equipment is supplied by multiple sources of
power.
To reduce the risk of injury from a hot component,
Laser Precautions
!
WARNING:
shock, remove all power cords to completely disconnect
power from the system.
WARNING:
the equipment, observe the following precautions:
■ Allow only Compaq Authorized Service Technicians to
■ Do not open any panels, operate controls, make
■ Do not stare into laser beam when panels are open.
To reduce the risk of injury from laser radiation or damage to
repair the equipment.
adjustments, or perform procedures to a laser device
other than those specified herein.
To reduce the risk of injury from electrical
IDE CD-ROM Drive for Servers and Workstations Installation and User Guide
Page 9
x About This Guide
Rack Warnings and Precautions
Before beginning these procedures, make sure you understand the following
warnings and caution:
WARNING:
To reduce the risk of personal injury, always ensure that the
rack is adequately stabilized before extending a component outside the
rack. A rack may become unstable if more than one component is
extended for any reason. Extend only one component at a time.
WARNING:
To reduce the risk of personal injury or damage to the
equipment, be sure that:
✟
The leveling jacks are extended to the floor.
✟
The full weight of the rack rests on the leveling jacks.
✟
The stabilizers are attached to the rack if it is a single rack installation.
✟
The racks are coupled together in multiple rack installations.
IDE CD-ROM Drive for Servers and Workstations Installation and User Guide
Page 10

xi About This Guide
Interlock Switches
Compaq ProLiant 3000, 5000, 5500, 6000, 6500, and 7000 Servers contain
built-in interlock switches. This feature:
■
■
The interlock switch does not limit access to the hot-pluggable SCSI drives
and power supplies. Do not attempt to bypass or defeat this device.
Getting Help
If you have a problem and have exhausted the information in this guide, you
can get further information and other help in the following locations.
WARNING:
hazardous energy, the equipment is provided with a safety interlocks. Do
not try to defeat these safety interlocks. If an access cover is removed,
the power supply is disabled until the cover is properly replaced.
Automatically turns the power off when you remove the server side or
top covers ensuring your personal safety.
Protects thermally sensitive components by providing optimal air flow
throughout the unit; therefore, removing this cover turns the power off
to prevent any undesirable temperature conditions that could result in
damage to the equipment.
To reduce the risk of personal injury from contact with
Compaq Web Site
The Compaq Web Site has information on this product as well as the latest
drivers and Flash ROM images. You can access the Compaq Web Site by
logging on to the Internet at http://www.compaq.com.
IDE CD-ROM Drive for Servers and Workstations Installation and User Guide
Page 11

xii About This Guide
Telephone Numbers
For the name of your nearest Compaq Authorized Reseller:
In the United States, call 1-800-345-1518
In Canada, call 1-800-263-5868
For Compaq technical support:
In the United States and Canada, call 1-800-386-2172
Elsewhere, call one of the numbers listed in the following table.
Location Voice FAX
APD 65-7503030 65-7504909
Argentina 54-1 313 3100 54-1 313 3100 Ext 21
Australia 61-2-9911-1955 61-2-9911-1900
Austria 0222-87816-16 0222-87816-82
Bahrain 973-210-214
Belgium (02) 716-96-96 (02) 725-22-13
Brazil 55 11 5505-3600 55 11 5505-3922
Canada 1-800-386-2172
Caribbean 1-800-345-1518
Central America 281-378-2206
Chile 562-274-3007
China 86-10-834-6721 86-10-834-6713
Colombia 571-345-0266 571-312-0157
Czech Republic 42-2-232-8772 42-2-232-8773
Denmark 45-90-4545 45-90-4595
Ecuador 593-2504540
Compaq Worldwide Technical Support Telephone Numbers
Ext 4336
continued
IDE CD-ROM Drive for Servers and Workstations Installation and User Guide
Page 12

xiii About This Guide
Compaq Worldwide Technical Support Telephone Numbers
continued
Location Voice FAX
Europe/Middle East/Africa (49) 089-9933-2891
Finland 9800-206-720
(+358-800-1-206720)
90-6155-9899
(+358-0-61559899)
France (33 1) 41-33-4455 (33 1) 41-33-4263
Germany 0180-5-212111 089-9933-3399
Hong Kong 852-90116633 852-28671734
Hungary 36-1-201-8776 36-1-201-9696
India (91-80) 559-6023
Italy 392-57-90300 392-575-00686
Japan 0120-101589 +81 3-5402-5959
Korea 82-2-523-3575 82-2-3471-0321
Malaysia (603) 718-1636
Mexico (525) 229-7910 (525) 229-7988
Netherlands 06-91681616 06-8991116
New Zealand 649-307-3969
Norway 22-072-020 22-072-021
Poland 48-2-630-3535 48-2-630-3553
Portugal 351-1-4120132 351-1-4120654
Singapore 65-7503030 65-7504909
South Africa +27-11-728-6999 +27-11-728-3335
Spain 341-640-1302 341-640-0124
Sweden (46) 8 703 5240 (46) 8 703 5222
Switzerland 411 838 410/2222 01-837-0969
Taiwan (886) 2-3761170 (886) 2-7322660
Thailand 62-2-679-6222 62-2-679-6220
United Kingdom 44-81-332-3888 44-81-332-3409
United States 1-800-386-2172 1-800-345-1518
Venezuela (582) 953.69.44 (582) 952.86.70
IDE CD-ROM Drive for Servers and Workstations Installation and User Guide
Page 13

xiv About This Guide
IDE CD-ROM Drive for Servers and Workstations Installation and User Guide
Page 14
1-1 Introduction
Chapter 1
Introduction
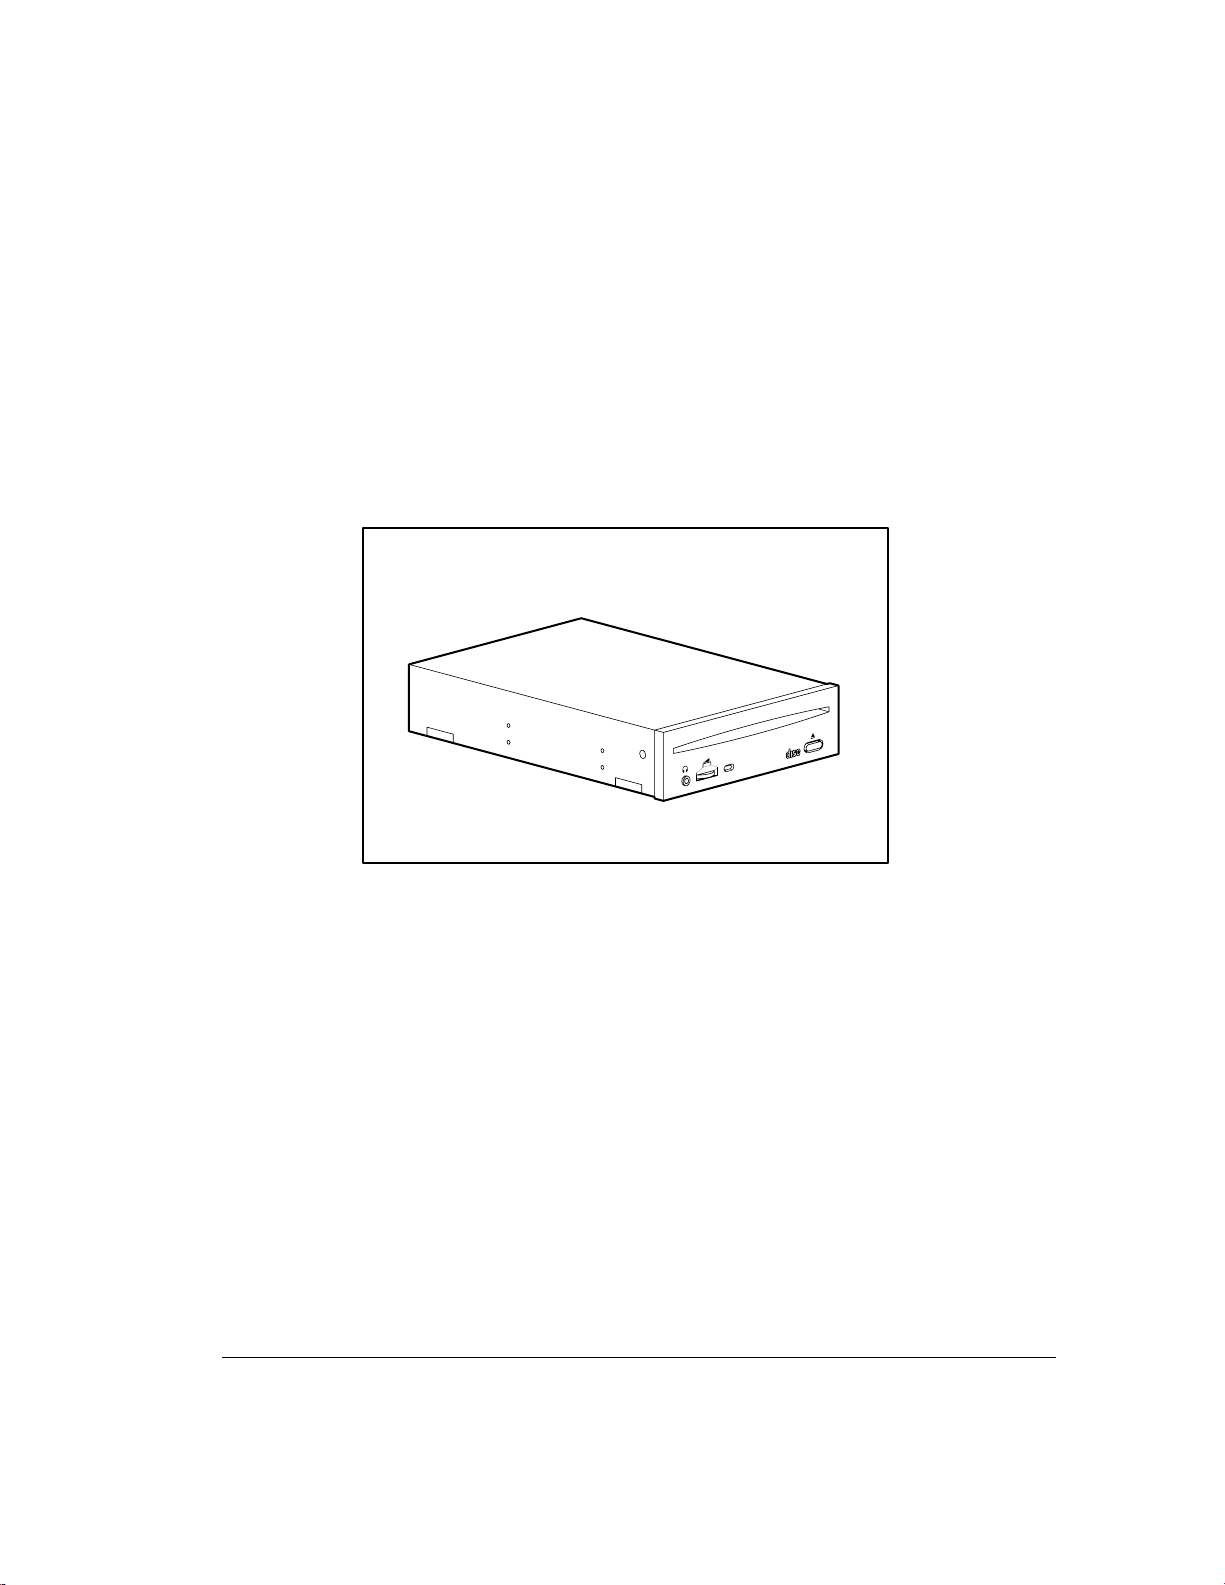
The Compaq IDE CD-ROM Drive is a 5.25-inch, half-height, compact disc
read-only memory (CD-ROM) drive with an integrated drive electronics (IDE)
interface. The drive is a random access, read-only storage device capable of
retrieving data from removable compact disc media. The compact discs
designed for this drive can store as much as 650 megabytes of digital
information.
COMPACT
Figure 1-1.
Several vendors are used to source drives manufactured as Compaq IDE
CD-ROM drives. Because of this, the drive you receive may appear slightly
different from the drive portrayed in this guide. All drives are, however,
identical in capability and operation, and each drive has been thoroughly tested
for use in Compaq systems.
Compaq IDE CD-ROM Drive
IDE CD-ROM Drive for Servers and Workstations Installation and User Guide
Page 15

1-2 Introduction
Features
Compatibility
Special features of the drive include:
■ 150-millisecond access time
■ Slot load
■ Operation in horizontal or vertical orientation
■ Dust-proof enclosure
■ Layered error correction
■ Two-way slot load/unload operation: host (software) and
button (manual)
■ MPC 2 (Multimedia Personal Computers) compatibility
The Compaq IDE CD-ROM Drive operates under most industry-standard
system software, including products from Novell, Microsoft, SCO, and IBM.
The drive is compatible with industry-standard ISO 9660, MPC (Multimedia
Personal Computers) 2, and High Sierra logical formats. It can read:
■ CD-Digital Audio (CD-DA)
■ CD-ROM (Mode 1 and Mode 2)
■ CD-ROM XA Ready (Mode 2, form 1 and form 2)
■ CDi Ready
■ Photo CD discs (single- and multi-session)
IDE CD-ROM Drive for Servers and Workstations Installation and User Guide
Page 16
1-3 Introduction
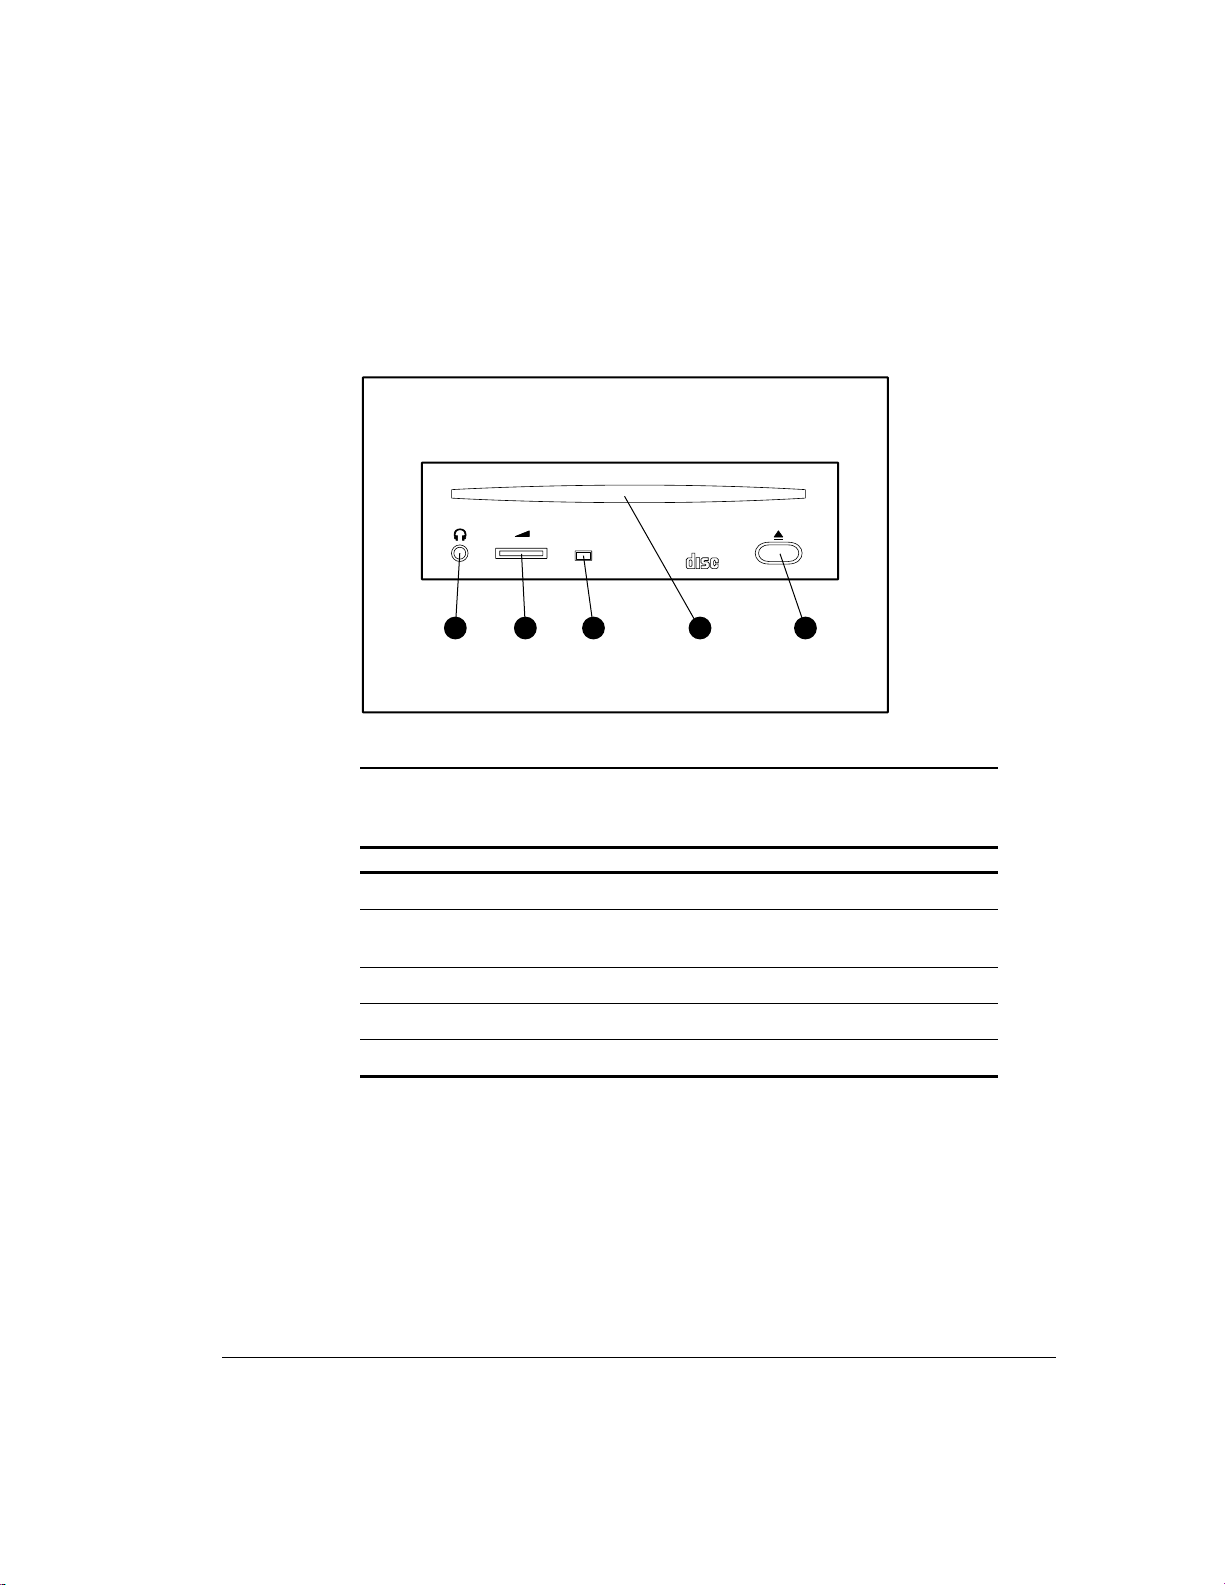
Front Panel Controls
The front panel controls for an optional Compaq IDE CD-ROM Drive are
indicated as follows:
COMPACT
1 2 3 4 5
Figure 1-2.
Front Panel Controls on a Compaq IDE CD-ROM Drive
Table 1-1
Front Panel Controls for a Compaq IDE CD-ROM Drive
Ref Component Function
➊
➋
➌
➍
➎
Headphone Jack Connects the headphone
Headphone Volume
Control
Busy Indicator Flashes amber when the drive is reading a CD
Disc Slot Slides in and out. Holds the CD in place
Eject Button Ejects the disc
Increases or decreases the headphone volume
IDE CD-ROM Drive for Servers and Workstations Installation and User Guide
Page 17

1-4 Introduction
Rear Panel Components
While the front panel controls are identical on all drives, some features on the
rear panels may vary.
The following illustrates the general arrangement of rear panel components for
an optional Compaq IDE CD-ROM drive. The drive you receive may differ
slightly.
1 2 3 4 5
Figure 1-3.
Rear Panel Components on a Compaq IDE CD-ROM Drive
Rear Panel Components for a Compaq IDE CD-ROM Drive
Reference Component
➊
➋
➌
➍
➎
Two-pin digital audio connector *
Analog audio connector
Jumpers
IDE signal connector
Power connector
Table 1-2
IDE CD-ROM Drive for Servers and Workstations Installation and User Guide
Page 18

2-1 Installing an Optional CD-ROM Drive
Chapter 2
Installing an
Optional CD-ROM Drive
This chapter outlines general instructions for installing an optional Compaq
IDE CD-ROM Drive in a generic Compaq system. For more information on
installation in your particular system, see the documentation that was shipped
with your unit.
Since several vendors are used to source Compaq IDE CD-ROM drives, the
drive you receive may appear slightly different from the drives portrayed in
this guide. All drives are, however, identical in capability and operation, and
each vendor’s drive has been thoroughly tested for use in Compaq systems.
Tools Needed
To install this drive in a system, you will need the following tools:
■ Torx T-15 screwdriver
■ Torx T-10 screwdriver
IDE CD-ROM Drive for Servers and Workstations Installation and User Guide
Page 19

2-2 Installing an Optional CD-ROM Drive
Components Included
in the Option Kit
In addition to this guide, the following hardware components are included in
the option kit. If any of these items are missing, contact an authorized Compaq
dealer, reseller, or service provider.
In addition to the listed components, your kit may also contain some productspecific components. Read any included reference cards and check your kit
contents carefully to determine if your system needs a product-specific
component.
Components in the CD-ROM Drive Option Kit
Illustration Name
T
C
A
P
M
O
C
Table 2-1
Compaq IDE CD-ROM Drive
18- and 26-inch 2-Device IDE Interface Cables
1 pair of Mounting rails
Four rail-attaching screws (M3 x 0.0-5L slotted
Torx Taptite pan head)
Two drive-retaining screws (6-32 x ¼ TF, HI/TP
w/serr)
IDE CD-ROM Drive for Servers and Workstations Installation and User Guide
Page 20

2-3 Installing an Optional CD-ROM Drive
Recommended Configurations
Built-in IDE controllers are designated as primary and secondary. Each
primary and secondary controller can support two IDE devices. If your system
supports 2 IDE controllers, a total of 4 IDE devices can be installed in your
unit.
■ The recommended configuration is to install the CD-ROM drive on the
secondary IDE controller.
■ If no hard drive is connected to the secondary IDE controller, attach the
CD-ROM drive to the device 0 connector on the secondary IDE
controller signal cable.
■ If a hard drive is already connected to the secondary controller, the
CD-ROM drive must be attached to the device 1 connector on the
IDE controller signal cable.
■ A preinstalled hard drive that is connected to the built-in (primary) IDE
controller is typically set as device 0. If you want to connect an optional
Compaq IDE CD-ROM Drive to the built-in (primary) controller, the
CD-ROM drive jumpers must be set to the secondary/slave
configuration.
■ If you have only one IDE controller and already have 2 IDE devices
connected, you must install a secondary IDE controller for this option.
Recommended configurations are shown in the following table. See Appendix
D, “Getting Help,” for information on how to contact Compaq or an
authorized representative to order a second controller, if necessary.
IDE CD-ROM Drive for Servers and Workstations Installation and User Guide
Page 21

2-4 Installing an Optional CD-ROM Drive
Recommended IDE Controller Configurations
Devices Installed Controller Connector
Table 2-2
One hard drive
One CD-ROM drive
One hard drive
One CD-ROM drive
One hard drive
Two CD-ROM drives
Two hard drives
One CD-ROM drive
Three hard drives
One CD-ROM drive
Primary Device 0 Hard drive
Device 1 CD-ROM Drive *
Secondary Not installed
Primary Device 0 Hard drive
Device 1 Not used
Secondary Device 0 CD-ROM drive
Device 1 Not used
Primary Device 0 Hard drive
Device 1 Not used
Secondary Device 0 CD-ROM drive
Device 1 CD-ROM drive
Primary Device 0 Hard drive
Device 1 Hard drive
Secondary Device 0 CD-ROM drive
Device 1 Not used
Primary Device 0 Hard drive
Device 1 Hard drive
Secondary Device 0 Hard drive
Device 1 CD-ROM drive
* This is not a recommended configuration. The better solution is to install a
secondary IDE controller for the CD-ROM drive.
IDE CD-ROM Drive for Servers and Workstations Installation and User Guide
Page 22

2-5 Installing an Optional CD-ROM Drive
Installation Summary
Prepare the system by:
■ Performing a normal system shutdown.
■ Turning OFF the system and then all peripheral devices.
■ Disconnecting the power cord from the outlet, then from the system and
all peripheral devices.
■ Preparing your system so that you have access to the removable media
drive bays.
Refer to the documentation included with your system for detailed instructions
on performing these tasks.
Once you have prepared the system, complete the following steps to install
your optional IDE CD-ROM drive:
1. Set the jumpers on the CD-ROM drive.
2. Attach the drive rails.
3. Slide the drive into the bay and secure it.
4. Connect the IDE and power cables.
IDE CD-ROM Drive for Servers and Workstations Installation and User Guide
Page 23

2-6 Installing an Optional CD-ROM Drive
Installation Sequence
Step 1 - Setting the Jumpers
CAUTION:
components. Be sure you are properly grounded before beginning
this procedure. See Appendix B, “Electrostatic Discharge” for
further information.
Make sure that the jumpers on the rear of the drive match the settings
indicated in Table 2-3.
123
Figure 2-1.
Default Jumper Setting on a Compaq IDE CD-ROM Drive
Electrostatic discharge (ESD) can damage electronic
IDE CD-ROM Drive for Servers and Workstations Installation and User Guide
Page 24

2-7 Installing an Optional CD-ROM Drive
Jumpers on a Compaq IDE CD-ROM Drive
Reference Description Setting
➊
CS - Cable select for device 0 or
device 1
Table 2-3
Enabled, installed over both pins
➋
➌
SL - Device 1 (Secondary/slave
device)
MA - Device 0
(Primary device)
Disabled, not installed
Disabled, not installed
Although the Compaq IDE CD-ROM drive is set for cable select, the IDE
Interface Cables included in this option kit do not support cable select. If you
must use one of these cables, use the table above to set the jumpers on the drive
to Device 1 (secondary/slave) or Device 0 (primary), as appropriate for your
system.
IDE CD-ROM Drive for Servers and Workstations Installation and User Guide
Page 25

2-8 Installing an Optional CD-ROM Drive
Step 2 - Installing the Drive Rails
If your system requires drive rails, attach the two rails in this kit with the four
screws provided (two screws for each side).
COMPACT
Figure 2-2.
Attaching Drive Rails to a Compaq IDE CD-ROM Drive
IDE CD-ROM Drive for Servers and Workstations Installation and User Guide
Page 26

2-9 Installing an Optional CD-ROM Drive
Step 3 - Inserting the Drive
Horizontal Orientation
Position the drive on the drive guides, then slide it into the drive bay, as
indicated.
COMPACT
Figure 2-3.
Inserting the CD-ROM Drive into a Horizontal Drive Bay
IDE CD-ROM Drive for Servers and Workstations Installation and User Guide
Page 27

2-10 Installing an Optional CD-ROM Drive
Vertical Orientation
Position the drive on the drive guides, then slide it into the drive bay, as
indicated.
Figure 2-4.
Inserting the CD-ROM Drive into a Vertical Drive Bay
Securing the Drive
Secure the drive to the computer with the 2 retaining screws provided in this
kit, or with the retaining screws from the front bezel.
Step 4 - Connecting the Cables
If a 2-device IDE cable was not shipped with your system, use one of the
2-device IDE cables supplied with this kit to connect your IDE devices. These
cables are identical, except in length. It is a good idea to save your 1-device
IDE cable for future use.
Note the position of each connector on the IDE interface cable supplied with
your kit, as indicated in Figure 2-5.
IDE CD-ROM Drive for Servers and Workstations Installation and User Guide
Page 28

2-11 Installing an Optional CD-ROM Drive
1
2
3
Figure 2-5.
IDE Interface Cable Connectors
Table 2-4
IDE Interface Cable Connectors
Reference Connector
➊
➋
➌
Connector ➋ is for the secondary drive (device 1); connector ➌ is for the
primary drive (device 0).
Connect end ➊ to the system board. Connect the hard drive to cable connector
and the CD-ROM drive to cable connector ➋.
➌
Connect the power and IDE interface cables to the drive, as indicated in
Figure 2-6.
System board connector
Secondary drive connector (Device 1)
Primary drive connector (Device 0)
IDE CD-ROM Drive for Servers and Workstations Installation and User Guide
Page 29

2-12 Installing an Optional CD-ROM Drive
1
2
3
Figure 2-6.
Connecting the Drive Cables
Table 2-5
Drive Cable Connections
Reference Connector
➊
➋
➌
If you are installing this IDE drive as the primary drive and your system has
audio capabilities, attach the audio cable supplied with your system to the
audio connector on the CD-ROM drive.
Audio connector
IDE connector
Power connector
IDE CD-ROM Drive for Servers and Workstations Installation and User Guide
Page 30

2-13 Installing an Optional CD-ROM Drive
Completing the Installation
To complete the installation:
1. Reassemble your system according to the documentation that shipped
with it.
2. Reconnect the peripheral devices to the system.
3. Plug the power cord into the computer, then into a properly grounded
electrical outlet.
Configuring Your New Drive
No special driver or software support is needed if you are replacing a drive of
the same type, or if you are installing a CD-ROM drive in addition to an
existing drive of the same type. Run the System Configuration Utility
according to the documentation provided with your system to make sure the
drive has been recognized and properly configured.
If this IDE CD-ROM drive is of a different type than the one installed, or if it
is a new IDE device, see Appendix D, “Getting Help,” for information on how
to contact Compaq or an authorized representative to determine if you need an
additional driver for your system configuration.
The installation is now complete. See Chapter 3, "Operating the Drive," in this
guide for instructions on how to use your IDE CD-ROM drive.
IDE CD-ROM Drive for Servers and Workstations Installation and User Guide
Page 31

3-1 Operating the Drive
Chapter 3
Operating the Drive
This chapter outlines the basic functions of your new Compaq IDE
CD-ROM Drive.
Front Panel Controls
The following controls are located on the front panel.
4
Figure 3-1.
1
2
3
COMPACT
Front Panel Controls on a Compaq IDE CD-ROM Drive
5
Table 3-1
Front Panel Controls for a Compaq IDE CD-ROM Drive
Ref Component Function
Busy Indicator Turns amber when drive runs diagnostics
➊
Headphone Volume Control Increases or decreases the headphone volume
➋
Headphone Jack Connects the headphone
➌
Disc Slot Accepts and ejects the CD-ROM disc
➍
Eject Button Ejects the CD-ROM disc
➎
IDE CD-ROM Drive for Servers
Page 32

3-2 Operating the Drive
Loading a Disc
Use the following steps to load a compact disc in the drive:
1. Turn on the computer. The busy indicator on the CD-ROM drive
illuminates.
2. Holding the disc by the edges, not by the flat surfaces of the disc, slide it
label side up into the drive. When inserted deeply into the drive, the
loading mechanism grasps the disc and pulls it fully into the drive.
Horizontal Orientation
of the CD-ROM Drive
COMPACT
Figure 3-2.
Loading a Compact Disc into a Horizontal CD-ROM Drive
IDE CD-ROM Drive for Servers
Page 33

3-3 Operating the Drive
Vertical Orientation
of the CD-ROM Drive
Figure 3-3.
Precautions
Follow these precautions for the best care of your CD-ROM drive and discs.
Drive Precautions
■
Keep the original packing materials for future transportation of
the drive.
■
Avoid exposing the drive to sudden changes in temperature, as
condensation may form inside the unit. If the temperature suddenly
changes while the drive is on, wait at least one hour before you turn off
the power. If you operate the unit immediately, it may malfunction
while reading.
■
Avoid placing the drive in a location that is subject to high humidity,
extreme temperatures, mechanical vibration, or direct sunlight.
■
Make sure there is sufficient clearance for the disc to be ejected from
the slot.
Loading a Compact Disc into a Vertical CD-ROM Drive
IDE CD-ROM Drive for Servers
Page 34

3-4 Operating the Drive
■
Do not move the drive during operation. Doing so may cause it to
malfunction during reading.
■
Remove the disc before moving the drive.
■
Clean the cabinet, panel, and controls with a soft, dry cloth, or a soft
cloth lightly moistened with a mild detergent solution. Never spray
cleaning fluids directly on the unit.
■
Any type of solvent, such as alcohol or benzene, may damage the finish.
■
If any object or liquid falls into the cabinet, immediately unplug the
computer and have it checked by a Compaq authorized service provider.
Disc Precautions
■
Remove the disc from the drive before moving the unit.
■
Do not drop the disc or subject it to physical shock.
■
Do not put the disc in a location subject to dust, direct sunlight, extreme
temperatures, or high humidity.
■
Hold the disc by the edges, not by the flat surface.
■
Do not use solvents, such as benzene or antistatic spray.
■
Store the disc in its case after use.
IDE CD-ROM Drive for Servers
Page 35

A-1 Regulatory Compliance Notices
Appendix A
Regulatory Compliance Notices
Federal Communications
Commission Notice
Part 15 of the Federal Communications Commission (FCC) Rules and
Regulations has established Radio Frequency (RF) emission limits to provide
an interference-free radio frequency spectrum. Many electronic devices,
including computers, generate RF energy incidental to their intended function
and are, therefore, covered by these rules. These rules place computers and
related peripheral devices into two classes, A and B, depending upon their
intended installation. Class A devices are those that may reasonably be
expected to be installed in a business or commercial environment. Class B
devices are those that may reasonably be expected to be installed in a
residential environment (i.e., personal computers). The FCC requires devices
in both classes to bear a label indicating the interference potential of the device
as well as additional operating instructions for the user.
The rating label on the device shows which class (A or B) the equipment falls
into. Class B devices have an FCC logo or FCC ID on the label. Class A
devices do not have an FCC logo or ID on the label. Once the class of the
device is determined, refer to the following corresponding statement.
Class A Equipment
This equipment has been tested and found to comply with the limits for a Class
A digital device, pursuant to Part 15 of the FCC Rules. These limits are
designed to provide reasonable protection against harmful interference when
the equipment is operated in a commercial environment. This equipment
generates, uses, and can radiate radio frequency energy and, if not installed
and used in accordance with the instructions, may cause harmful interference
to radio communications. Operation of this equipment in a residential area is
likely to cause harmful interference, in which case the user will be required to
correct the interference at personal expense.
IDE CD-ROM Drive for Servers and Workstations Installation and User Guide
Page 36

A-2 Regulatory Compliance Notices
Class B Equipment
This equipment has been tested and found to comply with the limits for a Class
B digital device, pursuant to Part 15 of the FCC Rules. These limits are
designed to provide reasonable protection against harmful interference in a
residential installation. This equipment generates, uses, and can radiate radio
frequency energy and, if not installed and used in accordance with the
instructions, may cause harmful interference to radio communications.
However, there is no guarantee that interference will not occur in a particular
installation. If this equipment does cause harmful interference to radio or
television reception, which can be determined by turning the equipment off
and on, the user is encouraged to try to correct the interference by one or more
of the following measures:
■ Reorient or relocate the receiving antenna.
■ Increase the separation between the equipment and receiver.
■ Connect the equipment into an outlet on a circuit different from that to
which the receiver is connected.
■ Consult the dealer or an experienced radio or television technician for
help.
IDE CD-ROM Drive for Servers and Workstations Installation and User Guide
Page 37

A-3 Regulatory Compliance Notices
Declaration of Conformity for Products
Marked with FCC Logo, United States Only
This device complies with Part 15 of the FCC Rules. Operation is subject to
the following two conditions: (1) this device may not cause harmful
interference, and (2) this device must accept any interference received,
including interference that may cause undesired operation. For questions
regarding this declaration, contact:
Compaq Computer Corporation
P. O. Box 692000, Mail Stop 510101
Houston, Texas 77269-2000
Or call (281) 514-3333
To identify this product, refer to the Series number found on the product.
Modifications
The FCC requires the user to be notified that any changes or modifications
made to this device that are not expressly approved by Compaq Computer
Corporation may void the user's authority to operate the equipment.
IDE CD-ROM Drive for Servers and Workstations Installation and User Guide
Page 38

A-4 Regulatory Compliance Notices
Canadian Notice
(Avis Canadien)
Class A Equipment
This Class A digital apparatus meets all requirements of the Canadian
Interference-Causing Equipment Regulations.
Cet appareil numérique de la classe A respecte toutes les exigences du
Règlement sur le matériel brouilleur du Canada.
Class B Equipment
This Class B digital apparatus meets all requirements of the Canadian
Interference-Causing Equipment Regulations.
Cet appareil numérique de la classe B respecte toutes les exigences du
Règlement sur le matériel brouilleur du Canada.
European Union Notice
Products with the CE Marking comply with both the EMC Directive
(89/336/EEC) and the Low Voltage Directive (73/23/EEC) issued by the
Commission of the European Community.
Compliance with these directives implies conformity to the following
European Norms (in brackets are the equivalent international standards):
■ EN55022 (CISPR 22) - Electromagnetic Interference
■ EN50082-1 (IEC801-2, IEC801-3, IEC801-4) - Electromagnetic
Immunity
■ EN60950 (IEC950) - Product Safety
IDE CD-ROM Drive for Servers and Workstations Installation and User Guide
Page 39

A-5 Regulatory Compliance Notices
Japanese Notice
Australian Notice
This customer equipment is to be installed and maintained by service
personnel as defined by AS/NZS 3260 Clause 1.2.14.3. Service Personnel.
Incorrect connection of connected equipment to the General Purpose Outlet
could result in a hazardous situation. Safety requirements are not fulfilled
unless the equipment is connected to a wall socket outlet with protective earth
contact.
IDE CD-ROM Drive for Servers and Workstations Installation and User Guide
Page 40

A-6 Regulatory Compliance Notices
Laser Devices
The CD-ROM drive contains a laser device. All Compaq systems equipped
with a laser device comply with safety standards, including International
Electrotechnical Commission (IEC) 825. With specific regard to the laser, the
equipment complies with laser product performance standards set by
government agencies as a Class 1 laser product. The product does not emit
hazardous light; the beam is totally enclosed during all modes of customer
operation and maintenance.
Laser Safety Warnings
WARNING:
equipment, observe the following precautions:
- Do not operate controls, make adjustments, or perform procedures to a
laser device other than those specified herein or in the CD-ROM drive
installation guide.
- Allow only Compaq Authorized Service Technicians to repair the laser
equipment.
To reduce the risk of fire, bodily injury, and damage to the
Compliance with CDRH Regulations
The Center for Devices and Radiological Health (CDRH) of the U.S. Food and
Drug Administration implemented regulations for laser products on August 2,
1976. These regulations apply to laser products manufactured from August 1,
1976. Compliance is mandatory for products marketed in the United States.
Compliance with International Regulations
All Compaq systems equipped with CD-ROM drives comply with appropriate
safety standards including IEC 825.
IDE CD-ROM Drive for Servers and Workstations Installation and User Guide
Page 41

A-7 Regulatory Compliance Notices
Laser Product Label
The following label or equivalent is located on the surface of your CD-ROM
drive.
Laser Information
Laser Type Semiconductor GaAIAs
Wave Length 780 nm +/- 35 nm
Divergence Angle 53.5 degrees +/- 0.5 degrees
Output Power Less than 0.2 mW /10,869 W·m-2 sr
Polarization Circular 0.25
Numerical Aperture 0.45 inches +/- 0.04 inches
This label indicates that the product is
classified as a CLASS 1 LASER
PRODUCT. This label appears on a
laser device installed in your product.
-1
IDE CD-ROM Drive for Servers and Workstations Installation and User Guide
Page 42

A-8 Regulatory Compliance Notices
IDE CD-ROM Drive for Servers and Workstations Installation and User Guide
Page 43

B-1 Electrostatic Discharge
Appendix B
Electrostatic Discharge
To prevent damaging the system, be aware of the precautions you need to
follow when setting up the system or handling parts. A discharge of static
electricity from a finger or other conductor may damage system boards or
other static-sensitive devices. This type of damage may reduce the life
expectancy of the device.
To prevent electrostatic damage, observe the following precautions:
■ Avoid hand contact by transporting and storing products in static-safe
containers.
■ Keep electrostatic-sensitive parts in their containers until they arrive at
static-free workstations.
■ Place parts on a grounded surface before removing them from their
containers.
■ Avoid touching pins, leads, or circuitry.
■ Always be properly grounded when touching a static-sensitive
component or assembly.
Grounding Methods
There are several methods for grounding. Use one or more of the following
methods when handling or installing electrostatic-sensitive parts:
■ Use a wrist strap connected by a ground cord to a grounded workstation
or computer chassis. Wrist straps are flexible straps with a minimum of
1 megohm 10 percent resistance in the ground cords. To provide
proper ground, wear the strap snug against the skin.
■ Use heel straps, toe straps, or boot straps at standing workstations.
Wear the straps on both feet when standing on conductive floors or
dissipating floor mats.
■ Use conductive field service tools.
■ Use a portable field service kit with a folding static-dissipating
work mat.
IDE CD-ROM Drive for Servers and Workstations Installation and User Guide
Page 44

B-2 Electrostatic Discharge
If you do not have any of the suggested equipment for proper grounding, have
an Authorized Compaq Reseller install the part.
: For more information on static electricity, or assistance with product
NOTE
installation, contact your Authorized Compaq Reseller.
IDE CD-ROM Drive for Servers and Workstations Installation and User Guide
Page 45

C-1 Specifications
Appendix C
Specifications
Specific dimensions and features for some of the components mentioned in this
guide are listed here.
Compact Disc
Applicable Disc CD-ROM Mode 1 and Mode 2, mixed mode (audio
Table C-1
Compact Disc
Feature Details
and data combined)
CD-DA Ready
CD-XA Ready
CDi Ready
Photo CD Single and Multiple Session
Block Size CD-ROM Mode 1 2048 bytes
CD-ROM Mode 2 2340, 2336 bytes
CD-DA 2352 bytes
CD-XA 2328 bytes
Center Hole 0.6 in (15 mm) diameter
Disc Diameter 4.7 in, 3.1 in (12 cm, 8 cm)
Disc Thickness 0.05 in (1.2 mm)
Track Pitch 0.06 in (1.6 m)
IDE CD-ROM Drive for Servers and Workstations Installation and User Guide
Page 46

C-2 Specifications
IDE CD-ROM Drive
Physical Characteristics
Dimensions Width 5.91 in 150.1 mm
Weight 2.65 lb 1200 g
Power Requirements
+5 VDC +/- 5% Ripple 100 mVp-p
+12 VDC +/- 5% Ripple 200 mVp-p
Table C-2
CD-ROM Drive Physical Characteristics
Feature U.S. Metric
Height 1.69 in 42.9 mm
Depth 8.19 in 208.0 mm
Table C-3
CD-ROM Drive Power Requirements
Power Requirement Details
Current 450 mA (typ)
1800 mA max
Current <1800 mA (seek, spinup)
IDE CD-ROM Drive for Servers and Workstations Installation and User Guide
Page 47

C-3 Specifications
Performance
Table C-4
CD-ROM Drive Performance
Feature Details
Audio Output Level Line out 0.7 V rms
Cache/Buffer Minimum 128 Kbytes
Error Rates Soft error
Hard error
Seek error
Interface Cable Length Maximum 18 in (45.7 cm)
Start-up Time <7 seconds per single session
Stop Time <4 seconds
Access Time <85 ms (random read typical)
Data Transfer Rate 150 Kb/s sustained 1X audio
9
-
10
12
-
10
6
-
10
26 in (65.0 cm)
<150 ms (fullstroke read typical)
1500 - 3600 Kb/s 10x to 24x variable,
with 650 MB CD disc
IDE CD-ROM Drive for Servers and Workstations Installation and User Guide
Page 48

D-1 Getting Help
Appendix D
Getting Help
If you have a problem and have exhausted the information in this guide, you
can get further information with the following help facilities.
Self-Help Tools
Compaq offers comprehensive self-help information tools that link you with a
wide variety of Compaq support programs.
Online Support
Compaq technical support areas are accessible on the Internet and the three
leading commercial online networks. These electronic communities allow you
direct access to Compaq technical information on products and services, 7 days
a week 24 hours a day. As a subscriber to any one of these networks, you can
exchange technical information and questions with other Compaq users, as
well as download software solutions, drivers, and utilities.
Internet Access
■ E-Mail address: support@compaq.com
■ Anonymous FTP site: ftp.compaq.com
■ WorldWide Web Server: http://www.compaq.com
Online Networks
■ America Online: 1-800-827-6364
Extension 0948 COMPAQ
■ CompuServe: 1-800-524-3388
Operator #371 GO COMPAQ
■ Prodigy: 1-800-776-3449
Extension 68 JUMP COMPAQ
IDE CD-ROM Drive for Severs and Workstations Installation and User Guide
Page 49

D-2 Getting Help
PaqFax
Dial 1-800-345-1518 to access Compaq's fax retrieval service. Via your touchtone phone, product features, configurations and specifications, service
program information, press releases, and the latest Compaq news are available
directly to your fax, 365 days a year, 24 hours a day.
Compaq Download Facility
Dial 1-281-378-1418 to access the Compaq Download Facility. This PC-based
dial-in service allows you to download drivers, utilities, and software solutions
from Compaq via modem. To expedite the download of a file, you should
already know the name of the file you need (from a Compaq Technical Support
Engineer, another Compaq user, or a Service Advisory).
QuickFind
QuickFind is a subscription service offered by Compaq that provides access to
a comprehensive CD-ROM library, including Maintenance and Service
Guides, Service Advisories and Bulletins, technical reference guides and more.
To order a subscription to QuickFind, dial 1-800-952-7689.
Telephone Support
You can contact Compaq directly for personal assistance, 7 days a week,
24 hours a day, using the following phone numbers.
Customer Support
For pre-sales product specifications, service program updates, and Compaq
Authorized Reseller information:
■ In the United States, call 1-800-345-1518
■ In Canada, call 1-800-263-5868
IDE CD-ROM Drive for Severs and Workstations Installation and User Guide
Page 50

D-3 Getting Help
Technical Support
For expert technical diagnosis and troubleshooting:
■ In the United States and Canada, call 1-800-386-2172
■ Elsewhere, call one of the following numbers:
Location Voice FAX
APD 65-7503030 65-7504909
Argentina 54-1 313 3100 54-1 313 3100 Ext 21
Australia 61-2-9911-1955 61-2-9911-1900
Austria 0222-87816-16 0222-87816-82
Bahrain 973-210-214
Belgium (02) 716-96-96 (02) 725-22-13
Brazil 55 11 5505-3600 55 11 5505-3922
Location Voice FAX
Canada 1-800-386-2172
Caribbean 1-800-345-1518
Central America 281-378-2206
Chile 562-274-3007
China 86-10-834-6721 86-10-834-6713
Colombia 571-345-0266 571-312-0157
Czech Republic 42-2-232-8772 42-2-232-8773
Denmark 45-90-4545 45-90-4595
Ecuador 593-2504540
Europe/Middle East/Africa (49) 089-9933-2891
Finland 9800-206-720
France (33 1) 41-33-4455 (33 1) 41-33-4263
Germany 0180-5-212111 089-9933-3399
Hong Kong 852-90116633 852-28671734
Hungary 36-1-201-8776 36-1-201-9696
Compaq Worldwide Technical Support Telephone Numbers
Ext 4336
90-6155-9899
(+358-800-1-206720)
(+358-0-61559899)
Continued
IDE CD-ROM Drive for Severs and Workstations Installation and User Guide
Page 51

D-4 Getting Help
Compaq Worldwide Technical Support Telephone Numbers
India (91-80) 559-6023
Italy 392-57-90300 392-575-00686
Japan 0120-101589 +81 3-5402-5959
Korea 82-2-523-3575 82-2-3471-0321
Malaysia (603) 718-1636
Mexico (525) 229-7910 (525) 229-7988
Netherlands 06-91681616 06-8991116
New Zealand 649-307-3969
Norway 22-072-020 22-072-021
Poland 48-2-630-3535 48-2-630-3553
Portugal 351-1-4120132 351-1-4120654
Singapore 65-7503030 65-7504909
South Africa +27-11-728-6999 +27-11-728-3335
Spain 341-640-1302 341-640-0124
Sweden (46) 8 703 5240 (46) 8 703 5222
Switzerland 411 838 410/2222 01-837-0969
Taiwan (886) 2-3761170 (886) 2-7322660
Thailand 62-2-679-6222 62-2-679-6220
United Kingdom 44-81-332-3888 44-81-332-3409
United States 1-800-386-2172 1-800-345-1518
Venezuela (582) 953.69.44 (582) 952.86.70
Continued
IDE CD-ROM Drive for Severs and Workstations Installation and User Guide
Page 52

ndex -1
Index
A
C
D
F
G
H
About This Guide v
Cables, connecting 2-11
Compaq Web Site ix
Compatible drive formats 1-2
Components
option kit 2-2
rear panel 1-4
Configurations, recommended 2-3
Connecting cables 2-11
Contents of option kit 2-2
Controller configurations 2-3
Controls, front panel 1-3
Drive rails, installing 2-8
Drive, compatible formats 1-2
Features 1-2
Formats, compatible 1-2
Front panel controls 1-3
Getting Help ix
I
Icons See Symbols on Equipment
IDE cable 2-11
Installation 2-1
connecting cables 2-11
drive rails 2-8
inserting the drive 2-9
summary 2-5
tools 2-1
Interlock switch features ix
K
Kit components 2-2
O
Option kit, contents 2-2
P
Product Safety Information vi
R
Rack
safety warnings viii
Rack warnings and precautions viii
Rails, installing 2-8
Rear panel components 1-4
S
Symbols
in text vi
on equipment vi
Symbols in Text vi
http://www.compaq.com ix
T
Technical Support Telephone x
IDE CD-ROM Drive for Servers and Workstations Installation and User Guide
Page 53

ndex -2
Telephone Numbers x
Text Conventions v
Tools needed 2-1
Error! Cannot open file referenced
on page 11
IDE CD-ROM Drive for Servers and Workstations Installation and User Guide
 Loading...