

HP Compaq Presario 900AP, Compaq Presario 900LA, Compaq Presario 900US, Compaq Presario 901AP, Compaq Presario 901EA Software Guide
...Page 1

b
Software Guide
Compaq Notebook Series
Document Part Number: 272631-001
June 2002
This guide provides settings and procedures for managing
notebook power and security. It also provides instructions for
obtaining system information and using diagnostic utilities to
help detect, solve, and prevent problems.
Page 2

© 2002 Compaq Information Technologies Group, L.P.
Compaq, the Compaq logo, Evo, Presario, RomPaq, and SoftPaq are
trademarks of Compaq Information Technologies Group, L.P. in the U.S.
and/or other countries. Microsoft and Windows are trademarks of
Microsoft Corporation in the U.S. and/or other countries. All other product
names mentioned herein may be trademarks of their respective companies.
Compaq shall not be liable for technical or editorial errors or omissions
contained herein. The information is provided “as is” without warranty of
any kind and is subject to change without notice. The warranties for
Compaq products are set forth in the express limited warranty statements
accompanying such products. Nothing herein should be construed as
constituting an additional warranty.
Software Guide
First Edition June 2002
Reference Number: N1005/900
Document Part Number: 272631-001
Page 3

Contents
1 Power Management
Selecting a Power Source. . . . . . . . . . . . . . . . . . . . . . . . . 1–1
Using Standby and Hibernation . . . . . . . . . . . . . . . . . . . . 1–2
Standby . . . . . . . . . . . . . . . . . . . . . . . . . . . . . . . . . . . 1–2
Hibernation . . . . . . . . . . . . . . . . . . . . . . . . . . . . . . . . 1–2
Selecting Standby, Hibernation or Shutdown . . . . . . 1–3
Using Hibernation or Standby While
Playing Media . . . . . . . . . . . . . . . . . . . . . . . . . . . . . . 1–3
Standby, Hibernation and Shutdown Procedures. . . . . . . 1–4
Identifying Power Controls and Indicators . . . . . . . . 1–4
Using the Default Power Procedures. . . . . . . . . . . . . 1–5
Setting Power Procedure Preferences . . . . . . . . . . . . 1–6
Managing Low-Battery Conditions . . . . . . . . . . . . . . . . . 1–7
Identifying a Low-Battery Condition . . . . . . . . . . . . 1–7
Identifying a Critical Low-Battery Condition . . . . . . 1–8
Resolving Low-Battery Conditions . . . . . . . . . . . . . . 1–9
Charging a Battery Pack. . . . . . . . . . . . . . . . . . . . . . . . . 1–10
Monitoring the Charge in a Battery Pack. . . . . . . . . . . . 1–11
Obtaining Accurate Charge Information . . . . . . . . . 1–11
Displaying Charge Information on the Screen . . . . 1–11
Battery Conservation Procedures and Settings . . . . . . . 1–12
2 Security Management
Security Features Quick Reference . . . . . . . . . . . . . . . . . 2–1
If You Forget a Password. . . . . . . . . . . . . . . . . . . . . . . . . 2–2
Using a Power-On Password . . . . . . . . . . . . . . . . . . . . . . 2–2
Setting, Changing or Deleting a Power-On Password 2–2
Entering a Power-On Password. . . . . . . . . . . . . . . . . 2–3
Software Guide iii
Page 4

Contents
Using a Setup Password . . . . . . . . . . . . . . . . . . . . . . . . . . 2–4
Using DriveLock . . . . . . . . . . . . . . . . . . . . . . . . . . . . . . . 2–6
Protecting a Hard Drive with DriveLock . . . . . . . . . 2–6
Accessing a Protected Hard Drive. . . . . . . . . . . . . . . 2–7
Changing a DriveLock Password or
Removing DriveLock Protection from a Drive . . . . . 2–8
Using Device Security . . . . . . . . . . . . . . . . . . . . . . . . . . . 2–9
Setting Device Security . . . . . . . . . . . . . . . . . . . . . . . 2–9
Connecting an Optional Cable Lock . . . . . . . . . . . . 2–10
3 Software Updates and Restorations
Updating Software . . . . . . . . . . . . . . . . . . . . . . . . . . . . . . 3–1
Preparing for a Software Update . . . . . . . . . . . . . . . . . . . 3–1
Accessing Notebook Model Information . . . . . . . . . 3–1
Accessing Software Updates . . . . . . . . . . . . . . . . . . . 3–2
Updating Software from the Internet. . . . . . . . . . . . . 3–2
Downloading and Installing a SoftPaq . . . . . . . . . . . 3–3
Restoring Software. . . . . . . . . . . . . . . . . . . . . . . . . . . . . . 3–4
4 Setup Utilities and Diagnostics
Selecting the Setup Utility . . . . . . . . . . . . . . . . . . . . . . . . 4–1
Using the Setup Utility. . . . . . . . . . . . . . . . . . . . . . . . . . . 4–2
Selecting from the Main Screen . . . . . . . . . . . . . . . . 4–3
Selecting from the Advanced Screen. . . . . . . . . . . . . 4–4
Selecting from the Security Screen . . . . . . . . . . . . . . 4–5
Selecting from the Exit Screen . . . . . . . . . . . . . . . . . 4–6
Using Compaq Diagnostics for Windows . . . . . . . . . . . . 4–6
Installing Compaq Diagnostics . . . . . . . . . . . . . . . . . 4–7
Accessing Compaq Diagnostics . . . . . . . . . . . . . . . . 4–7
Obtaining, Saving or Printing
Configuration Information. . . . . . . . . . . . . . . . . . . . . 4–7
Obtaining, Saving or Printing
Diagnostic Test Information . . . . . . . . . . . . . . . . . . . 4–8
Index
iv Software Guide
Page 5

Power Management
Selecting a Power Source
Any supported power source can be used to work in most
software applications, but some tasks require the specific power
sources described in the following table.
Task Powe r Sou r c e
1
Work in a software
application.
Charge or calibrate a
primary or external
battery pack.
Install or modify system
software.
■
Charged battery pack in the
notebook.
or
■
External power supplied through
one of the following devices:
❖
AC Adapter
❖
Optional Aircraft Power Adapter
❖
Optional Automobile Power
Adapter/Charger
External power supplied through the
AC Adapter.
External power supplied through the
AC Adapter.
Software Guide 1–1
Page 6

Power Management
Using Standby and Hibernation
Standby and Hibernation are energy-saving features that conserve
power and reduce startup time. They can be initiated by you or by
the system.
Standby
Standby in the Microsoft Windows XP and Microsoft
Windows XP Home operating systems reduces power to system
components that are not being used. When Standby is initiated,
your work is saved in RAM (random access memory) and the
screen is cleared. When you exit Standby, your work returns to
the screen where you left off.
Hibernation
Hibernation saves all information in RAM to a hibernation file
on the hard drive, then shuts down the notebook. When you exit
Hibernation, your work returns to the screen where you left off.
If a power-on password is set, the password must be entered to
exit Hibernation.
Hibernation is enabled by default, but can be disabled (usually to
save space on the hard drive). Disabling Hibernation is not
recommended. When Hibernation is disabled, system-initiated
Hibernation cannot save your work if the notebook reaches a
critical low-battery condition while it is on or in Standby.
To verify that Hibernation is enabled, select Start > Control
Panel > Performance and Maintenance > Power Options icon.
Select the Hibernate tab, then ensure that the Enable Hibernation
check box is selected.
1–2 Software Guide
Page 7

Power Management
Selecting Standby, Hibernation or Shutdown
If you plan to resume shortly—Initiate Standby. Standby clears
the screen, uses less power than leaving the notebook on, and
your work returns instantly to the screen when you exit Standby.
A fully charged new battery pack can support Standby for at least
two days. A battery pack that has been frequently charged and
discharged will support Standby for less time.
If you plan to resume within one week—Initiate Hibernation.
Hibernation clears the screen, saves your work to the hard drive,
and uses much less power than Standby. Returning to work saved
in Hibernation takes longer than returning to work saved in
Standby, but is faster than returning to your place manually after
restarting the notebook. A fully charged battery pack supports
Hibernation indefinitely.
If the notebook will be disconnected from external power for
more than one week—Recharge the battery pack before using it
to run the notebook.
Using Hibernation or Standby While Playing Media
CAUTION: To prevent possible video degradation and loss of audio
Ä
or video playback functionality, do not initiate Standby or
Hibernation while playing media.
If you are playing a medium in an optional drive, turn off the
medium before initiating Standby or Hibernation.
If Standby or Hibernation is accidentally initiated while a
medium is playing:
1. Exit Standby or Hibernation.
2. Restart the notebook.
Software Guide 1–3
Page 8
Power Management
Standby, Hibernation and Shutdown Procedures
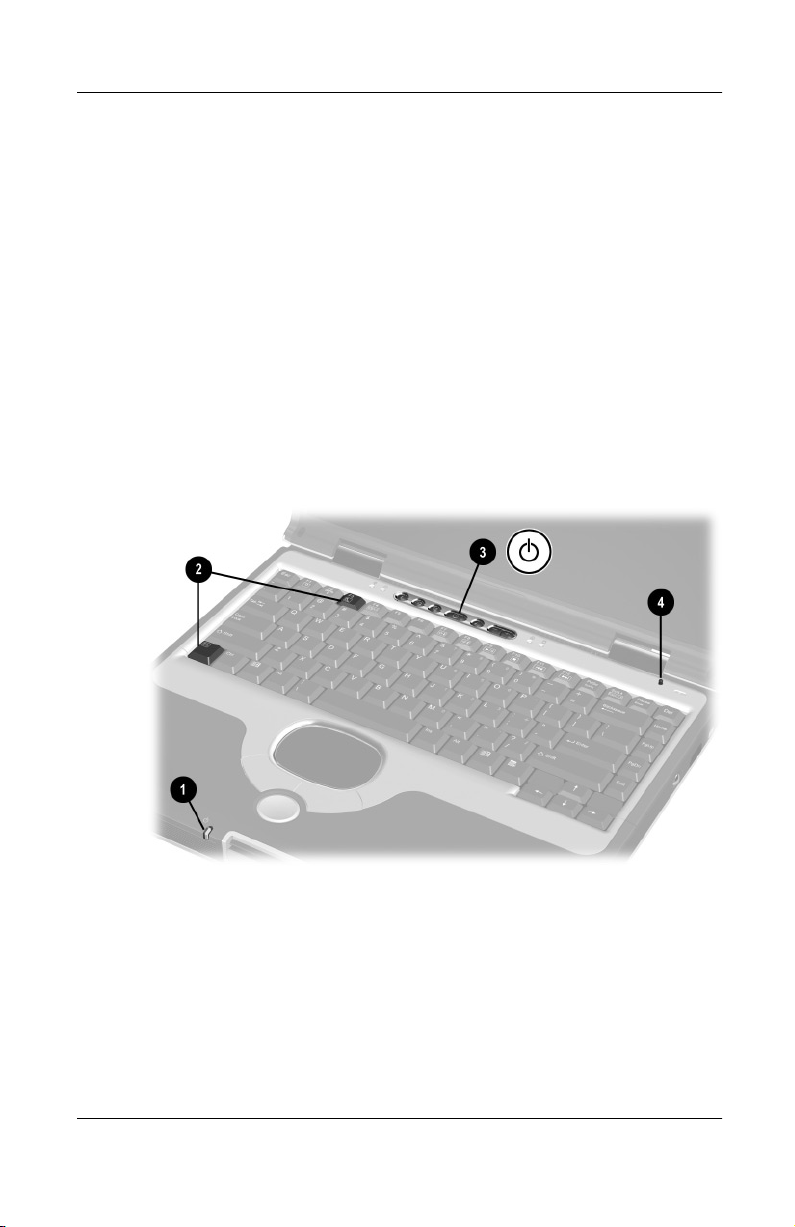
Identifying Power Controls and Indicators
Standby, Hibernation, and shutdown procedures use the following
light and controls:
Power/standby light
1
Fn+F3 hotkeys (default Standby)
2
Power button
3
Display switch
4
Identifying power controls and indicators
1–4 Software Guide
Page 9

Using the Default Power Procedures
The following table describes the default procedures for manually
turning the notebook on and off, for manually initiating or exiting
Standby or Hibernation, and for turning off the display when the
notebook is closed while it is on.
You can assign different functions to the power button and
display switch. For instructions, see “Setting Power Procedure
Preferences” in this chapter.
Task Procedure Result
Power Management
Turn the notebook
on from shutdown.
Shut down the
notebook.
Turn off the
display when the
notebook is closed
while it is on.
Initiate Standby. Press Fn+F3
Press the power
button.
Shut down the
notebook as
directed by your
operating system
documentation.
Close the notebook. Closing the notebook
hotkeys.
or
Select Start > Turn
Off Computer >
Stand By.
■
Power/standby light
turns on.
■
Operating system
loads.
■
Operating system
closes.
■
Power/standby light
turns off.
■
Computer turns off.
activates the display
switch, which turns off
the display.
■
Power/standby light
blinks.
■
Screen clears.
■
Your work is saved
in system memory.
Software Guide 1–5
Page 10

Power Management
Task Procedure Result
Exit Standby. Press the power
button.
Initiate
Hibernation.
Exit Hibernation. Press the power
Assign this function
as instructed in
“Setting Power
Procedure
Preferences” in this
chapter.
button.
■
Power/standby light
turns on.
■
Your work returns
to the screen.
■
Power/standby light
turns off.
■
Screen clears.
■
Your work is saved
to the hard drive
and the notebook
turns off.
■
Power/standby light
turns on.
■
Your work returns
to the screen.
Setting Power Procedure Preferences
To access the settings that change the functions of the power
button and display switch, select Start > Control Panel >
Performance and Maintenance > Power Options icon >
Advanced tab.
The initiate Hibernation setting is available only if Hibernation is
enabled. Hibernation is enabled by default. To verify that
Hibernation is enabled, select Start > Control Panel >
Performance and Maintenance > Power Options icon. Select the
Hibernate tab, then ensure that the Enable Hibernation check box
is selected.
For more information about power options settings, refer to your
operating system documentation.
1–6 Software Guide
Page 11
Power Management
Managing Low-Battery Conditions
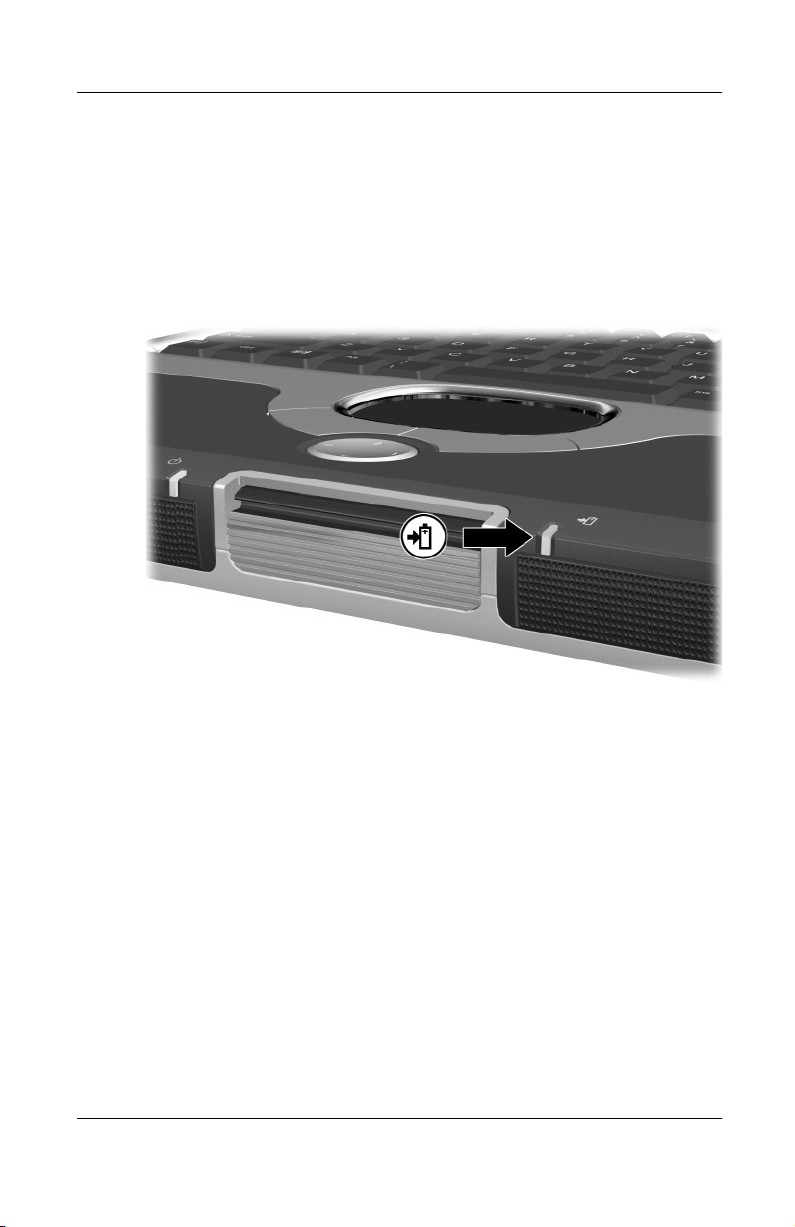
Identifying a Low-Battery Condition
When the battery pack reaches a low-battery condition, the
system beeps several times and the battery light blinks.
Identifying the battery light
Software Guide 1–7
Page 12
Power Management
Identifying a Critical Low-Battery Condition
If a low-battery condition is not resolved, the notebook enters a
critical low-battery condition. In a critical low-battery condition:
■
If Hibernation is enabled and the notebook is on or in
Standby, the notebook then initiates Hibernation.
■
If Hibernation is disabled and the notebook is on or in
Standby, the power/standby light blinks. The notebook
remains briefly in Standby, then shuts down and your
unsaved work is lost.
Hibernation is enabled by default. To verify that Hibernation is
✎
enabled, follow the instructions in “Setting Power Procedure
Preferences” earlier in this chapter.
Identifying the power/standby light
1–8 Software Guide
Page 13

Resolving Low-Battery Conditions
When External Power Is Available
Select one of the following options:
■
Connect the notebook to an electrical outlet.
■
Plug an optional Automobile Power Adapter/Charger into the
notebook and into a vehicle cigarette lighter receptacle.
■
Plug an optional Aircraft Power Adapter into the notebook
and into the in-seat power supply available on some
commercial aircraft. (An Aircraft Power Adapter can run the
notebook but cannot charge a battery pack.)
When a Charged Battery Pack Is Available
Turn off the notebook or initiate Hibernation, then insert a
charged battery pack. For instructions, see the Hardware Guide,
Chapter 3, “Battery Pack,” on this CD.
When No Power Source Is Available
Power Management
Shut down the notebook or initiate Hibernation.
Software Guide 1–9
Page 14

Power Management
Charging a Battery Pack
CAUTION: Allow sufficient air circulation around the notebook and
Ä
the AC Adapter during use and while charging the battery pack to
ensure adequate cooling of the devices. Prevent direct exposure to
radiant heat sources.
To charge a battery pack, connect the notebook to external power
through:
■
The AC Adapter.
■
An optional Automobile Power Adapter/Charger.
Charging may be delayed if a battery pack is new, has not been
used for 2 weeks or more, or is much warmer or cooler than room
temperature.
While the battery pack is charging, the battery light turns on. The
light turns off when the battery pack is fully charged.
Identifying the battery light
1–10 Software Guide
Page 15

Power Management
Monitoring the Charge in a Battery Pack
Obtaining Accurate Charge Information
To increase the accuracy of the battery charge display:
■
Allow a battery pack to discharge to the low-battery level
through normal use before charging it.
■
When you charge a battery pack, charge it fully.
■
Calibrate a new battery pack before you charge it.
■
Calibrate an in-use battery pack that has not been used for
one month or more before you charge it.
Displaying Charge Information on the Screen
The amount of charge remaining in the battery pack is displayed
on the Power Meter tab.
To display the battery charge information, select Start > Control
Panel > Performance and Maintenance > Power Options icon >
Power Meter tab.
Software Guide 1–11
Page 16

Power Management
Battery Conservation Procedures and Settings
Use the following procedures to conserve power while the
notebook is running on battery power:
■
Turn off local area network (LAN) connections, and exit
modem applications when you are not using them.
■
Disconnect external equipment you are not using that is not
connected to an external power source.
■
If you leave your work, initiate Standby or Hibernation or
shut down the notebook.
■
Stop or remove a PC Card that you are not using.
■
Use the Fn+F7 and Fn+F8 hotkeys to quickly increase or
decrease screen brightness as you work.
1–12 Software Guide
Page 17

Security Management
This chapter describes security features specific to your
notebook. For information about Windows XP Professional or
Windows XP Home security features, refer to your operating
system documentation.
Security Features Quick Reference
To Protect Against This Risk Use This Feature
Unauthorized use of the notebook Power-on password
2
Unauthorized access to the notebook
system upon starting up
Unauthorized access to the contents of a
hard drive
Enable or Disable a CD-ROM drive, floppy
drive, or a parallel port during notebook
startup
Unauthorized removal of the notebook Security cable slot
Software Guide 2–1
Setup password
DriveLock
Device Security
Page 18

Security Management
If You Forget a Password
■
If you forget your power-on password or setup password,
refer to Worldwide Telephone Numbers, included with the
notebook, for the General Information number to call for
information about contacting a Compaq authorized service
provider.
■
If you forget your DriveLock password, the hard drive is
permanently unusable.
Using a Power-On Password
A power-on password prevents unauthorized use of the notebook.
After being set, a power-on password must be entered each time
the notebook is turned on, restarted, or exits Hibernation. A
power-on password:
■
Can be the same as any other password.
■
Does not display as you set, enter, change, or delete it.
■
Must be set and entered with the same keys. For example,
a password set with keyboard number keys will not be
recognized if entered with embedded keypad number keys.
■
Can include up to 8 alphanumeric characters and is not case
sensitive.
Setting, Changing or Deleting a Power-On Password
A power-on password is set, changed, or deleted in the Setup
Utility.
1. To open the Setup Utility, turn on or restart the notebook,
then press
F10 message is displayed in the lower left corner of the
screen.
2–2 Software Guide
while the To Change System Settings, Press
F10
Page 19

Security Management
2. Select Security from the menu bar. (To select a menu, use the
arrow keys.)
3. Select the Set Power-On Password field. Then,
❏
To set a power-on password:
a. Type the password in the New Password field, then
press
enter.
b. Type the password in the Confirm New Password
field, then press
❏
To change a power-on password:
enter.
a. Type the current password in the Enter Current
Password field, then press
enter.
b. Type the new password in the Enter New Password
field, press
enter.
c. Type the new password in the Confirm New
Password field, then press
❏
To delete a power-on password, select the Set Power on
enter.
Password option, type the current password in the Enter
Current Password field, then press
4. When you are prompted to continue, press
enter
3 times.
enter.
5. To save your preferences and exit the Setup Utility, press
esc
(or select Exit from the menu bar), select Exit Saving
Changes, then follow the instructions on the screen.
Entering a Power-On Password
When prompted as the notebook is turned on or restarted, or exits
Hibernation, type your password using the same keys you used to
set the password, then press
to enter the password, you must restart the notebook to try again.
Software Guide 2–3
After 3 unsuccessful attempts
enter.
Page 20

Security Management
Using a Setup Password
A setup password prevents unauthorized use of the notebook
settings when turning on or restarting the system.
A setup password:
■
Can be the same as any other password.
■
Does not display as you set, enter, change, or delete it.
■
Must be set and entered with the same keys. For example,
a password set with keyboard number keys will not be
recognized if entered with embedded keypad number keys.
■
Can include up to 8 alphanumeric characters and is not case
sensitive.
Setting, Changing or Deleting a Setup
Password
A setup password is set in the Setup Utility.
1. To open the Setup Utility, turn on the notebook, then press
while the To Change System Settings, Press F10 message
F10
is displayed in the lower left corner of the screen.
2. Select Security from the menu bar. (To select a menu, use the
arrow keys.)
3. Select Setup Password, then press
❏
To set a setup password:
enter.
a. Type the password in the New Password field, then
press
enter.
b. Type the password in the Confirm New Password
field, then press
2–4 Software Guide
enter.
Page 21

Security Management
❏
To change a setup password:
a. Type the current password in the Enter Current
Password field, then press
enter.
b. Type the new password in the Enter New Password
field, then press
enter.
c. Type the password in the Confirm New Password
field, then press
❏
To delete a setup password, select the Set Setup Password
enter.
option, type the current password in the Enter Current
Password field, then press
enter
3 times.
4. When you are prompted to continue, press
enter.
5. To save your preferences and exit the Setup Utility, press
(or select Exit from the menu bar), select Exit Saving
Changes, then follow the instructions on the screen.
esc
Software Guide 2–5
Page 22

Security Management
Using DriveLock
CAUTION: If you forget the DriveLock password, the protected
Ä
hard drive is permanently unusable.
DriveLock prevents unauthorized access to the contents of a hard
drive. After DriveLock protection is applied to a hard drive, the
DriveLock password must be entered to access the drive
A DriveLock password:
■
Can be deleted only by removing DriveLock protection from
the drive. Removing DriveLock protection from a drive
requires the use of the DriveLock password.
■
Does not display as you set, enter, change, or delete it.
■
Must be set and entered with the same keys. For example,
a password set with keyboard number keys will not be
recognized if you enter it with embedded keypad
number keys.
■
Can include up to 8 alphanumeric characters and is not case
sensitive.
Protecting a Hard Drive with DriveLock
CAUTION: If you forget the DriveLock password, the protected
Ä
hard drive is permanently unusable.
CAUTION: To prevent system lockup and loss of information:
Ä
■
Shut down the notebook before removing a hard drive from the
hard drive bay. Do not remove a hard drive while the notebook
is on, in Standby, or in Hibernation.
■
If you are not sure whether the notebook is in Hibernation, turn
the notebook on, then shut it down.
2–6 Software Guide
Page 23

Security Management
DriveLock preferences are entered in the Setup Utility. To access
the DriveLock settings in the Setup Utility, shut down, then turn
on the notebook to open the utility. If you open the Setup Utility
from a Windows restart, DriveLock settings are not accessible.
1. To open the Setup Utility, turn on the notebook, then press
while the To Change System Settings, Press F10 message
F10
is displayed in the lower left corner of the screen.
2. Select Security from the menu bar. (To select a menu, use the
arrow keys.)
3. Select the DriveLock Passwords field, then press
4. Read the warning. To continue, press
5. Type the password in the New Password field, then press
enter.
6. Type the password in the Confirm New Password field, then
press
enter.
7. To confirm DriveLock protection on the drive you have
selected, type the word
then press
F10.
DriveLock
in the confirmation field,
8. To save your password, apply DriveLock protection to the
drive, and exit the Setup Utility, press
the menu bar). Select Exit Saving Changes, then follow the
instructions on the screen.
Accessing a Protected Hard Drive
When prompted for the DriveLock password, type your
DriveLock password using the same keys you used to set the
password, then press
the password correctly, you must restart the notebook to try again.
After 2 unsuccessful attempts to enter
enter.
enter.
enter.
(or select Exit from
esc
Software Guide 2–7
Page 24

Security Management
Changing a DriveLock Password or Removing DriveLock Protection from a Drive
CAUTION: To prevent system lockup and loss of information:
Ä
■
Shut down the notebook before removing a hard drive from the
hard drive bay. Do not remove a hard drive while the notebook
is on, in Standby, or in Hibernation.
■
If you are not sure whether the notebook is in Hibernation, turn
the notebook on, then shut it down.
DriveLock preferences are entered in the Setup Utility. To access
the DriveLock settings in the Setup Utility, shut down, then turn
on the notebook to open the utility. If you open the Setup Utility
from a Windows restart, DriveLock settings are not accessible.
1. To open the Setup Utility, turn on the notebook, then press
while the To Change System Settings, Press F10 message
F10
is displayed in the left corner of the screen.
2. Select Security from the menu bar. (To select a menu, use the
arrow keys.) Select the DriveLock Protection field, then press
enter.
❏
To change a DriveLock password:
a. Type the current password in the Enter Current
Password field, then press
enter.
b. Type the new password in the Enter New Password
field, then press
enter.
c. Type the new password in the Confirm New
Password field, then press
❏
To remove DriveLock protection from the drive, type the
enter.
current password in the Enter Current Password field,
then press
3. To save your preferences and exit the Setup Utility, press
enter
3 times.
esc
(or select Exit from the menu bar), select Exit Saving
Changes, then follow the instructions on the screen.
2–8 Software Guide
Page 25

Using Device Security
The Device Security feature allows an administrator to set the
system startup preferences by enabling or disabling notebook
devices.
Setting Device Security
1. To open the Setup Utility, turn on or restart the notebook,
while the To Change System Settings, Press
then press
F10 message is displayed in the lower left of the screen.
2. Select Security from the menu bar. (To select a menu, use the
arrow keys.)
3. In the Device Security field:
❏
❏
❏
F10
Select the enable or disable parallel port setting during
boot time.
Select the enable or disable floppy boot during boot time.
Select the enable or disable CD-ROM boot during
boot time.
Security Management
4. To save your preferences and exit the Setup Utility, press
esc
(or select Exit from the menu bar), select Exit Saving
Changes, then follow the instructions on the screen.
Software Guide 2–9
Page 26

Security Management
Connecting an Optional Cable Lock
Loop the cable around a secure object, then insert the cable
lock
cable lock key
into the security cable slot 2 and lock it with the
1
.
3
Connecting the optional cable lock
2–10 Software Guide
Page 27

Software Updates and
Restorations
Updating Software
For optimal notebook performance and to make sure your
notebook remains compatible with changing technologies,
Compaq strongly recommends that you install the latest versions
of Compaq software as they become available.
To update Compaq software:
1. Prepare for any update by identifying your notebook type,
series or family, and, in some cases model. Access the
updates on your local Compaq Web site.
2. Download and install the updates.
Preparing for a Software Update
3
If your notebook connects to a network, Compaq recommends
that you consult with your Network Administrator before
installing any software updates.
Accessing Notebook Model Information
To access the updates for your notebook, you may need to know
the following information about your notebook:
■
The product category is Notebook.
Software Guide 3–1
Page 28

Software Updates and Restorations
■
The product family name and series number are printed on
the display bezel.
■
More complete model information is provided on the serial
number label on the underside of the notebook.
To open Computer Setup, turn on or restart the notebook. Press
while the To Change System Settings, Press F10 message is
F10
displayed in the lower left of the screen.
■
To change the language, press
■
For navigation instructions, press
F2.
F1.
Accessing Software Updates
For instructions for updating software from the Compaq Web site,
http://www.compaq.com/athome/support/.
visit
Updating Software from the Internet
Most software at the Compaq Web site is available in English
only and packaged in a compressed file called a SoftPaq™. Some
Read Only Memory (ROM) updates may be packaged in a
compressed file called a RomPaq™. Other ROM updates may be
provided as a CPQFlash SoftPaq.
Most download packages contain a file named Readme.txt. A
Readme.txt file contains detailed descriptions, installation, and
troubleshooting information about the download. The Readme.txt
files included with RomPaqs are in English only.
3–2 Software Guide
Page 29

Software Updates and Restorations
Downloading and Installing a SoftPaq
To update software:
1. Access the page at the Compaq Web site that provides
software for your notebook.
❏
For home and small office products, visit:
http://www.compaq.com/athome/support/
❏
For corporate office products, visit:
http://www.compaq.com/support/files
2. In the Notebook column, select your notebook series.
3. On the next page that is displayed, select your notebook from
the lists. Then follow the instructions on the screen to select a
software package.
4. At the download area:
a. Write down the number or name of the software package.
b. Follow the instructions on the Web page to download the
software package.
5. When the download is complete, open Windows Explorer.
6. In the left pane of the Windows Explorer window, select My
Computer > your hard drive (usually, drive C) > Compaq.
7. In the Compaq folder, select the name or number of the
software package.
8. Select the file that ends with an .exe extension (for example,
Filename.exe), and press
9. To complete the installation, follow the instructions on the
screen.
After a message on the screen reports a successful installation,
✎
you can delete the download package from the Compaq folder.
Software Guide 3–3
The installation begins.
enter.
Page 30

Software Updates and Restorations
Restoring Software
The Restore CDs included with the notebook contain all the
software that shipped preinstalled or preloaded on the notebook
and instructions for restoring it.
You can use the Restore CDs to install or reinstall individual
software items, such as applications, or to restore the notebook
factory image.
The notebook factory image is the notebook software as it was
when the notebook was shipped. When you restore to the
factory image:
■
All settings are as they were set at the factory when the
notebook was shipped.
■
All software is the version installed at the factory.
■
All software not included in the factory-supplied image,
including drivers, applications, and utilities that you
personally installed, will have to be reinstalled.
If the notebook has become unresponsive, you may be able to
start the notebook from a bootable Restore CD. For information
about starting the notebook from a bootable Restore CD, see the
documentation included with the Restore CDs.
CAUTION: To prevent an unsuccessful restoration, use a Restore CD
only while the notebook is connected to reliable external power using the
Ä
AC Adapter. (Do not use a Restore CD while the notebook is running on
battery power or connected to an optional power source.) During a
restoration or installation:
■
Do not unplug the notebook from the electrical outlet.
■
Do not shut down the notebook.
■
Do not remove or insert a drive.
3–4 Software Guide
Page 31

Setup Utilities and Diagnostics
Selecting the Setup Utility
The notebook features two system management utilities:
■
PhoenixBIOS Setup Utility—A system information and
customization utility that can be used even when your
operating system is not working or will not load. This utility
includes settings that are not available in the Windows
XP Professional or Windows XP Home operating systems.
■
Compaq Diagnostics for Windows—A system information
and diagnostic utility that is used within your Windows
operating system. Use this utility whenever possible to:
❏
Display system information.
❏
Test system components.
❏
Troubleshoot a device configuration problem.
4
It is not necessary to configure a device connected to a USB
✎
connector on the notebook.
Software Guide 4–1
Page 32

Setup Utilities and Diagnostics
Using the Setup Utility
To open the utility:
1. Turn on or restart the notebook.
2. Press
while the To Change System Settings, Press F10
F10
message is displayed in the lower left corner of the screen.
3. Use the arrow keys
select the Main, Advanced, or Security
to
menu, or Exit from the menu bar.
4. For navigation and selection instructions, read the
information in the bar at the bottom of the screen.
To exit the utility:
1. Press
or select the Exit screen.
esc
2. Select an exit option.
3. At the exit prompt, select Yes to exit the utility or No to
return to the utility, then press
(When the Setup Utility
enter.
closes, your Windows operating system restarts.)
4–2 Software Guide
Page 33

Selecting from the Main Screen
Select To Do This
System Time* Set the time.
System Date* Set the date.
Product Name* Display Compaq notebook name.
Notebook Model* Display Model number of
notebook.
CPU Type* Display the CPU family.
CPU Speed* Display the CPU clock speed.
BIOS Version* Display the version number of the
BIOS (Basic Input Output System).
KBC Version* Display the version number of the
KBC (keyboard controller).
Serial Number* Display the serial number of the
notebook.
Setup Utilities and Diagnostics
Asset Tag* Displays a unique asset tag.
Ownership Tag* Displays a unique ownership tag.
UUD Number* Unique system ID for systems with
NICs installed
Note: Pressing
factory default settings. Pressing
*Can be viewed on the Main screen without making a selection.
Software Guide 4–3
replaces all settings on the Main screen with
F9
saves settings and exits.
F10
Page 34

Setup Utilities and Diagnostics
Selecting from the Advanced Screen
Select To Do This
Language Select a display language for the
BIOS from the popup menu:
■
US (English)
■
FR (French)
■
IT (Italian)
■
GR (German)
■
SP (Spanish)
■
JR (Japanese)
■
CT (Traditional Chinese)
■
NL (Dutch)
Boot Select from the following options:
■
Floppy Diskette Drive
■
CD-ROM Drive
■
Hard Drive
■
Network Adapter
USB Legacy Support Enable or disable access to the
following legacy devices:
■
Mouse
■
Keyboard
DMA (Direct Memory Access)
Frame Buffer Size
Set the DMA buffer at 11 MB, 32 MB,
or 64 MB.
Primary Master Displays primary hard drive
information.
Section 508 Compliance Display the F10 delay in seconds.
Enter 1, 2, 3, or 4.
PXE (Pre Execution Boot) Enable or disable the PXE remote
boot function.
Note: Pressing
factory default settings. Pressing
replaces all settings on the Main screen with
F9
saves settings and exits.
F10
4–4 Software Guide
Page 35

Setup Utilities and Diagnostics
Selecting from the Security Screen
For more information about passwords, see Chapter 2, “Security
Management.”
.
Select To Do This
Setup Password Set, change, or delete a setup
password.
Power-On Password Set, change, or delete a power-on
password.
DriveLock Passwords ■
Device Security
replaces all settings on the Main screen with
Note: Pressing
factory default settings. Pressing
F9
Protect a hard drive with
DriveLock.
■
Set or change a DriveLock
password.
■
Remove DriveLock protection
from a hard drive.
■
Enable or disable a parallel port
setting during notebook startup.
■
Enable or disable the floppy
boot during notebook startup.
■
Enable or disable the CD-ROM
boot during notebook startup.
saves settings and exits.
F10
Software Guide 4–5
Page 36

Setup Utilities and Diagnostics
Selecting from the Exit Screen
The command is followed by a confirmation prompt. Select Yes
to confirm your exit command or No to return to the Setup Utility.
.
Select To Do This
Exit Saving Changes Save settings entered during current
Setup Utility session, then exit and
close the utility.
Exit Discarding Changes Discard settings entered during
current Setup Utility session, then
exit and close the utility.
Load Setup Defaults Replace all configuration settings in
the Setup Utility with factory default
settings. (Identification information is
retained.)
Discard Changes Discard settings entered during
current Setup Utility session.
Save Changes Save settings entered during current
Setup Utility session.
Note: Pressing
factory default settings. Pressing
F9
replaces all settings on the Main screen with
saves settings and exits.
F10
Using Compaq Diagnostics for Windows
When you open Compaq Diagnostics, a scan of all system
components appears on the screen before the Compaq
Diagnostics window opens.
You can display more or less information from anywhere within
Compaq Diagnostics by selecting Level on the menu bar.
Compaq Diagnostics is designed to test Compaq components. If
non-Compaq components are tested, the results may be
inconclusive.
4–6 Software Guide
Page 37

Setup Utilities and Diagnostics
Installing Compaq Diagnostics
The Compaq Diagnostics utility is preloaded on the computer, but
is not installed.
To install Compaq Diagnostics (or any other preloaded Compaq
utility), select Start > All Programs > Setup Compaq Software >
Next. Select the check box for Compaq Diagnostics for Windows.
Clear the check boxes for preloaded software you do not want to
install.
Accessing Compaq Diagnostics
To access the Compaq Diagnostics, select Start > Control Panel >
Performance and Management, Compaq Diagnostics icon.
Obtaining, Saving or Printing Configuration Information
1. Open Compaq Diagnostics by selecting Start > Control
Panel > Performance and Management > Compaq
Configuration Record.
2. Select Categories, then select a category from the
drop-down list.
❏
To save the information, select File > Save As.
❏
To print the information, select File > Print.
3. To close Compaq Diagnostics, select File > Exit.
Software Guide 4–7
Page 38

Setup Utilities and Diagnostics
Obtaining, Saving or Printing Diagnostic Test Information
1. Open Compaq Diagnostics by selecting Start > Control
Panel > Performance and Management > Compaq
Diagnostics.
2. Select the Test tab.
3. In the scroll box, select the category or device you want
to test.
4. Select a test type:
❏
Quick Test—Runs a quick, general test on each device in
a selected category.
❏
Complete Test—Performs maximum testing on each
device in a selected category.
❏
Custom Test—Performs maximum testing on a selected
device.
◆
To run all tests for your selected device, select the
Check All button.
◆
To run only the tests you select, select the Uncheck
All button, then select the check box for each test you
want to run.
5. Select a test mode:
❏
Interactive Mode—Provides maximum control over the
testing process. You determine whether the test was
passed or failed and may be prompted to insert or remove
devices.
❏
Unattended Mode—Does not display prompts. If errors
are found, they are displayed when testing is complete.
6. Select the Begin Testing button.
4–8 Software Guide
Page 39

7. Select a tab to display a test report:
❏
Status tab—Summarizes the tests run, passed, and failed
during the current testing session.
❏
Log tab—Lists tests run on the system, the numbers of
times each test has run, the number of errors found on
each test, and the total run time of each test.
❏
Error tab—Lists all errors found on the computer with
their error codes.
8. Select a tab to save the report:
❏
Log tab—Select the Log tab Save button.
❏
Error tab—Select the Error tab Save button.
9. Select a tab to print the report:
❏
Log tab—Select the File menu > Save As, then print the
file from your folder.
❏
Error tab—Select the Error tab Print button.
Setup Utilities and Diagnostics
Software Guide 4–9
Page 40

Index
A
air circulation and the
computer 1–10
audio/video playback,
degraded by Hibernation or
Suspend 1–3
B
battery charge level displays
on the screen 1–12
battery conservation checklist
1–12
battery pack
charging accessories 1–10
delayed charging 1–10
BIOS (Basic Input Output
System) 3–1
C
cable lock, connecting 2–10
CDs, Restore 3–4
Compaq Diagnostics
configuration information
4–7
described 4–1
diagnostic test information
4–8
installing 4–7
Compaq technical support
telephone numbers 2–2
Compaq Web site, updating
software from 3–1
Compaq worldwide telephone
numbers 2–2
configuration of USB device
4–1, 4–3
connecting optional cable lock
2–10
conserving power
battery conservation
checklist 1–12
Hibernation 1–2
Suspend 1–2
CPQFlash file 3–2
critical low-battery condition
identifying 1–8
resolving 1–9
restoring from 1–9
D
diagnostics utility. See
Compaq Diagnostics
display switch
changing functions 1–6
default function 1–5
identifying 1–4
DriveLock
changing password 2–8
entering password 2–8
forgetting password 2–2,
2–6
Software Guide Index–1
Page 41

Index
protecting hard drive with
2–6
removing protection 2–8
setting 2–7
using 2–6
E
energy-saving tools
Hibernation 1–2
Suspend 1–2
F
family, identifying notebook
3–1
forgetting passwords
DriveLock password 2–2
power-on password 2–2
H
hard drive and DriveLock
password 2–8
Hibernation
affecting hard drive
removal 2–6
compared to Suspend and
Shutdown 1–3
degraded playback of
video/audio 1–3
described 1–2
disabling/enabling 1–2
exiting 1–6
initiating 1–6
setting preferences 1–6
when to use 1–2
K
KBC ROM (Keyboard
Controller Read Only
Memory) 3–1
keyboard locking at power-on
2–2, 2–4
L
locked system and reinstalling
software 3–4
low-battery conditions
identifying 1–7
resolving 1–9
M
model, identifying notebook
3–1
N
notebook model, family, type
3–1
O
operating system, reinstalling
3–4
P
passwords
changing or deleting
DriveLock password 2–8
entering power-on
password 2–3
forgetting DriveLock
password 2–2, 2–6
forgetting power-on
password 2–2
Index–2 Software Guide
Page 42

Index
setting DriveLock
password 2–6
setting, changing, or
deleting power-on
password 2–2, 2–9
playback of audio/video,
degraded 1–3
pointing device, locking at
power-on 2–2, 2–4
power button
changing functions 1–6
identifying 1–4
power conservation
battery conservation
checklist 1–12
Hibernation 1–2
Suspend 1–2
power controls, identifying
1–4
power procedures, default
initiating/exiting
Hibernation 1–6
initiating/exiting Suspend
1–5, 1–6
turning on/off 1–5
power settings, accessing 1–6
power source, selecting
battery pack 1–1
external power 1–1
power/suspend light,
identifying 1–4
power-on and keyboard or
mouse locking 2–2, 2–4
power-on password
described 2–2, 2–4
entering 2–3
forgetting 2–2
setting, changing, or
deleting 2–2, 2–9
R
removal of hard drive 2–6
Restore CDs 3–4
restoring software 3–4
RomPaq 3–2
S
security features quick
reference 2–1
series, identifying notebook
3–1
setting DriveLock password
2–7
setting power-on password
2–2, 2–4
Setup Compaq Software icon
4–7
Setup utility
advanced screen 4–4
described 4–1
DriveLock password 2–6
exit screen 4–6
main screen 4–3
power-on password 2–2,
2–9
security screen 4–5
using 4–2
Shutdown compared to
Hibernation and Suspend
1–3
Software Guide Index–3
Page 43

Index
SoftPaq 3–2
software
reinstalling 3–4
restoring 3–4
software updates
CPQFlash file 3–2
determining notebook
model, family, type 3–1
identifying software
packages 3–2
RomPaq 3–2
SoftPaq 3–2
summary of procedures
3–1
updating KBC ROM from
Internet 3–2
updating system ROM
from Internet 3–2
Suspend (Standby)
affecting hard drive
removal 2–6
compared to Hibernation
and Shutdown 1–3
degraded playback of
video/audio 1–3
described 1–2
exiting 1–6
initiating 1–5
setting preferences 1–6
when to use 1–3
Suspend button (sleep button)
changing functions 1–6
identifying 1–4
system lock-up and
reinstalling software 3–4
system ROM (Read Only
Memory) 3–1
T
telephone numbers, Compaq
Technical Support 2–2
U
unresponsive system and
reinstalling software 3–4
USB device configuration 4–1,
4–3
V
video/audio playback affected
by Hibernation/Suspend 1–3
W
worldwide telephone numbers
2–2
Index–4 Software Guide
 Loading...