

Page 1
Compaq MyMovieSTUDIO
Getting Started
Page 2

Congratulations and welcome
to the Compaq MyMovieSTUDIO
leading edge digital video editing
and DVD authoring desktop
computer. You have purchased a
premier desktop solution for
quickly recording, authoring, and
editing DVDs without needing
Ta ke a moment to familiarize yourself
with the components that enable you
to create professional looking DVDs
or VCDs. With your Compaq
MyMovieSTUDIO bundled solution,
you should have:
> A DVD Rewriteable drive or a CD
Rewriteable drive (installed in
your computer, only if you configure with a rewriteable drive.)
any specialized video editing
or computing skills. Compaq
MyMovieSTUDIO is bundled with
Sonic MyDVD Video Suite.
You can:
>Record directly to a DVD or VCD* from
any video source, such as a VCR**,
television tuner**, or digital camcorder.
> Use wizards to successfully guide you
through recording, editing, assisting
with choices and preventing
frustrating errors.
>Re-edit from a previously-recorded
DVD or VCD with MyDVD software.
> Digital Video Center (3 IEEE-1394
ports with 2 Front USB ports)
> MyDVD Video Suite software
(packaged with this booklet)
The DVD Rewriteable drive allows
you to record movies onto a blank
DVD or CD, create music and video
CDs on a CD-R disc, and store data on
a CD or DVD Rewriteable disc. You
can use the data recording software
provided to create music CDs and
data storage CDs or DVDs.
> Make CD-R and CD-RW recordings.
* VCD = Video CD is a digital videodisc format that is based
on MPEG-1 video and audio compression. Video quality is
similar to VHS videotape.
** Requires an ALL-IN-WONDER Radeon card or equivalent,
available on selected models only.
Note: Purchased or rented DVD movies are encrypted to
prevent illegal copying.
You can use the MyDVD Video Suite
software to create home DVDs and
the ShowBiz software bundled with
it to perform advanced edits on your
home DVD.
Page 3

Now that you have the Compaq MyMovieSTUDIO what can
you do?
Create home DVD
or VCD discs
Create CDs
How to Get Started
First, install the MyDVD Video Suite software.
To install this software, insert the CD into
your CD/DVD drive and follow the
on-screen steps.
Note: When you have finished installing your applications,
re-boot your Compaq computer.
Next, connect the hardware.
Connect your camcorder or other recording
device to the IEEE-1394 port on the front of
your Compaq computer. Insert a DVD or CD
disc into the DVD or CD Rewriteable drive,
and you are ready to make DVDs or CDs.
Store data on CD or
DVD Rewriteable discs
3
Page 4
Record Directly
to DVD or CD
Create or Author a
New Project
What can you do with MyMovieSTUDIO?
The Compaq MyMovieSTUDIO makes it easy and fun to put video and
audio onto recordable DVDs and CDs. MyMovieSTUDIO PC is bundled
with Sonic MyDVD Video Suite package software. You can capture
video from your camcorder or VHS* and share it with friends and
family via DVD**, VCD**, and even email. Video Suite combines the
sheer simplicity†and power of Sonic MyDVD with the†professionallevel editing features of the ArcSoft ShowBiz video editor to create a
fully-integrated video production center. Sharing your video couldn’t
be easier or more flexible. Using the MyMovieSTUDIO bundled
solution, you can record directly to a DVD or CD, create or author a
new project, or edit an existing DVD project previously recorded on a
DVD or CD disc.
What about advanced editing?
If you are a video enthusiast who wants to perform advanced editing
on your movies, MyDVD Video Suite offers ShowBiz that has some
creative options for your movie creation. Advanced users can enhance
your movie with titles, transitions, music, and other special effects with
real-time rendering. When you are done with editing, you can send
your video clips or edits to MyDVD software for DVD authoring and
recording it onto a DVD or CD disc. MyDVD Video Suite offers a smart
integration between applications for a more flexible, easy-to-use DVD
and VCD creation tool. No more clumsy installation of separate
applications from different sources for capture, edit and record.
My Movie
Edit an Existing
Project
What do you need to make a recording?
To make a recording, you need a video source, such as a digital
camcorder, TV*, or VHS* and DVD or CD media.
What can you do if you donít have a CD or DVD
Rewriteable drive?
You can still create movie files, VCD or DVD projects on your hard drive.
You can share with your friends and family via email or post it on the web.
* Requires an ATI ALL-IN-WONDER Radeon card or equivalent, available on
selected models only.
**Requires DVD or CD Rewriteable drive.
4
Page 5
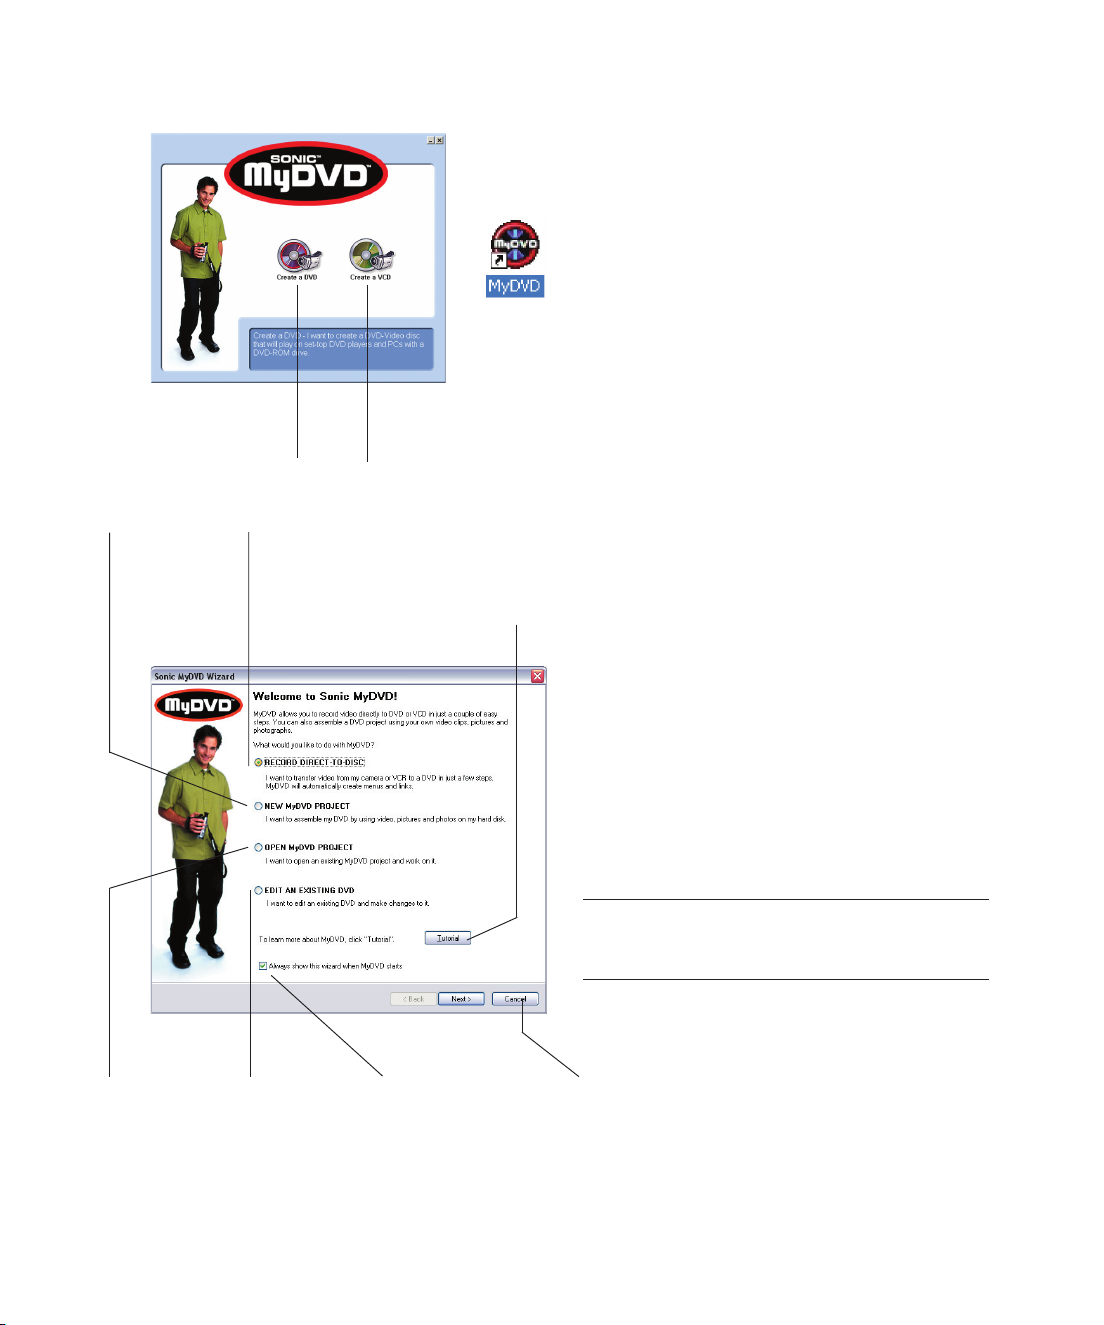
Click to record a
DVD or create a
DVD project
Select New
MyDVD Project
and click Next
begin creating a
DVD project.
Select Record
Direct-To-DVD
and click Next
to
to begin
recording video
and audio to a
DVD disc.
Click to record a
VCD or create a
VCD project
Click Tutorial
to see a
demonstration on how
to use
MyDVD.
Get to know MyDVD
Ta ke a few minutes to familiarize yourself with
MyDVD.
To open the MyDVD application, double click the
MyDVD
button, click All Programs, MyDVD, then MyDVD.
It is recommended that you view the MyDVD
software at a screen resolution of 1024 x 768
pixels. To modify your screen resolution:
1. Right click your desktop.
2. Click Properties, then the
3. In the Screen Resolution area, click and drag
4. Click Apply, then OK.
If you need additional help, refer to the MyDVD
User Guide. To open the MyDVD User Guide from
the Start button, click All Programs, MyDVD, then
MyDVD User Guide.
The MyDVD Wizard
The MyDVD Wizard displays when you open
MyDVD. The Wizard guides you through setting up
the MyDVD software to:
•Record directly to a DVD or a VCD
•Create a new project*
•Edit an existing project
•View the tutorial
icon on your desktop or from the Start
Settings
the slider to 1024 x 768 pixels.
tab.
Select Open
MyDVD Project
and click Next
to open an
existing project
in MyDVD.
Select Edit An
Existing DVD
and click Next
to open an
existing
project on a
DVD disc.
Deselect to stop the
Wizard appearing
every time you start
MyDVD. (To make the
Wizard appear again,
please refer to the
MyDVD User Guide.)
* If you want to download videos from a digital camcorder
and edit them later, click New MyDVD Project from the
Wizard or New Project from the toolbar.
Note: Once you start a DVD or VCD project, you can not
change it to the other format; for example, if you
choose to create a DVD project, you can not save it as a
VCD project or create VCD discs from it.
Click Cancel
Wizard - you will see the MyDVD
toolbar and Menu Editor. You
can then use the buttons on
the toolbar to record to DVD or
create a project.
to close the MyDVD
5
Page 6

The Toolbar and Menu Editor
You can use the toolbar to perform most of the
functions in MyDVD. You can add video clips, send
your video clips to ShowBiz for advanced editing,
create menus and buttons, select styles, and
navigate through your project using the Menu
Editor.
Toolbar
Menu label.
Click to edit
the text
Button label.
Click to edit the
text
This button
links to the
main (“Title”)
menu
Start the
New Project
Wizard
Open an
existing
project
Save the
current
project
Start the
Record
DirectTo-Disc
Wizard
Open the
“My Videos”
folder
Start the
Capture
Wizard
Send clips
to ShowBiz
for editing
Preview
the current
project
Create a
Disc
Click to create
a button that
links to a new
menu
Click to open
the Select a
Style window
(lets you
choose and
edit the menu
styles)
This is your
Windows
background
Menu Editor
This button links to
the previous menu
in a sequence of
menus
6
Indicates how much
disc space the project
will fill
This button links to the
next menu in a
sequence of menus
Page 7

Create a Direct-to-Disc
Recording
This feature allows you to quickly transfer or
archive videos to a DVD or VCD without having to
manually create or author titles, menus, or buttons.
The Wizard walks you through the steps to
automatically create a DVD or VCD that is ready
to play.
1. Connect the video device to your computer
and insert a DVD or CD into the CD or DVD
Rewriteable drive.
2. Click Record Direct-To-Disc on the Wizard screen,
then the Next button or click theDirect-To-Disc
button on the toolbar.
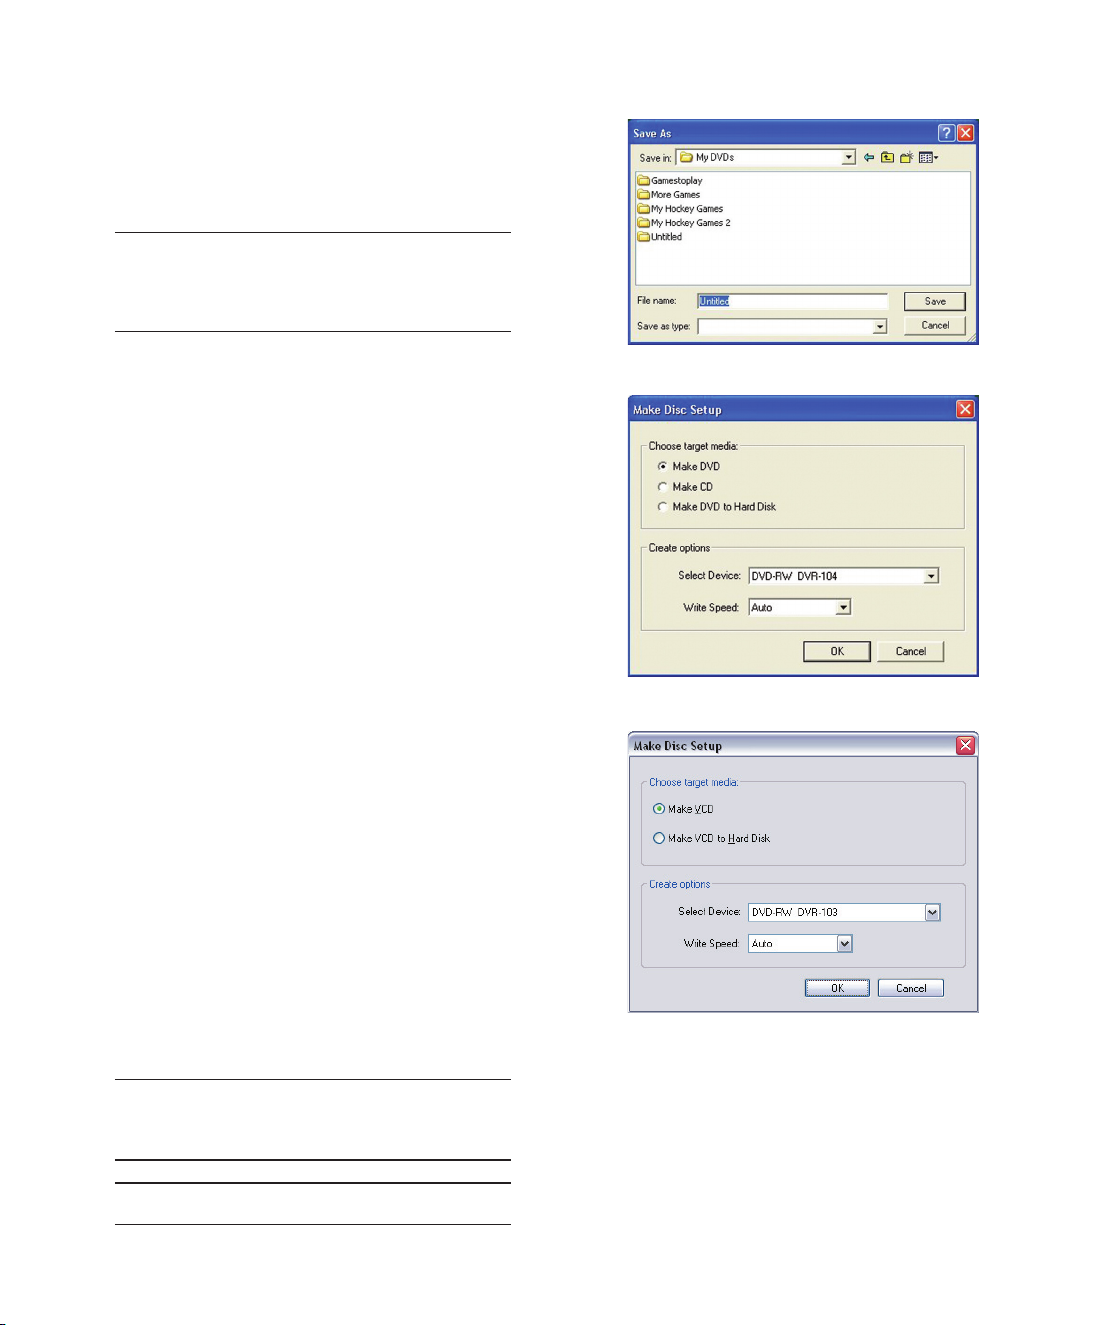
Name Your Project
The project name is used to label the menu buttons
and finished disc.
3. Enter a project name (maximum number of
characters is 20) and click the Next button.
to record to
Click to select speedSelect the disc
Screenshot above reflects “Create a DVD” option
Choose Recording Media
You must have media in the drive or you will not
be allowed to proceed. If you record DVD-video
content on a CD-R or CD-RW disc, you can only
playback the CD on a desktop computer with a
CD-ROM or DVD-ROM drive. This CD does not
playback on a DVD set-top player. The MyDVD
software includes a special version of Intervideo’s
WinDVD that should automatically play the CD
when it is inserted into a Windows-based computer.
4. Select a disc type for recording from Choose
Target Media.
5. Select the device for recording and the write
speed from Create Options.
Note: The write speed is automatically selected as
“A uto” if you are making a DVD.
7
Page 8

6. Click the Next button.
Choose Your Menu Style
7. Select a category of menu styles from the
Category drop-down list.
8. Scroll through the list, click the style to use for
your menus, and click the Next button.
Set Recording Parameters
9. Select your record settings from Record drop-
down list.
10.Select the quality for your recordings from the
Set Quality drop-down list. Refer to the table
below for more information on video quality
settings and record time.
Make the Recording
You can use the VCR playback control buttons to
locate the video you want to record on the DVD.
11.Click the Record button to begin recording.
12.Click the Stop button to finish recording. A
message displays on the screen to indicate the
process is complete.
Click to
select style
Scroll to
desired
style
Select to
give menu
buttons
and text a
3-D effect
Record
Rewind
Set
Record
Length
Play
Stop
Choose what you
want to record
Fast
Forward
Move
back one
frame
Move
forward
one
frame
Choose
the video
quality
Add
chapter
points
automatically
Time
Elapsed
File Size
Temp
Space
Used
You can fit this amount of video on the disc...
If you select a video DVD CD CD VCD* VCD*
quality setting of... (4.7 GB) (700 MB) (650 MB) (650 MB) (700 MB)
Best 60 minutes 9 minutes 8 minutes 60 minutes 65 minutes
Better 120 minutes 18 minutes 16 minutes
Good 180 minutes 27 minutes 24 minutes
Note: A typical Direct-to-Disc project using a 60 minute tape will take 60 minutes to capture and an additional 60
minutes to author to DVD. Project times may vary if you perform editing.
*You can not select quality of settings on VCD.
8
Page 9

Screenshot above reflects “Create a DVD” option
Create or Author a New Project
Authoring or creating a movie project involves:
•Creating video
•Creating menus with buttons
•Adding movie clips to your project
•Previewing the project
•Recording to disc from the project
For advanced editing and story creation capabilities,
Send to the Editor Send to the Editor
select
Send to the Editor on the toolbar. This will
Send to the Editor Send to the Editor
bring you to ShowBiz for advanced video editing.
1. Click New MyDVD Project on the Wizard, then
the Next button or click New Project on the
toolbar.
Choose Your Style
A style consists of a background image and a
layout for menu buttons and labels. For more
information on editing styles, see the MyDVD User
Guide.
2. Select a category of menu styles from the
Category drop-down list.
3. Scroll through the list, click the style to use for
your layout (for example, background, menus,
and buttons).
4. Click the Finish button.
Scroll to
desired style
Add Movie Clips to Your DVD or VCD
Menu
5. Click Get Movies on the toolbar.
6. Locate the clip you want to link to your menu.
Note: MyDVD saves movie clips to the My Videos folder
located in the My Documents folder on your desktop. You
can save movie clips in other locations.
7. Click Open to add movie clips to your DVD or
VCD project.
9
Page 10
Save the Project
8. Click Save Project on the toolbar or choose File,
Save Project.
9. Type a file name for the project and click Save.
Note: MyDVD saves all projects to the My DVDs folder
located in the My Documents folder on your desktop.
Each project has a unique folder that contains the
project file saved with the name you entered and a .dvd
extension.
Create a DVD
You can record your project to:
•A DVD Write Once or Rewriteable disc
•A CD Write Once or Rewriteable disc
•Save on your hard drive
For more information on DVD and CD disc
properties, see the MyDVD User Guide.
10. Insert a disc in your DVD or CD
Rewriteable drive.
11. Click Make Disc on the toolbar.
12. Choose your recording options on the Make
Disc Setup window.
13. Click OK
to start recording.
Create a VCD
You can record your project to:
•A CD-R or CD-RW disc
•Save on your hard drive
For more information on VCD properties, see the
MyDVD User Guide.
14. Insert a disc in your DVD or CD
Rewriteable drive.
15. Click Make Disc on the toolbar.
16. Choose your recording options on the Make
Disc Setup window.
17. Click OK
Note: Depending on the size of your project, this may
take a while to complete. A message displays on the
screen when the process is finished and MyDVD ejects
the disc.
Note: Refer to the Driver and Media Information table
on page 15 for DVD playback capability.
to start recording.
10
Page 11

Open
your
file
from
hard
drive,
DVD or
CD
disc
Make
edits
to
your
DVD or
VCD
project
Click
Preview
to
preview
your
project
and exit
preview
Save
new
DVD or
VCD
project
* You can record back to existing DVD or CD disc if
DVD Rewriteable is being used.
Your DVD project file will appear on the D drive
if it is a single-drive configuration.
Record
back
to
DVD* or
CD*
disc,
or hard
drive
Select
the disc
Edit an Existing Project
You can open and edit any projects that you have
already recorded to your hard drive, DVD, or CD
disc. You do not have to store your video, audio, or
graphic files on your hard drive in order to edit
your projects.
For more information on advanced editing, see
“What about advanced editing?” on page 4.
Open a recorded DVD or VCD file
1. Insert the DVD disc into the DVD or CD
Rewriteable drive.
2. Open the MyDVD software.
3. Choose File, then Edit DVD (when editing a
DVD project) or Edit VCD (when editing a VCD
project).
4. Select the DVD or CD Rewriteable drive that
contains the files.
5. Click OK.
Make edits to your project
From the menu editor, you can:
• Add and edit video clips
•Create additional menus
• Delete buttons
• Change menu styles
• Modify menu and buttons labels
Project name
Chapter
Point
Add Video Clips
When creating movie clips, you can use chapter
points to separate your video into one or more
sections that are linked to menu buttons.
If you add chapter points while capturing your
video, MyDVD creates menu buttons for each
chapter point and labels them consecutively with
the project name. For example, if the project name
was “My Hockey Games,” then chapter point
menu buttons would be “My Hockey Games 1,”
“My Hockey Games 2,” and so on.
If you do not add chapter points, MyDVD creates a
single menu button that links to the captured clip.
11
Page 12

1. Connect the video device to your computer.
2. Click Capture on the toolbar or choose Tools,
then Capture.
3. Choose your settings from the Capture to Disk
window.
4. Click Record to start recording and Stop when
finished.
5. Enter a file name and click Save.
Note: MyDVD saves movie clips to the My Videos folder
by default located in the My Documents folder. You can
save movie clips in other locations.
6. Click Done to close the window.
Edit Video Clips
You may want to edit or “trim” your video clip to
remove unwanted material.
1. On the menu editor, double click the button you
want to edit.
Note: If the menu contains chapter points, you must click
the button that contains the first chapter point.
2. Drag the Green slider bar to the right to modify
the start frame.
3. Drag the Red slider bar to the left to modify the
end frame.
Record
Before “trim”
Select to add chapter
points automatically
while capturing
Note: Click the Reset button to return the sliders to their
original positions.
4. Click OK to apply the changes.
Note: Adjusting the length of a video that has chapter
points might cause some chapter points to be deleted
and automatically renumbered.
Note: You can send video clips from MyDVD to ShowBiz,
edit them, then export them back to MyDVD as new
clips. The original clips will not be changed. Please see
the ShowBiz documentation for details.
12
Thumbnail slider - “Change
image displayed on a button”
After“trim”
Scroll to
desired
frame
Page 13

Back to
home
You can not delete
these navigation
buttons
To
previous
menu
You can delete
these buttons
To next
menu
Create
new
menus
Create Additional Menus
MyDVD automatically creates additional menus
when the number of buttons exceeds the
maximum number for the menu style. You can
also manually create additional menus.
For additional help on creating menus, see the
MyDVD User Guide.
1. On the Menu Editor, click Menu or choose
Project, then New Menu.
Note: MyDVD places a button that links you to the new
menu page.
2. Add video clips and/or additional menus and
buttons as needed.
Delete Buttons
You can delete buttons that link to video clips,
chapter points, and menus. You can not delete
buttons that are used for navigation.
If you delete a video clip, MyDVD deletes:
• Buttons associated with the clip
• Buttons linked to chapter points in that project
• The video clip from the project, but does not
delete the file from your computer
When you delete buttons, the remaining buttons
move to fill the empty space.
1. On the menu editor, right click the button you
want to delete.
2. Click Delete Chapter, Delete Movie, or Remove
Audio
from the pop-up menu.
Note: If you select Delete Chapter or Remove Audio, the
deletion occurs without any message.
3. If you select Delete Movie, click Ye s to delete
the movie and associated chapters from the
project.
13
Page 14

Modify menu styles
You can change the style of the menus in your
project. To create a custom style, click Style, then
the New Custom Style button on the Menu Editor.
You can also download additional styles from the
MyDVD web site.
1. On the menu editor, click Style or choose
Project, then Change Menu Style.
2. Choose a style category from the Category drop
down list.
3. Scroll through the styles for the category and
click the style you want to use for your project.
4. Click OK to use the new style.
Modify button and menu labels
You can change the labels of buttons and menus in
your project.
You can only change the font, size, or color of text
by choosing a different style or creating a custom
one.
1. Click the button label you want to modify.
2. Enter the new text.
3. Press Enter or click anywhere on the menu
editor outside the text box to stop editing the
text.
Preview your project
You can preview your project at any time using the
remote control.
1. Click Preview or choose Tools, then Preview
from the toolbar.
2. Click the remote control’s buttons to control the
playback.
3. Click the remote controlís Close button to
resume editing the project.
14
Modify the
button label
New button
label
Main
menu
For DVD Playback
For VCD Playback
Status
of
project
To
higher
level
menu
Page 15

Drive and Media Information
You can use several different types of media with your CD or DVD drives. Media simply refers to the type of disc you insert
into the drive. Compatibility of DVD Rewriteable media with DVD set-top players varies per model. Some DVD set-top
players may not recognize the DVD Rewriteable media.
The type of drive you have determines what you can do and the media you use in the drive. For example, you can listen to
music, but not record it, if you use a CD-ROM disc in the CD drive. On the other hand, you can record and playback a DVD
movie, if you use a DVD-R or DVD-RW disc in the DVD-R/RW drive.
Media and Drive Comparison The following are types of media supported on your DVD or CD Rewriteable drive.
Media File Type Ability to Ability to Playback on DVD Set-top
CD-ROM Data No Requires CD-ROM, DVD-ROM, No
Audio CD No Requires CD-ROM, DVD-ROM, Yes (varies per model)
CD-R Data Yes (only once) Requires CD-ROM, DVD-ROM, No
Audio CD Yes (only once) Requires CD-ROM, DVD-ROM, CD or Yes (varies per model)
MP3 Music Yes (only once) Requires CD-ROM, DVD-ROM, CD or Yes (varies per model)
Video CD Yes (only once) Requires CD-ROM, DVD-ROM, Yes (varies per model)
CD-RW Data Yes Requires CD-ROM, DVD-ROM, No
Audio CD Yes Requires CD-ROM, DVD-ROM, CD or Yes (varies per model)
MP3 Music Yes Requires CD-ROM, DVD-ROM, CD or Yes (varies per model)
Video CD Yes Requires CD-ROM, DVD-ROM Yes (varies per model)
DVD-ROM Data No Requires DVD-ROM or DVD No
DVD Video No Requires DVD-ROM or DVD Yes
DVD-R Data Yes (only once) Requires DVD-ROM or DVD No
DVD Video Yes (only once) Requires DVD-ROM or DVD Yes (varies per model)
DVD-RW Data Yes Requires DVD-ROM or DVD No
DVD Video Yes Requires DVD-ROM or DVD Yes (varies per model)
DVD+R Data Yes (only once) Requires DVD-ROM or DVD No
DVD Video Yes (only once) Requires DVD-ROM or DVD Yes (varies per model)
DVD+RW Data Yes Requires DVD-ROM or DVD No
DVD Video Yes Requires DVD-ROM or DVD Yes (varies per model)
Record other computers
CD or DVD Rewriteable hardware
CD or DVD Rewriteable hardware
CD or DVD Rewriteable hardware
DVD Rewriteable hardware/software
DVD Rewriteable hardware/software
CD or DVD Rewriteable hardware
and DVD playback software
CD or DVD Rewriteable hardware
DVD Rewriteable hardware/software
DVD Rewriteable hardware/software
CD or DVD Rewriteable hardware
and DVD playback software
Rewriteable hardware
Rewriteable hardware and DVD
playback software
Rewriteable hardware
Rewriteable hardware and
DVD playback software
Rewriteable hardware
Rewriteable hardware and DVD
playback software
Rewriteable hardware
Rewriteable hardware and DVD
playback software
Rewriteable hardware
Rewriteable hardware and DVD
playback software
15
Page 16

©2002 Compaq Information Technologies Group, L.P.
Compaq and the Compaq logo are trademarks of Compaq Information Technologies Group, L.P. in the U.S. and/or other
countries. Windows is a trademark of Microsoft Corporation in the U.S. and/or other countries. All other product names
mentioned herein may be trademarks of their respective companies. Second Edition April 2002.
16
277980-372
 Loading...