

Page 1

Notice
The information in this guide is subject to change without notice.
COMPAQ COMPUTER CORPORATION SHALL NOT BE LIABLE FOR
TECHNICAL OR EDITORIAL ERRORS OR OMISSIONS CONTAINED
HEREIN; NOR FOR INCIDENTAL OR CONSEQUENTIAL DAMAGES
RESULTING FROM THE FURNISHING, PERFORMANCE, OR USE OF
THIS MATERIAL.
This guide contains information protected by copyright. No part of this
guide may be photocopied or reproduced in any form without prior
written consent from Compaq Computer Corporation.
© 2000 Compaq Computer Corporation.
Printed in U.S.A., U.K., Singapore, and Taiwan.
COMPAQ, the Compaq logo, Armada, and ROMPaq Registered in
U.S. Patent and Trademark Office.
Microsoft, Windows, and Windows NT are trademarks or registered
trademarks of Microsoft Corporation.
Intel and Pentium are registered trademarks, and SpeedStep is a
trademark of Intel Corporation.
Phoenix is a registered trademark and MultiBoot is a trademark of
Phoenix Technologies Ltd.
Imation and SuperDisk are trademarks of Imation Corporation.
CardWare is a registered trademark of Unicore Software, Inc.
All other product names mentioned herein may be trademarks or
registered trademarks of their respective companies.
Software described herein is furnished under a license agreement or
nondisclosure agreement. The software may be used or copied only in
accordance with the terms of the agreement.
ETTING STARTED
G
Compaq Armada M700 Series of Personal Computers
First Edition (August 2000)
Part Number 168894-001
Compaq Computer Corporation
Writer: Karen Williams Saved by: Integrity Group Saved date: 05/24/00 11:59 AM
COMPAQ CONFIDENTIAL - NEED TO KNOW REQUIRED
Pages: 1 Words: 221 Template: c:\template\ref\ref-ntc.dot
Part Number: 168894-001 File name: NOTICE.doc
ROUBLESHOOTING
& T
Page 2

ONTENTS
C
chapter 1
ETTING UP THE COMPUTER
S
chapter 2
AKING A LOOK AT THE COMPUTER
T
Pointing Device Components..........................................................2-1
Top Components .............................................................................2-2
Left Side Components.....................................................................2-3
Right Side Components...................................................................2-4
Front Components...........................................................................2-5
Rear Panel Components ..................................................................2-6
Bottom Components........................................................................2-7
Additional Standard Components ...................................................2-8
chapter 3
INDING INFORMATION
F
Using the Compaq Portable Product Reference
Library CD-ROM............................................................................3-1
Updating Your System....................................................................3-2
Obtaining Update Information and Software..............................3-2
Downloading Software Updates .................................................3-3
Installing Software Updates........................................................3-3
Restoring Software..........................................................................3-5
Installing the Retail Version of an Operating System.....................3-5
Obtaining Technical Support ..........................................................3-6
Using the Compaq Support Forum.............................................3-6
Preparing to Call Technical Support...........................................3-6
Worldwide Telephone Numbers.................................................3-7
PDATES, AND HELP
, U
chapter 4
OMPUTER SETUP AND DIAGNOSTICS UTILITIES
C
Selecting Computer Setup or Compaq Diagnostics........................4-1
Using Computer Setup ....................................................................4-2
Selecting from the File Menu .....................................................4-2
Selecting from the Security Menu..............................................4-3
Selecting from the Advanced Menu ...........................................4-4
Contents iii
COMPAQ CONFIDENTIAL - NEED TO KNOW REQUIRED
Writer: Karen Williams Saved by: Integrity Group Saved date: 05/23/00 5:33 PM
Pages: 2 Template: c:\template\ref\ref-toc.dot
Part Number: 168894-001 File name: CONTENTS.doc
Page 3

Using Compaq Diagnostics ............................................................4-6
Displaying System Information..................................................4-6
Running a Diagnostic Test .........................................................4-6
chapter 5
ROUBLESHOOTING
T
Quick Solutions Checklist ..............................................................5-2
Solving Audio Problems.................................................................5-3
Solving Battery Problems...............................................................5-5
Solving CD Drive/DVD-ROM Drive Problems.............................5-7
Solving Diskette Drive/SuperDisk LS-120 Drive Problems..........5-8
Solving Hard Drive Problems......................................................... 5-9
Solving Infrared Problems............................................................5-10
Solving Keyboard/Numeric Keypad Problems ............................5-12
Solving Modem Problems ............................................................5-12
Solving PC Card Problems...........................................................5-16
Solving Power Problems...............................................................5-18
Solving Display Problems ............................................................5-19
Solving USB Problems.................................................................5-20
.....................................................................................................I-1
NDEX
I
a.
iv Contents
COMPAQ CONFIDENTIAL - NEED TO KNOW REQUIRED
Writer: Karen Williams Saved by: Integrity Group Saved date: 05/23/00 5:33 PM
Part Number: 168894-001 File name: CONTENTS.doc
Page 4
chapter
1
ETTING UP THE COMPUTER
S
1. Record the Product Key number for your operating system.
When you start the computer for the first time, you may be
■
prompted to enter this number. You may also need this
number to update or troubleshoot your operating system.
■
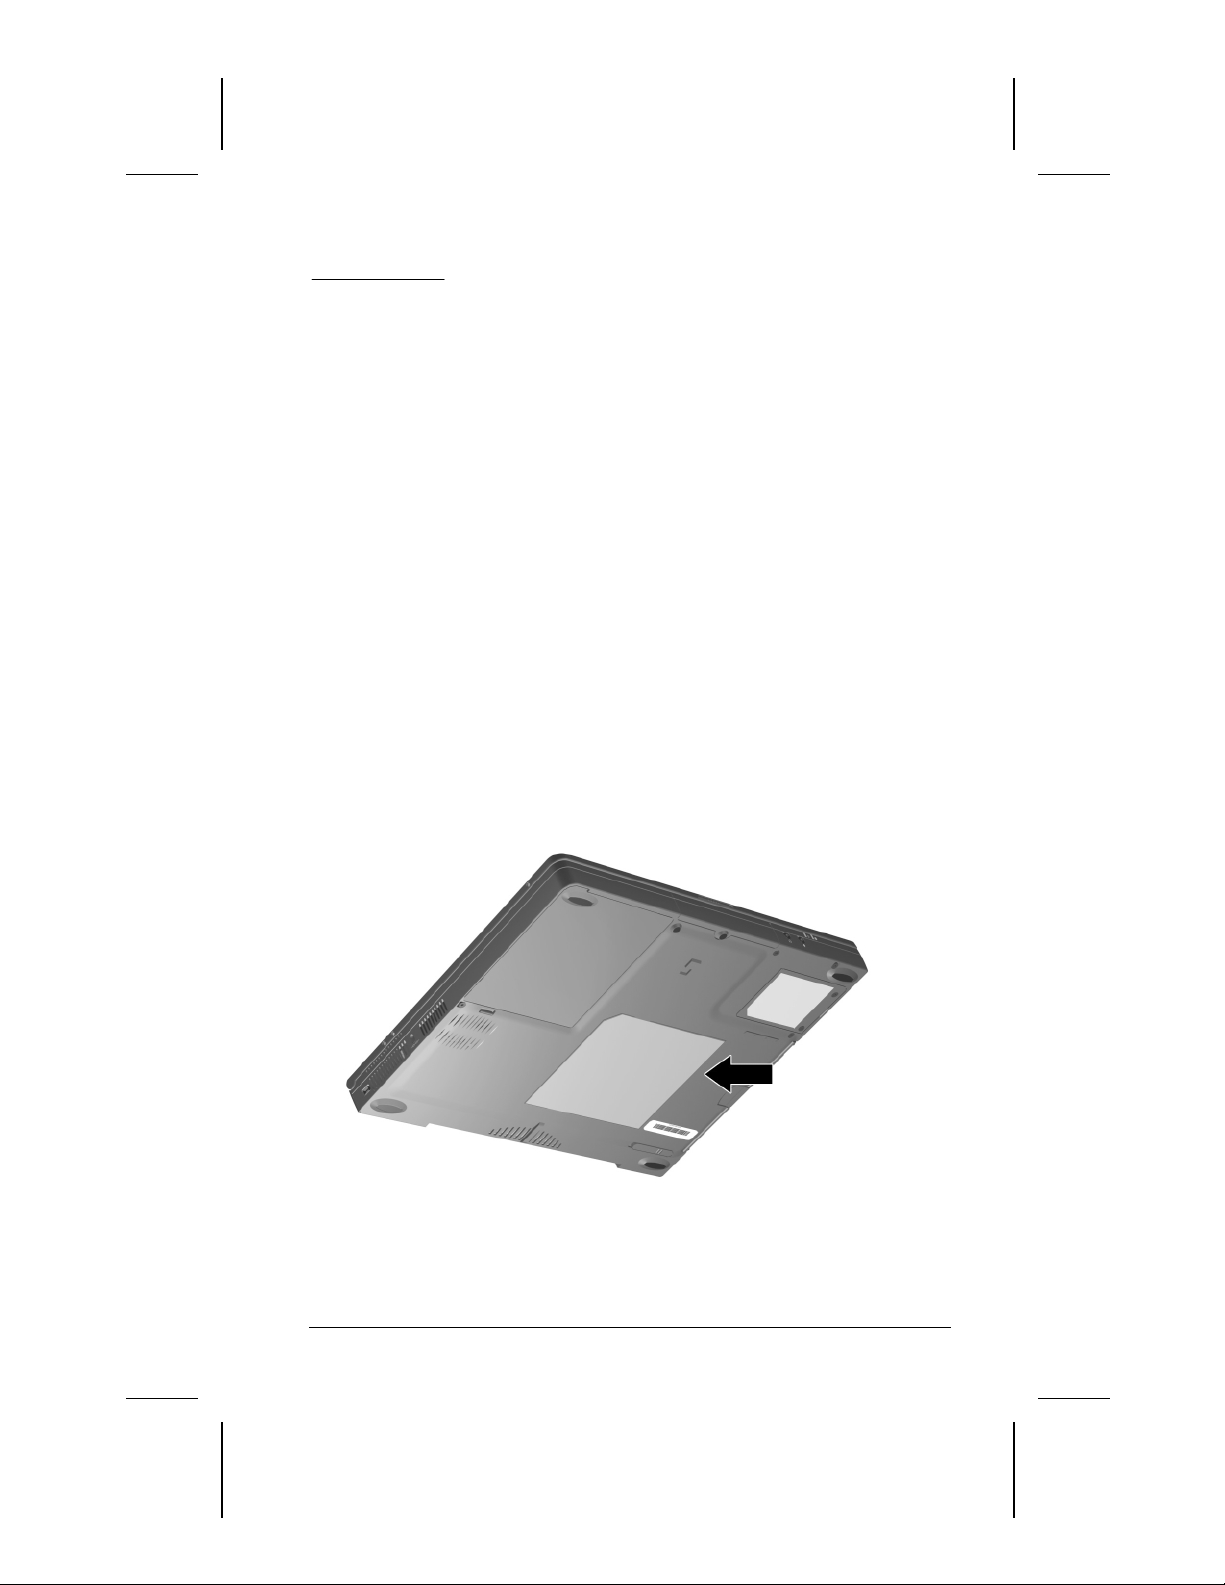
To locate your Product Key number
If an operating system guide with a Certificate of
❏
Authenticity on the cover is included with the computer,
the number is on the certificate.
If an operating system guide is not included with the
❏
computer, the number is on the Certificate of
Authenticity label on the bottom of the computer.
—
Setting Up the Computer 1-1
COMPAQ CONFIDENTIAL - NEED TO KNOW REQUIRED
Writer: Karen Williams Saved by: Integrity Group Saved date: 05/23/00 4:19 PM
Pages: 6 Words: 762 Template: c:\template\ref\ref.dot
Part Number: 168894-001 File name: cH01.doc
Page 5
2. Place the computer on a flat surface near an electrical outlet.
WARNING:
!
of the FCC Rules. For more Class B information, refer to the
Compaq Portable Product Reference Library
with the computer.
To reduce the risk of personal injury, electric shock, fire, or
damage to the equipment:
■
Do not set up the computer while it is docked in an optional
docking base.
■
Do not disable the power cord grounding plug. It is an
important safety feature.
■
Plug the equipment into a grounded (earthed) electrical outlet
that is easily accessible at all times.
This is a Class B digital device, pursuant to Part 15
CD-ROM included
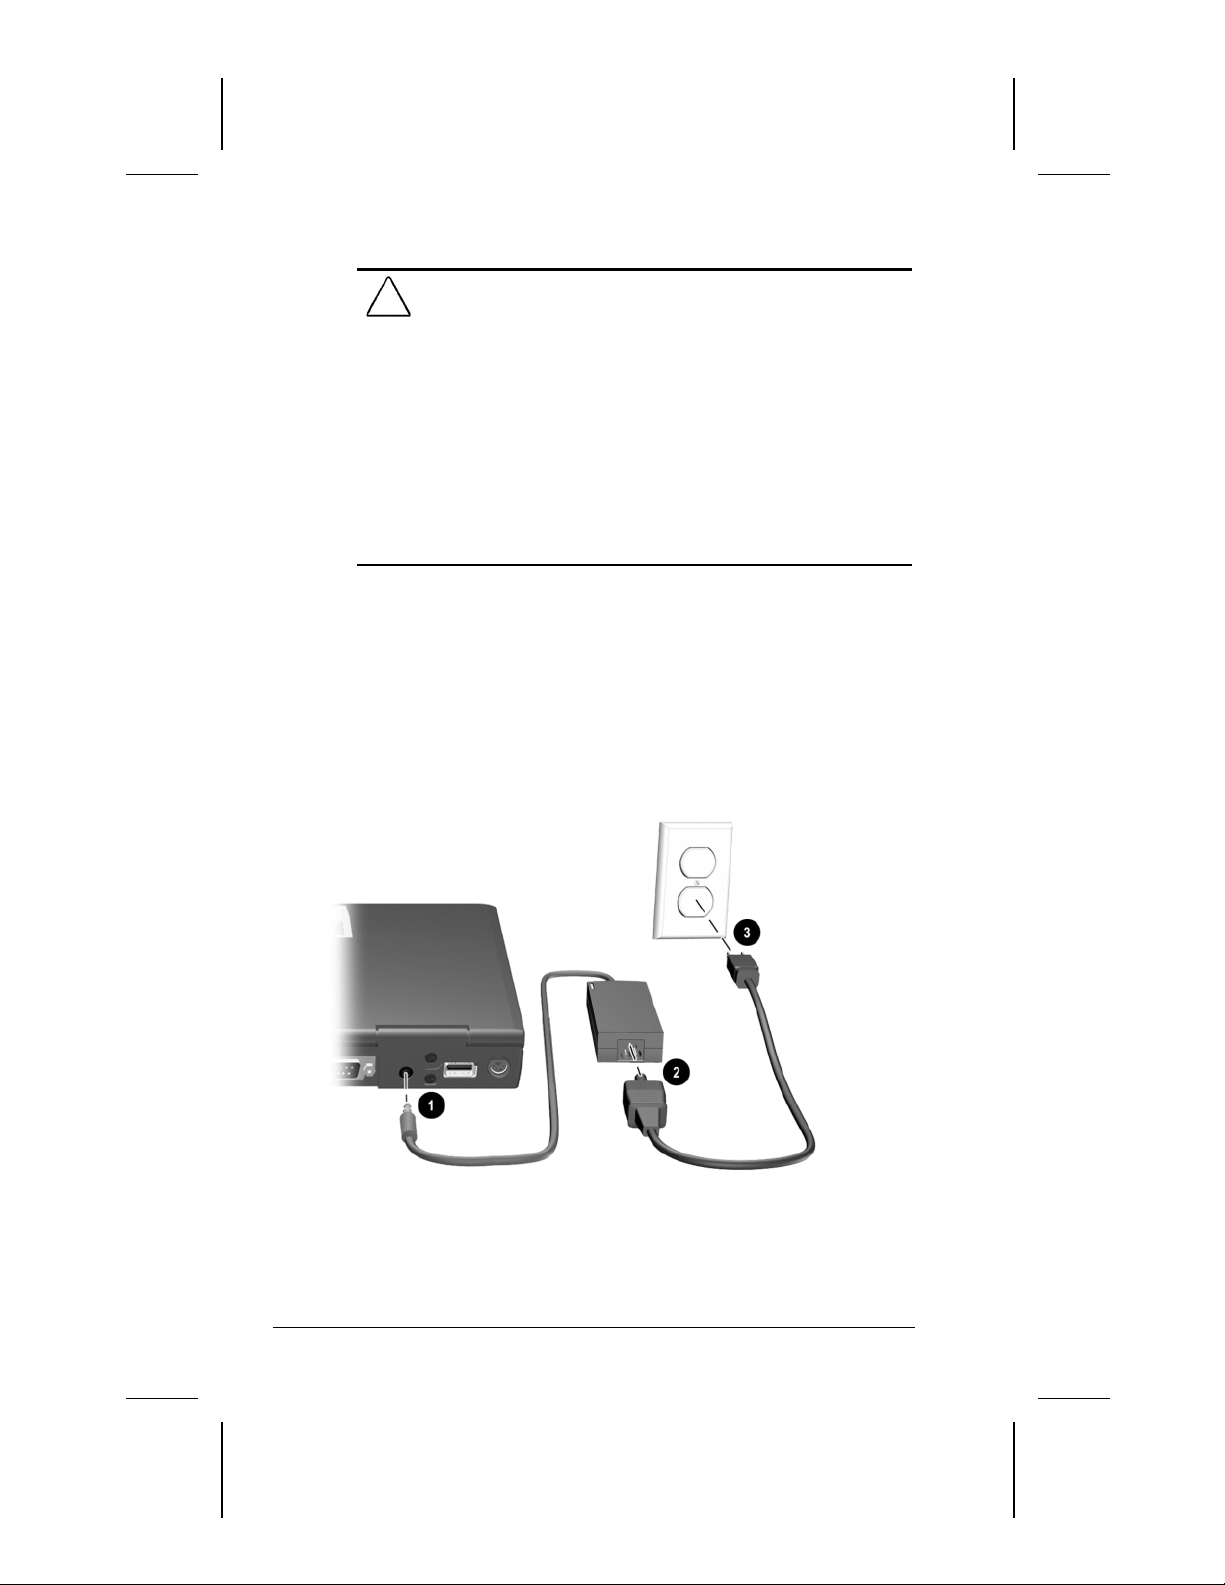
3. Connect the computer to external power.
To connect a model with an AC Adapter
First, plug the AC Adapter cable into the power connector
■
—
on the rear panel of the computer 1.
Second, plug the power cord into the AC Adapter 2.
■
Third, plug the other end of the power cord into an
■
electrical outlet 3.
1-2 Setting Up the Computer
COMPAQ CONFIDENTIAL - NEED TO KNOW REQUIRED
Writer: Karen Williams Saved by: Integrity Group Saved date: 05/23/00 4:19 PM
Part Number: 168894-001 File name: cH01.doc
Page 6
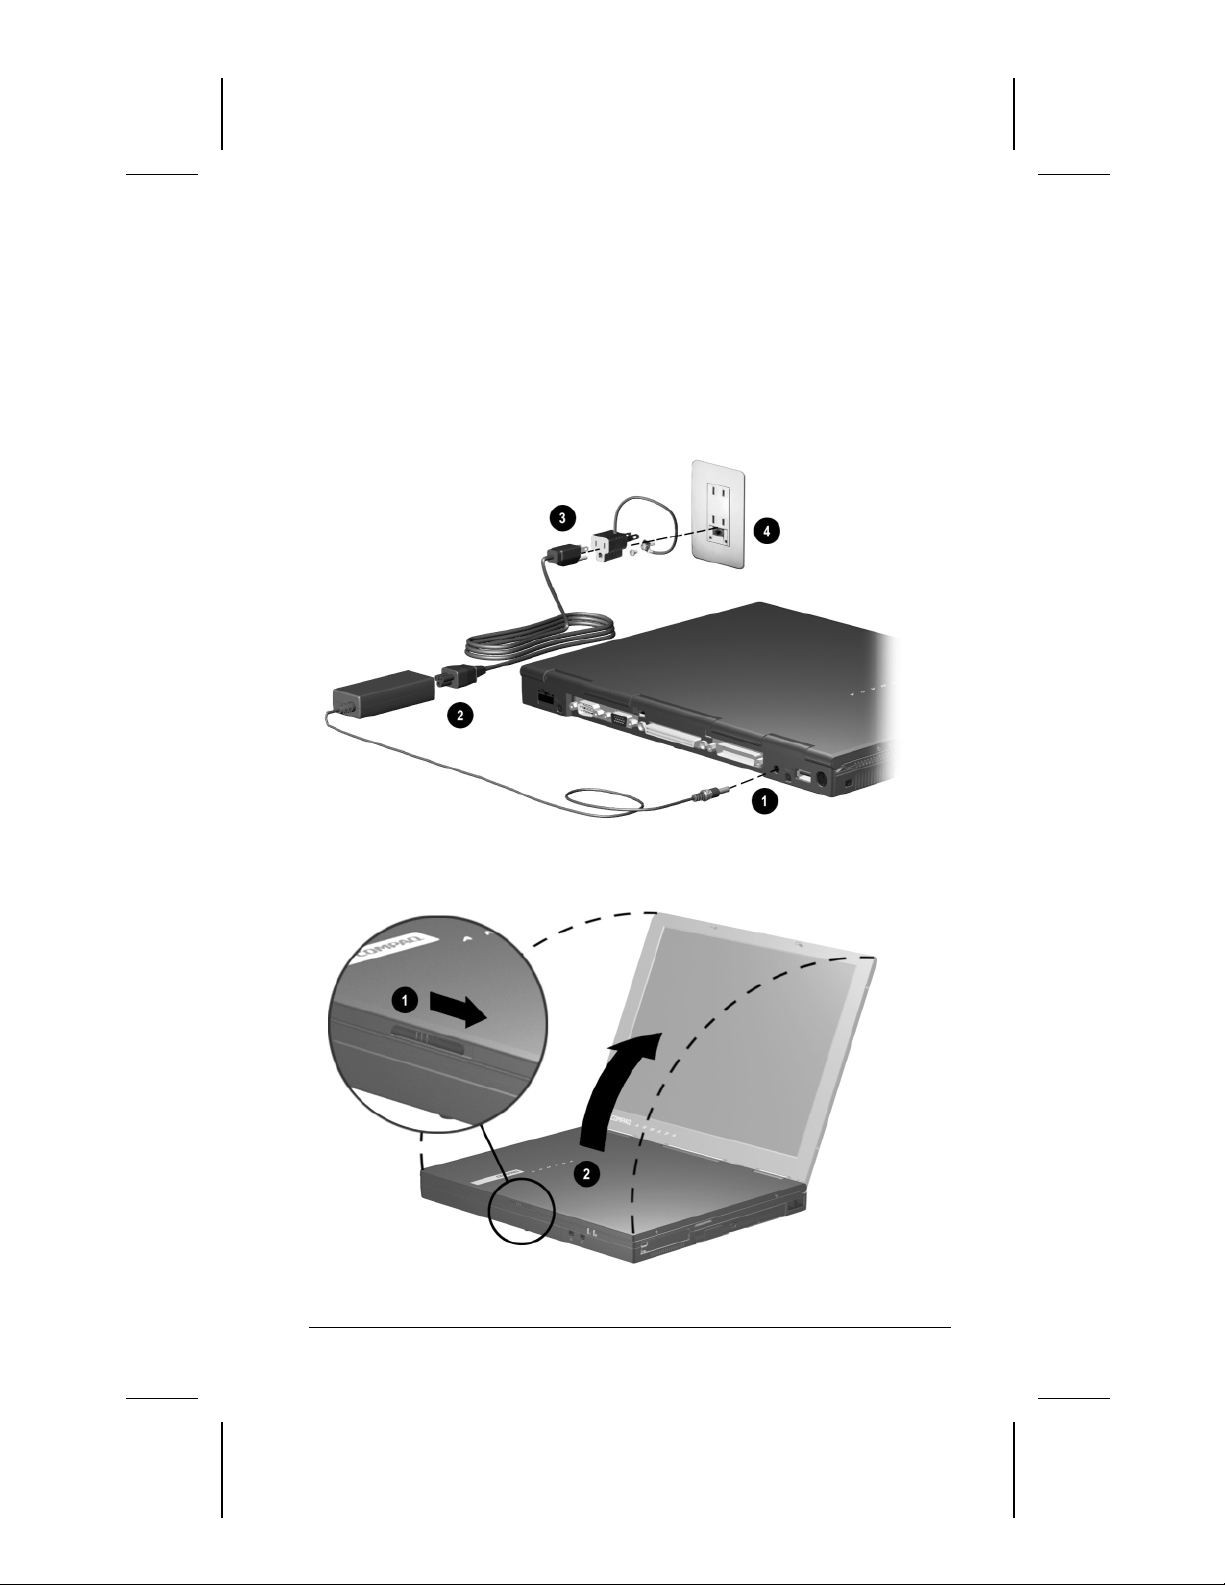
To connect a model with a 3-to-2-prong plug adapter
(Japan only
First, plug the AC Adapter cable into the power connector
■
)—
on the rear panel of the computer 1.
Second, plug the power cord into the AC Adapter 2.
■
Third, plug the 3-to-2-prong plug adapter into the power
■
cord 3, then into an electrical outlet 4.
4. Open the computer by sliding the display latch right 1 and
raising the display 2.
Setting Up the Computer 1-3
COMPAQ CONFIDENTIAL - NEED TO KNOW REQUIRED
Writer: Karen Williams Saved by: Integrity Group Saved date: 05/23/00 4:19 PM
Part Number: 168894-001 File name: cH01.doc
Page 7
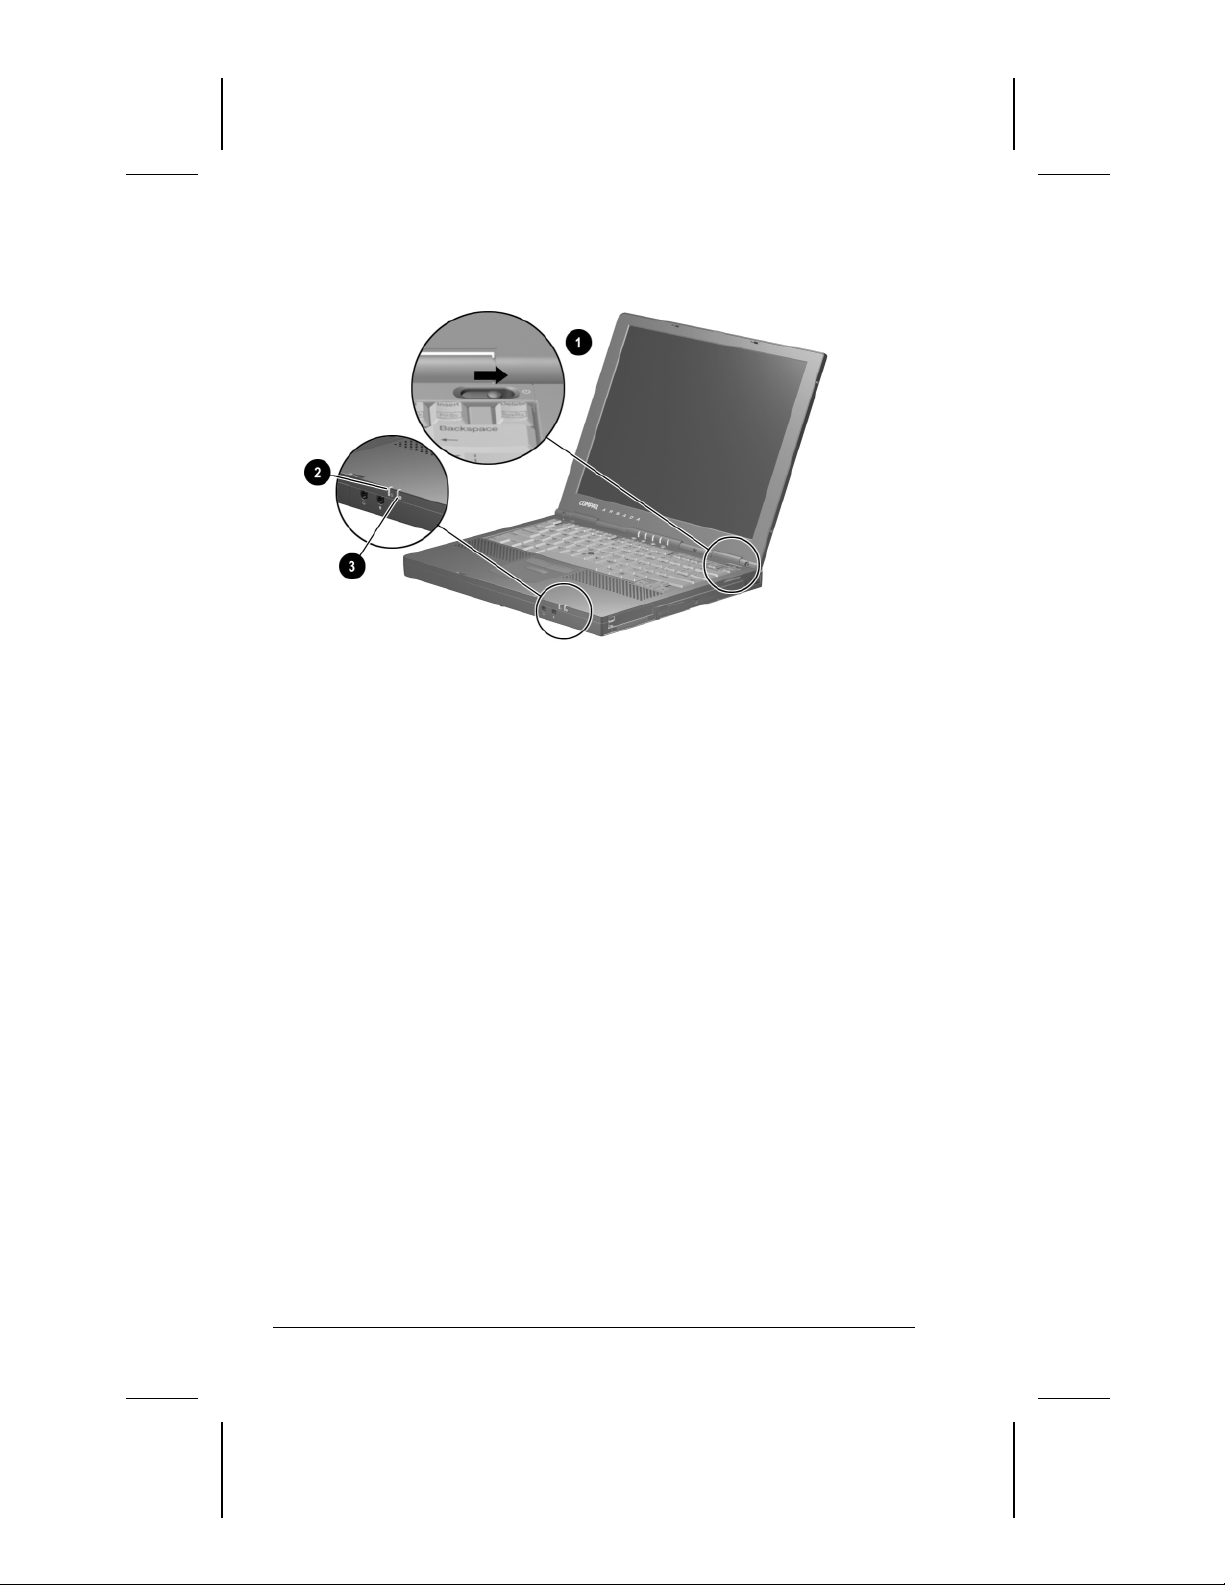
5. Turn on the computer by sliding, then releasing the power
switch 1.
When power is turned on
The power/suspend light 2 turns on.
■
The battery pack in the battery bay begins to charge and the
■
battery light 3 turns on. The battery light
Remains on while the battery pack is charging.
❏
Turns off when the battery pack is fully charged.
❏
You are prompted to begin software setup.
■
1-4 Setting Up the Computer
COMPAQ CONFIDENTIAL - NEED TO KNOW REQUIRED
Writer: Karen Williams Saved by: Integrity Group Saved date: 05/23/00 4:19 PM
Part Number: 168894-001 File name: cH01.doc
Page 8

6. Read the following, then set up the software as prompted.
An operating system available during initial setup is
■
enhanced by Compaq. When the operating system is
deleted, the enhancements are also deleted.
Once you begin software setup, you must complete the
■
entire process. Setup time varies by configuration from less
than 10 minutes to up to 60 minutes.
CAUTION:
correct drivers install during initial setup:
■
■
■
If you are prompted to select a language or operating
■
To prevent file corruption and ensure that the
Do not unplug the computer from the electrical outlet.
Do not shut down the computer.
Do not remove or insert a drive.
system, choose carefully.
IMPORTANT:
The operating system or languages that you do
not choose will be deleted from the computer and cannot
be restored during initial setup.
7. After initial setup is complete, you may want to do the
following:
Install any additional software.
■
Calibrate the battery pack.
■
IMPORTANT:
Although you can use a new battery pack that
has been fully charged to run the computer, the computer
cannot accurately report the amount of charge in the
battery pack until the battery pack has been calibrated. For
calibration information and instructions, refer to
“Calibrating a Battery Pack” in Chapter 4 of the
on the
Guide
Compaq Portable Product Reference Library
Reference
CD-ROM included with the computer.
For information about choosing a workspace and creating a
■
safe and comfortable work environment, refer to the
& Comfort Guide
Reference Library
COMPAQ CONFIDENTIAL - NEED TO KNOW REQUIRED
Writer: Karen Williams Saved by: Integrity Group Saved date: 05/23/00 4:19 PM
Part Number: 168894-001 File name: cH01.doc
on the
Compaq Portable Product
CD-ROM included with the computer.
Setting Up the Computer 1-5
Safety
Page 9

WARNING:
!
fire, or damage to the equipment:
■
Disconnect power from the equipment by unplugging the
To reduce the risk of personal injury, electric shock,
power cord from the electrical outlet.
■
Do not place anything on power cords or cables. Arrange
them so that no one may accidentally step on or trip over
them. Do not pull on a cord or cable. When unplugging from
the electrical outlet, grasp the cord by the plug.
1-6 Setting Up the Computer
COMPAQ CONFIDENTIAL - NEED TO KNOW REQUIRED
Writer: Karen Williams Saved by: Integrity Group Saved date: 05/23/00 4:19 PM
Part Number: 168894-001 File name: cH01.doc
Page 10
chapter
2
AKING A LOOK AT THE COMPUTER
T
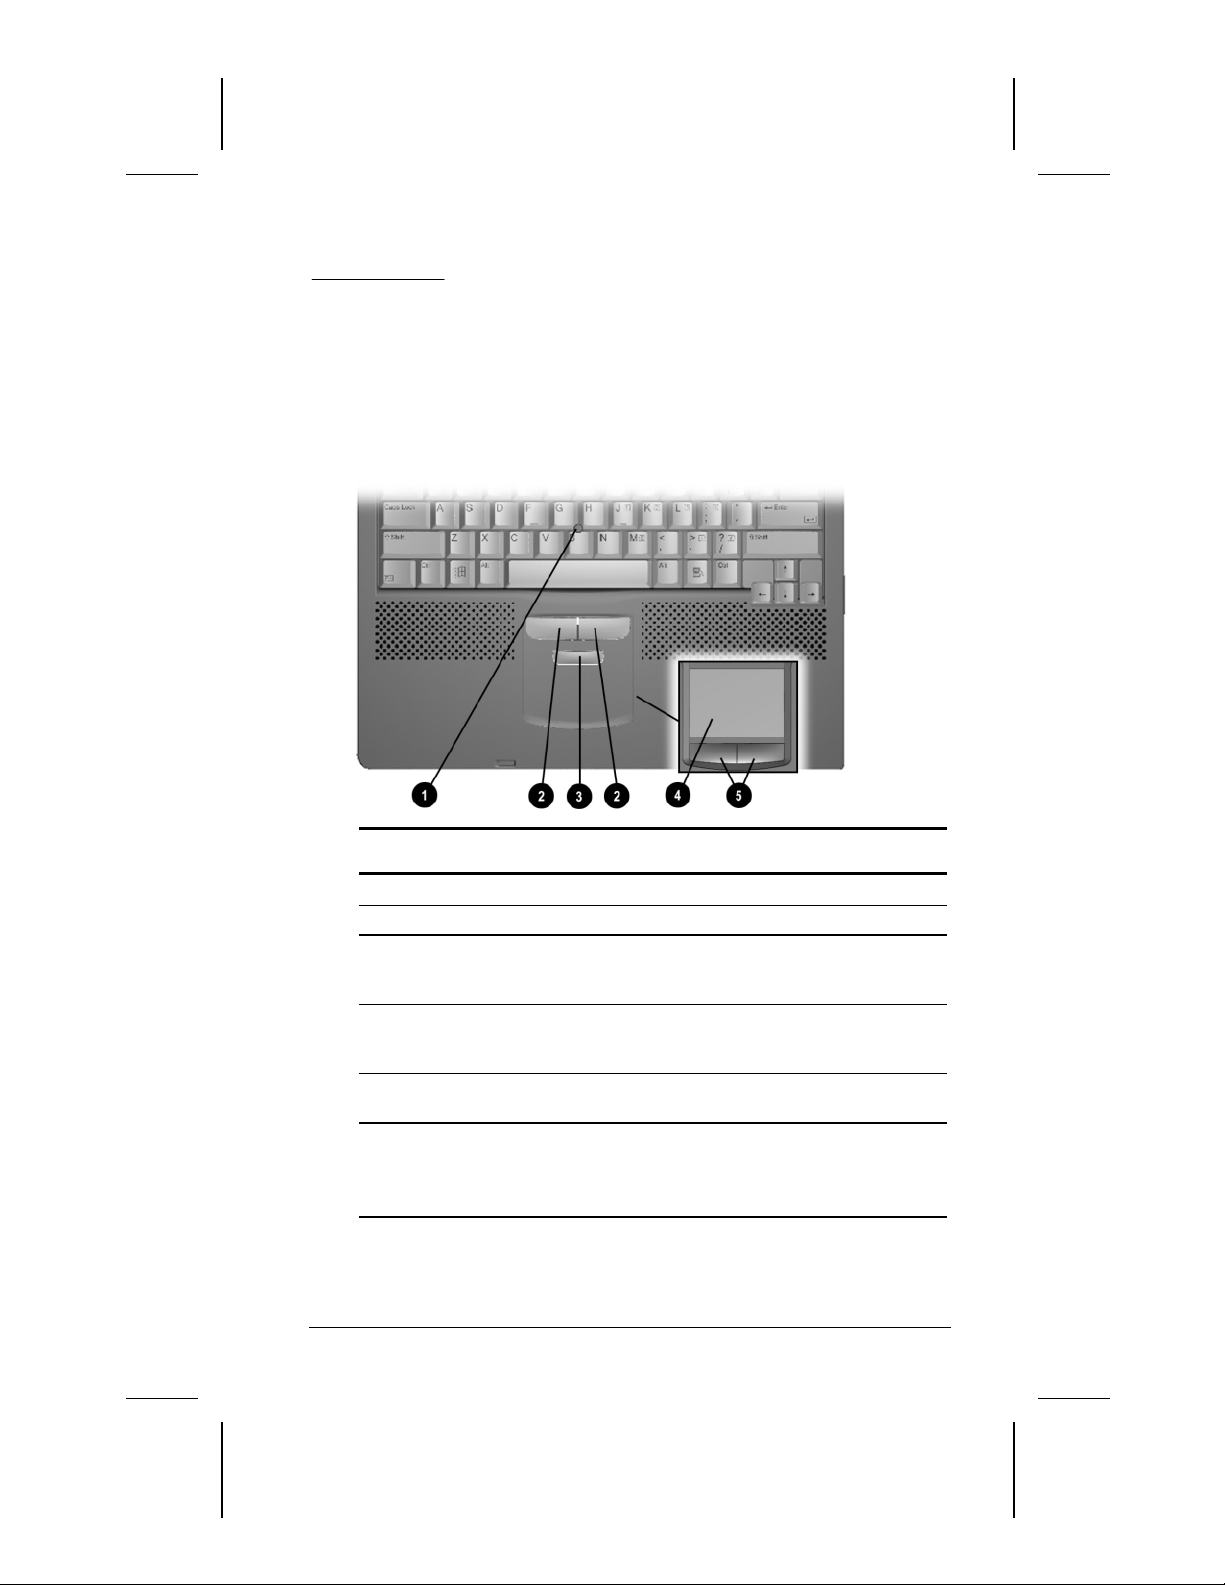
Pointing Device Components
Pointing Device Components
Component Function
Pointing stick Moves the pointer.
1
Left and right pointing-stick
2
buttons (pointing-stick
models only)
Scroll pointing-stick button
3
(pointing-stick models only)
TouchPad (TouchPad
4
models only)
Left and right TouchPad
5
buttons (TouchPad models
only)
Function like the left and right buttons
on an external mouse.
Can be set to scroll, magnify, or
function like the scroll button on an
external mouse.
Moves the pointer, selects, and
activates.
Function like the left and right buttons
on an external mouse.
Used with the TouchPad, the left
TouchPad button drags and highlights.
Taking a Look at the Computer 2-1
Writer: Karen Williams Saved by: Karen Williams Saved date: 05/30/00 12:58 PM
COMPAQ CONFIDENTIAL - NEED TO KNOW REQUIRED
Pages: 9 Words: 1207 Template: c:\template\ref\ref.dot
Part Number: 168894-001 File name: cH02.doc
Page 11
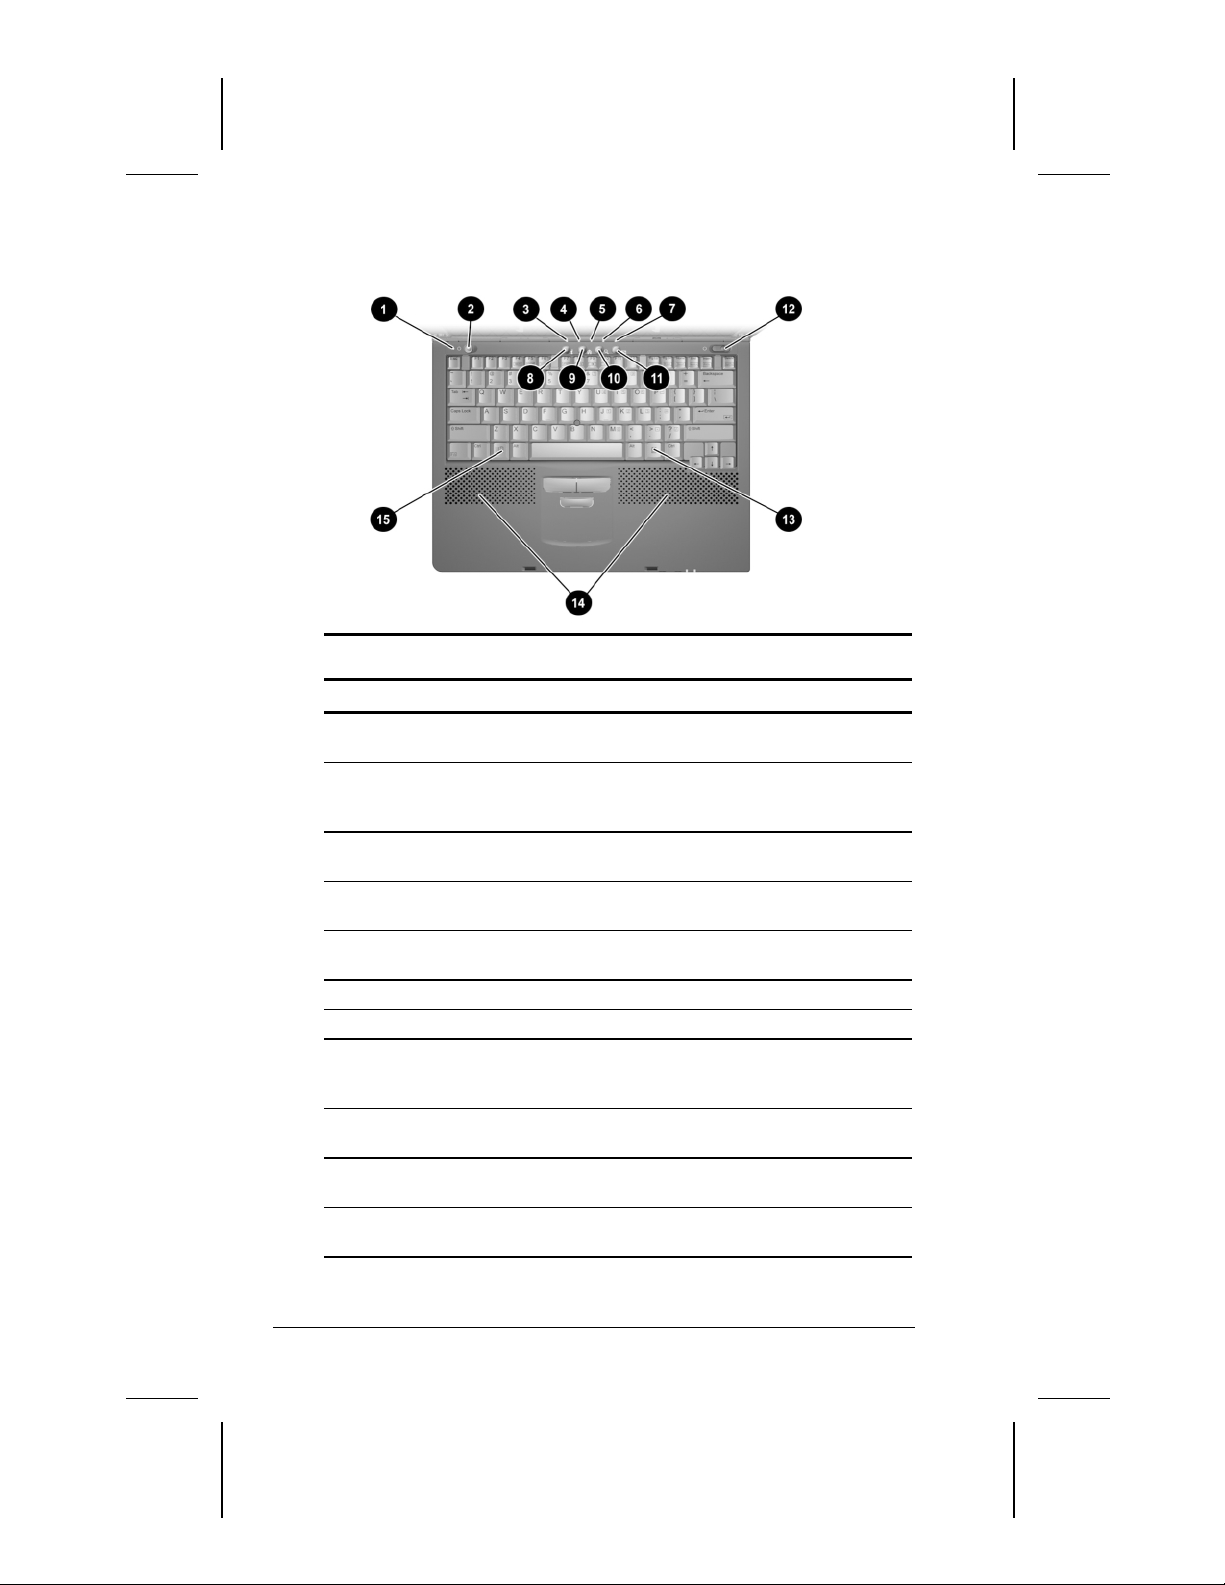
Top Components
Component Function
Display switch Turns off the computer display if the
1
Suspend button* Initiates and exits Suspend.** When
2
Hard drive light On: The primary hard drive is being
3
MultiBay drive light On: A drive in the MultiBay or the external
4
Num lock light On: Num lock is on and the embedded
5
Caps lock light On: Caps lock is on.
6
Scroll lock light On: Scroll lock is on.
7
Armada Information
8
Page Easy Access
Button***
MyArmada
9
Easy Access Button***
Search
:
Easy Access Button***
Email
;
Easy Access Button***
Top Components
computer is closed while on.
pressed with the Fn key, initiates
Hibernation.
accessed.
diskette drive bay is being accessed.
numeric keypad is enabled.
Direct link to Compaq Armada mobile
user information for quick answers to
your computer questions.
Opens a Web page you can personalize
and use as your Internet starting point.
Opens the AltaVista search engine
website.
Provides one-touch access to your
default email application.
Continued
2-2 Taking a Look at the Computer
Writer: Karen Williams Saved by: Karen Williams Saved date: 05/30/00 12:58 PM
COMPAQ CONFIDENTIAL - NEED TO KNOW REQUIRED
Part Number: 168894-001 File name: cH02.doc
Page 12
Top Components
Continued
Component Function
Power switch Turns the computer on or off or exits
<
Windows application key Displays a shortcut menu for item
=
Internal speakers Produce stereo sound.
>
Microsoft logo key Displays Windows Start menu.
?
*In Windows 98 the term sleep button replaces the term suspend
button.
**In Windows 98 and Windows 2000 Professional the term Standby
replaces the term Suspend.
***These programmable buttons function as described only after you
have set up Internet service with an Internet Service Provider (ISP).
Suspend.**
beneath the pointer.
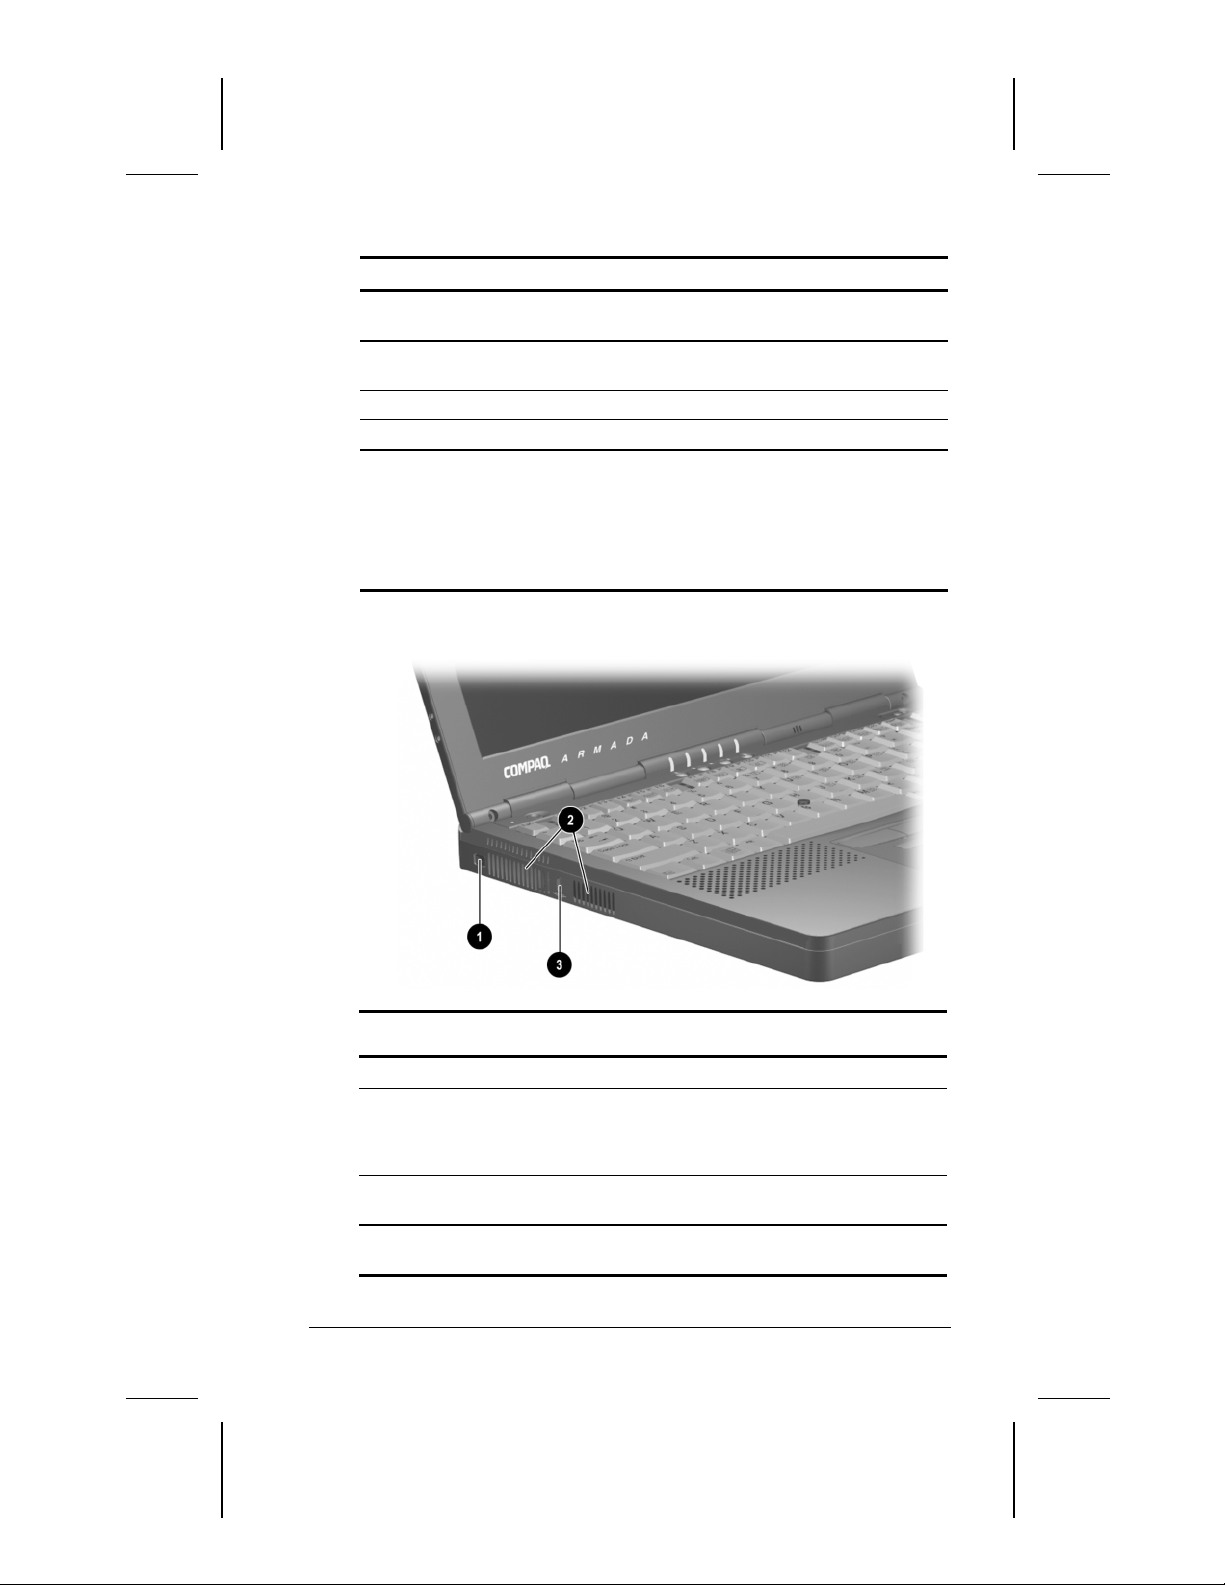
Left Side Components
Left Side Components
Component Description
Composite
1
video-out jack
Airflow vents (2) Allows airflow needed to cool computer
2
Security cable slot Attaches an optional security cable to the
3
Writer: Karen Williams Saved by: Karen Williams Saved date: 05/30/00 12:58 PM
COMPAQ CONFIDENTIAL - NEED TO KNOW REQUIRED
Part Number: 168894-001 File name: cH02.doc
Connects any video device such as a television,
VCR, camcorder, overhead projector, or video
capture card that supports video-in through a
composite video connector.
components. Do not block airflow vents.
computer.
Taking a Look at the Computer 2-3
Page 13
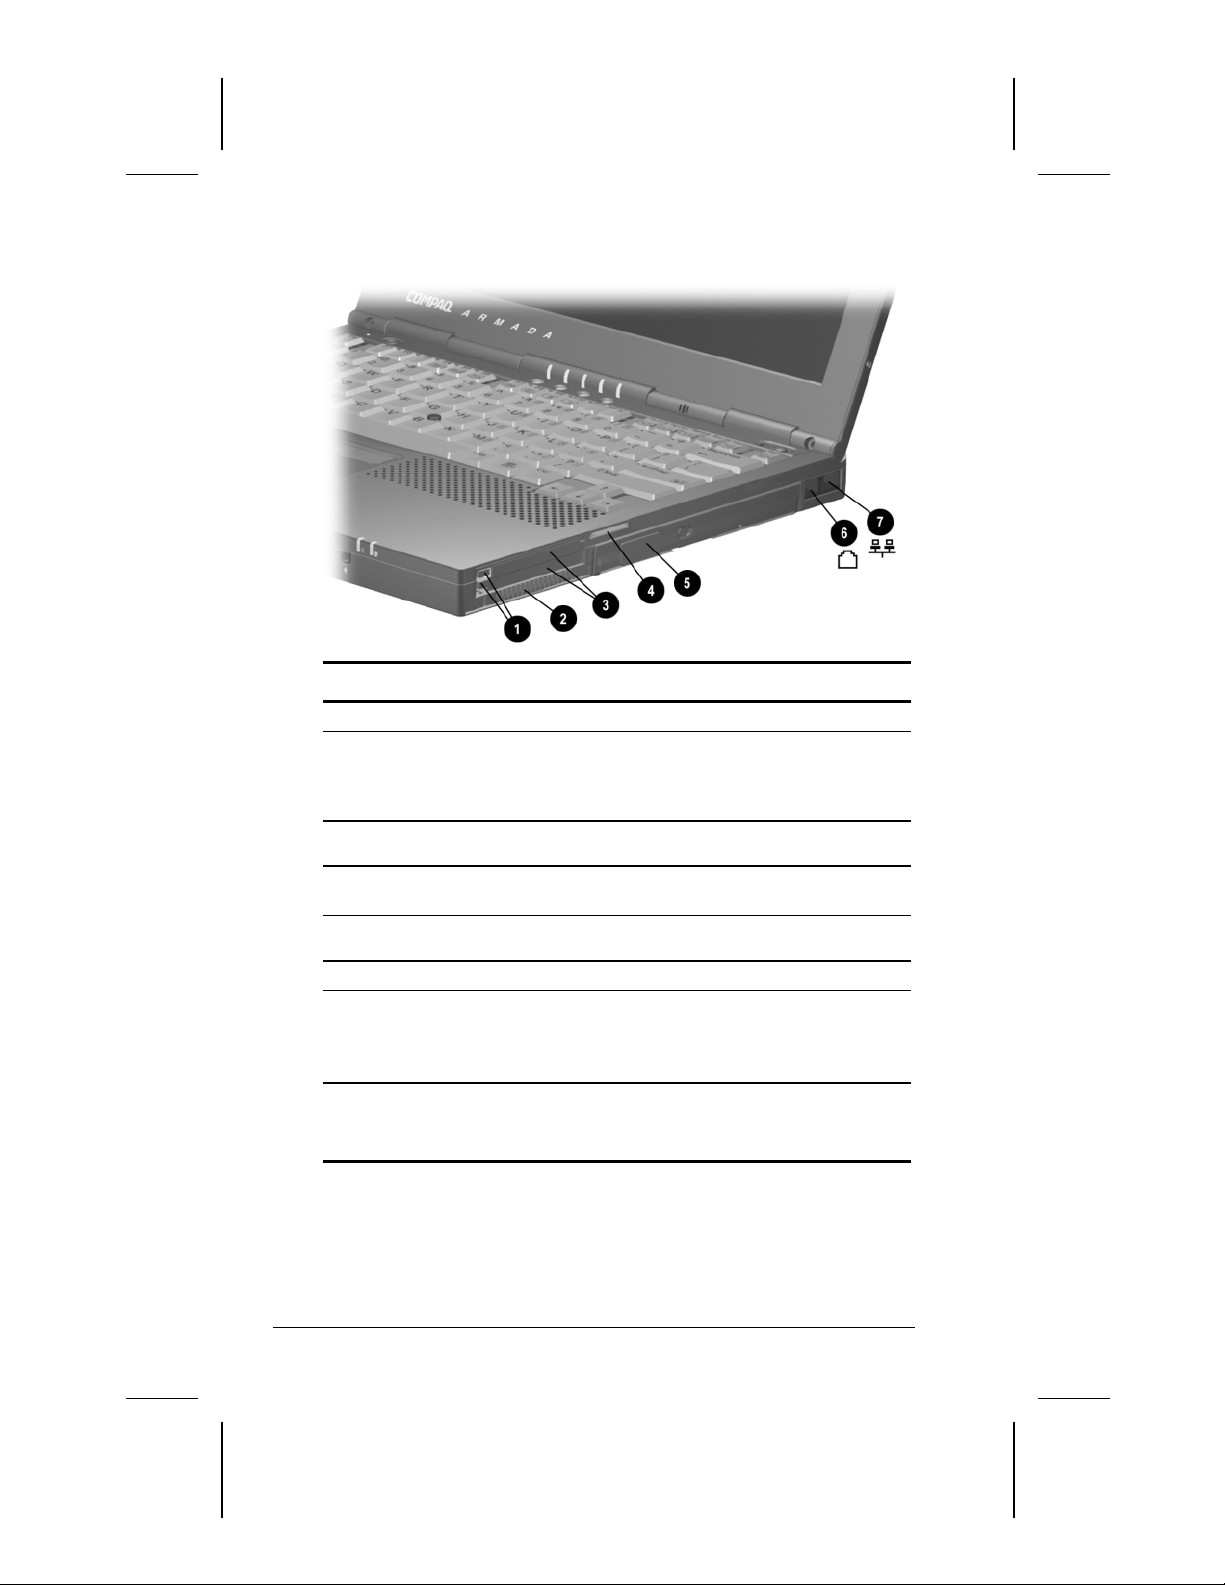
Right Side Components
Right Side Components
Component Description
PC Card eject buttons
1
(2)
Airflow vent
2
PC Card slots (2) Support 32-bit (CardBus) and 16-bit
3
Acoustic vent
4
MultiBay
5
RJ-11 jack (internal
6
modem models only)
RJ-45 jack (network
7
models only)
Top button: Ejects a PC Card from the
top PC Card slot.
Bottom button: Ejects a PC Card from the
bottom PC Card slot.
Allows airflow needed to cool computer
components. Do not block airflow.
PC Cards.
Allows airflow needed to cool sound
components. Do not block airflow.
Supports MultiBay devices.
Connects the modem cable or a standard
telephone cable to the computer.
A modem cable is included with
NOTE:
internal modem models.
Connects the network cable.
A network cable is included with
NOTE:
network models.
2-4 Taking a Look at the Computer
Writer: Karen Williams Saved by: Karen Williams Saved date: 05/30/00 12:58 PM
COMPAQ CONFIDENTIAL - NEED TO KNOW REQUIRED
Part Number: 168894-001 File name: cH02.doc
Page 14
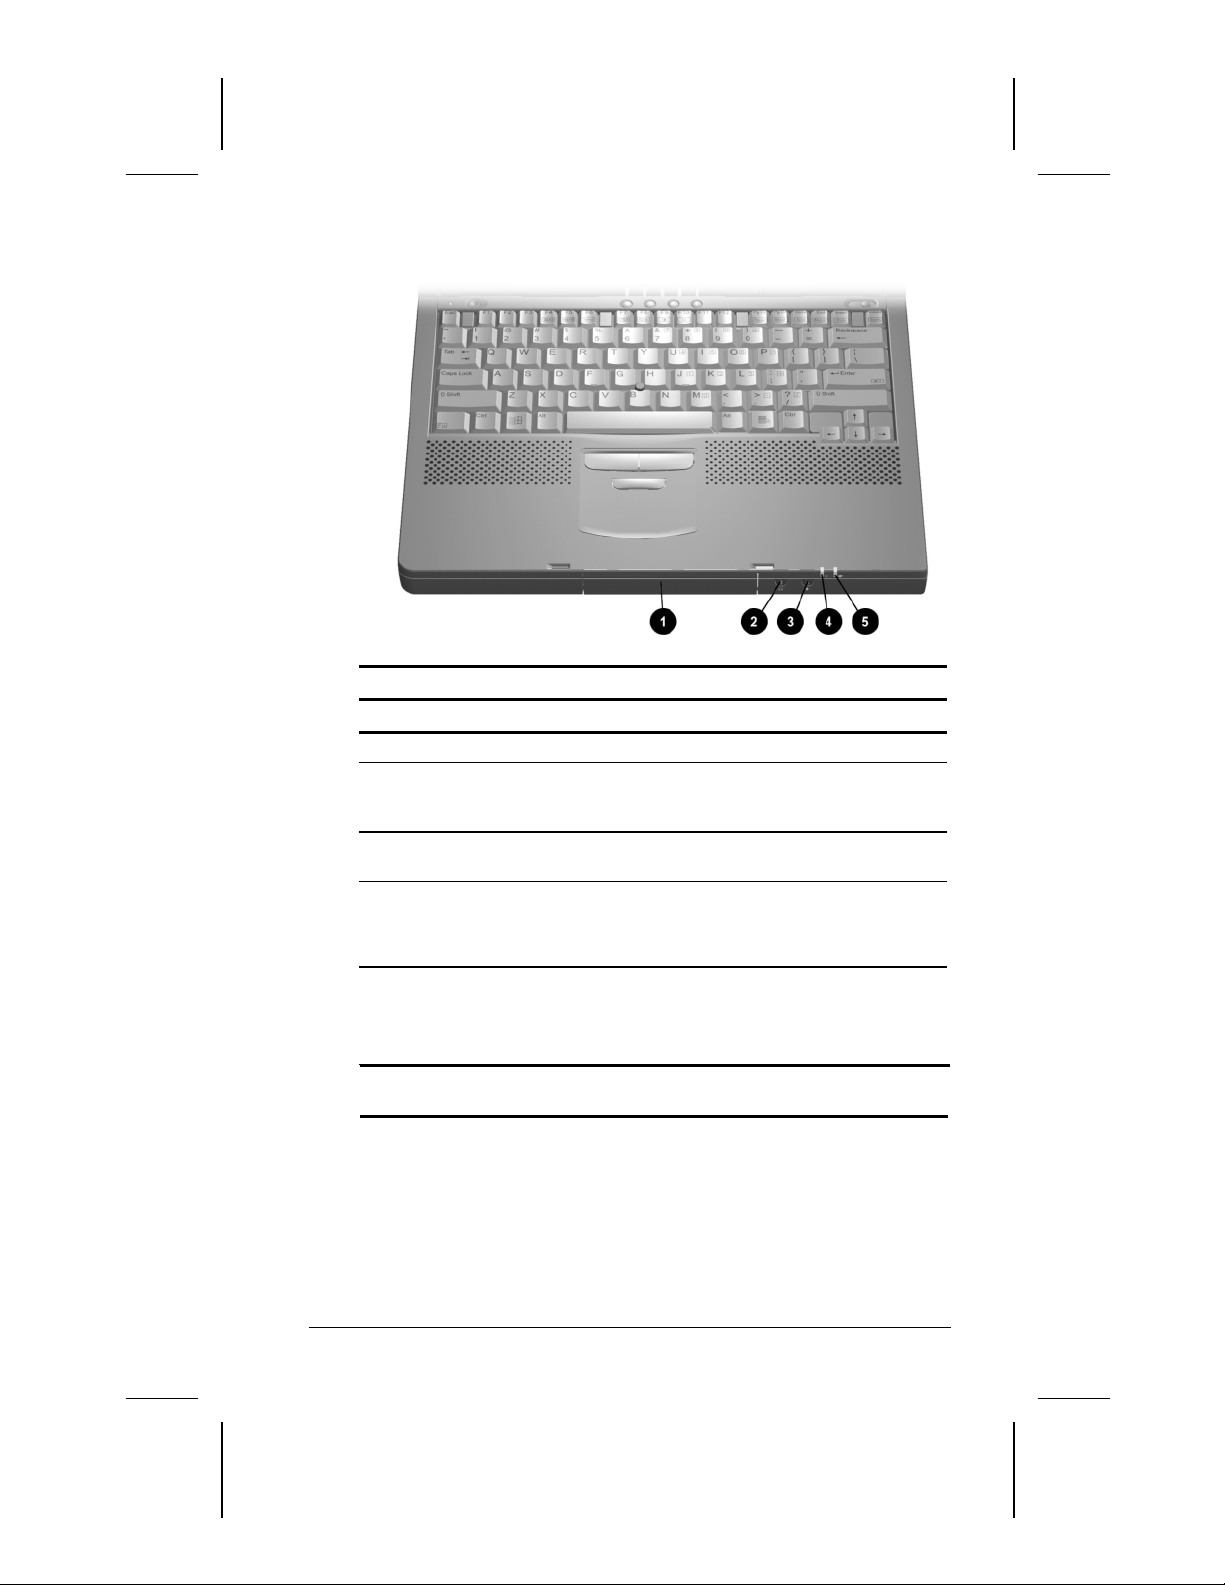
Front Components
Front Components
Component Description
1
Hard drive bay Holds the primary hard drive.
2
Stereo speaker/
headphone jack
3
Microphone jack Connects a single sound channel
4
Power/suspend light On: Power is turned on.
5
Battery light On: A battery pack is charging.
*In Windows 98 and Windows 2000 Professional the term Standby
replaces the term Suspend.
Connects external speakers,
headphones, headset, or television
audio.
microphone.
Off: Power is turned off.
Blinking: Computer is in Suspend.*
Blinking: A battery pack that is the only
available power source has reached a
low-battery condition.
Taking a Look at the Computer 2-5
Writer: Karen Williams Saved by: Karen Williams Saved date: 05/30/00 12:58 PM
COMPAQ CONFIDENTIAL - NEED TO KNOW REQUIRED
Part Number: 168894-001 File name: cH02.doc
Page 15
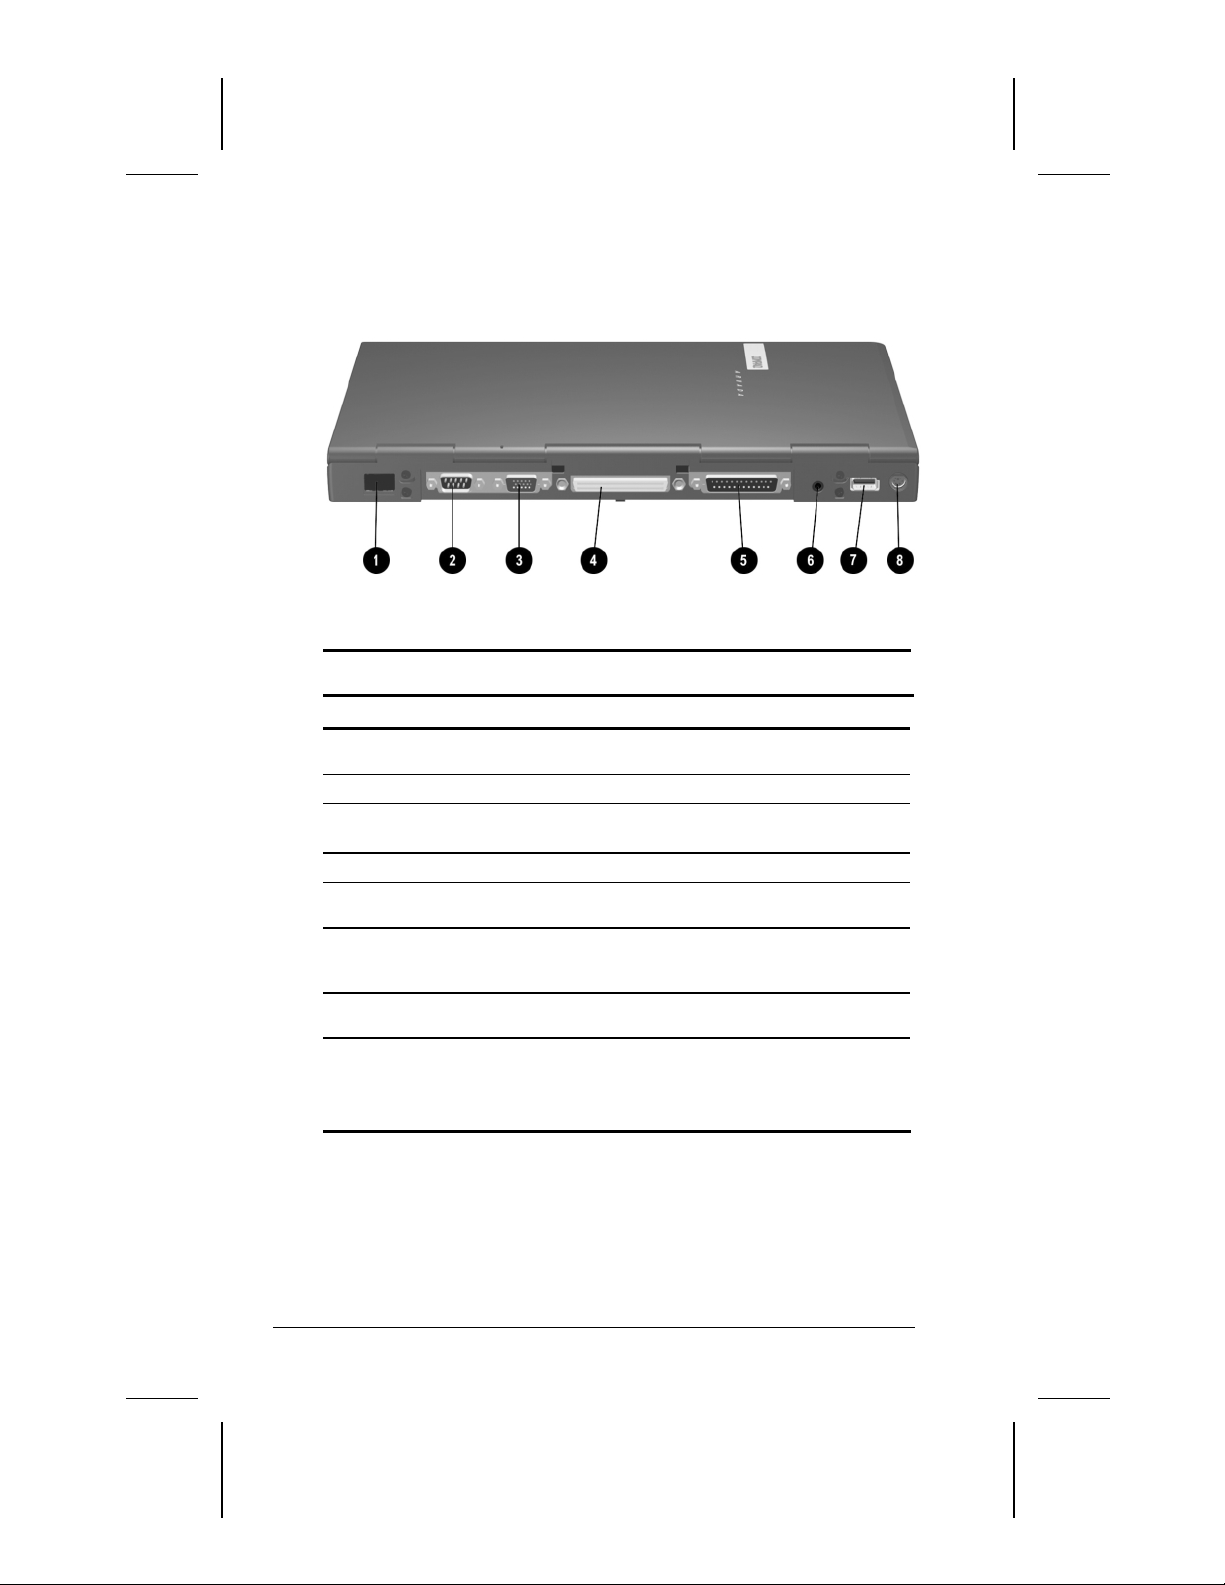
Rear Panel Components
Rear Panel Components
Component
1
Infrared port
2
Serial connector
3
External monitor
connector
4
Docking connector
5
Parallel connector
6
Power connector
7
USB port
8
Keyboard/mouse
connector
Description
Links another IrDA-compliant device for wireless
communication.
Connects a serial device.
Connects an external monitor or overhead
projector.
Connects the computer to a docking base.
Connects the external diskette drive assembly
or another parallel device.
Connects the AC Adapter or an optional Aircraft
Power Adapter or Automobile Power
Adapter/Charger to the computer.
Connects a Universal Serial Bus (USB) device
or hub.
Connects an external keyboard or a
PS/2-compatible external mouse.
To connect a keyboard and a mouse
NOTE:
simultaneously, use an optional Y-adapter.
2-6 Taking a Look at the Computer
Writer: Karen Williams Saved by: Karen Williams Saved date: 05/30/00 12:58 PM
COMPAQ CONFIDENTIAL - NEED TO KNOW REQUIRED
Part Number: 168894-001 File name: cH02.doc
Page 16
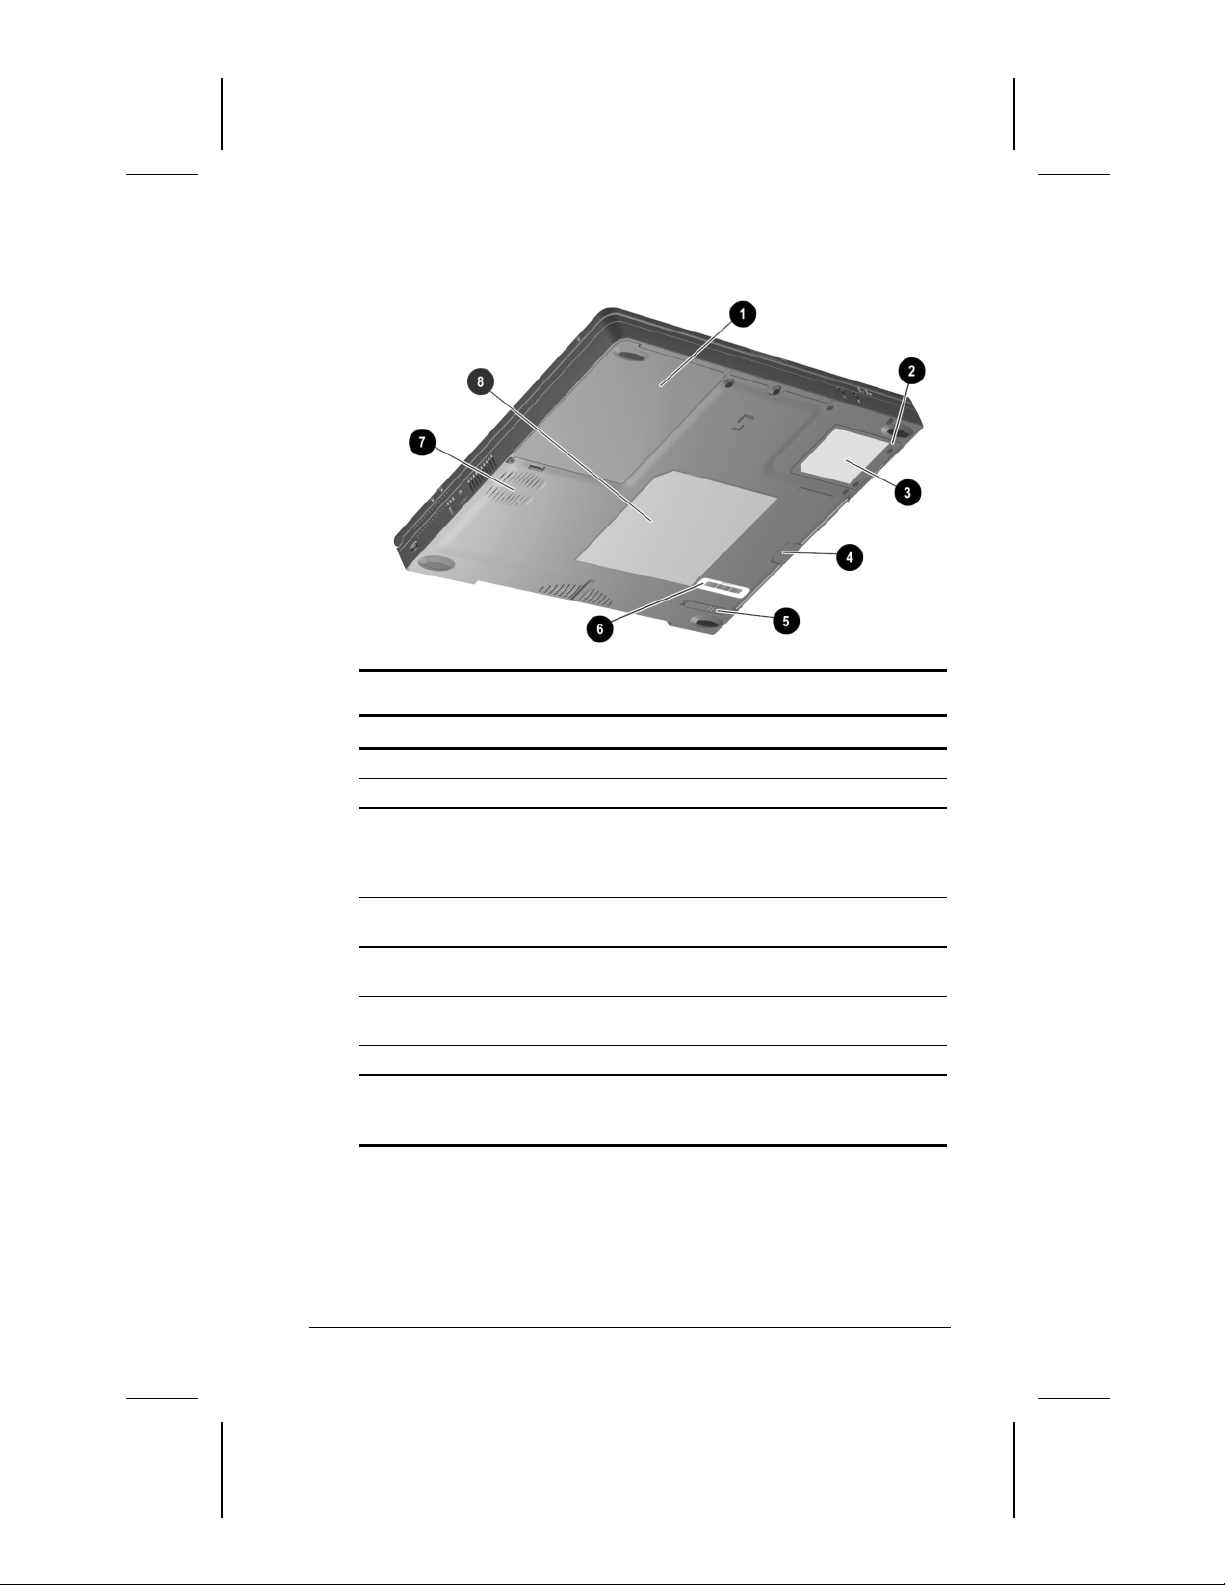
Bottom Components
Component Description
Battery bay Holds the primary battery.
1
Modem slot cover Covers the modem compartment.
2
Modem agency
3
approvals label
(internal modem
models only)
MultiBay notch Helps you remove a drive or battery pack
4
MultiBay release
5
latch
Serial number label Identifies the computer; needed when you
6
Fan Provides airflow to cool internal components.
7
Certificate of
8
Authenticity label
Bottom Components
Lists the countries in which the modem has
been approved for use. You may need this
information to use the modem while
traveling.
from the MultiBay.
Releases a removable drive or battery pack
from the MultiBay.
call Compaq customer support.
Contains your Product Key number, which
you may need to set up, update, or
troubleshoot your operating system.
Taking a Look at the Computer 2-7
Writer: Karen Williams Saved by: Karen Williams Saved date: 05/30/00 12:58 PM
COMPAQ CONFIDENTIAL - NEED TO KNOW REQUIRED
Part Number: 168894-001 File name: cH02.doc
Page 17
Additional Standard Components
The components included with the computer vary by geographic
region and the computer hardware configuration ordered.
The following illustration and table identify the standard
components included with most computer models.
Some components, such as the hard drive and the primary
NOTE:
battery pack, ship inside computer bays identified in previous
sections and are not included in this illustration.
2-8 Taking a Look at the Computer
Writer: Karen Williams Saved by: Karen Williams Saved date: 05/30/00 12:58 PM
COMPAQ CONFIDENTIAL - NEED TO KNOW REQUIRED
Part Number: 168894-001 File name: cH02.doc
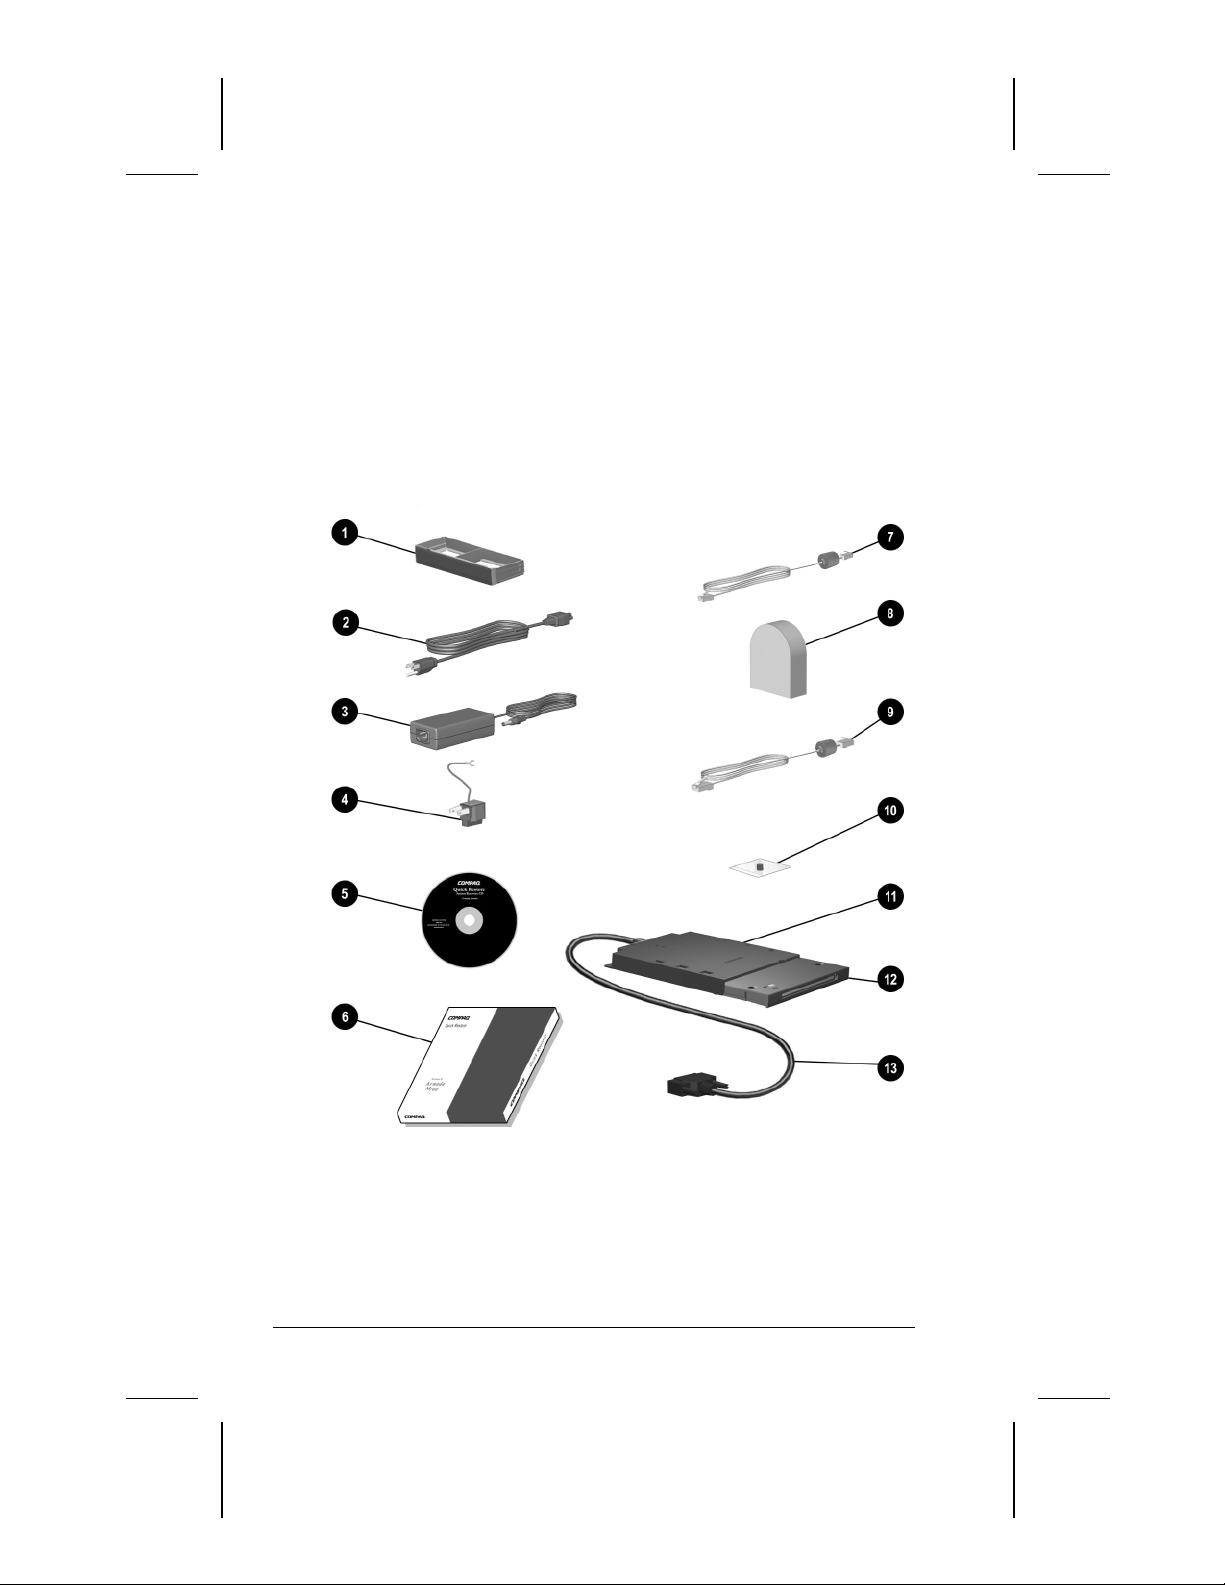
Page 18

Additional Standard Components
Component Function
Weight saver Can replace a MultiBay device to protect
1
Power cord
2
AC Adapter Converts AC power to DC power.
3
3-to-2-prong plug
4
adapter (Japan only)
Compaq Portable
5
Product Reference
Library CD-ROM
QuickRestore package Contains the software preinstalled on the
6
Modem cable (internal
7
modem models only)*
Country-specific modem
8
adapter (included with
internal modem models
by region as required)
Network cable (network
9
models only)*
Bag containing spare
:
pointing-stick cap
(pointing-stick models
only)
External diskette drive
;
bay
Diskette drive Can be used in the external diskette drive
<
External diskette drive
=
cable
the MultiBay and reduce computer weight.
Connects the AC Adapter to an AC
electrical outlet.
Adapts the power cord to a 2-prong
electrical outlet.
Contains:
Reference Guide.
■
Modem Commands.
■
Safety & Comfort Guide.
■
Safety and regulatory information.
■
computer.
Connects the modem to an RJ-11
telephone jack or to a country-specific
adapter.
Adapts the modem cable to a nonRJ-11
telephone jack.
Connects the computer to an Ethernet
network jack.
To replace a worn pointing-stick cap:
1. Turn off the computer.
2. Gently pull off the used rubber
pointing-stick cap, then push the
replacement cap into place.
Supports only a diskette drive (not an
Imation SuperDisk LS-120 drive).
bay or the MultiBay.
Connects the external diskette drive bay to
the computer.
*The modem cable has a 6-pin RJ-11 connector at each end. The
network cable has an 8-pin RJ-45 connector at each end.
Taking a Look at the Computer 2-9
Writer: Karen Williams Saved by: Karen Williams Saved date: 05/30/00 12:58 PM
COMPAQ CONFIDENTIAL - NEED TO KNOW REQUIRED
Part Number: 168894-001 File name: cH02.doc
Page 19

chapter
3
INDING INFORMATION
F
PDATES
, U
AND HELP
Using the Compaq Portable Product Reference Library CD-ROM
The
Compaq Portable Product Reference Library
instructions for using the CD-ROM are included with the
computer. The CD-ROM contains:
The
■
■
■
■
Reference Guide,
computer. The guide includes information about power
management, battery packs, modems, keyboard features,
MultiBay devices, and more.
Modem Commands,
Status registers, and result codes.
Safety and regulatory information that supplements the safety
and regulatory information in the
The
Safety & Comfort Guide,
safety information about setting up your work area.
a comprehensive guide for using the
which lists and describes AT commands,
Reference Guide.
which includes ergonomic and
CD-ROM and
,
Finding Information, Updates, and Help 3-1
COMPAQ CONFIDENTIAL - NEED TO KNOW REQUIRED
Writer: Karen Williams Saved by: Integrity Group Saved date: 05/30/00 1:00 PM
Pages: 14 Words: 2422 Template: c:\template\ref\ref.dot
Part Number: 168894-001 File name: cH03.doc
Page 20

Updating Your System
IMPORTANT:
Compaq recommends that you install all software
updates as they become available. However, if your system is
connected to a network, you may need to confer with your
Information Services department before updating system ROM.
Obtaining Update Information and Software
Checking the Compaq Website
You can obtain the latest available update information and
software from the Compaq website at http://www.compaq.com.
To ensure optimal computer performance, check the Compaq
website frequently for product news and software updates.
Registering with Info Messenger
You can set up a customized search of the Compaq website for
new information about the software and hardware in your system
by registering with Info Messenger.
■
To access Info Messenger
then select Info Messenger.
Once you have registered, you can
■
Run your customized search whenever you prefer from the
❏
Info Messenger page.
—Go to http://www.compaq.com,
Set Info Messenger to email you the information as it
❏
becomes available.
Subscribing to the Compaq Support Software CD
You can subscribe to the
contains detailed software support information and the software
and installation instructions for the latest device drivers, system
ROMs, and utilities.
To obtain ordering information
authorized dealer, reseller, or service provider or go to the
Compaq website at http://www.compaq.com.
3-2 Finding Information, Updates, and Help
COMPAQ CONFIDENTIAL - NEED TO KNOW REQUIRED
Writer: Karen Williams Saved by: Integrity Group Saved date: 05/30/00 1:00 PM
Part Number: 168894-001 File name: cH03.doc
Compaq Support Software CD
—Contact your Compaq
that
Page 21

Downloading Software Updates
You can obtain download software updates and installation
instructions from the Download page at the Compaq website. In
addition, each download includes a Readme.txt file that includes
installation instructions and other information.
Most software at the Compaq website is packaged in a
NOTE:
compressed file called a
SoftPaq.
system read only memory (ROM) is called a
A compressed file containing
ROMPaq
.
To download software updates from the Compaq website
1. Go to http://www.compaq.com/support/files.
2. From the Downloadables menu, select Portables.
3. Select your computer family, model, and operating system,
then select Locate Software.
4. Browse through the entries and ensure that you have the latest
software, especially the ROM and video updates.
To determine the version of the system ROM installed
NOTE:
on the computer, press
Fn+Esc.
The version of the Compaq
System BIOS is the version of your system ROM. If you are
unable to display the system ROM version with
Fn+Esc,
to “Using Computer Setup” in Chapter 4 of this guide.
5. Download any updates that are later than those currently on
your computer.
If you are downloading a ROMPaq, you will need a
NOTE:
formatted 1.44-megabyte or larger diskette and either a
diskette drive or an Imation SuperDisk LS-120 drive. A
ROMPaq can be installed from a diskette inserted into either
a diskette drive or a SuperDisk LS-120 drive, but cannot be
installed from a SuperDisk LS-120 disk.
Installing Software Updates
—
refer
Installing a Downloaded SoftPaq
1. Open and read the Readme.txt file included with the
download.
2. Follow the installation instructions in the Readme.txt file or
on the Compaq website.
Finding Information, Updates, and Help 3-3
COMPAQ CONFIDENTIAL - NEED TO KNOW REQUIRED
Writer: Karen Williams Saved by: Integrity Group Saved date: 05/30/00 1:00 PM
Part Number: 168894-001 File name: cH03.doc
Page 22

Installing a System ROM
The easiest way to install a system ROM is from a diskette.
A system ROM cannot be installed directly from any other
NOTE:
drive medium, including a SuperDisk LS-120 disk. A system
ROM can be installed directly from your hard drive only if you
start up the computer and perform the installation in MS-DOS.
The procedures for downloading a ROMPaq or loading a system
ROM from a Compaq CD-ROM include the extraction of the
installation files to a diskette.
Be sure you have removed the diskette containing the system
ROM from the drive before beginning the following procedure.
1. Shut down the computer.
2. Connect the computer to an electrical outlet.
CAUTION:
is docked or running on battery power. During the installation, do
not shut down or unplug the computer.
The system ROM will not install properly if the computer
3. Insert the diskette containing the system ROM into a diskette
drive or a SuperDisk LS-120 drive.
4. Turn on the computer, then follow the instructions on
the screen.
5. When a message on the screen confirms that the installation is
complete, remove the diskette from the drive.
6. To complete the installation, shut down the computer.
NOTE:
Do not
the computer immediately after installing
restart
a system ROM. To continue working after a message on the
screen reports that the installation is complete,
shut down
the
computer, wait 10 seconds, then turn on the computer.
3-4 Finding Information, Updates, and Help
COMPAQ CONFIDENTIAL - NEED TO KNOW REQUIRED
Writer: Karen Williams Saved by: Integrity Group Saved date: 05/30/00 1:00 PM
Part Number: 168894-001 File name: cH03.doc
Page 23

Restoring Software
If it ever becomes necessary, you can restore any or all of the
software for the operating system and language you selected
during initial setup. The software and instructions for restoring it
are in the QuickRestore package included with the computer.
CAUTION:
drivers install:
■
■
■
■
To prevent file corruption and ensure that the correct
Do not restore software while the computer is docked in a
docking base.
Plug the computer into an electrical outlet and do not unplug it.
Do not shut down the computer.
Do not remove or insert a drive.
Installing the Retail Version of an Operating System
The Microsoft Windows operating system available during the
original computer setup is enhanced by Compaq. The
enhancements provide additional functionality in such areas as
power management and the use of drives and PC Cards.
All Compaq enhancements can be obtained from the
Support Software CD
http:/www.compaq.com.
CAUTION:
retail version will result in the loss of all enhancements added by
Compaq. In some cases it may result in system lockups and loss of
unsaved information. Most preinstalled reference files, such as Help
files, are available only through a Windows interface. If the operating
system is removed from the computer, these reference files become
unavailable. In some cases, complete USB support is available only
through the Windows interface.
or from the Compaq Web site at
Replacing a Compaq-enhanced operating system with a
Compaq
Finding Information, Updates, and Help 3-5
COMPAQ CONFIDENTIAL - NEED TO KNOW REQUIRED
Writer: Karen Williams Saved by: Integrity Group Saved date: 05/30/00 1:00 PM
Part Number: 168894-001 File name: cH03.doc
Page 24

Obtaining Technical Support
Using the Compaq Support Forum
Personal technical support is available from the Compaq Support
Forum at the Compaq website. You can either browse the
postings as a guest, or register as a user and submit your own
questions. Compaq responds to questions within one business
day.
To access the Compaq Support Forum
—Go to the Compaq
website at http://www.compaq.com, then select Compaq
Support Forum.
Preparing to Call Technical Support
If you cannot solve a problem using the Compaq Support Forum
or the troubleshooting tips later in this guide, you may need to
call technical support.
To receive the fastest possible solution
items and information available when you call:
The computer.
■
Serial number and model description on the bottom of
■
the computer.
Purchase date on invoice.
■
Conditions under which the problem occurred.
■
Error messages that have displayed.
■
Type of printer connected.
■
Operating system version number and registration number.
■
To view these numbers, select Start!Settings
Control Panel!System!General tab.
System ROM version number and Computer Setup version
■
number. To view these version numbers,
1. Turn on or restart the computer.
2. When the blinking cursor appears upper-right on the
screen, press
F10.
3. Select File!System Information.
Configuration and diagnostics information.
■
To obtain, save, or print configuration and diagnostic
information, refer to “Using Compaq Diagnostics” in
Chapter 4 of this guide.
—Have the following
!
3-6 Finding Information, Updates, and Help
COMPAQ CONFIDENTIAL - NEED TO KNOW REQUIRED
Writer: Karen Williams Saved by: Integrity Group Saved date: 05/30/00 1:00 PM
Part Number: 168894-001 File name: cH03.doc
Page 25

Worldwide Telephone Numbers
To use the following table
—Locate your country. If your
location is not listed individually, refer to the “Support for the
following countries” section at the end of the table.
To view addresses and the latest telephone numbers
—Go to
the Compaq website at http://www.compaq.com, then select
Contact Us!Compaq offices worldwide.
Telephone numbers are subject to change without notice.
NOTE:
Worldwide Telephone Numbers
Country
Location
Argentina
General Information +54 14-704-3800
Technical Support +54 14-704-3800
Australia
General Information
Toll Free*
Technical Support* 1-300-368-369
PaqFax 61-2-9911-1982
Austria
General Information +43 01-546-521-552
Technical Support Business
Products
Technical Support +43 01-546-521-552
Belgium
General Information* +32 -02-717-4000
Compaq Care Center* +32 -02-717-4000
General Fax +32 -2-725-22-13
Ordering Backup Software +32 -2-716-96-78
Ordering Backup Software
Fax
Bolivia
Technical Support +51 1-211-2802
*Indicates toll-free domestic numbers not available internationally.
**Indicates telephone numbers not available internationally.
Code Telephone Number
61-2-9911-1999
1-300-368-369
+43 01-546-521-552
+32 -2-716-96-79
Continued
Finding Information, Updates, and Help 3-7
COMPAQ CONFIDENTIAL - NEED TO KNOW REQUIRED
Writer: Karen Williams Saved by: Integrity Group Saved date: 05/30/00 1:00 PM
Part Number: 168894-001 File name: cH03.doc
Page 26

Worldwide Telephone Numbers
Continued
Country
Location
Brazil
General Information +55 0800-550307
Compaq Customer Assistance
Service
Canada
General Information 905-707-1715
Technical Support*
For continuous quality
improvement, calls may be
monitored.
Customer Support* 1-800-263-5868
Ordering Backup Software* 1-800-952-7689
Central America and Caribbean
Technical Support +52 1 954 724 7900
Chile
General Information +56 -2-290-6550
Technical Support +56 -2-290-6550
China
General Information +86 800-810 9900
Customer Response
Center(CRC)
Technical Support +86 10 6207 7711
E-mail for Compaq ASE Training
BBS +86 10 6834 6709
Compaq Verification Center +86 10 6834 6739
Compaq Management Service
Center
Colombia
General Information +57 1-606-9191/9192
Technical Support +57 1-606-9191/9192
Czech Republic
General Information +420 -26 1108 158
Technical Support +420 -26 1108 158
*Indicates toll-free domestic numbers not available internationally.
**Indicates telephone numbers not available internationally.
Code Telephone Number
+55 0800-550307
1-800-OKCOMPAQ
(1-800-652-6672)
+86 800-810 6888
China.Training@compaq.com
+86 10 6831 3399-5873
Continued
3-8 Finding Information, Updates, and Help
COMPAQ CONFIDENTIAL - NEED TO KNOW REQUIRED
Writer: Karen Williams Saved by: Integrity Group Saved date: 05/30/00 1:00 PM
Part Number: 168894-001 File name: cH03.doc
Page 27

Worldwide Telephone Numbers
Continued
Country
Location
Denmark
General Information +45 -45-90-45-90
Technical Support +45 -45-90-45-45
QuickLine (BBS) +45 -45-90-45-50
Eastern Europe, the Middle
East, and Africa
General Information +353 1 402 68 33
Fax +353 1 402 68 55
Ecuador
General Information +59 1-954-724-7900
Technical Support +59 1-954-724-7900
Finland
General Information +358 203 206 720
Technical Support* +358 203 206 720**
QuickLine (BBS) 9-615-9870
France
General Information
Technical Support
QuickLine (BBS) RTC Standard 01 41 33 44 50**
QuickLine (BBS) (RNIS)
Germany
General Information
General Information Fax
All Products Fax
Desktop Hotline
*Indicates toll-free domestic numbers not available internationally.
**Indicates telephone numbers not available internationally.
Code Telephone Number
0803 804 805**
FTTC/mn)
0803 813 823** (0,99
FTTC/mn)
01 41 33 42 25**
+49
+49
+49
+49
0180/3 22 12 21**
(0,18 DM/min.)
0180/3 22 12 20**
(0,18 DM/min.)
0180/5 21 21 17**
(0,24 DM/min.)
0180/5 21 21 11**
(0,24 DM/min.)
(0,99
Continued
Finding Information, Updates, and Help 3-9
COMPAQ CONFIDENTIAL - NEED TO KNOW REQUIRED
Writer: Karen Williams Saved by: Integrity Group Saved date: 05/30/00 1:00 PM
Part Number: 168894-001 File name: cH03.doc
Page 28

Worldwide Telephone Numbers
Continued
Country
Location
Greece
General Information +30 1 6141 371
Technical Support +30 1 6141 731
Hong Kong
General Information 852-28681382
Technical Support 852-90116633
PaqFax 852-28671648
Hungary
General Information +36 1-458-5555
Technical Support (Level 1,
CS Engrs) Partner only)
Customer Support
(Carepaq/Non-Desktop Notebook)
Email Info.hu@compaq.com
India
General Information 91-80-337-4194
Email Info.hu@compaq.com
Ireland
General Information
Israel
General Information +972 - 9-959 3443
Fax +972 - 9-957 1332
Technical Support + 353 - 1-402-6833
Italy
General Information +39 -02 57-590-330
Technical Support
(Commercial monitor
products)
BBS +39 -2-89-200-222
Ordering Backup Software +39 -1-67-859-030
Fax Technical Support +39 -2-48-320-002
*Indicates toll-free domestic numbers not available internationally.
**Indicates telephone numbers not available internationally.
Code Telephone Number
+36 1-458-5402
+36 1-458-5520
01800 409 454**
+39 -02 48-230-023
Continued
3-10 Finding Information, Updates, and Help
COMPAQ CONFIDENTIAL - NEED TO KNOW REQUIRED
Writer: Karen Williams Saved by: Integrity Group Saved date: 05/30/00 1:00 PM
Part Number: 168894-001 File name: cH03.doc
Page 29

Worldwide Telephone Numbers
Continued
Country
Location
Japan
General Information*
Technical Support*
Dial Q2 Technical Support*
Ordering Backup Software* 0120-250589
Korea
General Information
Technical Support
Hotline
Luxembourg
General Information +352 49.13.02
Compaq Care Center* +352 49.12.34
Compaq Care Center Fax +352 49.12.34
General Fax +352 49.14.40
Ordering Backup Software +32 -2-716-96-78
Ordering Backup Software
Fax
Malaysia
General Information 603-758-2688
Technical Support 603-754-1155
Mexico
General Information 01-800-010-2020
Technical Support +52 01-800-010-2020
PaqFax +52 -5-229-7920
Netherlands
General Information +31 353-1214-1452
Customer Support
Compaq Customer Service
Center
Compaq Customer Service
Center Fax*
*Indicates toll-free domestic numbers not available internationally.
**Indicates telephone numbers not available internationally.
Code Telephone Number
0120-101589
0120-101589
0990-505589
822-347-0700
822-523-3575
822-080-902-7777
(12.5 Flux/min.)
+32 -2-716-96-79
0900-1681616**
(Dfl. 0.75/min.)
0900-8991116**
(Dfl. 0.40/min.)
Continued
Finding Information, Updates, and Help 3-11
COMPAQ CONFIDENTIAL - NEED TO KNOW REQUIRED
Writer: Karen Williams Saved by: Integrity Group Saved date: 05/30/00 1:00 PM
Part Number: 168894-001 File name: cH03.doc
Page 30

Worldwide Telephone Numbers
Continued
Country
Location
New Zealand
General Information 64-9-373-9165
Norway
General Information +47 -22-07-20-20
Technical Support +47 -22-07-20-20
Fax -22-07-20-21
Paraguay
Technical Support +54 1-14-704-3800
Peru
General Information +51 1-211-2802
Poland
General Information +48 -22-800 122 622
Technical Support +48 -22-64 00 000
Portugal
General Information +351 -21-412-8400
Technical Support +351 -21-412-2659
Fax +351 -21-412-0654
Russia
General Information
Technical Support
Singapore
Compaq Call Center 65-395-1111
General Information 65-395-1515/1151
Customer Support Center 65-395-3030
Fax 65-395-1010
South Africa
General Information +27 -11-320 4300
Technical Support +27 -11-483-3411
*Indicates toll-free domestic numbers not available internationally.
**Indicates telephone numbers not available internationally.
Code Telephone Number
+7 -095-967-1700
+7 -095-967-3138
or (toll number
0800 115338 - 0800 600 212
Continued
3-12 Finding Information, Updates, and Help
COMPAQ CONFIDENTIAL - NEED TO KNOW REQUIRED
Writer: Karen Williams Saved by: Integrity Group Saved date: 05/30/00 1:00 PM
Part Number: 168894-001 File name: cH03.doc
Page 31

Worldwide Telephone Numbers
Continued
Country
Location
Spain
General Information +34 -90-210-14-14
Technical Support Business
Products
Software Fulfillment +34 90-099-31-03
Fax +34 91-634-88-11
Sweden
General Information +46 -8-730 01 50
Sales Information +46 -8-730 01 50
Technical Support, charged
calls*
FaqPax +46 -8-730 01 62
QuickLine (BBS) +46 -8-730 01 62
Switzerland
InfoLine
Equipment Hotline
(Monitors, Desktop and
Notebooks)
QuickLine Bulletin Board
Ordering Backup Software
Taiwan
General Information 886-2-2735-1000
Technical Support 886-2-2578-1010
Compaq Care Center 886-2-2393-9376
Code Telephone Number
+34 91-590-93-31
729-36 20 00**
(75 SEK per call)
+41
+41
+41
+41 01/8 38 24 21
01/801 4222**
01/838 22 22 (German)
01/838 22 23 (French)
0800 556 206**
Thailand
General Information 66-2-679-6222
Turkey
General Information +90 2163918430 /100
Technical Support +90 800-2611917
Customer Support +90 2163918430 /362
Fax +90 2163918428
*Indicates toll-free domestic numbers not available internationally.
**Indicates telephone numbers not available internationally.
Finding Information, Updates, and Help 3-13
COMPAQ CONFIDENTIAL - NEED TO KNOW REQUIRED
Writer: Karen Williams Saved by: Integrity Group Saved date: 05/30/00 1:00 PM
Part Number: 168894-001 File name: cH03.doc
Continued
Page 32

Worldwide Telephone Numbers
Continued
Country
Location
United Arab Emirates (Dubai)
General Information +97 14-818100
United Kingdom
General Information
General Information 141 270 4000
FaxPaq 181 332 3550
QuickLine (BBS) 181 332 9499
United States
Technical Support*
For continuous quality
improvement, calls may be
monitored.
General Information* 1-800-345-1518
PaqFax* 1-800-345-1518
Download Facility (modem
access only)
Ordering Backup Software or
replacement user guides*
Uruguay
Technical Support -1-14-704-3800
Venezuela
General Information -2-955-3800/3900
Technical Support -2-955-3800/3900
Support for the following countries:
Albania, Algeria, Armenia, Azerbaijan, Belarus, Benin, Bosnia,
Bulgaria, Burkina Faso, Cameroon, Chad, Croatia, Cyprus, Estonia,
Georgia, Ghana, Guinea, Gabon, Ivory Coast, Kasakhstan,
Kyrgztan, Latvia, Lithuania, Macedonian, Malta, Mauritania,
Moldavia, Morocco, Niger, Nigeria, Romania, Senegal, Sierra Leone,
Slovakia, Togo, Tunisia, Ukraine, Uzbekistan, Yugoslavia
Customer Support -1-402 68 33
Customer Support Fax -1-402 68 55
Customer Support BBS - 89 - 9933 1380
Customer Support Email
Address bdgsupport.irdub@compaq.com
*Indicates toll-free domestic numbers not available internationally.
**Indicates telephone numbers not available internationally.
Code Telephone Number
845 270 4000**
1-800-OK-COMPAQ
(1-800-652-6672)
1-281-518-1418
1-800-952-7689
3-14 Finding Information, Updates, and Help
COMPAQ CONFIDENTIAL - NEED TO KNOW REQUIRED
Writer: Karen Williams Saved by: Integrity Group Saved date: 05/30/00 1:00 PM
Part Number: 168894-001 File name: cH03.doc
Page 33

chapter
4
OMPUTER SETUP AND
C
IAGNOSTICS UTILITIES
D
Selecting Computer Setup or Compaq Diagnostics
The computer features two Compaq system management utilities:
■
Computer Setup
utility that can be used even when your operating system is
not working or will not load. This utility includes settings that
are not available in Windows.
■
Compaq Diagnostics
utility that is used within your Windows operating system.
Use this utility whenever possible to
Display system information.
❏
Test system components.
❏
Troubleshoot a device configuration problem in
❏
Windows 95, Windows 98, or Windows 2000 Professional.
It is not necessary to configure a device connected
NOTE:
to a USB connector on the computer or an optional
docking base.
is a system information and customization
is a system information and diagnostic
Computer Setup and Diagnostics Utilities 4-1
COMPAQ CONFIDENTIAL - NEED TO KNOW REQUIRED
Writer: Karen Williams Saved by: Integrity Group Saved date: 05/23/00 5:02 PM
Pages: 7 Words: 1282 Template: c:\template\ref\ref.dot
Part Number: 168894-001 File name: cH04.doc
Page 34

Using Computer Setup
Information and settings in Computer Setup are accessed from the
File, Security, or Advanced menus:
1. Turn on or restart the computer. When the blinking cursor
appears upper-right on the screen, press
To change the language, press
■
To view navigation information, press
■
To return to the Computer Setup menu, press
■
2. Select the File, Security, or Advanced menu.
3. To close Computer Setup and restart the computer
Select File!Save Changes and Exit, then press
■
or
Select File!Ignore Changes and Exit, then press
■
F2
F10
.
.
F1
.
Esc
.
Enter
Enter
.
.
4. When you are prompted to confirm your action, press
Selecting from the File Menu
Selecting from the File Menu
Select To Do This
System information
Save to floppy Save system configuration settings to a
Restore from floppy Restore system configuration settings from
Restore defaults Replace configuration settings in
Ignore changes and exit Cancel changes entered during the current
Save changes and exit Save changes entered during the current
View identification information about
■
the computer, a docking base, and
any battery packs in the system.
View specification information
■
about the processor, memory and
cache size, and system ROM.
diskette.
a diskette.
Computer Setup with factory default
settings. (Identification information is
retained.)
session, then exit and restart the
computer.
session, then exit and restart
the computer.
F10
.
4-2 Computer Setup and Diagnostics Utilities
COMPAQ CONFIDENTIAL - NEED TO KNOW REQUIRED
Writer: Karen Williams Saved by: Integrity Group Saved date: 05/23/00 5:02 PM
Part Number: 168894-001 File name: cH04.doc
Page 35

Selecting from the Security Menu
For more information about the security features available
NOTE:
on the Security menu, refer to Chapter 6 in the
Reference Guide
on the CD-ROM.
Selecting from the Security Menu
Select To Do This
Setup password Enter, change, or delete a setup
Power-on password Enter, change, or delete a power-on
DriveLock passwords Enable/disable DriveLock; change a
Password options
Password options
NOTE:
can be selected only when
a power-on password
is set.
Device security Enable/disable
System IDs Enter identification numbers for the
*Not applicable to SuperDisk LS-120 drives.
password.
password.
DriveLock User or Master password.
DriveLock settings are accessible
NOTE:
only when you enter Computer Setup by
turning on (not restarting) the computer.
Enable/disable
QuickLock.
■
QuickLock on Suspend.
■
QuickBlank.
■
Lock keyboard and mouse at
■
power-on.
To enable QuickLock on Suspend or
NOTE:
QuickBlank, you must first enable
QuickLock.
Ports or diskette drives.*
■
Diskette write.*
■
CD-ROM or diskette startup.
■
Settings for a DVD-ROM can be
NOTE:
entered in the CD-ROM field.
computer, a docking base, and any
battery packs in the system.
Computer Setup and Diagnostics Utilities 4-3
COMPAQ CONFIDENTIAL - NEED TO KNOW REQUIRED
Writer: Karen Williams Saved by: Integrity Group Saved date: 05/23/00 5:02 PM
Part Number: 168894-001 File name: cH04.doc
Page 36

Selecting from the Advanced Menu
Selecting from the Advanced Menu
Select To Do This
Language (or press F2) Change the Computer Setup language.
Boot Options Enable/disable
QuickBoot, which starts the computer
■
more quickly by eliminating some
startup tests. (If you suspect a
memory failure and want to test
memory automatically during startup,
disable QuickBoot.)
MultiBoot, which sets a startup
■
sequence that can include most
bootable devices and media in the
system. For instructions, refer to
“Changing the Startup Sequence with
MultiBoot” in Chapter 5 of the
Reference Guide on the CD-ROM.
Device Options
Enable/disable the embedded numeric
■
keypad at startup.
Enable/disable multiple standard
■
pointing devices at startup. (To set the
computer to support only a single,
usually nonstandard, pointing device
at startup, select Disable.)
Enable/disable USB legacy support for
■
a USB keyboard. (When USB legacy
support is enabled, the keyboard
works even when a Windows
operating system is not loaded.)
Set an optional external monitor or
■
overhead projector connected to a
video card in a docking base as the
primary device. (When the computer
display is set as secondary, the
computer must be shut down before
undocking.)
Change the parallel port mode from
■
EPP (default) to standard,
bidirectional, EPP, or ECP.
Continued
4-4 Computer Setup and Diagnostics Utilities
COMPAQ CONFIDENTIAL - NEED TO KNOW REQUIRED
Writer: Karen Williams Saved by: Integrity Group Saved date: 05/23/00 5:02 PM
Part Number: 168894-001 File name: cH04.doc
Page 37

Selecting from the Advanced Menu
Continued
Select To Do This
Device Options (continued)
*Video modes vary even within regions. However, NTSC is common
in North America; PAL, in Europe, Africa, and the Middle East; NTSC-J,
in Japan; and PAL-M, in Brazil. Other South and Central American
regions may use NTSC, PAL, or PAL-M.
Set video-out mode to NTSC (default),
■
PAL, NTSC-J, or PAL-M.*
Enable/disable all settings in the
■
SpeedStep window. (When Disable is
selected, the computer runs in Battery
Optimized mode.)
Specify how the computer recognizes
■
multiple, identical docking bases that
are identically equipped. (Select
Disable to recognize the docking
bases as a single docking base; select
Enable to recognize the docking bases
individually, by serial number.)
Enable/Disable the reporting of the
■
processor serial number by the
processor to software.
Computer Setup and Diagnostics Utilities 4-5
COMPAQ CONFIDENTIAL - NEED TO KNOW REQUIRED
Writer: Karen Williams Saved by: Integrity Group Saved date: 05/23/00 5:02 PM
Part Number: 168894-001 File name: cH04.doc
Page 38

Using Compaq Diagnostics
When you access Compaq Diagnostics, a scan of all system
components appears on the screen before the Compaq Diagnostics
window opens.
You can display more or less information from anywhere within
Compaq Diagnostics by selecting Level on the menu bar.
Compaq Diagnostics is designed to test Compaq components. If
non-Compaq components are tested, the results may be
inconclusive.
Displaying System Information
1. Access Compaq Diagnostics by selecting Start
Settings!Control Panel!Compaq Diagnostics.
2. Select Categories, then select a category from the
drop-down list.
To save the information, select File!Save As.
■
To print the information, select File!Print.
■
3. To close Compaq Diagnostics, select File!Exit.
Running a Diagnostic Test
1. Access Compaq Diagnostics by selecting Start
Settings!Control Panel!Compaq Diagnostics.
2. Select the Test tab.
3. In the scroll box, select the category or device you want
to test.
!
!
4-6 Computer Setup and Diagnostics Utilities
COMPAQ CONFIDENTIAL - NEED TO KNOW REQUIRED
Writer: Karen Williams Saved by: Integrity Group Saved date: 05/23/00 5:02 PM
Part Number: 168894-001 File name: cH04.doc
Page 39

4. Select a test type:
■
Quick Test
runs a quick, general test on each device in a
selected category.
■
Complete Test
performs maximum testing on each device
in a selected category.
■
Custom Test
performs maximum testing on a selected
device.
To run all tests for your selected device, select the
❏
Check All button.
To run only the tests you select, select the Uncheck All
❏
button, then select the checkbox for each test you want
to run.
5. Select a test mode:
■
Interactive Mode
provides maximum control over the
testing process. You determine whether the test was passed
or failed and may be prompted to insert or remove devices.
■
Unattended Mode
does not display prompts. If errors are
found, they are displayed when testing is complete.
6. Select the Begin Testing button.
7. Select a tab to view a test report. The report on the
■
Status tab s
ummarizes the tests run, passed, and failed
during the current testing session.
■
Log tab
lists tests run on the computer, the numbers of
times each test has run, the number of errors found on each
test, and the total run time of each test.
■
Error tab
lists all errors found on the computer with their
error codes.
8. To save the report on the
■
Log tab
■
Error tab
—Select the Log tab Save button.
—Select the Error tab Save button.
9. To print the report on the
■
Log tab
—Select File menu!Save As, then print the file
from your folder.
■
Error tab
COMPAQ CONFIDENTIAL - NEED TO KNOW REQUIRED
Writer: Karen Williams Saved by: Integrity Group Saved date: 05/23/00 5:02 PM
—Select the Error tab Print button.
Computer Setup and Diagnostics Utilities 4-7
Part Number: 168894-001 File name: cH04.doc
Page 40

chapter
5
ROUBLESHOOTING
T
Problems that occur while using the computer may originate with
the computer, the operating system, a software application, or an
optional docking base or external device:
For problems that may not originate with the computer, refer
■
to your operating system, docking base, software application,
or external device documentation.
For problems that may originate with the computer or system
■
software, refer in this chapter
First, to the “Quick Solutions Checklist.”
❏
Then, to the troubleshooting tables.
❏
If the problem persists, refer in this guide to
■
Chapter 4, for information about checking configurations
❏
and running diagnostic tests.
Chapter 3, for information about using the Compaq
❏
Support Forum or contacting a Compaq authorized dealer,
reseller, or service provider.
IMPORTANT:
dealer, reseller, or service provider for service, provide all
necessary passwords.
Writer: Karen Williams Saved by: Karen Williams Saved date: 05/23/00 11:51 AM
COMPAQ CONFIDENTIAL - NEED TO KNOW REQUIRED
Pages: 20 Words: 3755 Template: c:\template\ref\ref.dot
If you take the computer to a Compaq authorized
Troubleshooting 5-1
Part Number: 168894-001 File name: cH05.doc
Page 41

Quick Solutions Checklist
To reset a locked system, press and hold the suspend button
NOTE:
while sliding the power switch.
Is adequate power available to the computer?
■
If the computer is connected to an electrical outlet
❏
Are all power connections, including the power cord
and any adapters required by your configuration,
secure?
Is the electrical outlet providing a standard
power supply?
If the computer is running on battery power, is the battery
❏
pack in the computer fully charged?
Is the system turned on?
■
Is the computer positioned to allow adequate airflow around
■
the fan and vents?
Is the latest available system ROM installed?
■
For instructions, refer to “Updating Your System” in
NOTE:
Chapter 3 of this guide.
If the problem is with an external device
■
Is the device securely connected to its corresponding
❏
connector?
Is the device receiving reliable electrical power?
❏
Is the device turned on?
❏
Are all necessary device drivers installed and loaded?
❏
5-2 Troubleshooting
Writer: Karen Williams Saved by: Karen Williams Saved date: 05/23/00 11:51 AM
COMPAQ CONFIDENTIAL - NEED TO KNOW REQUIRED
Part Number: 168894-001 File name: cH05.doc
Page 42

Solving Audio Problems
Problem Possible Cause Solution
Adjust the overall
Internal speaker
does not produce
sound when an
external audio
source is
connected to
the stereo line-in
jack.
External
microphone does
not work.
Volume may be turned
off or set too low.
Line input may not be
connected properly.
Headphones or speakers
are connected to the
stereo speaker/
headphone jack, which
disables the internal
speakers.
Volume may be muted. Uncheck the mute box in
You are using the wrong
type of microphone or
microphone plug for the
computer.
The microphone may not
be connected properly.
Sound source not
selected.
Audio settings are not set
correctly.
Volume control on the
computer is turned down.
■
volume by pressing
the Fn+F5 hotkeys.
Adjust the sliding
■
mixer controls by
double-clicking the
speaker icon on the
Windows taskbar.
Check line input
connection.
Disconnect the
headphones or speakers
to enable the internal
speakers.
the volume properties.
Check to see if you are
using a monophonic
electret condenser
microphone with a
3.5-mm plug.
Ensure that the
microphone plug is
properly connected to the
mono microphone jack.
Ensure that microphone
is selected as the
recording source in
Control Panel!
Multimedia and that the
recording level is
adjusted.
Check the game
program's audio settings.
Adjust the computer
volume with the Fn+F5
hotkeys.
Continued
Troubleshooting 5-3
Writer: Karen Williams Saved by: Karen Williams Saved date: 05/23/00 11:51 AM
COMPAQ CONFIDENTIAL - NEED TO KNOW REQUIRED
Part Number: 168894-001 File name: cH05.doc
Page 43

Solving Audio Problems
Continued
Problem Possible Cause Solution
No sound from
headphones.
Volume too low
or too loud.
Volume or mixing
controls set incorrectly.
Sound source not
selected.
The headphones are
connected to the
wrong jack.
Volume or mixing
controls set incorrectly.
Adjust the overall
■
volume with the
Fn+F5 hotkeys.
Use the mixing
■
features available by
double-clicking the
speaker icon on the
Windows taskbar.
Make sure the mute
■
box is not checked.
Verify that the sound
source is selected in
Control Panel!
Multimedia.
Check the connection.
Adjust the overall
■
volume with the
Fn+F5 hotkeys.
Check the mixing
■
features available by
double-clicking the
speaker icon on the
Windows taskbar.
5-4 Troubleshooting
COMPAQ CONFIDENTIAL - NEED TO KNOW REQUIRED
Writer: Karen Williams Saved by: Karen Williams Saved date: 05/23/00 11:51 AM
Part Number: 168894-001 File name: cH05.doc
Page 44

Solving Battery Problems
Problem Possible Cause Solution
Computer is
beeping and
battery light is
blinking.
Computer
battery light
blinks to indicate
low battery
condition, but
computer does
not beep.
Battery pack will
not charge.
Computer shut
down and
memory was
lost when
replacing the
battery pack.
Battery pack charge is
low.
Volume turned down
too low.
Battery pack was
exposed to temperature
extremes.
Battery pack is already
charged.
Battery pack has
exceeded its useful
life cycle.
Hibernation was not
initiated before removing
the battery pack.
Charge the battery
■
pack by connecting to
an external power
source.
Replace the battery
■
pack with another
fully charged battery.
Initiate Hibernation or
■
turn the computer off
until external power
or a fully charged
battery is available.
Turn up the volume using
the Fn+F5 hotkeys.
Allow time for the battery
pack to return to room
temperature.
No action required.
Use a different battery
pack.
Work is lost.
Continued
Troubleshooting 5-5
Writer: Karen Williams Saved by: Karen Williams Saved date: 05/23/00 11:51 AM
COMPAQ CONFIDENTIAL - NEED TO KNOW REQUIRED
Part Number: 168894-001 File name: cH05.doc
Page 45

Solving Battery Problems
Continued
Problem Possible Cause Solution
Battery charge
does not last
very long.
Date and time
must be set
every time
computer is
turned on.
Battery gauge
seems
inaccurate.
Battery pack is
warm after
charging.
Battery is exposed to
higher temperatures.
Battery is exposed to
extremely cold
temperatures.
Battery conservation is
disabled or set to drain.
An external device is
draining the battery.
Battery gauge may be
inaccurate and require
recalibration.
The Real Time Clock
battery has reached the
end of its useful life.
The battery pack may
need calibration.
The battery pack has
reached the end of its
useful life.
Warming occurs during
charging.
Put the computer in a
cooler place and recharge
the battery pack.
Put the computer in a
warmer place and
recharge the battery
pack.
The recommended
NOTE:
operating temperature
range for the battery is
from 10°C to 40°C
(50°F to 104°F). The
recommended storage
temperature range for the
battery is from 0°C to
30°C (32°F to 86°F).
Reset the battery
conservation level.
Turn off or remove any
external device or PC
Cards when not in use.
Recalibrate the battery.
Restore power, then
■
turn on the computer
with the power switch
Contact your Compaq
■
authorized service
provider to replace
the Real Time Clock
battery.
Recalibrate the battery.
Replace the battery pack.
No action required.
5-6 Troubleshooting
COMPAQ CONFIDENTIAL - NEED TO KNOW REQUIRED
Writer: Karen Williams Saved by: Karen Williams Saved date: 05/23/00 11:51 AM
Part Number: 168894-001 File name: cH05.doc
Page 46

Solving CD Drive/DVD-ROM Drive Problems
Problem Possible Cause Solution
Drive cannot
read a disc.
CD drive or
DVD-ROM drive
is not detected
by the computer.
Disc is not properly
seated in the drive.
Disc is loaded in the
loading tray upside down.
Disc has a scratch on its
surface.
Drive is not connected
properly.
Open the loading tray,
insert the disc, then close
the tray.
Open the loading tray,
turn over the disc (label
facing up), then close the
tray.
Insert a different disc.
If you are running a
version of Windows that
was preinstalled by
Compaq, remove the
drive from the MultiBay
and reinsert it.
If you are running a
version of Windows that
was not preinstalled by
Compaq, turn off the
computer. Then remove
the drive from the
MultiBay and reinsert it.
Troubleshooting 5-7
Writer: Karen Williams Saved by: Karen Williams Saved date: 05/23/00 11:51 AM
COMPAQ CONFIDENTIAL - NEED TO KNOW REQUIRED
Part Number: 168894-001 File name: cH05.doc
Page 47

Solving Diskette Drive/SuperDisk LS-120 Drive Problems
Problem Possible Cause Solution
Drive cannot
write to
a diskette.
System cannot
start up from
diskette drive or
SuperDisk
LS-120 drive.
Diskette is not formatted. Format the diskette.
Diskette is writeprotected.
Writing to the wrong
drive.
Not enough space is left
on the diskette.
Drive is disabled. Enable the proper drive
Disable diskette write
ability is turned on.
A bootable diskette is not
in the drive.
Diskette bootability is
disabled in Computer
Setup.
Use another diskette that
is not write-protected or
disable the write-protect
feature.
Check the drive letter in
your path statement.
Save the information to
another diskette.
through Device Manager.
Run Computer Setup.
Select Device security
from the Security Menu.
Make sure Floppy write
ability is not enabled.
Verify that a diskette with
the necessary system
files is in the drive.
Enable diskette bootabilty
in Computer Setup,
Security Menu.
5-8 Troubleshooting
COMPAQ CONFIDENTIAL - NEED TO KNOW REQUIRED
Writer: Karen Williams Saved by: Karen Williams Saved date: 05/23/00 11:51 AM
Part Number: 168894-001 File name: cH05.doc
Page 48

Solving Hard Drive Problems
Problem Possible Cause Solution
Accessing
information on
the hard drive
is much slower
than usual.
Hard drive does
not work.
Errors occur
after starting
from an
additional
hard drive.
System does not
recognize a hard
drive.
DriveLock
settings cannot
be accessed in
Computer
Setup.
Hard drive entered low
power state due to
timeout and is now
exiting from it.
Hard drive is
fragmented/not optimized
or has errors
Hard drive is not seated
properly.
Additional hard drive
has not been specially
prepared with necessary
software.
The drive is not seated
properly.
The drive is damaged. Try using the hard drive in
The drive was inserted
while system was on or in
Suspend or Hibernation.
The DriveLock settings
are accessible only when
you enter Computer
Setup by turning on (not
restarting) the computer.
Wait for the system to
restore the previously
saved data to its state
prior to initiating a low
power state.
Run ScanDisk and Disk
Defragmenter.
Turn off and unplug the
computer, remove the
hard drive, and reinsert
the hard drive.
Boot from the original
hard drive or a specially
prepared hard drive.
Remove, then reinsert the
drive.
another bay (for example,
a docking base) to verify
that the problem is with
the drive. Run ScanDisk
on the drive.
Shut down the computer
before inserting removing
a hard drive.
Completely turn off the
computer. Turn the
computer back on, then
run Computer Setup by
pressing F10 when the
blinking cursor light
appears in the upper-right
corner of the screen.
Troubleshooting 5-9
Writer: Karen Williams Saved by: Karen Williams Saved date: 05/23/00 11:51 AM
COMPAQ CONFIDENTIAL - NEED TO KNOW REQUIRED
Part Number: 168894-001 File name: cH05.doc
Page 49

Solving Infrared Problems
Problem Possible Cause Solution
Cannot
communicate
with another
computer.
The appropriate software
is not running on both
computers.
The other computer
does not have an IrDAcompliant infrared port.
Your Compaq computer
uses the IrDA
communications protocol.
The pathway between the
infrared ports is
obstructed, one port is
more than 30 degrees
(plus or minus 15
degrees off the center
line) from the other, or
the ports are more than
one meter apart.
There is an interrupt
request (IRQ) conflict.
There is a baud rate
conflict.
There is a conflict with
the # bits.
There is a stop byte
conflict.
There is a parity conflict. Select the same parity
Install the appropriate
software on the second
device, start the second
device, and start the
program on both
computers.
Communication between
infrared devices must use
the same
communications protocol.
Check the manufacturer’s
instructions for
connecting with infrared
devices or try connecting
with a device you know to
be IrDA-compliant.
Remove the obstruction,
align the infrared ports to
within 30 degrees, and
position computers within
1.5 feet (about 0.5 meter)
of each other.
Check for IRQ conflicts in
the Device Manager. If
two devices have the
same IRQ address,
reassign one of the
devices.
Select the same baud
rate for both computers.
Select the same # bits
setting for both
computers.
Select the same stop byte
for both computers.
setting for both
computers.
Continued
5-10 Troubleshooting
COMPAQ CONFIDENTIAL - NEED TO KNOW REQUIRED
Writer: Karen Williams Saved by: Karen Williams Saved date: 05/23/00 11:51 AM
Part Number: 168894-001 File name: cH05.doc
Page 50

Solving Infrared Problems
Continued
Problem Possible Cause Solution
Cannot transmit
data.
Infrared port
doesn’t work.
Direct sunlight,
fluorescent light,
or flashing
incandescent light
is close to the
infrared connections.
There is interference
from other wireless
devices.
There is a physical
obstruction in the way.
One of the units was
moved during data
transmission.
The orientation of the
units is wrong.
The distance between
the units is too great.
Direct sunlight,
fluorescent light,
or flashing
incandescent light
is close to the
infrared connections.
There is interference
from other wireless
devices.
Computer is in
Standby (Windows
2000 Professional
only)
Remove the interfering light
source(s).
Keep remote control units
such as wireless
headphones and other audio
devices away from the
infrared connections.
Do not place objects that will
interfere with a line-of-sight
data transmission between
the two units.
Do not move either unit
during data transmission.
Adjust the devices so that
the IR ports point directly at
each other.
Verify that devices are not
more than 1.5 feet (0.5
meter) apart.
Remove the interfering light
source(s).
Keep remote control units
such as wireless
headphones and other audio
devices away from the
infrared connections.
Press the suspend button.
Troubleshooting 5-11
Writer: Karen Williams Saved by: Karen Williams Saved date: 05/23/00 11:51 AM
COMPAQ CONFIDENTIAL - NEED TO KNOW REQUIRED
Part Number: 168894-001 File name: cH05.doc
Page 51

Solving Keyboard/Numeric Keypad Problems
Problem Possible Cause Solution
Screen is blank
and keyboard is
working.
Embedded
numeric keypad
keyboard is
disabled.
A screen timeout has
been initiated.
QuickLock/QuickBlank
has been initiated.
LCD has been disabled. Press
Num Lock function is
not turned on.
Press any key to refresh
the screen.
To enable the keyboard
and return your information
to the screen, enter your
power-on password.
external monitor to
internal LCD.
Press Fn+Num Lk to
enable the Num Lock
function and embedded
numeric keypad.
Solving Modem Problems
Problem Possible Causes Solution
Modem loses
connection.
The cable connection
from the phone line to
the modem is loose.
Call Waiting has not
been disabled.
There is noise or
excessive traffic on your
phone line.
Check to make sure the
telephone cable is
properly connected.
Disable Call Waiting:
1. Select Start!
Settings!Control
Panel!Modems.
2. From the General tab
of the Modems
Properties page,
select Dialing
Properties.
3. From the My
Locations tab of the
Dialing Properties
page, check the box
labeled This location
has call waiting.
Depending on your
phone system, select
*70, 70#, or 1170
from the drop-down
list to disable call
waiting.
Try connecting later.
Fn+F4
to cycle from
Continued
5-12 Troubleshooting
COMPAQ CONFIDENTIAL - NEED TO KNOW REQUIRED
Writer: Karen Williams Saved by: Karen Williams Saved date: 05/23/00 11:51 AM
Part Number: 168894-001 File name: cH05.doc
Page 52

Solving Modem Problems
Continued
Problem Possible Cause Solution
Modem not
responding.
Modem does
not dial
correctly.
Characters are
garbled/transfer
rates are slow.
Modem is not set up
correctly in system BIOS.
Telephone number is not
entered correctly in the
modem’s dialing software.
There is noise in the
telephone line.
Check the computer
BIOS setup. If it requires
specific settings for
modems, be sure that
they have been enabled.
Make sure the
■
telephone number
you dialed is correct if
you are using the
dialing directory or
the terminal mode.
Dial 1 if you are
■
dialing long distance.
The other line could
■
be busy or not
answering.
Make sure call
■
waiting is disabled.
The modem may not
■
recognize an
international dial
tone. Try the ATX3DT
command and the
telephone number.
Check your
■
telephone and
modem cable
connections. If they
are a little loose, they
can cause noise on
the line.
Check with your local
■
telephone company
for a phone line filter.
Continued
Troubleshooting 5-13
Writer: Karen Williams Saved by: Karen Williams Saved date: 05/23/00 11:51 AM
COMPAQ CONFIDENTIAL - NEED TO KNOW REQUIRED
Part Number: 168894-001 File name: cH05.doc
Page 53

Solving Modem Problems
Continued
Problem Possible Cause Solution
No dial tone. Phone service is not
connected to the
telephone wall jack.
The modem is not
responding to
commands from the
computer keyboard.
Verify that service from the
local phone company by
following these steps:
1. Unplug the telephone
cable from the telephone
wall jack.
2. Connect a telephone to
the jack, pick up the
handset, and listen for a
dial tone. If there is a dial
tone, reconnect the
modem to the telephone
wall jack with the
telephone cable and
make sure all
connections are secure.
3. If there is still no dial
tone, contact your local
phone company or
building manager.
Verify that the modem and
computer are connected:
1. Select Start!Programs
!Accessories!
HyperTerminal, then go
to Terminal Mode.
2. Type AT and press the
Enter
displays OK, the modem
and computer are
working together. If the
modem displays ERROR,
or does not respond,
restart the computer and
repeat step 1.
3. Type
a dial tone.
4. Type
key. If the modem
and listen for
ATDT
to hang up.
ATH0
Continued
5-14 Troubleshooting
COMPAQ CONFIDENTIAL - NEED TO KNOW REQUIRED
Writer: Karen Williams Saved by: Karen Williams Saved date: 05/23/00 11:51 AM
Part Number: 168894-001 File name: cH05.doc
Page 54

Solving Modem Problems
Continued
Problem Possible Cause Solution
Modem does
not connect at
highest speed.
Line conditions in your
area or in the area you
are calling may not
support the highest
connect speeds.
Another device on your
telephone line may be
causing interference.
The service or site
called does not
support 56K or
supports an
incompatible 56K
implementation.
There is noise on the
telephone line.
The telephone line
does not support 56K
implementation.
Have your telephone line
checked by your local
telephone service provider.
Try dialing an alternate
telephone number for the
service you are using.
Hang up an extension
telephone and disconnect
any other devices that may
be using the same
telephone line, then redial.
An internal modem supports
K56flex.
To find an Internet service
provider (ISP) that supports
K56flex, go to the Compaq
Web site at
www.compaq.com.
The 56K protocol of an
internal modem will fall back
to lower speeds if the
telephone line is too noisy
for a high-speed
connection.
Try using another telephone
line.
The 56K protocol requires
that the telephone line
contain no more than one
analog-to-digital conversion.
Try connecting from an
alternate site.
Troubleshooting 5-15
Writer: Karen Williams Saved by: Karen Williams Saved date: 05/23/00 11:51 AM
COMPAQ CONFIDENTIAL - NEED TO KNOW REQUIRED
Part Number: 168894-001 File name: cH05.doc
Page 55

Solving PC Card Problems
Problem Possible Causes Solution
Computer does
not beep when
a PC Card is
inserted.
Computer
beeps only once
when a PC Card
is inserted.
Network PC
Card does not
work.
PC Card is not inserted
properly.
Speakers are turned off
or volume is turned down.
PC Card or card driver is
not PCMCIA compliant.
The computer beeps
once to indicate that a
PC Card is recognized
but not properly
configured.
Necessary drivers are not
installed (turned on).
PC Card is not fully
inserted or is upside
down.
Network PC Card or
driver is not PCMCIA
compliant.
Try reinserting the card.
Ensure that the PC Card
is inserted in the correct
orientation. Insert the
card gently to prevent
damage to the pins.
Adjust the overall system
volume control using the
Fn+F5 hotkeys. Make
sure the mute box is not
checked
Contact your Compaq
authorized dealer,
reseller, or service
provider for a list of PC
Cards tested successfully
in Compaq PC Card
platforms.
Before a new PC Card can
be used, it may be
necessary to perform an
initial setup procedure.
Follow the PC Card
manufacturer's
instructions for formatting
a hard drive card or
installing PC Card–specific
drivers for a network card.
Refer to the instructions
that came with the PC
Card or contact the
vendor for information on
installing the correct
drivers.
Ensure the PC Card is
inserted correctly.
Contact your Compaq
authorized dealer,
reseller, or service
provider for a list of PC
Cards tested successfully
in Compaq PC Card
platforms.
Continued
5-16 Troubleshooting
COMPAQ CONFIDENTIAL - NEED TO KNOW REQUIRED
Writer: Karen Williams Saved by: Karen Williams Saved date: 05/23/00 11:51 AM
Part Number: 168894-001 File name: cH05.doc
Page 56

Solving PC Card Problems
Continued
Problem Possible Cause Solution
Storage PC
Card does not
work.
SRAM and flash memory
PC Cards require the
memory card driver to
be loaded.
You are trying to access
the storage PC Card
using the wrong drive
letter.
The PC Card is not
formatted.
The card is not
supported.
Storage cards, such as
SRAM, do not work in the
desktop expansion base.
Memory cards can only
be accessed using DOS
real mode drivers.
Verify or change the drive
letter assignment.
For memory cards, run
MCFORMAT in MS-DOS
Mode to format the PC
Card. For ATA cards,
run ATAINIT, then run
MCFORMAT in MS-DOS
Mode to format the
PC Card.
Contact your Compaq
authorized dealer,
reseller, or service
provider for a list of PC
Cards tested successfully
in Compaq PC Card
platforms.
Use the storage card in
the computer.
Troubleshooting 5-17
Writer: Karen Williams Saved by: Karen Williams Saved date: 05/23/00 11:51 AM
COMPAQ CONFIDENTIAL - NEED TO KNOW REQUIRED
Part Number: 168894-001 File name: cH05.doc
Page 57

Solving Power Problems
Problem Possible Cause Solution
Computer will
not turn on.
Computer
turned off
while it was left
unattended.
Computer will
not initiate
Suspend
(Standby)
(Windows 95,
and Windows 98
only)
Battery is discharged and
computer is not
connected to a power
source.
Battery is discharged and
cables to the external
power source are
unplugged.
Computer initiated
Hibernation because of a
critical low battery
condition.
The computer initiated
Hibernation after a userdefined timeout expired.
Infrared Monitor search is
enabled.
Charge the battery
■
pack.
Replace the battery
■
pack.
Connect the
■
computer to an
external power
source.
Ensure that cables
connecting the computer
and the external power
source are plugged in
properly.
Charge the battery
■
pack.
Replace the battery
■
pack.
Connect the
■
computer to an
external power
source.
Turn on the computer.
To disable Infrared
Monitor search:
1. Select the Infrared
icon in the taskbar.
2. Select the Options
tab.
3. Clear the checkbox
for Search For and
Provide Status for
Devices in Range.
5-18 Troubleshooting
COMPAQ CONFIDENTIAL - NEED TO KNOW REQUIRED
Writer: Karen Williams Saved by: Karen Williams Saved date: 05/23/00 11:51 AM
Part Number: 168894-001 File name: cH05.doc
Page 58

Solving Display Problems
Problem Possible Cause Solution
Characters on
computer
display are dim.
Computer
screen is blank
and external
monitor displays
information.
Computer is in direct
light.
The brightness control
is not set properly.
You may have a screen
saver or screen blanking
utility installed.
Screen timeout was
initiated.
System initiated Suspend
after a user-defined
timeout expired.
Computer initiated a
low battery Suspend or
Hibernation.
Power Management,
which controls Suspend
and Hibernation, is
disabled and the battery
pack has discharged.
Display was switched
to the external monitor.
Display switch is stuck.
Move the computer or
adjust the screen.
Adjust the brightness
control by pressing the
Fn+F10 hotkeys.
Press any key to refresh
the screen.
Press any key to light
the screen.
Press the suspend button
to exit Suspend.
Replace the battery
■
pack and exit
Suspend or
Hibernation.
Connect the
■
computer to an
external power
source and exit
Suspend or
Hibernation.
Replace the battery
■
pack and turn on the
computer.
Connect the
■
computer to an
external power
source and turn on
the computer.
Press
information on the
computer screen;
press
display information
simultaneously on both
screens.
Tap the switch.
Fn+F4
Fn+F4
to display
again to
hotkey
Fn+F4
combination
does not switch
between
internal and
external
displays.
Writer: Karen Williams Saved by: Karen Williams Saved date: 05/23/00 11:51 AM
COMPAQ CONFIDENTIAL - NEED TO KNOW REQUIRED
CRT or other display
device is not connected
properly.
Part Number: 168894-001 File name: cH05.doc
Check your connections
to ensure that an external
device is connected
properly.
Troubleshooting 5-19
Page 59

Solving USB Problems
Problem Possible Cause Solution
External device
connected to a
USB connector
does not work.
External device
connected to
USB connector
does not work
during startup
(before
Windows 95,
Windows 98, or
Windows 2000
Professional
loads).
External devices
in lower tiers do
not work.
The operating system
limits external devices
connected by USB to two
tiers which can include
no more than two hubs
on the first tier and no
more than one keyboard
and one pointing device
on the first or second tier.
During startup, only two
tiers are supported by the
USB port. These tiers can
include no more than two
hubs on the first tier and
no more than one
keyboard and one
pointing device on the
first or second tier.
An unpowered hub is
connected to another
unpowered hub.
Reduce the number of
connected external USB
devices to no more than
two hubs on the first tier,
and no more than one
keyboard and one
pointing device on the
first or second tier.
Use the external device
only after Windows 95,
Windows 98, or
Windows 2000
Professional has loaded.
Reduce the number of
connected external USB
devices to no more than
two hubs on the first tier,
and no more than one
keyboard and one
pointing device on the
first or second tier.
Use only powered hubs.
Make sure that all
unpowered hubs are
immediately preceded by
powered hubs in the USB
chain.
5-20 Troubleshooting
COMPAQ CONFIDENTIAL - NEED TO KNOW REQUIRED
Writer: Karen Williams Saved by: Karen Williams Saved date: 05/23/00 11:51 AM
Part Number: 168894-001 File name: cH05.doc
Page 60

NDEX
I
A
AC Adapter, 1-2, 2-6, 2-9
AC power connector, 1-2, 2-6
acoustic vent, 2-4
adapter
AC, 1-2, 2-9
country-specific modem, 2-9
three-to-2-prong plug, 1-3, 2-9
Y-, (optional) for keyboard/mouse
connector, 2-6
addresses, obtaining, for Compaq
service providers, 3-6
Aircraft Power Adapter (optional), 2-6
airflow vent, 2-3, 2-4
AltaVista website, 2-2
applications.
approvals label, modem agency, 2-7
Armada Information Page button, 2-2
AT commands, 3-1
audio problems, 5-3
Automobile Power Adapter/Charger
See
software
(optional), 2-6
B
backup
QuickRestore, 3-5
system configuration, 4-2
base, docking.
(optional); expansion base
(optional)
battery bay
device supported, 2-7
battery light, 1-4, 2-5, 5-5
Battery Optimized mode, 4-5
battery pack, MultiBay, 2-9
battery pack, primary, 2-7, 2-8
battery packs
calibrating, 1-5
charging, 1-4
identification number, 4-3
low-battery condition, 2-5
preparing for use, 1-5
problems, 5-5
See
convenience base
bay
battery, 2-7
external diskette drive, 2-9
hard drive, 2-5
MultiBay, 2-4, 2-7
bidirectional parallel port mode, 4-4
button(s).
See also
Armada Information Page, 2-2
Easy Access, 2-2
Email, 2-2
MyArmada, 2-2
pointing-stick, 2-1
Search, 2-2
suspend, 2-2
TouchPad, 2-1
key; switch
C
See also
cable.
AC Adapter, 1-2
external diskette drive, 2-9
modem, 2-9
network, 2-9
security (optional), 2-3
calibrating a battery pack, 1-5
camcorder, 2-3
cap, pointing stick, 2-9
caps lock light, 2-2
CD drive, 5-7
CD-ROM
Compaq Portable Product Reference
Compaq Support Software CD
Certificate of Authenticity, 1-1, 2-7
compact disc.
Compaq customer support, 3-6
Compaq Diagnostics, 4-1, 4-6
Compaq Portable Product Reference
Compaq Support Forum, 3-6
Compaq Support Software CD
Compaq telephone numbers, 3-7
Compaq website
Compaq software enhancements, 3-5
Info Messenger, 3-2
subscribing to
power cord
Library
, 1-2, 3-1
See
CD-ROM
Library CD-ROM, 1-2, 2-9, 3-1
Software CD
Compaq Support
, 3-2
, 3-2
, 3-2, 3-5
Index I-1
COMPAQ CONFIDENTIAL - NEED TO KNOW REQUIRED
Writer: Karen Williams Saved by: Integrity Group Saved date: 05/23/00 5:10 PM
Pages: 6 Words: 1536 Template: c:\template\ref\ref-indx.dot
Part Number: 168894-001 File name: INDEX.doc
Page 61

Support Forum, 3-6
updating the system from, 3-2
worldwide telephone numbers and
addresses, 3-6
components, standard, included with
computer, 2-8
composite video-out jack, 2-3
Computer Setup
Advanced menu, described, 4-4
changing language of, 4-2
displaying version of, 3-6
File menu, described, 4-2
navigating in, 4-2
Security menu, described, 4-3
using, vs. Compaq Diagnostics, 4-1
configuration and diagnostic
information, saving or printing in
Compaq Diagnostics, 4-7
connector.
AC power, 1-2
docking, 2-6
external monitor, 2-6
keyboard/mouse, 2-6
parallel, 2-6
power, 2-6
serial, 2-6
USB, 4-1
convenience base (optional)
docking connector on computer, 2-6
identification number, 4-3
recognition of more than one, 4-5
using during initial setup, 1-2
cord.
country-specific modem adapter, 2-9
customer support, 2-2, 3-6
See also
See
cable; power cord
jack; port
D
default settings, restoring, 3-5, 4-2
device, disabling/enabling, 4-3
diagnostic and configuration
information, saving or printing in
Compaq Diagnostics, 4-7
diagnostic utility, Compaq, 4-1, 4-6
diskette
backup, 4-2
installing software from, 3-4
diskette drive, 3-3
problems, 5-8
using externally, 2-6, 2-9
display, 1-3, 5-19
display latch, 1-3
display switch, 2-2, 5-19
docking base (optional).
convenience base (optional);
expansion base (optional)
docking connector, 2-6
downloading software updates, 3-3
DriveLock, 4-3
drivers, device
reinstalling, 3-5
updating, 3-2
See also
drives.
drive; hard drives; SuperDisk
LS-120 drive
activity indicated by MultiBay drive
light, 2-2
disabling/enabling, 4-3
inserting or removing while installing
software, 1-5, 3-5
problems, 5-7
replacing with weight saver, 2-9
CD drive; diskette
See
E
Easy Access buttons, 2-2
ECP (Enhanced Capabilities Port)
parallel port mode, 4-4
Email button, 2-2
EPP (Enhanced Parallel Port) parallel
port mode, 4-4
expansion base (optional)
docking connector on computer, 2-6
identification number, 4-3
recognition of more than one, 4-5
setting device connected to video
card in, as primary, 4-4
USB connector, 4-1
using during initial setup, 1-2
external diskette drive bay
assembly, illustrated, 2-9
connector for, 2-6
drive activity indicator, 2-2
external diskette drive cable, 2-6, 2-9
external monitor connector, 2-6
F
factory default settings, restoring, 3-5,
4-2
fan, 2-7
FCC (Federal Communications
Commission) rules, 1-2
floppy disk drive.
See
diskette drive
I-2 Index
COMPAQ CONFIDENTIAL - NEED TO KNOW REQUIRED
Writer: Karen Williams Saved by: Integrity Group Saved date: 05/23/00 5:10 PM
Part Number: 168894-001 File name: INDEX.doc
Page 62

H
hard drive
primary, 2-5
problems, 5-9
shipped inside hard drive bay, 2-8
hard drive bay, 2-5
hard drive light, 2-2
headphones, headset, external, 2-5
See
help.
Hibernation, 2-2
Compaq customer support
I
Info Messenger, 3-2
infrared
port, 2-6
problems, 5-10
installing
initial setup software, 1-5
operating system, 1-5
SoftPaq, 3-3
system ROM, 3-4
Intel SpeedStep technology, 4-5
internal modem.
See
modem, internal
L
label
Certificate of Authenticity, 1-1, 2-7
modem agency approvals, 2-7
serial number, 2-7
with Product Key number, 1-1, 2-7
See
LAN.
language, choosing
latch, display, 1-3
light
local area network (LAN)
lock, security cable (optional), 2-3
locked system, resetting, 5-2
LS-120 drive, SuperDisk, 3-3
local area network (LAN)
during initial setup, 1-5
in Computer Setup, 4-2
battery, 1-4, 2-5
caps lock, 2-2
hard drive, 2-2
MultiBay drive, 2-2
num lock, 2-2
power/suspend, 1-4, 2-5
scroll lock, 2-2
network cable, 2-9
RJ-45 jack, 2-4
J
See also
jack.
composite video-out, 2-3
microphone, 2-5
RJ-11, 2-4
RJ-45, 2-4
stereo speaker/headphone, 2-5
Japan, connecting power cord in, 1-3
connector; port
K
See also
key.
Microsoft logo, 2-3
Windows application, 2-3
keyboard
external, 2-6
internal, 2-1
problems, 5-12
USB, 4-4
keyboard/mouse connector, 2-6
keypad, embedded numeric, 2-2, 5-12
button(s); switch
M
maintenance
replacing the pointing stick cap, 2-9
updating software, 3-2
memory, random access (RAM), 4-2,
4-4
microphone jack, 2-5
microphone, external, 2-5
Microsoft logo key, 2-3
modem adapter, country-specific, 2-9
modem agency approvals label, 2-7
modem cable, 2-4, 2-9
modem slot cover, 2-7
modem, internal.
network (LAN)
cable, 2-9
commands, 2-9, 3-1
compartment, 2-7
modem agency approvals label, 2-7
problems, 5-12
slot cover, 2-7
monitor, external, 2-6, 5-19
mouse, external, 2-6, 4-4
See also
local area
Index I-3
COMPAQ CONFIDENTIAL - NEED TO KNOW REQUIRED
Writer: Karen Williams Saved by: Integrity Group Saved date: 05/23/00 5:10 PM
Part Number: 168894-001 File name: INDEX.doc
Page 63

MultiBay
location of, 2-4
notch, 2-7
using weight saver in, 2-9
MultiBay battery pack
replacing with weight saver, 2-9
MultiBay drive light, 2-2
MyArmada button, 2-2
N
navigation, 2-1, 4-2
network cable, 2-4, 2-9
network connector (RJ-45 jack), 2-4
num lock light, 2-2
number, Product Key, 1-1
numeric keypad, embedded, 2-2, 5-12
O
operating system
Certificate of Authenticity, 2-7
deleting, 1-5
preinstalled, 3-5
Product Key number, 2-7
reinstalling, 2-9, 3-5
removing, 3-5
retail version of, 3-5
selecting during initial setup, 1-5
updating, 1-1
version number, displaying, 1-1, 3-6
overhead projector, 2-3, 2-6
P
packing box contents, 2-8
parallel connector, 2-6
parallel port, 4-4
passwords, 5-1
PC Card
problems, 5-16
slots, 2-4
phone numbers, worldwide, 3-7
pointer, moving the, 2-1
pointing stick
buttons, 2-1
replacement cap, 2-9
See also
port.
disabling/enabling, 4-3
infrared, 2-6
USB, 2-6
connector; jack
See also
power.
connecting to external, 1-2
conservation, 4-5
problems, 5-18
setting preferences, 4-5
power connector, 2-6
power cord, 1-2, 1-6, 2-9
power switch, 1-4, 2-3, 5-2
power/suspend light, 1-4, 2-5
primary battery pack
included with computer, 2-7
problem solving.
processor
displaying information about, 4-2
processor speed
setting, in Computer Setup, 4-5
Product Key number, 1-1
projector, overhead, 2-3, 2-6
PS/2 connector (keyboard/mouse
connector), 2-6
battery packs
See
troubleshooting
Q
QuickBoot, 4-4
QuickRestore package, 2-9, 3-5
R
read only memory (ROM), 3-2, 3-6
Reference Guide
3-3
registration number, displaying, 3-6
regulatory information, 1-2
release latch, MultiBay, 2-7
resetting a locked system, 5-2
restoring software, 3-5, 4-2
Result Codes, 3-1
RJ-11 jack, 2-4
RJ-45 jack, 2-4
ROM, system (read only memory), 3-2,
3-6
ROMPaq, 3-3
on the CD-ROM, 2-9,
S
S registers, 3-1
Safety & Comfort Guide
See also
screen.
screen, problems, 5-19
scroll lock light, 2-2
Search button, 2-2
display
, 1-5
I-4 Index
COMPAQ CONFIDENTIAL - NEED TO KNOW REQUIRED
Writer: Karen Williams Saved by: Integrity Group Saved date: 05/23/00 5:10 PM
Part Number: 168894-001 File name: INDEX.doc
Page 64

security
passwords, 5-1
processor serial number, 4-5
security cable lock, 2-3
security cable slot, 2-3
serial connector, 2-6
serial number, 2-7, 3-6
of computer, 2-7
of docking base, 4-5
of processor, 4-5
setting up the computer, 1-1
Setup, Computer.
shipping box contents, 2-8
sleep button (Windows 98), 2-3
slot(s)
PC Card, 2-4
security cable, 2-3
SoftPaq, 3-3
software
configuration, diagnostic, and system
information, 4-1, 4-3, 4-6
QuickRestore, 2-9, 3-5
reinstalling, 2-9, 3-5
ROMPaq, 3-3
setting up, 1-5
SoftPaq, 3-3
updating, 3-2
software drivers.
solving problems.
speakers
external, 2-5
internal, 2-3
standard components included with
computer, 2-8
Standby (Windows 98), 2-3
Status registers, 3-1
stereo speaker/headphone jack, 2-5
stereo speakers, internal, 2-3
SuperDisk LS-120 drive, 3-3
support, technical, 2-2, 3-6
Suspend (Standby)
exiting, 2-2
indicated by power/suspend light, 2-5
initiating, with Suspend button, 2-2
suspend button, 2-2, 5-2
See also
switch.
display, 2-2, 5-19
power, 1-4, 2-3
system information about
Computer Setup version number, 4-2
operating system version number,
1-1, 3-6
Product Key number, 1-1, 3-6
system ROM version number, 4-2
See
Computer Setup
See
drivers, device
See
troubleshooting
button(s); key
system information, displaying
in Compaq Diagnostics, 4-1, 4-6
in Computer Setup, 3-6
in operating system, 3-6
system lockup, 5-2
system ROM (read only memory), 3-2,
3-6
T
technical support, 2-2, 3-6
telephone connector (RJ-11 jack), 2-4
telephone numbers, Compaq worldwide,
3-7
television, 2-3, 2-5
three-to-2-prong plug adapter, 1-3, 2-9
TouchPad, 2-1
troubleshooting
audio problems, 5-3
battery problems, 5-5
compact disc/CD drive problems, 5-7
display problems, 5-19
hard drive problems, 5-9
infrared problems, 5-10
keyboard/numeric keypad problems,
5-12
modem problems, 5-12
PC Card problems, 5-16
power problems, 5-18
quick solutions checklist, 5-2
resetting a locked system, 5-2
technical support, 2-2, 3-6
USB problems, 5-20
turning the computer on or off, 1-4
U
updating the system, 3-2
USB (Universal Serial Bus)
configuring, devices, 4-1, 4-4
port, 2-6
problems, 5-20
Index I-5
COMPAQ CONFIDENTIAL - NEED TO KNOW REQUIRED
Writer: Karen Williams Saved by: Integrity Group Saved date: 05/23/00 5:10 PM
Part Number: 168894-001 File name: INDEX.doc
Page 65

V
VCR, 2-3
vent
acoustic, 2-4
airflow, 2-3, 2-4
version numbers.
information
video capture card, 2-3
video card in expansion base, 4-4
video-out jack, composite, 2-3
See
system
W
web page, personal, 2-2
weight saver, 2-9
Windows application key, 2-3
worldwide telephone numbers, 3-7
I-6 Index
COMPAQ CONFIDENTIAL - NEED TO KNOW REQUIRED
Writer: Karen Williams Saved by: Integrity Group Saved date: 05/23/00 5:10 PM
Part Number: 168894-001 File name: INDEX.doc
 Loading...