

Page 1

ONTENTS
C
USING THIS GUIDE.................................................1
Text Conventions in This Guide ................................ 1
Special Messages....................................................... 1
Locating Help............................................................. 1
Basic Troubleshooting......................................... 1
Index .................................................................... 1
Service and Support............................................. 1
Getting Additional Help............................................. 2
Application Help.................................................. 2
GETTING STARTED ................................................3
Step 1: Unpack the Box.............................................. 3
Step 2: Choose a Location to Operate the A900......... 5
Step 3: Prepare the A900 for Use............................... 5
Step 4: Install the Document Trays............................ 5
Document Exit Tray............................................. 5
Document Input Tray Extension .......................... 5
Step 5: Connect the Telephone (Line) Cord............... 6
Step 6: Connect the Printer Cable .............................. 6
Step 7: Connect the AC Power Cord .......................... 7
Step 8: Load Paper..................................................... 7
Step 9: Install the Ink Cartridges................................ 8
Installing the Ink Cartridges for
the First Time ....................................................... 8
Installing the Ink Cartridges for
Standalone Operations......................................... 9
COMPAQ A900 SOFTWARE INSTALLATION ..........10
Description of Programs and Drivers....................... 10
Printer Driver..................................................... 10
Compaq A900 Software..................................... 10
Scanner Driver................................................... 10
WinFax Basic Edition........................................ 10
Pagis ScanWorks................................................ 10
System Requirements............................................... 10
Installing the Software for Your Compaq A900....... 10
Installing WinFax Basic Edition ........................ 12
Installing Pagis ScanWorks................................ 13
Configuring WinFax................................................ 16
COMMON PROCEDURES......................................17
Changing Default Settings ....................................... 17
Common Procedures................................................ 17
Setting the Date and Time........................................ 17
Setting the Date and Time from
the Computer...................................................... 17
Setting the Date and Time from the
A900 Control Panel............................................ 17
Printing Reports....................................................... 17
Transmission Report Default Settings................ 17
Transmission and Reception Logs ..................... 18
Speed Dial List................................................... 18
Self Test............................................................. 18
Changing Print Cartridges........................................ 18
Changing Print Cartridges from
the Computer...................................................... 18
Changing Print Cartridges from
the A900 Control Panel...................................... 19
Aligning Print Cartridges..........................................19
Aligning Print Cartridges from
the Computer.......................................................19
Aligning Print Cartridges from
the A900 Control Panel .......................................20
Cleaning Print Cartridges..........................................21
Printing the Cartridge Clean and Nozzle
Test from the Computer......................................21
Printing the Cartridge Clean and Nozzle
Test from the Control Panel................................21
Checking the Clean Nozzle Printout...................21
Wipe the Print Nozzles........................................22
Installing and Using the Optional
Photo Cartridge.........................................................22
Storing an Additional Ink Cartridge....................22
Loading Different Sized Paper..................................23
Setting Paper Size for Standalone Copying and
Faxing from the Computer..................................23
Setting Paper Size for Standalone Copying and
Faxing from the Control Panel............................23
Setting the Paper Size for Computer-assisted
Copying and Printing..........................................23
Printing on envelopes................................................23
Preparing Envelopes for Printing........................23
Loading an Envelope..........................................23
Using the Manual Feed.............................................24
Control Panel Setup Button.......................................25
Compaq A900 Settings Utility..................................26
Changing Settings Overview...............................26
Accessing the Compaq A900 Settings Utility.....26
Print Settings.......................................................26
Fax Settings.........................................................27
Fax From Setup...................................................28
Fax To Setup .......................................................28
WinFax Phonebook Setup...................................29
Speed Dial Setup.................................................29
Advanced Fax Settings........................................29
More Fax Settings...............................................30
Copy Settings......................................................30
Scan Settings.......................................................31
Scan To Application Setup..................................31
COMPAQ A900 CONTROLS AND FEATURES .........32
Control Locations and Functions..............................32
Control Panel ......................................................32
Rear View...........................................................33
Side View............................................................33
COMPAQ A900 CONTROL FORM ..........................34
Overview...................................................................34
Getting Started with Control Form............................34
PRINTING.............................................................37
Printing Overview.....................................................37
Printing a Document...........................................37
Printer Settings....................................................37
Accessing the Compaq A900 Control
Program Window......................................................37
Using the Status Tab...........................................38
Using the Options Tab ........................................38
i
Page 2

Using the Cartridge Tab..................................... 39
Using the DOS Printing Tab .............................. 39
Using the About Tab.......................................... 40
Preparing Envelopes for Printing............................. 40
Loading an Envelope..........................................40
FAXING................................................................41
Faxing Overview...................................................... 41
Preparing Documents for Faxing ............................. 41
Loading the Documents........................................... 41
Sending a Fax Using the Control Panel.................... 41
Faxing in Quick Mode....................................... 41
Advanced Faxing Features................................. 42
Speed Dialing..................................................... 43
Redial................................................................. 43
On Hook Dialing (OHD).................................... 43
Confirming Transmission................................... 43
Automatic Redial............................................... 43
Receiving a Fax.................................................. 44
Sending Faxes from the Computer........................... 45
Sending a Fax........................................................... 45
Using WinFax Basic for Faxing ............................... 46
Using the Compaq Control Form to Fax.................. 46
Faxing with the Compaq Control Form.............. 46
COPYING .............................................................47
Copying Overview................................................... 47
Loading the Documents........................................... 47
Loading the Documen t Using the
Copy/Scan Sleeve .............................................. 47
Copying.................................................................... 47
Advanced Copy Features......................................... 48
Copying with the Computer..................................... 49
Copying with the Compaq Control Form................. 49
SCANNING...........................................................50
Scanning Overview.................................................. 50
Loading Documents for Scanning............................ 50
Loading the Documen t Using the
Copy/Scan Sleeve .............................................. 50
Scanning................................................................... 50
Advanced Scanning.................................................. 51
Scanning with the Computer.................................... 52
Scanning with the Compaq Control Form................ 52
MAINTAINING YOUR A900....................................53
Cleaning the Document Scanner.............................. 53
Cleaning the Cartridge Carrier................................. 53
Replacing the Document Separator Pad................... 54
BASIC TROUBLESHOOTING ..................................55
Preparation............................................................... 55
Clearing Document and Paper Jams......................... 55
Document Jams during Copying, Scanning
or Sending Faxes................................................ 55
Paper Jams during Printing, Copying,
or Printing Faxes................................................ 55
Error Messages..........................................................55
Correcting Problems .................................................62
REGULATORY AND SAFETY NOTICES ...................68
Electromagnetic Interference Compliance Notices...68
Modifications......................................................68
Cables..................................................................68
Declaration Of Conformity For Products Marked With
The FCC Logo–United States Only..........................68
Canadian Notice..................................................68
Avis Canadien.....................................................68
Safety........................................................................68
Power Cords..............................................................68
U.S. Regulations Governing the Use
of Modems..........................................................69
Ringer Equivalence Number...............................69
Telephone Consumer Protection Act of 1991 ...........69
Canadian Regulations Governing the Use
of Modems................................................................70
General Precautions for Compaq Products................70
Precautions for Products with Modems,
Telecommunications, or Local Area
Network Options.......................................................72
WARRANTY INFORMATION...................................73
What is the warranty for my Comp aq A900
All-In-One? ...............................................................73
What are the terms of this limited warranty?............73
How do I obtain warranty service?............................73
How do I obtain online support?...............................73
What is not covered by this limited warranty?..........73
Limited Warranty Statement for the
United States and Canada..........................................74
Terms of the Warranty..............................................74
Limitation of Remedy...............................................74
APPENDIX A....................................................... A-1
Using the A900 Extension Feature......................... A-1
Sharing a Telephone Line with Other Devices....... A-1
Telephones....................................................... A-1
Answering Machines........................................A-2
Computer Modems (internal or external)......... A-2
DRPD..................................................................... A-2
Connecting and Configuring Equipment................ A-2
Devices and Connections....................................... A-2
Changing the WinFax Active Connection
Device.............................................................. A-3
Setting up WinFax Fax Reception ................... A-3
A. A900 and Telephone (Optional).................. A-3
B. A900 Answering Machine and Telephone .. A-3
C. A900 Computer Modem (Internal or
External) and Telephone.................................. A-4
D. A900, Computer Modem, Answering
Machine, and Telephone .................................. A-4
INDEX
ii
Page 3

Using This Guide
Text Conventions in This Guide
The examples below identify and explain specially
formatted text that is used throughout this guide.
xý The names of your keyboard keys, A900 control
panel buttons, and certain software instructions
appear in a bold type. For example,
.
or
Cancel.
key. You will be told to
Enter
key. You will be
Enter
Tab, Start, Setup,
xý Some keys must be pressed at the same time to
perform a task. We show this with the key
names and the plus (+) symbol; for example,
Ctrl+Home
xý When we discuss hard drives and diskette
drives, the drives are identified by capital
letters; for example, drive A.
xý Software is stored in directories on the hard
drive. These directories are called folders. We
also show them in capital letters; for example,
MY FOLDER.
xý File names are shown in capital letters and italic
type; for example, FILENAME.
xý Sometimes, you will need to type information
and press the
“enter” this information.
xý Sometimes, you will need to type information
without pressing the
asked to "type" this information.
xý Sometimes you will enter a command into a
text box. This is similar to older operating
systems. We show these commands in lower
case and bold type; for example, LQVWDOO or
Dã?LQVWDOOï
Home, End
WARNING:
follow directions may result in bodily harm or loss of life.
!
Text set off in this manner indicates that failure to
Locating Help
,
Compaq provides you with several resources to help
you learn about your Compaq A900. A few of these
resources are:
Basic Troubleshooting
The Basic Troubleshooting chapter of this guide shows
how to fix many common A900-related issues.
Index
Look for specific topics in the index at the end of this
guide. Look for a topic by name, such as "printer" or,
try looking for the action word, such as "printing a
file."
Service and Support
If you need further technical support, you can contact
Compaq using our Internet site, or by telephoning one
of our technical support centers. Our web site can be
found at
www.compaq.com
and Compaq's Technical Support telephone numbers,
by region, can be found in the Limited Warranty
Statement located in the rear of this User’s Guide.
IMPORTANT: Be sure you know serial number for
your A900 before you call technical support. The serial
number is located on the rear of the machine. Write
this number below for future use.
Special Messages
The following words and symbols have special
meaning in this guide:
Text set off in this manner presents helpful hints for using your
computer.
IMPORTANT: Text set off in this manner presents
specific instructions, commentary, sidelights, or
interesting points of information.
CAUTION:
follow directions could result in equipment damage or loss of
information.
Text set off in this manner indicates that failure to
Model and Serial Numbers
Model Number: A900
Serial Number:
1
Page 4

2
Getting Additional Help
If you see green text while using Help, click on the green
text for more information.
Application Help
Many software programs or applications have Help
files. To access Help for a specific application, you
need to be using that program. Click Help on the menu
bar, or press the
IMPORTANT: If you are using a program, and you
open Help with the Start button, you will get the
general Windows Help.
F1
key.
Page 5
Getting Started
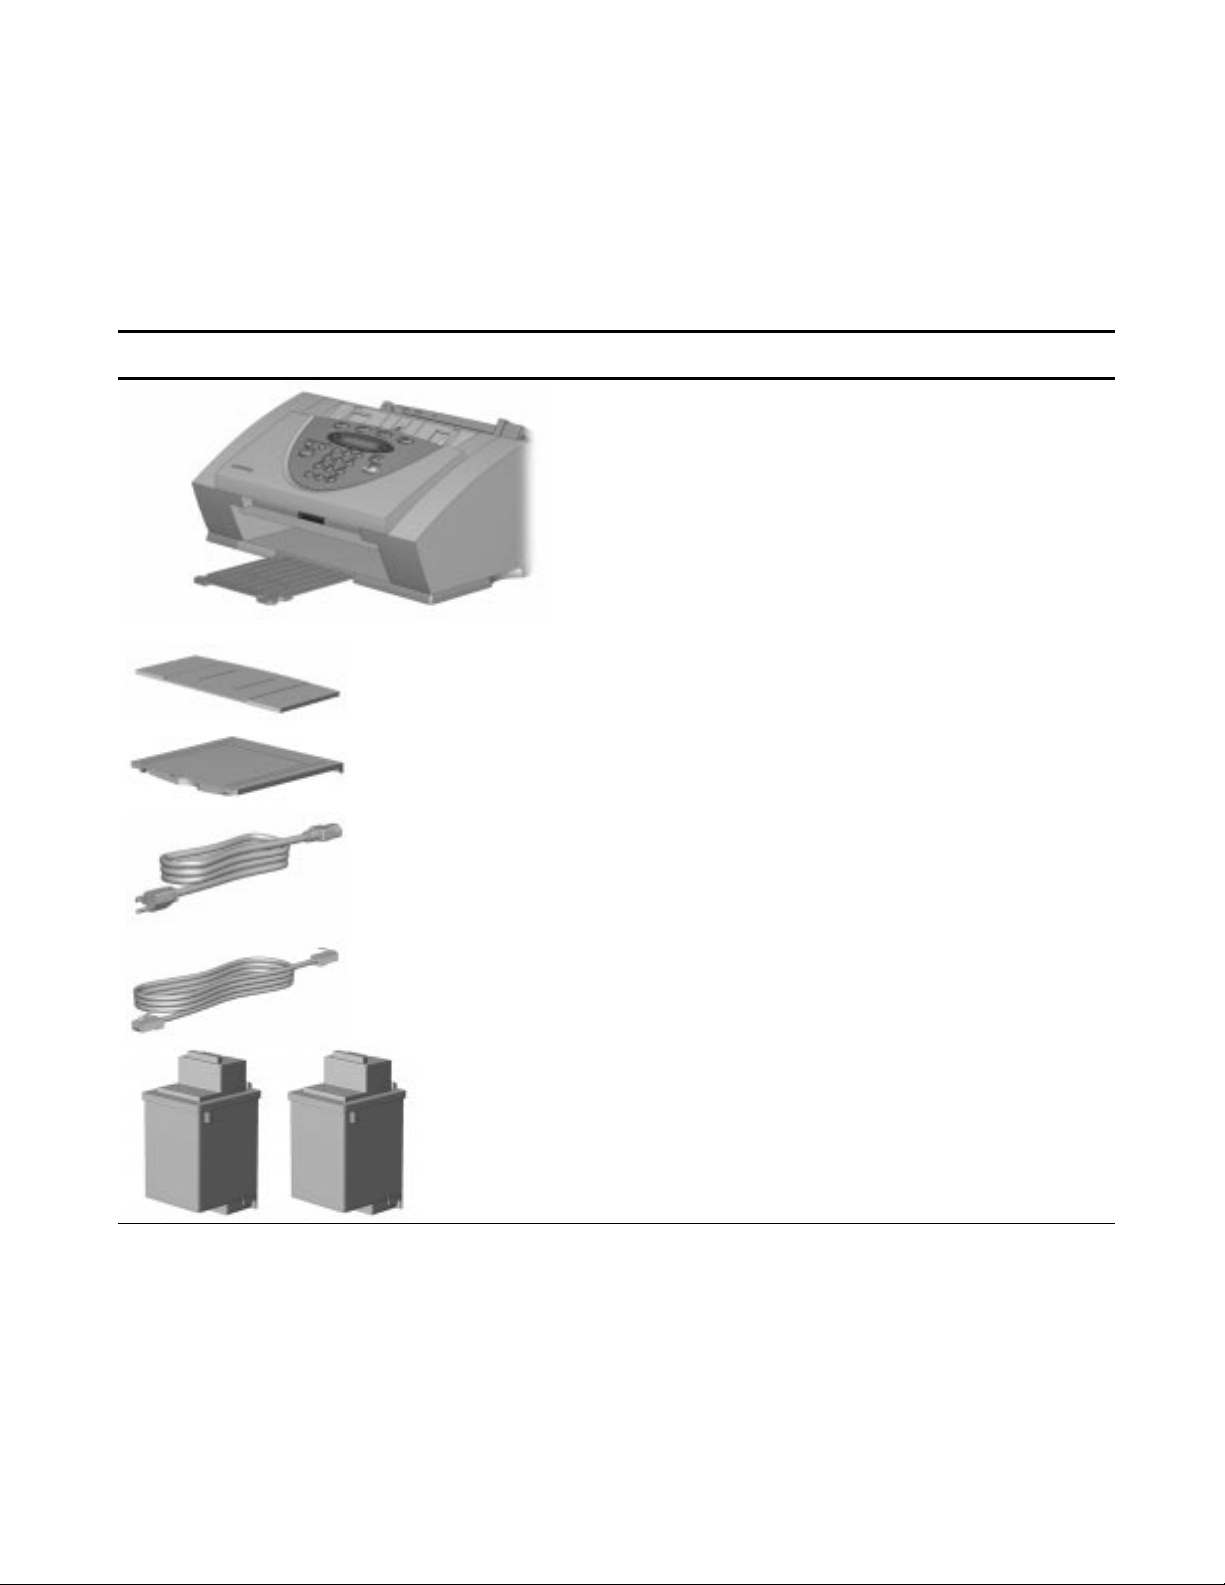
Step 1: Unpack the Box
When you unpack the box containing your Compaq A900 All-In-One, make sure that all of the items listed below are
included. If there are any missing or damaged parts, return the All-In-One in its original packaging to the place of purchase.
Box Contents
One Compaq A900 All-In-Oneuse the All-In-One for all of your printing, faxing,
copying, and scanning needs.
One document input tray extensionsupports the original document when
faxing, copying, or scanning.
One document exit traysupports the original document when faxing, copying,
or scanning is complete.
One AC power (electrical) cordplugs into the rear of the All-In-One to supply
electrical power.
One telephone cordplugs into the A900 telephone line jack.
Two ink cartridges1 color cartridge and 1 black cartridge.
continued
3
Page 6
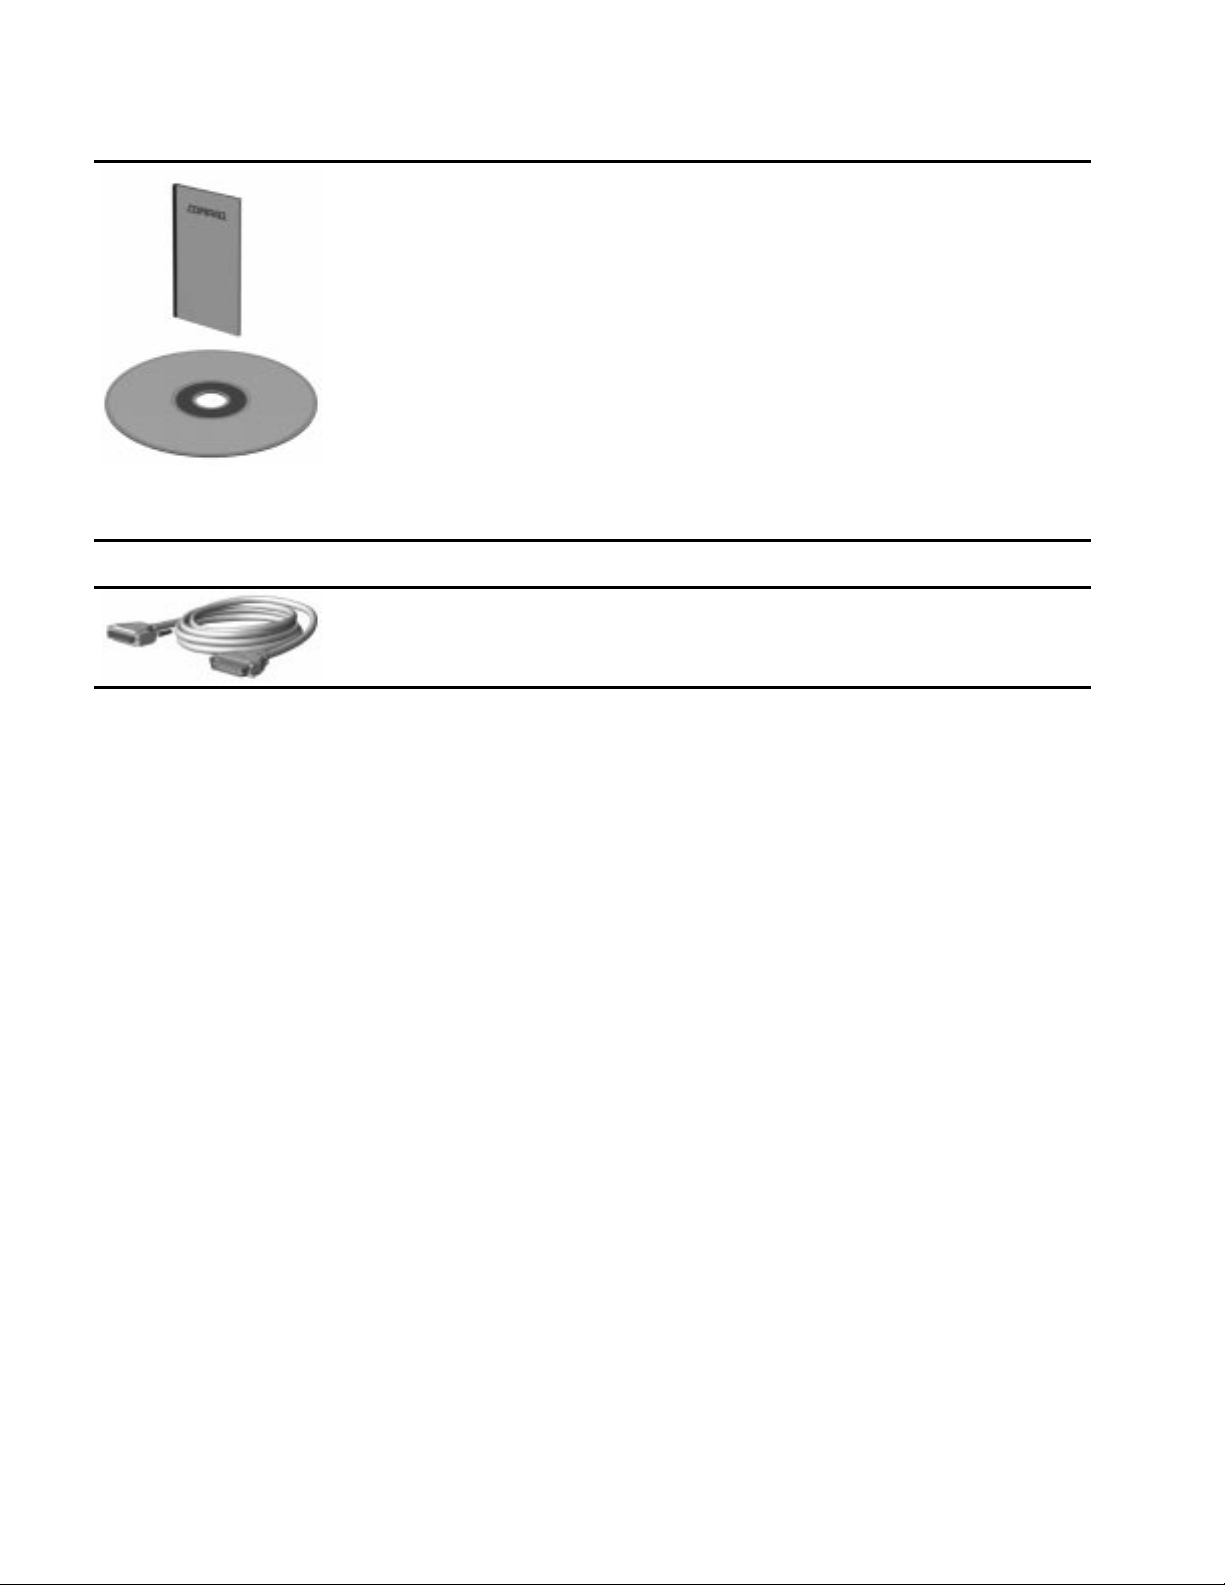
Box Contents,
continued
Documentationprovides the information required to set up, operate, and
maintain the A900. Your documentation also provides important safety
information and troubleshooting tips.
CD-ROM(s)contain the software drivers and application software required to
operate the A900.
One copy/scan sleevefor faxing, copying, and scanning. Protects photographs
to be scanned. Also allows you to scan irregular size paper. (Not shown)
Required Additional Purchases
Printer cableThe Compaq A900 uses a standard, bidirectional, IEEE 1284
Compliant parallel printer cable. This cable is not included with your All-In-One.
You may need to purchase this cable separately.
4
Page 7
Step 2: Choose a Location to Operate the A900
To help guarantee trouble-free operation of your A900,
place it on a flat, stable surface. Leave enough space
behind and in front of the A900 to allow for easy paper
loading, document removal, and for opening the
control panel.
IMPORTANT: Do not place the A900 in direct
sunlight, near heat sources or air conditioners, or in
dusty or dirty environments.
Step 3: Prepare the A900 for Use
When you take the A900 out the box, note that it has
been packaged to protect it during shipping. Before
you use the A900, make certain that you check for the
following items:
xý Remove all tape.
xý Remove all packing materials.
NOTE: For instructions on removing the packing
material, see the Compaq A900 All-In-One setup
poster.
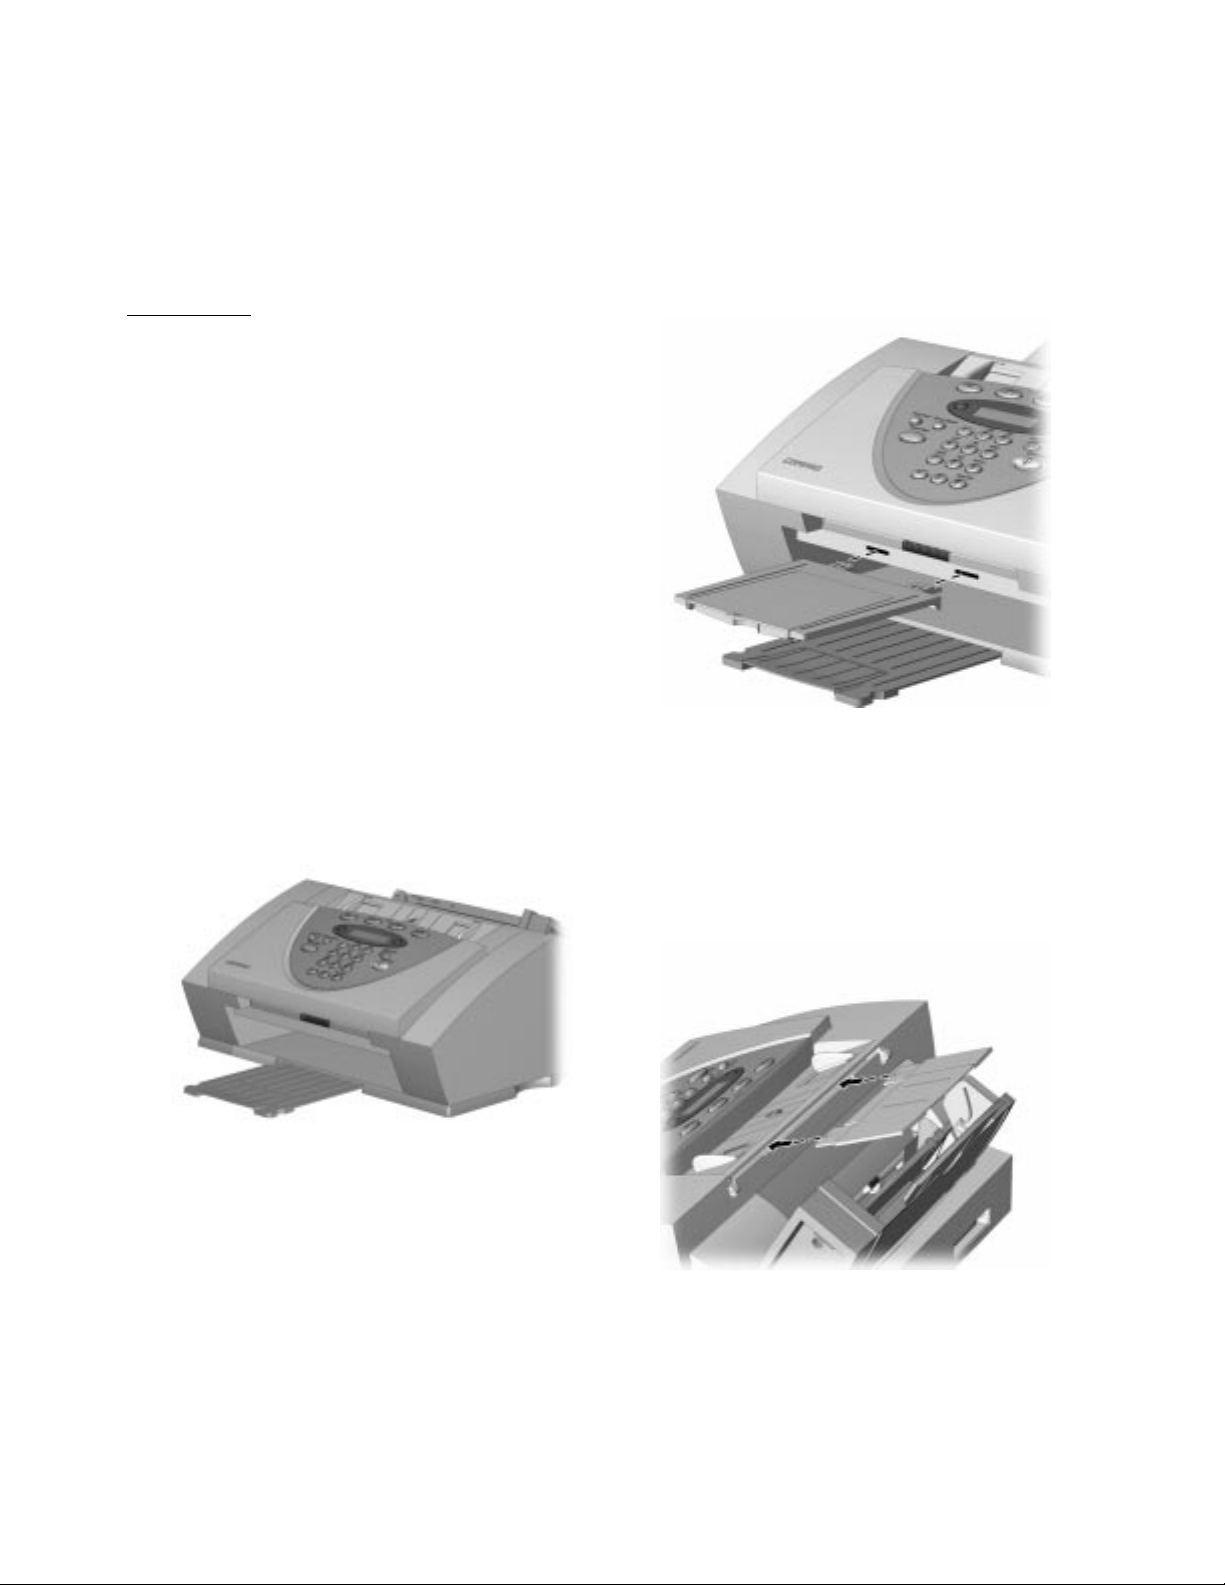
Document Exit Tray
To install the document exit tray:
ý
Align the latches on the trays with the slots on
1.
the front of the All-In-One.
ý
Slide the tray latches into the appropriate slots
2.
until the latches lock into place.
Step 4: Install the Document Trays
The A900 uses several trays to support your paper
documents.
NOTE: The A900 ships with the paper exit tray
already installed.
Extending the paper exit tray
Installing the document exit tray
Document Input Tray Extension
To install the document input tray extension:
ý
Align the latches on the tray with the slots on
1.
the top of the All-In-One.
ý
Slide the tray latches into the appropriate slots
2.
until the latches lock into place.
Installing the document input tray extension
5
Page 8
NOTE: To support documents before and after
printing, faxing, copying, or scanning, extend all four
paper trays. The A900 appears as follows:
Connecting the telephone (line) cord
Step 6: Connect the Printer Cable
Extending the paper trays
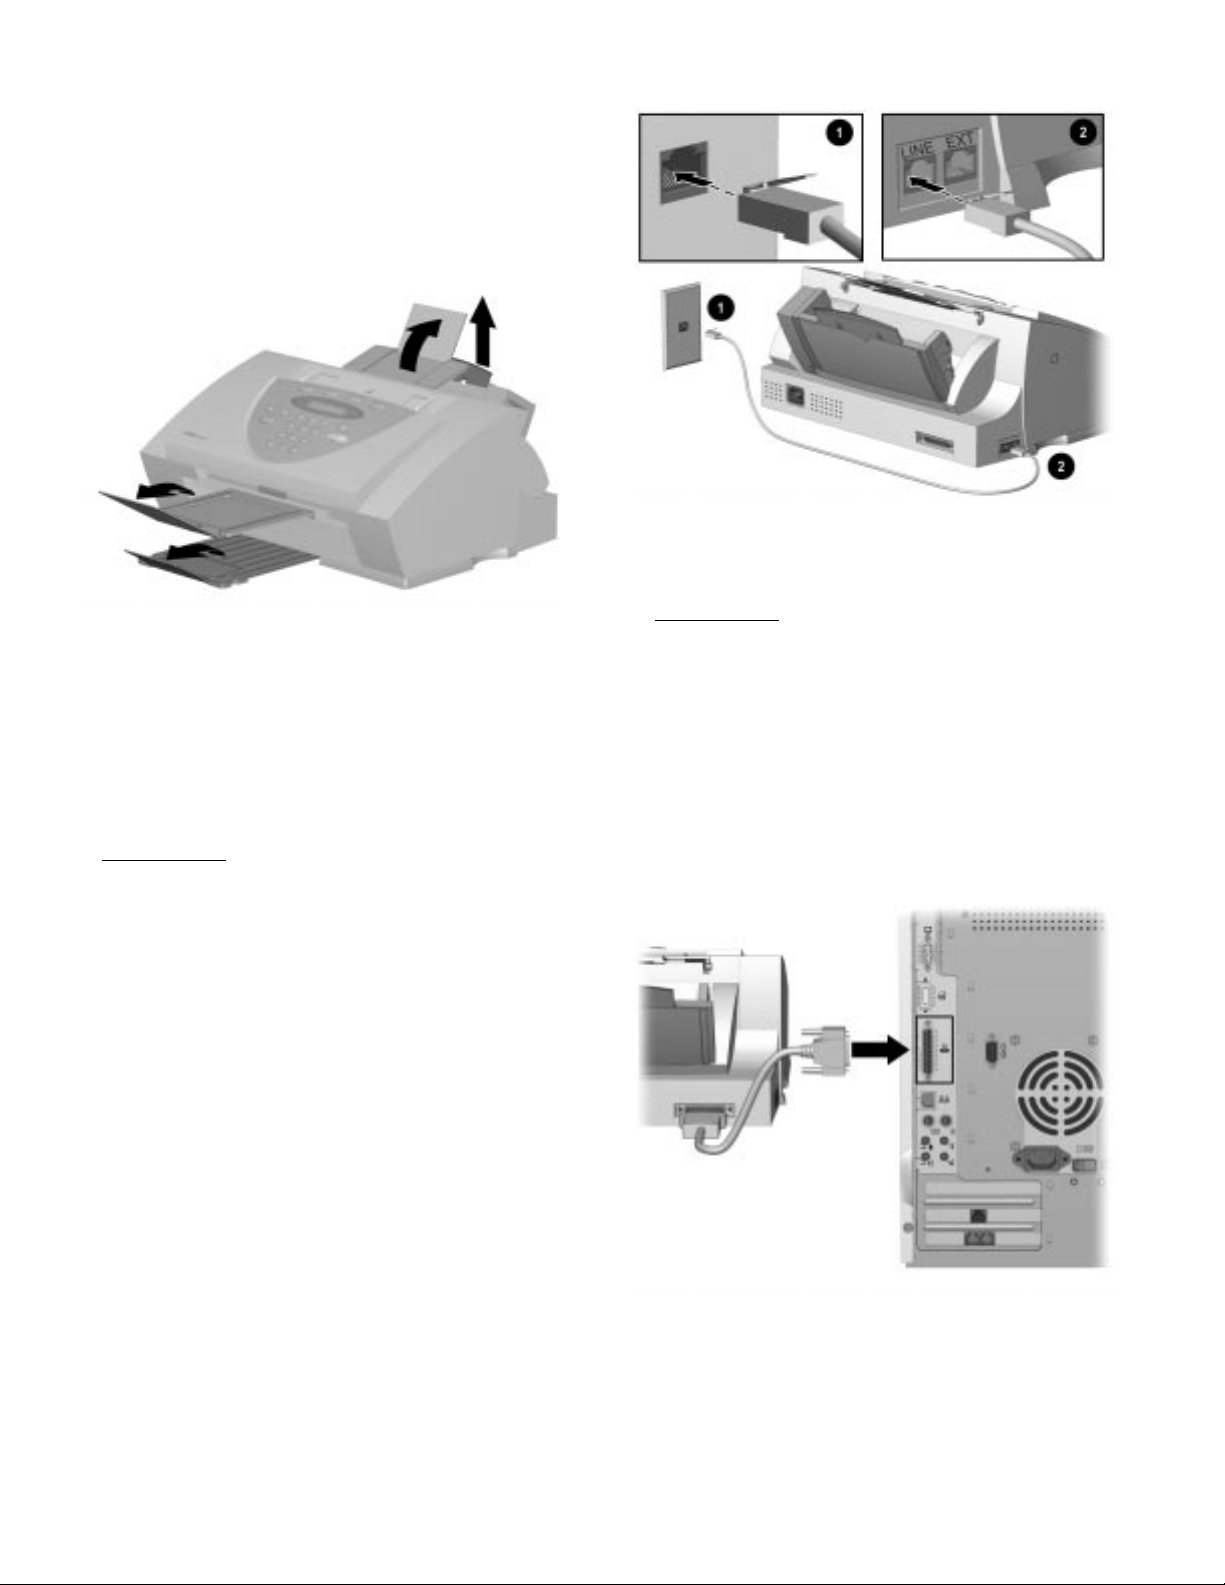
Step 5: Connect the Telephone (Line) Cord
This section shows you how to connect the telephone
(line) cord to the A900. You may also choose to add
an extension telephone, answering machine, or
computer modem. If you have a single telephone line,
this allows you to use your telephone when you are not
faxing.
IMPORTANT: This unit does n ot come with an
extension telephone or handset. However, any standard
telephone may be used. For more information on
connecting an extension telephone or other optional
equipment to the A900, see Appendix A.
To connect the telephone (line) cord:
ý
Plug one end of the telephone (line) cord into a
1.
standard telephone wall jack 1.
ý
Plug the telephone (line) cord into the socket
2.
marked LINE on the left side of the A900 2.
IMPORTANT: The printer cable does not come
standard with your unit. You may have to purchase an
IEEE 1284 compliant printer cable separately.
To connect the printer cable:
ý
Turn off the computer before connecting the
1.
printer cable.
ý
Connect one end of the printer cable to the
2.
printer port on the rear of the A900.
ý
Connect the other end of the printer cable to the
3.
parallel printer port on the rear of your
computer.
Connecting the printer cable
6
Page 9
Step 7: Connect the AC Power Cord
This section shows you how to connect the A900 to
the electrical outlet using the AC power cord.
ý
Connect one end of the AC power cord into the
1.
back of the A900.
ý
Connect the other end into a standard AC power
2.
outlet (120V, 60Hz).
CAUTION:
grounded (three-prong) wall outlet. Using an outlet that is not
grounded may damage the A900.
Connecting the AC power cord
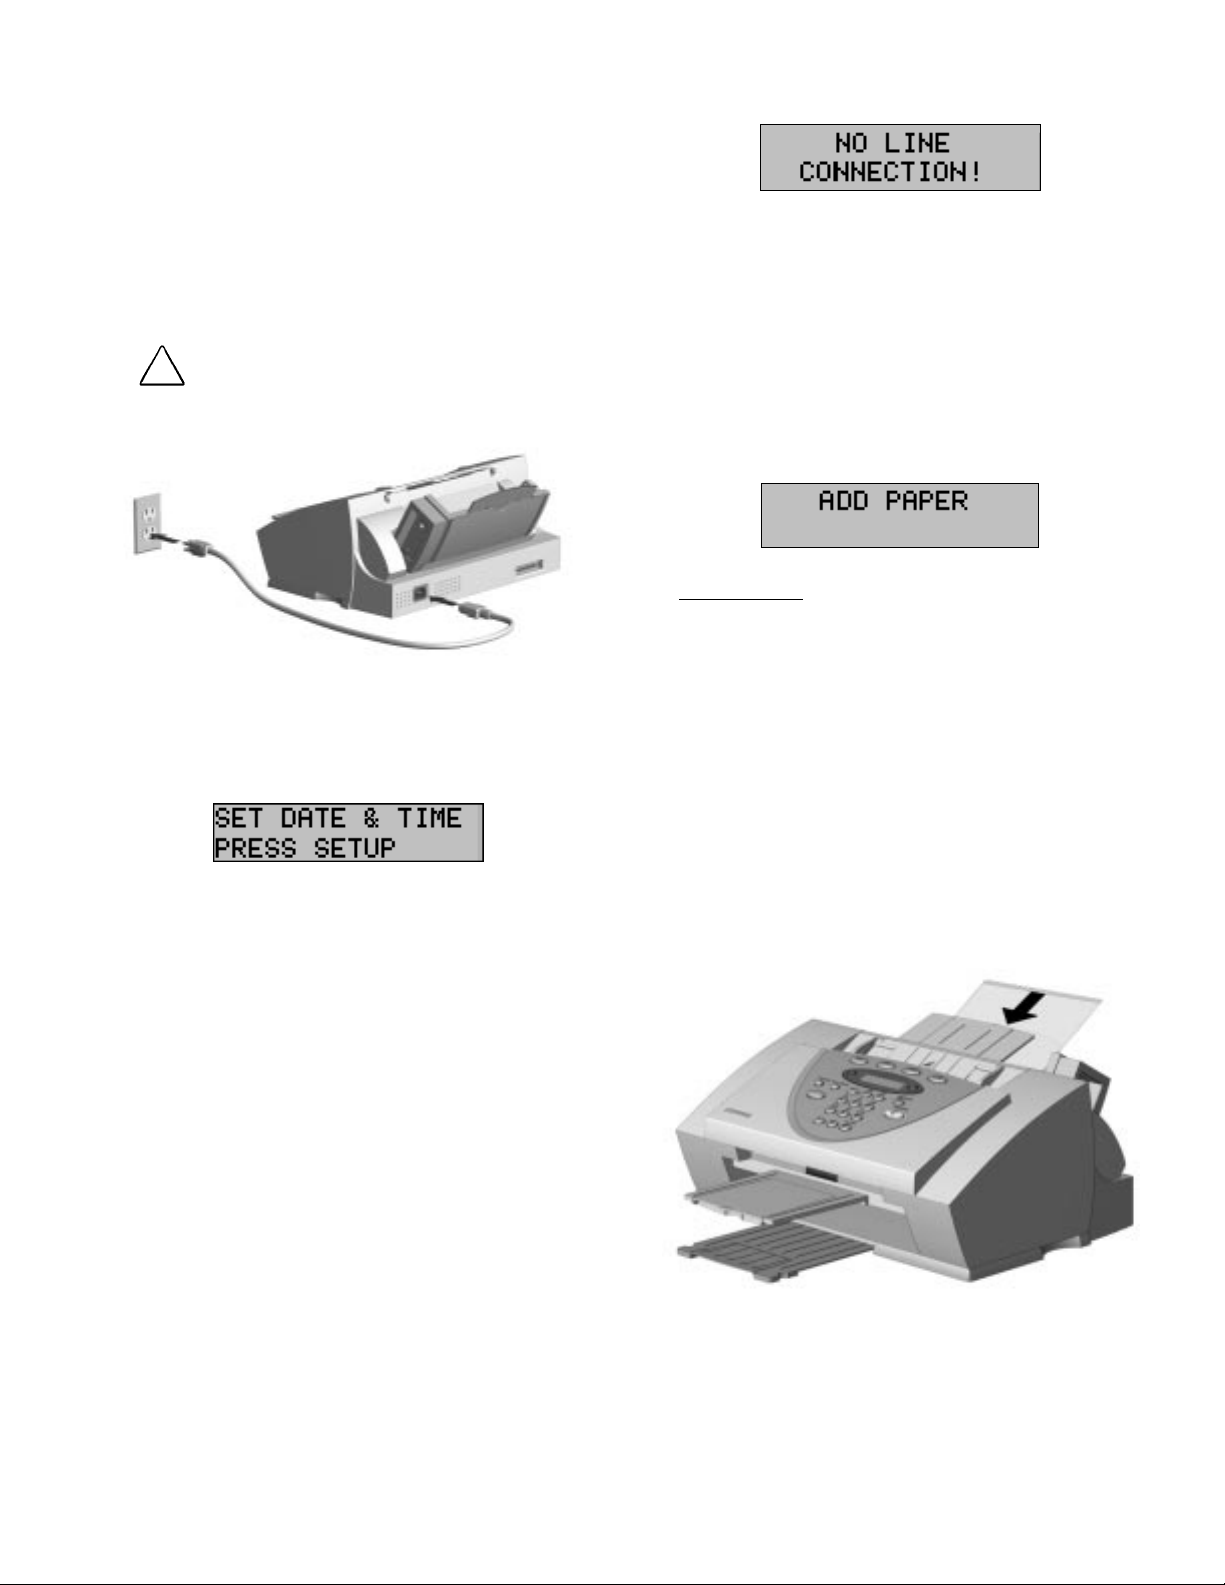
ý
When the A900 turns on, the LCD panel
3.
displays the following:
Make certain that you plug the cord into a
Verify that the telephone line cord is securely
connected into the wall and into the socket of the
A900 marked LINE.
Step 8: Load Paper
You can load up to 100 sheets of plain paper into the
paper input tray. When paper is not loaded, the A900
emits warning beeps or tones. The LCD panel displays
the following message:
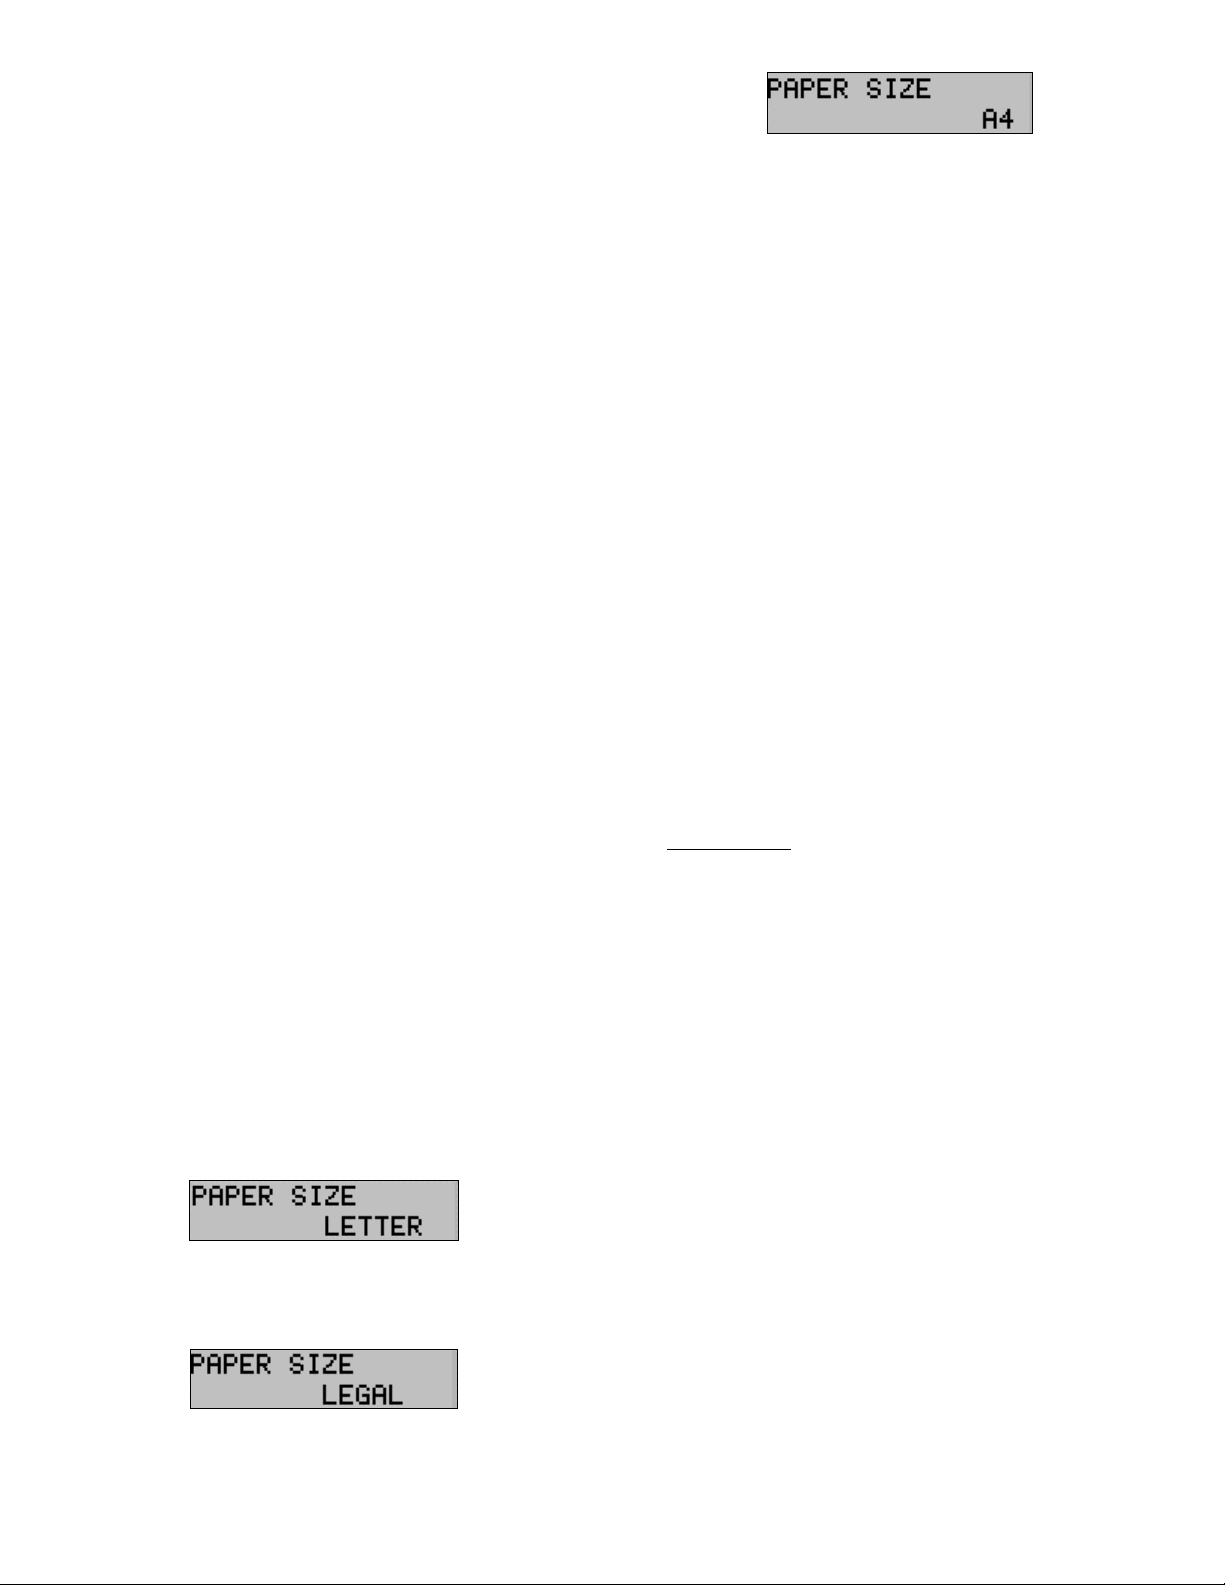
IMPORTANT: If you load any paper other than
8 ½” by 11”-sized paper, such as legal-sized paper,
into the paper input tray, you must change the default
paper size. Change the default paper size in the printer
software and on the A900 before printing on that
paper. See the Loading Different Sized Paper of the
“Common Procedures” chapter for instructions. The
software must be installed before the paper size may
be set in the printer software.
NOTE: If you want to turn off the A900,
unplug the power cord. However, Compaq
recommends that you leave the A900 on at all
times. The A900 goes into an energy saving
mode when not in use.
ý
Press the
4.
button on the A900 Control
Setup
Panel.
ý
Press the
5.
button. The date and time will be
Stop
set by the computer during software installation .
NOTE: If you are using the A900 as a
standalone machine, see the Setting Da te and
Time section of the “Common Procedures”
chapter.
ý
If you have connected the telephone line, press
6.
. You should hear a dial tone. If you hear a
Start
dial tone, you are properly connected . Press
to hang up.
Stop
If you do not hear a dial tone, the following
message may appear on the LCD panel:
To load paper into the A900:
ý
Insert the paper into the paper input tray. Make
1.
certain the side you want to print on is facing
you. Orient the head of the paper so that the
head is facing down.
Inserting paper into the A900
7
Page 10
2.ý Align the paper with the paper guide. Squeeze
the left paper guide and move it to the right to
match the width of the paper.
Aligning the paper guides
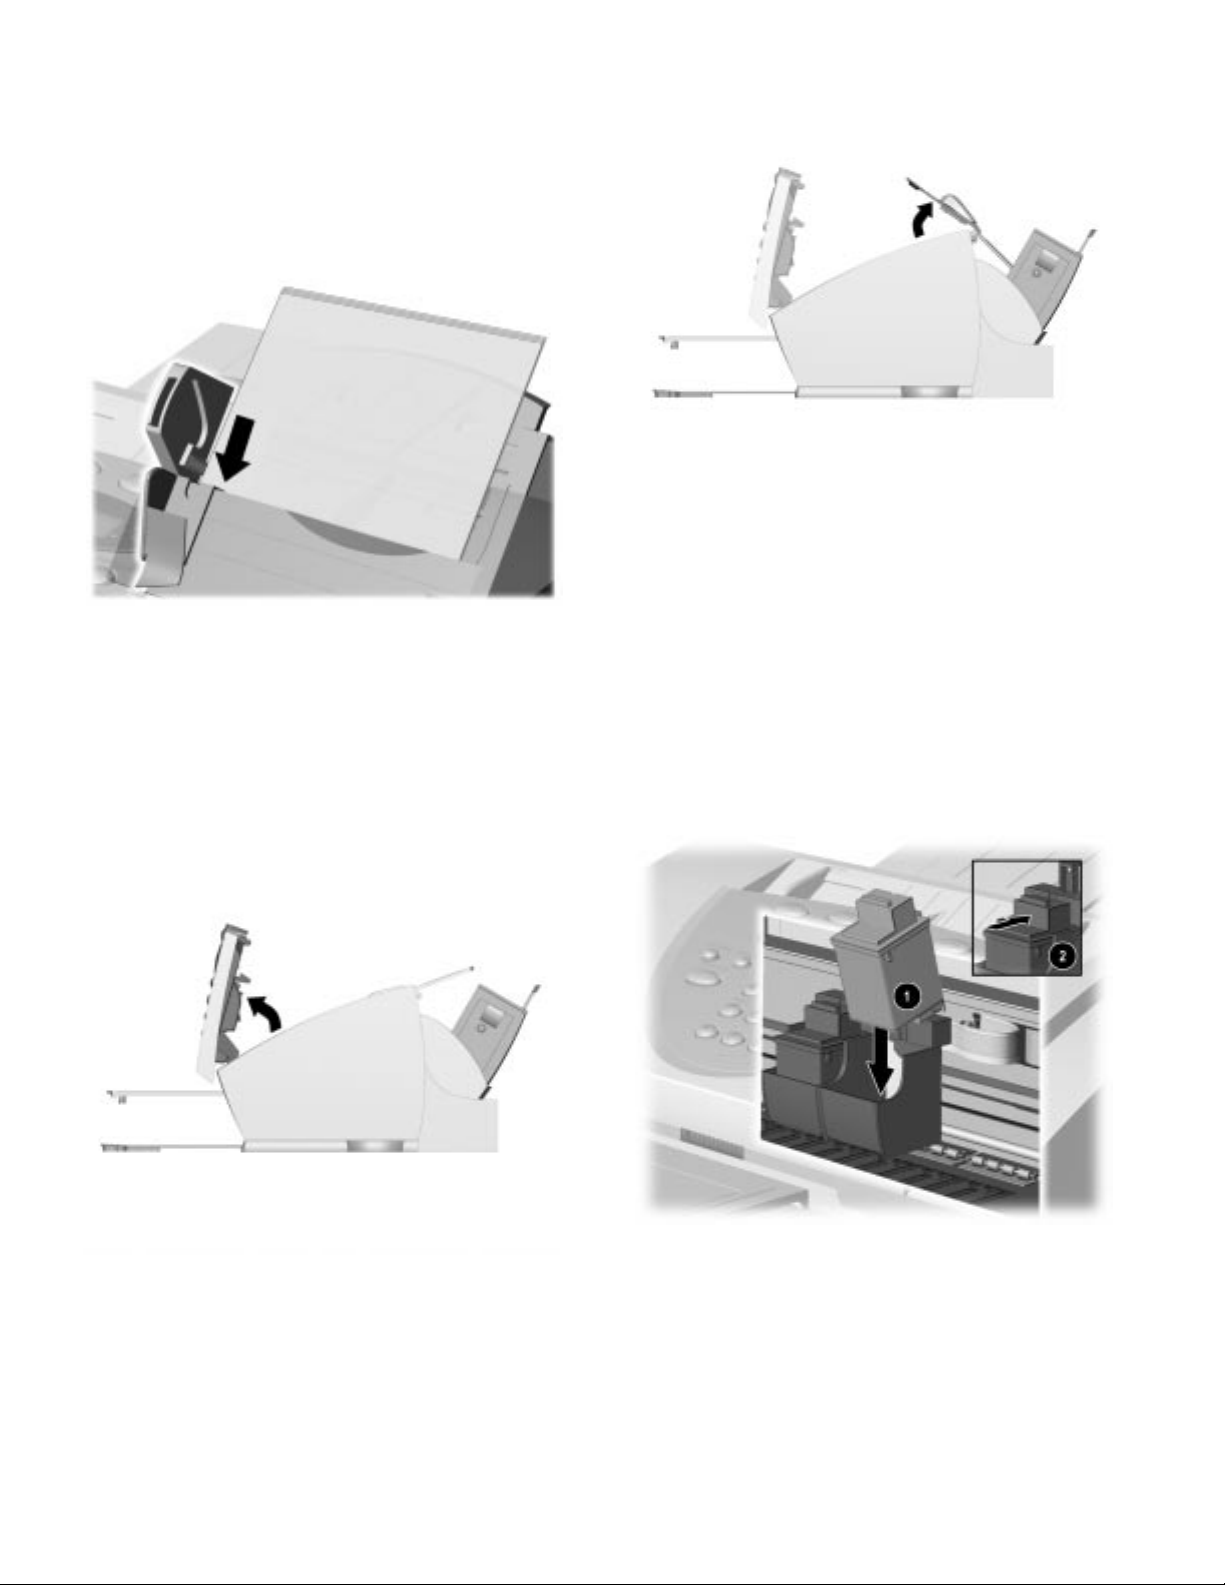
Step 9: Install the Ink Cartridges
Installing the Ink Cartridges for the First Time
To install the ink cartridge:
ý
Lift the control panel by grabbing the panel
1.
along the top edge.
ý
Pull the control panel forward.
2.
Lifting the ink cartridge access door
ý
Remove the new ink cartridge from its
4.
packaging. Hold the ink cartridge by the black
areas or colored top only.
ý
Carefully remove the tape covering the print
5.
head. Be sure to remove all of the tape. Do not
touch the copper area on the bottom of the
cartridge.
ý
Insert the bottom of the black ink cartridge into
6.
the right carriage slot 1. Press back until the
cartridge locks firmly into place 2.
Lifting the control panel
ý
Lift the ink cartridge access door. The carriage
3.
will automatically center itself.
8
Installing the printer cartridge
ý
Insert the bottom of the color ink cartridge into
7.
the left carriage slot. Press back until the
cartridge locks firmly into place.
Page 11
9
If the ink cartridges move loosely in the carriage, they are not
locked into place.
NOTE: The carriages are color coded with the ink
cartridge to help with their installation.
ý
Close the ink cartridge access door and the
8.
control panel. Press firmly at the top center of
the control panel until it snaps closed. The
following displays on the LCD panel:
ý
9.
Press
Start
.
IMPORTANT: Before you use the A900, you should
properly align the ink cartridges. This will be done
when you install the Compaq A900 so f tware. For
standalone use, see the Aligning Print Cartridges
section of the “Common Procedures” chap ter.
Installing the Ink Cartridges for Standalone
Operations
If you intend to use the A900 as a standalone fax
machine or copier, without connecting it to a
computer, see Changing Print Cartridges in the
“Common Procedures” chapter of this guide.
Page 12

0
Compaq A900 Software Installation
This chapter discusses how to install your Compaq
A900 Software. You will need to do this after you
have set up your A900 and connected it to your
computer. The software is located on the A900 Drivers
CD. The A900 Drivers CD includes the following
software:
zý Printer Driver
zý Compaq A900 Software
zý WinFax Basic Edition
zý Pagis ScanWorks with Text Bridge OCR
IMPORTANT: All software on the A900 Drivers CD
must be installed for the A900 to function properly.
Description of Programs and Drivers
Printer Driver
Before you can use any printer with your computer,
you must install a printer driver. The printer driver
tells the computer what kind of a printer you are using,
and controls the various settings, such as prin t quality
and paper type. You define these settings within the
printer driver, which then communicates the settings to
both the computer and the printer.
To use the A900 as your printer, you must install the
A900 printer driver on your computer. After installing
the printer driver, make sure Compaq A900 is selected
as the default printer.
Pagis ScanWorks
With Pagis ScanWorks, you can easily scan documents
and photographs into your computer and maintain
them as electronic documents. You can also use Pagis
ScanWorks to quickly transmit scanned documents by
fax or electronic mail, or to print a copy on your
printer.
System Requirements
Before you start, make sure you have the minimum
computer setup:
zý 486 processor (recommend Pentium 100 or
better for optimum performance)
zý Microsoft Windows 95 or 98
zý 24 MB RAM (32 MB RAM or more for
optimum performance)
zý 125 MB available hard drive space
zý Additional 100 MB free hard drive space
recommended for full-color scanning
zý CD-ROM drive required for software
installation
zý Dedicated bi-directional parallel port
zý An IEEE 1284 compliant parallel cable
IMPORTANT: The Compaq A90 0 All-In-One is not
for use outside of the country purchased.
Compaq A900 Software
The Compaq A900 software allows you to control how
you want to use your Compaq A900 to print, fax, copy,
and scan.
Scanner Driver
The scanner driver allows you to scan images from any
graphics or OCR (Optical Character Recognition)
applications program that supports the TWAIN
standard (for example, Pagis ScanWorks, MS Imaging,
MS Paint.)
For information on how to use the scan options, see the
“Scanning” chapter.
WinFax Basic Edition
This fax program allows you to fax and receive
documents from your computer.
1
Installing the Software for Your Compaq A900
Before you start, make sure your computer meets or
exceeds the system requirements for the drivers and
application programs you want to install. See System
Requirements.
IMPORTANT: The Compaq A900 requires a
dedicated parallel port. Uninstall any devices that
control the parallel port before installing the A900
software. These devices include other printers, scanner
software, or other external devices.
To install the Compaq A900 software:
Turn on your computer.
1.
ý
NOTE
plugged in and connected to your computer.
Make sure that the Compaq A900 is
:
Page 13

Windows detects new hardware.
2.
ý
Windows detects that you have installed the
Compaq A900 and asks you for the Driver disk.
Select
. If you are starting Windows for the
Cancel
first time, Windows asks you to select a printer.
Again, select
Put the CD in the CD-ROM drive. The
3.
ý
Cancel.
installation will start after a short period of time.
If the CD does not run automatically to start the
software installation, click
Start
ÆÆÆÆ
Run
.
Type x:\setup.exe
where x is the drive letter for your CD-ROM drive.
Then click
The Welcome screen displays. Click
4.
ý
OK.
Next.
The A900 Software Setup screen displays. Click
6.
ý
Next.
The Compaq Software License Agreement
7.
ý
screen displays. (Not shown)
Click
8.
ý
The Install New Cartridge Set screen displays.
9.
ý
to agree.
Yes
Select the type of Cartridge Set that was
installed. See the “Getting Started” chapter for
instructions on installing the cartridge in the
All-In-One.
NOTE:
2QHýEODFNýDQGýRQHýFRORUýFDUWULGJHýDUH
LQFOXGHGýZLWKý\RXUý&RPSDTý$äííï
The Software License Agreement screen
5.
ý
displays. Read the Software License Agreement.
Click
Yes.
11
Page 14
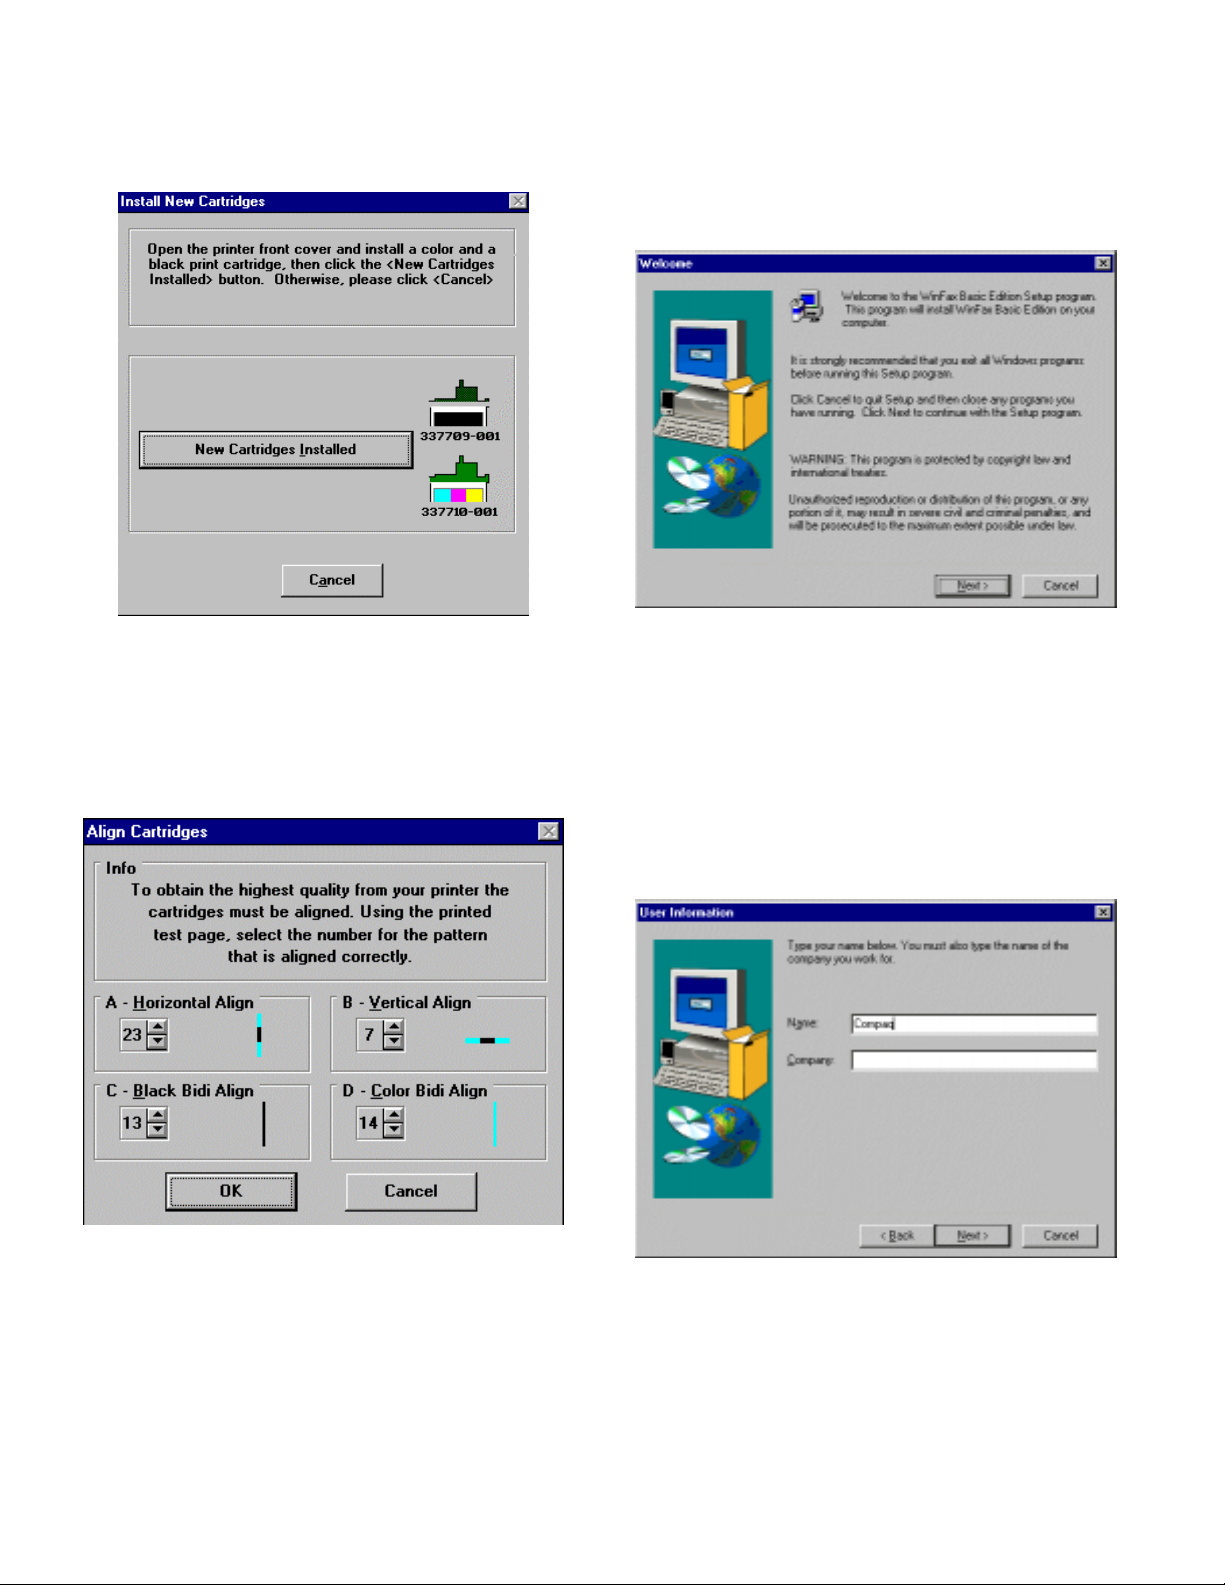
2
The Install New Cartridge Instruction screen
10.
ý
displays. Click
The Align Cartridges screen displays and the
11.
ý
New Cartridges Installed.
printer prints an alignment page. Use the printed
page to select the number that is most correctly
aligned for each alignment type. Use the Up and
arrow buttons to select the numbers. Click
Down
when finished.
OK
Installing WinFax Basic Edition
The Welcome to the WinFax Basic Edition
12.
ý
Setup screen displays. Click
WinFax Basic Edition.
The Software License Agreement screen
13.
ý
displays. (Not shown)
Read the Software License Agreement. Click
to agree to the terms.
Yes
The User Information screen displays. Type the
14.
ý
information in the fields. Click
finished.
NOTE: Use
Tab
and
Shift+Tab
between fields.
Next
Next
to move
to install
when
1
Page 15
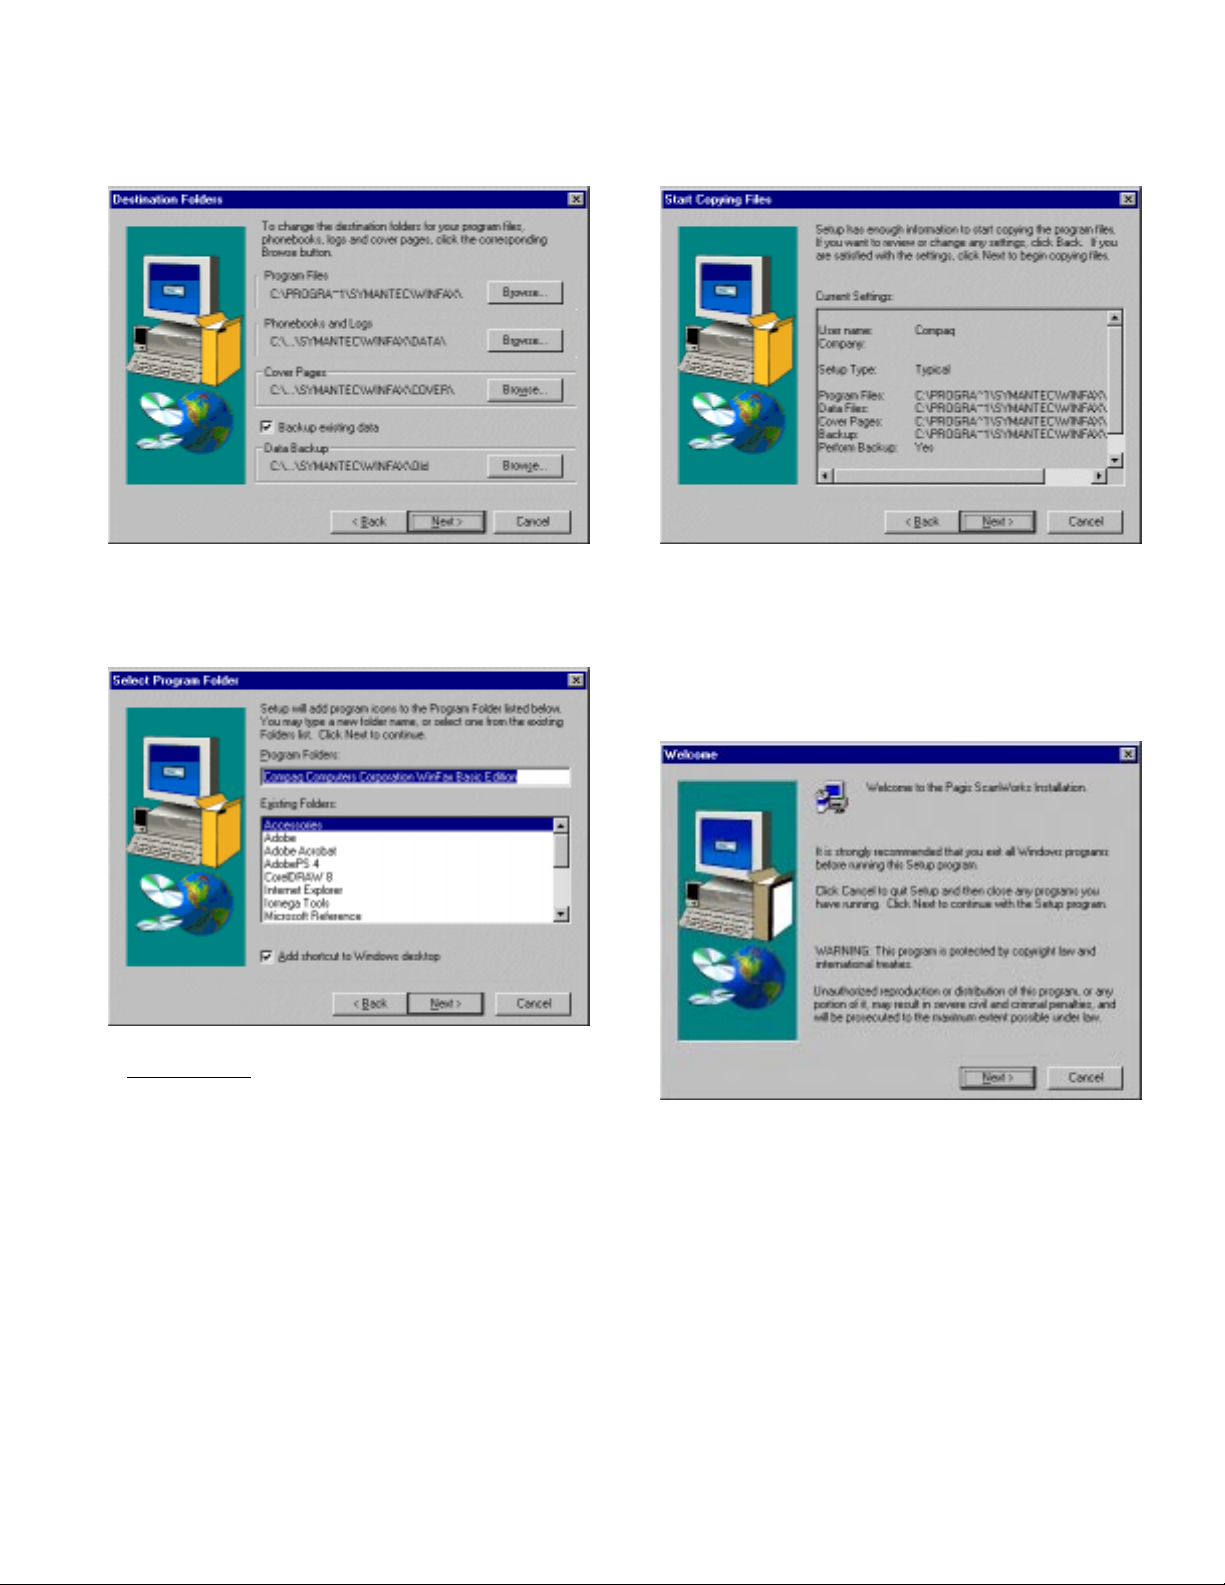
The Destination Folders screen display s. Click
15.
ý
Next.
The Select Program Folder screen displays.
16.
ý
Type the program folder name or use the default
name, then click
Next.
The Start Copying Files screen displays. Click
17.
ý
WinFax Basic Edition installs.
Next.
The File Copy Complete screen displays. (Not
18.
ý
shown)
Click
Finish.
Installing Pagis ScanWorks
The Welcome Screen displays. Click
19.
ý
Next.
IMPORTANT: If you do not have a printer already
installed on your computer, you may be asked to insert
your Windows CD. Do not insert your Windows CD.
Click
Next.
The Software License Agreement screen
20.
ý
displays. (Not shown)
Click
to continue.
Yes
13
Page 16

The Choose Destination Location screen
21.
ý
displays. Click
The Setup Type screen displays. Select
22.
ý
for the setup type, then click
Next.
Next.
Typical
The Select Program Folder screen displays.
23.
ý
Type the program folder name or use the default
name. Click
The Pagis Send To Directory Setup screen
24.
ý
The installation begins.
Next.
displays. These are programs that scanned
images may be sent from within Pagis
ScanWorks.
To shorten the list and select only applications
where you plan to send scanned images, click
Select None
Click OK when you are finished.
25.
ý
The Pagis ScanWorks Registration screen
26.
ý
. Then select the applications.
displays. (Not shown)
Click
Next.
The first Pagis ScanWorks User Information
27.
ý
screen displays. Type the information in the
fields. Click
NOTE
:
Use
to go to the next screen.
Next
and
Tab
Shift+Tab
to move
between fields.
14
Page 17
5
Type the information on the remaining
28.
ý
information screens.
The Thanks Again for Registering screen
29.
ý
displays. (Not shown)
Click
Exit.
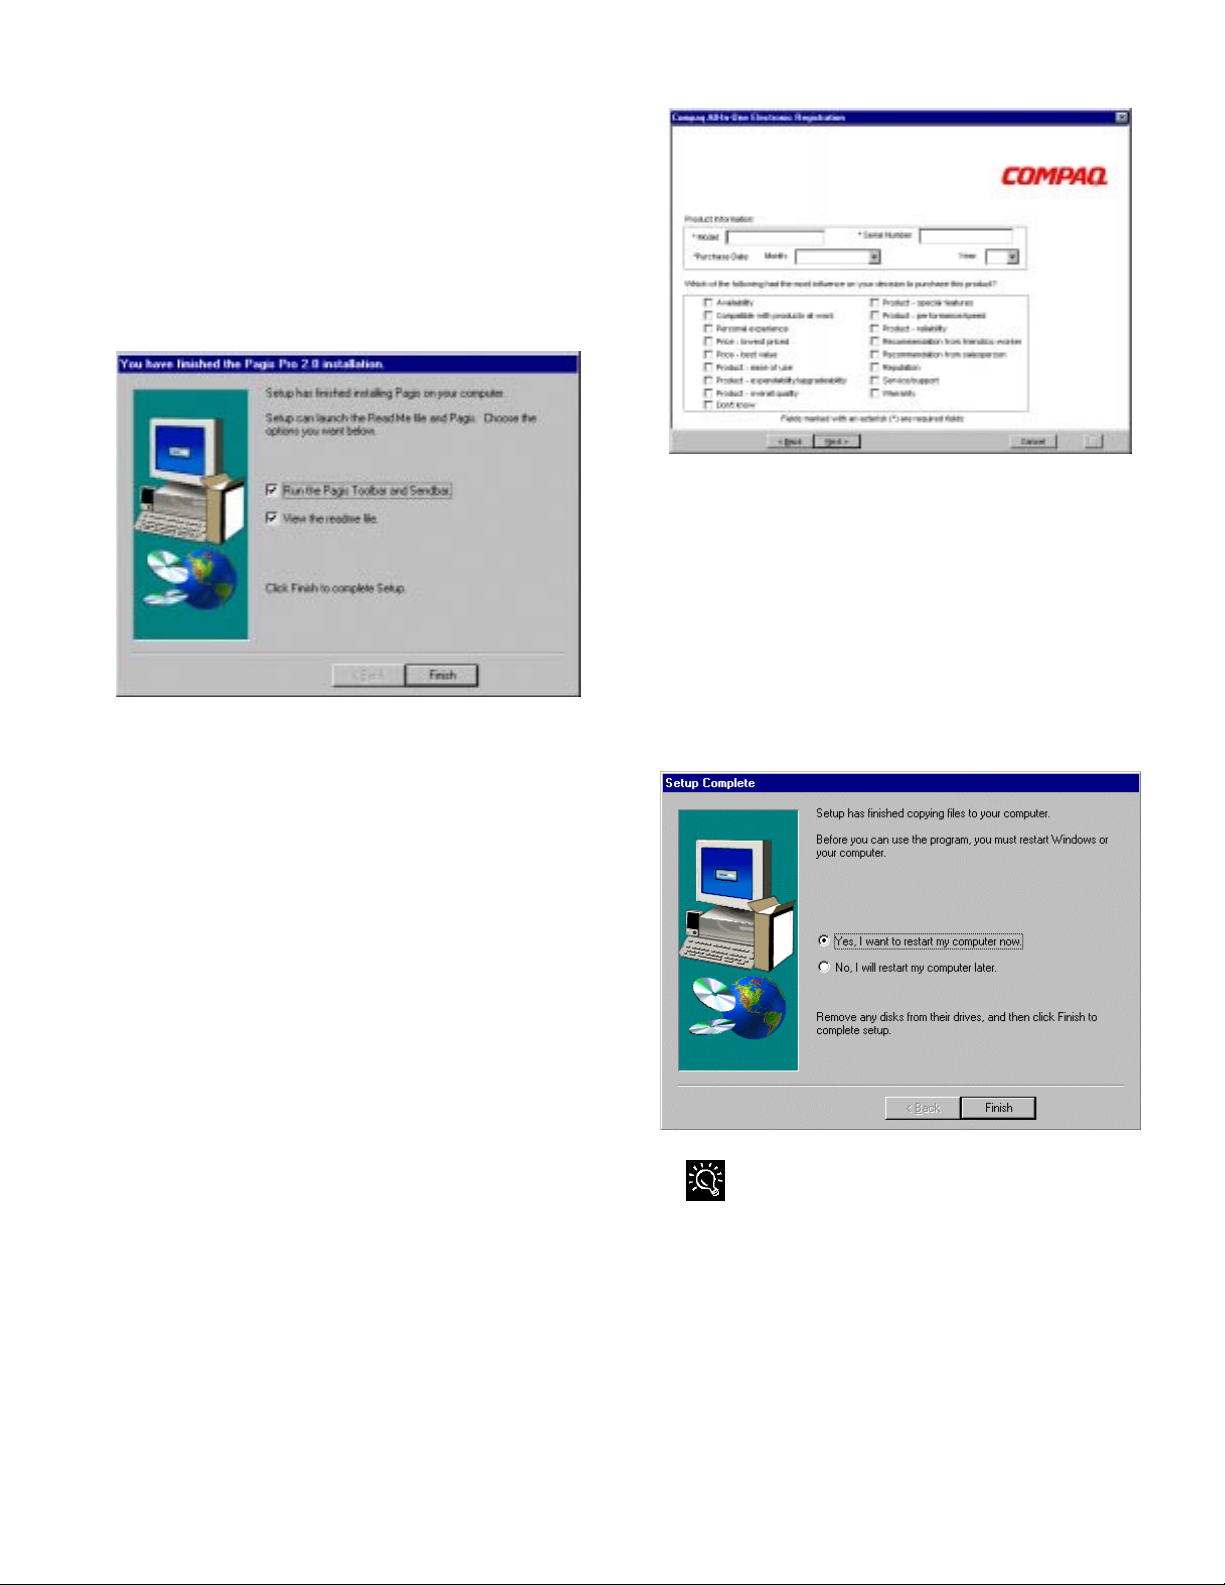
The Pagis ScanWorks Installation I s Co mplete
30.
ý
screen displays. Select the options on the screen,
then click
The Compaq All-In-One Electronic Registration
31.
ý
screen displays. Click
The first Compaq All-In-One User Information
32.
ý
Finish.
Next.
screen displays. Type the information in the
fields and click
NOTE: Use
Tab
Next
and
when finished.
Shift+Tab
to move
between fields.
The second Compaq All-In-One User
33.
ý
Information screen displays. Type the
information in the fields and click
Next
when
finished.
NOTE
:
Use
Tab
and
Shift+Tab
to move
between fields.
The third Compaq All-In-One User Information
34.
ý
screen displays. Select the options on the screen,
then click
The Registration Complete screen displays.
35.
ý
Click
OK.
The A900 Software Setup Complete screen
36.
ý
displays. Select
. The registration begins.
Finish
and click
Yes
Finish
to restart
your computer.
NOTE
<RXýPXVWýUHVWDUWý\RXUýFRPSXWHUýIRUýWKH
:
SULQWHUýWRýZRUNï
Setting your parallel port to ECP mode may increase your
scan and copy speed significantly. Refer to your computers
user guide for further instructions on how to change the
parallel port BIOS setting to ECP mode.
1
Page 18
6
Configuring WinFax
WinFax Basic must be configured before sending and
receiving faxes.
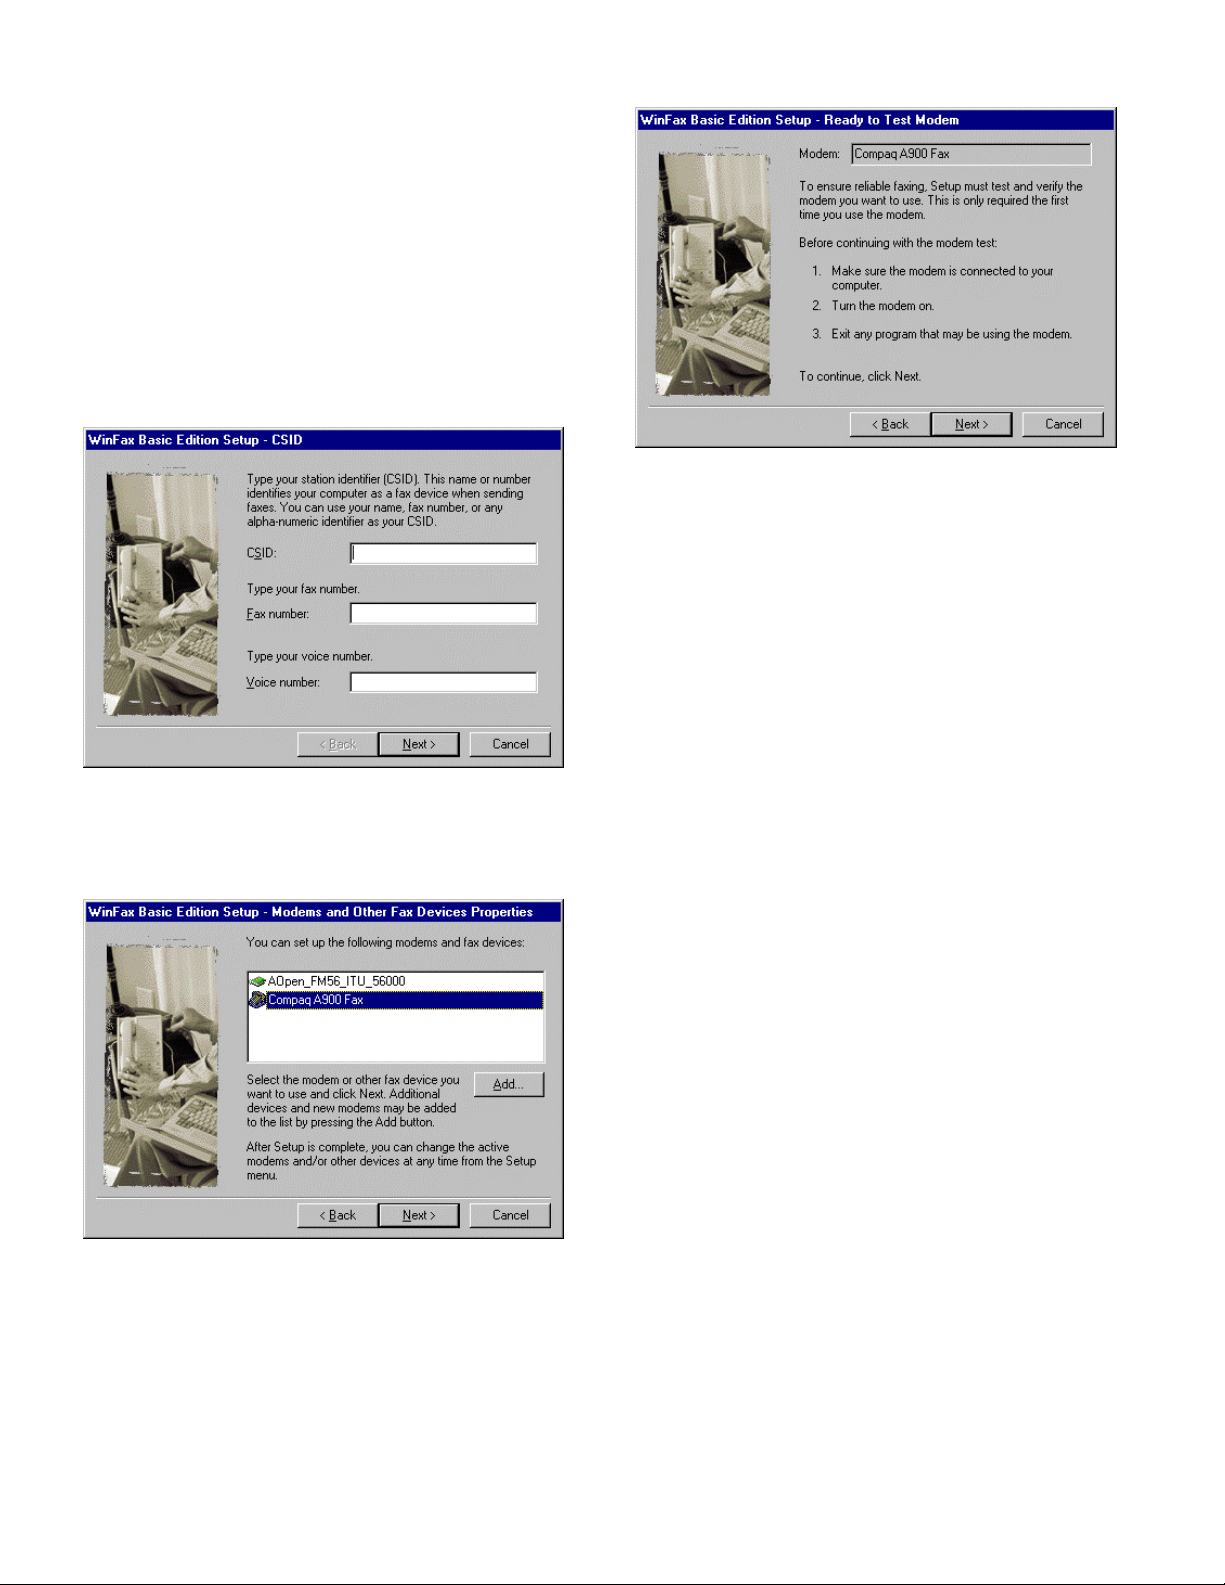
When Windows restarts, the WinFax Basic
1.
ý
Edition Setup screen displays. Type the
information in the fields. Click
finished.
NOTE:
,Iý:LQ)D[ý&RQILJXUDWLRQýGRHVýQRW
DXWRPDWLFDOO\ýUXQñýFOLFNýWKHý&RQILJXUHý:LQ)D[
LFRQýRQýWKHýGHVNWRSï
Next
when
The WinFax Testing Modem screen
4.
ý
displays. (Not shown)
Click
The Winfax Ready To Configure System Screen
5.
ý
when testing is complete.
Next
displays. (Not shown)
6.
Click
Select
ý
to configure the system.
Finish
or No if you want to view the Read
Yes
Me file. The configuration is finished.
When the configuration is finished, the Software
7.
ý
License Agreement displays. (Not shown)
Click
to agree.
Yes
The Modems and Other Fax Devices Properties
2.
ý
screen displays. Select the Compaq A900 Fax
and click
The Ready to Test Modem screen displays.
3.
ý
Click
Next.
Next
.
Your A900 software installation is now comp lete!
1
Page 19

7
Common Procedures
This section describes the procedures for changing the
default settings and performing common functions with
your Compaq A900 All-In-One.
Changing Default Settings
xý From the control panel you can change a limited
number of settings. The functions accessible by the
control panel include standalone features such as
faxing and black and white copying.
xý The computer-based Compaq A900 Settings
Utility provides a simple user interface to change
the print, fax, copy, scan, and Compaq Control
Form settings.
To access the Compaq A900 Settings utility, click
Start
Utility
ÆÆÆÆ
Programs
ÆÆÆÆ
Compaq A900
ÆÆÆÆ
A900 Settings
Common Procedures
This section also describes several common procedures
that you will need to perform on the Compaq A900.
These procedures include:
xý Setting the date and time
xý Printing reports
xý Changing print cartridges
xý Aligning print cartridges
xý Cleaning print cartridges
xý Installing and using the photo cartridge
xý Loading different-sized paper
xý Printing on envelopes
xý Using the manual feed
Setting the Date and Time
When the A900 is without power for an extended length
of time, you will have to reset the date and time. The
LCD panel displays the following:
Setting the Date and Time from the Computer
To change date and time from the computer:
ý
Run the Compaq A900 Settings Utility. Click
1.
ÆÆÆÆ
Start
Programs
.
Utility
ý
Select the
2.
ý
Click the
3.
ý
Select the check box to Set A900 time to computer
4.
time. Alternately, if this box is not checked, you
can enter the date and time.
ý
Click OK to update the time in the A900 display.
5.
See the More Fax Settings section in this chapter.
ÆÆÆÆ
Compaq A900
tab.
Fax
More Fax Settings
ÆÆÆÆ
button.
A900 Settings
Setting the Date and Time from the A900 Control Panel
By default, the computer sets the date and time for the
A900. Set the date and time from the A900 control panel
when the A900 is used in standalone mode.
To change the date and time from the control panel.
ý
Press the
1.
menu option in the
ý
Enter two digits for the month. For example, enter
2.
01 for January. Note that as you enter valid
information, the top line displays the updated date
and time.
ý
Enter two digits for the day. For example, enter 07
3.
for the 7
ý
Enter two digits for the year. For example, enter 99
4.
for 1999, or 00 for 2000.
ý
Enter two digits for the hour. For example, enter 02
5.
for 2 PM.
ý
Enter two digits for the minute. For example, enter
6.
45.
ý
Enter 1 for AM or 2 for PM.
7.
You can also use the
settings that are correct. Pressing
the last valid date entered.
button. (Date and time is the first
Setup
menu.)
Setup
th
.
Options
button to step through
Stop
at any time uses
Printing Reports
Set the date and time from the computer using the
Compaq A900 Settings Utility or from the A900 control
panel.
Transmission Report Default Settings
When you send a fax from the A900, you can choose to:
xý Never print a confirmation report
xý Always print a confirmation report
xý Print a report if there is an error sending the fax
(default setting)
1
Page 20
To make your selection, use the Message Confirm pulldown box in the Fax tab of the Compaq A900 Settings
Utility. To access the A900 Settings Utility, click
Start
ÆÆÆÆ
Programs
ÆÆÆÆ
Compaq A900
ÆÆÆÆ
A900 Settings Utility.
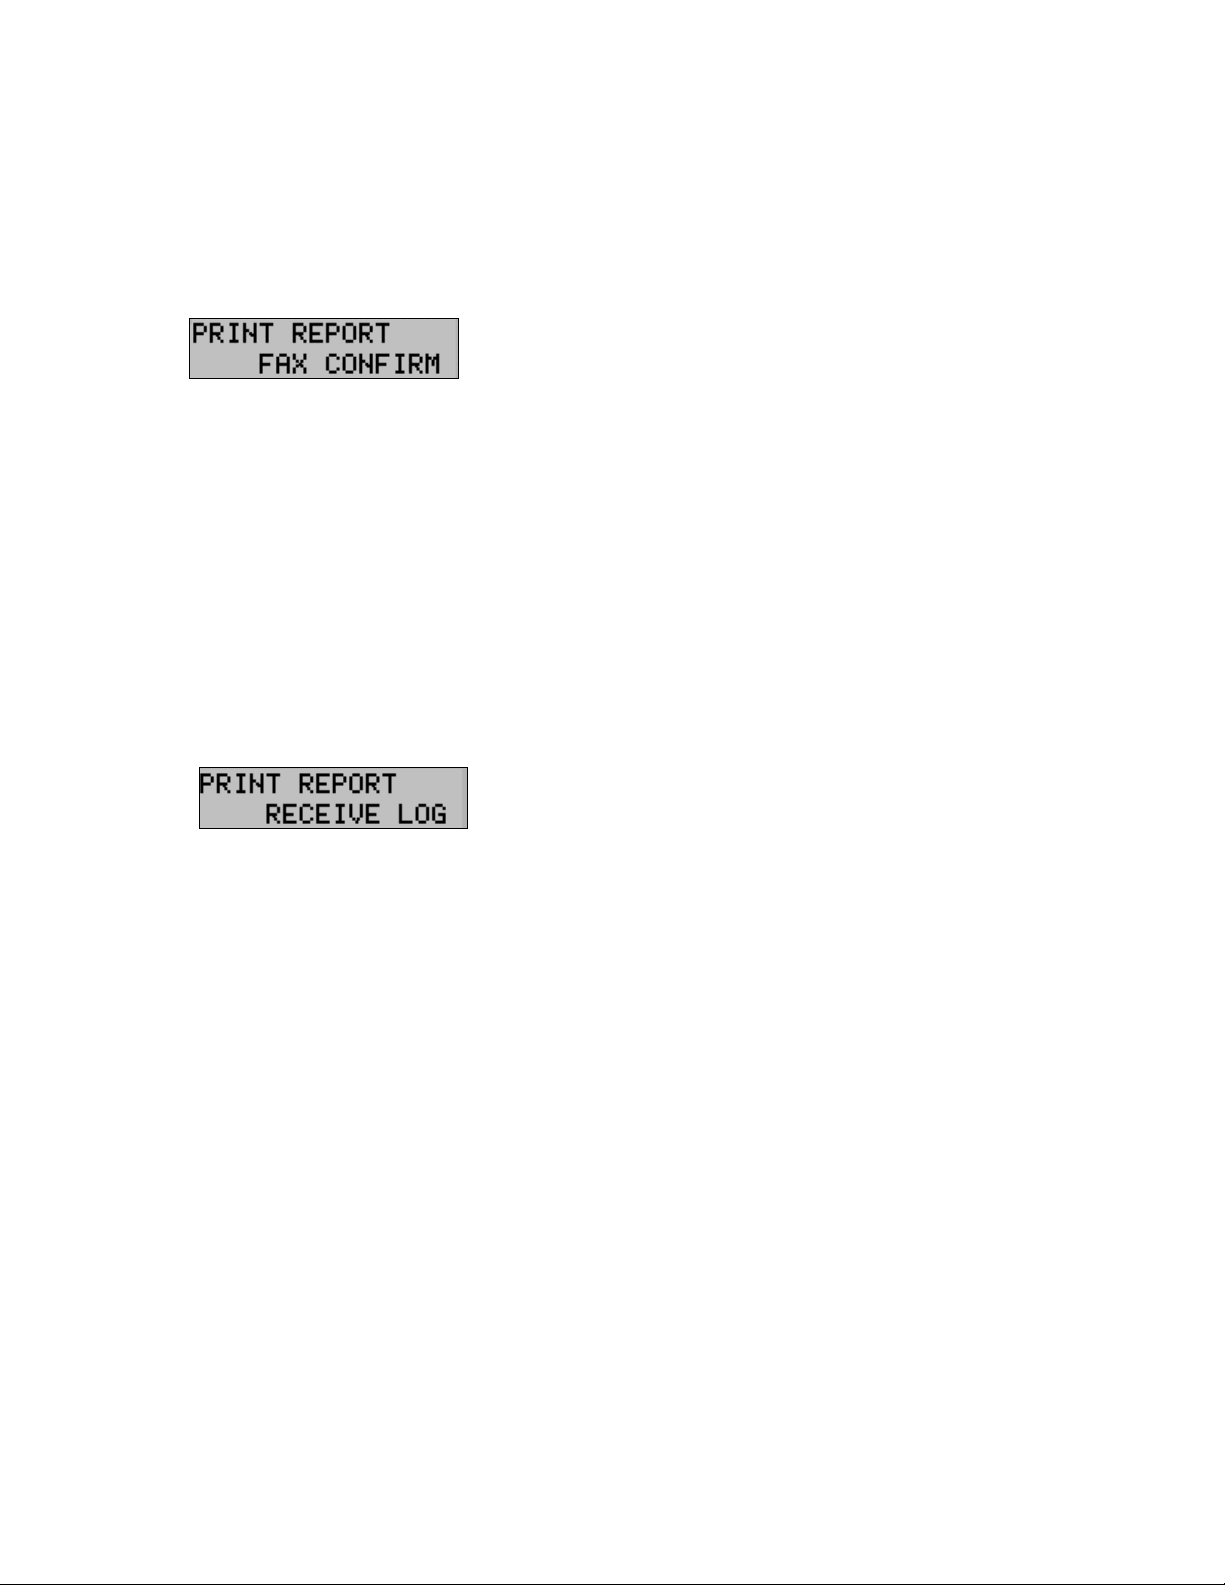
From the control panel you can print out a confirmatio n
report for the last fax sent.
ý
1.
Press
, then press the
Setup
button. The LCD
Menu
panel displays the following:
Self Test
The Self Test Report prints a nozzle test pattern along
with some service information that might be asked for
during a service call.
To print a report use the following procedure:
ý
Press
1.
2.
3.
4.
Setup.
ý
Press the
button until Print Report is
Menu
displayed in the top of the display.
ý
Press the
ý
Press
Options
Start
button to select the Self Test.
to print the self test.
ý
2.
Press
to print the report.
Start
Transmission and Reception Logs
Logs for faxes received or sent by the A900 are stored on
the A900 and can be printed out on request or
automatically every 40 transactions.
To print a report, use the following procedure:
ý
Press
1.
2.
ý
Press the
Setup.
Menu
button until Print Report displays in
the top line of the LCD panel.
ý
Press the
3.
Options
button to select the log you want
to print.
ý
Press the
4.
button to print the report.
Start
NOTE: The logs for the faxes sent or received on th e
computer are available from within the WinFax
application.
Speed Dial List
The Speed Dial List contains all of the current speed dial
names and numbers. To access the Speed Dial List, click
ÆÆÆÆ
Start
Programs
Click the
To print a report, use the following procedure:
ý
Press
1.
2.
ý
Press the
Setup.
displayed in the top of the display.
ý
Press the
3.
List.
ý
Press
4.
Start
ÆÆÆÆ
Compaq A900
tab, then select the
Fax
button until Print Report is
Menu
Options
button to select the Speed Dial
to print the list.
ÆÆÆÆ
A900 Settings Utility
Speed Dial
button.
Changing Print Cartridges
The system can keep track of the ink level in each of the
three cartridge types: black, color, and photo. When you
tell the system that a new cartridge has been installed,
then the ink level for that cartridge type is set back to fu ll.
If you tell the system that you are installing an old
cartridge, the ink level for that cartridge type is not reset.
This allows exchanging the black and photo cartridge as
required while maintaining the ink level for both. You can
also use the old selection when you take a cartridge out
for cleaning. For more information, see the Cleaning
Print Cartridges section.
Changing Print Cartridges from the Computer
ý
Access the Compaq A900 Printer Control Program
1.
by clicking
A900 Printer Control
or
by a double click on the “Q” icon in the system
tray.
ý
Select the
2.
ý
In the Cartridge pull-down box, select the cartridge
3.
you want to install or change (black, color, or
photo.)
ý
In the Action pull-down box, select the action you
4.
want, such as Install New or Reinstall Old.
.
ý
Click the
5.
the procedure. The cartridge carriage moves to the
load position.
ý
Lift the control panel by pulling toward you on the
6.
edge nearest the
ý
Lift the cartridge access door.
7.
ý
Replace/install the selected cartridge.
8.
ý
Close the cartridge access door.
9.
ý
Close the control panel. Press firmly on the top
10.
center of the control panel until it snaps into place.
ý
On the computer, click
11.
ÆÆÆÆ
Start
Cartridges
Program
tab.
ÆÆÆÆ
Compaq A900
Install/Reinstall Cartridge
Fax, Copy
, or
Scan
Continue
.
ÆÆÆÆ
button to start
buttons.
18
Page 21
9
ý
If new cartridges were installed, then an alignment
12.
is required and an alignment pattern will
automatically print. Go to step 3 of Aligning Print
Cartridges from the Computer in the following
section.
ý
If old cartridges are installed, then the alignment
13.
procedure is optional.
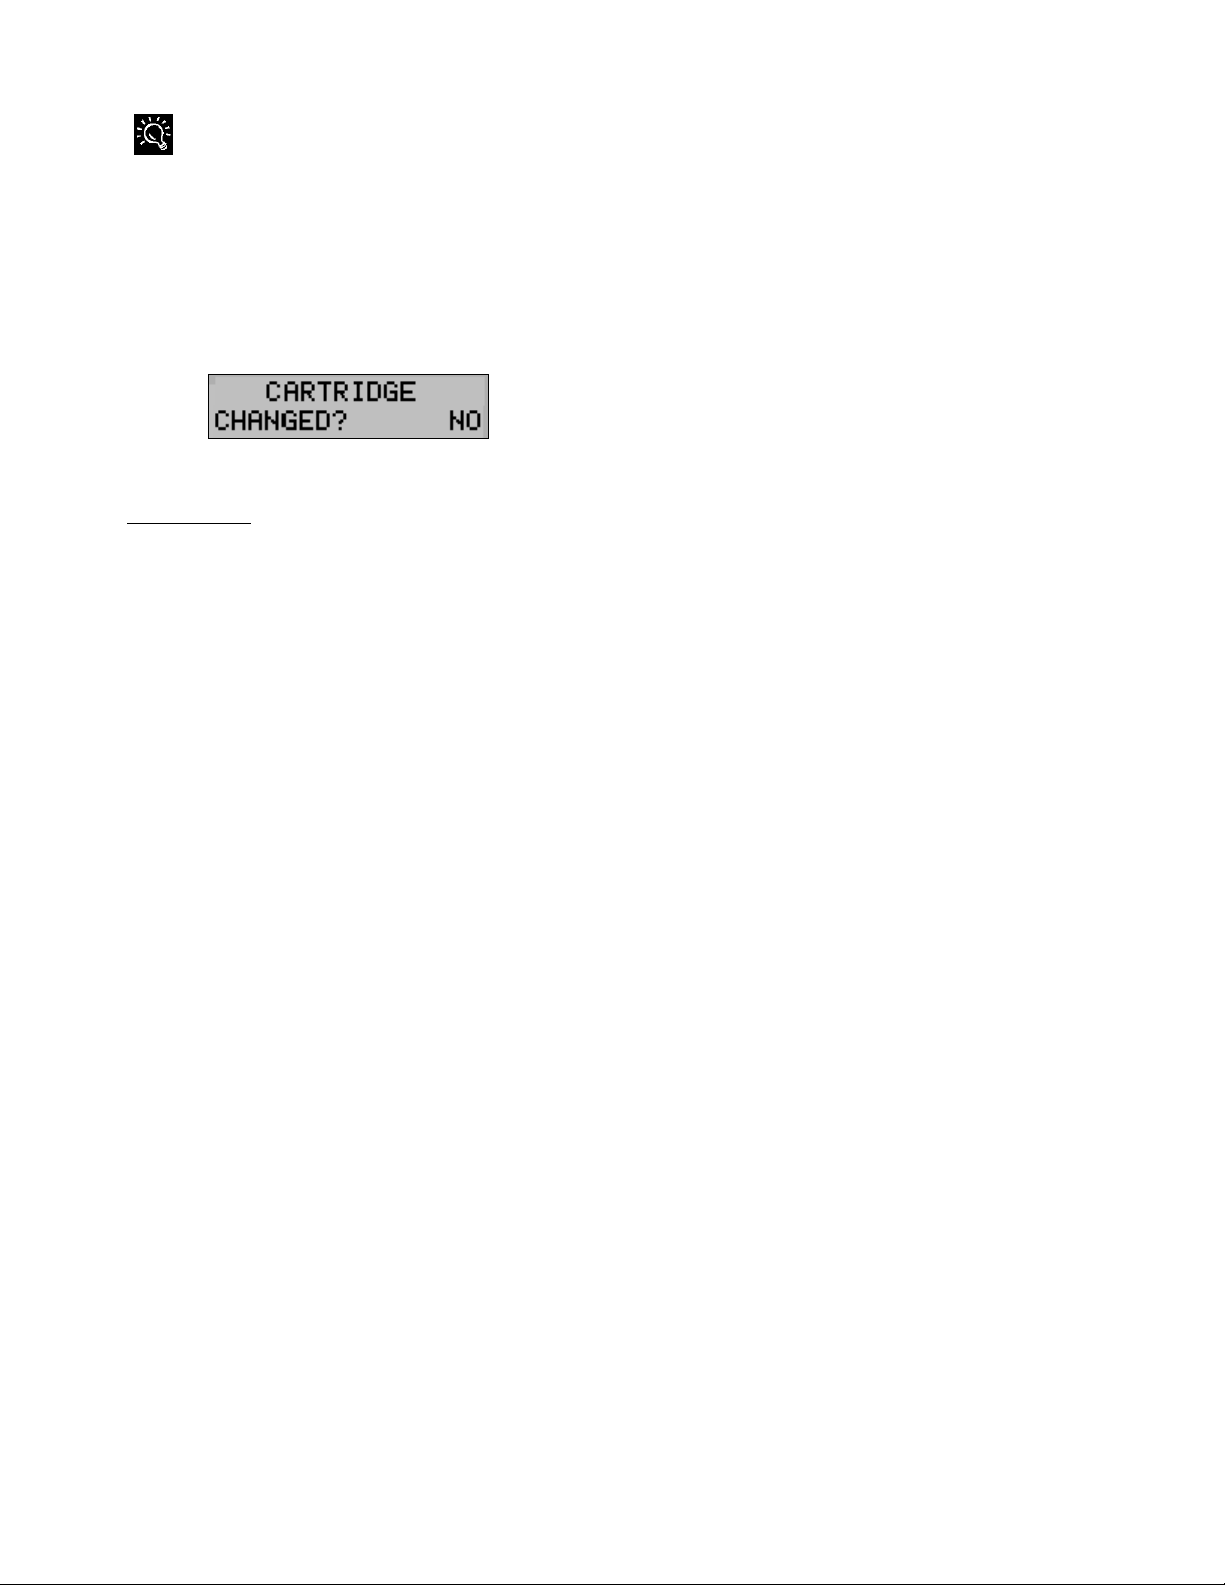
Changing Print Cartridges from the A900 Control Panel
Each time you open the A900 control panel, the LCD
panel prompts you for cartridge maintenance information.
If you have not changed the ink or photo cartridges, press
to clear the message. If you have ch anged a
Start
cartridge, use a combination of the
Options
buttons to allow the A900 to recognize the changed
cartridge(s).
ý
Lift the control panel by pulling toward you on the
1.
edge nearest the
ý
Lift the cartridge access door. The carriage
2.
Fax, Copy
, and
Scan
automatically centers itself.
ý
Replace/install the selected cartridge. Install the
3.
color cartridge in the left position. Install the black
or photo cartridge in the right position.
ý
Close the cartridge access door and the control
4.
panel. Press firmly on the top center of the control
panel until it snaps into place. The LCD panel
displays:
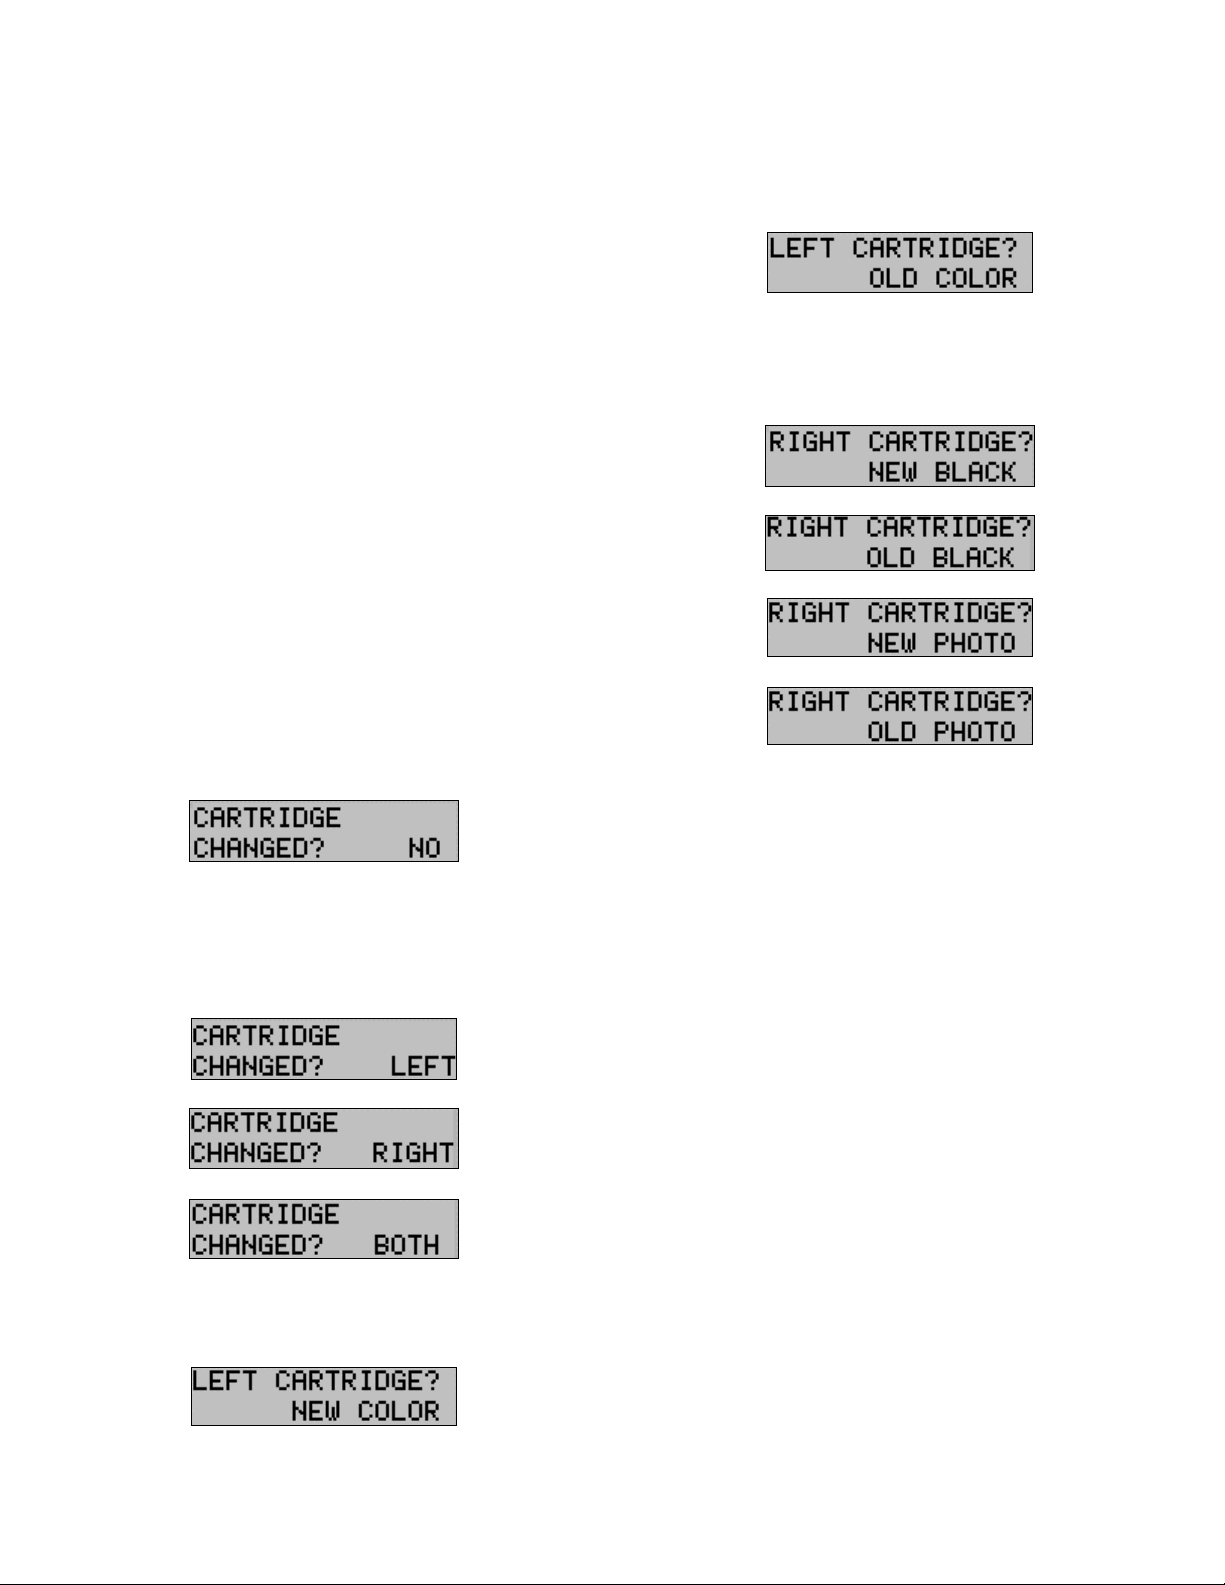
ý
If you did not change any cartridges, press
5.
you changed a cartridge, press the
until the correct answer displays: Left (color),
Right (black or photo) or Both. Then press
and
buttons.
Options
Start
Start
button
Start.
. If
ý
If you installed a new color cartridge, press
7.
ý
If you are reinstalling the old color cartridge, press
8.
the
press
button until Old Color displays. Then
Options
The following displays on the LCD
.
Start
Start
panel:
ý
If you selected Right in Step 5, then use the
9.
button to select the correct response from
Options
those displayed below. Press
ý
If any NEW cartridges were installed, then an
10.
Start
.
alignment is required. An alignment pattern
automatically prints. Go to step 6 of Aligning Print
Cartridges from the A900 Control Panel in the
following section.
Aligning Print Cartridges
Cartridge alignment can be done from the computer using
the Compaq A900 Printer Control or from the A900
control panel.
.
The print cartridges should be aligned after installing a
new print cartridge or if the black portions of graphics do
not align with the color portions. The alignment pattern is
automatically printed after installing a new cartridge.
Aligning Print Cartridges from the Computer
To print the alignment pattern:
ý
Access the Compaq A900 Printer Control Program
1.
by clicking
ÆÆÆÆ
A900
A900 Printer Control
ý
If you select Left or Both cartridges in Step 5, the
6.
following displays on the LCD panel:
or
by a double click on the “Q” icon in the system
tray.
ý
From the A900 Printer Control Program, click the
2.
Cartridges
Start
tab.
ÆÆÆÆ
Programs
ÆÆÆÆ
Compaq
1
Page 22
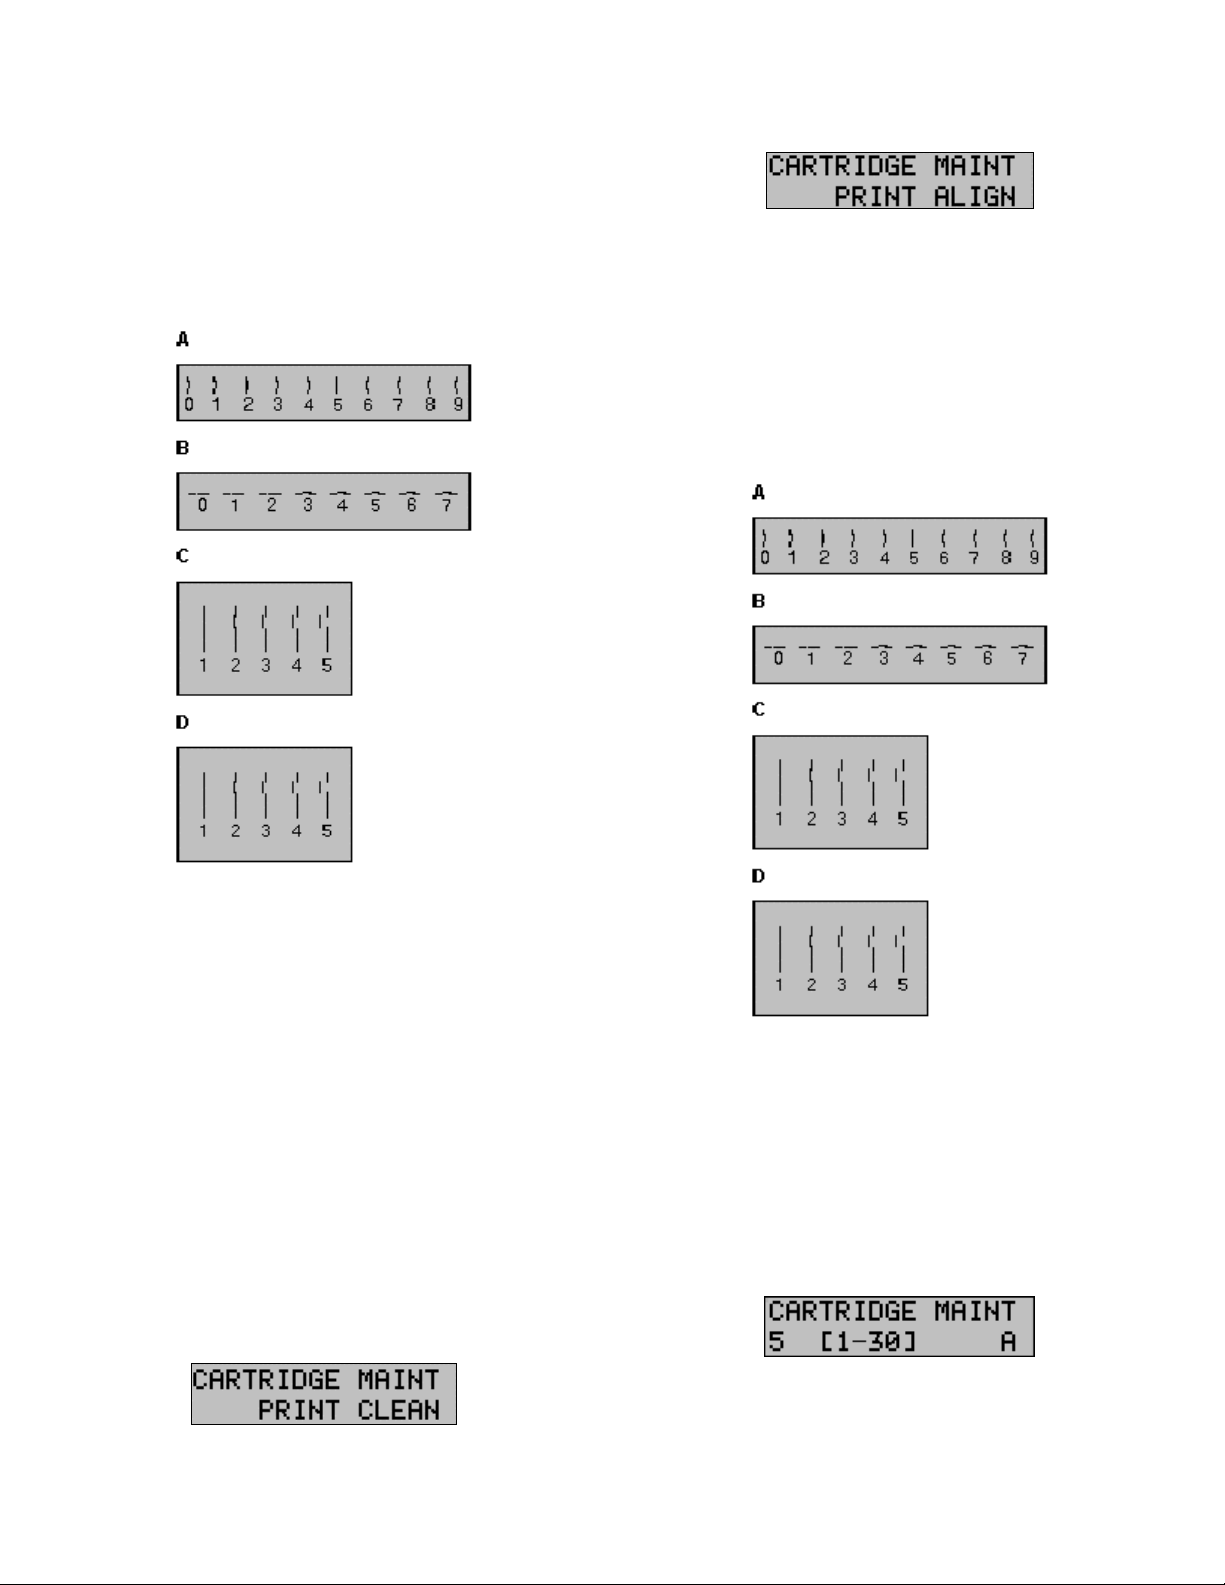
ý
Click the
3.
Align Cartridges
button. The Ink
Cartridge Alignment dialog box appears on your
screen.
ý
Enter the alignment information.
4.
Depending on the cartridge combination you have
installed in your printer, a test page with one or more
alignment patterns similar to th e on e s shown below is
printed. Each pattern has a number under it.
ý
Press the
3.
Options
button until the following
displays:
ý
4.
Press
Start
.
The Cartridge Alignment page prints.
ý
Enter the Cartridge Alignment information.
5.
Depending on the cartridge combination you have
installed in your printer, a test page with one or
more alignment patterns similar to the ones shown
below is printed. Each pattern has a number under
it.
ý
From each group on the test page, locate the
5.
number under the alignment pattern that comes
closest to forming a perfectly straight line.
For example, in sample group A above, pattern 5
comes closest to forming a straight lin e.
ý
In the dialog box, enter the number you chose as
6.
the appropriate alignment setting for each group.
Use the Up and
ý
After you have entered a number for each of the
7.
Down
arrow keys.
groups, click OK.
Aligning Print Cartridges from the A900 Control Panel
To print the alignment pattern:
ý
Press
1.
ý
Press the
2.
appears on the LCD panel:
Setup
Menu
.
button until the following display
ý
From each group on the test page, locate the
6.
number under the alignment pattern that comes
closest to forming a perfectly straight line.
For example, in sample group A above, pattern 5
comes closest to forming a straight lin e.
ý
For the “A” alignment pattern, enter the 2-digit
7.
number on the keypad using a leading 0 if
necessary. In this example, press the 0 and
buttons. The LCD panel displays the following:
ý
Press the
8.
Options
button to save the entered value,
then go to the B entry display. Enter the B, 2-digit
5
20
Page 23
value. Repeat for C and D patterns, if the black
cartridge is installed.
ý
Press the
9.
Options
button or the
Start
button to
complete the operation.
Cleaning Print Cartridges
There are approximately 200 nozzles on each of the
cartridges. Depending on the cartridge type, the nozzles
are all one color (black) or split into 3 groups of different
colors (color or photo).
Cleaning the ink jet nozzles on the print cartridges
improves the print quality.
There are several situations that can result in some of the
nozzles not working properly.
xý If the cartridge is new, it may take a couple of
cleaning cycles to get all of the nozzles working.
xý If the printer has not been used for an extended
period of time, the cartridges may not function
properly.
xý A build up of ink on the bottom of the cartridge
may affect the cartridge performance.
xý If the cartridge is running out of ink, the cartridge
will not function properly. In this case, cleaning
the cartridge will not help the nozzles to fire. You
must replace the ink cartridge.
There are two methods to clean the ink cartridges:
xý Clean and nozzle test, which can be done from the
control panel or the computer application
xý Wiping the print cartridge nozzles
Printing the Cartridge Clean and Nozzle Test
from the Computer
ý
Access the Compaq A900 Printer Control Program
1.
by clicking
A900 Printer Control
or
by a double click on the “Q” icon in the system
tray.
ý
Click the
2.
Nozzles
button. The cleaning pattern prints.
Start
Cartridge
ÆÆÆÆ
Programs
ÆÆÆÆ
tab, then on the
Compaq A900
Clean Print
ÆÆÆÆ
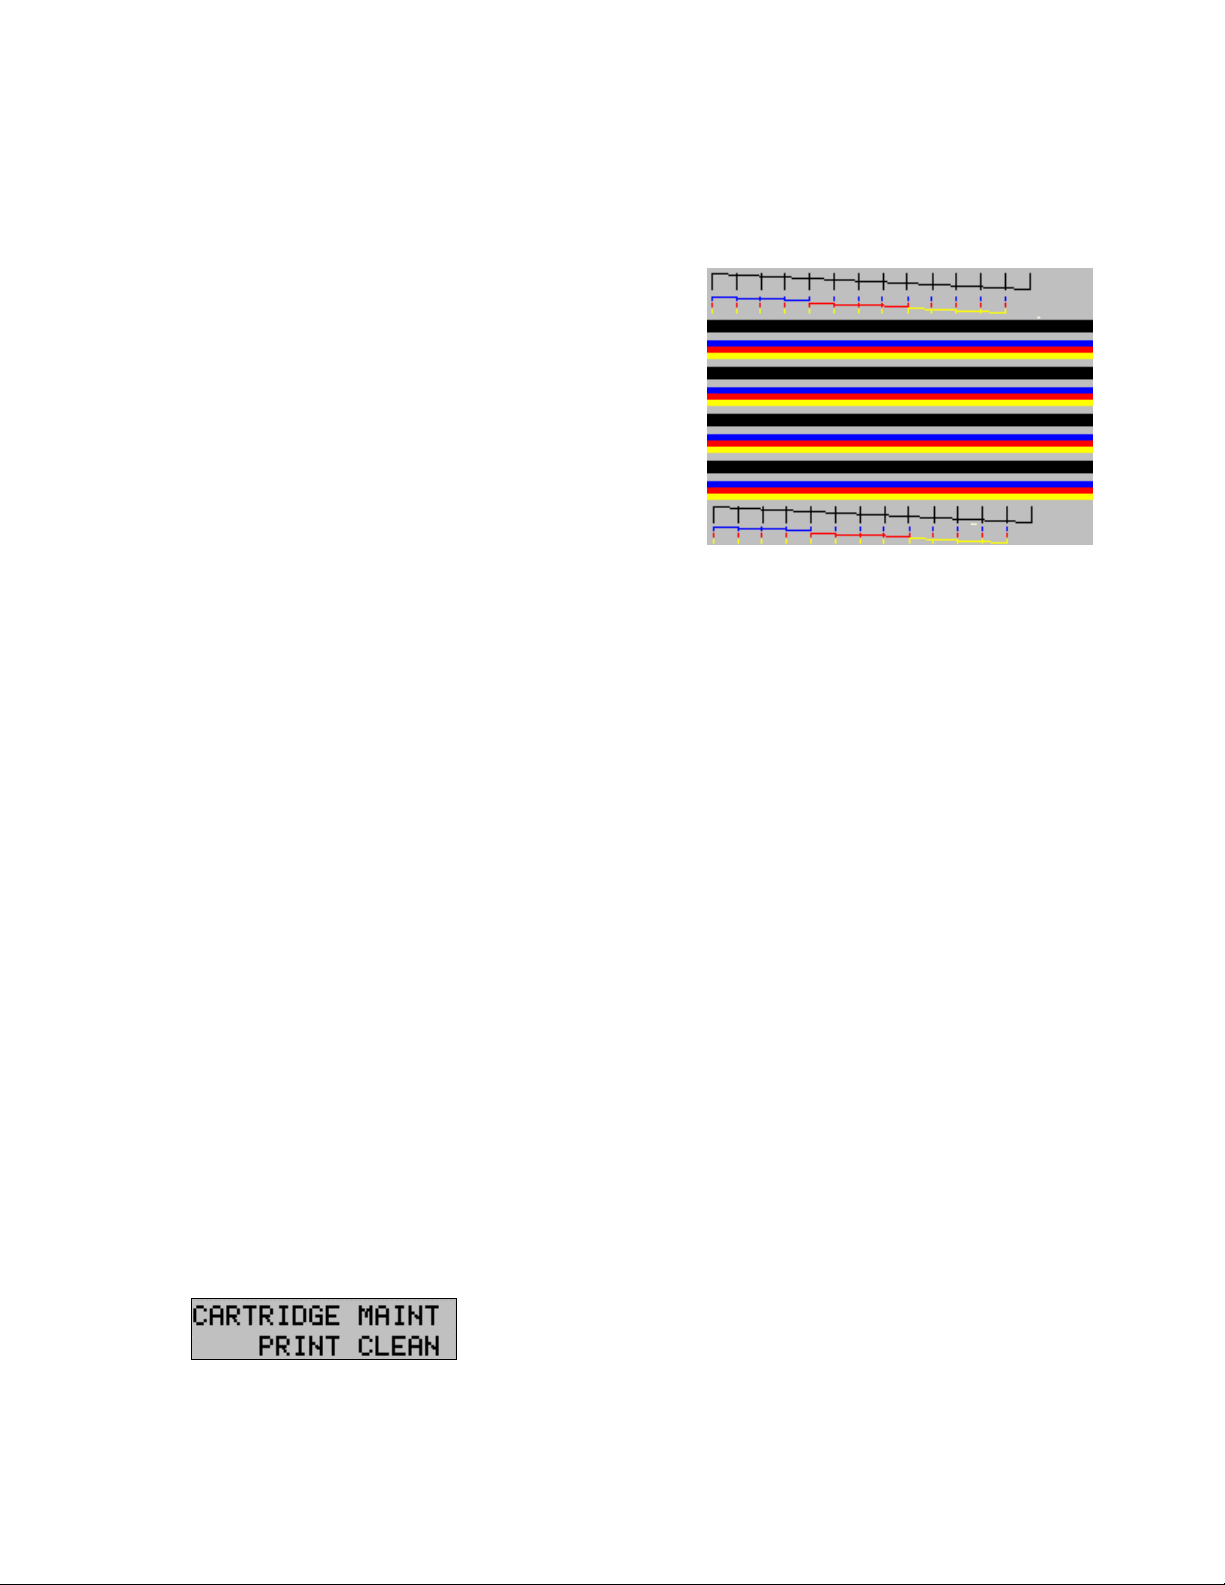
Checking the Clean Nozzle Printout
ý
Examine the test pattern.
1.
The example below shows a test pattern of all nozzles
functioning correctly. The first pattern printed in each
group is from the black (or photo) cartridge. The
second one is from the color cartridge.
ý
Compare the diagonal line above the printed bars
2.
to the diagonal line below the printed bars.
Look for a break in the diagonal lines. A broken line
indicates clogged nozzles.
If the bottom line has fewer breaks, or better print
quality than the top line, run the test two more tim es. If
the print quality is satisfactory after runn ing the test
three times, the print nozzles are clean. You do not
need to complete the remaining steps.
If the print quality of both lines is not satisfactory after
running the test three times, perform the following
steps.
a.ý Remove and reinstall the print cartridge. Fo r
more information see the Changing Print
Cartridges section.
b.ý Repeat the nozzle test.
c.ý If the lines are still broken, wipe the print
cartridge nozzles.
Printing the Cartridge Clean and Nozzle Test
from the Control Panel
ý
Press
1.
2.
3.
Setup.
ý
Press the
button until the following display
Menu
appears on the LCD panel:
ý
Press
Start.
21
Page 24
2
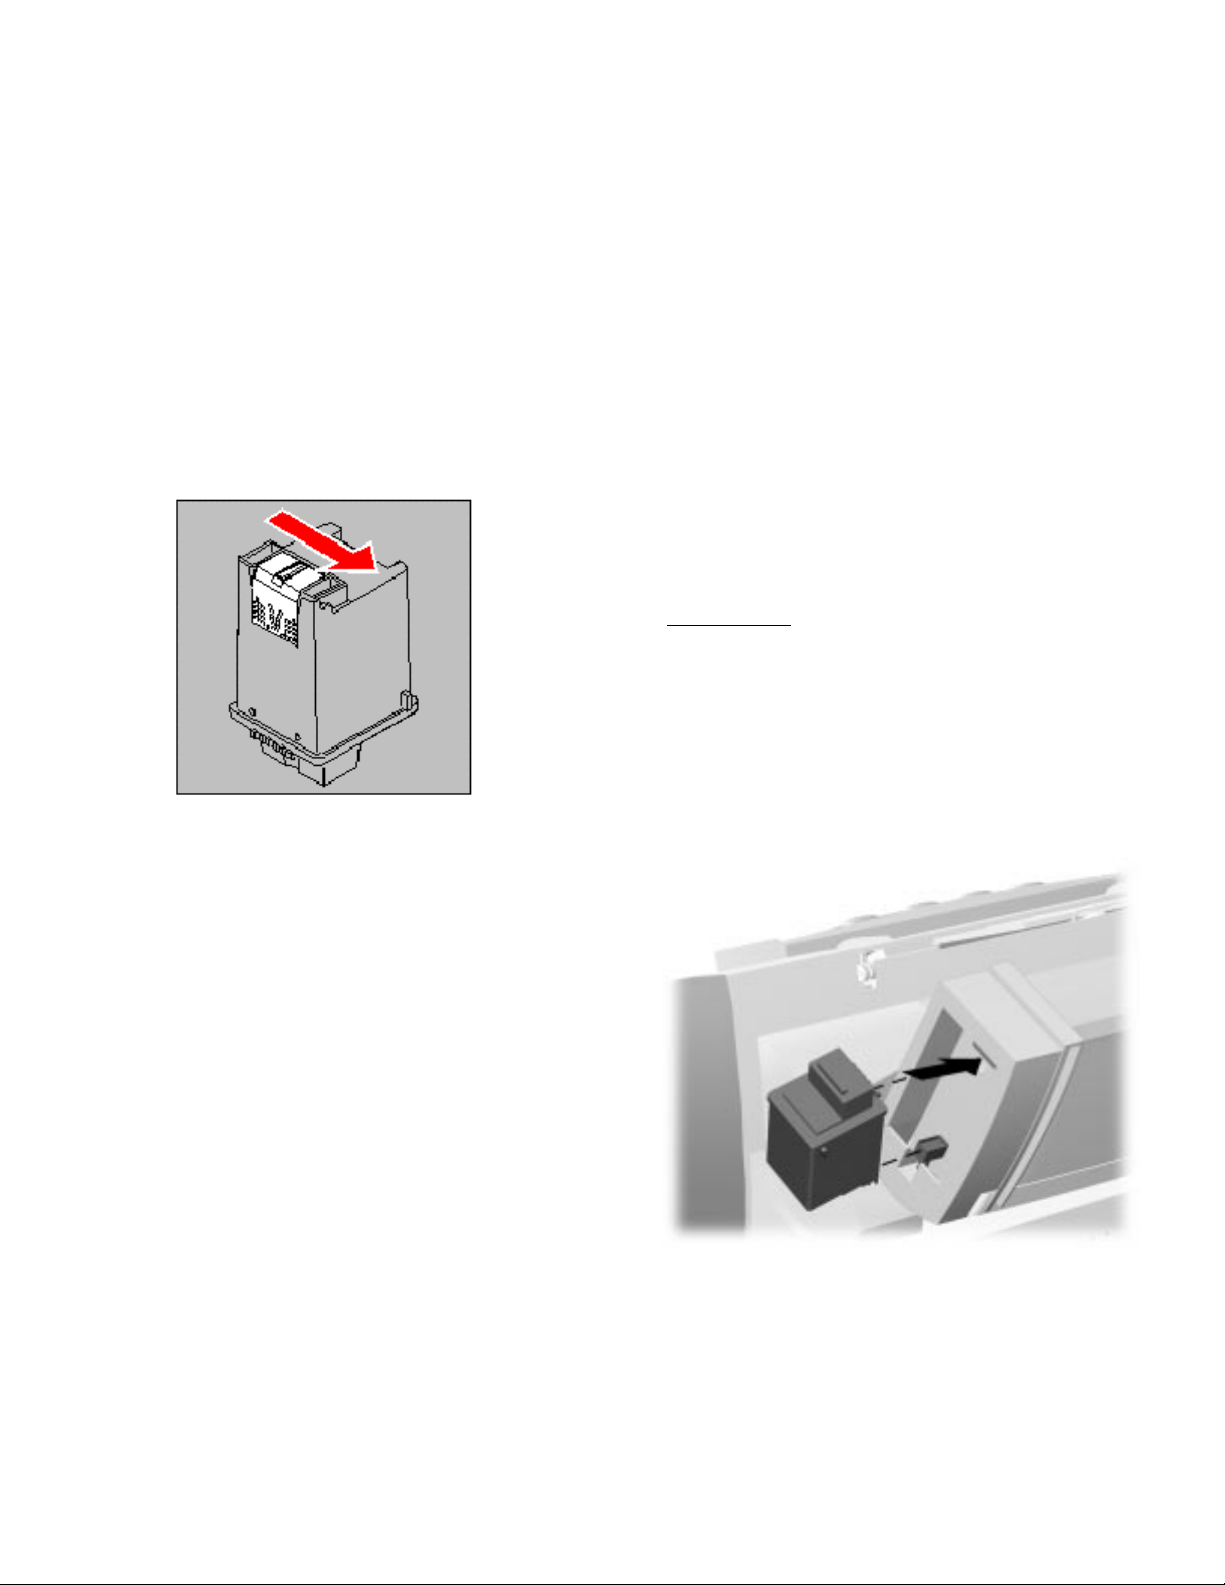
Wipe the Print Nozzles
Wipe the print nozzles only if you have already cleaned
the print nozzles but the print quality is still not
satisfactory.
Wiping the print nozzles removes dried ink from the
nozzles. To wipe the print nozzles:
ý
Remove the print cartridge from the printer.
1.
Because you will be replacing the old cartridge, be
sure you select old as the cartridge type to ensure
that ink monitoring system stays accurate. For
instructions see the Changing Print Cartridges
section.
ý
Use a dry tissue to gently clean the entire copper
2.
colored area, including the nozzles and contacts.
To change the photo or black cartridge, use the install
cartridge procedure described in the Changing Print
Cartridges section. To ensure correct ink level records are
maintained, always select OLD when installing a used
black or used photo cartridge. Use NEW only when
installing a new cartridge. The ink level for one used ink
cartridge of each type (color, black, and photo) is tracked.
The use of a second old cartridge of the same type
disrupts ink tracking and will result in incorrect ink level
reporting and possibly lost faxes.
When you have finished using th e photo cartridge,
immediately swap it with the black cartridge. Store the
photo cartridge in the storage compartment located on the
right rear of the A900.
Storing an Additional Ink Cartridge
The Compaq A900 has a convenient, dedicated area for
storing an additional cartridge. This compartment
prevents an opened cartridge from drying out when it is
not being used. For example, store your black ink
cartridge when the photo cartridge is being used.
IMPORTANT: This compartmen t is f or storage only.
An ink cartridge stored in this location cannot be used to
print until it is installed in the ink carriage area. See the
Changing Print Cartridges section for installing ink
cartridges.
Cleaning the print cartridges
When cleaning the color print cartridge, wipe the nozzles
in one direction so the colors do not mix.
To dissolve dried ink, hold a damp cloth against the
nozzles for about three seconds. Gently blot and wipe dry.
ý
Allow the copper-colored area to dry.
1.
ý
Reinstall the print cartridge and repeat th e nozzle
2.
test. Be sure that you select old when re-installing
the cartridge to maintain the current ink count.
ý
If the nozzle test line is still broken, remove the
3.
cartridge. Wipe the print cartridge carrier contacts
with a tissue or soft cloth.
Installing and Using the Optional Photo Cartridge
The photo cartridge gives excellent, near photo quality
printing when used in conjunction with specialty coated
or photo papers.
When you wish to use a photo cartridge, replace the black
cartridge (right carriage position) with the photo
cartridge. Store the black cartridge in the storage
compartment located on the right rear of the A900.
To install the ink cartridge in the storage area:
ý
Insert the ink cartridge into the storage area.
1.
ý
Gently push the top in.
2.
Storing an additional ink cartridge
2
Page 25
The reasons for replacing the photo cartridge with the
black ink cartridge are:
xý Photo cartridges should be used for printing
pictures. Using it for normal faxing and black
printing operations will prematurely deplete the
black ink in the photo cartridge.
xý Printing black with the photo cartridge installed
will be much slower than using the black cartridge.
Loading Different Sized Paper
The A900 supports A4, Letter, and Legal in the paper
input tray.
To load paper into the A900:
ý
Insert the paper into the paper input tray. Make
1.
certain that the side you want to print on is facing
you. Orient the paper so that the head of the paper
is facing down.
ý
Align the paper with the paper guides. Squeeze the
2.
paper guide and move it to the right to match the
width of the paper.
For standalone copy and fax operations make sure that
you select the correct paper size. For more information on
setting the paper size, see the Setting Paper Size from the
Control Panel section in this chapter.
Setting Paper Size for Standalone Copying and Faxing
from the Computer
ý
Access the Compaq A900 Settings Utility. Click
1.
ÆÆÆÆ
Start
Programs
Utility.
ý
Select the
2.
ý
In the Paper Size drop down box, select the paper
3.
size loaded.
ý
Click
4.
OK.
Fax
ÆÆÆÆ
Compaq A900
tab.
ÆÆÆÆ
A900 Settings
ý
4.
Press
to return to the ready state. The last
Stop
paper size displayed is the size that will be u sed .
Setting the Paper Size for Computer-assisted
Copying and Printing
ý
Open the PRINTERS folder. Click
1.
ÆÆÆÆ
Start
Settings
ý
Click with the right mouse button on
2.
icon, then select
ý
Select the
3.
ý
Select the size and type of paper installed.
4.
ý
Click
5.
OK.
Paper
ÆÆÆÆ
Printers.
Properties.
tab.
Compaq A900
Printing on envelopes
Preparing Envelopes for Printing
The following envelopes are not recommended because
they may cause jams or smears, or may damage the A900.
xý Envelopes with windows, holes, perforations,
cutouts, and double flaps
xý Envelopes made with special coated paper or
deeply embossed paper
xý Envelops in which letters have been enclosed
Loading an Envelope
IMPORTANT: Before you can print on an envelope,
you must select the envelope as your paper size. Refer to
the printing documentation of your word processing
software for instructions.
Setting Paper Size for Standalone Copying and Faxing
from the Control Panel
ý
Press
1.
ý
Press the
2.
appears on the LCD panel:
ý
Press the
3.
displays.
Setup
Menu
Options
.
button until the following display
button until the desired paper size
23
Page 26

ý
Remove the paper from paper input tray.
1.
ý
Lift the envelope positioning tab that is inset in the
2.
right side of the paper input tray.
ý
Load envelopes to the right (viewed from front)
3.
against the envelope positioning tab. The side you
will be printing on should be facing you.
Inserting an envelope
ý
Squeeze and slide the paper guide so that it touches
4.
envelopes.
ý
Set up the application to print on the size of
5.
envelope loaded. You can set up the print size from
the
Properties
ý
Print the envelope(s).
6.
button of the
dialog box.
Print
When printing is complete
ý
Put the envelope tab back into its storag e position.
1.
ý
Replace the printer paper in paper input tray.
2.
ý
Squeeze and slide the paper guide so that it touches
3.
the paper.
ý
Click the
2.
ý
Select
3.
ý
Select the size and type of paper installed in the
4.
Properties
Manual Feed.
button of the
dialog box.
Print
manual feed tray.
ý
Click
5.
OK.
Using the Manual Feed
In front of the paper input tray is the manual feed. Use the
manual feed for printing on different paper than is loaded
in the paper input tray.
NOTE: If any paper is loaded in the manual feed tray
when a print job is started, that paper will be used instead
of the paper loaded in the main paper input tray.
Set up the application to print on the type of the pape r in
the manual feed tray. To change the paper type:
ý
24
Select
1.
or
Click the
File
ÆÆÆÆ
Print
icon in your application.
Printer
Page 27

5
Control Panel Setup Button
From the
button on the All-In-One control panel, you can select the following features. Most of the features and many more
Setup
are available from the Compaq A900 Settings Utility in your compu ter.
To access
ý
Press the
1.
ý
Press the
2.
ý
Press the
3.
button features:
Setup
button.
Setup
button to cycle through
Menu
Options
Setup
button to change the settings.
button features.
Setup Button
Menu Options Description
Month
ý
Date/Time
Print Report
x
Date
ý
x
Year
ý
x
Hour
ý
x
Minute
ý
x
AM/PM
ý
x
Fax Confirm
ý
x
Transmit Log
ý
x
Receive Log
ý
x
Speed Dial List
ý
x
Self Test
ý
x
Use these when you want to change the date and time.
This setting allows you to print five different reports.
The Fax Confirm Report prints a report for the last fax sent.
The Transmit Log lists the faxes that were sent.
The Receive Log lists the faxes that were received.
The Speed Dial List lists the speed dial numbers and names.
The Self Test checks that the printer is functioning correctly.
Cartridge Maintenance
Paper Size
Fax Print
Ringer Volume
Fax Receive Mode
Setup DRPD
Fax Memory XMIT
ý
x
ý
x
ý
x
ý
x
ý
x
ý
x
ý
x
ý
x
ý
x
ý
x
ý
x
ý
x
ý
x
ý
x
ý
x
ý
x
ý
x
Print Align
Print Clean
Letter
Legal
A4
Letter Quality
Draft Quality
Off
Low
Mid
High
Tel
Ans/Fax
Fax
DRPD
Learn
On or Off
Press the
Use Print Align when the printed text looks jagged. Use Print Clean
when the Self Test page shows a clogged nozzle.
Press the
This feature is used only for fax printing and standalone copy
functions.
Letter quality provides the best quality print. Draft quality prints faster
and uses less ink.
Use these settings to adjust the ringer volume.
The Tel setting allows you to use an extension telephone and start
the fax by pressing *9* on the handset if an incoming fax is heard.
The Ans/Fax settings allow an answering machine to be attached to
your A900. When a call comes in, the fax senses the fax tones. If it
doesnt sense these tones, then the answering machine allows the
caller to leave a message. The Fax setting should be used when the
A900 is attached to a dedicated Fax telephone line. The DRPD mode
is available once a distinctive ring pattern is learned.
Pressing
the Fax telephone number from another telephone within three
minutes. You must have the DRPD Service enabled by your telephone
company.
When On, all faxes will be scanned into memory and then faxed.
When Off, all faxes will be faxed and scanned at the same time.
button to initiate the selected report.
Start
button to initiate setting.
Start
will set the A900 to learn the next ring pattern. Call
Start
2
Page 28

Compaq A900 Settings Utility
Changing Settings Overview
This section describes default features and settings of the
A900. When you need to make a temporary change for a
specific job, you can use the A900 control panel. When
you are finished with the current job, the A900 defaults
back to the features settings that you select in this section.
Accessing the Compaq A900 Settings Utility
To change default settings of the A900:
ý
Click
1.
ScanWorks Toolbar.
ý
From the toolbar, press the
2.
ý
The All-In-One Settings screen displays. (Not
3.
shown)
Start
ÆÆÆÆ
Programs
ÆÆÆÆ
Compaq A900
button.
A900
ÆÆÆÆ
Pagis
Print Settings
This section describes the Print tab.
Print Settings
Field Description Options
Printer
Control
Program
Print Allows you to print
Allows you to access
the Printer Control
Program.
one of the Compaq
Control Forms.
Click this button to access the
Printer Control Program.
Highlight the form you want to
print and select the number of
copies to print. Click
when you are ready to print.
Print
26
Page 29

Fax Settings
This section describes the different settings for fax mode.
Fax Settings
Field Description Options
System ID Station ID. This info
appears in the
header of outgoing
faxes.
System Name Your company or
personal name. This
information appears
in the header of
outgoing faxes.
Receive Mode Allows you to set the
mode from Fax, Tel,
Ans/Fax, and DRPD.
For more information
on the various
modes, see the
Faxing chapter in
this guide.
Dial Mode Type of phone line. Settings are Tone or
Print Quality
Paper Size Change size for the
Message
Confirm
Answer on
Ring
Forced
Memory
Transmission
Quality of incoming
fax.
paper in the input
tray.
Confirmation report. Settings are Off, On, or
The number of rings
before the fax
answers.
Outgoing faxes are
transferred to A900
memory, then faxed.
By default, this is the
CSID information that
you entered in WinFax
Configuration.
By default, this is the
Name information that
you entered in WinFax
Configuration.
Press arrow down to
select from the pull
down menu. See the
section in the
DRPD
Faxing chapter before
selecting DRPD.
Pulse.
Settings are Letter
Quality or Draft.
Settings are Letter, A4,
or Legal.
On-Error.
Settings are 1-7.
All pages are scanned
before the fax operation
begins.
Fax Settings
Continued
Field Description Options
Fax From
Setup
Fax To Setup Add names from
Purge Old
Versions
Speed Dial
Setup
Resolution Resolution of
Contrast
More Fax
Settings
Advanced Fax
Settings
Set Defaults Changes settings to
Add names from the
Winfax Phonebook to
the Fax From section
on Control Form.
your WinFax
Phonebook to the
Fax To section on
Control Form.
Allows you to
remove old versions
of Control Form.
Add names to the
speed dial menu on
the A900 control
panel.
outgoing fax.
Darkens or lightens
copy.
Press this button to
access More Fax
Settings.
Press this button to
access Advanced
Fax Settings.
factory default
settings.
Press this button to set
up names that will
appear in the Fax From
section of the Control
Form. For more
information, see the
Control Form chapter.
Press this button to set
up the names that will
appear in the Fax To
section of the Control
Form. For more
information, see the
Control Form chapter.
Press this button to
purge old versions of
Control Form.
Press this button to add
names and telephone
numbers to the speed
dial list.
Settings are Standard,
Fine, or Fine Photo
NOTE
Super Fine Photo modes
can be set from the
A900 Control Panel if
forced memory
transmission is set to
OFF.
Settings are Darkest,
Darker, Normal, Lighter,
or Lightest.
Allows you to set ringer
volume, speaker volume,
and the time and date.
Sets auto reduction,
discard sizes, redial,
options, and
miscellaneous options.
Press this button to set
the defaults.
: Super Fine and
27
Page 30

Fax From Setup
This section describes Fax From Setup. To access this
screen, click
Fax From Setup
Settings Utility. This allows you to set up names in
memory to use Control Form.
on the
tab of the A900
Fax
Fax To Setup
This section describes Fax To Setup. To access this
screen, click
Fax To Setup
Settings Utility. This allows you to setup names in
memory to use Control Form.
on the
tab of the A900
Fax
NOTE: Before you can set up Fax From entries, you first
enter fax contacts in the WinFax Phonebook. See WinFax
Phonebook Setup in the following section.
For more information on the Control For m, see the
“Control Form” chapter of this guide.
Fax From Settings
Field Description Options
Phonebook
Folders
Folder
Entries
Compaq
Control
Form Fax
From
Add Adds the highlighted
Del Deletes the name
Allows you to view the
names from different
address books.
Lists all names in the
selected Phonebook.
Lists the names that
are in the Fax From
section of the Compaq
Control Form.
name in the address
book list to the
Compaq Control Form
Fax From list.
from the Compaq
Control Form Fax
From list.
Scroll up or down to select the
desired Phonebook.
Scroll to select the name from
the list.
Names can be added to or
subtracted from the selected
line.
Press this button to add the
highlighted name from the
Folder Entries list to the
Compaq Control Form Fax
From list.
Press this button to delete the
highlighted name from the
Compaq Control Form Fax
From list.
NOTE: Before you can set up Fax To entries, you must
first enter fax contacts in the WinFax Phonebook. See
Winfax Phonebook Setup in the following section.
For more information on Control Form, see the “Control
Form” chapter of this guide.
Fax To Settings
Field Description Options
Phonebook
Folders
Folder
Entries
Compaq
Control
Form Fax
To
Add Adds the highlighted
Del
Allows you to view the
names from different
address books.
Lists all names in the
selected Phonebook .
Lists the names that
are in the Fax To
section of the Compaq
Control Form.
name to the Compaq
Control Form.
Deletes the name from
the Compaq Control
Form.
Scroll up or down to select
the desired Phonebook.
Scroll to select the name from
the list.
Names can be added to or
subtracted from the selected
line.
Press this button to add the
highlighted name from the
Folder Entries list to the
Compaq Control Form Fax To
list.
Press this button to delete the
highlighted name from the
Compaq Control Form Fax To
list.
28
Page 31

WinFax Phonebook Setup
Before you can add Phonebook entries to the Fax From
and Fax To sections of the Compaq Control Form, you
must first add entries to the WinFax Phonebook.
ý
Open the WinFax Message Manager by clicking
1.
ÆÆÆÆ
Start
Programs
Basic Edition Messaging Manager.
ý
From the Go menu, select
2.
alternately select the
side of the Message Manager window.
ý
To add an entry, double click the
3.
line in the main window. Enter the name, fax
number, and other pertinent information for the
recipient.
ý
Click OK to add to the Phonebook.
4.
NOTE: The same Phonebook entries are used to fill
in both Fax From and Fax To entries on the Compaq
Control Form.
ÆÆÆÆ
WinFax Basic Edition
Phonebooks.
Phonebooks
ÆÆÆÆ
WinFax
You may
icon on the left
New Recipient
Advanced Fax Settings
This section describes Advanced Fax Settings. To access
this screen, click
Advanced Fax Settings
the Compaq A900 Settings Utility. This allows you to
change advanced features related to faxing.
on the
Fax
tab of
Speed Dial Setup
This section describes Speed Dial Setup. To access this
screen, click
Speed Dial Setup
on the
tab of the A900
Fax
Settings Utility. This allows you to set up names for
speed dialing from the control panel of the A900.
Speed Dial Settings
Field Description Options
Speed Dial
Entries
Edit Entry Allows you to add or
Allows you to view and
set up the speed dial
entries.
edit the Name and
Phone Number of the
highlighted speed dial
entries.
Highlight the name or number
in the speed dial entries list
you wish to change.
Type the information in the
fields after highlighting the
speed dial number. Click
when finished.
OK
Advanced Settings
Field Description Options
Automatic
Reduction
Discard Size Allows you to set the
Set Defaults Changes Advanced Fax
Redialing
Options
Error
Correction
Mode (ECM)
Print
Terminal ID
Reduces an incoming fax
to fit on the paper in the
input tray.
discard size for incoming
faxes that are slightly
longer than the paper in
the A900.
settings to factory default
settings.
Allows you to set how
many minutes to wait
before redialing and how
many times to redial
when a line is busy.
Allows you to ensure
error-free transmission
with another fax machine
running ECM when the
line quality is poor.
Allows the machine to
print the page number,
date, time of reception,
the CSID, and System
Name of the remote fax at
the top of a received
document.
Settings are Off, On with
Vertical only (reduces
vertically), On (reduces
horizontally and
vertically).
Settings are 0mm
30mm in 1mm
increments. Setting a
discard size prevents a
tiny amount of data
being printed at the top
of a second page.
Press this button to set
the defaults to factory
defaults.
Settings are 1-7 minutes
and 0-2 times to redial.
Select this box to turn on
this feature.
Select this box to turn on
this feature.
29
Page 32

0
More Fax Settings
To access this screen, click
tab of the A900 Settings Utility.
More Fax Settings
More Fax Settings
Field Description Options
Ring Volume Set the ring
volume.
Speaker
Volume
Set Defaults
Log Fax
Transmissions
and Receptions
A900 Time and
Date Settings
Set the speaker
volume.
Changes on
this screen to
factory default
settings.
Prints out a log
every 40
transactions.
Set the time
settings for
Compaq A900.
Settings are Off, Low, Mid, or
High.
Settings are Low, Mid, MidHigh, or High
Press this button to set the
defaults.
Select this box to print out a
log every 40 transactions.
Select Set A900 Time to PC
time or set the time using the
down arrows to select the
month, day, year, hour,
minute, and second.
on the
Fax
Copy Settings
This section describes the different settings for copy
mode.
Copy Settings
Field Description Options
Type Changes type of copy.
Contrast Darkens or lightens
copy.
Scale Reduces or enlarges
copy.
Collate Arranges multiple
copies in 1-2-3 order.
Set Defaults
Changes settings to
factory default settings.
Settings are Black Draft,
Black Normal, Black
Photo, Color Draft, Color
Normal, and Color Best.
Settings are Darkest,
Darker, Normal, Lighter,
and Lightest.
Settings are 75% Lg to
Ltr, 80% Lgl to A4, 90%
A4 to Ltr, 93% Ltr to A4,
and 100% Normal.
Check this box to
activate the collate
feature.
Press this button to set
the defaults.
3
Page 33

Scan Settings
This section describes the different settings for scan
mode.
Scan Settings
Scan To Application Setup
This section describes how to add up to five application
names to the A900 control panel. To access this screen,
press the
Scan To Application Setup
tab of the Compaq A900 Settings Utility.
button on the
Scan
Field Description Options
Type Changes type of scan.
Contrast Darkens or lightens
scan.
Set Defaults Changes settings to
factory default settings.
User
Directory
Setup
Scan To
Application
Setup
Folder to save images
scanned to User
Directory from the
control panel.
Set up the software
application names that
will appear in the
control panel Scan
menu.
Settings are Black Draft,
Black Normal, Black
Photo, Color Draft, Color
Normal, and Color Best.
Settings are Darkest,
Darker, Normal, Lighter,
and Lightest.
Press this button to set
the defaults.
Type or press Browse to
browse to select a file
location and select the
file type (*.bmp, *.tif,
*.jpeg).
Press this button to
access the Scan To
Application Setup panel.
Scan To Application Setup
Field Description Options
Pagis
ScanWorks
Application
Add Adds the highlighted
Delete Deletes the selected
Applications
in A900 Scan
Short Name
Lists the software
applications in your
computer.
name to the
Applications in Scan
Menu list.
name from the A900
Control Panel Scan
To Menu.
Shows the current
applications loaded
in the control panel
of the Compaq
A900.
Shortened name
appears on the A900
control panel Scan
To menu.
Highlight the software
application you want to
add to the Scan To menu
of your Compaq A900
control panel.
Press this button to add
the highlighted name from
the Pagis ScanWorks
Application list.
Press this button to delete
the highlighted name in
the A900 Control Panel
Scan To Menu.
Scroll up or down to
select from the list.
Highlight the name in the
Applications in the A900
Scan Menu and type the
short name.
31
Page 34

Compaq A900 Controls and Features
Control Locations and Functions
Take a moment to become familiar with the main
components of your A900.
Front view of the A900
Controls
Control Panel Accesses the functions of the A900.
1
Document Input
2
Tray
Document Input
3
Guides
Paper Input Tray
4
Extension
Ink Cartridge
5
Storage
Paper Exit Tray Holds printed pages.
6
Document Exit Tray
7
Supports documents for faxing,
copying, or scanning.
Aligns original document for faxing,
copying, or scanning.
Supports paper.
Store optional photo cartridges when
not in use. Or store the black ink
cartridge when using the photo
cartridge.
Holds original documents that have
been fed through the A900 scanner.
Control Panel
The control panel is located on the front of the A900.
Control Panel Features
Fax Use to fax a document.
1
Copy Copies a document.
2
Scan
3
Setup Provides menus to access the system setup,
4
Menu Displays features for each operation.
5
Options Changes the settings for that feature when
6
Pause/Redial
7
Stop/Clear Halts an action or clears an incorrect value.
8
Form Feed Removes paper if paper does not exit
9
Start/Dial Begin a selected action, such as faxing.
:
Compaq
;
Control Form
Keypad Dials a number or selects a value for printing
<
#/Speed Enters the # symbol when dialing. If
=
Creates electronic files on your host
computer from hardcopy documents.
cartridge maintenance, and print report
features.
pressed after the menu button.
Adds a three-second pause when dialing or
dials the last number called.
Use the
when multiple jobs are running.
completely after printing.
Press this button first for On Hook Dialing
(OHD).
Prints out the Compaq Control Form or starts
a task using this form.
copies.
pressed when system is in the idle state, this
button provides access to the speed dial
menu.
button to select a job to stop
Option
32
Page 35

Rear View
Rear View Features
AC power cord connector
1
Printer port
2
Telephone (LINE) to wall jack
3
Extension (EXT) Line to telephone or answering machine
4
Side View
A900 base indentions
The A900 has curved indentions on the left and right
side of the base. Use these indentions to grip the A900
if you must move it.
33
Page 36

Compaq A900 Control Form
Overview
The Compaq Control Form is a paper document that
you can use to give instructions to your A900. You can
mark it with a pencil or pen, feed it into the scanner,
and the A900 software will read your instructions and
execute them. Control Form compliments the A900
Control Panel and the A900 software on your
computer.
A Control Form can be used more than once, and you
can use it to perform various operations
simultaneously. For example, if you wanted to make a
paper copy of a document and store an image of that
document on your computer, you could do both of
these operations at once on a single Control Form. You
could also reuse that form each time you want to do a
similar job.
You may want to print several copies. Keeping a supply of
printed Control Forms available will save time when you are
ready for the A900 to perform a task.
Whenever you want to do several th ings with a
document, you should consider using a Control Form.
For example:
xý By checking a few boxes, you may
automatically send a fax to several recipients
with an optional hand-written note on the cover
page.
xý Checking the scan box allows you to store a
scanned image on your hard drive in a .GIF
format, enabling you to put it on your website.
xý Checking a combination of Fax, Copy, and
Scan boxes on the Compaq Control Form
allows you to perform several operations at
once.
NOTE: Refer to the sample Control Form and the
corresponding table on the following pages for more
information about specific functions of each section on
the Control Form.
ý
First, enter names and telephone numbers into
1.
your WinFax Phonebook. Make sure the
WinFax Phonebook has all the entries that you
will want to have printed in the Fax FROM and
Fax TO sections of your Control Form. See the
WinFax Phonebook section of the “Common
Procedures” chapter for instructions on how to
make WinFax phonebook entries.
ý
Since WinFax can contain more than sixteen
2.
entries, indicate which of the entries in your
WinFax Phonebook should appear on the
Control Form. This is done in the Control Form
section on the
Utility.
ý
Print a Control Form by pressing the
3.
button and then the
Form
control panel.
ý
Use a check mark to identify the operations
4.
(fax, copy, or scan) you want to perform at the
top of the page.
ý
Checkmark the settings for the operations.
5.
NOTE: The default settings are identified by a
triangle. You do not need to recheck these boxes if
these are the settings you want.
ý
When you have made your selections, put the
6.
document that you want to fax, copy, or scan
behind the Control Form.
ý
Place the Control Form and documents face
7.
down in the document input tray with the top of
the document facing down.
ý
Press the
8.
panel, and the operations will be performed.
NOTE: When sending a fax using the Control
Form, only the recipient’s name appears on their
individual cover page. Information written in the
Note section of the Control Form appears on all
recipients’ cover pages.
Control Form
tab of the A900 Settings
Fax
button on the
Start
button on the control
Control
Getting Started with Control Form
Control Form can display up to eight FROM entries
and sixteen TO entries in the Fax section. These
entries are tied to your WinFax Phonebook. There are
two easy steps to configure faxing with Control Form.
34
Page 37

35
Page 38

6
Control Form
Boxes and Functions
No. Box Function
1.
10.
11.
12.
13.
14.
15.
16.
ý
2.
ý
3.
ý
4.
ý
5.
ý
6.
ý
7.
ý
8.
ý
9.
ý
ý
ý
ý
ý
ý
ý
ý
Fax Check to send a Fax.
Copy Check to make a Copy.
Scan Check to Scan.
Contrast Sets contrast lighter or darker for faxes, copies, or scans.
Fax From Check to identify the Fax sender (select one only).
Fax To Check to identify the Fax recipients (select one or more).
Default Mark Identifies settings used if nothing is checked.
Fax Cover Page Automatically generates a cover sheet.
Fax Note If you choose YES for cover page, the note box and anything you've written in it will be copied
onto the cover page.
Fax Resolution Sets the Fax Resolution.
Copy/Scan Type Sets the type of Copy or Scan to be performed.
Copy Size (Scaling) Reduces or enlarges your copies.
: This will be ignored if scan or fax options are also checked.
NOTE
Copy Quantity Sets number of copies.
Copy Collate Puts pages of multiple copies in order.
Scan To Directory Determines the directory to which your scanned image will be saved.
Scan To File Format Determines the format in which your scanned image will be saved.
3
Page 39

7
Printing
Printing Overview
This chapter provides some basic steps for printing a
document. The exact steps for printing may vary from
one software program to another. Refer to your
software application’s user manual for detailed
printing steps.
Printing a Document
To print a document:
ý
Start a program and create a document, or open
1.
an existing document that you want to print.
ý
Select
2.
Make sure the Compaq A900 printer is selected
as your default printer.
NOTE: To set your printer as the default printer,
click
icon, right mouse click and select
ý
Click
3.
to change the settings that are appropriate for
printing that document.
ý
Select OK to close the
4.
ý
After making any necessary changes to print
5.
settings, select OK to print.
or
Print
ÆÆÆÆ
Start
Settings
Properties
Print Setup
ÆÆÆÆ
Printers
or the
Setup
Properties
from the
. Highlight the
button if you want
menu.
File
Set as Default.
dialog box.
A900
Accessing the Compaq A900
Control Program Window
To access the Compaq A900 control program window:
Click
x
ý
Compaq A900 Printer Control.
Or
x
Double-click on the “Q” icon in the bottom
ý
right corner of the taskbar.
When the Compaq A900 Control Program window
appears, click the appropriate tab for the options you
want to display. Make the necessary changes on each
tab.
Start
ÆÆÆÆ
Programs
ÆÆÆÆ
Compaq A900
ÆÆÆÆ
Printer Settings
Most Windows software applications allow you to
make changes to the printer settings. This includ e s
settings that determine how a print job looks, such
as, page size, paper orientation, and margins. Settings
changed in the software application will override
settings made in the printer driver.
The printer driver includes many of the settings
mentioned above (in case your software does not
include them). It also includes all settings that
determine how your printer will operate.
Control Program Tab Description
Option Description
Status Displays the printer status and the ink level.
Options Controls program options.
Cartridges Installs, cleans, and aligns ink cartridges.
DOS Printing Changes DOS printing settings.
About Displays information on the program version.
3
Page 40

Using the Status Tab
The
tab shows the current printer status.
Status
Status Tab Description
Option Description
Ink Levels Shows how much ink remains.
Cancel Print Stops a print job.
Pause Temporarily halts a print job.
Using the Options Tab
The
program setup options.
tab allows you to specify the control
Options
Options Tab Description
Option Description
Run Minimized Displays the Control Program in the
taskbar when a job is printing.
Close Status at End of Job
Enable Sound Effects Activates the sound effects.
Enable Buffer Mode Activates the buffer mode.
Place Control Program in
System Tray
Disable Smart Ink Disables the ink level predictions on
Disable Compaq A900 DOS
Printing (Enable DOS
printing to other printers)
Closes the status monitor
automatically at the end of a job.
Allows you to have quick access to
the control panel.
the control panel.
Disables the Compaq A900 from
printing in DOS applications and
use other printers in DOS
applications.
38
Page 41

9
Using the Cartridge Tab
The
Cartridge
options.
tab allows you to select cartridge
Cartridges Tab Description
Using the DOS Printing Tab
Use the
DOS Printing
printing from DOS applications. If you cannot change
the settings from within the application, use this tab f or
settings. Otherwise, the settings in the DOS application
will override the
tab to change print settings for
DOS Printing
tab settings.
Option Description
Cartridge
Action Select to Install New or Reinstall Old
Action/No Action This button changes according to what is
Clean Print Nozzles Use this when there are missing portions
Align Cartridges
Print Test Page
Supplies
Smart Ink Use this to select how you want to view
Select the type of cartridge to install or
change. (Black, Color, or Photo).
cartridge.
selected in Cartridge and Action. Press this
to begin the action.
on the printed page.
Use this after you install a new cartridge or
when the black portions of text or graphics
dont line up with the color portions.
Use this when you want to check the
functionality of the printer.
Use this to view the printer supplies for
your printer.
the time remaining on the ink cartridges
and when you want the warning to be
given.
DOS Printing Tab Description
Option Description
Quality Select Letter, Draft, or Presentation for
print quality.
Ink Saver
Graphics Select the resolution for the print job.
CR Select to run in carriage return mode.
Text Scale Mode
Perforation Skip Select to add a ½ top margin to the
High Speed Printing Select to print at a faster rate
Form Feed Timeout
Char Set Allows you to select the character set
Font Allows you to select the font as needed.
Enable Font Download
Allows you to save ink by setting it on
High (saves 50%), Medium (saves 25%)
or Off.
CR + LF instructs the printer to perform
a line feed (LF) after each carriage
return (CR).
Select to automatically set how many
lines per page will print on each page.
print job.
Select 1-99 seconds for the time out
period for form feed.
as needed.
Check this to use any fonts that are
downloaded from a software
application.
Continued
3
Page 42

0
DOS Printing Tab,
continued
Option Description
Size Select paper size from the list.
Source Select the printers manual or automatic
feeder.
Type
Orientation Select portrait or landscape page
Print Fonts Prints a list of fonts you can use in DOS
Set Defaults
Select the paper type that you are
using. You can select Plain Paper,
Coated Paper (for ink jet printers),
Glossy/Photo Paper, or Transparencies.
orientation.
applications.
Changes settings to original settings
that were loaded on your computer
when the driver was installed.
Using the About Tab
The
number.
tab gives you the program name and version
About
Preparing Envelopes for Printing
The following envelopes are not recommended
because they may cause jams or smears, or may
damage the A900:
Envelopes with windows, holes, perforations,
x
ý
cutouts, and double flaps
x
Envelopes made with special coated paper or
ý
deeply embossed paper
Envelopes in which letters have been enclosed
x
ý
Inserting an envelope
ý
Set up the application to print on the size of the
5.
envelope(s) loaded. Select the envelope size
from the
Properties
button of the
Print
box.
ý
Print the envelope(s).
6.
When printing is complete:
ý
Put the envelope tab back into its storage
7.
position.
ý
Replace the printer paper in the paper input tray.
8.
ý
Squeeze and slide the paper guide so that it
9.
touches the paper.
dialog
Loading an Envelope
IMPORTANT: Before you can print on an envelope,
you must select the envelope as your paper size. Refer
to the printing documentation of your word processing
software for instructions.
To load an envelope:
ý
Remove the paper from the paper input tray.
1.
ý
Lift the envelope positioning tab that is inset in
2.
the right side of the paper input tray.
ý
Load envelope(s) to the right (viewed from the
3.
front) against the envelope positioning tab. The
side you will be printing on should face you.
ý
Squeeze and slide the paper guide that it touches
4.
the envelope(s).
4
Page 43

Faxing
Faxing Overview
The Compaq A900 All-In-One offers three ways to
send a fax:
xý Using the control panel
xý Using the Compaq Control Form
xý Using the computer
Until you are ready to send or receive a fax, the LCD
panel on the control panel displays READY.
Preparing Documents for Faxing
You can use the A900 to fax documents that are
printed on standard letter, legal, or A4-sized paper.
Follow these guidelines to prepare your documents.
ý
Adjust the document guides to match the width
2.
of the document, if necessary.
ý
Slide the document down into the tray until the
3.
machine grips the first sheet. The lower LCD
panel displays the message:
Sending a Fax Using the Control Panel
To send a fax using the control panel, complete the
following steps.
ý
Load the documents as described above.
1.
ý
Press the
2.
Fax
button.
For the following types of documents, u se th e
Copy/Scan Sleeve:
ý
z
Envelopes
ý
z
Checks
ý
z
Receipts
ý
z
Fragile or thin documents
ý
z
Photographs
ý
z
Wrinkled or creased paper
ý
z
Curled or rolled paper
ý
z
Torn paper
ý
z
Carbon or carbon-backed paper
ý
z
Coated or glossy paper
ý
z
Onion skin or thin paper
xý Remove all staples, paper clips, and similar
items before feeding the document.
xý Make sure any glue, ink, or correction fluid on
the paper is completely dry before feeding the
document.
Loading the Documents
The following displays on the LCD panel:
ý
Enter the fax number using the numeric keys.
3.
Pressing the
Pause/Redial
button when entering a
number inserts a “P” into the number. When the
All-In-One dials, the “P” results in a three-second
delay before sending the next digit. This is useful
when you have to dial a number and wait for an
outside line. (For example, 9P5551212)
ý
Press
4.
Start.
The All-In-One dials the entered fax number and
the document transmits.
ý
Place the document(s) to be faxed face down
1.
and top down in the document input tray.
Faxing in Quick Mode
To send a fax using the default settings simply Load the
documents, enter the fax number and press the
Fax
button.
41
Page 44

Advanced Faxing Features
In addition to the telephone number, you can adjust the fax resolution and contrast. Use the
located on the left and right side of the LCD panel.
To access the advanced faxing features:
ý
Load the documents printed side facing down in the document input tray.
1.
ý
Press the
2.
ý
Enter the fax number using the numeric keypad.
3.
ý
Press the
4.
ý
Press the
5.
ý
Press
6.
Start
button.
Fax
button to cycle through the advanced fax features. (See the table below.)
Menu
Options
button to change the settings.
to fax.
Advanced Fax Features
MENU OPTIONS Description
Standard
ý
Fax Resolution
Fax Contrast
x
Fine
ý
x
Fine Photo
ý
x
Super Fine*
ý
x
Super Fine Photo*
ý
x
Dark to Light
ý
x
Use when the originals are black text or line art. This mode provides the
fastest fax speed, but resolution is 203 x 98 dpi.
Use when the originals are black text or line art. Slower than Standard, but
resolution is 203 x 196 dpi.
Use when the originals are photos or have color content. Slower than Fine,
but resolution is 203 x 196 dpi and gray level imaging is used.
Use when the originals are small black text or line art. Slower than Fine
Photo, but resolution is 300 x 300 dpi.
Use when the originals are photos or have color content. Slower than Super
Fine, but resolution is 300 x 300 dpi and gray level imaging is used.
Adjust this when your originals are too light or too dark.
Menu
and
Options
buttons
* If the default settings have been set for FAX MEMORY XMIT to be ON, then the SUPER FINE and SUPER FINE PHOTO settings
are not available.
42
Page 45

Speed Dialing
Up to 70 speed dial numbers are set up on the host
computer using the Compaq A900 Settings Utility as
described in the Speed Dial Setup section. Once the
speed dial numbers are set up and downloaded to the
Compaq A900, you are ready to begin faxing with the
Speed Dial.
ý
Load the documents printed side facing down in
1.
the document input tray.
ý
Press
2.
3.
ý
Press the
#/Speed Dial.
Options
button to select the speed dial
destination or enter the speed dial number
associated with the name desired.
NOTE:
the name associated with the speed dial
When you select the speed dial number,
number
displays in the lower LCD panel.
ý
4.
Press
Start
to fax.
To obtain a speed dial report, see the Printing Reports
section.
Redial
Pressing the
last entered. You can also modify the number using the
button and the numeric keypad.
Clear
If the last number dialed was a SPEED DIAL number,
then pressing the
that speed dial. This may be more convenient than
printing out the speed dial list or going into the Compaq
A900 Settings Utility to verify a speed dial number.
button dials the number that was
Redial
button displays the number for
Redial
On Hook Dialing (OHD)
This feature provides the ability to dial a number,
respond to an automated answering system and then
receive or send a fax.
Because the All-In-One does not have a microphone,
you can only listen.
For OHD, complete the following procedure:
ý
When the LCD panel displays
1.
documents face down on the document input
tray.
ý
2.
Press
Start/Dial
button to simulate lifting the
handset.
ý
Dial the number just as you would on a standard
3.
telephone.
Ready
, place
Make sure to dial the number carefully. If you make a
mistake, press the
ý
When the called station answers, you can listen
4.
button and start over.
STOP
to the answering message.
A volume control feature is available when you
press the
the
Menu
Then use the
button. To change the volume, press
Menu
button until this display appears:
button to select the desired
Options
volume.
ý
5.
Press
when you hear the fax tones. The fax
Start
begins.
Confirming Transmission
When the last page of your document has been sent
successfully, the machine beeps and returns to the
state. If something goes wrong during the fax
Ready
transmission, an error message appears on the LCD
panel.
Use the Compaq A900 Settings Utility to print a
confirmation report each time faxing is complete or
when there is an error. See the Compaq A900 Settings
Utility section.
Automatic Redial
When you send a fax, if the number you have dialed is
busy or there is no answer, the A900 hangs up, waits
for a specified interval, and redials the number. When
this occurs, the LCD panel shows the retry count and
the number of minutes left before the next retry. If
after a specified number of retry attempts (retry count)
the All-In-One fails to connect, the machine returns to
the
Set the retry interval and count from the Compaq A900
Settings Utility.
Ready
state.
43
Page 46

Receiving a Fax
The All-In-One has four receiving modes
xý In FAX mode, the All-In-One answers an
incoming call and immediately goes into
receive mode.
xý In ANS/FAX mode, the answering machine
answers the incoming call and the caller can
leave a message on the answering machine. If
the All-In-One senses a fax tone on the line, the
call automatically switches over to the All-InOne. To use the ANS/FAX, you have to attach
an answering machine to the EXT socket on the
All-In-One. You also need to set the machine to
answer after one ring.
xý In TEL mode, automatic fax reception is turned
OFF. You can receive a fax by picking up the
handset and pressing *9* (star-nine-star) or
press the
panel.
xý In DRPD (Distinctive Ring Pattern Detection)
mode, the All-In-One will answer a call on the
line that has a specific ring pattern. It then
immediately goes into receive mode, waiting
for the fax to be sent. Use the DRPD setup to
teach the All-In-One the ring pattern it should
respond to. DRPD service must be obtained
from your local telephone company.
The current receive mode is displayed in the top right
corner of the LCD panel when the A900 is in
mode.
You can change the RECEIVE MODE either on the
computer using the A900 Settings Utility or from th e
SETUP, FAX RECEIVE MODE menu on the A900
control panel. See the Compaq A900 Settings section.
While you are printing from the computer to the All-In-One, an
incoming fax will be received into memory. The memory can
store up to 30 pages. However, other tasks, such as copying
or sending a fax, may temporarily reduce the amount of
memory available.
Receiving Automatically in FAX Mode
ý
Press
1.
Setup
FAX RECEIVE MODE. Press the
button until the FAX setting displays.
ý
When you receive a call, the All-In-One
2.
answers the call on the second ring and receives
a fax automatically. You can change the number
of rings from the Compaq A900 Settings Utility.
button twice on the control
Start
then the
button to access the
Menu
Ready
Options
The fax mode is recommended when you have a dedicated
telephone line for your Compaq A900.
Receiving Manually in TEL Mode Using an Extension
Telephone
This feature works best when you are using an
extension telephone connected to the EXT jack on the
A900. You can receive a fax from someone you are
talking to on the extension telephone without having to
go to the control panel.
ý
1.
Press
Setup
then the
button to access the
Menu
FAX RECEIVE MODE feature. Press the
Options
ý
If you receive a call on the extension telephone
2.
and hear fax tones, press the
button until the TEL setting displays.
button twice
Start
on the control panel or press the buttons *9*
(star-nine-star) on the extension telephone.
When using the extension telephone, press these
buttons slowly in sequence. If you still hear the
fax tone and do not hear the sound indicating
data transfer from the remote machine, try
pressing *9* once.
ý
The machine receives the document. Replace
3.
the handset on the extension telephone.
NOTE: You cannot send a fax in this mode.
Receiving Automatically in ANS/FAX Mode
To use this mode, you must attach an answering
machine to the EXT socket on the All-In-One
ý
1.
Press
Setup
then the
button to access the
Menu
FAX RECEIVE MODE feature. Press the
Options
button until the ANS/FAX setting
displays.
ý
When you get a call, the answering machine
2.
answers it. If the caller leaves a message, the
answering machine stores the message
normally. If the All-In-One hears a fax tone on
the line, the receive fax mode is activated.
If you have set the All-In-One to ANS/FAX mode and your
answering machine is turned off, or no answering machine is
connected to the All-In-One, the All-In-One will automatically
attempt to receive a fax after 6 rings.
If your answering machine has a user-selectable ring
counter, set it to answer incoming calls within 1 ring.
44
Page 47

5
Receiving Automatically in DRPD Mode
‘Distinctive ring’ is a telephone company serv ice that
enables a user to use a single telephone line to answer
several different telephone numbers. The particular
numbers that someone calls is identified by a
distinctive ringing pattern consisting of various
combinations of long and short ringing sounds.
Use the following steps on the Compaq A900 control
panel to teach the All-In-One the ring pattern that it
should answer:
ý
Press
1.
2.
3.
4.
Setup.
ý
Press the
ý
Press
Start.
ý
Call the telephone number that you want the
button until you see this display:
Menu
distinctive ring pattern to recognize.
NOTE: You have 3 minutes to call the A900 to
learn the distinctive ring. If three minutes have
passed, follow these steps again.
ý
The All-In-One will learn the distinctive ring
5.
pattern.
ý
6.
Press
Setup
then the
button to access the
Menu
FAX RECEIVE MODE feature. Press the
button to select DRPD mode.
Start.
ý
7.
Options
Press
NOTE: DRPD mode is not available in the FAX
RECEIVE MODE menu until a ring pattern has
been successfully learned.
ý
When the distinctive ring pattern is detected, the
8.
All-In-One answers the call on the second ring
and receives a fax automatically. All other ring
patterns will be ignored.
Sending Faxes from the Computer
Your Compaq A900 comes with the ability to send
faxes through your computer. Before you send faxes,
set up and connect your Compaq A900. This section
contains basic information about sending faxes with
your computer. Prior to faxing from the computer you
must have completed:
xý The “Getting Started” chapter of the user guide
xý The Compaq A900 software installation (including
Configuring WinFax Basic)
xý Optionally, you may enter names and telephone
numbers into the WinFax address book. See the
WinFax Phonebook section for instructions.
Sending a Fax
ý
Double click on the Pagis Inbox icon on the
1.
Windows desktop.
Or
Click
Pagis Toolbar.
ý
Place the document(s) to be faxed face down
2.
and top down in the document input tray.
ý
Click
3.
the
toolbar.
ý
Make sure
4.
Fax Printer
ý
Click
5.
ÆÆÆÆ
Start
Programs
on the Pagis ScanWorks toolbar, or
Fax
Fax machine
Fax To
and select
Properties
ÆÆÆÆ
Pagis ScanWorks
icon on the Pagis Inbox
is set to
WinFax.
WinFax.
to set enhancement options.
ÆÆÆÆ
If not, click
4
Page 48

ý
6.
Click
The All-In-One then scans the
Fax.
document.
ý
7.
Select
Send Fax
once the scan is complete. The
WinFax Basic Send screen displays.
ý
Select a name from the phone book listing or
8.
enter a name, fax number and subject. Follow
the instructions on the screens to send the fax.
You can set up
automatically on the computer using the A900 modem. This is
not recommended since you cannot perform other tasks, such
as copying, scanning, or printing, with the A900 when WinFax
is set up in receive mode. If you want to set up WinFax to
automatically receive faxes on the computer, be sure to set
WinFax to use the computer modem. See Appendix A for more
details.
WinFax Basic Edition
to receive faxes
Using WinFax Basic for Faxing
You may also use WinFax Basic to fax from the
computer. Consult the online WinFax Basic Help
within the WinFax program for instructions.
Using the Compaq Control Form to Fax
You can use the Compaq Control Form to fax
documents. The Compaq Control Form must be set up
in the computer before printing a copy of Compaq
Control Form. See the Compaq A900 Settings Utility
section for instructions.
Faxing with the Compaq Control Form
ý
Press the
1.
Start
Control Form
button. A copy of the Control Form prints.
Default settings are identified with a triangle
next to the setting box.
ý
After printing the Compaq Control Fo rm, ch eck
2.
the
box at the top of the page and the
Fax
desired settings in the
areas.
ý
Check the name of the person who is sending
3.
the
Fax From
ý
Check the names of the people who are
4.
section.
receiving the fax in the
ý
Write your message, within the box, in the
5.
section.
ý
When you are finished, put the documents that
6.
you want to fax behind the Compaq Control
Form. Place the documents printed side face
down and top down in the document input tray.
ý
Press the
7.
Control Form
panel. The fax begins.
button and then press the
Fax To
and
Fax Settings
section.
Contrast
Note
button on the control
46
Page 49

7
Copying
Copying Overview
The Compaq A900 All-In-One offers three ways to
make copies. You can make copies:
xý Using the control panel
xý Using the Compaq Control Form
xý Using the computer
Until a task is selected, the LCD panel displays
READY.
Loading the Documents
You can use the A900 to copy documents that are
printed on standard letter, legal, or A4-sized paper.
Follow these guidelines to prepare your documents.
For the following types of documents, u se th e
Copy/Scan Sleeve:
ý
z
Envelopes
ý
z
Checks
ý
z
Receipts
ý
z
Fragile or thin documents
ý
z
Photographs
ý
z
Wrinkled or creased paper
ý
z
Curled or rolled paper
ý
z
Torn paper
ý
z
Carbon or carbon-backed paper
ý
z
Coated or glossy paper
ý
z
Onion skin or thin paper
xý Remove all staples, paper clips, and similar
items before feeding the document.
xý Make sure any glue, ink, or correction fluid on
the paper is completely dry before feeding the
document.
ý
Place the document(s) to be copied face down
1.
and top down in the document input tray.
ý
Adjust document guides to match the width of
2.
the document, if necessary.
Loading the Document Using the Copy/Scan Sleeve
To protect irregular-sized or delicate documents or
photos that were mentioned above, use the copy/scan
sleeve when making copies.
ý
Position the document or photograph in the
1.
upper left corner of the sleeve.
ý
Place the copy/scan sleeve face down and top
2.
down in the document input tray.
Copying
ý
Slide document down into the tray until the
1.
machine grips the first sheet. The lower LCD
panel displays the message:
ý
Press the
2.
ý
Use the numeric keypad to enter the number of
3.
copies to be made.
ý
Press
4.
Start.
ý
z
The All-In-One will then make the requested
copies of all the documents in the document
input tray. Note that for some types of copies
the computer may be required.
Copy
button.
4
Page 50

Advanced Copy Features
In addition to the copy quantity, you can adjust the copy type, contrast, and size. This is done using the
Menu
and
Options
keys located on the left and right side of the LCD panel. To adjust the copy type, contrast, size and collation, complete the
following procedure.
To access advanced copy features:
ý
Load the documents printed side facing down in the document input tray.
1.
ý
Press the
2.
ý
Enter the number of copies you want using the numeric keypad.
3.
ý
Press the
4.
ý
Press the
5.
ý
Press the
6.
button.
Copy
button to cycle through advanced copy features. (See the table below.)
Menu
button to change the copy feature settings.
Options
Start
button to copy.
Advanced Copy Features
Menu Options Description
Copy Quantity 1-99 Use the numeric keypad to enter the quantity of copies you want.
Black Draft
ý
Copy Type
Copy Contrast
Copy Size
1.
For multiple copies, the computer must be operational.
2.
The computer must be operation al for color copies.
x
Black Normal
ý
x
Black Photo
ý
x
Color Draft
ý
x
Color Normal
ý
x
Color Best
ý
x
Dark to Light
ý
x
100%
ý
x
93% Fit, Letter to A4
ý
x
90% A4 to Letter
ý
x
80% Legal to A4
ý
x
75% Legal to Letter
ý
x
Custom
ý
x
(25 to 250%)
1
2
2
2
Use Black Draft when the originals are black text or line art. Black Draft is the fastest
copy setting, but the resolution is reduced.
Use Black Normal when the originals are black text or line art. Black Text is slower
than Black Draft, but the resolution is better.
Use Black Photo when the originals are photos or have color content. Black Photo is
faster than the color settings, but it prints in grayscale.
Use Color Draft to make quick color copies.
Use Color Normal to make color copies with a better resolution than Color Draft.
Use Color Best to make color copies with the best quality.
Adjust this when your originals are too light or too dark.
Use this when you want the copied image the same size as the original.
Use this to copy the full page, including areas outside of printable margins. This will
also reduce from Letter to A4.
Use this to reduce from A4 to letter.
Use this to reduce from Legal to A4.
Use this to reduce from Legal to Letter.
Use this for a custom reduction. Use the numeric keypad to enter the size you want.
48
Page 51

Copying with the Computer
Using Pagis ScanWorks, you can make copies of
scanned images. These are basic steps to help you
through a copy process. For more information on
copying with Pagis ScanWorks, refer to the online
documentation for Pagis ScanWorks.
ý
Click
1.
Toolbar.
ý
Place the document(s) to be copied face down
2.
and top down into the document input tray.
ý
Click
3.
ý
Select the desired options on the screen.
4.
ý
z
ý
z
ý
z
ÆÆÆÆ
Start
Programs
on the Pagis ScanWorks toolbar.
Copy
Click
Printer
Click
Properties
Select
Reduce/Enlarge
ÆÆÆÆ
Compaq A900
to set the paper size and type.
to set enhancement options.
to set the proper
scaling.
ÆÆÆÆ
Pagis
Copying with the Compaq Control Form
ý
Press the
1.
Control Form
copy of Control Form prints.
ý
Check the
2.
ý
The default settings on Control Form are
3.
Copy
indicated with a triangle. You can change these
settings by checking the desired settings in the
Copy Setting section. For example, if you want
9 copies, check the 9 box.
ý
When you are finished, put the documents that
4.
you want to copy behind the Control Form.
Place the document(s) to be copied face down
and top down into the document input tray.
ý
Press the
5.
Control Form
panel. The copy process begins.
button and press
box at the top of the page
button on the control
Start
A
.
ý
5.
Click
The All-In-One then scans the
Copy.
document and sends the image to the selected
printer.
49
Page 52

Scanning
Scanning Overview
All scanning activities require the host computer to be
connected and powered up.
The Compaq A900 All-In-One offers three ways to
scan a document. You can scan:
xý Using the control panel of the A900
xý Using the Compaq Control Form
xý Using the computer
The driver supports scanning from the bundled
applications as well as all your favorite computer
applications.
Loading Documents for Scanning
You can use the A900 to scan documents that are
printed on standard letter, legal, or A4-sized paper.
Follow these guidelines to prepare your documents.
ý
Place the document(s) to be scanned face down
1.
and top down in the document input tray.
ý
Adjust the document guides to match the width
2.
of the document, if necessary.
For the following types of documents use the
Copy/Scan sleeve:
ý
z
Envelopes
ý
z
Checks
ý
z
Receipts
xý Fragile or thin documents
ý
z
Photographs
ý
z
Wrinkled or creased paper
ý
z
Curled or rolled paper
ý
z
Torn paper
ý
z
Carbon or carbon-backed paper
ý
z
Coated or glossy paper
ý
z
Onion skin or thin paper
xý Remove all staples, paper clips, and similar
items before feeding the document.
xý Make sure any glue, ink, or correction fluid on
the paper is completely dry before feeding the
document.
Loading the Document Using the Copy/Scan Sleeve
To protect irregular-sized or delicate documents or
photos that were mentioned above, use the Copy/Scan
sleeve when scanning.
ý
Slide the document or photograph in the upper
1.
left corner of the sleeve.
ý
With the original document/photo facing away
2.
from you, place the sleeve in the document
input tray.
Scanning
To send a scan, complete the following steps.
ý
Slide document into the tray until the machine
1.
grips the first sheet. The lower LCD panel
displays the message:
ý
Press the
2.
IMPORTANT: Scan destinations must have been
previously set up from the computer. See the section
Scan Settings in the “Common Procedures” chapter for
information on setting up a scan destination.
ý
Select the SCAN TO destination. Use the
3.
Options
choices.
ý
Press
4.
Start
The All-In-One will then contact the host computer
and scan all the documents in the document input tray
to the chosen destination.
button.
Scan
button to cycle through the available
.
50
Page 53

Advanced Scanning
You can adjust the scan type and contrast. Use the
Menu
and
Options
panel to make adjustments.
To access advanced scanning features:
ý
Load the documents printed side facing down in the document input tray.
1.
ý
Press the
2.
ý
Select the Scan To destination using the
3.
ý
Press the
4.
ý
Press the
5.
ý
Press the
6.
button.
Scan
Options
button to cycle through advanced scan features.
Menu
Options
Start
button to change the scan feature settings.
button to scan.
button.
Advanced Scan Features
Menu Options Description
Black Draft
ý
Scan Type
Scan Contrast
x
Black Normal
ý
x
Black Photo
ý
x
Color Draft
ý
x
Color Normal
ý
x
Color Best
ý
x
Dark to Light
ý
x
Use when the originals are black text or line art. This is the fastest scan,
but the resolution is reduced.
Use when the originals are black text or line art. This is slower than
Black Draft, but the resolution is better.
Use when the originals are photos or have color content. Black Photo is
slower than Black Normal but it captures grayscale information.
Use when the originals are color photos. This is the fastest color scan,
but the resolution is reduced.
Use when you want a better quality color scan. This is slower than Color
Draft.
Use when you want the best quality color scan. This is slower than Color
Normal and the slowest scan possible. The resolution is the best.
Adjust this when your originals are too light or too dark.
buttons located on the left and right side of the LCD
.
51
Page 54

Scanning with the Computer
Using Pagis ScanWorks, you can scan documents and
photos. These are basic steps to help you through a
scan process. For more information on scanning with
Pagis ScanWorks, refer to the online user’s manual.
ý
Click
1.
Pagis Toolbar.
ý
Place the document(s) to be scanned face down
2.
and top down in the document input tray.
ý
Click
3.
ý
Select the desired options on the screen.
4.
ý
z
ý
z
ý
z
ÆÆÆÆ
Start
Scan
Programs
on the Pagis ScanWorks toolbar.
ÆÆÆÆ
Compaq A900
ÆÆÆÆ
Select the page type that most closely
resembles your document.
Click
Properties
to set enhancement options.
Select the Scan To selection to set where the
image will be sent to when it is scanned.
Scanning with the Compaq Control Form
ý
Press the
1.
Start
Control Form
button. A copy of Compaq Control Form
prints.
ý
Check the
2.
ý
The default settings on the Control Form are
3.
Scan
indicated with a triangle. You can change these
settings by checking the desired settings in the
Scan Settings
ý
When you are finished, put the documents that
4.
section.
you want to scan behind the Compaq Control
Form. Place the document(s) to be scanned face
down and top down in the document input tray.
ý
Press the
5.
Control Form
panel. The scan process begins.
ý
The Control Form and document are scanned
6.
and the image is sent to the selected destination.
button and then press the
box at the top of the page.
button on the control
ý
5.
Click
The All-In-One then scans the
Scan.
document and sends the image to the selected
application.
52
Page 55

Maintaining Your A900
Cleaning the Document Scanner
For best quality faxes and scans, you may occasionally
need to clean some internal parts of the machine, such
as the:
xý white roller
xý scanning glass
If these parts are dirty, documents scanned or sent to
another fax machine will not be clear.
To clean the internal parts of the A900:
ý
Unplug the power cord from the electrical outlet
1.
or the rear of the machine.
ý
Open the control panel.
2.
Removing the white roller
ý
Wipe the roller surface with a soft cloth
4.
dampened with water.
ý
Wipe the scanner glass surface with a soft cloth
5.
dampened with water. Dry with a soft tissue.
Opening the control panel
ý
Disassemble the white roller as follows:
3.
Both ends of the white roller have plastic bushings
that are snapped shut with small tabs on them. Pull
the bushing slightly out 1, then rotate the bushing
until it reaches the slot 2. Then pull the roller up.
Cleaning the Cartridge Carrier
If the ink cartridge is not printing from some nozzles
as indicated on the test page, the cartridge carrier
contacts may need cleaning. See the Cleaning Print
Cartridges of the “Common Procedures” chapter for
more information.
To clean the cartridge carrier contacts:
ý
Open the control panel and the cartridge access
1.
door.
ý
Unplug the power cord from the electrical outlet
2.
or the rear of the machine.
ý
Remove the ink cartridges.
3.
ý
Use a clean dry cloth or tissue to clean the print
4.
cartridge contacts inside of the machine.
ý
Replace the ink cartridges.
5.
ý
Plug in the power cord.
6.
53
Page 56

Replacing the Document Separator Pad
If documents continually feed more than one page at a
time through the scanner assembly, you may need to
replace the document separator pad. Visit the Compaq
website at www.compaq.com to order the separator
pad. Or call Customer Service at 1-800-OKCOMPAQ
(1-800-652-6672).
The life of the automatic document feed rubber varies with
use. You may not have to replace this pad during the life of
the A900.
54
Page 57

5
Basic Troubleshooting
Preparation
Many times a problem can be easily solved by
verifying that simple things are installed and/or
connected properly. Before continuing in this section,
be sure to check:
xý The power is on at the unit.
xý The ink cartridges are present.
xý The paper is installed.
xý The cables and cable connections are secure.
Clearing Document and Paper Jams
Document Jams during Copying, Scanning or
Sending Faxes
While scanning documents with your Compaq A900,
you could experience a document jam.
If a document jam occurs, the following displays on
the LCD panel:
CAUTION:
not pull the document out of the slot. Doing so could harm your
machine.
If an original document jams:
ý
Open the control panel.
1.
ý
Carefully remove the jammed document. Be
2.
sure to remove the entire document to prevent
the jam from reoccurring.
ý
Ensure that the document input tray is clear.
3.
ý
Close the control panel firmly until it clicks into
4.
place.
ý
Retry.
5.
If a document jams while you are sending a fax, do
Paper Jams during Printing, Copying, or
Printing Faxes
Paper may get jammed in the printer exit.
If a paper jam occurs, the following displays on the
LCD panel:
If you experience a jam in the printer exit tray:
ý
Carefully pull the jammed paper out the p aper
1.
exit of the A900.
ý
Clear the printer exit tray’s path and ensure that
2.
the paper in the paper feed is aligned properly.
ý
Press the
3.
Stop/Clear
button.
The plain paper feed area can become obstructed.
If you experience a jam in the plain paper feed area:
ý
Gently pull the jammed paper out.
1.
ý
Clear the paper tray.
2.
ý
Reload the paper.
3.
ý
Press the
4.
Stop/Clear
button.
If the jam occurs inside the A900:
ý
Unplug the A900 power cord.
1.
ý
Open the control panel and the cartridge
2.
compartment cover.
ý
Carefully remove the jammed paper.
3.
ý
Close the cartridge compartment cover.
4.
ý
Close the control panel firmly until it clicks into
5.
place.
ý
Plug in the power cord
6.
Error Messages
Occasionally the A900 may display an error message
on the Control Panel’s Liquid Crystal Display (LCD)
screen. Often, the error can be easily resolved and the
current task can be completed. The following table
lists the error messages you may encounter, the most
probable cause, and a simple solution.
5
Page 58

6
Troubleshooting Error Messages
Ready State Messages
SYMPTOM/MESSAGE CAUSE SOLUTION
ADD PAPER No paper detected in the paper input tray. Load paper in the input tray.
CHANGE BLACK INK
Received faxes are stored to memory, not
printed.
CLR DOCUMENT JAM A document jam or a very long document
REMOVE PAPER JAM THEN PRESS
CLEAR
MEMORY TO PRINT A copy collate or incoming fax is in
COVER OPEN
û
CLOSE COVER"
Smart Ink has determined that the ink
cartridge is empty.
was scanned.
Paper jam occurred in printer paper path. Clear paper jam then press
memory while the printer is busy.
The cartridge access door is open.
Replace the Black ink cartridge. Replacing
the Black ink cartridge and selecting NEW
BLACK CARTRIDGE will reset the ink
monitoring system and print any faxes in
memory. (Note that if you keep the old
cartridge installed and tell the system you
have installed new cartridges you may get
some more pages printed but you will
defeat the ink management system and
may lose incoming faxes.)
Open cover and remove document or jam
See Clear Paper Jam instructions
A copy job will complete when a print job is
finished.
Close the cover. The display will ask if any
cartridges were changed with CARTRIDGE
CHANGE.
The default is NO - press
this. If cartridges were changed, see the
Changing Cartridges from the A900 Control
section.
Panel
START
CLEAR/STOP
to select
5
Page 59

Troubleshooting Error Messages
Fax Messages
SYMPTOM/MESSAGE CAUSE SOLUTION
ENTER FAX NUMBER TO DIAL" with beep
warning tone and return to READY state.
LOAD DOCUMENT" with beep warning
tone and return to READY state.
RESOURCE BUSY, TRY LATER with beep
warning tone and return to prior state.
CLR DOCUMENT JAM A document jam or very long document
DOCUMENT OUT, PLEASE WAIT Pressing STOP after paper is loaded. Wait for all document(s) in the document
FAX SPEED # ?
UNDEFINED
beep warning tone and return to READY
state.
Display MEMORY FULL! and returns to
READY state
MEMORY FULL, TO CONTINUE, START
NO LINE CONNECTION, beep warning
tone and return to READY state.
STOP PRESSED, PLEASE WAIT STOP key pressed during fax transmission. Wait for the fax job to be terminated.
CHANGE BLACK INK
MEMORY TO PRINT
MEMORY FULL! The memory becomes full while receiving a
An attempt to send a fax without entering a
fax number.
An attempt to start a fax operation before
loading the document.
Tried to fax a document with MEMORY
XMIT OFF while another fax operation is
happening.
was scanned.
Entered a number of an unassigned speed
dial.
Memory Full occurred while scanning the
first page of a document.
Memory Full occurred after the first page of
a document has been scanned into
memory.
Phone line disconnected while trying to
send a fax.
Smart Ink has determined that the ink
cartridge is empty. An incoming FAX has
been saved to memory
fax.
A900 will print out (or save to memory) the
received pages.
Enter a fax number before sending a fax.
Load the document to be copied before
pressing START.
Wait for the current fax operation to
complete.
Open the cover and remove document or
jam.
input tray to be fed to the document exit
tray.
Enter an assigned speed dial number. Use
the A900 Settings Utility to set up speed
dial numbers.
Wait for memory to become available, then
try again or Turn Memory XMIT off from
SETUP or A900 Settings Utility.
Press
completely stored pages. Current and
remaining pages will not be sent.
Pressing
Check the phone line connection.
Faxes will continue to be received to
memory (until full). Replace Black ink
cartridge to print out received faxes.
Replacing the Black ink cartridge and
selecting NEW BLACK CARTRIDGE will
reset the ink counting system. (Note that if
you keep the old cartridge installed and tell
the system you have installed new
cartridges you may get some more pages
printed but you will defeat the ink
management system and may lose
incoming faxes.)
Sending station should see a transmission
error and re-send the fax.
and the A900 will send
START
STOP/CLEAR
will cancel the job.
Continued
57
Page 60

Fax Messages, Continued
SYMPTOM/MESSAGE CAUSE SOLUTION
"PC DRPD SETUP
FAILED!
A900 failed to learn the DRPD tones.
Ring pattern not detected.
System timed out waiting for ring.
Note that DRPD mode can not be selected
until a ring pattern has been successfully
learned.
Check phone line connection.
58
Page 61

Troubleshooting Error Messages
Copy Messages
SYMPTOM/MESSAGE CAUSE SOLUTION
LOAD DOCUMENT" with beep warning
tone and return to READY state.
ADD PAPER with beep warning tone and
return to READY state.
RESOURCE BUSY, TRY LATER with beep
warning tone and return to prior state.
REMOVE PAPER JAM THEN PRESS
CLEAR
DOCUMENT OUT, PLEASE WAIT STOP pressed after paper is loaded.
CLR DOCUMENT JAM A document jam or a very long document
PC NOT AVAILABLE displayed on the LCD
panel with a beep warning tone and return
to READY state.
ADD PAPER
MEMORY TO PRINT
ADD PAPER with beep warning tone and
return to READY state.
MEMORY TO PRINT Starting a copy collate or multiple copy
MEMORY FULL! Collate is off and insufficient memory to
MEMORY FULL, TO CONTINUE, START During a multiple copy operation, the
Tried to start a copy operation before
loading the document.
Tried to start a copy operation with no
paper in the paper input tray.
Tried to copy when the scanner is in use.
Tried to copy when printer is in use.
Tried to start a computer-assisted copy
while parallel port is in use by another
task.
Paper jam occurred in paper path.
was scanned.
Computer is not available for a copy task
that required computer assistance.
(multiple photo or color copies)
Making copies without paper and collate
on.
Making copies without paper and collate
off.
operation while the printer is busy.
copy current sheet of document.
memory became full.
Load document to be copied before
pressing
Load paper in the input tray.
Verify that the computer is connected and
available.
Wait for resource to become free then try
again.
Clear paper jam, then press
See
section
Wait for all document(s) in the document
input tray to be fed to the document output
tray.
Open the control panel and remove
document or jam.
Verify that the computer is connected and
available.
Make sure the cables are connected, the
computer is on and not in sleep mode.
Retry when the computer is available.
Add paper and printing will continue
Add paper before attempting to copy.
Copy job will complete when print job is
finished.
Job will be automatically aborted. Retry
when more memory becomes available.
Press
full pages scanned so far, then continue
the scanning process.
Press
START
Clearing Documents and Paper Jam
.
START
STOP
.
CLEAR /STOP
to print (collated) the current
to cancel the copy operation.
.
59
Page 62

0
Troubleshooting Error Messages
Scan Messages
SYMPTOM/MESSAGE CAUSE SOLUTION
SCAN TO
UNDEFINED. with beep warning tone and
return to READY state.
LOAD DOCUMENT" with beep warning
tone and return to READY state.
RESOURCE BUSY, TRY LATER with beep
warning tone and return to prior state.
CLR DOCUMENT JAM
DOCUMENT OUT, PLEASE WAIT Pressing STOP after paper is loaded. Wait for all document(s) in the document
PC NOT AVAILABLE with beep warning
tone and return to READY state
.
Trying to scan to an undefined scan
destination.
Trying to start a scan operation before
loading the document.
Trying a SCAN operation while the scanner
is busy.
Trying to scan while parallel port is in use
by another task
A document jam or a very long document
was scanned.
There is no response from computer.
Use A900 Settings Utility to define the scan
locations.
Load document to be scanned before
pressing
Verify that the computer is connected and
available.
Wait for resource to become free then try
again.
Open the cover and remove document or
jam.
input tray to be fed to the document output
tray.
Verify that an IEEE 1284 cable is connected
to the computer and that the computer is
on and not in sleep mode.
Verify that the A900 software is properly
installed and running by selecting A900
Settings from the Compaq A900 program
group.
Retry.
START
.
6
Page 63

Troubleshooting Error Messages
Control Form Messages
SYMPTOM/MESSAGE CAUSE SOLUTION
RESOURCE BUSY, TRY LATER with beep
warning tone and return to prior state.
CLR DOCUMENT JAM A document jam or a very long document
DOCUMENT OUT, PLEASE WAIT Pressing STOP after paper is loaded Wait for all document(s) in the document
ADD PAPER with beep warning tone and
return to READY state.
CHANGE BLACK INK Trying to print a Control Form but Smart Ink
REMOVE PAPER JAM THEN PRESS
CLEAR
PC NOT AVAILABLE with beep warning
tone and return to READY state.
Trying to scan Control Form sheet while the
computer is using parallel port for another
job.
Trying to print a Control form sheet while
computer is using parallel port for another
job.
was scanned.
Trying to print a Control Form when no
paper is in the paper input tray.
has determined that the ink cartridge is
empty.
Trying to print a Control Form when a
Paper jam occurred in the paper path.
There is no response from the computer. Verify that an IEEE 1284 cable is connected
Wait for current computer to printer port
activity to complete, then try again.
Open the cover and remove document or
jam.
input tray to be fed to the document output
tray.
Load paper into the paper input tray.
Replace Black ink cartridge. Replacing the
Black ink cartridge and selecting NEW
BLACK CARTRIDGE will reset the ink
counting system. (Note that if you keep the
old cartridge installed and tell the system
you have installed new cartridges you may
get some more pages printed but you will
defeat the ink management system and
may lose incoming faxes.)
Clear paper jam, then press
to the computer and that the computer is
on and not in sleep mode.
Verify that the A900 software is properly
installed and running by selecting A900
Settings from the Compaq A900 program
group.
Retry.
STOP/CLEAR
.
61
Page 64

Correcting Problems
Some of the problems that you may encounter are listed in the table titled “Error Messages.” Occasionally, other problems
may arise that you could solve yourself. They are listed in the tables below along with a possible cause and possible
solution.
Fax Problems
Symptom Solution
Check the power cord connection.
ý
The machine is not working. There is no
display. The buttons do not work.
No dial tone (when START key is pressed
form READY display.)
The numbers stored in the SPEED DIAL
memory do not dial correctly.
The document does not feed into the
machine.
Incoming faxes are not received
automatically.
Faxes can not be received manually.
The machine will not send a fax.
Incoming faxes are incomplete or contain
blank spaces.
Spots on incoming faxes.
You are receiving poor quality faxes.
Stretched words on incoming faxes.
There are vertical lines or stripes on copies
or documents you send.
The machine dials a number, but fails to
make a connection with another fax
machine.
Pages have a small strip of text printed at the
top with a large blank area below.
Losing characters on the bottom edge of the
page.
x
Check to make sure your electrical outlet is live.
ý
x
Ensure that the telephone cord is connected properly.
ý
x
Plug another telephone into the phone jack to check the socket.
ý
x
Make sure the numbers are stored in the memory correctly. To print speed dial list
ý
x
press
the
OPTIONS
Make sure the document is not wrinkled or folded and is not too thick or too thin.
ý
x
Make sure that the cover is firmly closed.
ý
x
Make sure that the A900 FAX RECEIVE mode is not set to TEL. The current receive
ý
x
mode is displayed in the upper right corner of the LCD panel.
Make sure the extension phone is on the hook properly.
ý
x
Check to see if there is paper in the paper input tray.
ý
x
Insufficient memory to receive fax. (See
ý
x
Messages)
Press
ý
x
Make sure the document is loaded face down.
ý
x
Check the machine you are sending to for problems.
ý
x
The machine sending you the fax may be faulty.
ý
x
A noisy phone line can cause line errors.
ý
x
Make a copy to check your machine.
ý
x
The cartridge may be running out of ink. See
ý
x
Check the phone for line noise.
ý
x
Run a printer self test to be sure the print head is clean. See
ý
x
The machine sending you a fax may have a dirty scan glass.
ý
x
Check the phone for line noise.
ý
x
The machine sending you the fax had a temporary document jam.
ý
x
Check your scan glass. It may need to be cleaned. See
ý
x
The fax machine you are trying to reach may be turned off, out of paper, or can not
ý
x
answer incoming calls.
You may have selected the wrong paper size setting. See The
ý
x
Paper
Set AUTO REDUCTION ON. This control is located in the A900 Settings Utility on the
ý
x
FAX TAB
, then press
SETUP
button to select the
twice , or *9* on the EXT phone, before you hang up the handset.
START
section.
button to select the PRINT REPORT feature. Press
MENU
SPEED DIAL LIST.
Memory To Print, Memory Full
Press
START
Print Quality Problems.
Print Quality Problems.
Maintaining Your A900.
to print.
Loading Different Size
in Fax
62
Page 65

3
Print Quality Problems
Symptom Solution
The print cartridge may be running out of ink.
ý
Light or blurred characters
Smudged or dark characters
Characters with white lines
Color print quality is poor.
Characters are improperly formed or not
aligned correctly.
Vertical straight lines in tables, borders and
graphs are not smooth.
Solid black areas on transparencies contain
white streaks.
Printed color does not match screen color.
Documents are printing black and white
instead of color.
Printer pauses frequently during a print job
x
The print cartridge may need to be cleaned. See
ý
x
Make sure you are using the correct type of paper.
ý
x
Make sure you are using the correct type of paper.
ý
x
The paper should be straight and without wrinkles.
ý
x
Let the ink dry for a moment before handling the document.
ý
x
Adjust the Print Quality settings.
ý
x
The print cartridge may need to be cleaned. See
ý
x
The print cartridge may be running low on ink.
ý
x
Remove and reinstall the print cartridge.
ý
x
The print cartridge may need to be cleaned. See
ý
x
Make sure you are using the correct type of paper.
ý
x
Adjust the Print Quality settings.
ý
x
The media is loaded incorrectly or is an unsupported size or type. Try feeding one
ý
x
sheet at a time.
Make sure you do not have hard-coded spaces at the left margin in your application.
ý
x
The print cartridge may need to be cleaned. See
ý
x
The print cartridge may need to be aligned. See
ý
x
The print cartridge may need to be aligned. See
ý
x
The print cartridge may need to be cleaned. See
ý
x
Try changing the fill pattern in your application software.
ý
x
The color print cartridge has run out of one or more ink colors. Install a new color
ý
x
ink cartridge.
The print cartridge may need to be cleaned. See
ý
x
The print settings may be incorrect.
ý
x
If your printer pauses frequently (every two or three lines) during a print job, and the
ý
x
printed pages have alternating bands of light and dark print, choose Enable Buffer
Mode from the
1.ýFrom the printer's Control Program, click the
2.ýChoose the
tab.
Options
Enable Buffer Mode
option.
Cleaning Print Cartridges
Cleaning Print Cartridges
Cleaning Print Cartridges
Cleaning Print Cartridges
Aligning Print Cartridges
Aligning Print Cartridges
Cleaning Print Cartridges
Cleaning Print Cartridges
tab.
Options
section
section
section
section
section
section
section
section
.
.
.
.
.
.
.
.
6
Page 66

Printing and Copying Problems
Symptom Solution
The scan tool may be using the parallel port. Close the scan tool application.
ý
Printer is on, but nothing prints.
Printer seems to be printing, but no
characters are printing.
Unexpected characters print or characters
are missing.
Printer prints very slowly.
The Control Panel does not respond.
Making a local copy at 100% does not print
on a single sheet although the same size
paper is in the paper input tray.
Page does not print.
The A900 doesnt respond.
x
The printer may be improperly connected to the computer. Check the cable
ý
x
connections at the All-In-One and at the computer.
Make sure that the printer cable is IEEE 1284 compliant.
ý
x
The printer cable may be defective. Try another cable.
ý
x
Make sure your application has the A900 selected as the default printer.
ý
x
Make sure there is paper in the paper input tray.
ý
x
Make sure that your selected port is not already being used by another device.
ý
x
Make sure that the paper path is not blocked.
ý
x
Be sure the tape covering the nozzle of the print cartridge has been removed.
ý
x
The print cartridge may be out of ink.
ý
x
Make sure that your application has the A900 selected as the default printer.
ý
x
Check the printer cable connections.
ý
x
The print head may need to be cleaned. See
ý
x
You may be using High print quality. Adjust your Print Quality settings to
ý
x
or
QUICK PRINT.
Graphics print more slowly than text.
ý
x
Color prints more slowly than black.
ý
x
Special media prints more slowly than plain paper.
ý
x
Open applications affect print speed. Close other running programs if they are not
ý
x
required.
Unplug the A900 power cord, then plug it back in.
ý
x
The A900 does not know the paper size that is loaded in the printer output tray.
ý
x
Press
button until the correct paper size (letter, legal, A4) is displayed.
Complicated page formats may not be printable on the printer. Too many fonts
ý
x
and/or complex graphics can cause this problem. Simplify your page.
Unplug the A900 power cord, then plug back in.
ý
x
Restart Windows.
ý
x
, use the menu key to select the
Setup
Cleaning Print Cartridges
Paper Size
menu. Press the
section
.
NORMAL
Options
64
Page 67

Paper Feeding Problems
Symptom Solution
Clear the paper jam. See section,
ý
Paper is jammed
Paper sticks together
Paper fails to feed
Multiple sheets of paper fed
Paper skews or buckles in the paper bin
Envelopes skew or fail to feed correctly in the
paper bin.
Transparencies stick together in the paper
exit.
x
Make sure there is not too much paper in the paper input tray.
ý
x
Make sure you are using the correct type of paper.
ý
x
Fan the paper to allow some air between the sheets.
ý
x
Humid conditions may cause some paper to stick together.
ý
x
Make sure there is not too much paper in the paper input tray.
ý
x
Make sure that the envelope guide is not in the install position.
ý
x
Remove any obstructions from inside the printer.
ý
x
Make sure there is not too much paper in the paper bin.
ý
x
Load paper of only one type, size, and weight.
ý
x
Do not force paper down into the printer when loading.
ý
x
If multiple sheets have caused a paper jam, clear the paper jam.
ý
x
Make sure there is not too much paper in the paper input tray.
ý
x
Make sure the paper guide does not push the paper and cause it to bow.
ý
x
Make sure you are using the correct type of paper.
ý
x
Do not force paper down into the printer when loading.
ý
x
Make sure that the right side of the paper is aligned with the right edge of the
ý
x
feeder, and the left paper guide is set against the left side of the paper.
Make sure that the envelope guide is not in the envelope position.
ý
x
Make sure that the envelope guide has been turned to the envelope load position.
ý
x
Make sure that the paper guide is against the left side of the envelopes.
ý
x
Use only transparencies designed for Inkjet Printers.
ý
x
Remove each transparency as it exits from the printer.
ý
x
Clearing Document And Paper Jams
.
65
Page 68

Scanning and Copying Problems
Symptom Solution
Make sure you load the document to be scanned into the document tray.
ý
Can not scan a document into memory
Scanning very slowly
There is no document or the document is
loaded improperly. Insert the document
properly and try again, message appears on
the screen.
Scanner is busy receiving or printing data.
When the current job is completed, try
again, message appears on the screen.
The scanner driver is not installed or an
operation environment is not set up properly.
Reinstall the scanner driver and try again,
message appears on the screen.
Port is disabled. Check if the port is properly
connected, or power is on. Then restart your
computer, message appears on the screen.
Port is disabled. Check if the port is properly
connected, power is on, scanner is not
busy, message appears on the screen.
Vertical black line or strip over the entire
length of the scan or copy.
x
Print out any received documents that are stored in the memory.
ý
x
If there are any outgoing faxes stored in the memory waiting to be sent, print out the
ý
x
received documents that are stored in memory.
Graphics are scanned more slowly than text and color is slower than black.
ý
x
Increasing resolution will slow scanning.
Adding more memory to the computer can dramatically improve scanning speed,
ý
x
especially for higher resolution color images. If there is a lot of disk activity when
scanning is the only application running on the computer, this is a good indication
that additional memory is needed.
Communication speed becomes slow in scan mode because a lot of memory is
ý
x
required to analyze and reproduce the scan image. It is recommended that you set
your computers Parallel Port to ECP mode for maximum performance. Bi-directional
mode can also be used, but it will run slower than ECP mode. (Do not select EPP as
this mode is not supported by A900.). For details on how to set the mode in your
BIOS, refer to the documentation that came with your computer.
Insert the document properly and push it down until the A900 grips the document.
ý
x
Your scanner may be busy with a copying or faxing job. When the current job is
ý
x
completed, try again.
Make sure that the application selects the Compaq A900 Scanner as the Twain
ý
x
Scanner
Reinstall the scanner driver by re-installing the A900 software.
ý
x
I/O errors can occur during scanning. Check the cable and cable connections.
ý
x
The printer cable may be improperly connected or the power may be turned off.
ý
x
Check the cable. Make sure the power is turned on.
Contaminated scanner lens. See the
ý
x
instructions.
Maintaining Your A900
section for cleaning
66
Page 69

Control Form Problems
Symptom Solution
Computer is not available and system has reverted into demo mode.
ý
Demo Sample prints when
button is pressed
CONTROL FORM
x
Verify that an IEEE 1284 cable is connected to the computer and that the computer
ý
x
is on and not in sleep mode.
Verify that the A900 software is properly installed and running by selecting A900
ý
x
Settings from the Compaq A900 program group.
67
Page 70

Regulatory and Safety Notices
Electromagnetic Interference Compliance
Notices
This equipment has been tested and found to comply
with the limits for a Class B digital device, p ursuant to
Part 15 of the FCC Rules. These limits are designed to
provide reasonable protection against harmful
interference in a residential installation. This
equipment generates, uses, and can radiate radio
frequency energy and, if not installed and used in
accordance with the instructions, may cause harmful
interference to radio communications. However, there
is no guarantee that interference will not occur in a
particular installation. If this equipment does cause
harmful interference to radio or television reception,
which can be determined by turning the equipment off
and on, the user is encouraged to try to correct the
interference by one or more of the following measures:
xý Reorient or relocate the receiving antenna.
xý Increase the separation between the equipment
and receiver.
xý Connect the equipment into an outlet on a
circuit different from that to which the receiver
is connected.
xý Consult the dealer or an experienced radio or
television technician for help.
Modifications
The FCC requires the user to be notified that any
changes or modifications made to this device that are
not expressly approved by Compaq Computer
Corporation may void the user's authority to operate
the equipment.
Cables
Connections to this device must be mad e with shielded
cables with metallic RFI/EMI connector hoods in order
to maintain compliance with FCC Rules and
Regulations
Declaration Of Conformity For Products
Marked With The FCC LogoUnited States Only
This device complies with Part 15 of the FCC Rules.
Operation is subject to the following two con ditions:
(1) this device may not cause harmful interference, and
(2) this device must accept any interference received,
including interference that may cause undesired
operation.
For questions regarding your product, call 1-800- 6526672 (1-800-OK COMPAQ) or contact:
Compaq Comp uter Corporation
P. O. Box 692000, Mail Stop 530113
Houston, Texas 77269-2000
For questions regarding this FCC declaration, call
1-281-514-3333 or contact:
Compaq Comp uter Corporation
P. O. Box 692000, Mail Stop 510101
Houston, Texas 77269-2000
To identify this product, refer to the Part, Series, or
Model number found on the product.
Canadian Notice
This Class B digital apparatus meets all requirements
of the Canadian Interference-Causing Equipment
Regulations.
Avis Canadien
Cet appareil numérique de la classe B respecte toutes
les exigences du Règlement sur le matériel brouilleu r
du Canada.
Safety
Safety is important when you are operating your unit.
Follow the guidelines in this section to enjoy your
experience.
Power Cords
68
If you were not provided with a power cord for your
unit, you should purchase a power cord that is
approved for use in your country.
Page 71

The power cord must be rated for the product and for the
voltage and current marked on the product’s electrical
ratings label. The voltage and current rating of the cord
should be greater than the voltage and current rating
marked on the product. In addition, the diameter of the
wire must be a minimum of 0.75 mm
2
/18AWG, and the
length of the cord must be between 5 feet (1.5 m) and 6
½ feet (2m). If you have questions about the type of
power cord to use, contact your Compaq authorized
service provider.
A power cord should be routed so that it is not likely to
be walked on or pinched by items placed upon it or
against it. Particular attention should be paid to the plug,
electrical outlet, and the point where the cord exits from
the product.
WARNING:
should attempt to repair this equipment. All troubleshooting
!
and repair procedures are detailed to allow only
subassembly/module-level repair. Because of the complexity
of the individual boards and subassemblies, no one should
attempt to make repairs at the component level or to make
modifications to any printed wiring board. Improper repairs can
create a safety hazard.
Only authorized technicians trained by Compaq
If your telephone equipment causes harm to the
telephone network, the telephone company may
discontinue your service temporarily. If possible, they
will notify you in advance. But, if advance notice is
not practical, you will be notified as soon as possible.
You will also be informed of your right to file a
complaint with the FCC.
Your telephone company may make changes in its
facilities, equipment, operations, or procedures that
could affect the proper functioning of your equipment.
If they do, you will be notified in advance to give you
an opportunity to maintain uninterrupted telephone
service.
If you experience trouble with this telephone
equipment, contact your local telephone company for
information on obtaining service or repairs. The
telephone company may ask that you disconnect this
equipment from the network until the problem has
been corrected or until you are sure that the equipment
is not malfunctioning.
This equipment may not be used on coin service
provided by the telephone company. Connection to
party lines is subject to state tariffs.
U.S. Regulations Governing the Use of Modems
This equipment complies with Part 68 of the FCC
rules. Located on the rear of the Compaq A900 All-In-
One is a label that contains, among other information,
the FCC Registration Number and Ringer Equivalence
Number (REN) for this equipment. Upon request, you
must provide this information to your telephone
company.
Ringer Equivalence Number
The REN is useful to determine the quantity of devices
you may connect to your telephone line and still have
all of those devices ring when your telephone number
is called. In most areas (but not all), the sum of the
RENs of all devices connected to one line should not
exceed five (5.0). To be certain of the number of
devices you may connect to your telephone line, as
determined by the REN, you should contact your local
telephone company to determine the maximum REN
for your calling area.
The REN for this device is 0.7B.
An FCC Compliant 6-position modular plug is
provided with this equipment. This equipment is
designed to be connected to the telephone network or
premises wiring using a compatible 6-position modular
jack which is FCC Part 68 Compliant.
For the Compaq Customer Support Center and your
nearest Compaq Authorized reseller in North America,
call 1-800-345-1518 or write:
Compaq Customer Support Center
P.O. Box 692000
Houston, Texas 77269-2000
Telephone Consumer Protection Act of 1991
The Telephone Consumer Protection Act of 1991
makes it unlawful for any person to use a computer or
other electronic device to send any message via a
telephone facsimile machine unless such message
clearly contains, in a margin at the top or bottom of
each transmitted page, or on the first page of the
transmission, the date and time it is sen t an d an
identification of the business, or entity, or individual
sending the message and the telephone number of the
sending machine or such business, or entity, or
individual.
69
Page 72

Canadian Regulations Governing the Use of
Modems
NOTE
: The Industry Canada label identifies certified
equipment. This certification means that the equipment
meets certain telecommunications network protective,
operational, and safety requirements. The Department
does not guarantee the equipment will operate to the
user’s satisfaction.
Before installing the equipment, users should ensure
that it is permissible to be connected to the facilities of
the local telecommunications company. The
equipment must also be installed using an acceptable
method of connection. In some cases, the company’s
inside wiring associated with a single line individual
service may be extended by means of a certified connector assembly (telephone extension cord). The
customer should be aware that compliance with the
above conditions may not prevent degradation of
service in some situations.
Repairs to certified equipment should be made by an
authorized Canadian maintenance facility designated
by the supplier. Any repairs or alterations made by the
user to this equipment, or equipment malfunctions,
may give the telecommunications company cause to
request the user to disconnect the equipment.
Users should ensure for their own protection that the
electrical ground connections of the power utility,
telephone lines, and internal metallic water pipe
system, if present, are connected together. This
precaution may be particularly important in rural areas.
CAUTION:
FRQQHFWLRQVýWKHPVHOYHVñýEXWýVKRXOGýFRQWDFWýWKH
DSSURSULDWHýHOHFWULFýLQVSHFWLRQýDXWKRULW\ýRUýDQ
HOHFWULFLDQï
NOTICE:
assigned to each terminal device provides an indication
of the maximum number of terminals allowed to be
connected to a telephone interface. The termination on
an interface may consist of any combination of
devices, subject only to the requirement that the sum
of the Ringer Equivalence Numbers of all the devices
does not exceed 5.
Ringer Equivalence Number (REN)
The
device is 0.7B.
8VHUVýVKRXOGýQRWýDWWHPSWýWRýPDNHýVXFK
The Ringer Equivalence Number
for this
(REN)
&RPSDTý&DQDGDñý,QFï
éèý9RJHOOý5RDG
5LFKPRQGý+LOOñý2QWDULRýý/$è%ýê3ç
General Precautions for Compaq Products
Retain the product’s safety and operating instructions
for future reference. Follow all operating and usage
instructions. Observe all warnings on the product and
in the operating instructions.
To reduce the risk of fire, bodily injury, and damage to
the equipment, observe the following precautions.
xý Damage Requiring Service
Unplug the product from the electrical outlet
and take the product to a Compaq authorized
service provider under the following conditions:
ý
z
The power cord, extension cord, or plug is
damaged.
ý
z
Liquid has been spilled or an object has fallen
into the product.
ý
z
The product has been exposed to water.
ý
z
The product has been dropped or damaged in
any way.
ý
z
There are noticeable signs of overheating.
ý
z
The product does not operate normally when
you follow the operating instructions.
xý Servicing
Except as explained elsewhere in the Compaq
documentation, do not service any Compaq
product yourself. Opening or removing covers
that are marked
shock. Service needed on components inside
these compartments should be done by a
Compaq authorized service provider.
xý Mounting Accessories
Do not use the product on an unstable table,
cart, stand, tripod, or bracket. The product may
fall, causing serious bodily injury and serious
damage to the product. Use only with a table,
cart, stand, tripod, or bracket recommended by
the manufacturer, or sold with the product. Any
mounting of the product should follow the
manufacturer’s instructions, and should use a
mounting accessory recommended by the
manufacturer.
may expose you to electric
For the location of the authorized Canadian
maintenance facility nearest you, call 1-800-263-5868
or contact:
70
Page 73

xý Ventilation
Slots and openings in the product are provided
for ventilation and should never be blocked or
covered since these ensure reliable operation of
the product and protect it from overheating. The
openings should never be blocked by placing
the product on a bed, sofa, carpet, or other
similar flexible surface. The product should not
be placed in a built-in apparatus such as a
bookcase or rack unless the apparatus has been
specifically designed to accommodate the
product, proper ventilation is provided for the
product, and the manufacturer’s instructions
have been followed.
xý Water and Moisture
Do not use the product in a wet location.
xý Grounded (Earthed) Products
Some products are equipped with a three-wire
electrical grounding-type plug that has a third
pin for grounding. This plug only fits into a
grounded electrical outlet. This is a safety
feature. Do not defeat the safety purpose of the
grounding-type plug by trying to insert it into a
non-grounded outlet. If you cannot insert the
plug into the outlet, contact your electrician to
replace the obsolete outlet.
xý Power Sources
The product should be operated only from the
type of power source indicated on the product’s
electrical ratings label. If you have questions
about the type of power source to use, contact
your Compaq authorized service provider or
local power company. For a product that
operates from battery power or other power
sources, refer to the operating instructions
included with the product.
xý Accessibility
Be sure that the power outlet you plug the
power cord into is easily accessible and located
as close to the equipment operator as possible.
When you need to disconnect power to the
equipment, be sure to unplug the power cord
from the electrical outlet.
xý Power Cords
If you have not been provided with a power
cord for your unit or for any AC-powered
option intended for use with your unit, you
should purchase a power cord that is approved
for use in your country.
The power cord must be rated for the product and for
the voltage and current marked on the product’s
electrical ratings label. The voltage and current rating
of the cord should be greater than the voltage and
current rating marked on the product. In addition, the
diameter of the wire must be a minimum of 0.75 mm
18AWG and the cord should be between 5 and 6.5 feet
(1.5 and 2 meters) long. If you have questions about
the type of power cord to use, contact your Compaq
authorized service provider.
Route the power cord so that it will not be walked on,
tripped over, or pinched by items placed upon or
against it. Pay particular attention to the plug,
electrical outlet, and the point where the cord exits the
product.
xý Protective Attachment Plug
In some countries, the product cord set may be
equipped with a wall plug having overload
protection. This is a safety feature. If the plug
needs to be replaced, be sure the Compaq
authorized service provider uses a replacement
plug specified by the manufacturer as having
the same overload protection as the original
plug.
xý Extension Cord
If an extension cord or power strip is used,
make sure that the cord or strip is rated for the
product and that the total ampere ratings of all
products plugged into the extension cord or
power strip do not exceed 80% of the extension
cord or strip ampere ratings limit.
xý Overloading
Do not overload an electrical outlet, power
strip, or convenience receptacle. The overall
system load must not exceed 80% of the branch
circuit rating. If power strips are used, the load
should not exceed 80% of the power strip input
rating.
xý Cleaning
Unplug the product from the wall outlet before
cleaning. Do not use liquid cleaners or aerosol
cleaners. Use a damp cloth for cleaning.
xý Heat
The product should be placed away from
radiators, heat registers, stoves, or other pieces
of equipment (including amplifiers) that
produce heat.
xý Replacement Parts
When replacement parts are required, be sure
the service provider uses replacement parts
specified by Compaq.
2
/
71
Page 74

xý Safety Check
Upon completion of any service or repairs to the
product, have your Compaq authorized service
provider perform safety checks to determine
that the product is in proper operating
condition.
xý Options and Upgrades
Use only the options and upgrades
recommended by Compaq.
xý Object Entry
Never push a foreign object through an opening
in the product.
Precautions for Products with Modems,
Telecommunications, or Local Area Network
Options
In addition to the general precautions described earlier
in this chapter, be sure to observe the following
precautions when operating telecommunications and
network equipment. Failure to observe these
precautions could result in fire, bodily injury, and
damage to the equipment.
xý Do not connect or use a modem or telephone
(other than a cordless type) during a lightning
storm. There may be a remote risk of electric
shock from lightning.
xý Never connect or use a modem or telephone in a
wet location.
xý Do not plug a modem or telephone cable into
the Network Interface Card (NIC) receptacle.
xý Disconnect the modem cable before opening a
product enclosure, touching or installing
internal components, or touching an uninsulated
modem cable or jack.
xý Do not use a telephone line to report a gas leak
while you are in the vicinity of the leak.
72
Page 75

Warranty Information
What is the warranty for my Compaq A900 AllIn-One?
How do I obtain online support?
Compaq offers free technical support via the Internet
at www.compaq-at-home.com web site. You may
also Email Compaq Technical Support at
Support@Compaq.com and quickly receive answers
to your Compaq A900 All-In-One questions.
Your Compaq A900 All-In-One is covered by a
Compaq One Year Limited Warranty. You are entitled
to warranty service if a hardware repair is required on
your Compaq A900 All-In-One within the warranty
period. This limited warranty is valid only within the
United States or Canada, and only within the country
in which it was purchased.
What are the terms of this limited warranty?
Compaq warrants that the printer you have purchased
from Compaq or from a Compaq authorized reseller is
free from defects in materials or workmanship under
normal use during the warranty period. The warranty
period commences on the date of purchase. Your dated
sales receipt is your proof of the date of purchase. This
warranty extends only to you, the original purchaser.
You cannot transfer the warranty to anyone who
purchases the product from you.
Compaqs Extra Mile Program features free technical support
during the one-year warranty period. Contact the Compaq
Technical Support Center 1-800-OKCOMPAQ (1-800-652-
6672). Technical support is available during the warranty
period. Technical support specialists are available to diagnose
and troubleshoot problems seven days a week, 24 hours a
day.
What is not covered by this limited warranty?
xý Product purchased from anyone other than
Compaq or a Compaq authorized reseller
xý Product purchased outside the United States or
Canada
xý Software products except for obligations
specified in the software program license
agreement
xý Routine cleaning, or normal cosmetic and
mechanical wear
xý Damage from misuse, abuse, or neglect
xý Damage from use outside the product’s usage
parameters
xý Damage from use of parts not manufactured or
sold by Compaq
xý Damage from modification or in corporation
into other products
xý Damage from repair or replacement of
warranted parts by other than a Compaq
authorized service provider
xý Damage to or loss of any programs or data
xý Damage resulting from an act of God
How do I obtain warranty service?
Call Compaq's Technical Support Center at
1-800-OK-COMPAQ, 1-800-652-6672. Compaq's
highly trained technicians will first try to resolve the
problem by phone. If your problems cannot be
resolved by phone, Compaq will ship an exchange
printer to you. Upon receipt of the exchange printer,
pack the defective printer (in the carton which
contained the exchange printer) and make it available
for pickup by a Compaq representative. If you fail to
return the defective printer within 5 business d ays, you
will be responsible for the full amount of the
replacement printer.
If you prefer, your printer may be mailed to Compaq to
be repaired and returned, rather than exchanged. In
either case, Compaq pays for all shipping charges.
73
Page 76

Limited Warranty Statement for the United
States and Canada
This Limited Warranty is valid only within th e United
States or Canada, and within the country in which the
Hardware Product was purchased.
Hardware Products Covered and Duration of Warranty
This Limited Warranty applies in the United States and
Canada to Hardware Products manufactured or
distributed by Compaq Computer Corporation
(Compaq) under the Compaq brand name.
A Compaq Hardware Product is defined as Compaq
A900 All-In-One.
Contact your Compaq authorized reseller or Compaq if
you have any questions about this Limited Warranty.
Compaq’s obligations with respect to Software
distributed by Compaq under the Compaq brand name
are set forth in the applicable end-user license
agreement. Compaq has no other obligation to repair
or replace software under this limited warranty. NonCompaq Hardware and Software Products are
provided on an “AS IS” basis. However, non-Compaq
manufacturers, suppliers, or publishers may provide
their own warranties.
Terms of the Warranty
Compaq warrants that the Hardware Product you have
purchased from Compaq or from a Compaq authorized
reseller is free from defects in materials or
workmanship under normal use during the warranty
period. The warranty period commences on the date of
purchase. Your sales receipt, showing the date of
purchase of the Hardware Product, is your proof of the
date of purchase. This warranty extends only to you,
the original Purchaser. It is not transferable to anyone
who subsequently purchases the Hardware Product
from you. It excludes expendable parts.
During the warranty period, Compaq will, at no
additional charge, repair or replace defective parts with
new parts or, at the option of Compaq, serviceable
used parts that are equivalent or superior to new parts
in performance.
All exchanged parts and Products replaced under this
warranty will become the property of Compaq. If, after
repeated efforts, Compaq is unable to restore the
Product to good working order, you are entitled to a
refund of the purchase price.
If the Hardware Product is replaced by Compaq, and
you fail to return the defective Hardware Product
within 5 business days, you will be r e sponsible for the
full amount of the replacement printer.
This Limited Warranty extends only to Products
purchased from Compaq or from a Compaq authorized
reseller.
This Limited Warranty also does not extend to any
Product that has been damaged or rendered defective
(a) as a result of accident, misuse, or abuse; (b) as a
result of an act of God; (c) by operation outside the
usage parameters stated in the Product’s User’s Guide;
(d) by the use of parts not manufactured or sold by
Compaq; (e) by modification of the Product; or (f) as a
result of service by anyone other than Compaq, a
Compaq authorized reseller, or a Compaq authorized
service provider. Compaq is not responsible for
damage to or loss of any programs or data. Contact
your local Compaq authorized service provider for
geographic restrictions, proof-of-purchase
requirements, response time commitmen ts and other
specific on-site service requirements.
EXCEPT AS EXPRESSLY SET FORTH IN THIS
WARRANTY, COMPAQ MAKES NO OTHER
WARRANTIES, EXPRESSED OR IMPLIED,
INCLUDING ANY IMPLIED WARRANTIES OF
MERCHANTABILITY AND FITNESS FOR A
PARTICULAR PURPOSE. COMPAQ EXPRESSLY
DISCLAIMS ALL WARRANTIES NOT STATED IN
THIS LIMITED WARRANTY. ANY IMPLIED
WARRANTIES THAT MAY BE IMPOSED BY
LAW ARE LIMITED TO THE TERMS OF THIS
EXPRESS LIMITED WARRANTY.
Limitation of Remedy
Compaq is not liable for any damages caused by the
Product or the failure of the Product to perform,
including any lost profits, lost savings, incidental
damages, or consequential damages. Compaq is not
liable for any claim made by a third party or made by
you for a third party.
This limitation applies whether damages are sought, or
a claim made, under this warranty or as a tort claim
(including negligence and strict product liability), a
contract claim, or any other claim. This limitation
cannot be waived or amended by any person. This
limitation of liability will be effective even if Compaq
or an authorized representative of Compaq has been
advised by you of the possibility o f any such damages.
This limitation of liability, however, will not apply to
claims for personal injury.
74
U.S.A. State Laws
Page 77

Some states do not allow limitation on how long an
implied warranty lasts. In such states, the limitations or
exclusions of this Limited Warranty may not apply to
you. Some states do not allow the exclusion or
limitation in incidental or consequential damages for
consumer products. In such states, the exclusion or
limitation of this Limited Warranty may not apply to
you. This Limited Warranty gives you specific legal
rights. You may also have other rights that may vary
from state to state. You are advised to consult
applicable state laws for a full determination of your
rights.
75
Page 78

Appendix A
j
Using the A900 Extension Feature
When sharing a telephone line between the Compaq
A900 All-In-One and other equipment use the EXT
connection. If you wish to connect more than one
device, a multiple outlet adapter may be required.
To connect the A900 to an optional extension
telephone:
ý
Plug one end of the telephone cord into the
1.
telephone.
ý
Plug the opposite end of the cord into the socket
2.
marked EXT on the left side of the A900.
Connecting an extension telephone to the A900
Sharing a Telephone Line with Other Devices
Telephone
Wall Jack
Telephone
Wall Jack
Telephone
Telephone
Wall Jack
Answering
machine
Telephone
Wall Jack
Modem
Compaq recommends that you do not connect an
answering machine or computer modem to another
wall jack on the same telephone line as the A900. The
fax information can be corrupted by any voice,
answering machine or modem activity that occurs
during fax reception. Equipment plugged into the EXT
connection is disconnected from the line during A900
fax activities reducing the possibility o f fax corruption.
PC Modem
Answering
machine
If another phone must
connected to another
ack on the same line as
the A900 then use one
that has a line busy
indicator
Telephone
Telephones
When a telephone is connected directly (or through an
answering machine) to the EXT connection on the
A900, you can instruct the A900 to receive an
incoming fax. Press *9* (star-nine-star) if you pick up
the handset and hear a fax tone. A telephone connected
to the EXT connection will not interfere with FAX
transactions when it is off hook.
If you must have other telephones connected to the
same telephone line at other locations (not through the
EXT port) then use telephones that indicate that the
line is busy. This helps prevent the corruption of fax
data that would occur if the telephone is picked up
during fax transmissions.
A-1
Page 79

Answering Machines
If the answering machine and A900 will share the
same line then, for reliable fax operation, you must use
the EXT connection on the A900.
Computer Modems (internal or external)
If you have a modem in your computer that will use
the same line as the A900, use the EXT connection on
the A900. If the computer modem has a TELEPHONE
or EXT connection to it, use this to connect any
additional equipment such as telephones or answering
machines instead of using a multiple outlet adapter .
Depending on that equipment’s design, this prevents
such equipment from interfering with computer
modem activities.
DRPD
The recommendations above for connecting additional
devices still apply if using Distinctive Ring Pattern
Detection (DRPD). The A900 will only pick up calls
made to the telephone number that has the Ring
Pattern that it has learned. DRPD setup instructions
may be found in the Receiving Automatically in DRPD
Mode section of the “Faxing” chapter.
Connecting and Configuring Equipment
Deciding how to connect and configure equipment
depends on the number of lines available and the
intended usage. The main functions are:
A. A900 and Telephone (optional)
Telephone
Wall Jack
Telephone
B. A900 Answering Machine and Telephone
Telephone
Wall Jack
Answering
machine
Telephone
C. A900 Computer Modem (internal or external) and
Telephone
Telephone
Wall Jack
PC Modem
Telephone
D. A900, Computer Modem, Answering Machine and
Telephone
Fax
x
ý
Audio (including answering machines and voice
x
ý
messaging systems)
Internet (includes data or bulletin board link)
x
ý
If you only have a single line then only one of these
functions can be active any one time.
If you have more than one line then it may be
advantageous to dedicate a line to a specific function.
For example, with two telephone lines you can fax and
browse the Internet at the same time.
Devices and Connections
This section describes four ways to connect the A900
to a single telephone line with other equipment.
Additional equipment connected to other lines is not
shown.
Find the Diagram that shows the devices that you wish
to connect to the same telephone line.
Telephone
Wall Jack
PC Modem
Telephone
Sections A, B, C, or D below describe the Fax Receive
Mode options on the A900 and the WinFax setup
necessary to get your desired functio nality.
Changing A900 FAX RECEIVE MODE
Set up as described in the Control Panel Setup Button
section of the “Common Procedures” chap ter.
Changing WINFAX SETUP
The A900 is set up as the active modem for WinFax
when you install the A900.
A-2
Page 80

NOTE: Faxes sent from the computer using the
Compaq Control Form use the active WinFax device.
A900 Fax Receive Modes
Changing the WinFax Active Connection Device
Use the following procedure to change the modem that
WinFax uses.
ý
Start the WinFax Message Manager.
1.
Click
Edition
ý
Select
2.
ý
Select the
3.
ý
Click the
4.
ý
Select the modem from the list of connection
5.
devices. Select the
oooo
Start
Programs
oooo
WinFax Message Manager
oooo
Tools
Setup
oooo
WinFax Basic
oooo
Program Setup.
Modems and other Fax devices
Properties
button.
Compaq A900 Fax
icon.
, if you
wish to use the A900 for computer faxing.
Select the
Computer Modem
if you wish to use
this for computer faxing.
ý
Check the box to make it active. Follow any
6.
setup instructions necessary.
ý
Click
7.
OK.
Setting up WinFax Fax Reception
ý
Start the WinFax Message Manager.
1.
ý
Select
2.
Receive
the receive mode state, a check indicates it is
enabled.
oooo
Automatic Receive
to toggle
Mode Selection Description
FAX Receives faxes automatically.
TEL To receive faxes manually, press
the A900 or press *9* on the telephone.
ANS/FAX Do not use for this configuration.
DRPD The A900 answers the previously learned ring
pattern on 2 rings
Start
twice on
WinFax Active Connection Device Selections
Selection Description
Compaq A900 Fax
Computer Modem Send or receive computer faxes using a
B. A900 Answering Machine and Telephone
Telephone
Wall Jack
Send computer faxes using the A900.
(Note:-Do not set WinFax for AUTOMATIC
FAX RECEPTION. This will inhibit printing
and scanning functions to the A900).
computer modem. Your computer modem
must be connected to a different telephone
line. (Not shown)
WARNING:
!
Do not set WinFax for AUTOMATIC FAX RECEPTION when using
the Compaq A900 fax device as this will inhibit printing and
scanning functions to the A900
A. A900 and Telephone (optional)
Telephone
Wall Jack
Telephone
Answering
machine
Telephone
A900 Fax Receive Mode Selections
Mode Mode Description
FAX Do not use for this configuration.
TEL To receive faxes manually, press
on the A900 or press *9* on the telephone.
ANS/FAX Receives faxes automatically. The answering
machine will answer the call and the A900 will
listen for fax tones. It will intercept the call if
fax tones are detected. Set the answering
machine to answer in 1 or less rings. The
A900 will pick up after 6 rings.
DRPD
The A900 answers the learned ring pattern on
2 rings. Make sure that the Answering
Machine is set to answer after 4 or more rings
if it does not recognize DRPD patterns.
Start
twice
A-3
Page 81

WinFax Active Connection Device Selections
WinFax Active Connection Device Selections
Selection Description
Compaq A900 Fax
Computer Modem Send or receive computer faxes via a
Send computer faxes via A900. (Note:-Do
not set WinFax for AUTOMATIC FAX
RECEPTION, as this will inhibit printing and
scanning functions to the A900).
computer modem. Your computer modem
must be connected to a different telephone
line. (Not shown)
C. A900 Computer Modem (Internal or External) and
Telephone
Telephone
Wall Jack
PC Modem
Telephone
A900 Fax Receive Mode Selections
Mode Selection Description
FAX
TEL To receive faxes manually, press
ANS/FAX Use only if computer modem is providing
DRPD
Receives faxes automatically. Use if computer
modem is not set up to answer incoming calls.
twice on
Start
the A900 or press *9* on the telephone.
Use this mode if you wish to receive faxes
through the computer modem instead of the
A900.
answering machine functionality. Receives faxes
automatically. The computer modem will answer
the call and the A900 will listen for fax tones. It
will intercept the call if fax tones are detected.
Set the computer Modem to answer in 1 or less
rings. The A900 will pick up after 6 rings.
The A900 answers the learned ring pattern on 2
rings. Make sure that the computer Modem is set
to answer after 4 or more rings if it does not
recognize DRPD patterns.
Device Selection Description
Compaq A900
Fax
Computer Modem Send or receive computer faxes through a
Send computer faxes via A900. (Note:-Do not
set WinFax for AUTOMATIC FAX RECEPTION.
This will inhibit printing and scanning
functions to the A900.)
computer modem that is connected to the
same telephone line as the A900. This has the
advantage that printing and scanning
operations can happen concurrently with
computer modem/faxing or Internet activity.
If you wish to receive faxes through the
computer modem instead of the A900, set
WinFax for AUTOMATIC FAX RECEPTION. (You
will also need to set the A900 FAX RECEIVE
MODE to TEL so that the A900 does not
interrupt computer fax reception).
D. A900, Computer Modem, Answering Machine, and
Telephone
Telephone
Wall Jack
PC Modem
Answering
machine
Telephone
A900 Fax Receive Mode Selections
Mode Selection Description
FAX Do not use for this configuration.
TEL
To receive faxes manually, press
the A900 or press *9* on the telephone.
Also use this mode if you wish to receive faxes
through the computer modem instead of the A900.
ANS/FAX Receives faxes automatically. The answering
machine will answer the call and the A900 will
listen for fax tones. It will intercept the call if fax
tones are detected. Set the answering machine to
answer in 1 or less rings. The A900 will pick up
after 6 rings. The computer Modem should be
disabled from answering calls.
DRPD
The A900 answers the learned ring pattern on 2
rings. Make sure that the computer Modem is set
to answer after 4 or more rings if it does not
recognize DRPD patterns. Also make sure that the
answering machine is set to answer after more
rings than both the A900 and computer modem if
it does not recognize DRPD patterns.
START
twice on
A-4
Page 82

WinFax Active Device Selections
Device Selection Description
Compaq A900
Fax
Compaq A900
Fax
Send computer faxes via A900. (Note:-Do not set
WinFax for AUTOMATIC FAX RECEPTION, as this
will inhibit printing and scanning functions to the
A900.)
Send or receive computer faxes via a computer
modem that is connected to the same telephone
line as the A900. This has the advantage that
printing and scanning operations can happen
concurrently with computer modem/faxing or
even Internet activity.
If you wish to receive faxes through the computer
modem instead of the A900 set WinFax for
AUTOMATIC FAX RECEPTION. (You will also need
to set the A900 FAX RECEIVE MODE to TEL so
that the A900 does not interrupt computer fax
reception.)
A-5
Page 83

NDEX
I
$
$äíí
$OOð,Qð2QHñýê
SUHSDULQJýIRUýXVHñýè
VHWWLQJýXSñýç
$&ýSRZHUýFRUGñýæ
DFFHVVLQJ
&RQWUROý3URJUDPñýêæ
DGYDQFHGýFRS\ýVHWWLQJV
%ODFNý'UDIWñýéå
%ODFNý1RUPDOñýéå
%ODFNý3KRWRñýéå
&RORUý%HVWñýéå
&RORUý'UDIWñýéå
&RORUý1RUPDOñýéå
$GYDQFHGý)D[ý6HWWLQJVñýëæ
ID[ýFRQWUDVWñýéë
ID[ýUHVROXWLRQñýéë
DGYDQFHGýIHDWXUHV
ID[ñýéë
DGYDQFHGýVFDQýVHWWLQJV
%ODFNý'UDIWñýèì
%ODFNý1RUPDOñýèì
%ODFNý3KRWRñýèì
&RORUý%HVWñýèì
&RORUý'UDIWñýèì
&RORUý1RUPDOñýèì
VFDQýFRQWUDVWñýèì
VFDQýW\SHñýèì
$OOð,Qð2QH
$дннсэк
$OOр,Qр2QHэ'HIDXOWэ6HWWLQJVсэлз
DFFHVVLQJñýëç
$GYDQFHGý)D[ý6HWWLQJVñýëä
&RQWUROý3URJUDPñýëç
FRS\ýVHWWLQJVñýêí
GDWHýDQGýWLPHñýêí
)D[ý)URPý6HWXSñýëå
ID[ýVHWWLQJVñýëæ
)D[ý7Rý6HWXSñýëå
0RUHý)D[ý6HWWLQJVñýêí
VFDQýVHWWLQJVñýêì
$OOð,Qð2QHý'HIDXOWVý6HWWLQJV
SULQWýVHWWLQJVñýëç
$16î)$;ýPRGHñýéé
DQVZHUýRQýULQJ
ID[ñýëæ
DQVZHULQJýPDFKLQH
RSWLRQDOэSXUFKDVHсэзсэжж
DSSOLFDWLRQэVRIWZDUHсэйсэмн
DWWDFKLQJ
SULQWHUýFDEOHñýç
DXWRPDWLFýUHGLDOñýéê
DXWRPDWLFýUHGXFWLRQ
ID[ñýëä
%
%R[ýFRQWHQWVñýê
EXIIHUýPRGHñýêå
&
FDEOH
SULQWHUñýç
FDUULDJHýUHWXUQýPRGH
'26ý3ULQWLQJñýêä
FDUWULGJHñýê
LQNýOHYHOVñýêå
FDUWULGJHV
DOLJQLQJсэлисэкд
FOHDQLQJсэлисэкд
LQVWDOOLQJñýêä
PDLQWHQDQFHсэлисэкжсэкд
W\SHñýêä
FDXWLRQVîZDUQLQJV
XVLQJýWKHýSRZHUýRXWOHWñýæ
&'Vñýé
VRIWZDUHñýé
FKDUDFWHUýVHW
'26ý3ULQWLQJñýêä
FKHFNLQJýER[ýFRQWHQWVñýê
FKRRVLQJ
ORFDWLRQýWRýVHWýXSñýè
FOHDQLQJ
QR]]OHVñýëì
FOHDQLQJýSULQWýFDUWULGJHVñýëì
FROODWH
FRS\ñýêí
&RPSDTý$äííýVRIWZDUH
GHVFULSWLRQñýìí
FRQILJXULQJ
:LQ)D[ý%DVLFñýìç
FRQQHFWLQJ
WHOHSKRQHýFRUGñýç
FRQWHQWV
$äííýER[ñýê
FRQWUDVW
FRS\ñýêí
ID[сэлжсэйл
VFDQñýêì
&RQWUROý)RUP
FRS\LQJñýéä
)D[ý)URPý6HWXSñýëå
)D[ý7Rý6HWXSñýëå
ID[LQJñýéç
Index-1
Page 84

RYHUYLHZñýêé
SXUJLQJýROGýYHUVLRQVñýëæ
VFDQQLQJñýèë
&RQWUROý)RUPýHUURUýPHVVDJHVñýçì
&RQWUROý)RUPV
SULQWLQJñýëç
FRQWUROýORFDWLRQVñýêë
FRQWUROýSDQHO
FRS\ñýéæ
IHDWXUHVñýêë
FRQWUROýSURJUDP
LOOXVWUDWHGñýêæ
&RQWUROý3URJUDP
$ERXWý7DEñýéí
DFFHVVLQJñýêæ
DFFHVVLQJýWKURXJKý$OOð,Qð2QHý'HIDXOWý6HWWLQJVñýëç
EXIIHUýPRGHñýêå
&DUWULGJHэ7DEсэкжсэкд
GHVFULSWLRQñýêæ
GLVDEOHý6PDUWý,QNñýêå
GLVDEOLQJý'26ý3ULQWLQJñýêå
'26э3ULQWLQJэ7DEсэкжсэкд
PLQLPL]HGñýêå
2SWLRQVýWDEñýêæ
SULQWHUñýêæ
TXLFNýDFFHVVñýêå
VRXQGýHIIHFWVñýêå
VWDWXVýPRQLWRUñýêå
6WDWXVý7DEñýêæ
6WDWXVý7DEñýêå
FRQWUROVýDQGýIXQFWLRQV
WDEOHñýêë
FRS\
DGYDQFHGýIHDWXUHVñýéå
$OOð,Qð2QHý'HIDXOWý6HWWLQJVñýêí
FROODWHñýêí
FRQWUDVWñýêí
FRQWUROýSDQHOñýéæ
RYHUYLHZñýéæ
SUHSDULQJýGRFXPHQWVñýéæ
TXDQWLW\ýVHWWLQJVñýéå
VFDOHñýêí
W\SHñýêí
W\SHýVHWWLQJVñýéå
XVLQJýFRPSXWHUñýéä
XVLQJý&RQWUROý)RUPñýéä
XVLQJýFRS\îVFDQýVOHHYHñýéæ
FRS\ýHUURUýPHVVDJHVñýèä
FRS\ýVHWWLQJV
%ODFNý'UDIWñýéå
%ODFNý1RUPDOñýéå
%ODFNý3KRWRñýéå
&RORUý%HVWñýéå
&RORUý'UDIWñýéå
&RORUý1RUPDOñýéå
FRQWUDVWñýéå
FRS\ýTXDQWLW\ñýéå
FRS\ýVL]Hñýéå
FRS\ýW\SHñýéå
FRS\îVFDQýVOHHYH
XVLQJýWRýFRS\ñýéæ
FRUG
SRZHUñýê
WHOHSKRQHсэк
FRUUHFWLQJэID[эSUREOHPVсэзл
FRUUHFWLQJэSDSHUэIHHGLQJэSUREOHPVсэзи
FRUUHFWLQJэSULQWэTXDOLW\эSUREOHPVсэзк
FRUUHFWLQJэSULQWLQJэSUREOHPсэзй
FRUUHFWLQJэSUREOHPVсэзл
FRUUHFWLQJэVFDQQLQJэSUREOHPVсэззсэзж
'
GDWH
$äííýVHWWLQJVñýêí
GDWHîWLPHýVHWWLQJVñýëè
GHIDXOWýVHWWLQJV
ID[ñýëæ
GHVFULSWLRQ
&RPSDTý$äííýVRIWZDUHñýìí
3DJLVý6FDQ:RUNVñýìí
SULQWHUýGULYHUñýìí
VFDQQHUýGULYHUñýìí
:LQ)D[ý%DVLFý(GLWLRQñýìí
GLVFDUGýVL]H
ID[ñýëä
GRFXPHQW
SULQWLQJñýêæ
WUD\Vñýè
GRFXPHQWýLQSXWýWUD\ýH[WHQGHU
LQVWDOOLQJñýè
GRFXPHQWýMDPV
ZKLOHýSULQWLQJñýèè
GRFXPHQWýWUD\V
LQVWDOOLQJñýè
GRFXPHQWDWLRQñýé
GRFXPHQWV
SUHSDULQJýWRýFRS\ñýéæ
SUHSDULQJýWRýID[ñýéì
SUHSDULQJýWRýVFDQñýèí
'26ý3ULQWLQJ
FDUULDJHýUHWXUQýPRGHñýêä
FKDUDFWHUýVHWñýêä
FKRRVLQJýIRQWVñýêä
GLVDEOLQJñýêå
IRQWýGRZQORDGVñýêä
IRQWýOLVWñýéí
IRUPýIHHGýWLPHRXWñýêä
KLJKýVSHHGýSULQWLQJñýêä
LQNýVDYHUñýêä
SDSHUýRULHQWDWLRQñýéí
SDSHUýVL]Hñýéí
SDSHUýVRXUFHñýéí
SDSHUýW\SHñýéí
Index-2
Page 85

SHUIRUDWLRQэVNLSсэкд
SULQWэTXDOLW\сэкд
UHVROXWLRQсэкд
VHWWLQJVсэкжсэкд
WH[WýVFDOHýPRGHñýêä
'53'ñýëè
'53'ýPRGHñýéé
(
HOHFWURPDJQHWLFýLQWHUIHUHQFHýFRPSOLDQFHýQRWLFHVñýçå
HQHUJ\ýFRPSOLDQFHñýæí
HQYHORSHV
ORDGLQJñýëê
SUHSDULQJýIRUýSULQWLQJñýëê
(UURUý&RUUHFWLRQý0RGH
ID[ñýëä
HUURUýPHVVDJHVñýèè
&RQWUROý)RUPýPHVVDJHVñýçì
FRS\ýPHVVDJHVñýèä
ID[ýPHVVDJHVñýèæ
UHDG\ýVWDWHýPHVVDJHVñýèç
VFDQýPHVVDJHVñýçí
H[LWýWUD\
IURQWñýè
)
ID[
$GYDQFHGý)D[ý6HWWLQJVñýëä
DGYDQFHGýIHDWXUHVñýéë
$OOð,Qð2QHý'HIDXOWý6HWWLQJVñýëæ
DQVZHUýRQýULQJñýëæ
DXWRPDWLFýUHGLDOñýéê
DXWRPDWLFýUHGXFWLRQñýëä
FRQILUPDWLRQñýéê
FRQWUDVWсэлжсэйл
GLDOýPRGHñýëæ
GLVFDUGýVL]Hñýëä
(UURUý&RUUHFWLRQý0RGHñýëä
IRUFHGýPHPRU\ýWUDQVPLVVLRQñýëæ
ORJJLQJýID[ýWUDQPLVVLRQVýDQGýUHFHSWLRQVñýêí
PHVVDJHýFRQILUPñýëæ
0RUHэ)D[э6HWWLQJVсэлжсэкн
2Qэ+RRNэ'LDOLQJэх2+'фсэйк
RYHUYLHZñýéì
SDSHUýVL]Hñýëæ
SUHSDULQJýGRFXPHQWVñýéì
SULQWýTXDOLW\ñýëæ
SULQWý7HUPLQDOý,'ñýëä
TXLFNýPRGHñýéì
UHFHLYHýPRGHñýëæ
UHGLDOñýéê
UHGLDOLQJýRSWLRQVñýëä
UHVROXWLRQсэлжсэйл
ULQJýYROXPHñýêí
VSHDNHUэYROXPHсэкнсэйк
VSHHGýGLDOLQJñýéê
6\VWHPý,'ñýëæ
6\VWHPý1DPHñýëæ
XVLQJý&RQWUROý)RUPñýéç
ID[ýFRQILUPDWLRQ
SULQWLQJñýëè
ID[ýHUURUýPHVVDJHVñýèæ
)D[ý)URPý6HWXSïý6HHý&RQWUROý)RUP
ID[ýPHPRU\ý[PLW
VHWXSýEXWWRQñýëè
)$;ýPRGHñýéé
ID[ýSULQW
VHWXSýEXWWRQñýëè
ID[ýSUREOHPVñýçë
ID[ýUHFHLYLQJýPRGHV
$16î)$;ýPRGHñýéé
'53'ýPRGHñýéé
)$;ñýéé
7(/ýPRGHñýéé
)D[ý7Rý6HWXSñýëæ
ID[LQJýZLWKýFRPSXWHU
XVLQJý:LQ)D[ý%DVLFñýéè
IHDWXUHV
FRQWUROýSDQHOñýêë
IRQW
'26ý3ULQWLQJñýêä
IRQWýGRZQORDGV
'26ý3ULQWLQJñýêä
IRUFHGýPHPRU\ýWUDQVPLVVLRQñýëæ
IRUPýIHHGýWLPHRXW
'26ý3ULQWLQJñýêä
IURQW
H[LWýWUD\ñýè
IURQWýSDQHO
VFDQñýèí
*
JULSV
KDQGñýêê
+
KDQGýJULSVñýêê
KLJKýVSHHGýSULQWLQJ
'26ý3ULQWLQJñýêä
KRZýWR
LQVWDOOýWKHýLQNýFDUWULGJHñýä
KRZýWRýFRQQHFWýWKHýSULQWHUýFDEOHñýç
KRZýWRýXVHýWKLVýJXLGHñýì
,
,(((эмлейэ&RPSOLDQW
SULQWHUýFDEOHñýé
LOOXVWUDWHG
$&ýSRZHUýFRUGñýê
$OOð,Qð2QHñýê
FRPSDFWýGLVFVñýé
FRQQHFWLQJýWKHý$&ýSRZHUýFRUGñýæ
FRQQHFWLQJýWKHýSKRQHýOLQHñýç
FRQQHFWLQJýWKHýSULQWHUýFDEOHñýç
FRQQHFWLQJýWKHýWHOHSKRQHýFRUGñýç
GRFXPHQWýH[LWýWUD\ñýê
GRFXPHQWýLQSXWýWUD\ýH[WHQVLRQñýê
Index-3
Page 86

GRFXPHQWDWLRQсэй
LQNэFDUWULGJHVсэк
LQVWDOOLQJэWKHэGRFXPHQWэLQSXWэWUD\эH[WHQGHUсэи
LQVWDOOLQJэWKHэSULQWHUэFDUWULGJHсэе
OLIWLQJэWKHэFRQWUROэSDQHOсэе
OLIWLQJэWKHэLQNэFDUWULGJHэDFFHVVэGRRUсэе
SULQWHUэFDEOHсэй
UDLVLQJэWKHэFRQWUROэSDQHOсэе
UHDUэYLHZсэкк
VLGHэYLHZсэккпэ6HHý&KRRVLQJýDýORFDWLRQ
WHOHSKRQHýFRUGñýê
LQIRUPDWLRQ
KRZýWRýHQWHUñýì
LQNñýê
LQNýEXLOGXS
FRUUHFWLQJñýëì
LQNýFDUWULGJHV
LQVWDOOLQJñýä
VWRULQJñýëë
LQNýVDYHU
'26ý3ULQWLQJñýêä
LQVWDOOLQJ
GRFXPHQWýWUD\Vñýè
LQNýFDUWULGJHVñýä
3DJLVý6FDQ:RUNVñýìê
SKRWRýFDUWULGJHVñýëë
:LQ)D[ý%DVLFý(GLWLRQñýìë
LQVWDOOLQJýLQNýFDUWULGJHV
VWDQGDORQHýRSHUDWLRQVñýä
LQVWUXFWLRQVýIRUýFRQQHFWLQJýWKHý$&ýSRZHUýFRUGñýæ
LQVWUXFWLRQVýIRUýFRQQHFWLQJýWKHýSULQWHUýFDEOHñýç
LQVWUXFWLRQVýIRUýFRQQHFWLQJýWKHýWHOHSKRQHýFRUGñýç
/
ODWFKHV
H[LWýWUD\ñýè
ORDGLQJ
HQYHORSHVñýëê
ORDGLQJý$éðVL]HGýSDSHUñýëê
ORDGLQJýOHJDOýSDSHUñýëê
ORDGLQJýOHWWHUðVL]HGýSDSHUñýëê
ORDGLQJýSDSHUñýëê
ORFDWLQJýDGGLWLRQDOýKHOSñýì
ORFDWLRQ
FKRRVLQJñýè
0
PDLQWHQDQFH
FDUWULGJHVñýëè
PHVVDJHýFRQILUP
ID[ñýëæ
PLVVLQJýRUýGDPDJHGýSDUWV
UHWXUQLQJñýê
1
QR]]OHýWHVWñýëì
QR]]OHV
FOHDQLQJñýëì
ZLSLQJñýëë
2
2Qэ+RRNэ'LDOLQJэх2+'фсэйк
RSHUDWLRQV
VWDQGDORQHñýä
RSWLRQDOýSXUFKDVHV
DQVZHULQJýPDFKLQHñýç
H[WHQVLRQýSKRQHñýç
RYHUYLHZ
FRS\ñýéæ
ID[ñýéì
SULQWLQJñýêæ
VFDQñýèí
3
SDFNDJLQJñýè
SDFNDJLQJýPDWHULDOV
UHPRYLQJñýè
3DJLVý6FDQ:RUNV
FRS\LQJñýéä
GHVFULSWLRQñýìí
LQVWDOOLQJñýìê
VFDQQLQJñýèë
SDSHU
ORDGLQJñýëê
SDSHUýIHHGLQJýSUREOHPVñýçè
SDSHUýVL]H
'26ý3ULQWLQJñýéí
ID[ñýëæ
VHWXSýEXWWRQñýëè
SDSHUýVRXUFH
'26ý3ULQWLQJñýéí
SDSHUýW\SH
'26ý3ULQWLQJñýéí
SDUDOOHOýSULQWHUýFDEOHñýé
SDWWHUQV
WHVWñýëì
SHUIRUDWLRQýVNLS
'26ý3ULQWLQJñýêä
SKRQHýFRUGñýê
FRQQHFWLQJñýç
SKRWRýFDUWULGJHñýê
LQVWDOOLQJñýëë
SKRWRV
SURWHFWLQJñýé
SRZHU
FRUGñýæ
SUHSDULQJýWKHý$äííýIRUýXVHñýè
SULQW
$OOð,Qð2QHý'HIDXOWý6HWWLQJVñýëç
SULQWýFDUWULGJHV
FOHDQLQJñýëì
SULQWýMRE
FDQFHOOLQJñýêå
SDXVLQJñýêå
SULQWýSUREOHPV
GRFXPHQWýMDPñýèè
SULQWýTXDOLW\
Index-4
Page 87

'26ý3ULQWLQJñýêä
ID[ñýëæ
SULQWýTXDOLW\ýSUREOHPVñýçê
SULQWHU
DFFHVVLQJýGHIDXOWýVHWWLQJVñýëç
DFFHVVLQJýVXSSO\ýOLVWñýêä
&RQWUROý3URJUDPñýêæ
GHIDXOWýVHWWLQJVñýëç
LQNýOHYHOVñýêå
2SWLRQVý7DEñýêå
VHWýDVýGHIDXOWñýêæ
VHWWLQJVñýêæ
6WDWXVñýêæ
6WDWXVý7DEñýêå
SULQWHUýFDEOH
DWWDFKLQJñýç
SDUDOOHOñýé
SULQWHUýGULYHU
GHVFULSWLRQñýìí
VHWWLQJVñýêæ
SULQWHUýVRIWZDUH
$ERXWэ7DEсэкжсэйн
&DUWULGJHэ7DEсэкжсэкд
'26э3ULQWLQJэ7DEсэкжсэкд
2SWLRQVэ7DEсэкжсэке
6WDWXVэ7DEсэкжсэке
SULQWLQJ
&RQWUROý)RUPñýëç
GRFXPHQWñýêæ
RYHUYLHZñýêæ
WHVWýSDJHñýêä
SULQWLQJýSUREOHPñýçé
SULQWLQJýUHSRUWVñýëè
ID[ýFRQILUPñýëè
UHFHLYHýORJñýëè
VHOIýWHVWñýëè
VSHHGýGLDOýOLVWñýëè
WUDQVPLWýORJñýëè
4
TXLFNýDFFHVV
&RQWUROý3URJUDPñýêå
TXLFNýPRGH
ID[ñýéì
5
UHDG\ýVWDWHýHUURUýPHVVDJHVñýèç
UHDUýYLHZ
LOOXVWUDWHGñýêê
WDEOHñýêê
UHFHLYHýORJ
SULQWLQJñýëè
UHFHLYHýPRGH
ID[ñýëæ
UHFRPPHQGDWLRQV
VHWWLQJýXSñýè
UHGLDO
ID[ñýéê
UHGLDOLQJýRSWLRQV
ID[ñýëä
UHJLVWUDWLRQýIRUPñýìè
UHPRYLQJ
SDFNDJLQJýPDWHULDOVñýè
WDSHñýè
UHVROXWLRQ
'26ý3ULQWLQJñýêä
ID[сэлжсэйл
ULQJэYROXPH
ID[ñýêí
ULQJHUýYROXPHñýëè
6
VDIHW\ñýçå
SRZHUýFRUGVñýçå
VFDOH
FRS\ñýêí
VFDQ
$OOð,Qð2QHý'HIDXOWý6HWWLQJVñýêì
FRQWUDVWñýêì
IURQWýSDQHOñýèí
RYHUYLHZñýèí
SUHSDULQJýGRFXPHQWVñýèí
VFDQýFRQWUDVWñýèì
VFDQýW\SHñýèì
W\SHñýêì
XVLQJý&RQWUROý)RUPñýèë
XVLQJý6FDQî&RS\ý6OHHYHñýèí
XVLQJýWKHýFRPSXWHUñýèë
VFDQýHUURUýPHVVDJHVñýçí
VFDQýVHWWLQJV
%ODFNý'UDIWñýèì
%ODFNý1RUPDOñýèì
%ODFNý3KRWRñýèì
&RORUý%HVWñýèì
&RORUý'UDIWñýèì
&RORUý1RUPDOñýèì
6FDQî&RS\ý6OHHYH
XVLQJýWRýVFDQñýèí
VFDQQHUýGULYHU
GHVFULSWLRQсэмн
VFDQQLQJэSUREOHPVсэззсэзж
VHOIэWHVW
SULQWLQJñýëè
6HQGLQJýDý)D[ñýéì
VHSDUDWHýSXUFKDVH
SULQWHUýFDEOHñýé
VHWWLQJýXS
$дннсэз
VHWWLQJV
SULQWHUñýêæ
SULQWHUýGULYHUñýêæ
VHWXSýEXWWRQ
FDUWULGJHýPDLQWHQDQFHñýëè
GDWHîWLPHýVHWWLQJVñýëè
ID[ýPHPRU\ý[PLWñýëè
Index-5
Page 88

ID[ýSULQWñýëè
ID[ýUHFHLYHýPRGHñýëè
SDSHUýVL]Hñýëè
SULQWýUHSRUWñýëè
ULQJHUýYROXPHñýëè
VHWXSýEXWWRQýIHDWXUHVñýëè
DFFHVVLQJñýëè
VLGHýYLHZ
LOOXVWUDWHGñýêê
VOHHYH
FRS\оVFDQсэйсэйж
6PDUWý,QN
GLVDEOLQJñýêå
VHWWLQJVñýêä
VRFNHW
WHOHSKRQHñýç
VRIWZDUH
DSSOLFDWLRQñýé
&'Vñýé
FRPSOHWHýLQVWDOODWLRQñýìí
V\VWHPýUHTXLUHPHQWVñýìí
VRIWZDUHý&'Vñýé
VRXQGýHIIHFWV
&RQWUROý3URJUDPñýêå
VSHDNHUýYROXPH
ID[ñýéê
VSHHGýGLDOýOLVW
SULQWLQJñýëè
VSHHGýGLDOýVHWXSñýëæ
VSHHGýGLDOLQJñýéê
VWDQGDORQHýPDFKLQH
LQVWDOOLQJýLQNýFDUWULGJHVñýä
VWDQGDUGýZDOOýMDFNñýç
VWRULQJýDGGLWLRQDOýLQNýFDUWULGJHVñýëë
VXSSO\ýOLVW
SULQWHUñýêä
VXSSRUW
WHFKQLFDOñýì
6\VWHPý,'
ID[ñýëæ
6\VWHPý1DPH
ID[ñýëæ
V\VWHPýUHTXLUHPHQWVñýìí
7
WDEOH
FRQWUROýSDQHOýIHDWXUHVñýêë
FRQWUROVýDQGýIXQFWLRQVñýêë
UHDUýYLHZñýêê
WDNLQJýWKHý$äííýRXWýRIýWKHýER[ñýè
WDSH
UHPRYLQJñýè
7(/ýPRGHñýéé
WHOHSKRQH
VRFNHWñýç
WHOHSKRQHýFRUG
FRQQHFWLQJñýç
WHVW
SDWWHUQVñýëì
WHVWýSDJH
SULQWLQJñýêä
WHVWýSDWWHUQVñýëì
WHVWLQJ
QR]]OHVñýëì
WH[WýER[ñýì
WH[WýFRQYHQWLRQVñýì
WH[WýVFDOHýPRGH
'26ý3ULQWLQJñýêä
WLPH
$äííýVHWWLQJVñýêí
WUDQPLVVLRQýORJ
SULQWLQJñýëè
WUD\V
GRFXPHQWñýè
WURXEOHVKRRWLQJ
&RQWUROý)RUPýPHVVDJHVñýçì
FRS\ýPHVVDJHVñýèä
FRUUHFWLQJýSUREOHPVñýçë
HUURUýPHVVDJHVñýèè
ID[ýPHVVDJHVñýèæ
ID[ýSUREOHPVñýçë
LQNýQR]]OHVñýëë
SDSHUýIHHGLQJýSUREOHPVñýçè
SUHSDUDWLRQñýèè
SULQWýTXDOLW\ýSUREOHPVñýçê
SULQWLQJýSUREOHPVñýçé
UHDG\ýVWDWHýPHVVDJHVñýèç
VFDQýPHVVDJHVñýçí
VFDQQLQJэSUREOHPVсэззсэзж
W\SH
FRS\ñýêí
VFDQñýêì
8
XQSDFNLQJэWKHэ$дннсэи
XVLQJэWKHэSKRWRэFDUWULGJHсэлл
XVLQJэWKHэSRZHUэRXWOHW
FDXWLRQVîZDUQLQJVñýæ
:
ZDOOýMDFN
FRQQHFWLQJýWKHýWHOHSKRQHýOLQHñýç
VWDQGDUGñýç
:LQ)D[ý%DVLF
FRQILJXULQJñýìç
UHFHLYLQJýDýID[ñýéè
VHQGLQJýDýID[ñýéè
:LQ)D[ý%DVLFý(GLWLRQ
GHVFULSWLRQñýìí
LQVWDOOLQJñýìë
Index-6
 Loading...