

Page 1

HP CloudSystem 8.0 Installation and Configuration Guide
About this guide
This information is for use by administrators using HP CloudSystem Foundation and Enterprise Software 8.0, who are assigned
to configure and provision compute resources for deployment and use in virtual data centers.
HP Part Number: 5900-3382
Published: March 2014
Edition: 1
Page 2

© Copyright 2014 Hewlett-Packard Development Company, L.P.
Microsoft® and Windows® are U.S. registered trademarks of the Microsoft group of companies.
Red Hat® is a registered trademark of Red Hat, Inc. in the United States and other countries.
Confidential computer software. Valid license from HP required for possession, use or copying. Consistent with FAR 12.211 and 12.212, Commercial
Computer Software, Computer Software Documentation, and Technical Data for Commercial Items are licensed to the U.S. Government under
vendor's standard commercial license.
The information contained herein is subject to change without notice. The only warranties for HP products and services are set forth in the express
warranty statements accompanying such products and services. Nothing herein should be construed as constituting an additional warranty. HP shall
not be liable for technical or editorial errors or omissions contained herein.
The open source code used by HP CloudSystem is available on the HP web at http://www.hp.com/software/opensource.
Page 3

Contents
1 Welcome to HP CloudSystem.......................................................................5
Explanation of solution components............................................................................................6
Management hypervisors and integrated tools.........................................................................7
CloudSystem Foundation components.....................................................................................8
CloudSystem Enterprise components.......................................................................................8
CloudSystem networks..........................................................................................................9
2 Before you begin......................................................................................10
Audience...............................................................................................................................10
Assumptions...........................................................................................................................10
3 HP CloudSystem installation prerequisites....................................................11
Understand the installation process...........................................................................................11
Hardware requirements...........................................................................................................12
Physical configuration hardware requirements........................................................................12
Management hypervisors...............................................................................................12
Compute nodes............................................................................................................13
SAN and Storage.........................................................................................................14
Virtual appliance requirements — CloudSystem virtual appliances.......................................14
Software requirements.............................................................................................................15
Networking requirements.........................................................................................................15
Overview of network topology.............................................................................................16
Network definitions.......................................................................................................17
Configuration of management networks...........................................................................18
Browser requirements..............................................................................................................19
Tools requirements..................................................................................................................20
4 Prepare for the installation.........................................................................21
Installation kits.......................................................................................................................21
Contents of CloudSystem .zip files........................................................................................21
Preparing to install on ESX.......................................................................................................23
Preparing to install on KVM.....................................................................................................24
5 Installing CloudSystem on an ESX cluster.....................................................26
Understanding the network infrastructure....................................................................................26
Create the ESX management hypervisor and configure the network infrastructure........................27
Configuring the ESX management environment...........................................................................28
Selecting hypervisor security level for CloudSystem installation.................................................29
Configuring the Foundation base appliance on ESX................................................................29
6 Installing CloudSystem on a KVM hypervisor................................................33
Creating the management hypervisor........................................................................................33
Preparing the hardware......................................................................................................33
Installing RHEL...................................................................................................................33
Creating a local YUM repository and validating RHEL RPMs....................................................34
Configuring the CloudSystem network infrastructure.....................................................................35
Configure the network infrastructure on the KVM management hypervisor..................................36
Configuring the KVM management environment.........................................................................40
Selecting hypervisor security level for CloudSystem installation.................................................40
Configuring the Foundation base appliance on KVM..............................................................41
7 Setting up the CloudSystem Console for the first time.....................................44
Configuring cloud networking..................................................................................................44
Performing time synchronization on the Foundation base appliance...............................................44
Contents 3
Page 4

8 CloudSystem Foundation installation next steps.............................................46
9 Preparing HP Operations Orchestration for CloudSystem Foundation...............47
Using OO Central..................................................................................................................47
Installing OO Studio ..............................................................................................................47
10 Installing CloudSystem Enterprise..............................................................49
Installing the Enterprise appliance.............................................................................................49
11 Troubleshoot installation issues..................................................................52
Basic troubleshooting techniques..............................................................................................52
csstart errors..........................................................................................................................53
OO Studio installation errors....................................................................................................55
Enterprise upgrade errors.........................................................................................................55
12 Support and other resources.....................................................................57
Information to collect before contacting HP.................................................................................57
How to contact HP..................................................................................................................57
Registering for software technical support and update service.......................................................57
HP authorized resellers............................................................................................................58
Documentation feedback.........................................................................................................58
Related information.................................................................................................................58
HP CloudSystem documents.................................................................................................58
HP Software documents......................................................................................................59
Finding documents on the HP Software Product Manuals web site........................................59
HP Insight Management documents......................................................................................59
Third-party documents........................................................................................................59
HP 3PAR StoreServ Storage documents.................................................................................60
Finding documents on the HP Support Center web site.......................................................60
HP ProLiant servers documents.............................................................................................61
A Command line interfaces..........................................................................62
Preparing to use CLIs..............................................................................................................62
Installing OpenStack CLIs on Windows.................................................................................62
Installing OpenStack CLIs on Linux.......................................................................................62
Using CLI commands..............................................................................................................63
csstart commands..............................................................................................................63
csadmin CLI and OpenStack CLI..........................................................................................64
Additional CLI tasks................................................................................................................64
Using the csstart CLI to install the Foundation base appliance..................................................64
Enabling REST API for storage drivers...................................................................................66
Using the CLI to access the Enterprise console........................................................................66
B Configuring additional providers for CloudSystem Enterprise..........................67
Configuring HP Operations Orchestration to integrate with HP CSA..............................................67
Importing Operations Orchestration flows..................................................................................69
Importing a service design.......................................................................................................70
Configuring a Matrix OE resource provider................................................................................71
C Configuring a large-scale CloudSystem deployment......................................72
4 Contents
Page 5
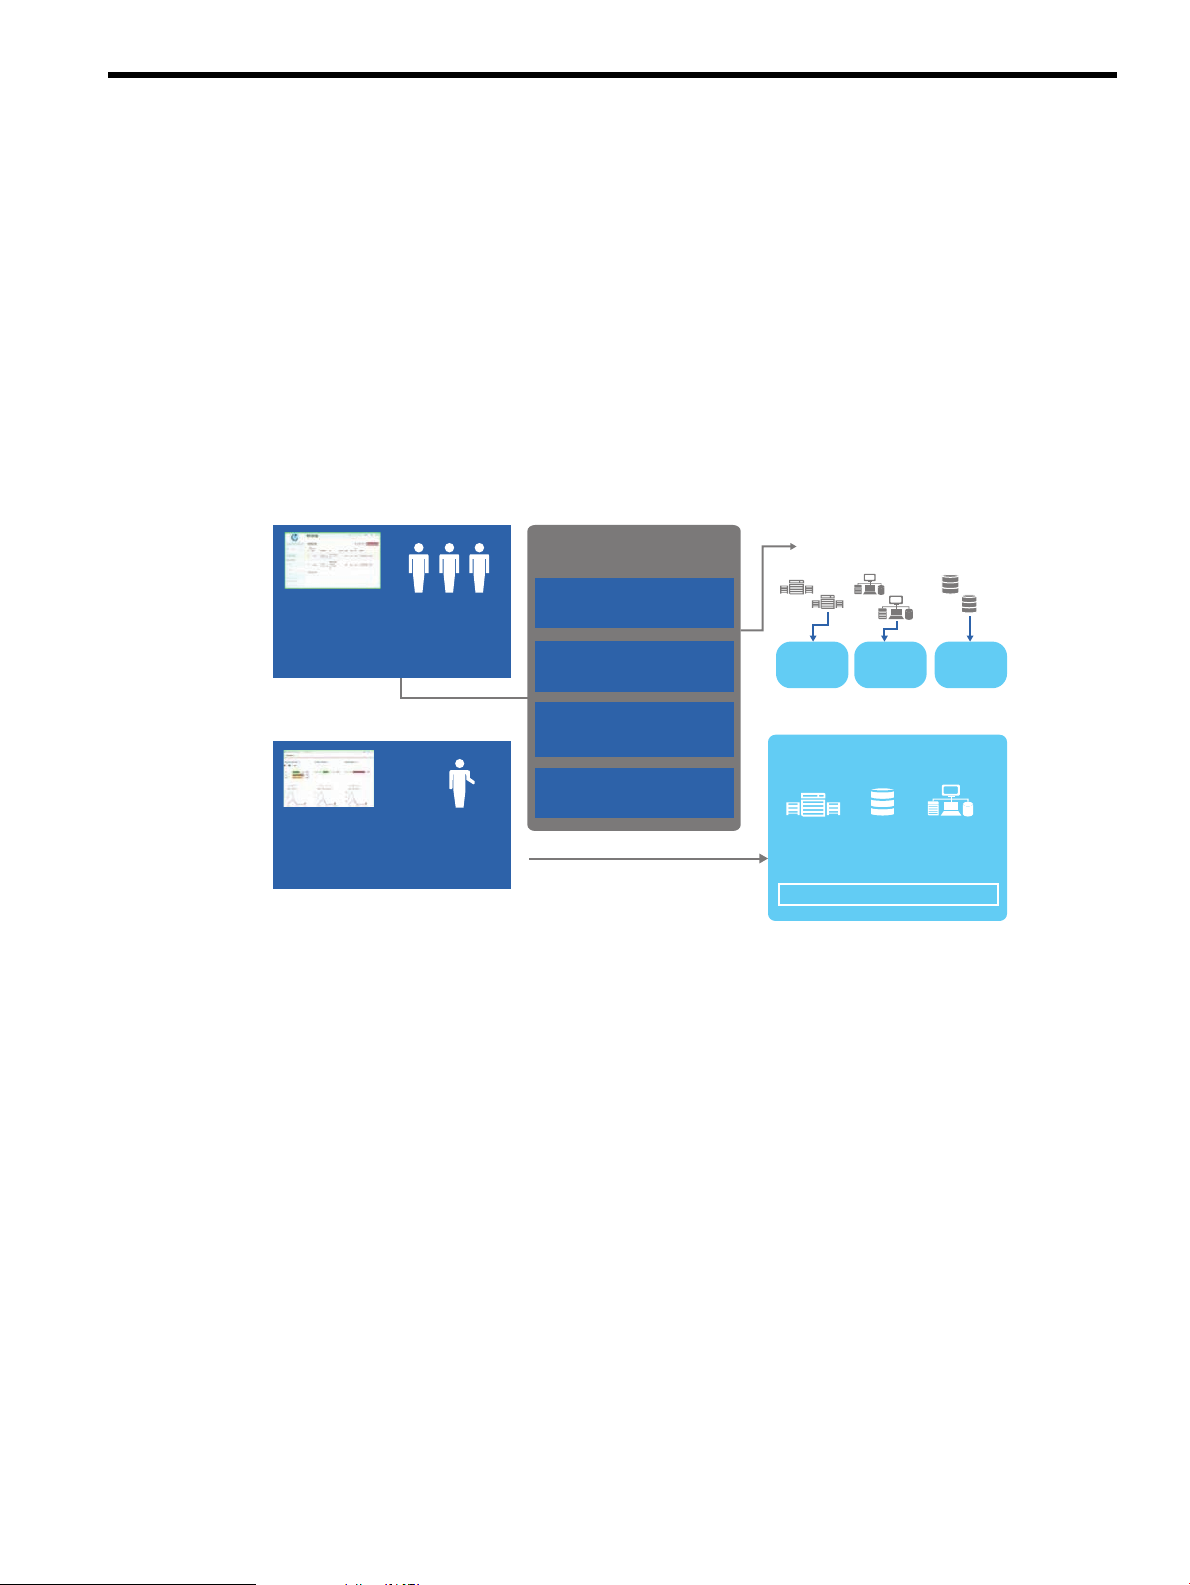
1 Welcome to HP CloudSystem
Virtual
machines
Networks
and
endpoints
Ephemeral
volumes
Compute
services
Network
services
Storage
services
Servers
HP Converged Infrastructure
Consumers
• Browse, request & manage
virtualized services
• Simple self-service portal
Administrator
• Manage resources and access
• Provision VM Hosts
Identity (Keystone)
users, projects,...
Compute (Nova)
images, instances,
security groups, ...
Network (Neutron)
provider and private tenant
networks, endpoints, routing
Volumes (Cinder)
block storage for VMs
Resources
OpenStack
service offerings
Storage Networking
HP CloudSystem provides a software-defined approach to managing the cloud in a converged
infrastructure environment. CloudSystem consists of two offerings:
• HP CloudSystem Foundation is based on the HP Cloud OS distribution of OpenStack Cloud
Software. It integrates hardware and software to deliver core Infrastructure as a Service (IaaS)
provisioning and lifecycle management of compute, network and storage resources. You can
manage CloudSystem Foundation from an administrative console, self-service portal, CLIs,
and OpenStack APIs. It provides an appliance-based deployment console to simplify installation
and maintenance, and an embedded version of HP Operations Orchestration (OO) for
automating administrative processes.
See CloudSystem Foundation components (page 8).
Figure 1 CloudSystem Foundation
• HP CloudSystem Enterprise expands on CloudSystem Foundation to integrate servers, storage,
networking, security, and management to automate the lifecycle for hybrid service delivery.
Template architects can use Enterprise to create infrastructure templates and offer them as
services in a Marketplace Portal. Users select services from a catalog and manage their
subscriptions. When a service is requested, Enterprise automatically provisions the servers,
storage, and networking. Enterprise also includes an enhanced set of Operations Orchestration
workflows.
CloudSystem Enterprise provides a hybrid cloud management platform where you can manage
all cloud services.
See CloudSystem Enterprise components (page 8).
5
Page 6
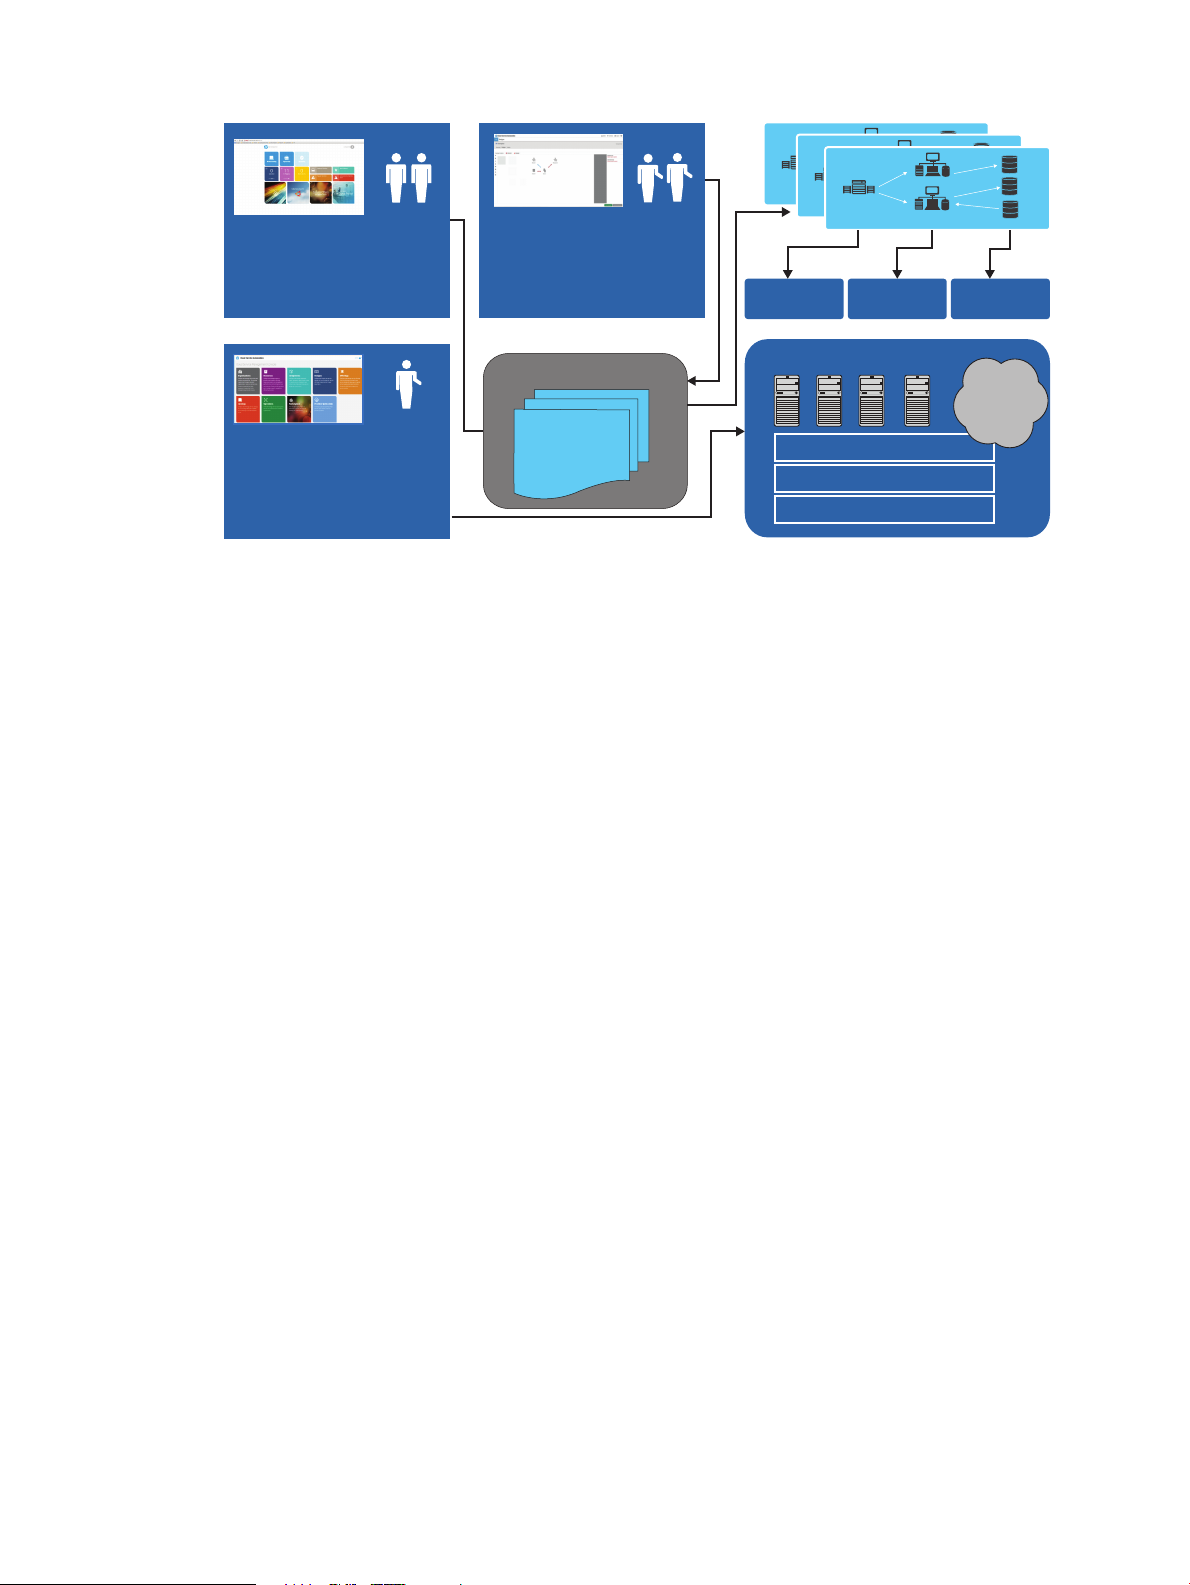
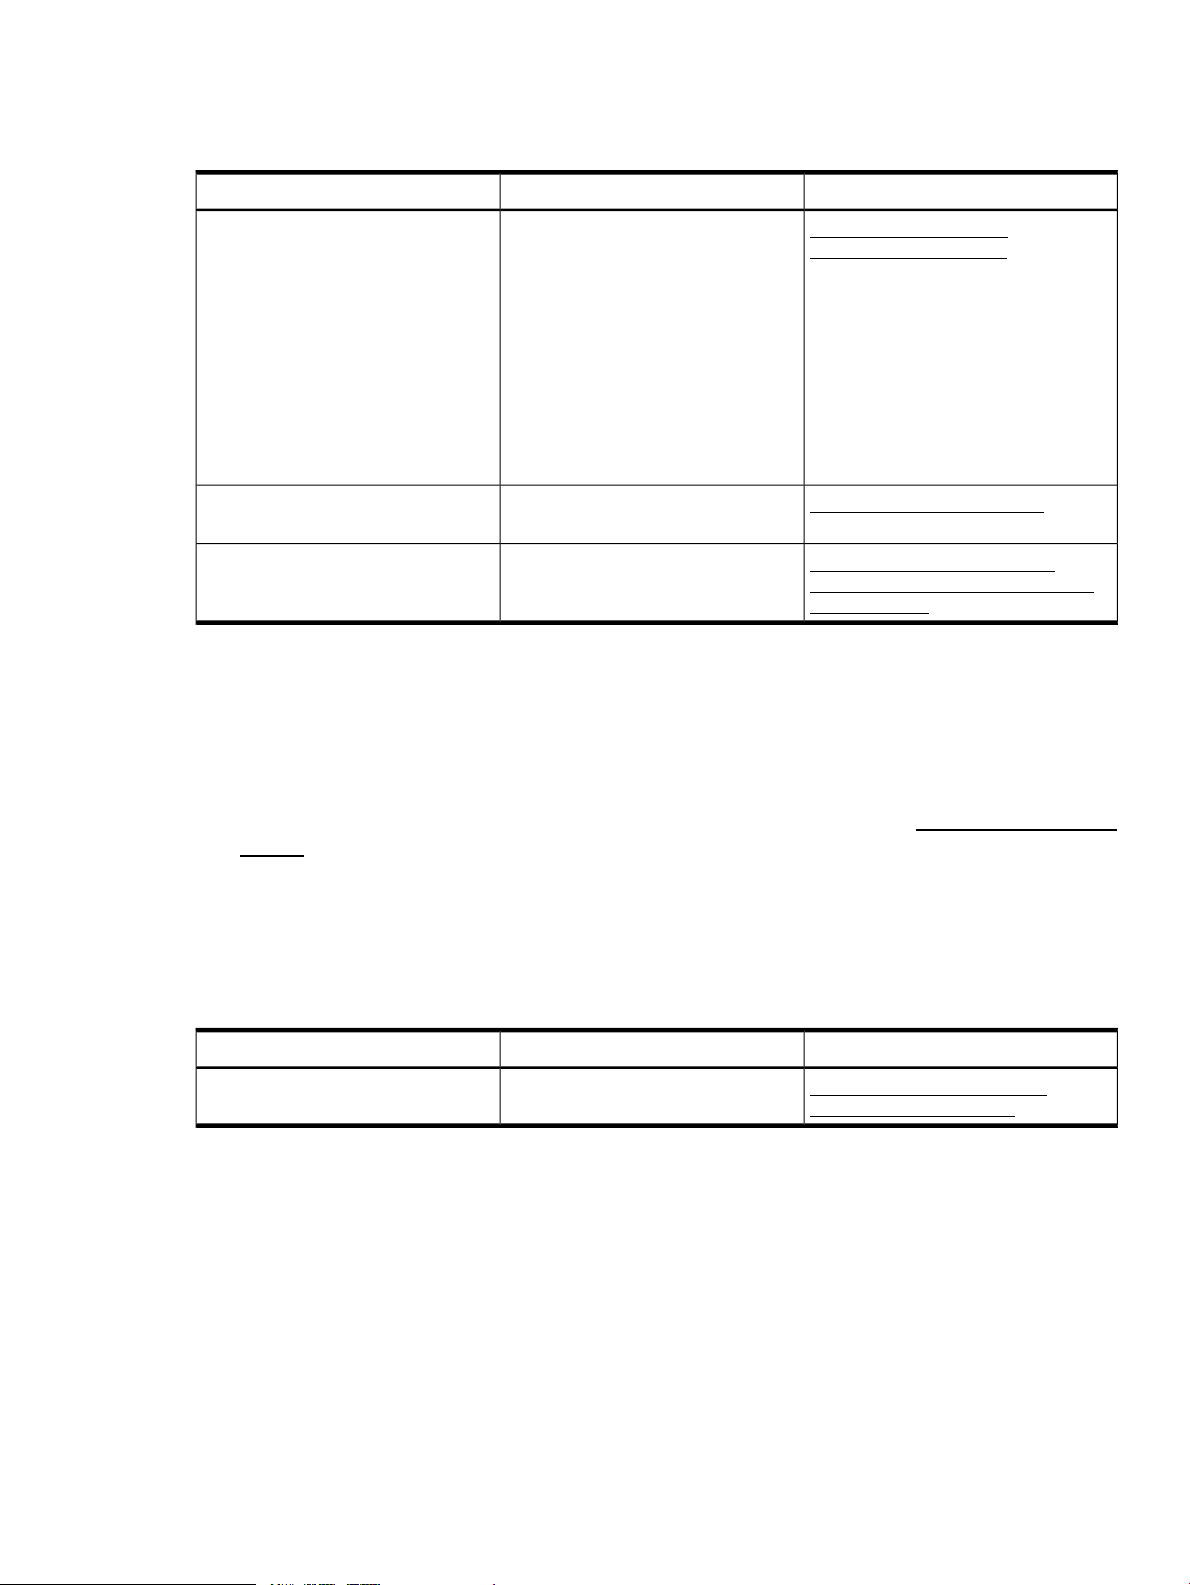
Figure 2 CloudSystem Enterprise
Consumers
• Browse request & manage
virtualized services
Complex service
template
HP Servers
HP Storage
HP Networking
Resources
Compute
services
Network
services
Storage
services
Figure 2 CloudSystem Enterprise
Design, provision, and manage complex services with HP CloudSystem Enterprise
Administrator
• Manage catalog, subscriptions
and providers
Service Catalog
Public
cloud
services
Architects
• Design and publish
infrastructure and
applications services
• Topology and service
design tools
Explanation of solution components
The components of CloudSystem Foundation and CloudSystem Enterprise are explained below.
• Management hypervisors and integrated tools (page 7)
• CloudSystem Foundation components (page 8)
• CloudSystem Enterprise components (page 8)
• CloudSystem networks (page 9)
6 Welcome to HP CloudSystem
Page 7
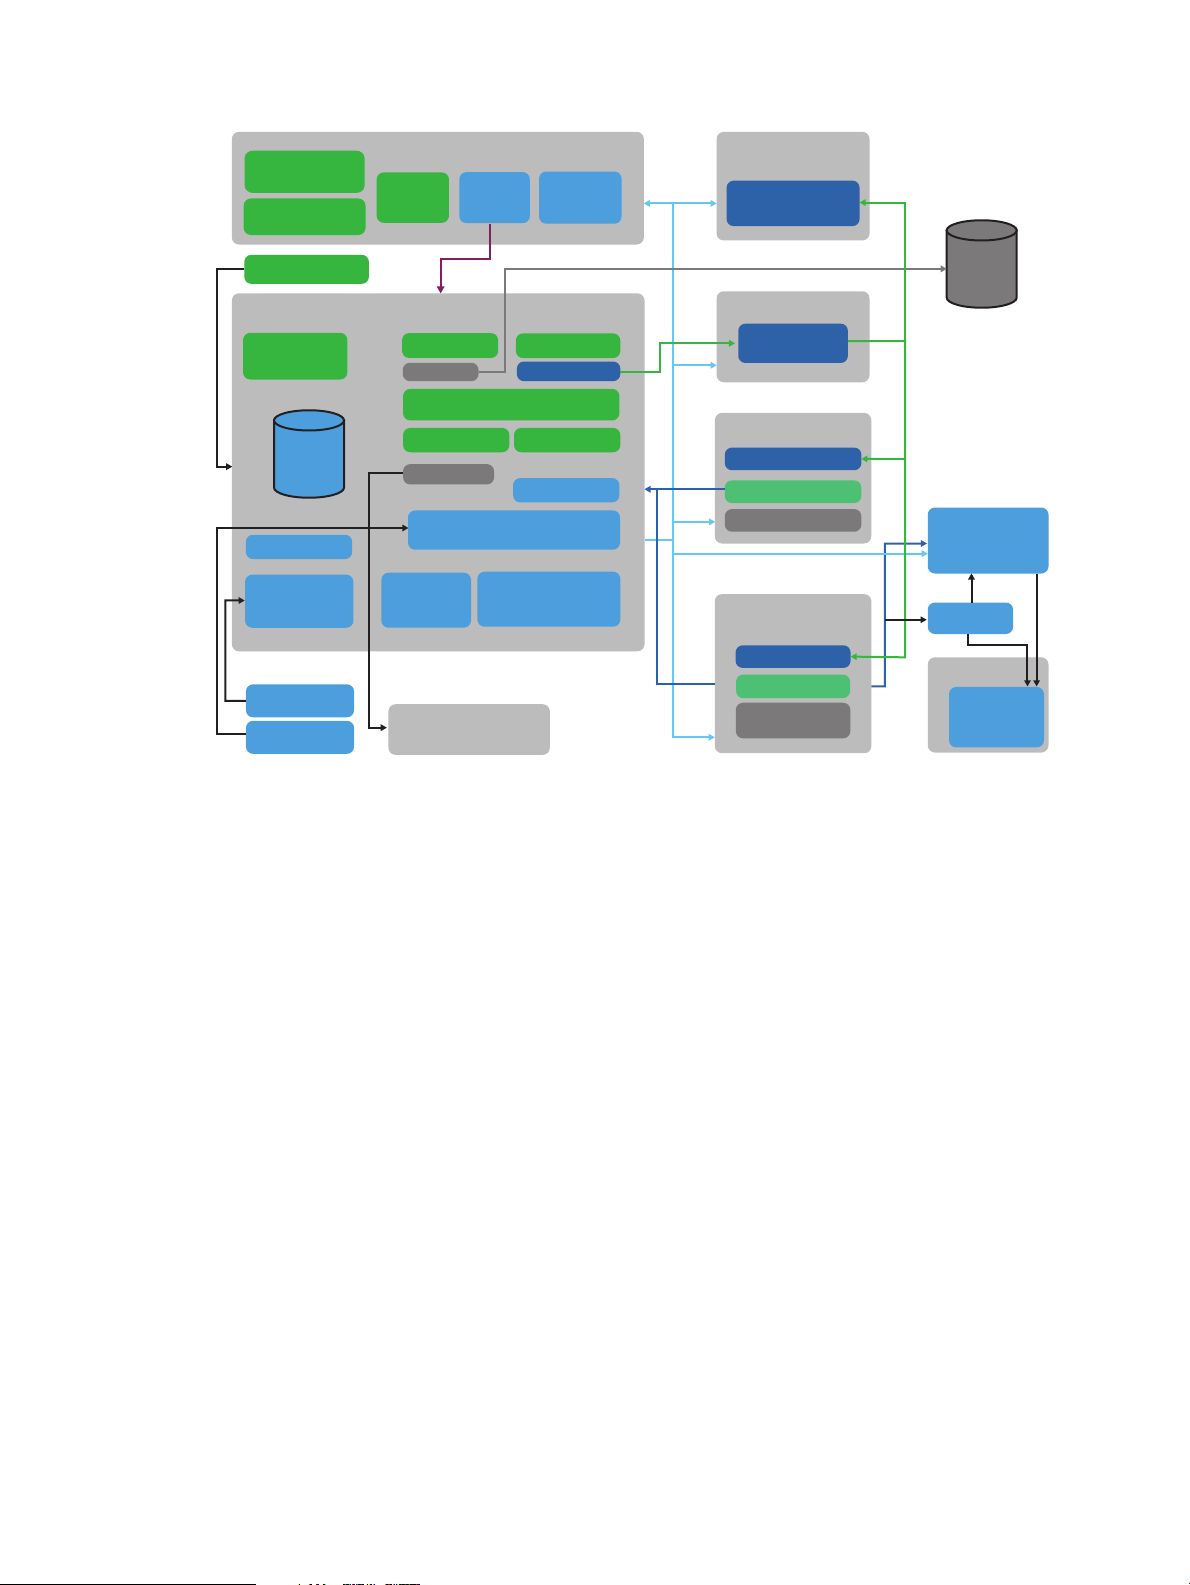
Figure 3 CloudSystem architecture
CSA Admin UI
(w Designer)
CSA Marketplace
Portal
CSA
Cloud OS
Services
Foundation
Services
OpenStacks CLIs
Horizon UI
CS Foundation Base Appliance
keystone
neutron
SDN plug-in
nova
postgres
cinder
3Par Driver
glance
rabbitmq
CS Management Services
CS Admin UI
Foundation Services
OO Central
OO Central UI
SDN Appliance
SDN Controller
KVM Compute Node(s)
neutron L2 agent
nova compute
libvirtd
neutron L2 agent
nova compute
Foundation
Services
vCenter Proxy
Appliance(s)
vCenter(s)
vCNS(s)
ESX Clusters
ESX Hosts
Network Node
Appliances
LDAP
(e.g. AD)
CS Enterprise Appliance
OO Studio
CS Admin CLI
3Par array(s)
LDAP driver
neutron L2 and L3
agents
Management hypervisors and integrated tools
• Management hypervisors host the various virtual machine appliances that make up the
• VMware vCenter Server acts as a central administrator for ESX clusters that are connected on
• An HP 3PAR storage system provides a method of carving storage for boot and data disks.
• An FC SAN, ISCSI or Flat SAN connects the HP 3PAR storage system to compute nodes or ESX
CloudSystem solution. Both ESX and KVM hypervisors are supported.
a network. vCenter Server allows you to pool and manage the resources of multiple hosts, as
well as monitor and manage your physical and virtual infrastructure. You can import and
activate ESX clusters in the CloudSystem Console after you register a connection with vCenter
Server.
VMware vCloud Networking and Security (vCNS) provides security for the ESX compute hosts.
Block storage drivers are imported from the HP 3PAR storage system to the CloudSystem
Console.
clusters.
Explanation of solution components 7
Page 8

CloudSystem Foundation components
• CloudSystem Foundation is the IaaS solution used for provisioning virtual machine instances.
Management tasks for both Foundation and Enterprise are performed from Foundation’s
CloudSystem Console. Foundation includes the following components, which all run on virtual
machines on one or more management hypervisors:
◦ The Foundation base appliance contains the core services and functionality of the
CloudSystem Console. The CloudSystem Portal, OpenStack services, OO Central and
supporting CLIs also reside on the Foundation base appliance.
– The SDN (Software Defined Networking) appliance is the control center for the network
infrastructure of the Foundation base appliance. When the OpenStack Neutron
service needs to define a new router or a plugin on the Foundation base appliance,
the request is sent to the SDN appliance.
CloudSystem Foundation automatically creates the SDN appliance after the
Foundation base appliance is installed and the Cloud Networking settings are saved
in the CloudSystem Console.
– The network node appliances manage various network services, such as DHCP and
L3 (routing) services, for provisioned virtual machines and provisioned virtual networks.
The SDN appliance manages the network node appliances as a cluster. When the
SDN appliance receives a request to create a new router, it creates the router in one
of the network node appliances.
Multiple network node appliances are created during installation, after the base
appliance is installed and Cloud Networking settings are saved in the CloudSystem
Console.
– A vCenter proxy appliance supports ESX configurations. OpenStack Nova and
Neutron agents reside in the vCenter proxy appliance, which acts as a proxy for the
ESX management hypervisor. The management hypervisor accepts each vCenter
Server cluster as one large compute node. This configuration allows your cloud to
take advantage of HA and load balancing features supported in vCenter Server.
The vCenter proxy appliance runs the OpenStack agents for up to 12 ESX clusters.
Foundation automatically creates the first vCenter proxy appliance when the first ESX
cluster is activated in the CloudSystem Console.
– The CloudSystem Console GUI supports administrative tasks, such as creating storage
templates, activating compute nodes, setting up networks, monitoring the Foundation
base appliance, and performing maintenance tasks on the appliance.
– The CloudSystem Portal GUI is accessed from a modified Foundation base appliance
URL by appending portal to the Foundation IP address. Example:
https://Foundation_IP/portal. Instances are created and managed from
this portal.
– HP Operations Orchestration (OO) Central provides the ability to run scripted
workflows on the Foundation base appliance. Access OO Central from the Integrated
Tools screen in the CloudSystem Console.
HP OO Studio provides the ability to edit the OO workflows. It has a separate installer,
which is included in the HP CloudSystem-OO-Studio-8.0.0.20 zip file.
See Preparing HP Operations Orchestration for CloudSystem Foundation (page 47).
CloudSystem Enterprise components
8 Welcome to HP CloudSystem
Page 9

• HP CloudSystem Enterprise expands on CloudSystem Foundation by integrating servers,
storage, networking, security, and management to automate the lifecycle for hybrid service
delivery. Template architects use Enterprise to create infrastructure templates, which are offered
as services in the Marketplace Portal. When a cloud user requests a service from the catalog,
Enterprise automatically provisions the servers, storage, and networking designed in the
service.
Enterprise is installed from Foundation and uses the Foundation platform to conduct management
tasks. Enterprise includes the following components:
◦ The Enterprise appliance contains the core functionality of the Enterprise offering, including
HP Cloud Service Automation (HP CSA), the Marketplace Portal, Topology Designer and
Sequential Designer.
– The Marketplace Portal displays offerings that can be purchased and applied to a
cloud environment.
– Enterprise includes two designers, Topology Design and Sequential Design. The
Topology Designer is an easy to use solution for infrastructure provisioning designs.
Sequential Designer handles more complex application provisioning designs. Designs
from both designers are offered as services in the Marketplace Portal.
– HP CSA is the administrative portal for the Enterprise appliance. Designs are created
in the HP CSA portal.
CloudSystem networks
See Network definitions (page 17).
Explanation of solution components 9
Page 10

2 Before you begin
HP CloudSystem is a flexible cloud management solution that supports multiple installation options.
This guide does not cover all possible options. If the installation required by your organization
does not match the installation described in this guide, contact an HP Support representative for
assistance.
Audience
This guide is intended for experienced system administrators with a working knowledge of the
following concepts.
• TOR switches for networking
• CLI commands for Windows and Linux
• VMware vCenter Server functionality, if using ESX hypervisors and compute nodes
• VMware distributed and standard vSwitches
• Red Hat KVM hypervisor configuration and use
If you plan to use the OpenStack CLI and APIs to manage some of the cloud resources from the
command line, it is helpful to have experience with OpenStack technologies such as Nova, Glance,
Cinder and Neutron.
Assumptions
This installation guide makes the following assumptions about your readiness for the installation.
Make sure these assumptions match the state of your environment before you begin the installation.
• All hardware required to support a CloudSystem installation is installed and configured. You
can use the requirements chapter to verify this before installation. See HP CloudSystem
installation prerequisites (page 11).
• If you are using ESX, then VMware vCenter Server is installed and ready to connect to
CloudSystem.
• If you plan to use block storage, then an HP 3PAR storage system is configured and ready to
connect to CloudSystem.
• You have a list of user names and passwords for VMware vCenter Server and HP 3PAR storage
system.
• You have a set of IP addresses that you can assign to CloudSystem virtual appliances.
Next steps: HP CloudSystem installation prerequisites (page 11).
10 Before you begin
Page 11
3 HP CloudSystem installation prerequisites
This chapter outlines the recommended and minimum hardware and software requirements, the
networking pre-configuration, and the solution integration tools that must be in place before installing
CloudSystem.
Hardware requirements (page 12)
Software requirements (page 15)
Networking requirements (page 15)
Browser requirements (page 19)
Tools requirements (page 20)
Understand the installation process
A high-level overview of the CloudSystem installation path is provided in the table below. The
Additional resources column contains links to information in this guide, as well as information from
other documentation sources.
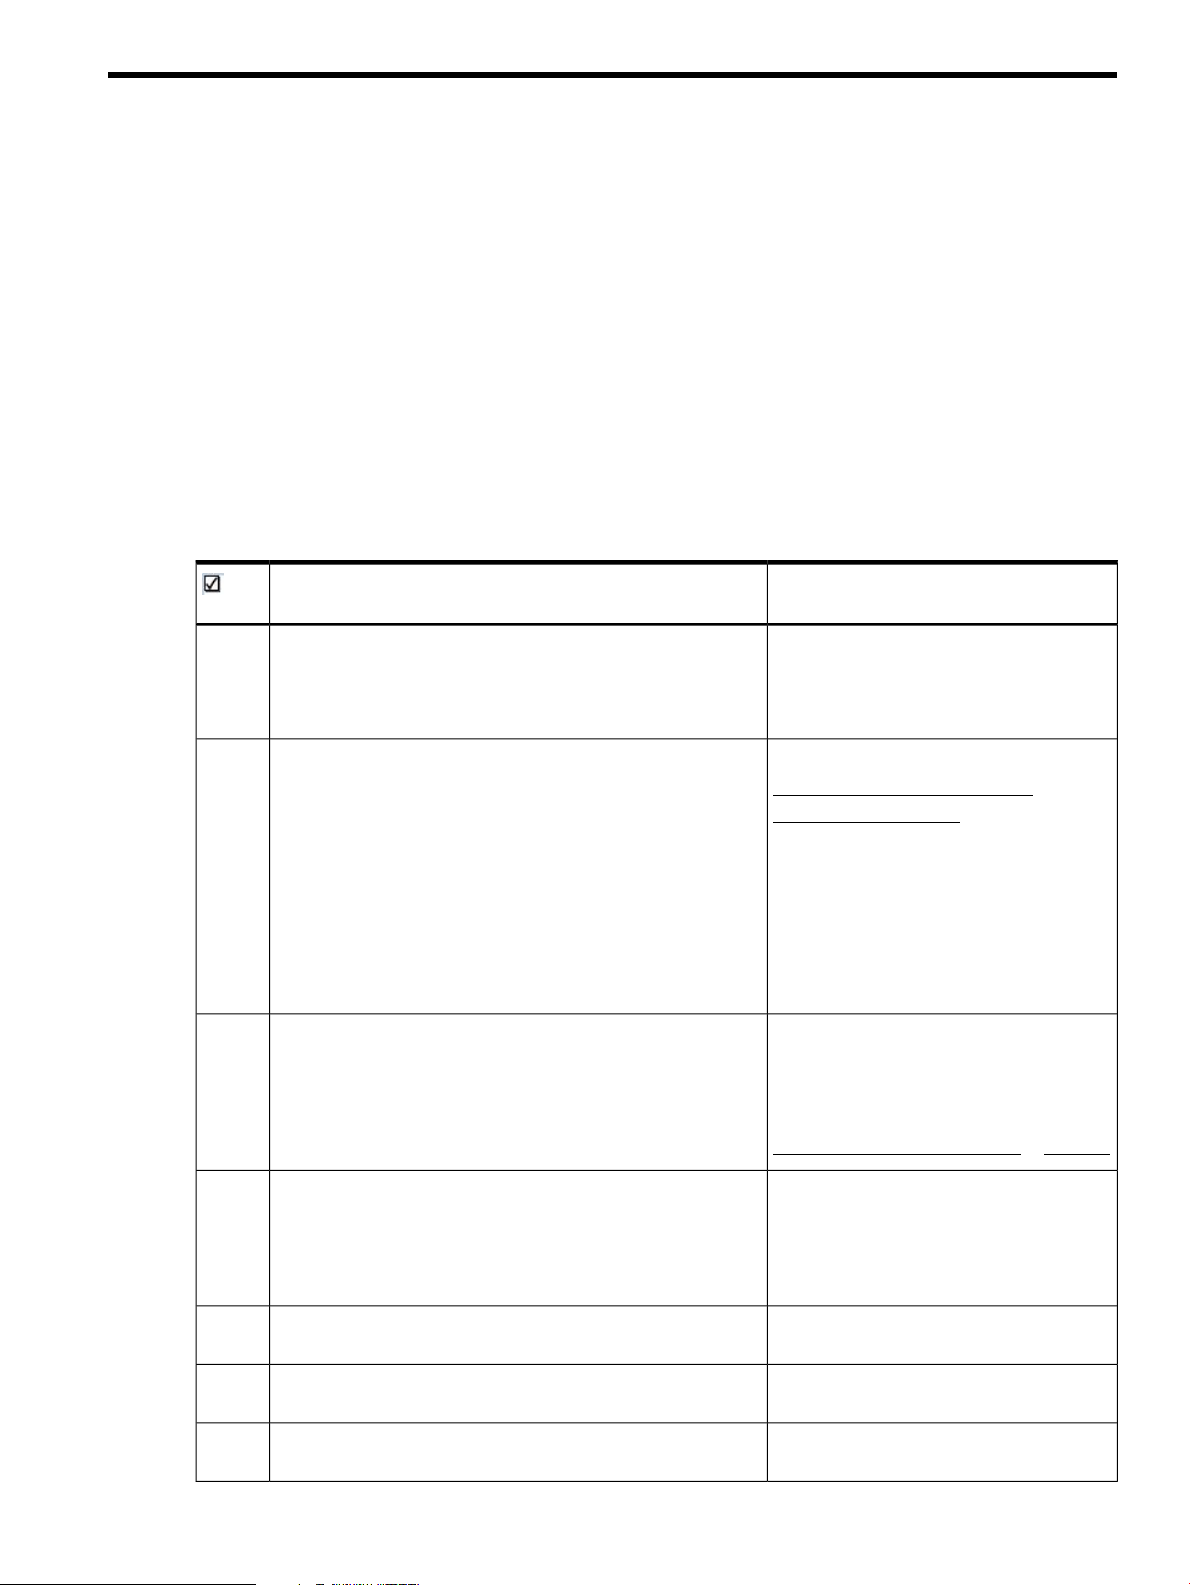
Table 1 Installation process
Additional resourcesInstallation step
SeeVerify that the target environment satisfies the hardware,
software, and networking prerequisites described in this guide.
Hardware requirements (page 12)
Software requirements (page 15)
Networking requirements (page 15)
requirements for compute nodes and virtual machine instances.
This guide does not cover the specific steps required to
accomplish this.
• The 3PAR storage system server certificate must contain a
Fully Qualified Domain Name (FQDN) in the CN attribute
Subject field.
• For block storage volumes, use the OpenStack interfaces
that are dependent on block storage support.
• For ephemeral storage, define the storage in the flavor
definitions.
CloudSystem requirements. If using ESX, configure vCenter
Server.
Enter and save Cloud Networking settings in the CloudSystem
Console.
SeeConfigure the HP 3PAR storage system to support storage
Openstack Cinder documentation
HP 3PAR documentation
SeeSet up the management hypervisor solution (ESX or KVM) per
Installing CloudSystem on an ESX cluster
(page 26)
Installing CloudSystem on a KVM hypervisor
(page 33)
VMware vSphere Documentation at VMware
SeeUse csstart to deploy the Foundation base appliance.
Configuring the ESX management
environment (page 28)
Configuring the KVM management
environment (page 40)
See Setting up the CloudSystem Console for
the first time (page 44)
Optional: Install OO Studio, if you want to customize workflows.
Optional: Install CloudSystem Enterprise.
See Preparing HP Operations Orchestration
for CloudSystem Foundation (page 47)
See Installing CloudSystem Enterprise
(page 49)
Understand the installation process 11
Page 12
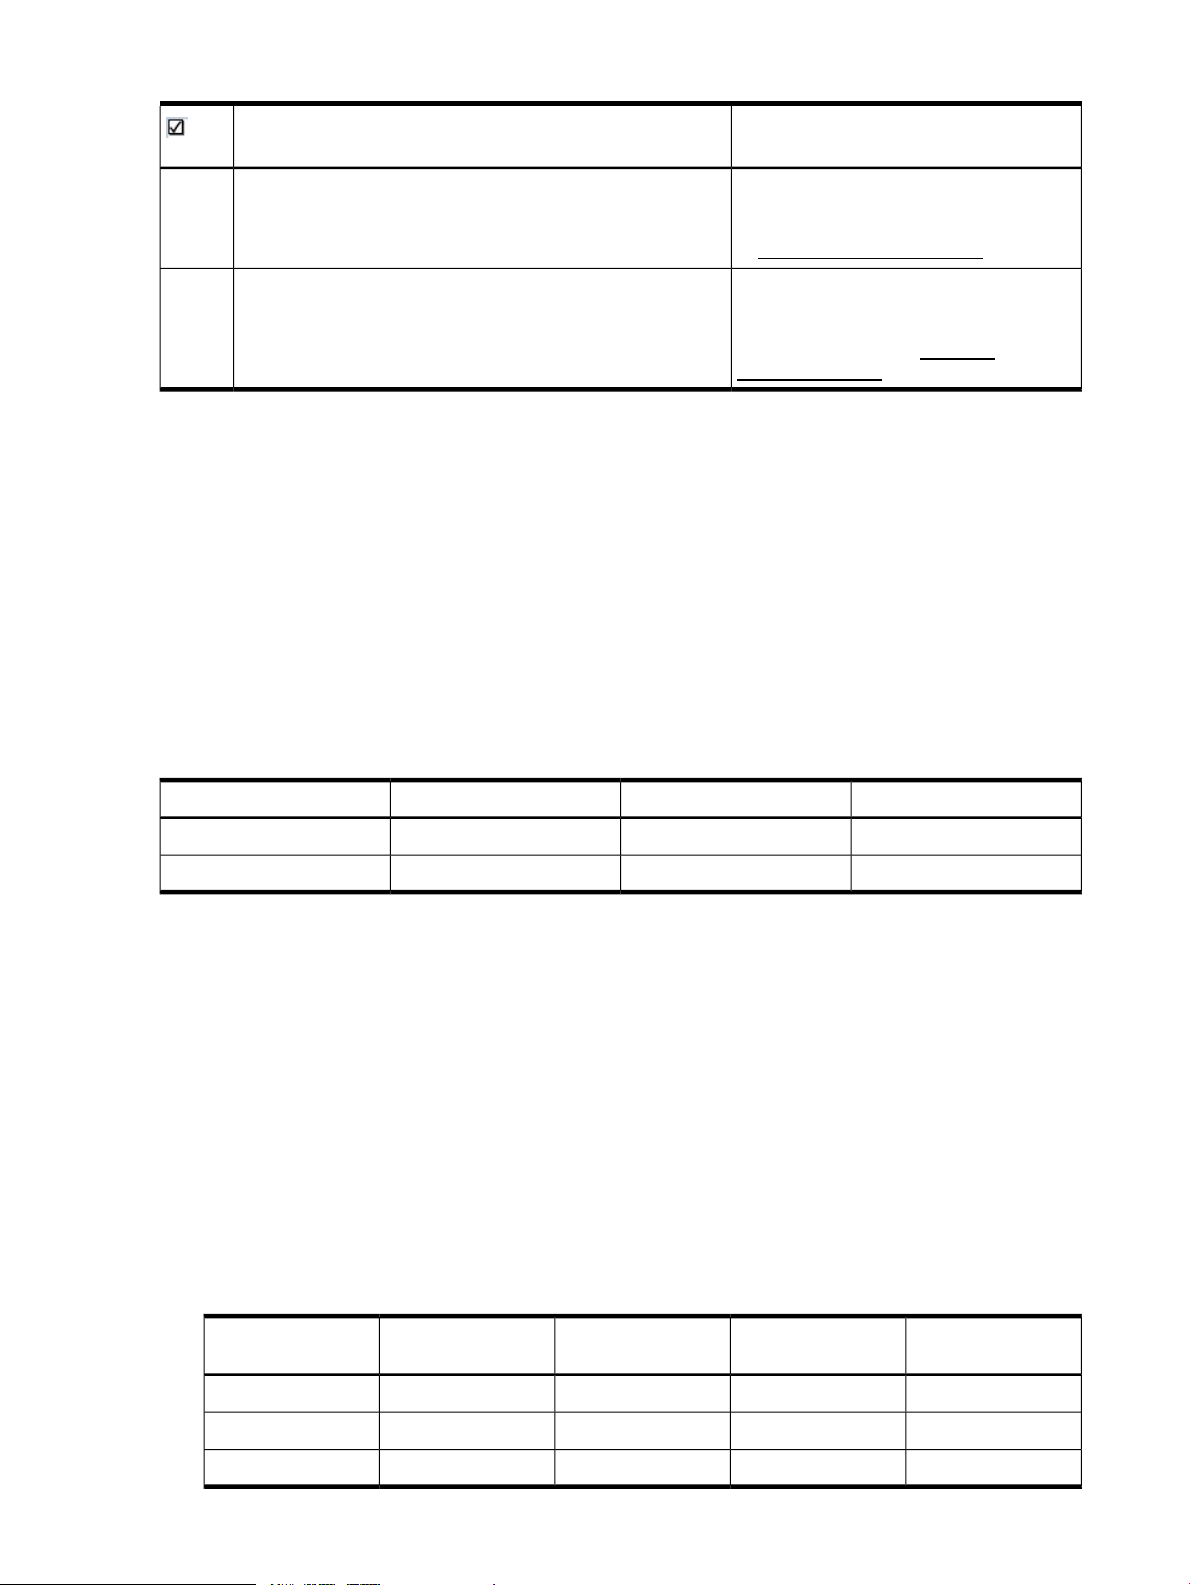
Table 1 Installation process (continued)
Additional resourcesInstallation step
Stage and prepare compute nodes. This guide does not cover
the specific steps required to accomplish this.
Build and manage cloud resources. This guide does not cover
the specific steps required to accomplish this.
Hardware requirements
Hardware requirements for management hypervisors, compute nodes, virtual appliances, and SAN
and Storage are provided in this section.
Physical configuration hardware requirements
Management hypervisors
The following table lists the recommended and minimum hardware requirements for a single ESX
or KVM management hypervisor. Only HP servers are supported as management hypervisors.
In an HA configuration, both the primary and failover hypervisors must meet the hardware
requirements described in this table.
Table 2 Management hypervisor hardware requirements
See “Resource Configuration in CloudSystem
Foundation: Compute node creation” in the
HP CloudSystem 8.0 Administrator Guide
at Enterprise Information Library
See “Cloud service provisioning,
deployment, and service management in
CloudSystem” in the HP CloudSystem 8.0
Administrator Guide at Enterprise
Information Library
StorageRAMCoresRequirements
See the formula below.128 GB16 coresRecommended
See the formula below.96 GB8 coresMinimum supported
Formula to determine the storage requirements for the management hypervisor
The formula used to determine the management hypervisor storage requirements is appliance
storage + glance images/snapshots = management hypervisor storage
• appliance storage: 600 GB
25 GB for templates◦
◦ 160 GB (3) for the Foundation base appliance, vCenter proxy appliance and Enterprise
appliance
◦ 20 GB (3) for the network node appliances
◦ 25 GB for the SDN appliance
• glance images/snapshots: varies
Table 3 Glance repository sizing guidelines
Linux images (4 GB
each)Glance repository
Windows images (16
GB each)
Snapshots (20 GB
each)
TOTAL
12 HP CloudSystem installation prerequisites
520 GB151015Small
1.2 TB401520Medium
10.1 TB5003025Large
Page 13
Use the links in the table below to verify component compatibility and find a list of supported
hardware.
Table 4 Verify compatibility and supported versions
Where do I find it...Use this to...Additional resources
HP Insight Management Support
Matrix version 7.3.1
HP Support Center
HP Customized ESXi images for
management hypervisor
Compute nodes
Compute node sizes vary according to your resource needs. The following questions are provided
to guide you as you determine the size of your compute node.
• What flavor settings will the provisioned instances use?
• What oversubscription rate is supported for each compute resource? See the Compute Node
Management chapter in the HP CloudSystem 8.0 Administrator Guide at Enterprise Information
Library.
Refer to the supported HP servers
tables. CloudSystem supports all
servers supported in the HP Matrix
Operating Environment, version 7.3.1.
• Table 26
• Table 28
• Table 29
• Table 30
The server must have a check in the
Matrix OE column.
drivers, firmware and software
Find customized ESXi images.
Supported versions are 5.0 Update 3,
5.1 Update 2, and 5.5.
http://www.hp.com/go/
insightmanagement/docs
http://www.hp.com/go/hpscVerify the compatibility of the servers,
http://h18004.www1.hp.com/
products/servers/software/vmware/
esxi-image.html
• How many instances will each compute node support?
After answering the questions above, determine the amount of CPU cores, memory, and storage
to allocate to each compute node. You can also use the HP Sizer for Server Virtualization website
to determine hypervisor sizing for compute nodes.
Table 5 Hardware requirements
Where do I find it...Use this to...Additional resources
HP Sizer for Server Virtualization
website
Find details on sizing hypervisors for
compute nodes
http://h71019.www7.hp.com/
ActiveAnswers/us/en/size
Use the links in the table below to verify component compatibility and find a list of supported
hardware.
Hardware requirements 13
Page 14
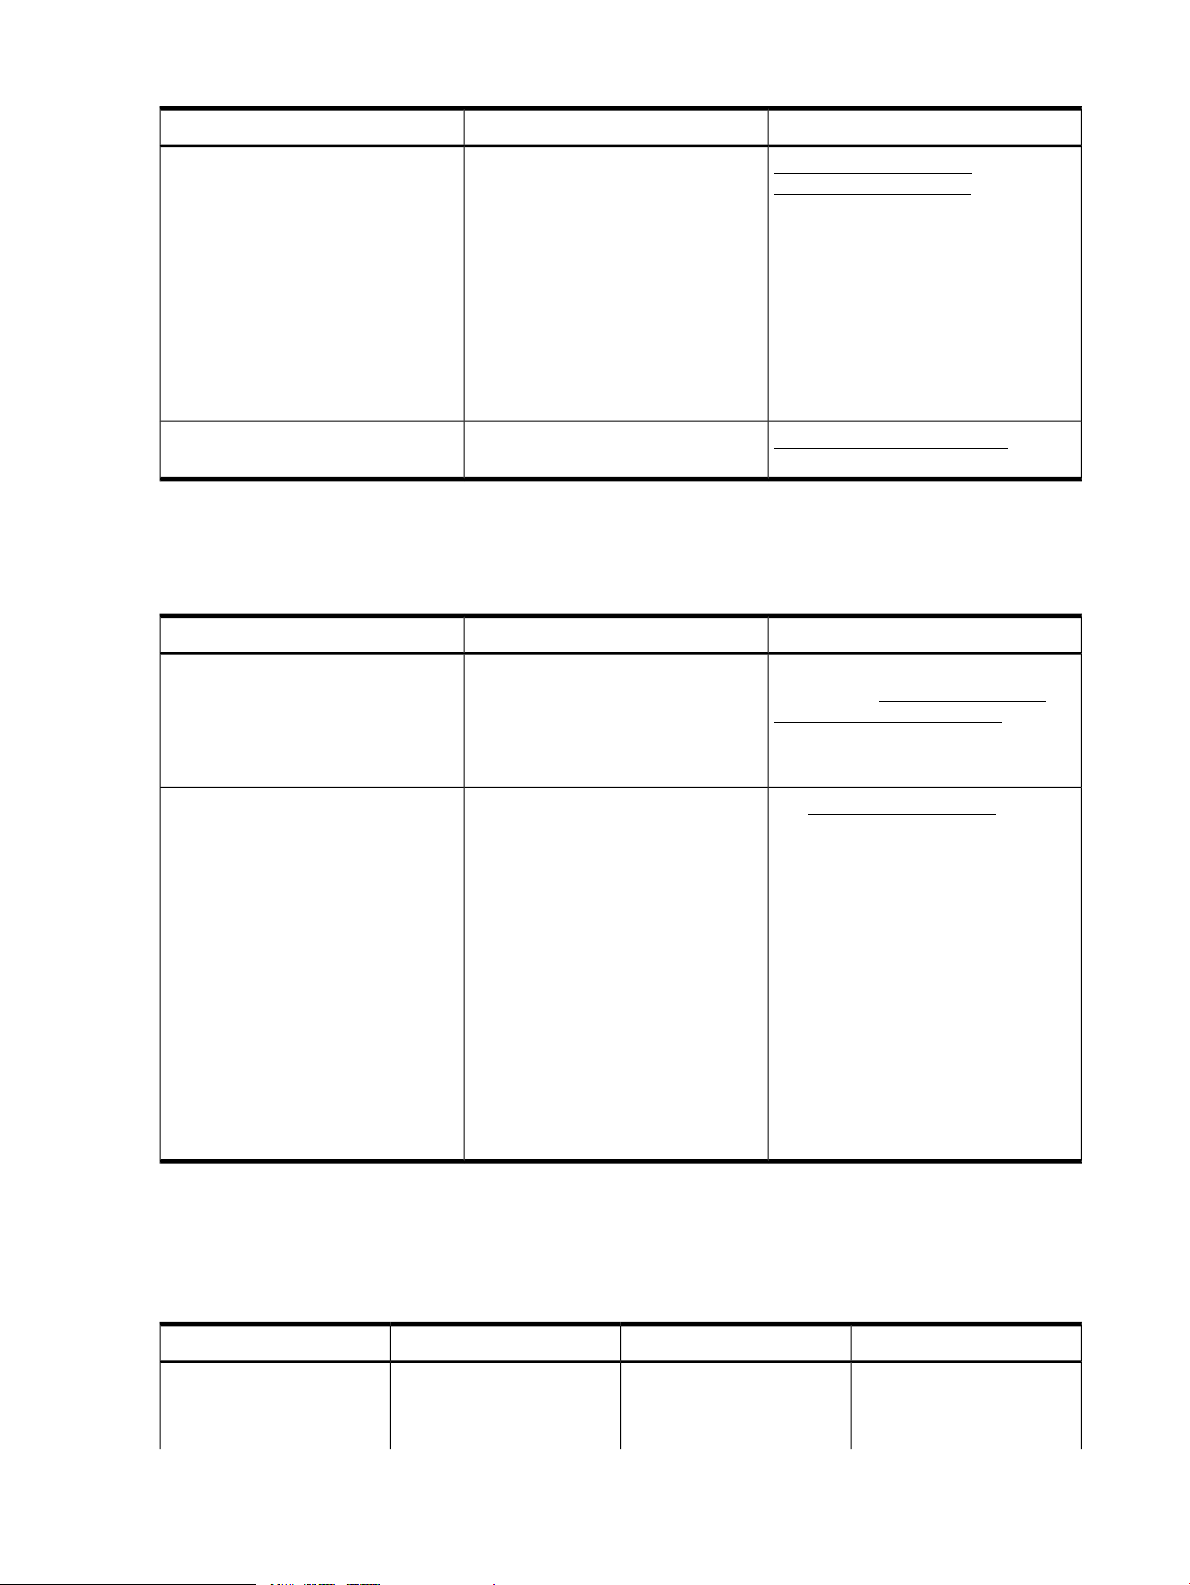
Table 6 Verify compatibility and supported versions
Where do I find it...Use this to...Additional resources
HP Insight Management Support
Matrix version 7.3.1
HP Support Center
SAN and Storage
The table below contains SAN and storage requirements for ephemeral and block storage.
Table 7 Hardware requirements
Ephemeral storage
Refer to the supported HP servers
tables. CloudSystem supports all
servers supported in the HP Matrix
Operating Environment, version 7.3.1.
• Table 26
• Table 28
• Table 29
• Table 30
The server must have a check in the
Matrix OE column.
drivers, firmware and software
This storage is used for provisioned
instances and is defined in the flavor.
When an instance is deleted, this
storage is released.
http://www.hp.com/go/
insightmanagement/docs
http://www.hp.com/go/hpscVerify the compatibility of your servers,
Find more information...PurposeRequirements
See HP Matrix Operating Environment,
version 7.3.1. http://www.hp.com/
go/insightmanagement/docs
• Chapter 4 Managed system
hardware
Block storage
3 PAR F-Class, P7000, P10000 series
Fibre Channel fabric support
• pre-configured zones where
storage system is zoned to the
appropriate virtual machine host
• open zoning where no zoning
configuration is enabled
FC SAN
iSCSI
Flat SAN
NOTE: REST API interface must be
enabled on the HP 3PAR storage
system.
virtual machine instances
(attach/detach). Storage is presented
to a single instance via the compute
node where the instance is hosted.
Virtual appliance requirements — CloudSystem virtual appliances
The table below lists all CloudSystem virtual appliances, along with compute, memory and storage
requirements.
Table 8 Hardware requirements
See HP 3PAR documentationBlock storage allocates storage to
StorageRAMCoresVirtual appliance
160 GB (Thin Provisioned)32 GB8vCPUsFoundation base appliance
Glance image storage of
2–4 TB is provided by a
14 HP CloudSystem installation prerequisites
Page 15
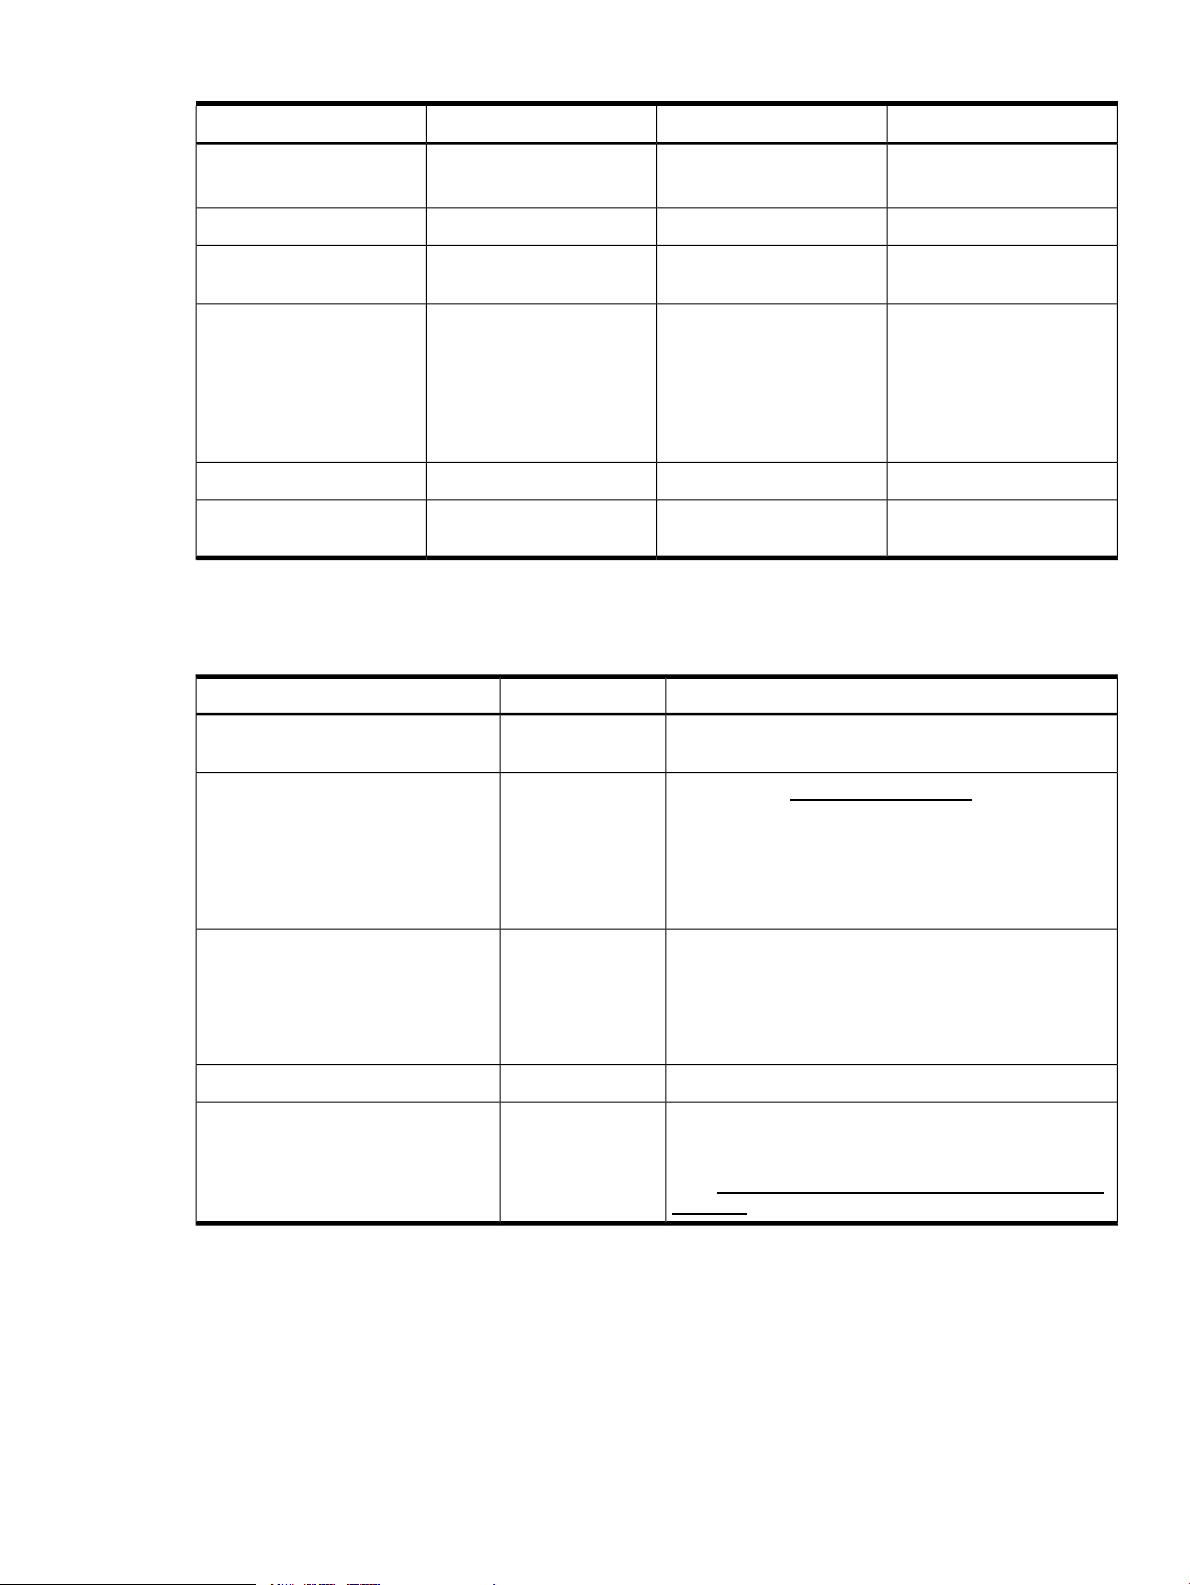
Table 8 Hardware requirements (continued)
(Foundation)
(Foundation)
NOTE: 1 vCenter proxy
appliance is required for
every VMware vCenter
Server
Enterprise appliances
Software requirements
Refer to the table below for a list of supported software versions.
StorageRAMCoresVirtual appliance
separate mounted volume in
a production environment.
25 GB (Thin Provisioned)8 GB4vCPUsSDN appliance (Foundation)
3(21 GB) (Thin Provisioned)3(4 GB)3(2vCPUs)network node appliances
160 GB (Thin Provisioned)16 GB4vCPUsvCenter proxy appliance
160 GB (Thin Provisioned)16 GB8vCPUsEnterprise appliance
568 GB (Thin Provisioned)84 GB30 vCPUs (15 cores)Total of all Foundation and
3PAR Inform
VMware vSphere
Security (vCNS)
Required on ESX compute nodes to
support security groups for provisioned
instances.
Networking requirements
Inform OS 3.1.2
MU2
ESXi 5.0.3, 5.1.2
and 5.5b (Custom
HP image)
For ESXi hosts, 5.5
is supported,
instead of 5.5b
10.02OO Studio
LocationVersionSoftware
Contact your HP 3PAR support representative for
additional information.
Available from http://software.hp.com. Select the
virtualization software link.
See Third-party documents (page 59)5.5VMware vCloud Networking and
See Third-party documents (page 59)6.4Red Hat Enterprise Linux
The upgrade executable file is available in the OO Studio
zip file. System requirements must be met to support the
upgrade to OO Studio. You can confirm requirements
here: HP Orchestration Operations System Requirements
document
Before installing CloudSystem, plan for the following networks.
Software requirements 15
Page 16
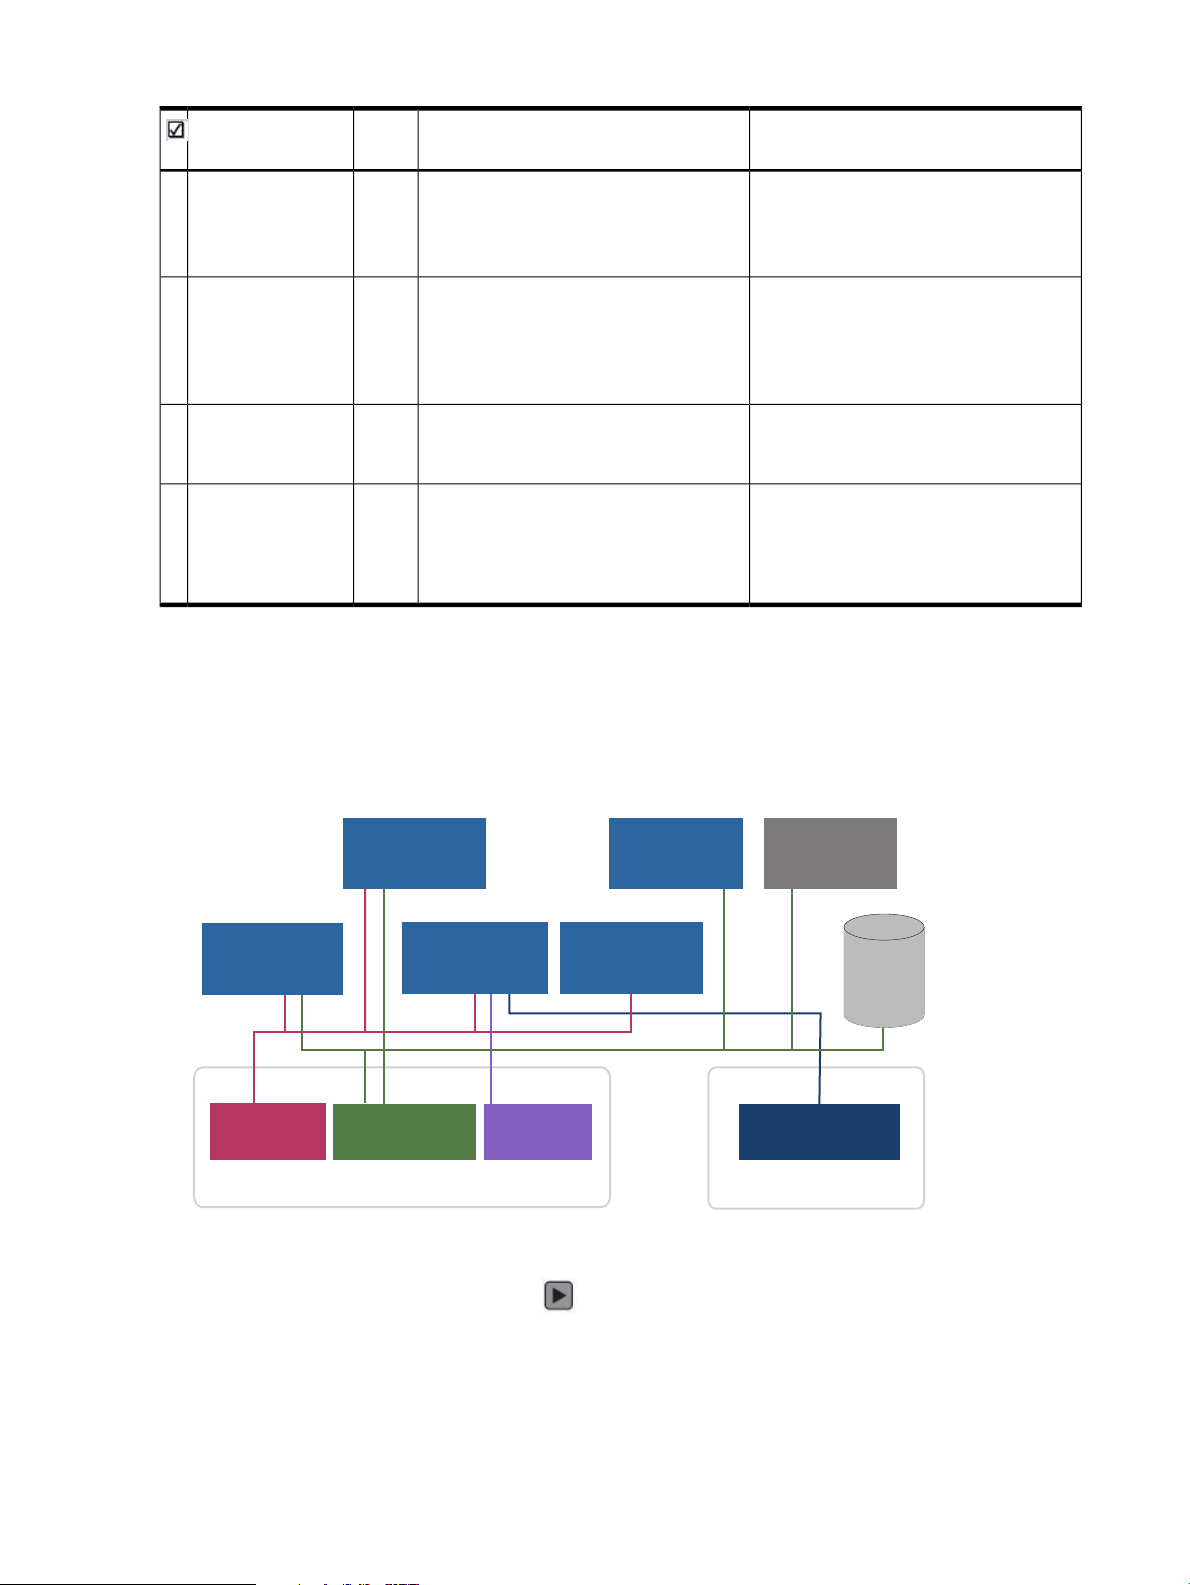
Table 9 Network planning
3PAR
Foundation
base appliance
vCenter proxy
appliance
Cloud Mgmt
Network
Data Center
Mgmt Network
External
Network
Provider or
Private Networks
Cloud Data TrunkManagement Trunk
Figure 4 CloudSystem appliances and the network architecture
Enterprise
appliance
vCenter Server
Network node
appliance
SDN appliance
Connected to...PurposeNumberNetwork
1Data Center
Management
Network
1Cloud Management
Network
1External Network network node appliances
Provider Networks
and/or Private
Networks
at
least 1
Overview of network topology
Networks are organized into two trunks. The Management trunk holds all infrastructure networks
that connect the virtual appliances, vCenter Server and the HP 3PAR storage system. The Cloud
Data Trunk holds the networks that connect provisioned virtual machines to the cloud.
This network connects virtual appliances
to HP 3PAR, VMware vCenter Server,
VMware vCloud Networking and Security
(vCNS) and enclosures.
This network connects the Foundation
base appliance, vCenter proxy appliance,
network node appliances, SDN appliance network node appliances
and KVM compute nodes. This is a private
network.
This network allows cloud end users to
attach public IP addresses to their
provisioned virtual machine instances.
A Provider Network is a data center
network routed through the existing data
center infrastructure. A Private Networkk
is created from a pool of VLANs. Both
networks support instance communication.
Foundation base appliance
VMware proxy appliance
Enterprise appliance
VMware vCenter Server
Foundation base appliance
SDN appliance
VMware proxy appliance
KVM compute nodes
Cloud Data Trunk
network node appliances
Figure 4 Network trunks
You can use the following interactive graphic to see how each network connects to the CloudSystem
virtual appliances. Click the play button to enable the graphic, then click a network name to
see which virtual appliances are supported by the network.
16 HP CloudSystem installation prerequisites
Page 17

Figure 5 Interactive network diagram
Network definitions
Management Trunk
The Management trunk contains the following networks.
• Data Center Management Network: This network provides access to the CloudSystem Console,
which is the interface for the Foundation base appliance. REST APIs calls are made from this
Networking requirements 17
Page 18

network. The Foundation base appliance and the Enterprise appliance access vCenter Server
and the HP 3PAR storage system over this network.
Three or more vCenter Server are supported.
◦ The Foundation base appliance uses this network to access the vCenter Server that is
managing the management hypervisor.
◦ The vCenter proxy appliance uses this network to access the vCenter Server that is
managing ESX compute clusters. This can be a separate vCenter Server or the same
vCenter Server used by the Foundation base appliance.
◦ The Enterprise appliance also uses this network to access vCenter Server. Enterprise can
be configured to use a third vCenter Server, or it can access one of the two existing
vCenter Servers.
• Cloud Management Network: This private network for the cloud is typically a VLAN, but could
also be a physical network. The Foundation base appliance runs a DHCP server for this
network.
IMPORTANT: The Cloud Management Network should be a dedicated private network for
Cloud System Management use only. Some of the contents transmitted between compute nodes
and the cloud controller are unencrypted. Network isolation should be used to prevent unwanted
exposure to sensitive data.
• External Network: This network is automatically connected to the network node appliances
after Cloud Networking settings are saved during the CloudSystem Console first time setup.
Subnets must be defined in the CloudSystem Portal before using this network.
Virtual machines are not connected directly to this network. Internal provider or private networks
connect directly to a virtual machine, then a virtual router is used to connect the internal and
external networks. A networking service routes outgoing traffic to the External Network. When
the External Network subnet assigns Floating IPs to virtual machines, then the External Network
can access them.
Cloud Data Trunk
This network must be configured as a group of VLANs. It hosts the VLANs that OpenStack networking
makes available to users. CloudSystem uses specific VLANs on this trunk as Private Networks.
Some VLANs may not be dedicated to CloudSystem. All compute nodes in the cloud must be
connected to this network.
The Cloud Data Trunk contains the following production networks.
• Provider Network: A Provider Network is a data center network routed through the existing
data center infrastructure. Adding a Provider Network allows you to add an existing data
center network to any number of virtual machine instances in the cloud.
• Private Networks: Private Networks are created from a pool of VLANs. The cloud administrator
configures this pool in the CloudSystem Console. Then, when the cloud administrator switches
to the CloudSystem Portal and creates a Private Networks, the OpenStack Neutron networking
service assigns a VLAN from the pool.
OpenStack Neutron networking manages all aspects of this network, including external routing.
IMPORTANT: All of the networks described above must be distinct networks, with the exception
of the External Network. You can use the same network for the External Network and the Data
Center Management Network.
Configuration of management networks
Management network configuration varies depending on the management hypervisor configuration.
18 HP CloudSystem installation prerequisites
Page 19
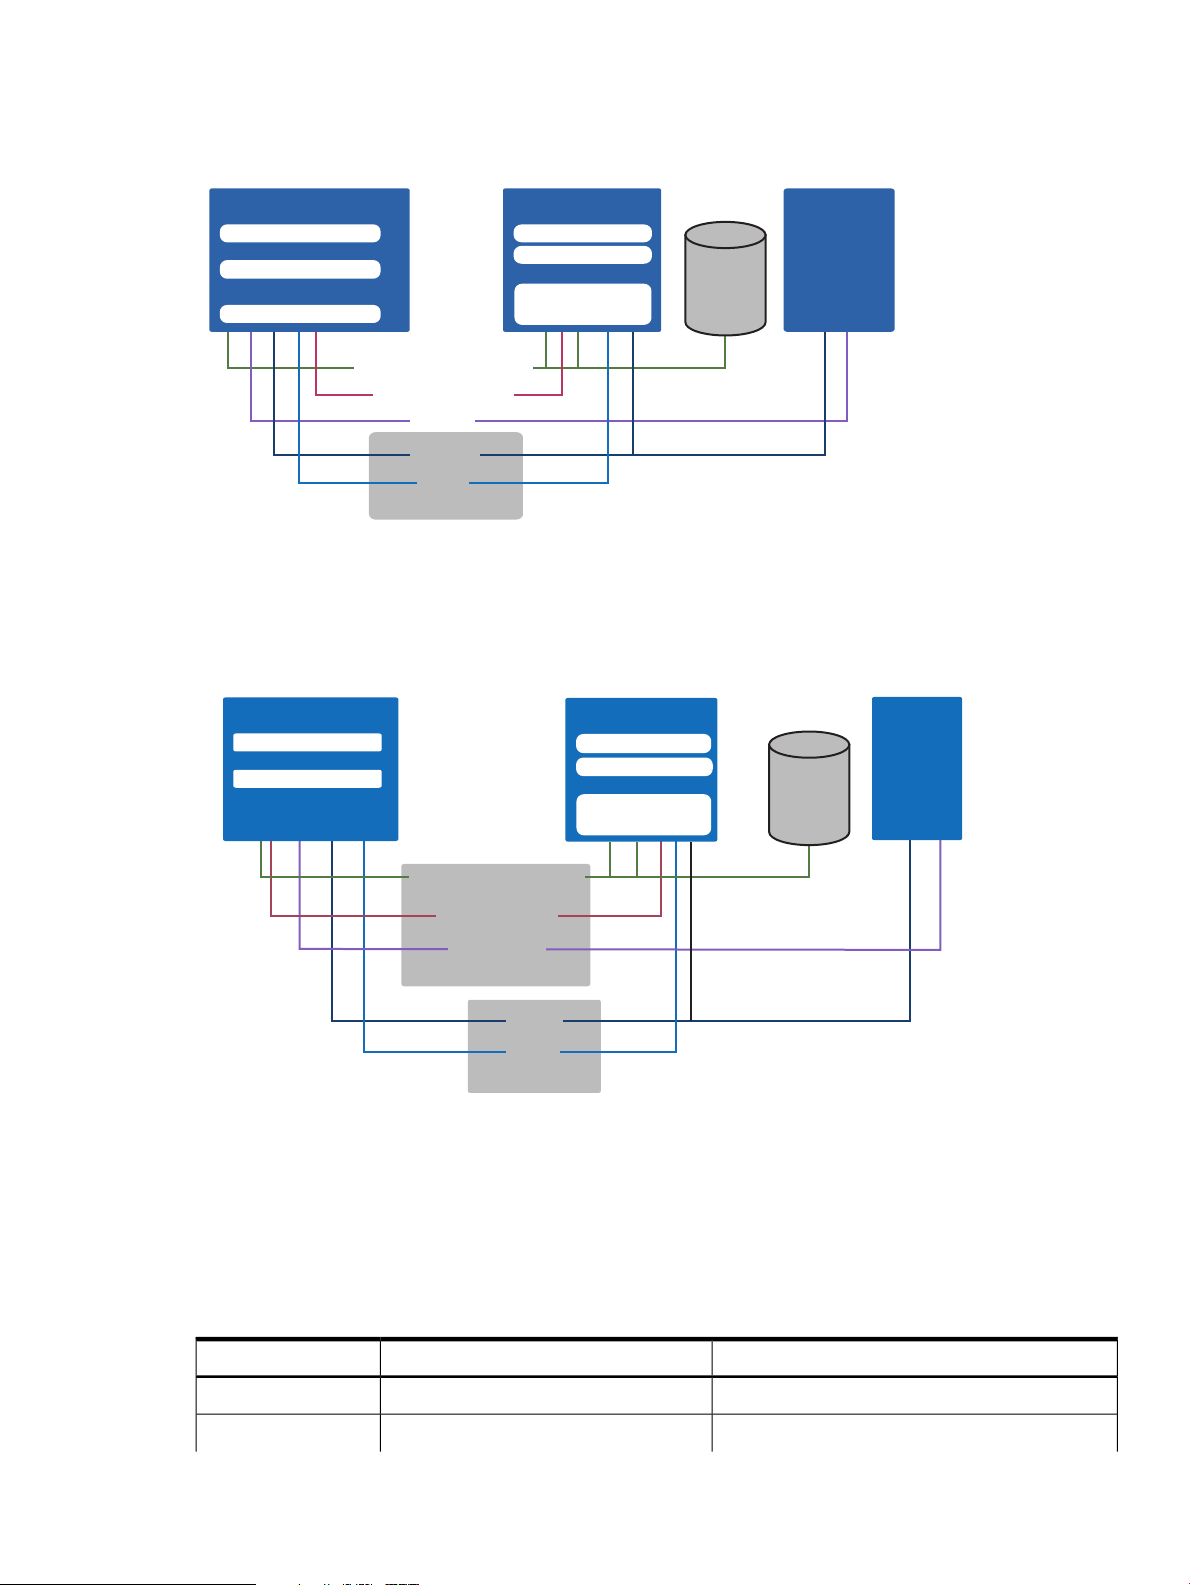
The following figure shows a sample configuration with an ESX management host, networks and
Data Center Management
External
Provider
Private
Cloud Managment
Cloud mgmt
VMware vCenter server
CloudSystem Foundation
CloudSystem Enterprise
Enclosure
ESX compute nodes
ESX compute nodes
Onboard Administrator
Virtual Connect
External router
ESX cluster mgmt host
Network architecture for ESX management host with ESX compute
nodes and 3PAR storage
Cloud Trunk
Figure 5
3PAR
Provider
Private
External
Cloud Management
Enclosure
KVM compute nodes
KVM compute nodes
CloudSystem Foundation
CloudSystem Enterprise
KVM mgmt host
Onboard Administrator
Virtual Connect
Data Center Management
Management Trunk
Cloud Trunk
Network architecture for KVM management host with KVM compute
nodes and 3PAR storage
External router
Figure 6
3PAR
ESX compute nodes.
Figure 6 ESX management host with ESX compute nodes
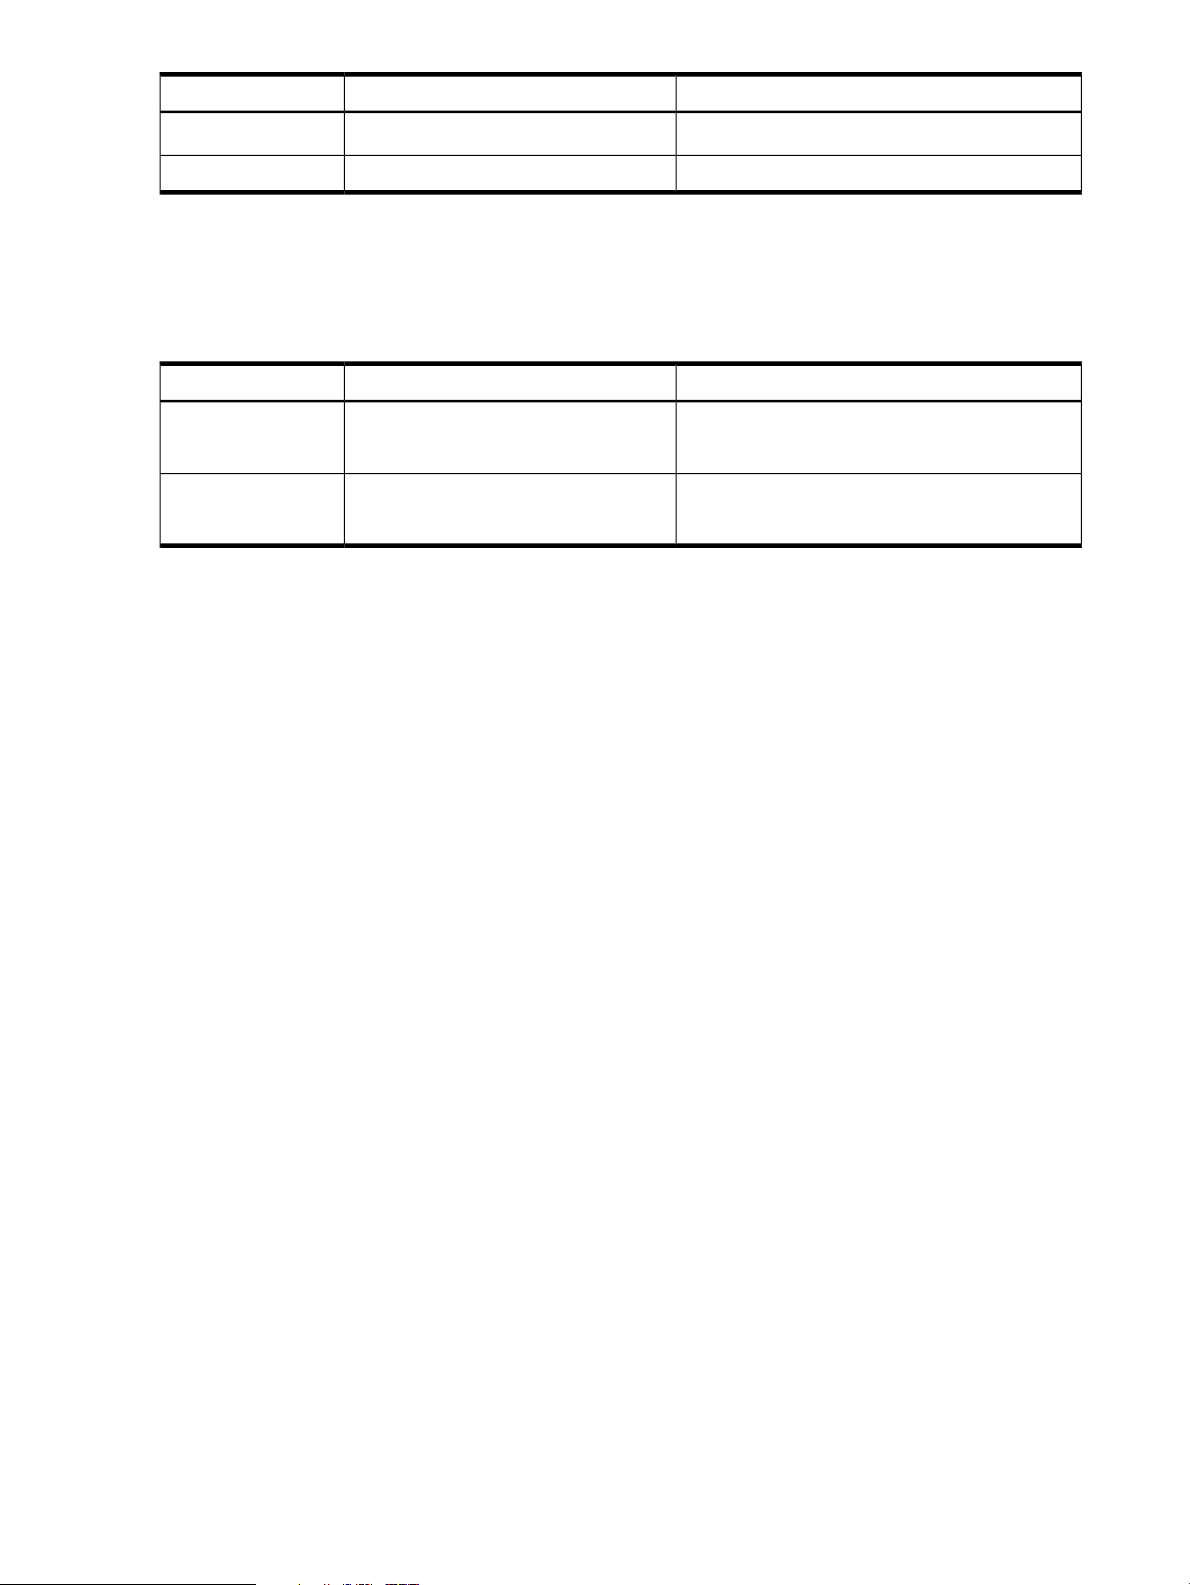
The following figure shows a sample configuration with a KVM management host, networks and
KVM compute nodes.
Figure 7 KVM management host with KVM compute nodes
Browser requirements
For a detailed explanation of the network configuration, see
Installing CloudSystem on an ESX cluster (page 26)
Installing CloudSystem on a KVM hypervisor (page 33)
The following browsers are supported for the CloudSystem installation.
VersionProductVendor
9, 10Internet ExplorerMicrosoft
24Firefox Extended Support Release (ESR)Mozilla
Browser requirements 19
Page 20
Tools requirements
The CloudSystem-Tools-8.0.0.20.zip file contains a csstart installation script and
several CLI packages. The requirements for the systems running these tools are listed in the table
below.
Next step: Prepare for the installation (page 21)
VersionProductVendor
Latest versionPersonal Edition
33ChromeGoogle
VersionProductCloudSystem Tool
Version 7, 2008 R2 (32-bit and 64-bit)Windowscsstart
RHEL 6.4Linux
Version 7, 2008 R2 (32-bit and 64-bit)WindowsCLI packages
CentOS 6.2, 6.3, 6.4, Ubuntu 12.04Linux
20 HP CloudSystem installation prerequisites
Page 21

4 Prepare for the installation
Before you begin the installation, it is important to have all of the required images and tools
unpacked and staged. The installation path varies, depending on whether you are installing
CloudSystem on an ESX or KVM management hypervisor.
• Installation kits (page 21)
• Preparing to install on ESX (page 23)
• Preparing to install on KVM (page 24)
Installation kits
Download the CloudSystem release kit from HP Software Depot at http://software.hp.com.
There are six .zip files that contain the installation components needed for CloudSystem Foundation
and CloudSystem Enterprise. The installation components vary, depending on the type of
management hypervisor you plan to install. The table below shows the .zip files and which
installation path they support.
Table 10 Components included in HP CloudSystem zip files
HP CloudSystem Foundation ESX 8.0
Mar 2014
(contains ESX images for base, SDN
appliance, and network node
appliances)
Enterprise KVMEnterprise ESXFoundation KVMFoundation ESXInstallation components
xx
HP CloudSystem Foundation KVM 8.0
Mar 2014
(contains KVM images for base, SDN
appliance, and network node
appliances)
HP CloudSystem Enterprise ESX 8.0
Mar 2014
(contains the ESX image for the
Enterprise appliance)
HP CloudSystem Enterprise KVM 8.0
Mar 2014
(contains the KVM image for the
Enterprise appliance)
HP CloudSystem Tools 8.0 Mar 2014
(contains the csstart installation script
and the CLI packages))
HP CloudSystem OO Studio 8.0 Mar
2014
(contains OO content packs and OO
Studio installation and upgrade)
x
xx
x
xxxx
xxxx
Signature files
Each zip file has a corresponding signature file. Signature files are used to verify the authenticity
of the downloaded files.
See HP GPG or RPM signature Verification.
Contents of CloudSystem .zip files
The contents of each CloudSystem .zip file are described in the following section.
Installation kits 21
Page 22

NOTE: Each qcow2 file comes with a corresponding sha1 checksum file. When csstart runs,
it uses the checksum file to verify that the files are copied to the hypervisor without errors.
HP CloudSystem Foundation ESX-8.0 Mar 2014 Z7550–01317.zip
• CS-Base-8.0.0.20.ova: Open Virtualization Format (OVF) package for the base appliance on
an ESX hypervisor.
• CS-Base-8.0.0.20.ova: OVF package for the SDN appliance on an ESX hypervisor.
• CS–NN–8.0.0.20.ova: OVF package for the network node appliance on an ESX hypervisor.
HP CloudSystem Foundation KVM 8.0 Mar 2014 Z7550–01318.zip
• CS-Base-8.0.0.20.qcow2: Disk image for the base appliance on a KVM hypervisor.
• CS-SDN-8.0.0.20.qcow2: Disk image for the SDN appliance on a KVM hypervisor.
• CS-NN-8.0.0.20.qcow2: Disk image for the network node appliance on a KVM hypervisor.
NOTE: Each qcow2 file comes with a corresponding sha1 checksum file. When csstart runs,
it uses the checksum file to verify that the files are copied to the hypervisor without error.
HP CloudSystem Enterprise ESX 8.0 Mar 2014 Z7550-01323.zip
• CS-Enterprise-8.0.0.20.ova: OVF package for the Enterprise appliance on an ESX hypervisor.
HP CloudSystem Enterprise KVM 8.0 Mar 2014 Z7550-01324.zip
• CS-Enterprise-8.0.0.20.qcow2: Disk image for the Enterprise appliance on a KVM hypervisor.
NOTE: Each qcow2 file comes with a corresponding sha1 checksum file. When csstart runs,
it uses the checksum file to verify that the files are copied to the hypervisor without error.
HP CloudSystem Tools 8.0 Mar 2014 Z7550-01325.zip
• csstartgui-secure.bat: Program used to deploy and configure the management appliances on
the management host. When csstart runs, it verifies the SSL certificate from the hypervisor,
and also verifies any additional virtual appliances created. This is for Windows or Linux
systems.
• csstartgui-auto-accept.bat: Program used to deploy and configure the management appliances
on the management host. When csstart runs, it does not verify the SSL certificate from the
hypervisor, but will inject the certificate into the Foundation base appliance and check all
subsequent virtual appliances when they are created. This is for Windows or Linux systems.
• csstartgui-insecure.bat: Program used to deploy and configure the management appliances
on the management host. When csstart runs, it does not verify any certificates for the initial
base appliance installation or for subsequent virtual appliances. This is for Windows or Linux
systems.
• csstart-linux.tar: Contains the command line to install CloudSystem from a Linux system.
• csstart-windows.zip: Contains the command line to install CloudSystem from a Windows
system. This is packaged as a folder of files, along with three .bat files, which are used to
invoke the command.
• csadmin: Provides Linux command line access to perform administrative functions such as
storage management, support dump actions for management virtual appliances, and password
setting for management appliance console access.
• csdamin.exe: Provides Windows command line access to perform administrative functions
such as storage management, support dump actions for management virtual appliances, and
password setting for management appliance console access.
22 Prepare for the installation
Page 23

• isc-remote-client-8.0.0.20.msi: Installs the Windows version of the commands for OpenStack
Windows workstation
ESX cluster
CloudSystem OVA images
CS-Base 8.0.0.20.ova
CS-SDN 8.0.0.20.ova
CS-NN-8.0.0.20.ova
CS-Enter-8.0.0.20.ova
Browser
CloudSystem installation tools
csstart
ESX mgmt host
CS-Base-8.0.0.20
CS-SDN-8.0.0.20
CS-NN-8.0.0.20
CS-Enter-8.0.0.20
Note: Use the same data store for
all OVA imports, converted
templates and running VM vmdks
1
VMware vCenter
Server
2
Keystone, Nova, Neutron and Cinder.
• isc–remote–client–8.0.0.20.rpm: Installs the Linux version of the commands for OpenStack
Keystone, Nova, Neutron and Cinder.
• rhel-kvm-deps-8.0.0.20.rpm: When run in a YUM repository, this file checks for required
RHEL RPMs and returns a list of any that are missing.
HP CloudSystem OO Studio 8.0 Mar 2014 Z7550-01319.zip
• Content packs that can be installed and edited in OO Studio:
OO-HP-Solutions-cp.jar◦
◦ OO-Systems-cp.jar
◦ OO-virtualization-cp.jar
◦ OO-Base-cp.jar
◦ OO-cloud-cp.jar
• OO-installer.exe: Used to install OO Studio.
• OO-studio-upgrade.zip: Used to upgrade OO Studio to 10.02.
Preparing to install on ESX
This section covers the steps required to download the contents of the release package and stage
the files on a Windows workstation. You can also use a Linux workstation to stage the files.
Figure 8 Path to install from a Windows workstation
Preparing to install on ESX 23
Page 24

Prerequisites
Copy images to the KVM host.
csstart uses the images
to configure virtual appliances.
csstart
CS-Base-8.0.0.20.qcow2
CS-SDN-8.0.0.20.qcow2
CS-NN-8.0.0.20.qcow2
CS-Enter-8.0.0.20.qcow2
CloudSystem qcow2 images
Linux workstation
CS-Base-8.0.0.20
CS-SDN-8.0.0.20
CS-NN-8.0.0.20
CS-Enter-8.0.0.20
KVM management host
• You have a Windows staging server with access to your vCenter Server. Required disk storage
is approximately 35GB.
• You have administrator privileges to log in to VMware vCenter Server.
Procedure 1 Downloading .zip files and extracting ESX contents
1. Log on to the Windows workstation.
2. Open a browser and navigate to the HP Software Depot at http://software.hp.com.
3. In the Search field, type CloudSystem.
4. Select the HP CloudSystem 8.0 offering.
5. Sign in with your HP Passport or create a new passport account.
6. Accept the license agreement.
7. Follow the HP Software Depot instructions for downloading the release files.
8. Move the following .zip files to the Windows workstation.
The Windows workstation used to stage the files must have access to the vCenter Server that
you plan to use to deploy the OVAs.
• HP CloudSystem-Foundation-ESX-8.0.0.20.zip
• HP CloudSystem-Enterprise-ESX-8.0.0.20.zip
• HP CloudSystem-Tools-8.0.0.20.zip
9. Extract the .zip file content on your workstation.
10. Make sure the csstart folder and the three csstart-XXX.bat files are extracted from the HP
CloudSystem-Tools-8.0.0.20.zip on your workstation so that you can run them later.
Next step: Installing CloudSystem on an ESX cluster (page 26)
Preparing to install on KVM
This section covers the steps required to download the contents of the release package and stage
the files on a Linux workstation. You can also use a Windows workstation to stage the files, but
you will need to substitute Windows commands in the procedures below.
Figure 9 Path to install from a Linux workstation
24 Prepare for the installation
Page 25

Prerequisites
• You have a Linux workstation to stage the KVM kit and run installation tools. Required disk
storage is approximately 35 GB.
• You have administrator privileges to log in to the KVM management hypervisor.
Procedure 2 Downloading .zip files and extracting KVM contents
1. Log on to the Linux workstation.
NOTE: If you prefer, you can use the KVM management host for staging instead of the Linux
workstation. Make sure you have at least 3 GB of extra space to stage the kits.
2. Open a browser and navigate to the HP Software Depot at http://software.hp.com.
3. In the Search field, type CloudSystem.
4. Select the HP CloudSystem 8.0 offering.
5. Sign in with your HP Passport or create a new passport account.
6. Fill in the required form details and accept the license agreement.
7. Follow the HP Software Depot instructions for downloading the release files.
8. Move HP CloudSystem Foundation KVM 8.0 Mar 2014, HP CloudSystem Enterprise KVM 8.0
Mar 2014 and HP CloudSystem Tools 8.0 Mar 2014 files to your Linux workstation or KVM
management host.
9. Log in to the management hypervisor and run:
gunzip
This command unpacks the .zip files.
10. Move the qcow2 image files and the checksum (.sh1) files to the /CloudSystem/images
directory.
11. In the HP CloudSystem Tools 8.0 Mar 2014 file there is a csstart-linux.tar file. Unpack
the .tar file.
12. Copy csstart.exe to any directory on the Linux workstation or KVM management host.
Next step: Installing CloudSystem on a KVM hypervisor (page 33)
Preparing to install on KVM 25
Page 26
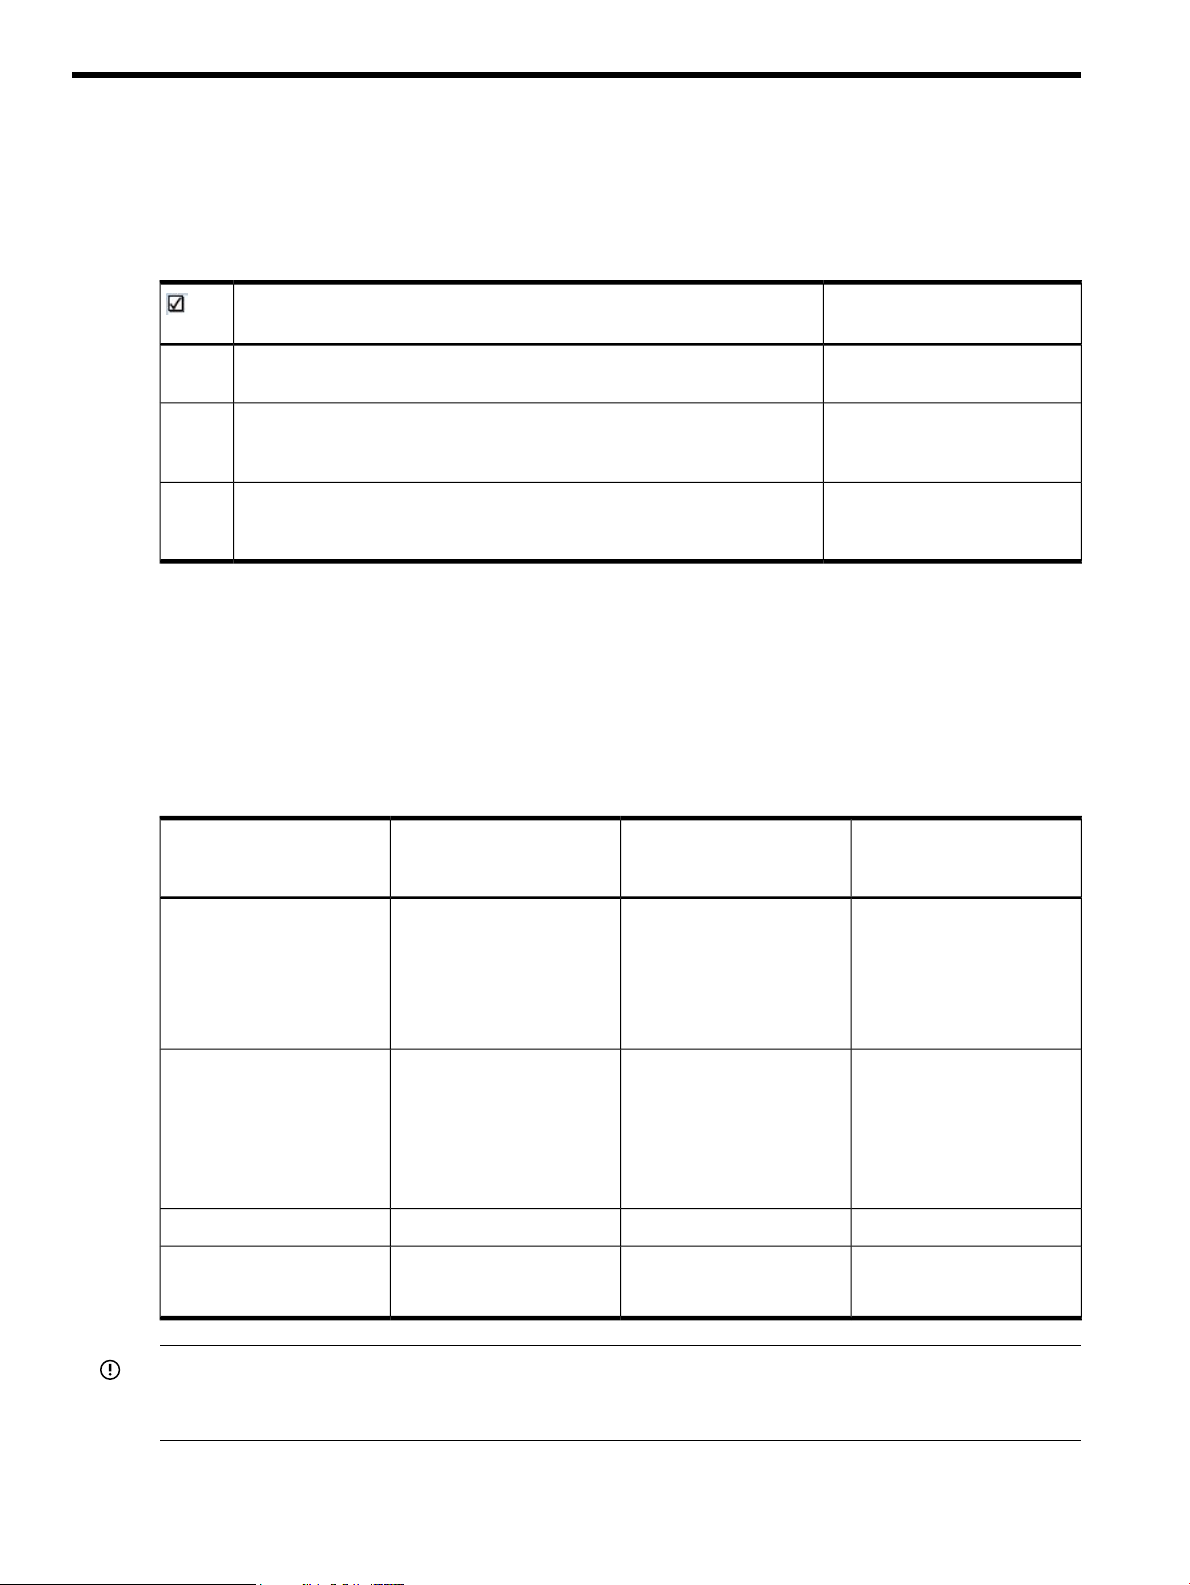
5 Installing CloudSystem on an ESX cluster
This chapter contains the procedures required to set up the network infrastructure and install the
CloudSystem Foundation base appliance on an ESX management hypervisor. The checklist below
provides an overview of the installation path.
Table 11 ESX management hypervisor installation path
Related informationInstallation step
Create the management host and define the vSwitch or port group IDs and
network security settings in vCenter Server.
Choose the type of security checks to perform when running csstart.
Launch csstart and install the Foundation base appliance.
Understanding the network infrastructure
Multiple networks provide the communication platform for CloudSystem, vCenter Server and the
HP 3PAR storage system. The configuration of the networks is flexible. This section explains the
major components of the networking infrastructure and provides an example of a supported
configuration. This is only a guide. Modify the procedure below to fit your network configuration
needs. For example, the VLAN IDs can vary according to your environment.
Explanation of networks
CloudSystem virtual
applianceNetwork
Network
vCenter proxy appliance
Enterprise appliance
vCenter Server ESX compute
nodes
Management hypervisor
vNICs
Understanding the network
infrastructure (page 26)
Configuring the ESX
management environment
(page 28)
Configuring the Foundation
base appliance on ESX
(page 32)
Example names for vSwitch
or port group (matches
figure below)
dc-mgmtvNIC0Foundation base applianceData Center Management
Cloud Management Network
Foundation base appliance
SDN appliance
network node appliances
vCenter proxy appliance
KVM compute nodes
all compute nodes
IMPORTANT: All of the networks described above must be distinct networks, with the exception
of the External Network. You can use the same network for the External Network and the Data
Center Management Network.
For a detailed explanation of the networks, see Overview of network topology (page 16).
26 Installing CloudSystem on an ESX cluster
cloud-mgmtvNIC1 on Foundation base
appliance and vCenter
proxy appliance
vNIC0 on SDN and network
node appliances
externalvNIC2network node appliancesExternal Network
CloudTrunkvNIC1network node appliancesCloud Data Trunk
Page 27

The figure below shows a visual representation of the recommended configuration for networks.
Network node
appliances
vNIC2 vNIC2vNICo
Network node
appliances
vNIC1 vNIC2vNIC0
Management Vswitch / Port group
Cloud Data Trunk Vswitch / Port group
dc-mgmt cloud-mgmt external
CloudTrunk
VLAND ID:All(4095)
Foundation
base
appliance
vCenter
proxy
appliance
Enterprise
appliance
SDN
appliance
vNIC0
vCenter
server
Provider Networks
Cloud Data TrunkManagement Trunk
Cloud Management Network
Data Center Management Network
External Network
vmkM vmkN vmkO vmkP
Private Network
Network node
appliances
vNIC0
vNIC2vNIC1
vNIC1
vNIC1
vNIC0
vNIC0
vNIC0
vNIC0
Figure 10 ESX sample network configuration
Create the ESX management hypervisor and configure the network infrastructure
The following procedure describes the steps required to create the ESX management hypervisor
and configure the network interfaces. The procedure is based on the information provided in the
image above, but you can modify the configuration to fit your network needs.
Do not begin the procedures in this section until you read the following important notes about
configuring networks.
Table 12 Important network configuration information
Why it mattersImportant to know
Do not configure the iSCSI initiators on the management
hypervisor.
Standard or distributed vSwitch names must be unique to
each host in vCenter Server.
Generic names are used in this procedure. Make sure to
substitute the actual names of your interfaces
(ifcfg-eth<ID>), bonds (ifcfg-bond<ID>), tagged
VLANs (bond<ID>.<VLANID>) and bridges
(ifcfg-br-<Name>) when configuring the network.
Prerequisites
• You have administrator privileges to log in to VMware vCenter Server
Procedure 3 Configuring the network infrastructure
iSCSI initiators are set up on the compute nodes, not the
management hypervisor. Initiators check to see which
storage resource on the network are available.
vCenter Server requires that all vSwitch names on a host
be unique names.
(Step 4)
It is important to use the same names defined in the
hardware profile when assigning the networks in the
management hypervisor. If the names do not match, then
network communication errors will occur.
(Step 4)
Return to procedure
1. Log in to vCenter Server with the administrator user name and password.
Understanding the network infrastructure 27
Page 28

2. Create the management hypervisor (host) in vCenter Server.
See Important network configuration information (page 27).
If you plan to use more than one host to manage the virtual appliances, they must be in a
cluster.
3. Select the management host and click the Configuration tab, then click the Networking link
on the left menu.
4. Set up the Management vSwitch or port group IDs according to the configuration that you
defined on the server profile and the dedicated network switch. You can also refer to the
sample diagram above for guidance on setting port group IDs.
See Important network configuration information (page 27).
5. Set the Cloud Data Trunk port group VLAN.
a. To set the port group on a standard vSwitch, set the port group VLAN to 4095 (all VLANs).
b. To set the port group on a distributed vSwitch, list the exact range of VLANs assigned to
the Cloud Data Trunk.
Example: 1–4, 5, 6, 10–100.
6. Add the following security settings to the Cloud Data Trunk port group.
• Set Promiscuous mode to ACCEPT.
• Set MAC Address Changes to ACCEPT.
• Set Forged Transmits to ACCEPT.
7. Add the following security settings to the External Network port group.
• Set Promiscuous mode to ACCEPT.
• Set MAC Address Changes to ACCEPT.
• Set Forged Transmits to ACCEPT.
Configuring the ESX management environment
The management environment consists of a single management hypervisor host or a cluster of
management hypervisor hosts that contain the following virtual appliances.
• A Foundation base appliance
• An SDN appliance
• An optional vCenter proxy appliance
One vCenter proxy appliance is needed for each vCenter that is managing compute nodes
in your cloud. If your cloud contains only KVM compute nodes, then you do not need any
vCenter proxy appliances.
• Three network node appliances
• An optional Enterprise appliance, if you are using CloudSystem Enterprise
The csstart installation script launches a setup assistant to guide you through the installation
process. When you run csstart, the setup assistant opens and displays fields for capturing details
about the new virtual appliance, network configuration, and vCenter Server connections. The
information is saved in a configuration file called deployer.conf.
Running csstart applies the configuration information saved in deployer.conf to the virtual
appliance designated to host the Foundation base appliance. When the installation completes,
the Foundation base appliance appears in the management cluster in vCenter Server.
The SDN appliance and the network node appliances are automatically created after the Cloud
Networking settings are entered and saved.
28 Installing CloudSystem on an ESX cluster
Page 29

Selecting hypervisor security level for CloudSystem installation
You can select one of three security options when you run the csstart setup assistant.
• Enable full security checks. When csstart runs, it validates certificates to ensure that it is
accessing the correct hypervisor. In an ESX environment, csstart searches for the stored
vCenter Server certificate and matches it to the vCenter Server defined in the installation setup.
The stored certificate file must have the hypervisor’s certificate along with the complete signing
authority chain, unless it is a valid, self-signed certificate. The name of the stored certificate
file is specified using the --os-cacert <filename> command from the csstart CLI. If
csstart cannot open the file or validate the certificate, then it will fail.
The Foundation base appliance also verifies certificates before starting up each additional
virtual appliance.
See csstart commands (page 63).
• Disable security checks for csstart, but enable security when creating the remaining virtual
appliances. When csstart runs, it injects the certificate into the Foundation base appliance,
but does not try to verify vCenter Server. When the additional virtual appliances are created
by the Foundation base appliance, the certificate is used to verify that the correct hypervisor
is used. This is selected by running --auto-accept-cert from the command line, or by
running the csstartgui-auto-accept.bat file to start the installation setup assistant on Windows.
See csstart commands (page 63).
• Disable security checks. When csstart runs, it does not verify the SSL certificate from the
hypervisor. The Foundation base appliance does not perform security checks when starting
up the other virtual appliances. This is selected by running --insecure from the command
line, or by running the csstartgui-insecure.bat file to start the installation setup assistant on
Windows.
See csstart commands (page 63).
See also
• Using the csstart CLI to install the Foundation base appliance (page 64)
• Troubleshoot installation issues (page 52)
Configuring the Foundation base appliance on ESX
Read the following important notes before configuring the Foundation base appliance.
Table 13 Important CloudSystem configuration information
Why it mattersImportant to know
HP recommends that you sync the management hypervisor
with a good set of external NTP servers. If CloudSystem is
appliances to sync with the same NTP servers configured
for the ESX hosts.
The management hypervisor must be configured with a
FQDN (not an IP address).
You cannot have multiple copies of an appliance image
stored in vCenter Server.
Data records can get out of sync between appliances when
time is not set to automatically sync with the NTP server. If
the Foundation and Enterprise appliance date/time is outdeployed on ESX, configure the Foundation and Enterprise
of sync, then you will not be able to create designs in HP
CSA.
The FQDN is necessary when attaching block storage
volumes using the 3PAR storage system.
csstart looks for appliance image names at random
and could select the wrong image. Using different
datastores or different folders does not resolve the issue.
If you need two copies of an appliance image on a single
instance of vCenter, then you must have unique names for
each image. Edit the deployer.conf file with a text
editor to point to the correct image.
Configuring the ESX management environment 29
Page 30

Table 13 Important CloudSystem configuration information (continued)
Why it mattersImportant to know
The vCenter Server user running csstart only needs the
top level privileges for Datastore, Network, Resource, and
Virtual machine. on the Windows server running vCenter Server. The user
The deployer.conf file contains confidential information,
such as passwords, and should be kept secure.
DRS is recommended for use in a cluster that is also hosting
virtual machines other than the CloudSystem management
hypervisors.
If you use a single management host that is not part of a
DRS cluster, then make sure you have enough resources
to host all CloudSystem virtual appliances.
When you run the csstart setup assistant, you will be
asked for a Glance disk size. The installation creates a
Glance disk on the same datastore where the base
appliance template is stored.
See Formula to determine the storage requirements for the
management hypervisor (page 12) for sizing calculations.
The vCenter Server user that is stored in the base appliance
by csstart does not need full administrator privileges
does not need full access to vCenter Server. Allocating the
lowest allowed level of privileges optimizes data center
security.
When installing with Windows, you should run the
csstart setup assistant from a directory with restricted
access in order to protect this file.
(Step 2)
The automatic placement of CloudSystem management
hypervisors in the cluster may overload some hypervisors
if DRS is not in use.
csstart creates the virtual appliances in the first host of
a non-DRS cluster. There is no way to select a specific host.
All hosts in the non-DRS cluster need to be large enough
to support all CloudSystem virtual appliances.
You must have sufficient space for the virtual appliance
boot disks, as well as the Glance disk, or the installation
process will not be able to complete.
(Step 3)
Return to procedure
Each OVA in the datastore needs to have a unique name.
You cannot use separate folders in the datastore.
The Enterprise image must be deployed in the same
datastore as the other CloudSystem virtual appliance
images.
Do not move or delete images, or rename the images, after
you create the base appliance.
Instances are started in the same datastore that contains
the OVA. If multiple OVAs with the same name are stored
in the datastore, csstart will not know which one to use
to create the instance.
The Enterprise installation will fail if the Enterprise OVA is
not included in the same datastore as the other virtual
appliance images.
In order to speed up virtual machine boot times and save
disk space, csstart does not make a full copy of the
image. Changing the name or location of the image
disrupts the operation of the shared copy encoded by
csstart.
Prerequisites
• The management hypervisor network infrastructure is in place.
See Create the ESX management hypervisor and configure the network infrastructure (page 27).
• You have administrator privileges to log in to vCenter Server.
• One large datastore is created with approximately 2 TB to support the virtual appliance boot
drives plus additional storage for OpenStack Glance images.
See Formula to determine the storage requirements for the management hypervisor (page 12).
• The management hypervisor has connectivity to the HP 3PAR storage system. This is required
if you are using block storage for instances.
See HP 3PAR StoreServ Storage documents (page 60).
30 Installing CloudSystem on an ESX cluster
Page 31

• The ESX management hypervisor can run as a standalone host. Multiple management hypervisor
hosts are configured in a cluster.
• The csstartgui.bat and the full csstart folder are extracted from
CloudSystem-Tools-8.0.0.20.tar.gz to a Windows workstation.
Procedure 4 Preparing the CloudSystem virtual machine images
1. Log in to vCenter Server using the VMware vSphere Client or a web browser.
2. Select Inventory→Hosts and Clusters and select your management cluster.
3. Select File→Deploy OVF template.
4. Follow the screen prompts. Use the CS-Base-8.0.0.20.ova image file that was staged on your
Windows workstation. Make sure to name the template CS-Base-8.0.0.20. The name should
match the ova file name.
a. Best practice is to select thin provisioning. Installation is much faster with this option. Thick
provisioning requires about an hour for the Foundation base appliance, vCenter proxy
appliance and Enterprise appliance to install and it requires 560 GB of space.
b. The location where the OVA images are stored is the same location where csstart
creates the virtual machine appliances. Make sure the datastore you plan to use has 500
GB of space.
5. Verify that the virtual appliance was created. It should be listed on the left side of the screen
under the VMs and templates view.
Do NOT boot the virtual appliance.
6. Repeat steps 3-6 for the SDN appliance, selecting the CS-SDN-8.0.0.20.ova image file that
was staged on your Windows workstation. Make sure to name the template CS-SDN–8.0.0.20.
The name should match the ova file name.
7. Repeat steps 3-6 for the network node appliance, selecting the CS-NN-8.0.0.20.ova image
file that was staged on your Windows workstation. Make sure to name the template
CS-NN-8.0.0.20. The name should match the ova file name.
8. Repeat steps 3-6 for the Enterprise appliance, selecting CS-Enterprise-8.0.0.20.ova image file
that was staged on your Windows workstation. Make sure to name the template
CS-Enterprise-8.0.0.20. The name should match the ova file name.
Configuring the ESX management environment 31
Page 32

Procedure 5 Configuring the Foundation base appliance on ESX
1. Gather the following information, which you will enter later in the csstart setup assistant.
See Important CloudSystem configuration information (page 29).
• Foundation base appliance host name and IP address, if using static IP
• Glance disk size
• Foundation base appliance new secure password
• Data Center Management Network subnet mask
• Gateway address (jump box on the management network)
• Preferred DNS server IP address
• vCenter Server IP address or host name
• vCenter Server user name and password
• Management cluster name
• vCenter Server name for the Data Center Management Network
Refer to Cluster→Host→Configuration→Networking in vCenter Server to find the network
name.
• vCenter Server name for the Cloud Management Network
• vCenter Server name for the Cloud Data Trunk
• vCenter Server name for the External Network
2. Log on to the Windows server that has network connectivity to the vCenter Server managing
the management hypervisor.
See Important CloudSystem configuration information (page 29).
3. Navigate to the csstart-XXX.bat file with the preferred security checks and double-click to
launch csstart.
See Selecting hypervisor security level for CloudSystem installation (page 29).
Opening the .bat file launches a browser, opens URL localhost:5000, and starts the
csstart setup assistant.
4. Follow the prompts in the csstart setup assistant, using the information you gathered in step
one.
See Important CloudSystem configuration information (page 29).
5. When the installation is complete, verify that the Foundation base appliance appears in the
management cluster in vCenter Server.
The SDN appliance and network node appliances are created after entering Cloud Network
settings in the CloudSystem Console.
See Troubleshoot installation issues (page 52).
Next step: Setting up the CloudSystem Console for the first time (page 44)
32 Installing CloudSystem on an ESX cluster
Page 33

6 Installing CloudSystem on a KVM hypervisor
This chapter contains the procedures required to set up the network infrastructure and install the
CloudSystem Foundation base appliance on a KVM management hypervisor. The checklist below
provides an overview of the installation path.
Table 14 KVM management hypervisor installation path
Related informationInstallation step
Create the management hypervisor.
Configure the network infrastructure.
Choose the type of security checks to perform when running csstart.
Launch csstart and install the Foundation base appliance.
Creating the management hypervisor
Use the procedures in this section to create the KVM management hypervisor.
Preparing the hardware
1. If using a blade, edit the server profile.
2. On blades or standalone DLs, perform the following two tasks.
a. Define the management networks.
b. Define the Cloud Data Trunk and identify the VLANs to include in the trunk.
Installing RHEL
Creating the management
hypervisor (page 33)
Configuring the CloudSystem
network infrastructure (page 35)
Selecting hypervisor security
level for CloudSystem
installation (page 40)
Configuring the Foundation
base appliance on KVM
(page 41)
Obtain the installation media from http://www.redhat.com. Red Hat distributions and documentation
are titled generically as RHEL6, instead of 6.3, 6.4 and so on. Check the documentation revision
history or distribution version to be certain you are referencing the correct information.
Prerequisites
• An iLO connection is established.
• The time is set in the BIOS.
• Smart arrays are disabled in the BIOS.
• The iLO virtual media or physical DVD is presented.
Using the RHEL installation media, mount the DVD or ISO image and complete the following steps.
Procedure 6 Installing RHEL on the management hypervisor
1. Test the media.
2. Set the language.
3. Set the keyboard for the language.
4. Configure the installation device types:
a. Select Specialized Storage Devices.
b. Click the Multipath Devices tab.
c. Select Boot Volume.
Creating the management hypervisor 33
Page 34

TIP: Take a screen capture of the boot volume to use as a reference for later
configuration.
d. Acknowledge the storage device warning (typically Yes, discard any data).
5. Set the Fully Qualified Domain Name (FQDN) as the Hostname.
6. Click Next and skip configuring the network until later.
7. Select the time zone.
8. Set the root password.
9. Select Use All Space and check the option to Review and modify partitioning layout.
10. Define logical volumes.
The root directory needs to have enough space to accommodate the appliance images and
Glance repository.
See Formula to determine the storage requirements for the management hypervisor (page 12).
11. Write changes to disk.
12. Select the Minimum install.
13. Unmount the DVD or ISO image and reboot.
14. Update the RHEL installation with the latest security patches from https://access.redhat.com/
security/updates.
15. Log in to the management host.
16. Configure DHCP_HOSTNAME to allow the management host to register itself with the DNS
server:
vi /etc/sysconfig/network
DHCP_HOSTNAME=management host name
17. Add the DNS server IP address:
$ vi /etc/sysconfig/network-scripts/ifcfg-eth0
DNS1=192.0.2.2
18. Restart the network service:
service network restart
Creating a local YUM repository and validating RHEL RPMs
An empty RPM file, rhel-kvm-deps-8.0.0.20rpm, is included in the
CloudSystem-Tools-8.0.0.20.tar.gz. This file lists all the required RHEL RPMs. After creating the
YUM repository, run the RPM file and download any missing RPMs. Add the missing RPMs to your
local YUM repository.
See Third-party documents (page 59).
Prerequisites
• rhel-kvm-deps-8.0.0.20rpm is extracted from the CloudSystem-Tools-8.0.0.20.tar.gz file and
moved to the Linux workstation.
Procedure 7 Creating a local YUM repository and validating dependencies
For the configuration in this section, use a utility such as WinSCP, which can be downloaded from
http://winscp.org.
1. Make a new directory and copy RHEL 6.4 to a directory location such as /home/kits:
# mkdir /home/kits
2. Make a new directory for the DVD mount point:
# mkdir /dvd
34 Installing CloudSystem on a KVM hypervisor
Page 35

3. Mount the DVD:
# mount —o loop /home/kits/rhel-server-6.4–x86_64–dvd.iso /dvd
4. Create the repository:
a. # cd /etc/yum.repos.d/
b. # vi LocalDCRhel.repo
[RHELDVD]
name=Locally Mounted RHEL 6.4 ISO
baseurl=file:///dvd/
enabled=0
5. Import the GPG-Key (GNU Privacy Guard):
a. # rpm --import /etc/pki/rpm-gpg/RPM-GPG-KEY-redhat-release
b. # yum clean all
c. # yum update
6. Install the RPM file:
yum install —y rhel-kvm-deps-8.0.0.xx.rpm --enablerepo=RHELDVD
Missing RHEL RPMs are identified and installed.
7. Verify that the libguestfs and libguestfs-tools packages were installed:
yum list | grep libguestfs*
Configuring the CloudSystem network infrastructure
Several networks provide the communication platform for HP CloudSystem and the suite of integrated
tools. The configuration of the networks is flexible. This section explains the major components of
the networking infrastructure and provides an example of a supported configuration. This is only
a guide. Modify the procedures below to fit your network configuration needs. For example, the
bridge names can vary according to your environment.
Explanation of CloudSystem networks
CloudSystem virtual
applianceNetwork
Network
Management hypervisor
interface
vNIC0vCenter proxy appliance
vNIC0Enterprise appliance
vNIC1vCenter proxy appliance
vNIC0SDN appliance
vNIC0KVM compute nodes
Example names for bridges
(matches figure below)
br-dc-mgmtvNIC0Foundation base applianceData Center Management
br-cloud-mgmtvNIC1Foundation base applianceCloud Management Network
br-cloud-trunkvNIC1network node appliancesCloud Data Trunk
br-externalvNIC2network node appliancesExternal Network
IMPORTANT: All of the networks described above must be distinct networks, with the exception
of the External Network. You can use the same network for the External Network and the Data
Center Management Network.
For a detailed explanation of the networks, see Overview of network topology (page 16).
The figure below shows a visual representation of the recommended configuration for networks.
Configuring the CloudSystem network infrastructure 35
Page 36

Figure 11 KVM sample network configuration
Provider Networks
Cloud Data TrunkManagement Trunk
Cloud Management Network
Data Center Management Network
External Network
Private Provided Network
KVM appliance management - CloudSystem components
CS Network Node
Appliance VM
Beta 2
Multiple
vNICo vNIC1 vNIC2
CS Network Node
Appliance VM
Beta 2
Multiple
vNICo vNIC1 vNIC2
vSphere
VM
5.X
CloudSystem
Foundation base
appliance VM
vCenter proxy
appliance VM
CloudSystem
Enterprise
appliance VM
SDN
appliance
VM
bondA X
DC Mgmt
bondB bondC
bondA Y
Cloud Mgmt
br-dc-mgmt br-cloud-mgmt br-external br-cloud-trunk
ethQ ethRvmkM vmkN
vNIC1 vNIC0 vNIC0
vNIC0
Management Vswitch / Port groups
dc-mgmt
vmkM vmkN
ethO ethPethM ethN
vNIC0
vNIC0
vNIC1
Network node
appliance VMs
(multiple)
vNIC0 vNIC2
vNIC1
bondA
NOTE: The vCenter proxy appliance shown in the figure is only used if you are managing ESX
compute nodes from a KVM management hypervisor.
Configure the network infrastructure on the KVM management hypervisor
The following procedure describes the steps needed to configure the network interfaces on a KVM
hypervisor. The procedure is based on the information provided in the image above, but you can
modify the configuration to fit your network needs.
Read the following important information before you configure the networks for the Foundation
36 Installing CloudSystem on a KVM hypervisor
base appliance.
Table 15 Important network configuration information
Make sure the VLANs in the Management Trunk are
actually assigned to cables plugged into the interface
network ports. networks. Make sure the virtual and physical components
Do not configure the iSCSI initiators on the management
hypervisor.
Generic names, as shown on the sample configuration
figure above, are used in this procedure. Make sure to
Why it mattersImportant to know
A network of cables must be physically connected to allow
the supported virtual appliances to communicate over the
have correct association such that data can transfer
between points (between appliances, hypervisors, servers,
nodes, etc.)
iSCSI initiators are set up on the compute nodes, not the
management hypervisor. Initiators check to see which
storage resource on the network are available.
It is important to use the same names defined in the
hardware profile when assigning the networks in the
management hypervisor ifconfig files. If the names do
not match, then network communication errors will occur.
Page 37

Table 15 Important network configuration information (continued)
Why it mattersImportant to know
(Steps 3-5)substitute the actual names of your interfaces
(ifcfg-eth<ID>), bonds (ifcfg-bond<ID>), tagged
VLANs (bond<ID>.<VLANID>) and bridges
(ifcfg-br-<Name>) when configuring the network.
Do not include spaces in bridge name.
csstart does not support spaces in bridge names.
(Steps 3-5)
Return to procedure
Prerequisites
• Red Hat Enterprise Linux 6.4 is installed on the management host.
• You are using a Linux server as your staging environment.
• The management hypervisor has connectivity to the HP 3PAR storage system. This is required
if you are using block storage for instances. See HP 3PAR StoreServ Storage documents
(page 60).
Procedure 8 Configuring the network infrastructure
1. Log in to the management hypervisor.
2. Change the directory to etc/sysconfig/network-scripts.
3. Create the interface, bond and bridge configuration files for the Data Center Management
Network and the Cloud Management Network.
See KVM sample network configuration (page 36).
See Important network configuration information (page 36).
a. Open the ifcfg-ethM file and add the following lines:
MASTER=bondA
SLAVE=yes
NM_CONTROLLED=no
Save the change and close the file.
b. Open the ifcfg-ethN file and add the following lines:
MASTER=bondA
SLAVE=yes
NM_CONTROLLED=no
Save the change and close the file.
c. Create a new bond configuration file using the name ifcfg-bondA. This bond connects to
bondA.X for the Data Center Management Network and bond A.Y for the Cloud
Management Network. The configuration file should contain the following lines:
DEVICE=bondA
BOOTPROTO=none
ONBOOT=yes
NM_CONTROLLED=no
USERCTL=no
BONDING_OPTS=”mode=5 miimon=100”
Save and close the file.
d. Create a new bond configuration file using the name ifcfg-bondA.X. This bond connects
to the Data Center Management Network bridge. The configuration file should contain
the following lines:
DEVICE=bondA.X
BOOTPROTO=none
ONBOOT=yes
NM_CONTROLLED=no
Configuring the CloudSystem network infrastructure 37
Page 38

USERCTL=no
VLAN=yes
BRIDGE=br-dc-mgmt
Save and close the file.
e. Create a new bond configuration file using the name ifcfg-bondA.Y. This bond connects
to the Cloud Management Network bridge. The configuration file should contain the
following lines:
DEVICE=bondA.Y
BOOTPROTO=none
ONBOOT=yes
NM_CONTROLLED=no
USERCTL=no
VLAN=yes
BRIDGE=br-cloud-mgmt
Save and close the file.
f. Create a new bridge configuration file using the name ifcfg-br-dc-mgmt. This bridge
connects the Foundation base appliance, the optional vCenter proxy appliance and the
Enterprise appliance to the Data Center Management Network. The configuration file
should contain the following lines:
DEVICE=br-dc-mgmt
TYPE=”Bridge”
DNS1=name_of _the_primary_DNS_server
IPADDR=IP_address_of_the_KVM_management_host
NETMASK=netmask_ID
BOOTPROTO=static
ONBOOT=yes
NM_CONTROLLED=no
DELAY=0
# dc-mgmt, vlan 10
Save and close the file.
g. Create a new bridge configuration file using the name ifcfg-br-cloud-mgmt. This bridge
connects the Foundation base appliance, the optional vCenter proxy appliance, the SDN
appliance and the network node appliances to the Cloud Management Network. The
configuration file should contain the following lines:
DEVICE=br-cloud-mgmt
TYPE=”Bridge”
NM_CONTROLLED=no
BOOTPROTO=none
ONBOOT=yes
DELAY=0
# region mgmt, vlan 12
Save and close the file.
4. Create the interface, bond and bridge configuration for the External Network.
See KVM sample network configuration (page 36).
a. Open the ifcfg-ethO file and add the following lines:
MASTER=bondB
SLAVE=yes
NM_CONTROLLED=no
Save the change and close the file.
b. Open the ifcfg-ethP file and add the following lines:
MASTER=bondB
SLAVE=yes
NM_CONTROLLED=no
Save the change and close the file.
38 Installing CloudSystem on a KVM hypervisor
Page 39

c. Create a new bond configuration file using the name ifcfg-bondB. This bond connects to
the External Network bridge. The configuration file should contain the following lines:
DEVICE=bondB
BOOTPROTO=none
ONBOOT=yes
USERCTL=no
NM_CONTROLLED=no
BONDING_OPTS=”mode=5 miimon=100”
BRIDGE=br-external
Save the change and close the file.
d. Create a new bridge configuration file using the name ifcfg-br-external. This is the bridge
that connects the network node appliances to the External Network. The configuration
file should contain the following lines:
DEVICE=br-external
TYPE=”Bridge”
BOOTPROTO=none
ONBOOT=yes
NM_CONTROLLED=no
DELAY=0
5. Create the interface, bond and bridge configuration files for the Cloud Data Trunk.
See KVM sample network configuration (page 36).
a. Open the ifcfg-ethQ file and add the following lines:
MASTER=bondC
SLAVE=yes
NM_CONTROLLED=no
Save the change and close the file.
b. Open the ifcfg-ethR file and add the following lines:
MASTER=bondC
SLAVE=yes
NM_CONTROLLED=no
Save the change and close the file.
c. Create a new bond configuration file using the name ifcfg-bondC. This bond connects to
the Cloud Data Trunk bridge. The configuration file should contain the following lines:
DEVICE=bondC
BOOTPROTO=none
ONBOOT=yes
USERCTL=no
NM_CONTROLLED=no
BONDING_OPTS=”mode=5 miimon=100”
BRIDGE=br-cloud-trunk
Save the change and close the file.
d. Create a new bridge configuration file using the name ifcfg-br-cloud-trunk. This is the
bridge that connects the network node appliance to the Cloud Data Trunk. The
configuration file should contain the following lines:
DEVICE=br-cloud-trunk
TYPE=”Bridge”
BOOTPROTO=none
ONBOOT=yes
NM_CONTROLLED=no
DELAY=0
# cloud trunk, vlan all
Save the change and close the file.
Configuring the CloudSystem network infrastructure 39
Page 40

6. Run the following command to restart networking and allow the new configuration to take
effect:
service network restart
7. Run the following command to see a list of the bridges that were created and the interfaces
for each bridge:
brctl show
8. Run the following command to make sure all of the interfaces, bridges and bonds are configured
and running:
ifconfig
9. Verify that the network is configured correctly by pinging the DNS server or the gateway
server for the Foundation base appliance.
Configuring the KVM management environment
The management environment consists of a single management hypervisor host or a cluster of
management hypervisor hosts that contain the following virtual appliances.
• A Foundation base appliance
• An SDN appliance
• Three network node appliances
• An optional vCenter proxy appliance for ESX compute nodes
• An optional Enterprise appliance, if you are using CloudSystem Enterprise
The csstart installation script launches a setup assistant to guide you through the installation
process. When you run csstart, the setup assistant opens and displays fields for capturing details
about the new virtual appliance and network configuration. The information is saved in a
configuration file called deployer.conf.
Running csstart applies the configuration information saved in deployer.conf to the virtual
appliance designated to host the Foundation base appliance. When the installation completes,
the Foundation base appliance appears in the management hypervisor appliance list.
The SDN appliance and the network node appliances are automatically created after the Cloud
Networking settings are entered and saved during first time setup.
Selecting hypervisor security level for CloudSystem installation
You can select one of three security options when you run the csstart setup assistant.
• Enable full security checks. When csstart runs, it requests the SSH key from the hypervisor
and then verifies the key against the ssh/known_hosts file in the Users directory.
The Foundation base appliance continues to use this certificate to verify that it is communicating
with the correct hypervisor before starting up any virtual appliances.
See csstart commands (page 63).
• Disable security checks for csstart, but enable security when creating the remaining virtual
appliances. When csstart runs, it injects the certificate into the Foundation base appliance,
but does not perform security checks. When the additional virtual appliances are created by
the Foundation base appliance, that certificate is used to verify that the correct hypervisor is
used.
See csstart commands (page 63).
• Disable security checks. When csstart runs, it does not verify the SSL certificate from the
hypervisor. The Foundation base appliance does not perform security checks when starting
up the other virtual appliances.
See csstart commands (page 63).
40 Installing CloudSystem on a KVM hypervisor
Page 41

See also
• Using the csstart CLI to install the Foundation base appliance (page 64)
• Troubleshoot installation issues (page 52)
Configuring the Foundation base appliance on KVM
Read the following important notes before configuring the Foundation base appliance.
Table 16 Important CloudSystem configuration information
Why it mattersImportant to know
HP recommends that you set the time on the management
hypervisor to automatically sync with the NTP server. The
Foundation and Enterprise appliances should be synced
with the virtual machine host running the management
hypervisor.
If you are using the RHEL default driver, Broadcom TG3
NIC, then you must update the driver.
See HP Support Center.
If you are using the Emulex driver, be2net, then you must
upgrade the driver to version 4.4.245.0 or later.
See Citrix support.
When installing with Linux, you should run the csstart
setup assistant from a directory with restricted access in
order to protect this file.
The installation images and the corresponding checksums
should be placed in the default /CloudSystem/images
directory
Exit the csstart setup assistant before using a text editor
to change the advanced fields in the deployer.conf file.
Data records can get out of sync between appliances when
time is not set to automatically sync with the NTP server.
Using an outdated driver will prevent you from accessing
a provisioned instance with a floating IP.
Using an outdated driver will interrupt SSH and TCP
network traffic.
The deployer.conf file contains confidential information,
such as passwords, and should be kept secure.
(Step 2)
The csstart setup assistant does not provide a way to
change the image location. You must update that directly
in the deployer.conf file.
See Using the csstart CLI to install the Foundation base
appliance (page 64).
The setup assistant caches the contents of the deployer.conf
file in memory. If you edit deployer.conf outside of the
setup assistant, then the updates are not captured and
applied during installation.
See Using the csstart CLI to install the Foundation base
appliance (page 64).
When you run the csstart setup assistant, you will be
asked for a Glance disk size. Make sure to size the disk
appropriately.
See Formula to determine the storage requirements for the
management hypervisor (page 12) for sizing calculations.
Do not move, delete or rename images after you create
the base appliance.
The installation creates a Glance disk on the same
datastore where the base appliance template is stored.
You must have sufficient space for the virtual appliance
boot disks, as well as the Glance disk, or the installation
process will not be able to complete.
(Step 7)
In order to speed up virtual machine boot times and save
disk space, csstart does not make a full copy of the
image. Changing the name or location of the image
disrupts the operation of the shared copy encoded by
csstart.
Return to procedure
Prerequisites
• CloudSystem-Foundation-KVM–8.0.0.20 is downloaded from the release site and images are
unpacked on a Linux server.
• A /CloudSystem directory is created on the management hypervisor.
Configuring the KVM management environment 41
Page 42

• A /CloudSystem/images directory is created on the management hypervisor and the
qcow2 images and checksums are moved to this directory. The /CloudSystem/images
directory should be owned by root and should have permissions set to 755. This setting allows
write access only to the root user for the files owned by root.
• 128 GB of memory is available on the management hypervisor for image storage
See HP CloudSystem installation prerequisites (page 11).
• The csstart folder and the three csstart-XXX.bat files are moved to the management hypervisor.
See Prepare for the installation (page 21).
• The network ifcfg files are created in the management hypervisor
etc/sysconfig/network-scripts directory.
See Configure the network infrastructure on the KVM management hypervisor (page 36).
Procedure 9 Configuring the Foundation base appliance on KVM
1. Gather the following information, which you will enter later in the csstart setup assistant.
• Foundation base appliance host name and IP address, if using static IP
• Glance disk size
• Foundation base appliance new secure password
• Data Center Management subnet mask
• Gateway address (jump box on the management network)
• Preferred DNS server IP address
• Management hypervisor host name, user name and password
• Name of the Data Center Management Network bridge
• Name of the Cloud Management Network bridge
• Name of the Cloud Data Trunk bridge
• Name of the External Network bridge
2. Log in to the management hypervisor.
See Important CloudSystem configuration information (page 41).
3. Set permissions to run csstart:
chmod 700 csstart
4. Add a hole in the firewall for port 5000 on the Linux system:
iptables -I INPUT 3 -p tcp -m state --state NEW -m tcp --dport 5000 -j ACCEPT
5. Launch the csstart-XXX.bat file with the preferred security checks.
See Selecting hypervisor security level for CloudSystem installation (page 40).
6. Open a supported browser and type http://IP_address_of_the_KVM
management_host:5000
7. Follow the prompts in the csstart setup assistant, using the information you gathered in step
one.
See Important CloudSystem configuration information (page 41).
8. When the installation completes, log in to the management hypervisor and verify that the
Foundation base appliance was created:
virsh list –all
The SDN appliance and network node appliances are created after entering Cloud Network
settings in the CloudSystem Console.
42 Installing CloudSystem on a KVM hypervisor
Page 43

See Troubleshoot installation issues (page 52).
Next step: Setting up the CloudSystem Console for the first time (page 44)
Configuring the KVM management environment 43
Page 44

7 Setting up the CloudSystem Console for the first time
To complete the final step of the CloudSystem Foundation installation, add Cloud Networking
information to the CloudSystem Console. Once the network setting is saved, the Foundation base
appliance automatically creates the SDN appliance and network node appliances.
For definitions of the SDN appliance and network node appliances, see CloudSystem Foundation
components (page 8).
Configuring cloud networking
IMPORTANT: Before you apply the Cloud Networking configuration in the CloudSystem Console,
verify that you have the correct subnets. Cloud Networking is intended to be configured only once.
If you need to change Cloud Networking after compute nodes are activated, you will need to
delete all of the compute nodes first.
Prerequisites
• Minimum required privileges: Infrastructure administrator
• The appliance is physically connected to the network.
• The Foundation base appliance is installed.
Procedure 10 Configuring cloud networking for the first time
1. Open a supported browser and enter the url https://<IP address of the Foundation
base appliance>.
2. Log in to the CloudSystem Console using the administrator user name and the new secure
password you defined in csstart.
The console opens to the Dashboard screen.
3. Expand the help icon along the right side of the screen.
4. Under the Recommended actions heading, select Edit Cloud Networking.
The Cloud Networking window opens.
5. Enter the Cloud Management subnet in the field provided. This is the Cloud Management
Network you established in Configuring the CloudSystem network infrastructure (page 35) or
Understanding the network infrastructure (page 26).
6. Click OK to save the settings.
7. Verify that the SDN appliance and network node appliances are created and running:
• For ESX, check vCenter Server to make sure the appliances are in the cluster.
• For KVM, log in to the management hypervisor and run the command
virsh list
Performing time synchronization on the Foundation base appliance
CloudSystem services can encounter errors and unpredictable system behavior can occur if the
time on the Foundation base appliance, vCenter proxy appliance and the Enterprise appliance
differ by more than a few minutes. Make sure the correct Time and Language synchronization
setting in the CloudSystem Console is selected before CloudSystem is available for general use.
Prerequisites
• Foundation base appliance is successfully installed on a management hypervisor.
• Management hypervisor where the Foundation base appliance was installed is synchronized
with a set of NTP servers.
44 Setting up the CloudSystem Console for the first time
Page 45

Procedure 11 Synchronizing the Foundation base appliance with the management hypervisor NTP
servers
1. Log in to the CloudSystem Console.
2. From the Settings screen, click the Edit icon in the Appliance panel.
• For ESX:
In the Time and Language settings section, change the setting to Synchronize with
1.
time server.
2. Enter the IP address of the external NTP servers.
These servers should be the same NTP servers used by the management hypervisor.
• For KVM:
1. In the Time and Language settings section, keep the setting Synchronize with VM
host.
3. Save the changes.
Next steps: Choose any of the following next steps.
• Refer to the HP CloudSystem 8.0 Administrator Guide at Enterprise Information Library for
additional information on configuring ESX and KVM compute nodes, configuring cloud
resources and deploying instances.
• Preparing HP Operations Orchestration for CloudSystem Foundation (page 47)
• Installing CloudSystem Enterprise (page 49)
Performing time synchronization on the Foundation base appliance 45
Page 46

8 CloudSystem Foundation installation next steps
The CloudSystem Foundation installation is complete, but you still need to prepare and build
resources for the cloud. The table below provides links to resources that will help you complete
these tasks.
Table 17 Cloud preparation steps
Additional ResourcesInstallation Step
Stage and prepare compute nodes.
Build and manage cloud resources.
See the Resource configuration in
CloudSystem: Compute node creation
chapter in the HP CloudSystem 8.0
Administrator Guide at Enterprise
Information Library
See Cloud service provisioning, deployment
and service management in CloudSystem in
the HP CloudSystem 8.0 Administrator
Guide at Enterprise Information Library
If you are not ready to prepare your cloud, you can go to:
• Preparing HP Operations Orchestration for CloudSystem Foundation (page 47)
• Installing CloudSystem Enterprise (page 49)
46 CloudSystem Foundation installation next steps
Page 47

9 Preparing HP Operations Orchestration for CloudSystem
Foundation
HP Operations Orchestration (OO) is a next generation IT Process Automation solution. OO supports
CloudSystem in two ways.
• HP Operations Orchestration Central (OO Central) is integrated with CloudSystem Foundation.
It allows you to run workflows to perform administrative tasks in Foundation.
• HP Operations Orchestration Studio (OO Studio) is a separate installation. It allows you to
customize workflows, which you can then run in OO Central.
Using OO Central
To access OO Central, open the CloudSystem Console and select Integrated Tools from the main
menu.
OO Central comes with five general use workflows, which perform administrative tasks for
CloudSystem Foundation. You can run these workflows from OO Central.
• base-cp: This workflow provides support for integrations with various solutions (email, excel,
active directory, file system, etc). It also includes basic operations used by other the content
packs.
• systems-cp: This workflow provides support for integrating operating systems such as AIX,
FreeBSD, HP UX, Red Hat, Solaris, SUSE Linux and Windows.
• virtualization-cp: This workflow supports integration with virtualization platforms such as Citrix
Xen Server, Hyper-V, KVM, SCVMM and VMware.
• hp-solutions-cp: This workflow provides support for integrating HP solutions such as HP
ArchSight, HP Fortify, HP Load Runner, HP Application Lifecycle Management, and HP Onboard
Administrator.
• cloud-cp: This workflow supports exposed APIs from cloud providers like OpenStack, Amazon
EC2, IAM, S3 and VMware vCloud.
Once the workflows are loaded, you can run them at any time. For more information about HP
Operations Orchestration, see http://www.hp.com/go/oo.
Installing OO Studio
There are two parts to the OO Studio installation.
• Installing OO Studio (page 47)
• Upgrading OO Studio (page 48)
Installing OO Studio allows you to customize workflows. Customized flows are saved as content
packs and exported to a local directory. You can then pull the customized flows into OO Central
and run them to perform administrative tasks in CloudSystem Foundation.
Prerequisites
• Foundation is fully installed and first time setup is completed.
• You have access to a Windows workstation.
• System requirements are met. Refer to HP Operations Orchestration System Requirements at
Enterprise Information Library.
Procedure 12 Installing OO Studio
1. Unzip the HP CloudSystem OO Studio 8.0 Mar 2014 .zip file (Z7550-01319.zip).
2. Untar the zip file.
Using OO Central 47
Page 48

3. Launch the OO-installer.exe file.
a. Take all default settings when moving through the installation setup, until the Content
packs screen.
b. Do not import content packs at this time. Skip to the next screen.
c. Click Next and finish the installation.
4. Complete the OO Studio upgrade procedure. Upgrading to OO Studio 10.02 is required.
Procedure 13 Upgrading OO Studio
1. From the unzipped HP CloudSystem OO Studio 8.0 Mar 2014 .zip file, find
oo-studio-upgrade.zip.
2. Unzip the oo-studio-upgrade.zip file into the C:/Program
Files/Hewlett-Packard/HP Operations Orchestration folder.
A new folder named upgrade is created.
IMPORTANT: Make sure to extract the zip file directly in the main installation folder, and
not a sub-folder. The apply-upgrade.bat script will only work if the upgrade folder is directly
under the main installation folder.
3. Open a Windows command line and perform the following directory changes:
cd/ HP Operations Orchestration
cd/ upgrade
cd 10.02
cd bin
4. Make sure OO Studio is closed. You should not execute the following command with the
program open.
5. Run the command
apply–upgrade.bat
6. Type Y to apply the upgrade.
7. Wait for the UPGRADE SUCCESS message to verify that the upgrade completed without errors.
This can take several minutes.
8. Optional: If you want to edit the content packs included in OO Central, import the content
packs using the following steps:
• Open OO Studio.
• Under Dependencies, click Import Content Pack.
• Select all the jar files extracted from the OOContentPacks.zip and click Open.
• Verify that the content packs display in the Dependencies section.
Next steps
• Refer to the OO Studio documentation bundled with the OO Studio program files for additional
information on using workflows.
• Refer to the HP CloudSystem 8.0 Administrator Guide at Enterprise Information Library for
additional information.
48 Preparing HP Operations Orchestration for CloudSystem Foundation
Page 49

10 Installing CloudSystem Enterprise
CloudSystem Enterprise is an IaaS, PaaS and SaaS solution used for complex cloud provisioning.
Administrators create infrastructure templates and provide them as service offerings in the
Marketplace Portal. Enterprise includes designer software, the Marketplace Portal, and full HP CSA
functionality. See Explanation of solution components (page 6) for a detailed description of
components.
IMPORTANT: Do not change the Foundation base appliance network configuration (host name,
IP address, subnet mask, gateway address, DNS server or alternate DNS server) after Enterprise
is installed. Doing so will break communication between Foundation and Enterprise and you will
not be able to create subscriptions, create or edit designs or manage existing subscriptions in HP
CSA.
Installing the Enterprise appliance
Use the CloudSystem Console to launch the Enterprise installation. When you install Enterprise, a
new virtual appliance is created on the management hypervisor. The entire installation process
should take about 20 minutes.
Table 18 Important CloudSystem configuration information
Why it mattersImportant to know
The management hypervisors hosting the Foundation
appliance and Enterprise appliance must use the same
NTP servers for time sync.
Enterprise and Foundation must use the same IP address
conventions.
If you want to enable strong OpenLDAP or Active Directory
certificate validation for authentication to the CloudSystem
CloudSystem 8.0 Administrator Guidebefore you install
Enterprise.
When the two appliances are out of sync, then you will
not be able to create designs using HP CSA.
If Foundation was configured to support DHCP address
assignments, this configuration will apply automatically to
Enterprise. If Foundation was configured to support static
IP addresses, you must enter an IP address for the new
Enterprise virtual appliance.
Strong certificate validation may require a change to the
alternate DNS server on the Foundation base
appliance. Any changes to the Foundation base appliancePortal, review the steps in the “Enabling strong certificate
network configuration must be made before Enterprise isvalidation in the CloudSystem Portal” appendix of the HP
installed, because Enterprise uses these settings to
communicate with Foundation.
Prerequisites
• Foundation is fully installed and first time setup is complete.
• In an ESX configuration, the Enterprise OVA is added to the datastore that supports the
management cluster in vCenter Server.
• In a KVM configuration, the Enterprise qcow2 image is saved to the Linux or Windows server
where you ran csstart to install the Foundation base appliance.
• You are using a supported Chrome browser. See HP CloudSystem installation prerequisites
(page 11).
• You have selected an IP address, if using static IPs, and registered the FQDN for the Enterprise
appliance with the DNS server.
Procedure 14 Installing CloudSystem Enterprise
1. Log in to the CloudSystem Console.
2. Select Enterprise from the main menu.
3. Click the Install CloudSystem Enterprise button.
The installation window opens.
Installing the Enterprise appliance 49
Page 50

Figure 12 Enterprise screen in CloudSystem Foundation
4. Review the installation instructions, then click Next.
5. In the Enterprise appliance host name field, enter the FQDN that you registered with the DNS
server.
6. Enter the static IP address for the new Enterprise appliance.
NOTE: If the Data Center Management Network configured in Foundation uses DHCP, skip
this step.
7. Click Next.
8. Enter the user name and password required to log in to OO Central.
OO Central runs on the Foundation base appliance. The user name and password are the
same as the user name and password used to access the CloudSystem Console, except that
you must enter the OO user name with all lower case letters. Once you log in to OO Central
for the first time, you can change the user name and password.
9. Click Install.
10. Verify that the appliance was created successfully.
After Enterprise is installed, a Tools and Configuration pane are added to the Enterprise screen.
The Tools pane displays links to the Cloud Service Management Console and the Marketplace
Portal.
All existing Foundation functionality will continue to be available. Enterprise appliance details can
be monitored in the CloudSystem Console from the Enterprise screen. Perform all management
tasks for the Enterprise appliance in the CloudSystem Console on the Settings screen.
50 Installing CloudSystem Enterprise
Page 51

Procedure 15 Configure Enterprise to use the Foundation NTP servers for time sync
If you are using an ESX management hypervisor to mange the Enterprise appliance, then you will
need to perform the following procedure.
1. Enable the console user for the Enterprise appliance.
See appendix C, “Supported console operations on the CloudSystem Foundation appliance”
in the HP CloudSystem 8.0 Administrator Guide at the Enterprise Information Library.
2. Log in as cloudadmin through the Enterprise console. You can use CTRL+ALT+F1 to switch
to the console log in prompt.
3. Edit the NTP configuration file to add the server entries:
sudo vi/etc/ntp.conf
4. Restart the NTP service:
sudo service ntpd restart
5. Restart the Enterprise appliance.
See also: Refer to the HP CloudSystem 8.0 Administrator Guide at the Enterprise Information Library
for additional information on using HP CSA to create designs.
Next steps: See “Understanding CloudSystem Enterprise” in the HP CloudSystem 8.0 Administrator
Guide at Enterprise Information Library.
Installing the Enterprise appliance 51
Page 52

11 Troubleshoot installation issues
• csstart errors (page 53)
• OO Studio installation errors (page 55)
• Enterprise upgrade errors (page 55)
NOTE: For additional troubleshooting information, see the Troubleshooting chapters in the HP
CloudSystem 8.0 Administrator Guide, available at Enterprise Information Library.
Basic troubleshooting techniques
HP CloudSystem has a variety of troubleshooting tools you can use to resolve issues. By following
a combined approach of examining screens and logs, you can obtain a history of activity and the
errors encountered.
• The Activity screen in the CloudSystem Console displays a log of all changes made on the
appliance, whether user-initiated or appliance-initiated. It is similar to an audit log, but with
finer detail and it is easier to access from the UI.
The Activity screen also provides a log of health alerts and status notifications.
• You can download an audit log in the CloudSystem Console to help you understand what
security relevant actions took place on the system.
• You can create a support dump file in the CloudSystem Console to gather logs and other
information required for debugging into an encrypted, compressed file that you can send to
your authorized support representative for analysis.
Look for a message
Examine the Activity
screen
Examine the appliance
virtual machine
DetailsRecommendation
About syntax errors:
• The user interface checks for syntax when you enter a value. If you make a syntax error,
an instructional message appears next to the entry. The user interface or command line
continues to display messages until you enter the correct value.
About network setup errors:
• Before applying them, the appliance verifies key network parameters like the IP address
and the fully qualified domain name (FQDN), to ensure that they have the proper format.
• After network settings are applied, the appliance performs additional validation, such as
reachability checks and host name to IP lookup. If a parameter is incorrect, the appliance
generates an alert that describes validation errors for the Network Interface Card (NIC),
and the connection between the browser and the appliance can be lost.
To find a message for an activity:
1. Locate recent activities with a severity of Critical, Warning, or Unknown.
2. Read the message for problem identification and potential solutions.
3. Expand the activity to add notes to the activity details.
When VM host is down or nonresponsive:
1. From the local computer, use the ping command to determine if you can reach the
appliance.
• If the ping command is successful, determine that the browser settings, especially the
proxy server, are correct.
Consider bypassing the proxy server.
52 Troubleshoot installation issues
• If the ping command did not reach the appliance, ensure that the appliance is connected
to the network.
2. Log onto hypervisor to verify that the hypervisor is running.
Page 53

DetailsRecommendation
3. Verify that the virtual guest for the appliance is operational.
4. Ensure that the VM host configuration is valid.
Verify the accuracy of the IP address and other network parameters for the VM host.
5. From the management console, ensure that the appliance network settings are accurate.
6. Examine the hypervisor performance data. If the appliance is running at 100% utilization,
restart the hypervisor.
Enable console access
csstart errors
About console access:
• Use the following csadmin console-users CLI commands to enable console access and set
the password. After running the command, you can locate logs for additional troubleshooting
information. The VM_name is the virtual machine where you want to execute the command.
The csadmin console-users commands are supported on the Foundation base appliance,
the Enterprise appliance, and the Proxy appliances.
To enable console access:
1. Open the CLI.
2. Enter the command:
csadmin console-users enable --vm-name VM_name
To set the password console access:
• Open the CLI.
• Enter the command:
csadmin console-users set-password --password CAPasswd --vm-name
VM_name
Where CAPasswd is the password for the Cloud Administrator.
For more information on the use of CLI, see HP CloudSystem 8.0 Administrator Guide at
Enterprise Information Library.
The log file is the best resource for identifying the type of error that occurred. Check the log file
first to narrow down error possibilities. You can also review the problems and recommendations
listed below.
Table 19 ESX troubleshooting tips
Possible cause and recommendationSymptom
You see the error
Installation
failed. Please
correct the error
and try again.
The csstart web UI does not run correctly on a Japanese Windows system
• Before running csstart, set the environment variable PYTHONIOENCODING=UTF-8
in the steps below.
◦ If you are running csstart using one of the csstartgui-*.bat files, set this
variable in the csstartgui-*.bat file that you are using.
◦ If you are running csstart from a command prompt window, set this variable in
the csstartgui-*.bat file before running the csstart gui --start-browser
... command.
csstart errors 53
Page 54

Table 19 ESX troubleshooting tips (continued)
Possible cause and recommendationSymptom
1. Edit csstartgui-*.bat.
2. Add set PYTHONIOENCODING=UTF-8 as the first line of the file, and save the file.
3. Double-click the file.
• Run the Linux version of csstart. When you install CloudSystem on a KVM host, you
can run csstart on the hypervisor.
• Set English or Chinese as the preferred language in the web browser.
csstart fails to install
CloudSystem on vCenter
Server and you see the
error message
[Intlmpl-ESX]
cloneFromTemplate,
com.vmware.vim25.No
Permission
Security check fails when
running csstart and
you see the message
Warning: Different
certificates are
being used for SSL
and Solution users.
Manual intervention
is required.
Security checks fail when
running csstart and
you see the message
Using certificate
file: No File Found
Error: Failed to
validate your
vCenter using ssl.
User does not have proper privileges in vCenter Server to create virtual
machines
1. Log in to vCenter Server.
2. Add the privilege for clone operations to the role that is running csstart.
This operation allows users to allocate space in the datastore, create virtual machines,
power up and down virtual machines and delete virtual machines on the management
cluster.
3. From the Host and Cluster view, select the management cluster.
4. Right-click the management cluster and select Add Permissions.
The Assign Permissions window opens.
5. In the left pane, select the role that is running csstart.
This is the role that receives the new permission.
6. In the right pane, scroll down to Virtual machine and expand Provisioning.
7. Select the clone virtual machine permission.
8. Click OK to save the new permission for the role.
Certificate files do not match
1. Press CTRL-C to interrupt csstart.
2. Query the hypervisor where vCenter Server is installed:
# keytool –printcert –rfc –sslserver servername[:port]
3. Copy everything from -----BEGIN CERTIFICATE----- to -----END CERTIFICATE----- into a new
file.
4. Add a name to the file:
--os-cert option <filename>
5. Move the file to the same directory where csstart is located.
6. Retry the procedure Configuring the Foundation base appliance on ESX (page 32).
Security checks fail
because the SSL certificate
expired or is invalid due
to a hypervisor host name
change
You see the message
Certificates do not
conform to
algorithm
constraints
54 Troubleshoot installation issues
Certificate file is missing
1. Use the Add CA Cert option in the vCenter Server Registration screen to add the new
SSL certificate.
2. Retry the procedure Configuring the Foundation base appliance on ESX (page 32).
An upgraded version of vCenter Server has a server certificate with a 512
bit key length
1. Generate a new certificate for vCenter Server.
2. Retry the procedure Configuring the Foundation base appliance on ESX (page 32).
Page 55

Table 19 ESX troubleshooting tips (continued)
Possible cause and recommendationSymptom
Modify the java.security file to accept RSA keys shorter than 1024 bits
1. Log on to the Foundation base appliance.
2. Open
/usr/lib/jvm/jre-1.7.0-openjdk.x86_64/lib/security/java.security
3. Comment out the following line:
jdk.certpath.disabledAlgorithms=MD2, RSA keySize < 1024
IMPORTANT: Make sure that you understand the security implications of using shorter
keys before you modify the java.security file.
Table 20 KVM troubleshooting tips
Possible cause and recommendationSymptom
RHEL default drivers are
not able to manage
VLANs
Security checks fail when
running csstart and
you see the message
Using certificate
file: No File Found
Error: Failed to
validate your
vCenter using ssl.
Broadcom TG3 NIC driver needs to be upgraded
1. Find the driver and firmware here: HP Support Center.
2. Install the upgrade and retry the procedure Configuring the Foundation base appliance
on ESX (page 32).
Users directory does not contain an SSH key
1. Log on to Foundation base appliance.
2. Edit the known_hosts file with the SSH key value.
3. Run csstart again.
OO Studio installation errors
Possible cause and recommendationSymptom
Anti-virus software
prevents OO Studio
install and displays the
message vbasic
error
OO Studio version needs an upgrade
1. Apply the OO Studio upgrade using the Upgrading OO Studio (page 48) procedure.
Enterprise upgrade errors
The table below contains errors that can occur during an Enterprise upgrade or when using the
HP CSA management console.
Support dump details: You can create a support dump from the csadmin CLI, if you have it installed
on your Windows or Linux server. It is included in the CloudSystem-Tools-8.0.0.20.tar.
Once csadmin is installed, there are two relevant commands:
• $csadmin appliance list: lists the names of the available management virtual machines.
This lets you find the appropriate appliance name.
• $csadmin appliance supportdump —av <appliance_name>: creates a dump of all
relevant logs and stores it on the management hypervisor. The support dump is saved to your
staging server.
OO Studio installation errors 55
Page 56

Table 21 Enterprise troubleshooting tips
Possible cause and recommendationSymptom
The Enterprise
installation progress
indicator is not visible
You see the message
CloudSystem
Enterprise
installation
failed
You see the message
CloudSystem
Enterprise
installation
succeeded, but
could not start up
due to a
communication
problem
The console session was terminated
1. While the installation is in progress, keep your console session active.
• Do not refresh the Enterprise screen.
• Do not log off the CloudSystem Console.
NOTE: While the installation is in progress, you can navigate to other console screens
and see the progress indicator when you return to the Enterprise screen.
CloudSystem-Enterprise–8.0.020 was not added to the ESX cluster or KVM
management hypervisor
1. For ESX:
• Log in to vCenter Server and make sure the CS-Enterprise-8.0.0.20 OVA is
saved to the datastore supporting the management cluster.
• The image name must be CS-Enterprise-8.0.0.20.
2. For KVM:
• Log in to the management hypervisor and make sure the
CloudSystem-Enterprise-8.0.0.20 image is saved in
/CloudSystem/images.
Enterprise appliance is not done booting
1. Wait a few minutes. The Enterprise appliance is not ready.
2. Retry the login action.
When logging in to HP
CSA for the first time you
see the message
Default
organization not
found
Enterprise appliance is not ready
1. Wait a few minutes. The Enterprise appliance is not ready and is still trying to bring up
the HP CSA appliance or is still recovering from a reboot.
2. Retry the login action.
56 Troubleshoot installation issues
Page 57

12 Support and other resources
IMPORTANT: This product contains a technical feature that will allow an on-site authorized
support representative to access your system, through the system console, to assess problems that
you have reported. This access will be controlled by a password generated by HP that will only
be provided to the authorized support representative. You can disable access at any time while
the system is running.
HP technical support personnel are not granted remote access to the appliance.
• Information to collect before contacting HP (page 57)
• How to contact HP (page 57)
• Registering for software technical support and update service (page 57)
• HP authorized resellers (page 58)
• Documentation feedback (page 58)
• Related information (page 58)
Information to collect before contacting HP
Be sure to have the following information available before you contact HP:
• Software product name
• Hardware product model number
• Operating system type and version
• Applicable error message
• Third-party hardware or software
• Technical support registration number (if applicable)
How to contact HP
Use the following methods to contact HP:
• To obtain HP contact information for any country, see the Contact HP worldwide website:
http://www.hp.com/go/assistance
• Use the Get help from HP link on the HP Support Center:
http://www.hp.com/go/hpsc
• To contact HP by telephone in the United States, use the Contact HP – Phone Assist website
to determine the telephone number that precisely fits your needs. For continuous quality
improvement, conversations might be recorded or monitored.
http://www8.hp.com/us/en/contact-hp/phone-assist.html#section1
Registering for software technical support and update service
HP CloudSystem includes one year of 24 x 7 HP Software Technical Support and Update Service.
This service provides access to HP technical resources for assistance in resolving software
implementation or operations problems.
The service also provides access to software updates and reference manuals, either in electronic
form or on physical media as they are made available from HP. Customers who purchase an
electronic license are eligible for electronic updates only.
Information to collect before contacting HP 57
Page 58

With this service, HP CloudSystem customers benefit from expedited problem resolution as well as
proactive notification and delivery of software updates. For more information about this service,
see the following website:
http://www.hp.com/services/insight
Registration for this service takes place following online redemption of the license certificate.
HP authorized resellers
For the name of the nearest HP authorized reseller, see the following sources:
• In the United States, see the U.S. HP partner and store locator website:
http://www.hp.com/service_locator
• In other locations, see the Contact HP worldwide website:
http://www.hp.com/go/assistance
Documentation feedback
HP is committed to providing documentation that meets your needs.
To help us improve the documentation, send your suggestions and comments to:
docsfeedback@hp.com
In your mail message, include the following information. They are located on the front cover.
• Document title
• Published date
• Edition number
Help us pinpoint your concern by posting the document title in the Subject line of your mail message.
Related information
• HP CloudSystem documents (page 58)
• HP Software documents (page 59)
• HP Insight Management documents (page 59)
• Third-party documents (page 59)
• HP 3PAR StoreServ Storage documents (page 60)
• HP ProLiant servers documents (page 61)
Use this section to learn about available documentation for HP CloudSystem components and
related products.
HP CloudSystem documents
The latest versions of HP CloudSystem manuals and white papers can be downloaded from the
Enterprise Information Library at http://www.hp.com/go/CloudSystem/docs, including the following
documents:
• HP CloudSystem 8.0 Release Notes
• HP CloudSystem 8.0 Installation and Configuration Guide
• HP CloudSystem 8.0 Administrator Guide
• HP CloudSystem Help
• HP CSA Concepts Guide
• HP CSA Release Notes
58 Support and other resources
Page 59

• HP CSA API Quick Start Guide
• HP CSA Troubleshooting
• HP CSA API Reference
• HP CSA Documentation List
• HP Operations Orchestration Concepts
• HP Operations Orchestration Central User Guide
• HP Operations Orchestration Application Program Interface (API) Guide
Online help for the CloudSystem Console is available by clicking the help control button:
The help control button expands the help sidebar. Links in the sidebar open UI screens for
Recommended Tasks, help for the current screen (Help on this page), and help for all tasks and
procedures (Browse help).
HP Software documents
The latest versions of HP Software product manuals and white papers can be downloaded from
the HP Software Product Manuals web site at http://support.openview.hp.com/selfsolve/manuals.
Finding documents on the HP Software Product Manuals web site
Follow these instructions to access all technical manuals for HP Cloud Service Automation and HP
Operations Orchestration.
1. Go to the HP Software Product Manuals web site (http://support.openview.hp.com/selfsolve/
manuals).
2. Log in with your HP Passport user name and password.
OR
If you do not have an HP Passport, click New users — please register to create an HP Passport,
then return to this page and log in.
3. In the Product list box, scroll down and select a product name.
4. In the Product Version list, select the version of the manuals that you are interested in.
5. In the Operating System list, select the relevant operating system.
6. Click the Search button to see a list of linked titles.
HP Insight Management documents
The latest versions of HP Matrix Operating Environment manuals, white papers, and the HP Insight
Management Support Matrix can be downloaded from the HP Enterprise Information Library at
http://www.hp.com/go/matrixoe/docs, including the following documents:
• HP Matrix Operating Environment Release Notes
• HP Insight Management Support Matrix
• HP Matrix Operating Environment Infrastructure Orchestration User Guide
• Cloud bursting with HP CloudSystem Matrix infrastructure orchestration
Third-party documents
CloudSystem incorporates OpenStack technology (listed below), and interoperates with other
third-party virtualization software.
Related information 59
Page 60

OpenStack Havana
• OpenStack Documentation for Havana releases
◦ Cloud Administrator Guide
◦ Virtual Machine Image Guide
◦ API Quick Start
◦ Admin User Guide
◦ End User Guide
– Command reference
– Keystone commands
– Glance commands
– Neutron commands
– Nova commands
– Cinder commands
Red Hat
• Red Hat Enterprise Linux 6 documents
VMware
• VMware vSphere documents
HP 3PAR StoreServ Storage documents
The latest versions of HP 3PAR StoreServ Storage manuals can be downloaded from the HP Support
Center, including the following documents:
• HP 3PAR StoreServ Storage Concepts Guide
• HP 3PAR StoreServ Storage Troubleshooting Guide
Finding documents on the HP Support Center web site
Follow these instructions to access all technical manuals hosted on the HP Support Center.
1. Go to the HP Support Center web site (http://www.hp.com/go/support).
2. Select the Drivers & Software tab.
3. Type a product name in the Find by product box and click Go.
4. Select a specific product from the resulting list.
5. On the specific product support page, locate the search fields at the top right of the web page.
The top search field will contain the product name that you selected earlier in your search.
6. In the second search field below the first, type “manuals” and press Enter.
If the list of documents is long, it might take a few seconds to load the page with the search
results.
7. You can refine the search results using the sorting options in the document table headers or
by further refining your search criteria in the search feature that is located immediately above
the document list.
60 Support and other resources
Page 61

HP ProLiant servers documents
• The HP Integrated Lights-Out QuickSpecs contain support information and are available from
the iLO product website:
http://www.hp.com/go/ilo
• HP ProLiant servers:
◦ ProLiant BL BladeSystem servers:
http://www.hp.com/go/blades
◦ ProLiant DL series rack mount servers:
http://www.hp.com/servers/dl
◦ ProLiant ML series tower servers:
http://www.hp.com/servers/ml
◦ ProLiant SL series scalable system servers:
http://h10010.www1.hp.com/wwpc/us/en/sm/WF02a/15351-15351-3896136.html
Related information 61
Page 62

A Command line interfaces
Four command line interfaces (CLIs) are packaged in the CloudSystem release download.
• csstart.exe: provides command line access to run CloudSystem installation commands.
• csadmin.exe: provides command line access to run CloudSystem administrative commands.
• CS-client-CLI-8.0.0.2.msi: provides the ability to run CloudSystem and OpenStack command
lines from a Windows command prompt.
• CS-client-CLI-8.0.0.2.rpm: provides the ability to run CloudSystem and OpenStack command
lines from a Linux system.
Preparing to use CLIs
The CLIs are packaged in the CloudSystem-Tools-8.0.0.20 release tar. The csstart and csadmin
CLIs do not require additional installation steps.
The OpenStack CLIs must be installed on either a Windows or Linux workstation.
Installing OpenStack CLIs on Windows
Prerequisite
• If using an ESX management hypervisor, the CS-client-CLI-8.0.0.2.rpm file is in the
cluster datastore.
• If using a KVM management hypervisor, the CS-client-CLI-8.0.0.2.msi is in the
/CloudSystem directory.
Procedure 16 Installing the OpenStack CLI on a Windows workstation
1. From a Windows workstation, double-click the MSI file to execute it and launch the Windows
installer.
2. Follow the Windows installer screen instructions to complete the installation.
The executable is installed in c:\Program Files\Hewlett-Packard\RemoteCli.
3. Open the Windows command prompt and execute the CLI.
See also
• For a list of unsupported OpenStack Havana CLI commands, see the Limitations on support
for OpenStack CLI commands appendix in the HP CloudSystem 8.0 Administrator Guide at
Enterprise Information Library.
• For a list of all OpenStack Havana CLI commands, see OpenStack Documention for Havava
releases.
Installing OpenStack CLIs on Linux
Prerequisite
• If using an ESX management hypervisor, the CS-client-CLI-8.0.0.2.rpm file is in the
cluster datastore.
• If using a KVM management hypervisor, the CS-client-CLI-8.0.0.2.msi is in the
/CloudSystem directory.
Procedure 17 Installing the OpenStack CLI on a LInux workstation
1. From a Linux workstation run:
yum install CS–client–CLI–8.0.0.2.rpm
The executable is installed under /usr/bin.
2. Open an SSH client and execute the CLI.
62 Command line interfaces
Page 63

See also
• For a list of unsupported OpenStack Havana CLI commands, see the Limitations on support
for OpenStack CLI commands appendix in the HP CloudSystem 8.0 Administrator Guide at
Enterprise Information Library.
• For a list of all OpenStack Havana CLI commands, see OpenStack Documention for Havava
releases.
Using CLI commands
csstart commands
Table 22 csstart commands
What it doesExampleCLI commandTask
accepting it
Create a sample
configuration file
Secure start of
csstart
save-eulaView the EULA before
create-config
[--config]
start [--config]
--os-cacert<filename>
--eula accepted
csstart save-eula
csstart create-config
csstart start --eula
accepted
This command saves a copy of
the EULA to your local
directory. Search for eula.html.
You can open the file and read
the EULA before accepting it.
This command creates the
configuration file. The default
name is deployer.conf.
The [--config] flag allows
you to create a unique name
for the file, if you don’t want to
use the default name.
Starts the Foundation base
appliance virtual machine and
checks the vCenter certificate
(ESX) or SSH key (KVM) before
creating the base appliance.
Certificates and keys are also
checked before starting the
other virtual appliances.
The [--config] flag allows
you to specify a configuration
file, if you didn’t use the default
deployer.conf name.
The
--os-cacert<filename>
flag identifies the file used to
verify the certificate or key.
The EULA is automatically
accepted.
See Installing CloudSystem on
an ESX cluster (page 26) for
instructions on pointing to the
certificate.
See Installing CloudSystem on
a KVM hypervisor (page 33)
for instructions on pointing to
the SSH key.
Semi-secure start of
csstart
start [--config]
--auto-accept-cert
--eula accepted
csstart start
--auto-accept-cert
--eula accepted
Automatically accepts the
vCenter Server certificate (ESX)
or SSH key (KVM) and uses it
to verify additional virtual
appliances started by the
Foundation base appliance.
Using CLI commands 63
Page 64

Table 22 csstart commands (continued)
What it doesExampleCLI commandTask
The [--config] flag
identifies the configuration file
if you chose not to use the
default deployer.conf file
name.
The EULA is automatically
accepted.
Insecure start of
csstart
Start a web server
listening on a specific
port
start [--config]
--insecure --eula
accepted
gui [--listen
ipaddr:port]
csadmin CLI and OpenStack CLI
csstart start
--insecure --eula
accepted
csstart gui [--listen
127.0.0.1:5000]
Starts the Foundation base
appliance without checking the
vCenter certificate (ESX) or SSH
key (KVM) before creating the
base appliance. Virtual
appliances are also started
without certificate checks.
The [--config] flag
identifies the configuration file
if you chose not to use the
default deployer.conf file
name.
The EULA is automatically
accepted.
The ipaddr:port defaults to
127.0.0.1:5000 which means
the webs server only listens to
a web browser running on the
local host. A very common
value for the listen flag is
--listen 0.0.0.0:5000.
The web server listens for
connections from any host,
such as your workstation.
For an explanation of csadmin CLI commands, see the Working with the csadmin CLI appendix
in the HP CloudSystem 8.0 Administrator Guide at Enterprise Information Library.
For a list of all OpenStack Havana CLI commands, see OpenStack Documention for Havava
releases.
Additional CLI tasks
• Using the csstart CLI to install the Foundation base appliance (page 64)
• Enabling REST API for storage drivers (page 66)
• Using the CLI to access the Enterprise console (page 66)
Using the csstart CLI to install the Foundation base appliance
Procedure 18 Using the csstart CLI to install the Foundation base appliance
1. Log in to the management hypervisor.
2. Run the command to create the deployer.conf configuration file:
./csstart create-config
This will create a sample configuration file. The default name is deployer.conf, but you can
specify a unique name by putting it inside the [--config] tag.
64 Command line interfaces
Page 65

3. Open the config file:
vi deployer.conf
4. Fill in the Hypervisor section of the configuration file. The hints provided in the configuration
file explain the hypervisor entries.
5. Fill in the Image file location section of the configuration file.
• If you created the /CloudSystem/images directory and placed images there, then
enter default for each image location. The configuration file hints show each default
location.
• If you created a different directory, then enter the actual path to the image location.
Example: /CloudSystem/templates/CS-SDN-8.0.0.20.qcow2
6. Fill in the Appliance setup section of the configuration file.
• Enter a new administrator password to use when accessing the CloudSystem Console.
• Enter a support access option. Enabled allows HP support to access your system in the
event of an error. Disabled will not allow access.
• Enter the amount of space to allocate to the Glance disk, in GBs.
7. Fill in the Appliance Networking section of the configuration file. The hints provided in the
configuration file explain the hypervisor entries.
8. Add the network configuration to the Network Mapping section. The information below
corresponds to the sample provided in the network infrastructure section.
IMPORTANT: The following information must match exactly the configuration you created
in the network infrastructure section. See, Configure the network infrastructure on the KVM
management hypervisor (page 36). You may alter this information to fit your specific
configuration needs as long as it corresponds to the setup you performed previously.
NOTE: Delete any trailing spaces after bridge names. The bridge names should not contain
any white space.
[Data Center Management Network]
bridge=”br-dc-mgmt”
[Cloud Management Network]
bridge=”br-cloud-mgmt”
[Cloud Data Trunk]
bridge=”br-cloud-trunk”
[External Network]
bridge=”br-external”
9. Save and close the configuration file:
:wq
10. Run the script to create the Foundation base appliance:
./csstart start --[type of security] --eula accepted
See csstart commands (page 63) for details on the secure, semi-secure or insecure mode for
csstart.
NOTE: You can modify the above command if you want to generate a log file, which is
helpful in the event of an error. Use ./csstart start —v --log-file <name of
log file>.
11. Verify that the Foundation base appliance was created on the management hypervisor:
The SDN appliance and network node appliances are created later after entering Cloud
Networking settings in the CloudSystem Console.
Additional CLI tasks 65
Page 66

IMPORTANT: Do not move or delete images after you create the Foundation base appliance. In
order to speed up virtual machine boot times and save disk space, csstart does not make a full
copy of the image. A copy is shared across all of the virtual machines.
See Troubleshoot installation issues (page 52).
Next step: Setting up the CloudSystem Console for the first time (page 44)
Enabling REST API for storage drivers
This is a condensed version of the OpenStack instructions. You can see the complete instructions
here: Enabling the HP 3PAR Fibre Channel and iSCSI Drivers
Prerequisites
• HP3PARFCDriver is installed with OpenStack software
• HP3PARISCSIDriver is installed with OpenStack software
Procedure 19 Enabling REST API for storage drivers
• Verify that the HP 3PAR WebServices API server is enabled and running on the HP 3PAR
storage system.
a. Using administrator credentials, log on to the HP 3PAR storage system:
#ssh 3parad@<HP EPAR IP Address>
b. Check the current state of the WebServices API server:
#showwsapi
c. If the WebService API server is disabled, then start it:
#startwsapi
d. If the HTTP or HTTPS state is disabled, enable one of them:
#setwsapi —http enable
#setwsapi —https enable
NOTE: If you need a list of WebService API commands, type setwsapi —h. A list of Web
Service commands will display.
Using the CLI to access the Enterprise console
You can log in to the Enterprise appliance and view configuration files and network properties
using the following commands:
• virsh console enterprise with root credentials gives you access to the Enterprise
appliance
• ifconfig shows all interfaces created for appliance
• Ctrl+Q exits the Enterprise console
66 Command line interfaces
Page 67

B Configuring additional providers for CloudSystem
Enterprise
HP Cloud Service Automation (HP CSA) is the administrative portal for the Enterprise appliance.
You can configure HP CSA to allow Enterprise to connect to HP Matrix Operating Environment
(Matrix OE), CloudSystem Foundation, and HP Operations Orchestration (OO) Central.
When Enterprise is installed, a CloudOS provider is already configured. This provider allows
Enterprise to provision instances in Foundation.
Use the procedures in this appendix to create additional connections between HP CSA, OO Central
and Matrix OE.
• Configuring HP Operations Orchestration to integrate with HP CSA (page 67)
• Importing Operations Orchestration flows (page 69)
• Importing a service design (page 70)
• Configuring a Matrix OE resource provider (page 71)
You can find a list of related HP CSA documentation in the Enterprise Information Library.
Configuring HP Operations Orchestration to integrate with HP CSA
OO Central is part of the CloudSystem Foundation base appliance. You can configure OO Central
to integrate with HP CSA. The required configuration steps are listed below.
• Configuring an internal user (page 67)
• Deploying required content packs to HP CSA (page 68)
• Deploying the HP CSA content pack (page 68)
• Configuring system accounts for the HP CSA content pack (page 69)
• Configuring system properties for the HP CSA content pack (page 69)
NOTE: In the following instructions, $CSA_HOME is the directory where HP CSA resides. In
Enterprise, $CSA_HOME = /ci/usr/local/hp/csa/.
In CloudSystem, SSL is already configured between HP CSA and OO Central.
Procedure 20 Configuring an internal user
The internal user configures OO Central for HP CSA and imports the OO flows. When importing
flows, this user is configured in the OO input file used by the process definition tool.
1. Log in to OO Central (https://<cs_foundation_ip_or_hostname>/oo).
2. Select System Workspace.
The System Workspace screen displays.
3. Select Security→Internal Users.
4. Click Add.
5. In the User Name field, type:
csaoouser
6. In the Password field, type:
cloud
7. In the Roles field, type:
ADMINISTRATOR, SYSTEM_ADMIN
8. Click Save.
9. Log out of OO Central and log back in as the internal user csaoouser.
Configuring HP Operations Orchestration to integrate with HP CSA 67
Page 68

Procedure 21 Deploying required content packs to HP CSA
Download the following content packs from HP Live Network – Operations Orchestration to a
Windows or Linux staging server.
• oo10-sm-cp-1.0.0
• oo10-sa-cp-1.0.2
IMPORTANT: Make sure to deploy theses required content packs before deploying the HP CSA
content pack.
1. From OO Central, select Content Workspace.
The Content Workspace displays.
2. From the Flow Library tab, select Deploy New Content.
The Deploy New Content dialog displays.
3. Click Add.
4. Browse to the staging server that contains the content packs you downloaded from HP Live
Network.
The staging server can be a Windows or Linux server.
5. Select oo10-sm-cp-1.0.0 and click Open.
6. Click Deploy.
NOTE: The deployment can take several minutes. The cursor displays the “busy” icon during
deployment.
You can find information about the success of the deployment in the Deployment Result section.
7. Repeat steps 3-6 for the oo10-sa-cp-1.0.2 content pack.
8. Click the Close button to return to the Content Workspace.
Procedure 22 Deploying the HP CSA content pack
Make sure the required content packs are deployed in OO before you complete this procedure.
1. Copy the $CSA_HOME/CSAKit-4.0/OO Flow Content/oo10-csa-cp-4.0.0.jar
file from the Enterprise appliance to your staging server.
a. From the Enterprise appliance console, enable the cloudadmin user access through the
csadmin command line interface (CLI).
See the Working with csadmin appendix in the HP CloudSystem 8.0 Administrator Guide
at Enterprise Information Library.
b. When enabled, log in to the Enterprise appliance console as cloudadmin.
c. Copy the $CSA_HOME/CSAKit-4.0/OO Flow Content/oo10-csa-cp-4.0.0.jar
file from the Enterprise appliance to the staging server:
scp /ci/usr/local/hp/csa/CSAKit-4.0/OO Flow Content/
oo10-csa-cp-4.0.0.jar user@destination:file_path
2. From the CloudSystem Console, select Integrated Tools.
3. Log in to OO Central and navigate to Content Workspace.
4. Select Deploy New Content.
5. Click Add.
6. Select the oo10-csa-cp-4.0.0 content pack and click Open.
7. Click Deploy.
NOTE: The deployment may take several minutes. The cursor displays the “busy” icon during
the deployment.
You can find information about the success of the deployment in the Deployment Result section.
8. Click Close to return to the Content Workspace.
68 Configuring additional providers for CloudSystem Enterprise
Page 69

Procedure 23 Configuring system accounts for the HP CSA content pack
There are three system accounts that must be set up to support the HP CSA content pack.
1. From the Content Workspace in OO Central, select Configuration Items→System Accounts.
2. Click Edit.
3. In the System Account Name field, type:
CSA_REST_CREDENTIALS
4. In the User Name field, type:
ooInboundUser
NOTE: The User Name configured for the SA_REST_CREDENTIALS System Account setting
must match the Override Value configured for the CSA OO_USER System Property setting.
5. In the Password field, type:
cloud
6. Click Save.
7. Click Edit.
8. In the System Account Name field, type:
CSA_SERVICEMANAGER_CREDENTIALS
9. In the User Name field, type:
falcon
10. Leave the Password field blank.
11. Click Save.
Procedure 24 Configuring system properties for the HP CSA content pack
1. From the Content Workspace in OO Central, select Configuration Items→System Accounts.
2. Click Edit.
3. In the Name field, type CSA_REST_URI.
4. In the Override Value field, type
https://ENTERPRISE_APPLIANCE_IPADDRESS_OR_FQDN/csa/rest.
5. Click Save.
Importing Operations Orchestration flows
OO flows are imported to HP CSA with the Process Definition Tool. This tool creates an HP CSA
process definition for every imported OO flow. The process definitions are associated with a
process engine, which corresponds to the OO system containing the imported flows. HP CSA uses
the flows to perform lifecycle actions and submit delegated approvals.
• Creating a database properties file (page 69)
• Creating an Operations Orchestration input file (page 70)
• Running the process definition tool (page 70)
TIP: HP recommends that you generate sample database properties files and an input file. Use
the following steps to create these files.
Procedure 25 Generating sample database properties files and an input file
1. Navigate to the $CSA_HOME/Tools directory.
2. Run the command:
sudo /ci/usr/local/hp/csa/openjre/bin/java -jar ProcessDefinitionTool/process-defn-tool.jar -g
Procedure 26 Creating a database properties file
1. Navigate to the $CSA_HOME/Tools directory.
Importing Operations Orchestration flows 69
Page 70

2. In the working directory, make a copy of the PostgreSql sample database properties file,
and rename the copy to db.properties: sudo cp
PostgreSqlInputSample.properties db.properties
3. Edit the db.properties file and make the following name changes:
• db.url=jdbc:postgresql://127.0.0.1:5432/csadb to
db.url=jdbc:postgresql://127.0.0.1:5432/csa
• db.user=csadbuser to db.user=csa
• db.password=ENC(UUV/PSwS9If1NURGsObYPQ==) to db.password=csa
4. Save and close the file.
Procedure 27 Creating an Operations Orchestration input file
This procedures uses the sample files that were generated when you performed the tip above. If
you did not follow the tip instructions, complete them now.
1. In the working directory ($CSA_HOME/Tools), make a copy of the sample input file
HPOOInputSample.xml and rename it to HPOOInfoInput.xml: sudo cp
HPOOInputSample.xml HPOOInfoInput.xml.
2. Update the following attributes and values for all ooengine entries in the
HPOOInfoInput.xml file:
• truststore="/ci/usr/local/hp/csa/openjre/lib/security/cacerts”
• url=”https://<foundation_ipaddress_or_hostname>/PAS/services/WSCentralService”
• username="csaoouser”
• password=" cloud”
• Truststorepassword: “changeit”
3. Save and close the file.
Procedure 28 Running the process definition tool
• Execute the following commands from the Enterprise appliance to run the process definition
tool:
• cd /ci/usr/local/hp/csa/Tools
• sudo /ci/usr/local/hp/csa/openjre/bin/java -jar
process-defn-tool.jar -d db.properties -i HPOOInfoInput.xml
Importing a service design
Use the Cloud Service Management Console to import a service design.
Procedure 29 Importing a service design
1. Copy all content in the CSA_HOME/CSAKit-4.0/Content Archives folder from the
Enterprise appliance to a staging server.
a. Log in to the Enterprise appliance console as cloudadmin.
See the Working with csadmin appendix in the HP CloudSystem 8.0 Administrator Guide
at Enterprise Information Library.
b. Copy the CSA_HOME/CSAKit-4.0/Content Archives folder to an external device.
From there it can be imported to HP CSA.
c. Run the following copy command:
scp /ci/usr/local/hp/csa/CSAKit-4.0/Content Archives/
<file_path> user@destination:file_path
2. From the CloudSystem Console, select Enterprise.
3. From the Tools pane, select Cloud Service Management Console.
4. Navigate to Designs→Sequenced.
5. Select Import and browse to the folder you copied in step 1.
70 Configuring additional providers for CloudSystem Enterprise
Page 71

6. Click Import.
NOTE: For additional information about the process definition tool, see HP Cloud Service
Automation – Process Definition Tool in the Enterprise Information Library.
Configuring a Matrix OE resource provider
After importing a service design to Enterprise, you are ready to configure additional providers,
such as Matrix OE.
Use the HP CSA documentation to help you complete the following steps:
• Define additional resource providers.
• Associate resource offerings (like the ones imported in the previous section) to the appropriated
provider (Matrix OE resource offerings with Matrix OE resource providers).
Refer to the Enterprise Information Library for HP CSA documentation on configuring a Matrix OE
resource provider.
Configuring a Matrix OE resource provider 71
Page 72

C Configuring a large-scale CloudSystem deployment
In a large-scale deployment, CloudSystem Foundation can manage over 4,000 virtual machine
instances. To support this type of deployment, HP recommends that you update the maximum heap
size parameter of the jetty-Atlas Java web server on the Foundation base appliance.
The best practice is to perform the procedure in this section after the Foundation base appliance
is successfully deployed using cssstart, and before CloudSystem is made available for use by
end users.
See also“Working with the csadmin CLI” in the HP CloudSystem 8.0 Administrator Guide at
Enterprise Information Library.
Prerequisites
• Minimum required privileges: Infrastructure administrator
• The csadmin CLI package is installed on the CloudSystem Foundation base appliance.
Procedure 30 Updating the maximum heap size of the jetty-Atlas Java web server
1. From the csadmin CLI, enable the cloudadmin user access on the Foundation base appliance.
2. Open the VNC Console terminal window to the Foundation base appliance.
3. Log in as the cloudadmin user.
4. Change the maximum heap size for the jetty-Atlas Java web server from –Xmx512m to
–Xmx750m.
Example:
[cloudadmin@Basehost ~]$ sudo vi /ci/etc/jvm.d/jetty-Atlas
[cloudadmin@Basehost ~]$ cat /ci/etc/jvm.d/jetty-Atlas
-Xss256k
-Xms256m
-Xmx750m
-XX:PermSize=128m
-XX:ReservedCodeCacheSize=32m
-XX:+UseCompressedOops
-verbose:gc
-XX:+PrintGCDetails
-Xloggc:/ci/jetty-Atlas/logs/gc.log
-XX:+UseGCLogFileRotation
-XX:NumberOfGCLogFiles=2
-XX:GCLogFileSize=1m
5. Save the changes.
6. Restart the jetty-Atlas Java web server using the following command:
[cloudadmin@Basehost ~]$ sudo crm resource restart JettyAtlas
72 Configuring a large-scale CloudSystem deployment
 Loading...