

Page 1
HP CLASSROOM MANAGER
Empowering teachers, engaging students
QuickStart Guide for Teachers
Page 2

Page 3

© Copyright 2011 Hewlett-Packard
Development Company, L.P.
The information contained herein is subject
to change without notice. The only
warranties for HP products and services are
set forth in the express warranty statements
accompanying such products and services.
Nothing herein should be construed as
constituting an additional warranty. HP shall
not be liable for technical or editorial errors
or omissions contained herein.
First Edition: May 2011
Document Part Number: 653103-001
Page 4

Table of contents
1 Welcome .......................................................................................................................................................... 1
Teacher view ........................................................................................................................................ 2
Identifying the Classroom Manager control window ............................................................ 3
Identifying the top toolbar icons ........................................................................................... 4
Identifying the side toolbar icons ......................................................................................... 5
Student view ......................................................................................................................................... 6
Finding more information ...................................................................................................................... 7
Upgrading your software ...................................................................................................................... 7
Evaluating the full-featured version of Classroom Manager ................................................ 7
Upgrading Classroom Manager ........................................................................................... 8
2 Working with students ................................................................................................................................. 10
Planning your class ............................................................................................................................ 10
Registering a student ......................................................................................................... 10
Creating a registration report ............................................................................ 11
Creating a lesson plan ....................................................................................................... 11
Browsing the Internet with students ................................................................................................... 11
Sending and collecting files ................................................................................................................ 12
Sending files ...................................................................................................................... 12
Collecting files .................................................................................................................... 12
Chatting and sending messages ........................................................................................................ 13
Chatting with students ....................................................................................................... 13
Sending messages to students .......................................................................................... 13
Creating pre-set messages ............................................................................... 13
Showing your screen to students ....................................................................................................... 14
Creating student journals ................................................................................................................... 14
3 Using Multimedia Features .......................................................................................................................... 15
Showing videos to the class ............................................................................................................... 15
Using audio features .......................................................................................................................... 16
Adjusting the volume ......................................................................................................... 16
Monitoring students' audio activity ..................................................................................... 16
Making an announcement ................................................................................................. 17
Using the virtual whiteboard ............................................................................................................... 17
Creating a whiteboard leader ............................................................................................. 17
Capturing images ............................................................................................................................... 18
iii
Page 5

4 Testing and surveys ..................................................................................................................................... 19
Using the Test Designer ..................................................................................................................... 19
Using the Testing Console ................................................................................................................. 19
Creating surveys ................................................................................................................................ 19
Sending surveys ................................................................................................................ 20
Showing survey results ...................................................................................................... 20
Saving survey results ......................................................................................................... 20
Printing survey results ....................................................................................................... 20
5 Managing students' computers ................................................................................................................... 21
Locking and unlocking students' keyboards and mice ....................................................................... 21
Blanking students' screens ................................................................................................................. 21
Monitoring key words ......................................................................................................................... 21
Creating a word list ............................................................................................................ 22
Controlling Web access ...................................................................................................................... 22
Controlling mass storage devices ...................................................................................................... 22
Blocking access to storage devices ................................................................................... 23
Creating read-only access to storage devices ................................................................... 23
Printing ............................................................................................................................................... 23
6 Power Management ...................................................................................................................................... 24
Turning on students' computers ......................................................................................................... 24
Turning off students' computers ......................................................................................................... 24
Logging in students ............................................................................................................................ 24
Restarting students' computers .......................................................................................................... 25
Appendix A Glossary ....................................................................................................................................... 26
Index ................................................................................................................................................................... 28
iv
Page 6
1Welcome
The following sections are included in this chapter:
Teacher view
●
Student view
●
●
Finding more information
●
Upgrading your software
HP Classroom Manager is a digital toolkit that empowers you to create and manage your classroom
from a centralized location. With the easy-to-learn software, you can streamline lesson plans, get
more control over the classroom, use enhanced audio and visual tools, and make learning more
collaborative and more fun.
NOTE: This guide describes features included in the full-featured software version. To make sure
that you are using the full-featured version, refer to
information.
NOTE: The information in this guide applies to the standard version of Classroom Manager and
some features may not apply to an HP MultiSeat environment.
Here are some of the things you can do with Classroom Manager:
Upgrading your software on page 7 for more
Plan, prepare, and conduct your classes
●
Create lesson plans for each class
◦
Pre-schedule activities and resources for students
◦
Create and print classroom layouts
◦
Register and track students in each class
◦
Collaborate in real time
●
Communicate with multiple students and teachers outside the classroom
◦
Distribute files to one or more students' computers
◦
View students' screens to track lesson progress
◦
Request information from students
◦
Streamline testing
●
Distribute, collect, and grade tests
◦
Distribute and collect files and folders
◦
Use the journal feature to capture all items relating to a subject and compile them into a
◦
PDF file
Control students' computers and devices
●
Remotely log students' computers on and off
◦
Monitor chat and instant messaging on all computers
◦
1
Page 7

Blank student screens and lock keyboards and mice to get the students' attention
◦
◦ Control access to printers and other devices
Control access to Web sites
◦
Enhance audio and video instruction
●
◦ Broadcast audio and show video to your students
◦ Record and play back audio
Monitor student audio activity
◦
Control access to USB drives, CDs, and DVDs on students' computers
◦
◦ Use the collaborative virtual whiteboard to draw diagrams, annotate charts, and encourage
student interaction
Teacher view
To open HP Classroom Manager teacher view:
Double click the HP Classroom Manager Tutor Console icon on your desktop.
–or–
Select Start > All Programs > HP Classroom Manager > HP Classroom Manager Tutor Console.
2 Chapter 1 Welcome
Page 8
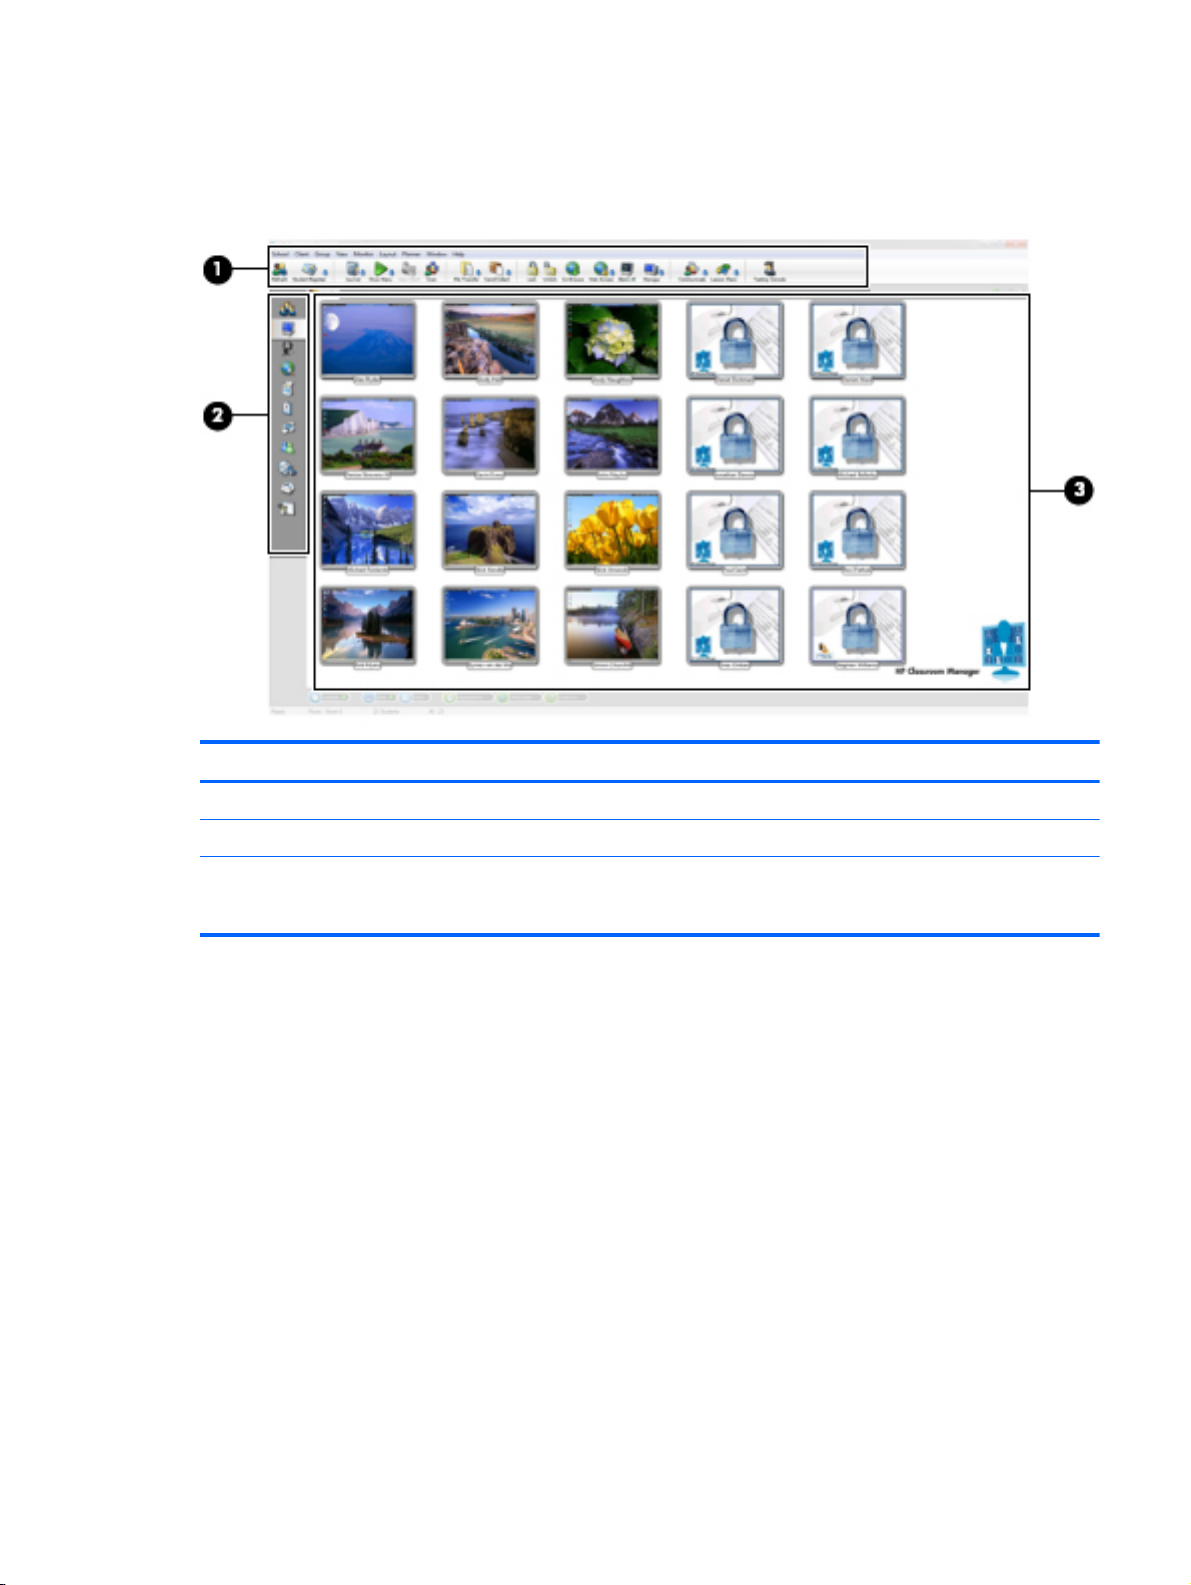
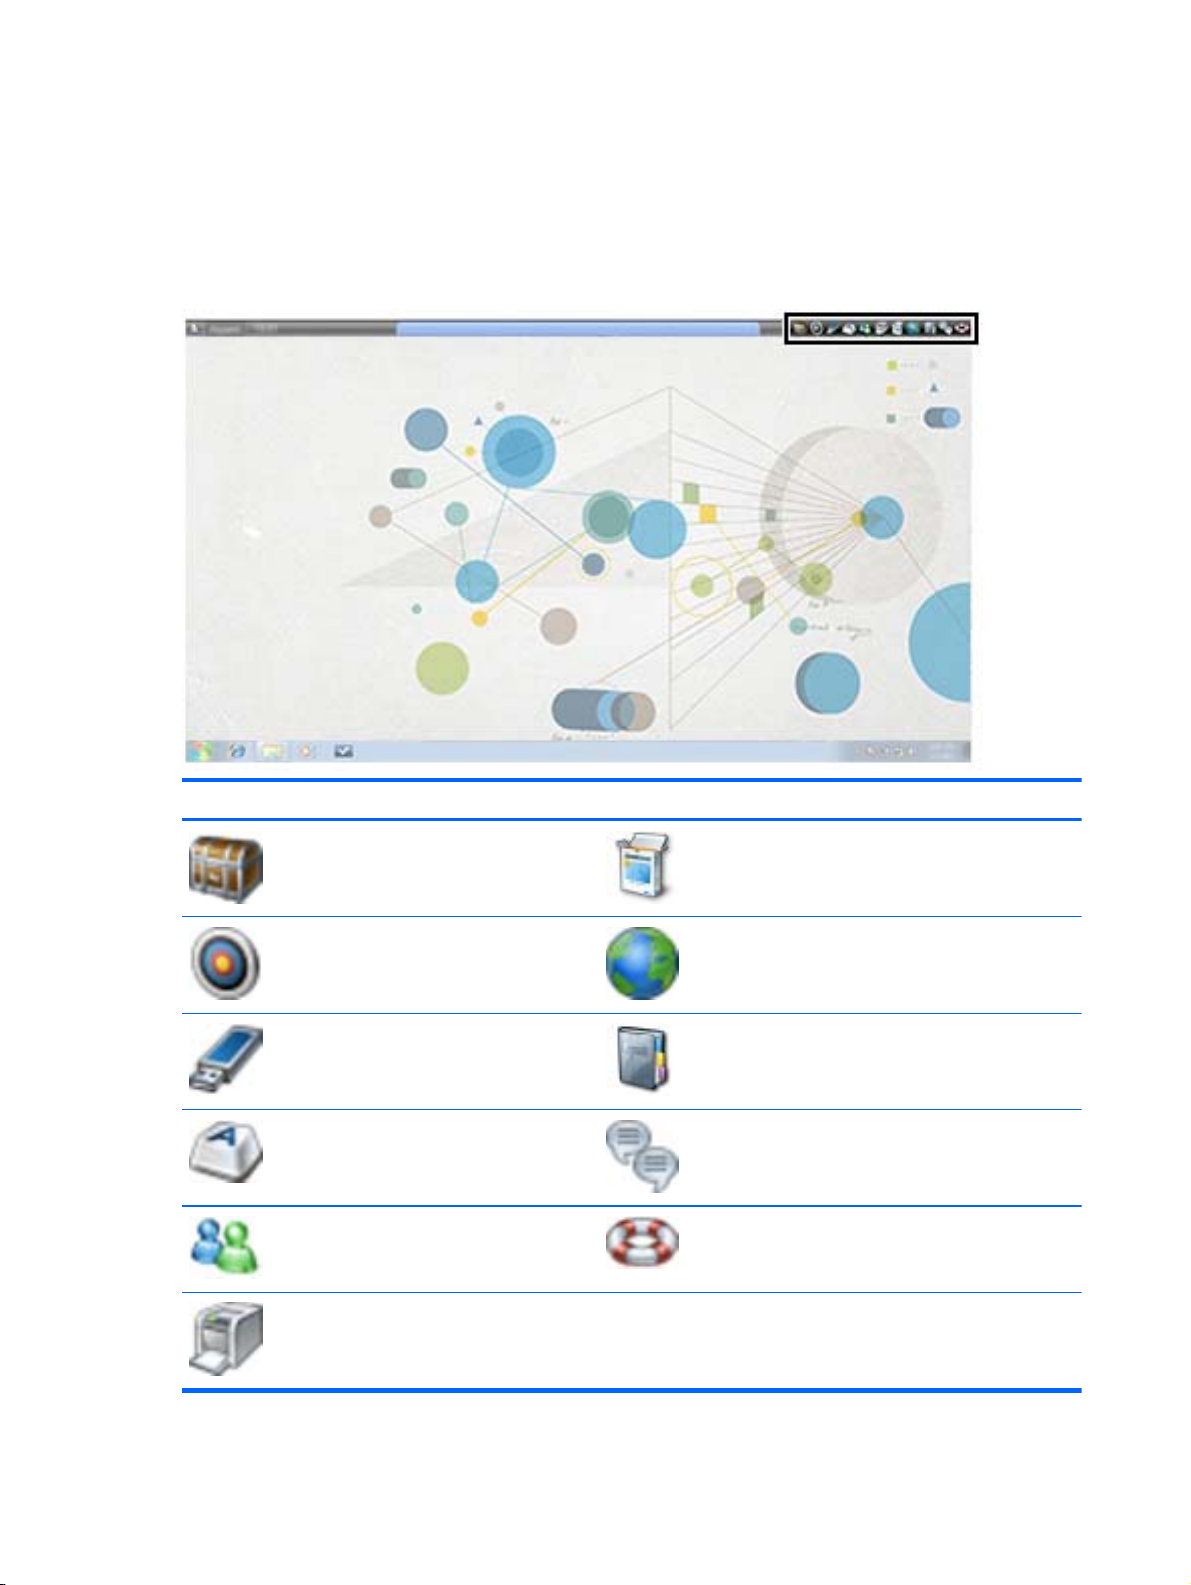
Identifying the Classroom Manager control window
In Classroom Manager, the control window is the primary workspace for connecting to students,
maintaining information, and selecting the actions you want to perform.
View Description
(1) Top toolbar Allows you to perform selected actions on one or more students' computers.
(2) Side toolbar Allows you to select a specific feature set.
(3) Control window Displays a thumbnail or icon of each student computer. Enables you to select either
an individual student, a group of students, or all students to interact and collaborate
with.
Teacher view 3
Page 9
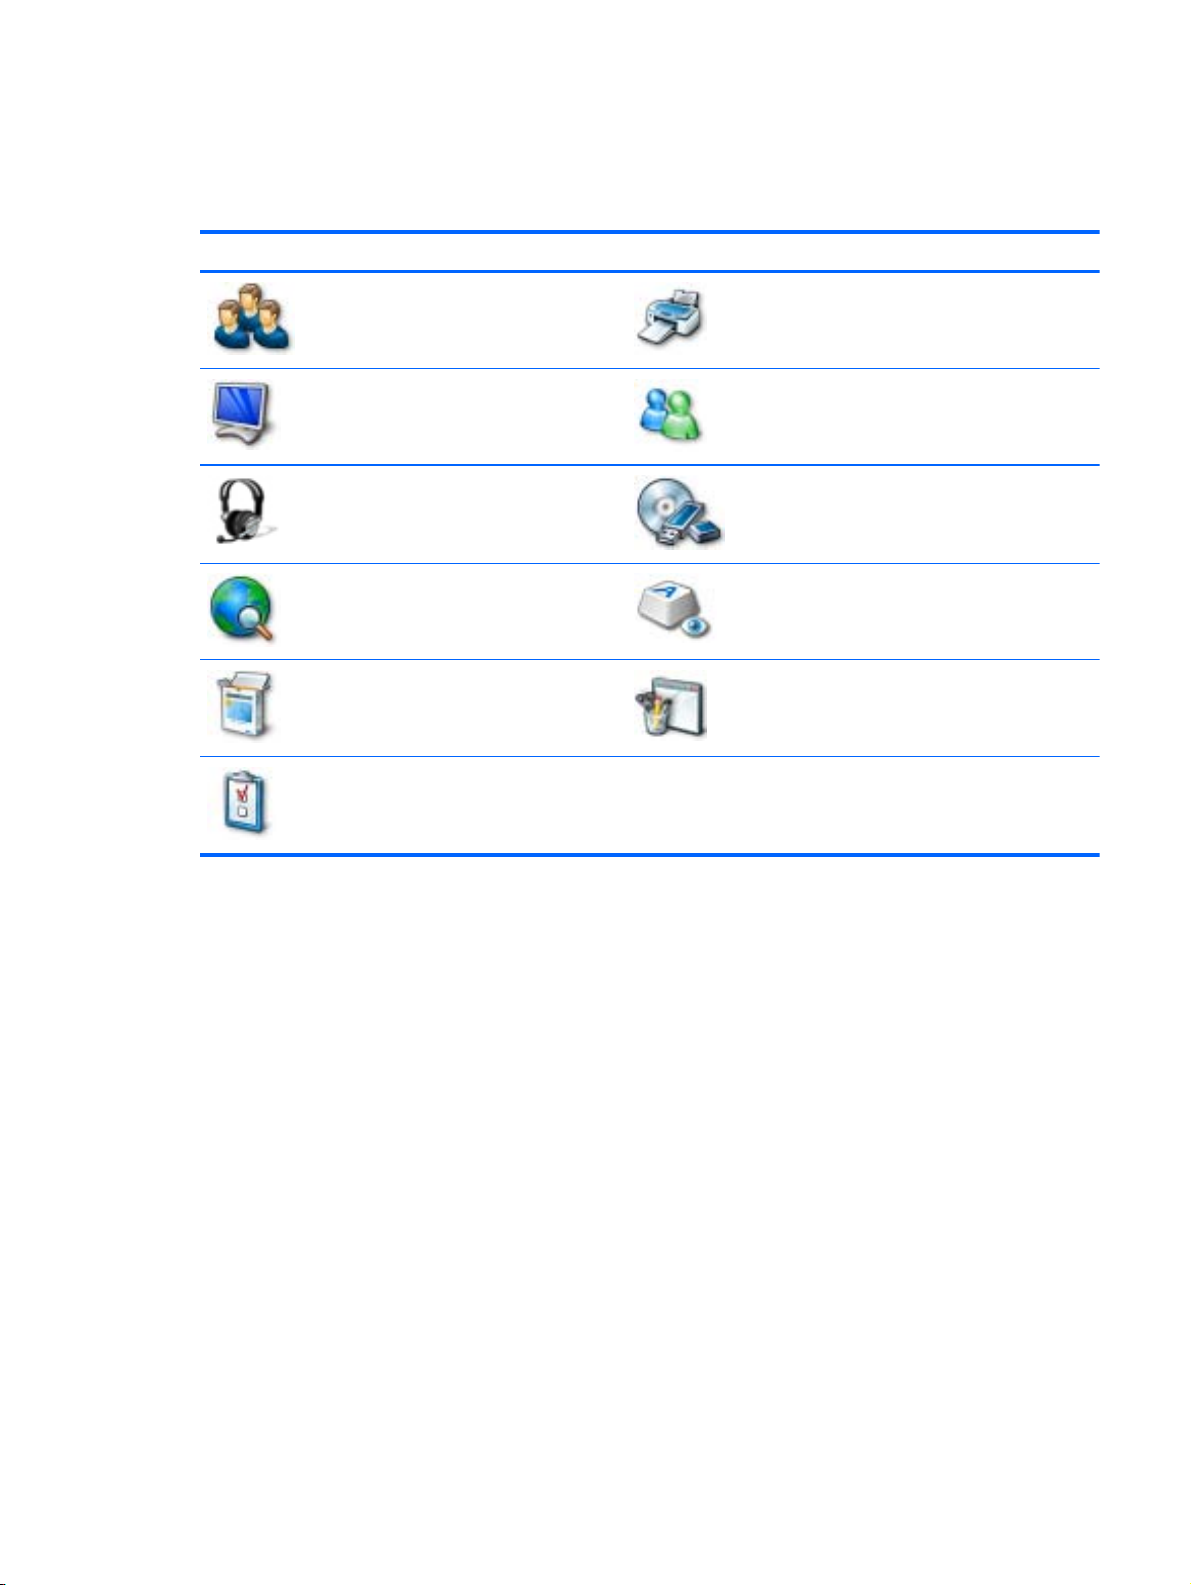
Identifying the top toolbar icons
These options allow you to perform actions on one or more students' computers. The top toolbar is
located on the top of the control window.
Icon Function Icon Function
Refresh—Refresh the list of
students.
Student Register—Sign in and sign
out students and create registration
reports.
Journal—Manage students' journals. Web Access—Set Web access permissions.
Show Menu—Show videos and
applications to your students.
View Client—View the selected
student's screen.
Scan—Scan through the connected
students.
File Transfer—Manage and
distribute files to your students.
Unlock—Unlock selected students' mice and
keyboards.
Co-Browse—Browse the Web with your students.
You can navigate across a Web site and the
students' computers will follow.
Blank All—Blank the screens of all students'
computers.
Manage—Manage power of your students'
computers. You can turn on, turn off, restart, log in,
and log out selected computers.
Communicate—Communicate with your students.
You can chat, send instant messages (IM), send an
announcement, and create preset messages.
Lesson Plans—Manage your lesson plans.
Send/Collect—Send work to your
students and collect work from them.
Lock—Lock selected students' mice
and keyboards.
4 Chapter 1 Welcome
Testing Console—Launch tests on students'
computers.
Upgrade—Evaluate the full-feature program or
purchase the full-feature license key.
Page 10
Identifying the side toolbar icons
These options allow you to perform selected functions on students' computers. The side toolbar is
located on the left side of the control window.
Icon Function Icon Function
Student List—Display the list of
students.
Monitor Students—Monitor
students' computers.
Audio Activity—Monitor and
record students' audio activity.
Web Site Access—Manage Web
site access.
Student Applications—Manage
students' programs.
Student Surveys—Manage
student surveys.
Printer Management—Manage students' printer
settings.
Instant Messenger—Monitor students' IM status.
Device Control—Control access to audio, USB,
CD, and DVD devices.
Keyboard Input—Monitor students' keyboard
input.
Interactive Whiteboard—Draw diagrams,
annotate charts and images, and pass access to
students so they can collaborate directly onto the
whiteboard.
Teacher view 5
Page 11
Student view
The student toolbar, located at the top of each student's screen, provides a quick and convenient way
for students to participate in class and access the resources required for a given lesson. The toolbar
provides key information to the class throughout the lesson, such as class details, objectives, time
remaining, available Web sites and applications the students are approved to use, and student
rewards.
Icon Function Icon Function
Resources—Enables the student
to view different resources, such as
Word documents and, Web pages.
Lesson Objective—Shows the
objective for the lesson.
USB Access—Allows student to
access USB drive and indicates
status.
Keyboard Monitor—Shows
students whether keyboard input is
being monitored.
IM Status—Shows students
whether IM is being monitored.
Printer Status—Advises students
of the current printing restrictions.
Applications—Advises students of the current
application status.
Web Access—Advises students of current Web
restrictions.
Student Journal—Opens the student's journal and
enables them to add notes and screenshots.
Chat—Request a chat with you or the class.
Help—Request help from the teacher.
6 Chapter 1 Welcome
Page 12

Finding more information
There are several resources available to help you fully experience Classroom Manager and perform
various tasks within the software.
Resources For information about
Software Help
To access the software Help, open Classroom
Manager, and then click Help > Contents.
HP Web site
To access this Web site, go to
hpclassroommanager.
http://www.hp.com/go/
Provides detailed information about using this software.
Help topics for you:
Identifying and using the software components
●
Using the multimedia features
●
● Creating and deploying tests and quizzes
Help topics for the administrator:
Installing the software
●
Deploying the software
●
Configuring teacher and student computers
●
Using the Tech Console
●
NOTE: In the software, the word Tutor is used for Teacher, and
the word Client is used for Student.
Provides you with quick and easy access to the following:
Product overview
●
Recommended educational products
●
Software downloads and upgrading your software
●
● Product demo—Learn more about the possibilities and
benefits of Classroom Manager while demonstrating
everyday tasks and features.
NOTE: The product demos are in English only.
Upgrading your software
Evaluating the full-featured version of Classroom Manager
After you install Classroom Manager Lite, you can upgrade to the full-featured version for a free 30day evaluation period, or purchase a valid license key to continue using the full-featured version.
NOTE: If you do not see the Upgrade icon on the top toolbar, click Help > Apply License.
To activate the 30-day evaluation copy:
1.
Open Classroom Manager, and then click on the Upgrade icon
2. Select Evaluate to try the full-featured software for 30 days, or select Upgrade to purchase the
full-featured license key.
on the top toolbar.
Finding more information 7
Page 13

Upgrading Classroom Manager
To continue to use the full-featured version of Classroom Manager after your 30-day evaluation
period or to upgrade during this evaluation period, you will need to purchase a valid license key.
To upgrade your software:
1. Go to
http://www.hp.com/go/hpclassroommanager and follow the instructions on how to
purchase a license key.
NOTE: After you purchase the software, you will be sent an e-mail with a link to enter your
entitlement number on a Web site. You will then receive an e-mail with the license key
information. You will need this key when entering the information in the Classroom Manager
License Manager.
2. Open Classroom Manager, and then click Help..
3. Select Apply License, and then select Enter Details.
The HP Classroom Manager License Manager dialog opens.
Item Description Item Description
(1) Serial Number (3) Licensee Name
(2) Maximum Clients (4) Authorization Key
4. Enter the information and authorization key in the fields exactly as shown on the license that was
sent to you.
NOTE: This information is case sensitive.
8 Chapter 1 Welcome
Page 14

5. Click Generate.
6. Click Activate to apply to all listed students.
Upgrading your software 9
Page 15

2 Working with students
The following sections are included in this chapter:
Planning your class
●
Browsing the Internet with students
●
●
Sending and collecting files
●
Chatting and sending messages
Showing your screen to students
●
Creating student journals
●
Classroom Manager encourages student participation, collaboration, and the safe use of technology.
With these features, teachers are able to help students stay on track.
Planning your class
Classroom Manager makes it easy to plan your class and keep your students focused. You can
encourage continuous assessment and be more productive.
With these features, you can make planning your class much easier.
Register students with standard and custom information at the start of class.
●
Create interactive lesson plans with shared content.
●
Share resources with selected students or the entire class.
●
Registering a student
When you register a student at the beginning of the class you can create a custom registration form
that will prompt students for their information. You can also request custom information that is unique
to your school. Registration reports can also be generated that provide student details.
To prompt students to register:
1.
Click the Student Register icon
2. Select the information that the student will be required to complete.
NOTE: The information in the student registration is fully customizable.
To unregister students:
▲
Click the Student Register icon
on the top toolbar, and then click Sign In.
on the top toolbar, and then click Sign Out.
10 Chapter 2 Working with students
Page 16

Creating a registration report
You can create reports that provide information on student details and printer usage.
To create a registration report:
▲
Click the Student Register icon
Creating a lesson plan
Lesson plans enable you to structure lessons around a pre-defined set of tasks for each plan. When
creating your lesson plan, you can pre-schedule activities and resources for the class, track lesson
progress in real-time, and share plans with other teachers.
When you create a lesson plan, you can edit and execute the plan through the Classroom Manager
toolbar. When a lesson plan is executed, the Lesson Plan bar appears that shows the progress. At
any point during the lesson you can use the tools on the Lesson Plan bar to pause, skip, fast forward,
or stop the lesson.
To create a lesson plan:
on the top toolbar, and then click Registration Report.
1.
Click the Lesson Plans icon
The Lesson Plans window is displayed.
2. From the Available Items list, drag the required task and drop it into the window, and then enter
any additional information that is required.
3. Click OK, and then click Yes to save the lesson plan.
on the top toolbar, and then click Manage Plans.
Browsing the Internet with students
The co-browse feature provides you and the student, group of students, or entire class with a shared
Web browser. This enables you to control Web browsing during your lesson and guide the students
through Web pages. When you co-browse, the students' computers are locked so they can only view
the pages that you open.
To browse the Internet with the students:
1. Select the students that you want to include in the lesson.
2.
Click the Co-Browse icon
3. The Co-Browse window opens on both your computer and the students'. From here, you can
open Web pages and create new tabs that allow you to navigate between Web pages.
4. Use the lock, restrict, and free options to control whether the students' computers follow your
selections. You can view the Web pages you have made available or you can use the Web
browser with no restrictions.
on the top toolbar.
Browsing the Internet with students 11
Page 17

Sending and collecting files
You can electronically send pre-prepared work files to students' computers and collect the files from
them.
● Distribute files and folders from your computer to multiple students' computers.
● Transfer files to and from a selected computer in a single action.
Hand out and automatically collect files with each student's details appended.
●
Distribute files to multiple computers in a single action.
●
NOTE: For more information on sending and collecting files, refer to the software Help. Click
Contents > Help > Sending and Collecting Work Files.
Sending files
You can send files to all connected students or a pre-defined group of students.
To send files:
1.
Click the Send/Collect icon
The Quick Send window opens.
2. Click Browse to locate the file(s) you want to send.
on the top toolbar, and then click Send Work.
3. Select the location where you want to place the files on the student's computer from the drop-
down menu.
4. Click Send.
Collecting files
You can electronically collect the files you sent from students at the end of a lesson.
To collect the files:
1.
Click the Send/Collect icon
The Quick Collect window opens.
2. Type the name of the file you want to collect in the Collect files field.
3. Using the drop down menu, select the location on the student's computer where you want to
collect the files.
4. Click Browse to select the location on your computer where you want to save the files.
5. Click Collect.
on the top toolbar, and then click Collect Work.
12 Chapter 2 Working with students
Page 18

Chatting and sending messages
Open a discussion session that all or selected students can join.
Chatting with students
Classroom Manager allows you to chat with any number of students simultaneously.
To chat with students:
1.
Click the Communicate icon
The Chat Properties window is displayed.
2. Select the students that you want to include in the Chat session, and then click OK.
The Chat window is displayed on both your computer and the selected students' computers.
Sending messages to students
You can send messages to individual students or the entire class.
NOTE: If you send the same message on a regular basis, you can create up to four pre-set
messages.
To send a new message:
on the top toolbar, and then select Chat.
1.
Click the Communicate icon
The Message window is displayed.
2. Select the recipient (s) of the message and then type the message.
3. Click Send.
Creating pre-set messages
You can create up to four pre-set messages that you can store and quickly broadcast to students.
1.
Click the Communicate icon
Messages.
2. Type your message in one of the message boxes and set any additional message properties.
3. Click OK.
on the top toolbar, and then click Message.
on the top toolbar, and then click Manage Pre-set
Chatting and sending messages 13
Page 19

Showing your screen to students
The Show feature allows you to show your screen to all students in your class, show a selected
screen (if you use multiple monitors), or even show a selected application.
To show your screen to students:
1.
Click the Show Menu icon
The Show options are displayed.
2. Select the students to whom you want to show your screen.
3. Click Show.
4.
To exit, select the Show Menu icon
on the top toolbar, and then click Show.
in the notification area and click End.
Creating student journals
A student journal is a digital record of key information that was covered during class. During a typical
class, all appropriate items relating to the subject can be captured and automatically included in a
PDF file for review by each student. The student journal also offers a welcome summary for any
students who were absent from a lesson as well as a structured summary of activity for you.
NOTE: A PDF Reader is required to view the student journal.
The student journal allows you to store the following activities ready for a student to review after
class:
Lesson details and objectives
●
Teacher and individual student notes
●
Screenshots from within a presentation and supporting explanation
●
Class or group survey results
●
Virtual whiteboard screens
●
Individual student test results
●
URLs of Web sites used during the lesson
●
Copies of any class Chat transcripts
●
Messages sent to students
●
To start student journals:
1.
Click the Journal icon
2. In the Start Journal window, enter the teacher name and lesson title, and then click OK.
Information automatically begins collecting and is saved as a PDF file.
on the top toolbar, and then select Start Journal.
14 Chapter 2 Working with students
Page 20

3 Using Multimedia Features
The following sections are included in this chapter:
Showing videos to the class
●
Using audio features
●
●
Using the virtual whiteboard
●
Capturing images
Classroom Manager's range of multimedia features provides both you and the student with the tools
to instruct and learn both visually and audibly. The multimedia features include:
● Showing videos to the class
Real-time audio monitoring and playback
●
Virtual whiteboard
●
● Capturing images
Showing videos to the class
With the Classroom Manager video player, you can show a video file to selected students or the
entire class. The video player supports full audio, video, and remote control capabilities. This can
enhance your lessons and aid in class demonstrations.
NOTE: All mainstream video files are supported. For optimum performance, store the video files
locally on each computer. You can use the File Distribution feature to do this.
To show a video file on students' computers:
1.
Click the Show Menu icon
2. Click Open and browse to the video file that you want to show the students.
3. Select the students to whom you want to show the video.
NOTE: To select all students at one time, click These Clients. To exclude a student from the
show, remove the check mark next to the student.
4. Click Show.
NOTE: While the video is showing, the students' computers are locked.
on the top toolbar, and then select Show Video.
Showing videos to the class 15
Page 21

Using audio features
The Classroom Manager audio features include:
Adjusting the student microphone and speaker volume
●
Monitoring and record student audio activity
●
Sending audio announcements to the class
●
NOTE: Your computer must have audio hardware and software installed for some of the audio
features to work.
Adjusting the volume
You can adjust the audio settings in Classroom Manager for both your computer and the students'
computers.
1. To adjust the volume:
2.
Click the Audio Activity icon
3. Click the Volume icon on the bottom of the Control Window.
4. Use the sliders to adjust the volume, lock student volume, or mute the sound for both your
computer and the students' computers.
NOTE: To view and configure additional audio settings, click View > Current Settings. Select
Audio to open the audio settings window.
on the side toolbar.
Monitoring students' audio activity
Monitoring students' audio activity allows you to listen to microphone or speaker activity on a selected
student's computer. You can also record the audio activity and play it back for the students or
yourself.
NOTE: If the student toolbar is enabled, students will be notified that the audio is being monitored.
This notification can be disabled if required.
To listen to student audio:
1. Select the student whose audio activity you want to monitor.
2.
Click the Audio Activity icon
3. Click the Listen icon on the bottom of the Control Window to begin listening to the student.
4. Click the Stop icon on the bottom of the Control Window to stop listening.
To record students' audio activity:
1. While listening to the students' audio activity, click the Record button in the Audio Playback
window at the bottom of the Control Window.
The Audio Playback window shows that you are now recording the audio.
2. Click the Stop button in the Audio Playback window to stop recording the audio.
3. To play back the recorded audio, click Recordings in the Audio Playback window.
on the side toolbar.
4. Double-click the audio file that you want to play back.
16 Chapter 3 Using Multimedia Features
Page 22

Making an announcement
You can send an announcement using the computer's internal microphone and speakers to the entire
class or selected students' computers. Students will be able to hear you, but will not be able to speak
back.
To make an announcement:
1.
Click the Communicate icon
2. Select the students to whom you want to send an announcement.
NOTE: To select the entire class at one time, click These Clients. Removing the check mark
next to a student prevents the student receiving the announcement.
3. Click Announce, and then begin speaking into your computer's microphone.
4. Click OK when you are done with the announcement.
on the top toolbar, and then click Announce.
Using the virtual whiteboard
A full page virtual whiteboard allows you to draw diagrams, annotate charts and images and even
pass access to a student so they can collaborate directly onto the whiteboard.
To create a virtual whiteboard:
1.
Click the Interactive Whiteboard icon
2. Use the annotation tools at the bottom of the screen to create your content.
3. Before, during, or after completing your whiteboard content, you can:
a. Show the students the whiteboard. Click Show at the bottom of the screen. The content of
the whiteboard is displayed on the students' computers. You can continue to annotate the
whiteboard in real time.
on the side toolbar.
NOTE: To remove the whiteboard from the students' computers, click Show at the bottom
of the screen.
b. Save the file for later use. Click File at the bottom of the screen, and then click Save
Whiteboard.
Creating a whiteboard leader
When using the whiteboard, you can nominate a “whiteboard group leader.” This allows student
leaders to annotate on the whiteboard on their computer. This is helpful when students are working in
small groups and can be used to provide each group with its own virtual whiteboard for collaboration .
To create a whiteboard group leader:
1.
Click the Interactive Whiteboard icon
2. In the Student list on the right side of the whiteboard, right-click the student and select Make
Leader.
3. To remove leader status, right-click the student name.
on the side toolbar.
Using the virtual whiteboard 17
Page 23

Capturing images
You can capture a snapshot of a selected student's screen and save the image. The student name,
login ID, computer name, date, and time will also be recorded on the snapshot when you save the
file.
To capture an image:
1. When viewing a student's screen, click the Capture icon at the top of the View toolbar.
2. In the Save As window, enter a file name and click Save.
18 Chapter 3 Using Multimedia Features
Page 24

4 Testing and surveys
The following sections are included in this chapter:
Using the Test Designer
●
Using the Testing Console
●
●
Creating surveys
Design tests and quizzes with minimum effort, including text, pictures, audio and video questions.
You can then use the Testing Console to deploy the test to the students' computers and monitor the
results.
NOTE: For additional information on testing, refer to the software Help. Select Help > Contents >
Testing Module.
Using the Test Designer
The Test Designer is used to create questions, tests and quizzes, and maintain stored questions.
To start the Test Designer:
1. Select Start > All Programs > HP Classroom Manager > HP Classroom Manager Test
Designer.
2. Enter your user name and password, and then click OK.
NOTE: The default user name is admin and the default password is admin. HP recommends
that you change your user name and password once you start using Test Designer. Refer to the
online Help for additional information.
3. Follow the on-screen instructions to finish designing your test.
Using the Testing Console
After you create and publish your test in the Test Designer, you can use the Testing Console to
deploy the test to the students' computers and monitor the test results.
1.
Click the Testing Console icon
2. Select the students whom you want to take the test, and then click Next.
3. Select the test you want the students to take, and then click Finish.
The Classroom Manager Test Player will automatically launch on the students' computer. A
dialog will appear on your computer allowing you to track individual student progress.
Creating surveys
To confirm that your students understand the content covered during the lesson, you can conduct an
instant survey using pre-supplied or custom responses. You can instantly see all responses and a
summary that you can show to the class in the form of a pie chart. Students can also be temporarily
on the top toolbar.
Using the Test Designer 19
Page 25

grouped by response which enables you to see which students selected the same answer. This is
useful if you need to send a quick follow-up question or message to particular student.
Sending surveys
To create and send a survey:
1.
Click the Student Survey icon
2. Select the students to include in the survey, and then click OK.
NOTE: The entire class is selected by default.
The survey window is displayed.
3. Type a question in the box provided.
4. Type the responses to the question and separate each with a comma.
5. Click the Send icon at the bottom of the Survey window.
A dialog will open on students' computers displaying the question and responses. Students can
choose the appropriate response and submit the answer.
NOTE: As students submit their answers, the Survey Results window displays the percentage
response for each option. Select View > Details from the Control Window drop down menu to
view the results. To sort students into temporary groups by response, select Survey > Auto
Group Students from the Control window drop down menu.
on the side toolbar.
6. When the survey is complete, click Cancel on the bottom of the Survey window to remove the
survey from the screen.
NOTE: The survey will be cleared from all computers whether the student has responded or
not.
Showing survey results
To show the survey results, click the Show icon at the bottom of the Control Window.
▲
The results will be displayed as a pie chart on the students’ screens.
NOTE: Survey results are only displayed as a pie chart on the students' screens if they have
submitted an answer and you have chosen to show the results.
Saving survey results
You can save the survey results as a .CSV file.
To save the survey, click the Save icon at the bottom of the survey window.
▲
Printing survey results
Before deleting the survey you can print a permanent record of the results.
To print the survey results, click the Print icon displayed at the bottom of the Survey window.
▲
NOTE: The student survey results can be added to the Student Journal. Click Add Survey Results
to Journal at the bottom of the Survey window.
20 Chapter 4 Testing and surveys
Page 26

5 Managing students' computers
The following sections are included in this chapter:
Locking and unlocking students' keyboards and mice
●
Blanking students' screens
●
●
Monitoring key words
●
Controlling Web access
Controlling mass storage devices
●
Printing
●
Locking and unlocking students' keyboards and mice
The lock and unlock features allow you to lock the students' keyboards and mice. You can only lock
and unlock students' computers that are connected to Classroom Manager.
To lock students' computers:
1. Select the individual student's computer or group of computers that you want to lock.
2.
Click the Lock icon
on the top toolbar.
A lock symbol will appear on the students' screens' to indicate you have locked their keyboards'
and mice.
To unlock students' computers:
1. Select the individual student's computer or group of computers that you want to unlock.
2.
Click the Unlock icon
on the top toolbar.
Blanking students' screens
To turn off all student computer screens simultaneously:
1.
Click the Blank All icon
All students' screens will blank.
2. To restore the student screens, click the Blank All icon again.
on the top toolbar.
Monitoring key words
You can monitor both real-time key words and word lists with approved and restricted key words. This
helps you keep the students on track when working on written lessons. You can monitor the entire
class quickly, viewing any content and keeping an eye on student activity levels. Both “target” and
“inappropriate” key word lists can be created.
Locking and unlocking students' keyboards and mice 21
Page 27

To monitor key words:
1.
Click the Keyboard Input icon
2. Click the Monitor icon at the bottom of the Control window.
Creating a word list
You can create word lists with both “target” and “inappropriate” key words. When a student types a
word on the list, it will be identified with a visual indicator (green for target words and red for
inappropriate words).
To create a word list:
on the side toolbar.
1.
Click the Keyboard Input
Control Window.
2. Enter the file name and click Save.
3. To add target words:
a. To add target words, click the + sign in the Target Words window. Type the words, and then
click OK.
–or–
b. To add inappropriate words, click the + sign in the Inappropriate Words window. Type the
words, and then click OK.
NOTE: You can then add these target words to the student journal.
Controlling Web access
The Web Control Module is used to monitor and control the Web sites that the students can visit. You
can block or approve specific Web sites or selected pages of a URL.
The Web Control Module can be used to perform the following functions:
Identify URLs currently running on students' computers
●
Approve or block specific URLs
●
icon on the side toolbar, and then click New at the bottom of the
Block all Internet access
●
Activate approved site lists
●
Block FTP sites
●
NOTE: For more information on controlling Web access, refer to the software Help. Click Help >
Contents > Web Control Module.
Controlling mass storage devices
You can prevent data being copied to or from USB drives and CD/DVD devices. You can also provide
read-only access to the devices.
NOTE: For more information on controlling mass storage devices, refer to the software Help. Click
Help > Contents > Device Control.
22 Chapter 5 Managing students' computers
Page 28

Blocking access to storage devices
1. Select the student whose access you want to block.
2.
Click the Storage Devices icon
3. Click the CD/DVD or USB icon at the bottom of the screen, and then select Block Access.
on the side toolbar.
Creating read-only access to storage devices
1. Select the student (s) for whom you want to create read-only access.
2.
Click the Device Control icon
3. Click the CD/DVD or USB icon at the bottom of the screen, and then select Read Only.
on the side toolbar.
Printing
Printer Management gives you control over printer usage in the classroom. You can prevent printing,
set print quotas, remove duplicate print jobs, authorize print requests, and print visuals.
NOTE: The Printer Management feature supports multiple printers in a classroom. Printers must be
added to the students' computers before you connect to Classroom Manager. Once the students are
connected, printers cannot be added, removed or modified.
NOTE: For more information on Printer Management, refer to the software Help. Click Help >
Contents > Printer Management.
1.
To start Printer Management, click the Printer Management icon
The Print Queue and Printer Lists are displayed.
2. Select a student, group of students, or printer, and then choose to pause, block, or resume
printing. You can also select delete duplicates.
on the side toolbar.
Printing 23
Page 29

6 Power Management
The following sections are included in this chapter:
Turning on students' computers
●
Turning off students' computers
●
●
Logging in students
●
Restarting students' computers
Classroom Manager includes the ability for you to remotely power on, power off, restart, and log in
and log out students' computers. This feature helps you save time and conserve power.
Turning on students' computers
To turn on selected students' computers:
1. Select the students' computers you want to turn on.
2.
Click the Manage icon
The students' computers will turn on.
on the top toolbar, and then click Power On.
Turning off students' computers
To turn off selected students' computers:
1. Make sure all programs are closed on the students' computers.
2. Select the students' computers you want to turn off.
3.
Click the Manage icon
The students' computers will turn off.
on the top toolbar, and then click Power Off.
Logging in students
You can remotely log in students in a single action. This ensures that the computers are ready when
class begins.
1. Select an individual student or group of students.
2.
Click the Manage icon
3. Click Yes.
on the top toolbar, and then click Login.
24 Chapter 6 Power Management
Page 30

Restarting students' computers
When students are connected to Classroom Manager, you can remotely log out or restart the
students' computers at the end of a lesson. This is a simple way to prepare multiple computers for the
next class.
To restart or log out students' computers:
1. Select an individual student or group of students.
2.
Click the Manage icon
3. Click Yes.
on the top toolbar, and then click Reboot or Logout.
Restarting students' computers 25
Page 31

A Glossary
Term Definition
Chat Allows a two-way on-screen chat session between you and a student so assistance
can be provided without disturbing the rest of the class. You can also allow a group
chat session between students.
Class Wizard The Class Wizard, which loads on startup, provides you with a simple to use interface
Co-browse A simple and straightforward interface that enables you to navigate students through
Device control Prevent data being copied to or from USB devices, CD/DVD drives and the creation of
Keyboard monitoring Provides a real-time insight into student activity by allowing the teacher to quickly view
Lesson planner Pre-plan the scope of a lesson, building in appropriate timings and prompts as
Message monitoring Monitor and control the use of Messenger applications during a lesson.
Monitor mode You can see a thumbnail view of all connected students' computers. The Auto Zoom
Screen capture Keep a visual record of student activity by taking a ‘snapshot’ of a student's screen.
Student or Client The workstation that is being shown to, viewed or taken over.
Student journal During a typical class, all appropriate items relating to the subject can be captured and
Student register Keep in touch with each class and prompt the students to register their details. Their
in order to combine the elements required during a lesson.
various Web pages with the added security of locking/unlocking students to or from a
Web page, depending on the needs of the lesson.
new network drives for the duration of the class.
any typed content while using approved applications.
required.
feature allows you to mouse over a specific student thumbnail for a better view.
Student thumbnails can be sized using a flexible slide-bar enabling you to make better
use of the space available on your screen.
automatically included in a PDF file for post-lesson review by each student.
real names can be displayed on the teacher screen instead of a less meaningful
computer name. Ideal for use with the Classroom Layout feature. Student registration
details can be viewed in a Registration Report that can be saved for each class.
Student toolbar Provides a quick and convenient way for students to access the resources required for
Surveys Obtain instant feedback by displaying a question on the student screens. Receive real-
Teacher toolbar When your application is minimized a convenient toolbar is provided for quick access to
Teacher or Tutor The workstation that shows to or views/takes over the student's computer.
Tech Console Specifically for Lab Technicians and Network Managers to manage and maintain the
26 Appendix A Glossary
a given lesson. The student toolbar is located at the top of each student screen and
can be set to be always visible, hidden, or to auto-hide.
time analysis of the student's responses. Publish survey results to all students.
key features within Classroom Manager. This toolbar is optimized for use with virtual
whiteboards.
computers.
Page 32

Testing module Create customized tests that can be remotely delivered to students' computers and
marked in real-time.
Virtual whiteboard Provides you with a range of drawing tools which enables you to present learning
points in graphic form. The content of the whiteboard can be shown to students at any
point during a lesson.
27
Page 33

Index
A
announcements 17
Applications icon 6
Audio Activity icon 5
audio activity, monitoring 16
audio features, using 16
audio settings 16
B
Blank All icon 4
blanking student screens 21
C
capture an image 18
Chat icon 6
chatting 13
Class Wizard 26
class, planning 10
Co-Browse icon 4
co-browse Internet 11
Communicate icon 4
computers, restarting 25
control window 3
identifying 3
D
device control 26
Device Control icon 5
F
File Transfer icon 4
files
collecting 12
sending 12
FTP sites, blocking 22
H
Help icon 6
I
IM Status icon 6
images, capturing 18
inappropriate words 22
Instant Messaging 13
Instant Messenger icon 5
Interactive Whiteboard icon 5
Internet
browsing 11
sharing 11
Internet access, blocking 22
J
Journal icon 4
K
key words, monitoring 21
Keyboard Input icon 5
Keyboard Monitor icon 6
keyboard monitoring 26
keyboards, locking 21
L
Lesson Objective icon 6
lesson plan, creating 11
Lesson Plans icon 4
Lock icon 4
locking student keyboards/mice
21
logging in students 24
M
Manage icon 4
message monitoring 26
messages
pre-set 13
sending 13
monitor mode 26
Monitor Students icon 5
mouse, locking 21
P
preset messages, creating 13
Printer Management icon 5
Printer Status icon 6
printing 23
Q
quizzes 19
R
read-only access 22
Refresh icon 4
registering students 10
registration report, creating 11
Resources icon 6
restarting student computers 25
restricted key words 21
S
Scan icon 4
screen capture 26
Send/Collect icon 4
Show Menu icon 4
showing videos 15
side toolbar
icons 5
identifying 3
software, upgrading 7
storage devices
blocking 23
controlling 22
read only 23
Student Applications icon 5
student audio, listening 16
student computers
blanking screens 21
logging in 24
restarting 25
turning off 24
turning on 24
Student Journal icon 6
student journals, creating 14
Student List icon 5
student printer management 23
Student Register icon 4
Student Surveys icon 5
student toolbar 6
student view 6
student, registering 10
surveys
creating 19
printing 20
saving 20
28 Index
Page 34

sending 20
showing results 20
T
target words 22
teacher screen, showing 14
teacher view 2
Tech Console 26
Test Designer, using 19
test designing 19
Testing Console icon 4
Testing Console, using 19
top toolbar
icons 4
identifying 3
turning off student computers 24
turning on student computers 24
U
Unlock icon 4
unlocking student keyboards/
mice 21
unregister students 10
Upgrade icon 4
upgrading software 7
URLs, approving 22
USB Access icon 6
V
videos, showing 15
View Client icon 4
virtual whiteboard
leader 17
using 17
volume, adjusting 16
W
Web Access icon 4, 6
Web access, controlling 22
Web Control Module 22
Web Site Access icon 5
whiteboard group leader 17
whiteboard, using 17
word lists, creating 22
Index 29
 Loading...