

Page 1
LASERJET PROFESSIONAL P1100 Printer series
User Guide
www.hp.com/support/ljp1100series
Page 2

Page 3

HP LaserJet Professional P1100 Printer series
User Guide
Page 4

Copyright and License
© 2010 Copyright Hewlett-Packard
Development Company, L.P.
Trademark Credits
®
, Acrobat®, and PostScript® are
Adobe
trademarks of Adobe Systems Incorporated.
Reproduction, adaptation, or translation
without prior written permission is prohibited,
except as allowed under the copyright laws.
The information contained herein is subject
to change without notice.
The only warranties for HP products and
services are set forth in the express warranty
statements accompanying such products
and services. Nothing herein should be
construed as constituting an additional
warranty. HP shall not be liable for technical
or editorial errors or omissions contained
herein.
Part number: CE651-90926
Edition 1, 3/2010
Intel® Core™ is a trademark of Intel
Corporation in the U.S. and other countries.
ENERGY STAR and the ENERGY STAR
mark are registered U.S. marks.
Microsoft®, Windows®, Windows® XP, and
Windows Vista® are U.S. registered
trademarks of Microsoft Corporation.
Page 5

Conventions used in this guide
TIP: Tips provide helpful hints or shortcuts.
NOTE: Notes provide important information to explain a concept or to complete a task.
CAUTION: Cautions indicate procedures that you should follow to avoid losing data or damaging the
product.
WARNING! Warnings alert you to specific procedures that you should follow to avoid personal injury,
catastrophic loss of data, or extensive damage to the product.
ENWW iii
Page 6

iv Conventions used in this guide ENWW
Page 7

Table of contents
1 Product basics
Product comparison ............................................................................................................................. 2
Environmental features ........................................................................................................................ 2
Product features ................................................................................................................................... 3
Product views ....................................................................................................................................... 4
Front and left side view ........................................................................................................ 4
Back view ............................................................................................................................. 6
Serial number and product number location ........................................................................ 6
Control-panel layout ............................................................................................................. 7
2 Software for Windows
Supported operating systems for Windows ........................................................................................ 10
Supported printer-drivers for Windows ............................................................................................... 10
Priority for print settings ...................................................................................................................... 11
Change printer-driver settings for Windows ....................................................................................... 12
Remove software for Windows ........................................................................................................... 13
Use the uninstall utility to remove Windows software ........................................................ 13
Use the Windows Control Panel to remove software ........................................................ 13
Supported utilities (wireless models only) .......................................................................................... 14
Embedded Web server ...................................................................................................... 14
3 Use the product with Mac
Software for Mac ................................................................................................................................ 16
Supported operating systems for Macintosh ..................................................................... 16
Supported printer drivers for Macintosh ............................................................................. 16
Remove software for Mac .................................................................................................. 16
Priority for print settings for Mac ........................................................................................ 16
Change printer-driver settings for Macintosh ..................................................................... 17
Software for Mac computers .............................................................................................. 18
HP Printer Utility for Mac ................................................................................... 18
Supported utilities for Mac (wireless models only) ............................................................. 18
Embedded Web server ..................................................................................... 18
Print with Mac ..................................................................................................................................... 19
Create and use printing presets in Macintosh ................................................................... 19
ENWW v
Page 8

Resize documents or print on a custom paper size ........................................................... 19
Print a cover page .............................................................................................................. 19
Print multiple pages on one sheet of paper in Macintosh .................................................. 20
Print on both sides (duplex) ............................................................................................... 20
4 Connect the product
Supported network operating systems (wireless models only) .......................................................... 22
USB connection .................................................................................................................................. 23
HP Smart Install ................................................................................................................. 23
CD installation .................................................................................................................... 23
Network connection (wireless models only) ....................................................................................... 24
Supported network protocols ............................................................................................. 24
Install the product on a wireless network with HP Smart Install ........................................ 24
Install the product on a wireless network with the software CD ......................................... 25
Install the software for a product currently on the network ................................................ 25
Perform a peer-to-peer (ad-hoc) wireless installation ........................................................ 26
Turn off the product wireless unit ....................................................................................... 26
Configure the network product ........................................................................................... 27
Print on both sides manually ............................................................................. 20
Use the Wireless Configuration utility ............................................................... 27
Restore default wireless settings ...................................................................... 27
View or change network settings ...................................................................... 27
Set or change the network password ................................................................ 27
IP address ......................................................................................................... 28
Link speed setting ............................................................................................. 28
5 Paper and print media
Understand paper and print media use .............................................................................................. 30
Special paper or print media guidelines ............................................................................................. 31
Change the print driver to match the media type and size ................................................................. 32
Supported paper sizes ....................................................................................................................... 33
Supported paper types and tray capacity ........................................................................................... 34
Supported paper and print media types ............................................................................. 34
Tray and bin capacity ......................................................................................................... 34
Paper orientation for loading trays ..................................................................................................... 35
Load paper trays ................................................................................................................................ 35
Priority feed slot ................................................................................................................. 35
Input tray ............................................................................................................................ 35
Tray adjustment for short media (base models only) ........................................ 36
6 Print tasks
Cancel a print job ............................................................................................................................... 38
Stop the current print job from the control panel (wireless models only) ........................... 38
vi ENWW
Page 9

Stop the current print job from the software program ........................................................ 38
Print with Windows ............................................................................................................................. 39
Open the Windows printer driver ....................................................................................... 39
Get help for any print option with Windows ....................................................................... 39
Change the number of print copies with Windows ............................................................. 39
Print colored text as black with Windows ........................................................................... 39
Save custom print settings for reuse with Windows .......................................................... 39
Use a printing quick set ..................................................................................... 39
Create a custom printing quick set .................................................................... 40
Improve print quality with Windows ................................................................................... 40
Select a page size ............................................................................................. 40
Select a custom page size ................................................................ 40
Select a paper type ........................................................................................... 40
Select the print resolution .................................................................................. 40
Print the first or last page on different paper with Windows ............................................... 41
Scale a document to fit page size with Windows ............................................................... 41
Add a watermark to a document with Windows ................................................................. 41
Print on both sides (duplex) with Windows ........................................................................ 41
Manually print on both sides (duplex) ............................................................... 41
Create a booklet with Windows ......................................................................................... 42
Print multiple pages per sheet with Windows .................................................................... 43
Select page orientation with Windows ............................................................................... 43
7 Manage and maintain the product
Print the information pages ................................................................................................................ 46
Configuration page ............................................................................................................ 46
Supplies status page ......................................................................................................... 46
Demo page ........................................................................................................................ 46
Use the HP Embedded Web Server (wireless models only) .............................................................. 47
Open the HP Embedded Web Server by using a network connection .............................. 47
HP Embedded Web Server sections ................................................................................. 47
Information tab .................................................................................................. 47
Settings tab ....................................................................................................... 48
Networking tab .................................................................................................. 48
HP Smart Install tab .......................................................................................... 48
Links .................................................................................................................. 48
Economy settings ............................................................................................................................... 49
Auto-Off mode ................................................................................................................... 49
Print with EconoMode ........................................................................................................ 49
Manage supplies and accessories ..................................................................................................... 50
Check and order supplies .................................................................................................. 50
Print-cartridge storage ....................................................................................... 50
HP policy on non-HP print cartridges ................................................................ 50
ENWW vii
Page 10

Clean the product ............................................................................................................................... 61
Product updates ................................................................................................................................. 65
8 Solve problems
Solve general problems ...................................................................................................................... 68
Interpret control-panel light patterns ................................................................................................... 70
Clear jams .......................................................................................................................................... 73
Solve paper-handling problems .......................................................................................................... 81
Solve image-quality problems ............................................................................................................ 82
HP fraud hotline and Web site .......................................................................... 50
Recycle supplies ............................................................................................... 50
Replacement instructions .................................................................................................. 51
Redistribute toner .............................................................................................. 51
Replace the print cartridge ................................................................................ 52
Replace the pickup roller ................................................................................... 55
Replace the separation pad .............................................................................. 58
Clean the pickup roller ....................................................................................................... 61
Clean the paper path ......................................................................................................... 62
Clean the print-cartridge area ............................................................................................ 63
Clean the exterior .............................................................................................................. 65
Troubleshooting checklist .................................................................................................. 68
Factors that affect product performance ............................................................................ 69
Common causes of jams ................................................................................................... 73
Jam locations ..................................................................................................................... 74
Clear jams from the input tray ............................................................................................ 74
Clear jams from the output areas ...................................................................................... 77
Clear jams from inside the product .................................................................................... 79
Solve repeated jams .......................................................................................................... 80
Change the jam recovery setting ....................................................................................... 80
Image defect examples ...................................................................................................... 82
Light print or faded ............................................................................................ 82
Toner specks ..................................................................................................... 82
Dropouts ............................................................................................................ 83
Vertical lines ...................................................................................................... 83
Gray background ............................................................................................... 83
Toner smear ...................................................................................................... 83
Loose toner ....................................................................................................... 84
Vertical repetitive defects .................................................................................. 84
Misformed characters ........................................................................................ 84
Page skew ......................................................................................................... 84
Curl or wave ...................................................................................................... 85
Wrinkles or creases ........................................................................................... 85
Toner scatter outline ......................................................................................... 85
viii ENWW
Page 11

Moisture ............................................................................................................ 86
Optimize and improve image quality .................................................................................. 86
Change print density ......................................................................................... 86
Solve performance problems ............................................................................................................. 88
Solve connectivity problems ............................................................................................................... 89
Solve direct-connect problems .......................................................................................... 89
Solve wireless problems .................................................................................................... 89
Solve product software problems ....................................................................................................... 91
Solve common Windows problems ................................................................................... 91
Solve common Macintosh problems .................................................................................. 91
Appendix A Supplies and accessories
Order parts, accessories, and supplies .............................................................................................. 96
Part numbers ...................................................................................................................................... 96
Paper-handling accessories .............................................................................................. 96
Print cartridges ................................................................................................................... 96
Cables and interfaces ........................................................................................................ 96
Appendix B Service and support
Hewlett-Packard limited warranty statement ...................................................................................... 98
HP's Premium Protection Warranty: LaserJet print cartridge limited warranty statement .................. 99
End User License Agreement .......................................................................................................... 100
Customer self-repair warranty service .............................................................................................. 102
Customer support ............................................................................................................................. 102
Repack the product .......................................................................................................................... 103
Appendix C Specifications
Physical specifications ..................................................................................................................... 106
Power consumption, electrical specifications, and acoustic emissions ............................................ 106
Environmental specifications ............................................................................................................ 106
Appendix D Regulatory information
FCC regulations ............................................................................................................................... 108
Environmental product stewardship program ................................................................................... 109
Protecting the environment .............................................................................................. 109
Ozone production ............................................................................................................ 109
Power consumption ......................................................................................................... 109
Toner consumption .......................................................................................................... 109
Paper use ........................................................................................................................ 109
Plastics ............................................................................................................................ 109
HP LaserJet print supplies ............................................................................................... 109
Return and recycling instructions ..................................................................................... 110
United States and Puerto Rico ........................................................................ 110
ENWW ix
Page 12

Multiple returns (more than one cartridge) ..................................... 110
Single returns ................................................................................. 110
Shipping .......................................................................................... 110
Non-U.S. returns ............................................................................................. 110
Paper ............................................................................................................................... 110
Material restrictions .......................................................................................................... 111
Disposal of waste equipment by users in private households in the European Union ... . 111
Chemical substances ....................................................................................................... 111
Material Safety Data Sheet (MSDS) ................................................................................ 111
For more information ....................................................................................................... 111
Declaration of conformity (base models) .......................................................................................... 112
Declaration of conformity (wireless models) ..................................................................................... 113
Safety statements ............................................................................................................................. 114
Laser safety ..................................................................................................................... 114
Canadian DOC regulations .............................................................................................. 114
VCCI statement (Japan) .................................................................................................. 114
Power cord instructions ................................................................................................... 114
Power cord statement (Japan) ......................................................................................... 114
EMC statement (Korea) ................................................................................................... 114
Laser statement for Finland ............................................................................................. 115
GS statement (Germany) ................................................................................................. 115
Substances Table (China) ............................................................................................... 116
Additional statements for wireless products ..................................................................................... 117
FCC compliance statement—United States .................................................................... 117
Australia statement .......................................................................................................... 117
Brazil ANATEL statement ................................................................................................ 117
Canadian statements ....................................................................................................... 117
European Union regulatory notice ................................................................................... 117
Notice for use in France ................................................................................................... 118
Notice for use in Russia ................................................................................................... 118
Korean statement ............................................................................................................ 118
Taiwan statement ............................................................................................................ 118
Index ................................................................................................................................................................. 119
x ENWW
Page 13

1 Product basics
Product comparison
●
Environmental features
●
Product features
●
Product views
●
ENWW 1
Page 14
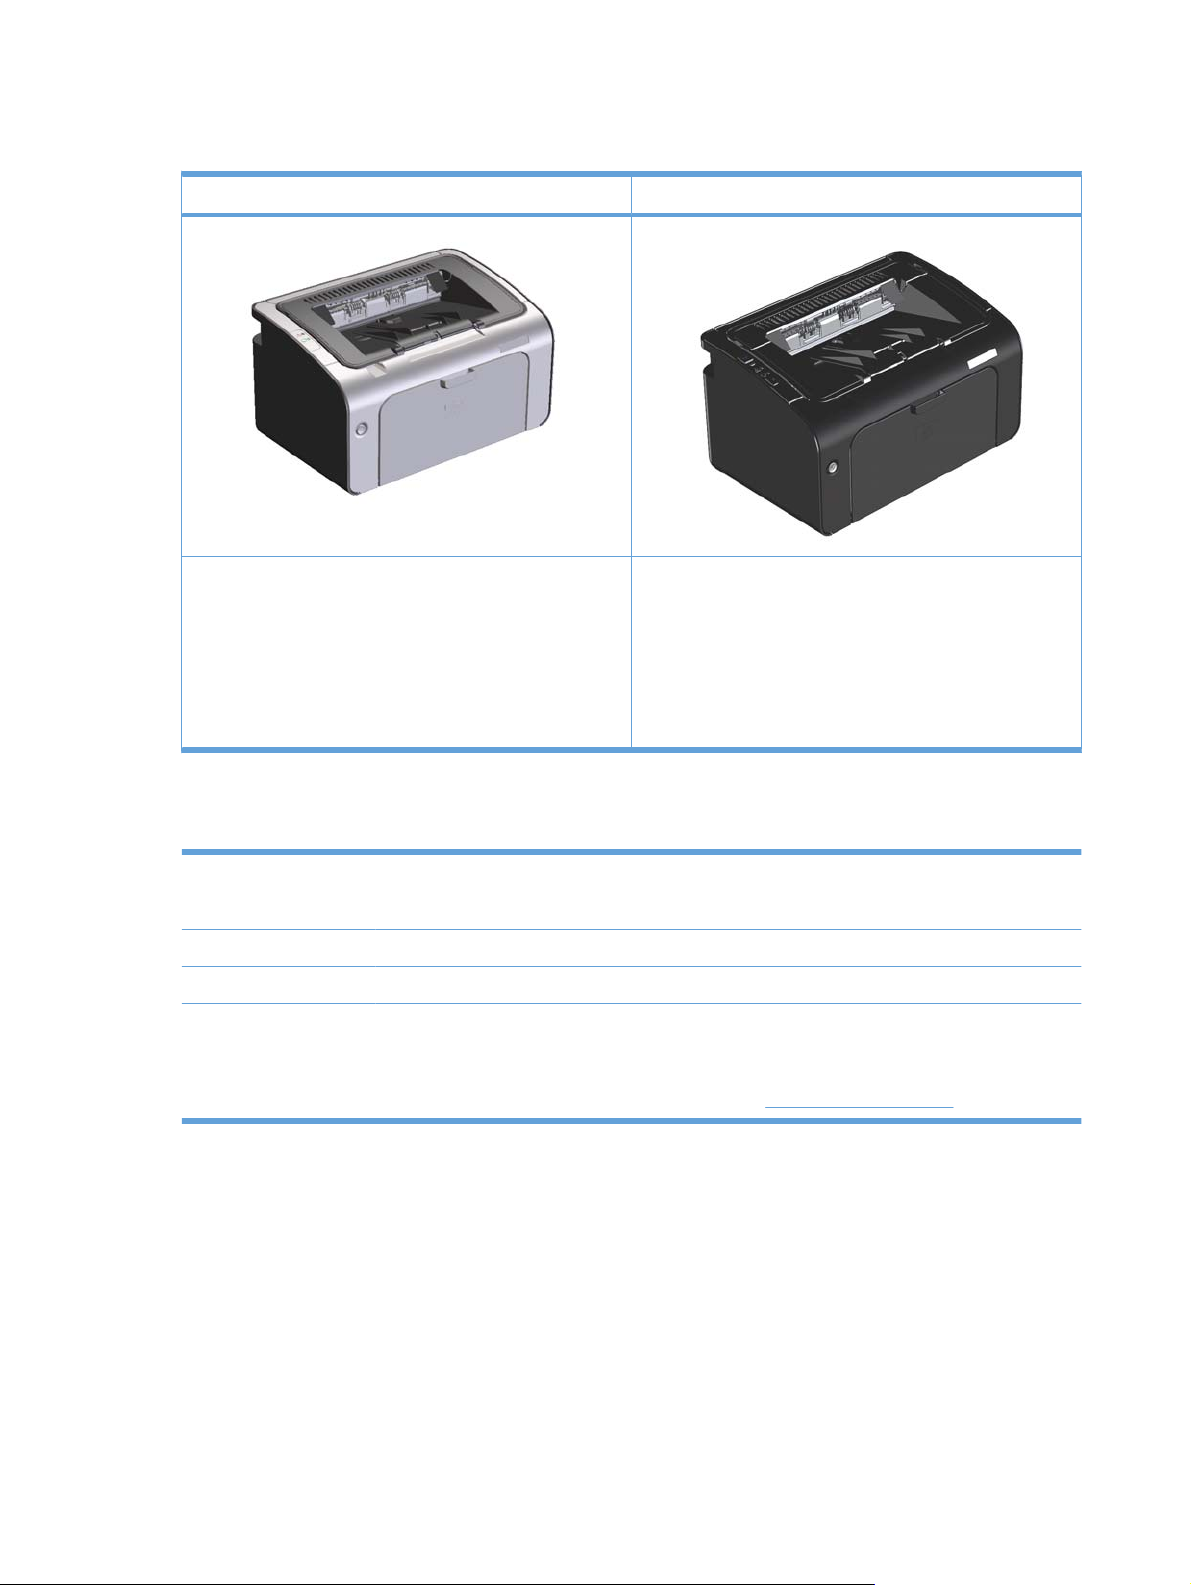
Product comparison
HP LaserJet Professional P1100 Printer series HP LaserJet Professional P1100w Printer series
Speed: Up to 18 A4 pages per minute (ppm), 19 letter-
●
size ppm
Tray: 150-sheet input tray
●
Connectivity: Hi-Speed USB 2.0 port
●
Duplexing: Manual duplexing (using the printer driver)
●
Environmental features
Recycling Reduce waste by using recycled paper.
Recycle print cartridges by using the HP return process.
Energy savings Save energy with product Auto-Off mode.
Duplex Save paper by using the manual duplex printing setting.
HP Smart Web Printing Use HP Smart Web Printing to select, store, and organize text and graphics from multiple Web
pages and then edit and print exactly what you see onscreen. It gives you the control you need for
printing meaningful information while minimizing waste.
Download HP Smart Web Printing from this Web site:
Speed: 18 A4 pages per minute (ppm), 19 letter-size ppm
●
Trays: 150-sheet main-input tray and 10-sheet priority
●
input slot
Connectivity: Hi-Speed USB 2.0 port and 802.11b/g
●
wireless networking
Duplexing: Manual duplexing (using the printer driver)
●
www.hp.com/go/smartweb.
2 Chapter 1 Product basics ENWW
Page 15

Product features
Benefit Supporting features
Excellent print quality
Supported operating
systems
Ease of use
Flexible paper handling
Genuine HP print cartridge.
●
FastRes 600 setting provides 600 dots per inch (dpi) effective print quality. FastRes 1200
●
setting provides 1,200 dpi effective print quality.
Adjustable settings to optimize print quality.
●
Windows Vista (32-bit and 64-bit)
●
Windows XP (32-bit and 64-bit)
●
Windows 7
●
Windows Server 2003 (32-bit and 64-bit)
●
Windows Server 2008 (32-bit and 64-bit)
●
Mac OS X v10.4, v10.5, v10.6
●
HP Smart Install feature installs product software when you connect a USB cable between
●
the product and a Windows computer.
The print cartridge is easy to install.
●
Convenient access to the print cartridge and to the paper path through the print-cartridge door.
●
Paper tray can be adjusted with one hand.
●
A 10-sheet priority input slot (wireless models only)
●
2
A 150-sheet (75 g/m
●
A 125-sheet (75 g/m
●
(20 lb) paper) input tray.
2
(20 lb) paper) output bin.
Interface connections
Energy savings
Economical printing
Supplies management
Accessibility
Security
Manual duplexing (two-sided printing).
●
Hi-Speed USB 2.0 port
●
802.11b/g wireless networking (wireless models only)
●
After a user-specified time, the Auto-Off feature automatically conserves electricity by
●
substantially reducing power consumption when the product is not printing.
N-up printing (printing more than one page on a sheet) and the manual two-sided printing
●
features save paper.
EconoMode printer driver feature saves toner.
●
Authentication for genuine HP print cartridges.
●
Easy ordering for replacement supplies.
●
Supplies status page shows estimated toner level in the print cartridge. Not available for non-
●
HP supplies.
The online user guide is compatible with text screen-readers.
●
All doors and covers can be opened by using one hand.
●
Kensington lock receptacle on the back of the product.
●
ENWW Product features 3
Page 16
Product views
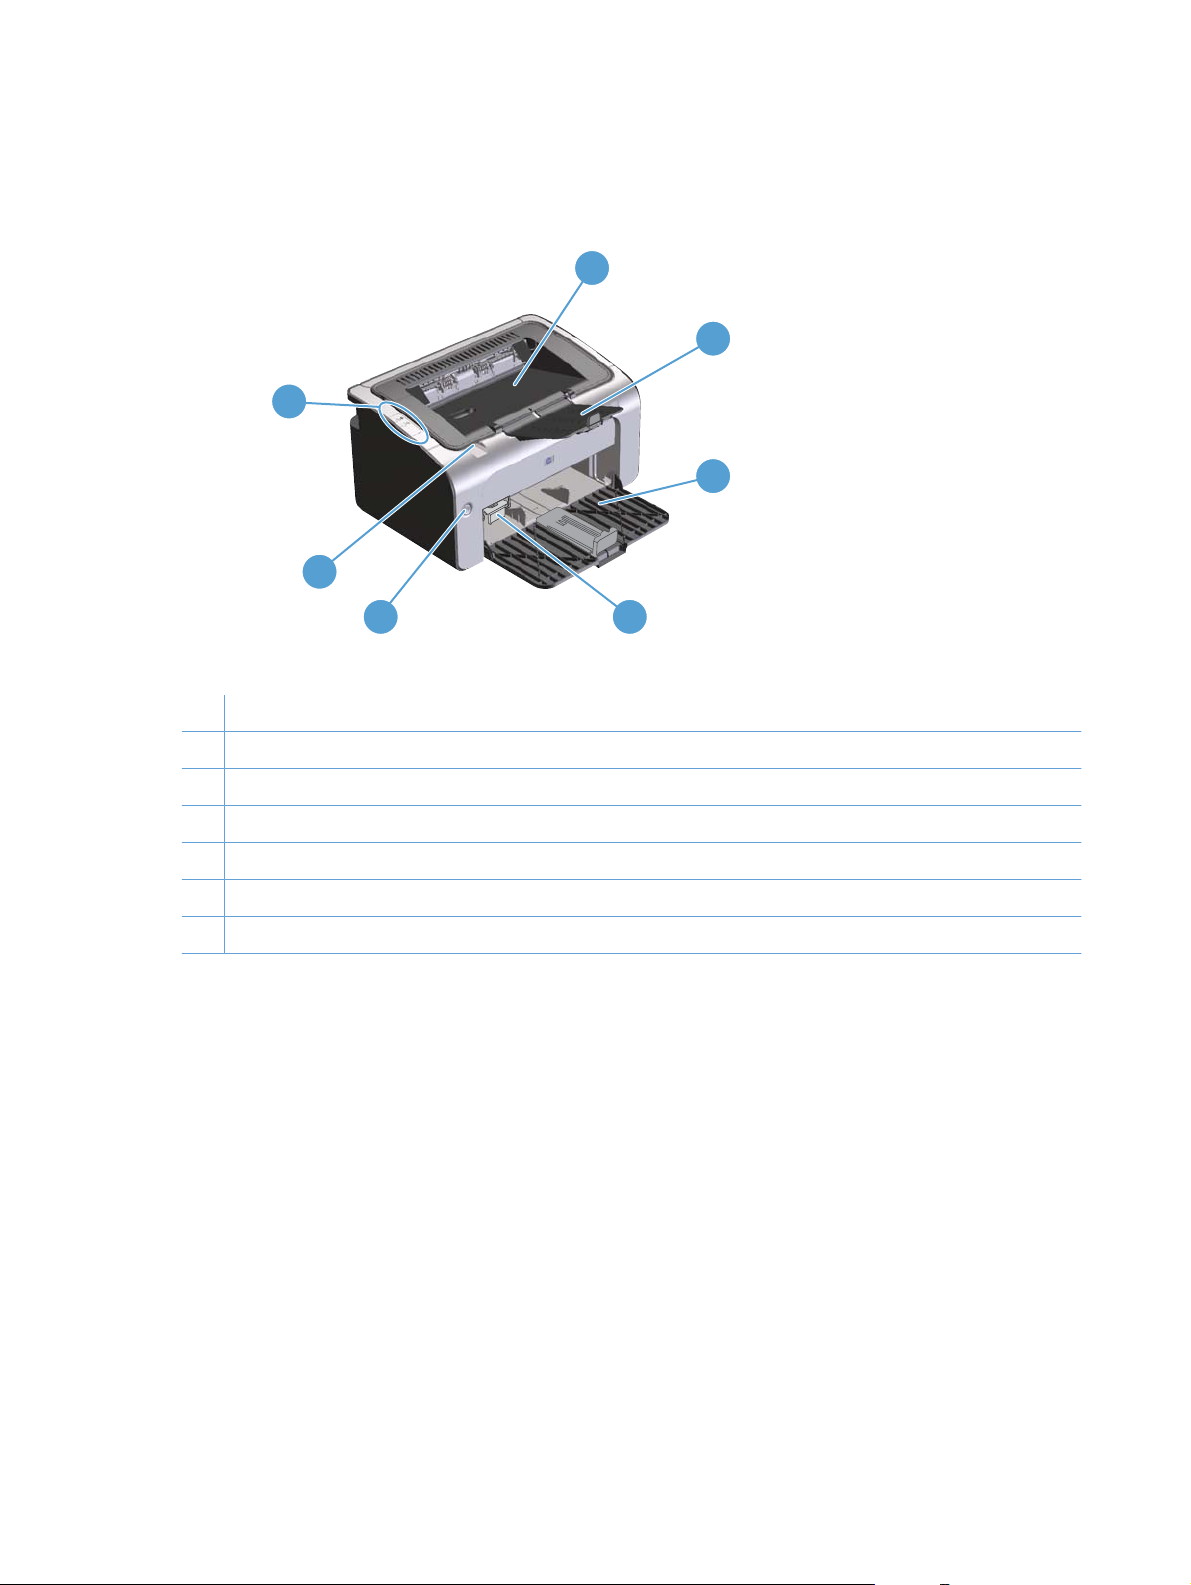
Front and left side view
7
6
1
2
3
5
Table 1-1 HP LaserJet Professional P1100 Printer series
1 Output bin
2 Foldable output tray extension
3 Input tray
4 Short media extender tool
5 Power button
6 Print-cartridge door lift-tab
7 Control panel
4
4 Chapter 1 Product basics ENWW
Page 17
1
7
6
5
4
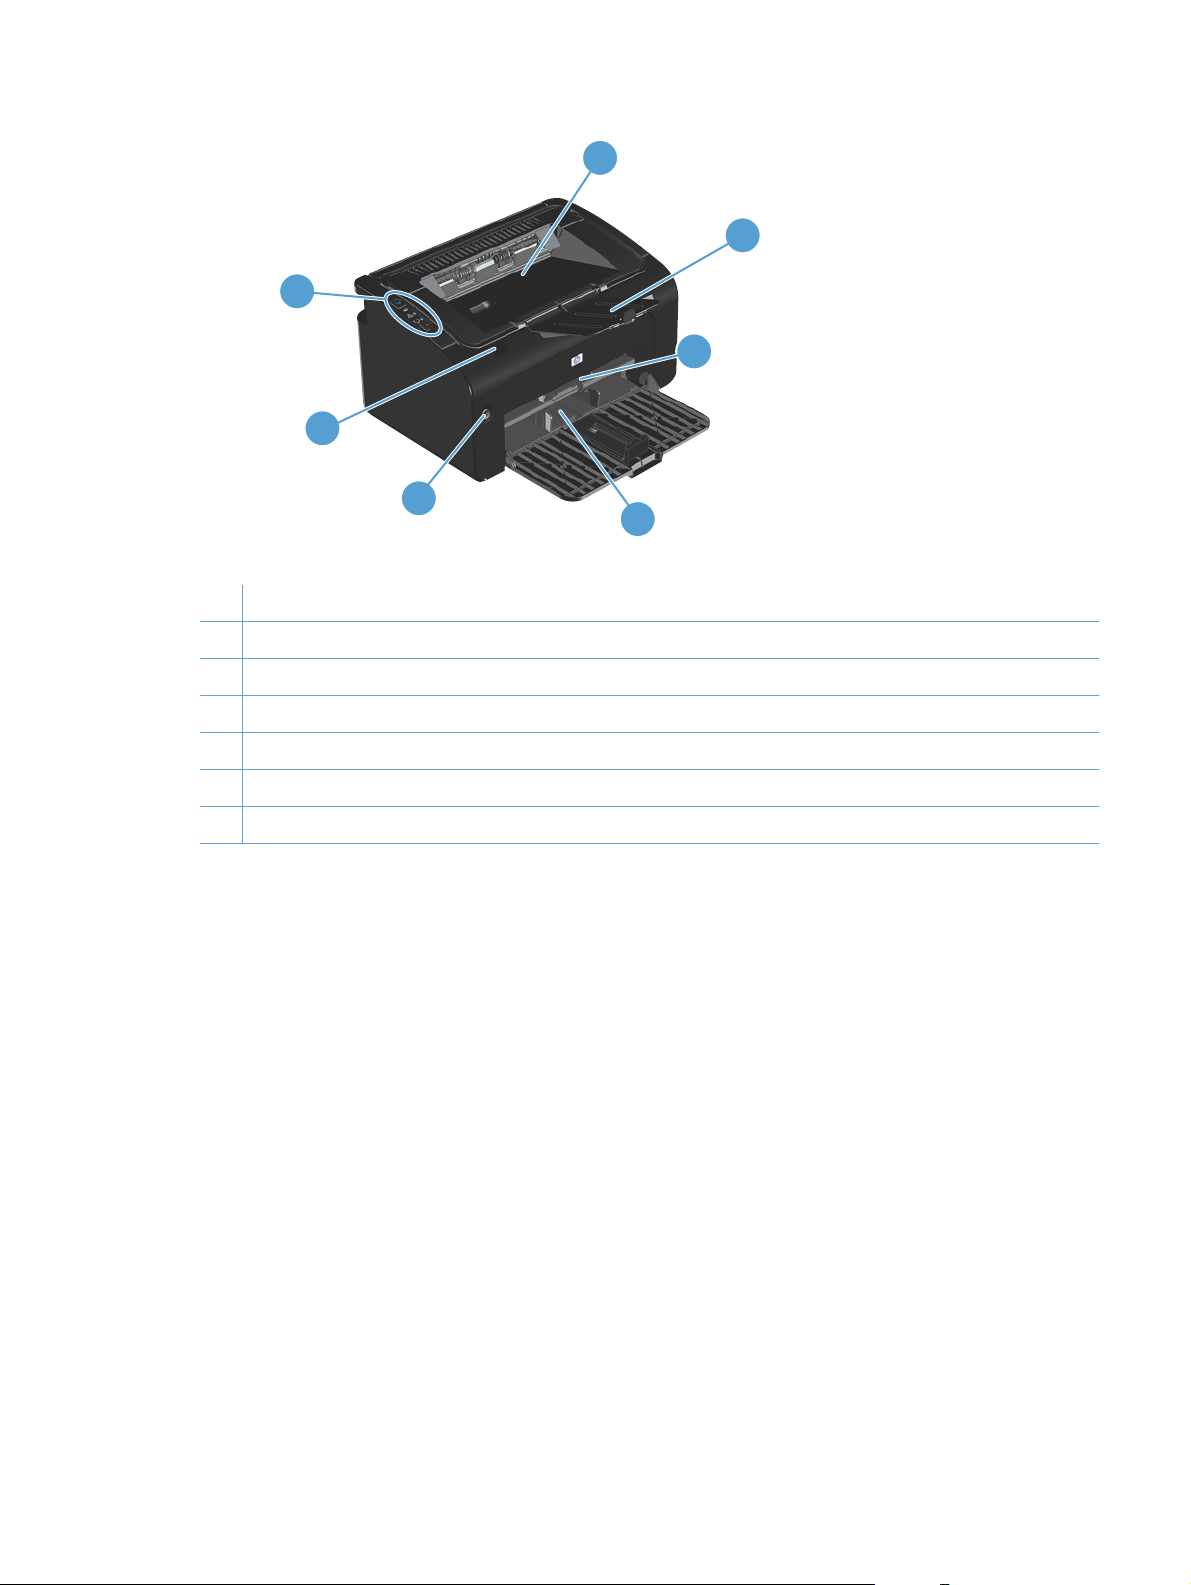
Table 1-2 HP LaserJet Professional P1100w Printer series
1 Output bin
2 Foldable output tray extension
3 Priority input slot
4 Main input tray
2
3
5 Power button
6 Print-cartridge door lift-tab
7 Control panel
ENWW Product views 5
Page 18
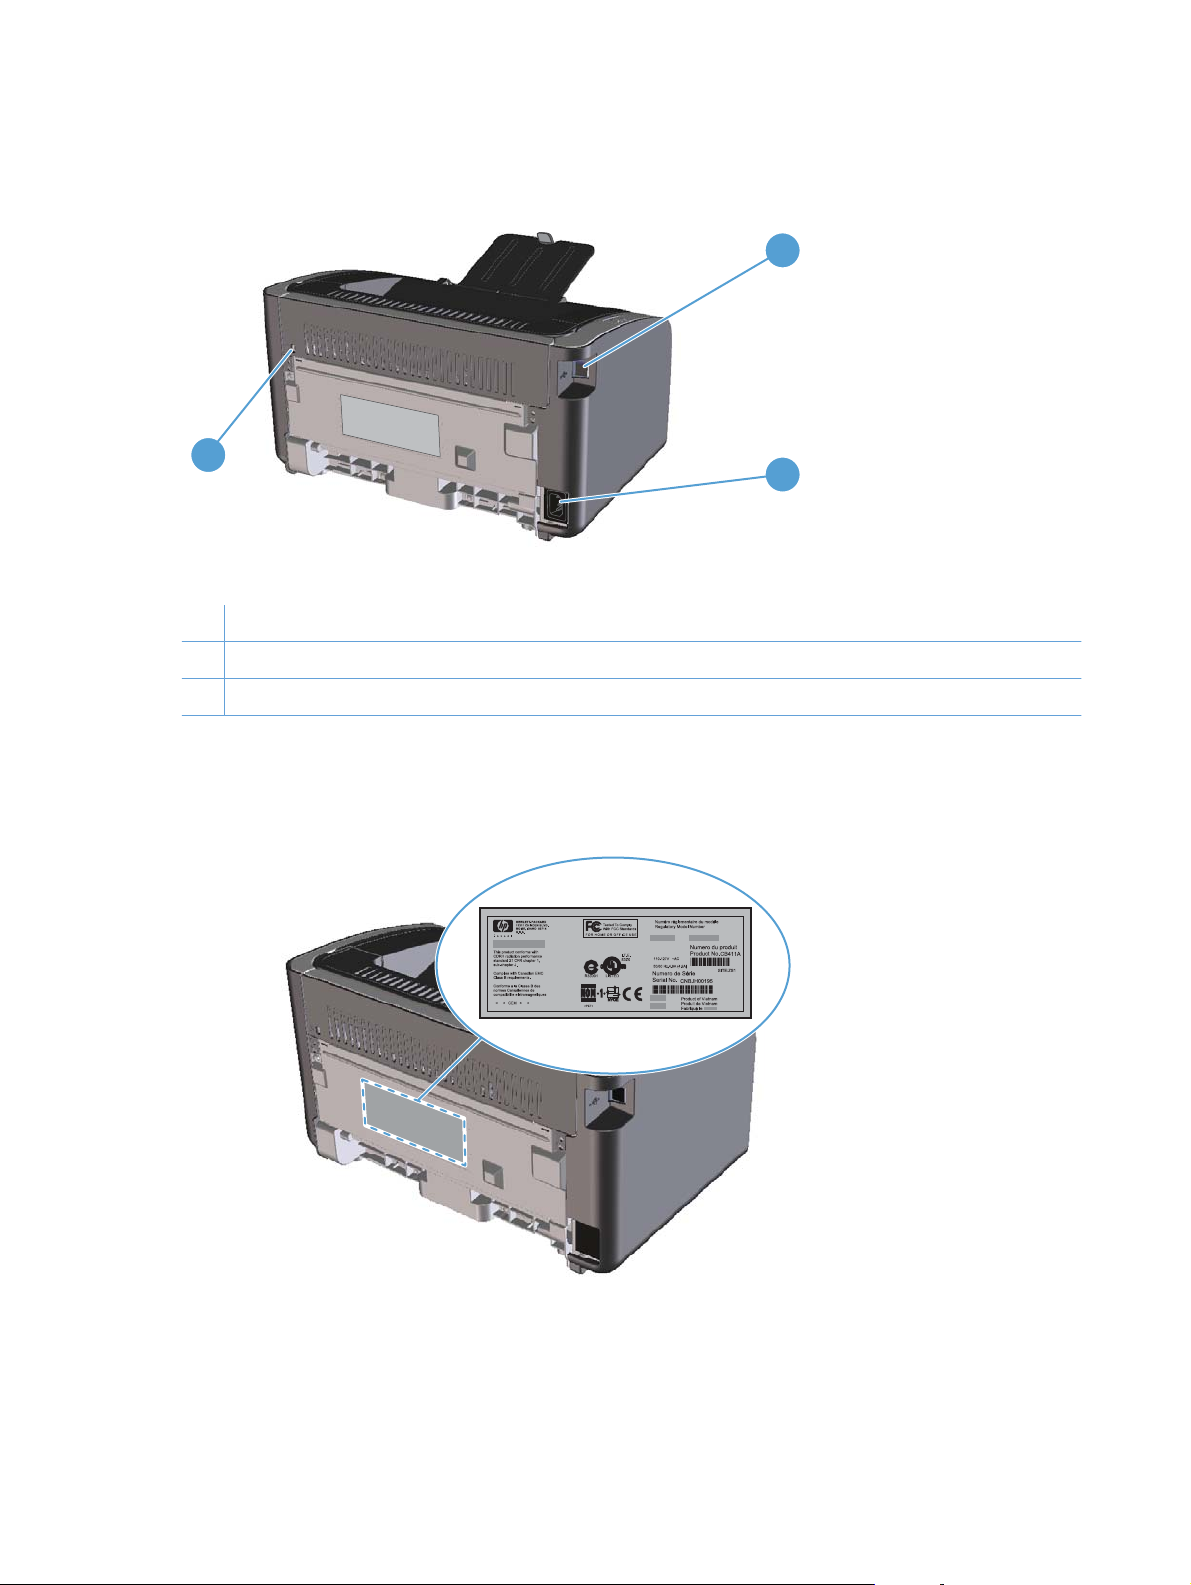
Back view
1
3
1 USB port
2 Power connector
3 Kensington lock
Serial number and product number location
The label that contains the product number and serial number is on the rear of the product.
2
6 Chapter 1 Product basics ENWW
Page 19
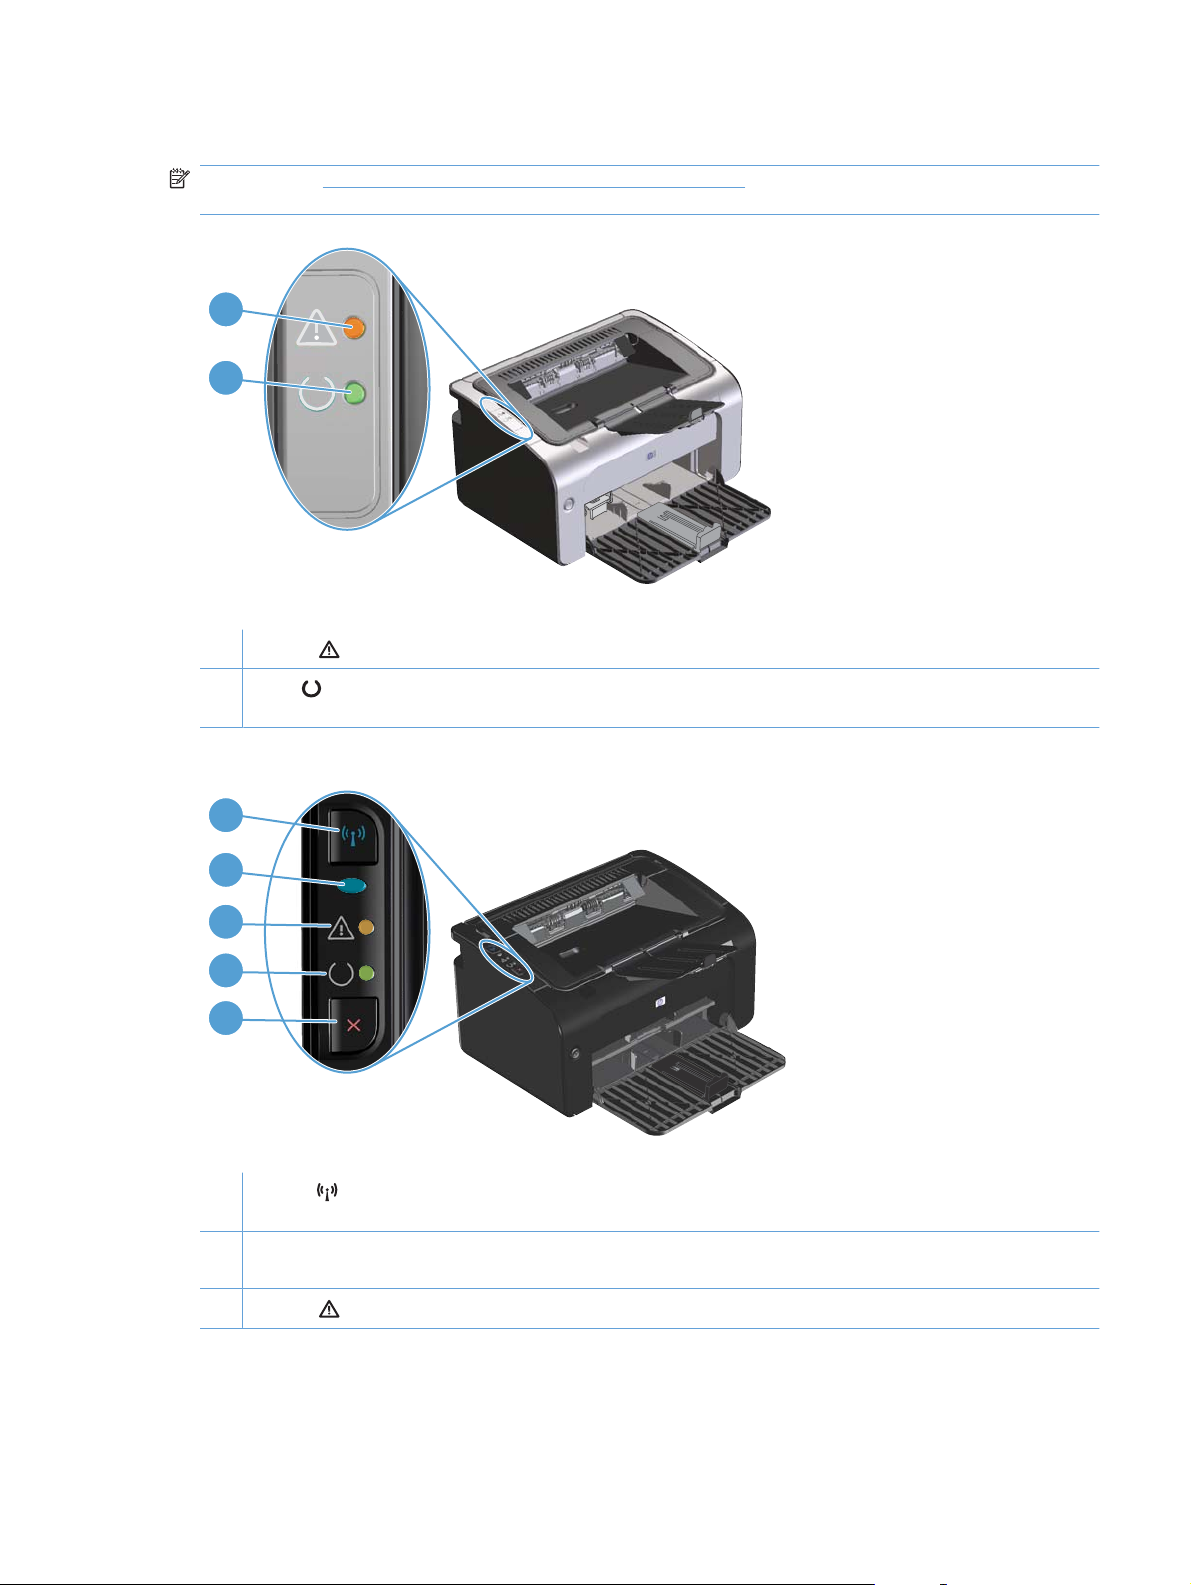
Control-panel layout
NOTE: See Interpret control-panel light patterns on page 70 for a description of what the light
patterns mean.
1
2
Table 1-3 HP LaserJet Professional P1100 Printer series
1 Attention light: Indicates that the print cartridge door is open or other errors exist.
2 Ready light: When the product is ready to print, the ready light is on. When the product is processing data, the ready
light blinks.
1
2
3
4
5
Table 1-4 HP LaserJet Professional P1100w Printer series
1 Wireless button: To detect wireless networks, press the wireless button. This button also enables and disables the
wireless feature.
2 Wireless light: When the product is searching for a network, the wireless light blinks. When the product is connected to
a wireless network, the wireless light is on.
3 Attention light: Indicates that the print cartridge door is open or other errors exist.
ENWW Product views 7
Page 20

Table 1-4 HP LaserJet Professional P1100w Printer series (continued)
4 Ready light: When the product is ready to print, the ready light is on. When the product is processing data, the ready
light blinks.
5 Cancel button: To cancel the print job, press the cancel button. Press and hold the button for 5 seconds to print a
configuration page.
8 Chapter 1 Product basics ENWW
Page 21

2 Software for Windows
Supported operating systems for Windows
●
Supported printer-drivers for Windows
●
Priority for print settings
●
Change printer-driver settings for Windows
●
Remove software for Windows
●
Supported utilities (wireless models only)
●
ENWW 9
Page 22

Supported operating systems for Windows
The product comes with software for the following Windows® operating systems:
Windows Vista (32-bit and 64-bit)
●
Windows XP (32-bit and 64-bit)
●
Windows 7
●
Windows Server 2003 (32-bit and 64-bit)
●
For more information about upgrading from Windows 2000 Server to Windows Server 2003, using
Windows Server 2003 Point and Print, or using Windows Server 2003 Terminal Services and
Printing, go to
Windows Server 2008 (32-bit and 64-bit)
●
www.microsoft.com.
Supported printer-drivers for Windows
The product comes with software for Windows that allows the computer to communicate with the
product. This software is called a printer driver. Printer drivers provide access to product features, such
as printing on custom-sized paper, resizing documents, and inserting watermarks.
NOTE: The most recent drivers are available at www.hp.com/support/ljp1100series. Depending on
the configuration of Windows-based computers, the installation program for the product software
automatically checks the computer for Internet access in order to obtain the latest drivers.
In addition to the printer driver that is installed during the HP Smart Install or from the product CD, the
XML Paper Specification (XPS) driver is available for download from the Web.
10 Chapter 2 Software for Windows ENWW
Page 23

Priority for print settings
Changes to print settings are prioritized depending on where the changes are made:
NOTE: The names of commands and dialog boxes might vary depending on your software program.
Page Setup dialog box: Click Page Setup or a similar command on the File menu of the program
●
you are working in to open this dialog box. Settings changed here override settings changed
anywhere else.
Print dialog box: Click Print, Print Setup, or a similar command on the File menu of the program
●
you are working in to open this dialog box. Settings changed in the Print dialog box have a lower
priority and usually do not override changes made in the Page Setup dialog box.
Printer Properties dialog box (printer driver): Click Properties in the Print dialog box to open
●
the printer driver. Settings changed in the Printer Properties dialog box usually do not override
settings anywhere else in the printing software. You can change most of the print settings here.
Default printer driver settings: The default printer driver settings determine the settings used in
●
all print jobs, unless settings are changed in the Page Setup, Print, or Printer Properties dialog
boxes.
ENWW Priority for print settings 11
Page 24

Change printer-driver settings for Windows
Change the settings for all print jobs
until the software program is closed
1. On the File menu in the software
program, click Print.
2. Select the driver, and then click
Properties or Preferences.
The steps can vary; this procedure is
most common.
Change the default settings for all
print jobs
1. Windows Vista and Windows 7:
Click Start, click Control Panel,
and then in the category for
Hardware and Sound click
Printer.
-or-
Windows XP, Windows Server
2003, and Windows Server 2008
(using the default Start menu
view): Click Start, and then click
Printers and Faxes.
-or-
Windows XP, Windows Server
2003, and Windows Server 2008
(using the Classic Start menu
view): Click Start, click Settings,
and then click Printers.
2. Right-click the driver icon, and then
select Printing Preferences.
Change the product configuration
settings
1. Windows Vista and Windows 7:
Click Start, click Control Panel,
and then in the category for
Hardware and Sound click
Printer.
-or-
Windows XP, Windows Server
2003, and Windows Server 2008
(using the default Start menu
view): Click Start, and then click
Printers and Faxes.
-or-
Windows XP, Windows Server
2003, and Windows Server 2008
(using the Classic Start menu
view): Click Start, click Settings,
and then click Printers.
2. Right-click the driver icon, and then
select Properties.
3. Click the Device Settings tab.
12 Chapter 2 Software for Windows ENWW
Page 25

Remove software for Windows
Use the uninstall utility to remove Windows software
1. Click the Start button, and then click the Programs or All Programs menu item.
2. Click the HP menu item, and then click the HP LaserJet Professional P1100 Printer series menu
item.
3. Click the Uninstall menu item, and then follow the onscreen instructions to remove the software.
Use the Windows Control Panel to remove software
Windows XP, Windows Server 2003, and Windows Server 2008
1. Click the Start button, click the Control Panel item, and then click the Add or Remove
Programs item.
2. Find and select the product from the list.
3. Click the Change/Remove button to remove the software.
Windows Vista and Windows 7
1. Click the Start button, click the Control Panel item, and then click the Programs and Features
item.
2. Find and select the product from the list.
3. Select the Uninstall/Change option.
ENWW Remove software for Windows 13
Page 26

Supported utilities (wireless models only)
Embedded Web server
The product is equipped with an embedded Web server, which provides access to information about
product and network activities. This information appears in a Web browser, such as Microsoft Internet
Explorer, Apple Safari, or Firefox.
The embedded Web server resides on the product. It is not loaded on a network server.
The embedded Web server provides an interface to the product that anyone who has a networkconnected computer and a standard Web browser can use. No special software is installed or
configured, but you must have a supported Web browser on your computer. To gain access to the
embedded Web server, type the IP address for the product in the address line of the browser. (To find
the IP address, print a configuration page. For more information about printing a configuration page,
see
Print the information pages on page 46.)
For a complete explanation of the features and functionality of the embedded Web server, see
HP Embedded Web Server sections on page 47.
14 Chapter 2 Software for Windows ENWW
Page 27

3 Use the product with Mac
Software for Mac
●
Print with Mac
●
ENWW 15
Page 28

Software for Mac
Supported operating systems for Macintosh
The product supports the following Macintosh operating systems:
Mac OS X v10.4, v10.5, and v10.6
●
NOTE: PPC and Intel® Core™ processors are supported.
Supported printer drivers for Macintosh
The HP LaserJet software installer provides PostScript® Printer Description (PPD) files, a CUPS driver,
and the HP Printer Utilities for Mac OS X. The HP printer PPD file, in combination with the CUPS driver,
provides full printing functionality and access to specific HP printer features.
Remove software for Mac
Use the uninstall utility to remove the software.
1. Browse to the following folder:
Library/Printers/hp/laserjet/P1100_P1560_P1600Series/
2. Double-click the HP Uninstaller.app file.
3. Click the Continue button, and then follow the onscreen instructions to remove the software.
Priority for print settings for Mac
Changes to print settings are prioritized depending on where the changes are made:
NOTE: The names of commands and dialog boxes might vary depending on your software program.
Page Setup dialog box: Click Page Setup or a similar command on the File menu of the program
●
you are working in to open this dialog box. Settings changed here might override settings changed
anywhere else.
Print dialog box: Click Print, Print Setup, or a similar command on the File menu of the program
●
you are working in to open this dialog box. Settings changed in the Print dialog box have a lower
priority and do not override changes made in the Page Setup dialog box.
Default printer driver settings: The default printer driver settings determine the settings used in
●
all print jobs, unless settings are changed in the Page Setup or Print dialog boxes.
16 Chapter 3 Use the product with Mac ENWW
Page 29

Change printer-driver settings for Macintosh
Change the settings for all print jobs
until the software program is closed
1. On the File menu, click Print.
2. Change the settings that you want
on the various menus.
Change the default settings for all
print jobs
1. On the File menu, click Print.
2. Change the settings that you want
on the various menus.
3. On the Presets menu, click Save
as and type a name for the preset.
These settings are saved in the
Presets menu. To use the new settings,
you must select the saved preset option
every time you open a program and print.
Change the product configuration
settings
Mac OS X v10.4
1. From the Apple menu, click System
Preferences and then Print &
Fax.
2. Click Printer Setup.
3. Click the Installable Options
menu.
Mac OS X v10.5 and v10.6
1. From the Apple menu, click System
Preferences and then Print &
Fax.
2. Click Options & Supplies.
3. Click the Driver menu.
4. Select the driver from the list, and
configure the installed options.
ENWW Software for Mac 17
Page 30

Software for Mac computers
HP Printer Utility for Mac
Use the HP LaserJet Utility to print the product information pages and to change the Auto-Off setting
from a Mac computer.
To open the HP LaserJet Utility, complete the procedure below.
Open the Print Queue, and then click the Utility icon.
▲
Supported utilities for Mac (wireless models only)
Embedded Web server
Network models are equipped with an embedded Web server, which provides access to information
about device and network activities. This information appears in a Web browser, such as Microsoft
Internet Explorer, Netscape Navigator, Apple Safari, or Firefox.
The embedded Web server resides on the device. It is not loaded on a network server.
The embedded Web server provides an interface to the device that anyone who has a networkconnected computer and a standard Web browser can use. No special software is installed or
configured, but you must have a supported Web browser on your computer. To gain access to the
embedded Web server, type the IP address for the device in the address line of the browser. (To find
the IP address, print a configuration page.)
18 Chapter 3 Use the product with Mac ENWW
Page 31

Print with Mac
Create and use printing presets in Macintosh
Use printing presets to save the current printer driver settings for reuse.
Create a printing preset
1. On the File menu, click Print.
2. Select the driver.
3. Select the print settings.
4. In the Presets box, click Save As..., and type a name for the preset.
5. Click OK.
Use printing presets
1. On the File menu, click Print.
2. Select the driver.
3. In the Presets box, select the printing preset that you want to use.
NOTE: To use printer-driver default settings, select Standard.
Resize documents or print on a custom paper size
You can scale a document to fit on a different size of paper.
1. On the File menu, click Print.
2. Open the Paper Handling menu.
3. In the area for Destination Paper Size, select Scale to fit paper size, and then select the size
from the drop-down list.
4. If you want to use only paper that is smaller than the document, select Scale down only.
Print a cover page
You can print a separate cover page for your document that includes a message (such as “Confidential”).
1. On the File menu, click Print.
2. Select the driver.
3. Open the Cover Page menu, and then select whether to print the cover page Before Document
or After Document.
4. In the Cover Page Type menu, select the message that you want to print on the cover page.
NOTE: To print a blank cover page, select Standard as the Cover Page Type.
ENWW Print with Mac 19
Page 32

Print multiple pages on one sheet of paper in Macintosh
You can print more than one page on a single sheet of paper. This feature provides a cost-effective way
to print draft pages.
1. On the File menu, click Print.
2. Select the driver.
3. Open the Layout menu.
4. Next to Pages per Sheet, select the number of pages that you want to print on each sheet (1, 2,
4, 6, 9, or 16).
5. Next to Layout Direction, select the order and placement of the pages on the sheet.
6. Next to Borders, select the type of border to print around each page on the sheet.
Print on both sides (duplex)
Print on both sides manually
1. Insert enough paper into the input tray to accommodate the print job. If you are loading special
paper such as letterhead, load it face-down in the tray.
2. On the File menu, click Print.
3. Mac OS X v10.4: In the Layout drop-down list, select the Long-edged binding item or the Short-
edged binding item.
-or-
Mac OS X v10.5 and v10.6: Click the Two-sided check box.
4. Click Print. Follow the instructions in the dialog box that opens on the computer screen before
placing the output stack in the tray for printing the second half.
5. Go to the product, and remove any blank paper that is in the tray.
6. Take the printed stack from the output bin, and then insert the stack printed side down into the tray
with the top edge feeding into the product first.
7. At the computer, click the Continue button to finish the print job.
20 Chapter 3 Use the product with Mac ENWW
Page 33

4 Connect the product
Supported network operating systems (wireless models only)
●
USB connection
●
Network connection (wireless models only)
●
ENWW 21
Page 34

Supported network operating systems (wireless models only)
The product supports the following operating systems for wireless printing:
Windows Vista (32-bit and 64-bit)
●
Windows XP (32-bit and 64-bit)
●
Windows 7
●
Windows Server 2003 (32-bit and 64-bit)
●
Windows Server 2008 (32-bit and 64-bit)
●
Mac OS X v10.4, v10.5, and v10.6
●
22 Chapter 4 Connect the product ENWW
Page 35

USB connection
This product supports a Hi-Speed USB 2.0 connection. You must use an A-to-B type USB cable that is
no longer than 2 m (6.56 ft).
HP Smart Install
NOTE: This installation type is supported for Windows only.
The HP Smart Install allows you to install the product driver and software by connecting the product to
a computer through a USB cable.
NOTE: The installation CD is not required during a HP Smart Install. Do not insert the software
installation CD into the computer CD drive.
1. Turn the product on.
2. Connect the USB cable.
3. The HP Smart Install program should start automatically. Follow the onscreen instructions to install
the software.
If the HP Smart Install program does not start automatically, AutoPlay might be disabled on
●
the computer. Browse the computer and double-click the HP Smart Install drive to run the
program. If you cannot find the HP Smart Install drive, use the product installation CD to install
the software.
●
CD installation
1. Insert the software installation CD into the computer CD drive.
NOTE: Do not connect the USB cable until prompted.
2. If the installation program does not start automatically, browse the CD contents and run the
SETUP.EXE file.
3. Follow the onscreen instructions to install the software.
When you use the CD to install the software, you can choose the following types of installations:
Easy Install (recommended)
●
You will not be prompted to accept or make changes to default settings, and you automatically will
accept the software license agreement.
Advanced Install
●
You will be prompted to accept or make changes to default settings.
If the program prompts you to select a connection type, select the connection type you will
use to print to the product after installation.
ENWW USB connection 23
Page 36

Network connection (wireless models only)
The product can connect to wireless networks.
Supported network protocols
To connect a networking-equipped product to a network, you need a network that uses one of the
following protocols.
TCP/IP (IPv4 or IPv6)
●
Port 9100
●
LPR
●
DHCP
●
AutoIP
●
SNMP
●
Bonjour
●
SLP
●
WSD
●
NBNS
●
Install the product on a wireless network with HP Smart Install
NOTE: This installation type is supported for Windows only.
The HP Smart Install allows you to install the product driver and software by connecting the product to
a computer through a USB cable. If the product previously has been installed on a network, reset the
wireless defaults. See
NOTE: The installation CD is not required during a HP Smart Install. Do not insert the software
installation CD into the computer CD drive.
1. Turn on the product, and then connect the USB cable to the product and the computer. The
installation program should start automatically.
Restore default wireless settings on page 27.
24 Chapter 4 Connect the product ENWW
Page 37

If the HP Smart Install program does not start automatically, AutoPlay might be disabled on
●
the computer. Browse the computer and double-click the HP Smart Install drive to run the
program. If you cannot find the HP Smart Install drive, use the product installation CD to install
the software.
If the program prompts you to select a connection type, select the connection type you will
●
use to print to the product after installation.
2. Follow the onscreen instructions to complete the product installation.
3. When the installation is complete, if you want to verify that the product has a network IP address,
print a configuration page. Press and hold the product cancel
and then release the button to print the configuration page.
button until the ready light blinks,
Install the product on a wireless network with the software CD
1. Insert the software CD into the computer CD tray.
If the installation program does not start automatically, browse the CD contents and run the
SETUP.EXE file.
2. Follow the onscreen instructions to complete the product installation.
3. When the installation is complete, if you want to verify that the product has a network IP address,
print a configuration page. Press and hold the product cancel
and then release the button to print the configuration page.
button until the ready light blinks,
Install the software for a product currently on the network
When the product previously has been installed on a network computer (so that it already has an IP
address), and you want to install the printer driver on another computer, complete the following steps.
1. At the computer, open the HP Embedded Web Server. See
by using a network connection on page 47.
2. Click the HP Smart Install tab.
3. Click the Download button.
4. Follow the onscreen instructions to complete the product installation.
ENWW Network connection (wireless models only) 25
Open the HP Embedded Web Server
Page 38

Perform a peer-to-peer (ad-hoc) wireless installation
The product can be installed wirelessly to a computer through a peer-to-peer (ad-hoc) installation.
1. Turn on the product, and then restore the network setting.
2. Print a configuration page (see
(SSID) in the Network Information section.
3. Refresh the computer wireless network connection list, and then click the product network name
(SSID) and connect to it.
4. After several minutes, print a configuration page, and then find the product IP address.
5. At the computer, open a web browser, type the product IP address in the address box, and then
press the Enter key to open the HP Embedded Web Server.
6. Click the HP Smart Install tab, and then click the Download button to install the product software.
The figures below show the difference between an ad-hoc network connection and an infrastructure
network connection.
Ad-hoc network Infrastructure network
Configuration page on page 46), and find the network name
Turn off the product wireless unit
If you want to disconnect the product from a wireless network, you can turn off the wireless unit in the
product.
1. At the product control panel, press and hold the wireless button for more than 5 seconds.
2. To confirm that the wireless unit is turned off, print a configuration page, and then verify that the
product IP address is specified as 0.0.0.0 on the configuration page.
26 Chapter 4 Connect the product ENWW
Page 39

Configure the network product
Use the Wireless Configuration utility
Use the Wireless Configuration utility to configure the product to print on a wireless network.
1. Connect the wireless product to the computer through a USB cable.
2. Click the Start button, and then click the Programs or All Programs menu item.
3. Click the HP menu item, and then click the HP LaserJet Professional P1100 Printer series menu
item.
4. Click the Wireless Configuration menu item.
5. Follow the onscreen instructions to configure the product to print on a wireless network.
Restore default wireless settings
1. Turn the product off.
2. Press and hold the wireless
3. Hold the buttons until all the lights blink in unison, and then release the buttons.
View or change network settings
Use the embedded Web server to view or change IP configuration settings.
1. Print a configuration page, and locate the IP address.
If you are using IPv4, the IP address contains only digits. It has this format:
●
xxx.xxx.xxx.xxx
If you are using IPv6, the IP address is a hexadecimal combination of characters and digits.
●
It has a format similar to this:
xxxx::xxxx:xxxx:xxxx:xxxx
2. To open the embedded Web server, type the IP address into the address line of a Web browser.
3. Click the Networking tab to obtain network information. You can change settings as needed.
Set or change the network password
Use the embedded Web server to set a network password or change an existing password.
button and the cancel button, and then turn the product on.
1. Open the embedded Web server, click the Networking tab, and click the Password link.
NOTE: If a password has previously been set, you are prompted to type the password. Type the
password, and then click the Apply button.
2. Type the new password in the Password box and in the Confirm Password box.
3. At the bottom of the window, click the Apply button to save the password.
ENWW Network connection (wireless models only) 27
Page 40

IP address
The product IP address can be set manually, or it can be configured automatically using DHCP, BootP,
or AutoIP.
To change the IP address manually, use the HP Embedded Web Server.
1. Open the HP Embedded Web Server, and then click the Networking tab.
2. In the navigation pane, click the IPv4 Configuration link or the IPv6 Configuration link.
3. In the IP Address Configuration section, click the Manual IP option.
4. Type the required data in the Manual IP Address box, the IP Subnet Mask box, and the Manual
Default Gateway box.
5. Click the Apply button.
Link speed setting
Use the Networking tab in the HP Embedded Web Server to set the link speed if necessary. The setting
is on the Advanced page.
Incorrect changes to the link speed setting might prevent the product from communicating with other
network devices. For most situations, leave the product in automatic mode. Changes can cause the
product to turn off, and then on. Only make changes when the product is idle.
28 Chapter 4 Connect the product ENWW
Page 41

5 Paper and print media
Understand paper and print media use
●
Special paper or print media guidelines
●
Change the print driver to match the media type and size
●
Supported paper sizes
●
Supported paper types and tray capacity
●
Paper orientation for loading trays
●
Load paper trays
●
ENWW 29
Page 42

Understand paper and print media use
This product supports a variety of paper and other print media in accordance with the guidelines in this
user guide. Paper or print media that does not meet these guidelines might cause poor print quality,
increased jams, and premature wear on the product.
For best results, use only HP-brand paper and print media designed for laser printers or multiuse. Do
not use paper or print media made for inkjet printers. Hewlett-Packard Company cannot recommend
the use of other brands of media because HP cannot control their quality.
It is possible for paper to meet all of the guidelines in this user guide and still not produce satisfactory
results. This might be the result of improper handling, unacceptable temperature and/or humidity levels,
or other variables over which Hewlett-Packard has no control.
CAUTION: Using paper or print media that does not meet Hewlett-Packard's specifications might
cause problems for the product, requiring repair. This repair is not covered by the Hewlett-Packard
warranty or service agreements.
30 Chapter 5 Paper and print media ENWW
Page 43

Special paper or print media guidelines
This product supports printing on special media. Use the following guidelines to obtain satisfactory
results. When using special paper or print media, be sure to set the type and size in the printer driver
to obtain the best results.
CAUTION: HP LaserJet products use fusers to bond dry toner particles to the paper in very precise
dots. HP laser paper is designed to withstand this extreme heat. Using inkjet paper could damage the
product.
Media type Do Do not
Envelopes
Labels
Transparencies
Letterhead or preprinted forms
Heavy paper
Store envelopes flat.
●
Use envelopes where the seam
●
extends all the way to the corner of
the envelope.
Use peel-off adhesive strips that
●
are approved for use in laser
printers.
Use only labels that have no
●
exposed backing between them.
Use labels that lie flat.
●
Use only full sheets of labels.
●
Use only transparencies that are
●
approved for use in laser printers.
Place transparencies on a flat
●
surface after removing them from
the product.
Use only letterhead or forms
●
approved for use in laser printers.
Use only heavy paper that is
●
approved for use in laser printers
and meets the weight specifications
for this product.
Do not use envelopes that are
●
wrinkled, nicked, stuck together, or
otherwise damaged.
Do not use envelopes that have
●
clasps, snaps, windows, or coated
linings.
Do not use self-stick adhesives or
●
other synthetic materials.
Do not use labels that have wrinkles
●
or bubbles, or are damaged.
Do not print partial sheets of labels.
●
Do not use transparent print media
●
not approved for laser printers.
Do not use raised or metallic
●
letterhead.
Do not use paper that is heavier
●
than the recommended media
specification for this product unless
it is HP paper that has been
approved for use in this product.
Glossy or coated paper
Use only glossy or coated paper
●
that is approved for use in laser
printers.
Do not use glossy or coated paper
●
designed for use in inkjet products.
ENWW Special paper or print media guidelines 31
Page 44

Change the print driver to match the media type and size
Selecting media by type and size results in significantly better print quality for heavy paper, glossy paper,
and overhead transparencies. Using the wrong setting can result in unsatisfactory print quality. Always
print by type for special print media, such as labels or transparencies. Always print by size for envelopes.
NOTE: Depending on the software program, the commands and dialog box names that follow might
be different.
1. On the File menu in the software program, click the Print menu item.
2. Select the driver, and then click the Properties button or the Preferences button.
3. Click the Paper/Quality tab.
4. In the Type is or Size is list box, select the correct media type or size.
5. Click the OK button.
32 Chapter 5 Paper and print media ENWW
Page 45

Supported paper sizes
This product supports various paper sizes, and it adapts to various media.
NOTE: To obtain best print results, select the appropriate paper size and type in your print driver before
printing.
Table 5-1 Supported paper and print media sizes
Size Dimensions Input tray Priority input slot
Letter 216 x 279 mm (8.5 x 11 in)
Legal 216 x 356 mm (8.5 x 14 in)
A4 210 x 297 mm (8.27 x 11.69 in)
Executive 184 x 267 mm (7.25 x 10.5 in)
A5 148 x 210 mm (5.83 x 8.27 in)
A6 105 x 148 mm (4.13 x 5.83 in)
B5 (ISO) 176 x 250 mm (6.93 x 9.84 in)
(wireless models
only)
B5 (JIS) 182 x 257 mm (7.17 x 10.12 in)
16k 184 x 260 mm (7.24 x 10.23 in)
195 x 270 mm (7.68 x 10.62 in)
197 x 273 mm (7.75 x 10.75 in)
Custom Minimum: 76 x 127 mm (3 x 5 in)
Maximum: 216 x 356 mm (8.5 x 14.0 in)
Table 5-2 Supported envelopes and postcards
Size Dimensions Input tray Priority input slot
Envelope #10 105 x 241 mm (4.13 x 9.49 in)
Envelope DL 110 x 220 mm (4.33 x 8.66 in)
Envelope C5 162 x 229 mm (6.93 x 9.84 in)
Envelope B5 176 x 250 mm (6.7 x 9.8 in)
(wireless models
only)
Envelope Monarch 98 x 191 mm (3.9 x 7.5 in)
Double postcard
(JIS)
148 x 200 mm (5.83 x 7.87 in)
ENWW Supported paper sizes 33
Page 46

Supported paper types and tray capacity
Supported paper and print media types
For a complete list of specific HP-brand paper that this product supports, go to www.hp.com/support/
ljp1100series.
Paper type (printer driver) Input tray Priority input slot (wireless models only)
Paper, including the following types:
Plain
●
Vellum
●
Recycled
●
Rough
Envelope
Labels
Cardstock
Transparency
Postcards
Tray and bin capacity
Tray or bin Paper type Specifications Quantity
Input tray Paper Range:
60 g/m
(43 lb) bond
Envelopes
Transparencies Minimum 0.13 mm (0.005 in)
Output bin Paper Range:
Envelopes
Transparencies Minimum 0.13 mm (0.005 in)
60 g/m2 (16 lb) bond to 90 g/m
(24 lb) bond
thick
60 g/m
(43 lb) bond
Less than 60 g/m2 (16 lb) bond to
90 g/m
thick
2
(16 lb) bond to 163 g/m
2
(16 lb) bond to 163 g/m
2
(24 lb) bond
150 sheets of 75 g/m2 (20 lb)
bond
2
2
Up to 10 envelopes
Up to 75 transparencies
Up to 125 sheets of 75 g/m
(20 lb) bond
2
Up to 10 envelopes
Up to 75 transparencies
2
34 Chapter 5 Paper and print media ENWW
Page 47

Paper orientation for loading trays
If you are using paper that requires a specific orientation, load it according to the information in the
following table.
Paper type How to load paper
Preprinted or letterhead
Prepunched
Envelope
Load paper trays
CAUTION: If you try to print on media that is wrinkled, folded, or damaged in any way, a jam might
occur. See
Priority feed slot
The priority feed slot holds up to 10 sheets of media or one envelope, one transparency, or one sheet
of labels or cardstock. Load media with the top forward and the side to be printed on facing up. To
prevent jams and skewing, always adjust the side media guides before feeding the media.
Input tray
Clear jams on page 73 for more information.
Face up
●
Top edge leading into the product
●
Face up
●
Holes toward the left side of the product
●
Face up
●
Left short edge leading into the product
●
The input tray holds 150 pages of 75 g/m2 (20 lb) paper, or fewer sheets of heavier media (a 15 mm
(0.6 in) stack height or less).
Load media with the top forward and the side to be printed on facing up. To prevent jams and skewing,
always adjust the side and front media guides.
NOTE: When you add new media, make sure that you remove all of the media from the input tray and
straighten the entire stack. This helps prevent multiple sheets of media from feeding through the product
at one time, reducing media jams.
ENWW Paper orientation for loading trays 35
Page 48

Tray adjustment for short media (base models only)
To print on media shorter than 185 mm (7.28 in), use the short media extender to adjust your input tray.
1. Remove the short media extender tool from the storage slot on the left side of the media input area.
2. Attach the tool to the adjustable media guide.
3. Insert the media into the product until it stops, and then slide the adjustable media guide, with the
tool attached to support the media.
4. When finished printing with short media, remove the short media extender tool, and then place it
back in the storage slot.
36 Chapter 5 Paper and print media ENWW
Page 49

6 Print tasks
Cancel a print job
●
Print with Windows
●
ENWW 37
Page 50

Cancel a print job
You can stop a print job by using the software program.
NOTE: It can take several minutes for all print jobs to clear after you have canceled a print job.
Stop the current print job from the control panel (wireless models only)
Press the cancel button on the control panel.
▲
Stop the current print job from the software program
When you send the print job, a dialog box opens briefly on the screen, giving you the option to cancel
the print job.
If several jobs are sent to the product through your software, they might be waiting in a print queue (for
example, in Windows Print Manager). See the software program documentation for specific instructions
about canceling a print job from the computer.
If a print job is waiting in a print queue or print spooler, delete the print job there.
1. Windows Vista and Windows 7: Click Start, click Control Panel, and then in the category for
Hardware and Sound click Printer.
-or-
Windows XP, Windows Server 2003, and Windows Server 2008 (using the default Start menu
view): Click Start, click Settings, and then click Printers and Faxes.
-or-
Windows XP, Windows Server 2003, and Windows Server 2008 (using the Classic Start menu
view): Click Start, click Settings, and then click Printers.
2. In the list of printers, double-click the name of this product to open the print queue or spooler.
3. Select the print job that you want to cancel, right-click the job, and then click the Cancel or
Delete item.
38 Chapter 6 Print tasks ENWW
Page 51

Print with Windows
NOTE: Depending on the software program, the commands and dialog box names that follow might
be different.
Open the Windows printer driver
1. On the File menu in the software program, click Print.
2. Select the product, and then click Properties or Preferences.
Get help for any print option with Windows
Printer-driver Help is separate from program Help. The printer-driver help provides explanations for the
buttons, check boxes, and drop-down lists that are in the printer driver. It also includes instructions for
performing common printing tasks, such as printing on both sides, printing multiple pages on one sheet,
and printing the first page or covers on different paper.
Activate the printer-driver Help screens in one of the following ways:
In the printer driver Properties dialog box, click the Help button.
●
Press the F1 key on the computer keyboard.
●
Click the question-mark symbol in the upper-right corner of the printer driver.
●
Right-click on any item in the driver.
●
Change the number of print copies with Windows
1. Open the printer driver, click the Properties or Preferences button, and then click the
Advanced tab.
2. In the Copies area, use the arrow buttons to adjust the number of copies.
If you are printing multiple copies, click the Collate check box to collate the copies.
3. Click the OK button.
Print colored text as black with Windows
1. Open the printer driver, click the Properties or Preferences button, and then click the
Advanced tab.
2. Click the Print All Text as Black check box.
3. Click the OK button.
Save custom print settings for reuse with Windows
Use a printing quick set
1. Open the printer driver, and then click the Properties or Preferences button. The Print Tasks
Quick Sets drop-down list appears on all tabs except the Services tab.
2. In the Print Tasks Quick Sets drop-down list , select one of the quick sets, and then click OK to
print the job with the predefined settings.
ENWW Print with Windows 39
Page 52

Create a custom printing quick set
1. Open the printer driver, and then click the Properties or Preferences button. The Print Tasks
Quick Sets drop-down list appears on all tabs except the Services tab.
2. Select an existing quick set as a base.
3. Select the print options for the new quick set.
4. Click Save As, type a name for the quick set, and then click OK.
Improve print quality with Windows
Select a page size
1. Open the printer driver, click the Properties or Preferences button, and then click the Paper/
Quality tab.
2. Select a size from the Size is drop-down list.
3. Click the OK button.
Select a custom page size
1. Open the printer driver, and then click the Paper/Quality tab.
2. Click the Custom button. The Custom Paper Size dialog box opens.
3. Type a name for the custom size, specify the dimensions, and then click Save.
4. Click the Close button, and then click the OK button.
Select a paper type
1. Open the printer driver, click the Properties or Preferences button, and then click the Paper/
Quality tab.
2. Select a type from the Type is drop-down list.
3. Click the OK button.
Select the print resolution
1. Open the printer driver, click the Properties or Preferences button, and then click the Paper/
Quality tab.
2. In the Print Quality area, select an option from the drop-down list. See the printer-driver online
Help for information about each of the available options.
NOTE: To use a draft-quality resolution, in the Print Quality area, click the EconoMode check
box.
3. Click the OK button.
40 Chapter 6 Print tasks ENWW
Page 53

Print the first or last page on different paper with Windows
1. Open the printer driver, click the Properties or Preferences button, and then click the Paper/
Quality tab.
2. Click the Use Different Paper/Covers check box, and then select the necessary settings for the
front cover, other pages, and back cover.
3. Click the OK button.
Scale a document to fit page size with Windows
1. Open the printer driver, click the Properties or Preferences button, and then click the Effects tab.
2. Click the Print document on check box, and then select a size from the drop-down list.
3. Click the OK button.
Add a watermark to a document with Windows
1. Open the printer driver, click the Properties or Preferences button, and then click the Effects tab.
2. Select a watermark from the Watermarks drop-down list.
To print the watermark on the first page only, click the First page only check box. Otherwise, the
watermark is printed on each page.
3. Click the OK button.
Print on both sides (duplex) with Windows
Manually print on both sides (duplex)
1. Load paper face-up in the input tray.
2. Open the printer driver, and then click the Properties or Preferences button.
3. Click the Finishing tab.
4. Click the Print On Both Sides (manually) check box. If you will bind the document along the top
edge, click the Flip pages up check box.
5. Click the OK button to print the first side of the job.
ENWW Print with Windows 41
Page 54

6. Retrieve the printed stack from the output bin, and, maintaining the paper orientation, place it with
the printed-side facing down in the input tray.
7. At the computer, click the Continue button to print the second side of the job.
Create a booklet with Windows
1. Open the printer driver, click the Properties or Preferences button, and then click the Finishing
tab.
2. Click the Print on both sides (manually) check box.
3. In the Booklet layout drop-down list, click the Left binding or Right binding option. The Pages
per sheet option automatically changes to 2 pages per sheet.
4. Click the OK button.
42 Chapter 6 Print tasks ENWW
Page 55

Print multiple pages per sheet with Windows
1. Open the printer driver, click the Properties or Preferences button, and then click the Finishing
tab.
2. Select the number of pages per sheet from the Pages per sheet drop-down list.
3. Select the correct options for Print Page Borders, Page Order, and Orientation.
4. Click the OK button.
Select page orientation with Windows
1. Open the printer driver, click the Properties or Preferences button, and then click the Finishing
tab.
2. In the Orientation area, select the Portrait or Landscape option.
To print the page image upside down, select the Rotate by 180 degrees option.
3. Click the OK button.
ENWW Print with Windows 43
Page 56

44 Chapter 6 Print tasks ENWW
Page 57

7 Manage and maintain the product
Print the information pages
●
Use the HP Embedded Web Server (wireless models only)
●
Economy settings
●
Manage supplies and accessories
●
Clean the product
●
Product updates
●
ENWW 45
Page 58

Print the information pages
You can print the following information pages.
Configuration page
The configuration page lists current product settings and properties. It also contains a status log report.
To print a configuration page, do the following:
1. Open the printer driver, and then click the Properties or Preferences button.
2. Click the Services tab, and then, in the Print Information Pages drop-down list, click the Config
Page list item.
3. Click the Print button.
On wireless models, you can print the configuration page from the product control panel.
At the control panel, press and hold the cancel button until the ready light starts blinking, and
▲
then release the button.
Supplies status page
To print the supplies status page, select it from the Print Information Pages drop-down on the
Services tab in the printer driver. The supplies status page provides the following information:
●
●
●
Demo page
To print the demo page, select it from the Print Information Pages drop-down on the Services tab in
the printer driver. The demo page contains examples of text and graphics, and is used to show product
print quality.
The estimated percentage of toner remaining in the print cartridge
The number of pages and print jobs that have been processed
Ordering and recycling information
46 Chapter 7 Manage and maintain the product ENWW
Page 59

Use the HP Embedded Web Server (wireless models only)
Use the HP Embedded Web Server (EWS) to view product and network status and to manage printing
functions from a computer.
View product status information
●
Determine the remaining life on all supplies and order new ones
●
View and change the product default configuration settings
●
View and change network configuration
●
You do not need to install any software on the computer. You only need to use one of these supported
Web browsers:
Internet Explorer 6.0 (and later)
●
Firefox 1.0 (and later)
●
Mozilla 1.6 (and later)
●
Opera 7.0 (and later)
●
Safari 1.2 (and later)
●
Konqueror 3.2 (and later)
●
The HP Embedded Web Server works when the product is connected to a TCP/IP-based network. The
HP Embedded Web Server does not support IPX-based connections or direct USB connections.
NOTE: You do not have to have Internet access to open and use the HP Embedded Web Server.
However, if you click a link on any of the pages, you must have Internet access to go to the site
associated with the link.
Open the HP Embedded Web Server by using a network connection
To open the HP Embedded Web Server, type the IP address or host name of the product in the address
field of a supported Web browser. To find the IP address, print a configuration page at the product by
pressing and holding the cancel
Hold the button until the ready
TIP: After you open the URL, bookmark it so that you can return to it quickly in the future.
button when the ready light is on and no other jobs are printing.
light starts blinking.
HP Embedded Web Server sections
Information tab
The Information pages group consists of the following pages:
Device Status displays the status of the product and HP supplies.
●
Device Configuration shows the information found on the Configuration page.
●
Supplies Status shows the status of HP supplies and provides part numbers. To order new
●
supplies, click Order Supplies in the upper-right part of the window.
Network Summary shows the information found on the Network Summary page.
●
ENWW Use the HP Embedded Web Server (wireless models only) 47
Page 60

Settings tab
Use this tab to configure the product from your computer. If this product is networked, always consult
with the product administrator before changing settings on this tab.
The Settings tab contains the Printing page where you can view and change the default print job
settings.
Networking tab
Network administrators can use this tab to control network-related settings for the product when it is
connected to an IP-based network.
HP Smart Install tab
NOTE: This tab is supported for Windows only.
Use this tab to install the product driver and software on a computer. Click the Download button to start
the installation process, and then follow the onscreen instructions to finish the process.
Links
Links are located in the upper-right part of the status pages. You must have Internet access to use any
of these links. If you use a dial-up connection and did not connect when you first opened the
HP Embedded Web Server, you must connect before you can visit these Web sites. Connecting might
require that you close the HP Embedded Web Server and reopen it.
Shop for Supplies. Click this link to connect to the Sure Supply Web site and order genuine
●
HP supplies from HP or a reseller of your choice.
Support. Connects to the product support site. You can search for help regarding general
●
topics.
48 Chapter 7 Manage and maintain the product ENWW
Page 61

Economy settings
Auto-Off mode
Auto-Off is an energy-saving feature of this product. After a user-specified time period, the product
automatically reduces its power consumption (Auto-Off). The product returns to the ready state when a
button is pressed or a print job is received. When the product is in Auto-Off mode, all of the control-panel
LEDs and the power button backlight LED are off.
NOTE: Although the product lights are off in Auto-Off mode, the product will work normally when it
receives a print job.
Change the Auto-Off delay time
You can change how long the product remains idle (Auto-Off delay) before it enters Auto-Off mode.
NOTE: The default Auto-Off delay setting is 5 minutes.
1. Open the printer properties, and then click the Device Settings tab.
2. Select the Auto-Off delay from the Auto-Off drop-down list.
NOTE: The changed setting does not go into effect until a print job is sent to product.
Print with EconoMode
This product has an EconoMode option for printing drafts of documents. Using EconoMode can use
less toner and decrease the cost per page. However, using EconoMode can also reduce print quality.
HP does not recommend the full-time use of EconoMode. If EconoMode is used full-time, the toner
supply might outlast the mechanical parts in the print cartridge. If print quality begins to degrade under
these circumstances, you must install a new print cartridge, even if there is toner supply remaining in
the cartridge.
Enable EconoMode with Windows
1. Open the printer driver, and then click the Properties or Preferences button.
2. Click the Paper/Quality tab.
3. Click the EconoMode check box.
ENWW Economy settings 49
Page 62

Manage supplies and accessories
Correctly using, storing, and monitoring the print cartridge can help ensure high-quality print output.
Check and order supplies
Print-cartridge storage
Do not remove the print cartridge from its package until you are ready to use it.
CAUTION: To prevent damage to the print cartridge, do not expose it to light for more than a few
minutes.
HP policy on non-HP print cartridges
Hewlett-Packard Company cannot recommend the use of non-HP print cartridges, either new or
remanufactured.
NOTE: Any damage caused by a non-HP print cartridge is not covered under the HP warranty and
service agreements.
To install a new genuine HP print cartridge, see Replace the print cartridge on page 52.
HP fraud hotline and Web site
Call the HP fraud hotline (1-877-219-3183, toll-free in North America) or go to www.hp.com/go/
anticounterfeit when you install an HP print cartridge and the control-panel message says the cartridge
is non-HP. HP will help determine if the cartridge is genuine and take steps to resolve the problem.
Your print cartridge might not be a genuine HP print cartridge if you notice the following:
You are experiencing a high number of problems with the print cartridge.
●
The cartridge does not look like it usually does (for example, the orange pull tab is missing, or the
●
packaging differs from HP packaging).
Recycle supplies
To recycle a genuine HP print cartridge, place the used cartridge in the box in which the new cartridge
arrived. Use the enclosed return label to send the used supply to HP for recycling. For complete
information, see the recycling guide that is included with each new HP supply item.
50 Chapter 7 Manage and maintain the product ENWW
Page 63

Replacement instructions
Redistribute toner
When a small amount of toner remains in print cartridge, faded or light areas might appear on the printed
page. You might be able to temporarily improve print quality by redistributing the toner.
1. Open the print-cartridge door, and then remove the print cartridge.
2. To redistribute the toner, gently rock the print cartridge from front to back.
CAUTION: If toner gets on your clothing, wipe it off with a dry cloth and wash the clothing in cold
water. Hot water sets toner into the fabric.
ENWW Manage supplies and accessories 51
Page 64

3. Reinsert the print cartridge into the product, and then close the print-cartridge door.
If the print is still light, install a new print cartridge.
Replace the print cartridge
When a print cartridge approaches the end of useful life, you can continue printing with the current
cartridge until redistributing the toner no longer yields acceptable print quality.
1. Open the print-cartridge door, and then remove the old print cartridge.
52 Chapter 7 Manage and maintain the product ENWW
Page 65

2. Remove the new print cartridge from the packaging. Place the used print cartridge in the bag and
box for recycling.
CAUTION: To prevent damage to the print cartridge, hold the print cartridge at each end. Do not
touch the cartridge shutter or the roller surface.
3. Grasp both sides of the print cartridge and gently rock the print cartridge to distribute the toner
evenly inside the cartridge.
ENWW Manage supplies and accessories 53
Page 66

4. Bend the tab on the left side of the cartridge until the tab breaks loose, and then pull the tab until
all the tape is removed from the cartridge. Place the tab and tape in the print-cartridge box to return
for recycling.
5. Insert the print cartridge in the product, and then close the print-cartridge door.
CAUTION: If toner gets on your clothing, wipe it off with a dry cloth and wash the clothing in cold
water. Hot water sets toner into the fabric.
54 Chapter 7 Manage and maintain the product ENWW
Page 67

Replace the pickup roller
Normal use with good media causes wear. The use of poor media might require more frequent
replacement of the pickup roller.
If the product regularly mispicks (no media feeds through), you might need to change or clean the pickup
roller. See
1. Open the print-cartridge door, and then remove the print cartridge.
Clean the pickup roller on page 61 to order a new pickup roller.
CAUTION: To prevent damage to the print cartridge, minimize its exposure to direct light. Cover
the print cartridge with a sheet of paper.
2. Find the pickup roller.
ENWW Manage supplies and accessories 55
Page 68

3. Release the small, white tabs on each side of the pickup roller, and rotate the pickup roller toward
the front.
4. Gently pull the pickup roller up and out.
5. Position the new pickup roller in the slot. The circular and rectangular slots on each side prevents
you from installing the roller incorrectly.
56 Chapter 7 Manage and maintain the product ENWW
Page 69

6. Rotate the top of the new pickup roller away from you until both sides snap into place.
7. Insert the print cartridge in the product, and then close the print-cartridge door.
ENWW Manage supplies and accessories 57
Page 70

Replace the separation pad
Normal use with good media causes wear. The use of poor media might require more frequent
replacement of the separation pad.
If the product regularly pulls multiple sheets of media at a time, you might need to change the separation
pad.
NOTE: Before you change the separation pad, clean the pickup roller. See Clean the pickup roller
on page 61.
WARNING! Before changing the separation pad, turn the product off, disconnect the power cord from
the wall outlet, and then wait for the product to cool.
1. Disconnect the product power cord from the product.
2. Remove the paper and close the input tray. Set the product on its front.
3. At the bottom of the product, unscrew the two screws holding the separation pad in place.
58 Chapter 7 Manage and maintain the product ENWW
Page 71

4. Remove the separation pad.
5. Insert the new separation pad, and screw it into place.
ENWW Manage supplies and accessories 59
Page 72

6. Reconnect the power cord, and then turn on the product.
60 Chapter 7 Manage and maintain the product ENWW
Page 73

Clean the product
Clean the pickup roller
If you want to clean the pickup roller before deciding to replace it, follow these instructions:
1. Unplug the power cord from the product and remove the pickup roller as described in
pickup roller on page 55.
2. Dab a lint-free cloth in isopropyl alcohol, and scrub the roller.
WARNING! Alcohol is flammable. Keep the alcohol and cloth away from an open flame. Before
you close the product and plug in the power cord, allow the alcohol to dry completely.
NOTE: In certain areas of California, air pollution control regulations restrict the use of liquid
Isopropyl Alcohol (IPA) as a cleaning agent. In those areas of California, please disregard the
previous recommendations and use a dry, lint-free cloth, moistened with water, to clean the pickup
roller.
3. Using a dry, lint-free cloth, wipe the pickup roller to remove loosened dirt.
Replace the
4. Allow the pickup roller to dry completely before you reinstall it in the product.
5. Reconnect the power cord.
ENWW Clean the product 61
Page 74

Clean the paper path
If you are experiencing toner specks or dots on the printouts, clean the paper path. This process uses
a transparency to remove dust and toner from the paper path. Do not use bond or rough paper.
NOTE: For best results use a sheet of transparency. If you do not have any transparencies, you can
use copier-grade media (60 to 163 g/m
1. Make sure that the product is idle and the ready light is on.
2. Load media in the input tray.
3. Open the printer Properties.
4. Click the Device Settings tab.
5. In the Cleaning Page area, click the Start button to process the cleaning page.
NOTE: The cleaning process takes about 2 minutes. The cleaning page stops periodically during the
cleaning process. Do not turn the product off until the cleaning process has finished. You might need to
repeat the cleaning process several times to thoroughly clean the product.
2
(16 to 43 lb)) that has a smooth surface.
62 Chapter 7 Manage and maintain the product ENWW
Page 75

Clean the print-cartridge area
You do not need to clean the print-cartridge area often. However, cleaning this area can improve the
quality of the printed sheets.
WARNING! Before changing the separation pad, turn the product off, disconnect the power cord from
the wall outlet, and then wait for the product to cool.
1. Disconnect the power cord from the product. Open the print-cartridge door, and then remove the
print cartridge.
CAUTION: Do not touch the black-sponge transfer roller inside the product. Doing so can
damage the product.
CAUTION: To prevent damage, do not expose the print cartridge to light. Cover it with a piece
of paper.
ENWW Clean the product 63
Page 76

2. With a dry, lint-free cloth, wipe any residue from the paper-path area and the print-cartridge cavity.
3. Reinstall the print cartridge, and then close the print-cartridge door.
64 Chapter 7 Manage and maintain the product ENWW
Page 77

4. Disconnect the power cord.
Clean the exterior
Use a soft, damp, lint-free cloth to wipe dust, smudges, and stains off of the exterior of the device.
Product updates
Software and firmware updates and installation instructions for this product are available at
www.hp.com/support/ljp1100series. Click Downloads and drivers, click the operating system, and
then select the download for the product.
ENWW Product updates 65
Page 78

66 Chapter 7 Manage and maintain the product ENWW
Page 79

8 Solve problems
Solve general problems
●
Interpret control-panel light patterns
●
Clear jams
●
Solve paper-handling problems
●
Solve image-quality problems
●
Solve performance problems
●
Solve connectivity problems
●
Solve product software problems
●
ENWW 67
Page 80

Solve general problems
If the product is not responding correctly, complete the steps in the following checklist, in order. If the
product does not pass a step, follow the corresponding troubleshooting suggestions. If a step resolves
the problem, you can stop without performing the other steps on the checklist.
Troubleshooting checklist
1. Make sure that the product is set up correctly.
a. Press the power button to turn on the product or to deactivate the Auto-Off mode.
b. Check the power-cable connections.
c. Make sure that the line voltage is correct for the product power configuration. (See the label
that is on the back of the product for voltage requirements.) If you are using a power strip and
its voltage is not within specifications, plug the product directly into the wall. If it is already
plugged into the wall, try a different outlet.
d. Make sure that the print cartridge is installed correctly.
e. If none of these measures restores power, contact HP Customer Care.
2. Check the cabling or wireless connection (wireless models only).
a. Check the cable connection between the product and the computer. Make sure that the
connection is secure.
b. Make sure that the cable itself is not faulty by using a different cable, if possible.
c. For a wireless connection, look at the control panel wireless light.
If the light is on, the product has a connection with a network.
●
If the light is blinking, the product is searching for a network connection. Make sure that
●
the wireless router or access point and the product are set to use the same mode or
protocol.
If the light is off, the product is not connected to the network and the wireless unit in the
●
product might be off. Press the wireless button to try connecting to the network, or run
the Wireless Configuration utility to configure the product. See
Configuration utility on page 27. To verify that the product finds the network, print a
configuration page. The product should have an IP address assigned to it.
If the product remains unable to connect to the network, uninstall and then reinstall the
product. If the error persists, contact a network administrator or refer to the user manual of
the wireless router or access point.
3. Check to see if any control-panel lights are lit. See
on page 70.
4. Make sure that the paper that you are using meets specifications.
5. Make sure that the paper is loaded correctly in the input tray.
Interpret control-panel light patterns
Use the Wireless
6. Make sure that the product software is installed correctly.
7. Verify that you have installed the printer driver for this product. Check the program to make sure
that you are using the printer driver for this product.
68 Chapter 8 Solve problems ENWW
Page 81

8. Print a configuration page. See Print the information pages on page 46.
a. If the page does not print, verify that the input tray contains paper.
b. If the page jams in the product, see
9. Print a small document from a different program that has worked in the past. If this solution works,
then the problem is with the program you are using. If this solution does not work (the document
does not print), complete these steps:
a. Try printing the job from another computer that has the product software installed.
b. Check the USB cable connection. Direct the product to the correct port, or reinstall the
software, selecting the connection type that you are using.
c. If the print quality is unacceptable, complete the following steps:
Verify that the print settings are correct for the media that you are using. See
●
the print driver to match the media type and size on page 32.
Use the procedures in
●
problems.
Solve image-quality problems on page 82 to solve print-quality
Clear jams on page 73.
Factors that affect product performance
Several factors affect the time it takes to print a job:
The use of special paper (such as transparencies, heavy paper, and custom-size paper)
●
Product processing and download time
●
Change
The complexity and size of graphics
●
The speed of the computer you are using
●
The USB or network connection
●
The product I/O configuration
●
ENWW Solve general problems 69
Page 82

Interpret control-panel light patterns
Table 8-1 Status-light legend
Symbol for "light off"
Symbol for "light on"
Symbol for "light blinking"
Table 8-2 Control-panel light patterns
Light status State of the product Action
All lights are off. The product is in Auto-Off mode or is
Status lights cycle The status lights cycle during the
Ready light is on, and attention light is
off.
turned off.
formatter initialization period or when the
product is processing a cleaning page.
The product is in the ready state. No action is required. The product is
Press the power button to deactivate the
Auto-Off mode or to turn on the product.
No action is required. Wait for the
initialization period to end. The product
should enter the ready state when the
initialization period is finished.
ready to receive a print job.
70 Chapter 8 Solve problems ENWW
Page 83

Table 8-2 Control-panel light patterns (continued)
Light status State of the product Action
Ready light is blinking, and attention
light is off.
Attention light is blinking, and ready
light is off.
Attention light is blinking, and ready
light is on.
The product is receiving or processing
data.
The product has experienced an error that
can be corrected at the product, such as
a jam, an open door, the absence of a
print cartridge, or the absence of paper in
the proper tray.
The product has experienced a continual
error from which it will recover on its own.
No action is required. The product is
receiving or processing a print job.
Inspect the product, determine the error,
and then correct the error. If the error is
the absence of paper in the proper tray or
the product is in a manual feed mode, put
the proper paper in the tray and follow the
onscreen instructions, or open and close
the print-cartridge door to resume
printing.
If the recovery is successful, the product
continues to the processing data state
and completes the job.
The attention and ready lights are on. The product has experienced a fatal error
from which it cannot recover.
If the recovery is unsuccessful, the
product continues to the continuable
error state. Try removing any media from
the media path and turning the product
power off, and then on again.
1. Turn off the product or disconnect
the power cord from the product.
2. Wait 30 seconds, and then turn on
the product or reconnect the power
cord to the product.
3. Wait for the product to initialize.
If the error persists, contact HP customer
support. See
on page 102.
Customer support
ENWW Interpret control-panel light patterns 71
Page 84

Table 8-2 Control-panel light patterns (continued)
Light status State of the product Action
The wireless light is blinking. The product is attempting to locate a
wireless network.
The wireless light is on. The product is connected to a wireless
network.
The wireless light is off. The product is not connected to a
network, and the wireless unit in the
product might be turned off.
No action is required.
No action is required.
If the light is off, the product is not
connected to the network and the
wireless unit in the product might be off.
Press the wireless button to try
connecting to the network, or run the
Wireless Configuration utility to configure
the product. See
Configuration utility on page 27. To verify
that the product finds the network, print a
configuration page. The product should
have an IP address assigned to it.
Use the Wireless
For information about connecting
wirelessly to a network, see
connection (wireless models only)
on page 24.
If the product remains unable to connect
to the network, uninstall and then reinstall
the product. If the error persists, contact
a network administrator or refer to the
user manual of the wireless router or
access point.
Network
72 Chapter 8 Solve problems ENWW
Page 85

Clear jams
When clearing jams, be careful not to tear jammed paper. If a small piece of paper remains in the product,
it could cause additional jams.
Common causes of jams
The input tray is loaded incorrectly or is too full.
●
NOTE: When you add new media, always remove all of the media from the input tray and
straighten the entire stack. This helps prevent multiple feeds and reduces media jams.
The media does not meet HP specifications.
●
The product might need to be cleaned to remove paper dust and other particles from the paper
●
path.
Loose toner might remain in the product after a media jam. This toner clears up after a few sheets print.
CAUTION: If you get any toner on your clothes, wash them in cold water. Hot water will permanently
set the toner into the fabric.
ENWW Clear jams 73
Page 86

Jam locations
Jams can occur at the following locations in the product.
1 Internal areas
2 Input tray
3 Output bin
1
3
2
NOTE: Jams can occur in more than one location.
Clear jams from the input tray
CAUTION: Do not use sharp objects, such as tweezers or needle-nose pliers, to remove jams.
Damage caused by sharp objects will not be covered by the warranty.
When removing jammed media, pull the jammed media straight away from the product. Pulling jammed
media out of the product at an angle can damage the product.
74 Chapter 8 Solve problems ENWW
Page 87

NOTE: Depending on where the jam is located, some of the following steps might not be necessary.
1. Open the print-cartridge door, and then remove the print cartridge.
2. Remove the media stack from the input tray.
ENWW Clear jams 75
Page 88

3. With both hands, grasp the side of the jammed media that is most visible (this includes the middle),
and carefully pull it free from the product.
4. Reinstall the print cartridge, and then close the print-cartridge door.
76 Chapter 8 Solve problems ENWW
Page 89

Clear jams from the output areas
CAUTION: Do not use sharp objects, such as tweezers or needle-nose pliers, to remove jams.
Damage caused by sharp objects will not be covered by the warranty.
1. Open the print-cartridge door, and then remove the print cartridge.
2. Keep the print cartridge door open, and then with both hands, grasp the side of the jammed media
that is most visible (this includes the middle), and carefully pull it free from the product.
ENWW Clear jams 77
Page 90

3. Reinstall the print cartridge, and then close the print-cartridge door.
78 Chapter 8 Solve problems ENWW
Page 91

Clear jams from inside the product
1. Open the print-cartridge door, and then remove the print cartridge.
CAUTION: To prevent damage, do not expose the print cartridge to light. Cover it with a piece
of paper.
2. If you can see the jammed paper, carefully grasp the jammed paper, and slowly pull it out of the
product.
ENWW Clear jams 79
Page 92

3. Reinstall the print cartridge, and then close the print-cartridge door.
Solve repeated jams
Verify that the input tray is not overfilled. The input tray capacity varies depending on the type of
●
print media that you are using.
Verify that the media guides are properly adjusted.
●
Check that the input tray is securely in place.
●
Do not add print media into the input tray while the product is printing.
●
Use only HP-recommended media types and sizes.
●
Do not fan media prior to loading it in a tray. To loosen the ream, hold it firmly in both hands and
●
twist the media by rotating your hands in the opposite direction.
Do not let print media stack up in the output bin. The print media type and the amount of toner used
●
affect the output bin capacity.
Check the power connection. Make sure that the power cord is firmly connected to both the product
●
and the power supply box. Plug the power cord into a grounded power outlet.
Change the jam recovery setting
When the Jam Recovery feature is turned on, the product reprints any pages that are damaged during
a jam.
1. Open the product Properties dialog box.
2. Click the Device Settings tab.
3. Click the Auto option or the Off option under Jam Recovery.
80 Chapter 8 Solve problems ENWW
Page 93

Solve paper-handling problems
The following problems with media cause print-quality deviations, jamming, or damage to the product.
Problem Cause Solution
Poor print quality or toner adhesion The paper is too moist, too rough, too
heavy or too smooth, or it is embossed
or from a faulty paper lot.
Dropouts, jamming, or curl The paper has been stored incorrectly. Store paper flat in its moisture-proof
The paper has variability from one side
to the other.
Excessive curl The paper is too moist, has the wrong
grain direction, or is of short-grain
construction
The paper varies from side-to-side. Turn the paper over.
Jamming, damage to product The paper has cutouts or perforations. Use paper that is free of cutouts or
Problems with feeding The paper has ragged edges. Use high-quality paper that is made for
The paper varies from side-to-side. Turn the paper over.
The paper is too moist, too rough, too
heavy or too smooth, has the wrong grain
direction, or is of short-grain construction
or it is embossed or from a faulty paper
lot.
Print is skewed (crooked). The media guides might be incorrectly
adjusted.
Try another kind of paper, between 100
and 250 Sheffield, with 4% to 6%
moisture content.
wrapping.
Turn the paper over.
Use long-grain paper.
perforations.
laser printers.
Try another kind of paper, between 100
and 250 Sheffield, 4% to 6% moisture
content.
Use long-grain paper.
Remove all media from the input tray,
straighten the stack, and then load the
media in the input tray again. Adjust the
media guides to the width and length of
the media that you are using and try
printing again.
More than one sheet feeds at one time. The media tray might be overloaded. Remove some of the media from the tray.
The product does not pull media from the
input tray.
The media might be wrinkled, folded, or
damaged.
The product might be in manual-feed
mode.
The pickup roller might be dirty or
damaged.
The paper-length adjustment control in
the input tray is set at a length that is
greater than the media size.
Verify that the media is not wrinkled,
folded, or damaged. Try printing on
media from a new or different package.
At the computer, follow the onscreen
instructions to deactivate manual-feed
mode. Or, at the product, open and close
the print-cartridge door.
Contact HP Customer Care. See Service
and support on page 97 or the support
flyer that came in the box.
Set the paper-length adjustment control
to the correct length.
ENWW Solve paper-handling problems 81
Page 94

Solve image-quality problems
You can prevent most print-quality problems by following these guidelines.
Use paper that meets HP specifications. See
●
Clean the product as necessary. See
●
Image defect examples
This section provides information about identifying and correcting print defects.
NOTE: If these steps do not correct the problem, contact an HP-authorized dealer or service
representative.
Light print or faded
Paper and print media on page 29.
Clean the product on page 61.
Redistribute the toner to extend the life. See
●
toner on page 51.
The print cartridge is nearing end of life. Install a new
●
genuine HP print cartridge.
The media might not meet Hewlett-Packard's media
●
specifications (for example, the media is too moist or too
rough).
If the whole page is light, the print density adjustment is
●
too light or EconoMode might be turned on. Adjust the
print density, and disable EconoMode in the product
Properties.
Redistribute
Toner specks
The media might not meet Hewlett-Packard's media
●
specifications (for example, the media is too moist or too
rough).
The product might need to be cleaned.
●
The print cartridge might be defective. Install a new
●
genuine HP print cartridge.
82 Chapter 8 Solve problems ENWW
Page 95

Dropouts
Vertical lines
A single sheet of media might be defective. Try reprinting
●
the job.
The media moisture content is uneven or the media has
●
moist spots on its surface. Try printing with new media.
The media lot is bad. The manufacturing processes can
●
cause some areas to reject toner. Try a different type or
brand of media.
The print cartridge might be defective. Install a new
●
genuine HP print cartridge.
Toner might be on the photosensitive drum. Print a few
●
more pages to see if the problem might correct itself.
The photosensitive drum inside the print cartridge has
●
probably been scratched. Install a new genuine HP print
cartridge.
Gray background
Toner smear
Change the media to a lighter basis weight.
●
Check the product environment. Very dry (low humidity)
●
conditions can increase the amount of background
shading.
The density setting might be too high. Adjust the density
●
setting. See
Install a new genuine HP print cartridge.
●
If toner smears appear on the leading edge of the media,
●
the media guides might be dirty. Wipe the media guides
with a dry, lint-free cloth.
Check the media type and quality.
●
The fuser temperature might be too low. In the printer
●
driver, make sure the appropriate media type is selected.
Try installing a new genuine HP print cartridge.
●
Change print density on page 86
ENWW Solve image-quality problems 83
Page 96

Loose toner
The fuser temperature might be too low. In the printer
●
driver, make sure the appropriate media type is selected.
Vertical repetitive defects
Misformed characters
Clean the inside of the product. See
●
on page 61.
Check the media quality.
●
Plug the product directly into an AC outlet instead of into
●
a power strip.
The print cartridge might be damaged. If a repetitive mark
●
occurs at the same spot on the page, install a new
genuine HP print cartridge.
The internal parts might have toner on them. If the defects
●
occur on the back of the page, the problem probably will
correct itself after a few more printed pages.
In the printer driver, make sure the appropriate media
●
type is selected.
Clean the product
Page skew
If characters are improperly formed, producing hollow
●
images, the media stock might be too slick. Try a different
media.
If characters are improperly formed, producing a wavy
●
effect, the product might need service. Print a
configuration page. If the characters are improperly
formed, contact an HP-authorized dealer or service
representative.
Make sure that the media is loaded correctly and the
●
media guides are not too tight or too loose against the
media stack.
The input bin might be too full.
●
Check the media type and quality.
●
84 Chapter 8 Solve problems ENWW
Page 97

Curl or wave
Wrinkles or creases
Check the media type and quality. Both high temperature
●
and high humidity cause media to curl.
The media might have been in the input tray too long.
●
Turn over the stack of media in the tray. Also, try rotating
the media 180° in the input tray.
The fuser temperature might be too high. In the printer
●
driver, make sure that the appropriate media type is
selected. If the problem persists, select a media type that
uses a lower fuser temperature, such as transparencies
or light media.
Make sure that media is loaded properly.
●
Check the media type and quality.
●
Turn over the stack of media in the tray. Also, try rotating
●
the media 180° in the input tray.
For envelopes, this can be caused by air pockets inside
●
the envelope. Remove the envelope, flatten the
envelope, and then try printing again.
Toner scatter outline
If large amounts of toner have scattered around the
●
characters, the transfer of toner to the media is not
optimal. (A small amount of toner scatter is normal for
laser printing.) Try a different media type setting in the
printer driver, or use a different media type.
Turn over the stack of media in the tray.
●
Use media that is designed for laser printers.
●
ENWW Solve image-quality problems 85
Page 98

Moisture
NOTE: This product dissipates heat by using convective
cooling. The heat and moisture generated by the printing
process escape through vents in the product exterior or
through the output bin area.
Verify normal product operation
The release of moisture is a result of normal product operation.
However, HP recommends using the following steps to verify
that the product is releasing steam and does not have a
functional problem.
1. Turn the product off, and then on.
2. Send a print job to the product, and then verify that the
product is operating correctly.
3. When printing a job and vapor is visible, immediately
reprint the job using the same sheet of paper. There
should be either no visible vapor, or much less vapor
during the printing process.
Limit or reduce steam or vapor
Make sure that the product is placed in a well-ventilated
●
area that meets the environmental specifications in this
guide. See
Environmental specifications on page 106.
Optimize and improve image quality
Change print density
You can change the print density setting by from the printer properties dialog box.
1. Windows XP, Windows Server 2008, and Windows Server 2003 (using the default Start menu
view): Click Start, and then click Printers and Faxes.
-or-
Windows XP, Windows Server 2008, and Windows Server 2003 (using the Classic Start menu
view): Click Start, and then click Printers.
-or-
Do not place the product, or store paper, near an outside
●
entrance where temperature changes can increase
humidity.
Use an unopened ream of paper that has not been
●
exposed to high humidity.
Store paper in an airtight container, where it will be less
●
likely to absorb moisture.
Windows Vista: Click Start, click Control Panel, and then in the category for Hardware and
Sound click Printer.
2. In the list of printers, right-click the name of this product, and then click the Properties menu item
to open the printer properties dialog box.
86 Chapter 8 Solve problems ENWW
Page 99

3. Click the Device settings tab, and then move the Print Density slider to the desired setting.
4. Click the Apply button to accept the setting, and then click the OK button to close the dialog box.
ENWW Solve image-quality problems 87
Page 100

Solve performance problems
Problem Cause Solution
Pages print but are totally blank. The cartridge pull tab or the sealing tape
might still be in the print cartridge.
The document might contain blank
pages.
The product might be malfunctioning. To check the product, print a
Pages print very slowly. Heavier paper types can slow the print
job.
Complex pages can print slowly.
Narrow or small media can print slowly.
Using the FastRes 1200 print quality
setting can cause slow printing.
Pages did not print. The product might not be pulling paper
correctly.
Verify that the cartridge pull tab and tape
have been removed completely from the
print cartridge.
Check the document that you are printing
to see if content appears on all of the
pages.
Configuration page.
Print on a different type of paper.
Proper fusing may require a slower print
speed to ensure the best print quality.
1. Open the print driver, and then click
the Properties or Preferences
button.
2. Click the Paper/Quality tab, and
then use the Print Quality dropdown list to select a lower resolution
setting.
3. Click the OK button or the Apply
button to accept the setting.
Make sure that paper is loaded in the tray
correctly.
The paper is jamming in the product. Clear the jam. See Clear jams
The USB cable might be defective or
incorrectly connected.
Other devices are running on the
computer.
on page 73.
Disconnect the USB cable at both
●
ends, and then reconnect it.
Try printing a job that has printed in
●
the past.
Try using a different USB cable.
●
The product might not share a USB port.
If you have an external hard drive or
switchbox that is connected to the same
port as the product, the other device
might be interfering. To connect and use
the product, disconnect the other device,
or use two USB ports on the computer.
88 Chapter 8 Solve problems ENWW
 Loading...