

Page 1

hp cc800ps,
815mfp,
5500mfp,
4200 scanner
color accuracy
in a proofing
workflow
color
reproduction
Color Reproduction
for the HP Large Format Color Copier products family:
cc800ps, 815mfp, 5500mfp and 4200 scanner
Notes about the document
The settings and examples described in this document apply to the HP Large Format Color Copiers family
with HP DesignJet Scan software version 2.6.4 or later.
Please download the latest
Pantone tables from the
technical support section of:
http://www.designjet.hp.com
Page 2

Contents
1. INTRODUCTION TO THE DOCUMENT................................................................... 4
2. COLOR COPYING GUIDELINES ............................................................................ 5
2.1 CHECKPOINTS BEFORE STARTING A JOB ......................................................................5
2.1.1 Scanner .....................................................................................................5
2.1.2 Printer........................................................................................................ 6
2.1.3 Touch Screen.............................................................................................. 7
2.2 TOUCH SCREEN SETTINGS DECISIONS ........................................................................7
2.3 RUNNING A JOB: OPERATOR SETTINGS..................................................................... 10
2.3.1 Scanning .................................................................................................11
2.3.1.1 Type of original (1.2).......................................................................... 12
2.3.1.2 Scan Resolution (1.4).......................................................................... 17
2.3.2 Printing....................................................................................................18
2.3.2.1 Printer and Media Profile (2.1 and 2.2)................................................ 18
2.3.2.2 Print Quality (2.3), Ink Printer Original (2.4), Enhance gray (2.5)........... 19
2.3.3 Additional operating recommendations ...................................................... 20
2.4 POST-JOB RECOMMENDATIONS AND TROUBLESHOOTING .............................................22
2.4.1 Post-job recommendations......................................................................... 22
2.4.2 Troubleshooting........................................................................................ 22
2.4.2.1 The colors of the copy are very different from the original...................... 23
2.4.2.2 Grays are wrong in a color copied image............................................24
2.4.2.3 The copy is not as shiny as the original ................................................ 24
2.4.2.4 There is a big difference between right and left sides of the copy............ 24
2.4.2.5 The background results colored when copying newspapers.................... 24
2.4.2.6 Vertical Bands appear in the copy .......................................................25
2.4.2.7 A B&W image appears greenish (or pinkish, or bluish) ......................... 25
3. ANNEX............................................................................................................. 26
3.1 COLOR REPRODUCTION: THEORY OF OPERATION ....................................................... 26
3.1.1 Original...................................................................................................27
3.1.2 Large Format Scanner ............................................................................... 29
3.1.2.1 Light Source....................................................................................... 30
3.1.2.2 Paper Movement and glass plate ......................................................... 30
3.1.2.3 Cameras............................................................................................30
3.1.2.4 Electronics .........................................................................................31
3.1.3 Touch Screen............................................................................................ 32
3.1.4 Large Format Printer..................................................................................33
3.1.5 Final Image .............................................................................................. 34
Color Reproduction for the HP Large Format Color Copiers family: cc800ps, 815mfp, 5500mfp and 4200 scanner 2/2
Page 3

3.1.6 Overall system..........................................................................................35
3.1.6.1 Color Management ............................................................................35
3.1.6.2 Image Enhancement ...........................................................................36
3.2 WHICH COLORS CAN BE REPRODUCED? ...................................................................37
3.3 GUIDELINES TO CREATE OR VALIDATE A MEDIA PROFILE .................................................41
3.3.1 How to create a new media profile............................................................. 41
3.3.2 How to validate an existing media profile ................................................... 45
3.4 CREATING A NEW TYPE OF ORIGINAL: COLOR ...........................................................47
3.4.1 Method....................................................................................................48
3.4.2 Lightness .................................................................................................. 48
3.4.3 Saturation ................................................................................................ 48
3.4.4 Color Balance...........................................................................................49
3.4.5 Black Enhancement ................................................................................... 52
3.4.6 Background cleaning ................................................................................ 52
3.4.7 Sharpen................................................................................................... 52
3.4.8 Blur .........................................................................................................53
3.5 CREATING A NEW TYPE OF ORIGINAL: B&W............................................................. 54
3.5.1 Method....................................................................................................54
3.5.2 Lightness .................................................................................................. 55
3.5.3 Sharpen................................................................................................... 55
3.5.4 Blur .........................................................................................................55
3.6 WORKING WITH THICK MEDIA............................................................................... 56
4. GLOSSARY........................................................................................................ 59
Color Reproduction for the HP Large Format Color Copiers family: cc800ps, 815mfp, 5500mfp and 4200 scanner 3/3
Page 4

1. INTRODUCTION TO THE DOCUMENT
The aim of this document is to provide customers with a simple guide to getting good
color reproduction when using the HP Large Format Color Copier products. By making
the process of scanning and printing easier to understand, we believe users will be able
to achieve the desired color reproduction results.
This document contains two parts:
• The first part provides a set of guidelines, checkpoints, settings and
troubleshooting cases that will help the owner of an HP Large Format Color
Copier system in the copying experience.
• The second part (Annex) provides an introduction to color copying concepts,
especially those related to the systems under discussion. In addition, the Annex
includes:
o an assessment of which colors can be reproduced,
o a set of guidelines to assist the user in creating or validating media
profiles,
o a set of guidelines to the creation of new types of originals,
o a set of guidelines for reproduction when using thick media originals.
Users who have a good understanding of color copying concepts can use the first part
of this document as a practical guide to perform a color reproduction job and as an aid
to problem solving.
Users who require more detailed information regarding color copying concepts or who
seek assistance for advanced configuration of the system, should instead refer to the
Annex.
This document does not include features that are not color related, such as: rotating,
scaling, nesting, accounting, paneling, tiling, mirroring and alignment. It neither
provides details about scanner and printer maintenance (please refer to the other guides
for questions related to these features).
We hope this document will be useful for you and will help you to succeed in your
business.
Best regards,
HP Designjet printers
Color Reproduction for the HP Large Format Color Copiers family: cc800ps, 815mfp, 5500mfp and 4200 scanner 4/4
Page 5

2. COLOR COPYING GUIDELINES
The HP Large Format Color Copiers allow an original image to be reproduced using a
scanner, a printer and a controller (called Touch Screen). The reproduction can be
done:
• as one step (a Copy process);
• in two steps (a Scan process followed by a Print process) with an intermediate
saving of the digitized data into a file.
In this document, we will not differentiate between the two cases: we will describe the
Scan process and the Print process separately. If you are performing a Copy, please
follow both processes consequently.
To reproduce an image accurately, the following steps should be followed:
• Checkpoints before starting a job: you should answer to these points
before starting the job;
• Touch Screen settings decisions: you should take these decisions before
setting up the Touch Screen;
• Running a job: you should configure the Touch Screen according to the
settings decided in the previous step;
• Post-job recommendations and Troubleshooting: you can make some
considerations when the job is finished and, in case the output is not as
expected, you can use this part as a guide to troubleshooting.
2.1 Checkpoints before starting a job
Before starting a color reproduction job, you should answer the following questions to
ensure you are in a correct state to proceed. If any of the answers are negative or
uncertain, please follow the recommended actions.
22..11..11 SSccaannnneerr
Is the glass plate clean and free from dust? If not, or not sure, please
Color Reproduction for the HP Large Format Color Copiers family: cc800ps, 815mfp, 5500mfp and 4200 scanner 5/5
follow the scanner maintenance manual to clean it. Typically, vertical lines
appear in the copy if the glass plate is not clean enough.
Page 6

Is the white background element of the loading mechanism
clean? If not, the grays will show a color cast in the copy and the system will
behave erratically (some copies will be acceptable whilst some others won’t).
Has the scanner been on for more than 1 hour? If not the colors may
vary along the scanning.
Does the scanner need to run the scanner maintenance process?
If so, follow the scanner maintenance manual. If unsure, see section 3.1.2.2 of
the Annex. Typically, the scanner maintenance process should be run every
100 scans or once a month, but it depends widely on the type of originals you
are scanning. If you suspect that the scanner may have a problem (colors very
different from the original, grays not neutrals, broken leaned lines), then run
the scanner maintenance process.
Has the original dried-up? If the ink is still fresh, the original may be
damaged and the glass plate of the scanner may be dirtied.
Is the height setting in the loading mechanism adapted to the
thickness of the original? If the original is thicker than 2 mm., please
follow the guidelines in section 3.6 of the Annex and always remember to
handle the original with care.
22..11..22 PPrriinntteerr
Is the media properly loaded and with the correct name
appearing in the front panel? If not, change the media name or reload a
new media, or otherwise you risk having a deteriorated Image Quality.
Did you run the Pen Alignment and Color Calibration for the
media loaded and the current set of pens? If not, execute a Pen
Alignment and a Color Calibration as described in section 3.1.4 of the Annex.
Is Color Calibration On? Follow the steps in section 3.1.4 of the Annex.
Has the printer been inactive for more than 6 hours? If so take into
account that the first swaths (ink dropping passes) may show a duller color
(less ink delivered) than the rest. To avoid this, run a small print test from the
printer front panel.
Is there enough ink for the job? You may look at the ink level indication
on the printer front panel. If necessary, replace any empty cartridges; there is
no need to do a Closed Loop Color or Printhead Alignment afterwards.
Color Reproduction for the HP Large Format Color Copiers family: cc800ps, 815mfp, 5500mfp and 4200 scanner 6/6
Page 7

22..11..33 TToouucchh SSccrreeeenn
Do you have a Media Profile adapted to the media currently
loaded into the printer? If not or not known, please follow section 3.3 in
the Annex on how to create or validate the Media Profile. If it is not correct,
the output image may have serious defects: too much ink (dark images,
smearing, bleeding), too little ink (washed out, low contrasted images), wrong
colors.
2.2 Touch Screen settings decisions
You should now decide what kind of scanning, printing or copying you would like to
perform. To do so, you will have to select amongst different options provided in the
Touch Screen.
This section can be used as a reference chart, where you can tick and select options
that later will be used to configure the Touch Screen. The terms in bold are the actual
options’ names that appear in the Touch Screen menus.
1. Scanning options
1.1 Color Mode:
do you want to process the image in Black&White or Color? (even if the
original is a color image the copy could be B&W)
Many settings depend on this decision.
B&W
Color
1.2 Type of content:
what is the content of the original? Select the type of content that matches best
among the followings. This decision will be related to the type of original
defined in the Touch Screen (see section 2.3.1.1). The type of original is
specified between parenthesis (), in black for B&W scanning mode and in
italics
for color scanning mode.
Pictorial (B&W Photo;
Cad Drawing with clean white background (Line;
Text or Line Art with clean white background (Line;
Color Photo
)
Cad
Cad
)
)
Color Reproduction for the HP Large Format Color Copiers family: cc800ps, 815mfp, 5500mfp and 4200 scanner 7/7
Page 8
Cad Drawing, Text or Line Art with a background that is difficult to
distinguish from the lines:
Blueprint (blue background) (Blueprint;
settings)
Sepia background (Sepia;
Other …..
Document: mixed text (or lines) and pictures (Normal;
Map (solid areas and lines) (Normal;
Other: ……..
1.3 Definition of own type of original:
do you need some extra color management or image enhancement applied to
the image? If unsure refer to sections 3.4 and 3.5 of the Annex. Please
remember that if you change any of the predefined values for the settings
below, the final image may not be color consistent with the original or its
image quality could be compromised. The italic items are applicable only
when scanning in Color mode. Default values are 0.
Lightness (-3 to +6): ……..
Saturation
Balance. Choose either RGB or CMY values (-6 to +6):
Background Cleaning
Black Enhancement
Blur (Color 0 to 12; B&W On/Off): ……..
Sharpen (0 to 6): ………
1.4 Scan Resolution:
Which scanning resolution do you need? High (or Best) gives higher
quality but produces bigger files and has lower throughput; Low (or Fast) gives
higher throughput and smaller files but lower quality. Normal is a compromise
between the previous two cases. If selecting another resolution, it is
recommended to choose a resolution that is a multiple, or sub-multiple, of
600dpi to avoid picture artifacts. See discussion in section 2.3.1.2.
Low (Scan) or Fast (Copy)
Normal
High (Scan) or Best (Copy)
Other: ………….
Red
Green
Blue
(-6 to +6): …….
: ………..
: ……...
: ……….
Cad
with advanced settings)
Map
Cyan
Magenta
Yellow
(0 to 255): ….
(0 to 255): ……
: .….………
: ………
: ...………
Cad
with advanced
)
Brochure
)
Color Reproduction for the HP Large Format Color Copiers family: cc800ps, 815mfp, 5500mfp and 4200 scanner 8/8
Page 9

2. Printing options
2.1
What is the Printer name in the Touch Screen?
…………………………..
2.2
Which Media Profile are you going to use? (For information see section
3.3 in the Annex)
…………………………..
2.3
Which Print Quality do you need? Best gives higher quality but lower
throughput; Fast gives higher throughput but lower quality. It is recommended
to select Fast for drafts, Normal for non-critical tasks and Best for final
presentations.
Best
Normal
Fast
2.4 Do you know which inking technology has been used to produce the original?
If not known select Non Inkjet:
Inkjet
Non Inkjet (Offset, Traditional Photography, Laser Printer, …)
2.5
(Optional) Do you think you need to enhance grays? If unsure, select No.
For further information, see section 2.3.2.2.
Yes
No
Color Reproduction for the HP Large Format Color Copiers family: cc800ps, 815mfp, 5500mfp and 4200 scanner 9/9
Page 10

2.3 Running a job: operator settings
The third step of the process, after having got through the checkpoints in section 2.1
and answered the questions in section 2.2, is to configure the Touch Screen.
Firstly, you should choose the tab corresponding to the action you are about to perform:
• Scan: scan the original and save the digitized image to a file on CD, hard disk,
flexible disk or networked disk. This file may be printed later. We will call this
option Scan to File.
• Print: perform a printout from a previously digitized image file. We will call this
option File to Print.
• Copy:
scan the original and print it immediately (no intermediate file created). In this
case, the settings are a combination of the Scan and Print settings1.
Please beware that different tabs may have settings in common (for example Lightness
in the Copy and Scan tab) and most of them keep their value when you move from one
Selected
action
Toolbar
1
If you select Copy you should follow the guidelines to Scan followed by the ones to Print.
Color Reproduction for the HP Large Format Color Copiers family: cc800ps, 815mfp, 5500mfp and 4200 scanner 10/10
Page 11
tab to another. However, all settings under the Settings button will change their value
when moving between tabs, even if their name is the same (such as Enhance gray,
existing in both Print and Copy settings).
Therefore, you should first select the tab, according to the action to be performed, and
then select the settings for that tab.
The settings selected in section 2.2 are herein referred to by their line number
appearing in brackets (e.g. (1.1) when setting the Color mode).
22..33..11 SSccaannnniinngg
Scanning is the digitization of the original image. It happens either when we are
Copying or Scanning to File (i.e. Copy or Scan tabs). Special attention should be paid
to this process where, besides the digitization, most of the image enhancement and part
of the color management take place.
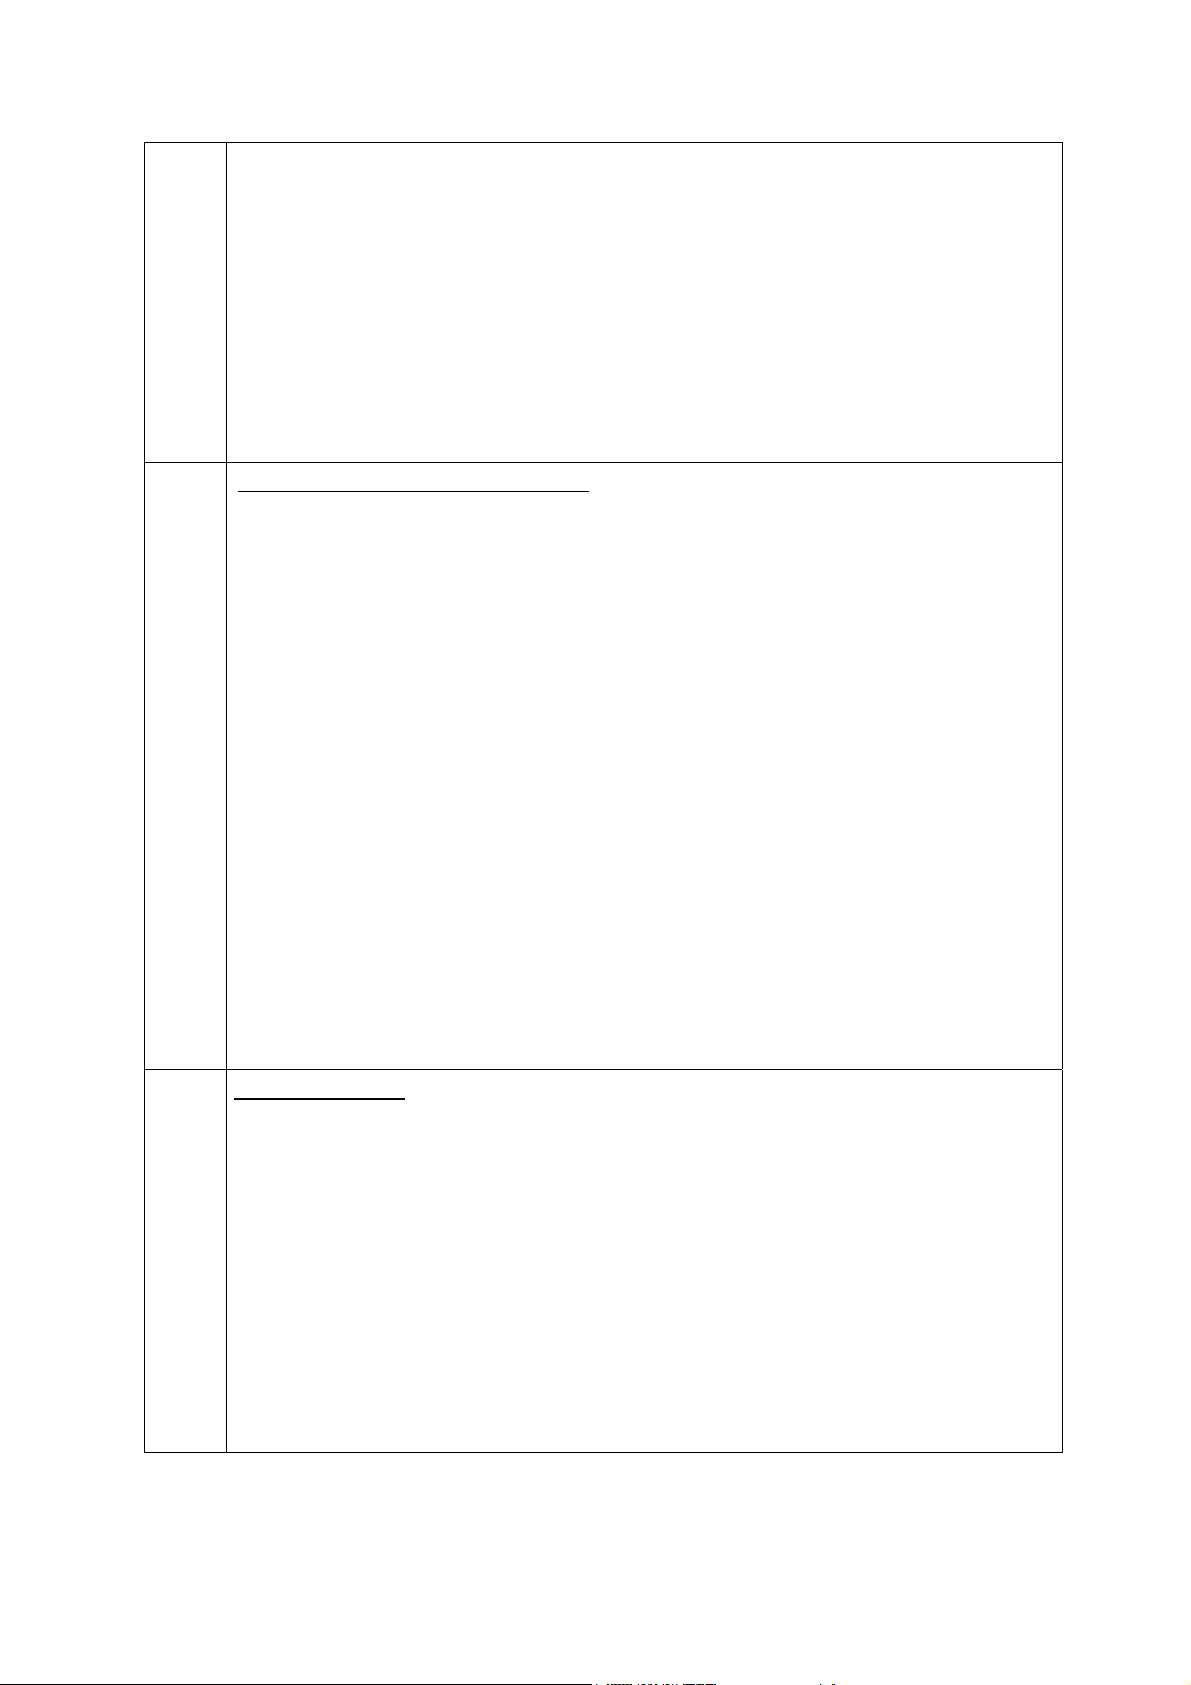
It is recommended to preview the image after applying the settings, by pressing the
preview button (see figure below). You can also increase the details of the image by
selecting the Zoom buttons in the Preview pane.
Zoom buttons
Color related
settings
Preview button
Color Reproduction for the HP Large Format Color Copiers family: cc800ps, 815mfp, 5500mfp and 4200 scanner 11/11
Page 12
Before scanning, you will have to make three color-related selections from the main
menu:
• B&W or Color (1.1): defines whether the scanning result will have color
information or just grayscales.
• Type of original (1.2): is a template for image enhancement and color
management. Please refer to the following section for more details.
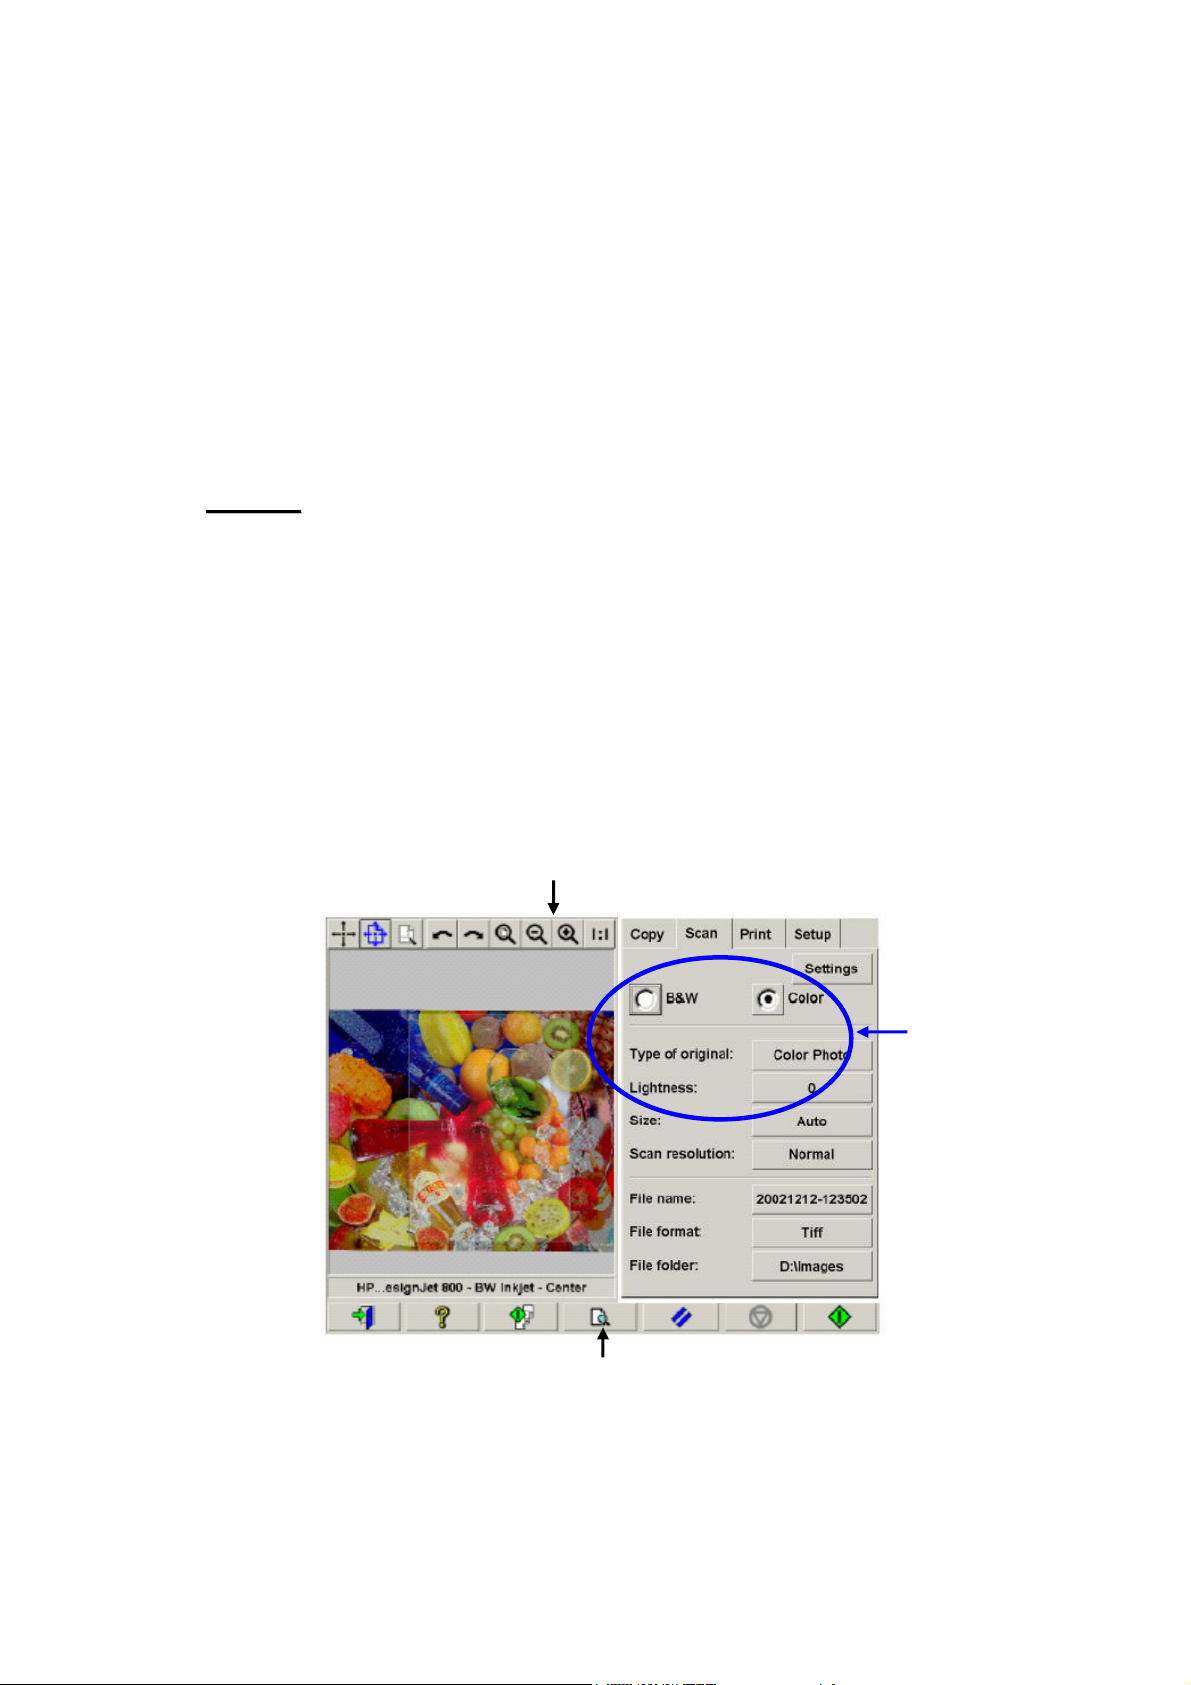
• Lightness (1.3): allows to increase or decrease the luminosity of the overall
image.
Lightness -3
Lightness 0
Lightness +6
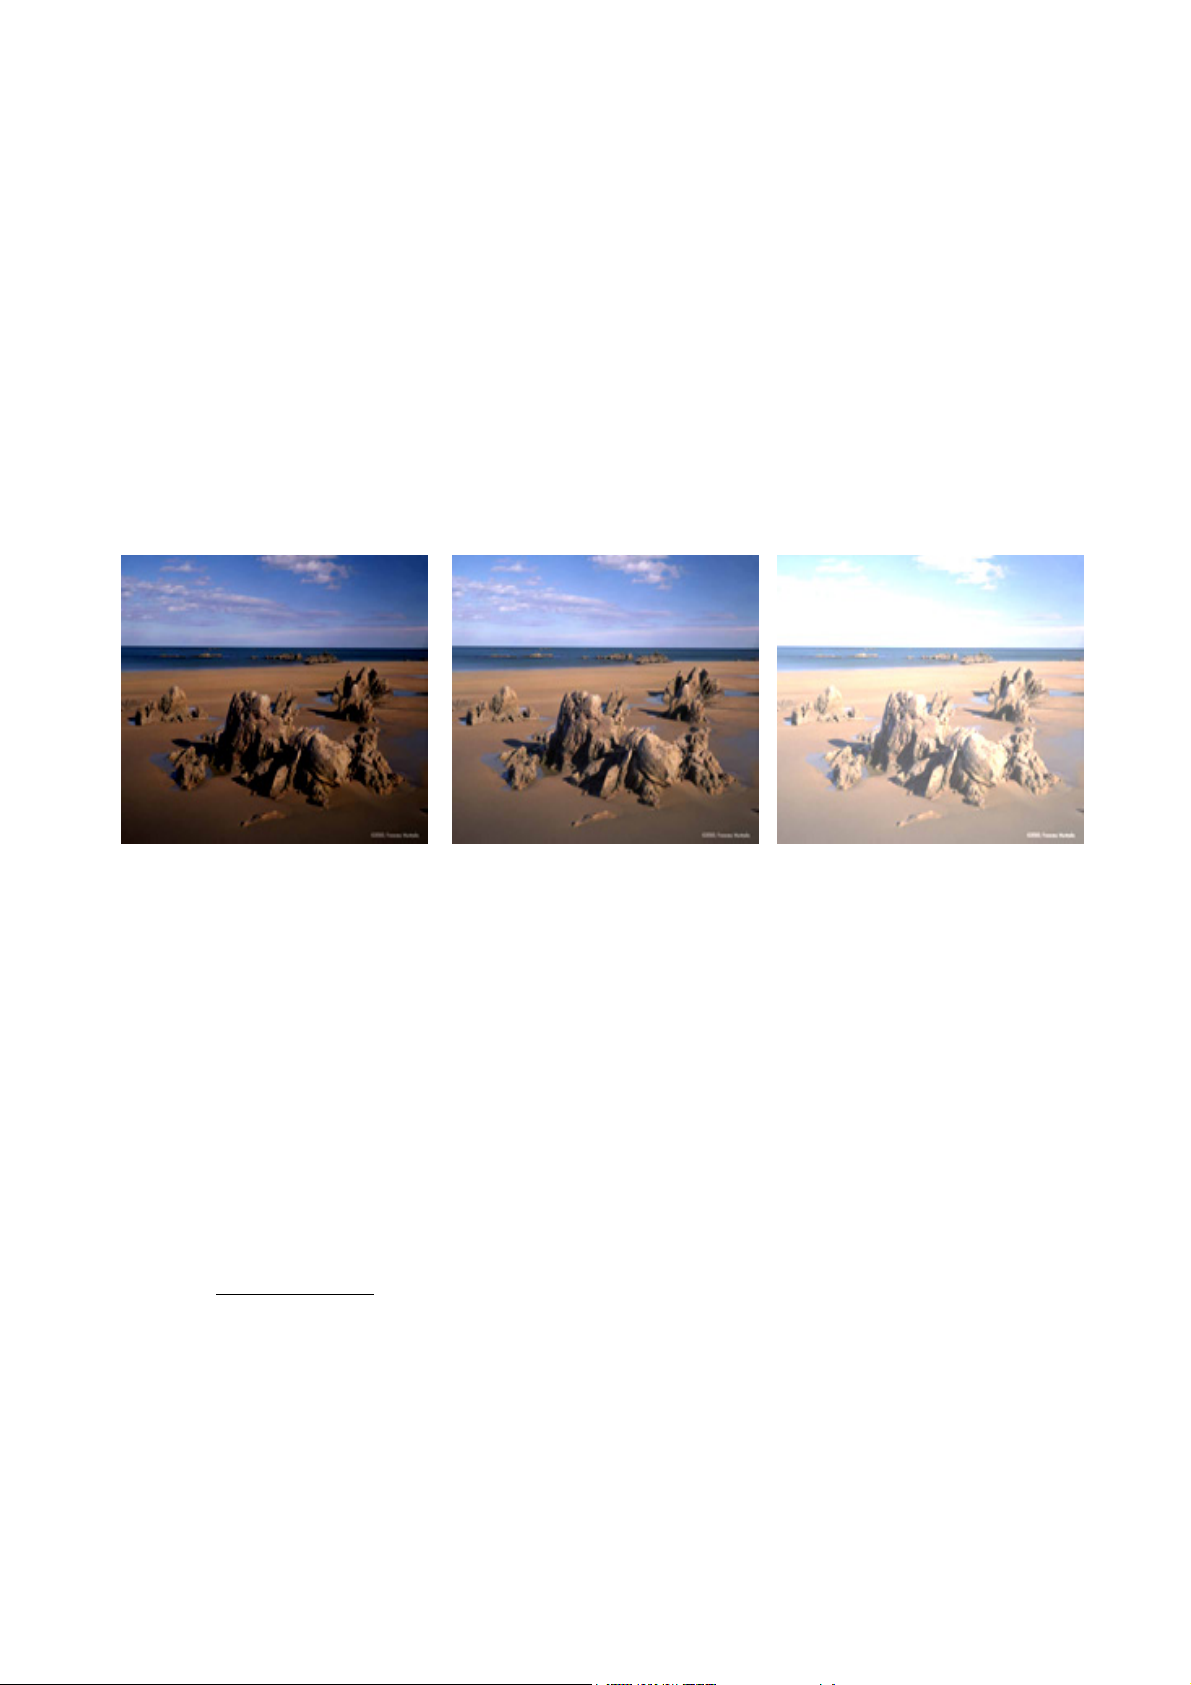
2.3.1.1 Type of original (1.2)
Since there are many settings to specify for image enhancement and color
management, a template (or group of settings) is provided to ease this task: the type
of original. It consists of the definition of archetypes of different originals to which
specific settings’ values have been associated. Depending on whether you are trying to
scan in B&W or Color, you may choose between different “type of original” templates:
• Color scanning
o Color Photo
o Brochure
o Map
o Cad
Color Reproduction for the HP Large Format Color Copiers family: cc800ps, 815mfp, 5500mfp and 4200 scanner 12/12
Page 13
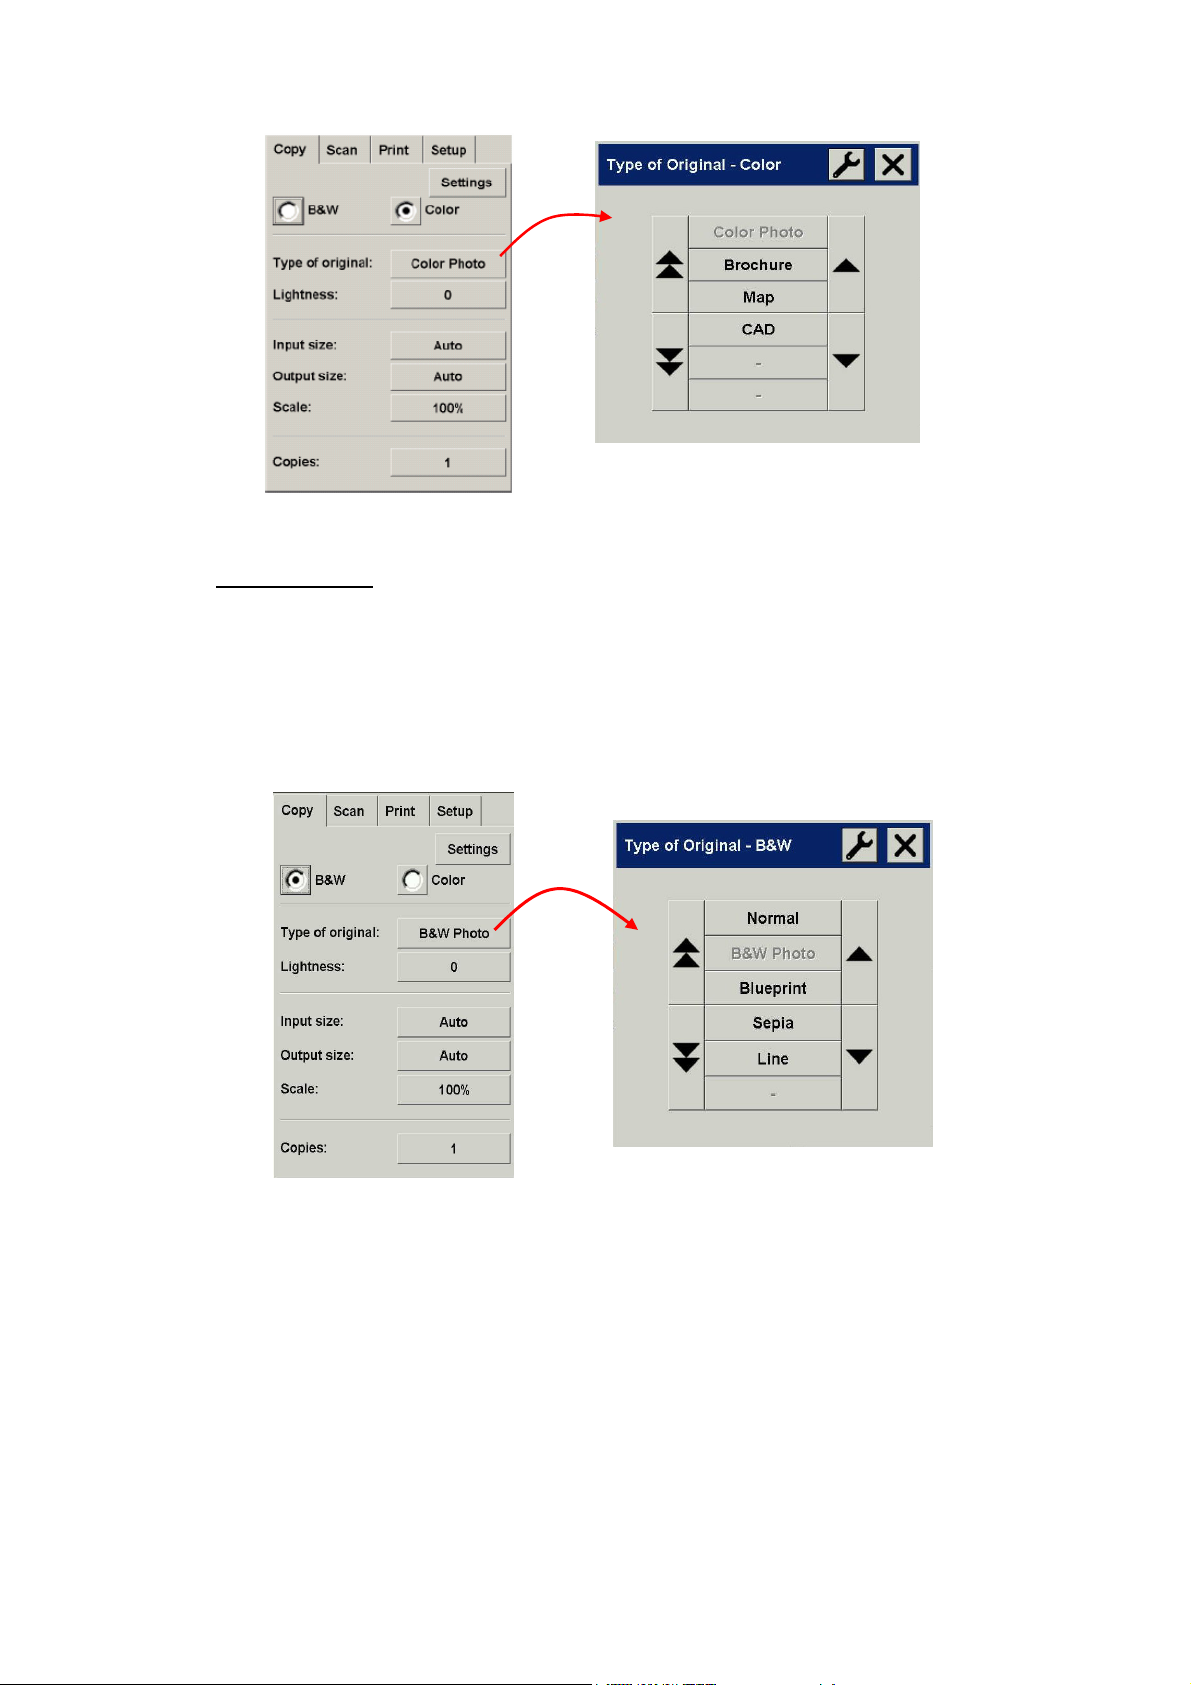
• B&W scanning
o Normal
o B&W Photo
o Blueprint
o Sepia
o Line
In most cases, choosing the correct type of original, as specified by point 1.2 in section
2.2, is enough to obtain a good scan and, subsequently, a good print.
A description of when each type of original should be used is provided in the following
tables.
Color Reproduction for the HP Large Format Color Copiers family: cc800ps, 815mfp, 5500mfp and 4200 scanner 13/13
Page 14
Color Mode
Color Photo
Should be used when copying color pictorial
images, characterized by having many colors,
transitions between colors or shadings. The main
intention is to have a copy as perceptually similar
to the original as possible, even though the colors
are not exactly the same.
Brochure
Should be used when there is a mix of text (sharp
and crisp contrast) and pictures. It is a
compromise between having good perceptual
reproduction of the pictures and crisp text.
Map
Should be used for maps, graphics and other
documents that have area fills: areas of one color
surrounded by areas of another color. The edges
between adjacent color areas are enhanced
(sharpened) and, assuming that the background
is white, a background cleaning feature is
applied.
Cad
Should be used for line drawings (architectural,
mechanical, electrical drawings) or text
document. Lines may be thin, and should be
copied as sharply as possible. The same image
enhancements of the Map type are applied.
Color Reproduction for the HP Large Format Color Copiers family: cc800ps, 815mfp, 5500mfp and 4200 scanner 14/14
Page 15
Black and White Mode
Normal
Should be used for line drawings, text and
shades of gray. It is similar to the Brochure
type seen before, but for black and white.
B&W Photo
Should be used for pictorial images that
have many shades of gray. In principle,
this is equivalent to the Color Photo type.
Blueprint
Should be used when the original has very
similar bluish background and foreground.
If you selected Normal or B&W Photo for
this type of original the output would be
very noisy and it would be hard to
distinguish the lines.
This type of original performs a cleaning
of the background in order to make the
output clearer.
Sepia
This option uses the same principles as
Blueprint but it is designed for sepia color
backgrounds.
Color Reproduction for the HP Large Format Color Copiers family: cc800ps, 815mfp, 5500mfp and 4200 scanner 15/15
Page 16
Line
Should be used for line drawings and pure
black text. It is not suitable for pictures and
it is the equivalent of the CAD type seen
before, but for black and white.
At this point, if you don’t like how the original appears on the preview pane, or if you
have already made a copy and the result is not what you expected, you can try to do
one of the followings:
• try a different pre-defined type of original;
• modify the current type of original;
• create your own type of original (same as before, but saving the new type of
original under a new name, thus preserving the pre-defined one).
To create your own new type of original, please refer to sections 3.4 and 3.5 of the
Annex.
Color Reproduction for the HP Large Format Color Copiers family: cc800ps, 815mfp, 5500mfp and 4200 scanner 16/16
Page 17

2.3.1.2 Scan Resolution (1.4)
You can specify the scanning resolution decided in point 1.4 of section 2.2 in the Scan
Resolution setting of the Scan tab (or in the Copy Quality setting under the Settings
button of the Copy tab).
If you select a scanning resolution other than the predefined ones, please make sure that
it is a multiple or sub-multiple of 600dpi, otherwise picture artifacts may appear in the
copy.
As a rule of thumb, the scanning resolution (for best print mode and large format
images) should be 150dpi x (Output Size/Input Size); therefore, if the original is not
enlarged (Output Size = Input Size), a 150dpi resolution is sufficient. If the original is
enlarged four times, a 600dpi resolution is needed.
If the image contains fine details (CAD drawings, fine art, maps), you may consider
scanning at a higher resolution.
Color Reproduction for the HP Large Format Color Copiers family: cc800ps, 815mfp, 5500mfp and 4200 scanner 17/17
Page 18
22..33..22 PPrriinnttiinngg
Printing is the materialization of the image and can be performed whether you are in
the Copy or Print tabs of the Touch Screen. Please remember that, besides the
formatting required to send the image to the printer, most of the color management
takes place in this phase.
With regard to color management you should define:
• which printer will be used (2.1);
• which media profile defines the media loaded in the printer (2.2);
• what print quality is required (2.3);
• whether the original image comes from an inkjet printer (2.4);
• (optionally) whether you prefer gray enhancement or not (2.5).
All these settings can be specified in the Touch Screen menu.
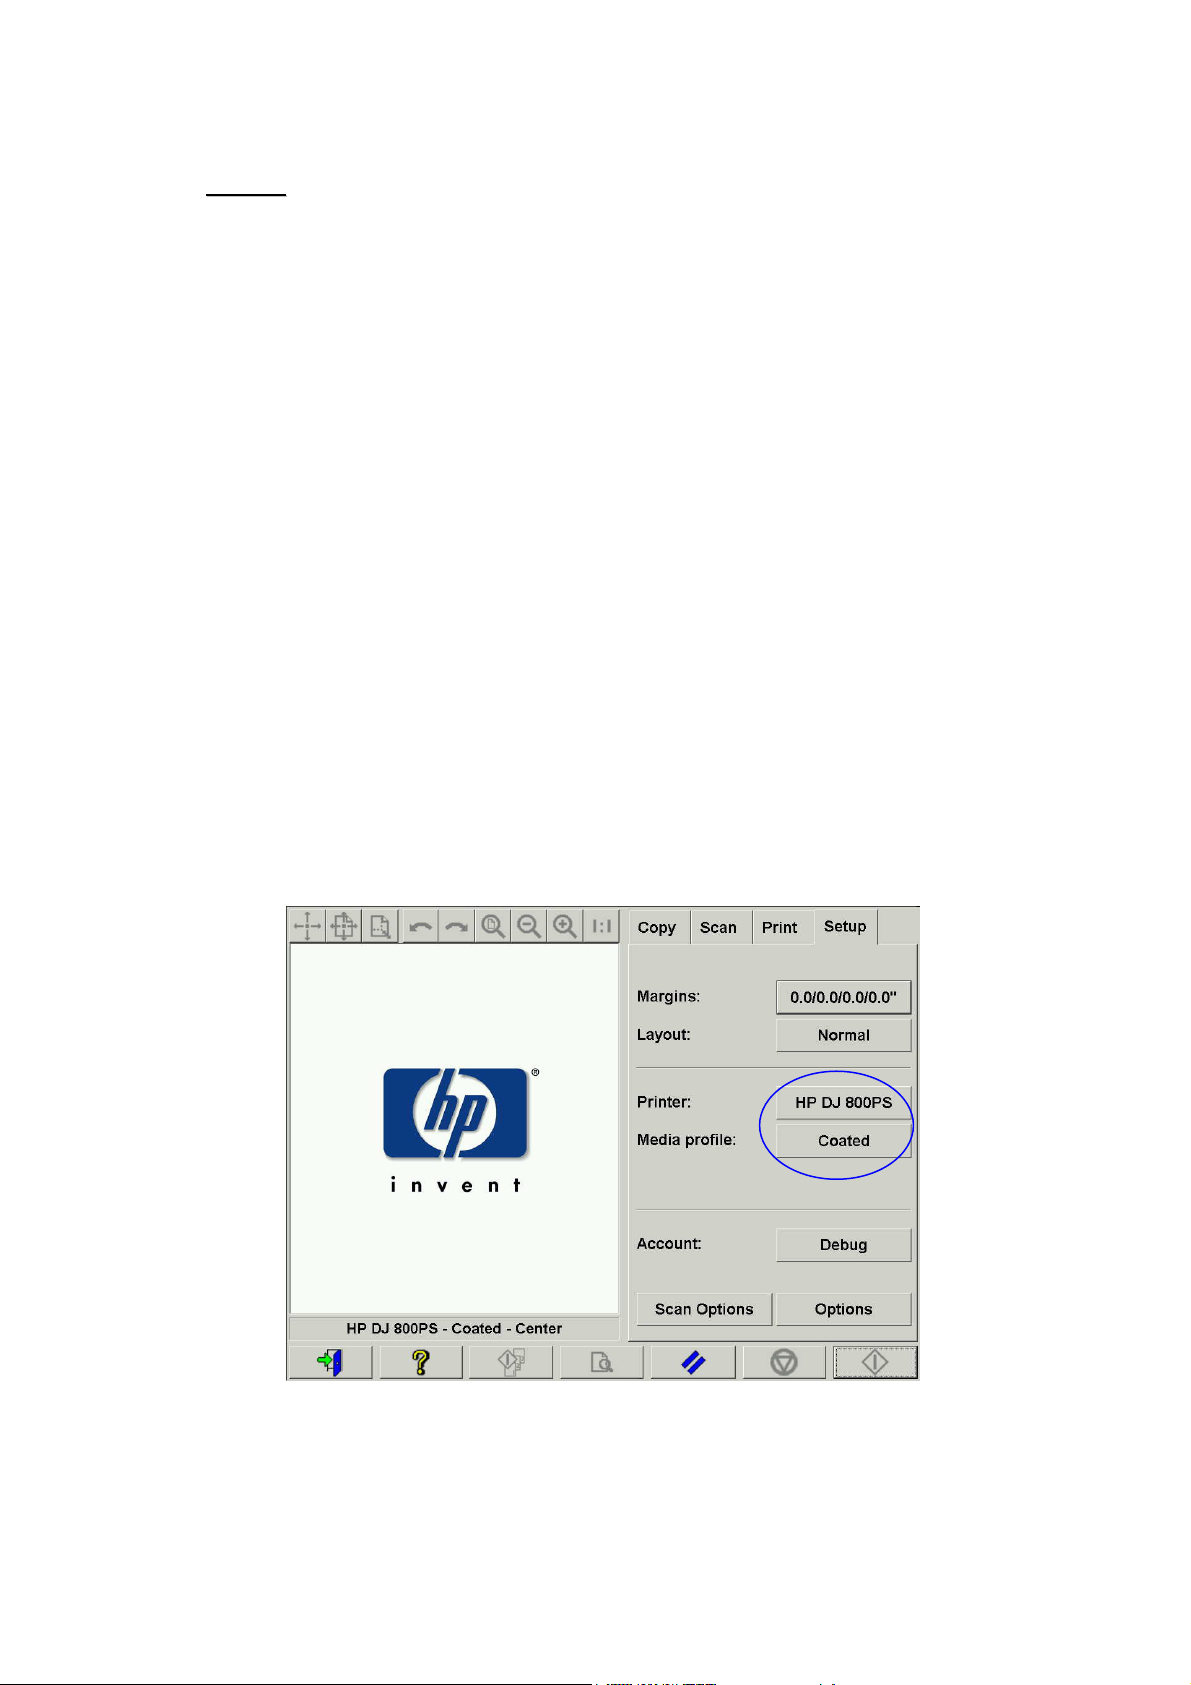
2.3.2.1 Printer and Media Profile (2.1 and 2.2)
Printer name and Media profile can be specified in the Setup tab, as shown in the
picture below.
Color Reproduction for the HP Large Format Color Copiers family: cc800ps, 815mfp, 5500mfp and 4200 scanner 18/18
Page 19

2.3.2.2 Print Quality (2.3), Ink Printer Original (2.4), Enhance gray (2.5)
The Print quality, the Ink printer original and the Enhance gray settings are
specified under the Settings button in the Copy or Print tab:
To get the best possible image quality and in order not to loose any of the reproducible
colors, you should choose Best print quality together with a good media such as
Photo Gloss. For all other cases, you should decide whether to favor image quality
(Best), print speed (Fast) or balance the two (Normal).
The Ink printer original setting should be specified when the original image comes
from an inkjet printer. If the original is a traditional silver-halide photo, or comes from
an offset press, a laser printer or some other printer rather than inkjet, then this option
should not be set.
Color Reproduction for the HP Large Format Color Copiers family: cc800ps, 815mfp, 5500mfp and 4200 scanner 19/19
Page 20

The Enhance gray option may be used when a previous printout shows a color cast
in the gray areas. This may happen either when the media profile is not well adapted to
the printer + media conditions or when the viewing conditions are altered (e.g. Light
bulb instead of fluorescent light).
Enhance Gray
Previous Print
Final Print
22..33..33 AAddddiittiioonnaall ooppeerraattiinngg rreeccoommmmeennddaattiioonnss
The following recommendations relate to color reproduction as well as to other
characteristics of the system, such as collating and accounting.
¾ To be sure that the chosen settings are suitable, you should always do a
preview scan before the final Copy or Scan operation.
¾ To cancel any operation like a Copy, Print or Collate, it is recommended that
you press the Cancel button of the Touch Screen as well as the Cancel button of
the printer's front panel, especially if you combine the operation with a nesting
layout.
¾ Every time you need to change the media roll, you should go to “Setup->
Printer-> Printer Setup-> Unprintable Area”, and update the value of the media
width. If the media width value is incorrect, errors can take place in the nesting
layout of a final Collate or in a Print operation. In addition, the incorrect media
width may affect the result of operations like Paneling or Tiling.
¾ When you power back on the scanner after the maintenance process, or when
the message “
No scanner was found
” appears, it is not necessary to restart
the Touch Screen. Just disconnect the FireWire cable of your Touch Screen,
connect it again and then press the Rescan button. You can verify the scanner
detection in “Setup-> Scan Options-> Scanner-> Rescan Bus”.
Color Reproduction for the HP Large Format Color Copiers family: cc800ps, 815mfp, 5500mfp and 4200 scanner 20/20
Page 21

¾ The Accounting feature helps keeping track of your copy activities. It may be
used to record your copy expenses and for billing your customers. The
accounting system records the number of times the system scans, prints, and
copies. The number of square feet or square meters for scanning and printing
activities is calculated from the Input size and Output size settings. The
calculations for paper usage (in square feet) take into account the full media
width and not just the printed image. When using the accounting feature, please
note that if you cancel a print or copy job, the accounting fields are increased as
if the job was not cancelled; on the other hand, if you cancel a scan job, the
corresponding fields are not increased.
Color Reproduction for the HP Large Format Color Copiers family: cc800ps, 815mfp, 5500mfp and 4200 scanner 21/21
Page 22

2.4 Post-job recommendations and Troubleshooting
22..44..11 PPoosstt--jjoobb rreeccoommmmeennddaattiioonnss
¾ Handle the copy with care, letting it dry completely.
It is recommended not to expose it to direct sun light (or any other source of UV
rays) or other extreme conditions (humidity, temperature) and, if appropriate, it is
recommendable to laminate it in order to avoid scratches and to increase its
“light-fastness” (i.e. durability of colors).
¾ Clean the glass plate
If you suspect that the original has left some dust on the glass plate, clean it with
a soft cotton tissue.
22..44..22 TTrroouubblleesshhoooottiinngg
If the output is not as expected, please check if your problem is one of those listed
below, and if so, consult the following sections for a deeper diagnosis and a potential
solution. Alternatively, please contact the HP Support Organization.
The most common issues in color reproduction are:
1. The colors of the copy are very different from the original:
a. there is an overall color cast (e.g. bluish, pinkish)
b. most of the colors are OK but certain ones are very different
2. Grays are wrong in a color copied image
3. The copy is not as shiny as the original
4. There is a big difference between right and left sides of the copy
5. The background results colored when copying newspapers
6. Vertical Bands appear in the copy
7. A B&W image appears greenish (or pinkish, or bluish)
Color Reproduction for the HP Large Format Color Copiers family: cc800ps, 815mfp, 5500mfp and 4200 scanner 22/22
Page 23

2.4.2.1 The colors of the copy are very different from the original
p
A
1.a There is an overall color cast
1
2
3
re you viewing the
copy in the expected
viewing conditions?
Yes
Is the Media properly
specified in the
rinter front panel?
Yes
Is it a new Media type?
Needs a new Media Profile
to be created?
No
No
No
Yes
Try viewing it with
the correct light and
environment
Reload the Media
type in the printer
and try again
Create a new
Media Profile
4
5
Have you validated this
Media recently?
Yes
Print the gray scale in the
Advanced Gray Balance
window in the Media Profile
Creation. Is the ramp
neutral?
Yes
Scan or Copy modifying the RGB settings.
No
No
Validate the Media
Profile. Make sure the
glass plate is clean
Modify RGB
values and
recreate the
media profile
Color Reproduction for the HP Large Format Color Copiers family: cc800ps, 815mfp, 5500mfp and 4200 scanner 23/23
Page 24

1.b Most of the colors are OK but certain ones are very different
A
A
Follow the steps 1 to 5 as in 1.a and proceed from there:
re some of the colors
non reproducible?
See section 3.2 in the
nnex
Yes
System Limitation. Try
modifying saturation
and/or lightness
No
Contact HP Support Organization
2.4.2.2 Grays are wrong in a color copied image
Follow steps 1 to 4 as in 1.a of section 2.4.2.1. If the problem persists, try cleaning the
white background plate that is on the top assembly of the scanner over the glass plate.
2.4.2.3 The copy is not as shiny as the original
This may be due to not using the correct media: High Gloss or Semi Gloss media should
be used in this case.
2.4.2.4 There is a big difference between right and left sides of the copy
This may be due to right-left cameras’ miscalibration. Try performing scanner
maintenance. If this does not solve the problem, please contact the HP Support
Organization.
2.4.2.5 The background results colored when copying newspapers
To avoid copying the background of a background colored document (typically sepia)
you should use the background cleaning option when scanning in color mode; if you
are interested in B&W copying you should use either Sepia or Blueprint type of original.
Color Reproduction for the HP Large Format Color Copiers family: cc800ps, 815mfp, 5500mfp and 4200 scanner 24/24
Page 25

2.4.2.6 Vertical Bands appear in the copy
This normally happens when the glass plate is dirty (either because it was dirty before
the scanning or because the original left tiny bits of coating as it moved over it). In the
first case, clean the glass plate according to the scanner maintenance procedure and in
the second case, laminate the original (if possible) or place a transparent cover over it
before scanning again.
2.4.2.7 A B&W image appears greenish (or pinkish, or bluish)
If you selected scanning in B&W and the output image has a noticeable color cast, then
probably the problem is in the printer itself. Make sure that the printer CLC (Closed-Loop
Color) has been performed and is active. See section 3.1.4 for details on the CLC
process. If this does not solve the problem, consider copying in Color mode. If the
problem persists, follow the steps described in section 2.4.2.2.
Color Reproduction for the HP Large Format Color Copiers family: cc800ps, 815mfp, 5500mfp and 4200 scanner 25/25
Page 26

3. ANNEX
g
3.1 Color Reproduction: Theory of Operation
Color Reproduction consists of transferring an original image that resides on a substrate
onto another substrate (paper or other media), as accurately as possible. With HP Color
Copier systems reproduction is done by digitizing the original image with a large
format scanner, applying color transformations and image enhancements, and finally
sending the data to a large format printer to generate the reproduction of the image.
There are five components involved in this process as depicted by the following picture:
1) The original image
2) The image digitizer (large format scanner)
3) The color transformation and image enhancement engine (Touch Screen)
4) The image producer (large format printer)
5) The reproduced or final image
Scanner
Original
Touch Screen Printer
3 2 4
Storage
5 1
Final Ima
e
Color Reproduction for the HP Large Format Color Copiers family: cc800ps, 815mfp, 5500mfp and 4200 scanner 26/26
Page 27

The principle behind Color Reproduction is that the original and the final image relate
to each other according to the desired reproduction intent.
It is also important to underline that the process includes image enhancement. This
feature is included so that when the original is noisy, badly contrasted or imperfect, the
resulting output can be enhanced (smoother, better contrasted, with enhanced edges
and lines). In this case, the process is mainly driven by image enhancement rather than
color reproduction fidelity.
The following sections describe in more details each component of the HP Color
Reproduction system.
33..11..11 OOrriiggiinnaall
The original is where the image to be reproduced resides. In relation to color and
image enhancement, originals can be classified as follows:
• According to the way the image was created:
o Inkjet originals
Thermal Inkjet
Piezoelectric Inkjet
Continuous Inkjet
o Non Inkjet originals
Press/Offset
Silver Halide (traditional photography)
Electro photography:
- Dry ink (toner): laser printers
- Liquid ink: Digital Press
Others
• According to the contents of the image:
o Pictorial images
o Maps and graphic images with solid areas
o CAD and drawings with solid lines
o Text Documents
• According to the color content:
o Color images
o Monochromatic images:
Black and white
Sepia
Blueprint
Color Reproduction for the HP Large Format Color Copiers family: cc800ps, 815mfp, 5500mfp and 4200 scanner 27/27
Page 28

• According to the shadows or contrast levels:
o two levels: only black and white (e.g. text document)
o multilevel: many gray levels (e.g. picture)
• According to the original’s conditions:
o Clean image
o Damaged or noisy original:
Stained, marked, smudged, spotted, …
Scratched, torn, …
It is important to know what type of original you are handling in order to use the correct
reproduction settings.
When using a Color Reproduction system it is also very important to handle the original
with maximum care in order not to damage it and to be able to generate a good copy.
Finally, it is very important to make sure that, if the original has been recently printed, it
is completely dry before using it.
Color Reproduction for the HP Large Format Color Copiers family: cc800ps, 815mfp, 5500mfp and 4200 scanner 28/28
Page 29

33..11..22 LLaarrggee FFoorrmmaatt SSccaannnneerr
g
The scanner is the device that digitizes the original and sends it to the processor for
further digital treatment. It consists of a light source, a paper movement mechanism, two
RGB image sensors (cameras) and the electronics required to process the data from the
sensors.
Vision strip
Light source
Ima
e
sensors
Tri-linear CCD
Color Reproduction for the HP Large Format Color Copiers family: cc800ps, 815mfp, 5500mfp and 4200 scanner 29/29
Page 30

3.1.2.1 Light Source
The light source provides enough light along the vision strip so that after being modified
by the original image2, there is sufficient reflected light to reach the image sensors.
The light source (lamp) stabilizes after the scanner has been on for approximately one
hour. Therefore, if the color reproduction is critical and you don’t want to see
differences from one end of the copy to the other, it is advisable to start scanning one
hour after powering on the scanner.
3.1.2.2 Paper Movement and glass plate
Since only one strip of the original image at a time is “seen” by the color sensors, either
the sensors are moved to scan the original (as in most home/office scanners) or, as in
the case of a large format scanner, the original is moved through a looking glass by a
roller mechanism.
As the paper is moved over, small fragments of the original media or dust stuck onto the
glass plate may cause image quality problems, like undesired vertical bars appearing
on the copy. To minimize this problem make sure that your original is completely dry
before loading it into the scanner and, as previously mentioned, handle it with care,
choosing the proper document height in the loading mechanism. If the original is thicker
than 2mm., please refer to section 3.6 for guidelines on how to handle it.
Before starting a new color reproduction job it is recommended to clean the glass plate,
following the guidelines provided in the maintenance manual, as well as to clean the
white background element (white plate) that is in the removable top assembly. This
element is used from time to time by the scanner to self-adjust the sensors and if it is not
clean, some colors may be scanned incorrectly, particularly the grays.
3.1.2.3 Cameras
There are two cameras to digitize the full width of the original image. Each of them
consists of an optics part3 and a tri-linear CCD (Charge-Coupled Device), which are the
same active elements found in digital cameras. The CCD is able to digitize the color of
the pixels in three components: Red, Green and Blue. When scanning in Black and
White mode a combined signal is produced from the Red, Green and Blue signals.
2
Red patches absorb more light in the blue, green and yellow parts of the visible spectrum than in the red
part.
3
The optics part of a camera is a series of mirrors and lenses that enable the small CCD to see 22" of the
original.
Color Reproduction for the HP Large Format Color Copiers family: cc800ps, 815mfp, 5500mfp and 4200 scanner 30/30
Page 31

The cameras must be periodically calibrated in order to avoid undesired geometrical
distortions in the final copy, as well as ensure a correct color capture. Calibration can
be performed using the scanner maintenance tool provided with the system. It is
advisable to run the scanner calibration every time the system warns the user to do so,
or when any of the following defects appear: jagged lines, blurry images, modified
colors (with respect to previous copies).
3.1.2.4 Electronics
After each strip has been digitized, the electronics compose the whole image and apply
several image treatments and linearizations to correct geometrical and color space
distortions. The result is a digital image ready to be sent to the Touch Screen, which in
turn will either store the image or send it to the printer.
During the scanner maintenance process, the electronics calibrate all the responses from
other elements (light, optics and CCDs) and between the CCDs themselves to obtain an
accurate response. From time to time, the electronics performs a check to correct small
deviations, using the white background when no image is in the media path.
The scanner maintenance should be run whenever you suspect that copies are loosing
image quality due to the scanner maladjustment or periodically (e.g. once a month),
depending on:
• number of hours of usage,
• types of original loaded (some originals dirt the glass plate more than others),
• variations of temperature and humidity.
Color Reproduction for the HP Large Format Color Copiers family: cc800ps, 815mfp, 5500mfp and 4200 scanner 31/31
Page 32

33..11..33 TToouucchh SSccrreeeenn
The Touch Screen has several roles:
• acts as a user interface to the operator (takes orders and provides feedback on
the processing);
• communicates with the scanner to send orders on scanning and to get the
scanned image;
• communicates with the printer (or printers) and sends the print jobs;
• stores information either onto its hard disk, on a CD, on a floppy disk or
somewhere on the network;
• processes the original image information, according to the operator’s settings, to
make it ready for printing.
The application that performs all these tasks is the HP Designjet Scan software, the GUI
of which is divided in three parts (see picture below):
• the Control Section, with four main control tabs: Copy (from original to final
output), Scan (for scanning to a file), Print (for printing from a file) and Setup;
• the Preview Window, where you can see how the image will look like in the final
output;
• the Toolbar, a set of command buttons at the bottom, used to start/stop various
actions (e.g. see a preview image, start copying).
Preview
Window
Control
Toolbar
Color Reproduction for the HP Large Format Color Copiers family: cc800ps, 815mfp, 5500mfp and 4200 scanner 32/32
Page 33

33..11..44 LLaarrggee FFoorrmmaatt PPrriinntteerr
s
pixel colo
The task of the printer is to gently send tiny drops of ink to the media (paper or other
substrate) in order to form an image that corresponds to the data file received.
Desired
r
Input Image
Pen
Ink drops
Printed Image
The HP Large Format Copier systems family includes the following models:
• HP Designjet 500/800 series
• HP Designjet 105x series
• HP Designjet 5500 series
All of them are thermal inkjet printers, which means that little drops of ink are heated up
to the boiling point and sent to the media. The amount of ink that reaches the media is
controlled by the writing system of the printer (the printer’s controller) and depends on
the type of media and desired print quality (e.g. Coated media accepts less ink than
Photo Gloss media and Best quality mode requires more ink than Fast mode).
As the type of media loaded into the printer cannot be modified by any command on
the Touch Screen, it is very important that the media name appearing in the printer’s
front panel corresponds to the currently loaded media.
The real amount of ink dropped may be different from what the printer’s controller
requested, due to dissimilar performance of the printheads: a printhead may drop 12pl4
4
A picoliter is equal to one millionth of one millionth of a liter. It is similar to a nanogram of ink (one
millionth of a milligram).
Color Reproduction for the HP Large Format Color Copiers family: cc800ps, 815mfp, 5500mfp and 4200 scanner 33/33
Page 34

whilst another may drop 14pl, thus resulting in different final colors. Another nuisance is
that different media lots may behave differently: one lot may allow more ink than others
to reach the inner part of the substrate, thus resulting in “duller” (washed-out) final
colors.
The HP Large Format Printers have a way to compensate for these problems: the CloseLoop Color Calibration (CLC). This process consists of calibrating the printer by
applying a color value table, which is built by printing a color ramp for each ink and
measuring it with an internal color sensor.
Depending on the printer model, there are different ways to access this feature:
HP Designjet
500/800
HP Designjet
105x
HP Designjet
5500
To calibrate
and use CLC
To calibrate
To use CLC
To calibrate
To use CLC
Ink menu -> Color Calibration -> Calibrate Paper
Printer menu -> Utilities-> Printhead Alignment
Printer menu -> Image Quality ->
Color Calibration -> On
Printer menu -> Utilities -> Calibration ->
Color Calibration
Printer menu -> Internal RIP settings ->
Color Calibration -> On
Each time a new printhead is replaced, a printhead alignment should be run to avoid
registration problems in the output (this is automatically started in most cases).
If these basic rules are followed, the final printout will almost certainly fulfill the
expectations.
e
33..11..55 FFiinnaall IImmaagge
The final image is the outcome of the printer. It should be handled with care, ensuring
that the ink is completely dry before using it.
Please note that the perceived color is a result of the ink, media, light and air physical
or chemical interactions, and it can, therefore, change unexpectedly when conditions
differ significantly: direct sun light, temperature, humidity, air contamination, etc. In
order to avoid fading, it is recommended to cover the copy with a glass or transparent
film and not to expose it to direct sunlight.
Color Reproduction for the HP Large Format Color Copiers family: cc800ps, 815mfp, 5500mfp and 4200 scanner 34/34
Page 35

33..11..66 OOvveerraallll ssyysstteemm
The previous sections have described each of the components of the Color Reproduction
system. This section talks about the interactions between these components.
If you were to print directly what has been captured from the scanner (without the
intervention of the Touch Screen), the output would be unacceptable. It would have
several image quality issues: too low or highly contrasted, too light or dark, too noisy,
etc. To prevent this, the Touch Screen should be used to perform two very important
tasks: Color Management and Image Enhancement.
3.1.6.1 Color Management
To obtain a good color reproduction, the color definitions coming from the scanner
have to be adapted to the color definitions needed by the printer. For example, a
specific green color may be reported by the scanner as:
Red: 60%, Green: 70% and Blue: 40%
but can only be reproduced identically by the printer if defined as:
Red: 42%, Green: 81% and Blue: 38%
There is therefore a need to convert the scanner’s RGB green color to the printer’s RGB
green color, and, analogously, all colors in the original image need to be converted.
This conversion is done automatically by the Touch Screen using the media profiles.
The media profiles define the relationship between the colors the scanner sees and the
colors the printer is able to print. For each printer type there is a set of pre-installed
media profiles (High Gloss Photo, Coated, Bright White, etc.). However, if you need to
print on other media, or desire a color reproduction system that better matches your
media, it is advisable to create new media profiles, as specified in section 3.3.
A new media profile will ensure that the scanner and the printer are perceptually better
adapted to each other. It is recommended to create a new media profile every time a
printhead is replaced (just the printhead, not the cartridge) or a new media type, for
which no media profile already exists, is loaded into the printer.
In addition to the always-active color conversion provided by the media profile, there
are some optional settings in the Touch Screen that allow the operator to modify the
colors of the printed output. Any modification to such settings may produce a copy that
is not perceptually similar to the original, but may be desirable for some other reasons
(more vivid colors, darker or lighter image).
Color Reproduction for the HP Large Format Color Copiers family: cc800ps, 815mfp, 5500mfp and 4200 scanner 35/35
Page 36

These settings are:
• Lightness: it makes the whole image darker or lighter.
• Saturation: intensifies or weakens the colors. The final image results more vivid
or grayer.
• Color Balance: corrects the Red, Green and Blue of the whole image. For
example, if the image has a yellow color cast, increasing the blue color balance
may reduce it.
• Black Enhancement: it makes all areas over a specified threshold of darkness
completely black. This feature should be used when text that should be black
appears in the copy as gray.
• Background Cleaning: it makes all areas below a specified threshold of
lightness completely white. It is useful when copying drawings that have a
colored (not white) background, like blueprints.
• Enhance Grays: makes the unsaturated colors (colors that are very close to
gray) to be gray. This feature is used to improve the appearance of gray areas
of the image, when the copy has previously shown a light colorcast in these
areas.
To see these settings in action, please refer to section 3.4. An example of how to use
the Enhance Grays setting is provided in section 2.3.2.2.
3.1.6.2 Image Enhancement
Image enhancement is used to improve the original image or a portion of it. The final
image will not be an exact copy of the original but, rather, a re-interpretation of it that
corrects some of the original’s shortcomings (e.g. stains, fuzziness).
There are two types of image enhancement available in the Touch Screen:
• Blur: smoothing of the whole image. It is used, for example, when the original is
worn out and has spikes or stains that you don’t want appearing in the copy.
• Sharpen: enhancement of the edges. It is used, for example, when a drawing
has smudged text or lines.
Blur and sharpen are not mutually exclusive, good results are sometimes obtained by
combining both of them: an application example is provided in section 3.4.
Image Enhancement is optional and should only be selected if necessary, as the final
image may result not coherent with the original.
Color Reproduction for the HP Large Format Color Copiers family: cc800ps, 815mfp, 5500mfp and 4200 scanner 36/36
Page 37

3.2 Which colors can be reproduced?
The colors that can be reproduced vary between different printers and different printing
media. At HP, we analyzed various environments and reached the following
conclusions:
• Glossy media (such as High Gloss Photo) has a much wider “gamut” (amount of
reproducible colors) than matte media, such as Heavy Weight Coated. Typically,
the main difference resides in the darkest tones (those found in shadow areas of
pictorial images) and in the most saturated colors (vibrant Red or Blue).
• The cyan ink is not as saturated as the cyan found in traditional silver-halide
pictures. This may lead to problems when reproducing saturated cyan (sky blue)
or dark blue (navy blue).
• The darkest blacks are difficult to reproduce, especially on coated media.
Sometimes, the problem is to achieve the desired darkness; in other cases, the
darkness is correct but has a color cast (green or pink tint).
In any case, the fact that an original image shows colors that cannot be matched
exactly does not mean that the copy will be unacceptable. It will depend on the relation
of these colors with the surrounding ones and their “criticality”. If the affected colors are
not well reproduced, but the surrounding ones are, the result is normally acceptable (the
difference may be barely noticeable). On the other hand, when a color must be
reproduced as accurately as possible (such as colors in a company logo) even a small
deviation may cause the job to be rejected.
The following images show the non-reproducible colors for certain printers and media
as patches surrounded by a white square. This test has been based on the IT8.7/2
target provided in the scanner maintenance tool, which is a silver-halide picture and has
been scanned and reproduced with the HP Designjet 500/800, HP Designjet 105x and
HP Designjet 5500 printers on High Gloss Photo and Heavy Coated media. Please note
that the result may vary if a different original, a different media or a not well-calibrated
printer is used.
Color Reproduction for the HP Large Format Color Copiers family: cc800ps, 815mfp, 5500mfp and 4200 scanner 37/37
Page 38

HP Designjet 500/800 with High Gloss Photo paper (HP Q1427A)
HP Designjet 500/800 with Heavy Weight Coated paper (C6030A)
Color Reproduction for the HP Large Format Color Copiers family: cc800ps, 815mfp, 5500mfp and 4200 scanner 38/38
Page 39

HP Designjet 105x with High Gloss paper (Q1427A)
HP Designjet 105x with Heavy Weight Coated paper (C6030A)
Color Reproduction for the HP Large Format Color Copiers family: cc800ps, 815mfp, 5500mfp and 4200 scanner 39/39
Page 40

HP Designjet 5500 with High Gloss Photo paper (C6963A)
HP Designjet 5500 with Heavy Weight Coated paper (C6030A)
Color Reproduction for the HP Large Format Color Copiers family: cc800ps, 815mfp, 5500mfp and 4200 scanner 40/40
Page 41

3.3 Guidelines to create or validate a media profile
Many of the color problems appearing in the HP Large Format Color Copiers products
are related to the mismatch between the media’s color characteristics set up in the
Touch Screen and those of the real media that is loaded into the printer. If there is such
a mismatch, colors may not be reproduced correctly, grays may have some color cast
or some colors may be lost.
The characteristics of the media are defined in the media profile and are selected by the
media profile setting under the Setup tab. There are a number of predefined media
profiles (e.g. High Gloss Photo, Bright White, Heavy Weight Coated); however, if you
are using a media type that is not included in the list, a new media profile has to be
created. By using a media profile that does not correspond to the characteristics of the
interaction between the printer, the media and the ink, you risk having color copies that
do not correspond to the original.
It is recommended to check the media profile in use from time to time, for example,
once a month or when you suspect the overall system has changed its “behavior” (e.g.
you see colors that are consistently substituted with other colors). This is done through
the media profile validation.
33..33..11 HHooww ttoo ccrreeaattee aa nneeww mmeeddiiaa pprrooffiillee
1. Select the Setup tab.
2. Press the Printer button.
If “Setup tab -> Options -> Quick select lists”
is selected then press the Tool button.
3. Press the Add Media Profile button.
Color Reproduction for the HP Large Format Color Copiers family: cc800ps, 815mfp, 5500mfp and 4200 scanner 41/41
Page 42

4. Press the Calibrate RIP button that will take you
to the “Calibrate Raster Image Processing”
window.
5. Set the Ink level (HP Designjet 105x series
only):
Print the Ink Level Sheet at different ink levels starting by
100% and choose the value that gives good results: not
too much ink (in order to avoid quality problems
cockle, bleeding, cracking or other), not too little (colors
should be vivid enough). Take into account the amount
of time the printout takes to dry.
such as
6. Specify the Gray Balance in order to ensure a 100% neutral appearance of the printed
grays. The values to specify are the relative “strengths” of Red, Green and Blue.
To help specifying these values you can:
• Print the Gray Balance Sheet. It consists of 25
“gray” ramps, according to various values of Red
and Green ranging from 0.6 to 1.4. Blue is
arbitrarily chosen to be 1.0.
• Choose the ramp that appears more neutral to the
final image viewing conditions.
• Specify the preferred values for Red, Green and
Blue in the Set gray balance boxes of the Calibrate
Raster Image Processing window. You may also
specify values that are between the printed ramps
(e.g. if you think that the ramp at position 0.8 is too
bluish and at 1.0 is too reddish, you can specify
0.9)
Color Reproduction for the HP Large Format Color Copiers family: cc800ps, 815mfp, 5500mfp and 4200 scanner 42/42
Page 43

7. (Optional step)
If you are not satisfied with your choice of gray
ramp (e.g. not neutral enough) you can finetune it. To do this press the Advanced button in
the Calibrate Raster Image Processing window.
Press the Print Gray Scale button.
A printout like the following will appear:
Check the 255 levels ramp under the final image viewing conditions and decide whether it
is good enough or it has some color cast (greenish, bluish, reddish).
If the ramp is OK proceed with step 8; otherwise, find out new values for Red, Green and
Blue and go back to step 6. If after several attempts you are still not satisfied, proceed as
follows.
Construct a Look-Up Table (LUT) file: whilst the standard Gray Balance adjusts the shape of
the RGB curves with simple gamma curves, with the Advanced Gray Balance option and
the LUT file you can adjust the RGB curves to any desired shape.
Before proceeding with the LUT creation please note that this procedure is prone to errors
and you will probably have to make many attempts before getting the desired result, so
only proceed if you are really not satisfied with the steps taken so far.
If you decide to proceed, create the LUT file according to the following guidelines:
a. The LUT file should be a CSV-file (comma separated
values file).
The “//” sign indicates that the line is a comment and
shall be ignored.
Each line in the file has the format
“Index,RedValue,GreenValue,BlueValue”, where all
values range from 0 to 255.
Index is the gray tone value: in the sample file, for
example, the gray tone value 64 should be created
using Red=Green=Blue=118. Note that the file does
not need to contain 256 entries: the entries are taken
as fix points for a transfer function, meaning that
values in between them will be calculated by the LUT
A sample LUT file:
// Gray balance LUT file
0,0,0,0
64,118,118,118
128,174,174,190
176,195,195,221
208,227,227,233
255,255,255,255
Color Reproduction for the HP Large Format Color Copiers family: cc800ps, 815mfp, 5500mfp and 4200 scanner 43/43
Page 44

file interpreter. The file should always include entries
for indexes 0 and 255.
b. The LUT file should be placed in the Customer Color Maps folder, which is under “D:\system\Custom
Color Maps”. Since system is a hidden folder, you should go to Windows Explorer’s main menu, under
“Tools->Folder Options->View” and select the option “Shown hidden files and folders” from the Advanced
Settings, then press Apply and OK.
c. To use a LUT file for Gray Balance settings, you need to
select the Use gray balance LUT file check box and
specify the File name.
d. Check the results by pressing Print Gray Scale.
Modify the LUT until you have a good result and press OK when completed.
8. Press OK on the Calibrate Raster Image Processing window to return to the Media Setup
menu.
9. Press the Print Color Sheet button to print a color patch reference sheet.
10. Load the color sheet into the scanner face down, aligning the arrow to the 10.5-inch
mark (26.7 cm) from the right side of the scanner. The ink must be dry before loading the
color sheet in to the scanner.
11. Press the Name and Scan Sheet button to assign a name to your new media profile.
12. Press the Enter key to accept the new name and start scanning the color sheet. When
completed, the new media profile will be in the list of available media profiles.
Color Reproduction for the HP Large Format Color Copiers family: cc800ps, 815mfp, 5500mfp and 4200 scanner 44/44
Page 45

33..33..22 HHooww ttoo vvaalliiddaattee aann eexxiissttiinngg mmeeddiiaa pprrooffiillee
1. Follow steps 1 to 3 of the procedure in section 3.3.1.
2. To validate a media profile, press the
Validate button.
3. If your scanner is in optimal conditions
to work (as stated in the window) press
the Next button.
4. Press the Print Color Sheet button to
print a color patch reference sheet as
the one that appears in step 9 of the
procedure in section 3.3.1.
5. Once the Color Sheet is dry, load it as
pointed out in step 10 of the procedure
in section 3.3.1 and press Next. The
scanning will Start.
Color Reproduction for the HP Large Format Color Copiers family: cc800ps, 815mfp, 5500mfp and 4200 scanner 45/45
Page 46

6. After processing the image, a new window will recommend whether it is necessary to
update the media profile with the new calculated values or not.
Note:
¾ You can use the Delete button to delete media profiles (only user created profiles
can be deleted).
¾ You can use the Rename button to rename media profiles (only user created
profiles can be renamed).
Color Reproduction for the HP Large Format Color Copiers family: cc800ps, 815mfp, 5500mfp and 4200 scanner 46/46
Page 47

3.4 Creating a new Type of original: Color
To create or modify5 a type of original you need to select an existing one (Color Photo
in this example) and press the tool button .
In the preview pane you will see two copies of the image: the bottom one is the original
and the top one is the image modified by the settings of the selected type of original.
Therefore, when modifying the settings you can immediately see the effect on the
image. You will also see an asterisk (*) on the upper right side of the type of original
name (as in the picture above), to show that some settings have been modified.
If you plan to scan many originals of the same type, it is advisable to store the newly
created type of original under a meaningful name.
The following sections describe the settings that can be modified and their possible
values. Please also refer to the values defined in paragraph 1.3 of section 2.2.
5
Please note that when creating or modifying a type of original, the color accuracy between original and copy can be
compromised.
Color Reproduction for the HP Large Format Color Copiers family: cc800ps, 815mfp, 5500mfp and 4200 scanner 47/47
Page 48

33..44..11 MMeetthhoodd
Method defines the basic image enhancement to apply. It has one of the following
values:
Continuous Tone:
used when the image has many colors and transitions among them.
This method is used in the “Color Photo” type of original.
Graphics:
used for images where lines and edges should be sharp. Used in
“Map” and “CAD” types of original.
Mixed:
used when the original contains both text and pictures. Used in the
“Brochure” type of original.
33..44..22 LLiigghhttnneessss
This setting is used to increase or decrease the lightness of the image. It can be used to
compensate for dull or faded originals. Possible values range from -3 to +6.
33..44..33 SSaattuurraattiioonn
When positive, this setting increases the colors’ saturation (i.e. colors become more
vivid); when negative, it makes the image duller (grayer). It can be used to compensate
for faded originals. Possible values range from -6 to +6.
Color Reproduction for the HP Large Format Color Copiers family: cc800ps, 815mfp, 5500mfp and 4200 scanner 48/48
Saturation - 6 Saturation 0 Saturation + 6
Page 49

33..44..44 CCoolloorr BBaallaannccee
This setting is used to adjust the colors’ balance for the whole image. If you find that the
overall image has a color cast (e.g. it is too greenish) then you may correct it by
modifying the color balance. You may set the Color balance value to RGB (Red, Green
and Blue) or CMY (Cyan, Magenta and Yellow), depending on the selection made in
the “Setup tab -> Options button -> Color Balance”.
Please note that same results can be obtained either using RGB or CMY. The following
table explains the relationship between the variations of such colors:
Setting positive value results in a … image negative value results in a … image
Red Redder “Cyaner”, turquoise
Green Greener “Magenter”, pinker
Blue Bluer Yellower
Cyan “Cyaner”, turquoise Redder
Magenta Magenter, pinker Greener
Yellow Yellower Bluer
As you can see, the same effect (e.g. having a redder image) may be achieved by
increasing the Red value (in RGB mode) or by decreasing the Cyan value (in CMY
mode). In addition, increasing (or decreasing) the value of one color has the same
effect as decreasing (or increasing) the values of the two remaining colors of the same
set. For example, to make the image bluer you may increase the Blue value or decrease
both the Red and Green values.
The entity of the color change differs depending on the direction you are heading. In
other words, when moving towards positive values in RGB mode the appearance of the
image changes slightly, whilst when moving towards negative values, the image
Color Reproduction for the HP Large Format Color Copiers family: cc800ps, 815mfp, 5500mfp and 4200 scanner 49/49
Page 50

endures a much bigger change. In CMY mode, it is the opposite: moving towards
positive values produces greater changes than moving towards negative values.
This behavior is shown in the table above where the Cyan, Magenta and Yellow boxes
are more saturated (i.e. stronger) than the Red, Green and Blue boxes. This does not
exclude the possibility of having slight increases in the amount of Cyan, Magenta and
Yellow. These are achieved through the usage of the complementary colors: for
example to produce a slight increase of Yellow, you will need to modify Red and Green
(in RGB) or Cyan and Magenta (in CMY).
It is advisable to use only one system (either RGB or CMY) and not to mix them. If in
doubt about which system to choose, you should consider that RGB is, in most cases,
more intuitive. The following table is a guideline to the correct actions required to obtain
the desired color balance:
Color Balance Needs: Should move to … values Should move to … values
Increase in
Strength in
change
Red Green Blue Cyan Magenta Yellow
Hard
Red
Soft
Hard
Yellow
Soft
Hard
Green
Soft
Hard
Cyan
Soft
Hard
Blue
Soft
Hard
Magenta
Soft
Please remember that Orange and Brown lie between Red and Yellow, and Violet is
between Magenta and Blue.
- - + +
+ -
- +
+ + - -
- - + +
+ -
- +
+ + - -
- - + +
+ -
- +
+ + - -
Color Reproduction for the HP Large Format Color Copiers family: cc800ps, 815mfp, 5500mfp and 4200 scanner 50/50
Page 51

The following picture shows the effects of increasing the RGB values of an image:
+R +G
+G +B
Color Reproduction for the HP Large Format Color Copiers family: cc800ps, 815mfp, 5500mfp and 4200 scanner 51/51
Page 52

33..44..55 BBllaacckk EEnnhhaanncceemmeenntt
This setting is used to blacken all areas below the defined lightness level. It is employed
to enhance the text parts of a document, when black text is copied as gray. Valid
values range from 0 to 255. If 0 is selected, the image is not modified; if 255 is
selected the whole image will be black.
33..44..66 BBaacckkggrroouunndd cclleeaanniinngg
This setting is used to whiten all areas above the defined lightness level. Valid values
range from 0 to 255. If 0 is selected the image is not modified; if 255 is selected the
whole image will be white.
33..44..77 SShhaarrppeenn
This setting is used to sharpen the image. It enhances the edges between areas of
different colors, thus resulting in better-defined text and edges. The strength of the
sharpening is controlled by its value. Valid values range from 0 to 6.
Color Reproduction for the HP Large Format Color Copiers family: cc800ps, 815mfp, 5500mfp and 4200 scanner 52/52
Page 53

33..44..88 BBlluurr
This setting is used to smooth the image. It is useful when the scanned original is “noisy”
(i.e. color disturbance, graininess and non-area uniformity). Valid values range from 0
to 12.
Blurring is not the opposite of sharpening: sharpening works on the image’s edges only,
whilst blurring smoothes out the whole color or gray tone areas. In fact, these two
settings combined, by blurring away noise in the image first and then sharpening the
result, may be used to further enhance the image. Observe below the same example as
before, with blur and sharpening applied. Note that now there is no “augmented noise”
in the text area, with respect to when only sharpening was applied.
Color Reproduction for the HP Large Format Color Copiers family: cc800ps, 815mfp, 5500mfp and 4200 scanner 53/53
Page 54

3.5 Creating a new Type of original: B&W
As described in section 3.4, to create or modify a type of original you have to select an
existing one and press the tool button .
If you plan to scan many originals of the same type, it is advisable to store the newly
created type of original under a meaningful name.
The settings that can be modified and their possible values are described in the
following sections.
d
33..55..11 MMeetthhood
Method defines the basic image enhancement to apply. It has one of the following
values:
Graytone:
used for pictorial images (pictures with many gray shades).
B&W Threshold:
used for pure B&W clear CAD drawings and/or text only
documents, where the background is pure white and the text or
lines are well defined. It only distinguishes two elements, black
and white, and they are defined depending on a threshold
value (which is the user specified lightness value described in
section 3.5.2). There will be no gray levels in the output.
Color Reproduction for the HP Large Format Color Copiers family: cc800ps, 815mfp, 5500mfp and 4200 scanner 54/54
Page 55

Normal:
used when the original contains both text/CAD lines and
pictures/graphics.
Photo:
this method exists for historical reasons and was designed for
pictures; however, better results are obtained with Graytone
and there is no predefined type of original that uses this
method.
Adaptive:
used for CAD or text documents where the background is
barely distinguishable from the lines or characters, where, for
example, the original is a blueprint or an old and worn out
document. This method is similar to Normal but extracts the
background gray level from the input image.
33..55..22 LLiigghhttnneessss
This setting increases or decreases the lightness of the image. It can be used to
compensate for dull or faded originals. Possible values range from -3 to +6
33..55..33 SShhaarrppeenn
This setting is used to sharpen the image; it enhances the edges between areas of
different colors (see the explanation in section 3.4.7). Valid values are On or Off.
33..55..44 BBlluurr
This setting is used to smooth the image. It is useful when the scanned original is “noisy”
(see the explanation in section 3.4.8). Valid values range from 0 to 12.
All comments made in section 3.4.8 regarding the combined usage of sharpening and
blurring apply here as well.
Color Reproduction for the HP Large Format Color Copiers family: cc800ps, 815mfp, 5500mfp and 4200 scanner 55/55
Page 56

3.6 Working with Thick Media
Scanning thick media may require enlarging the insertion slot (see “How do I change
the insertion slot height?” in the On-line Help or in the Users reference guide).
To facilitate the scanning of thick originals in the extended media thickness positions it is
important to insert the original aligned in the center, as the scanner transport rollers grip
more evenly with central loading. Bulky thick media need to be supported with both
hands. This should be done at both the entrance and exit side of the scanner. Specially
designed support tables can be attached behind the scanner for users who perform
many thick media scans.
Normally, only stiff media will affect stitching. Flexible media will usually be stitched
correctly regardless of thickness.
Thick stiff originals will rest on top of the scanner rollers and thus raise a small distance
over the glass plate, which will lead to changes in the stitching of the image at some
points between the two cameras (overlapping pixels). The stitching parameters will need
to be modified in order to correct this. Stitching errors are more evident on an image
with one or more clear diagonal lines.
If the lines are uneven, do the following:
1. Select the Setup tab and press the Scan
Options button.
2. Press the Scanner button.
Color Reproduction for the HP Large Format Color Copiers family: cc800ps, 815mfp, 5500mfp and 4200 scanner 56/56
Page 57

3. Press the Setup button.
4. Select the Extended Thickness tab.
5. Change the value of the Camera A-B field. Normally, only positive values should
be used.
6. Run test scans and readjust the values until you are satisfied that the lines are
stitched correctly.
7. Scanning thick originals can give distorted results at the top and bottom edges of
the image, where the edge meets the scanner’s rollers. You can omit edge
distortion by letting the scanner skip the leading and trailing edges. Check the
box Use extended thickness paper handling to enable skipping of the image
edges.
8. Click OK to accept your settings.
9. Repeat the above steps until you are satisfied with the results.
Note:
¾ Auto-adjustment of the scanner’s light profile, stitching and other functions only
take place with the insertion slot in the Normal position. When in extended
media thickness position, the last auto-adjustment is stored and utilized. This
means that you should from time to time, and especially when powering on the
scanner, return to the Normal position to allow it to auto-adjust.
Color Reproduction for the HP Large Format Color Copiers family: cc800ps, 815mfp, 5500mfp and 4200 scanner 57/57
Page 58

¾ The Normal position gives the highest scanning speed. In the extended media
thickness position, scanning speed is automatically reduced.
¾ When combining thick media handling (paper guide in extended position) with
Auto Size Detection, the size detection should be done separately by running a
preview scan before the final copy or scan.
Color Reproduction for the HP Large Format Color Copiers family: cc800ps, 815mfp, 5500mfp and 4200 scanner 58/58
Page 59

4. GLOSSARY
Background Cleaning
Black Enhancement
Blueprint
Blur
CAD Drawing
Color balance
Color Calibration (CLC)
Color Management
Copying
Gray Balance ramp
Gray Enhancement
Hue
Image Enhancement
Inkjet printer
Lightness
Image enhancement feature that whitens all areas above a
defined lightness level. Typically used to avoid noise,
stains or wear marks.
Image enhancement feature that blackens all areas below
a defined lightness level. Typically used to enhance text.
A white print on a blue background; especially used for
copying maps, mechanical drawings and architects’
plans.
Image enhancement feature that makes the image softer
and less sharp.
Computed Aided Design technical drawing: mechanical,
electrical/electronic, architectural.
Adjustment of the ratio of Red, Green and Blue (or Cyan,
Magenta and Yellow) components, which aims at
producing a copy free from any unwanted color cast or
color bias.
The process of bringing the color printer system to
standard operating conditions.
The process of controlling colors to obtain what expected
from a color reproduction device.
Reproducing an original image onto a substrate.
Sequence of gray patches, ranging from very light (white)
to very dark (black) shades, in a constant decrease of
lightness.
Color transformation feature that makes all the colors that
are close to gray to be exactly gray.
Attribute of color that determines whether it is red, yellow,
green, blue, or some combination of pairs of these (e.g.
an orange can be 30% red and 70% yellow).
Any process which aims at improving the appearance of
an image. This can be done using filtering, transformation
or “threshold” techniques, e.g. edge enhancement,
blurring, sharpening, blunt masking, etc.
A type of printer that shoots fast drying drops of ink
through tiny nozzles to create an image on paper or other
material.
The attribute of visual perception in accordance with
which an area appears to emit or reflect more or less light.
It distinguishes light from dark areas.
Color Reproduction for the HP Large Format Color Copiers family: cc800ps, 815mfp, 5500mfp and 4200 scanner 59/59
Page 60

LUT file
Media
Media Profile
Non-reproducible color
Original
Pen or
Printhead Alignment
Printing
Saturation
Scan Resolution
Scanning
Sharpen
Stitching
Thick media
Touch Screen
Type of original
A Look-Up Table (LUT) file. It correlates n-dimensional
entries to m-dimensional outputs. In this instance, it
correlates a 1-dimensional entry (the lightness) with a 3dimensional output (the corresponding Red, Green and
Blue values).
The physical material on which an image is formed
(printed).
A description of the media and printing system’s behavior,
including which colors can be reproduced on the media
and how to reproduce them.
A color that cannot be reproduced by the system either
because the color is not correctly “seen” by the scanner
(which detects it as a different color) or because it cannot
be printed by the printer (ink/media limitation).
The printed media that has the original image formed on
it.
The process of setting printer parameters to minimize ink
drops placement errors when printing. It is performed
automatically each time a printhead is replaced or may be
started manually.
The transfer of ink onto paper or other media to reproduce
text and images.
The purity of a color's hue, moving from gray to the pure
color. A high saturation corresponds to a strong color.
Conceptually equivalent to a scale from pale/weak (low
saturation) to pure/strong (high saturation).
The resolution at which the scanner digitizes the original
image. It is reported as dpi (dots per inch).
The digitizing of the original image.
To enhance the contrast at the edges of light and dark
areas, with the effect of making an image appear better
defined, more in focus.
The process of aligning the two cameras of the scanner so
that when the two images are composed the differences
along the overlapping area are minimized. It is executed
every time the operator performs scanner maintenance.
Media that is thicker than 2mm.
The interface between the user, the scanner and the
printer.
A template that describes the characteristics of an original
image and the color management and image
enhancements it requires.
Color Reproduction for the HP Large Format Color Copiers family: cc800ps, 815mfp, 5500mfp and 4200 scanner 60/60
Page 61

e
NNoottiicce
All rights are reserved. No part of this document
may be photocopied, reproduced, or translated
into another language without the prior written
consent of Hewlett-Packard Company.
The information contained in this document is
subject to change without notice and should not
be construed as a commitment by the HewlettPackard Company.
© Copyright Hewlett-Packard Company 2004
Hewlett-Packard assumes no responsibility for
any errors that may appear in this document
nor does it make expressed or implied
warranty of any kind with regard to this
material, including, but not limited to the
implied warranties of merchantability and
fitness for a particular purpose.
The Hewlett-Packard Company shall not be
liable for incidental or consequential damages
in connection with, or arising out of the
furnishing, performance, or use of this
document and the program material, which it
describes.
Any trademarks referenced herein are the
properties of their respective owners.
Edition: May 2004
Hewlett-Packard Company
Barcelona Division
Avenida Graells, 501
08174 Sant Cugat del Vallès
Spain
Color Reproduction for the HP Large Format Color Copiers family: cc800ps, 815mfp, 5500mfp and 4200 scanner 61/61
 Loading...