

Page 1

C and C++ SoftBench User's Guide
Manufacturing Part Number: B6454-97413
June 2000
© Copyright 2000 Hewlett-Packard Company.
Page 2

Legal Notices
The information contained in this document is subject to change without
notice.
Hewlett-Packard makes no warranty of any kind with regard to this
manual, including, but not limited to, the implied warranties of
merchantability and fitness for a particular purpose. Hewlett-Packard
shall not be liable for errors contained herein or direct, indirect, special,
incidental or consequential damages in connection with the furnishing,
performance, or use of this material.
Copyright © 2000 Hewlett-Packard Company.
This document contains information which is protected by copyright. All
rights are reserved. Reproduction, adaptation, or translation without
prior written permission is prohibited, except as allowed under the
copyright laws.
Corporate Offices:
Hewlett-Packard Co.
3000 Hanover St.
Palo Alto, CA 94304
Use, duplication or disclosure by the U.S. Government Department of
Defense is subject to restrictions as set forth in paragraph (b)(3)(ii) of the
Rights in Technical Data and Software clause in FAR 52.227-7013.
Rights for non-DOD U.S. Government Departments and Agencies are as
set forth in FAR 52.227-19(c)(1,2).
Use of this manual and flexible disc(s), compact disc(s), or tape
cartridge(s) supplied for this pack is restricted to this product only.
Additional copies of the programs may be made for security and back-up
purposes only. Resale of the programs in their present form or with
alterations, is expressly prohibited.
A copy of the specific warranty terms applicable to your Hewlett-Packard
product and replacement parts can be obtained from your local Sales and
Service Office.
Copyright © 1980, 1984, 1986 AT&T Technologies, Inc. UNIX and
System V are registered trademarks of AT&T in the USA and other
countries.
2
Page 3

Copyright © 1994 X/Open Company Limited.
UNIX is a registered trademark in the United States and other
countries, licensed exclusively through X/Open Company Limited.
Copyright © 1980, 1984, 1986 Novell, Inc.
Copyright © 1979, 1980, 1983, 1985-1990 Regents of the University of
California. This software is based in part on the Fourth Berkeley
Software Distribution under license from the Regents of the University
of California.
Copyright © 1990 Motorola, Inc. All Rights Reserved.
PostScript is a trademark of Adobe Systems, Inc.
Copyright © 1985-1986, 1988 Massachussetts Institute of Technology.
X Window System is a trademark of the Massachussetts Institute of
Technology.
Portions of this software and documentation are based in part on
software and documentation for the X Window System, Version 11,
developed and distributed by Massachusetts Institute of Technology.
Copyright © 1989, 1990, 1993 Open Software Foundation.
Portions of this software and documentation are based in part on Motif
software and documentation developed and distributed by the Open
Software Foundation.
OSF/Motif is a trademark of the Open Software Foundation, Inc. in the
U.S. and other countries.
RCS, the Revision Control System, manages multiple revisions of files.
Copyright © 1982, 1988, 1989 Walter Tichy. Copyright 1990, 1991 by
Paul Eggert. Distributed under license by the Free Software Foundation,
Inc.
Copyright © 1986 Digital Equipment Corp.
3
Page 4

Printing History
New editions of this manual incorporate all material updated since the
previous edition.
The manual printing date and part number indicate its current edition.
The printing date changes when a new edition is printed. Minor
corrections and updates incorporated at reprint do not cause this date to
change. The manual part number changes when extensive technical
changes are incorporated.
August 1992 Edition 1 (B2600-90010)
August 1994 Edition 1 (B2600-90031)
January 1996 Edition 1 (B5072-90002)
August 1996 Edition 1 (B5072-90017)
February 1998 Edition 1 (B6454-90002)
September 1999 Edition 1 (B6454-93003)
4
Page 5

Table 1
Typeface Conventions
Convention Description
italic font
typewriter font Computer commands or other information that
boldface font A term that may need further clarification or
[…] Optional parameters in syntax examples are
KeyCap Represents a key on your keyboard that you
Information you supply, either in syntax
examples or in text descriptions. Forexample,if
told to type:
name like sample. Italics are also used for
emphasis, and for Titles of Books.
must be typed exactly as shown. For example, if
told to type: sample, you type exactly the word
in typewriter font, sample. Menu selections are
in typewriter font separated by colons. See
"Menu Conventions" in this chapter.
definition, especially a familiar word (such as
menu) used with a computer-specific meaning.
These terms are clarified in the glossary.
enclosed in brackets.
must press, or an on-screen button that you
must select, as part of the operation. For
example, Return is the "Carriage Return" key,
which completes a command input. This key
may be labelled "RETURN", "Return", or "Enter".
filename
, you supply an actual file
Key1-Key2 A hyphen between keys indicates that two or
more keys must be pressed at the same time.
For example, "Control-C" means to press and
hold the Control key while pressing and
releasing the C key. The Control key may be
labelled "CTRL", "Ctrl", or "Control".
5
Page 6

6
Page 7

1. Maximizing Your Results with SoftBench
SoftBench Task Flow . . . . . . . . . . . . . . . . . . . . . . . . . . . . . . . . . . . . . . . . . . . . . . . . . . . 20
Understanding Projects . . . . . . . . . . . . . . . . . . . . . . . . . . . . . . . . . . . . . . . . . . . . . . . . . 21
Building Targets . . . . . . . . . . . . . . . . . . . . . . . . . . . . . . . . . . . . . . . . . . . . . . . . . . . . . 22
Understanding Build Configurations and Packages . . . . . . . . . . . . . . . . . . . . . . . . . 23
Choosing Between Project Build and External Build Models . . . . . . . . . . . . . . . . . . 25
Sharing Projects with a Team . . . . . . . . . . . . . . . . . . . . . . . . . . . . . . . . . . . . . . . . . . . . 27
One Project, One Author . . . . . . . . . . . . . . . . . . . . . . . . . . . . . . . . . . . . . . . . . . . . . . . 27
One Project, Many Authors . . . . . . . . . . . . . . . . . . . . . . . . . . . . . . . . . . . . . . . . . . . . . 27
One Project with Subprojects, Many Authors . . . . . . . . . . . . . . . . . . . . . . . . . . . . . . 29
Planning Your Project . . . . . . . . . . . . . . . . . . . . . . . . . . . . . . . . . . . . . . . . . . . . . . . . . . . 31
Using the SoftBench Integrated Environment . . . . . . . . . . . . . . . . . . . . . . . . . . . . . . . 32
Using SoftBench Tools Together . . . . . . . . . . . . . . . . . . . . . . . . . . . . . . . . . . . . . . . . . 34
Using SoftBench Tools on Multiple Projects . . . . . . . . . . . . . . . . . . . . . . . . . . . . . . . 35
Using SoftBench Tools as Standalone Tools . . . . . . . . . . . . . . . . . . . . . . . . . . . . . . . . 36
Reusing Tool Windows . . . . . . . . . . . . . . . . . . . . . . . . . . . . . . . . . . . . . . . . . . . . . . . . . 37
Copying Data between SoftBench Tools . . . . . . . . . . . . . . . . . . . . . . . . . . . . . . . . . . . 37
An Example SoftBench Session . . . . . . . . . . . . . . . . . . . . . . . . . . . . . . . . . . . . . . . . . . . 38
Learning SoftBench . . . . . . . . . . . . . . . . . . . . . . . . . . . . . . . . . . . . . . . . . . . . . . . . . . . . 40
Contents
2. Using SoftBench
Prerequisites to Using SoftBench . . . . . . . . . . . . . . . . . . . . . . . . . . . . . . . . . . . . . . . . . 42
Starting SoftBench . . . . . . . . . . . . . . . . . . . . . . . . . . . . . . . . . . . . . . . . . . . . . . . . . . . . . 43
Understanding SoftBench Window Areas . . . . . . . . . . . . . . . . . . . . . . . . . . . . . . . . . . . 44
Understanding the Builder Page . . . . . . . . . . . . . . . . . . . . . . . . . . . . . . . . . . . . . . . . 47
Understanding the SoftBench CodeAdvisor Page . . . . . . . . . . . . . . . . . . . . . . . . . . . 48
Setting Up a Project . . . . . . . . . . . . . . . . . . . . . . . . . . . . . . . . . . . . . . . . . . . . . . . . . . . . 50
Creating a Project Using Project Build . . . . . . . . . . . . . . . . . . . . . . . . . . . . . . . . . . . 50
Creating a Project Using External Build . . . . . . . . . . . . . . . . . . . . . . . . . . . . . . . . . . 52
Cloning a Project from an Existing Project . . . . . . . . . . . . . . . . . . . . . . . . . . . . . . . . 53
Repartitioning an Existing Project . . . . . . . . . . . . . . . . . . . . . . . . . . . . . . . . . . . . . . . 54
Creating a Subproject . . . . . . . . . . . . . . . . . . . . . . . . . . . . . . . . . . . . . . . . . . . . . . . . . 55
Modifying a Project Definition . . . . . . . . . . . . . . . . . . . . . . . . . . . . . . . . . . . . . . . . . . . . 56
Creating Files within a Project . . . . . . . . . . . . . . . . . . . . . . . . . . . . . . . . . . . . . . . . . . . 57
Adding Existing Files to a Project . . . . . . . . . . . . . . . . . . . . . . . . . . . . . . . . . . . . . . . . . 58
Defining Targets for Project Build . . . . . . . . . . . . . . . . . . . . . . . . . . . . . . . . . . . . . . . . . 60
Creating a Target . . . . . . . . . . . . . . . . . . . . . . . . . . . . . . . . . . . . . . . . . . . . . . . . . . . . . 60
Specifying Dependency Relationships . . . . . . . . . . . . . . . . . . . . . . . . . . . . . . . . . . . . 61
7
Page 8

Contents
Customizing Build Configurations . . . . . . . . . . . . . . . . . . . . . . . . . . . . . . . . . . . . . . . 62
Using Build Packages . . . . . . . . . . . . . . . . . . . . . . . . . . . . . . . . . . . . . . . . . . . . . . . . . 63
Defining Targets for External Build . . . . . . . . . . . . . . . . . . . . . . . . . . . . . . . . . . . . . . . 64
Using the Target Graph . . . . . . . . . . . . . . . . . . . . . . . . . . . . . . . . . . . . . . . . . . . . . . . . . 66
Understanding the Graph . . . . . . . . . . . . . . . . . . . . . . . . . . . . . . . . . . . . . . . . . . . . . . 67
Displaying Dependencies . . . . . . . . . . . . . . . . . . . . . . . . . . . . . . . . . . . . . . . . . . . . . . . 68
Controlling Graph Complexity . . . . . . . . . . . . . . . . . . . . . . . . . . . . . . . . . . . . . . . . . . 69
Building a Selected Target . . . . . . . . . . . . . . . . . . . . . . . . . . . . . . . . . . . . . . . . . . . . . 69
Starting Your Configured Editor . . . . . . . . . . . . . . . . . . . . . . . . . . . . . . . . . . . . . . . . . 69
Building Projects and Targets . . . . . . . . . . . . . . . . . . . . . . . . . . . . . . . . . . . . . . . . . . . . 70
Setting the Compile Mode . . . . . . . . . . . . . . . . . . . . . . . . . . . . . . . . . . . . . . . . . . . . . . 70
Using the "External Build Command" Dialog Box . . . . . . . . . . . . . . . . . . . . . . . . . . 72
Previewing the Build . . . . . . . . . . . . . . . . . . . . . . . . . . . . . . . . . . . . . . . . . . . . . . . . . . 72
Compiling Instead of Building . . . . . . . . . . . . . . . . . . . . . . . . . . . . . . . . . . . . . . . . . . 73
Building Subprojects . . . . . . . . . . . . . . . . . . . . . . . . . . . . . . . . . . . . . . . . . . . . . . . . . . 73
Handling Errors . . . . . . . . . . . . . . . . . . . . . . . . . . . . . . . . . . . . . . . . . . . . . . . . . . . . . . 73
Running the Build on a Remote System . . . . . . . . . . . . . . . . . . . . . . . . . . . . . . . . . . . 75
Checking Your Code Using SoftBench CodeAdvisor . . . . . . . . . . . . . . . . . . . . . . . . . . . 76
Running Other SoftBench Tools . . . . . . . . . . . . . . . . . . . . . . . . . . . . . . . . . . . . . . . . . . . 77
Managing Your SoftBench Environment . . . . . . . . . . . . . . . . . . . . . . . . . . . . . . . . . . . . 78
Adding and Removing Tool Icons . . . . . . . . . . . . . . . . . . . . . . . . . . . . . . . . . . . . . . . . 79
Choosing Tool Preferences . . . . . . . . . . . . . . . . . . . . . . . . . . . . . . . . . . . . . . . . . . . . . . 80
Registering New Tools with SoftBench . . . . . . . . . . . . . . . . . . . . . . . . . . . . . . . . . . . . 80
Customizing SoftBench by Setting Resources . . . . . . . . . . . . . . . . . . . . . . . . . . . . . . 81
Accessing Distributed Data and Tools . . . . . . . . . . . . . . . . . . . . . . . . . . . . . . . . . . . . 81
Running SoftBench on a Remote System . . . . . . . . . . . . . . . . . . . . . . . . . . . . . . . . . . 82
Integrating with CDE . . . . . . . . . . . . . . . . . . . . . . . . . . . . . . . . . . . . . . . . . . . . . . . . . 82
Stopping SoftBench . . . . . . . . . . . . . . . . . . . . . . . . . . . . . . . . . . . . . . . . . . . . . . . . . . . 82
Restoring Your Previous SoftBench Session . . . . . . . . . . . . . . . . . . . . . . . . . . . . . . . 83
Getting Help . . . . . . . . . . . . . . . . . . . . . . . . . . . . . . . . . . . . . . . . . . . . . . . . . . . . . . . . . .84
Using the Help Menu . . . . . . . . . . . . . . . . . . . . . . . . . . . . . . . . . . . . . . . . . . . . . . . . . . 85
Accessing On Item Help . . . . . . . . . . . . . . . . . . . . . . . . . . . . . . . . . . . . . . . . . . . . . . . 85
If Something Goes Wrong . . . . . . . . . . . . . . . . . . . . . . . . . . . . . . . . . . . . . . . . . . . . . . . . 86
For More Information . . . . . . . . . . . . . . . . . . . . . . . . . . . . . . . . . . . . . . . . . . . . . . . . . . . 87
3. Using SoftBench Configuration Manager
8
Page 9

Contents
Understanding SoftBench CM . . . . . . . . . . . . . . . . . . . . . . . . . . . . . . . . . . . . . . . . . . . . 90
Getting Started - A Brief Overview . . . . . . . . . . . . . . . . . . . . . . . . . . . . . . . . . . . . . . . . 92
Managing the Archive System . . . . . . . . . . . . . . . . . . . . . . . . . . . . . . . . . . . . . . . . . . . . 95
Browsing Local Network Servers and Archives . . . . . . . . . . . . . . . . . . . . . . . . . . . . . 95
Creating an Archive Directory . . . . . . . . . . . . . . . . . . . . . . . . . . . . . . . . . . . . . . . . . . 97
Creating a Mapping between an Archive Directory and Local Directory . . . . . . . . . 98
Modifying Mappings between Local and Archive Directories . . . . . . . . . . . . . . . . . . 99
Managing Archive Files and Directories . . . . . . . . . . . . . . . . . . . . . . . . . . . . . . . . . . . 102
Creating Initial Archive Files . . . . . . . . . . . . . . . . . . . . . . . . . . . . . . . . . . . . . . . . . . 102
Checking Out Archive Files . . . . . . . . . . . . . . . . . . . . . . . . . . . . . . . . . . . . . . . . . . . . 102
Cancelling Archive File Check Out . . . . . . . . . . . . . . . . . . . . . . . . . . . . . . . . . . . . . . 103
Updating a Local Directory . . . . . . . . . . . . . . . . . . . . . . . . . . . . . . . . . . . . . . . . . . . . 103
Viewing Contents of Archive Files . . . . . . . . . . . . . . . . . . . . . . . . . . . . . . . . . . . . . . 104
Deleting Archive Files and Directories . . . . . . . . . . . . . . . . . . . . . . . . . . . . . . . . . . . 106
Locking an Archive File . . . . . . . . . . . . . . . . . . . . . . . . . . . . . . . . . . . . . . . . . . . . . . . 106
Breaking a Lock on an Archive File . . . . . . . . . . . . . . . . . . . . . . . . . . . . . . . . . . . . . 107
Viewing the Revision History of Archive Files . . . . . . . . . . . . . . . . . . . . . . . . . . . . . 107
Setting Archive Display Filters . . . . . . . . . . . . . . . . . . . . . . . . . . . . . . . . . . . . . . . . . 109
Managing Local Files . . . . . . . . . . . . . . . . . . . . . . . . . . . . . . . . . . . . . . . . . . . . . . . . . . 110
Modifying Local Source Files . . . . . . . . . . . . . . . . . . . . . . . . . . . . . . . . . . . . . . . . . . 110
Checking In Modified Files . . . . . . . . . . . . . . . . . . . . . . . . . . . . . . . . . . . . . . . . . . . . 110
Creating a Default Symbolic Name for Archive Files . . . . . . . . . . . . . . . . . . . . . . . . . 112
Understanding Symbolic Names . . . . . . . . . . . . . . . . . . . . . . . . . . . . . . . . . . . . . . . . 112
Defining Symbolic Names . . . . . . . . . . . . . . . . . . . . . . . . . . . . . . . . . . . . . . . . . . . . . 113
Symbolic Name Example . . . . . . . . . . . . . . . . . . . . . . . . . . . . . . . . . . . . . . . . . . . . . . 113
Using the SoftBench CM Command Line Interface . . . . . . . . . . . . . . . . . . . . . . . . . . 115
4. Using SoftBench Editors
Using Editors with Projects . . . . . . . . . . . . . . . . . . . . . . . . . . . . . . . . . . . . . . . . . . . . . 118
Configuring an Editor . . . . . . . . . . . . . . . . . . . . . . . . . . . . . . . . . . . . . . . . . . . . . . . . . . 119
Configuring SoftBench vi Editor . . . . . . . . . . . . . . . . . . . . . . . . . . . . . . . . . . . . . . . . 119
Configuring SoftBench Program Editor . . . . . . . . . . . . . . . . . . . . . . . . . . . . . . . . . . 119
Starting the Configured SoftBench Editor . . . . . . . . . . . . . . . . . . . . . . . . . . . . . . . . . 121
Editing with SoftBench XEmacs Editor . . . . . . . . . . . . . . . . . . . . . . . . . . . . . . . . . . . 122
Using SoftBench XEmacs . . . . . . . . . . . . . . . . . . . . . . . . . . . . . . . . . . . . . . . . . . . . . 123
Accessing Help . . . . . . . . . . . . . . . . . . . . . . . . . . . . . . . . . . . . . . . . . . . . . . . . . . . . . . 124
Editing Multiple Files . . . . . . . . . . . . . . . . . . . . . . . . . . . . . . . . . . . . . . . . . . . . . . . . 124
Editing with SoftBench vi Editor . . . . . . . . . . . . . . . . . . . . . . . . . . . . . . . . . . . . . . . . . 126
9
Page 10

Contents
Using the Mouse Pointer Versus the Text Cursor . . . . . . . . . . . . . . . . . . . . . . . . . . 127
Editing Multiple Files . . . . . . . . . . . . . . . . . . . . . . . . . . . . . . . . . . . . . . . . . . . . . . . . 127
Reusing the Edit Window . . . . . . . . . . . . . . . . . . . . . . . . . . . . . . . . . . . . . . . . . . . . . 128
Selecting, Copying, and Pasting Text . . . . . . . . . . . . . . . . . . . . . . . . . . . . . . . . . . . . 129
Calling Other SoftBench Tools from the Editors . . . . . . . . . . . . . . . . . . . . . . . . . . . . . 130
Compiling a Program File . . . . . . . . . . . . . . . . . . . . . . . . . . . . . . . . . . . . . . . . . . . . . 130
Building a Project . . . . . . . . . . . . . . . . . . . . . . . . . . . . . . . . . . . . . . . . . . . . . . . . . . . 130
Accessing SoftBench Static Analyzer from the Editor . . . . . . . . . . . . . . . . . . . . . . . 130
Setting Breakpoints in a Program File . . . . . . . . . . . . . . . . . . . . . . . . . . . . . . . . . . . 131
Using Configuration Management . . . . . . . . . . . . . . . . . . . . . . . . . . . . . . . . . . . . . . 131
For More Information . . . . . . . . . . . . . . . . . . . . . . . . . . . . . . . . . . . . . . . . . . . . . . . . . . 132
5. Using SoftBench Class Graph/Editor
Editing C++ Structures with SoftBench Class Graph/Editor . . . . . . . . . . . . . . . . . . . 134
Understanding the SoftBench Class Graph/Editor Use Model . . . . . . . . . . . . . . . . 134
Using SoftBench Class Graph/Editor with Other SoftBench Editors . . . . . . . . . . . 136
Synchronizing Editor Views and the Static Database . . . . . . . . . . . . . . . . . . . . . . . 136
Using SoftBench Class Graph/Editor in Your Work . . . . . . . . . . . . . . . . . . . . . . . . . . 138
Viewing the Existing Class Hierarchy . . . . . . . . . . . . . . . . . . . . . . . . . . . . . . . . . . . 138
Creating New Components . . . . . . . . . . . . . . . . . . . . . . . . . . . . . . . . . . . . . . . . . . . . 139
Modifying Existing Components . . . . . . . . . . . . . . . . . . . . . . . . . . . . . . . . . . . . . . . . 139
Deleting Existing Components . . . . . . . . . . . . . . . . . . . . . . . . . . . . . . . . . . . . . . . . . 140
Sample Use Models . . . . . . . . . . . . . . . . . . . . . . . . . . . . . . . . . . . . . . . . . . . . . . . . . . . . 141
Creating a New Program . . . . . . . . . . . . . . . . . . . . . . . . . . . . . . . . . . . . . . . . . . . . . . 141
Modifying an Existing Program . . . . . . . . . . . . . . . . . . . . . . . . . . . . . . . . . . . . . . . . 141
Working with Class Templates . . . . . . . . . . . . . . . . . . . . . . . . . . . . . . . . . . . . . . . . . 141
Using Configuration Management . . . . . . . . . . . . . . . . . . . . . . . . . . . . . . . . . . . . . . 142
If Something Goes Wrong . . . . . . . . . . . . . . . . . . . . . . . . . . . . . . . . . . . . . . . . . . . . . . . 143
6. Using SoftBench CodeAdvisor
Comparing SoftBench CodeAdvisor to Debuggers or Dynamic Analyzers . . . . . . . . 148
Performing the "Check Code" Operation . . . . . . . . . . . . . . . . . . . . . . . . . . . . . . . . . . . 149
Preparing Your Program with Project Build . . . . . . . . . . . . . . . . . . . . . . . . . . . . . . 149
Preparing Your Program with External Build . . . . . . . . . . . . . . . . . . . . . . . . . . . . . 149
Accessing SoftBench CodeAdvisor . . . . . . . . . . . . . . . . . . . . . . . . . . . . . . . . . . . . . . 150
Selecting Rule Groups . . . . . . . . . . . . . . . . . . . . . . . . . . . . . . . . . . . . . . . . . . . . . . . . 150
10
Page 11

Checking Your Program . . . . . . . . . . . . . . . . . . . . . . . . . . . . . . . . . . . . . . . . . . . . . . . 150
Viewing Violations . . . . . . . . . . . . . . . . . . . . . . . . . . . . . . . . . . . . . . . . . . . . . . . . . . . 151
Terminating SoftBench CodeAdvisor . . . . . . . . . . . . . . . . . . . . . . . . . . . . . . . . . . . . 152
Filtering Rule Violations . . . . . . . . . . . . . . . . . . . . . . . . . . . . . . . . . . . . . . . . . . . . . . 152
For More Information . . . . . . . . . . . . . . . . . . . . . . . . . . . . . . . . . . . . . . . . . . . . . . . . . . 154
7. Using SoftBench Debugger
Understanding SoftBench Debugger . . . . . . . . . . . . . . . . . . . . . . . . . . . . . . . . . . . . . . 156
Preparing Your Program for Debugging . . . . . . . . . . . . . . . . . . . . . . . . . . . . . . . . . . . 159
Using SoftBench Debugger Window Areas . . . . . . . . . . . . . . . . . . . . . . . . . . . . . . . . . 160
Tearing Apart the Main Toolface . . . . . . . . . . . . . . . . . . . . . . . . . . . . . . . . . . . . . . . . . 163
Loading or Rerunning an Executable Program . . . . . . . . . . . . . . . . . . . . . . . . . . . . . . 165
Specifying the Runtime Environment . . . . . . . . . . . . . . . . . . . . . . . . . . . . . . . . . . . 165
Specifying Source Locations . . . . . . . . . . . . . . . . . . . . . . . . . . . . . . . . . . . . . . . . . . . 168
Debugging Executables in a Project . . . . . . . . . . . . . . . . . . . . . . . . . . . . . . . . . . . . . 169
Stepping through Your Program . . . . . . . . . . . . . . . . . . . . . . . . . . . . . . . . . . . . . . . . . 171
Interrupting a Running Program . . . . . . . . . . . . . . . . . . . . . . . . . . . . . . . . . . . . . . . . . 172
Interrupting in System or Non-debuggable Routines . . . . . . . . . . . . . . . . . . . . . . . 172
Interacting with Your Program . . . . . . . . . . . . . . . . . . . . . . . . . . . . . . . . . . . . . . . . . . 174
Interacting with a Standard I/O Program . . . . . . . . . . . . . . . . . . . . . . . . . . . . . . . . 174
Interacting with a Terminal-Smart Program . . . . . . . . . . . . . . . . . . . . . . . . . . . . . . 175
Interacting with a Window-Smart Program . . . . . . . . . . . . . . . . . . . . . . . . . . . . . . . 175
Specifying Identifier Locations . . . . . . . . . . . . . . . . . . . . . . . . . . . . . . . . . . . . . . . . . . . 177
Specifying Program Location . . . . . . . . . . . . . . . . . . . . . . . . . . . . . . . . . . . . . . . . . . 177
Specifying Variables . . . . . . . . . . . . . . . . . . . . . . . . . . . . . . . . . . . . . . . . . . . . . . . . . . 178
Examining and Changing Data in Your Program . . . . . . . . . . . . . . . . . . . . . . . . . . . . 181
Examining Data in Your Program . . . . . . . . . . . . . . . . . . . . . . . . . . . . . . . . . . . . . . 182
Printing Hex or String Values . . . . . . . . . . . . . . . . . . . . . . . . . . . . . . . . . . . . . . . . . . 183
Changing Data in Your Program . . . . . . . . . . . . . . . . . . . . . . . . . . . . . . . . . . . . . . . 183
Using Debugger Variables . . . . . . . . . . . . . . . . . . . . . . . . . . . . . . . . . . . . . . . . . . . . . 183
Using Expressions . . . . . . . . . . . . . . . . . . . . . . . . . . . . . . . . . . . . . . . . . . . . . . . . . . . 184
Using Constants . . . . . . . . . . . . . . . . . . . . . . . . . . . . . . . . . . . . . . . . . . . . . . . . . . . . . 185
Calling Functions . . . . . . . . . . . . . . . . . . . . . . . . . . . . . . . . . . . . . . . . . . . . . . . . . . . . 186
Viewing the Call Stack . . . . . . . . . . . . . . . . . . . . . . . . . . . . . . . . . . . . . . . . . . . . . . . 186
Viewing Thread Stacks . . . . . . . . . . . . . . . . . . . . . . . . . . . . . . . . . . . . . . . . . . . . . . . 187
Understanding the Operation of Your Program . . . . . . . . . . . . . . . . . . . . . . . . . . . . . 188
Setting and Using Breakpoints . . . . . . . . . . . . . . . . . . . . . . . . . . . . . . . . . . . . . . . . . . 189
Debugging a Program Using Breakpoints . . . . . . . . . . . . . . . . . . . . . . . . . . . . . . . . 189
Contents
11
Page 12

Contents
Setting a Breakpoint . . . . . . . . . . . . . . . . . . . . . . . . . . . . . . . . . . . . . . . . . . . . . . . . . 190
Viewing and Modifying Breakpoints . . . . . . . . . . . . . . . . . . . . . . . . . . . . . . . . . . . . 193
Clearing a Breakpoint . . . . . . . . . . . . . . . . . . . . . . . . . . . . . . . . . . . . . . . . . . . . . . . . 194
Executing DDE Commands at a Breakpoint . . . . . . . . . . . . . . . . . . . . . . . . . . . . . . 195
Setting C++ Breakpoints . . . . . . . . . . . . . . . . . . . . . . . . . . . . . . . . . . . . . . . . . . . . . . . 197
Setting Group Breakpoints . . . . . . . . . . . . . . . . . . . . . . . . . . . . . . . . . . . . . . . . . . . . 197
Viewing and Modifying Group Breakpoints . . . . . . . . . . . . . . . . . . . . . . . . . . . . . . . 197
Setting and Using Watchpoints . . . . . . . . . . . . . . . . . . . . . . . . . . . . . . . . . . . . . . . . . . 199
Creating Watchpoints . . . . . . . . . . . . . . . . . . . . . . . . . . . . . . . . . . . . . . . . . . . . . . . . 200
Viewing and Modifying Watchpoints . . . . . . . . . . . . . . . . . . . . . . . . . . . . . . . . . . . . 201
Clearing a Watchpoint . . . . . . . . . . . . . . . . . . . . . . . . . . . . . . . . . . . . . . . . . . . . . . . . 202
Tracing Program Flow . . . . . . . . . . . . . . . . . . . . . . . . . . . . . . . . . . . . . . . . . . . . . . . . . 204
Creating Traces . . . . . . . . . . . . . . . . . . . . . . . . . . . . . . . . . . . . . . . . . . . . . . . . . . . . . 204
Viewing Traces . . . . . . . . . . . . . . . . . . . . . . . . . . . . . . . . . . . . . . . . . . . . . . . . . . . . . . 205
Clearing Traces . . . . . . . . . . . . . . . . . . . . . . . . . . . . . . . . . . . . . . . . . . . . . . . . . . . . . 206
Correcting Errors in Your Program . . . . . . . . . . . . . . . . . . . . . . . . . . . . . . . . . . . . . . . 207
Editing Source Code . . . . . . . . . . . . . . . . . . . . . . . . . . . . . . . . . . . . . . . . . . . . . . . . . 207
Synchronizing Files . . . . . . . . . . . . . . . . . . . . . . . . . . . . . . . . . . . . . . . . . . . . . . . . . . 208
Debugging Dynamic Libraries . . . . . . . . . . . . . . . . . . . . . . . . . . . . . . . . . . . . . . . . . . . 209
Viewing Assembly Language and CPU Registers . . . . . . . . . . . . . . . . . . . . . . . . . . . . 211
Tracing Assembly Language . . . . . . . . . . . . . . . . . . . . . . . . . . . . . . . . . . . . . . . . . . . 211
Tracing Registers . . . . . . . . . . . . . . . . . . . . . . . . . . . . . . . . . . . . . . . . . . . . . . . . . . . . 212
Handling Signals and Events . . . . . . . . . . . . . . . . . . . . . . . . . . . . . . . . . . . . . . . . . . . . 214
Viewing and Editing Intercepts . . . . . . . . . . . . . . . . . . . . . . . . . . . . . . . . . . . . . . . . 214
Handling Signals . . . . . . . . . . . . . . . . . . . . . . . . . . . . . . . . . . . . . . . . . . . . . . . . . . . . 216
Debugging After a Program Fails (Core Dump) . . . . . . . . . . . . . . . . . . . . . . . . . . . . . 217
Debugging with a Core File . . . . . . . . . . . . . . . . . . . . . . . . . . . . . . . . . . . . . . . . . . . . 217
Debugging Forked Processes . . . . . . . . . . . . . . . . . . . . . . . . . . . . . . . . . . . . . . . . . . . . 219
Debugging Threaded Applications . . . . . . . . . . . . . . . . . . . . . . . . . . . . . . . . . . . . . . . . 220
Viewing and Manipulating Threads . . . . . . . . . . . . . . . . . . . . . . . . . . . . . . . . . . . . . 220
Setting Breakpoints on Threads . . . . . . . . . . . . . . . . . . . . . . . . . . . . . . . . . . . . . . . . 221
Attaching the Debugger to a Running Program . . . . . . . . . . . . . . . . . . . . . . . . . . . . . 222
Debugging C++ Programs . . . . . . . . . . . . . . . . . . . . . . . . . . . . . . . . . . . . . . . . . . . . . . . 223
Using Breakpoints for Exception Handling . . . . . . . . . . . . . . . . . . . . . . . . . . . . . . . 225
Accessing Inherited C++ Values . . . . . . . . . . . . . . . . . . . . . . . . . . . . . . . . . . . . . . . . 225
Debugging Static Constructors . . . . . . . . . . . . . . . . . . . . . . . . . . . . . . . . . . . . . . . . . 225
12
Page 13

Debugging Optimized Code . . . . . . . . . . . . . . . . . . . . . . . . . . . . . . . . . . . . . . . . . . . . . 227
Customizing SoftBench Debugger . . . . . . . . . . . . . . . . . . . . . . . . . . . . . . . . . . . . . . . . 228
Specifying Debugger Options . . . . . . . . . . . . . . . . . . . . . . . . . . . . . . . . . . . . . . . . . . 228
Customizing User Buttons . . . . . . . . . . . . . . . . . . . . . . . . . . . . . . . . . . . . . . . . . . . . 228
If Something Goes Wrong . . . . . . . . . . . . . . . . . . . . . . . . . . . . . . . . . . . . . . . . . . . . . . . 231
For More Information . . . . . . . . . . . . . . . . . . . . . . . . . . . . . . . . . . . . . . . . . . . . . . . . . . 234
8. Using SoftBench Debugger Data Graph Window
Starting and Stopping the Data Graph Window . . . . . . . . . . . . . . . . . . . . . . . . . . . . . 236
Beginning a Browsing Session . . . . . . . . . . . . . . . . . . . . . . . . . . . . . . . . . . . . . . . . . 236
Stopping a Browsing Session . . . . . . . . . . . . . . . . . . . . . . . . . . . . . . . . . . . . . . . . . . 236
Understanding Data Graph Window Areas . . . . . . . . . . . . . . . . . . . . . . . . . . . . . . . . 237
Understanding the Layout Control Area . . . . . . . . . . . . . . . . . . . . . . . . . . . . . . . . . 237
Understanding the Display Control Area . . . . . . . . . . . . . . . . . . . . . . . . . . . . . . . . . 238
Understanding the Graph Area . . . . . . . . . . . . . . . . . . . . . . . . . . . . . . . . . . . . . . . . 238
Understanding the Window Control Area . . . . . . . . . . . . . . . . . . . . . . . . . . . . . . . . 240
Using the Graph Area . . . . . . . . . . . . . . . . . . . . . . . . . . . . . . . . . . . . . . . . . . . . . . . . . . 241
Displaying New Nodes . . . . . . . . . . . . . . . . . . . . . . . . . . . . . . . . . . . . . . . . . . . . . . . . 241
Using the "Node Values" Dialog Box . . . . . . . . . . . . . . . . . . . . . . . . . . . . . . . . . . . . . 241
Suspending Graph Updates . . . . . . . . . . . . . . . . . . . . . . . . . . . . . . . . . . . . . . . . . . . 244
Deactivating the Graph . . . . . . . . . . . . . . . . . . . . . . . . . . . . . . . . . . . . . . . . . . . . . . . 244
Stopping a Graph Process . . . . . . . . . . . . . . . . . . . . . . . . . . . . . . . . . . . . . . . . . . . . . 244
Sample Use Models . . . . . . . . . . . . . . . . . . . . . . . . . . . . . . . . . . . . . . . . . . . . . . . . . . . . 245
Verifying Correct Data Structures . . . . . . . . . . . . . . . . . . . . . . . . . . . . . . . . . . . . . . 245
Viewing Values of Data Members . . . . . . . . . . . . . . . . . . . . . . . . . . . . . . . . . . . . . . . 247
For More Information . . . . . . . . . . . . . . . . . . . . . . . . . . . . . . . . . . . . . . . . . . . . . . . . . . 250
Contents
9. Using SoftBench Static Analyzer
Starting SoftBench Static Analyzer . . . . . . . . . . . . . . . . . . . . . . . . . . . . . . . . . . . . . . . 252
Preparing to Make Queries . . . . . . . . . . . . . . . . . . . . . . . . . . . . . . . . . . . . . . . . . . . . . 254
Generating Static Data . . . . . . . . . . . . . . . . . . . . . . . . . . . . . . . . . . . . . . . . . . . . . . . 254
Updating Static Data without Building . . . . . . . . . . . . . . . . . . . . . . . . . . . . . . . . . . 255
Specifying Static Data to Analyze . . . . . . . . . . . . . . . . . . . . . . . . . . . . . . . . . . . . . . . 255
Using SoftBench Static Analyzer Window Areas . . . . . . . . . . . . . . . . . . . . . . . . . . . . 258
Making Textual Static Queries . . . . . . . . . . . . . . . . . . . . . . . . . . . . . . . . . . . . . . . . . . 260
Making General Queries . . . . . . . . . . . . . . . . . . . . . . . . . . . . . . . . . . . . . . . . . . . . . . 260
Making Queries Based on a Program Identifier . . . . . . . . . . . . . . . . . . . . . . . . . . . 260
Using Query Results . . . . . . . . . . . . . . . . . . . . . . . . . . . . . . . . . . . . . . . . . . . . . . . . . . . 264
13
Page 14

Contents
Browsing the Query Result . . . . . . . . . . . . . . . . . . . . . . . . . . . . . . . . . . . . . . . . . . . . 264
Editing the Source File . . . . . . . . . . . . . . . . . . . . . . . . . . . . . . . . . . . . . . . . . . . . . . . 264
Updating the Database . . . . . . . . . . . . . . . . . . . . . . . . . . . . . . . . . . . . . . . . . . . . . . . 264
Performing a Query . . . . . . . . . . . . . . . . . . . . . . . . . . . . . . . . . . . . . . . . . . . . . . . . . . 265
Simplifying Query Results . . . . . . . . . . . . . . . . . . . . . . . . . . . . . . . . . . . . . . . . . . . . . . 266
Filtering Results Using the File Set . . . . . . . . . . . . . . . . . . . . . . . . . . . . . . . . . . . . . 266
Filtering C++ Query Results . . . . . . . . . . . . . . . . . . . . . . . . . . . . . . . . . . . . . . . . . . . 268
Using Scoping . . . . . . . . . . . . . . . . . . . . . . . . . . . . . . . . . . . . . . . . . . . . . . . . . . . . . . . 268
Redisplaying Past Queries . . . . . . . . . . . . . . . . . . . . . . . . . . . . . . . . . . . . . . . . . . . . . . 271
Redisplaying Query Results . . . . . . . . . . . . . . . . . . . . . . . . . . . . . . . . . . . . . . . . . . . 271
Deleting a Query Result . . . . . . . . . . . . . . . . . . . . . . . . . . . . . . . . . . . . . . . . . . . . . . 271
Saving and Printing a Query Result . . . . . . . . . . . . . . . . . . . . . . . . . . . . . . . . . . . . . 271
Using SoftBench Static Analyzer in Standalone Mode . . . . . . . . . . . . . . . . . . . . . . . . 273
Generating Static Data from the Command Line . . . . . . . . . . . . . . . . . . . . . . . . . . 273
Searching Subdirectories . . . . . . . . . . . . . . . . . . . . . . . . . . . . . . . . . . . . . . . . . . . . . . 273
Using the Staticfileset File . . . . . . . . . . . . . . . . . . . . . . . . . . . . . . . . . . . . . . . . . . . . 274
Customizing SoftBench Static Analyzer . . . . . . . . . . . . . . . . . . . . . . . . . . . . . . . . . . . 275
If Something Goes Wrong . . . . . . . . . . . . . . . . . . . . . . . . . . . . . . . . . . . . . . . . . . . . . . . 276
For More Information . . . . . . . . . . . . . . . . . . . . . . . . . . . . . . . . . . . . . . . . . . . . . . . . . . 281
10. Using Static Graphs
Starting SoftBench Static Analyzer Graphs . . . . . . . . . . . . . . . . . . . . . . . . . . . . . . . . 285
Making Graphical Static Queries . . . . . . . . . . . . . . . . . . . . . . . . . . . . . . . . . . . . . . . . . 286
General Static Graph Features . . . . . . . . . . . . . . . . . . . . . . . . . . . . . . . . . . . . . . . . . 286
Finding Graph Nodes . . . . . . . . . . . . . . . . . . . . . . . . . . . . . . . . . . . . . . . . . . . . . . . . 287
Operating on Static Graph Nodes . . . . . . . . . . . . . . . . . . . . . . . . . . . . . . . . . . . . . . . 287
Switching between Static Graphs . . . . . . . . . . . . . . . . . . . . . . . . . . . . . . . . . . . . . . . 288
Displaying Nodes on Another Graph . . . . . . . . . . . . . . . . . . . . . . . . . . . . . . . . . . . . 288
Using Description Boxes . . . . . . . . . . . . . . . . . . . . . . . . . . . . . . . . . . . . . . . . . . . . . . 289
Setting Breakpoints for SoftBench Debugger . . . . . . . . . . . . . . . . . . . . . . . . . . . . . 290
Saving Static Graph Images to Files . . . . . . . . . . . . . . . . . . . . . . . . . . . . . . . . . . . . 290
Simplifying Graph Displays . . . . . . . . . . . . . . . . . . . . . . . . . . . . . . . . . . . . . . . . . . . . . 292
Reducing Graph Complexity . . . . . . . . . . . . . . . . . . . . . . . . . . . . . . . . . . . . . . . . . . . 292
Filtering Sourceless Nodes . . . . . . . . . . . . . . . . . . . . . . . . . . . . . . . . . . . . . . . . . . . . 293
Customizing Static Graphs . . . . . . . . . . . . . . . . . . . . . . . . . . . . . . . . . . . . . . . . . . . . . . 294
Removing the Graph Legend . . . . . . . . . . . . . . . . . . . . . . . . . . . . . . . . . . . . . . . . . . . 294
14
Page 15

Viewing Multiple Graphs . . . . . . . . . . . . . . . . . . . . . . . . . . . . . . . . . . . . . . . . . . . . . 294
11. Using SoftBench File Compare
Understanding the SoftBench File Compare Window . . . . . . . . . . . . . . . . . . . . . . . . 296
Understanding the Menu Bar . . . . . . . . . . . . . . . . . . . . . . . . . . . . . . . . . . . . . . . . . . 296
Understanding the "Working Directory" Input Box . . . . . . . . . . . . . . . . . . . . . . . . . 296
Using the "Left File" and "Right File" Input Boxes . . . . . . . . . . . . . . . . . . . . . . . . . 297
Using the "Merge File" Input Box . . . . . . . . . . . . . . . . . . . . . . . . . . . . . . . . . . . . . . . 297
Understanding the Text Areas . . . . . . . . . . . . . . . . . . . . . . . . . . . . . . . . . . . . . . . . . 297
Reading the Gutter Column . . . . . . . . . . . . . . . . . . . . . . . . . . . . . . . . . . . . . . . . . . . 297
Selecting Lines for Merging . . . . . . . . . . . . . . . . . . . . . . . . . . . . . . . . . . . . . . . . . . . 298
Highlighting Differences . . . . . . . . . . . . . . . . . . . . . . . . . . . . . . . . . . . . . . . . . . . . . . 299
Traversing by Single Line . . . . . . . . . . . . . . . . . . . . . . . . . . . . . . . . . . . . . . . . . . . . . 299
Comparing Two Files . . . . . . . . . . . . . . . . . . . . . . . . . . . . . . . . . . . . . . . . . . . . . . . . . . 300
Merging Compared Files . . . . . . . . . . . . . . . . . . . . . . . . . . . . . . . . . . . . . . . . . . . . . . . 301
If Something Goes Wrong . . . . . . . . . . . . . . . . . . . . . . . . . . . . . . . . . . . . . . . . . . . . . . . 302
For More Information . . . . . . . . . . . . . . . . . . . . . . . . . . . . . . . . . . . . . . . . . . . . . . . . . . 303
12. Using SoftBench Message Monitor
Starting SoftBench Message Monitor . . . . . . . . . . . . . . . . . . . . . . . . . . . . . . . . . . . . . 306
Understanding the SoftBench Message Monitor Window Area . . . . . . . . . . . . . . . . . 307
Understanding the Menu Bar . . . . . . . . . . . . . . . . . . . . . . . . . . . . . . . . . . . . . . . . . . 307
Understanding Broadcast Messages . . . . . . . . . . . . . . . . . . . . . . . . . . . . . . . . . . . . . 307
Clearing the Broadcast Message Area . . . . . . . . . . . . . . . . . . . . . . . . . . . . . . . . . . . 308
Composing and Sending a Message . . . . . . . . . . . . . . . . . . . . . . . . . . . . . . . . . . . . . . . 309
Logging Messages . . . . . . . . . . . . . . . . . . . . . . . . . . . . . . . . . . . . . . . . . . . . . . . . . . . . . 311
Specifying a Log File . . . . . . . . . . . . . . . . . . . . . . . . . . . . . . . . . . . . . . . . . . . . . . . . . 311
Starting and Stopping Message Logging . . . . . . . . . . . . . . . . . . . . . . . . . . . . . . . . . 311
Contents
13. Using SoftBench with SQL
Determining Supported Environments . . . . . . . . . . . . . . . . . . . . . . . . . . . . . . . . . . . . 314
Configuring SoftBench with SQL . . . . . . . . . . . . . . . . . . . . . . . . . . . . . . . . . . . . . . . . . 315
Using Default SQL File Types . . . . . . . . . . . . . . . . . . . . . . . . . . . . . . . . . . . . . . . . . 315
Using SQL with Project Build . . . . . . . . . . . . . . . . . . . . . . . . . . . . . . . . . . . . . . . . . . 315
Using SQL with External Build . . . . . . . . . . . . . . . . . . . . . . . . . . . . . . . . . . . . . . . . 317
Updating RDBMS Versions . . . . . . . . . . . . . . . . . . . . . . . . . . . . . . . . . . . . . . . . . . . . 317
Using SQL with SoftBench Tools . . . . . . . . . . . . . . . . . . . . . . . . . . . . . . . . . . . . . . . . . 319
Using SQL Preprocessor Wrappers . . . . . . . . . . . . . . . . . . . . . . . . . . . . . . . . . . . . . 319
15
Page 16

Contents
Debugging with SQL . . . . . . . . . . . . . . . . . . . . . . . . . . . . . . . . . . . . . . . . . . . . . . . . . 319
Editing and Rebuilding with SQL for SoftBench Debugger . . . . . . . . . . . . . . . . . . 321
Using SoftBench CodeAdvisor and SoftBench Static Analyzer with SQL . . . . . . . 321
For More Information . . . . . . . . . . . . . . . . . . . . . . . . . . . . . . . . . . . . . . . . . . . . . . . . . . 322
A. Using SoftBench Graph Windows
Accessing SoftBench Graph Windows . . . . . . . . . . . . . . . . . . . . . . . . . . . . . . . . . . . . . 324
Using Graph Window Areas . . . . . . . . . . . . . . . . . . . . . . . . . . . . . . . . . . . . . . . . . . . . . 326
Using Popup Menus . . . . . . . . . . . . . . . . . . . . . . . . . . . . . . . . . . . . . . . . . . . . . . . . . . 326
Using Save Options for the Graph Image . . . . . . . . . . . . . . . . . . . . . . . . . . . . . . . . 326
Using Vertical and Horizontal Scrolling . . . . . . . . . . . . . . . . . . . . . . . . . . . . . . . . . . 330
Zooming In or Zooming Out . . . . . . . . . . . . . . . . . . . . . . . . . . . . . . . . . . . . . . . . . . . 331
Clearing the Graph Area . . . . . . . . . . . . . . . . . . . . . . . . . . . . . . . . . . . . . . . . . . . . . . 331
Understanding Nodes and Arcs . . . . . . . . . . . . . . . . . . . . . . . . . . . . . . . . . . . . . . . . . . 332
Reading Graph Area Nodes . . . . . . . . . . . . . . . . . . . . . . . . . . . . . . . . . . . . . . . . . . . . 332
Selecting Nodes and Arcs . . . . . . . . . . . . . . . . . . . . . . . . . . . . . . . . . . . . . . . . . . . . . 332
Moving Nodes . . . . . . . . . . . . . . . . . . . . . . . . . . . . . . . . . . . . . . . . . . . . . . . . . . . . . . . 334
Customizing SoftBench Graphs . . . . . . . . . . . . . . . . . . . . . . . . . . . . . . . . . . . . . . . . . . 336
Controlling Graph Layout . . . . . . . . . . . . . . . . . . . . . . . . . . . . . . . . . . . . . . . . . . . . . 336
Controlling Graph Display . . . . . . . . . . . . . . . . . . . . . . . . . . . . . . . . . . . . . . . . . . . . 336
Understanding Window Status Information . . . . . . . . . . . . . . . . . . . . . . . . . . . . . . 337
For More Information . . . . . . . . . . . . . . . . . . . . . . . . . . . . . . . . . . . . . . . . . . . . . . . . . . 338
B. Customizing SoftBench CM Configuration
Modifying the Configuration Files . . . . . . . . . . . . . . . . . . . . . . . . . . . . . . . . . . . . . . . . 340
Configuring Where Archive Files are Stored . . . . . . . . . . . . . . . . . . . . . . . . . . . . . . 341
Defining User Access to the Server . . . . . . . . . . . . . . . . . . . . . . . . . . . . . . . . . . . . . . 342
Recommended Format for Permissions File . . . . . . . . . . . . . . . . . . . . . . . . . . . . . . . 345
Setting Logging and Debug Options . . . . . . . . . . . . . . . . . . . . . . . . . . . . . . . . . . . . . 346
Controlling Client Machine Access to the SoftBench CM Server on HP-UX . . . . . 346
Performing SoftBench CM Administrator Tasks . . . . . . . . . . . . . . . . . . . . . . . . . . . . 348
Migrating Archive Files From RCS . . . . . . . . . . . . . . . . . . . . . . . . . . . . . . . . . . . . . 348
Migrating Archive Files From SCCS . . . . . . . . . . . . . . . . . . . . . . . . . . . . . . . . . . . . 348
Modifying the Lockinfo File . . . . . . . . . . . . . . . . . . . . . . . . . . . . . . . . . . . . . . . . . . . . 349
Creating Archive Backups . . . . . . . . . . . . . . . . . . . . . . . . . . . . . . . . . . . . . . . . . . . . . 349
Moving Archive Storage Locations . . . . . . . . . . . . . . . . . . . . . . . . . . . . . . . . . . . . . . 349
16
Page 17

Troubleshooting . . . . . . . . . . . . . . . . . . . . . . . . . . . . . . . . . . . . . . . . . . . . . . . . . . . . . 351
C. Using Regular Expressions
Pattern Matching . . . . . . . . . . . . . . . . . . . . . . . . . . . . . . . . . . . . . . . . . . . . . . . . . . . . . 354
D. Customizing SoftBench for Native Language Support (NLS)
Preparing to Use NLS in SoftBench . . . . . . . . . . . . . . . . . . . . . . . . . . . . . . . . . . . . . . 362
Setting the LANG Environment Variable . . . . . . . . . . . . . . . . . . . . . . . . . . . . . . . . . . 364
Converting from One Encoding Method to Another . . . . . . . . . . . . . . . . . . . . . . . . 365
Rebinding Alt . . . . . . . . . . . . . . . . . . . . . . . . . . . . . . . . . . . . . . . . . . . . . . . . . . . . . . . . 366
SoftBench Mnemonics and Non-USASCII Character Inputs . . . . . . . . . . . . . . . . . . . 367
Changing or Removing Menu Mnemonics . . . . . . . . . . . . . . . . . . . . . . . . . . . . . . . . 367
SoftBench Keyboard Accelerators and Non-USASCII Character Inputs . . . . . . . . . 369
Customizing Keyboard Accelerators . . . . . . . . . . . . . . . . . . . . . . . . . . . . . . . . . . . . . 369
Starting Your Localized SoftBench . . . . . . . . . . . . . . . . . . . . . . . . . . . . . . . . . . . . . . . 371
Remote Execution Hosts and NLS . . . . . . . . . . . . . . . . . . . . . . . . . . . . . . . . . . . . . . . . 372
Editing in SoftBench . . . . . . . . . . . . . . . . . . . . . . . . . . . . . . . . . . . . . . . . . . . . . . . . . . . 373
Character Input Example . . . . . . . . . . . . . . . . . . . . . . . . . . . . . . . . . . . . . . . . . . . . . 373
Contents
Glossary
17
Page 18

Contents
18
Page 19

Maximizing Your Results with SoftBench
1 Maximizing Your Results with
SoftBench
SoftBench facilitates the development of reliable software, an especially
difficult and time-consuming process when you work on large and
complicated projects. SoftBench provides an integrated, consistent
windowed interface to the tools you need the most.
Chapter 1 19
Page 20

Maximizing Your Results with SoftBench
SoftBench Task Flow
SoftBench Task Flow
The tools pass information and control from one tool to the next, helping
you move smoothly through the software development and maintenance
tasks shown in Figure 1-1.
Figure 1-1 Major Software Development Tasks Supported by SoftBench
SoftBench tools and the data on which they operate can be distributed
across a network and accessed transparently by individuals or teams.
SoftBench provides an open, customizable environment, allowing users
to add their own tools or purchase products integrated by third party
software vendors. Additionally, SoftBench provides online help and an
online tutorial to simplify learning.
SoftBench provides a dynamic build environment. As you develop your
project, SoftBench learns about your source files and how to transform
them into your build targets. Based on build information contained in
build configurations, SoftBench can maintain the Makefile
instructions for you. SoftBench automatically shares this knowledge
about files and targets in your project with other SoftBench tools.
SoftBench project management allows you:
• ease of navigation through project code and files that may be spread
across file system directories
• automatic maintenance of simple to complex target dependencies
• definition of the project once, so that all tools benefit from the
knowledge rather than maintaining multiple lists of files throughout
your toolset
Chapter 120
Page 21
Maximizing Your Results with SoftBench
Understanding Projects
Understanding Projects
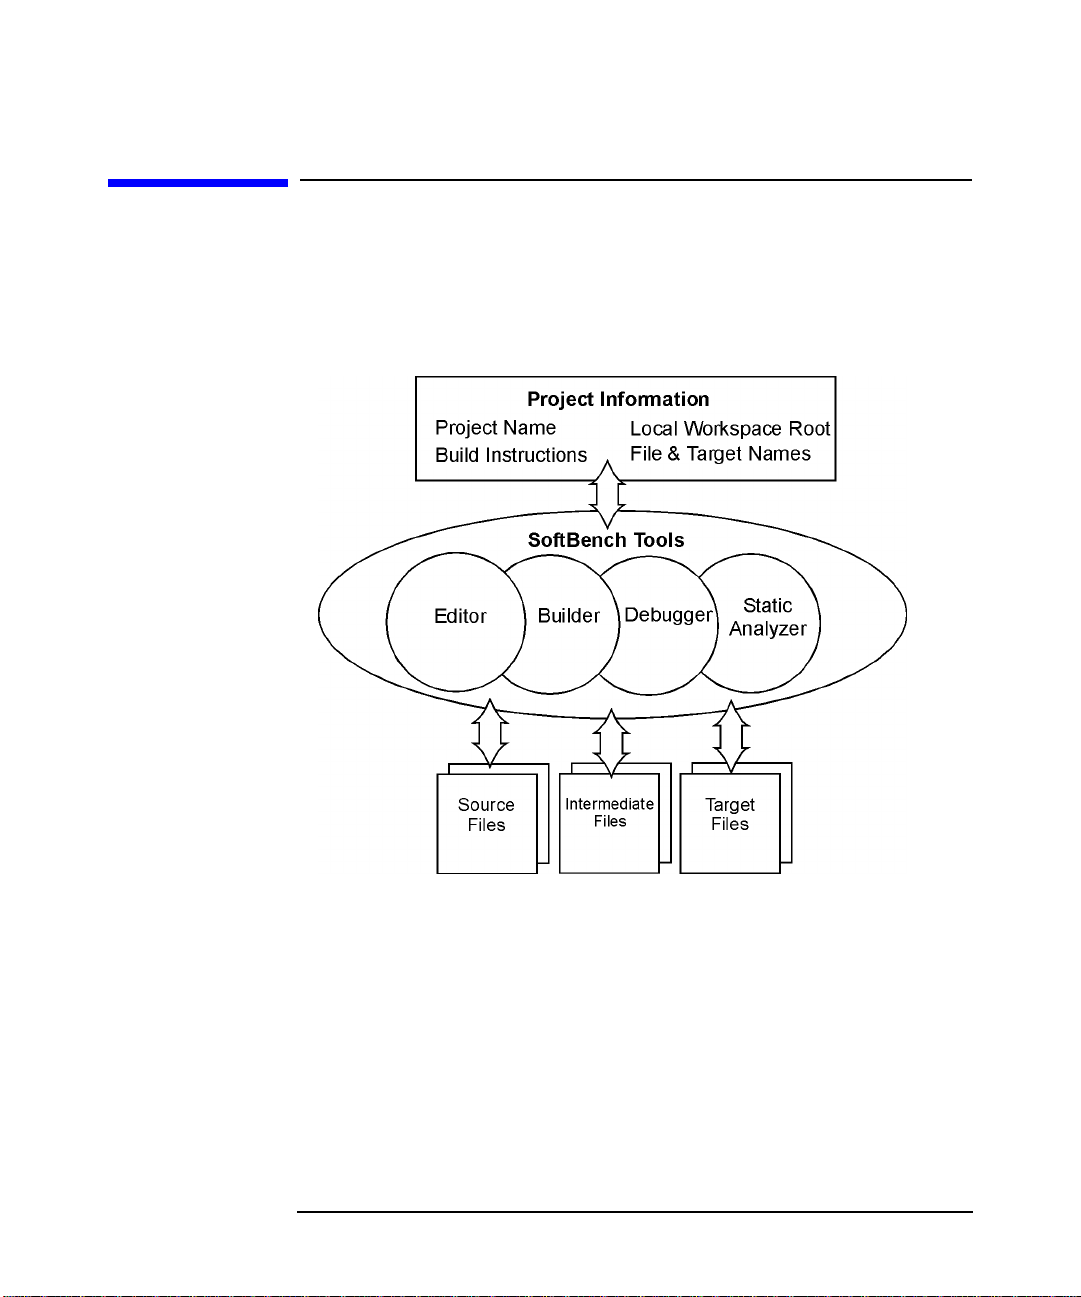
Projects are the fundamental work unit in SoftBench. Projects consist
of a named set of files that produce a set of related targets using one or
more sets of build instructions and dependencies.
Figure 1-2 SoftBench Tools Interacting with Project and Files
The critical parts of a project definition are:
Project Name The logical name for the project.
Local Workspace Root The root directory of the file system hierarchy
under which all your source files are found, and where
editing and building take place. The project does not
have to include all the files under the hierarchy, and
files in the hierarchy can be used in different projects if
desired.
Chapter 1 21
Page 22

Maximizing Your Results with SoftBench
Understanding Projects
Project file set The source, documentation and test files you wish to
associate with the project.
Project targets The executables, libraries, message catalogs, and other
files that are the product of one or more builds.
Build Configurations Instructions for how to transform your source files
into your target files.
Project names contain regular characters. Control characters, spaces,
and punctuation characters special to the shell are not allowed in project
names.Thefiles and targets that comprise your project are located under
your local workspace root. SoftBench's project description data contains
lists of these files and their relationships.
When you change file and target information in SoftBench, you change
only SoftBench internal descriptions of their relationships. For example,
deleting a file from a project only changes your project description data.
It has no impact on your files in the file system.
Subprojects are projects with a defined dependent relationship to a
parent project. A subproject relationship implies a build order
dependency. A project is always an entity to itself; that is, it does not
dynamically inherit options or build information from any other project.
Examples of subprojects include:
• a project to build a library that is linked into a parent project target
• a project to build an executable that is used to generate files or
targets in the parent project
Building Targets
Source files are files you create and edit directly. A target is a project file
that is the end product of a build. Examples of targets include linked
executables, shared libraries, archive libraries, and message catalogs.
Chapter 122
Page 23
Maximizing Your Results with SoftBench
Understanding Projects
Figure 1-3 Building Sources into Targets Using Project's Build Instructions
Targets that SoftBench builds:
• are project-specific. They are not shared between projects, though
projects may have targets of the same name
• are user defined
• are created from a build within a project
• are built in no specified order unless a specific dependency has been
created between them
• each have a physical file system location specified when you define
the target
• are distinguished from intermediate files (.o's or .C's built from lex or
SQL files)
Not every target is an executable file and not every executable file in a
project is a target. Targets are created from a build within the project
and are only those things a user has defined as such.
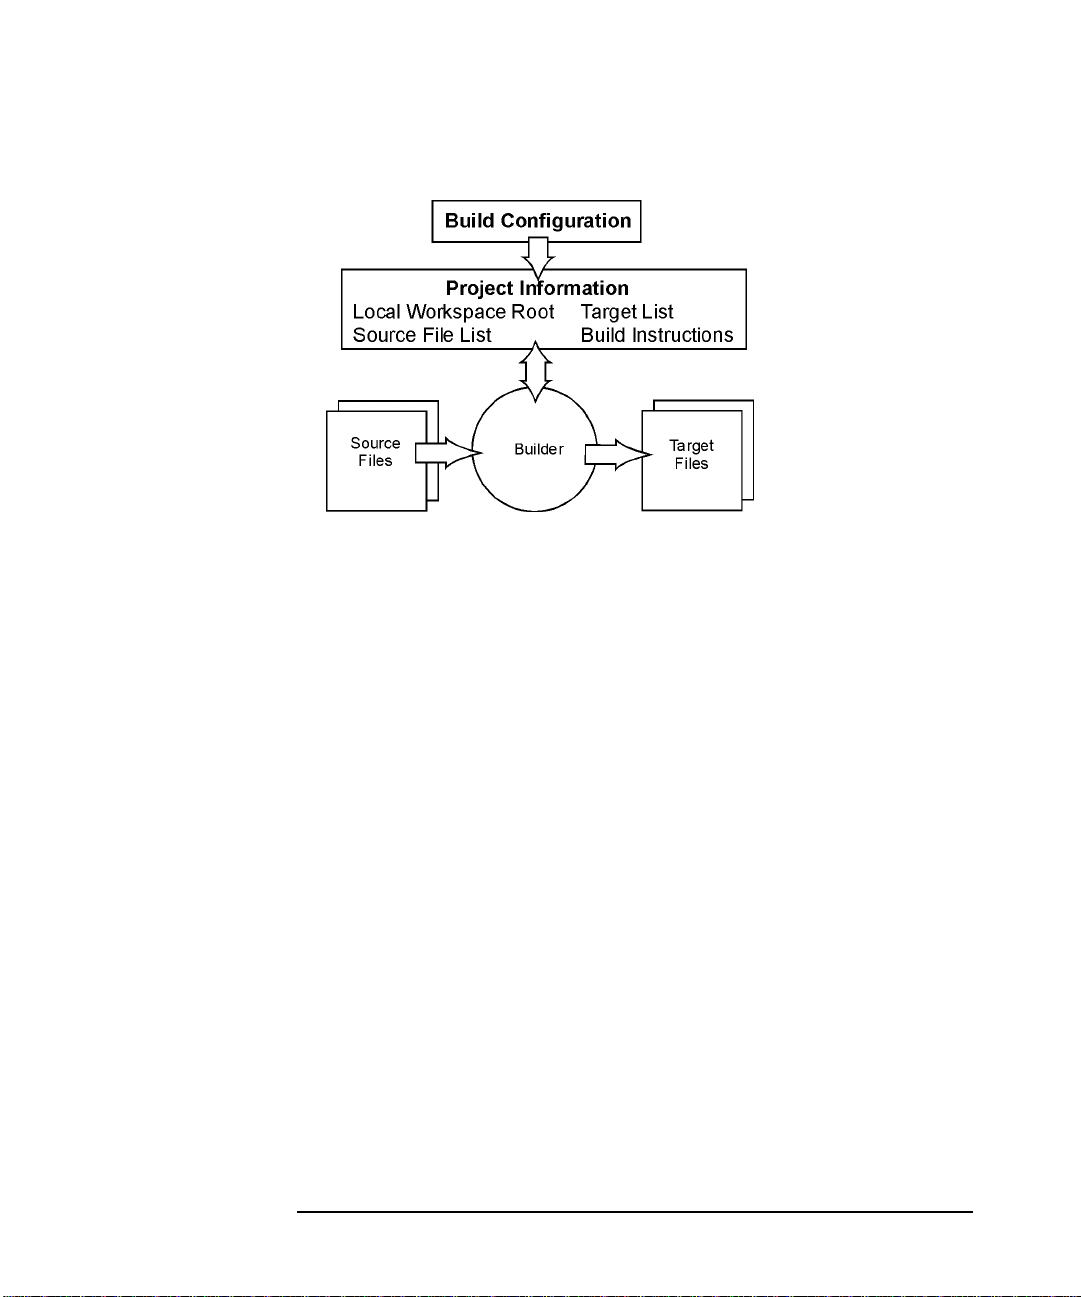
Understanding Build Configurations and Packages
A build configuration provides the complete set of build instructions to
produce a target of a particular type, such as a C++ executable, a C
shared library, or an Oracle C executable. Build configurations specify
libraries, include directories, compiler options, defines, and other
information required to transform source files into a target. When you
use project build, you can use one of the many default build
Chapter 1 23
Page 24

Maximizing Your Results with SoftBench
Understanding Projects
configurations provided by SoftBench.
Build configurations are independent of projects and targets. SoftBench
ships with a basic set of build configurations. You can create new user
build configurations based on the shipped build configurations, adding
build instructions that are unique to your environment. To have your
administrator save these as shared customizations available to other
users, see "Sharing Build Configurations with Your Team" in SoftBench
Online Help.
Once you decide on build configurations (system or customized) that
work for your environment, you can use the same build configuration for
many targets, and you can further customize a build configuration for a
specific target.
A build package is a collection of build instructions that makes it easy
to use third-party libraries, utilities, or compiler directives in many build
configurations. Packages also make it easy to specify the compiler to use
for the target. Packages are similar to build configurations because they
include library and include directories, compiler options, defines, and
other information needed for using the library or utility. First, choose a
system or customized package; then include the package in all
appropriate build configurations. If the package's build instructions need
to change, you modify the package, and all build configurations which
use the package update automatically.
For example, SoftBench provides packages for Motif, X11R6, SoftBench
Encapsulator, RogueWave, and Oracle. If the requirements for building
the library change, you can modify customized packages. All build
configurations that include the package automatically update to use the
modified package.
A transform is a set of operations that run a program or shell utility
that converts a file from one form to another. Forexample, the C compiler
transforms a source file into an object file. SQL preprocessors transform
a source file with embedded SQL into a generated source file with all the
SQL statements expanded. The gencat utility transforms a file of
message strings into a message catalog. For more information about
these concepts, refer to the "SoftBench Key Concepts" topics on "Build
Configurations", "Build Packages", and "Transforms" available through
"Help: Overview".
Transforms are the building blocks of build packages and build
configurations. A build package contains zero or more transforms plus
modifiers that influence how transforms operate. An example of a
Chapter 124
Page 25

Maximizing Your Results with SoftBench
Understanding Projects
package with no transform, just modifiers, would be the X11 library to be
linked into an executable. A build configuration contains one or more
transforms and zero or more packages (which may include transforms
and/or other packages). A very simplified version of the actual build
configuration to create an executable target from C source containing
embedded SQL is shown in Figure 1-4.
Figure 1-4 Simplified Build Configuration, Package, and Transform Series
Choosing Between Project Build and External Build
Models
SoftBench supports two build models, allowing you two ways to specify
your build instructions:
• With project build, you supply the necessary information to
SoftBench, and SoftBench converts the build configuration and
dependency information into build commands.
Chapter 1 25
Page 26

Maximizing Your Results with SoftBench
Understanding Projects
Project build lets SoftBench manage your build instructions. You can
specify source-to-target dependencies and build order dependencies,
choose convenient system or customized build configurations and
build packages, and automatically generate Makefiles or do without
Makefiles altogether if you prefer.
• SoftBench provides an external build model as an alternative to
project build for people who already have a highly-tuned build
environment. With external build, you edit and maintain the
Makefile or build script. SoftBench provides an "External Build
Command" dialog box for you to initiate your builds.
External build lets you use your own make utilities, such as imake,
make,ornmake files or scripts. External build is the opposite of project
build, where SoftBench handles building without the need for a
Makefile. SoftBench does not read or parse your Makefile. By using
external build you lose some of the conveniences that project build
provides, such as access to the target graph and automatic generation
of a Makefile. You can also add secondary source locations to
SoftBench's search lists through alternate source roots.
The "External Build Command" dialog box can be utilized during
project build to build software which is not in a project, or to execute a
shell command and view the output in the output browser.
Recommendation: Use project build for your projects whenever
possible. You may choose to use external build and maintain the make
process yourself when:
• You have one source that becomes many types of objects.
• Your process cannot use file suffixes to tell what file types are in use.
• Your build process uses the VPATH environment variable for make(1).
• You have a working build process and are perfectly happy with it.
Chapter 126
Page 27

Maximizing Your Results with SoftBench
Sharing Projects with a Team
Sharing Projects with a Team
SoftBench projects provide the flexibility to have your development
environment reflect your team interactions.
Sharing a project description has all the benefits and difficulties
associated with sharing any source file. A centralized project description
means that everyone is working from the same project files, but there
can be collisions when more than one person wants to make changes. You
may "break up" your file into several subprojects so that people can
work independently and let SoftBench handle the complexities and
relationships of the build.
There are several scenarios for partitioning a project:
• One Project, One Author
• One Project, Many Authors
• One Project with Subprojects, Many Authors
One Project, One Author
When your project has only one author, you may want to set up a single
project definition.
Alternatively, you can choose to use subprojects to organize your work
hierarchically, if that is more convenient. For example, if the subproject
is a library, you can modify the build configuration of targets in the
parent project to use the library. If you work on both the library and its
parent project, using the subproject relationship provides the flexibility
to either build the subproject or use it in its current state. If you never
want to build the subproject alone, setting up the subproject relationship
may not be the best way to structure the project. You can just leave all
your targets in one project and use build-order dependencies.
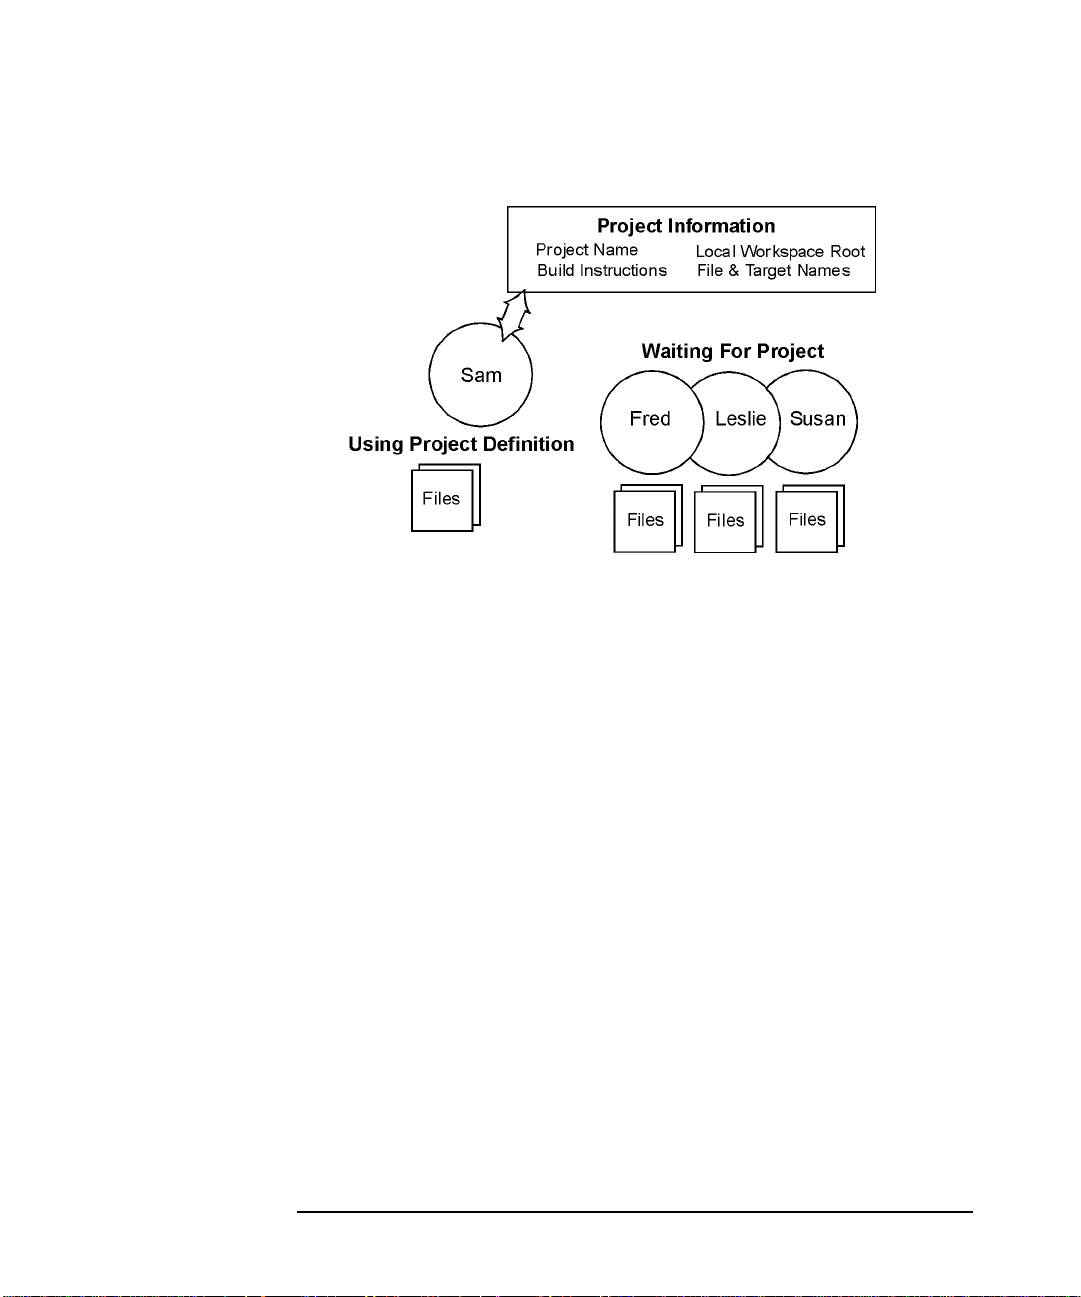
One Project, Many Authors
As your project grows past what one author can accomplish, you face the
issues of sharing the work across the team.
The preferred way to work at this level is to designate one person as the
owner of the project definition file and have the rest of the team clone
Chapter 1 27
Page 28

Maximizing Your Results with SoftBench
Sharing Projects with a Team
from that definition for their local working copies. Anyone who discovers
the need for a change in the project definition communicates that to the
owner, who makes the update, and then all of the team members re-clone
their project definitions.
Figure 1-5 Team Members Cloning the Project Definition
The least usable method is to share the project definition files. Choose
"Options: Set Default Project Root…" to specify the location of the
shared project definition. Sharing a project definition has several
limitations, primarily that only one person can open the project at a
time.
Chapter 128
Page 29
Maximizing Your Results with SoftBench
Sharing Projects with a Team
Figure 1-6 Team Members Sharing the Project Definition
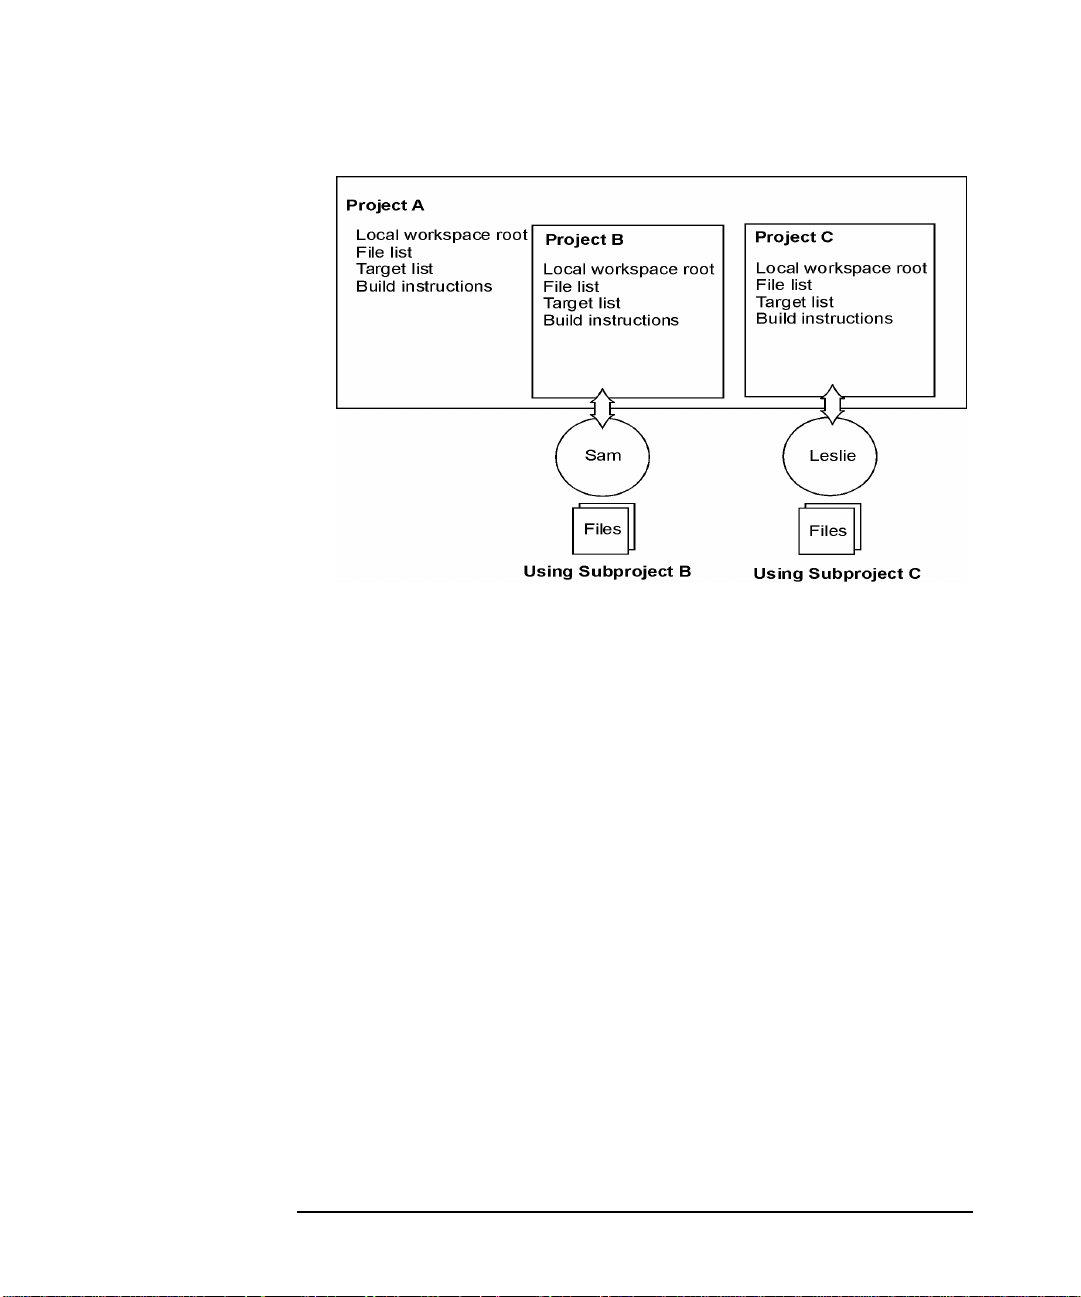
One Project with Subprojects, Many Authors
Finally, your team can choose to divide up the project along the same
lines as they divide up the work, especially if the project is large enough
that multiple teams are cooperating on a single system release.
Figure 1-7 Team Members Using Subprojects
Each person's module of work may be designated as a subproject of the
team's project. Team members then open the parent project for short
periods of time, as necessary, but work primarily in the subprojects.Each
team member's project is a subproject of the larger project, then the
whole team's project is actually a subproject of the overall system
delivery. Using SoftBench to manage this level of hierarchical complexity
saves tremendous time and confusion when system builds are needed.
Chapter 1 29
Page 30
Maximizing Your Results with SoftBench
Sharing Projects with a Team
Chapter 130
Page 31

Maximizing Your Results with SoftBench
Planning Your Project
Planning Your Project
You can use SoftBench as your project planning environment by
specifying the files of the project and their relationships even before the
files exist. Unique icons in the Files view remind you which files have yet
to be created in the file system. You can always change file lists to add,
remove, or rename files as your project actually takes shape.
First determine how you will share pieces of your project among your
team members. From this you can lay out your parent project and
subproject definitions. See “Setting Up a Project” on page 50 for more
information.
Next populate your projects with your files. You can add existing files
into your project or create new files in your editor and have them
automatically become members of the project. See “Adding Existing Files
to a Project” on page 58 and “Using Editors with Projects” on page 118
for more information.
Define your targets and how to build them. Then set up dependencies
between your source files and your targets, or between two targets that
must be build in a specific order. Refer to “Specifying Dependency
Relationships” on page 61 for details.
Now continue your development process in your SoftBench environment
where all of your tools, from editor to debugger, understand your project
files and build dependencies.
For in-depth information about using the project model in your
development process, choose "Help: SoftBench How To".
Chapter 1 31
Page 32

Maximizing Your Results with SoftBench
Using the SoftBench Integrated Environment
Using the SoftBench Integrated Environment
The SoftBench project environment provides smooth transitions between
all of your SoftBench tools. See Figure 1-6 on page 29 and “An Example
SoftBench Session” on page 38 for how the tools flow together. The tools
shipped with SoftBench include:
Main SoftBench Window with Builder and SoftBench CodeAdvisor
Define your projects, customize the SoftBench
interface, and launch other SoftBench tools through
the main toolface. You use Builder to transform your
source files into your targets. CodeAdvisor inspects
your source files for coding problems beyond what your
compiler can detect.
Editors
Making changes in your project code is easy with
editors that understand your project structure.
Configure your choice of SoftBench XEmacs Editor or
SoftBench vi Editor. SoftBench Program Editor is also
provided as contributed software for your convenience,
but it neither understands projects nor automatically
adds files to projects. SoftBench Class Graph/Editor
allows you to see and modify your C++ program
visually.
Configuration Management
Keep your software changes under version control with
your integrated configuration management system.
SoftBench ships with SoftBench CM. Third party
vendors also offer integrated configuration
management systems integrated with SoftBench.
SoftBench Static Analyzer
Evaluate the structure of your code without executing
it using SoftBench Static Analyzer. For example, you
can determine where variables are modified, classes
are declared, and functions are called. Static Graphs
Chapter 132
Page 33

show you pictures of your code structure.
SoftBench Debugger
Monitor your program's execution with SoftBench
Debugger. You can set breakpoints, trace function calls,
and watch variable values to isolate defects in your
code. Data Graph Window gives you a visual image of
your data structures as they change.
SoftBench File Compare
Compare two versions of a file and select lines from
each to create a merged file using SoftBench File
Compare.
SoftBench Message Monitor
Watch SoftBench internal messages between tools to
assist in isolating problems with SoftBench and to
debug the integration of new tools into the SoftBench
environment.
Maximizing Your Results with SoftBench
Using the SoftBench Integrated Environment
Figure 1-8 Using SoftBench Tools Throughout Your Development Cycle
Chapter 1 33
Page 34

Maximizing Your Results with SoftBench
Using the SoftBench Integrated Environment
SoftBench supports three ways to use tools:
• using SoftBench tools together on one project
• using SoftBench tools together on more than one project
• using individual SoftBench tools in a standalone mode outside of
projects
Using SoftBench Tools Together
The recommended way to use SoftBench is as a set of tools that
communicate with each other. To accomplish this, start SoftBench and
launch other tools as you need them from the menus or toolbar in the
main SoftBench window.
From the SoftBench window, you can perform many actions on the
project data (source files, targets, and build information). Select the data
on which you want to work, then choose the task you need to accomplish.
Some tasks, such as building your application and checking your code for
SoftBench CodeAdvisor violations, take place within the main SoftBench
window. Other tasks automatically start other SoftBench tools, such as
your configured SoftBench editor or SoftBench Debugger.
SoftBench's integrated environment allows you to move easily from one
software development task to another. You can use the main SoftBench
window to initiate tasks, and you can move from one task to another
seamlessly using menu commands in other SoftBench tools.
Chapter 134
Page 35

Maximizing Your Results with SoftBench
Using the SoftBench Integrated Environment
Figure 1-9 Tools That Can Directly Invoke Other Tools
Using SoftBench Tools on Multiple Projects
If you want to work on multiple projects at the same time, you can either
start multiple sessions of SoftBench or you can open multiple projects
within a single session of SoftBench. When you run a single session of
SoftBench, you can access only one project, the current project, at a time
in the main SoftBench window. With either alternative your assisting
tools, such as the editor, stay open and available for use.
To open multiple projects within a single SoftBench session, select the
project you want to open, then select Open. When you open a project,
SoftBench:
• locks the project for write access
Chapter 1 35
Page 36

Maximizing Your Results with SoftBench
Using the SoftBench Integrated Environment
• makes the opened project the current project
• switches the project browser from the Projects view to the Files view,
displaying the project's files
Only the current project's files display in the Files view. If you had
another project open, SoftBench by default leaves it open and all its tools
running. To close the previous project and stop its associated tools
whenever a new project opens, set the "Options:■ Close Tools when
Switching Projects" toggle button. When you set it, the previous
project closes, stopping associated tools. When you turn it off, the
previous project remains open and any associated SoftBench tools
remain running.
Each tool instance shows its associated project in its title bar. A build
initiated from one of the tools builds the project named in its title bar.
When you open a tool with one current project, then switch projects in
the main SoftBench window, the tool remains attached to the project for
which it was started. The editors save files in the project with which they
are associated.
To help simplify window management when working in multiple
projects, SoftBench provides "Iconize Project" and "Normalize Project"
buttons (see Figure 1-10). From the Projects view, select the project, then
select the button to either iconize or normalize the associated tool
windows. Alternatively, you can use CDE workspaces to simplify window
management for multiple projects.
Figure 1-10 Iconize and Normalize Project Buttons
Using SoftBench Tools as Standalone Tools
When you start SoftBench tools directly from the command line, the tools
have no knowledge of project data associated with the files, and you
cannot access build functionality. Other types of tool interactions, suchas
accessing the editor from SoftBench Static Analyzer,stillwork. However,
Chapter 136
Page 37

Maximizing Your Results with SoftBench
Using the SoftBench Integrated Environment
without access to project data, tool interactions may behave
unpredictably.
Recommendation: Even if you want to use only one or two SoftBench
tools, launch the tools from the SoftBench main window.
Reusing Tool Windows
Within a single project, you can start only one instance of some tools and
multiple instances of other tools. For example, within a project, you can
open only one instance of SoftBench Static Analyzer, but you can open a
different instance of SoftBench Debugger for each executable target in
the project.
If you prefer to see only one instance of a tool, change the data on which
the tool operates from within the tool itself. For example, in SoftBench
Debugger choose "File: Unload Executable" to unload the current
target, then choose "File: Load Executable…" to debug another
program.
Copying Data between SoftBench Tools
SoftBench shares internal project definition data across all the tools for
you. At times you may want to copy some information from one tool's
screen to another tool's input box. You can do this using the clipboard.
To copy information to the clipboard:
1. Select the text using the left mouse button and dragging across the
text.
2. Press Control-Insert to copy the text to the clipboard.
To paste information from the clipboard to an input field:
1. Position the mouse cursor within the input field and click the left
mouse button.
2. Press Shift-Insert to paste the text from the clipboard.
Chapter 1 37
Page 38

Maximizing Your Results with SoftBench
An Example SoftBench Session
An Example SoftBench Session
The following example shows how you can use SoftBench as you develop
an application. To use the project build model where SoftBench takes
care of the build instructions and Makefile:
1. Create a project by choosing "Project: New → Create…".
2. Set up a configuration management mapping between your local
workspace root and the CM archive.
3. Write the code for your project. If the files already exist, choose
"Project: Add File(s) to Project…" to make the files part of the
project. To edit the file, double-click on the file name. To create new
files, choose "File: New…".
4. Throughout the development cycle, remember to check files into your
configuration management system. Select the files, then choose the
desired command from the "File: Configuration Management"
submenu.
5. Define the targets in your project and their dependencies:
a. Choose "Target: New…" to specify the target name and its build
configuration. The build configuration provides instructions on
how to build the target.
b. Create a dependency relationship between the files and targets.
Select each source file that makes up the target, then choose
"File: Link Source to Target…".
c. If the target needs special build instructions, select the target,
then choose "Target: Modify Properties…". Withinthe"Modify
Target Properties" dialog box, select Customize Build
Configuration…
box, make the changes that you need.
6. To build your project, select the project, then select the Build button.
SoftBench displays the build results in the Builder's output browser.
From the output browser, you can browse syntax errors in the editor
and correct them before rebuilding.
If your project has subprojects, setting the "■ Build Subprojects"
toggle button on the main toolface causes SoftBench to update all
subprojects before building the current project.
. In the "Customize Build Configuration" dialog
Chapter 138
Page 39

Maximizing Your Results with SoftBench
An Example SoftBench Session
7. When all syntax errors are fixed, use SoftBench CodeAdvisor
(available with C++ SoftBench only, although rules exist for both C
and C++) to find hidden coding problems not found by the compiler.
Select the project or files of interest, then select the Check Code button.
8. To validate how well your application works, select the desired target,
then choose either "Target: Debug…" or "Target: Run…". If you use
"Target: Debug…" and find problems, you can start your editor from
SoftBench Debugger, edit the source code, then choose "File: Build"
to recompile the application and restart the debugging process.
9. To better understand your code, select the "Static Analyzer" icon in
the toolbar. Alternatively, you can access SoftBench Static Analyzer
from your configured SoftBench editor or SoftBench Debugger by
selecting a program identifier, then choosing a command from the
"Static" menu.
10.Cycle through editing, building, and debugging as many times as
necessary to develop a correct executable.
If you are using the external build model where you write and
maintain the build instructions, replace step 3 above with:
3. Define the targets in your project and their dependencies
a. Edit the Makefile or build script. With external build, you can save
the build instructions for your Makefile targets when your build
command supports entering a target name as part of the command:
b. Choose "Target: New…" to display the "External Build Command"
dialog box.
c. Specify the build instructions for the external build target. For
example, enter make in the “Command” input box, and enter the target
name in the “Target” input box.
d. Select Save as T ar get to save the instructions as a target node that you
can select in the project browser and target graph.
Chapter 1 39
Page 40

Maximizing Your Results with SoftBench
Learning SoftBench
Learning SoftBench
The SoftBench Online Tutorial teaches you the fundamentals of getting
started with SoftBench. Youcan learn SoftBench using either a C or C++
example. The tutorial walks you through code development and
maintenance tasks, introducing you to key SoftBench tools.Through this
hands-on experience, you can learn the basic functions of the SoftBench
tools and understand how to use these tools together to help you develop
software.
To access SoftBench Online Tutorial, choose "Help: Tutorial" from the
main SoftBench window. If you are interested in more in-depth training,
contact your Hewlett-Packard sales representative.
Chapter 140
Page 41

2 Using SoftBench
This chapter provides the basic information that you need to start using
SoftBench. From setting up your project to making sure that your
software does what you intend, SoftBench provides an easy-to-use,
integrated environment to support your software development tasks.
Using SoftBench
Chapter 2 41
Page 42

Table 2-1
Using SoftBench
Prerequisites to Using SoftBench
Prerequisites to Using SoftBench
SoftBench requires that your PATH environment variable be set correctly.
Your system administrator may have done this for you when SoftBench
was installed. If you have a problem with your PATH, SoftBench notifies
you.
To see the current value of your PATH, type
echo $PATH
Verify that /opt/softbench/bin precedes /bin, /usr/bin,
/usr/ccs/bin, and /opt/aCC/bin and that /usr/bin/X11 is included in
your PATH.
If your PATH is incorrect, then you need to modify the PATH environment
variable:
1. Edit the appropriate file for your environment.
For Bourne, Korn, or Posix shell, edit $HOME/.profile. For C shell,
edit $HOME/.cshrc or $HOME/.login.
2. Add the PATH statements shown below to the file. Use the format
already in your file to guide your use of these examples.
Shell Syntax
For
Bourne,
Korn, or
Posix
shell
For C
shell
3. If you are running CDE, you may also need to modify your
$HOME/.dtprofile file.
Uncomment the line near the bottom of the file that instructs CDE to
read your $HOME/.profile or$HOME/.login file (depending on which
shell you are using). By uncommenting this line, the changes you
made in Step 2 are used by your windowing environment.
4. In order for these changes to take effect, log out and log in again.
PATH=/opt/softbench/bin:/usr/bin/X11:$PATH
export PATH
set path = ( /opt/softbench/bin /usr/bin/X11 $path )
Chapter 242
Page 43

Using SoftBench
Starting SoftBench
Starting SoftBench
You can start SoftBench in two ways:
• From the command line, type
softbench
• From CDE,
1. Select the CDE Application Manager icon on the CDE front panel.
2. In the CDE Application Manager, open the SoftBench folder and
double-click on the SoftBench icon.
Either action displays the main SoftBench window and opens a scratch
project named Untitled. If you have existing projects, SoftBench opens
the last project in which you worked.
Chapter 2 43
Page 44

Using SoftBench
Understanding SoftBench Window Areas
Understanding SoftBench Window Areas
The main SoftBench window is shown in Figure 2-1. Table 2-2 contains
descriptions of each window area.
Figure 2-1 Unexpanded SoftBench Window
Chapter 244
Page 45

Understanding SoftBench Window Areas
Table 2-2 Description of SoftBench Window Areas
Window Area Description
1 Menu Bar Provides access to many SoftBench functions.
When using most commands on the "Project",
"File" and "Target" menus, select the project,
file, or target of interest in the project browser or
the target graph, then choose the menu command.
Refer to SoftBench Online Help for detailed
descriptions of any menu command.
2 Toolbar Starts associated SoftBench tools using the data
selected in the project browser or target graph.
SoftBench displays the name of the tool when you
place the mouse pointer over an icon.
Using SoftBench
3 Current
Project Area
4 Project
Browser
Displays the name of the current project and local
workspace root, and provides buttons to iconize
and normalize tool windows.
Presents project data in tree outline form. The
project browser offers two views of your project
data—the Projects view and the Files view,
accessible by selecting the appropriate tab:
• Use the Projects view to see available projects
and understand dependencies and
relationships between various levels of the
application being developed.
• Use the Files view to access and use specific
files and targets within the current project.
Chapter 2 45
Page 46

Using SoftBench
Understanding SoftBench Window Areas
Table 2-2 Description of SoftBench Window Areas
Window Area Description
5 Button Area Provides quick access to important actions:
• Open to open a project or make an already open
project current
• CheckCode (available with C++ SoftBench only)
to find coding violations beyond errors already
caught by the compiler
• Build to build the entire project or selected
target(s)
Select one or more list items in the project
browser or target graph, then select the desired
button to initiate the action.
6 Build Control
Area
7 Expand/Close
Button
8 Status Line Displays messages about the status (startup,
Contains controls for the build process:
•"Compile Mode" toggle buttons set the "■
Debug",
"■ Static", and "■ Optimized" compiler
options
•" Build Subprojects" toggle button, controls
whether subprojects ofthecurrent project are
also built or used in their current state
The Expand >> button expands the SoftBench
window to display the Builder or CodeAdvisor
pages. When the window expands, the button
changes to Close <<. The Close << button closes the
Builder and CodeAdvisor pages and returns the
SoftBench window to its compact state.
completion, success, failure, problem encountered)
of actions that you take. The spinning clock icon
indicates when a "Build" or "Check Code"
operation is in progress.
Chapter 246
Page 47

Understanding SoftBench Window Areas
Understanding the Builder Page
The Builder page, shown in Figure 2-2, consists of two main parts: the
target graph and the output browser. For information on using the
Builder page, see “Building Projects and Targets” on page 70.
Figure 2-2 Expanded SoftBench Window Displaying Builder Page
Using SoftBench
Target Graph Provides a graphical view of targets and dependencies
in a project using the project build model. For
external build projects, the target graph shows each
target as a separate, selectable node, but shows no
dependencies. The only operation available from target
graph for external build projects is Build. See “Using
the Target Graph” on page 66.
Output Browser Displays build output. When compile errors occur, the
error browsing buttons (First, Previous, Next, Last,
Selected) provide easy access to the source code that
triggered the compile error. See “Browsing and
Correcting Build Errors” on page 74.
Chapter 2 47
Page 48

Using SoftBench
Understanding SoftBench Window Areas
Understanding the SoftBench CodeAdvisor Page
The CodeAdvisor page, shown in Figure 2-3, consists of two main parts:
the rule group selection area and the output browser. This page is
available only when you have C++ SoftBench.
Figure 2-3 Expanded SoftBench Window Displaying SoftBench
CodeAdvisor Page
Rule Group Selection Area Provides toggle buttons to select the type of
violations you want to find. You can see the number of
active rules that CodeAdvisor checks, based on the rule
groups you select. The Rule Group Help… button provides
help on the rules in each rule group. See “Selecting
Rule Groups” on page 150 for more information.
Output Browser Displays SoftBench CodeAdvisor output. Controls
include:
• Error browsing buttons (First, Previous, Next, Last,
Selected) which provide easy access to the source
code that triggered the rule violation.
• Filtering buttons (This, Rule, File, Dir, and Undo Last)
which allow you to suppress rule violations you do
not plan to fix. The Undo Last button allows you to
undo the last filter operation.
• Violation Help… button which provides help on the
Chapter 248
Page 49

Using SoftBench
Understanding SoftBench Window Areas
specific rule violation selected in the output
browser. See “Viewing Violations” on page 151 for
more information.
•“■ Hide Filtered Items" toggle button which
allows you to control whether you view the filtered
violations, in the output browser.
For more information about SoftBench CodeAdvisor see “Checking Your
Code Using SoftBench CodeAdvisor” on page 76 and Chapter 6, “Using
SoftBench CodeAdvisor,” on page 145.
Chapter 2 49
Page 50

Using SoftBench
Setting Up a Project
Setting Up a Project
You can create a project several ways:
• Create a project from scratch. (See “Creating a Project Using Project
Build” on page 50 and “Creating a Project Using External Build” on
page 52.)
• Create a project by cloning another project. (See “Cloning a Project
from an Existing Project” on page 53.)
• Repartition a project into two projects. (See “Repartitioning an
Existing Project” on page 54.)
When you create a project, you must specify:
• The project name. Project names contain regular characters. Control
characters,spaces,and punctuation characters special to the shell are
not allowed in project names.
• The local workspace root, the top-level directory of the local
workspace. For example, assume you have a project named MyBigApp
with executables in bin, source code in src, and libraries in lib.
These subdirectories are grouped under a directory named
$HOME/MyBigApp. In this example, the local workspace root would be
$HOME/MyBigApp. SoftBench resolves all relative file paths from the
local workspace root.
• The type of build model. You can choose either project build, where
SoftBench takes care of the build instructions and Makefile, or
external build, where you write and maintain the build instructions
(probably in your own Makefiles).
You can also share projects with other team members. (See “Sharing
Projects with a Team” on page 27.) In addition to creating projects, you
can set up subprojects, which create build order dependency
relationships between projects. (See “Creating a Subproject” on page 55.)
Creating a Project Using Project Build
With project build, SoftBench manages the build instructions for the
project. Project build frees you from writing and maintaining Makefiles,
while allowing you to create complex projects spanning multiple
directories and involving multiple targets.
Chapter 250
Page 51

To create a project build project:
1. Choose "Project: New → Create…" which displays the dialog box
shown in Figure 2-4.
Figure 2-4 Create Project" Dialog Box
2. In the "Create Project" dialog box, provide the project name, local
workspace root, and a descriptive comment.
Using SoftBench
Setting Up a Project
3. Select the "❍ Project Build" radio button.
4. Optionally, select Add Existing Source Files… to specify the source files
during project creation. Alternatively, you can choose "Project: Add
File(s) to Project…" after you create the project. The button and
the menu command perform the same function. (For more
information, see “Adding Existing Files to a Project” on page 58.)
5. Optionally, select Define Targets… to specify the build commands for
targets in the project. Alternatively, you can add targets after the
project is created by choosing the command "Target: New…". The
button and the menu command perform the same function. (For more
information, see “Defining Targets for Project Build” on page 60.)
6. Select Create to close the "Create Project" dialog box and create the
project.
7. Once you have created the project, added source files, and defined
targets, specify source file dependencies by selecting the files for a
target, then choosing "File: Link Source to Target…".
8. If necessary, modify the build configuration for the target by selecting
the target, then choosing "Target: Modify Properties…". In the
"Modify Target Properties" dialog box, select Customize Build
Chapter 2 51
Page 52

Using SoftBench
Setting Up a Project
Configuration… and make the needed changes. (For more information,
see “Customizing Build Configurations” on page 62.)
If you want to have SoftBench generate a Makefile for use external to
SoftBench, for example in a nightly build script, choose "Builder:
Generate Makefile…".
Creating a Project Using External Build
External build provides build support when you write and maintain
your own Makefiles or build scripts. With external build, you also need to
specify the files that belong to the project, and you may also want to
specify the targets (see “Defining Targets for External Build” on page
64). Doing so enables SoftBench to show your targets on the target graph
for easy selection and building. SoftBench does not read or parse your
Makefile.
To create an external build project:
1. Choose "Project: New → Create…".
Figure 2-5 "Create Project" Dialog Box for External Build
2. In the "Create Project" dialog box, provide the project name, local
workspace root, and descriptive comment.
3. Select the "❍ External Build" radio button.
4. Your build directory should be the same as your local workspace root.
If for some reason it is not, enter the build directory.
5. Enter the build command for building the project. For example, enter
make to build the default target in a make(1) Makefile. Your Makefile
Chapter 252
Page 53

Using SoftBench
Setting Up a Project
must properly handle paths relative to your build directory.
6. Optionally, select Add Existing Source Files… to specify the source files
during project creation. Alternatively, you can choose "Project: Add
File(s) to Project…" after you create the project.
7. Optionally, select Define Targets… to specify the build commands for
targets in the project. Alternatively, you can choose "Target: New…"
after you create the project.
8. Select Create to close the "Create Project" dialog box and create the
project.
Cloning a Project from an Existing Project
SoftBench allows you to clone existing projects. Cloning uses an existing
project definition as the basis for a new project. The cloning process
copies only the SoftBench description of the file set, target list, and build
configurations. It does not copy the physical project source and target
files.
See “One Project, Many Authors” on page 27 for a diagram of using
cloning.
To clone a project:
1. Choose "Project: New → Clone…".
2. In the "Clone Project" dialog box, provide the project name, your
local workspace root, and descriptive comment. choose a different
local workspace root for the cloned project; otherwise you might
overwrite files or targets unintentionally.
3. Select the project from the "Project to Clone" list.
If the project you are cloning is not in the list, then change the project
search path:
a. Enter the new "Project Search Path".
b. Select Search for Projects to update the "Project to Clone" list.
c. Select the project to clone.
For example, if you are cloning a project created by a coworker, you
need to tell SoftBench where the coworker's project definitions are
located. By default, SoftBench stores project definitions under
$HOME/.softbench.
Chapter 2 53
Page 54

Using SoftBench
Setting Up a Project
4. Select Create.
5. Once the project is cloned, make any needed changes to the project.
For example, you may need to change the build instructions, add or
remove files, or remove or define additional targets.
6. Then, make sure you have the project files under your local
workspace root. For example, you may need to copy the files or check
out the files from configuration management.
Repartitioning an Existing Project
SoftBench provides the ability to restructure a project, creating a second
project from parts of the original project. You may want to do this as your
project outgrows a simple model or as you add developers to your team.
During this process, you choose whether the new project is a subproject
of the current project. You also choose whether the selected targets and
files remain in the current project.
To restructure a project:
1. Select the files and/or targets to be restructured. Selecting targets
automatically includes the source files required in the project
description data.
2. Choose "File: Convert to Project…".
3. In the "Convert Files to Project" dialog box, provide the project
name, local workspace root, and descriptive comment.
When you change your local workspace root to point somewhere
further up or down its current hierarchy, SoftBench does not
recalculate the relative path names. You can select the files in the
project and choose "Modify Properties…" to change the relative path
names.
4. Decide whether to make the new project a subproject of the current
project.
5. Decide whether to remove the selected files and targets from the
current project or leave them shared by both projects.
6. Select Create.
7. Once the project has been restructured, make any needed changes to
both projects. You may need to change build instructions, add or
remove files,or remove or define additional targets in the new project.
Chapter 254
Page 55

Using SoftBench
Setting Up a Project
Forexternal build projects, you may need to change build instructions
in the current project if files have been removed.
8. Finally, make sure you copy the physical project files under your new
local workspace root.
Creating a Subproject
When you create a subproject relationship, you also need to create the
build instructions that implement the relationship. For example, if the
subproject is a library, you need to add the library to the target's build
configuration in the parent project. (For more information, see
“Customizing Build Configurations” on page 62.)
When you create a subproject, you can treat the subproject as code that
you do not control and do not want to build, or you can build the
subproject before building the project. The "■ Build Subprojects"
toggle button in the Build Control Area controls whether the subproject
is built prior to building the parent project.
You can create a subproject in two ways:
• When the project already exists, select the project in the Projects
view, then choose "Project: Make Subproject Of…". In the dialog
box, specify the parent project.
• When you are restructuring the current project and wish to convert
part of it into a subproject, select the targets and/or files that you
want in the subproject, then choose "File: Convert to Project…".
See “Repartitioning an Existing Project” on page 54 for more
information.
Chapter 2 55
Page 56

Using SoftBench
Modifying a Project Definition
Modifying a Project Definition
Under certain circumstances you may wish to change information about
your project definition. SoftBench allows you to change the name,
location, and type of project by choosing "Project: Modify
Properties…".
• To change the name of your project enter a new project name. Project
names contain regular characters. Control characters, spaces, and
punctuation characters special to the shell are not allowed in project
names.
• To change the location of your project enter a new local workspace
root. You can use the … button to select from a list.
When you change the local workspace root, SoftBench preserves the
exact relative path names for files. This allows you to maintain
identical subtrees under two different roots for building different
product releases. You can just change your local workspace root to
point to one, then the other. However, if you try to change your local
workspace root to point somewhere further up or down its current
hierarchy, SoftBench does not recalculate the relative path names.
You can select the files in the project and choose "Modify
Properties…" to change the relative path names.
• Tochange the build type of your project select the "❍ Project Build"
or the "❍ External Build" radio button. For external build, enter
the build directory and build command. See “Creating a Project Using
External Build” on page 52 for complete information.
Changing the build model for a project significantly affects
SoftBench's internal representations of your project. All targets are
deleted and must be redefined.
• To change the Static database location, enter a directory in the
"Static Database Location" input box. Youcan use the … button to
browse the directory you want.
• To return to the default Static database location, clear the "Static
Database Location" input box.
Chapter 256
Page 57

Using SoftBench
Creating Files within a Project
Creating Files within a Project
New files that you create within SoftBench automatically become
members of your project. Choosing "File: New" starts your configured
editor with an untitled file. Alternatively,choose the "Editor" icon when
you have no files selected. SoftBench vi Editor and SoftBench XEmacs's
"File: Save" and "File: Save As…" menu commands automatically
add the file into your project.
SoftBench also allows you to pre-define files before you create them. You
can use this when you plan your project. Choose "Project: Add
File(s) to Project". Select the "■ Choose Files Individually"
toggle button and enter the name of the file in the text field. The path to
the file must exist, but the file itself does not have to. You can later use
your editor to open and edit this file.
Chapter 2 57
Page 58

Using SoftBench
Adding Existing Files to a Project
Adding Existing Files to a Project
Once a project is created, you can add files to the project in a number of
ways. SoftBench vi Editor and SoftBench XEmacs's "File: Save" and
"File: Save As…" menu commands automatically add a file into the
project listed in the editor's title bar.
From the main SoftBench window, you can choose "Project: Add
File(s) to Project…" (see Figure 2-6). This command allows you to
add files individually, or you can add files in groups based on directory
and file type. As you select files, SoftBench displays the file names in the
"Files Selected" list.
You do not need to add intermediate files, such as .o files and generated
C files, explicitly. Add files that you want to build as target files using the
"Target: New" menu command.
Figure 2-6 "Add Files to Project" Dialog Box
To add files one at a time:
1. Select the "❍ Choose Files Individually" radio button.
2. Enter the file name, or select … to browse to the desired file.
3. Select Add to add the file to the "Files Selected" list.
To add files in groups:
Chapter 258
Page 59

Using SoftBench
Adding Existing Files to a Project
1. Select the "❍ Choose Files By Directory" radio button.
2. Enter the directory name, or select … to browse to the desired
directory.
3. Optionally, select the "m This Directory Down Recursively" radio
button. Note: The recursive option on a deep hierarchy can take a
long time, because this process looks at every file in the hierarchy.
The recursive option works best on fairly shallow or restricted
hierarchies.
4. Select the desired file types. For example, to add C++ source files and
header files, select both "C++ Source" and "C++ Include" in the
"Select types of files to add" list. If the file types you need are
not in the list, select More File Types to edit the list.
5. Select Add to add the qualified files to the "Files Selected" list.
Qualified files are files in the specified directory (and possibly its
subdirectories) with the specified file types.
6. To selectively delete files from the "Files Selected" list, select the
files and select the Delete button. (This does not delete files from your
file system.)
7. Select OK.
After you close the dialog box, the Files view displays the files that you
added to the project. The Files view is a logical representation of a file
set. It shows you all the files in the project, regardless of whether the
files exist on the file system.
The icon beside each file in the Files view shows whether the file exists.
When you create a file in the file system, or check a file out of
configuration management, the file's icon appearance changes. A page
with lines indicates that the file exists in the local workspace and a blank
page indicates that it does not exist in the local workspace. A page with
an arrow indicates a target, and lines indicate whether it exists in the
local workspace or not. To update the Files view with the current file
status, choose "View: Refresh Files View".
Chapter 2 59
Page 60

Using SoftBench
Defining Targets for Project Build
Defining Targets for Project Build
SoftBench attaches build instructions to targets. Each target in your
project must be defined and have its build instructions described.
Creating a Target
To define a new target:
1. Choose "Target: New…", which displays the "Define New Targets"
dialog box shown in Figure 2-7.
Figure 2-7 "Define New Targets" Dialog Box
2. Enter a target name in the "Target Name" input box. Target names
must be unique within a project. Target names contain regular
characters. Control characters, spaces, and punctuation characters
special to the shell are not allowed in target names.
3. If desired, modify the directory name for storing the target in the
"Directory Path" input box. The … button lets you select a valid
directory name. Otherwise, the directory name defaults to the local
workspace root.
4. From the "Select Build Configuration" pulldown list, select the
build configuration that most closely matches the target you want to
create.
Chapter 260
Page 61

Using SoftBench
Defining Targets for Project Build
5. Select Add to add the new target to the "Pending New Targets" list.
6. Define as many targets as you need while the dialog box is posted.
When you are done, select OK.
If the SoftBench-provided build configurations do not meet your needs,
you can either define your own new build configuration or add
target-specific customizations to an existing build configuration. See
“Customizing Build Configurations” on page 62 for more information.
Specifying Dependency Relationships
In the main SoftBench window, the Files view shows the newly created
targets. Targets can have two types of dependency relationships:
• source-to-target dependencies
• build order dependencies between two targets
Dependency relationships can only be created for project build targets.
To create a source-to-target dependency:
1. Select the files to link into the target, then choose "File: Link
Source to Target…".
2. In the dialog box, select the target.
To see the dependency relationship:
1. Select Expand >>. This action expands the main SoftBench window to
display the Builder page.
2. If the CodeAdvisor page is displayed, select the Builder tab.
3. In the target graph, select the target.
4. Select "Source File Dependencies" from the Display Dependencies
menu button.
To create a build order dependency, you need at least two targets:
1. Select the target that must be built first, then choose "Target: Add
Build Order Dependency…".
2. In the dialog box, select the target that must be built last.
You can also use subprojects to create build order dependencies. See
“Creating a Subproject” on page 55 for more information.
Chapter 2 61
Page 62

Using SoftBench
Defining Targets for Project Build
Customizing Build Configurations
A build configuration specifies how to convert your source files into
your targets. Build configurations may include packages as a shorthand
notation for a common transform and its associated options or for
common libraries.
To create or modify build configurations:
1. Choose "Builder: Manage Build Configurations…" which displays
the dialog box shown in Figure 2-8.
Figure 2-8 "Manage Build Configuration" Dialog Box
2. Select the build configuration from the "Build Configuration"
drop-down list.
3. Modify the build configuration by expanding the sections of the dialog
box and making the changes.
For example, if you need to add the math library to the build
configuration:
a. Expand the "Specify Library and Linker Options" section.
b. Select the Add… button for adding libraries.
c. Enter "m" in the input box, and select OK to close the "Add -l
Libraries" dialog box.
In the "Manage Build Configuration" dialog box, the
"Libraries (-l) to Use" list now contains "-lm" for the math
library.
Chapter 262
Page 63

Using SoftBench
Defining Targets for Project Build
Depending on the changes you need, you can add packages (see
“Using Build Packages” on page 63), libraries, library directories,
include directories, compiler options, and other build instructions. To
modify compile modes, defines, undefines, and compiler flags, you
must select your compiler first.
4. Select Save to save changes under the current name. Select Save As…
to save changes under a new name. If you selected a SoftBench build
configuration, you must use Save As… to provide a new build
configuration name. See “Understanding Build Configurations and
Packages” on page 23 for information about SoftBench build
configurations.
To customize a build configuration for a specific target:
1. Select the target in the project browser or target graph.
2. Choose "Target: Modify Properties…"
3. From the "Modify Target Properties" dialog box, select Customize
Build Configuration…
4. Modify the build configuration by expanding the sections of the dialog
box and making the changes.
5. Select OK to save the changes as a build configuration customization
to the build configuration associated with the selected target. The
"Modify Target Properties" dialog box reflects the addition of the
customizations in the "Current Build Configuration" field.
.
Once you make a specific build configuration, SoftBench does not
maintain a connection with the base build configuration from which it
was derived. Changes you later make to the base build configuration are
not inherited by the customized build configuration. Youmust repeat the
changes for each customized build configuration individually.
For more information on customizing build configurations, refer to
SoftBench Online Help for the "Customize Build Configuration"
dialog box.
Using Build Packages
To create or modify build packages, choose "Builder: Manage
Packages…". Once a package is defined, you can include it in build
configurations as a quick and reliable way to specify all build
instructions for the compiler, library, or utility.
For more information on customizing build packages, refer to SoftBench
Online Help for the "Manage Package Information" dialog box.
Chapter 2 63
Page 64

Using SoftBench
Defining Targets for External Build
Defining Targets for External Build
As part of SoftBench's support for the external build model, you can
create targets and save the command to initiate your build:
1. Choose "Target: New…" to display the "External Build Command"
dialog box shown in Figure 2-9.
Figure 2-9 "External Build Command" Dialog Box
2. Enter the build directory, build command, target name, and options
for a target.
3. Select Save as T arget. This adds the target to the project file set, saves
its build instructions, and allows you to bypass this dialog box in the
future.
4. Repeat as necessary to define all of the project's targets, then select
Close to close the dialog box.
Now you can build this project or individual targets within it as
described in “Building Projects and Targets” on page 70.
When you use external build, your Makefile or build script contains the
knowledge of how to build your targets. You must manually edit the
appropriate file whenever the build instructions change.
To edit your Makefile or build script:
1. Add the Makefile to the project file set by choosing "Project: Add
File(s) to Project…".
You can add Makefiles to projects using the file types mechanism if
Chapter 264
Page 65

Using SoftBench
Defining Targets for External Build
the file is named "Makefile", "makefile", or ends in the ".mk" suffix.
a. In the "Add Files to Project" dialog box, select More File Types….
b. Add the "Makefile" file type to the "File Types to Use" list.
c. Select the file type in the "Add Files to Project" dialog box.
d. Select Add.
Alternatively, you can add a Makefile to the project by selecting the
"❍ Choose Files Individually" radio button and entering the
Makefile name in the "Filename" input box.
2. Double-click on the Makefile in the Files view of the project browser,
or choose "File: Open…" to load the Makefile into the editor. Modify
the Makefile as necessary.
Chapter 2 65
Page 66

Using SoftBench
Using the Target Graph
Using the Target Graph
To conserve screen real estate, the target graph is not always visible. To
display the target graph, select Expand >>, then select the Builder tab.
The target graph is in the top half of the Builder page (see Figure 2-10).
To hide the target graph entirely, turn off "View: Display Target
Graph".
Figure 2-10 Target Graph in Builder Page
Alternatively, you can display the target graph by selecting a target in
the project browser, then choosing "Target: Display on Graph". Use
the sash to expand or reduce size of the graph display area.
The target graph fully supports the project build model and partially
supports the external build model.
Table 2-3 Build Model Operations in the Target Graph
Operation Project Build External Build
Display Target
Nodes
Yes Yes
Chapter 266
Page 67

Table 2-3 Build Model Operations in the Target Graph
Operation Project Build External Build
Using SoftBench
Using the Target Graph
Display
Dependencies
Select Target Nodes Yes Yes
Operations
Available
Graph Operations
(save, find, zoom,
hide, clear)
The target graph has selection-sensitive popup menus. Depending on
what is selected, an appropriate popup menu is available. You can edit
the dependencies shown on the graph by choosing the appropriate menu
commands from the "File", "Target", or "Graph" menu or from the
popup menu. Commands that interact with intermediate files are
available only from the popup menu.
Yes No
All Build only
Yes Yes
Understanding the Graph
The target graph contains four types of nodes:
• targets—the end product of a build, such as a linked executable,
library, or message catalog
• intermediate files—a file derived from a source file, but not the end
product of the build, for example, an object file or a generated source
file. These files are not part of the project file set.
• source files—files in the project file set from which targets are
derived
• include files—files included in source files, and required, through
the include relationship, to successfully derive a target
SoftBench uses shape and color to show the type and state of the node.
Each node type has a different shape. Color describes the possible
possible possible statesfor target graph nodes. See Table on page 68.
Chapter 2 67
Page 68

Using SoftBench
Using the Target Graph
Table 2-4 Graph Node States
Color Meaning
Blue Up-to-date—the target or intermediate file does not
need to be built.
Red Out-of-date—the files from which the target or
intermediate file is derived have changed and the
node needs to be rebuilt.
White Not buildable—the file is not an appropriate build
target; source files and include files are not
buildable.
Grey Non-existent—the file does not currently exist on
the file system.
Within SoftBench, actions which change a node's status cause the graph
to update automatically. To update the display of graph nodes if you
make changes to the files in the project from outside of SoftBench, choose
"Graph: Update Status of Nodes".
Displaying Dependencies
When you display targets on the target graph, choose one of the
commands on the Display Dependencies menu button. The Display
Dependencies
• Target Only (default value)
• Intermediate File Dependencies
• Source File Dependencies
• Include File Dependencies
To display dependencies:
1. Select the nodes for which you want to see dependencies.
2. Select the desired command on the Display Dependencies menu button.
menu commands include:
Chapter 268
Page 69

Using SoftBench
Using the Target Graph
Controlling Graph Complexity
Controlling how many dependencies the target graph displays with the
DisplayDependencies menu button, discussed in the previous section, helps
control graph complexity. Other mechanisms for controlling the
complexity and appearance of the target graph include:
• Choose one of the "Hide" commands from the "Graph" menu. These
commands allow you to hide selected nodes, children of selected
nodes, or unselected nodes from the graph.
• Use the "Zoom" commands on the "Graph" menu to make the graph
nodes larger or smaller.
Building a Selected Target
To build a target from the target graph:
1. Select the target on the target graph.
2. Select the Build button, use the popup menu to access the "Build"
command or choose "Target: Build" from the menu.
Starting Your Configured Editor
When you have source or include file dependencies displayed on your
target graph, you can start your editor preloaded with a file by either
• double-clicking on the source or include file
• selecting the file and choosing "Open File" from the popup menu or
"File: Open" from the main menu
• selecting the file, then selecting the "Editor" icon from the toolbar
Chapter 2 69
Page 70

Using SoftBench
Building Projects and Targets
Building Projects and Targets
Whether you use the project build model or the external build model,
SoftBench provides the flexibility to build either the entire project or
individual targets. When nothing is selected in the project browser,
SoftBench acts as if the current project is selected. Selecting the Build
button in this state builds the entire current project. Alternatively, you
can select targets from the Files view or the target graph and select Build
or choose "Target: Build".
The build action completes all steps necessary to create the target. For
example, out-of-date files are compiled and object files are linked into an
executable file or a library. When a build is not successful, SoftBench
displays compile errors in the Builder output browser. (See “Handling
Errors” on page 73 for more information.)
After you request a build, the Build button changes to Terminate. If you do
not want the build to complete, select Terminate to end the build process.
In most cases, this stops the build process. Occasionally, the Terminate
button changes to TERMINA TE!.If the build process does not stop, selecting
TERMINA TE! sends a SIGKILL signal which cannot be ignored by the build
process. The build stops and displays an appropriate message in the
output browser.
Setting the Compile Mode
Setting the compile mode before you build is important, because using
the correct compile mode is a prerequisite to debugging and static
analysis. Regardless of the build model your project uses, you can set the
compile mode using the "Compile Mode" toggles below the project
browser. The compiler flags used for the compile modes are shown in
Table2-5. Initially, the toggle buttons for "■ Debug" and "■ Static" are
set.
Chapter 270
Page 71

Table 2-5 Compile Mode Settings
Compile Mode Default Compiler Flag
■ Debug Select to prepare an object file for
■ Static Select to prepare for static analysis; "-y" is
■ Optimized Select to tell the compiler to optimize the
For project build projects, you can override the default compiler flags
sent to the compiler for a compile mode by changing the build
configuration:
Using SoftBench
Building Projects and Targets
debugging; "-g" is the default for all
compilers exceptaCC;"-g0" isthedefaultfor
the aCC compiler.
the default.
executable (tomaximizethe execution speed
and minimize space usage); "-O" is the
default.
1. To change the compile mode settings for all targets using a build
configuration, choose "Builder: Manage Build Configurations…".
To change the compile mode settings for a single target, select the
target, then choose "Target: Modify Properties…". In the "Modify
Target Properties" dialog box, select Customize Build Configuration….
2. Expand the "Specify Include and Compile Options" section of the
dialog box.
3. Select the compiler in the "Set Information for Compiler"
drop-down list. This setting controls what compiler is affected when
you enter information such as additional compiler flags, defines,
undefines, and compile modes.
4. Select Set Compile Modes… to display the "Set Compile Modes" dialog
box.
5. In the "Set Compile Modes" dialog box, enter the compiler flags. For
example, to override the "-g0" compile mode setting for debugging
aC++ code, enter another value, such as "-g" in the "DEBUG Compiler
Flags" input box.
6. Save your changes and close the dialog boxes.
Chapter 2 71
Page 72

Using SoftBench
Building Projects and Targets
External build projects do not use the "Set Compile Modes"dialog box
to change the compiler flags sent via the "Compile Modes" toggle
buttons. To override the compiler flags for an external build:
1. Turn off the toggle buttons for the compile mode that you want to
override.
2. Choose "Builder: Use External Build Command…" to display the
"External Build Command" dialog box.
3. In the "Options" input box, specify the options you want make to send
to the compiler. Which macro you use depends on how your Makefile
is structured. The default rules for make accept CFLAGS for C and
CXXFLAGS for C++. For example, you might enter CFLAGS=-y into the
options field to have make pass the whole string to your compiler.
Using the "External Build Command" Dialog Box
External build projects can use the Build button to repeat a build or
"Builder: Use External Build Command…" to customize a build. This
allows you to control the target to be built, the build command used, and
the options you want make to send to the compiler. Once you enter this
information, you can save it by selecting Save as Target. Then when you
select the target in the browser, its information automatically appears in
the dialog box. The dialog box also remembers a history of entries made
in each field, accessible via the arrow button next to the field.
Previewing the Build
When you preview a build, SoftBench simulates the build without
performing the actions. SoftBench displays the commands that the build
would run in the output browser. This information helps you determine
which source code files create the targets, if any of your files are
out-of-date or missing, or if there are problems in the build instructions.
Topreview a build, choose "Target: More Build Actions → Preview
Build".
As an alternative to previewing the build, you can choose "Graph:
Update Status of Nodes". This command updates the target graph,
changing the status of the nodes when appropriate. SoftBench displays
out-of-date nodes in red and up-to-date nodes in blue.
The "Preview Build" command works only with project build. The
command is equivalent to the make -n command. To see the same result
Chapter 272
Page 73

Using SoftBench
Building Projects and Targets
for external build projects using make(1) as the build command, enter
the -n option in the "Options" input box of the "External Build
Command" dialog box.
Compiling Instead of Building
SoftBench supports both compiling and building the elements of a
project. With a "Build" command, you select a target and SoftBench
transforms the dependencies to create the target. During a build,
SoftBench typically compiles files into object files, then links object files
into a target.
In contrast, the "Compile" command transforms the selected source file
into the next transformation state, for example, transforming the
selected source file into an object file, but not linking the object file into a
target.
To compile a file:
1. Select the file in either the project browser or target graph.
2. Choose "File: Compile".
The "Build" command is more reliable. SoftBench can predictably build
your projects and targets, using either project build or external build.
SoftBench can only make intelligent guesses about how to compile files
in an external build project, because the build instructions are
contained within the Makefile or build script and are not available to
SoftBench's internal "Compile" command.
Building Subprojects
When you specify a subproject relationship, SoftBench by default builds
the subproject before building the current project. As with any build,
SoftBench builds only out-of-date files (files that have changed since the
last build). If you do not wantSoftBench to build the subprojects, turn off
the "■ Build Subprojects" toggle button in the Build Control Area.
Handling Errors
When a build detects errors in your source files, SoftBench displays error
messages in the output browser. You can go directly from the errors to
the supporting source code that caused the error by double-clicking on
the message.
Chapter 2 73
Page 74

Using SoftBench
Building Projects and Targets
Interpreting Error Messages
The error messages displayed in the output browser depend on the
compiler you are using. The messages always contain a line number,
indicating the point in your source code where the compiler detected the
error. The file name may be on the same line or on a previous line in the
error output. An error message indicatestheproblemthecompilerfound.
For more information on compiler errors, refer to "Help: Language
Reference" and your appropriate language.
Error messages may not point to the actual error. For example, if you
forget to declare a variable in a C program, the C compiler indicates the
first use of the variable with the message:
cc: '
filename
', line
number
: error
errnum:name
undefined.
To fix this problem, you may need to declare the variable earlier in the
file, or perhaps in another file. You get the same message if
name
is
misspelled; in that case, the compiler finds the actual error location, and
the error is easy to fix.
After the first error in a location, the compiler sometimes produces
misleading errors. Subsequent errors may be a ripple effect from the first
error. You may want to fix the earlier errors, then build again.
Browsing and Correcting Build Errors
You can double-click on the errors in the output browser to view and edit
the related source code. The editor opens with the source file loaded and
the cursor at the beginning of the line where the error was detected.
Alternatively, you can browse the compile errors using the error
browsing buttons. Select First to select the first error in the output
browser and go to the related source file in the editor. If you have write
access to the file, you can edit the source, correcting problems as you
browse.
Select Next, Previous, or Last, or double-click on other errors in the output
browser, to display and correct other compile errors. If you have scrolled
the window to where the currently highlighted error is no longer visible,
select Selected to see it again. When all your errors have been corrected,
save your file from the editor, and rebuild your project to make sure it
builds successfully.
The output browser has a popup menu and pulldown menu available
from "Builder: Browser" submenu with additional features to help you
handle your errors:
Chapter 274
Page 75

Using SoftBench
Building Projects and Targets
• Choose "Open Editor on Selected Item…" to edit your source file.
• Choose "Find String…" or type Control-S to find a specific string in
the text displayed in the output browser.
• Choose "Print/Save Browser Output…" to print or save the output
browser's display.
• Choose "Load Browser from File…" to reload a saved copy of the
browser output that allows you to address the compile errors later
without recreating the error list through another build.
Running the Build on a Remote System
You can specify a remote computer on which the "Build" command runs,
including both the compile and link processes. When you take this
action, the build process runs on another computer. Before you can run a
remote SoftBench build, you need to configure both systems. Refer to
Installing SoftBench for the configuration steps required.
To run the build on a remote computer:
1. Choose "Options: Build Settings…".
2. In the "Build Settings" dialog box, select the "Build Behavior"
tab.
3. Enter the hostname in the "Compile Host" input box. When you want
the build to run on the same computer as SoftBench, clear the input
box or if the setting is "Local Host", allow that value to remain.
4. Select OK to save the remote compile host and close the dialog box.
Chapter 2 75
Page 76

Using SoftBench
Checking Your Code Using SoftBench CodeAdvisor
Checking Your Code Using SoftBench
CodeAdvisor
If you purchase C++ SoftBench, you can use SoftBench CodeAdvisor to
check your code for critical coding violations beyond compiler errors.
SoftBench CodeAdvisor allows you to check the entire project, selected
targets, or selected files.
To check your code:
1. Select Expand >> to expand the main SoftBench window.
2. Select the "CodeAdvisor" tab to display the CodeAdvisor page.
3. In the rule group selection area, select the rule groups that you want.
For information on rule groups, select Rule Group Help....
4. Select the project, targets, or files that you want to check. When
nothing is selected in the project browser or on the target graph,
SoftBench assumes the entire current project.
5. Select Check Code to begin the code checking process.
You can see SoftBench CodeAdvisor results in CodeAdvisor's output
browser. The output browser for SoftBench CodeAdvisor works similarly
to the output browser for Builder errors (see “Handling Errors” on
page 73). You can browse the source of rule violations as described in
“Browsing and Correcting Build Errors” on page 74.
In addition, SoftBench CodeAdvisor offers several unique features as
well:
• The line format is different:
[
filename line_number violation_description [rule_name
• SoftBench CodeAdvisor provides filtering mechanisms (see Chapter
6, “Using SoftBench CodeAdvisor,”) to suppress output that you do
not want to see.
• SoftBench CodeAdvisor provides help on rule violations. Select the
violation in the output browser, then select Violation Help….
For more information on using SoftBench CodeAdvisor, see Chapter 6,
“Using SoftBench CodeAdvisor,” on page 145.
]]
Chapter 276
Page 77

Using SoftBench
Running Other SoftBench Tools
Running Other SoftBench Tools
SoftBench provides menu commands and a toolbar for starting other
tools in the SoftBench environment. When you position the mouse over a
tool icon, SoftBench tells you which tool the icon represents.
You can start tools in several ways:
• Select files or targets in the project browser or on the target graph,
then select the tool icon in the toolbar.When you start tools with data
selected, the tool loads that data.
• Use the tool icon on the toolbar when nothing is selected in the project
browser. This starts the tool without any associated project data.
Once the tool starts, you may need to specify a file.For example, if you
select the "Editor" icon, choose "File: Open…" in the editor to specify
the file to edit.
• Select files or targets in the project browser or on the target graph,
then choose a menu command. For example, select a target, then
choose "Target: Debug…" to start SoftBench Debugger with the
executable file loaded.
• Drag and drop files from the CDE File Manager onto the tool icon. For
example, drag an executable file onto the "Debug" icon to start
SoftBench Debugger with the executable file loaded. However,
dragging and dropping files does not make them project files. Todoso,
you must add them to the project with the "Project: Add File(s)
to Project…" command or, for source files, save them in your project
through the editor.
If the tool you want to start is not present on the toolbar or menus,
SoftBench provides several options for accessing the tool:
• Choose "Options: Toolbar Setup…" and see if the tool you want is
available in SoftBench. (See “Adding and Removing Tool Icons” on
page 79.)
• Choose "Custom: Edit Menus…" to define a menu command that
starts the tool you need. (See SoftBench Online Help on the "Custom"
menu for information on adding custom menu commands.)
• Advanced users can integrate tools using SoftBench Encapsulator,
then register the tools with SoftBench, following the instructions in
“Registering New Tools with SoftBench” on page 80.
Chapter 2 77
Page 78

Using SoftBench
Managing Your SoftBench Environment
Managing Your SoftBench Environment
SoftBench provides several ways to customize your environment. In
general, customizations are located on the "View" and "Options" menus.
The "Options" menu lets you tailor SoftBench's behavior to meet your
needs. For example, you can:
• change the tool icons displayed on the toolbar
• set tool preferences
• change where SoftBench looks for projects
• customize build behavior
• set behavior of current project when opening a new project
• set language preferences (requires restarting SoftBench to take
effect)
The "View" menu lets you tailor SoftBench's appearance. You can:
• refresh the Files view, which updates the status of the file icons
• show or hide the toolbar
• show or hide the target graph
• show or hide the local workspace root
The Custom menu allows you to create your own commands on the
SoftBench toolface. You can add entries under the Custom menu, and
have those entries available on all tool menu bars ("System" commands),
or on all instances of a specific tool class ("User" commands). Any
command that could be entered at a shell prompt can be launched from
the Custom menu. (See SoftBench Online Help on the "Custom" menu for
information on customizing SoftBench menus.)
This feature is especially useful if you need to run a command within the
SoftBench environment. Commands launched from the Custom menu
inherit the full SoftBench environment, including environment
variables. See "SoftBench Environment Variables" in SoftBench
Online Help for a listing of useful environment variables.
Choose "Custom: Edit Menus…" to add your commands. New commands
are added to the "Custom" menu under the "User Commands" label. These
commands are visible only to you.
Chapter 278
Page 79

Using SoftBench
Managing Your SoftBench Environment
You can make your custom menu entries visible to all tool classes in your
SoftBench session. These entries appear under the "System Commands"
label. To create these menu entries:
1. Create the desired menu commands using "Custom: Edit Menus…".
SoftBench saves the menu information in
$HOME/.softbench/menus/custom/toolname.
2. Rename the toolname file to
$HOME/.softbench/menus/custom/shared.
Your SoftBench administrator can create system-wide commands that
are visible to all users. These commands appear under the "System
Commands" label as well. System commands may be scoped to apply to an
individual tool class, or may be made available to every instance of every
SoftBench tool. For information on creating "Custom" menus that are
available to all users on the system, refer to SoftBench Online Help.
You must use the "Custom: Edit Menus…" command to create the menu
files. Do not edit the menu files directly.
For more information on adding menu commands, see SoftBench Online
Help.
Adding and Removing Tool Icons
The toolbar contains a set of frequently used tools, but this set may not
be right for you. You can easily add new tool icons to the toolbar:
1. Choose "Options: Toolbar Setup…".
2. From the "Available Tools" list, select the tool you want to add.
3. Select Add to T oolbar.
Alternatively, you can double-click on a tool in the "Available
Tools" list to select and add the tool in a single step.
4. Select OK.
If your preferred tool does not appear on the "Available Tools" list, see
“Registering New Tools with SoftBench” on page 80.
To remove tool icons using the "Toolbar Setup" dialog box, select the
tool in the "Tools on the Toolbar" list, then select Remove from Toolbar.
Toreorder the tool icons, remove all the icons, then add them back in the
order you want.
Chapter 2 79
Page 80

Using SoftBench
Managing Your SoftBench Environment
Choosing Tool Preferences
Some classes of SoftBench tools offer more than one choice of tool. For
example, SoftBench supports two editors, SoftBench XEmacs Editor and
SoftBench vi Editor. Other editors are available as SoftBench
contributed tools and as third-party encapsulations.
To see your tool choices, choose "Options:
Tool Preferences…". If your preferred tool does not appear on the
"Available Tools" list, see “Registering New Tools with SoftBench” on
page 80 for information about making it available. To change which tools
are used:
1. From the "Select a Tool" list on the left, select the tool class.
2. From the "Available Tools" list on the right, select the specific tool
you want.
If you have created a $HOME/.softbench/bmsinit file, setting tool
preferences through SoftBench overrides your bmsinit entries. To
use an entry in your bmsinit file, set the tool preference to Default
for the tool class.
3. Select OK.
To make your change in tool preferences take effect, you need to stop all
processes related to the tool class you changed. For example, to start a
new editor, close all text editing windows and the editor index window (if
applicable).
Registering New Tools with SoftBench
SoftBench provides an open, extensible environment in which advanced
users can develop tool encapsulations and run those encapsulations as
SoftBench tools.
Tousea third-party encapsulated tool or create a new encapsulation and
allow all users on the system to access it from the SoftBench toolbar:
1. Install the third-party encapsulated tool or write the encapsulation
using SoftBench Encapsulator. For more information, see the
Encapsulator SDK Integration documentation on the SoftBench
online support page found at:
http://devresource.hp.com/softbench
2. Register the tool with SoftBench Broadcast Message Server by adding
Chapter 280
Page 81

Using SoftBench
Managing Your SoftBench Environment
a file to the /opt/softbench/config/bmsinit directory. See the
bmsinit(5) man page for more information.
3. Register the tool with SoftBench toolbar by editing the
/opt/softbench/config/toolbar/config file. Changing this file
requires superuser access. The file documents the format for new
entries.
4. Add the new tool to the toolbar. See “Adding and Removing Tool
Icons” on page 79. You may need to use the "Default" selection for
your tool preference for the tool class.
Customizing SoftBench by Setting Resources
You control most customizations through the SoftBench user interface.
However, a few customizations must be made by setting X resources in
the $HOME/.softbench/softbenchrc file or by using an X mechanism
such as xrdb.
Set X resources only when the customization is not available from the
user interface. Refer to the tool's man page for detailed information on X
resources. SoftBench Online Help provides a high-level summary of the
resources as well. For SoftBench resources, see the softbench(1) and
softbench(5) man pages and the "Customizing SoftBench" entry in
SoftBench Online Help (accessible by choosing "Help: Welcome"). Most
resource files under $HOME/.softbench should not be edited since they
are overwritten by the tools.
Accessing Distributed Data and Tools
Before you use SoftBench in a distributed environment, your network
must be properly configured. Work with your system administrator,
using the 'Setting Up Network-Distributed Operation' chapter in
Installing SoftBench.
SoftBench takes advantage of networking in several ways:
• You can direct SoftBench tools to access data anywhere on your
network that you can reach through NFS. Supply the path name to
the directory or file that you want.
• You can execute build and debug processes on any system where
SoftBench is installed. Remote execution allows you to use dedicated
servers for particular jobs, such as compilation.
Chapter 2 81
Page 82

Using SoftBench
Managing Your SoftBench Environment
To specify remote execution for builds, choose "Options: Build
Settings…", then select the "Build Behavior" tab. Enter the remote
system name in the "Compile Host" input box. See “Running the
Build on a Remote System” on page 75 for more information.
To specify remote execution for SoftBench Debugger, choose
"Options: Debug Host…" from the SoftBench Debugger menu bar
and enter the remote system name.
• You can execute SoftBench on one system and display it on another.
See “Running SoftBench on a Remote System” on page 82 for more
information.
Running SoftBench on a Remote System
To run SoftBench remotely on another computer that has SoftBench
C.06.0 or newer installed and display SoftBench on your local system, do
the following:
1. On your local system, start the X Window System and execute the
following command in a terminal window:
xhost
Where
run SoftBench.
2. Log in to
the name of your local display.
3. Start SoftBench on
softbench
remotehost
remotehost
remotehost
is the name of the system on which you want to
and set your DISPLAY environment variable to
remotehost
from a command line:
Integrating with CDE
When you install SoftBench, you automatically get a CDE integration.
With the integration, you can start SoftBench from CDE Application
Manager, and you can drag and drop files from CDE File Manager onto
the SoftBench toolbar. However, dragging and dropping files does not
make them project files.
Stopping SoftBench
You can stop individual SoftBench tools, or you can stop SoftBench and
all tools associated with the SoftBench session:
Chapter 282
Page 83

Using SoftBench
Managing Your SoftBench Environment
• To stop a SoftBench tool, choose "File: Exit" on the tool's menu bar.
• Tostop all tools associated with a project, close the project. Select the
project in the project browser, then choose "Project: Close".
• To stop SoftBench and all tools associated with a SoftBench session,
choose "Project: Exit SoftBench" in the main SoftBench window.
If you are working in an Untitled project, SoftBench asks you to
name your project or delete it before you exit.
Restoring Your Previous SoftBench Session
When you stop SoftBench, session information is saved. When you
restart SoftBench, SoftBench reopens the current project, but does not
restart any tools.
To start SoftBench with a different current project, type
softbench -project
project_name
Chapter 2 83
Page 84

Using SoftBench
Getting Help
Getting Help
SoftBench provides online help, accessible from the "Help" menu. You
can access general help on any SoftBench tool, task-oriented help, or
specific help on a selected window item. Figure 2-11 shows the Welcome
window from SoftBench Online Help.
Figure 2-11 SoftBench Online Help Window
Chapter 284
Page 85

Using SoftBench
Getting Help
Using the Help Menu
All SoftBench tools display "Help" as the last item in the menu bar.
Common online help menu commands include:
Tool Overview Gives you an overview of the tool and a list of
subtopics. In the main SoftBench window, this menu
command is "Help: Overview".
Show Man Page Displays the man page for the current tool.
On Item Displays a question mark cursor; move the cursor over
the portion of the screen for which you want help and
click the left mouse button.
Using Help… Provides assistance for using SoftBench Online Help.
Other help options are available on a tool by tool basis. Forexample, you
can access the SoftBench Welcome window, SoftBench Online Tutorial,
SoftBench copyright information, and language specific help from the
main SoftBench window. You can access help for the underlying DDE
debugger in SoftBench Debugger.
Accessing On Item Help
To view information about screen areas such as menu commands, input
boxes, or dialog boxes, move the mouse pointer over the item, then press
the Help key (F1).
If the system cannot find any help information for the screen area under
the pointer, a dialog box appears with the message:
A request to the help server failed.
The desired help is not available.
You can move the mouse pointer to a slightly different screen element
and press F1 again.
Chapter 2 85
Page 86

Table 2-6
Using SoftBench
If Something Goes Wrong
If Something Goes Wrong
Condition or
Message
Toolbar is missing Check the setting of the "View:■ Display
Target graph
missing from
Builder page
You want to rebuild
a target or project,
but SoftBench
reports that the
target is up-to-date.
You set a new tool
preference, but it
does not take effect.
Explanation
Toolbar" toggle button. Alternatively, check
"Options: Toolbar Setup" to ensure that
you have tools selected or to configure your
tool preferences.
Check the setting of the "View:■ Display
Target Graph" toggle button. Set the toggle
button to display the target graph.
Choose "Target: More Build Actions →
Force Build" to force SoftBench to rebuild a
project build project. Alternatively use
"Target: More Build Actions → Remove
Intermediate Files (clean)"or"Target:
More Build Actions →Remove All
Derived Files (clobber)". Foran external
build project, touch or remove the "*.o" files.
Some tools have background processes that do
not shut down when you close the tool
window. For example, SoftBench CM has both
a user interface process and a message server
process. Only the user interface process stops
when you close SoftBench CM. You can stop
all running processes by stopping SoftBench.
You cannot open a
project because the
project is locked.
Close it in another SoftBench session you may
be running, or ask your teammate to do so.
Chapter 286
Page 87

Using SoftBench
For More Information
For More Information
• On getting started with SoftBench, choose "Help: Tutorial".
• On understanding particular features of a SoftBench tool, build
configurations, build packages, and transforms, see SoftBench Online
Help.
• On compiler-generated error messages, see the language reference
manual available under "Help: Language Reference".
• On SoftBench CodeAdvisor, see Chapter 6, “Using SoftBench
CodeAdvisor,” on page 145 and the softcheck(1) man page, available
under "Help: Show Man Page".
• On installing and configuring your SoftBench environment, see
Installing SoftBench.
• On customizing SoftBench, see the "Customizing SoftBench" entry
in SoftBench Online Help (accessible by choosing "Help: Welcome").
Chapter 2 87
Page 88

Using SoftBench
For More Information
Chapter 288
Page 89

Using SoftBench Configuration Manager
3 Using SoftBench Configuration
Manager
SoftBench CM is a configuration management tool that helps manage
code between software team members, software teams, and even
corporate sites. SoftBench CM is fully integrated with the SoftBench
environment, allowing access to configuration management
functionality.
SoftBench CM provides many advantages:
• network access to archive files
• consistent access to local and remote archive files
• menu interface for common commands
• browsing of archive directories
• delete and rename archive file operations
• lock, unlock, and break-lock archive file operations
• recursive display of archive directories
• display, cut, and paste from archive files without the overhead of
check out
• tight integration with SoftBench
Chapter 3 89
Page 90

Using SoftBench Configuration Manager
Understanding SoftBench CM
Understanding SoftBench CM
SoftBench CM helps you manage software development projects that
consist of many versions and configurations. Using SoftBench CM, you
can retrieve and build any version of an application in a consistent,
repeatable manner.
SoftBench CM is fully integrated with the SoftBench environment. You
can access the tool through the SoftBench main window or from the
SoftBench vi Editor, SoftBench XEmacs Editor, SoftBench Debugger,and
SoftBench Class Graph/Editor (see Figure 3-1). The SoftBench main
window and related tools include menu selections for checking files into
and out of an archive, creating initial file versions, cancelling file check
outs, showing the revision history of files, and comparing file revisions.
Figure 3-1 Integration of SoftBench CM with SoftBench
Each SoftBench CM server is configured to manage one or more
archives — a directory hierarchy consisting of versioned files. Youcan
access archives on multiple local or remote servers, support an unlimited
number of licensed users per server, and store as many files as archive
disk space allows. SoftBench CM uses GNU RCS ™ as its versioning
system, so each versioned file is an RCS file that contains file revision
information, multiple revisions of content, descriptive text, and control
attributes.
To access files contained within a given archive, you establish a
mapping between the archive file system and your local file system.
This lets you create local copies of the files you need to access or browse
Chapter 390
Page 91

Using SoftBench Configuration Manager
Understanding SoftBench CM
within the archive. Using the SoftBench CM interface and the SoftBench
main window together provides a complete view of your configuration
management files. The SoftBench main window lets you browse the local
files associated with a project, and SoftBench CM lets you browse
archive files and directories.
Chapter 3 91
Page 92

Using SoftBench Configuration Manager
Getting Started - A Brief Overview
Getting Started - A Brief Overview
SoftBench CM is an archive browser that lets you view, traverse, and
modify the SoftBench archive system. SoftBench CM and SoftBench are
integrated so that you use SoftBench CM to browse archive files and the
SoftBench main window to manage projects containing your local files.
To begin using SoftBench CM for your basic configuration management
needs, follow the steps in this section:
1. Verify that SoftBench CM is your preferred configuration
management tool.
a. Choose "Options: Tool Preferences…" in the SoftBench main
window to ensure your configuration management tool is set to
SoftCM. (See “Choosing Tool Preferences” on page 80 for more
information.)
a. Start SoftBench CM by clicking on the "Configuration Manager"
icon from SoftBench main window.
SoftBench CM starts and displays the setup instructions if this is
the first time you have started SoftBench CM. Once you close this
window, you can view the instructions again by selecting
"Actions: Show Set Up Instructions…" or print the file located
in /opt/softbench/share/welcome.txt.
2. Select an archive.
Your system administrator should have configured one or more
servers for managing your archive(s).
a. Choose "Actions: Show Local Server Information…" to see a
list of local servers and archives.
Machine configuration automatically sets up a test archive
(/TestArchive) on each server. If the dialog box displays with no
server/archive names, ask your system administrator to recheck
the installation process.
b. Select the archive you want to view.
c. Select Browse Archive.
d. Select Done to close the dialog box.
Chapter 392
Page 93

Using SoftBench Configuration Manager
Getting Started - A Brief Overview
The SoftBench CM window displays the files and directories
contained within the selected archive.
3. Create an archive directory.
a. Navigate through the current server to the area where you want
to create an archive directory.
b. Choose "Directory: Create…".
c. Enter the name of the directory you want to create in the "Create
Directory" input box.
d. Select OK.
4. Create a mapping.
a. Choose "Actions: Create New Mapping…".
b. In the "Mapped to Local Directory" input area, enter the path
and name of the local directory that corresponds to the selected
archive directory.
c. Select OK.
The SoftBench CM window displays the empty archive directory
that is mapped to your local directory.
5. Create an initial archive file.
a. Open the archive directory in which you want to create an initial
archive file.
b. Choose "File: Create…".
c. Enter the name of your new file in the "Create File" input area.
d. Select OK.
The name of the file you created displays in the current archive
directory of SoftBench CM. If a mapped file of the same name
exists on your local system, the newly created archive file is
identical to the local file. Otherwise, the archive file contains no
data.
6. Check out archive files to a local directory.
Once you have created a mapping, you can check out files and
directories from the archive to your local system.
a. Select the archive file(s) you want to check out.
Chapter 3 93
Page 94

Using SoftBench Configuration Manager
Getting Started - A Brief Overview
b. Choose "Actions: Check Out to Local Directory".
c. Select the appropriate submenu:
If you want to edit an archive file, check it out as locked so that
you have read-write permissions and others know you are
modifying the file.
Checking a file out unlocked gives you a read-only copy of that file.
If a file with the same name exists in your local directory,
SoftBench CM overwrites it with the current archive version. If
this file does not yet exist in your local directory, SoftBench CM
creates a copy.
7. Check in files to an archive.
Once you finish modifying a file, check the file in so that the changes
are reflected in the archive.
a. Select the archive file(s) you want to check in.
b. Choose "Actions: Check In from Local Directory…".
You can include comments, revision number, and/or state.
c. Select OK.
8. Include new files or directories in the related project.
When you update your local directory from SoftBench CM, new files
or directories are not included in a SoftBench project. The files and
directories are updated only into the mapped local file system.
a. From the SoftBench main window, choose "Project: Add
File(s) to Project…" to include new files or directories in a
project.
Chapter 394
Page 95

Using SoftBench Configuration Manager
Managing the Archive System
Managing the Archive System
An archive is a file system located on a separate archive server. You use
archives to store revisions of your local files and related information,
including file revision history, descriptive text, and control attributes.
You can establish a relationship between archive files and directories
and your local system by creating mappings. (See “Creating a Mapping
between an Archive Directory and Local Directory” on page 98 for more
information.)
Browsing Local Network Servers and Archives
SoftBench CM lets you access archives on multiple servers from your
local network.
To browse a server and its associated archive:
1. Choose "Actions: Show Local Server Information…".
The "Local Server Information" dialog box displays the Host
Name for each archive directory that is set up on your local network
(see Figure 3-2).
Chapter 3 95
Page 96

Using SoftBench Configuration Manager
Managing the Archive System
Figure 3-2 Viewing Local Servers and SoftBench CM Archives
2. Select the server and archive directory you want to open and the
archive you want to browse.
3. Select Browse Archive to view the contents of this archive.
The SoftBench CM main window displays the contents of the current
archive directory (see Figure3-3).To traverse directories,double-click
on the desired directory. To move up a directory, double-click on the
"Parent" directory. If the archive is not mapped, SoftBench CM
displays a "Not mapped" message at the top of the directory display
area. (See “Creating a Mapping between an Archive Directory and
Local Directory” for more information.)
The default archive listing for the SoftBench CM main window includes:
• UNIX file permissions
• File type
• Lock status (If locked, SoftBench CM displays the name of the lock
holder)
• Archive file size
• Date of last archive modification
Chapter 396
Page 97

• File or directory name
Figure 3-3 SoftBench CM Main Window
Using SoftBench Configuration Manager
Managing the Archive System
Creating an Archive Directory
You use an archive to store revisions of your local files and make them
available to other development team members. To help better organize
projects, structure files in directories.
To create an archive directory:
1. Navigate through the current server to the area where you want to
create an archive directory.
2. Choose "Directory: Create…".
3. Enter the name of the directory you want to create in the "Create
Directory" input box.
4. Select OK.
SoftBench CM displays the name of the archive directory you created
in the main window.
Chapter 3 97
Page 98

Using SoftBench Configuration Manager
Managing the Archive System
Creating a Mapping between an Archive Directory
and Local Directory
SoftBench CM uses mappings to establish relationships between your
local files and directories and the corresponding SoftBench CM server
archive files and directories (see Figure 3-4). Before you can modify files
in an archive directory, you need to create a mapping between that
directory and a directory on your local system. The directory display area
lists the mappings that exists between the current archive directory and
your local system.
Figure 3-4 SoftBench CM File Mapping
To create a mapping:
1. Choose "Actions: Create New Mapping…".
SoftBench CM displays the "SoftCM Create Mapping" dialog box.
The current archive directory automatically appears in the "Archive
Directory" input area.
2. Enter the path of the local directory in the "Mapped to Local
Directory" input area.
3. Select OK.
The SoftBench CM window lists the local directory to which the
archive directory is mapped and displays the contents of the current
archive directory. Once a mapping exists, you can create copies of
archive files and directories on your local file system, modify the local
files, or create new files and directories.
Chapter 398
Page 99

Using SoftBench Configuration Manager
Managing the Archive System
Modifying Mappings between Local and Archive
Directories
SoftBench CM lets you view and modify existing mappings between local
and archive files and directories.
To view existing mappings, choose "Actions: Show/Modify
Mappings…". SoftBench CM displays the "Show/Modify Mappings"
dialog box (see Figure 3-5).
The upper area displays the Host and Archive Directory information for
the archives that are currently defined in your local mapping file. The
lower area displays the current mappings between local and archive
directories and the associated symbolic names (see “Creating a Default
Symbolic Name for Archive Files” on page 112). You can add, modify,
and delete all entries to your local mapping file from this dialog box.
Changes are written to your local mapping file only if you select OK or
Apply. Selecting OK writes the changes and exits the dialog box. Selecting
Apply writes the changes, but leaves the dialog box open for further
modifications. Selecting Cancel discards any changes and exits the dialog
box.
Chapter 3 99
Page 100

Using SoftBench Configuration Manager
Managing the Archive System
Figure 3-5 "Show / Modify Mappings" Dialog Box
To modify the server and archive locations:
1. Select an entry in the upper area of the "Show/Modify Mappings"
dialog box.
2. Select Modify....
3. Enter the correct server and archive information in the "Modify
Mapping" dialog box.
4. Select OK.
To modify a mapping between an archive and local directory:
1. Select the entry from the bottom window of the "Show/Modify
Mappings" dialog box.
2. Select Modify....
3. Enter the correct "Archive Directory", "Local Directory", and
Chapter 3100
 Loading...