

Page 1
HP 618 Digital Camera
HP Imaging Technology
User’s Guide
Page 2

Legal Notices
Copyright 2000 Hewlett-Packard Company. ALL RIGHTS RESERVED.
The information contained in this document is subject to change without notice.
Hewlett-Packard Company shall not be liable for errors contained herein or for
consequential damages in connection with the furnishing, performance, or use of this
material. No part of this document may be photocopied, reproduced, or translated to
another language without the prior written consent of Hewlett-Packard Company.
HP, the HP logo, JetSend, the JetSend logo, PhotoSmart, and the PhotoSmart logo are
property of Hewlett-Packard Company.
PENTAX is a trademark of Asahi Optical Co., Ltd.
The Digita camera operating system is
ALL RIGHTS RESERVED.
Digita and the Digita logo are trademarks of FlashPoint Technology, Inc.
SanDisk and CompactFlash are trademarks of SanDisk Corporation.
Adobe and Acrobat are registered trademarks of Adobe Systems Incorporated.
Microsoft and Windows are registered trademarks of Microsoft Corporation.
Apple, Macintosh, and Mac are trademarks of Apple Computer, Inc., registered in the U.S.
and other countries.
copyright 2000 FlashPoint Technology, Inc.
HP 618 Digital Camera User’s Guide 2 Legal Notices
Page 3

Table of Contents
Chapter 1: Introduction ............................................................................................................................................................. 5
Product Overview ...................................................................................................................................................... 5
What’s in this Guide .................................................................................................................................................. 6
How to Use this Guide ..............................................................................................................................................7
Related Information ..................................................................................................................................................7
Chapter 2: Preparing to Take Pictures .............................................................................................................................. 8
Accessing the Capture Mode and Powering on the Camera ............................................................... 8
Using the Status LCD ..............................................................................................................................................9
Using the Image LCD .............................................................................................................................................12
Chapter 3: Taking Pictures .................................................................................................................................................... 16
Taking Simple Point-and-Shoot Pictures .................................................................................................... 16
Taking More Advanced Pictures .......................................................................................................................17
Using the Zoom Lever ...........................................................................................................................................22
Using the Diopter Control ..................................................................................................................................22
Understanding the LEDs on the Camera .....................................................................................................23
Using Instant Review ..............................................................................................................................................25
Recording Sound .................................................................................................................................................... 26
Chapter 4: Viewing and Reviewing Images ..................................................................................................................27
Using Playback Mode ...........................................................................................................................................27
Using Review Mode ............................................................................................................................................... 30
Chapter 5: Sharing Images ...................................................................................................................................................38
Transferring Images to Your Computer .......................................................................................................38
Using a Digital Print Order Format (DPOF) File ...................................................................................... 44
JetSending Images to a Printer .......................................................................................................................46
Transmitting Images Between Two Cameras ............................................................................................ 48
Connecting the Camera to Your Television ..............................................................................................50
Chapter 6: Menu and Soft Key Reference ....................................................................................................................52
Capture Mode Menus and Soft Keys ............................................................................................................52
Playback Mode Menu and Soft Keys ............................................................................................................74
Review Mode Menus and Soft Keys ...............................................................................................................78
HP 618 Digital Camera User’s Guide 3 Table of Contents
Page 4

Chapter 7: Troubleshooting ................................................................................................................................................ 88
Troubleshooting Common Problems .......................................................................................................... 88
Contacting HP Customer Care .........................................................................................................................93
Appendix A: Using the Preferences Menu ...................................................................................................................94
Accessing the Preferences Menu ....................................................................................................................94
Setting the Display ................................................................................................................................................ 95
Controlling Camera Sounds .............................................................................................................................97
Formatting the Memory Card .......................................................................................................................... 98
Selecting the PC Connect Mode ..................................................................................................................... 98
Setting the Date and Time ................................................................................................................................. 99
Setting the Image Counter ..............................................................................................................................100
Naming Your Camera ......................................................................................................................................... 101
Selecting a Language ........................................................................................................................................ 102
Resetting Camera Settings .............................................................................................................................. 102
Appendix B: Camera and Accessories Information ...............................................................................................103
Camera Specifications ........................................................................................................................................103
Battery Life .............................................................................................................................................................. 106
HP Accessories for Powering the Camera .................................................................................................107
Storage Capacities of Memory Cards ........................................................................................................ 109
Appendix C: Product Warranties ..................................................................................................................................... 110
Limited Product Warranty ................................................................................................................................. 110
Hewlett-Packard Year 2000 Warranty ........................................................................................................ 112
Appendix D: Product Safety and Regulatory Information ................................................................................. 113
Safety Information ................................................................................................................................................ 113
Regulatory Notices ................................................................................................................................................114
Glossary .......................................................................................................................................................................................115
Index .............................................................................................................................................................................................. 125
HP 618 Digital Camera User’s Guide 4 Table of Contents
Page 5
Chapter 1: Introduction
Note: For more detailed information about the
camera’s features, see “Camera Specifications”
on page 103.
Welcome to the HP 618 Digital Camera User’s Guide. This guide will help you take high-quality
pictures quickly and easily with your HP 618 digital camera.
Product Overview
The HP 618 is a versatile, point-and-shoot digital camera. It provides these key features:
HP Imaging Technology
3x optical /2x digital zoom
Three image type settings − One Shot, Continuous, and Timelapse
Two focus modes − Auto and Manual
Three auto focus range settings − Normal, Macro, and Infinity
Six exposure settings − Auto, Landscape Program, Portrait Program, Action Program,
Aperture Priority, and Shutter Priority
Built-in flash with seven flash modes − Auto, Auto with Red-Eye Reduction, Forced On,
Forced On with Red-Eye Reduction, Forced Off, Night, and Night with Red-Eye Reduction
Three timer modes − Off, 10-Second Timer, and 3-Second Remote
Your camera comes equipped with four operating modes (see Table 1). To set the mode, turn the
camera mode dial on top of the camera to the mode you want to use.
Note: Capture, Playback, and Review modes
Tab le 1 : Camera Modes
have menus and related soft keys you can use
to change your camera’s settings and to edit
and organize images. (PC Connect mode does
Mode Use this Mode to...
not have menus or soft keys.)
Capture
Capture Take pictures (or “capture images”).
CaptureCapture
Playback
Playback
Playback Playback
Review
Review
ReviewReview
PC Connect
PC Connect Transfer images from the camera to a computer.
PC ConnectPC Connect
Chapter 1: Introduction 5 Product Overview
View the captured images in a variety of ways. You can
view images full screen, play back timelapse and grouped
image sequences, and create slideshows of images.
Sort and edit the captured images in a variety of ways. For
example, you can group, categorize, delete, and search for
captured images.
Page 6

What’s in this Guide
This User’s Guide provides all the “how to” and reference information you need to use your
camera successfully.
Part of Manual What is Covered
“Chapter 2: Preparing to Take Pictures” How to adjust settings in the status LCD, image LCD, and Capture mode
menus to prepare your camera to take pictures.
“Chapter 3: Taking Pictures” How to take simple point-and-shoot pictures, as well as more advanced
pictures. Also how to use the zoom, Instant Review, and the sound
recording features.
“Chapter 4: Viewing and Reviewing
Images”
“Chapter 5: Sharing Images” How to share images by transferring them to your computer, JetSending
“Chapter 6: Menu and Soft Key Reference” What each of your camera’s menus and related soft keys do.
“Chapter 7: Troubleshooting” How to fix common problems when using the camera, and how to contact
“Appendix A: Using the Preferences Menu” How to use the Preferences menu to change a variety of your camera’s
“Appendix B: Camera and Accessories
Information”
“Appendix C: Product Warranties” Limited product warranty and the HP Year 2000 warranty for the camera.
“Appendix D: Product Safety and
Regulatory Information”
How to view images full screen, play back timelapse and grouped image
sequences, and create slideshows of images in Playback mode. Also how
to edit, organize, delete, and search for images in Review mode.
them to a printer, transmitting them to other cameras and printers, and
viewing them on a television.
HP Customer Care for help, if needed.
general settings.
Specifications for the camera, as well as information about some of the
accessories that the camera supports.
Safety information and regulatory notices regarding the camera and
some of its accessories.
“Glossary” Definitions of the terms related to your camera that are used throughout
this guide and in the camera’s Quick Start Guide.
“Index” Where to find particular topics about your camera throughout this guide.
Chapter 1: Introduction 6 What’s in this Guide
Page 7

Note: If you choose to print this guide, be aware
that printing it in color may take a long time.
Therefore, you may want to print this guide in
black and white, instead.
Note: It is assumed that you have already used
the HP 618 Digital Camera Quick Start Guide to
install the batteries and the memory card in
your camera.
How to Use this Guide
You can use this guide online, or you can print it out. The main advantage of using it online is that
you can use its built-in searching and linking capabilities on your computer to quickly find the
information you need. Of course, an advantage of having a print-out is that you can take it anywhere
you want to use your camera. You may also prefer to read information about your camera from a
printed version, rather than on a computer screen.
This online guide is provided in Adobe
Acrobat’s searching and linking features, see the online Help for the Acrobat software.
To print this guide, select Print
button to print the entire guide, or specify the Print Range
Print from Acrobat’s File menu. In the Print dialog box, either click the OK
Print Print
®
Acrobat
®
version 4.0 (.pdf) format. To learn how to use
Print Range of pages you want and then click OK
Print RangePrint Range
Related Information
For a complete listing and description of your camera’s features, including diagrams showing the
locations of all the buttons, dials, displays, and so on, see the printed HP 618 Digital Camera Quick
Start Guide that was included with your camera. Along with helping you use your camera for the first
time to capture and view images, the Quick Start Guide also explains how to transfer images from the
camera to your computer.
To learn how to use the software that came with your camera, see the software’s online Help. All the
documentation for the software is provided in the form of online Help within the software itself.
Finally, you can get project ideas, troubleshooting assistance, and up-to-date information about
your camera and the HP Photo Imaging Software from the HP website at: www.hp.com/photosmart
Updates for your camera’s firmware are also posted to this website from time-to-time. You can
install these updates on your camera so that you can always have the most current functionality
running on it.
www.hp.com/photosmart.
www.hp.com/photosmartwww.hp.com/photosmart
OK.
OKOK
OK
OKOK
Chapter 1: Introduction 7 How to Use this Guide
Page 8

Chapter 2: Preparing to Take Pictures
Overview
You can use your camera’s default settings to take pictures in a point-and-shoot fashion, or you can
use more advanced features that you set via the camera’s status LCD and image LCD. This chapter
explains how to prepare your camera to take pictures by adjusting various settings on it.
This chapter covers the following topics:
“Accessing the Capture Mode and Powering on the Camera” on page 8
“Using the Status LCD” on page 9
“Setting the Flash Mode” on page 10
“Setting the Timer Mode” on page 11
“Setting the Auto Focus Range” on page 11
“Using the Image LCD” on page 12
“Setting the Image Type” on page 13
“Understanding the Text Message Area” on page 12
“Viewing the Camera Status” on page 14
“Using the Overlay Soft Key” on page 14
“Using the Capture Mode Menus” on page 15
“Using the 4-Way Controller” on page 15
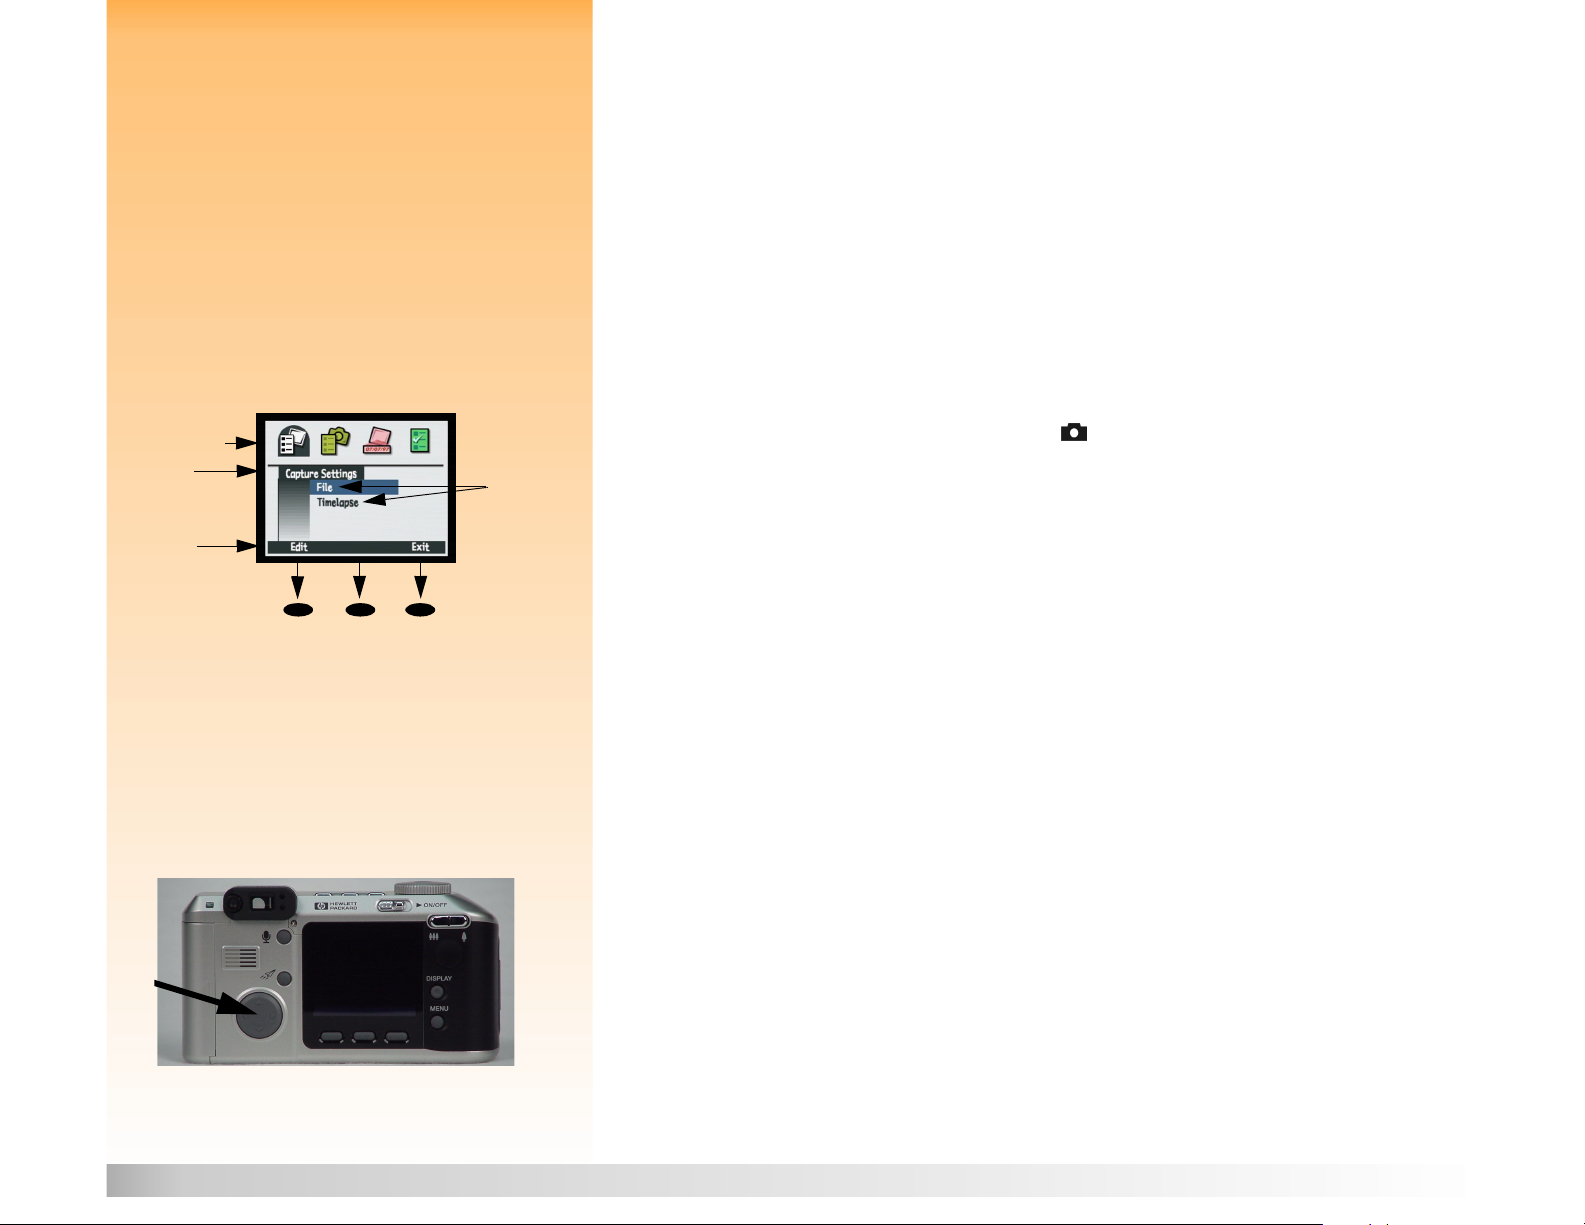
Accessing the Capture Mode and Powering on the Camera
Figure 1: Setting the Camera to Capture Mode To prepare your camera to take pictures, you must first set your camera to Capture mode and power
on the camera:
1 Turn the camera mode dial on the top of the camera to (see Figure 1).
2 Power on the camera by sliding the ON/OFF power switch on the back of the camera to the
right and releasing it. The status LCD on the top of the camera turns on and displays the status
of the camera.
Chapter 2: Preparing to Take Pictures 8 Accessing the Capture Mode and Powering on the Camera
Page 9
Battery
status
Using the Status LCD
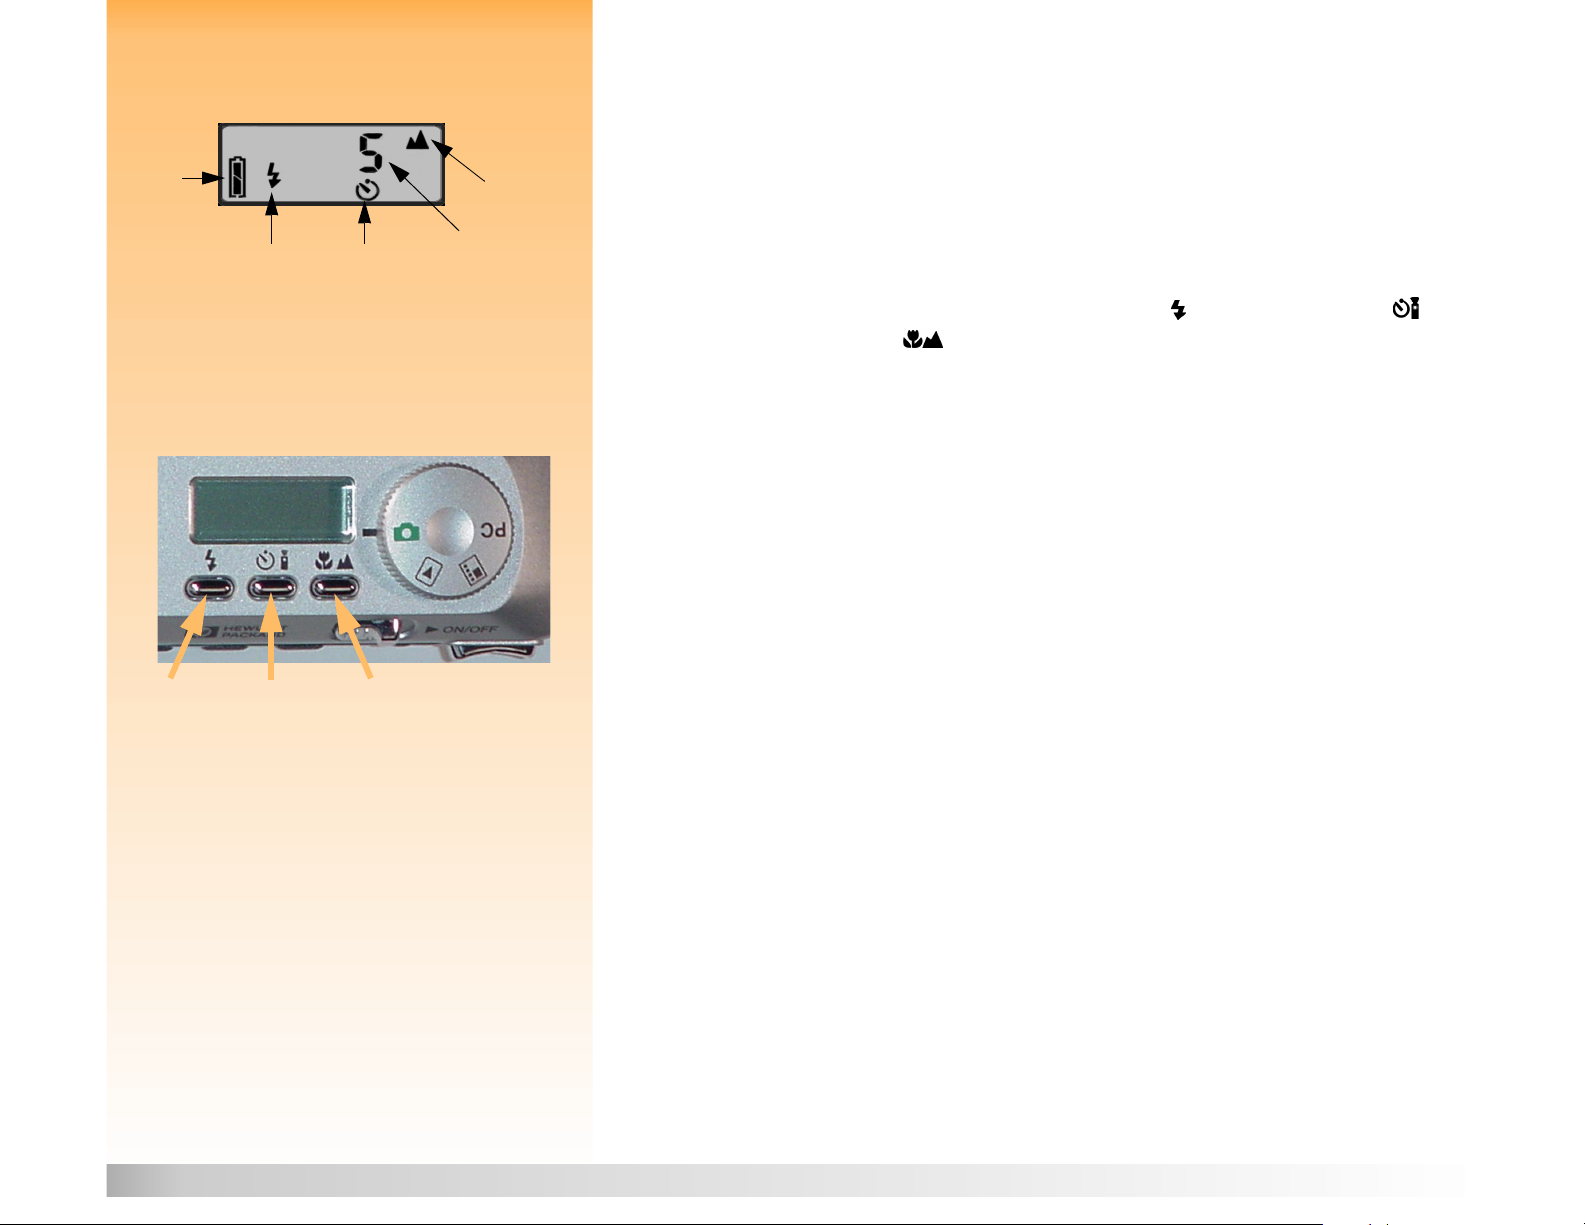
Figure 2: Status LCD Indicators The status LCD conveys important information about the camera’s status. The status LCD shows you
the status of the camera’s batteries, the settings for the flash mode, timer mode, and auto focus
range, as well as the number of pictures remaining on the memory card (see Figure 2).
The status LCD turns on every time you power on the camera. You can use the status LCD to assess
the current status of the camera, and to change the flash mode, timer mode, and auto focus range
settings when preparing to take pictures.
Flash
Timer
mode mode
Auto
focus
range
Pictures
remaining
The buttons beneath the status LCD
the auto focus range button
−
the flash mode button , the timer mode button , and
−
toggle the associated camera settings on and off within the
status LCD (see Figure 3). To change one of these settings, press the associated button until you see
the desired icon or set of icons displayed in the status LCD for the setting you want.
Figure 3: Status LCD Buttons The next three subsections explain the possible settings for the flash mode, timer mode, and auto
focus range on the camera.
Auto focus rangeTimer modeFlash mode
Note: If you see
000
flashing in the status
LCD, this means that either there is no memory
card in the camera, or the memory card is full.
Chapter 2: Preparing to Take Pictures 9 Using the Status LCD
Page 10
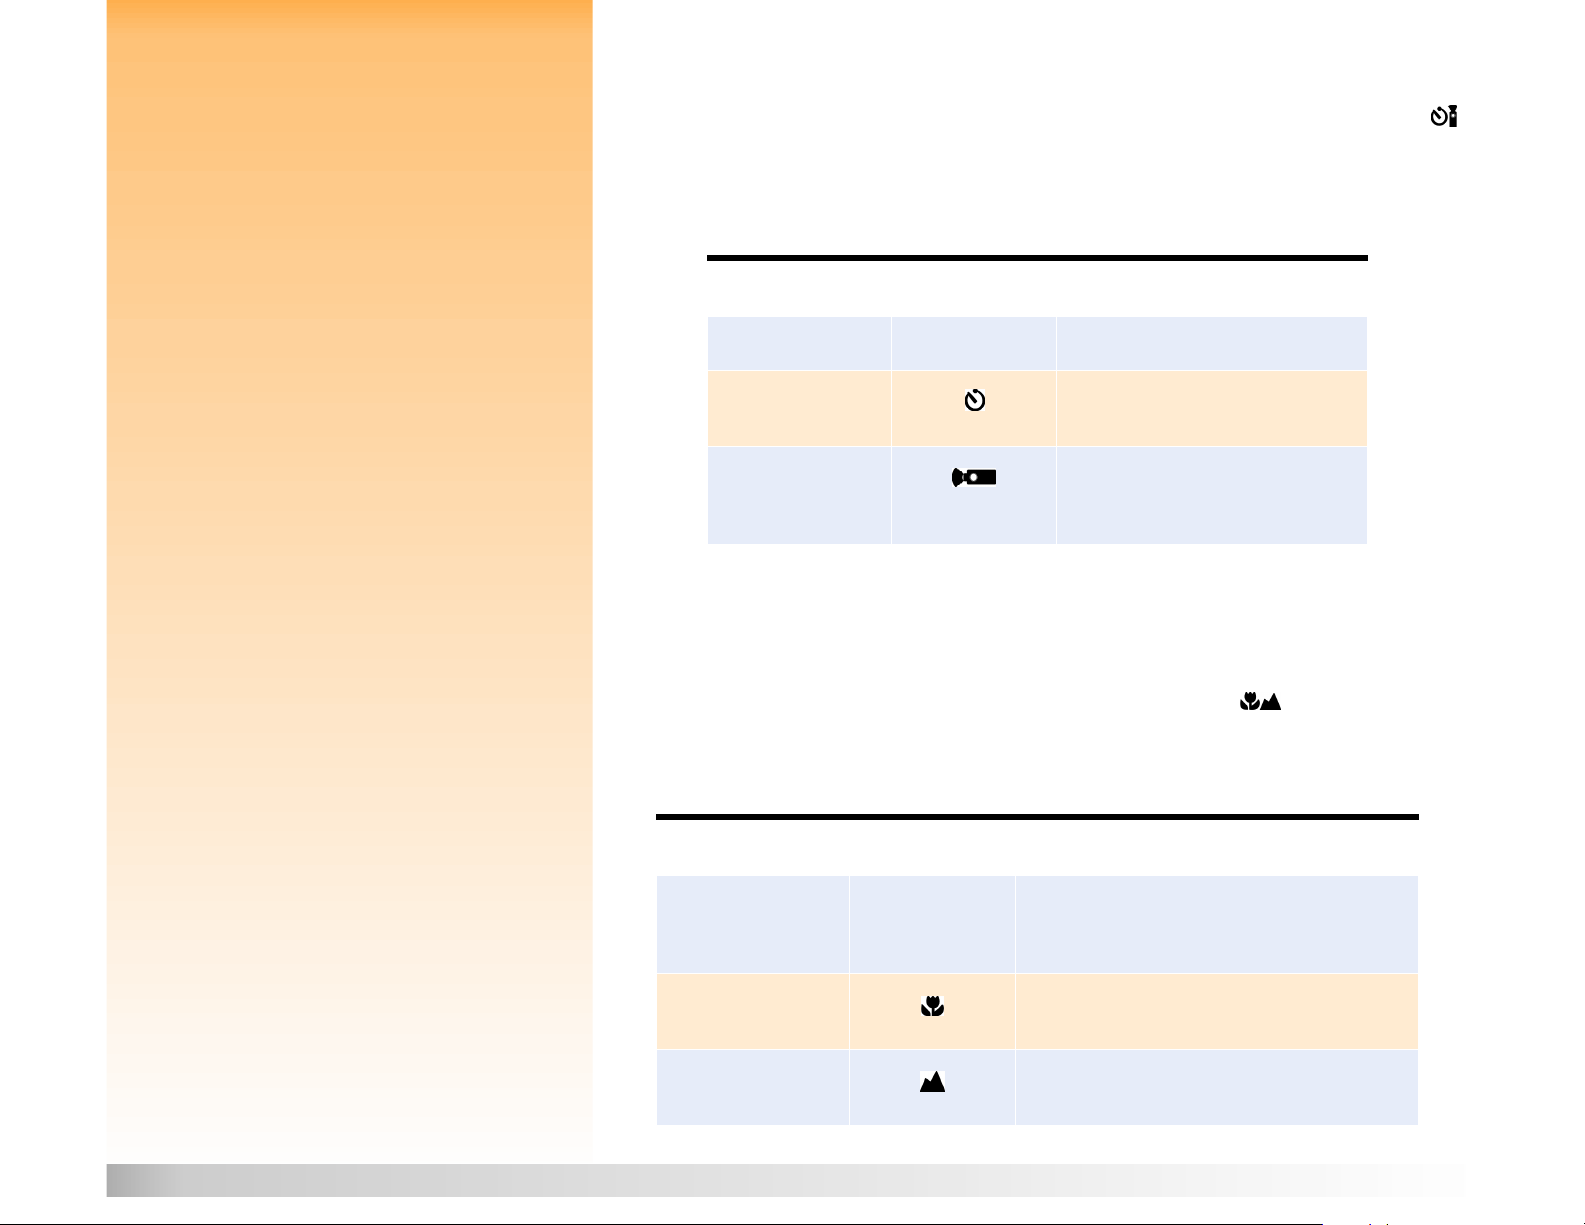
Setting the Flash Mode
Your camera has seven flash modes. The default flash mode is Auto (no icons displayed). Each mode
is displayed on the status LCD with the icon(s) shown in Table 2. To set the flash mode, press the flash
mode button beneath the status LCD to toggle through the icons on the status LCD until you see
the flash mode setting you want (see Table 2).
Note: The flash mode setting remains set
between shots, but will return to Auto after you
cycle the power on the camera (power it off and
then on again).
If the batteries’ charge is low, the camera will
not take a picture if the flash mode is set to
Forced On or Night, and it will disable the flash
if set to Auto.
Also note that flash pictures may be overexposed when using the Macro auto focus
range (see “Setting the Auto Focus Range” on
page 11). Thus, you may want to turn off the
flash (set the flash mode to Forced Off) when
taking pictures with the Macro auto focus
range setting.
Tab le 2 : Flash Mode Settings
Flash Mode Icon Displayed When to Use
Auto (default) No Icon To allow the camera to determine the need for flash
based on the lighting conditions.
Auto with Red-Eye
Reduction
Forced On To use the flash, regardless of the lighting conditions.
Forced On w ith R ed- Eye
Reduction
Forced Off To take pictures without flash, regardless of the
Night To use a slow sync mode of the flash in which the
To allow the camera to determine the need for flash
based on the lighting conditions. When flash is used,
red-eye reduction minimizes the occurrence of redeye in pictures of people or animals by flashing twice.
To use the flash, regardless of the lighting conditions.
Red-eye reduction minimizes the occurrence of redeye in pictures of people or animals by flashing twice.
lighting conditions.
camera collects the image background with the
available light and flashes to illuminate the
foreground of the image.
Night with Red-Eye
Reduction
To use a slow sync mode of the flash in which the
camera collects the image background with the
available light and flashes to illuminate the
foreground of the image. Red-eye reduction
minimizes the occurrence of red-eye in pictures of
people or animals by flashing twice.
Chapter 2: Preparing to Take Pictures 10 Using the Status LCD
Page 11
Setting the Timer Mode
Note: The 10-Second Timer mode is disabled
for the Timelapse image type. (See “Setting the
Image Type” on page 13.)
Note: After each timed exposure in 10-Second
Timer mode, the camera will default to the Off
timer mode setting. You must reset the timer to
take another timed picture. In contrast, the
3-Second Remote timer mode setting remains
set shot-to-shot.
Note: The auto focus range remains set
between shots, but returns to Normal after you
cycle the power on the camera (power it off and
then on again).
If you change the focus mode from Auto to
Manual Focus in the Photo Assist menu (see
“Using the Capture Mode Menus” on page 15),
the auto focus range is cancelled.
Your camera has three timer modes. The default timer mode is Off. Each mode is displayed on the
status LCD with the icon shown in Table 3. To set the timer mode, press the timer mode button
beneath the status LCD to toggle through the icons on the status LCD until you see the timer setting
you want (see Table 3).
Tab le 3 : Timer Mode Settings
Timer Mode Icon Displayed When to Use
Off (default) No Icon To take pictures without using the timer.
10-Second Timer To take a picture 10 seconds after
pressing the shutter release button.
3-Second Remote To use the remote infrared trigger on the
HP Remote Control (included with the
camera), which has a 3-second delay.
Setting the Auto Focus Range
You can choose from three auto focus ranges that are available via the status LCD. The default auto
focus range is Normal. Each range setting is displayed on the status LCD with the icon shown in
Table 4. To set the auto focus range, press the auto focus range button beneath the status LCD
to toggle through the icons on the status LCD until you see the setting you want (see Table 4).
Tab le 4 : Auto Focus Range Settings
If you set the camera to the Macro auto focus
Auto Focus Range Icon Displayed When to Use
range, the image LCD will turn on. This is
because you will be unable to frame an image
properly in the viewfinder due to parallax error.
Normal (default) No Icon To take a picture of a subject that is within the normal
focus range (neither close-up nor in the distance).
The focus range is set from 0.5 meters to infinity.
Finally, if the camera cannot focus when set to
the Normal auto focus range, it will make a
“best guess” at the focus and take the picture.
Macro To take a close-up picture of a subject, such as a flower.
The focus range is set from 0.1 to 0.6 meters.
However, if it cannot focus when set to Macro, it
will not take a picture.
Chapter 2: Preparing to Take Pictures 11 Using the Status LCD
Infinity To take a picture of a subject in the distance, such as a
mountain range. The focus range is set at infinity.
Page 12

Using the Image LCD
Figure 4: Image LCD Screen in Live View Turn the image LCD on by pressing the DISPLAY button on the back of the camera. You now see the
To p
overlay bar
shows status
Bottom
overlay bar
shows soft key
labels
Note: By default, the image LCD is turned off
when you power on the camera in Capture
mode. If you want the image LCD to always turn
on instead, you can change the setting in the
Display submenu of the Preferences menu. (See
“Display Submenu” on page 67 and “Setting
the Display” on page 95.)
However, note that the image LCD uses a lot of
battery power. If you are running your camera
on batteries rather than with the HP-approved
AC power adapter, you may want to limit your
use of the image LCD.
Soft keys
live view of Capture mode on the image LCD. Live view lets you preview the pictures you can take
with the camera, as well as view and change some of the camera’s settings.
The image LCD screen in the live view of Capture mode includes two opaque overlay bars and an
image area in the center for viewing your picture subjects (see Figure 4). The top overlay bar displays
status information about the camera while you are taking pictures. The bottom overlay bar contains
labels that describe the function of the soft keys immediately below them. For example, if you press
the right (Status) soft key in Capture mode, the Status screen displays. To turn the overlay bars off or
on, press the middle (Overlay) soft key.
You can also use the image LCD to access menus to change camera settings in the Capture,
Playback, and Review modes, and to play back and review captured images in the Playback and
Review modes, respectively. The image LCD is disabled in PC Connect mode.
The following subsections provide more information about the overlay bars and the soft keys in the
live view of Capture mode.
Understanding the Text Message Area
The text message area is a one-line text area in the middle of the top overlay bar. An example text
message is: “Battery Low.” The following indicators will also appear in the text message area when
you change certain settings in the Capture mode menus. For information on using the Capture mode
menus to change camera settings, see “Using the Capture Mode Menus” on page 15.
Exposure Mode Indicator
When you set the Exposure Mode in the Photo Assist menu to either Landscape Program, Portrait
Program, or Action Program, the current Exposure Mode is displayed in the text message area.
Note: For information on setting the Exposure
Mode, see “Exposure Mode Submenu” on
page 56.
Aperture Value and Shutter Speed Indicators
When you set the Exposure Mode in the Photo Assist menu to Aperture Priority (Av) or Shutter
Priority (Tv), the current aperture value and shutter speed are displayed in the text message area (for
example: Tv 1/125 F5.6). The aperture value and shutter speed will update automatically and change
continually as the camera zooms and measures the exposure. When the camera cannot set the
correct exposure because you have selected an aperture or shutter speed that is too big or small, the
line in the text message area will turn red.
Manual Focus Distance
Note: For information on setting the Focus
Mode, see “Focus Mode Submenu” on page 59.
Chapter 2: Preparing to Take Pictures 12 Using the Image LCD
When you set the Focus Mode in the Photo Assist menu to Manual Focus, the focus distance appears
on the left side of the text message area.
Page 13

Note: For the Timelapse image type, you can
set the number of images that will be captured
and the interval between them in the Timelapse
Settings submenu of the Capture Settings
menu. (See “Timelapse Settings Submenu” on
page 54.)
Also note that if the interval you set for
Timelapse image capture is long, the camera
may go into sleep mode (shutting off the image
LCD) between taking pictures to conserve
battery power.
Macro and Infinity Auto Focus Range Indicators
When the auto focus range is set to Macro, a Macro icon is displayed on the right side of the text
message area. When the auto focus range is set to Infinity, INF is displayed.
Digital Zoom Indicator
When the camera is in digital zoom, the digital zoom icon is displayed on the right side of the text
message area. For information on digital zooming, see “Using the Zoom Lever” on page 22.
Setting the Image Type
Your camera can take three types of pictures (that is, three “image types”):
One Shot
Continuous
Timelapse
The image type is displayed at the left side of the bottom overlay bar in the live view of Capture
mode. Image type settings are listed in Table 5. The default image type is One Shot. To set the image
type, press the left soft key to toggle through the types until you see the image type setting you
want (see Table 5).
Tab le 5 : Image Type Settings
Image Type When to Use How to Use
One Shot (default) When capturing a single image. Press and release the shutter release
button to capture a single image.
Finally, if you set the Timelapse interval to 15 or
30 sec and you have the File Type set to TIFF,
the camera may skip capturing an image if it is
not finished processing the previous image in
Continuous When capturing a series of
images in rapid succession.
Recommended for action shots.
Hold the shutter release button down.
Continuous images are captured until
you release the button or until the
memory card is full.
the Timelapse sequence.
Timelapse When capturing a slow process
with a series of images.
Chapter 2: Preparing to Take Pictures 13 Using the Image LCD
Press and release the shutter release
button, and the camera captures the first
image. Then it displays a countdown to
the next image capture on the top
overlay bar. To cancel, press the Stop
soft key.
Page 14

Using the Overlay Soft Key
Press the middle (Overlay) soft key to turn both overlay bars off in the live view of Capture mode. To
turn the overlay bars on again, press any of the three soft keys. When the overlay bars are off, the
soft keys are disabled for their normal functions and are, instead, enabled only to turn the overlay
bars on again.
Viewing the Camera Status
Figure 5: Status Screen You can press the right (Status) soft key while in the live view of Capture mode to display the Status
screen (see Figure 5). This screen allows you to check the current camera status, such as the current
resolution, quality, and white balance settings. (To change these settings, use the Capture mode
menus. See the next subsection for details.) One or more icons may also appear on the Status
screen, including:
means that a memory card is inserted in the camera.
means that the current auto focus range setting is Macro.
shows the battery status.
The following status information is provided:
Resolution
Quality
White Balance
EV Comp
ISO Speed
AE Metering
Version
Resolution setting for capturing images (Full Size or 1/4)
Quality setting for capturing images (Good, Better, or Best for the JPEG file
type, or TIFF for the TIFF file type)
Color correction setting to make white areas appear white with no color cast
Exposure Value compensation setting for exposure control
ISO Speed setting
Auto Exposure Metering setting
The version number of your camera’s firmware
To exit the Status screen and return to the live view of Capture mode, press the right (Exit) soft key.
Chapter 2: Preparing to Take Pictures 14 Using the Image LCD
Page 15
Note: For more information about all of the
Capture mode menus and related soft keys, see
“Chapter 6: Menu and Soft Key Reference”
starting on page 52.
Using the Capture Mode Menus
Your camera has four Capture mode menus:
Capture Settings
Photo Assist
Image Stamp
Preferences
For more information about the Preferences
menu, see “Appendix A: Using the Preferences
Menu” starting on page 94.
Figure 6: Parts of a Menu To access the Capture mode menus:
Menu icons
Current
menu’s title
Overlay
bar
Soft keys
Menu
options
The Capture Settings, Photo Assist, and Image Stamp menus have settings you can change which
affect the images you capture. The Preferences menu allows you to change a variety of your
camera’s general settings.
1 Set the camera mode dial to Capture mode .
2 Power on the camera if you haven’t already.
3 Press the MENU button on the back of the camera. The Capture mode menus are displayed on
the image LCD (see Figure 6).
4 Press the right or left arrow on the 4-way controller to move across the menu icon bar to access
a particular menu. (See the next subsection, “Using the 4-Way Controller.”)
5 Press the down or up arrow on the 4-way controller to move the highlight to the menu option
you want to select.
6 Press the left soft key to select the highlighted menu option.
Figure 7: 4-Way Controller
Chapter 2: Preparing to Take Pictures 15 Using the Image LCD
Using the 4-Way Controller
The 4-way controller is the large button located on the back of your camera (see Figure 7). Press an
arrow on the 4-way controller to move in the direction of that arrow (up, down, right, or left) in the
image LCD, such as within the menu structures of the Capture, Review, or Playback modes.
Page 16

Chapter 3: Taking Pictures
Overview
Once you have set your camera to Capture mode and you have a basic understanding of how to use
your camera’s status LCD and image LCD (see “Chapter 2: Preparing to Take Pictures” starting on
page 8), you are ready to take pictures. To optimize your camera’s capabilities, it is important to
understand how to use the zoom lever, what the various LEDs mean when they light solid or blink,
how to use Instant Review, and how to use the sound recording features when taking pictures.
This chapter covers the following topics:
“Taking Simple Point-and-Shoot Pictures” on page 16
“Taking More Advanced Pictures” on page 17
“Using Focus Lock” on page 18
“Shooting a One Shot Image” on page 19
“Shooting Continuous Images” on page 20
“Shooting Timelapse Images” on page 21
“Using the Zoom Lever” on page 22
“Using the Diopter Control” on page 22
“Understanding the LEDs on the Camera” on page 23
“Using Instant Review” on page 25
“Recording Sound” on page 26
Taking Simple Point-and-Shoot Pictures
Note: These instructions for taking simple
point-and-shoot pictures assume that your
camera is set to the default image type (One
Shot), and that Instant Review is on as well.
(See “Setting the Image Type” on page 13 and
“Using Instant Review” on page 25 for more
information.)
Chapter 3: Taking Pictures 16 Taking Simple Point-and-Shoot Pictures
Here is the simplest method for taking pictures with your camera:
1 Set the camera mode dial to the Capture mode .
2 Power on the camera if you haven’t already.
3 Look through the viewfinder to select and frame a subject for your picture.
Page 17

4 Press the shutter release button. Wait for the shutter sound, indicating the camera has captured
the image. Then release the button.
The captured image appears for a 3-second Instant Review period on the image LCD. If you are
happy with it, do nothing, and the image will be saved on the memory card. If not, you can
delete the image while it is still displayed in Instant Review by pressing the middle (Delete)
soft key.
Taking More Advanced Pictures
As explained in Chapter 2: “Preparing to Take Pictures,” your camera has more advanced features
that you can set via your camera’s status LCD and image LCD. Here is the general procedure for
taking more advanced pictures:
1 Set the camera mode dial to the Capture mode .
2 Power on the camera if you haven’t already.
3 Set the flash mode, timer mode, and/or the auto focus range via the status LCD buttons on the
top of the camera, as desired. (For information on these settings, see “Using the Status LCD” on
page 9.) The settings you choose are displayed in the status LCD.
4 Press the DISPLAY button on the back of the camera to turn the image LCD on.
5 Press the left soft key to set the image type (One Shot, Continuous, or Timelapse). (For more
information, see “Setting the Image Type” on page 13.) The image type you choose is displayed
on the left side of the bottom overlay bar in the image LCD.
6 Press the MENU button on the back of the camera to display the Capture mode menus on the
image LCD, if you wish to change any of the default camera settings in the menus.
7 Select the menu options you wish to change in the Capture Settings, Photo Assist, and/or Image
Stamp menus, and then make the changes to the camera settings within those menus, as
desired. (For information about changing settings in these Capture mode menus, see“Capture
Mode Menus and Soft Keys” on page 52.)
For example, if you have set the camera to the Timelapse image type, then you might want to
change the default settings in the Timelapse menu option of the Capture Settings menu. In this
case, you could change the number of images and/or the interval between them for the timelapse sequence that you want to shoot.
Chapter 3: Taking Pictures 17 Taking More Advanced Pictures
Page 18

8 Press the right (Exit) soft key to exit the Capture mode menus.
Note: The image LCD uses a lot of battery
power. If you are running your camera on
batteries rather than with the HP-approved AC
power adapter, you may want to limit your use
of the image LCD and use the viewfinder
instead. To turn the image LCD off, press the
DISPLAY button on the back of the camera.
9 Use the image LCD or the viewfinder to select and frame the subject for your picture. If needed,
use the zoom lever (see page 22) to adjust the focal length of the camera lens to zoom in or out
on the picture subject. You can also use the diopter control (see page 22) when looking through
the viewfinder to adjust the focus of the picture subject in the viewfinder. Note that the diopter
control has no effect on the image you capture, however.
If you cannot obtain focus on your picture subject, see the next subsection, “Using Focus Lock.”
Otherwise, go on to the “What’s Next?” subsection.
Using Focus Lock
If you cannot obtain focus on your picture subject, use Focus Lock as follows to get the proper focus:
1 If the main subject of your picture is:
Not within the center of the viewfinder frame or image LCD screen, center the main subject
of your picture in the center of the viewfinder frame or image LCD screen. Go on to step 2.
Near a very bright or dark area, or is behind another object (such as a screen or fence) which
overlaps the subject, focus the camera on another object the same distance from you as the
subject. Go on to step 2.
2 Press the shutter release button halfway down and continue to hold it halfway down. This locks
the focus.
3 Without releasing the shutter release button, recompose the picture as you originally wanted it,
and then press the shutter button all the way down to take the picture. (Also see the following
subsections for how to take pictures for each image type.)
What’s Next?
What you need to do next to actually take a picture depends on the image type you have selected,
and whether or not you have set a timer mode. The following subsections describe how to capture
the image(s), as well as what occurs once you do, for each image type setting.
Chapter 3: Taking Pictures 18 Taking More Advanced Pictures
Page 19

Shooting a One Shot Image
If you are using the:
Shutter release button with no timer mode set
Shutter release button with no timer mode set, press the shutter release button. Wait for the
Shutter release button with no timer mode setShutter release button with no timer mode set
shutter sound, indicating the camera has captured the image. Then release the button.
10-Second Timer
10-Second Timer mode
10-Second Timer10-Second Timer
front of the camera (see page 24) lights solid for 7 seconds. It then blinks for the final 3 seconds
before the camera captures the image.
3-Second Remote
3-Second Remote
3-Second Remote3-Second Remote
and release the Remote Control’s trigger button. The timer LED on the front of the camera (see
page 24) blinks faster for 3 seconds. Then the camera captures the image.
If Instant Review is on (see “Using Instant Review” on page 25), you can do any of the following while
the image you just captured is displayed in Instant Review on the image LCD:
Record sound that will be attached to this image. For information on how to do this, see
“Recording Sound” on page 26.
Delete the image by pressing the middle (Delete) soft key.
mode, press and release the shutter release button. The timer LED on the
modemode
timer mode
timer mode, point the HP Remote Control at the camera, and press
timer modetimer mode
Save the image to the memory card and return to the Capture mode immediately by pressing
the right (Exit) soft key.
Do nothing and, when Instant Review times out (the default time-out is 3 seconds), the image is
then saved to the memory card automatically.
Chapter 3: Taking Pictures 19 Taking More Advanced Pictures
Page 20

Shooting Continuous Images
Note: If you set the timer mode to 10-Second
Timer or 3-Second Remote for the Continuous
image type, you can only take one picture.
Therefore, to capture a Continuous sequence of
images, use the shutter release button with no
timer mode set (that is, with the timer mode set
to its default Off setting).
Note: If Instant Review is on, each image in a
Continuous sequence except for the final one is
automatically saved to the memory card before
the camera captures the next image in the
sequence. If Instant Review is off, each image is
automatically saved before the next one is
captured, and then the final one is saved
automatically, as well.
Also note that, unlike Timelapse images,
Continuous images are not grouped together
but are individual images. Thus, they are saved
as individual images on the memory card.
Press the shutter release button and continue to hold the button down. Then the camera begins to
capture the images in the Continuous sequence.
Continuous images are captured until you release the shutter release button, or the memory card
becomes full, whichever comes first.
The camera will capture images as fast as it can. The capture rate (that is, the time between pictures)
will vary depending on the processing required (for such things as the resolution and image quality
settings) before each image is saved to the memory card (see the second Note on the left). The
capture rate also depends on whether or not the flash is being charged between shots. If you wish to
increase the capture rate of Continuous images, you can turn the live view of Capture mode off by
pressing the DISPLAY button on the back of the camera, turn Instant Review off through the
Display menu option in the Preferences menu of Capture mode (see “Display Submenu” on page
67), and set the flash mode to Forced Off (see “Setting the Flash Mode” on page 10).
If Instant Review is on (see “Using Instant Review” on page 25). at the end of taking a Continuous
sequence of images, the final image of the sequence is displayed in the Instant Review on the image
LCD. You can do any of the following during the Instant Review period:
Record sound that will be attached to the final image of the sequence. For information on how
to do this, see “Recording Sound” on page 26.
Delete the final image of the sequence by pressing the middle (Delete) soft key. (All of the
other images in the sequence were already saved to the memory card.)
Save the final image of the sequence to the memory card and return to the Capture mode
immediately by pressing the right (Exit) soft key. (All of the other images in the sequence were
already saved to the memory card.)
Do nothing and, when Instant Review times out (the default time-out is 3 seconds), the final
image of the sequence is then saved to the memory card automatically.
Note: If you are unhappy with any other
images within a Continuous sequence (rather
than just the final image, which you can only
delete during Instant Review), you can delete
those images in the Review mode. To do this,
see “Deleting Images” on page 32.
Chapter 3: Taking Pictures 20 Taking More Advanced Pictures
Page 21

Shooting Timelapse Images
Note: The 10-Second Timer mode is disabled
for the Timelapse image type.
Note: If the interval you set for Timelapse
image capture is long, the camera may go into
sleep mode (shutting off the image LCD)
between taking pictures to conserve
battery power.
Also, if you set the Timelapse interval to 15 or
30 sec and you have the File Type set to TIFF,
the camera may skip capturing an image if it is
not finished processing the previous image in
the Timelapse sequence.
If you are using the:
Shutter release button with no timer mode set
Shutter release button with no timer mode set, press and release the shutter release button
Shutter release button with no timer mode setShutter release button with no timer mode set
one time. Then the camera captures the first image of the Timelapse sequence.
3-Second Remote
3-Second Remote
3-Second Remote3-Second Remote
and release the Remote Control’s trigger button one time. The timer LED on the front of the
camera (see page 24) blinks faster for 3 seconds. Then the camera captures the first image of the
Timelapse sequence.
The settings in the Timelapse menu option of the Capture Settings menu determine the number of
pictures that are taken and the interval between pictures in the Timelapse sequence of images that
are captured. (To change the Timelapse settings, see “Timelapse Settings Submenu” on page 54.)
The image LCD displays the previously captured image while counting down to the next image
capture. The only option you have is to stop the Timelapse sequence by pressing the right (Stop)
soft key.
If Instant Review is on (see “Using Instant Review” on page 25). at the end of taking a Timelapse
sequence of images, the first image in the sequence is displayed in the Instant Review on the image
LCD. You can do any of the following during the Instant Review period:
timer mode
timer mode, point the HP Remote Control at the camera, and press
timer modetimer mode
Note: If you are unhappy with one or more
images within a Timelapse sequence, you can
delete only those images in the Review mode
(rather than deleting all of the images in the
sequence during Instant Review). To do this, see
“Deleting Images” on page 32.
Note: All images in a Timelapse sequence are
saved as one group on the memory card.
Record sound that will be attached to the first image of the sequence. For information on how to
do this, see “Recording Sound” on page 26.
Delete all of the images in the sequence by pressing the middle (Delete) soft key.
Save all of the images in the sequence to the memory card and return to the Capture mode
immediately by pressing the right (Exit) soft key.
Do nothing and, when Instant Review times out (the default time-out is 3 seconds), all of the
images in the sequence are then saved to the memory card automatically.
What’s Next?
The following sections provide more information about various features of your camera that you
can use when taking pictures (such as the zoom), or that provide you with important feedback on the
status of your camera while you are taking pictures (such as the LEDs). Once you have read through
the following sections, continue on to Chapter 4 to learn how to view and review the images you
have captured via the camera’s Playback and Review modes.
Chapter 3: Taking Pictures 21 Taking More Advanced Pictures
Page 22
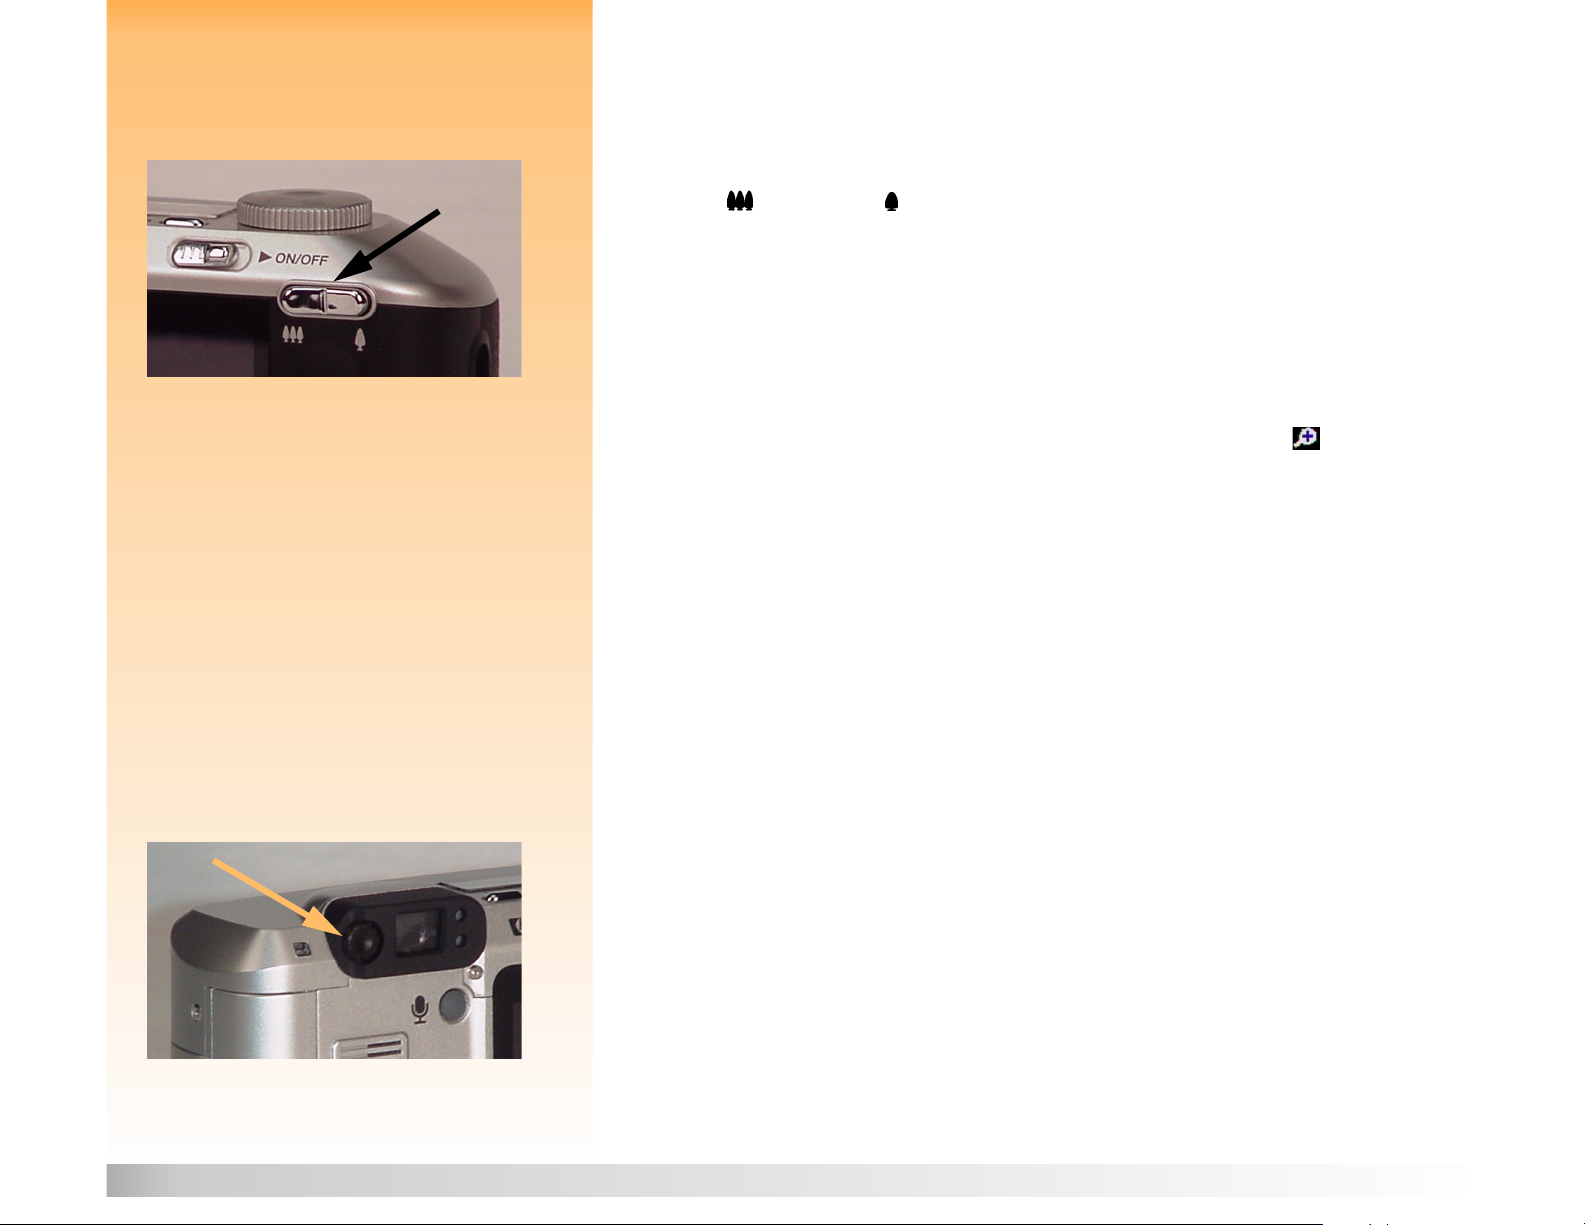
Figure 8: Zoom Lever
Note: In digital zoom mode, enlargement is
accomplished without changes in the lens
configuration. Since the lens is not involved
in digital zoom, the changes appear only in
the image LCD; they are not evident through
the viewfinder.
Using the Zoom Lever
While you are framing the subject for a picture, you will likely find that you need to zoom in or out
on the subject. This section explains the camera’s zoom lever, which you can use for this purpose.
Rocking the zoom lever (see Figure 8) left and right moves the lens continuously between wide
angle and telephoto focal lengths for optical zooming.
The zoom lever also controls digital zooming. Digital zooming refers to digital cropping of the
image, giving the appearance of greater zoom. After the optical zoom is at its maximum setting, you
can digitally zoom in three steps (see below). Note, however, that you must have the image LCD on
for the digital zoom to operate. (To turn the image LCD on, press the DISPLAY button on the back of
the camera.)
If the image LCD is turned on and the camera’s zoom is at the end of the telephoto range, releasing
and pressing the zoom lever will initiate digital zooming. A digital zoom icon will appear in the
text message area of the image LCD’s top overlay bar. Digital zooming occurs in three steps:
1.2x
1.5x
2x
The camera pauses for 250 milliseconds (1/4 second) between steps. Digital zoom remains set shotto-shot, but turns off when you cycle the power on the camera. It also turns off any time you exit the
live view of Capture mode (for example, you press the MENU button on the camera to display the
Capture mode menus, or you turn the camera mode dial to set the camera to another mode).
To exit the digital zoom, you can also press, release, and then re-press the zoom lever in the wide
angle direction.
Figure 9: Diopter Control
Note: The diopter control does not affect the
captured image itself.
Chapter 3: Taking Pictures 22 Using the Zoom Lever
Using the Diopter Control
The diopter control (see Figure 9) is the small dial on the left side of the viewfinder that you can turn
to adjust the focus of the picture subject in the viewfinder. Note that the diopter control has no effect
on the image you capture, however.
Page 23
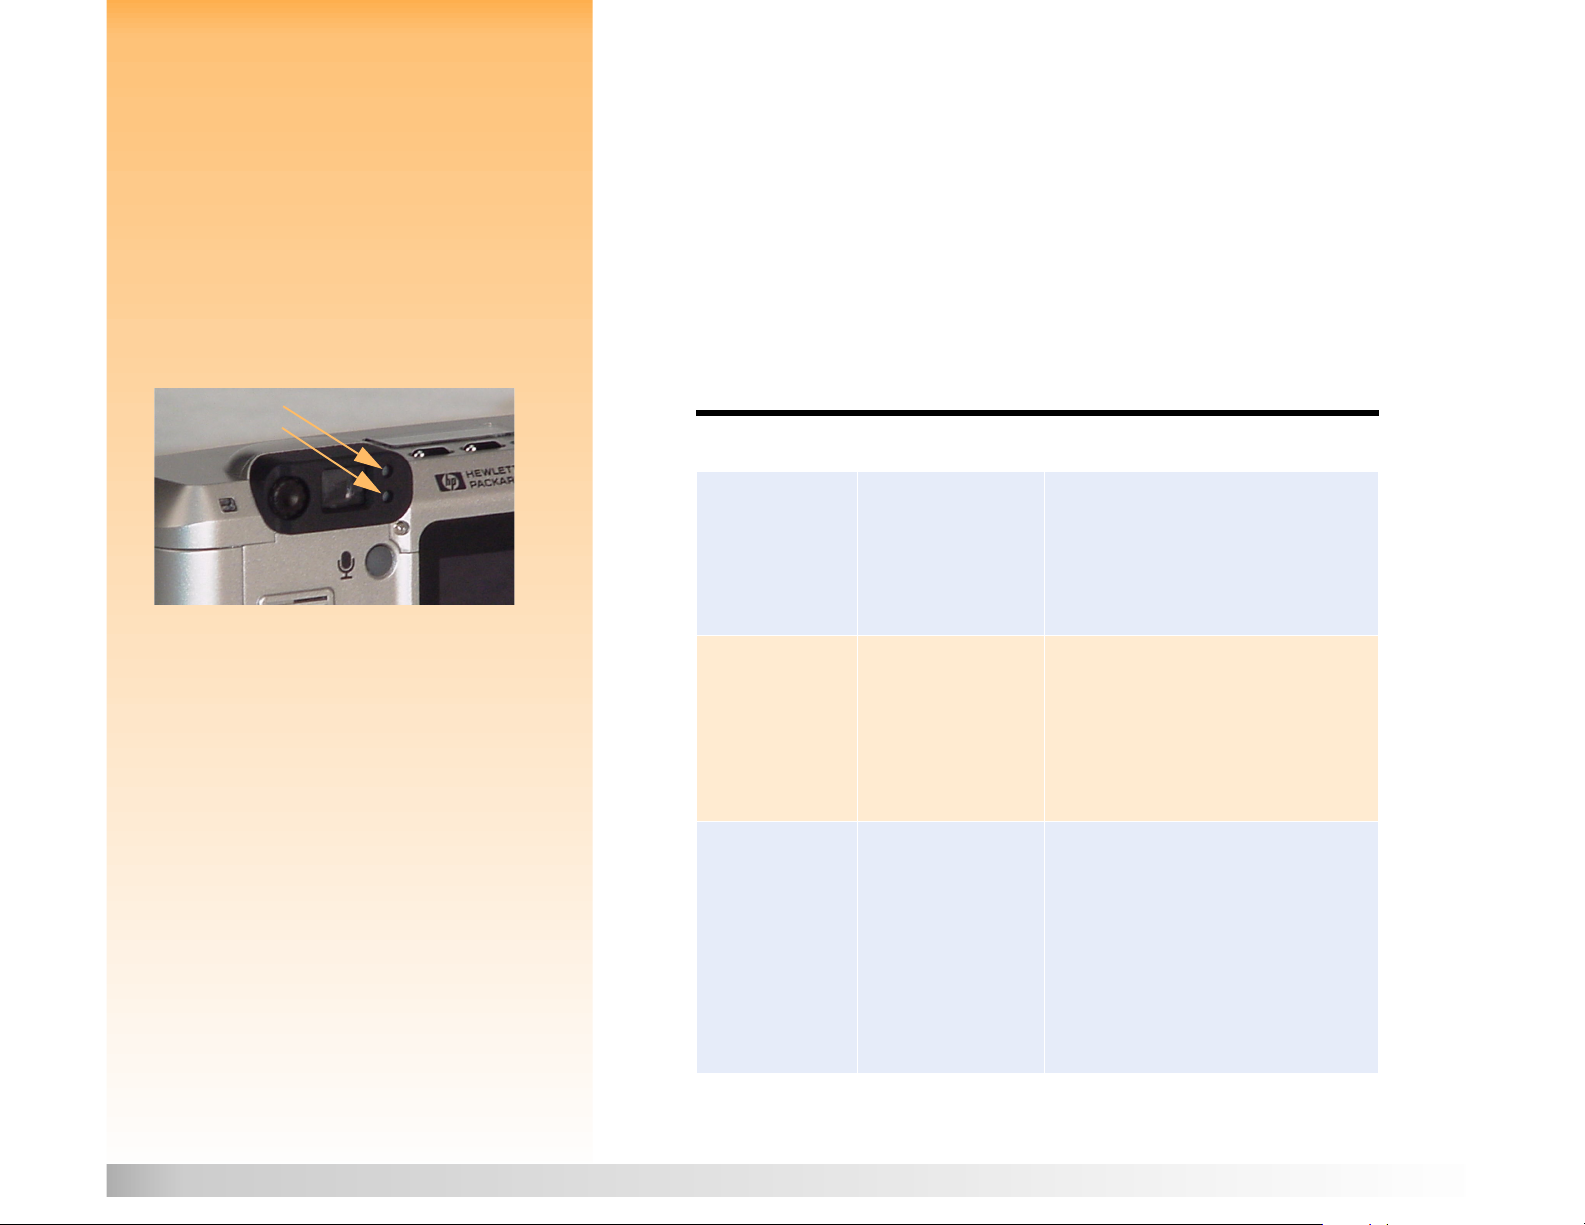
Understanding the LEDs on the Camera
Your camera has several LEDs (Light Emitting Diodes) that light solid or blink to indicate that certain
actions are occurring within the camera, or particular problems may have occurred while you were
performing a particular task with the camera. This section describes what these LEDs are and how
they behave.
Viewfinder LEDs
The LEDs on the right side of the viewfinder (see Figure 10) display either a green light, red light, or
both, indicating either the focus status, flash status, a memory card problem, or that the camera is
processing an image and is not ready to take a picture.
Figure 10: Viewfinder LEDs Tab le 6 : Viewfinder LEDs
Green
Red
LED Function Behavior
Green (Top) Indicates focus status Lights solid when the shutter release button
is pressed halfway down to indicate that the
picture is ready to take.
Blinks when the camera cannot focus on the
picture subject.
Red (Bottom) Indicates flash status Lights solid when the shutter release button
is pressed halfway down to indicate that the
flash is charged and ready to fire.
Blinks when the shutter release button is
pressed halfway down to indicate that the
flash is charging.
Both Indicate a memory
card problem, or
that the camera is
processing an image
and is not ready to
take a picture
In the event of a full or m issing memory card,
both LEDs blink when you press the shutter
release button halfway down. In this case,
000 will also blink on the status LCD.
In the event of a bad or unformatted memory
card, or when the camera is processing an
image and is not ready to take a picture,
both LEDs blink when you press the shutter
release button halfway down.
Chapter 3: Taking Pictures 23 Understanding the LEDs on the Camera
Page 24

Timer LED
Figure 11: Timer LED The red timer LED on the front of the camera (see Figure 11) lights solid and/or blinks depending on
the timer mode you set (see “Setting the Timer Mode” on page 11). If you set the timer mode to the:
10-Second Timer setting
10-Second Timer setting, when you press and release the shutter release button, the timer LED
10-Second Timer setting10-Second Timer setting
lights solid for 7 seconds. It then blinks for the final 3 seconds before the camera captures
the image.
3-Second Remote setting
3-Second Remote setting, the timer LED blinks slowly while waiting for you to press the
3-Second Remote setting3-Second Remote setting
Remote Control’s trigger button. Once you press the trigger button, the timer LED blinks faster
for 3 seconds before the camera captures the image.
Memory Card Access LED
Figure 12: Memory Card Access LED The amber memory card access LED on the back of the camera (see Figure 12) blinks whenever the
camera is reading from or writing to the memory card.
Caution: Make sure the camera is powered off
any time you remove the memory card from
the camera. Removing the memory card when
the memory card access LED is blinking could
corrupt the images and other files on the
memory card.
Chapter 3: Taking Pictures 24 Understanding the LEDs on the Camera
Page 25

Using Instant Review
The Instant Review feature allows you to see displayed on the image LCD either the One Shot image,
the final image of a Continuous image sequence, or the first image of a Timelapse sequence you just
captured. The default setting is that Instant Review is on for 3 seconds after the One Shot image or
the final image in a Continuous or Timelapse sequence is captured.
You can change the duration that the image is displayed in Instant Review or turn Instant
Review off through the Display menu option in the Preferences menu of Capture mode. (See
“Display Submenu” on page 67 and “Setting the Display” on page 95.)
Note: When Instant Review is set to Off, the
camera immediately returns to Capture mode,
and the captured image or sequence of images
is automatically saved to the memory card.
Note: If you are unhappy with any other
images within a Continuous sequence (rather
than just the final image, which you can only
delete during Instant Review), you can delete
those images in the Review mode. To do this,
see “Deleting Images” on page 32.
Similarly, if you are unhappy with one or more
images within a Timelapse sequence, you can
delete only those images in the Review mode
(rather than deleting all of the images in the
sequence during Instant Review). To do this, see
“Deleting Images” on page 32.
While an image is displayed in Instant Review on the image LCD, you can do any of the following:
Record sound that will be attached either to the One Shot image, to the final image of a
Continuous sequence, or to the first image of a Timelapse sequence (see the next section,
“Recording Sound”).
Delete the captured image(s) by pressing the middle (Delete) soft key. Either the One Shot
image, the final image of a Continuous sequence, or all of the images in a Timelapse sequence
will be deleted.
When you press the Delete soft key, you will be prompted Delete? in the top overlay bar. You
can press either the left (Delete) soft key to delete the image(s), or the right (Cancel) soft key to
cancel the delete operation. If you recorded sound, then the option of deleting Sound Only is
also provided for the middle soft key.
Save the image(s) to the memory card and return to the Capture mode immediately by pressing
the right (Exit) soft key. Either the One Shot image, the final image of a Continuous sequence, or
all of the images in a Timelapse sequence will be saved.
Do nothing and, when Instant Review times out (the default time-out is 3 seconds), the image(s)
are then saved to the memory card automatically. Either the One Shot image, the final image of
a Continuous sequence, or all of the images in a Timelapse sequence will be saved.
Chapter 3: Taking Pictures 25 Using Instant Review
Page 26

Recording Sound
Note: You can record up to 45 seconds of
sound per image or sequence of images.
Note: The microphone is located on the front of
the camera. So if you are recording your own
voice, you may get better sound quality by
rotating the camera around to face you.
Figure 13: Screen During Sound Recording 1 Press the sound record button on the back of the camera to activate the recording. A
You can record sound to attach to your images when your camera is in Capture mode and has
Instant Review set on (see the previous section). During the Instant Review period, the camera records
the sound and then attaches it to either the One Shot image, to the final image of a Continuous
sequence, or to the first image of a Timelapse sequence that you just captured. The sound recording
capability remains active during the entire Instant Review period.
You can also record sound in the Playback or Review modes to attach to images. (See the second
Note on the left for more information.)
Once you have captured an image or sequence of images in Capture mode and the Instant Review is
displayed on the image LCD, do the following to record sound that will be attached to the image:
microphone icon flashes and the length of the recording in minutes and seconds (00:00)
appears in the top overlay bar of the image LCD (see Figure 13).
2 Record your sound (up to 45 seconds).
3 Press the sound record button again to stop the recording. The screen displays Ready in the top
overlay bar, and three soft key labels in the bottom overlay bar: Play, Delete, and Exit (from left
to right).
4 Do any of the following:
Press the left (Play) soft key to play back the sound recorded.
Note: You can also record sound to attach to a
One Shot image, any of the images in a
Continuous sequence, or to the first image in a
Timelapse sequence of images after the Instant
Review period has finished. To do so, you must
set the camera to either Playback or Review
mode. Then select an image or sequence
of images in the Playback or Review mode and
follow steps 1-4 (to the right on this page) to
record sound that will be attached to the
selected image or sequence of images.
Chapter 3: Taking Pictures 26 Recording Sound
Press the middle (Delete) soft key to delete either the image(s) and the sound, or to delete
the sound only.
Press the right (Exit) soft key to immediately save the image(s) and the attached sound to
the memory card.
Do nothing and allow the Instant Review to time out. In this case, the image(s) and the
attached sound are automatically saved to the memory card.
Page 27

Chapter 4: Viewing and Reviewing Images
Overview
This chapter explains how to view captured images via the Playback mode and how to review the
images via the Review mode.
This chapter covers the following topics:
“Using Playback Mode” on page 27
“Accessing the Playback Mode” on page 27
“Viewing Images Full Screen” on page 28
“Understanding the Overlay Bars” on page 28
“Turning the Overlay Bars Off and On” on page 28
“Zooming in on Images” on page 28
“Playing Back Timelapse and Grouped Images” on page 28
“Creating and Playing a Slideshow” on page 29
“Using Review Mode” on page 30
“Accessing the Review Mode” on page 30
“Selecting Images” on page 30
“Marking and Unmarking Images” on page 31
“Expanding and Collapsing Timelapse or Grouped Images” on page 31
“Deleting Images” on page 32
“Grouping Images and Dissolving Image Groups” on page 33
“Protecting and Unprotecting Images” on page 34
“Categorizing Images and Deselecting Image Categories” on page 35
“Searching for Images by Date and by Category” on page 36
Using Playback Mode
Accessing the Playback Mode
Note: You cannot delete images while in
Playback mode. You can delete images in
Review mode, however. (See “Deleting Images”
on page 32.)
Chapter 4: Viewing and Reviewing Images 27 Using Playback Mode
To access the Playback mode:
1 Set the camera mode dial to Playback mode .
2 Power on the camera if you haven’t already. The Playback mode screen is displayed on the
image LCD.
Page 28

Viewing Images Full Screen
When you first enter Playback mode, the image LCD displays the last image saved on the memory
card. The image appears full screen. To view a full screen image of the other captured images on the
memory card, press the right or left arrow on the 4-way controller to scroll through the images.
Understanding the Overlay Bars
The Playback mode displays two overlay bars. The top overlay bar contains information about the
image (including the image number, the date and time the image was captured, as well as some of
the key camera settings that were used to capture the image, such as the image type and exposure
mode). The bottom overlay bar contains the soft key labels.
Turning the Overlay Bars Off and On
By default, both the top and bottom overlay bars are displayed in Playback mode. However, you
can turn one or both overlay bars off so you can see more of each image on the image LCD. Simply
press the DISPLAY button on the back of the camera once to turn both overlay bars off, a second
time to turn the bottom one on only, and a third time to turn both on again.
Zooming in on Images
If you want to see a portion of an image in more detail, press the middle (Zoom) soft key. When you
are zoomed in, you can use the 4-way controller to see different parts of the image. You must then
zoom out by pressing the middle (Zoom Out) soft key before moving to a different image.
Playing Back Timelapse and Grouped Images
Note: You can change the playback rate in the
Playback Rate submenu of the Play Settings
menu. For more information, see “Playback
Rate Submenu” on page 76.
Chapter 4: Viewing and Reviewing Images 28 Using Playback Mode
You can play back sequences of Timelapse and grouped images at a pre-defined rate, much like
a slideshow.
To play back image sequences:
1 Use the 4-way controller to scroll to the Timelapse or grouped images you want to play back.
2 Press the left (Play) soft key. The images, including any sound you have attached to them, will
play back on the image LCD.
3 Press the left (Stop) soft key to stop playing back your images.
Page 29

Creating and Playing a Slideshow
You can create a slideshow to display your images on the image LCD or on a television screen. Your
slideshow can include all of the images on the memory card, or you can choose a single category of
images to use.
For more information on:
Categories, see “Categorizing Images and Deselecting Image Categories” on page 35.
Connecting your camera to a television so that you can view a slideshow on the television, see
“Connecting the Camera to Your Television” on page 50.
To create and play a slideshow:
1 Press the MENU button on the back of the camera. The Slideshow option of the Play Settings
menu is highlighted.
2 Press the left (Edit) soft key to go to the Slideshow submenu.
3 Change any of the settings in the Slideshow submenu, as desired. For more information about
these settings, see “Slideshow Submenu” on page 75.
4 Press the left (Start) soft key to begin the slide show.
5 You can stop the slideshow at any time by pressing the left (Stop) soft key.
6 After you have stopped the slideshow or it has ended, press the right (Exit) soft key to save the
settings and exit the Slideshow menu.
Chapter 4: Viewing and Reviewing Images 29 Using Playback Mode
Page 30

Using Review Mode
Accessing the Review Mode
To access the Review mode:
Figure 14: Image LCD Screen in Review Mode 1 Set the camera mode dial to Review mode .
Thumbnails
Selected
image
Soft key labels
Selection
marker
Image
information
2 Power on the camera if you haven’t already.
The Review mode screen is displayed on the image LCD (see Figure 14). The image LCD displays the
images that are saved on the memory card. The images appear as small thumbnails along the top of
the screen.
The small thumbnail that has the selection marker under it is the selected image. The selected image
is also displayed as the large thumbnail on the bottom left of the screen. Information about the
selected image (including the image number and the date and time the image was captured)
appears on the bottom right of the screen. If the selected image is a part of a group, the group
name is also displayed. If the image was transmitted to this camera from another camera, and the
other camera had a camera name assigned, then the camera name is displayed (instead of any
group name).
The icon bar above the image information area shows whether the selected image is a single image,
a collapsed Timelapse sequence of images, or a collapsed group of images. The icon bar also shows
a sound icon if sound is attached to the selected image, as well as a category icon if a category has
been assigned to the selected image.
Selecting Images
The selection marker beneath the small thumbnail row indicates which image is selected and is
displayed as the large thumbnail, along with its image information, at the bottom of the screen.
To select an image, press the right or left arrow on the 4-way controller to scroll through the
thumbnails until the selection marker is under the image that you want to select. The selected image
is now displayed as the large thumbnail, along with its image information, at the bottom of the
screen.
Chapter 4: Viewing and Reviewing Images 30 Using Review Mode
Page 31

Marking and Unmarking Images
You can mark several images so that, when you select an action from the Review mode menus, that
action will apply to all the marked images. For example, you can mark several images and delete
them all at once, instead of having to delete one image at a time.
Figure 15: A Marked Image To mark or unmark all of the images on the memory card, press and hold the left (Mark or Unmark)
soft key for 3 seconds, and then release it.
To mark one or more (but not all) images:
1 Press the right or left arrow on the 4-way controller to scroll through the thumbnails until the
selection arrow is under an image you want to mark.
A notch
indicates
a marked
image
2 Press the left (Mark) soft key. A notch appears in the lower right corner of the selected thumbnail
image (see Figure 15).
3 Repeat steps 1 and 2 to mark additional images.
To unmark an image, scroll to the marked image, and then press the left (Unmark) soft key.
Expanding and Collapsing Timelapse or Grouped Images
When you take Timelapse pictures, the camera takes a sequence of pictures and automatically
groups the captured images, using the first captured image to represent the sequence. You can also
group individual images using the Group menu option of the Review mode menus (see “Grouping
Images and Dissolving Image Groups” on page 33). This section explains how to expand Timelapse
or grouped images into the individual images, and how to collapse them again.
Figure 16: An Expanded Group
Chapter 4: Viewing and Reviewing Images 31 Using Review Mode
To expand Timelapse or grouped images:
1 Select the image that represents the Timelapse or grouped image sequence that you want
to expand.
2 Press the right (Expand) soft key. Thumbnails of all the images in the sequence are displayed
with links between them (see Figure 16).
To collapse Timelapse or grouped images:
1 Select any image in the Timelapse sequence or group you want to collapse.
2 Press the right (Collapse) soft key.
Page 32

Deleting Images
You can delete a single image that is currently selected (whether it is a One Shot or Continuous
image, an individual image within an expanded Timelapse sequence, or an individual image within
an expanded group of images), all marked images, a collapsed Timelapse sequence of images, or a
collapsed group of images from the memory card.
To delete images:
1 Select the image or mark the images you want to delete.
Note: To mark or unmark all of the images on
the memory card, press and hold the left (Mark
or Unmark) soft key for 3 seconds, and then
release it.
Note: Protected images will not be deleted. See
“Protecting and Unprotecting Images” on
page 34.
If you want to delete one or more images (but not all the images) within a Timelapse sequence
or a group of images, first follow the instructions in “Expanding and Collapsing Timelapse or
Grouped Images” on page 31 to expand the Timelapse sequence or group of images. Then
select the image or mark the images you want to delete from the expanded Timelapse sequence
or group of images.
2 If you want to:
Delete only the currently selected single image, collapsed Timelapse sequence of images,
or collapsed group of images, press the middle (Delete) soft key in the Review mode screen.
Delete all of the marked images, press the MENU button on the back of the camera. The
Edit menu of Review mode is displayed, with the Delete menu option highlighted. Press the
middle (Delete) soft key.
3 Press the left (Delete) soft key again to delete the image(s).
Chapter 4: Viewing and Reviewing Images 32 Using Review Mode
Page 33

Grouping Images and Dissolving Image Groups
Note: A group becomes a folder on the
memory card, in which all the images in that
group are stored.
Note: Group names must be eight characters or
less, and cannot contain spaces. Also, the
camera does not accept group names that
begin with BR or TL (regardless of language)
because these letters are reserved.
Figure 17: Two Images in a Group 6 Press the right (Exit) soft key to exit the Group Name menu, and then press Exit again to exit the
You can group images to organize them in one folder on the memory card. To group images:
1 Mark the images you wish to group.
2 Press the MENU button on the back of the camera. The Edit menu of Review mode is displayed.
3 Press the down arrow on the 4-way controller to scroll to the Group menu option.
4 Move to the Group Name menu by pressing either the left (Create) soft key if there are no
existing groups, or the left (Add) soft key and then the middle (Create New) soft key if there are
existing groups.
5 Name the new group by doing the following. (See the Note on the left for restrictions on
group names.)
Press the up or down arrow on the 4-way controller to scroll to the letter you want to use.
Press the right arrow on the 4-way controller to add a letter to the name, or the left arrow to
delete a letter. For example, if you select the letter “L” and then press the right arrow on the
4-way controller, the letter appears in the center of the screen.
Review mode menus. You are returned to the Review mode screen. The name of the group now
appears in the image information for all the images in the group when each image is selected,
and the images in the group have a link icon between them (see the example in Figure 17).
To dissolve (remove) the grouping on images:
1 Select any image included in the group you want to dissolve.
2 Press the MENU button on the back of the camera. The Edit menu of Review mode is displayed.
3 Press the down arrow on the 4-way controller to scroll to the Group menu option.
4 Press the center (Dissolve) soft key to dissolve (remove) the grouping.
Note: Dissolving a group does not delete the
images in the group, only the group name.
Chapter 4: Viewing and Reviewing Images 33 Using Review Mode
5 Press the right (Exit) soft key. You are returned to the Review mode screen, and the images are no
longer grouped.
Page 34

Protecting and Unprotecting Images
You can protect images so that they won’t be deleted accidentally. (When an image is protected, it
cannot be deleted from the memory card.)
To protect images:
Figure 18: A Protected Image 1 Select an image or mark the images you want to protect.
2 Press the MENU button on the back of the camera. The Edit menu of Review mode is displayed.
3 Press the down arrow on the 4-way controller to scroll to the Protect menu option.
4 Press the center (Protect) soft key. You are returned to the Review mode screen, and a Protect
icon appears in the image information for the protected image(s) (see Figure 18).
Protect
icon
To remove protection from (unprotect) images:
1 Select an image or mark the images you want to unprotect.
2 Press the MENU button.
3 Press the down arrow on the 4-way controller to scroll to the Protect menu option.
4 Press the left (Unprotect) soft key. You are returned to the Review mode screen, and there is no
longer a Protect icon in the image information for the image(s).
Chapter 4: Viewing and Reviewing Images 34 Using Review Mode
Page 35

Categorizing Images and Deselecting Image Categories
You can assign a category to your images to make them easier to find and organize. You can also
play a slideshow of a category of images very easily.
You can either categorize one image at a time, or mark a number of them and apply one category to
all of the marked images.
To categorize one or more images:
1 Select or mark the image(s) you wish to categorize.
2 Press the MENU button on the back of the camera. The Edit menu of Review mode is displayed.
Figure 19: A Categorized Image 3 Press the down arrow on the 4-way controller to scroll to the Categorize menu option.
Category
icon
4 Press the left (Edit) soft key to move to the Categories submenu.
5 Press the down arrow on the 4-way controller to scroll to the category you want to assign to the
image(s).
6 Press the left (Select) soft key. A checkmark appears next to that category, and you are returned
to the Review mode screen. An icon representing the category you assigned to the image(s) now
appears in the image information for the selected image(s) (see Figure 19).
To deselect an image’s category:
1 Select the image whose category you want to deselect.
2 Press the MENU button on the back of the camera. The Edit menu of Review mode is displayed.
3 Press the down arrow on the 4-way controller to scroll to the Categorize menu option.
4 Press the left (Edit) soft key to move to the Categories submenu.
5 Press the down arrow on the 4-way controller to scroll to the category you want to deselect.
6 Press the left (Deselect) soft key. You are returned to the Review mode screen, and the category
icon is no longer in the image information for the selected image.
Chapter 4: Viewing and Reviewing Images 35 Using Review Mode
Page 36
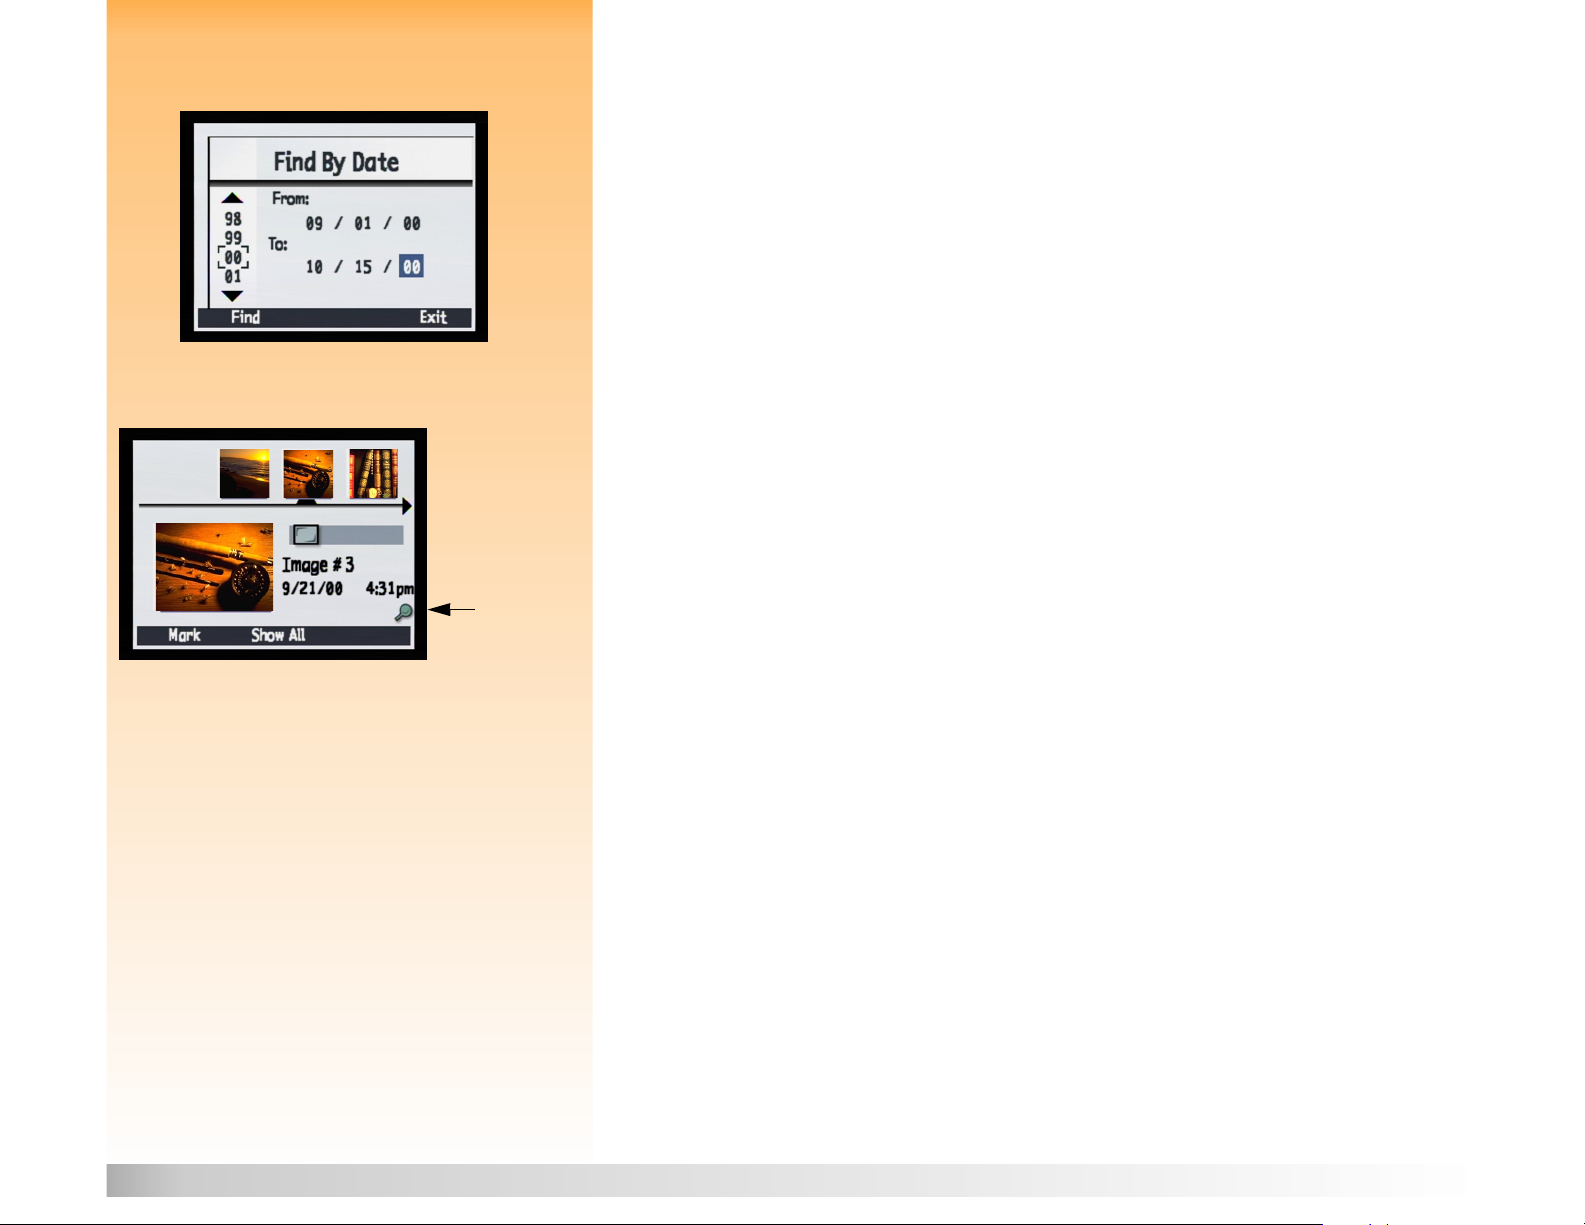
Searching for Images by Date and by Category
Figure 20: Find By Date You can use the Find menu in Review mode to search for images by date or by category. For more
information on categories, see “Categorizing Images and Deselecting Image Categories” on
page 35.
To search for images by date:
1 Press the MENU button on the back of the camera. The Edit menu of Review mode is displayed.
2 Press the right arrow on the 4-way controller to scroll to the Find menu.
3 Press the left (Edit) soft key.
Figure 21: Results of a Find by Date Operation 4 Enter the range of dates you want the camera to use to search for images (see Figure 20).:
Press the right arrow of the 4-way controller to scroll to the month, day, and year fields.
Press the up and down arrows to change the month, day, and year.
5 Press the left (Find) soft key. The results of your search appear on the image LCD (see Figure 21).
Notice the Find icon at the bottom right of the screen, which indicates that the displayed images
are the result of a Find operation.
Find
icon
6 Press the arrows on the 4-way controller to scroll through the images. When you are done, press
the center (Show All) soft key to resume viewing all the images stored on the memory card.
Note: If there are no images within the range of
dates that you specified, the image LCD
displays the message: “No images matched
search criteria.” In this case, you can either press
the middle (Show All) soft key to resume
viewing all images stored on the memory card,
or press the left (Find) soft key to select a new
range of dates.
Chapter 4: Viewing and Reviewing Images 36 Using Review Mode
Page 37

To search for images by category:
1 Press the MENU button on the back of the camera. The Edit menu of Review mode is displayed.
2 Press the right arrow on the 4-way controller to scroll to the Find menu.
3 Press the down arrow on the 4-way controller to scroll to By Category.
4 Press the left (Edit) soft key.
5 Press the down arrow on the 4-way controller to scroll to the category you want to view.
6 Press the left (Select) soft key. The results of your search appear on the image LCD. Notice the
Find icon at the bottom right of the screen, which indicates that the displayed images are the
result of a Find operation.
7 Press the arrows on the 4-way controller to scroll through the images. When you are done, press
the center (Show All) soft key to resume viewing all the images stored on the memory card.
Chapter 4: Viewing and Reviewing Images 37 Using Review Mode
Page 38

Chapter 5: Sharing Images
Overview
You can use the images you capture with your camera in many fun and creative ways. You can
transfer them to your computer for use in creative projects, or for sharing with family and friends via
the Internet. If you have a printer that supports the HP JetSend infrared technology, you can use
JetSend for wireless printing of your images. You can even connect the camera to your television to
view a slideshow of your images on the television.
This chapter covers the following topics:
“Transferring Images to Your Computer” on page 38
“Using a Digital Print Order Format (DPOF) File” on page 44
“JetSending Images to a Printer” on page 46
“Transmitting Images Between Two Cameras” on page 48
“Connecting the Camera to Your Television” on page 50
Transferring Images to Your Computer
Caution: Be aware that any sound (namely,
sound tags and other EXIF tags) you have
captured and attached to images with your
camera may not be supported and may be lost
if you use image editing software other than the
HP Photo Imaging Software with the images on
your computer.
Chapter 5: Sharing Images 38 Transferring Images to Your Computer
You can transfer images to your computer when the camera is set to PC Connect mode. The
PC Connect Mode submenu of the Preferences menu lets you specify how the camera will appear to
your computer when connected via the USB interface. You can set the camera to one of the following
settings in the PC Connect Mode submenu depending on the operating system that is running on
your computer:
PC Connect Mode
PC Connect Mode How Images are Transferred
PC Connect ModePC Connect Mode
DigitaTM Device
(default)
USB Disk Drive The camera is operated as a USB Mass Storage
How Images are Transferred Operating Systems
How Images are TransferredHow Images are Transferred
You can use software included with your computer
or camera to transfer images to the computer.
Device and appears as a disk drive connected to
your computer. So you can copy images from
your camera to the computer as you would from
another disk drive.
Operating Systems
Operating SystemsOperating Systems
Windows® Me, 98,
and 2000
Mac® OS 8.6
or better,
Windows Me, 98,
and 2000
and
Page 39

The one exception is Windows NT 4.0, because it does not support the USB interface. A Windows
NT 4.0 computer must have either an HP P1000/1100 or similar printer, or a memory card reader
connected to its serial or parallel interface. You can then transfer images from the camera’s memory
card to the computer via either the memory card slot in the HP printer, or the memory card reader.
The following three subsections explain how to transfer images to a computer depending on the PC
Connect Mode setting on the camera and/or the operating system that is running on the computer:
To use the Digita Device setting to transfer images from your camera to a Windows Me, 98, or
2000 computer, see the first subsection below.
To use the USB Disk Drive setting to transfer images from your camera to either a Macintosh®
computer running Mac OS 8.6 or better, or a Windows Me, 98, or 2000 computer, see the
subsection on page 41.
To transfer images from the memory card to a Windows NT 4.0 computer, see the subsection on
page 43.
Note: If you have a Windows 98 or 2000
computer, it is assumed in this subsection that
you have already followed the HP 618 Digital
Camera Quick Start Guide to install the
HP Photo Imaging Software on your computer.
Figure 22: Connectors on the USB Cable
To Comput er
To C am e ra
Transferring Images Using the Digita Device Setting
If your computer is running Windows Me, 98, or 2000, you can transfer images from your camera to
the computer by using the default Digita Device setting in the PC Connect Mode submenu. If your
camera is running:
Windows Me
Windows Me, you can then use the Microsoft® Scanner and Camera Wizard that is included on
Windows MeWindows Me
your Windows Me system to transfer the images from the camera to your computer.
Windows 98 or 2000
Windows 98 or 2000, you can then use the HP Photo Imaging Software that came with your
Windows 98 or 2000Windows 98 or 2000
camera to transfer the images from the camera to your computer.
To transfer images to your Windows Me, 98, or 2000 computer, do the following:
1 Power off the camera if it is still on.
2 Power on the computer if you haven’t already.
3 Connect the rectangular end of the USB cable to the USB port on the front or back exterior of
your computer (see Figure 22).
Chapter 5: Sharing Images 39 Transferring Images to Your Computer
Page 40

Figure 23: Connecting the USB Cable to the Camera 4 Open the door to the camera’s connector compartment and connect the square end of the USB
cable to the bottom (USB) connector (see Figure 23).
5 Set the camera to PC Connect mode .
6 Power on the camera. Within a few seconds, your computer detects the camera on the USB port.
What happens next depends on what version of Windows your computer is running:
Windows Me
Windows Me Your computer runs the Microsoft Scanner and Camera
Windows MeWindows Me
Wizard. Follow the prompts in the Wizard to copy the
images to your computer.
Windows 98
Windows 98
Windows 98Windows 98
or 2000
or 2000
or 2000or 2000
The main window of the HP Photo Imaging Software
opens. Do the following:
1. Click Unload Camera
2. Click the Start
Unload Camera in the main window.
Unload CameraUnload Camera
Start button in the Unload Images window.
StartStart
The images are copied to your computer.
Chapter 5: Sharing Images 40 Transferring Images to Your Computer
Page 41

Transferring Images Using the USB Disk Drive Setting
If your computer is running either Macintosh OS 8.6 or better, or Windows Me, 98, or 2000, you
can transfer images from your camera to the computer by using the USB Disk Drive setting in the
PC Connect Mode submenu. In so doing, the camera will operate as a USB Mass Storage Device and
appear as a disk drive connected to your computer. You can then copy images from your camera to
the computer as you would from another disk drive. The following two subsections explain how.
Setting the USB Disk Drive Mode on the Camera
Note: If you have a Macintosh computer and
have already followed the instructions in
the HP 618 Digital Camera Quick Start Guide to
set the USB Disk Drive mode on your
camera, skip these instructions and go on
to “Using Your Camera as a USB Mass Storage
Device to Transfer Images” on page 42.
You must first set your camera to USB Disk Drive mode as follows:
1 Set the camera mode dial to Capture mode .
2 Power on the camera if you haven’t already.
3 Press the MENU button on the back of the camera. The Capture mode menus are displayed on
the image LCD.
4 Press the right arrow on the 4-way controller three times to move to the Preferences menu.
5 Press the down arrow on the 4-way controller three times to move to the PC Connect Mode
menu option.
6 Press the left (Edit) soft key. The PC Connect Mode submenu is displayed, and the USB Disk
Drive option is highlighted.
7 Press the left (Select) soft key. The checkmark moves to the USB Disk Drive option, and
you return to the Preferences menu of Capture mode. The camera is now set to USB Disk
Drive mode.
8 Press the right (Exit) soft key to exit the menu.
9 Power off the camera by using the camera’s power switch.
The USB Disk Drive mode will remain set on your camera only if you power off the camera by
using the power switch. By powering off the camera correctly, you will not have to repeat the
previous procedures when transferring images to your computer via the USB Disk Drive mode in
the future.
Chapter 5: Sharing Images 41 Transferring Images to Your Computer
Page 42

Using Your Camera as a USB Mass Storage Device to Transfer Images
Note: Software for Macintosh computers was
included with your camera. If you wish, you can
use this software to transfer images to your
Macintosh, instead of the procedures here. This
software also provides tools for editing images
and using them in creative projects.
Figure 24: Connectors on the USB Cable 3 Open the door to the camera’s connector compartment and connect the square end of the USB
To Macint os h Ke yb oa rd
or Windows Computer
To C am e ra
Once your camera is set to USB Disk Drive mode, you can transfer images to either your Macintosh
OS 8.6 or better computer, or your Windows Me, 98, or 2000 computer, by doing the following:
1 Power on the computer if you haven’t already.
2 Connect the rectangular end of the USB cable to the USB port on either your Macintosh
computer’s keyboard, or to the front or back exterior of your Windows computer (see Figure 24).
cable to the bottom (USB) connector (see Figure 25).
4 Set the camera mode dial to PC Connect mode .
5 Power on the camera. If you have a:
Macintosh computer, an icon labeled “Untitled” appears on your computer’s desktop. The
camera is now viewed by your Macintosh as a new disk drive.
A Windows computer, the camera appears as a removable disk drive connected to your
computer under the My Computer folder in Windows Explorer.
If you have a Windows 98 or 2000 computer and have installed the HP Photo Imaging
Software on your computer (by following the instructions in the HP 618 Digital Camera
Quick Start Guide), then the main window of the HP Photo Imaging Software also opens. You
can either follow step 6 below to copy the image files from the camera to the computer in
Windows Explorer, or you can use the HP Photo Imaging Software to transfer the images.
Figure 25: Connecting the USB Cable to the Camera 6 Copy the image files from the disk drive (the camera) to the hard drive of your computer as you
would from a floppy disk.
Chapter 5: Sharing Images 42 Transferring Images to Your Computer
Page 43

Transferring Images from a Memory Card to a Windows NT 4.0 Computer
Note: It is assumed in this subsection that
you have already followed the HP 618 Digital
Camera Quick Start Guide to install the
HP Photo Imaging Software on your computer.
To transfer images to your Windows NT 4.0 computer, you must have either an HP printer (such as
the HP P1000/1100) that has a slot for reading a memory card, or a memory card reader connected
to the computer’s serial or parallel interface. (This is because Windows NT 4.0 does not support the
USB interface.) You can then transfer images from the camera’s memory card to your computer via
either the HP printer’s memory card slot, or the memory card reader.
If you are using an HP printer that has a memory card slot
If you are using an HP printer that has a memory card slot, refer to the printer’s documentation
If you are using an HP printer that has a memory card slotIf you are using an HP printer that has a memory card slot
to transfer images from the memory card to your Windows NT 4.0 computer via the printer’s
memory card slot.
If you are using a memory card reader
If you are using a memory card reader, transfer images from the memory card to your Windows
If you are using a memory card readerIf you are using a memory card reader
NT 4.0 computer as follows:
1 Power off the camera if it is still on.
2 Remove the memory card from the camera. To do this, open the memory card door and press
the memory card release button to eject the card. Grasp the card by its side edges and pull it out
of the slot.
3 Insert the memory card into the memory card slot in the memory card reader.
4 Power on
the computer if you haven’t already.
5 Double-click the HP Photo Imaging Software icon on the Windows desktop. The main window of
the HP Photo Imaging Software opens.
6 Click Unload Camera
7 Select the drive letter (such as H:
8 Click the Start
Chapter 5: Sharing Images 43 Transferring Images to Your Computer
Unload Camera in the main window. Because no USB camera is found, the software
Unload CameraUnload Camera
displays a dialog box in which you can select the drive letter for your memory card reader.
H:) for your memory card reader in the dialog box.
H:H:
Start button in the Unload Images window. The images are copied to your computer.
StartStart
Page 44

Note: If you delete an image that is referenced
in a DPOF file on the memory card, you must
erase and then re-create the DPOF file before
you can print images via the DPOF file.
Using a Digital Print Order Format (DPOF) File
A DPOF file is a file you create using your camera that allows you to pre-select which images you
want to print. The file is stored on the memory card and contains information about which images
are selected, how many of each image is to be printed, and at what size to print each of them. The file
is used by selected HP printers and other printing devices that can read a DPOF file directly from the
memory card.
Creating a DPOF File
To create a DPOF file:
1 Set the camera mode dial to Review mode .
2 Power on the camera if you haven’t already.
3 Either select one image or mark multiple images in the Review mode screen that you want to
include in the DPOF file. (See “Selecting Images” on page 30 and “Marking and Unmarking
Images” on page 31 for more information.)
4 Press the MENU button on the back of the camera. The Review mode menus are displayed.
5 Press the right arrow on the 4-way controller once to move to the Print Order Form menu.
Note: For more information on the Print Order
Form menu, see page 81.
Chapter 5: Sharing Images 44 Using a Digital Print Order Format (DPOF) File
6 Press the left (Add) soft key to select the highlighted Add Images menu option. The Add to
Order submenu is displayed.
7 Use the arrows on the 4-way controller to specify the number of Copies you want of the
selected or marked images, as well as the Size you want them printed. The Size settings include:
Standard (default) − One of the standard print sizes. You specify the exact size you want
your Standard prints to be at the printer. For example, you can specify that all Standard
images be printed at 4” x 6”.
Index − Thumbnails of the images.
8 Press the left (Add) soft key to save the settings and return to the Print Order Form menu.
Page 45

Viewing a DPOF File
To view a DPOF file, do the following while in the Print Order Form menu:
1 Press the down arrow on the 4-way controller to highlight the View Order menu option.
2 Press the left (Select) soft key. The Print Order Form screen is displayed, which lists the contents
of the DPOF file. You can scroll through this list using the up and down arrows on the 4-way
controller. However, you cannot edit this list.
Erasing a DPOF File
To erase a DPOF file, do the following while in the Print Order Form menu:
1 Press the down arrow on the 4-way controller to highlight the Erase Order menu option.
2 Press the left (Erase) soft key. You will see a confirmation of your choice to erase all entries from
the Print Order Form.
3 Press the middle (Erase) soft key to erase all of the entries from the Print Order Form.
Chapter 5: Sharing Images 45 Using a Digital Print Order Format (DPOF) File
Page 46

JetSending Images to a Printer
HP JetSend allows for easy, wireless printing. If your printer supports the HP JetSend infrared
technology, you can transfer your images directly from the camera to the printer without connecting
any cables. See your printer’s documentation for more information.
Note: It will take an average of 20 seconds to
JetSend an image from the camera to a printer.
There are two different ways you can JetSend images to a printer. You can use the Send button
on the back of the camera to JetSend only the current image in the Capture, Playback, or Review
mode to a printer. Or you can use the Transmit menu in Review mode to JetSend the current image
or all marked images to a printer. Each of these methods is explained in the following subsections.
Using the Send Button to JetSend Only the Current Image
To JetSend only the current image to a JetSend-capable printer:
1 Set the camera mode dial to either Capture , Playback , or Review mode.
2 Power on the camera if you haven’t already.
3 If you are in:
Capture mode, you will automatically be JetSending the last image you captured. You do
not need to do anything to select the image.
Playback or Review mode, press the right or left arrow on the 4-way controller to scroll
through your images in the Playback or Review mode screen until the image you want to
transfer is displayed or selected.
4 Set your printer to receive images to print. See your printer’s documentation for details.
Figure 26: Infrared Window on the Camera 5 Aim the camera’s infrared window (see Figure 26) at the printer’s infrared sensor, and place the
camera about 10 inches away from the printer.
6 Press the Send button on the back of the camera. The camera immediately starts a JetSend
session, searches for a compatible printer, and sends the current image to the printer. (If the
current image is actually a collapsed Timelapse sequence or group of images, only the first
image of the sequence or group is sent.)
During the transfer, the image LCD reads: “Sending 1 image...” and shows a progress bar.
You can cancel the transfer at any time by pressing the center (Stop) soft key on the camera.
A confirmation screen will display to show that the Send was successful.
7 Press the right (Done) soft key when you have finished transmitting images to the printer.
Chapter 5: Sharing Images 46 JetSending Images to a Printer
Page 47

Using the Transmit Menu to JetSend the Current or All Marked Images
To JetSend the current image or all marked images to a JetSend-capable printer:
1 Set the camera mode dial to Review mode .
2 Power on the camera if you haven’t already.
3 Either select one image or mark multiple images in the Review mode screen that you want to
JetSend. (See “Selecting Images” on page 30 and “Marking and Unmarking Images” on page 31
for more information.)
4 Press the MENU button on the back of the camera. The Review mode menus are displayed.
5 Press the right arrow on the 4-way controller two times to move to the Transmit menu.
6 Press the down arrow on the 4-way controller to highlight the Camera-Printer menu option.
7 Set your printer to receive images to print. See your printer’s documentation for details.
8 Aim the camera’s infrared window (see Figure 26 on page 46) at the printer’s infrared sensor, and
place the camera about 10 inches away from the printer.
9 Press the left (Send) soft key on the camera. The camera immediately starts a JetSend session,
searches for a compatible printer, and sends the current or all marked images to the printer.
During the transfer, the image LCD reads: “Sending X image(s)...” and shows a progress bar.
You can cancel the transfer at any time by pressing the middle (Stop) soft key on the camera.
A confirmation screen will display to show that the Send was successful.
10Press the right (Done) soft key when you have finished transmitting images to the printer.
Chapter 5: Sharing Images 47 JetSending Images to a Printer
Page 48

Transmitting Images Between Two Cameras
You can use the Camera-Camera option in the Transmit menu of Review mode to send images from
your camera to another camera, or to receive images from another camera. The other camera must
use the standard Digita transmit protocol. See the other camera’s documentation for details.
Sending Images to Another Camera
To send the current image or all marked images to another Digita camera:
1 Set the camera mode dial to Review mode .
2 Power on the camera if you haven’t already.
3 Either select one image or mark multiple images in the Review mode screen that you want to
send to the other camera. (See “Selecting Images” on page 30 and “Marking and Unmarking
Images” on page 31 for more information.)
4 Press the MENU button on the back of the camera. The Review mode menus are displayed.
5 Press the right arrow on the 4-way controller two times to move to the Transmit menu. The
Camera-Camera menu option is highlighted.
6 Press the left (Send) soft key on your camera. Your camera’s image LCD reads: “Receiving
Camera Ready?”
7 Set the other camera to receive images. See the other camera’s documentation for details.
8 Aim your camera’s infrared window (see Figure 26 on page 46) at the other camera’s infrared
sensor, and set the cameras about 10 inches apart.
9 Press the left (Continue) soft key on your camera. Your camera immediately searches for
another compatible camera and begins to transmit images to the other camera.
During the transfer, the image LCD reads: “Sending X image(s)...” and shows a progress bar.
You can cancel the transfer at any time by pressing the middle (Stop) soft key on your camera.
A confirmation screen will display to show that the transfer was successful.
10Press the right (Done) soft key when you have finished transmitting images to the other camera.
Chapter 5: Sharing Images 48 Transmitting Images Between Two Cameras
Page 49

Receiving Images from Another Camera
To receive images from another Digita camera:
1 Set the camera mode dial to Review mode .
2 Power on the camera if you haven’t already.
3 Press the MENU button on the back of the camera. The Review mode menus are displayed.
4 Press the right arrow on the 4-way controller two times to move to the Transmit menu. The
Camera-Camera menu option is highlighted.
5 Press the middle (Receive) soft key on your camera.
6 Set the other camera to send images. See the other camera’s documentation for details.
7 Aim your camera’s infrared window (see Figure 26 on page 46) at the other camera’s infrared
sensor, and set the cameras about 10 inches apart.
8 Send the images from the other camera. See the other camera’s documentation for details.
9 Press the right (Done) soft key when your camera has received all of the images.
Chapter 5: Sharing Images 49 Transmitting Images Between Two Cameras
Page 50

Connecting the Camera to Your Television
Note: Your camera comes with a 6 ft. audio/
video cable, which you can use to connect the
camera to a television.
Note: Refer to your television’s or VCR’s
documentation for more information about the
video input format.
When the camera is connected to a television, the television functions the same as the camera’s
image LCD. You can use your television to view a slideshow, making it easy to share your images
with family and friends.
Selecting the Camera’s Video Output Format
Before you connect the camera to the television, you need to select the camera’s video output
format. The format that you choose (NTSC or PAL) depends on your television’s video input format:
NTSC is the video connection standard used in the United States and Japan.
PAL is the video connection standard used in Europe.
To select the video output format for the camera:
1 Set the camera mode dial to Playback mode .
2 Power on the camera if you haven’t already.
3 Press the MENU button on the back of the camera.
4 Press the down arrow on the 4-way controller to scroll to Video.
5 Press the left (Edit) soft key.
6 Press the right or left arrows on the 4-way controller to select NTSC or PAL in the Video
Preferences submenu.
Making the Connection
To connect the camera to the television:
1 Connect the video input end of the audio/video cable into your television:
If you are using an NTSC connection, plug the video input (yellow) end of the audio/video
cable into your television’s video input connector (on most televisions, this is also yellow).
Note: See your television’s documentation for
specific instructions on how to locate the video
input connector, and how to set the video input.
Chapter 5: Sharing Images 50 Connecting the Camera to Your Television
If you are using a PAL connection, plug the video input (yellow) end of the audio video
cable into your television’s video input connector. On older television sets, plug the video
cable into a SCART adapter (purchased separately), then plug the adapter into your
television’s video input connector.
Page 51

Note: To conserve battery power, you may want
to use an HP-approved AC power adapter to
power the camera while you have it connected
to a television.
Figure 27: Connecting the Video Cable to the Camera 4 On the television, set the video input to be the video input connector where you connected
2 Connect the audio input (red) end of the audio/video cable into the television’s audio input
connector. This will allow you to hear sound that you recorded and attached to your images.
3 Plug the other end of the video cable into the camera (see Figure 27).
the camera.
Viewing Images on the Television
When the camera is connected to a television, you can play or review your images on the television
screen just as you would on the camera’s image LCD. You can also mark, protect, categorize, group,
or delete images, or create a slideshow.
To view images on a television:
1 Turn on the television and select the video input. See your television’s documentation for
specific instructions on how to select the video input.
2 Set the camera mode dial to either Playback mode or Review mode .
Note: When the camera is connected to a
television, the image LCD turns off.
Chapter 5: Sharing Images 51 Connecting the Camera to Your Television
3 View your images on the television using either Playback or Review mode.
The television functions the same as the camera’s image LCD. You can use the buttons on the
4-way controller to scroll through your images, or press the MENU button on the back of the
camera to use the camera menus on your television’s screen.
Page 52

Chapter 6: Menu and Soft Key Reference
Overview
Note: Updates for your camera’s firmware are
posted from time-to-time on the HP website at:
www.hp.com/photosmart
www.hp.com/photosmart. You can install
www.hp.com/photosmartwww.hp.com/photosmart
these updates on your camera so that you can
always have the most current functionality
running on it.
Note: The PC Connect mode does not have
any menus or soft keys; thus, that mode is not
included in this chapter.
This chapter contains a reference to all of the menus and soft keys you can use to make or adjust
settings on your camera. This chapter is divided into three main sections, which correlate to the three
camera modes that have menus and soft keys:
“Capture Mode Menus and Soft Keys” on page 52
“Playback Mode Menu and Soft Keys” on page 74
“Review Mode Menus and Soft Keys” on page 78
Capture Mode Menus and Soft Keys
To access the Capture mode menus and related soft keys, turn the camera mode dial to Capture
mode and press the MENU button on the back of the camera. You can choose options and
settings from four Capture mode menus:
“Capture Settings Menu” on page 52
“Photo Assist Menu” on page 55
“Image Stamp Menu” on page 62
“Preferences Menu” on page 66
Capture Settings Menu
Figure 28: Capture Settings Menu Use the Capture Settings menu to specify characteristics of how to capture each image.
Ta bl e 7 : Capture Settings Soft Keys
Soft Key Function
Edit Opens submenu associated
with selected menu option.
Exit Exits this menu and returns
the camera to Capture mode.
Chapter 6: Menu and Soft Key Reference 52 Capture Mode Menus and Soft Keys
Page 53
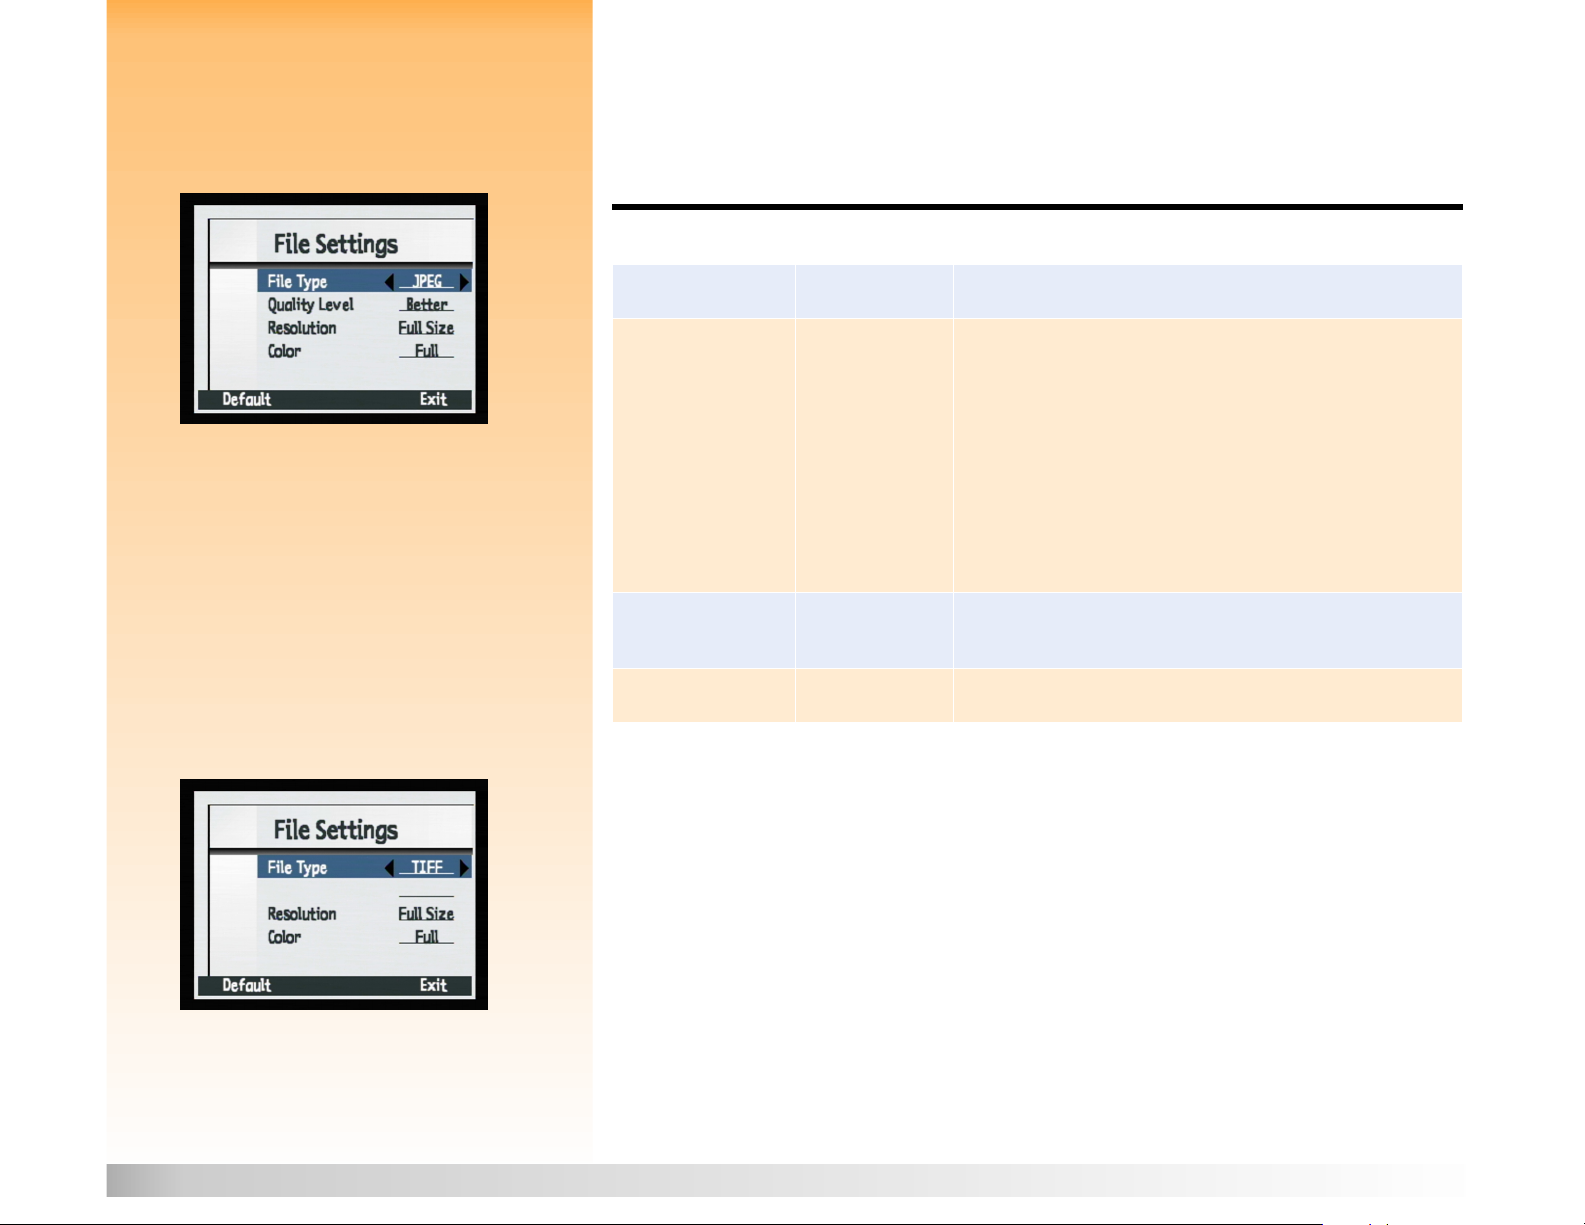
File Settings Submenu
Note: All options you set are active from shot-
to-shot; they also remain set when you cycle
Use the File Settings submenu to set how your pictures will be captured for all image types (One
Shot, Continuous, and Timelapse).
the power on the camera.
Figure 29: File Settings Submenu - JPEG Tab le 8: File Settings Submenu
Setting Default Options
File Type JPEG JPEG, TIFF
Quality Level
(Specifies JPEG
compression level
and does not apply
to TIFF images.)
Resolution Full Size Full Size (1600 x 1200 pixels)
Better Good - Produces quality images and uses less memory than the Better
setting (uses the highest compression rate). Use this setting for images
you plan to use on a computer, or to print photos of up to 4” x 6”.
Better - Produces high-quality images and uses less memory than the
Best setting (uses a medium compression rate). Use this setting for
images you plan to print photos of up to 5” x 7”.
Best - Produces the highest-quality images and uses the most memory
(uses the lowest compression rate). Use this setting for images you plan
to enlarge and print photos of up to 8” x 10”.
1/4 (800 x 600 pixels)
Color Full Full, B&W, Sepia
Figure 30: File Settings Submenu - TIFF
Note: TIFF is an uncompressed file type used
when you nee d the absolute best i mage quality.
Because TIFF file size is very large, it may take
up to 50 seconds to save the image.
Chapter 6: Menu and Soft Key Reference 53 Capture Mode Menus and Soft Keys
Page 54
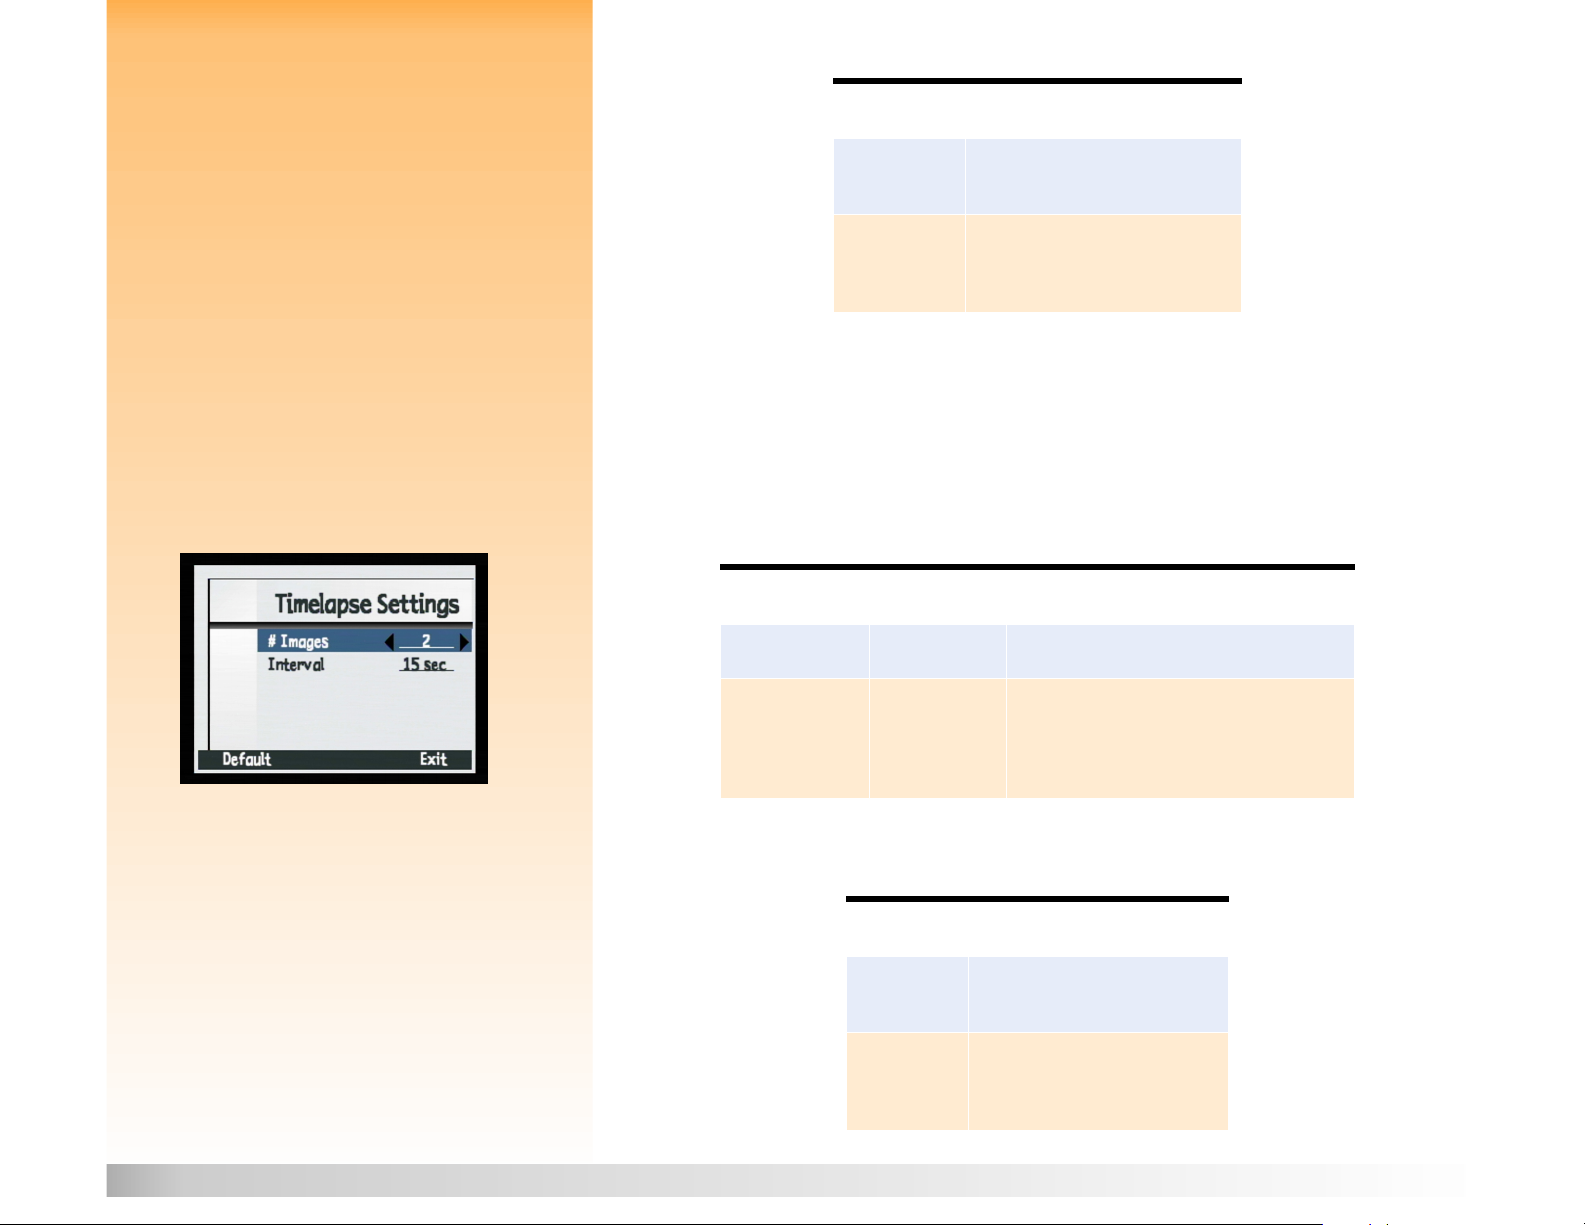
Note: “Storage Capacities of Memory Cards”
on page 109 lists the number of images an 8
MB, 16 MB, and 32 MB
memory card can store,
depending on the JPEG quality level or TIFF
setting at which the camera is set.
Tab le 9 : File Settings Soft Keys
Soft Key Function
Default Returns all settings on screen to
their defaults.
Exit Saves the settings, exits this
submenu, and returns t he cam era to
the Capture Settings menu.
Timelapse Settings Submenu
Note: All options you set are active from shot-
to-shot; they also remain set when you cycle
Use the Timelapse Settings submenu to specify the number and interval of images in a
timelapse sequence.
the power on the camera.
Figure 31: Timelapse Settings Submenu Tab le 1 0: Timelapse Settings Submenu
Setting Default Options
Note: If you select more
#
Images than there is
# Images
Interval 15 seconds Seconds - 15 sec, 30 sec
2 2-1,000
Minutes - 1 min, 2 min, 3 min, 4 min, 5 min,
10 min, 15 min, 20 min, 30 min, 50 min
Hours - 1 hr, 2 hr, 3 hr, 4 hr, 8 hr, 12 hr, 24 hr
Tab le 1 1 : Timelapse Settings Soft Keys
space on the memory card, you will see the
error message “Not enough memory” on the
overlay bar.
Soft Key Function
Default Returns all settings on screen to
their defaults.
Exit Saves the settings, exits this
submenu, and returns the camera
to the Capture Settings menu.
Chapter 6: Menu and Soft Key Reference 54 Capture Mode Menus and Soft Keys
Page 55

Photo Assist Menu
Use the Photo Assist menu to manipulate these more advanced camera operations:
Figure 32: Photo Assist Menu
Exposure
EV Compensation
White Balance
Focus
AE Metering
ISO Speed
Tab le 1 2: Photo Assist Soft Keys
Soft Key Function
Edit Opens submenu associated with
highlighted menu option.
Exit Exits this menu and returns the
camera to Capture mode.
Chapter 6: Menu and Soft Key Reference 55 Capture Mode Menus and Soft Keys
Page 56

Note: The option you set is active from shot-to-
shot; it resets to its default setting when you
cycle the power on the camera.
Exposure Mode Submenu
Use the Exposure Mode submenu to select how the camera calculates exposure. You can select from
these setting options:
Figure 33: Exposure Mode Submenu
Auto
Auto (Default) − All exposure settings are at their defaults and cannot be changed.
AutoAuto
Landscape Program
Landscape Program − Automatically optimizes the camera settings for taking pictures of
Landscape ProgramLandscape Program
distant subjects, such as landscape scenes.
Portrait Program
Portrait Program − Automatically optimizes the camera settings for portrait photography.
Portrait ProgramPortrait Program
Action Program
Action Program − Automatically optimizes the camera settings for taking pictures of subjects
Action ProgramAction Program
in action, such as people playing sports.
Aperture Priority (Av)
Aperture Priority (Av) − Lets you select an aperture, and the camera automatically selects the
Aperture Priority (Av)Aperture Priority (Av)
shutter speed.
Shutter Priority (Tv)
Shutter Priority (Tv) − Lets you select a shutter speed, and the camera automatically selects
Shutter Priority (Tv)Shutter Priority (Tv)
the aperture setting.
If you select Landscape Program, Portrait Program, Action Program, or Shutter Priority exposure
modes, then the ISO Speed submenu options will be grayed-out as soon as you exit the Exposure
Mode submenu. Likewise, if you change the exposure mode from Landscape Program, Portrait
Program, Action Program, or Shutter Priority to either Auto or Aperture Priority (Av) exposure mode,
then the ISO Speed options will become available as soon as you exit the Exposure Mode submenu.
After you set the exposure mode to Aperture Priority (Av) or Shutter Priority (Tv) and exit the
submenu, the live view of Capture mode will turn on automatically. You can then use the 4-way
controller to adjust the aperture value (if in Av mode) or shutter speed (if in Tv mode) by pressing the
up and down arrows (see below). If the camera cannot properly expose because the picture subject is
out of range, as in very bright or very dark scenes, the text string (such as Av F5.6 1/1500) will turn red
in the top overlay bar of live view. If you turn the image LCD off, the exposure mode will not change,
but you will be unable to adjust the aperture value or shutter speed with the 4-way controller.
When you set the exposure mode to Aperture Priority (Av) and live view is on, pressing the up and
down arrows on the 4-way controller will perform these specific functions:
Up arrow − stops down the aperture (toward higher f-numbers)
Down arrow
When you set the exposure mode to Shutter Priority (Tv) and live view is on, pressing the up and
down arrows on the 4-way controller will perform these specific functions:
Up arrow − decreases toward shorter shutter speeds
Down arrow − increases toward faster shutter speeds
Chapter 6: Menu and Soft Key Reference 56 Capture Mode Menus and Soft Keys
−
stops up the aperture (toward lower f-numbers)
Page 57
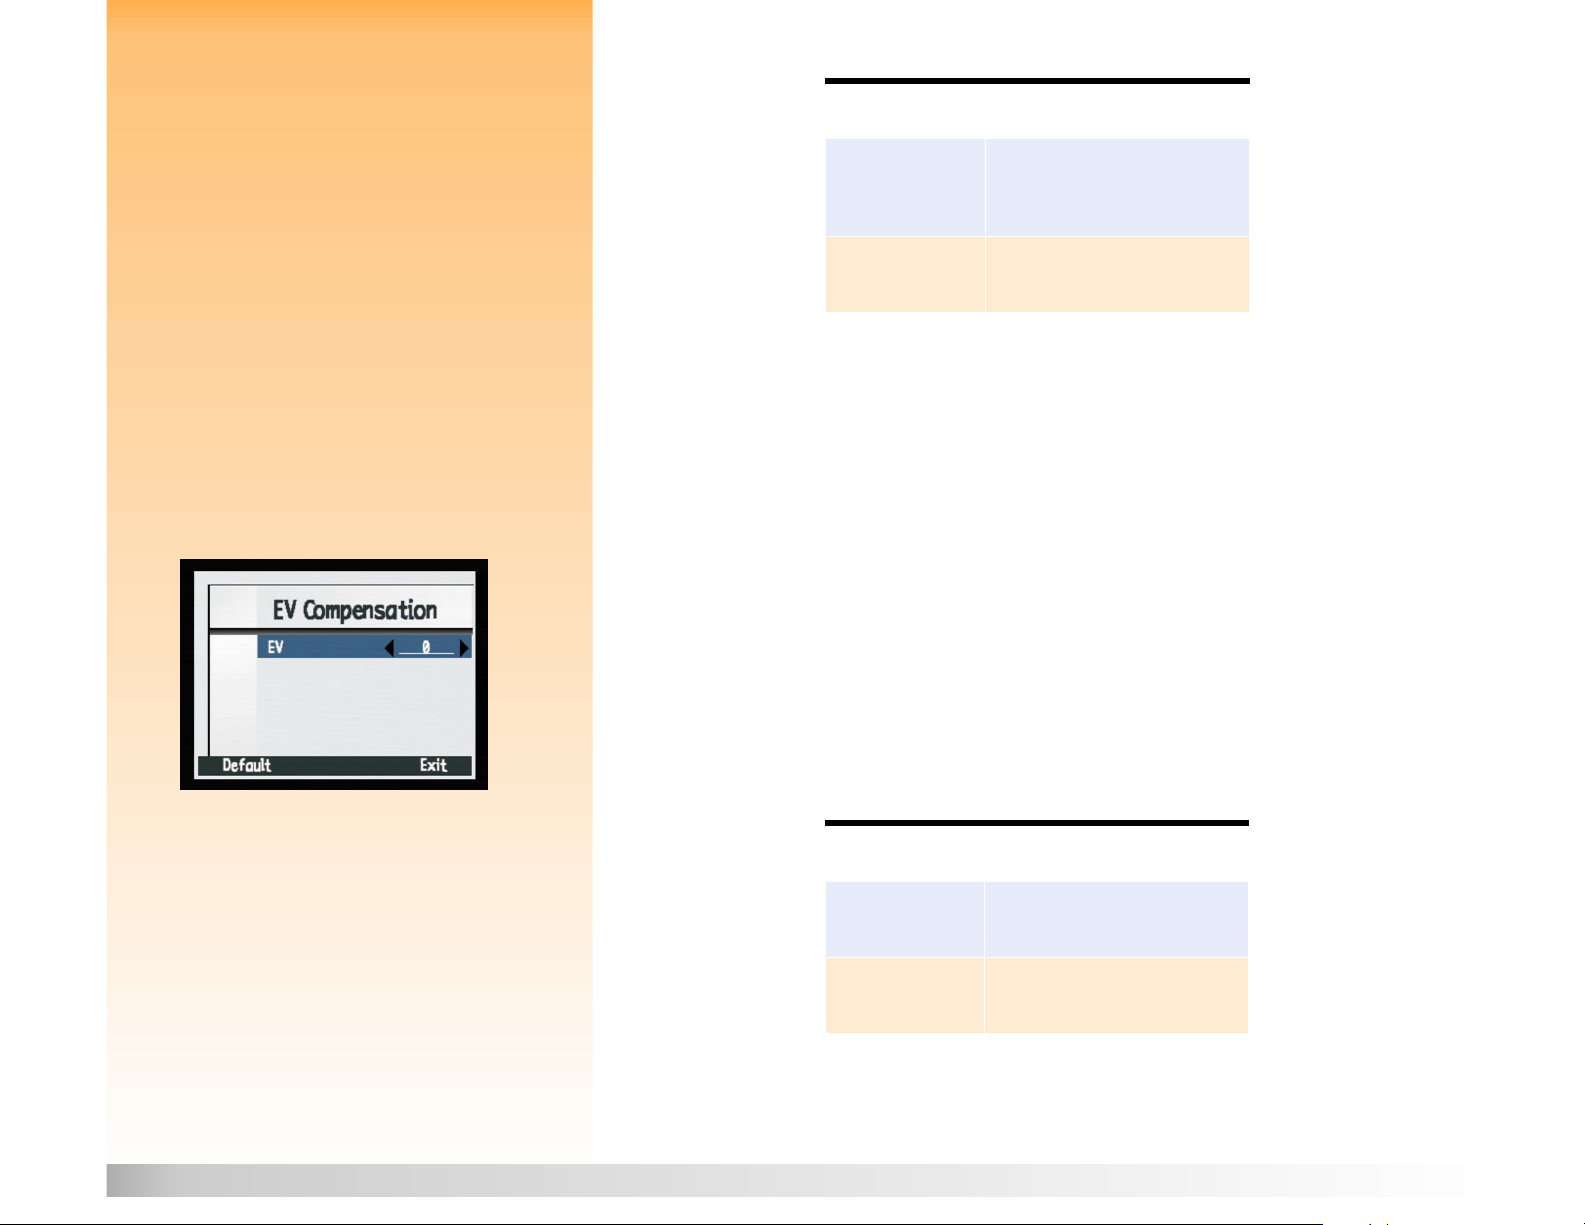
Tab le 1 3: Exposure Mode Soft Keys
Soft Key Function
Select Places a checkmark by the
Exit Returns to the Photo Assist menu
EV Compensation Submenu
highlighted setting, then returns to
the Photo Assist menu.
without changing the setting.
Note: The option you set is active from shot-to-
shot; it resets to its default setting when you
cycle the power on the camera.
Figure 34: EV Compensation Submenu
Use the EV (Exposure Value) Compensation submenu to manually adjust the exposure in
0.5 EV increments (
-
values for darker images, + values for lighter images). You can select from
these options:
-2.0
-1.5
-1.0
-0.5
0 (Default)
+0.5
+1.0
+1.5
+2.0
Tab le 1 4: EV Compensation Soft Keys
Soft Key Function
Default Sets the exposure compensation
to the default value.
Exit Saves the setting and returns to
the Photo Assist menu.
Chapter 6: Menu and Soft Key Reference 57 Capture Mode Menus and Soft Keys
Page 58

White Balance Submenu
Note: The option you set is active from shot-to-
shot; it resets to its default setting when you
cycle the power on the camera.
Figure 35: White Balance Submenu
Use the White Balance submenu to correct the color applied to a captured image under different
lighting conditions in order to make white areas in the image appear white without any color cast.
You can select from these setting options:
Auto
Auto (Default) − Use when you want the camera to automatically sense the lighting conditions
AutoAuto
and adjust the white balance appropriately for optimum color reproduction in the image.
Daylight
Daylight − Use when you are taking a picture in daylight without artificial lighting.
Daylight Daylight
Tungsten
Tungsten − Use when you are taking a picture under normal incandescent lighting, such as the
TungstenTungsten
light from tungsten filament light bulbs in household lamps.
Fluorescent
Fluorescent − Use when you are taking a picture under fluorescent lighting.
FluorescentFluorescent
Tab le 1 5: White Balance Soft Keys
Soft Key Function
Select Places a checkmark by the
selected setting, then returns to
the Photo Assist menu.
Exit Returns to the Photo Assist menu
without changing the setting.
Chapter 6: Menu and Soft Key Reference 58 Capture Mode Menus and Soft Keys
Page 59

Focus Mode Submenu
Note: The option you set is active from shot-to-
shot; it resets to its default setting when you
Use the Focus Mode submenu to control how your camera focuses. You can select from these
setting options:
cycle the power on the camera.
Auto Focus (Default)
Manual Focus
Figure 36: Focus Mode Submenu After you set the focus mode to Manual Focus and exit the submenu, the live view of Capture mode
will turn on automatically, and the focus distance will appear in the far left side of the top overlay
bar. You can then adjust the focus distance by pressing the left and right arrows on the 4-way
controller (see below). If you turn off the image LCD, Manual Focus will still be on, but you will no
longer be able to adjust the focus distance with the 4-way controller.
When you set the focus mode to Manual Focus and live view is on, pressing the right and left arrows
on the 4-way controller will perform these specific functions:
−
increases focus distance
−
decreases focus distance
Tab le 1 6: Focus Mode Soft Keys
Note: Setting the camera to Manual focus
Right arrow
Left arrow
mode cancels any selected auto focus
range (Macro or Infinity) and turns off the
corresponding icon on the status LCD.
Soft Key Function
Select Places a checkmark by the
highlighted setting, then returns to
the Photo Assist menu.
Exit Returns to the Photo Assist menu
without changing the setting.
Chapter 6: Menu and Soft Key Reference 59 Capture Mode Menus and Soft Keys
Page 60

Note: The option you set is active from shot-to-
shot; it resets to its default setting when you
cycle the power on the camera.
Figure 37: AE Metering Submenu
AE Metering Submenu
Use the AE (Automatic Exposure) Metering submenu to select the area of the scene that the camera
will use to set the exposure when you take a picture.
Tab le 1 7: AE Metering Submenu
Setting Function
Average (default) The camera uses the entire frame to
calculate exposure.
Center-weighted The camera uses the center half of
the total pixels to calculate exposure.
Spot The camera calculates exposure
based only on a small region in the
center of the scene.
Tab le 1 8: AE Metering Soft Keys
Soft Key Function
Select Places a checkmark by the
highlighted setting, then returns to the
Photo Assist menu.
Exit Returns to the Photo Assist menu
without changing the setting.
Chapter 6: Menu and Soft Key Reference 60 Capture Mode Menus and Soft Keys
Page 61

ISO Speed Submenu
Note: The option you set is active from shot-to-
shot; it resets to its default setting when you
cycle the power on the camera.
Figure 38: ISO Speed Submenu
Use the ISO Speed submenu to set the ISO speed. Similar to film, slower ISO speeds require longer
exposures, but produce higher quality images. In contrast, faster ISO speeds allow for shorter
exposures, but produce noisier images. You can select from these setting options:
Auto (Default) − The camera automatically determines the best ISO speed for the scene.
100
200
The ISO Speed submenu is only available for Auto and Aperture Priority exposure modes. When the
exposure mode is set to Landscape Program, Portrait Program, Action Program, or Shutter Priority,
the ISO Speed submenu is grayed-out and the ISO Speed is set to Auto.
Tab le 1 9: ISO Speed Soft Keys
Soft Key Function
Select Places a checkmark by the
highlighted setting, then returns
to the Photo Assist menu.
Exit Returns to Photo Assist menu
without changing the setting.
Chapter 6: Menu and Soft Key Reference 61 Capture Mode Menus and Soft Keys
Page 62

Image Stamp Menu
Note: An image stamp becomes permanently
embedded in the image and overwrites data in
the image. You cannot remove it later.
Figure 39: Image Stamp Menu
Use the Image Stamp menu to place watermarks on your images as you capture them. The Image
Stamp menu has these options:
Date & Time
Te xt
Logo
Tab le 2 0: Image Stamp Soft Keys
Soft Key Function
Edit Opens submenu associated with
the selected menu option.
Exit Exits this menu and returns to
the live view in Capture mode.
Date/Time Stamp Submenu
Figure 40: Date/Time Stamp Submenu Use the Date/Time Stamp submenu to stamp an image with the current date, time, both date and
time, or neither.
You can set the following properties of the date/time stamp:
Type
Placement
Transparency
Te xt c o lo r
Background
Chapter 6: Menu and Soft Key Reference 62 Capture Mode Menus and Soft Keys
Page 63

Tab le 2 1: Settings for Date/Time, Text, and Logo Stamp Submenus
Setting Options
Typ e None (default), Both, Date, Time
Note: If you have set the Color in the File
Settings submenu to either B&W (black and
white) or Sepia, the Image Stamp will also be
B&W or Sepia, regardless of the color you set
for the Text and Background Colors in the
Image Stamp menu.
Placement
Transparency Opaque - There will be a background box around the text.
Tex t C ol or White, red, green, blue, cyan, magenta, yellow, black
Background Black, white, red, green, blue, cyan, magenta, yellow
Top right quadrant of image
Center of image
Bottom left quadrant of image
Bottom right quadrant of image
Top left quadrant of image
Semi - There will be a translucent background box.
Clear - There will be no background behind the text.
Table 22: Date/Time Stamp Soft Keys
Soft Key Function
Default Returns all settings on screen to
their defaults
Exit Saves the settings, exits this
submenu, and returns to the
Image Stamp menu.
Chapter 6: Menu and Soft Key Reference 63 Capture Mode Menus and Soft Keys
Page 64

Tex t St am p S ub me nu
Figure 41: Text Stamp Submenu Use the Text Stamp submenu to stamp an image with text that you enter using the text entry dialog.
Text Stamp is either On or Off, and the default is Off. When it is On, you can set the following
properties of the text stamp:
Placement
Transparency
Te xt c o lo r
Background
Note: Text strings can be a maximum of
31 characters.
Tab le 2 3 : Text Stamp Soft Keys
Soft Key Function
Edit Ope ns tex t entr y scr een to ent er
the text stamp that will appear
on the images. (Available only
when the first line is set to On.)
Default Returns all settings on screen to
their defaults.
Exit Exits this submenu and returns
to the Image Stamp menu.
Chapter 6: Menu and Soft Key Reference 64 Capture Mode Menus and Soft Keys
Page 65

Logo Stamp Submenu
Figure 42: Logo Stamp Submenu Logo Stamp is either On or Off, and the default is Off. When it is On, you can:
Stamp the image with a logo file
Choose one logo from a list
Choose the placement of the logo
Choose the color
Choose the transparency level
Tab le 2 4: Logo Stamp Soft Keys
Soft Key Function
Edit Opens the Logo Files dialog.
(Available only when Logo
Stamp is on.)
Default Returns all settings on screen to
their defaults.
Exit Exits this submenu and returns
to the Image Stamp menu.
Logo Files Dialog
Note: By default, no logo files are included with
your camera. To learn how to get logo files, see
the HP website at: www.hp.com/photosmart
Chapter 6: Menu and Soft Key Reference 65 Capture Mode Menus and Soft Keys
www.hp.com/photosmart.
www.hp.com/photosmart www.hp.com/photosmart
When you press the Edit soft key in the Logo Stamp submenu, the Logo Files dialog is displayed. Use
the up and down arrows on the 4-way controller to select the file you want to use as the Logo Stamp
from the list of available files.
Tab le 2 5: Logo Files Soft Keys
Soft Key Function
Select Places a checkmark next to the logo file, returns to the
Logo Stamp submenu, and displays the selected file
name in the second line of the submenu.
Exit Exits this dialog and returns to Logo Stamp submenu.
Page 66

Note: All options you set in the Preferences
menu are active from shot-to-shot; they also
remain set when you cycle the power on
the camera.
Preferences Menu
Use the Preferences menu to change a variety of your camera’s general settings. You can select from
these options:
Figure 43: Preferences Menu
Note: For more information on using the
Preferences menu to set up your camera,
see “Appendix A: Using the Preferences Menu”
starting on page 94.
Display
Sound
Format Card
PC Connect Mode
Date & Time
Image Counter
Camera Name
Language
Reset Settings
Tab le 2 6: Preferences Soft Keys
Soft Key Function
Edit Opens submenu associated with
the highlighted menu option.
Format Available only when Format Card
is highlighted.
Reset Available only when Reset
Settings is highlighted.
Exit Exits this submenu and returns
camera to Capture mode.
Chapter 6: Menu and Soft Key Reference 66 Capture Mode Menus and Soft Keys
Page 67

Display Submenu
Figure 44: Display Submenu Use the Display submenu to control the display on the camera’s image LCD.
Tab le 2 7: Display Submenu
Setting Default Options
Brightness Level 4 1 (dimmest) - 7 (brightest)
Note: The Instant Review setting determines the
amount of time an Instant Review of an image
you just captured is displayed on the image
LCD. See “Using Instant Review” on page 25 for
more information.
The Live View setting determines whether the
live view of Capture mode will automatically
display on the image LCD or not when you
power on the camera and set the camera to
Capture mode.
Instant Review
(see Note)
Live View
(see Note)
Sleep Timeout
(see Note)
3 sec 1-10 sec
Off On / Off
2 min 30 sec
Tab le 2 8: Display Soft Keys
Soft Key Function
Default Returns all settings to their defaults.
Exit Saves the settings, exits this
submenu, and returns to the
Preferences menu.
15 sec
20 sec
25 sec
30 sec
Off
1 min
2 min
5 min
The Sleep Timeout setting determines how
quickly the camera goes into sleep mode and
turns off the image LCD when you are not using
the camera.
Chapter 6: Menu and Soft Key Reference 67 Capture Mode Menus and Soft Keys
Page 68
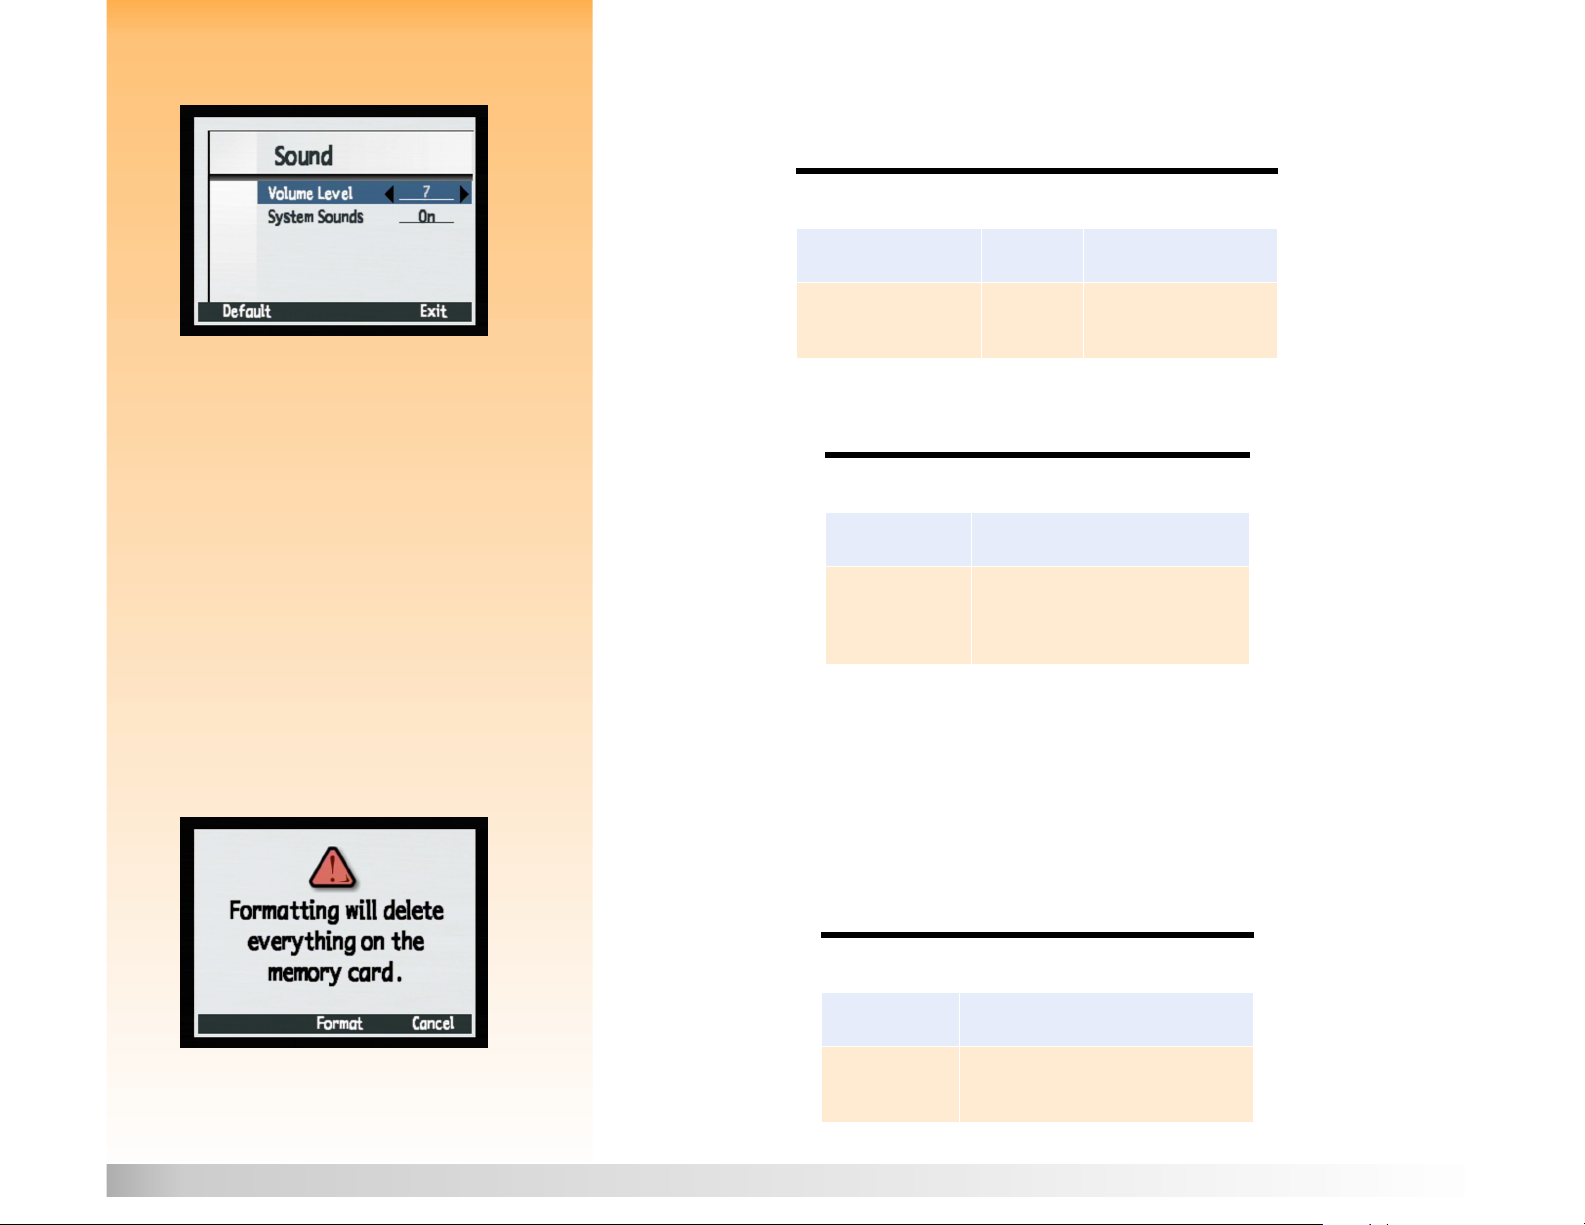
Sound Submenu
Figure 45: Sound Submenu Use the Sound submenu to control the sounds used on your camera.
Ta bl e 2 9 : Sound Submenu
Setting Default Options
Vol ume L evel 7 1 (lowest) - 7 (highest)
System Sounds
(see Note)
On On / Off
Note: The System Sounds setting determines
whether or not you will hear the camera’s
Tab le 3 0: Sound Soft Keys
system sounds, such as shutter clicks, beeps,
and so forth.
Soft Key Function
Default Returns all settings to their defaults.
Exit Saves the settings, exits this
submenu, and returns to the
Preferences menu.
Format Card Option
Figure 46: Format Card Confirmation Screen Use the Format Card option to reformat the memory card. Reformatting will erase all of the
files on the card, including all images, protected files, folders, scripts, and so forth. You will see a
confirmation of your choice to format the memory card (see Figure 46).
Tab le 3 1: Format Card Soft Keys
Soft Key Function
Format Reformats the memory card.
Cancel Exits the confirmation screen and
returns to the Preferences menu.
Chapter 6: Menu and Soft Key Reference 68 Capture Mode Menus and Soft Keys
Page 69
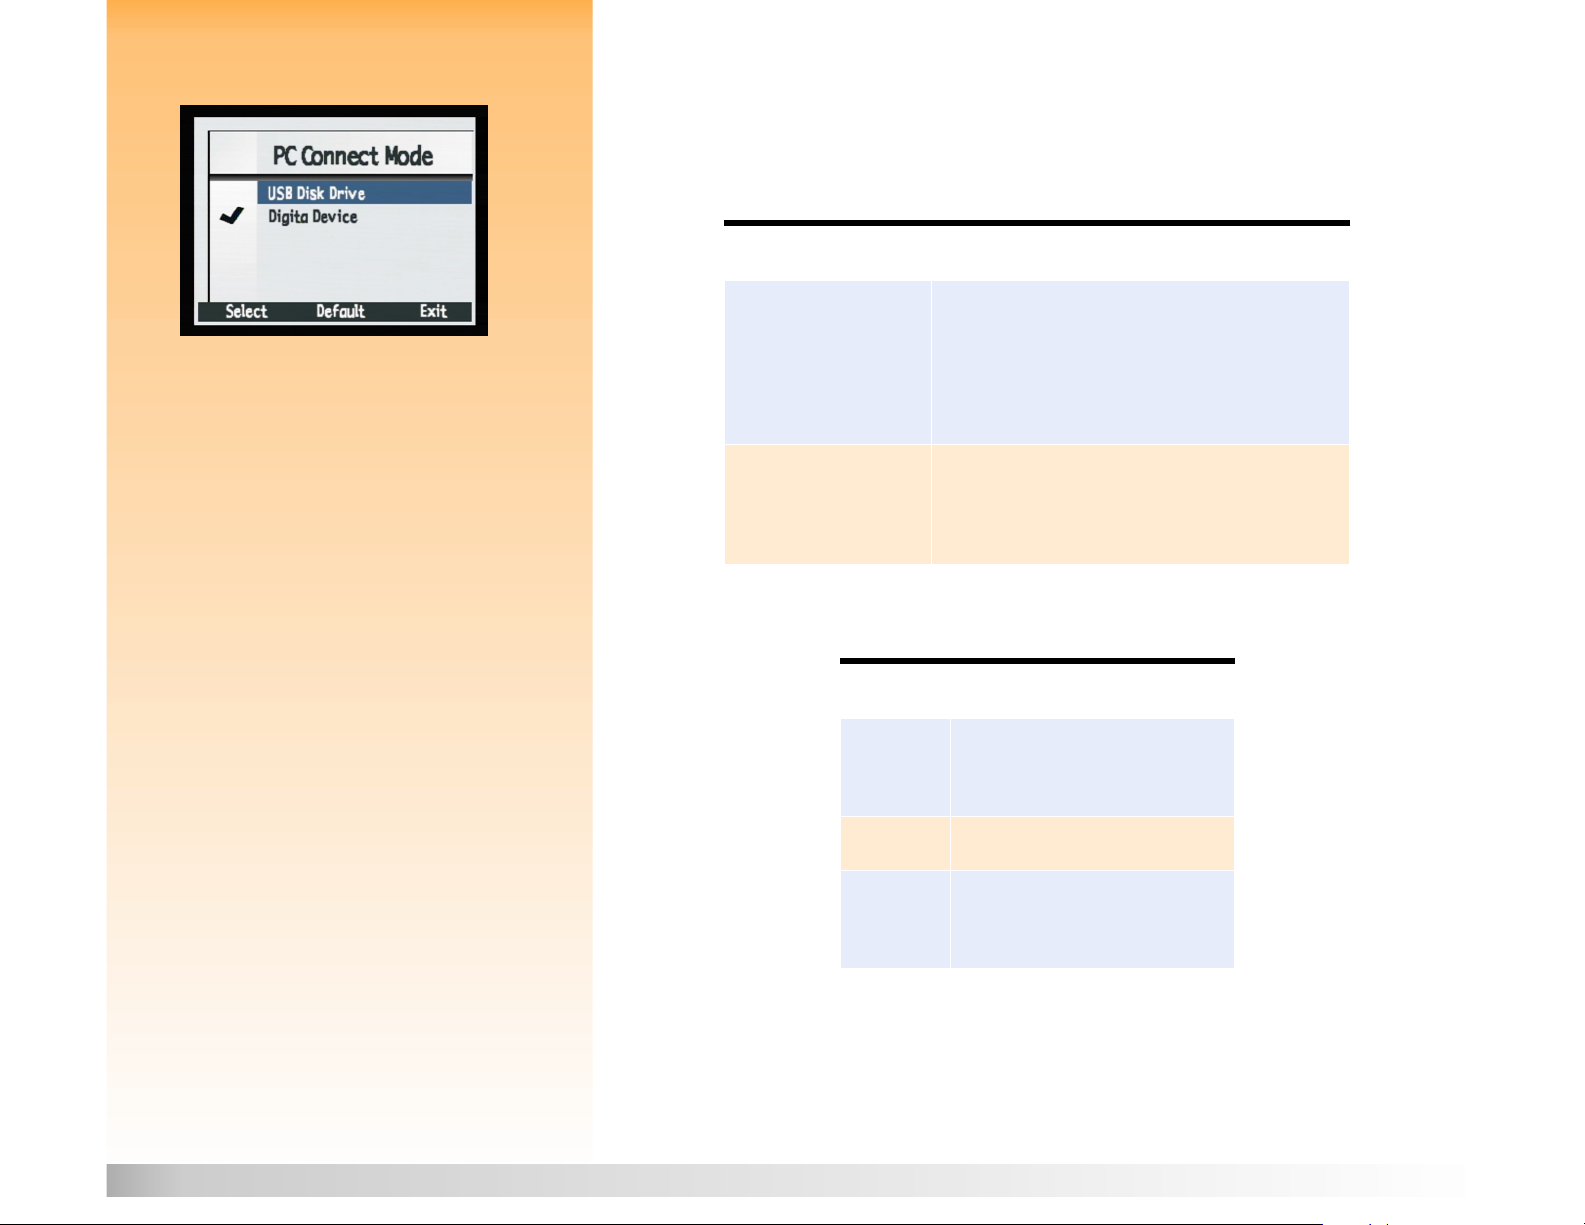
PC Connect Mode Submenu
Figure 47: PC Connect Mode Submenu Use the PC Connect Mode submenu to specify how the camera will appear to your computer when
connected via the USB interface in PC Connect mode. You can then transfer images from your
camera to the computer via the USB interface.
Tab le 3 2: PC Connect Mode Submenu
Setting Function
USB Disk Drive The camera is operated as a USB Mass Storage Device and
appears as a disk drive connected to the computer. You
can copy images from your camera to the computer as
you would from another disk drive. Use this setting to
connect the camera to a Mac OS 8.6 or better computer,
or to a Windows Me, 98, or 2000 computer.
Digita Device (default) You can use software included with your computer or
camera to transfer images to the computer. Use this
setting to connect the camera to a Windows Me, 98, or
2000 computer.
Note: For more information on using the
PC Connect Mode settings, see “Transferring
Images to Your Computer” on page 38.
Tab le 3 3: PC Connect Mode Soft Keys
Soft Key Function
Select Places a checkmark next to the
selected item and returns to the
Preferences menu.
Default Resets the settings to their defaults.
Exit Exits this submenu without changing
the settings and returns to the
Preferences menu.
Chapter 6: Menu and Soft Key Reference 69 Capture Mode Menus and Soft Keys
Page 70

Set Date & Time Submenu
Figure 48: Set Date & Time Submenu Use the Set Date & Time submenu to set the camera’s date and time. Press the up and down arrows
on the 4-way controller to scroll through the list of numbers. Press the left and right arrows to move
between the date/time fields.
Tab le 3 4: Set Date & Time Soft Keys
Soft Key Function
Format Opens the Format List dialog
where you can select the format.
Exit Saves the date and time settings,
exits this submenu, and returns to
the Preferences menu.
Format Dialog
Figure 49: Format Dialog When you press the Format soft key in the Set Date & Time submenu, you see the Format dialog,
which allows you to select from a list of six, predefined date and time formats.
Tab le 3 5: Format Soft Keys
Soft Key Function
Select Places a checkmark next
to the selected format and
returns to the Set Date &
Time submenu.
Exit Exits this dialog and
returns to the Set Date &
Time submenu.
Chapter 6: Menu and Soft Key Reference 70 Capture Mode Menus and Soft Keys
Page 71
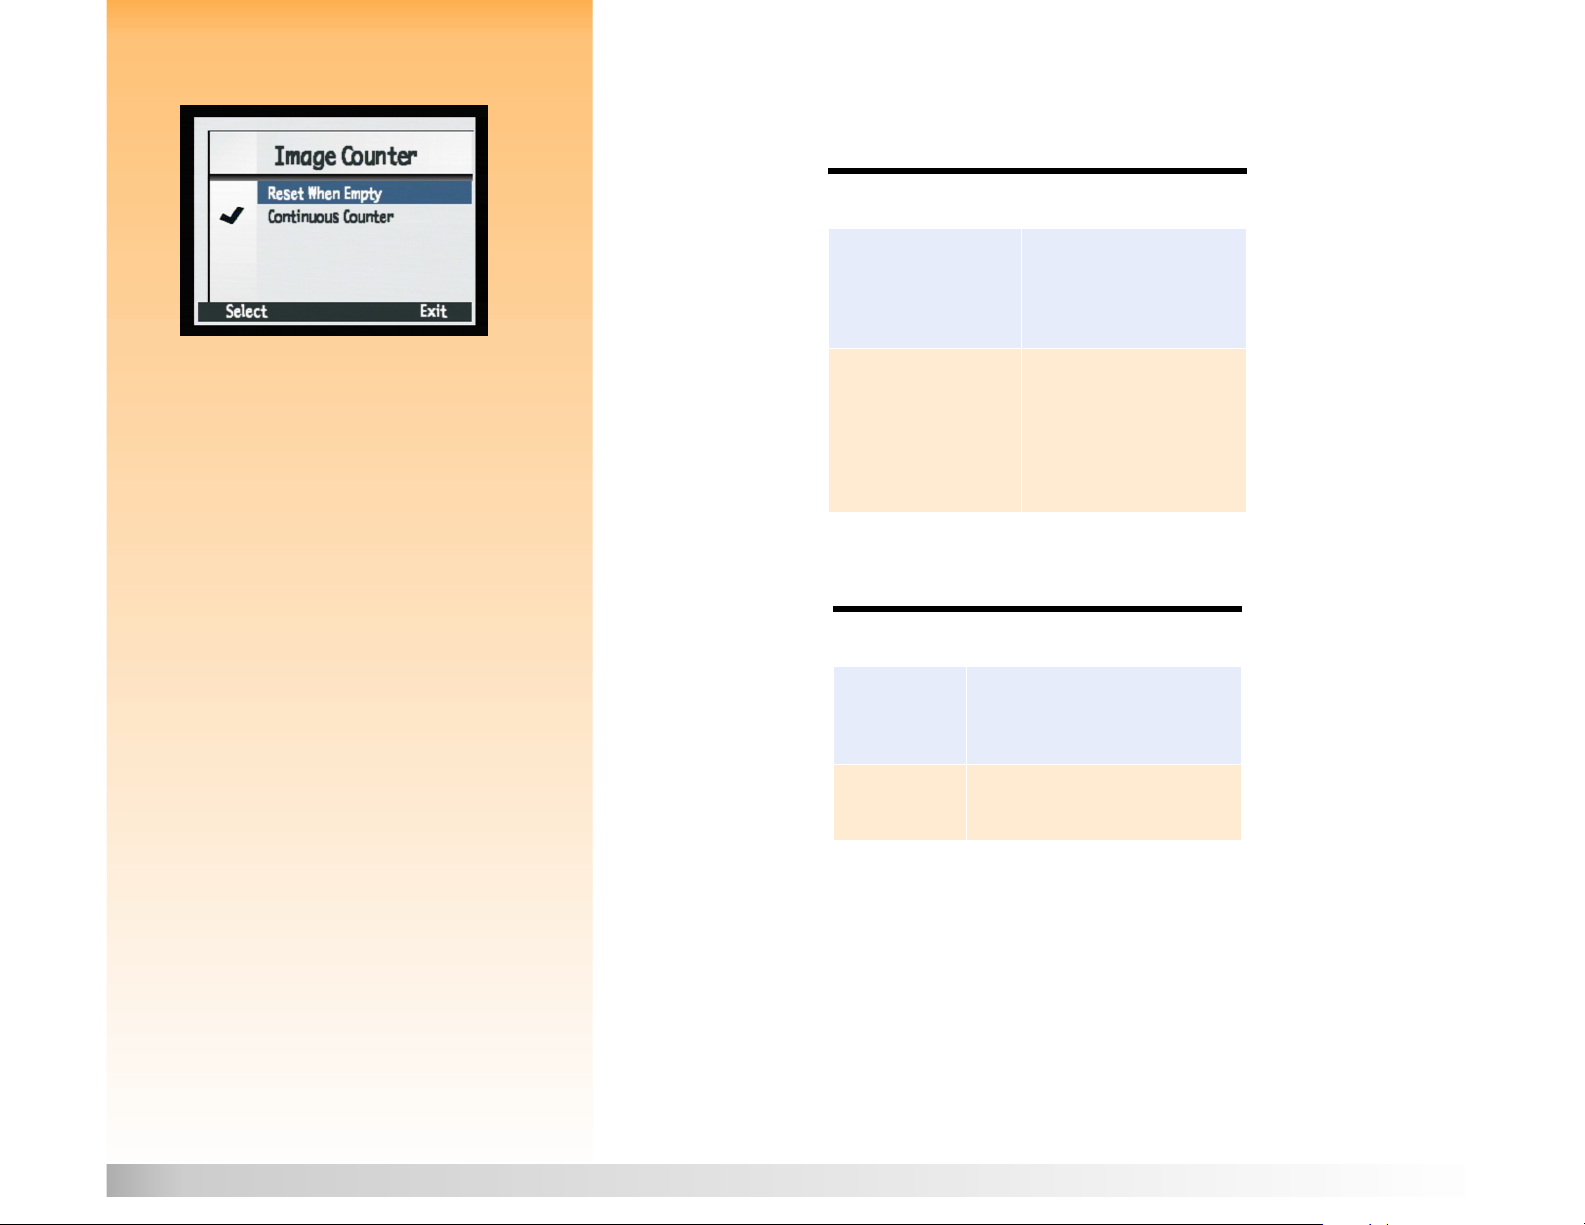
Image Counter Submenu
Figure 50: Image Counter Submenu Use the Image Counter submenu to set how the image counter works.
Tab le 3 6: Image Counter Submenu
Setting Function
Reset When Empty Each time you delete all of
the images on your camera,
the counter restarts the first
image captured at number 1.
Note: Once you have changed the Image
Counter setting, you must power the
camera off and then on again for the new
setting to take effect.
Continuous Counter
(default)
The images are counted
according to the history of
the camera’s use. For
example: image #400 is the
400th image to be captured
with this camera.
Tab le 3 7: Image Counter Soft Keys
Soft Key Function
Select Places a checkmark next to the
selected setting and returns to the
Preferences menu.
Exit Returns to the Preferences menu
without changing the setting.
Chapter 6: Menu and Soft Key Reference 71 Capture Mode Menus and Soft Keys
Page 72

Camera Name Submenu
Figure 51: Camera Name Submenu Use the Camera Name submenu to enter a unique name for your camera.
Press the left (Character Set Icon) soft key to toggle through the four character sets (capital letters,
lowercase letters, numbers, and symbols) until you see the character set you want to use displayed
in the left soft key label area on the overlay bar. Then press the:
Up or down arrow on the 4-way controller to scroll through the list of characters.
Right arrow on the 4-way controller to enter the selected character and advance the
insertion point in the center of the screen.
Left arrow on the 4-way controller to back up and delete a character.
Middle (Space) soft key to create a space between words in the camera name.
Note: Words wrap to the next line when they
get too long.
Tab le 3 8: Camera Name Soft Keys
Soft Key Function
Character Set Icon Toggles through four character
sets: capital letters, lowercase
letters, numbers, and symbols.
Space Adds a space, instead of a letter,
and advances the insertion point.
(The Space key does not appear
if a space is not a valid character.)
Exit Saves the text entered and
returns to the Preferences menu.
Chapter 6: Menu and Soft Key Reference 72 Capture Mode Menus and Soft Keys
Page 73
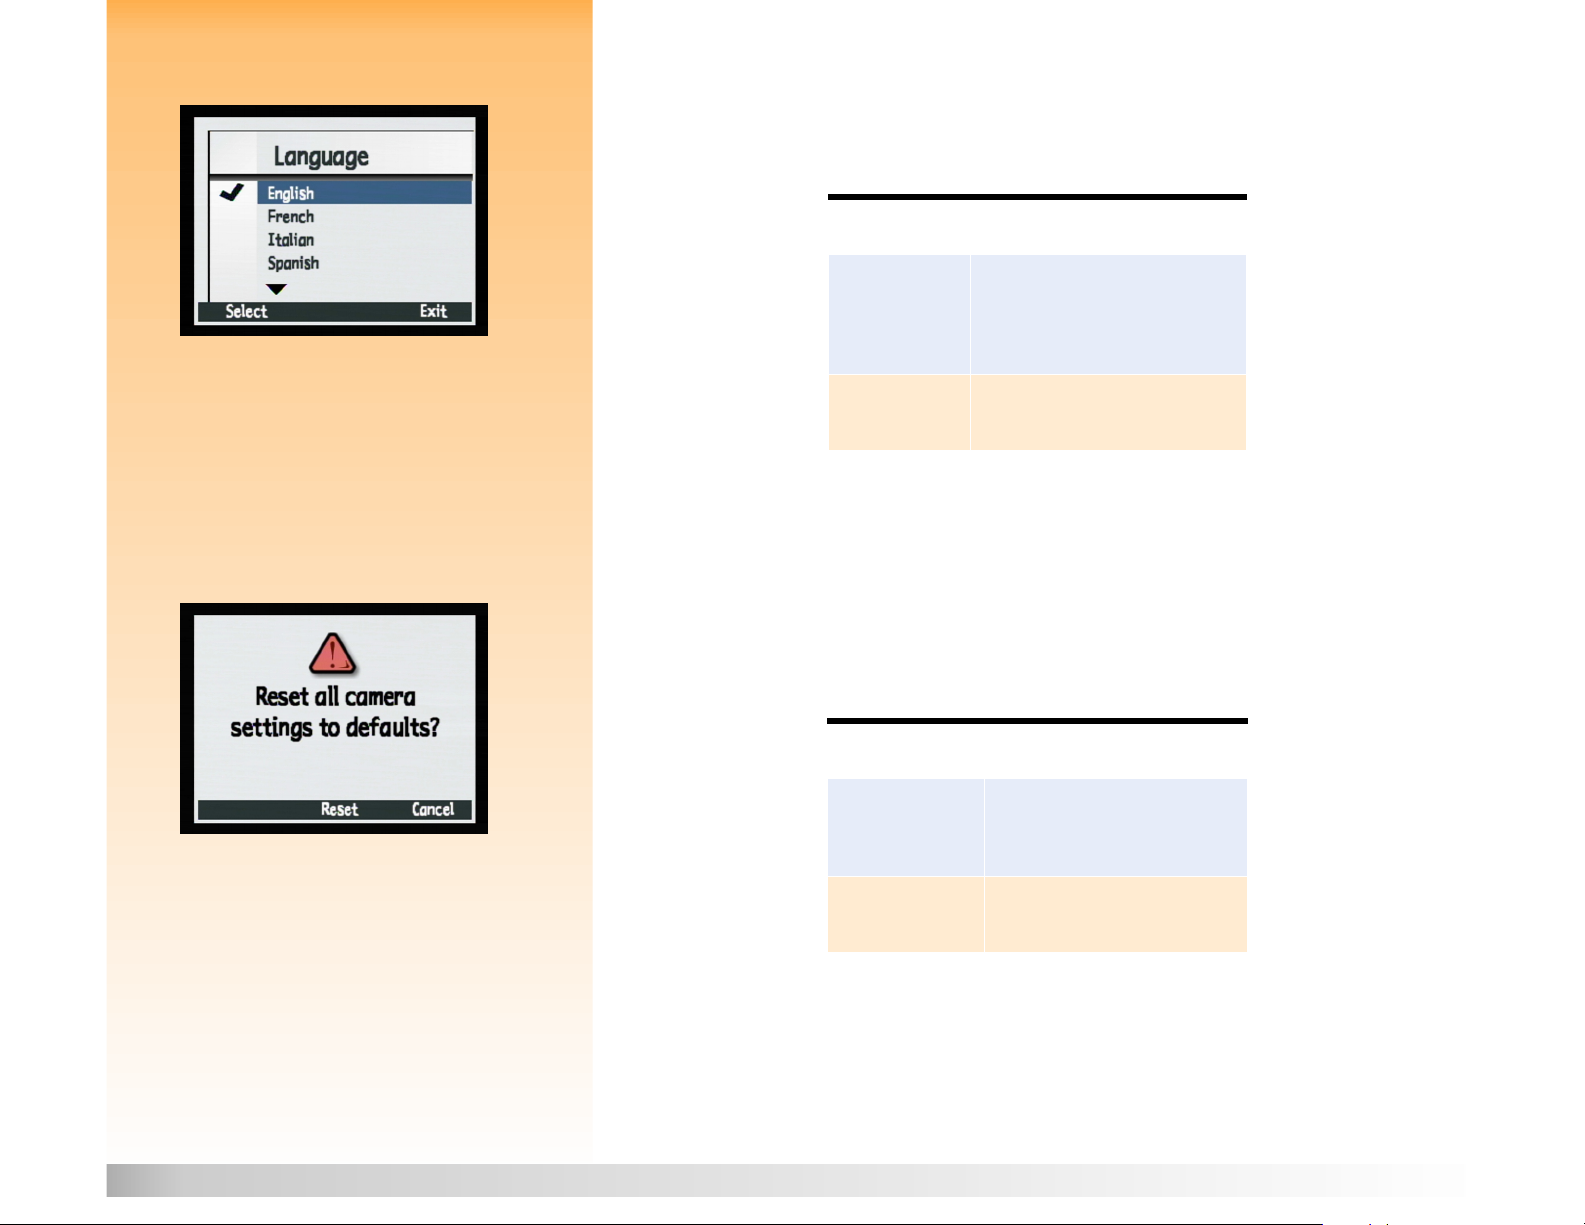
Language Submenu
Figure 52: Language Submenu English is set as the default language that is used on the camera. Use the Language submenu to
select a language from the list of installed languages.
Tab le 3 9: Language Soft Keys
Soft Key Function
Select Places a checkmark next to the
highlighted language and returns to
the Preferences menu. The selected
language is now used.
Exit Returns to the Preferences menu
without changing the setting.
Reset Settings Option
Figure 53: Reset Settings Confirmation Screen Use the Reset Settings option to reset all of the camera settings (except for the Language, Format for
the Set Date & Time, PC Connect Mode, and Video Preferences settings) to their defaults in one step.
You will see a confirmation of your choice to reset the camera settings (see Figure 53).
Tab le 4 0: Reset Settings Soft Keys
Soft Key Function
Reset Resets all camera settings to their
defaults and returns to the
Preferences menu.
Cancel Returns to the Preferences menu
without changing the settings.
Chapter 6: Menu and Soft Key Reference 73 Capture Mode Menus and Soft Keys
Page 74

Playback Mode Menu and Soft Keys
To access the Playback mode menu and related soft keys, turn the camera mode dial to Playback
mode and press the MENU button on the back of the camera. Once you have captured
images, you can choose options and settings for the images within the one menu (Play Settings) of
Playback mode.
Play Settings Menu
Figure 54: Play Settings Menu There are three options in this menu:
Slideshow
Playback Rate
Video
Tab le 4 1 : Play Settings Soft Keys
Soft Key Function
Edit Displays submenu for the
Exit Exits this menu and returns to the
highlighted option.
Playback mode screen.
Chapter 6: Menu and Soft Key Reference 74 Playback Mode Menu and Soft Keys
Page 75

Slideshow Submenu
Figure 55: Slideshow Submenu Use the Slideshow submenu to select the criteria for a slideshow to be viewed “on the fly.”
Tab le 4 2: Slideshow Submenu
Setting Default Options
Content All All, Category
Duration 2 sec 1-10 sec
Sound On On, Off
Loop On On, Off
Tab le 4 3: Slideshow Soft Keys
Soft Key Function
Start Exits this submenu and displays the slideshow.
Cancel Exits this submenu without changing the settings
and returns to the Play Settings menu.
Exit Sets all the settings, exits this submenu, and
returns to the Play Settings menu.
Chapter 6: Menu and Soft Key Reference 75 Playback Mode Menu and Soft Keys
Page 76

Playback Rate Submenu
Figure 56: Playback Rate Submenu Use the Playback Rate submenu to establish a default playback rate for each image type.
Table 44: Playback Rate Submenu
Setting Default Options
Timelapse 3 sec 1-10 sec rate
Group 3 sec 1-10 sec rate
Tab le 4 5: Playback Rate Soft Keys
Soft Key Function
Default Returns all settings to their defaults.
Cancel Exits this submenu without changing the settings
and returns to the Play Settings menu.
Exit Sets all the settings, then exits this submenu, and
returns to the Play Settings menu.
Chapter 6: Menu and Soft Key Reference 76 Playback Mode Menu and Soft Keys
Page 77

Video Preferences Submenu
Figure 57: Video Preferences Submenu Use the Video Preferences submenu to specify the video format: NTSC or PAL. The format that you
choose (NTSC or PAL) depends on your television’s video input format:
NTSC is the video connection standard used in the United States and Japan.
PAL is the video connection standard used in Europe.
Tab le 4 6: Video Preferences Submenu
Setting Default Options
Video Out NTSC NTSC, PAL
Tab le 4 7: Video Preferences Soft Keys
Soft Key Function
Cancel Exits this submenu without
chang ing th e settings and returns
to the Play Settings menu.
Exit Saves the setting, exits this
submenu, and returns to the Play
Settings menu.
Chapter 6: Menu and Soft Key Reference 77 Playback Mode Menu and Soft Keys
Page 78

Review Mode Menus and Soft Keys
To access the Review mode menus and related soft keys, turn the camera mode dial to Review mode
and press the MENU button on the camera. Once you have captured images, you can change
specifications for the images within the four Review mode menus:
“Edit Menu” on page 78
“Print Order Form Menu” on page 81
“Transmit Menu” on page 84
“Find Menu” on page 86
Edit Menu
Figure 58: Edit Menu Use the Edit menu to perform the following actions on selected images:
Delete
Group
Protect
Categorize
Delete Option
Figure 59: Delete Confirmation Screen Use the Delete option to delete the current image, a group of images, or all of the marked images
from the memory card. Note that protected images within a group marked for deletion will not be
deleted until you unprotect them. You will see a confirmation of your choice to delete the images
(see Figure 59).
Tab le 4 8: Delete Soft Keys
Soft Key Function
Delete Deletes the selected image(s) and then
returns to the Review mode screen.
Cancel Exits and returns to the Review mode
screen without deleting image(s).
Chapter 6: Menu and Soft Key Reference 78 Review Mode Menus and Soft Keys
Page 79

Note: A group becomes a folder on the
memory card, in which all the images in that
group are stored.
Figure 60: Group Name Submenu
Group Name Submenu
Use the Group Name submenu to group all of the images that you have marked. You can start a
group, add images to an existing group, or move images from one group to a new group. Note that
you can use the Dissolve soft key to dissolve groups.
Tab le 4 9: Group Name Soft Keys
Soft Key Function
Add (If current image is
not grouped, but at least
one group exists.)
Create (If current image
is not grouped and no
groups exist.)
Dissolve Removes any grouping previously applied.
Exit Exits and returns to the Review mode screen.
Displays a dialog that allows you to create a
new group or add to an existing group. (Images
are moved into groups, not replicated.)
Protect Option
Figure 61: Protect Option Use the Protect option to protect or unprotect marked images. When an image is protected, you can’t
delete it. If there are no marked images, then the Protect command protects the currently selected
image. If the marked or selected single image is unprotected, only the Protect soft key appears. If the
image is protected, only the Unprotect soft key appears. If multiple images, both protected and
unprotected, are marked, then both the Protect and Unprotect soft keys appear.
Once you have protected an image, the following restrictions apply to the image file:
You cannot delete the image nor an attached sound.
You cannot attach or re-record a sound.
You cannot attach, change, or remove a category.
Deleting a group will delete only the unprotected images within that group.
You cannot change the file name.
You can move the image file into and out of groups.
The image file will be marked “Read Only” in Windows when transferred to a PC.
Chapter 6: Menu and Soft Key Reference 79 Review Mode Menus and Soft Keys
Page 80

Tab le 5 0: Protect Soft Keys
Soft Key Function
Protect Appears if selected images are unprotected.
Allows you to protect the current image.
Unprotect If multiple images are marked, this soft key
appears along with the Protect soft key.
Allows you to unprotect images.
Exit Cancels the protect operation and returns
to the Review mode screen.
Note: A category is an image tag which is
useful for finding images or playing a
slideshow of a category of images.
Figure 62: Categories Submenu
Categories Submenu
Use the Categories submenu to assign images to a category. The camera has predefined categories,
such as vacation, work, pets, family, and friends
Choose the category you want using the 4-way controller, then use the Select soft key to attach the
category to the image. You can assign categories to one image at a time, or you can categorize all
marked images at once.
Tab le 5 1: Categories Soft Keys
Soft Key Function
Select Assigns a category to an image or marked
images. Places a checkmark next to the
assigned category.
Exit Updates the image files with the new categories
and returns to the Review mode screen.
Chapter 6: Menu and Soft Key Reference 80 Review Mode Menus and Soft Keys
Page 81

Print Order Form Menu
Figure 63: Print Order Form Menu Use the Print Order Form menu to create a Digital Print Order Format (DPOF) file.
Tab le 5 2: Print Order Form Menu
Option Function
Add Images Allows you to add current image or marked
images to the DPOF file. Opens a seco ndary
screen to specify number of copies and size
of photos.
View Order Displays a scrolling list of the contents of
the DPOF file.
Erase Order Erases the contents of your DPOF file.
Note: See “Using a Digital Print Order Format
(DPOF) File” on page 44 for more information. Tab le 5 3: Print Order Form Soft Keys
Soft Key Function
Add/Select Opens appropriate submenu.
Erase Asks for confirmation to delete all entries of
the DPOF file.
Exit Exits and returns to the Review mode screen.
Chapter 6: Menu and Soft Key Reference 81 Review Mode Menus and Soft Keys
Page 82

Add to Order Submenu
Figure 64: Add to Order Submenu Use the Add to Order submenu to add current or marked images to the DPOF file and to set up the
print settings for those images.
If you have any marked images, they are added to the order. If no images are marked, the image
currently selected in the Review mode is added to the order.
Tab le 5 4: Add to Order Submenu
Setting Options
Copies 1-999 (1=default)
Size Index - Thumbnails
Standard (default) - One of
the standard print sizes
(see Note)
Note: Standard means one of the standard
print sizes. You specify the exact size you want
your Standard prints to be at the printer. For
example, you can specify that all Standard
images be printed at 4” x 6”.
Table 55: Add to Order Soft Keys
Soft Key Function
Add Adds images to the DPOF file.
Cancel Exits without adding images.
Chapter 6: Menu and Soft Key Reference 82 Review Mode Menus and Soft Keys
Page 83

View Order Option
Figure 65: Print Order Form Screen of the
View Order Option
Use the View Order option to view a list of ordered images in the DPOF file. You can scroll through
this list using the up and down arrows on the 4-way controller. However, you cannot edit this list.
Tab le 5 6: View Order Option Soft Key
Soft Key Function
Exit Returns to the Print Order Form menu.
Erase Order Option
Figure 66: Erase Order Confirmation Screen Use the Erase Order option to erase all of the entries from the DPOF file. You will see a confirmation
of your choice to erase all entries (see Figure 66).
Tab le 5 7: Erase Order Soft Keys
Soft Key Function
Erase Erases the contents of the DPOF file.
Exit Returns to the Print Order Form menu
without clearing the DPOF file.
Chapter 6: Menu and Soft Key Reference 83 Review Mode Menus and Soft Keys
Page 84

Transmit Menu
Figure 67: Transmit Menu Use the Transmit menu to transfer images in one of two ways:
Camera-Camera
Camera-Printer
Camera-Camera Option
Use the Camera-Camera option to send current or marked images to, or receive images from,
another Digita camera.
Note: For more information, see “Transmitting
Images Between Two Cameras” on page 48. Ta bl e 58 : Camera-Camera Soft Keys
Soft Key Function
Send Sets the camera into sender mode.
Displays a screen to confirm sending
images to another camera and then
returns to the Review mode screen.
Receive Sets the camera to receiver mode.
Brings up a screen to confirm
receiving images from another
camera and returns to the Review
mode screen.
Stop Stops transmitting and returns to the
Tran smi t m enu.
Exit Exits this screen and returns to the
Review mode screen.
Chapter 6: Menu and Soft Key Reference 84 Review Mode Menus and Soft Keys
Page 85

Camera-Printer Option
Use the Camera-Printer option to send current or marked images to a printer via the
HP JetSend infrared technology.
Note: For more information, see “JetSending
Images to a Printer” on page 46. Tab le 5 9: Camera-Printer Soft Keys
Soft Key Function
Send Sets the camera to sender mode.
Displays a screen to confirm sending
images and then returns to the Review
mode screen.
Exit Exits this screen and returns to the
Review mode screen.
Chapter 6: Menu and Soft Key Reference 85 Review Mode Menus and Soft Keys
Page 86

Find Menu
Figure 68: Find Menu Use the Find menu to search for specific images, either by category or by date (but not both at the
same time). When you return to the Review mode to view the results of the find operation, the Find
icon will appear in the lower, right corner. All find results will be chronologically displayed. If no
images match your search criteria, then you will see an error message.
Tab le 6 0: Find By Date and Find By Category Soft Keys
Soft Key Function
Edit Displays specific find options (Find By
Date, or Find By Category).
Select Selects the category to find.
Exit Exits the Find screen and returns to the
Review mode screen.
Mark After the Find operation, marks a selected
image.
Show All After the Find operation, returns the
thumbnail row to the original,
chronological list of images and turns off
the Find icon.
Chapter 6: Menu and Soft Key Reference 86 Review Mode Menus and Soft Keys
Page 87
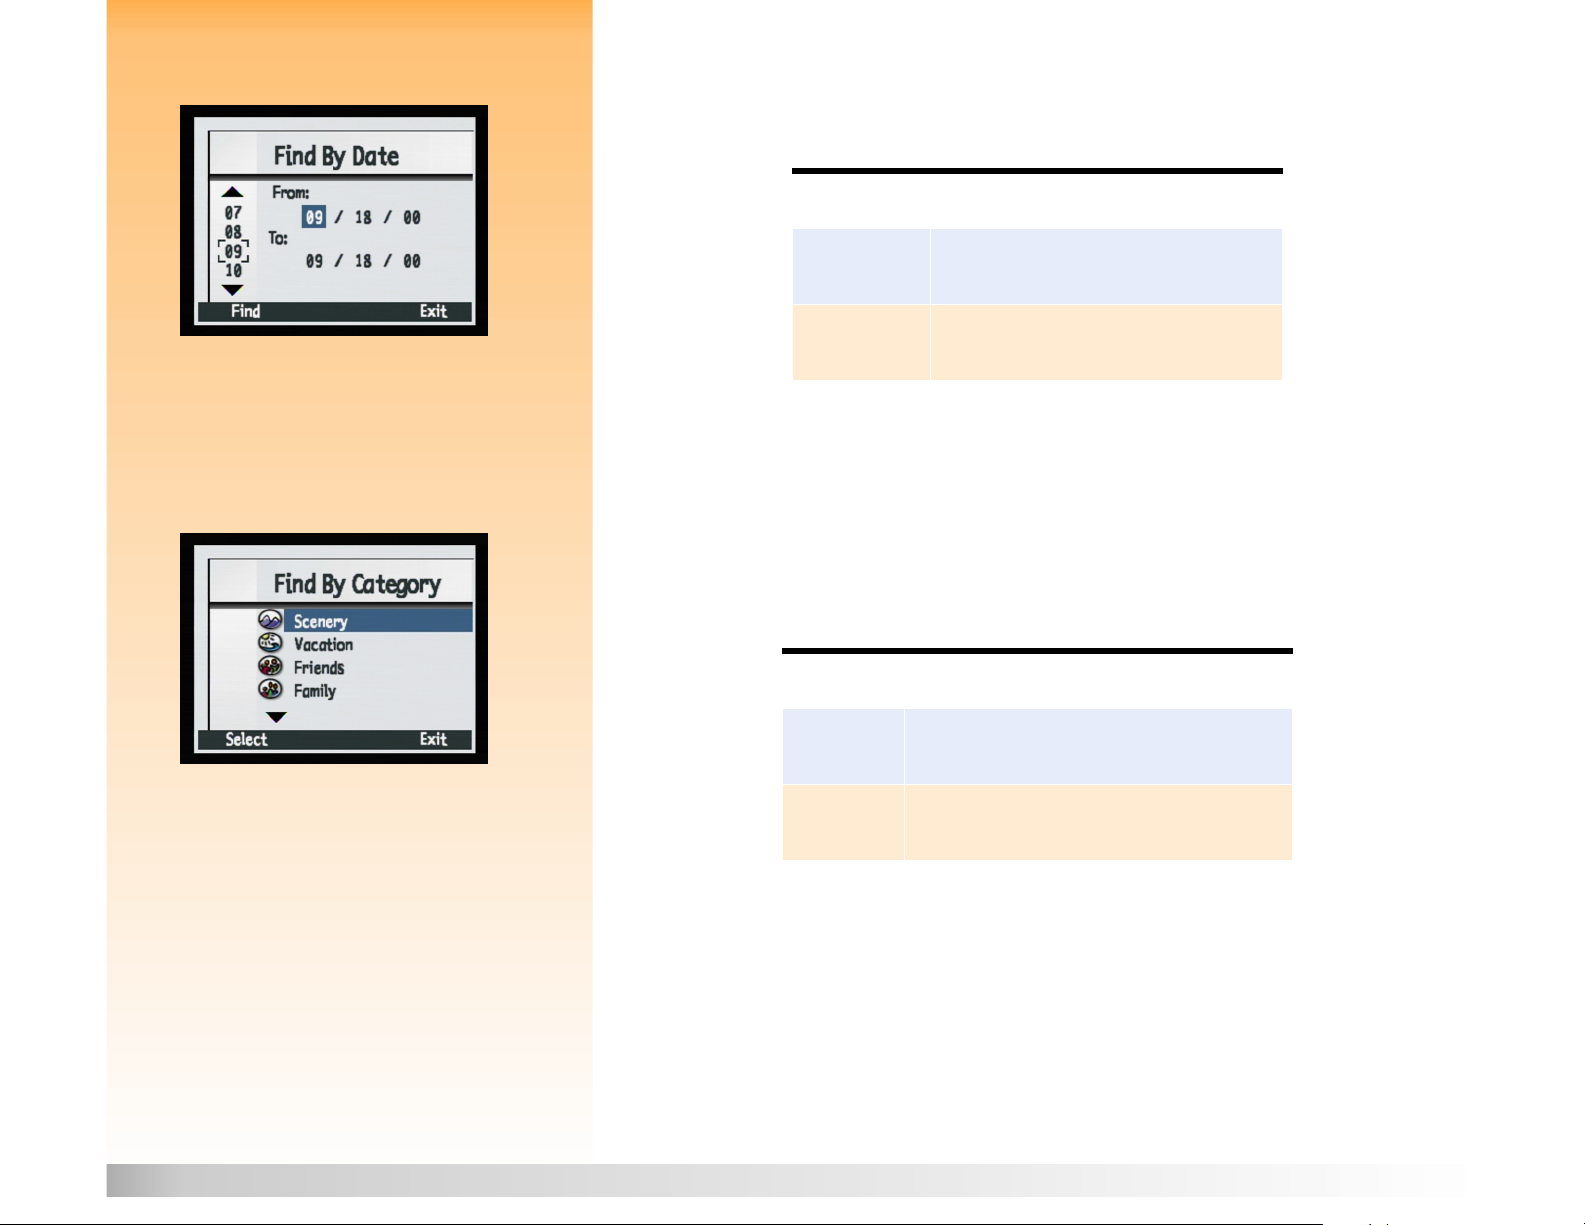
Find By Date Submenu
Figure 69: Find By Date Submenu Use the Find By Date submenu to enter the range of dates using the 4-way controller.
Ta bl e 6 1 : Find By Date Soft Keys
Soft Key Function
Find Executes the Find criteria and returns to the
Review mode screen to display results.
Exit Exits this screen and returns to the Find menu
without executing the Find command.
Find By Category Submenu
Figure 70: Find By Category Submenu Use the Find By Category submenu to scroll through the list of categories and enter the “find”
category with the 4-way controller. You can then use the Select soft key to select the category with
which you want to do the search.
Tab le 6 2: Find By Category Soft Keys
Soft Key Function
Select Selects the checkmarked category from the Find By
Category list and executes the Find command.
Exit Exits this screen and returns to the Find menu without
executing the Find command.
Chapter 6: Menu and Soft Key Reference 87 Review Mode Menus and Soft Keys
Page 88

Chapter 7: Troubleshooting
Note: For information about preserving battery
life and about HP accessories you can use to
power the camera (such as the HP AC power
adapter, and the HP rechargeable batteries and
battery recharger), see Appendix B starting on
page 103.
Overview
This chapter explains how to troubleshoot some common problems you may encounter while using
your camera.
If you still cannot remedy the problem, contact HP for help. See “Contacting HP Customer Care” on
page 93.
Troubleshooting Common Problems
Problem Solution
The camera will not
power on
If you are using batteries:
Check the type of batteries that you have installed in the camera. They
may not be the appropriate type for a digital camera. Use only high
quality AA photo lithium, high drain alkaline, or NiMH batteries.
Check to make sure the batteries are inserted correctly. The positive and
negative poles may be reversed.
The batteries’ charge may be low or completely drained. Try installing
new batteries or recharged batteries,
If you are using the HP AC power adapter instead of batteries:
Is the AC power adapter plugged in?
Is there power at the outlet?
Is the AC power adapter dead?
Also see the next problem and solution, below.
The camera is not
responding at all − it
won’t power on or off
The camera is powered
on, but there’s no display
on the image LCD
Chapter 7: Troubleshooting 88 Troubleshooting Common Problems
Open the battery compartment door, remove the batteries and/or unplug the HP AC
power adapter, and let the camera sit for about 20 minutes with the battery door
open to allow the camera to discharge fully. Then either re-install the batteries or
plug in the AC power adapter, close the battery door, and try powering on the
camera again.
Press the DISPLAY button again.
Power the camera off and then on again.
The batteries may be nearly drained. (If so, you should see an empty battery
status icon on the status LCD.) Leave the image LCD turned off, or insert
charged batteries.
Page 89

Problem Solution
The camera is powered
on, but when I press a
button, the camera does
not respond
I always have to re-set the
date and time after I
change the batteries in
the camera or unplug the
HP AC power adapter
from the camera
The rechargeable HP
NiMH batteries I’m using
don’t seem to power the
camera for very long
The incorrect language is
set on the camera
Try powering the camera off and then on again.
Remove the batteries or unplug the HP AC power adapter. Then reinstall the
batteries or plug in the AC power adapter, and power on the camera again.
This will happen if either you remove the batteries from the camera, or you remove
the batteries and unplug the HP AC power adapter, for more than 5 minutes. (Note
that even if the batteries are drained, the date and time will remain set as long as
you leave the drained batteries in the camera.)
When changing batteries, try to put the new batteries in within 5 minutes of when
you remove the old batteries. Similarly, if you are using the HP AC power adapter,
either leave batteries in the camera (even if the batteries are drained) when you
unplug the adapter, or unplug the adapter for less than 5 minutes at a time.
You must recharge all 4 HP NiMH batteries after fully draining them four times for
the batteries to reach their optimum capacity and performance. For more
information, see “Using the HP NiMH Batteries and Recharger” on page 108.
1. Set the camera mode dial to Capture mode .
2. Power on the camera if you haven’t already.
3. Press the MENU button to display the Capture mode menus on the image LCD.
4. Press the right arrow on the 4-way controller three times to move to the
Preferences menu.
5. Press the down arrow on the 4-way controller seven times to move to the
Language menu option.
6. Press the left (Edit) soft key. The Language submenu is displayed.
7. Press the down or up arrow on the 4-way controller to highlight the language
you want.
8. Press the left (Select) soft key to select the highlighted language and to exit this
screen. You return to the Preferences menu of Capture mode, and the camera is now
using the language you set.
9. Press the right (Exit) soft key to exit the menu.
Chapter 7: Troubleshooting 89 Troubleshooting Common Problems
Page 90

Problem Solution
The camera is displaying
an error message
The camera’s status LCD
is flashing 000
The image counter on the
camera’s status LCD won’t
reset when the memory
card is empty
There are 3 different types of error messages you may see on the camera:
Memory card is not formatted - “Err” is displayed on the status LCD and the
message “Card requires formatting” is displayed on the image LCD. This
means the memory card needs to be formatted. Either see “Formatting the
Memory Card” on page 98 for information on how to format the card, or
replace the current memory card with another, formatted one.
Fla sh canno t charge - “Err” and the l ightnin g bolt icon blink s on the status LC D
for 3 seconds, then the camera powers off. “Err” and the lightning bolt will
remain displayed on the status LCD until the batteries are drained. This
problem requires repair of the camera. See “Contacting HP Customer Care” on
page 93 to call HP for help.
Other errors - The camera locks up and blinks a 3-digit error code on the status
LCD. Try powering the camera off and then on again. You may also need to
remove the batteries and install them again. If the problem persists, see
“Contacting HP Customer Care” on page 93 to call HP for help. Be sure to tell
the HP representative the error code that you see displayed on the status LCD.
There is no memory card installed in the camera, or the memory card is full. If there
isn’t one installed, power off the camera, install a memory card in it, and then power
on the camera again. If the memory card is full, transfer the images you want to
keep to your computer (see “Transferring Images to Your Computer” on page 38),
and then delete images from the memory card to free-up space.
The default setting for the image counter is continuous counting of images. If you
want to have it reset to zero when the memory card is empty, you can change the
setting in the Image Counter submenu (under the Preferences menu in Capture
mode). See “Image Counter Submenu” on page 71. Once you have changed the
image counter setting, you must power the camera off and then on again. Also
ensure that the camera’s memory card is completely empty.
The camera will not focus
Digital zoom is not
working
Ensure that the camera mode dial is set to Capture mode .
You may be too close to the subject. Try using the Macro auto focus range.
Try using Focus Lock. See “Using Focus Lock” on page 18.
For digital zoom to work correctly, the camera’s image LCD must be turned on.
Ensure that the camera mode dial is set to Capture mode . Then press the
DISPLAY button.
Chapter 7: Troubleshooting 90 Troubleshooting Common Problems
Page 91

Problem Solution
The HP Remote Control is
not working
The captured images are
over- or under-exposed
The computer does not
recognize the camera
when connected via the
USB cable
The HP Remote Control does not work while the flash is charging. Try pressing
the Remote Control’s trigger again once the flash has charged.
The HP Remote Control may not work if the camera is sitting under bright
lights or in full sun. In this case, use the 10-Second Timer mode, instead. (See
“Setting the Timer Mode” on page 11.)
The battery in the HP Remote Control may be dead. If so, replace the battery.
Change the exposure compensation setting in the EV Compensation submenu of
the Photo Assist menu. See “EV Compensation Submenu” on page 57.
On both Windows and Macintosh computers:
Is the camera powered on?
Is the camera mode dial set to PC Connect mode ?
Is the USB cable firmly attached to both the camera and computer?
Is the USB port enabled on the computer?
Are you using a USB hub? If so, you may need to reset the hub. (It may have
become disabled due to an electrical disturbance such as that generated by
static electricity.) To reset the USB hub, leave the camera connected to the hub,
disconnect the hub from the computer, and remove power from the hub. Then
reconnect the power to the USB hub and reconnect the hub to the computer.
Try powering the camera off and then on again.
On Windows Me, 98, and 2000 computers:
If you are using the Microsoft Scanner and Camera Wizard (for Windows Me) or
the HP Photo Imaging Software (for Windows 98 and 2000) to transfer images,
is the PC Connect Mode submenu setting (under the Preferences menu of
Capture mode) in the camera set to Digita Device?
If you are using the PC Connect Mode submenu setting of USB Disk
Drive in the camera instead, does the camera appear as a disk drive in
Windows Explorer?
Note: Computers running Windows NT 4.0 cannot connect to the camera via the
USB cable, because Windows NT 4.0 does not support the USB interface. You must
use either an HP P1000/1100 or similar printer, or a memory card reader to transfer
the images to your Windows NT 4.0 computer, instead.
On Macintosh computers:
Is the PC Connect Mode submenu setting (under the Preferences menu of
Capture mode) in the camera set to USB Disk Drive?
Chapter 7: Troubleshooting 91 Troubleshooting Common Problems
Page 92

Problem Solution
A TWAIN error occurs
when a software program
tries to acquire an image
from the camera
I am trying to name a
group of images, but the
camera is not responding
I am searching through
images by date, and have
selected the find dates,
but the camera is not
responding
I can’t get images to
display on my television
when I connect my
camera to it
Verify that the software program can see the camera through its own TWAIN
select source. While software programs vary on how to select a TWAIN source,
generally the easiest way to determine whether a program supports TWAIN is
to see if there is an Acquire selection in the File menu. If not, then check for a
TWAIN command located under the Import selection of the File menu. If
neither exits, and you have a scanner, check the manual for the software
program to see if you can use TWAIN to scan images, instead.
For more detailed information about this problem, consult the Technical
Support section for this camera that is located on the HP website at:
www.hp.com/photosmart
www.hp.com/photosmart.
www.hp.com/photosmartwww.hp.com/photosmart
Try using a different group name. Note that the camera does not accept group
names that begin with BR or TL (regardless of language).
Group names must be eight characters or less, and cannot contain spaces.
Make sure that the From date is prior or equal to the To date.
Make sure that the video output format (NTSC or PAL) that you set in the Video
Preferences submenu of Playback mode is correct for the video input format of
your television. (See “Video Preferences Submenu” on page 77.)
I’m having trouble
JetSending an image to
my printer
I’m having trouble
sending images to
another camera
Be aware that it will take an average of 20 seconds to transfer an image from
the camera to a printer via JetSend.
Make sure that your printer is JetSend-capable.
Make sure that the camera’s infrared window is lined-up with the printer’s
infrared sensor, and that the camera and printer are about 10 inches apart.
Make sure that the other camera is a Digita camera.
Make su re that the c amera’s i nfrared window is lined-u p with the ot her camera’s
infrared sensor, and that the cameras are about 10 inches apart.
Chapter 7: Troubleshooting 92 Troubleshooting Common Problems
Page 93

Contacting HP Customer Care
HP Customer Care Online
Note: For a complete list of HP’s Customer
Support Centers worldwide, go to the HP
website, www.hp.com/photosmart,
the Assistance
www.hp.com/photosmart, and click
www.hp.com/photosmart,www.hp.com/photosmart,
Assistance button on the navigation bar.
AssistanceAssistance
Click your way to a great solution! The HP website, www.hp.com/photosmart
www.hp.com/photosmart, is a great place to
www.hp.com/photosmartwww.hp.com/photosmart
start for answers to questions about your HP products. You’ll get instant access to helpful tips and
−
tricks, downloadable drivers, and the latest product and software updates
24 hours a day,
7 days a week.
HP Customer Care by Phone
If you encounter a problem with your camera that is not covered in this chapter, contact HP for help.
HP has Customer Support Centers worldwide, some of which are listed below.
HP’s Customer Support Centers
Replace a + with your international telephone access code.
North America
Europe
Canada: 905-206-4663
Mexico - Mexico City: +52 58 9922
Mexico - Outside Mexico City: +01 800 472 6684
United States: 208-376-3686
Belgium - Dutch: +32 (0)2 626 8806
Belgium - French: +32 (0)2 626 8807
Denmark: +45 39 29 4099
Finland: +358 (0)203 47 288
France: +33 (0)1 43 62 34 34
Germany (24PF/min): +49 (0)180 52 58 143
Italy: +39 02 264 10350
Netherlands: +31 (0)20 606 8751
Norway: +47 22 11 6299
Spain: +34 902 321 123
Sweden: +46 (0)8 619 2170
United Kingdom: +44 (0)207 512 52 02
English language support from
other European countries:
+44 (0)171 512 52 02
Asia/Pacific
Chapter 7: Troubleshooting 93 Contacting HP Customer Care
Australia: +61 3 8877 8000
Korea: +82 (2) 3270 0700
Singapore: +65 272 5300
Taiwan: +886 (2) 2717 0055
Page 94

Appendix A: Using the Preferences Menu
Overview
Note: For reference information regarding the
options and soft keys in the Preferences menu,
see “Preferences Menu” starting on page 66.
Figure 71: Preferences Menu
Use the Preferences menu in Capture mode to change a variety of your camera’s general settings.
For example, with the Preferences menu options you can change the brightness of the camera’s
image LCD or the volume of the camera’s sounds, reformat the memory card in the camera, change
the date and time on the camera, or set the mode for connecting the camera to a computer.
This appendix covers the following topics:
“Accessing the Preferences Menu” on page 94
“Setting the Display” on page 95
“Controlling Camera Sounds” on page 97
“Formatting the Memory Card” on page 98
“Selecting the PC Connect Mode” on page 98
“Setting the Date and Time” on page 99
“Setting the Image Counter” on page 100
“Naming Your Camera” on page 101
“Selecting a Language” on page 102
“Resetting Camera Settings” on page 102
Accessing the Preferences Menu
To access the Preferences menu:
1 Set the camera mode dial to Capture mode .
2 Power on the camera if you haven’t already.
3 Press the MENU button on the back of the camera. The Capture mode menus are displayed on
the image LCD.
4 Press the right arrow on the 4-way controller three times to move to the Preferences menu (see
Figure 71).
Note: All of the settings you make in the
Preferences menu are active from shot-to-shot;
they also remain set when you cycle the power
on the camera.
Appendix A: Using the Preferences Menu 94 Accessing the Preferences Menu
5 Press the down arrow on the 4-way controller to move the highlight to the menu option you
want to select.
6 Press the left (Edit, Format, or Reset) soft key to select the highlighted menu option.
Page 95

Setting the Display
Figure 72: Display Submenu Use the Display submenu to control the display on the camera’s image LCD.
Brightness Level
Use the Brightness Level setting to control the brightness of the display on the camera’s image LCD.
You can set the Brightness Level from 1 (dimmest) to 7 (brightest). The default value is 4.
To change the Brightness Level:
1 Press the down or up arrow on the 4-way controller, if needed, to highlight the Brightness
Level option.
2 Press the right or left arrow on the 4-way controller to scroll through the values until you see
the value you want.
3 Press the right (Exit) soft key to save the setting, exit the Display submenu, and return to the
Preferences menu.
Instant Review
The camera’s Instant Review feature allows you to see displayed on the image LCD either the One
Shot image, the final image of a Continuous image sequence, or the first image of a Timelapse
sequence you just captured. (See “Using Instant Review” on page 25 for more information.) The
default setting is that Instant Review is on for 3 seconds, and the maximum setting is that it is
on for 30 seconds, after you capture either a One Shot image or the final image in a Continuous or
Timelapse sequence.
To change the duration of the Instant Review period, or to turn Instant Review Off:
1 Press the down or up arrow on the 4-way controller to highlight the Instant Review option.
2 Press the right or left arrow on the 4-way controller to scroll through the values until you see
the value you want.
3 Press the right (Exit) soft key to save the setting, exit the Display submenu, and return to the
Preferences menu.
Appendix A: Using the Preferences Menu 95 Setting the Display
Page 96

Live View
Note: The image LCD uses a lot of battery
power. If you are running your camera on
batteries rather than with the HP-approved AC
power adapter, you may want to limit your use
of the image LCD. In turn, you may want to
leave the Live View setting at its default Off
value to preserve battery power.
Note: For convenience as you learn to use your
camera’s features and menu options, you may
want to set the Sleep Timeout to the longest
interval (5 minutes). This will give you time to
consider a feature or menu option before the
camera goes into sleep mode and the image
LCD turns off.
The Live View setting determines whether the live view of Capture Mode will automatically display
on the image LCD or not when you power on the camera and set the camera to Capture mode. The
default value for Live View is Off.
To change the setting so Live View is On (that it will always display on the image LCD when you
power on the camera and set the camera to Capture mode):
1 Press the down or up arrow on the 4-way controller to highlight the Live View option.
2 Press the right or left arrow on the 4-way controller to change the value to On.
3 Press the right (Exit) soft key to save the setting, exit the Display submenu, and return to the
Preferences menu.
Sleep Timeout
Prior to the camera completely powering itself off due to inactivity, the camera goes to “sleep” by
turning off the image LCD and either turning off or slowing down other functions to conserve power.
Pressing any button on the camera (except the power switch) “wakes” the camera from sleep mode.
After the camera goes to sleep, it will power off after an additional 5 minutes of inactivity. Once the
camera completely powers itself off, you must use the power switch to power it on again.
The Sleep Timeout setting determines how quickly the camera goes into sleep mode when you are
not using the camera. The default value is 2 minutes.
To change the Sleep Timeout:
1 Press the down or up arrow on the 4-way controller to highlight the Sleep Timeout option.
2 Press the right or left arrow on the 4-way controller to scroll through the values until you see
the value you want.
3 Press the right (Exit) soft key to save the setting, exit the Display submenu, and return to the
Preferences menu.
Appendix A: Using the Preferences Menu 96 Setting the Display
Page 97

Controlling Camera Sounds
Figure 73: Sound Submenu Use the Sound submenu to control the sounds used on your camera
Volume Level
The Volume Level setting allows you to determine the volume level of the sounds on your camera.
This includes both the system sounds (see the next subsection) and the sounds you attach to images
via the Sound Record button (see “Recording Sound” on page 26). You can set the Volume Level
from 1 (lowest/softest) to 7 (highest/loudest). The default value is 4.
To change the Volume Level:
1 Press the down or up arrow on the 4-way controller, if needed, to highlight the Volume
Level option.
2 Press the right or left arrow on the 4-way controller to scroll through the values until you see
the value you want.
3 Press the right (Exit) soft key to save the setting, exit the Sound submenu, and return to the
Preferences menu.
System Sounds
The Systems Sounds setting determines whether or not you will hear the camera’s system sounds,
such as shutter clicks, beeps, and so forth. The default value is On (that you will hear system sounds).
To change the setting so that System Sounds are turned Off:
1 Press the down or up arrow on the 4-way controller to highlight the System Sounds option.
2 Press the right or left arrow on the 4-way controller to change the value to Off.
3 Press the right (Exit) soft key to save the setting, exit the Sound submenu, and return to the
Preferences menu.
Appendix A: Using the Preferences Menu 97 Controlling Camera Sounds
Page 98

Figure 74: Format Card Confirmation Screen
Formatting the Memory Card
Use the Format Card option to reformat the memory card in your camera. Reformatting will erase all
of the files (images) on the memory card, including protected files, folders, scripts, and so forth.
When you select the Format Card option by pressing the left (Format) soft key, you will see a
confirmation of your choice to format the memory card (see Figure 74). You can either press the
middle (Format) soft key to reformat the memory card, or press the right (Cancel) soft key to exit the
confirmation screen without reformatting the memory card and return to the Preferences menu.
Selecting the PC Connect Mode
Figure 75: PC Connect Mode Submenu Use the PC Connect Mode submenu to specify how the camera will appear to your computer when
connected via the USB interface in PC Connect mode. You can then transfer images from your
camera to the computer via the USB interface. Table 63 explains the PC Connect Mode settings
and their functions. The currently selected mode is indicated by the checkmark to the left of it. The
default mode is Digita Device.
Ta bl e 6 3 : PC Connect Mode Submenu
Setting Function
USB Disk Drive The camera is operated as a USB Mass Storage Device and appears as
a disk drive connected to the computer. You can copy images from
your camera to the computer as you would from another disk drive.
Use this setting to connect the camera to a Mac OS 8.6 or better
computer, or to a Windows Me, 98, or 2000 computer.
Note: The USB Disk Drive mode will remain
Digita Device
(default)
To change the PC Connect Mode:
You can use software included with your computer or camera to
transfer images to the computer. Use this setting to connect the
camera to a Windows Me, 98, or 2000 computer.
set on your camera only if you power off the
camera by using the power switch. By powering
off the camera correctly, you will not have to
1 Press the down or up arrow on the 4-way controller, if needed, to highlight the PC Connect
Mode you want.
repeat these procedures when transferring
images to your computer in the future.
2 Press the left (Select) soft key. The checkmark moves to the highlighted mode, and you return to
the Preferences menu. The camera is now set to the mode you just selected.
Appendix A: Using the Preferences Menu 98 Formatting the Memory Card
Page 99

Figure 76: Set Date & Time Submenu
Note: Press the up or down arrow on the 4-way
controller to scroll through the numbers on the
left side of the screen. Press the right or left
arrow to move between the date/time fields in
the center of the screen.
Setting the Date and Time
Use the Set Date & Time submenu to set the camera’s date and time. If you wish to change the
format that is used for the date and time, see the next subsection, “Format Dialog.”
Press the up or down arrow on the 4-way controller to scroll through the list of numbers on the left
side of the screen until you reach the number you want. The number in the currently highlighted
field in the center of the screen (such as the Month field, as shown in the example in Figure 76)
changes accordingly. When you have selected the number for the currently highlighted field, press
the right arrow on the 4-way controller to move to the next field. When you have finished setting the
date and time, press the right (Exit) soft key to save the date and time settings and return to the
Preferences menu.
For example, to set the date to September 18, 2000 and the time to 2:51 pm, as shown in the example
in Figure 76:
1 Press the up or down arrow on the 4-way controller until you highlight 9999, which sets the Month
field in the center of the screen to 9 (for the month of September).
2 Press the right arrow on the 4-way controller to move to the Day field.
3 Press the up or down arrow on the 4-way controller until you highlight 18
4 Press the right arrow on the 4-way controller to move to the Year field.
5 Press the up or down arrow on the 4-way controller until you highlight 00
6 Press the right arrow on the 4-way controller to move to the Hour field.
7 Press the up or down arrow on the 4-way controller until you highlight 02
8 Press the right arrow on the 4-way controller to move to the Minutes field.
9 Press the up or down arrow on the 4-way controller until you highlight 51
Since the am/pm setting is set to pm by default, simply leave the am/pm field as it is.
10Press the right (Exit) soft key to save the date and time settings and return to the
Preferences menu.
18.
18 18
00.
0000
02.
0202
51.
5151
Appendix A: Using the Preferences Menu 99 Setting the Date and Time
Page 100

Figure 77: Format Dialog
Format Dialog
When you press the left (Format) soft key in the Set Date & Time submenu, you see the Format
dialog, which allows you to select from a list of six, predefined date and time formats. There are three
formats which use the 24-hour clock format, and three formats which use the 12-hour clock format.
The default format for the date and time is MM/DD/YY 12 hr, which means the date is in the Month/
Day/Year format, and the time is in the 12-hour clock format.
For example, to set your camera to the MM/DD/YY 24 hour format (so that the date will be in the
Month/Day/Year format, and the time will be in the 24-hour clock format), follow these steps:
1 Press the left (Format) soft key in the Set Date & Time submenu to move to the Format dialog.
2 Press the up or down arrow on the 4-way controller to highlight the MM/DD/YY 24 hours
format in the Format dialog.
3 Press the left (Select) softkey, The checkmark moves to the highlighted date and time format,
and you return to the Set Date & Time submenu. The camera is now set to the date and time
format you just selected.
Setting the Image Counter
Figure 78: Image Counter Submenu Use the Image Counter submenu to set how the image counter works. You can set the camera either
to restart numbering at 1 (one) each time you delete all the images from your camera, or to keep a
continuous count of images from the beginning of the camera’s use.
Table 64 explains the Image Counter settings and their functions. The currently selected setting is
indicated by the checkmark to the left of it. The default setting is Continuous Counter.
Ta bl e 6 4 : Image Counter Submenu
Setting Function
Reset When Empty Each time you delete all of the images on your camera, the
counter restarts the first image captured at number 1.
Continuous Counter
(default)
Appendix A: Using the Preferences Menu 100 Setting the Image Counter
The images are counted according to the history of the
camera’s use. For example: image #400 is the 400th
image to be captured with this camera.
 Loading...