

Page 1

Page 2

© Copyright Hewlett-Packard Company 1998
All rights are reserved. No part of the document
may be photocopied, reproduced, or translated to
another language without the prior written consent
of Hewlett-Packard Company.
Publication number: C5370-90000
First edition: February 1998
Printed in U.S.A.
Notice
The information contained in this document is
subject to change without notice and should not be
construed as a commitment by the HewlettPackard Company.
Hewlett-Packard assumes no responsibility for
any errors that may appear in this document,
nor does it make expressed or implied
warranty of any kind with regard to this
material, including, but not limited to, the
implied warranties of merchantability and
fitness for a particular purpose. The Hewlett-
Packard Company shall not be liable for incidental
or consequential damages in connection with, or
arising out of the furnishing, performance, or use
of this document and the program material which
it describes.
Note: Regulatory information can be found in
Chapter 9 of this User’s Guide.
It is not lawful in many places to make copies of
the following items. When in doubt, check with a
legal representative first.
Governmental paper or documents:
- Passports
- Immigration papers
- Selective service papers
- Identification badges, cards, or insignias
Governmental stamps:
- Postage stamps
- Food stamps
Checks or drafts drawn or Governmental
agencies
Paper currency, traveler’s checks, or money
orders
Certificates of deposit
Copyrighted works
Page 3
Please complete the following for future reference.
HP Color Copier Model _________
Serial Number:
Date of Purchase:
Place of Purchase:
Address:
Phone Number:
Service Contract Number:
Date of Contract Expiration:
Safety Symbols
Owner’s Information
!
If present, this symbol is placed on
the copier where it is necessary for
you to refer to the manual in order to
understand a hazard.
If present, this symbol is placed on
the copier within the area where
hazardous voltage is present. Only
trained service persons should
perform work in this area.
If present, this symbol is placed on
the copier within the area where
electrostatic discharge (ESD) may
occur. ESD can damage the copier’s
electronic components. Av oid
touching electronic components or
circuit paths. Use proper grounding
devices when circuits are open to
outside areas.
Page 4

Page 5

contents
g
Chapter 1 — Welcome!
About Your Copier . . . . . . . . . . . . . . . . . . . . . . . . . . . . . . . . . . . . . . . . . . . . . . . . . 1-2
About This Guide. . . . . . . . . . . . . . . . . . . . . . . . . . . . . . . . . . . . . . . . . . . . . . . . . . . 1-2
Conventions Used . . . . . . . . . . . . . . . . . . . . . . . . . . . . . . . . . . . . . . . . . . . . . . 1-2
Chapter 2 — Setting Up Your New HP Color Copier
Copier Location and Environment. . . . . . . . . . . . . . . . . . . . . . . . . . . . . . . . . . . . . . 2-1
Step 1 — Unpack Your HP Color Copier . . . . . . . . . . . . . . . . . . . . . . . . . . . . . . . . 2-2
Step 2 — Attach the Front Panel Overlay . . . . . . . . . . . . . . . . . . . . . . . . . . . . . . . . 2-3
Step 3 — Unlock Your HP Color Copier . . . . . . . . . . . . . . . . . . . . . . . . . . . . . . . . 2-4
Step 4 — Load Paper Into Your HP Color Copier . . . . . . . . . . . . . . . . . . . . . . . . . 2-5
Step 5 — Insert the Color and Black Print Cartridges . . . . . . . . . . . . . . . . . . . . . . 2-6
Step 6 — Connect the Power Cord . . . . . . . . . . . . . . . . . . . . . . . . . . . . . . . . . . . . . 2-8
Step 7 — Set the Front Panel Language and Default Paper Size . . . . . . . . . . . . . . 2-9
Step 8 — Align Your Black and Color Print Cartridges . . . . . . . . . . . . . . . . . . . . 2-10
Step 9 — Test the Copier. . . . . . . . . . . . . . . . . . . . . . . . . . . . . . . . . . . . . . . . . . . . 2-12
Chapter 3 — Copyin
How to Make Copies . . . . . . . . . . . . . . . . . . . . . . . . . . . . . . . . . . . . . . . . . . . . . . . . 3-1
Controlling How Copies Will Look. . . . . . . . . . . . . . . . . . . . . . . . . . . . . . . . . . . . . 3-3
Number of Copies . . . . . . . . . . . . . . . . . . . . . . . . . . . . . . . . . . . . . . . . . . . . . . 3-4
Copy Quality . . . . . . . . . . . . . . . . . . . . . . . . . . . . . . . . . . . . . . . . . . . . . . . . . . 3-4
Reduce/Enlarge Options . . . . . . . . . . . . . . . . . . . . . . . . . . . . . . . . . . . . . . . . . 3-4
Paper Types . . . . . . . . . . . . . . . . . . . . . . . . . . . . . . . . . . . . . . . . . . . . . . . . . . . 3-6
Lighter/Darker . . . . . . . . . . . . . . . . . . . . . . . . . . . . . . . . . . . . . . . . . . . . . . . . . 3-6
Color Intensity . . . . . . . . . . . . . . . . . . . . . . . . . . . . . . . . . . . . . . . . . . . . . . . . . 3-7
TE (Text Enhancement) . . . . . . . . . . . . . . . . . . . . . . . . . . . . . . . . . . . . . . . . . . 3-7
ELC (Enhance Light Colors) . . . . . . . . . . . . . . . . . . . . . . . . . . . . . . . . . . . . . . 3-8
Changing Other Front Panel Settings . . . . . . . . . . . . . . . . . . . . . . . . . . . . . . . . . . . 3-8
Front Panel Language . . . . . . . . . . . . . . . . . . . . . . . . . . . . . . . . . . . . . . . . . . . 3-8
Copy Paper Size . . . . . . . . . . . . . . . . . . . . . . . . . . . . . . . . . . . . . . . . . . . . . . . . 3-9
Set Defaults . . . . . . . . . . . . . . . . . . . . . . . . . . . . . . . . . . . . . . . . . . . . . . . . . . . 3-9
Factory Defaults . . . . . . . . . . . . . . . . . . . . . . . . . . . . . . . . . . . . . . . . . . . . . . . 3-10
Clear/Stop . . . . . . . . . . . . . . . . . . . . . . . . . . . . . . . . . . . . . . . . . . . . . . . . . . . 3-10
Using the Automatic Document Feeder (ADF). . . . . . . . . . . . . . . . . . . . . . . . . . . 3-11
Chapter 4 — All About Paper
Paper Choices When Copying . . . . . . . . . . . . . . . . . . . . . . . . . . . . . . . . . . . . . . . . . 4-1
Copy Paper in the Input Tray . . . . . . . . . . . . . . . . . . . . . . . . . . . . . . . . . . . . . . 4-2
Using the Right Paper Type Option . . . . . . . . . . . . . . . . . . . . . . . . . . . . . . . . 4-3
Tips on Loading Paper in the Paper Tray . . . . . . . . . . . . . . . . . . . . . . . . . . . . 4-3
Special Considerations When Using Transparency Film . . . . . . . . . . . . . . . . . . . . 4-4
HP Color Copier User’s Guide iii
Page 6

Automatic Document Feeder Requirements. . . . . . . . . . . . . . . . . . . . . . . . . . . . . . 4-4
g
How to Order Quality HP Papers . . . . . . . . . . . . . . . . . . . . . . . . . . . . . . . . . . . . . . 4-4
Chapter 5 — Troubleshootin
How to Clear a Paper Jam in the Paper Tray . . . . . . . . . . . . . . . . . . . . . . . . . . . . . 5-1
How to Clear a Paper Jam in the Automatic Document Feeder. . . . . . . . . . . . . . . 5-2
How to Use the Self Test Page . . . . . . . . . . . . . . . . . . . . . . . . . . . . . . . . . . . . . . . . 5-2
Front Panel Messages . . . . . . . . . . . . . . . . . . . . . . . . . . . . . . . . . . . . . . . . . . . . . . . 5-4
Blank page . . . . . . . . . . . . . . . . . . . . . . . . . . . . . . . . . . . . . . . . . . . . . . . . . . . . . . . 5-5
Some colors faded, distorted, or missing . . . . . . . . . . . . . . . . . . . . . . . . . . . . . . . . 5-6
Placement on the page wrong or edges cut off. . . . . . . . . . . . . . . . . . . . . . . . . . . . 5-6
Auto Fit, Clone, or Poster not working properly . . . . . . . . . . . . . . . . . . . . . . . . . . 5-7
Copies too vivid or bright. . . . . . . . . . . . . . . . . . . . . . . . . . . . . . . . . . . . . . . . . . . . 5-7
No copies coming out. . . . . . . . . . . . . . . . . . . . . . . . . . . . . . . . . . . . . . . . . . . . . . . 5-7
Copies taking too long . . . . . . . . . . . . . . . . . . . . . . . . . . . . . . . . . . . . . . . . . . . . . . 5-8
Paper wrinkled and very wet . . . . . . . . . . . . . . . . . . . . . . . . . . . . . . . . . . . . . . . . . 5-8
Copies faded or colors dull. . . . . . . . . . . . . . . . . . . . . . . . . . . . . . . . . . . . . . . . . . . 5-9
Copy streaked, smeared, or with white horizontal lines. . . . . . . . . . . . . . . . . . . . 5-10
Black bar in margins on copy (Models 145 and 155 only). . . . . . . . . . . . . . . . . . 5-10
Copies crooked on page . . . . . . . . . . . . . . . . . . . . . . . . . . . . . . . . . . . . . . . . . . . . 5-11
Miscellaneous problems . . . . . . . . . . . . . . . . . . . . . . . . . . . . . . . . . . . . . . . . . . . . 5-11
Chapter 6 — HP Support Services
On-Line Services . . . . . . . . . . . . . . . . . . . . . . . . . . . . . . . . . . . . . . . . . . . . . . . . . . 6-1
Internet . . . . . . . . . . . . . . . . . . . . . . . . . . . . . . . . . . . . . . . . . . . . . . . . . . . . . . . 6-1
HP FIRST . . . . . . . . . . . . . . . . . . . . . . . . . . . . . . . . . . . . . . . . . . . . . . . . . . . . . 6-1
CompuServe . . . . . . . . . . . . . . . . . . . . . . . . . . . . . . . . . . . . . . . . . . . . . . . . . . .6-2
HP Customer Support. . . . . . . . . . . . . . . . . . . . . . . . . . . . . . . . . . . . . . . . . . . . . . . 6-2
Calling in the U.S. and Canada During Warranty . . . . . . . . . . . . . . . . . . . . . . 6-2
Calling in the U.S. and Canada Post Warranty . . . . . . . . . . . . . . . . . . . . . . . . .6-2
Chapter 7 — Maintaining Your HP Color Copier
Cleaning the Exterior Case. . . . . . . . . . . . . . . . . . . . . . . . . . . . . . . . . . . . . . . . . . . 7-1
Cleaning the Glass . . . . . . . . . . . . . . . . . . . . . . . . . . . . . . . . . . . . . . . . . . . . . . . . . 7-1
Aligning Cartridges. . . . . . . . . . . . . . . . . . . . . . . . . . . . . . . . . . . . . . . . . . . . . . . . . 7-2
Using the Self Test Page. . . . . . . . . . . . . . . . . . . . . . . . . . . . . . . . . . . . . . . . . . . . . 7-2
Cleaning Cartridges . . . . . . . . . . . . . . . . . . . . . . . . . . . . . . . . . . . . . . . . . . . . . . . . 7-3
Chapter 8 — Hewlett-Packard Limited Warranty
Extent of Limited Warranty . . . . . . . . . . . . . . . . . . . . . . . . . . . . . . . . . . . . . . . . . . 8-1
Warranty Service . . . . . . . . . . . . . . . . . . . . . . . . . . . . . . . . . . . . . . . . . . . . . . . . . . 8-3
Express Service . . . . . . . . . . . . . . . . . . . . . . . . . . . . . . . . . . . . . . . . . . . . . . . . .8-3
Warranty Upgrades. . . . . . . . . . . . . . . . . . . . . . . . . . . . . . . . . . . . . . . . . . . . . . . . . 8-3
Returning Your HP Color Copier for Service . . . . . . . . . . . . . . . . . . . . . . . . . . . . 8-4
Before You Call . . . . . . . . . . . . . . . . . . . . . . . . . . . . . . . . . . . . . . . . . . . . . . . . 8-4
iv Contents
Page 7

Prepare your HP Color Copier for Shipment . . . . . . . . . . . . . . . . . . . . . . . . . 8-5
Chapter 9 — Technical Information
Regulatory Notices. . . . . . . . . . . . . . . . . . . . . . . . . . . . . . . . . . . . . . . . . . . . . . . . . . 9-3
Ordering Accessories and Supplies . . . . . . . . . . . . . . . . . . . . . . . . . . . . . . . . . . . . . 9-4
HP Color Copier User’s Guide v
Page 8

vi Contents
Page 9
Welcome!
1
Welcome to your new Hewlett-Packard Color Copier! And welcome
to this User’s Guide, which will help you set up and use your Color
Copier.
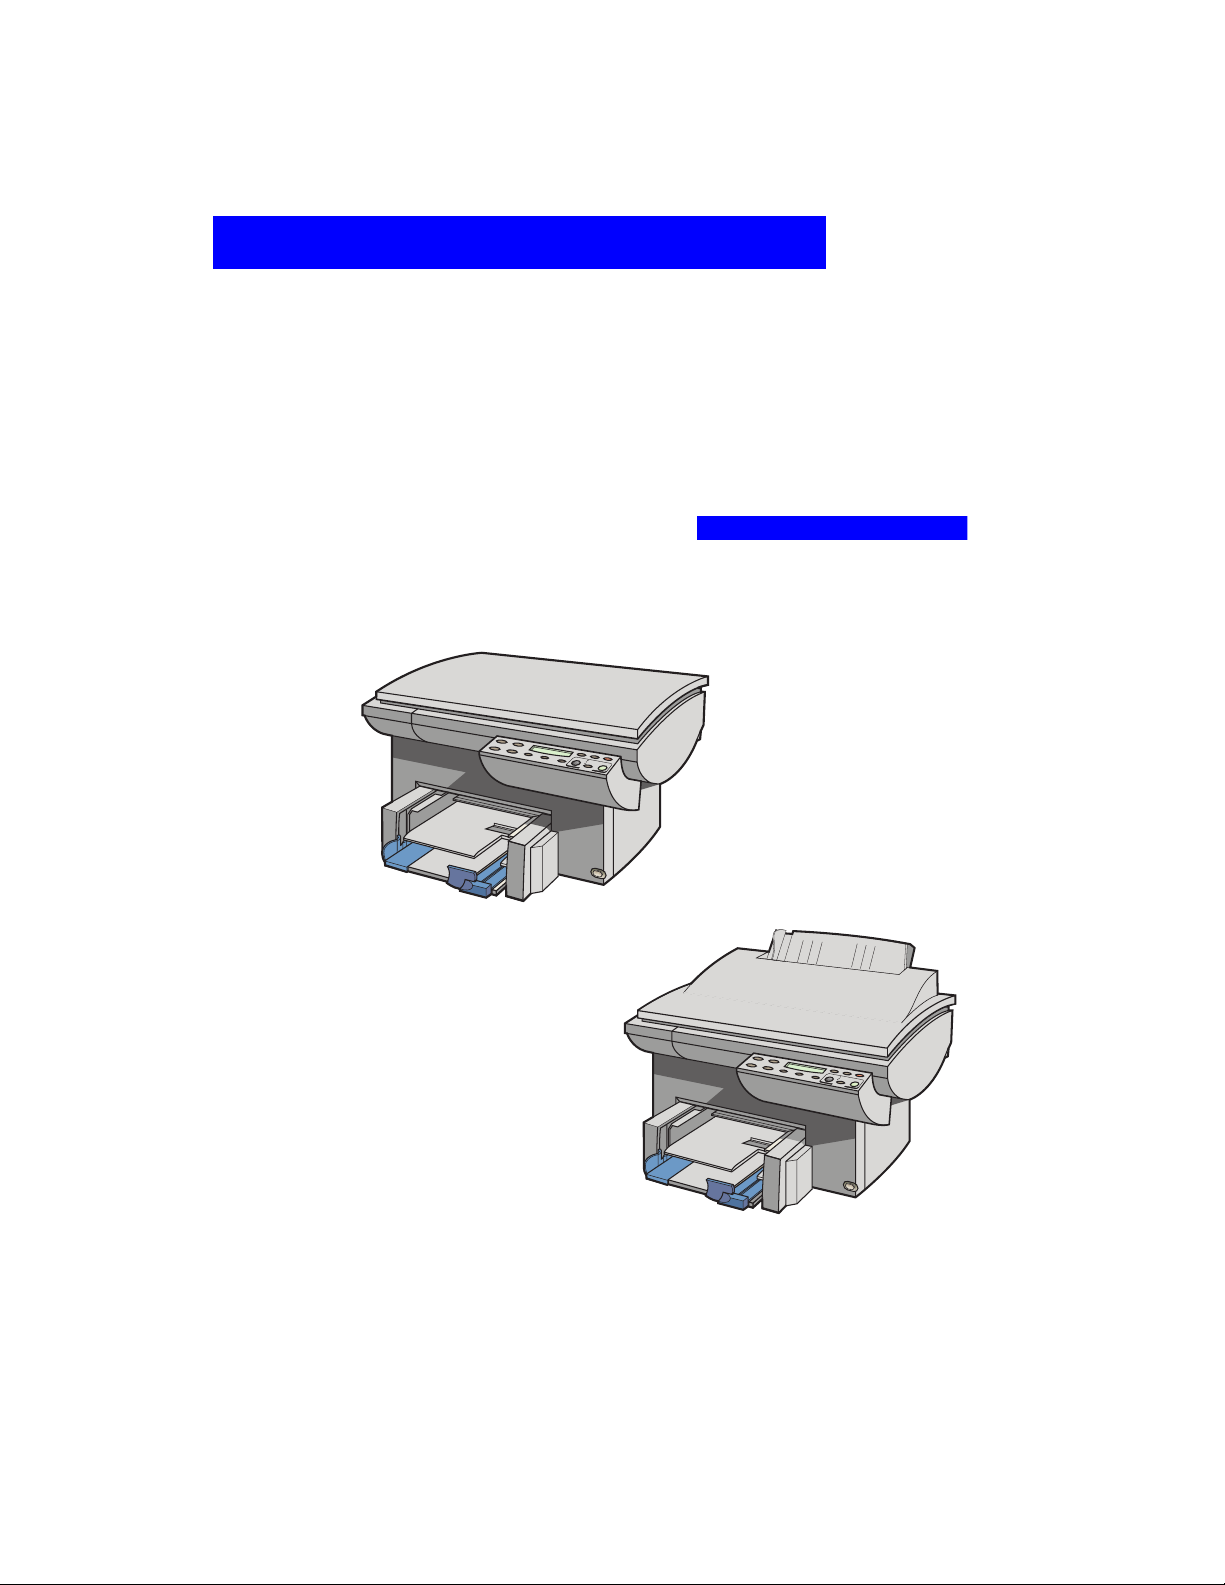
HP Color Copier 140
and 150
HP Color Copier 145 and
155 (with automatic
document feeder)
HP Color Copier User’s Guide 1-1
Page 10

About Your Copier
With your HP Color Copier, you can produce high-quality color and
black and white copies on letter- (8.5 x 11 in.) and A4(210 x 297 mm, the European standard) sized paper. You can print on
a variety of paper types, including plain paper, premium inkjet paper,
photo paper, transparency film, and iron-on transfers. You can enlarge
or reduce the size of the copies you make, from 25% to 400% of the
image’s original size, and use special sizing features to help you create
business cards, brochures, name badges—even posters. And, if you
purchased Model 145 or 155, you will be able to load up to 25 originals
in the automatic document feeder.
About This Guide
This Guide explains how to unpack and set up your Color Copier. It
also explains how to make copies and use each of the product’s special
features to full advantage. This Guide also provides troubleshooting
information to help you resolve common copying problems and
explains how to maintain your HP Color Copier.
Conventions Used
Throughout this Guide, we use special conventions to help you quickly
identify information:
1-2 Welcome!
boldface
CAUTION
NOTE
“quotation marks” Information enclosed in quotation marks identifies the
TIP
WARNING
Bold typeface identifies a specific button name or
command you need to enter.
The Caution label calls attention to an operating
procedure, practice, or the like, which, if not correctly
performed or adhered to, could result in damage to or
destruction of part or all of the product. Do not
proceed beyond a Caution label until you fully
understand and have met the indicated conditions.
The Note label precedes information you need to
know before you continue reading or performing a
procedure.
exact message that appears on the front panel display.
The Tip label precedes helpful hints and
recommendations.
The Warning label calls attention to a procedure,
practice, or the like, which, if not correctly performed
or adhered to, could result in personal injury. Do not
proceed beyond a Warning label until you fully
understand and have met the indicated conditions.
Page 11

Setting Up Your New
HP Color Copier
This chapter presents recommendations for placement of your
HP Color Copier and presents the nine simple steps for unpacking and
setting up your copier. Be sure to perform the steps in the order listed.
Copier Location and Environment
2
Use only within normal office temperature and humidity ranges.
The recommended range is 59
humidity ranges.
Avoid direct sunlight or locations where a quick change in
temperature might cause condensation inside the machine.
Make sure the location is well ventilated. Dust, gases, or fumes
(such as ammonia or paint thinner) can damage the machine.
Choose a site that is level, flat, and stable. The copier will vibrate
and needs to be on a sturdy surface.
Be sure a grounded outlet is nearby and easily accessible.
o
95oF (15
–
o
35oC) and 20%–80%
–
HP Color Copier User’s Guide 2-1
Page 12
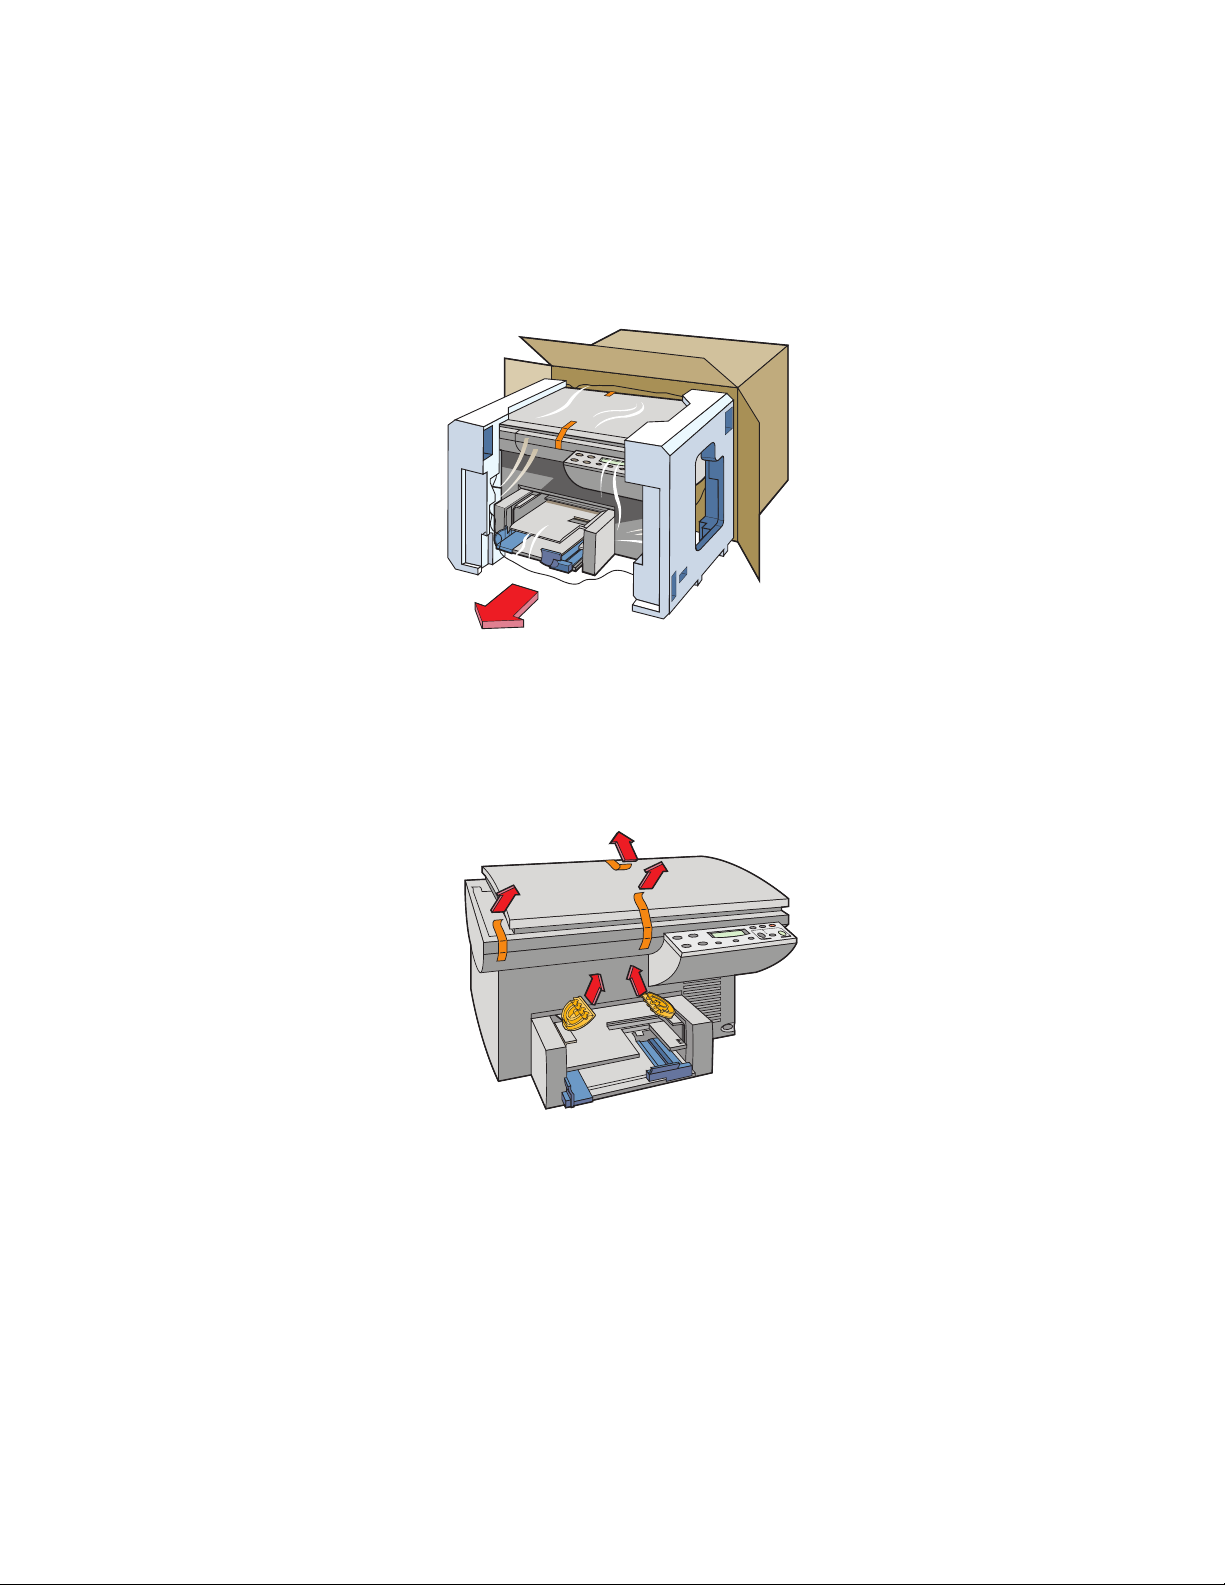
Step 1 — Unpack Your HP Color Copier
Remove the cardboard tray containing the accessory items.
1
Rest the box on its side and pull out your HP Color Copier.
2
Remove the packing material and the orange packing tape from
3
the outside of the copier.
Save the packing materials in case you ever need to move
TIP
or ship your HP Color Copier.
Remove the two yellow/orange plastic inserts from the print tray
4
by pulling up and toward the center of the copier.
2-2 Setting Up Your New HP Color Copier
Page 13

Verify that the following items are included with your HP Color
y
5
Copier:
front-panel overlay (has text on it)
a
one black and one color print cartridge
b
User’s Guide
c
power cord (appropriate for your location)
d
Help card
e
If any of the items are missing or damaged, contact the dealer from
whom you purchased your HP Color Copier.
e
d
c
b
a
Step 2 — Attach the Front Panel Overla
Align the front panel overlay with the front panel buttons.
1
Push straight down firmly on both ends and the middle to snap
2
the overlay into place.
HP Color Copier User’s Guide 2-3
Page 14
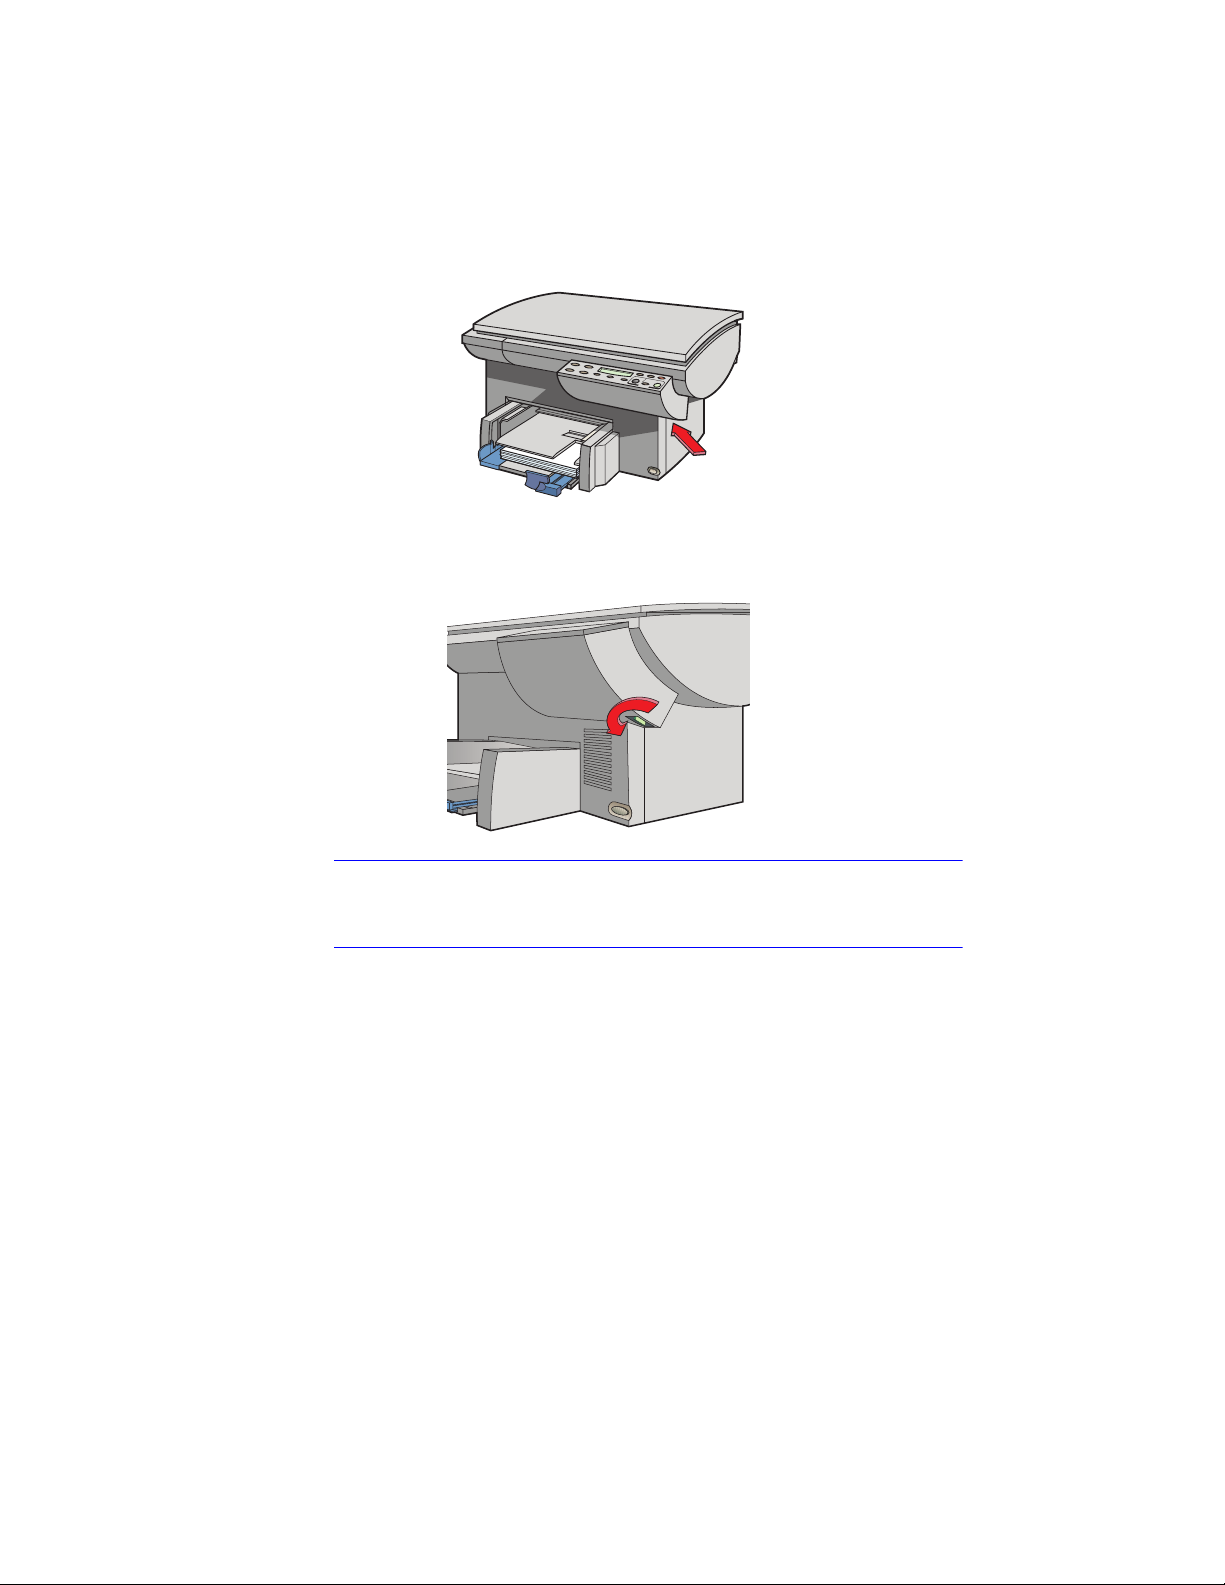
Step 3 — Unlock Your HP Color Copier
y
g
g
g
The scanner lock is under the front panel.
Unlock the scanner by twisting the green knob under the front panel
toward the back of your HP Color Copier, until it stops. The knob only
turns one way.
NOTE
2-4 Setting Up Your New HP Color Copier
Leave the scanner unlocked unless
Lockin
Color Copier for Shipment” on pa
the scanner protects it durin
ou need to move your HP Color Copier.
moving. Refer to “Prepare your HP
e 8-5 for locking instructions.
Page 15

Step 4 — Load Paper Into Your HP Color Copier
y
y
Remove the yellow/orange shipping inserts from the paper tray,
1
if you have not already done so.
Slide the paper width and length adjusters to their outermost
2
positions.
Insert a stack of up to 150 sheets of paper into the bottom (IN)
3
tray, print side down, until it stops.
NOTE
The output tray can hold a maximum of 50 sheets. If
50 copies, remove the excess copies from the output tra
excess copies may either fall off the tray or cause a paper jam.
Slide the paper width and length adjusters in until they stop at the
4
edges of the paper.
See “Paper Choices When Copying” on page 4-1 for tips on loading
specific paper types.
ou making more than
. If you do not, the
HP Color Copier User’s Guide 2-5
Page 16
Step 5 — Insert the Color and Black Print Cartrid
g
g
y
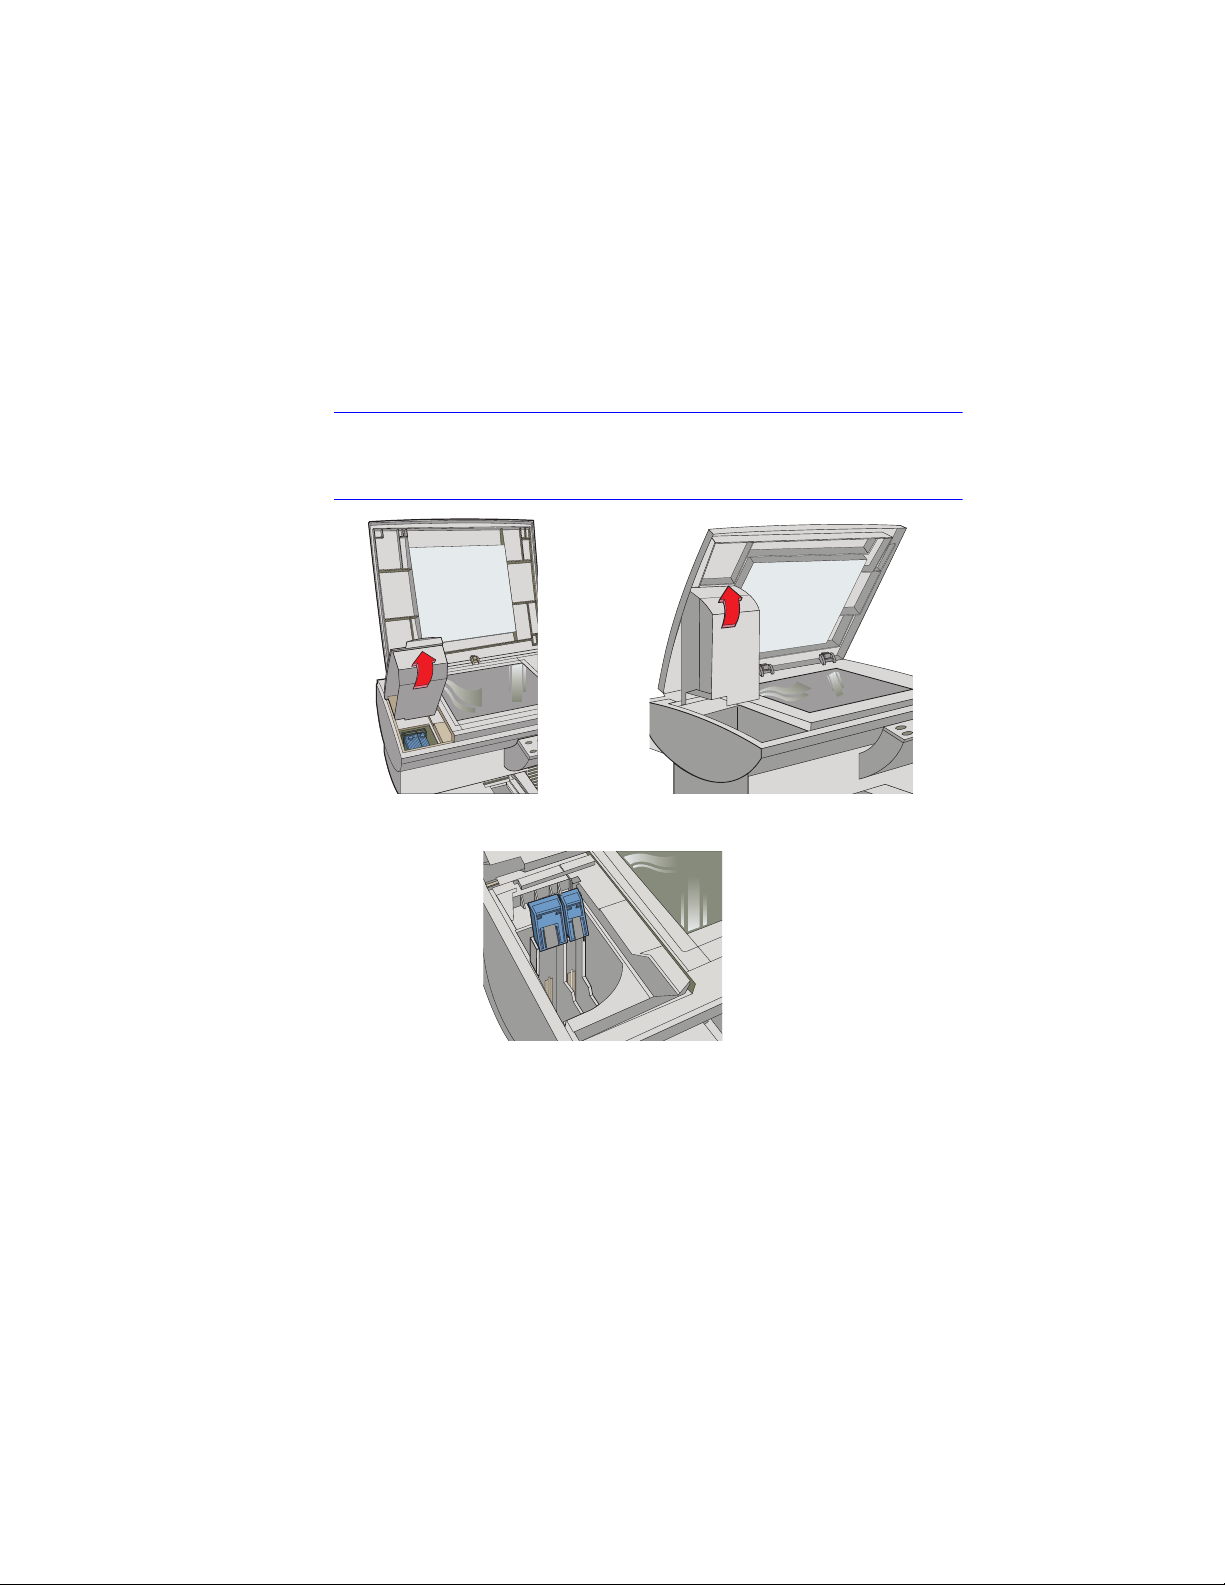
Lift the document cover, open the print cartridge access cover , and
1
remove the yellow/orange shipping insert from the inside of the
cartridge cradles.
es
TIP
NOTE
Keep and store the shipping insert and other packing materials in
case you ever need to move or ship your copier.
If your copier has an automatic document feeder, use the print cartrid
access cover to prop open the document cover while
cartridges.
Lift up both print cartridge latches.
2
ou insert the print
e
2-6 Setting Up Your New HP Color Copier
Page 17
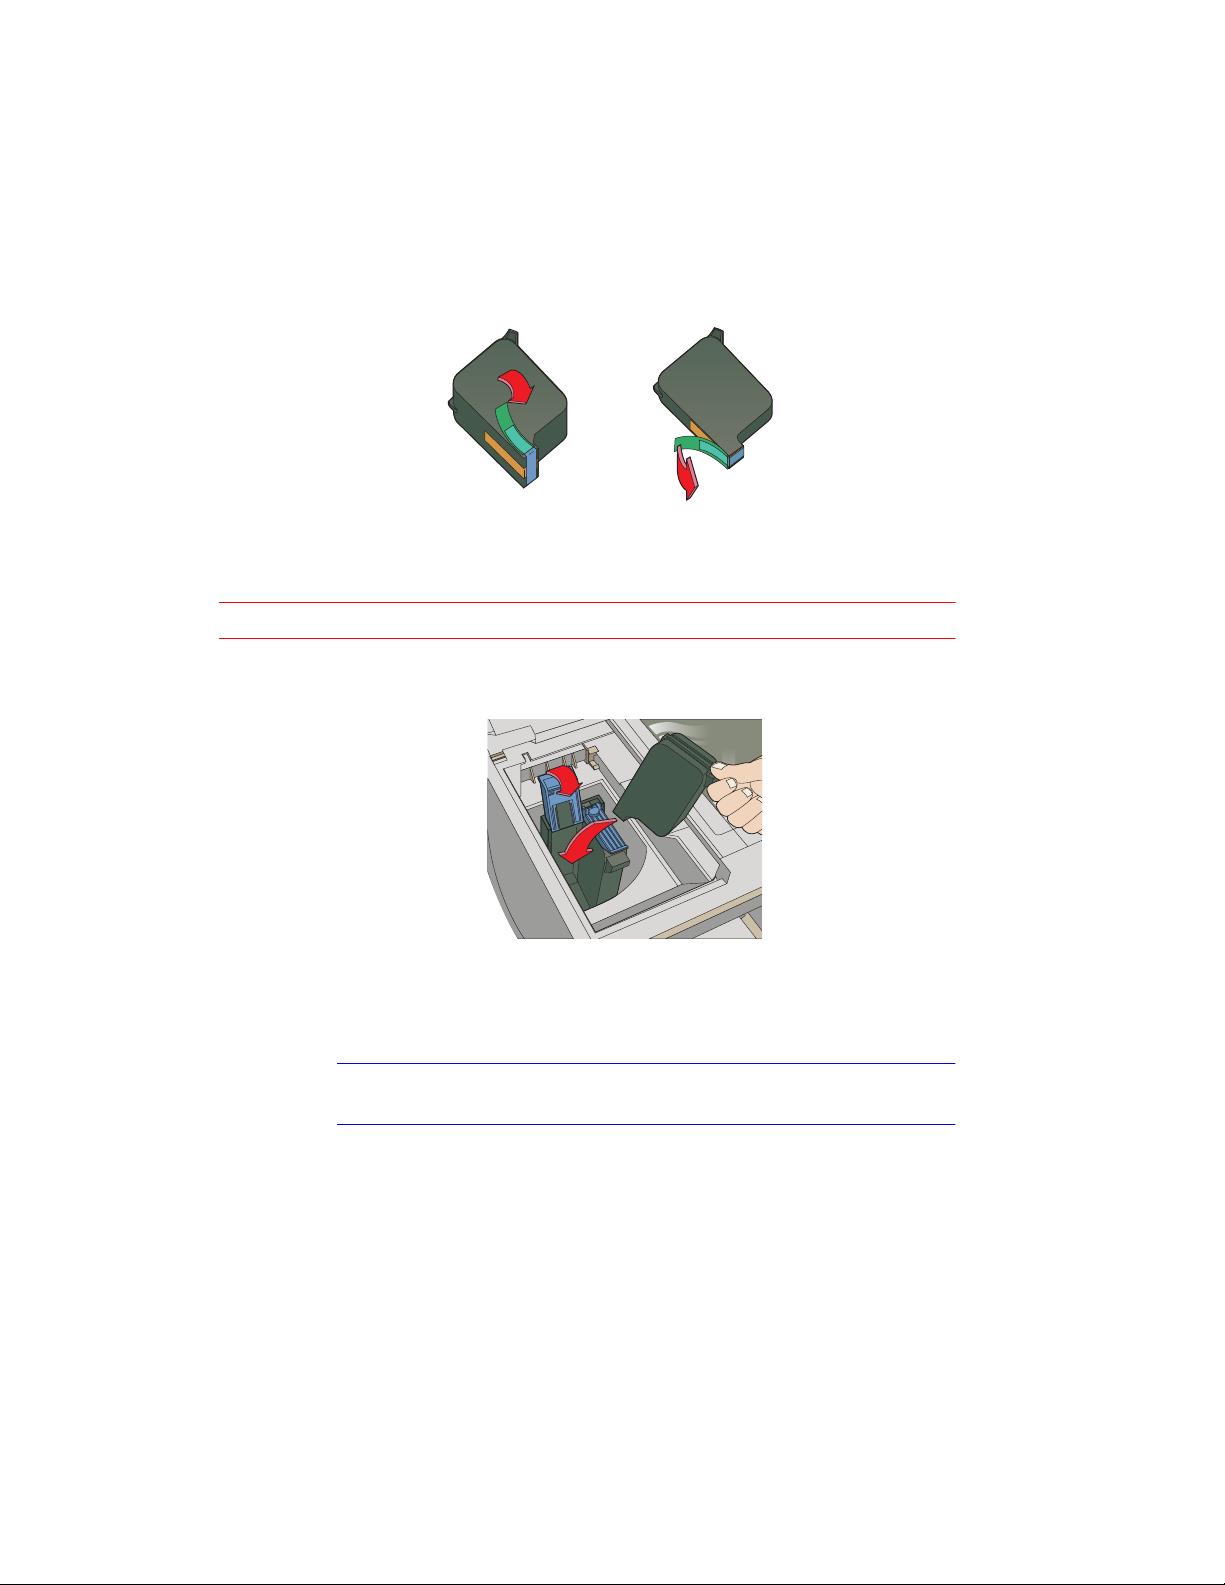
Remove the color print cartridge (the thicker one, part number
3
C1823A) from its package and, being careful to touch only the
black plastic, gently remove both the green pull tab and blue tape
covering the nozzles.
CAUTION
NOTE
tri-color print cartridge,
part number C1823A
black print cartridge,
part number C51645A
Be careful not to touch the gold-colored contacts.
Push the color print cartridge firmly down into the cradle on the
4
left, and close the cartridge latch.
Repeat steps 3 and 4 to install the black print cartridge (part
5
number 51645A) into the cradle on the right.
Close the print cartridge access cover.
6
Both print cartridges must be correctly installed (with the green tab and blue
tape removed) for your HP Color Copier to work.
HP Color Copier User’s Guide 2-7
Page 18
Step 6 — Connect the Power Cord
y
y
y
g
y
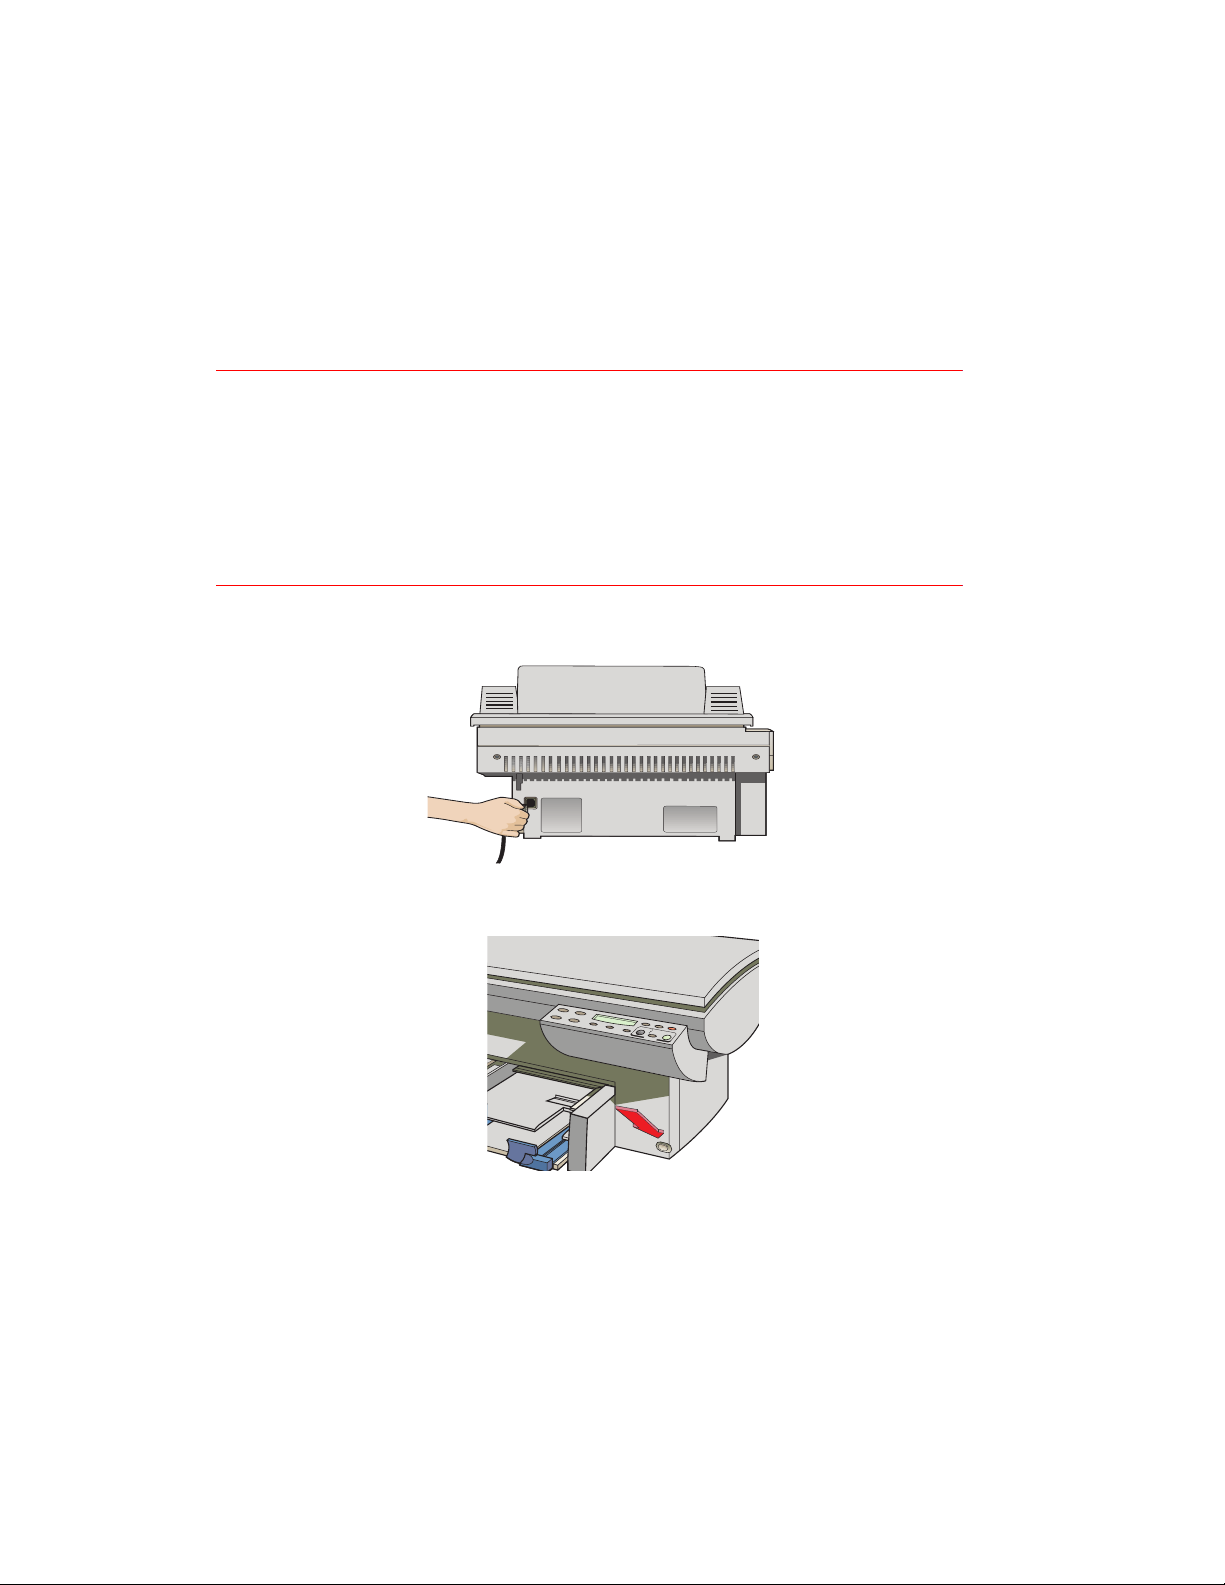
The HP Color Copier comes with a power cord for the country to
which it is shipped. If the plug on your power cord does not look
familiar, contact your dealer or local HP Sales and Support Office. See
“HP Customer Support” on page 6-2 for more information.
WARNING Power is present in the product even if the white button is off. To completel
shut off power,
To avoid electric shock, be sure to use the power cord with a properl
rounded outlet.
Choose an outlet that is eas
emergency and you need to shut off power to the HP Color Copier.
Plug the power cord into the back of your HP Color Copier, and
1
plug the other end into a grounded outlet.
Turn on the HP Color Copier by pressing the white button in the
2
lower right front corner.
ou must disconnect the power cord.
for everyone to access, in case there is an
2-8 Setting Up Your New HP Color Copier
Page 19

Step 7 — Set the Front Panel Lan
guag
e and Default
Paper Size
The front panel initially displays English as the default language and
assumes letter-sized paper (8.5 x 11 in.) as the default paper size.
To change the default language and associated paper size, perform
the following steps.
While holding down the
1
Intensity
Release both buttons.
2
The current language is displayed.
Press the Plus (+) and Minus (–) buttons to scroll through the list
3
of available languages until the language you want is highlighted.
The following languages are available: English, Español,
Deutsch, Français, Italiano, Nederlands, Dansk, Norsk,
Portugués, Svenska, and Suomi.
Press the
4
language.
After you select a language, you will be prompted to select letter
(8.5 x 11 in.) or A4 (210 x 297 mm) as the default paper size.
Press the Plus (+) or Minus (–) buttons to toggle between letter
5
and A4.
Press the
6
size.
button.
Select/Resume
Select/Resume
Select/Resume
button to select the highlighted
button to choose the highlighted paper
button, press the
Color
HP Color Copier User’s Guide 2-9
Page 20

Step 8 — Align Your Black and Color Print Cartrid
g
Before you start using your HP Color Copier, you need to align the
black and color print cartridges to ensure the best copy quality.
When you turn on your HP Color Copier for the first time, you will see
the message “Initializing,” followed by the message “Press Resume to
Align Cartridges” on the front panel display.
es
Press the
1
The copier prints a page with two sets of paired lines on it. A set
of numbered, horizontal lines appears at the top of the page, and a
set of vertical lines, each with a unique letter, appears at the bottom
of the page.
The mid-range number for horizontal alignment appears on the
front panel display.
Look closely at the set of horizontal bars, and determine which set
2
of black and color lines is aligned the best.
Select the number that represents the best horizontal alignment
3
pattern on the front panel display, and press
If necessary, use the Plus (
panel to change the number on the display.
The mid-range number for vertical alignment appears on the front
panel display.
Select/Resume
button.
Select/Resume
) and Minus (–) buttons on the front
+
.
2-10 Setting Up Your New HP Color Copier
Page 21

Now look closely at the set of vertical bars, and determine which
4
set lines up the best.
Select the letter that represents the best vertical alignment on the
5
page, and press
Select/Resume
.
If necessary , use the Plus (
panel to change the letter on the display.
The HP Color Copier then prints another page to confirm that the
6
print cartridges are correctly aligned.
Match the alignment in Sample 2 to the alignment in Sample 1.
7
If the lines are straight, continue with Step 9 of the setup
8
procedure.
If the lines are not straight, you will need to repeat the Align
Cartridges procedure. T o do this, press the
message “Align Cartridges” is displayed, press
and then repeat steps 2-4.
) and Minus (–) buttons on the front
+
button until the
Menu
Select/Resume
,
HP Color Copier User’s Guide 2-11
Page 22

Step 9 — Test the Copier
Use the copier’s built-in Self T est to verify that the copier is operating
properly. The Self Test Page lists current front panel settings and, if
you are using Model 145 or 155, tells whether the automatic document
feeder is attached properly.
Make sure the Best, Normal, or Fast light is on and not blinking.
1
Press the
2
in the panel display.
Press the
3
The test-page printout has a set of lines which should appear
unbroken, and colored bars which should appear solid. The
intensity of the colors will vary, depending on the type of paper
you are using (that is, plain paper, HP Premium InkJet Paper, and
so on).
For more information, see “How to Clear a Paper Jam in the
Automatic Document Feeder” on page 5-2.
To verify proper functioning of your copier, make a copy of the
4
Self Test Page.
Congratulations! Y ou have finished setting up your HP Color Copier .
Now you are ready to start using it.
button until the message “Self T est Page” appears
Menu
Select/Resume
button.
2-12 Setting Up Your New HP Color Copier
Page 23

Copyin
g
y
y
ying
gy
g
This chapter explains how to make copies and how to use the special
copying features of the HP Color Copier. It also explains how to use
other features on the copier front panel and special considerations of
the automatic document feeder (Models 145 and 155 only).
How to Make Copies
If it is not already on, turn on the HP Color Copier by pressing the
1
white button on the lower right front corner of the product.
3
NOTE
The scanner light remains on for approximatel
HP Color Copier or make the first cop
for optimal cop
12 hours, the Copier turns off the scanner bulb to save ener
a “Power Save On” messa
press any button on the front panel.
performance. The light uses very little power. After
e. When you are ready to start copying again, just
of the day. This keeps the bulb warm
HP Color Copier User’s Guide 3-1
12 hours after you turn on the
, and displays
Page 24

g
Manually (on the copy glass):
g
2
Lift the document cover, place
the original face down on the glass along the two green borders,
and close the document cover.
Put the long edge of your original along the longer green border.
NOTE
Be sure to place all originals, including small photographs, in the corner along
the two
reen borders. Some features of the HP Color Copier look for items
specifically in that corner.
Using the automatic document feeder (Model 145 or 155 only)
Load the original(s) with the printed-side facing back in the document
feeder, with the top of the document to the right. Adjust the page guide
to the length of the original(s).
When the originals are in place, the phrase “Document Loaded”
appears on the display.
:
NOTE
Refer to “Automatic Document Feeder Requirements” on page 4-4 for
information on the types of paper you can use in the document feeder.
3-2 Copyin
Page 25

If you are making more than one copy , press the Plus (+) button
g
3
or the Number of Copies button followed by the Plus (+) button
until the appropriate number is displayed on the front panel.
Adjust the way your copy will look using the Copy Quality,
4
Reduce/Enlarge, Lighter/Darker, and Color Intensity buttons.
See “Controlling How Copies Will Look” later in this chapter for
details.
Start copying:
5
Press the
Press the
button to make a black and white copy.
Black
button to make a color copy.
Color
Controlling How Copies Will Look
You can change default copy settings to produce copies that look the
way you want them to.
NOTE
There is a small margin around the edge of paper that the HP Color Copier
cannot copy onto. See “Copy Margins” on page 9-1 for more information.
This section explains how to use the following settings and options:
Number of copies
Copy quality
Reduce/enlarge features
Paper types
Lighter/darker
Color intensity
Text enhancement (TE)
Enhance light colors (ELC)
Copy paper size
Set defaults
NOTE
TIP
The copy settings are reset to their default settin
s two minutes after each
copy job is complete.
If you consistently use front panel settings other than the default,
consider establishing those settings as your new “defaults.” See
“Set Defaults” on page 3-9 for more information.
HP Color Copier User’s Guide 3-3
Page 26

g
Number of Copies
y
g
y
g
You can specify the number of copies to make in either of two ways:
When “1 copy” is displayed on the front panel, press the Plus (+)
button.
Press the Number of Copies button, then press the Plus (
) button.
+
Copy Qualit
The Copy Quality button changes the speed and quality of the copies
you make. You can choose from the following three copy settings:
Best produces the highest copy quality for all paper and eliminates
the banding (striping) effect that sometimes occurs in solid areas.
The Best setting copies more slowly than the Normal setting.
Normal delivers high-quality output and is the recommended
setting for most of your copying. Normal is the default copy
quality setting for most paper types, and is faster than Best.
Fast copies faster than the Normal setting, and the text is of
comparable quality . Using Fast also cuts down on the frequency of
replacing your print cartridges because it uses less ink.
NOTE
To change the Copy Quality setting, press the
Copy Quality
button,
the small button directly beneath the three quality settings (Best,
Normal, Fast), until the light next to the copy quality setting you want
to use is lit.
Reduce/Enlarge Options
Using the HP Color Copier’s digital Reduce/Enlarge features, you can
quickly and easily reduce or enlarge images to the exact size you want.
Some Reduce/Enlarge features let you specify the exact percent reduction or
ement you want to use. The Minus/Plus (
enlar
name let
button once to chan
ou know that this option is available. Press the Minus (–) or Plus (+)
e the percentage by 1. Hold down the Minus
(–) or Plus (+) button to change the percentage in increments o
Normal 100% makes a copy that is the same size as your original.
Entire 91% reduces your copy to ensure that all the edges are
copied.
– +
) signs next to the feature
f 5.
3-4 Copyin
Page 27

Auto Fit pre-scans the original to determine where its edges are.
g
y
g
g
g
g
y
Auto Fit then reduces or enlarges the original to fit on the paper
you are copying onto.
When enlarging, Auto Fit increases the size of the copy to the
largest size that will fit on the page without distorting the image,
and centers the image on the page.
NOTE
NOTE
Use Auto Fit or Entire 91% to sli
htly reduce your original and ensure that
ou copy the entire page. Entire 91% is a faster solution, because it uses a
fixed percenta
size of the ori
calculates the reduction percenta
Custom 100% (– +) lets you specify (using the plus or minus
e to make the copy—no pre-scan is needed to calculate the
inal. Auto Fit is an easy solution—the Auto Fit feature
e for you.
buttons) the exact reduction or enlargement percentage to use.
You can specify any percentage between 25% and 400%.
Poster 400% (– +) determines how to divide up the original
image and enlarge each part to end up with an image that is up to
400% larger than your original. You can specify a different
percent total enlargement using the Minus (
) or Plus (+) buttons.
–
A poster may be created using up to 25 sheets of paper (5 sheets
wide by 5 sheets long).
For example, you can use Poster to create posters of your work
to hang in your office or store. Use HP Premium Photo Paper for
a glossy, near-photo-quality look.
There is a minimum 1/4-inch overlap on all pa
that ke
elements on the page do not get cut off, and makes it easy for you
es of the poster. This ensures
to paste the pages together.
Clone 100% (– +) fits as many copies of the original as will fit on
one sheet of the paper you are using. Y ou can specify a reduction
or enlargement using the Minus (
) or Plus (+) buttons.
–
For example, you can use Clone to make extra copies of special
photographs for family and friends. For glossy,
near-photo-quality copies, use HP Premium Photo Paper.
HP Color Copier User’s Guide 3-5
Page 28

g
Mirror 100% (– +) reverses the image of your original and makes
y
y
g
a copy based on the percent reduction/enlargement you specify.
You can use Mirror to copy favorite photos or images onto
HP Iron-On T-Shirt Transfers. Then iron the image to make
custom t-shirts, banners, and flags. You can also use Mirror to
copy presentation materials onto HP Premium Transparency Film.
Then, when you flip each film over to make your presentation, you
can write on it and erase, without worrying about smearing the ink.
NOTE
When you select Iron-On as the paper t
selects Mirror as the Reduce/Enlar
To change Reduce/Enlarge settings:
Press the
1
want is displayed.
If the feature you are using allows, press the Plus (+) or Minus (–)
2
button to change the reduce/enlarge percentage.
Press the
3
setting, or press the
Reduce/Enlarge
Select/Resume
Clear/Stop
pe, the HP Color Copier automaticall
e setting.
button repeatedly , until the setting you
button to select the new reduce/enlarge
button to cancel.
Paper Types
The Paper Type you select affects how the HP Color Copier makes
copies. It is important that you select the appropriate Paper Type
setting for the kind of paper you are copying onto. Review the table on
page 4-2 for more information.
To change Paper Type:
Press the
1
of available paper types.
When the paper type you are using is listed, press
2
to choose it.
Paper Type
button repeatedly to scroll through the list
Select/Resume
Lighter/Darker
Use the Lighter/Darker button to adjust the lightness and darkness of
the copies you make.
3-6 Copyin
Page 29

To make copies Lighter or Darker:
y
Press the
1
lightness/darkness values appears on a scale on the display.
To make your copy darker, press the Plus (+) button. The dot
2
moves to the right.
To make your copy lighter, press the Minus (–) button. The dot
moves to the left.
Press
3
Lighter/Darker
Select/Resume
button. The range of
to confirm your selection.
Color Intensit
Use the Color Intensity feature to make the colors on your copy more
vivid or more subtle.
To change Color Intensity:
Press the
1
values appears on a scale on the display.
To produce copies with more intense or vivid colors, press the
2
Plus (
T o produce copies with paler, more subtle colors, press the Minus
(
) button. The dot moves to the left on the scale.
–
Press
3
Color Intensity
) button. The dot moves to the right on the scale.
+
Select/Resume
button. The range of color intensity
to choose the new color intensity setting.
NOTE
TE (Text Enhancement)
TE sharpens the edges of black text. It is turned on by default and
should, in most situations, be left on. However, turn TE off if:
Large, black typefaces look splotchy (not smooth).
Horizontal grainy or white bands in light- to medium-gray areas.
Thin, colored objects or lines contain black sections.
TE is automatically turned off when Photo Paper is selected.
HP Color Copier User’s Guide 3-7
Page 30

g
To turn TE On/Off:
g
Press the
1
display.
Press the Plus (+) and Minus (–) buttons to switch between
2
(off) and
Press
3
Select/Resume
button until “TE” appears on the front panel
Menu
z
(on).
to confirm your selection.
ELC (Enhance Light Colors)
Use the Enhance Light Colors (ELC) setting to enhance light-color
backgrounds in documents, such as maps, photos, and invoices, so the
background is included on the copy. The ELC feature improves the
appearance of very pale colors. Turn on ELC if pale colors are copying
as white.
To change the ELC setting:
Press the Menu button repeatedly until ELC appears on the front
1
panel display.
Press the Plus (+) and Minus (–) buttons to switch between
2
(off) and
Press the
3
Changing Other Front Panel Settin
This section explains how to use the following settings and options:
z
(on).
Select/Resume
button to confirm the change.
s
3-8 Copyin
Front panel language
Copy paper size
Set defaults
Factory defaults
Clear/Stop
Front Panel Language
You established the Front Panel Language when you first set up your
HP Color Copier. To switch to a different language, follow these steps.
While holding down the
1
Intensity
The current setting for default language is displayed.
button, then release both buttons.
Select/Resume
button, press the
Color
Page 31

Press the Plus (+) or Minus (–) button to scroll through the
2
available languages until the language you need appears.
The following languages are available: English, Español,
Deutsch, Français, Italiano, Nederlands, Dansk, Norsk,
Portugués, Svenska, and Suomi.
NOTE
Press
3
Select/Resume
to choose the displayed language.
Copy Paper Size
With your HP Color Copier, you can copy on either Letter(8.5 x 11 inches) or A4- (210 x 297 mm) sized paper.
To change Copy Paper Size:
Press the
1
Size” on the front panel display.
Press
2
3
4
Select/Resume
Press the Plus (+) or Minus (–) button to toggle between the two
paper sizes.
Press
Select/Resume
button repeatedly until you see “Copy Paper
Menu
to view the current default paper size.
when you see the paper size you want.
Set Defaults
If you consistently use settings on the front panel other than the
default, you can establish those setting as your new default.
The default setting is always indicated by a solid dot.
You can change default settings for all your front panel options. To
establish new defaults, first set all options the way you want them to
be. Then use the Set Defaults feature to save all the settings.
Here is an example using Auto Fit.
Press the
1
displayed.
Press
2
Reduce/Enlarge setting from Normal 100% to Auto Fit.)
Reduce/Enlarge
Select/Resume
button repeatedly until “Auto Fit” is
. (This step changes your regular
HP Color Copier User’s Guide 3-9
Page 32

g
Press the
3
panel display.
button until “Set Defaults” appears on the front
Menu
Press the
4
saved as defaults” is displayed. (This step saves the new
setting—Auto Fit—as your default.)
Select/Resume
button. The message “Current settings
Factory Defaults
You can return all the control panel settings to their factory defaults at
one time.
To return to Factory Defaults:
Press the
1
Defaults” on the front panel display.
Press
2
Select/Resume
The message “Returned to factory defaults” appears on the front
panel display.
button repeatedly until you see “Factory
Menu
.
Clear/Stop
Use the Clear/Stop button to cancel copy settings you have specified
or to stop copying.
When you press the
they are reset to default settings.
When you press the
“Copy Cancelled” appears on the front panel display . After a few
seconds, the copier cancels the job.
Clear/Stop
Clear/Stop
button to cancel copy settings,
button to stop copying, the phrase
3-10 Copyin
Page 33

Using the Automatic Document Feeder (ADF)
With the automatic document feeder (Models 145 and 155 only), you
can feed up to 25 originals at a time. You can use etter-sized or
A4-sized originals in the feeder. Here are some other tips:
Always feed your originals with the printed-side facing back in
the document feeder, and the top of the document to the right.
Do not mix paper types or sizes in the ADF.
Load only originals printed on 16-24 lb. paper in the document
feeder. Originals on lighter or heavier paper will not feed
correctly and may jam in the copier.
To prevent paper jams, use the ADF with plain paper or HP
Premium Inkjet paper only.
Do not use photo paper, transparency film, photos, labels, or
envelopes in the document feeder.
When you make more than one copy using the document feeder,
you will need to collate the sets manually.
For instructions on how to clear an automatic document feeder
paper jam, see page 5-2.
HP Color Copier User’s Guide 3-11
Page 34

3-12 Copyin
g
Page 35

All About Paper
ying
4
This chapter explains the paper types you can use when copying. It
also presents some tips on loading paper and transparency film, and
sets forth paper requirements for originals used in the automatic
document feeder.
For a current list of HP copier papers, visit our website:
http://www.hp.com/go/copiers/paper
Paper Choices When Cop
The HP Color Copier is designed to copy onto a variety of paper types
and weights. Be sure that all paper is free of rips, dust, wrinkles, and
curled or bent edges.
For best results, use HP papers.
HP Premium InkJet papers ensure the maximum color brilliance.
HP Bright White Inkjet Paper delivers high-contrast colors and
sharp text. It is opaque enough for two-sided color printing, with
no show-through. It is ideal for newsletters, reports, proposals, and
flyers.
HP Premium Transparency Film is designed to make your color
presentations vivid and even more impressive. This film is easy to
use and easy to handle and dries quickly without smudging.
HP Premium Heavyweight Inkjet paper is matte-coated on both
sides for double-sided copying. It is the perfect choice for nearphotographic reproductions and business graphics for report
covers, special presentations, brochures, mailers, and calendars.
HP Color Copier User’s Guide 4-1
Page 36

HP Photo Paper is a high-quality , glossy-finish, photo-based inkjet
y
paper. It looks and feels like a photograph and can be mounted
under glass or in an album. HP Photo paper dries rapidly and
resists fingerprints and smudges.
HP Iron-On T-Shirt Transfers can be used to transfer your designs
or photos onto t-shirts, sweatshirts, and fabric crafts.
Use the ordering information on page 9-4 for paper sizes, types, and
part numbers.
NOTE
See page 4-4 for automatic document feeder paper requirements.
Copy Paper in the Input Tra
Recommended Use Not Recommended
16– to 36–lb (60– to 135–g/m2)
copier paper or letterhead
HP Premium InkJet Paper Paper with cutouts or perforations
HP Premium Photo Paper Photo paper other than HP Premium
HP Bright White Inkjet Paper Envelopes
HP Premium Transparency Film Transparency film other than HP
Letter- or A4- size paper Any size paper other than letter or A4
HP Premium Heavyweight Inkjet
paper
HP Iron-On T-Shirt Transfers Multiple-part forms or label stock
Paper heavier than 36 lb (90 g/m2) or
lighter than 16 lb (60 g/m
Photo
Premium
Heavyweight paper other than HP
Premium
2
)
4-2 All About Paper
Page 37

Using the Right Paper Type Option
y
The Paper Type option you select determines how the HP Color
Copier prints on the paper you are using. Each time you load a
different type of paper in the paper tray or document feeder, be sure
to set the corresponding Paper Type option on the front panel.
For this Kind of Paper Select this Paper Type
Copier paper or letterhead Plain Paper
HP Bright White Inkjet Paper Plain Paper
HP Premium Transparency Film Transparency
HP Deluxe Photo Paper Photo Paper
HP Premium Photo Paper Photo Paper
HP Premium InkJet Paper Premium InkJet
HP Premium Heavyweight InkJet Paper Premium Inkjet
HP Iron-On T-Shirt Transfers Iron-On
Tips on Loading Paper in the Paper Tra
All paper: Load the print-side down with the letterhead (or top of
page) going into the tray first. Be sure paper is loaded fully
forward in the lower tray.
HP Premium InkJet Paper: Locate the gray arrow on the
nonprinting side of the paper and insert the paper with the arrow
side up.
HP Premium Photo Paper: Load the shiny side facing down.
Always load at least 5-10 sheets in the paper tray . You can place
the photo paper sheets on top of plain paper in the paper tray.
HP Premium Transparency Film: Insert the film so that the
white transparency strip, with arrows and the HP logo, is on top
and going into the tray first.
HP Iron-On T-Shirt Transfers: For best results, manually feed
one sheet at a time, with the unprinted side facing down. Flatten
the transfer sheet completely before using; do not load curled
sheets. To prevent curling, keep transfer sheets sealed until just
before printing.
HP Color Copier User’s Guide 4-3
Page 38

Special Considerations When Usin
g
y
y
Load a maximum of 80 transparency sheets at a time.
Be sure to specify “Transparency” as the Paper Type setting.
Ink dries slower on film. Be sure to allow enough time for the ink
Transparency Film
to dry before using the transparency.
If you are copying from a transparency (that is, your original is
printed on transparency film), place a blank piece of paper over the
transparency on the copier glass.
NOTE
We recommending using only HP Premium Transparency Film when copying
on transparencies. Other transparenc
film can jam in the copier.
Automatic Document Feeder Requirements
Load a maximum of 25 originals in the automatic document feeder
at a time.
Use only originals printed on plain paper (white and colored),
letterhead, and HP Premium Inkjet Paper in the 16
(60
90 g/m2) range in the automatic document feeder.
–
Always insert originals with the printed-side facing back in the
24 lb
–
feeder and the top of the paper to the right.
Do not start copying until the “Document loaded” message
appears on the front panel display and you see the Copy Quality
lights flash.
NOTE
Do not load photos, paper sizes other than letter or A4, photo paper,
transparenc
film, labels, or envelopes in the automatic document feeder.
Doing so may cause a paper jam.
How to Order Quality HP Papers
You can order your copier supplies from any local, authorized
HP dealer. See page 9-4 for more information.
4-4 All About Paper
Page 39

Troubleshootin
g
y
This chapter presents procedures for resolving paper jams in the paper
tray and automatic document feeder (Models 145 and 155 only). It also
includes lists common copying problems and their solutions.
How to Clear a Paper Jam in the Paper Tra
The message “Paper Jam” appears on the display when paper cannot
feed from the paper tray properly. To resolve this problem:
5
Press and hold down the
1
When you do this, the paper rollers in the HP Color Copier move
forward to help eject the jammed paper.
If this does not work, press and hold down
2
The paper rollers move in reverse.
If the paper is still jammed, repeat steps 1 and 2 to move the paper
3
rollers forward and backward.
Gently remove the paper.
4
Select/Resume
HP Color Copier User’s Guide 5-1
button.
Select/Resume
again.
Page 40

g
If all else fails, remove the paper tray by pinching together the two
g
5
levers under the paper tray. Pull the tray toward you, and gently
remove the jammed paper. Then slide the paper tray back into the
copier.
Turn the copier off, then on again to continue copying.
6
If paper has jammed in the copier, but no message is displayed, press
and hold down the
button. Then follow the directions above.
Select/Resume
button, then the
Paper Type
How to Clear a Paper Jam in the Automatic Document Feeder
Rotate the automatic document feeder back to expose the paper
1
jam.
Gently remove the paper.
2
Rotate the automatic document feeder back.
3
Press
4
Select/Resume
How to Use the Self Test Pa
The Self Test Page lets you know whether the copier is operating
properly. It lists current, default front panel settings and, if you are
using Model 145 or 155, tells whether the automatic document feeder
is attached properly. You can also use it to check print alignment.
To print a Self Test Page:
Press the
1
in the panel display.
Press the
2
The test-page printout has a set of lines which should appear
unbroken, and colored bars which should appear solid. The
intensity of the colors will vary, depending on the type of paper
you are using (that is, plain paper, HP Premium InkJet Paper, and
so on).
Menu
Select/Resume
to continue.
e
button until the message “Self T est Page” appears
button.
5-2 Troubleshootin
Page 41

Check to make sure the margins are aligned and not skewed.
3
Fold the Self Test Page in half carefully so that the “A” and
a
the “C” along the left margin line up.
Line up the equal signs (=).
b
Verify that the vertical line next to the “A” appears between
c
the two vertical lines next to the “C” (does not have to be
centered).
If the alignment is satisfactory , the copier mechanism is working
4
properly .
If the alignment is not satisfactory, see Troubleshooting
information on page 5-11.
If the Troubleshooting help does not resolve the problem, contact
5
HP Customer Support. See “HP Customer Support” on page 6-2.
HP Color Copier User’s Guide 5-3
Page 42

g
Front Panel Messages
Message What You Should Do
Power Save On The front panel displays this message when the OfficeJet Pro
Door Open. Close cartridge
door.
Paper Jam. Press and hold
Resume to eject paper.
ADF Paper Jam. Refer to “How to Clear a Paper Jam in the Automatic
Busy. Can’t start another
copy job.
Out of Paper. Replace paper
then press Resume.
has not been used for 12 hours or more. Press any button on
the front panel or load originals in the automatic document
feeder.
Close the print cartridge door.
To clear the paper jam, press and hold the Select/Resume
button. The paper should eject. If this does not work, refer to
the procedures on page 5-1.
If only one or two sheets of paper are in the paper tray, the
copier might not pick up the paper properly, causing a jam in
the copier.
Remove the papers that are jammed, and add more paper to
the paper tray.
Document Feeder” on page 5-2.
You will see this message when you try to start a new copy
job before the first job is complete, or you try to change front
panel settings while a copy job is in progress.
W ait until the first copy job is complete before trying to start
another.
If the paper tray is empty, load paper in the paper tray, and
press Select/Resume.
If the paper is not inserted correctly, adjust the paper, then
press Select/Resume.
Remove original from the
document glass.
Remove and check (black or
color) cartridge
No Cartridge. Insert (black
or color) cartridge.
Remove and check black
cartridge. Verify Part
Number: 51645A
5-4 Troubleshootin
Remove the original from the copier glass, then press the
Select/Resume on the front panel to continue.
One of the print cartridges is either incorrectly installed, the
wrong type, or defective.
Remove the print cartridge (black or tri-color), and then
replace it in the carriage stall.
Make sure to remove the tape from the print cartridge, and
close the latch securely.
A print cartridge is missing. Insert the missing cartridge.
The wrong black cartridge is installed. Remove it, and
replace it with the correct cartridge, part number 51645A.
Page 43

p
y
g
p
g
y
p
g
p
p
g
g
g
p
p
Front Panel Messages (Continued)
Message What You Should Do
Remove and check color
cartridge. Verify Part
Number: C1823A
Unlock scanner. The scanner is locked.
Cartridge carriage blocked. Unblock the carriage, and turn power off then on again.
Scanner bulb failin
Turn Power off then on
a
ain.
Additional cleanin
ineffective. Replace
cartridge.
. The scanner bulb is becoming too dim to work properly.
will be
The wrong tri-color cartridge is installed. Remove it, and
replace it with the correct cartridge, part number C1823A.
Turn off the HP Color Co
beneath the front panel on the right side. Unlock the scanner
by twisting the green knob under the front panel toward the
back of
turns one way.)
Turn
the light flickers or does not come on, your HP Color Copier
needs to be serviced. See page 8-4 for more information.
A system error has occurred that you cannot resolve
ourself.
Turn
repeatedly, or remains on the display, call HP Customer
Support for help (see page 6-2).
Replace the print cartridge.
.
our HP Color Copier, until it stops. (The lever only
ower off, then on again. If the message continues and
ower off, then on again. If this message appears
ier. The scanner lock is located
Blank page
Possible Causes Solutions
The original was placed
rint-side up on the glass or
rinted side facing forward in the
document feeder.
Protective tape is still on the print
cartrid
e.
Turn the ori
is placed print-side down on the glass and against the
reen borders. If you are using an automatic document
feeder, be sure to place the original with the printed side
facing back in the document feeder.
Each new
lastic tape covering the ink nozzles. Remove the print
cartridge from its cradle and, being careful to touch only
the black plastic, gently remove any tape covering the
nozzles. Then insert the print cartridge back in its cradle.
inal over. Be sure the page you are copying
rint cartridge is packaged with protective
HP Color Copier User’s Guide 5-5
Page 44

g
g
g
Blank page (Continued)
Possible Causes Solutions
The print cartridges need to be
replaced.
You are making a large
Custom % enlargement, and
have not positioned the original
along the green borders.
The automatic document feeder
plug is loose or unattached.
No original is on the glass or in
the automatic document feeder.
The HP Color Copier black or color cartridge may need
to be replaced. The best way to check this is to print a
Self T e st Page. (See the procedure on page 2-12.)
If any of the colored bars are missing (blue, magenta, or
yellow), the color print cartridge must be replaced.
Place all originals on the glass along the green borders.
Check the plug to make sure it is secure.
Place all originals on the glass along the green borders.
Some colors faded, distorted, or missin
Possible Causes Solutions
The print cartridges may need to
be replaced.
One of the color ink chambers is
running out of ink, the nozzles in
the print cartridge may be
clogged, the print cartridges may
need to be replaced, or you may
have a defective print cartridge.
The HP Color Copier color cartridge may need to be
replaced. The best way to check this is to print a Self
Test Page. (See the procedure on page 2-12.)
If any of the colored bars are missing (blue, magenta, or
yellow), the color print cartridge must be replaced.
Print a Self T est Page. (See the procedure on page 2-12.)
If any of the colored bars are missing (blue, magenta, or
yellow), the color print cartridge must be replaced.
If the page shows streaking or white lines through any
of the colored bars, the cartridges need to be cleaned
(see the procedure on page 7-3).
If copy quality still seems poor after you clean the
cartridges, replace them. (Be sure to remove the
protective tape before using the new cartridge.)
Placement on the pa
e wrong or edges cut off
Possible Causes Solutions
Edges get cut off of the copy. Use either the Entire 91% or Auto Fit reduce/enlarge
5-6 Troubleshootin
feature. See page 3-4 for more information.
Page 45

g
y
g
Placement on the page wrong or edges cut off (Continued)
Possible Causes Solutions
The Paper Size setting on the
front panel is set to A4, and
letter-size paper is loaded, or the
Paper Size setting is set to letter,
and A4-size paper is loaded.
Auto Fit, Clone, or Poster not workin
Possible Causes Solutions
Auto Fit does not enlarge to full
size.
The Clone feature does not make
enough duplicate copies.
Poster makes extra, blank pages.
Copies too vivid or bri
Possible Causes Solutions
Color intensity is set too high. Lower the color intensity. Press the Color Intensity
Check to make sure that Paper Size is set correctly. See
“Copy Paper Size” on page 3-9.
properl
Make sure to place the original in the corner along
the two green borders.
Make sure that the scanner glass, lid, and/or
automatic document feeder lid are all clean and free
from smudges and dust. If there is dirt or a hair on the
glass or lid, the copier may misread the size of the
image when scanning. See “Cleaning the Glass” on
page 7-1.
ht
button. Press the Minus (–) button to reduce the color
intensity and make your copy paler. The round dot
moves to the left on the scale.
No copies coming out
Possible Causes Solutions
The copier may be out of paper,
or the paper may not be loaded
properly.
The scanner may be locked. A locking mechanism holds and protects the scanner
Load paper in the HP Color Copier using the procedure
on page 4-3.
optics during shipment. You must unlock the scanner
before you can use the HP Color Copier. See “Step 3 —
Unlock Your HP Color Copier” on page 2-4 for
instructions.
Note: If the scanner is locked, you may hear a loud,
grinding, clicking noise when you try to make a copy.
HP Color Copier User’s Guide 5-7
Page 46

g
g
y
No copies coming out (Continued)
Possible Causes Solutions
The HP Color Copier may not be
turned on.
The paper has jammed in the
copier.
Turn the HP Color Copier on by pressing the Power
button on the front of the product in the bottom right
corner. The current Copy Quality setting will light up,
and a message will appear on the front panel.
Clear the paper jam using the procedure on page 5-1.
Copies taking too lon
Possible Causes Solutions
You are using the Best copy
quality setting.
You are using the Transparency
or Photo Paper T ype setting.
You pressed the Color start
button for a black and white
document.
The copier is not warmed up. The scanner bulb shuts off if it remains idle for 12 hours.
The Best setting produces the highest quality copies, but
it is the slowest setting. Change the Copy Quality setting
to either Normal or Fast. To learn more about copy
quality settings, see page 3-4.
When you copy onto transparency film and photo paper
and use the Transparency or Photo Paper Type setting,
the copying process slows down, for second and
subsequent copies, to allow the ink to dry.
Press Clear/Stop to cancel the first copy job. Then press
the Black start button.
It must warm up the first time it is used.
The copier glass is dirty. Dirty copier glass (fingerprints, smudges, etc.) slows
You are printing on plain paper,
but have selected another Paper
T ype on the front panel.
Paper wrinkled and ver
down the copying process. Clean the glass using the
procedure on page 7-1.
Change the Paper Type setting on the front panel to
Plain Paper.
wet
Possible Causes Solutions
The Paper T ype front panel
setting is set to Photo Paper, and
you are using Plain Paper.
5-8 Troubleshootin
Change the Paper Type setting to Plain Paper.
Page 47

Paper wrinkled and ver
y
wet (Continued)
Possible Causes Solutions
Y ou are copying a page with very
dark colors.
Press the Lighter/Darker button. Press the Minus (–)
button to lighten your copy . The round dot moves to the
left on the scale.
Y ou can also press the Color Intensity button to decrease
the intensity of the colors. Press the Minus (–) button to
reduce the color intensity and make your copy paler. The
round dot moves to the left on the scale.
Copies faded or colors dull
Possible Causes Solutions
The Paper Type setting does not
match the paper loaded in the
paper tray.
The Lighter/Darker setting is too
low.
The Color Intensity setting is too
low.
Light colors print as white. Turn on ELC (Enhance Light Colors) on the front panel
Make sure the Paper Type setting selected on the front
panel display is the same as the type of paper actually
loaded in your HP Color Copier.
Press the Lighter/Darker button. Press the Plus (+)
button to darken your copy. The round dot moves to the
right on the scale.
Press the Color Intensity button. Press the Plus (+)
button to intensify the color and make your copy more
vivid. The round dot moves to the right on the scale.
display by pressing the Menu button repeatedly until
“ELC” appears. Press the Plus (+) button to turn on
ELC. The round dot becomes a solid round dot. Press
the Select/Resume button, then press the Color button to
make a copy.
The scanner bulb is too dim. If there is a “Scanner bulb failing” message on the front
panel display, turn the copier of f, then back on again. If
the bulb flickers or does not light up, the lamp needs to
be replaced. Contact HP Customer Service. See “HP
Customer Support” on page 6-2 for more information.
HP Color Copier User’s Guide 5-9
Page 48

g
Copy streaked, smeared, or with white horizontal lines
y
Possible Causes Solutions
The Paper Type setting does not
match the paper loaded in the
paper tray.
You are copying on the wrong
side of the paper.
The nozzles in the print cartridge
may be clogged.
Black bar in margins on copy (Models 145 and 155 onl
If you are using special papers, such as photo, premium
inkjet, iron-on, or transparencies, you need to make sure
the Paper T ype setting you selected matches the type of
paper you have in the bottom tray. Press the Paper Type
button until the paper type on the display matches the
type of paper you have loaded in the bottom tray. Then
press Select/Resume.
Be sure to put the paper print-side down. Photo paper
should be placed glossy-side down. Gray arrows on
premium papers should be facing up. Blue arrows on
transparencies should be facing up.
Print a Self T est Page using the procedure on page 2-12.
If any of the colored bars are missing (blue, magenta,
yellow, or black), the color print cartridge must be
replaced.
If the page shows streaking or white lines through any
of the colored bars, the cartridges need to be cleaned
(see the procedure on page 7-3). If copy quality still
seems poor after you clean the cartridges, replace them.
)
Possible Causes Solutions
You are copying from a
transparency (that is, your
original is printed on
transparency film), and a black
bar is showing up on the copy.
Place a blank piece of white paper over the transparency
on the copier glass. This will prevent an image of the
document feeder rollers from being included on your
copy.
You are using the Normal, Auto
Fit, Clone, or Poster
reduce/enlarge option, and a
black bar is showing up on the
copy.
You are copying a Letter-size
original onto A4-size paper, and
your copy will include an image
of the document feeder roll-off at
the bottom of the page.
5-10 Troubleshootin
The copier’s sizing sensor (on the top of the document
feeder lid) is misreading the size of your original.
Clean the glass, especially the right back corner, using
the procedure on page 7-1.
If you selected “Normal 100%” change the Copy Paper
Size setting to Letter for this copy only. Change the copy
Paper Size back when finished.
If you selected a Custom zoom percentage less than
100%, place the original on the glass and place white
sheets of paper on top of the original to cover the entire
glass.
Page 49

p
g
pap
g
g
y
g
g
pap
pap
g
g
j
Black bar in margins on copy (Models 145 and 155 onl
y
)
Possible Causes Solutions
You are copying an original that
is greater than 8” wide, and the
solution above did not solve the
roblem.
.
Copies crooked on pa
Place the ori
e
Possible Causes Solutions
The original is crooked on the
lass.
The original is placed incorrectly
in the automatic document
feeder.
The width and length adjusters
on the bottom tray are not flush
a
ainst the paper.
Different sizes of
loaded in the tray.
The document feeder
adjuster is not flush against the
bottom of your originals.
er are
er
Reposition the original against the green borders.
Be sure to place originals in the document feeder with
the printed side facing back and the top of the document
all the wa
Move the width and len
of paper.
Load only one size of paper at a time. Only A (Letter)
and A4 size paper can be used.
Move the document feeder paper adjuster until it is flush
against the bottom of your originals.
er on toe of the original to cover the entire glass.
inal on the glass and place white sheets of
to the right.
th adjusters up against the stack
Miscellaneous problems
Symptoms Solutions
Back of newspaper print shows
through.
Lar
e, black typefaces have a
splotchy (not smooth)
appearance; or thin, color objects
or lines have black sections.
Press the Lighter/Darker button. Press the Minus (–)
button to li
the left on the scale.
Place a dark piece of paper on top of the newspaper.
Turn off TE (T ext Enhancement). Press the Menu button
until “TE” appears on the display. Press the Plus (+) or
Minus (–) button to turn TE off (noted by a round dot),
and then press the Select/Resume button.
Ad
ust the Lighter/Darker setting: lighten the copy by at
least 3 notches.
hten your copy. The round dot moves to
HP Color Copier User’s Guide 5-11
Page 50

g
Miscellaneous problems (Continued)
Symptoms Solutions
White lines on copies appear
between adjacent black and color
areas, or black and color overlap.
Unwanted dots appear in the
background.
Y ou are using A4-size paper , and
the last few lines on the original
do not appear on the copy.
You are using letter-size paper,
and the right side of the original
is not being copied.
The print cartridges may need to be aligned:
Press the Menu button until “Align Print Cartridges”
appears on the display.
Press the Select/Resume button; instructions are
printed. Follow the instructions that are printed.
This often occurs if you are copying from a gray or
pastel original. Do one of the following:
Press the Lighter/Darker button. Press the Minus (–)
button to lighten your copy. The round dot moves to
the left on the scale.
You can also press the Color Intensity button. Press
the Minus (–) button to make your copy paler. The
round dot moves to the left on the scale.
The Paper Size settings may not be correct. Press the
Menu button until “Copy Paper Size” appears on the
display. If “Letter” is listed as the current setting, press
the Plus (+) or Minus (–) buttons until the A4 paper size
appears, and then press the Select/Resume button.
The Paper Size setting may not be correct. Press the
Menu button until “Copy Paper Size” appears on the
display. If “A4” is listed as the current setting, press the
Plus (+) or Minus (–) buttons until A (Letter) appears,
then press the Select/Resume button.
When you choose new settings
on the front panel, they always
get reset when you press the
Clear/Stop button or turn off the
HP Color Copier.
There is a loud noise coming
from the inside of the copier
when you are making copies, and
you see the message “Cartridge
Carriage Blocked” on the front
panel display.
5-12 Troubleshootin
You can save your current settings as defaults. Choose
the appropriate settings on the front panel. Press the
Menu button until “Set Defaults” is displayed, and then
press the Select/Resume button.
Make sure you have removed the yellow/orange
shipping insert from the top of the print cartridge
carriage. To do this, lift the document cover, then the
print cartridge access cover on the left side of the copier.
The shipping insert is inside.
Page 51

Miscellaneous problems (Continued)
Symptoms Solutions
Paper repeatedly jams or the
copier tears the corner of the
paper.
The wrong size paper is loaded. Load the correct size
paper.
The leading edge is damaged or bent. Do not use
damaged paper.
The paper width and length adjusters are not set
correctly. Be sure the paper width and length
adjusters on the bottom tray are set for your paper
size.
The paper may be damaged or curled. Replace
damaged or curled paper.
HP Color Copier User’s Guide 5-13
Page 52

5-14 Troubleshootin
g
Page 53

HP Support Services
If you are unable to find the answer you need in this book, you can
contact one of the HP support services listed in the following pages.
Some support services are available only in the U.S. and Canada,
while others are available in many countries worldwide. If a support
service number is not listed for your country, contact your nearest
authorized HP dealer for help.
On-Line Services
Internet
You can obtain updated product information on the Hewlett-Packard
Worldwide Web home page at the following address:
6
http://www.hp.com/go/copiers
This website is updated whenever information and contact numbers
change.
HP FIRST
Phone (800) 333-1917 (U.S. and Canada) to access HPFIRST. When
you call, you can request that information be faxed directly to you. T o
use HPFIRST, you need a touch-tone phone. You need a 9600-baud,
Group 3 facsimile machine to receive the information.
Hewlett-Packard offers this service free of charge.
HP Color Copier User’s Guide 6-1
Page 54

CompuServe
y
g
y
y
Support information and interactive sharing of technical information
are available on CompuServe’s HP Peripherals forum GO HPPER. To
subscribe, call CompuServe, Inc. at (800) 848-8199 (U.S.).
NOTE
This service is not operated b
HP Customer Support
If you are unable to resolve problems with your HP Color Copier using
information in this User’s Guide, call HP Customer Support.
Calling in the U.S. and Canada Durin
Call (208) 323-2551 Monday through Friday from 6 am to 10 pm
Mountain Standard Time (MST) and Saturdays from 9 am to 4 pm
MST. This service is free during the warranty period of the HP Color
Copier; however, your standard long-distance phone charges still
apply.
Calling in the U.S. and Canada Post Warrant
If your copier is not under warranty, you can call (800) 999-1148. A
per-call, out-of-warranty support fee will be charged to your credit
card. You can also call (900) 555-1500 ($2.50 per minute) from 7 am
to 6 pm MST and Saturdays from 9 am to 3 pm MST. Charges begin
only when you connect with a support technician. (Prices and hours
are subject to change without notice.)
HP.
Warrant
6-2 HP Support Services
Page 55

Maintaining Your
g
g
g
HP Color Copier
With minimal maintenance you can keep your HP Color Copier in top
working condition. Perform the following maintenance procedures as
necessary .
Cleaning the Exterior Case
Use a soft, damp, lint-free cloth to wipe dust, smudges, and stains off
the case. The interior of the HP Color Copier does
cleaning.
Cleaning the Glass
Dirty copier glass (fingerprints, smudges, etc.) slows down copier
performance by as much as half a minute! This is because the scanner
is actually processing the smudges on the glass. Be sure to keep the
glass clean and free from dust, smudges, and fingerprints.
Keep fluids away from the interior of the HP Color Copier.
require
not
7
WARNING Turn off the HP Color Copier and unplu
thou
h the HP Color Copier is off, power is still being supplied if the power
cord is plugged in.
the power cord before cleanin
HP Color Copier User’s Guide 7-1
. Even
Page 56

To clean the glass:
g
y
Turn off the HP Color Copier, remove the power cord, and then
1
raise the document cover.
Clean the glass with a soft cloth or sponge slightly moistened with
2
warm water and a mild soap or detergent. You may also use glass
cleaner.
CAUTION
Do not use abrasives, acetone, benzene, or carbon tetrachloride on the
lass; these can damage the glass.
Do not place liquids directl
damage your copier.
Rinse the soft cloth or sponge with clean water, wring out excess
3
water, and wipe the remaining soap or detergent off the glass.
Dry the glass with a chamois or cellulose sponge to prevent
4
spotting. If soap or detergent does not clean the glass sufficiently,
you can use isopropyl alcohol as a cleaning agent.
Aligning Cartridges
Use the Align Cartridges feature whenever you install new print
cartridges. See “Step 8 — Align Your Black and Color Print
Cartridges” on page 2-10 for step-by-step instructions.
Using the Self Test Page
Use the Self Test Page to check the print cartridges and to determine
whether the automatic document feeder is successfully installed.
To Print a Self Test Page:
on the glass. They may seep under it and
Press the
1
front panel display.
Press
2
7-2 Maintaining Your HP Color Copier
Select/Resume
The message “Printing” appears on the front panel display, and a
Self Test Page will be printed. See “How to Clear a Paper Jam in
the Automatic Document Feeder” on page 5-2 for more
information.
button repeatedly until you see “Self T est” on the
Menu
.
Page 57

Cleaning Cartridges
Use the Clean Cartridges feature when the Self Test Page shows
streaking or white lines through any of the colored bars. Do not clean
cartridges unnecessarily . This wastes ink and shortens the life of your
print cartridges.
To clean the cartridges:
NOTE
Press the
1
Cartridges” on the front panel display.
Press
2
If copy quality still seems poor after you clean the cartridges, replace them.
Select/Resume
The message “Printing a Cleaning Check Sheet” appears on the
front panel display, and a Print Cartridge Cleaning Page will be
printed.
button repeatedly until you see “Clean
Menu
.
HP Color Copier User’s Guide 7-3
Page 58

7-4 Maintaining Your HP Color Copier
Page 59

Hewlett-Packard
y
y
Limited Warrant
Model Number: C5370A
Product Numbers: 140, 145, 150, and 155
Duration of Limited Warranty (Hardware): 1 Year
Duration of Limited Warranty (Print Cartridges): 90 Days
Extent of Limited Warrant
HP warrants to you, the end-user customer, that HP hardware,
1
accessories and supplies will be free from defects in materials and
workmanship after the date of purchase, for the period specified above.
If HP receives notice of such defects during the warranty period, HP will,
at its option, either repair or replace products which prove to be
defective. Replacement products may be either new or like-new.
HP warrants to you that HP software will not fail to execute its
2
programming instructions after the date of purchase, for the period
specified above, due to defects in material and workmanship when
properly installed and used. If HP receives notice of such defects during
the warranty period, HP will replace software media which does not
execute its programming instructions due to such defects.
HP does not warrant that the operation of HP products will be
3
uninterrupted or error free. If HP is unable, within a reasonable time, to
repair or replace any product to a condition as warranted, you will be
entitled to a refund of the purchase price upon prompt return of the
product.
HP products may contain remanufactured parts equivalent to new in
4
performance or may have been subject to incidental use.
Warranty does not apply to defects resulting from (a) improper or
5
inadequate maintenance or calibration, (b) software, interfacing, parts or
supplies not supplied by HP , (c) unauthorized modification or misuse, (d)
operation outside of the published environmental specifications for the
product, or (e) improper site preparation or maintenance.
8
HP Color Copier User’s Guide 8-1
Page 60

HP MAKES NO OTHER EXPRESS WARRANTY OR CONDITION
6
WHETHER WRITTEN OR ORAL. TO THE EXTENT ALLOWED BY
LOCAL LAW, ANY IMPLIED WARRANTY OR CONDITION OF
MERCHANTABILITY, SATISFACTORY QUALITY, OR FITNESS
FOR A PARTICULAR PURPOSE IS LIMITED TO THE DURATION
OF THE EXPRESS WARRANTY SET FORTH ABOVE. Some
countries, states or provinces do not allow limitations on the duration of
an implied warranty, so the above limitation or exclusion might not apply
to you. This warranty gives you specific legal rights and you might also
have other rights that vary from country to country, state to state, or
province to province.
TO THE EXTENT ALLOWED BY LOCAL LAW, THE REMEDIES
7
IN THIS WARRANTY STATEMENT ARE YOUR SOLE AND
EXCLUSIVE REMEDIES. EXCEPT AS INDICATED ABOVE, IN NO
EVENT WILL HP OR ITS SUPPLIERS BE LIABLE FOR LOSS OF
DATA OR FOR DIRECT, SPECIAL, INCIDENTAL,
CONSEQUENTIAL (INCLUDING LOST PROFIT OR DATA), OR
OTHER DAMAGE, WHETHER BASED IN CONTRACT, TORT , OR
OTHERWISE. Some countries, States or provinces do not allow the
exclusion or limitation of incidental or consequential damages, so the
above limitation or exclusion may not apply to you.
8-2 Hewlett-Packard Limited Warranty
Page 61

Warranty Service
Express Service
T o obtain HP express repair service, the customer must contact an HP
service office or an HP Customer Support Center for basic
troubleshooting first.
If a customer unit needs a minor part replacement and these parts can
normally be replaced by the customer, the customer-replaceable
components may be serviced through expedited part shipment. In this
event, HP will prepay shipping charges, duty and taxes; provide
telephone assistance on replacement of the component; and pay
shipping charges, duty, and taxes for any part that HP asks to be
returned.
For some repairs, the HP Customer Support Center may direct
customers to designated Authorized Service Providers who are
certified by HP to service the HP Color Copier.
If you need to return your copier to HP for repair, HP will expedite
the repair of your unit by using an express delivery service to
expedite the return of the repaired or exchanged unit.
Warranty Upgrades
Extended warranties and service option upgrades may be obtained
through your local HP authorized dealer or HP service centers.
In the U.S. and Canada, extended warranties may also be obtained by
calling HP at (800) 835-4747.
HP Color Copier User’s Guide 8-3
Page 62

Returning Your HP Color Copier for Service
Before You Call
Before you call HP Customer Support:
Make sure that the copier is plugged in and powered on, that the
1
specified inkjet print cartridges are installed correctly , and that the
recommended paper is properly loaded in the input tray.
Review the setup section (Chapter 2) and the troubleshooting
2
section (Chapter 5Chapter 5) in this User’s Guide.
Try resetting the copier by powering it off, then on again, using the
3
power button in the lower front corner of the product.
Call the HP FIRST toll-free number (see page 6-1) and/or check
4
HP’s Internet site (see page 6-1) for information that might help
you quickly resolve your problem.
If you are still experiencing problems and need to speak with an
5
HP Customer Support Representative:
Have your copier serial number ready.
a
Print a Self Test Page (see page 2-12).
b
Make a color copy.
c
Be prepared to describe the problem you are experiencing in
d
detail.
Call HP Customer Support. See page 6-2 for more information.
6
After you receive authorization for hardware service from HP
Customer Support Center, prepare it for shipment and pack it a
protective carton. We recommend you save the original shipping
container for this purpose.
NOTE
8-4 Hewlett-Packard Limited Warranty
In-transit damage is not covered by the warranty, so always insure your
shipment.
Page 63

Prepare your HP Color Copier for Shipment
Turn on the HP Color Copier, and leave it on for at least 2
1
minutes.
Raise the document cover, and then raise the print cartridge
2
access cover.
Remove both print cartridges and close the print cartridge
3
latches. Place print cartridges in an airtight bag so they will not
dry out, and put them aside (do not send them with the copier).
NOTE
Print cartridges that remain inside may damage your copier.
Attach the orange packing insert (if available).
4
Turn off the HP Color Copier.
5
You will see the message “Shutting Down” on the front panel
display.
T o prevent damage to the HP Color Copier during shipping, lock
6
the scanner.
HP Color Copier User’s Guide 8-5
Page 64

Pack the copier for shipment using the original packing materials.
7
Please also include the following items in the box:
8
A brief description of symptoms for service personnel
(samples of print quality problems are helpful).
A copy of the sales slip or other proof of purchase to establish
the warranty coverage period.
Your name, address, and a phone number where you may be
reached during the day.
If you do not have the original packaging materials, you can
request a replacement package set from HP Customer Support.
NOTE
Shipping damage caused by improper packaging is not covered under the
warranty.
8-6 Hewlett-Packard Limited Warranty
Page 65

Technical Information
9
Speed Specifications
Copy speed is related to the complexity of the
document.
Black Copy Speed (letter-sized, text)
Fast mode: 9 pages per minute
Normal mode: 8 pages per minute
Color Copy Speed
(letter-sized, mixed text and graphics)
Fast mode: 3 pages per minute
Normal mode: 1 page per minute
Color Copy Speed
(letter-sized, full page, full-color graphics)
Fast mode: 1.7 pages per minute
Normal mode: 0.5 page per minute
Copy Margins
Copy at 100% or Clone Option:
Margin Letter
(8.5 x 11 in.)
Top 0.07 in. 1.8 mm
Bottom 0.5 in. 12.7 mm
Left 0.2 in. 3.3 mm
Right 0.2 in. 3.3 mm
A4
(210 x 297 mm)
All other Reduce/Enlarge Settings:
Margin Letter
(8.5 x 11 in.)
Top 0.5 in. 12.7 mm
Bottom 0.5 in. 12.7 mm
Left 0.38 in. 9.4 mm
Right 0.38 in. 9.4 mm
A4
(210 x 297 mm)
Functional Specifications
Paper Sizes
U.S. letter-sized (8.5 x 11 in.)
European A4 (210 x 297 mm)
Duty Cycle
Maximum Monthly Usage: 3,000 pages
Paper weight
In paper tray: 16–36 lb (60–135g/m
In automatic document feeder: 16–24 lb
(60–90 g/m
2
)
2
)
HP Color Copier User’s Guide 9-1
Page 66

Black Resolution
Fast: 300 x 300 dpi
Normal: 600 x 600 dpi
Best: 600 x 600 dpi
Color Resolution
Fast: 300 x 300 dpi
Normal: 600 x 300 dpi CREt
Best: 600 x 600 dpi CREt
Colors
Up to 16.8 million
Other
Resolution Enhancement technology
(REt)/Color (CREt)
CopySmart text enhancement technology,
which includes:
Text Enhancement
Digital enlarge/reduce (25%–400%)
Auto Fit functionality
Automatic color adjustment for different
paper types
Enhanced grayscale for better black and
white copying
Environmental Specifications
Operating ranges
o
5
–40oC (41o–104oF)
Recommended ranges
o
15
–35oC (59o–95oF)
Humidity
15%–80% RH non-condensing
Non-operating ranges
o
40
–70oC (104o–140oF)
Physical Specifications
Height
Product IDs 140 and 150: 12.8 in. (32.5 cm)
Product IDs 145 and 155: 19 in. (48.26 cm)
Width
Product IDs 140 and 150: 21.25 in. (54 cm)
Product IDs 145 and 155: 21.25 in. (54 cm)
Depth
Product IDs 140 and 150: 17 in. (43.2 cm)
Product IDs 145 and 155: 17.7 in. (45 cm)
Power Specifications
Source voltage
100–240V
Frequency
50–60 Hz
Current
1A maximum
Power
45 W maximum
9-2 Technical Information
Weight
Product IDs 140 and 150: 32.2 lb (14.61 kg)
Product IDs 145 and 155: 36.85 lb (16.38 kg)
Page 67

Regulatory Notices
FCC Statement (U.S.A.)
The United States Federal Communications
Commission (in 47 CFR 15.105) has
specified that the following notice be brought
to the attention of users of this product.
This equipment has been tested and found to
comply with the limits for a Class B digital
device, pursuant to part 15 of the FCC Rules.
These limits are designed to provide
reasonable protection against harmful
interference in a residential installation. This
equipment generates, uses, and can radiate
radio frequency energy and, if not installed
and used in accordance with the instructions,
any cause harmful interference to radio
communications. However, there is no
guarantee that interference will not occur in a
particular installation. If this equipment does
cause harmful interference to radio or
television reception, which can be
determined by turning the equipment off and
on, the user is encouraged to try to correct the
interference by one or more of the following
measures:
reorient the receiving antenna
increase the separation between the
equipment and the receiver
connect the equipment into an outlet on
a circuit different from that to which the
receiver is connected
consult the dealer or an experienced
radio/TV technician for help
The user may find the following booklet
prepared by the Federal Communications
Commission helpful: How to Identify and
Resolve Radio-TV Interference Problems.
This booklet is available from the US
Government Printing Office, Washington
DC, 20402. Stock No. 004-000-00345-4.
CAUTION
: Pursuant to Part 15.21 of the
FCC Rules, any changes or modifications to
this equipment not expressly approved by the
Hewlett-Packard Company, may cause
harmful interference and void the FCC
authorization to operate this equipment.
DOC Statement (Canada)
Le present appareil numerique n'emet pas de
bruitis radioelectriques depassant les limits
applicables aux appareils numeriques de la
class B prescrites dans le Reglement sur le
brouillage radioelectrique edicte par le
ministere des Communications du Canada.
This digital apparatus does not exceed the
Class B limits for radio noise emissions from
digital apparatus set out in the Radio
Interference Regulations of the Canadian
Department of Communications.
Geräuschemission
LpA < 70 dB
am Arbeitsplatz
im Normalbetrieb
nach DIN 45635 T. 19
VCCI-2
HP Color Copier User’s Guide 9-3
Page 68

Ordering Accessories and Supplies
In the U.S., you may order printer supplies by calling HP Direct, (800) 538-8787, to get the
name of your local authorized HP dealer. Outside the U.S. call your local authorized HP dealer.
Supplies/Accessories HP Reorder Number
Print cartridges
Black print cartridge 51645A
Tri-color print cartridge C1823A
Papers
HP Premium InkJet Paper, Letter
(200 sheets, 8.5 x 11 in.) 51634Y
HP Premium InkJet Paper, A4
(200 sheets, 210 x 297 mm) 51634Z
HP Premium Heavyweight InkJet Paper, Letter
(15 sheets, 8.5 x 11 in.) C1852A
HP Premium Heavyweight InkJet Paper, A4
(15 sheets, 210 x 297 mm) C1853A
HP Premium Photo Paper, Letter
(15 sheets, 8.5 by 11 in.) C6039A
HP Premium Photo Paper, A4
(15 sheets, 210 x 297 mm, Europe) C6040A
(15 sheets, 210 x 297 mm, Asia) C6043A
HP Premium Transparency Film, Letter
(50 sheets, 8.5 by 11 in.) C3834A
(20 sheets, 8.5 by 11 in.) C3828A
HP Premium Transparency Film, A4
(50 sheets, 210 by 297 mm) C3835A
(20 sheets, 210 by 297 mm) C3832A
HP Iron-On T-Shirt Transfers
(10 sheets, 8.5 x 11 in.) C6049A
Customer Replaceable Parts
Document Cover C5300-60015
Paper Tray C5364-60339
HP Color Copier User’s Guide C5370-90000
Copier Help Card C5370-90015
Right side panel of copier case C5300-40023
Print cartridge access cover C5300-40014
Power cord Call dealer for part number for your location.
9-4 Technical Information
Page 69

index
A
ADF - see automatic document feeder 5-10
4-4
2-10
4-4
5-7
3-11, 5-2
5-10
aligning print cartridges
alignment
3-5
3-11
2-11
2-10
horizontal
vertical
Auto Fit
does not work properly
automatic document feeder
how to clear a paper jam
image of rollers included on copy
loading originals
paper specifications
tips
B
background
color
3-8
Best quality
black
blank page
boldface, what it means in the user’s guide
3-4
and white copies
copy speed
print cartridge
resolution
5-5
9-2
9-1
2-7
3-3
1-2
C
cancelling copying 3-10
cartridges, print
1-2
3-5
3-3
2-10
2-6
9-4
7-2
7-1
3-10
7-1
3-8
5-7
aligning
inserting
ordering
caution, what this label means in the user’s guide
cleaning
cartidges
copier glass
exterior case
clear/stop button
Clone 100%
does not work properly
color
backgrounds
copies
copy speed
dots in background
enhance light colors
faded, distorted, or missing
how to change color intensity
intensity
print cartridge
resolution
text enhancement
CompuServe support
conventions used in guide
copies
black and white
color
3-3
faded, with dull colors
horizontal, white lines
how to make
how to make copies
making lighter or darker
miscellaneous problems
multiple
newspaper
no copies coming out
paper size
paper wet
placing originals in automatic document
placing originals manually
quality
quality problems
slow
5-8
5-8
speed
streaked, smeared, or lines
too vivid or bright
wrinkled, wet paper
copy quality
Best setting
changing setting
Fast setting
Normal setting
settings available
copying
canceling
CopySmart
Custom 100%
9-1
3-7
9-2
3-3, 3-4
5-11
3-9
5-8
feeder
5-7, 5-12
3-4
3-4
3-10
9-2
3-5
2-6, 2-7
6-2
3-3
3-1
3-2
5-6
3-4
3-4
5-12
3-7, 3-8
3-7
3-1
5-7
5-8
3-4
1-2
5-7
5-8
5-10
3-6
5-11
3-2
5-10
5-6
3-7
HP Color Copier User’s Guide I-1
Page 70

D
damage
2-3
parts
dark colors
darkness, copy
defaults
5-9
changing
3-10
factory
front panel
indicator
paper size
when reset
3-9
3-6
3-9
2-9
3-9
3-3
E
edges cut off 5-6
ELC (Enhance Light Colors)
changing the setting
enlarging
Entire 91%
environmental specifications
error messages
3-4
3-4
5-3
3-8
F
factory defaults 3-10
how to reset
faded copies
Fast quality
front panel
attaching overlay
language
5-6
3-4
3-10
2-9, 3-8
2-3
G
graphics copy speed 9-1
H
heavyweight inkjet paper 4-1
help
CompuServe support
6-1
6-1
6-1
HP FIRST
internet
horizontal alignment
HP
customer support
HP FIRST
on-line services
papers to use
4-1
2-10
6-1
6-2
6-2
9-2
I
inkjet paper 4-1
4-3
loading
inserting print cartridges
internet
6-1
iron-on transfers
4-3
loading
2-6
L
language
4-3
3-9
4-4
available on front panel
front panel
light copies
light, scanner
lighter/darker
lightness, copy
loading
originals in the document feeder
paper
paper in input tray
5-9
2-5
3-1
3-6
3-6
2-9, 3-8
M
minus/plus buttons 3-4
Mirror 100%
multiple copies
3-6
3-4
N
newspaper, copying 5-11
Normal 100%
Normal quality
note, what this label means in the user’s guide
3-4
3-4
O
on-line services 6-1
originals
3-2
3-2
placing on copier glass
placing when using automatic document
feeder
outlet
grounded
type to use
2-8
2-8
P
paper
bright white inkjet
4-1
1-2
I-2
Page 71

changing copy paper size 3-9
2-8
5-1
5-6
2-8
2-12
4-3
4-3
4-1
9-2
4-1
6-2
2-6
9-2
4-1
2-5
4-2
4-1
3-1
4-4
4-2
5-7
4-4
5-2
heavyweight inkjet
how to order from HP
HP papers to use
inkjet
4-1
iron-on t-shirt transfers
5-13
jams
loading
2-5
ordering
output tray capacity
photo
recommended types
settings to use
size
tips on loading
to use when copying
transparencies
type to use in copier input tray
types
website location for updates
paper jam
automatic document feeder
in input tray
paper type
changing
parts
included
missing
percentage, reducing and enlarging
photo paper
loading
physical specifications
placement wrong
Poster 400%
does not work properly
overlap
post-warranty support
power button
how to turn copier on
power cord
connecting
outlet to use
power specifications
print cartridges
aligning
inserting
inserting when using automatic document
printing
self test page
4-2
2-9, 3-9
3-6, 4-3
2-3
4-2
4-3
3-5
3-5
9-4
3-6
2-3
2-10
2-6
feeder
3-4
4-2
Q
quality, copy 5-6
quotation marks, what they mean in the user’s
1-2
guide
R
reduce/enlarge
3-4
3-5
3-4
3-6
3-5
3-5
3-4
3-6
3-4
3-5
9-3
Auto Fit
changing settings
Clone 100%
Custom 100%
Entire 91%
Mirror 100%
Normal 100%
overview
Poster 400%
reducing
regulatory information
S
scanner
3-1
light
unlocking
self test page
service, copier
setup
aligning print cartridges
choosing location for copier
front panel overlay
inserting print cartridges
lading paper
power cord
setting front panel language and default paper
summary
testing the copier
unlocking scanner
unpacking
shipping copier
size
copy paper
slow copying
smeared copies
smudges on copies
specifications
environmental
functional
physical
2-4
2-12, 7-2
8-4
2-5
2-8
size
2-1
2-2
8-5
3-9
5-8
5-10
9-1
9-2
2-9
5-8
9-2
2-12
2-4
2-3
2-10
2-6
2-1
HP Color Copier User’s Guide I-3
Page 72

power 9-2
9-1
speed
speed specifications
streaked copies
support
CompuServe
HP FIRST
internet
on-line services
6-1
5-10
6-1
6-2
9-1
6-1
T
text
splotchy
text enhancement
turning it off
tip, what this label means in the user’s guide
torn paper
transparencies
loading
tips on using
transparency film
loading
troubleshooting
5-13
5-11
4-4
4-3
5-1
3-7
4-1
3-8
4-4
U
unlocking scanner 2-4
unpacking HP Color Copier
2-2
1-2
V
vertical alignment 2-11
W
warning, what this label means in the user’s guide
1-2
warranty
website
wet paper
wrinkled paper
I-4
8-3
express service
preparing your copier for shipment
returning copier for service
upgrades
what to do before you call
current list of HP papers
updated product information
5-8
8-3
5-8
8-3
4-1
8-4
8-4
6-1
8-5
 Loading...