

Page 1

Chapter 3 -Taking Photos
This chapter describes the process of taking photos with your HP PhotoSmart C500 Digital Camera, including how
to take Still, Burst, and Timelapse photos, and detailed descriptions of adjusting the camera settings. If you want a
quick overview, see the Basics guide that you received with your camera.
There are three settings you can use to take photos: Still, Burst, and Timelapse.
Still Use this setting for taking a single color or black and white photo.
Burst Use this setting for taking up to 4 photos in rapid succession.
Timelapse Use this setting for taking several photos, with a set amount of time (1 minute to 24
hours) between photos.
Tip:
The Burst setting is ideal for taking action photos. Use the Timelapse setting for observing a subject over a
longer period of time.
Overview
Taking a Photo
The HP PhotoSmart C500 Digital Camera has a 2-step Shutter button. When you press the Shutter button 1/2 way
down, the camera adjusts the focus and exposure of the photo. After these settings are adjusted, a green light
appears to the left of the viewfinder, indicating that you can press the Shutter button all the way down to take the
photo. You may want to practice to get used to the timing, before taking important photos.
HP PhotoSmart C500 Digital Camera User’s Guide 30
Page 2
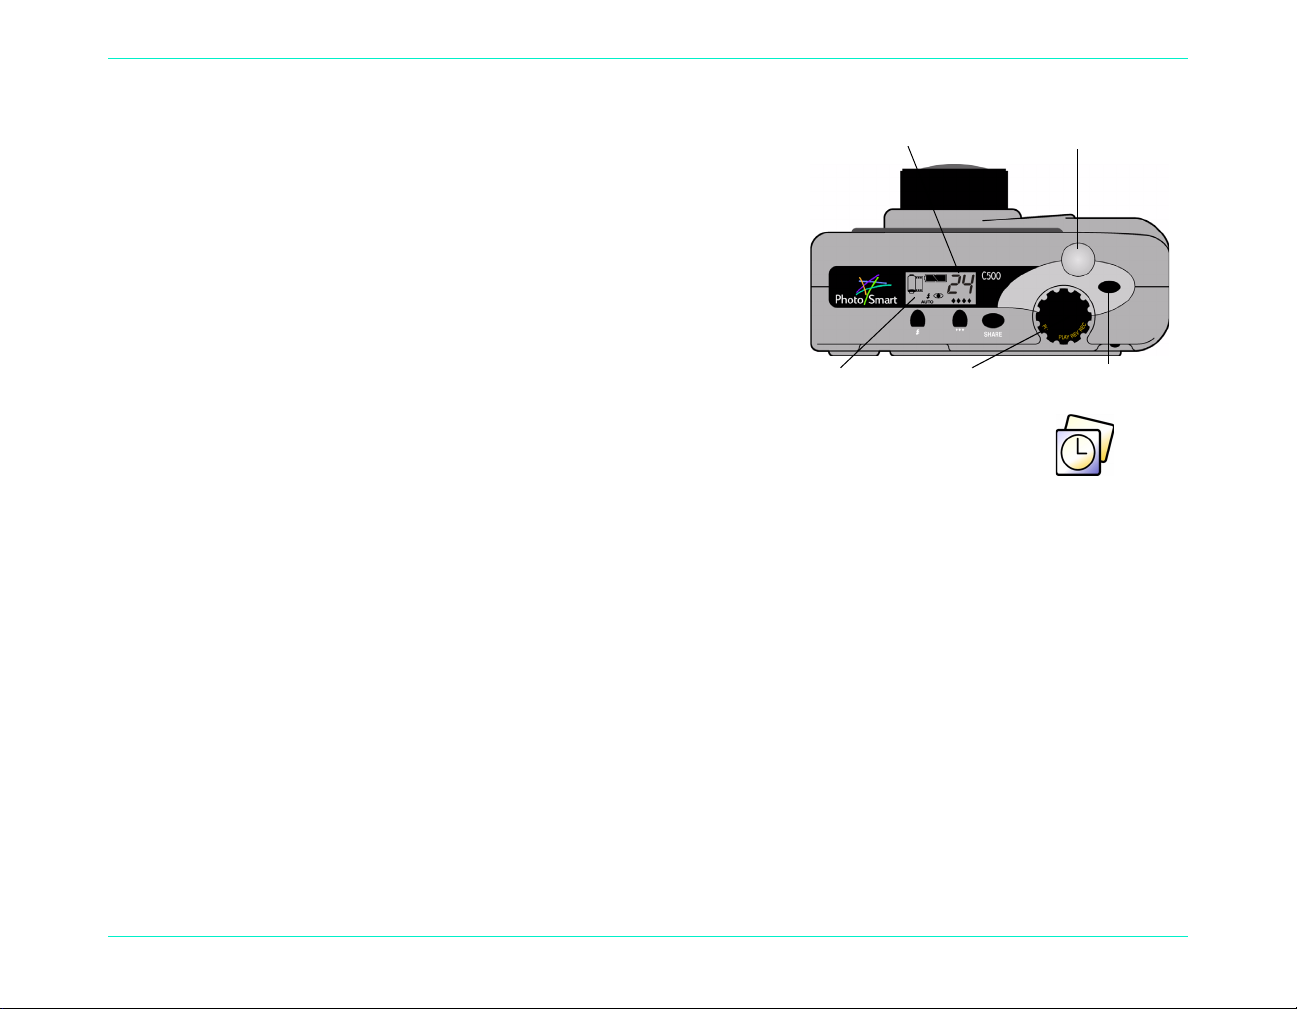
Overview
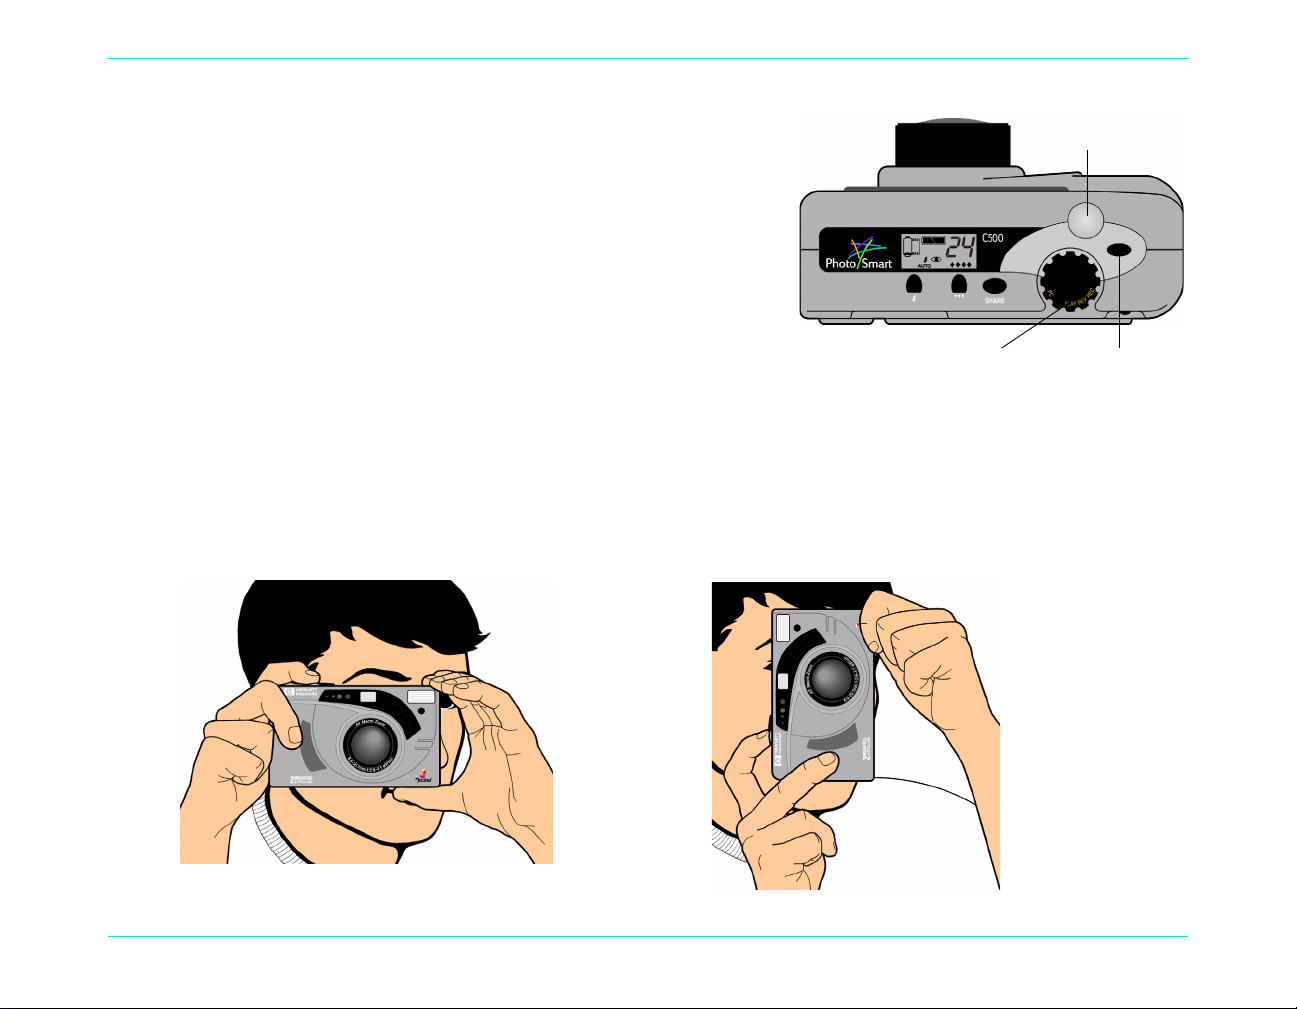
Camera mode dial On/off button
Shutter button
To take a photo:
1. Remove the lens cover.
2. Turn the camera on and turn the camera mode dial to Rec.
The camera is automatically ready to take a Still photo.
3. Frame your subject in the viewfinder.
4. Press and hold the Shutter button 1/2 way down to allow the
camera to adjust the focus and exposur e.
5. When you see the green light to the left of the viewfinder, press the Shutter button all the way down to take the
photo. Wait for the beeps, indicating your photo has been taken, then release the Shutter button.
Tip:
When you are taking a photo, be especially careful to keep your fingers away from the lens, flash, and
sensors on the front of the camera. The following illustrations give you examples of how to hold the camera.
HP PhotoSmart C500 Digital Camera User’s Guide 31
Page 3
Checking the Camera Status
Use the status LCD and the color LCD to check the status of the camera. Basic camera information such as battery
level, number of photos remaining, photo quality, flash status, and memory card status display on the status LCD.
The color LCD shows information such as the number of photos stored on the memory card, the current
compression level, resolution setting, and battery status.
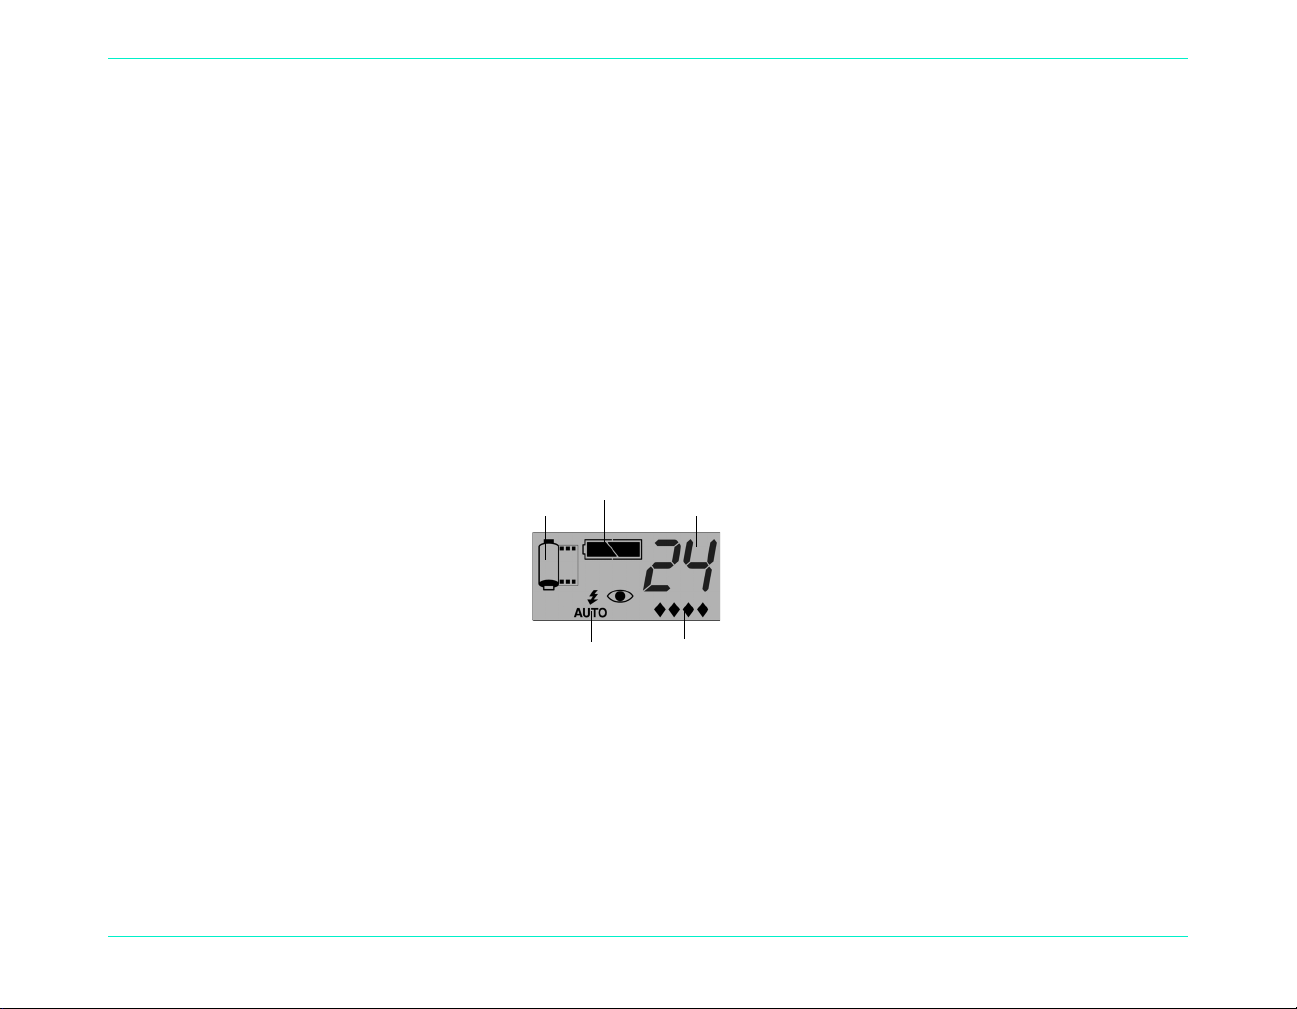
Using the Status LCD
Use the status LCD on the top of the camera to check the status of the memory card, the battery level, and the
number of photos ava ilabl e on th e m em ory card. The status L C D a ls o dis pla ys th e fla sh and photo quality settin gs,
and any camera error messages.
Overview
Memory
card status
Battery level
Flash
Photos
remaining
Photo quality
To view the camera status on the status LCD:
Press the on/off button to turn the camera on.
•
Individual icons are discussed throughout this guide or you can see a list of all the icons in Appendix B “Icons”
on page 129.
HP PhotoSmart C500 Digital Camera User’s Guide 32
Page 4
Overview
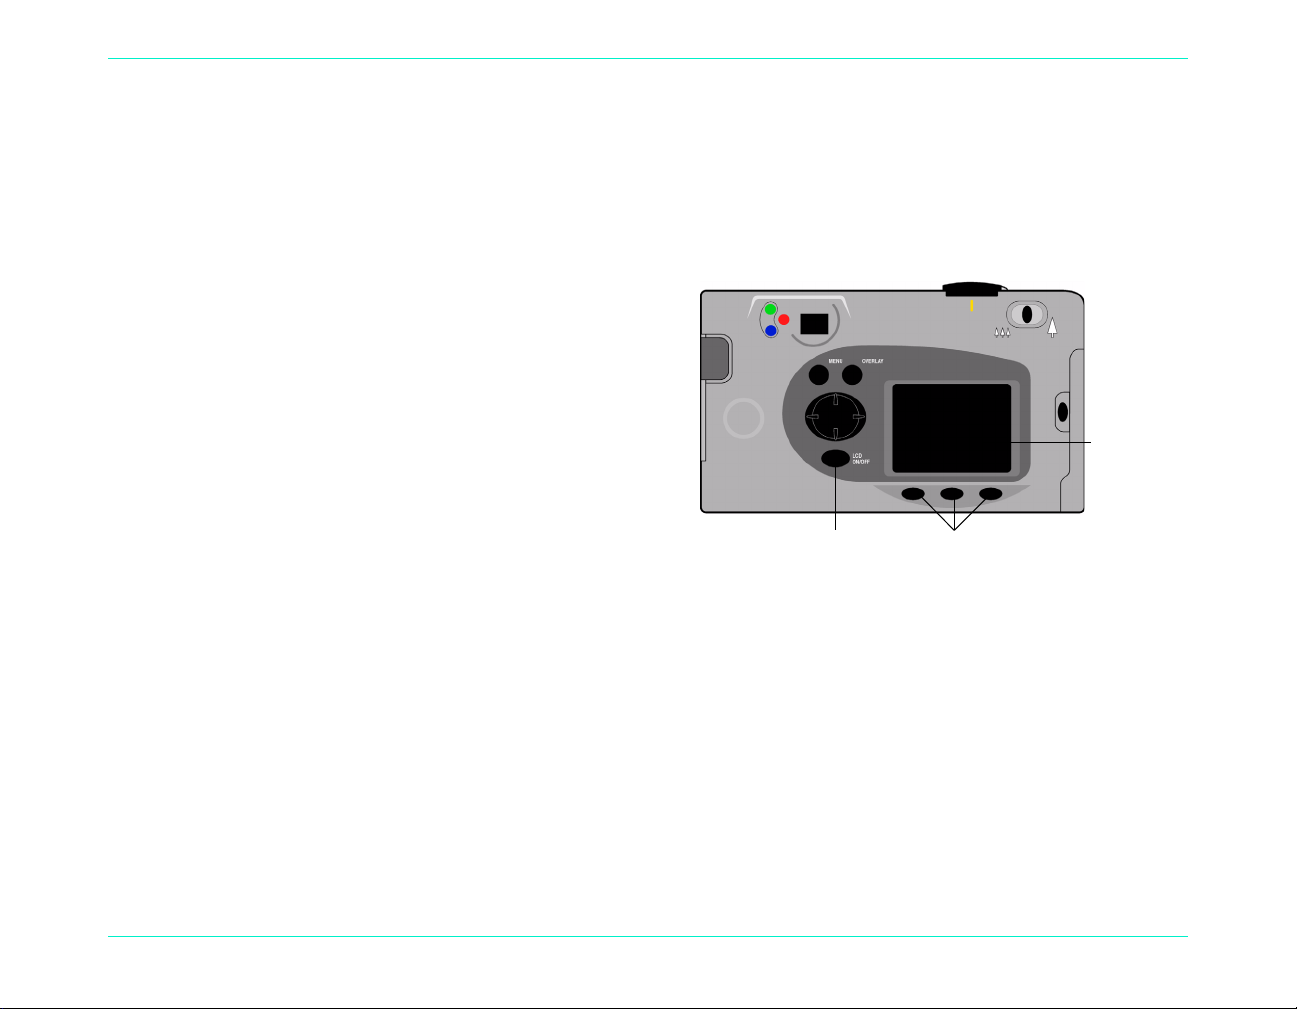
Using the Color LCD
Use the color LCD on the back of the camera to check current camera settings and status, including the number of
photos stored on the memory card , and the compression and resolution settings.
To view the camera status on the color LCD:
1. Turn the camera on and turn the camera mode dial to
Rec.
2. Press the color LCD on/off button to turn the color
LCD on.
3. Press the Status button (right soft key).
Color LCD
The color LCD displays the current camera settings
and status. To change the camera settings, use the
camera menus. See the following sections of this
Color LCD
on/off button
Soft keys
chapter for details. One or more icons may also
appear on the Status screen, depending on the
camera status.
HP PhotoSmart C500 Digital Camera User’s Guide 33
Page 5

Memory card inserted Battery status
Images taken The number of photos stored on the
memory card.
Compression The current compression level.
Resolution The current resolution setting.
White Bal The current white balance setting.
Digita The camera firmware version number.
Color LCD Status
4. When you have finished viewing the camera status, press the Exit button (right soft key).
Overview
HP PhotoSmart C500 Digital Camera User’s Guide 34
Page 6
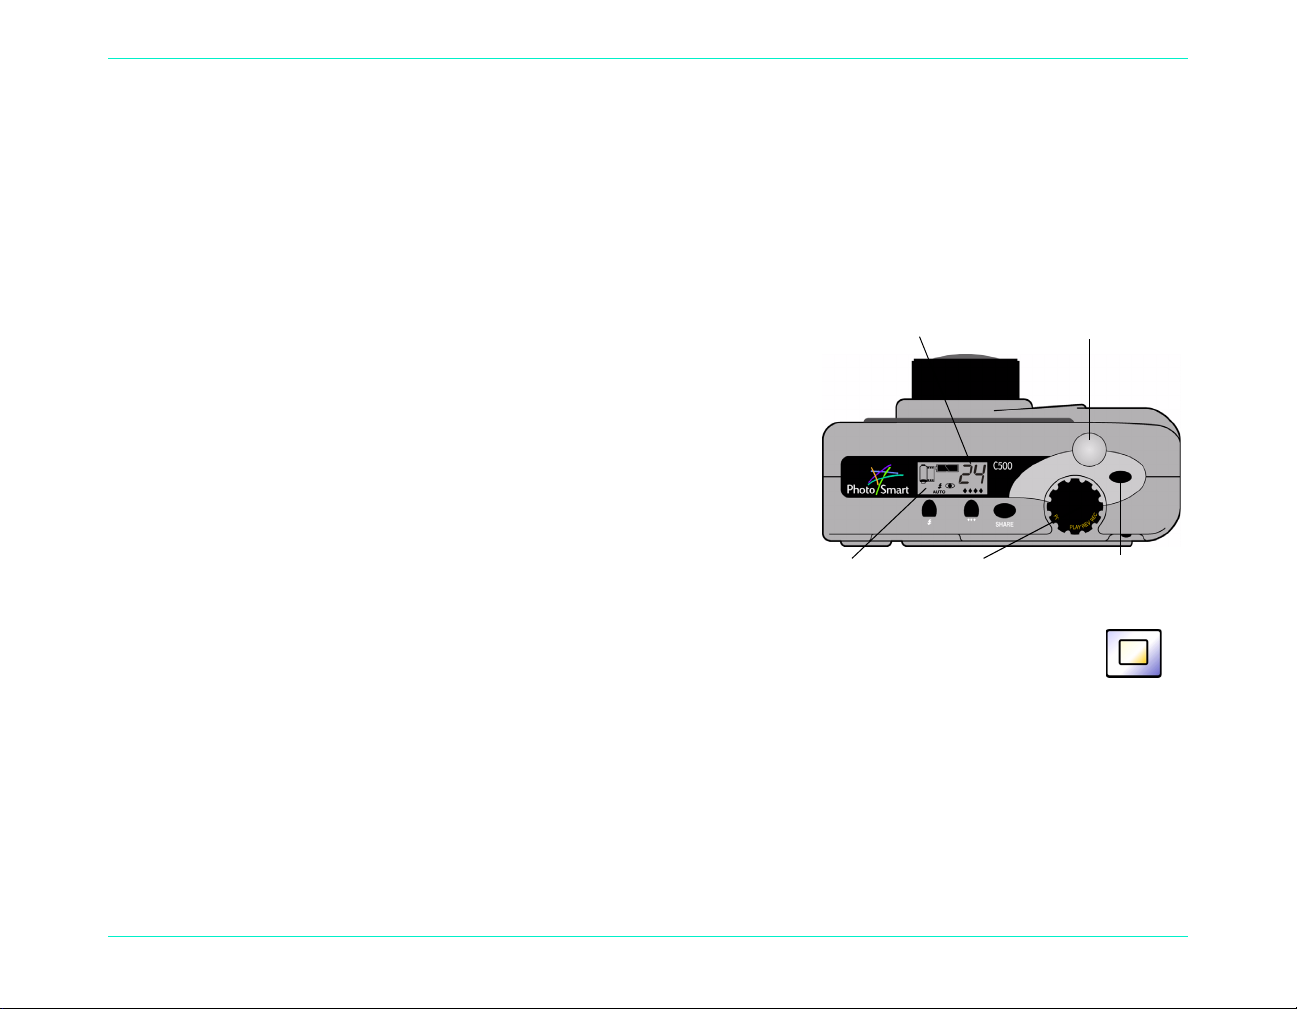
Taking Still, Burst and Timelapse Photos
Status LCD
Shutter button
On/off buttonCamera mode dial
Number of
photos available
Taking Still Photos
Use the Still setting to take one photo each time you press the Shutter button.
To take a Still photo:
1. Remove the lens cover.
2. Turn the camera on and turn the camera mode dial to Rec.
The status LCD displays the approximate number of photos
available on the memory card. The camera is not ready until
this number appears.
3. Adjust your camera settings as needed. See “Adjusting the
Camera Settings” on page 42 for details.
Taking Still, Burst and Timelapse Photos
4. Press the color LCD on/off button to turn the color LCD on, then press the left soft key until the
Still icon appears on the lower overlay bar.
HP PhotoSmart C500 Digital Camera User’s Guide 35
Tip:
5. Frame your subject in the viewfinder, then press and hold the Shutter button 1/2 way down to allow the camera
to adjust the focus and exposure. If you see an orange light to the left of the viewfinder, you may need to
change the flash setting to adjust for the lighting conditions.
To conserve battery power, turn the color LCD off after you choose the photo type.
Still icon
Page 7

6. When you see the green light to the left of the viewfinder, press the Shutter button all the way dow n to take the
Status LCD
Shutter button
On/off buttonCamera mode dial
Number of
photos available
photo. Wait for the beeps, indicating the photo has been taken, before releasing the Shutter button.
7. If Instant Review is on, your photo appears briefly on the color LCD. If you are happy with the photo, press the
Save button (right soft key) to save it on the memory card. If not, press the Delete button (center soft key) to
discard the photo and try again. If you do not press either button, the camera automatically saves the photo.
Taking Burst Photos
Use the Burst setting to take photos in rapid succession while holding the Shutter button down. You can take up to
four photos at a rate of one to three frames per second. The Burst setting is recommended for taking action photos.
The default Bur st rate is two fra mes per se cond. If you want to chan ge the Burst r ate, see below . Note that you cannot
use the flash for Burst photos; the flash button is inactive.
Taking Still, Burst and Timelapse Photos
Note:
Burst photos take longer to process than Still photos because the camera takes up to three frames per
second rather than a single photo.
To take Burst photos:
1. Turn the camera on and turn the camera mode dial to Rec.
The status LCD displays the approximate number of photos
available on the memory card. The camera is not ready until
this number appears.
2. Adjust your camera settings as needed. See “Adjusting the
Camera Settings” on page 42 for details.
3. Press the color LCD on/off button to turn the color LCD on.
HP PhotoSmart C500 Digital Camera User’s Guide 36
Page 8

Taking Still, Burst and Timelapse Photos
4. Press the left soft key until the Burst icon appears on the lower overlay bar.
Tip:
To conserve battery power, turn the color LCD off after you choose the photo type.
Burst icon
If there is not enough space on the memory card for the number of photos specified, the red
light to the left of t he viewf inder flashes and th e upp er overl ay bar d isplays “Not en ough me mory. ” To solve this
problem, insert a new memory card, or try a lower photo quality setting .
5. Frame your subject in the viewfinder, then press and hold the Shutter button 1/2 way down to allow the camera
to adjust the focus and exposure. If you see an orange light to the left of the viewfinder, there may not be
enough light on your subject. You can still take the photo.
6. W hen you see a green light to the left of the viewfind er, press the Shutter button a ll the wa y down an d hold it fo r
the amount of time you want to take photos, or until the camera beeps.
Tip:
If you are taking an action sequence, you can move the camera to follow your subject as you hold the
Shutter button down.
7. If Instant Review is on, your first photo appears briefly on the color LCD. If you are happy with the photo, press
the Save button (right soft key) to save the series of ph o tos on the memor y car d. If no t, p ress the Delete button
(center soft k ey) to discard the phot os and try ag ain. Pressi ng Delete discards the enti re series of photos, not j ust
the first photo. If you do not press either button, the camera automatically saves the photo.
HP PhotoSmart C500 Digital Camera User’s Guide 37
Page 9

To change the Burst rate:
1. Turn the camera on and turn the camera mode dial to Rec.
2. Press the Menu button.
The color LCD displays the Me dia Se ttings menu.
3. Use the 4-way arrow button to scroll to Burst.
4. Press the Edit button (left soft key), and then scroll down to Burst Rate.
5. Use the 4-way arrow button to choose the desired setting, from 1 to 3
frames per second.
6. Press the Exit button (right soft key) twice to save your settings and exit the menus.
Taking Timelapse Photos
Use the Timelapse setting to take a series of photos at preset time intervals. You can specify the number of photos
you want the camera to take, as well as the amount of time between photos. It is recommended that you attach the
camera to a tripod, or place it on a firm surface at an appropriate dis tance and height from the subject, to keep the
camera steady.
Taking Still, Burst and Timelapse Photos
It is recommended that you use an AC power adapter for long Timelapse photo sequences. See “Using an AC Power
Adapter (recommended)” on page 29 for more information.
Tip:
HP PhotoSmart C500 Digital Camera User’s Guide 3 8
By default the camera takes 10 photos with 1 minute intervals between photos. If you want to change the
Timelapse settings, see below.
Page 10
Taking Still, Burst and Timelapse Photos
Status LCD
Shutter button
On/off buttonCamera mode dial
Number of
photos available
To take Time lapse photos:
1. Turn the camera on and turn the camera mode dial to Rec.
The status LCD displays the approximate number of photos
available on the memory card. The camera is not ready until
this number appears.
2. Adjust your camera settings as needed. See “Adjusting the
Camera Settings” on page 42 for details.
3. Press the color LCD on/off button to turn the colo r LCD on.
4. Press the left soft key until the Timelapse icon appears on the lower overlay bar.
Tip:
To conserve batter y pow er, tu r n the col or LCD off after you c hoose the photo type.
Timelapse
icon
If there is not enough space on the memory card for the number of photos specified, the
red light to the left of the view finder flashes a nd the upper overla y bar disp lays “No t enough mem ory.” To solve
this problem, insert a new memory card, try a lower photo quality setting or decrease the number of photos
specified in the Timelapse settings.
5. Frame your subject in the viewfinder, then press and hold the Shutter button 1/2 way down to allow the camera
to adjust the focus and exposure. If you see an orange light to the left of the viewfinder, there may not be
enough light on your subject. You can still take the photo.
HP PhotoSmart C500 Digital Camera User’s Guide 39
Page 11

Taking Still, Burst and Timelapse Photos
6. When you see a green light to the left of the viewfinder, press the Shutter button all the way down to take the
first photo. Wait for the beeps, indicating the photo has been taken, before releasing the Shutter button.
The camera automatically takes the number of photos at the time interval specified in the Timelapse settings.
Tip:
7. If Instant Review is on and you are using an AC power adapter, your firs t photo appears on th e color LCD; an
indicator on the upper overlay bar shows the number of photos that have been taken and a timer counts down
the time until the next photo is taken.
If Instant Revi ew is on and you are using batteries, your first photo appears briefly on the color LCD. The color
LCD turns itself off after 30 seconds.
Once the series of photos has been taken and the first photo appears on the color LCD, press the Save button
(right soft key) to save the series of photos on the memory card, or press the Delete button (center soft key) to
discard the photos and try again. Pressing Delete discards the entire series of photos, not just the first one. If
you do not press either button, the camera automatically saves the photos.
To change the Timelapse settings:
1. Turn the camera on and turn the camera mode dial to Rec.
2. Press the Menu button.
The color LCD displays the Me dia Se ttings menu.
3. Use the 4-way arrow button to scroll down to Timelapse.
If you want to stop taking photos before the camera reaches the number of photos specified in the
Timelapse settings, press the Stop button (right soft key).
4. Press the Edit button (left soft key).
HP PhotoSmart C500 Digital Camera User’s Guide 40
Page 12

Taking Still, Burst and Timelapse Photos
5. Use the 4-way arrow button to select a setting to change.
Setting Description Default
Interval This is the amount of time you want the camera to wait before
taking the next photo. Select from 1 minute to 24 hours.
# Images This is the number of photos you want the camera to take.
Select from 2 to 1000 photos.
6. Use the 4-way arrow button to select the desired setting.
7. Press the Exit button (right soft key) twice to save your settings and exit the menus.
1 min
10
HP PhotoSmart C500 Digital Camera User’s Guide 41
Page 13

Adjusting the Camera Settings
Taking Black and White Photos
You can take either color or black and white photos using the Still, Burst, or Timelapse settings. The default is color.
This setting remain s until you change it, even if you turn the camera off.
To change to color or black and white photos:
1. Turn the camera on and turn the camera mode dial to Rec.
2. Press the Menu button.
3. Select the photo type.
4. Press the Edit button (left soft key), then scroll down to Color.
5. Use the 4-way arrow button to choose B&W (black and white) or Full
color.
Adjusting the Camera Settings
6. Press the Exit button (right soft key) twice to save the settings and exit the menus.
HP PhotoSmart C500 Digital Camera User’s Guide 42
Page 14

Changing the Flash Setting
Flash button
To change the flash setting:
1. Turn the camera on and turn the camera mode dial to Rec.
2. Press the Flash button repeatedly until th e f la sh setting you want
displays on the status LCD. The flash setting is effective for Still
and Timelapse photos, and remains unt i l you change it, even if
you turn the camera off.
Adjusting the Camera Settings
Note:
The flash settings are indicated by icons on the status LCD:
Note:
HP PhotoSmart C500 Digital Camera User’s Guide 43
You cannot use the flash for Burst photos; the flash button is inactive.
Auto The camera determines the need for a flash based on lighting
conditions. This is the default setting.
On The flash will be used, regardless of the lighting conditions.
Off The flash will not be used, regardless of the lighting conditions.
Auto with red-eye
reduction
The flash needs to recharge between photos. When the red light next to the viewfinder is off, you can
take another flash photo.
The flash will be used if needed. Red-eye reducti on minimiz es the
occurrence of red-eye in photos of people or animal s by flashing
twice.
Page 15

Adjusting the Camera Settings
You can also change the flash settings using the camera menus.
To select a flash setting using the camera menus:
1. Turn the camera on and turn the camera mode dial to Rec.
2. Press the Menu button.
3. Use the 4-way arrow button to scro ll to the Preferences menu, then scroll
down to Capture.
4. Press the Edit button (left soft key).
5. Scroll to Flash.
6. U se t h e 4-w ay arrow button to select a fl a sh set tin g. See th e ta ble ab ov e for in for ma ti on abou t eac h of t he fla sh
settings.
Note:
7. Press the Exit button (right soft key) twice to save the settings and exit the menus.
Tip:
HP PhotoSmart C500 Digital Camera User’s Guide 44
You cannot use the flash for Burst photos. If you choose a flash setting from the menu but you are
taking Burst photos, the setting will not be effective until you take your next Still or Timelapse photo.
To conserve battery power, turn the color LCD off after you choose the setting.
Page 16

Adjusting the Photo Quality
The photo quality setting determines the photo’s resolution and compression. Because of this, it also affects how
many photos can be stored on the memory card. The photo quality setting remains the same for each photo of the
same type (Still, Burst, and Timelapse) until you change it, even if you turn the camera off and on again.
When selecting the photo quality, keep in mind:
How you plan to use the photo (on screen, printed, enlarged, etc.).
•
Higher photo quality requires more space on the memory card; lower photo quality requires less space.
•
Because photo quality affects the number of photos that can be stored on the memory card, the number of
•
available photos (di splayed on th e status LCD) changes a s you change t he photo qual ity. The num ber of phot os
is a conservative estimate, so you might find that you can take more photos than it indicates.
You can use different phot o qual it y set tin gs for di fferent photos on the same memory card.
•
You can choose different photo quality settings for Still, Burst and Timelapse photos.
•
Adjusting the Camera Settings
The camera processes photos with Fine or Super-fine diamond photo quality faster than those with lower photo
•
quality. If you want to take several photos, one after the other, in a short period of time, use the Fine or Superfine photo quality setting.
HP PhotoSmart C500 Digital Camera User’s Guide 45
Page 17

Adjusting the Camera Settings
To adjust the photo quality:
1. Turn the camera on and turn the camera mode dial to Rec.
2. Press the Photo Quality button repeatedly until the desired photo quality setting displays on the status LCD.
Photo quality icon Photo quality button
HP PhotoSmart C500 Digital Camera User’s Guide 46
Page 18

Adjusting the Camera Settings
Each of the photo quality settings corresponds to a combination of resolution and compression settings. The
diamond icons on the status LCD indicate photo quality as follows:
Photo quality Description Resolution Compression
E-mail Is the most memory-efficient. Use this
setting for photos that you plan to send
via e-mail, place on the Internet, use for
screen savers or wallpaper, or print up to
3x5 inch prints.
Basic Produces quality photos and uses less
memory than Fine m ode . U se this setting
for photos that you plan to store on your
disk or in a database, or print up to 4x6
inch prints.
Fine Produces high-quality photos and
requires less memory than Super-fine
mode. Use this setting for photos that
you plan to print up to 5x7 inch prints.
This is the default setting.
Super-fine Produces the highest-quality photos and
uses the most memory. Use this setting
for taking photos you plan to enlarge
and print.
Low
(640x480 pixels)
Medium
(1152x864 pixels)
High
(1600x1200 pixels)
High
(1600x1200 pixels)
High
Medium
Medium
Low
HP PhotoSmart C500 Digital Camera User’s Guide 47
Page 19

Adjusting the Camera Settings
Y ou ca n also a djust the p hoto qual ity by adj usting the individual resolut ion and com pressio n settings for each of th e
three types of photos: Still, Burst and Timelapse.
To adjust the photo quali t y using the menus:
1. Turn the camera on and turn the camera mode dial to Rec.
2. Press the Menu button.
3. Select the photo type.
4. Press the Edit button (left soft key).
5. Use the 4-way arrow button to select a resolution or compression
setting to change.
Setting Description Default
Resolution This is the number of pixels in each photo. More pixels results in
higher photo quality. Choose from High, Medium, or Low. Select a
higher resolution for photos that you want to enlarge. Select a lower
resolution for photos that you want to email (so that the photo file
size is small).
Compression This is the amount each photo is compressed. The compression level
is a trade-off between photo quality and storage space: the lower the
compression level, the higher the photo quality but the larger the
photo file size. Choose from High, Medium, or Low. Select a lower
compression level for better quality photos. Select a higher
compression level to save space on the memory card.
HP PhotoSmart C500 Digital Camera User’s Guide 48
High
Medium
Page 20

Adjusting the Camera Settings
6. Use the 4-way arrow button to select the desired setting.
As you decide which settings to use, remember that there is a trade-off between resolution and compression.
Higher resolution photos provide better quality, but if you use high resolution and high compression, some of
the photo’s detail will be lost.
Some combinations of settings correspond to the camera’s standard settings indicated by the photo quality
diamonds on the status LCD. If you choose to use combinations of settings that do not correspond to the
camera’s standard photo quality settings, you will see no photo quality diamonds on the status LCD. This just
means that you are using a custom photo quality setting.
Tip:
7. Press the Exit button (right soft key) twice to save your settings and exit the menus.
HP PhotoSmart C500 Digital Camera User’s Guide 49
If you aren’t sure which settings to s el ec t, press the Default button (left soft key).
Page 21

Using the Zoom
The HP PhotoSmart C500 Di gital Came ra ha s opt ical z oom a nd di gital z oom. Op tic al zoom uses the len s to focus i n
on a distant object. Use it to increase the size of a subject that is distant from you. Digital zoom selects pixels from
the center of the photo and enlarges the image further. Use digital zoom once you have reached the maximum
optical zoom, to increase the size of your subject even fu rther.
Zoom type When to use it Example
Adjusting the Camera Settings
Optical (3x) Use this setting when your su b je ct is di sta nt
from you and you want to increase or
decrease its size in the photo.
Digital (2x) Use this setting when your subject is distant
from you and you want to increase its size
more than you can with the optical zoom.
If you use the digital zoom, your photos will have lower resolution than they usually would for a particular photo
quality setti ng. It is recommended that you print these photos in smaller sizes.
Photo quality Standard resolution Resolution with digital zoom
640x480 pixels 640x480 pixels
1152x864 pixels 800x600 pixels
1600x1200 pixels 800x600 pixels
1600x1200 pixels 800x600 pixels
You are taking a photo of a scene and you
want to zoom in on a tree.
You are taking a photo of a scene and you
want to increase the si z e of a bird in the tree.
HP PhotoSmart C500 Digital Camera User’s Guide 50
Page 22

To use optical zoom:
Zoom control
1. Turn the camera on and turn the camera mode dial to Rec.
2. As you frame your subject in the viewfinder, move the Zoom control
to the right to zoom in on your subject, or to the left to zoom out.
3. Take your photo.
To use digital zoom:
1. Turn the camera on and turn the camera mode dial to Rec.
2. Press the color LCD on/off button to turn the color LCD on.
Adjusting the Camera Settings
Note:
The color LCD must be on for digital zoom.
3. If you do not see the overlay bars on the color LCD, press the Overlay button to turn the overlay bars on.
4. Z oom all the way in on your su bject usin g the Zoom control. Release the Zoom control and
then press it to the right again.
The digital zoom icon displays in the top overlay bar.
5. Frame your subject on the color LCD rather than through the viewfinder. Use the Zoom
Digital zoom
icon
control to make further adjustments.
6. Take your photo.
7. Press the color LCD on/off button to turn the color LCD and digital zoom off.
HP PhotoSmart C500 Digital Camera User’s Guide 51
Page 23

Using Macro Mode
Use macro mode to ta k e close-up photos o f small ob jects. F or exa mple, use macro mod e to tak e a cl ose-up photo of
a flower.
To turn on macro mode:
1. Turn the camera on and turn the camera mode dial to Rec.
2. Press the color LCD on/off button to turn the color LCD on.
Adjusting the Camera Settings
Note:
The color LCD must be on for macro mode.
3. If you do not see the overlay bars on the color LCD, press the Overlay button to turn the overlay bars on.
4. Press the center soft key until the macro mode icon appears in color at the center of the lower
overlay bar.
Note:
The center soft key toggles between the self-timer and macro mode so that you can
Macro mode
icon
take photos using just one of the modes, or both at the same time. The icons appear in
color if they are on. Keep pressing the button until you have selected the combination
of self-timer and macro mode that you want; one on, both on, or both off.
5. View your subject through the viewfinder, and then frame your photo on the color LCD.
Self-timer
icon
6. Take your photo.
7. Press the center soft key twice to turn macro mode off. The macro mode icon appears in black and white,
indicating that macro mode is off.
HP PhotoSmart C500 Digital Camera User’s Guide 52
Page 24

Using the Self-Timer
Tripod mount
Still icon
Use the self-timer to t ak e a phot o of yoursel f or a pos ed group ph oto. Ten seconds (:10) is the default amount of ti me
the camera waits before taking the photo. You can change this delay time to 3, 5, 10, 20, or 30 seco nds.
Adjusting the Camera Settings
Note:
To use the self-timer:
1. Attach the camera to a tripod, or place it on a firm surface at an
2. Turn the camera on and turn the camera mode dial to Rec.
3. Press the color LCD on/off button to tu rn the color LCD on.
4. Select the Still option:
The self-timer is only available for Still photos.
appropriate distance and height from the subject.
Press the left soft key repeatedly until the Still icon displays
•
on the lower overlay bar.
HP PhotoSmart C500 Digital Camera User’s Guide 53
Page 25

5. Press the center soft key until you see :10 (or the number
Self-timer
activated
Self-timer icon Macro mode icon
Self-timer indica to r light
of seconds you have set) appear on the upper overlay
bar, and the self-timer icon appear in color on the lower
overlay bar.
Adjusting the Camera Settings
6. F rame your subject in the viewfinde r, then pres s and hold the Shutter
7. When you see a green light to the left of the viewfinder, press the
Note:
The center soft key toggles between the selftimer and macro modes so that you can take
photos using just one of the modes, or both at
the same time. The icons appear in color if they
are on. Keep pressing the button unti l you have
selected the combination of self-timer and
macro mode that you want; one on, both on, or
both off.
button 1/2 way down to allow the camera to adjust the focus and
exposure.
Shutter button all the way down, then release it.
The red self-timer indicator light on the front of the camera starts
blinking. The light blinks faster for the final 3 seconds, then stops
blinking just before the camera takes the photo.
HP PhotoSmart C500 Digital Camera User’s Guide 54
Page 26

Adjusting the Camera Settings
To change the self-timer delay:
1. Turn the camera on and turn the camera mode dial to Rec.
2. Press the color LCD on/off button to turn the color LCD on.
3. Press the Menu button.
4. Use the 4-way arrow button to scroll to the Preferences menu, then
scroll down to Capture.
5. Press the Edit button (left soft key).
6. Scroll to Self-Timer.
7. Use the 4-way arrow button to decrease or increase the number of seconds the camera waits before taking the
photo. You can select 3, 5, 10, 20, or 30 seconds.
8. Press the Exit button (right soft key) twice to save the settings and exit the menus.
HP PhotoSmart C500 Digital Camera User’s Guide 55
Page 27

Setting the Exposure
The HP PhotoSmart C500 Digital Camera automatically adjusts the amount of light in your photo for different
lighting conditions. It includes two automatic methods (Matrix and Spot) whic h calculate the exposure setting
differently. To make the final photo lighter or darker than the automatic exposure would produce, you can also
manually adjust the exposure. Exposure can be adjusted as much as +/-1.5 EVs (Exposure Values) in 0.3 EV
increments.
To change the exposure setting:
1. Turn the camera on and turn the camera mode dial to Rec.
2. Press the Menu button.
3. Use the 4-way arrow button to scroll to the Photo Assist menu.
The Photo Assist menu displays with Exposure selected.
4. Press the Edit button (left soft key).
Adjusting the Camera Settings
5. Use the 4-way arrow button to select an exposure option.
HP PhotoSmart C500 Digital Camera User’s Guide 56
Page 28

Adjusting the Camera Settings
Option Description Default
EV Select EV (Exposure Value) to manually adjust the exposure
from -1.5 EV to +1.5 EV, in 0.3 EV increments, + values for lighter
photos, - values for darker photo s.
AE Method Select AE (Automatic Exposure) Method to have the camera
automatically adjust the exposure for differe nt lighting
conditions. There are two AE methods, Matrix and Spot. Matrix
calculates the exposure by taking the average of several points
of light in the photo. Spot calculates the exposure by reading
the light from one small spot in the center of the photo.
6. Use the 4-way arrow button to choose a setting.
Tip:
7. Press the Exit button (right soft key) twice to save the settings and exit the menus.
If you use the AE method, yo u can also adjust whether the camera continuously calculates the exposure
(Continuous AE), or calculates the exposure when you press the Shutter button 1/2 way down and then locks the
exposure (Auto Exposure Lock). If you are taking a photo of a scene that has darker and lighter sections, (for
example, a subject standing in a shadow) Auto Exposure Lock can help you to expose the photo correctly. For
example, you can aim the camera at a darker part of the scene, press the Shutter button 1/2 way down, and then
move the camera to include a brighter part of the scene.
If you aren’t sure which settings to s el ec t, press the Default button (left soft key).
0
Matrix
HP PhotoSmart C500 Digital Camera User’s Guide 57
Page 29

Adjusting the Camera Settings
To adjust the AE method’s meter setting:
1. Turn the camera on and turn the camera mode dial to Rec.
2. Press the Menu button.
3. Use the 4-way arrow button to scroll to the Preferences menu, then scroll down to Meter.
4. Press the Edit button (left soft key).
5. Use the 4-way arrow button to select an exposure option.
Continuous AE calculates the automatic exposure continuously
•
when you press the Shutter button.
Auto Exposure Lock calculates the automatic exposure when you
•
press the Shutter button 1/2 way down, and then locks the exposure
at that setting.
6. Press the Select button (left soft key) to choose an option.
7. Press the Exit button (right soft key) twice to save the settings and exit the menus.
Setting the White Balance
For the trues t colo r r eprod uction in you r phot os, the HP P hotoS mart C 500 D igital Camera au tomati cally a djus ts th e
balance of colors to make a true white in different lighting conditions. You can manually adjust this setting to have
the camera compensate for specific lighting conditions. The white balance setting remains the same until you
change it, even if you turn the camera off.
HP PhotoSmart C500 Digital Camera User’s Guide 58
Page 30

Adjusting the Camera Settings
To manually adjust the white balance setting:
1. Turn the camera on and turn the camera mode dial to Rec.
2. Press the Menu button.
3. Use the 4-way arrow button to scroll to the Photo Assist menu, then
scroll down to White Balance.
4. Press the Edit button (left soft key).
5. Use the 4-way arrow button to select a white balance option.
Setting Select this option when
Auto You want the camera to automatically sense the lighting conditions and
adjust the white balance appropriately for optimum color reproduction in
your photo. Auto is the default.
Daylight You are taking a photo in daylight without artificial lighting.
Fluorescent You are taking a photo under flu o resc en t ligh t .
Tungsten You are taking a photo under normal incandescent light, such as the light
from tungsten filament light bulbs in household lamps.
Flash You are using the flash to illuminate the subject.
6. Press the Select button (left soft key).
7. Press the Exit button (right soft key) twice to save the settings and exit the menus.
HP PhotoSmart C500 Digital Camera User’s Guide 59
Page 31

Using Instant Review
After you take a photo, Instant Review briefly displays the photo on the color LCD, even if you have not turned the
color LCD on. If you are happy with the photo, you can then save it on the me mory card. If not, you can discard the
photo and try again. If you do not use Instant Review, the camera automatically saves the photo. Instant Review
defaults to off, so if you want to use this feature, you need to turn it on first.
Adjusting the Camera Settings
Tip:
To turn Instant Review on or off:
1. Turn the camera on and turn the camera mode dial to Rec.
2. Press the Menu button.
3. Use the 4-way arrow button to scroll to the Preferences menu, then
4. Press the Edit button (left soft key).
5. Scroll to Instant Review.
6. Use the 4-way arrow button to turn Instant Review on or off.
7. Press the Exit button (right soft key) twice to save the settings and exit the menus.
If you want to take several photos in quick succession, turn Instant Review off. With Instant Review on, the
camera takes longer to process each photo.
scroll down to Capture.
HP PhotoSmart C500 Digital Camera User’s Guide 60
Page 32

To use Instant Review:
1. Take your photo .
After a few seconds, your photo appears briefly on the color LCD.
Adjusting the Camera Settings
Note:
2. Press the Save button (right soft key) to save your photo, or press the Delete button (center soft key) to discard
the photo.
Note:
3. If you chose to delete the photo, press the Delete button (left soft key) to confirm the deletion. If you do not
confirm that you wa nt to delet e the photo b efore the photo disa ppears f rom the colo r L CD, th e camera sa ves the
photo.
If your photo does not appear on the color LCD, you need to turn Instant Review on.
The camera automatically saves the photo if you do not specify that you want to save or delete it. You
can clear the color LCD and save the photo by pressing the Shutter button 1/2 way down.
HP PhotoSmart C500 Digital Camera User’s Guide 61
Page 33

Setting the Eye Start
Eye Start brings the camera out of sleep mode and starts adjusting the exposure when your eye is close to the
viewfinder. Eye Start works by using sensors located next to the viewfinder. It is on by default.
Adjusting the Camera Settings
To turn Eye Start on or off:
1. Turn the camera on and turn the camera mode
dial to Rec.
2. Press the Menu button.
3. Use the 4-way arrow button to scroll to the
Preferences menu, then scroll down to Capture.
4. Press the Edit button (left soft key).
5. Use the 4-way arrow button to turn Eye Start on or off.
6. Press the Exit button (right soft key) twice to save the settings and exit
the menus.
Setting Hand Held
The camera ha s a H and Held setti ng whic h h elps yo u to take photos that are
clear and sharp. If the Ha nd Held setti ng is on, the camera allows you to take photos with a sl owe st sh u tte r sp eed of
1/8 second. By default, Hand Held is on. If you turn the Hand Held setting off, the camera allows you take photos
with a shutter speed as slow as 2 seconds. It is recommended that you use the camera with a tripod, or place the
camera on a firm, stable surface if you need to use a slow shutter speed.
Eye Start sensors
HP PhotoSmart C500 Digital Camera User’s Guide 62
Page 34

To turn Hand Held on or off:
1. Turn the camera on and turn the camera mode dial to Rec.
2. Press the Menu button.
3. Use the 4-way arrow button to scroll to the Preferences menu, then scroll down to Capture.
4. Press the Edit button (left soft key).
5. Scroll down to Hand Held.
6. Use the 4-way arrow button to turn Hand Held on or off.
7. Press the Exit button (right soft key) twice to save the settings and exit the menus.
Setting the Counter Reset
Counter Reset allows you to choose how you want to number your photos on the memory card. If you want to start
numbering photos from 1 each time you delete all the photos from the memory card, turn Counter Reset on. If you
want to continue numbering photos, even after erasing all the photos from the memory card, so that you know the
total number of photos you have taken since you bought the camera, turn Counter Reset off. It is off by default.
Adjusting the Camera Settings
To set Counter Reset:
1. Turn the camera on and turn the camera mode dial to Rec.
2. Press the Menu button.
3. Use the 4-way arrow button to scroll to the Preferences menu, then scroll down to Capture.
HP PhotoSmart C500 Digital Camera User’s Guide 63
Page 35

4. Press the Edit button (left soft key).
5. Scroll down to Counter Reset.
6. Use the 4-way arrow button to turn Counter Reset on or off.
7. Press the Exit button (right soft key) twice to save the settings and exit the menus.
Setting Auto Shutoff
Your HP PhotoSmart C500 Digital Camera has an automatic shutoff, which is designed to help conserve battery life
during periods of inactivity. Auto Shutoff is on by default. It is recommended that you turn Auto Shutoff off when
you are downloading photos to your com put er.
Auto Shutoff turns off camera functions after the following periods of inactivity:
Power source Camera mode Sleep Power off
Battery power Rec, Rev, Play 30 seconds 10 minutes
Adjusting the Camera Settings
PC 4 minutes 10 minutes
AC power adapter Rec, Rev, Play, PC 30 minutes
If the camera is in sleep mode, press any button to “wake up” the camera.
•
If the camera has turned itself off, press the on/off button to turn it back on.
•
HP PhotoSmart C500 Digital Camera User’s Guide 64
Page 36

To turn Auto Shutoff on or off:
1. Turn the camera on and turn the camera mode dial to Rec.
2. Press the Menu button.
3. Use the 4-way arrow button to scroll to the Preferences menu, then
scroll down to General.
4. Press the Edit button (left soft key).
5. Scroll down to Auto Shutoff.
6. Use the 4-way arrow button to turn Auto Shutoff on or off.
7. Press the Exit button (right soft key) to save the settings and exit the menus.
Setting the Beep
The camera uses a beep to communicate that an event has taken place. For example, when you take a photo, the
camera beeps to let you know that it has finished capturing the image. Beep is on by default.
Adjusting the Camera Settings
The camera beeps:
Twice after a photo has been taken.
•
Once at the beginning of a Burst series, and then twice at the end of the series.
•
For 3 seconds when the batteries are low.
•
HP PhotoSmart C500 Digital Camera User’s Guide 65
Page 37

When you turn the camera on, if the memory card is damaged or unformatted.
•
When you press the Shutter button, if the memory card is full.
•
If the camera is on and you insert a full memory card.
•
To turn the Beep on or off:
1. Turn the camera on and turn the camera mode dial to Rec.
2. Press the Menu button.
3. Use the 4-way arrow button to scroll to the Preferences menu, then
scroll down to General.
4. Press the Edit button (left soft key).
5. Use the 4-way arrow button to turn Beep on or off.
6. Press the Exit button (right soft key) twice to save the settings and exit the menus.
Adjusting the Camera Settings
HP PhotoSmart C500 Digital Camera User’s Guide 66
 Loading...